


1
36V 18" BATTERY POWERED LAWN MOWER
BRU36v9601
OPERATOR’S MANUAL

2
TABLE OF CONTENTS
Introduction
Safety Rules & Precautions
Important Information
Battery & Charger Safety Rules
Product Description
Detailed Description Of The Product
Technical Data
Assembly
Unpacking
Unfolding & Adjusting Lower Handle
Installing Cup Holder
Installing The Grass Catcher Bag
Installing/Removing The Mulching Plug
Installing Side Discharge Chute
To Install Battery Pack
To Remove Battery Pack
09
09
10
11
11
11 - 12
12
Using The Product
Starting/Stopping The Mower
Cutting Height Adjustment
Slope Gauge
Mowing Tips
Mulching Tips
Emptying The Grass Catcher Bag
Battery & Charger
13
13
14
14
14 - 15
Care & Maintenance
Replacing The Cutting Blade
Remove Battery
Cleaning the Mower
Service Adjustments
16
16
16 - 17
Service & Adjustments
03 - 04
Introduction
04 - 07
07 - 08
12
12
15
15
Transporting Lithium Batteries
Recycling & Disposing
Warranty
18
19
19
11
16 - 17

3
INTRODUCTION
Thank you for choosing this Bushranger® product. We are sure you shall appreciate the quality and performance of this
machine, which will facilitate your task for a long period of time.
Remember that you can contact your Bushranger® dealer for any queries regarding assembly and maintenance, as well as
for the resolution to any problems that may arise, and for the purchase of spare parts and/or accessories.
WARNING
Please read these Operating Instructions carefully as well as the safety precautions before using your device. Failure to do
so could result in an electric fault, fire hazard and/or in personal injury. The manufacturer will not take responsibility for
accidents or injuries caused to the user, third parties or objects as a result for not following
the instructions in the user manual.
WARNING
This machine must only be used to mow lawn. Do not attempt to use this machine for other purposes for which the
machine is not intended for, such as to clear land, to trim hedges, pruning bushes or for cutting vegetation other than
short grass. Do not use this machine as a crushing machine. Using the lawnmower for other purposes the machine is not
intended for may lead to dangerous situations.
This machine is not intended for professional use.
Keep this user manual safe for future reference. Should you sell this machine in the future, please remember to hand it to
the new owner.
Know Your Lawn Mower
Read this manual carefully, observing the recommended safety instructions before, during and after using your lawn mower.
Following these simple instructions will also maintain your lawn mower in good working order. Familiarize yourself with
the controls on your mower before attempting to operate it, but above all, be sure you know how to stop your mower in an
emergency.
Safety Markings and Symbols
Read this instruction book carefully before using the
lawn mower and keep it in a safe place for future
reference.
Warning!
Keep bystanders 15m away.
Wear hearing and eye protection.
Do not expose to rain or damp conditions.
Beware of sharp blades. Blades continue to rotate after
the motor is switched off.
Switch off isolator key before adjusting, cleaning and
before leaving the product unattended for any period.
Isolator key is red placed inbetween the batteries.
The charger is intended for indoor use only.
Wait until all machine componenets have
completely stopped before touching them.
The machine is protected against ingress of water
drop from vertical direction.
Do not operate on inclines greater than 15°. Mow
across the face of slopes,never up and down.
CE Marking: The product meets demands and
regulations set by the European Community.
WEEE Marking: CAUTION! Unusable power tools
do not belong with domestic waste. They must be
taken to a communal collecting point for
environmentally friendly disposal in accordance
with local regulation.

4
INTRODUCTION
Accumulator Disposal
Old Accumulators and batteries must not be added to household waste, but should be disposed of in accordance with the
applicable legislation.
• Take unusable rechargeable batteries to the dealer or community’s battery collection point.
Disposing Of The Packaging
The packaging is made of cardboard and separately labeled foil which is also recyclable.
• Take these materials to a recycling centre.
Battery Packs / Batteries
Li-Ion
Do not dispose of batteries into household waste, water or fire. Battery packs/batteries must be collected, recycled
or disposed of in an environmentally friendly way.
Only for EC countries
Defective or dead batteries must be recycled according to the directive 2006/66/E C.
Noise level marking
Your tool noise is not more than 96dB.
General Safety Rules
The purpose of the safety rules is to attract your attention to possible dangers. The safety symbols and the explanations
with them, require your careful attention and understanding. The safety warnings do not by themselves eliminate any
danger. The instruction or warnings they give are not substitutes for proper accident prevention measures.
WARNING
Failure to obey a safety warning can result in serious injury to yourself or to others. Always follow the safety precautions to
reduce the risk of fire, electric shock and personal injury. Save owners manual and review frequently for continuing safe
operation and instructing others who may use this tool.
WARNING
This machine produces an electromagnetic field during operation. This field may under some circumstances interfere
with active or passive medical implants. To reduce the risk of serious or fatal injury, we recommend persons with medical
implants to consult their physician and the medical implant manufacturer before operating this machine.
WARNING
The operation of any tool can result in foreign objects being thrown into your eyes, which can result in eyes severely
damaged. Before beginning power tool operation, always wears safety goggles or safety glasses with side shields and a full
face shield when needed. We recommend Wide Vision Safety Mask for use over eyeglasses or standard safety glasses with
side shield.
Important
READ CAREFULLY BEFORE USE. KEEP FOR FUTURE REFERENCE.
• Read the instructions carefully. Be familiar with the controls and the proper use of the equipment.
• Never allow children or people unfamiliar with these instructions to use the lawnmower.
• Never mow while people, especially children, or pets are nearby.
6
CE Marking
The product meets demands and regulations set by the European Community.
WEEE Marking
CAUTION! Unusable power tools do not belong with domestic waste. They must be
taken to a communal collecting point for environmentally friendly disposal in accordance
with local regulations.
Accumulator Disposal:
Old Accumulators and batteries must not be added to household waste, but should be disposed of in
accordance with the applicable
legislation.
-
Take unusable rechargeable batteries to the dealer’s or community’s battery collection point.
Disposing of the packaging:
The packaging is made of cardboard and separately labeled foil which is also recyclable.
- Take
these materials to a recycling centre.
Disposing of the packaging:
The packaging is made of cardboard and separately labeled foil which is also recyclable.
- Take these materials to a recycling centre.
Battery packs/batteries:
Li-lon
Do not dispose of batteries into household waste, water or fire. Battery packs/batte
ries must be
collected, recycled or disposed of in an environmenta lly
- friendly way.
Only for EC countries:
Defective or dead batteries must be recycled according to the directive 2006/66/EC
Noise level marking
Your tool noise is not more than 96dB .
SAFETY RULES & PRECAUTIONS
4

5
SAFETY RULES & PRECAUTIONS
NOTE: Remove batter from mower when not in use or in storage.
• Keep in mind that the operator or user is responsible for accidents or hazards occurring to other people or their
property.
• While mowing, always wear substantial footwear and long trousers. Do not operate the equipment when barefoot or
wearing open sandals. Avoid wearing clothing that is loose fitting or that has hanging cords or ties.
• Thoroughly inspect the area where the equipment is to be used and remove all objects which can be thrown by the
machine.
• Before using remove battery packs, always visually inspect to see that the blades, blade nut and cutter assembly are
not worn or damaged. Replace worn or damaged blades and bolts in sets to preserve balance. Replace damaged or
unreadable labels.
• Mow only in daylight or in good artificial light.
• Avoid operating the equipment in wet grass, where feasible,
• Always be sure of your footing on slopes.
• Walk, never run.
• For wheeled rotary machines; mow across the face of slopes, never up and down.
• Exercise extreme caution when changing direction on slopes.
• Do not mow excessively steep slopes
• Use extreme caution when reversing or pulling the lawnmower towards you.
• Stop the blades if the lawn mower has to be tilted for transportation when crossing surfaces other than grass, and
when transporting the lawn mower to and from the area to be mowed.
• Never operate the lawnmower with defective guards, or without safety devices, for example deflectors and/or grass
catchers, in place.
• Switch on the motor carefully according to instructions and with feet well away from the blades.
• Do not tilt the mower unless the battery has been removed.
• Do not start the motor when standing in front of the discharge chute.
• Do not put hands or feet near or under rotating parts, Keep clear of the discharge opening at all times.
• Stay alert, watch what you are doing and use your common sense when operating a power tool. Do not use a power
tool while you are tired or under the influence of drugs, alcohol or medication. A moment of inattention while operating
power tools may result in serious personal injury.

6
• Never pick up or carry a lawnmower while the motor is running.
• Stop the motor and switch off isolator key. Make sure that all moving parts have come to a complete stop:
- Whenever you leave the machine;
- Before clearing blockages or unclogging chute;
- Before checking, cleaning or working on the lawnmower;
- After striking a foreign abject. Inspect the lawnmower for damage and make repairs before restarting and operating
the lawnmower.
• If lawnmower starts to vibrate abnormally (check immediately);
- Remove isolator key and battery/batteries;
- Inspect for damage;
- Replace or repair any damage parts;
- Check for and tighten any loose parts.
• Stop the mower:
- Whenever you leave the lawnmower.
• Keep all nuts, bolts and screws tight to be sure the equipment is in safe working condition.
• Check the grass catcher frequently for wear or deterioration.
• Replace worn or damaged parts for safety.
• Children are not allowed to use the machine.
• This appliance is not intended for use by persons with reduced physical sensory, mental capabilities, lack of experience
and knowledge, unless they have been given supervision or instruction concerning use of the appliance by a person
responsible for their safety.
• Be careful during adjustment of the machine to prevent entrapment of the fingers between moving blades and fixed
parts of the machine.
• Always allow the machine to cool before storing and removing battery or batteries.
• After use and before storage, remove the battery from the machine and check for damage.
• When servicing the blades be aware that, even though the power source is switched off, the blades can still be moved.
Remove battery pack and isolator key.
• Replace worn or damaged parts for safety; Use only genuine replacement parts and accessories.
• Recharge only with the charger specified by the manufacture. Using a charge with an incompatible battery pack may
create a risk of fire.
• Use power tools only with specifically designated battery packs. Use of any other battery packs may create a risk of
injury and fire.
SAFETY RULES & PRECAUTIONS

7
• When battery pack is not in use, keep it away from other metal objects like paper clips, coin, keys, nails, screws, or
other small metal objects, that can make a connection from one terminal to another. Shorting the battery terminals
together may cause burns or a fire.
• Under abusive conditions, liquid may be ejected from the battery:
- If contact accidentally occurs, flush with water.
- If liquid contacts eyes additionally seek medical help. Liquid ejected from the battery may cause irritation or burns
• Children shall not play with the appliance.
• Cleaning and user maintenance shall not be made by children.
Safety Advice For Rechargeable Battery and Charger
• Use only the battery provided with the lawn mower and the provided charger.
• Protect battery and battery charger from humidity.
• Do not operate the battery charger outdoors.
• Tragic accidents can occur if the operator is not aware of the presence of children. Keep children out of the mowing
area and under the watchful care of a responsible adult.
• Stay alert, and turn the mower off if a child or any other person enters the mowing area.
• Look behind and down for small children before and while moving backwards.
• Use extreme care when approaching blind corners, doorways, shrubs, trees, or other objects that may obscure your
view of a child who may run into the path of the mower.
• When it is not in use or before cleaning and servicing, disconnect the battery charger from the power supply
• Take special care of the battery. Avoid dropping it onto any hard surface and do not subject it to pressure or any other
form of mechanical stress.
• Keep the battery away from extreme heat and cold.
• Do not open or attempt to repair the battery or the battery charger. If any parts are defective, have them repaired by a
qualified technician or send them to our service department for repair.
• Only charge the battery at an ambient (surrounding air) temperature between 0ºC and +50ºC.
• A charged battery can be used to power the machine under ambient temperature conditions between 20ºC and +70ºC.
• When not in use, store the battery in a dry place between 10ºC and 30ºC.
SAFETY RULES & PRECAUTIONS

8
• The battery should be recharged when it fails to produce sufficient power on jobs which were easily done previously.
DO NOT CONTINUE using product with its battery in a depleted condition. The battery is not fully charged at the factory.
Before attempting to use it must be fully charged firstly.
WARNING
Never short-circuit the battery or expose it to moisture. Do not store it together with any metal parts which
could short-circuit the contacts. The battery could overheat, start burning or explode.
If any person comes into contact with acid or similar internal fluids or substances contained in the battery,
wash off these substances immediately with plenty of water. If these substances make contact with the eyes,
rinse with plenty of water and seek medical attention immediately.
WARNING
Do not open the battery pack to get the battery out.
Do not place the rechargeable battery into fire or water. It can explode. The Rechargeable Battery should not be discarded to
domestic refuse, regardless of whether used or unused. You should return it to a local battery collection point in accordance
with Battery Regulations or return them to us suitably marked “Used Battery”.
SAFETY RULES & PRECAUTIONS

9
PRODUCT DESCRIPTION
Handle knobs
Height
adjustment
lever
Baillever
Grass
catcher
bag
Lower
handle
Rearchute
cover
Frontwheel
Rearwheel
Upper
handle
Safety
lock-out
button
Batterydoor
Sidedischargecover
10
PRODUCT DESCRIPTION
The safe use of this product requires an understanding of the information on the product and in
this operator’s manual as well as a knowledge of the project you are attempting. Before use of this
product, familiarize yourself with all operating features and safety rules.
DETAILED DESCRIPTION OF THE PRODUCT
Sidedischarge
chute
Mulching
plug
36VCharger
36VBattery
CORDLESS LAWNMOWER
Model BRU36v9601
Battery Type 36 v DC Lithium-ion
Charge Time 123 mins (5.0Ah Battery)
No-load Speed 2800-3300 rpm
Cutting Width 457 mm
Cather Capacity 60 L (1.7 Bushel)
Height Adjustments 2.5 - 7.5 cm (6 positions)
Functions 3-in-1: Mulch, side discharge or rear bag
Weight (with one 5.0Ah battery) 24.9 kg
BATTERY AND CHARGER
Battery Pack BRAT36v6500
Charger BRAT36v6525
Compatible Battery Pack BRAT36v6250,
BRAT36v6251
NOTE: Bushranger® reserves the right to modify the specifications of the device without prior notice.
The safe use of this product requires an understanding of the information on the product and in this operator’s manual as
well as a knowledge of the project you are attempting. Before use of this product, familiarize yourself with all operating
features and safety rules.

10
ASSEMBLY
Unpacking
• Before beginning assembly of product, make sure all parts are present. Compare parts with package contents list and
hardware contents list. If any part is missing or damaged, do not attempt to assemble the product.
• Carefully remove the product and any accessories from the box. Make sure that all items listed in the packing list are
included.
• Inspect the product carefully to make sure no breakage or damage occurred during shipping.
• Do not discard the packing material until you have carefully inspected and satisfactorily operated the product.
WARNING
• If any parts are damaged or missing do not operate this product until the parts are replaced. Using a product with
damaged or missing parts could result in serious personal injury.
• Do not attempt to modify this product or create accessories not recommended for use with this product. Any such
alteration or modification is misuse and could result in a hazardous condition leading to possible serious personal injury.
• Do not insert battery until assembly is complete and you are ready to mow. Failure to comply could result in accidental
starting and possible serious personal injury.
• Never operate the mower without the proper safety devices in place and working. Never operate the mower with
damaged safety devices. Operation of this product with damaged or missing parts could result in serious personal injury.
PACKING LIST
PART NAME FIGURE PART NO.
Lawn Mower 1
Mulching Plug 1
Side Discharge Chute 1
Grass Catcher Bag 1
Handle Knob 4
Handle Bolt 4
Owners Manual 1
Cup Holder 1
13
EN
PACKING LIST
13
EN
PACKING LIST
13
EN
PACKING LIST
1
13
EN
PACKING LIST
1
13
EN
PACKING LIST
1
13
EN
PACKING LIST
1
13
EN
PACKING LIST
1
1
1
P

11
Unfolding and Adjusting Lower Handle
WARNING
• Folding or unfolding the handle improperly can damage the cables, causing an
unsafe operating condition.
• Do not damage the cables when folding or unfolding the handle.
• If a cable is damaged, contact an authorized Bushranger® Service Dealer.
Install Cup Holder (Fig. 1)
• Open attachment bag find 4 PCS M4x15 screw and find the cup holder (P) in packing box.
• Install cup holder (P) to upper handle assembly and lock screw.
Unfolding and Adjusting Handle Assembly
To raise handle assembly:
• Pull up and back on the lower handle (1) until it is aligned with the hole position of
the arm support and the mower housing.
• To secure the lower handle (1) in place, lock the lower screw (3).
• Open the upper cam locks (2).
• Pull up and back on the upper handle to raise it into operating position.
• To secure the upper handle in place, close the upper cam locks (2).
NOTE: If the upper handle is loose or separated from the lower handle, tighten the
knobs on the upper handle locks by turning them clockwise.
Installing The Grass Catcher
• Make sure all rotating parts have come to a stop.
• Lift the rear discharge door (1).
• Lift the grass catcher by its handle (2) and place under the rear discharge
door so that the hooks (3) on the grass catcher are seated on the door rod (4).
• Release the rear discharge door. When installed correctly, the hooks on the grass
catcher will extend through the openings on the rear discharge door.
NOTE: When using the grass catcher, do not install either the side discharge deflector
or the mulching plug.
Installing/Removing The Mulching Plug
• Make sure all rotating parts have come to a stop.
• To remove the mulching plug, lift the rear discharge door (1).
• Grasp the handle (2) of the mulching plug.
• Lift and pull the mulching plug out using the handle.
1
3
2
1
3
2
2
4
3
1
1
2
3
15
EN
ASSEMBLY
1
P
3
2
1
3
4
2
1
3
2
1

12
Installing/Removing The Mulching Plug (continued)
• The mulching plug (3) is inserted at an angle, so it requires some force to remove it.
• The mulching plug must be removed in order to install the grass catcher bag.
• The mulching plug must be re-installed when the grass catcher bag is removed.
NOTE: When mulching, do not install either the side discharge deflector or the grass catcher bag.
Installing Side Discharge Chute
• Make sure all rotating parts have come to a stop.
• Lift the side discharge cover (1).
• Align the grooves (2) on the discharge chute (3) with the pins (4) on the
underside of the discharge cover (1).
• Lower the discharge chute until the hooks on the mower deck are secured in
the openings in the discharge chute
• Release the side discharge cover.
NOTE: When using side discharge, do not install the the grass catcher bag. Ensure
the mulch plug is installed.
To Install Battery Pack
• Lift and hold up the battery door (1).
• Align the battery (2) with the mower’s battery port.
NOTE: Mower can be used with one battery or two batteries.
• Make sure the battery release button (3) snaps in place and that battery is fully seated and secure in the mower before
beginning operation.
• If the machine is not going to be used immediately, remove the battery.
To Remove Battery Pack
• Release the bail lever to stop the mower.
• Press the battery release button (3) on the mower. Open the battery
door.
• Remove battery from the mower.
1
2
3
15
EN
2
3
4
1
2
3
1
ASSEMBLY

13
USING THE PRODUCT
Starting/Stopping The Mower
To Start The Motor:
• Open the battery door.
• Insert the battery.
• Press and hold the safety lock-out button (1).
• Pull the bail lever (2) upward to the handle to start the mower and
release the button.
To Stop The Motor:
• Release the bail lever.
Soft-Start
This LI-ION mower is equipped with a “soft- start” feature. When initially starting up, the mower will take approx. 3 seconds
to get up to full speed. If the mower does not initially start: Remove the battery and check under the mower deck to ensure
there is nothing obstructing the blade and that the blade can spin freely by hand. Even a small amount of grass on start up
will prevent the “softstart” from turning the mower on.
CAUTION
Do not attempt to override the operation of the safety lock-out button or bail lever.
WARNING
The operation of any mower can result in foreign objects being thrown into the eyes, which can cause severe eye damage.
Always wear safety glasses while operating the mower and while performing any adjustments or repairs.
WARNING
Ensure that other people and pets remain at least 100 feet (30 m) away when the mower is in use.
Inspect The Cutting Area
Remove all stones, sticks, wire, bones, and other debris that might be thrown by the rotating blades.
Cutting Height Adjustment
When shipped, the wheels on the mower are set to a low-cutting position. Before using the mower for the first time, raise
the cutting position to the height best suited for your lawn. The average lawn should be between 1” to 2” (2.5 to 5 cm)
during cool months and between 2” and 3” (5 to 7.5 cm) during hot months.
To Adjust The Blade Height
• To raise the blade height, grasp the height adjustment lever (1) and move
it toward the back of the mower.
• To lower the blade height, grasp the height adjustment lever (1) and
move it toward the front of the mower.
2
A
B
1
17
EN
1

14
Slope Gauge
WARNING
Slopes are a major factor related to accidents involving slips and falls, which can result in severe injury. Operating the
mower on a slope requires extra caution. If you feel uneasy on a slope, do not mow it.
• Mow across the face of a slope, and never up and down. Exercise extreme caution when changing direction on a slope
• Watch for holes, ruts, rocks, hidden objects, or bumps that may cause a slip or a trip. Tall grass can hide obstacles.
• Always be sure of your footing. If you feel like you are losing your balance, release the blade/motor control handle
immediately. The blade will stop rotating within 3 seconds.
• Do not mow near drop-offs, ditches, or embankments, because you could lose your footing or balance.
• Do not mow a slope that has an angle of greater than 15°.
• Do not mow wet or damp grass. Unstable footing can cause slipping.
WARNING
Do not mow a slope that has an angle of greater than 15° (a rise of approximately 2 1/2 feet [.75 m] every 10 feet [3 m]).
Mow across the face of a slope, and never up and down.
Mowing Tips
NOTE: A sharp blade will greatly enhance the performance of the mower, especially when cutting high grass. Be sure to
check the blade and replace it when required.
• Verify that the lawn is free of stones, sticks, wires, and other objects that could damage the blades or the motor. These
objects could be accidentally thrown by the mower in any direction, and could cause serious personal injury to the
operator and to others. In order to prevent electric shock, do not operate the mower in damp or wet conditions.
• Do not mow in circles. Travel back and forth across the lawn.
• When cutting thick grass, reduce walking speed in order to allow for a more effective cut and a proper discharge of the
clippings.
• For a healthy lawn, always cut off one-third or less of the total length of the grass. The average lawn should be
approximately 1” to 2” (2.5 to 5 cm) long during cool months, and between 2” to 3 1/4” (5 cm to 8.3 cm) long during hot
months. If there is growth, the lawn should be cut in the fall.
Mulching Tips
NOTE: Inspect the area where the mower is to be used, and remove all stones, sticks, wire, bones, and other debris that
might be thrown by the rotating blade.
• Release the bail lever to turn the mower OFF when crossing any graveled area (stones can be thrown by the blade).
• Set mower to the highest cutting height when mowing on uneven ground or in tall weeds.
USING THE PRODUCT

15
USING THE PRODUCT
Mulching Tips (continued)
• For effective mulching, do not cut wet grass, because it tends to stick to the underside of the deck, preventing proper
mulching of grass clippings. New or thick grass may require a narrower cut. The ground speed should be adjusted to
the condition of the lawn. If mowing has been delayed and the grass has been allowed to grow longer than 4” (10 cm),
mow the lawn twice in order to reduce the grass height to a maximum of 3 1/4” (8.3 cm).
• Walk at a steady pace. Overlap the cutting rows. Do not let the grass get too tall. If the grass gets too long, start at the
highest cutting position and work down to the desired cutting height.
WARNING
If you strike a foreign object, stop the motor and remove the battery. Thoroughly inspect the mower for any damage. Repair
any damage before operating the mower. Excessive vibration of the mower during operation is an indication of damage.
Thoroughly inspect the mower and repair any damage before operating the mower.
Emptying The Grass Catcher Bag
• Stop mower, allow blades to completely stop, and remove the battery.
• Lift the rear discharge cover.
• Lift the grass catcher bag by its handle to remove from mower.
• Empty grass clippings.
• Lift the rear discharge cover and reinstall the grass catcher bag as described earlier in this
manual.
Battery and Charger
battery and charger
1
2
battery and charger
1
1. Battery 2. Charger
Battery & Charger connected
1
2
16
Replacing The Cutting Blade
WARNING
Always protect your hands by wearing heavy gloves and/or wrapping the cutting edges with rags or other materials when
performing any maintenance on the blades. ALWAYS remove the battery when servicing or transporting the mower.
NOTE: Only use authorized Bushranger
®
replacement parts.
Remove Battery
• While wearing leather padded gloves, wedge a block of wood between the blade and the mower deck in order to
prevent the blade from turning w hen the nut (1) is being removed.
• Using an adjustable wrench or 15 mm socket, loosen the nut (1) and remove the washer (2) and blade (3). Turn the nut
“COUNTERCLOCK WISE” to loosen it and “CLOCKWISE” to tighten it.
• Remove the nut (1), the washer (2) and the blade (3).
• To re-install the blade, position the blade with the cutting edges toward the ground. Assemble the nut as shown. Using a
15mm socket or wrench, turn the blade nut “CLOCKWISE” in order to secure the blade. Torque to 40-45 N.M.
NOTE: Be sure to replace the parts in the exact order in which they were removed. When installing the cutting blade, verify
that it is installed with the curved ends pointing toward the mower deck, and not toward the ground.
Cleaning The Mower
WARNING
In order to reduce the risk of electric shock, do not expose the mower to water. The underside of the mower deck should be
cleaned after each use, because grass clippings, leaves, dirt, and other debris will accumulate, which will cause rust and
corrosion.
• Remove any build-up of grass and leaves on or around the motor cover (do not use water). Occasionally wipe the
mower clean with a dry cloth. If debris builds up on the underside of the mower during use, stop the motor, disconnect it
from the battery, and then tilt the mower on its side, and scrape it clean using an appropriate tool.
Service and Adjustments
• Identical replacement parts that are available from the manufacturer. When ordering replacement parts, remember
the use of parts that do not meet the original equipment specifications may lead to improper performance, and may
compromise safety and warranty.
• Before cleaning, repairing, or inspecting, verify that the blade and all moving parts have come to a complete stop.
CARE AND MAINTENANCE
1
2
19
CARE AND MAINTENANCE
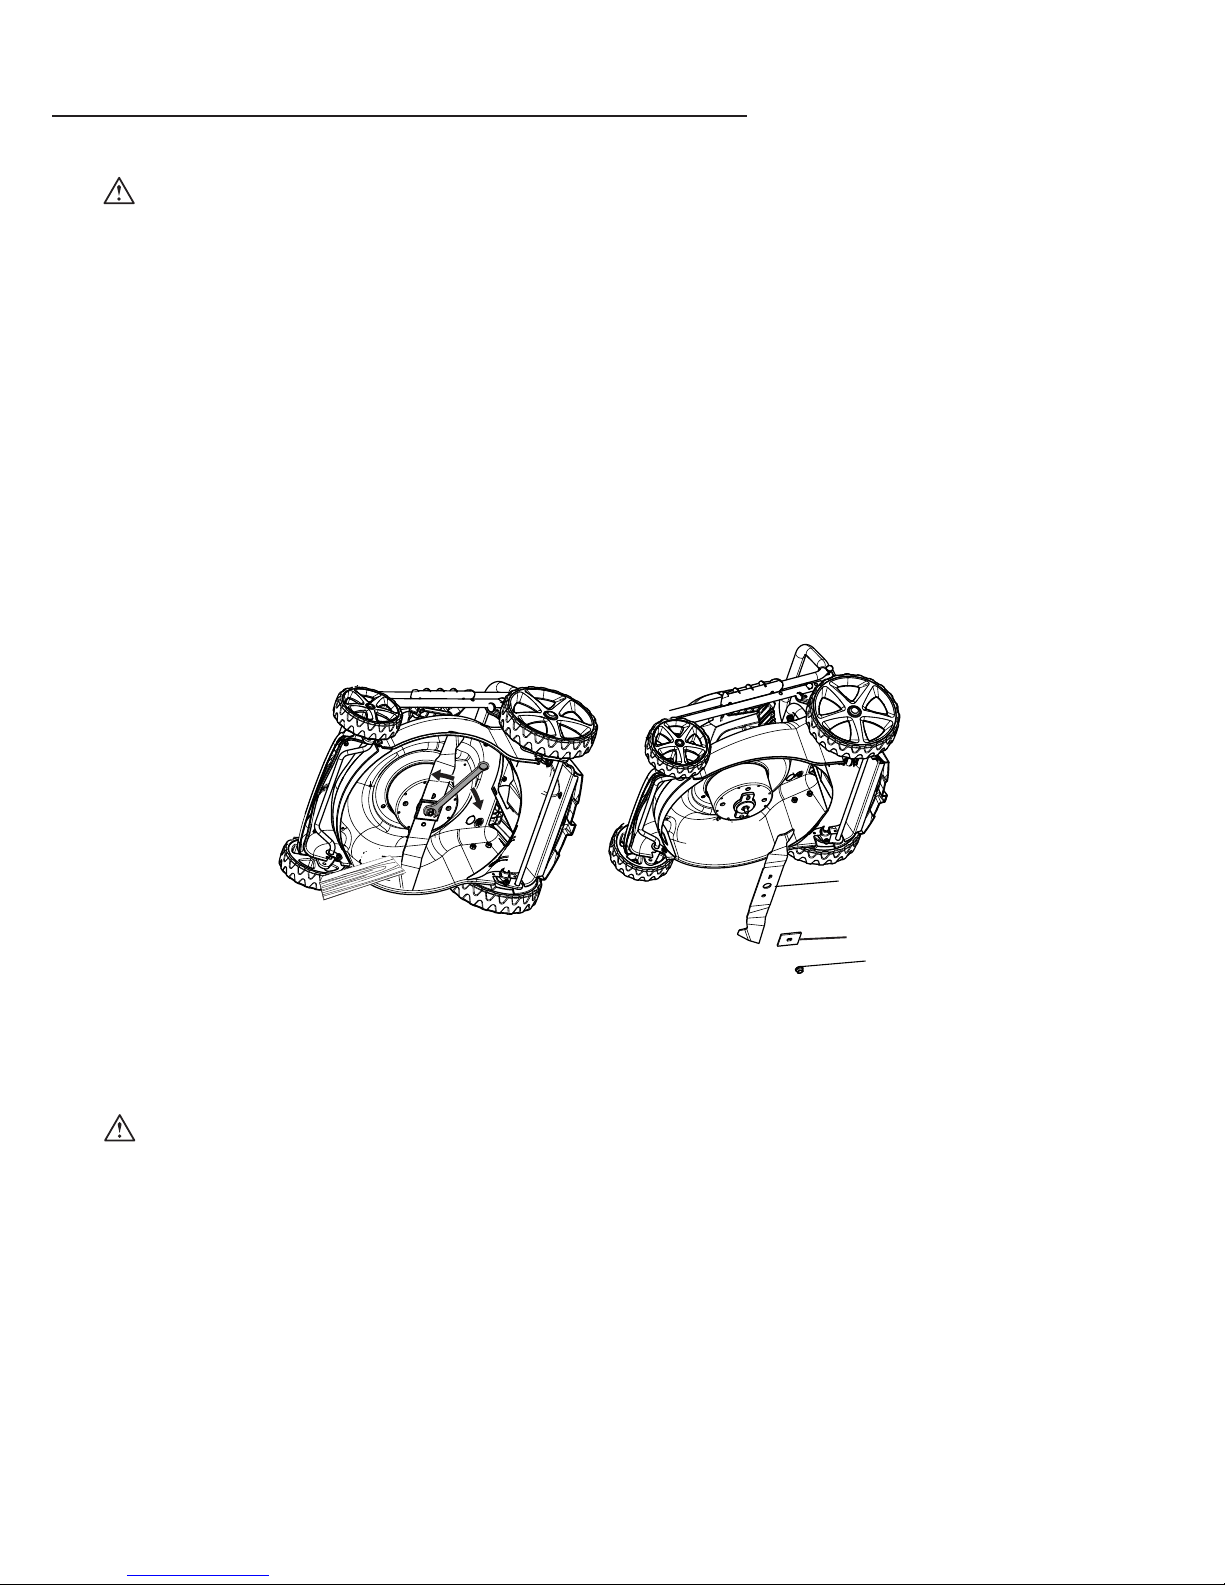
REPLACING THE CUTTING BLADE
WARNING
Always protect your hands by wearing heavy gloves and/or wrapping the cutting
edges with rags or other materials when performing any maintenance on the
blades. ALWAYS remove the battery when servicing or transporting the mower.
REMOVE BATTERY
While wearing leather padded glov es, wedge a block of wood between the blade and the mower
deck in order to prevent the blade from turning w hen the bolt (1) is being removed.
• Using an adjustable wrench or 27 mm socket, loosen the bolt (1) and remove the blade (2). Turn
the bolt “COUNTERCLOCK WISE” to loosen it and “CLOCKWISE” to tighten it.
• Remove the bolt (1) and the blade (2).
• To re-install the blade, position the blade with the cutting edges toward the ground. Assemble
the bolt as shown. Using a 27 mm socket or wrench, turn the blade nut “CLOCKWISE” in order
to secure the blade.
2
3

17
CARE AND MAINTENANCE
Service and Adjustments (continued)
• Keep the handles dry, clean, and free of oil and grease.
• In order to reduce the risk of fire, keep the motor free of grass, leaves, and debris build-up.
• Check the blade and motor mounting bolts for proper tightness frequently. Visually inspect blade for damage (e.g., bent,
cracked, or worn).
• For best and safest performance, maintain the mower with care. Keep the mower blade sharp and clean.
• Keep all nuts, bolts, and screws tight in order to be sure that the equipment is in safe working condition.
• Never tamper with safety devices. Check them regularly for proper operation.
• After striking a foreign object, stop the motor and remove battery. Thoroughly inspect the mower for any damage.
Repair any damage before operating the mower.
• The grass catcher components, discharge cover, and trail shield are subject to wear and damage, which could
expose moving parts or allow objects to be thrown. As a safety precaution, check these components frequently,
and immediately replace any parts that show signs of wear, or that are cracked or broken. Use original equipment
manufacturer’s parts only.
• When it is not in use, store the mower indoors in a dry area, and out of the reach of children.
WARNING
Always remove battery when servicing or transporting the mower.

18
CARE AND MAINTENANCE
Transporting Lithium Batteries
Transport the battery in accordance with local and national provisions and regulations. Follow all special requirements on
packaging and labelling when transporting batteries by a third party. Ensure that no batteries can come in contact with other
batteries or conductive materials while in transport by protecting exposed connectors with insulating, non-conductive caps
or tape. Do not transport batteries that are cracked or leaking. Check with the forwarding company for further advice.
WARNING
Not intended for use other than what’s listed in this manual.
Recycling and Disposing
When you decide to get rid of the machine, make sure to follow the local regulation. The batteries used in this mower’s
battery pack contain the following toxic and corrosive material: LITHIUM-ION.
WARNING
Toxic materials must be disposed of in a specified manner in order to prevent contamination of the environment. Before
disposing of damaged or worn out Lithium-Ion battery packs, contact your local waste disposal agency for information
and specific instructions. Take the battery to a local recycling and/or disposal centre that is certified for disposal. If the
battery pack cracks or breaks, whether it leaks or not, do not recharge it and do not use it. Dispose of it and replace it with a
new battery pack. DO NOT ATTEMPT TO REPAIR IT!
PROBLEM POSSIBLE CAUSE SOLUTION
The mower does not start.
The battery is not charged. Charge the battery.
Grass jammed between the deck and
blade.
Remove battery; check under deck for
jams.
The battery is not fully inserted in the
mower.
Check the connection between the battery
and the mower. Make sure the battery
clicks into place.
Battery may need
replacement.
Replace battery.
The mower cuts the grass
unevenly.
The lawn is rough or uneven. Check the mowing area.
The cutting height is not set properly. Move the height lever to a higher setting.
The mower does not mulch
properly.
Wet grass clippings are sticking to the
underside of the deck.
Wait until the grass dries before mowing.
The mulching plug is missing. Install the mulching plug.
The mower is hard to push.
The grass is too tall, or the cutting height
is too low.
Raise the cutting height.
The rear of the grass catcher bag is
dragging in thick grass.
Empty the grass clippings from the grass
catcher bag.
The mower is excessively noisy
and vibrates.
The motor shaft is bent. Stop the motor, and
inspect for damage.
The blade is unbalanced. Repair before restarting.

19
Recycling and Disposing (continued)
Follow these instructions in order to avoid injury and the risk of fire, explosion, or electric shock, and
to avoid damage to the environment:
• Cover the battery’s terminals with heavy- duty adhesive tape.
• Do not attempt to remove or destroy any of the components of the battery pack.
• Do not attempt to open the battery pack.
• If a leak develops, the electrolytes that are released are corrosive and toxic. Do not get the solution in the eyes
or on the skin, and do not swallow it.
• DO NOT place batteries in regular household trash.
• DO NOT incinerate batteries.
• DO NOT place batteries where they will become part of any waste landfill or municipal solid waste stream
• Dispose of batteries at a certified recycling or disposal center.
• Package materials are recyclables. Please, throw them away on the appropriate trash can.
CARE AND MAINTENANCE
WARRANTY
1. Australian Consumer Law (REG. 90):
The benefits to the consumer given by this warranty are in addition to other rights and remedies of the consumer under a
law in relation to the good or services to which this warranty relates.
Our goods come with guarantees that cannot be excluded under the Australia Consumer Law. You are entitled to a
replacement or refund for a major failure and for compensation for any other reasonably foreseeable loss or damage. You
are also entitled to have the good repaired or replaced if the goods fail to be of acceptable quality and the failure does not
amount to major failure.
The text above applies notwithstanding anything else expressed or implied to the contrary in this warranty document.
Powerup Lawn Care
a division of
Roy Gripske & Sons Pty. Ltd
11 Sodium St, Narangba QLD 4504
Telephone: 1300 363 027
Fax: 1800 332 213
Email: powerup@rgs.com.au
For more information please visit our website:
poweruplawncare.com.au
3
Y E ARS
D OMESTIC
W ARRANTY

20
Visit www.rgs.com.au or call 1300 363 027 for more information.
Copyright © Roy Gripske and Sons Pty. Ltd. 2018. All rights reserved. 1041. Images are for illustrative purposes only.
Bushranger™ is a trademark of Roy Gripske & Sons Pty Ltd. PLP shall not be liable for technical or editorial errors
or omissions contained herein, nor for incidental or consequential damages resulting from furnishing this material. The
information is provided “as is” without warranty of any kind and is subject to change without notice. PLP also reserves
the right to revise the content of this document at any time without prior notice. No part of this document may be
reproduced or transmitted in any form or by any means, electronic or mechanical, including photocopying, recording or
storing in a retrieval system, or translated into any language form without prior written permission of PLP.
Powerup Lawncare Products
Phone 1300 363 027
Fax: 1800 332 213
Email: powerup@rgs.com.au
Web: www.rgs.com.au
 Loading...