

Page 1
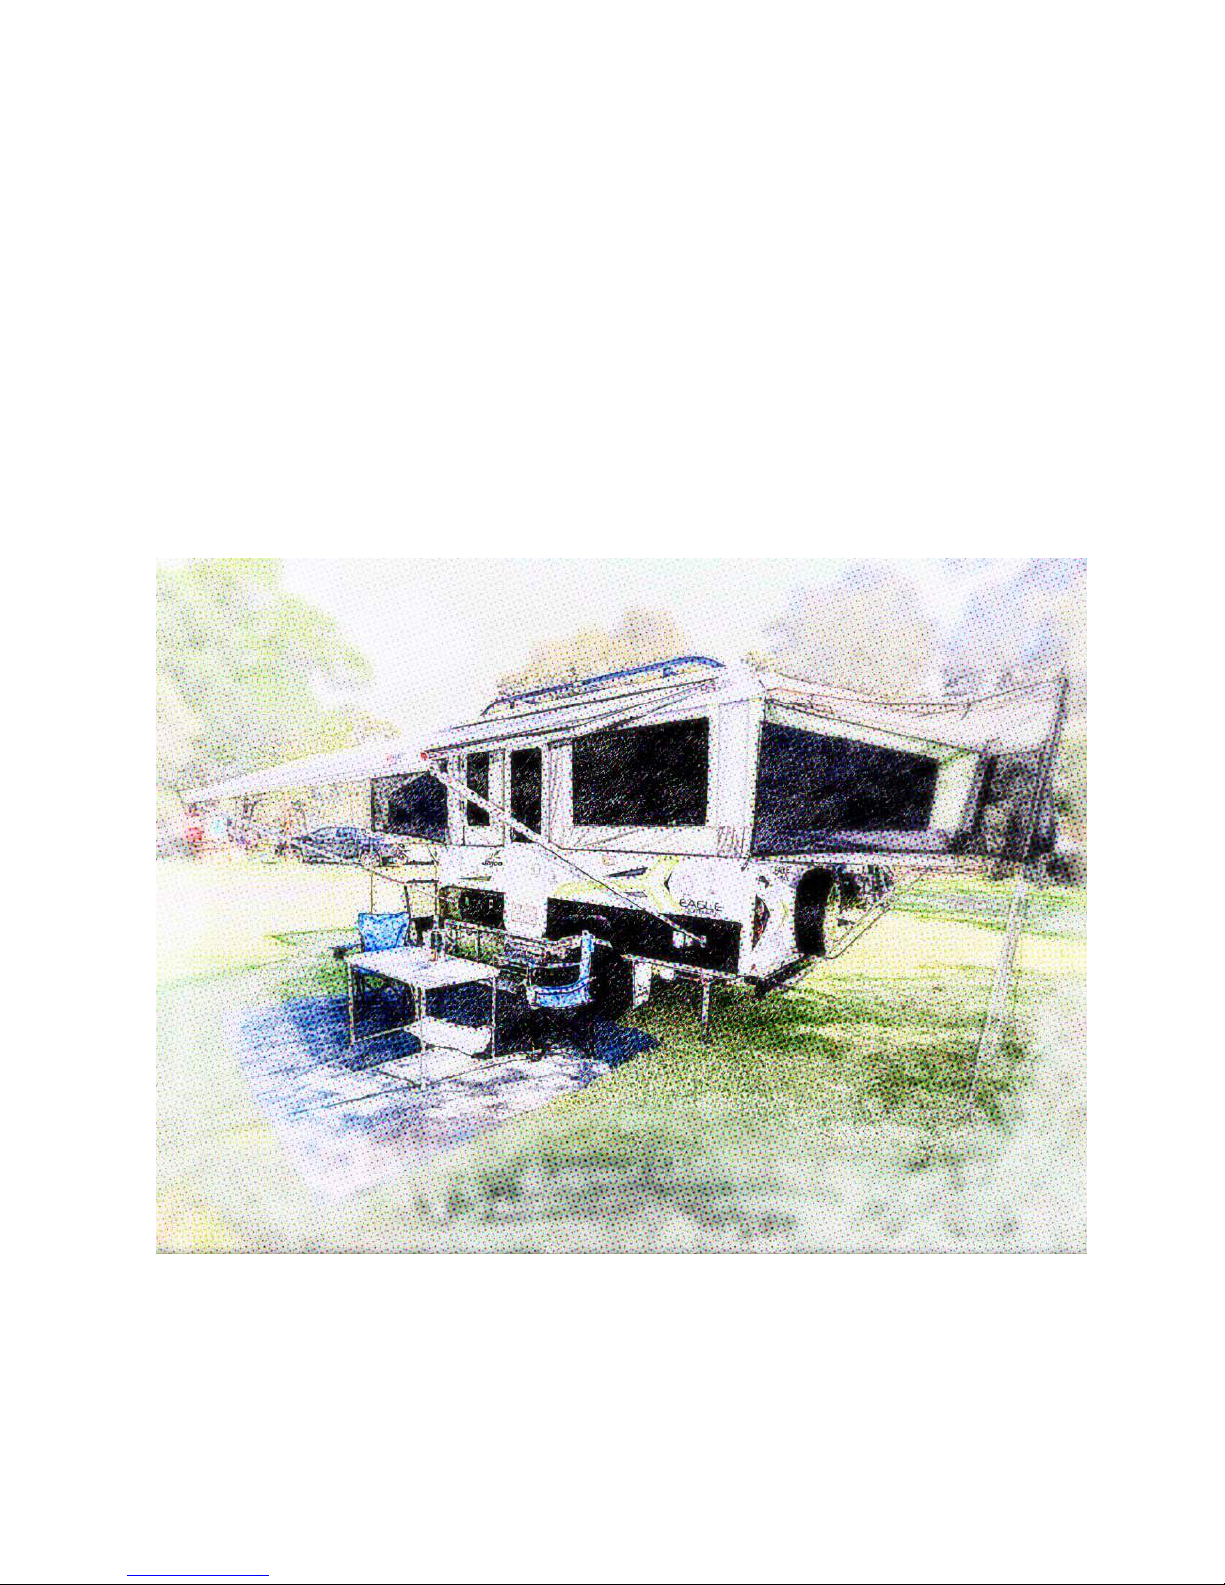
BUSH PALACE FLAMINGO
SETUP GUIDE
Version 1.0 March 2017
Page 2

Bush Palace Flamingo Setup Guide © 2017 Bush Palace Camper Hire
2
INTRODUCTION
Thanks for hiring the Bush Palace Flamingo. It is supplied with everything you need to take it away
and enjoy your holiday. The setup varies slightly depending on whether or not you have access to
mains power and water, and whether or not you require the bed end privacy screens and awning.
These instructions assume that you have never used a wind up style camper before; if you have there
may still be some steps that are unique to this RV. Please follow the instructions carefully to minimise
the setup time and to ensure that the camper remains in excellent condition.
The instructions may appear daunting, but in practice they are easy to follow and you will have the
camper set up in no time!
We hope that the Bush Palace Flamingo has everything that you need; if there is anything that
you are not happy with we would ask that you contact us and give us the opportunity to fix it
for you. If you have any issues you can contact us on-
Kathryn – 0435 918405
David – 0407 780281
Email [email protected]
We would love to hear your feedback. Please take a moment to leave a comment on Camplify,
and send us a photo of where your adventures have taken you!
Happy camping,
Kathryn & David
Page 3

Bush Palace Flamingo Setup Guide © 2017 Bush Palace Camper Hire
3
TABLE OF CONTENTS
INTRODUCTION .................................................................................................................................................... 2
TABLE OF CONTENTS ......................................................................................................................................... 3
BEFORE YOU SET OFF ........................................................................................................................................ 4
SETTING UP .......................................................................................................................................................... 5
ARRIVAL AT SITE ................................................................................................................................................... 5
RAISING THE ROOF ............................................................................................................................................... 6
SETTING UP THE BEDS .......................................................................................................................................... 7
FITTING THE DOOR ............................................................................................................................................... 8
MISCELLANEOUS SETUP ....................................................................................................................................... 8
IF MAINS WATER AND POWER ARE AVAILABLE…. .................................................................................................... 9
Hot Water (240v Electric) ............................................................................................................................... 9
IF YOU ARE FREE CAMPING…. ............................................................................................................................. 10
Hot Water (Gas) ........................................................................................................................................... 10
TV/DVD ............................................................................................................................................................ 11
AWNING ............................................................................................................................................................. 12
ANNEX WALLS .................................................................................................................................................... 12
MISCELLANEOUS ................................................................................................................................................ 13
Barbecue ...................................................................................................................................................... 13
SIT DOWN & ENJOY! ............................................................................................................................................ 13
PACKING UP ....................................................................................................................................................... 14
INITIAL STEPS ..................................................................................................................................................... 14
AWNING ............................................................................................................................................................. 14
POLES & GUY ROPES .......................................................................................................................................... 15
TV ANTENNA ...................................................................................................................................................... 15
DOOR ................................................................................................................................................................ 15
INTERIOR ........................................................................................................................................................... 15
BEDS ................................................................................................................................................................. 16
ROOF ................................................................................................................................................................. 16
HOOKING UP ...................................................................................................................................................... 17
FINAL CHECK ..................................................................................................................................................... 18
INVENTORY ......................................................................................................................................................... 19
OPTIONAL ITEMS ............................................................................................................................................... 23
SATELLITE DISH ................................................................................................................................................. 23
Page 4
Bush Palace Flamingo Setup Guide © 2017 Bush Palace Camper Hire
4
Unpack ......................................................................................................................................................... 23
Pack away .................................................................................................................................................... 24
INFLATABLE KAYAKS ........................................................................................................................................... 25
Setup ............................................................................................................................................................ 25
Packing away ............................................................................................................................................... 25
GAZEBO ............................................................................................................................................................. 26
SOLAR PANELS ................................................................................................................................................... 26
BEFORE YOU SET OFF
• Make sure that all 4 corner jacks are raised.
• Make sure that the hitch is connected properly and the latch is closed on the ball.
• Check chains and make sure that the shackles are done up. It is usually best to cross the
chains underneath the drawbar.
• Connect the 12 pin socket to car, using the portable brake controller if required.
• Connect Anderson plug to vehicle if available
The camper can not be towed unless the electric brakes are connected to your vehicle
• Make sure that the trailer handbrake is off
• check all lights for proper operation
WATER
If you intend to free camp, please note that the camper is supplied with the water tank empty to keep
the towing weight down. Remember to fill the tank with potable water when you are close to your
destination, using the drinking water quality hose provided.
Page 5
Bush Palace Flamingo Setup Guide © 2017 Bush Palace Camper Hire
5
SETTING UP
ARRIVAL AT SITE
• Park the camper on a level area, making sure to leave enough room (~2m) at rear for the bed.
• If required use a levelling ramp to level the camper left to right (a bubble level is in the side boot;
place this on the A-frame))
• Once level left to right, engage the handbrake, undo the chains and electrical connection.
• Place a chock against each wheel
• Put the jockey wheel into its bracket and tighten
• Disengage the hitch
• Raise the camper with the jockey wheel
• Move the vehicle away from the towball
• Level the camper front to back using the jockey wheel to adjust the height, again using the
bubble level.
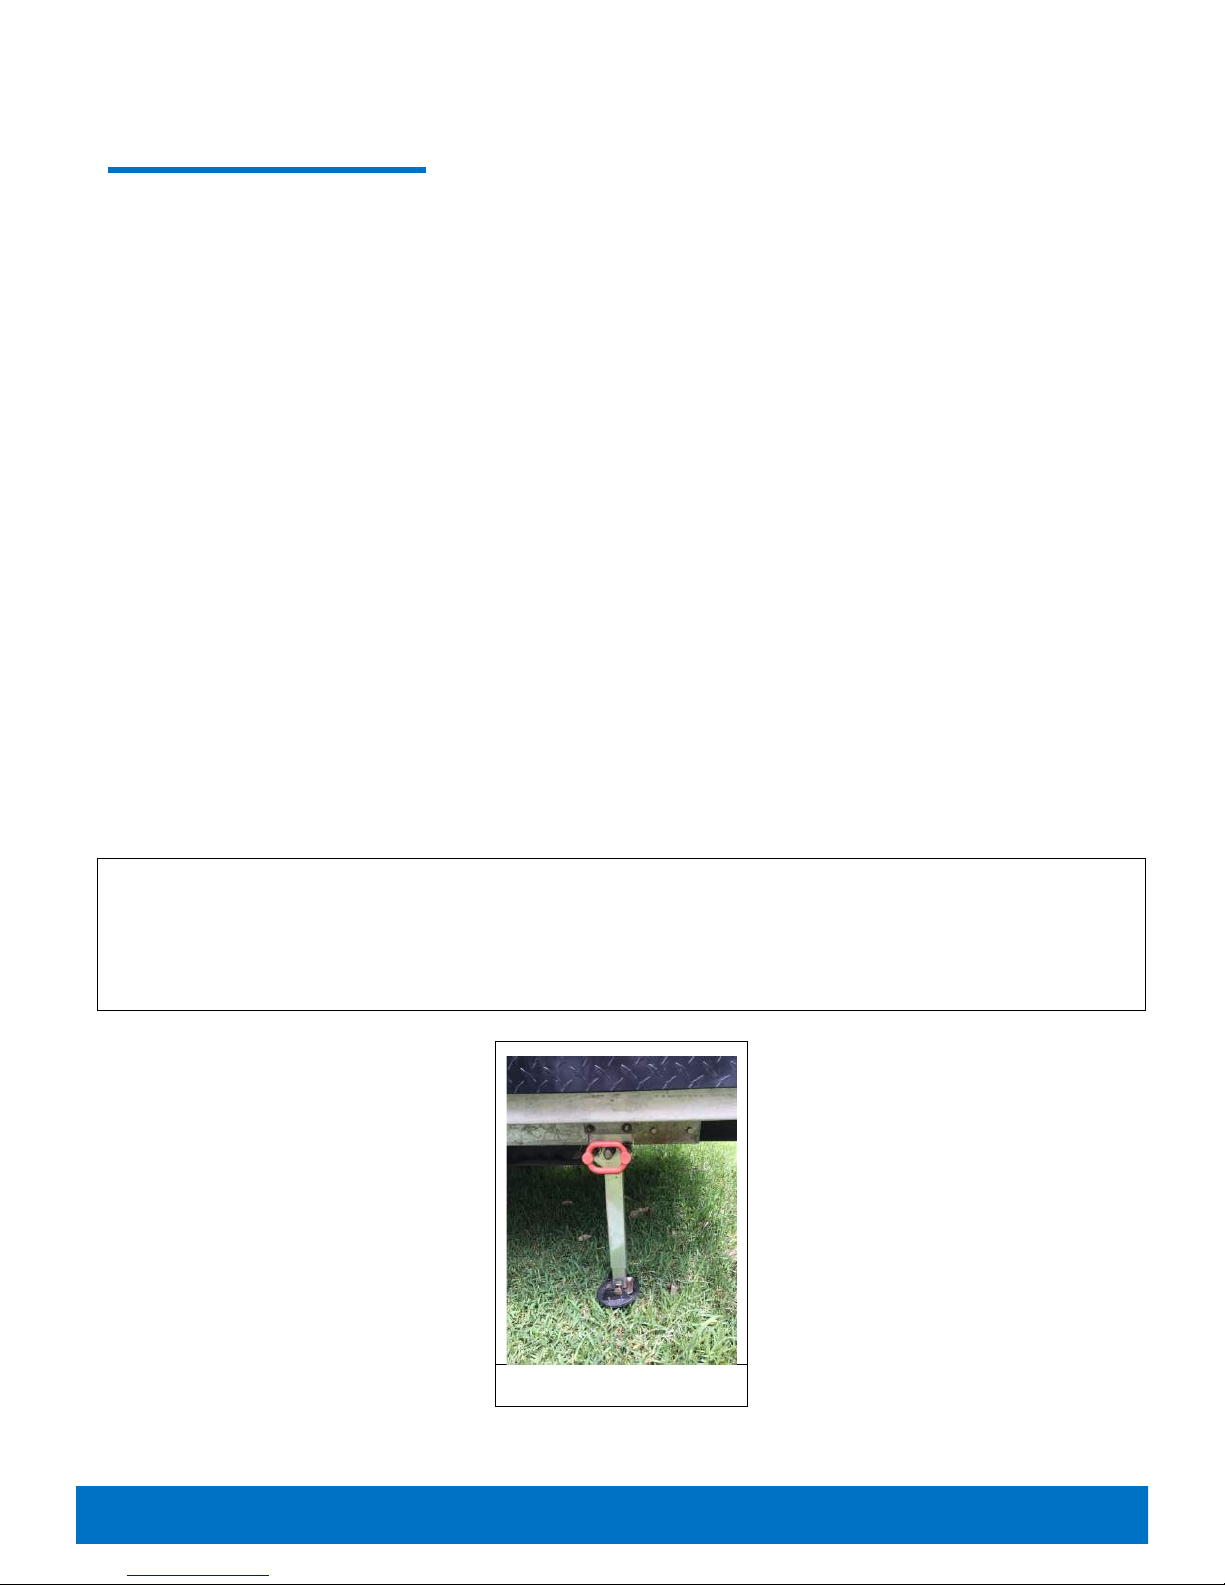
• Drop each corner jack by pulling the red handle
• wind them down using the long winder handle in the front boot.
• Replace bubble level to side boot
The corner jacks should not take the weight of the camper and so just need to be down enough to be
stable.
The fridge will not work well if the camper is not level
Corner Jack
Page 6
Bush Palace Flamingo Setup Guide © 2017 Bush Palace Camper Hire
6
RAISING THE ROOF
• Remove any load from the roof rack
• Unlock front boot, side boot, shower and water filler.
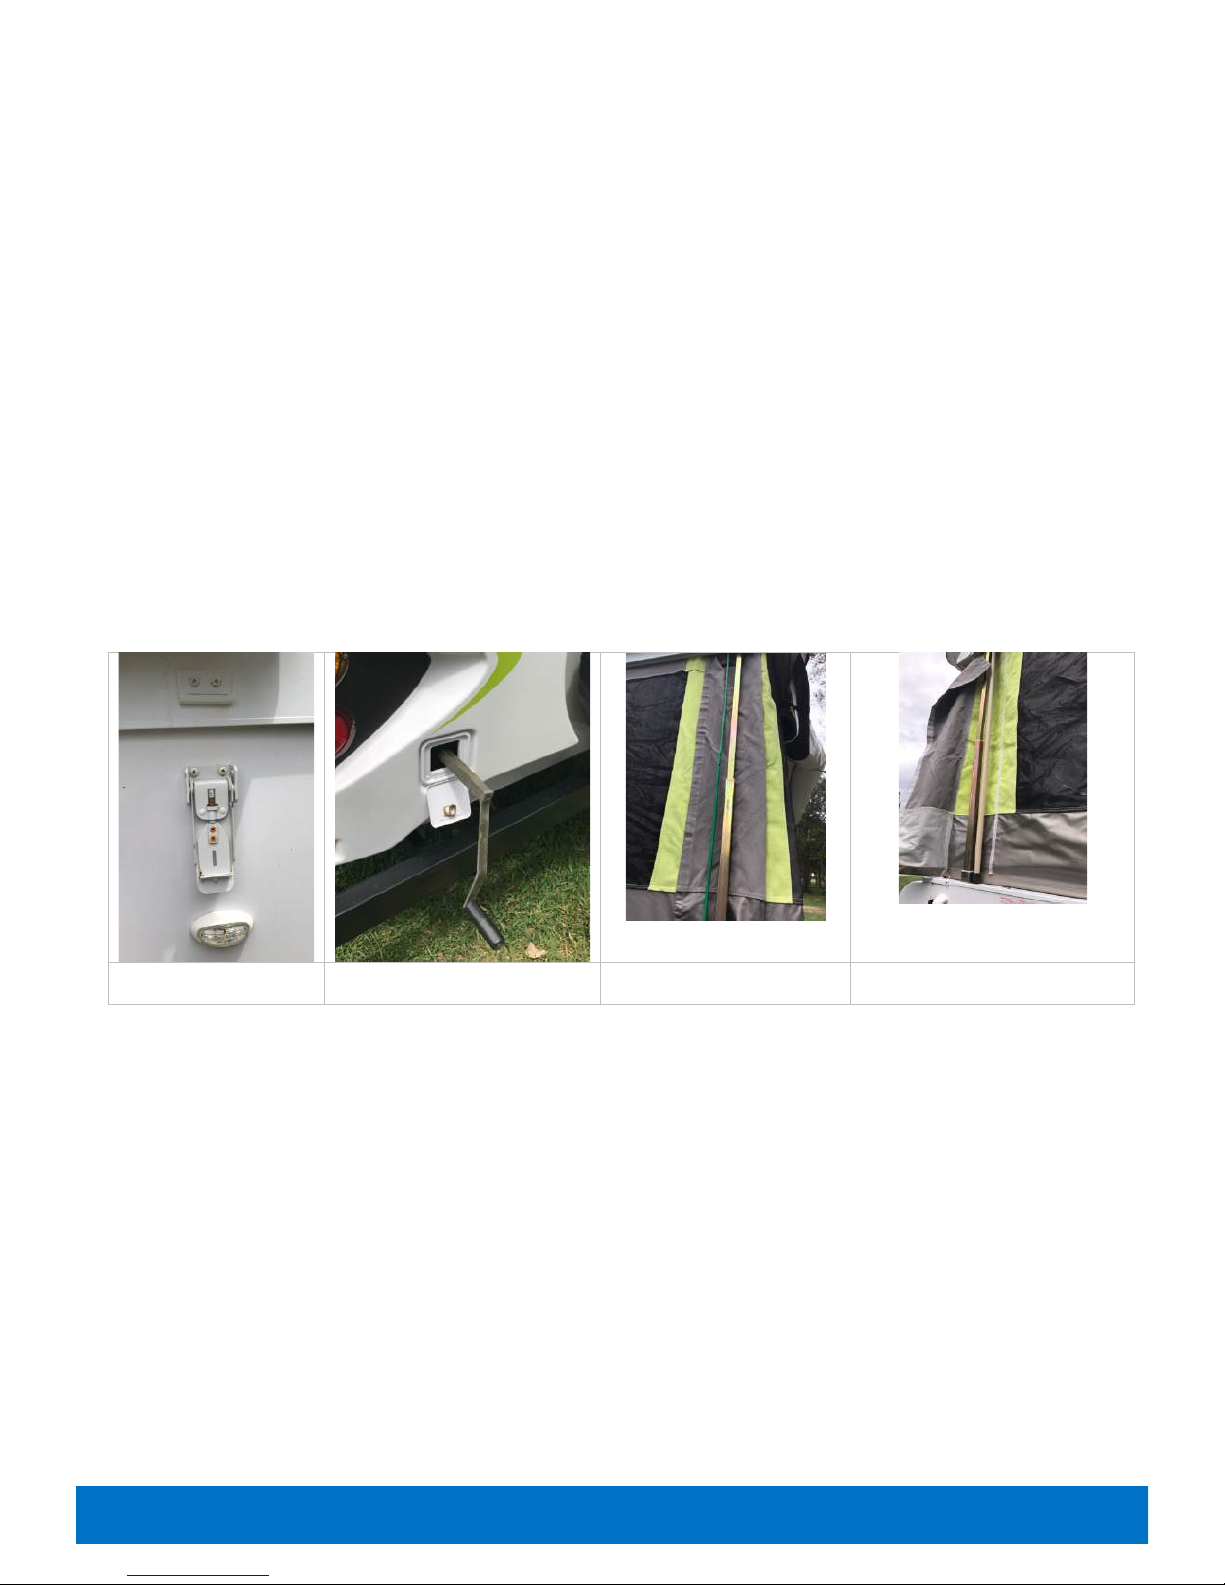
• Undo the roof clips at each corner.
• If you intend to use the privacy screens and/or awning, unzip them now and let them drop down
from their bags.
• Using the winding handle from the front boot, wind the camper roof up about 6 inches (winder is
inside a small door at the front right of the camper)
• Check around camper to make sure nothing is snagged.
• Raise the camper roof fully, until the green tension indicator wire at the left front of the camper
is almost tight
• Return the winder handle to front boot and close winder hatch.
• Insert a roof prop (stored under mattress) in two opposite corners
Roof clip
Winder handle
Roof tension indicator
Roof prop in place
Page 7
Bush Palace Flamingo Setup Guide © 2017 Bush Palace Camper Hire
7
SETTING UP THE BEDS
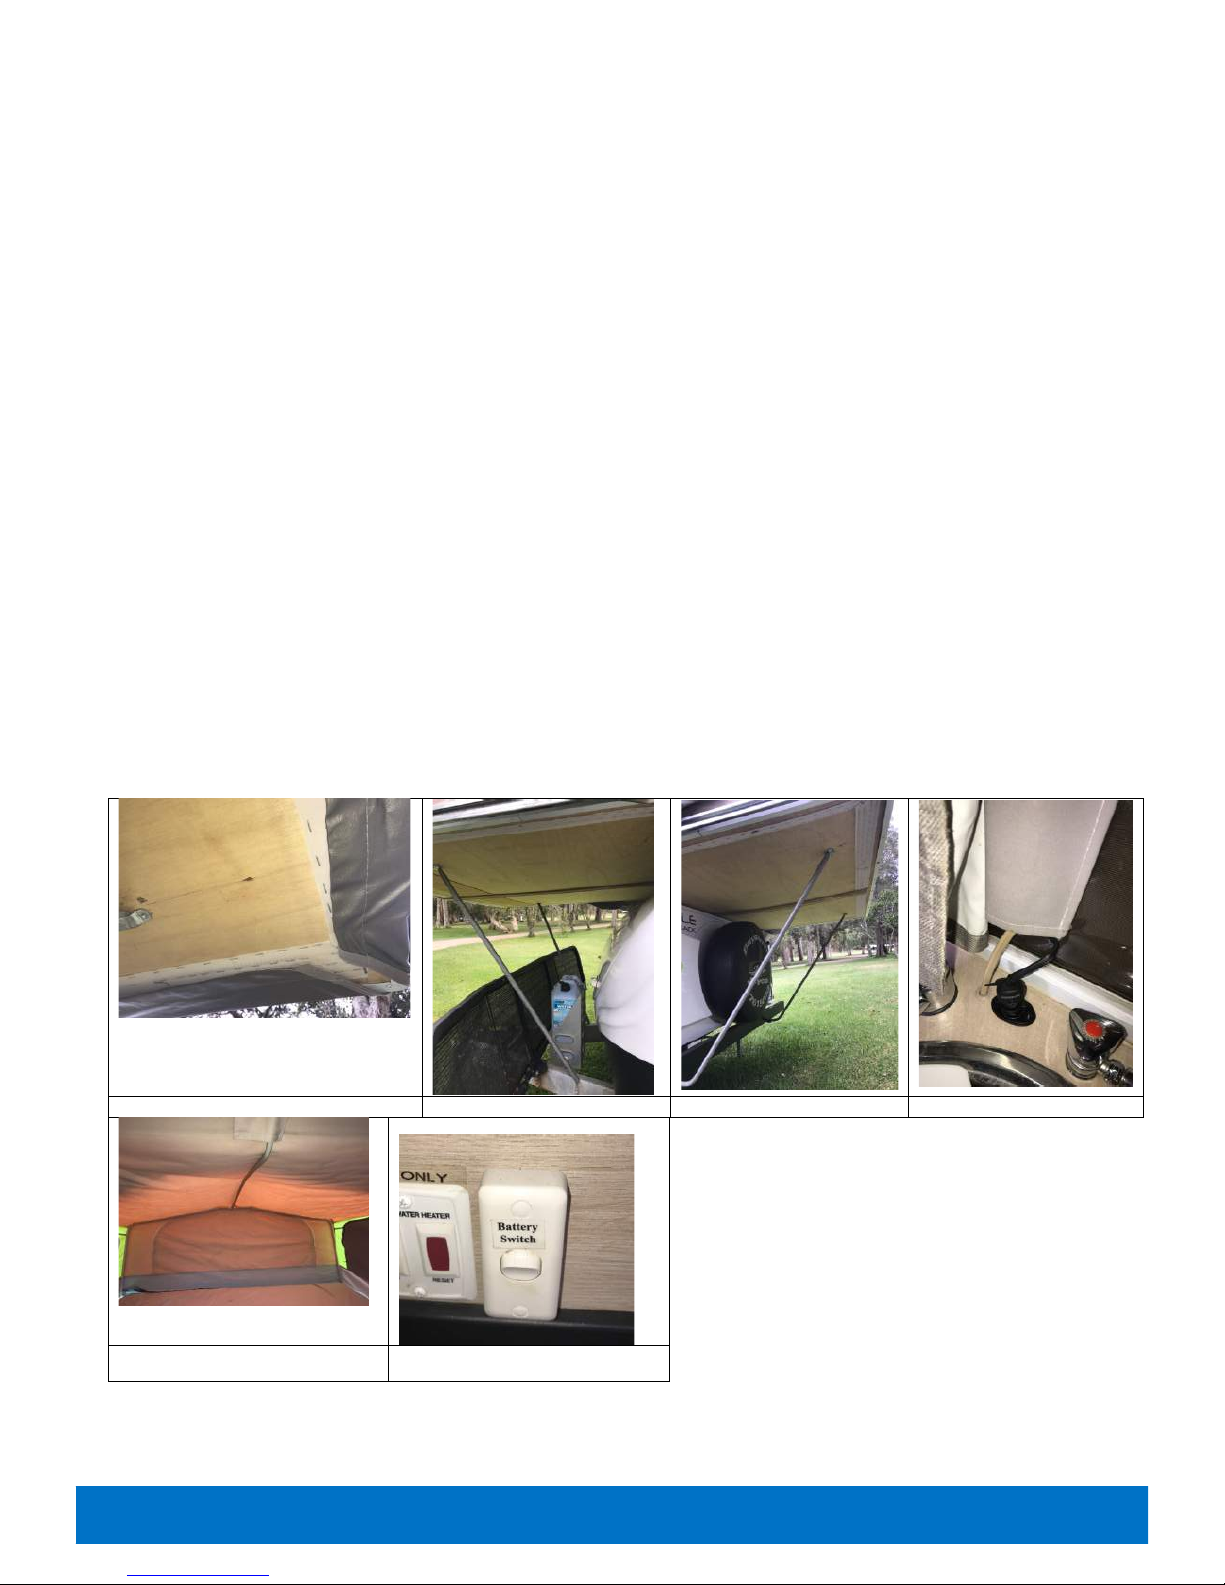
• Pull the rear bed out fully
• Using the support poles stored under mattress, support the bed end by placing one end of each
pole into the bracket on the bumper and the other into the bracket under the bed. You may
need to lift the bed slightly as you do this
• Close front boot and repeat for front bed
• At each corner cover the riser arms with canvas flap and Velcro closed
• Pull step out from under door
• Unlock the door and enter the camper
• Remove BBQ (it is only stored here for travel)
• Turn battery switch on (under table)
• Plug in roof light connector (next to sink)
• Using the crook shaped pole (under the mattress), insert into plastic fitting in the rear bed hoop
and raise the roof of the bed. Insert the other end into the bracket on roof and close Velcro flap.
• Do the same for front bed
• Pull the corners of the canvas down over the bed ends and secure with velcro
Velcro to bed base
Front Supports
Rear Supports
Roof light connector
Bed roof in place
Battery switch
Page 8
Bush Palace Flamingo Setup Guide © 2017 Bush Palace Camper Hire
8
FITTING THE DOOR
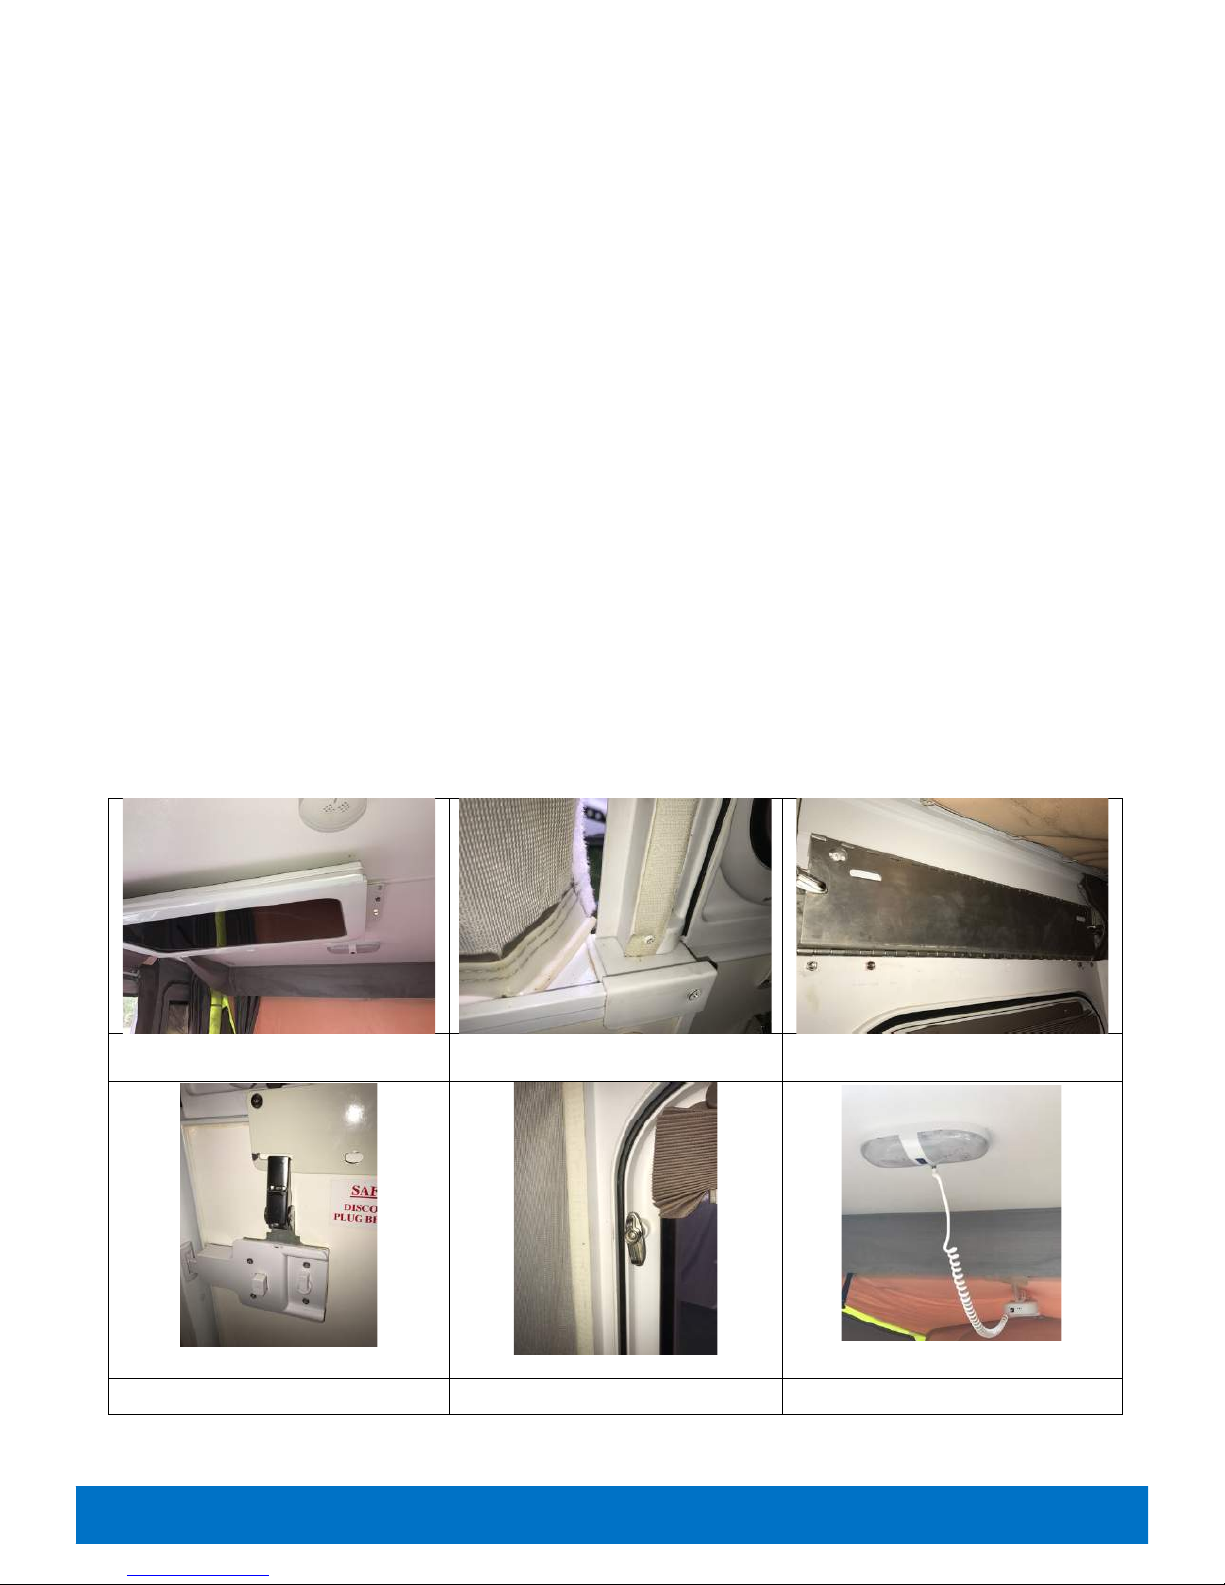
• With the door closed, remove clear protector and place under seat cushion for storage
• Lower the door top section from the roof and place it onto the locating pins next to the lower
door.
• Lock the top of the door in place using the two wing nuts at the hinge, then clip the two door
sections together using the latch at the top of the lower section.
• Unclip the door from the door frame.
• Secure the camper walls to door frame using Velcro inside & out
MISCELLANEOUS SETUP
• Turn fridge on (switch under table)
• Using the poles and guy ropes from the side boot set up the privacy screens if required,
securing the bottom of the screen to the clips on the poles and on the camper
• Connect the black 25mm silage hose to the barbed connector under the camper just in front of
the r/h wheel (if you can't find it run the tap and look for the water coming out!)
• Fit the 12v light/fans to the bed roof support pole and plug into socket on main light
Door stored in roof
Upper door frame connected to lugs on
camper body
Butterfly clips at top of door
Lower & upper door clip
Butterfly clip on door frame
Lower & upper door clip
Page 9
Bush Palace Flamingo Setup Guide © 2017 Bush Palace Camper Hire
9
IF MAINS WATER AND POWER ARE AVAILABLE….
For example at a caravan park:
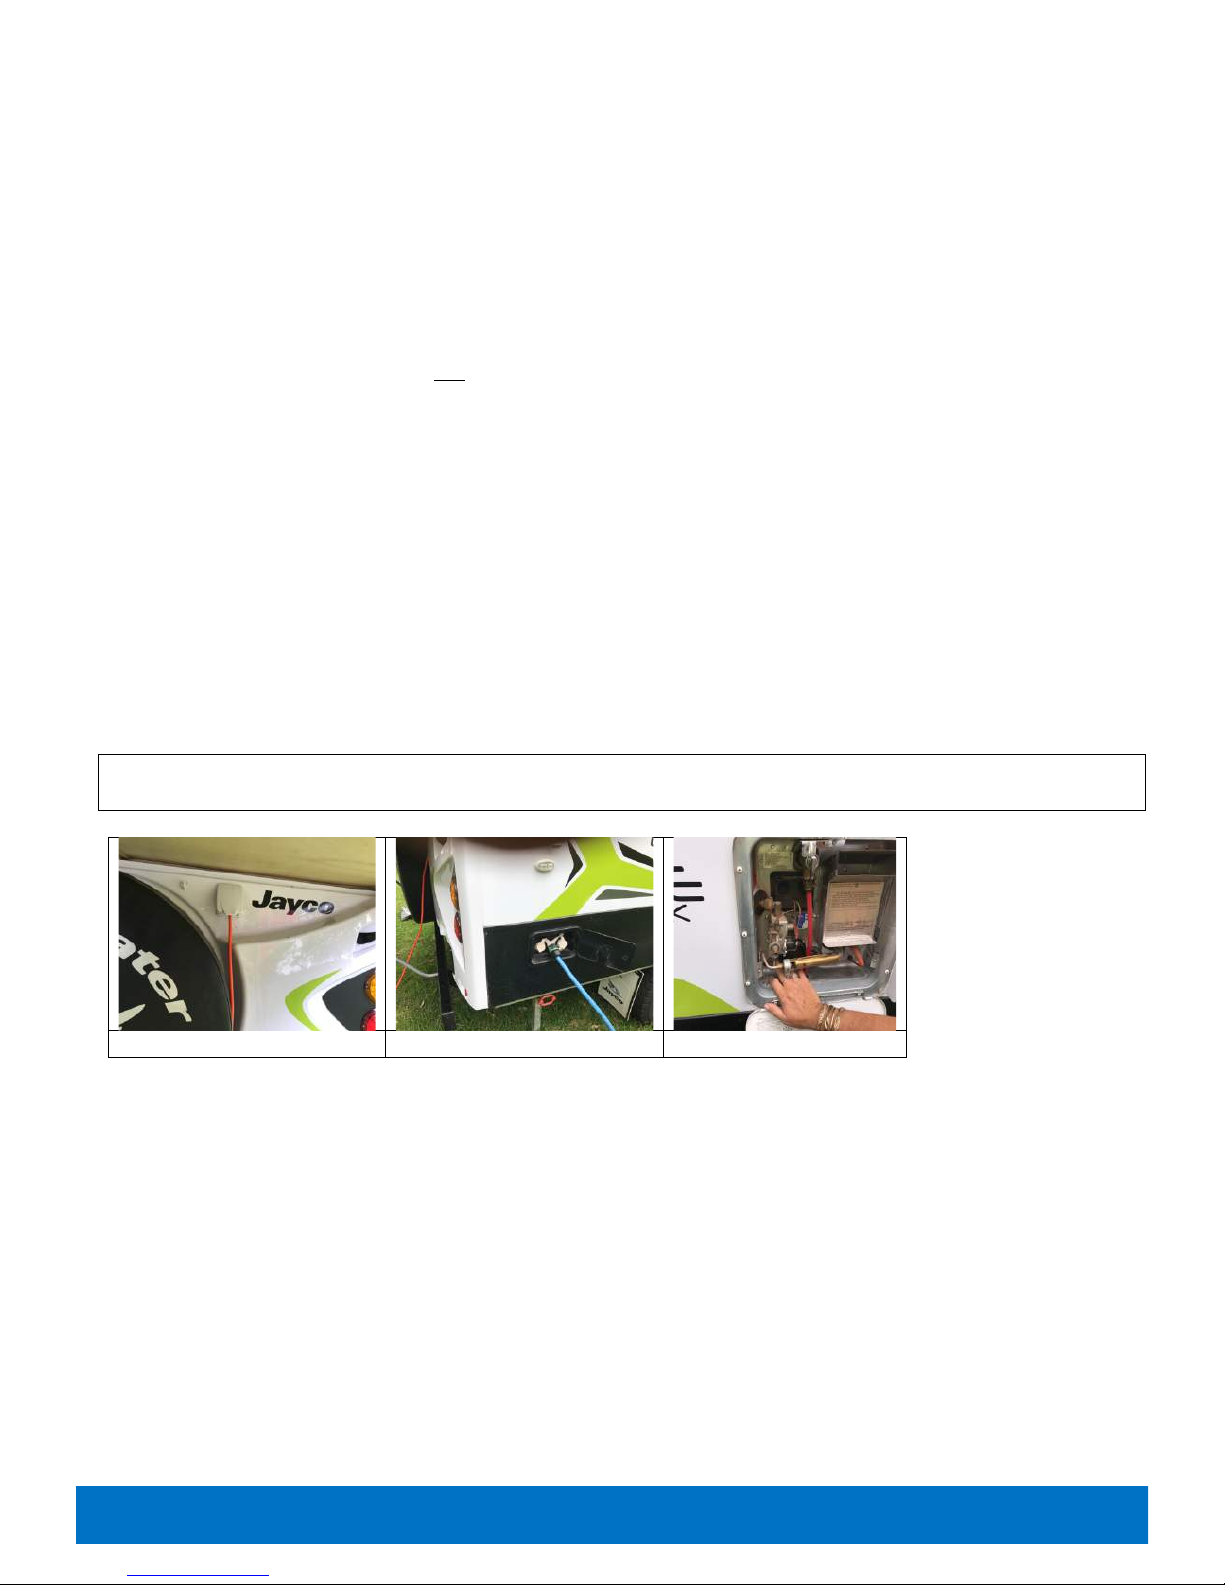
• connect the power to the socket at the rear of the camper using the 15a cable provided (do not
use any other cable).
• Unlock the small white door on the right side of the camper and connect the water hose.
• Make sure water pump is off (switch under table)
Hot Water (240v Electric)
• Inside camper, turn hot tap on to ensure water is flowing (this makes sure that there is water in
the hot water tank)
• Outside camper, open the hot water cover and turn switch to ON (do not use the switch inside
the camper).
• Close hot water door
• HWS takes ~20 minutes to heat water
If you are setting up at someone’s house or property you will need to use the 10amp to 15amp
connector supplied to allow you to plug into 240v power.
240v connection
Mains water connection
240v hot water switch
Page 10
Bush Palace Flamingo Setup Guide © 2017 Bush Palace Camper Hire
10
IF YOU ARE FREE CAMPING….
I.e. there is no mains water/240v power available. In this case you are reliant on the 82l water tank,
the 2 x 100a/h batteries, and the 9Kg gas cylinder.
• Make sure water tank is full. It is filled via the filler inside the small white door at the rear of the
right side of the camper.
• Switch on the water pump using the switch (under table)
• Turn on the gas bottle in the front boot, making sure to push down on the gas fuse once turned
on.
Hot Water (Gas)
• Outside camper, open the hot water cover and make sure switch is set to OFF
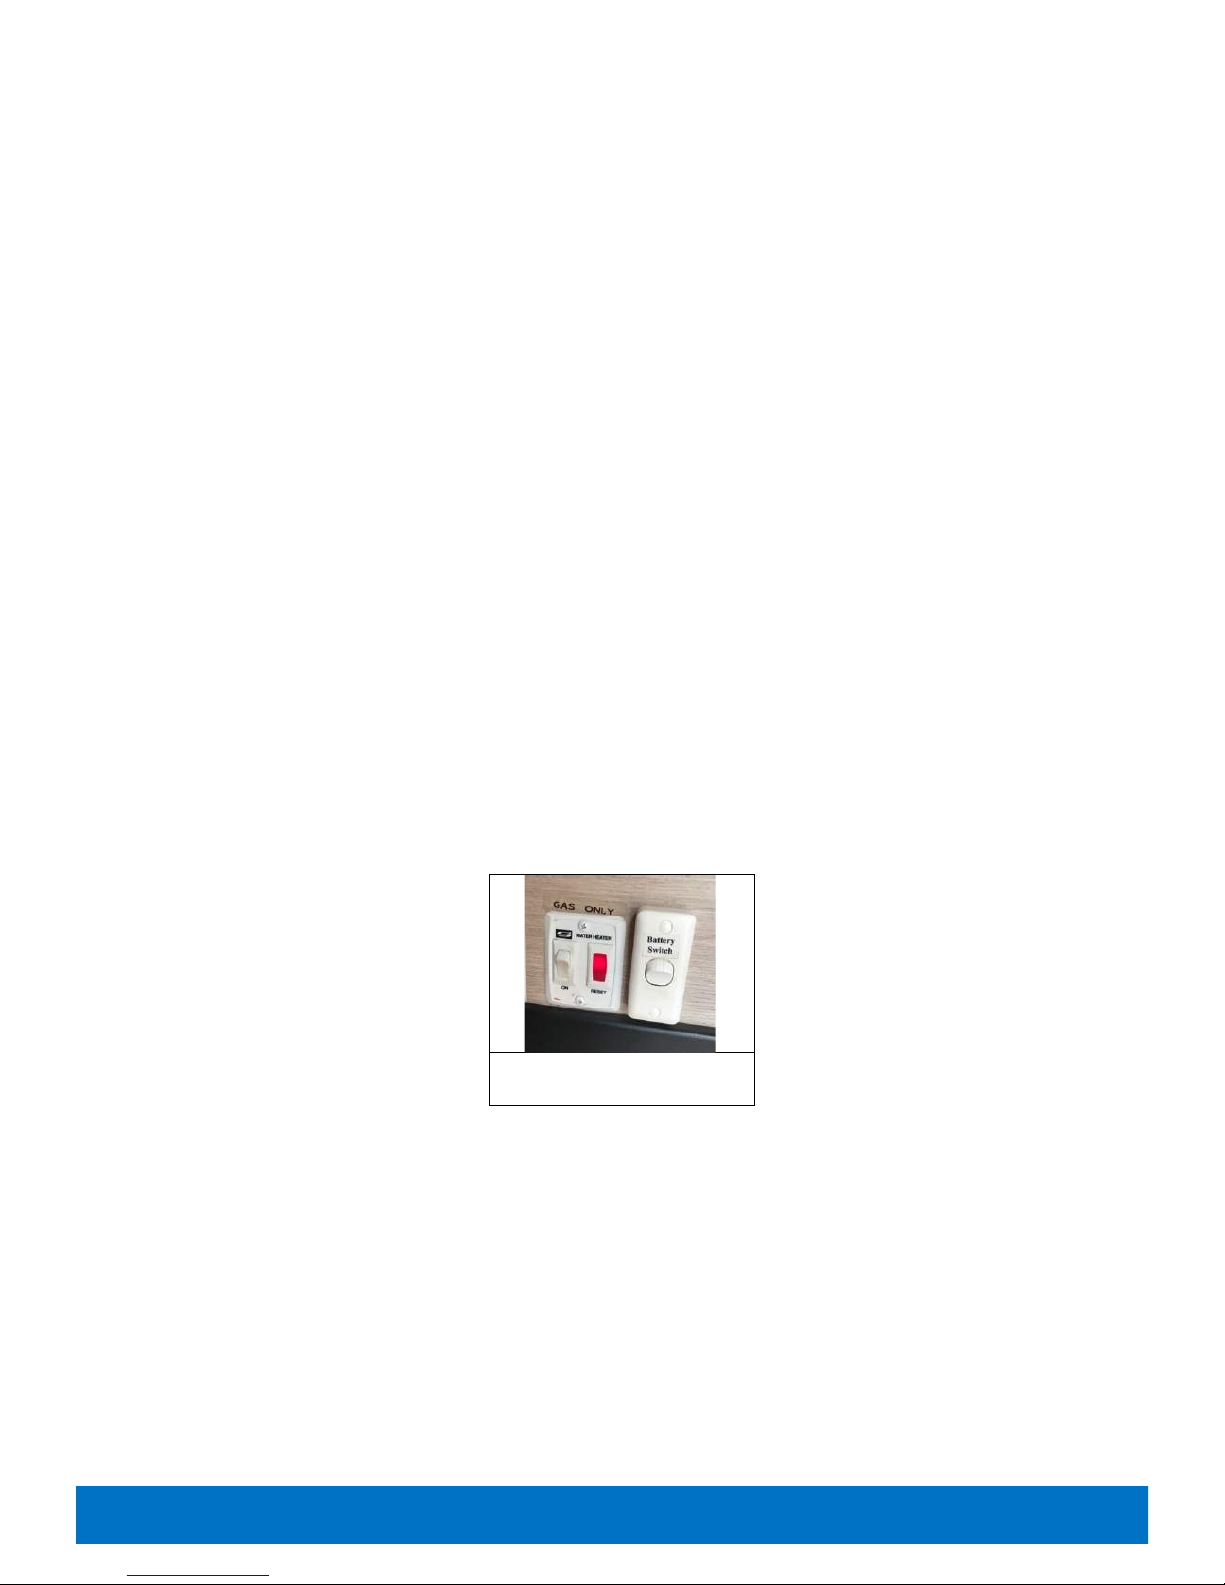
• Inside camper, ensure battery switch and water pump are on (under table)
• flick tap to hot and ensure water is flowing
• Turn on the white ‘Water Heater’ switch inside the camper. A red light will ignite and remain lit
until the hot water burner has ignited. Turn switch off when not in use.
• Do not light the hot water with no water in the tanks.
• HWS takes ~20 minutes to heat water
Gas hot water switch &
battery switch
Page 11
Bush Palace Flamingo Setup Guide © 2017 Bush Palace Camper Hire
11
TV/DVD
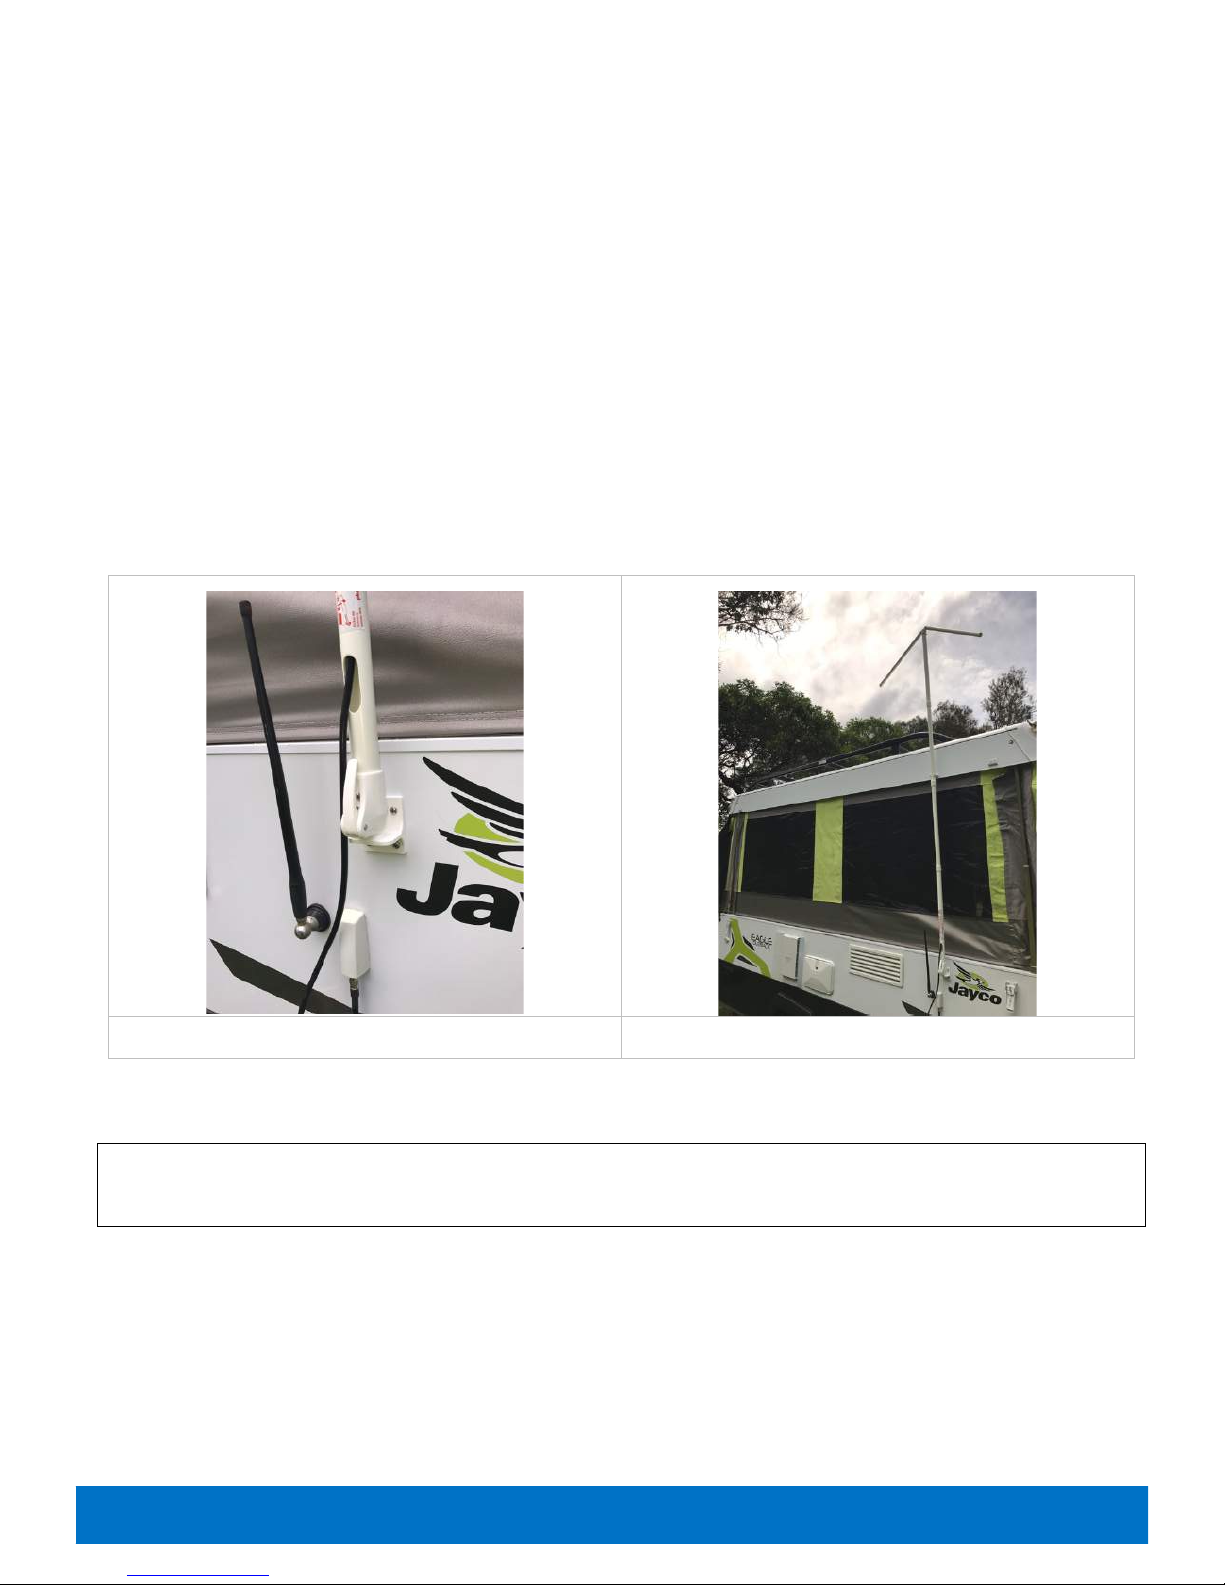
The antenna is stored in a tube in the side boot. To erect:
• join the sections securely together
• Raise the top arms to be at the ‘4’ and ‘8’ o’clock positions
• Insert the bottom of the antenna into the mount on the right front of the camper
• Clip the top of the antenna into the roof lip
• Plug the coax cable into the socket.
You may need to turn the antenna or adjust the angle of the horizontal arms to get the best picture.
Please see the leaflet in the folder for more details
Antenna base
Antenna setup
If you are at a caravan park that provides reticulated TV signals simply plug their cable into the
external aerial socket.
Page 12

Bush Palace Flamingo Setup Guide © 2017 Bush Palace Camper Hire
12
AWNING
You should have unzipped the awning from its bag and undone the ties when raising the roof, so
the awning is hanging down in front of the camper. If you didn’t, do that now. To set up the
awning:
• Connect roof rafters (x4) to camper roof brackets and clip ends onto main awning pole
• Clip upright poles (x3) onto main awning pole
• Clip two upright poles (on on either side) to end rafters
• Adjust height of all poles
• Velcro awning around riser arms and roof rafters
• Attach guy ropes to all upright poles and peg to ground
ANNEX WALLS
The annex walls are an optional hire item. They fully enclose the awning and add a great additional
internal space to the Flamingo. You can also add a couple of camp stretchers to increase the capacity
of the camper to 7.
To set up:
• Attach draught skirt using press studs and sail track on camper and peg down
• Zip front wall & rear wall on
• Velcro awning walls around riser arms
• Velcro bottom of walls to draught skirt
• Zip long wall on
• Velcro upright poles to awning walls
• Zip front and rear side awning walls to long awning wall.
• Peg walls to ground
Page 13
Bush Palace Flamingo Setup Guide © 2017 Bush Palace Camper Hire
13
MISCELLANEOUS
Barbecue
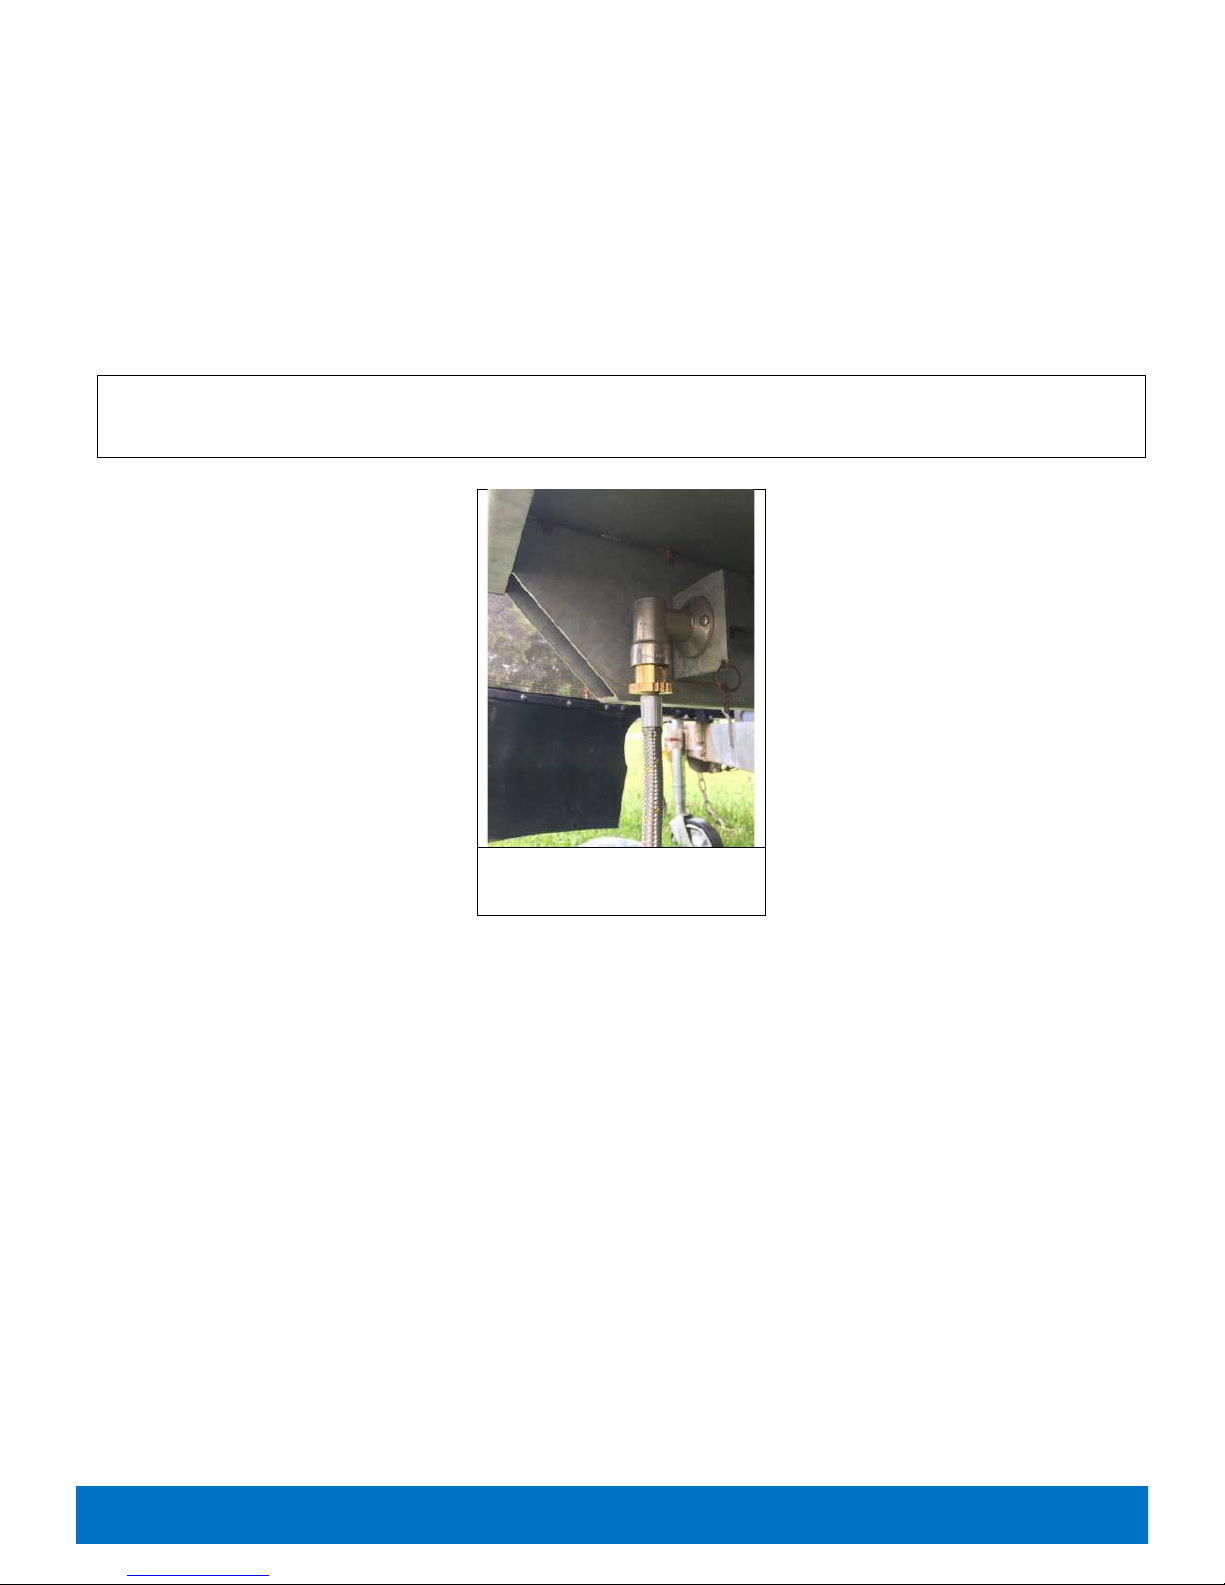
• Turn on gas, making sure to push gas fuse (instruction for the gas fuse are in the folder also)
• Connect barbecue to the camper using the bayonet fitting under the front LHS (push bayonet
into fitting and turn to secure)
It is advisable to place aluminium foil around the bowl of the barbecue to ensure that it is returned
clean
Gas bayonet with BBQ
hose connected
SIT DOWN & ENJOY!
That’s it! All that’s left to do is put out the annex mat, set up the table and chairs, and relax. Enjoy
your holiday!
Page 14

Bush Palace Flamingo Setup Guide © 2017 Bush Palace Camper Hire
14
PACKING UP
Packing up is almost a reverse of the setting up process but there are a few differences - the sequence
is often important.
Whilst the instructions may say to return something to the front or side boot, it may be easier to lay
everything neatly on the ground as you take things down and then return them to their appropriate
storage in one go.
INITIAL STEPS
• Turn off water pump
• Turn off battery switch
• Turn off hot water (inside camper if using gas, or from the hot water unit outside if using 240v)
• Turn fridge off
• Clean & return all cutlery, plates, utensils etc
• Remove bed end light/fans
• Close roof hatch
• Zip all windows closed
• Unplug roof light connector
• Remove bed roof hockey sticks and place under mattress (front & rear)
• Turn off gas bottle in front boot.
• Disconnect all cables & hoses (including the sullage hose), drain, place in storage bags and
return to front boot
AWNING
• If fitted remove annex walls and skirt, clean and pack into bag
• Remove poles, guy ropes and pegs and return to pole carrier/front boot
• Leave the awning hanging down while you lower the roof (see below)
• Once the roof is closed, roll the awning into its bag and secure with the ties, then zip bag closed
and secure clips
Page 15
Bush Palace Flamingo Setup Guide © 2017 Bush Palace Camper Hire
15
POLES & GUY ROPES
• Remove guy ropes and poles from privacy screens and put in pole carrier
TV ANTENNA
• Dismount and dismantle the TV antenna, put it back into its tube and return to side boot
DOOR
• Close door from inside
• Undo Velcro securing camper walls to door frame, inside & out
• Unclip connector securing door sections together
• Clip upper door section to door frame using butterfly clips
• Unclip butterfly clips at top of door
• Lift upper door section and secure to roof, making sure it is flat against ceiling
• Velcro clear protector into place
INTERIOR
• Now is a great time to sweep the camper!
• Make sure all doors, cupboards and drawers are closed and latches engaged
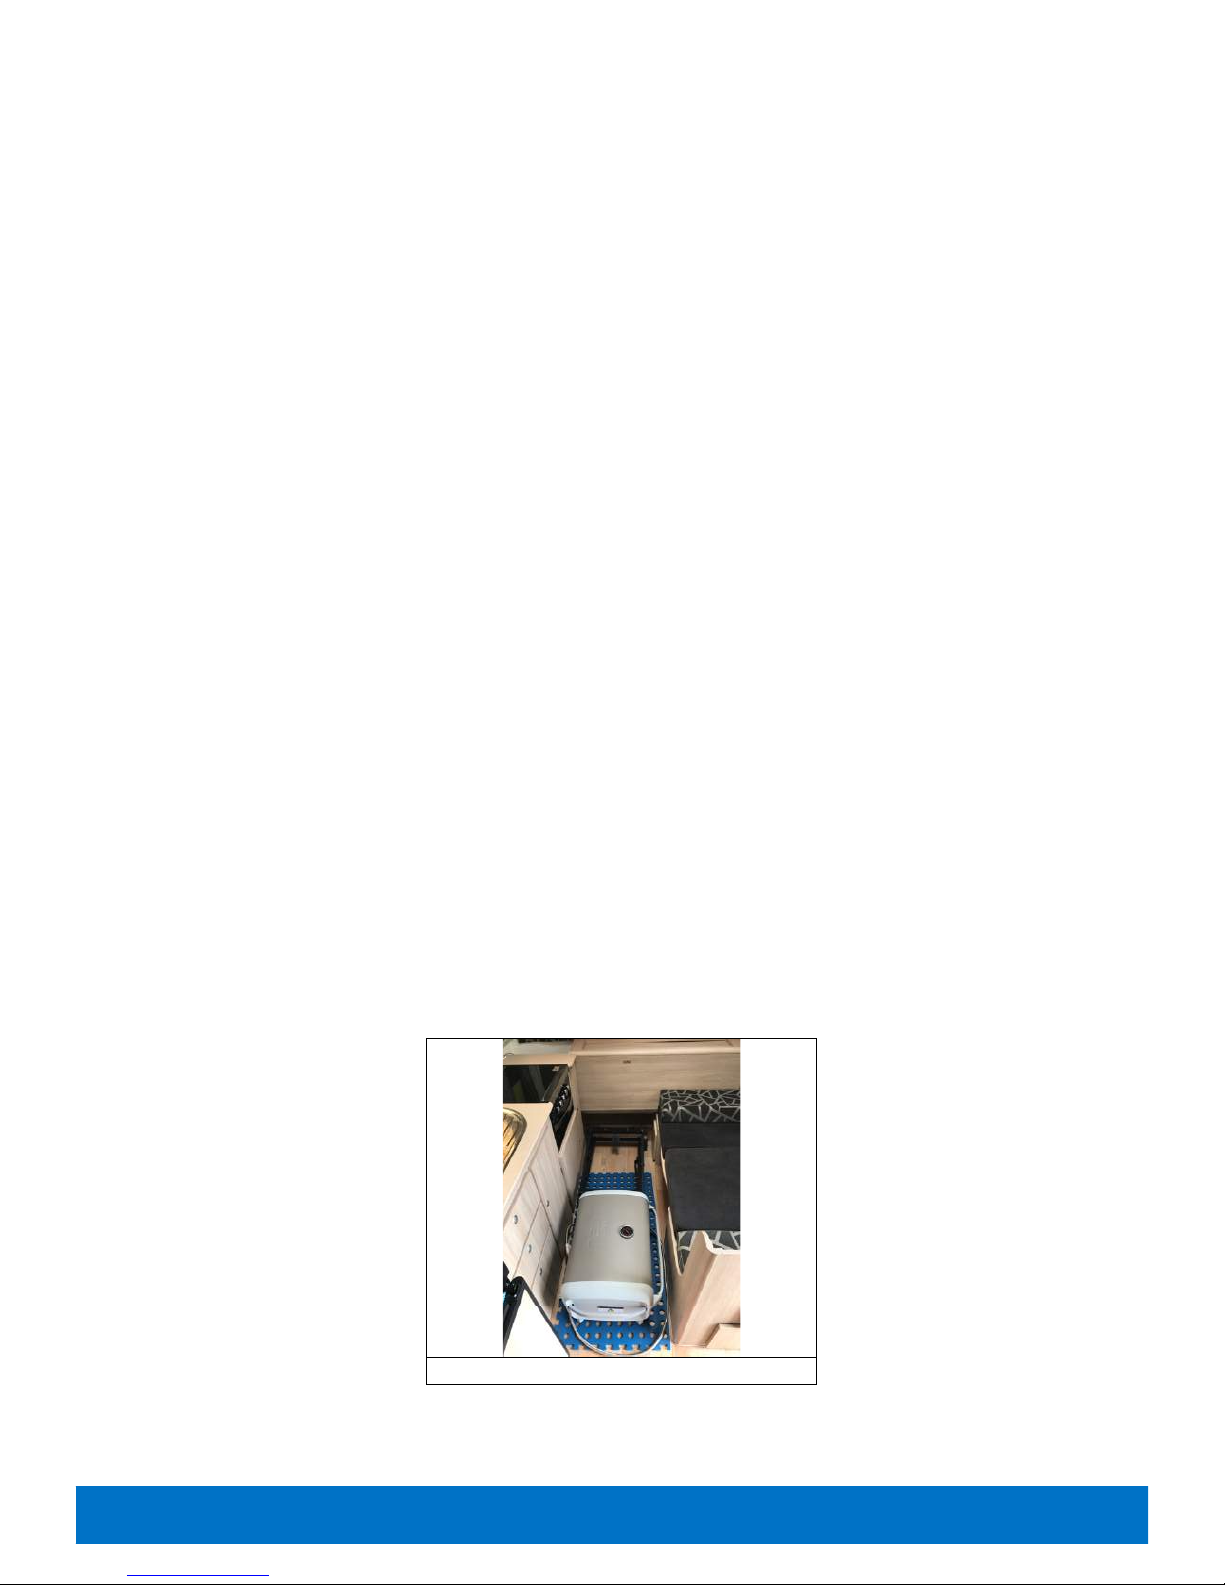
• Place BBQ inside camper at rear (use the blue rubber mats to protect floor)
• Close door
• Fold steps away
BBQ & stand storage position
Page 16
Bush Palace Flamingo Setup Guide © 2017 Bush Palace Camper Hire
16
BEDS
• Undo Velcro securing bed walls to bed base
• Fold walls onto bed as flat as possible, making sure that no canvas hangs over the end of the
bed
• Remove support poles from underneath and place alongside mattress
• Undo Velcro flaps covering riser arms
• Push bed in until it is inside the frame of the camper
• Repeat for rear bed
ROOF
• Remove roof props and place under mattresses
• Using the winder handle, wind the camper down until it is about 30cm from being down
• Walk around the camper and make sure that no canvas is sticking out, push it back in if needed.
• Lower until 10cm and repeat canvas check
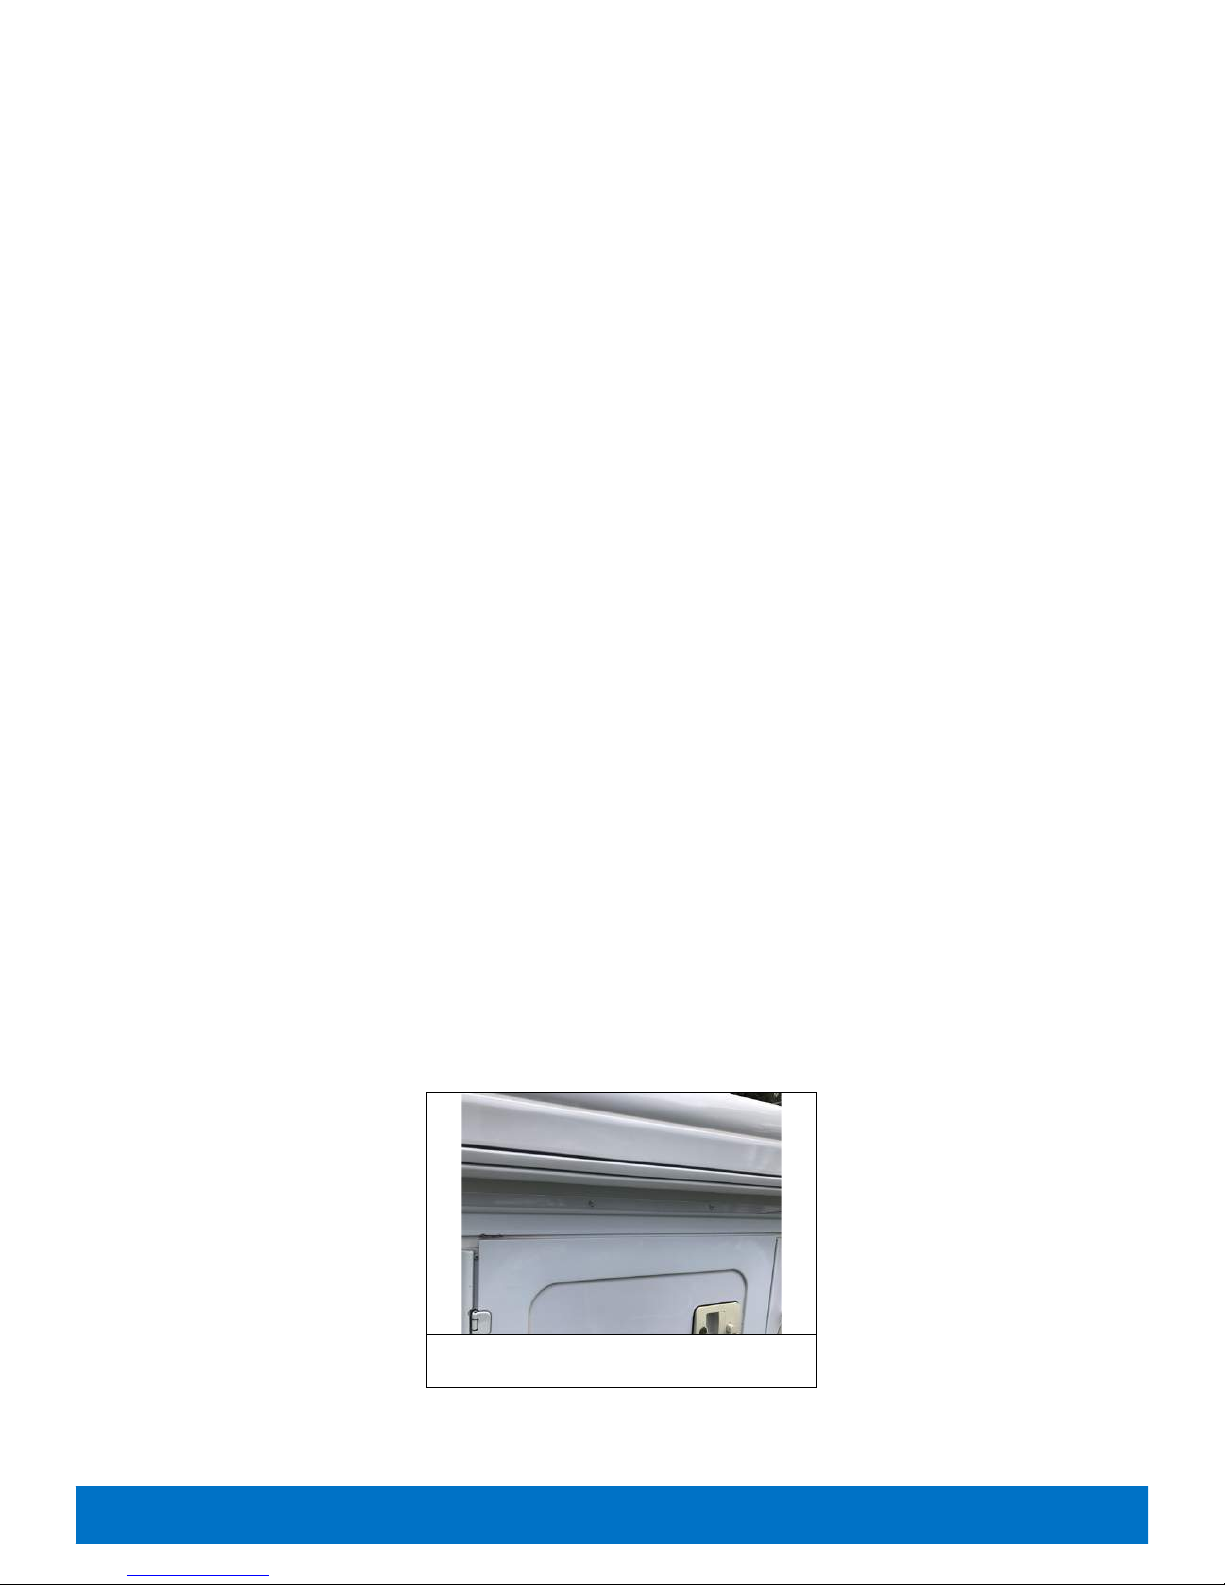
• Lower completely, making sure that the top edge of the door sits inside the edge of the camper
roof.
• Return winder handle to front boot
• Clip down each corner of the roof
• Roll privacy screen back into bag, secure by tying them with the attached tape and then zip the
bags closed.
• Secure the clips on the bag awnings.
• Replace shower and close & lock door
• Close & lock water filler door
Correct position of door when roof
closed
Page 17

Bush Palace Flamingo Setup Guide © 2017 Bush Palace Camper Hire
17
HOOKING UP
• Raise front & rear legs with winder and fold backwards
• Hook vehicle up to tow hitch
• Raise jockey wheel, remove and place in front boot (or vehicle boot).
• Connect chains and electrical connection to vehicle
• Release camper handbrake
• Remove chocks
• Move camper to release levelling ramp if used
• Return all chocks, ramp, winders & handles to front/side boot
• Close and lock all external hatches and lock
That's it packed away!
Page 18
Bush Palace Flamingo Setup Guide © 2017 Bush Palace Camper Hire
18
FINAL CHECK
• Camper, fridge, stove, BBQ, cutlery, plates etc cleaned & put away
• All winders and handles returned to front boot
• All cables and hoses have been neatly put in storage bags and returned to front boot
• All poles, pegs and guy ropes have been put in their bags and returned to side boot
• Support poles have been put in side boot
• Chocks & Ramp removed and put away
• Roof secured with no canvas trapped
• Gas off
• All chairs, table, annex mat etc cleaned & put away
• All doors and hatches closed and locked
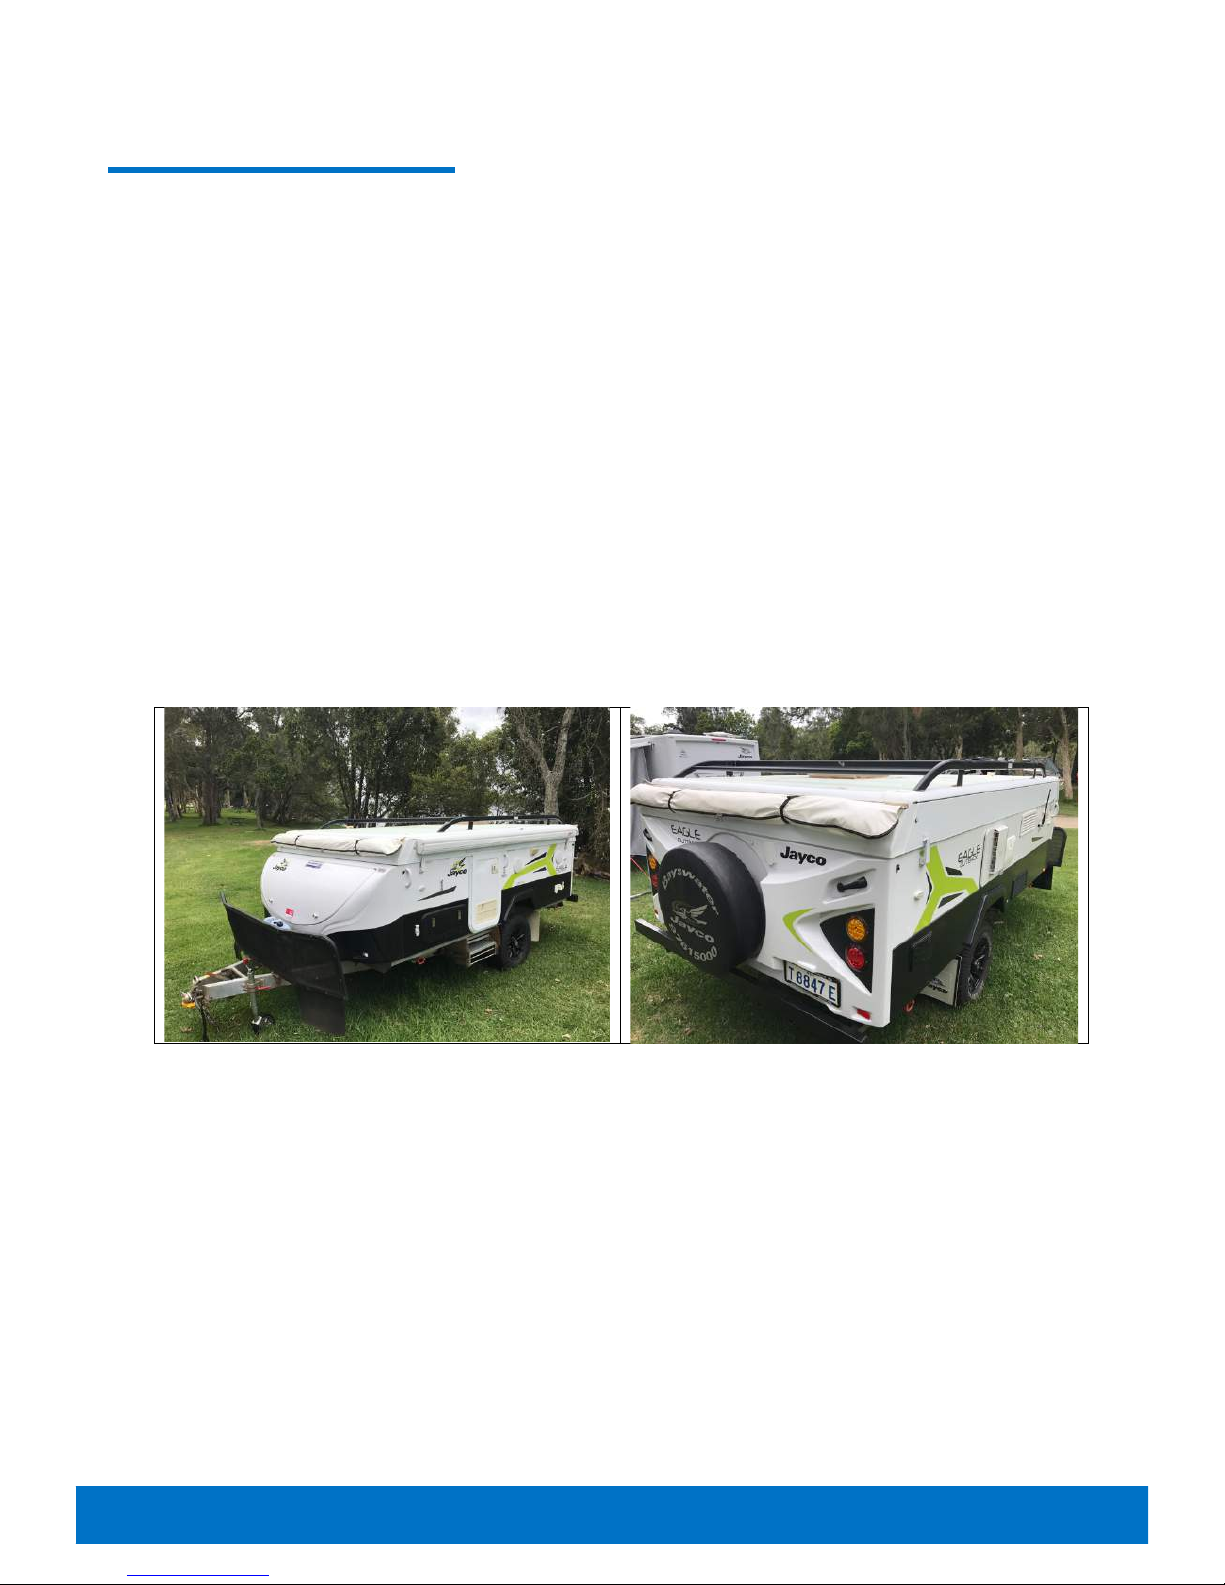
It should look something like this -
Page 19
Bush Palace Flamingo Setup Guide © 2017 Bush Palace Camper Hire
19
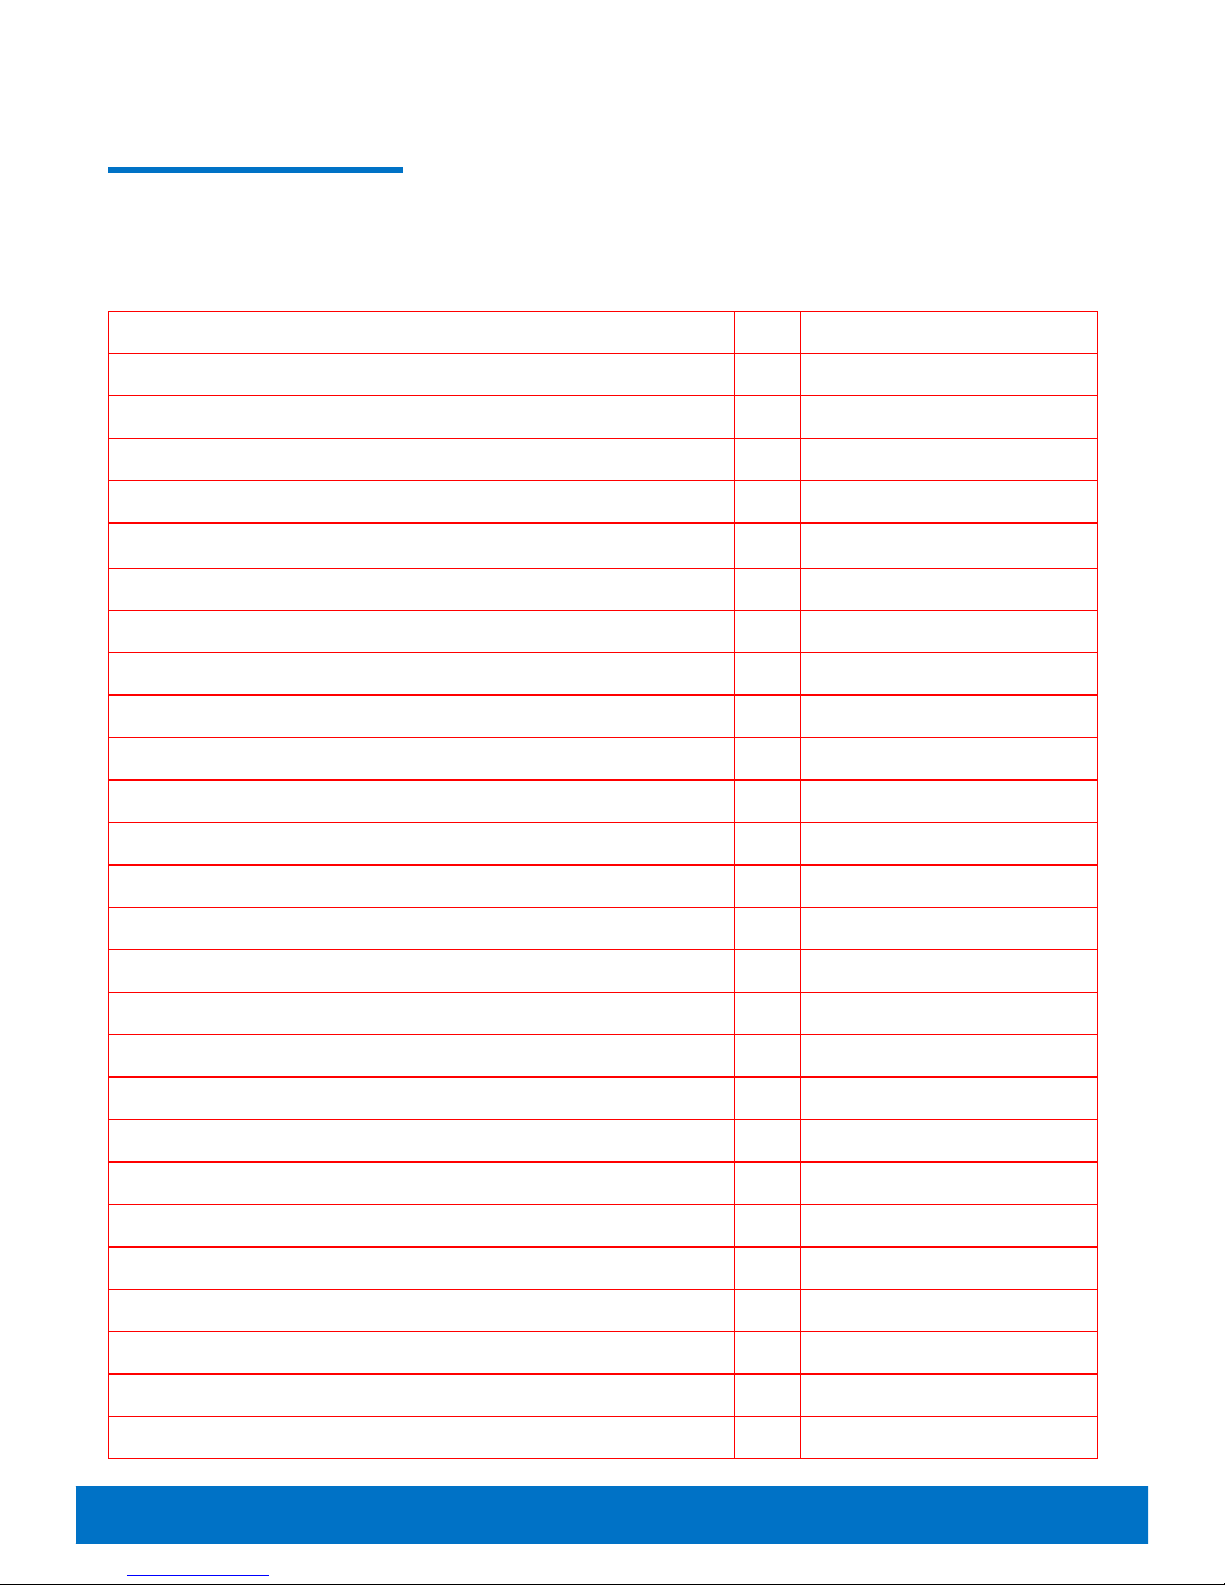
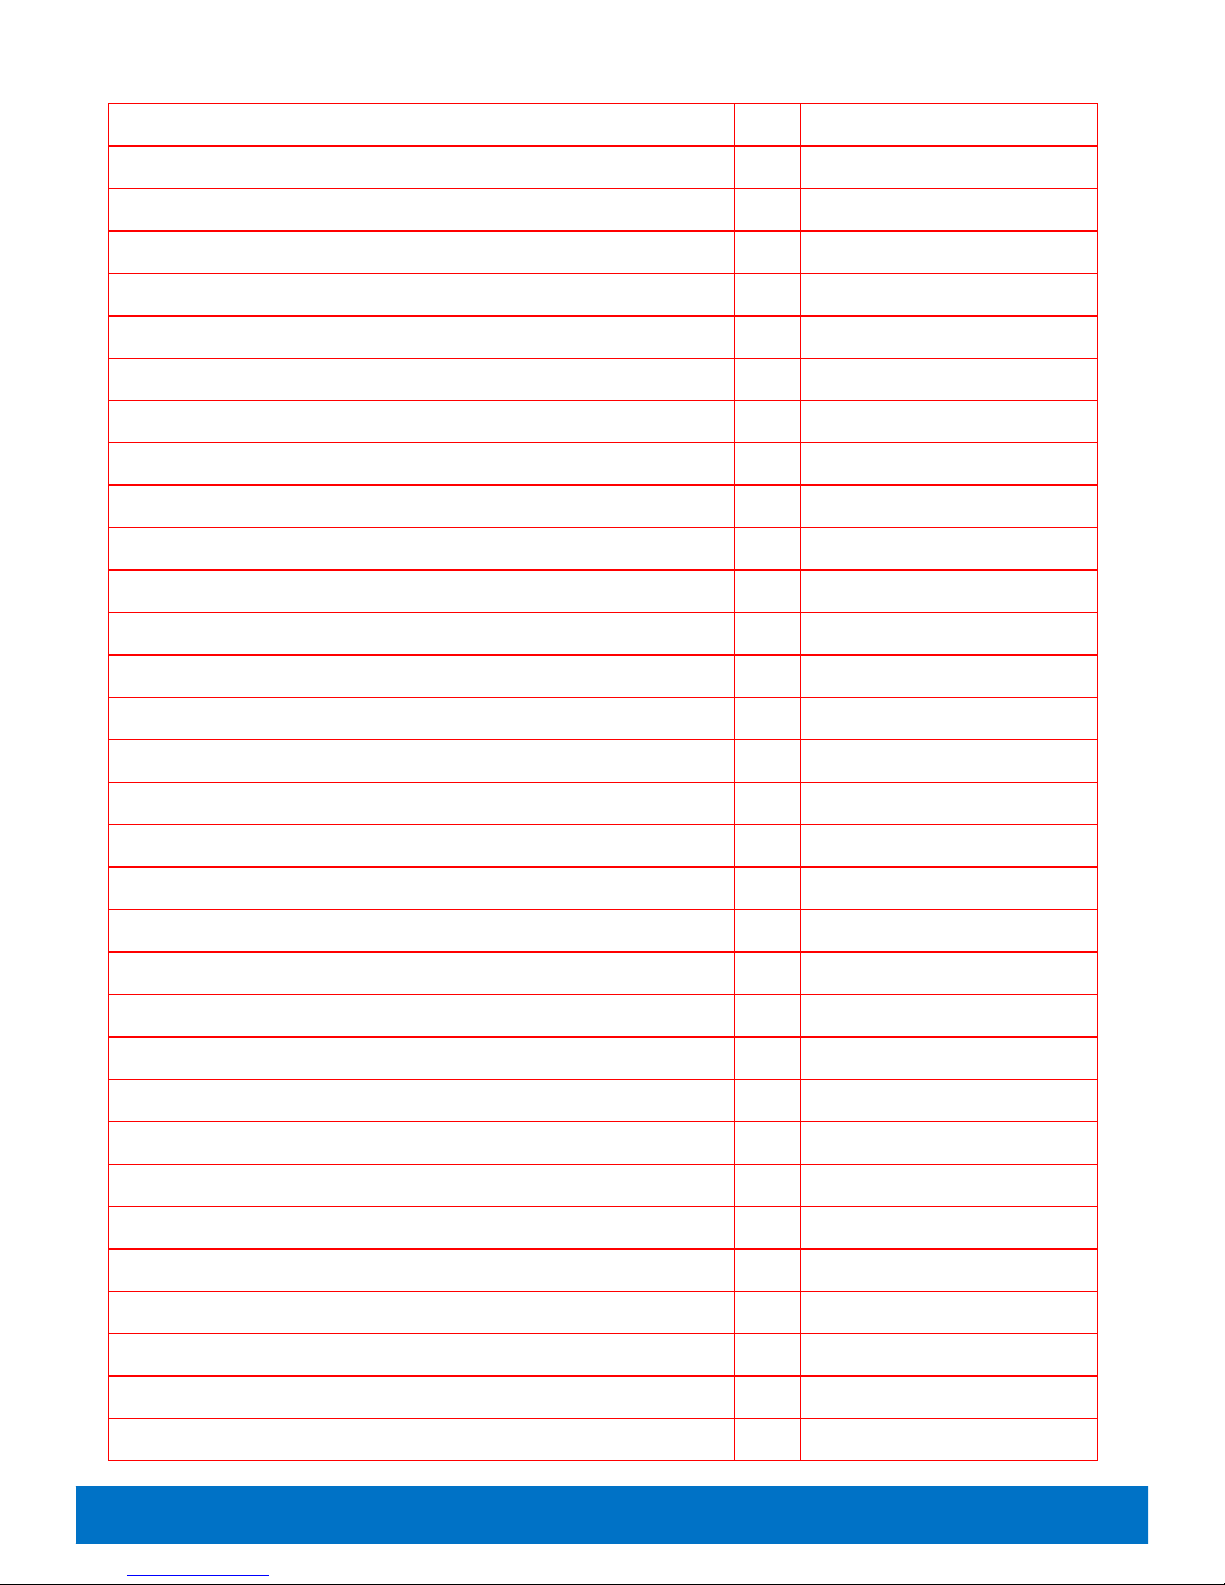
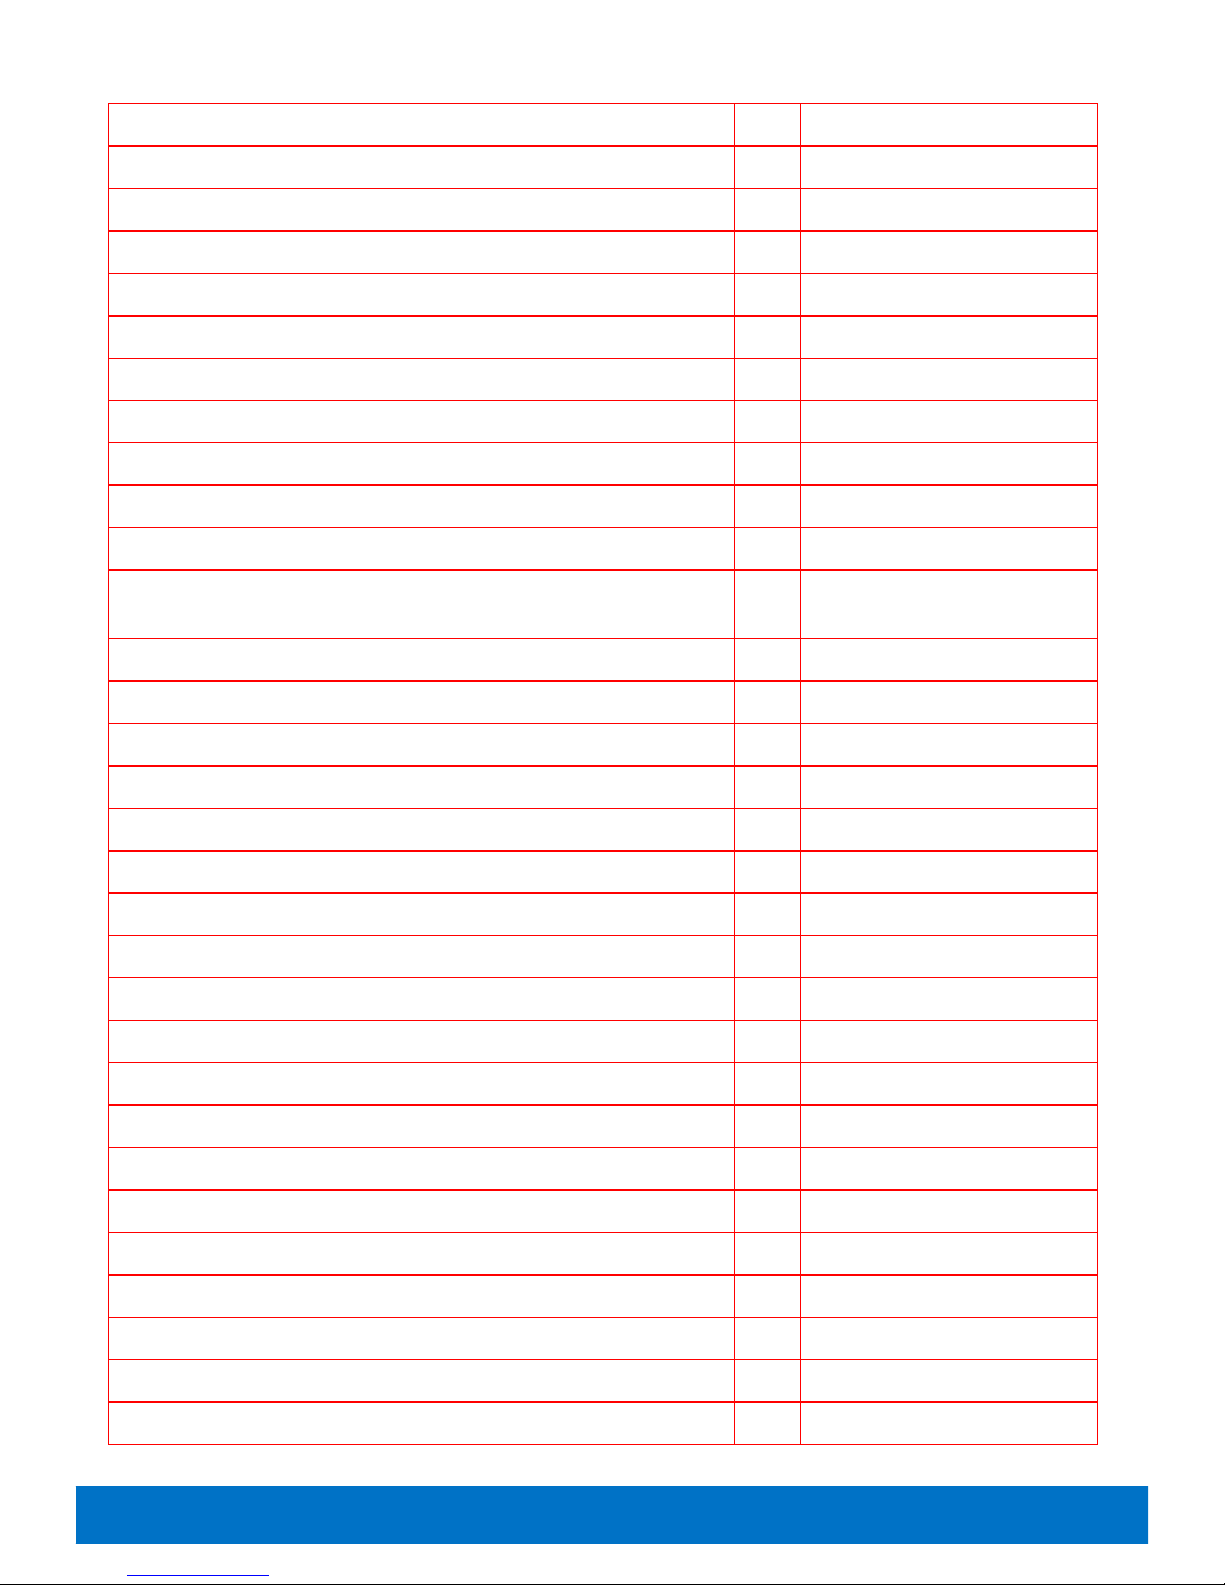
INVENTORY
This is a comprehensive listing of the items supplied with the camper. The location will help you to find
things, and may also be useful when packing away – everything has a home!
Item
Qty
Storage Location
Can opener
1
2nd drawer
Cutlery sets
5
Cutlery drawer
Egg flip
1
Cutlery drawer
Ladle
1
Cutlery drawer
Large knives
3
2nd drawer
Pastry brush
1
2nd drawer
Potato masher
1
2nd drawer
Potato peeler
1
2nd drawer
Scissors
1
2nd drawer
Tongs
3
Cutlery drawer
Wooden spoon
1
2nd drawer
Stone deflector
1
A-frame
Queen size mattress protector
*
Bed
Queen size sheet
*
Bed
Queen size mattress topper
*
Bed
Double mattress protector
*
Bed
Double sheet
*
Bed
BBQ stand
*
Camper floor
BBQ with 2m stainless bayonet hose
*
Camper floor
Cleaning products
~
Cupboard under drawers
Fly spray
*
Cupboard under drawers
Mosquito repellent
*
Cupboard under drawers
Olive oil spray
*
Cupboard under drawers
Paper towels
*
Cupboard under drawers
Salt & pepper
*
Cupboard under drawers
Sunblock
*
Cupboard under drawers
Page 20
Bush Palace Flamingo Setup Guide © 2017 Bush Palace Camper Hire
20
Item
Qty
Storage Location
DVD’s
*
Dinette drawer
Games
2
Dinette drawer
Hand towel
2
Dinette drawer
Mosquito coils
*
Dinette drawer
Power board
1
Dinette drawer
Tea Towels
2
Dinette drawer
12v light/fan
2
Dinette drawer
Battery lantern
1
Entry cupboard
9kg gas cylinder
1
Front boot
Awning floor mat
1
Front boot
Camping chairs
5
Front boot
Drinking quality water hose in bag, w/ fittings
1
Front boot
Gas fuse
2
Front boot
Jack
1
Front boot
Jack handle
1
Front boot
Jockey wheel
1
Front boot
Leg handle
1
Front boot
Power lead in bag
1
Front boot
Sullage hose in bag
1
Front boot
Table
1
Front boot
Wheel brace
1
Front boot
Winding handle
1
Front boot
22 litre plastic water jerry
1
Front jerry holder
BBQ utensils
3
In BBQ
Hotplate (for use in BBQ)
1
In BBQ
Electric kettle
1
Sink cupboard
Gas kettle (collapsible)
1
Sink cupboard
Pot set
6
Sink cupboard
Sandwich maker
1
Sink cupboard
Camp toaster
1
Sink cupboard
Small chopping board
1
Large cupboard
Page 21
Bush Palace Flamingo Setup Guide © 2017 Bush Palace Camper Hire
21
Item
Qty
Storage Location
Toaster
1
Sink cupboard
Microwave plate
1
Microwave
Microwave rice cooker
1
Microwave
Microwave Container
2
Cupboard next to stove
Coffee
~
Narrow cupboard
Hot chocolate
~
Narrow cupboard
Sugar
~
Narrow cupboard
Tea
~
Narrow cupboard
Tissues
1
Narrow cupboard
Beakers
5
Plate drawer
Bowls
5
Cupboard under cutlery
drawer
Champagne flutes
2
Drawer next to stove
Cups
5
Plate drawer
Dinner Plates
5
Plate drawer
Egg rings
5
Plate drawer
Salad bowl
1
Plate drawer
Side plates
5
Plate drawer
Wine glasses
2
Plate drawer
Spare wheel
1
Rear
10A to 15A adapter
*
Side boot
Broom
1
Side boot
Bubble level
1
Side boot
Chocks
2
Side boot
Clothesline & pegs
1
Side boot
Dustpan & brush
1
Side boot
guy ropes
6
front boot
Levelling ramps
1
Side boot
Mallet
1
Side boot
Pegs
~
Side boot
Plastic Step
1
Side boot
Page 22
Bush Palace Flamingo Setup Guide © 2017 Bush Palace Camper Hire
22
Item
Qty
Storage Location
Poles
9
Side boot
Rafters
4
Side boot
TV antenna
1
Side boot
Umbrella
1
Side boot
Aluminium foil
1
Stove cupboard
Cling wrap
1
Stove cupboard
Grater
1
Stove cupboard
BBQ lighter
1
Entry cupboard
Bottle opener
1
Sink plug
1
sink
Torch
1
Top drawer
TV remote control
1
Top drawer
Wine knife
1
Cutlery drawer
Front bed support poles
2
Under front mattress
Roof props
2
Under mattress
Rear bed support poles
2
Under Rear mattress
TV/DVD
1
Page 23

Bush Palace Flamingo Setup Guide © 2017 Bush Palace Camper Hire
23
OPTIONAL ITEMS
These items are available on request, some of them at additional cost.
SATELLITE DISH
This is a portable 85cm satellite dish configured for the Optus satellite that provides free to air services
under the VAST scheme (Viewer Access Satellite Television). There are no subscription fees
associated with the VAST service and it enables access to television services just about everywhere in
Australia.
The full setup instructions are included in the folder however these are the basic steps and the actions
specific to the Bush Palace
Unpack
The dish comes in a carry bag which contains:
• 85cm satellite dish
• 20m coax cable
• Single LNB (fitted to dish)
• 1m coax cable (fitted to dish)
• Satellite signal meter
• Compass
• 2 x Pegs
• Aetech satellite decoder
• Smart card (in decoder)
• Remote control
• HDMI cable
• Small inverter
Set the dish up according to the instructions, making sure that it is flat & level and has clear line of
sight to the sky. Trees, buildings, the camper and other obstructions will prevent you finding a signal.
• Connect the signal finder to the 1m cable
Page 24

Bush Palace Flamingo Setup Guide © 2017 Bush Palace Camper Hire
24
• Place the decoder in the camper and plug it in, either to the 240v socket in the cupboard under
the TV point into the small inverter.
• Unplug the coaxial cable from the back of the TV and plug it into the back of the decoder.
• Connect the HDMI cable to both the decoder and TV
• Set the TV input to HDMI
• Outside again, connect the 20m cable to the satellite signal finder at one end and the caravan
antenna input (forward tight hand side of camper) at the other. If all connections have been
made properly, the signal finder will now be powered on through the coax cable.
• Using the elevation marks on the rear leg of the dish and the compass point the dish toward the
satellite. You may find it useful to use a satellite finder app on your smartphone to help here;
we use the satellite finder that is included in the Wikicamps application. This has a camera
function that allows you to see exactly where in the sky the satellite is.
• Now it is simply a process of adjusting the elevation and rotation of the dish until the signal
meter shows a strong signal.
• Once the signal is acquired the decoder needs to be tuned. Go to the advanced setup menu
where you will see a signal strength meter. Once the decoder indicates that it has locked onto
the satellite, you can start the autotune process.
The satellite card will sometimes need to be ‘re-hit’. To do this go to
https://myvast.com.au/register/reactivate and enter smartcard number 10020893219
You are now setup. Use the ‘Aetech’ remote to change channels on the TV.
Pack away
• Unplug all cables
• Place the decoder, power cable and HDMI lead in its box into the satellite dish bag
• Fold the satellite dish and place it in the bag
• Carefully wind the 20m cable, being sure to not introduce any kinks into the cable. Place it onto
the satellite dish
• Put the signal finder & compass back into the pocket in the bag lid
• Set the TV to DTV input
• Connect the white coax cable to the antenna input on the TV
Page 25

Bush Palace Flamingo Setup Guide © 2017 Bush Palace Camper Hire
25
INFLATABLE KAYAKS
We have 2 x 2 man kayaks (Colorado) and 1 x 1 man kayak (Rio). Each is supplied with a personal
floatation device and paddle, and a hand pump is provided for inflation.
Setup
• Unpack from storage bag
• There are 3 main inflation zones – one for each side, and the floor. An additional inflation zone
is under each seat.
• Inflate the floor first, then the sides, then the seat(s)
• The seat attaches to the floor with Velcro, and then a forward and aft webbing strap on each
side.
• Make sure the bung is in before using, but open it to drain any water after use.
Packing away
The kayak should be dry and clean before packing away
• Fold seat flat by loosening webbing straps and Velcro strips. The seat will sit flat if you rotate it
90degrees once straps are undone
• Deflate all inflation zones, leaving the inflators open
• Pull the sides into the centre of the kayak
• Using the skegs on the bottom of the kayak as a guide;
o Fold the nose of the kayak
o Then fold in half
o Finally fold over again
• You can then wrestle the kayak back into its bag.
If the kayak is wet please let us know so that we can properly dry it. A cleaning charge may apply if
the kayak is very wet or dirty.
Page 26

Bush Palace Flamingo Setup Guide © 2017 Bush Palace Camper Hire
26
GAZEBO
The 3m x 3m gazebo is useful for providing additional shade outside the camper. To setup:
Stand the gazebo on its feet
Pull the corners apart until they are fully extended horizontally
Raise each leg to full height
Peg down using the pegs and guy ropes provided.
Packing away is the reverse of the above; please make sure that the gazebo is clean and dry. If you
have to pack it away in the rain please let us know so that we can dry it on return
SOLAR PANELS
The 140w solar panel is supplied in a protective bag. The bag contains the panels with controller and
5m cable.
To use, simply:
Unpack panels and setup facing the sun, angled to receive the sunlight directly.
Connect the grey plug to the corresponding plug on the A frame of the camper. The plug can only be
connected one way so there is no risk of reversing polarity.
That’s it!
When packing away please make sure that the panels are clean and the cord neatly coiled.
 Loading...