

Page 1
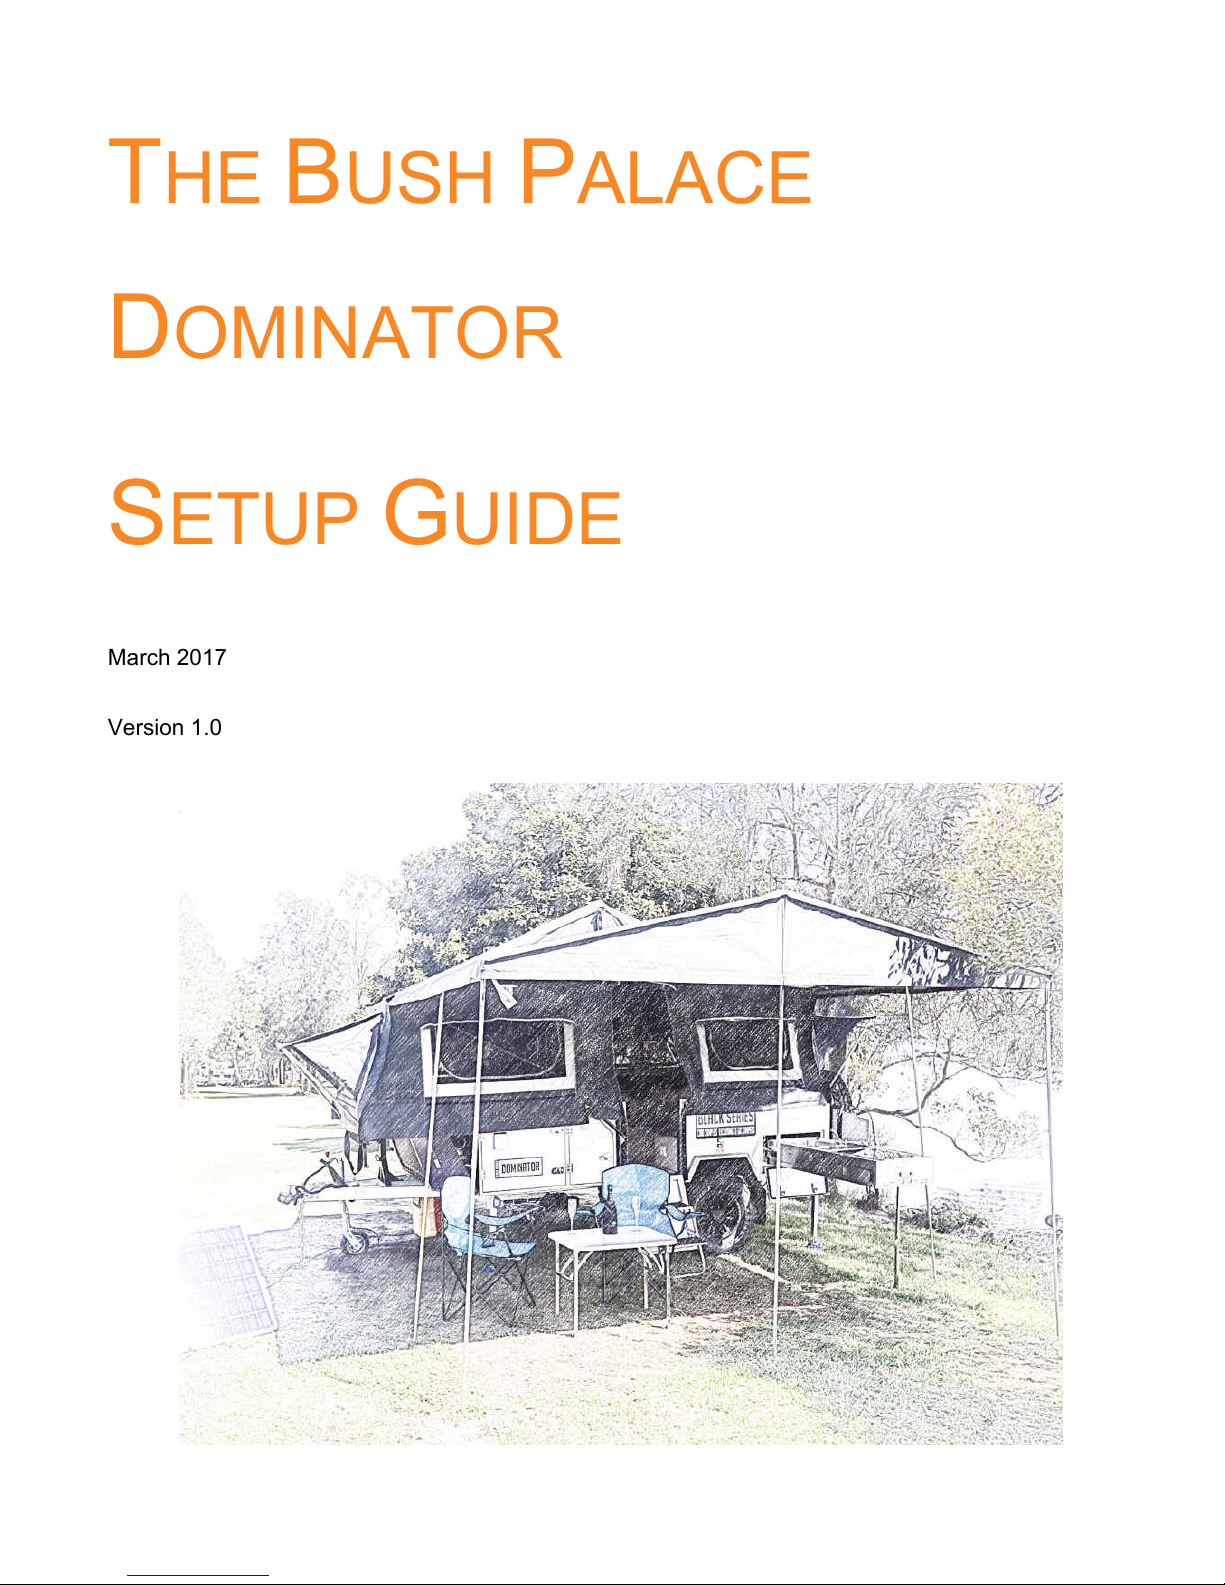
THE BUSH PALACE
DOMINATOR
SETUP GUIDE
March 2017
Version 1.0
Page 2
Bush Palace Dominator Setup Guide © 2017 Bush Palace Camper Hire
2
INTRODUCTION
Thanks for hiring the Bush Palace Dominator. It is supplied with everything you need to take it away
and enjoy your holiday.
These instructions assume that you have never used a hard floor style camper before; if you have
there may still be some steps that are unique to this camper. Please follow the instructions carefully to
minimise the setup time and to ensure that the camper remains in excellent condition.
Please also read the ‘Additional Manufacturers Information’ which covers some important care items
that you are responsible whilst hiring the camper
The instructions may appear daunting, but in practice they are easy to follow and you will have the
camper set up in no time!
We hope that the Bush Palace Dominator has everything that you need; if there is anything that
you are not happy with we would ask that you contact us and give us the opportunity to fix it
for you. If you have any issues you can contact us on-
Kathryn – 0435 918405
David – 0407 780281
We would love to hear your feedback. Please take a moment to leave a comment on Camplify,
and send us a photo of where your adventures have taken you!
Happy camping,
Kathryn & David
Page 3
Bush Palace Dominator Setup Guide © 2017 Bush Palace Camper Hire
3
TABLE OF CONTENTS
INTRODUCTION .................................................................................................................................................... 2
TABLE OF CONTENTS ......................................................................................................................................... 3
BEFORE YOU SET OFF ........................................................................................................................................ 4
SETTING UP .......................................................................................................................................................... 5
ARRIVAL AT SITE ................................................................................................................................................... 5
RAISING THE ROOF ............................................................................................................................................... 6
SETTING UP THE INTERIOR .................................................................................................................................... 7
KITCHEN SETUP ................................................................................................................................................... 9
MISCELLANEOUS SETUP ....................................................................................................................................... 9
SIT DOWN & ENJOY! ............................................................................................................................................ 10
PACKING UP ....................................................................................................................................................... 11
INITIAL STEPS ..................................................................................................................................................... 11
HOOKING UP ...................................................................................................................................................... 12
FINAL CHECK ..................................................................................................................................................... 13
POLE GUIDE ....................................................................................................................................................... 14
INVENTORY ......................................................................................................................................................... 15
OPTIONAL ITEMS ............................................................................................................................................... 18
TV/DVD ............................................................................................................................................................ 18
SATELLITE DISH ................................................................................................................................................. 18
Unpack ......................................................................................................................................................... 18
Pack away .................................................................................................................................................... 20
INFLATABLE KAYAKS ........................................................................................................................................... 21
Setup ............................................................................................................................................................ 21
Packing away ............................................................................................................................................... 21
GAZEBO ............................................................................................................................................................. 22
GIC BLACK SERIES TRAILER CARE GUIDE ................................................................................................... 23
ANDERSON PLUG: .......................................................................................................................................... 23
WINCHES ........................................................................................................................................................... 23
JOCKEY WHEEL .................................................................................................................................................. 23
STABILISER LEGS ............................................................................................................................................... 23
CANVAS & TENT SECTION ................................................................................................................................... 24
BATTERY GUIDE ................................................................................................................................................. 26
Page 4
Bush Palace Dominator Setup Guide © 2017 Bush Palace Camper Hire
4
BEFORE YOU SET OFF
• Make sure that all 4 corner jacks are raised.
• Make sure that the hitch is connected properly and the latch is closed on the ball.
• Check chains and make sure that the shackles are done up. It is usually best to cross the
chains underneath the drawbar.
• Connect the 12 pin socket to car, using the portable brake controller if required.
• Connect Anderson plug to vehicle if available
The camper can not be towed unless the electric brakes are connected to your vehicle
• Make sure that the trailer handbrake is off
• check all lights for proper operation
WATER
If you intend to free camp, please note that the camper is supplied with the water tank empty to keep
the towing weight down. Remember to fill the tanks with potable water when you are close to your
destination, using the drinking water quality hose provided.
Page 5
Bush Palace Dominator Setup Guide © 2017 Bush Palace Camper Hire
5
SETTING UP
ARRIVAL AT SITE
• Park the camper on a level area
• If required use a levelling ramp to level the camper left to right (a bubble level is in the side boot;
place this on the A-frame))
• Once level left to right, engage the handbrake, undo the chains and electrical connections.
• Place a chock against each wheel
• Put the jockey wheel into its bracket and tighten
• Disengage the hitch (remove pin)
• Raise the camper with the jockey wheel
• Move the vehicle away from the hitch
• Level the camper front to back using the jockey wheel to adjust the height, again using the
bubble level.
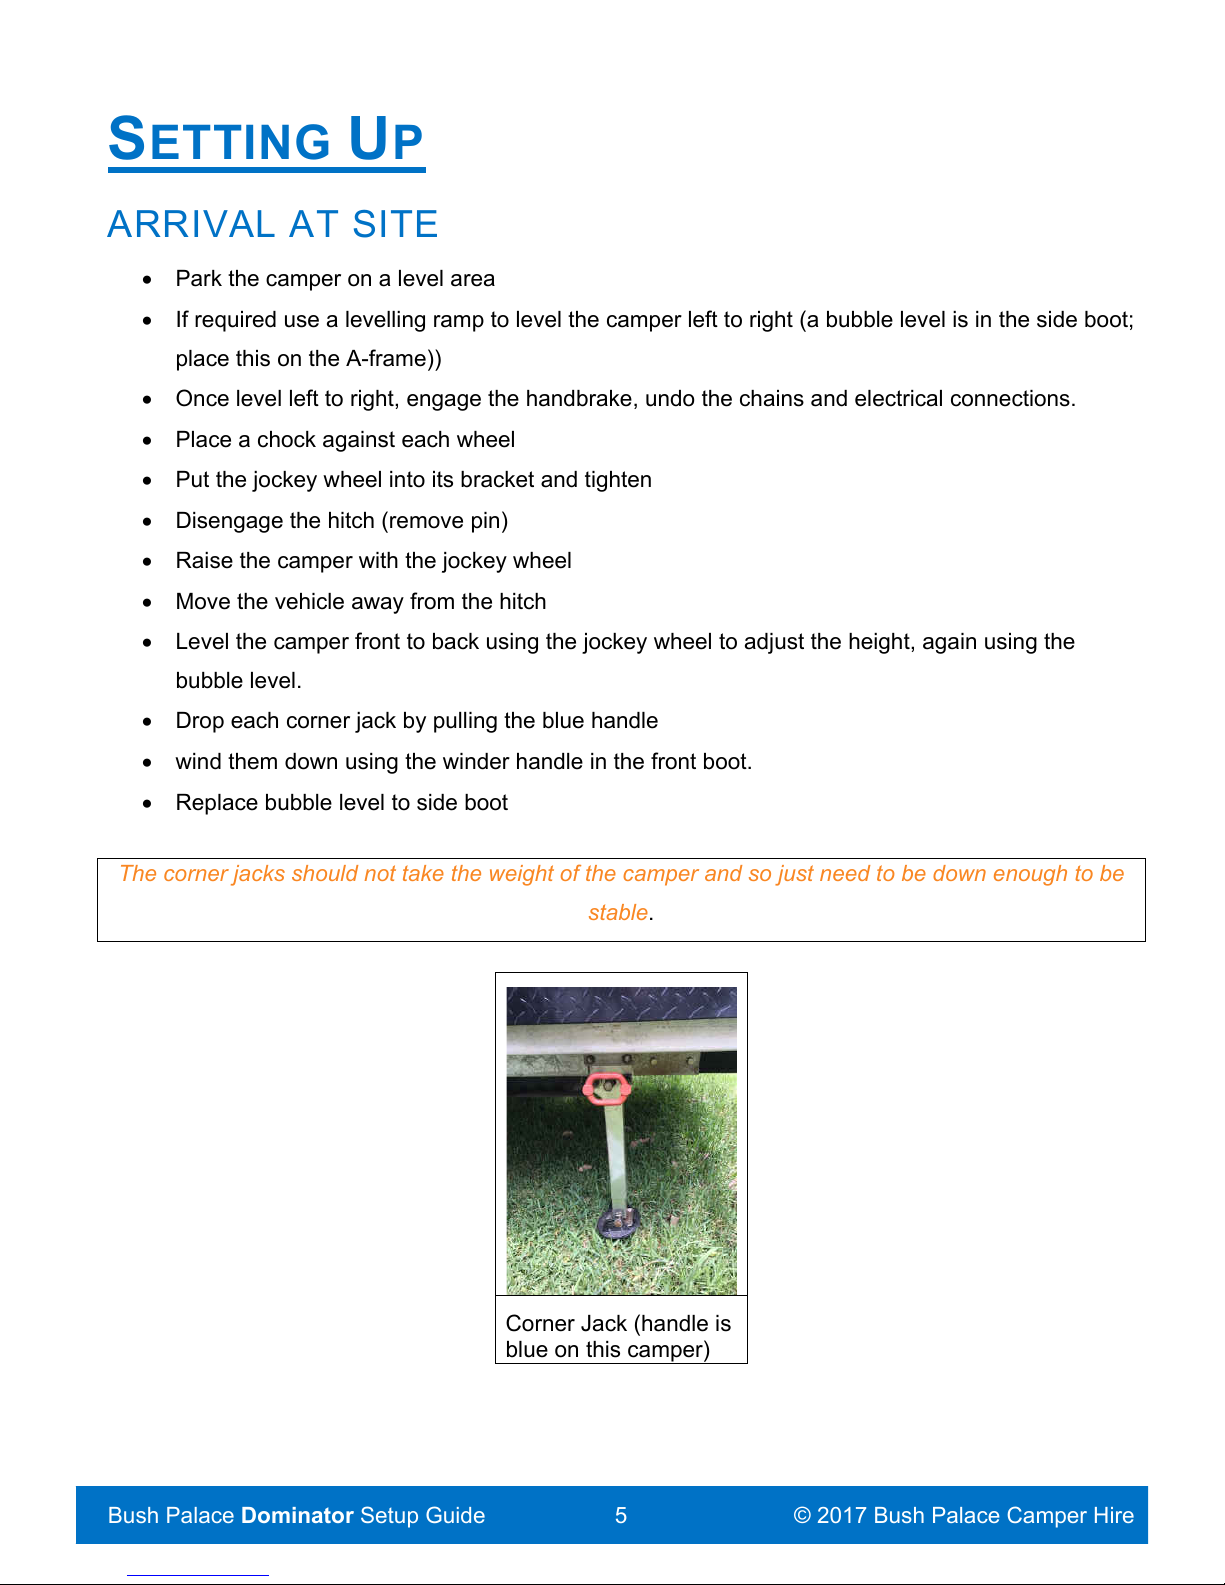
• Drop each corner jack by pulling the blue handle
• wind them down using the winder handle in the front boot.
• Replace bubble level to side boot
The corner jacks should not take the weight of the camper and so just need to be down enough to be
stable.
Corner Jack (handle is
blue on this camper)
Page 6
Bush Palace Dominator Setup Guide © 2017 Bush Palace Camper Hire
6
RAISING THE ROOF
• Remove any load from the roof rack
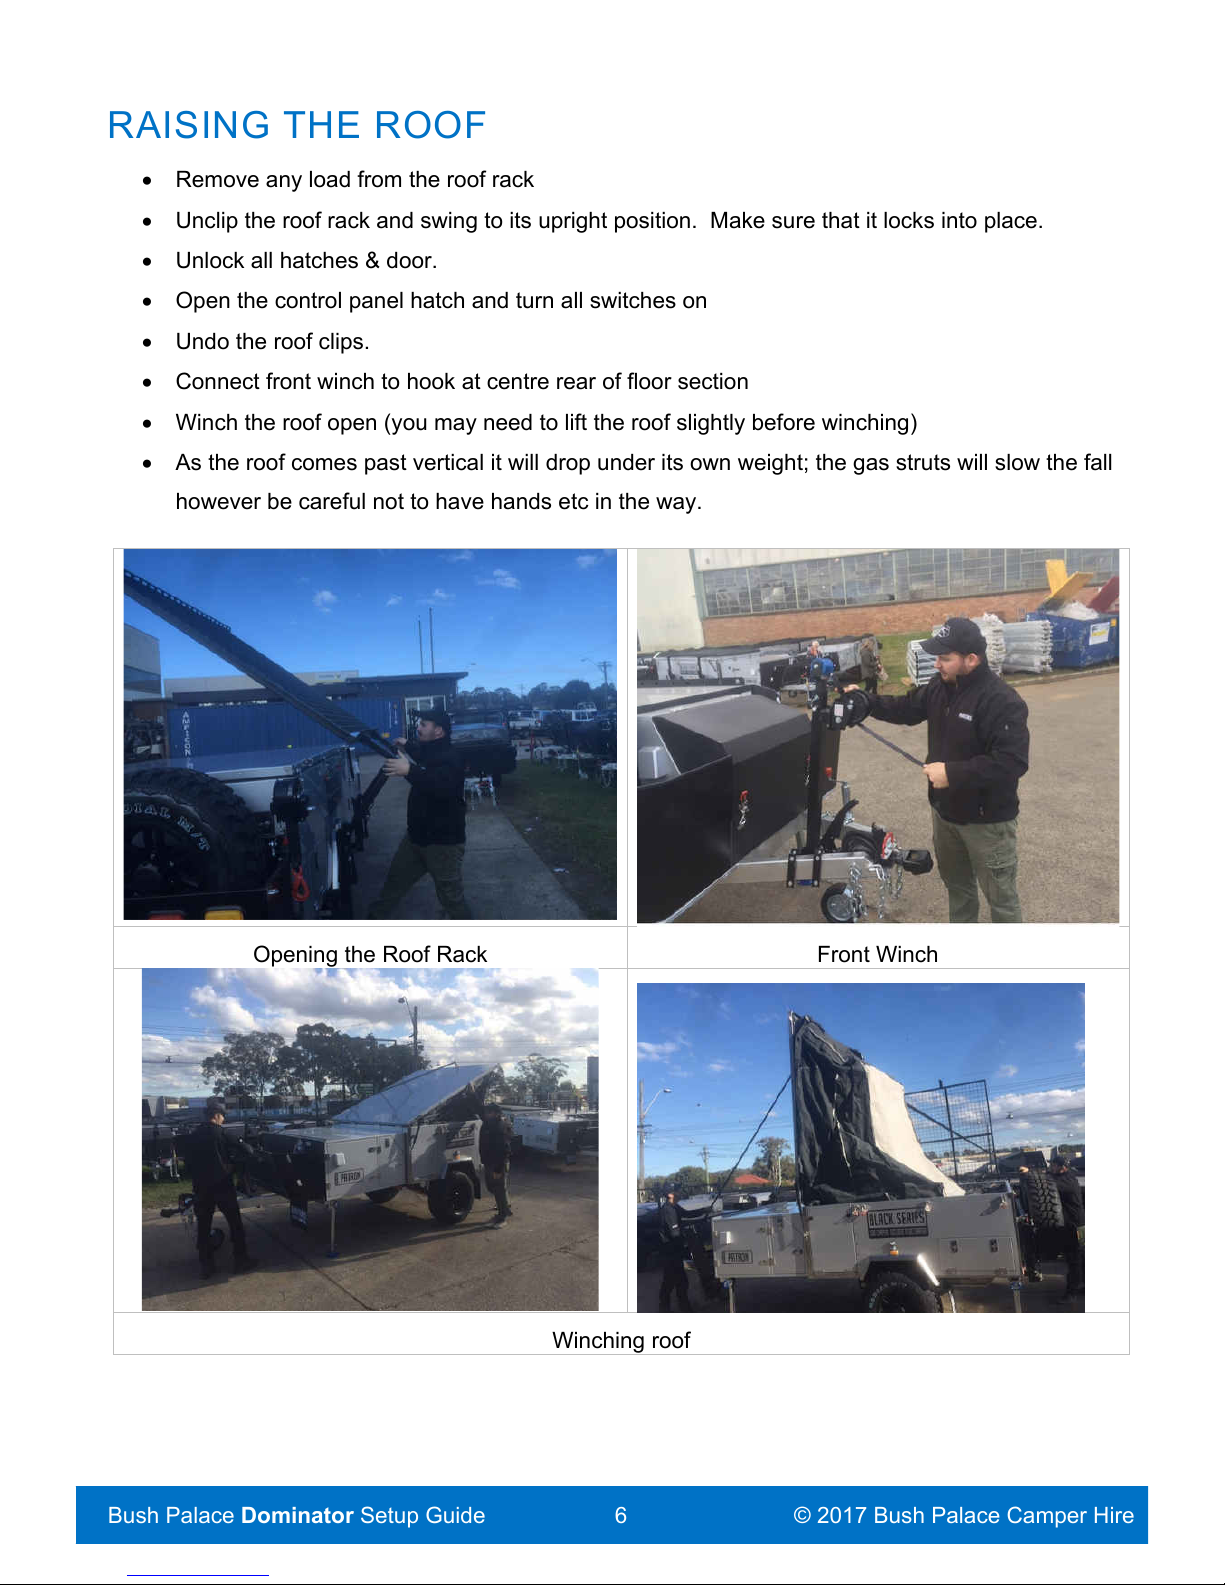
• Unclip the roof rack and swing to its upright position. Make sure that it locks into place.
• Unlock all hatches & door.
• Open the control panel hatch and turn all switches on
• Undo the roof clips.
• Connect front winch to hook at centre rear of floor section
• Winch the roof open (you may need to lift the roof slightly before winching)
• As the roof comes past vertical it will drop under its own weight; the gas struts will slow the fall
however be careful not to have hands etc in the way.
Opening the Roof Rack
Front Winch
Winching roof
Page 7
Bush Palace Dominator Setup Guide © 2017 Bush Palace Camper Hire
7
SETTING UP THE INTERIOR
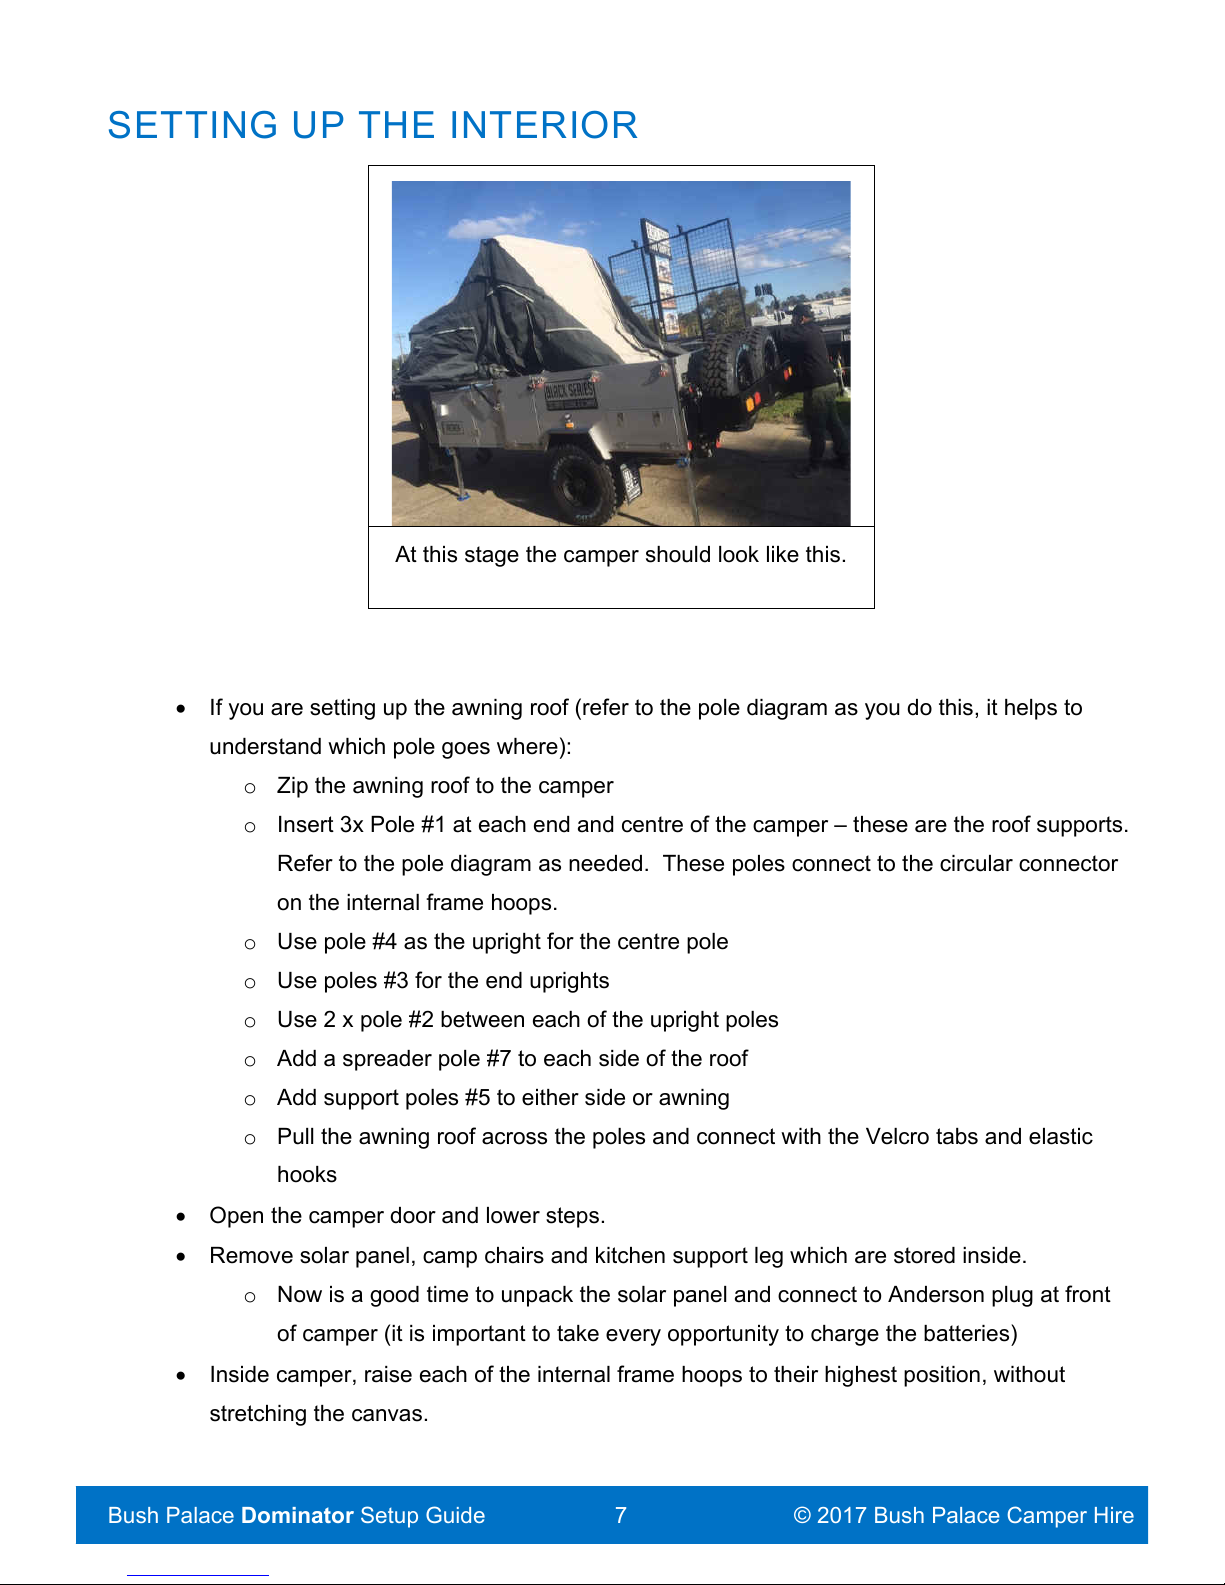
At this stage the camper should look like this.
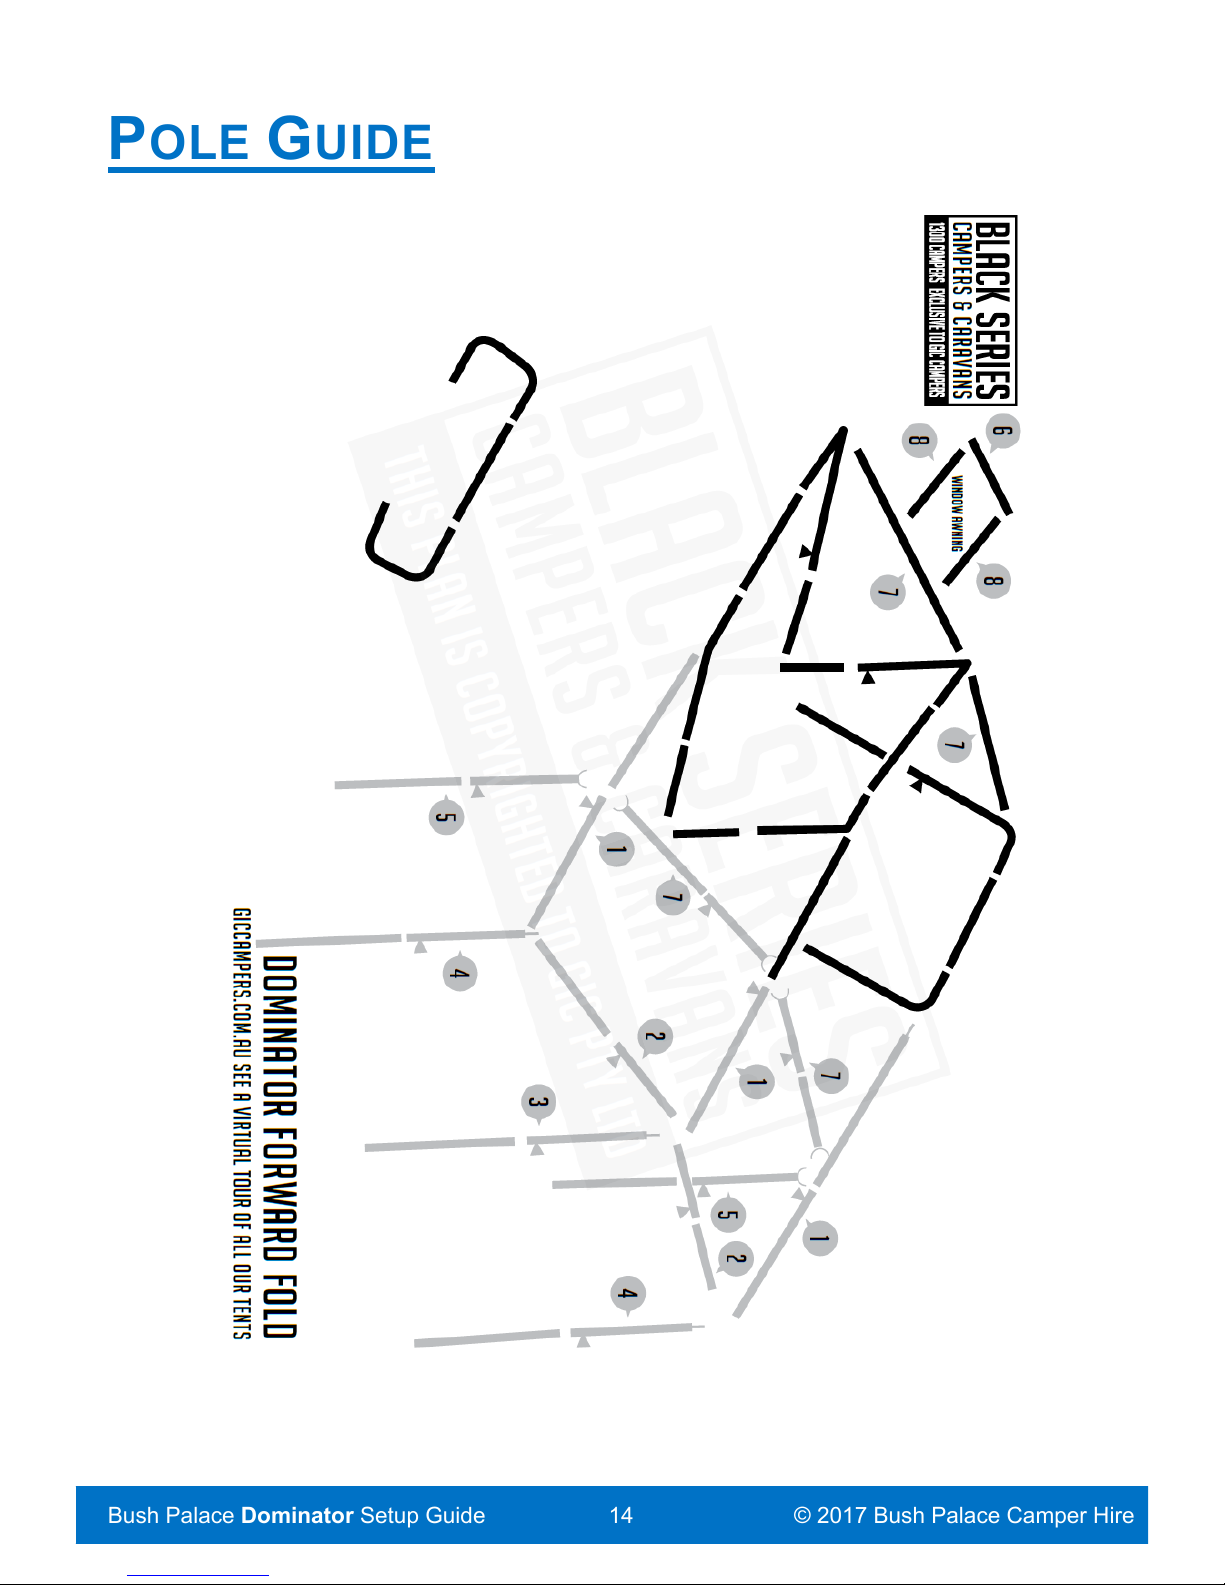
• If you are setting up the awning roof (refer to the pole diagram as you do this, it helps to
understand which pole goes where):
o Zip the awning roof to the camper
o Insert 3x Pole #1 at each end and centre of the camper – these are the roof supports.
Refer to the pole diagram as needed. These poles connect to the circular connector
on the internal frame hoops.
o Use pole #4 as the upright for the centre pole
o Use poles #3 for the end uprights
o Use 2 x pole #2 between each of the upright poles
o Add a spreader pole #7 to each side of the roof
o Add support poles #5 to either side or awning
o Pull the awning roof across the poles and connect with the Velcro tabs and elastic
hooks
• Open the camper door and lower steps.
• Remove solar panel, camp chairs and kitchen support leg which are stored inside.
o Now is a good time to unpack the solar panel and connect to Anderson plug at front
of camper (it is important to take every opportunity to charge the batteries)
• Inside camper, raise each of the internal frame hoops to their highest position, without
stretching the canvas.
Page 8
Bush Palace Dominator Setup Guide © 2017 Bush Palace Camper Hire
8
• Insert internal poles #13 at the front of the bed. They go into pockets in the canvas and clip
onto the forward support hoop. Make sure that the outside canvas is not pinched under
these poles or it will allow water to seep through the canvas.
• Use 4 x spreader poles #7 to support the edges of the internal roof; these clip to the support
hoops.
• Clip the tent to the body of the camper using the press studs & Velcro as appropriate.
The basic tent setup is now complete. It is worth going around and adjusting all poles &
spreaders now to make sure they are tensioned properly without being too tight. If they are too
tight is can stretch and damage the canvas, and will also increase the risk of heavy rain seeping
through seams.
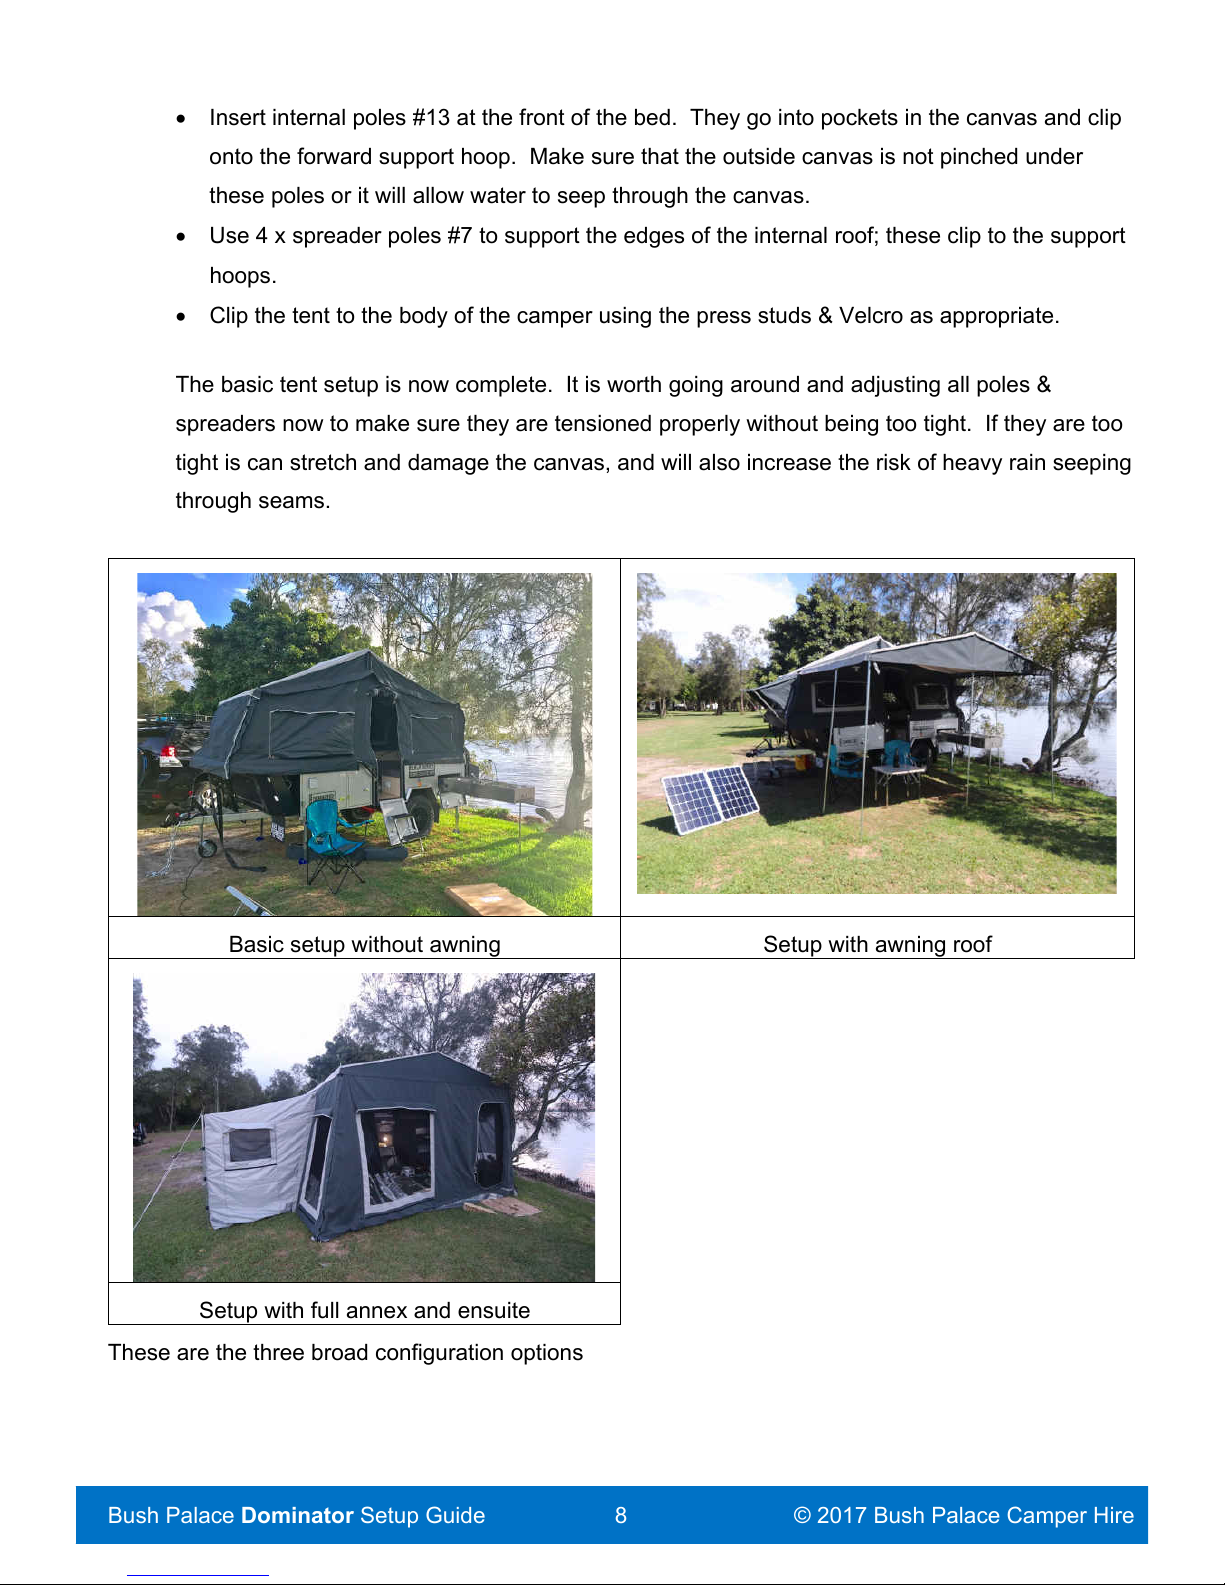
Basic setup without awning
Setup with awning roof
Setup with full annex and ensuite
These are the three broad configuration options
Page 9
Bush Palace Dominator Setup Guide © 2017 Bush Palace Camper Hire
9
KITCHEN SETUP
• Pull out the kitchen and support the end using the support leg provided
• Extend the sink drain and direct it away from the camper. If you are installing the walls and floor
place a bucket (folding bucket provided) under the drain.
• Connect the blue water hose to the water bayonet
• Plug in the kitchen light (small electrical connector next to water spigot)
• Connect the orange gas hose to the gas bayonet at the rear of the camper.
• Turn gas on at gas bottle
MISCELLANEOUS SETUP
• Set up the window awnings if needed using 2 x pole #8 and spreader pole #6 for each one.
Front and rear window awnings use spreader pole 0
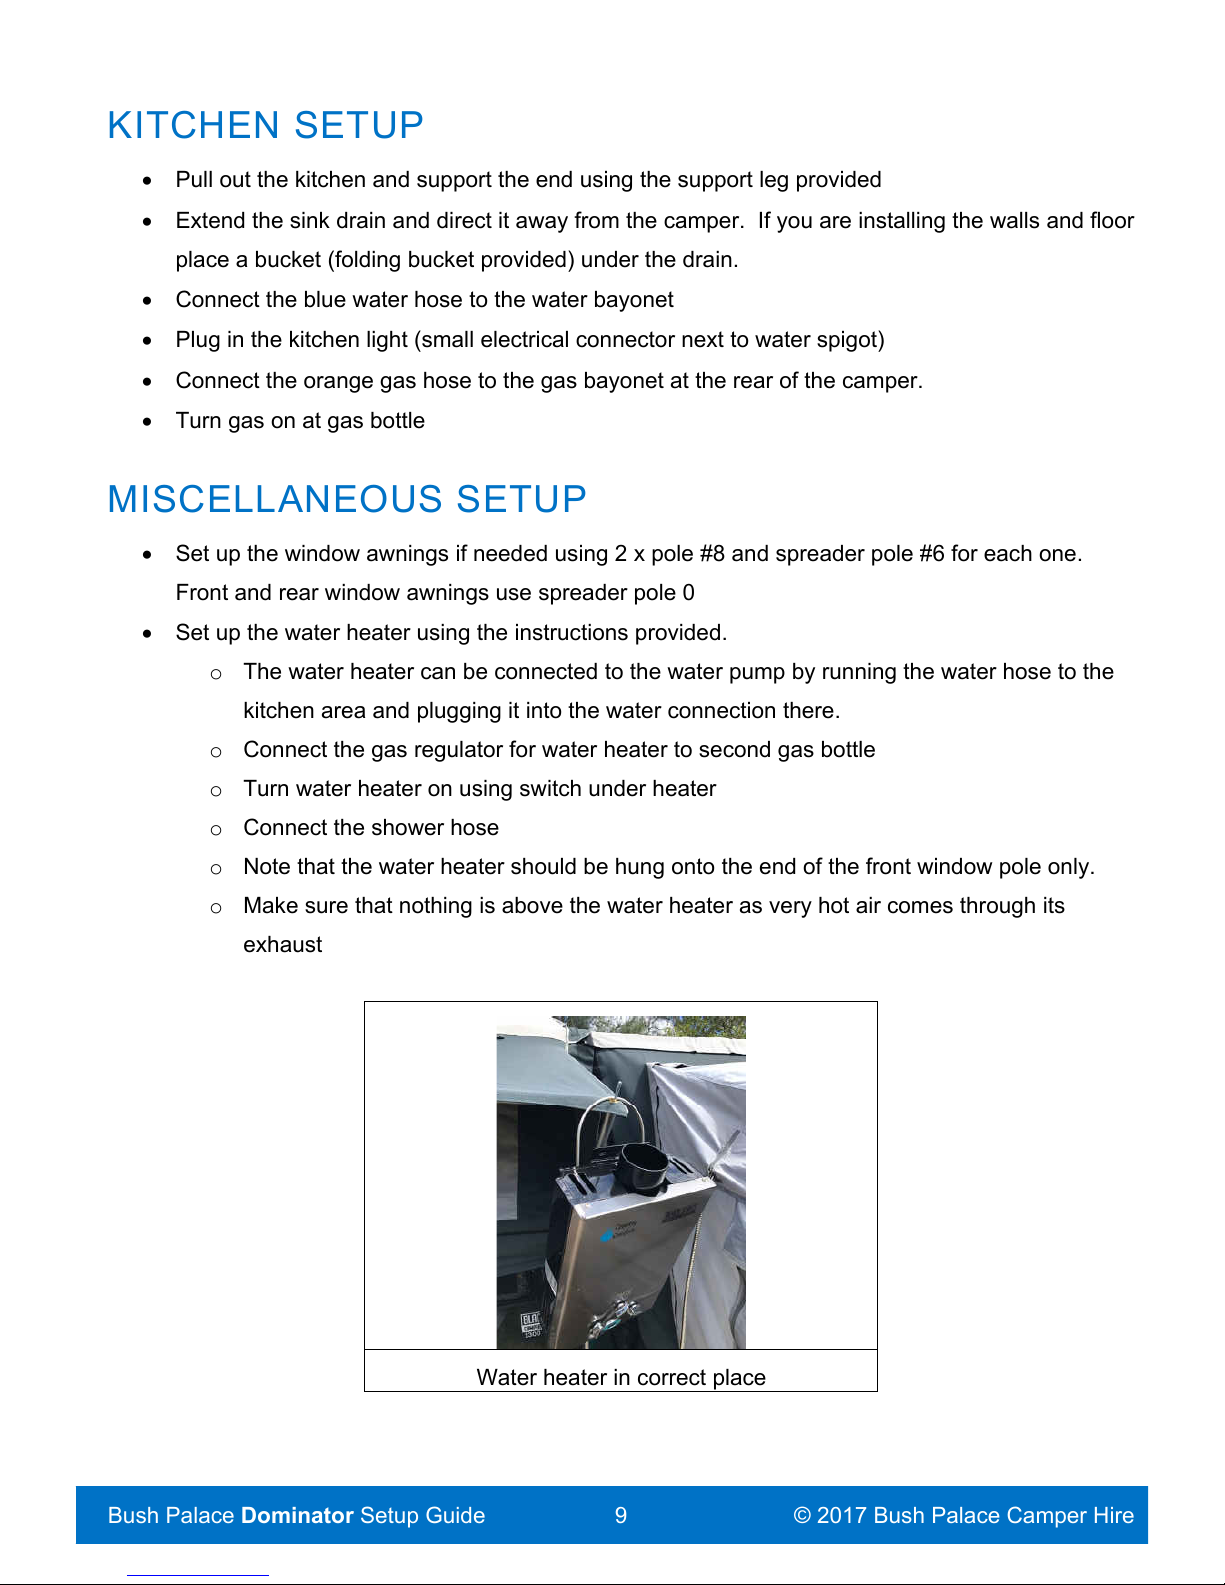
• Set up the water heater using the instructions provided.
o The water heater can be connected to the water pump by running the water hose to the
kitchen area and plugging it into the water connection there.
o Connect the gas regulator for water heater to second gas bottle
o Turn water heater on using switch under heater
o Connect the shower hose
o Note that the water heater should be hung onto the end of the front window pole only.
o Make sure that nothing is above the water heater as very hot air comes through its
exhaust
Water heater in correct place
Page 10
Bush Palace Dominator Setup Guide © 2017 Bush Palace Camper Hire
10
• If required, zip the annex walls to the awning roof and close
• Velcro the annex floor to the annex walls
• Velcro the ensuite room onto the left hand side of the awning. Support using 2 x external #4
poles and guy ropes
• Pass the shower head through the small zip at the top of the ensuite tent
• Place chemical toilet in ensuite room and add chemicals as per instructions on bottles
SIT DOWN & ENJOY!
That’s it! All that’s left to do is set up the table and chairs, and relax. Enjoy your holiday!
Page 11
Bush Palace Dominator Setup Guide © 2017 Bush Palace Camper Hire
11
PACKING UP
Packing up is almost a reverse of the setting up process but there are a few differences - the sequence
is often important.
Lay everything neatly on the ground as you take things down and then return them to their appropriate
storage in one go.
It is critical that everything is dry before it is put away, including the floor, walls and ensuite. Pay
special attention to the plastic windows in the awning walls as condensation can form on an
otherwise dry wall.
If the items have to be put away wet they must be opened and reassembled within 24 hours or
mould may start to form. If you return the camper wet we may have to charge an additional fee to
cover the cost of drying and treating any mould, including any lost rental resulting!
INITIAL STEPS
• Turn off all switches in control panel
• Zip all windows closed
• Disassemble all optional setup items including
o Toilet
o Water heater
o Ensuite
o Floor
o Walls
o Awning
o skirt
o TV & antenna
o Solar panel
• Return all cutlery, plates, utensils etc
• Turn off gas bottles
• Remove all internal bracing poles (#7 and #13)
• Lower internal support hoops to their lowest level
Page 12
Bush Palace Dominator Setup Guide © 2017 Bush Palace Camper Hire
12
• Fold table and set interior up as a bed (ie with cushions placed on table)
• Disconnect gas, water and electrical connections from kitchen
• Push kitchen closed
• Return support leg to inside of camper
• Undo all press studs (being careful not to damage them; they can be quite fragile!)
• Return solar panel and camp chairs to inside of camper
• Close and lock camper door (must be done now as it cannot be done once camper roof
has been closed)
• Fold rear hoop down as far as it will go into body of camper
• Connect rear winch to hook on right forward side of camper roof (winch handle is stored in right
rear small locker)
• Winch closed, stopping to make sure that all canvas is carefully folded inside the camper body
• When fully closed, disconnect winch and wind in
• Return winch handle to storage
• Secure roof with all clips
• Close roof rack and secure clips
• Lock all hatches & door
HOOKING UP
• Raise front & rear legs with winder and fold away
• Hook vehicle up to tow hitch
• Insert hitch pin and secure with ‘R’ clip
• Raise jockey wheel, and swing to closed position
• Connect chains and electrical connection to vehicle
• Release camper handbrake
• Remove chocks
• Move camper to release levelling ramp if used
• Return all chocks, ramp, winders & handles to front/side boot
That's it packed away!
Page 13
Bush Palace Dominator Setup Guide © 2017 Bush Palace Camper Hire
13
FINAL CHECK
• Camper, fridge, stove, optional items, solar, cutlery, plates etc cleaned & put away
• All winders and handles returned to storage
• All cables and hoses have been neatly put in storage bags and returned to storage
• All poles, pegs and guy ropes have been put in their bags and returned to pole storage
• Chocks & Ramp removed and put away
• Roof secured with no canvas trapped
• Roof rack secured with clips
• Gas off
• All chairs, table, annex mat etc cleaned & put away
• All doors and hatches closed and locked
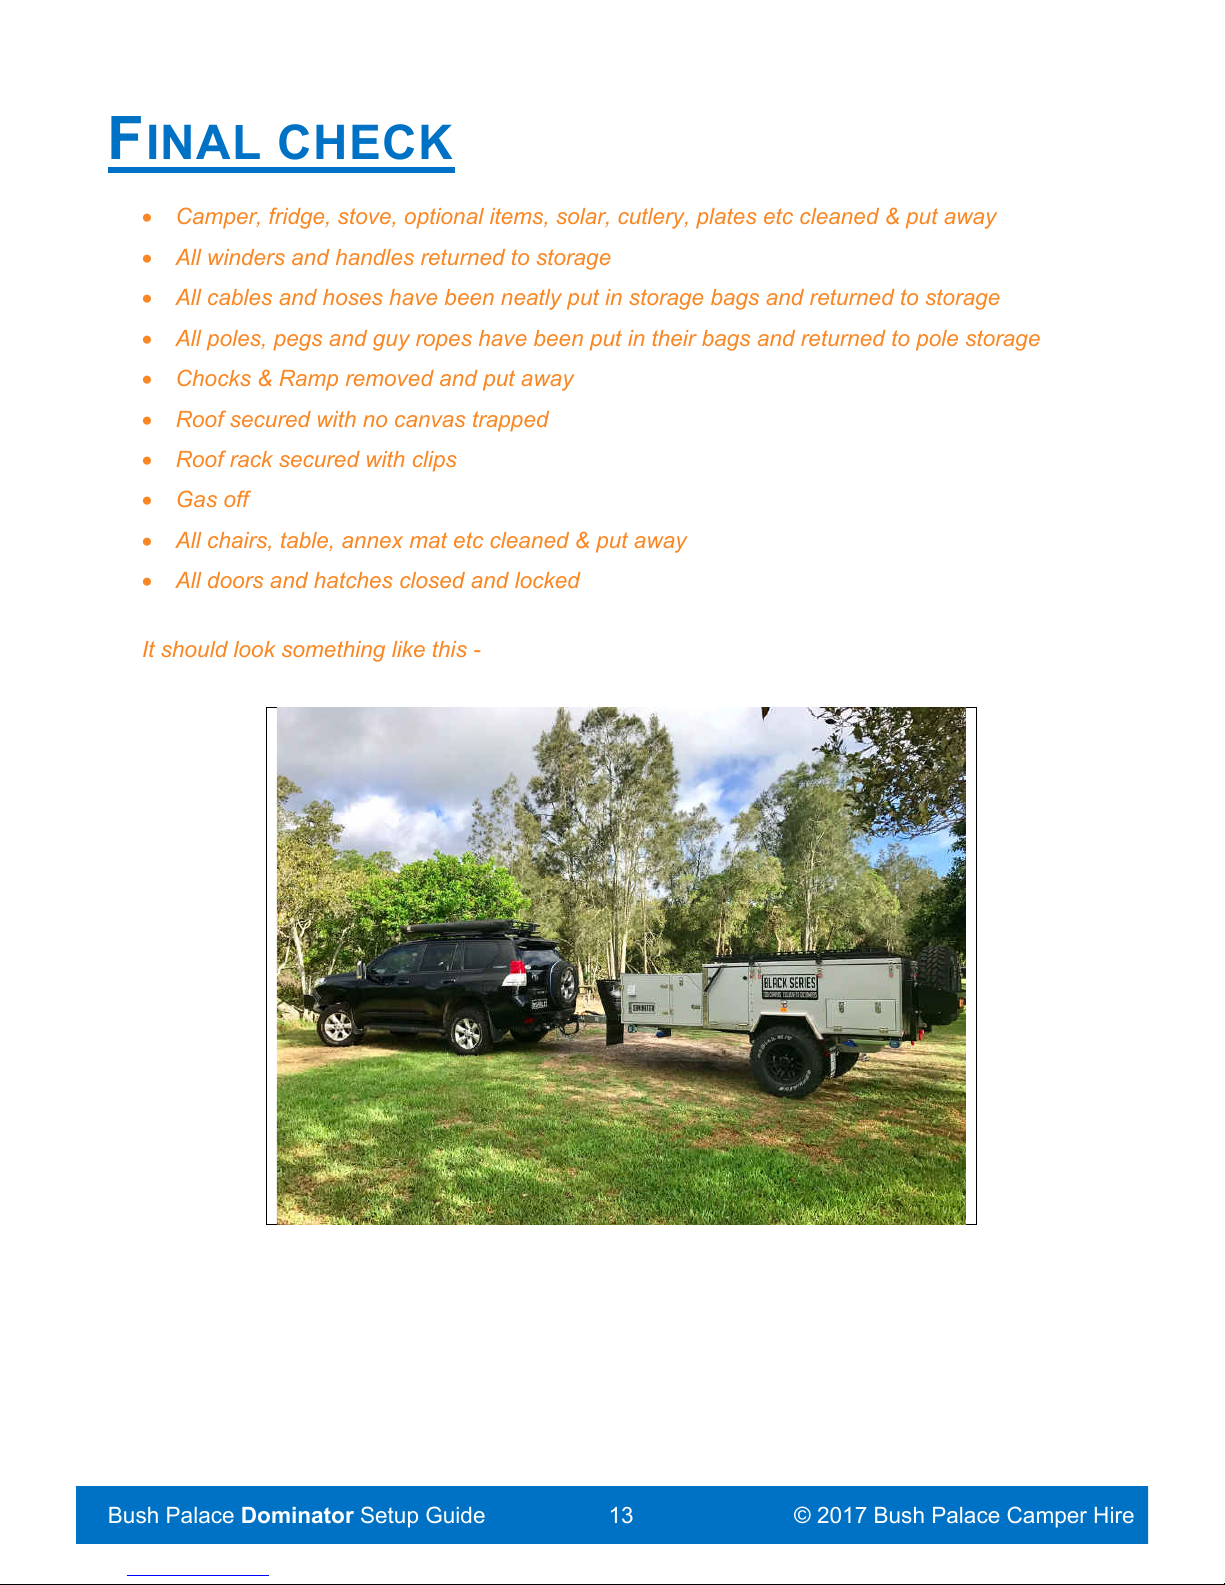
It should look something like this -
Page 14
Bush Palace Dominator Setup Guide © 2017 Bush Palace Camper Hire
14
POLE GUIDE
Page 15
Bush Palace Dominator Setup Guide © 2017 Bush Palace Camper Hire
15
INVENTORY
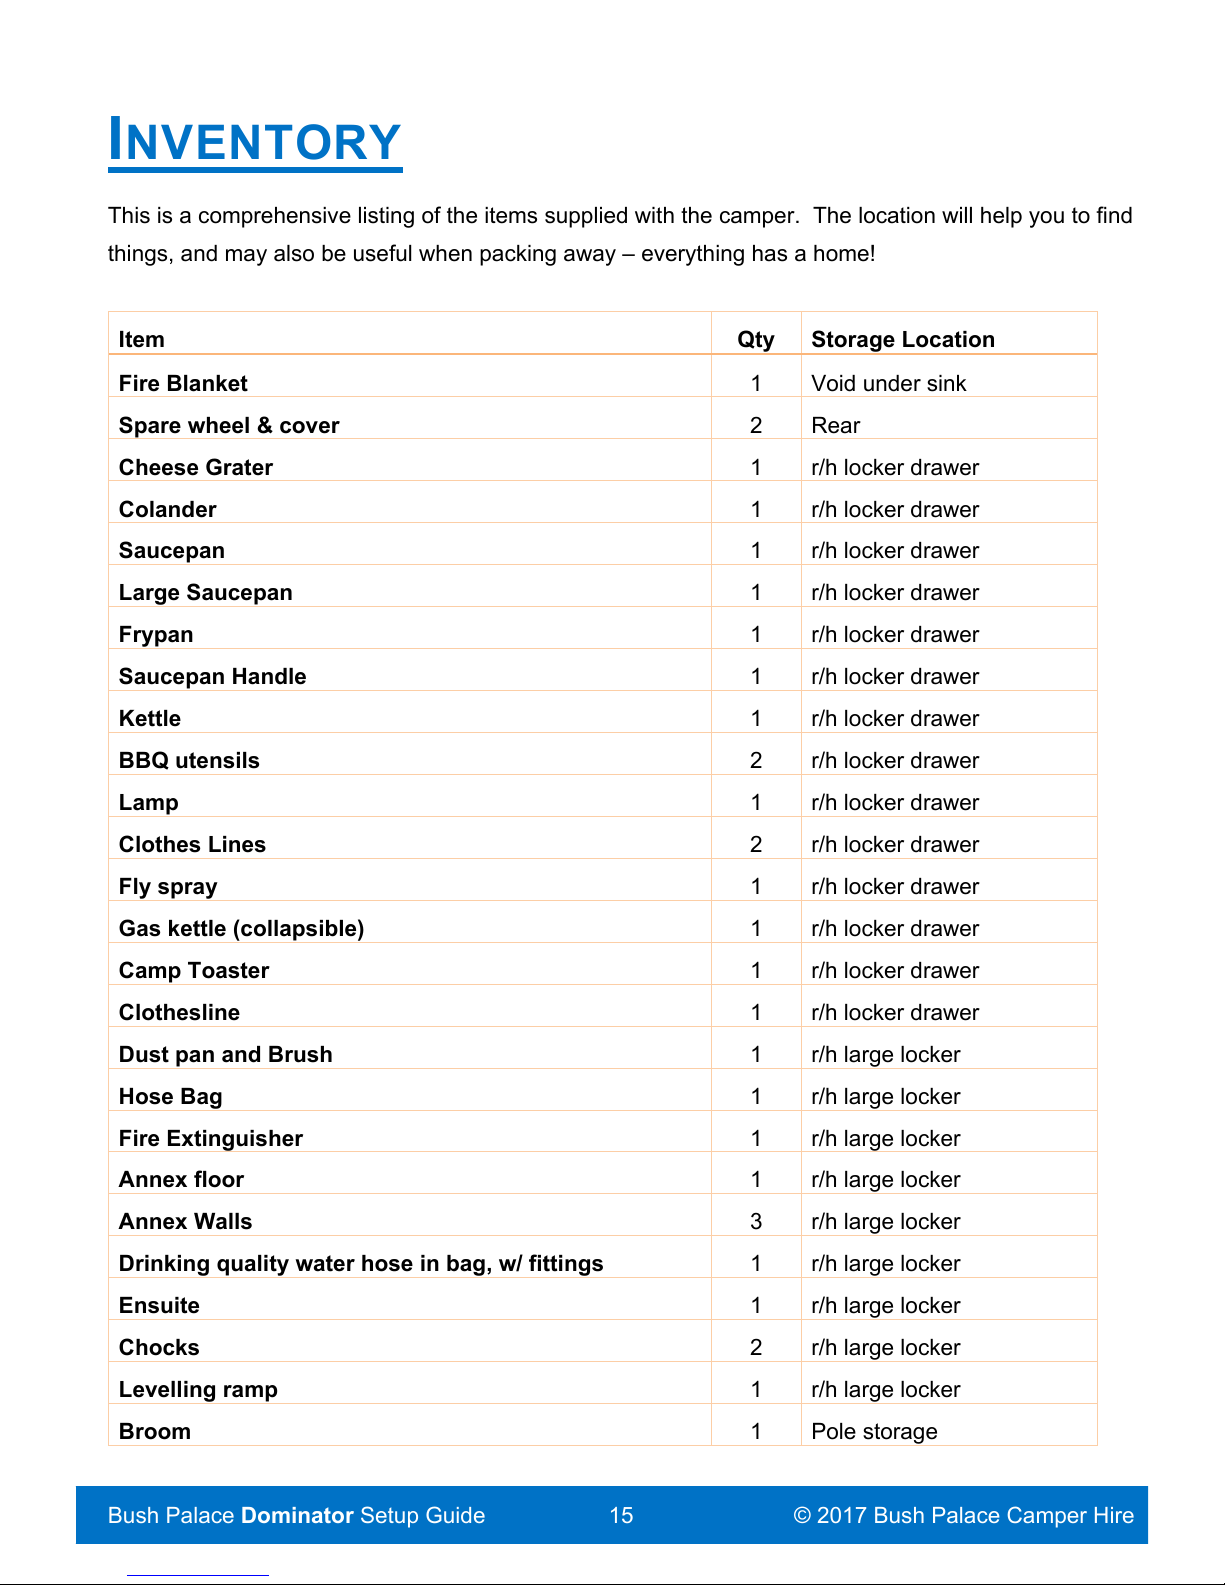
This is a comprehensive listing of the items supplied with the camper. The location will help you to find
things, and may also be useful when packing away – everything has a home!
Item
Qty
Storage Location
Fire Blanket
1
Void under sink
Spare wheel & cover
2
Rear
Cheese Grater
1
r/h locker drawer
Colander
1
r/h locker drawer
Saucepan
1
r/h locker drawer
Large Saucepan
1
r/h locker drawer
Frypan
1
r/h locker drawer
Saucepan Handle
1
r/h locker drawer
Kettle
1
r/h locker drawer
BBQ utensils
2
r/h locker drawer
Lamp
1
r/h locker drawer
Clothes Lines
2
r/h locker drawer
Fly spray
1
r/h locker drawer
Gas kettle (collapsible)
1
r/h locker drawer
Camp Toaster
1
r/h locker drawer
Clothesline
1
r/h locker drawer
Dust pan and Brush
1
r/h large locker
Hose Bag
1
r/h large locker
Fire Extinguisher
1
r/h large locker
Annex floor
1
r/h large locker
Annex Walls
3
r/h large locker
Drinking quality water hose in bag, w/ fittings
1
r/h large locker
Ensuite
1
r/h large locker
Chocks
2
r/h large locker
Levelling ramp
1
r/h large locker
Broom
1
Pole storage
Page 16
Bush Palace Dominator Setup Guide © 2017 Bush Palace Camper Hire
16
Item
Qty
Storage Location
Wheel brace/stabiliser winder
1
Pole storage
Bubble level
2
Pole storage
Poles pegs & guy ropes
Set
Pole storage
Mallet
1
Peg bag (Pole storage)
Dinner Plates
4
l/h locker drawer
Bread Plates
4
l/h locker drawer
Desert Plates
4
l/h locker drawer
Salad Bowl
1
l/h locker drawer
Champagne flutes
2
l/h locker drawer
Wine Glasses
2
l/h locker drawer
Glasses
4
l/h locker drawer
Tea Towels
2
l/h locker drawer
Hand Towel
1
l/h locker drawer
Beer Coolers
2
l/h locker drawer
Tea
1
l/h locker drawer
Coffee
1
l/h locker drawer
Sugar
1
l/h locker drawer
Milk
1
l/h locker drawer
Olive Oil
1
l/h locker drawer
Salt and Pepper
1
l/h locker drawer
Paper towels
1
l/h locker drawer
Hotplate (for use in BBQ)
1
l/h locker drawer
Hot chocolate
1
l/h locker drawer
Steak knives
4
Kitchen sink Drawer
Salad serving set
1
Kitchen sink Drawer
Vegetable peeler
1
Kitchen sink Drawer
Potato Masher
1
Kitchen sink Drawer
Egg Rings
4
Kitchen sink Drawer
Can Opener
1
Kitchen sink Drawer
Wine knife
1
Kitchen sink Drawer
Measuring Spoons
1
Kitchen sink Drawer
Page 17
Bush Palace Dominator Setup Guide © 2017 Bush Palace Camper Hire
17
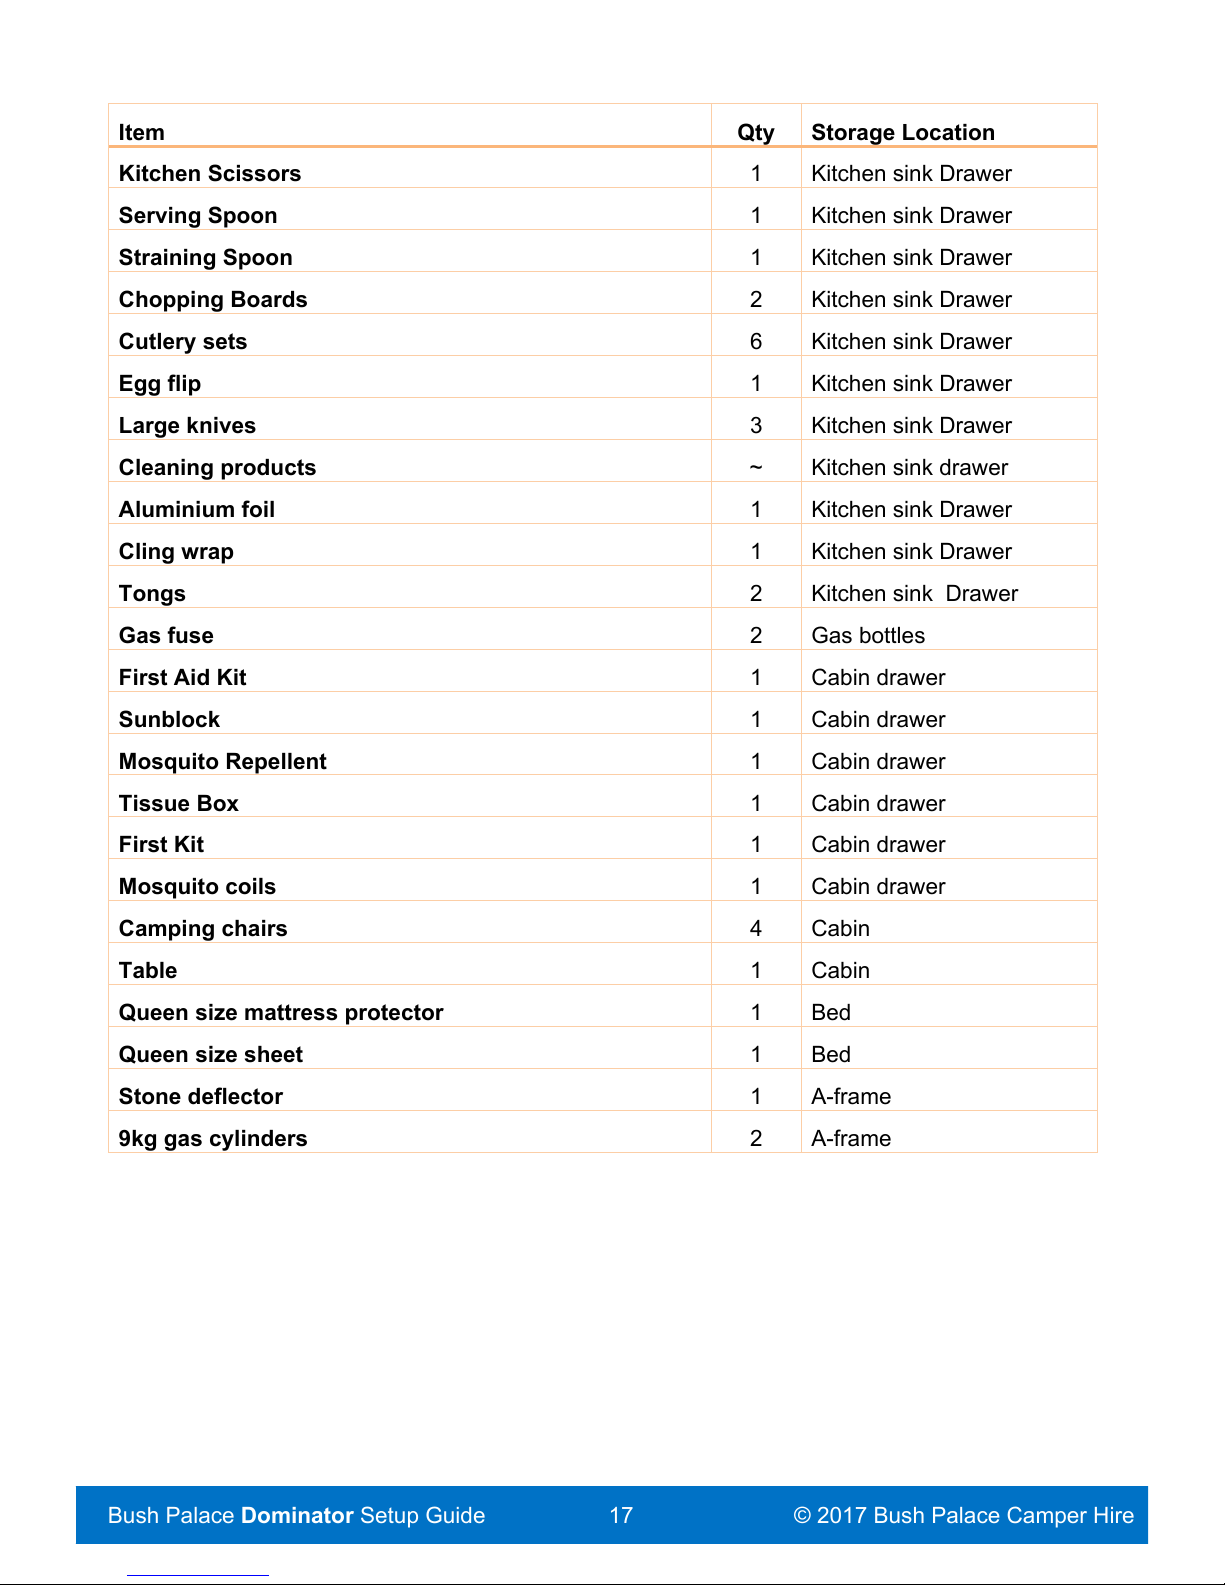
Item
Qty
Storage Location
Kitchen Scissors
1
Kitchen sink Drawer
Serving Spoon
1
Kitchen sink Drawer
Straining Spoon
1
Kitchen sink Drawer
Chopping Boards
2
Kitchen sink Drawer
Cutlery sets
6
Kitchen sink Drawer
Egg flip
1
Kitchen sink Drawer
Large knives
3
Kitchen sink Drawer
Cleaning products
~
Kitchen sink drawer
Aluminium foil
1
Kitchen sink Drawer
Cling wrap
1
Kitchen sink Drawer
Tongs
2
Kitchen sink Drawer
Gas fuse
2
Gas bottles
First Aid Kit
1
Cabin drawer
Sunblock
1
Cabin drawer
Mosquito Repellent
1
Cabin drawer
Tissue Box
1
Cabin drawer
First Kit
1
Cabin drawer
Mosquito coils
1
Cabin drawer
Camping chairs
4
Cabin
Table
1
Cabin
Queen size mattress protector
1
Bed
Queen size sheet
1
Bed
Stone deflector
1
A-frame
9kg gas cylinders
2
A-frame
Page 18
Bush Palace Dominator Setup Guide © 2017 Bush Palace Camper Hire
18
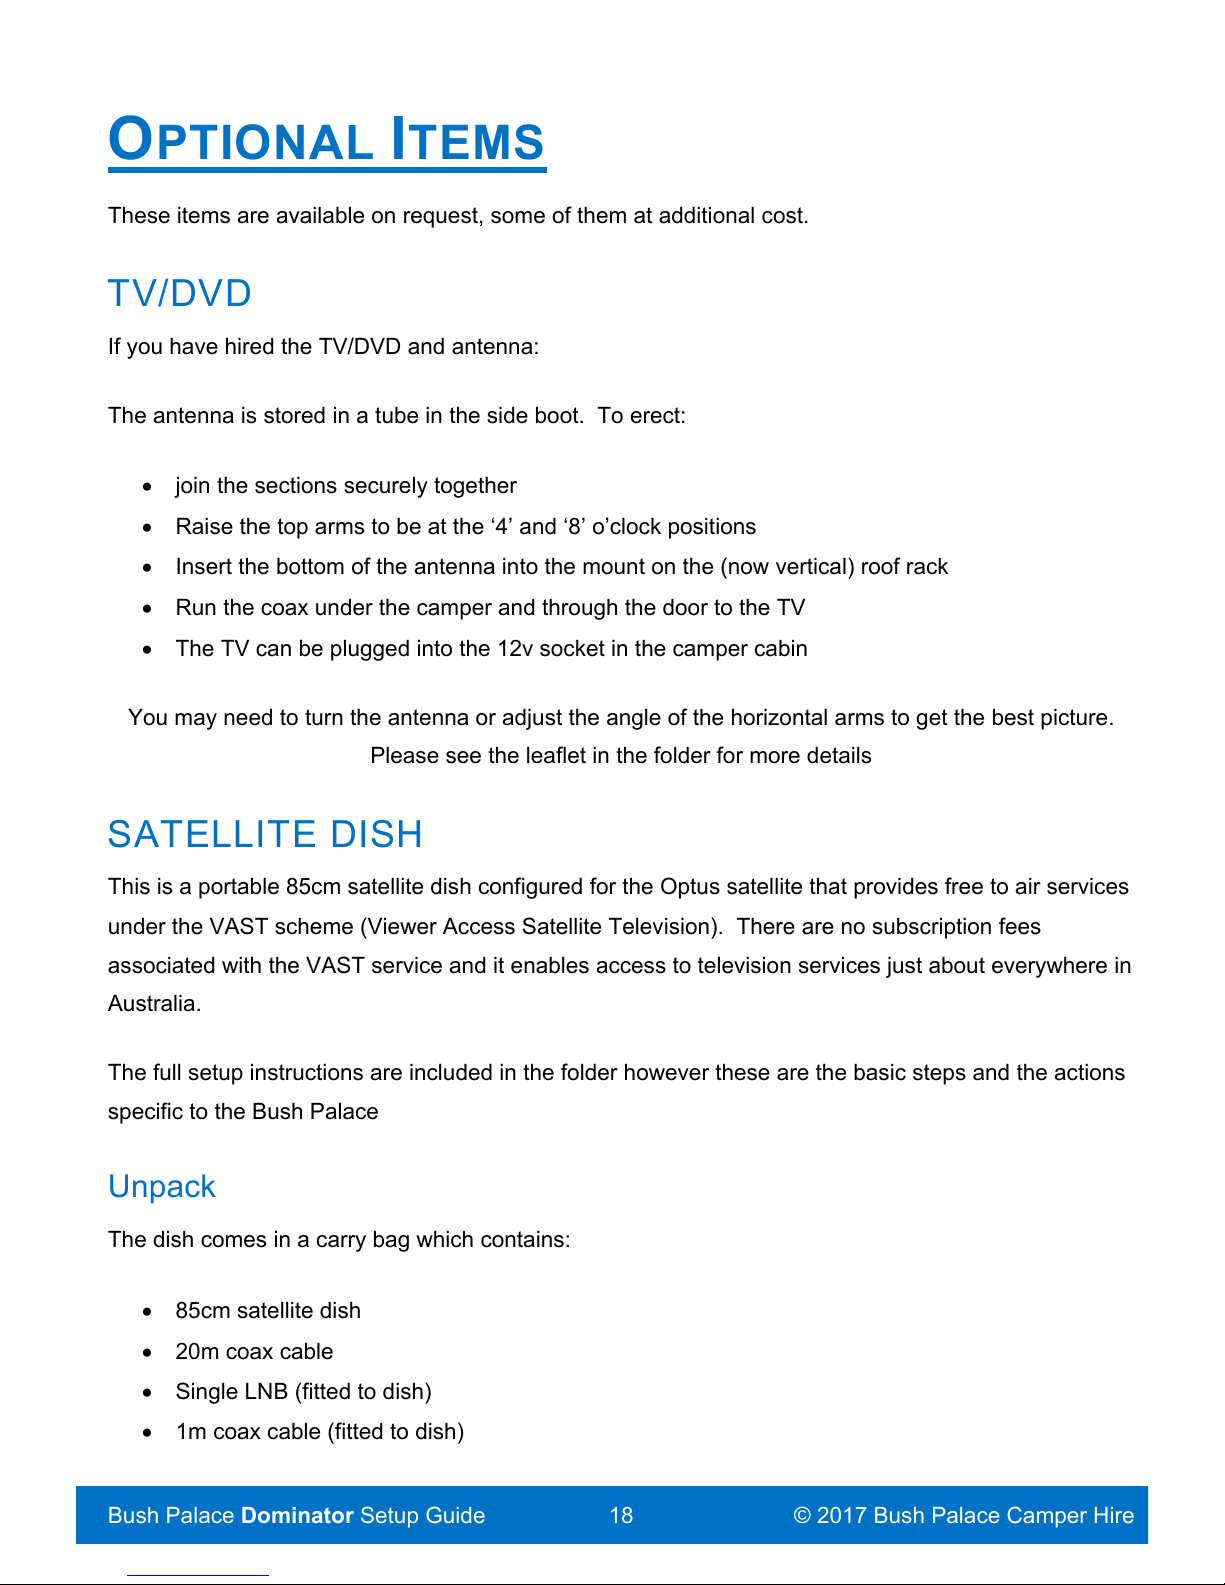
OPTIONAL ITEMS
These items are available on request, some of them at additional cost.
TV/DVD
If you have hired the TV/DVD and antenna:
The antenna is stored in a tube in the side boot. To erect:
• join the sections securely together
• Raise the top arms to be at the ‘4’ and ‘8’ o’clock positions
• Insert the bottom of the antenna into the mount on the (now vertical) roof rack
• Run the coax under the camper and through the door to the TV
• The TV can be plugged into the 12v socket in the camper cabin
You may need to turn the antenna or adjust the angle of the horizontal arms to get the best picture.
Please see the leaflet in the folder for more details
SATELLITE DISH
This is a portable 85cm satellite dish configured for the Optus satellite that provides free to air services
under the VAST scheme (Viewer Access Satellite Television). There are no subscription fees
associated with the VAST service and it enables access to television services just about everywhere in
Australia.
The full setup instructions are included in the folder however these are the basic steps and the actions
specific to the Bush Palace
Unpack
The dish comes in a carry bag which contains:
• 85cm satellite dish
• 20m coax cable
• Single LNB (fitted to dish)
• 1m coax cable (fitted to dish)
Page 19
Bush Palace Dominator Setup Guide © 2017 Bush Palace Camper Hire
19
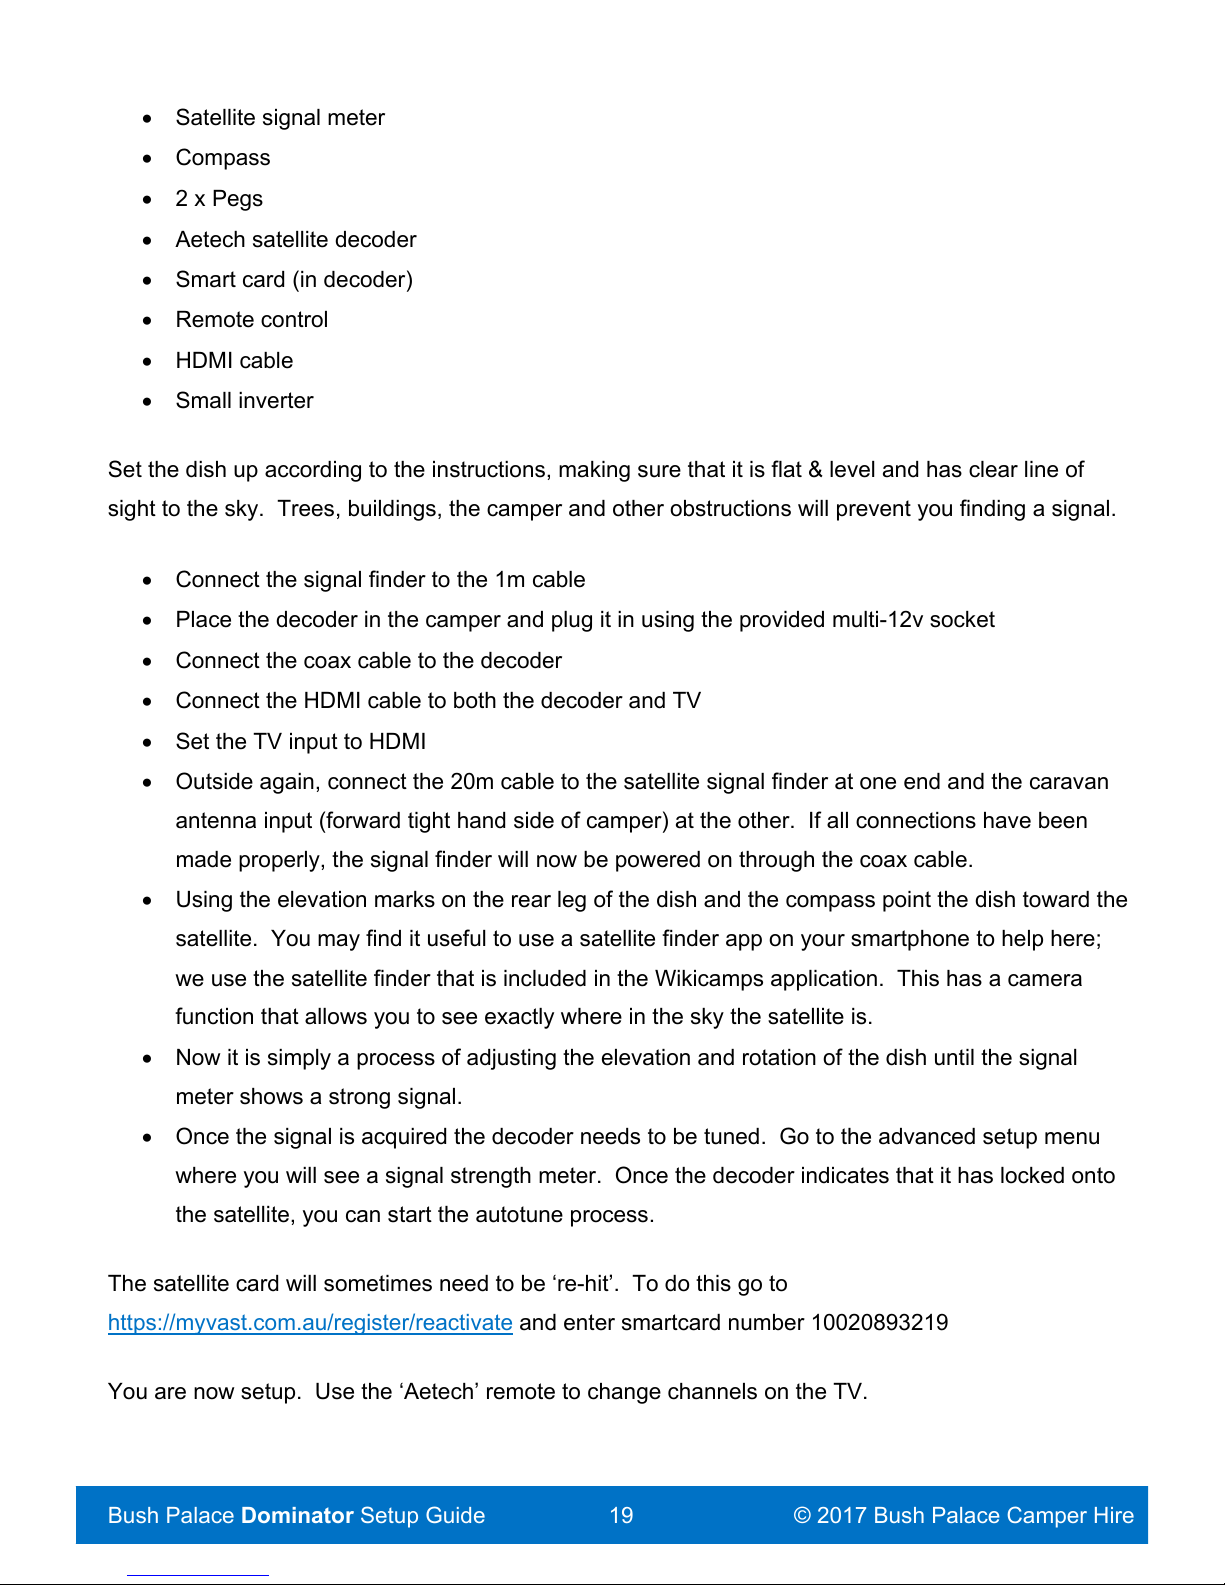
• Satellite signal meter
• Compass
• 2 x Pegs
• Aetech satellite decoder
• Smart card (in decoder)
• Remote control
• HDMI cable
• Small inverter
Set the dish up according to the instructions, making sure that it is flat & level and has clear line of
sight to the sky. Trees, buildings, the camper and other obstructions will prevent you finding a signal.
• Connect the signal finder to the 1m cable
• Place the decoder in the camper and plug it in using the provided multi-12v socket
• Connect the coax cable to the decoder
• Connect the HDMI cable to both the decoder and TV
• Set the TV input to HDMI
• Outside again, connect the 20m cable to the satellite signal finder at one end and the caravan
antenna input (forward tight hand side of camper) at the other. If all connections have been
made properly, the signal finder will now be powered on through the coax cable.
• Using the elevation marks on the rear leg of the dish and the compass point the dish toward the
satellite. You may find it useful to use a satellite finder app on your smartphone to help here;
we use the satellite finder that is included in the Wikicamps application. This has a camera
function that allows you to see exactly where in the sky the satellite is.
• Now it is simply a process of adjusting the elevation and rotation of the dish until the signal
meter shows a strong signal.
• Once the signal is acquired the decoder needs to be tuned. Go to the advanced setup menu
where you will see a signal strength meter. Once the decoder indicates that it has locked onto
the satellite, you can start the autotune process.
The satellite card will sometimes need to be ‘re-hit’. To do this go to
https://myvast.com.au/register/reactivate and enter smartcard number 10020893219
You are now setup. Use the ‘Aetech’ remote to change channels on the TV.
Page 20
Bush Palace Dominator Setup Guide © 2017 Bush Palace Camper Hire
20
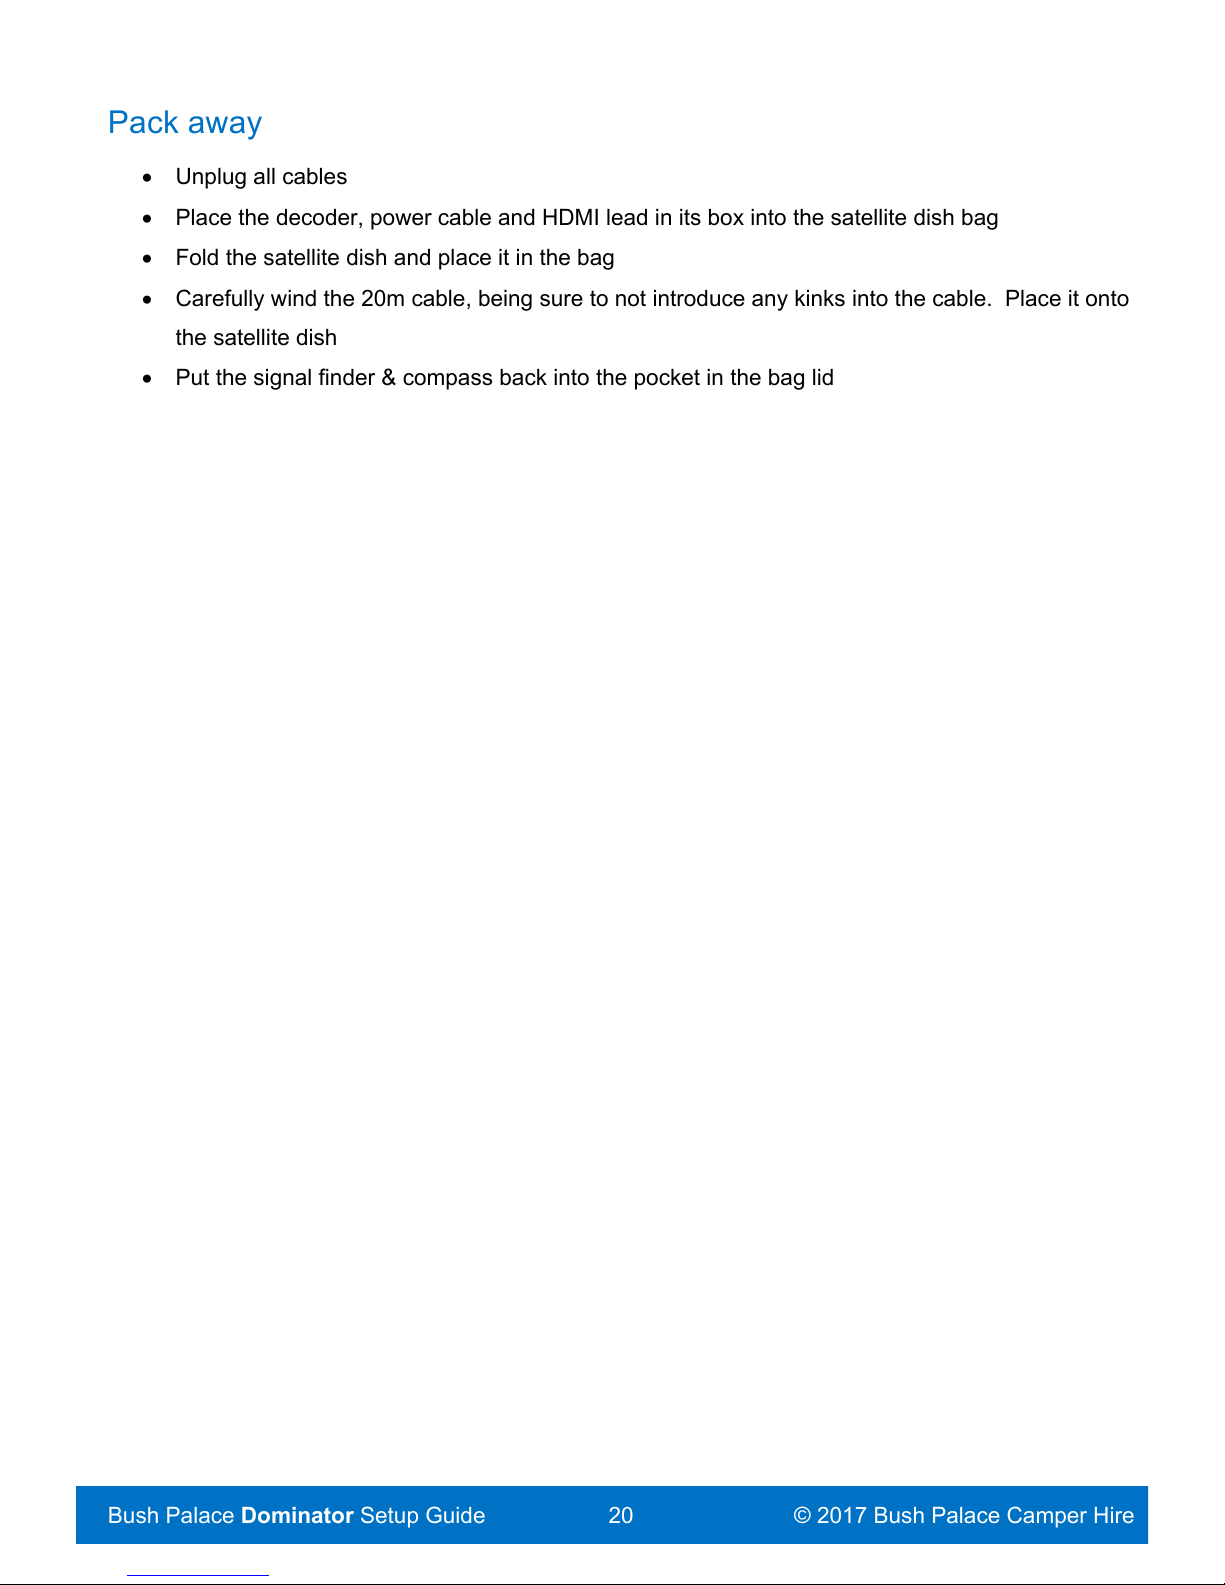
Pack away
• Unplug all cables
• Place the decoder, power cable and HDMI lead in its box into the satellite dish bag
• Fold the satellite dish and place it in the bag
• Carefully wind the 20m cable, being sure to not introduce any kinks into the cable. Place it onto
the satellite dish
• Put the signal finder & compass back into the pocket in the bag lid
Page 21
Bush Palace Dominator Setup Guide © 2017 Bush Palace Camper Hire
21
INFLATABLE KAYAKS
We have 2 x 2 man kayaks (Colorado) and 1 x 1 man kayak (Rio). Each is supplied with a personal
floatation device and paddle, and a hand pump is provided for inflation.
Setup
• Unpack from storage bag
• There are 3 main inflation zones – one for each side, and the floor. An additional inflation zone
is under each seat.
• Inflate the floor first, then the sides, then the seat(s)
• The seat attaches to the floor with Velcro, and then a forward and aft webbing strap on each
side.
• Make sure the bung is in before using, but open it to drain any water after use.
Packing away
The kayak should be dry and clean before packing away
• Fold seat flat by loosening webbing straps and Velcro strips. The seat will sit flat if you rotate it
90degrees once straps are undone
• Deflate all inflation zones, leaving the inflators open
• Pull the sides into the centre of the kayak
• Using the skegs on the bottom of the kayak as a guide;
o Fold the nose of the kayak
o Then fold in half
o Finally fold over again
• You can then wrestle the kayak back into its bag.
If the kayak is wet please let us know so that we can properly dry it. A cleaning charge may apply if
the kayak is very wet or dirty.
Page 22
Bush Palace Dominator Setup Guide © 2017 Bush Palace Camper Hire
22
GAZEBO
The 3m x 3m gazebo is useful for providing additional shade outside the camper. To setup:
Stand the gazebo on its feet
Pull the corners apart until they are fully extended horizontally
Raise each leg to full height
Peg down using the pegs and guy ropes provided.
Packing away is the reverse of the above; please make sure that the gazebo is clean and dry. If you
have to pack it away in the rain please let us know so that we can dry it on return
Page 23
Bush Palace Dominator Setup Guide © 2017 Bush Palace Camper Hire
23
GIC BLACK SERIES TRAILER
CARE GUIDE
This information is taken from the manufacturers instructions and may be of use.
ANDERSON PLUG:
This camper is fitted with a 50amp Anderson plug. This is to allow for your batteries to be charge from
your solar panels, 240v charger or your 50amp Anderson on your vehicle if fitted. In the event your
batteries are not charging, this may be because your 50amp circuit breaker has tripped, your
batteries/wiring may have been overloaded; try to reset the breaker by removing all electronics
plugged into the camper, and flicking the 50amp switch.
WINCHES
This camper is fitted with winches and gas struts to assist in setting up. To help assist with setting up
and packing down, please ensure to use both winches for setup and pack up. Please note we
JOCKEY WHEEL
Always ensure your jockey wheel is secured with the handle & wheel at least level with or higher than
your draw bar. This will reduce the possibility of damage being sustained. However, you must
remember to loosen the handle & allow the wheel to swivel, before moving your Camper Trailer.
FAILING, TO DO SO, WILL RESULT IN DAMAGE TO THE AXLE OF THE JOCKEY WHEEL.
STABILISER LEGS
A spindle has been supplied to allow you to lower & raise them. Please ensure they are raised &
secured on each occasion before your departure. This should prevent them lowering during travel &
sustaining any damage, PLEASE NOTE; STABILZER LEGS SHOULD NEVER BE FULLY EXTENED
TO SUPPORT THE CAMPER, IN THE EVENT OF NEEDING FURTHER ADJUSTMENT, WE
RECOMMEND USING CHOCKS UNDERNEATH THE LEGS.
Page 24
Bush Palace Dominator Setup Guide © 2017 Bush Palace Camper Hire
24
CANVAS & TENT SECTION
DO NOT LEAVE YOUR CAMPER TENT PACKED AWAY IN A DAMP OR WET STATE AS
MOISTURE WILL DESTROY ANY CANVAS, THE TENT MUST BE DRY, CLEAN AND FREE FROM
DIRT.
During any instance that you are required to pack away your Camper Tent in the above state, place a
plastic sheet over your bedding (Queen size mattress up to 15cm in depth, along with your blankets,
pillows, sheets & possibly, a couple of kids mattresses).
AS SOON AS POSSIBLE, OPEN YOUR CAMPER TENT & ALLOW IT TO DRY. On any of your future
departure dates, there is rain, forecast, we suggest you place a tarp over your Camper Tent. During a
break in the rain, pack your Camper Tent away so as to help you minimize the drying time required.
Using a tarp, will also help keep bird droppings off your Camper Tent & help keep it clean.
Stitch holes:Every care is taken to ensure that your canvas is made using the finest water repellent
fabric. However, canvas products are not permanent structures and in extreme conditions, some water
may penetrate. Seepage may occur in the seams through the needle holes created in the sewing
process. This is normal and can be corrected with the application of seam sealing compound. It is
suggested you purchase a wax stick or water proofing compound to keep with your camping
equipment.
RAIN AND HEAVY WIND CONDTIONS:When raining Please ensure to lower the awning to allow for
better water flow, this will help stop pooling occurring on your awning.
SPREADER BARS:Spreader bars are to help minimize the chance of pooling, these are
recommended to be used for every camping trip.
CARING FOR TENT POLES:
The steel poles have been hot dipped galvanized to provide long life with minimum corrosion. Salt,
sand, dirt and water are the enemy of any steel products and zip. Make sure the poles and zips are
always clean and dry before storage. When the poles and zips have been used in damp, dusty. Sandy
or salty conditions, they must be cleaned and coated with a thin film of oil or silicon based liquid spray
before storage. Many of the frame poles are connected with pole joiners, which are designed to keep
them organized and allow quick assembly of the pole frame. Over stretching or dropping the poles will
Page 25
Bush Palace Dominator Setup Guide © 2017 Bush Palace Camper Hire
25
easily damage the pole joiners and this may not be covered under warranty. Please ensure to handle
the poles carefully; especially when unpacking and packing away.
PEGGING:Please ensure your tent pegs are secured into the ground before fully extending your
ceiling poles. Please remember, any excessive puling force may result in stitching, fabric, zip or mesh
damage
CONDENSATION:Condensation is a natural occurrence in cold weather. In confined areas like
swags and tents the body releases more moisture than the canvas can dispose of. To minimize the
chance of condensation, we recommend slightly opening the window of the swag or tent to enable
airflow on cold nights.
MOULD:Most moulds need 24-48 hours of moisture to begin to grow. Therefore if a suitable material
in your camper/tent is wet for more than 24 hours then you run the risk of mould starting to
grow.Many species of mould can begin to grow from humidity alone if the humidity stays high for long
enough. In fact the humidity only needs to be higher than 55% before some moulds can begin to grow.
Please see below for the most popular causes of mould:
• A relative Humidity of roughly 50% or higher
• Moisture
• Damp or Dusty Conditions
• Lack of Ventilation
Page 26
Bush Palace Dominator Setup Guide © 2017 Bush Palace Camper Hire
26
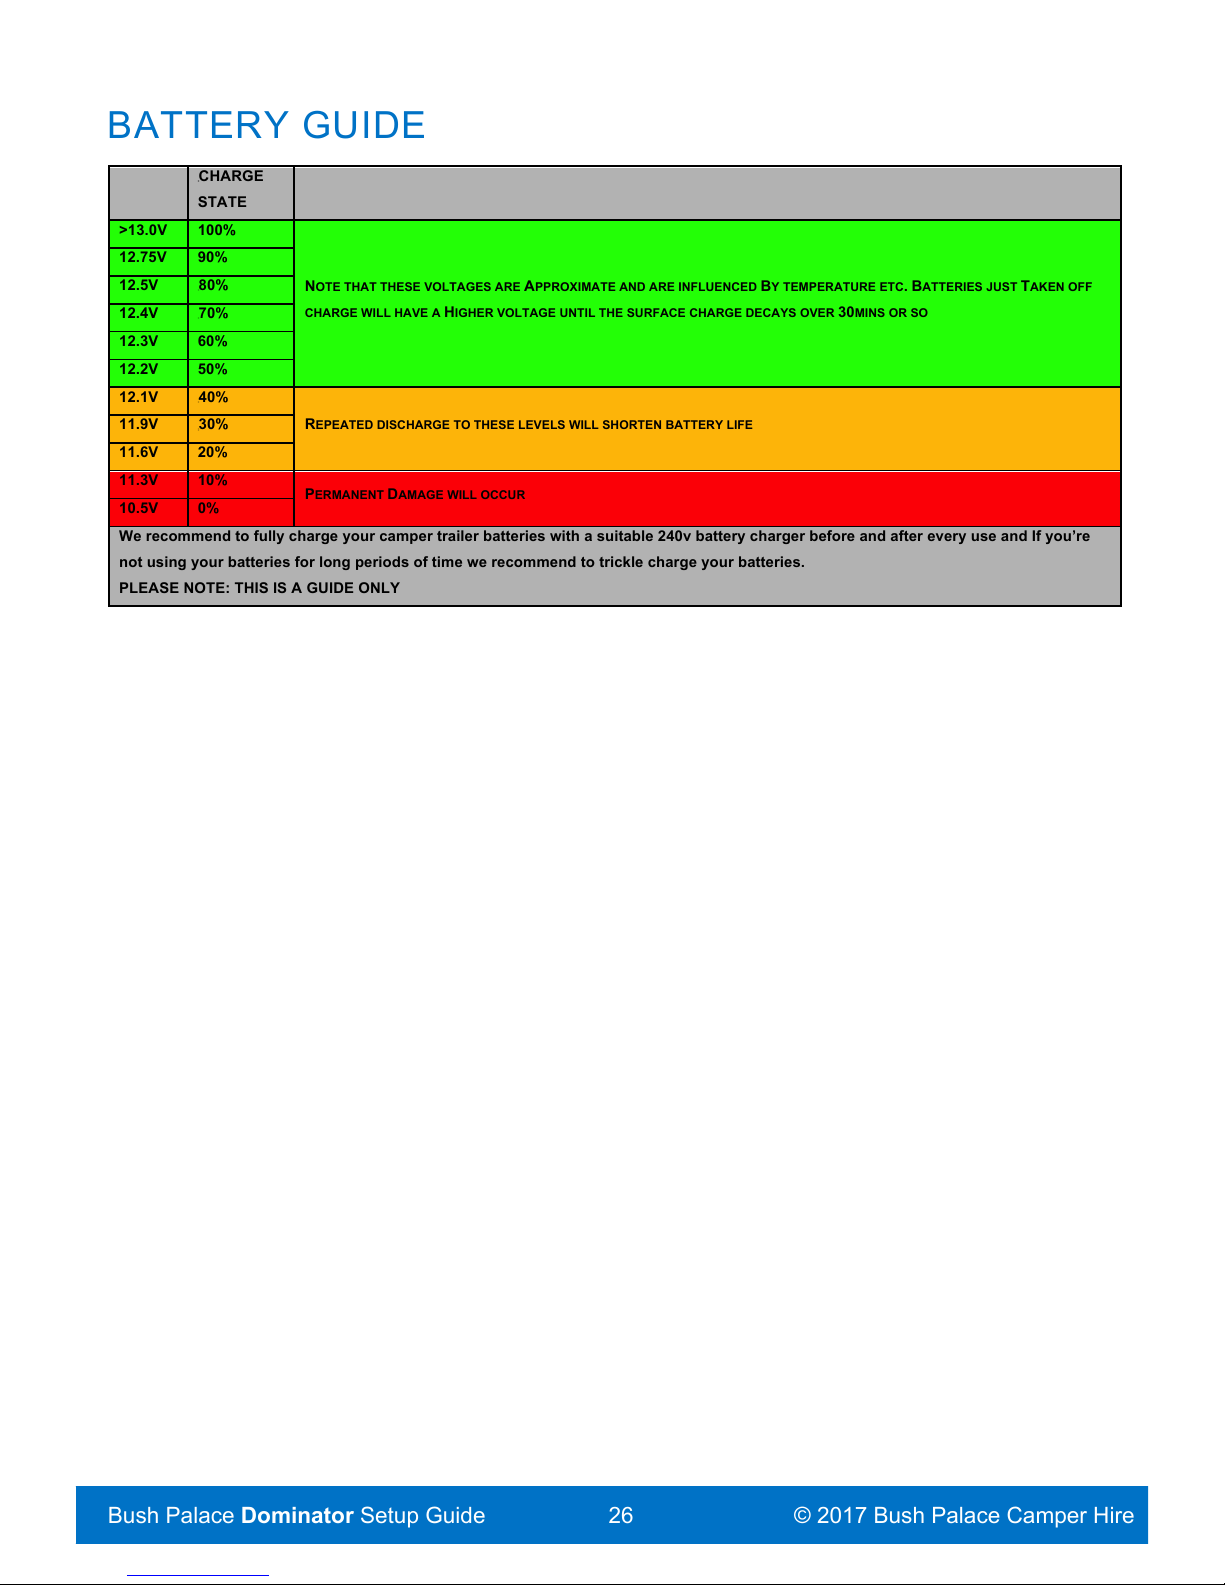
BATTERY GUIDE
CHARGE
STATE
>13.0V
100%
NOTE THAT THESE VOLTAGES ARE APPROXIMATE AND ARE INFLUENCED BY TEMPERATURE ETC. BATTERIES JUST TAKEN OFF
CHARGE WILL HAVE A HIGHER VOLTAGE UNTIL THE SURFACE CHARGE DECAYS OVER 30MINS OR SO
12.75V
90%
12.5V
80%
12.4V
70%
12.3V
60%
12.2V
50%
12.1V
40%
REPEATED DISCHARGE TO THESE LEVELS WILL SHORTEN BATTERY LIFE
11.9V
30%
11.6V
20%
11.3V
10%
PERMANENT DAMAGE WILL OCCUR
10.5V
0%
We recommend to fully charge your camper trailer batteries with a suitable 240v battery charger before and after every use and If you’re
not using your batteries for long periods of time we recommend to trickle charge your batteries.
PLEASE NOTE: THIS IS A GUIDE ONLY
 Loading...