

Page 1

1
Model: 201660/201661
07-16
Page 2

2
English. . . . . . . . . . . . . . . . 3
Français. . . . . . . . . . . . . . . 16
Español. . . . . . . . . . . . . . . 30
Deutsch. . . . . . . . . . . . . . . 44
Italiano. . . . . . . . . . . . . . . 58
Page 3

3
EyEpiEcE
powEr/FirE
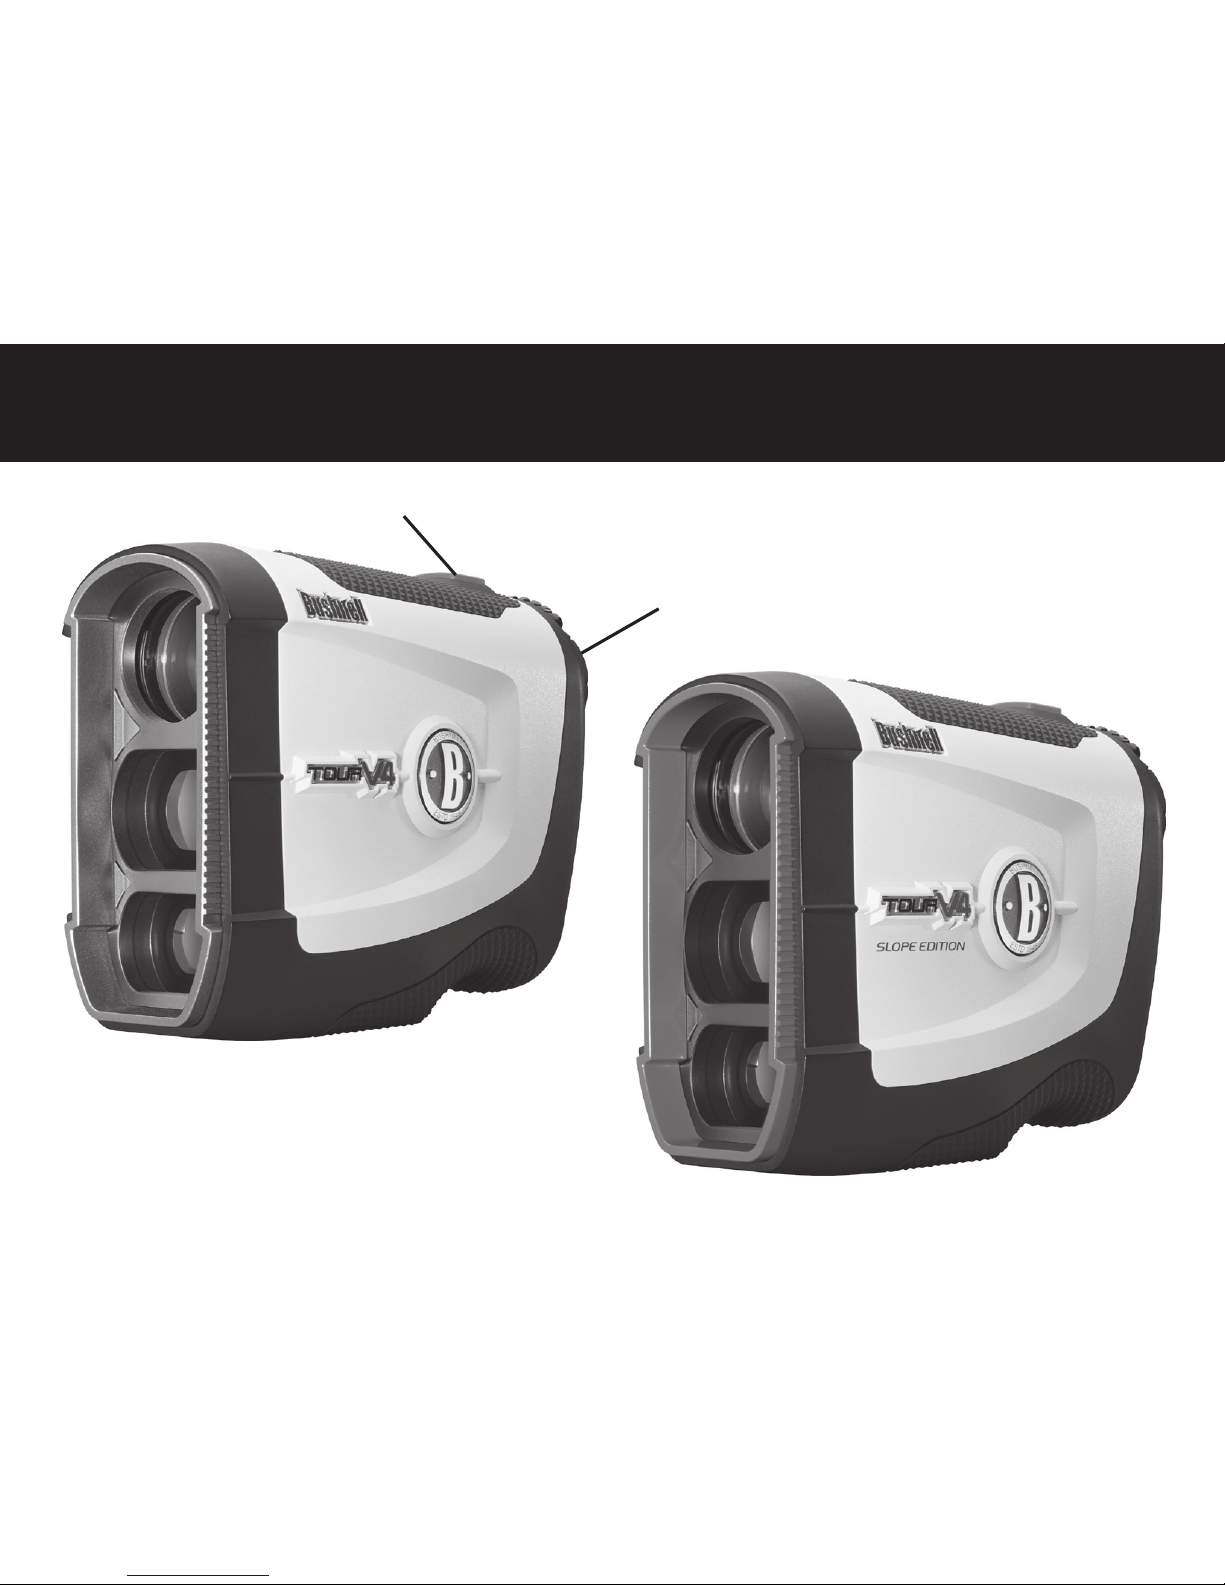
Model # 201660
Model # 201661
Page 4

4
CONGRATULATIONS ON YOUR PURCHASE OF THE BUSHNELL® TOUR V4™
INCORPORATING PINSEEKER™ TECHNOLOGY WITH JOLT™.
The TOUR V4 is a precision Laser Rangefinding optical instrument designed to provide many years of
enjoyment. This booklet will help you achieve optimum performance by explaining its adjustments and
features as well as how to care for this precise laser rangefinding optical instrument. To ensure optimal
performance and longevity, please read these instructions before using your TOUR V4.
INTRODUCTION
Your TOUR V4 is Bushnell’s newest addition to an award winning line of golf laser rangefinders specifically
made for golfers. TOUR V4 features PinSeeker™ technology with JOLT™, allowing the golfer to easily and
quickly “zero” in on the flag without acquiring background targets. The TOUR V4 weighs a mere 5.6 ounces
and made to fit into the palm of your hand. TOUR V4 also features an adjustable eyepiece, 5X magnification,
and is capable of providing distance from 5 to 1000 yards with incredible one yard accuracy! Like other
Bushnell laser rangefinders, the TOUR V4 is not dependent upon reflectors, and will provide distance to trees,
bunkers, and virtually any object on any golf course in the world.
Page 5

5
HOW OUR DIGITAL TECHNOLOGY WORKS
The TOUR V4 WITH PINSEEKER emits invisible, eye safe, infrared energy pulses. The TOUR V4’s Advanced
Digital microprocessor and ASIC chip (Application-Specific Integrated Circuit) results in instantaneous
and accurate readings every time. Sophisticated digital technology instantaneously calculates distances
by measuring the time it takes for each pulse to travel from the rangefinder, to the target, and back.
RANGING ACCURACY
The ranging accuracy of the TOUR V4 is plus or minus one yard/meter under most circumstances. The
maximum range of the instrument depends on the reflectivity of the target. The maximum distance for most
objects is 700 yards/640 meters while for highly reflective objects the maximum is 1000 yards/914
meters. Note: You will get both longer and shorter maximum distances depending on the reflective properties of the
particular target and the environmental conditions at the time the distance of an object is being measured.
The color, surface finish, size and shape of the target all affect reflectivity and range. The brighter the
color, the longer the range. Red is highly reflective, for example, and allows longer ranges than the color
black, which is the least reflective color. A shiny finish provides more range than a dull one. A small target
is more difficult to range than a larger target. The angle to the target also has an effect. Shooting to a
target at a 90 degree angle (where the target surface is perpendicular to the flight path of the emitted
energy pulses) provides good range while a steep angle on the other hand, provides limited ranging. In
addition, lighting conditions (e.g. the amount of sunlight) will affect the ranging capabilities of the unit.
The less light (e.g. overcast skies) the farther the unit’s maximum range will be. Conversely, very sunny
days will decrease the unit’s maximum range.
English
Page 6

6
GETTING STARTED
REPLACING THE BATTERY
Your TOUR V4 comes with a battery already installed, so it’s ready to use right away. To replace the
battery, remove the battery cap by lifting the battery cap tab and then rotating counter clockwise. Insert a
CR-2 3-volt lithium battery into the compartment negative end first, then replace the battery cap.
NOTE: It is recommended that the battery be replaced at least once every 12 months.
Low Battery Indicator: If “
“ is displayed within the in-view readout, this means “low battery” or
battery charge is getting low and the 3-volt lithium battery should be replaced.
ADJUSTING THE EYEPIECE
Your TOUR V4 is constructed with an adjustable eyepiece (+/- 3 Diopter Adjustment) that allows one
to focus the LCD display relative to the image. Simply rotate the eyepiece until the reticle and object
distanced to are both in focus to your eye.
OPERATIONAL SUMMARY
While looking through the 5x eyepiece, depress the POWER/FIRE button once to activate the in-view
Liquid Crystal Display (LCD). Place the aiming circle (located in the center of the field of view) upon a
target at least 5 yards away, depress and hold the POWER/FIRE button down until the range reading
is displayed near the bottom of the in-view display. Crosshairs surrounding the aiming circle indicate
that the laser is being transmitted. Once a range has been acquired, you can release the POWER/
FIRE button. The crosshairs surrounding the aiming circle will disappear once the POWER/FIRE button
has been released (i.e. the laser is no longer being transmitted). Note: Once activated, the LCD will
remain active and display the last distance measurement for 10 seconds. You can depress the power
Page 7

7
button again at any time to distance to a new target. As with any laser device, it is not recommended to
directly view the emissions for long periods of time with magnified lenses. The maximum time the laser is
transmitted (fired) is 10 seconds. To re-fire, press the POWER/FIRE button down again.
LIQUID CRYSTAL DISPLAY (LCD) INDICATORS
Your TOUR V4 ’s LCD incorporates illuminated icons or symbols that indicate the selected unit of measure,
when the laser is actively firing, when a target has been acquired, and targeting modes. A summary of
these features follows:
MODE and UNIT OF MEASURE OPTIONS
The TOUR V4 can be used to measure distances in yards or meters. The unit of measure indicators are
located in the lower right portion of the LCD. To select between yards and meters (#201660), press and
hold the POWER/FIRE button. The display will begin to cycle through the options (#201661): Yards w/
Slope, Yards, Meters w/Slope, Meters (for details on the Slope feature, see “About Tour V4-Slope Edition”). When
the units and Slope mode you want to use are displayed, release the POWER/FIRE button to select it. If
you are changing from yards to meters, a change in unit of measure will be indicated by the illumination
of the M for meter indicator while the Y for Yard indicator is turned off. If you are changing from meters
to yards, the opposite will occur. The TOUR V4 will return to the last unit of measure setting used each
time the unit is turned on.
ACTIVE LASER
Crosshairs surrounding the aiming circle indicate that the laser is being transmitted. Once a range has
been acquired, you can release the POWER/FIRE button. The crosshairs surrounding the circle will
disappear once the POWER/FIRE button has been released (i.e. the laser is no longer being transmitted).
Page 8
8
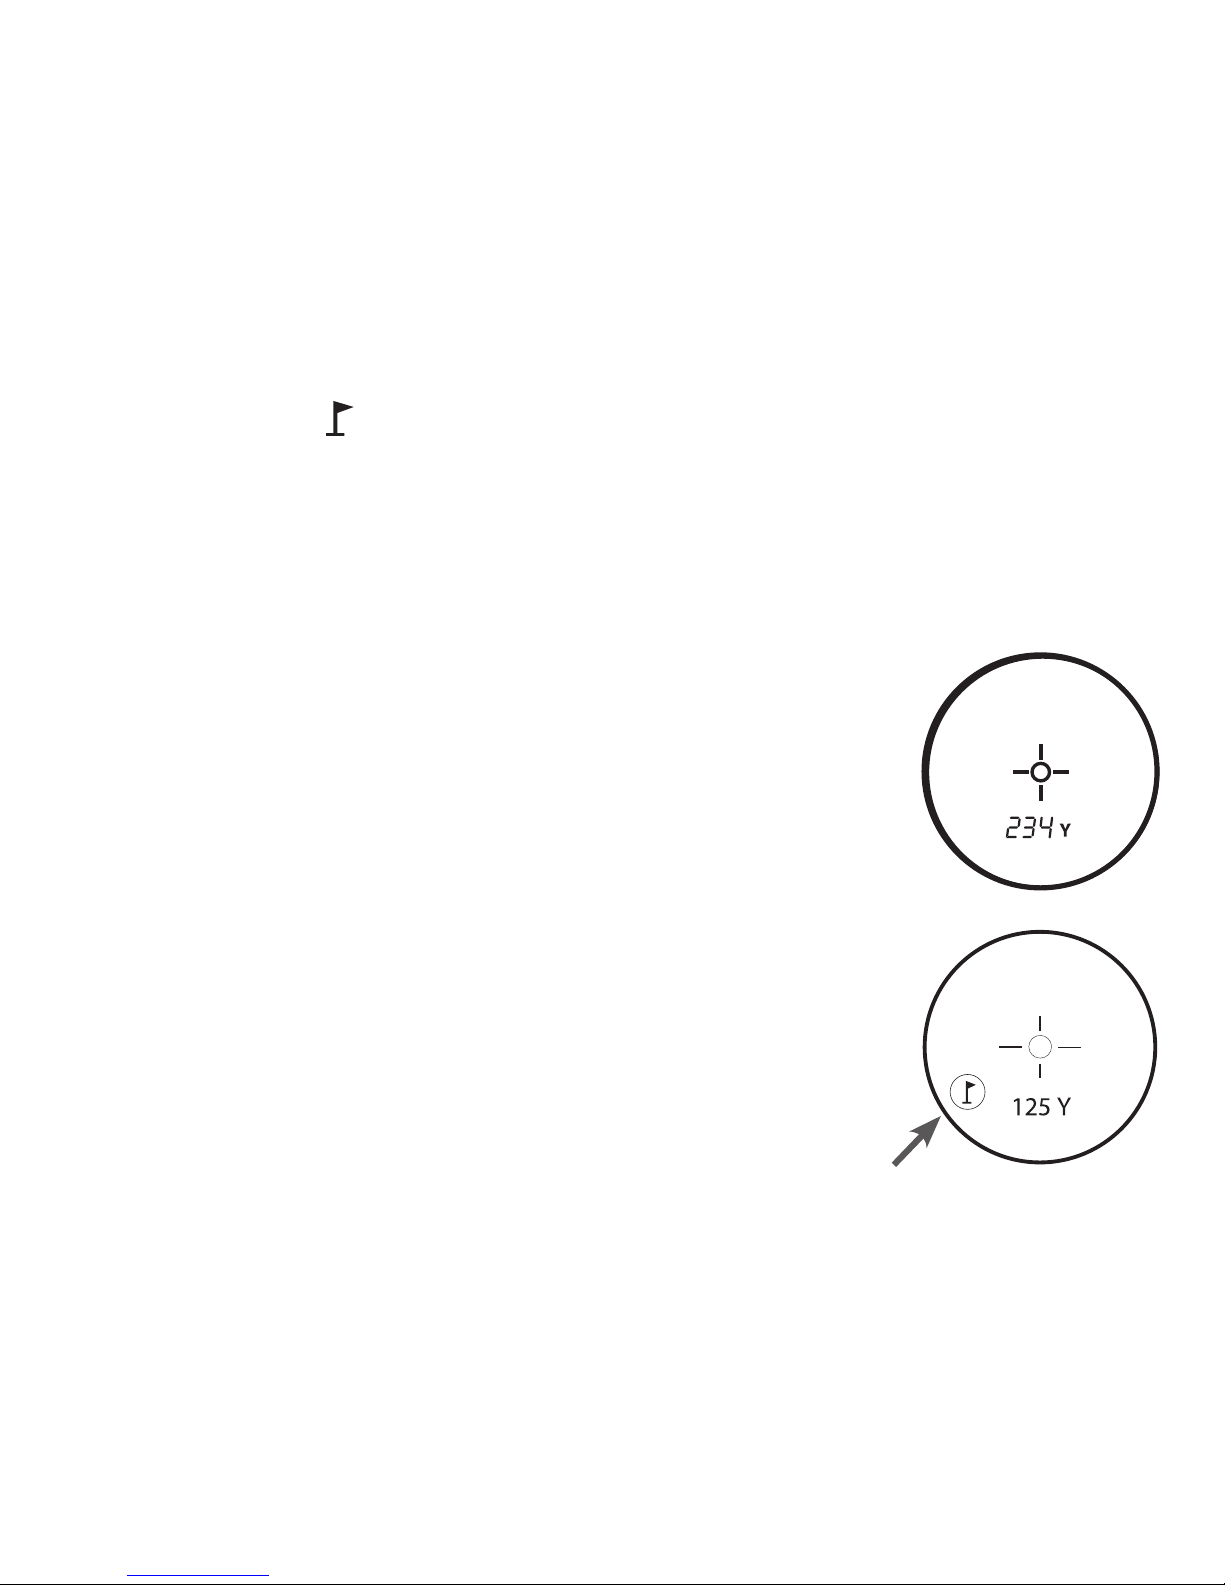
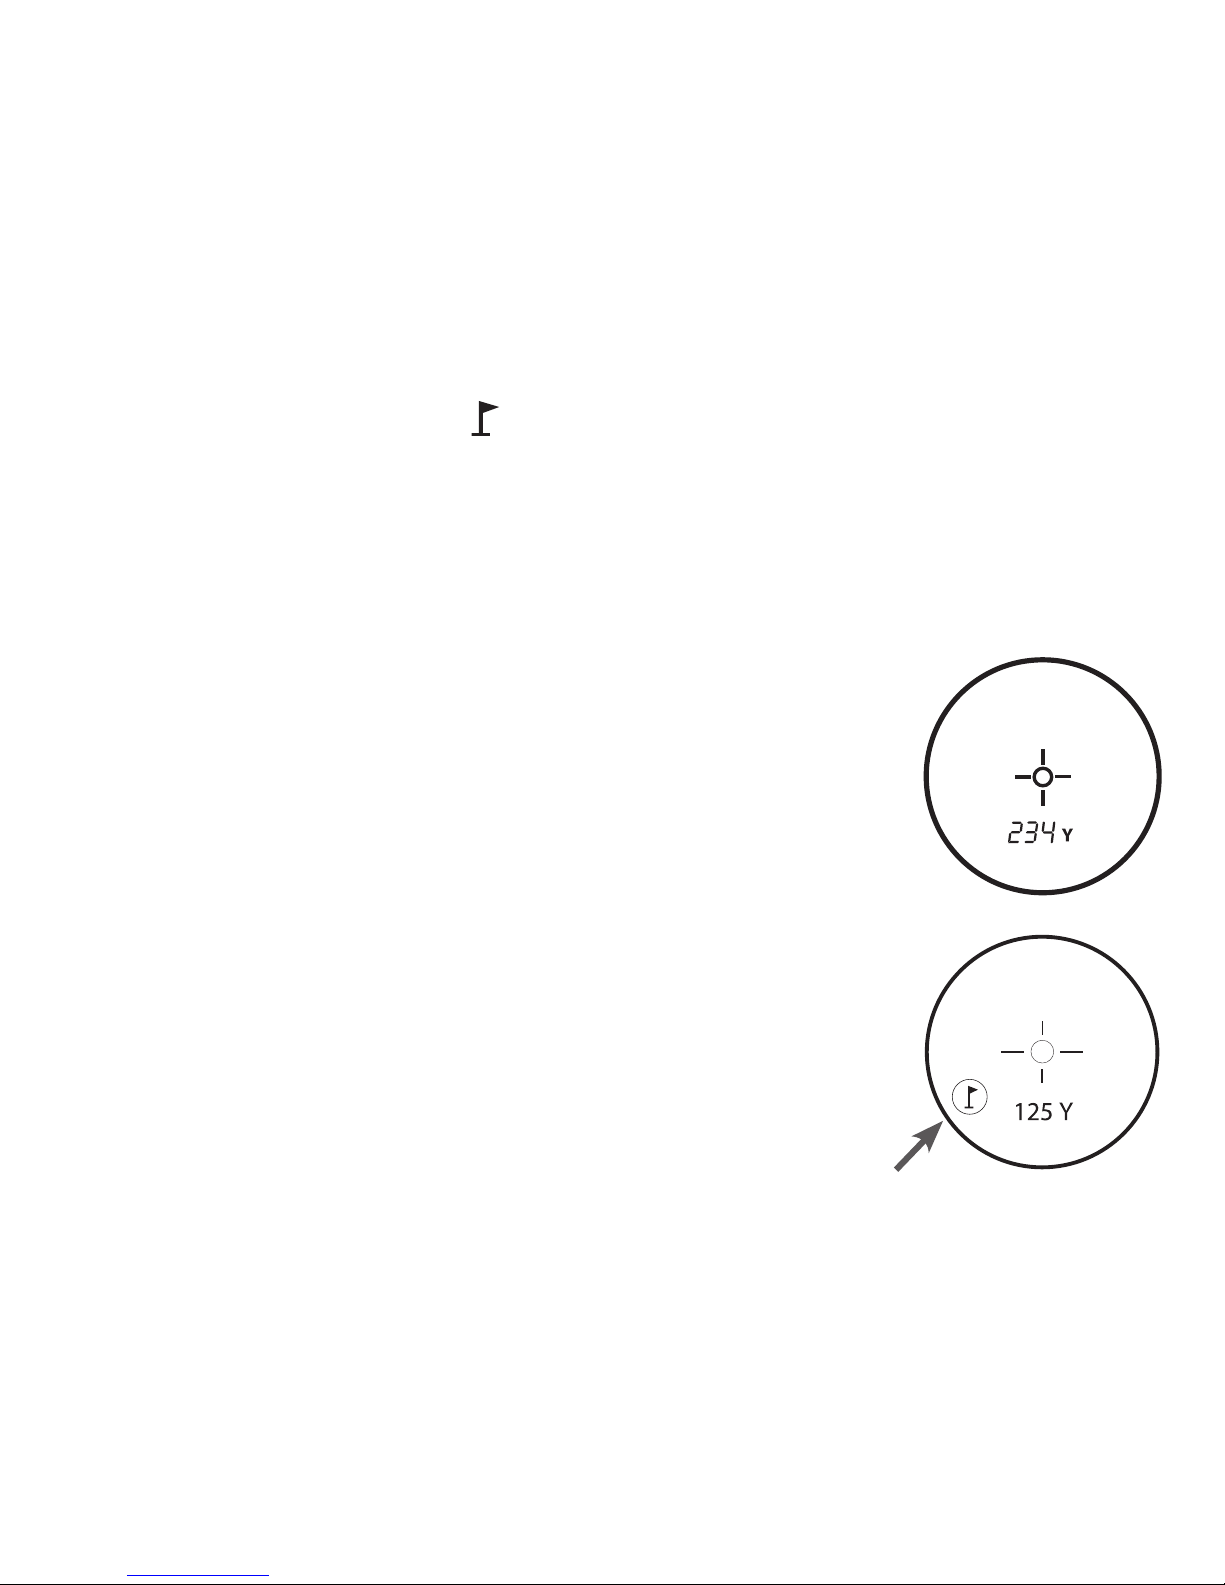
PinSeeker (LCD Indicator - ) Ever have trouble getting distance to the flag? This advanced mode allows
easy acquisition of the flag without inadvertently getting distances to background targets (i.e. trees) that
have stronger signal strength.
Press the POWER/FIRE button to turn the unit on. Next, align the aiming circle reticle onto the flag that
you want distance to. Then, press and hold the POWER/FIRE button and move the laser slowly over
the flag or desired object until a circle surrounds the flag indicator. If the laser beam recognized more
than one object (i.e. flag and background trees), distance of the flag will
be displayed and a circle will surround the PinSeeker indicator informing
the user that distance to the flag (i.e. closer object) is being displayed in the
LCD (as seen below). There may be times when only the laser beam only
sees one object in its path. In this case, the distance will be displayed, but
because more than one object was not acquired, a circle will not surround
the flag indicator.
TIP: While pressing the POWER/FIRE button, you can move the device slowly
from object to object and intentionally force the laser to hit multiple objects
to ensure that you are only displaying the closest of the objects recognized
by the laser.
Once the device has shut off, the unit will always default back to the last
mode used.
About JOLT
The new JOLT feature provides a vibration signal (similar to setting a cell
phone to “vibrate”) that will be felt when the Pinseeker technology indicates
the flag has been detected and the distance to it is displayed in the LCD.
Page 9

9
About TOUR V4 - Slope Edition (LCD Indicator “ - - - “ ) This advanced and patented technology found
on SLOPE EDITION models features a built-in accelerometer-based inclinometer that digitally displays
the exact slope angle from -20 to +20 degrees of elevation and is +/- 1.0 degree accurate. The Slope
+/-™ Edition models will automatically compute an angle compensated range based upon distance and
slope angle determined by the laser rangefinder and built-in inclinometer. This data is then combined with
internal algorithmic formulas dealing with average club use and ball trajectories. The angle compensated
range provides direction on how to play the shot (i.e. add distance if an incline, subtract distance if a
decline).
PINSEEKER™ WITH SLOPE +/-
™
The advanced patented SLOPE mode is available only on model 201661 (Tour V4™ Slope +/-™).
This model features a built-in accelerometer-based inclinometer that digitally displays the exact slope
angle from -20 to +20 degrees of elevation and is +/- 1.0 degree accurate. The Slope +/-™ mode will
automatically compute an angle compensated range based upon distance and slope angle determined
by the laser rangefinder and built-in inclinometer. This data is then combined with internal algorithmic
formulas dealing with average club use and ball trajectories. The angle compensated range provides
direction on how to play the shot (i.e. add distance if an incline, subtract distance if a decline).
HOW TO USE SLOPE +/-
™
Once in this mode, you will see a “ - - - ” in the field of view informing you that you are in the Slope
+/- Mode. Press the POWER button to obtain distance to the flag or other objects. Once the range is
displayed, continue to hold the POWER button down for approximately 2 seconds while holding the
aiming circle on the flag and keeping the unit as steady as possible so as to allow the inclinometer
enough time to measure slope. Then release the POWER button. Once you have released the power
button, a degree of angle and compensated range will be displayed.
Page 10
10
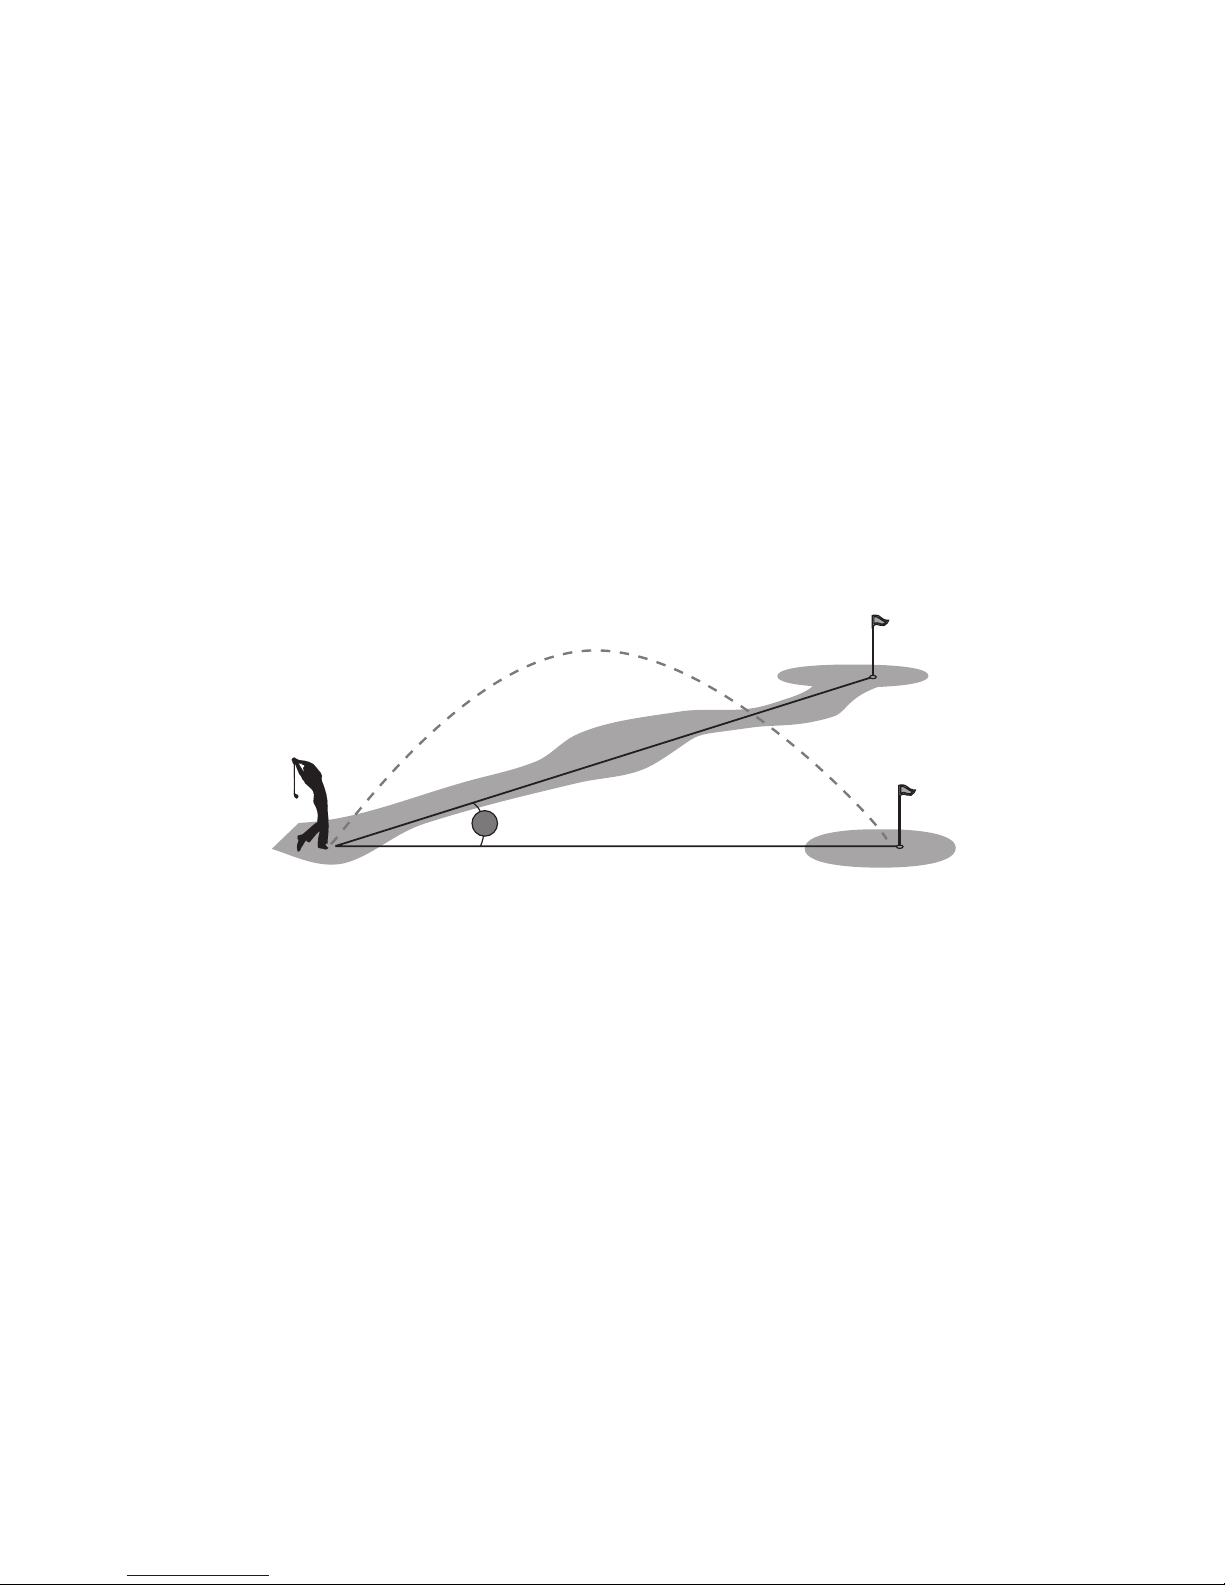
The Advantage of Slope Edition
The distance to flag A in the drawing below is 162 yards. It is also 162 yards to flag B although it is on
a slope.
However, if you were to play this hole as 162 yards, the ball (X) would fall short of the hole/flag because
you did not take slope into account.
OPTICAL DESIGN
Magnification and Coatings
The TOUR V4 features 5x magnification and Multi-Coated optics. A liquid crystal display (LCD) is mounted
within the optical system and when activated, displays a reticle for targeting, yards/meters, and Mode
indicators. Inherent in the manufacturing process are small black spots that appear in the optical system.
These are a natural characteristic of the LCD and cannot be fully eliminated in the manufacturing process.
They do not affect the distancing performance of the unit.
162 YARDS
162 YARDS
X
4°
Page 11

11
SPECIFICATIONS:
Dimensions: Measuring 4.1 x 3.1 x 1.6 inches
Weight: 5.6 oz.
Ranging Accuracy: +/- 1 yard
Range: 5-1000 Yards / 5-914 Meters
Magnification: 5x
Objective Diameter: 20 mm
Optical Coatings: Multi-Coated
Patent #’s: 6,445,444 | 5,612,779 | 6,057,910 | 6,226,077
(Slope Edition) | 7,239,377 | 7,859,650 | 7,535,553
CLEANING
Gently blow away any dust or debris on the lenses (or use a soft lens brush). To remove dirt or fingerprints,
clean with a soft cotton or microfiber cloth, rubbing in a circular motion. Use of a coarse cloth or
unnecessary rubbing may scratch the lens surface and eventually cause permanent damage. For a more
thorough cleaning, photographic lens tissue and photographic-type lens cleaning fluid or isopropyl
alcohol may be used. Always apply the fluid to the cleaning cloth – never directly on the lens.
Display: LCD
Power Source: 3-volt lithium (included)
Field Of View: 420 ft. @ 1000 yards
Extra Long Eye Relief: 17mm
Exit Pupil: 4.0 mm
Includes battery & carrying case
Page 12

12
TWO-YEAR LIMITED WARRANTY
Your Bushnell product is warranted to be free of defects in materials and workmanship for two years after the date of purchase. In the event of a defect under this
warranty, we will, at our option, repair or replace the product, provided that you return the product postage prepaid. This warranty does not cover damages caused
by misuse, improper handling, installation, or maintenance provided by someone other than a Bushnell Authorized Service Department.
Any return made under this warranty must be accompanied by the items listed below:
1. A check/money order in the amount of $10.00 to cover the cost of postage and handling.
2. Name, address and daytime phone # for product return.
3. An explanation of the defect.
4. Copy of your dated proof of purchase.
Do not send in accessories (batteries, case, etc.), only the product for repair.
Product should be well packed in a sturdy outside shipping carton to prevent damage in transit, and shipped to the address listed below:
IN U.S.A. Send To: IN CANADA Send To:
Bushnell Outdoor Products Bushnell Outdoor Products
Attn.: Repairs Attn.: Repairs
9200 Cody 140 Great Gulf Drive, Unit B
Overland Park, Kansas 66214 Vaughan, Ontario L4K 5W1
For products purchased outside the United States or Canada please contact your local dealer for applicable warranty information.
In Europe you may also contact Bushnell at: Bushnell Germany GmbH
European Service Centre
Mathias-Brüggen-Str. 80
D-50827 Köln
GERMANY
Tel: +49 221 995568-0
Fax: +49 221 995568-20
This warranty gives you specic legal rights.
You may have other rights which vary from country to country.
©2015 Bushnell Outdoor Products
Page 13

13
TROUBLESHOOTING
If unit does not turn on - LCD does not illuminate:
• Depress POWER/FIRE button.
• Check and if necessary, replace battery.
If unit does not respond to key presses, replace the battery with a good quality 3 volt lithium battery.
If unit powers down (display goes blank when attempting to power the laser):
• The battery is either weak or low quality. Replace the battery with a good quality 3 -volt lithium
battery.
If target range cannot be obtained:
• Make sure LCD is illuminated.
• Make sure that the POWER/FIRE button is being depressed.
• Make sure that nothing, such as your hand or finger, is blocking the objective lenses
(lenses closest to the target) that emit and receive the laser pulses.
• Make sure unit is held steady while depressing the POWER/FIRE button.
NOTE: The last range reading does not need to be cleared before ranging another target. Simply aim at the new target
using the LCD’s reticle, depress the POWER/FIRE button and hold until new range reading is displayed.
Specifications, instructions, and the operation of these products are subject to change without notice.
Page 14
14
FCC NOTE
This equipment has been tested and found to comply with the limits for a Class B digital device, pursuant to Part 15 of
the FCC Rules. These limits are designed to provide reasonable protection against harmful interference in a residential
installation. This equipment generates, uses and can radiate radio frequency energy and, if not installed and used
in accordance with the instructions, may cause harmful interference to radio communications. However, there is no
guarantee that interference will not occur in a particular installation. If this equipment does cause harmful interference
to radio or television reception, which can be determined by turning the equipment off and on, the user is encouraged
to try to correct the interference by one or more of the following measures:
• Reorient or relocate the receiving antenna.
• Increase the separation between the equipment and receiver.
•
Connect the equipment into an outlet on a circuit different from that to which the receiver is connected.
• Consult the dealer or an experienced radio/TV technician for help.
Shielded interface cable must be used with the equipment in order to comply with the limits for a digital device pursuant
to Subpart B of Part 15 of FCC Rules.
Specifications and designs are subject to change without any notice or
obligation on the part of the manufacturer.
FDA SAFETY
Class 1 laser product in accordance with IEC 60825-1:2007.
Complies with 21 CFR 1040.10 and 1040.11 for laser products except for deviations pursuant to Laser Notice No.
50, dated June 24, 2007.
Caution: There are no user controls, adjustments or procedures. Performance of procedures other than those specified
herein may result in access to invisible laser light.
Page 15

15
Page 16
16
powEr/FirE (alimEntation)
oculairE
201660
201661
Page 17

17
Français
201660/201661
07-16
Page 18

18
FÉLICITATIONS POUR VOTRE ACHAT DU TÉLÉMÈTRE BUSHNELL® TOUR V4™ AVEC
TECHNOLOGIE PINSEEKER™ AVEC JOLT™. Le TOUR V2 est un appareil a laser de haute precision
conçu pour offrir plusieurs annees de plaisir. Ce manuel vous aidera a atteindre la performance optimale
en vous expliquant les reglages et caracteristiques ainsi que l’entretien de cet appareil de telemetrie a
laser de haute precision. Pour assurer une performance et une duree de vie optimales, veuillez lire les
instructions avant d’utiliser votre TOUR V2.
INTRODUCTION
Le TOUR V4 est la nouvelle addition de Bushnell à sa ligne de télémètres à laser spécialement conçus
pour les golfeurs. Le TOUR V4 met en vedette la technologie PINSEEKER™ avec JOLT™ qui permet aux
golfeurs de cibler rapidement et facilement le drapeau, et non pas les objets en arrière-plan. Conçu
pour tenir dans la paume de la main, le TOUR V4 ne pèse que 5,6 oz (159 g). Il met aussi en vedette
un oculaire ajustable, un grossissement 5 x et est capable d’offrir une portée de 5 à 1000 yards (5 à
914 mètres) avec une précision incroyable de 1 yard (1 mètre)! Différent des autres télémètres au laser
Bushnell, le TOUR V4 ne dépend pas des réflecteurs et offre une distance à partir des arbres, des abris
en fait de n’importe quel objet sur le parcours, sur n’importe quel terrain de golf au monde.
Page 19

19
VOICI COMMENT NOTRE TECHNOGÉNIE NUMÉRIQUE FONCTIONNE
Le TOUR V4 avec PINSEEKER émet des impulsions d’énergie infrarouge invisibles et sans risque pour les
yeux. Son microprocesseur numérique avancé et la puce CIAS (Circuits intégrés à application spécifique)
du TOUR V4 avec PINSEEKER produisent chaque fois des relevés de distances précises et instantanées.
La technogénie numérique sophistiquée calcule instantanément les distances en mesurant le temps requis
par le parcours aller-retour de chaque impulsion du télémètre à la cible.
PRÉCISION DE L’ÉVALUATION DES DISTANCES
La précision de l’évaluation des distances du TOUR V4 est de +/- 1 yard/mètre dans la pluspart des cas.
La distance maximale du télémètre dépend de la réflectivité de la cible. La distance maximale pour la
majorité des objets est de 700 yards/640 mètres alors que le maximum pour les objets à haute réflectivité
est de 1000 yards/914 mètres. Note: Vous obtiendrez les distances maximales et minimales selon les
propriétés réfléchissantes d’une cible particulière et les conditions environnementales au moment de la
mesure de la distance d’une cible.
La couleur, le fini de la surface, la dimension et la forme de la cible affectent la réflectivité et la plage de
mesure. Plus la couleur est vive, plus la plage est longue. Par exemple, le rouge a une grande reflectivité
et permet une plus grande distance que le noir, la couleur ayant le moins de réflectivité. Un fini brillant
permet une plage plus longue qu’un fini mât. L’évaluation de la distance d’une cible de petite taille est
plus difficile que celle d’une grande taille. L’angle de la cible a également un effet. Viser une cible avec
un angle de 90 degrés (alors que la surface de la cible est perpendiculaire à la trajectoire émise par les
amplitudes d’impulsion) offre une distance maximale tandis qu’une pente raide offre une distance limitée.
De plus, les conditions d’éclairage (p. ex. le niveau d’ensoleillement) affectera les capacités de distance
de l’appareil. Moins d’ensoleillement (par ex.: journée nuageuse) permet de maximiser l’évaluation de
la distance de l’appareil. De manière générale, les journées très ensoleillées diminuent l’évaluation de la
distance maximale de l’appareil.
Page 20

20
MISE EN PLACE DE LA PILE
Votre TOUR V4 est livré avec une batterie déjà installée, et donc prêt à l’emploi. Pour remplacer la
batterie, enlevez le cache de la pile en soulevant l’ergot du couvercle puis en le tournant dans le sens
inverse des aiguilles d’une montre. Insérez une pile au lithium de CR-2 de 3 volts dans le compartiment
en introduisant d’abord la borne négative, puis refermez le cache.
REMARQUE: Il est recommandé de remplacer la pile au moins une fois par an.
Indicateur de batterie faible: Si “
“est affiché lors de l’affichage, ceci indique que la charge de la pile
est faible et qu’elle doit être remplacée.
RÉGLAGE DE L’OCULAIRE
Votre TOUR V4 est muni d’un oculaire de ajustable (réglage dioptrique +/- 3) qui permet d’effectuer la
mise au point de l’afficheir ACL par rapport à l’image. Tournez simplement l’oculaire jusqu’à ce que la
réticule et l’objet à distance soit allignée à votre œil.
MODE D’EMPLOI EN BREF
Tout en regardant dans l’oculaire de grossissement 5 x, appuyez une fois sur le bouton POWER/FIRE afin
d’activer l’afficheur à cristaux liquides (ACL). Positionnez le cercle de visée (situé au centre du champ
de vision) sur une cible à une distance minimal de 5 verges (4,6 m), appuyez sur le bouton POWER/
FIRE et maintenez enfoncé jusqu’à ce que la lecture de la distance soit affichée près du bas de l’afficheur
intégré. Les réticules à proximité du cercle de visée indiquent que le laser est en cours de transmission.
Une fois qu’une distance a été acquise, vous pouvez relâchez le bouton. Les réticules entourant le cercle
de visée disparaitront lorsque le bouton POWER/FIRE aura été relâché (ce qui veut dire que le laser
n’est plus en cours de transmission). Note: Une fois activé, l’écran ACL demeure actif et affiche le dernier
relevé de distance pendant 10 secondes. Vous n’avez qu’à enfoncer de nouveau le bouton POWER/FIRE
Page 21

21
afin de viser une autre cible. Comme avec tout dispositif laser, il est déconseiller d’observer longuement
et directement les émissions avec des lentilles grossissante, pendant une période prolongée. La durée
maximale pendant laquelle le rayonnement laser est transmis est de 10 secondes. Pour transmettre le
laser à nouveau, appuyez sur le bouton encore une fois.
INDICATEURS DE L’AFFICHEUR À CRISTAUX LIQUIDES (ACL)
L’écran ACL de votre TOUR V4 est doté d’icônes et de symboles lumineux indiquant l’unité de mesure
sélectionnée, l’émission effective du rayonnement laser, l’acquisition de la distance de la cible et les
différents modes de ciblage. Voir le résumé des caractéristiques ci-dessous:
OPTIONS MODE et UNITÉS DE MESURE
Le TOUR V4 peut mesurer les distances en yards ou en mètres. Les indicateurs d’unités de mesure se situent
dans la portion inférieure droite de l’afficheur ACL. Pour sélectionner les yards ou les mètres (#201660),
appuyez et maintenez enfoncé le bouton POWER/FIRE. L’écran affichera successivement les différentes
options (#201661): yards avec Slope, yards, mètres avec Slope, mètres (pour plus de détails sur l’option
Slope, voir la section « À propos de Slope »). Si vous passez de yards à mètres, l’indicateur M (pour
mètres) s’illuminera tandis que le Y (pour yards) s’éteindra. Si vous de mètres à yards, c’est l’inverse qui
se produit. Le TOUR V4 revient au dernier réglage utilisé chaque fois qu’il est remis en marche.
LASER ACTIF
Les réticules à proximité du cercle de visée indiquent que le laser est en cours de transmission. Une fois
qu’une distance a été acquise, vous pouvez relâchez le bouton. Les réticules entourant le cercle de visée
disparaissent une fois que le bouton POWER/FIRE a été relâché (c’est-à-dire que le rayonnement laser
n’est plus en cours).
Page 22
22
PinSeeker (indicateur d’affichage - ) Avez-vous de la difficulté à connaître la distance jusqu’au
drapeau? Ce mode perfectionné permet une acquisition facile jusqu’au drapeau sans obtenir par erreur
la distance d’autres cibles d’arrière-plan (tels que les arbres) qui ont un signal plus fort.
Appuyez sur le bouton POWER/FIRE pour allumer l’unité. Ensuite, aligner les réticules du cercle de visée
sur le drapeau dont vous voulez connaître la distance. Puis pressez et maintenanez le bouton POWER/
FIRE puis déplacez doucement le laser jusqu’au drapeau ou l’objet désiré jusqu’à ce que le cercle entoure
l’indicateur du drapeau. Si le rayonnement laser reconnait plus d’un objet (p. ex. le drapeau et les arbres
en arrière-plan) la distance du drapeau sera affichée et un cercle entourera
l’indicateur PinSeeker, informant l’utilisateur que la distance du drapeau
est affichée sur l’afficheur ACL (comme ci-dessous). Parfois, le rayonnement
laser ne voit qu’un seul objet sur sa trajectoire. Las distance est alors affichée,
mais comme plusieurs objets n’ont pas été détectés, l’indicateur du drapeau
n’est pas entouré d’un cercle. CONSEIL: Tout en appuyant sur le bouton
POWER/FIRE, vous pouvez déplacer l’instrument lentement d’un objet à un
autre et forcer ainsi le rayonnement laser à toucher plusieurs objets pour
vérifier que la seule distance des objets les plus proches reconnus par le
rayonnement est affichée.
Une fois le dispositif fermé, l’instrument revient par défaut au dernier mode
utilisé.
À propos de JOLT
Si vous le souhaitez (voir « Unités de mesure »), la nouvelle option JOLT vous
permet d’enclencher un signal sous la forme d’une vibration semblable à
celle d’un téléphone portable en option vibreur. Cette vibration se produit
lorsque la technologie Pinseeker indique que le drapeau a bien été repéré
Page 23

23
et que la distance est affichée sur l’écran LCD.
TOUR V4 - Édition Slope (indicateur d’affichage - “ - - - ” ) Ce mode perfectionné se trouve seulement sur
les modèles ÉDITION SLOPE et met en vedette un inclinomètre à base d’accéléromètre intégré qui
permet l’affichage numérique de l’angle de pente excate de - 20 à + 20 degrés d’élévation avec une
précision de +/- 1,0 degré. Le mode Slope +/-™ calcule automatiquement la distance compensée par
l’angle en fonction des mesures de distances et d’angle de pente déterminées par le télémètre à l’aser
et l’inclinomètre intégré. Ces données sont alors combinées avec des formules algorythmiques internes
concernant l’utilisation moyenne des clubs et les trajectoires de balles. La mesure de distance compensée
par l’angle renseigne sur la manière de jouer (C’est -à-dire ajouter de la distance s’il s’agit d’une montée,
soustraire de la distance s’il s’agit d’une décente).
PINSEEKER™ AVEC SLOPE (PENTE) +/-™
Le mode breveté et perfectionné SLOPE (PENTE) est disponible uniquement sur le modèle 201661 (Tour
V4™ Slope +/-™). Le modèle 201661 est doté d’un inclinomètre à accéléromètre intégré qui permet
l’affichage numérique de l’angle de pente exact de -20 à +20 degrés d’élévation et une précision de
+/- 1,0 degré. Le mode Slope +/-™ calcule automatiquement la distance compensée par l’angle en
fonction des mesures de distance et l’angle de pente déterminés par le télémètre à laser et l’inclinomètre
intégré. Puis ces données sont ensuite combinées avec des formules algorithmiques internes concernant
l’utilisation moyenne du club et des trajectoires des balles. La mesure de distance compensée par l’angle
oriente sur la manière de jouer (par ex. augmenter la distance en cas de montée, la réduire en cas de
descente).
COMMENT UTILISER SLOPE +/-™
Une fois dans ce mode, vous verrez un “ - - - ” dans le champ de vision vous informant que vous êtes en
mode Slope +/-. Appuyez sur le bouton MARCHE (Power) pour obtenir la distance jusqu’au drapeau ou
Page 24

24
jusqu’à d’autres objets. Une fois la distance affichée, continuez de maintenir le bouton MARCHE (Power)
enfoncé pendant environ 2 secondes tout en maintenant le cercle de visée sur le drapeau et l’appareil
aussi immobile que possible pour laisser le temps nécessaire à l’inclinomètre de mesurer la pente. Puis
relâchez le bouton MARCHE. Lorsque vous aurez relâché le bouton marche (power), un degré d’angle et
une distance compensée seront affichées en dessous de la distance standard.
L’avantage du Slope
™
Dans le schéma ci-dessous, la distance jusqu’au drapeau A est de 162 yards (148 mètres). Elle est aussi
de 162 yards (148 mètres) jusqu’au drapeau B, mais elle est en pente. Si vous deviez jouer ce coup
comme 162 yards (148 mètres), la balle (X) ne parviendrait pas au trou/drapeau parce que la pente
n’a pas été prise en compte.
162 YARDS
162 YARDS
X
4°
Page 25

25
CONCEPTION OPTIQUE
Grossissement et traitements
Le modèle TOUT V3 dispose d’un puissant monoculaire à grossissement 5 x et des éléments optiques
multicouches. Un afficheur à cristaux liquides (ACL) est monté à l’intérieur du système optique; une fois
activé, il présente un réticule pour la visée, des indicateurs d’unités de mesure (yards ou mètres) et des
indicateurs de mode. Des petits points noirs, inhérents au procédé de fabrication, sont visibles dans le
système optique. Ils constituent une caractéristique naturelle de l’afficheur à cristaux liquides et ne peuvent
être totalement éliminés lors de la fabrication. Ils n’affectent d’aucune manière l’évaluation des distances
par l’instrument.
FICHE TECHNIQUE:
Dimensions : Mesure 4,1 x 3,1 x 1,6 po (10,4 x 7,9 x 4,1 cm)
Poids: 5,6 oz (159 g)
Précision d’évaluation des distances: +/- 1 yard (1 m)
Portée: 5-1000 yards/5-914 mètres
Grossissement: 5 x
Diamètre de l’objectif: 20 mm
Traitement optique: Multicouches
Afficheur: Cristaux liquides
Source d’alimentation: 3 volts au lithium (inclus)
Largeur de champ: 420 pi (140 m) @ 1000 yards (1000 m)
Dégagement oculaire extra long: 17 mm
Pupille de sortie: 4,0 mm
Inclus batterie & sacoche
Numéros de brevet: 6,445,444 | 5,612,779 | 6,057,910 | 6,226,077 | 7,239,377
(Édition Slope) 7,239,377 | 7,859,650 | 7,535,553
Page 26

26
NETTOYAGE
Soufflez doucement toute saleté ou débris des lentilles (ou utilisez une brosse douce pour lentilles). Pour
enlever la saleté ou les traces de doigts, nettoyez avec un chiffon doux en coton ou en microfibre , en
faisant des mouvements circulaires. L’utilisation d’un tissu rugueux ou un frottage inutile peut égratigner
la surface des lentilles et causer un dommage permanent. Pour nettoyer en profondeur, utiliser un papier
Joseph et un nettoyant pour verres photo ou de l’alcool isopropylique. Ne jamais nettoyer en vaporisant
du liquide directement sur les lentilles - vaporiser préférablement sur un linge.
Page 27

27
GARANTIE LIMITÉE DE 2 ANS
Votre produit Bushnell est garanti exempt de défaut de matériaux et de fabrication pendant deux ans après la date d’achat. Au cas où un défaut apparaîtrait sous
la pr.sente garantie, nous nous réservons l’option de réparer ou de remplacer le produits, à condition de nous le renvoyer en port payé. Cette garantie ne couvre
pas les dommages causés par le mauvais traitement, mauvaise manipulation, l’installation ou l’entretien effectué par quelqu’un d’autre qu’un centre de service
autorisé Bushnell.
Tout retour fait en vertu de cette garantie doit être accompagné des points énumérés ci-dessous:
1. Un chèque/mandat de 10 $ pour couvrir les frais de port et de manutention.
2. Nom, adresse et n° de téléphone en journée pour le retour du produit.
3. Une explication de la défaillance constatée.
4. Copie de votre preuve d’achat datée.
N’envoyez pas les accessoires (batteries, etc.), mais uniquement le produit à réparer.
Le produit doit être correctement emballé dans un carton d’expédition renforcé, pour éviter tout dommage pendant le transport, et expédié à l’adresse ci-dessous :
AUX É.-U.: AU CANADA:
Bushnell Outdoor Products Bushnell Outdoor Products
Attn: Repairs Attn: Repairs
9200 Cody 140 Great Gulf Drive, Unit B
Overland Park, Kansas 66214 Vaughan, Ontario L4K 5W1
Veuillez communiquer avec votre détaillant local si les produits ont été achetés ailleurs qu’aux États-Unis ou au Canada pour connaître les détails de la garantie. En
Europe, vous pouvez communiquer avec Bushnell à: Bushnell Germany GmbH
European Service Centre
Mathias-Brüggen-Str. 80
D-50827 Köln
GERMANY
Tél. : +49 221 99556-0
Téléc. : +49 221 995568-20
La présente garantie vous donne des droits légaux spéciques.
Vous pouvez avoir d’autres droits qui varient selon les pays.
©2015 Bushnell Outdoor Products
Page 28

28
GUIDE DE DEPANNAGE
L’appareil ne s’allume pas - L’afficheur ACL ne s’allume pas:
• Appuyer sur le bouton POWER/FIRE.
• Vérifier les piles et remplacer si nécessaire.
Si l’appreil ne répond par à la pression des touches, remplacer les piles par des piles au lithium 3 volts
de qualité.
Si l’appareil se décharge (écran s’éteint en allumant le laser) :
• La pile est faible ou de mauvaise qualité. Remplacer les piles par des piles au lithium
3 volts de qualité.
Si la mesure de la cible ne peut être établie:
• S’assurer que l’afficheur ACL est allumé.
• S’assurer que le bouton POWER/FIRE est pressé.
• S’assurer qu’aucun élément n’obstrue les lentilles de focalisation, ne nuit aux impulsions laser,
comme une main ou un doigt (lentilles trop près de la cible).
• S’assurer que l’appareil est stable lorsqu’on appuie sur le bouton POWER/FIRE.
NOTE: La lecture de la dernière mesure n’a pas besoin d’être annulée avant la mesure d’une autre cible.
Visez une nouvelle cible en utilisant le réticule de l’écran ACL, appuyez sur le bouton POWER/FIRE et
maintenez-le enfoncé jusqu’à ce que la nouvelle distance soit affichée.
La fiche technique, les instructions et le mode d’emploi de ces produits sont sujets à changement sans
préavis.
Les spécifications techniques et les conceptions sont modifiables sans préavis ou obligations de la part du fabricant.
Page 29

29
TRAITEMENT DES DÉCHETS D’ÉQUIPEMENTS ÉLECTRIQUES ET ÉLECTRONIQUES
(En vigueur dans l’Union européenne et autres pays européens ayant des systèmes de collecte des déchets séparés)
Cet équipement contient des composants électriques et/ou électroniques et par conséquent ne doit pas être éliminé
en fin de vie avec les autres déchets ménagers. Vous devez au contraire vous débarasser de ce produit afin qu’il soit
recyclé aux points de collecte respectifs fournis par les communautés locales. Pour vous, ceci est sans frais.
Si l’équipement contient des piles amovibles (rechargeables), celles-ci doivent également être retirées de l’équipement
et, si nécessaire, être éliminées à leur tour conformément aux règlements en vigueur (voir également les commentaires
respectifs dans la notice d’utilisation de ce produit).
De plus amples renseignements à ce sujet sont disponibles auprès de votre mairie, votre compagnie de ramassage
d’ordures locale, ou dans le magasin où vous avez acheté cet équipement.
Cet appareil numérique de la classe B est conforme à la norme NMB-003 du Canada.
SECURITE FDA
Produit pour techniques au laser de classe 1, conforme aux normes IEC 60825-1:2007.
Conforme à la norme 21 CFR 1040.10 et 1040.11 pour les produits laser à l’exception des déviations
conformément à la notice Laser n ° 50, daté du 24 Juin, 2007.
Avertissement: Il n’y a pas de commandes, de réglages ou de procédures externes.
L’exécution de procédures non spécifiées dans ce document risque de donner accès à une lumière laser
invisible.
Page 30

30
powEr/FirE
(EncEndido/disparo)
oclar
201660
201661
Page 31

31
Español
201660/201661
07-16
Page 32

32
FELICITACIONES POR HABER ADQUIRIDO EL TOUR V4™ DE BUSHNELL® QUE INCORPORA
TECNOLOGÍA PINSEEKER™ CON JOLT™. El TOUR V4 es un instrumento óptico de Telemetría
de Rayos Láser de precisión, pensado para poder ser disfrutado por muchos años. Este cuadernillo
lo ayudará a alcanzar un rendimiento óptimo, ya que explica los ajustes y las características de este
instrumento óptico de telemetría de rayos láser de precisión, como así también su cuidado. Para
asegurarse un rendimiento óptimo y una larga vida, le rogamos leer estas instrucciones antes de usar
su TOUR V4.
INTRODUCCIÓN
Su TOUR V4 es el agregado más reciente que hecho Bushnell a una galardonada línea de telémetros de
rayos láser para el golf, fabricado específicamente para golfistas. El TOUR V4 se caracteriza por contar
con tecnología PinSeeker con JOLT™, lo cual le permite al golfista “centrarse” en la bandera en forma
sencilla y rápida, sin adquirir los blancos del fondo. El TOUR V4 pesa aproximadamente 5,6 onzas y está
diseñado para que quepa en la palma de la mano. El TOUR V4 también se caracteriza por contar con un
ocular ajustable, trabajar a 5 aumentos y ser capaz de leer distancias desde 5 a 1000 yardas ¡con una
precisión increíble de una yarda! Al igual que otros telémetros de rayos láser de Bushnell, el TOUR V4
no depende de reflectores y leerá la distancia hasta árboles, refugios y prácticamente todo objeto que se
encuentre en el trayecto, en cualquier cancha de golf del mundo.
Page 33

33
CÓMO FUNCIONA NUESTRA TECNOLOGÍA DIGITAL
El TOUR V4 CON PINSEEKER emite impulsos de energía infrarroja invisibles y seguros para el ojo. La
pastilla extensible microprocesadora y ASIC (Circuito Integrado Específico a la Aplicación) Advanced
Digital del TOUR V4 CON PINSEEKER permite lecturas instantáneas y precisas en todo momento. Una
tecnología digital sofisticada calcula instantáneamente las distancias, midiendo el tiempo que tarda
cada impulso en hacer el trayecto desde el telémetro hasta el blanco y volver.
PRECISIÓN CON QUE SE MIDEN LAS DISTANCIAS
La precisión del TOUR V4 para medir las distancias es de más o menos una yarda/metro, en la mayoría
de los casos. El alcance máximo del instrumento depende de la reflectividad del blanco. La distancia
máxima para la mayoría de los objetos es de 700 yardas/640 metros, mientras que para objetos
altamente reflectantes, la distancia máxima es de 1000 yardas/914 metros. Nota: Usted obtendrá
distancias tanto más largas o cortas, según las propiedades reflectantes del blanco en particular y las
condiciones ambientales presentes en el momento en que se mide la distancia de un objeto.
El color, el acabado superficial, el tamaño y la forma del blanco afectan todos la reflectividad y el
alcance. Cuanto más brillante sea el color, más largo será el alcance. Por ejemplo, el rojo es altamente
reflectante y permite alcances más largos que el color negro, el cual es el color menos reflectante. Un
acabado lustroso ofrece más alcance que uno apagado. Un blanco pequeño es más difícil de alcanzar
que uno más grande. El ángulo con respecto al blanco también influye. Tirar hacia un blanco que está
en ángulo de 90 grados (donde la superficie del blanco es perpendicular a la trayectoria de vuelo de
los impulsos de energía emitidos) ofrece un buen alcance, mientras que -por otro lado- un ángulo agudo
ofrece un alcance limitado. Además, las condiciones de iluminación (por ejemplo, la cantidad de luz
solar) afectarán la capacidad de alcance de la unidad. Cuanta menos luz haya (por ejemplo, cielo
nublado), más lejano será el alcance máximo de la unidad. Contrariamente, en los días muy soleados,
el alcance máximo de la unidad disminuirá.
Page 34

34
COLOCACIÓN DE LA PILA
Su TOUR V4 se provee con una batería ya instalada, de manera que está listo para usar de inmediato. Para
sustituir la batería, retire la tapa de la batería levantando la aleta de la tapa de la batería y para después
girarla en sentido contrahorario. Introduzca una pila de litio CR-2 de 3 voltios en el compartimento, con
el polo negativo primero y, a continuación, vuelva a colocar la tapa del compartimento de pilas.
NOTA: Se recomienda reemplazar la pila por lo menos una vez cada 12 meses.
Indicador de Pila Baja: Si se observa “
” en la lectura que se visualiza, significa que la “pila está
baja” o que la carga de la pila se está agotando, debiéndose reemplazar la pila de litio de 3 voltios.
AJUSTE DEL OCULAR
Su TOUR V4 está construido con un ocular ajustable (Ajuste Dióptrico de +/- 3) que le permite enfocar
la pantalla de cristal líquido (LCD) con relación a la imagen. Simplemente deberá girar el ocular hasta
que la retícula y el objeto cuya distancia desea medir sean enfocados por su ojo.
RESUMEN DEL FUNCIONAMIENTO
Mientras mira a través del ocular de 5 aumentos, pulse POWER/FIRE (el botón de encendido/disparo)
una vez para activar la visualización en la Pantalla de Cristal Líquido (LCD). Coloque el círculo de
puntería (ubicado en el centro del campo visual) por encima de un blanco que esté por lo menos a 5
yardas de distancia, pulse y mantenga pulsado el botón de encendido hasta que la lectura de la distancia
se visualice cerca de la parte inferior de la pantalla que se visualiza. Las cruces reticulares que rodean el
círculo de puntería indican que el láser se está transmitiendo. Una vez adquirida la distancia, se puede
soltar el botón de encendido. Las cruces reticulares que rodean al círculo de puntería desaparecerán
una vez que se suelte el botón de encendido (es decir, el láser ha dejado de transmitirse). Nota: Una vez
activada, la pantalla de cristal líquido permanecerá activa y mostrará la última medición de distancia
durante 10 segundos. Usted podrá pulsar el botón de encendido nuevamente en cualquier momento
Page 35

35
para determinar la distancia hasta un nuevo blanco. Al igual que ocurre con cualquier dispositivo láser,
no se recomienda visualizar directamente las emisiones durante largos períodos de tiempo con lentes
de aumento. El tiempo máximo en que se transmite (dispara) el láser es de 10 segundos. Para volver a
disparar, pulse el botón hacia abajo nuevamente.
INDICADORES DE LA PANTALLA DE CRISTAL LÍQUIDO (LCD)
La pantalla LCD de TOUR V4 incluye símbolos o iconos luminosos que indican la unidad de medida,
la activación del láser, la confirmación de que se ha adquirido un blanco y el modo de apuntado. A
continuación presentamos un resumen de estas características:
OPCIONES DE UNIDADES DE MEDIDA
El TOUR V4 puede ser usado para medir distancias en yardas o en metros. Los indicadores de la unidad
de medida están ubicados en la porción inferior derecha de la pantalla de cristal líquido (LCD). Para
seleccionar entre yardas y metros (#201660), mantenga pulsado el botón POWER/FIRE (encendido/
disparo). La pantalla comenzará a pasar por las opciones de configuración (#201661): Yards w/Slope
(Yardas con Slope), Yards (Yardas), Meters w/Slope (Metros con Slope), Meters (Metros). Para obtener
información detallada de la función Slope, consulte “Acerca de Slope”. Si cambia de yardas a metros, el
cambio de la unidad de medida se indicará mediante la iluminación de la M para el caso del indicador
de metros, mientras que -para el caso del indicador de Yardas- la Y se apagará. Si cambia de metros a
yardas, ocurrirá lo contrario. El TOUR V4 retornará al último parámetro de unidad de medida utilizado,
toda vez que se encienda la unidad.
LÁSER ACTIVO
Las cruces reticulares que rodean el círculo de puntería indican que el láser se está transmitiendo. Una
vez adquirida la distancia, se puede soltar el botón de encendido. Las cruces reticulares que rodean al
círculo desaparecerán una vez que se haya soltado POWER/FIRE (el botón de encendido/disparo) (es
decir, el láser ha dejado de transmitirse).
Page 36

36
PinSeeker (Indicador de la Pantalla de Cristal Líquido [LCD] - ) ¿Alguna vez le costó calcular la distancia
hasta la bandera? Este modo avanzado le permite adquirir fácilmente la bandera, sin que se calculen
inadvertidamente distancias hasta blancos del fondo (es decir, árboles) que poseen una resistencia de
señal más fuerte.
Pulse el botón POWER/FIRE (encendido/disparo) para encender la unidad. Luego, alinee la retícula
del círculo de puntería sobre la bandera cuya distancia desea medir. A continuación, pulse y mantenga
pulsado el botón POWER (de encendido) y desplace el láser lentamente
por encima de la bandera o del objeto que desee, hasta que un círculo
rodee el indicador de la bandera. Si el haz del rayo láser reconoció más
de un objeto (es decir, la bandera y los árboles del fondo), se visualizará la
distancia hasta la bandera y un círculo rodeará el indicador del PinSeeker,
informándole al usuario que la distancia hasta la bandera (es decir, el objeto
más cercano) se está visualizando en la Pantalla de Cristal Líquido -LCD- (tal
como se observa abajo). Hay veces en que el haz del rayo láser sólo ve un
objeto en su trayecto. En dicho caso, se podrá visualizar la distancia pero
-dado que no se adquirió más de un objeto- no habrá un círculo que rodee
al indicador de la bandera.
CONSEJO: Mientras pulsa el botón POWER/FIRE (de encendido), puede
desplazar el dispositivo lentamente de objeto en objeto e intencionalmente
forzar al láser a impactar sobre múltiples objetos, con el fin de asegurarse
de estar visualizando solamente el objeto más cercano reconocido por el
rayo láser.
Una vez detenido el dispositivo, la unidad volverá siempre en forma
predeterminada al último modo utilizado.
Page 37

37
ACERCA DE JOLT
La nueva función JOLT le permite activar (en “Opciones de unidades de medida”) una señal vibratoria
(parecida a la vibración de un teléfono móvil) que sentirá cuando la tecnología Pinseeker indique la
detección de la bandera y la distancia hasta ella en la pantalla LCD.
TOUR V4 – EDICIÓN SLOPE (INDICADOR DE LA PANTALLA DE CRISTAL LÍQUIDO [LCD] - “ - - - ” ) Este modo avanzado
y patentado hallado en los modelos de la EDICIÓN SLOPE (con inclinación) se caracteriza por contar
con un inclinómetro basado en un acelerómetro incorporado que muestra digitalmente el ángulo de
inclinación exacto de -20 a +20 grados de elevación y tiene una precisión de +/- 1,0 grado. El modo
Slope +/-™ (inclinación +/-) calcula automáticamente una gama de compensación de ángulo en base
a la distancia y al ángulo de inclinación determinados por el telémetro de rayos láser y el inclinómetro
incorporado. A estos datos se los combina luego con fórmulas algorítmicas internas que tienen que ver
con el uso de un palo de golf término medio y las trayectorias de la pelota. La gama de compensación
de ángulo ofrece una orientación sobre la forma de ejecutar el tiro (es decir, agregar distancia si se trata
de una subida; restar distancia si se trata de una bajada).
PINSEEKER™ CON SLOPE +/-™
El modo avanzado SLOPE, patentado, está disponible únicamente en el modelo 201661 (Tour V4™
Slope +/-™). El modelo 201661 incorpora un inclinómetro basado en acelerómetro que muestra
digitalmente el ángulo exacto de la pendiente desde -20 a +20 grados de elevación con una precisión
de +/- 1 grado. El modo Slope +/-™ calculará de forma automática el alcance angular compensado en
función de la distancia y el ángulo de la pendiente determinados por telémetro láser y el inclinómetros
integrado. Estos datos se combinan después con fórmulas algorítmicas internas relacionadas con las
medias de uso de los palos y de las trayectorias de las bolas. El alcance del ángulo compensado indica
cómo realizar el tiro (por ejemplo, aumentar la distancia se hay inclinación, reducir la distancia si hay
bajada).
Page 38

38
USO DEL MODO SLOPE +/-
™
Cuando esté en este modo, verá un “ - - - ” en el campo de visión, que le informa de que está en modo
Slope +/-. Pulse el botón de encendido para obtener la distancia a la bandera o a otros objetos. Cuando
se visualice la distancia, siga manteniendo apretado el botón de encendido durante unos 2 segundos
mientras mantiene el círculo de puntería en el objeto y sujetando la unidad lo más firme posible para
que el inclinómetro tenga tiempo suficiente para medir el ángulo. Luego suelte el botón POWER. Cuando
haya soltado el botón de encendido, se mostrarán unos grados del ángulo y un alcance compensado
debajo de la distancia estándar.
VENTAJA DE LA EDICIÓN SLOPE (CON INCLINACIÓN)
La distancia hasta la bandera A en el siguiente dibujo es de 162 yardas. También hay 162 yardas hasta
la bandera B, si bien en forma inclinada. Sin embargo, si usted jugara ese hoyo como si estuviera a 162
yardas, la pelota (X) quedaría cerca del hoyo/la bandera porque usted no tuvo en cuenta la inclinación.
162 YARDS
162 YARDS
X
4°
Page 39

39
DISEÑO ÓPTICO
Aumentos y Revestimientos
El TOUR V4 se caracteriza por trabajar a 5 aumentos y contar con una óptica Multi-Revestida. Existe
una pantalla de cristal líquido (LCD) instalada dentro del sistema óptico que -cuando se la activa- muestra
una retícula para la determinación del blanco, las yardas/los metros y los indicadores de Modo.
Existen pequeños puntos negros que aparecen en el sistema óptico y que son inherentes al proceso
de fabricación. Éstos constituyen una característica natural de la Pantalla de Cristal Líquido (LCD) y no
pueden eliminarse por completo durante el proceso de fabricación. Dichos puntos no afectan el poder
de alcance de la unidad.
ESPECIFICACIONES:
Dimensiones: Mide 4,1 x 3,1 x 1,6 pulgadas (10,4 x 7,9 x 4,1 cm)
Peso: 5,6 onzas
Precisión para la Medición de Distancias: +/- 1 yarda
Alcance: 5-1000 Yardas / 5-914 Metros
Aumentos: 5x
Diámetro del Objetivo: 20 mm
Revestimientos ópticos: Multi-Revestida
Pantalla: LCD (Pantalla de Cristal Líquido)
Fuente de Alimentación: pila de litio de 3 voltios (incluida)
Campo Visual: 420 pies a 1000 yardas
Distancia de la Pupila al Ocular Extra Larga: 17 mm
Pupila de Salida: 4,0 mm
Incluye pila y estuche
Números de Patentes: 6.445.444 | 5.612.779 | 6.057.910 | 6.226.077
(Edición Slope [con inclinación]) | 7,239,377 | 7,859,650 | 7,535,553
Page 40

40
LIMPIEZA
Quite el polvo o los residuos que pueda haber, soplando suavemente sobre las lentes (o bien utilice
un cepillo suave para lentes). Para retirar suciedad o marcas de dedos, limpie con un paño suave
de algodón o de microfibras con movimientos circulares. Utilice un paño grueso, ya que una fricción
innecesaria podría rayar la superficie de la lente y eventualmente provocar un daño permanente. Para
una limpieza más completa, se puede usar papel tisú para lentes fotográficas y líquido limpiador de
lentes del tipo fotográficas o alcohol isopropílico. Aplique siempre el fluido al paño de limpieza –nunca
directamente sobre la lente.
Page 41

41
GARANTÍA LIMITADA DE DOS AÑOS
Se garantiza que su producto Bushnell® estará libre de defectos en los materiales y en la mano de obra durante dos años a contar desde la fecha de compra. En
el caso de un defecto cubierto por esta garantía, podremos optar por reparar o reemplazar el producto, siempre que usted lo devuelva con franqueo pagado. Esta
garantía no cubre los daños provocados por el mal uso, el manipuleo inadecuado y la instalación o el mantenimiento no provistos por el Departamento de Servicio
Técnico Autorizado de Bushnell.
Toda devolución realizada en virtud de esta garantía deberá estar acompañada por los detalles indicados a continuación:
1. Un cheque u orden de pago por valor de 10.00 dólares para cubrir el coste del envío y manipulación.
2. Nombre, dirección y número de teléfono diurno para la devolución del producto.
3. Una explicación del defecto.
4. Copia de su comprobante de compra fechado.
No envíe accesorios (baterías, etc.), solo el producto a reparar.
El producto debe embalarse debidamente en una caja de cartón resistente, para evitar que se dañe durante el transporte, y enviarse a la dirección que se indica a
continuación:
En ESTADOS UNIDOS, envíe a: EN CANADÁ enviar a:
Bushnell Outdoor Products Bushnell Outdoor Products
Attn.: Repairs Attn.: Repairs
9200 Cody 140 Great Gulf Drive, Unit B
Overland Park, Kansas 66214 Vaughan, Ontario L4K 5W19
Para productos adquiridos fuera de los Estados Unidos o Canadá, le rogamos ponerse en contacto con su distribuidor local para conocer la información sobre la
garantía que corresponde. En Europa, también puede ponerse en contacto con Bushnell, en: Bushnell Germany GmbH
European Service Centre
Mathias-Brüggen-Str. 80
D-50827 Köln
GERMANY
Tel: +49 221 995568-0
Fax: +49 221 995568-20
Esta garantía le otorga derechos legales especícos.
Es posible que usted cuente con otros derechos que varían de país en país.
©2015 Bushnell Outdoor Products
Page 42

42
TABLA DE LOCALIZACIÓN DE FALLAS
Si la unidad no se enciende – la pantalla de cristal líquido (LCD) no se ilumina:
• Pulse el botón POWER/FIRE de encendido/disparo.
• Verifique la pila y, de ser necesario, reemplácela.
Si la unidad no responde cuando se oprime una tecla, reemplace la pila por una de litio de 3 voltios,
de buena calidad.
Si la unidad se apaga (la pantalla se queda en blanco cuando se intenta activar el láser):
• La pila está baja o bien es de baja calidad. Reemplace la pila por una pila de litio de 3 voltios, de
buena calidad.
Si el alcance del blanco no se puede obtener:
Asegúrese de que la pantalla de cristal líquido (LCD) esté iluminada.
• Asegúrese de estar pulsando el botón de encendido.
• Asegúrese de que no haya algo -tal como su mano o el dedo- bloqueando las lentes del objetivo
(las lentes más cercanas al blanco) que emiten y reciben los impulsos del láser.
• Asegúrese de estar sosteniendo la unidad firmemente mientras pulsa el botón POWER/FIRE de encendido.
NOTA: No es necesario borrar la última lectura del alcance antes de determinar la distancia de otro
blanco. Simplemente apunte hacia el nuevo blanco usando la retícula de la Pantalla de Cristal Líquido
(LCD), pulse el botón de encendido y manténgalo pulsado hasta visualizar la nueva lectura de distancia.
Las especificaciones, las instrucciones y el funcionamiento de estos productos están sujetos a cambio sin previo aviso.
Page 43

43
ELIMINACIÓN DE EQUIPOS ELÉCTRICOS Y ELECTRÓNICOS
(Aplicable en la UE y otros países europeos con sistemas de recogida separada)
Este equipo contiene elementos eléctricos o electrónicos y por tanto no debe
eliminarse con los residuos domésticos normales. En cambio, debe eliminarse en los
correspondientes puntos de recogida para reciclaje previstos por las comunidades.
Para usted resultará gratuito.
Si el equipo incorpora baterías intercambiables (recargables), estas también deben
retirarse antes y, si es necesario, eliminarlas de acuerdo con las regulaciones
correspondientes (consulte también los comentarios al efecto de las instrucciones de
estas unidades).
La administración de su comunidad, su empresa local de recogida o la tienda en la que adquirió este
equipo pueden proporcionarle información adicional sobre este tema.
SEGURIDAD DE LOS OJOS SEGÚN LA FDA
Productos láser de Clase 1 de acuerdo con la norma IEC 60825-1:2007.
Cumple con 21 CFR 1040.10 y 1040.11 para los productos láser, excepto en lo relacionado con el
aviso de láser N º 50, de fecha 24 de junio 2007.
PRECAUCIÓN: No hay controles, ajustes ni procedimientos que pueda realizar el usuario.
La realización de procedimientos distintos de los aquí especificados puede provocar la exposición a luz
láser invisible.
Page 44

44
powEr/FirE
(stromvErsorgung)
ovular
201660
201661
Page 45

45
dEutsch
201660/201661
07-16
Page 46

46
HERZLICHEN GLÜCKWUNSCH ZUM KAUF DES BUSHNELL® TOUR V4™ MIT PINSEEKER™TECHNOLOGIE UND JOLT™. TOUR V4 ist ein präzises Optikinstrument zur Laser-Entfernungsmessung
und soll Ihnen viele Jahre Freude bereiten. Diese Broschüre soll Ihnen dabei helfen, die optimale Leistung
des Geräts herauszuholen, indem die Einstellungsmöglichkeiten und Funktionen, als auch die Pflege
dieses optischen Präzisionsinstruments zur Laser-Entfernungsmessung erklärt werden. Lesen Sie vor dem
ersten Einsatz Ihres TOUR V4 bitte diese Anleitung, um eine möglichst optimale Leistung und Lebensdauer
zu gewährleisten.
EINFÜHRUNG
Ihr TOUR V4 ist die neueste Ergänzung der preisgekrönten Bushnell-Serie für Golf Laser-Entfernungsmesser,
die speziell für Golfspieler konzipiert wurde. TOUR V4 verfügt über die PinSeeker
™
Technologie mit JOLT™,
mit deren Hilfe der Golfspieler problemlos und schnell, ohne das Anvisieren von Hintergrundzielen, die
Flagge anpeilen kann. Das TOUR V4 ist nur 159 g leicht und passt perfekt in Ihre Handfläche. Der
TOUR V4 verfügt weiterhin über ein einstellbares Okular mit 5X Vergrößerung und kann Entfernungen
von 5 bis 1000 Yards (5 Meter bis 915 Meter) mit einer unglaublichen Genauigkeit bis auf ein Yard
anzeigen! Genau wie die anderen Entfernungsmesser von Bushnell, ist der TOUR V4 nicht auf Reflektoren
angewiesen und liefert Entfernungsmessungen zu Bäumen, Bunkern und nahezu allen Objekten auf dem
Platz, und das auf allen Golfplätzen der Welt.
SO FUNKTIONIERT UNSERE DIGITALTECHNOLOGIE
Der TOUR V4 MIT PINSEEKER sendet unsichtbare, für das Auge sichere, Infrarot-Energieimpulse aus. Der
hochentwickelte, digitale Mikroprozessor und der ASIC Chip (Application-Specific Integrated Circuit) des
TOUR V4 mit PINSEEKER sorgen jederzeit für sofortige und akkurate Messungen. Die ausgefeilte digitale
Page 47

47
Technologie berechnet augenblicklich Entfernungen, indem die Zeit gemessen wird, die jeder Impuls für
den Weg vom Entfernungsmesser zum Ziel und wieder zurück benötigt.
GENAUIGKEIT DER MESSUNG
Unter den meisten Bedingungen beträgt die Messgenauigkeit des TOUR V4 plus oder minus ein Yard/
Meter. Die maximale Reichweite des Instruments hängt vom Reflexionsvermögen des Ziels ab. Die
maximale Entfernung für die meisten Objekte beträgt 700 Yard/640 Meter, während die Entfernung
für Objekte mit hohem Reflexionsvermögen 1000 Yard/914 Meter beträgt. Hinweis: Abhängig von
den Reflexionseigenschaften des einzelnen Ziels und den Umgebungsbedingungen zu dem Zeitpunkt,
an dem die Entfernung eines Objekts gemessen wird, können Sie sowohl längere, als auch kürzere
Maximalentfernungen erzielen.
Die Farbe, Oberflächenausführung, Größe und Form des Ziels beeinflussen allesamt das
Reflexionsvermögen und die Reichweite. Je heller die Farbe, desto länger die Reichweite. Rot weist
zum Beispiel ein hohes Reflexionsvermögen auf und ermöglicht somit größere Reichweiten als die
Farbe Schwarz, welche die Farbe mit dem geringsten Reflexionsvermögen darstellt. Eine schimmernde
Oberfläche führt zu größeren Reichweiten als eine matte Oberflächenausführung. Ein kleines Ziel ist
schwerer zu messen als ein größeres Ziel. Auch der Winkel zum Ziel beeinflusst die Leistungsfähigkeit.
Das Schießen auf ein Ziel in einem Winkel von 90 Grad (wenn die Zielfläche rechtwinklig zur Flugbahn
der ausgestrahlten Energieimpulse steht) führt zu einer guten Reichweite, währenddessen ein steiler Winkel
die Reichweite verkürzt. Weiterhin beeinflussen die Lichtbedingungen (z.B. Menge des Sonnenlichts)
das Messungsvermögen des Geräts. Je weniger Licht (z.B. bei bewölktem Himmel) vorhanden ist, desto
größer wird die Reichweite, die das Gerät maximal erzielen kann. Umgekehrt reduziert sich die maximale
Reichweite des Geräts bei sehr sonnigem Wetter.
Page 48

48
INBETRIEBNAHME
EINLEGEN DER BATTERIE
Beim TOUR V4 ist der Akku bereits vorinstalliert, und das Gerät ist sofort einsatzbereit. Zum Austauschen
des Akkus entfernen Sie die Akkuabdeckung, indem Sie die Lasche der Akkuabdeckung anheben und
gegen den Uhrzeigersinn drehen. Legen Sie eine 3-Volt-CR-2-Lithiumbatterie mit dem Negativen (-) voran
in das Fach ein und bringen Sie die Batteriekappe wieder an.
HINWEIS: Es wird empfohlen, die Batterie wenigstens alle 12 Monate zu wechseln.
Anzeige für niedrige Batterieleistung Wenn “
” auf der inneren Anzeige angezeigt wird, bedeutet
die “niedrige Batterieleistung” oder abnehmende Batteriestärke und die 3 Volt Lithiumbatterie sollte
gewechselt werden.
EINSTELLEN DES OKULARS
Das TOUR V4 verfügt über ein einstellbares Okular (+/- 3 Dioptrieneinstellung) zur Scharfeinstellung der
LCD-Anzeige in Bezug auf das Bild. Hierzu drehen Sie einfach das Okular, bis das Fadenkreuz und das
Objekt, dessen Entfernung gemessen werden soll, für Sie scharf eingestellt sind.
ZUSAMMENFASSUNG DER BEDIENUNG
Schauen Sie durch das 5x Okular und drücken dabei POWER/FIRE (den Einschaltknopf) einmal, um die
innen liegende Flüssigkristallanzeige (LCD) zu aktivieren. Richten Sie den Zielkreis (mittig im Sichtfeld
positioniert) auf ein Ziel, das mindestens 5 Yard entfernt liegt drücken und halten den Einschaltknopf
unten, bis die Entfernung unten auf der innen liegenden Anzeige erscheint. Das Fadenkreuz um den
Zielkreis herum zeigt an, dass der Laser übertragen wird. Wenn ein Abstand erfasst wurde, können Sie
den Einschaltknopf loslassen. Das Fadenkreuz um den Zielkreis herum verschwindet wieder, sobald Sie
den Einschaltknopf losgelassen haben (d.h. der Laser wird nicht länger übertragen). Hinweis: Nach
Page 49

49
erfolgter Aktivierung bleibt der LCD-Monitor aktiv und zeigt Ihnen für 10 Sekunden die zuletzt gemessene
Entfernung an. Sie können den Einschaltknopf jederzeit nochmals drücken, um ein neues Ziel zu erfassen.
Wie bei jeder Lasereinrichtung empfiehlt es sich nicht, über eine längere Zeit direkt in die Ausstrahlung
vergrößernder Linsen zu sehen. Die maximale Zeit, in welcher der Laser ausstrahlt (schießt) beträgt 10
Sekunden. Um erneut zu schießen, drücken Sie den Knopf erneut herunter.
FLÜSSIGKRISTALLANZEIGEN (LCD)
Die LCD Ihres TOUR V4 verfügt über beleuchtete Symbole, an denen Sie die ausgewählte Messeinheit,
die Aktivität des Lasers, die Erfassung eines Zielobjekts und den Zielmodus ablesen können. Eine
Zusammenfassung dieser Funktionen wird nachfolgend dargestellt:
MODUS und OPTIONEN ZUR AUSWAHL DER MESSEINHEIT
Der TOUR V4 kann Entfernungen in Yards oder Metern messen und anzeigen. Die Anzeigen für die
Messeinheit befinden sich in unteren, rechten Bereich des LCDs. Um die Einheit (Yards/Meter) zu wechseln
(#201660), halten Sie die POWER/FIRE-Taste gedrückt. In der Anzeige können Sie zwischen den SetupOptionen blättern (#201661): Yards w/Slope (Yard mit Slope), Yards (Yard), Meters w/JOLT (Meter mit
Slope), Meters (Meter). (Nähere Informationen zur Slope-Funktion erhalten Sie unter „Informationen zu
Slope”). Wenn Sie von Yards auf Meter wechseln, wird die Änderung der Messeinheit durch Beleuchtung
des M für die Meteranzeige angezeigt, während das Y für Yards ausgeschaltet wird. Wenn Sie von
Metern auf Yards wechseln, geschieht das Gegenteil. Der TOUR V4 kehrt bei jedem erneuten Einschalten
des Geräts zu der zuletzt verwendeten Maßeinheit zurück.
AKTIVER LASER
Das Fadenkreuz um den Zielkreis herum zeigt an, dass der Laser übertragen wird. Wenn ein Abstand
erfasst wurde, können Sie den Einschaltknopf loslassen. Das Fadenkreuz um den Zielkreis herum
verschwindet wieder, sobald Sie den Einschaltknopf losgelassen haben (d.h. der Laser wird nicht länger
übertragen).
Page 50

50
PinSeeker (LCD Anzeiger - ) Haben Sie ständig Probleme mit der Entfernung zur Flagge? Dieser
erweiterte Modus ermöglicht eine einfache Erfassung der Flagge, ohne dass dabei versehentliche Ziele
im Hintergrund (z.B. Bäume) erfasst werden, die eine größere Signalstärke aufweisen.
Drücken Sie die POWER/FIRE-Taste zum Einschalten des Geräts. Nun richten
Sie das Richtkreis-Fadenkreuz auf die Flagge, deren Entfernung Sie messen
möchten, aus. Als nächstes drücken und halten Sie den POWER/FIRE-Taste
und fahren mit dem Laser langsam über die Flagge oder das gewünschte
Objekt, bis ein Kreis den Flaggenanzeiger einkreist. Wenn der Laserstrahl
mehr als ein Ziel erkannt hat (d.h. Flagge und Bäume in Hintergrund), wird
die Entfernung zur Flagge angezeigt und ein Kreis kreist den PinSeekerAnzeiger ein, um dem Anwender so anzuzeigen, dass die Entfernung zur
Flagge (d.h. zum näheren Objekt) auf dem LCD angezeigt wird (wie unten
dargestellt). Es kommt natürlich auch vor, dass der Laserstrahl nur ein Objekt
in seinem Pfad erkennt. In diesem Fall wird die Entfernung angezeigt, da
jedoch nicht mehr als ein Objekt erfasst wurde, erscheint kein Kreis um den
Flaggenanzeiger herum.
TIPP: Während Sie den POWER/FIRE-Taste gedrückt halten, können Sie
das Gerät langsam von Objekt zu Objekt bewegen und den Laser damit
absichtlich veranlassen, mehrere Objekte zu treffen, so dass Sie sicherstellen
können, dass Sie nur das am nächsten gelegene Objekt, welches vom Laser
erkannt wurde, anzeigen.
Wenn das Gerät einmal abgeschaltet wurde, wird es beim erneuten Einschalten stets den zuletzt
verwendeten Modus wieder aktivieren.
Page 51

51
Informationen zu JOLT
Mit der neuen JOLT-Funktion können Sie ein Vibrationssignal mit der gewünschten Option (siehe „Auswahl
der Messeinheit“) aktivieren (ähnlich dem Vibrationsalarm bei Handys), das eingeschaltet wird, wenn die
Pinseeker-Technologie signalisiert, dass die Flagge erkannt wurde. Der Abstand zu dieser Flagge wird
dann im LCD angezeigt.
TOUR V4 - Slope Edition (LCD Anzeiger - “ - - - ” ) Dieser erweiterte und patentierte Modus, mit dem die
SLOPE EDITION Modelle ausgestattet sind, bietet einen auf Beschleunigungsmessung basierenden
Neigungsmesser, der digital den exakten Neigungswinkel von -20 bis +20 Grad Steigung anzeigt und
eine Genauigkeit von +/- 1,0 Grad gewährleistet. Der Slope +/-™ Edition modelen errechnet automatisch
die Reichweite mit Winkelausgleich basierend auf der durch den Laser-Entfernungsmesser und den
eingebauten Neigungsmesser festgelegten Entfernung und dem Neigungswinkel. Diese Daten werden
dann mit internen algorithmischen Formeln kombiniert, die sich mit der durchschnittlichen Clubanwendung
und der Flugkurve der Bälle befassen. Die Reichweite mit Winkelausgleich liefert Informationen darüber,
wie der Ball zu spielen ist (z.B. Abstand erweitern bei Gefälle, Abstand verringern bei Anstieg).
PINSEEKER™ MIT SLOPE +/-™
Der moderne patentierte SLOPE-Modus ist nur am Modell 201661 (Tour V4™ Slope +/-™) verfügbar.
Das Modell 201661 verfügt über einen eingebauten, auf einem Beschleunigungsmesser basierten,
Neigungsmesser, der digital den exakten Neigungswinkel von -20 bis +20 Grad Steigung anzeigt
und eine Genauigkeit von +/- 1.0 Grad gewährleistet. Der Slope +/-™ Modus errechnet automatisch
die Reichweite mit Winkelausgleich basierend auf der durch den Laser-Entfernungsmesser und den
eingebauten Neigungsmesser festgelegten Entfernung und dem Neigungswinkel. Diese Daten werden
dann mit internen algorithmischen Formeln kombiniert, die sich mit der durchschnittlichen Clubanwendung
und der Flugkurve der Bälle befassen. Die Reichweite mit Winkelausgleich liefert Informationen darüber,
wie der Ball zu spielen ist (z.B. Abstand erweitern bei Gefälle, Abstand verringern bei Anstieg).
Page 52

52
ÜBER DIE VERWENDUNG DER FUNKTION SLOPE +/-
™
In diesem Modus sehen Sie ein “ - - - ” im Sichtfeld. Dieses Zeichen zeigt an, dass Sie sich im Slope +/Modus befinden. Drücken Sie den POWER Knopf, um die Entfernung zur Flagge oder anderen Objekten
zu erhalten. Wenn die Entfernung angezeigt wird, halten Sie den POWER Knopf für weitere 2 Sekunden
gedrückt und halten gleichzeitig den Richtkreis auf die Flagge. Dabei halten Sie das Gerät so ruhig wie
möglich, so dass der neigungsmesser genug Zeit hat, um die Neigung zu messen. Dann lassen Sie die
POWER-Taste los. Wenn Sie den Einschaltknopf losgelassen haben, werden neben der standardmäßigen
Entfernung ein Winkelgrad und die kompensierte Reichweite angezeigt.
DER VORTEIL DER SLOPE EDITION
Die Entfernung zur Flagge A in der Zeichnung unten beträgt 162 Yard. Die Entfernung zur Flagge B beträgt
ebenfalls 162 Yard, obwohl ein Gefälle vorhanden ist. Wenn Sie dieses Loch jedoch als 162 Yard spielen
würden, würde der Ball (X) vor dem Loch/der Flagge auftreffen, da Sie das Gefälle nicht berücksichtigt
haben.
162 YARDS
162 YARDS
X
4°
Page 53

53
OPTISCHE GESTALTUNG
Vergrößerung und Vergütungen
Der TOUR V4 verfügt über eine 5 Vergrößerung und mehrfach vergütete Optiken. Das Optiksystem
verfügt über eine eingebaute Flüssigkristallanzeige (LCD), die nach dem Einschalten ein Fadenkreuz für
die Zielanvisierung, Yard/Meter und Modi Anzeiger anzeigt. Mit dem Herstellungsprozess gehen kleine,
schwarze Punkte einher, die im Optiksystem erscheinen. Dies ist eine natürliche Charakteristik des LCD
und kann beim Herstellungsprozess nicht vollständig eliminiert werden. Diese Punkte beeinträchtigen
nicht die Messleistung des Geräts.
SPEZIFIKATIONEN:
Abmessungen: Maße 4,1 x 3,1 x 1,6 Inch (10,4 x 7,9 x 4,1 cm)
Gewicht: 5,6 oz (159 g).
Entfernungsgenauigkeit: +/- 1 Yard
Bereich: 5-1000 Yards / 5-914 Meter
Vergrößerung: 5x
Objektivdurchmesser: 20 mm
Optische Vergütung: Mehrfach vergütet
Anzeige: LCD
Energiequelle: 3 Volt Lithium (im Lieferumfang)
Sehfeld: 420 ft. @ 1000 yd / 140 m @ 1000 m
Extra-langer Augenabstand: 17 mm
Austrittspupille: 4,0 mm
Schließt Batterie und Tragetasche ein
Patentnummern: 6,445,444 | 5,612,779 | 6,057,910 | 6,226,077
(Slope Edition) | 7,239,377 | 7,859,650 | 7,535,553
Page 54

54
REINIGUNG
Blasen Sie sanft mögliche Stäube oder Fremdkörper von den Linsen ab (oder verwenden Sie einen weichen
Pinsel für die Linse). Zum Entfernen von Schmutz oder Fingerabdrücken verwenden Sie ein weiches
Baumwoll- oder Mikrofasertuch und reiben damit kreisförmig. Die Verwendung eines rauen Tuches oder
ein unnötigen Rubbeln kann die Linsenoberfläche zerkratzen und zu dauerhaften Schäden führen. Für eine
gründlichere Reinigung können Sie photographische Linsentücher und ein Reinigungsfluid für den Photobedarf
oder Isopropylalkohol verwenden. Geben Sie das Fluid stets auf das Reinigungstuch –- niemals direkt auf
die Linse.
Page 55

55
BESCHRÄNKTE ZWEI-JAHRES GARANTIE
Bushnell gewährt eine Garantie auf fehlerfreie Materialien und Verarbeitung für den Zeitraum von zwei Jahren ab Kaufdatum. Bei jeglichen Schäden unter dieser
Garantie behalten wir uns nach eigenem Gutdünken vor, das Produkt zu reparieren oder zu ersetzen, vorausgesetzt, dass Sie das Produkt frei Haus an und senden.
Diese Garantie decke keine Schäden ab, die durch Zweckentfremdung, falsche Behandlung, Installation oder Instandhaltung durch andere Personen als die des von
Bushnell autorisiertem Kundenservice durchgeführt wurden.
Jede Rücksendung innerhalb der Garantiezeit muss die nachfolgend aufgeführten Punkte beinhalten:
1. Einen Scheck/eine Zahlungsanweisung in Höhe von 10,00 US-Dollar zur Deckung von Porto und Bearbeitungskosten.
2. Name, Adresse und Telefonnummer tagsüber für die Produktrücknahme.
3. Erläuterung des Defekts.
4. Kopie Ihres Original-Kaufbelegs mit Datum.
Senden Sie kein Zubehör (Batterien, Kabel), sondern nur das zu reparierende Gerät ein.
Das Produkt muss gut in einem robusten Versandkarton verpackt sein, um Transportschäden zu vermeiden, und an die folgende Adresse geschickt werden:
Versandadresse in den USA: Versandadresse in KANADA:
Bushnell Outdoor Products Bushnell Outdoor Products
Attn.: Repairs Attn.: Repairs
9200 Cody 140 Great Gulf Drive, Unit B
Overland Park, Kansas 66214 Vaughan, Ontario L4K 5W1
Für Produkte, die außerhalb der USA oder Kanada gekauft wurden, sprechen Sie im Garantiefall bitte Ihren Händler vor Ort zwecks weiterer Vorgehensweise an. In
Europa können Sie Bushnell ebenfalls unter folgender Anschrift kontaktieren: Bushnell Germany GmbH
European Service Centre
Mathias-Brüggen-Str. 80
D-50827 Köln
GERMANY
Tel: +49 221 995568-0
Fax: +49 221 995568-20
Diese Garantie gewährt Ihnen gewisse gesetzliche Rechte.
Abhängig von Ihrem Standort können Sie möglicherweise andere Rechte haben, da dies von Land zu Land unterschiedlich sein kann.
© 2015 Bushnell Outdoor Products
Page 56

56
TABELLE ZUR FEHLERSUCHE UND – BEHEBUNG
Wenn sich das Gerät nicht einschalten lässt - LCD leuchtet nicht:
• Drücken Sie den POWER/FIRE (Ein-/Ausschaltknopf).
• Prüfen Sie die Batterie und ersetzen diese gegebenenfalls.
Wenn das Gerät nicht auf Knopfdruck reagiert, ersetzen Sie die Batterie durch eine 3 Volt
Lithium-Markenbatterie.
Wenn das Gerät an Leistung verliert (Display zeigt nicht an, wenn versucht wird, den Laser einzuschalten):
• Die Batterie ist entweder zu schwach oder die Batteriequalität ist minderwertig. Ersetzen Sie die Batterie
durch eine 3 Volt Lithium-Markenbatterie.
Wenn die Zieldistanz nicht erreicht werden kann:
• Stellen Sie sicher, dass das LCD beleuchtet ist.
• Stellen Sie sicher, dass der POWER/FIRE (Ein-/Ausschaltknopf).eingedrückt ist.
• Achten Sie darauf, dass die Laserimpulse ausgebenden und empfangenden Objektivlinsen
(die Linsen, die näher am Zielobjekt liegen) durch nichts verdeckt werden, beispielsweise Ihre Hand
oder Ihren Finger.
• Stellen Sie sicher, dass das Gerät ruhig gehalten wird, während der Einschaltknopf gedrückt wird
HINWEIS: Die letzte Bereichsanzeige muss nicht gelöscht werden, bevor Sie ein neues Ziel anvisieren.
Visieren Sie das neue Ziel einfach mithilfe des beleuchteten Fadenkreuzes an, drücken den Einschaltknopf
und halten solange, bis die neue Entfernung angezeigt wird.
Spezifikationen, Instruktionen und die Funktion dieser Produkte können ohne vorherige Ankündigung geändert
werden.
Page 57

57
Entsorgung von elektrischen und elektronischen Geräten
(Gültig in der EU und anderen europäischen Ländern mit getrennten Sammelsystemen)
Dieses Gerät enthält elektrische und/oder elektronische Bauteile und darf deshalb
nicht im normalen Haushaltmüll entsorgt werden. Stattdessen sollte es an den
entsprechenden Sammelstellen für Recycling der jeweiligen Gemeinden abgegeben
werden. Ihnen entstehen hierdurch keine Kosten.
Wenn die Ausrüstung austauschbare (wiederaufladbare) Batterien enthält, müssen
diese zuvor auch herausnehmen und, falls nötig, entsprechend der geltenden
Vorschriften entsorgt werden (siehe auch die jeweiligen Anmerkungen in der
Anleitung dieses Produkts).
Weitere Informationen zu diesem Thema sind in Ihrer Gemeinde-/Stadtverwaltung, Ihrem regionalen
Abfallentsorgungsunternehmen oder in dem Geschäft, in dem Sie Ihr Equipment gekauft haben, erhältlich.
FDA-AUGENSICHERHEIT
Laserprodukt der Klasse 1 gemäß IEC 60825-1:2007.
Entspricht 21 CFR 1040.10 und 1040.11 für Laser-Produkte mit Ausnahme von Abweichungen gemäß
Laser Notice Nr. 50 vom 24. Juni 2007.
VORSICHT: Es gibt keine für den Benutzer verstellbaren Steuerelemente oder vom Benutzer durchführbare
Justierungen oder Verfahren. Die Ausführung von anderen als den angegebenen Verfahren kann
unsichtbares Laserlicht freisetzen.
Page 58

58
powEr/FirE
(alimEntazionE)
ocularE
201660
201661
Page 59

59
italiano
201660/201661
07-16
Page 60

60
CONGRATULAZIONI PER L’ACQUISTO DI BUSHNELL® TOUR V4™ CON TECNOLOGIA
PINSEEKER™ CON JOLT™.
Il TOUR V4 è uno strumento ottico laser di precisione di calcolo delle distanze concepito e realizzato
per regalarle moiti anni di piacevoli esperienze. Questo opuscolo la aiuterà ad ottenere il massimo
delle prestazioni, spiegandole le caratteristiche funzionali di questo strumento ottico di precisione, come
regolarlo e come prendersene cura. Per assicurare prestazioni e durata ottimali leggere queste istruzioni
prima di usare il TOUR V4.
INTRODUZIONE
Il TOUR V4 è l’articolo più recente di una linea di strumenti ottici laser di precisione per rilevare la
distanza ideati specificamente per gli appassionati di golf. Il TOUR V4 è dotato di tecnologia PinSeeker
™
con JOLT™, che permette di ottenere facilmente e rapidamente la distanza solo alla bandierina, senza
acquisire altri eventuali obiettivi sullo sfondo. TOUR V4 pesa appena 159 grammi ed entra nel palmo
di una mano. Il TOUR V4 è inoltre dotato di un oculare regolabile, di ingrandimento 5X, ed è in grado
di indicare distanze da 5 cm a 912 m con la massima accuratezza! Come tutti gli altri strumenti ottici
laser Bushnell per rilevare la distanza, il TOUR V4 non ha bisogno di riflettori, e permetterà di ottenere
la distanza agli alberi, agli ostacoli di sabbia, e a qualsiasi altro oggetto presente sul corso di golf, in
qualunque corso di golf del mondo.
DESCRIZIONE DELLA TECNOLOGIA DIGITALE IMPIEGATA
Il TOUR V4 CON PINSEEKER emette impulsi laser ad infrarossi, invisibili, sicuri per gli occhi. Il
microprocessore Advanced Digital e il chip ASIC (Application-Specific Integrated Circuit) utilizzati nel
nel TOUR V4 con PINSEEKER permettono di ottenere letture immediate e precise ogni volta. Sofisticati
Page 61

61
circuiti digitali calcolano istantaneamente le distanze misurando l’intervallo necessario a ciascun impulso
emesso per raggiungere il bersaglio e ritornare al telemetro.
PRECISIONE DELLE LETTURE
La precisione delle letture ottenibili con il TOUR V4 è di +/- un metro nelle maggior parti delle condizioni.
La portata massima dello strumento dipende dal grado di rilfettività del bersaglio. La distanza massima
per la maggior parte degli oggetti è di 640 metri, mentre per oggetti ad alta riflettività il massimo è di
914 metri. Nota: Sarà possibile ottenere sia la distanza massima che quella minima, a seconda delle
proprietà riflettenti del bersaglio particolare e delle condizioni ambientali presenti nel momento in cui
viene misurata la distanza di un oggetto.
Il colore, la finitura superficiale, la dimensione e la forma del bersaglio influiscono sul potere riflettente
e sulla distanza. Quanto più brillante è il colore, tanto maggiore sarà la distanza di mira possibile.
Per esempio, il rosso è altamente riflettente, e consente distanze di mira più lunghe del nero, che è
il colore meno riflettente. Una finitura lucida consente una mira maggiore di una finitura opaca. Un
bersaglio piccolo è più difficile da puntare di un bersaglio più grande. Anche l’angolazione rispetto al
bersaglio influisce sul potere riflettente e sulla distanza. Mirare ad un bersaglio ad un’angolazione di
90 gradi (dove la superficie del bersaglio è perpendicolare al percorso di volo degli impulsi di energia
emessi), offre un buon campo di mira, mentre un’angolazione molto stretta permette un campo di mira
limitato. Inoltre, le condizioni di luce (per esempio, la quantità di luce solare) influiscono sulle capacità
di puntamento dell’unità. Quanto minore sarà l’entità della luce disponibile (per esempio, con un cielo
molto nuvoloso), tanto maggiore sarà la capacità di mira massima dell’unità. Analogamente, giornate
molto soleggiate riducono la capacità di mira massima dell’unità.
Page 62

62
INSERIMENTO DELLA PILA
Il dispositivo TOUR V4 viene fornito con una batteria già installata, in modo che sia subito pronto all’uso.
Per sostituire la batteria, togliere il tappo di quest’ultima sollevando la relativa linguetta e ruotandolo in
senso antiorario. Inserire una batteria al litio CR-2 3-volt prima nel vano negativo della batteria e poi
rimettere il coperchio.
NOTA: Si raccomanda di sostituire la pila almeno una volta ogni 12 mesi.
Indicatore di bassa carica delle pile: Se appaiono le lettere “
”, significa che la carica della pila è
bassa ed è necessario sostituire la pila al litio da 3 volt.
REGOLAZIONE DELL’OCULARE
Il TOUR V4 è dotato di un oculare regolabile (regolazione diottrica di +/-3) che consente di mettere a
fuoco l’immagine e il display a cristalli liquidi. Basta semplicemente girare l’oculare finché il reticolo e
l’oggetto siano a fuoco.
MODALITÀ D’USO
Mentre osservate attraverso l’oculare 5x, premere una volta il pulsante dell’alimentazione (POWER/
FIRE) per accendere il display a cristalli liquidi (LCD). Puntare il reticolo circolare (situato al centro del
campo visivo) verso un oggetto lontano almeno 5 metri, quindi premere e mantenere premuto il pulsante
dell’alimentazione finché quasi in fondo al display non si visualizza la distanza misurata. I crocicchi
intorno al reticolo circolare indicano che la trasmissione del lase è in corso. Una volta acquisita la
distanza, rilasciare il pulsante. Dopo aver rilasciato il pulsante, i crocicchi spariscono (cioè, il laser non
viene più trasmesso). Nota: Dopo averlo attivato, l’LCD rimarrà attivo e indicherà la misura dell’ultima
distanza per 10 secondi. È possibile premere di nuovo il pulsante dell’alimentazione in qualsiasi
momento per misurare la distanza da un altro bersaglio. Così come per qualsiasi dispositivo laser, si
Page 63

63
raccomanda di non osservare direttamente le emissioni per lunghi periodi con lenti di ingrandimento. La
durata massima di trasmissione (lancio) del laser è 10 secondi. Per lanciare di nuovo il laser, premere
di nuovo il pulsante.
INDICATORI SUL DISPLAY A CRISTALLI LIQUIDI (LCD)
Il display LCD di TOUR V4 mostra icone o simboli illuminati che indicano l’unità di misura selezionata,
lo stato di accensione del laser, la conferma di bersaglio acquisito e la modalità di puntamento. Queste
caratteristiche sono descritte qui sotto:
MODALITÀ E OPZIONI RELATIVE ALLE UNITÀ DI MISURA
Il TOUR V4 può visualizzare le distanze misurate in iarde o metri. Gli indicatori dell’unità di misura sono
situati sulla parte inferiore destra del display LCD. Per selezionare iarde o metri (#201660), premere e
tenere premuto il pulsante POWER/FIRE. Il display inizierà a scorrere le varie opzioni di configurazione
(#201661): Iarde con Slope, Iarde, Metri con Slope, Metri (per informazioni sulla funzionalità Slope,
consultare “Informazioni su Slope”). Se si sta passando da iarde a metri, s’illumina la lettera M e la
lettera Y si spegne. Se si sta passando da metri a iarde, s’illumina la Y e si spegne la M. Il TOUR V4
ritornerà all’ultima unità di misura impostata tutte le volte che si accende l’unità.
LASER ATTIVO
I crocicchi intorno al reticolo circolare indicano che la trasmissione del lase è in corso. Una volta acquisita
la distanza, rilasciare il pulsante. Dopo aver rilasciato il pulsante, i crocicchi spariscono (cioè, il laser
non viene più trasmesso).
PinSeeker (Indicatore LCD -
) Avete mai avuto problemi nel calcolare la distanza alla bandierina?
Questa modalità avanzata permette di ottenere facilmente la distanza solo alla bandierina, e non ad altri
eventuali obiettivi sullo sfondo (per esempio, alberi) che hanno segnali più potenti.
Page 64

64
Premere il pulsante POWER/FIRE per accendere l’unità. Allineare quindi il reticolo del mirino sulla
bandiera alla quale si desidera calcolare la distanza. Premere e tenere poi premuto il pulsante
POWER/FIRE, e spostare lentamente il laser sulla bandierina o su altro oggetto desiderato, fino a
quando un cerchietto circonda l’indicatore della bandierina. Se il fascio
laser riconosce più di un oggetto (per esempio, la bandierina e gli alberi
retrostanti), verrà visualizzata la distanza alla bandierina, ed un cerchietto
circonderà l’indicatore di PinSeeker segnalando all’utente che la distanza
alla bandierina (cioè l’oggetto più vicino) è visualizzata sul display (come
mostrato qui sotto). Può accadere che il fascio laser veda solo un oggetto
nella sua traiettoria. In questo caso, la distanza verrà visualizzata, ma.
Ppoiché è stato acquisito solo un oggetto, il cerchietto non circonderà
l’indicatore ella bandierina.
CONSIGLIO:
Mentre si preme il pulsante POWER/FIRE, spostare lentamente il dispositivo
da un oggetto ad un altro, e costringere volutamente il laser a colpire diversi
oggetti al fine di garantirvi la visualizzazione solo dell’oggetto più vicino fra
quelli riconosciuti dal laser.
Una volta che il dispositivo è spento, l’unità torna sempre all’ultma modalità
usata.
Informazioni su JOLT
La nuova funzionalità JOLT permette di attivare (in base all’opzione scelta,
consultare la sezione relativa alle opzioni sulle unità di misura) una vibrazione simile a quella di un
telefono cellulare, che potrà essere avvertita dall’utente quando la tecnologia Pinseeker indicherà che la
bandierina è stata rilevata e sull’LCD verrà visualizzata la distanza.
Page 65

65
TOUR V4 - Slope Edition (Indicatore LCD- “ - - - ” ) Questo modello avanzato e brevettato è dotato di un
inclinometro basato su un accelerometro, che visualizza in forma digitale l’esatto angolo di pendenza
da -20 to +20 gradi di altezza, con una precisione di +/- 1 grado. La modalità Slope +/-™ calcolerà
automaticamente una distanza compensata per l’angolo, in base alla distanza e all’angolo determinati
dal telemetro laser e dall’inclinometro incorporato. Questi dati vengono combinati con formule interne
relative all’uso medio del club e alle traiettorie delle palline. La distanza compensata per l’angolo mostra
la direzione su come fare il tiro (aggiungere distanza se si tratta di una pendenza, sottrarre distanza se
si tratta di un declino).
PINSEEKER
™
CON SLOPE +/-™
La modalità avanzata brevettata SLOPE è disponibile unicamente per il modello 201661 (Tour V4™
Slope +/-™). Il modello 201661 è dotato di un inclinometro basato su un accelerometro, che visualizza
in formato digitale l’esatto angolo di pendenza -20 to +20 gradi di altezza, con una precisione di +/-
1.0 grado. La modalità Slope +/-™ calcolerà automaticamente una distanza compensata per l’angolo,
in base alla distanza e all’angolo determinati dal telemetro laser e dall’inclinometro incorporato. Questi
dati vengono combinati con formule interne relative all’uso medio del club e alle traiettorie delle palline.
La distanza compensata per l’angolo indica pertanto la direzione su come eseguire il tiro (es. aumentare
la distanza in caso di una pendenza, diminuire la distanza se si tratta di un declino).
COME USARE SLOPE +/-
™
In questa modalità, viene visualizzato “ - - - ” nel campo visivo ad indicare che l’utente in trova in modalità
Slope +/-. Premete il pulsante POWER per ottenere la distanza alla bandierina o ad altri oggetti. Dopo
che la distanza è visualizzata, continuate a tenere premuto il pulsante POWER per circa 2 secondi,
mantenendo al tempo stesso il cerchietto del mirino sulla bandierina e tenendo il più possibile ferma
l’unità in modo da concedere sufficiente tempo all’inclinometro per misurare la pendenza. Rilasciate
quindi il pulsante POWER. Un volta rilasciato il pulsante dell’alimentazione, sotto la distanza standard
saranno visualizzati un grado di angolazione e la distanza compensata.
Page 66

66
IL VANTAGGIO DELL’EDIZIONE SLOPE
Nel disegno sottostante, la distanza alla bandierina A è 162 iarde. 162 iarde è anche la distanza alla
bandierina B, che però si trova su un pendio. Tuttavia, se vorreste giocare questa buca come se fosse
a 162 iarde di distanza, la pallina (X) non arriverebbe alla buca/bandierina perché non avete tenuto
conto della pendenza.
CARATTERISTICHE OTTICHE
Ingrandimento e trattamento
E lenti multistrato Sul sistema ottico è montato un display a cristalli liquidi che, quando è acceso,
visualizza un reticolo per l’ingrandimento del dettaglio, l’unità di misura (yard/metri) e un indicatore
della modalità operativa. I piccoli punti neri che compaiono nel sistema ottico sono intrinseci al processo
di fabbricazione. Essi costituiscono una caratteristicha naturale del display e non possono essere eliminati
completamente durante la produzione. Tuttavia non influiscono sulle prestazioni del telemetro.
162 YARDS
162 YARDS
X
4°
Page 67

67
SPECIFICHE:
Dimensioni: 10,4 x 7,9 x 4,1 cm.
Peso: 159 g
Precisione della lettura di distanza: +/- 1 metro
Portata: 5-914 metri
Ingrandimento: 5X
Diametro dell’obiettivo: 20 mm
Trattamento delle lenti: Multistrato
Display: A cristalli liquidi
Alimentazione: Pila al litio da 3 volt (inclusa)
Campo visivo: 140 m a 1000 m
Grandissima estrazione pupillare: 17 mm
Pupilla di uscita: 4,0 mm
Comprende batteria e custodia
Brevetto n,: 6.445.444 | 5.612.779 | 6.057.910 | 6.226.077
(Edizione Slope) | 7,239,377 | 7,859,650 | 7,535,553
PULIZIA
Spolverare le lenti soffiandovi delicatamente (o usare un pennellino morbido per lenti). Per rimuovere lo
sporco o le impronte digitali dalle lenti, usare un panno di cotone morbido o in microfibra passandolo
con movimenti circolari. Utilizzando un panno ruvido o strofinando eccessivamente, si possono graffiare
le lenti e anche danneggiare irreversibilmente. Per una pulizia più accurata si possono usare salviette per
lenti e un detergente apposito o alcol isopropilico. Applicare sempre il liquido al panno, mai direttamente
alle lenti.
Page 68

68
GARANZIA LIMITATA DI DUE ANNI
Si garantisce che questo prodotto Bushnell sarà esente da difetti di materiale e fabbricazione per due anni a decorrere dalla data di acquisto.
In caso di difetto durante il periodo di garanzia, a nostra discrezione ripareremo o sostituiremo il prodotto purché sia restituito franco
destinatario. Sono esclusi dalla garanzia eventuali danni causati da abuso, maneggiamento improprio, installazione o manutenzione eseguiti
da persone non autorizzate dal servizio di assistenza Bushnell.
A un prodotto restituito e coperto da questa garanzia occorre allegare quanto segue:
1. Assegno/Ordine di pagamento per l’importo di USD 10,00 per coprire i costi di spedizione.
2. Nome, indirizzo e numero di telefono raggiungibile in orario diurno per il reso del prodotto.
3. Spiegazione del difetto.
4. Copia della prova di acquisto datata.
Non inviare accessori (batterie, cavi), ma solo il prodotto da riparare.
Il prodotto deve essere riposto in un imballaggio da spedizione robusto al fine di evitare possibili danni durante il tragitto. La spedizione deve
essere effettuata ai seguenti indirizzi:
Recapito negli STATI UNITI: Recapito in CANADA:
Bushnell® Outdoor Products Bushnell® Outdoor Products
Attn.: Repairs Attn.: Repairs
9200 Cody 140 Great Gulf Drive, Unit B
Overland Park, Kansas 66214 Vaughan, Ontario L4K 5W1
Per prodotti acquistati fuori dagli Stati Uniti o dal Canada, rivolgersi al rivenditore per le clausole pertinenti della garanzia. In Europa si può
anche contattare la Bushnell al seguente recapito: Bushnell Germany GmbH
European Service Centre
Mathias-Brüggen-Str. 80
D-50827 Köln
GERMANY
Tel: +49 221 995568-0
Fax: +49 221 995568-20
Questa garanzia vi conferisce diritti legali specifici.
Oltre ai diritti descritti in questa sede, potreste godere di altri diritti che variano da un paese all’altro.
©2015 Bushnell Outdoor Products
Page 69

69
GUIDA ALLA SOLUZIONE DEI PROBLEMI
Se il telemetro o il display non si accende:
• Premere il pulsante POWER/FIRE.
• Controllate e, se necessario, sostituite la pila.
Se il telemetro non risponde alla pressione di un tasto, sostituite la pila con una pila al litio da 3 volt di
buona qualità.
Se il telemetro si spegne (il display si spegne al momento di alimentare il laser):
• La pila è quasi scarica o di bassa qualità. Sostituitela con una pila al litio da 3 volt di buona qualità.
Se non si riesce a misurare la distanza dal bersaglio:
• Accertarsi che il display sia acceso.
• Accertarsi che il pulsante power sia premuto.
• Accertarsi che nulla, come la mano o un dito, stia bloccando le lenti dell’obiettivo
(quelle più vicine al bersaglio) che emettono e ricevono gli impulsi laser.
• Accertarsi che il telemetro rimanga fermo mentre si preme il pulsante POWER/FIRE.
NOTA: Non occorre cancellare l’ultima misura visualizzata prima di eseguire un’altra misura di distanza;
basta mirare al nuovo bersaglio utilizzando il reticolo del display a cristalli liquidi; premere il pulsante
power e mantenerlo premuto finché non si visualizza la nuova misura. Basta mirare al nuovo bersaglio
utilizzando il reticolo del display a cristalli liquidi, premere il pulsante power e mantenerlo premuto finché
non si visualizza la nuova misura.
Le specifiche, le istruzioni e il funzionamento di questi prodotti possono cambiare senza preavviso.
Page 70

70
Smaltimento di apparecchiature elettriche ed elettroniche
(Vigente presso i Paesi UE e altri Paesi europei con sistemi di raccolta differenziata dei rifiuti)
Il presente apparecchio componenti elettriche e/o elettroniche e non può pertanto essere
smaltito come rifiuto domestico ordinario. Al contrario, dovrebbe essere smaltito presso
punti di raccolta destinati al riciclaggio, in base alle istruzioni delle amministrazioni
locali. Tale operazione non prevede alcun costo per l’utente.
Qualora l’apparecchio dovesse contenere batterie (ricaricabili) sostituibili, anche queste
devono essere prima rimosse e, laddove previsto, smaltite in conformità alle normative
specfiche (cfr. altresì i commenti specifici nelle presenti istruzioni sull’unità).
Per ulteriori informazioni su questa tematica, rivolgersi all’amministrazione locale, all’azienda incaricata
della raccolta dei rifiuti o alla rivendita presso cui è stato acquistato l’apparecchio.
PROTEZIONE OCCHI CONFORME ALLE DIRETTIVE DELLA FDA
Prodotto laser classe 1 in accordo con la direttiva IEC 60825-1:2007.
Conforme alle 21 CFR 1040.10 e 1040.11 per i prodotti laser fatta eccezione per le deviazioni a norma
Laser Notice No. 50, in data 24 giugno 2007.
ATTENZIONE: Non vi sono controlli, regolazioni o procedure utilizzabili dall’utente. Utilizzare procedure non elencate in queste istruzioni
può portare all’esposizione a invisibili raggi laser.
Page 71

71
Page 72

72
www.bushnellgolf.com
9200 Cody, Overland Park, KS 66214
4 rue Diderot, Suresnes, France 92150
©2016 Bushnell Outdoor Products
Bushnell,™, ®, denotes trademark of Bushnell Outdoor Products
 Loading...