

Page 1
Congratulations on your choice of a Bushnell® Sharpshooter® riescope. This booklet
will help you achieve optimum performance by explaining how to use its various
features and how to care for it. Read the instructions carefully before mounting
and using your scope.
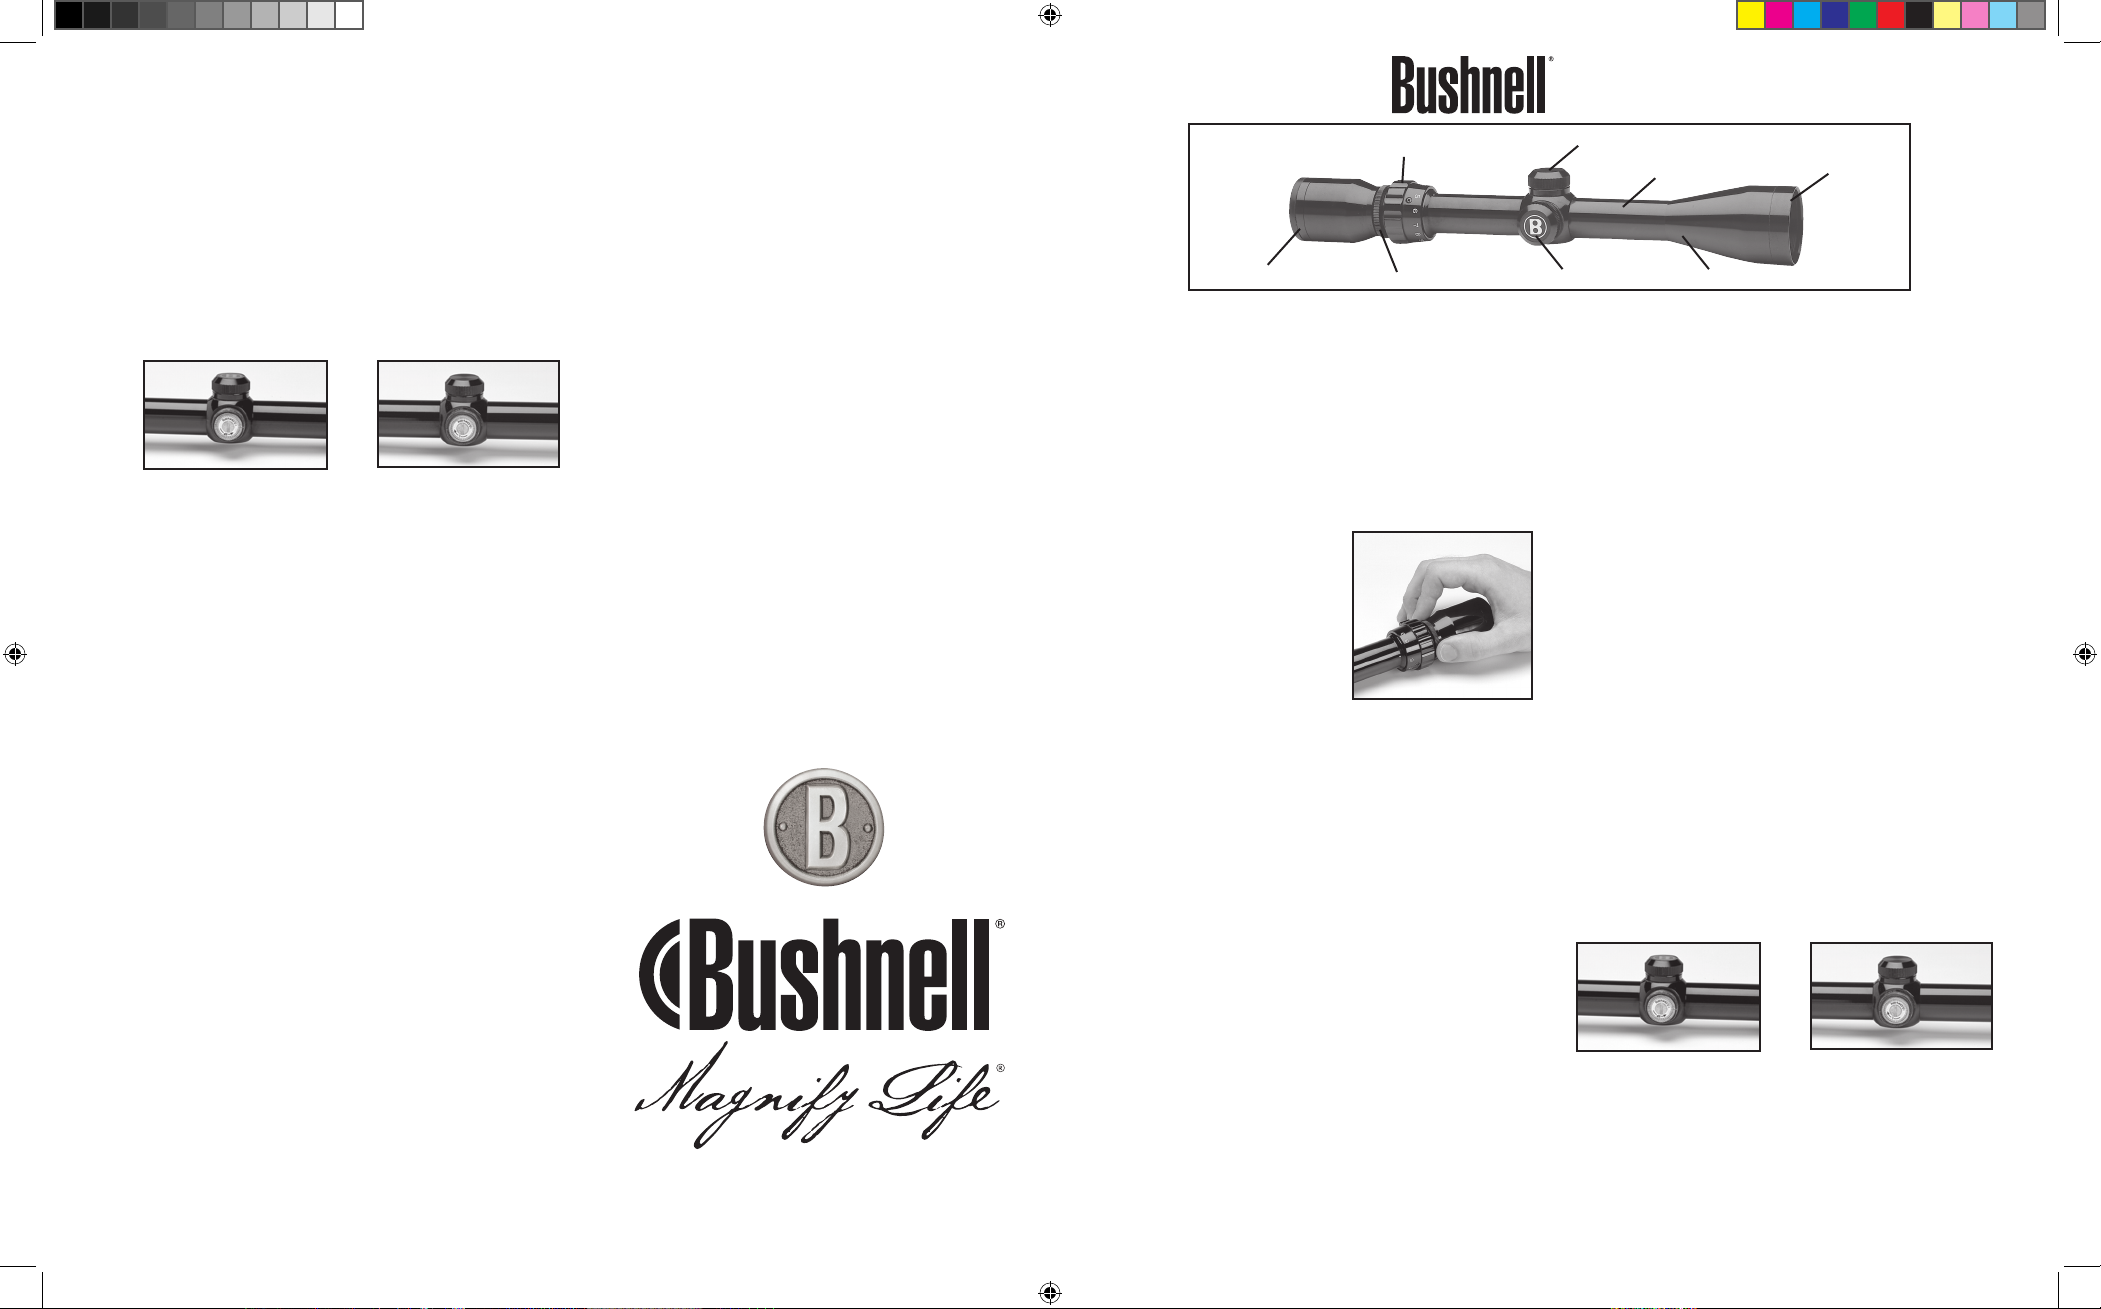
The accompanying photographs are guides to the nomenclature and location of the
riescope parts mentioned throughout this text.
EYEPIECE FOCUSING
This adjusts the focus so that the reticle (cross hairs) appears sharp to your eyes.
All Bushnell® riescopes are focused at the factory for 20/20 or corrected vision. If
the reticle appears sharp, no adjustment is needed. If the reticle appears unsharp,
adjust as follows.
1. Release the Eyepiece from the Lock Ring
by grasping the eyepiece with one hand
and turning it counterclockwise away from
the Lock Ring. No tools are needed.
2. Point the scope at the sky or a blank wall
and with your eye about three inches from
the eyepiece, turn the eyepiece (clockwise
for nearsightedness and counterclockwise
for farsightedness) until the reticle appears
sharp.
3. Check the focus by looking away for a few seconds and then quickly glancing
back through the scope. Refocus if necessary.
4. When satised with the focus, retighten the Lock Ring against the Eyepiece.
WARNING: Never look at the sun through the riflescope (or
any other optical instrument). It may permanently damage
your eye.
MOUNTING
To achieve the best accuracy from your rie, your Bushnell® scope must be mounted
properly. (We strongly recommend that those unfamiliar with proper procedures
have the scope mounted by a qualied gunsmith). Should you decide to mount it
yourself:
1. Use a high-quality mount with bases designed to t your particular rie. The scope
should be mounted as low as possible without touching either the barrel or the
receiver.
2. Carefully follow the instructions packed with the scope mounts you have selected.
3. Before tightening the mount rings, look through the scope in your normal shooting
position. Adjust the scope (either forward or backward) until you nd the furthest
point forward (to insure maximum eye relief) that allows you to see a full eld of
view.
SHARPSHOOTER
®
Riescope Instructions
WARNING: If the scope is not mounted far enough forward,
its rearward motion may injure the shooter when the rifle
recoils.
4. Rotate the scope in the rings until the reticle pattern is perpendicular to the bore
and the elevation adjustment is on top.
5. Tighten the mounting screws as tight as possible.
BORE SIGHTING
Bore sighting is a preliminary procedure to achieve proper alignment of the scope
with the rie bore. It is best done using a Bushnell® Bore Sighter. If a bore sighter
is not available, it can be done as follows: Remove the bolt and sight through
the gun barrel at a 100 yard target. Then sight through the scope and bring the
crosshairs to the same point on the target. Certain mounts have integral windage
adjustments and, when bore sighting, these should be used instead of the scope’s
internal adjustments. If major elevation adjustments are needed, they should be
accomplished by shimming the mount base.
ZEROING
Final sighting-in of your rie should be done with live ammunition, based on your
expected shooting distance. If most of your shots will be at short range, zero-in at
100 yards. But, for long-range shooting at big game, most experienced shooters
zero-in about three inches high at 100 yards. Three-shot groups are useful for
averaging the point of impact.
ELEVATION AND WINDAGE ADJUSTMENT
1. Remove the covers from the Elevation and Windage Adjustments.
2. Using a coin or screwdriver, turn the slot in the appropriate “UP” (and/or “R”)
direction indicated by the arrows. Each “click” or increment on the Adjustment
Scale Ring will change the bullet impact by 1/4” Minute of Angle. 1/4 MOA
corresponds to 1/4 inch at 100 yards, 1/2 inch at 200 yards, 3/4 inch at 300
yards and so on.
VARIABLE POWER ADJUSTMENTS
To change magnication, simply rotate the Power Selector Ring to align the desired
number on the power scale with the Index Dot.
When still-hunting or stalking game, a variable scope should be set to the lowest
power. You then have the widest eld of view for quick shots at close range. Higher
powers should be reserved for precise long-range shots.
POWER SELECTOR RING
EYEPIECE
ELEVATION ADJUSTMENT
EYEPIECE LOCK RING
WINDAGE ADJUSTMENT SHOULDER
SCOPE TUBE
OBJECTIVE LENS
ELEVATION ADJUSTMETN DIAL WINDAGE ADJUSTMETN DIAL
© 2006 BUSHNELL OUTDOOR PRODUCTS
AJUSTE DE ELEVACION AJUSTE POR EL VIENTO
TIRO AL BLANCO
El alineamiento final del fusil debe hacerse con balas, según la
di stancia de tiroesperada. Si la mayoría de sus tiros serán de corta
di stancia, escoja unblanco a 100 yar das . Pe ro, pa ra t iro s d e la rgo
al cance para la caza mayor, los tir ado res más ex per imen tad os
ti ran a tres pulgadas por encima del blanco a 10 0 ya rda . E s út il
re alizar disparos en grupos de tres para lograr el promedio del
pu nto de impacto.
AJUSTE DE ELEVACIÓN Y CORRECCIÓN POR EL
VIENTO
1. Q uite las coberturas de los Ajustes de Elevación y Corrección
po r el Viento.
2. Usando una moneda o un destornillador gire la ranura en la
di rección apropiada “UP” (y/o “R”) indicada por las flechas.
Ca da chasquido o incremento en el Anillo de Escala del Ajuste
ca mbiará el impacto de la bala en un π” (6,3 mm) de Minuto de
Án gulo. 1/4 MdA corresponde a 1/4 de pulgada a 10 0 ya rda s.
1/ 2 de pulgada a 200 yardas. 3/4 de pulgada a 300 yards, etc.
AJUSTES DE POTENCIA VARIABLES
Par a c amb iar el aum ento , s imp leme nte ro te e l A nil lo S ele cto r de
Pot enc ia para al ine ar e l n úme ro d ese ado de la esc ala de aum ento
co n el Punto Indicador.
Al estar inmóvil o al asecho esperando la presa, el visor variable
de be dejarse en posición de la potencia minima. De esta manera
te ntrá el mayor campo visual para tiros rápidos a corta distancia.
La s potencias más altas deben reserv ars e pa ra los tir os de
pr ecisión de largo alcance.
ADVERTENCIA: Nunca debe usarse el visor en
lugar de binoculares o anteojos buscadores.
Podría apuntar el arma hacia una persona por
equivocación.
OCULAR AJUSTABLE
Es ta caracteristica (en caso de estar incluida en su visor)
pe rmite un enfoque exacto, mientras reajusta simultaneamente
la distancia libre de paralaje, para cualquier alcance desde 50
ya rdas hasta el infinito. Pa ra camb iar el enf oqu e d el a lca nce ,
gi re el Anillo de Ajuste del Objetivo alinée el número con el Punto
In dicador de distancia. Otro método alternativo a través del visor
y girar el Anillo de Ajuste del Objetivo hasta que el blanco, a
cu alquier distancia, esté Zclaramente enfocado.
MANUTENCIÓN
Aunque es extraordinariamente resistente, su visor fusil Bushnell®, es un
instrumento de precisión y necesita ser cuidado con cuatela razonable.
1. Para quitar el polvo o suciedad de los lentes, sople o use un cepillo suave
para lentes. Puede quitar las huellas digitales y los lubricantes con papel para
lentes, o una tela de algodón suave y limpia, humedecida con solución para
lentes
ADVERTENCIA: Frotar el lente innecesariamente o usar
de una tela áspera puede causar daño permanente a las
capas exteriores del lente.
2. Todas las partes móviles del visor están permanentemente
lubricarlas.
3. La supercie exterior del lente no necesita manutención, con excepción de
limpiar de vez en cuando el polvo y las huellas digitales con una tela suave.
4. Cubra los lentes todas las veces que sea conveniente.
ALMACENAMIENTO
Evite almacenar el visor en lugares calientes, tales como los compartimentos
de pasajeros de vehículos en días calurosos. Las temperaturas altas pueden
afectar negativamente los lubricantes y las capas impermeables. Es preferible
guardarlo en la cajuela del auto o en una caja o armario para armas. Nunca
deje el visor en un lugar donde la luz directa del sol pueda entrar por el
objetivo o el ocular. La concentración de los rayos del sol puede producir
daños.
REPARACIONES
Para los productos comprados fuera de los Estados Unidos y Canada diríjase
al distribuidor para información sobre la garantía. Esta garantía le da a usted
derechos legales especícos. Estos derechos varían de país a país.
Lit. #: 98-0703/12-05
Sharpshooter 4LIM.indd 1 12/6/05 4:27:12 PM
Page 2
WARNING: A scope should never be used as a substitute
for either a binocular or spotting scope. It may result in your
inadvertently pointing the gun at another person.
ADJUSTABLE OBJECTIVE LENS
This feature (if present on your scope) permits precise focusing, while simultaneously
readjusting the parallax-free distance for any range from 10 yards to innity. To change
range focus, turn the Objective Adjustment Ring and align the number with the distance
Index Dot. An alternative method is to look through the scope and turn the Objective
Adjustment Ring until the target, at whatever range, is sharply focused.
MAINTENANCE
Your Bushnell® Sharpshooter® riescope, though amazingly tough, is a precision instrument
that deserves reasonably cautious care.
1.When cleaning the lenses, rst blow away any dry dirt and dust, or use a soft lens
brush. Fingerprints and lubricants can be wiped off with lens tissue, or a soft clean cloth,
moistened with lens cleaning uid.
WARNING: Unnecessary rubbing or use of a course cloth may
cause permanent damage to the lens coatings.
2. All moving parts of the scope are permanently lubricated. Do not try to lubricate them.
3. No maintenance is needed on the scope’s outer surface, except to occasionally wipe
off dirt or ngerprints with a soft cloth.
4. Use lens covers whenever it is convenient.
STORAGE
Avoid storing the scope in hot places, such as the passenger compartment of a vehicle
on a hot day. The high temperature could adversely affect the lubricants and sealants.
A vehicle’s trunk, a gun cabinet or a closet is preferable. Never leave the scope where
direct sunlight can enter either the objective or the eyepiece lens. Damage may result
from the concentration (burning glass effect) of the sun’s rays.
REPAIR
In U.S.A.: If your scope should ever need repair send it postage prepaid to: Bushnell,
9200 Cody, Overland Park, KS 66214.Your name, address and an explanation of the
defect must be included.
In Canada: Send it postage prepaid to Bushnell Corporation Of Canada, 25A East
Pearce Street, Unit # 1, Richmond Hill, Ontario L4B 2M9. Include your name, address
and an explanation of the defect.
In Europe: In the event of a defect we will at our option, repair or replace the product.
Contact your local dealer to nd out where to send your riescope. Please include your
name, address and an explanation of the defect.
TNous vous félicitons d’avoir choisi une lunette de visée Sharpshooter® de Bushnell®.
Cet instrument de précision est fabriqué avec les meilleurs matériaux et est
assemblé par des ouvriers très qualiés pour une utilisation sans problème dans les
conditions les plus difciles.
L’explication des nombreuses options ainsi que les conseils d’entretien contenus
dans ce livret vous aideront à obtenir les performances optimales. Lisez
attentivement les instructions avant d’installer et d’ utiliser votre lunette.
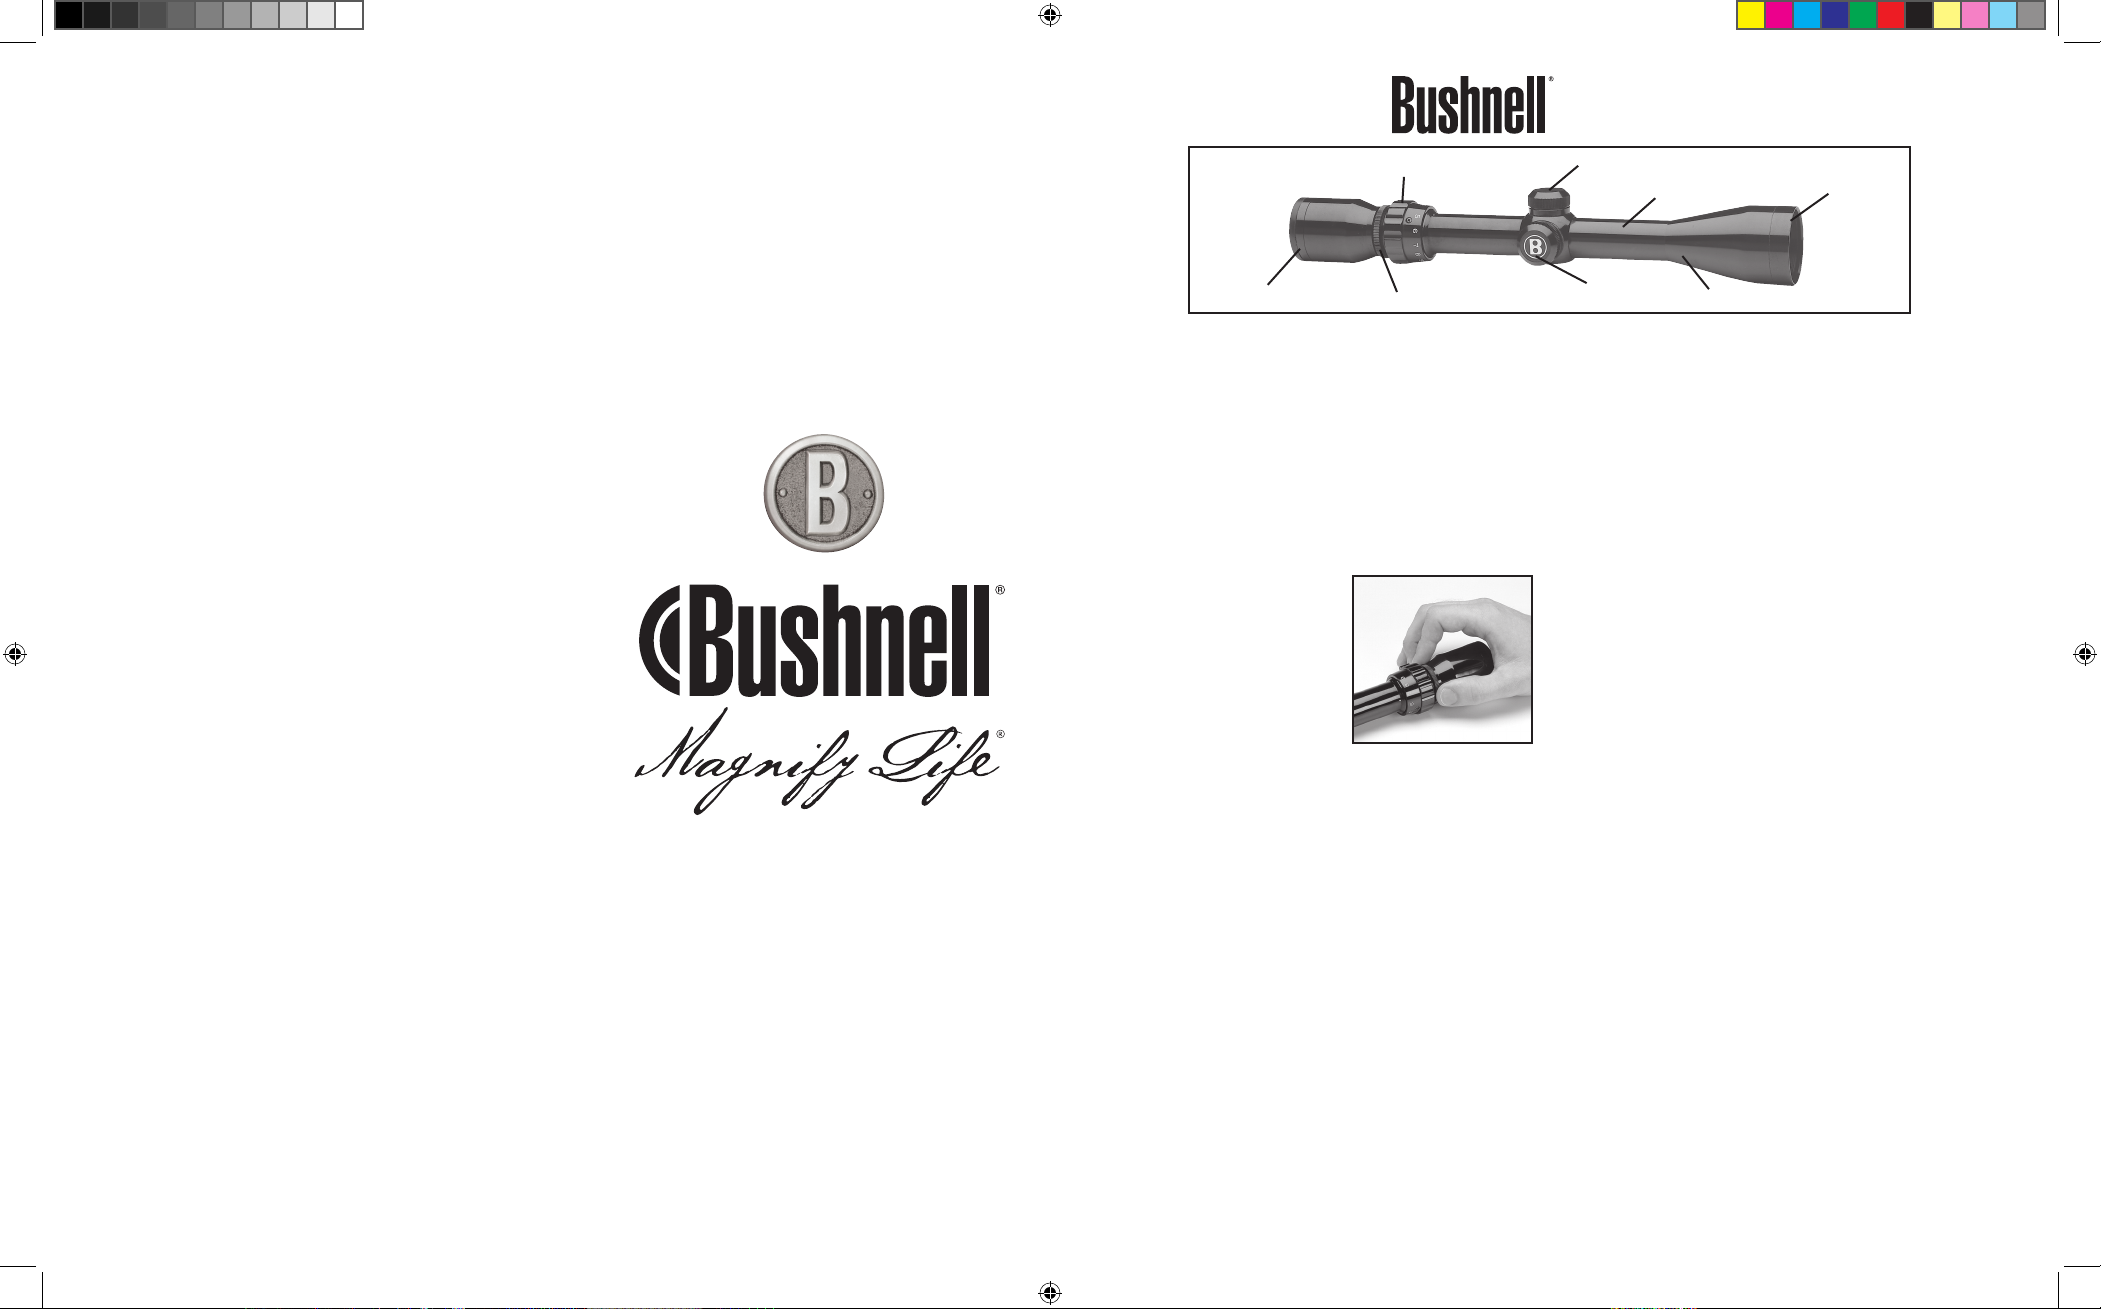
Les photos de ce livret vous permettent de reconnaìtre et de retrouver les
différents composants de la lunette mentionnés dans le texte.
MISE AU POINT DE L’OCULAIRE
Cette étape vous explique comment faire la
mise au point de facon á ce que le réticule
(viseur) vous paraisse net. Toutes les lunettes
Bushnell sont mises au point á l’usine pour des
personnes ayant une vue parfaite ou portant
des verres correcteurs. Si le réticule est net, il
n’est pas neecessaire de faire la mise au point.
Dans le cas contraire procédez comme suit:
1. Prenez l’oculaire d’une main et en faisant-le
tourner dans le sens contraire des aiguilles
d’une montre pour le dégager de la Bague de
serrage. Vous n’avez besoin d’aucun outil.
2. Pointez la lunette vers le ciel ou un mur nu et, maintenant votre oeil á environ 7.5
cm de l’oculaire, tournez-le (dans la sens des aiguilles d’une montre si vous souffrez
de myopie et dans le sens contraire des aiguilles d’une montre si vous sóuffrez de
presbytie) jusqu’à ce que le réticule vous paraisse net.
3. Vériez la miseau point en arrètant de regarder dans la lunette pendant quelques
secondes pois en y regardant à nouveau. Corrigez la mise au point si nécessaire.
4. Lorsque vous êtes satisfait de la mise au point, resserrez la bague de serrage
contre l’oculaire.
AVERTISSEMENT: Ne regardez jamais le soleil avec la lunette
(ou tout autre instrument optique) Vous pourriez vous
abimer la vue de facon permanente.
MONTAGE
Votre lunette Bushnell® doit être correctement installée de facon á obtenir la plus
grande prècision possible (Nous recommandons visement aux personnes n’étant
pas familiarisées avec les procédures d’installation de faire installer la lunette par
un armurier qualié) Si vous décidez d’installer la lunette vous-même.
SHARPSHOOTER
®
INSTRUCTIONS POUR LA LUNETTE
DE VISÉE
1. Ut ilis ez u n su ppor t de hau te q uali té c oncu pou r êt re i nsta llé sur votr e
fusil . La lun ette doi t êt re i nsta liée le plus bas pos sibl e sa ns t ouch er l e
canon ou la c hamb re.
2. Su ivez att enti veme nt l es i nstr ucti ons four nies ave c le sup port de lune tte
que v ous avez cho isi.
3. Av ant de s erre r le s an neau x du sup port reg arde z da ns l a lu nett e en
assum ant votr e po siti on d e ti r no rmal e. A just ez l a lu nett e(ve rs l ’ava nt
ou ve rs l’ar rièr e) j usqu ’à c e vo us t rouv iez la p osit ion la p lus en a vant
possi ble (pou r év iter de ne p as v ous fati guer les yeu x) v ous perm etta nt
d’avo ir l e pl us g rand cha mp d e vi sion .
AVERTISSEMENT: Si la lunetten’est pas montée
suffisamment vers l’avant son déplacement vers
l’arriére lors du recul du fusil risque de blesser le
tireur.
4. Fa ites tou rner la lune tte dans les ann eaux jus qu’à ce que le grap hiqu e
du ré ticu le s oit perp endi cula ire à la lig ne d e mi re d u fu sil et q ue l e
dispo siti f d’ ajus teme nt d e l’ élév atio n so it d irig é ve rs l e ha ut.
5. Se rrez fer meme nt l es v is d u su ppor t.
VÉRIFICATION DE LA LIGNE DE MIRE
La vé rifi cati on d e la lig ne d e mi re e st u ne p rocé dure pré limi nair e de stin ée
a vér ifie rl’a lign ment cor rect de la l unet te a vec la l igne de mire du fusi l.
Ilest pré féra ble d’ut ilis er u n Bu shne ll® Bore Sig hter. S i v ous ne d ispo sez
pas d e ce t éq uipm ent proc édez com me s uit reti rez la c ulas se e t vi sez une
cible à e nvir on 9 0 m à tr aver s le can on d e la car abin e du fus il. Util isez
alors la lune tte pour vis er c ette cib le e t am enez le vise ur s ur l e mê me p oint
de la cib le. Cert ains sup port s so nt d oté de d ispo siti fs v ous perm etta nt
d’aju ster la déri ve. Lors de la v érif icat ion de l a li gne de m ire, ceu x-ci
doive nt n orma leme nt ê tre util isés à l a pl aced es disp osit ifs inte rnes
d’aju stem ent de l a lu nett e. U tili sez des cale s so us l e su ppor t si l’é léva tion
a bes oin d’êt re b eauc oup ajus tée.
RÉGLAGE DE LA HAUSSE
Le ré lgag e fi nal de v otre car abin e de vra être eff ectu e à l’ai de d e ba lles
réell es e t êt re b asé sur la d ista nce de t ir l a pl us f réqu emme nt u tili sée. Si
la pl upar t de cib les sont sit uées à c ourt e di stan ce, régl ez l a ha usse à 9 0
m. Pour des dist ance s de tir plu s im port ante s et pou r du gro s gi bier, l a
plupa rt d es c hass eurs exp érim enté s ré glen t la hau sse avec un déca lage
vers le h aut d’en viro n 7.5 cm à 90 m. D es g roup es d e tr ois ball es s ont
utile s po ur j uger le poin t d’ impa ct m oyen .
BAGUE DE SERRAGE
DE L’OCULAIRE
OCULAIRE
REGLAGE DE L’ELEVATION
BAGUE DE SELECTION DU GROSSISSEMENT
REGLAGE DE LA DERIVE
TEPAULE
BOITIER DE LA LUNETTE
OBJECTIF
Sharpshooter 4LIM.indd 2 12/6/05 4:27:13 PM
Page 3

RÉGLAGE DE L’ÉLÉLVATION RÉGLAGE DE DÉRIVATION
AJUSTEMENT DE L’ÉLÉVATION ET DE LA DÉRIVE
1. Retirez le couvercle des dispositifs d’ajustement de l’élélvation et de la dérive.
2. À l’aide d’une pièce de monnaie ou d’un tournevis, orientez la fente “VERSLE
HAUT” (et/ou “R”), dans la direction appropriée indiquée par les èches.
Chaque “déclic” ou cran de progression sur l’anneau de réglage modie
l’impact de la balle d’1/4 po (6,3 mm) par minute d’angle. 1/4 MOA correspond
à 6.5 mm à 90 m, 13 mm à 180 m, 19 mm à 270 m et ainsi de suite.
RÉGLAGE DU GROSSISSEMENT
Pour modier le grossissement, faites simplement tourner la Bague de sélection
du grossissement pour aligner le numéro du grossissement désiré avec le point de
repère.
Lorsque vous chassez à l’approche, vous devez régler votre lunette sur un
grossissement minimal. Vous disposerez ainsi du champ de vue le plus grand
possible vous permettant de viser et tirer rapidement à courte portée. Les
grossissements plus importants sont normalement réservés pour les tirs précis à
longue distance.
AVERTISSEMENT: N’utilisez jamais une lunette pour
remplacer une paire de jumelle ou une lunette
d’observation. Vous pourriez par inadvertance, pointer
votre fusil vers une autre personne.
OBJECTIF RÉGLABLE
Cette option (si votre lunette en est dotée) vous permet une mise au point précise,
tout en réajustant simultanément la distance sans parallaxe, pour toute portée de 50
m à l’inni. Pour modier la distance pour laquelle la lunette est mise au point, faites
tourner la Bague d’ajustement de l’objectif et alignez le numéro avec le point de
repère de a distance. Une autre méthode consiste à regarder ldans la lunette et à
tourner la bague d’ajustement de l’objectif jusqu’à ce que la cible soit mise au point,
quelque soit la distance à laquelle elle se trove
ENTRETIEN
Votre lunette Sharpshooter® de Bushnell® bien qu’extrêmement résistante, est une
instrument de pr’cision qui nécessite un entretien minutieux.
1. Lorsque vous nettoyez les lentilles, soufez dessus pour eliminer toute poussière
ou saleté, ou utilisez un pinceau à objectif souple. Les empreintes et lubriants
peuvent être nettoyés à l’aide d’un chiffon à objectif ou d’un chiffon doux en coton,
légèrent humidié avec du liquide de nettoyage pour objectifs.
AVERTISSEMENT: Les frottements inutiles ou l’utilisation
d’un chiffon rugueux risquent d’endommager de facon
permanente les couches antireflets des lentilles.
2. Toutes les pièces mobiles de votre lunette sont lubriées à vie. N’essayez pas de
les lubrier.
3. L’entretien de l’extérieur de la lunette n’est pas nécessaire ll vous suft d’essuyer
occasionnellement les empreintes et la poussière à l’aide d’un chiffon doux.
4. Utilisez un protecteur de lentilles si possible.
RANGEMENT
Eviter de ranger la lunette dans endroits exposés à la chaleur, comme par exemple
à l’intérieur de votre voiture, par temps chaud. Les températures extrêmes pourraient
endommager les lubriants et les joints. Le coffre d’unevoiture, un cabinet à fusil ou
une armoire sont préférables. Ne laissez jamais la lunette dans une position dans
laquelle l’oculaire et l’objectif seraient exposés à la lumière directe du soleil. La
concentration des rayons du soleil (effet de loupe) risque d’endommager la lunette.
RÉPARATIIONS
Pour les produits achetés en dehors des Etats-Unis et du Canada, veuillez
contacter votre revendeur local an connaitre les conditions de garantie
applicables. Cette garantie vous donne des droits légaux spéciques. Ces droits
peuvent varier d’un pays à l’autre.
SHARPSHOOTER
®
GEBRAUCHSANLEITUNG FÜR DAS
ZIELFERNROHR
LEISTUNGSWÄHLSCHEIBE
OKULART
HÖHENEINSTELLUNG
OKULARVERSCHLUSSRING
SCHULTERV
ZIELFERNROHR
OBJEKTIVLINSE
LUFTWIDERSTANDSEINSTELLUNG
Wir grat ulier en zu m Erw erb d es Bu shnel l® Sh arpsh ooter ®
Zei lfern rohrs . Be i die sem Z ielfe rnroh r han delt es si ch um ein
Präzisionsinstrument, das aus den feinsten Materialien hergestellt und
fachmännisch zusammengesetzt worden ist, um Ihnen legenslang den
mangelfreien Gebrauch unter schwierigsten Bedingungen zu
gewährleisten.
Diese Broschüre beschreibt die Merkmale und die Pflege des
Zielfernrohrs und hilft Ihnen dadurch, die bestmögliche Leistung zu erreichen.
Bitte, lesen Sie diese Gebrauchsanleitung sorgfältig durch, bevor Sie Ihr
Zielfernrohr montieren und benutzen.
Dei anliegenden Photos erklären die Terminologie und dienen als Hilfe beim
Aufnden der Bestandteile des Zielfernrohrs, auf die im Verlauf dieses Textes
Bezug genommen wird.
EINSTELLUNG DES OKULARS
Die Einstellung regelt die Schärfe, so daß
Sie das Fadenkreuz scharf im Auge
haben.
Alle Bushnell Zielfernrohre werden in der
Fabrik auf 20/20 bzw. auf korrigierte
Sehschärfe eingestellt. Wenn das Fadenkreuz
scha rf erscheint, ist keine Anpassung
notwendig. Sollte das Fadenkreuz unscharf
sein, stellen Sie dierichtige Schärfe wie
folgt ein:
1. Schrauben Sie das Okular vom Verschlußring los, indem Sie das
Okul ar mit
der Hand festhalten und nach links entgegen dem
Uhrzeigersinn von dem Verschlußring losdrehen. Hierzu ist kein Werkzeug
notwendig.
2. Halten Sie das Okular gegen den Himmel oder eine leere Wand. Ihr
Auge sollte ca. 7,5 cm vom Okular entfernt sein. Drehen Sie das Okular (bei
Kurzsichtigkeit nach rechts, bei Weitsichtigkeit nach links), bis das Fadenkreuz
scharf erscheint.
3. Überprüfen Sie die Schärfeeinstellung, indem Sie einige Sekunden
wegblicken und anschließend noch einmal schnell durch das
Ziel fernrohr schauen. Fall s erfor derlich, wiederholen Sie den
Einstellungsvorgang.
4. Wenn Sie mit der Schärfeeinstellung zufrieden sind, schrauben Sie den
Verschlußring wieder fest.
WARNUNG: Schauen Sie nie durch das Zielfernrohr (oder
ein anderes optisches Instrument) direkt auf die Sonne,
da das zu Daueraugenschaden führen kann.
MONTAGE
Um die größte Genauigkeit Ihres Gewehrs zu erzielen, muß Ihr Bushnell®
Zielfernrohr richtig montiert werden. (Unerfahrenen
Benu tzern empfehlen
wir, die Montage einem komp etenten
Büchsenmacher zu überlassen).
Sollten Sie sich entscheiden, es selbst zu montieren:
1. Verwenden sie einen Qualitätsuntergestell mit Basen, die speziell für Ihr
Gewehr hergestellt worden sind. Das Zielfernrohr sollte so tief wie möglich
montiert werden, so daß es weder mit dem Lauf noch mit dem Laufgehause
in Berührung kommt.
2. Beachten sie die Anleitungen sorgfältig, die den von Ihnen gewählten
Montageteilen beigefügt sind.
3. Bevor Sie die Montageringe festdrehen, sehen sie in Ihrer gewohnten
Schießstellung durch das Zielfernrohr. Verstellen Sie das Zielfernrohr
(vorwärts oder rückwärts) bis Sie die Stellung
fin den, die a m wei teste n
vor n lie gt (u m ein e max imale
Augenentlastung zu gewährleisten) und
die Ihnen ein volles Blickfeld ermöglicht.
WARNUNG: Ist das Zielfernrohr nicht weit genug vorn
montiert, kann beim Rückstoß des Gewehrs seine
Rückwärtsbewegung den Schützen verletzen.
4. Drehen Sie das Zielfernrohr in den Ringen, bis das Fadenkreuz senkrecht
zum Lauf steht und die Höheneinstellung oben ist.
5. Drehen Sie die Montageschrauben so fest wie möglich.
VISIERKONTROLLE
Die Visierkontrolle ist eine vorbereitende Maßnahme, um die richtige
Ausrichtung des Zielfernrohrs mit dem Lauf des Gewehrs sicherzustellen.
Am zweckmäßigsten wird dies mit Hilfe einer Bushnell® Professional
Visierkontrolle durchgeführt. Sollte eine Visierkontrolle nicht verfügbar sein,
kann die Ausrichtung wie folgt durchgeführt werden: Bolzen entfernen und
eine Zielscheibe in 100 m Entfernung durch den Gewehrlauf anvisieren.
TAnschließend durch das Zielfernrohr sehen und das Fadenkreuz auf
denselben Punkt der Zielscheibe richten. Manche Untersätze haben eine
eingebaute Luftwiderstandsanpassung und bei der
Visie rkon trol le
sollt e di ese anst elle der ein geba uten
Einstellungsregulierung
des Zielfernrohrs benutzt werden. Sind wesentliche Höhenverstellungen
notwendig, ist dies durch eine ausgleichende Bewegung des Basisgestells
zu erreichen.
Sharpshooter 4LIM.indd 3 12/6/05 4:27:15 PM
Page 4

H ÖH EN E IN ST EL L UN G LUFTWIDERSTANDSEINSTELLUNG
TAnschließend durch das Zielfernrohr sehen und das Fadenkreuz auf denselben
Punkt der Zielscheibe richten. Manche Untersätze haben eine eingebaute
Luftwiderstandsanpassung und bei der Visierkontrolle sollte diese anstelle der
eingebauten Einstellungsregulierung des Zielfernrohrs benutzt werden. Sind
wesentliche Höhenverstellungen notwendig, ist dies durch eine ausgleichende
Bewegung des Basisgestells zu erreichen.
EINSCHIEßEN
Die endgültige Visierung Ihres Gewehrs sollte mit scharfer Munition durchgeführt
werden, baslerend auf Ihrer gewünschten Zielentfernung. Wenn Sie meistens
kurze Entfernungen schießen werden, sollte auf 100 m Entfernung eingeschossen
werden. Bei Weitschüssen auf Großwild schießen erfahrene Schützen bei einer
Entfernung von 100 m meistens 7,5 cm höher ein. Serien von Dreierschußfolgen
sind zur Ermittlung einer durchschnittlichen Treffsicherheit zu empfehlen.
HÖHEN- UND LUFTWIDERSTANDSANPASSUNG
1. Entfernen Sie den Verschluß and der Höhen- und Luftwiderstandseinstellung.
2. Den Schlitz mit einer Münze oder einem Schraubenzieher in die
entsprechende Pfeilrichtung “UP‰ (und/oder “R‰) drehen. Jedes “Klicken‰
oder Verstellen auf dem Einstellring ändert den Kugeleinschlag um 1/4‰
Winkelminute. 1/4 Wm entspricht ca. 6 mm auf 100 Meter, 1/2 Wm auf 200 m,
3/4 auf 300 m, usw.
VARIABLE LEISTUNGSREGULIERUNGEN
Um die Vergrößerung zu ändern, drehen Sie einfach die Leistungswählscheibe, so
daß die gewünschte Zahl auf der Leistungsskala mit dem Leistungsmarkierungspunkt
übereinstimmt.
Auf der Stilljagd oder auf der Pirsch sollte ein regulierbares Zielfernrohr auf die
niedrigste Stufe eingestellt werden. Dadurch haben sie das weiteste Blickfeld
für schnelle Nahschüsse. Höhere Leistungen sollten für präzise Weitschüsse
vorbehalten bleiben.
WARNUNG: Ein Zielfernrohr sollte niemals als Ersatz für ein
Fernglas oder ein Erkennungsfernrohr benutzt werden. Sie
Könnten aus Versehen das Gewehr auf eine andere Person
richten.
VERSSTELLBARE ZIELLINSE
Diese Besonderheit (sollte sie bei Ihrem Zielfernrohr vorhanden sein) erlaubt eine
präzise Schärfeneinstellung und stellt gleichzeitig die parallaxenfreie Reichweite für
jede Entfernung zwischen 50 m bis unendlich ein. Die Reichweitenschärfe wird neu
eingestellt, indem der Zielverstellring gedreht und die Ziffer mit dem Entfernungsmeßpunkt in eine Linie gebracht wird. Sie können auch durch das Zielfernrohr
schauen und am Zielverstellring drehen, bisdas Ziel je nach Entfernung scharf
eingestellt ist.
WARTUNG
Obgleich sehr widerstandsfähig, ist Ihr Bushnell®
Sharpshooter® Zeilfernrohr ein Präzisionsinstrument, das
sorgfältige Pflege braucht.
1. Bevor Sie die Linsen reinigen, blasen Sie eventuell vorhandenen,
trockenen Schmutz oder Staub weg oder verwenden Sie dazu eine weiche
Linsenbürste Fingerabdrücke und Schmiermittel können mit einem
Linsentuch bzw. einem sauberen, weichen, mit Linsenreinigungsmittel befeuchteten
Baumwolltuch abgewischt werden.
WARNUNG: Überflüssiges Reiben oder die Verwendung
eines groben Tuches kann zu Dauerschaden der
Linsenbeschichtung führen.
2. Alle beweglichen Teile des Zielfernrohrs sind auf Dauer geschmiert. Versuchen
Sie nicht, sie zu schmieren.
3. Die Oberäche des Zielfernrohrs bedarf keiner besonderen Pege außer dem
gelegentlichen Abwischen von Schmutz oder Fingerabdrücken mit einem weichen
Tuch.
4. Falls möglich, halten Sie die Linse immer bedeckt.
AUFBEWAHRUNG
Vermeiden sie die Aufbewahrung des Zielfernrohrs an heißen Orten, wie z.B. im
Innenraum von Fahrzeugen an heißen Tagen. Die hohe Temperatur könnte die
Schmier- und Dichtungsmittel beeinträchtigen. Der Kofferraum eines Fahrzeuges,
ein Gewehrschrank oder eine Gewehrkammer sind vorzuziehen. Lassen Sie das
Zielfernrohr niemals an einem Platz, wo direktes Sonnenlicht in das Objektiv oder
die Okularlinse eindringen kann, die Konzentration der Sonnenstrahlen (“der
Brennglaseffekt”) kann Schäden verursachen.
REPARATUR
Fur Produkte, die auserhalb der USA oder Kanada gekauft wurden, kontaktieren
Sie bitte den ortansässigen Handler, bezüglich der Garantie. Mit dieser Garantie
sind spezische Rechte verbunden die von Land zu Land verschieden sein können.
SHARPSHOOTER
®
INSTRUCCIÓNES PARA LA MIRA
TELESCÓPICA
ANILLO SELECTOR
DE POTENCIA
OCULAR
AJUSTE DE ELEVACION
ANNILLO DE CIERRE DEL OCULAR
HOMBRERA
TUBO DEL VISOR
OBJETIVO
AJUSTE POR EL VIENTO
Felicitaciones por haber escogido la mira telescópica de fusil
Sharpshooter® Bushnell®. Es un instrumento de precisión construido con los
mejores materiales y ensamblado por artesanos altamente capacitados
para ofrecer uso de large duración y sin problemas bajo las más exigentes
condiciones.
Este folleto le ayudará a gozar de un óptimo funcionmiento
explicándole sus varias características y el cuidado necesario para su
manutención. Lea las instrucciones atentamente antes de montar y usar el visor.
Las fotografías incluidas sirven de guía para la nomenclatura y
ubicación de las partes de visor mencionadas en el texto.
ENFOQUE DEL OCULAR
Esta operación ajusta el foco para que
Ud. pueda distinguir nitidaente
el reticulo.
Todos los visores para fusiles de Bushnell® son
enfocados en la fábrica para la visión 20/20
o con gafas correctoras. Si
el retículo aparece
borroso, ajuste come sigue:
1.
Suelte el Ocular del Anillo de Cierre
agarrando el ocul ar con u na mano y
girándolo en dirección contraria a las agujas
del reloj del Anillo de Cierre. No se necesita
herramienta alguna.
2. Apunte el visor hacia el cielo o una pared blanca y, con su ojo a una distancia
de aproximadamente tres pulgadas del ocular, gire el Ocular (En dirección de
las agujas del reloj para la miopia y en dirección contraria para la hipemetropia)
hasta que el retículo aparezca nitido.
3. Verique el foco mirando por unos segundos en otra dirección y después
mirando rápidamente a través del visor. Vuelva a enfocar si es necesario.
4. Cuando se sienta satisfecho con el enfoque, vuelva a apretar el Anillo de Cierre
contra el Ocular.
ADVERTENCIA: Nunca mire hacia el sol a través del visor
(u otro instrumento óptico). Podria dañarse el ojo
permanentemente.
MONTAJE
Paralograr la máxima precisión de su rie, su visor Bushnell® debe ser
ontado correctamente. (Urgimos a los que no estén familiarizados con
los procedimientos apropiados a que hagan montar el visor por un armero
calicado) Si decide montarlo Ud. mismo.
1. Use soportes de alta calidad con bases diseñadas especialmente para su fusil.
El visor debe ser montado lo más, bajo posible sin tocar el cañón ni la recámara.
2. Siga con cuidado las instrucciones que se incluyen con los soportes de visor
seleccionados por Ud.
3. Antes de apretar los anillos de los soportes, mire a través del visor desde su
posicion normal de dispara. Ajuste el visor (ya sea para adelante o para atrás)
hasta que encuentre el punto más alejado (para conseguir el máximo alivio para
el ojo) que le permita abarcar el campo visual completo.
ADVERTENCIA: Si el visor no está montado lo
suficientemente adelante, su movimiento hacia atrás
podría causar lesión al tirador en caso de que el fusil
retroceda repentinamente.
4. Gire el visor en los anillos hasta que el dibujo del reticulo quede
perpendicular al ánima y el ajuste de elevación quede por encima.
5. Apriete bien los tornillos del soporte.
ALINEAMIENTO DEL VISOR CON EL ÁNIMA
El alineamiento del visor con el ánimas es un procedimiento para asegurar que
el punto de mira esté correctamente alineado con el ánima del fusil. Se realiza
optimamente con la ayuda de un instrumento llamado Bushnell Professional Bore
Sighter. En caso de no tener un instrumento de alineamiento este procedimiento
se puede llevar a cabo como se explica a continuación.
Quite el cerrojo y mire a través del cañon hacia un blanco a 100 yardas de
distancia. Después mire por el visor y mueva el reticulo hasta el mismo punto del
blanco. Algunas miras telescópicas vienen con ajustes integrates de corrección
por el viento y, al realizar el alinemiento, use aquellas y no los ajustes internos
del visor. Si se necesita ajuste para mayor elevación, esto se logra calzando el
soporte.
Sharpshooter 4LIM.indd 4 12/6/05 4:27:17 PM
 Loading...