

Page 1
1x20 TACTICAL MONOCULAR • INSTRUCTION MANUAL
MONOCULAIRE TACTIQUE 1x20 • MANUEL D’INSTRUCTIONS
MONOCULAR 1x20 TÁCTICO • MANUAL DE INSTRUCCIONES
TAKTISCHES 1
x20 MONOKULARES NACHTSICHTGERÄT • BEDIENUNGSANLEITUNG
MONOCULARE TATTICO 1
MONÓCULO 1
x20 • MANUALE DI ISTRUZIONI
x20 TÁTICO • MANUAL DE INSTRUÇÕES
LIT. #: 98-0662/09-05
Page 2

ENGLISH 2
FRANÇAIS 10
ESPAÑOL 18
DEUTSCH 26
ITALIANO 34
PORTUGUÊS 42
1
Page 3
ENGLISH
Congratulations on the purchase of your Bushnell Night Vision Product. Bushnell Night Vision products
are comprised of high quality image intensifier tubes and optics. Bushnell Night Vision products amplify
existing light, allowing you to see in dark conditions too dark for the naked eye.
5
6
4
7
3
9
14
1
2
11
8
13
12
10
HOW NIGHT VISION WORKS
Bushnell Night Vision products collect and amplify existing light through the objective lens, which is
then focused on the image intensifier. Inside the intensifier, a photocathode is “excited” by the light and
converts the photon energy into electrons. These electrons accelerate across an electrostatic field inside
the intensifier and strike a phosphor screen (like a green monochrome TV screen) which emits an image
that you can see. It is the acceleration of electrons, which provides gain and enhances the image. This is a
Generation I device.
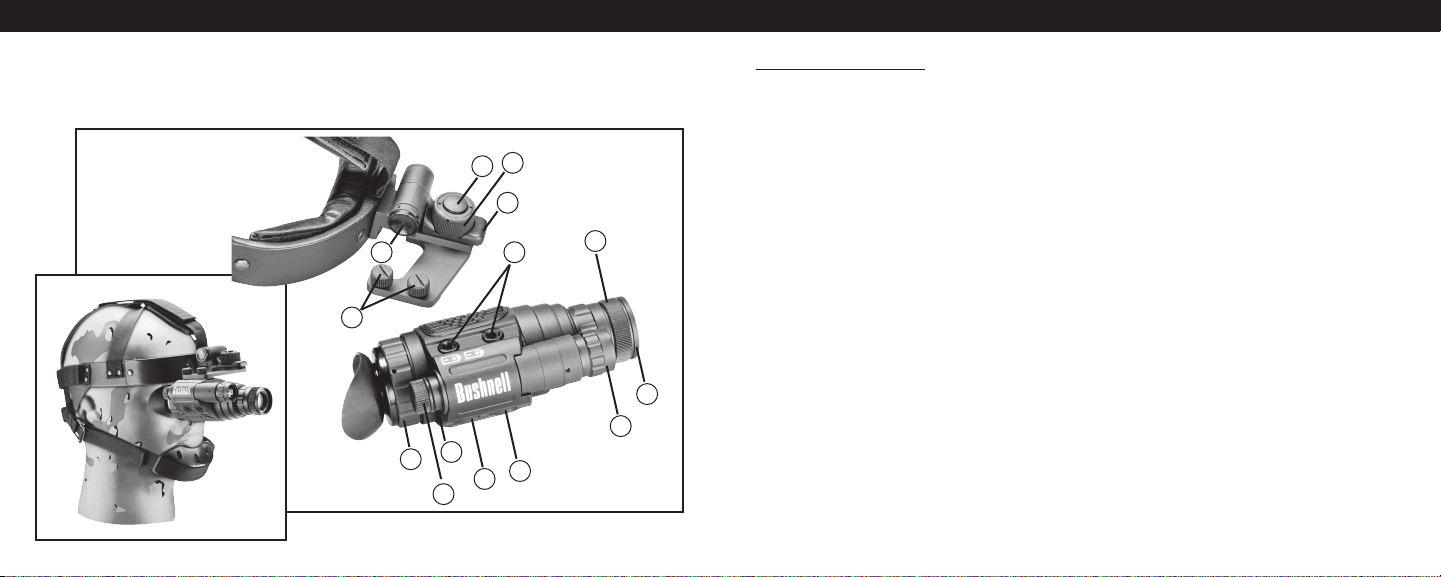
Installing Batteries
• Unscrew the Battery Compartment. (1).
• Insert two “N” batteries into the compartment positive end first.
• Reseal the Battery Compartment Cover.
Attaching The Monocular To The Headset
• Remove the plugs from the monocular housing (near the battery compartment) (2)
• Attach and tighten the bracket to the monocular using two screws (3).
• Slide the dovetailed bracket of the headgear into the slot of the bracket (4).
Detaching The Monocular From The Headset
• Loosen the knob located on the headset bracket (5).
• Push down on the release button on top of the knob - the Monocular cannot become detached unless
you push this button (6).
• Pull the headset away from the Monocular.
32
Page 4

Attaching The HeadGear To Your Head
• Release the two Velcro® straps on the rear of the Headset.
• Slide your head forward into the headset with your chin in the chinstrap.
• Close the two Velcro straps at the rear.
• Adjust all straps until the Headset feels most comfortable and secure.
Adjusting The Monocular To The Vertical Position
• Push the side-mounted button, situated to the rear of the attachment screw, inwards (7).
• Push the monocular upwards.
• The monocular will now lock in the vertical position.
• Press the button again to release.
Using The Power Button
• Never turn the scope on in daylight conditions with the lens cap off. The pinhole in the lens cap allows
you to test the scope in daylight conditions.
• To use the scope, press the ON button (8). When the device is on, a red indicator will be lit (9).
• To turn the scope off, press the ON button. The image will slowly fade out, possibly taking several
minutes. This is normal and is not a defect.
To Activate The IR Illuminator
• Your Bushnell Night Vision Product includes a built-in infrared (I.R) illuminator (10). This allows you
to see in complete darkness when no ambient light source is available.
• To turn the I.R. on, press the IR button (11). This will activate the built-in IR Illuminator allowing use
in total darkness over limited range.
• Remember to turn the IR off after use by pressing the IR button.
To Focus
• Remove the objective lens cap (12).
• Adjust the Objective Lens Focusing Ring to infinity (13).
• While looking at a distant object (at least 40 feet away), adjust the Eyepiece Focusing Ring for the
sharpest image (14).
• Once the Eyepiece Focusing Ring is adjusted, you need only adjust the Objective Lens Focusing Ring
as needed.
TROUBLESHOOTING
Spots in the Image.
You may see spots in the image. These vary from scope to scope and are cosmetic blemishes inside the
scope. These are normal for Night Vision scopes and are not a defect.
Scope will not turn on.
Check that the batteries are installed properly. Replace the batteries with new ones. Check the battery
contacts to ensure they are clean and free of corrosion. This night vision binocular contains a light sensor
between the objective lens and Infrared Illuminator. This sensor is a bright light protection circuit. Do not
cover up this sensor when using in dark conditions. If focusing the unit during the day, (remember to do
so with objective lens cover on), you will need to cover this sensor with your finger.
Image is not focused.
Adjust the focus on the Eyepieces. You must be at least 8 inches./0.2 meters from the subject you are
viewing. If no improvement, clean lenses, they may be foggy or dusty.
Visibility decreases or disappears.
Night vision devices work by amplifying available light - they need reasonable levels of natural moonlight/
IR light to give good results. Bright light sources such as headlights may cause visibility to degrade or
disappear completely. Never point your scope towards such bright light sources or switch it on in a bright
environment/daylight with the lens caps off. If exposed to bright light, protection circuits will turn the
54
Page 5

scope off automatically - it can function again after 1 or 2 minutes. Poor atmospheric conditions such as
fog or extremely dark environments will decrease the visibility of the unit. Infra Red light sources, which
night scopes are sensitive to, will increase range capability in very low light conditions.
Scope flashes.
The scope may flash when used in a bright environment. It may also flash during the first few seconds of
use in dark environments.
CARE & MAINTENANCE
•
When not using for an extended amount of time, remove batteries and store the product in a dry location.
• Avoid turning the product on in extremely bright light conditions.
• Handle this product like you would a camera. Though Bushnell Night Vision products are durably
constructed, the image intensifier tube consists of glass and is subject to breakage.
• Keep the optics clean. We recommend using a camera cleaner kit to clean the outside of the objective
and eyepiece lenses. Follow the directions with the kit.
• Do not disassemble this product. Unauthorized disassembly not only voids the warranty but may also
cause damage from the lack of special tools and techniques.
WARRANTY / REPAIR
Two-Year Warranty
Your Bushnell® product is warranted to be free of defects in materials and workmanship for two years
after the date of purchase. In the event of a defect under this warranty, we will, at our option, repair or
replace the product, provided that you return the product postage prepaid. This warranty does not cover
damages caused by misuse, improper handling, installation, or maintenance provided by someone other
than a Bushnell Authorized Service Department.
Any return made under this warranty must be accompanied by the items listed below:
1) A check / money order in the amount of $10.00 to cover the cost of postage and handling
2) Name and address for product return
3) An explanation of the defect
4) Proof of Date Purchased
5 Product should be well packed in a sturdy outside shipping carton, to prevent damage in transit,
with return postage prepaid to the address listed below:
IN U.S.A. Send To: IN CANADA Send To:
Bushnell Performance Optics Bushnell Performance Optics
Attn.: Repairs Attn.: Repairs
8500 Marshall Drive 25A East Pearce Street, Unit 1
Lenexa, Kansas 66214 Richmond Hill, Ontario L4B 2M9
For products purchased outside the United States or Canada please contact your local dealer for applicable
warranty information. In Europe you may also contact Bushnell at:
BUSHNELL Performance Optics Gmbh
European Service Centre
MORSESTRASSE 4
D- 50769 KÖLN
GERMANY
Tél: +49 (0) 221 709 939 3
Fax: +49 (0) 221 709 939 8
This warranty gives you specific legal rights. You may have other rights which vary from country to
country. ©2005 Bushnell Performance Optics
Class 1 LED product per IEC 60825-1/nov 1993, appendix EN 60825-1A11/oct 1996
76
Page 6

FCC NOTE:
This equipment has been tested and found to comply with the limits for a Class B digital device, pursuant
to Part 15 of the FCC Rules. These limits are designed to provide reasonable protection against harmful
interference in a residential installation. This equipment generates, uses and can radiate radio frequency
energy and, if not installed and used in accordance with the instructions, may cause harmful interference
to radio communications. However, there is no guarantee that interference will not occur in a particular
installation. If this equipment does cause harmful interference to radio or television reception, which
can be determined by turning the equipment off and on, the user is encouraged to try to correct the
interference by one or more of the following measures:
• Reorient or relocate the receiving antenna.
• Increase the separation between the equipment and receiver.
•
Connect the equipment into an outlet on a circuit different from that to which the receiver is connected.
• Consult the dealer or an experienced radio/TV technician for help.
Shielded interface cable must be used with the equipment in order to comply with the limits for a digital
device pursuant to Subpart B of Part 15 of FCC Rules.
Specifications and designs are subject to change without any notice or obligation on the part of the
manufacturer.
98
Page 7

FRANÇAIS
Nous vous félicitons d’avoir acheté un produit Bushnell pour vision nocturne. Les produits Bushnell pour
vision nocturne se composent de tubes et de dispositifs optiques amplificateurs d’images de haute qualité. Ils
amplifient la lumière existante, vous permettant de voir lorsque l’obscurité est trop forte pour l’œil nu.
5
6
4
7
3
9
14
1
2
11
8
13
12
10
COMMENT LES PRODUITS POUR VISION NOCTURNE FONCTIONNENT
Les produits Bushnell pour vision nocturne font entrer au travers de l’objectif et amplifient la lumière
existante, qui est ensuite focalisée sur l’amplificateur d’image. À l’intérieur de l’amplificateur d’image,
une photocathode, « excitée » par la lumière, convertit l’énergie des photons en électrons. Ces derniers
s’accélèrent en traversant un champ électrostatique à l’intérieur de l’amplificateur, puis ils frappent un
écran fluorescent (comme les écrans de télévision monochromes verts), lequel émet une image que l’on
peut voir. C’est l’accélération des électrons qui assure le gain et améliore l’image. C’est un dispositif de
Génération I.
Pour installer les piles
• Dévissez le couvercle du compartiment des piles. (1).
• Insérez deux piles «N» dans le compartiment, extrémité positive en premier.
• Refermez hermétiquement le couvercle du compartiment des piles.
Pour fixer la lunette monoculaire au casque
• Retirez les fiches du corps de la lunette monoculaire (près du compartiment des piles) (2).
• Attachez et serrez le support sur la lunette monoculaire à l’aide de deux vis (3).
• Glissez le support en queue d’aronde du casque dans la fente du support (4).
Pour enlever la lunette monoculaire du casque
• Desserrez le bouton situé sur le support du casque (5).
• Appuyez sur le déclencheur se trouvant sur le dessus du bouton – la lunette monoculaire ne peut pas se
détacher si vous n’appuyez pas sur le déclencheur (6).
• Tirez le casque pour l’éloigner de la lunette monoculaire.
1110
Page 8

Pour fixer le casque sur votre tête
• Dégagez les deux courroies Velcro® sur l’arrière du casque.
• Faites glisser votre tête en avant dans le casque, votre menton dans la jugulaire.
• Refermez les deux courroies Velcro® à l’arrière.
• Réglez toutes les courroies de manière à ressentir le plus possible de confort et de stabilité.
Réglage de la lunette monoculaire en position verticale
• Poussez vers l’intérieur le bouton à montage latéral, situé à l’arrière de la vis de fixation (7).
• Poussez la lunette monoculaire vers le haut.
• La lunette monoculaire se verrouille alors en position verticale.
• Appuyez à nouveau sur le bouton pour déverrouiller.
Utilisation du bouton d’alimentation
• N’activez jamais la lunette en plein jour si le bouchon d’objectif est retiré. Le trou d’épingle du bouchon
d’objectif vous permet de tester la lunette en plein jour.
• Pour utiliser la lunette, appuyez sur le bouton ON (marche) (8). Lorsque l’instrument est activé, un
indicateur rouge est allumé (9).
• Pour désactiver la lunette, appuyez sur le bouton ON (marche). L’image s’estompe lentement, prenant
peut-être pour cela plusieurs minutes. Cela est normal est n’est pas un défaut.
Pour Activer l’illuminateur infrarouge
•
Votre produit Bushnell pour vision nocturne comprend un illuminateur infrarouge (IR) intégré (10).
Celui-ci vous permet de voir dans l’obscurité la plus complète en l’absence de source d’éclairage ambiant.
• Pour activer la lumière infrarouge, appuyez sur le bouton IR (11). Cela active l’illuminateur IR intégré
pour permettre l’usage de la lunette dans l’obscurité totale, avec une portée limitée.
• N’oubliez pas de désactiver la lumière infrarouge après usage ; appuyez sur le bouton IR.
Pour mettre au point
• Enlevez le bouchon d’objectif (12).
• Réglez la bague de mise au point de l’objectif à l’infini (13).
• Tout en fixant un objet à distance (à au moins 12 mètres/40 pieds), réglez la bague de mise au point de
l’oculaire pour obtenir l’image la plus nette (14).
• Une fois la bague de mise au point de l’oculaire réglée, il ne reste que la bague de mise au point de
l’objectif à régler, selon le besoin.
DÉPANNAGE
Taches sur l’image.
Vous voyez peut-être des taches sur l’image. Celles-ci varient d’une lunette à l’autre et il s’agit de défauts
cosmétiques à l’intérieur de la lunette. Elles sont normales sur les lunettes de vision nocturne et ne sont
pas des défauts.
Impossible d’activer la lunette.
Assurez-vous que les piles sont correctement installées. Remplacez-les par des piles neuves. Assurez-vous
que les contacts sont propres et non corrodés. Ces jumelles de vision nocturne renferment un capteur de
lumière entre l’objectif et l’illuminateur infrarouge. Ce capteur constitue un circuit de protection contre
la lumière vive. Ne le recouvrez pas lorsque vous utilisez le produit dans l’obscurité. Si vous mettez cet
appareil au point le jour (veillez à ce que le couvercle de l’objectif soit mis), vous devez recouvrir ce capteur
avec un doigt.
L’image n’est pas nette.
Réglez la mise au point des oculaires. Vous devez vous tenir à au moins 0,2 mètre (8 po) du sujet que vous
observez. En l’absence d’amélioration, nettoyez les lentilles, car elles sont peut-être embuées ou poussiéreuses.
Diminution ou disparition de la visibilité.
Les appareils de vision nocturne amplifient la lumière disponible – dans une mesure raisonnable, un
clair de lune naturel ou un éclairage infrarouge est nécessaire pour obtenir de bons résultats. Les sources
1312
Page 9

d’éclairage intense telles que les phares de voiture peuvent diminuer la visibilité ou la faire disparaître
complètement. Ne dirigez jamais votre lunette vers de telles sources d’éclairage et ne l’activez pas dans un
éclairage intense ou en plein jour si le bouchon d’objectif est retiré. En présence d’une lumière vive, des
circuits de protection désactivent la lunette automatiquement – elle peut se remettre à fonctionner au bout
d’une ou deux minutes. De mauvaises conditions atmosphériques telles que le brouillard ou une très forte
obscurité diminuent la visibilité de l’instrument. Les sources infrarouges, auxquelles les lunettes de vision
nocturne sont sensibles, accroissent la portée lorsque l’éclairage est faible.
Clignotement de la lunette.
Cette lunette risque de clignoter lorsqu’elle est utilisée dans un endroit très éclairé. Elle peut également
clignoter durant les premières secondes d’utilisation dans des endroits sombres.
ENTRETIEN ET MAINTENANCE
•
Si l’instrument n’est pas en usage pendant un certain temps, enlevez les piles et rangez-le dans un endroit sec.
• Évitez d’activer le produit dans un éclairage extrêmement vif.
• Traitez ce produit comme une caméra. Bien que les produits Bushnell pour vision nocturne soient
construits pour durer, le tube de l’amplificateur d’image est en verre et il est cassable.
• Gardez les éléments optiques propres. Nous vous recommandons d’utiliser un kit de nettoyage de
caméra pour nettoyer l’extérieur de l’objectif et les oculaires. Suivez les instructions accompagnant le kit.
• Ne démontez pas ce produit. Tout démontage non autorisé non seulement annule la garantie mais peut
endommager le produit par suite du manque d’outils et de techniques spéciaux.
GARANTIE / RÉPARATION
GARANTIE LIMITÉE DE DEUX ANS
Votre produit Bushnell® est garanti exempt de défauts de matériaux et de fabrication pendant deux ans
après la date d’achat. Au cas où un défaut apparaîtrait sous cette garantie, nous nous réservons l’option de
réparer ou de remplacer le produit, à condition de nous le renvoyer en port payé. La présente garantie ne
couvre pas les dommages causés par une utilisation, une manipulation, une installation incorrectes ou un
entretien incorrect ou fourni par quelqu’un d’autre qu’un centre de réparation agréé par Bushnell.
Tout retour effectué dans le cadre de la présente garantie doit être accompagné des articles indiqués ci-dessous :
1)
un chèque ou mandat d’une somme de 10,00 $ US pour couvrir les frais d’envoi et de manutention
2) le nom et l’adresse pour le retour du produit
3) une description du défaut constaté
4) la preuve de la date d’achat
5) Le produit doit être emballé soigneusement, dans un carton d’expédition solide, pour éviter qu’il ne
soit endommagé durant le transport ; envoyez-le en port payé, à l’adresse indiquée ci-dessous :
AUX ÉTATS-UNIS, ENVOYEZ À: AU CANADA, ENVOYEZ À:
Bushnell Performance Optics Bushnell Performance Optics
Attn.: Repairs Attn.: Repairs
8500 Marshall Drive 25A East Pearce Street, Unit 1
Lenexa, Kansas 66214 Richmond Hill, Ontario L4B 2M9
Pour les produits achetés en dehors des États-Unis et du Canada, veuillez contacter votre distributeur local
pour tous renseignements concernant la garantie. En Europe, vous pouvez aussi contacter Bushnell au :
BUSHNELL Performance Optics Gmbh
European Service Centre
MORSESTRASSE 4
D- 50769 KÖLN
ALLEMAGNE
Tél. : +49 (0) 221 709 939 3
Fax : +49 (0) 221 709 939 8
La présente garantie vous donne des droits légaux spécifiques. Vous pouvez avoir d’autres droits qui
varient selon les pays. ©2005 Bushnell Performance Optics
1514
Page 10

Produit à DEL de classe 1 selon IEC 60825-1/nov. 1993, annexe EN 60825-1A11/oct. 1996
REMARQUE RELATIVE À LA FCC (Commission fédérale des télécommunications)
Ce matériel a été testé et s’est révélé être conforme aux limites d’un dispositif numérique de classe B,
conformément à la section 15 de la réglementation FCC. Ces limites ont été établies pour assurer une
protection raisonnable contre les parasites nuisibles dans les immeubles résidentiels. Ce matériel produit,
utilise et peut émettre de l’énergie radiofréquence ; en conséquence, s’il n’est pas installé et utilisé en
conformité avec les instructions, il risque de provoquer des parasites nuisibles aux communications radio.
Toutefois, il n’est pas garanti que des parasites ne se produiront pas dans une installation particulière. Si
ce matériel causait des parasites nuisibles à la réception radio ou télévision, qui peuvent être déterminés
en mettant le matériel hors tension puis sous tension, l’utilisateur peut essayer de remédier au problème
en appliquant l’une ou plusieurs des mesures suivantes :
• Réorienter ou déplacer l’antenne de réception.
• Augmenter la distance séparant le matériel du récepteur.
• Connecter le matériel à une prise de courant ou à un circuit différent(e) de celui (celle) auquel (à
laquelle) le récepteur est relié.
• Consulter le concessionnaire ou un technicien radio/TV expérimenté.
Le câble d’interface blindé doit être utilisé avec le matériel afin d’être conforme aux limites d’un dispositif
numérique, conformément à la sous-section B de la section 15 de la réglementation FCC.
Les spécifications et conceptions sont sujettes à modification sans préavis ni obligation de la part du
fabricant.
1716
Page 11

ESPAÑOL
Lo felicitamos por su elección de su producto Night Vision de Bushnell. Los productos Night Vision
(Visión Nocturna) de Bushnell están compuestos por tubos intensificadores de imágenes y una óptica
de alta calidad. Los productos Night Vision de Bushnell amplifican la luz existente, permitiendo ver en
condiciones demasiado oscuras para observar a simple vista.
5
6
4
7
3
9
14
1
2
11
8
13
12
10
CÓMO FUNCIONA NIGHT VISION
Los productos Night Vision de Bushnell captan la luz existente y la amplifican a través de la lente
del objetivo, que luego se enfoca en el intensificador de imágenes. Dentro del intensificador hay un
fotocátodo que es “excitado” por la luz y convierte la energía fotónica en electrones. Estos electrones se
desplazan aceleradamente a través de un campo electrostático dentro del intensificador y chocan contra
una pantalla fosforescente (igual que una pantalla de televisión monocroma de color verde) que emite una
imagen que se puede ver. La aceleración de los electrones es la que proporciona la captación y realza la
imagen. Este es un aparato de la Generación
Instalación de las pilas
• Destornille la tapa del compartimiento de pilas. (1).
• Inserte dos pilas “N”, con el extremo positivo primero, en el compartimiento.
• Vuelva a cerrar la tapa del compartimiento de pilas.
Montaje del monocular en el cabezal
• Quite los tapones de la cubierta del monocular (cerca del compartimiento de baterías) (2)
• Fije el soporte al monocular y apriete utilizando dos tornillos (3).
• Deslice el soporte en cola de milano del cabezal en la ranura del soporte (4).
Desmontaje del monocular del cabezal
• Afloje la perilla ubicada en el soporte del cabezal (5).
• Oprima el botón soltador ubicado encima de la perilla - no podrá desmontar el monocular a menos que
oprima este botón (6).
• Separe el cabezal del monocular.
1918
Page 12

Colocación del cabezal
• Suelte las dos bandas de Velcro® en la parte trasera del cabezal.
• Deslice su cabeza hacia adelante e introdúzcala en el cabezal apoyando su barbilla en el barboquejo.
• Cierre las dos bandas de Velcro en la parte trasera.
• Ajuste todas las bandas hasta que sienta el cabezal cómodo y bien sujeto.
Ajuste del monocular a la posición vertical
• Oprima hacia dentro (7) el botón lateral, situado detrás del tornillo de fijación.
• Empuje del monocular hacia arriba.
• El monocular se fijará en posición vertical.
• Oprima el botón otra vez para soltar.
Utilización del botón de encendido (Power)
• No encienda nunca la mira telescópica en condiciones de luz diurna con la lente sin la tapa. El agujero
diminuto en la tapa permite probar la mira telescópica en condiciones de luz diurna.
• Para usar la mira telescópica, oprima el botón de encendido (ON) (8). Cuando el aparato está
encendido, un indicador rojo se ilumina (9).
• Para apagar la mira telescópica, oprima el botón de encendido (ON). La imagen desaparecerá
lentamente; puede tardar varios minutos. Esto es normal y no es un defecto.
Para activar el iluminador infrarrojo (IR)
• Su producto Night Vision de Bushnell incluye un iluminador infrarrojo (IR) integral (10). Esto le
permitirá ver en completa oscuridad cuando no haya ninguna fuente de luminosidad ambiental.
• Para activar el iluminador infrarrojo, oprima el botón IR (11). Esto activará el iluminador IR integral
para permitir su utilización en oscuridad total abarcando una distancia limitada.
• Recuerde de desactivar el IR después de usarlo, oprimiendo el botón IR.
Para enfocar
• Quite la tapa (12) de la lente del objetivo.
• Ajuste el anillo de enfoque de la lente en la posición de infinito (13).
• Mientras observa un objeto distante (a una distancia de por lo menos 40 pies), ajuste el anillo de enfoque
el ocular hasta obtener la imagen más nítida (14).
• Una vez ajustado el anillo de enfoque del ocular, solamente tiene que ajustar el anillo de enfoque de la
lente del objetivo, según sea necesario.
LOCALIZACIÓN Y REPARACIÓN DE FALLAS
Manchas en la imagen.
Es posible que vea manchas o puntos en la imagen. Estos varían de una mira telescópica a otra y
son imperfecciones cosméticas en el interior de la mira telescópica. Esto es algo normal en las miras
telescópicas Night Vision (para visión nocturna) y no es un defecto.
La mira telescópica no se enciende.
Compruebe si instaló correctamente las pilas. Sustituya las pilas por otras nuevas. Revise los contactos
de las pilas para asegurarse de que estén limpios y sin corrosión. Este binocular de visión nocturna
contiene un sensor de luz entre la lente del objetivo y el iluminador infrarrojo. Este sensor es un circuito
de protección contra la luz brillante. No cubra este sensor cuando utilice el aparato en la oscuridad. Si
enfoca la unidad durante el día, (recuerde de hacerlo con la tapa de la lente colocada), tendrá que cubrir
este sensor con el dedo.
La imagen no se enfoca.
Ajuste el enfoque en los oculares. Tiene que estar a una distancia de por lo menos 8 pulgadas (0,2 metros)
del objeto que está viendo. Si no mejora, limpie las lentes, es posible que estén empañadas o con polvo.
La visibilidad disminuye o desaparece.
Los aparatos de visión nocturna funcionan amplificando la luz disponible - necesitan unos niveles
razonables de luz de la luna/luz infrarroja para dar buen resultado. Las fuentes de luz brillante, como
2120
Page 13

los faros de un vehículo, pueden causar la degradación o desaparición total de la visibilidad. No apunte
nunca su mira telescópica a fuentes de luz brillante, ni la encienda en un ambiente brillante/luz diurna
con la tapa de la lente quitada. Si llega a quedar expuesta a luz brillante, los circuitos protectores apagarán
automáticamente la mira telescópica. Puede funcionar nuevamente después de 1 ó 2 minutos. Las malas
condiciones atmosféricas, como la neblina o ambientes extremadamente oscuros hacen que disminuya la
visibilidad de la unidad. Las fuentes de luz infrarroja, a las cuales las miras telescópicas de visión nocturna
son sensibles, aumentarán la capacidad de alcance en condiciones de muy poca luz.
La mira telescópica destella.
La mira telescópica puede destellar cuando se utiliza en un medio ambiente brillante. También puede
destellar durante los primeros segundos de uso en ambientes oscuros.
CUIDADO Y MANTENIMIENTO
•
Cuando no lo use por un periodo de tiempo largo, saque las pilas y guarde el producto en un lugar seco.
• Evite encender el producto en condiciones de luz demasiado brillante.
•
Maneje este producto de la misma forma que su cámara fotográfica. Aunque los productos Night Vision de
Bushnell son de construcción robusta, el tubo intensificador de imágenes es de vidrio y puede quebrarse.
• Mantenga los elementos ópticos limpios. Recomendamos el uso de un kit limpiador de cámaras para
limpiar el exterior de las lentes del objetivo y del ocular. Sigas las instrucciones del kit.
• No desarme este producto. El desmontaje no autorizado no solamente anulará la garantía sino que
también puede causar daños por falta de herramientas y técnicas especiales.
GARANTÍA / REPARACIÓN
GARANTÍA LIMITADA DE DOS AÑOS
Su producto Bushnell® está garantizado contra defectos de materiales y fabricación durante dos años
a partir de la fecha de compra. En caso de defectos bajo esta garantía, nosotros, a nuestra opción,
repararemos o sustituiremos el producto siempre que lo devuelva con portes pagados. Esta garantía no
cubre defectos causados por el uso indebido, ni por un manejo, instalación o mantenimiento realizados
por alguien que no sea un departamento de servicio autorizado de Bushnell.
Cualquier envío que se haga bajo esta garantía deberá ir acompañado por lo siguiente:
1) Un cheque/giro postal por la cantidad de 10 dólares para cubrir los gastos postales y de manejo
2) Nombre y dirección donde quiere que se le envíe el producto
3) Una explicación del defecto
4) Una prueba de la fecha de compra
5 El producto debe empaquetarse bien en una caja resistente para evitar que se dañe durante el
transporte, con los portes prepagados a la dirección que se muestra a continuación:
En EE.UU. enviar a: En CANADÁ enviar a:
Bushnell Performance Optics Bushnell Performance Optics
Attn.: Repairs Attn.: Repairs
8500 Marshall Drive 25A East Pearce Street, Unit 1
Lenexa, Kansas 66214 Richmond Hill, Ontario L4B 2M9
En el caso de productos comprados fuera de Estados Unidos o Canadá, póngase en contacto con su
distribuidor local para que le den la información pertinente sobre la garantía. En Europa también puede
ponerse en contacto con Bushnell en: BUSHNELL Performance Optics Gmbh
European Service Centre
MORSESTRASSE 4
D- 50769 K÷LN
ALEMANIA
Tél: +49 (0) 221 709 939 3
Fax: +49 (0) 221 709 939 8
Esta garantía le ofrece derechos legales específicos. Puede que tenga otros derechos que varían de un país
a otro. ©2005 Bushnell Performance Optics
2322
Page 14

Producto LED Clase 1 según IEC 60825-1/nov 1993, apéndice EN 60825-1A11/oct 1996
NOTA DE FCC:
Este equipo se ha sometido a pruebas y se ha encontrado que cumple con los límites de los dispositivos
digitales de la Clase B, de conformidad con la Parte 15 del Reglamentos de FCC. Estos límites se han
establecido para proporcionar una protección razonable contra las interferencias perjudiciales en las
instalaciones residenciales. Este equipo genera, utiliza y puede irradiar energía de radiofrecuencia y, si
no se instala y utiliza de acuerdo con las instrucciones, puede causar interferencias perjudiciales en las
comunicaciones de radio. Sin embargo, no hay ninguna garantía de que no se produzcan interferencias
en una instalación particular. Si este equipo causara interferencias perjudiciales en la recepción de señales
de radio o televisión, lo cual se puede determinar encendiendo y apagando dicho equipo, aconsejamos al
usuario que trate corregir la interferencia aplicando una o más de las siguientes medidas:
• Reorientar o reubicar la antena receptora.
• Aumentar la separación entre el equipo y el receptor.
• Conectar el equipo en un enchufe de un circuito diferente al que esté conectado el receptor.
• Consultar al distribuidor o a un técnico de radio /televisión para que le ayude.
Con este equipo tiene que usarse un cable interfaz blindado para poder cumplir con los límites de los
dispositivos digitales de conformidad con la Subparte B de la Parte 15 del Reglamento de FCC.
Las especificaciones y los diseños están sujetos a cambios sin previo aviso ni obligación por parte del
fabricante.
2524
Page 15

DEUTSCH
Wir gratulieren zu Ihrem Kauf eines Bushnell Nachtsichtprodukts. Bushnell Nachtsichtprodukte
enthalten hochwertige Röhren und Optiken zur Bildverstärkung. Bushnell Nachtsichtprodukte verstärken
vorhandenes Licht, damit Sie auch bei geringem Licht sehen, das für das blosse Auge nicht ausreicht.
5
6
4
7
3
9
14
1
2
11
8
13
12
10
WIE DIE NACHTSICHT FUNKTIONIERT
Bushnell Nachtsichtprodukte sammeln und verstärken das vorhandene Licht durch die Objektivlinse, die
dann auf den Bildverstärker fokussiert. Im Verstärker wird eine Photokathode durch das Licht “erregt”
und wandelt die Photonenergie in Elektronen um. Diese Elektronen beschleunigen sich über ein
elektrostatisches Feld im Verstärker und berühren einen Phosphorschirm (wie ein grüner schwarz-weisser
TV-Bildschirm), der ein Bild abgibt, das Sie sehen können. Die Beschleunigung der Elektronen sorgt für
Verstärkung und reichert das Bild an. Dies ist ein Gerät der 1. Generation.
Die Batterien einsetzen
• Das Batteriefach losschrauben. (1).
• Zwei “N” Batterien in das Fach mit dem positiven Ende zuerst einlegen.
• Den Batteriefachdeckel wieder schliessen.
Befestigung des Sucherausblicks am Kopfhörer
• Die Stöpsel vom Sucherausblick (in der Nähe des Batteriefachs) entfernen (2).
• Die Klammer mit zwei Schrauben am Sucherausblick befestigen und festziehen (3).
• Die schwalbenschwanzförmige Klammer des Kopfsatzes in den Schlitz der Klammer einschieben (4).
Den Sucherausblick vom Kopfhörer lösen
• Den Knopf auf der Kopfhörerklammer lockern (5).
• Den Löseknopf oben auf dem Knopf drücken - der Sucherausblick kann sich nicht lösen, wenn dieser
Knopf nicht gedrückt wird (6).
• Den Kopfhörer vom Sucherausblick wegziehen.
2726
Page 16

Befestigung des Kopfsatzes am Kopf
• Die beiden Velcro® Riemen hinten am Kopfhörer lösen.
• Den Kopf nach vorne in den Kopfhörer mit dem Kinn im Kinnriemen schieben.
• Die beiden Velcro Riemen hinten schliessen.
• Alle Riemen anpassen, bis der Kopfhörer bequem und sicher sitzt.
Anpassung des Sucherausblicks an die senkrechte Position
• Den seitlichen Knopf hinter der Befestigungsschraube nach innen drücken (7).
• Den Sucherausblick nach oben drücken.
• Der Sucherausblick rastet jetzt in senkrechter Position ein.
• Zum Loslassen den Knopf erneut drücken.
Benutzung des Stromknopfes
• Das Glas niemals bei Tageslicht mit abgenommener Linsenschutzkappe einschalten. Mit dem Visierloch
in der Linsenschutzkappe kann das Glas unter Tageslichtbedingungen getestet werden.
• Zur Benutzung des Glases den ON Knopf drücken (8). Wenn das Gerät eingeschaltet ist, leuchtet eine
rote Anzeigelampe (9).
• Zum Abschalten des Glases den ON Knopf drücken. Das Bild schwächt sich langsam ab, was
möglicherweise mehrere Minuten dauert. Dies ist normal und kein Fehler.
Aktivieren des IR Illuminators
• Das Bushnell Nachtsichtgerät enthält einen eingebauten Infrarot- (IR) Illuminator (10). Damit kann in
völliger Dunkelheit gesehen werden, wenn keine Lichtquelle in der Umgebung vorhanden ist.
• Zum Einschalten des IR den IR Knopf drücken (11). Damit wird der eingebaute IR Illuminator
aktiviert, der den Einsatz in vollkommener Dunkelheit auf eine begrenzte Reichweite erlaubt.
• Daran denken, nach dem Gebrauch den IR durch Drücken des IR Knopfes abzuschalten.
Fokus
• Die Linsenschutzkappe vom Objektiv entfernen (12).
• Den Objektivring der Linse auf unendlich einstellen (13).
• Auf ein entferntes Objekt schauen (mindestens 13 m entfernt), den Einstellring des Okulars auf das
schärfste Bild einstellen (14).
• Wenn der Einstellring des Okulars einmal eingestellt ist, braucht nur noch der Objektivring der Linse
nach Bedarf eingestellt werden.
STÖRUNGSBESEITIGUNG
Punkte im Bild
Es können Punkte im Bild erscheinen. Sie fallen bei jedem Glas anders aus und sind kosmetische
Schönheitsfehler im Glas. Sie sind bei Nachtsichtgläsern normal und keine Mängel.
Das Glas schaltet nicht ein.
Prüfen, ob die Batterien richtig eingelegt sind. Die Batterien durch neue ersetzen. Die Batteriekontakte
prüfen, um sicherzustellen, dass sie sauber und rostfrei sind. Dieses Nachtsicht-Fernglas enthält einen
Lichtsensor zwischen der Objektivlinse und dem Infrarot-Illuminator. Der Sensor ist ein Schutzkreis für
helles Licht. Bei Benutzung in der Dunkelheit diesen Sensor nicht abdecken. Beim Fokussieren des Geräts
am Tag (daran denken, dies bei aufgesetzter Schutzkappe der Objektivlinse zu tun), muss dieser Sensor
mit dem Finger abgedeckt werden.
Bild nicht scharf
Den Fokus auf den Okularen einstellen. Eine Entfernung von mindestens 8 Zoll/0,2 Meter vom
betrachteten Objekt einhalten. Wenn keine Besserung eintritt, die Linsen reinigen, sie könnten
beschlagen oder staubig sein.
Die Sichtweite nimmt ab oder verschwindet.
Nachtsichtgeräte funktionieren durch die Verstärkung von verfügbarem Licht - für gute Ergebnisse
benötigen sie natürliches Mondlicht /IR-Licht in vernünftiger Stärke. Helle Lichtquellen wie Scheinwerfer
2928
Page 17

können verursachen, dass sich die Sichtweite verschlechtert oder vollständig verschwindet. Das Glas
niemals auf solche hellen Lichtquellen richten oder es bei abgenommener Linsenschutzkappe in heller
U
mgebung/Tageslicht einschalten. Wenn es hellem Licht ausgesetzt wird, schalten die Schutzkreise das Glas
automatisch ab - nach 1 bis 2 Minuten kann es wieder funktionieren. Schlechte atmosphärische Bedingungen
wie Nebel oder extrem dunkle Umgebungen verringern die Sichtweite des Geräts. Infrarot-Quellen, auf die
Nachtgläser empfindlich sind, erhöhen die Reichweiten unter sehr schlechten Lichtbedingungen.
Glasblitze
Bei Einsatz in heller Umgebung kann das Glas blitzen. Es kann auch in den ersten Sekunden der
Benutzung in dunkler Umgebung blitzen.
PFLEGE UND WARTUNG
• Wenn das Gerät längere Zeit nicht benutzt wird, die Batterien entfernen und das Produkt an einem
trockenen Ort aufbewahren.
• Es vermeiden, das Glas unter extrem hellen Lichtbedingungen einzuschalten.
• Mit diesem Produkt umgehen, als ob es eine Kamera wäre. Bushnell Nachtsichtprodukte sind für lange
Lebenszeit hergestellt, die Bildverstärkerröhre besteht aber aus Glas und kann zerbrechen.
•
Die Optiken sauberhalten Wir empfehlen, zum Reinigen der Aussenseite des Objektivs und der Okularlinsen
einen Reinigungskit für Kameras zu verwenden. Die Gebrauchsanweisung des Kits befolgen.
• Dieses Produkt nicht zerlegen. Unerlaubtes Zerlegen macht nicht nur die Garantie unwirksam, sondern
kann auch durch fehlendes Spezialwerkzeug und entsprechende Techniken Schäden verursachen.
GARANTIE / REPARATUR
AUF ZWEI JAHRE BEGRENZTE GARANTIE
Das Bushnell® Produkt ist für zwei Jahre ab dem Kaufdatum gegen Mängel in Material und Ausführung
garantiert. Sollte sich unter dieser Garantie ein Mangel herausstellen, werden wir nach eigenem
Gutdünken das Produkt reparieren oder ersetzen, wenn es mit vorher bezahltem Porto eingeschickt wird.
Diese Garantie deckt keine Schäden durch falsche Benutzung, unsachgemässe Handhabung, Installation
oder Wartung durch eine andere Person als diejenigen der von Bushnell zugelassenen Serviceabteilung.
Rücksendungen im Rahmen dieser Garantie müssen enthalten:
1)
Einen Scheck / Zahlungsanweisung in Höhe von 10,00 $ zur Deckung der Kosten für Porto und Handling.
2) Name und Adresse für die Rücksendung des Produkts
3) Eine Erklärung des Mangels
4) Kaufbeleg mit Datum
5
Das Produkt sollte in einem Karton mit kräftiger Aussenseite verpackt werden, damit Schaden beim
Transit vermieden wird, und das vorher bezahlte Rückporto muss an folgende Adresse beigefügt werden:
In den USA an: In KANADA an:
Bushnell Performance Optics Bushnell Performance Optics
Attn.: Repairs Attn.: Repairs
8500 Marshall Drive 25A East Pearce Street, Unit 1
Lenexa, Kansas 66214 Richmond Hill, Ontario L4B 2M9
Für ausserhalb der Vereinigten Staaten oder Kanadas gekaufte Produkte sich an den örtlichen Händler
wenden und die gültigen Informationen über die Garantie einholen. In Europa kann Bushnell auch an
folgender Adresse angesprochen werden: BUSHNELL Performance Optics GmbH
European Service Centre
MORSESTRASSE 4
D- 50769 KÖLN
DEUTSCHLAND
Tel.: +49 (0) 221 709 939 3
Fax: +49 (0) 221 709 939 8
Diese Garantie verleiht spezifische gesetzliche Rechte. Es kann je nach Land unterschiedliche andere
Rechte geben. ©2005 Bushnell Performance Optics
3130
Page 18

Klasse 1 LED Produkt nach IEC 60825-1/Nov. 1993, Anhang EN 60825-1A11/Okt. 1996
FCC HINWEIS:
Diese Ausrüstung ist getestet worden, und es hat sich herausgestellt, dass sie gemäss Teil 15 der FCC
Vorschriften die Grenzen einer digitalen Vorrichtung der Klasse B einhält. Mit diesen Grenzen soll
vernünftiger Schutz vor schädlichen Interferenzen in einer Anlage im Wohnbereich geboten werden.
Diese Ausrüstung generiert und benutzt Funkfrequenzenergie und kann diese abstrahlen, und wenn
sie nicht nach den Anweisungen installiert und benutzt wird, kann sie schädliche Interferenz für
Funkkommunikationen verursachen. Jedoch gibt es keine Garantie dafür, dass in einer bestimmten
Anlage keine Interferenz eintritt. Wenn diese Ausrüstung schädliche Interferenz für Funk- oder
Fernsehempfang verursacht, was durch Ein- und Ausschalten der Ausrüstung bestimmt werden kann,
wird der Benutzer zum Versuch ermuntert, die Interferenz mit einer oder mehrerer der nachstehenden
Massnahmen zu erheben:
• Die Empfangsantenne neu ausrichten oder an einer anderen Stelle montieren.
• Den Abstand zwischen der Ausrüstung und dem Empfänger vergrössern.
• Die Ausrüstung an einer Steckdose auf einem anderen Stromkreis als demjenigen anschliessen, an dem
der Empfänger angeschlossen ist.
• Den Händler oder einen erfahrenen Funk-/TV-Techniker um Hilfe bitten.
Für diese Ausrüstung muss geschirmtes Kabel eingesetzt werden, um die Grenzen für eine digitale
Vorrichtung laut Sub-Teil B von Teil 15 der FCC Vorschriften einzuhalten.
Technische Daten und Auslegungen können ohne jegliche Mitteilung oder Verpflichtung seitens des
Herstellers geändert werden.
3332
Page 19

ITALIANO
Grazie per la preferenza accordataci acquistando un prodotto per visione notturna Bushnell. Gli strumenti per
visione notturna Bushnell sono costruiti con ottiche e tubi intensificatori di immagine di alta qualità per amplificare
la luce disponibile, consentendo l’osservazione in condizioni di illuminazione insufficienti per l’occhio nudo.
5
6
4
7
3
9
14
1
2
11
8
13
12
10
COME FUNZIONA UNO STRUMENTO PER VISIONE NOTTURNA
I prodotti per visione notturna Bushnell raccolgono e amplificano la luce attraverso l’obiettivo e la
focalizzano sull’intensificatore di immagine, contenente un fotocatodo che, colpito dalla luce, trasforma
l’energia dei fotoni in elettroni. Questi ultimi vengono accelerati in un campo elettrostatico all’interno
dell’intensificatore e colpiscono uno schermo ai fosfori (simile a uno schermo televisivo monocromatico
verde), sul quale si forma l’immagine visibile. Il guadagno luminoso e il miglioramento dell’immagine sono
dovuti all’accelerazione degli elettroni. Lo strumento descritto è un dispositivo della prima generazione.
Installazione delle pile
• Svitare il coperchio del vano delle pile. (1).
• Inserire due pile “N” nel vano, estremità positiva per prima.
• Richiudere il coperchio del vano delle pile.
Montaggio del monocolo alla cuffia
• Rimuovere i tappi dalla sede del monocolo (accanto al vano delle pile) (2)
• Montare e serrare la staffa al monocolo, usando due viti (3).
• Inserire la staffa a coda di rondine della cuffia nella fessura della staffa (4).
Rimozione del monocolo dalla cuffia
• Allentare il pomello situato sulla staffa della cuffia (5).
• Premere il pulsante di sgancio in cima al pomello – non è possibile rimuovere il monocolo se non viene
premuto questo pulsante (6).
• Tirare via la cuffia dal monocolo.
3534
Page 20

Montaggio della cuffia sulla testa
• Sganciare le due fasce in Velcro® sul retro della cuffia.
• Scorrere la testa in avanti nella cuffia, con il mento nel sottogola.
• Chiudere le due fasce in Velcro sul retro.
• Regolare tutte le fasce fino a quando la cuffia risulta più comoda e sicura.
Regolazione del monocolo nella posizione verticale
• Spingere in dentro il pulsante laterale, situato sul retro della vite di attacco (7).
• Spingere in alto il monocolo.
• Il monocolo si bloccherà in posizione verticale.
• Premere di nuovo il pulsante per liberare.
Uso del pulsante dell’alimentazione
• Non accendere mai il binocolo alla luce diurna, con il cappuccio dell’obiettivo rimosso. Il forellino nel
cappuccio dell’obiettivo permettere di provare il monocolo alla luce diurna.
•
Per usare il binocolo, premere il pulsante ON (8). Quando l’unità è accesa, si illumina una luce spia rossa (9).
• Per spegnere il binocolo, premere il pulsante ON. L’immagine svanirà lentamente, impiegando anche
diversi minuti. Questo è un fatto normale, non un difetto.
Per attivare l’illuminatore IR
• Il prodotto per visione notturna Bushnell contiene un illuminatore infrarosso (IR) integrato (10), che
permette di vedere in condizioni di completa oscurità quando non è disponibile una fonte luminosa ambientale.
• Per accendere l’IR, premere il pulsante IR (11). L’illuminatore IR si attiverà permettendo di usare l’unità
in completa oscurità a una distanza limitata.
• Ricordarsi di spegnere l’IR dopo l’uso, premendo il pulsante IR.
Per mettere a fuoco
• Rimuovere il coperchietto dell’obiettivo (12).
• Regolare su infinito la ghiera di messa a fuoco dell’obiettivo (13).
• Guardando ad un oggetto lontano (almeno a 12 metri), regolare la ghiera di messa a fuoco dell’oculare
fino ad ottenere l’immagine più nitida (14).
• Dopo aver regolato la ghiera di messa a fuoco dell’oculare, regolare la ghiera di messa a fuoco
dell’obiettivo secondo necessità.
RISOLUZIONE DEI PROBLEMI
Punti sull’immagine
È possibile che si vedano punti sull’immagine; essi variano da uno strumento all’altro e sono difetti estetici
interni, normali negli strumenti per visione notturna; non sono difetti funzionali.
Il monocolo non si accende.
Accertarsi che le pile siano cariche e installate correttamente. Eventualmente sostituirle con pile nuove.
Verificare che i contatti delle pile siano puliti e senza tracce di corrosione. Questo binocolo per la visione
notturna contiene un sensore della luce fra l’obiettivo e l’illuminatore infrarosso. Il sensore è un circuito
di protezione contro la luminosità intensa. Non coprire il sensore durante l’uso in condizioni di oscurità.
Se l’unità viene messa a fuoco durante il giorno (ricordarsi di installare il coperchietto dell’obiettivo),
coprire il sensore con un dito.
L’immagine è sfocata.
Metterla a fuoco regolando gli oculari. È necessario trovarsi ad almeno 20 cm di distanza dal soggetto in
visione. Se ancora l’immagine non va a fuoco, pulite le lenti; potrebbero essere appannate o impolverate.
La visibilità diminuisce o si annulla.
I dispositivi per visione notturna funzionano amplificando la luce disponibile; per dare buoni risultati,
hanno bisogno di livelli ragionevoli di luce lunare naturale/luce IR. Le sorgenti che irradiano una luce
forte, come gli abbaglianti, possono peggiorare o annullare la visibilità. Non rivolgete il monocolo
3736
Page 21

verso tali sorgenti di luce forte, né accenderlo in un ambiente molto luminoso/di giorno con i
coperchietti dell’obiettivo rimossi. Se vengono esposti a luce intensa, i circuiti di protezione spegneranno
automaticamente lo strumento, che torna a funzionare dopo 1 o 2 minuti. Condizioni quali nebbia o
ambienti con pochissima luce diminuiscono la visibilità dell’unità. Le sorgenti luminose ad infrarosso, alle
quali i visori notturni sono sensibili, aumentano la capacità di visione in condizioni di pochissima luce.
Il monocolo lampeggia.
L’apparecchio può lampeggiare quando viene adoperato in un ambiente luminoso e anche durante i primi
secondi di utilizzo in ambienti oscuri.
CURA E MANUTENZIONE
• Se lo strumento non viene usato per un lungo periodo di tempo, rimuovere le pile e conservare il
prodotto in un luogo asciutto.
• Non accendere lo strumento in condizioni di luce molto forte.
• Maneggiare il prodotto allo stesso modo di una macchina fotografica. Sebbene i prodotto per visione
notturna Bushnell siano costruiti per durare a lungo, il tubo intensificatore dell’immagine è fatto di
vetro ed è soggetto a rompersi.
• Mantenere pulite le lenti. Per pulire l’esterno delle lenti dell’obiettivo e dell’oculare, si consiglia di usare
un kit per la pulizia delle macchine fotografiche. Seguire le istruzioni incluse nel kit.
• Non smontare il prodotto. Lo smontaggio non autorizzato non solo annulla la garanzia ma causa anche
danni dovuti al mancato uso di utensili e tecniche speciali.
GARANZIA/RIPARAZIONI
GARANZIA LIMITATA PER DUE ANNI
Si garantisce che questo prodotto Bushnell® sarà esente da difetti di materiale e fabbricazione per
due anni a decorrere dalla data di acquisto. In caso di difetto durante il periodo di garanzia, a nostra
discrezione ripareremo o sostituiremo il prodotto purché sia restituito franco destinatario. Sono esclusi
dalla garanzia eventuali danni causati da abuso, maneggiamento improprio, installazione o manutenzione
eseguiti da persone non autorizzate dal servizio di assistenza Bushnell.
A un prodotto restituito e coperto da questa garanzia occorre allegare quanto segue.
1) Assegno/ordine di pagamento per l’importo di 10 $US per coprire i costi di spedizione.
2) Nome e indirizzo da utilizzare per la restituzione del prodotto.
3) Una spiegazione del difetto.
4) Scontrino riportante la data di acquisto.
5) Il prodotto deve essere imballato in una scatola robusta, per prevenire danni durante il trasporto, e
va spedito franco destinatario a uno dei seguenti indirizzi.
RECAPITO NEGLI STATI UNITI RECAPITO IN CANADA
Bushnell Performance Optics Bushnell Performance Optics
Attn.: Repairs Attn.: Repairs
8500 Marshall Drive 25A East Pearce Street, Unit 1
Lenexa, Kansas 66214 USA Richmond Hill, Ontario L4B 2M9
Per prodotti acquistati fuori degli Stati Uniti o del Canada, rivolgersi al rivenditore per le clausole
pertinenti della garanzia. n Europa si può anche contattare la Bushnell a al seguente recapito.
BUSHNELL Performance Optics Gmbh
European Service Centre
MORSESTRASSE 4
D- 50769 KÖLN
GERMANIA
N. telefonico: +49 (0) 221 709 939 3
N. di fax: +49 (0) 221 709 939 8
Questa garanzia dà specifici diritti legali. Eventuali altri diritti variano da una nazione all’altra.
©2005 Bushnell Performance Optics
3938
Page 22

Prodotto LED di Classe 1 a norma IEC 60825-1/nov. 1993, appendice EN 60825-1A11/ott. 1996
Annotazione FCC
Questo apparecchio è stato testato e riscontrato conforme ai limiti stabiliti per gli apparati digitali
di classe B, ai sensi della Parte 15 delle normative FCC. Tali limiti sono stati fissati per fornire una
protezione ragionevole contro le interferenze dannose nelle installazioni residenziali. Questo apparecchio
genera, utilizza e può irradiare energia a radiofrequenza e, pertanto, se non viene installato e utilizzato
in conformità alle istruzioni fornite potrebbe interferire con le comunicazioni radio. Non è comunque
possibile garantire l’assenza delle interferenze in ogni installazione. Se l’apparecchio interferisce con la
ricezione radiotelevisiva, verificabile spegnendolo e riaccendendolo, si consiglia di eliminare l’interferenza
in uno dei seguenti modi:
• Riorentando o riposizionando l’antenna ricevente.
• Aumentando la distanza dall’apparecchio al ricevitore.
• Inserendo l’apparecchio nella presa di un circuito diverso da quello in cui è inserito il ricevitore.
• Rivolgersi, se necessario, al concessionario o ad un tecnico competente.
Utilizzare il cavo interfaccia schermato per soddisfare i limiti dei dispositivi digitali definiti nel
sottoparagrafo B della Parte 15 delle normative FCC.
Le specifiche e le caratteristiche di progettazione possono cambiare senza preavviso o alcun obbligo a
carico del produttore.
4140
Page 23

PORTUGUÊS
Parabéns pela aquisição de seu produto Bushnell com visão noturna. Os produtos com visão noturna da
Bushnell são compostos de tubos intensificadores de imagem e óptica de alta qualidade. Eles amplificam a luz
existente, permitindo fazer observações em condições que, para o olho nu, seriam demasiadamente escuras.
5
6
4
7
3
9
14
1
2
11
8
13
12
10
COMO FUNCIONA A VISÃO NOTURNA
Os produtos com visão noturna da Bushnell absorvem e amplificam a luz existente através da lente
objetiva; após a luz é focalizada no intensificador de imagem. No interior do intensificador, um fotocátodo
é “excitado” pela luz e converte a energia fotônica em elétrons. Esses elétrons aceleram no campo
eletrostático dentro do intensificador e golpeiam uma tela de fósforo (como a tela monocromática verde
de televisão), que emite uma imagem visível. É a aceleração dos elétrons que proporciona a captação e
melhoria da imagem. Isto é um dispositivo de Geração I.
Instalação das pilhas
• Desparafuse o compartimento de pilhas. (1).
• Insira duas pilhas “N” no compartimento, colocando primeiro a extremidade positiva.
• Feche a tampa do compartimento de pilhas.
Conexão do monóculo ao conjunto da cabeça
• Retire os plugues da caixa do monóculo (próxima ao compartimento de pilhas) (2)
• Conecte e aperte o suporte ao monóculo usando dois parafusos (3).
• Deslize o suporte em rabo-de-andorinha do conjunto da cabeça pela ranhura do suporte (4).
Como destacar o monóculo do conjunto da cabeça
• Afrouxe o botão localizado no suporte do conjunto da cabeça (5).
• Aperte a saliência de desengate na parte superior do botão. O monóculo não pode ser destacado a
menos que essa saliência seja pressionada (6).
• Afaste o conjunto da cabeça do monóculo
4342
Page 24

Como conectar o equipamento na cabeça
• Solte as duas tiras de Velcro® na parte posterior do conjunto para a cabeça.
• Deslize a cabeça para frente no sentido do conjunto, encaixando seu queixo no protetor.
• Feche as duas tiras de Velcro na parte posterior.
• Ajuste todas as tiras até o conjunto para a cabeça ficar confortável e seguro.
Ajuste do monóculo para a posição vertical
•
Empurre o botão montado lateralmente, situado na parte posterior do parafuso de conexão, para dentro (7).
• Empurre o monóculo para cima.
• Ele travará na posição vertical.
• Pressione novamente o botão para soltar.
Uso do botão de potência
• Se houver luz do dia, nunca ligue a luneta quando a tampa da lente estiver destacada. O orifício
minúsculo na tampa da lente permitirá testar a luneta durante a luz do dia.
• Para usar a luneta, pressione o botão ON (8). Quando o dispositivo estiver aceso, acenderá um
indicador vermelho (9).
• Para desligar a luneta, pressione o botão ON (8). A imagem desaparecerá lentamente, podendo levar
alguns minutos. Isso é normal e não constitui um defeito.
Para ativar o iluminador infravermelho
• O produto de visão noturna da Bushnell inclui um iluminador infravermelho (I.R) interno (10). Isso
permite enxergar na escuridão completa, quando não houver nenhuma fonte de luz disponível.
• Pressione o botão IR para ligar o I.R. (11). Isso ativará o iluminador infravermelho interno, permitindo
fazer observações na escuridão total, dentro de uma distância limitada.
• Não esqueça de desligar o IR após o uso pressionando o botão IR.
Para focalizar
• Retire a tampa da lente objetiva (12).
• Ajuste o anel de foco da lente objetiva até o infinito (13).
• Observando um objeto à distância (pelo menos a 12 metros), ajuste o anel de foco da ocular até obter
a imagem mais nítida possível (14).
•
Após o ajuste do anel de foco da ocular, basta ajustar o anel de foco da lente objetiva, conforme necessário.
IDENTIFICAÇÃO E SOLUÇÃO DE PROBLEMAS
Manchas na imagem.
Poderão ser observadas manchas na imagem. Elas variam de luneta para luneta e são imperfeições
cosméticas no seu interior, o que é normal em lunetas com visão noturna e não constituem defeito.
A luneta não liga.
Verifique se as pilhas estão instaladas corretamente. Substitua por pilhas novas. Verifique os contatos
das pilhas para assegurar que estão limpos e sem corrosão. O binóculo com visão noturna contém um
sensor de luz entre a lente objetiva e o iluminador infravermelho. Este sensor é um circuito de proteção
contra luzes brilhantes. Não cubra esse sensor ao usar o equipamento em condições escuras. Ao focalizar
a unidade durante o dia (lembre-se de que a tampa deve estar cobrindo a lente objetiva), é preciso cobrir
o sensor com o dedo.
A imagem não está bem focalizada.
Ajuste o foco nas oculares. Você deve estar afastado no mínimo 8 polegadas/0,2 metros do objeto
observado. Se isto não ajudar, limpe as lentes. Elas podem estar embaçadas ou empoeiradas.
A visibilidade diminui ou desaparece.
Os dispositivos com visão noturna funcionam amplificando a luz disponível: eles necessitam níveis
razoáveis de luz da luz/infravermelho para fornecer bons resultados. Fontes de brilho intenso como faróis
de carros podem fazer com que a visibilidade reduza ou desapareça completamente. Nunca aponte a
luneta para fontes de luz brilhantes nem a ligue em um ambiente com elevado brilho/luz do dia quando
4544
Page 25

a tampa da lente estiver removida. Se exposta à luz brilhante, os circuitos de proteção desligarão a
luneta automaticamente: ela poderá funcionar novamente após 1 ou 2 minutos. Condições atmosféricas
desfavoráveis como neblina ou ambientes extremamente escuros reduzirão a visibilidade da unidade.
Fontes de luz infravermelho, às quais as lunetas são sensíveis, reduzirão a capacidade de distância em
condições de baixa luminosidade.
A luneta pisca.
A luneta poderá piscar quando utilizada em um ambiente iluminado. Isso poderá ocorrer também
durante os primeiros segundos de uso em ambientes escuros.
CUIDADO E MANUTENÇÃO
•
Retire as pilhas e armazene o produto em um local seco se ele não será utilizado por um longo período.
• Evite ligar o produto em condições de luz extremamente brilhantes.
• Cuide desse produto da mesma forma que você cuida de sua câmara. Embora os produtos com visão
noturna da Bushnell são construídos com durabilidade, o tubo intensificador de imagens é feito de vidro
e pode quebrar.
• Mantenha a óptica limpa. Recomendamos usar um kit limpador de câmaras para limpar a parte externa
das lentes da ocular e objetiva. Siga as instruções que acompanham o kit.
• Não desmonte este produto. A desmontagem não autorizada não apenas anula a garantia, como também
poderá causar danos devido à falta de técnicas e ferramentas especiais.
GARANTIA / CONSERTO
GARANTIA LIMITADA DE DOIS ANOS
Seu produto Bushnell® oferece uma garantia contra defeitos nos materiais e fabricação por um período
de dois anos após a data de compra. Caso haja um defeito durante o prazo vigente desta garantia, iremos,
segundo nossa discrição, reparar ou substituir o produto, desde que você remeta o mesmo com porte
postal pré-pago. Esta garantia não cobre danos causados pelo uso indevido, manuseio impróprio e a
instalação ou manutenção realizada por qualquer outra empresa ou indivíduo, exceto o Departamento de
Serviços Autorizados da Bushnell (Bushnell Authorized Service Department).
Toda devolução feita sob esta garantia deverá incluir os itens relacionados abaixo:
1) Um cheque/money order no valor de US$ 10,00 para cobrir o custo de porte e manuseio
2) Nome e endereço para a devolução do produto
3) Explicação do defeito
4) Comprovante da data de compra
5 O produto deverá ser embalado em uma caixa para transporte resistente, a fim de evitar danos
durante o transporte, com porte de retorno pré-pago ao endereço relacionado abaixo:
Nos EUA envie para: No CANADÁ envie para:
Bushnell Performance Optics Bushnell Performance Optics
Attn.: Repairs Attn.: Repairs
8500 Marshall Drive 25A East Pearce Street, Unit 1
Lenexa, Kansas 66214 Richmond Hill, Ontário L4B 2M9
Para produtos adquiridos fora dos Estados Unidos ou Canadá, entre em contato com seu revendedor local
para obter informações de garantia aplicáveis ao produto adquirido. Na Europa, contate a Bushnell em:
BUSHNELL Performance Optics Gmbh
European Service Centre (Centro de Serviço na Europa)
MORSESTRASSE 4
D- 50769 KÖLN
ALEMANHA
Tel: +49 (0) 221 709 939 3
Fax: +49 (0) 221 709 939 8
4746
Page 26

Esta garantia concede-lhe direitos legais específicos. O comprador poderá ter outros direitos, que variam
conforme o país. ©2005 Bushnell Performance Optics
Produto LED da Classe 1 de acordo com a IEC 60825-1/nov de 1993, apêndice EN 60825-1A11/out de 1996
Nota da FCC:
Este equipamento foi testado e considerado estar em conformidade com os limites para um aparelho digital
de Classe B, de acordo com o Artigo 15 das Normas da FCC. Estes limites destinam-se a fornecer uma
protecção razoável contra interferências prejudiciais resultantes de uma má instalação. Este equipamento
gera, usa e pode irradiar energia de radiofrequência e, caso não seja instalado e utilizado conforme as
instruções, pode causar interferências nocivas nas comunicações de rádio. Contudo, não há qualquer
garantia de que essas interferências não irão ocorrer numa determinada instalação. Se este equipamento
causar, de facto, interferências nocivas na recepção televisiva ou de rádio, que pode constatar facilmente
ligando ou desligando o equipamento, recomendamos que o utilizador tente corrigir a interferência
através das seguintes medidas:
· Reorientar ou mudar a localização da antena de recepção.
· Aumentar a distância de separação entre o equipamento e o receptor.
· Ligar o equipamento a uma tomada de um circuito diferente daquele onde se encontra ligado o
receptor.
· Contactar e pedir ajuda ao distribuidor ou a um técnico qualificado de rádio/TV.
Com o equipamento tem de ser utilizado um cabo de ligação protegido, a fim de cumprir com os limites
estabelecidos para um aparelho digital de Classe B, de acordo com o Artigo 15 das Normas da FCC.
Estas especificações e concepções poderão ser alteradas sem aviso prévio ou qualquer outra obrigação da
parte do fabricante.
4948
Page 27

BUSHNELL OUTDOOR TECHNOLOGY
©2005 BUSHNELL PERFORMANCE OPTICS
WWW.BUSHNELL.COM
 Loading...