

Page 1

15-45x50mm
Spotting Scope
with Digital Camera
Model: 78-7348
LIT. #: 98-0465/08-04
Page 2

English…………………………………………………....
4-17
Français…………………………………………………..18-31
Español………………………………………………..….32-45
Deutsch……………………………………………..…….46-59
Italiano...…………………………………………..……..60-73
Português…..……………………..………………..…….74-87
32
Page 3

Congratulations on your purchase of the Bushnell ImageView®
spotting scope ! The Bushnell ImageView spotting scope takes
ENGLISH
the technology of digital photography and combines it with a
high-quality compact spotting scope. This allows you to observe
sporting events, wildlife, scenic vistas or anything you would
normally use a spotting scope for, and then save the image in a
built-in attached digital camera. You can then download these
images to your computer and e-mail them to your friends and
family, print off the picture using the included software or save
them in a photo album for future use.
4
System Requirements:
Pentium 166MMX minimum
(Recommended Pentium II 266)
Windows 95 / 98 /ME / NT and Windows 2000/XP
Minimum 32 MB of RAM
USB port
Minimum 200 MB of Hard Drive space with additional 65 MB space for IE and
DirectX
CD-ROM driver
Super VGA Monitor and video card
Software Installation:
To load software insert the CD into your CD-ROM drive and it will self-start. The CD contains
Roxio PhotoSuite, a photo editing program, as well as the drivers necessary for Windows
98/98SE to recognize the camera. Windows 2000, ME, and XP need no driver-the camera ‘s
photo files can be easily accessed as if they were on an external hard drive. Even if you have
photo-imaging software on your computer you prefer to use, and do not need the PhotoSuite
software, you will still need to install the drivers BEFORE CONNECTING the camera if you use
Windows 98/98SE.
Click the button on the CD startup screen labeled “Install Driver” if you have Windows 98,
or click “Install PhotoSuite” if you need photo editing software for Windows 98/2000/ME/XP.
The camera photo files are standard .jpg files that may be opened and viewed with any digital
imaging software. Follow the on screen instructions after clicking an install button. For more
details regarding connecting the camera and downloading photos, see the section titled
“Downloading the Pictures to Your Computer”.
5
Page 4
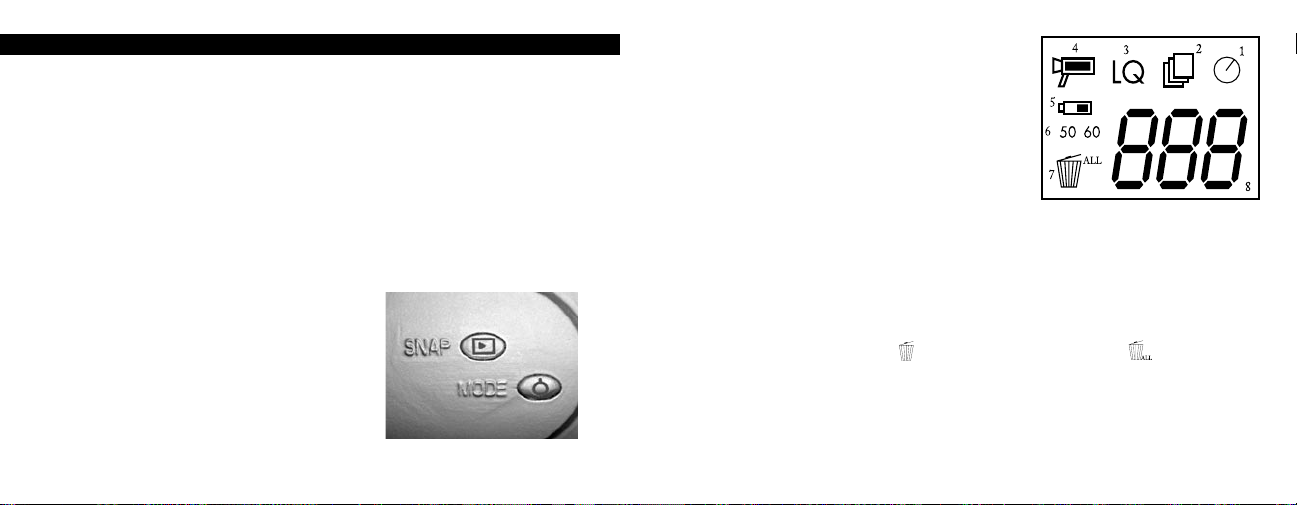
CAMERA OPERATION INSTRUCTIONS
Button Descriptions
A.
a. The MODE button has three
1. Power on: Press and hold button until camera turns on. When camera is
connected to a PC via the USB cable provided, the camera will power
on automatically
2. Power off: While camera is on, press and hold button until camera turns off.
If camera has not been used or if a button has not been pressed for over
2 minutes, the camera will automatically power off to save battery life. If the
camera is connected via USB, camera will not power off except when PC
powers off.
3. Mode change: press this button rapidly
to change modes.
b. The SNAP button has two
1. Take a picture: press this button to take
a picture when the camera is on. (But not
in the pc mode and mode change)
2. Select: in "Mode Change", press this
button to confirm the function that
is flashing.
functions:
functions:
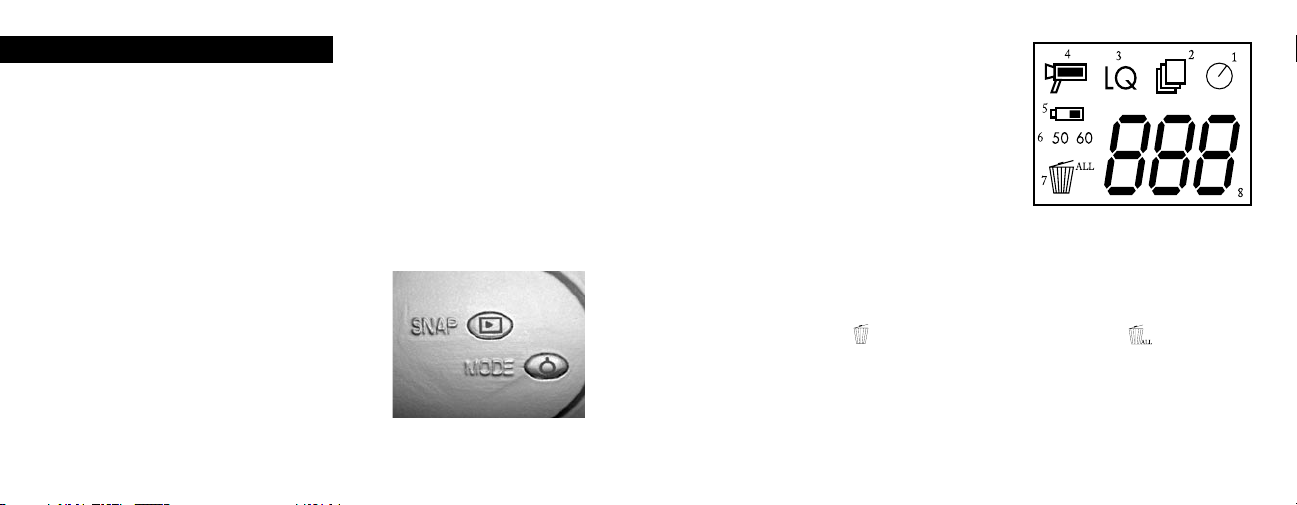
B. LCD Display
1. Timer: Select the timer to take a delayed
picture. This gives you approximately a
10 second delay.
2. Repeat Shot: T
with only one press of the SNAP button.
Shots are approximately 1 second apart.
3. Hi/Low Quality: No icon shows when
camera is in High Resolution Mode
(640 X 480). "LQ" shows when camera is in
Low Resolution Mode (320 X 240).
4. AVI Mode: This mode allows you to take
short movie clips, saved as ".avi" files.
5. Battery Indicator: Shows the amount of battery life left.
6. 50/60: Shows electrical power frequency output. "50" corresponds to 50Hz
electrical power frequency, and "60" corresponds to 60Hz electrical power
frequency, which is the frequency used in the United States. The correct setting
(i.e. 60 in the U.S., 50 in some countries) will not cause any flickering on images.
7. Delete Last/All: " " deletes the last picture taken, and " " deletes all the
pictures in the memory.
8. Picture Number/PC/Memory-Full: This area will show the number of pictures
in the memory when camera is in "Normal" mode. "PC" will appear when unit is
plugged in via USB cord to your PC. When memory is full in "Normal" mode,
display will show "FUL" and alarm will sound.
akes 3 continuous shots,
6
7
Page 5
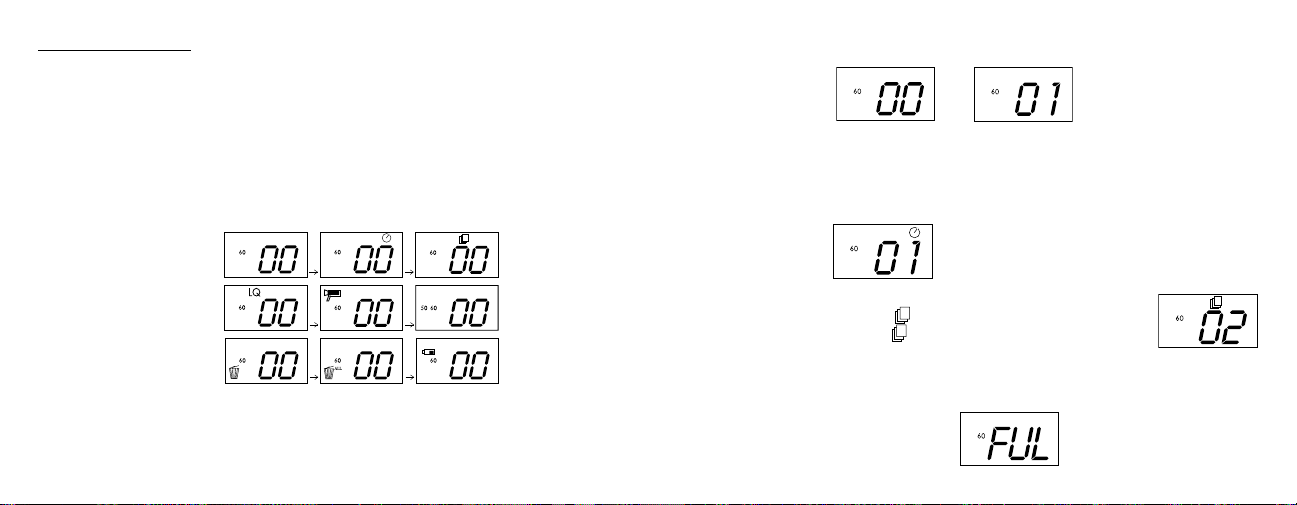
OPERATION GUIDE
The camera is powered by two "AAA" batteries (not included) or USB power (included)
1.
2. Insert two AAA alkaline batteries into battery compartment
3. Press and hold MODE button until camera turns on.
4. Press SNAP to take a picture, or press MODE button quickly to change mode
settings as described above. The camera is set at infinity and will not be focused
on an object closer than 20 feet.
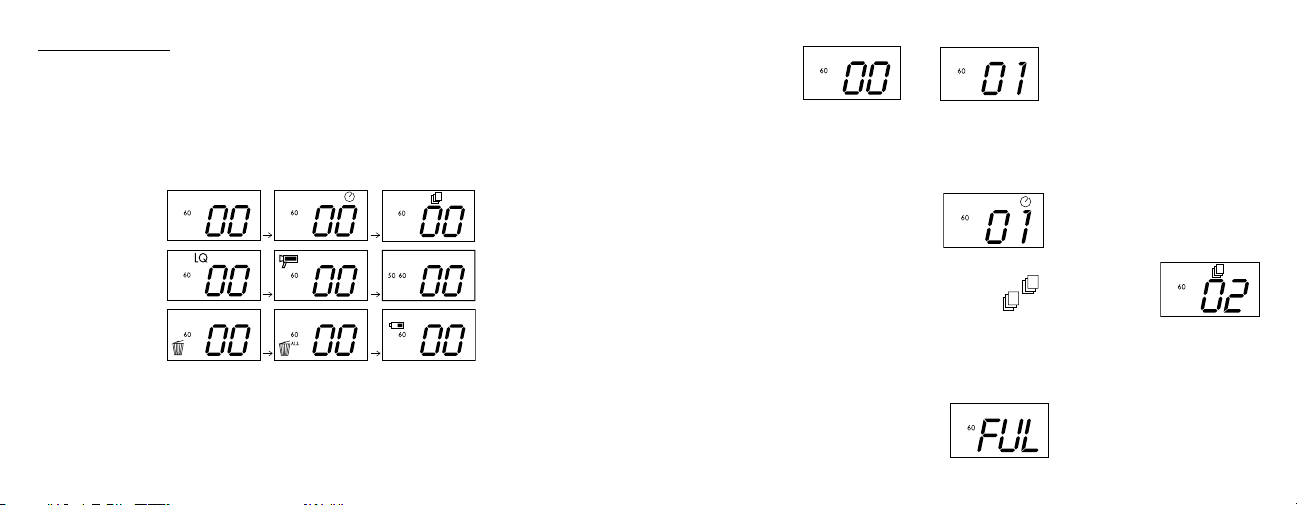
5. The mode setting operation is a cycle loop, so press MODE button to switch to
another mode. The loop order of the different modes is shown here:
9. When in "Normal" mode, pressing the MODE button will cause the camera to
enter "Mode Change."
10. To change to the "Self-Timer" mode, press MODE once and then press SNAP to
select. The self-timer is now on. The camera will remain in this mode until you
change the mode.
6. To change settings, toggle through the different modes by pressing the MODE
button. When a mode is selected, the indicator symbol on the LCD will start
flashing. You can then select that mode by then pressing the SNAP button.
7. When changing modes, if no buttons are pressed for 5 seconds, the camera will
return to normal mode.
8. When in "Normal" mode, press SNAP to take a picture.
8
11. When in "Normal" mode press MODE button twice to change
to "Repeat Shot" mode. When you see the " " icon blinking,
press SNAP to enter this mode (the “ “ icon will stop
blinking). By pressing and holding the SNAP button you
will now be able to take 3 consecutive pictures. The camera
will remain in this mode until you change the mode or until the
camera’s memory is full. When memory is full the display will show "FUL" and an
alarm will sound.
Press MODE
Press SNAP to enter this mode
Alarm will sound
9
Page 6
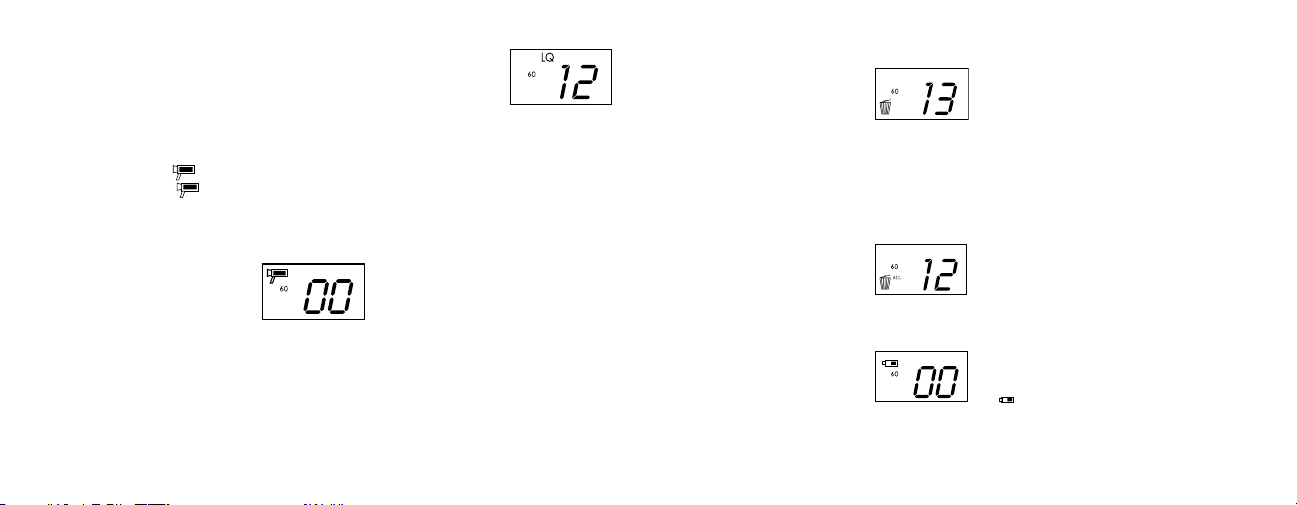
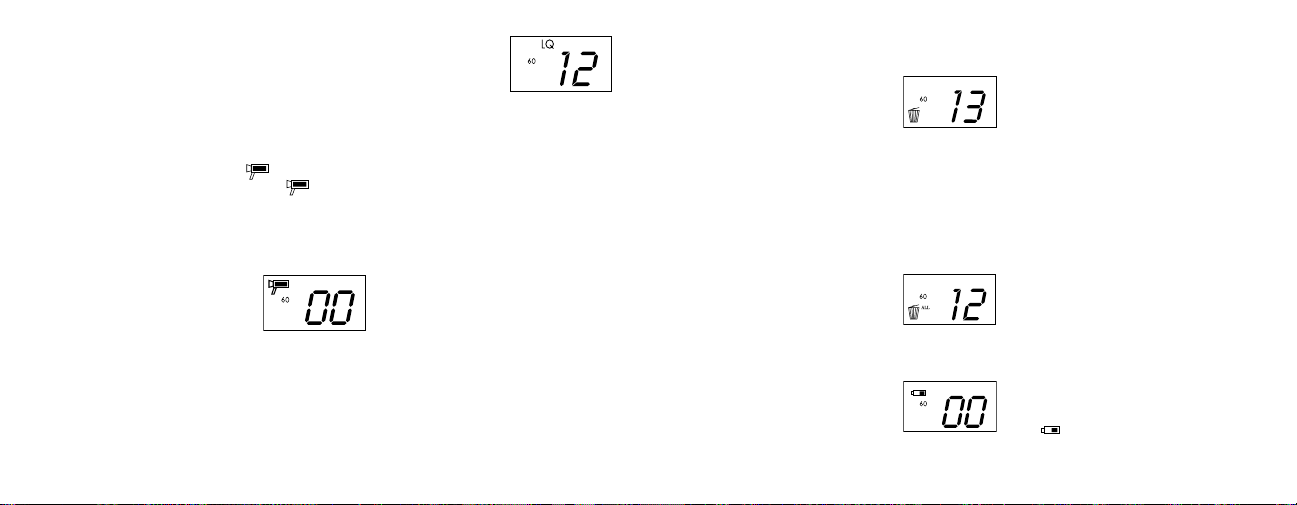
12. To enter "Low Resolution" mode, which will cause your
pictures to be of a lower resolution, but will also allow you to
store many more pictures in the camera’s memory, press the
MODE button 3
Press the SNAP button to select this mode. The "Low" icon
will then stop blinking. Entering this mode later and pressing
NAP again will return you to "High Resolution" mode.
S
13. When in "Normal" mode press the MODE button 4 times to enter the "AVI"
mode. The " " icon will begin to blink. Press the SNAP button to select this
mode. The " " will then stop blinking. Holding down the SNAP button will
take AVI clips as long as you continue to depress the button or until the memory
is full. Once you release the button the camera will revert back to "Normal" mode
so you can take still (i.e. non-action) pictures again as long as there is unused
memory left.
times until you see the "LQ" icon blinking.
Repeat step 11 if you want to change the camera to the AVI mode again.
14. You can chose between the 50mhz and 60mhz settings for the camera output.
The camera’s default mode is the "60" mode, which matches the power frequency
for the United States. To change to the "50" mode, press the SNAP button until
the "60" changes to "50." Confirm the selection by pressing the SNAP button. To
avoid any flickering on the picture, the correct power frequency (either 50 or 60)
for your country must be selected.
15. If "Delete Last" mode is selected, the display will show the following:
delete last picture then quit this mode
Press SNAP to delete the last picture from the camera’s memory.
16. If "Delete All" mode is selected, the word "ALL" appears next to the icon on the
display. To delete all pictures in the camera’s memory, select this mode. The picture
number will then blink. Press and hold the SNAP button. You will hear a tone that
becomes higher as the pictures are deleted. Once complete, the picture number
will reset to zero.
If no button is pressed for a while, the camera returns to stand-by.
17. If the "Battery" indicator is only one third highlighted, it is necessary to replace the
batteries soon.
the " " icon will blink and buzzer will sound
10
11
Page 7

18. If the camera is connected to your PC via USB cable, the display will show
SPOTTING SCOPE INSTRUCTIONS
MOUNTING
DOWNLOADING THE PICTURES TO YOUR COMPUTER:
The camera can be detached for more convenient downloading, just slide it out of the mounting
bracket. Windows 98 users must install the driver (inser
to connecting the camera , and following these instructions. Windows 2000, ME, and XP do not
require a driver. Once the camera is connected to your PC with the supplied USB cable, it will be
recognized as a "mass storage device". Open Windows Explorer or My Computer, the camera is
a new "Removable Disk" icon. Open this "Disk", and locate your photos (.jpg files) inside
shown as
the folders. Click on an individual photo file, or use "Edit>Select All" if you want to download all
the photos. Then choose "Move to Folder..." in the Edit menu. You may choose an existing folder
(e.g. "My Pictures") or create a new folder located
your photos will be transferred from the camera to that folder on your hard drive. The camera
then be disconnected-you should first click the camera's icon in your system tray (move the
may
mouse cursor over icons in lower right corner of screen to find this) and follow the directions to
stop and remove the USB device. T
"Install MGI PhotoSuite 5SE") from the included CD, or use any other photo editing software.
Select “File>Open” in the photo editor and navigate to the folder containing the transferred camera
files. Refer to the photo software’s instruction manual or Help menu for specific details on editing,
resaving and printing photos.
12 13
o view and edit your photos, you may install PhotoSuite (click
t the CD, and click "Install Driver") prior
and named as you wish. Then click "OK" and
Remove the spotting scope from the packaging. Attach the tripod with
the provided screw to the tripod mount hole located on the base of the
spotting scope. S
MAGNIFICATION
Note: Some specialized spotting scopes have a fixed magnification with
no zoom. For zoom magnification scopes, grasp and rotate magnification
ring to change power. The magnification ring is typically found near the
eyepiece. When rotating this ring, the image appears to zoom in and out.
It may be necessary to re-focus when the magnification is changed.
FOCUSING
ost focus rings are found in front of the eyepiece on the spotting scope
M
body. By turning this adjustment, the image will sharpen until in focus.
On some spotting scopes, the focus ring is on or near the eyepiece.
USING THE TRIPOD
(Included with most spotting scopes, except special use spotting scopes)
pread the tripod legs and set on a solid surface.
Page 8

To pan side to side or up and down, unloosen the tripod control handle by rotating it counterclockwise. To
lock into a desired position, rotate the tripod control handle clockwise.
CAUTION: DO NOT LOOK AT THE SUN THROUGH THIS SPOTTING
SCOPE AS SEVERE DAMAGE TO YOUR EYES MAY RESULT!
CARE
The lenses of your spotting scope are coated for highest light transmission. As with any coated optics,
special care must be taken in cleaning the lenses. Moisten the surface of the lens slightly and wipe dry
using a circular motion starting at the center of the lens. Wipe or brush off any dirt or dust on the outside
of the spotting scope.
CAUTION
ever disassemble your spotting scope. Special tools and equipment are required for service and irreparable
N
damage can result from untrained attempted service. Unauthorized service may also void the warranty.
14
TWO-YEAR LIMITED WARRANTY
Your Bushnell® product is warranted to be free of defects in materials and workmanship for
two years after the date of purchase. In the event of a defect under this warranty, we will, at
our option, repair or replace the product, provided that you return the product postage prepaid.
This warranty does not cover damages caused by misuse, improper handling, installation, or
maintenance provided by someone other than a Bushnell Authorized Service Department.
Any return made under this warranty must be accompanied by the items listed below:
1) A check/money order in the amount of $10.00 to cover the cost of postage and handling
2) Name and address for product return
3) An explanation of the defect
4) Proof of Date Purchased
5) Product should be well packed in a sturdy outside shipping carton, to prevent
damage in transit, with return postage prepaid to the address listed below:
IN
U.S.A. Send To: IN CANADA Send To:
Bushnell Performance Optics Bushnell Performance Optics
Attn.: Repairs Attn.: Repairs
8500 Marshall Drive 25A East Pearce Street, Unit 1
Lenexa, Kansas 66214 Richmond Hill, Ontario L4B 2M9
For products purchased outside the United States or Canada please contact your local dealer for
applicable warranty information. In Europe you may also contact Bushnell at:
BUSHNELL Performance Optics Gmbh
European Service Centre
MORSESTRASSE 4
D- 50769 KÖLN
GERMANY
Tél: +49 (0) 221 709 939 3
Fax: +49 (0) 221 709 939 8
This warranty gives you specific legal rights. You may have other rights which vary from country to country.
©2004 Bushnell Performance Optics
15
Page 9
Make sure you download any pictures from your camera
BEFORE you remove the batteries from the camera.
Do NOT look directly at the sun through your spotting scope
Doing so may cause permanent eye damage.
2 AAA Batteries Required, Not Included
WARNING
W
ARNING
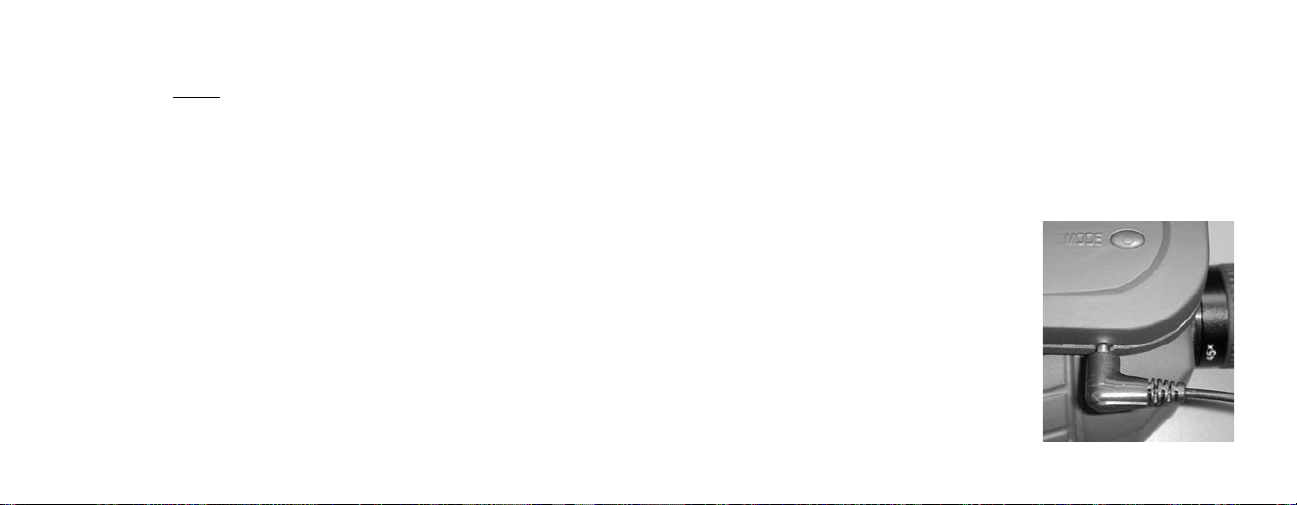
REMOTE SHUTTER CABLE
Whenever possible, using the included remote shutter release cable is recommended to avoid
accidentally jarring the camera when the SNAP button is pressed. Due to the high magnification
of the camera, any motion when the shutter is open can result in photos with a blurred or shaky
appearance. The remote cable is plugged into the jack on the bottom of the camera pod as shown
below. Pressing the button on the remote will then take a photo, just as if SNAP was pressed.
FCC Note:
This equipment has been tested and found to comply with the limits for a Class B digital device, pursuant to Part
15 of the FCC Rules. These limits are designed to provide reasonable protection against harmful interference in a
residential installation. This equipment generates, uses and can radiate radio frequency energy and, if not installed
and used in accordance with the instructions, may cause harmful interference to radio communications. However,
there is no guarantee that interference will not occur in a particular installation. If this equipment does cause harmful
interference to radio or television reception, which can be determined by turning the equipment off and on, the user
is encouraged to try to correct the interference by one or more of the following measures:
· Reorient or relocate the receiving antenna.
· Increase the separation between the equipment and receiver.
· Connect the equipment into an outlet on a circuit different from that to which the receiver is connected.
· Consult the dealer or an experienced radio/TV technician for help.
The shielded interface cable must be used with the equipment in order to comply with the limits for a digital device
pursuant to Subpart B of Part 15 of FCC Rules.
If the remote shutter cable is not available, you may instead
use the self-timer (as previously described in the manual)
o trip the shutter without touching or jarring the camera.
t
However, the timer will not allow you to take a photo at the
exact moment you choose, as the remote cable will.
1716
Page 10

Félicitations et merci d'avoir acheté d'une lunette terrestre
ImageView® de Bushnell ! La technologie de la photographie
numérique associée à celle d'une lunette terrestre de haute qualité
FRANÇAIS
se retrouve dans d'une lunette terrestre ImageView de Bushnell.
Cet instrument permet d'observer des rencontres sportives, la
faune, des paysages ou tout ce que l'on regarde normalement
avec d'une lunette terrestre puis de sauvegarder ces images au
moyen de l'appareil photo numérique intégré. Il est alors possible
de transférer ces images sur un ordinateur et de les envoyer aux
amis et à la famille par courrier électronique, ou de les imprimer à
l'aide du logiciel inclus, ou de les conserver dans un album-photo
pour une utilisation ultérieure.
18
Système Requis :
Pentium 166MMX minimum
(Pentium II 266 recommandé)
Windows 95 / 98 / ME / NT et Windows 2000/XP
Minimum 32 Mo de RAM
Port USB
Minimum 200 Mo d'espace sur disque dur avec
espace supplémentaire de 65 Mo pour IE et DirectX
Lecteur de CD-ROM
Écran Super VGA et carte vidéo
INSTALLATION DU LOGICIEL :
Pour charger le logiciel, introduisez le CD dans le lecteur de CD-ROM et le logiciel se lance de
lui-même. Le CD contient Roxio PhotoSuite, un programme de montage de photos, ainsi que les
pilotes nécessaires pour que Windows 98/98SE puisse reconnaître l’appareil photo. Aucun pilote
n’est nécessaire pour Windows 2000, ME et XP ; il est aussi facile d’accéder aux fichiers photos de
l’appareil que s’ils étaient sur un disque dur externe. Même si l’ordinateur contient déjà un logiciel de
photos-images que vous préférez utiliser et ne nécessite pas le logiciel PhotoSuite, il est cependant
nécessaire d’installer les pilotes AVANT DE CONNECTER l’appareil photo, si l’ordinateur comporte
Windows 98/98SE.
Sur l’écran de lancement du CD, cliquez sur le bouton appelé « Installer le pilote » si vous avez
Windows 98 ou cliquez sur « Installer PhotoSuite » si vous avez besoin d’un logiciel de montage de
photos pour Windows 98/2000/ME/XP. Les fichiers photos de l’appareil photo sont des fichiers .jpg
standard qui peuvent être ouverts et regardés avec n’importe quel logiciel d’imagerie numérique.
Suivez les instructions de l’écran après avoir cliqué sur un bouton d’installation. Pour plus de détails
concernant la connexion de l’appareil photo et le téléchargement de photos, consultez la section
intitulée « Transfert des photos vers un ordinateur ».
19
Page 11
INSTRUCTIONS SUR L'UTILISATION DE L'APPAREIL PHOTO
Description des Boutons
A.
a. Le bouton de MODE a trois
1. Mise sous tension: Maintenez le bouton enfoncé jusqu'à ce que l'appareil
photo se mette sous tension. Lorsque l'appareil est connecté à un PC à l'aide
du câble USB fourni, il se met sous tension automatiquement.
2. Mise hors tension: Lorsque l'appareil est sous tension, maintenez le bouton
enfoncé jusqu'à ce qu'il se mette hors tension. Si l'appareil n'a pas été utilisé
ou si un bouton n'a pas été actionné depuis plus de 2 minutes, l'appareil se
met automatiquement hors tension pour économiser l'énergie des piles. Si
l'appareil est connecté par le câble USB, il ne se met hors tension que lorsque
le PC est mis hors tension.
3. Changement de mode: Appuyez
brièvement sur ce bouton pour changer
de mode.
b. Le bouton SNAP a deux
1. Prendre une photo: Appuyez sur ce
bouton pour prendre une photo quand
l'appareil est sous tension (mais pas au
mode PC ni au changement de mode).
2. Sélectionner: Au Changement de
mode, appuyez sur ce bouton pour
confirmer la fonction qui clignote.
fonctions:
fonctions:
20
B. Écran LCD
1. Minuterie: Sélectionnez la minuterie pour
prendre une photo avec délai. Elle donne
un délai d'environ 10 secondes.
2. Rafale: Prend 3 images en continu, sur une
seule pression du bouton SNAP. Les prises
de vue sont à environ 1 seconde d'écart.
3. Haute/basse qualité: A
n'apparaît lorsque l'appareil est au mode
haute résolution (640 x 480). « LQ »
apparaît lorsque l'appareil est au mode
basse résolution (320 x 240).
4. Mode AVI: Ce mode permet de prendre de courts clips vidéo, sauvegardés en
fichiers « .avi ».
5. Indicateur des piles: Indique la quantité d'énergie restant dans les piles.
6. 50/60: I
de courant électrique de 50 Hz et « 60 » correspond à la fréquence de 60 Hz qui
7. Effacer la dernière/toutes: Efface la dernière photo prise, et efface toutes les
8. Nombre de photos/PC/mémoire pleine: Cet emplacement indique le nombre de
ndique la fréquence du courant électrique. « 50 » correspond à la fréquence
est celle utilisée aux États-Unis. Le réglage correct (c'est-à-dire 60 aux États-Unis et
50 dans d'autres pays) n'entraînera pas de scintillement sur les images.
photos de la mémoire.
photos dans la mémoire quand l'appareil est au mode Normal. « PC » apparaît
quand l'appareil est branché à un PC par l'intermédiaire du câble USB. Au mode
Normal, si la mémoire est pleine, l'affichage indique « FUL » (pleine) et un
avertisseur retentit.
ucune icône
21
Page 12
GUIDE D'UTILISATION
1. L'appareil photo est alimenté par deux piles de type AAA (non incluses) ou le câble
USB (inclus).
2. Mettez deux piles alcalines de type AAA dans le compartiment des piles.
3. Maintenez le bouton de MODE enfoncé jusqu'à ce que l'appareil se mette sous
tension.
Appuyez sur SNAP pour prendre une photo, ou brièvement sur le bouton de MODE
4.
changer le réglage de mode, comme décrit ci-dessus. L'appareil est réglé sur
pour
l'infini et n'effectuera pas la mise au point sur un objet à moins de 6 mètres.
5. L'opération de réglage de mode s'effectue sur un cycle en boucle ; appuyez sur le
bouton de MODE pour passer à un autre mode. L'ordre des différents modes sur la
est représenté ci-dessous :
boucle
8. Au mode Normal, appuyez sur SNAP pour prendre une photo.
9. Au mode Normal, une pression sur le bouton de MODE fait passer l'appareil au
Changement de mode.
10.Pour passer au mode de Minuterie automatique, appuyez une fois sur MODE puis
sur SNAP pour sélectionner. La minuterie automatique est alors enclenchée. L'appareil
este à ce mode jusqu'au changement suivant.
r
6. Pour changer de réglage, passez par les différents modes en appuyant sur le bouton
de MODE. Quand un mode est sélectionné, le symbole indicateur de l'écran LCD
commence
Lors du changement de mode, si aucun bouton n'a été actionné depuis 5 secondes,
7.
l'appareil retourne au mode Normal.
22
à clignoter. Sélectionnez alors ce mode en appuyant sur le bouton SNAP.
Appuyez sur MODE.
u mode Normal, appuyez deux fois sur MODE pour passer au
11. A
mode Rafale. Quand l'icône “
Appuyez sur SNAP pour entrer dans ce mode et un avertisseur retentit.
” clignote, appuyez sur SNAP pour
entrer dans ce mode (l'icône“ “cesse de clignoter). En maintenant
bouton SNAP enfoncé, il est alors possible de prendre 3 photos
le
consécutives.
L'appareil reste à ce mode jusqu'à ce que l'on change
de mode ou que la mémoire soit pleine. Lorsque la mémoire est pleine, l'affichage
indique "FUL" et un avertisseur retentit.
et tonalité d'alarme
23
Page 13
12. Pour entrer au mode de Basse résolution auquel les photos
sont d'une résolution inférieure, mais qui permet de stocker
davantage de photos dans la mémoire, appuyez 3 fois sur le
bouton de MODE jusqu'à ce que l'icône « LQ » clignote.
ppuyez sur SNAP pour sélectionner ce mode. L'icône «Low»
A
cesse
alors de clignoter. Une entrée dans ce mode plus tard et une nouvelle
pression sur SNAP ramènent au mode de Haute résolution.
13. Au mode Normal, appuyez 4 fois sur le bouton de MODE pour entrer au
mode "AVI". L'icône “ ” commence à clignoter. Appuyez sur SNAP pour
sélectionner ce mode. L'icône “ “ cesse alors de clignoter. Maintenez le bouton
SNAP enfoncé
jusqu'à ce que la mémoire soit pleine. Une fois le bouton relâché, l'appareil
retourne au mode Normal pour que l'on puisse prendre d'autres photos (sans
action), tant qu'il reste de la mémoire disponible. Refaites l'opération 11 pour
revenir au mode AVI.
pour prendre des clips AVI jusqu'au relâchement du bouton ou
15. Si le mode « Delete Last » (effacer la dernière) est sélectionné,
l'affichage indique :
Appuyez sur SNAP pour
16. Si le mode « Delete All » (effacer tout) est sélectionné, le mot « ALL » apparaît près
de l'icône de l'écran. Pour effacer toutes les photos de la mémoire, sélectionnez ce
mode. Le nombre de photos clignote alors. Maintenez le bouton SNAP enfoncé.
Une tonalité sonore devient plus forte à mesure que les photos s'effacent. Une fois
l'opération terminée, le nombre de photos est remis à zéro. Si aucun bouton n'est
actionné pendant un certain temps, l'appareil retourne au mode de veille.
effacer la dernière photo de la mémoire.
et effacer la dernière photo puis sortir de ce mode
14. Il est possible de choisir entre les réglages de 50 Hz et 60 Hz pour la sortie de
l'appareil. Le mode par défaut est celui de 60 qui correspond à la fréquence utilisée
aux États-Unis. Pour passer au mode de 50, appuyez sur le bouton SNAP jusqu'à
ce que 60 devienne 50. Confirmez la sélection en appuyant sur SNAP. Pour éviter
tout scintillement sur l'image, la fréquence correcte (50 ou 60) correspondant à
celle du pays doit être sélectionnée.
24
17. Si l'indicateur des piles n'est surligné que sur un tiers, il est nécessaire de les
remplacer sans tarder.
L'icône " " de pile clignote et la tonalité retentit
25
Page 14

18. Si l'appareil est connecté à un PC au moyen du câble USB, l'écran indique
TRANSFERT DES PHOTOS VERS UN ORDINATEUR :
Il est possible de détacher l’appareil photo pour que le transfert soit plus commode ; glissez-le simplement hors
du support de fixation. Les utilisateurs de Windows 98 doivent installer le pilote (insérez le CD et cliquez sur «
Installer le pilote ») avant de connecter l’appareil photo ; suivez ces instructions. Windows 2000, XP et ME ne
nécessitent pas de pilote. Une fois que l’appareil photo est connecté au PC avec le câble USB fourni, il est reconnu
comme « dispositif de mémoire de masse ». Ouvrez Windows Explorer ou Mon ordinateur; l’appareil photo est
représenté comme une icône de « disque amovible ». Ouvrez ce « disque » et repérez vos photos (fichiers .jpg) à
l’intérieur des dossiers. Cliquez sur le fichier d’une photo individuelle ou utilisez « Modifier>Sélectionner tout
» si vous voulez transférer toutes les photos. Puis choisissez « Déplacer au dossier... » dans le menu de Modification. Vous pouvez choisir un dossier existant (ex. : « Mes photos ») ou créer un nouveau dossier que vous placerez
et nommerez comme bon vous semble. Puis cliquez sur « OK » et vos photos seront transférées de l’appareil
photo vers ce dossier, sur le disque dur. L’appareil photo peut alors être déconnecté ; vous devez d’abord cliquer
sur l’icône de l’appareil dans le plateau de l’ordinateur (déplacez pour cela le curseur de la souris au-dessus des
icônes du coin inférieur droit de l’écran) et suivez les instructions pour désactiver et retirer le dispositif USB. Pour
observer et modifier vos photos, vous pouvez installer PhotoSuite (cliquez sur « Installer MGI PhotoSuite 5SE
») du CD inclus ou utiliser n’importe quel autre logiciel de montage de photos. Sélectionnez « Fichier>Ouvrir »
dans le programme de photos et naviguez jusqu’au dossier contenant les fichiers transférés depuis l’appareil photo.
Consultez le manuel d’utilisation du logiciel de photos ou le menu d’aide pour les détails sur la modification, la
nouvelle sauvegarde et l’impression des photos.
INSTRUCTIONS POUR D'UNE LUNETTE TERRESTRE
MONTAGE
Remarque : Certaines lunettes terrestres particulières n’utilisent pas de trépied. Toutefois, ces instructions
devraient être pertinentes pour la plupart des trépieds. Sortir la lunette terrestre de son carton. Visser le
trépied dans le trou de montage à la base de la lunette. Déployer le trépied et le placer sur une surface
ferme.
GROSSISSEMENT
emarque : Certaines lunettes terrestres particulières offrent un grossissement fixe et ne sont pas équipées
R
d’un zoom. Si la lunette terrestre est équipée d’un zoom, tourner la bague de grossissement pour changer la
puissance. La bague de grossissement se trouve généralement près de l’oculaire. Selon le sens dans lequel
la bague est tournée, le point observé semble se rapprocher ou s’éloigner. Une fois que le grossissement a
été changé, il peut être nécessaire de refaire la mise au point.
MISE AU POINT
Sur la plupart des lunettes terrestres, la bague de mise au point se trouve devant l’oculaire. Tourner
cette bague pour accroître la netteté de l’image jusqu’à ce qu’elle soit satisfaisante. Sur certaines lunettes
terrestres, la bague de mise au point se trouve sur l’oculaire ou à sa proximité.
UTILISATION DU TRÉPIED
(Inclus avec la plupart des lunettes terrestres, sauf certains modèles particuliers)
Pour orienter la lunette terrestre vers le haut ou le bas, desserrer la manette de contrôle en la tournant dans
le sens inverse des aiguilles d’une montre. Pour verrouiller sur position désirée, tourner la poignée dans le
sens des aiguilles d’une montre.
2726
Page 15

ATTENTION: NE PAS OBSERVER LE SOLEIL AVEC cette lunette terrestre ,
CE QUI POURRAIT CAUSER DES LÉSIONS OCULAIRES GRAVES !
ENTRETIEN
Les lentilles de cette lunette terrestre sont dotées d’un revêtement assurant une transmission maximum de
la lumière. Comme avec tout revêtement optique, des précautions particulières doivent être prises lors du
nettoyage des lentilles. Humecter légèrement la surface de la lentille et essuyer en utilisant un mouvement
circulaire, en partant du centre. Essuyer ou brosser la poussière ou les saletés se trouvant sur l’extérieur du
télescope.
ATTENTION
e jamais démonter la lunette terrestre. Des outils et équipements spéciaux sont requis pour l’entretien
N
et le démontage par une personne non qualifiée peut causer des dommages irréparables. Les entretiens et
réparations non autorisés peuvent entraîner l’annulation de la garantie.
N'oubliez pas de transférer les photos de l'appareil
AVERTISSEMENT
AVANT d'enlever les piles.
28
NE
REGARDEZ JAMAIS le soleil directement dans d'une
V
ous risqueriez des lésions oculaires permanentes.
FONCTIONNE SUR 2 PILES AAA, NON INCLUSESS
Remarque relative à la FCC (Commission fédérale des télécommunications)
Ce matériel a été testé et sʼest révélé être conforme aux limites dʼun dispositif numérique de classe B, conformément à la section 15 de la réglementation FCC. Ces limites ont été établies pour assurer une protection raisonnable
contre les parasites nuisibles dans les immeubles résidentiels. Ce matériel produit, utilise et peut émettre de lʼénergie
radiofréquence ; en conséquence, sʼil nʼest pas installé et utilisé en conformité avec les instructions, il risque de
provoquer des parasites nuisibles aux communications radio. Toutefois, il nʼest pas garanti que des parasites ne se
produiront pas dans une installation particulière. Si ce matériel causait des parasites nuisibles à la réception radio
ou télévision, qui peuvent être déterminés en mettant le matériel hors tension puis sous tension, lʼutilisateur peut
essayer de remédier au problème en appliquant lʼune ou plusieurs des mesures suivantes :
· Réorienter ou déplacer lʼantenne de réception.
· Augmenter la distance séparant le matériel du récepteur.
· Connecter le matériel à une prise de courant ou à un circuit différent(e) de celui (celle) auquel (à laquelle) le
récepteur est relié.
· Consulter le concessionnaire ou un technicien radio/TV expérimenté.
Le câble dʼinterface blindé doit être utilisé avec le matériel afin dʼêtre conforme aux limites dʼun dispositif numérique, conformément à la sous-section B de la section 15 de la réglementation FCC.
AVERTISSEMENT
lunette terrestre
29
Page 16

Votre produit Bushnell® est garanti exempt de défauts de matériaux et de fabrication pendant deux ans après la date
d'achat. Au cas où un défaut apparaîtrait sous cette garantie, nous nous réservons l'option de réparer ou de remplacer
le produit, à condition de nous le renvoyer en port payé. La présente garantie ne couvre pas les dommages causés
par une utilisation, une manipulation, une installation incorrecte(s) ou un entretien incorrect ou fourni par quelqu'un
d'autre qu'un centre de réparation agréé par Bushnell.
Tout retour effectué dans le cadre de la présente garantie doit être accompagné des articles indiqués ci-dessous :
1) Un chèque ou mandat d'une somme de 10,00 $ US pour couvrir les frais d'envoi et de manutention
2) Le nom et l'adresse pour le retour du produit
3) Une description du défaut constaté
4) La preuve de la date d'achat
5) Le produit doit être emballé soigneusement, dans un carton d'expédition solide, pour éviter qu'il ne soit
endommagé durant le transport ; envoyez-le en port payé, à l'adresse indiquée ci-dessous :
Aux États-Unis, envoyez à : Au CANADA, envoyez à :
Bushnell Performance Optics Bushnell Performance Optics
Attn.: Repairs Attn.: Repairs
8500 Marshall Drive 25A East Pearce Street, Unit 1
Lenexa, Kansas 66214 Richmond Hill, Ontario L4B 2M9
Pour les produits achetés en dehors des États-Unis et du Canada, veuillez contacter votre distributeur local pour tous
renseignements concernant la garantie. En Europe, vous pouvez aussi contacter Bushnell au :
BUSHNELL Performance Optics Gmbh
European Service Centre
MORSESTRASSE 4
D- 50769 Cologne
Allemagne
Tél: +49 (0) 221 709 939 3
Fax: +49 (0) 221 709 939 8
GARANTIE LIMITÉE de DEUX ans
La présente garantie vous donne des droits légaux spécifiques.
Vous pouvez avoir d'autres droits qui varient selon les pays.
©2004 Bushnell Performance Optics
CÂBLE D’OBTURATEUR À DISTANCE
Chaque fois que possible, il est recommandé d’utiliser le câble de commande d’obturateur à
distance inclus, afin d’éviter de faire bouger l’appareil photo par mégarde en appuyant sur le bouton SNAP (déclencheur). En raison du fort grossissement de l’appareil photo, tout mouvement
lorsque l’obturateur est ouvert peut provoquer des clichés d’aspect flou ou indistinct. Le câble de
commande à distance se branche sur le jack situé au bas de la nacelle de l’appareil photo, comme
illustré ci-dessous. Une pression sur le bouton de la télécommande permet alors de prendre une
photo, tout comme une pression sur le bouton SNAP.
Si le câble de commande d’obturateur à distance n’est pas disponible,
vous pouvez utiliser la minuterie automatique (comme décrit
précédemment dans le manuel) pour déclencher l’obturateur sans
toucher ni faire bouger l’appareil photo. Toutefois, la minuterie ne
permet pas de prendre une photo au moment exact choisi, comme il
est possible de le faire avec le câble de commande à distance.
3130
Page 17

¡Felicidades por haber comprado unos telescopio de localización
ImageView® de Bushnell! Lo telescopio de localización ImageView
de Bushnell toman la tecnología de fotografía digital y la combinan
ESPAÑOL
en unos telescopio de localización de alta calidad. De esta forma
podrá observar acontecimientos deportivos, la fauna y flora
silvestres, vistas o cualquier cosa para la que use normalmente los
telescopios de localización , y guardar la imagen en una cámara
digital incorporada. Luego podrá descargar esas imágenes en
su ordenador/computador y enviárselas por correo electrónico a
su familia y amigos, imprimir las imágenes usando el software
incluido o guardarlas en un álbum fotográfico para uso futuro.
Requisitos del sistema:
• Pentium 166MMX mínimo (Se recomienda Pentium II 266)
• Windows 95 / 98 /ME / NT y Windows 2000/XP
• Mínimo de 32 MB de RAM
• Puerto USB
• Mínimo de 200 MB de espacio en disco duro con espacio adicional
de 65 MB para IE y DirectX
• CD-ROM
• Monitor Super VGA y tarjeta de vídeo
INSTALACIÓN DEL SOFTWARE:
Para cargar el software, inserte el CD en la unidad de disco CD-ROM y se ejecutará automáticamente. El CD
contiene Roxio PhotoSuite, un programa de edición de fotografías, así como los controladores necesarios para
que Windows 98/98SE pueda reconocer la cámara. Windows 2000, ME y XP no necesitan ningún controladorse puede acceder con facilidad a los archivos fotográficos de la cámara, como si estuvieran en una unidad
externa de disco duro. Aun cuando tenga un software de formación de imágenes fotográficas en su ordenador
que prefiera usar y no necesite el software PhotoSuite, tendrá que instalar los controladores ANTES DE CONECTAR la cámara si usa Windows 98/98SE.
Haga clic en el botón de la pantalla inicial del CD llamada “Instalar Controlador” si tiene Windows 98, o
haga clic en “Instalar PhotoSuite” si necesita un software de edición de fotografías para Windows 98/2000/
ME/XP. Los archivos fotográficos de la cámara son archivos .jpg estándar que se pueden abrir y ver con
cualquier software de formación de imágenes digital. Siga las instrucciones que aparecen en pantalla después
de hacer clic en el botón de instalación. Para más detalles sobre la conexión de la cámara y cómo descargar las
fotografías, consulte la sección titulada “Cómo descargar las fotografías en su ordenador”.
32
33
Page 18

INSTRUCCIONES DE FUNCIOMIENTO DE LA CÁMARA
Descripciones de los Botones
A.
a. El botón MODE (Modalidad)
1. Encendido: Pulse y mantenga pulsado el botón hasta que se encienda la
cámara. Si la cámara está conectada a un PC por medio del cable USB
proporcionado, la cámara se encenderá automáticamente.
2. Apagado: Cuando la cámara esté encendida, pulse y mantenga pulsado el
botón hasta que se apague la cámara. Si no se ha usado la cámara o si no se
ha pulsado un botón durante más de 2
minutos, la cámara se apagará
automáticamente para no gastar las pilas.
Si la cámara está conectada por medio de
un cable USB, la cámara no se apagará
hasta que se apague el PC.
3. Cambio de modalidad: pulse este botón
rápidamente para cambiar de modalidad.
El botón SNAP (Instantánea) tiene dos funciones:
b.
1. Sacar una fotografía: pulse este botón
tiene tres funciones:
para sacar una fotografía cuando la
cámara está encendida. (Pero no en la
modalidad PC y de cambio de modalidad)
2. Seleccionar: en "Cambio de
modalidad", pulse este botón para
confirmar la función que esté destellando.
34
B. Pantalla LCD
emporizador: Seleccione el temporizador
1. T
para sacar una fotografía retardada. Esto le
proporciona un retraso de 10 segundos
aproximadamente.
2. Repetir la toma: Saca 3 fotos continuas, con
sólo pulsar una vez el botón SNAP. Las fotos
se sacan con una separación de 1 segundo
aproximadamente.
3. Calidad Alta/Baja: No aparece ningún icono
cuando la cámara está en la Modalidad
de Alta Resolución (640 X 480). Las letras "LQ" aparecen cuando la cámara está en
la Modalidad de Baja Resolución (320x240).
4. Modalidad AVI: Esta modalidad permite tomar unos clips cortos de película, y
guardarlos como archivos ".avi".
5. Indicador de pilas: Muestra el tiempo de vida útil de las pilas.
6. 50/60: Muestra la frecuencia de corriente eléctrica. "50" corresponde a una
frecuencia de corriente eléctrica de 50Hz, y "60" corresponde a una frecuencia de
corriente de 60Hz, que es la frecuencia que se usa en Estados Unidos. La posición
correcta (como 60 en EE.UU., 50 en algunos países) no causará ninguna oscilación
en las imágenes.
7. Borrar Última/Todas: " " borra la última foto sacada, y " " borra todas
las fotos que hay en la memoria.
8. Número de Fotografía/PC/Memoria-Llena: Esta área mostrará el número de fotografías
ue hay en la memoria cuando la cámara está en la modalidad "Normal". "PC"
q
aparecerá cuando la unidad está conectada por medio de un cable USB a su PC.
Cuando la memoria está llena en la modalidad "Normal", la pantalla mostrará
"FUL" y sonará la alarma.
35
Page 19

GUÍA DE FUNCIONAMIENTO
1. La cámara está alimentada por dos pilas "AAA" (no incluidas) o por medio de un
cable USB (incluido)
2. Inserte dos pilas AAA alcalinas en el hueco de las pilas
3. Pulse y mantenga pulsado el botón MODE hasta que se encienda la cámara.
4. Pulse SNAP para sacar una fotografía, o pulse el botón MODE rápidamente para
cambiar de modalidad como se describió anteriormente. La cámara se fija en el
infinito y no se enfocará en ningún objeto que esté a menos de 6 metros (20 pies).
5. La operación de configuración de modalidad es un ciclo de bucle, así que pulse el
botón MODE para cambiar a otra modalidad. Seguidamente se muestra el orden
del bucle de las diferentes modalidades:
6. Para cambiar las configuraciones, pase de una modalidad a otra pulsando el
botón MODE. Cuando se selecciona una modalidad, el símbolo indicador de la
pantalla LCD empezará a destellar. Entonces podrá seleccionar la modalidad
pulsando el botón SNAP.
7. Cuando se está cambiando de modalidad, si no se pulsa ningún botón durante 5
segundos, la cámara volverá a la modalidad normal.
36
8. C
uando se está en la modalidad "Normal", pulse SNAP para sacar una fotografía.
9. Cuando se está en la modalidad "Normal", si pulsa el botón MODE hará que la
cámara entre en "Cambio de modalidad."
Para cambiar a la modalidad "Self-Timer" (disparador automático), pulse MODE una
10.
vez y luego pulse SNAP para seleccionarlo. El disparador automático está ahora
conectado. La cámara permanecerá en esta modalidad hasta que cambie la modalidad.
Pulse MODE
11. Cuando esté en la modalidad "Normal" pulse el botón
ODE dos veces para cambiar a la modalidad "Repeat Shot"
M
Pulse SNAP para introducir esta modalidad y sonará la alarma
(Repetir la foto). Cuando vea destellar el icono " ", pulse
SNAP para entrar en esta modalidad (el icono " " dejará
de destellar). Si pulsa y mantiene pulsado el botón SNAP
podrá sacar 3 fotografías consecutivas. La cámara permanecerá en esta modalidad
hasta que cambie de modalidad o hasta que la memoria de la cámara esté
llena. Cuando la memoria esté llena la pantalla mostrará las letras "FUL" y sonará
la alarma.
y el sonido de la alarma
37
Page 20

12. Si se introduce la modalidad de "Low Resolution" (Baja
resolución), las fotografías tendrán una menor resolución, pero
también le permitirá almacenar más fotografías en la memoria
de la cámara. Pulse el botón MODE 3 veces hasta que vea
destellar el icono "LQ". Pulse el botón SNAP para seleccionar
esta modalidad. Entonces, el icono "Low" (Baja) dejará de destellar. Si introduce
esta modalidad más tarde y pulsa otra vez el botón SNAP volverá a la modalidad
de "High Resolution" (Alta resolución).
13. Cuando este en la modalidad "Normal" pulse el botón MODE 4 veces para
introducir la modalidad "AVI". El icono " " comenzará a destallar. Pulse
el botón SNAP para seleccionar esa modalidad. El icono " " dejará entonces
de destallar. Si mantiene pulsado el botón SNAP podrá tomar clips AVI mientras
mantenga pulsado el botón o hasta que se llene la memoria. Una vez que suelte el
botón, la cámara volverá a la modalidad "Normal" de forma que podrá tomar otra
vez fotografías fijas (que no son de acción) siempre que quede algo de memoria sin
usar. Repita el paso 11 si quiere cambiar la cámara a la modalidad AVI de nuevo.
14. Puede elegir entre configuraciones de 50mhz y 60mhz para la cámara. La modalidad
pr
edeterminada de la cámara es de "60", que corresponde a la frecuencia de
corriente de Estados Unidos. Para cambiar a la modalidad de "50", pulse el botón
SNAP hasta que "60" cambie a "50." Confirme la selección pulsando el botón
SNAP. Para evitar que se produzca cualquier oscilación en la fotografía, deberá
seleccionar la frecuencia de
38
corriente correcta (50 ó 60) que corresponda a su país.
15.
Si se selecciona la modalidad "Delete Last" (Borrar última), la pantalla mostrará lo siguiente:
y borre la última fotografía, luego salga de esta modalidad
Pulse SNAP para borrar la última fotografía de la memoria de la cámara.
16. Si se selecciona la modalidad "Delete All" (Borrar todas), la palabra "ALL" (Todas)
aparecerá al lado del icono en la pantalla. Selecciona esta modalidad para borrar
todas las fotografías de la memoria de la cámara. Entonces destellará el número de
fotografía. Pulse y mantenga pulsado el botón SNAP. Oirá un tono que se hará
más fuerte a medida que se vayan borrando las fotografías. Una vez completado, el
número de fotografía se pondrá en cero. Si no se pulsa ningún botón durante un
tiempo, la cámara volverá a la posición de espera.
17. Si el indicador de "Pila" sólo se alumbra una tercera parte, es necesario que
sustituya las pilas pronto.
el icono de la pila " " destellará y sonará un zumbador
39
Page 21

18. Si tiene conectada la cámara al PC por medio de un cable USB, la pantalla
mostrará
CÓMO DESCARGAR LAS FOTOGRAFÍAS EN SU ORDENADOR:
La cámara se puede desconectar para facilitar la descarga, sólo tiene que sacarla deslizándola del soporte de montaje. Los usuarios de
olador”) antes de conectar la cámara, y seguir las instrucciones. Windows 2000, XP y ME no requieren ningún
tr
controlador. Una vez que se conecte la cámara al PC con el cable USB que se entrega, lo reconocerá como un
“dispositivo de almacenamiento masivo”. Abra Windows Explorer o Mi Ordenador, la cámara se muestra como
un icono nuevo de “Disco Intercambiable”. Abra este “Disco” y localice sus fotos (archivos .jpg) dentro de las
carpetas. Haga clic en un archivo fotográfico individual, o use “Editar>Seleccionar Todas” si quiere descargar
todas las fotografías. Luego escoja “Mover a la Carpeta...” en el menú Editar. Puede escoger una carpeta existente
(por ejemplo, “Mis Fotografías”) o crear una carpeta nueva y ponerla donde quiera y con el nombre que desee.
Luego haga clic en “OK” y sus fotos serán transferidas desde la cámara hasta esa carpeta en su unidad de disco
duro. La cámara se puede desconectar entonces, aunque primero tiene que hacer clic en el icono de la cámara en
la bandeja de su sistema (mueva el cursor del ratón sobre los iconos de la esquina inferior derecha de la pantalla
para encontrarlo) y siga las instrucciones para parar y quitar el dispositivo USB. Para ver y editar sus fotografías,
puede instalar PhotoSuite (haga clic en “Instalar MGI PhotoSuite 5SE”) del CD que se adjunta, o usar cualquier
otro software de edición de fotografías. Seleccione “Archivo>Abrir” en el editor de fotografías y aceda a la carpeta
que contiene los archivos transferidos de la cámara. Consulte el manual de instrucciones del software fotográfico
o el menú de Ayuda para ver los detalles específicos para editar, volver a guardar e imprimir las fotografías.
Windows 98 tienen que instalar el controlador (inserte el CD y haga clic en “Instalar Con-
INSTRUCCIONES PARA LOS TELESCOPIO DE LOCALIZACION
MONTAJE
Nota: Hay algunos telescopios de localización para usos especiales que no incluyen el trípode. Sin embargo,
estas instrucciones se pueden aplicar a la mayoría de los trípodes. Saque el telescopio de localización de su
embalaje. Atornille el tornillo de conexión del trípode en el orificio de montaje del trípode situado en la
base del telescopio de localización. Extienda las patas del trípode y apóyelo sobre una superficie sólida.
AUMENTO
ota: Algunos telescopios de localización especializados tienen un aumento fijo sin zoom. En los
N
telescopios de aumento con zoom, agarre y gire el anillo de aumento para cambiar la potencia. El anillo de
aumento se encuentra normalmente cerca del ocular. Cuando se gira este anillo, la imagen parece que se
acerca y se aleja en zoom. Puede que sea necesario reenfocar cuando se cambia de aumento.
ENFOQUE
mayoría de los anillos de enfoque se encuentran enfrente del ocular en el cuerpo del telescopio de
La
localización. Si se gira este ajuste, la imagen se irá haciendo más nítida hasta que esté enfocada. En algunos
telescopios de localización, el anillo de enfoque se encuentra en el ocular o cerca del mismo.
40
41
Page 22

CÓMO SE USA EL TRÍPODE
(Se incluyen con la mayoría de los telescopios de localización, excepto con los de usos especiales) Para
moverlo de lado a lado o abajo y arriba, afloje el mango de control del trípode girándolo en sentido
contrario a las agujas del reloj. Para fijarlo en la posición deseada, gire el mango de control del trípode en
el mismo sentido que las agujas del reloj.
PRECAUCIÓN: NO MIRE AL SOL A TRAVÉS DE ESTE TELESCOPIO DE LOCALIZACIÓN
PORQUE PODRÍA SUFRIR DAÑOS GRAVES EN LOS OJOS
CUIDADO
Las lentes del telescopio de localización están revestidas para ofrecer la transmisión de luz más alta.
Como ocurre en cualquier óptica con revestimientos, se debe tener un cuidado especial para limpiar las
lentes. Humedezca ligeramente la superficie de la lente y séquela con un paño siguiendo un movimiento
circular, comenzando en el centro de la lente. Limpie con un paño o cepillo cualquier suciedad o polvo que
haya en la parte exterior del telescopio de localización.
PRECAUCIÓN
o desmonte nunca su telescopio de localización. Para realizar cualquier servicio en el mismo se necesitan
N
herramientas y equipos especiales y podría sufrir daños irreparables si alguien que no esté capacitado
efectúa cualquier servicio de mantenimiento en el telescopio. Un servicio no autorizado también puede
anular la garantía.
Asegúrese de descargar todas las fotografías de su cámara
ADVERTENCIA
ANTES de quitar las pilas de la misma.
ADVERTENCIA
NO mire directamente al Sol a través de lo telescopio de localización
De hacerlo podría sufrir lesiones permanentes en los ojos.
REQUIERE DOS PILAS AAA. NO INCLUIDAS
Nota de FCC:
Este equipo se ha sometido a las pruebas de rigor y se ha encontrado que cumple con los límites de los dispositivos digitales
de la Clase B, de conformidad con la Parte 15 de las normas de FCC. Estos límites se han concebido para ofrecer una
protección razonable contra las interferencias perjudiciales en las instalaciones residenciales. Este equipo genera, usa y puede
irradiar energía de radiofrecuencia y, si no se instala y usa de acuerdo con las instrucciones, podría causar interferencias
perjudiciales en las comunicaciones de radiofrecuencia. Sin embargo, no hay ninguna garantía de que no se produzcan
interferencias en una instalación particular. Si este equipo causara interferencias perjudiciales en las recepciones de radio
o televisión, lo cual puede determinarse encendiendo y apagando el equipo, se aconseja al usuario que trate de corregir la
interferencia aplicando una o más de las siguientes medidas:
· Reorientar o cambiar de lugar la antena receptora.
· Incrementar la separación entre el equipo y el receptor.
· Conectar el equipo a un enchufe que esté en un circuito diferente del que está conectado en receptor.
· Consultar al distribuidor o a un técnico de radio o televisión experimentado para que le ayuden.
Con el equipo se debe usar un cable de interfaz blindado para cumplir con los límites de dispositivos digitales de conformidad con la Subparte B de la Parte 15 de las Normas de FCC.
42
43
Page 23

GARANTÍA LIMITADA DE DOS AÑOS
Su producto Bushnell®
fecha de compra. En caso de defectos bajo esta garantía, nosotros, a nuestra opción, repararemos o sustituiremos el
producto siempre que lo devuelva con portes pagados. Esta garantía no cubre defectos causados por el uso indebido,
ni por un manejo, instalación o mantenimiento del producto inapropiados o el mantenimiento hecho por otro que
no sea un Centro de Servicio Autorizado de Bushnell.
Cualquier envío que se haga bajo garantía deberá venir acompañado por lo siguiente:
1) Un cheque/giro postal por la cantidad de 10 dólares para cubrir los gastos de manejo y envio
2) Nombre y dirección donde quiere que se le envíe el producto
3) Una explicación del defecto
4) Prueba de fecha de compra
5) El producto debe empaquetarse bien en una caja resistente para evitar que se dañe durante el transporte,
y enviarse con portes pagados a la dirección que se muestra a continuación:
EE UU, enviar a: En CANADÁ, enviar a:
En
Bushnell Performance Optics Bushnell Performance Optics
Attn.: Repairs Attn.: Repairs
8500 Marshall Drive 25A East Pearce Street, Unit 1
Lenexa, Kansas 66214 Richmond Hill, Ontario L4B 2M9
En el caso de los productos comprados fuera de los Estados Unidos o Canadá, llame al distribuidor local para la
información pertinente sobre la garantía. En Europa también puede llamar al:
BUSHNELL Performance Optics Gmbh
European Service Centre
MORSESTRASSE 4
D- 50769 KÖLN
ALEMANIA
Tél: +49 (0) 221 709 939 3
Fax: +49 (0) 221 709 939 8
está garantizado contra defectos de material y fabricación durante dos años a partir de la
garantía le ofrece derechos legales específicos.
Esta
Puede que tenga otros derechos que varían de un país a otro.
©2004 Bushnell Performance Optics
CABLE REMOTO DEL DISPARADOR
Siempre que sea posible, se recomienda el uso del cable remoto del disparador para no mover sin
querer la cámara cuando se pulsa el botón SNAP (INSTANTÁNEA). Debido al gran aumento
de la cámara, cualquier movimiento cuando el obturador está abierto puede hacer que se saquen
fotografías con apariencia borrosa o inestable. El cable remoto se conecta al jack situado en la
parte inferior de la cápsula de la cámara, como se muestra abajo. Pulsando el botón del cable
remoto se tomará una fotografía, de la misma forma que se tomaría pulsando el botón SNAP.
Si no tiene a mano el cable remoto, puede usar el disparador
automático (como se describe anteriormente en este manual)
para poner en mar
cha el disparador sin tocar ni mover la cámara. Sin embargo, el disparador automático no le permitirá
sacar una fotografía en el momento exacto que elija, como
en el caso del cable remoto.
4544
Page 24

Herzlichen Glückwunsch zum Erwerb Ihres Bushnell ImageView®
Spektiv! Das ImageView Fernglas der Marke Bushnell vereint die
digitale Fototechnologie mit einem hochwertigen Spektiv. Das
DEUTSCH
bedeutet: Sie können Sportveranstaltungen, Natur, Panoramen
und alles, was Sie normalerweise durchs Spektiv betrachten,
beobachten und anschließend mit einer zusätzlichen eingebauten
Digitalkamera im Bild festhalten. Die Bilder können Sie auf
Ihren Computer laden und per E-Mail an Freunde oder Familie
versenden oder mit Hilfe der beigefügten Software drucken bzw.
archivieren.
46
Systemvoraussetzungen:
• Pentium 166MMX oder höher (Empfehlung: Pentium II 266)
• Windows 95/98/ME/NT und Windows 2000/XP
• Mindestens 32 MB RAM
• USB-Port
• Mindestens 200 MB Festplatte mit zusätzlich 65 MB freiem Speicher für IE und
DirectX
• CD-ROM-Laufwerk
• Super-VGA-Monitor und Video Card
SOFTWAREINSTALLATION:
Zum Herunterladen der Software legen Sie die CD in Ihr CD-ROM Laufwerk ein und sie startet automatisch. Auf der CD befindet sich Roxio PhotoSuite, ein Bildbearbeitungsprogramm, als auch die für Windows 98/98 SE zur Kameraerkennung erforderlichen Treiber. Für Windows 2000, ME und XP werden
keine Treiber benötigt, die Photodateien der Kamera sind leicht zugänglich, als ob sie sich auf einem
externen Hardware-Antrieb befinden würden. Selbst wenn Sie auf Ihrem Computer über die nötige
Software zur Photoabbildung verfügen, die Sie bevorzugt verwenden, und die PhotoSuite Software
nicht benötigen, müssen Sie dennoch VOR DEM ANSCHLUSS der Kamera die Treiber installieren, wenn
Sie mit Windows 98/98 SE arbeiten.
Klicken Sie auf die Taste „Treiberinstallation“ auf dem CD-Startbild, wenn Sie mit Windows 98
arbeiten, oder klicken Sie auf „Installation PhotoSuite, wenn Sie die Photobearbeitungssoftware für
Windows 98/2000/ME/XP benötigen. Bei den Photodateien der Kamera handelt es sich um Standard
.jpg-Dateien, die mit jeder digitalen Bildbearbeitungssoftware geöffnet und betrachtet werden können.
Nach dem Klicken der Installationstaste folgen Sie den Anweisungen auf dem Bildschirm. Weitere
Einzelheiten über den Anschluss der Kamera und das Herunterladen von Photos finden Sie in dem
Abschnitt mit der Überschrift „Herunterladen der Bilder in Ihren Computer“.
47
Page 25

BETRIEBSANLEITUNG FÜR DIE KAMERA
A. Beschreibung der Tasten
a. Die Taste MODE hat drei
Funktionen.
1. Einschalten: Halten Sie die Taste gedrückt, bis sich die Kamera einschaltet.
Wenn die Kamera über das mitgelieferte USB-Kabel an den PC angeschlossen
ist, geht sie automatisch an.
2. Ausschalten: Bei eingeschalteter Kamera die Taste so lange drücken, bis sich
die Kamera ausschaltet. Falls die Kamera nicht benutzt oder länger als zwei
Minuten keine Taste betätigt wurde, schaltet sich die Kamera automatisch ab,
um Batterie zu sparen. Falls die Kamera mittels USB angeschlossen ist, schaltet
3. Modus ändern: Die Taste kurz betätigen,
erst dann ab, wenn der PC ausgeschaltet wird.
sie
um den Modus zu ändern.
b. Die Taste SNAP hat zwei Funktionen.
1. Fotografieren: Drücken Sie die Taste bei
eingeschalteter Kamera, um ein Foto zu
machen. (Aber nicht im Modus „PC"
oder „Modus ändern".)
2. Auswahl bestätigen: Im Modus „Modus
ändern" diese Taste drücken, um die
Auswahl des aufblinkenden Modus zu
bestätigen.
B. LC-Display
1. Timer: Wählen Sie Timer, um die Auslösung
des Fotos zu verzögern. Dadurch gewinnen
Sie circa 10 Sekunden Zeit.
2. Aufnahme wiederholen: fertigt bei
einmaligem Druck auf die Taste SNAP
intereinander 3 Aufnahmen an. Sie erfolgen
h
in einem Abstand von circa 1 Sekunde.
3. Qualitätseinstellung: Befindet sich die
Kamera im Modus „hohe Auflösung" (640
x 480), ist kein Symbol zu sehen. „LQ" wird
angezeigt, wenn sich die Kamera im Modus
„niedrige Auflösung" befindet (320 x 240).
Modus AVI: Diese Funktion ermöglicht kurze Filmclips, die als „AVI-File" gespeichert werden.
4.
5. Batterieanzeige: Zeigt den Batteriestand an.
6. 50/60: zeigt die Stromfrequenz an. „50" entspricht einer Stromfrequenz von 50Hz;
„60" entspricht der in den USA gebräuchlichen Stromfrequenz von 60 Hz. Bei
korrekter Einstellung (d. h. 60 in den USA, 50 in anderen Ländern) gibt es kein
Bildflimmern.
7. Letzte/alle löschen: löscht die letzte Aufnahme und ALL löscht alle Bilder im
Speicher.
8. Fotozahl/PC/Speicher voll: Dieser Bereich zeigt die Zahl der Bilder im Speicher, wenn
sich die Kamera im Modus „Normal" befindet. „PC" erscheint, wenn das Gerät per
USB-Kabel an Ihren PC angeschlossen ist. Wenn der Speicher im Modus „Normal"
voll ist, erscheint auf dem Display die Anzeige „FUL" und es ertönt ein Alarm.
48
49
Page 26

BEDIENERHINWEISE
1. Der Betrieb der Kamera erfolgt durch 2 „AAA"-Batterien (nicht im Lieferumfang
enthalten) bzw. über USB (Kabel im Lieferumfang enthalten).
2. Legen Sie 2 AAA-Alkaline-Batterien in das Batteriefach ein.
3. Halten Sie die Taste MODE gedrückt, bis die Kamera angeht.
4. Drücken Sie die Taste SNAP, um ein Foto zu machen, oder drücken Sie kurz auf
die Taste MODE, um die Funktionseinstellung wie oben beschrieben zu ändern. Die
Kamera ist auf „unendlich" eingestellt und lässt sich nicht auf Objekte fokussieren,
die näher als 6 m liegen.
5. Die Moduseinstellung ist als Schleife aufgebaut. Sie gelangen daher durch Drücken
der Taste MODE in einen anderen Modus. Die Schleifenreihenfolge der verschiedenen
Modi ist nachfolgend dargestellt:
8. Zum Fotografieren im Modus „Normal" die Taste SNAP drücken.
9. Wird im Modus „Normal" die Taste MODE gedrückt, wechselt die Kamera in den
„Modus ändern".
Modus
10. Um zum Modus „Self-Timer" zu wechseln, die Taste MODE einmal drücken und
ie Auswahl dann durch Drücken der Taste SNAP bestätigen. Der Self-Timer ist jetzt
d
aktiviert. Die Kamera bleibt so lange in diesem Modus, bis Sie den Modus ändern.
6. Zum Ändern der Einstellungen können Sie durch Drücken der Taste MODE durch
die unterschiedlichen Modi laufen. Sobald ein Modus ausgewählt wurde, beginnt
das Anzeigesymbol auf dem LC-Display zu blinken. Bestätigen Sie die Auswahl
dieses Modus dann durch Drücken der Taste SNAP.
7. Wird bei der Modusänderung 5 Sekunden lang keine Taste gedrückt, kehrt die
Kamera in den Modus „Normal" zurück.
50
MODE drücken
11. Im Modus „Normal" die Taste MODE zweimal drücken, um
Modus „Aufnahme wiederholen" zu gelangen. Wenn
zum
dieses Symbol aufblinkt, auf SNAP drücken,
einzugeben. (Das Symbol hört dann auf zu blinken). Wenn Sie
die Taste SNAP gedrückt halten, können Sie 3 Fotos hintereinander
machen.
oder der Kameraspeicher voll ist. Bei vollem Speicher erscheint die Anzeige „FUL" auf
Die Kamera bleibt so lange in diesem Modus, bis Sie den Modus wechseln
SNAP drücken, um diesen Modus zu bestätigen. Es ertönt ein Alarm
um den Modus
dem Display und es ertönt ein Alarmsignal.
und Alarmton
51
Page 27

12. Um in den Modus „Niedrige Auflösung" zu gelangen,
dreimal die Taste MODE drücken, bis das Symbol „LQ"
aufblinkt. In diesem Modus haben Ihre Fotos zwar eine
niedrigere Auflösung, dafür können Sie aber viel mehr Bilder
in der Kamera speichern. Drücken Sie die Taste SNAP, um die
Auswahl dieses Modus zu bestätigen. Das Symbol „Low" hört dann auf zu blinken.
Um wieder in den Modus „High Resolution" umzuschalten, noch einmal in diesen
Modus gehen und erneut auf die Taste SNAP drücken.
13. Zum Modus „AVI" gelangen Sie, wenn Sie im Modus „Normal" die Taste MODE
viermal
Modus auszuwählen. Das Symbol hört dann auf zu blinken. Die Kamera
drücken. Das Symbol blinkt auf. Drücken Sie die Taste SNAP, um den
erstellt so lange AVI-Clips, wie Sie die Taste SNAP gedrückt halten bzw. bis
der Speicher voll ist. Sobald Sie die Taste loslassen, kehrt die Kamera in den Modus
„Normal" zurück, sodass Sie noch weitere Standfotos (d. h. unbewegte Bilder)
machen können, wenn noch Speicherplatz frei ist. Wiederholen Sie Schritt 11, um
die Kamera wieder in den AVI-Modus zu stellen.
15. Bei Auswahl von „Letzte löschen" zeigt das Display Folgendes an:
und letztes Bild löschen, danach den Modus verlassen
SNAP drücken, um das letzte Bild aus dem Speicher der Kamera zu löschen.
16. Bei Auswahl des Modus „Alle löschen" erscheint das Wort „ALL" neben dem
Symbol auf dem Display. Wählen Sie diesen Modus, wenn Sie alle Bilder im
Speicher der Kamera löschen wollen. Die Zahl der Bilder leuchtet in diesem Fall auf.
Halten Sie die Taste SNAP gedrückt. Sie hören einen Ton, der beim Löschen der
Bilder höher wird. Nach erfolgreichem Löschen stellt sich die Zahl der Bilder auf Null
ein. Wird längere Zeit keine Taste betätigt, schaltet die Kamera auf Stand-by.
14. Sie haben bei der Stromleistung der Kamera die Wahl zwischen den Einstellungen
50 MHz und 60 MHz. Die Standardeinstellung der Kamera ist der Modus „60". Das
entspricht der Stromfrequenz der Vereinigten Staaten. Um zum Modus „50" zu
wechseln, die Taste SNAP drücken, bis die „60" auf „50" umspringt. Die Auswahl
durch Drücken der Taste SNAP bestätigen. Um ein Bildflimmern zu verhindern,
müssen Sie die für Ihr Land passende Frequenz (wahlweise 50 oder 60) einstellen.
52
17. Wenn bei der Anzeige für die Batterie nur noch ein Drittel ausgefüllt ist, müssen
die Batterien demnächst ausgetauscht werden.
das Batteriesymbol “ “ blinkt auf und ein Summen ertönt
53
Page 28

18.
Ist die Kamera per USB-Kabel an Ihren PC angeschlossen, erscheint auf der Anzeige:
HERUNTERLADEN DER BILDER IN IHREN COMPUTER:
Die Kamera lässt sich demontieren, um ein komfortableres Herunterladen zu ermöglichen, zu diesem Zweck ziehen Sie
diese einfach aus der Montagekonsole. Windows 98 Anwender müssen vor Anschluss der Kamera den Treiber installieren
(CD einlegen und den Befehl „Treiberinstallation“ anklicken), folgen Sie dann diesen Befehlen . Für die Betriebssysteme
Windows 2000, XP und ME ist kein Treiber erforderlich. Sobald die Kamera mit dem gelieferten USB-Kabel an Ihren PC
angeschlossen ist, wird diese als „Massespeichergerät“ erkannt. Öffnen Sie den Windows Explorer oder die Funktion My
Computer und die Kamera wird jetzt als neues „bewegliches Disk-Icon” angezeigt. Öffnen Sie dieses „Disk”, und ordnen
Sie Ihre Photos innerhalb der Dateiordner (.jpg-Dateien) zu. Klicken Sie auf eine individuelle Photodatei, oder verwenden
Sie den Befehl „Bearbeite>Wähle Alle”, wenn Sie alle Photos herunterladen möchten. Dann wählen Sie die Funktion
„Gehe zu Dateiordner...“ im Bearbeitungsmenü. Sie können einen vorhandenen Ordner (z.B. „Meine Bilder”) auswählen
oder einen neuen Ordner, den Sie nach Belieben speichern und benennen, einrichten. Dann klicken Sie auf „OK“ und Ihre
Photos werden von der Kamera zu dem benannten Dateiordner auf Ihren Hardware-Antrieb übertragen. Die Verbindung
zur Kamera kann dann getrennt werden – Sie sollten zuerst das Kamera Icon in Ihrer Systemablage anklicken (dieses finden
Sie, indem Sie den Maus-Cursor über die Icons am rechten unteren Bildschirmrand bewegen) und den Anweisungen zum
Stoppen und Entfernen des USB-Gerätes folgen. Zum Betrachten und Bearbeiten Ihrer Bilder installieren Sie aus der beigefügten CD das Programm PhotoSuite (klicken Sie auf „Installation MGI PhotoSuite 5SE“), oder verwenden Sie eine andere
Bildbearbeitungssoftware Ihrer Wahl. Wählen Sie den Befehl „Datei>Öffnen” im Bildeditor und bewegen Sie den Cursor
zu dem Dateiordner, der die übertragenen Kameradateien enthält. Bitte beziehen Sie sich auf die Bedienungsanleitung für
die Photosoftware oder das Hilfe-Menü bezüglich spezieller Einzelheiten über die Bearbeitung, Neuspeicherung und den
Ausdruck von Photos.
54
BEDIENERHINWEISE ZUM SPEKTIV
MONTAGE
Anmerkung: Einige spezielle Spektive beinhalten keine Stative, aber die folgenden Instruktionen dürften
für fast alle Stativarten gelten. Entnehmen Sie das Spektiv aus der Verpackung. Drehen Sie die StativMontageschraube des Stativs in die Stativmontageöffnung des Spektivs. Spreizen Sie die Stellbeine des
Stativs und stellen Sie dieses auf einen festen Untergrund.
VERGÖSSERUNG
kung: Einige spezielle Spektive haben eine feste Vergrößerung ohne Zoom. Bei Zoom Spektiven
Anmer
verstellen Sie die Vergrößerung durch greifen und drehen des Vergrößerungsringes. Dieser befindet sich
normalerweise in der Nähe des Okulars (Augenstück). Beim Drehen des Ringes wird das Bild heran oder
weggezoomt. Eine Nachstellung der Schärfe ist beim Wechsel der Vergrößerung manchmal notwendig.
FOKUSSIERUNG
ie meisten Fokussierungsringe befinden sich vor dem Okular am Gehäuse des Spektivs. Durch Drehen
D
dieses Ringes wird das Bild scharf gestellt. Bei einigen Spektiven befindet sich der Fokussierungsring auf
dem Okular oder in seiner Nähe.
BENUTZUNG DES STATIVS
(Bei den meisten Spektiven wird das Stativ mitgeliefert, außer bei speziellen Spektiven zur besonderen
Verwendung) Um das Spektiv vertikal oder horizontal zu bewegen, lösen Sie den Kontrollhebel am
Stativ durch Drehung gegen den Uhrzeigersinn. Um die gewünschte Position zu fixieren, drehen Sie den
Kontrollhebel im Uhrzeigersinn.
55
Page 29

ACHTUNG: SCHAUEN SIE NICHT IN DIE SONNE DURCH DIESES SPEKTIV,
DA DIES ZU SCHWEREN AUGENSCHÄDEN FÜHREN KANN!
INSTANDHALTUNG
Die Linsen Ihres Spektivs sind beschichtet, um die höchstmögliche Lichttransmission zu erreichen. Wie bei
allen beschichteten Optiken sollten Sie bei der Säuberung solcher Linsen besondere Vorsicht walten lassen.
Feuchten Sie die Oberfläche der Linsen leicht an und trocknen Sie anschließend mit einer rotierenden
Bewegung von der Mitte der Linse nach außen. Wischen oder pinseln Sie Verschmutzungen oder Staub
außen am Spektiv weg.
ACHTUNG
emontieren Sie niemals Ihr Spektiv. Dafür sind besondere Werkzeuge und Ausrüstung notwendig .Bei
D
unsachgemäßer Wartung können irreparable Schäden entstehen. Nicht autorisierte Wartung kann auch die
Garantieleistungen zum Erlöschen bringen.
WARNHINWEIS
Laden Sie alle Bilder von der Kamera,
BEVOR Sie die Batterien aus der Kamera entfernen.
Mit dem Spektiv NIEMALS direkt in die Sonne blicken,
WARNHINWEIS
um bleibende Augenschäden zu vermeiden.
2 AAA-BATTERIEN ERFORDERLICH: NICHT IM LIEFERUMFANG ENTHALTEN
Anmerkung bezüglich FCC-Vorschriften:
Dieses Gerät wurde getestet und es entspricht den Vorgaben für ein Digitalgerät der Kategorie B, gemäß Teil 15 der FCC
Vorschriften. Diese Grenzwerte werden vorgegeben, um in einem Wohngebäude einen vernünftigen Schutz vor schädlichen Störgeräuschen zu gewährleisten. Dieses Gerät erzeugt und verwendet Radiofrequenzenergie und kann diese ausstrahlen, und bei nicht der Bedienungsanleitung entsprechendem Einbau und Gebrauch kann es schädliche Störgeräusche
für Rundfunksendungen verursachen. Es gibt jedoch keinerlei Garantie dafür, dass in keinem Wohngebäude Störgeräusche irgendwelcher Art auftreten. Wenn durch dieses Gerät schädliche Störgeräusche beim Rundfunk- oder Fernsehempfang auftreten, welche durch Ausschalten und erneutes Einschalten des Gerätes festgestellt werden können, so soll der
Benutzer versuchen, mit Hilfe einer oder mehrerer der nachfolgend genannten Maßnahmen diese Störung zu beheben.
· Die Position der Empfangsantenne neu ausrichten oder diese an einen anderen Ort platzieren
· Den Abstand zwischen dem Gerät und dem Receiver vergrößern
· Das Gerät an einen Ausgang in einem anderen Stromkreis als den, mit dem der Receiver verbunden ist, anschließen
· Den Händler oder einen erfahrenen Radio- oder Fernsehtechniker um Hilfe fragen.
Das abgeschirmte Verbindungskabel muss mit dem Gerät verwendet werden, um die Vorgaben für ein Digitalgerät
entsprechend Unterpunkt B des Abschnitts 15 der FCC Vorschriften zu erfüllen.
56
57
Page 30

ZWEIJÄHRIGE BESCHRÄNKTE GARANTIE
Sie erhalten für Ihr Bushnell®-Pr
Garantie erstreckt sich auf Material- und Herstellungsfehler. Für den Fall, dass ein Mangel im Rahmen dieser Garantie
auftritt, werden wir das Produkt nach unserer Wahl reparieren oder austauschen, vorausgesetzt, dass Sie das Produkt
freigemacht zurückschicken. Von dieser Garantie ausgeschlossen sind Schäden, die auf Missbrauch, unsachgemäße
Behandlung, Installations- oder Wartungsarbeiten, die nicht von einer autorisierten Bushnell-Kundendienstabteilung
vorgenommen werden, zurückzuführen sind.
Jeder Rücksendung im Rahmen dieser Garantie müssen folgende Dokumente und Angaben beigefügt werden:
1)
Ein Scheck/eine Zahlungsanweisung in Höhe von 10,00 USD zur Abdeckung der Porto- und Bearbeitungskosten
2) Name und Anschrift für die Rücksendung des Produkts
3) Eine Erläuterung des Mangels
4) Nachweis des Kaufdatums
5) Das Produkt sollte zur Vermeidung von Transportschäden gut verpackt in einem stabilen Versandkarton an
die nachstehend aufgeführte Adresse geschickt werden, wobei die Gebühren für die Rücksendung im
Voraus zu entrichten sind.
Adresse für Rücksendungen in die USA: Adresse für Rücksendungen nach KANADA:
Bushnell Performance Optics Bushnell Performance Optics
Attn.: Repairs Attn.: Repairs
8500 Marshall Drive 25A East Pearce Street, Unit 1
Lenexa, Kansas 66214 Richmond Hill, Ontario L4B 2M9
Bei Produkten, die Sie außerhalb der Vereinigten Staaten oder Kanadas gekauft haben, erhalten Sie die entsprechenden
Informationen zur Garantie von ihrem Händler vor Ort. In Europa erreichen Sie Bushnell auch unter:
BUSHNELL Performance Optics Gmbh
European Service Centre
MORSESTRASSE 4
D- 50769 KÖLN
Deutschland
Tél: +49 (0) 221 709 939 3
Fax: +49 (0) 221 709 939 8
Sie haben möglicherweise darüber hinaus noch andere Rechte, die von Land zu Land variieren.
odukt eine Garantie für einen Zeitraum von zwei Jahren ab dem Kaufdatum. Die
Mit dieser Garantie erwerben Sie bestimmte Rechtsansprüche.
©2004 Bushnell Performance Optics
KABEL FÜR FERNAUFNAHMEN
Falls möglich, empfehlen wir den Gebrauch des beigefügten Kabels für Fernaufnahmen, um zu
vermeiden, dass die Kamera versehentlich bei gedrücktem AUSLÖSER gestört wird. Aufgrund
der starken Vergrößerung der Kamera führt jegliche Bewegung bei geöffneter Blende möglicherweise zu unscharfen und verwackelten Photos. Das Kabel für Fernaufnahmen wird in die Buchse
an der Kameraunterseite wie unten gezeigt eingesteckt. Durch Betätigen des Knopfes an der
Fernbedienung wird schließlich ein Photo aufgenommen, diese Vorgehensweise ist identisch mit
dem Betätigen des AUSLÖSERS.
Wenn das Kabel für Fernaufnahmen nicht verfügbar ist,
können Sie stattdessen zur Betätigung des Auslösers ohne
Berührung oder Störung der Kamera den „Selbstauslöser“
verwenden (wie zuvor in der Bedienungsanleitung beschrieben). J
edoch kann mittels Selbstauslöser das Photo nicht
exakt zu dem von Ihnen gewünschten Zeitpunkt aufgenommen werden, mit Hilfe des Kabels für Fernaufnahmen ist dies
möglich.
5958
Page 31

Grazie per avere acquistato un spotting scope Bushnell ImageView®.
Abbiamo integrato in un spotting scope e di alta qualità una
ITALIAN
fotocamera digitale che vi consentirà di memorizzare qualsiasi
immagine: animali selvatici, paesaggi, avvenimenti sportivi. In
un secondo tempo potrete scaricare le immagini nel computer e
inviarle allegandole alle e-mail, stamparle mediante il software in
dotazione o salvarle in un album.
Requisiti di Sistema
• Pentium 166MMX o processore più potente
(si suggerisce un Pentium II 266)
• Windows 95 / 98 /ME / NT o Windows 2000/XP
• Almeno 32 MB di RAM
• Porta USB
lmeno 200 MB di spazio libero sul disco rigido, con altri 65 MB di spazio per IE e
• A
DirectX
• Unità CD-ROM
• Monitor Super VGA e scheda video
INSTALLAZIONE DEL SOFTWARE:
Per caricare il software basta inserire il CD nel drive per CD-ROM: l’avviamento sarà automatico. Il CD contiene Roxio PhotoSuite, il potente software di elaborazione delle immagini fotografiche, e i driver necessari
perché Windows 98/98SE rilevi la presenza della fotocamera. Gli utenti Windows 2000, ME ed XP non hanno
bisogno dei driver perché possono accedere ai file contenenti le foto come se questi si trovassero su un disco
fisso esterno. Gli utenti Windows 98/98SE hanno bisogno di installare i driver PRIMA DI COLLEGARE la
fotocamera anche nel caso in cui preferissero usare, già installato nel loro computer, e non hanno bisogno del
software PhotoSuite.
Quando appare la schermata di avvio del CD, gli utenti Windows 98 devono cliccare sul pulsante “Install
Driver” (installa driver), mentre gli utenti Windows 98/2000/ME/XP devono cliccare su “Install PhotoSuite” se
hanno bisogno di un software per l’elaborazione delle immagini fotografiche. I file prodotti dalla fotocamera
sono normali file con estensione .jpg che possono essere aperti e visionati con un qualsiasi software per immagini digitali. Dopo aver cliccato sul pulsante di installazione, seguire le istruzioni visualizzate sullo schermo.
Per maggiori dettagli sulla connessione della fotocamera e sullo scaricamento delle foto, vedere la sezione
60
61
Page 32

ISTRUZIONI PER L’USO DELLA FOTOCAMERA
A. Descrizione dei Pulsanti
a. Il pulsante MODE (Modalità) ha tre funzioni:
1. Accensione: premete il pulsante e mantenetelo premuto finché la
fotocamera non si accende. La fotocamera si accende automaticamente se è
collegata al PC mediante il cavo USB in dotazione.
2. Sp
premuto finché la fotocamera non si spegne. Se la fotocamera rimane
collegata mediante il cavo USB, si spegne solo quando si spegne il computer.
3. Cambio di modalità: premete il pulsante
b. Il pulsante SNAP (Istantanea) ha due funzioni:
1. Ripresa di un’immagine: premete il
2. Selezione: durante il cambio modalità,
egnimento: mentre la fotocamera è accesa, premete il pulsante e mantenetelo
inattiva o non viene premuto nessun pulsante per due minuti, si spegne
automaticamente per
ridurre il consumo delle pile. Se la fotocamera è
rapidamente per selezionare un’altra
modalità.
pulsante per scattare una foto mentre
la fotocamera è accesa (ma non in
modalità "PC" né durante il cambio modalità).
premete il pulsante per confermare la
funzione lampeggiante.
B. Display a Cristalli Liquidi
1. Autoscatto: selezionatelo per scattare
una foto con un ritardo di circa 10 secondi.
2. Ripetizione scatto: per scattare tre foto una
dopo l’altra premendo una sola volta il
pulsante SNAP. Le foto vengono scattate a
circa 1 secondo l’una dall’altra.
3. Qualità alta/bassa: quando la fotocamera
funziona ad alta risoluzione (640 X 480),
non è visibile nessuna icona. Quando la
fotocamera funziona a bassa risoluzione
(320 x 240), si visualizza l’icona "Low".
4. Modalità AVI: consente di riprendere dei videoclip, che vengono salvati come
file ".avi".
5. Indicatore pile: mostra la carica rimanente nelle pile.
6. 50/60: mostra la frequenza dell’uscita di corrente, 50 Hz o 60 Hz. Quest’ultima è la
frequenza utilizzata nelle reti elettriche degli Stati Uniti. Selezionando la frequenza
corrispondente a quella della rete elettrica locale si evita lo sfarfallio delle immagini.
7. Cancella l’ultima/tutto: " " cancella l’ultima foto scattata, mentre " "
cancella tutte le foto memorizzate.
8. Numero della foto/PC/Memoria esaurita: questa sezione mostra il numero di
foto nella memoria quando la fotocamera è in modalità Normale. Quando la
fotocamera è collegata al computer mediante il cavo USB, si visualizza la dicitura
"PC". Quando la memoria è esaurita in modalità Normale, si visualizza "FUL" e
viene emesso un allarme acustico.
62
63
Page 33

GUIDA ALL’USO
1. La fotocamera può essere alimentata da due pile AAA ministilo (non incluse) o
mediante la porta USB (il cavo è incluso).
2. Inserite due pile AAA ministilo nell’apposito vano.
Premete il pulsante MODE e mantenetelo premuto finché la fotocamera non si accende.
3.
4. Premete il pulsante SNAP per scattare una foto o premete rapidamente MODE per
selezionare un’altra modalità come descritto in precedenza. La messa a fuoco è
regolata sull’infinito e non si può mettere a fuoco un oggetto che disti meno di
6,1 metri (20 ft).
5. Si passa da una modalità all’altra in sequenza ciclica, quindi premete MODE per
passare alla modalità successiva. Di seguito è illustrato l’ordine delle varie
modalità:
6. Per selezionare una modalità, premete MODE per passare da una modalità alla
successiva. Quando si passa a una modalità, il simbolo corrispondente comincia a
lampeggiare; a questo punto potete selezionare la modalità premendo SNAP.
7. Quando si passa da una modalità all’altra, se non si preme nessun pulsante per
cinque secondi la fotocamera ritorna alla modalità Normale.
64
8. Con la fotocamera in modalità Normale, premete SNAP per scattare una foto.
9. Quando la fotocamera è in modalità Normale, premendo MODE si attiva la
funzione di cambio modalità.
10. Per selezionare la modalità autoscatto, premete una volta MODE e poi premete
SNAP. L’autoscatto rimane attivato finché non si cambia modalità.
Premete MODE
11. Quando la fotocamera è in modalità Normale, premete due
volte MODE per passare alla modalità Ripetizione scatto.
Quando lampeggia l’icona " ", premete SNAP per selezionare
questa modalità (l’icona " " cessa di lampeggiare). A questo
punto, premendo e mantenendo premuto SNAP potete scattare
tre foto consecutivamente. La fotocamera rimane in questa modalità finché non si
cambia modalità o finché la memoria non è esaurita. In quest’ultimo caso si
visualizza "FUL" e viene emesso un allarme acustico.
Premete SNAP per passare a questa modalità
viene emesso l’allarme acustico.
65
Page 34

12. Per selezionare la modalità Bassa risoluzione, che consente
di memorizzare un numero maggiore di immagini ma a
risoluzione inferiore, premete tre volte MODE finché non si
visualizza l’icona "Low" lampeggiante. Premete SNAP per
selezionare questa modalità; l’icona "Low" cessa di
lampeggiare. Se in un secondo tempo si passa a questa
modalità e si preme di nuovo SNAP, si ritorna alla modalità Alta risoluzione.
13. Con la fotocamera in modalità Normale, premete quattro volte MODE per
passare alla modalità AVI; l’icona " " comincia a lampeggiare. Premete SNAP
per selezionare questa modalità; l’icona " " cessa di lampeggiare. Mantenendo
premuto SNAP potete riprendere dei videoclip AVI finché non rilasciate il pulsante
o finché la memoria non è esaurita. Non appena rilasciate il pulsante la fotocamera
ritorna alla modalità Normale, così che potete ancora scattare foto finché c’è
memoria disponibile. Ripetete le operazioni al punto 11 se volete ritornare alla
modalità AVI.
14. Potete selezionare la frequenza di 50 Hz o 60 Hz per l’uscita della fotocamera.
L’impostazione predefinita è 60, corrispondente alla frequenza di 60 Hz, utilizzata
nelle reti elettriche degli Stati Uniti. Per selezionare la frequenza di 50 Hz, premete
SNAP finché
premendo SNAP. Per evitare lo sfarfallio delle immagini occorre selezionare la
frequenza corrispondente a quella della rete elettrica locale.
66
il numero 60 sul display non cambia in 50. Confermate la selezione
15. Se selezionate la modalità Cancella l’ultima, si visualizza quanto segue:
cancellate l’ultima immagine e uscite da questa modalità.
Premete SNAP per cancellare l’ultima immagine dalla memoria della fotocamera.
16. Se selezionate la modalità Cancella tutto, accanto all’icona compare la parola
"ALL". Per cancellare tutte le immagini memorizzate, selezionate questa modalità.
Il numero delle immagini lampeggia. Premete e mantenete premuto SNAP. Viene
emesso un tono che aumenta di intensità man mano che le immagini vengono
cancellate; al termine, il numero delle immagini va a zero. Se non si preme nessun
pulsante per un certo tempo, la fotocamera ritorna in modalità di attesa.
17. Quando l’apposita icona mostra che rimane un terzo della carica delle pile, queste
vanno sostituite subito.
l’icona " " lampeggia e viene emesso un segnale acustico.
67
Page 35

18. Se la fotocamera è collegata al PC mediante il cavo USB, il display mostra
SCARICAMENTO DELLE IMMAGINI NEL COMPUTER
Per facilitare lo scaricamento si può staccare la fotocamera sfilandola dalla sua staffa di supporto. Gli utenti Windows 98 devono installare il driver (inserire il CD e cliccare su “Install Driver”) prima di collegare la fotocamera,
e poi seguire le istruzioni visualizzate. Per i sistemi operativi Windows 2000, XP e ME non occorre installare
alcun driver. La fotocamera viene riconosciuta dal sistema come “dispositivo di memorizzazione di massa” non
appena viene collegata al PC con il cavo USB in dotazione. Aprire Windows Explorer o Risorse del computer, la
fotocamera è visualizzata da un’icona che rappresenta il nuovo “Disco rimovibile”. Aprire questo “Disk” (disco)
e individuare le proprie foto (file .jpg) nelle cartelle. Cliccare sul file desiderato oppure selezionare “Edit>Select
All” (Modifica>Seleziona tutto) se si desidera scaricare tutti i file delle foto. Ora, scegliere “Move to Folder...”
(Spostarsi alla cartella) nel menu Modifica. Si può scegliere una delle cartelle già create (ad esempio “Mie foto”)
oppure se ne può creare una nuova scegliendo il nome e l’ubicazione desiderati. Quindi, cliccare su “OK”. Il
sistema trasferisce le foto dalla fotocamera alla cartella specificata sul disco fisso. A questo punto si può scollegare
la fotocamera avendo l’accortezza di cliccare, per prima cosa, sull’icona della fotocamera nella barra delle applicazioni del proprio sistema (spostare il cursore del mouse sulle icone, nell’angolo inferiore destro della schermata)
e seguire le istruzioni visualizzate per spegnere e staccare il dispositivo USB. Per visualizzare e ritoccare le foto si
può installare PhotoSuite (cliccare su “Install MGI PhotoSuite 5SE”) dal CD in dotazione oppure si può usare
un qualsiasi altro software di elaborazione delle immagini fotografiche. Selezionare “File>Open” (File>Apri)
nell’editor delle immagini fotografiche e navigare fino alla cartella che contiene i file trasferiti dalla fotocamera.
Leggere il manuale di istruzioni del software delle foto digitali oppure usare il menu Guida per istruzioni dettagliare sulle modalità di editing, salvataggio e stampa delle foto.
68
ISTRUZIONI PER L’USO DEL SPOTTING SCOPE
MONTAGGIO
Nota: alcuni spotting scope per uso speciale non comprendono i treppiedi. In ogni caso, queste istruzioni
si riferiscono alla maggior parte dei treppiedi. Rimuovere lo strumento dalla confezione. Avvitare la vite
sull’attacco del treppiede nel foro di montaggio situato sulla base dello spotting scope. Allargare le gambe
del treppiede e sistemarlo su una superficie solida.
INGRANDIMENTO
ota: alcuni spotting scope speciali hanno un ingrandimento fisso senza zoom. Per strumenti con
N
ingrandimento variabile (zoom), ruotare l’anello dell’ingrandimento per cambiare il campo inquadrato.
L’anello dell’ingrandimento si trova generalmente accanto all’oculare. Quando si ruota l’anello, l’immagine
appare ingrandita o rimpicciolita. Quando viene cambiato il livello di ingrandimento, può darsi sia
necessario rimettere a fuoco lo strumento.
MESSA A FUOCO
La maggior parte degli anelli per la messa a fuoco si trovano davanti all’oculare sul corpo dello spotting
scope. Ruotando quest’anello, l’immagine diventa sempre più nitida fino a quando risulta messa a fuoco.
Su alcuni spotting scope l’anello per la messa a fuoco si trova sull’oculare o vicino ad esso.
USO DEL TREPPIEDE
(Fornito con la maggior parte degli spotting scope, tranne quelli per uso speciale)
Per regolare il treppiede lateralmente o in altezza, allentare il manico di controllo del treppiede ruotandolo
in senso antiorario. Per bloccarlo nella posizione desiderate, ruotare il manico di controllo in senso
orario.
69
Page 36

ATTENZIONE: PER EVITARE IL RISCHIO DI DANNEGGIARE I PROPRI OCCHI, NON
GUARDARE MAI DIRETTAMENTE IL SOLE CON LO SPOTTING SCOPE.
MANUTENZIONE
Le lenti dello spotting scope sono trattate per la più alta trasmissione della luce. Come per tutte le ottiche
trattate, usare un’attenzione speciale per la pulizia delle lenti. Inumidire leggermente la superficie della
lente (con un prodotto specifico) e, con un movimento circolare, pulire partendo dal centro della lente.
Impiegare sempre cartine ottiche. Strofinare o rimuovere sporco o polvere dall’esterno dello spotting
scope.
TTENZIONE
A
Non smontare mai lo spotting scope. Per la riparazione sono necessari strumenti e arnesi speciali, e danni
irreparabili possono verificarsi se la riparazione viene eseguita da persone non addestrate. La riparazione
non autorizzata potrebbe anche annullare la garanzia.
ATTENZIONE
PRIMA di estrarre le pile dalla fotocamera,
verificate
che tutte le immagini siano state scaricate.
NON osservate direttamente il sole con un spotting scope
ATTENZIONE
Potreste subire lesioni oculari irreversibili.
RICHIEDE DUE PILE MINISTILO AAA NON INCLUSE
Annotazioni FCC:
Questo apparecchio è stato testato e riscontrato conforme ai limiti stabiliti per gli apparati digitali di classe B, ai
sensi della Parte 15 delle normative FCC. Tali limiti sono stati fissati per fornire una protezione ragionevole contro
le interferenze dannose nelle installazioni residenziali. Questo apparecchio genera, utilizza e può irradiare energia a
radiofrequenza e, pertanto, se non viene installato e utilizzato in conformità alle istruzioni fornite potrebbe interferire
con le comunicazioni radio. Non è comunque possibile garantire l’assenza delle interferenze in ogni installazione. Se
l’apparecchio interferisce con la ricezione radiotelevisiva, verificabile spegnendolo e riaccendendolo, si consiglia di
eliminare l’interferenza in uno dei modi seguenti:
· Riorientando o riposizionando l’antenna ricevente.
· Aumentando la distanza dall’apparecchio al ricevitore.
· Inserendo l’apparecchio nella presa di un circuito diverso da quello in cui è inserito il ricevitore.
· Rivolgersi, se necessario, al concessionario o ad un tecnico competente.
Utilizzare il cavo interfaccia schermato per soddisfare i limiti dei dispositivi digitali definiti nel sottoparagrafo B della
Parte 15 delle normative FCC.
70
71
Page 37

GARANZIA LIMITATA PER DUE ANNI
Si garantisce che questo prodotto Bushnell®
decorrere dalla data di acquisto. In caso di difetto durante il periodo di garanzia, a nostra discrezione ripareremo o
sostituiremo il prodotto purché sia restituito franco destinatario. Sono esclusi dalla garanzia eventuali danni causati
da abuso, maneggiamento improprio, installazione o manutenzione eseguiti da persone non autorizzate dal servizio
di assistenza Bushnell.
A un prodotto restituito e coperto da questa garanzia occorre allegare quanto segue.
1) Assegno/ordine di pagamento per l’importo di 10 $US per coprire i costi di spedizione.
2) Nome e indirizzo da utilizzare per la restituzione del prodotto.
3) Una spiegazione del difetto.
4) Scontrino riportante la data di acquisto.
5) Il prodotto deve essere imballato in una scatola robusta, per prevenire danni durante il trasporto,
e va spedito franco destinatario a uno dei seguenti indirizzi.
Recapito
Bushnell Performance Optics Bushnell Performance Optics
Attn.: Repairs Attn.: Repairs
8500 Marshall Drive 25A East Pearce Street, Unit 1
Lenexa, Kansas 66214 Richmond Hill, Ontario L4B 2M9
Per prodotti acquistati fuori degli Stati Uniti o del Canada, rivolgersi al rivenditore per le clausole pertinenti della
garanzia. In Europa si può anche contattare la Bushnell a questo numero: BUSHNELL Performance Optics Gmbh
European Service Centre
MORSESTRASSE 4
D- 50769 - Cologne
Germania
Tél: +49 (0) 221 709 939 3
Fax: +49 (0) 221 709 939 8
negli Stati Uniti Recapito in Canada
Eventuali altri diritti variano da una nazione all’altra.
sarà esente da difetti di materiale e fabbricazione per due anni a
Questa garanzia dà specifici diritti legali.
©2004 Bushnell Performance Optics
CAVO PER LO SCATTO REMOTO
Si raccomanda di utilizzare il cavo per lo scatto remoto, in dotazione, ogniqualvolta possibile per
evitare di muovere la fotocamera quando si preme il pulsante SNAP. Dato il notevole ingrandimento della fotocamera, un qualsiasi movimento mentre l’otturatore è aperto può produrre
foto mosse o sfuocate. Il cavo remoto viene inserito nella presa situata nella parte inferiore del
sostegno della fotocamera, come illustrato. Quando si preme il pulsante sul telecomando si scatta
la foto, proprio come se si fosse premuto il tasto SNAP (istantanea).
Se il cavo per lo scatto remoto non fosse disponibile si
può usare il timer automatico (descritto in precedenza
nel manuale) per far scattare l’otturatore senza toccare
o far vibrare la fotocamera. Tenere, tuttavia, presente
che il timer non permette di scattare la foto nel momento esatto in cui si desidera, mentr
e con il cavo
remoto ciò è possibile.
7372
Page 38

Parabéns pela sua compra do Telescópio de Localização Bushnell
ImageView®! O telescópio de localização Bushnell ImageView
utiliza a tecnologia da fotografia digital e a combina com a alta
PORTUGUÊS
qualidade de um telescópio de localização de alta qualidade. Isto
permite que possa observar eventos esportivos, animais selvagens,
vistas pitorescas ou qualquer coisa para a qual normalmente
utilizaria telescópio de localização e gravar a imagem na câmara
digital embutida. Em seguida poderá fazer o download destas
imagens para seu computador e enviá-las aos seus amigos e
familiares, imprimir a fotografia utilizando o software incluído ou
guardá-las num álbum de fotografias para uso futuro.
74
Requisitos do Sistema:
• Mínimo Pentium 166MMX
(Recomenda-se Pentium II 266)
• Windows 95 / 98 /ME / NT e Windows 2000/XP
• Mínimo 32 MB de RAM
• Porta USB
• Mínimo 200 MB de espaço de Disco Rígido com
65 MB de espaço adicional para IE e DirectX
• Driver CD-ROM
• Monitor Super VGA e placa de vídeo
INSTALAÇÃO DO SOFTWARE:
Para carregar o software, insira o CD no leitor de CD-ROM e ele iniciará automaticamente. O CD inclui
Roxio PhotoSuite, um programa de edição de fotografias, assim como os drivers necessários para que
os sistemas operacionais Windows 98/98SE reconheçam a câmara. Os sistemas operacionais Windows
2000, ME e XP não necessitam de drivers – os arquivos de fotografias da câmara podem ser facilmente
acessados como se estivessem em uma unidade rígida externa. Mesmo que já possua algum software
de imagem fotográfica de sua preferência instalado no computador e não necessite do software
PhotoSuite, será necessário instalar os drivers ANTES DE CONECTAR a câmara caso esteja rodando o
Windows 98/98SE.
Clique no botão denominado “Install Driver” (instalar driver) na tela de inicialização do CD caso esteja
rodando Windows 98 ou clique em “Install PhotoSuite” (Instalar PhotoSuite) se necessitar de software
de edição de fotografias para Windows 98/2000/ME/XP. Os arquivos de fotografias da câmara são
arquivos .jpg padrão que podem ser abertos e visualizados com qualquer software de imagem digital.
Siga as instruções na tela após clicar no botão de instalação. Para maiores detalhes sobre como conectar a câmara e fazer o download de fotografias, consulte a seção intitulada “Como fazer o download
de fotografias para o computador”.
75
Page 39

INSTRUÇÕES PARA OPERAÇÃO DA CÂMARA
A. Descrições dos Botões
a. O botão MODO tem três funções:
1. Ligar (Power on): Aperte e segure o botão até que a câmara ligue. Se a
câmara estiver conectada ao PC por meio do cabo USB fornecido a câmara
ligará automaticamente.
2. Desligar: Enquanto a câmara estiver ligada, aperte e continue apertando até
que a câmara desligue. Se a câmara não tiver sido usada ou se o botão não
tiver sido apertado por mais de 2 minutos, a câmara se desligará
automaticamente para economizar a vida da bateria. Se a câmara não estiver
conecta por meio do USB, a câmara não desligará a menos que se desligue
o PC.
3. Modificação do modo: aperte este botão
rapidamente para modificar os modos.
O botão SNAP (Instantâneo) tem duas funções:
b.
1. Tirar uma fotografia: aperte este botão
para tirar uma fotografia quando a câmara
está ligada. (Mas não no modo PC e no
modo modificar)
2. Selecione: no "Modificar Modo" apertar
este botão para confirmar a função que
está reluzindo.
B. Mostrador de Cristal Líquido
1. Cronômetro: Selecione o cronômetro para
tirar uma fotografia com retardamento.
Isto lhe dá aproximadamente 10 segundos
de prazo.
2. Repetir as fotos: Tira 3 fotos contínuas,
apertando somente uma vez o botão SNAP
Instantâneo). As fotos são tiradas
(
aproximadamente segundo à parte.
3. Qualidade Hi/Low (Alta/Baixa): Não se vê
nenhum ícone quando a câmara está no
Modo de Alta Resolução (640 x 480). Vê-se "LQ" quando a câmara está no Modo
de Baixa Resolução (320 x 240).
Modo AVI: Este modo permite-lhe tirar movie clips curtos, gravados como arquivos ".avi".
4.
5. Indicador de Bateria: Indica o quanto resta de carga total da bateria.
6. 50/60: Mostra a tensão da freqüência. "50" corresponde a 50Hz da tensão da
freqüência, e "60" corresponde a 60Hz a tensão da freqüência que é utilizada nos
Estados Unidos. O parâmetro correto (i.e. 60 nos EUA e 50 em alguns países)
evitará que as imagens cintilem (efeito flicker).
7. Delete (Apague) Último/Todos: " " apaga a última foto tirada e " "
apaga todas as fotos na memória.
8. Foto Número/PC/Memória Completa: Esta área mostra o número de fotos na memória
quando a câmara está no modo "Normal". Aparecerá "PC" quando a unidade estiver
ligada ao PC através do cabo USB. Quando não existe espaço suficiente no modo
"Normal", o vídeo mostrará "FUL" (Completa) e soará um alarma.
76
77
Page 40

GUIA DE OPERAÇÕES
A câmara é alimentada por duas baterias "AAA" (não incluídas) ou força USB (incluída)
1.
2. Inserir duas baterias alcalinas AAA no compartimento da bateria.
3. Apertar e segurar o botão MODO até que a câmara ligue.
4. Aperte SNAP para tirar uma foto, ou aperte o botão MODO rapidamente para
modificar os parâmetros descritos acima. A câmara está configurada para infinidade
e não será focalizada num objeto que esteja a menos de 20 pés de distância
(aproximadamente. 6 m).
5. A operação de configurar modo é um comando de ciclos (loop), portanto aperte o
botão MODO para ir para um outro modo. Demostramos a ordem dos ciclos dos
diversos modos a seguir.
8. Quando estiver no modo "Normal", aperte SNAP para tirar uma foto.
9. Quando estiver no modo "Normal", e apertar o botão M
ODO a sua
câmara entrará no "Mode Change." (Modificação de Modo)
10. Para alterar o modo "Disparador Automático", (Self-Timer) aperte MODO uma vez
e em seguinte aperte SNAP para escolher.. O disparador automático agora está
ligado. A câmara permanecerá neste modo até que o modo seja modificado.
6. Para mudar os parâmetros, alterne através dos diversos modos apertando o botão
MODO. Quando tiver selecionado o modo, o símbolo indicador no Vídeo de Cristal
Líquido (LCD) começará a piscar. Poderá então escolher aquele modo apertando o
botão SNAP.
o mudar de modos, se não tiver sido apertado nenhum botão durante 5 segundos,
7. A
a câmara voltará ao modo normal.
78
11. Quando estiver no modo "Normal" aperte o botão MODO
duas vezes para chegar ao modo "Repeat Shot" (Repetir foto). Ao
ver o " ", aperte SNAP para entrar neste modo (e o ícone
" " deixará de piscar). Ao apertar e segurar o botão SNAP
poderá tirar 3 fotos consecutivas. A câmara ficará neste modo
até ser feita uma modificação ou até que não haja mais espaço
suficiente na memória. Quando não houver mais espaço sufciente na memória o
vídeo indicará "FUL" e soará um alarma.
Aperte MODO
Aperte SNAP para entrar neste modo
e sinal de alarma
79
Page 41

12. Ao entrar no modo "Low Resolution" (Baixa Resolução), as suas
fotos terão menos nitidez, mas também poderá arquivar muito
mais fotos na memória da sua câmara; aperte o botão MODO
3 vezes até que veja o ícone "LQ" piscar. Aperte o botão SNAP
para selecionar este modo. O ícone "Low"
deixará então de piscar. Entrando neste modo
posteriormente, apertando SNAP novamente possibilitará que volte ao
modo "High Resolution" (Alta Resolução).
13. Quando estiver no modo "Normal" aperte o botão MODO 4 vezes para entrar
no modo "AVI". O ícone " " começará então a piscar. Aperte o botão SNAP
selecionar este modo. O " " deixará então de piscar. Serão tirados clips
para
AVI enquanto se aperte o botão SNAP ou até que não haja mais espaço suficiente
na memória . Quando desengatar o botão a câmara voltará ao modo "Normal"
e assim poderá tirar fotografias estáticas (ou seja inativas) novamente desde que
haja espaço suficiente na memória. Repita o passo 11 se quiser que a câmara volte
ao modo AVI novamente.
15.
Se for selecionado o modo "Delete Last" (Apagar última) o vídeo mostrará o seguinte:
apague a última imagem e depois saia deste modo
Aperte SNAP para apagar a última fotografia da memória da câmara .
16. Se for selecionado o modo "Delete All" (Apagar tudo) aparecerá a palavra "ALL"
ao lado do ícone no vídeo. Para apagar todas as fotografias na memória da câmara,
selecione este modo. O número da fotografia começará então a piscar. Aperte e
segure o botão SNAP botão. Ouvirá então um som que aumentará de intensidade
à medida que as fotografias são apagadas. Quando o processo tiver sido
completado, o número da fotografia voltará a zero. Se nenhum botão for apertado
durante um certo tempo, a câmara volta a posição de espera (stand-by).
14. Pode-se escolher entre 50mhz e 60mhz como parâmetros de alimentação da
câmara. O modo default da câmara é "60" que é a tensão da freqüência nos
Estados Unidos. Para mudar para o modo "50" modo, aperte o botão SNAP botão
até que o "60" passe para "50." Confirme a escolha apertando o botão SNAP.
Para evitar qualquer cintilação (efeito flicker) na fotografia, deve-se selecionar a
tensão de freqüência correta para o seu país (quer seja 50 ou 60).
80
17. Se o indicador "Bateria" estiver somente um terço iluminada é necessário trocar as
baterias brevemente.
o ícone " " da bateria irá piscar e zumbir
81
Page 42

18. Se a sua câmara está conectada com o computador por meio de um cabo USB, o
vídeo mostrará
COMO FAZER O DOWNLOAD DE FOTOGRAFIAS PARA O COMPUTADOR:
A câmara pode ser destacada para fazer um download com maior conveniência, basta deslizá-la para fora do
suporte de montagem. Os usuários de Windows 98 devem instalar o driver (insira o CD e clique em “Install
Driver” – Instalar Driver) antes de conectar a câmara e seguir estas instruções: Windows 2000, XP e ME não
requerem o driver. Depois que a câmara estiver conectada ao PC com o cabo USB fornecido, ela será reconhecida como um “dispositivo de armazenamento de massa”. Abra o Windows Explorer ou Meu computador, a
câmara aparece como um novo ícone de “Disco removível”. Abra este “disco” e localize as fotografias (arquivos
.jpg) no interior das pastas. Clique sobre o arquivo de uma fotografia individual ou use “Editar>Selecionar
todas” caso pretenda fazer o download de todas as fotografias. Em seguida, selecione “Mover para a Pasta...” no
menu Editar. Pode-se selecionar uma pasta existente (“Minhas figuras”) ou criar uma nova pasta com o endereço
e nome desejados. Clique “OK” e suas fotos serão transferidas da câmara para aquela pasta na unidade rígida.
A câmara poderá então ser desconectada – primeiro deve-se clicar no ícone da câmara na bandeja do sistema
(movimente o cursor do mouse sobre os ícones no canto inferior direito da tela para encontrar isso) e siga as instruções para parar e remover o dispositivo USB. Para ver e editar as fotografias, pode-se instalar o PhotoSuite
(clique em “Install MGI PhotoSuite 5SE” – Instalar o MGI PhotoSuite 5SE) no CD incluído ou use qualquer
outro software de edição de fotografias. Selecione “Arquivo>Abrir” no editor de fotografias e navegue até a pasta
contendo os arquivos transferidos da câmara. Consulte o manual de instruções do software de fotografias ou o
menu Ajuda para detalhes específicos sobre edição, gravação e impressão das fotografias.
INSTRUÇÕES PARA O TELESCÓPIO DE LOCALIZAÇÃO
MONTAGEM
Observação: Alguns telescópios de localização de uso especial não incluem tripés. Entretanto, essas
instruções se aplicam à maioria dos tripés. Retire o telescópio de localização da embalagem. Coloque
o parafuso de fixação no tripé pelo seu orifício de montagem localizado na base do telescópio. Afaste as
pernas do tripé e assente-as sobre uma superfície sólida.
AMPLIAÇÃO
bservação: Alguns telescópios de localização especiais possuem uma ampliação fixa sem zoom. Para os
O
telescópios com zoom, prenda e gire o anel de ampliação para mudar a potência. Este anel geralmente se
encontra próximo ao ocular. Ao girar este anel, a imagem se aproxima ou se afasta. Talvez seja necessário
refocalizar quando a potência for mudada.
FOCALIZAÇÃO
maioria dos anéis de foco se encontra na frente do ocular no corpo do telescópio de localização. Ao girar
A
este ajuste, a imagem ficará mais nítida até ficar bem focada. Em alguns telescópios de localização o anel
de foco fica próximo ou no ocular.
COMO USAR O TRIPÉ
(Vem incluído com a maioria dos telescópios de localização, com exceção daqueles para usos especiais) Para
movimentar lateralmente ou verticalmente, afrouxe o cabo de controle do tripé girando-o no sentido antihorário. Para travar na posição desejada, gire o cabo de controle do tripé no sentido horário.
82
83
Page 43

CUIDADO: NÃO OLHE DIRETAMENTE PARA O SOL PELO TELESCÓPIO DE
LOCALIZAÇÃO, POIS PODERÁ RESULTAR EM LESÕES SEVERAS NOS OLHOS!
CUIDADOS
As lentes de seu telescópio de localização são revestidas para proporcionar a mais elevada transmissão
de luz. Assim como todo equipamento óptico revestido, deve-se ter muito cuidado ao limpar as lentes.
Umedeça a superfície da lente levemente e seque usando um movimento circular começando pelo centro
da lente. Limpe toda sujeira ou poeira na parte externa do telescópio de localização.
CUIDADO
unca desmonte o seu telescópio de localização. Ferramentas e equipamentos especiais são necessários
N
para o serviço de manutenção e danos irreparáveis podem resultar quando pessoas não treinadas tentarem
realizar estes serviços. O serviço de manutenção não autorizado poderá invalidar a garantia.
AVISO
Assegure-se de que efetuou o "download" de todas as
fotos da câmara ANTES de retirar as baterias da câmara.
84
NÃO olhe diretamente para o sol através do Telescópio de Localização,
AVISO
isto pode causar danos permanentes para a sua vista.
pois
REQUER
Nota da FCC:
Este equipamento foi testado e verificou-se que cumpre com os limites para um dispositivo digital Classe B,
de acordo com a Parte 15 das regras da FCC. Esses limites são estabelecidos para oferecer proteções adequadas
contra a interferência prejudicial em uma instalação residencial. Este equipamento gera, usa e pode irradiar energia de radiofreqüência e, se não for instalado e usado de acordo com as instruções, poderá causar interferência
prejudicial nas radiocomunicações. Entretanto, não há garantia de que não ocorrerão casos de interferência em
determinadas instalações. Se este equipamento causar interferência prejudicial na recepção de rádio ou televisão
(a qual poderá ser determinada ligando-se e desligando-se o equipamento), tente corrigir o problema adotando
uma ou mais das medidas seguintes:
· Reoriente ou mude o lugar da antena receptora.
· Aumente a distância entre o equipamento e receptor.
· Conecte o equipamento em uma tomada que faça parte de um circuito diferente daquele onde o receptor se
encontra conectado.
· Consulte um representante ou um técnico experiente em rádio/televisão para auxílio.
O cabo de interferência blindado deve ser usado com o equipamento para cumprir os limites de dispositivo
digital segundo a Sub-parte B da Parte 15 das Regras da FCC.
PILHAS 2 AAA; NÃO INCLUÍDAS
85
Page 44

GARANTIA LIMITADA DE DOIS ANOS
Garantimos que seu produto Bushnell®
data de aquisição. Caso tenha algum um defeito sob esta garantia, iremos a nossa opção, consertar ou trocar este
produto desde que o produto seja devolvido com porte pago. Esta garantia não abrange danos causados por uso
indevido, operação, instalação, ou manutenção incorretas efetuadas a não ser que seja do Departamento do Serviço
de Manutenção Autorizada da Bushnell.
Qualquer devolução efetuada sob esta garantia deve incluir os itens relacionados a seguir:
Um cheque/ordem de pagamento no montante de $10,00 para cobrir as despesas de porte e gastos administrativos
1)
2) Nome e endereço para a devolução do produto
3) Uma explicação do defeito
4) Comprovante da Data de Aquisição
5) O produto deve ser cuidadosamente embalado, numa caixa de papelão resistente para prevenir danos
enquanto em trânsito e enviado para os endereços indicados a seguir com porte de devolução pago:
NOS EUA REMETER PARA: NO CANADÁ REMETER PARA:
Bushnell Performance Optics Bushnell Performance Optics
Attn.: Repairs Attn.: Repairs
8500 Marshall Drive 25A East Pearce Street, Unit 1
Lenexa, Kansas 66214 Richmond Hill, Ontario L4B 2M9
Para produtos adquiridos fora dos Estados Unidos ou do Canadá favor contatar seu revendedor local quanto a
informações aplicáveis referentes a sua garantia: A Bushnell também pode ser contatada na Europa pelo telefone:
BUSHNELL Performance Optics Gmbh
European Service Centre
MORSESTRASSE 4
D- 50769 KÖLN
Alemanha
Tél: +49 (0) 221 709 939 3
Fax: +49 (0) 221 709 939 8
Esta garantia lhe dá direitos legais específicos. Poderá ter outros direitos que podem variar de país para país.
estará isento de defeitos materiais e de fabricação. por dois anos após a
©2004 Bushnell Performance Optics
CABO DO OBTURADOR REMOTO
Sempre que possível, recomenda-se usar o cabo do obturador remoto para evitar que a
câmara acidentalmente sacuda quando o botão SNAP for pressionado. Devido à grande
ampliação da câmara, qualquer movimento quando o obturador estiver aberto poderá
resultar em fotografias sem nitidez ou tremidas. O cabo remoto é instalado no conector
encontrado na parte inferior da câmara, como indicado abaixo. A foto será tirada quando
o botão no remoto é pressionado, da mesma maneira como se fosse apertado o botão
SNAP.
Caso o cabo do obturador remoto não se encontre
disponível, pode-se usar o temporizador automático (conforme anteriormente descrito no manual) para disparar o
obturador sem tocar ou sacudir a câmara. E
ntretanto, o
temporizador não permitirá tirar a fotografia no instante
exato selecionado, como ocorre no caso do cabo remoto.
8786
Page 45

www.bushnell.com
©2004 Bushnell Performance Optics
 Loading...