

Page 1

Instruction Manual
Manuel D'Instructions
Manual de Instrucciones
Bedienungsanleitung
Manuale di Istruzioni
Manual de Instruções
Model #: 70-0101
Lit #: 98-0085/06-03
Deluxe Digital Compass • Navigateur Numérique de Luxe
Brújula Digital de Lujo • Deluxe Digital Compass
Bussola Digitale di Lusso • Bússola Digital de Luxo
Page 2

1
ENGLISH................................................... 2-17
FRANÇAIS.................................................. 18-33
ESPAÑOL....................................................34-49
DEUTSCH.................................................. 50-65
ITALIANO.................................................. 66-83
PORTUGUÊS............................................. 82-97
Page 3
32
Congratulations on your purchase of a BUSHNELL®DNS Pro Handheld
compass. It is a precision instrument constructed of the finest materials
and assembled by highly skilled craftsmen for a lifetime of trouble-free
use under the most demanding conditions. This booklet will help
you achieve optimum performance by explaining how to use its
various features.
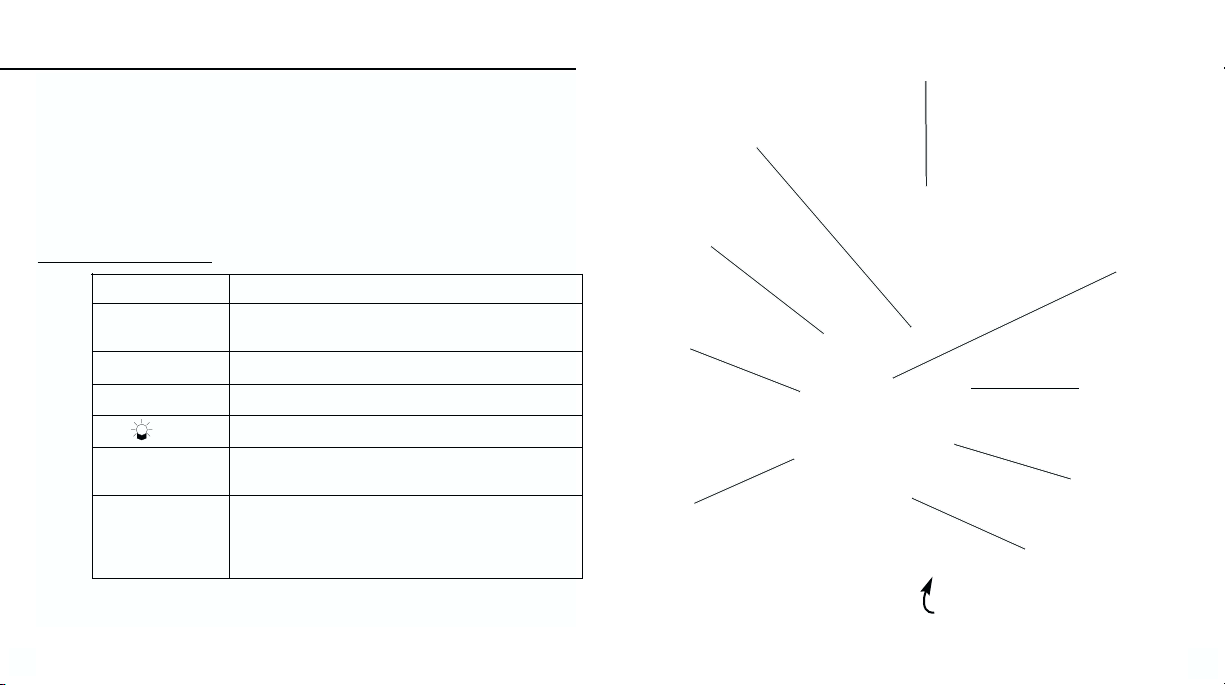
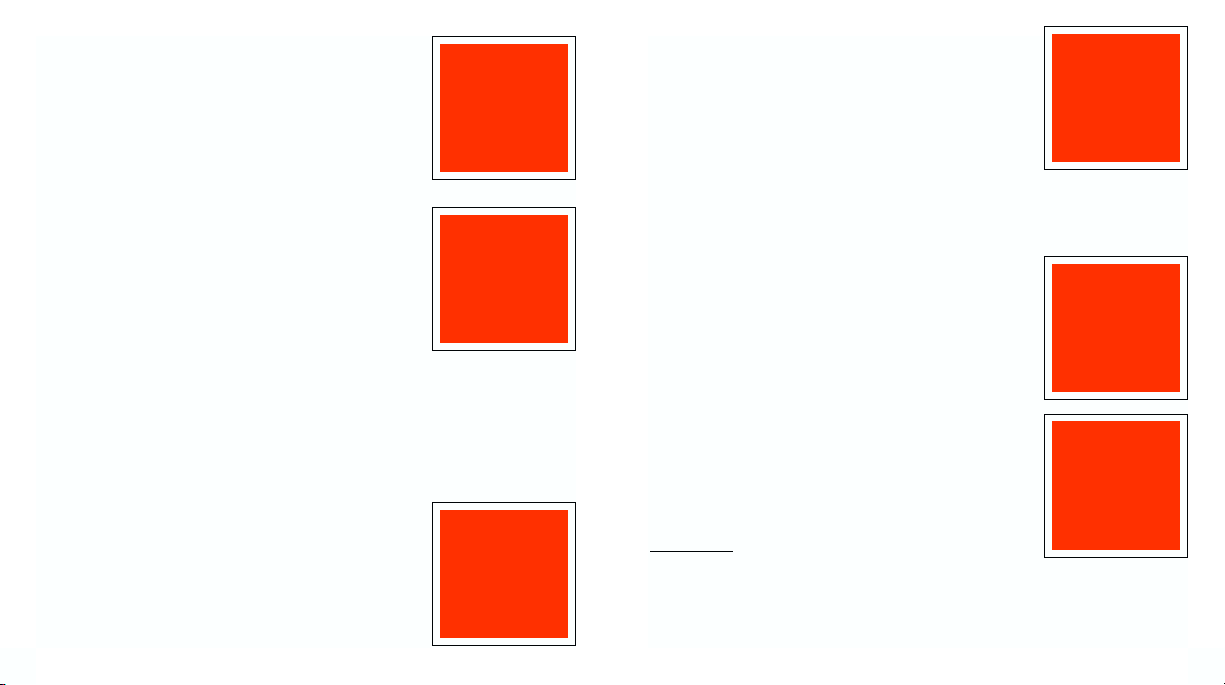
WHAT THE BUTTONS MEAN
(1) ADJ Adjusts your settings.
(2) MODE Changes display from one feature to the next within the
time or compass modes.
(3) ALTI Accesses ALTIMETER function from Time Function.
(4) Round button Turns map light on.
(5) Turns light on to illuminate LCD display.
(6) COMP/+ Switches from Time Mode to Compass Mode.
Also increases adjustment settings.
(7) BARO/- Accesses BAROMETER and WEATHER FORECASTING
feature from TIME Mode. Also decreases settings
while in adjustment modes.
LCD Display
(1)
(3)
(7)
(4)
(6)
(5)
Battery Compartment
Compass Level
ENGLISH
(2)
Page 4

New Settings
ALARM
Alarm Setting Mode
Press MODE button until Alarm Mode is displayed. The alarm
consists of 5 alarms, 3 for Time 1 for Altitude, and 1 for
Temperature. Press
COMP/+ or BARO/- button to scroll through
the different alarms. Press and hold down
ADJ for 3 seconds until
the minute blinks, press
COMP/+ or BARO/- button to adjust to
desired values. Press
MODE button for next setting. Press ADJ
button at any time to save changes and exit. The alarm is activated
automatically after adjustments have been made. To stop the alarm
from beeping, PRESS ANY BUTTON.
The alarm can also be turned on or off by going to the relevant alarm
and pressing the
ALTI button to activate alarm function, press again
to activate Snooze function, and press again to de-activate alarm.
Temperature Alarm
Sets the alarm to sound when the temperature measurement reaches
the programmed level. In the Alarm Mode, the Temperature alarm
uses the same measurement units (ºC or F) that were last set in the
Temperature Mode. To change this you must first change the
temperature units in the Barometer Mode. Pressing the
COMP/+ or
BARO/- once changes the temperature in tenths of a degree.
Holding the button down changes the temperature in increments of
1 degree.
SETTING THE TIME
Default Time Mode / Time Settings
Press MODE button until Time Mode is displayed. Press and hold down ADJfor 3 seconds. Press
COMP/+ or BARO/- button until desired value appears, and then press MODE button for next
setting. Press
ADJ button at any time to save changes and exit. When this is done, seconds will
be reset to 00. A small "A" or "P" will be to the lower left of the hours to denote AM or PM.
Date Settings
When setting the date, the year is also displayed. Press MODE
button until Time Mode is displayed. Press and hold down ADJ for
3 seconds. Press
MODE button and scroll to desired setting to
change. Press
COMP/+ or BARO/- button until desired value
appears, and then press
MODE button for next setting. Press ADJ
button at any time to save changes and exit.
For 24/12 hour setting press
MODE button until Time Mode is
displayed. Press and hold down
ADJ for 3 seconds. Press MODE
button and scroll through settings until 24/12 hour setting appears,
then press
COMP/+ or BARO/- button to enter desired setting.
Press
ADJ button at any time to save changes and exit.
5
4
Page 5
COUNTDOWN TIMER ALARM
Countdown / Reverse-Timer Mode
Press MODE button until Countdown Timer Mode is displayed,
represented by ‘RT’ (reverse timer). To operate press
COMP/+
button to start and press again to stop, then press BARO/- button
to reset the Countdown Timer.
To set the Countdown Timer press and hold down
ADJ button for
3 seconds, which will cause the seconds setting to blink. Adjust with
the
COMP/+ or BARO/- button, and then press MODE button to
adjust next setting. Press
ADJ button to save settings and exit. Press
ALTI for ‘AUTO’ to allow Countdown Timer to repeat function
automatically, and press
ALTI again to turn off ‘AUTO’ function.
Press any button when alarm sounds to stop the Countdown Timer.
If nothing is pressed the Countdown Timer will stop beeping after
10 seconds, but the countdown timer will continue if the ‘AUTO’
function is on. To stop the Countdown Timer if the ‘Auto’ function
is on, you must go to the Countdown Timer Mode and press
COMP/+ to turn off the ‘AUTO’ function and then press ALTI
button to stop it.
DIGITAL COMPASS
Compass Mode
Press MODE button until Time Mode is displayed, and then press
COMP/+ button. If already in Time Mode, simply press COMP/+
button and Compass Mode is displayed. Hold the compass level using
the bubble level to get a reading. If the Cardinal Points blink then the
compass may need to be calibrated. (See trouble shooting tips.)
Compass Calibration
In Compass Mode, hold down ADJ button for 3 seconds.
Calibration Mode is displayed. Put the compass on a level, nonmagnetic surface and press the
COMP/+ button. The word CAL
will start blinking. Then, rotate the compass 2 full circles slowly
WHILE HOLDING THE COMPASS LEVEL. Each revolution
should take about 10 seconds. When done, press
COMP/+ again.
When completed, the display shows ‘DONE’ and it will then go
Altitude Alarm
Sets the alarm to sound when the altitude reaches the programmed
level. In the Alarm Mode, the Altitude alarm uses the same
measurement units that were last set in the Altimeter Mode. To
change this you must first change it in the Altimeter Mode. To adjust
the altitude at which the alarm will go off, press
ADJ to enter the
setting mode. Press the
COMP/+ or BARO/- to change the
altitude alarm setting. Press
ADJ to save and exit.
Beep Function
In the Alarm Mode a Beep function is also available. When
activated, the Beep function causes a beep sound to be made
whenever a button is depressed, even when the Alarm function is
turned off. To activate the function go to the Beep function in the
Alarm Mode, press the
ALTI button and ‘ON’ is displayed. Press
again and ‘OFF’ is displayed.
Stopwatch Mode
Press MODE button until Stop Watch Mode is displayed. To
operate, press
COMP/+ button to start and press again to stop.
Pressing
BARO/- button will reset the Stop Watch.
Stop Watch Mode / Split Timing Function
For split timing function, press the BARO/- button while the Stop
Watch is operating in order to stop the display and press again to
continue. The display will show your time down to 1/100th of a
second. You can also press the
BARO/- button while the Stop
Watch is operating to stop the display and then press the
COMP/+
button to stop the Stop Watch and display the final reading. Press
the
BARO/- button again to reset the Stop Watch. Split timing
function is displayed as ‘SPL’ when activated and the display returns
to normal when
BARO/- button is pressed.
7
6
Page 6
To conserve energy the display in the Homing Mode will show 3
‘bars’ instead of the current bearing, and the segments will not be
displayed after 1minute. To activate the display again you must press
COMP/+. To exit the Homing Mode press MODE again to return
to default Compass Mode or
MODE to return to Time Mode.
AUTO BACK LIGHT
Press the LIGHT ( )button to turn on LCD backlight for 5 seconds.
Night Mode
Night Mode allows the backlight to come on automatically when
any of the function keys are pressed except when the compass is in
Compass Mode. Press and hold down
LIGHT ( ) button for 3
seconds, and the Night Mode icon (represented by the light symbol)
appears. To turn off press and hold down
LIGHT ( ) button until
the light symbol disappears.
BATTERY INDICATOR
Low Battery Indicator
A blinking battery icon will appear when the battery is low. The
battery compartment is on the back of the compass. Replace used
batteries with two AAA batteries.
Barometer and Temperature - Barometer Mode
Barometric pressure in hPa(mb) and temperature in degrees °F with
weather forecast graphic.
To enter the Barometer Mode press MODE
button until Time Mode is displayed, then press BARO/- button. If
in Time Mode, Compass Mode or Altimeter Mode then just press
BARO/- button and Barometer Mode is displayed. On entering the
Barometer Mode, a barometric graph is displayed graphically on the
dot matrix display.
automatically into Declination Setting Mode. If Calibration is unsuccessful, the Cardinal Points
will blink and you will have to repeat the previous 4 steps again. To skip setting the declination,
press the
ADJ button to return to the Compass Mode.
Declination Setting
Declination adjusts the compass for the local magnetic fields. In
some areas, magnetic declination can be considerable, so it is a good
idea to check for declination on your map or on the Internet. To
adjust the compass declination angle, go to Compass Mode and hold
down
ADJ button for 3 seconds, and the Compass Homing
Calibration Mode is displayed. Press
MODE button until you get
into Declination Setting Mode displayed as ‘DEC’. Press
COMP/+
or BARO/- button for desired value then just press ADJ button to
save settings and exit the mode. Declination is sometimes measured
as degrees positive and negative. Degrees East are considered positive
and Degrees West are considered negative. For example, to change
from 3 degrees East (positive) declination to 3 degrees West (negative) press the
BARO/- button
until 3W appears.
Self Homing Mode
Allows you to preset a reference bearing which tells the Compass to
alert you to the direction you should be heading. Go into Compass
Mode and press
COMP/+ button to display compass Homing. To
adjust homing bearing, press and hold
ADJ button for three
seconds. Press
COMP/+ button or BARO/- button to adjust to
desired bearing setting. Pressing
COMP/+ or BARO/- will increase
or decrease bearing by increments of ten. A single push of
COMP/+
or BARO/- moves bearing by 1 degree. When done, press ADJ to
return to Homing Mode. To return to Compass Mode press
COMP/+ button.
To operate the compass in Homing Mode go into the Compass Mode first, then press the
COMP/+ button again to get into Homing Mode.
The main reading displays the actual bearing and the lower reading shows the ‘home’ bearing. The
segments on the circumference show the difference between the two bearings, which can be used
to redirect you to stay on course.
9
8
Page 7
11
Weather Forecast Mode
To change to the Weather Forecast Mode, press the BARO/- button
and the weather forecast is displayed. Press
BARO/- button again to
change it back to a barometric graph display. For a full explanation
of how the weather forecasting mode works, please see the appendix.
Weather Forecasting Icons
Sunny Partly Cloudy Cloudy Rain/Snow
Barometer and Temperature Units
Barometric pressure in inHg and temperature in °C. To change the
type of units measurement used, press and hold down the
ALTI
button for 3 seconds until the temperature unit blinks and press
COMP/+ or BARO/- button to change it, then press MODE to go
to pressure unit and press
COMP/+ or BARO/- button to change it.
Press
ADJ button at any time to exit. To get an accurate reading of
temperature, please keep in mind that the unit needs to be kept away
from source of heat for about 15 minutes (i.e. the temperature will
reflect the temperature in your pocket instead of outside if the unit
is kept in your pocket.)
Sampling
Barometric pressure and temperature measurements are taken every time you enter the Barometer
Mode or when you press the
BARO/- button when you are in this mode. After that, temperature
measurements are taken every 5 seconds for the first 3 minutes, and then it is taken every 5
minutes thereafter.
The barometer automatically takes measurements on the start of every hour even when you are
not in the Barometer Mode, except when in the Altimeter Mode where no barometric
measurements are taken. The temperature is displayed in resolution of 0.1°C (or 0.2°F). 4 'bars'
are displayed when the temperature falls outside the range of -10°C to 60°C (14.0°F to 140°F).
Normal reading returns when the temperature value returns to within the set range.
10
Barometric Graph
The barometric pressure graph shows the barometric readings for the past 13 hours. The newest
reading is shown as a flashing point on the right side of the graph. The pressure graph readings
are relative to the newest measurement point, one dot above the newest point is plus 1
hPa(mb)/0.05 inHg, or if below then it is minus 1 hPa(mb)/0.05 inHg
Clearing Previous Barometric Readings
Sometimes you need to clear all the previous barometric readings,
e.g. when you are in a different country. To clear previous
information press
MODE button until Time Mode is displayed,
then press
BARO/- button. If already in Time Mode then just press
BARO/- button and Barometer Mode is displayed. Press and hold
down
ADJ button for 3 seconds, the display blinks and 'CLR ALL'
is displayed, then press
COMP/+ button to confirm that you want
to clear all the previous barometric readings,and the display will
then return to Barometer Mode automatically. Press
ADJ button to
exit and return to Barometer Mode if you do not want to clear the
previous readings.
Barometric pressure is displayed in units of 1 hPa(mb) (or 0.05 inHg). 4 'bars' is displayed when
the barometric pressure falls outside the range of 260 hPa(mb) to 1100 hPa(mb) (or 7.65 inHg to
32.45 inHg). Normal reading returns when the barometric value returns to within the set range.
Altimeter Mode
Press MODE button until Time Mode is displayed, then press
ALTI button. If already in Time Mode, Compass Mode or
Barometer Mode, then just press
ALTI button and the
Altimeter Mode is displayed. Press
ALTI button and hold
down for 3 seconds to change Altimeter setting from Feet to
Meters or vice versa.
Altitude is displayed in resolution of 5 meters (10 feet). The
measuring range is – 700 to 8940 meters (-2,300 to 29320 feet)
4 'bars' are displayed when the value exceeds this range. The
measured altitude may be negative value in cases where there is a
reference altitude value set or because of certain conditions.
Page 8
stored), and the display is returned to Altimeter Mode. If you decide
you do not want to store anything when you have entered the
memories, you will have to press
MODE button or ADJ button
which will return you to the Altimeter Mode.
'Full' is displayed when all 10 memories are used up. The memory
will need to be reset before you can store new entries
Reading Stored Memories
To read stored memories press and hold down MODE button for 3 seconds once while in the
Altimeter Mode, a memory number is displayed with 3 ’bars’ meaning it is empty, or the last
viewed memory is shown. If memories is full 'FULL' is displayed. Press
COMP/+ button and the
last viewed memory is displayed. To view other stored memories press
COMP/+ button again to
scroll through all stored memories.
Clearing Memory
To clear a memory press and hold down MODE button for 3
seconds while in the Altimeter Mode. The last viewed memory is
displayed, or if memories is full 'FULL' is displayed. Press
COMP/+
button until the memory you want to clear is displayed, then press
BARO/- button, a blinking ‘CLR' is displayed, press BARO/-
button again to confirm. To exit press MODE or ADJ button.
To clear all memory press and hold down
MODE button for 3
seconds while in the Altimeter Mode, the last viewed memory is
displayed, or if memories is full 'FULL' is displayed. Press
COMP/+
button to view memories. Then press BARO/- button and hold
down until 'CLR ALL' is displayed. Press
BARO/- button again to
confirm or press
MODE button or ADJ button to exit, or press
COMP/+ button to continue viewing the memory
MAP LIGHT
Press the small round button to activate the Map Light. This light is
red to protect your night vision.
13
The Altitude graph consists of 14 columns and 9 rows of dots with
each column of dots representing a period when the altitude
measurements were taken, with each dot representing a unit of 10
meters (30 feet)
The graph takes an altitude reading every 5 seconds for the first 3
minutes and then every 5 minutes thereafter.
Setting a Reference Altitude
The altimeter uses the built in ISA (International Standard
Atmosphere) values to convert the air pressure measured at the
current location to the equivalent altitude. But you can set a
reference altitude and the compass automatically adjusts its air
pressure to altitude conversion calculation accordingly.
To set a reference altitude, press and hold down
ADJ button for 3
seconds while in the Altimeter Mode. The reading displays 'OFF' or
the current reference value (if set) will blink, which indicates the
setting screen, if setting is 'OFF' press
ALTI button. Press COMP/+
button to increase the value in increments of 5 meters (10 feet) or
press
BARO/- button to decrease it. When in feet, holding down COMP/+ or BARO/- shifts the
altitude by 100 ft increments. When in meters, it shifts the altitude by 10 meter
increments.Pressing
ALTI button turns the value to 'OFF', repeating the procedure returns the
display to the set reference value. Setting the reference altitude to 'OFF' means that the air
pressure to altitude conversion based on factory preset data is used only. Pressing
ADJ button at
any time will exit the setting mode.
Memory Function
There are 10 memories where you can store altitude, time and date
information. To store current altitude measurement, time and date
press
MODE button and hold down for 3 seconds while in the
Altimeter Mode, a memory number is displayed with 3 ’bars’
meaning it is empty or the last viewed memory is shown then press
COMP/+ button until an empty memory is located. If the memory
is full 'FULL' is displayed (then nothing can be stored until memory
is made available). Press and hold down
COMP/+ button for 3 and
the displayed values are stored into the memory (the date is also
12
Page 9
APPENDIX: HOW THE WEATHER FORECASTER WORKS
Your barometer is a tool to that measures how heavy the air is. The trend is more important for
forecasting than the absolute amount of pressure. Generally speaking, a rising barometer means
that the air is becoming more stable (and nicer) and a falling barometer means the air is becoming
less stable (stormier). Your unit is designed to forecast the weather 12 to 24 hours from now.
Weather Forecast
The weather forecast for the next 12-24 hours is calculated from absolute pressure once the unit
is powered up.
Absolute Pressure / mbar Weather Condition
P < 970 Rainy
970 < P <1000 Cloudy
1000 < P < 1030 Partly Cloudy
P >1030 Sunny
Your DNS Pro takes barometric pressure every hour and compares current pressure with the
previous one to trace the change. If pressure keeps rising or falling for more than 3 hours, weather
condition will be changed relative to the change in pressure.
The weather forecast is calculated from the change in pressure per time period. The change in
weather condition is directly proportional to the speed of change in barometric pressure. A rising
slope indicates High Pressure System and a good (stable) weather trend. A falling slope means a
Low Pressure System and worsening weather trend (unstable).
Fluctuations in pressure typically due to a sudden change of conditions (ex. rapid change in
elevation due to flying from one elevation to another) are filtered out and no weather forecast is
made. If this happens, the unit will restart monitoring the pressure for required time period.
Barometric pressure that keeps constantly rising or falling during the past 3 hours will effectively
change the forecast weather condition.
15
BATTERY LIFE
Your DNS is designed for continuous use and batteries will last over one year with regular usage.
Heavy use of the alarms, light, or compass will shorten battery life.
TROUBLE SHOOTING
• If the Cardinal points (N, NE, E, SE etc.) on your compass blink – Try holding the compass
LEVEL using the bubble level as a guide. The Cardinal points may also blink when the Compass
encounters magnetic interference from the surrounding areas. The Cardinal points blink because
the Compass is unable to measure Bearings accurately. If this does not fix the blinking, please
recalibrate your compass. Remember to keep the Compass away from metal objects which may
cause magnetic interference. Also double check that your declination is properly set (In general,
zero degrees should be the default setting).
•
Three dashes are displayed – Your compass has gone into a "sleep" mode to save batteries. Press
COMP to reactivate the compass.
•
Can’t turn unit off – This unit is designed to be constantly on and the batteries will last about a
year assuming normal usage.
•
The Temperature does not seem accurate – remember that it takes 15 minutes for the unit to
adjust to the ambient temperature. Keeping the unit in a pocket or in direct sunlight will impact
the temperature.
•
My weather forecaster shows rain but it is sunny right now – Your weather forecaster is designed
to forecast the weather 12-24 hours from the current time.
•
Reset button – Located inside battery compartment. To access, open the battery compartment
door. Use a sharp object to press the Reset button. When the Reset button is pressed all
the Compass settings will be reset. Also, when the batteries are removed the Compass is
automatically reset.
14
Page 10
1716
WARRANTY / REPAIR
TWO-YEAR LIMITED WARRANTY
Your Bushnell® product is warranted to be free of defects in materials and workmanship
for two years after the date of purchase. In the event of a defect under this warranty, we
will, at our option, repair or replace the product, provided that you return the product
postage prepaid. This warranty does not cover damages caused by misuse, improper
handling, installation, or maintenance provided by someone other than a Bushnell
Authorized Service Department.
Any return made under this warranty must be accompanied by the items listed below:
1) A check/money order in the amount of $10.00 to cover the
cost of postage and handling
2) Name and address for product return
3) An explanation of the defect
4) Proof of Date Purchased
5) Product should be well packed in a sturdy outside shipping carton, to prevent
damage in transit, with return postage prepaid to the address listed below:
IN U.S.A. SEND TO:
IN CANADA SEND TO:
Bushnell Performance Optics Bushnell Performance Optics
Attn.: Repairs Attn.: Repairs
8500 Marshall Drive 25A East Pearce Street, Unit 1
Lenexa, Kansas 66214 Richmond Hill, Ontario L4B 2M9
For products purchased outside the United States or Canada please contact your local dealer
for applicable warranty information. In Europe you may also contact Bushnell at:
BUSHNELL Performance Optics Gmbh
European Service Centre
MORSESTRASSE 4
D- 50769 KÖLN
GERMANY
Tél: +49 (0) 221 709 939 3
Fax: +49 (0) 221 709 939 8
This warranty gives you specific legal rights.
You may have other rights which vary from country to country.
©2003 Bushnell Performance Optics
Page 11
Nous vous remercions d'avoir acheté un navigateur numérique portatif
DNS Pro BUSHNELL
®
. C'est un instrument de précision, fabriqué
avec les matériaux de la meilleure qualité, assemblé par des artisans
hautement spécialisés, pouvant assurer toute une vie de service sans
problème, dans les conditions les plus rudes. Ce livret vous permettra
d'en obtenir les performances les meilleures car il explique comment
utiliser ses diverses fonctions.
R
ÔLE DES BOUTONS
ADJ Sert à ajuster les réglages.
MODE Fait passer l'affichage d'une fonction à la suivante,
à l'intérieur des modes temps et navigateur.
ALTI Accède à la fonction ALTIMÈTRE depuis la fonction temps.
Bouton rond Allume le lecteur de cartes.
Sert à éclairer l'affichage à cristaux liquides.
COMP/+ Fait passer de Time Mode (mode temps) à Compass Mode
(mode navigateur). Sert aussi à l'augmentation des réglages.
BARO/- Accède aux fonctions BAROMÈTRE et PRÉVISIONS
MÉTÉOROLOGIQUES depuis TIME Mode
(mode temps). Sert aussi à la diminution des réglages
aux modes de réglage.
18
FRENCH
19
Ecran à cristaux liquides
Compartiment des piles
Niveau du
navigateur
numérique
(1)
(3)
(7)
(4)
(6)
(5)
(2)
Page 12

Nouveaux Réglages (New Settings)
ALARME
Mode Réglage Alarme (Alarm Setting Mode)
Appuyez sur le bouton MODE jusqu'à ce que Mode Alarme (Alarm
Mode) soit affiché. Ce mode comprend 5 alarmes, 3 pour le temps,
1 pour l'altitude et 1 pour la température. Appuyez sur le bouton
COMP/+ ou BARO/- pour faire défiler les différentes alarmes.
Maintenez
ADJ enfoncé pendant 3 secondes jusqu'à ce que le chiffre
de la minute clignote ; appuyez sur
COMP/+ ou BARO/- pour
ajuster les valeurs souhaitées. Appuyez sur le bouton
MODE pour le
réglage suivant. Appuyez sur le bouton
ADJ à n'importe quel
moment pour sauvegarder les changements et sortir. L'alarme
s'active automatiquement une fois les réglages effectués. Pour faire
taire l'alarme, appuyez sur n'importe quel bouton.
Il est aussi possible d'activer et de désactiver l'alarme en accédant à
l'alarme appropriée et en appuyant sur le bouton
ALTI pour activer
la fonction d'alarme, en rappuyant pour activer la fonction de rappel
et en rappuyant pour désactiver l'alarme.
Alarme Température (Temperature Alarm)
Programme le déclenchement de l'alarme quand la température
atteint la valeur programmée. Au Mode Alarme (Alarm Mode),
l'alarme de température utilise les unités (ºC ou ºF) qui ont été
programmées en dernier au Mode Température (Temperature
Mode). Pour changer cela, vous devez d'abord changer les unités de
température au Barometer Mode (mode baromètre).Une seule
pression sur
COMP/+ ou BARO/- change la température par paliers
d'un dixième de degré. Si vous maintenez le bouton enfoncé, la
température change par paliers de 1 degré.
21
Mode Temps par Défaut/Réglages de l'heure (Default Time Mode/Time Settings)
Appuyez sur le bouton MODE jusqu'à ce que Mode Temps (Time Mode) soit affiché. Maintenez
ADJ enfoncé pendant 3 secondes. Appuyez sur le bouton COMP/+ ou BARO/- jusqu'à ce que la
valeur souhaitée apparaisse puis appuyez sur le bouton
MODE pour le réglage suivant. Appuyez
sur le bouton
ADJ à n'importe quel moment pour sauvegarder les changements et sortir. Cela fait,
les secondes sont remises à 00. Un petit "A" ou "P" apparaît en bas, à gauche des heures pour
indiquer AM (avant midi) ou PM (après midi).
Réglages de Date (Date Settings)
Lors du réglage de la date, l'année est aussi affichée. Appuyez sur le
bouton
MODE jusqu'à ce que Mode Temps (Time Mode) soit
affiché. Maintenez
ADJ enfoncé pendant 3 secondes. Appuyez sur le
bouton
MODE et faites défiler jusqu'au réglage à changer. Appuyez
sur le bouton
COMP/+ ou BARO/- jusqu'à ce que la valeur
souhaitée apparaisse puis appuyez sur le bouton
MODE pour le
réglage suivant. Appuyez sur le bouton
ADJ à n'importe quel
moment pour sauvegarder les changements et sortir.
Pour le réglage 24/12 heures, appuyez sur le bouton
MODE jusqu'à
ce que Mode Temps (Time Mode) soit affiché. Maintenez
ADJ
enfoncé pendant 3 secondes. Appuyez sur le bouton MODE et faites
défiler les réglages jusqu'à ce que le réglage 24/12 heures apparaisse
puis appuyez sur le bouton
COMP/+ ou BARO/- pour entrer le
réglage souhaité. Appuyez sur le bouton
ADJ à n'importe quel
moment pour sauvegarder les changements et sortir.
20
Page 13

ALARME DE MINUTERIE DE COMPTE À REBOURS
Mode Compte à Rebours / Minuterie Inverse
(Countdown / Reverse-Timer Mode)
Appuyez sur le bouton MODE jusqu'à ce que Mode Minuterie de
Compte à Rebours (Countdown Timer Mode) soit affiché,
représenté par ‘RT’ (minuterie inverse). Pour l'utiliser, appuyez sur
le bouton
COMP/+ pour démarrer et appuyez de nouveau pour
arrêter ; appuyez sur le bouton
BARO/- pour remettre le compte à
rebours à zéro.
Pour régler la minuterie de compte à rebours, maintenez le bouton
ADJ enfoncé pendant 3 secondes, ce qui fait clignoter le réglage des
secondes. Ajustez à l'aide du bouton
COMP/+ ou BARO/- puis
appuyez sur le bouton
MODE pour ajuster le réglage suivant.
Appuyez sur le bouton
ADJ pour sauvegarder les réglages et sortir.
Appuyez sur
ALTI pour ‘AUTO’ afin de permettre la répétition
automatique de la fonction de minuterie de compte à rebours ;
appuyez de nouveau sur
ALTI pour désactiver la fonction ‘AUTO’.
Lorsque l'alarme retentit, appuyez sur n'importe quel bouton pour
arrêter le compte à rebours. Si vous n'appuyez sur aucun bouton, la minuterie cessera de biper au
bout de 10 secondes, mais elle continuera si la fonction ‘AUTO’ est activée. Pour arrêter le compte
à rebours si la fonction ‘Auto’ est activée, vous devez accéder au Countdown Timer Mode (mode
minuterie de compte à rebours) et appuyer sur
COMP/+ pour désactiver la fonction ‘Auto’ puis
appuyer sur le bouton
ALTI pour arrêter.
NAVIGATEUR NUMÉRIQUE
Mode Navigateur Numérique (Compass Mode)
Appuyez sur le bouton MODE jusqu'à ce que Time Mode (mode
temps) soit affiché puis appuyez sur le bouton
COMP/+. Si vous
êtes déjà au Time Mode (mode temps), appuyez simplement sur le
bouton
COMP/+ et Compass Mode (mode navigateur) est affiché.
Maintenez le navigateur horizontal à l'aide du niveau à bulle pour
obtenir un relevé. Si les points cardinaux clignotent, il est
probablement nécessaire d'étalonner le navigateur numérique. (Voir
les conseils de dépannage).
23
Alarme Altitude (Altitude Alarm)
Programme le déclenchement de l'alarme quand l'altitude atteint la
valeur programmée. Au Mode Alarme, Alarme Altitude (Altitude
Alarm) utilise les unités de mesure établies en dernier au Mode
Altimètre (Altimeter Mode). Pour changer cela, vous devez d'abord
les changer au Mode Altimètre (Altimeter Mode). Pour régler
l'altitude à laquelle l'alarme doit se déclencher, appuyez sur
ADJ
pour entrer au mode de réglage. Appuyez sur COMP/+ ou BARO/-
pour changer le réglage de l'alarme d'altitude. Appuyez sur ADJ
pour sauvegarder les réglages et sortir.
Fonction Bip (Beep Function)
Au Mode Alarme (Alarm mode), la fonction bip est aussi disponible.
Lorsqu'elle est activée, la fonction bip fait retentir un bip chaque fois
que vous appuyez sur un bouton, même si la fonction alarme est
désactivée. Pour activer la fonction, allez à la fonction bip au Mode
Alarme (Alarm mode), appuyez sur le bouton
ALTI et ‘ON’ (activé)
est affiché. Appuyez de nouveau et ‘OFF’ (désactivé) est affiché.
Mode Chronomètre (Stopwatch Mode)
Appuyez sur le bouton MODE jusqu'à ce que Mode Chronomètre
(Stopwatch Mode) soit affiché. Pour le faire fonctionner, appuyez sur
le bouton
COMP/+ pour démarrer et appuyez de nouveau pour
arrêter. Appuyez sur le bouton
BARO/- pour remettre le
chronomètre à zéro.
Mode Chronomètre/ Fonction de Chronométrage Fractionné
(Split Timing Function/Stop Watch Mode)
Pour la fonction de chronométrage fractionné, appuyez sur le
bouton
BARO/- pendant le fonctionnement du chronomètre afin
d'arrêter l'affichage et appuyez de nouveau pour continuer.
L'affichage indique le temps jusqu'au centième de seconde. Vous
pouvez aussi appuyer sur le bouton
BARO/- pendant le
fonctionnement du chronomètre afin d'arrêter l'affichage puis
appuyer sur le bouton
COMP/+ pour arrêter le chronomètre et
afficher le relevé final. Appuyez de nouveau sur le bouton
BARO/-
pour remettre le chronomètre à zéro.La fonction de chronométrage
fractionné s'affiche ‘SPL’ quand elle est activée et l'affichage retourne
à la normale quand vous appuyez sur le bouton
BARO/-.
22
Page 14
Accédez au Mode Navigateur Numérique (Compass Mode) et appuyez sur le bouton de COMP/+
pour afficher l'autoguidage du navigateur. Pour régler le relèvement d'autoguidage, maintenez le
bouton
ADJ enfoncé pendant 3 secondes. Appuyez sur le bouton COMP/+ ou BARO/- pour
entrer le réglage de relèvement approprié. Une pression sur
COMP/+ ou BARO/- augmente ou
diminue la valeur du relèvement par paliers de dix. Une seule poussée sur
COMP/+ ou BARO/-
change le relèvement de 1 degré. Cela fait, appuyez sur ADJ pour retourner au Homing mode
(mode autoguidage). Pour retourner au Compass Mode (mode navigateur numérique), appuyez
sur le bouton
COMP/+.
Pour utiliser le navigateur numérique au Mode Autoguidage (Self Homing Mode), passez d'abord
au Mode Navigateur (Compass Mode) puis rappuyez sur le bouton
COMP/+ pour accéder au
mode autoguidage.
L'affichage principal indique le relèvement présent et l'affichage inférieur indique le relèvement
d'autoguidage. Les segments de la circonférence représentent la différence entre les deux
relèvements, ce qui vous permet de corriger votre trajectoire.
Pour économiser l'énergie, l'affichage au Mode Autoguidage (Self
Homing Mode) indiquera 3 ‘barres’ au lieu de la valeur du relèvement
présent et les segments disparaîtront au bout d'une minute. Pour
réactiver l'affichage, vous devez appuyer sur
COMP/+. Pour sortir du
Mode Autoguidage (Self Homing Mode), rappuyez sur
MODE pour
retourner au Mode Navigateur (Compass Mode) par défaut ou sur
MODE pour retourner au Mode Temps (Time Mode).
RÉTROÉCLAIRAGE
Appuyez sur le bouton LIGHT ( ) pour allumer le rétroéclairage de
l'affichage à cristaux liquides pendant 5 secondes.
Mode Nuit (Night Mode)
Night Mode (mode nuit) permet au rétroéclairage de s'allumer
automatiquement lorsque l'une des touches de fonctions est
actionnée, sauf lorsque le navigateur numérique est au Compass
Mode (mode navigateur). Maintenez le bouton
LIGHT ( )
enfoncé pendant 3 secondes ; l'icône Night Mode (mode nuit)
(symbole de l'ampoule d'éclairage) apparaît. Pour le désactiver,
maintenez le bouton
LIGHT ( ) enfoncé jusqu'à ce que le
symbole de l'ampoule d'éclairage disparaisse.
25
Étalonnage du Navigateur Numérique (Compass Calibration)
Au Mode Navigateur (Compass Mode), maintenez le bouton ADJ
enfoncé pendant 3 secondes. Calibration Mode (mode étalonnage)
est affiché. Placez le navigateur numérique sur une surface
horizontale, non magnétique et appuyez sur le bouton
COMP/+. Le
mot CAL doit commencer à clignoter. Tournez alors le navigateur
numérique de 2 tours complets, lentement, TOUT EN LE
MAINTENANT HORIZONTAL. Chaque tour doit prendre
environ 10 secondes. Cela fait, appuyez de nouveau sur
COMP/+.
Cela terminé, l'affichage indique ‘DONE’ (FAIT) et il passe
automatiquement au Declination Setting Mode (mode de réglage de déclinaison). Si l'étalonnage
échoue, les points cardinaux continuent de clignoter et vous devrez répéter les 4 opérations
précédentes. Pour sauter le réglage de la déclinaison, appuyez sur le bouton
ADJ pour retourner
au Compass Mode (mode navigateur numérique).
Réglage de Déclinaison (Declination Setting)
La déclinaison règle le navigateur numérique pour les champs
magnétiques locaux. Dans certaines régions, la déclinaison
magnétique peut être considérable ; il est donc recommandé de
vérifier la déclinaison sur votre carte ou sur l'Internet. Pour régler
l'angle de déclinaison du navigateur numérique, allez au Mode
Navigateur Numérique (Compass Mode) et maintenez le bouton
ADJ enfoncé pendant 3 secondes ; le Compass Calibration Mode
(mode étalonnage du navigateur) est affiché. Appuyez sur le bouton
MODE jusqu'à ce que vous accédiez au Mode de Réglage de
Déclinaison (Declination Setting Mode) affiché ‘DEC’. Appuyez sur le bouton
COMP/+ ou
BARO/- pour entrer la valeur appropriée et appuyez sur le bouton ADJ pour sauvegarder les
réglages et sortir du mode. La déclinaison est parfois mesurée en degrés positifs et degrés négatifs.
Les degrés vers l'est sont considérés positifs et les degrés vers l'ouest sont considérés négatifs. Par
exemple, pour passer d'une déclinaison de 3 degrés est (positifs) à
une déclinaison de 3 degrés ouest (négatifs), appuyez sur le bouton
BARO/- jusqu'à ce que 3W apparaisse.
Mode Autoguidage (Self Homing Mode)
Il vous permet de programmer un relèvement de référence qui
indique au navigateur numérique de vous prévenir de la direction
vers laquelle vous devez vous diriger.
24
Page 15
27
INDICATEUR DE PILE
Indicateur de Tension Faible de Pile (Low Battery Indicator)
Une icône clignotante de pile apparaît quand la tension de pile est faible.
Le compartiment de pile se trouve à l'arrière du navigateur numérique.
Remplacez les piles usées par deux piles neuves de type AAA.
Baromètre et Température - Mode Baromètre
(Barometer and Temperature - Barometer Mode)
Pression atmosphérique en hPa (mbar) et température en degrés F avec
graphique de météo.
Pour entrer au Mode Baromètre (Barometer
Mode), appuyez sur le bouton
MODE jusqu'à ce que Time Mode
(mode temps) soit affiché puis appuyez sur le bouton
BARO/-. Si
vous êtes au mode temps, au Compass Mode (mode navigateur
numérique) ou Altimeter Mode (mode altimètre), appuyez juste sur
le bouton
BARO/- et le mode baromètre est affiché. Lors de l'entrée
au mode baromètre, un graphique barométrique apparaît sur
l'affichage par matrice de points.
Mode Prévisions Météo (Weather Forecast Mode)
Pour passer au Mode Prévisions Météo (Weather Forecast Mode),
appuyez sur le bouton
BARO/- et les prévisions météo apparaissent.
Rappuyez sur le bouton
BARO/- pour revenir au graphique
barométrique. L'explication détaillée du fonctionnement du mode
prévisions météo se trouve à l'annexe.
Icônes des Prévisions Météo (Weather Forecasting Icons)
Ensoleillé Partiellement Nuageux Nuageux Pluie/Neige
26
Unités de Pression Atmosphérique et Température
(Barometer and Temperature Units)
Pression atmosphérique enin. Hg et température en °C. Pour changer
les unités de mesure utilisées, maintenez le bouton
ALTI enfoncé
pendant 3 secondes, jusqu'à ce que l'unité de température clignote
et appuyez sur
COMP/+ ou BARO/- pour changer ; appuyez
ensuite sur
MODE pour accéder aux unités de pression et appuyez
sur
COMP/+ ou BARO/- pour changer. Appuyez sur le bouton
ADJ à n'importe quel moment pour sortir. Pour obtenir un relevé de
température exact, n'oubliez pas que l'instrument doit rester éloigné
d'une source de chaleur pendant environ 15 minutes (c'est-à-dire qu'il détectera la température de
votre poche au lieu de la température extérieure si vous le gardez dans votre poche).
Fréquence des Relevés (Sampling)
Les relevés de pression atmosphérique et de température sont pris chaque fois que vous entrez au
Mode Baromètre (Barometer Mode) ou quand vous appuyez sur le bouton
BARO/- quand vous
êtes dans ce mode. Après cela, les relevés de température sont pris toutes les 5 secondes pendant
les 3 premières minutes puis toutes les 5 minutes.
Le baromètre effectue automatiquement les relevés au début de chaque heure, même si vous n'êtes
pas au mode baromètre, excepté au mode altimètre où aucun relevé barométrique n'est pris. La
température est affichée par paliers de 0,1 °C (ou 0,2 °F). 4 'barres' apparaissent quand la
température passe en dehors de la plage de -10 à 60 °C (14,0 à 140 °F). Les relevés normaux
réapparaissent quand la température revient dans la plage établie.
Graphique Barométrique (Barometric Graph)
Le graphique de pression atmosphérique indique les relevés barométriques des 13 dernières heures.
Le relevé le plus récent est un point clignotant du côté droit du graphique. Les relevés du
graphique de pression sont en relation avec le point de relevé le plus récent : un point au-dessus
du point le plus récent est plus 1 hPa (mbar)/0,05 in. Hg, ou s'il est en dessous, c'est moins 1 hPa
(mbar)/0,05 in. Hg.
Effacement des Relevés Barométriques Précédents
(Clearing Previous Barometric Readings)
Il est parfois nécessaire d'effacer tous les relevés barométriques précédents, par exemple, en arrivant
dans un pays différent. Pour effacer l'information précédente, appuyez sur le bouton
MODE
jusqu'à ce que Time Mode (mode temps) soit affiché puis appuyez sur le bouton BARO/-. Si
l'instrument est déjà dans Time Mode (mode temps), appuyez simplement sur le bouton
BARO/-
Page 16
Établissement d'une Altitude de Référence (Setting a Reference Altitude)
L'altimètre utilise les valeurs de l'ISA (International Standard
Atmosphere) intégrée pour convertir la pression atmosphérique
mesurée à l'emplacement en question à l'altitude équivalente. Mais
vous pouvez établir une altitude de référence et le navigateur
numérique réglera automatiquement ses calculs de conversion de
pression atmosphérique en altitude pour en tenir compte.
Pour établir une altitude de référence, maintenez le bouton
ADJ
enfoncé pendant 3 secondes au Altimeter mode (mode altimètre).
L'affichage indique 'OFF' (désactivé) ou la valeur de référence (si elle
a été établie) clignote, ce qui indique l'écran de réglage ; si le réglage
est 'OFF', appuyez sur le bouton
ALTI. Appuyez sur le bouton COMP/+ pour augmenter la
valeur par paliers de 5 mètres (10 pieds) ou sur le bouton
BARO/- pour la diminuer. Lors du
réglage en pieds, maintenez
COMP/+ ou BARO/- pour modifier l'altitude par paliers de 100
pieds. Lors du réglage en mètres, l'altitude est modifiée par paliers de 10 mètres. Une pression sur
le bouton
ALTI change la valeur à 'OFF' ; la répétition de l'opération ramène l'affichage à la valeur
de référence établie. Si l'altitude de référence est sur 'OFF', cela signifie que la conversion de la
pression atmosphérique en altitude sera basée uniquement sur les données pré-établies en usine.
Une pression sur le bouton
ADJ à n'importe quel moment permet de sortir du mode de réglage.
Fonction de Mémoire (Memory Function)
Il y a 10 mémoires où vous pouvez enregistrer les informations
d'altitude, de temps et de date. Pour enregistrer l'altitude, l'heure et
la date actuelles, appuyez sur le bouton
MODE et maintenez-le
enfoncé pendant 3 secondes au Mode Altimètre (Altimeter Mode) ;
un numéro de mémoire apparaît avec 3 « barres » signifiant qu'elle
est vide ou la dernière mémoire visualisée est représentée et il suffit
d'appuyer sur
COMP/+ jusqu'à une mémoire vide. Si la mémoire
est pleine, 'FULL' s'affiche (rien ne peut y être enregistré jusqu'à ce
qu'elle soit disponible). Maintenez le bouton
COMP/+ enfoncé
pendant 3 secondes et les valeurs affichées sont mémorisées (la date est aussi mémorisée) et
l'affichage revient au mode altimètre. Si vous décidez de ne rien enregistrer après être entré dans
les mémoires, vous devez appuyer sur le bouton
MODE ou ADJ pour retourner au mode
altimètre.
29
et Barometer Mode (mode baromètre) s'affiche. Maintenez le
bouton
ADJ enfoncé pendant 3 secondes ; l'affichage clignote et
'CLR ALL' (effacer tout) apparaît, puis appuyez sur le bouton
COMP/+ pour confirmer que vous voulez effacer tous les relevés
barométriques précédents ; l'affichage retourne alors
automatiquement au mode baromètre. Appuyez sur le bouton
ADJ
pour sortir et retourner au mode baromètre si vous ne souhaitez pas
effacer les relevés précédents. La pression atmosphérique apparaît en
unités de 1 hPa (mbar) (ou 0,05 in. Hg). 4 'barres' apparaissent
quand la pression atmosphérique passe en dehors de la plage de 260
hPa (mbar) à 1 100 hPa (mbar) (ou 7,65 in. Hg à 32,45 in. Hg). Les relevés normaux
réapparaissent quand la pression atmosphérique revient dans la plage établie.
Mode Altimètre (Altimeter Mode)
Appuyez sur le bouton MODE jusqu'à ce que Mode Temps (Time
Mode) soit affiché puis appuyez sur le bouton
ALTI. Si l'instrument
est déjà au Mode Temps (Time Mode), au Mode Navigateur
Numérique (Compass Mode) ou au Mode Baromètre (Barometer
Mode), appuyez simplement sur le bouton
ALTI pour passer au
mode altimètre. Appuyez sur le bouton
ALTI et maintenez-le
pendant 3 secondes pour changer le réglage d'altimètre des pieds aux
mètres ou vice versa.
L'altitude est affichée par paliers de 5 mètres (10 pieds). La plage de mesure est de - 700 à 8 940
mètres (- 2 300 à 29 320 pieds). 4 « barres » sont affichées quand la valeur dépasse cette plage. La
valeur de l'altitude mesurée peut être négative dans les cas où une valeur de référence a été établie
ou en raison de certaines conditions.
Le graphique de l'altitude comprend 14 colonnes et 9 rangs de
points, chaque colonne de points représentant une période pendant
laquelle les mesures d'altitude ont été prises, chaque point
représentant une unité de 10 mètres (30 pieds).
Les relevés d'altitude sont effectués toutes les 5 secondes durant les
3 premières minutes et toutes les 5 minutes par la suite.
28
Page 17

DÉPANNAGE
• Si les points cardinaux (N, NE, E, SE, etc.) du navigateur numérique clignotent – essayez de
le tenir HORIZONTAL en utilisant le niveau à bulle comme guide. Il est également possible que
les points cardinaux clignotent lorsque le navigateur numérique rencontre des parasites
magnétiques venant des zones voisines. Les points cardinaux clignotent parce que le navigateur
numérique ne peut mesurer les relèvements avec précision. Si cela ne corrige pas le clignotement,
veuillez refaire l'étalonnage de l'instrument. N'oubliez pas de garder le navigateur éloigné des
objets métalliques pouvant causer des parasites magnétiques.Vérifiez aussi que le réglage de
déclinaison est correct (en général, zéro degré doit être le réglage par défaut).
• Trois tirets à l'affichage – Le navigateur est passé au mode de "veille" pour conserver l'énergie
des piles. Appuyez sur COMP pour le réactiver.
• Impossible de désactiver l'instrument – Il est conçu pour être constamment activé et les piles
durent environ un an avec un usage normal.
• La température ne semble pas exacte – Rappelez-vous qu'il faut 15 minutes pour que
l'instrument s'ajuste à la température ambiante. S'il est dans une poche ou à la lumière solaire
directe, la température reflétera cet environnement.
• Mon baromètre indique de la pluie mais il y a du soleil maintenant – L'instrument est conçu
pour prévoir le temps des 12 à 24 heures à venir.
• Bouton de réinitialisation – à l'intérieur du compartiment de pile. Ouvrez le couvercle du
compartiment de pile. Utilisez un objet pointu pour appuyer sur le bouton de réinitialisation.
Lorsque vous appuyez sur ce bouton, tous les réglages sont réinitialisés ; lorsque les piles sont
retirées, l'instrument est automatiquement réinitialisé.
.
ANNEXE : PRINCIPE DE FONCTIONNEMENT DU BAROMÈTRE
Le baromètre est un instrument qui mesure la pression atmosphérique. Il semble plus important
de connaître les prévisions météo que la pression absolue. De manière générale, si le baromètre
monte, cela signifie que l'air devient plus stable (meilleur temps) ; si le baromètre descend, cela
signifie que l'air devient moins stable (plus de perturbations). Votre instrument est conçu pour
prévoir le temps des 12 à 24 heures à venir.
31
'FULL' s'affiche quand les 10 mémoires sont pleines et elles doivent être
réinitialisées avant de pouvoir enregistrer de nouvelles informations.
Lecture des Données Mémorisées (Reading Stored Memories)
Pour lire les données mémorisées, maintenez le bouton MODE
enfoncé pendant 3 secondes au Mode Altimètre (Altimeter Mode) ;
un numéro de mémoire s'affiche avec 3 « barres » signifiant qu'elle
est vide, ou la dernière mémoire visualisée est représentée. Si les
mémoires sont pleines, 'FULL' s'affiche. Appuyez sur le bouton
COMP/+ et la dernière mémoire visualisée apparaît. Pour voir les autres données mémorisées,
rappuyez sur
COMP/+ pour faire défiler toutes les données mémorisées.
Effacement de la Mémoire (Clearing Memory)
Pour effacer une mémoire, maintenez le bouton MODE enfoncé
pendant 3 secondes au Mode Altimètre (Altimeter Mode) ; la
dernière mémoire visualisée apparaît, ou si les mémoires sont
pleines, 'FULL' s'affiche. Appuyez sur le bouton
COMP/+ jusqu'à
ce que la mémoire à effacer apparaisse, puis sur le bouton
BARO/- ;
‘CLR' (effacer) clignotant apparaît ; rappuyez sur
BARO/- pour
confirmer. Pour sortir, appuyez sur le bouton
MODE ou ADJ.
Pour effacer toute la mémoire, maintenez le bouton
MODE enfoncé
pendant 3 secondes au Mode Altimètre (Altimeter Mode) ; la
dernière mémoire visualisée apparaît, ou si les mémoires sont
pleines, 'FULL' s'affiche. Appuyez sur le bouton
COMP/+ pour voir
les données mémorisées puis sur
BARO/- et le maintenir enfoncé
jusqu'à ce que 'CLR ALL' (effacer tout) soit affiché ; rappuyez sur
BARO/- pour confirmer ou appuyez sur MODE ou ADJ pour
sortir, ou sur
COMP/+ pour continuer à voir les données.
LECTEUR DE CARTES
Appuyez sur le petit bouton rond pour activer le lecteur de cartes.
Cet éclairage est rouge pour protéger votre vision nocturne.
DURÉE DE VIE DES PILES
Votre navigateur numérique est conçu pour un usage continu et les piles doivent durer plus d'un
an en étant utilisées régulièrement. L'utilisation intense des alarmes, de l'éclairage et du
navigateur numérique raccourcit la durée de vie des piles.
30
Page 18

33
Prévisions Météo
Une fois que l'instrument est activé, les prévisions météo des 12 à 24 heures à venir sont calculées
à partir de la pression absolue.
Pression absolue / mbar Temps qu'il fait
P < 970 Pluvieux
970 < P <1 000 Nuageux
1 000 < P <1 030 Partiellement nuageux
P >1 030 Ensoleillé
Le navigateur numérique DNS Pro relève la pression atmosphérique toutes les heures et compare
la pression actuelle à la précédente pour noter le changement. Si la pression monte ou descend
pendant plus de 3 heures, le temps sera modifié en fonction du changement de pression.
Les prévisions météo sont calculées à partir du changement de pression par unité de temps. Le
changement de temps est directement proportionnel à la vitesse de changement de la pression
atmosphérique. Une pente montante indique un système de haute pression et une tendance de
beau temps (stable). Une pente descendante indique un système de basse pression et une tendance
de mauvais temps (instable).
Les fluctuations de pression généralement dues à un changement soudain de conditions (ex. :
changement rapide d'altitude en raison d'un vol d'une altitude à une autre) sont filtrées et aucune
prévision météo n'est faite. Dans ce cas, l'instrument recommencera à surveiller la pression
pendant la période requise. Une pression atmosphérique qui monte ou descend constamment au
cours des 3 dernières heures provoquera un changement des prévisions météo.
32
GARANTIE / RÉPARATION
GARANTIE LIMITÉE de DEUX ans
Votre produit Bushnell® est garanti exempt de défauts de matériaux et de fabrication pendant deux
ans après la date d'achat. Au cas où un défaut apparaîtrait sous cette garantie, nous nous réservons
l'option de réparer ou de remplacer le produit, à condition de nous le renvoyer en port payé. La
présente garantie ne couvre pas les dommages causés par une utilisation, une manipulation, une
installation incorrecte(s) ou un entretien incorrect ou fourni par quelqu'un d'autre qu'un centre de
réparation agréé par Bushnell.
Tout retour effectué dans le cadre de la présente garantie doit être accompagné des articles indiqués
ci-dessous :
1) un chèque ou mandat d'une somme de 10,00 $ US pour couvrir les frais d'envoi
et de manutention
2) le nom et l'adresse pour le retour du produit
3) une description du défaut constaté
4) la preuve de la date d'achat
5) Le produit doit être emballé soigneusement, dans un carton d'expédition solide, pour
éviter qu'il ne soit endommagé durant le transport ; envoyez-le en port payé, à
l'adresse indiquée ci-dessous :
Aux États-Unis, envoyez à: Au CANADA, envoyez à:
Bushnell Performance Optics Bushnell Performance Optics
Attn.: Repairs Attn.: Repairs
8500 Marshall Drive 25A East Pearce Street, Unit 1
Lenexa, Kansas 66214 Richmond Hill, Ontario L4B 2M9
Pour les produits achetés en dehors des États-Unis et du Canada, veuillez contacter votre distributeur
local pour tous renseignements concernant la garantie. En Europe, vous pouvez aussi contacter
Bushnell au: BUSHNELL Performance Optics Gmbh
European Service Centre
MORSESTRASSE 4
D- 50769 Cologne
Allemagne
Tél: +49 (0) 221 709 939 3
Fax: +49 (0) 221 709 939 8
La présente garantie vous donne des droits légaux spécifiques.
Vous pouvez avoir d'autres droits qui varient selon les pays.
©2003 Bushnell Performance Optics
Page 19

Felicidades por haber comprado una brújula de mano para profesionales
BUSHNELL
®
DNS. Es un instrumento de precisión construido con los
materiales más selectos y ensamblado por artesanos altamente
cualificados para que disfrute de toda una vida sin problemas en las
condiciones más exigentes. Este folleto le ayudará a lograr un
rendimiento óptimo explicando cómo debe usar sus diferentes funciones
y características.
Q
UÉ SIGNIFICAN LOS BOTONES
(1) ADJ Sirve para ajustar las posiciones
(2) MODE Cambia la pantalla de una función a la siguiente
dentro de las modalidades de tiempo o brújula
(3) ALTI Accede a la función ALTÍMETRO desde la
función de Tiempo
(4) Botón redondo Enciende la luz para mapas
(5) Enciende la luz para iluminar la pantalla LCD
(6) COMP/+ Cambia de Modalidad de tiempo (Time Mode) a
Modalidad de brújula (Compass Mode). También
aumenta el ajuste de las posiciones
(7) BARO/- Accede a la función de BARÓMETRO y
PRONÓSTICO DEL TIEMPO desde la
modalidad de TIEMPO. También disminuye
las posiciones mientras está en las modalidades de ajuste.
34
SPANISH
35
Pantalla LCD
Compartimiento de la pila
(1)
(3)
(7)
(4)
(6)
(5)
(2)
Nivel de Brújula
Page 20

Ajustes Nuevos (New Settings)
ALARMA
Modalidad de Ajuste de Alarma (Alarm Setting Mode)
Pulse el botón MODE hasta que se visualice Modalidad de alarma
(Alarm Mode). La alarma consta de 5 alarmas, 3 de tiempo y 1 de
altitud. Pulse el botón
COMP/+ o BARO/- para avanzar o
retroceder en pantalla entre las diferentes alarmas. Pulse y mantenga
pulsado
ADJ durante tres segundos hasta que destellen los minutos,
pulse el botón
COMP/+ o BARO/- para ajustar los valores deseados.
Pulse el botón
MODE para la siguiente posición. Pulse el botón
ADJ en cualquier momento para guardar los cambios y salir. La
alarma se activa automáticamente después de hacer los ajustes. Para
evitar que la alarma emita señales acústicas, pulse cualquier botón.
La alarma también se puede encender o apagar yendo a la alarma
pertinente y pulsando el botón
ALTI para activar la función de
alarma, pulse otra vez para activar la función Snooze, y pulse otra vez
para desactivar la alarma.
Alarma de Temperatura (Temperature Alarm)
Fija la alarma para que suene cuando la medida de temperatura
alcanza el nivel programado. En la Modalidad de alarma (Alarm
Mode), la alarma de temperatura utiliza las mismas unidades de
medición (ºC o F) que se fijaron por último en la Modalidad de
Temperatura (Temperature Mode). Para cambiar este valor hay que
cambiar primero las unidades de temperatura en la Modalidad de
Barómetro (Barometer Mode).Pulsando el botón
COMP/+ o
BARO/- una vez, se cambia la temperatura en décimas de grado. Si
se mantiene pulsado el botón se cambia la temperatura en
incrementos de 1 grado.
3736
CÓMO SE AJUSTA EL TIEMPO
Modalidad de Tiempo Predeterminada/Ajustes de Tiempo (Default Time Mode/Time Settings)
Pulse el botón MODE hasta que se visualice Modalidad de tiempo (Time Mode). Pulse y
mantenga pulsado
ADJ durante 3 segundos. Pulse el botón COMP/+ o BARO/- hasta que
aparezca el valor deseado, y luego pulse el botón
MODE para pasar a la siguiente posición. Pulse
el botón
ADJ en cualquier momento para guardar los cambios y salir. Cuando haga esto, los
segundos se reajustarán en 00. Verá una "A" o una "P" pequeñas en el lado inferior, a la izquierda
de las horas, para indicar si es AM o PM.
Ajustes de Fecha (Date Settings)
Cuando fije la fecha, el año también se visualizará. Pulse el botón
MODE hasta que se visualice Modalidad de tiempo (Time Mode).
Pulse y mantenga pulsado
ADJ durante tres segundos. Pulse el
botón
MODE y haga avanzar o retroceder el texto que aparece en
pantalla hasta que llegue a la posición que quiere cambiar. Pulse el
botón
COMP/+ o BARO/- hasta que aparezca el valor deseado, y
luego pulse el botón
MODE para la siguiente posición. Pulse el
botón
ADJ en cualquier momento para guardar los cambios y salir.
Para el ajuste de 24/12 horas, pulse el botón
MODE hasta que se
visualice Modalidad de tiempo (Time Mode). Pulse y mantenga
pulsado el botón
ADJ durante tres segundos. Pulse el botón
MODE y avance o retroceda en pantalla por los ajustes hasta que
aparezca el ajuste de 24/12 horas, entonces pulse el botón
COMP/+ o BARO/- para introducir la posición deseada. Pulse el
botón
ADJ en cualquier momento para guardar los cambios y salir.
Page 21

La función de medición de tiempos parciales se visualiza como ‘SPL’ cuando está activada y la
pantalla vuelve a ser normal cuando se pulsa el botón
BARO/-.
ALARMA DEL TEMPORIZADOR DE CUENTA ATRÁS
Modalidad de Cuenta Atrás / Temporizador Inverso
(Countdown Reverse-Timer Mode)
Pulse el botón MODE hasta que se visualice Modalidad de
temporizador de cuenta atrás (Countdown Timer Mode), representada
por ‘RT’ (temporizador inverso). Para que funcione, pulse el botón
COMP/+ para empezar y púlselo otra vez para parar, luego pulse el
botón
BARO/- para reajustar el Temporizador de cuenta atrás.
Para fijar el Temporizador de cuenta atrás, pulse y mantenga pulsado
el botón
ADJ durante tres segundos, lo cual hará que destelle la
posición de segundos. Ajuste con el botón
COMP/+ o BARO/-, y
luego pulse el botón
MODE para fijar la siguiente posición. Pulse el
botón
ADJ para guardar los ajustes y salir. Pulse ALTI y entre en
‘AUTO’ para permitir que el Temporizador de cuenta atrás repita la
función automáticamente, y pulse
ALTI otra vez para apagar la
función ‘AUTO’.
Pulse cualquier botón cuando suene la alarma si quiere detener el
Temporizador de cuenta atrás. Si no se pulsa nada, el Temporizador
de cuenta atrás dejará de emitir señales acústicas después de 10 segundos, pero el temporizador de
cuenta atrás seguirá emitiéndolas si está conectada la función ‘AUTO’. Para detener el
Temporizador de cuenta atrás cuando está conectada la función ‘Auto’, tiene que ir a la Modalidad
de temporizador de cuenta atrás (Countdown Timer Mode) y pulsar
COMP/+ para desconectar
la función ‘Auto’, luego pulsar el botón
ALTI para detenerlo.
BRÚJULA DIGITAL
Modalidad de Brújula (Compass Mode)
Pulse el botón MODE hasta que se visualice Modalidad de tiempo
(Time Mode), y luego pulse el botón
COMP/+. Si ya está en la
Modalidad de tiempo (Time Mode), sólo tiene que pulsar el botón
COMP/+ y se visualizará la Modalidad de brújula. Mantenga la brújula
nivelada utilizando el nivel de burbuja para obtener una lectura. Si
destellan los Puntos Cardinales es posible que haya que calibrar la brújula.
(Consulte las sugerencias para corregir anormalidades).
39
Alarma de Altitud (Altitude Alarm)
Fija la alarma para que suene cuando la altitud alcance el nivel
programado. En la Modalidad de alarma (Alarm Mode), la alarma de
altitud utiliza las mismas unidades de medida que se dejaron en la
Modalidad de altímetro (Altimeter Mode). Para cambiar este ajuste,
debe cambiarlo primero en el Modalidad de altímetro (Altimeter
Mode). Para ajustar la altitud a la que debe sonar la alarma, pulse
ADJ para introducir la modalidad del ajuste. Pulse el botón
COMP/+ o BARO/- para cambiar el ajuste de la alarma de altitud.
Pulse
ADJ para guardarlo y salir .
Función de Señal Acústica (Beep Function)
En la Modalidad de alarma (Alarm mode) también se dispone de
una función de señal acústica. Cuando está activada, esta función
hace sonar una señal acústica siempre que se oprima un botón, aun
cuando la función de Alarma esté desconectada. Para activar esta
función, vaya a la función de señal acústica (Beep) en la Modalidad
de alarma (Alarm Mode), pulse el botón
ALTI y se visualizará ‘ON’.
Pulse el botón otra vez y se visualizará ‘OFF’.
Modalidad de Cronómetro (Stopwatch Mode)
Pulse el botón MODE hasta que se visualice Modalidad de
cronómetro (Stop Watch Mode). Para que funcione, pulse el botón
COMP/+ para comenzar y pulse este botón otra vez para parar.
Pulsando el botón
BARO/- se reajustará el cronómetro.
Modalidad de Cronómetro/Medición de Tiempos Parciales
(Stop Watch Mode/Split Timing Function)
Para la función de medición de tiempos parciales, pulse el botón
BARO/- mientras está funcionando el cronómetro para detener la
imagen y púlselo otra vez para continuar. La pantalla mostrará el
tiempo hasta 1/100 de segundo. También puede pulsar el botón
BARO/- mientras está funcionando el cronómetro para detener la
imagen y luego pulse el botón
COMP/+ para detener el cronómetro
y visualizar la lectura final. Pulse el botón
BARO/- otra vez para
reajustar el cronómetro.
38
Page 22

ajustar la posición del rumbo deseado. Pulsando COMP/+ o BARO/- aumentará o disminuirá el
rumbo en incrementos de diez. Una simple pulsación en
COMP/+ o en BARO/- mueve el rumbo
1 grado. Cuando termine, pulse el botón
ADJ para regresar a la Modalidad de indicador de rumbo
(Homing mode). Para volver a la Modalidad de brújula (Compass Mode) pulse el botón
COMP/+.
Para utilizar la brújula en la Modalidad de indicador de rumbo (Homing Mode) vaya primero a
la Modalidad de brújula (Compass Mode), luego pulse el botón
COMP/+ otra vez para entrar en
la Modalidad de indicador de rumbo.
La lectura principal presenta el rumbo real y la lectura inferior muestra el rumbo que lleva a ‘casa’.
Los segmentos de la circunferencia muestran la diferencia entre los dos rumbos, que puede utilizar
para que le ayude a mantener el curso.
Para conservar energía, la pantalla de la Modalidad de indicador de
rumbo (Homing Mode) mostrará 3 ‘barras’ en lugar del rumbo
presente, y los segmentos no se visualizarán después de 1 minuto.
Para reactivar la pantalla, tiene que pulsar
COMP/+. Para salir de la
Modalidad de indicador de rumbo (Homing Mode) pulse
MODE
otra vez y volverá a la Modalidad de brújula (Compass Mode)
predeterminada, o pulse
MODE para volver a la Modalidad de
TIEMPO (Time Mode).
LUZ DE FONDO AUTOMÁTICA
Pulse el botón LIGHT ( ) para encender la iluminación de fondo de la pantalla LCD durante
5 segundos.
Modalidad Nocturna (Night Mode)
La Modalidad nocturna (Night Mode) permite que la iluminación
de fondo se encienda automáticamente al pulsar cualquiera de las
teclas de función, excepto cuando la brújula está en la Modalidad de
brújula (Compass Mode). Pulse y mantenga pulsado el botón
LIGHT ( )durante tres segundos, y aparecerá el icono Modalidad
nocturna (Night Mode) (representado por el símbolo de la luz). Para
apagarlo, pulse y mantenga pulsado el botón
LIGHT ( ) hasta que
desaparezca el símbolo de la luz.
41
Calibración de la Brújula (Compass Calibration)
En la Modalidad de brújula (Compass Mode), mantenga pulsado el
botón
ADJ durante tres segundos. Se visualizará Modalidad de
calibración (Calibration Mode). Ponga la brújula en una superficie
horizontal que no sea magnética y pulse el botón
COMP/+. La
palabra CAL empezará a destellar. Entonces, gire lentamente la
brújula dos círculos completos, MIENTRAS MANTIENE LA
BRÚJULA NIVELADA. Cada revolución debe tomar unos 10
segundos. Después de hacerlo, pulse el botón
COMP/+ otra vez.
Cuando termine, la pantalla mostrará HECHO (‘DONE’) y pasará
automáticamente a la Modalidad de ajuste de la declinación (Declination Setting Mode). Si no se
hace la calibración con éxito, destellarán los Puntos Cardinales y tendrá que repetir los 4 pasos
previos. Para saltarse el ajuste de la declinación, pulse el botón
ADJ y regresará a la Modalidad de
brújula (Compass Mode).
Ajuste de Declinación (Declination Setting)
La declinación ajusta la brújula de acuerdo con los campos magnéticos
locales. En algunas zonas, la declinación magnética puede ser
considerable, de modo que siempre es bueno comprobar la
declinación en el mapa o en Internet. Para ajustar el ángulo de
declinación de la brújula, vaya a la Modalidad de brújula (Compass
Mode) y mantenga pulsado el botón
ADJ durante tres segundos,
entonces se visualizará la Modalidad de calibración de la brújula
(Compass Calibration Mode). Pulse el botón
MODE (modalidad)
hasta que la Modalidad de ajuste de declinación (Declination Setting
Mode) se visualice como ‘DEC’. Pulse el botón
COMP/+ o BARO/- para fijar el valor deseado y
luego pulse el botón
ADJ para guardar los ajustes y salir de la modalidad. La declinación se mide
algunas veces en grados positivos y negativos. Los grados Este se consideran positivos y los grados
Oeste, negativos. Por ejemplo, para cambiar de una declinación de 3 grados Este (positivo) a 3 grados
Oeste (negativo) pulse el botón
BARO/- hasta que aparezca 3W.
Modalidad de Autoindicación del Rumbo (Self Homing Mode)
Le permite preseleccionar un rumbo de referencia que indica a la
Brújula que le alerte hacia la dirección que debe seguir. Vaya a la
Modalidad de brújula (Compass Mode) y pulse el botón
COMP/+
para visualizar el indicador de rumbo de la brújula (Homing). Para
ajustar el rumbo en el indicador, pulse y mantenga pulsado el botón
ADJ durante tres segundos. Pulse el botón COMP/+ o BARO/- para
40
Page 23

43
INDICADOR DE PILAS
Indicador de Nivel Bajo de las Pilas (Low Battery Indicator)
Un icono de pila destellante aparecerá cuando la pila esté baja. El
compartimiento de las pilas está en la parte posterior de la brújula.
Sustituya las pilas gastadas por dos pilas AAA nuevas.
Barómetro y Temperatura – Modalidad de Barómetro
(Barometer and Temperature – Barometer Mode)
Presión barométrica en hPa (mb) y temperatura en ° F con el gráfico de
pronóstico del tiempo.
Para introducir la Modalidad de barómetro
(Barometer Mode), pulse el botón
MODE hasta que se visualice la
Modalidad de tiempo (Time Mode), luego pulse el botón
BARO/-. Si
está en la Modalidad de tiempo, Modalidad de brújula (Time Mode,
Compass Mode) o en la Modalidad de altímetro (Altimeter Mode),
sólo tiene que pulsar el botón
BARO/- y se visualizará la Modalidad
de barómetro. Al introducir la Modalidad de barómetro se visualizará
un gráfico barométrico en el visualizador de matriz de puntos.
Modalidad de Pronóstico del Tiempo (Weather Forecast Mode)
Para cambiar a la Modalidad de pronóstico del tiempo (Weather
Forecast Mode), pulse el botón
BARO/- otra vez y se visualizará el
pronóstico del tiempo. Pulse el botón
BARO/- otra vez para
cambiarlo de nuevo a la pantalla de gráfico barométrico. Para ver una
explicación completa de cómo funciona la modalidad de pronóstico
del tiempo, consulte el apéndice.
Iconos de pronóstico del tiempo (Weather Forecasting Icons)
Soleado Parcialmente Nublado Nublado Lluvia/Nieve
42
Unidades de Barómetro y Temperatura (Barometer and Temperature Units)
Presión barométrica en HG y temperatura en ° C. Para cambiar el tipo
de unidades de medida utilizado, pulse y mantenga pulsado el botón
ALTI durante 3 segundos hasta que destalle la unidad de
temperatura y pulse el botón
COMP/+ o BARO/- para cambiarlo,
luego pulse
MODE para ir a la unidad de presión y pulse el botón
COMP/+ o BARO/- para cambiarlo. Pulse el botón ADJ en
cualquier momento para salir. Para obtener una lectura precisa de la
temperatura, recuerde que la unidad debe mantenerse alejada de
cualquier fuente de calor durante unos 15 minutos (por ejemplo, si
mantiene la unidad en un bolsillo la lectura puede reflejar la
temperatura dentro del mismo en lugar de la temperatura externa).
Toma de Muestras (Sampling)
Las mediciones de la presión barométrica y la temperatura se toman cada vez que se introduce la
Modalidad de barómetro (Barometer Mode), o si pulsa el botón
BARO/- cuando está en esta
modalidad. Después, las mediciones de temperatura se toman cada 5 segundos durante los 3
primeros minutos, y a partir de entonces se toman cada 5 minutos.
El barómetro toma mediciones automáticamente al comienzo de cada hora, aunque no esté en la
Modalidad de barómetro, excepto en la Modalidad de altímetro, donde no se toman mediciones
barométricas. La temperatura se visualiza en una resolución de 0,1° C (o 0,2° F). Cuando la
temperatura cae por debajo de la gama de -10° C a 60° C(14,0° F a 140° F), se visualizan 4
‘barras’. Cuando los valores de temperatura vuelven a estar dentro de la gama fijada, se vuelve a
tener lecturas normales.
Gráfico Barométrico (Barometric Graph)
El gráfico de presión barométrica muestra las lecturas barométricas correspondientes a las 13 horas
anteriores. La lectura más reciente se muestra como un punto destellante a la derecha del gráfico.
Las lecturas del gráfico de presión son en relación con el punto de medición más reciente, un
punto por encima del punto más reciente es más 1 hPa (mb)/0.05
en Hg, o si está por debajo será menos 1hPA (mb)/0,05 en Hg.
Cómo se Borran las Lecturas Barométricas Previas
(Clearing Previous Barometric Readings)
A veces es necesario borrar todas las lecturas barométricas previas,
por ejemplo, cuando se llega a otro país. Para borrar las
informaciones previas, pulse el botón
MODE hasta que se visualice
Page 24

Cómo se Fija una Altitud de Referencia (Setting a Reference Altitude)
. El altímetro utiliza los valores ISA (Atmósfera Estándar
Internacional) incorporados para convertir la presión de aire medida
en la posición actual en una altitud equivalente. Pero puede fijar
una altitud de referencia y la brújula ajustará en consecuencia,
automáticamente, su presión de aire al cálculo de la conversión
de altitud.
Para fijar una altitud de referencia, pulse y mantenga pulsado el
botón
ADJ durante 3 segundos mientras está en la Modalidad de
altímetro (Altimeter Mode). La lectura presentará ‘OFF’ o destellará
(si la unidad está encendida), que indica la pantalla de ajuste, si está
apagada (OFF) pulse el botón
ALTI. Pulse el botón COMP/+ para aumentar el valor en
incrementos de 5 metros (10 pies) o pulse el botón
BARO/- para disminuirlo. Cuando esté en
pies, si se mantienen pulsados los botones
COMP/+ o BARO/- se cambia la altitud en
incrementos de 100 pies. Cuando está en metros, cambia la altitud en incrementos de 10 metros.
Si se pulsa el botón
ALTI se pone el valor en la posición ‘OFF’, y si se repite el procedimiento la
pantalla regresa al valor de referencia fijado. Si se fija la altitud de referencia en ‘OFF’, significa
que sólo se utiliza la conversión de presión de aire a altitud basada en los datos prefijados en
fábrica. Pulsando el botón
ADJ en cualquier momento saldrá de la modalidad fijada.
Función de Memoria (Memory Function)
Hay 10 memorias en las que puede almacenar la información de
altitud, tiempo y fecha. Para almacenar la medición actual de altitud,
tiempo y fecha, pulse el botón
MODE y manténgalo pulsado
durante 3 segundos mientras está en la Modalidad de altímetro
(Altimeter Mode), se visualizará un número de memoria con 3
‘barras, lo que significa que está vacío, o bien se mostrará la última
memoria visualizada, entonces pulse el botón
COMP/+ hasta que
localice una memoria que esté vacía. Si la memoria está llena, se
visualizará ‘FULL’(entonces no se puede almacenar nada hasta que se
disponga de memoria).Pulse y mantenga pulsado el botón
COMP/+
durante 3 segundos y los valores visualizados se almacenarán en la memoria (la fecha se almacena
también) y la pantalla regresa a la Modalidad de altímetro. Si decide que no quiere almacenar nada
cuando haya entrado en las memorias, tendrá que pulsar el botón
MODE o el botón ADJ y
regresará a la Modalidad de altímetro.
45
la Modalidad de tiempo (Time Mode), luego pulse el botón BARO/-. Si ya se encuentra en la
Modalidad de tiempo, sólo tiene que pulsar el botón
BARO/- y se visualizará la Modalidad de
barómetro. Pulse y mantenga pulsado el botón
ADJ durante 3 segundos, la pantalla destellará y se
visualizará ‘CLR ALL’ (Borrar Todo), entonces pulse el botón
COMP/+ para confirmar que quiere
borrar todas las lecturas barométricas previas y la pantalla regresará automáticamente a la
Modalidad de barómetro. Pulse el botón
ADJ para salir y regresar a la Modalidad de barómetro si
no quiere borrar todas las lecturas previas.
La presión barométrica se muestra en unidades de 1 hPa (mb), o 0,05 en HG. Cuando la presión
barométrica cae fuera de la gama de 260 hPa (mb) a 1100 hPa (mb) (o 7,65 en Hg a 32,45 en
Hg) se visualizarán 4 ‘barras’. Cuando el valor barométrico vuelve a estar dentro de la gama fijada,
se obtienen de nuevo lecturas normales.
Modalidad de Altímetro (Altimeter Mode)
Pulse el botón MODE hasta que se visualice Modalidad de tiempo
(Time Mode), luego pulse el botón
ALTI. Si ya está en la Modalidad
de tiempo, Modalidad de brújula (Time Mode, Compass Mode), o
en la Modalidad de barómetro (Barometer Mode), sólo tiene que
pulsar el botón
ALTI y se visulaizará la Modalidad de altímetro.
Pulse el botón
ALTI y manténgalo pulsado durante 3 segundos para
cambiar el ajuste del Altímetro de Pies a Metros o viceversa.
La altitud se visualiza en una resolución de 5 metros (10 pies). La
gama de medida es de -700 a 8940 metros (-2300 a 29320 pies).
Cuando el valor supera esta gama se visualizan 4 ‘barras’. La altitud medida puede ser un valor
negativo en casos donde haya un valor fijado de altitud de referencia o debido a ciertas
condiciones.
El gráfico de Altitud consta de 14 columnas y 9 filas de puntos. Cada
columna de puntos representa un periodo en el que se tomaron
medidas de altitud, y cada punto representa una unidad de 10
metros (30 pies).
El gráfico toma una lectura de altitud cada 5 segundos durante los 3
primeros minutos, y cada 5 segundos a partir de entonces.
44
Page 25

LUZ PARA LEER MAPAS
Pulse el botón redondo pequeño para activar la luz para leer mapas. Esta luz es roja para proteger
su visión nocturna.
VIDA ÚTIL DE LAS PILAS
Su unidad DNS se ha diseñado para usarse continuamente y las pilas durarán más de un año con
un uso normal. Si se usan mucho las alarmas, la luz o la brújula disminuirá la vida útil de las pilas.
CORRECCIÓN DE ANORMALIDADES
• Si destellan los puntos cardinales (N, NE, E, SE etc.) de su brújula – trate de sujetar la brújula
NIVELADA usando el nivel de burbuja como guía. Puede que los puntos cardinales destellen
cuando la brújula encuentre interferencias magnéticas en los alrededores. Los puntos cardinales
destellan porque la brújula no puede medir el rumbo con precisión. Si de esta forma no se corrigen
los destellos, vuelva a calibrar la brújula. (Consulte la página de Calibración de la brújula.).
Recuerde que no debe acercar la brújula a objetos metálicos que puedan causar interferencias
magnéticas. También, verifique si la declinación está debidamente ajustada. (En general, el ajuste
predeterminado debe ser de cero grados).
•
Se visualizan tres rayas – La brújula ha entrado en la modalidad de "letargo" para evitar que se
gasten las pilas. Pulse COMP para reactivar la brújula.
•
No se puede apagar la unidad – Esta unidad se ha diseñado para mantenerse constantemente
encendida y las pilas durarán aproximadamente un año siempre que se someta a un uso normal.
•
No parece que la temperatura sea exacta – recuerde que la unidad necesita 15 minutos para
ajustarse a la temperatura ambiente. Mantener la unidad en un bolsillo o bajo la luz directa del sol
tendrá un impacto en la temperatura.
•
Mi pronosticador de tiempo muestra lluvia pero está soleado – su pronosticador de tiempo está
diseñado para pronosticar el tiempo de 12 a 24 horas a partir de un momento dado.
•
Botón de reajuste – está dentro del compartimiento de las pilas. Abra la puerta del
compartimiento. Use un objeto punzante para pulsar el botón de Reajuste. Cuando oprima el
botón de reajuste se reajustarán todas las posiciones de la brújula. Cuando se quitan las pilas, la
brújula se reajusta automáticamente.
.
47
Se visualizará ‘FULL’ cuando se hayan utilizado las 10 memorias y
hay que reajustar la memoria antes de que se puedan almacenar
nuevos datos.
Cómo se Leen las Memorias Almacenadas
(Reading Stored Memories)
Para leer las memorias almacenadas pulse y mantenga pulsado el botón MODE durante 3
segundos una vez mientras está en la Modalidad de altímetro (Altimeter Mode) se visualizará un
número de memoria con 3 ‘barras’, lo cual significa que está vacía, o se mostrará la última memoria
visualizada. Si las memorias están llenas, se visualizará la palabra ‘FULL’. Pulse el botón
COMP/+
y se verá la última memoria visualizada. Para buscar otra memoria almacenada, pulse el botón
COMP/+ otra vez con el fin de mover la pantalla por todas las memorias almacenadas
Cómo se Borra la Memoria (Clearing Memory)
Para borrar una memoria, pulse y mantenga pulsado el botón
MODE durante 3 segundos mientras está en la Modalidad de
altímetro (Altimeter Mode); se mostrará la última memoria
visualizada, o si las memorias están llenas se visualizará la palabra
‘FULL’. Pulse el botón
COMP/+ hasta que se visualice la memoria
que quiere borrar, entonces pulse el botón
BARO/- y se visualizará
‘CLR’ destellando, pulse el botón
BARO/- otra vez para confirmar.
Si quiere salir, pulse el botón
MODE o el botón ADJ.
Para borrar toda la memoria, pulse y mantenga pulsado el botón
MODE durante 3 segundos mientras está en la Modalidad de
altímetro; se mostrará la última memoria visualizada o, si las
memorias están llenas, se visualizará la palabra ‘FULL’. Pulse el
botón
COMP/+ para ver las memorias y luego pulse el botón
BARO/- y manténgalo pulsado hasta que se visualice ‘CLR ALL’;
pulse el botón
BARO/- otra vez para confirmar o pulse el botón
MODE o el botón ADJ para salir del programa, o bien pulse el
botón
COMP/+ para seguir viendo la memoria.
46
Page 26

49
APÉNDICE: CÓMO FUNCIONA EL PRONOSTICADOR DE TIEMPO
El barómetro es una herramienta que mide la densidad del aire. La tendencia es más importante
para el pronóstico que la cantidad absoluta de presión. En términos generales, un barómetro que
está subiendo significa que el aire se está haciendo más estable (y más agradable), y un barómetro
que baja significa que el aire se está haciendo menos estable (más tormentoso). Su unidad está
diseñada para pronosticar el tiempo de 12 a 24 horas a partir de un momento dado.
Pronóstico del Tiempo
El pronóstico del tiempo para las próximas 12 a 24 horas se calcula a partir de la presión absoluta
una vez que se enciende la unidad.
Presión absoluta / mbar Estado del Tiempo
P < 970 Lluvioso
970 < P < 1000 Nublado
1000 < P < 1030 Parcialmente nublado
P > 1030 Soleado
Su DNS Pro mide la presión barométrica cada hora y compara la presión actual con la anterior
para analizar el cambio. Si la presión sube o baja durante más de 3 horas, el estado del tiempo
cambiará en función del cambio de la presión.
El pronóstico del tiempo se calcula a partir del cambio en la presión por periodo de tiempo. El
cambio en el estado del tiempo es directamente proporcional a la velocidad del cambio en la
presión barométrica. Una pendiente hacia arriba indica que hay un Sistema de presión alta y una
tendencia buena (estable) del tiempo. Una pendiente hacia abajo significa que hay un Sistema de
presión baja y una tendencia del tiempo a empeorar (inestable).
Las fluctuaciones en la presión debido normalmente a un cambio repentino en el estado del
tiempo (por ejemplo, un cambio rápido de elevación debido al paso de una elevación a otra)
se filtran y no se hace ningún pronóstico del tiempo. En este caso, la unidad volverá a monitorear
la presión durante un periodo de tiempo recomendado. Una presión barométrica que sube o
baja constantemente durante las 3 últimas horas cambiará efectivamente el estado del pronóstico
del tiempo.
48
GARANTÍA / REPARACIÓN
GARANTÍA LIMITADA DE DOS AÑOS
Su producto Bushnell® está garantizado contra defectos de material y fabricación durante dos años
a partir de la fecha de compra. En caso de defectos bajo esta garantía, nosotros, a nuestra opción,
repararemos o sustituiremos el producto siempre que lo devuelva con portes pagados. Esta garantía
no cubre defectos causados por el uso indebido, ni por un manejo, instalación o mantenimiento del
producto inapropiados o el mantenimiento hecho por otro que no sea un Centro de Servicio
Autorizado de Bushnell.
Cualquier envío que se haga bajo garantía deberá venir acompañado por lo siguiente:
1) Un cheque/giro postal por la cantidad de 10 dólares para cubrir los gastos de manejo y envio
2) Nombre y dirección donde quiere que se le envíe el producto
3) Una explicación del defecto
4) Prueba de fecha de compra
5) El producto debe empaquetarse bien en una caja resistente para evitar que se dañe
durante el transporte, y enviarse con portes pagados a la dirección que se muestra
a continuación:
En EE UU, enviar a: En CANADÁ, enviar a:
Bushnell Performance Optics Bushnell Performance Optics
Attn.: Repairs Attn.: Repairs
8500 Marshall Drive 25A East Pearce Street, Unit 1
Lenexa, Kansas 66214 Richmond Hill, Ontario L4B 2M9
En el caso de los productos comprados fuera de los Estados Unidos o Canadá, llame al distribuidor
local para la información pertinente sobre la garantía. En Europa también puede llamar al:
BUSHNELL Performance Optics Gmbh
European Service Centre
MORSESTRASSE 4
D- 50769 KÖLN
ALEMANIA
Tél: +49 (0) 221 709 939 3
Fax: +49 (0) 221 709 939 8
Esta garantía le ofrece derechos legales específicos.
Puede que tenga otros derechos que varían de un país a otro.
©2003 Bushnell Performance Optics
Page 27

Mit Ihrem BUSHNELL®DNS Pro Handkompass haben Sie ein
Präzisionsinstrument erworben, das aus hochwertigsten Materialien und
mit hohem handwerklichem Geschick hergestellt wurde. Der Kompass
wird Ihnen auf Lebensdauer auch unter anspruchsvollsten Bedingungen
störungsfreie Dienste leisten. Diese Bedienungsanleitung erläutert
die wichtigsten Funktionen des Instruments, damit Sie es optimal
nutzen können.
E
RLÄUTERUNG DER BUTTONS
(1) ADJ Dient zur Änderung Ihrer Einstellungen
(2) MODE Schaltet die Anzeige im Modus Zeit oder Kompass
von einer Eigenschaft zur nächsten um
(3) ALTI Schaltet vom Modus Höhenmesser auf den Modus
Zeit um
(4) Rundbutton Schaltet Licht auf der Karte ein
(5) Schaltet Licht zur Beleuchtung der LCD-Anzeige ein
(6) COMP/+ Schaltet von Funktion Zeit auf Funktion Kompass.
Dient auch zur Erhöhung der Einstellungen
(7) BARO/- Schaltet von Funktion Zeit auf Funktion BAROMETER
und auf Funktion Wettervorhersage um
50
GERMAN
51
LCD-Display
Batteriefach
Kompass-Level
(1)
(3)
(7)
(4)
(6)
(5)
(2)
Page 28

Neue Einstellungen (New Settings)
ALARM
Funktion Alarm- einstellung (Alarm Setting Mode)
Den Button MODE drücken, bis die Anzeige Alarm Mode
erscheint. Der Alarm besteht aus 5 Signalen, 3 für Zeit, 1 für Höhe
und 1 für Temperatur. Den Button
COMP/+ oder BARO/-
drücken, um durch die verschiedenen Alarme zu blättern. Den
Button
ADJ 3 Sekunden lang gedrückt halten, bis die Minute
aufblinkt, mit dem Button
COMP/+ oder BARO/- die
gewünschten Werte einstellen. Den Button
MODE drücken, um
zur nächsten Einstellung zu gelangen. Durch Drücken auf
ADJ
werden Änderungen gespeichert und der Vorgang beendet. Der
Alarm wird automatisch nach Durchführen der Einstellungen
aktiviert. Zum Ausschalten des Alarms beliebigen Button drücken.
Die Aktivierung oder Deaktivierung des Alarms können Sie auch
vornehmen, indem Sie zum entsprechenden Alarm gehen und den
Button
ALTI drücken, um die Alarmfunktion zu aktivieren.
Erneutes Drücken aktiviert die Schlummerfunktion (Snooze).
Durch erneutes Drücken wird der Alarm wieder deaktiviert.
Temperaturalarm (Temperature Alarm)
Aktiviert ein akustisches Alarmsignal, wenn die Temperaturmessung
die programmierte Höhe erreicht. Im Modus Alarm verwendet der
Temperaturalarm die in der Funktion Temperature Mode zuletzt
eingestellten Maßeinheiten (ºC oder F). Um dies zu ändern, müssen
zunächst die Temperaturmaßeinheiten in der Funktion Barometer
Mode geändert werden. Durch einmaliges Drücken von
COMP/+
oder BARO/- wird die Temperatur um Zehntelgrade geändert. Hält
man den Button gedrückt, ändert sich die Temperatur in Schritten
von 1 Grad.
53
EINSTELLEN DER ZEIT
Funktion Voreingestellte Zeit/Zeiteinstellungen (Setting Time Mode/Time Settings)
Den Button MODE drücken, bis Time Mode angezeigt wird. ADJ 3 Sekunden lang gedrückt
halten. Den Button
COMP/+ oder BARO/- drücken, bis der gewünschte Wert erscheint. Dann
den Button
MODE für die nächste Einstellung drücken. Durch Drücken des Button ADJwerden
Änderungen gespeichert und der Vorgang beendet. In diesem Fall werden die Sekunden auf 00
zurückgestellt. Ein kleines „A" oder „P" links neben der Stundenzahl steht für AM (vor 12 Uhr
mittags) oder PM (nach 12 Uhr mittags).
Datumseinstellungen (Date Settings)
Beim Einstellen des Datums wird auch das Jahr angezeigt. Den
Button
MODE drücken, bis die Anzeige Time Mode erscheint. ADJ
3 Sekunden lang gedrückt halten. Den Button MODE drücken und
zu der Einstellung scrollen, die geändert werden soll. Den Button
COMP/+ oder BARO/- drücken, bis der gewünschte Wert
erscheint. Dann den Button
MODE für die nächste Einstellung
drücken. Durch Drücken des Buttons
ADJ werden Änderungen
gespeichert und der Vorgang beendet.
Für die Einstellung 24/12 Stunden den Button
MODE drücken, bis
der die Anzeige Time Mode erscheint.
ADJ 3 Sekunden lang
gedrückt halten. Den Button
MODE drücken und durch die
Einstellungen scrollen, bis die Einstellung 24/12 Stunden erscheint.
Dann die gewünschte Einstellung durch Drücken von
COMP/+
oder BARO/- eingeben. Durch Drücken auf ADJ werden
Änderungen gespeichert und der Vorgang beendet.
52
Page 29

COUNTDOWN-TIMER-ALARM
Funktion Countdown/Reverse Timer (Countdown/ Reverse-Timer Mode)
Den Button MODE drücken, bis die Anzeige Countdown Timer
Mode, dargestellt durch ‚RT‘ (reverse timer), erscheint. Zum Starten
den Button
COMP/+ drücken, zum Stoppen erneut. Dann den
Button BARO drücken, um den Countdown Timer zurückzustellen.
Zum Einstellen des Countdown Timer den Button
ADJ 3 Sekunden
lang gedrückt halten, bis die Sekundeneinstellung blinkt. Die
Einstellung mit dem Button
COMP/+ oder BARO/- vornehmen,
dann den Button
MODE drücken, um die nächste Einstellung
einzustellen. Durch Drücken des Buttons
ADJ werden Änderungen
gespeichert und der Vorgang beendet. Den Button
ALTI für
‚AUTO‘ drücken, damit der Countdown Timer die Funktion
automatisch wiederholen kann. Erneut
ALTI drücken, um die
Funktion ‚AUTO‘ auszuschalten.
Beim Ertönen des Alarms kann der Countdown Timer durch Drücken
eines beliebigen Buttons gestoppt werden. Erfolgt keine Eingabe, hört
das Piepen des Countdown Timer nach 10 Sekunden wieder auf, geht
aber weiter, wenn die Funktion ‚AUTO‘ eingestellt ist. Zum Stoppen
des Countdown Timer bei eingestellter Funktion ‘Auto’ zur Funktion
Countdown Timer Mode gehen und
COMP/+ drücken. Dadurch
wird die Funktion ‚Auto‘ ausgeschaltet. Dann zum Stoppen den Button
ALTI drücken.
DIGITALER KOMPASS
Kompass-Funktion (Compass Mode)
Den Button MODE drücken, bis die Anzeige Time Mode erscheint,
dann den Button
COMP/+ drücken. Wenn Sie sich bereits in der
Funktion Time Mode befinden, einfach den Button
COMP/+
drücken. Dann erscheint die Funktion Compass Mode. Um eine
Anzeige zu erhalten, müssen Sie den Kompass mit Hilfe der
Wasserwaage gerade halten. Ein Aufblinken der Kardinalpunkte
deutet darauf hin, dass der Kompass kalibriert werden muss. (Siehe
Tipps unter Störhinweise.)
55
Altitude Alarm (Altitude Alarm)
Aktiviert den Alarm, wenn die Höhe den programmierten Wert
erreicht. Im Modus Alarm werden für den Höhenalarm die gleichen
Maßeinheiten verwendet, die zuletzt im Modus Höhenmesser
eingestellt wurden. Zur Einstellung des Wertes, an dem der Alarm
aktiviert werden soll,
ADJ drücken, um zum Modus Einstellungen
zu gelangen. Auf
COMP/+ oder BARO/- drücken, um die
Einstellung für den Höhenalarm zu ändern. Durch Drücken auf
ADJ werden Änderungen gespeichert und der Vorgang beendet.
Beeper-Funktion (Beep Function)
Im Modus Alarm steht auch eine Beeper-Funktion zur Verfügung.
Bei Aktivierung verursacht diese Funktion, dass beim Loslassen eines
Buttons ein Piepton erklingt, auch dann, wenn die Alarmfunktion
ausgeschaltet ist. Für die Aktivierung der Beeper-Funktion in den
Modus Alarm gehen, den Button
ALTI drücken. Es erscheint ‚ON‘.
Erneut drücken und ‚OFF‘ wird angezeigt.
Stoppuhr-Funktion (Stopwatch Mode)
Den Button MODE drücken, bis die Funktion Stop Watch Mode
angezeigt wird. Zum Starten den Button
COMP/+ drücken und
erneut drücken, um zu stoppen. Durch Drücken des Buttons
BARO/- wird die Stoppuhr zurückgestellt.
Stoppuhr-Funktion / Zeitteilungsfunktion
(Stopwatch Mode / Split Timing Function)
Für die Zeitteilungsfunktion während des Betriebs der Stoppuhr den
Button
BARO/- drücken, um die Anzeige zu stoppen und erneut
drücken, um weiterzumachen. Die Zeit wird bis auf
1/100stel-Sekunde angezeigt. Sie können den Button
BARO/-
während des Betriebs der Stoppuhr auch drücken, um die Anzeige
zu stoppen, und dann den Button
COMP/+ drücken, um die
Stoppuhr zu stoppen und die letzte Messung anzuzeigen. Den
Button
BARO/- erneut drücken, um die Stoppuhr zurückzustellen.
Die Zeitteilungsfunktion wird bei Aktivierung als ‚SPL‘ (split timing
function) angezeigt. Die Anzeige kehrt zum Normalzustand zurück,
wenn der Button
BARO/- gedrückt wird.
54
Page 30

BARO/- drücken, um die erwünschte Orientierung einzustellen. Durch Drücken auf COMP/+
oder BARO/- wird die Einstellung in Zehnerschritten erhöht oder gesenkt. Ein einziger Druck
auf
COMP/+ oder BARO/- bewegt die Orientierung um 1 Grad. Nach Beendigung auf ADJ
drücken, um zur Funktion Homing Mode zurückzugelangen. Durch Druck auf den Button
COMP/+ gelangen Sie zur Funktion Compass Mode zurück.
Um den Kompass in der Funktion Homing Mode zu betätigen, zunächst zur Funktion Compass Mode
gehen. Dann auf den Button
COMP/+ drücken, um zur Funktion Homing Mode zu gelangen.
Die Hauptzeile zeigt die tatsächliche Orientierung an, die untere Zeile die ‚Heimatorientierung‘.
Die Segmente auf dem Umkreis zeigen den Unterschied zwischen den beiden Orientierungen.
Dieser kann genutzt werden, um Sie auf dem richtigen Kurs zu
halten oder zu diesem zurückzuleiten.
Um Energie zu sparen, zeigt die Anzeige in der Funktion Homing
Mode statt der derzeitigen Orientierung nur 3 Striche an und die
Segmente verschwinden nach 1 Minute. Um die Anzeige erneut zu
aktivieren,
COMP/+ drücken. Zum Verlassen der Funktion
Homing Mode erneut
MODE drücken, um zur Standardeinstellung
Compass Mode zurückzukehren oder
MODE, um zur Funktion
Time Mode zu gelangen.
BELEUCHTUNG
Durch Druck auf den Button LIGHT ( ) wird 5 Sekunden lang eine LCD-Beleuchtung
eingeschaltet.
Nachtfunktion (Night Mode)
Die Funktion Night Mode macht es möglich, das Hintergrundlicht
automatisch einzustellen, sobald eine der Funktionstasten gedrückt
wird – außer, wenn sich der Kompass in der Funktion Compass
Mode befindet. Den Button
LIGHT ( ) 3 Sekunden lang
gedrückt halten. Das Symbol Night Mode (dargestellt durch das
Lichtsymbol) erscheint. Zum Abschalten den Button
LIGHT ( )
so lange drücken, bis das Lichtsymbol verschwindet.
57
Kompasskalibrierung (Compass Calibration)
In der Funktion Compass Mode den Button ADJ 3 Sekunden lang
gedrückt halten. Die Anzeige Calibration Mode erscheint. Den
Kompass auf eine gerade, nicht magnetische Oberfläche legen und
den Button
COMP/+ drücken. Das Wort CAL beginnt zu blinken.
Den Kompass dann zweimal langsam komplett im Kreis drehen.
DEN KOMPASS DABEI GERADE HALTEN. Jede Drehung
sollte circa 10 Sekunden dauern. Danach erneut
COMP/+ drücken.
Bei Abschluss zeigt die Anzeige das Wort ‚DONE‘ an und stellt sich
dann automatisch auf die Funktion Declination Setting Mode ein.
Bei erfolgloser Kalibrierung blinken die Kardinalpunkte und Sie müssen die gerade erläuterten
vier Schritte wiederholen. Um die Einstellung der Deklination zu überspringen, den Button
ADJ
drücken. Die Anzeige kehrt zurück in die Funktion Compass Mode.
Deklinationseinstellung (Declination Setting)
Die Abweichung (Declination) stellt den Kompass auf die örtlichen
Magnetfelder ein. In einigen Gebieten kann die magnetische
Deklination beachtlich sein. Es empfiehlt sich daher, die Deklination
auf Ihrer Landkarte oder im Internet zu überprüfen. Um den
Deklinationswinkel des Kompasses einzustellen, zur Funktion
Compass Mode gehen und den Button
ADJ 3 Sekunden lang
gedrückt halten. Die Anzeige Compass Calibration Mode erscheint.
Den Button
MODE drücken, bis Sie zur Funktion Declination
Setting Mode gelangen. Diese wird als ‚DEC‘ angezeigt. Den Button
COMP/+ oder BARO/- drücken, um den erwünschten Wert
einzustellen, dann nur den Button
ADJ drücken, um die Einstellungen zu speichern und die
Funktion zu verlassen. Die Deklination wird manchmal in positiven und negativen Graden
gemessen. Grad Ost gelten als positiv, Grad West als negativ. Um z. B. von einer Deklination von 3
Grad Ost (positiv) auf 3 Grad West (negativ) zu wechseln, den Button
BARO/- drücken, bis 3W
erscheint.
Funktion Self Homing (Self Homing Mode)
Erlaubt Ihnen die Voreinstellung einer Referenzorientierung. Sie
gibt dem Kompass den Befehl, Sie auf die einzuschlagende Richtung
hinzuweisen. Gehen Sie zur Funktion Compass Mode und drücken
Sie den Button
COMP/+, bis die Anzeige Compass Homing
erscheint. Zum Einstellen der Orientierung den Button
ADJ 3
Sekunden lang gedrückt halten. Den Button
COMP/+ oder
56
Page 31

59
BATTERIEANZEIGE
Batteriestandsanzeiger (Low Battery Indicator)
Ein blinkendes Batteriesymbol erscheint, wenn die Batteriespannung
nachlässt. Das Batteriefach befindet sich auf der Rückseite
des Kompasses. Verbrauchte Batterien sind durch zwei neue
AAA-Batterien zu ersetzen.
BAROMETER UND TEMPERATUR
Barometer-Funktion (Barometer Mode)
Luftdruck in hPa(mb) und Temperatur in °F mit WettervorhersageSymbol
. Um zur Funktion Barometer Mode zu gelangen, den Button
MODE drücken, bis die Funktion Time Mode angezeigt wird. Dann
den Button
BARO/– drücken. Wenn Sie sich in den Funktionen
Time Mode, Compass Mode oder Altimeter Mode befinden, einfach
nur den Button
BARO/– drücken und die Funktion Barometer
Mode wird angezeigt. Es wird ein Barometer-Diagramm in grafischer
Form auf dem Punktmatrix-Display angezeigt.
Wettervorhersage-Funktion (Weather Forecast Mode)
Zum Ändern der Funktion Weather Forecast Mode den Button
BARO/– drücken. Es erscheint die Wettervorhersage. Bei erneutem
Drücken auf
BARO/– erscheint wieder die Barometeranzeige. Eine
genaue Erklärung der Funktion Weather Forecast Mode finden Sie
im Anhang.
Symbole für die Wettervorhersage (Weather Forecasting Icons)
Sonnig Heiter bis wolkig Bewölkt Regen/Schnee
58
Maßeinheiten Barometer und Temperatur (Barometer und Temperature Units)
Luftdruck in inHg und Temperatur in °C. Um die Maßeinheit zu
ändern, den Button
ALTI 3 Sekunden lang gedrückt halten, bis die
Temperaturanzeige aufblinkt. Dann den Button
COMP/+ oder
BARO/– drücken, um die Einheit zu ändern. Anschließend auf
MODE drücken, um zur Maßeinheit für den Druck zu gelangen.
Auch hier zum Ändern entweder den Button
COMP/+ oder
BARO/– drücken, um die Einheit zu ändern. Durch Drücken auf
den Button
ADJ können Sie den Vorgang jederzeit abbrechen.
Damit Sie eine präzise Temperaturanzeige erhalten, muss der
Kompass circa 15 Minuten lang von Wärmequellen ferngehalten
werden. (Beispiel: Wenn Sie den Kompass in der Tasche
aufbewahren, zeigt die Temperaturanzeige die Temperatur in Ihrer Tasche und nicht die
Außentemperatur an.)
Ablesen (Sampling)
Luftdruck und Temperatur werden jedes Mal gemessen, sobald Sie in die Funktion Barometer
Mode wechseln oder wenn Sie den Button
BARO/– in diesem Modus drücken. Danach wird die
Temperatur in den ersten 3 Minuten alle 5 Sekunden gemessen, anschließend alle 5 Minuten.
Die Luftdruckmessungen finden automatisch zu Beginn jeder Stunde statt, selbst wenn Sie sich
nicht in der Funktion Barometer Mode befinden. Eine Ausnahme ist die Funktion Altimeter
Mode, in der überhaupt keine Luftdruckmessungen stattfinden. Die Temperatur wird in Schritten
von 0,1 °C (oder 0,2 °F) angezeigt. 4 ‚Balken‘ erscheinen, wenn die Temperatur außerhalb des
Bereichs von –10 °C bis 60 °C (14,0 °F bis 140 °F) fällt. Sobald der Temperaturwert in den
vorgegebenen Bereich zurückkehrt, werden die normalen Messungen wieder angezeigt.
Luftdruckdiagramm (Barometric Graph)
Das Luftdruckdiagramm zeigt die Messergebnisse der vergangenen 13 Stunden an. Die neueste
Messung wird als blinkender Punkt auf der rechten Seite des Diagramms angezeigt. Der Graph
wird in Relation zur jüngsten Messung aufgebaut, ein Punkt über dem neusten Messpunkt ist plus
1 hPa (mb)/0,05 inHg oder, falls im Minusbereich, minus 1 hPa (mb)/0,05 inHg.
Löschen der alten Luftdruckmessungen (Clearing Previous Barometric Readings)
Manchmal ist es erforderlich, alle alten Luftdruckmessungen zu löschen, z. B. bei Ankunft in
einem anderen Land . Zum Löschen der alten Daten den Button
MODE drücken, bis die
Funktion Time Mode angezeigt wird. Dann den Button
BARO/– drücken. Wenn Sie sich bereits
im Time Mode befinden, einfach nur den Button
BARO/– drücken und die Funktion Barometer
Page 32

Einen Referenzwert für die Höhe einstellen (Setting a Reference Altitude)
Der Höhenmesser verwendet die integrierten ISA-Werte
(International Standard Atmosphere), um den gemessenen
Luftdruck an dem jeweiligen Ort der entsprechenden Höhe
zuzuordnen. Sie können aber einen Referenzwert für die Höhe
einstellen. Der Kompass erstellt dann die Umrechnung von
Luftdruck auf Höhe in Relation zum Referenzwert.
Um einen Referenzwert für die Höhe einzurichten, in die Funktion
Altimeter Mode gehen und den Button
ADJ 3 Sekunden lang
drücken. Als Messwert erscheint entweder ‚OFF‘ oder der aktuelle
Bezugswert blinkt auf. Das zeigt den Einstellungsbildschirm an. Ist
die Einstellung ‚OFF‘, den Button
ALTI drücken. Dann den Button COMP/+ drücken, um den
Wert in Schritten von 5 Metern (10 Feet) zu erhöhen oder den Button
BARO/– drücken, um ihn
zu verringern. Wird in Feet gemessen, wird durch Drücken von
COMP/+ oder BARO/– die
Höhe in 100-Foot-Schritten geändert. Wird in Meter gemessen, ändert sich der Wert in
Zehnmeterschritten. Durch Drücken auf den Button
ALTI wird der Wert auf ‚OFF‘ gestellt.
Wiederholt man den Vorgang, kehrt die Anzeige zum eingegebenen Referenzwert zurück. Das
Einstellen der Referenzhöhe auf ‚OFF‘ bedeutet, dass der Umrechnung des Luftdrucks die
werkseitig eingestellten Daten zugrunde gelegt werden. Durch Drücken auf
ADJ kann die
Einstellungsfunktion jederzeit verlassen werden.
Speicherfunktion (Memory Function)
Es gibt 10 Speicherplätze zum Speichern von Höhendaten, Zeit und
Datum. Um die aktuelle Höhenmessung, Zeit und Datum zu
speichern, in der Funktion Altimeter Mode den Button
MODE 3
Sekunden lang drücken. Es wird entweder eine Speichernummer
mit 3 ‚Balken‘ angezeigt, was heißt, dass der Speicher leer ist, oder
es werden die zuletzt betrachteten abgespeicherten Daten angezeigt.
In diesem Fall drücken Sie den Button
COMP/+, bis ein leerer
Speicherplatz gefunden ist. Ist der Speicher voll belegt, erscheint die
Anzeige ‘'FULL'‘ (dann ist ein Speichern erst möglich, wenn
Speicherplatz freigegeben wird). Drücken Sie den Button
COMP/+
3 Sekunden lang und die angezeigten Werte werden gespeichert (auch das Datum ist gespeichert).
Die Anzeige springt dann in die Funktion Altimeter Mode zurück. Wenn Sie nach Zugriff auf die
Speicherplätze nichts speichern wollen, auf den Button
MODE oder den Button ADJ drücken.
Damit gelangen Sie in die Funktion Altimeter Mode zurück.
61
Mode wird angezeigt. Den Button ADJ 3 Sekunden lang drücken.
Das Display blinkt und die Anzeige ‚CLR ALL‘ erscheint.
Den Button
COMP/+ drücken, um zu bestätigen, dass Sie alle alten
Messergebnisse löschen wollen. Das Display kehrt dann
automatisch zur Funktion Barometer Mode zurück. Den Button
ADJ drücken, um die Anzeige zu verlassen und zur Barometer-
Funktion zurückzukehren, wenn Sie die alten Messungen nicht
löschen wollen.
Der Luftdruck wird in Einheiten von 1 hPa (mb) (oder 0,05 inHg) angezeigt. 4 ‚Balken‘
erscheinen, wenn der Luftdruckruck nicht im Bereich von 260 hPa (mb) bis 1.100 hPa (mb) (oder
7,65 inHg bis 32,45 inHg) liegt. Der Luftdruck wird wieder normal angezeigt, wenn sich der
Wert wieder innerhalb des vorgegebenen Bereichs befindet.
Höhenmesser-Funktion (Altimeter Mode)
Den Button MODE drücken, bis die Funktion Time Mode
erscheint, dann den Button
ALTI drücken. Wenn Sie sich bereits in
der Funktion Time Mode, Compass Mode oder Barometer Mode
befinden, einfach den Button
ALTI drücken und die Funktion
Altimeter Mode wird angezeigt. Den Button
ALTI 3 Sekunden lang
drücken, um die Höhenmesser-Einstellung von Feet auf Meter oder
umgekehrt einzustellen.
Die Höhe wird in Schritten von 5 Metern (10 Feet) angegeben. Der
Messbereich liegt zwischen –700 und 8.940 Metern (–2.300 bis
29.320 Feet). 4 ‚Balken‘ werden angezeigt, wenn der Wert nicht in diesem Bereich liegt. Die
gemessene Höhe kann auch negativ sein, wenn ein Bezugswert für die Höhe eingestellt wurde
oder bestimmte andere Bedingungen zutreffen.
Das Höhendiagramm besteht aus 14 Spalten und 9 Reihen aus
Punkten. Jede Spalte stellt einen Zeitraum für die Höhenmessung
dar, wobei jeder Punkt eine Einheit von 10 Metern (30 Feet)
darstellt.
Das Diagramm misst die Höhe in den ersten 3 Minuten alle 5
Sekunden und im Anschluss daran alle 5 Minuten.
60
Page 33

KARTENLICHT
Drücken Sie den kleinen runden Button, um das Kartenlicht zu aktivieren. Dieses Licht ist rot,
um Ihre Nachtsicht zu schützen.
BATTERIEHALTBARKEIT
Ihr DNS ist auf Dauerbetrieb ausgelegt. Die Batterien halten bei regelmäßigem Gebrauch über
ein Jahr lang. Häufiger Gebrauch von Alarmfunktionen, Licht oder Kompass verkürzt die
Lebensdauer der Batterien.
STÖRHINWEISE
• Die Kardinalpunkte (N, NE, E, SE etc.) auf Ihrem Kompass blinken – versuchen Sie den
Kompass gerade zu halten. Nutzen Sie dafür die Wasserwaage. Die Kardinalpunkte können auch
blinken, wenn der Kompass auf magnetische Interferenz aus der Umgebung stößt. Die
Kardinalpunkte blinken, weil der Kompass nicht in der Lage ist, die Richtung akkurat zu messen.
Anhaltendes Blinken bedeutet, dass der Kompass neu kalibriert werden muss. (Hinweise dazu auf
der Seite mit dem Punkt Kompass-Kalibrierung.) Achtung: Der Kompass sollte nicht in die Nähe
von Metallgegenständen kommen, um magnetische Interferenz zu vermeiden. Überprüfen Sie
darüber hinaus, ob Ihre Deklination richtig eingestellt ist (im Allgemeinen sollte die
Standardeinstellung null Grad betragen).
•
3 Striche werden angezeigt – Ihr Kompass ist in die Schlummerfunktion getreten, um Batterien
zu sparen. Auf COMP drücken, um den Kompass zu reaktivieren.
•
Das Instrument kann nicht ausgeschaltet werden – das Instrument ist auf Dauerbetrieb
angelegt. Bei normalem Betrieb halten die Batterien circa ein Jahr.
•
Die Temperaturanzeige scheint nicht zu stimmen – denken Sie daran, dass es 15 Minuten
dauert, bis sich das Instrument auf die Umgebungstemperatur eingestellt hat. Wenn Sie das
Instrument in der Tasche aufbewahren oder es dem direkten Sonnenlicht ausgesetzt ist, hat dies
einen Einfluss auf die Temperatur.
•
Die Wettervorhersage zeigt Regen an, aber es ist zurzeit sonnig – die Wettervorhersage ist
darauf ausgelegt, das Wetter der kommenden 12 bis 24 Stunden anzuzeigen.
•
Reset-Button – im Innern des Batteriefachs. Das Batteriefach öffnen. Den Reset-Button mit
einem spitzen Gegenstand drücken. Durch Drücken des Reset-Button werden alle KompassEinstellungen zurückgesetzt. Der Kompass wird bei Entfernen der Batterien automatisch
zurückgesetzt.
63
‘'
FULL'‘ wird angezeigt, wenn alle 10 Speicherplätze voll sind und
der Speicher zurückgestellt werden muss, um neue Einträge
speichern zu können.
Ablesen gespeicherter Daten (Reading Stored Memories)
Zum Ablesen gespeicherter in der Funktion Altimeter Mode den Button MODE 3 Sekunden lang
drücken. Dadurch wird ein Speicherwert angezeigt. Erscheinen 3 ‚Balken‘, ist der Speicher leer.
Andernfalls wird der zuletzt betrachtete Speicherwert angezeigt. Sind die Speicherplätze alle
belegt, wird ‘'FULL'‘ angezeigt. Drücken Sie den Button
COMP/+ und der zuletzt betrachtete
Speicherwert wird angezeigt. Wenn Sie andere gespeicherte Daten betrachten wollen, erneut den
Button
COMP/+ drücken, um durch alle gespeicherten Daten zu scrollen.
Speicher löschen (Clearing Memory)
Zum Löschen eines Speicherplatzs den Button MODE 3 Sekunden
lang drücken, wenn Sie sich in der Funktion Altimeter Mode
befinden. Dadurch wird der zuletzt betrachtete Speicherwert
angezeigt. Sind die Speicherplätze alle belegt, wird ‘'FULL'‘
angezeigt. Drücken Sie den Button
COMP/+, bis der
Speichereintrag, den Sie löschen wollen, angezeigt wird. Dann den
Button
BARO/– drücken. Die Anzeige ‘'CLR'‘ blinkt auf. Drücken
Sie den Button
BARO/– erneut, um zu bestätigen. Zum Verlassen
den Button
MODE oder ADJ drücken.
Um alle Speicherdaten zu löschen, den Button
MODE in der
Funktion Altimeter Mode 3 Sekunden lang drücken. Es erscheint
der zuletzt betrachtete Speicherwert oder, wenn die Speicherplätze
alle belegt sind, die Anzeige ‘'FULL'‘. Drücken Sie den Button
COMP/+, um die Speichereinträge zu sichten. Drücken Sie dann
den Button
BARO/– so lange, bis die Anzeige ‘'CLR ALL'‘
erscheint. Zum Bestätigen dann erneut den Button
BARO/–
drücken oder den Vorgang durch Drücken auf MODE oder ADJ
abbrechen. Drücken Sie auf den Button COMP/+, um mit dem
Sichten der Speichereinträge fortzufahren.
62
Page 34

65
ANHANG: WIE DIE WETTERVORHERSAGE FUNKTIONIERT
Ihr Barometer ist ein Instrument, das misst, wie schwer die Luft ist. Die Tendenz ist für die
Vorhersage wichtiger als der genaue Druckwert. Allgemein gesprochen heißt das: Ein steigendes
Barometer bedeutet, dass die Luft stabiler (und besser) wird, ein fallendes Barometer bedeutet,
dass die Atmosphäre weniger stabil (windiger) wird. Das Instrument ist auf die Vorhersage des
Wetters in den nächsten 12 bis 24 Stunden ausgelegt.
Wettervorhersage
Die Wettervorhersage für die nächsten 12 bis 24 Stunden erfolgt nach Einschalten des
Instruments über den absoluten Druck.
Absoluter Druck (mb) Wetterlage
D < 970 Regen
970 < D <1.000 Bewölkt
1.000 < D < 1.030 Heiter bis wolkig
D >1030 Sonnig
Ihr DNS Pro misst den Luftdruck jede Stunde und vergleicht den aktuellen Wert mit dem davor
gemessenen. Steigt oder fällt der Druck mehr als 3 Stunden in Folge, ändert sich das Wetter in
Relation zur Veränderung des Luftdrucks.
Die Wettervorhersage basiert auf der Veränderung des Drucks in einem bestimmten Zeitraum.
Die Änderung der Wetterlage steht in direktem Verhältnis dazu, wie schnell sich der
Luftdruckruck ändert. Eine Steigung weist auf ein Hochdrucksystem und damit eine gute (stabile)
Wetterlage hin. Ein Sinken bedeutet ein Niederdrucksystem, was heißt, dass sich die Wetterlage
verschlechtert.
Fluktuationen im Druck, die etwa durch eine plötzliche Änderung der Bedingungen (z. B.
schnelle Höhenänderung durch Fliegen von einer Höhenlage zur nächsten) werden herausgefiltert
und nicht für die Wettervorhersage genutzt. In diesem Fall wird das Instrument den Druck
danach erneut im erforderlichen Zeitraum kontrollieren. Konstantes Steigen oder Absinken des
Luftdrucks über 3 Stunden ist ein deutliches Zeichen für eine veränderte Wetterlage.
64
GARANTIE / REPARATUR
ZWEIJÄHRIGE BESCHRÄNKTE GARANTIE
Sie erhalten für Ihr Bushnell®-Produkt eine Garantie für einen Zeitraum von zwei Jahren ab dem
Kaufdatum. Die Garantie erstreckt sich auf Material- und Herstellungsfehler. Für den Fall, dass ein
Mangel im Rahmen dieser Garantie auftritt, werden wir das Produkt nach unserer Wahl reparieren
oder austauschen, vorausgesetzt, dass Sie das Produkt freigemacht zurückschicken. Von dieser
Garantie ausgeschlossen sind Schäden, die auf Missbrauch, unsachgemäße Behandlung,
Installations- oder Wartungsarbeiten, die nicht von einer autorisierten BushnellKundendienstabteilung vorgenommen werden, zurückzuführen sind.
Jeder Rücksendung im Rahmen dieser Garantie müssen folgende Dokumente und Angaben
beigefügt werden:
1) Ein Scheck/eine Zahlungsanweisung in Höhe von 10,00 USD zur Abdeckung der
Porto- und Bearbeitungskosten
2) Name und Anschrift für die Rücksendung des Produkts
3) Eine Erläuterung des Mangels
4) Nachweis des Kaufdatums
5) Das Produkt sollte zur Vermeidung von Transportschäden gut verpackt in einem
stabilen Versandkarton an die nachstehend aufgeführte Adresse geschickt werden,
wobei die Gebühren für die Rücksendung im Voraus zu entrichten sind.
Adresse für Rücksendungen in die USA: Adresse für Rücksendungen nach KANADA:
Bushnell Performance Optics Bushnell Performance Optics
Attn.: Repairs Attn.: Repairs
8500 Marshall Drive 25A East Pearce Street, Unit 1
Lenexa, Kansas 66214 Richmond Hill, Ontario L4B 2M9
Bei Produkten, die Sie außerhalb der Vereinigten Staaten oder Kanadas gekauft haben, erhalten Sie
die entsprechenden Informationen zur Garantie von ihrem Händler vor Ort. In Europa erreichen Sie
Bushnell auch unter: BUSHNELL Performance Optics Gmbh
European Service Centre
MORSESTRASSE 4
D- 50769 KÖLN
Deutschland
Tél: +49 (0) 221 709 939 3
Fax: +49 (0) 221 709 939 8
Mit dieser Garantie erwerben Sie bestimmte Rechtsansprüche.
Sie haben möglicherweise darüber hinaus noch andere Rechte, die von Land zu Land variieren.
©2003 Bushnell Performance Optics
Page 35

67
Grazie per avere scelto una bussola palmare BUSHNELL®DNS Pro, uno
strumento di precisione costruito con materiali della massima qualità e
assemblato da operai altamente specializzati, che vi assicurerà anni e anni
di impiego senza problemi nelle condizioni più difficili. Il presente
manuale spiega come usare le varie funzioni dello strumento e vi
consentirà di ottenere prestazioni ottimali.
DESCRIZIONE DEI PULSANTI
ADJ Serve a regolare le impostazioni.
MODE Visualizza una dopo l’altra le varie funzioni
della modalità Data/Ora o Bussola.
ALTI Serve a passare alla modalità Altimetro
dalla modalità Data/Ora.
Pulsante Circolare Accende la luce della mappa.
Illumina il display.
COMP/+
Seleziona alternativamente la modalità Data/Ora o Bussola.
Inoltre incrementa i valori delle impostazioni.
BARO/- Serve a passare alla modalità Barometro e Previsioni
meteorologiche dalla modalità Data/Ora. Inoltre
decrementa i valori delle impostazioni nelle
modalità di regolazione.
66
ITALIANO
Display a Cristalli Liquidi
(1)
(3)
(7)
(4)
(6)
(5)
Vano Portapile
Bussola, Livella
(2)
Page 36

Nuove Impostazioni
ALLARME
Modalità di Impostazione Dell’allarme
Premete il pulsante MODE fino a visualizzare la modalità Allarme.
Sono disponibili cinque allarmi acustici: tre per la data/ora, uno per
l’altitudine e uno per la temperatura. Per fare scorrere gli allarmi
premete
COMP/+ o BARO/-. Premete ADJ e mantenetelo premuto
per tre secondi, finché l’indicazione dei minuti non lampeggia, e
premete
COMP/+ o BARO/- per regolare i valori prescelti. Premete
MODE per passare all’impostazione successiva. Premete ADJ in
qualsiasi momento per salvare le modifiche e uscire. L’allarme si
inserisce automaticamente una volta eseguite le regolazioni. Per fare
cessare l’allarme, premete un pulsante qualsiasi.
È possibile anche inserire o disinserire un allarme selezionandolo e
premendo il pulsante
ALTI per inserirlo; premendo di nuovo il
pulsante si inserisce la funzione Snooze, premendolo ancora si
disinserisce l’allarme.
Allarme Temperatura
L'allarme suona quando la temperatura misurata raggiunge il livello
prefissato. Nella modalità di allarme vengono utilizzate le stesse
unità di misura (ºC or F) impostate l’ultima volta in modalità di
misura della temperatura. Per modificare questa impostazione
occorre prima cambiare le unità della temperatura in modalità
Barometro. Premendo una volta
COMP/+/BARO/- si cambia la
temperatura in decimi di grado; se si mantiene premuto il pulsante
la temperatura varia in incrementi di 1 grado.
IMPOSTAZIONE DELLA DATA E DELL’ORA
Modalità Data/Ora Predefinita/Impostazione Dell’ora
Premete il pulsante MODE fino a visualizzare la modalità Data/Ora. Premete ADJ e mantenetelo
premuto per tre secondi. Premete
COMP/+ o BARO/- finché non compare il valore prescelto e
poi premete
MODE per passare all’impostazione successiva. Premete ADJ in qualsiasi momento
per salvare le modifiche e uscire. Completate le impostazioni, l’indicazione dei secondi ritorna a
00. Una piccola “A” o “P” nell’angolo in basso a sinistra delle ore indica AM (ante meridiem) o
PM (post meridiem).
Impostazione della Data
Durante l’impostazione della data si visualizza anche l’anno. Premete
il pulsante
MODE finché non si visualizza la modalità Data/Ora.
Premete
ADJ e mantenetelo premuto per tre secondi. Premete
MODE e fate scorrere le impostazioni fino a quella che desiderate
modificare. Premete
COMP/+ o DOWN finché non compare il
valore prescelto e poi premete
MODE per passare all’impostazione
successiva. Premete
ADJ in qualsiasi momento per salvare le
modifiche e uscire.
Per selezionare la notazione 24 / 12 ore, premete il pulsante
MODE
fino a visualizzare la modalità Data/Ora. Premete ADJ e
mantenetelo premuto per tre secondi. Premete
MODE e fate
scorrere le impostazioni fino a visualizzare quella relativa alla
notazione 24 / 12 ore e poi premete
COMP/+ o BARO/- per
immettere il valore prescelto. Premete
ADJ in qualsiasi momento per
salvare le modifiche e uscire.
68 69
Page 37

ALLARME CONTEGGIO ALLA ROVESCIA
Modalità Conteggio alla Rovescia
Premete il pulsante MODE fino a visualizzare la modalità Conteggio
alla rovescia, indicata dalla sigla ‘RT’ (reverse timer). Per avviare il
conteggio alla rovescia premete
COMP/+; premetelo di nuovo per
arrestare il conteggio e poi premete
BARO/- per azzerare il timer del
conteggio alla rovescia.
Per impostare il timer del conteggio alla rovescia premete il pulsante
ADJ e mantenetelo premuto per tre secondi; le cifre dei secondi
cominciano a lampeggiare; regolate l’impostazione con il pulsante
COMP/+ o BARO/- e poi premete MODE per passare
all’impostazione successiva. Premete
ADJ per salvare le modifiche e
uscire. Premete
ALTI per inserire la funzione ‘AUTO’, che consente
al timer del conteggio alla rovescia di funzionare automaticamente;
premete di nuovo
ALTI per disinserire la funzione ‘AUTO’.
Quando l’allarme suona, premete un pulsante qualsiasi per arrestare
il conteggio alla rovescia. Se non si preme nessun pulsante, l’allarme
cessa dopo 10 secondi ma il timer continua a funzionare se la
funzione ‘AUTO’ è inserita. In quest’ultimo caso, per arrestare il
conteggio alla rovescia occorre passare alla modalità Conteggio alla
rovescia, premere
COMP/+ per disinserire la funzione ‘AUTO’ e poi
premere
ALTI per arrestare il conteggio.
BUSSOLA DIGITALE
Modalità Bussola
Premete il pulsante MODE fino a visualizzare la modalità Data/Ora
e poi premete
COMP/+. Se siete già in modalità Data/Ora basta
premere
COMP/+ per visualizzare la modalità Bussola. Mantenete la
bussola orizzontale mediante la livella a bolla per ottenere una
lettura. Se i punti cardinali lampeggiano, può essere necessario tarare
la bussola (vedi sezione Guida alla soluzione dei problemi).
Taratura della Bussola
In modalità Bussola, mantenete premuto il pulsante ADJ per tre
secondi; si visualizza la modalità Taratura. Collocate la bussola su
una superficie orizzontale e amagnetica, e premete
COMP/+. La
71
Allarme Altitudine
L'allarme suona quando l’altitudine misurata raggiunge il livello
prefissato. Nella modalità di allarme vengono utilizzare le stesse
unità di misura impostate l’ultima volta in modalità Altimetro. Per
modificare questa impostazione occorre prima cambiare le unità in
modalità Altimetro. Per impostare l’altitudine alla quale l’allarme
suona, premete
ADJ per passare alla modalità di regolazione e poi
premete
COMP/+/BARO/- per cambiare l’altitudine impostata.
Premete
ADJ per salvare le modifiche e uscire.
Funzione Bip
In modalità di allarme è disponibile anche una funzione Bip.
Quando questa è inserita, viene emesso un segnale acustico ogni
volta che si preme un pulsante anche se la funzione di allarme è
disinserita. Per inserire la funzione Bip, selezionatela dalla modalità
di allarme e premete il pulsante
ALTI; si visualizza ‘ON’. Premendo
di nuovo il pulsante si visualizza ‘OFF’.
Modalità Cronometro
Premete il pulsante MODE fino a visualizzare la modalità
Cronometro. Per azionare il cronometro, premete
COMP/+ per
avviarlo e premetelo di nuovo per arrestare il cronometro. Per
azzerare il cronometro premete
BARO/-.
Modalità Cronometro / Funzione Tempo Parziale
Per usare la funzione Tempo parziale, premete il pulsante BARO/-
mentre il cronometro è in funzione, per fermare il display, e
premetelo di nuovo per continuare. Il display mostra l'intervallo di
tempo con la precisione di 1/100 di secondo. Potete anche premere
BARO/- mentre il cronometro è in funzione, per fermare il display, e
poi premere
COMP/+ per arrestare il cronometro e visualizzare la
lettura finale. Per azzerare il cronometro premete di nuovo
BARO/-.
La funzione Tempo parziale è indicata sul display con 'SPL' (split)
quando è inserita; il display ritorna alla visualizzazione normale
quando si preme
BARO/-.
70
Page 38

La lettura principale indica la direzione effettiva e quella inferiore indica
la direzione di riferimento. I segmenti sulla circonferenza mostrano la
differenza tra le due direzioni, utilizzabile per correggere la rotta.
Per consumare meno potenza, in modalità Radiobussola il display
mostra tre barre invece della direzione attuale e i segmenti non
vengono visualizzati dopo un minuto. Per riattivare il display occorre
premere
COMP/+. Per uscire dalla modalità Radiobussola premete
di nuovo
MODE per ritornare alla modalità Bussola, predefinita,
oppure
MODE per ritornare alla modalità Data/Ora.
RETROILLUMINAZIONE AUTOMATICA
Premete il pulsante LIGHT ( ) per attivare per cinque secondi la
retroilluminazione del display.
Modalità Notte
La modalità Notte fa sì che la retroilluminazione si attivi
automaticamente quando si preme uno qualsiasi dei tasti funzione,
eccetto quando la bussola è in modalità Bussola. Premete il pulsante
LIGHT ( ) e mantenetelo premuto per tre secondi; compare
l’apposita icona (il simbolo della lampadina). Per disattivare la
retroilluminazione premete il pulsante LIGHT ( ) e mantenetelo
premuto finché l’icona scompare.
INDICATORE DELLA BATTERIA
Indicatore di Bassa Carica della Batteria
Quando la carica della batteria è bassa lampeggia un’apposita icona.
Il vano della batteria è sul retro della bussola. Sostituite le pile usata
con due pile ministilo AAA.
BAROMETRO E TEMPERATURA
Modalità Barometro
Visualizza la pressione atmosferica in hPa (mbar) e la temperatura in
gradi °F con un diagramma di previsioni meteorologiche. Per andare
alla modalità Barometro premete il pulsante
MODE fino a
visualizzare la modalità Data/Ora e poi premete
BARO/-. Se siete in
modalità Data/Ora, Bussola o Altimetro basta premere
BARO/-.
Quando si passa alla modalità Barometro si visualizza un diagramma
barometrico.
73
parola CAL comincia a lampeggiare. Girate lentamente la bussola per due giri completi
MANTENENDOLA ORIZZONTALE. Ciascuna rivoluzione deve richiedere circa 10 secondi.
Al termine premete di nuovo
COMP/+. Completata la procedura, il display visualizza ‘DONE’ e
passa automaticamente alla modalità di impostazione della declinazione. Se la taratura non riesce,
i punti cardinali lampeggiano e occorre ripetere le quattro fasi precedenti. Per saltare
l’impostazione della declinazione, premete
ADJ per ritornare alla modalità Bussola.
Impostazione della Declinazione
La declinazione regola la bussola in base al campo magnetico locale.
In alcune aree la declinazione magnetica può essere notevole, quindi
è consigliabile verificarne il valore sulla mappa o su Internet. Per
regolare l’angolo di declinazione della bussola andate alla modalità
Bussola e mantenete premuto il pulsante
ADJ per tre secondi, fino a
visualizzare la modalità Taratura bussola. Premete
MODE fino a
passare alla modalità di impostazione della declinazione, indicata
dalla sigla ‘DEC’. Premete
COMP/+ or BARO/- per selezionare il
valore prescelto e poi
ADJ per salvare le modifiche e uscire dalla
modalità. A volte la declinazione viene misurata come gradi positivi
e negativi. I gradi Est sono considerati positivi e quelli Ovest sono considerati negativi. Ad
esempio, per passare da una declinazione di 3 gradi Est (positiva) a una di 3 gradi Ovest (negativa)
premete
BARO/- finché non si visualizza 3W.
Modalità Radiobussola
Permette di impostare una direzione di riferimento, in modo che la
bussola indichi il punto verso cui dirigersi. Andate alla modalità
Bussola e premete il pulsante
COMP/+ per visualizzare il
riferimento; premete
ADJ e mantenetelo premuto per tre secondi e
poi premete
COMP/+ o BARO/- per modificare l’impostazione
della direzione di riferimento. Premendo
COMP/+ o BARO/- si
aumenta o diminuisce l’impostazione in incrementi di dieci. Una
singola pressione su
COMP/+ o BARO/- varia la direzione di
riferimento di 1 grado. Al termine premete
ADJ per ritornare alla
modalità Radiobussola. Per ritornare alla modalità Bussola premete
COMP/+.
Per usare la bussola in modalità Radiobussola andate prima alla modalità Bussola e poi premete il
pulsante
COMP/+.
72
Page 39

dell’intervallo compreso tra -10 °C e 60°C (14,0 °F - 140 °F), si visualizzano quattro barre.
Quando la temperatura rientra nell’intervallo prefissato, la lettura ritorna normale.
Diagramma Barometrico
È un diagramma della pressione che mostra le letture durante le ultime 13 ore. La lettura più
recente è indicata da un punto lampeggiante sul lato destro del diagramma. Le letture di pressione
sono riferite alla misura più recente, un punto sopra di essa corrisponde a + 1 hPa (mbar) / 0,05
inHg, un punto sotto di essa corrisponde a - 1 hPa (mbar) / 0,05 inHg.
Cancellazione delle Letture Barometriche Precedenti
A volte occorre cancellare tutte le letture barometriche precedenti,
per esempio quando ci si trova in un altro Paese. Per cancellare le
informazioni precedenti premete il pulsante
MODE fino a
visualizzare la modalità Data/Ora e poi premete
BARO/-. Se siete
già in modalità Data/Ora basta premere
BARO/- per visualizzare la
modalità Barometro. Premete il pulsante
ADJ e mantenetelo
premuto per tre secondi; il display lampeggia e si visualizza 'CLR
ALL'; premete
COMP/+ per confermare che volete cancellare tutte
le letture barometriche precedenti e il display torna
automaticamente alla modalità Barometro. Se non volete cancellare
le letture precedenti, premete
ADJ per uscire e ritornare alla modalità Barometro.
La pressione atmosferica viene visualizza in unità di 1 hPa (mbar) (o 0,05 inHg). Se la pressione è fuori
dell’intervallo 260 hPa (mbar) - 1100 hPa (mbar) (o 7,65 inHg - 32,45 inHg), si visualizzano quattro
barre. Quando la pressione rientra nell’intervallo prefissato, la lettura ritorna normale.
Modalità Altimetro
Premete il pulsante ALTI fino a visualizzare la modalità Data/Ora e
poi premete
ALTI. Se siete già in modalità Data/Ora, Bussola o
Barometro, basta premere
ALTI. Per cambiare l’indicazione
dell’altimetro da piedi a metri o viceversa premete
ALTI e
mantenetelo premuto per tre secondi.
L’altitudine viene visualizzata con una risoluzione di 5 metri (10
piedi [ft]). L’intervallo di misura è compreso tra – 700 e 8940 metri
(da -2.300 a 29320 ft). Se il valore è fuori di questi limiti si
visualizzano quattro barre. L’altitudine misurata può essere un valore negativo in quei casi in cui
è stato impostato un certo valore di riferimento o a causa di determinate condizioni.
75
Modalità Previsioni Meteorologiche
Per passare alla modalità Previsioni meteorologiche, premete il
pulsante
BARO/-; si visualizza un apposito diagramma. Premete di
nuovo
BARO/- per tornare a visualizzare il diagramma barometrico.
L’appendice riporta una spiegazione dettagliata di come funziona la
modalità Previsioni meteorologiche.
Icone delle Previsioni Meteorologiche
Sereno Parzialmente Nuvoloso Nuvoloso Pioggia/Neve
Unità del Barometro e della Temperatura
La pressione atmosferica è indicata in pollici (in) di Hg e la
temperatura in °C. Per cambiare le unità di misura adoperate,
premete il pulsante
ALTI e mantenetelo premuto per tre secondi,
finché le unità della temperatura lampeggiano e poi premete
COMP/+ o BARO/- per cambiarle. Successivamente premete
MODE per passare alle unità di misura della pressione e poi premete
COMP/+ o BARO/- per cambiarle. Premete ADJ in qualsiasi
momento per uscire. Per ottenere una lettura accurata della
temperatura, tenete presente che lo strumento deve rimanere
lontano da fonti di calore per circa 15 minuti (p. es., se lo si tiene
nella tasca, la temperatura visualizzata è quella all’interno della tasca anziché quella all’esterno).
Campionamento
La misurazione della temperatura e della pressione atmosferica viene eseguita ogni volta che si
passa alla modalità Barometro o, se si è in tale modalità, ogni volta che si preme il pulsante
BARO/-. Poi la temperatura viene misurata ogni cinque secondi duranti i primi tre minuti e
successivamente ogni cinque minuti.
Il barometro esegue le misurazioni automaticamente all’inizio di ogni ora anche se non si è in
modalità Barometro, eccetto che in modalità Altimetro, nella quale non esegue alcuna misura. La
temperatura viene visualizzata con una risoluzione di 0,1°C (o di 0,2 °F). Se la temperatura è fuori
74
Page 40

niente finché non si rendono disponibili posizioni di memoria).
Premete
COMP/+ e mantenetelo premuto per tre secondi; i valori
visualizzati vengono memorizzati (viene memorizzata pure la data) e
il display ritorna alla modalità Altimetro. Se decidete di non volere
memorizzare niente dopo aver immesso i valori nella memoria,
premete
MODE o ADJ per ritornare alla modalità Altimetro.
Quando tutte e dieci le posizioni di memoria sono occupate, si
visualizza 'Full'; per immettere nuovi valori, occorre prima azzerare
la memoria.
Lettura dei Valori Memorizzati
Per leggere i valori in memoria premete il pulsante MODE e mantenetelo premuto per tre secondi in
modalità Altimetro; si visualizza un numero con tre barre, indicando che la posizione di memoria è
vuota o che è mostrato l’ultimo valore in memoria visualizzato. Se la memoria è piena, si visualizza
'FULL'. Premete
COMP/+; si visualizza l’ultimo valore in memoria comparso sul display. Per
visualizzare altri valori memorizzati premete di nuovo
COMP/+ per farli scorrere sul display.
Cancellazione della Memoria
Per cancellare una posizione di memoria premete il pulsante MODE
e mantenetelo premuto per tre secondi in modalità Altimetro;
compare l’ultimo valore in memoria visualizzato oppure 'FULL' se la
memoria è piena. Premete
COMP/+ fino a visualizzare la posizione
di memoria che volete cancellare e poi premete
BARO/-; si
visualizza, lampeggiante, ‘CLR'; premete di nuovo
BARO/- per
confermare. Per uscire premete
MODE o ADJ.
Per cancellare l’intera memoria premete il pulsante
MODE e
mantenetelo premuto per tre secondi in modalità Altimetro;
compare l’ultimo valore in memoria visualizzato oppure 'FULL' se la
memoria è piena. Premete
COMP/+ per visualizzare i valori
memorizzati e poi premete
BARO/- e mantenetelo premuto finché
si visualizza ‘CLR ALL’. Premete di nuovo
BARO/- per confermare
oppure
MODE o ADJ per uscire, oppure premete COMP/+ per
continuare a visualizzare i valori memorizzati.
ILLUMINAZIONE MAPPA
Per illuminare la mappa premete il piccolo pulsante circolare. La luce è rossa, per preservare la
visione notturna.
77
Il diagramma dell’altitudine è composto da 14 colonne e 9 righe di
punti; ciascuna colonna rappresenta un periodo durante il quale
sono state eseguite le misure di altitudine e ciascun punto
rappresenta un’unità di 10 metri (30 ft)
Il diagramma mostra una lettura di temperatura ogni cinque secondi
durante i primi tre minuti e poi ogni cinque minuti.
Impostazione di Un’altitudine di Riferimento
L’altimetro utilizza i valori incorporati di atmosfera standard
internazionali ISA (International Standard Atmosphere) per
convertire la pressione dell’aria misurata localmente nell’altitudine
equivalente. È possibile anche impostare un’altitudine di
riferimento; lo strumento regolerà automaticamente il rapporto di
conversione pressione-altitudine in modo corrispondente.
Per impostare un’altitudine di riferimento, premete il pulsante
ADJ
e mantenetelo premuto per tre secondi in modalità Altimetro. Si
visualizza 'OFF' oppure l’attuale valore di riferimento (se impostato)
lampeggia, a indicare la schermata di impostazione. Se il valore
visualizzato è 'OFF', premete
ALTI. Premete COMP/+ per
aumentare il valore in incrementi di 5 metri (10 piedi) o
BARO/- per diminuirlo. Se gli
incrementi sono in piedi, tenendo premuto
COMP/+ o BARO/- si varia l’altitudine secondo
incrementi di 100 piedi, mentre se gli incrementi sono in metri la si varia secondo incrementi di
10 metri. Premendo
ALTI si cambia il valore in 'OFF', ripetendo la procedura si torna a
visualizzare il valore di riferimento impostato. L’impostazione 'OFF' corrisponde all’utilizzo del
rapporto di conversione pressione-altitudine basato sui dati di fabbrica. Premete
ADJ in qualsiasi
momento per uscire dalla modalità di impostazione.
Funzione di Memoria
Sono disponibili 10 posizioni di memoria in cui si possono salvare i
dati relativi ad altitudine, data e ora. Per memorizzare l’altitudine
misurata, la data e l’ora, premete il pulsante
MODE e mantenetelo
premuto per tre secondi in modalità Altimetro; si visualizza un
numero con tre barre, indicando che la posizione di memoria è vuota
o che è mostrato l’ultimo valore in memoria visualizzato. Premete
COMP/+ fino a individuare una posizione di memoria vuota. Se la
memoria è piena, si visualizza 'FULL' (non si può memorizzare
76
Page 41

APPENDICE: COME FUNZIONA LA MODALITÀ PREVISIONI METEOROLOGICHE
Il barometro misura il peso dell’aria. L’andamento della pressione è più rilevante per le previsioni
meteorologiche rispetto al valore assoluto. In genere, un’indicazione in aumento significa che l’aria
sta diventando più stabile (miglioramento del tempo), mentre se il barometro scende significa
l’aria sta diventando più instabile (peggioramento del tempo). Le previsioni meteorologiche
indicate dallo strumento si riferiscono al periodo successivo di 12 - 24 ore.
Previsioni Meteorologiche
Le previsioni meteorologiche per il periodo successivo di 12 -24 ore vengono calcolate in base alla
pressione assoluta non appena lo strumento si accende.
Pressione assoluta / mbar Condizioni del tempo
P < 970 Pioggia
970 < P <1000 Nuvoloso
1000 < P < 1030 Parzialmente nuvoloso
P >1030 Sereno
Lo strumento rileva la pressione atmosferica ogni ora e la confronta con il valore precedente per
seguire l’andamento. Se la pressione continua ad aumentare o diminuire per più di tre ore, le
condizioni meteorologiche previste vengono cambiate in base alla variazione di pressione.
Le previsioni meteorologiche vengono calcolate in base alla variazione di pressione; il
cambiamento delle condizioni meteorologiche previste è direttamente proporzionale alla velocità
della variazione della pressione atmosferica. Una variazione con pendenza positiva indica un
sistema ad alta pressione e un andamento meteorologico buono (stabile), mentre una variazione
con pendenza negativa indica un sistema a bassa pressione e un andamento meteorologico in fase
di peggioramento (instabile).
Le fluttuazioni di pressione dovute in genere a un cambiamento improvviso della condizioni (p.
es. una variazione rapida dell’altitudine che si può verificare durante un volo) vengono eliminate
da un filtro e non vengono fatte previsioni meteorologiche. In tal caso, lo strumento ricomincia a
monitorare la pressione per il periodo di tempo richiesto. Una pressione atmosferica in aumento
o diminuzione costante durante le ultime tre ore cambia le condizioni del tempo previste.
79
DURATA DELLA BATTERIA
Lo strumento DNS funziona ininterrottamente e la batteria dura oltre un anno in condizioni di
utilizzo normale. Un uso frequente degli allarmi, della retroilluminazione o della bussola accorcia
la durata della batteria.
GUIDA ALLA SOLUZIONE DEI PROBLEMI
• Se i punti cardinali (N, NE, E, SE ecc..) sulla bussola lampeggiano – cercate di mantenere la
bussola ORIZZONTALE mediante la livella a bolla. I punti cardinali possono lampeggiare anche
quando la bussola rileva un'interferenza magnetica dalle aree circostanti. I punti cardinali
lampeggiano in quanto la bussola non riesce a misurare con precisione le direzioni.
•
Se i punti cardinali continuano a lampeggiare anche se la bussola rimane orizzontale –
taratela di nuovo. Mantenetela sempre lontano da oggetti metallici, che possono causare
interferenza magnetica
•
Verificate inoltre che la declinazione – sia impostata correttamente (in genere l'impostazione
predefinita deve essere zero gradi).
•
Si visualizzano tre trattini – La bussola è passata a una modalità di consumo energetico ridotto.
Per riattivarla premete
COMP/+.
•
Non è possibile spegnere lo strumento – Questo strumento funziona ininterrottamente e la
batteria dura circa un anno in condizioni di utilizzo normale.
•
La misura di temperatura non sembra precisa – Tenete presente che occorrono 15 minuti
perché lo strumento si adatti alla temperatura ambiente; tenendolo in una tasca o esposto alla luce
solare diretta, la temperatura indicata varia.
•
Le previsioni meteorologiche indicano pioggia ma il cielo è sereno – Le previsioni
meteorologiche indicate dallo strumento si riferiscono al periodo successivo di 12 - 24 ore.
•
Pulsante di azzeramento – È situato all’interno del vano della batteria. Aprite il coperchio del
vano e premete il pulsante con un oggetto a punta. Quando si preme il pulsante, tutte le
impostazioni della bussola vengono azzerate. Inoltre la bussola si azzera automaticamente quando
si estraggono le pile
.
78
Page 42

8180
GARANZIA/RIPARAZIONI
GARANZIA LIMITATA PER DUE ANNI
Si garantisce che questo prodotto Bushnell® sarà esente da difetti di materiale e fabbricazione
per due anni a decorrere dalla data di acquisto. In caso di difetto durante il periodo di garanzia,
a nostra discrezione ripareremo o sostituiremo il prodotto purché sia restituito franco
destinatario. Sono esclusi dalla garanzia eventuali danni causati da abuso, maneggiamento
improprio, installazione o manutenzione eseguiti da persone non autorizzate dal servizio di
assistenza Bushnell.
A un prodotto restituito e coperto da questa garanzia occorre allegare quanto segue.
1) Assegno/ordine di pagamento per l’importo di 10 $US per coprire i costi di spedizione.
2) Nome e indirizzo da utilizzare per la restituzione del prodotto.
3) Una spiegazione del difetto.
4) Scontrino riportante la data di acquisto.
5) Il prodotto deve essere imballato in una scatola robusta, per prevenire danni durante il
trasporto, e va spedito franco destinatario a uno dei seguenti indirizzi.
Recapito negli Stati Uniti: Recapito in Canada:
Bushnell Performance Optics Bushnell Performance Optics
Attn.: Repairs Attn.: Repairs
8500 Marshall Drive 25A East Pearce Street, Unit 1
Lenexa, Kansas 66214 Richmond Hill, Ontario L4B 2M9
Per prodotti acquistati fuori degli Stati Uniti o del Canada, rivolgersi al rivenditore per le clausole
pertinenti della garanzia. In Europa si può anche contattare la Bushnell a questo numero:
BUSHNELL Performance Optics Gmbh
European Service Centre
MORSESTRASSE 4
D- 50769 - Cologne
Germania
Tél: +49 (0) 221 709 939 3
Fax: +49 (0) 221 709 939 8
Questa garanzia dà specifici diritti legali.
Eventuali altri diritti variano da una nazione all’altra.
©2003 Bushnell Performance Optics
Page 43

83
Parabéns pela aquisição da bússola portátil BUSHNELL®DNS Pro. Ela
é um instrumento de precisão construído com os melhores materiais e
montado por especialistas experientes para uma vida útil sem problemas,
mesmo sob as condições mais exigentes. Este livreto o ajudará a obter os
melhores resultados, explicando como usar os diversos recursos.
PARA QUE SERVEM OS BOTÕES
ADJ Use este botão para ajustar suas configurações
MODE Muda o display de um recurso para o próximo
nos modos de horário ou bússola
ALTI Acessa a função ALTÍMETRO a partir da Função Horário.
Botão redondo Acende a luz do mapa
Acende a luz para iluminar o display de LCD
COMP/+ Comuta entre os modos de horário e de bússola. Este
botão também aumenta as configurações de ajuste.
BARO/- acessa os recursos de BAROMETER (BARÔMETRO) e
WEATHER FORECASTING (PREVISÃO DO
TEMPO) a partir do TIME Mode (Modo de HORÁRIO).
Este botão também diminui as configurações nos modos
de ajuste.
82
PORTUGUÊS
Tela de LCD
(1)
(3)
(7)
(4)
(6)
(5)
Compartimento para Pilha
Nível de Bússola
(2)
Page 44

Novas Configurações
ALARME
Modo de Configuração do Alarme
Pressione o botão MODEaté que seja exibido o Alarm Mode (Modo
de alarme). Há cinco alarmes distintos: 3 para o horário, 1 para a
altitude e 1 para a temperatura. Pressione o botão
COMP/+ ou
BARO/- para percorrer os diferentes alarmes. Pressione e mantenha
o botão
ADJ pressionado por 3 segundos até que a parte
correspondente aos minutos comece a piscar; pressione o botão
COMP/+ ou BARO/- para ajustar para os números desejados.
Pressione o botão
MODE para a próxima configuração. Pressione o
botão
ADJ a qualquer momento para salvar as mudanças e sair. O
alarme é ativado automaticamente após os ajustes serem feitos.
Pressione qualquer botão para que o alarme pare de soar.
O alarme também pode ser ligado ou desligado movimentando-se
até o alarme relevante e pressionando o botão
ALTI para ativar a
função de alarme; pressione novamente para ativar a função Snooze,
e mais uma vez para desativá-lo.
Alarme de Temperatura
Configura o alarme para soar quando a temperatura atingir o nível
programado. No modo de alarme, o alarme de temperatura usa as
mesmas unidades de medida (ºC ou F) que foram configuradas no
último ajuste do modo de temperatura. Para mudar isto, primeiro
você deve mudar as unidades de temperatura no modo de
barômetro. Pressionar
COMP/+/BARO/- uma vez muda a
temperatura em décimos de grau. Se o botão for mantido
pressionado, as mudanças de temperatura ocorrerão em incrementos
de 1 grau.
85
AJUSTE DO HORÁRIO
Modo de Horário Padrão / Ajustes do Horário
Pressione o botão MODE até que seja exibido o Time Mode (Modo de horário). Pressione e
mantenha o botão
ADJ pressionado por 3 segundos. Pressione o botão COMP/+ ou BARO/- até
aparecer o valor desejado. Em seguida, pressione o botão
MODE para a próxima configuração.
Pressione o botão
ADJ a qualquer momento para salvar as mudanças e sair. Ao fazer isso, os
segundos retornarão para 00. A letra "A" ou "P" aparecerá na parte inferior esquerda das horas
para indicar AM (manhã) ou PM (noite).
Ajustes da Data
Ao ajustar a data, o ano também será exibido. Pressione o botão
MODE até que seja exibido o Time Mode (Modo de horário).
Pressione e mantenha o botão
ADJ pressionado por 3 segundos.
Pressione o botão
MODE e percorra a lista até a configuração a ser
mudada. Pressione o botão
COMP/+ ou DOWN até aparecer o
valor desejado. Em seguida, pressione o botão
MODE para a
próxima configuração. Pressione o botão
ADJ a qualquer momento
para salvar as mudanças e sair.
Para ajustar o horário na configuração de 24/12 horas, pressione o
botão
MODE até que seja exibido Modo de horário. Pressione e
mantenha o botão
ADJ pressionado por 3 segundos. Pressione o
botão
MODE e percorra as configurações até que apareça o ajuste do
horário 24/12. Depois, pressione o botão
COMP/+ ou BARO/-
para estabelecer o ajuste desejado. Pressione o botão ADJ a qualquer
momento para salvar as mudanças e sair.
84
Page 45

ALARME DO CRONÔMETRO DE CONTAGEM REGRESSIVA
Modo de Contagem Regressiva / Inversão de Temporizador.
Pressione o botão MODE até que seja exibido o Countdown Timer
Mode (modo de cronômetro de contagem regressiva), o qual é
representado por ‘RT’ (reverse timer – inversão de temporizador).
Para operá-lo, pressione o botão
COMP/+ para iniciar e mais uma
vez para parar. Depois, pressione o botão
BARO/- para zerar o
cronômetro de contagem regressiva.
Para ajustar o cronômetro de contagem regressiva, pressione e
mantenha o botão
ADJ pressionado por 3 segundos. Isso fará com
que o ajuste dos segundos comece a piscar. Ajuste com o botão
COMP/+ ou BARO/-, em seguida pressione o botão MODE para
ajustar a próxima configuração. Pressione
ADJ para salvar os ajustes
e sair. Pressione
ALTI para ‘AUTO’ a fim de que o cronômetro de
contagem regressiva repita a função automaticamente e pressione
mais uma vez para desligar essa função.
Quando o alarme soar, pressione qualquer botão para interromper o cronômetro de contagem
regressiva. Se nada for pressionado, o bip será interrompido após 10 segundos, mas o cronômetro
de contagem regressiva continuará caso a função ‘AUTO’ esteja ligada. A fim de interromper o
cronômetro de contagem regressiva se a função ‘Auto’ estiver ligada, você deve entrar no modo de
cronômetro de contagem regressiva e pressionar
COMP/+ para desligar essa função. Em seguida,
pressione o botão
ALTI para parar o cronômetro.
BÚSSOLA DIGITAL
Modo de Bússola
Pressione o botão MODE até que seja exibido o Time Mode (Modo
de horário). Em seguida, pressione o botão
COMP/+. Caso já se
encontre neste modo, basta pressionar o botão
COMP/+ e o modo
de bússola será exibido. Mantenha o nível da bússola usando o nível
de bolha para obter uma leitura. Se os pontos cardeais piscarem, a
bússola provavelmente precisa ser calibrada. (Veja as dicas para
resolução de problemas.)
Calibragem da Bússola
No modo de bússola, pressione o botão ADJ por 3 segundos. Será exibido o Calibration Mode
87
Alarme de Altitude
Configura para que o alarme soe quando a altitude atingir o nível
programado. No modo de alarme, o alarme de altitude usa as
mesmas unidades de medida que foram configuradas no último
ajuste do modo de altitude. Para mudar isto, primeiro você deve
mudar as unidades de temperatura no modo de altímetro. Para
ajustar a altitude na qual o alarme irá soar, pressione
ADJ para entrar
no modo de configurações. Pressione
COMP/+/BARO/- para
mudar a configuração do alarme de altitude. Pressione
ADJ para
salvar e sair.
Função de Bip
Uma função de bip está também disponível no modo de alarme.
Quando ativada, esta função faz com que seja emitido o som de um
bip toda vez que for pressionado algum botão, mesmo quando a
função de alarme estiver desligada. Para ativá-la, vá até a função de
bip no modo de alarme, pressione o botão
ALTI e será exibido ‘ON’
(LIGADO). Pressione novamente e será exibido ‘OFF’
(DESLIGADO).
Modo de Cronômetro
Pressione o botão MODE até que seja exibido o Stop Watch Mode
(Modo de cronômetro). Para operá-lo, pressione o botão
COMP/+
para iniciar e mais uma vez para parar. O cronômetro será zerado ao
pressionar o botão
BARO/-.
Modo de Cronômetro / Função de Divisão do Tempo
Para acessar a função de divisão de tempo, pressione o botão
BARO/- enquanto o cronômetro estiver operando para interromper
o display e pressione novamente para continuar. O display mostrará
o tempo com uma precisão de centésimos de segundo. Você pode
também pressionar o botão
BARO/- enquanto o cronômetro estiver
operando para interromper o display e pressionar o botão
COMP/+
para interromper o cronômetro e exibir a leitura final. Pressione o
botão
BARO/- novamente para zerar o cronômetro.
A função de divisão do tempo é exibida como ‘SPL’ quando ativada
e o display retorna para a exibição normal quando for pressionado o
botão
BARO/-.
86
Page 46

de concluído, pressione ADJ para retornar ao modo de orientação. Pressione o botão COMP/+
para retornar ao modo de bússola.
Para operar a bússola no Modo de orientação, vá primeiro para o modo da bússola e depois
pressione novamente o botão
COMP/+ para entrar no modo de orientação.
A leitura principal exibe o rumo verdadeiro e a leitura inferior mostra o rumo ‘orientado’. Os
segmentos na circunferência mostram a diferença entre os dois ângulos de direção, o que pode ser
usado para redirecioná-lo a fim de manter-se no curso correto.
Para economizar energia, o display no modo de orientação mostrará
3 ‘barras’ em vez do rumo atual e os segmentos não serão exibidos
após 1 minuto. Você deverá pressionar
COMP/+ novamente para
reativar o display. Para sair do modo de orientação, pressione
MODE outra vez para retornar ao modo de bússola padrão ou ao
modo de horário.
LUZ DE FUNDO AUTOMÁTICA
Pressione o botão LIGHT ( )para acender a luz de fundo do LCD
por 5 segundos.
Modo Noturno
O Modo Noturno (Night Mode) permite que a luz de fundo acenda
automaticamente quando qualquer uma das teclas de função for
pressionada, exceto quando a bússola estiver no modo de bússola.
Pressione e mantenha o botão LIGHT ( ) pressionado por 3
segundos. Aparecerá o ícone do modo noturno (representado pelo
símbolo de luz). Para desligá-lo, pressione e mantenha o botão
LIGHT ( ) pressionado até que o símbolo de luz desapareça.
INDICADOR DE PILHA
Indicador de Baixa Carga da Pilha
Um ícone de pilha piscando aparecerá quando ela estiver com baixa
carga. O compartimento da pilha fica localizado na parte posterior
da bússola. Substitua as pilhas usadas por duas pilhas AAA.
89
(Modo de calibragem). Coloque a bússola sobre uma superfície
nivelada, não magnética, e pressione o botão
COMP/+. A palavra
CAL começará a piscar. Em seguida, gire a bússola lentamente por
duas voltas completas SEMPRE MANTENDO-A NIVELADA.
Cada volta deverá levar aproximadamente 10 segundos. Depois
disso, pressione
COMP/+ novamente. Quando concluído, o display
exibe ‘DONE’ (PRONTO) e passará automaticamente para o
Declination Setting Mode (Modo de ajuste da declinação). Caso a
calibragem não tenha sido bem sucedida, os pontos cardeais piscarão
e você deverá repetir as 4 etapas anteriores novamente. Para pular a
etapa de configuração da declinação, pressione o botão
ADJ retornando ao modo da bússola.
Configuração de Declinação
A declinação ajusta a bússola para os campos magnéticos locais. Em
algumas áreas, a declinação magnética pode ser considerável. Por
este motivo, é sempre uma boa idéia verificar a declinação em seu
mapa ou pela Internet. Para ajustar o ângulo de declinação da
bússola, vá para o módulo de bússola e mantenha o botão
ADJ
pressionado por 3 segundos. O Compass Calibration Mode (Modo
de calibragem da bússola) será exibido. Pressione o botão
MODE
até chegar no modo de ajuste de declinação que aparece como
‘DEC’. Pressione o botão
COMP/+ ou BARO/- para obter o valor
desejado e após pressione o botão
ADJ para salvar os ajustes e sair desse módulo. Às vezes, a
declinação é medida em ângulos positivos e negativos. Graus Leste (em inglês East, abreviado E)
são considerados positivos ao passo que Graus Oeste (em inglês West, abreviado W) são negativos.
Por exemplo, para mudar a declinação de 3 graus Leste (positivo) para 3 graus Oeste (negativo)
pressione o botão
BARO/- até aparecer 3W.
Modo de Orientação Automática
Permite pré-configurar a direção de referência que pede à bússola
para lhe alertar sobre a direção que você deve seguir. Vá para o modo
de bússola e pressione o botão
COMP/+ para exibir a orientação da
bússola. Para ajustar a direção da orientação, pressione e mantenha
o botão
ADJ pressionado por três segundos. Pressione o botão
COMP/+ ou BARO/- para ajustar a configuração do rumo
desejado. Pressionar
COMP/+ ou BARO/- aumentará ou diminuirá
o ângulo de rumo em incrementos de dez. Cada vez que um desses
botões for pressionado, o ângulo de rumo muda em 1 grau. Depois
88
Page 47

Exemplo
As medidas de pressão barométrica e temperatura são tomadas toda vez que você entrar no modo
de barômetro ou ao pressionar o botão
BARO/- a partir desse modo. Depois disso, as medidas de
temperatura são tomadas a cada 5 segundos durante os primeiros 3 minutos e, posteriormente, a
cada 5 minutos.
O barômetro automaticamente toma medidas no início de cada hora, mesmo se você não estiver
no modo de barômetro. Entretanto, no modo de altímetro não são tomadas medidas barométricas.
A temperatura é exibida na resolução de 0,1°C (ou 0,2 °F). 4 ‘barras’ são exibidas quando a
temperatura estiver fora da faixa de –10 a 60 °C (14,0 °F a 140 °F). As leituras retornam ao normal
quando o valor da temperatura voltar para esta faixa estabelecida.
Gráfico Barométrico
O gráfico de pressão barométrica indica as leituras barométricas das últimas 13 horas. A leitura
mais recente é indicada como um ponto que pisca no lado direito do gráfico. As leituras do gráfico
de pressão são relativas ao mais recente ponto de medida tomada, um ponto acima dele representa
mais 1 hPa(mb)/0,05 pol. Hg, ou caso esteja abaixo representa menos 1 hPa(mb)/0,05 pol. Hg.
Remoção de Leituras Barométricas Anteriores
Às vezes será necessário apagar todas as leituras barométricas
anteriores, por exemplo, caso você chegar em um país diferente. Para
remover as informações anteriores, pressione o botão
MODE até
que seja exibido o modo de horário. Em seguida, pressione o botão
BARO/-. Caso já se encontre no modo de horário, basta pressionar
o botão
BARO/- e o modo de barômetro será exibido. Pressione e
mantenha o botão
ADJ pressionado por 3 segundos, o display
piscará e 'CLR ALL' (REMOVER TUDO) será exibido; após,
pressione o botão
COMP/+ para confirmar que você pretende
remover todas as leituras barométricas anteriores e então o display retornará automaticamente para
o modo de barômetro. Pressione o botão
ADJ para sair e retornar ao modo de barômetro caso você
decida não remover as leituras anteriores.
A pressão barométrica é exibida nas unidades de 1 hPa(mb) (ou 0,05 pol Hg). 4 'barras' são
exibidas quando a pressão barométrica não estiver na faixa de 260 hPa(mb) a 1100 hPa(mb) (ou
7,65 pol. Hg a 32,45 pol. Hg). As leituras retornam ao normal quando o valor barométrico
retornar para esta faixa estabelecida.
91
BARÔMETRO E TEMPERATURA
Modo de Barômetro
A pressão barométrica em hPa(mb) e temperatura em graus
Fahrenheit com gráfico de previsão do tempo. Para entrar no modo
de barômetro, pressione o botão
MODE até que seja exibido o
modo de horário. Em seguida, pressione o botão
BARO/-. Caso já
esteja no modo de horário, bússola ou de altímetro, basta pressionar
o
BARO/- para que o modo de barômetro seja exibido. Ao entrar
neste modo, um gráfico barométrico é exibido graficamente no
display da matriz de pontos.
Modo de Previsão do Tempo
Para mudar para o modo de previsão de tempo, pressione o botão
BARO/- e ele será exibido. Pressione esse botão novamente para
retornar ao display do gráfico barométrico. Consulte o apêndice
para uma explicação complete de como funciona o modo de previsão
do tempo.
Ícones de previsão do tempo
Ensolarado Parcialmente Nublado Nublado Chuva/Neve
Unidades Barométricas e de Temperatura
Pressão barométrica em polegadas de Hg e temperatura em °C Para mudar o tipo de unidades
de medida usadas, pressione e mantenha o botão
ALTI pressionado
por 3 segundos até que a unidade correspondente à temperatura
comece a piscar e após pressione o botão
COMP/+ ou BARO/- para
mudá-la. Em seguida, pressione
MODE para passar à unidade de
pressão e pressione o botão
COMP/+ ou BARO/- para mudá-la.
Pressione
ADJ a qualquer momento para sair. Não esqueça de que,
para obter uma leitura precisa de temperatura, a unidade deve ser
mantida afastada da fonte de calor por aproximadamente 15
minutos (ou seja, a temperatura indicada será a de seu bolso em vez
da temperatura externa caso a unidade for mantida no bolso).
90
Page 48

valor de referência estabelecido. Estabelecer a altitude de referência em ‘OFF’ significa que
somente será usada a conversão de pressão de ar em altitude baseada em dados pré-configurados
em fábrica. Pressione
ADJ a qualquer momento para sair do modo de configuração.
Função de Memória
Há 10 memórias onde podem ser armazenadas informações de
altitude, horário e data. Para armazenar a medida da altitude,
horário e data atuais, pressione e mantenha o botão
MODE
pressionado por 3 segundos no modo de altímetro. Um número de
memória é exibido com 3 ‘barras’, o que significa que ela está vazia
ou que a última memória visualizada está sendo exibida. Em seguida,
pressione o botão
COMP/+ até encontrar uma memória vazia. Caso
a memória esteja cheia, será exibido 'FULL' (CHEIA) e nada poderá
ser armazenado até que ela fique disponível. Pressione e mantenha o
botão
COMP/+ pressionado por 3 segundos e os valores exibidos
serão armazenados na memória (a data também é armazenada), e o
display retorna ao modo de altímetro. Caso decida que você não
deseja armazenar nada após ter acessado as memórias, você deverá
pressionar o botão
MODE ou ADJ e retornar ao modo de altímetro.
A palavra ‘Full’ é exibida quando todas as 10 memórias estiverem usadas
e precisem ser apagadas antes que novos dados possam ser armazenados.
Leitura das Memórias Armazenadas
Para ler as memórias armazenadas, pressione e mantenha o botão
MODE pressionado por 3 segundos no modo de altímetro. Um número de memória é exibido
com 3 ‘barras’, o que significa que ela está vazia ou que a última memória visualizada está sendo
exibida. Se as memórias estiverem cheias, será exibido 'FULL'. Pressione o botão
COMP/+ e a
última memória visualizada será exibida. Para visualizar outras memórias armazenadas, pressione
novamente o botão
COMP/+ para percorrer todas as memórias.
Como Limpar a Memória
Para limpar uma memória, pressione e mantenha o botão MODE
pressionado por 3 segundos no modo de altímetro. A última
memória visualizada será exibida ou, caso as memórias estejam
cheias, será indicado 'FULL'. Pressione o botão
COMP/+ até que
seja exibida a memória que você deseja limpar. Em seguida,
pressione o botão
BARO/-: a palavra ‘CLR' será exibida piscando;
pressione novamente o botão
BARO/- para confirmar. Para sair,
pressione o botão
MODE ou ADJ.
Modo de Altímetro
Pressione o botão MODE até que seja exibido o modo de horário.
Em seguida, pressione o botão
ALTI. Caso já esteja no modo de
horário, bússola ou barômetro, basta pressionar o
ALTI para que o
modo de altímetro seja exibido. Pressione e mantenha o botão
ALTI
pressionado por 3 segundos para mudar a configuração do altímetro
de pés para metros ou vice-versa.
A altitude é exibida na resolução de 5 metros (10 pés). A faixa
medida está compreendida entre –700 e 8940 metros (-2.300 e
29320 pés). 4 ‘barras’ são exibidas quando o valor ultrapassa esta
faixa. A altitude medida pode ter um valor negativo nos casos em
que há um valor de referência da altitude estabelecido ou em
decorrência de certas condições.
O gráfico de altitude consiste de 14 colunas e 9 linhas de pontos,
com cada coluna de pontos representando um período em que foram
tomadas as medidas de altitude e cada ponto representando uma
unidade de 10 metros (30 pés).
O gráfico toma leituras de altitude a cada 5 segundos durante os primeiros 3 minutos e,
posteriormente, a cada 5 minutos.
Como Estabelecer uma Altitude de Referência
O altímetro usa os valores integrados na ISA (International Standard
Atmosphere – Atmosfera Padrão Internacional) para converter a
pressão de ar medida no local atual em altitude equivalente. Mas,
você pode estabelecer uma altitude de referência e a bússola ajustará
sua pressão de ar automaticamente para fazer o cálculo de conversão
de altitude.
Para estabelecer uma altitude de referência, pressione e mantenha o
botão
ADJ pressionado por 3 segundos no modo de altímetro. A leitura exibe 'OFF'
(DESLIGADO) ou o atual valor de referência (se estabelecido) piscará, o que indicará a tela de
configuração. Caso a configuração seja “OFF”, pressione o botão
ALTI. Pressione o botão
COMP/+ para aumentar o valor em incrementos de 5 metros (10 pés) ou o botão BARO/- para
diminuir esse valor. Quando em pés, pressionar
COMP/+ ou BARO/- M muda a altitude em
incrementos de 100 pés. Em metros, a mudança de altitude se dá em incrementos de 10 metros.
Pressionar o botão
ALTI passa o valor para ‘OFF’; repetir o procedimento retorna o display ao
92 93
Page 49

• Botão Reset (reinicialização) – dentro do compartimento das pilhas. Abra a porta do
compartimento das pilhas. Use um objeto pontudo para pressionar o botão Reset. Quando ele
for pressionado, todas as configurações da bússola serão reinicializadas. Quando as pilhas forem
removidas, a bússola é também reinicializada automaticamente.
.
APÊNDICE: COMO FUNCIONA O PREVISOR DO TEMPO
O barômetro é uma ferramenta que mede o peso do ar. A tendência climática é mais importante
para a previsão do tempo do que a quantidade de pressão absoluta. Em geral, o aumento na leitura
no barômetro significa que o ar está ficando mais estável (e melhor); quando a leitura baixa, o ar
está ficando menos estável (maior probabilidade de tempestades). A unidade foi projetada para
prever o tempo para as próximas 12 a 24horas.
Previsão do Tempo
A previsão do tempo para as próximas 12-24 horas é calculada a partir da pressão absoluta medida
quando a unidade é ligada.
Pressão absoluta / mbar Condição do tempo
P < 970 Chuvoso
970 < P <1000 Nublado
1000 < P < 1030 Parcialmente Nublado
P < 1030 Ensolarado
Sua DNS Pro mede a pressão barométrica a cada hora e compara a pressão atual com a anterior
para rastrear a mudança. Se a pressão continuar aumentando ou diminuindo por mais de 3 horas,
a condição do tempo mudará de acordo com a mudança de pressão.
A previsão do tempo é calculada a partir da mudança na pressão por período de tempo. A
mudança na condição do tempo é diretamente proporcional à velocidade de mudança de pressão
barométrica. Uma inclinação ascendente indica sistema de alta pressão e uma boa (estável)
tendência climática. Uma inclinação descendente indica sistema de baixa pressão e que a tendência
climática está piorando (ficando instável).
Variações de pressão devidas a mudanças bruscas de condições (por exemplo, uma rápida
mudança de elevação causada por estar dentro de um avião subindo ou descendo) são filtradas e
nenhuma previsão do tempo é feita. Caso isso aconteça, a unidade recomeçará a monitorar a
pressão para o período necessário. Uma pressão barométrica que aumenta ou baixa
constantemente durante as últimas 3 horas mudará efetivamente a condição da previsão do tempo.
95
Para limpar toda memória, pressione e mantenha o botão MODE
pressionado por 3 segundos no modo de altímetro. A última memória
visualizada será exibida ou, caso as memórias estejam cheias, será
indicado 'FULL'. Pressione o botão
COMP/+ para visualizar as
memórias e depois pressione
BARO/- mantendo esse botão
pressionado até que seja exibido 'CLR ALL'. Pressione
BARO/-
novamente para confirmar, o botão MODE ou ADJ para sair, ou ainda
o botão
COMP/+ para continuar visualizando a memória.
LUZ PARA MAPAS
Pressione o botão redondo pequeno para ativar a luz do mapa. Essa luz é vermelha para proteger
sua visão noturna.
VIDA ÚTIL DA PILHA
A sua bússola DNS foi projetada para uso contínuo e as pilhas durarão por um ano com o uso
regular. O uso muito freqüente dos alarmes, luz ou bússola reduzirá a vida útil da pilha.
RESOLUÇÃO DE PROBLEMAS
• Se os pontos cardeais (N, NE, E, SE, etc.) da bússola estiverem piscando – tente manter a
bússola NIVELADA, usando o nível de bolha como guia. Os pontos cardeais poderão também
piscar quando a bússola encontra interferência magnética de áreas próximas. Isso acontece porque
a bússola não consegue medir os ângulos de rumo com precisão.
•
Caso isso não resolva o problema, recalibre a bússola – Não esqueça de manter a mesma
afastada de objetos metálicos que possam causar interferência magnética.
•
Certifique-se também de que a declinação foi ajustada corretamente (em geral, zero graus deve ser
o ajuste padrão).
•
São exibidos três traços – a bússola entrou no “modo de dormir” para poupar pilhas. Pressione
o botão
COMP/+ para reativar a bússola.
•
Não pode ser desligada – a unidade foi projetada para ficar constantemente acesa e as pilhas
durarão por aproximadamente um ano com uma utilização normal.
•
A temperatura não parece ser precisa – lembre-se de que leva 15 minutos para a unidade se
ajustar à temperatura ambiente. Manter a unidade no bolso ou exposta diretamente ao sol terá
um impacto sobre a temperatura.
•
O previsor do tempo indica chuva, mas está ensolarado– o indicador da previsão do tempo é
projetado para prever o tempo para as próximas 12 a 24 horas.
94
Page 50

9796
GARANTIA/CONSERTO
GARANTIA LIMITADA DE DOIS ANOS
Garantimos que seu produto Bushnell® estará isento de defeitos materiais e de fabricação. por
dois anos após a data de aquisição. Caso tenha algum um defeito sob esta garantia, iremos a
nossa opção, consertar ou trocar este produto desde que o produto seja devolvido com porte
pago. Esta garantia não abrange danos causados por uso indevido, operação, instalação, ou
manutenção incorretas efetuadas a não ser que seja do Departamento do Serviço de
Manutenção Autorizada da Bushnell.
Qualquer devolução efetuada sob esta garantia deve incluir os itens relacionados a seguir:
1) Um cheque/ordem de pagamento no montante de $10,00 para cobrir as despesas de
porte e gastos administrativos
2) Nome e endereço para a devolução do produto
3) Uma explicação do defeito
4) Comprovante da Data de Aquisição
5) O produto deve ser cuidadosamente embalado, numa caixa de papelão resistente para
prevenir danos enquanto em trânsito e enviado para os endereços indicados a seguir
com porte de devolução pago:
NOS EUA REMETER PARA: NO CANADÁ REMETER PARA:
Bushnell Performance Optics Bushnell Performance Optics
Attn.: Repairs Attn.: Repairs
8500 Marshall Drive 25A East Pearce Street, Unit 1
Lenexa, Kansas 66214 Richmond Hill, Ontario L4B 2M9
Para produtos adquiridos fora dos Estados Unidos ou do Canadá favor contatar seu revendedor
local quanto a informações aplicáveis referentes a sua garantia. A Bushnell também pode ser
contatada na Europa pelo telefone: BUSHNELL Performance Optics Gmbh
European Service Centre
MORSESTRASSE 4
D- 50769 KÖLN
Alemanha
Tél: +49 (0) 221 709 939 3
Fax: +49 (0) 221 709 939 8
Esta garantia lhe dá direitos legais específicos.
Poderá ter outros direitos que podem variar de país para país.
©2003 Bushnell Performance Optics
Page 51

2
www.bushnell.com
 Loading...