

Page 1

Quick Start Guide (W/Remote)
For full instruction manual go to: www.primos.com
Scan this QR code for the free App
“Primos Dogg App”
Control your electronic caller and update its settings from your mobile phone.
To get Started using your Primos Predator Caller:
1. Install the free Primos Predator App on your smartphone by scanning the QR Code above or
downloading it from the App Store (iPhone) or Google Play (Android)
2. Install 10 AA lithium batteries or the provided 18650 battery pack provided (Top Dogg Only) into
the speaker.
3. Install 3 AA batteries (lithium or alkaline) into the remote control provided
4. Once batteries are installed turn on the speaker and remote controller
5. Once both devices are powered up they will automatically search and connect
6. In order to start activating sounds you can select the sound folder, then the sub category for the
type of sound.
(See the full manual at www.primos.com for more details)
Customer Service: 601-879-9323
www.primos.com
Android and Google Play are registered trademarks of Google Inc.
iPhone is a registered trademark of Apple Inc.
Page 2

Quick Start Guide (W/O Remote)
For full instruction manual go to: www.primos.com
Scan this QR code for the free App
“Primos Dogg App”
Control your electronic caller and update its settings from your mobile phone.
To get Started using your Primos Predator Caller:
1. Install the free Primos Predator App on your smartphone by scanning the QR Code above or
downloading it from the App Store (iPhone) or Google Play (Android)
2. Install 10Teres AA lithium batteries into the battery tray and plug into the speaker
3. Once batteries are install turn on the speaker
4. Open the application that was installed on your mobile device
5. Turn on the Bluetooth connectivity on your mobile device and connect to the speaker
(device will display as “Device Name_Dogg”)
6. By navigating the application you can activate sounds by selecting the Sound folder, then
the sub category for the type of sound.
(See the full manual at www.primos.com for more details)
Customer Service: 601-879-9323
www.primos.com
Android and Google Play are registered trademarks of Google Inc.
iPhone is a registered trademark of Apple Inc.
Page 3
Instruction Manual
Getting Started
Welcome to the more powerful predator caller available! It Speaks the Language with volume,
dimensions and clarity that is unmatched. Offering 360 degrees of coverage because you don’t always
know where the predator is.
/!\ CAUTION: This is not a seat! Do not sit or place heavy equipment atop your Top Dogg/Horn Dogg
speaker system. Failure to do so may result in physical injury and/or damage to the product.
What is in the box:
• Primos electronic game call
• Primos Dogg Remote
• Quick Start Manual
• Nesting Plate
• Warranty Registration Card
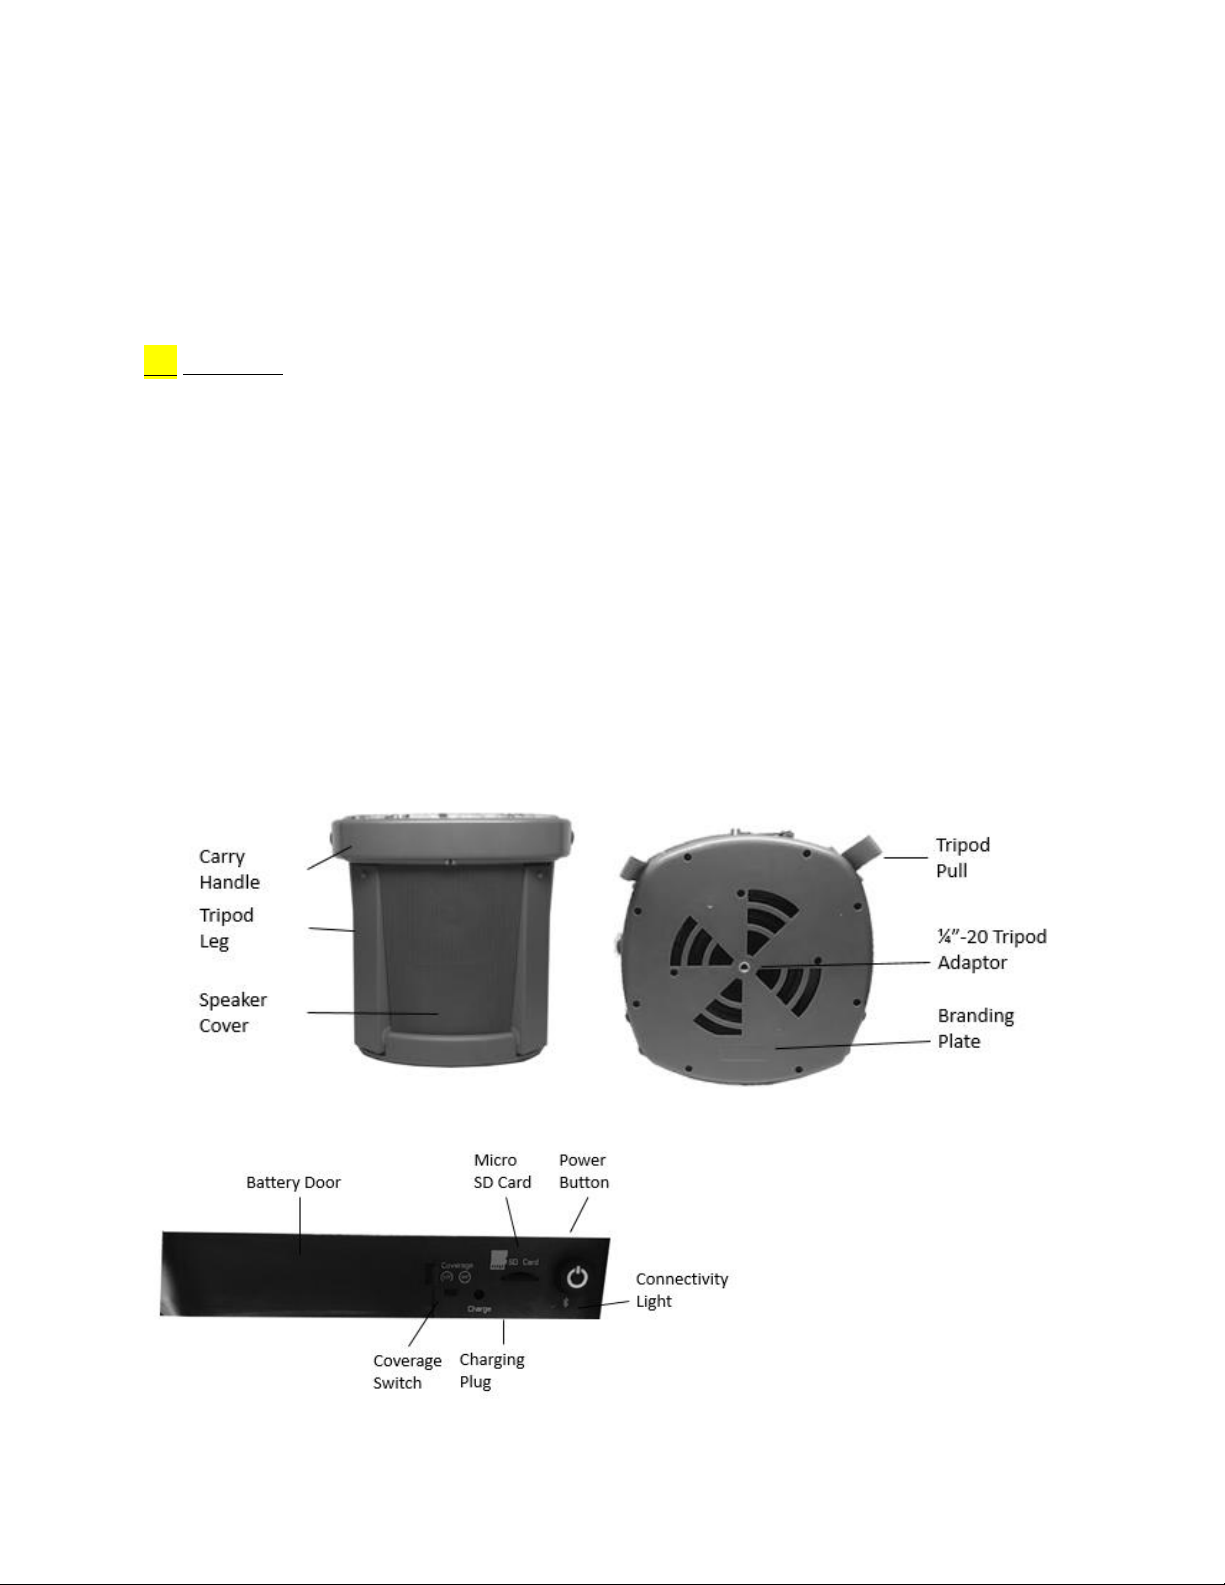
Device Overview
Page 4
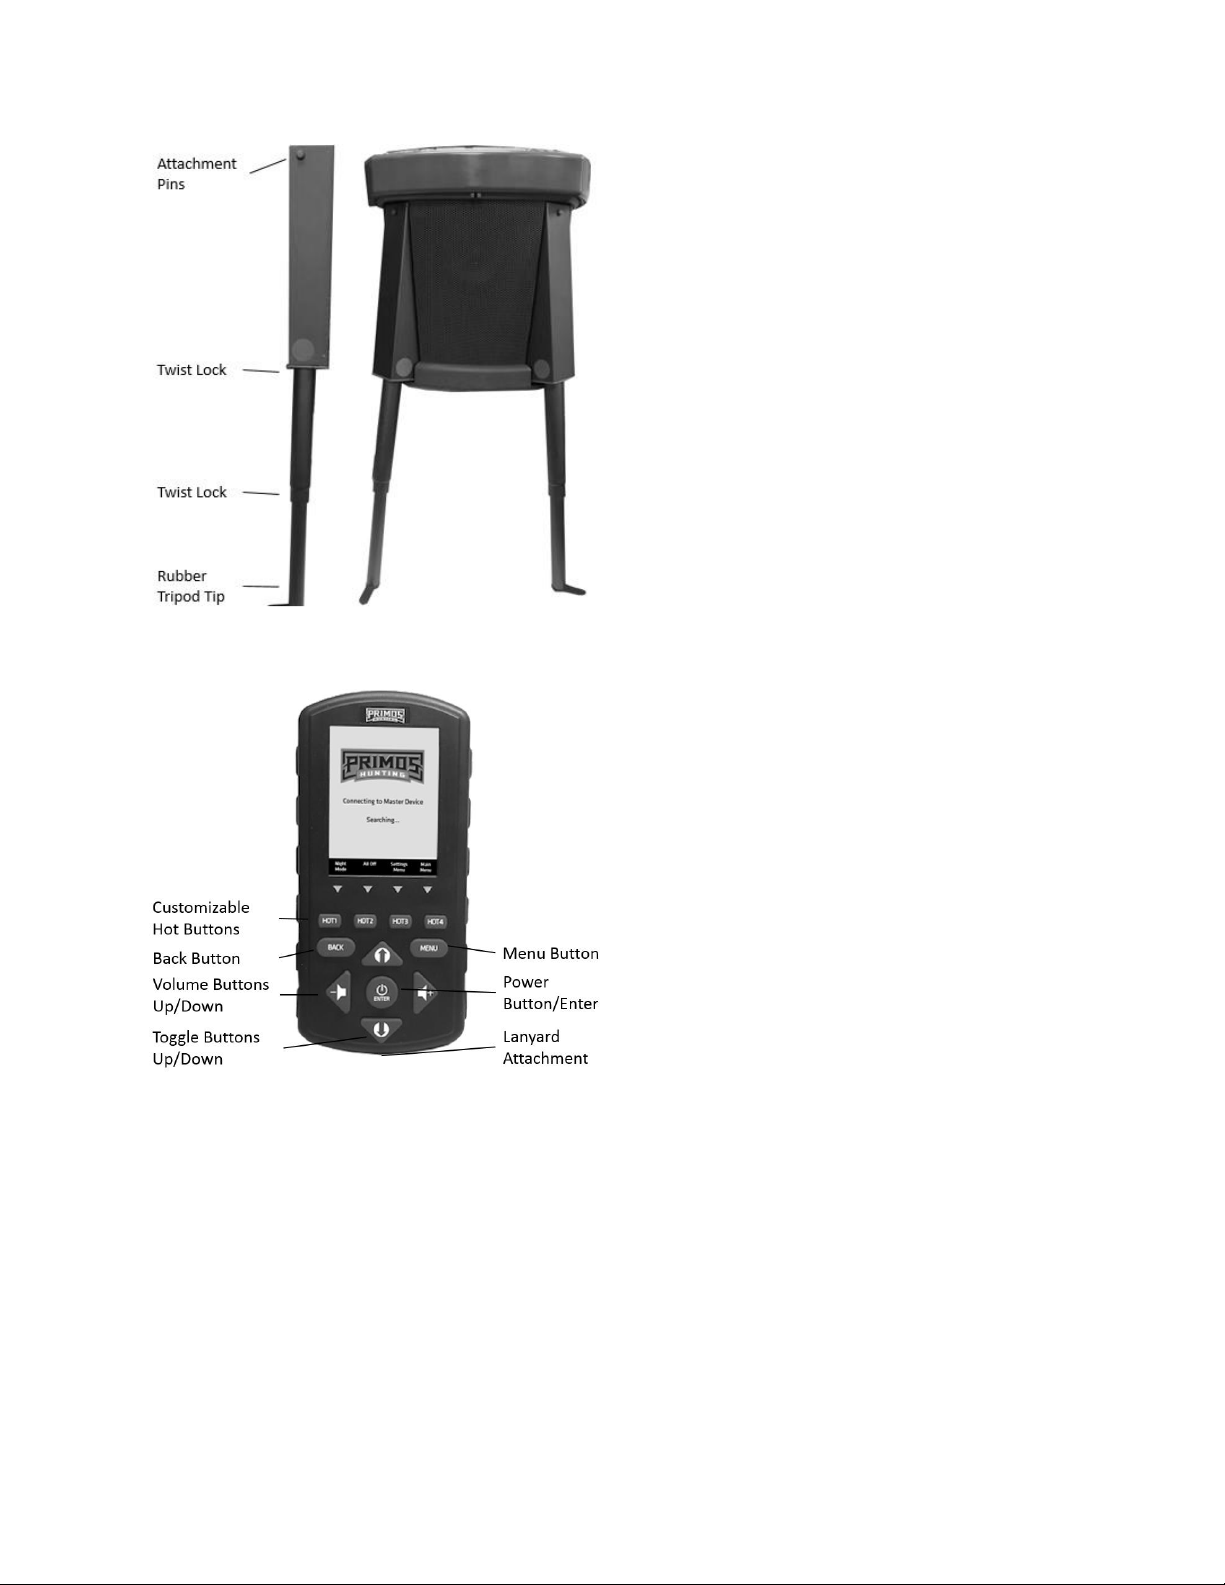
Remote Overview - Buttons
1. Customizable Hot Buttons 1 ⎯ 4
2. Back Button: Allows you to go back one previous screen
3. Volume Up and Down: Adjust the volume of the caller
4. Toggle Up and Down: Allows you to move with the menu structure up and down
5. Power Button/Enter: Press and hold for 3 second to power on/off the device, tap once in order
to enter
6. Menu Button: Brings you back to the beginning of the menu structure
Page 5
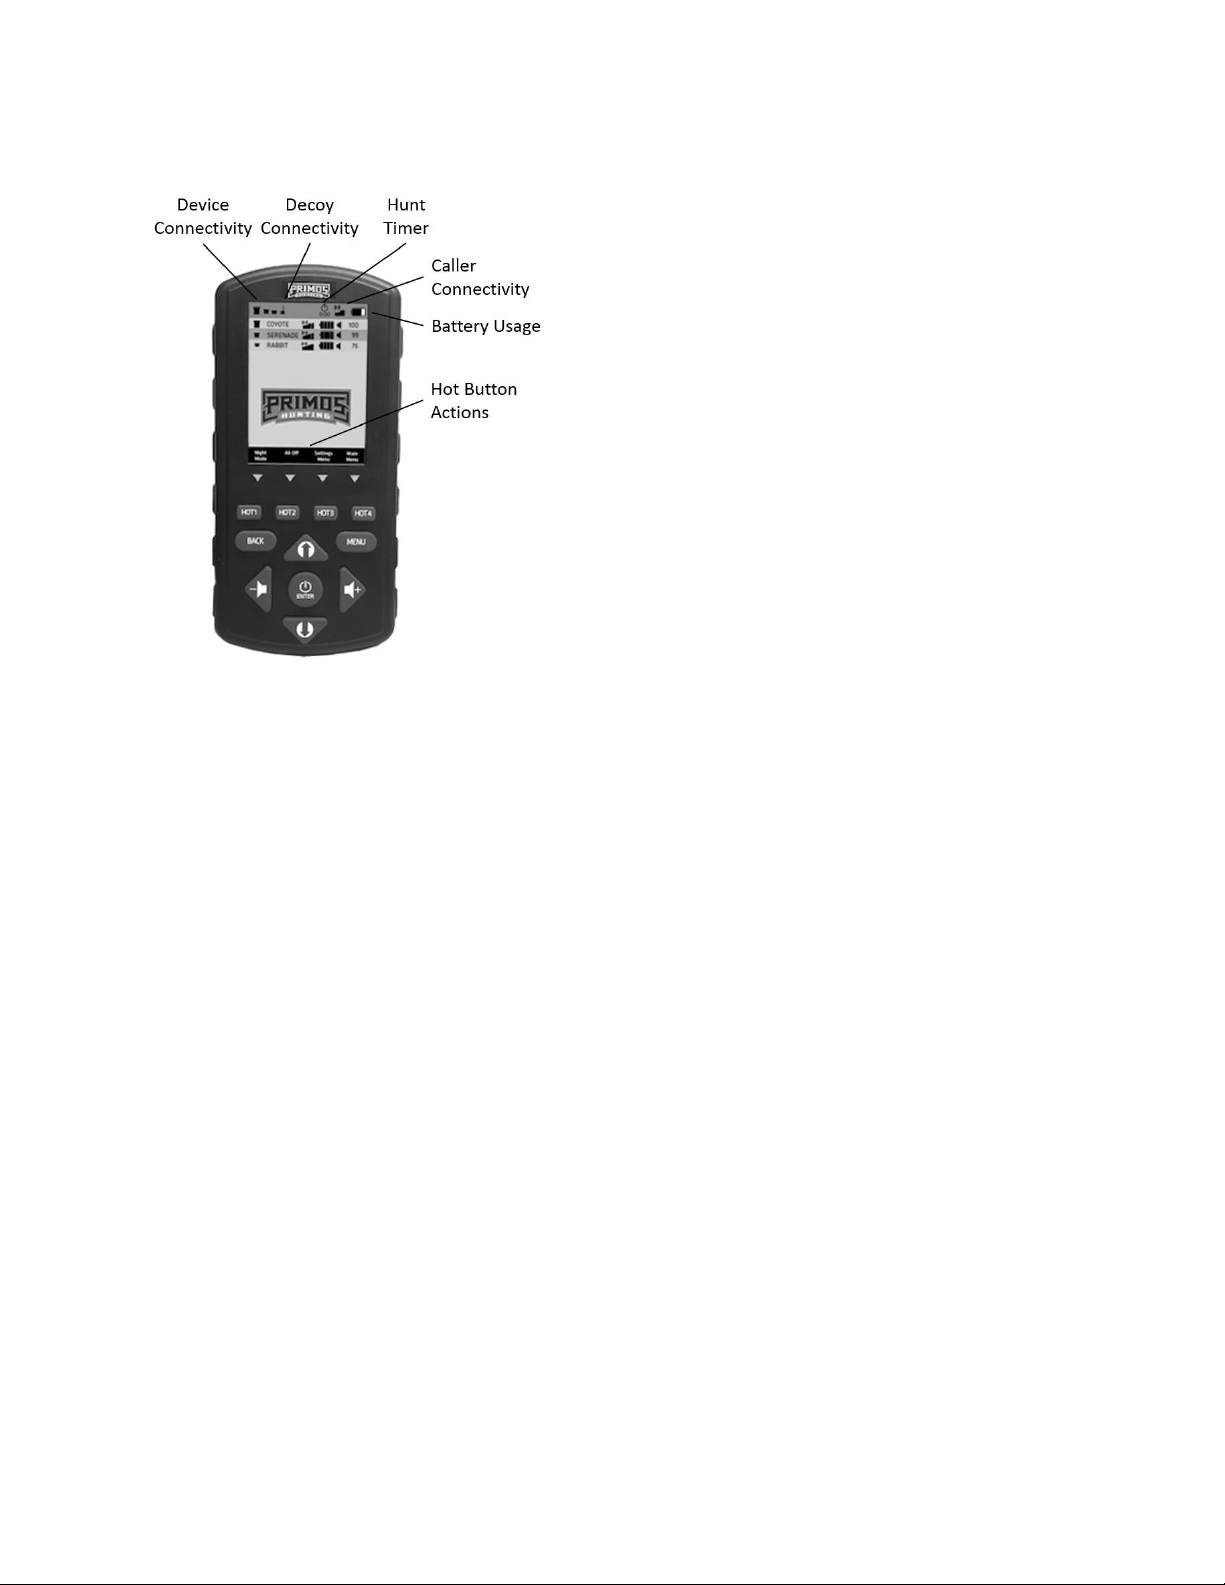
Remote Overview – On Screen
1. Device Connectivity: If icon is black it means connected
2. Decoy Connectivity: If black then device is connected to remote
3. Hunt Timer: Starts when the device is turned on, in order to stop or reset please refer to setting
menu
4. Caller Connectivity: Signal bar indicates the level of connection that the remote is receiving from
the electronic caller.
5. Battery gauge: This represents the battery on the remote control.
6. Hot Buttons: Customizable buttons to execute multiple actions at a single press
Page 6
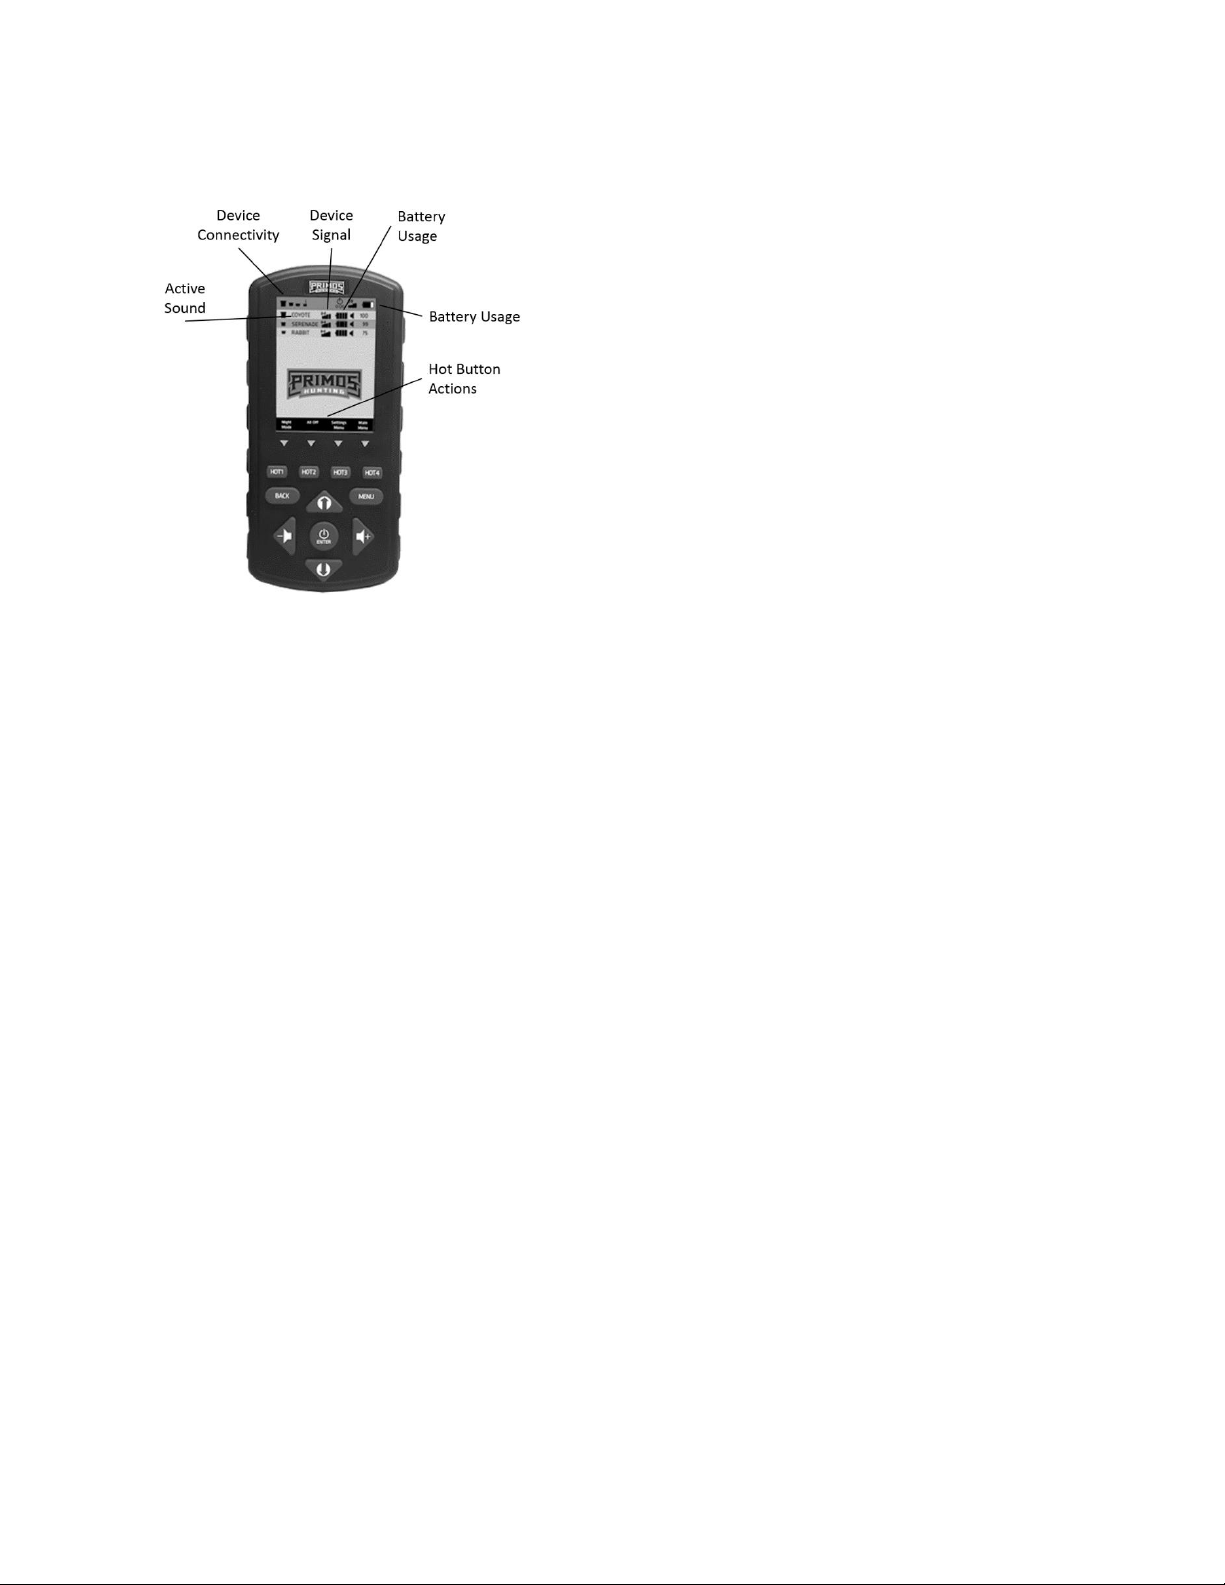
Remote Overview – On Screen
Device Connected: Depending on the devices are connected
to the device you will see the menu bar
Sound Name: This is the name of the current sound that is
being activated on the device.
Device Signal: This show the level of connectivity that the
device has to the remote control
Battery Life: This shows the battery life on the caller
connected to the remote
Volume Control: This shows the current volume control for
the specific speaker connected to the remote.
Page 7
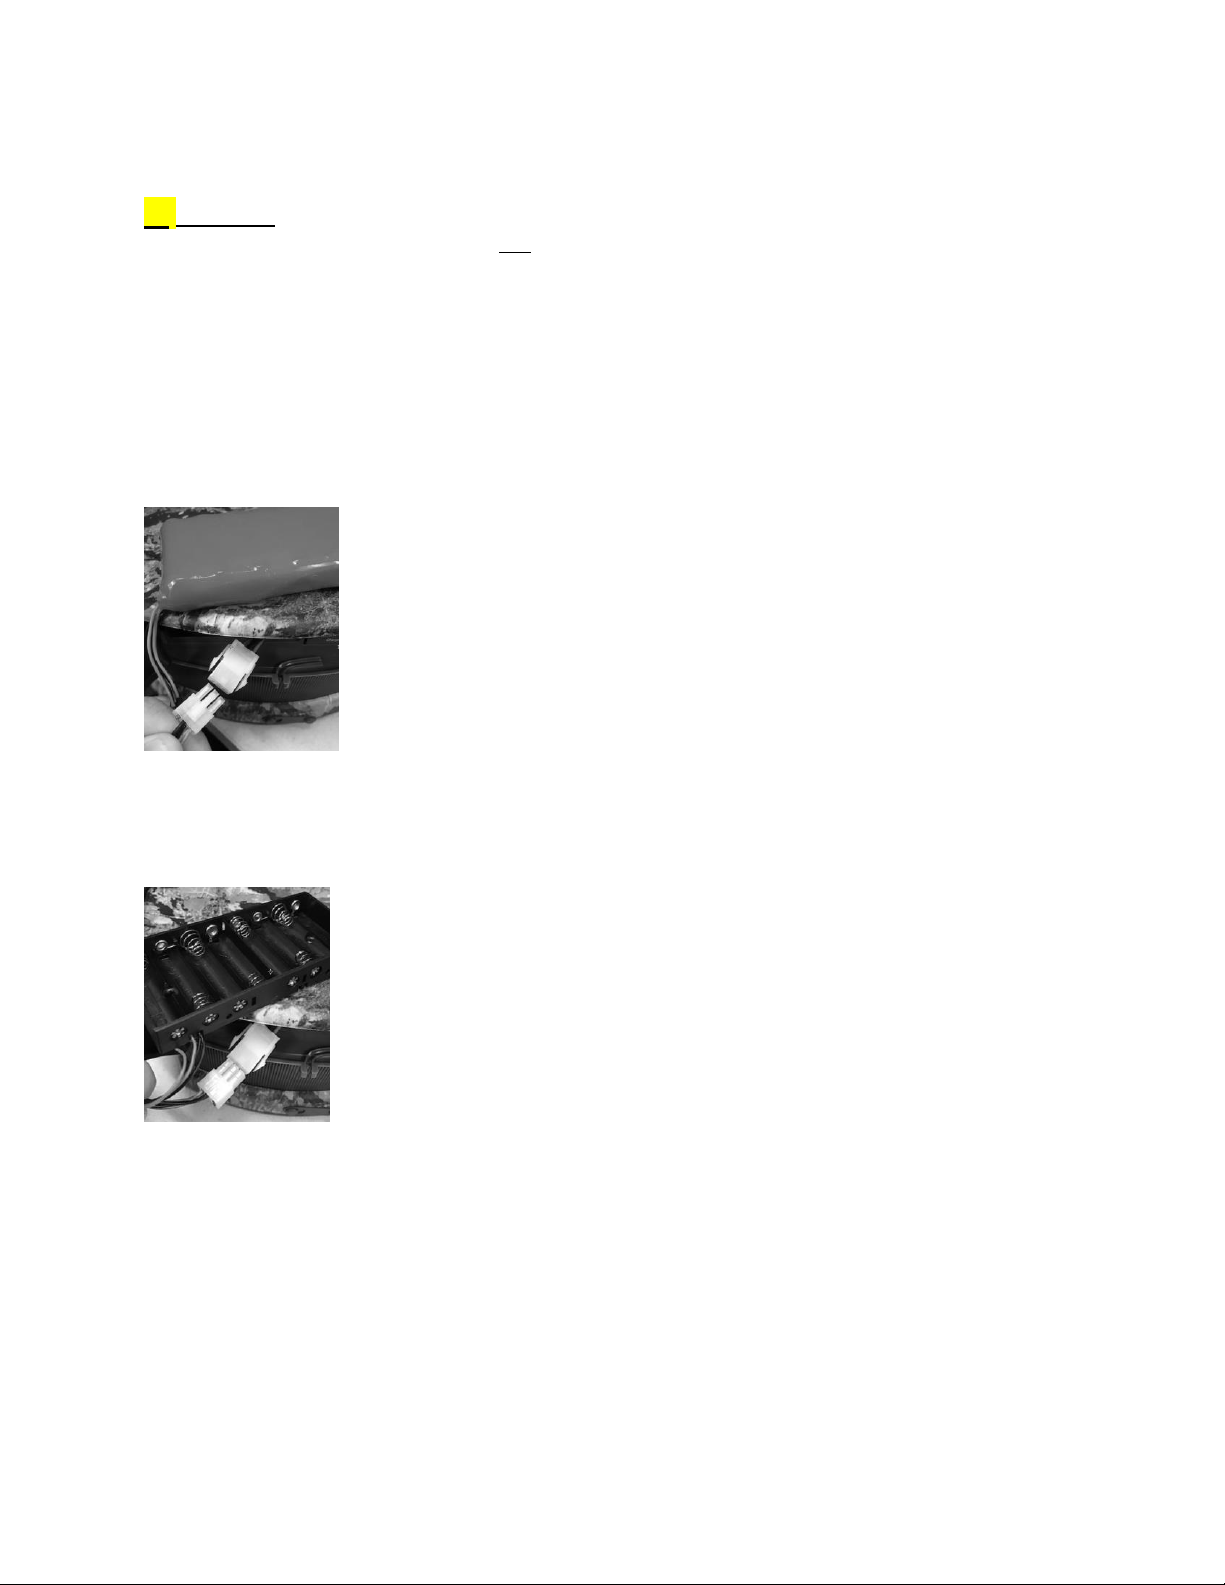
Installing Batteries
/!\ CAUTION: This product can use Lithium based batteries. Lithium batteries can overheat and cause
damage if physically abused. Never use any batteries that show signs of damage or physical wear. Never
use a mix of old and new batteries or batteries with different brand names.
There are two methods to power up your Primos Predator caller.
Option 1: With the included Lithium rechargeable battery (Top Dogg only) plug it into the internal
battery connector (See image below). Included with the Top Dogg is a wall charger that can be used to
charge the battery while connected.
Important Note: It take about 4 hours in order to fully charge the battery pack.
Option 2: With the included AA battery tray, insert 10 AA Lithium batteries and use the connector to
connect the tray to the device (See image below).
Page 8
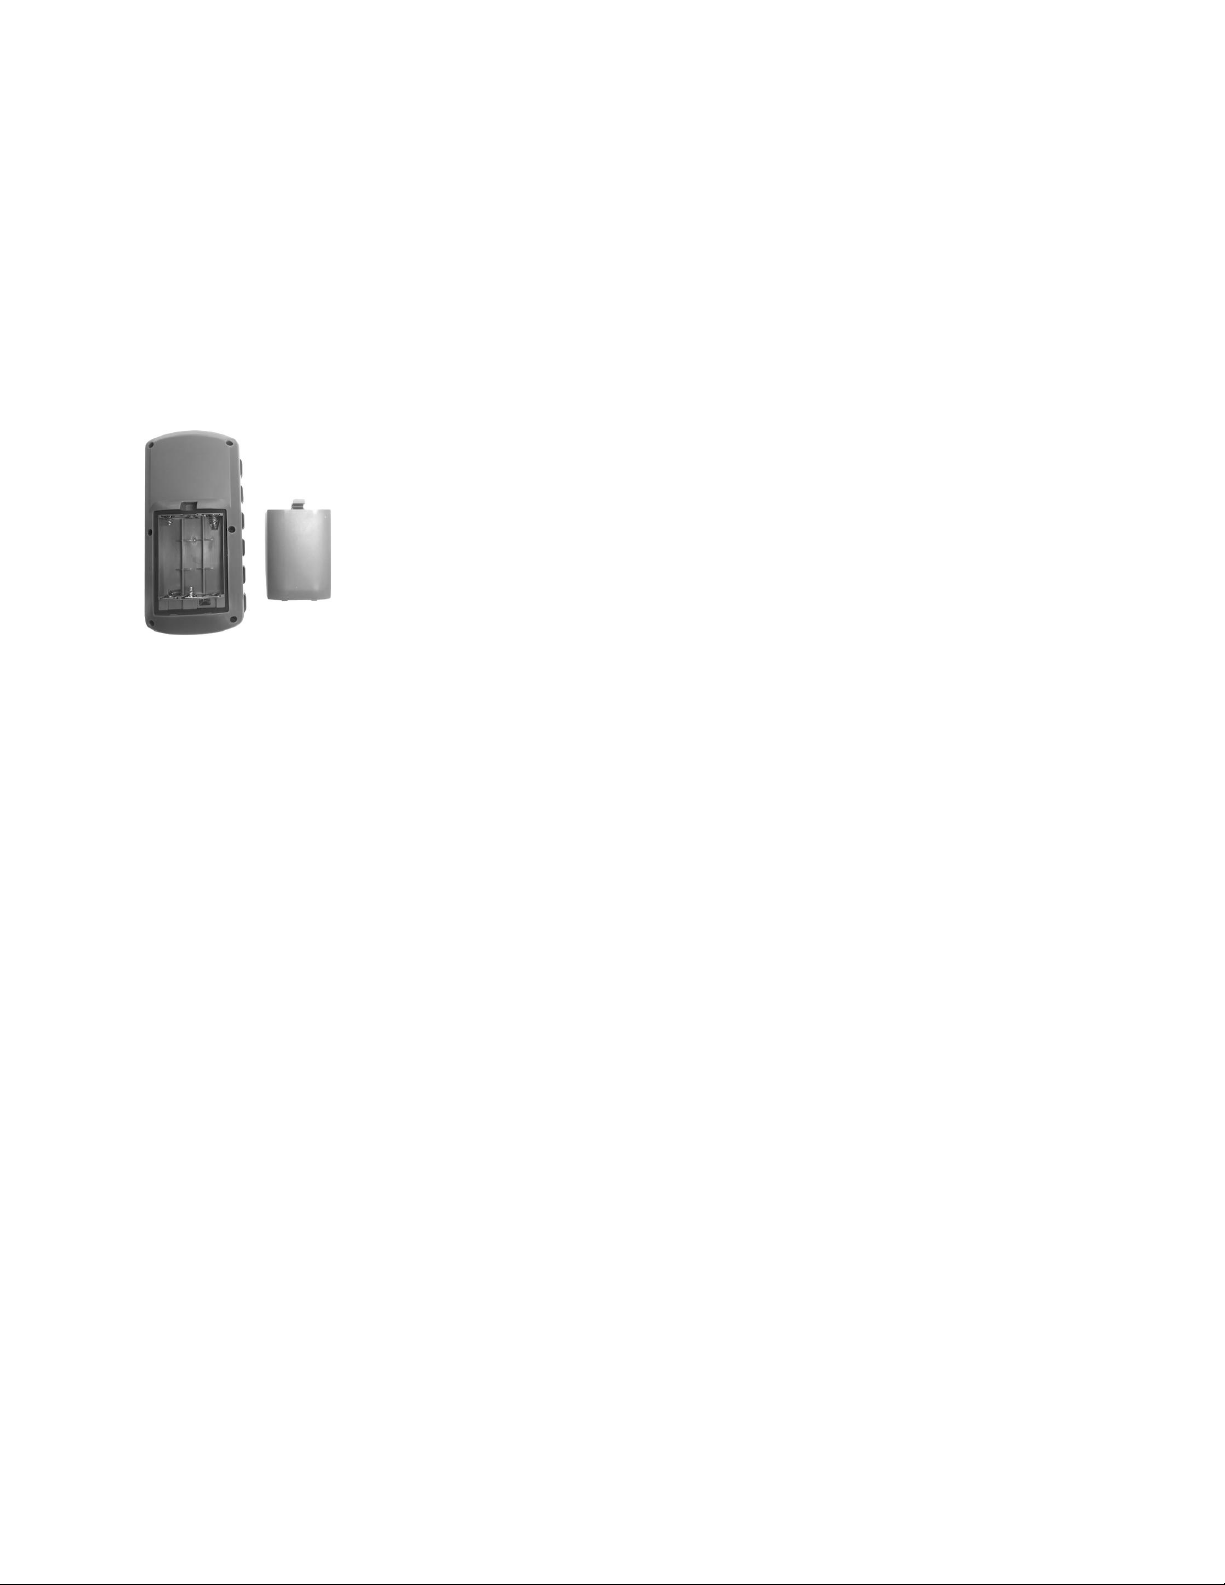
Remote Control: The Primos Dogg remote control operates on 3AA batteries. It is recommended that
you use high quality lithium batteries for the best performance.
Installing Batteries in the Primos Dogg Remote
• Access the battery compartment by removing the battery cover from the back of the remote.
The tab at the top of the cover will need to be depressed to take off the remote.
• Place the batteries into each battery cavity with the correct polarity as indicated.
• Install the battery compartment door back onto the remote.
Approximate Battery Life Expectation
Battery Pack AA Battery
Top Dogg 8 hours 6 hours
Horn Dogg 8 hours 6 hours
Triple Dogg 24+ hours 18 hours
Remote 24 hours
*All battery levels are measured at 100% volume playing continually, typical usage will be much longer.
Page 9
Remote Operation: Connecting Caller
First time connection: The first time you use your new Primos electronic predator call
you will need to install and power on the controller by pressing and holding the power
button for three seconds. Once the remote is powered on you will select go! In order
to add Speaker. You will then be directed to power on your speaker.
Once the remote finds the speaker within range you will select the speaker by hitting
Enter. You then have the opportunity to name this device for future identification.
EX: Top Dogg 09 – Name “TDogg” once you have named your device select enter, and
then submit. The device will automatically sync the remote in order to activate sounds.
Once the electronic caller is connected to the remote you will see the caller icon in the upper left corner.
Important Note: The Primos remote can pair up to three speakers to one remote simultaneously. This will
be indicated on the screen by each line.
In order to understand which device is connected, you will see an arrow on the left side of the screen
before the speaker icon.
Page 10

Remote Operation: Playing Sounds
If you have one speaker connected to remote the device will default to activate sounds
to the default device. If there are multiple speakers connected to the remote, you will
have to select which speaker you would like to interact with via the top tool bar. In
order to select this you can Press the up arrow on the remote in order to access the
top toolbar. In order to understand which device is connected, you will see an arrow
on the left side of the screen before the speaker icon.
The Primos Predator Call is preloaded with assorted animal sounds. In order to activate
these sound you will need to select the sounds from the designated categories.
From the Main menu select the Sounds Option
Next, you will select whether you would like to access All Sounds or Favorite Sounds.
Favorite Sounds feature allows users to place your favorite/most used sounds in a
category so that they are quickly accessible.
All Primos Calls are broken down into different categories to make it easier to find the
specific call you are looking for.
Once a sound is selected you will have the option to:
Play: This will activate the sound on the device.
Add Favorite: You can add this to Favorite
Page 11

Remote Operation: Adjusting Volume
One Speaker Connected:
If you have one caller paired to the remote you can adjust the
volume by selecting the Volume controls on the remote control.
The volume control adjust from 1-100. This number will be
displayed at the top of the device in the menu bar.
Multi Speakers Connected:
If you have multiple caller’s pairs to the remote you can adjust
the volume by using the scroll buttons up. Once you Press up it
will select the volume control of each of the calls. Depending on
which volume is highlighted will be the volume that can be
adjusted using the volume buttons.
IMPORTANT NOTE: If you tap the button the sounds will move in increments of 1 if you press and hold
the volume for more than 2 seconds will be adjust by 5 increments.
Page 12

Remote Operations: Expert Hunts
EXPERT HUNTS on this unit are a list of sound tracks that are combined in a specific sequence
with predetermined silent space. This allows the user to simply hit the PLAY button and the caller
does the rest, Some HUNTS might be 1 minute long, others may be 30 minutes, depending on the
type of hunting.
From the Main Menu Select Expert Hunts
Select Create New in order to create your personal Expert Hunt
Important Note: If you already have preloaded Expert Hunts you will be able to scroll
down to them and access them.
Once you select Create New, you will be able to use the on-screen Keyboard in order
to name the hunt.
Using the four directional arrows on the remote you can select the needed letters in
order to name your Expert Hunt
Once you have named your call, you can then select Submit.
Next you will select “Add” in order to find and select the specific sound you would like to play.
You also have the options to “Play” the expert Hunt before you save it, or “Save” in order to save it on
the device.
Page 13

Remote Operations: Favorite Sounds
In order to save a specific sound as a favorite you can select Favorite Sounds from the
Sounds Menu
Select the open Favorite Sound in order to select the sound that you want to create a
quick launch
Remote Operation: Settings
You can access the device setting by selecting Speaker Setting from the Main Menus
The Settings menu allows for the adjustment of Sound Settings, Wireless Settings,
Decoy Settings, Display Settings, Hot Key Settings, and Device information
Page 14

Sound Settings
Speaker Mode: This allows the customer to adjust the speaker mode from Hunt,
Dynamic Hunt and Music. Hunt Setting adjusts the equalizer in order to make the
animal sounds sound the loudest. Dynamic Hunt is equalized playback in order to
give the sound more true sound and deeper tones. Music setting adjust the
equalizer in order to make music sound correct.
Speaker Setting: This allows the customer to adjust the connectivity of the speaker.
SD Mode is accessing the micro SD card inserted into the device. BT Mode will activate the Bluetooth
connection in order to connect to the device with your mobile device.
Loop: Allow: the customer the ability to make the sounds continually play in a loop
Adjust Bass: Allows the ability to increase or decrease the Bass of the sound.
Adjust Treble: Allows the ability to increase or decrease the Treble of the sound.
Sync Settings
This will allow you to check the status of the device connection and or re sync the
device.
Decoy Settings
Pairing: Activates the wireless decoy capability setting.
Speed: You can control the ability of the fluctuation of the wireless decoy, 1 being the
slowest setting and 5 being the fastest.
Page 15

Display Settings
Display: This allows the customer the ability to change the display
from full color to a Night Mode. Night mode is designed to be used
in low light conditions.
Hunt Timer: The Hunt timer will start once the device is powered
on, you can activate this timer, or reset it from the settings.
Brightness: This allows you to increase or decrease the brightness
of the display for your surroundings.
Hot Keys Settings
The Hot Key Settings will allow you to customize the 4 additional buttons on the
remote.
After selecting the first button that you would like to customize you can select from a
predetermined group of actions.
Activate Sound: Allows you to activate a selected Sound/Expert Hunt on a speaker
connected to the device.
All Off: Allows you to cut the call off when needed with the press of a button.
Activate Decoy: Decoy activation button
Activate Night Mode: Allows you to quickly change the display setting to Night Mode.
Open Settings Menu: Allows you to quickly open the Settings Menu
Open Main Menu: Allows you to quickly open the Main Menu
Open Speaker Menu: Allows you to quickly open the Speaker Menu
Page 16

Device Information
Serial Number of the device that is connected to the remote
Version of software that the device is presently running and release date
My Doggs
This setting allows you to review what devices you have paired to your remote controler. You have the
ability to select and remove a speaker from this list.
Page 17

Sounds
On the Primos Dogg Net Series calls we come preloaded with proprietary .PRM files that will work on
your Primos electronic predator call. You also can playback any .MP3 files that you would like to add to
the device. In order to do this you can take the Micro SD card out fo the speaker and put it into your
computer. You have the ability to add, or move any sound on the SD card.
Important Note: You have to keep the initial Primos/Sounds folder structure in order for the remote to
read the sounds.
Preloaded Sounds
Triple Dogg
24 Deer Sounds
51 Predator Sounds
11 Silence
5 Expert Hunts
Horn Dogg
5 Crow Sounds
24 Deer Sounds
71 Predator Sounds
11 Silence
10 Expert Hunts
Top Dogg
5 Crow Sounds
24 Deer Sounds
4 Elk Sounds
9 Other Sounds
103 Predator Sounds
3 Turkey Sounds
2 Woods Sounds
11 Silence
15 Expert Hunts
Page 18

Mobile Application
The Primos Predator App is available for download to your iPhone® or Android® smartphone. Using the
Primos Hunt app via Bluetooth® connection with your Dogg Net Series electronic predator call will allow
you (or someone working with you) to view the speakers preloaded sounds, favorites, expert hunts,
settings on your mobile device’s screen. Also, you can access our sounds download page in order to
download and stream sounds while in the field.
To use the Primos Predator app with the Dogg Net Series:
1. Download the Primos Dogg Net app from the Apple® App Store (for iPhone) or Google Play® (for
Android phones).
2. Make sure Bluetooth is activated on your mobile device (iPhone: Settings>Bluetooth> on, or swipe up
from the Home button and touch the Bluetooth icon).
3. Launch the Primos Dogg Net App, and press the power button on the caller to turn the speaker on.
4. The Dogg Net App opens on the Main screen. On the Top Dogg and Horn Dogg you will have to
activate the BT mode within the setting of the device in order to connect. In order to do this you will
need to select Speaker Settings> Sound Settings> Speaker Type> BT. The Dogg will default into BT mode.
On the mobile device the speaker name defaults to the name of the device purchased, but you may
rename it by touching the name field twice.
5. Connect to your speaker by touching its name. This pairs the speaker and mobile device, and then
establishes a connection between them. Once the speaker connects to the App, the status will show
connected. The App will automatically reconnect to that speaker when it’s active, with no need to pair it
again.
If the App and Speaker Aren’t Connecting
Make sure the speaker is powered on (press power button). If the speaker has never paired with the app
it will not work. Navigate to the Bluetooth setting on your phone in order to connect to it. Once the App
and speaker are connected, they will automatically reconnect when the App is launched again and the
speaker is powered on.
Page 19

Page 20

Navigation Menu Actions
Connecting Device
First time you pair your mobile device with the speaker you will need to download and install the Primos
DoggNet Application on your Android or iOS device. In order to do this you can search for Primos in the
app store.
Step 1: Install and launch application. The application will require you to pair your speaker with the
phone.
Step 2: Power on the speaker within 1 meter of mobile device.
Step 3: Activate the Bluetooth function on the application. There will be a list of all Bluetooth devices,
please select the corresponding speaker from the list.
Step 4: Once you have selected the speaker that you would like to pair scroll to the bottom on the list
and select SYNC All.
Page 21

Pull Features
Volume Control – The top menu pulls down to reveal speaker volume adjustments.
This make it easy and accessible to change the volume levels of the speakers.
Device Settings – Within the device setting you will be able to adjust
Drop Down Menu
By selecting the menu option in the top right corner you will have access to navigation
around the application from any page.
Page 22

Activate Sounds – In order to activate sounds you can utilize the search bar or select
Sounds.
There is a list of sound categories that organize the sounds into an easy access menu.
Once you select the category you will get sub categories for more specific sounds.
After selecting a specific sound that you would like to activate you will be given the
option to play, add to favorites or add to an expert hunt.
Hot Buttons – There are three predetermined hot buttons that are easy to access.
All Off – turns off all sounds on speaker
Display – Quick launch button for the display settings
Home – Quick launch button to bring the customer back to the home device page
Page 23

Display Settings – This option gives the user the ability to customize the display. Adjust
the display mode; day mode will be full color, Night mode will inverse the colors to use in
low light situations.
Hunt Timer adjustments: Ability to turn the hunt timer on or off
Screen Brightness: Ability to increase or decrease the screen brightness for varying light
conditions.
Decoy Settings – This page allows the user to pair the decoy to the device.
Pairing – This activated the wireless decoy capability or Auxiliary Decoy setting.
IMPORANT NOTE: In order to use the Aux setting you will need to plug in the AUX jack
on the control panel.
Speed – You can control the ability of the fluctuation of the wireless decoy, 1 being the
slowest setting and 5 being the fastest setting.
Page 24

Expert Hunt
Expert Hunt – Each one of our devices has preloaded Expert Hunts provided by hunting professionals.
These tracks are fully developed with sounds and silence, so once activated you do not have to worry
about the next step.
Expert Hunts Creation – Allows customers to create their own Expert Hunt to save and utilize for a later
time. An expert Hunt is an organized list of sounds.
Favorite Sounds - Allows users to place your favorite sounds/ most used sound in a folder so that they
are quickly accessible.
Hunt Card – Allows the users to specific information from
the days hunt. It also gives them the ability to save the
data and share it with friends on social platforms. In
addition it will automatically save the calls that were used
and when they were activated, date/time, weather,
location and much more. If you do not want to share or
save the information you can deselect the option on the
right column.
Please Note: When you access the Hunt Card it will
automatically ask if you would like to attach an image to
the card.
Sounds – This will bring you to the sound downloading page on Primos.com
Page 25

Weather Conditions – This page will give you a snapshot of the current weather
conditions. Current Temperature, Weather conditions, moon phase.
Please Note: The first time that you access this feature you will need to allow access to
the cell phones weather data.
Page 26

Expert Hunts
Top Dogg
Horn Dogg
Triple Dogg
EXH00100
Buck Push Guard Doe
EXH00100
Buck Push Guard Doe
EXH00100
Buck Push Guard Doe
EXH00101
Short Buck Battle
EXH00101
Short Buck Battle
EXH00101
Short Buck Battle
EXH00102
Territorial Set
EXH00102
Territorial Set
EXH00102
Territorial Set
EXH00103
Mating Set
EXH00103
Mating Set
EXH00103
Mating Set
EXH00104
Denning Set
EXH00104
Denning Set
EXH00104
Denning Set
EXH00105
Coyote Jackrabbit
EXH00105
Coyote Jackrabbit
EXH00106
Coyote Fawn
EXH00106
Coyote Fawn
EXH00107
Coyote Cottontail
EXH00107
Coyote Cottontail
EXH00108
Cottontail Duel Set
EXH00108
Cottontail Duel Set
EXH00109
Coyote Fight Set
EXH00109
Coyote Fight Set
EXH00110
Matriarch Battle Set
EXH00111
Eastern Bobcat Set
EXH00112
Western Bobcat Set
EXH00113
Alfa Male Battle Set
Page 27

Purchase additional sounds
The Primos Dogg Net predator caller supports multiple audio formats. Primos branded sounds are in
a .PRI format that will only be played on Primos predator calls. You will also have the ability to
load .mp3 files onto the Primos Dogg Net series predator calls to be played.
Uploading New Sounds or Expert™ Hunts (PC & MAC compatible)
In order to add new sounds to your device you can perform two different procedures.
Utilizing a PC & Mac
Insert the micro SD card into your computer as a removable disc drive.
The computer will automatically open the file and show the contents of the card.
You can then place the new sounds that you would like onto the memory card. Navigating the folder
structure will allow you to categorize your sounds easier.
Utilizing the Mobile application
Within the mobile application you have the ability to access the mobile downloading page
(https://sounds.primos.com)
From this site you will have the ability to download new sounds
Once downloaded you can play these sounds directly form the phone on the speaker.
/!\ CAUTION: The speakers in the Top Dogg/Horn Dogg unit may reach or exceed volume levels of
110dB or more. Listening to high volume levels of this nature for extended periods have shown to
damage hearing. When using the device at high volumes, allow a minimum of 20 feet yourself and the
speaker. Failure to do so may result in serious hearing damage.
Page 28

CARING FOR YOUR CALLER
Your caller contains sensitive electronic components that can be permanently damaged if exposed to
excessive shock or vibration. To minimize the risk of damage to your unit, avoid dropping your unit and
operating it in high-shock and high-vibration environments.
- Do not store your unit where prolonged exposure to extreme temperatures can occur, because it can
cause permanent damage.
- Do not expose to prolonged exposure to moisture. This can cause this unit to malfunction.
- Never use a hard or sharp object to operate this unit or damage may result.
Cleaning the Unit:
The electronic dog callers are constructed of high-quality materials and do not require user maintenance
other than cleaning. Clean the outer casings (not the screen) using a cloth dampened with a mild detergent
solution, and then wipe dry.
Avoid chemical cleaners and solvents that can damage plastic components.
Cleaning Screen:
Clean the screen with a soft, clean, lint-free cloth. Use water or eyeglass cleaner, if needed. Apply the
liquid to the cloth, and then gently wipe the screen.
Caution: The caller is water resistant - not waterproof.
Page 29

FCC STATEMENT
Changes not expressly approved by Bushnell® could void the user’s authority to operate the equipment.
Note: This equipment has been tested and found to comply with the limits for a Class B digital device,
pursuant to Part 15 of the FCC Rules. These limits are designed to provide reasonable protection against
harmful interference in a residential installation. This equipment generates, uses and can radiate radio
frequency energy and, if not installed and used in accordance with the instructions, may cause harmful
interference to radio communications. However, there is no guarantee that interference will not occur in a
particular installation. If this equipment does cause harmful interference to radio or television reception,
which can be determined by turning the equipment off and on, the user is encouraged to try to correct the
interference by one or more of the following measures:
- Reorient or relocate the receiving antenna.
- Increase the separation between the equipment and receiver.
- Connect the equipment into an output on a circuit different from that to which the receiver is connected.
- Consult the dealer or an experienced radio/TV technician for help.
Shielded interface cable must be used with the equipment in order to comply with the limits for a
digital device pursuant to Subpart B of Part 15 of FCC Rules. Specifications and designs are
subject to change without any notice or obligation on the part of the manufacturer.
This device complies with Part 15 of the FCC Rules. Operation is subject to the following two conditions:
(1) this device may not cause harmful interference, and (2) this device must accept any interference
received, including interference that may cause undesired operation. Please note that changes or
modifications not expressly approved by the party responsible for compliance could void the user’s
authority to operate the equipment.
SOFTWARE LICENSE AGREEMENT
BY USING THE PRIMOS DOGG NET SERIES, YOU AGREE TO BE BOUND BY THE TERMS
AND CONDITIONS OF THE FOLLOWING SOFTWARE LICENSE AGREEMENT CAREFULLY.
Primos grants you a limited license to use the software embedded in this device (the “Software”) in binary
executable form in the normal operation of the product. Title, ownership rights, and intellectual property
rights in and to the software remain in Primos.
You acknowledge that the Software is the property of Primos and is protected under the United States of
America copyright laws and international copyright treaties. You further acknowledge that the structure,
organization, and code of the Software are valuable trade secrets of Primos. You agree not to decompile,
disassemble, modify, reverse assemble, reverse engineer, or reduce to human readable form the Software
or any part thereof or create any derivative works based on the software. You agree not to export or reexport the Software to any county in violation of the export control laws of the United States of America.
 Loading...