

Page 1
NIGHT VISION BINOCULARS
JUMELLES POUR VISION NOCTURNE
PRISMÁTICOS PARA VISIÓN NOCTURNA
NACHTSICHT-FERNGLAS
BINOCOLO PER VISIONE NOTTURNA
Model: 260401
02-14
Page 2

Page 3

ENGLISH 4
FRANÇAIS 12
ESPAÑOL 20
DEUTSCH 28
ITALIANO 36
2
Page 4

ENGLISH
SPECIFICATIONS
Magnification: 2.5 X
Objective Size: 40 mm
Vertical Resolution: 36 lines/mm
Viewing Range* 4–600 ft. / 1.2-183 m
Range of Built-In Infrared Illuminator Up to 90 yards
Field of View: 94 feet at 100 yards / 31 meters at 100 meters
Battery Type: AAA (2)
Operating Time: Up to 70 hours without IR /20 hours with IR illuminator on
Temperature Range: -22 to 104 º F / -30 to 40 º C
Eyepiece Adjustment: +/- 4 diopter
Length: 6.5 inches / 165 mm
Width: 6.3 inches / 160 mm
Height: 3.0 inches / 76 mm
Weight: 28.0 oz / 794 g
* Maximum distance at which a human figure can be recognized under ideal viewing conditions;
defined as clear conditions (no fog, dust, etc.) under the light of 1/4 moon.
4
Page 5

Congratulations on the purchase of your Bushnell Night Vision Product. Bushnell Night Vision products are comprised of high quality
image intensifier tubes and optics. Bushnell Night Vision products amplify existing light, allowing you to see in dark conditions too
dark for the naked eye.
HOW NIGHT VISION WORKS
Bushnell Night Vision products collect and amplify existing light through the objective lens, which is then focused on the image
intensifier. Inside the intensifier, a photocathode is “excited” by the light and converts the photon energy into electrons. These
electrons accelerate across an electrostatic field inside the intensifier and strike a phosphor screen (like a green monochrome TV
screen) which emits an image that you can see. It is the acceleration of electrons, which provides gain and enhances the image.
This is a Generation I (analog) night vision device.
Your Night Vision device is ideal for a variety of professional and recreational uses including the following:
• Wildlife Observation
• Astronomy
• Boating / Marine Use
• Police / Law Enforcement
• Search and Rescue
• Security
• Property Management
CAUTION: As with any analog night vision device based on light intensifier tube technology, DO NOT REMOVE THE LENS CAPS AND
OPERATE THE DEVICE IN BRIGHT LIGHT (DAYLIGHT). Turning on the device's power with the lens covers removed in brightly lit
environments (outdoors or indoors) can potentially damage your night vision unit, beyond repair if the light level is very high and/
or exposure time is extended. The objective lens caps have a pinhole opening to admit a small amount of light for testing purposes.
5
Page 6
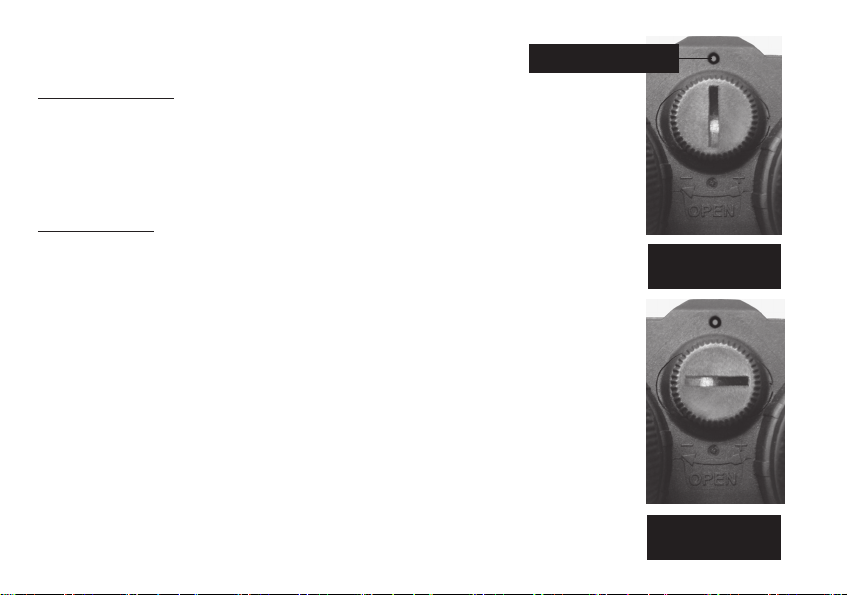
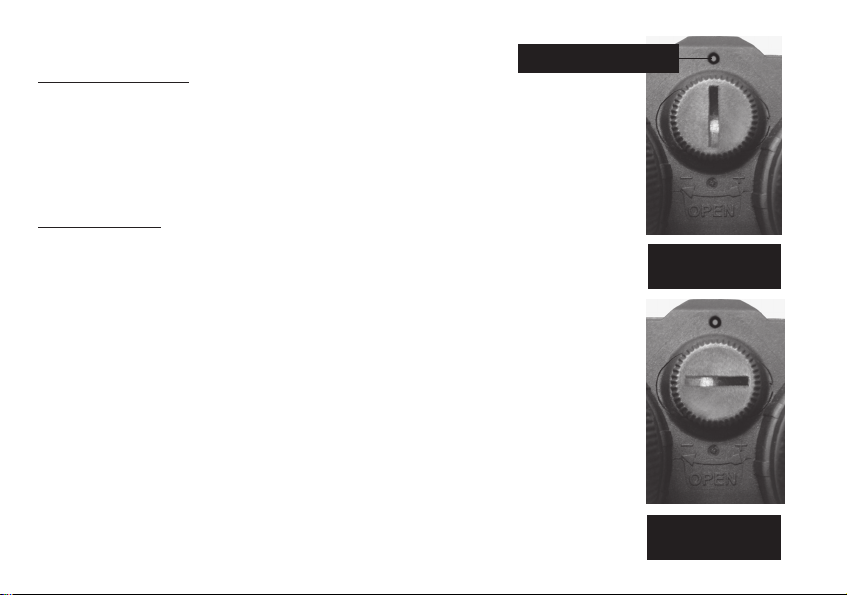
GETTING STARTED
Installing Batteries
This device operates on two AAA batteries (alkaline or lithium). To install, rotate
the battery cover in a clockwise direction, to the "open" position as shown in
the lower right photo. Insert the batteries into the battery compartment so that
the positive (+) and negative (-) terminals of the batteries facing you match the
markings above the OPEN arrow ("-" on left side, "+" on right side). Replace the
battery cover carefully, rotating it counter-clockwise back to the closed position.
Use and Testing
Make sure the batteries have been installed according to the instructions above.
If you wish to test your night vision device in a lighted area, be sure the
objective lens caps are covering both objective lenses prior to pressing the
“ON” button. The objective lens caps have a pinhole opening to admit a small
amount of light for testing purposes.
If testing or using the device in the dark, remove the objective lens caps and
activate the device by pushing the “ON” button. The power indicator LED above
the battery cover will light.
To focus, select an object at the approximate distance for the area that you
intend to view. Adjust each eyepiece diopter setting until the image appears the
sharpest for your eyesight. After your initial diopter setting, the front (objective)
lenses are now utilized for focusing: adjust the front lenses clockwise when you
need to focus on closer objects, counter clockwise for more distant objects. If
you are unable to focus on very close objects, the eyepieces may then be used
as well for fine adjustments only.
6
Power Indicator
Battery Cover
Closed Position
Battery Cover
Open Position
Page 7
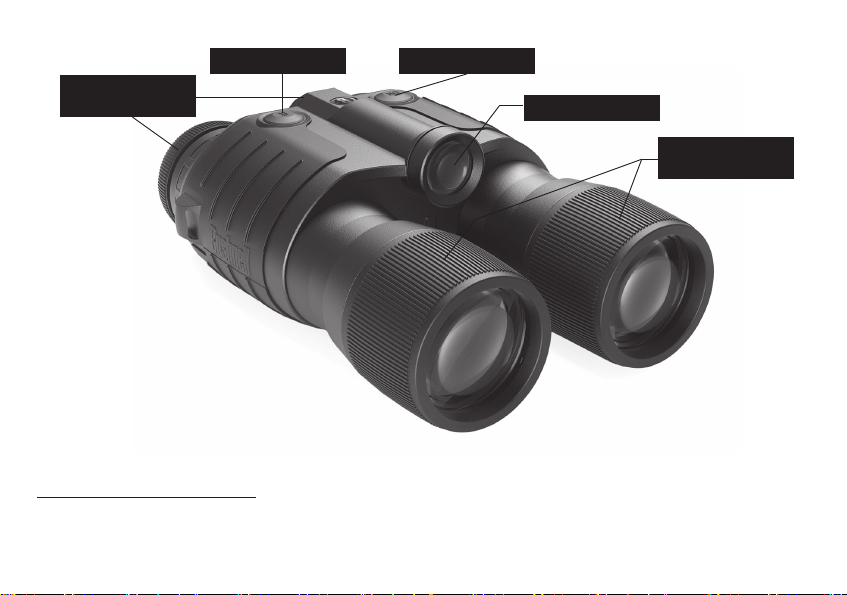
POWER BUTTONIR BUTTON
EYEPIECE
DIOPTER
IR ILLUMINATOR
OBJECTIVE LENS
(MAIN) FOCUS
Using the Infrared Illuminator
Your Night Vision device offers a Built-In Infrared Illuminator. This allows you to see in complete darkness where no ambient
light source, such as moonlight, is available. If the subject is to be viewed in a completely dark area, activate the infrared
illuminator by pressing the IR button. In brighter areas turn off the IR illuminator by pressing it again to maximise battery life.
7
Page 8

CAUTION: This device can be used in extreme cold weather. However, when the unit is brought back into a warm environment, you
must wait approximately 5 hours to allow it to adjust to the change in temperature before using the unit again. If this is not done,
damage could occur due to condensation that may have accumulated on the internal circuitry of the unit.
Spots In The Image
You may see spots in the image. These vary from device to device and are very small cosmetic blemishes inside the intensifier tubes.
These are normal for "Gen 1" analog technology Night Vision devices and are NOT a defect.
TROUBLESHOOTING
Device will not turn on.
Check that the batteries are installed properly. Replace the batteries with new ones. Check the battery contacts to ensure they are
clean and free of corrosion. If the power indicator LED is lit, make sure the objective covers are removed before viewing in dark
conditions.
Image is not focused.
Adjust the Eyepiece diopter rings for your vision. Use the Objective Lens focusing controls to adjust for subjects at different distances.
If still no improvement, clean the lenses; they may be foggy or dusty.
Visibility decreases or disappears.
Bright light sources such as headlights may cause visibility to degrade or disappear completely. Turn the Power OFF and turn
the binocular away from the light source. The unit will restore itself in 1 or 2 minutes. Conditions such as fog or extremely dark
environments will decrease visibility.
Image flashes.
The image may flash when used in a bright environment. It may also flash during the first few seconds of use in dark environments.
8
Page 9

CARE AND MAINTENANCE
Your Bushnell Night Vision device was designed to provide many years of reliable service.
To ensure that you get the most enjoyment out of your Night Vision device, always obey the following warning and precautions:
• Do not point this device toward any light source greater than 1 lux such as car headlights, for an extended period of time.
• This device utilizes an internal flash protection system which minimizes potential damage, but long-term exposure to bright lights
can damage the unit. Any such damage may void your warranty.
• This device was designed to be self-contained. Do not open the body of the device or otherwise attempt to service this device.
• Always store the device in a dry, well-ventilated room.
• Remove the batteries if the device is to be stored for longer than 2 months.
• Keep the device away from any heating and air conditioning vents or other heating devices, direct sunlight, and moisture.
• Avoid dropping or otherwise shocking the unit. Although designed for rugged outdoor use, this device incorporates a sophisticated
optical system, which could be damaged in extreme cases of misuse.
• The device is weather-resistant, not waterproof, and should never be submerged or subjected to a direct stream of water.
• Clean the optical lenses with professional lens cleaning supplies.
• Clean the exterior of the device with a soft clean cloth.
Class 1 LED product per IEC 60825-1/nov 1993, appendix EN 60825-1A11/oct1996
9
Page 10

Your Bushnell
®
product is warranted to be free of defects in materials and workmanship for one year after the date of
ONE YEAR LIMITED WARRANTY
purchase. In the event of a defect under this warranty, we will, at our option, repair or replace the product, provided that
you return the product postage prepaid. This warranty does not cover damages caused by misuse, improper handling,
installation, or maintenance provided by someone other than a Bushnell Authorized Service Department.
Any return made under this warranty must be accompanied by the items listed below:
1) A check/money order in the amount of $10.00 to cover the cost of postage and handling
2) Name and address for product return
3) An explanation of the defect
4) Proof of Date Purchased
5) Product should be well packed in a sturdy outside shipping carton, to prevent damage in transit, with return postage
prepaid to the address listed below:
IN U.S.A. Send To: IN CANADA Send To:
Bushnell Outdoor Products Bushnell Outdoor Products
Attn.: Repairs Attn.: Repairs
9200 Cody 140 Great Gulf Drive, Unit # B
Overland Park, Kansas 66214 Vaughan, Ontario L4K 5W5
For products purchased outside the United States or Canada please contact your local dealer for applicable warranty
information. In Europe you may also contact Bushnell at: Bushnell Germany GmbH
European Service Centre
Mathias-Brüggen-Str. 80
D-50827 Köln
GERMANY
Tél: +49 221 995568-0
Fax: +49 221 995568-20
This warranty gives you specific legal rights.
You may have other rights which vary from country to country.
©2014 Bushnell Outdoor Products
10
Page 11
FCC NOTE
This equipment has been tested and found to comply with the limits for a Class B digital device, pursuant to Part 15 of the FCC Rules. These
limits are designed to provide reasonable protection against harmful interference in a residential installation. This equipment generates, uses
and can radiate radio frequency energy and, if not installed and used in accordance with the instructions, may cause harmful interference to
radio communications. However, there is no guarantee that interference will not occur in a particular installation. If this equipment does cause
harmful interference to radio or television reception, which can be determined by turning the equipment o and on, the user is encouraged to
try to correct the interference by one or more of the following measures:
• Reorient or relocate the receiving antenna.
• Increase the separation between the equipment and receiver.
• Connect the equipment into an outlet on a circuit dierent from that to which the receiver is connected.
• Consult the dealer or an experienced radio/TV technician for help.
Shielded interface cable must be used with the equipment in order to comply with the limits for a digital device pursuant to Subpart B of Part
15 of FCC Rules.
Specications and designs are subject to change without any notice or obligation on the part of the manufacturer.
Disposal of Electric and Electronic Equipment
(Applicable in the EU and other European countries with separate collection systems)
This equipment contains electric and/or electronic parts and must therefore not be disposed of as normal household
waste. Instead, it should be disposed at the respective collection points for recycling provided by the communities. For
you, this is free of charge.
If the equipment contains exchangeable (rechargeable) batteries, these too must be removed before and, if necessary, in
turn be disposed of according to the relevant regulations (see also the respective comments in this unit’s instructions).
Further information about the subject is available at your community administration, your local waste collection
company, or in the store where you purchased this equipment.
11
Page 12

FraNçaIS
SPÉCIFICATIONS
Grossissement : 2,5 X
Taille d'objectif : 40 mm
Résolution verticale : 36 lignes/mm
Portée d'observation* 1,2-183 m/4-600 pi
Portée de l'illuminateur infrarouge intégré Jusqu'à 82,3 m (90 yards)
Champ de vision : 31 mètres à 100 mètres/94 pieds à 100 yards
Type de pile : AAA (2)
Durée de fonctionnement : Jusqu'à 70 heures sans IR/20 heures avec illuminateur IR
Plage de température : -30 à 40 ºC/-22 à 104 ºF
Réglage de l'oculaire : dioptrique +/- 4
Longueur : 165 mm/6,5 po
Largeur : 160 mm/6,3 po
Hauteur : 76 mm/3 po
Poids : 794 g/28 oz
* Distance maximum à laquelle une silhouette humaine peut être reconnue dans des conditions d'observation idéales, c'est-à-dire dégagées (sans
brouillard ni poussière ou autre), sous un quart de lune.
12
Page 13

Merci d'avoir acheté ce produit de vision nocturne Bushnell. Les produits de vision nocturne Bushnell sont constitués d'optiques et
de tubes intensificateurs qui fournissent des images de grande qualité. Les produits de vision nocturne Bushnell amplifient la lumière
existante et vous permettent ainsi de voir dans des conditions trop obscures pour une vision à l'œil nu.
COMMENT FONCTIONNE LA VISION NOCTURNE ?
Les produits de vision nocturne captent et amplifient la lumière existante par le biais de la lentille d'un objectif. La lumière est ensuite
dirigée vers l'intensificateur d'image. À l'intérieur de l'intensificateur, une photocathode est « excitée » par la lumière et convertit
l'énergie des photons en électrons. Ces électrons sont accélérés dans un champ électrostatique à l'intérieur de l'intensificateur
et viennent frapper un écran luminescent (semblable à un écran de télévision monochrome vert) qui produit une image visible.
C'est l'accélération des électrons qui assure l'amplification et l'amélioration de l'image. Il s'agit d'un dispositif de vision nocturne
(analogique) de génération I.
Votre dispositif de vision nocturne est idéal pour différents usages professionnels et récréatifs, y compris ce qui suit :
• Observation de la faune
• Astronomie
• Utilisation maritime/en bateau
• Police/application de la loi
• Recherches et sauvetage
• Sécurité
• Gestion de propriété
ATTENTION: comme pour tous les dispositifs de vision nocturne analogiques dotés de la technologie de tube intensificateur de lumière,
N'UTILISEZ PAS CE DISPOSITIF EN PLEINE LUMIÈRE (LUMIÈRE DU JOUR) SANS LES CAPUCHONS DE LENTILLE. L'allumage
de l'appareil avec les capuchons de lentille enlevés dans des environnements bien éclairés (extérieurs ou intérieurs) risque
d'endommager votre dispositif de vision nocturne, sans possibilité de réparation si le niveau de luminosité est très élevé et/ou si le
temps d'exposition est long. Les capuchons de lentille des objectifs sont dotés d'une très petite ouverture qui laisse passer une petite
quantité de lumière de manière à pouvoir effectuer des tests.
13
Page 14
POUR COMMENCER
Témoin d'alimentation
Installation des piles
Ce dispositif fonctionne avec deux piles AAA (alcaline ou lithium). Pour les placer, tournez le
couvercle de compartiment des piles dans le sens horaire, vers la position « ouverte » comme
illustré dans la photo en bas à droite. Placez les piles dans le compartiment des piles de
sorte que les bornes positives (+) et négatives (-) des piles face à vous correspondent aux
indications au-dessus de la flèche OPEN (ouverture) (« - » à gauche, « + » à droite). Remettez
soigneusement le couvercle de compartiment des piles, tournez-le dans le sens antihoraire pour
le replacer en position fermée.
Utilisation et test
Vérifiez que les piles sont installées conformément aux instructions ci-dessus.
Si vous souhaitez tester votre dispositif de vision nocturne dans une zone éclairée, assurez-
vous que les capuchons de lentille des objectifs couvrent les lentilles des deux objectifs avant
d'appuyer sur le bouton « ON » (marche). Les capuchons de lentille des objectifs sont dotés
d'une très petite ouverture qui laisse passer une petite quantité de lumière de manière à pouvoir
effectuer des tests.
Pour tester ou utiliser l'instrument dans l'obscurité, retirez les capuchons de lentille des objectifs
et activez l'appareil en appuyant sur le bouton « ON » (marche). La DEL témoin d'alimentation
au-dessus du couvercle de compartiment des piles s'allume (photo en haut à droite).
Pour faire la mise au point, choisissez un objet à une distance correspondant approximativement
à celle de la zone que vous avez l'intention de regarder. Ajustez le réglage dioptrique de
chaque oculaire jusqu'à ce que l'image soit la plus nette possible pour votre vue. Après le
réglage dioptrique initial, utilisez les lentilles (des objectifs) à l'avant pour la mise au point :
ajustez les lentilles à l'avant dans le sens horaire lorsque vous devez faire la mise au point sur
des objets plus près, dans le sens antihoraire pour les objets plus distants. Si vous n'arrivez
pas à faire la mise au point sur des objets très proches, les oculaires peuvent alors être utilisés
pour des ajustements précis uniquement.
14
Position fermée du
couvercle de compar-
timent des piles
Position ouverte du
couvercle de compar-
timent des piles
Page 15

Bouton IR (infrarouge)
Bouton d'alimentation
Réglage dioptrique
des oculaires
Illuminateur infrarouge
Mise au point
des lentilles des
objectifs
Utilisation de l'illuminateur infrarouge
Votre dispositif de vision nocturne est équipé d'un illuminateur infrarouge intégré. Celui-ci vous permet de voir même dans des
conditions d'obscurité totale, lorsqu'il n'existe aucune source de lumière ambiante, telle qu'un clair de lune. Si le sujet que
vous souhaitez voir se trouve dans une zone d'obscurité complète, activez l'illuminateur infrarouge en appuyant sur le bouton
IR. Pour les zones plus éclairées, éteignez l'illuminateur IR afin de rallonger la durée d'autonomie des piles.
15
Page 16

ATTENTION : il est possible d'utiliser cet appareil par temps très froid. Néanmoins, lorsque vous ramenez l'appareil dans
un environnement chaud, vous devez attendre environ 5 heures, afin qu'il puisse s'adapter au changement de température,
avant de l'utiliser à nouveau. Si vous ne le faites pas, l'appareil risque d'être endommagé en raison de la condensation qui
a pu s'accumuler dans ses circuits internes.
Taches sur l'image
Des taches peuvent apparaître sur l'image. Ce phénomène varie en fonction des dispositifs et est dû à de très petites imperfections
superficielles à l'intérieur des tubes intensificateurs.
Il est normal pour les dispositifs de vision nocturne de génération 1 avec une technologie analogique et ne constitue PAS un défaut.
GUIDE DE DÉPANNAGE
Le dispositif ne s'allume pas.
Vérifiez l'installation des piles. Changez les piles. Vérifiez que les contacts des piles sont propres et exempts de corrosion. Si la DEL
témoin d'alimentation est allumée, assurez-vous que les capuchons des objectifs sont retirés avant de regarder dans des conditions
d'obscurité.
L'image n'est pas nette.
Ajustez les bagues de réglage dioptrique des oculaires pour adapter l'appareil à votre vision. Utilisez les commandes de mise au
point des lentilles des objectifs pour adapter l'instrument aux sujets à différentes distances. En l'absence d'amélioration, nettoyez les
lentilles ; elles sont peut-être couvertes de buée ou de poussière.
La visibilité diminue ou disparaît.
Des sources de lumière intense telles que des phares peuvent diminuer ou bloquer complètement la visibilité. Éteignez l'appareil
et éloignez les jumelles de la source de lumière. L'appareil se réinitialise de lui-même en 1 à 2 minutes. Certaines conditions telles
que le brouillard ou une obscurité profonde diminuent la visibilité.
L'image clignote.
Il se peut que l'image clignote en cas d'utilisation dans un environnement très lumineux. Il se peut qu'elle clignote également durant
les premières secondes d'utilisation dans un environnement sombre.
16
Page 17

ENTRETIEN ET MAINTENANCE
Votre dispositif de vision nocturne Bushnell a été conçu pour fonctionner de manière fiable pendant de nombreuses années.
Pour être sûr d'en profiter au maximum, suivez toujours les mises en garde et précautions suivantes :
• Ne dirigez pas cet appareil vers une source lumineuse d'une intensité supérieure à 1 lux, telle que des phares d'automobile, sur
une période prolongée.
• Cet appareil est doté d'un système de protection interne contre la lumière éclair qui réduit les risques de dommages. Toutefois, une
exposition prolongée à une lumière vive peut endommager l'appareil. De tels dommages peuvent annuler votre garantie.
• Cet appareil a été conçu pour être autonome. N'ouvrez pas le corps de l'appareil et n'essayez pas de réparer cet appareil.
• Rangez toujours le dispositif dans une pièce bien ventilée et sèche.
• Enlevez les piles si l'appareil doit rester inutilisé pendant plus de 2 mois.
• Tenez l'appareil éloigné des bouches de chauffage et de climatisation ou de tout autre dispositif de chauffage, de la lumière directe
du soleil et de l'humidité.
• Évitez de laisser tomber l'appareil ou de le soumettre à des chocs. Bien qu'il soit conçu pour une utilisation dans des conditions
extérieures difficiles, cet appareil est doté d'un système optique sophistiqué qui peut être endommagé dans des cas extrêmes
d'usage impropre.
• Ce dispositif est résistant aux intempéries, mais n'est pas étanche, à l'eau. Il ne doit jamais être plongé dans de l'eau ou recevoir
un jet d'eau direct.
• Nettoyez les lentilles optiques avec des produits professionnels de nettoyage de lentille.
• Nettoyez l'extérieur de l'appareil avec un chiffon doux et propre.
Class 1 LED product per IEC 60825-1/nov 1993, appendix EN 60825-1A11/oct1996
17
Page 18

GARANTIE LIMITÉE de UN ANNÉE
Votre produit Bushnell® est garanti exempt de défauts de matériaux et de fabrication pendant un année après la date
d’achat. Au cas où un défaut apparaîtrait sous cette garantie, nous nous réservons l’option de réparer ou de remplacer le
produit, à condition de nous le renvoyer en port payé. La présente garantie ne couvre pas les dommages causés par une
utilisation, une manipulation, une installation incorrecte(s) ou un entretien incorrect ou fourni par quelqu’un d’autre qu’un
centre de réparation agréé par Bushnell.
Tout retour effectué dans le cadre de la présente garantie doit être accompagné des articles indiqués ci-dessous :
1) Un chèque ou mandat d’une somme de 10,00 $ US pour couvrir les frais d’envoi et de manutention
2) Le nom et l’adresse pour le retour du produit
3) Une description du défaut constaté
4) La preuve de la date d’achat
5) Le produit doit être emballé soigneusement, dans un carton d’expédition solide, pour éviter qu’il ne
soit endommagé durant le transport ; envoyez-le en port payé, à l’adresse indiquée ci-dessous :
IAux États-Unis, envoyez à Au CANADA, envoyez à:
Bushnell Outdoor Products Bushnell Outdoor Products
Attn.: Repairs Attn.: Repairs
9200 Cody 140 Great Gulf Drive, Unit # B
Overland Park, Kansas 66214 Vaughan, Ontario L4K 5W5
Pour les produits achetés en dehors des États-Unis et du Canada, veuillez contacter votre distributeur local pour tous
renseignements concernant la garantie. En Europe, vous pouvez aussi contacter Bushnell au:
Bushnell Germany GmbH
European Service Centre
Mathias-Brüggen-Str. 80
D-50827 Köln
GERMANY
Tél: +49 221 995568-0
Fax: +49 221 995568-20
18
La présente garantie vous donne des droits légaux spécifiques.
Vous pouvez avoir d’autres droits qui varient selon les pays.
©2014 Bushnell Outdoor Products
Page 19

Traitement des déchets d’équipements électriques et électroniques
(En vigueur dans l’Union européenne et autres pays européens ayant des systèmes de collecte des déchets séparés)
Cet équipement contient des composants électriques et/ou électroniques et par conséquent ne doit pas être éliminé en
fin de vie avec les autres déchets ménagers. Vous devez au contraire vous débarasser de ce produit afin qu’il soit recyclé
aux points de collecte respectifs fournis par les communautés locales. Pour vous, ceci est sans frais.
Si l’équipement contient des piles amovibles (rechargeables), celles-ci doivent également être retirées de l’équipement
et, si nécessaire, être éliminées à leur tour conformément aux règlements en vigueur (voir également les commentaires
respectifs dans la notice d’utilisation de ce produit).
De plus amples renseignements à ce sujet sont disponibles auprès de votre mairie, votre compagnie de ramassage
d’ordures locale, ou dans le magasin où vous avez acheté cet équipement.
19
Page 20

ESpañoL
ESPECIFICACIONES
Aumento: 2,5 X
Tamaño del objetivo: 40 mm
Resolución vertical: 36 líneas/mm
Alcance de visión* 4-600 pies/1,2-183 m
Alcance del iluminador por infrarrojos integrado Hasta 90 yardas (82,3 m)
Campo de visión: De 94 pies a 100 yardas/de 31 metros a 100 metros
Tipo de pila: AAA (2)
Tiempo de funcionamiento: Hasta 70 horas sin IR/20 horas con iluminador IR
Rango de temperatura De -22 a 104 º F/de -30 a 40 º C
Ajuste del ocular: +/- 4 dioptría
Longitud: 6,5 in/165 mm
Anchura 6,3 pulgadas/160 mm
Altura: 3,0 pulgadas/76 mm
Peso: 28,0 oz/794 g
* Distancia máxima a la cual se puede reconocer una figura humana en condiciones de visibilidad ideales; definidas como condiciones
transparentes (sin neblina, polvo, etc.) bajo luz de luna en cuarto menguante.
20
Page 21

Enhorabuena por la compra de su producto de visión nocturna de Bushnell. Los productos de visión nocturna de Bushnell están
formados por tubos y lentes intensificadores de imagen de alta calidad. Los productos de visión nocturna de Bushnell amplifican
la luz, lo que le permite ver en condiciones con muy poca luz, demasiado oscuras para el ojo humano.
CÓMO FUNCIONA LA VISIÓN NOCTURNA
Los productos de visión nocturna de Bushnell recopilan y amplifican la luz existente a través de lentes del objetivo y la enfocan en
el intensificador de la imagen. Dentro del intensificador, la luz "activa" unfotocátodo y convierte la energía de fotones en electrones.
Estos electrones se aceleran a través de un campo electrostático dentro del intensificador y golpean contra una trama de fósforo
(como una pantalla de televisión monocromática verde) que emite una imagen que puede ver. Es la aceleración de los electrones
la que proporciona beneficios y mejora la imagen. Este es un dispositivo de visión nocturna de primera generación (analógico).
Su dispositivo de visión nocturna es ideal para una serie de usos profesionales y recreativos que incluyen lo siguiente:
• Observación de la vida silvestre
• Astronomía
• Navegación/Uso marino
• Policía/Aplicación de la ley
• Servicios de búsqueda y rescate
• Seguridad
• Gestión de la propiedad
PRECAUCIÓN: Al igual que con cualquier otro dispositivo de visión nocturna basado en la tecnología de tubo intensificador de luz, NO
UTILICE EL DISPOSITIVO CON LUZ BRILLANTE (LUZ DE DÍA) CON LAS TAPAS DE LAS LENTES QUITADAS. Encender el dispositivo
con las tapas de las lentes quitadas en entornos con una iluminación brillante (exterior o interior) puede dañar la unidad de visión
nocturna, más allá de la reparación si el nivel de luz es muy alto o se amplía el tiempo de exposición. Las tapas de las lentes del
objetivo tienen un orificio pequeño para admitir una pequeña cantidad de luz para realizar pruebas.
21
Page 22

PRIMEROS PASOS
Indicador de alimentación
Instalación de pilas
Este dispositivo funciona con dos pilas AAA (alcalinas o de litio). Para realizar la
instalación, gire la cubierta de las pilas en el sentido de las agujas del reloj hasta
la posición "abierta", tal y como se muestra en la foto del extremo inferior derecho.
Inserte las pilas en el compartimento de forma que vea como los extremos positivo (+) y
negativo (-) coinciden con las marcas que aparecen encima de la flecha OPEN (Abrir)
("-" a la izquierda, "+" a la derecha). Vuelva a colocar con cuidado la cubierta de las
pilas, girándola cubierta en sentido contrario de las agujas del reloj hasta la posición
cerrada.
Uso y pruebas
Asegúrese de que las pilas se han instalado de acuerdo con las instrucciones anteriores.
Si desea probar su dispositivo de visión nocturna en un área iluminada, asegúrese de
que las tapas de las lentes del objetivo están tapando ambas lentes antes de pulsar el
botón "ON" (Encender). Las tapas de las lentes del objetivo tienen un orificio pequeño
para admitir una pequeña cantidad de luz para realizar pruebas.
Cuando pruebe o use el dispositivo en la oscuridad, quite la tapa de la lente del
objetivo y active el dispositivo pulsando el botón ON (Encender). El LED del indicador
de alimentación situado encima de la cubierta de las pilas se iluminará (foto del extremo
superior derecho).
Para enfocar, seleccione un objetivo a la distancia aproximada para el área que desea
ver. Ajuste el valor de dioptría de cada ocular hasta que la imagen aparezca de la
forma más nítida para su vista. Después de la definición inicial de dioptría, las lentes
frontales (objetivo) se utilizan para enfocar: ajuste las lentes frontales en sentido de las
agujas del reloj cuando necesite enfocar objetos más cercanos y en sentido contrario
para objetos distantes. Si no puede enfocar objetos muy lejanos, los oculares también
se pueden utilizar sólo para ajustes precisos.
22
Posición cerrada
de la cubierta de la
batería
Posición abierta de la
cubierta de la batería
Page 23

Botón IR (infrarrojo)
Botón de alimentación
Dioptría del
ocular
Iluminador IR
Enfoque de lentes
del objetivo
Utilización del iluminador por infrarrojos
Su dispositivo de visión nocturna ofrece un iluminador por infrarrojos incorporado. Este le permite ver en completa oscuridad,
donde no haya ninguna fuente de luz ambiental como, por ejemplo, la luz lunar. Si el sujeto se va a ver en un área totalmente
oscura, active el iluminador por infrarrojos pulsando el botón IR. En zonas más iluminadas, desactive el iluminador IR para
alargar la vida de la batería.
23
Page 24

PRECAUCIÓN: Este dispositivo se puede ser utilizar en climas extremadamente fríos. Sin embargo, si la unidad entra en
funcionamiento en un entorno cálido, deberá esperar aproximadamente 5 horas para que se pueda ajustar al cambio
de temperatura antes de volver a utilizar la unidad. Si esto no se lleva a cabo, se podrían producir daños debido a la
condensación acumulada en el circuito interno de la unidad.
Manchas en la imagen
Puede que vea manchas en la imagen. Estas varían de un dispositivo a otro y son unas manchas estéticas muy pequeñas dentro
de los tubos intensificadores.
Son normales para los dispositivos de visión nocturna analógicos de "primera generación" y NO son un defecto.
RESOLUCIÓN DE PROBLEMAS
El dispositivo no se enciende.
Compruebe que las pilas estén instaladas correctamente. Sustituya las pilas por unas nuevas. Revise el contacto de las pilas para
asegurarse de que están limpias y sin corrosión. Si el LED del indicador de alimentación está encendido, asegúrese de que se
han quitado las tapas del objetivo antes de ver en la oscuridad.
La imagen no está enfocada.
Ajuste los anillos de dioptría del ocular para adaptarlos a su visión. Utilice los controles de enfoque de las lentes del objetivo para
ajustar los sujetos a distancias diferentes. Si aún no mejora, limpie las lentes; pueden estar empañadas o sucias.
La visibilidad disminuye o desaparece.
Las fuentes de luminosidad, tales como faros, pueden hacer que la visibilidad disminuya o desaparezca por completo. Apague
la unidad y aleje el binocular de la fuente de luz. El dispositivo se reiniciará automáticamente en 1 o 2 minutos. En condiciones
de niebla o de ambientes extremadamente oscuros, la visibilidad disminuirá.
Parpadeos de la imagen
La imagen puede parpadear cuando se utiliza en un entorno de luz fuerte. También puede parpadear durante los primeros minutos
de uso en ambientes oscuros.
24
Page 25

CUIDADO Y MANTENIMIENTO
Su dispositivo de visión nocturna de Bushnell se ha diseñado para proporcionar muchos años de servicio de calidad.
Para garantizar que pueda aprovechar al máximo su dispositivo de visión nocturna, siga siempre las siguientes advertencias y
precauciones:
• No dirija este dispositivo hacia una fuente de luz superior a 1 lux como, por ejemplo, las luces delanteras de un vehículo, durante
tiempo prolongado.
• Este dispositivo utiliza un sistema de protección de flash interno que minimiza el daño potencial, pero las exposiciones de tiempo
prolongado a luces fuertes pueden dañar el dispositivo. Dichos daños pueden anular la garantía.
• Este dispositivo ha sido diseñado de forma autónoma. No abra el cuerpo del dispositivo y no intente repararlo.
• Guarde el dispositivo siempre en un lugar seco y bien ventilado.
• Extraiga las pilas si va a guardar el dispositivo durante más de 2 meses.
• Guarde el dispositivo lejos de corrientes de aire acondicionado, calefacción u otros dispositivos calefactores, así como de la luz
solar directa y de la humedad.
• Evite que la unidad se caiga o se golpee. Aunque esté diseñado para el uso al aire libre, este dispositivo incluye un circuito
óptico sofisticado que podía dañarse en casos extremos del mal uso.
• El dispositivo es resistente a la intemperie, no impermeable, y nunca se deberá sumergir ni someter a una corriente de agua directa.
• Limpie las lentes ópticas con suministros de limpieza de lentes profesionales.
• Limpie el exterior del dispositivo con un paño limpio y suave.
Class 1 LED product per IEC 60825-1/nov 1993, appendix EN 60825-1A11/oct1996
25
Page 26

GARANTÍA LIMITADA de UN AñO
Su producto Bushnell® está garantizado contra defectos de materiales y fabricación durante un año después de la fecha
de compra. En caso de defectos bajo esta garantía, nosotros, a nuestra opción, repararemos o sustituiremos el producto
siempre que lo devuelva con portes pagados. Esta garantía no cubre defectos causados por el uso indebido, ni por
un manejo, instalación o mantenimiento realizados por alguien que no sea un departamento de servicio autorizado de
Bushnell.
Cualquier envío que se haga bajo esta garantía deberá ir acompañado por lo siguiente:
1) Un cheque/giro postal por la cantidad de 10 dólares para cubrir los gastos postales y de manejo
2) Nombre y dirección donde quiere que se le envíe el producto
3) Una explicación del defecto
4) Una prueba de la fecha de compra
5) El producto debe empaquetarse bien en una caja resistente para evitar que se dañe durante el
transporte, con los portes prepagados a la direcciÛn que se muestra a continuación:
En EE.UU. enviar a: En CANADÁ enviar a:
Bushnell Outdoor Products Bushnell Outdoor Products
Attn.: Repairs Attn.: Repairs
9200 Cody 140 Great Gulf Drive, Unit # B
Overland Park, Kansas 66214 Vaughan, Ontario L4K 5W5
En el caso de productos comprados fuera de Estados Unidos o Canadá, póngase en contacto con su distribuidor local
para que le den la información pertinente sobre la garantía. En Europa también puede ponerse en contacto con Bushnell
en: Bushnell Germany GmbH
European Service Centre
Mathias-Brüggen-Str. 80
D-50827 Köln
GERMANY
Tél: +49 221 995568-0
Fax: +49 221 995568-20
26
Esta garantía le ofrece derechos legales específicos.
Puede que tenga otros derechos que varían de un país a otro.
©2014 Bushnell Outdoor Products
Page 27

Eliminación de equipos eléctricos y electrónicos
(Aplicable en la UE y otros países europeos con sistemas de recogida separada)
Este equipo contiene elementos eléctricos o electrónicos y por tanto no debe eliminarse con los residuos domésticos
normales. En cambio, debe eliminarse en los correspondientes puntos de recogida para reciclaje previstos por las
comunidades. Para usted resultará gratuito.
Si el equipo incorpora baterías intercambiables (recargables), estas también deben retirarse antes y, si es necesario,
eliminarlas de acuerdo con las regulaciones correspondientes (consulte también los comentarios al efecto de las
instrucciones de estas unidades).
La administración de su comunidad, su empresa local de recogida o la tienda en la que adquirió este equipo pueden
proporcionarle información adicional sobre este tema.
27
Page 28

DEutScH
TECHNISCHE DATEN
Vergrößerung: 2,5 X
Objektivgröße: 40 mm
Vertikale Auflösung: 36 Zeilen/mm
Sichtbereich* 4 Fuß –600 Fuß / 1,2 m -183 m
Bereich des integrierten Infrarotstrahlers Bis zu 90 Yard
Sichtfeld: 94 Fuß bei 100 Yard / 31 Meter bei 100 Meter
Battertyp: AAA (2)
Betriebsdauer: Bis zu 70 Stunden ohne IR / 20 Stunden mit IR-Strahler
Temperaturbereich: -22 º F bis 104 º F / -30 º C bis 40 º C
Okulareinstellung: +/-4 Dioptrien
Länge: 6,5 Zoll / 165 mm
Breite: 6,3 Zoll / 160 mm
Höhe: 3 Zoll / 76 mm
Gewicht: 28 Unzen / 794 g
* Die maximale Entfernung, in der eine menschliche Gestalt unter idealen Bedingungen zu erkennen ist; diese sind definiert als klares Wetter
(ohne Nebel, Staub usw.) im Licht eines Viertelmondes.
28
Page 29

Wir gratulieren Ihnen zum Kauf eines Nachtsichtgeräts von Bushnell. Die Nachtsichtgeräte von Bushnell sind mit qualitativ
hochwertigen Bildverstärkerrohren für eine optimale Sicht ausgestattet. Bei den Nachtsichtgeräten von Bushnell werden die
vorhandenen Lichtstrahlen verstärkt, wodurch Sie auch in für bloße Augen zu dunklen Umgebungen eine klare Sicht haben.
SO FUNKTIONIERT NACHTSICHT
Bei den Nachtsichtgeräten von Bushnell werden vorhandene Lichtstrahlen durch die Objektivlinse, die anschließend auf den
Bildverstärker gerichtet wird, gebündelt und verstärkt. Innerhalb des Verstärkers wird eine Fotokathode vom Licht „angeregt" und
wandelt die Photonenenergie in Elektronen um. Diese Elektronen werden an einem elektrostatischen Feld im Verstärker beschleunigt
und treffen auf einen Phosphorschirm (ähnlich einem einfarbig grünen Videobildschirm), der ein Bild abgibt, das Sie sehen
können. Es ist diese Beschleunigung der Elektronen, die die Verstärkung bewirkt und das Bild deutlich erkennbar macht. Dieses
Nachtsichtgerät gehört zur Generation I (analog).
Ihr Nachtsichtgerät ist ideal für eine Vielzahl an Verwendungsmöglichkeiten im Beruf sowie im Freizeitbereich geeignet. Dazu
gehören folgende:
• Wildbeobachtung
• Astronomie
• Bootsfahrten / Schifffahrt
• Polizei / Strafverfolgung
• Such- und Rettungsdienst
• Sicherheit
• Immobilienverwaltung
VORSICHT!: Wie bei jedem analogen Nachtsichtgerät, das auf der Lichtverstärkertechnologie basiert, VERWENDEN SIE DAS GERÄT
NICHT BEI HELLEM LICHT (TAGESLICHT) MIT ENTFERNTER LINSENKAPPE. Das Einschalten des Geräts mit entfernten Linsenkappen
in hellen Umgebungen (im Freien oder in geschlossenen Räumen) kann möglicherweise zu Beschädigungen ihres Nachtsichtgeräts
führen; bei sehr starken Lichtverhältnissen und/oder bei zu langer Belichtung sind diese Schäden irreparabel. Die Objektivlinsenkappen
besitzen eine Nadellochöffnung, die zu Testzwecken eine geringe Lichtmenge durchlässt.
29
Page 30

ERSTE SCHRITTE
Einsetzen der Batterien
Dieses Gerät funktioniert mit zwei AAA-Batterien (Alkalische oder Lithiumbatterien). Um
die Batterie einzusetzen, drehen Sie die Abdeckung im Uhrzeigersinn auf die Position
"geöffnet", wie auf dem Foto unten rechts abgebildet. Setzen Sie die Batterien in das
Batteriefach, sodass Pluspol (+) und Minuspol (-) der Batterien, die in Ihre Richtung
zeigen, den Markierungen über dem Pfeil "GEÖFFNET" entsprechen ("-" links, "+" rechts).
Setzen Sie die Batterieabdeckung vorsichtig wieder zurück, indem Sie diese gegen den
Uhrzeigersinn auf die geschlossene Position drehen.
Verwendung und Tests
Vergewissern Sie sich, dass diese den obenstehenden Anweisungen gemäß eingesetzt
wurden.
Wenn Sie Ihr Nachtsichtgerät in einem beleuchteten Bereich testen möchten,
vergewissern Sie sich zunächst, dass die Objektivlinsenkappen beide Objektivlinsen
abdecken, und betätigen Sie anschließend die Einschalttaste. Die Objektivlinsenkappen
besitzen eine Nadellochöffnung, die zu Testzwecken eine geringe Lichtmenge durchlässt.
Wenn Sie das Gerät in der Dunkelheit testen oder einsetzen, nehmen Sie die
Objektivlinsenkappen ab und aktivieren Sie das Gerät mithilfe der Einschalttaste. Die
Stromanzeige-LED über der Batterieabdeckung leuchtet auf (Foto oben rechts).
Wählen Sie zur Fokussierung ein Objekt in unmittelbarer Nähe des Bereichs, den Sie
betrachten möchten. Passen Sie die Dioptrieneinstellung jedes Okulars so an, dass das
die Schärfe des Bildes Ihrer Sehstärke entspricht. Nach anfänglicher Dioptrieneinstellung
werden die vorderen (Objektiv-)Linsen nun zur Fokussierung verwendet: Stellen Sie die
vorderen Linsen im Uhrzeigersinn ein, wenn Sie Objekte nahe Objekte fokussieren
möchten, und gegen den Uhrzeigersinn, wenn Sie weiter entfernte Objekte fokussieren
möchten. Wenn die Fokussierung sehr naher Objekte nicht möglich ist, können Sie die
Okulare ebenfalls nur zur Feineinstellung verwenden.
30
Stromanzeige
Batterieabdeckung
– geschlossene
Position
Batterieabdeckung –
geöffnete Position
Page 31

EinschalttasteInfrarot-Taste (IR)
Dioptrieneinstellung der Okulare
IR-Strahler
Objektivfokus
Verwendung des Infrarotstrahlers
Ihr Nachtsichtgerät verfügt über einen integrierten Infrarotstrahler. So können Sie auch bei vollständiger Dunkelheit sehen,
wenn keinerlei Umgebungslicht, wie z. B. Mondlicht, vorhanden ist. Wenn sich das zu betrachtende Objekt in einem
vollkommen dunklen Bereich befindet, aktivieren Sie den Infrarotstrahler durch Betätigen der IR-Taste. Schalten Sie den
Infrarotstrahler in helleren Bereichen aus, um die Batterielebenszeit zu verlängern.
31
Page 32

VORSICHT!: Das Gerät kann auch bei extrem kalten Wetterbedingungen benutzt werden. Wenn das Gerät jedoch wieder
in eine warme Umgebung gebracht wird, müssen Sie vor erneuter Verwendung ca. 5 Stunden warten, damit sich das Gerät
an die neue Temperatur anpassen kann. Andernfalls kann es zu Beschädigungen durch Kondenswasser kommen, das sich
eventuell an den internen Schaltkreisen des Geräts gebildet hat.
Fleckiges Bild
Möglicherweise erscheint das Bild fleckig. Diese Flecken variieren je nach Gerät; es handelt sich dabei um sehr geringfügige
Schönheitsfehler in den Verstärkerrohren.
Dies ist bei Nachtsichtgeräten der Analogtechnologie "Gen 1" normal und weist somit NICHT auf einen Defekt hin.
FEHLERBEHEBUNG
Das Gerät lässt sich nicht einschalten.
Prüfen Sie, ob die Batterien richtig eingesetzt wurden. Ersetzen Sie die Batterien durch neue. Prüfen Sie die Batteriekontakte und
vergewissern Sie sich, dass sie sauber und korrosionsfrei sind. Wenn die Stromanzeige-LED leuchtet, vergewissern Sie sich vor dem
Durchsehen in dunklen Umgebungen, dass die Objektivabdeckungen entfernt wurden.
Das Bild ist nicht scharf.
Die Dioptrien-Einstellringe der Okulare an Ihre individuelle Sehstärke anpassen. Benutzen Sie die Fokussierungs-Steuerung des
Objektivs, um die Sehstärke für Objekte unterschiedlicher Entfernung anzupassen. Tritt trotzdem keine Besserung ein, reinigen Sie
die Linsen; sie sind möglicherweise beschlagen oder staubig.
Die Sichtbarkeit nimmt ab oder verschwindet.
Helle Lichtquellen, wie z. B. Scheinwerfer, können die Sichtbarkeit beeinträchtigen oder vollständig behindern. Betätigen Sie die
Ausschalttaste und wenden Sie das Binokular von der Lichtquelle ab. Das Gerät erholt sich nach 1 oder 2 Minuten. Nebel oder
extreme Dunkelheit beeinträchtigen die Sichtbarkeit ebenfalls.
Das Bild flackert.
Beim Einsatz in einer hellen Umgebung kann das Bild flackern. Es kann außerdem während der ersten Sekunden des Einsatzes in
einer dunklen Umgebung flackern.
32
Page 33

PFLEGE UND WARTUNG
Ihr Nachtsichtgerät von Bushnell wurde für langjährigen Einsatz entwickelt.
Damit Sie lange Freude an Ihrem Nachtsichtgerät haben, beachten Sie stets die folgenden Warnungen und Vorsichtsmaßnahmen:
• Richten Sie das Gerät nicht für längere Zeit auf eine Lichtquelle von mehr als Lux, wie z. B. Fahrzeugscheinwerfer.
• Das Gerät verwendet ein eingebautes Blitzschutzsystem, das mögliche Schäden auf ein Minimum reduziert; wird das Gerät jedoch
über lange Zeit hellem Licht ausgesetzt, kann es beschädigt werden. Schäden dieser Art können Ihre Garantie verfallen lassen.
• Das Gerät ist als in sich abgeschlossenes Gerät ausgelegt. Öffnen Sie niemals das Gehäuse des Geräts und versuchen Sie nicht,
das Gerät instandzusetzen.
• Bewahren Sie das Gerät stets in einem trockenen, belüfteten Raum auf.
• Wenn das Gerät über mehr als 2 Monate eingelagert wird, entnehmen Sie die Batterien.
• Halten Sie das Gerät von jeglichen Heizungen und Ventilatoren oder anderen Wärmequellen, direktem Sonnenlicht und Feuchtigkeit
fern.
• Vermeiden Sie ein Herunterfallen oder anderweitige Stöße des Geräts. Obwohl das Gerät für raue Outdoor-Anwendungen gebaut
wurde, enthält es hochentwickelte digitale Schaltungen, die in extremen Fällen von Fehlgebrauch beschädigt werden können.
• Das Gerät ist witterungsbeständig, jedoch nicht wasserdicht, und sollte daher niemals in Wasser eingetaucht oder einem direkten
Wasserstrahl ausgesetzt werden.
• Reinigen Sie die optische Linse mit einem speziellen Linsenreiniger.
• Reinigen Sie das Äußere des Geräts mit einem weichen, sauberen Tuch.
Class 1 LED product per IEC 60825-1/nov 1993, appendix EN 60825-1A11/oct1996
33
Page 34

GEWÄHRLEISTUNGSFRIST EIN JAHRE
Auf das von Ihnen erworbene Produkt der Firma Bushnell
gültig ab dem Kaufdatum. Falls während dieser Garantiezeit ein Mangel auftreten sollte, behalten wir uns die Entscheidung darüber
vor, das Produkt zu reparieren oder zu ersetzen, unter der Voraussetzung, dass der Kunde das Produkt porto- und versandkostenfrei
an uns zurückschickt. Diese Gewährleistung schließt keinerlei Schäden ein, die durch Missbrauch, unsachgemäßen Umgang,
Einbau oder durch fehlerhafte Wartung verursacht wurden, und gilt ebenfalls nicht, wenn diese Tätigkeiten von anderen Personen
als den durch die Kundendienstabteilung der Firma Bushnell hierfür autorisierten Personen durchgeführt wurden.
Jegliche Rücksendung, die in bezug auf diese Gewährleistung erfolgt, muss folgende Begleitpapiere enthalten:
1) Einen Scheck/Bargeld in Höhe von $10.00 für die Porto- und Handlingkosten
2) Name und Adresse für Rücksendung des Produkts
3) Eine genaue Erläuterung des Mangels
4) Beleg des Kaufdatums
5) Das Produkt ist in einem stabilen Versandkarton gut zu verpacken, um Beschädigungen beim Transport zu vermeiden, die
Portospesen für den Versand an nachstehend aufgeführte Adresse sind im Voraus zu entrichten:
Versandadresse für die U.S.A: Versandadresse für Kanad:
Bushnell Outdoor Products Bushnell Outdoor Products
Attn.: Repairs Attn.: Repairs
9200 Cody
Overland Park, Kansas 66214 Vaughan, Ontario L4K 5W5
Was Produkte anbelangt, die nicht in den U.S.A. oder in Kanada gekauft wurden, erfragen Sie bitte die gültigen Garantiebedingungen
bei Ihrem örtlichen Händler. Innerhalb Europas kann die Firma Bushnell unter folgender Adresse kontaktiert werden:
Bushnell Germany GmbH
European Service Centre
Mathias-Brüggen-Str. 80
D-50827 Köln
GERMANY
Tél: +49 221 995568-0
Fax: +49 221 995568-20
34
Diese Gewährleistung räumt Ihnen besondere juristische Rechte ein.
Für die jeweiligen Länder gelten möglicherweise länderspezifische Rechte.
©2014 Bushnell Outdoor Products
®
gewähren wir 1 jahre Garantie auf Materialmängel und Verarbeitung,
140 Great Gulf Drive, Unit # B
Page 35

Entsorgung von elektrischen und elektronischen Ausrüstungen
(Gültig in der EU und anderen europäischen Ländern mit getrennten Sammelsystemen)
Diese Ausrüstung enthält elektrische und/oder elektronische Bauteile und darf deshalb nicht im normalen Haushaltmüll
entsorgt werden. Stattdessen sollte sie an den entsprechenden Sammelstellen für Recycling der jeweiligen Gemeinden
abgegeben werden. Ihnen entstehen hierdurch keine Kosten.
Wenn die Ausrüstung austauschbare (wiederaufladbare) Batterien enthält, müssen diese zuvor auch herausgenommen
werden und, falls nötig, entsprechend der geltenden Vorschriften entsorgt werden (siehe auch die jeweiligen
Anmerkungen in der Anleitung dieses Instruments).
Weitere Informationen zu diesem Thema sind in Ihrer Gemeinde-/Stadtverwaltung, Ihrem regionalen
Abfallentsorgungsunternehmen oder in dem Geschäft, in dem Sie Ihr Equipment gekauft haben, erhältlich.
35
Page 36

ITALIANO
SpEcIFIcHE
Ingrandimento: 2,5 X
Dimensioni dell'obiettivo: 40 mm
Risoluzione verticale: 36 linee/mm
Portata di osservazione* 4 –600 piedi / 1,2-183 m
Portata dell’illuminatore a infrarossi integrato Fino a 90 iarde
Campo visivo: da 94 piedi a 100 iarde/da 31 metri a 100 metri
Tipo di batteria: AAA (2)
Tempo di funzionamento: Fino a 70 ore senza IR/20 ore con illuminatore IR
Intervallo temperatura: Da -22 a 104 ºF / da -30 a 40 ºC
Regolazione dell’oculare: +/- 4 diottrie
Lunghezza: 6,5 pollici/165 mm
Larghezza: 6,3 pollici/160 mm
Altezza: 3,0 pollici/76 mm
Peso: 28,0 once/794 g
* Distanza massima a cui una figura umana può essere riconosciuta in condizioni ideali di visualizzazione; per condizioni ideali si intende un
ambiente chiaro (assenza di nebbia, polvere, ecc.), sotto la luce emessa da 1/4 di luna.
36
Page 37

Congratulazioni per aver acquistato un prodotto Bushnell Night Vision. I prodotti Bushnell Night Vision sono composti da ottiche
e tubi intensificatori di immagine di elevata qualità. I prodotti Bushnell Night Vision amplificano la luce esistente, consentendo di
vedere in condizioni di oscurità eccessiva per l’occhio nudo.
MODALITÀ DI FUNZIONAMENTO DEI PRODOTTI NIGHT VISION
I prodotti Bushnell Night Vision raccolgono e amplificano la luce esistente attraverso la lente dell’obiettivo, che viene poi focalizzata
sull’intensificatore di immagine. All'interno dell'intensificatore, un fotocatodo viene sollecitato dalla luce e trasforma l'energia dei
fotoni in elettroni. Tali elettroni accelerano in un campo elettrostatico all'interno dell'intensificatore e vanno a colpire lo schermo
al fosforo (analogamente a uno schermo video monocromatico verde), il quale emette l'immagine visualizzata dall'utente. È
l'accelerazione degli elettroni che consente il guadagno e il miglioramento dell'immagine. È un dispositivo per la visione notturna
di prima generazione (analogico).
Il dispositivo Night Vision è l’ideale per una varietà di utilizzi professionali e ricreativi, quali i seguenti ambiti:
• Osservazione della natura
• Astronomia
• Utilizzo nautico/marino
• Polizia/Forze dell'ordine
• Ricerca e soccorso
• Sicurezza
• Gestione delle proprietà
ATTENZIONE: come per qualunque dispositivo analogico per la visione notturna basato sulla tecnologia del tubo intensificatore
della luce, NON UTILIZZARE IN CONDIZIONI DI LUCE INTENSA (DIURNA) SENZA I COPERCHI DI PROTEZIONE DELLA
LENTE. L’accensione del dispositivo senza i coperchi di protezione della lente in ambienti molto luminosi (esterni o interni), può
potenzialmente danneggiare l'unità per la visione notturna, in modo irreparabile se i livelli di illuminazione sono molto elevati e/o il
tempo di esposizione è esteso. Il coperchio di protezione della lente dell'obiettivo presenta un’apertura a punta di spillo per consentire
l'accesso di una piccola quantità di luce onde poter effettuare una prova.
37
Page 38

PER INIZIARE
Indicatore di alimentazione
Installazione delle batterie
Questo dispositivo funziona con due batterie AAA (alcaline o al litio). Per installarle,
ruotare il coperchio della batteria in senso orario, in posizione “open” (aperto) come
mostrato nella foto in basso a destra. Inserire le batterie nel relativo vano in modo tale
che i terminali positivo (+) e negativo (-) delle batterie rivolti verso l’utente corrispondano
alle indicazioni sopra la freccia OPEN ("-" a sinistra, "+" a destra). Riporre con
attenzione il coperchio della batteria, ruotandolo in senso antiorario in posizione di
chiusura.
Utilizzo e prova
Assicurarsi che le batterie siano state inserite secondo le istruzioni sopra riportate.
Se si desidera provare il dispositivo per la visione notturna in un’area illuminata,
assicurarsi che i coperchi di protezione della lente dell'obiettivo siano applicati su
entrambe le lenti dell’obiettivo prima di premere il pulsante “ON”. Il coperchio di
protezione della lente dell'obiettivo presenta un’apertura a punta di spillo per consentire
l'accesso di una piccola quantità di luce onde poter effettuare una prova.
In caso di svolgimento di una prova o di impiego dell'unità in condizioni di oscurità,
rimuovere il coperchio di protezione della lente dell'obiettivo e attivare l'unità premendo
il pulsante “ON”. L’indicatore di alimentazione LED sopra al coperchio della batteria si
illuminerà (foto in alto a destra).
Per mettere a fuoco, selezionare un oggetto alla distanza approssimativa per l’area
che si desidera visualizzare. Regolare l’impostazione della diottria di ciascun oculare
finché l’immagine non appare nitida al massimo. Dopo l’impostazione iniziale delle
diottrie, le lenti anteriori (obiettivo) sono utilizzate per mettere a fuoco: regolare le lenti
anteriori ruotando in senso orario se si desidera mettere a fuoco oggetti più vicini, in
senso antiorario per oggetti più distanti. Se non si riesce a mettere a fuoco oggetti
molto vicini, gli oculari possono anche essere utilizzati solo per regolazioni precise.
38
Coperchio della
batteria-Posizione di
chiusura
Coperchio della
batteria-Posizione di
apertura
Page 39

Pulsante IR (infrarossi)
Pulsante di alimentazione
Diottria
dell’oculare
Illuminatore IR
Messa a fuoco
lenti dell’obiettivo
Utilizzo dell’illuminatore a infrarossi
Il dispositivo Night Vision presenta un illuminatore a infrarossi integrato. Esso consente la visione anche in condizioni di
oscurità completa, in caso di totale assenza della luce naturale, quale ad esempio la luce lunare. Se il soggetto deve essere
visualizzato in un’area con oscurità completa, attivare l’illuminatore a infrarossi premendo il pulsante IR. In aree più luminose,
spegnere l’illuminatore IR per estendere la durata della batteria.
39
Page 40

ATTENZIONE: Il presente dispositivo può essere utilizzato in condizioni di freddo estremo. Tuttavia, quando l’unità è
riportata in un ambiente caldo, prima di usarla di nuovo è necessario aspettare circa 5 ore per consentirle di adattarsi alla
variazione della temperatura, altrimenti potrebbero verificarsi danni dovuti alla condensa che potrebbe essersi accumulata
nella circuiteria interna dell’unità.
Puntini neri sull’immagine
È possibile che sull'immagine compaiano puntini neri. Questi variano da un dispositivo all’altro e sono delle macchioline molto
piccole all’interno dei tubi intensificatori.
Per i dispositivi Night Vision di tecnologia analogica di "prima generazione” sono normali e NON rappresentano un difetto.
RISOLUZIONE DEI PROBLEMI
Il dispositivo non si accende.
Accertarsi che le batterie siano installate correttamente. Sostituire le batterie vecchie con batterie nuove. Verificare che i contatti della
batteria risultino puliti e privi di segni di corrosione. Se l’indicatore di alimentazione LED risulta acceso, assicurarsi che i coperchi
di protezione dell’obiettivo siano rimossi prima della visualizzazione in condizioni di oscurità.
L'immagine è sfocata.
Regolare gli anelli diottrici degli oculari. Utilizzare i comandi della messa a fuoco della lente dell’obiettivo per regolare in base alle
diverse distanze dei soggetti. Laddove non si riscontrino miglioramenti, pulire le lenti per eliminare l'eventuale umidità formatasi o
la polvere depositata.
La visibilità diminuisce o scompare.
Le fonti luminose forti, quali i fari delle auto, possono causare la diminuzione o totale scomparsa della visibilità. Spegnere e
allontanare il binocolo dalla sorgente luminosa. L'unità verrà automaticamente ripristinata in 1-2 minuti. Eventuali condizioni di
nebbia o ambienti estremamente scuri provocheranno la diminuzione della visibilità.
L’immagine lampeggia.
L’immagine può iniziare a lampeggiare in caso di utilizzo in ambiente luminoso. Inoltre, può lampeggiare durante i primi secondi
di impiego in ambienti scuri.
40
Page 41

CURA E MANUTENZIONE
Il dispositivo Bushnell Night Vision è progettato per assicurare lunghi anni di funzionamento affidabile.
Al fine di garantire le massime prestazioni del dispositivo Night Vision, rispettare sempre le seguenti avvertenze e precauzioni:
• Evitare di puntare il presente dispositivo verso una qualsiasi sorgente luminosa superiore a 1 lux, quali i fari di un’automobile, per
un periodo prolungato di tempo.
• Questo dispositivo utilizza un sistema di protezione interno con flash, volto a ridurre al minimo i potenziali danni; tuttavia,
l'esposizione prolungata a luci particolarmente forti può danneggiare l'unità. Un eventuale danno di questo tipo può rendere non
valida la garanzia.
• Il presente dispositivo è stato progettato per essere compatto. Non aprire il corpo del dispositivo, né tentare di ripararlo in alcun
modo.
• Conservarlo sempre in un locale asciutto e ben ventilato.
• Rimuovere la batteria laddove il dispositivo debba essere conservato per un periodo superiore a 2 mesi.
• Tenere il dispositivo lontano da sfiati del riscaldamento e dell’aria condizionata o da altri dispositivi di riscaldamento, dalla luce
solare diretta e dall'umidità.
• Evitare che l'unità subisca cadute o urti violenti. Sebbene sia stato progettato per un uso esterno in condizioni estremamente rigide,
il presente dispositivo contiene un sistema ottico sofisticato che potrebbe essere danneggiato in casi estremi di uso improprio.
• Il dispositivo è resistente agli agenti atmosferici, non è impermeabile e non deve essere immerso né sottoposto a un flusso diretto
d’acqua.
• Pulire le lenti ottiche utilizzando prodotti professionali per la pulizia delle lenti.
• Pulire l'esterno del dispositivo con un panno morbido e pulito.
Class 1 LED product per IEC 60825-1/nov 1993, appendix EN 60825-1A11/oct1996
41
Page 42

GARANZIA LIMITATA PER UNO ANNO
Si garantisce che questo prodotto Bushnell® sarà esente da difetti di materiale e fabbricazione per uno anno a decorrere
dalla data di acquisto. In caso di difetto durante il periodo di garanzia, a nostra discrezione ripareremo o sostituiremo
il prodotto purché sia restituito franco destinatario. Sono esclusi dalla garanzia eventuali danni causati da abuso,
maneggiamento improprio, installazione o manutenzione eseguiti da persone non autorizzate dal servizio di assistenza
Bushnell.
A un prodotto restituito e coperto da questa garanzia occorre allegare quanto segue.
1) Assegno/ordine di pagamento per l’importo di 10 $US per coprire i costi di spedizione.
2) Nome e indirizzo da utilizzare per la restituzione del prodotto.
3) Una spiegazione del difetto.
4) Scontrino riportante la data di acquisto.
5) Il prodotto deve essere imballato in una scatola robusta, per prevenire danni durante il trasporto, e va
spedito franco destinatario a uno dei seguenti indirizzi.
IN U.S.A. Send To: IN CANADA Send To:
Bushnell Outdoor Products Bushnell Outdoor Products
Attn.: Repairs Attn.: Repairs
9200 Cody 140 Great Gulf Drive, Unit # B
Overland Park, Kansas 66214 Vaughan, Ontario L4K 5W5
Per prodotti acquistati fuori degli Stati Uniti o del Canada, rivolgersi al rivenditore per le clausole pertinenti della garanzia.
In Europa si può anche contattare la Bushnell a questo numero: Bushnell Germany GmbH
European Service Centre
Mathias-Brüggen-Str. 80
D-50827 Köln
GERMANY
Tél: +49 221 995568-0
Fax: +49 221 995568-20
42
Questa garanzia dà specifici diritti legali.
Eventuali altri diritti variano da una nazione all’altra.
©2014 Bushnell Outdoor Products
Page 43

Smaltimento di apparecchiature elettriche ed elettroniche
(Vigente presso i Paesi UE e altri Paesi europei con sistemi di raccolta differenziata dei rifiuti)
Il presente apparecchio componenti elettriche e/o elettroniche e non può pertanto essere smaltito come rifiuto
domestico ordinario. Al contrario, dovrebbe essere smaltito presso punti di raccolta destinati al riciclaggio, in base alle
istruzioni delle amministrazioni locali. Tale operazione non prevede alcun costo per l’utente.
Qualora l’apparecchio dovesse contenere batterie (ricaricabili) sostituibili, anche queste devono essere prima rimosse e,
laddove previsto, smaltite in conformità alle normative specfiche (cfr. altresì i commenti specifici nelle presenti istruzioni
sull’unità).
Per ulteriori informazioni su questa tematica, rivolgersi all’amministrazione locale, all’azienda incaricata della raccolta dei
rifiuti o alla rivendita presso cui è stato acquistato l’apparecchio.
43
Page 44

©2014 Bushnell Outdoor Products
www.bushnell.com
 Loading...