

Page 1

Model:
201951/201951EU
Literature #: 98-1967/10-12
1
Page 2

Page 3

English. . . . . . . . . . . . . . . . 4
Français. . . . . . . . . . . . . . . 27
Español. . . . . . . . . . . . . . . 52
Deutsch. . . . . . . . . . . . . . . 75
Italiano. . . . . . . . . . . . . . . 99
3
Page 4
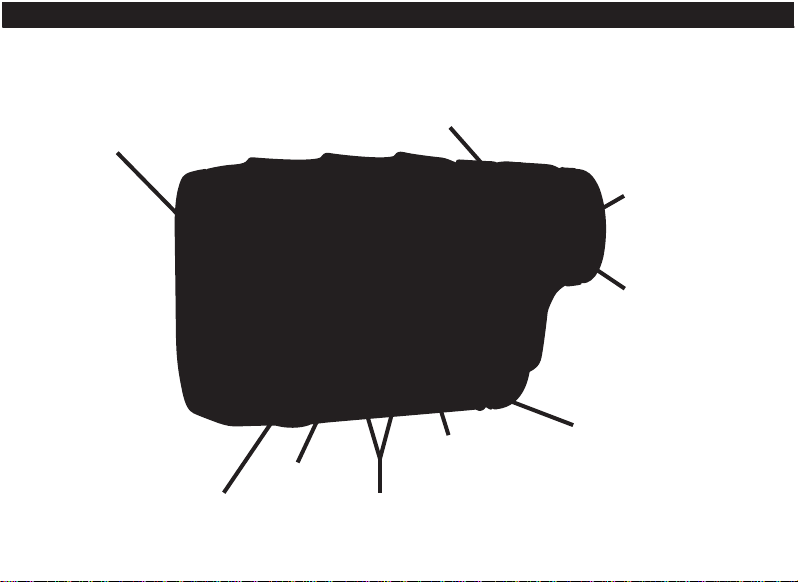
oBjective
lenS
Fire Button
eyepiece
diopter
AdjuStMent
ok/Shot
eSc/Menu
Screen
on/oFF
4
Scroll up/down
Page 5

engliSh
CONGRATULATIONS ON YOUR PURCHASE OF THE BUSHNELL® HYBRID™, THE FIRST
INTEGRATED LASER/GPS RANGEFINDER DEVICE FOR GOLF!
The Hybrid
in a single compact unit, allowing the avid golfer the ability to take full advantage of this dual capability. Knowing the
distances for each shot will assist you in lowering your score and enhance your overall golfing experience.
This manual will help you get familiar with your new ranging device and get the most out of it by explaining its operation
and features, as well as how to care for this precise instrument. To ensure optimal performance and longevity, please
read these instructions before using your Bushnell Hybrid.
The time proven Bushnell laser ranging technology that the pros rely on will always give you the most precise, exact
distance with one yard accuracy to any object you target.
The GPS satellite receiver with pre-loaded data for 20,000 golf courses will instantly provide distances to the front, back
and center of the green as soon as you leave the parking lot-a quick glance at the display and you’re ready to pull the
right club out and tee off. It even auto-advances to the next hole as you play.
Bushnell Golf GPS Website
IMPORTANT NOTE – PLEASE READ: Within 45 days of purchase, go to www.bushnell.igolf.com to register your
Hybrid, which will update the preloaded GPS course data and load any new courses that have been recently added to
the iGolf database. Registration is free and will only take a few minutes. If a unit that has not been registered is powered
on 45 days or more after the first GPS fix, the GPS section will not function (the laser rangefinder is not affected) and
display a prompt to register online (which will restore it to normal operation). For additional information on registering
your Hybrid please refer to “Registering and Updating Golf Course Data” on page 20.
™
combines the individual strengths of laser and GPS ranging technology to deliver “the best of both worlds”
5
Page 6

THE HYBRID ADVANTAGE
The time proven Bushnell laser ranging technology that the pros rely on will always give you the most
precise, exact distance with one yard accuracy to any object you target.
There are times on the course when you don’t have “line of sight” to the target-maybe you’re hitting out
from behind the trees where you just need the front, center, back distances. Or if you’re playing a course
that’s “carts on path only” -checking the GPS display can help you select your club in advance and save
you a trip back to the cart!
When seasoned pros, amateurs, or collegiate players, play golf, they always want to know the front and
back distances to the green, not just the exact distance to the flag. Using the GPS front/center/back data
along with the precise distance to the flag will provide the player with the vital information needed to plan
their approach strategically, without going long or coming up short. Save strokes and know how far you
need to carry the ball to miss that water guarding the green.
The Hybrid’s “Shot Distance” GPS feature makes it extremely easy to gauge how far a drive/approach
shot was hit, and the user can set up to four custom points that can be very helpful as a reference on blind
tee shots or approaches when returning to play a course.
CHARGING THE BATTERY
The Hybrid contains an internal rechargeable lithium-ion battery. The battery can be charged by connecting the included
USB cable between the mini USB port on the device (located on the front of the unit under the rubber cover plug) and
your computer’s USB port. Alternatively, the battery can be charged by connecting the USB cable to the device and
using the AC adapter included with your model to plug the Hybrid into a standard 110V/220V wall outlet. The battery
should be charged for at least six hours before using the device for the first time. When fully charged, the display will
indicate “BATTERY CHARGING COMPLETED”. Under normal operating conditions, a new battery will last 14-16 hours
6
Page 7
on a full charge. However, battery life is diminished due to a variety of factors including temperature and backlight
usage. All rechargeable batteries lose their effective charge length over time.
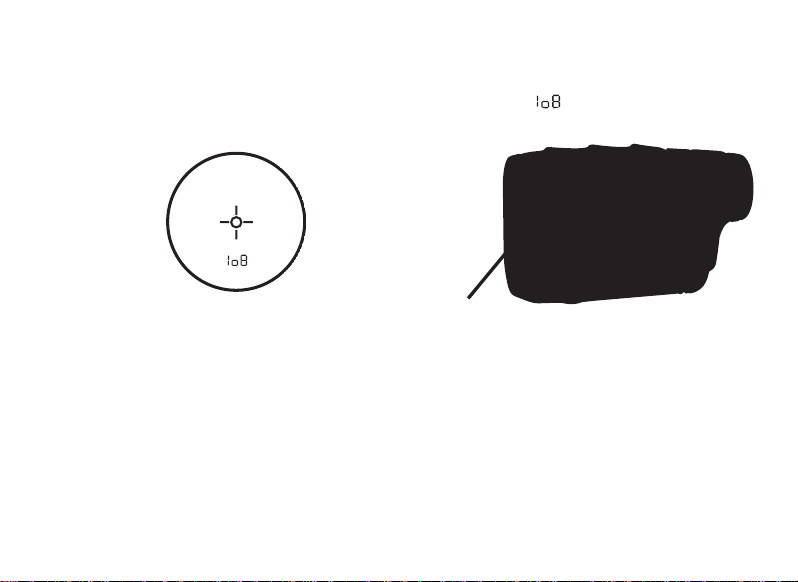
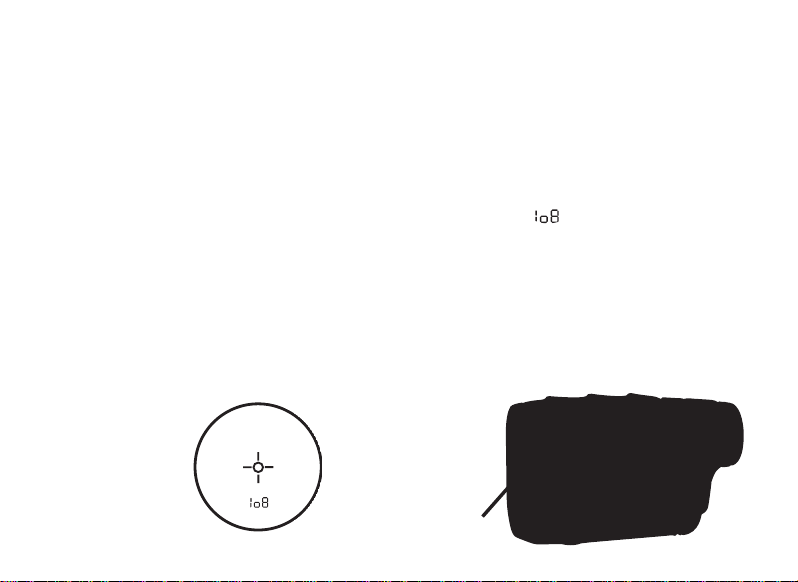
Low Battery Charge Indicator within the Laser Rangefinder Display: If the symbol “
display, this means that the battery charge is getting low and the internal battery should be recharged.
low BAttery indicAtor
BASIC OPERATION
While looking through the 5x eyepiece, press and release the FIRE button once to activate the in-view Liquid Crystal
Display (LCD). Place the aiming circle (located in the center of the image) on a target at least five yards away. Press the
FIRE button again and hold it down until the range reading is displayed near the bottom of the LCD. Crosshairs surrounding
the aiming circle indicate that the laser is being transmitted. Once a range has been acquired, you can release the FIRE
button. The crosshairs surrounding the aiming circle will disappear once the FIRE button has been released (the laser is
no longer being transmitted), but the LCD will remain active and display the last distance measurement for the next 30
seconds. You can depress the FIRE button again at any time to distance to a new target. The maximum time the laser is
transmitted (fired) is 10 seconds. To re-fire, press the button down again.
Mini uSB port
” is seen in the laser rangefinder
7
Page 8

USING THE LASER RANGEFINDER
Your Bushnell® HYBRID™ includes an advanced premium laser rangefinder using Digital Technology, allowing range
readings from 5-1000 yards / 4.5-914 meters. Measuring a mere 2.1 x 2.6 x 4.3 inches, this 8.5 ounce unit delivers
superb and accurate range performance to +/- one yard. The HYBRID features PinSeeker® Technology, 5x magnification,
and multi-coated optics for excellent light transmission, clarity, and brightness.
HOW OUR DIGITAL TECHNOLOGY WORKS
The Bushnell HYBRID’s laser rangefinder employs an eye safe FDA Class 1 and CE Class 3A laser
in its operation. The HYBRID’s Advanced Digital microprocessor and ASIC chip (Application-Specific
Integrated Circuit) results in instantaneous and accurate readings every time. Sophisticated digital
technology instantaneously calculates distances by measuring the time it takes for each pulse to travel
from the rangefinder to the target, and back.
RANGING ACCURACY
The ranging accuracy of the HYBRID is plus or minus one yard / meter under most circumstances. The
maximum range of the instrument depends on the reflectivity of the target. The maximum distance for
most objects is 600 yards / 549 meters while for highly reflective objects the maximum is 1000 yards /
914 meters. Note: You will get both longer and shorter maximum distances depending on the reflective
properties of the particular target and the environmental conditions at the time the distance of an object
is being measured.
The color, surface finish, size and shape of the target all affect reflectivity and range. Brightly colored
targets can be ranged at greater distances. Red is highly reflective, for example, and allows longer
ranges than the color black, which is the least reflective color. A shiny finish provides more range than a
dull one. A small target is more difficult to range than a larger target. The angle to the target also has an
effect. Shooting to a target at a 90 degree angle (where the target surface is perpendicular to the flight
8
Page 9

path of the emitted energy pulses) provides good range while a steep angle on the other hand, provides
limited ranging. In addition, lighting conditions (e.g. the amount of sunlight) will affect the ranging
capabilities of the unit. In reduced light (e.g. overcast skies) the unit’s maximum range will increase.
Conversely, very sunny days will decrease the unit’s maximum range.
MAGNIFICATION AND COATINGS
The HYBRID’s laser rangefinder features 5x magnification and multi-coated optics. A liquid crystal display
(LCD) is mounted within the optical system and when activated, displays a reticle for targeting, and
indicators for distance units (Yards/Meters) and PinSeeker operation. Inherent in the manufacturing
process are small black spots that appear in the optical system. These are a natural characteristic of
the LCD and cannot be fully eliminated in the manufacturing process. They do not affect the distancing
performance of the unit.
ADJUSTING THE EYEPIECE
Your HYBRID is constructed with an adjustable eyepiece (+/- 2 diopter range) that allows one to focus
the LCD display relative to the image. Simply rotate the eyepiece until the reticle and your ranging target
both appear sharp to your eye.
LIQUID CRYSTAL DISPLAY (LCD) INDICATORS
Your HYBRID LCD incorporates illuminated indicators that will let you know the unit of measure for the
displayed range, the laser’s active firing status, confirmation when a target has been acquired, and the
targeting mode. These LCD indicators function as follows:
UNIT OF MEASURE (display indication=Y or M)
The HYBRID can display the ranged distance in yards or meters. The unit of measure indicators are located in the lower
9
Page 10
right portion of the LCD. To select your preference for the distance units, start with the HYBRID powered off. While
looking through the eyepiece, press and hold the FIRE button down for at least 5 seconds. During this time all liquid
crystal segments and icons will be displayed. After approximately 5 seconds elapse, you will see the unit indicators on
the display begin to alternate between Yards and Meters. To set it to your preference, simply wait to release the FIRE
button when only the “Y” or “M” is visible. The device will always return to your last setting for the ranging units, so it will
not be necessary to reset this before each use.
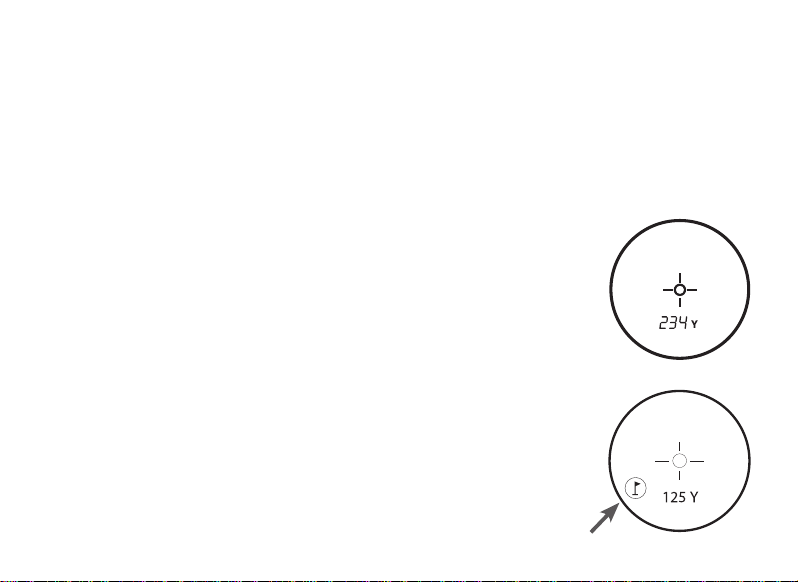
ACTIVE LASER
Crosshairs surrounding the aiming circle indicate that the laser is being transmitted. Once
a range has been acquired, you can release the FIRE button. The crosshairs surrounding
the circle will disappear once the FIRE button has been released (i.e. the laser is no longer
being transmitted).
PinSeeker™
Ever have trouble getting distance to the flag? This advanced feature allows easy
acquisition of the flag without inadvertently getting distances to background targets (i.e.
trees) that have stronger signal strength. Simply align the aiming circle reticle onto the
flag that you want distance to. Next, press and hold the FIRE button and move the laser
slowly over the flag or desired object until a circle surrounds the flag indicator. If the laser
beam recognized more than one object (i.e. flag and background trees), distance of the
flag will be displayed and a circle will surround the PinSeeker indicator informing the user
that distance to the flag (i.e. closer object) is being displayed in the LCD (as seen below).
There may be times when only the laser beam only sees one object in its path. In this case,
the distance will be displayed, but because more than one object was not acquired, a
circle will not surround the flag indicator.
TIP: While pressing the FIRE button, you can move the device slowly from object
10
Page 11

to object and intentionally force the laser to hit multiple objects to verify that you are only displaying the closest
of the objects recognized by the laser.
USING THE GPS SECTION
BUTTON FUNCTIONS
Note that most of the buttons on the GPS control panel have more than one function.
FIRE Button
• Turns the device on & off
• Turns the backlight on & off
Screen Button
• Displays distances to additional points of interest
Up Button
• Scrolls up
• Selects next hole
Down Button
• Scrolls down
• Selects previous hole
Ok/Shot Button
• Selects highlighted option
• Activates Shot Distance
Esc/Menu Button
• Cancels current operation
• Returns to previous step/screen/menu
Screen
on/oFF
Scroll up/down
ok/Shot
eSc/Menu
11
Page 12

STARTING UP/FIRE BUTTON OPERATION
Power On
• Press and hold the FIRE button until “Bushnell Hybrid” appears (about 2 seconds).
Power Off
• Press and hold the FIRE button until the screen goes blank*.
Backlight On/Off
• From any screen, press the FIRE button to turn the backlight on.
• Press FIRE button again to turn the backlight off.
*NOTE: the unit will automatically power off after 45 minutes if no buttons are pressed.
To override this, enter the OPTIONS menu, select SETTINGS and change the AUTO OFF setting to “OFF”.
First, be sure the battery has a full charge. If you are using it for the first time, it should be charged for 6 hours minimum
(refer to “Charging the Battery” on pg. 6 for details). Next, make sure you are outdoors, in a location with a clear view
of the sky overhead, to ensure good reception of GPS satellite signals. Now, you’re ready to power up and begin to
use your Hybrid.
Hold down the FIRE button until you see the startup screen, and then release it.
You will see the Main Menu screen, which has only two items: PLAY GOLF and
OPTIONS (Fig. 1).
Using the Hybrid menu system is simple:
1. Select (highlight) a menu item using the UP/DOWN buttons.
2. Press the OK/SHOT button to enter it.
3. Press the ESC/MENU button to return to the previous menu level.
Fig. 1
12
Page 13

PLAY GOLF MODE
With PLAY GOLF highlighted, press OK. The display will indicate that the
unit is SEARCHING FOR LOCAL COURSES. If it does not, and you see this
message: “Not enough satellites for local search. Press OK to start manual
search.” press OK/SHOT and follow the MANUAL SEARCH procedure
described in the next paragraph. When the search is complete, a list
of golf courses in order of their distance from your current location is displayed
(Fig. 2). Select the course you want from the list and press OK/SHOT.
A manual search option is also available. If no courses are found, or the one you want to play is not listed (as GPS info for
new courses is added to the iGolf.com database, it will be available via your user account), select MANUAL SEARCH
and press OK/SHOT, then enter the name of the state using the UP/DOWN buttons (Fig. 3). Select DELETE and press
OK/SHOT if you make a mistake. If you get multiple results, select the state from the list and press OK/SHOT, then enter
the course name (at least the first few letters) (Fig. 4). When finished, select “SEARCH” and press OK/SHOT. You should
then be able to select the course from the search results (Fig. 5).
Fig. 3 Fig. 4 Fig. 5
Once you have selected your course, the display will show you distances from your current location to the center (largest
Fig. 2
13
Page 14

digits), front (F) and back (B) of the green for the first hole of the course (Fig. 6).
The Hybrid will automatically advance to the next hole as you move around the
course, but you can manually select a different hole than the current one at any
time by pressing the UP/DOWN buttons.
Press the SCREEN button to view the distance to additional points for the current
green (Fig. 7). Press SCREEN again to see the next screen of additional points
(Fig. 8). When finished, press SCREEN once more to return to the Center/Front/
Back screen (Fig. 6).
Fig. 7 Fig. 8
SHOT DISTANCE FEATURE
This feature allows you to easily check the distance between any two points and would normally be used to measure the
length of your shot. To use it:
1. Press OK/SHOT to activate the Shot Distance feature (Fig. 9). The distance will automatically update as you move
(Fig. 10).
2. Press ESC/MENU to return to the previous screen at any time.
3. Press OK/SHOT again at any time to reactivate the Shot Distance feature and establish a new start position.
Fig. 6
14
Page 15

Fig. 9
PLAY GOLF MENU
When you are in “Play Golf” Mode, on the green distance display, pressing ESC/
MENU will display the Play Golf Menu (Fig. 11). Select an item from the menu and
press OK/SHOT to use or display it:
MAP GOLF HOLE: This feature allows you to edit the distances given for the various
points (Front, Center, Back, etc.) on the current hole/green. To use the feature:
• Highlight the point you want to re-map from the list (Fig. 12) and press OK/
SHOT.
• Stand at the desired location and press OK/SHOT to register the point (Fig.
13). Do not move until the process is complete.
• Repeat this process for any other points you wish to map.
• When finished, scroll to highlight “Save” and press OK/SHOT. The Hybrid
will retain this setting along with the course data, so your revised distance will
be displayed instead of the original distance next time you return to play this
course.
Fig. 10
Fig. 11
Fig. 12
Fig. 13
15
Page 16

SATELLITES: Displays the available GPS satellite relative positions and signal strength, along with an indication of the
overall satellite reception quality (“STRONG”, “GOOD”, “WEAK”).
BATTERY LEVEL: Displays the remaining battery power level as a percentage.
RESUME PLAY: Returns to the distance display for the current hole. Any edits you made via the Map Golf Hole option
will be shown instead of the original distance.
EXIT: Exits the Play Golf Menu and returns to the Main Menu.
OPTIONS MENU
From the Main Menu, select (press the DOWN button to highlight) OPTIONS and
press OK/SHOT to access the following features and settings in the Options Menu
(Fig. 14):
MAP COURSE: This feature allows you to customize existing course data (changing
front/back/center locations for a hole, or adding new points like bunkers, hazards,
etc.), or you can even create an entire new file of course data (if you want to map
a course not yet in the iGolf database). Begin by highlighting “MAP COURSE” and
pressing OK/SHOT. Here’s how to use the MAP COURSE feature:
1. Select EDIT COURSE to customize an existing course, or select CREATE
COURSE to begin setting up an entirely new set of data, and press OK/SHOT
(Fig. 15). Choose the course name from the list if you’re editing an existing
one, or select NEW COURSE 1 if you’re creating a new course data file (then
enter the state name).
Fig. 14
Fig. 15
16
Page 17

2. If you need to edit or create the course name, select COURSE NAME and press OK/SHOT. Names should be different
from any of your other golf courses to avoid duplication or confusion. If you’re editing an existing course and don’t want
to change the name, skip to step 4.
3. Using the UP/DOWN buttons, scroll to highlight each character and press OK/SHOT. To delete characters, scroll
to “DELETE” and press OK/SHOT. When finished, scroll to highlight “SAVE” and press OK/SHOT.
4. Next, select MAP GPS POINTS and press OK/SHOT (Fig. 16). Select the hole (Fig. 17), then the default name for
the point (Fig. 18) and press OK/SHOT.
Fig. 16 Fig. 17 Fig. 18
5. If editing an existing point, select its name from the list, then press OK/SHOT
while standing at the point to register its new location. When creating a new
custom point select CSTM 1 (CSTM 2, etc) and press OK/SHOT, You can
then select ABBREVIATIONS (Fig. 19) and pick from the list (CREEK, SAND,
HZRD, etc.), or give it your own USER DEFINED name. Next, make sure you
are standing at the point, and press OK/SHOT to register it. You can also just
accept the default name (CSTM 1) and go directly to REGISTER POINT.
Fig. 19
17
Page 18

BATTERY LEVEL: Displays the remaining battery power level as a percentage.
SATELLITES: Displays the available GPS satellite relative positions and signal strength, along with an indication of the
overall satellite reception quality (“STRONG”, “GOOD”, “WEAK”).
SETTINGS: Press OK/SHOT to view the Settings Submenu, which lets you set the following user preferences for the
display and GPS operation. Use the UP/DOWN buttons to highlight an item, then press OK/SHOT to select it. Make the
desired adjustment using UP/DOWN, then press OK/SHOT to confirm your setting and return to the Settings Submenu.
When finished setting your preferences, press ESC/MENU to exit the SETTINGS Submenu and return to the OPTIONS
menu. The SETTINGS Submenu items are:
CONTRAST: Use the UP/DOWN buttons to adjust the display contrast to improve viewing in different lighting
conditions.
AUTO ADVANCE: The default is ON. Select OFF if you don’t want the Hybrid to automatically advance to the next
hole on the course as you play, and would prefer to use the UP/DOWN buttons to manually select the displayed
hole yourself.
AUTO OFF: The default “ON” setting will shut power off after 45 minutes of inactivity (no buttons pressed) to avoid
unnecessary battery drain. Selecting “OFF” will allow the unit to remain powered on with no time limit, until manually
turned off.
YARDS/METERS: Select YARD or METER distance units.
WAAS: This allows you to turn off location correction used to improve GPS accuracy within the United States.
Commonly known as WAAS, this system of satellites and ground stations provides GPS signal corrections for much
18
Page 19

of the U.S. You may need to adjust the WAAS setting according to geographic location. The default setting is “ON”.
STABILIZER: Allows you to select the GPS position refresh mode. With the Stabilizer set to “ON”, the Hybrid will not
refresh the GPS distance readings when the unit is not in motion (when you are not walking). This can be useful if you
experience fluctuating distance readings when you remain stationary. The default setting is “ON”.
DEFAULT: Pressing OK will display “RESTORE?” -select YES and press OK again to reset the Hybrid GPS to its factory
default condition. All items in the OPTIONS menu (as listed above) will return to their original settings.
DELETE COURSE: This option erases a golf course data file from the Hybrid’s internal memory. Highlight DELETE
COURSE in the OPTIONS menu and press OK/SHOT. Select the golf course from the list and press OK/SHOT. To
verify you want to delete the course, select YES and press OK/SHOT. If you need to restore the deleted course data
at a later date, simply connect the Hybrid’s USB port to your computer, log on to your iGolf account and download it.
ABOUT: Displays the software version.
19
Page 20

Registering and Updating Golf Course Data
Within 45 days of purchase, go to www.bushnell.igolf.com to register your Hybrid,
which will update the preloaded GPS course data and load any new courses that have
been recently added to the iGolf database. Registration is free and will only take a few
minutes. If a unit that has not been registered is powered on 45 days or more after the
first GPS fix, the GPS section will not function (the laser rangefinder is not affected) and
display a prompt to register online (which will restore it to normal operation).
1) Go to www.bushnell.igolf.com and fill in your info to register your Hybrid and create an account. The serial #
of your Hybrid can be found on the back of the unit as shown in the example. Click “Next” at the end of Step 1 to go
to Step 2 and complete your registration.
2) In Step 3, you will download and run an installer for the USB driver that allows your computer to recognize your
Hybrid. The installer is compatible with Windows XP, Vista, and Windows 7 (to date, Mac OS is not supported). For
best results, we recommend using Microsoft Internet Explorer as your browser.
3) After the driver installation is complete, click Next.
4) Step 4 (optional) provides access to a pdf document with detailed instructions for updating the internal operating
software of the Hybrid. A button (web link) is included in the pdf that will take you to the Software Wizard that
downloads the update. Updating your Hybrid’s software is recommended to ensure that you have the latest features
and operating improvements.
5) Once you’ve registered your Hybrid and installed the USB driver, you’ll be on the webpage that allows you to
search for a golf course. Enter all or part of the course’s name and click “Search”. You’ll be taken to the course info on
the iGolf.com site, and can click “Download GPS Course File” to get the latest updated data for the course.
20
Page 21

GENERAL SPECIFICATIONS:
Dimensions: Measuring 2.1 x 2.6 x 4.3 inches
Weight: 8.0 oz.
Built-In Tripod Mount (for cart attachment)
Includes USB charger, cable, carrying case and strap
LASER RANGEFINDER SPECIFICATIONS:
Ranging Accuracy: +/- 1 yard
Range: 5-1000 Yards / 4.5-914 Meters
Magnification: 5x
Objective Diameter: 24 mm
Optical Coatings: Multi-Coated
Display: LCD
Power Source: internal rechargeable lithium-ion battery pack (included)
Field Of View: 367 ft. @ 1000 yards
Extra Long Eye Relief: 21mm
Exit Pupil: 4.8 mm
Patent #’s: 6,445,444 | 5,612,779 | 6,057,910 | 6,226,077
CLEANING
Gently blow away any dust or debris on the lenses (or use a soft lens brush). To remove dirt or fingerprints, clean with a
soft cotton cloth, rubbing in a circular motion. Use of a coarse cloth or unnecessary rubbing may scratch the lens surface
and eventually cause permanent damage. For a more thorough cleaning, photographic lens tissue and photographictype lens cleaning fluid or isopropyl alcohol may be used. Always apply the fluid to the cleaning cloth - never directly
on the lens.
21
Page 22

ONE-YEAR LIMITED WARRANTY
Your Bushnell® product is warranted to be free of defects in materials and workmanship for one year after the date of purchase. In the event of a defect under this
warranty, we will, at our option, repair or replace the product, provided that you return the product postage prepaid. This warranty does not cover damages caused by
misuse, improper handling, installation, or maintenance provided by someone other than a Bushnell Authorized Service Department.
Any return made under this warranty must be accompanied by the items listed below:
1) A check/money order in the amount of $10.00 to cover the cost of postage and handling
2) Name and address for product return
3) An explanation of the defect
4) Proof of Date Purchased
5) Product should be well packed in a sturdy outside shipping carton, to prevent damage in transit, with return postage prepaid to the address listed below:
IN U.S.A. Send To: IN CANADA Send To:
Bushnell Outdoor Products Bushnell Outdoor Products
Attn.: Repairs Attn.: Repairs
9200 Cody 25A East Pearce Street, Unit 1
Overland Park, Kansas 66214 Richmond Hill, Ontario L4B 2M9
For products purchased outside the United States or Canada please contact your local dealer for applicable warranty information.
In Europe you may also contact Bushnell at:
Bushnell Germany GmbH
European Service Centre
Mathias-Brüggen-Str. 80
D-50827 Köln
GERMANY
Tel: +49 221 995568-0
Fax: +49 221 995568-20
This warranty gives you specific legal rights.
You may have other rights which vary from country to country.
© 2012 Bushnell Outdoor Products
22
Page 23

LASER TROUBLE SHOOTING
If unit does not turn on - LCD does not illuminate:
• Depress FIRE button.
• Check battery condition and if necessary, charge battery.
If unit powers down (display goes blank when attempting to fire the laser):
• The battery charge is too low. Charge the battery using the USB cable and AC adapter for at least 6 hours.
If target range cannot be obtained:
• Make sure LCD is illuminated.
• Make sure that the FIRE button is being depressed.
• Make sure that nothing, such as your hand or finger, is blocking the two front lenses that transmit and receive the laser
pulses.
• Make sure unit is held steady while depressing FIRE button.
NOTE: The last range reading does not need to be cleared before ranging another target. Simply aim at the
new target using the LCD’s circular reticle, depress the FIRE button and hold until the new range reading is
displayed.
GPS TROUBLE SHOOTING
Problem: The backlight does not work.
Turn the Hybrid off for ten (10) seconds and try again. Re-test in a low-light environment.
From the Main Menu, press and release the FIRE button.
Problem: The Hybrid will not turn off.
Press and hold FIRE button for at least ten (10) seconds.
23
Page 24

Problem: There is no GPS data for the selected golf course.
The course files are not loaded on the Hybrid.
Confirm the GPS file was downloaded from www.bushnell.igolf.com.
Confirm mapped GPS points were saved prior to exiting the Map Course page.
Confirm the Hybrid has acquired at least 3 satellites (using SATELLITES on the Settings page menu).
Problem: The distances on the Hybrid are in yards, not meters.
Go to the Settings page menu and set YARD OR METER to “Meters”.
NOTE: For additional FAQ’s please visit our company website at www.bushnellgolf.com, and then select the
Bushnell product that you have.
LEGAL DISCLAIMER
By using this product, you agree that Bushnell Outdoor Products will not be held legally responsible for
any injury or damage to you or any person or property caused by the user’s improper operation and/or
poor judgment while using this product. As with any laser device, it is not recommended to directly view
the emitted laser for long periods of time with magnified lenses.
Note: See the Warranty statement for other limitations on our liability.
ABOUT THE GPS SYSTEM
The Global Positioning System (GPS), a network of 32 satellites orbiting Earth, is operated and maintained
by the U.S. government. This GPS device requires at least 3 satellites to be acquired to accurately
determine your position. Any change made to the system by the government could affect the accuracy
and performance of this product.
24
Page 25

FCC NOTE
This equipment has been tested and found to comply with the limits for a Class B digital device, pursuant to Part 15 of the FCC Rules. These limits are
designed to provide reasonable protection against harmful interference in a residential installation. This equipment generates, uses and can radiate
radio frequency energy and, if not installed and used in accordance with the instructions, may cause harmful interference to radio communications.
However, there is no guarantee that interference will not occur in a particular installation. If this equipment does cause harmful interference to radio
or television reception, which can be determined by turning the equipment off and on, the user is encouraged to try to correct the interference by
one or more of the following measures:
· Reorient or relocate the receiving antenna.
· Increase the separation between the equipment and receiver.
· Connect the equipment into an outlet on a circuit different from that to which the receiver is connected.
· Consult the dealer or an experienced radio/TV technician for help.
Shielded interface cable must be used with the equipment in order to comply with the limits for a digital device pursuant to Subpart B of Part 15 of
FCC Rules. Specifications and designs are subject to change without any notice or obligation on the part of the manufacturer.
FDA EYE SAFETY
Class 1 laser product in accordance with IEC 60825-1:2007.
Complies with 21 CFR 1040.10 and 1040.11 for laser products except for deviations pursuant to Laser Notice No. 50, dated June 24, 2007
Caution: There are no user controls, adjustments or procedures . Performance of procedures other than those specified in this document may result
in access to invisible light.
25
Page 26

26
FrAnçAiS
Page 27

lentille
d’oBjectiF
déclencheur
oculAire
réglAge
dioptrique
MArche/Arrêt
écrAn
ok/coup
hAut et BAS
echAp/Menu
27
Page 28

FrAnçAiS
TOUTES NOS FÉLICITATIONS POUR AVOIR FAIT L’ACQUISITION DE L’APPAREIL HYBRID™
DE BUSHNELL®, LE PREMIER TÉLÉMÈTRE AVEC LASER ET GPS INCLUS, CONÇU POUR JOUER
AU GOLF !
L’Hybrid allie les points forts des technologies de télémétrie GPS et laser dans un seul et unique boîtier compact, afin
de permettre à tout golfeur passionné de bénéficier pleinement des avantages de ces deux technologies. Connaître la
distance exacte de chaque coup vous permettra d’améliorer votre score ainsi que l’ensemble de votre jeu.
Ce manuel vous aidera à vous familiariser avec l’Hybrid. Afin d’en tirer le meilleur parti, veuillez lire cette notice qui
détaille son fonctionnement et ses caractéristiques, et explique comment entretenir un tel instrument de précision. Pour
garantir une performance et une longévité optimales, veuillez lire ces instructions avant d’utiliser l’Hybrid de Bushnell.
Cet appareil de télémétrie laser éprouvé, signé Bushnell, auquel les plus grands joueurs se fient, vous donnera toujours
la distance précise jusqu’à l’emplacement que vous ciblez, et ce, au mètre près.
Le récepteur satellite GPS – préchargé avec les données de plus de 20000 parcours de golf – fournira de manière
instantanée les distances jusqu’à l’entrée, le milieu et la sortie du green. Un rapide coup d’œil à l’écran vous permettra
de choisir le bon club et de partir à la conquête de chaque trou du parcours ! L’appareil s’actualise et passe au trou
suivant automatiquement pendant que vous jouez.
Site Bushnell pour les GPS de golf: REMARQUE IMPORTANTE – A LIRE : Dans les 45 jours suivant la première mise
en service de votre Hybrid (c’est-à-dire la première acquisition d’un signal GPS), rendez vous sur le site www.bushnell.igolf.com
pour l’enregistrer. Cela vous permettra de mettre à jour les données GPS des parcours préchargés dans votre appareil, ainsi que de
charger les nouveaux parcours récemment ajoutés à la base de données iGolf. L’enregistrement est gratuit et ne prend que quelques
minutes. Passé ce délai de 45 jours, si vous n’avez toujours pas enregistré votre appareil, le mode GPS ne sera plus fonctionnel (seule
la mesure laser fonctionnera) et l’écran du GPS affichera un message vous invitant à vous enregistrer en ligne. Une fois enregistré,
l’appareil fonctionnera de nouveau normalement. Pour plus d’informations sur l’enregistrement de votre Hybrid, merci de vous référer au
paragraphe « Enregistrement et mise à jour des données de parcours de golf », en page 44 de cette notice.
28
Page 29

L’AVANTAGE « HYBRID »
Cet appareil de télémétrie laser éprouvé, signé Bushnell, auquel les plus grands joueurs se fient, vous donnera toujours
la distance précise jusqu’à l’emplacement que vous ciblez, et ce, au mètre près.
Sur le parcours, il arrive parfois que votre cible ne soit pas directement visible – lorsque des arbres se trouvent devant
vous et que vous devez frapper la balle. Dans une telle situation, tout ce dont vous avez besoin sont les distances jusqu’à
l’entrée, au milieu et à la sortie du green. Ou, si vous jouez sur un parcours où les voiturettes peuvent être conduites
uniquement sur un chemin et non sur la pelouse, l’appareil GPS peut vous aider à sélectionner le bon club en avance et
vous éviter de devoir retourner à la voiturette !
Lorsque les professionnels expérimentés, les amateurs ou les joueurs collégiaux jouent au golf, ils souhaitent toujours
connaître les distances jusqu’à l’entrée, le milieu et la sortie du green, et pas seulement la distance exacte jusqu’au
drapeau. Grâce aux données fournies par le GPS (distances précises entrée/milieu/sortie de green) et grâce
à la distance précise jusqu’au drapeau fournie par le télémètre laser, les joueurs détiennent toutes les informations
nécessaires pour planifier stratégiquement leur approche, sans que leur coup soit trop long ou trop court. Terminez les
trous en un nombre de coups réduit et prenez conscience de la portée à laquelle votre balle doit être lancée afin d’éviter
les points d’eau qui vous guettent !
La fonction « Shot Distance » (Distance du coup) du GPS vous permet d’évaluer la distance à laquelle une approche
ou un drive a été joué. L’utilisateur peut créer jusqu’à quatre points personnalisés qui sauront se révéler très utiles. En
répertoriant de tels points de référence dans l’appareil, vous aurez la possibilité de savoir dans quelle direction frapper
la balle la prochaine fois que vous jouerez sur ce même parcours, si jamais la visibilité était réduite.
CHARGEMENT DE LA BATTERIE
L’Hybrid est équipé d’une batterie au lithium-ion rechargeable. Celle-ci peut être rechargée en connectant le mini port
USB de l’appareil (situé sur le devant de celui-ci, sous un cache en caoutchouc) au port USB de votre ordinateur, au
29
Page 30
moyen du câble USB fourni avec le produit. Une autre solution pour recharger la batterie consiste à connecter le câble
USB à l’appareil et d’utiliser un adaptateur secteur (inclus avec le produit) pour brancher l’Hybrid à une prise murale
standard de 110 V/220 V. La batterie doit être rechargée pendant au moins six heures avant que l’appareil ne soit utilisé
pour la première fois. Lorsque le télémètre est entièrement rechargé, la mention « BATTERY CHARGING COMPLETED »
(le chargement de la batterie est terminé) s’affichera alors à l’écran. Dans des conditions de fonctionnement normales,
une batterie neuve dure 14 à 16 heures à pleine charge. Cependant, l’autonomie de la batterie diminue à cause d’une
variété de facteurs, tels que la température et l’utilisation du rétroéclairage. Toutes les batteries rechargeables perdent
leur charge effective avec le temps.
L’indicateur de batterie faible à partir de l’écran du télémètre laser : Si le symbole “ ” apparaît à l’écran du télémètre
laser, cela signifie que le niveau de la batterie devient faible et que cette dernière devrait être rechargée.
FONCTIONNEMENT DE BASE
Tout en regardant dans l’oculaire à grossissement de 5x, appuyez une fois sur le déclencheur pour activer l’affichage
à cristaux liquides (LCD). Placez le réticule de visée (situé au centre de l’image) sur la cible, à une distance d’au moins
4,5 m (5 yd). Appuyez sur le déclencheur de nouveau et maintenez-le enfoncé jusqu’à ce que l’évaluation de la
distance s’affiche en bas de l’écran LCD. Les fils croisés autour du réticule de visée indiquent que le laser est en cours de
transmission. Une fois que la mesure de la distance a été acquise, vous pouvez relâcher le déclencheur. Les fils croisés
30
indicAteur de BAtterie FAiBle
Mini port uSB
Page 31

autour du réticule de visée disparaîtront une fois que le déclencheur aura été relâché (le laser n’est alors plus en cours
de transmission) mais l’écran LCD restera actif et affichera la dernière distance mesurée pendant 30 secondes. Vous
pouvez appuyer de nouveau sur le déclencheur à tout moment pour obtenir la distance d’une nouvelle cible. La période
maximale de la transmission (envoi) du laser est de 10 secondes. Pour toute nouvelle mesure, veuillez appuyer de
nouveau sur le bouton.
UTILISER LE TÉLÉMÈTRE LASER
Votre Hybrid™ de Bushnell® comprend un télémètre laser de première qualité qui utilise la technologie numérique et
permet une lecture des distances entre 10 et 915 mètres. Mesurant à peine 6 x 7 x 11 cm, cet appareil de 227 g
évalue les distances de manière précise et efficace, au mètre près. L’Hybrid dispose de la technologie PinSeeker®, d’un
grossissement de 5x et d’optiques traitées multicouches pour assurer une transmission de la lumière, une clarté et une
luminosité parfaites.
FONCTIONNEMENT DE NOTRE TECHNOLOGIE NUMÉRIQUE
Le télémètre laser de l’Hybrid de Bushnell utilise un laser CE de classe 3A conforme aux normes de sécurité oculaire de
la FDA (classe 1). Le microprocesseur numérique de pointe et la puce ASIC (Circuit intégré d’application spécifique)
permettent à chaque fois des relevés de distance instantanés et précis. La technologie numérique sophistiquée calcule
les distances instantanément en mesurant le temps nécessaire à chaque pulsion pour aller du télémètre à la cible et
revenir.
PRÉCISION DE L’ÉVALUATION DES DISTANCES
La précision de l’évaluation des distances de l’Hybrid est de plus ou moins un mètre dans la plupart des cas. La plage
d’évaluation maximale de l’appareil dépend de la réflectivité de la cible. La distance maximale pour la plupart des
objets est de 600 yd / 549 m alors que pour les objets très réfléchissants elle peut atteindre plus de 900 mètres.
Remarque : Vous obtiendrez des distances maximales plus longues ou plus courtes selon les propriétés de réflectivité
d’une cible particulière et les conditions climatiques au moment de la mesure de distance d’un objet.
31
Page 32

La couleur, l’aspect de la surface, la taille et la forme de la cible affectent tous la réflectivité et la portée. La portée des
cibles de couleur vive peut être plus élevée. Le rouge, par exemple, est très réfléchissant et permet des plages de mesure
plus longues que la couleur noire, qui est la couleur la moins réfléchissante. Un fini brillant permet une plage de mesure
plus longue qu’un aspect mat. Une cible de petite taille est plus difficile à évaluer qu’une cible plus grande. L’angle de la
cible a également un effet. Viser une cible à un angle de 90° (lorsque la surface de la cible est perpendiculaire au trajet
du laser émis) permet une longue plage de mesure alors que viser une cible à angle aigu, réduit la mesure. De plus, les
conditions de luminosité ambiante affecteront également les capacités de mesure de l’appareil. Dans des conditions de
faible luminosité (ex. : ciel nuageux), la plage de mesure maximale de l’appareil augmentera. Inversement, les journées
très ensoleillées réduiront la plage de mesure de l’appareil.
GROSSISSEMENTS ET TRAITEMENTS
Le télémètre laser de l’Hybrid de Bushnell dispose d’un grossissement de 5x et d’un optiques traitées multicouches.
Un écran à cristaux liquides (LCD) est placé à l’intérieur du système optique et, lorsqu’activé, il affiche un réticule
pour faciliter la visée, ainsi que des indicateurs pour les unités de distance (yards/mètres) et l’option PinSeeker. Des
petits points noirs inhérents au procédé de fabrication sont visibles à l’intérieur du système optique. Ils constituent
une caractéristique naturelle de l’affichage LCD et ne peuvent pas être complètement éliminés lors du processus de
fabrication. Ils n’affectent pas l’évaluation de la distance de l’appareil.
RÉGLAGE DE L’OCULAIRE
Votre Hybrid est équipé d’un oculaire réglable (+/- 2) qui permet la mise au point de l’affichage LCD relatif à l’image.
Faites simplement tourner l’oculaire jusqu’à ce que le réticule et votre cible apparaissent nettement à votre œil.
INDICATEURS DE L’AFFICHAGE À CRISTAUX LIQUIDES (LCD)
L’écran de votre Hybrid contient des indicateurs qui vous permettront de connaître l’unité de mesure choisie pour
l’évaluation des distances, l’état de la transmission du laser, le mode de visée, et il vous indiquera également lorsque
une cible a été acquise. Les indicateurs de l’affichage à cristaux liquides sont les suivants :
32
Page 33

UNITÉ DE MESURE (paramètres affichés = Y ou M)
L’Hybrid peut afficher la distance calculée en yards ou en mètres. Les indicateurs d’unité de mesure se trouvent en bas
à droite de l’écran LCD. Pour sélectionner l’unité de mesure de votre choix, commencez par éteindre l’appareil. Tout en
regardant dans l’oculaire, maintenez le déclencheur enfoncé pendant environ 5 secondes. Pendant cette période, tous
les segments à cristaux liquides et icônes seront affichés. Une fois ces 5 secondes écoulées, les indicateurs d’unités de
mesure s’afficheront à l’écran et s’alterneront entre yards et mètres. Pour faire votre choix, patientez avant de relâcher
le déclencheur, jusqu’à ce que seulement le « Y » ou le « M » soit visible à l’écran. L’appareil conservera toujours votre
dernier paramétrage en ce qui concerne l’unité de mesure de la portée, sans que vous ayez besoin de reconfigurer cette
option à chaque utilisation.
LASER ACTIF
Les fils croisés autour du cercle de visée indiquent que le laser est en cours de transmission. Une
fois que la mesure de la distance a été acquise, vous pouvez relâcher le déclencheur. Les fils
croisés autour du cercle disparaîtront lorsque le déclencheur sera relâché (c’est-à-dire que le
laser n’est plus en cours de transmission).
PinSeeker
TM
Avez-vous déjà rencontré des problèmes pour obtenir la distance jusqu’au drapeau ? Ce
mode sophistiqué permet une acquisition facile de la distance jusqu’au drapeau sans obtenir
par erreur la distance d’autres cibles en arrière-plan (ex. : des arbres) qui émettent un signal
plus fort. Alignez simplement le réticule de visée sur le drapeau pour connaître la distance
qui vous sépare de lui. Puis, appuyez et maintenez le déclencheur enfoncé et déplacez le
télémètre lentement sur le drapeau jusqu’à ce qu’un cercle entoure l’indicateur du drapeau.
Si le rayon laser reconnaît plus d’un objet (ex. : le drapeau et les arbres en arrière-plan),
la distance jusqu’au drapeau sera affichée et un cercle entourera l’indicateur PinSeeker
informant l’utilisateur que cette distance jusqu’au drapeau (c’est-à-dire : l’objet le plus proche)
33
Page 34

est affichée sur le LCD (comme illustré ici). Il peut y avoir des cas où le rayon laser ne voit qu’un seul objet sur sa
trajectoire. Dans ce cas, la distance sera affichée, mais comme plusieurs objets n’auront pas été détectés, aucun cercle
n’entourera l’indicateur du drapeau.
CONSEIL : Tout en appuyant sur le déclencheur, vous pouvez déplacer l’appareil lentement d’un objet à l’autre, et forcer
ainsi le rayon laser à atteindre plusieurs objets pour vérifier que seuls les objets les plus proches parmi ceux reconnus par
le laser s’affichent.
UTILISER LA SECTION GPS
FONCTIONNALITÉS DES BOUTONS
Veuillez noter que la plupart des boutons du panneau de contrôle du GPS ont plus d’une fonctionnalité.
Bouton Marche-Arrêt
• Allume et éteint l’appareil
• Allume et éteint le rétro-éclairage
Bouton SCREEN (Écran)
• Affiche les distances vers d’autres points d’intérêt
Bouton Haut
• Défile vers le haut
• Sélectionne le trou suivant
Bouton Bas
• Défile vers le bas
• Sélectionne le trou précédent
Bouton OK/SHOT (OK/Coup)
• Sélectionne l’option surlignée
• Active la fonction « Shot Distance » (Distance de coup)
MArche/Arrêt
écrAn
ok/coup
echAp/Menu
hAut et BAS
34
Page 35

Bouton ESC/MENU (Echap/Menu)
• Annule l’opération en cours
• Retourne à l’étape/écran/menu précédent
DÉMARRAGE / UTILISATION DU BOUTON MARCHE-ARRÊT)
Mise en marche
• Maintenir le bouton Marche-Arrêt enfoncé jusqu’à ce que le texte « Bushnell Hybrid » s’affiche (environ 2 secondes).
Arrêt
• Maintenir le bouton Marche-Arrêt enfoncé jusqu’à ce que l’écran s’éteigne*.
Allumage/Arrêt du rétro-éclairage
• Appuyer sur le bouton Marche-Arrêt pour allumer le rétro-éclairage (quel que soit l’écran consulté).
• Appuyer de nouveau sur le bouton Marche-Arrêt pour éteindre le rétro-éclairage.
*REMARQUE : l’appareil s’éteindra automatiquement après 45 minutes si aucun bouton n’est actionné.
Pour modifier ce paramètre, allez dans le menu OPTIONS, sélectionnez SETTINGS (Paramètres) et réglez le paramètre
AUTO OFF (Arrêt auto) sur OFF (Désactivé).
Tout d’abord, assurez-vous que la batterie soit complètement chargée. Si vous l’utilisez pour la première fois, un temps
de chargement de 6 heures minimum doit être respecté (voir « Chargement de la batterie » à la page 29 pour plus
d’informations). Ensuite, assurez-vous que vous êtes à l’extérieur et que vous bénéficiez d’une vue dégagée sur le ciel,
afin de garantir une bonne réception des signaux satellite GPS. Vous êtes désormais prêt(e) à démarrer et utiliser votre
Hybrid.
Maintenez le bouton Marche-Arrêt enfoncé jusqu’à ce que l’écran de démarrage s’affiche, puis relâchez-le.
L’écran du menu principal affichera les options suivantes : PLAY GOLF (Jouer au golf) et OPTIONS (Fig. 1).
Le système de menus de l’Hybrid est simple à utiliser :
35
Page 36

1. Sélectionnez (surlignez) un élément du menu en utilisant les boutons Haut et
Bas.
2. Appuyez sur le bouton OK/SHOT (OK/Coup) pour entrer dans l’élément en
question.
3. Appuyez sur le bouton ESC/MENU (Echap/Menu) pour revenir au menu
précédent.
MODE « PLAY GOLF » (Jouer au golf)
Une fois le texte PLAY GOLF (Jouer au golf) sélectionné, appuyez sur OK. L’affichage indique que l’instrument est en recherche
de parcours locaux (« SEARCHING FOR LOCAL COURSES »). Si, au contraire, le message suivant apparaît : « Not enough
satellites for local search. Press OK to start manual search. » (Nombre de satellites insuffisant pour une recherche locale.
Appuyer sur OK pour lancer une recherche manuelle.), appuyez sur le bouton
OK/SHOT (OK/Coup) et suivez la procédure de MANUAL SEARCH (Recherche
manuelle) décrite dans le paragraphe suivant. Une fois la recherche terminée, une
liste de parcours de golf classés selon leur éloignement s’affiche (Fig. 2).
Sélectionnez le parcours qui vous intéresse dans la liste, puis appuyez sur OK/SHOT
(OK/Coup).
Une option de recherche manuelle est également disponible. Si aucun résultat ne
s’affiche, ou si le parcours souhaité n’apparaît pas dans les résultats (les informations
GPS sur les nouveaux parcours étant ajoutées à la base de données iGolf.com, elles
seront disponibles via votre compte utilisateur), sélectionnez MANUAL SEARCH (Recherche manuelle) et appuyez sur OK/
SHOT (OK/Coup), puis saisissez le nom de du pays en utilisant les boutons Haut et Bas (Fig. 3). Sélectionnez DELETE (Effacer)
et appuyez sur OK/SHOT (OK/Coup) en cas d’erreur. Si vous obtenez plusieurs résultats, sélectionnez le pays dans la liste et
appuyez sur OK/SHOT (OK/Coup), puis saisissez le nom du parcours (au moins les premières lettres) (Fig. 4).
Fig. 1
Fig. 2
36
Page 37

Lorsque vous avez terminé, sélectionnez « SEARCH » (Rechercher) et appuyez sur OK/SHOT (OK/Coup). Vous devriez alors
être en mesure de sélectionner le parcours à partir de la liste de résultats (Fig. 5).
Fig. 3
Une fois le parcours sélectionné, les distances depuis votre position actuelle jusqu’au centre (les chiffres les plus gros), à l’entrée
(F) à la sortie (B) du green correspondant au premier trou du parcours (Fig. 6) s’affichent.
L’Hybrid avancera automatiquement au le trou suivant au fur et à mesure de vos déplacements sur le parcours, mais vous
pouvez, à tout moment, sélectionner manuellement un trou différent du trou en cours, en appuyant sur les boutons Haut et Bas.
Appuyez sur le bouton SCREEN (Écran) pour voir à quelle distance vous vous situez d’autres points du green (Fig. 7). Appuyez
de nouveau sur SCREEN (Écran) pour visualiser l’écran suivant indiquant des points supplémentaires (Fig. 8). Lorsque vous
avez terminé, appuyez de nouveau sur SCREEN (Écran) pour revenir à l’écran Entrée/Milieu/Sortie de green (Fig. 6).
Fig. 4
Fig. 5
37
Page 38

Fig. 6
FONCTION “SHOT DISTANCE” (Distance du coup)
Cette fonction vous permet de vérifier facilement la distance entre deux points. Elle est normalement utilisée pour mesurer
la longueur de votre coup. Pour l’utiliser :
1. Appuyez sur OK/SHOT (OK/Coup) pour activer la fonction Shot Distance (Distance de coup) (Fig. 9). La distance
se mettra automatiquement à jour en fonction de vos déplacements (Fig. 10).
2. Il vous suffit à tout moment d’appuyer sur ESC/MENU (Echap/Menu) pour revenir à l’écran précédent.
3. Appuyez sur OK/SHOT (OK/Coup) pour réactiver la fonction Shot Distance (Distance de coup) et établir une
nouvelle position de départ.
Fig. 7 Fig. 8
38
Fig. 9 Fig. 10
Page 39

MENU PLAY GOLF (Jouer au golf)
En mode Play Golf (Jouer au golf), sur l’affichage de la distance du green, le fait d’appuyer sur ESC/MENU
(Echap/Menu) affichera le menu Play Golf (Jouer au golf) (Fig. 11). Sélectionnez un élément du menu et appuyez
sur OK/SHOT (OK/Coup) pour l’utiliser ou l’afficher :
MAP GOLF HOLE (Cartographie du trou) : Cette fonctionnalité vous permet de modifier les distances données
pour les différents points (Front (Entrée), Center (Milieu), Back (Sortie), etc.) sur le trou/green en cours. Pour
utiliser cette fonctionnalité :
• Sélectionnez le point que vous souhaitez recartographier dans la liste (Fig. 12) et appuyez sur OK/SHOT (OK/
Coup).
• Positionnez-vous à l’endroit souhaité puis appuyez sur OK/SHOT (OK/Coup) pour enregistrer le point (Fig. 13).
Ne bougez pas tant que l’opération n’est pas terminée.
• Répétez cette opération pour tout autre point que vous souhaitez cartographier.
• Une fois l’opération terminée, défilez jusqu’à « Save » (Enregistrer) et appuyez sur OK/SHOT (OK/Coup). L’Hybrid
retiendra ce paramètre dans les données du parcours. La nouvelle distance s’affichera alors à la place de la distance
initiale la prochaine fois que vous jouerez ce parcours.
Fig. 11
Fig. 12
Fig. 13
39
Page 40

SATELLITES (Satellites) : Affiche les positions relatives des satellites GPS disponibles et la force du signal, ainsi qu’une
indication de la qualité générale de réception du signal (STRONG (Forte), GOOD (Bonne), WEAK (Faible}.
BATTERY LEVEL (Niveau de charge de la batterie) : Affiche le niveau de charge restant de la batterie sous forme de
pourcentage.
RESUME PLAY (Reprendre la partie) : Retourne à l’affichage de la distance pour le trou en cours. Tout changement
effectué via l’option MAP GOLF HOLE (Cartographie du trou) remplacera la distance initiale.
EXIT (Quitter) : Quitte le menu PLAY GOLF (Jouer au golf) pour revenir au menu principal.
MENU OPTIONS
À partir du menu principal, sélectionnez (appuyez sur le bouton Bas pour surligner)
OPTIONS (Options) et appuyez sur OK/SHOT (OK/Coup) pour accéder aux
fonctionnalités et paramètres disponibles dans ce menu (Fig. 14) :
MAP COURSE (Cartographie du parcours) : Cette fonctionnalité vous permet de
personnaliser les données existantes du parcours (changer les localisations entrée/
milieu/sortie d’un green, ou ajouter de nouveaux points tels que des bunkers,
obstacles, etc.). Vous pouvez également créer un nouveau fichier de données sur
le parcours (si vous souhaitez cartographier un parcours qui ne figure pas encore
dans la base de données iGolf). Commencez par sélectionner MAP COURSE (Cartographie du parcours) et appuyez
sur OK/SHOT (OK/Coup). Voici comment utiliser la fonctionnalité MAP COURSE (Cartographie du parcours) :
1. Sélectionnez EDIT COURSE (Modifier le parcours) pour personnaliser un parcours existant, ou sélectionnez CREATE
COURSE (Créer un parcours) pour commencer le paramétrage d’un nouvel ensemble de données, puis appuyez sur
OK/SHOT (OK/Coup) (Fig. 15). Choisissez le nom du parcours dans la liste si vous modifiez un parcours existant,
ou sélectionnez NEW COURSE 1 (Nouveau parcours 1) si vous créez un nouveau fichier de données (puis saisissez
le nom du pays).
Fig. 14
40
Page 41

Fig. 15
2. Si vous devez modifier ou créer le nom du parcours, sélectionnez COURSE
NAME (Nom du parcours) et appuyez sur OK/SHOT (OK/Coup). Le nom
doit être différent de ceux de vos autres parcours afin d’éviter tout doublon ou
confusion. Si vous modifiez un parcours existant et que vous ne souhaitez pas
changer son nom, passez à l’étape 4.
3. Sélectionnez chaque caractère à l’aide des boutons Haut et Bas, puis appuyez
sur OK/SHOT (OK/Coup). Pour effacer des caractères, défilez jusqu’à « DELETE
» (Effacer) et appuyez sur OK/SHOT (OK/Coup). Une fois l’opération terminée,
défilez jusqu’à « SAVE » (Enregistrer) et appuyez sur OK/SHOT (OK/Coup).
4. Ensuite, sélectionnez MAP GPS POINTS (Cartographie des points GPS) et
appuyez sur OK/SHOT (OK/Coup) (Fig. 16). Sélectionnez le trou (Fig. 17),
puis le nom proposé par défaut pour le point (Fig. 18) et appuyez sur OK/SHOT
(OK/Coup).
5. Pour modifier un point existant, sélectionnez son nom dans la liste, puis appuyez
sur OK/SHOT (OK/Coup) tout en vous tenant à l’endroit souhaité pour
enregistrer la nouvelle localisation. Lors de la création d’un nouveau point
personnalisé, sélectionnez CSTM 1 (CSTM 2, etc.) et appuyez sur OK/SHOT
Fig. 16
Fig. 17
Fig. 18
Fig. 19
41
Page 42

(OK/Coup). Vous pouvez ensuite sélectionner ABBREVIATIONS (Abréviations) (Fig. 19) puis choisir un élément
dans la liste (CREEK (Crique), SAND (Sable), HZRD (Obstacle, etc.), ou bien lui donner votre nom d’utilisateur (USER
DEFINED). Ensuite, assurez-vous que vous êtes bien positionné(e) à l’endroit voulu et appuyez sur OK/SHOT (OK/
Coup) pour effectuer l’enregistrement. Vous avez également la possibilité d’accepter le nom par défaut (CSTM 1) et
de vous rendre directement à REGISTER POINT (Enregistrer le point).
BATTERY LEVEL (Niveau de charge de la batterie) : Affiche le niveau de charge restant de la batterie sous forme de pourcentage.
SATELLITES (Satellites) : Affiche les positions relatives des satellites GPS disponibles et la force du signal, ainsi qu’une indication de
la qualité générale de réception du signal (STRONG (Forte), GOOD (Bonne), WEAK (Faible).
SETTINGS (Paramètres) : Appuyez sur OK/SHOT (OK/Coup) pour visualiser le sous-menu SETTINGS (Paramètres) qui vous
permet de configurer les préférences utilisateur suivantes pour l’affichage et l’utilisation du GPS. Utilisez les boutons Haut et Bas
pour surligner un élément, puis appuyez sur OK/SHOT (OK/Coup) pour le sélectionner. Effectuez les réglages désirés en utilisant
les boutons Haut et Bas, puis appuyez sur OK/SHOT (OK/Coup) pour confirmer votre configuration et revenir au sous-menu
SETTINGS (Paramètres). Une fois le paramétrage de vos préférences terminé, appuyez sur ESC/MENU (Echap/Menu) pour
sortir du sous-menu SETTINGS (Paramètres) et revenir au menu OPTIONS (Options). Les éléments du sous-menu SETTINGS
(Paramètres) sont :
CONTRAST (Contraste) : Utilisez les boutons Haut et Bas pour régler le contraste de l’affichage et améliorer la visibilité selon
les conditions de luminosité.
AUTO ADVANCE (Avancement automatique) : L’avancement automatique est activé par défaut (ON). Sélectionnez OFF
(Désactivé) si vous ne souhaitez pas que l’Hybrid avance automatiquement au prochain trou du parcours lorsque vous jouez,
et si vous préférez utiliser les boutons Haut et Bas pour sélectionner manuellement le trou à afficher.
42
Page 43

AUTO OFF (Arrêt automatique) : Après 45 minutes d’inactivité (c’est-à-dire qu’aucun bouton n’est actionné), si l’arrêt
automatique est activé (ON), l’appareil s’éteindra automatiquement afin d’éviter de décharger la batterie inutilement. Si
l’arrêt automatique est désactivé (OFF), l’instrument restera allumé sans limite de temps, jusqu’à ce qu’il soit mis hors tension
manuellement.
YARDS/METERS (Yards/Mètres) : Sélectionnez l’unité de distance de votre choix : en yards ou en mètres.
WAAS : Cela vous permet de désactiver la correction de localisation utilisée pour améliorer l’exactitude du GPS aux États-Unis.
Connu sous le nom de WAAS, ce système de satellites et de stations au sol fournit des corrections de signal GPS sur une grande
partie du territoire américain. Selon votre situation géographique, il peut être nécessaire d’ajuster le paramètre WAAS. Par
défaut, ce paramètre est activé (ON).
STABILIZER (Stabilisateur) : Vous permet de sélectionner le mode de rafraîchissement de la position GPS. Si le stabilisateur est
activé (ON), l’Hybrid ne rafraîchit pas les affichages de distance du GPS lorsque l’appareil n’est pas en mouvement (lorsque
vous ne marchez pas). Cela peut s’avérer utile si l’affichage de la distance fluctue à l’arrêt. Par défaut, ce paramètre est activé
(ON).
DEFAULT (Défaillance) : Appuyez sur le bouton OK pour afficher l’option RESTORE ? (Réinitialiser ?). – sélectionnez YES (Oui)
et appuyez de nouveau sur OK pour réinitialiser le GPS Hybrid à son paramétrage de sortie d’usine. Tous les éléments du menu
OPTIONS (tels que listés ci-dessus) retrouveront leur configuration d’origine.
DELETE COURSE (Effacer le parcours) : Cette option supprime un fichier de données relatives à un parcours de golf de la
mémoire interne de l’Hybrid. Sélectionnez DELETE COURSE (Effacer le parcours) dans le menu OPTIONS et appuyez sur OK/
SHOT (OK/Coup). Sélectionnez le parcours de golf dans la liste, puis appuyez sur OK/SHOT (OK/Coup). Pour confirmer la
suppression du parcours, sélectionnez YES (Oui) et appuyez sur OK/SHOT (OK/Coup). Si, ultérieurement, vous avez besoin
de rétablir le parcours supprimé, il suffit de brancher l’appareil à votre ordinateur, de vous connecter à votre compte iGolf et
de le télécharger.
43
Page 44

ABOUT (À propos) : Affiche la version du logiciel.
Enregistrement et mise à jour des données de parcours de golf
Dans les 45 jours suivant la première mise en service de votre Hybrid (c’est-à-dire la
première acquisition d’un signal GPS), rendez vous sur le site www.bushnell.igolf.com
pour l’enregistrer. Cela vous permettra de mettre à jour les données GPS des parcours
préchargés dans votre appareil, ainsi que de charger les nouveaux parcours récemment
ajoutés à la base de données iGolf. L’enregistrement est gratuit et ne prend que quelques
minutes. Passé ce délai de 45 jours, si vous n’avez toujours pas enregistré votre appareil,
le mode GPS ne sera plus fonctionnel (seule la mesure laser fonctionnera) et l’écran du GPS affichera un message vous
invitant à vous enregistrer en ligne. Une fois enregistré, l’appareil fonctionnera de nouveau normalement.
1) Rendez-vous sur www.bushnell.igolf.com et complétez le formulaire d’informations pour enregistrer votre
Hybrid et créer un compte. Le n° de série de votre Hybrid se trouve sous l’appareil. Cliquez sur « Next » (Suivant) à
la fin de l’étape 1 pour accéder à l’étape 2 et terminer l’enregistrement.
2) Au cours de l’étape 3, vous devrez télécharger et exécuter un programme d’installation pour le pilote USB afin
que votre ordinateur puisse reconnaître votre Hybrid. Le programme d’installation est compatible avec Windows XP,
Vista, et Windows 7 (Mac OS n’est pas pris en charge à ce jour). Pour un résultat optimal, nous vous recommandons
d’utiliser Microsoft Internet Explorer comme navigateur.
3) Une fois l’installation du pilote terminée, cliquez sur « Next » (Suivant).
4) Lors de l’étape 4 (facultative) vous pourrez visualiser un fichier .pdf contenant les instructions détaillées pour la mise
à jour du logiciel d’exploitation interne de l’Hybrid. Un bouton (lien internet) intégré au fichier .pdf vous permettra
d’accéder à l’assistant logiciel qui téléchargera la mise à jour. Il vous est recommandé de mettre à jour le logiciel
44
Page 45

d’exploitation interne de votre Hybrid afin de bénéficier des dernières fonctionnalités et améliorations apportées à
son fonctionnement.
5) Une fois l’enregistrement de votre Hybrid et l’installation de votre pilote USB terminées, vous serez redirigé sur la
page internet où vous pourrez rechercher un parcours de golf. Saisissez le nom du parcours de golf (en entier ou
partiellement) puis cliquez sur « Search » (Recherche). Vous serez redirigé vers la page d’informations du parcours
sur le site iGolf.com. Cliquez sur « Download GPS Course File » (Télécharger le ficher GPS du parcours) pour obtenir
les dernières données actualisées du parcours.
CARACTÉRISTIQUES GÉNÉRALES
Dimensions : 5,3 x 6,6 x 10,9 cm
Poids : 227 g
Emplacement pour trépied intégré (pour installation en voiturette)
Comprend un chargeur USB, un câble, une sacoche de transport et une sangle
CARACTÉRISTIQUES DU TÉLÉMÈTRE LASER :
Précision de l’évaluation des distances : +/- 1 yd/m
Portée : 10-1 000 yd / 4.5-914 m
Grossissement : 5x
Diamètre de l’objectif : 24 mm
Traitements optiques : Multicouches
Affichage : LCD
Alimentation : batterie interne au lithium-ion rechargeable (incluse)
Champ de vision : 122m à 1000m
Dégagement oculaire extra long: 21 mm
Pupille de sortie : 4,8 mm
Numéros de brevet : 6,445,444 | 5,612,779 | 6,057,910 | 6,226,077
45
Page 46

NETTOYAGE
Soufflez délicatement pour enlever la poussière ou les débris se trouvant sur les lentilles (ou utilisez une brosse à poils
doux pour lentilles). Pour enlever la saleté ou les traces de doigts, nettoyez avec un chiffon doux en coton, en faisant des
mouvements circulaires. L’utilisation d’un tissu rêche ou un frottement inutile risquerait de rayer la surface de la lentille et
pourrait éventuellement causer des dégâts permanents. Pour un nettoyage plus en profondeur, vous pouvez utiliser des
tissus ou des nettoyants pour lentilles spéciaux ou de l’alcool isopropylique. Appliquez toujours le liquide sur un chiffon
– jamais directement sur la lentille.
GARANTIE LIMITÉE DE UNE ANNÉE
Votre produit Bushnell® est garanti contre les éventuels vices de matière ou de fabrication pendant une année après la date d’achat. En cas de défaut durant la période
de garantie, nous nous réservons la possibilité de réparer, ou d’échanger le produit, sous condition que vous retourniez le produit en port payé. Cette garantie ne couvre
pas les dommages causés par une mauvaise utilisation, une mauvaise manipulation, une mauvaise installation, ou un entretien incorrect effectué par une personne autre
que le Centre de Réparation agréé par Bushnell.
Tout retour effectué dans le cadre de la présente garantie doit être accompagné des éléments ci-dessous :
1) Chèque ou mandat-poste de 10,00 $ pour couvrir les frais de retour par la poste et la manutention
2) Nom et adresse de l’expéditeur du produit
3) Une explication de la défectuosité
4) Preuve de date d’achat
5) Le produit doit être emballé adéquatement dans une boîte d’expédition rigide afin de prévenir les dommages durant le transport, accompagné des frais de port
payé et envoyé à l’adresse suivante :
AUX É.-U. Envoyez à : AU CANADA :Envoyez à :
Bushnell Outdoor Products Bushnell Outdoor Products
Attn.: Repairs Attn.: Repairs
9200 Cody 25A East Pearce Street, Unit 1
Overland Park, Kansas 66214 Richmond Hill, Ontario L4B 2M9
46
Page 47

Veuillez communiquer avec votre détaillant local si les produits ont été achetés ailleurs qu’aux États-Unis ou au Canada pour connaître les détails de la garantie.
En Europe, vous pouvez communiquer avec Bushnell à :
Bushnell Germany GmbH
European Service Centre
Mathias-Brüggen-Str. 80
D-50827 Köln
GERMANY
Tel: +49 221 995568-0
Fax: +49 221 995568-20
Cette garantie vous donne des droits légaux spécifiques.
Vous pouvez avoir d’autres droits qui varient d’un pays ou d’une province à l’autre.
© 2012 Bushnell Outdoor Products
DÉPANNAGE (LASER)
Si l’appareil ne se met pas en marche (l’affichage LCD ne s’allume pas) :
• Enfoncez le déclencheur.
• Vérifiez l’état de la batterie et, si nécessaire, rechargez-la.
Si l’appareil s’éteint (l’affichage s’efface lorsque vous tentez d’activer le laser) :
• La batterie est trop faible. Rechargez la batterie à l’aide du câble USB et d’un adaptateur secteur pendant au moins
6 heures.
Si la distance de la cible ne peut pas être obtenue :
• Vérifiez que l’affichage LCD est allumé.
• Vérifiez que le déclencheur est enfoncé.
• Assurez-vous que rien, pas même votre main ou votre doigt, ne bloque les deux lentilles de devant qui émettent et
reçoivent les impulsions du laser.
• Vérifiez que l’appareil reste immobile pendant que vous appuyez sur le déclencheur.
47
Page 48

REMARQUE : Il n’est pas nécessaire d’attendre la disparition de la dernière distance mesurée avant de viser une autre
cible. Il suffit de viser une autre cible à l’aide du réticule LCD, d’appuyer sur le déclencheur et de le maintenir enfoncé
jusqu’à ce que la lecture de la nouvelle distance apparaisse.
DÉPANNAGE (GPS)
Problème : Le rétro-éclairage ne fonctionne pas.
Mettez l’appareil hors tension pendant 10 secondes et essayez de nouveau. Réessayez dans un environnement de
faible luminosité.
À partir du menu principal, appuyer sur le bouton Marche-Arrêt, puis relâchez-le.
Problème : L’appareil ne veut pas s’éteindre.
Maintenez le bouton Marche-Arrêt enfoncé pendant 10 secondes minimum.
Problème : Aucune donnée GPS n’est disponible pour le parcours de golf sélectionné.
Les fichiers de parcours ne sont pas chargés dans l’Hybrid.
Vérifiez que le fichier GPS a été téléchargé à partir du site www.bushnell.igolf.com.
Vérifiez que les points GPS cartographiés ont été sauvegardés avant de quitter la page MAP COURSE (Cartographie
du parcours).
Vérifiez que l’Hybrid a acquis au moins 3 satellites (en utilisant le paramètre SATELLITES sur la page SETTINGS
(Paramètres}.
Problème : Les distances de l’Hybrid sont en yards et non en mètres.
Rendez-vous sur la page SETTINGS (Paramètres) et sélectionnez « Mètres » dans le paramètre YARD OR METER (Yard
ou mètre).
48
Page 49

REMARQUE : Pour toute question supplémentaire, veuillez consulter la FAQ sur notre site internet www.bushnellgolf.
com, où il vous sera demandé de sélectionner le produit Bushnell dont vous disposez.
AVIS DE NON-RESPONSABILITÉ
En utilisant ce produit, vous reconnaissez que Bushnell Outdoor Products ne peut être tenue légalement responsable en
cas de blessure ou de préjudice subi par vous-même, un tiers ou un bien, en raison d’un usage inapproprié ou d’une
négligence de l’utilisateur lors de l’utilisation du produit. Comme pour tout dispositif à laser, il est déconseillé de regarder
directement les émissions pendant des périodes prolongées avec des lentilles grossissantes.
REMARQUE : Référez-vous à la déclaration de garantie pour prendre connaissance de toute autre limitation de notre
responsabilité.
À PROPOS DU SYSTÈME GPS
Le système de positionnement à capacité globale (GPS - Global Positioning System), un réseau de 32 satellites en orbite
autour de la Terre, est géré et maintenu par le gouvernement américain. Cet appareil GPS requiert au moins l’acquisition
de signaux de 3 satellites pour déterminer précisément votre position. Toute modification effectuée dans le système par
le gouvernement pourrait affecter l’exactitude et la performance de ce produit.
49
Page 50

TRAITEMENT DES DÉCHETS D’ÉQUIPEMENTS ÉLECTRIQUES ET ÉLECTRONIQUES
(En vigueur dans l’Union européenne et autres pays européens ayant des systèmes de collecte des déchets séparés)
Cet équipement contient des composants électriques et/ou électroniques et par conséquent ne doit pas être éliminé en fin
de vie avec les autres déchets ménagers. Vous devez au contraire vous débarasser de ce produit afin qu’il soit recyclé aux
points de collecte respectifs fournis par les communautés locales. Pour vous, ceci est sans frais.
Si l’équipement contient des piles amovibles (rechargeables), celles-ci doivent également être retirées de l’équipement
et, si nécessaire, être éliminées à leur tour conformément aux règlements en vigueur (voir également les commentaires
respectifs dans la notice d’utilisation de ce produit).
De plus amples renseignements à ce sujet sont disponibles auprès de votre mairie, votre compagnie de ramassage
d’ordures locale, ou dans le magasin où vous avez acheté cet équipement.
Cet appareil numérique de la classe B est conforme à la norme NMB-003 du Canada.
SECURITE FDA
Produit laser de classe 1 conforme à IEC 60825-1:2007.
Conforme à 21 CFR 1040.10 et 1040.11 pour les produits laser sauf écart selon Laser Notice numéro 50 du 24 juin 2007
Attention: Il n’y a pas de commandes, de réglages ou de procédures d’utilisateur. L’exécution de procédures non spécifiées dans ce document risque
de donner accès à une lumière invisible.
50
Page 51

eSpAñol
51
Page 52

lente del
oBjetivo
Botón de lAnzAMiento
viSor
AjuSte de
dioptríAS
AceptAr/
pAntAllA
encender/
ApAgAr
52
deSplAzArSe hAciA
ArriBA/ABAjo
golpe
eSc/Menú
Page 53

eSpAñol
ENHORABUENA POR LA COMPRA DE SU BUSHNELL® HYBRID™, EL PRIMER TELÉMETRO
LÁSER CON GPS INTEGRADO PARA JUGAR AL GOLF.
Hybrid combina los puntos fuertes del láser y de la tecnología de telemetría por GPS para entregar “lo mejor de los dos
mundos” en una única y compacta unidad, lo que permite a los ávidos golfistas aprovecharse de su doble capacidad.
El hecho de saber las distancias de cada lanzamiento le ayudará a reducir su puntuación y a mejorar su experiencia
de golf.
Este manual le ayudará a familiarizarse con su nuevo dispositivo de telemetría y a sacarle el máximo partido. Para
ello le explicaremos su manejo y funciones, así como el modo de cuidar este preciso instrumento. Para garantizar un
rendimiento óptimo y una mayor duración, lea estas instrucciones antes de usar su Bushnell Hybrid.
Los profesionales confían en la imperecedera tecnología de telemetría láser de Bushnell que siempre le dará la
distancia más exacta con un margen de error de menos de una yarda de distancia a cualquier blanco al que apunte.
El receptor del satélite GPS con datos precargados de más de 20 000 campos de golf le proporcionará de manera
instantánea las distancias a las zonas delantera, trasera y central del green. En cuanto salga del aparcamiento y eche
un vistazo a la pantalla ya estará listo para sacar el equipo. El dispositivo incluso avanza automáticamente al siguiente
hoyo mientras juega.
Sitio web de Bushnell Golf GPS
AVISO IMPORTANTE - POR FAVOR LEALO: Durante los primeros 45 días una vez haya comprado el dispositivo, vaya a www.
bushnell.igolf.com para registrar su Hybrid, donde podrá actualizar la pre-cargada información de los campos y cargar cualquier
campo que haya sido añadidos recientemente a la base de datos de igolf. Registrarse es gratis y tan solo le llevara unos minutos. Si un
dispositivo, que no haya sido registrado, se usa después de los 45 días de su compra, las funciones del GPS no funcionaran (el medidor
láser no se vera afectado) y muestra un aviso para registrarse on-line (una vez lo actualice se restaurara). Para más información sobre el
registro de su Hybrid por favor vaya a la pagina 68 “Registro y actualización de los campos de Golf”.
53
Page 54

LA VENTAJA DE SER HYBRID
Los profesionales confían en la imperecedera tecnología de telemetría láser de Bushnell que siempre le dará la
distancia más exacta con un margen de error de menos de una yarda de distancia a cualquier blanco al que apunte.
Se dan ocasiones en el campo en las que no tiene el blanco “a la vista”: quizás esté golpeando la pelota desde detrás
de unos árboles y necesita saber las distancias a las zonas delantera, central y trasera. O, si está jugando en un campo
en el que solo puede dejar el carro en el camino, echar un vistazo a la pantalla del GPS le puede ayudar a seleccionar
el palo por adelantado y ahorrarle un viaje al carro.
Cuando alguien juega al golf, ya sea un avezado experto, un principiante o un jugador colegiado, siempre quiere
saber las distancias a las zonas delantera y trasera al green, no solo la distancia a la bandera. El uso de los datos
delanteros/centrales/traseros del GPS junto con la precisión de la distancia a la bandera proporcionará al jugador
la información vital que necesita para planear su estrategia, sin pasarse ni quedarse corto. Ahorre golpes y sepa con
cuanta fuerza tiene que golpear la pelota para evitar el agua que rodea al green.
La función “Shot Distance” (Distancia de lanzamiento) del GPS Hybrid hace extremadamente fácil medir cómo de lejos
se ha enviado un lanzamiento; además, el usuario puede establecer cuatro puntos personalizados que pueden ser una
referencia muy útil en lanzamientos ciegos desde el punto de salida o aproximaciones al volver a jugar a un campo.
CARGA DE LA BATERÍA
El sistema Hybrid contiene una batería interna de iones de litio recargable. La batería se puede cargar conectando el
cable USB incluido al puerto mini USB del dispositivo (ubicado en la parte frontal de la unidad, debajo de una cubierta
de goma) y el puerto USB de su ordenador. De manera alternativa, la batería se puede cargar conectando el cable
USB al dispositivo y utilizando el adaptador incluido para enchufar el cargador del Hybrid a un enchufe estándar de
110/220 V. La batería se debe cargar al menos durante seis horas antes de usar el dispositivo por primera vez. Cuando
esté totalmente cargado, la pantalla mostrará el mensaje “BATTERY CHARGING COMPLETED” (Batería cargada
54
Page 55

completamente). En condiciones normales, una batería nueva durará entre 14 y 16 horas con una carga completa. Sin
embargo, la vida útil de la batería disminuye debido a varios factores, entre los que se incluyen la temperatura y el uso
de la retroiluminación. Todas las baterías recargables pierden duración de la carga efectiva con el tiempo.
Indicador de batería baja en la pantalla del telémetro láser: Si se observa el símbolo “ ” en la pantalla del telémetro
láser, significa que la carga de la batería es baja y que se debe recargar la batería interna.
indicAdor de BAteríA BAjA
FUNCIONAMIENTO BÁSICO
Mientras mira a través del visor de 5x, pulse y suelte el botón de lanzamiento una vez para activar la pantalla de cristal
líquido (LCD). Coloque el objetivo (ubicado en el centro de la imagen) en un blanco que se encuentre al menos a
4,5 metros (5 yardas) de distancia. Mantenga pulsado el botón de lanzamiento hasta que se muestre la lectura de la
distancia en la parte inferior de la pantalla LCD. La mira que rodea al objetivo indica que el láser se está transmitiendo.
Una vez adquiera la distancia, puede soltar el botón de lanzamiento. La mira que rodea al objetivo desaparecerá
cuando suelte el botón de lanzamiento (pues ya no se transmite el láser), pero la pantalla LCD permanecerá activa
y mostrará la última medición de distancia durante los siguientes 30 segundos. Puede volver a pulsar el botón de
lanzamiento en cualquier momento para medir la distancia a un nuevo blanco. 10 segundos es el máximo de tiempo
que se dispara el láser. Para volver a dispararlo, pulse el botón otra vez.
puerto Mini uSB
55
Page 56

USO DEL TELÉMETRO LÁSER
Su Bushnell® HYBRID™ incluye un avanzado telémetro láser que utiliza tecnología digital, lo que permite lecturas de
entre 4.5-914 metros (5-1000 yardas). La unidad mide aproximadamente 5,3 x 6,6 x 10,9 cm (2,1 x 2,6 x 4,3 in) y
pesa 240 gr (8,5 oz). Proporciona un rendimiento excelente con un margen de error de aproximadamente un metro
(una yarda). El HYBRID utiliza tecnología PinSeeker®, con un aumento de 5x y lentes multicapa para proporcionar unos
extraordinarios niveles de transmisión de luz, claridad y brillo.
FUNCIONAMIENTO DE NUESTRA TECNOLOGÍA DIGITAL
El telémetro láser Bushnell HYBRID usa láseres seguros para los ojos (FDA de clase 1 y CE de clase 3A) en su
funcionamiento. El microprocesador digital avanzado del HYBRID y el chip ASIC (circuito integrado de aplicación
específica) dan como resultado unas lecturas instantáneas y precisas siempre. La sofisticada tecnología digital calcula
instantáneamente las distancias midiendo el tiempo empleado por cada impulso en viajar desde el telémetro al blanco
y de vuelta a la unidad.
PRECISIÓN
La precisión en el cálculo de distancias del sistema HYBRID tiene un error de aproximadamente un metro (una yarda)
en la mayoría de situaciones. El alcance máximo del instrumento depende de la reflectividad del blanco. La distancia
máxima con la mayoría de los objetos es de 549 metros (600 yardas), mientras que con objetos de gran reflectividad
alcanza los 914 metros (1000 yardas). Nota: Las distancias máximas podrían aumentar o disminuir en función de las
propiedades reflectantes de cada blanco concreto y de las condiciones ambientales en el momento en que se mida la
distancia a un objeto.
El color, el acabado de la superficie, el tamaño y la forma del blanco afectan a la reflectividad y el alcance. Los
blancos con colores más brillantes se pueden alcanzar desde más lejos. El rojo es muy reflectante, por ejemplo, y
admite alcances más largos que el negro, que es el color menos reflectante. Un acabado con brillo proporciona mayor
alcance que uno mate. Un blanco pequeño es más difícil de medir que uno grande. El ángulo al blanco también influye.
56
Page 57

Apuntar a un blanco con un ángulo de 90 grados (donde la superficie del blanco es perpendicular a la trayectoria
de los impulsos de energía emitidos) proporciona un buen alcance, mientras que un ángulo pronunciado ofrece un
alcance limitado. Además, la luminosidad (por ejemplo, la cantidad de luz solar) afectará a la capacidad de alcance
de la unidad. Con menos luz (si el cielo está nublado, por ejemplo), el alcance máximo de la unidad será mayor. A la
inversa, en días soleados disminuirá el alcance máximo de la unidad.
AUMENTO Y CAPAS
El telémetro láser HYBRID presenta un aumento de 5x y lentes multicapa. Dispone de una pantalla de cristal líquido
(LCD) integrada en el sistema óptico que, al activarse, muestra una retícula para apuntar, indicadores de unidades
métricas (yardas/metros) y el funcionamiento PinSeeker. Las manchas negras de pequeño tamaño que aparecen en
el sistema óptico son inherentes al proceso de fabricación. Son una característica natural de la pantalla LCD y no se
pueden eliminar completamente en el proceso de fabricación. No afectan a la precisión de la medida de distancia de
la unidad.
AJUSTE DEL VISOR
Su sistema HYBRID dispone de un visor ajustable (+/- 2 dioptrías) que permite centrar la pantalla LCD relativa a la
imagen. Simplemente gire el visor hasta que la retícula y el blanco aparezcan nítidamente.
INDICADORES DE LA PANTALLA DE CRISTAL LÍQUIDO (LCD)
La pantalla LCD de su HYBRID incorpora indicadores iluminados que le mostrarán la unidad de medida de la distancia,
el estado de activación del láser, la confirmación de que se ha adquirido un blanco y el modo de apuntado. Los
indicadores de la pantalla funcionan así:
UNIDAD DE MEDIDA (indicador en pantalla=Y o M)
El sistema puede mostrar la distancia en yardas o metros. Los indicadores de unidad de medida se encuentran en la
parte inferior derecha de la pantalla LCD. Para seleccionar su unidad de medida preferida, empiece con el sistema
57
Page 58

apagado. Mientras observa a través del visor, mantenga pulsado el botón de lanzamiento durante al menos 5
segundos. Durante este tiempo, aparecerán todos los elementos e iconos de cristal líquido. Después de los 5 segundos,
verá que los indicadores de unidad de la pantalla empiezan a alternar entre yardas y metros. Para establecer su
preferencia, suelte el botón de lanzamiento cuando solo la “Y” o la “M” se encuentren visibles. El dispositivo recordará
su último ajuste de unidad de medida, por lo que no tendrá que hacer esto antes de cada uso.
LÁSER ACTIVO
La mira que rodea al objetivo indica que el láser se está transmitiendo. Una vez
adquiera la distancia, puede soltar el botón de lanzamiento. La mira que rodea al
círculo desaparecerá cuando suelte el botón de lanzamiento, es decir, el láser ya no
se transmitirá.
PinSeeker™
¿Le cuesta obtener la distancia hasta la bandera? Esta función avanzada la permitirá
una rápida adquisición de la bandera sin el peligro de obtener por equivocación
la distancia a blancos del fondo (es decir, árboles) que tienen una señal más fuerte.
Simplemente alinee la retícula del círculo con la bandera de la que desea saber la
distancia. A continuación, mantenga pulsado el botón de lanzamiento y mueva el láser
lentamente sobre la bandera o el objeto deseado hasta que un círculo rodee el indicador
de la bandera. Si el haz del láser reconoce más de un objeto (es decir, la bandera y
los árboles del fondo), se mostrará la distancia de la bandera y un círculo rodeará el
indicador de PinSeeker informando al usuario de que se está visualizando la distancia a
la bandera (es decir, al objeto más cercano). Habrá ocasiones en las que el haz del láser
solo encuentre un objeto en su camino. En este caso, se mostrará la distancia, pero dado
que no se adquiere más de un objeto, el círculo no rodeará el indicador de la bandera.
58
Page 59

CONSEJO: Mientras presiona el botón de lanzamiento, puede mover el dispositivo lentamente de un objeto a otro y,
de manera intencional, forzar al láser a adquirir varios objetos para verificar que solo está mostrando el más cercano
de los objetos reconocidos por el láser.
USO DE LA SECCIÓN GPS
FUNCIONES DE LOS BOTONES
Observe que la mayoría de los botones del panel de control del GPS tienen más de una función.
Botón de encendido
• Enciende y apaga el dispositivo
• Activa y desactiva la retroiluminación
Botón Screen (Pantalla)
• Muestra distancias a puntos de interés adicionales
Botón arriba
• Desplaza el cursor hacia arriba
• Selecciona el hoyo siguiente
Botón abajo
• Desplaza el cursor hacia abajo
• Selecciona el hoyo anterior
Botón OK/SHOT (Aceptar/Golpe)
• Selecciona la opción resaltada
• Activa la distancia de lanzamiento
Botón ESC/MENU (Escape/Menú)
• Cancela la operación actual
• Vuelve al paso/pantalla/menú anterior
pAntAllA
encender/
ApAgAr
deSplAzArSe hAciA
ArriBA/ABAjo
AceptAr/
golpe
eSc/Menú
59
Page 60

INICIO/MANEJO DEL BOTÓN DE ENCENDIDO
Encendido
• Mantenga pulsado el botón hasta que aparezca “Bushnell Hybrid” (unos 2 segundos).
Apagado
• Mantenga pulsado el botón de encendido hasta que se apague la pantalla*.
Activación y desactivación de la retroiluminación
• Pulse el botón de encendido en cualquier pantalla para activar la retroiluminación.
• Vuelva a pulsar el botón de encendido para desactivar la retroiluminación.
*NOTA: La unidad se apagará automáticamente si no se pulsa ningún botón en 45 minutos.
Para evitarlo, acceda al menú OPTIONS (Opciones), seleccione SETTINGS (Ajustes) y cambie el ajuste AUTO OFF
(Autoapagado) a “OFF” (Desactivado).
Primero, asegúrese de que la batería está completamente cargada. Si lo está utilizando por primera vez, debería
cargarlo durante al menos 6 horas (consulte “Carga de la batería” en la página 54 para obtener más información). A
continuación, asegúrese de estar al aire libre, en una ubicación a cielo abierto, para asegurarse de que obtiene una
buena recepción de la señal de los satélites GPS. Ya está listo para encender y comenzar a usar su sistema Hybrid.
Mantenga pulsado el botón de encendido hasta que visualice la pantalla de inicio y después suéltelo.
Verá la pantalla del menú principal, que tiene únicamente dos elementos: PLAY
GOLF (Jugar al golf) y OPTIONS (Opciones) (Fig. 1).
El uso del menú del sistema Hybrid es simple:
1. Seleccione (resalte) un elemento del menú con los botones arriba/abajo.
2. Pulse el botón OK/SHOT (Aceptar/Lanzamiento) para seleccionar.
3. Pulse el botón ESC/MENU (Escape/Menú) para volver el nivel anterior del
menú.
60
Fig. 1
Page 61

Modo PLAY GOLF (Jugar al golf)
Con PLAY GOLF (Jugar al golf) resaltado, pulse OK (Aceptar). La pantalla
indicará que la unidad está buscando campos locales (SEARCHING FOR
LOCAL COURSES). Si no encuentra ninguno y aparece este mensaje: “Not
enough satellites for local search. Press OK to start manual search.” (No hay
suficientes satélites para realizar una búsqueda local. Pulse Aceptar para iniciar
una búsqueda manual), pulse OK/SHOT (Aceptar/Lanzamiento) y siga al
procedimiento de búsqueda manual (MANUAL SEARCH) que se describe en el
siguiente párrafo. Cuando se complete la búsqueda, aparecerá una lista
de campos de golf en orden de distancia desde su ubicación actual (Fig. 2). Seleccione el campo de golf de la lista y
pulse OK/SHOT (Aceptar/Lanzamiento).
También habrá disponible una búsqueda manual. Si no se encuentra ningún campo, o no aparece el que desea (a
medida que se añada información GPS de nuevos campos a la base de datos de iGolf.com, estará disponible a través
de su cuenta de usuario), seleccione MANUAL SEARCH (Búsqueda manual), pulse OK/SHOT (Aceptar/Lanzamiento)
y, a continuación, introduzca el nombre del estado mediante los botones arriba/abajo (Fig. 3). Seleccione DELETE
(Eliminar) y pulse OK/SHOT (Aceptar/Lanzamiento) si se equivoca. Si obtiene varios resultados, seleccione el estado
de la lista, pulse OK/SHOT (Aceptar/Lanzamiento) y, a continuación, introduzca el nombre del campo (al menos
los primeros caracteres) (Fig. 4). Cuando termine, seleccione “SEARCH” (Buscar) y pulse OK/SHOT (Aceptar/
Lanzamiento). Ya debería poder seleccionar el campo desde los resultados de búsqueda (Fig. 5).
Cuando haya seleccionado el campo, la pantalla le mostrará las distancias desde su ubicación actual hasta el centro
(los números más grandes), la parte delantera (F) y la parte trasera (B) del green del primer hoyo del campo (Fig. 6).
Hybrid avanzará automáticamente al siguiente hoyo a medida que se mueva por el campo, pero puede seleccionar
manualmente un hoyo diferente al actual si pulsa los botones arriba y abajo.
Fig. 2
61
Page 62

Fig. 3 Fig. 4 Fig. 5
Pulse el botón SCREEN (Pantalla) para ver la distancia a otros puntos adicionales del green actual (Fig. 7). Pulse el
botón de pantalla otra vez para ver la siguiente pantalla de puntos adicionales (Fig. 8). Cuando acabe, pulse de nuevo
SCREEN (Pantalla) para volver a la pantalla Center/Front/Back (Central/Delantera/Trasera) (Fig. 6)
.
Fig. 6
FUNCIÓN DISTANCIA DE LANZAMIENTO
Esta función le permite comprobar con facilidad la distancia entre dos puntos cualesquiera y normalmente se utilizará
para medir la distancia de su lanzamiento. Para utilizarla:
Fig. 7 Fig. 8
62
Page 63

Fig. 9
1. Pulse OK/SHOT (Aceptar/Lanzamiento) para activar la función Shot Distance
(Distancia de lanzamiento) (Fig. 9). La distancia se actualizará automáticamente a
medida que se mueve (Fig. 10).
2. Pulse ESC/MENU (Escape/Menú) para volver a la pantalla anterior en
cualquier momento.
3. Pulse OK/SHOT (Aceptar/Lanzamiento) de nuevo para reactivar la función
Shot Distance (Distancia de lanzamiento) y establecer una nueva posición.
MENÚ PLAY GOLF (Jugar al golf)
Cuando se encuentra en modo “Play Golf” (Jugar al golf), en la pantalla de
distancia al green, si pulsa ESC/MENU (Escape/Menú) se mostrará el menú Play
Golf (Fig. 11). Seleccione un elemento del menú y pulse OK/SHOT (Aceptar/
Lanzamiento) para utilizarlo o mostrarlo:
MAP GOLF HOLE (Trazar hoyo de golf): Esta función le permite editar las
distancias dadas para los puntos (partes delantera, central, trasera, etc.) del hoyo/
green actual. Para utilizar esta función:
Fig. 10
Fig. 11
Fig. 12
Fig. 13
63
Page 64

• Resalte el punto que desea volver a trazar en la lista (Fig. 12) y pulse OK/SHOT (Aceptar/Lanzamiento).
• Permanezca en la ubicación que desee y pulse OK/SHOT (Aceptar/Lanzamiento) para registrar el punto (Fig.
13).No se mueva hasta que se complete el proceso.
• Repita el proceso para cualquier otro punto que desee trazar.
• Cuando termine, desplácese hasta “Save” (Guardar) y pulse OK/SHOT (Aceptar/Lanzamiento). Hybrid
guardará este ajuste junto con los datos del campo, por lo que la próxima vez que juegue este campo, se mostrará
su distancia en vez de la original.
SATELLITES (Satélites): Muestra las posiciones relativas y la fuerza de la señal de los satélites GPS disponibles, junto
con una indicación de la calidad de recepción del satélite (“STRONG” [Fuerte], “GOOD” [Buena], “WEAK” [Débil]).
BATTERY LEVEL (NIVEL DE BATERÍA): Muestra el nivel de batería restante en forma de porcentaje.
RESUME PLAY (Volver al juego): Vuelve a la visualización de la distancia del hoyo actual. Se mostrará cualquier
edición que haya realizado en la opción Map Golf Hole (Trazar hoyo de golf) en vez de la original.
EXIT (Salir): Sale del menú Play Golf (Jugar al golf) y vuelve al menú principal.
Menú OPTIONS (Opciones)
Desde el menú principal, seleccione (pulse el botón abajo para resaltar) OPTIONS
(Opciones) y pulse OK/SHOT (Aceptar/Lanzamiento) para acceder a las
siguientes funciones y configuraciones del menú de opciones (Fig. 14):
MAP COURSE (Trazar campo): Esta función le permite personalizar los datos de
los campos existentes (cambiar las ubicaciones de los puntos delantero, trasero y
central o añadir nuevos puntos como búnkers, obstáculos, etc.) o incluso crear un
nuevo archivo de datos de campo (si desea crear un campo que no esté todavía en
Fig. 14
64
Page 65

la base de datos de iGolf). Comience por resaltar “MAP COURSE” (Trazar campo) y presione OK/SHOT (Aceptar/
Lanzamiento). Así se utiliza la función MAP COURSE (Trazar campo):
1. Seleccione EDIT COURSE (Editar campo) para personalizar un campo existente
o CREATE COURSE (Crear campo) para comenzar a configurar un archivo de
datos nuevo y, a continuación, pulse OK/SHOT (Aceptar/Lanzamiento) (Fig.
15). Seleccione el nombre del campo de la lista si está editando uno existente
o seleccione NEW COURSE 1 (Nuevo campo 1) si está creando un archivo
nuevo (e introduzca el nombre del estado).
2. Si necesita editar o crear el nombre del campo, seleccione COURSE NAME
(Nombre del campo) y pulse OK/SHOT (Aceptar/Lanzamiento). Los nombres
deben ser diferentes de entre sí para evitar duplicados y confusiones. Si está
editando un campo existente y no desea cambiar el nombre, salte al paso 4.
3. Mediante los botones de arriba y abajo, desplácese para resaltar cada carácter y pulse OK/SHOT (Aceptar/
Lanzamiento). Para eliminar caracteres, desplácese a “DELETE” (Eliminar) y pulse OK/SHOT (Aceptar/
Lanzamiento). Cuando termine, desplácese hasta “SAVE” (Guardar) y pulse OK/SHOT (Aceptar/Lanzamiento).
4. A continuación, seleccione MAP GPS POINTS (Trazar puntos GPS) y pulse OK/SHOT (Aceptar/Lanzamiento) (Fig.
16). Seleccione el hoyo (Fig. 17), el nombre predeterminado para el punto (Fig. 18) y pulse OK/SHOT (Aceptar/
Lanzamiento).
Fig. 15
Fig. 16 Fig. 17
Fig. 18
65
Page 66

5. Si está editando un punto existente, seleccione el nombre de la lista y, a
continuación, pulse OK/SHOT (Aceptar/Lanzamiento) mientras permanece
quieto en el punto para registrar su nueva ubicación. Cuando cree un nuevo
punto personalizado, seleccione CSTM 1 (CSTM 2, [Personalizado 1, 2, etc.]) y
pulse OK/SHOT (Aceptar/Lanzamiento). Puede seleccionar ABBREVIATIONS
(Abreviaturas) (Fig. 19) y seleccionarlas de la lista (CREEK, SAND, HZRD,
[arroyo, arena, obstáculo, etc.]), o darles el nombre que desee (USER
DEFINED). A continuación, asegúrese de estar en el punto correcto y pulse
OK/SHOT (Aceptar/Lanzamiento) para registrarlo. También puede aceptar
el nombre predeterminado (CSTM 1) e ir directamente a REGISTER POINT
(Registrar punto).
BATTERY LEVEL (NIVEL DE BATERÍA): Muestra el nivel de batería restante en forma de porcentaje.
SATELLITES (Satélites): Muestra las posiciones relativas y la fuerza de la señal de los satélites GPS disponibles, junto
con una indicación de la calidad de recepción del satélite (“STRONG” [Fuerte], “GOOD” [Buena], “WEAK” [Débil]).
SETTINGS (Ajustes): Pulse OK/SHOT (Aceptar/Lanzamiento) para ver el submenú Settings (Ajustes), que le permitirá
establecer las siguientes preferencias de la pantalla y el manejo del GPS. Use los botones arriba y abajo para resaltar
un elemento y, a continuación, pulse OK/SHOT (Aceptar/Lanzamiento) para seleccionarlo. Haga el ajuste que desee
usando arriba y abajo y, a continuación, pulse OK/SHOT (Aceptar/Lanzamiento) para confirmar el ajuste y volver
al submenú Settings (Ajustes). Cuando termine de ajustar sus preferencias, pulse ESC/MENU (Escape/Menú) para
salir del submenú SETTINGS (Ajustes) y volver al menú OPTIONS (Opciones). Los elementos del submenú SETTINGS
(Ajustes) son:
CONTRAST (Contraste): Utilice los botones arriba/abajo para ajustar el contraste de la pantalla y mejorar la
Fig. 19
66
Page 67

visualización en diferentes condiciones lumínicas.
AUTO ADVANCE (Autoavanzar): ON (Activado) de forma predeterminada. Seleccione OFF (Desactivado) si no
desea que Hybrid avance automáticamente al siguiente hoyo del campo a medida que juega y prefiere utilizar los
botones arriba/abajo para seleccionar manualmente el hoyo que se visualiza.
AUTO OFF (Autoapagado): El ajuste predeterminado “ON” (Activado) apagará el dispositivo después de 45
minutos de inactividad (sin pulsación de botones) para evitar una pérdida innecesaria de batería. Si selecciona
“OFF” (Desactivado), la unidad solo se apagará de manera manual.
YARDS/METERS (Yardas/Metros): Seleccione entre las unidades métricas YARD (Yarda) o METER (Metro).
WAAS (Sistema ancho de aumento del área): Esta opción le permite apagar la corrección de ubicación que se
utiliza para mejorar la precisión del GPS dentro de Estados Unidos. Comúnmente conocido como WAAS, este
sistema de satélites y estaciones de control terrestre proporcionan correcciones de la señal GPS en la mayoría de los
EE. UU. Es posible que deba ajustar los valores de WAAS de acuerdo con su ubicación geográfica. La configuración
predeterminada es “ON” (Activado).
STABILIZER (Estabilizador): Le permite seleccionar el modo de actualización de la posición del GPS. Con el
estabilizador en modo “ON” (Encendido), Hybrid no actualizará las lecturas de las distancias del GPS cuando
la unidad no esté en movimiento (cuando no está andando). Esto puede ser útil si experimenta fluctuaciones en las
lecturas de las distancias cuando está parado. La configuración predeterminada es “ON” (Activado).
DEFAULT (Predeterminado): Si pulsa OK (Aceptar), se mostrará “RESTORE?” (¿Restablecer?). Seleccione YES (Sí) y
pulse OK (Aceptar) otra vez para restablecer el GPS Hybrid a sus condiciones predeterminadas de fábrica. Todos
los elementos del menú OPTIONS (Opciones) citados anteriormente volverán a sus ajustes originales.
67
Page 68

DELETE COURSE (Eliminar campo): Esta opción elimina el archivo de un campo de golf de la memoria interna del
sistema Hybrid. Resalte DELETE COURSE (Eliminar campo) en el menú OPTIONS (Opciones) y pulse OK/SHOT
(Aceptar/Lanzamiento). Seleccione el campo de golf de la lista y pulse OK/SHOT (Aceptar/Lanzamiento). Para
confirmar que desea eliminar el campo, seleccione YES (Sí) y pulse OK/SHOT (Aceptar/Lanzamiento). Si más tarde
necesita restablecer los datos de campo eliminados, simplemente conecte Hybrid a su ordenador mediante el puerto
USB, inicie sesión en su cuenta de iGolf y descárguelo.
ABOUT (Acerca de): Muestra la versión del software.
Registro y actualización de datos de campos de golf
Durante los primeros 45 días una vez haya comprado el dispositivo, vaya a www.
bushnell.igolf.com para registrar su Hybrid, donde podrá actualizar la pre-cargada
información de los campos y cargar cualquier campo que haya sido añadidos
recientemente a la base de datos de igolf. Registrarse es gratis y tan solo le llevara unos
minutos. Si un dispositivo, que no haya sido registrado, se usa después de los 45 días de
su compra, las funciones del GPS no funcionaran (el medidor láser no se vera afectado)
y muestra un aviso para registrarse on-line (una vez lo actualice se restaurara).
1) Visite www.bushnell.igolf.com e introduzca sus datos en la página para registrar su sistema Hybrid y crear una
cuenta. Encontrará el número de serie en la parte trasera de la unidad, como se muestra en el ejemplo. Haga clic en
“Next” (Siguiente) al finalizar el paso 1 para continuar hasta el paso 2 y completar su registro.
2) En el paso 3, tendrá que descargar y ejecutar el instalador para el controlador USB, que permitirá que su
ordenador reconozca el sistema Hybrid. El instalador es compatible con Windows XP, Vista y Windows 7 (aún
no es compatible con el sistema operativo Mac). Para obtener mejores resultados, le recomendamos que utilice el
navegador Microsoft Internet Explorer.
3) Cuando se haya completado la instalación del controlador, haga clic en Next (Siguiente).
68
Page 69

4) El paso 4 (opcional) proporciona acceso a un documento pdf con instrucciones detalladas para actualizar el
sistema operativo interno del sistema Hybrid. En el pdf encontrará un botón (enlace a una página web) que le llevará
al asistente de software para que pueda descargar la actualización. Le recomendamos que actualice el software de
su sistema Hybrid para asegurarse de que disfruta de las últimas funciones y mejoras de funcionamiento.
5) Cuando haya registrado su sistema Hybrid e instalado el controlador USB, verá la página web en la que podrá
buscar campos de golf. Introduzca el nombre completo del campo o una parte del mismo y haga clic en “Search”
(Buscar). Aparecerá la página del sitio iGolf.com con la información sobre el campo. Haga clic en “Download GPS
Course File” (Descargar archivo de GPS para campos) para obtener los últimos datos actualizados del campo.
ESPECIFICACIONES GENERALES:
Dimensiones: Medidas: 5,3 x 6,6 x 10,9 cm (2,1 x 2,6 x 4,3 in)
Peso: 225 gr (8,0 oz)
Trípode integrado (para sujetarlo a un carro)
Incluye cargador USB, cable, maletín de transporte y correa
ESPECIFICACIONES DEL TELÉMETRO LÁSER:
Precisión: +/- 1 metro (+/- 1 yarda)
Alcance: 4.5-914 metros (5-1000 yardas)
Aumento: 5x
Diámetro del objetivo: 24 mm
Capas ópticas: Multicapa
Pantalla: LCD
Fuente de alimentación: Batería interna de iones de litio recargable (incluida)
Campo de visión: 122 m a 1000 m (367 pies a 1000 yardas)
Distancia extra larga del ocular al ojo: 21 mm
Pupila de salida: 4,8 mm
Números de patente: 6,445,444 | 5,612,779 | 6,057,910 | 6,226,077
69
Page 70

LIMPIEZA
Sople el polvo o suciedad en las lentes con cuidado (o use un cepillo suave para lentes). Para retirar suciedad o
marcas de dedos, limpie con un paño suave de algodón con movimientos circulares. Usar un paño áspero o frotar
innecesariamente las lentes puede rayar su superficie y causar daños permanentes. Para una limpieza más profunda,
se pueden usar tejidos y líquidos de limpieza para lentes fotográficas o alcohol isopropílico. Aplique siempre el líquido
en el paño; nunca directamente en la lente.
GARANTÍA LIMITADA DE UN AÑO
Se garantiza que su producto Bushnell® estará libre de defectos en los materiales y en la mano de obra durante un año a contar desde la fecha de compra. En el caso
de un defecto cubierto por esta garantía, podremos optar por reparar o reemplazar el producto, siempre que usted lo devuelva con franqueo pagado. Esta garantía
no cubre los daños provocados por el mal uso, el manipuleo inadecuado y la instalación o el mantenimiento no provistos por el Departamento de Servicio Técnico
Autorizado de Bushnell.
Toda devolución realizada en virtud de esta garantía deberá estar acompañada por los detalles indicados a continuación:
1) Un cheque/giro postal por la cantidad de $10,00 para cubrir el costo del franqueo y del manipuleo
2) El nombre y la dirección para devolver el producto
3) Una explicación del defecto
4) Un comprobante de la Fecha de Compra
5) El producto deberá estar bien embalado en una caja de cartón para envíos que posea un exterior firme, con
el fin de evitar daños durante el tránsito, y ser devuelto con franqueo pagado a la dirección indicada más abajo:
EN ESTADOS UNIDOS DE AMÉRICA, Enviar A: EN CANADÁ, Enviar A:
Bushnell Outdoor Products Bushnell Outdoor Products
Attn.: Repairs Attn.: Repairs
9200 Cody 25A East Pearce Street, Unit 1
Overland Park, Kansas 66214 Richmond Hill, Ontario L4B 2M9
70
Page 71

Para productos adquiridos fuera de los Estados Unidos o Canadá, le rogamos ponerse en contacto con su distribuidor local para conocer la información sobre la garantía
que corresponde.
En Europa, también puede ponerse en contacto con Bushnell, en:
Bushnell Germany GmbH
European Service Centre
Mathias-Brüggen-Str. 80
D-50827 Köln
GERMANY
Tel: +49 221 995568-0
Fax: +49 221 995568-20
Esta garantía le otorga derechos legales específicos.
Es posible que usted cuente con otros derechos, que pueden variar según el país.
©2012 Bushnell Outdoor Products
RESOLUCIÓN DE PROBLEMAS DEL LÁSER
Si la unidad no se enciende o la pantalla LCD no se ilumina:
• Suelte el botón de lanzamiento.
• Compruebe el estado de la batería y, sí es necesario, reemplácela.
Si la unidad se apaga (la pantalla se apaga cuando intenta encender el láser):
• La batería está demasiado baja. Cargue la batería con el cable USB o el adaptador de CA al menos durante 6 horas.
Si no puede obtener la distancia al blanco:
• Compruebe que la pantalla LCD esté iluminada.
• Asegúrese de que está pulsado el botón de lanzamiento.
• Asegúrese de que nada, por ejemplo su mano o su dedo, está bloqueando las dos lentes frontales que transmiten y reciben los pulsos
del láser.
• Asegúrese de que la unidad esté estable mientras pulsa el botón de lanzamiento.
NOTA: No es necesario borrar la última lectura de distancia antes de apuntar a otro blanco. Basta con apuntar a otro blanco mediante
la retícula circular de la pantalla LCD y mantener pulsado el botón de lanzamiento hasta que aparezca la nueva lectura en la pantalla.
71
Page 72

RESOLUCIÓN DE PROBLEMAS DEL GPS
Problema: La retroiluminación no funciona.
Apague el sistema Hybrid durante diez (10) segundos e inténtelo de nuevo. Vuelva a intentarlo en un entorno con poca luz.
En el menú principal, pulse y suelte el botón de encendido.
Problema: El sistema Hybrid no se apaga.
Mantenga pulsado el botón de encendido durante al menos diez (10) segundos.
Problema: No hay datos GPS para el campo de golf seleccionado.
Los archivos del campo no están cargados en el sistema Hybrid.
Confirme que el archivo GPS se descargó del sitio www.bushnell.igolf.com.
Confirme que los puntos GPS trazados se guardaron antes de salir de la página Map Course (Trazar campo).
Confirme que el sistema Hybrid ha adquirido al menos 3 satélites (usando SATELLITES [Satélites] en el menú de la página Settings
[Ajustes]).
Problema: Las distancias del sistema Hybrid están en yardas, no en metros.
Vaya al menú de la página Settings (Ajustes) y, en YARD OR METER (Yardas o metros), elija “Meters” (Metros).
NOTA: Para ver más Preguntas frecuentes, visite nuestro sitio web en www.bushnellgolf.com y seleccione el producto Bushnell que
haya adquirido.
EXENCIÓN DE RESPONSABILIDAD LEGAL
Al utilizar este producto acepta que Bushnell Outdoor Products no tiene ninguna responsabilidad legal por lesiones o daños causados
a usted mismo o a otra persona o propiedad debido a un uso inadecuado o a la falta de juicio del usuario al utilizar este producto. Al
igual que con cualquier dispositivo láser, no se recomienda mirar directamente a las emisiones del láser durante largos períodos de
tiempo con lentes de aumento.
NOTA: Consulte la declaración de la garantía para ver otras limitaciones relativas a nuestra responsabilidad.
72
Page 73

ACERCA DEL SISTEMA GPS
El sistema de posicionamiento global (Global Positioning System, GPS) consiste en una red de 32 satélites que orbitan alrededor de
la Tierra, y está gestionado y mantenido por el gobierno de EE. UU. Este dispositivo GPS necesita captar al menos 3 satélites para
determinar su posición con precisión. Cualquier cambio que el gobierno estadounidense realice en el sistema podría afectar a la
precisión y rendimiento de este producto.
ELIMINACIÓN DE EQUIPOS ELÉCTRICOS Y ELECTRÓNICOS
(Aplicable en la UE y otros países europeos con sistemas de recogida separada)
Este equipo contiene elementos eléctricos o electrónicos y por tanto no debe eliminarse con los residuos
domésticos normales. En cambio, debe eliminarse en los correspondientes puntos de recogida para reciclaje
previstos por las comunidades. Para usted resultará gratuito.
Si el equipo incorpora baterías intercambiables (recargables), estas también deben retirarse antes y, si es
necesario, eliminarlas de acuerdo con las regulaciones correspondientes (consulte también los comentarios al
efecto de las instrucciones de estas unidades).
La administración de su comunidad, su empresa local de recogida o la tienda en la que adquirió este equipo
pueden proporcionarle información adicional sobre este tema.
SEGURIDAD DE LOS OJOS SEGÚN LA FDA
Productos láser de Clase 1 de acuerdo con la norma IEC 60825-1:2007.
Cumple con 21 CFR 1040.10 y 1040.11 para los productos láser, excepto en lo relacionado con el aviso de láser N º 50, de fecha 24
de junio 2007.
PRECAUCIÓN: No hay controles, ajustes ni procedimientos que pueda realizar el usuario. La realización de procedimientos distintos de
los aquí especificados puede provocar la exposición a luz láser invisible.
73
Page 74

74
deutSch
Page 75

oBjektivlinSe
AuSlöSer
okulAr
dioptrieeinStellung
ein/AuS
Anzeige
ok/SchlAg
nAch oBen/nAch unten
ABBrechen/Menü
75
Page 76

deutSch
WIR BEGLÜCKWÜNSCHEN SIE ZUM ERWERB DES BUSHNELL® HYBRID™, DEM ERSTEN
INTEGRIERTEN LASER-/GPS-ENTFERNUNGSMESSER FÜR GOLF!
Das Hybrid vereint die Stärken der Laser- und GPS-Messtechnologien zum „Besten beider Welten“ in einem kompakten
Gerät, das dem passionierten Golfer die Vorteile beider Funktionen bietet. Durch das Wissen um die genaue Entfernung
bei jedem Schlag können Sie Ihren Score verringern und Ihr Golfspiel noch mehr genießen.
Diese Bedienungsanleitung erklärt Ihnen dieses neue Entfernungsmessgerät genauer. Sie beschreibt seine Bedienung
und seine Funktionen im Einzelnen und gibt Ihnen Pflegetipps, so dass Sie noch lange viel Freude an Ihrem neuen
Präzisionsgerät haben werden. Lesen Sie diese Anleitung bitte vor dem ersten Einsatz Ihres Bushnell Hybrid, um eine
möglichst optimale Leistung und Lebensdauer zu gewährleisten.
Auf die bewährte Bushnell-Lasermesstechnologie können Sie sich wie die Profis verlassen. Mit einer Messgenauigkeit
von einem Meter gibt sie die präzise Entfernung zu jedem Objekt an, das Sie anvisieren.
Der GPS-Satellitenempfänger mit vorinstallierten Daten von mehr als 20.000 Golfplätzen zeigt Ihnen schon beim
Verlassen des Parkplatzes die Entfernungen zum Anfang, Ende und der Mitte des Grüns an – ein schneller Blick auf das
Display, und schon können Sie den richtigen Schläger herausziehen und loslegen. Noch während Sie spielen, zeigt das
Gerät bereits die Daten zum nächsten Loch an.
Website für das Golf GPS von Bushnell
Wichtige Information: Bitte aufmerksam lesen: Bitte gehen Sie innerhalb von 45 Tagen nach Er werb des Hybrids auf die Seite
www.bushnell.igolf.com, um das Gerät zu registrieren und um alle neue Kursdaten aus der Datenbank upzudaten. Die Registrierung
ist kostenfrei und dauert nur wenige Minuten. Wenn Ihr Produkt innerhalb von 45 Tagen nach dem ersten einschalten nicht registriert wird,
dann wird die GPS Funktion seitens des Geräts abgeschaltet. Auf dem Display erscheint die Aufforderung, den Entfernungsmesser zu
registrieren. Die Laserfunktion bleibt hiervon unbeeinträchtigt. Für weitere Informationen hinsichtlich der Registrierung gehen Sie bitte auf
Seite 92 “Registrierung und Updaten von Golfplatzdaten”.
76
Page 77

DIE VORTEILE DES HYBRID
Auf die bewährte Bushnell-Lasermesstechnologie können Sie sich wie die Profis verlassen. Mit einer Messgenauigkeit
von einem Meter gibt sie die präzise Entfernung zu jedem Objekt an, das Sie anvisieren.
In manchen Fällen ist das Ziel auf dem Golfplatz nicht in Sicht. Vielleicht müssen Sie aus dem Buschwerk abschlagen und
wären froh, wenn Sie die Entfernungen zur Vorder- und Rückseite und zur Mitte wüssten. Oder Sie spielen einen Kurs,
bei dem der Caddie auf den Wegen bleiben muss. Ein Blick auf das GPS-Display sagt Ihnen sofort, welchen Schläger
Sie brauchen, und spart Ihnen so den Weg zurück zum Caddie!
Egal ob erfahrener Golfprofi, Amateur oder Gelegenheitsspieler – alle können die genaue Entfernung zur Vorder- oder
Rückseite des Grüns, nicht nur zur Flagge, gut gebrauchen. Mit den Front-, Center- und Back-Daten des GPS-Empfängers
sowie der präzisen Entfernungsangabe zur Flagge erhält der Spieler alle Informationen, die er zur strategischen Planung
seines Abschlags benötigt, ohne über das Loch hinauszuschießen oder zu kurz zu zielen. Sie sparen sich dadurch nicht
nur Schläge, sondern wissen genau, wie weit Sie den Ball schlagen müssen, damit er nicht im Teich um das Grün landet.
Die GPS-Funktion des Hybrid zur Berechnung der Schlagdistanz erleichtert die Messung der Weite eines erfolgten
Abschlags erheblich. Außerdem kann der Anwender auf dem Hybrid bis zu vier benutzerspezifische Positionen
einstellen, die zum Beispiel bei Blind-Tee-Abschlägen oder beim wiederholten Bespielen eines Kurses hilfreich sein
können.
LADEN DER BATTERIE
Das Hybrid enthält eine eingebaute, aufladbare Lithium-Ionen-Batterie. Das Aufladen der Batterie erfolgt über das
mitgelieferte USB-Kabel, das am Mini-USB-Anschluss des Geräts (unter der Gummiverschlusskappe an der Vorderseite)
und am USB-Anschluss Ihres Computers eingesteckt wird. Alternativ kann die Batterie auch über den im Lieferumfang
Ihres Modells enthaltenen Wechselstromadapter und das USB-Kabel aufgeladen werden. Stecken Sie das Netzteil
hierfür in eine herkömmliche 110/220 V-Steckdose. Vor dem ersten Einsatz des Geräts sollte die Batterie mindestens
77
Page 78

sechs Stunden lang aufgeladen werden. Im vollständig aufgeladenen Zustand zeigt das Display BATTERY CHARGING
COMPLETED (Aufladen der Batterie abgeschlossen) an. Unter normalen Betriebsbedingungen hält eine vollständig
aufgeladene Batterie 14 bis 16 Stunden. Die Lebensdauer der Batterie kann aber aufgrund vielzähliger Faktoren,
beispielsweise aufgrund der Temperatur oder der ständigen Nutzung der Hintergrundbeleuchtung, auch nachlassen.
Alle wiederaufladbaren Batterien verlieren langfristig an effektiver Ladezeit.
Anzeige für niedrige Batterieleistung auf dem Display des Laser-Entfernungsmessers: Wenn das Symbol „ “ im
Display des Laser-Entfernungsmessers angezeigt wird, geht die Batterieleistung zur Neige. Die Batterie sollte in diesem
Fall baldmöglichst aufgeladen werden.
Anzeige Für niedrige BAtterieleiStung
Mini-uSBAnSchluSS
GRUNDLEGENDE BEDIENUNG
Sehen Sie durch das 5fach-Okular und drücken Sie kurz den Auslöser, um die innen liegende Flüssigkristallanzeige
(LCD) zu aktivieren. Richten Sie den Zielkreis (in der Mitte der Anzeige) auf ein mindestens fünf Meter entferntes Objekt
aus. Drücken Sie den Auslöser erneut, halten Sie sie dieses Mal aber so lange gedrückt, bis unten in der Anzeige die
Entfernung erscheint. Das Fadenkreuz um den Zielkreis herum zeigt an, dass der Laser übertragen wird. Das Fadenkreuz
um den Zielkreis verschwindet, sobald Sie den Auslöser loslassen (d. h. der Laser wird nicht länger übertragen), die
78
Page 79

LCD-Anzeige bleibt aber aktiv und zeigt die letzte Entfernungsmessung 30 Sekunden lang an. Sie können den Auslöser
jederzeit nochmals drücken, um ein neues Ziel zu erfassen. Die maximale Zeit, in welcher der Laser ausstrahlt (schießt),
beträgt 10 Sekunden. Um erneut zu schießen, drücken Sie die Taste erneut herunter.
BEDIENUNG DES LASER-ENTFERNUNGSMESSERS
Ihr Bushnell® HYBRID™ verfügt über einen hochpräzisen digitalen Laser-Entfernungsmesser der Spitzenklasse, mit
dem Entfernungen von 5-1000 Yards (4.5-914 Metern) gemessen werden können. Mit seinen Abmessungen von nur
2,1 x 2,6 x 4,3 Inch (5,3 x 6,6 x 10,9 cm) bietet das 8,5 oz (240 g) leichte Gerät eine ausgezeichnete und genaue
Entfernungsmessung von +/- einem Meter. Die PinSeeker®-Technologie, 5fach-Vergrößerung und mehrfach vergütete
Optik des HYBRID gewährleisten eine herausragende Lichtübertragung, Klarheit und Helligkeit.
UND SO FUNKTIONIERT UNSERE DIGITALE TECHNOLOGIE
Der Laser-Entfernungsmesser des Bushnell HYBRID arbeitet mit einem für die Augen unschädlichen Laser der FDA-Klasse
1/CE-Klasse 3A. Der hochentwickelte, digitale Mikroprozessor und der ASIC Chip (Application-Specific Integrated
Circuit) sorgen jederzeit für sofortige und akkurate Messungen. Die ausgefeilte digitale Technologie berechnet
augenblicklich Entfernungen, indem die Zeit gemessen wird, die jeder Impuls für den Weg vom Entfernungsmesser zum
Ziel und wieder zurück benötigt.
GENAUIGKEIT DER MESSUNG
Unter den meisten Bedingungen beträgt die Messgenauigkeit des HYBRID plus/minus einen Meter. Die maximale
Reichweite des Instruments hängt vom Reflexionsvermögen des Ziels ab. Die maximale Entfernung für die meisten
Objekte beträgt 600 Yard / 549 Meter, während die Entfernung für Objekte mit hohem Reflexionsvermögen 1000
Yard / 914 Meter beträgt. Hinweis: Sie können sowohl längere als auch kürzere Maximalentfernungen erzielen. Dies
ist abhängig von den Reflexionseigenschaften des jeweiligen Ziels und den Umgebungsbedingungen zu dem Zeitpunkt,
an dem die Entfernung eines Objekts gemessen wird.
79
Page 80

Die Farbe, Oberflächenausführung, Größe und Form des Ziels beeinflussen allesamt das Reflexionsvermögen und die
Reichweite. Bei farblich hervor stechenden Zielen kann sich die Reichweite des Geräts durchaus erhöhen. Rot weist
zum Beispiel ein hohes Reflexionsvermögen auf und ermöglicht somit größere Reichweiten als die Farbe Schwarz,
deren Reflexionsvermögen am geringsten ist. Eine schimmernde Oberfläche führt zu größeren Reichweiten als eine
matte Oberflächenausführung. Ein kleines Ziel ist schwerer zu messen als ein größeres Ziel. Auch der Winkel zum
Ziel beeinflusst die Leistungsfähigkeit. Das Schießen auf ein Ziel in einem Winkel von 90 Grad (wenn die Zielfläche
rechtwinklig zur Flugbahn der ausgestrahlten Energieimpulse steht) führt zu einer guten Reichweite, während ein steiler
Winkel die Reichweite verkürzt. Weiterhin beeinflussen die Lichtbedingungen (z. B. die Menge des Sonnenlichts) die
Reichweitenfähigkeit des Geräts. Bei weniger Licht (beispielsweise bei bewölktem Himmel) kann sich die maximal
erzielbare Reichweite des Geräts erhöhen. Umgekehrt reduziert sich die maximale Reichweite des Geräts bei sehr
sonnigem Wetter.
Vergrößerung und Vergütungen
Der Laser-Entfernungsmesser des HYBRID bietet eine 5fach-Vergrößerung und eine mehrfach vergütete Optik. Das
Optiksystem verfügt über eine eingebaute Flüssigkristallanzeige (LCD), die nach dem Einschalten ein Fadenkreuz
für die Zielanvisierung sowie Angaben zur Messeinheit (Yard/Meter) und zum PinSeeker-Betrieb anzeigt. Mit dem
Herstellungsprozess gehen kleine, schwarze Punkte einher, die im Optiksystem erscheinen. Dies ist eine natürliche
Charakteristik des LCD und kann beim Herstellungsprozess nicht vollständig eliminiert werden. Diese Punkte
beeinträchtigen nicht die Messleistung des Geräts.
JUSTIEREN DES OKULARS
Ihr HYBRID ist mit einem einstellbaren Okular (im Bereich von +/- 2 Dioptrien) ausgestattet, mit dem sich die LCDAnzeige relativ zum Bild scharf stellen lässt. Drehen Sie einfach am Okular, bis Fadenkreuz und Zielmotiv vor Ihrem
Auge scharf erscheinen.
80
Page 81

FLÜSSIGKRISTALLANZEIGEN (LCD)
Die LCD Ihres HYBRID verfügt über beleuchtete Anzeigen, an denen Sie die Messeinheit, die Aktivität des Lasers, die
Erfassung des Zielobjekts und den Zielmodus ablesen können. Diese LCD-Anzeigen haben folgende Funktionen:
MESSEINHEIT (Anzeige = Y oder M)
Das HYBRID kann die gemessene Entfernung in Yard oder Metern anzeigen. Die Anzeigen für die Maßeinheit befinden
sich im unteren, rechten Bereich der LCD. Zur Auswahl der Messeinheit schalten Sie Ihr HYBRID zunächst aus. Sehen
Sie dann durch das Okular und halten Sie den Auslöser mindestens 5 Sekunden lang
gedrückt. Während dieser Zeit werden alle LCD-Elemente und Symbole angezeigt. Nach
etwa 5 Sekunden werden im Display im Wechsel Yard (Y) und Meter (M) angezeigt. Zur
Einstellung lassen Sie den Auslöser einfach in dem Moment los, in dem die gewünschte
Einheit angezeigt wird. Da sich das Gerät die zuletzt eingestellte Messeinheit merkt,
müssen Sie diese vor dem nächsten Gebrauch nicht erneut einstellen.
AKTIVER LASER
Das Fadenkreuz um den Zielkreis herum zeigt an, dass der Laser übertragen wird. Das
Fadenkreuz um den Zielkreis herum verschwindet wieder, sobald Sie die FIRE-Taste
losgelassen haben (d. h. der Laser wird nicht länger übertragen).
PinSeeker™
Hatten Sie schon Probleme damit, die Entfernung zur Flagge richtig einzuschätzen?
Diese erweiterte Funktion ermöglicht eine einfache Erfassung der Flagge, ohne dass
dabei versehentlich Ziele im Hintergrund (z. B. Bäume) erfasst werden, die eine größere
Signalstärke aufweisen. Richten Sie das Richtkreis-Fadenkreuz einfach auf die Flagge,
deren Entfernung Sie messen möchten. Als nächstes drücken und halten Sie den Auslöser
und fahren mit dem Laser langsam über die Flagge oder das gewünschte Objekt, bis
81
Page 82

ein Kreis den Flaggenanzeiger umgibt. Wenn der Laserstrahl mehr als ein Ziel erkannt hat (d.h. Flagge und Bäume
in Hintergrund), wird die Entfernung zur Flagge angezeigt und ein Kreis kreist den PinSeeker-Anzeiger ein, um dem
Anwender so anzuzeigen, dass die Entfernung zur Flagge (d.h. zum näheren Objekt) auf dem LCD angezeigt wird (wie
unten dargestellt). Es kommt natürlich auch vor, dass der Laserstrahl nur ein Objekt in seinem Pfad erkennt. In diesem
Fall wird die Entfernung angezeigt, da jedoch nicht mehr als ein Objekt erfasst wurde, erscheint kein Kreis um den
Flaggenanzeiger herum.
TIPP: Während Sie den Auslöser gedrückt halten, können Sie das Gerät langsam von Objekt zu Objekt bewegen und
den Laser damit absichtlich veranlassen, mehrere Objekte zu treffen, so dass Sie sicherstellen können, dass Sie nur das
am nächsten gelegene Objekt anzeigen, welches vom Laser erkannt wurde.
BEDIENUNG DES GPS
TASTENFUNKTIONEN
Die meisten Tasten auf dem GPS-Bedienfeld haben mehrere Funktionen.
FIRE-Taste
• Schaltet das Gerät ein & aus
• Schaltet die Hintergrundbeleuchtung ein & aus
Taste SCREEN (Anzeige)
• Zeigt Entfernungen zu zusätzlichen Punkten an
Up-Taste (Nach oben)
• Blättert nach oben
• Wechselt zum nächsten Loch
Down-Taste (Nach unten)
• Blättert nach unten
• Wechselt zum vorherigen Loch
Anzeige
ein/AuS
nAch oBen/unten
ok/SchlAg
ABBrechen/
Menü
82
Page 83

Taste OK/SHOT (OK/Schlag)
• Wählt die markierte Option aus
• Aktiviert die Schlagdistanz
Taste ESC/MENU (Abbrechen/Menü)
• Bricht den aktuellen Vorgang ab
• Wechselt zum vorherigen Schritt/Bildschirm/Menü
BEDIENUNG DER EINSCHALT-/FIRE-TASTE
Einschalten
• Drücken und halten Sie die Einschalttaste, bis die Anzeige „Bushnell Hybrid“ erscheint (nach ca. 2 Sekunden).
Ausschalten
• Drücken und halten Sie die FIRE-Taste, bis sich der Bildschirm abschaltet*.
Hintergrundbeleuchtung An/Aus
• Drücken Sie, egal in welchem Menü Sie sich gerade befinden, auf die FIRE-Taste, um die Hintergrundbeleuchtung
einzuschalten.
• Drücken Sie erneut die FIRE-Taste, um die Hintergrundbeleuchtung auszuschalten.
*Hinweis: Das Gerät schaltet sich nach 45 Minuten Inaktivität automatisch aus.
Diese Einstellung können Sie im Menü OPTIONS (Optionen) ändern. Gehen Sie dafür auf SETTINGS (Einstellungen) und
stellen Sie die Einstellung AUTO OFF (Automatisches Ausschalten) auf OFF (Aus)
Stellen Sie zunächst sicher, dass die Batterie vollständig aufgeladen ist. Vor dem ersten Einsatz des Geräts sollten Sie
die Batterie mindestens 6 Stunden lang aufladen (weitere Infos finden Sie im Abschnitt „Laden der Batterie“ auf Seite
77). Stellen Sie als Nächstes sicher, dass Sie sich unter freiem Himmel befinden, um ein gutes GPS-Satellitensignal zu
empfangen. Jetzt sind Sie für das Einschalten und die Verwendung Ihres Hybrid bereit.
Halten Sie die Einschalttaste gedrückt, bis Sie den Startbildschirm sehen.
83
Page 84

Anschließend sehen Sie das Hauptmenü, das aus zwei Menüpunkten besteht: PLAY
GOLF (Golf spielen) und OPTIONS (Optionen) (Abb. 1).
Die Verwendung des Hybrid-Menüs ist einfach:
1. Wählen (markieren) Sie einen Menüpunkt mithilfe der Tasten NACH OBEN/
NACH UNTEN.
2. Drücken Sie die Taste OK/SHOT (OK/Schlag), um zu dem gewünschten
Menüpunkt zu gelangen.
3. Drücken Sie die Taste ESC/MENU (Abbrechen/Menü), um zum vorherigen
Menü zurückzukehren.
PLAY GOLF-Modus
Wenn PLAY GOLF (Golf spielen) markiert ist, drücken Sie auf OK. Der Bildschirm
zeigt SEARCHING FOR LOCAL COURSES (Nach lokalen Plätzen suchen) an.
Wenn stattdessen diese Meldung erscheint: „Not enough satellites for local
search. (Nicht genügend Satelliten für die lokale Suche vorhanden.) Drücken Sie
auf OK, um die manuelle Suche zu starten. Drücken Sie auf OK/SHOT (OK/
Schlag) und folgen Sie der im nächsten Abschnitt beschriebenen Vorgehensweise
für die MANUAL SEARCH (Manuelle Suche). Sobald die Suche abgeschlossen
ist, wird eine Liste an Golfplätzen, nach Entfernung von Ihrem aktuellen Standort geordnet, angezeigt (Abb. 2). Wählen
Sie den gewünschten Platz aus der Liste aus und drücken Sie die Taste OK/SHOT (OK/Schlag).
Es besteht des Weiteren die Möglichkeit einer manuellen Suche. Wenn keine Plätze gefunden werden oder der von
Ihnen gewünschte Platz nicht aufgelistet ist (wenn GPS-Informationen für einen neuen Platz zu der iGolf.com-Datenbank
hinzugefügt werden, können Sie über Ihr Benutzerkonto darauf zugreifen), gehen Sie auf MANUAL SEARCH (manuelle
Suche) und drücken Sie die Taste OK/SHOT (OK/Schlag) und geben Sie dann den Namen des Landes mithilfe der
Tasten NACH OBEN/NACH UNTEN ein (Abb. 3). Bei einem Fehler wählen Sie DELETE (Löschen) und drücken Sie
Abb. 1
Abb. 2
84
Page 85

OK/SHOT (OK/Schlag). Wenn Sie mehrere Ergebnisse erhalten, wählen Sie das Land aus der Liste und drücken Sie auf
OK/SHOT (OK/Schlag) und geben Sie anschließend den Platznamen ein (mindestens die ersten beiden Buchstaben)
(Abb. 4). Gehen Sie anschließend auf SEARCH (Suche) und drücken Sie OK/SHOT (OK/Schlag). Anschließend
Abb. 3 Abb. 4 Abb. 5
sollten Sie den gewünschten Platz aus der Ergebnisliste der Suche auswählen können (Abb. 5).
Sobald Sie Ihren Platz ausgewählt haben, zeigt der Bildschirm Ihnen die Entfernung von Ihrem aktuellen Standort bis zur
Mitte (größte Zahl), zur Vorderseite (F) und zur Rückseite (B) des ersten Lochs auf dem Platz an (Abb. 6).
Während Sie sich auf dem Platz bewegen, springt das Hybrid automatisch zum nächsten Loch. Mit den Tasten NACH
OBEN/NACH UNTEN können Sie jedoch jederzeit manuell ein anderes Loch auswählen.
Abb. 6
Abb. 7 Abb. 8
85
Page 86

Drücken Sie SCREEN (Anzeige), um die Entfernung zu weiteren Punkten auf dem Grün anzuzeigen (Abb. 7). Drücken
Sie erneut auf SCREEN (Anzeige), um den nächsten Bildschirm mit zusätzlichen Punkten anzuzeigen (Abb. 8). Drücken
Sie abschließend ein letztes Mal auf SCREEN (Anzeige), um zum Bildschirm mit der Anzeige der Entfernungen zur Mitte
bzw. zur Vorder-/Rückseite zurückzukehren (Abb. 6).
FUNKTION FÜR DIE SCHLAGWEITE
Mithilfe dieser Funktion können Sie auf einfache Weise die Entfernung zwischen zwei beliebigen Punkten feststellen.
Beim normalen Einsatz wird diese Funktion für die Messung der Schlagdistanz verwendet. Verwendung:
1. Drücken Sie OK/SHOT (OK/Schlag), um die Funktion für die Messung der Schlagdistanz zu aktivieren (Abb. 9). Die
Entfernung wird, während Sie sich bewegen, automatisch aktualisiert (Abb. 10).
2. Mit ESC/MENU (Abbrechen/Menü) können Sie jederzeit zum vorherigen Bildschirm zurückkehren.
3. Drücken Sie erneut auf OK/SHOT (OK/Schlag), um die Funktion zur Messung der Schlagdistanz wieder
einzuschalten und eine neue Startposition festzulegen.
Abb. 9
Abb. 10
Abb. 11
86
Page 87

PLAY GOLF-Menü
Wenn Sie sich im Modus PLAY GOLF (Golf spielen) in der Distanz-Anzeige befinden, drücken Sie ESC/MENU
(Abbrechen/Menü), um das PLAY GOLF-Menü anzuzeigen (Abb. 11). Wählen Sie einen Menüpunkt aus und drücken
Sie auf OK/SHOT (OK/Schlag), um diesen zu verwenden oder anzuzeigen:
MAP GOLF HOLE (Loch erfassen): Diese Funktion ermöglicht es Ihnen, die für die verschiedenen Punkte (Vorderseite,
Mitte, Rückseite etc.) angegebenen Entfernungen für das aktuelle Loch zu bearbeiten. Verwendung:
• Markieren Sie in der Liste den Punkt, den Sie neu festlegen möchten (Abb. 12)
und drücken Sie OK/SHOT (OK/Schlag).
• Stellen Sie sich an den gewünschten Punkt und drücken Sie OK/SHOT (OK/
Schlag), um die Position einzutragen (Abb. 13). Bewegen Sie sich erst wieder,
wenn der Vorgang abgeschlossen ist.
• Wiederholen Sie diesen Vorgang für jeden Punkt, den Sie aufzeichnen möchten.
• Gehen Sie danach auf SAVE (Speichern) und drücken Sie OK/SHOT (OK/
Schlag). Das Hybrid behält diese Einstellung zusammen mit den Kursdaten
bei, so dass beim nächsten Spiel auf diesem Platz Ihre bearbeitete Entfernung
anstelle der ursprünglichen Entfernung angezeigt wird.
SATELLITEN: Zeigt die relativen Positionen der verfügbaren Satelliten
und die Signalstärke zusammen mit der Anzeige der Gesamtqualität des
Satellitenempfangs (STRONG (Stark), GOOD (Gut), WEAK (Schwach} an.
BATTERIESTAND: Zeigt die noch verbleibende Batterieleistung in Prozent an.
RESUME PLAY (Spiel fortsetzen): Wechselt zur Entfernungsanzeige für das aktuelle
Abb. 12
Abb. 13
87
Page 88

Loch. Alle von Ihnen durchgeführten Änderungen über die Option MAP GOLF
HOLE (Loch erfassen) werden anstelle der ursprünglich festgelegten Entfernung
angezeigt.
EXIT (Beenden): Beendet das PLAY GOLF-Menü und kehrt zum Hauptmenü zurück.
Menü OPTIONS (Optionen)
Wählen Sie im Hauptmenü (drücken Sie zur Markierung die Taste NACH UNTEN)
OPTIONS (Optionen) aus und drücken Sie auf OK/SHOT (OK/Schlag), um auf
die folgenden Funktionen und Eigenschaften im Menü OPTIONS (Optionen)
zuzugreifen (Abb. 14):
MAP COURSE (Golfplatz kartieren): Diese Funktion ermöglicht es Ihnen, die
bestehenden Platzdaten anzupassen (die Lochpositionen zu ändern oder neue
Punkte, wie Bunker und Gefahrenzonen, hinzuzufügen) oder eine komplett neue
Platzdatendatei zu erstellen (wenn Sie einen Platz kartieren möchten, der noch
nicht in der iGolf-Datenbank enthalten ist). Markieren Sie zunächst MAP COURSE
(Golfplatz kartieren) und drücken Sie OK/SHOT (OK/Schlag). Und so wird die
Funktion MAP COURSE (Golfplatz kartieren) verwendet:
1. Verwenden Sie die Option EDIT COURSE (Platz bearbeiten), um einen
bestehenden Platz anzupassen, oder gehen Sie auf CREATE COURSE (Platz
erstellen), um einen komplett neuen Datensatz anzulegen, und drücken Sie
dann OK/SHOT (OK/Schlag)(Abb. 15). Wenn Sie einen bestehenden Platz
bearbeiten, wählen Sie dessen Namen aus der Liste aus, wenn Sie einen neuen
Datensatz anlegen, wählen Sie NEW COURSE 1 (Neuer Platz 1) aus und
geben Sie dann das Land ein.
88
Abb. 14
Abb. 15
Abb. 16
Page 89

2. Wenn Sie den Platznamen bearbeiten oder neu erstellen möchten, wählen Sie COURSE NAME (Platzname) aus
und drücken Sie OK/SHOT (OK/Schlag). Zur Vermeidung von Verwechslungen sollten die Namen der Golfplätze
eindeutig sein. Wenn Sie einen bestehenden Platz bearbeiten, dessen Namen aber nicht ändern möchten, fahren
Sie mit Schritt 4 fort.
3. Blättern Sie mithilfe der Tasten NACH OBEN/NACH UNTEN, um jedes Zeichen zu markieren, und drücken Sie
danach OK/SHOT (OK/Schlag). Zum Löschen von Zeichen blättern Sie zu DELETE (Löschen) und drücken Sie OK/
SHOT (OK/Schlag). Gehen Sie danach auf SAVE (Speichern) und drücken Sie OK/SHOT (OK/Schlag).
4. Wählen Sie als nächstes MAP GPS POINTS (GPS-Punkte kartieren) aus und drücken Sie OK/SHOT (OK/Schlag)
(Abb. 16). Wählen Sie das Loch (Abb. 17) und die Standardbezeichnung für die Position (Abb. 18) aus und drücken
Sie dann OK/SHOT (OK/Schlag).
5. Wenn Sie einen bestehenden Punkt bearbeiten, wählen Sie dessen Namen aus der Liste aus, stellen Sie sich an die
Position des Punktes und drücken Sie dort OK/SHOT (OK/Schlag), um die neue Position einzutragen. Wenn Sie
einen benutzerspezifischen Punkt erstellen, wählen Sie CSTM 1 (Benutzerspezifisch1), CSTM 2 (Benutzerspezifisch2)
usw. aus und drücken Sie OK/SHOT (OK/Schlag). Danach können Sie ABBREVIATIONS (Abkürzungen) (Abb.
19) und eine gängige Bezeichnung (CREEK (Bach), SAND, HZRD (Hindernis) usw.) auswählen oder einen eigenen
benutzerdefinierten Namen eingeben. Stellen Sie sich danach an die Position des Punktes und drücken Sie OK/
Abb. 17 Abb. 18
Abb. 19
89
Page 90

SHOT (OK/Schlag), um den neuen Punkt einzutragen. Sie können auch einfach die Standardbezeichnung CSTM 1
(Benutzerspezifisch1) übernehmen und direkt zum Menüpunkt REGISTER POINT (Position eintragen) gehen.
BATTERIESTAND: Zeigt die noch verbleibende Batterieleistung in Prozent an.
SATELLITEN: Zeigt die relativen Positionen der verfügbaren Satelliten und die Signalstärke zusammen mit der Anzeige
der Gesamtqualität des Satellitenempfangs (STRONG (Stark), GOOD (Gut), WEAK (Schwach} an.
SETTINGS (Einstellungen): Drücken Sie die Taste OK/SHOT (OK/Schlag), um das Untermenü der Einstellungen
anzuzeigen. Dort können Sie die folgenden Benutzereinstellungen für den Bildschirm und den GPS-Betrieb einrichten.
Verwenden Sie die Tasten NACH OBEN/NACH UNTEN, um ein Element zu markieren. Drücken Sie anschließend
auf die Taste OK/SHOT (OK/Schlag), um dieses auszuwählen. Führen Sie die gewünschten Änderungen mit den
Tasten NACH OBEN/NACH UNTEN durch und drücken Sie anschließend auf die Taste OK/SHOT (OK/Schlag),
um Ihre Einstellungen zu bestätigen und zum Untermenü der Einstellungen zurückzukehren. Drücken Sie, nachdem
Sie Ihre Einstellungen vorgenommen haben, auf die Taste ESC/MENU (Abbrechen/Menü), um das Untermenü
SETTINGS (Einstellungen) zu verlassen und zum Menü OPTIONS (Optionen) zu wechseln. Das Untermenü SETTINGS
(Einstellungen) beinhaltet folgende Menüpunkte:
CONTRAST (Kontrast): Verwenden Sie die Tasten NACH OBEN/NACH UNTEN, um den Bildschirmkontrast und die
Ansicht den verschiedenen Lichtverhältnissen anzupassen.
AUTO ADVANCE (Automatisches Weiterspringen): Diese Funktion ist standardmäßig auf ON (Ein) gestellt. Wählen
Sie OFF (Aus), wenn Sie nicht möchten, dass das Hybrid während des Spiels automatisch zum nächsten Loch auf dem
Platz weiterspringt und Sie lieber die Tasten NACH OBEN/NACH UNTEN verwenden möchten, um das angezeigte
Loch manuell auszuwählen.
90
Page 91

AUTO OFF (Automatisches Ausschalten): Diese Funktion ist standardmäßig auf ON (Ein) gestellt und schaltet das
Gerät nach 45 Minuten Inaktivität (wenn keine Tasten gedrückt werden) aus, um unnötigen Batterieverbrauch zu
vermeiden. Wählen Sie OFF (Aus), wenn das Gerät so lange in Betrieb sein soll, bis es manuell ausgeschaltet wird.
YARDS/METERS (Yards/Meter): Wählen Sie als Maßeinheit zur Entfernungsbestimmung YARD oder METER aus.
WAAS: Diese Funktion ermöglicht es Ihnen, die Standortkorrektur, die innerhalb der USA für eine bessere GPSGenauigkeit verwendet wird, auszuschalten. Dieses gemeinhin als WAAS bekannte System, bestehend aus Satelliten
und Bodenstationen, korrigiert das GPS-Signal in vielen Regionen der USA. Sie müssen die WAAS-Einstellungen
möglicherweise an den geografischen Standort anpassen. Diese Funktion ist standardmäßig auf ON (Ein) gestellt.
STABILIZER (Stabilisator): Ermöglicht es Ihnen, den Aktualisierungsmodus für die GPS-Position auszuwählen. Ist
der Stabilisator auf ON (Ein) gestellt, aktualisiert das Hybrid die GPS-Entfernungsanzeigen nicht, wenn das Gerät
nicht bewegt wird (wenn Sie stehenbleiben). Das kann besonders nützlich sein, wenn die Entfernungsanzeigen
schwanken, obwohl Sie sich nicht bewegen. Diese Funktion ist standardmäßig auf ON (Ein) gestellt.
DEFAULT (Standard): Durch das Drücken auf OK erscheint die Anzeige „RESTORE?” (Zurücksetzen?) - Gehen Sie auf
YES (Ja) und drücken Sie erneut OK, um das Hybrid auf seine Werkseinstellungen zurückzusetzen. Alle Menüpunkte
im Menü OPTIONS (Optionen) (wie unten aufgeführt) werden auf Ihre Standardeinstellungen zurückgesetzt.
PLATZ LÖSCHEN: Mit dieser Option wird eine Datei mit Golfplatzdaten aus dem internen Speicher des Hybrid
gelöscht. Markieren Sie die Option DELETE COURSE (Platz löschen) im Menü OPTIONS (Optionen) und drücken
Sie auf die Taste OK/SHOT (OK/Schlag). Wählen Sie den Golfplatz aus der Liste aus und drücken Sie auf die
Taste OK/SHOT (OK/Schlag). Bestätigen Sie den Löschvorgang mit YES (Ja) und drücken Sie auf die Taste OK/
SHOT (OK/Schlag). Wenn Sie die gelöschten Platzdaten zu einem späteren Zeitpunkt wiederherstellen möchten,
verbinden Sie das Hybrid einfach über den USB-Anschluss mit Ihrem Computer, melden Sie sich bei Ihrem iGolf-
91
Page 92

Konto an und laden Sie die gewünschten Platzdaten herunter.
ABOUT (Infos): Zeigt die Softwareversion an.
Registrieren und Aktualisieren von Golfplatzdaten
Gehen Sie bitte innerhalb 45 Tagen nach Kauf des Produktes auf www.bushnell.
igolf.com um Ihren Hybrid zu registrieren und um alle verfügbaren Plätze auf
Ihren Entfernungsmesser zu übertragen. Die Registrierung ist kostenfrei und dauert
nur wenige Minuten. Wenn Ihr Produkt innerhalb von 45 Tagen nach dem ersten
einschalten nicht registriert wird, dann wird die GPS Funktion seitens des Geräts
abgeschaltet. Auf dem Display erscheint die Aufforderung, den Entfernungsmesser
zu registrieren. Die Laserfunktion bleibt hiervon unbeeinträchtigt.
1) Geben Sie unter www.bushnell.igolf.com Ihre Daten ein, um Ihr Hybrid zu registrieren und ein Konto
einzurichten. Die Seriennummer des Hybrid finden Sie an dessen Rückseite, wie im Beispiel dargestellt. Klicken Sie
am Ende von Schritt 1 auf „Next“ (Weiter), um mit Schritt 2 fortzufahren und Ihre Registrierung abzuschließen.
2) In Schritt 3 laden Sie ein Installationsprogramm für den USB-Treiber herunter, der es dem Computer ermöglicht,
Ihr Hybrid zu erkennen. Das Installationsprogramm wird anschließend ausgeführt. Das Installationsprogramm ist mit
Windows XP, Vista und Windows 7 kompatibel (Mac OS wird derzeit noch nicht unterstützt). Für beste Ergebnisse
wird empfohlen, Microsoft Internet Explorer als Browser zu verwenden.
3) Nachdem der Treiber installiert wurde, klicken Sie auf „Next” (Weiter).
4) In Schritt 4 (optional) erhalten Sie Zugriff auf ein PDF-Dokument mit ausführlichen Anweisungen zum
Aktualisieren der Betriebssoftware des Hybrid. Die PDF enthält eine Schaltfläche (einen Weblink), über die Sie
zum Softwareassistenten gelangen, der das Update herunterlädt. Es wird empfohlen, die Software des Hybrid zu
aktualisieren, damit Sie stets über die neuesten Funktionen und Verbesserungen verfügen.
92
Page 93

5) Nachdem Sie Ihr Hybrid registriert und den USB-Treiber installiert haben, gelangen Sie zu einer Webseite, auf der
Sie nach einem Golfplatz suchen können. Geben Sie den vollständigen Namen des Golfplatzes ein und klicken Sie
auf „Search“ (Suchen). Anschließend gelangen Sie zu den Platzinformationen auf iGolf.com, wo Sie durch Klicken
auf „Download GPS Course File“ (GPS-Platzdatei herunterladen) die aktuellen Platzdaten abrufen können.
TECHNISCHE DATEN (ALLGEMEIN):
Abmessungen: Maße: 2,1 x 2,6 x 4,3 Inch (5,3 x 6,6 x 10,9 cm)
Gewicht: 8,0 oz (230 g).
Eingebauter Stativanschluss (zur Befestigung am Caddie)
Mit USB-Ladegerät, USB-Kabel, Transporttasche und Gurt
TECHNISCHE DATEN (LASER-ENTFERNUNGSMESSER):
Entfernungsgenauigkeit: +/-1 Yard
Bereich: 5-1000 Yard / 4.5-914 Meter
Vergrößerung: 5x
Objektivdurchmesser: 24 mm
Optische Vergütung: Mehrfach vergütet
Anzeige: LCD
Energiequelle: eingebaute, aufladbare Lithium-Ionen-Batterie (im Lieferumfang enthalten)
Sichtfeld: 367 ft. @ 1000 yd / 122 m @ 1000 m
Extra-langer Augenabstand: 21 mm
Austrittspupille: 4,8 mm
Patentnummern: 6,445,444 | 5,612,779 | 6,057,910 | 6,226,077
93
Page 94

REINIGUNG
Blasen Sie sanft Staub oder Fremdkörper von den Linsen (oder verwenden Sie einen weichen Pinsel für die Linse).
Zum Entfernen von Schmutz oder Fingerabdrücken verwenden Sie ein weiches Baumwolltuch und reiben damit
kreisförmig. Die Verwendung eines rauen Tuches oder ein unnötiges Rubbeln kann die Objektivoberfläche zerkratzen
und zu dauerhaften Schäden führen. Für eine gründlichere Reinigung können Sie fotografische Objektivtücher und ein
Reinigungsfluid für den Fotobedarf oder Isopropylalkohol verwenden. Geben Sie das Fluid stets auf das Reinigungstuch
- niemals direkt auf die Linse.
GEWÄHRLEISTUNGSFRIST EIN JAHR
Wir garantieren für ein Jahr ab Erwerbsdatum, dass Ihr Bushnell® -Produkt frei von Material- und Verarbeitungsfehlern ist. Bei allen Schäden unter dieser Garantie
behalten wir uns nach eigenem Ermessen vor, das Produkt entweder zu reparieren oder zu ersetzen, vorausgesetzt, dass Sie das Produkt frei Haus an uns senden. Diese
Garantie deckt keine Schäden ab, die durch Zweckentfremdung, falsche Behandlung, Installation oder Instandhaltung durch andere Personen als die des von Bushnell
autorisiertem Kundenservice durchgeführt wurden.
Jede Rücksendung innerhalb der Garantiezeit muss die nachfolgend aufgeführten Punkte beinhalten:
1. Einen Scheck/eine Zahlungsanweisung in Höhe von 10 USD zur Deckung von Porto und Bearbeitungskosten.
2. Name und Adresse für die Produktrücksendung
3. Erläuterung des Defekts
4. Beleg des Erwerbsdatums
5. Das Produkt sollte in einem robusten Versandpaket verpackt sein, um Beschädigungen während des Transports zu vermeiden, und sollte mit Rückporto versehen
sein, vorausbezahlt an die folgende Adresse:
Versandadresse in den USA: Versandadresse in KANADA:
Bushnell Outdoor Products Bushnell Outdoor Products
Attn.: Repairs Attn.: Repairs
9200 Cody 25A East Pearce Street, Unit 1
Overland Park, Kansas 66214 Richmond Hill, Ontario L4B 2M9
94
Page 95

Für Produkte, die außerhalb der USA oder Kanada gekauft wurden, wenden Sie sich bitte wegen der geltenden Garantieinformationen an Ihren Händler vor Ort:
In Europa können Sie Bushnell® ebenfalls unter folgender Anschrift kontaktieren:
Bushnell Germany GmbH
European Service Centre
Mathias-Brüggen-Str. 80
D-50827 Köln
GERMANY
Tel: +49 221 995568-0
Fax: +49 221 995568-20
Diese Gewährleistung beinhaltet spezifische gesetzliche Rechte.
Zusätzlich enthaltene Rechte sind von Land zu Land unterschiedlich.
©2012 Bushnell Outdoor Products
FEHLERBEHEBUNG (LASER)
Wenn sich das Gerät nicht einschalten lässt – LCD leuchtet nicht:
• Drücken Sie den Auslöser.
• Prüfen Sie den Ladezustand der Batterie und laden Sie die Batterie bei Bedarf auf.
Wenn das Gerät an Leistung verliert (Display zeigt nichts an, wenn versucht wird, den Laser einzuschalten):
• Die Batterieleistung geht zur Neige. Laden Sie die Batterie über das USB-Kabel und den Wechselstromadapter mindestens 6 Stunden
lang auf.
Wenn die Zieldistanz nicht erreicht werden kann:
• Prüfen Sie, ob die LCD-Anzeige leuchtet.
• Stellen Sie sicher, dass den Auslöser gedrückt ist.
• Achten Sie darauf, dass die Objektivlinsen an der Vorderseite des Geräts, durch die die Laserimpulse ausgegeben und erfasst werden,
nicht verdeckt werden (auch nicht durch Ihre Hand oder Ihren Finger).
• Achten Sie darauf, das Gerät ruhig zu halten, während den Auslöser gedrückt wird.
HINWEIS: Die letzte Bereichsanzeige muss nicht gelöscht werden, bevor Sie ein neues Ziel anvisieren. Visieren Sie das neue Ziel einfach
mithilfe des Fadenkreuzes der LCD-Anzeige an und drücken Sie den Auslöser so lange, bis die neue Entfernung angezeigt wird.
95
Page 96

FEHLERBEHEBUNG (GPS)
Problem: Die Hintergrundbeleuchtung funktioniert nicht.
• Schalten Sie das Hybrid für zehn (10) Sekunden aus und versuchen Sie es erneut. Versuchen Sie die Hintergrundbeleuchtung bei
schwachen Lichtverhältnissen erneut einzuschalten.
• Drücken Sie im Hauptmenü die FIRE-Taste und lassen Sie die Taste wieder los.
Problem: Das Hybrid kann nicht mehr ausgeschaltet werden.
• Drücken Sie auf die FIRE-Taste und halten Sie sie für mindestens zehn (10) Sekunden gedrückt.
Problem: Für den gewählten Golfplatz gibt es keine GPS-Daten.
• Die Golfplatzdateien werden nicht auf das Hybrid geladen.
• Überprüfen Sie, ob die GPS-Dateien von www.bushnell.igolf.com heruntergeladen wurden.
• Wurden die kartierten GPS-Punkte vor dem Verlassen der Seite MAP COURSE (Platz kartieren) gespeichert?
• Vergewissern Sie sich im Menü der Einstellungsseite unter SATELLITES (Satelliten), dass das Hybrid mindestens 3 Satelliten erfasst.
Problem: Die auf dem Hybrid angezeigten Entfernungen sind in Yard, nicht in Metern angegeben.
• Setzen Sie YARDS/METERS (Yard/Meter) im Menü der Einstellungsseite auf METERS (Meter).
HINWEIS: Weitere FAQs finden Sie auf unserer Website unter www.bushnellgolf.com. Wählen Sie dort das Bushnell-Produkt aus, zu
dem Sie Fragen haben.
HAFTUNGSAUSSCHLUSS
Mit der Verwendung dieses Produkts erklären Sie sich damit einverstanden, dass Outdoor-Produkte von Bushnell nicht rechtlich für
Personen- oder Sachschäden verantwortlich gemacht werden können, die durch die unsachgemäße Benutzung und/oder das schlechte
Urteilsvermögen bei der Verwendung dieses Produkts entstehen. Wie bei jeder Lasereinrichtung sollten Sie keinesfalls längere Zeit über
vergrößernde Linsen direkt in den ausgestrahlten Laser sehen.
HINWEIS: Weitere Haftungsausschlüsse entnehmen Sie bitte dem Garantiehinweis.
96
Page 97

INFO ZUM GPS-SYSTEM
Das globale Positionsbestimmungssystem (GPS), ein Netzwerk bestehend aus 32 Satelliten, die die Erde umkreisen, wird von der USRegierung betrieben. Dieses GPS-Gerät benötigt mindestens 3 Satelliten, um Ihre Position genau bestimmen zu können. Jegliche von der
US-Regierung vorgenommenen Änderungen am GPS-System, könnten die Leistung dieses Produkts einschränken.
FDA-Augensicherheit
Laserprodukt der Klasse 1 gemäß IEC 60825-1:2007.
Entspricht 21 CFR 1040.10 und 1040.11 für Laser-Produkte mit Ausnahme von Abweichungen gemäß Laser Notice Nr. 50 vom 24. Juni
2007.
Vorsicht: Es gibt keine für den Benutzer verstellbaren Steuerelemente oder vom Benutzer durchführbare Justierungen oder Verfahren. Die
Ausführung von anderen als den angegebenen Verfahren kann unsichtbares Laserlicht freisetzen.
Entsorgung von elektrischen und elektronischen Geräten
(Gültig in der EU und anderen europäischen Ländern mit getrennten Sammelsystemen)
Dieses Gerät enthält elektrische und/oder elektronische Bauteile und darf deshalb nicht im normalen
Haushaltmüll entsorgt werden. Stattdessen sollte es an den entsprechenden Sammelstellen für Recycling der
jeweiligen Gemeinden abgegeben werden. Ihnen entstehen hierdurch keine Kosten.
Wenn die Ausrüstung austauschbare (wiederaufladbare) Batterien enthält, müssen diese zuvor auch
herausnehmen und, falls nötig, entsprechend der geltenden Vorschriften entsorgt werden (siehe auch die
jeweiligen Anmerkungen in der Anleitung dieses Produkts).
Weitere Informationen zu diesem Thema sind in Ihrer Gemeinde-/Stadtverwaltung, Ihrem regionalen
Abfallentsorgungsunternehmen oder in dem Geschäft, in dem Sie Ihr Equipment gekauft haben, erhältlich.
97
Page 98

98
itAliAno
Page 99

lenti
oBiettivo
pulSAnte MiSurAzione
oculAre
regolAzione
diottricA
ScherMAtA
Accendi/Spegni
ok/tiro
Scorri Su/giù
eSc/Menu
99
Page 100

itAliAno
CONGRATULAZIONI PER AVER ACQUISTATO IL VOSTRO NUOVO BUSHNELL® HYBRID™, IL
PRIMO TELEMETRO LASER/GPS INTEGRATO SPECIFICO PER IL GOLF !
L’Hybrid combina i punti di forza delle due tecnologie telemetriche laser e GPS per unire “il meglio dei due mondi”
in un’unità singola e compatta, regalando ai veri appassionati golfisti la possibilità di sfruttare pienamente questa
doppia capacità. Conoscere le distanze di ciascun tiro sarà di grande aiuto nel ridurre il numero di colpi e rendere più
piacevole il gioco del golf.
Grazie a questo manuale potrà acquisire familiarità con il suo nuovo telemetro, apprenderne tutte le funzionalità e le
caratteristiche per ottenere le massime prestazioni e conoscere le informazioni necessarie per avere cura di questo
strumento di precisione. Per assicurare prestazioni ottimali e la massima longevità, leggere queste istruzioni prima di
utilizzare il Bushnell Hybrid.
Col passare del tempo, la tecnologia telemetrica laser di Bushnell ha dimostrato ai professionisti che vi si affidano di
riuscire a produrre sempre la misurazione di distanza esatta più precisa da qualsiasi oggetto mirato, con la tolleranza
di un metro.
Il ricevitore satellitare GPS, in cui sono precaricati i dati di oltre 20.000 campi da golf, fornisce istantaneamente le
distanze da front, back e centro del green, appena avrete lasciato il parcheggio! Un rapido sguardo al display e
sarete già pronti per prendere il club giusto e iniziare a giocare. Durante il gioco, inoltre, sarà il ricevitore a procedere
automaticamente alla prossima buca.
Sito Web di risorse per Golf GPS di Bushell
NOTA IMPORTANTE - LEGGERE: Entro 45 giorni dalla data d’acquisto, visitare il sito www.bushnell.igolf.com per registrare
l’Hybrid,che aggiornerà i dati GPS dei campi precaricati ed introdurrà i nuovi campi che sono stati recentemente aggiunti nel database
iGolf. La registrazione è gratuita e richiede solo pochi minuti. Se un’unità che non è stata registrata ed è utilizzata da 45 giorni o più
100
 Loading...