

Page 1
1
A A
2
3
重 要 度
4
[B]
技术要求
1.颜色 要 求 :封面 : 黑 白印刷
内页: 黑 白 印刷;
B
C
批量时 要 求 统一, 不 能 有明显 色 差 ,
2.版面 内 容 :封二 印 内 容,
6-1 0页 大 写字高 需 大 于3mm
图案与 文 字 应印刷 清 晰 、
规范, 不 能 有印刷 缺 陷;
3.页面 印 刷 :双面 印 刷 ;
4.成型 方 式 :骑马 钉 ;
5.成品 尺 寸 :A5( 1 4 0X2 1 0 )
尺寸公 差 按G B/T 1 8 0 4-c;
6.批量 生 产 前须送 样 确 认。
B
C
D
借(通)用 件登记
出图审 查
日 期
标志
设计
制图
审核
工艺
1
处数
更改文 件 号 签 名
陈家怡
何思琴
会签
标准化
批准
日期
日 期
刘金利
李梅方
2021 - 0 6-16
2
封面:8 0 g双 胶
内页:8 0 g双 胶
重 量
共 1 张 第 1 张
视角符 号
比 例
3
D
E
广东奥马 冰 箱 有 限公司
说明书
F
CKB S H -E0 3 -C
4
Page 2
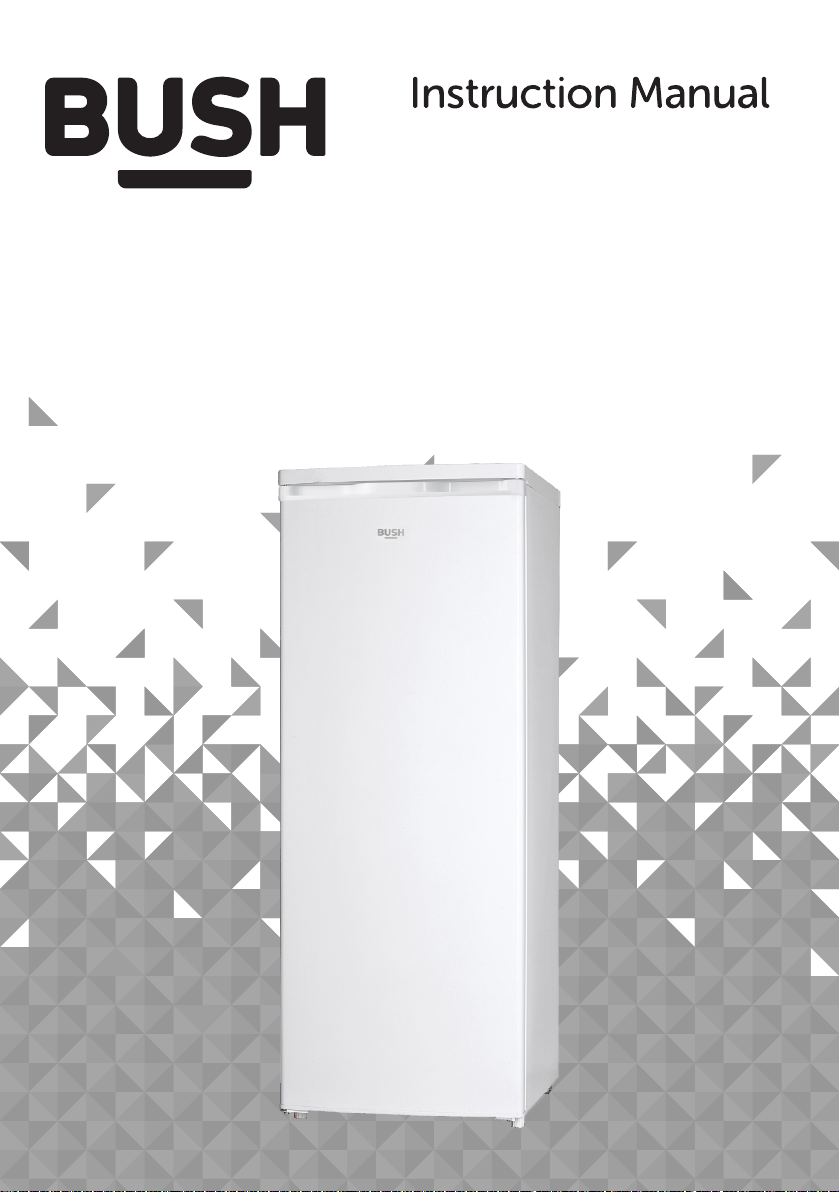
ME55TLW20
Page 3

You'll soon be enjoying your new refrigerator.
It all begins here,with your instructions.Don't worry,
there's nothing too technical coming up.Just simple,
step-by-step guidance to get you up and running
quickly.Sound good?Then let's get started
Help and Guidance
We' re here to help you get the most from your refrigerator.Should you require
any guidance,a simple solution can often be found online at.
www.bush-support.com
If you assistance,call one of our experts on 0345 257 7271. still require further
Issue-1 02/04/2021
Troubleshooting
2 Help and Guidance
Page 4

Contents
1 Safety i nformation
S afety i n form ati on 6
Getting to know 2
your refrigerator
Read y?L et' s begin. .. 13
14Par ts
Installing your3
refrigerator
Transportation 17
Inst all ation 17
Door Reverse 18
Electrical C onn ect ion 19
4Using your
refrigerator
Before f irst u se 22
U sin g y our a ppliance 22
U seful i nformati on 22
6Product support
Trouble Shoo tin g 30
Help and 31assist anc e
Guarantee 32
Care and Maintenance 5
Genera l 26
2 6Light bulb re pla cem ent
26Vacation
Mov ing your a ppl ian ce 26
Tec hnica l Specification s 27
0345 257 7271.
Contents 3
Page 5
Troubleshooting
Page 6

Safety information 1
Page 7
Safety information
Important-Please read these instructions fully
before installing or operating
Before use
6 Safety infor mat ion
0345 257 7271.
Page 8
Safety information
Important-Please read these instructions fully
before installing or operating
Troubleshooting
Safety infor mat ion 7
Page 9
Safety information
Important-Please read these instructions fully
before installing or operating
8 Safety infor mat ion
0345 257 7271.
Page 10
Safety information
Important-Please read these instructions fully
before installing or operating
Troubleshooting
Safety infor mat ion 9
Page 11
Safety information
Important-Please read these instructions fully
before installing or operating
similar
and with yellow or orange
color.
z
The refrigerating
appliance is not
intended to be used as
a built-inappliance,
unless specifically
shown as such into its
instruction manual.
z
The drawers, baskets
and shelves should be
kept in their current
position unless
otherwise specified in
th
is document.
10 Safety info rma tio n
0345 257 7271.
Page 12

Troubleshooting
Page 13

Getting to know
your refrigerator 2
Page 14
Getting to know your refrigerator
You'll be up and running in no time
Ready?Let's begin...
Please read these instructions carefully.They contain
important information which will help you get the best
from your refrigerator and ensure safe and
correct installation and operation
If you require any further assistance,our technical
experts are happy to help.For full details,refer to
the product support section at the end of these
instructions.
0345 257 7271.
Gettin g to kn ow your ref rigerator 13
Page 15
Getting to know your refrigerator
You'll be up and running in no time
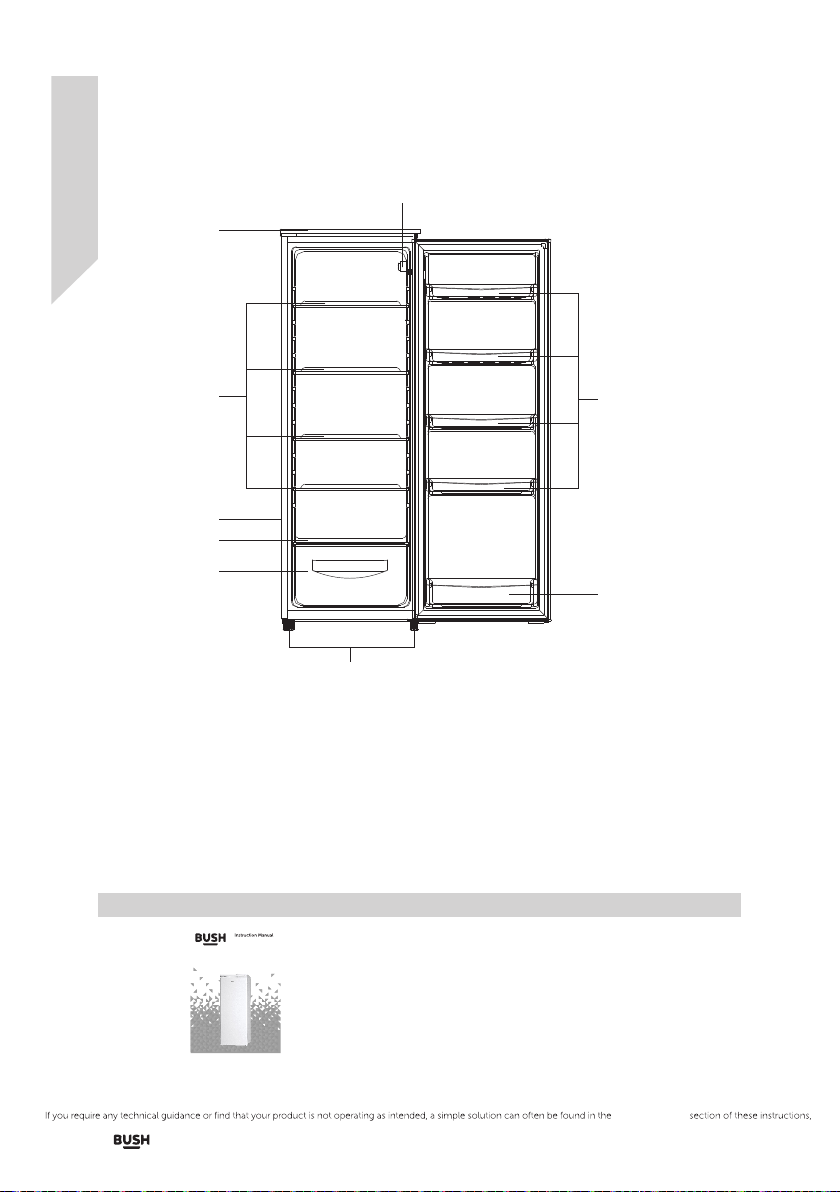
Parts
1
2
3
4
5
1.Top cover
2.Shelves
3.C omp ressor
4.C ris per c over
5.C ris per
7
8
9
6
6.Leve lin g feet
7.Thermostat
8.U pper bra cket
9.Lowe r bracket
Accessories included
M55TLW20
Instru ctions x 1
14 Getti ng to know your refri gerator
Troubleshooting
Page 16

0345 257 7271.
Page 17

Installing your refrigerator 3
Page 18
Installing your refrigerator
Bringing it all together
Transportation
Caution: 2 people are requ ired to unpack
and handle the appliance, it is
rec omm end ed th at gl oves are worn.
.T he ap pli anc e sho uld b e transp orted only in an
upright pos iti on. Do not tilt the appliance gre ater
than 45 degre es . T he pa ckaging as supplied must
be in tact during transportat ion .
.A fter transporting the appliance, leave it for at
least 4 ho urs before switching on to allow the
coo lin g system to settle. Failu re to co mply cou ld
res ult i n dam age to the appliance.
.D o not m ove the applianc e by pulli ng th e doo r or
handle as it may dam age your flooring and wall
coverings etc.
.E mpty any water in the d rain tray before moving .
.M ake su re th at the defrost w ater pipe at the back
of the pro duc t is fixed to the plastic evapo rating
pan on the top of the co mpress or to avoid deforst
water spillage on the floor .
.E nsu re the supply cable is not caught under the
appliance during and after mo vin g.
.C arefully remove a ll pa ckaging materials
including the foam base, dispose of correctly
Installation
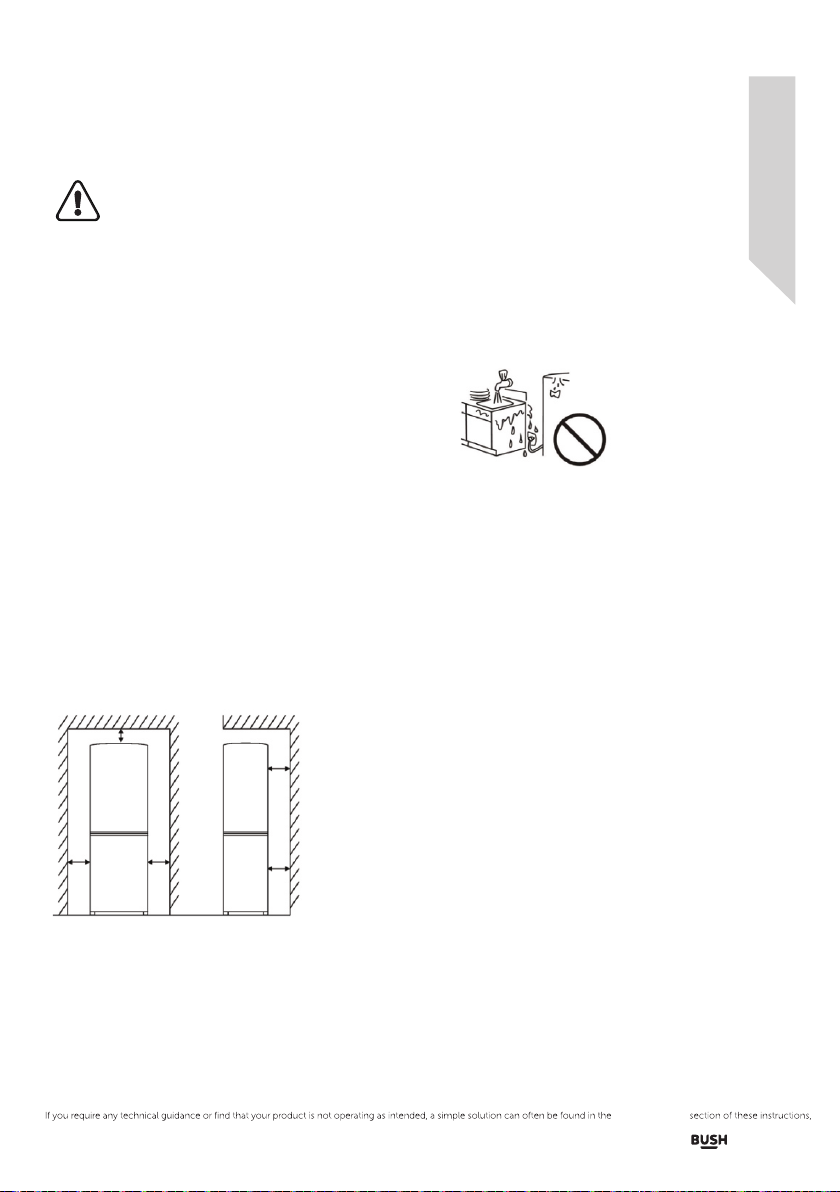
.E nsu re sufficient spacing is provi ded for th e
appliance to be insta lle d. Le ave space on both
sides (5cm), back (5cm) and above the
appliance (5cm) to ensure pro per ventilation.
.
.D o not i nstall the a
liance in a moist and we
pp
t p
lace
.A dju st the feet a t front to level t he ap pli anc e. It
should be instal led o n a smo oth surface to avoid
excessive vibration and n ois e.
.Each appliance has a climate class (shown on the
rating plate) where it i ndicates the tempera ture
ran ge of the ap pli anc e ope ration in place. The
appliance may no t wor k properly if it is left for a
long period at a tem perature outside the specified
ran ge.
extended temperate: ‘this refrigerating appliance is
intended to be used at ambient temperatures
ranging from 10 °C to 32 °C (from 50°F to 90°F )’;
temperate: ‘this refrigerating appliance is intended
to be used at ambient temperatures ranging from
16 °C to 32 °C
subtropical: ‘this refrigerating appliance is intended
to be used at ambient temperatures ranging from
16 °C to 38 °
tropical: ‘this refrigerating appliance is intended to
be used at ambient temperatures ranging from
16
°C to 43 °C
.Refer to section
pre par e your appliance for use .
(from 61°F to 90°F )’;
C (from 61
°F to 100°
(
from 61°F to 110°
“
Care and M ain tenanc e” to
F )
’;
F )
’
.D o not p lac e the a ppl ian ce near a heat so urc e or
in direc t sun light.
.D o not p ut any heavy objects on top of the
appliance. It will damage the appliance.
Instal lin g your refrigerator 17
Troubleshooting
Page 19
Installing your refrigerator
Bringing it all together
Door Reverse
Warning: Remove t he ma in pl ug before
reversing the door. 2 people may be
req uir ed to reverse th e doo r
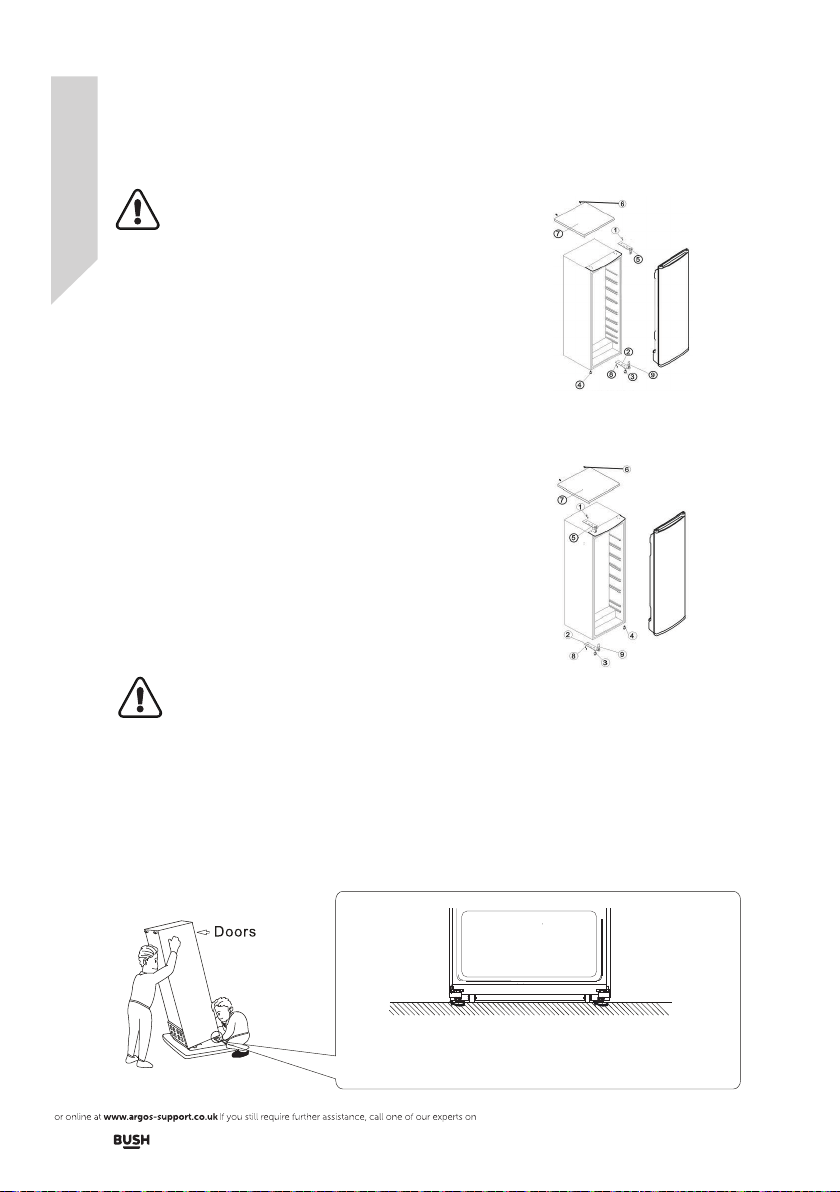
1. Re move the screws (6) holding the top panel (7)
to th e unit. Re move the top panel.
2. Re move the two screws ( 1) ho lding the top
hinge (5) (right s ide) to th e frame. Remove the
top h inge (5) .
3. Lift the door off the botto m hin ge pi n and p lac e
it on a non-scratching surface.
4. Re move the two screws ( 8) ho lding the bottom
hinge (2). Re move the bottom hinge (2).
5. Re move the left front l eg (4 ) and tran sfer i t to
the right side.
6. Before repl acing the bottom h ing e (2) , remove
the hinge pin (9) and rev erse the direction of
the hinge (2). Rea sse mbl e the bottom hinge (2)
on the left hand side using the two screws (8 ).
7. Refit the hi nge pin (9) into the botto m hin ge (2 ).
8. Lower t he do or onto th e bottom hinge pin (9).
9. While holding the door in the clos ed po sit ion ,
rea sse mbl e the upper hinge (5) on the left hand
side using the two scre ws (1 ). Do n ot ti ghten
the scre ws (1 ) until th e top of the uppe r doo r is
level wi th th e cou nter top.
10. Refit the top panel (7) us ing t he sc rews (6)
Warning: Please make s ure the un it to
be tilte d more tha n45 d egr ee to access
the bott om hi nge . It is a dvi sed t o leave the unit for
4 hours to a llo w the cooling to settle before
switch o n.
Levelling the appliance
1.Rotate feet clockwise to heighten.
2.Rotate feet anti clock wise to lower.
FIG URE 1
Doo r openi ng from le ft side
FIG URE 2
Doo r openi ng from ri ght sid e
18 Insta lli ng your refrigerator
0345 257 7271.
Page 20
Installing your refrigerator
Bringing it all together
Electrical connection
Any e lec tri cal work that is required to
instal l thi s app lia nce M UST b e car rie d out
by a qualified electrician.
Warning: THIS APPLIANCE MUST BE
EAR THE D
Before making any electrical connections,
ensure t hat :
.E lec tri cal s afet y is on ly guara nteed when the earth
system of your h ouse is in acco rda nce w ith t he
rel ated local regulations.
.D o not d ama ge th e refrigerant circuit.
.D o not b end , stretch or pull the supply cable to
avoid el ect ric s hoc k.
.D o not u se el ect ric al ap pli anc es inside the food
sto rage comp artments of t he appliance, unless
they are o f the t ype recommende d by th e
manufa ctu rer.
.E nsu re the power socket is sui table for the
max imum power of t he ma chine (fuses in the
power ci rcu it mu st be 13 amp ).
.T he su ppl y vol tage should be the same a s that
indicated i n the technical specifications and the
appliance rati ng pl ate.
.T he ap pli anc e should be earthed and in
com pliance with the applicable law.
.W hen i nstalled, the power socket must be within
easy reach.
.I f the s ocket outlet s in yo ur ho me are not s uitable
for t he pl ug su ppl ied with this unit check with a
qualified electrician for repl ace men t.
.T he us e of ad apters, multiple connectors or
ext ens ion cabl es are not recommended.
.T he ap pli anc e must be co nne cted to a 220-240
vol t 50Hz AC su pply by me ans of a three pi n
socket, suitably earthed and protected by a 1 3
amp fuse.
.S hou ld th e fus e nee d to be replace d, a 13 a mp
fuse approv ed to BS1362 mu st be used.
.T he pl ug co ntains a removabl e fus e cover that
must be refitted when the fuse is replaced. If the
fuse cov er is l ost or damaged, the plu g must not
be used until a repl ace men t cover has been fitted
or the plug is replaced.
.A d ama ged plug s hou ld be c ut of f as cl ose t o the
plug body as possible, the fus e sho uld b e removed
and the plug disposed of safely.
Instal lin g your refrigerator 19
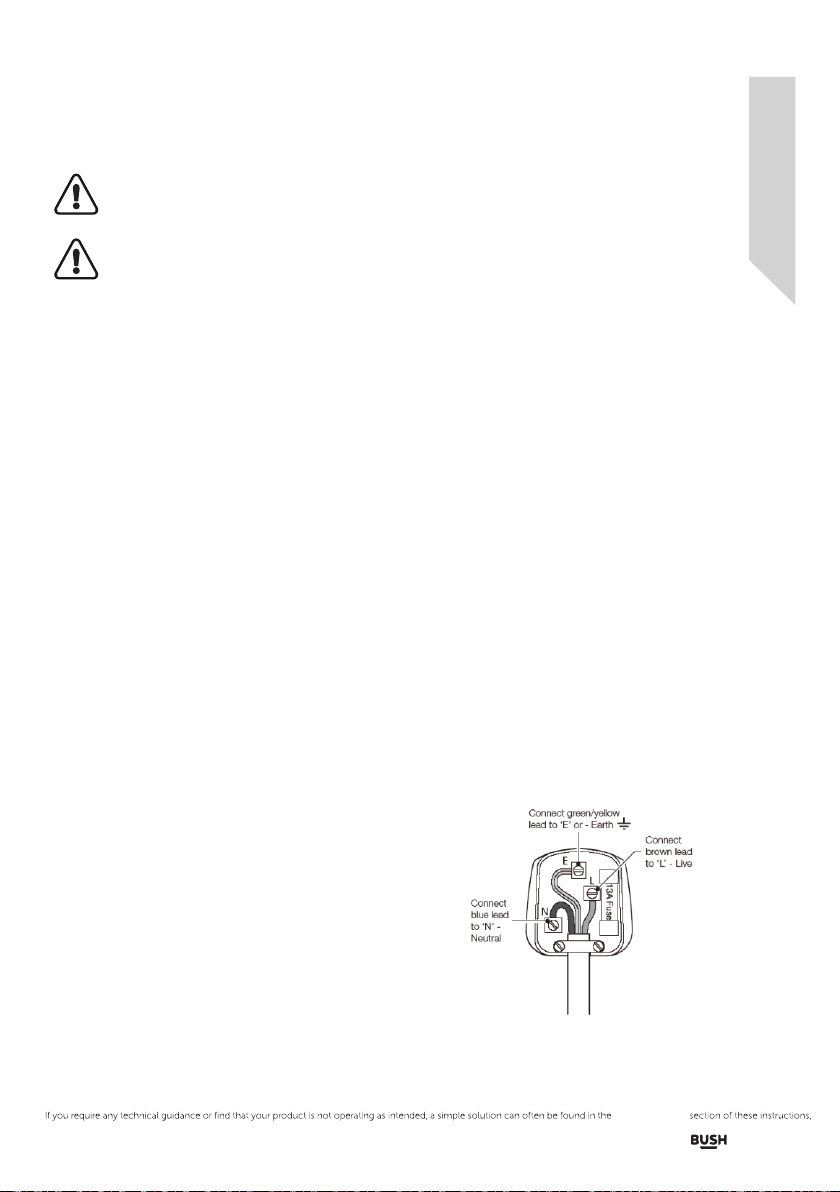
Plug rep lacement (U K & Ire lan d onl y)
Should you need to r epl ace t he pl ug; t he wires
in the power ca ble a re coloured in the
fol low ing way:
Blue Neutra l 'N'
Bro wn Li ve 'L '
Gre en & Yellow Ea rth 'E'
As the colours of th e wires in t he po wer cable
may n ot correspond with th e coloured
markings identifying the terminals in your
plug, and proceed as fo llo ws:
The gree n & yel low w ire must be connected to
the term inal in the plug that is marked with the
letter E or by the earth symbol.
The blue wire must b e con nec ted to the
ter min al that is m arked with the letter N.
The brow n wire must be connected to the
ter min al that is m arked with the letter L.
If the power supply cor d is da mag ed, i t must be
rep lac ed by t he ma nufact urer or its ser vic e
age nt or a s imi lar q ualified perso n in order
to avoid a hazard.
Troubleshooting
Page 21

0345 257 7271.
Page 22

Using your refrigerator 4
Page 23
Using your refrigerator
Getting the most from your appliance
Before first use
Final checks before opera tin g the a ppl ian ce
1. Good air circulati on aroun d the a ppl ian ce
positioned.
2. The feet have b een adjuste d for perfe ct
levell ing .
3. Clean the compartment per re com men dat ion
in section Care and M ainten anc e .“ ”
4.Plug in the appliance
The compres sor s tarts up and in
operation m ay pro duce some background noise
and it is normal, this is not a defec t.
Using your appliance
1. Temperature adjustment
.Th e compartment te mpe rature ca n be se t by
the thermostat b etween "1"and "7"(coldest
settin g), w hil e the " 0" means turn off.
We recomm end s etting t he th erm ostat
midway first.
.To en sure the compartment is maintained at
the desired t emp erature, it is advised to
monitor the temp erature periodically by a
thermometer an d adjust t he te mpe rature
knob accord ing ly.
.L oad t he ap pli ance aft er sw itch on for a while
to al low t he te mpe rature re ach t he de sired
settin g.
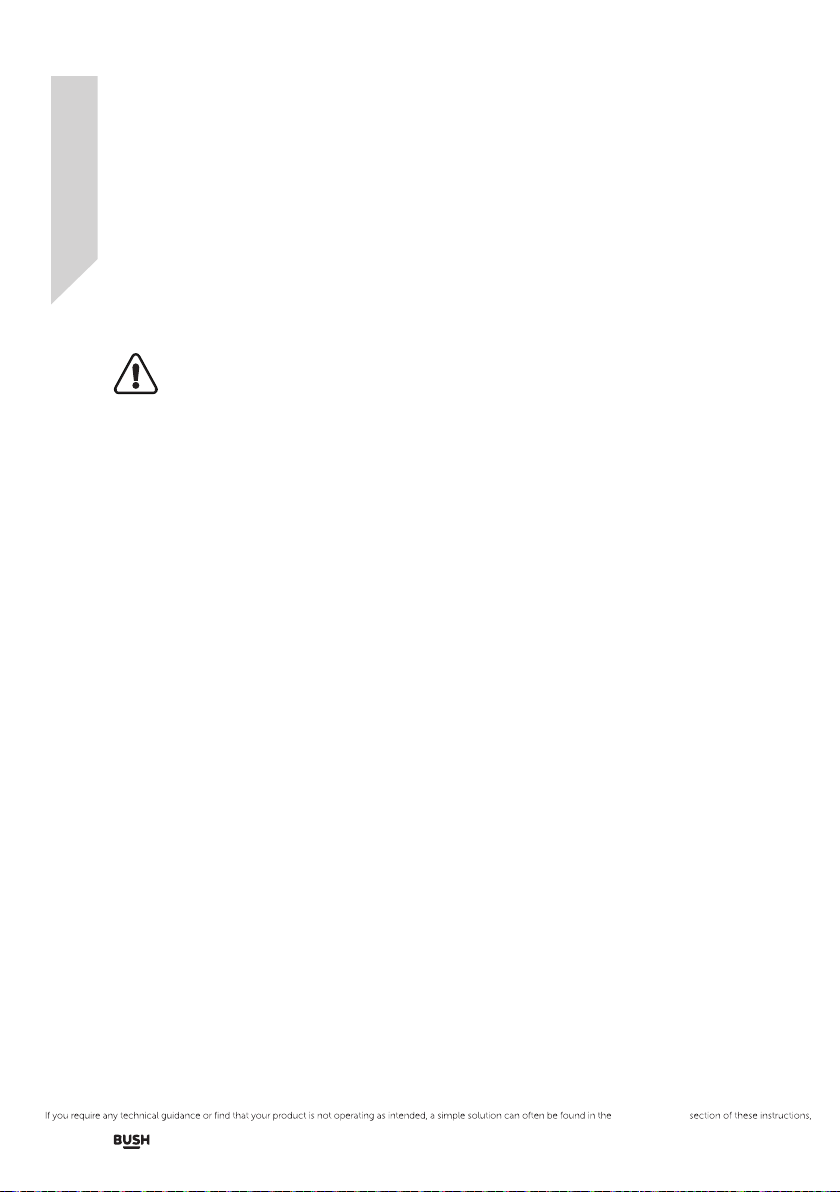
2. Stori ng frozen food
.U se th e fri dge compart ment to sto re fresh
foo d and d rin ks .
.D o not excee d the food capacit y that the
appliance able to handle .
.D o not p ut warm food to the appliance
immediate ly as i t may cause exce ssi ve cooling
of the compartment .
Set the te mpe rature knob at m edium position .
for storing fresh food .
Do not mix already frozen foo d and f resh food.
Useful information
The foll owi ng gu ide lines and rec omm end ati ons
are s uggested to obtain the best resu lts a nd
sto rage hygiene.
Fre que nt do or op enings can ca use t he in ternal .
tem perature rise so the door shall be closed
as soon as possible after use.
For hygiene re asons, it is always a good prac tis e .
to pa ck, wrap and cover the foo d before stori ng.
Use a polythene bag to store raw meat and p lace .
on the lowest s hel f. Avoi d contact with cooked
foo d to prevent contamination. For safety
rea son , store raw m eat for two t o three days
only.
Cooked dishes mu st be store d in ai rti ght .
cov ered contain ers.
Foo d and b eve rages shall cool to room .
tem perature before freez ing .
Most vegetables should be blanch ed an d chi lle d .
before freez ing .
Some fruits and veget abl es li ke pineapples ,.
melons, tomato es, a nd cu cum bers sha ll be
wra ppe d in po lythene bags .
Do not leave frozen food at room temp erature to .
thaw. You cou ld de frost the food b y putting it in
the fridge to t haw s low ly. Make sure you av oid
def rosting food from d roppin g food juices on
to ot her food .
22 Using your refrigerator
Troubleshooting
Page 24
Using your refrigerator
Getting the most from your appliance
Energy s avi ng ti ps
Place yo ur fridge away from d ire ct su nli ght , .
you r ove n or any other heat sources. Allow
20 cm clear space on both sides and above,
and at least 5 cm b ehi nd.
Cover al l food stored, a nd arrange it so that cold .
air can circu late freely.
Higher cold sett ing w ill u se mo re en ergy. Do not .
set to max imu m cold if it i s not n ece ssa ry.
Cool the hot/warm foo d to room temperature .
before put them into you r fri dge .
Fre que ntl y ope nin g and closing the door will .
cau se the int ern al tempe rature to rise a nd it
will consume more ene rgy.
Close the door(s) properly, an d make sure t he .
seals and hinges are ai rtight . Che ck the seals by
puttin g a sheet of p aper bet wee n the d oor a nd
the main body of the fridge. If the paper moves,
you r sea ls need re pla cin g.
Def rost regularly if your refr igerato r is no t a .
fro st-free or cyclic defrost model. Accum ulated
ice layer should n ot be m ore than 5 m m thi ck.
The pre- set c omb ina tio n of drawers, ba sket s and .
shelves have already been set in the most
eff ici ent way for the us e of th is product.
0345 257 7271.
Using yo ur refrigera tor 23
Page 25
Using your refrigerator
Getting the most from your appliance
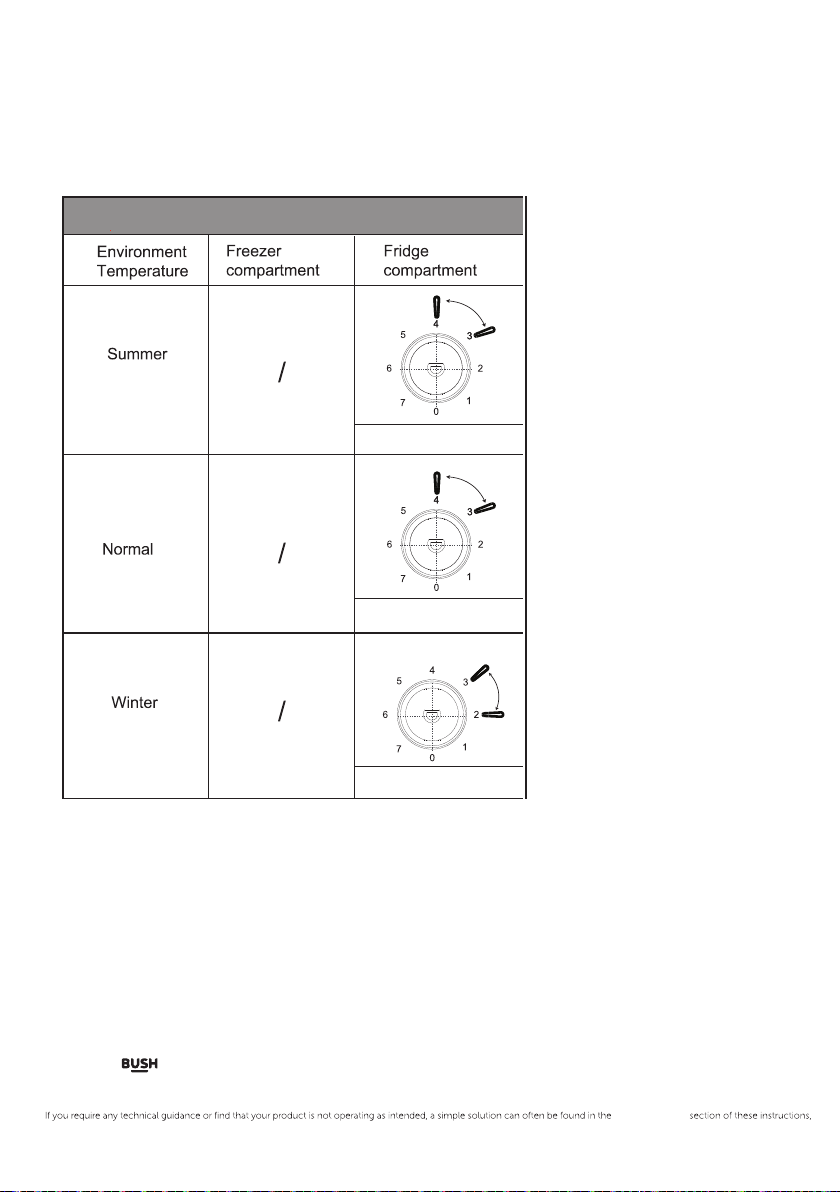
Temperature setting recommendation
Temperature Setting Recommendation
34
3<4
23
Impact on Food Storage
To avoid food waste, please refer to the recommended setting and storage times.
Under Recommended setting, the best storage time of fridge is no more than 3 days.
·
The best storage time may reduce under other settings.
·
Tips for Storing Foodstuffs
Load limits are determined by baskets, flaps, drawers, shelves etc. Make sure that these
·
components can still close easily after loading.
24 Using yo ur refrigera tor
Troubleshooting
Page 26

Care and Maintenance 5
Page 27
Care and maintenance
Looking after your appliance
General
Important : Alw ays unplug the appliance
fro m the p owe r soc ket during cleaning
and mainten anc e.
Never us e any sharp instruments or abrasive .
substance s, so ap, h ous ehold cleaner,
detergent or wax po lis h for cleanin g.
Use luke warm water to clean the cabinet .
of the appliance and wipe it dry.
Never cl ean t he appliance with flammable .
fluids. It could cause damage and a fire ha zard.
Clean the exteri or of t he ap pliance and door .
seal with a damp cloth and dr y it th rough.
Avoid water go ing i nto the temperatu re .
con trol box.. Clean with a dry cloth only.
Clean the condenser (locate d at th e bac k of .
the appliance) with a vacuum cleaner. It is
suggested t o remove the dust eve ry year.
Shelves are a ll removable for cl ean ing p urpose..
Important : Care must be taken while
cleaning /carry ing t he ap pliance not to
tou ch the bottom o f the cond ens er me tal wires
at th e back of the appliance, as this could cause
injury to fingers and h and s.
Light bulb replacement
This appliance is equipped w ith L ED li ght b ulb .
It ca n be used fo r lon g tim e. In c ase , the L ED bu lb
is blown, it must be repl ace d by th e qua lified
person t o avoid any h azard. Conta ct th e service
age nt at 0345 2 57 72 71.
Vacation
Short va cation
There is n o need to di sco nne ct th e appliance
fro m the m ain s if yo u wil l be away for t wo to
three we eks. Use up the p eri sha ble food.
Long vac ation
Rem ove all the food if you are away for three
wee ks or m ore. Unp lug t he ap pli ance and leave
the doors ope n to provide air circulation to
pre vent odour and mou ld.
Moving your appliance
Moving
Refer to se cti on “Transportatio n”
under “Insta lla tio n”
26 Care an d mai ntenance
0345 257 7271.
Page 28
Care and maintenance
Looking after your appliance
Technical Specificatio ns
Model ME55TLW20
Energy e fficiency clas s F
Energy c ons ump tio n Kwh/ yea r 129
Net storage vo lum e fresh food (litres) 237
Net storage vo lum e frozen food (litres /)
Total n et storag e (li tres) 237
Frozen food compartment ratin /g
Climate class
Operating nois e level dB(A) 40
Minimum Operat ion Tem peratur 1e 6°C
Pro duc t Dim ens io 5n 50mmx58 0mmx1430m m
The model information can be retrieved using the QR-Code reported in the energy label.
The label also includes the model identifier that can be used to consult the portal of the registry at
https://eprel.ec.europa.eu
This product contains a light source of energy efficiency class G (if present).
N/ST
Disposal information
The symb ol on t he produ ct or i ts pa ckaging indicates that th is produ ct may not be
tre ated as househol d waste . Instead it sh oul d be ha nde d over to the applicable
col lection point for the recycling of electrical and electronic equipment , By
ensuring this product is disposed of corre ctl y, you will help preve nt potential
negative consequences for the env ironment and human health , which could
otherwise be caused by inappropriat e waste handling of this prod uct . For mo re
detail ed in formation about recycli ng th is produ ct , pl eas e contact your loca l
cou ncil off ice , y our h ous eho ld wa ste disposal servic e or th e sho p whe re the
pro duc t was p urchased .
Rem emb er : Ol d fri dge s must be dispo sed o f carefully - older models contain CFC gases
that are h armful - if in do ubt , contact yo ur lo cal c oun cil for details on how to dispose of
an old fridge .
Doors and lids of the refrigeration appliance should be removed before disposal in the
landfill, to avoid children or animals getting trapped inside.
Care and m ain tenance 27
Troubleshooting
Page 29

0345 257 7271.
Page 30

Product support 6
Page 31

Product support
Help is always at hand
Troubleshooting
If you have a problem with yo ur product, these questions may be able to assist you?
Question - Appliance does not wor k.
Answer
Appliance is not switched on - Switc h on th e app liance.
Mains plug is not plug ged in or is loos e. -I nse rt ma ins p lug.
Fuse has blown or is defe cti ve - Check fuse , replace if necessar y.
Socket is defe cti ve - Mains m alf unc tio ns ar e to be correcte d by an e lec trician.
Question - A ppliance cools too much.
Answer
Temperature is too cold - Adjust the thermostat dial to a warmer setti ng.
Question - T he fo od is too warm.
Answer
Temperature is not properly adjuste d - Adj ust t he th erm ostat to a co oler set tin g.
Door was o pen for an extended period - Open the do or on ly as l ong a s nec essary.
A large qu antity of warm food was pl ace d in the appliance - Adjust the thermosta t
to a co ole r setting. Cool warm foo d before placing in the refri gerator.
The appliance is near a heat source - Posit ion t he refrigerator away from a heat source.
Question - Interior light does not work.
Answer
Led light is defective - Repl ace w ith equival ent L ed li ght.
Question -Heavy bui ld up of frost, pos sibly also on the door seal.
Answer
Door seal is not air tight - Carefu lly warm t he le aki ng se cti ons of the door seal with a
hair dryer(not hott er th an ap prox 50 degree). At the same time sh ape t he warme d doo r sea l
by hand such that it sits correct ly.
Question - Water o n the floor or on sto rage shelves.
Answer
Wate r drain hole is b loc ked - Re move food resi due o r ice f rom t he entrance of the drain h ole .
Question - A ppliance is making unusual no ises
Answers
Appliance is not level - Rea dju st th e front levelling feet.
Appliance is in conta ct wi th wa ll or o the r obj ect s. - Pu sh appliance away a short distance
A part at the back of the appliance,e.g. a tub e, is i n contact with another app lia nce p art o r
wal l - Gen tly b end t his p art away caref ull y if ne ces sar y
30 Produ ct su pport
Troubleshooting
Page 32
Product support
Help is always at hand
Help and assistance
If yo u req uire any te chn ica l gui dan ce or find that your refrigerator is not operating as inte nde d,
a simple solution can often be fo und i n the Trou ble sho oti ng section of these instruction or online at
www.bush-support.com
If yo u sti ll require further assistance,cal l one of our expe rts o n 0345 257 7271.To help give us give
you a fast and eff icient s ervice please have th e following infor mat ion read y.
Model Ref.
Serial number
Date of purchase
Local ca ll rates applies*
You can find these on
the rating plate-a small
information panel (usua lly
a sti cker or metal pl ate)on
the rear o f you r app lia nce
This will be shown on
you r rec eipt
Line open 8am-7pm Monday to Saturday and 10am-4pm Sunday
*Calls to Bush enquiry lines may attract a charge an d set u p fee from re sid ent ial l ine s dep end ing
on yo ur ca ll pl an/ tar iff. Mobile and other providers costs may va ry, see www.bt.com/ pri cing for d etails.
For s ecu rit y and trai nin g pur pos e,tel eph one c all s to an d from customer service centre s may be
rec orded and monitored.Cal l from Republic of Ireland will attract internati onal cal l cha rges.
This appliance complies with the following EEC directives:
2014/35/EEC Low voltage directive
2014/30/EU EMC directive
0345 257 7271.
Pro duc t sup port 31
Page 33
Product support
Help is always at hand
Call us now and activate your 12 month guarantee
Thank you for choosing Bush. Your new product is guaranteed against
faults and breakdowns for 12 months.Don' t forget to register it with us
today so we can provide you with our best possible after-sale service
and useful updates.
www.bushregistration.co.uk
FREEPHONE*
0800 597 8548
Lines are ope n 8am-8pm,365 days a year.*Call may be recorded and monitored .
Your Bush Guarantee
This pro duc t is gu aranteed for t wel ve months from the date of o rig ina l purcha se. A ny defect
that arises due to faulty materials or workmanship will be repaire d fre e of ch arge (or if
applicable the prod uct w ill b e rep lac ed or t he pu rch ase p ric e refunded)where possible
during this period by the dealer from who your p urc has ed un it.
. The guarantee does not cover
accidenta l dam age,m isu se ca bin et
parts, knobs or consumable items.
. The prod uct m ust b e correctly insta lled
and operated in accord ance with the
instru ctions contained in the ma nua l
. It must be u sed s olely fo r dom estic
purposes. The guara ntee will
be re nde red i nvalid if the produ ct is
To find out how we and Domestic & General In surance Plc use your data ple ase refer to the
guarantee registration mate rial or visit www.b ushreg ist rations.co.uk
The guarantee is subject to the following provisions:
re- sol d or ha s been damaged by in exp ert repair.
. Specificatio ns ar e sub jec t to ch ange
without notice.
. Bush disclaim any lia bility for lo ss or d ama ge
arising fro m the b rea kdown of the pro duct
. This guarantee is in addition to and does not
diminish your statutory or legal right s
Important Data Protection Information
32 Produ ct su ppo rt
Troubleshooting
Page 34
Product support
Help is always at hand
Spare Parts Supply
To order spare parts, please contact our customer helpline: 0345 257 7271. The original
spare parts for some specific components are available for a minimum of 7 or 10 years,
based on the type of component, from the placing on the market of the last unit of the
model.
0345 257 7271.
P
rod uct s upp ort
33
Page 35

Troubleshooting
Page 36

0345 257 7271.
Page 37

Contact
www.bush-support.com
Helpline:0345 257 7271
CKBSH-E03-C
 Loading...