

Page 1

Instruction manual
V7SDW
V7SDS
V7SDB
Page 2

You’ll soon be enjoying your new <tumble dryer>.
It all begins here, with your instructions. Don’t worry,
there’s nothing too technical coming up. Just simple,
step-by-step guidance to get you up and running
quickly. Sound good? Then let’s get started.
Help and Guidance
We’re here to help you get the most from your < >. Should you require tumble dryer
any guidance, a simple solution can often be found online at:
www.argos-support.co.uk
If you still require further assistance, call one of our experts on 0345 257 7271.
Page 3

or online at www.argos-support.co.uk If you still require further assistance, call one of our experts on 0345 257 7271.
Contents
Safety information
1
Safety information 6
Getting to know your
2
< >tumble dryer
Ready? Let’s begin 10
Accessories 12
Installing your
3
< >tumble dryer
Installation requirements 14
Connections
Electrical connection
Functions
4
Functions 18
15
16
Product support
7
Troubleshooting
Help and assistance 31
Declaration of conformance to product
standards 32
Disposal 33
30
Using your < >tumble dryer
5
Using your < > tumble dryer 22
Care and Maintenance
6
Cleaning 26
Technical specifications 27
Product fiche
28
3
Page 4

Page 5

1Safety information
Page 6

Safety information
Safety information
Important - Please read these instructions fully before
installing or operating
Before use
The installation of this appliance is
•
best carried out by 2 people.
•
Dispose of all packing carefully and
responsibly.
The appliance is designed for indoor
•
use only and must be protected from
rain, moisture and extreme
temperature variations.
•
This appliance is designed for
household use.
Do not use the appliance for
Industrial and commercial use, or
any other purpose.
•
The appliance MUST be positioned
on a firm level base.
Do not splash water on the appliance.
•
It may cause electrical parts to fail and
result in an electric shock.
For appliance with ventilation
•
openings in the base, the carpet must
not obstruct the openings.
The appliance must not be installed
•
behind a lockable door, a sliding door
or a door with a hinge on the
opposite side to that of the tumble
dryer, in such a way that a full
opening of the tumble dryer door
is restricted.
•
Do not sit, stand or place any other
heavy objects on top of the
appliance. This could result in injury
or damage to the appliance.
Do not allow children to play with
•
the appliance to avoid the risk of
entrapment and suffocation.
Keep ventilation opening, in the
•
appliance enclosure or in the built-in
structure, clear of obstruction.
The lint trap has to be cleaned frequently,
•
if applicable.
Clean lint screen before or after each load.
•
•
Never use the dryer without the lint filter.
During use
•
This appliance can be used by children
aged from 8 years and above and persons
with reduced physical, sensory or mental
capabilities or lack of experience and
knowledge if they have been given
supervision or instruction concerning use
of the appliance in a safe way and
understand the hazards involved. Children
shall not play with the appliance. Cleaning
and user maintenance shall not be made
by children without supervision.
The tumble dryer is not to be used if
•
industrial chemicals have been used for
cleaning.
Lint must not to be allowed accumulate
•
around the tumble dryer.
Do not dry unwashed items in the tumble
•
dryer.
Items that have been soiled with
•
substances such as cooking oil, acetone,
alcohol, petrol, kerosene, spot removers,
turpentine, waxes and wax removers
should be washed in hot water with an
extra amount of detergent before being
dried in the tumble dryer.
Items such as foam rubber(latex foam),
•
shower caps, waterproof textiles, rubber
backed articles and clothes or pillows
fitted with foam rubber pads should not
be dried in the tumble dryer.
6
Page 7
or online at www.argos-support.co.uk If you still require further assistance, call one of our experts on 0345 257 7271.
Safety information
Safety information
Important - Please read these instructions fully before
installing or operating
•
Fabrics softeners, or similar products,
should be used as specified by the
fabric softener instructions.
•
The final part of a tumble dryer cycle
occurs without heat (cool down cycle)
to ensure that the items are left at a
temperature that ensure that the items
will not be damaged.
•
Remove all objects from pockets such
as lighters and matches.
WARNING: Never stop a tumble dryer
•
before the end of drying cycle unless
all items are quickly removed and
spread out so that the heat is dissipated.
Children of less than 3 years should
•
be kept away unless continuously
supervised.
Do not attempt to repair the appliance
•
yourself.
Contact the Customer Helpline:
0345 257 7271.
•
If it is unavoidable that fabrics that
contain vegetable or cooking oil or
have been contaminated by hair care
products be placed in a tumble dryer
they should first be washed in hot water
with extra detergent - this will reduce,
but not eliminate, the hazard.
CAUTION: HOT SURFACE!
CAUTION: RISK OF FIRE!
•
If the supply cord is damaged, it must
be replaced by the manufacturer, its
service agent or similarly qualified
persons in order to avoid a hazard.
Oil-affected items can ignite
•
spontaneously, especially when
exposed to heat sources such as in a
tumble dryer. The items become warm,
causing an oxidation reaction in the oil.
Oxidation creates heat. If the heat
cannot escape, the items can become
hot enough to catch fire. Piling, stacking
or storing oil-affected items can prevent
heat from escaping and so create a fire
hazard.
7
Page 8

Page 9

Getting to know your
< >tumble dryer
2
Page 10

Getting to know your < >tumble dryer
You’ll be up and running in no time
Ready? Let’s begin...
Please read these instructions carefully. They contain
important information which will help you get the best
from your < > and ensure safe tumble dryer
and correct installation and operation.
If you require any further assistance, our technical
experts are happy to help. For full details, refer to
the product support section at the end of these
instructions.
10
Getting to know your < >tumble dryer
Page 11
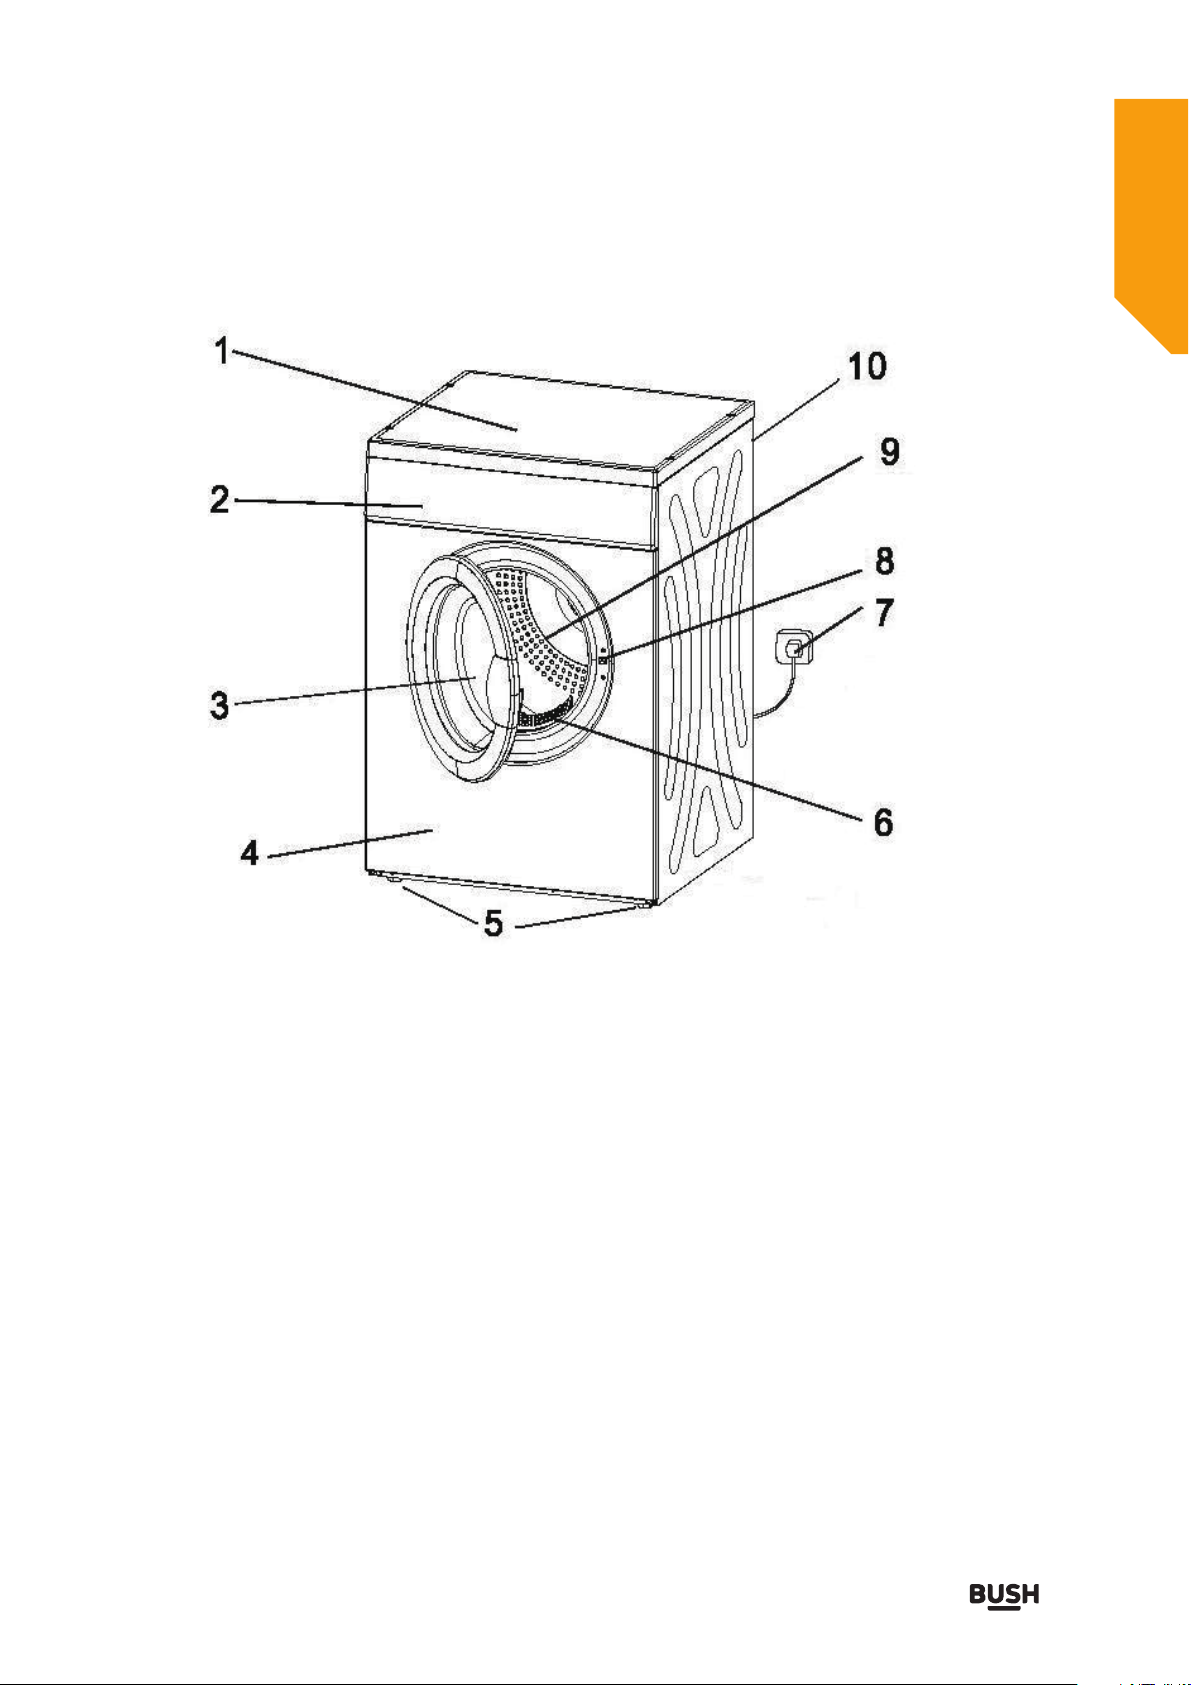
Component
or online at www.argos-support.co.uk If you still require further assistance, call one of our experts on 0345 257 7271.
Getting to know your < >tumble dryer
You’ll be up and running in no time
1.Top board 6. Lint filter
2.Control panel 7. Plug
3.Door 8. Door sensor
4.Front case 9. Tumble drum
5.Adjustable feet 10. Overheat Safety rest switch (back)
Getting to know your < >tumble dryer
11
Page 12

Model
Getting to know your < >tumble dryer
You’ll be up and running in no time
V7SDW 7kg C White
V7SDS 7kg C Silver
V7SDB
capacity
7kg
Energy class Color
C
Black
Accessories
• Instructions X 1
• Hose (2.5M) X 1
Tools
You may use this tools to help install above parts
glove
•
spanner
•
Instruction manual
V6SDW
V6SDS
V6SDB
12
Getting to know your < >tumble dryer
Page 13

Installing your < >tumble dryer
3
Page 14

Installing your < >tumble dryer
Bringing it all together
Installation requirements
Transportation
Caution: 2 people are required to
•
unpack and handle the appliance, it is
recommended that gloves are worn.
The appliance should be transported only in
•
an upright position. Do not tilt the appliance
greater than 45°. The packaging as supplied
must be intact during transportation.
Do not move the appliance by pulling the
•
door or handle as it may damage your
flooring and wall coverings etc.
Ensure the supply cable is not caught under
•
the appliance during and after moving.
Carefully remove all package materials
•
including the foam base, dispose of correctly.
Unpacking Tumble dryer
Caution: 2 people are required to unpack
the tumble dryer, it is recommended that
gloves are worn.
Installation
•
Ensure sufficient spacing is provided for the
appliance to be installed. Leave space on
back (10cm) to ensure proper ventilation.
Install the tumble dryer in a well ventilated
•
room.
Make sure that your machine is not placed
•
on the power cord.
Do not place the appliance near a heat
•
source or in direct sunlight.
Do not put any heavy objects on top of the
•
appliance. It will damage the appliance.
Do not install the appliance in moist and wet
•
place.
Adjust the feet at front to level the appliance.
•
It should be installed on a smooth surface to
avoid excessive vibration and noise.
Never unscrew the adjustable feet from their
•
housings.
Carefully remove all packaging materials
Including the foam base, dispose of correctly.
14
Installing your < >tumble dryer
•
Refer to section “User instructions” to prepare
your appliance for use.
Fig1 Fig2
Page 15

or online at www.argos-support.co.uk If you still require further assistance, call one of our experts on 0345 257 7271.
Levelling feet
Installing your < >tumble dryer
Bringing it all together
1:For your machine to work efficiently with
minimum vibration it should be settled on flat,
nonslippery,firm ground.
2:You can adjust the balance of your machine by
changing the positioning of its feet.
3:First,loosen the plastic adjustment nut.(Fig 3)
4:Adjust by rotating the feet upwards or
downwards.(Fig 4)
5:After the desired position has been reached,
tighten the plastic adjustment nut again by rotating
it upwards.
Note:Never put cartons,wooden blocks or similar
materials under the machine to balance
irregularities in the level of the ground.
Connections
Hose connection
Warning:
install the hose. It is recommended to
wear the gloves
NOTE:
air from the inside of the tumble dryer.
Carefully remove all packing materials including
from the foam, dispose of correctly.
Ventilation hose assures exhausting of the
2 people may be required to
Fig3
Fig4
Fig5
Before installation, ensure that the unit is power off
and unplug from the mains.
1.Connect hose to the air outlet of the machine by
screwing it tight in a clockwise direction.
2.Extended the hose to the suitable length.
3.Route the hose to the outdoors via a window or
it can be connected to an outlet in the wall (see the
diagrams).
The air outlet hose must be extended directly to
the outdoors. Keep bends to a minimum to ensure
adequate ventilation.
To prevent water accumulation in the hose, make
sure the hose is not folded on the floor.
In winter, the room temperature may be cold. The
water may condense inside the hose. Periodical
check is required to avoid hose damaged by the
water.
Warning: Do not connect the hose to the
chimney of a stove or fireplace.
Fig6
Fig7
Installing your < >tumble dryer
15
Page 16

Electrical connection
Installing your < >tumble dryer
Bringing it all together
Any electrical work that is required to
install this appliance MUST be carried
out by a qualified electrician.
Warning: THIS APPLIANC MUST BE
EARTHED
Before making any electrical connections,
ensure that:
Electrical safety is only guaranteed when the
earth system of your house in accordance with
the related local regulations.
Do not bend, stretch or pull the supply cable to
avoid electric shock.
Ensure the power socket is suitable for the
Maximum power of the machine (fuses in the
power circuit must be 13 amp).
The supply voltage should be the same as that
indicated in the technical specifications and
the appliance rating plate.
The appliance should be earthed and in
compliance with the applicable law.
When installed, the power socket must be
within easy reach.
If the socket outlets in your home are not
suitable for the plug supplied with this unit
check with a qualified electrician for
replacement.
To avoid the risk of overloading your plug
socket, the use of adapters, multiple connectors
or extension cables are not recommended.
The appliance must be connected to a 220240 volt 50Hz AC supply by mean of a three pin
socket, suitably earthed and protected by a
13 amp fuse.
Should the fuse need to be replaced, a 13 amp
fuse approved to BS1362/A must be used.
The plug contains a removable fuse cover that
must be refitted when the fuse is replaced. If
the fuse cover is lost or damaged, the plug must
not be used until a replacement cover has been
fitted or the plug is replaced.
A damaged plug should be cut off as close to
the plug body as possible, the fuse should be
removed and the plug disposed of safety.
Plug replacement (UK & lreland only)
Should you need to replace the plug;the wires
in the power cable are coloured in the following
way:
Blue - Neutral ’ N’
Brown - Live ’ L’
Green Yellow - Earth ’E’ &
As the colours of the wires in the power cable
may not correspond with the coloured markings
identifying the terminals in your plug,and
proceed as follows(Fig8):
The green yellow wire must be connected to
the terminal in the plug that is marked with the
letter E or by the earth symbol.
The blue wire must be connected to the terminal
that is marked with the letter N.
The blue wire must be connected to the terminal
that is marked with the letter L.
If power supply cord is damaged , it must replaced
by the manufacturer or its service agent or a
similar qualified person in order to avoid a hazard.
&
Fig8
16
Installing your < >tumble dryer
Page 17

Page 18

Simple everyday use
Control panel
On/Off button
-To turn on the machine press once.
Full + 1
Mixed
-To turn off the machine press once again.
Airing - 1
Start / pause button
-To start the set program, press once.
-To pause the running program, press once.
To continue the program, press once again.
Program
-Continue to press the program button to select the desire drying program (Mixed/Cotton/Synthetic
/1HR). The indicator next to the selected program will be illuminated.
Dryness
-Continue to press the dryness button to select the dire dryness setting (Full+1/Standard/Airing-1).
The indicator next to the selected program will be illuminated.
Anti-crease
-To turn on the anti-crease, press the button once. The anti-crease indicator will be illuminated.
To turn it off, press the button once again. The anti-crease will be off and the indicator will go off.
The Anti-Crease function provides approximately 120 minutes of intermittent tumbling in unheated
air at the end of the cycle to reduce wrinkling. Dried laundry is prevented from wrinkled by periodic
drum one way running after the completion of the drying course.
Child safety lock( )
-This is to avoid the operation being interrupted by a child.
-Lock : press both dryness and program knobs for 3 seconds, the child safety lock indicator will be
illuminated denoting entering the child-lock state.
-Unlock : press both dryness and program knobs for 3 seconds, the child safety lock indicator will
go off denoting that the lock is released.
Operating steps for the machine
Caution : Before using the machine, you should study the program chart to select the
desired program setting for your clothes.
1.Open the door.
2.Make sure that the lint filter is installed.
3.Load your clothes into dryer loosely. Do not overload the machine.
4.Turn on your machine by pressing “On/Off” button. The “Cotton” & “Standard” indicator lights
will be illuminated.
5.Select the desire program for you clothes, i.e.Mixed-(Full+1)-ANTI-CREASE
-Continue to press “PROGRAM” button until the indicator for “Mixed” is illuminated.
-Continue to press “dryness” button until the indicator for “Full+1” is illuminated.
-Press “ANTI-CREASE” once and the indicator is illuminated.
6.Close the door.
7.Press “START/PAUSE” button to start the drying cycle.
8.When the drying cycle is finished, it will keep once time.
9.Open the door and wait for several minutes in order to let the temperature inside the capacity
to cool down.
10.Turn off the machine by press “On/Off” button. All the indicator lights will go off.
11.Remove all of the clothes from the dryer.
12.Clean the drum and pull out the lint filter to clean before next use.
18
Functions
Page 19

Simple everyday use
or online at www.argos-support.co.uk If you still require further assistance, call one of our experts on 0345 257 7271.
Remarks: The door is equipped with a sensor. When the door is opened during the operation,
the program will change to pause mode immediately. You can close the door and press
“START/PAUSE” to continue the operation. If you want to stop the operation, please press
“On/Off” to stop and off the machine.
Full program chart & consumption table
Choose the appropriate program in the below table which affect the time of the drying cycle.
Mixed
Cotton
Synthetics
1 HR
Suitable for clothing comprising particularly thick or multi-layered
materials and towels.
Suitable for cotton clothing fabrics.
Suitable for light man-made fabrics.
A timed program of approximately 1 hour. Dryness level will be
dependent on the amount of clothes within the machine.
Program Selection
Program Dryness
Customer expected
Max Capacity (KG) Approx. Drying time
result
Cotton
Cotton
Cotton
Cotton
Synthetic
Standard
Synthetic
Synthetic Standard
Mixed
Mixed
Mixed
Clothes equal or less than 1kg
1Hr
Full + 1
1
Airing -
Full + 1
Full + 1
Standard
/
Ready to wear
Ready to wear
Ready to iron
Ready to wear
Ready to wear
Ready to wear
Ready to wear
/
7
7
7
3.5
3.5
7
7
<=1
Energy consumption values
Program
Cotton
Cotton
.
Please note that different program will have different max loading / capacity.
Dryness Customer expected
result
Standard
Ready to wear
Capacity (KG) Energy consumption
7
(minutes)
150
130
74
65
50
150
130
60
value kWh
4.38
.
All values given in the table have been fixed according to EN61121:2012 Standard.
These values may deviate from the table according to the laundry type, laundry spin speed,
environment condition and voltage fluctuation.
.
When the weight of the clothed is less than 1kg, please use the “1HR” program.
Functions
19
Page 20

Simple everyday use
Ending the program – Cancelled by customer
To cancel the program:
1.Press “On/Off” button.
2.The machine will stop immediately.
3.Open the door and wait for five minutes to let the temperature inside cool down.
4.Remove the clothes.
Warning: The temperature inside the capacity may still be high. Take extra care when
remove the clothes.
Clean the drum and lit filter after each drying.
Child safety lock
This machine is equipped with a child safety lock ( ) to prevent any program interruption due to
the pressing of buttons during the drying operation. All the buttons the panel are deactivated when
the child safety lock is active except the On/Off button.
To activate the lock: press both Dryness and program button for 3 seconds, the child safety lock
indicator will be illuminated and denoting entering the child-lock state.
To deactivate the lock: press both Dryness and program buttons for 3 seconds, the child safety lock
indicator will go off denoting that the lock is released.
Overheat Safety device
This machine is equipped with an overheat safety device that
switches off the machine in the event of overheating. Should
the machine stop heating, turn the machine off and inspect lint
filter or exhaust outlet or ventilation of the laundry room.
Blockage on the filter & exhaust outlets (hose) and poor
ventilation in laundry room will cause the overheating on the
machine. Clean the blockage on filter & exhaust outlet and
open the window in the laundry room to improve the situation.
Wait for at least 10 minutes for the machine to cool down.
Then press the reset key at the back of the machine before
attempting to restart the machine.
20
Functions
Page 21

Using your < >tumble dryer
5
Page 22

Using your < >tumble dryer
Getting the most from your appliance
Before first use
Final checks before operating the appliance
1.Good air circulation around the appliance positioned appliance.
2.The feet have been adjusted for perfect leveling.
3.Check the hose has been extended to the outdoors.
4.Plug in the appliance.
Garments suitable for drying in tumble dryer
Before using the tumble dryer, you have to ensure the laundry is suitable to dry in the tumble dryer.
Always follow the advice on the garment labels. Dry only laundry with a label stating they are
suitable for drying in the dryer and select the appropriate program.
Garment NOT suitable for drying in tumble dryer
Do not dry articles that have been previously cleaned in, washed in, soaked in or spotted with
Petrol,/gasoline, dry-cleaning solvents or other flammable or explosive substances as they give
off vapors that could ignite or explode.
Do not dry the articles containing rubber, plastic or similar elastic materials such as padded bras,
tennis shoes, galoshes, bath mats, rugs, bibs, baby pants, raincoat plastic bags or pillows that may
melt or burn. Some rubber materials, when heated, can under certain circumstances produce fire
by spontaneous combustion.
Do not dry clothes / articles made of foam or rubber as they may be deformed.
Clothes / articles made of containing meal, hard plastic and similar materials, such as belt buckles,
jeans, bra wires, buttons and similar accessories will damage the machine and may cause breakdown.
Do not place such items in the tumble dryer.
Do not dry items such as woolen, silk articles and nylon stockings, delicate embroidered fabrics,
garments with metal accessories and items such as sleeping bags.
Too wet laundry or laundry with dripping water must not be put into the tumble dryer.
Preparation for the clothes to be dried
Thoroughly spin the laundry in washing machine. High spin speed can reduce the drying time and
save energy consumption.
Separate your laundry before placing them into the tumble dryer.
Sort the laundry according to their types thickness. Put the same type of laundry together.
22
Using your < >tumble dryer
Page 23

Load capacity
Using your < >tumble dryer
Getting the most from your appliance
or online at www.argos-support.co.uk If you still require further assistance, call one of our experts on 0345 257 7271.
Caution : Overload is not recommended. The drying performance will be degraded
when it is overloaded. The machine and your clothes may get damaged.
Please refer to the program table to select the desire loading for each setting. Do not
overloaded the machine.
Following table can provide you the idea of the weight for different kind of clothes.
Articles / Clothes
Cotton quilt covers(single/double)
Bed sheets (single/double)
Approx. Weight(g)
900/1500
600/900
Work clothes
Large tablecloths
Small tablecloths
Tea napkins
Bath towels
Hand towels
Blouses
1120
700
350
100
700
300
150
Cotton shirts
Shirts
Cotton dressed
Jeans
Jacket
Handkerchiefs
T-shirts 150
300
180
500
800
800
100
Shorts 70
Socks 50
Place your clothes into dryer loosely so that they have enough room during and will not get tangled.
Using your < >tumble dryer
23
Page 24

Using your < >tumble dryer
Getting the most from your appliance
Quick start
1.Open the door and
load the laundry
6.Press【start/Pause】
5.Select the desired program
2.Close the door
4.Press On/Off
3.Plug the power supply
24
Using your < >tumble dryer
Page 25

Care and maintenance
6
Page 26

Care and maintenance
Looking after your appliance
General
Important: Always unplug the appliance from the power socket during cleaning and
maintenance.
Never use any sharp instruments or abrasive substance, soap, household cleaner, detergent or wax
polish for cleaning.
Use luke warm water to clean the cabinet of the appliance and wipe it dry.
Never clean the appliance with flammable fluids. It could cause a damage and fire hazard.
Clean the exterior of the appliance, inner tube and door seal with a damp cloth. Open the door for
aeration to dry the inner tube through.
Avoid water going in the control panel. Clean with a dry cloth only.
Clean the lint filter after each use.
Clean the lint filter
Important: Always unplug the appliance from the power socket during cleaning and
maintenance.
Clean the lint filter after each use.
Pull it upward to remove the filter from the machine.
Clean the filter with a damp cloth.
Put it back to the machine after cleaning.
26
Care and maintenance
Page 27

or online at www.argos-support.co.uk If you still require further assistance, call one of our experts on 0345 257 7271.
Care and maintenance
Looking after your appliance
Technical specifcation
Model
Energy efficiency class C
Energy consumption – per year 510kWh
Rated capacity (max.) 7kg
Operating noise level dB(A) 69
Product dimension H840xW595xD550
Net Weight 33kg
Rated power input 2000W
Rated voltage/Frequency 220-240V~/50Hz
Minimum operation temperature
V7SDW
V7SDS
V7SDB
-10°C
NOTE:
1 A+++(most efficiency) to D (least efficiency)
2 Energy consumption 510 kWh per year, based on Standard cotton program at full(7kg) and
partial(3.5kg) load, and the consumption of the low-power modes. Actual energy consumption
per cycle will depend on how the appliance is used.
We apologise for any inconvenience caused by any minor inconsistencies in these instructions,
which may occur as a result of product improvements and development.
Care and maintenance
27
Page 28

Care and maintenance
Looking after your appliance
Product fiche
Brand BUSH
Model V7SDW/V7SDS/V7SDB
Dryer Type Air-Vented
Rated capacity 7 kg
Energy efficiency class 1 C
Energy consumption 2 510 kWh
Automatic or non-automatic Automatic
EU Ecolabel N/A
Energy consumption of the standard cotton
programme at full load
Energy consumption of the standard cotton
programme and partial load
Power consumption of the off-mode (Po) 0.46 W
Power consumption of the left-on mode (PI) 0.46 W
Duration of the left- on mode 10 min
Weighted programme time of the standard
cotton programme at full and partial load
Programme time of the standard cotton
programme at full load
Programme time of the standard cotton
programme at partial load
Sound power level for the s tandard cotton
programme at full load
Cotton + Standard programme, which is the “standard cotton programme”
Used at full and partial load is the standard drying programme to which the
Information in the label and the fiche relates, that this programme is suitable for
Drying normal wet cotton laundry and that it is the most efficient programme in
Terms of energy consumption for cotton.
NOTE:
1 A+++(most efficiency) to D (least efficiency)
2 Energy consumption 510 kWh-per year, based on 160 drying cycles of the
standard cotton programme at full and partial load, and the consumption of the
low-power modes/ Actual energy consumption per cycle will depend on how the
appliance is used.
4.38 kWh
2.38 kWh
100 min
130 min
74 min
69 dB
We apologise for any inconvenience caused by any minor inconsistencies in these instructions,
which may occur as a result of product improvements and development.
28
Care and maintenance
Page 29

Product support
7
Page 30

Product support
Help is always at hand
Product support
Troubleshooting
1.Tumble dryer doesn't operate?
Please make sure the power plug was inserted well and check the
protection devices and fuses.
2.Laundry has shrunk?
Please review the advice on the garments label to select the suitable
program setting.
3.Laundry not dry enough at the end of drying?
Please reduce the quantity of clothes for drying each time and clean
the lint filter after each use.
4.Laundry too dry?
Please take out the clothes immediately while the drying cycle is
finished and review the advice on the garments label to select the
suitable program setting.
5.The tumble dryer has noisy?
Please make sure the tumble dryer was installed on even surface and
leveling the appliance.
30
Page 31

Product support
Help is always at hand
Product support
or online at www.argos-support.co.uk If you still require further assistance, call one of our experts on 0345 257 7271.
Help and assistance
If you require any technical guidance or find that your < > is not operating as intended, a simple tumble dryer
solution can often be found in the Troubleshooting section of these instructions or online at
www.argos-support.co.uk
If you still require further assistance, call one of our experts on 0345 257 7271* . To help give us give you a fast
and efficient service please have the following information ready:
Model Ref.
Serial number
Date of purchase
Local call rates applies*
You can find these on
the rating plate - a small
information panel (usually
a sticker or metal plate) on
the rear of your appliance
This will be shown on
your receipt
Lines open 8am-7pm Monday to Saturday and 10am-4pm Sunday.
*Calls to Argos enquiry lines may attract a charge and set up fee from residential lines depending on your call plan/tarif. Mobile and other
providers costs may vary, see www.bt.com/pricing for details.
For Security and training purposes, telephone calls to and from customer service centres maybe recorded and monitored. Calls from
Republic of Ireland will attract international call charges.
31
Page 32

Product support
Help is always at hand
Product support
This appliance complies with the following EEC directives:
2006/95/EEC low voltage directive
2004/108/EMC directive
Notes on disposal:
This marking indicates that this product should not
be disposed with other household wastes throug-
hout the EU.To prevent possible harm to the env-
ironment or human health from uncontrolled waste
disposal,recycle it responsibly to promote the
sustainable reuse of material resources.To return
your used device,please use the collection systems
or contact the retailer where the product was pur chased. They return and can take this product for
environmental safe recycling.
Remember: Old machine must be disposed of carefully – Cut off the mains
plug and /or remove the door to be unusable before disposed – if in doubt,
contact your local council for details on how to dispose of an old dryer.
32
Page 33

Product support
Help is always at hand
Product support
or online at www.argos-support.co.uk If you still require further assistance, call one of our experts on 0345 257 7271.
Call us now and activate your 12 month guarantee
Thank you for choosing Bush. Your new product is guaranteed against faults and
breakdowns for 12 months. Don’t forget to register it with us today so we can provide you
with our best possible after-sales service and useful updates.
Lines are open 8am - 8pm, 365 days a year. *Calls may be recorded and monitored.
www.bushregistration.co.uk
FREEPHONE*
0800 597 8548
Your Bush Guarantee
This product is guaranteed for twelve months from the date of original purchase. Any defect that arises due to
faulty materials or workmanship will be repaired free of charge (or if applicable the product will be replaced or the
purchase price refunded) where possible during this period by the dealer from who your purchased the unit.
The guarantee is subject to the following provisions:
• The guarantee does not cover accidental damage,
misuse, cabinet parts, knobs or consumable items.
• The product must be correctly installed and
operated in accordance with the instructions
contained in the manual.
• It must be used solely for domestic purposes. The
guarantee will be rendered invalid if the product is
re-sold or has been damaged by inexpert repair.
• Specifications are subject to change without notice.
• Bush disclaim any liability for loss or damage arising
from the breakdown of the product.
• This guarantee is in addition to and does not
diminish your statutory or legal rights.
Important Data Protection Information
If you provide us with information about another
person, you confirm that they have appointed you
to act for them, to consent to the processing of their
personal data including sensitive personal data and
that you have informed them of our identity and the
purposes (as set out in the Important Data Privacy
notice displayed overleaf) for which their personal data
will be processed.
You are entitled to ask for a copy of the information
we hold about you (for which we may charge a small
fee) and to have any inaccuracies in your information
corrected.
Guaranto r: Argos Limited - 48 9 - 499 Avebury Blvd. - Mil ton Keynes - MK9 2NW
For quality control and training purposes, we may
monitor or record your communications with us.
If your personal details change, if you change your
mind about any of your marketing preferences or if you
have any queries about how we use your information,
please let us know by contacting our Data Protection
Officer, Domestic & General, Leicester House
17 Leicester Street, Bedworth, Warwickshire
CV12 8JP.
33
Page 34

Page 35

Page 36

Contact:
www.argos-support.co.uk
Helpline: 0345 257 7271
 Loading...