

Page 1

DVD Micro System
MC004DVD
Page 2

IMPORTANT SAFETY
INSTRUCTIONS
1
Page 3
IMPORTANT SAFETY
INSTRUCTIONS
PRECAUTIONS
AVIS
SAFETY
RISQUE CHOC ELECTRIQUE NE
PAS OUVRIR
2 3
Page 4
TABLE OF CONTENTS
ABOUT YOUR
DVD PLAYER
IMPORTANT SAFETY INSTRUCTIONS ..
SAFETY PRECAUTIONS ........................
TABLE OF CONTENTS ...........................
ABOUT YOUR DVD PLAYER ..................
FRONT AND BACK PANELS .. .............
FRONT PANEL...................................................
BACK PANEL....................................................
REMOTE CONTROL...............................
OPERATING THE REMOTE CONTROL......
CONNECTING DEVICES..........................
BASIC DVD OPERATION .......................
PLAYING THE RADIO...........................
MPEG4/MP3 PLAYBACK ................
FUNCTION OF USB
CD RIPPING FUNCTION
....................................
.........
............................
...
1
3
4
5
6
6
7
8
9
10
12
16
17
18
18
SYSTEM SETUP....................................
LANGUAGE SETUP ..............................
AUDIO SETUP... ....................................
VIDEO SETUP ......................................
SPEAKER SETUP ..................................
DIGITAL SETUP ......................................
TROUBLE SHOOTING..............................
TECHNICAL SPECIFICATIONS .................
18
22
24
25
27
27
28
29
Disc formats supported by this player:
MPEG4 files on discs
Dolby Digital
KODAK picture CD
MP3 files on CD-R/CD-RW
DVD video
9
32
8
LB
16:9
RESTRICTED
R
Multi-angle
Subtitle choices
Audio choices
TV Aspect Ratio modes
Parental Lock
This product incorporates copyright protection technology that is protected by U.S. patents
and other intellectual property rights. Use of this copyright protection technology must be
authorized by Macrovision, and is intended for home and other limited viewing uses only
unless otherwise by Macrovision. Reverse engineering or disassembly is prohibited.
The product complies with the KODAK Picture CD format and will display KODAK Picture CDs. The "KODAK
Picture CD Compatible" logo is a trademark of Eastman Kodak Company and is used with permission.
Manufactured under license from Dolby Laboratories.
Dolby Laboratories. Confidential Unpublished Works.c 1992-1997 Dolby Laboratories, Inc. All rights reserved.
"Dolby" and the double-D symbol are trademarks of
4 5
Page 5
FRONT AND
BACK PANELS
FRONT AND
BACK PANELS
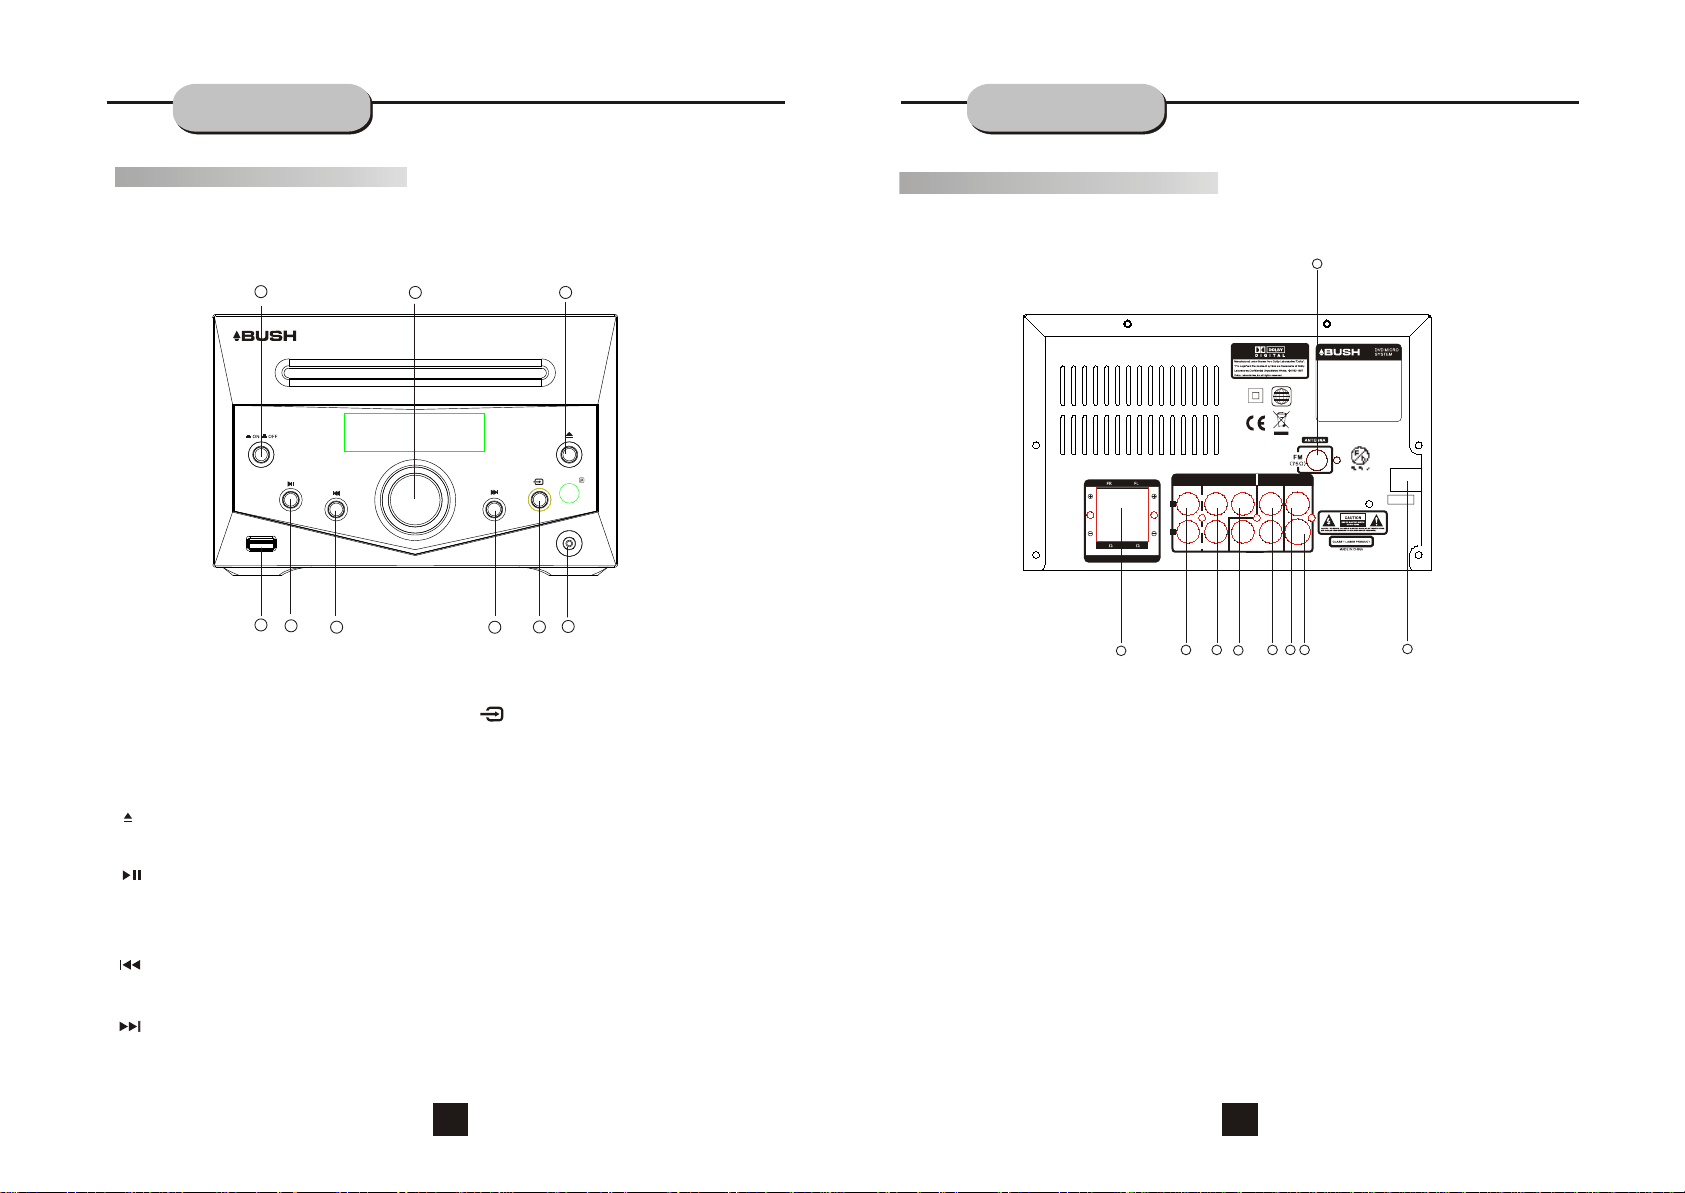
Front Panel Functions
9
8
4
5
1.HEADPHONE JACK
Use to connect headphone to the unit.
2. VOLUME
Use this button to control the unit's volume. It
controls 2 channels simultaneously.
3. OPEN/CLOSE
Use this button to open and close the disc tray
while in DVD mode.
4.
Use this button to begin play function while in
DVD mode.
Use this button to pause play function while in
DVD mode.
5. PREV
While in the DVD mode, you may press this
button for previous track.
6. NEXT
While in the DVD mode, you may press this
button for the next track.
PLAY /
PAUSE
2
6
7.
Use this button to select the proper input signal
source. (Note: The selected input will correspond to
the selected input terminal on the rear panel.)
3
1
7
INPUT SIGNAL SOURCE
8. USB CONNECT
To connect a USB memory device
9. POWER
Before plugging the power cord into the AC
outlet, check to make sure all of the connections
have been properly completed.
When they have been, carefully plug power cord
into the power outlet.
Press the POWER button on the front panel to
power the unit. The display panel will light.
When the unit is initially powered, a brief surge
of electricity may cause interference with other
electronic equipment on the same circuit. If this
occurs, connect the unit to an outlet on a different
circuit.
Back Panel Functions
AUDIO VIDEO OUTPUT
IN
COAXIAL VIDEOY
OUT
L
1
music source.
R
Pr/Cr
3
2
4
4 4
SPEAKERS IMPEDANCE
1. FRONT/MAIN
Use to connect the four terminals of the left
and right front or main speakers.
2. AUX INPUT
Use to connect input for auxiliary
3. LINE OUT
Use to connect the analog 2 channel audio output.
4. COAXIAL DIGITAL AUDIO OUTPUT
Use to connect the digital audio output.
5. Component Videos Output(Y,Cr/Pr,Cb/Pb)
Use to connect the component videos output.
6. VIDEO OUTPUT
Use to connect the composite video output.
7. S-VIDEO OUTPUT
Use to connect the s-video output.
8
MC004DVD
MODEL:
100-240V~ 50/60Hz
POWER :
POWERC ONSUMPTION:
BUSH WARRANTY:
1800 509 394 Australia
0800 450 259 New Zealand
4
SERIALN O.:
S-VIDEO
Pb/Cb
5
7
6
8. ANTENNA
Use to connect the provided indoor FM
antennas.
45W
100-240V~
50/60HZ
9
9. 100-240V~ 50/60HZ
This product will work under 100-240V voltage.
Frequency is 50/60HZ.
6 7
Page 6

REMOTE CONTROL
OPERATING THE
REMOTE CONTROL
OPEN/CLOSE
SUBTITLE
LANGUAGE
1 2
4
7
0
DISPLAY
MENU
PAUSE/STEP
VOL
FM/MODE PRE/TUN
SLOW
VIDEO
DVD
TITLE
5
8 9
+10
ENTER
PLAY
+ +
MEMO AUTO
REPEAT
PROG
P/N
ZOOM L/R
USB
CH
MUTE
ANGLE
3
6
GOTO
SETUP
RETURN
STOP
A-B
SOURCE
1
MUTE
2
ANGLE
3
TITLE
4
NUMBER KEYS
5
GOTO
6
SETUP
7
SCROLL UP
8
SCROLL RIGHT
9
RETURN
10
STOP
11
PLAY
12
FAST FORWARD
13
FAST BACK
CH+
14
-
15
CH
16
AUTO
17
MEMORY
18
A-B
19
REPEAT
20
L/R
21
ZOOM
22
SOURCE
23
USB
24
OPEN/CLOSE
25
SUBTITLE
26
LANGUAGE
27
DISPLAY
28
SCROLL LEFT
29
ENTER
30
SCROLL DOWN
31
PAUSE/STEP
32
PAUSE/STEP
33
PREV BUTTON
34
NEXT BUTTON
35
VOL +
36
VOL
37
FM/MODE
38
PRE/TUN
39
SLOW
40
PROG
41
VIDEO
42
P/N
43
DVD
Battery Installation
1. Push down and out on the battery compart-
ment cover to remove it.
2. Insert the two AAA b atteries into the battery ""
compartment of the remote control, making
sure the + and - signs on the batteries and
inside the batteries compartment match up.
3. Replace the battery compartment cover.
Notes:
Do not direct the remote sensor toward
any light source, such as direct sunlight or
a strong fluorescent light, as it may cause
the unit to not operate correctly.
When other remote controls are used
nearby or when the remote is used near
equipment using infrared rays, interference
may occur.
Notes:
Do not mix batteries from different
manufacturers, nor old ones with new.
If the remote control will not be used for an
extended period of time, remove the
batteries to prevent damage-causing
corrosion.
Remove dead batteries immediately to
prevent damage-causing corrosion.
If battery leakage occurs, wipe the battery
liquid from the battery compartment, then
Placing an object on the remote control
may cause it to inadvertently press a
button, changing a function and shortening
battery life.
Make sure there is no barrier including
remote control and remote between the
could prevent the unit from sensor, as it
signal.receiving the
Do not spill water or put wet items on the
remote control.
Never disassemble remote control.
replace both batteries.
Always replace both batteries at the same
time, using new, fully charged batteries.
Life expectancy of batteries may vary
depending on amount of use.
Using the Remote Control
Point the remote control at the remote sensor.
(The picture below is for reference only.)
OPEN/CLOSEOPEN/CLOSE
MUTE MUTE
ANGLEANGLE
LANGUAGELANGUAGE
TITLE TITLE
SUBTITLE SUBTITLE
3 3
1 1 2 2
5 5
6 6
4 4
7 7 8 8 9 9
GOTOGOTO
00
+10 +10
SETUPSETUP
DISPLAYDISPLAY
ENTER ENTER
MENU MENU
RETURNRETURN
STOP STOP
PAUSE/STEP PAUSE/STEP PLAY PLAY
CHCH
VVOOLL
++ ++
-
FM/MODE FM/MODE PRE/TUN PRE/TUNMEMOMEMOAUTOAUTO
REPEAT REPEA T
A-BA-B
SLOW SLOW
PROG PROG
P/NP/NVIDEO VIDEO ZOOM ZOOM L/RL/R
DVD DVD
USB USB
SOURCE SOURCE
Notes:
Point the remote control directly at the
Point the remote control directly at the
player's remote sensor.
player's remote sensor.
Do not leave the remote control in an
Do not leave the remote control in an
extremely hot or humid place.
extremely hot or humid place.
Do not spill water or put anything wet
Do not spill water or put anything wet
on the remote control.
on the remote control.
8 9
Page 7

CONNECTING
DEVICES
CONNECTING
DEVICES
MC004DVD
MODEL:
100-240V~ 50/60Hz
POWER :
45W
POWERCONSUMPTION:
BUSH WARRANTY:
1800 509 394 Australia
0800 450 259 New Zealand
4
SERIALNO.:
AUDIO VIDEO OUTPUT
IN
COAXIAL VIDEOY
L
R
4 4
SPEAKERS IMPEDANCE
Main speaker Main speaker
OUT
Pb/Cb
Pr/Cr
100-240V~
50/60HZ
S-VIDEO
CONNECTING
DEVICES
1
2
4
1.TV set or screen
2. Front or main left speaker
3.Front or main right speaker
10 11
3
Coaxial cable(75 ohm)
FM
Coaxial cable (75 ohm)
Outdoor FM antenna
4.Viewer's location
Page 8

BASIC DVD
OPERA TION
BASIC DVD
OPERA TION
12 13
Page 9

BASIC DVD
OPERA TION
BASIC DVD
OPERA TION
1 - - - - 5 - - - - 9 - - - - 1 3 - - - -
2 - - - - 6 - - - - 1 0 - - - - 1 4 - - - -
3 - - - - 7 - - - - 1 1 - - - - 1 5 - - - -
4 - - - - 8 - - - - 1 2 - - - - 1 6 - - - -
T C T C T C T C
1 - - : - - 5 - - : - - 9 - - : - - 1 3 - - : - -
2 - - : - - 6 - - : - - 1 0 - - : - - 1 4 - - : - -
3 - - : - - 7 - - : - - 1 1 - - : - - 1 5 - - : - -
4 - - : - - 8 - - : - - 1 2 - - : - - 1 6 - - : - -
PROGRAM
PLAY CLEAR
PROGRAM
Selecting Sound Source
1. Press any function button (USB,Source)
to select the desired sound source.
2. Press the source button to switch to the FM Tuner.
the last station listened to will play.
PLAY CLEAR
Volume Control
The volume may be adjusted by either turning the
large volume knob on the front panel or using the
appropriate volume buttons on the remote control.
Mute
Pressing the MUTE button temporarily mutes
every speaker. To resume audio, press the MUTE
button again.
14 15
Page 10

PLAYING THE RADIO
Basic operations
Automatic Tuning
OPEN/CLOSE
SUBTITLE
LANGUAGE
1 2
4
7 8 9
0
DISPLAY
MENU
PAUSE/STEP
VOL
FM/MODE PRE/TUN
SLOW
PROG
VIDEO
DVD
TITLE
5
+10
ENTER
PLAY
+ +
MEMO AUTO
REPEAT
P/N
ZOOM L/R
USB
MPEG4/MP3 PLAYBACK
MUTE
ANGLE
3
6
GOTO
SETUP
RETURN
STOP
CH
A-B
SOURCE
When a MPEG4 or Mp3 disc is loaded, the screen will display as follows:
Current MP3/JPEG file
name. If a JPEG file is
Current
directory
name
The playing file
is a Mp3 audio
file.
playing, the name should
have a JPEG extension.
File Switch Region: Displays
the file typa of the playing
and the switching.
The playing file is
a JPEG picture file.
Memory number
FM MHZ
Wave band
Station frequency
Current
directory
name
The playing file
is a Mp3 audio
file.
Press to select the file when the cursor appears in the file window.
Press enter to play the current file selected by the cursor.
Press to switch between the directory window and the file window.
Note: The player will not function correctly under the following conditions:
1. The disc is badly scratched, damaged or dirty.
2. The disc is not finalised.
3. The recording format is not supported by the player.
16 17
Current Mp4 file name.
If a JPEG file is playing,
the name should have a
JPEG extension.
File Switch Region: Displays
the file type of the playing
and the switching.
The playing file is
a JPEG picture file.
Page 11

USB interface
This unit has a USB input, When no disc is inserted in the player, you can
insert a USB or Mp3 Player with USB Interface to play Mp3 music or view
JPEG files. All functions are the same as playing a disc.
When a disc is in the player, you can access the USB by pressing the USB
button on the remote. Not all USB devices are supported by this system.
CD RIPPING
FUNCTION
SYSTEM SETUP
SYSTEM SETUP
TV SYSTEM
VIDEO
TV TYPE
PASSWORD
RATING
DEFAULT
VIDEO SETUP
SCREEN SAVER
BRIGHTNESS
CONTRAST
HUE
SATURATION
SYSTEM SETUP
VIDEO SETUP
SCREEN SAVER
BRIGHTNESS
CONTRAST
HUE
SATURATION
18 19
12
10
8
6
4
2
0
Page 12

SYSTEM SETUP
SYSTEM SETUP
SYSTEM SETUP
TV SYSTEM
VIDEO
TV TYPE
PASSWORD
RATING
DEFAULT
SYSTEM SETUP
TV SYSTEM
VIDEO
TV TYPE
PASSWORD
RATING
DEFAULT
SYSTEM SETUP
TV SYSTEM
VIDEO
TV TYPE
PASSWORD
RATING
DEFAULT
AUTO
PAL
NTSC
P-SCAN YPBPRP-SCAN YPBPR
INTERLACE-YUVINTERLACE-YUV
S-VIDEOS-VIDEO
4£º 3PS
4£º3PS
4£º 3LB
4£º 3LB
16£º 9
16£º 9
SYSTEM SETUP
TV SYSTEM
VIDEO
TV TYPE
PASSWORD
RATING
DEFAULT
SYSTEM SETUP
TV SYSTEM
VIDEO
TV TYPE
PASSWORD
RATING
DEFAULT
SYSTEM SETUP
TV SYSTEM
VIDEO
TV TYPE
PASSWORD
RATING
DEFAULT
--------
1 1 KID KID SAFESAFE
2 2 GG
3 3 PGPG
4 4 PG13PG13
5 5 PG-RPG-R
6 6 RR
7 7 NC-17NC-17
8 8 ADULTADULT
RESTORERESTORE
20 21
Page 13

LANGUAGE SETUP LANGUAGE SETUP
LANGUAGE SETUP
OSD LANGUAGE
AUDIO LANG
SUBTITLE LANG
MENU LANG
LANGUAGE SETUP
OSD LANGUAGE
AUDIO LANG
SUBTITLE LANG
MENU LANG
ENGLISHENGLISH
GERMANGERMAN
SPANISHSPANISH
FRENCHFRENCH
ENGLISHENGLISH
GERMANGERMAN
SPANISHSPANISH
FRENCHFRENCH
PORTUGUESEPORTUGUESE
ITALIAN ITALIAN
DUTCHDUTCH
LATINLATIN
LANGUAGE SETUP
OSD LANGUAGE
AUDIO LANG
SUBTITLE LANG
MENU LANG
LANGUAGE SETUP
OSD LANGUAGE
AUDIO LANG
SUBTITLE LANG
MENU LANG
ENGLISH
GERMAN
SPANISH
FRENCH
PORTUGUESE
ITALIAN
DUTCH
OFF
ENGLISH
GERMAN
SPANISH
FRENCH
PORTUGUESE
ITALIAN
DUTCH
LATIN
22 23
Page 14

AUDIO SETUP
3
VIDEO SETUP
DOWN SAMPLE
AUDIO SETUP
AUDIO OUT
DOWN SAMPLE
AUDIO SETUP
AUDIO OUT
DOWN SAMPLE
SPDIF/OFF
SPDIF/OFF
SPDIF/RAW
SPDIF/RAW
SPDIF/PCM
SPDIF/PCM
48K
48K
96K
96K
192K
192K
VIDEO SETUP
BRIGHTNESS
CONTRAST
HUE
SATURATION
VIDEO SETUP
BRIGHTNESS
CONTRAST
HUE
SATURATION
12
10
8
6
4
2
0
12
10
8
6
4
2
0
24 25
Page 15

VIDEO SETUP
VIDEO SETUP
BRIGHTNESS
CONTRAST
HUE
SATURATION
VIDEO SETUP
BRIGHTNESS
CONTRAST
HUE
SATURATION
SPEAKER SETUP
SPEAKER SETUP
DOWNMIX LT/RT
+6
+4
+2
0
-2
-4
-6
DIGITAL SETUP
DYNAMIC RANGE
DUAL MONO
12
10
8
6
4
2
0
STEREO
FULL
OFF
6/8
4/8
2/8
DIGITAL SETUP
DYNAMIC RANGE
DUAL MONO
26 27
STEREO
MONO L
MONO R
MIX MONO
Page 16

TROUBLE SHOOTING
This handy trouble-shooting guide is provided to save
You time in case you experience any inconvenience with
this DVD player.
Various Problems and suggested solutions are
outlined below
No power
1. Check to ensure that the power plug is secured
in the wall outlet.
No sound
1. Check the connection between the DVD player
and the TV set, amplifier, or any other unit it is
connected to.
2.Check to ensure the TV and amplifier are in the
correct mode.
No picture
1. Check the connection between the DVD
player and the TV set or any other unit it
is connected to.
2.Check to make sure TV is turned on.
Disc does not play
1.Check to make sure the disc is loaded correctly
Label side facing up on disc tray.
2.Check that disc is clean from dirt, dust, fingerprints,
And smudges.
3.Check to ensure disc is within the guides
4.Check if parental lock function is on.
5.Make sure that the disc is a region 4 DVD.
Remote does not work.
1. Check that the batteries have power.
2. Check to ensure there aren't any obstacles between
the remote sensor on the unit's front panel and the
remote control.
3.Be sure the remote is aimed at the remote
Divided picture
1.Check that the disc is clean and has no scratches.
2.The unit is controlled by a micro computer which
may need to be reset. Turn off the unit's power,
wait for fifteen seconds, then turn it back on.
on the tray.
sensor.
TECHNICAL
SPECIFICA TIONS
DVD Player
TV System NTSC/PAL
Compatible Discs MPEG4,DVD, CD, MP3,
CD-R, CD-RW
Resolution Ratio Greater Than 500 lines
Video S/N Ratio 65dB
Frequency Response fs (96KHz/24bit)
4Hz - 44KHz:+/-2dB
Audio S/N Ratio 95dB
Degree of Distortion <0.01%
D/A Converter 192KHz/24bit
Video Out 1Vp-p
S-Video Out Y: 1Vp-p(75 )
C: 0.3Vp-p(75 );
Audio Out 2.0V+0/-1V
Digital Audio Output Coaxial
Connections USB,CVBS
YUV,S-Video, 2 Channel
Output
Audio,Aux Input
FM Tuner
Tuning Range 87.5-108MHz
S/N Ratio >46dB
Monophonic >46dB
Stereo >50dB (DIN)
Selectance 50dB
THD
Monophonic 2%
Stereo 3%
Frequency Response 30Hz-10kHz +/- 1dB
Stereo Resolution 35dB (1kHz)
30dB (100Hz-10kHz)
Amplifier
Output Power:
10W+10W 4 )
)
FrequencyR esponse:
S/N Ratio > 76dB
Channel Resolution > 30dB (Normal)
Remote Control
Transmitter Infrared Ray
Signal Range Approximately 5m
Power Source 2 AAA B at teries""
General
Power Supply 100-240V~ 50/60HZ
Consumed Power 45W
Designs and Specifications are subject to
change without notice.
200Hz-20kHz+ /-3dB
28 29
 Loading...