

Bush LUNAR Instruction Manual
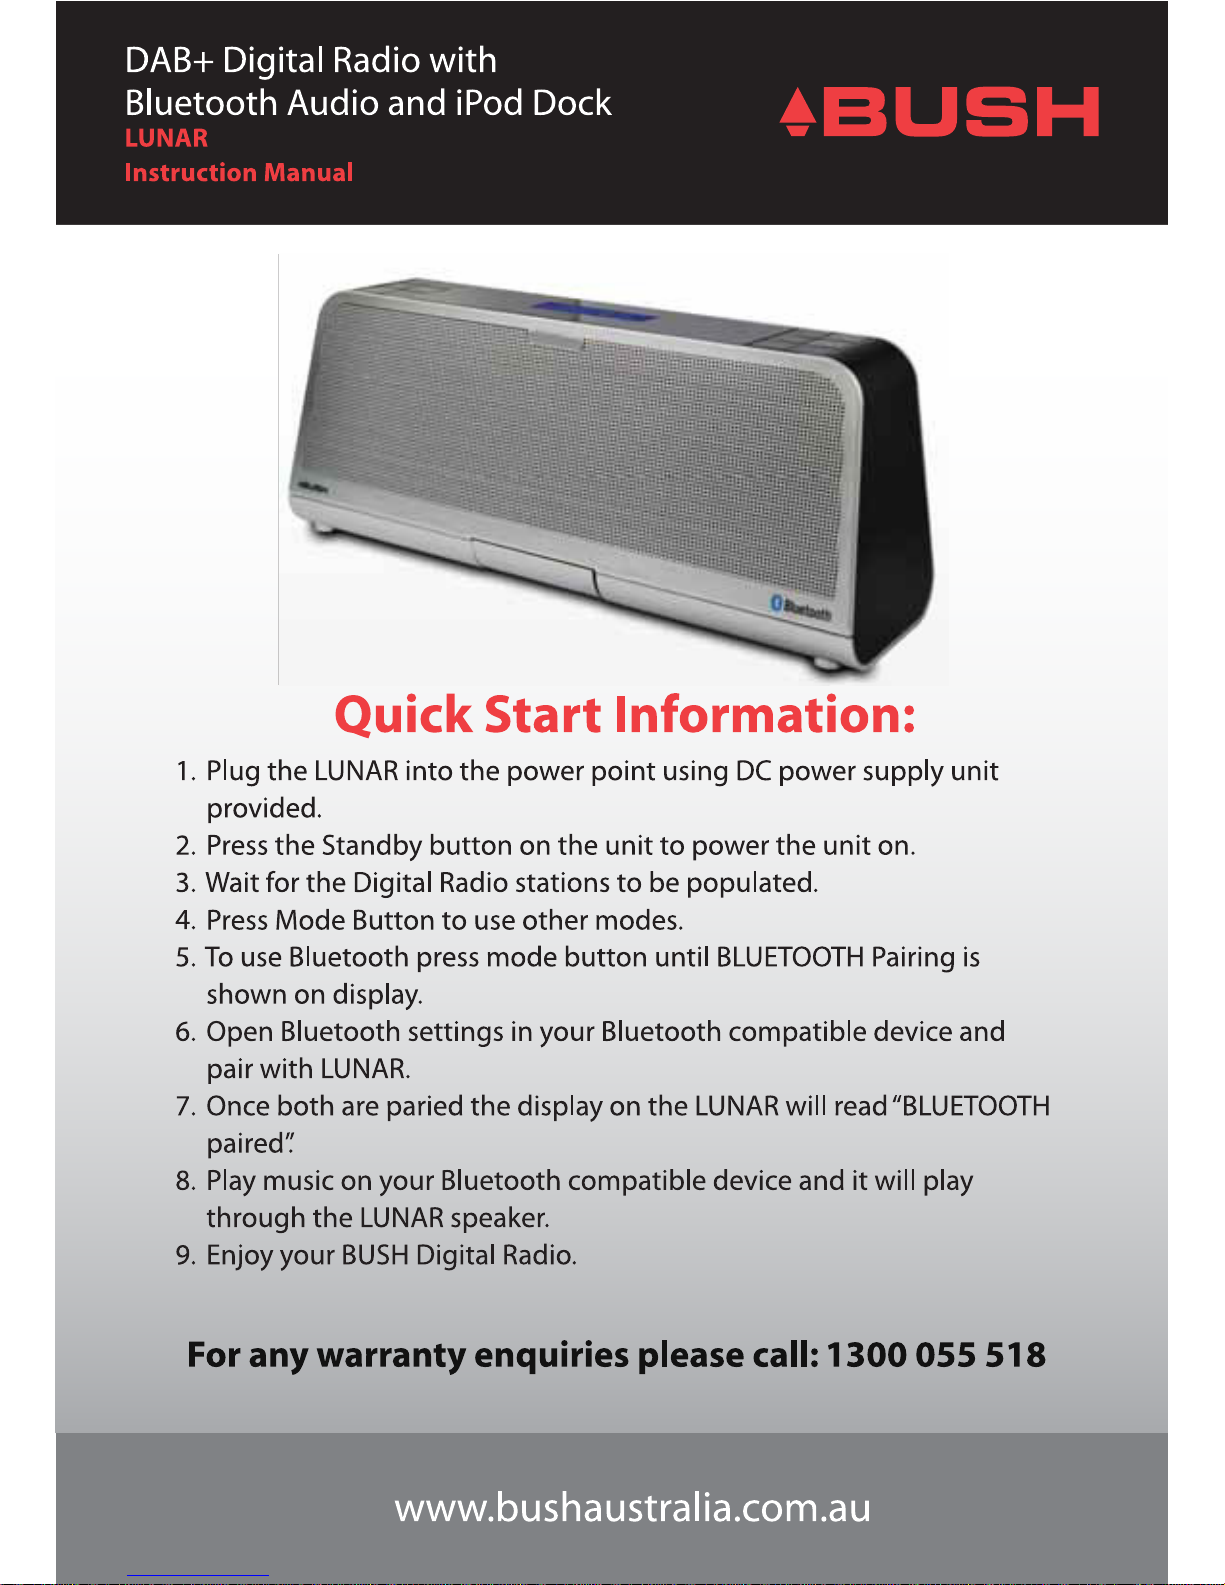

LUNAR
Introduction and Contents
Thank you for buying this Bush product, which is designed to give you many years of
trouble-free service. You may already be familiar with using a similar unit, but please
take time to read these instructions, as they are designed to familiarise you with the
unit’s many features and to ensure you get the very best from your purchase.
Safety is important
Your safety and the safety of others are important. Please therefore, ensure you read
the “Safety Instructions” before you operate this unit.
Warranty
In the unlikely event that your product fails to work normally, please call the below free
phone number to discuss the problem with one of our qualified service engineers.
Bush Warranty: 1300 055 518
- 2 -

LUNAR
- 3 -
Safety Instructions
General Safety Considerations
Cleaning
Electrical Information
1) The nameplate artwork is located at the bottom or rear of the apparatus.
2) The apparatus shall not be exposed to dripping or splashing and that no objects
filled with liquids, such as vases, shall be placed on apparatus.
3) The mains plug or adapter of the apparatus shall be disconnected from the mains,
when completely disconnecting the unit.
4) Batteries shall not be exposed to excessive heat such as sunshine, fire or the like.
Attention should be drawn to the environmental aspects of battery disposal.
5) Excessive sound pressure from earphones and headphones can cause hearing loss.
6) A minimum distance of 10cm around the apparatus is sufficient ventilation;
7) The ventilation should not be impeded by covering openings with items such as
newspaper, table-cloths, curtain etc;
8) No naked flame sources such as lighted candles should be placed on the apparatus.
9) Only use the apparatus in moderate climates.
10) Please read these operating instructions before you attempt to use the DAB+
Bluetooth Speaker.
11) Please ensure that all electrical connections (including the mains plug, extension
leads and interconnections between pieces of equipment) are properly made in
accordance with the manufacturer’s instructions.
12) Switch off and remove the mains plug when making or changing any connections.
13) Please consult your dealer if you are ever in doubt about the installation, operation
or safety of your DAB+ Bluetooth Speaker.
14) Don’t continue to operate the DAB+ Bluetooth Speaker. If you are ever in doubt
about it working normally, or if it is damaged in any way. Switch it off, withdraw the
plug from the mains and consult your dealer.
15) Don’t remove any fixed covers as this may expose you to dangerous voltages.
16) Don’t leave the DAB+ Bluetooth Speaker, switched ON when it is unattended for
long periods of time, unless it is specifically stated that it is designed for unattended
operation or has a standby mode.
17) Make sure that other people in your household are conversant with the DAB+
Bluetooth Speaker.
18) Under the influence of electrostatic phenomenon, the product may malfunction and
require user to reset
1. Ensure that the mains supply is disconnected before the unit is cleaned.
2. Do not use any liquids or aerosol cleaners, as this may damage the unit.
3. The unit should be cleaned with a soft, damp cloth.
Make sure that the voltage of your electricity supply is the same as that indicated on the
rating plate of the power supply unit supplied with your product. It requires a compatible
mains supply.
Do not use any other supply.
Under the influence of electrostatic phenomenon, the product may malfunction and
require the user to reset.

LUNAR
- 4 -
Your DAB+ Bluetooth Speaker

LUNAR
- 5 -
Interference free reception
Analogue systems suffer from an effect called “multipath distortion”. This is caused
because waves do not behave in an orderly fashion, but bounce and reflect off buildings
etc. DAB+ sees this as an advantage and uses the direct and reflected signals to actually
reinforce the end result, allowing for better service more of the time.
No need to re-tune
A single DAB+ frequency can be used to cover the whole of the Australia, so solving
many of the problems experienced with the earlier analogue system. DAB+ scans
automatically and tunes-in all of the available stations in your area.
Scrolling text
Broadcasters can transmit text to your radio. This way you can read the name of the DJ,
artist, song title or any other information they choose.
DAB+ was developed in Europe by a consortium of broadcasters and manufacturers.
DAB+ uses digital compression techniques to transform the source material, i.e. music
and speech, into better quality audio.
What is DAB+
LUNAR
- 6 -
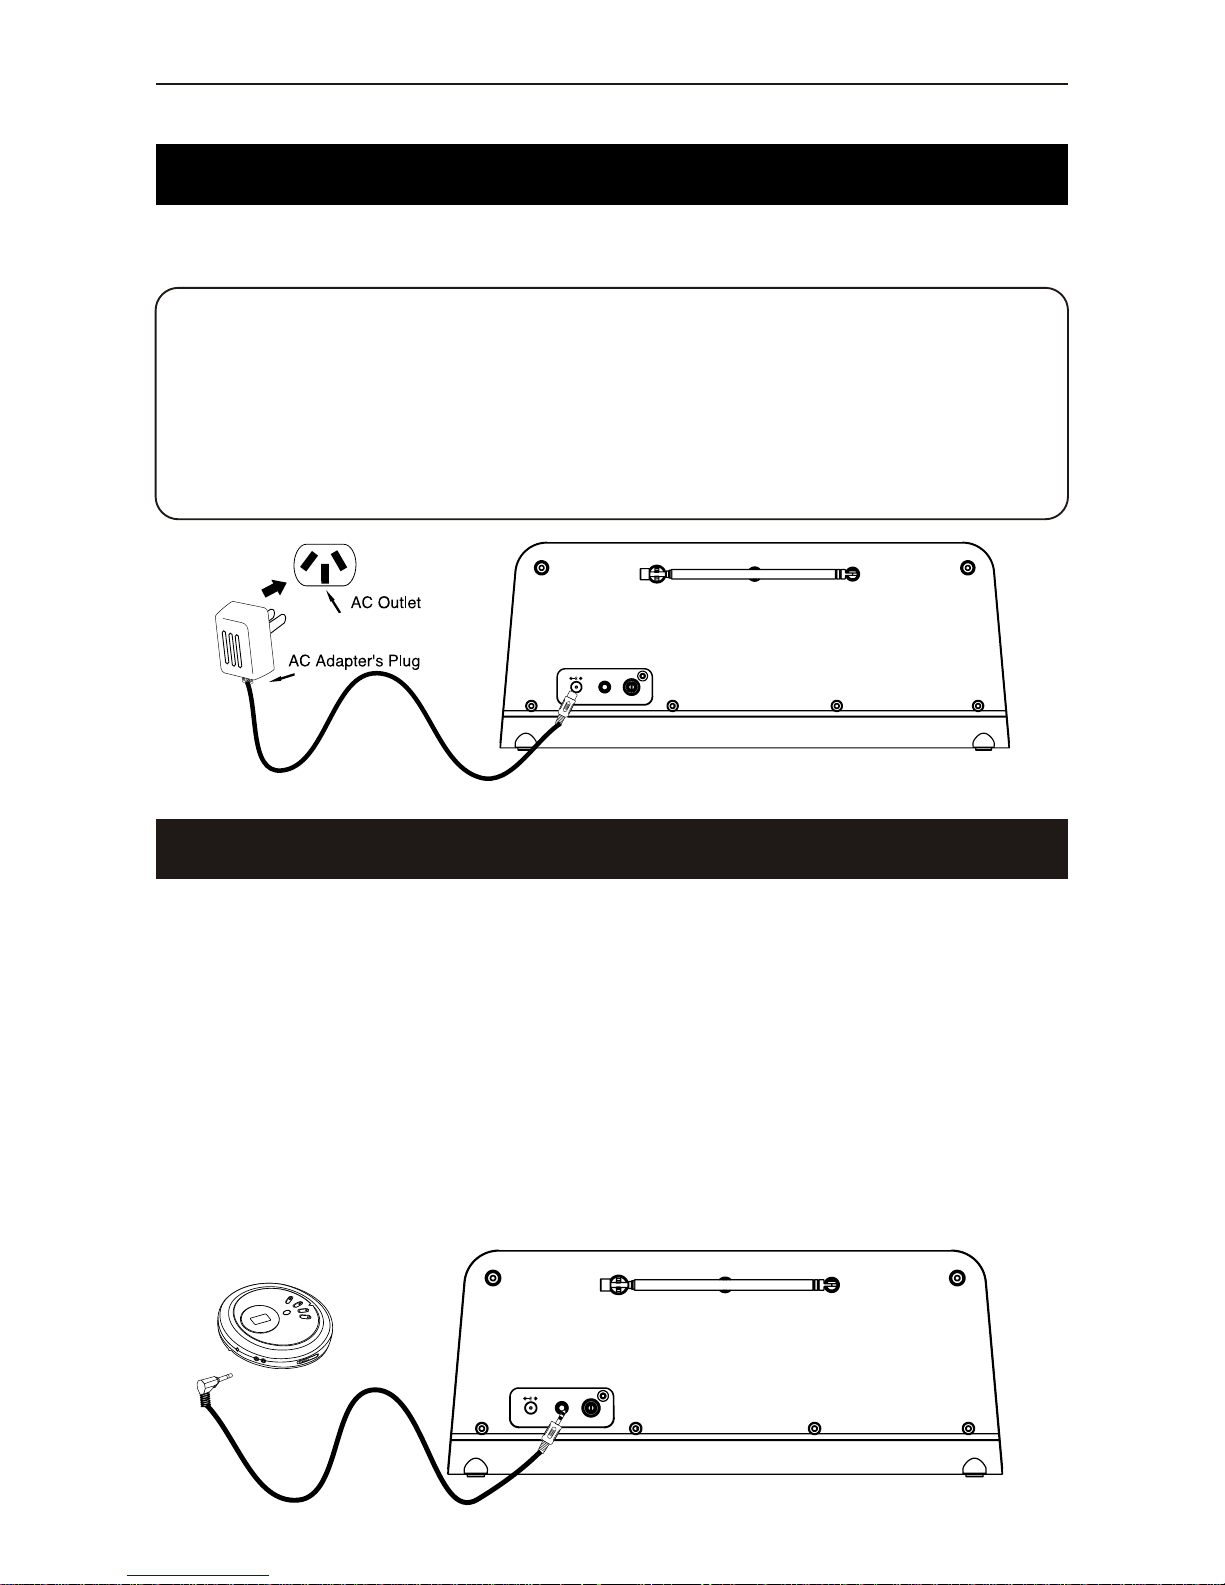
Connect the small end of adapter to main unit DC IN and insert the main plug of adapter
into standard AC wall socket. Press the STANDBY button to power on the unit.
Connecting AC Power
Set up your line in port (AUX IN)
CONNECTION:
1. Plug a 3.5 mm audio cable (not included) into your MP3 or MP4 player aux out or
phones port and connect the other end (3.5mm jack) into the AUX-IN port at the
rear of DAB+Bluetooth Speaker.
2. Make sure both units are turned on.
3. Press the MODE button of DAB+ Bluetooth Speaker to change source to AUX
mode.
4. Set your device to start playing.
5. This will allow you to transmit sound through your DAB+ Bluetooth Speaker.
This will allow you to transmit sound through your DAB+ Receiver speakers.
Aux-In (Line-In / Audio-In) Connection
Warning!
1) The DAB+ Bluetooth Speaker is designed to operate from a mains supply of
AC 240V~50Hz.If the plug of adapter not fit properly, turn it over and again.
Do not force it.
2) When the DAB+ Bluetooth Speaker is not used for long periods of time,
please turn offu nit power and remove the adapter from the wall outlet and
unplug from the DAB+ Bluetooth Speaker.
AUX IN
VIDEO
OUT
DC 6V
AUX IN
VIDEO
OUT
DC 6V
AC 240V 50Hz
LUNAR
- 7 -
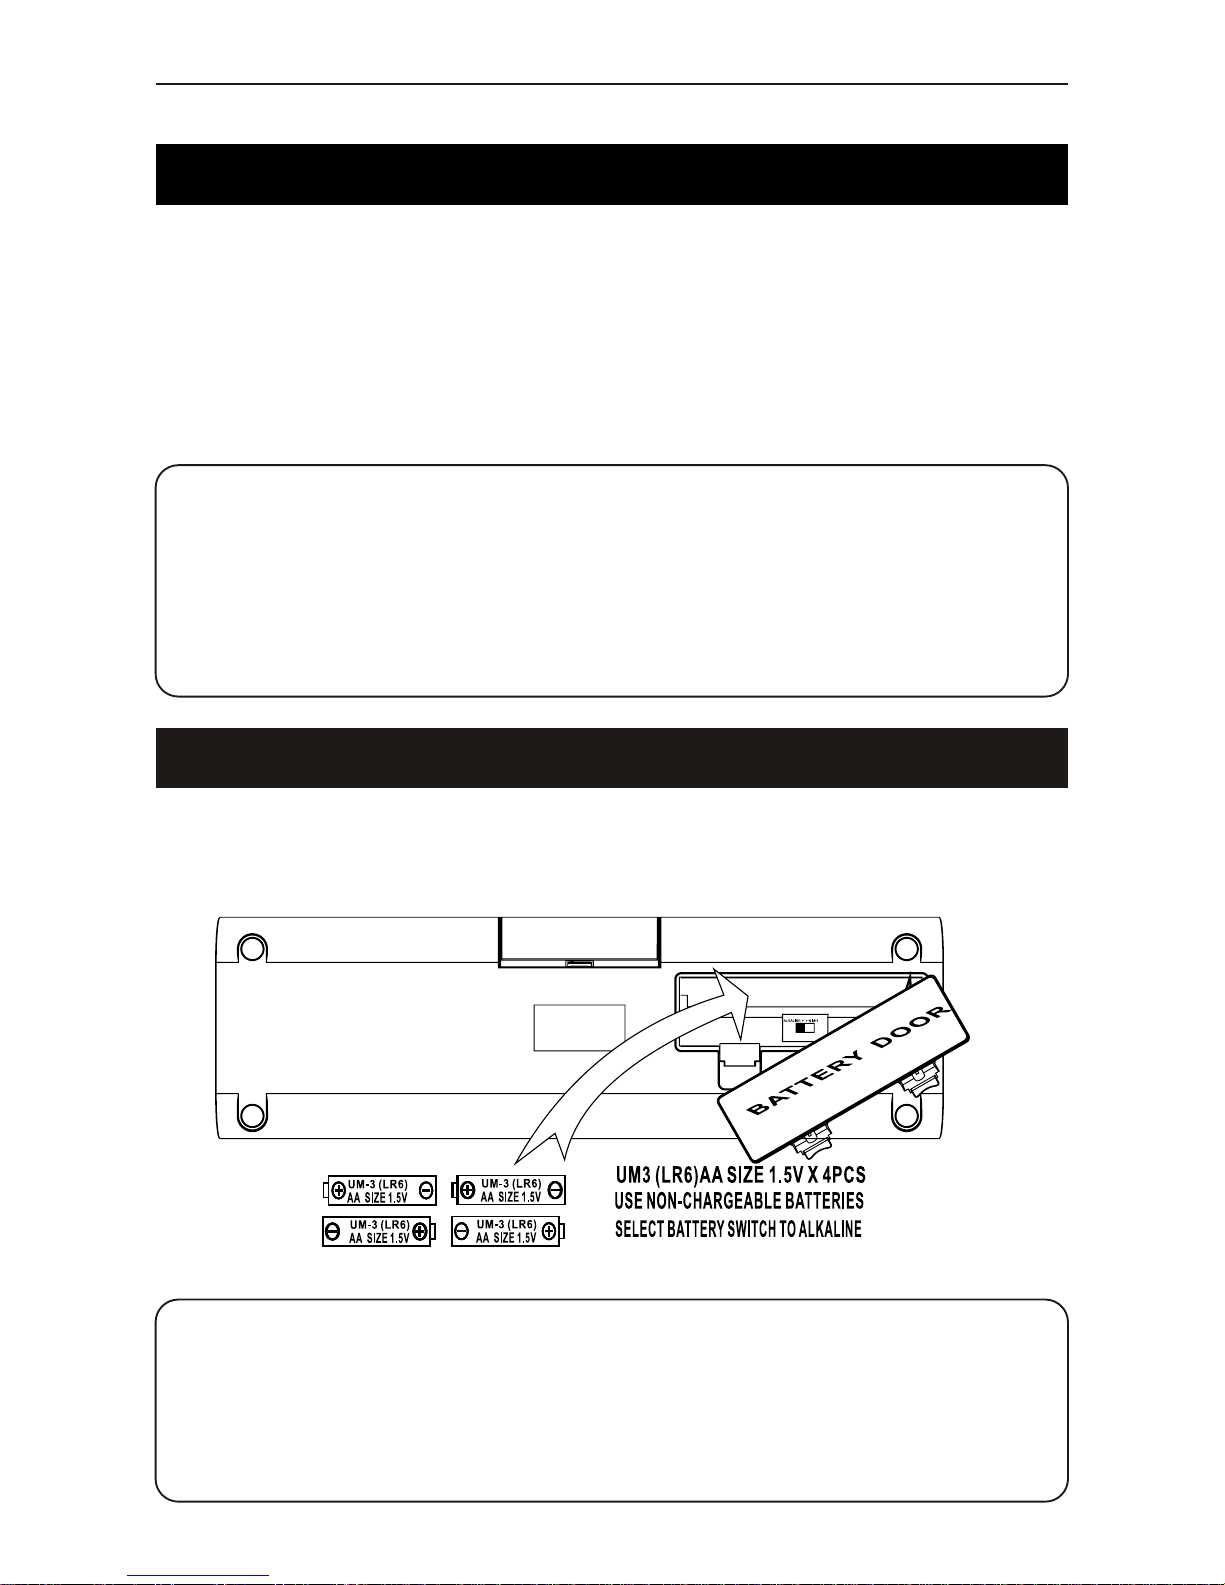
Before installing batteries (not included), ensure that the unit is disconnected from the
mains supply.
Remove the battery compartment cover on the back of the DAB+ Receiver by carefully
pushing the two lugs down.The battery cover can then be lifted away. Select the battery
switch (Alkaline or NI-MH) in the batteries compartment. Fit the 1.5V (UM3) x 4 pcs
batteries (not included), referring to the polarity markings. Finally, replace the cover.
For battery operation, remove the adapter from the wall outlet and unplug from the
DAB+Receiver.
Connecting AC Power
1) We recommend the use of High Quality batteries.
2) Select the battery switch to Alkaline position.
Please be aware alarm will not work in battery mode.
3) Follow the “Battery Operation” to insert correct batteries.
Using Non-Rechargeable Batteries
Warning!
1. There is danger of explosion if batteries are incorrectly replaced.
2. Select correct the type batteries of battery switch. Danger of explosion if
batteries are incorrectly battery switch setting.
3. Using Non-chargeable battery, the batteries switch must set to Alkaline position.
4. Using chargeable battery, the batteries switch must set to NiMh position.
5. Replace batteries with the same equivalent type only.
Warning!
1. There is danger of explosion if batteries are incorrectly replaced.
2. There is danger of explosion if battery switch has the wrong setting.
3. When using Non-chargeable battery, the batteries switch must set to Alkaline
position.
4. Please replace batteries with the same equivalent type only.

LUNAR
- 8 -
The preferred rechargeable battery type use NIMH AA size.
1) A fully charged battery, depending on its capacity will take approximately 15 - 20
hours for a full charge.
2) Charging of the batteries is possible with the radio powered on or off as long as it
is connected to the mains supply.
3) With the unit connected to a mains supply move the batteries switch to NiMH
position. The “Insert Battery” indicator will show on display. At this moment, install
rechargeable battery into the batteries compartment.
4) Insert 4 x AA size rechargeable batteries into the battery compartment observing
the correct polarity as indicated inside the battery compartment. The “Batt
Charging” show on display and the battery charging start.
5) After approximately 15 - 20 hours, the “Batt Charged” show on display and the
batteries are fully charged.
6) Remove the adapter from the back of the unit to operate the unit.
Using Rechargeable Batteries NIMH
Warning!
There is danger of explosion if use non-rechargeable batteries with the NIMH
switch set. Overtime batteries will loose the charge, please always remember
to check the Batteries.
Please be aware alarm will not work in battery mode.
Warning!
1) The charge current in this unit has been optimized for overnight charging of
NI-MH rechargeable batteries. NiCad batteries can be used but the charge time
will need to be reduced.
2) If using rechargeable batteries, select the batteries switch to NiMh position. At
the time display will show “Insert Battery”.
3) After installing battery, the “Batt Charging” show on display.
4) “Batt charged” show on display that the rechargeable batteries fully charged.
 Loading...