

Page 1
I
(0
D
DVD PLAYER WITH INTEGRATED STANDARD DEFINITION DIGITAL TUNER
DFTA9DVD
<
Z
<
s
z
o
H
o
3
H
0)
ID
The Gold Technical Support Line: 1902 215 259
(Charges will apply at $2.95 per minute)
Page 2

Introduction Important Safety Instructions
Thank you for buying this Bush product, which is designed to give you many i) Read and foiiow aii instructions and
years of troubie-free service. warnings carefuliy.
The DFTA9DVD issuitabieforpiaying: DVDs, DVD+RWs, DVD-RWs, DVD+Rs, DVD-Rs, ?! cu.an m^v with dre
Audio CDs,MP3 Data and Picture Data, it aiso aiiows you to access DVB-T reception ^ ^ | ^ n ^ ^
which covers VHF& UHF band reception. ^
You may already be famiiiar with using a simiiar unit, but piease take time to devices (inciuding ampiifiers) that produce
read these instructions. They are designed to famiiiarise you with the unit’s "f?,-j j , j
many features and to ensure you get the very best from your purchase. 5) I”"® provided plug does not fit into your
Safety is important of the obsolete outlet.
Your safety and the safety of others is important. Please therefore, ensure you 6) Protect the power cord from being
readthe '‘Safety Instructions” before you operate this unit. walked on or pinched particularly at plugs,
Warranty where they exit from the apparatus.
In the unlikely event that your product fails to work normally, please call the 7) Only use attachments/accessories
below Bush warranty number for support. specified by the manufacturer.
n 1 stormsorwhenunusedforlongperiodsof
Bush Warranty: 1800 509 394
New Zealand servicing to qualified service
Bush Warranty: 0800 450 259 technician. Servicing is required when the
...................................................................................................................................................... liquid has been spilled or objects have fallen
Table of Contents apparatus, the apparatus has been
Front panel and Rear panel..........................................................................................................1 operate normallyorhas been dropped.
Remote Control................................................................................................................1
Connecting to a TV Set....................................................................................................2
Connecting to an AV Amplifier
The Setup Menu System DVD.......................................................................3
MP3 Playback...................................................................................................................5
Kodak Picture CD Playback.............................................................................................5
The Setup Menu System DVB-T-....................................................................6
Troubleshooting................................................................................................................9
Specifications.................................................................................................................10
Warranty.........................................................................................................................10
' apparatus has been damaged in any way. If
.........................................................................................
outlet consult an electrician for replacement
convenience receptacles and the point
8) Unplug this apparatus during lighting
exposed to rain or moisture, does not
2
10) The ventilation should not be covered.
This may cause the unit to over heat.
11) No naked flame sources, such as candles,
should be placed on or near the apparatus.
WARNING: To reduce the risk of fire or
electric shock, do not expose this
apparatus to rain or moisture.
The symbol indicates that
dangerous voltages constituting a
A
risk of electric shock are present
within this unit.
The symbol indicates that there are
^ important operating and maintenance
instructions in the literature
accompanying this unit.
The symbol indicates that this
product Incorporates double
insulation between hazardous mains
voltage and user accessible parts.
When servicing use only identical
replacement parts.
Page 3
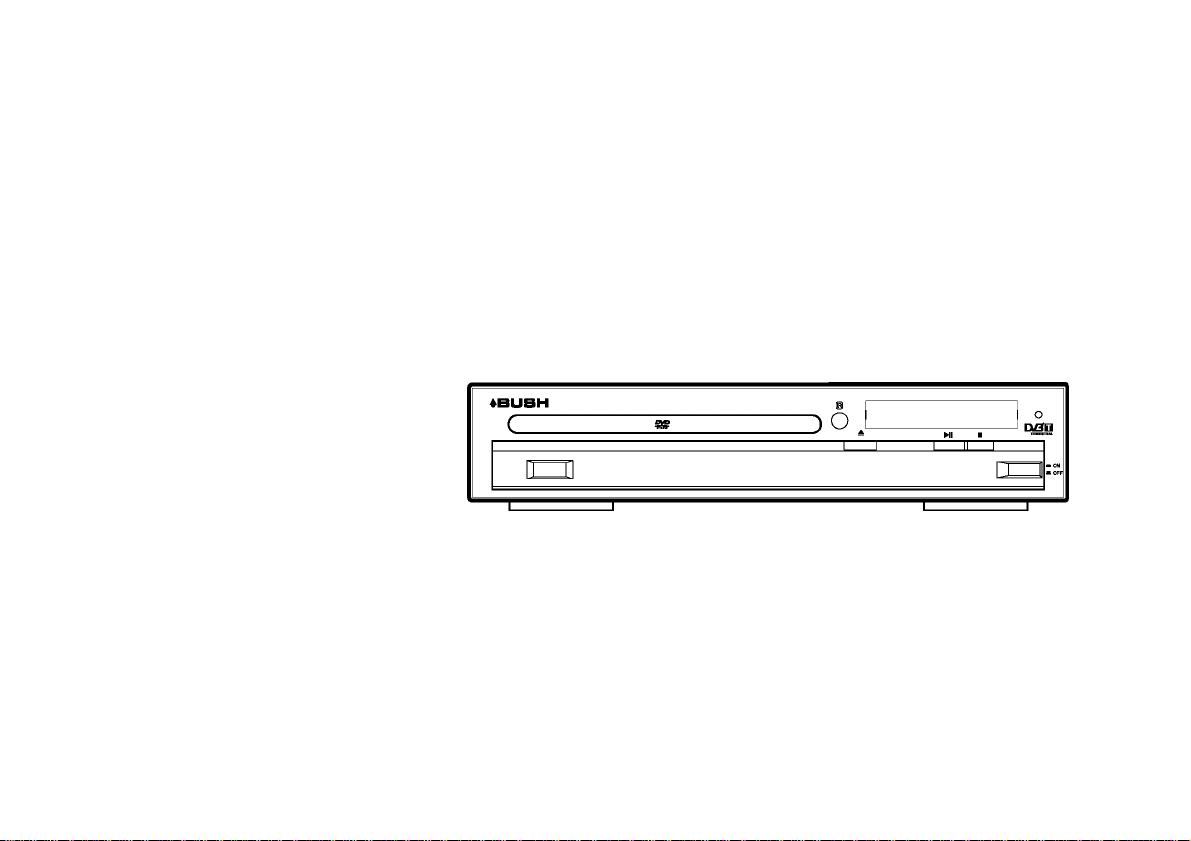
Front and Rear Panel
1. Front panel
(
d b
® USB PORT
@ CABIN DOOR
@ SENSOR
@ OPEN/CLOSE BUTTON
Rear panel
® @
©oQ
© RFIN
@ RFLOOPTHROUGH
©AUDIO OUTPUT (L/R)
© VIDEO OUTPUT JACK
® ® ®
9
db
® PLAY/PAUSE BUTTON
® STOP BUTTON
® POWER
® INDICATOR LIGHT
♦BUBH nrTnnmi
Te o M 1
® S-VIDEO OUTPUT JACK
® COMPONENT VIDEO OUTPUT (Y, PB/CB, PR/CR)
® DIGITALAUDIOCOAXIALOUTPUTJACK
® MAINS CABLE
u
A A
Remote Control
O OPEN/CLOSE Q
© 0-10+NUMBER KEY
© EPG
O INFO
© PAUSE
© SETUP
© MOVE(*,T,-,.)
© SOURCE
© REV
® FWD
® PBC
© SUBTITLE
® PROGRAM
© LANGUAGE
© REPEAT
0A-B
Note:
1. In this manual, -<□ will be used to represent different
NAVIGATION ARROWS on the remote respectively.
2. In order to operate any of the remote functions, you must first press the
Power button on the DVD player.
3. Some of the keys have multiple funtions.
® POWER
© MUTE
© TITLE/TTX
® MENU
® FAVORITE
0 GOTO
® VOL+/ VOL-
© STOP
0 PLAY
0 RETURN
® CH+
© ENTER
® CH® TV/RADIO
® NEXT
® PREV
® VIDEO
© ZOOM
0 P/N
® L/R
© SLOW
0 ANGLE
Page 4
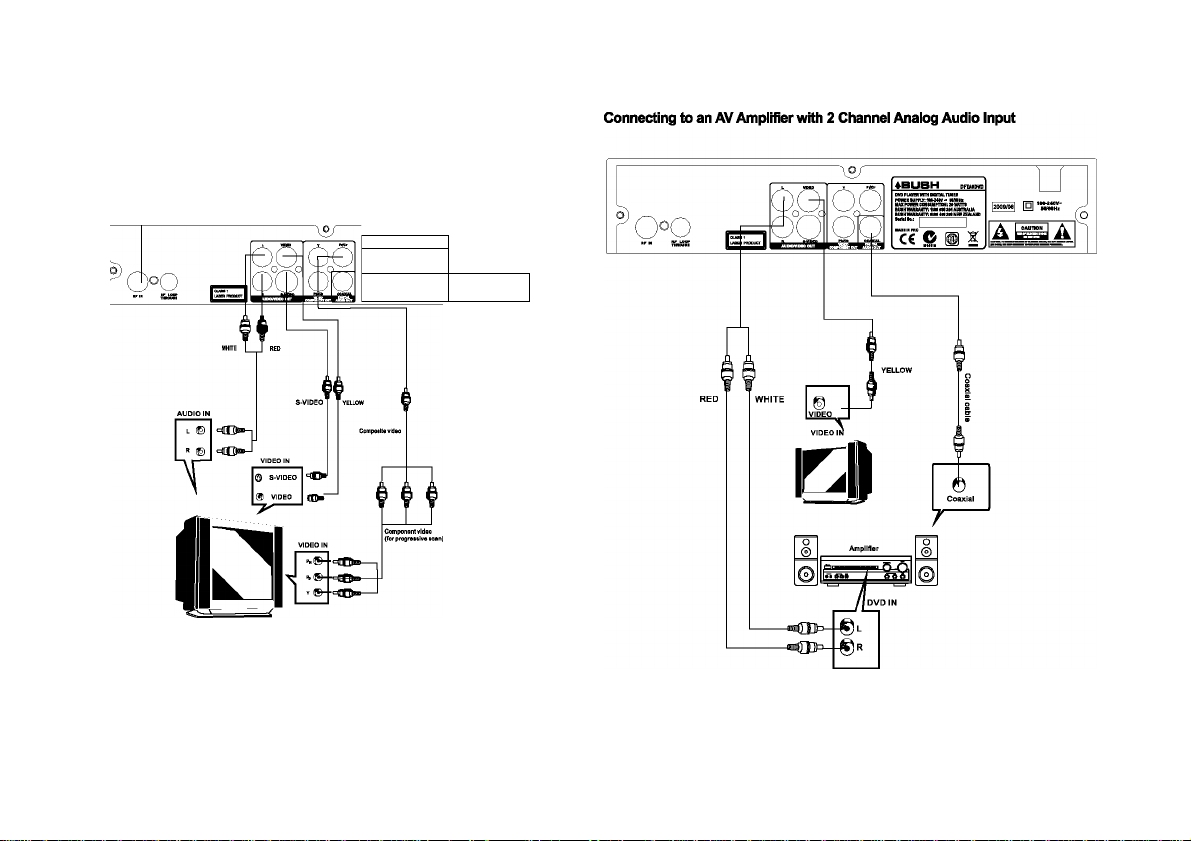
Connecting to a Television
TV Aerial
4BUOH cnwm
”C"€ ® ffi 5
|SM»/0g| [□!
AL^ A
u
Notes:
There are three ways of connecting the player's AV Output to your Televsion;
1. S-Video cable or CVBS Video cable [ set the (S-VIdeo) to (Video)].
2. Component Video cable [set the (Video) to (iNTERLACE-YUV or P-SCAN Y, Pb, Pr)j.
3. Left/RIght Audio cable [ set the (Audio out) ].
Page 5

The Setup Menu System-DVD
1. General Setup Menu
In the DVD mode, Press the <STOP>
button or open mode, then press
<SETUP> button for the DVD Main
Setup Menu to appear.
DVD Setup-language Setup
Press the Up/Down button to select
the DVD Setup Menu andenterthe
Language Setup option.
1) . LANGUAGE
Highlight the MENU option and press the Arrow buttons to choose the
language you prefer. Press <ENTER> to confirm. If the disc you are
playing has that language available. It will be displayed in the Language
Menu.
Notes:
If your preferred language Is not available, the discs default language
will be played.
2) . AUDIO
Highlight the AUDIO option and press the Arrow buttons to choose the
audio language you prefer. Press <ENTER> to confirm.
3) . SUBTITLE
Highlight the SUBTITLE option and press the Arrow buttons to
choose the subtitle language you prefer. Press <ENTER> to confirm.
4) . EXTERNAL SUBTITLE
Highlight the EXTERNAL SUBTITLE option and press the Arrow
buttons to choose the supported subtitle language.
DVD Setup-Audio Setup
Press the <DOWN> Arrow button to highlight the Audio Setup option on
the screen.
1) .DIGITALOUT
Highlight the Digital Out option
and press theArrow buttons to
choose the Audio Output mode you
prefer.
Press Enter to confirm. There are three
Audio Output modes:
SPDIF / RAW, SPDIF/ PCM, OFF.
Notes:
When Digital Output is NOT in use, it is recommended to turn « OFF » ,
the Digital Output setting for the purpose of minimising the circuit
interference.
2) . ANALOG OUT
Highlight the Analog Out option and press the Arrow buttons to
choose the Audio Output mode you prefer. Press <ENTER> to confirm.
NOTE: If you choose OFF cut off Analog Audio Output.
3) . DOWNMIX
There are two modes, one is LO/RO and the other one is LT/RT.
DVD Setup-Custom Setup
Press the <Down> arrow button to highlight
the Custom Setup option on the screen.
DVD Setup-Audio Setup
E)2J0(B
1). PARENTAL CTRL
If you want to set the Parental Control
setting enter the default password (6666). Now enter your own password
to set.
If the input code has been confirmed, the Level Setup Menu will
appear. Move the cursor to choose the accepted level and press
<ENTER> button to confirm and save.
Page 6

2) ANGLE
You can choose to have the Angle function on or off.
In the On mode you will be able to view the disc playing from multiple
angles(dependlng on the disc options).
DVD Setup-Exit
Press the <DOWN> arrow button to highlight the <EXIT> option on
the screen.
In the DVD Setup-Exit, choose the Exit option to return the DVD
Main Setup.
2. DVD Mode of System Setting
Press the <SETUP> button and the DVD Main Setup Menu appears the
screen, then press the <DOWN> button to highlight the system
setting option.
DVD Setup Menu-Language Setup
1) .TV STANDARD
According to the Color System your TV, you can choose the TV
Standard.
2) .DISPLAYTYPE
According to the Display Type, you can choose 4:3PS,4:3LB or 16:9.
3) .VIDEO OUTPUT
According to the Output Jack of the TV set, you can choose CVBS(Video)+
S-VIDEO, CVBS(Video)+YUV, YUV+ P-SCAN.
4) .BRIGHTNESS
According to the Brightness, you can choose Normal, Bright or soft.
5) .CONTRAST
Use the <UP> and <DOWN> arrow buttons to move the scroll and
adjust the contrast.
C. System setting Menu-Preference
Press the <DOWN> arrow button to highlight the Preference option on
the screen.
System Setting Menu-Preference
System Setting Menu-Dispiay Setup
Press the <DOWN> Arrow button to highlight the Setup option on the
screen.
DVD Setting Menu-Display Setup
S (B 0 (B © :Conflrm
O S) O :Select (0 :Conflrm
1). Ul Style
According to Ul Style, you can choose Style1,Style2,Style3,Style4.
Page 7

2) . Default Type
In the Default Type options, you can choose the DVD MODE, DVB
MODE, USER SELECT MODE, LAST OPERATION TYPE MODE.
NOTE: In the Default Type, if you choose the DVB MODE.
That next time you turn on the PLAYER will direct enter DVB
MODE, and won’t display the Source list.
3) . Default
The Default Setup options are Restore Factory Setup.
3. Game Options
Press the <SETUP> button to go to the DVD Main Setup Menu. Then
press the <DOWN> button to highlight the Game option.
In the Main Menu-Game Setup, you can choose Mine, Tetris, Rush
Hour and Calendar.
For example: If you want to play the Mine Game, you can press
the <DOWN> button to highlight the Mine options. Then press
the <ENTER> button to enter.
MP3 Playback
When a MP3 disc is loaded, the screen will display as follows:
Current
directory
name
PressOo to select the file when the cursor appears in the file window.
Press select to play the current file selected by the cursor.
PressOL>to switch between the directory window and the file window.
Current MP3/JPEG file
name. If a JPEG file is
playing, the name should
have a JPEG extension.
Kodak picture CD Playback
General function:
• You can set sideshow transition modes for any pictures.
• Press PAUSE to stop playing.
• Press Н40ГРМ to see the previous or next picture.
• Press PLAY to continue sideshow transitions.
• Press STOP to return to Main Menu.
IMAGE ROTATION
• Press the Arrow buttons (f ^ ^ • ■ )to rotation the image as you prefer.
Zoom function:
This player provides both Zoom in /out and Zoom pan function. Press the ZOOM
consecutively, the picture will zoom in/out in turn as follows:
ZoomXI ->ZoomX2->ZoomX3->ZoomX4
□
Page 8

The Setup Menu System—DVB
1. First Time instaiiation
After all the connections have been made properly, switch on your TV.
Make sure the receiver is connected to the Mains Power and press
<POWER> to switch the receiver on. Then press the i Source } button to
switch to DVB reception. The i Source )) button is to switch among
DVD, DVB, and USB. If you are using the receiver for the first time, a
First Time Installation Menu will be displayed to guide you through the
initial -setup. Use the Remote Control to finish the setup.
A. At the First Time Installation
Menu, select YES and press the
<ENTER> button on the Remote
Control to proceed.
First Time Iristallatiori
D. Wait till scanning is completed.
In case you want to stop the
scanning, press the <RETURN>
button. The channels already
found will still be stored.
When finished, all active
channels found will be stored
automatically. The last found
channel will be played.
2. DVB Mode of Main Menu
Press the <SETUP> button and the
DVB Main Setup Menu will appear.
Then press the <DOWN> button to
highlight the DVB Menu option.
Press the <UP> and <DOWN>
button move on the DVB Menu
and press the <ENTER> button to
enter the DVB Menu-Program list.
B. Enter your regional settings,
include your Country, Language and
Time Zone . Then select <NEXT>
to proceed.
C. Select Yes to start the Automatic
Channel Search.
First Time lnstailation(2)
Do you want to start Auto Search?
Previous channei iist wiii be repiaced.
1).TV Program
Press the <RIGHT> button to
highlight the TV Program, then press
DVB Menu-Program List-Program Edit Table
the <ENTER> button to enter the TV
program options. All active channels
are listed in the Program List,
allowing you to make your own
favorite channel group, move or delete
channels.
Create a Favourite Channel Group
This feature allows you to group your favourite channels. To create
your favorite groups:
A. Select the channel which you would like to add to the group and
go to the Favor column.
B. When the Favor column of the desired channel is highlighted, one
red heart symbol will appear, after you press <ENTER>.
Page 9

Pressing the <ENTER> button again wiil un-select the channel
In the favourite group.
C. Once your favourite group is created, you can press the
<FAVOURITE> key to quickiy access your favorite channels.
Moving a Channel
A. Select the channel which you like to move and go to the Move column.
B. Press the <ENTER> button and a I t symbol will be displayed.
C. Use the <UP/ DOWN> key to move the channel to a desired position.
D. Press the <ENTER> button again to exit the moving channel mode.
Deleting a Channel
A. Select the channel which you like to delete and go to the Del column.
B. Press the <ENTER> button and an X symbol will be displayed. Repeat
this step to delete more channels.
C. Press <SETUP> or<RETURN> button and the marked channel will
be deleted.
D. Press <ENTER> button again to exit the deleting channel mode.
2) .Music Program
Press the <DOWN> button to highlight the Music Program, then press
the <ENTER> button to enter the Music program options.
3) .Sort
Press the <DOWN> button to highlight the Sort options. You can
choose the channels Sort style: By Name, By Service ID,
By Channel No or By LCN.
Press the Up/Down button to select the search option on the DVB Menu
Program.
In the DVB Menu-Program Search, you can setup the Automatic
Search, Manual Search options.
Automatic Search.
Automatic search option will search
for channels automatically.
Manual Search.
If any channels are missing after you
have completed an Automatic
Search or you want to add newly
launched channels, you can use
Manual Search to scan the desired
channels. To Manually Search the
target channel you must know
Its parameters (e.g. the channel
number). After the channel Is found.
It Is added to the current channel
list.
A. Enter the Manual Search Menu via Main Menu > Program Search
> Manual Search.
B. Specify the appropriate channel number In the Channel No field by
pressing the <DOWN> and <UP> button. Enter your selection, the frequency
and bandwidth values are changed accordingly.
C. Select <ENTER> button to start Manual Search
D. If no signal Is found, a message Indicating no signal will appear.
Otherwise scanned channel will be saved and added to the current
channel list.
4). Parental Control
This feature allows you to prevent children or unauthorized people
from watching channels.
A. Enter Main Menu > Parental Control.You will need to enter the default
PIN Is 6666.
B. After PIN Is entered you are provided with the following options:
Channel Lock: Allows you to activate orde-activate the overall Parental
Control. When set to YES, all the channels with lock settings will be locked.
Parental Setting: In the channel list, select the channel you want to lock
and then press <ENTER>.
A padlock symbol will be displayed. To remove the lock, press <ENTER> again.
DVB Menu-Program Search
0
Page 10

5).Country
Selectyourcountry of residence, I.e Australia, England, New Zealand,
Germany, etc.
6) .Language
Press the <DOWN> button to highlight the Language options, then
Press the <ENTER> button to select Language setup.
1st/2nd Audio : This option allows you to select your first and second
choice for the Audio Language. If neither of your selected languages
are available on the program transmitted, the main language of the
program will be used.
Subtitle : Allows you to select the Subtitle Language. If your selected
language Is not available on the program transmitted, the main
language of the program will be used.
7) .GMT usage:
Allows you to enable/dlsable Greenwich Mean Time (GMT) usage.
If you know the GMT time zone of your location, set GMT usage to ON
and select an appropriate time zone.
If you prefer to set the time manually, select OFF In GMT usage Item
and then manually select the date and time.
8) . Time Zone
Select an appropriate time zone to display the local time correctly.
Both EPG and System Schedule need a correct time zone setting.
9). System Schedule
Press the <DOWN> button to highlight the System Schedule options,
then press the <ENTER> button to select the System Schedule Setup.
This feature allows the receiver to automatically switch on and tune to
a pre-specified channel for a pre-set length of time. Up to 10 tasks can
be scheduled.
A. In the System Schedule Menu use the <UP / DOWN> key to select a task
and use <RIGHT / LEFT > key to switch between Inactive and Active.
B. Press <ENTER> to enter the detail page.
C. Enter the following settings as required. Use the <UP/ DOWN>
key to move between setting Items, the «RIGHT / LEFT> key to switch
between available selections and numeric keys to enter numeric value.
Mode: You can repeat the task by setting the frequency as Once,
Daily or Weekly. You can select Stop to disable the task.
Start and End Time: Enter the start and end time that automatically turns
on and off the receiver.
Channel Type: Select TV or Radio channel as required.
Channel No: Select the channel to be played at scheduled time.
When the setting Is done, press <SETUP> or <RETURN> to save the
changes.
Page 11

Troubleshooting-DVD
I f you have any questtona, please consult ttie troubleshooting guide below.
I
NO PICTURE OR SOUNdI
• Ensure the powerbutton Ison.
• Ensure the power outlet is operational.
• Ensure the power cord Is not damaged.
• Ensure the power plug Is connected firmly to the outlet.
[picture but no sound] I REMOTE NOT WORKIN^
d Ensure the Audio Jacks are securely connected.
• Ensure the Audio Connector Is not damaged,
d Ensure the volume Is turned up.
• Ensure you have set the playersAudIo Settings correctly,
e EnsureyouhaveenteredthecorrectAVInputforyourTV. • Remove any obstacles between the Remote and the
• Ensure the audio Is not set to mute. IRsensor.
[SOUND BUT NO PICTURE
• Ensure the Video Jacks are securely connected,
d Ensure you have entered the correct AV Input for your TV.
d Ensure the Video Connector Is not damaged,
d Ensure you have set the player's Video Settings correctly.
[ POOR PICTURE OR SOUNP| |'NO DISC DISPLAYED |
d Ensure you have set the playersAudIo Settings correctly, d Ensure you have put the disc on the tray.
d Ensure the disc Is not scratched or stained,
d Ensure the AV Connector or the output terminal Is not
damaged.
I *BAD DISC' DISPLAYED~|
d Ensure the disc Is not warped, damaged or deformed.
• Ensure the disc Is not badly stained or damaged,
d Ensure the disc format Is compatible with the player.
d Make sure the Main unit's POWER button Is on
d Ensure the Remote batteries are working,
d Point the Remote Control directly at the players IR
sensor.
lUNfT NOT WORKING I
• Turnoff the power and then turn It on again.
d Ensure the disc Is not upside down,
d Ensure the disc Is not distorted, stained or scratched.
Troubleshooting-DVB-T
If you experience problems with this receiver or Its Installation, please read carefully
the relevant sections of this User Manual and this Troubleshooting section.
Problem
Standby light not lit Mains lead unplugged Check mains lead
No signal found
No picture or sound
Mosaic blocks in picture
or picture freezes
Scrambled channel
message
Locked out of
channels
No response to
Remote Control
After moving the receiver
to another room, you
can’t receive the digital
reception
Possible cause What to do
Mains fuse blown
Aerial is disconnected
Aerial is damaged/misaligned
Out of digital signal area
Program not broadcasting
Aerial may not be compatibleCheck aerial
Channel is scrambled Select an alternative
Forgotten channel
lock code
Receiver off
Handset not aimed correctlyAim handset at front
Front oanel obstructed
Remote control batteries are
inserted incorrectly
Handset batteries exhausted
The aerial feed may come
through a distribution system
which may reduce the digital
signal now received by the
receiver
Check fuse
Check aerial lead
Check aerial
Check with retailer
Press the DTV/VCR
button
Re-tune to another
channel
channel
Re-install channels to
cancel channel lock
Plug in and turn on
receiver
panel
Check for obstructions
Check batteries
direction
Replace Remote Control
batteries
Tty a direct feed
from the antenna
Page 12

Specifications
Item
Tuner
Demodulation
Connectors
Power
Display
Decoding
Others
You can help protect the environment!
Please remember to hand-in the non-working electrical
device to an appropriate waste disposal center.
Specification
Frequency Range VHF: 174MHz to 230MHz
Input Impedance 75 Ohms unbalanced
Signal Input Level
Bandwidth 7/8MHZ
Demodulator COFDM
OFDM Modulation 2K, 8K FFT, SFN and MFN
Packet Carries 2K/8K
Guard Interval 1/4,1/8,1/16,1/32
RFIN lEC 169-2 Female Connector
RF LOOPTHOUGH lEC 165-2 Male Connector
YPbPr
Video CVBS Video Output
S-Video Y/C Video Output
COAXIAL RCA, for SPDIF Digital Audio Output
USB JACK
Input
Consumption ISWmax.
Decoder Module PAL, NTSC
Resolution 720 X 576(PAL); 720 x 480(NTSC).
Aspect Ratio 4:3 (Letterbox, Pan & Scan),16:9
Video
Audio MPEG2 Audio Layer l&ll
Compliance ETSI EN 300 744 DVB-T Compliance
Sound Mode Right, Left, Stereo
UHF: 470MHz to 862MHz
■78 ~ -25DBM
Component Video Output
For file Playback or Software Upgrade
100-240V- 50/60HZ
MPEG2 Transport MP@ML
‘Specifications are subject to change without further notice'
Warranty
Please keep your receipt as proof of purchase. This product is warranted
for any defect in materials or workmanship for one year after the original
date of purchase. This product is for normal domestic and office use only.
This warranty does not cover damage from misuse or neglect, accidental
damage, vermin infestation, excessive voltages such as lightning or power
surges or any alteration that affects the performance or reliability of the
product.
In the unlikely event that your product fails to work normally, please
contact the Bush Warranty on 1800 509 394 (Australia) or
0800 450 259 (New Zealand) and have your receipt of purchase on hand.
This warranty is subject to the following provisions:
e It is only valid within the boundaries of the country of purchase,
e The product must be correctly assembled and operated in
accordance with the instructions contained in this manual,
e The product must be used solely for domestic purposes.
• The warranty does not cover accidental damage, misuse, cabinet
parts or consumable items.
• The warranty will rendered invalid if the product is resold or has
been damaged by inexpert repair.
• The manufacturer disclaims any liability for incidental or
consequential damages.
This warranty Is In addition to, and does not diminish, your statutory or legal
rights.
PO BOX 6287,
SILVERWATER NSW 1811
www.bushaustralia.com.au
Bush Warranty: 1800 509 394 Australia
Bush Warranty: 0800 450 259 New Zealand
10
Page 13

PO BOX 6287,
SI LVERWATER NSW 1811
www.bushaustralia.com.au
 Loading...