

Page 1
Digita l Set Top Box
D FTA7C
INSTRUCTION MANUAL
The Gold Technical Support Line: 1902 215 259
Personal Product S upport
(C harges will apply at $2.95 per minute)
Page 2
S a fe ty Instructions
Alw ays read the safety instru ctions carefully
Keep this User's M anual for future re ference
Keep this equipm ent aw ay fro m hum idity
Lay this equipm ent on a re liable flat
Do not stand it on soft furnishings.
If any of the follow ing situation arises, get the equipm ent checked by
a service technician:
The equipm ent has been exposed to moisture.
The equipm ent has been dropped and dam aged.
The equipm ent has obvious sign of breakage.
The
equipm ent has not been working well or you cannot get it work
according to User's M anual.
Warning
To prevent the risk of electric shock, do not open the cover or the
back of the re c e iver .
Do not block the ventilation holes of the device. Leave appropriate
gap above and around it to all
Do not place the device in an unventilated cabinet or on top of a unit
which em its heat.
C opyright S tatem en t
No part of this publication may be reproduced in any form by any m eans
without the prior written perm ission. Other tradem arks or brand nam es
m entioned
respective com panies.
herein are tradem arks or registered tradem arks of their
sur face before setting it up.
ow for adequate ventilation.
Disclaimer
Inform ation in this docum ent is subject to change without notice.
The m anufacturer does not make any representations or w arranties
(implied or otherw ise) regarding the accur acy and com pleteness of this
docum ent and shall in no event be liable for any loss of profit or any
commerci
consequential, or other dam age.
al dam age, including but not limited to special, incidental,
Page 3

Introduction
Thank you for buying this Bush product, which is designed to give you m any
years of trouble-free service.
You may already be fam iliar with using a similar unit, but please take time to
read these instru c tions. They are designed to fam iliarize you with the units
eatures and to ensure you get the very best fro m your purchase.
m anyf
S a fe ty is im portant
Your safety and the safety of others is im portant. Please therefore, ensur e you
read the Safety Instru c tions before you operate this unit.
W arra n ty
In the unlikely event that your product fails to work norm al
below Bush warranty num ber for support.
Australia
Bush W arra n ty: 1800 509 394
New Zealand
Bush W arra n ty: 0800 450 259
ly, please call the
Page 4

A bout th e Set Top Box
This D VB-T TV Receiver is a Free-To-Air digital te rre s trial receiver,
allow ing you to access free-to-air digital te rre s trial TV channels
and radio broadcasts on your TV set. Its digital r
VH F & UHF band. C om pared with the analog TV program s, digital
TV program s eliminate the noise and interference but offer high
quality video and audio. An on-screen initial installat
provided so that you can easily start to enjoy watching the
program s. In addition, a fully featured re m o te contro l is included
that offers you access to every feature
button.
Main Features
Full com ply with Austra lian D VB-T standard
Full M PEG 2 ISO/IEC 13818 transport stream com pliant audio/
video decoding
Bandw idth of 6/7/8M H z supported
CO FDM dem odulator
Autom atic/m anual channel search
C hannel edit, moving and deletion
Parental lock contro l
NTSC/PAL convert
EPG (E lectronic Program Guide) and Teletext function (where
available)
Multiple-language OSD
Supports multi-subtitle
R S-232 serial port for software upgrade
Tuner RF in/loop through
SD TV only
Full function re m o te contro l
ing autom atically and m anually
with a simple press of a
eception covers
ion guide is
Package C ontents
Before installation, please check t
The package should contain the follow ing item s:
~ DVB-T TV Receiver x1 pcs
~ Rem ote Contro l
~ AA A Battery for the re m o te contro ller x1 pair
~ Instru ction M anual
x1 pcs
he item s of the package.
x1 pcs
Page 5

Table of Contents
Front and Rear Panel Illustra tion.................................................... 1
Rem ote Contro ller ...................
..................................................... 2
Connecting to a Television.....................................
Connecting to an Audio System .....................................................5
Connecting to a DVDRecorder or VCR...
User Interface..............................................................................7
Quick Installation..................................................................... 7
M enu O perations......................................................................8
Norm al Play........................................................................... 13
Troubleshooting .........................................................................17
Specifications.............................................................................18
W arranty. ............................................................
.........................................6
........................ 4
.......................19
Page 6
N14119
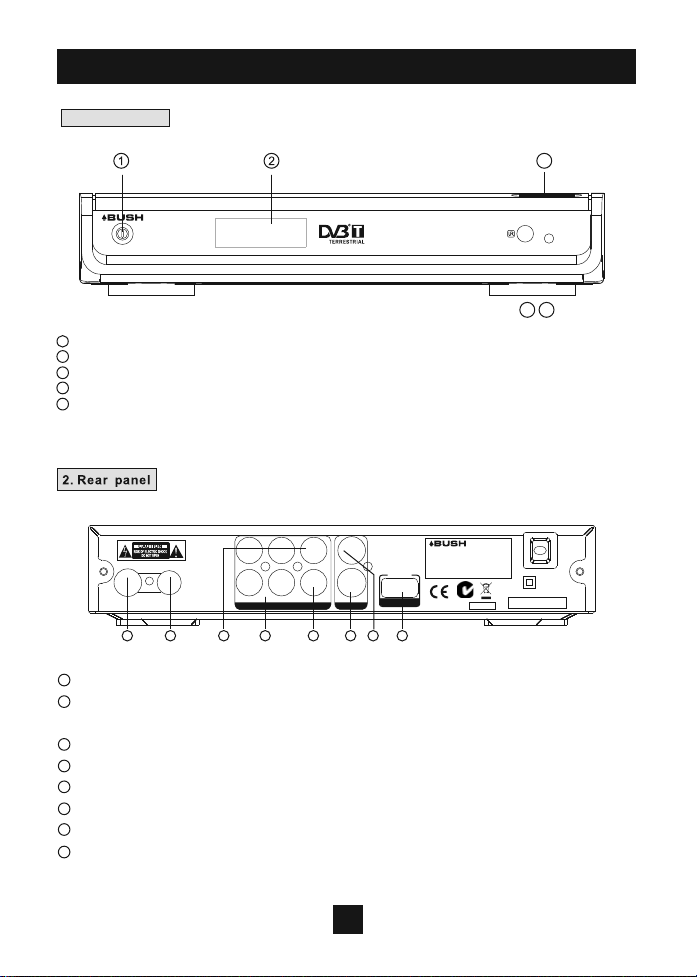
Front and Rear Panel Illustration
1. Front panel
3
5
4
1 POW ER BUTTO N: Used to sw itch the set top box on and off.
2 LED DISPLAY: U sed to display the time or channel inform ation
3 CHANNEL UP/DOW N: Used to change channels without using the re m o te contro l.
4 REMOTE CONTROL SENSO R : U sed to rec e ive the
5 STANDBY INDICATOR: Used to visually show power st ate of the set top box, the green
LE D will be lit if the set top box is turned on and the re d LED will be lit if the set
is in standby m ode.
signal fro m the re m ote contro l.
top box
2009/02
DFTA7C
Serial No.:
100-240V~
50/60Hz
term inals.
INPUT: 100-240V~ 50/60HZ
POW ER CONSUMPTION: 10WAT TS
7
Upgrade
USB
8
al.
MADE IN PRC
BUSH WARRANTY: 1800 509 394 AUSTRALIA
BUSH WARRANTY: 0800 450 259 NEW ZEALAND
CrY
COAXIAL
5
VIDEO
S-VIDEO
VIDEO OUT
6
Cb
R
LOOPRF
INRF
THROUGH
1 2
RF IN : This socket connects to your external aeri
1
RF LOOP THROUGH: This socket will bypass the RF signal to either your TV or another
2
L
COMPONENT VIDEO / AUDIO OUT
3
4
video system .
3 COM PONENT VIDEO OUT:
AUDIO L/R: This socket outputs analog audio L/R signal.
4
CO AXIAL: This socket connects to a coaxial socket on your surround sound system .
5
S-Video output: This socket outputs separate Y/C video signal.
6
VIDEO: This socket outputs com posite video signal.
7
8
USB: This socket is used to upgrade the software. For technician use only .
These sockets connect to your TV com ponent input
1
Page 7
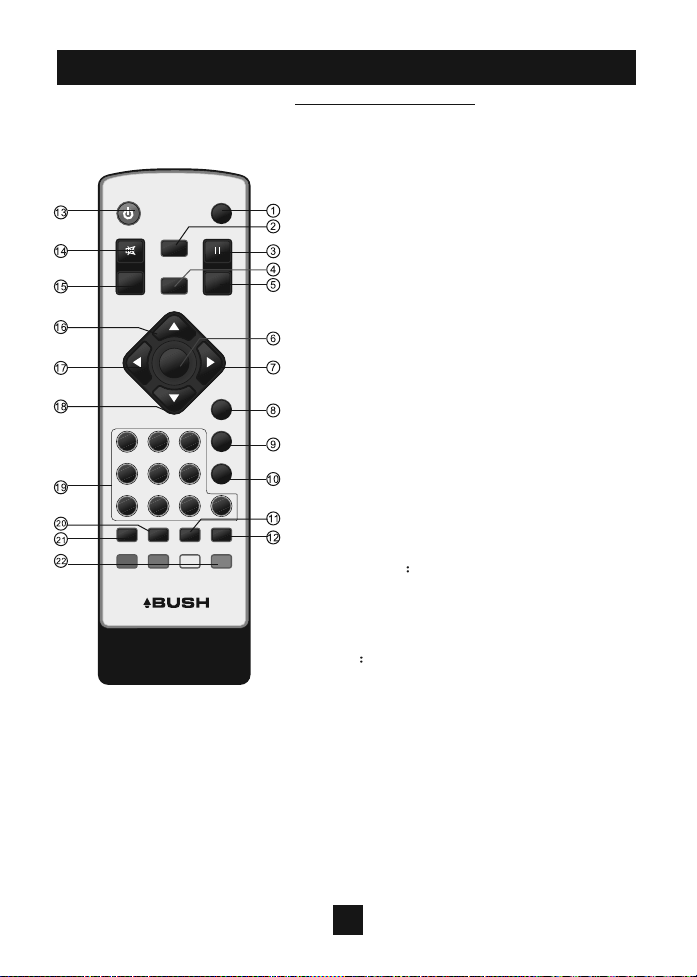
Rem ote Controller
Rem ote K ey Function:
1. VIDEO: U sed to sw itch the video output
m ode.
2. INFO : Used to display information about
the channel being view ed or further information
STANDBY
MUTE
MENU
INFO
VIDEO
PAU S E
EPG
CH+
EXIT
about the program w hen in normal play m ode.
3. PAUSE: Used to pause the program being
view ed .
4. EPG : Used to display information about the
program being viewed and w hat's on next.
5. EXIT: U sed to return to the previous scr een
or m enu.
6. OK: Used to confirm a selection within a
m enu.
VOL
-
OK
VOL
+
7. VO L+: U sed to move around the m enu
scr eens or changing the
volum e in normal
play m ode.
CH-
AUDIO
FAVO R ITE
RECALL
SUBTITLE T EXT
123
456
7890
TV/RADIO
GAME
8. FAVO R ITE: U sed to access y our favourite
channels.
9. GAME: U sed to select the gam e: Gomoku.
10. RECALL: U sed to sw itch between the last
two viewed channels.
11. SUBTITLE: U sed to sw itch am ong
different subtitles that are broadcas ted.
12. TEXT: U sed to open teletex t OSD display
if teletext available in the broadcasted stream .
13. STANDBY Used to sw itch the set top
box to on or standby .
14. MUTE: U sed to turn the sound on or off.
15. M ENU: U sed to open the main m enu
window.
16. CH+ Used to move around the m enu
scr eens or changing the channels in normal
play m ode.
17. VOL-: Used to move around the m enu screens or changing the
volum e in norm al play m ode.
18. CH-: Used to move around the m enu screens or changing the
channels in norm al play m ode.
19. NUMBER KEYS: Used to select channel num bers or input num bers
in m enus.
20. AUDIO: Used to select the available audio tra c k or
m ode as LR(s tereo),LL(left),R R (right).
21. TV/RADIO: Used to sw itch betw een TV channels and Radio stations.
22. COLOR K EYS(RED/G REEN /Y E LLO W /BLUE): Used to operate
different functions in TE XT scr een or other m enus.
N o te : SUBTITLE / TEXT / AUDIO may not be available fo r all channels.
set the sound
2
Page 8
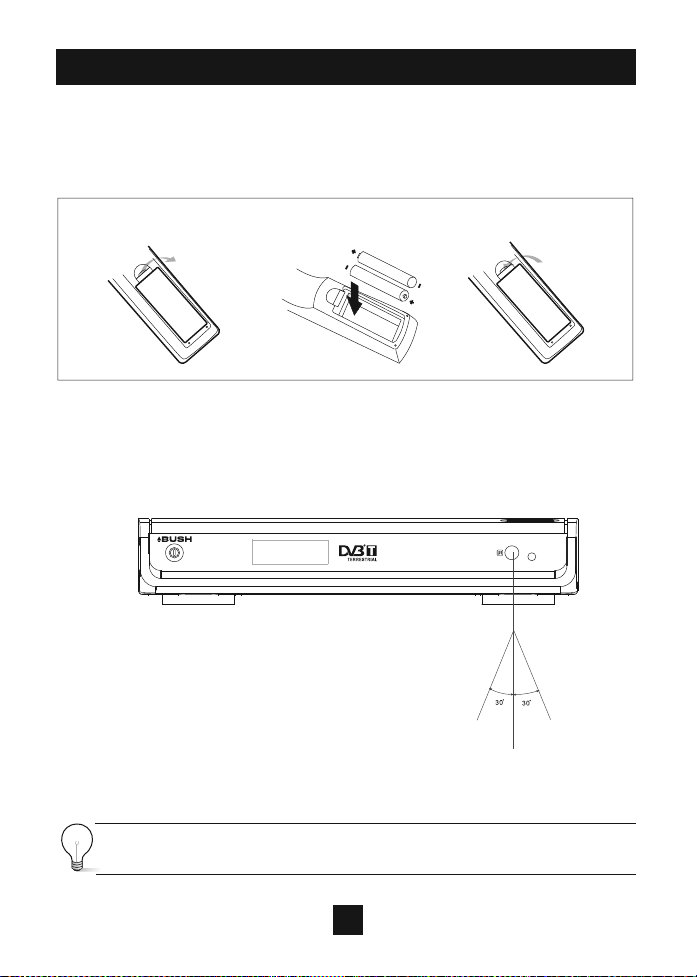
Installing th e B a tte ries
Rem ove the battery cover fro m the re m o te contro l and put 2xAAA size
batteries inside the com partm ent.
The diagram inside the battery com partm ent shows the correct way to
install the batteries.
1.O pen the cover
OPEN
2.Install batteries
3.Close the cover
N
OPE
Using th e Rem ote Control
To use the re m o te contro l, point it tow ards the front of the digital set top
box The re m o te contro l has a range of up to 7 metre s fro m the set top
box at an angle of up to 60 degrees.
The re m o te contro l will not operate if its path is blocked.
Sunlight or very bright light will d ecrease th e sensitivity of
th e rem o te control.
3
Page 9

N14119
C onnecting to a Television
For a basic connection fro m your set top box to the television,
use the com posite connection outlined below.
For a higher quality connection, use the com ponent video
connection outlined below com bined with the com posite audio.
TV Aerial
2009/02
DFTA7C
Serial No.:
100-240V~
50/60Hz
INPUT: 100-240V~ 50/60HZ
POW ER CONSUMPTION: 10WAT TS
Upgrade
USB
RFIN
MADE IN PRC
BUSH WARRANTY: 1800 509 394 AUSTRALIA
BUSH WARRANTY: 0800 450 259 NEW ZEALAND
Cr
Cb
COAXIAL
VIDEO
CrY
S-VIDEO
VIDEO OUT
Cb
R
Com posite
audio
L
COMPONENT VIDEO / AUDIO OUT
LOOPRF
INRF
THROUGH
(O p tional)
4
Page 10

N14119
C onnecting to an A udio System
2009/02
DFTA7C
Serial No.:
100-240V~
50/60Hz
INPUT: 100-240V~ 50/60HZ
POW ER CONSUMPTION: 10WA TTS
Cb
R
LOOPRF
INRF
THROUGH
L
COMPONENT VIDEO / AUDIO OUT
COAXIAL
VIDEO
CrY
S-VIDEO
VIDEO OUT
Upgrade
USB
MADE IN PRC
BUSH WARRANTY: 1800 509 394 AUSTRALIA
BUSH WARRANTY: 0800 450 259 NEW ZEALAND
Coaxial cable
Coaxial
Am plifier
VOLUME
POWER
PRO LOGIC
TEST
MODE
3 STEREO
BYPASS
MIC
MIC VOL
EXCITE
211
2
INPUT SELECTOR
MUTE
CHANNEL
KARAOKE
DOWN
UP
BASS
ECHO
MIC
TREBLE
5
5
Page 11

N14119
C onnecting to a DVD Recorder or VC R
TV Aerial
2009/02
DFTA7C
Serial No.:
100-240V~
50/60Hz
INPUT: 100-240V~ 50/60HZ
POW ER CONSUMPTION: 10WAT TS
Upgrade
USB
MADE IN PRC
BUSH WARRANTY: 1800 509 394 AUSTRALIA
BUSH WARRANTY: 0800 450 259 NEW ZEALAND
COAXIAL
VIDEO
CrY
S-VIDEO
VIDEO OUT
Cb
R
LOOPRF
INRF
THROUGH
L
COMPONENT VIDEO / AUDIO OUT
6
Page 12

User Interface
1.Quick Installation
1.1 S e tting C ountry and Language
User can select prefe rre d country and language at Setup - Installation
page.
(1 ) Press <M enu> button to enter Main Menu.
(2 ) Press <Left/Right> button to select SETUP option.
(3 ) Press <Up/Down> button to select Installation option.
(4 ) Press <OK> button to enter Instal
(5 ) Press <Up/Down> button to select Country option.
(6 ) Press <Left/Right> button to set Country S e tting.
(7 ) Press <Up/Down> button to select OSD Language option.
(8 ) Press <Left/Right> button to set a language.
If there is no channel database in the STB, it wi
when booting.
1.2 How to receive th e program s?
Scan the possible frequency and bandw idth to re c e ive the program s.
Pr ess <R ED > or <GR EEN> button to start Auto Scan or M anual Scan.
1.2.1 Auto Scan
Auto Scan will erase the database firs t, and scans default frequency
and bandw idth by
C ountry S e tting. Follow the steps (1 ) ~ (8 ) at
section 1.1.
(9 ) Press <RE D > button to be confirm e d to clear the database.
(10) Press <O K> button to confirm clear action and start Auto Scan.
It costs time to do Auto Scan, user can press <Exit> button to exit at
anytime.
See Figure 1. Later if you w ant to scan again, you can follow
above Quick Installation procedure.
lation page.
ll start at step(5) dire c tly
SETUP. Instal lat ion
Antenna_Setting
Country Setting
OSD Language
Audio Language
Subtitle Language
LCN
Auto Scan
Database will be cleared! Continue?
OK
Move
M anual Scan
Switch
Exit YES
01/ 01/2008 00:19
OFF
England
English
OFF
English
ON
Exit
Figure 1. Clear database m essage
MANUAL SCAN
Channel No.
Fr equenc y
Bandw idth
Edit
Strength
Quality
Move
65 %
94 %
01/ 01/2008 02:19
CH .21
474. 000 Mhz
8 Hz
OK
Move
Scan
Figure 2. M anual Scan edit
7
Exit
Page 13

1.2.2 M anual Scan
M anual Scan adds the scanning re su lts into database, it doesn't erase
the database. But the User has to know the Frequency and B andw idth
for scanning. If the user scans the sam e Frequency and B andw idth
more than once, the previous program s will be overwritten. Follow the
steps (1 ) ~ (8 )
( 9 ) P r ess <G R EEN> button to enter M anual Scan Page.
(10) Press <Up/Down> button to select Frequency option.
(11 ) Press <0~9> button to input the Frequency value.
(12) Press <Up/Down> button to select Bandw idth option.
(13) Press <Left/Right> button to set B andw idth value.
(14)
Pr ess <OK/Exit> button to start scan or exit.
See Figure 2.
2.Menu O p erations
Once the channel scan is finished and all the channels are stored into
the database, you can start to watch the digital te rre s tri al TV channel
or listen to the radio broadcast, som e typical operations are given in
this chapter.
2.1 Main Menu
Main Menu for operati
(1 ) Press <M enu> button to enter Main Menu.
(2 ) Press <Info> button to display the version inform ation of STB.
2.2 SETUP
Set the system settings of STB.
2.2.1 Installation
Set the re c e iving and playing program settings of STB.
2.2.1.1 Antenna S e tting
Set the antenna pow er on or off to supply +5V power to antenna or not.
at section 1.1.
ng a lot of functions.
8
Page 14

Note: The default is OFF, set this option to O N only if this STB is
connected to an active antenna which am plifies the re ce ived RF signal,
otherwise please set it to O FF .
2.2.1.2 Country S e tting
Set the country for Auto Scan, M anual Scan and Time Zone.
N o te : C hange the Country S e tting will autom atically change the
default Time Zone and set the default Frequency and B andwidth for
Auto Scan.
2.2.1.3 OSD Language
Set the On S creen Display Language.
2.2.1.4 Audio Language
Set the audio language for watching program .
2.2.1.5 S ubtitle Language
the language for displaying subtitle.
Set
2.2.1.6 LCN
Set the Logical C hannel Num ber to on or off.
N o te : LCN is a num ber that uniquely identifies a logical channel,
which is popular in som e european countries such as England, France.
2.2.1.7 D aylight Saving/Region S e tting/Time Zone
Allow you to enable or disable daylight saving. If you know the region of
your location,select an appropriate Region Setting or set the Time Zone
offset m anually.
2.2.1.8 Auto Scan
Pr ess <R E D > button to start
Auto Scan. See section 1.2.1 for details.
2.2.1.9 M anual S can
Pr ess <G R EE N > button to start M anual Scan. See section 1.2.2 for details.
2.2.2 TV Setup
Setup the display m ode for TV. See Figure 3.
SETUP. TV Setup
Switch
4: 3 LB
PAL
6
3S
CVBS+RGB
OFF
TV Format
TV Mode
OSD Transparency
Banner Display Time
Video Output
Video Enhancement
5761
Move
Figure 3. TV Setup
01/ 01/2008 00:19
Exit
Flesh T one
Black/White Expans ion
Move
Switch
OFF
OFF
Exit
Figure 4. Video Enhancem ent
9
Page 15

2.2.2.1 TV Form at
Set display form at for watching program , such as 4:3LB , 4:3PS,
16:9PB ,16:9 FIT.
4:3LB (LetterB o x): Typically for wide screen content displays on
conventional 4:3 TV with black bars above and below the picture.
4:3PS (PanScan ): Typically for wide screen content displays on
conventional 4:3 TV with l
16:9PB (PillarB ox)/16:9 FIT: Typically for wide screen 16:9 TV.
2.2.2.2 TV M ode
Set PAL, NTSC or AU TO for display. AUTO will sw itch PAL or NTSC
by program content. This setting should be matched with user's TV.
2.2.2.3 OSD Transparency
Set the On
2.2.2.4 B anner Display Time
Set B anner displays time. Banner doesn't disappear when set as
Always and disappears at tim eout w hen set as other values.
2.2.2.5 Video O utput
Set the video output m ode to TV .
2.2.2.6 Video Enhancem ent
Set the Video Enhancem ent. See Figure 4.
(1 ) Press <Up/Down> button to select Video Enhancem ent option.
(2 ) Press <Left/Right> button to set Video Enhancem ent.
(3 ) Press <Up/Down> button to select Flesh Tone or Black/White
Expansion.
(4 ) Press <Left/Right> button to set Flesh Tone and Black/White
Expansion.
2.2.3 Passw ord
Set password for m enu lock or channel lock or censorship lock. And the
user can change passw ord here, the default PIN C ode is 6666.
2.2.3.1 M enu Lock
Lock the m enus by password.
2.2.3.2 C hannel Lock
Lock the channel which has been set to lock status w hen turning on the
C hannel
2.2.3.3 C ensorship Lock
Lock the program by password and censorship threshold.
The censorship info is in program content. Under the censorship ra ting,
user has to enter the right password for watching program .
2.2.3.4 C hange Passw ord
To change the PIN code,
to trigger changing passw ord and <0~9> buttons to enter old passw ord,
new password and confirm new passw ord. If succeed, the PIN C ode
C hanged m essage will be displayed, otherwise the PIN Code E rro r
m essage will be displayed.
Screen Display transparency. 1 is the most transparent.
Lock. Please see section 2.3.1.2 for details.
eft and right edges cropped.
select this option, press <Left/Right> button
10
Page 16

2.2.4 Advan ce Timer
User can set timer for watching the program by date and time m anually
or fro m the TV/Radio Guide(see section 2.3.2). W hen setting date and
start time is a rrived, STB will autom atically sw itch to the w anted
program . P ress any key except <Vol-/Vol+/
Mute> button, STB asks user
to abort it or not w hen watching booked program . User can delete the
event while it isn't at running.
2.2.5 Set Default
Restore STB to factory default. All set tings did by us er will be restored to
factory default values and the database will be erased together.
2.3 TV /RADIO
There are two types of program : TV and Radio. The
operation of the List
and Guide of TV and R adio are almost the sam e. Herein take TV as ex am ple.
2.3.1 List
User can operate som e functions in List. See Figure 5.
TV Li st
All
No. Progr am Nam e Stat us
0001 CT SPORT
0002 Aplikace MHP
0003 CT 1
0004 CT 2
0005 CT 24
0006 NOVA
Favorites
CH+/-
1-8: Favor ite Group Edit
Tool
CH 23/ 490166 KHz
PID:V 1025 , A 104 1
Save
01/ 01/2008 02:19
Exit
TV Guide
No.Program Name
0800 TVE 1
0800 TVE 2
0802 24 H TVE
0803 CLAN TVE
Book
W ed.
2007
10/ 17
Today 18 19 20 21 22 23
11: 30 Por La Manana 20 07
13: 15 EI Negociador
14: 00 Infor mativo Madrid 2007
14: 30 Corazon De Otono 200 7
15: 00 Teledi ario 1 Edicion 2007
EPG+/-
17/ 07/2007 02:19
Date
2
OK
Detai l
Date
Exit
Figure 5. TV List
Figure 6. Guide - Event
2.3.1.1 Favor ites
User can quickly channel up/dow n the favorite program s by favori
te filter.
There are 8 groups of fav orite for user setting: News, Sport, Movie, Music,
Shopping, Travel, Boy and Girl. Press <1~8> button to set or clear the
favorite group when Favorites option selected.
2.3.1.2 Lock
Lock will ask pas sw ord before watching this program w hen SETUP ->
Passw ord ->C hannel Lock is turned on. Please see section 2.2.3.2 for
details. Press <OK> button to set or clear lock status w hen Lock option
selec ted.
2.3.1.3 Edit
User can edit the progr
am nam e, maximum length is 20 characters.
(1) Pres s <Left/Right> button to selec t Edit option and <U p/Down> button
to select the program .
11
Page 17

(2) Pres s <O K> button to display program info and press it again to edit
program nam e.
(3) Pres s <U p/Down/Left/Right/0~9/RED/GR EEN > button to select the
character.
(4) Pres s <O K> button to finish the editing and return to prev ious program
info page.
(5) Pres s <R ED> button to save the editing and return to List or press
<Exit> button to return to List without saving.
2.3.1.4 Move
Move will allow you move the position of the channels in the list.
Note: This option will not appears in this list w hen SETUP->Installation
-> L C N is set to ON.
2.3.1.5 Sort
Sort will allow you sort the channels by A<->Z or Pay< ->Free.
Note: This option will not appears in this list w hen SETUP->Installation
-> L C N is set to ON.
2.3.1.6 Skip
Skip will skip the program w hen changing program by CH+/-. P ress
<O K > button to set or clear skip status w hen Skip option selected.
2.3.1.7 Delete
Delete wi
rescan to recover it.
Pr ess <OK/G R EEN> button to set delete one or delete all w hen Delete
option selected.
2.3.1.8 Search
User can search the program nam e by partial keyword.
(1 ) Press <Left/Right> button to select Search option.
(2 ) Press
(3 ) Press <Up/Down/Left/Right/OK/0~9/RED/G R EEN> button to input
keyw or d.
(4 ) Press <OK> button to Search and re turn List. The matched program
will be focused.
(5 ) Press <G REEN /YELLO W > button to the next or previous matched
program .
2.3.2 Guide
Guide is also nam ing EPG (E lectroni
See Figure 6.
(1 ) Press <Up/Down> button to select program or EPG event.
(2 ) Press <Left/Right> button to change event or date.
(3 ) Press <OK> button to exit all the m enus or show the detail
inform ation of selected event.
(4 ) Press <Exit> button to exit to
ll delete the program perm anently fro m database. User must
<O K > button to entry search page.
c Program Guide).
previous m enu.
12
Page 18

(5) Press <RED > button to enter B ook page and <YELLO W > button to save
after edited. If it conflict with itself or other event, a conflict m essage will be
displayed. The successful booking will be added to Main M enu-> SETUP->
Advance Timer(see sect
ion 2.2.4).
2.4 AC CESSO RY
There are three options: Gom oku, Calendar, Calculator.
Gomoku
P r ess <Up/Down/Left/Right> button to set play m ode and difficulty.
P r ess <O K > button to start play Gomoku.
P r ess <Up/Down/Left/Right> button to select the posit
ion.
P r ess <O K > button to place the piece.
Calendar displays the year, m onth, and date.
Calculator can used for mathem atical calculations.
3.Norm al Play
Norm al Play m eans STB under watching TV or listening to the Radio.
See Figure 7.
Program Nam e ITV1
Program No 0003 Vi deo PID 0512
Channel No. 0045 Au d io PID 0650
Fr equenc y 665934 KHz
Bandw idth 0008 MHz
Constel
Guard Interval 1/ 32 HP Code Rate 7/8
FFT 8K LP Code Rate 1/2
Strength 62%
Quality 88%
Program Info
lation QAM 64 Hierar chy M ode N/A
Figure7. Normal Play - Radio
Figure 8. Program Info
3.1 Inform ation
Pr ess <Info> button once to display info banner. Banner displays the
program No., favorite setting, current time, program nam e, now and
event, lock, scram ble, subtitle and teletext info.
next
Pr ess <Info> button when banner exist to display detail info of now
event. Pr ess <Info> button w hen detail exist to display current
program info. See Figure 8.
3.2 Sw itc h Program
User can sw itch program by CH+/
- or input program num ber dire c tly.
If the input program num ber doesn't exist, STB will ignore the input.
Or press <Recall> button to sw itch to last watching program fro m
current watching program .
3.3 Volum e
Pr ess <V ol-/Vol+> button to adjust the volum e.
Pr ess <M ute> button
to mute.
If adjust the volum e while mute, mute will be canceled.
13
Page 19

3.4 P rogram List
Pr ess <OK> button to display P rogram List with No., nam e and lock/
scram ble/skip status.
Pr ess <U p/Down/Left/Right> to sw itch the program .
Pr ess <OK/Exit> to re turn norm al play m ode.
TELETEXT
Teletext
Channel
Audio PID
Sound Mode
Audio channel
eng
0650
LR
Language
eng
OFF
Figure 9. Audio C hannel
Figure 10. Te l etext Setting Page
3.5 A udio
Switch the sound channel and sw itch sound m ode to LR (stereo) or LL
(left) or R R (right). If setting audio language at SETUP->Installation->
A udio Language, the audio channel default language will be chosen
by setting. See Figure 9. P r ess <Audio> button to display the audio
channel
page. P ress <U p/Down> button to select C hannel/Audio PID
or Sound M ode option. Press <Left/Right> button to set the value.
3.6 Pause
Pause video and audio. But it will be canceled by any input.
3.7 F avorite s
User can sw itch the favorite program s in the sam e favorite group.
About favorites setting, see section 2.3.1.1 for details.
Pr ess <YELLO W > button to sw itch the favorite group
in Program list.
Pr ess <C H +/-> button to sw itch the sam e favorite program in norm al
play m ode.
3.8 Teletext
Display teletext on screen, the style of teletext may be different by
content provider. See Figure 10.
Pr ess <Text> button to display the teletext set
ting page.
Pr ess <U p/Down> button to select the teletext language if the program
has teletext.
Pr ess <OK/Exit> button to exit the teletext setting page.
Pr ess <0~9/Up/Down/Left/Right> button to change teletext page if
teletext exists.
14
Page 20

3.9 Subtitle
Display the subtitle on screen, the style of subtitle may be different by
content provider. See Figure 11 .
Pr ess <Subtitle> button to display subtitle setting page.
Pr ess <Up/Down> button to select subtitle language, if the program has
subtitle.
Pr ess <O K/Exit> button to exit subtitle setting page.
SUBTITLE
Subtitle Language
eng
OFF
Figure 11. Subtitle Setting Page
3.10 Tel etext S ubtitle
Figure 12. Digest
Display subtitle by teletext, the style of the teletext subtitle may be
different by content provider.
Pr ess <Text/Subtitle> button to display teletext or subtitle setting page.
Pr ess <Left/Right> button to select TTX Subtitle.
Pr ess <Up/Down> button to select teletext subtitle language.
Pr ess <O K/Exit> button to exit the setting page.
3.11 Guide
Press <GU IDE> button at normal play state, see section 2.3.2 for details.
3.12 Auto Sleep
Press <RED> button for the auto sleep function at normal play state,
12, 30,
60, 120 minutes and OFF can be selected.
3.13 List
Press <GR EEN> button at normal play state, see section 2.3.1 for details.
3.14 Digest
Press <YELLO W > button at normal play state, digest can display 9
program s on scr een eac h time. But only
the selec ted program is
play ing, others will display their s napshot. See Figure 12.
Press <YELLO W > button to display digest.
Press <Up/Down/Left/Right> button to browse program .
Press <OK> button to sw itch program and watch it.
Press <Exit> button to r
eturn normal play m ode.
15
Page 21

3.15 M essage
There are som e m essages to inform user the current status of the STB.
3.15.1 No Signal
STB can't get signal, for exam ple, cable is disconnected.
3.15.2 No Service
Program doesn't have any content to play.
3.15.3 Service Scram bled
Program is scram bled for paym ent, you need contact with
provider to know how to descram ble it.
3.15.4 A ntenna O verload
The pow er of antenna is overload.
3.15.5 HDTV Not S upport
If the program content is HDTV form at, this STB doesn't support it.
the content
3.15.6 C hannel Locked
Program is locked by setting lock (see section 2.3.1.2)
channel lock in password setting (s e e section 2.2.3.2). User must input
cor rect password to watch program .
and turning on
16
Page 22

Troubleshooting
If you experience problem s with this re c e iver or its installation,
in the first instance please read carefully the re levant sections
of this User M anual and this Troubleshooting section.
17
Page 23

Specifications
This sym bol on the product or in the instru c tions m eans that your electrical and
electronic equipm ent should be disposed at the end of life separately fro m your
household waste. There are separate collection system s for r ecycling in the EU.
For more inform ation, please contact t
you purchased the product.
he local authority or your re tailer where
18
Page 24

W arra n ty
Please keep your re c e ipt as proof of purchase. This product is w arranted
for any defect in materials or workm anship for one year after the original
date of purchase. This product is for norm al dom estic and office use only.
This warranty does not cover dam age fro m misuse or neglect, accidental
dam age, verm in infestation, excessive voltages such as lightning or pow er
surges or any alteration that affects the perform ance or re liability of the
product.
In the unlikely event that your product fails to work norm ally, please
contact the Bush W arranty on 1800 509 394 (A u s tra lia) or
0800 450 259 (N e w Zealand) and have your re c e ipt of purchase on hand.
w arra n ty
This is subject to th e fo llow ing provisions:
It is only valid within the boundaries of the country
of purchase.
The product must be corr ectly assem bled and operated in
accordance with the instru c tions contained in this m anual.
The product must be used solely for dom estic purposes.
warranty
The does not cover accidental dam age, misuse, cabinet
parts or consum able item s.
warranty
The will
rendered invalid if the product is re s o ld or has
been dam aged by inexpert repair.
The m anufacturer disclaims any liability for incidental or
consequential dam ages.
W arra n ty
This is in addition to , and does not diminish,
your statuto ry or legal ri
PO BOX 6287,
SILVERW ATER NSW 1811
www.bushaustra lia.com .au
Bush : 1800 509 394 Austra lia
W arranty
Bush : 0800 450 259 New Zealand
W arranty
ghts.
19
Page 25

PO BO X 6287,
SILVER W ATER NSW 1811
www.bushaustra lia.com .au
 Loading...