

Page 1
Instruction manual
Built-In Single Oven
5539284 BSOFTC
Page 2

If you require any technical guidance or find that your product is not operating as intended, a simple solution can often be found in the Troubleshooting section of these instructions,
You’ll soon be enjoying your new Built-In Single Oven
It all begins here, with your instructions. Don’t worry,
there’s nothing too technical coming up. Just simple,
step-by-step guidance to get you up and running
quickly. Sound good? Then let’s get started.
Help and Guidance
We’re here to help you get the most from your Built-In Single Oven. Should you require
any guidance, a simple solution can often be found online at:
www.argos-support.co.uk
If you still require further assistance, call one of our experts on 01759 487838.
Page 3

5
8
9
11
11
12
14
18
20
20
21
23
24
25
25
26
3
Contents
Product support
Troubleshooting
Help and assistance
Declaration of conformance to product
standards
Disposal
Guarantee
6
Safety information
Safety information
Getting to know your Built-In
Single Oven
Ready? Let’s begin
Accessories
Installing your Built-In Single
Oven
Installation requirements
Unpacking
Connections (electrical)
Using your Built-In Single Oven
First use of Built-In Single Oven
Standard and advanced functions/use
Care and Maintenance
Cleaning
Maintenance actions
Technical specifications
1
2
3
4
5
Page 4

1Safety information
Page 5

5
Safety information
Important - Please read these instructions fully before
installing or operating
Safety information
If you require any technical guidance or find that your product is not operating as intended, a simple solution can often be found in the Troubleshooting section of these instructions,
INSTALLATION WARNINGS
IMPORTANT: This product MUST be installed
by a qualied installer in accordance with local
regulations.
IMPORTANT: This appliance has been designed
for non-professional, domestic use only.
IMPORTANT: Carefully unpack and examine
the appliance for any damage. If you think there
is a defect, do not use the appliance and contact
Argos Product Support on 01759 487838.
IMPORTANT: The oven is supplied setup
according to the conditions shown on the rating
label which is stuck to the rear of the appliance.
IMPORTANT: Keep the electrical cable (not
supplied) of your oven away from the hot areas;
do not let it touch the appliance. Keep the cable
away from sharp edges and heated surfaces.
IMPORTANT: In the event that the cable
connecting your oven becomes damaged, it must
be replaced by a suitably qualied person.
This cable must not be replaced by an
unauthorised person.
IMPORTANT: When using the grill the oven door
must be kept closed to prevent damage to the
oven knobs and to prevent the burn hazard that
very hot knobs would present.
IMPORTANT: Children and persons with reduced
physical, sensory or mental capabilities or lack of
experience and knowledge should not be allowed
to use the oven unless supervised and warned of
the hazards involved
DURING USAGE
IMPORTANT: Children and persons with reduced
physical, sensory or mental capabilities or lack of
experience and knowledge should not be allowed to
use the oven unless supervised and warned of the
hazards involved
WARNING: The appliance and its accessible parts
become hot during use. Care should be taken to avoid
touching hot parts.
WARNING: NEVER try to extinguish a cooking re
with water. Instead switch o the appliance and cover
ame e.g. with a lid or a re blanket.
CAUTION: Do not allow children in the kitchen when
cooking or while oven parts may still be hot. Many
parts of the oven will become hot and present a
considerable hazard to children.
CAUTION: When the oven is hot never touch the oven
glass by hand or with tools.
CAUTION: Before starting to use your appliance,
ensure curtains, paper or ammable items are kept
away from your appliance.
Do not keep ammable materials inside of or around
your oven.
CAUTION: Take care when closing the oven door that
there is nothing obstructing it from closing as this may
break the glass door.
IMPORTANT: When using the grill the oven door must
be kept closed.
Page 6

6
Safety information
Important - Please read these instructions fully before
installing or operating
Safety information
or online at www.argos-support.co.uk If you still require further assistance, call one of our experts on 01759 487838
IMPORTANT: Make sure the oven is turned o when
not in use
IMPORTANT: If you do not intend to use your oven for
a long period of time turn o the electric supply to the
oven
GENERAL SAFETY WARNINGS
IMPORTANT: This appliance has been designed for
non-professional, domestic use only. Do not use this
oven for commercial use or any other application e.g.
room heating
WARNING: Danger of re: do not store ammable
items on or near the cooking surfaces or inside the
oven.
IMPORTANT: Do not try to lift or move this oven by
pulling on the door handle
WARNING: Ensure that the appliance is switched o
before replacing the lamp to avoid the possibility of
electric shock.
IMPORTANT: Your appliance is produced in
accordance with all applicable local and
international standards and regulations.
IMPORTANT: Maintenance and repair work must only
be performed by authorized service technicians.
Installation and repair work that is carried out by
unauthorised technicians is dangerous and could
invalidate your guarantee
IMPORTANT: When the door of the oven is open, do
not hang or lean anything on it. You may damage the
door or door hinges.
IMPORTANT: Do not hang towels, dishcloths or
clothes from the oven handle.
CLEANING AND MAINTENANCE
IMPORTANT: Always turn the appliance o
before operations such as cleaning or
maintenance. You can do this by switching the oven
o using oven isolation switch.
TO MAINTAIN THE EFFICIENCY AND SAFETY
OF YOUR APPLIANCE,
WE RECOMMEND YOU ALWAYS USE
OUR AUTHORIZED SERVICE AGENTS AND
ORIGINAL SPARE PARTS.
FOR ASSISTANCE CALL
ARGOS PRODUCT SUPPORT
01759 487838.
Page 7

Getting to know your
Built-In Single Oven
2
Page 8

8
Getting to know your Built-In Single Oven
Getting to know your Built-In Single Oven
If you require any technical guidance or find that your product is not operating as intended, a simple solution can often be found in the Troubleshooting section of these instructions,
Ready? Let’s begin...
Please read these instructions carefully. They contain
important information which will help you get the best
from your Built-In Single Oven and ensure safe and
correct installation and operation.
If you require any further assistance, our technical
experts are happy to help. For full details, refer to
the product support section at the end of these
instructions.
Page 9
9
Getting to know your Built-In Single Oven
You’ll be up and running in no time
Getting to know your Built-In Single Oven
or online at www.argos-support.co.uk If you still require further assistance, call one of our experts on 01759 487838
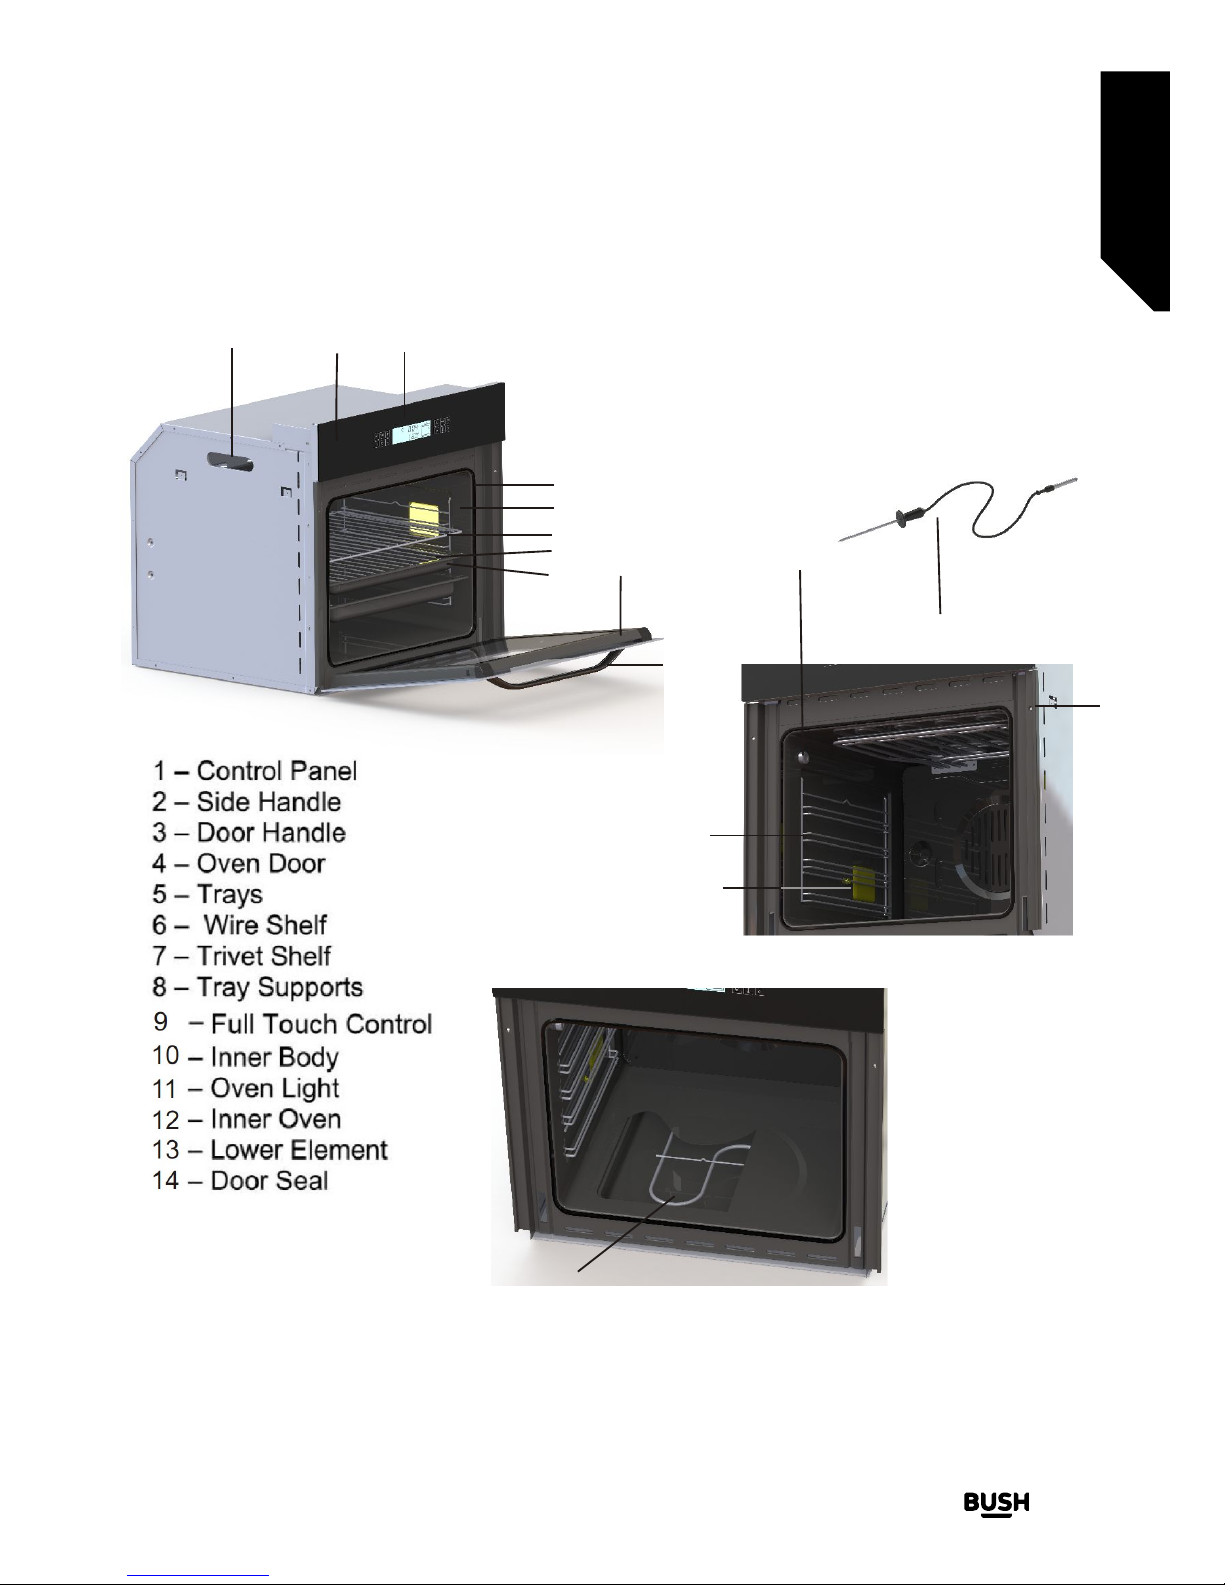
Oven Parts
2
1
9
14
8
7
6
5
4
3
10
11
12
15
16
15 - Meat Probe
16 - Probe Connection
13
Page 10

Installing your
Built-In Single Oven
3
Page 11

11
Installing your Built-In Single Oven
Bringing it all together
Installing your Built-In Single Oven
If you require any technical guidance or find that your product is not operating as intended, a simple solution can often be found in the Troubleshooting section of these instructions,
Installation requirements
THIS OVEN MUST BE INSTALLED BY A SUITABLY
QUALIFIED INSTALLER
This modern oven was manufactured with
parts and materials of the highest quality and
was designed to meet your cooking needs. You
should read this manual so that you are able to
use the oven correctly and to avoid any potential
problems with using the oven. The following
information outlines the required rules for correct
installation and service of your oven. This is
particularly important for the technician who will
install the appliance.
Positioning
The furniture close to the oven must be
manufactured resistant to temperatures up to
100°C
First Use
IMPORTANT: When using your oven for the first time
your oven may give o an unusual odour from the
heating elements and insulation materials. This is
normal for new ovens. To eliminate this odour run
the oven at 250 degrees for 40-60 mins with the
oven empty.
Unpacking
Carefully unpack and examine the appliance for
any damage. If you think there is a defect, do not
use the appliance and contact Argos Product
Support on 01759 487838.
Packaging materials should be collected
together and disposed of immediately as they
may be harmful to children.
Page 12

12
Installing your Built-In Single Oven
Bringing it all together
Installing your Built-In Single Oven
or online at www.argos-support.co.uk If you still require further assistance, call one of our experts on 01759 487838.
Connections
Electrical
• IMPORTANT: Electrical connections must
be carried out by a suitably qualified
person and in accordance with all
relevant local building and installation
regulations.
1. See the rating label at the rear of the product for the
appliance’s load rating.
2. The oven must be connected to a dedicated circuit
suitably rated for the load of the appliance (see rating
label at rear of appliance) it must be connected via
a suitably rated cable to a double pole isolator oven
switch also suitably rated for the appliance.
3. The electrical cable should not touch the hot
parts of the appliance.
The electrical cable (not supplied) should not be
routed through any area that may be aected by
heat from the oven, especially the area directly
behind the oven.
The Connection diagram can be found on
the rear of the appliance
In the event of a power failure please reset the
timer. This oven will not operate until the timer is
properly set
This appliance must be installed by a suitably
qualified installer
! Failure to do this
will invalidate your warranty
Page 13

Using your Built-In Single Oven 4
Page 14

14
Using your Built-In Single Oven
Getting the most from your appliance
Using your Built-In Single Oven
If you require any technical guidance or find that your product is not operating as intended, a simple solution can often be found in the Troubleshooting section of these instructions,
Touch keys :
1. - ON/OFF- switches the device ON or OFF
2. - Stops any program;
3. - Temperature adjustment;
4. - Timer Menu/Meat probe functions;
5. - Minus;
6. - Plus;
7. - Function adjustment-down;
8. - Function adjustment-up
9. - Rapid heat
10. - Lock control panel
11. - Oven light
12. - Start selected function;
General Overview:
Element and fan combinations can be
selected from the menu using touch keys in
the user interface.
Cooking time, end time and temperature
(if meat probe is used) are adjustable.
Additionally keep warm, heat up, real time
display, stopwatch, and key lock functions are
available.
Switching the oven control ON or OFF:
key activates or deactivates the oven
control (independently from child lock).
When the control is OFF, the screen is
completely blank. Pressing key for 1
second, activates the control.
The current time of day appears on the
display.
Note: In case of any power interruption, the
current time of day will be lost. A flashing
0:00 will appear on the time of day display.
It is not possible to use any features of the
oven control without setting the time of day.
The correct time can be adjusted using the
and keys.
Pressing
for 1 second when the oven
control is ON, turns the oven control OFF.
Time of day – shows the time of day;
Function Display-indicates the selected cooking function
Temperature Display –indicates the adjusted oven temperature
Timer / Meat probe Display – shows timer or food temperature status
Status Display- shows the oven status
Pause – indicates that the cooking with the parameters on screen, is paused by user
Key lock indicator
Oven Touch Control and Timer
Page 15

15
Using your Built-In Single Oven
Getting the most from your appliance
Using your Built-In Single Oven
or online at www.argos-support.co.uk If you still require further assistance, call one of our experts on 01759 487838
Adjusting the time of day:
Touch and hold both
and buttons until
time of day digits start flashing. Using
or
keys, set the correct time. Wait for 7 seconds,
flashing will stop, adjustment is completed.
Selecting a cooking function:
Using either of or keys, you may scroll
through the function menu.
The current function will flash on the Function
Display for 7 seconds and the default cooking
temperature assigned to this function will
appear on the temperature display (Note: For
some functions, a temperature control is not
possible and the temperature display is blank).
The is steady on the status display, and
is flashing, indicating that you are ready
to cook but not started yet. Now check the
cooking temperature
Changing the default temperature:
The Temperature Setting on the Temperature
Display can be changed by touching the
button- the Temperature Display starts
flashing- and setting the desired value using
or in 5 degree intervals.
(!) Note: If you want to replace the default
temperature setting for this function with
this adjusted temperature permanently,
touch
for approximately 5 seconds,
until a buzzer tone is heard. The factory set
default temperature for this function is now
permanently changed
Start manual cooking:
Once a function is selected, touching the
key, initiates cooking at the temperature
setting on the temperature display (if any).
disappears , and the cooking time passed is
displayed on the timer/meat probe display.
Cooking will continue until it is either ended
by the user manually (see: to pause,edit
or end cooking) or the maximum allowed
cooking time, depending on the selected
cooking temperature, has passed, as listed
below:
050-120 C 10h
121-200 C 6h
201-250 C 3h
To pause edit or end cooking:
Touching
during cooking, interrupts the
cooking progress and starts flashing,
whereas other portions of the display remain
the same. All oven heating elements and
turbo fan are turned o temporarily. Cooking
is paused.
To end cooking, touch
once again, all
cooking related indications on the display
disappear. The temperature display will
indicate the residual heat ,if any ( see: Residual
Heat Indication ).
Note: After cooking has ended, touching
brings the previous function and temperature
settings on the screen, touching
a second
time will restart cooking
Page 16

16
Edit cooking settings:
To edit the cooking parameters (Function,
Temperature, etc.), while cooking is paused
you can change the (function, temperature
etc.) as described in this document. Touching
will restart cooking with the edited
parameters.
AUTOMATIC COOKING:
Automatic cooking means, that cooking
will end automatically according to the
parameters you tell the control after selecting
the cooking function and temperature but
before touching
.
Half Automatic Cooking:
This method is used when NO meat probe
is used and you want to start cooking
immediately, by entering the desired cooking
duration.
1)Select the desired function and adjust the
temperature (if needed) as described before in
this document.
2) Touch key. will flash on the timer
screen. 3) Adjust the required cooking
duration using and keys, appears
on the status display. ( If duration is set to
0:00, two warning beeps will sound)
4)Touch the
key, disappears, and
cooking starts. The cooking end time is
displayed on the timer display, together with
the
symbol.
Full Automatic Cooking:
This method is used when NO meat probe is
used and you want the food to be ready at a
certain time in future. Therefore, this method
is also called ‘Delayed Cooking’
1)Go through steps 1 to 3 of half automatic
cooking (setting the cooking duration)
2)Touch
key again, flashes on the timer
screen and the current cooking end time.
3) Adjust the desired end time using
and
keys. on the status display will disappear
and is showing, indicating that delayed
cooking is programmed and cooking will not
start immediately.
4)Touch the
key, and disappears,
cooking is ready to start at the time set. The
cooking end time is displayed on the timer
display, together with the
symbol
Cooking with the Meat Probe:
The Meat Probe is a sensor, connected to plug
inside the oven (top left simply plug it in, see
Figure A.) and inserted into the meat to be cooked
(Figure B). Using the meat probe, cooking is
automatically ended when the meat reaches the
desired temperature.
1)Select the desired function and (if needed)
adjust the temperature as described before in
this document.
2)Touch the
key. The default value of the
meat probe temperature will flash on the right
two digits of the timer/meat probe display.
will appear on the screen.
3) Adjust the desired target meat temperature
at cooking end in the range of 20-99 C using
and keys.
4)Touch
, disappears and cooking
starts. The actual meat temperature is
displayed on the left , the adjusted end
temperature is displayed on the right portion
of the timer/meat probe display
During Cooking:
The 5 bars on the temperature display give an
indication about the actual oven temperature.
Each bar is assigned to 1/5 th of the adjusted
value. The up-arrow near the bars flashes,
when the heating elements are currently
active.
Figure A
Figure B
Page 17

17
Auto end of cooking:
After cooking ends automatically, the
temperature display will indicate the residual
heat ,if any (see: Residual Heat Indication ),
will be flashing and buzzer will sound
for 7 minutes. Touching
will cancel the
buzzer.
Residual Heat Indication:
After cooking has ended manually or
automatically, if the internal oven temperature
is above 60 °C, ‘down arrow’ on the right
side of heat bars flashes every 2 seconds also
“hot” is displayed on the temperature display.
Each one of the 5 heat bars symbolizes an
amount over 60 °C. This indication goes on
until the oven temperature falls below 60 °C.
Special Features:
Lamp ON/OFF: The lamp inside the oven will
be ON, whenever a function is being selected
or is being adjusted. It will turn OFF, after
cooking has finished and the residual heat
indication ends. However, it can be switched
ON or OFF by touching
, except when
using the defrost function.
Heat Up Rapidly:
Sometimes it is desired to bring the oven
temperature rapidly to the adjusted value.
Touching
will energize the circular element
and/or turbo fan temporarily to achieve a
rapid heat up. The
symbol will be visible on
the screen, after reaching the adjusted oven
temperature, it will vanish and a buzzer tone is
heard.
Note: Rapid heat up is not allowed for
some functions (grill) or when the actual
temperature is less than 50C away from the
adjusted one or the adjusted temperature is
below 100 C.
Child Lock:
Child lock can be activated or deactivated
via touching the
key for 1 second, until
the
symbol appears on the screen. When
child lock is activated, no key except
, is
accepted.
Minute Minder Alarm:
Touch and release
key until appears
flashing. Set the time in minutes, using the
or
keys. Flashing will stop after 7 seconds, a
buzzer alarm lasting 7 minutes will sound after
the set time has elapsed. This alarm can be
stopped by touching either the or keys.
Alarm Clock:
Touch and release
key until appears
flashing. Set the alarm time , using the or
keys. Flashing will stop after 7 seconds,
a buzzer alarm will be produced when the
adjusted time has come. This alarm can be
stopped by touching either the
or keys.
ERROR INDICATIONS:
When a situation occurs that prevents normal
operation, the oven enters “error mode.” The
oven is in the standby status and an error
code is displayed on the Time of Day Display.
Even if the error recovers, this code will
remain on the display until
key is touched.
A total number of 8 error codes exist:
Err1: Communication error
Err2: PT1000 open circuit
Err3: PT1000 short circuit
Err4: Temperature exceeded in user interface
Err5: Temperature exceeded in the power
module.
Err6: Temperature sensor failure in the user
interface.
Err7: Temperature sensor failure in the power
module.
Err8: Main power error. There is no warm up
detected although heating elements seem to
be activated.
Page 18

18
Using your Built-In Single Oven
Getting the most from your appliance
Using your Built-In Single Oven
If you require any technical guidance or find that your product is not operating as intended, a simple solution can often be found in the Troubleshooting section of these instructions,
Programmable Options:
Buzzer Tone:
There are three buzzer tones to select. Touch
the
key 5 seconds long, the time of day
display will show the currently valid tone as
“tn 1” (high) or “tn 2 (medium)” or “tn 3 (low)”.
The valid tone can be changed by touching
the
key within 7 seconds of the last touch.
The default tone is “tn 1”.
Key Sound:
There are three key sound options to select.
Touch the
key for 5 seconds, the time
of day display will show the currently valid
key tone as “bt” (beep tone) or“c” (click tone)
or “nt” (no tone). The valid key sound can
be changed by touching the
key within
7 seconds of the last touch. The default key
sound is “bt”.
Time of Day Mode 24h/12h:
The default mode is 24 hours. If 12h am/pm
mode is desired, touch both the
and
keys for 5 seconds. The Mode changes and
a beep tone sounds. Do the same again to
switch back.
Auto Power Save (APS):
APS is an option not set as factory setting.
If set, the control will be switched OFF
automatically, whenever there is nothing
other than the time of day to be displayed.
Touching
for 5 seconds in idle mode (no
cooking related operation present) activates
this option, Time of day digits will show PS
ON for a few seconds accompanied with a
beep tone. Cancelling this option is done in
the same way, PS OF will be shown on the
screen.
Grill Function of Oven - Closed Door
Grilling
Using the oven control select grill function
We advise you to use trivet shelf placed into
grill tray when you are grilling. This will help
avoid spills and help keep your oven clean
If you decide use a grill wire on a shelf rather
than placing in a tray, position a tray below to
collect oils and fats.
For easy cleaning, put some water in the tray.
Preheat the grill with the door closed for 5-10
minutes before use.
Always pre-heat grill before use and grill with
door closed.
Page 19

Care and maintenance
5
Page 20

20
Care and maintenance
Looking after your appliance
Care and maintenance
If you require any technical guidance or find that your product is not operating as intended, a simple solution can often be found in the Troubleshooting section of these instructions,
Cleaning
WARNING! Isolate the power supply to the oven and
make sure that the oven is cool.
Do not clean using caustic creams, abrasive
cleaning powders, thick wire wool or hard
tools. Enamelled parts of the oven can be
damaged if excess cleaning liquids are not
immediately removed.
After cleaning the interior parts of the oven
with a soapy cloth, rinse it and then dry
thoroughly with a soft cloth.
Clean the glass surfaces with special glass
cleaning agents.
Never use flammable agents like acid, thinner
or petrol when cleaning your oven.
Do not clean your oven with a steam cleaner.
Do not wash any part of your oven in a
dishwasher.
Changing the oven lamp:
Oven door seal:
Please check the oven door seal at regular
intervals. If the seal requires cleaning, clean
it without using abrasive materials
If the door seal is damaged contact your
authorised service agent on 01759 487838
Do not use the oven until the door seal has
been repaired or replaced
Enamelled Parts:
In order to keep them as new, it is necessary
to clean them frequently with mild warm
soapy water and then dry with a cloth. Do not
wash them while hot and never use abrasive
powders or abrasive cleaning materials. Do
not leave anything spilled onto enamelled
parts for long periods of time.
Stainless Steel:
Stainless steel parts must be cleaned
frequently with mildly warm soapy water and
a soft sponge and then dried with a soft cloth.
Do not use abrasive powders or abrasive
cleaning materials. Do not leave anything
spilled onto stainless steel parts for long
periods of time.
1. Pull the plug out of socket.
2. Turn the lamp fixing glass counterclockwise direction to separate it or the
glass lamb cover over the screwdriver
is removed (A).
3. To seperate lamp from body turn it to
counter-clockwise direction.
4. Fix new lamp that you gain from
authorised service in place of old lamp.
5. Ensure the appliance is switched off
before replacing the lamp to avoid the
possibility of electric shock.
Bulb Type: 25W E screwed
Page 21

21
Care and maintenance
Looking after your appliance
Care and maintenance
or online at www.argos-support.co.uk If you still require further assistance, call one of our experts on 01759 487838
Technical specification
Model BUSH BSOFTC
Power supply 220-240V~50 Hz
Maximum power 3350W
Size (H x W x D) 594 x 595 x 540
Net Weight 29.9 kg
Oven volume 67 lt
Energy rating A
We apologise for any inconvenience caused by minor inconstancies within these instructions
that may occur due to product improvements and development
All images and drawing are for illustration purposes only.
Page 22

Product support
6
Page 23

23
Product support
Help is always at hand
Product support
If you require any technical guidance or find that your product is not operating as intended, a simple solution can often be found in the Troubleshooting section of these instructions,
1. If no electrical functions appear to work,
check the oven isolation switch has not been
turned o also check the fuse in the switch
and the circuit breaker in your consumer unit
2. After replacing the fuse or resetting the
circuit breaker turn on your oven and check
the functions
3. DO NOT attempt to repair this oven
yourself. Call Argos Product Support or
consult a qualied person
Troubleshooting
If oven does not power up
Check that your supply has not tripped
If oven does not heat
Ensure timer is set and an oven function is selected
Temperature incorrect
Please check that the correct temperature has been set
Please check that any fuses have not blown
If oven lamp does not light
Check that your oven is turned on
Change the bulb (see page 24)
If oven does not cook evenly
Adjust shelf positions check temperature settings
Ensure that you preheat the oven before use
If there is still a problem
Call Argos product support on 01759 487838
Page 24

24
Product support
Help is always at hand
Product support
or online at www.argos-support.co.uk If you still require further assistance, call one of our experts on 01759 487838
Help and assistance
If you require any technical guidance or find that your Dual Fuel 60cm Oven is not operating as intended, a simple
solution can often be found in the Troubleshooting section of these instructions or online at
www.argos-support.co.uk
If you still require further assistance, call one of our experts on 01759 487838*. To help give us give you a fast and
efficient service please have the following information ready:
Model Ref.
Serial number
Date of purchase
Local call rates applies*
Lines open 8am-7pm Monday to Saturday and 10am-4pm Sunday.
*Calls to Argos enquiry lines may attract a charge and set up fee from residential lines depending on your call plan/tari. Mobile and other
providers costs may vary, see www.bt.com/pricing for details.
For Security and training purposes, telephone calls to and from customer service centres maybe recorded and monitored. Calls from
Republic of Ireland will attract international call charges.
You can find these on
the rating plate - a small
information panel (usually
a sticker or metal plate) on
the rear of your appliance
This will be shown on
your receipt
Page 25

Declaration of conformance to
product standards
This appliance conforms to all relavant standards
applicable to domestic appliances sold in the UK
Disposal
This appliance/tting is marked
according to the European directive
2002/96/EC on Waste Electrical and
Electronic Equipment (WEEE).
By ensuring this product is disposed of
correctly, you will help prevent potential
negative consequences for the environment
and human health, which could otherwise be
caused by inappropriate waste handling of
this product.
The symbol on the product, or on the
documents accompanying the product, the
crossed out wheelie bin symbol, indicates
that this appliance/tting may not be treated
as household waste. Instead it shall be
handed over to the applicable collection point
for the recycling of electrical and electronic
equipment.
Disposal must be carried out in accordance
with local environmental regulations for waste
disposal.
For more detailed information about
treatment, recovery and recycling of this
product, please contact your local authority,
your household waste disposal service or the
retailer where you purchased the product.
25
Page 26

Your Bush Guarantee
This product is guaranteed for twelve months from the date of original purchase. Any defect that arises due to
faulty materials or workmanship will be repaired free of charge (or if applicable the product will be replaced or the
purchase price refunded) where possible during this period by the dealer from who your purchased the unit.
The guarantee is subject to the following provisions:
• The guarantee does not cover accidental damage,
misuse, cabinet parts, knobs or consumable items.
• The product must be correctly installed and
operated in accordance with the instructions
contained in the manual.
• It must be used solely for domestic purposes. The
guarantee will be rendered invalid if the product is
re-sold or has been damaged by inexpert repair.
• Specifications are subject to change without notice.
• Bush disclaim any liability for loss or damage arising
from the breakdown of the product.
• This guarantee is in addition to and does not
diminish your statutory or legal rights.
Important Data Protection Information
If you provide us with information about another
person, you confirm that they have appointed you
to act for them, to consent to the processing of their
personal data including sensitive personal data and
that you have informed them of our identity and the
purposes (as set out in the Important Data Privacy
notice displayed overleaf) for which their personal data
will be processed.
You are entitled to ask for a copy of the information
we hold about you (for which we may charge a small
fee) and to have any inaccuracies in your information
corrected.
For quality control and training purposes, we may
monitor or record your communications with us.
If your personal details change, if you change your
mind about any of your marketing preferences or if you
have any queries about how we use your information,
please let us know by contacting our Data Protection
Officer, Domestic & General, Leicester House
17 Leicester Street, Bedworth, Warwickshire
CV12 8JP.
Guarantor: Argos Limited - 489 - 499 Avebury Blvd. - Milton Keynes - MK9 2NW
Call us now and activate your 12 month guarantee
Thank you for choosing Bush. Your new product is guaranteed against faults and
breakdowns for 12 months. Don’t forget to register it with us today so we can provide you
with our best possible after-sales service and useful updates.
www.bushregistration.co.uk
FREEPHONE*
0800 597 8548
Lines are open 8am - 8pm, 365 days a year. *Calls may be recorded and monitored.
26
Page 27

Page 28

Contact:
www.argos-support.co.uk
Helpline: 01759 487838
 Loading...