

Page 1

Instruction manual
Combi Fridge-Freezer
54180BX
54180SX
54180WX
Page 2

You’ll soon be enjoying your new Combi Fridge-Freezer.
It all begins here, with your instructions. Don’t worry,
there’s nothing too technical coming up. Just simple,
step-by-step guidance to get you up and running quickly.
Sound good? Then let’s get started.
Help and Guidance
We’re here to help you get the most from your Combi Fridge-Freezer. Should you require any guidance,
a simple solution can often be found online at:
www.bush-support.com
If you still require further assistance, call one of our experts on 0345 257 7271.
If you require any technical guidance or find that your product is not operating as intended, a simple solution can often be found in the Troubleshooting section of these instructions.
2
Page 3

Contents
Safety Information 5
1
Safety Instructions 6
Getting to know your
2
Combi Fridge - Freezer 9
Installing your
3
Combi Fridge - Freezer 13
Electrical information (For UK type
plug) 14
Installation warnings 14
During Usage 15
Shipment and Repositioning 16
Transportation and Changing
Positioning 16
Repositioning the Door 16
Product Support 31
7
Before Calling After-Sales Service 32
Tips for Savıng Energy 33
Help and assistance 34
Disposal 35
Functions 17
4
5
6
Information on the Frost Free
Technology 18
Thermostat Setting 18
Temperature Adjustment Warnings 19
Using your
Combi Fridge - Freezer 21
Food Storage 22
Tips for Saving Energy 24
Accessories 24
Care and Maintenance 27
Cleaning and Maintenance 28
Defrosting 28
Replacing the Light Bulb 28
Technical specification 29
or online at www.bush-support.com If you still require further assistance, call one of our experts on 0345 257 7271.
3
Page 4
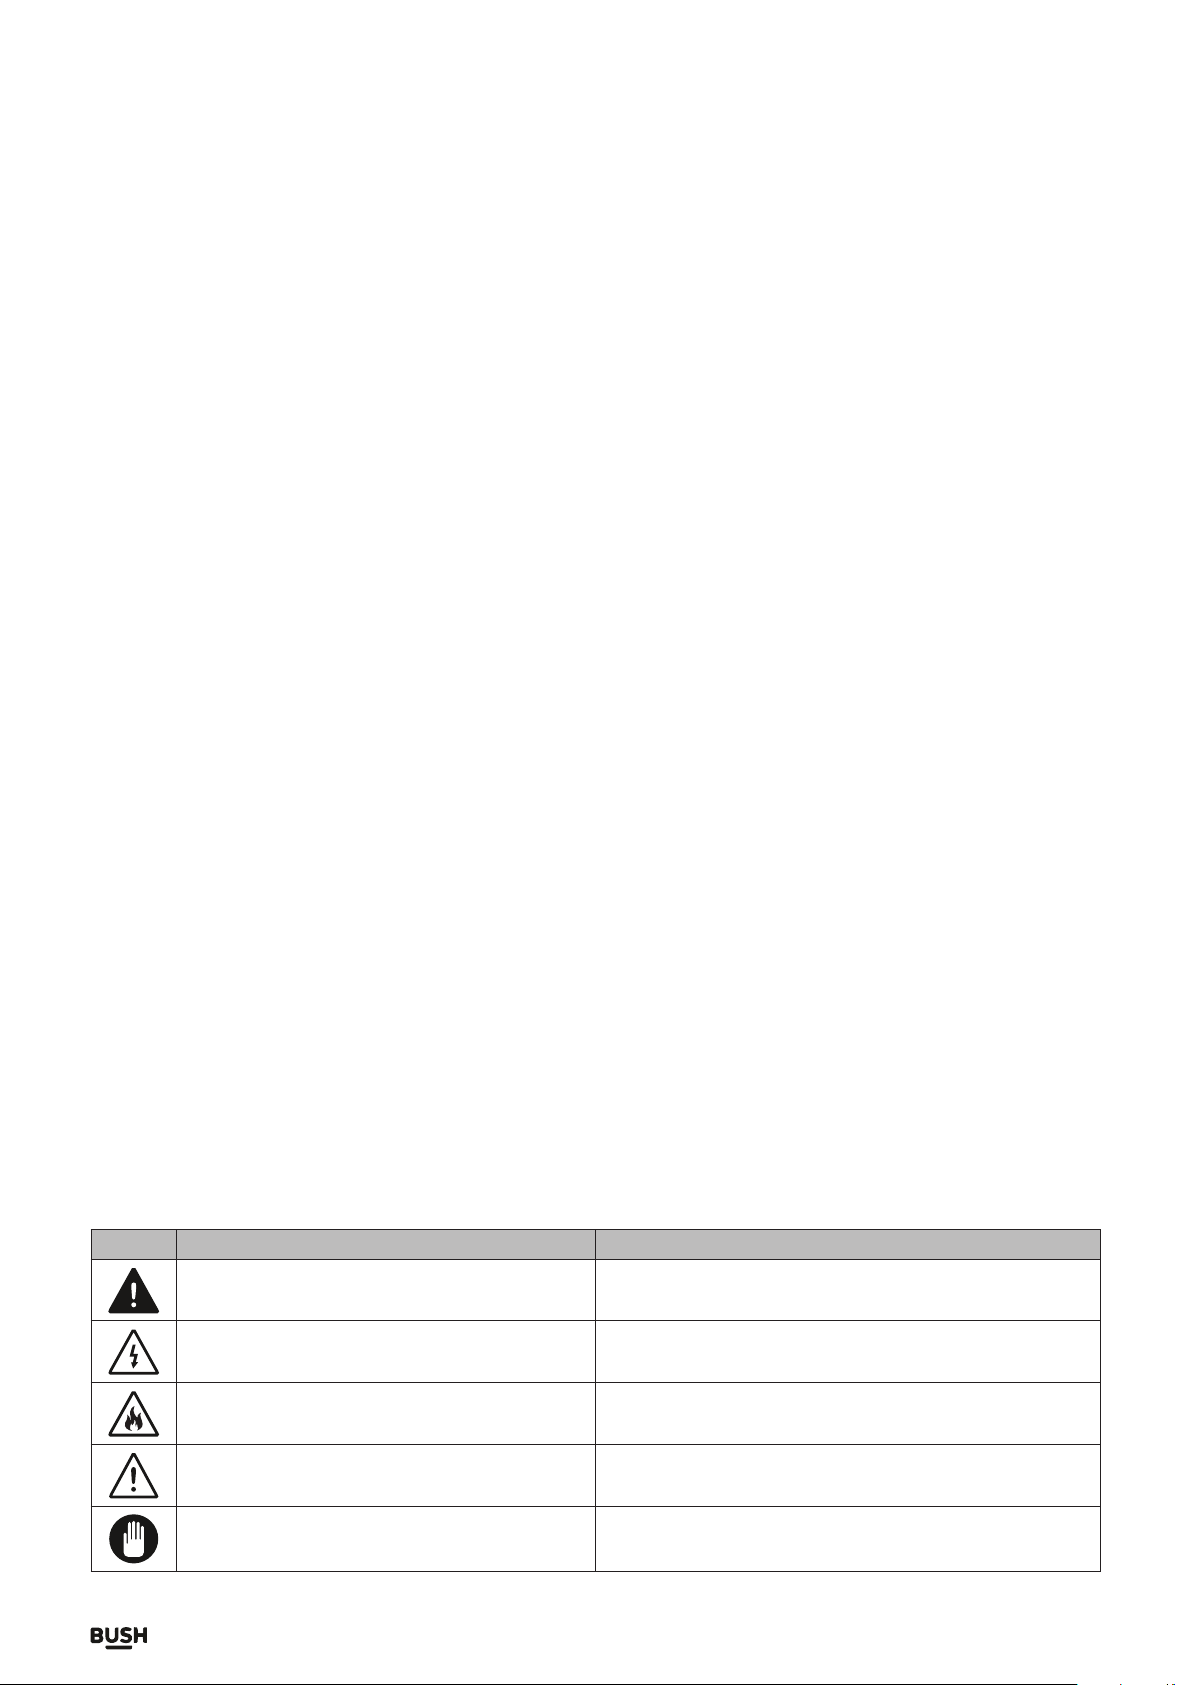
Icon Type Meaning
WARNING Serious injury or death risk
RISK OF ELECTRIC SHOCK Dangerous voltage risk
FIRE Warning; Risk of fire / flammable materials
CAUTION Injury or property damage risk
IMPORTANT Operating the system correctly
If you require any technical guidance or find that your product is not operating as intended, a simple solution can often be found in the Troubleshooting section of these instructions.
4
Page 5

Safety Information
1
Page 6

Safety information
Important - Please read these instructions fully before installing or
operating
Safety Instructions
General Safety Warnings
Read this user manual carefully.
WARNING: Keep ventilation openings,
in the appliance enclosure or in the built-in
structure, clear of obstruction.
WARNING: Do not use mechanical
devices or other means to accelerate the
defrosting process, other than those
recommended by the manufacturer.
WARNING: Do not use electrical
appliances inside the food storage
compartments of the appliance, unless
they are of the type recommended by the
manufacturer.
WARNING: Do not damage the
refrigerant circuit.
WARNING: When positioning the
appliance, ensure the supply cord is not
trapped or
damaged.
WARNING: Do not locate multiple
portable socket-outlets or portable power
supplies at the
rear of the appliance.
WARNING: In order to avoid any
hazards resulting from the instability of the
appliance, it must be fixed in accordance
with the following instructions:
If your appliance uses R600a as a
refrigerant (this information will be
provided on the label of the cooler) you
should take care during transportation and
installation to prevent the cooler elements
from being damaged. R600a is an
environmentally friendly and natural gas,
but it is explosive. In the event of a leak due
to damage of the cooler elements, move
your fridge away from open flames or heat
sources and ventilate the room where the
appliance is located for a few minutes.
•While carrying and positioning the
fridge, do not damage the cooler gas
circuit.
•Do not store explosive substances
such as aerosol cans with a flammable
propellant in this appliance.
•This appliance is intended to be
used in household and domestic
applications such as:
- staff kitchen areas in shops, offices
and other working environments.
- farm houses and by clients in hotels,
motels and other residential type
environments.
- bed and breakfast type
environments;
- catering and similar non-retail
applications.
•If the socket does not match the
refrigerator plug, it must be replaced
by the manufacturer, a service agent or
similarly qualified persons in order to
avoid a hazard.
•A specially grounded plug has been
connected to the power cable of your
refrigerator. This plug should be used
with a specially grounded socket of 13
amperes. If there is no such socket in
your house, please have one installed
by an authorised electrician.
If you require any technical guidance or find that your product is not operating as intended, a simple solution can often be found in the Troubleshooting section of these instructions.
6
Safety information
Page 7

Safety information
Important - Please read these instructions fully before installing or
operating
•This appliance can be used by children
aged from 8 years and above and
persons with reduced physical, sensory
or mental capabilities or lack of
experience and knowledge if they have
been given supervision or instruction
concerning use of the appliance in a
safe way and understand the hazards
involved. Children shall not play with
the appliance. Cleaning and user
maintenance shall not be made by
children without supervision.
•Children aged from 3 to 8 years
are allowed to load and unload
refrigerating appliances. Children are
not expected to perform cleaning or
user maintenance of the appliance,
very young children (0-3 years old)
are not expected to use appliances,
young children (3-8 years old) are
not expected to use appliances safely
unless continuous supervision is given,
older children (8-14 years old) and
vulnerable people can use appliances
safely after they have been given
appropriate supervision or instruction
concerning use of the appliance. Very
vulnerable people are not expected
to use appliances safely unless
continuous supervision is given.
•If the supply cord is damaged, it must
be replaced by the manufacturer, an
authorised service agent or similar
qualified persons, in order to avoid a
hazard.
•This appliance is not intended for use
at altitudes exceeding 2000 m.
or online at www.bush-support.com If you still require further assistance, call one of our experts on 0345 257 7271.
Safety information
7
Page 8

If you require any technical guidance or find that your product is not operating as intended, a simple solution can often be found in the Troubleshooting section of these instructions.
8
Page 9

Getting to know your
Combi Fridge - Freezer
2
Page 10

Getting to know your Combi Fridge-Freezer
You’ll be up and running in no time
Ready? Let’s begin...
Please read these instructions carefully. They
contain important information which will help
you get the best from your Combi Fridge Freezer
and ensure safe
and correct installation and operation.
If you require any further assistance, our technical
experts are happy to help. For full details, refer to
the product support section at the end of these
instructions.
If you require any technical guidance or find that your product is not operating as intended, a simple solution can often be found in the Troubleshooting section of these instructions.
10
Getting to know your Combi Fridge-Freezer
Page 11
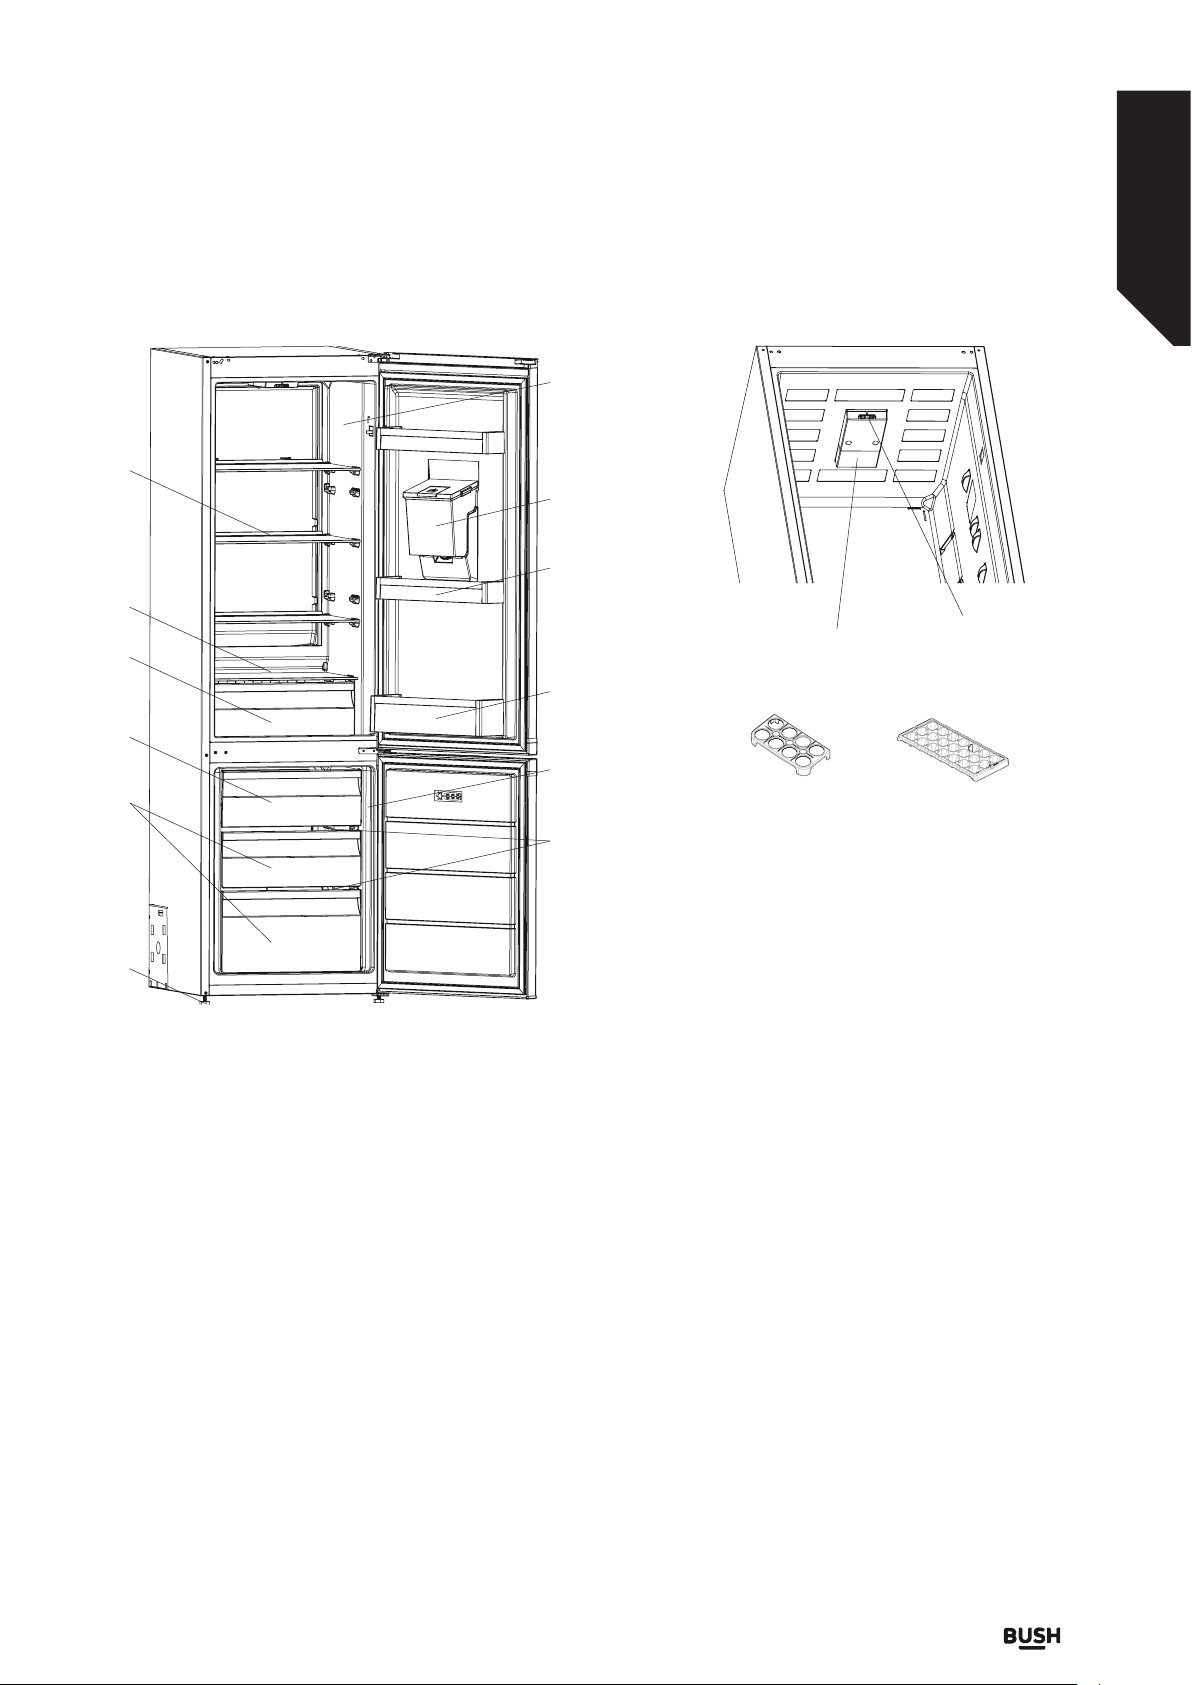
Getting to know your Combi Fridge-Freezer
You’ll be up and running in no time
A
3
12
11
4
5
2
1
6
7
8
This presentation is only for information about
the parts of the appliance. Parts may vary
according to the appliance model.
A) Refrigerator compartment
B) Freezer compartment
1) Thermostat knob
2) Refrigerator lamp and cover
3) Refrigerator shelves
4) Crisper cover
5) Crisper
6) Freezer upper flap
7) Freezer drawers
10
B
13 14
9
8) Levelling feet
9) Freezer shelves *
10) Bottle shelf
11) Door shelves
12) Water tank *
13) Egg holder
14) Ice box tray
* In some models
or online at www.bush-support.com If you still require further assistance, call one of our experts on 0345 257 7271.
Getting to know your Combi Fridge-Freezer
11
Page 12
Getting to know your Combi Fridge-Freezer
You’ll be up and running in no time
Parts of the Water Dispenser
(A) Front reservoir group
1
2
3
(B) Water tank group
4
5
2
1
6
9
8
1) Water reservoir upper cover
2) Glass lid
3) Water drip reservoir
4) Water tank upper cover
5) Water tank cover
6) Lateral locking lids
7) Water tank
8) Tank gasket
9) Tap detail
7
4
3
If you require any technical guidance or find that your product is not operating as intended, a simple solution can often be found in the Troubleshooting section of these instructions.
12
Getting to know your Combi Fridge-Freezer
Page 13

Installing your
Combi Fridge - Freezer
3
Page 14

Installing your Combi Fridge - Freezer
Bringing it all together
Electrical information (For UK type
plug)
Warning! This appliance must be earthed.
The mains lead of this appliance has been fitted
with a specially earthed plug.
Important: Do not use the appliance
without the fuse cover in position. Should the fuse
need to be replaced, it must be replaced with a
13A fuse, ASTA approved to BS1362.
The plug must be used with a specially earthed
socket of 13 amperes. If there is no such socket
in your house, please have one installed by an
authorised electrician.
The mains lead of this appliance has been fitted
with a BS 1363A 13A fused plug. To change a fuse
in this type of plug, follow the steps below:
1. Remove the fuse cover and fuse.
2. Fit replacement 13A fuse, ASTA approved to BS
1362 type, into the fuse cover.
3. Replace fuse cover.
Installation warnings
Before using your fridge freezer for the first time,
please pay attention to the following points:
• The operating voltage for your fridge freezer
is 220-240 V at 50Hz.
• The plug must be accessible after installation.
• Your fridge freezer may have an odour when
it is operated for the first time. This is normal
and the odour will fade when your fridge
freezer starts to cool.
• Before connecting your fridge freezer, ensure
that the information on the data plate (voltage
and connected load) matches that of the
mains electricity supply. If in doubt, consult a
qualified electrician.
• Insert the plug into a socket with an efficient
ground connection. If the socket has no
ground contact or the plug does not match,
we recommend you consult a qualified
electrician for assistance.
• The appliance must be connected with a
properly installed fused socket. The power
supply (AC) and voltage at the operating point
must match with the details on the name
plate of the appliance (the name plate is
located on the inside left of the appliance).
• We do not accept responsibility for any
damages that occur due to ungrounded
usage.
• Place your fridge freezer where it will not be
exposed to direct sunlight.
• Your fridge freezer must never be used
outdoors or exposed to rain.
• Your appliance must be at least 50 cm away
from stoves, gas ovens and heater cores, and
at least 5 cm away from electrical ovens.
• If your fridge freezer is placed next to a deep
freezer, there must be at least 2 cm between
them to prevent humidity forming on the
outer surface.
• Do not cover the body or top of fridge freezer
with lace. This will affect the performance of
your fridge freezer.
• Clearance of at least 150 mm is required
at the top of your appliance. Do not place
anything on top of your appliance.
• Do not place heavy items on the appliance.
• Clean the appliance thoroughly before use
(see Cleaning and Maintenance).
• The installation procedure into a kitchen
unit is given in the installation manual. This
product is intended to be used in proper
kitchen units only.
If you require any technical guidance or find that your product is not operating as intended, a simple solution can often be found in the Troubleshooting section of these instructions.
14
Installing your Combi Fridge - Freezer
Page 15

Installing your Combi Fridge - Freezer
Bringing it all together
• Before using your fridge freezer, wipe all parts
with a solution of warm water and a teaspoon
of sodium bicarbonate. Then, rinse with clean
water and dry. Return all parts to the fridge
freezer after cleaning.
• Use the adjustable front legs to make sure
your appliance is level and stable. You can
adjust the legs by turning them in either
direction. This must be done before placing
food in the appliance.
• Install the two plastic distance guides (the
parts on the black vanes
-condenser- at the rear) by
turning it 90° (as shown in the
figure) to prevent the condenser
from touching the wall.
• The distance between the
appliance and back wall must be a minimum
of 75 mm.
During Usage
• Do not connect your fridge freezer to the
mains electricity supply using an extension
lead.
• Do not use damaged, torn or old plugs.
• Do not pull, bend or damage the cord.
• Do not use plug adapter.
• This appliance is designed for use by adults.
Do not allow children to play with the
appliance or hang off the door.
• Never touch the power cord/plug with wet
hands. This may cause a short circuit or
electric shock.
• Do not place glass bottles or cans in the icemaking compartment as they will burst when
the contents freeze.
• Do not place explosive or flammable material
in your fridge. Place drinks with high alcohol
content vertically in the fridge compartment
and make sure their tops are tightly closed.
• When removing ice from the ice-making
compartment, do not touch it. Ice may cause
frost burns and/or cuts.
or online at www.bush-support.com If you still require further assistance, call one of our experts on 0345 257 7271.
• Do not touch frozen goods with wet
hands. Do not eat ice-cream or ice cubes
immediately after they are removed from the
ice-making compartment.
• Do not re-freeze thawed frozen food.
This may cause health issues such as food
poisoning.
Old and Out-of-order Fridges
• If your old fridge or freezer has a lock, break
or remove the lock before discarding it,
because children may get trapped inside it
and may cause an accident.
• Old fridges and freezers contain isolation
material and refrigerant with CFC. Therefore,
take care not to harm environment when you
are discarding your old fridges.
CE Declaration of conformity
We declare that our products meet the applicable
European Directives, Decisions and Regulations
and the requirements listed in the standards
referenced.
Disposal of your old appliance
The symbol on the product or on its
packaging indicates that this product
may not be treated as household waste.
Instead it shall be handed over to the
applicable collection point for the recycling of
electrical and electronic equipment. By ensuring
this product is disposed of correctly, you will
help prevent potential negative consequences
for the environment and human health, which
could otherwise be caused by inappropriate
waste handling of this product. For more detailed
information about recycling of this product, please
contact your local city offi ce, your household
waste disposal service or the shop where you
purchased the product.
Packaging and the Environment
Packaging materials protect your machine
from damage that may occur during
transportation. The packaging materials
are environmentally friendly as they are recyclable.
The use of recycled material reduces raw material
consumption and therefore decreases waste
production.
Installing your Combi Fridge - Freezer
15
Page 16

Installing your Combi Fridge - Freezer
Bringing it all together
Notes:
• Please read the instruction manual carefully
before installing and using your appliance.
We are not responsible for the damage
occurred due to misuse.
• Follow all instructions on your appliance and
instruction manual, and keep this manual in a
safe place to resolve the problems that may
occur in the future.
• This appliance is produced to be used in
homes and it can only be used in domestic
environments and for the specified purposes.
It is not suitable for commercial or common
use. Such use will cause the guarantee of the
appliance to be cancelled and our company
will not be responsible for the losses to be
occurred.
• This appliance is produced to be used in
houses and it is only suitable for cooling /
storing foods. It is not suitable for commercial
or common use and/or for storing substances
except for food. Our company is not
responsible for the losses to be occurred in
the contrary case.
Shipment and Repositioning
Transportation and Changing
Positioning
• The original packaging and foam may be kept
for re-transportation (optional).
• Fasten your appliance with thick packaging,
bands or strong cords and follow the
instructions for transportation on the
packaging.
• Remove all movable parts (shelves,
accessories, vegetable bins, and so on) or fix
them into the appliance against shocks using
bands when re-positioning or transporting.
Always carry your appliance in the upright
position.
Repositioning the Door
• It is not possible to change the opening
direction of your appliance door if door
handles are installed on the front surface of
the appliance door.
• It is possible to change the opening direction
of the door on models without handles.
• If the door-opening direction of your
appliance can be changed, contact the
nearest Authorised Service Centre to change
the opening direction.
If you require any technical guidance or find that your product is not operating as intended, a simple solution can often be found in the Troubleshooting section of these instructions.
16
Installing your Combi Fridge - Freezer
Page 17

Functions
4
Page 18

Functions
Simple everyday use
Information on the Frost Free
Technology
The Frost Free refrigerators have a different
operating system to static
refrigerators.
In normal (static) fridges, the
humidity entering the fridge due
to opening the door, and the
humidity inherent in the food,
causes frost build-up in the
freezer compartment. To defrost
the frost and ice in the freezer
compartment, you are required to
periodically switch off the fridge,
place the frozen food in a separate
cooled container, then remove
the ice gathered in the freezer
compartment.
The situation is completely different
in No-frost fridges. A built-in fan
blows dry and cold air evenly
throughout the cooler and freezer compartments.
The cold air disperses uniformly between the
shelves, ensuring all your food is cooled equally,
thus preventing humidity and frost build-up.
Therefore, your No-frost fridge allows ease of
use, in addition to its huge capacity and stylish
appearance.
Thermostat Setting
The thermostat automatically regulates the
temperature inside the refrigerator and freezer
compartments. Cooler temperatures can be
obtained by rotating the knob to higher numbers,
1 to 5.
Thermostat knob
Thermostat settings:
1 – 2 : For short-term storage of food in the
freezer compartment.
3 – 4 : For long-term storage of food in the freezer
compartment.
5: For freezing fresh food. The appliance will work
longer. Once the food is fully frozen, reset the
thermostat to its original position.
If you require any technical guidance or find that your product is not operating as intended, a simple solution can often be found in the Troubleshooting section of these instructions.
18
Functions
Page 19

Temperature Adjustment Warnings
• It is not recommended that you operate your
fridge in environments colder than 10°C in
terms of its efficiency.
• Do not start another adjustment while you are
already making an adjustment.
• Temperature adjustments should be made
according to the frequency of door openings,
the quantity of food kept inside the fridge and
the ambient temperature in the location of
your fridge.
• In order to allow your fridge to reach the
operating temperature after being connected
to mains, do not open the doors frequently
or place large quantities of food in the fridge.
Please note that, depending on the ambient
temperature, it may take 24 hours for your
fridge to reach the operating temperature.
• A 5 minute delay function is applied to
prevent damage to the compressor of your
fridge when connecting or disconnecting to
mains, or when an energy breakdown occurs.
Your fridge will begin to operate normally
after 5 minutes.
• Your appliance is designed to operate in the
ambient temperature (ST/N = 16°C - 38°C)
intervals stated in the standards, according to
the climate class displayed on the information
label. We do not recommend operating your
appliance out of the stated temperature limits
in terms of cooling effectiveness.
Climate
Class
T Between 16 and 43 (°C)
ST Between 16 and 38 (°C)
N Between 16 and 32 (°C)
SN Between 10 and 32 (°C)
Ambient Temperature oC
or online at www.bush-support.com If you still require further assistance, call one of our experts on 0345 257 7271.
19
Page 20

If you require any technical guidance or find that your product is not operating as intended, a simple solution can often be found in the Troubleshooting section of these instructions.
20
Page 21

Using your Combi Fridge - Freezer
5
Page 22

Using your Combi Fridge-Freezer
Getting the most from your appliance
Food Storage
Refrigerator Compartment
• To reduce humidity and avoid the
consequent formation of frost, always store
liquids in sealed containers in the refrigerator.
Frost tends to concentrate in the coldest
parts of the evaporating liquid and, in time,
your appliance will require more frequent
defrosting.
• Never place warm food in the refrigerator.
Warm food should be allowed to cool at
room temperature and should be arranged
to ensure adequate air circulation in the
refrigerator compartment.
• Make sure no items are in direct contact with
the rear wall of the appliance as frost will
develop and packaging will stick to it. Do not
open the refrigerator door frequently.
• We recommend that meat and clean fish
are loosely wrapped and stored on the glass
shelf just above the vegetable bin where the
air is cooler, as this provides the best storage
conditions.
• Store loose fruit and vegetable items in the
crisper containers.
• Store loose fruit and vegetables in the crisper.
• Storing fruit and vegetables separately helps
prevent ethylene-sensitive vegetables (green
leaves, broccoli, carrot, etc.) being affected
by ethylene-releaser fruits (banana, peach,
apricot, fig etc.).
• Do not put wet vegetables into the
refrigerator.
• Storage time for all food products depends
on the initial quality of the food and an
uninterrupted refrigeration cycle before
refrigerator storage.
• To avoid cross-contamination do not store
meat products with fruit and vegetables.
Water leaking from meat may contaminate
other products in the refrigerator. You should
package meat products and clean any
leakages on the shelves.
• Do not put food in front of the air flow
passage.
• Consume packaged foods before the
recommended expiry date.
NOTE: Potatoes, onions and garlic should not
be stored in the refrigerator.
Freezer Compartment
• The freezer is used for storing frozen food,
freezing fresh food, and making ice cubes.
• To freeze fresh food, ensure that as much
of the surface of the food as possible is in
contact with the cooling surface.
• Do not store fresh food next to frozen food as
it can thaw the frozen food.
• Before freezing fresh food, divide it into
portions that can be consumed in one sitting.
• Consume thawed frozen food within a short
period of time after defrosting
• Never place warm food in the freezer
compartment as it will thaw the frozen food.
• Always follow the manufacturer's instructions
on food packaging when storing frozen food.
If no information is provided food, should not
be stored for more than 3 months from the
date of purchase.
• When purchasing frozen food, make sure
that it has been stored under appropriate
conditions and that the packaging is not
damaged.
• Frozen food should be transported in
appropriate containers and placed in the
freezer as soon as possible.
• Do not purchase frozen food if the packaging
shows signs of humidity and abnormal
swelling. It is probable that it has been stored
at an unsuitable temperature and that the
contents have deteriorated.
• The storage life of frozen food depends on
the room temperature, the thermostat setting,
how often the door is opened, the type of
food, and the length of time required to
transport the product from the shop to your
home. Always follow the instructions printed
If you require any technical guidance or find that your product is not operating as intended, a simple solution can often be found in the Troubleshooting section of these instructions.
22
Using your Combi Fridge-Freezer
Page 23

Using your Combi Fridge-Freezer
Getting the most from your appliance
on the packaging and never exceed the
maximum storage life indicated.
• The maximum amount of fresh food (in kg)
that can be frozen in 24 hours is indicated on
the appliance label.
• For optimum appliance performance to
reach maximum freezing capacity, set the
refrigerator thermostat at 4 - 5 for 24 hours
before placing fresh food into the freezer.
• After placing fresh food into the freezer,
change the setting to 4 - 5 for 24 hours is
generally sufficient. After 24 hours, you can
reduce the setting if required.
• For optimum appliance performance to
reach maximum freezing capacity, turn the
thermostatknob to the coldest setting 24
hours before placing fresh food in the freezer.
• It is generally sucient to set the thermostat
to the coldest setting for a further 24 hours
after placing the fresh food in the freezer. After
this time, reduce the thermostat knob setting
if required.
• Attention. To save energy, if you are only
freezing small amounts of food, do not set
the thermostat knob to the coldest setting.
NOTE: If you attempt to open the freezer door
immediately after closing it, you will find that it will
not open easily. This is normal. Once equilibrium
has been reached, the door will open easily.
Important note:
• Never refreeze thawed frozen food.
• The taste of some spices found in cooked
dishes (anise, basilica, watercress, vinegar,
assorted spices, ginger, garlic, onion, mustard,
thyme, marjoram, black pepper, etc.) changes
and they assume a strong taste when they are
stored for a long period of time. Therefore,
add small amounts of spices to food to be
frozen, or the desired spice should be added
after the food has thawed.
• The storage time of food is dependent on the
type of oil used. Suitable oils are margarine,
calf fat, olive oil and butter. Unsuitable oils are
peanut oil and pig fat.
• Food in liquid form should be frozen in plastic
cups and other food should be frozen in
plastic folios or bags.
To avoid contamination of food, please respect
the following instructions:
• Opening the door for long periods can cause
a significant increase of the temperature in
the compartments of the appliance.
• Clean regularly surfaces that can come in
contact with food and accessible drainage
systems.
• Store raw meat and fish in suitable containers
in the refrigerator, so that it is not in contact
with or drip onto other food.
• Two-star frozen-food compartments are
suitable for storing pre-frozen food, storing or
making ice cream and making ice cubes.
• One-, two- and three-star compartments are
not suitable for the freezing of fresh food.
• If the refrigerating appliance is left empty for
long periods, switch off, defrost, clean, dry,
and leave the door open to prevent mould
developing within the appliance.
The water dispenser is available
Clean water tanks if they have not been used for
48 h; flush the water system connected to a water
supply if water has not been drawn for 5 days.
or online at www.bush-support.com If you still require further assistance, call one of our experts on 0345 257 7271.
Using your Combi Fridge-Freezer
23
Page 24

Using your Combi Fridge-Freezer
Getting the most from your appliance
Tips for Saving Energy
1. Install the appliance in a cool, well ventilated
room, but not in direct sunlight or near heat
sources (radiators, cooker, etc....).
2. Allow warm food and drinks to cool down
before placing in the appliance.
3. When thawing frozen food, place it in the
refrigerator compartment. The frozen food
will help to cool the refrigerator compartment
when it is thawing.
4. When placing liquids in the appliance they
must be covered.
5. When placing food and drinks, open the
appliance door as briefly as possible.
6. Keep closed the covers of any different
temperature compartments in the appliance
(crisper, chiller ...etc ).
7. Door seals should be kept clean and
undamaged.
Accessories
Ice Tray
• Fill the ice tray with water and place in the
freezer compartment.
• After the water has completely frozen, you
can twist the tray as shown below to remove
the ice cubes.
The Bottle Holder (In some models)
Use the bottle holder to prevent bottles from
slipping or falling over.
The Water Dispenser
Mounting the Water Tank
1. Place the water tank in the plastic holder on the
door, pitched in the direction of the arrow on
the diagram.
If you require any technical guidance or find that your product is not operating as intended, a simple solution can often be found in the Troubleshooting section of these instructions.
24
Using your Combi Fridge-Freezer
Page 25

Using your Combi Fridge-Freezer
Getting the most from your appliance
2. After you have mounted the water tank, push it
down to firmly secure it in the holder.
3. Add your drinks with the help of the water tank
top cover.
4. Release the side locking covers to detach the
water tank cover.
5. To serve your drinks, gently press the valve lever.
Filling the Water Tank
• Remove the top cover of the water tank.
• Fill the tank up with water.
• Mount the top cover back on the water tank.
Important: Do not use the water dispenser
for anything except water.
Important: If you leave water in the tank for a
long time, it will cause an odour. In this case,
clean the tank and keep using it.
Important: Clean the water tank before using
it for the first time.
Cleaning the Water Tank
• Lift the water tank.
• Remove the tank cover by releasing the side
locking covers.
• Clean the tank with warm water and
reassemble the pieces that you have
removed.
Stowing the Water Tank
• Install the water tank as shown.
• Make sure that the tap and the hole match
each other while installing.
• Water flow may not be as expected if the
tank has not been installed properly. Also
check that the gaskets have been assembled
properly.
Drip Tray
Please pay attention in order not to go down min
level on the tank surface. During the usage of
dispenser the water can be splash after min water
level.
Please hold the glass momentarily after
distribution to avoid drips.
or online at www.bush-support.com If you still require further assistance, call one of our experts on 0345 257 7271.
Visual and text descriptions in
the accessories section may
vary according to the model of
your appliance.
Using your Combi Fridge-Freezer
25
Page 26

If you require any technical guidance or find that your product is not operating as intended, a simple solution can often be found in the Troubleshooting section of these instructions.
26
Page 27

Care and Maintenance
6
Page 28

Care and maintenance
Looking after your appliance
Cleaning and Maintenance
Disconnect the unit from the power supply
before cleaning.
Do not wash your appliance by pouring water
on it.
Do not use abrasive products, detergents or
soaps for cleaning the appliance. After
washing, rinse with clean water and dry carefully.
When you have finished cleaning, reconnect the
plug to the mains supply with dry hands.
• Make sure that no water enters the lamp
housing and other electrical components.
• The appliance should be cleaned regularly
using a solution of bicarbonate of soda and
lukewarm water.
• Clean the accessories separately by hand with
soap and water. Do not wash accessories in a
dish washer.
• Clean the condenser with a brush at least
twice a year. This will help you to save on
energy costs and increase productivity.
The power supply must be disconnected
during cleaning.
Defrosting
• Your appliance performs automatic
defrosting. The water formed as a result
of defrosting passes through the water
collection spout, flows into the vaporisation
container behind your appliance and
evaporates there.
• Make sure you have disconnected the
plug of your appliance before cleaning the
vaporisation container.
• Remove the vaporisation container from its
position by removing the screws as indicated.
Clean it with soapy water at specific time
intervals. This will prevent odours from
forming.
Replacing the Light Bulb
Important note: Unplug the unit from the
power supply before start the process.
2
1
4
1. Press the hooks on light cover. (Fig. 1)
2. Open the light cover towards arrow when top
hooks pull out from housing. (Fig. 2)
3. Pull out the cover towards arrow remove it. (Fig.
3)
4. Turn the light bulb counter clockwise and
remove it. (Fig. 4)
5. Change the present light bulb with a new one of
not more than 15 W. (Fig. 4)
6. Implement the steps in reverse order.
7. After waiting 5 minutes, plug the unit.
Replacing LED Lighting
If your fridge has LED lighting contact the Bush
helpline as this should be changed by
authorized personnel only.
3
If you require any technical guidance or find that your product is not operating as intended, a simple solution can often be found in the Troubleshooting section of these instructions.
28
Care and maintenance
Page 29

Care and maintenance
Looking after your appliance
Technical specification
Supplier’s name or trademark
Model / Item 54180BX / 54180SX / 54180WX
Type of appliance GST/N287M
Energy efficiency class A+
Voltage 220-240V / 50 Hz
Energy consumption 0.723 kWh/24h - 264 kWh/year
Net storage volume of fresh food 202 lt.
Net storage volume of frozen food 70 lt.
Star rating of frozen food storage compartment 4 (****)
Power cut failure safe storage 11 hours (25°C)
Freezing capacity 3,5 Kg
Climate class ST/N (16°C - 38°C)
Size (mm) (W x D x H) 540 x 595 x 1800
Noise 42 dB (A)
We apologise for any inconvenience caused
by minor change or inconsistencies in these
instructions that may occur as a result of product
improvements and development.
or online at www.bush-support.com If you still require further assistance, call one of our experts on 0345 257 7271.
Care and maintenance
29
Page 30

If you require any technical guidance or find that your product is not operating as intended, a simple solution can often be found in the Troubleshooting section of these instructions.
30
Page 31

Product Support
7
Page 32

Product support
Help is always at hand
Before Calling After-Sales Service
If you are experiencing a problem with your
refrigerator, please check the following before
contacing the after-sales service.
Your refrigerator does not operate
Check if:
• Your fridge is plugged in and switched on
• The fuse has blown
• The thermostat setting is on position '1'
• The socket is faulty. To check this, plug
another working appliance into the same
socket.
Your refrigerator is performing poorly
Check if:
• The appliance is overloaded
• The doors are closed properly
• There isany dust on the condenser
• There is an adequate distance between the
appliance and surrounding walls
Your refrigerator is operating noisily
The following noises can be heard during normal
operation of the appliance.
Cracking (ice cracking) noise occurs:
• During automatic defrosting.
• When the appliance is cooled or warmed
(due to expansion of appliance material).
Clicking noise occurs: When the thermostat
switches the compressor on/off.
Motor noise: Indicates the compressor is
operating normally. The compressor may
cause more noise for a short time when it is first
activated.
Bubbling noise and splashing occurs: Due to
the flow of the refrigerant in the tubes of the
system.
Water flowing noise occurs: Due to water
flowing to the evaporation container. This noise
is normal during defrosting.
Air blowing noise occurs: During normal
operation of the system due to the circulation
of air.
There is a build-up of humidity inside the fridge
Check if:
• All food is packed properly. Containers must
be dry before being placed in the fridge.
• The fridge doors are opened frequently.
Humidity of the room will enter the fridge
each time the doors are opened. Humidity
increases faster if the doors are opened
frequently, especially if the humidity of the
room is high.
• There is a build-up of water droplets on
the rear wall. This is normal after automatic
defrosting (in Static Models).
The doors are not opening or closing properly
Check if:
• There is food or packaging preventing the
door from closing
• The door compartments, shelves and drawers
are placed properly
• The door gaskets are broken or torn
• Your fridge is level.
The edges of the fridge in contact with the door
joint are warm
Especially during summer (warm weather),
the surfaces in contact with the door joint
may become warmer during operation of the
compressor. This is normal.
About the water dispenser;
If the water flow is abnormal;
Check that;
• The tank is well installed.
• The tank gaskets are well assembled.
If dripping occurs;
Check that;
• The tap is well assembled.
• The tap gaskets are well assembled.
If you require any technical guidance or find that your product is not operating as intended, a simple solution can often be found in the Troubleshooting section of these instructions.
32
Product support
Page 33

Product support
Help is always at hand
Important Notes:
• In the case of a power failure, or if the
appliance is unplugged and plugged in
again, the gas in the cooling system of your
refrigerator will destabilise, causing the
compressor protective thermal element to
open. Your refrigerator will start to operate
normally after 5 minutes.
• If the appliance will not be used for a long
period of time (such as during holidays),
disconnect the plug. Defrost and clean the
refrigerator, leaving the door open to prevent
the formation of mildew and odour.
• If the problem persists after you have followed
all the instructions above, please consult the
nearest Authorised Service Centre.
• This appliance is designed for domestic use
and for the stated purposes only. It is not
suitable for commercial or common use. If
the consumer uses the appliance in a way
that does not comply with these instructions,
we emphasise that the manufacturer and the
dealer will not be responsible for any repair or
failure within the guarantee period.
Tips for Savıng Energy
1. Install the appliance in a cool, well-ventilated
room, but not in direct sunlight and not near
a heat source (such as a radiator or oven)
otherwise an insulating plate should be used.
2. Allow warm food and drinks to cool before
placing them inside the appliance.
3. Place thawing food in the refrigerator
compartment. The low temperature of the
frozen food will help cool the refrigerator
compartment while the food is thawing. This will
save energy. Frozen food left to thaw outside of
the appliance will result in a waste of energy.
4. Drinks or other liquides should be covered
when inside the appliance. If left uncovered,
the humidity inside the appliance will increase,
therefore the appliance uses more energy.
Keeping drinks and other liquids covered helps
preserve their smell and taste.
5. Avoid keeping the doors open for long periods
and opening the doors too frequently as warm
air will enter the appliance and cause the
compressor to switch on unnecessarily often.
6. Keep the covers of the different temperature
compartments ( such as the crisper and chiller)
closed.
7. The door gasket must be clean and pliable.
Replace gaskets if worn.
8. Energy consumption of your appliance is
declared without drawers and fully loaded in
freezer compartmant.
9. For saving energy, do not use volume between
the load limit and the door, along the load
limit line. Load limit line is also used in energy
consumption declaration.
or online at www.bush-support.com If you still require further assistance, call one of our experts on 0345 257 7271.
Product support
33
Page 34

Product support
Help is always at hand
Help and assistance
If you require any technical guidance or find that your Combi Fridge-Freezer is not operating as
intended, a simple solution can often be found in the Troubleshooting section of these instructions or
online at www.bush-support.com
If you still require further assistance, call one of our experts on 0345 257 7271*. To help give us give you
a fast and efficient service please have the following information ready:
Model Ref.
Serial number
Date of purchase
Local call rates applies*
You can find these
on the rating plate - a
small information panel
(usually a sticker or
metal plate) on the rear
of your appliance
This will be shown on
your receipt
Lines open 8am-7pm Monday to Saturday and 10am-4pm Sunday.
*Calls to Argos enquiry lines may attract a charge and set up fee from residential lines depending on your
call plan/tariff . Mobile and other providers costs may vary, see www.bt.com/pricing for details.
For Security and training purposes, telephone calls to and from customer service centres maybe
recorded and monitored. Calls from Republic of Ireland will attract international call charges.
If you require any technical guidance or find that your product is not operating as intended, a simple solution can often be found in the Troubleshooting section of these instructions.
34
Product support
Page 35

Product support
Help is always at hand
Disposal
• The symbol on the product or on
its packaging indicates that this
product may not be treated as
household waste. Instead it shall
be handed over to the applicable
collection point for the recycling of
electrical and electronic equipment.
• By ensuring this product is disposed
of correctly, you will help prevent
potential negative consequences
for the environment and human
health, which could otherwise be
caused by inappropriate waste
handling of this product.
• For more detailed information
about recycling of this product,
please contact your local city office,
your household waste disposal
service or the shop where you
purchased the product.
If you are creating instructions, you
may find the following links helpful:
www.environmentlaw.org.uk
or online at www.bush-support.com If you still require further assistance, call one of our experts on 0345 257 7271.
Product support
35
Page 36

Product support
Help is always at hand
Call us now and activate your 12 month guarantee
Thank you for choosing Bush. Your new product is guaranteed against faults and
breakdowns for 12 months. Don’t forget to register it with us today so we can provide
you with our best possible after-sales service and useful updates.
www.bushregistration.co.uk
FREEPHONE*
0800 597 8548
Lines are open 8am - 8pm, 365 days a year. *Calls may be recorded and monitored.
Your Bush Guarantee
This product is guaranteed for twelve months from the date of original purchase. Any defect that arises
due to faulty materials or workmanship will be repaired free of charge (or if applicable the product will be
replaced or the purchase price refunded) where possible during this period by the dealer from who your
purchased the unit.
The guarantee is subject to the following provisions:
• The guarantee does not cover accidental
damage, misuse, cabinet parts, knobs or
consumable items.
• The product must be correctly installed and
operated in accordance with the instructions
contained in the manual.
• It must be used solely for domestic purposes.
The guarantee will be rendered invalid if the
product is re-sold or has been damaged by
inexpert repair.
• Specifications are subject to change without
notice.
• Bush disclaim any liability for loss or damage
arising from the breakdown of the product.
• This guarantee is in addition to and does not
diminish your statutory or legal rights.
Important Data Protection Information
If you provide us with information about another
person, you confirm that they have appointed you
to act for them, to consent to the processing of
their personal data including sensitive personal
data and that you have informed them of our
identity and the purposes (as set out in the
Important Data Privacy notice displayed overleaf)
for which their personal data will be processed.
You are entitled to ask for a copy of the
information we hold about you (for which we may
charge a small fee) and to have any inaccuracies in
your information corrected.
For quality control and training purposes, we may
monitor or record your communications with us.
If your personal details change, if you change your
mind about any of your marketing preferences or
if you have any queries about how we use your
information, please let us know by contacting
our Data Protection Officer, Domestic & General,
Leicester House 17 Leicester Street, Bedworth,
Warwickshire CV12 8JP.
Guarantor: Argos Limited - 489 - 499 Avebury Blvd. - Milton Keynes - MK9 2NW
If you require any technical guidance or find that your product is not operating as intended, a simple solution can often be found in the Troubleshooting section of these instructions.
36
Product support
Page 37

Product support
Help is always at hand
Call us now and activate your 12 month guarantee
Thank you for choosing Bush. Your new product is guaranteed against faults and
breakdowns for 12 months. Don’t forget to register it with us today so we can provide
you with our best possible after-sales service and useful updates.
www.bushregistration.co.uk
FREEPHONE*
0800 597 8548
Lines are open 8am - 8pm, 365 days a year. *Calls may be recorded and monitored
Your Bush Guarantee
This product is guaranteed for twelve months from the date of original purchase. Any defect that arises
due to faulty materials or workmanship will be repaired free of charge (or if applicable the product will be
replaced or the purchase price refunded) where possible during this period by the dealer from who your
purchased the unit.
The guarantee is subject to the following provisions:
• The guarantee does not cover accidental
damage, misuse, cabinet parts, knobs or
consumable items.
• The product must be correctly installed and
operated in accordance with the instructions
contained in the manual.
• It must be used solely for domestic purposes.
The guarantee will be rendered invalid if the
product is re-sold or has been damaged by
inexpert repair.
• Specifications are subject to change without
notice.
• Bush disclaim any liability for loss or damage
arising from the breakdown of the product.
• This guarantee is in addition to and does not
diminish your statutory or legal rights.
Important Data Protection Information
To find out how we and Domestic & General Insurance Plc use your data please refer to the guarantee
registration material or visit www.bushregistrations.co.uk.
Guarantor: Argos Limited - 489 - 499 Avebury Blvd. - Milton Keynes - MK9 2NW
or online at www.bush-support.com If you still require further assistance, call one of our experts on 0345 257 7271.
Product support
37
Page 38

If you require any technical guidance or find that your product is not operating as intended, a simple solution can often be found in the Troubleshooting section of these instructions.
38
Page 39

or online at www.bush-support.com If you still require further assistance, call one of our experts on 0345 257 7271.
39
Page 40

Contact:
www.bush-support.com
Helpline: 0345 257 7271
52282419
 Loading...