

Page 1
DVD142TV
14" DVD/TV COMBI
WITH REMOTE CONTROL
Page 2

14" DVD/TV Combi with Remote Control
Introduction
Thank you for buying this DVD142TV 14" DVD/TV Combi
which is designed to give you many years of trouble-free
service.
You may already be familiar with using a television and DVD
but do please take time to read these instructions. They are
designed to familiarise you with the unit’s many new features
and to ensure you get the very best out of your purchase.
Safety is Important
Your safety and the safety of others is important. Please,
therefore, ensure you read the Safety instructions on page 4
before you operate this DVD142TV 14" DVD/TV Combi.
NOTE: This 14" DVD/TV Combi is referred to
throughout this user guide as DVD/TV.
2 Customer Helpline: 0870 873 0079
Page 3

Contents
DVD142TV
Introduction ........................................................................ 2
Safety is Important............................................................. 2
Safety Precautions............................................................. 4
Laser Safety........................................................................ 5
Electrical Information ........................................................ 6
Wiring Instructions.......................................................... 6
Getting Started ................................................................... 7
Compatible Discs ........................................................... 7
Quick Setup ........................................................................ 8
Connecting External Equipment..................................... 11
Switching On .................................................................... 12
The Remote Control ..................................................... 12
Mains Power................................................................. 12
Identification of Controls................................................. 13
Setting Up the TV ............................................................. 17
Menu Navigation .......................................................... 17
Autostore ...................................................................... 18
Using the TV ..................................................................... 19
TV Controls .................................................................. 19
Previous Programme.................................................... 20
Input Source Selection ................................................. 20
Using Teletext .................................................................. 21
On-screen Menus............................................................. 24
Sound Menu ................................................................. 24
Picture Menu ................................................................ 26
Feature Menu ............................................................... 28
Install Menu .................................................................. 30
Program Menu.............................................................. 33
Using the DVD .................................................................. 36
Playing Discs.................................................................36
Zoom.............................................................................39
Subtitle ..........................................................................40
Audio.............................................................................40
Angle.............................................................................40
Search...........................................................................41
Display ..........................................................................43
Time Information ...........................................................43
Title ...............................................................................44
Menu .............................................................................44
The DVD On-Screen Menus .............................................45
Video Setup Menu ........................................................45
Language Setup Menu..................................................47
Preference Setup Menu ................................................49
Troubleshooting ...............................................................53
Care and Maintenance......................................................55
Handling Discs ..............................................................55
Cleaning........................................................................55
How Do I Dispose of this Product? ...............................55
Technical Specification....................................................56
Guarantee ..........................................................................57
www.bush-radio.co.uk 3
Page 4

14" DVD/TV Combi with Remote Control
Safety Precautions
Please read all the safety information before use.
Safety Considerations
• Position the power supply lead so that it cannot be
walked on or pinched by items placed on or against it.
• Do not use the DVD/TV in humid or damp conditions.
• Do not allow the DVD/TV to get wet.
• Do not expose the DVD/TV to splashing or dripping.
• Do not expose the DVD/TV to naked flames.
Power Source
You should only plug the DVD/TV into a 220V to 240V AC,
50/60Hz supply.
High Voltage
• Do not remove the rear cover as high voltage
components are accessible.
• Disconnect the DVD/TV from the power supply when the
DVD/TV is not to be used for a prolonged period of time.
Cleaning
• Disconnect the DVD/TV from the power supply before
you clean it.
Ventilation
• The slots and openings on the DVD/TV are for
ventilation. Do not cover or block them as it may cause
overheating.
• NEVER let children push anything into the holes or slots
on the case.
Servicing
• There are no user serviceable parts in this DVD/TV.
• When servicing, refer to qualified service personnel.
• Consult your dealer if you are ever in doubt about the
installation, operation or safety of this DVD/TV.
• Do not use liquid or aerosol cleaners.
• Clean your DVD/TV with a soft, damp (not wet) cloth.
4 Customer Helpline: 0870 873 0079
Page 5
Laser Safety
WARNING: THIS DVD/TV USES A CLASS 1
LASER. ONLY QUALIFIED SERVICE
PERSONNEL SHOULD ATTEMPT REPAIR.
Exposure to the laser beam can damage your eyesight.
Under normal working conditions the DVD/TV is safe. If,
however, the DVD/TV drawer interlock is broken or defeated
in some way or if the enclosure is removed, there is a danger
of invisible laser radiation. In these circumstances avoid
direct exposure to the beam and return the DVD/TV for repair
by qualified personnel.
DVD142TV
www.bush-radio.co.uk 5
Page 6
14" DVD/TV Combi with Remote Control
Electrical Information
This appliance is fitted with a BS1363/A 13 amp plug. If it is
not suitable for your supply sockets it must be removed and
replaced with an appropriate plug. If the plug becomes
damaged and/or needs to be replaced please follow the
wiring instructions below. The plug removed must be
disposed of immediately. It must not be plugged into a supply
socket as this will be an electrical hazard.
If the fuse needs to be replaced it must be of the same rating
and ASTA approved to BS1362. If the plug is changed, a fuse
of the appropriate rating must be fitted in the plug, adapter or
at the distribution board. If the fuse in a moulded plug is
replaced, the fuse cover must be refitted before the appliance
can be used.
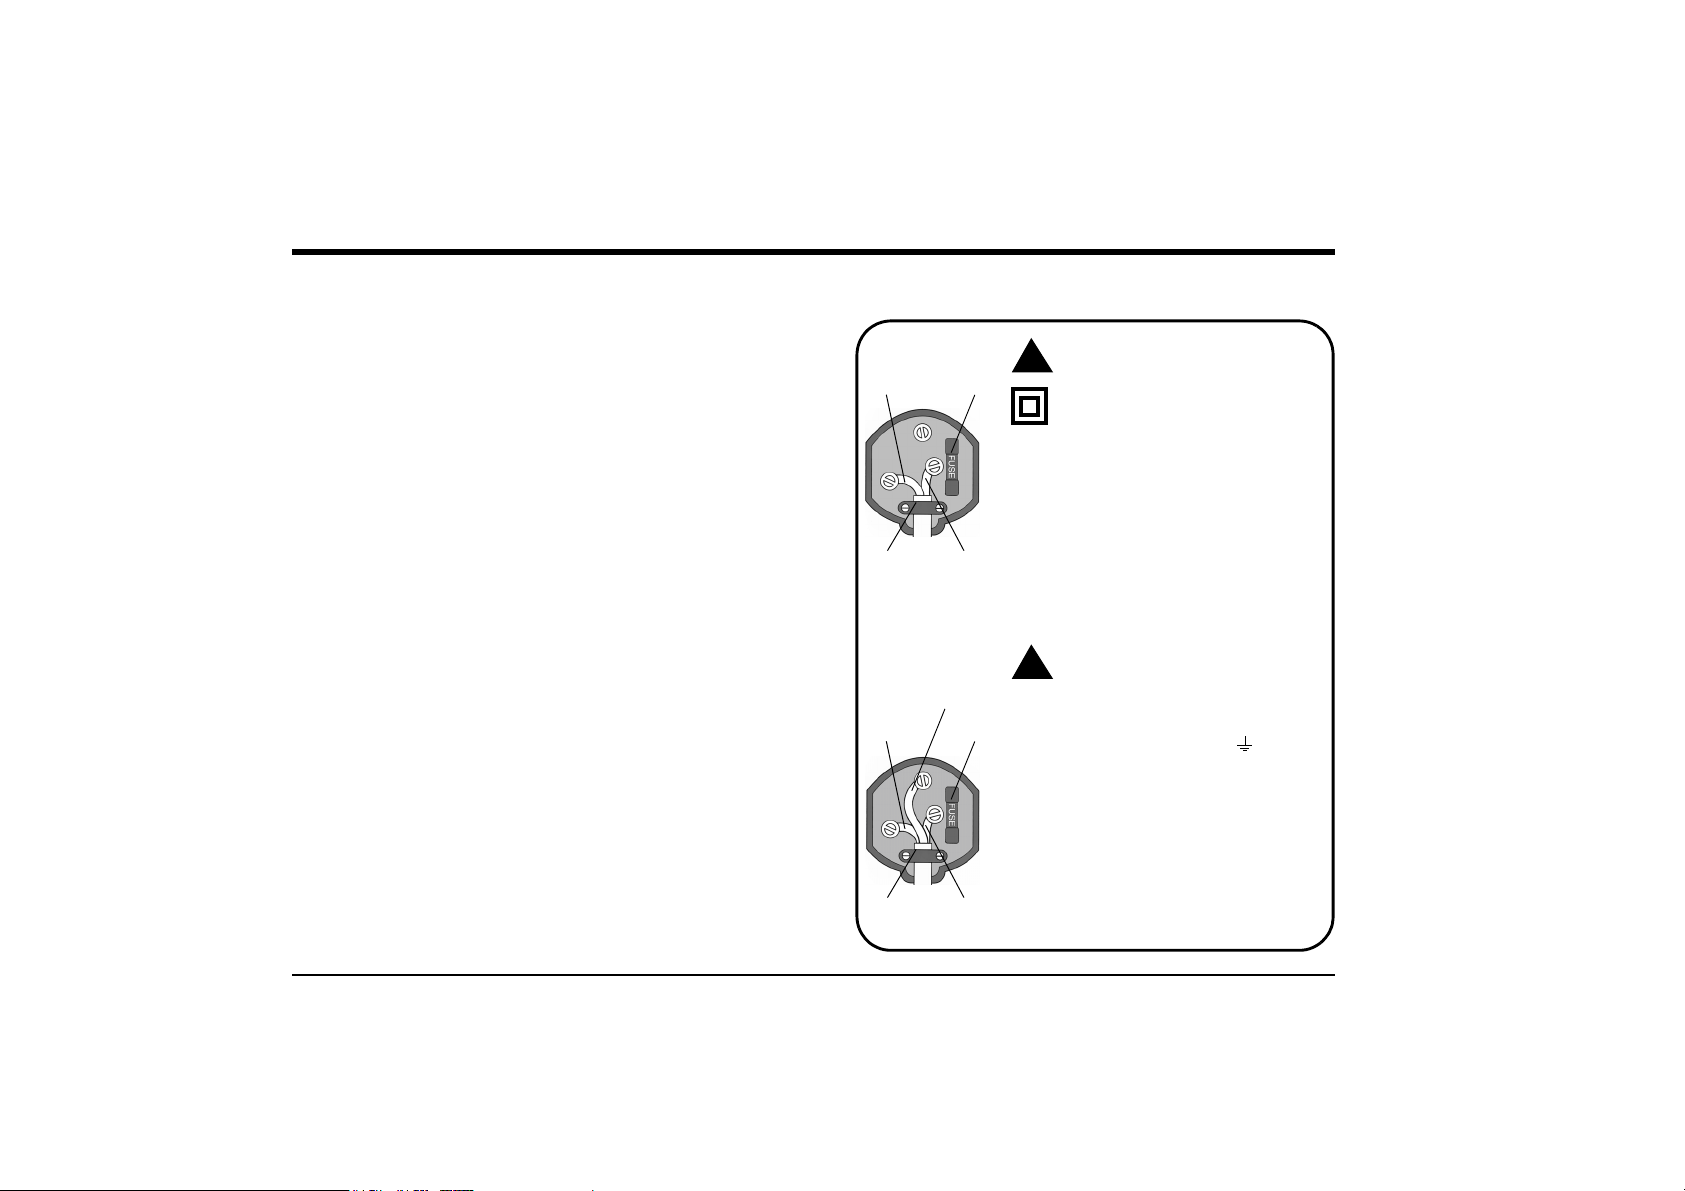
Wiring Instructions
The supply cable will be either 2-core or 3-core. Follow
the appropriate wiring instructions given opposite. In
both cases ensure that the outer sheath of the cable is
firmly held by the cable clamp
.
2 - CORE
BLUE
(Neutral)
Cable
clamp
BROWN
(Live)
3 - CORE
GREEN and
YELLOW
(Earth)
BLUE
(Neutral)
Cable
clamp
BROWN
(Live)
WARNING! Do not connect either
!
Fuse
Fuse
wire to the earth terminal.
This symbol indicates that this 2-core
appliance is Class ll and does not
require an earth connection.
The wire coloured blue must be connected to
the terminal marked with the letter N or
coloured black.
The wire coloured brown must be connected
to the terminal marked with the letter L or
coloured red.
WARNING! This appliance must be
!
earthed.
The wire coloured green and yellow must be
connected to the terminal marked with the
letter E, or by the earth symbol, , or
coloured green or green and yellow.
The wire coloured blue must be connected to
the terminal marked with the letter N or
coloured black.
The wire coloured brown must be connected
to the terminal marked with the letter L or
coloured red.
6 Customer Helpline: 0870 873 0079
Page 7
Getting Started
DVD142TV
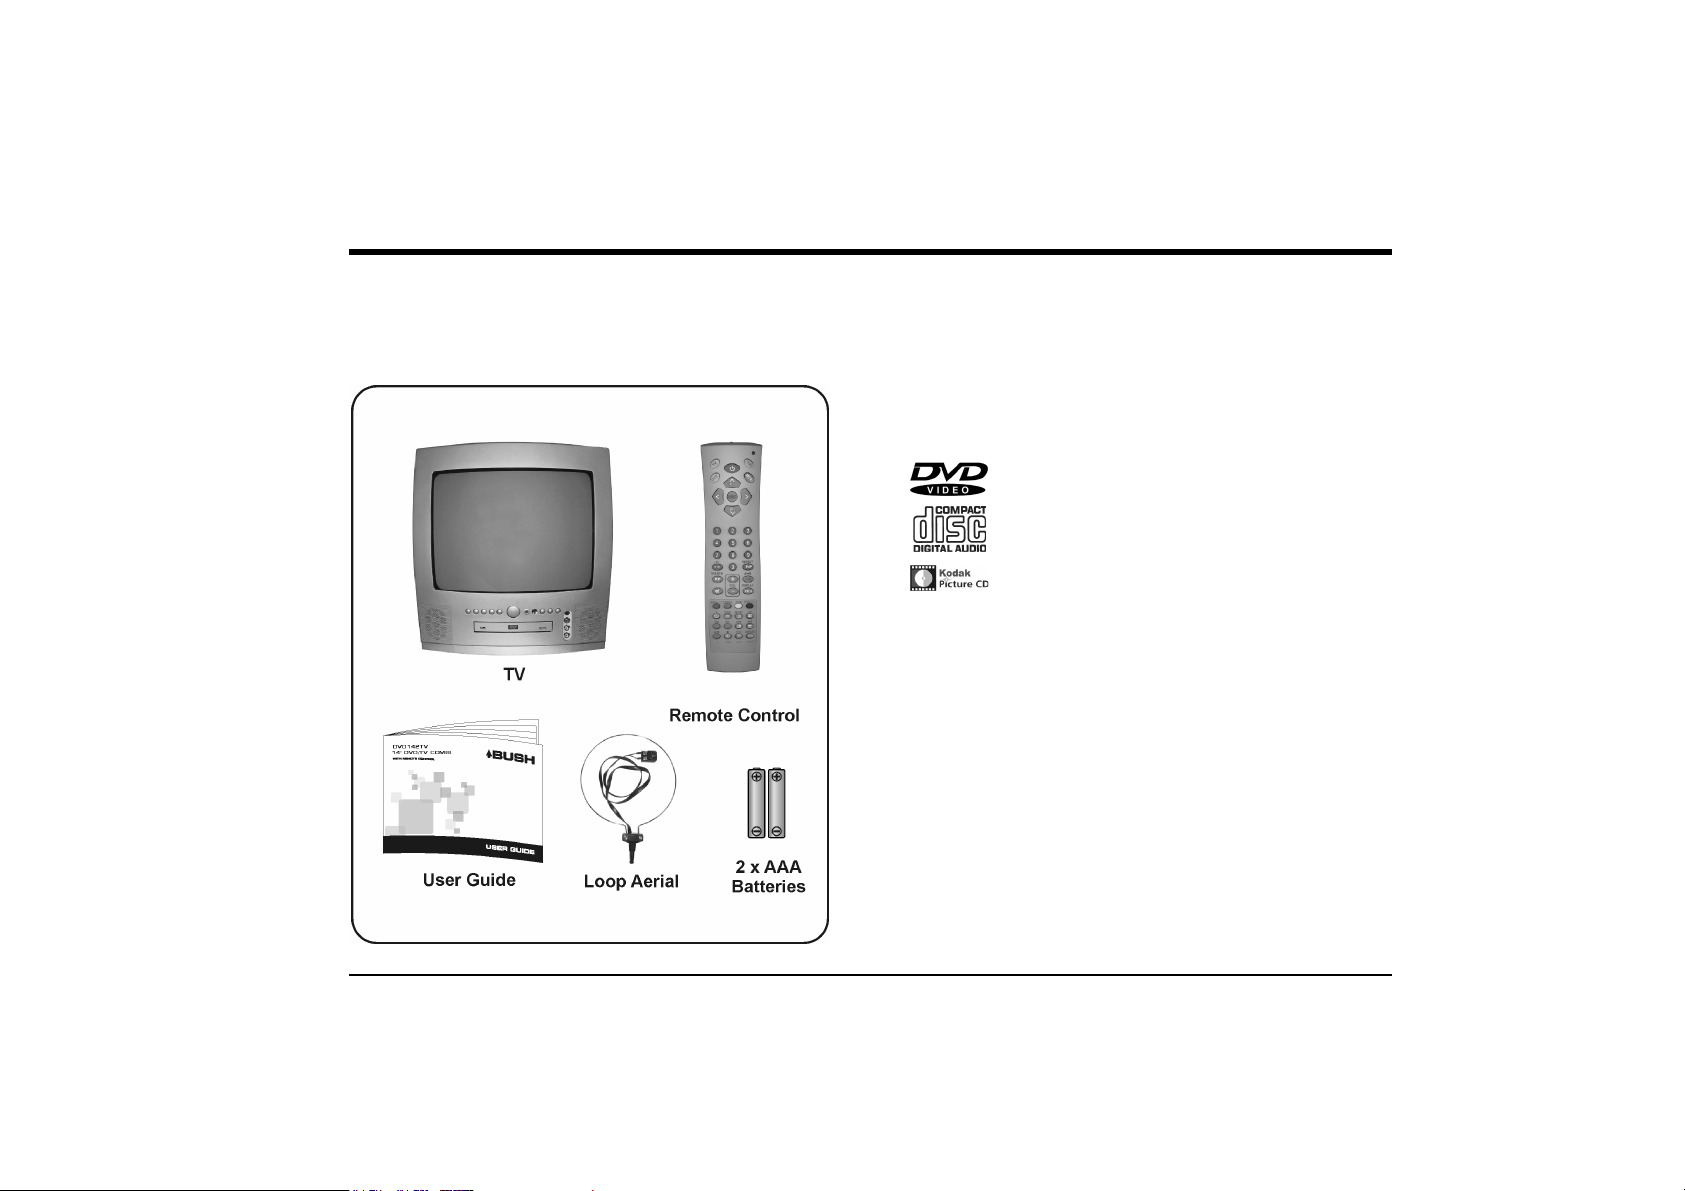
Remove your DVD/TV carefully from the box. You may wish
to store the packaging for future use.
If any items are missing, please contact Product Support
Telephone: 0870 873 0079
Internet: www.bush-radio.co.uk
Compatible Discs
8cm/12cm DVD Video Discs.
8cm/12cm Compact Disc Audio Discs.
8cm/12cm Photo Compact Discs including JPEG
and Kodak picture CDs.
www.bush-radio.co.uk 7
Page 8
14" DVD/TV Combi with Remote Control
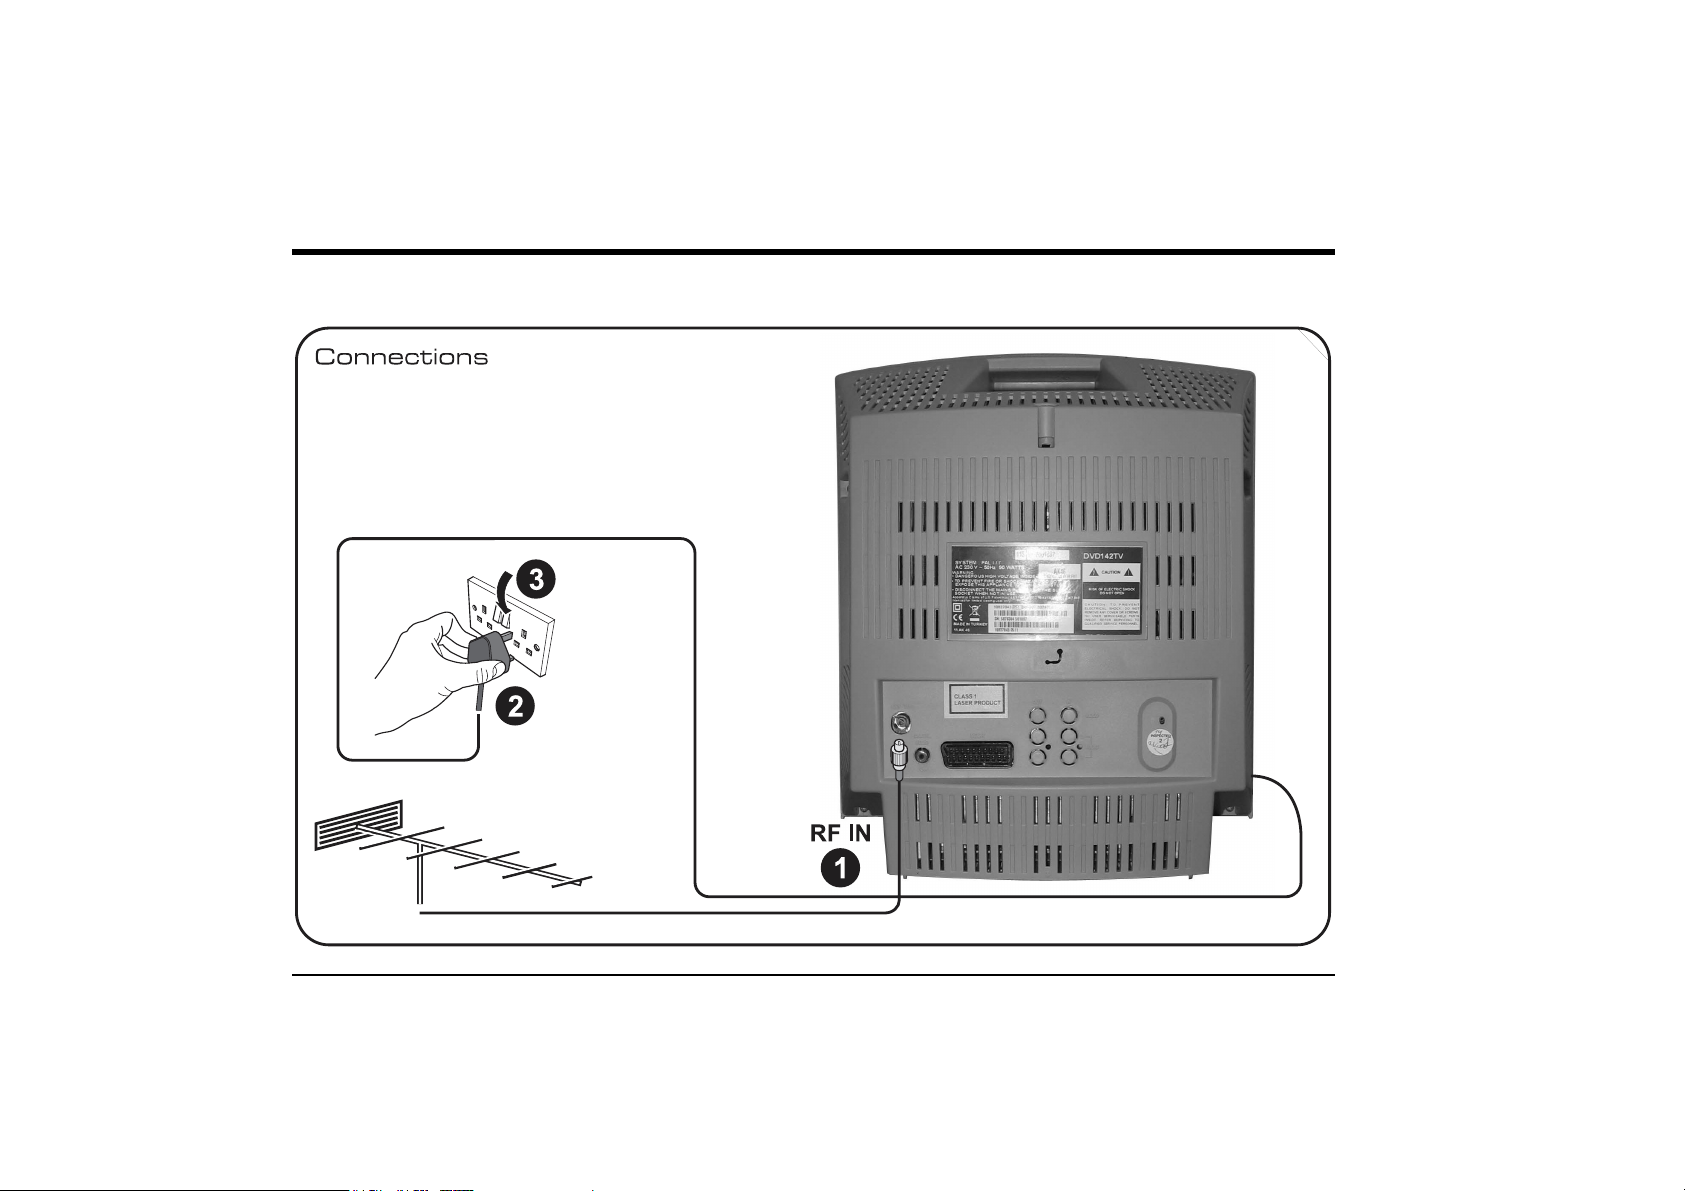
Quick Setup
8 Customer Helpline: 0870 873 0079
Page 9
DVD142TV
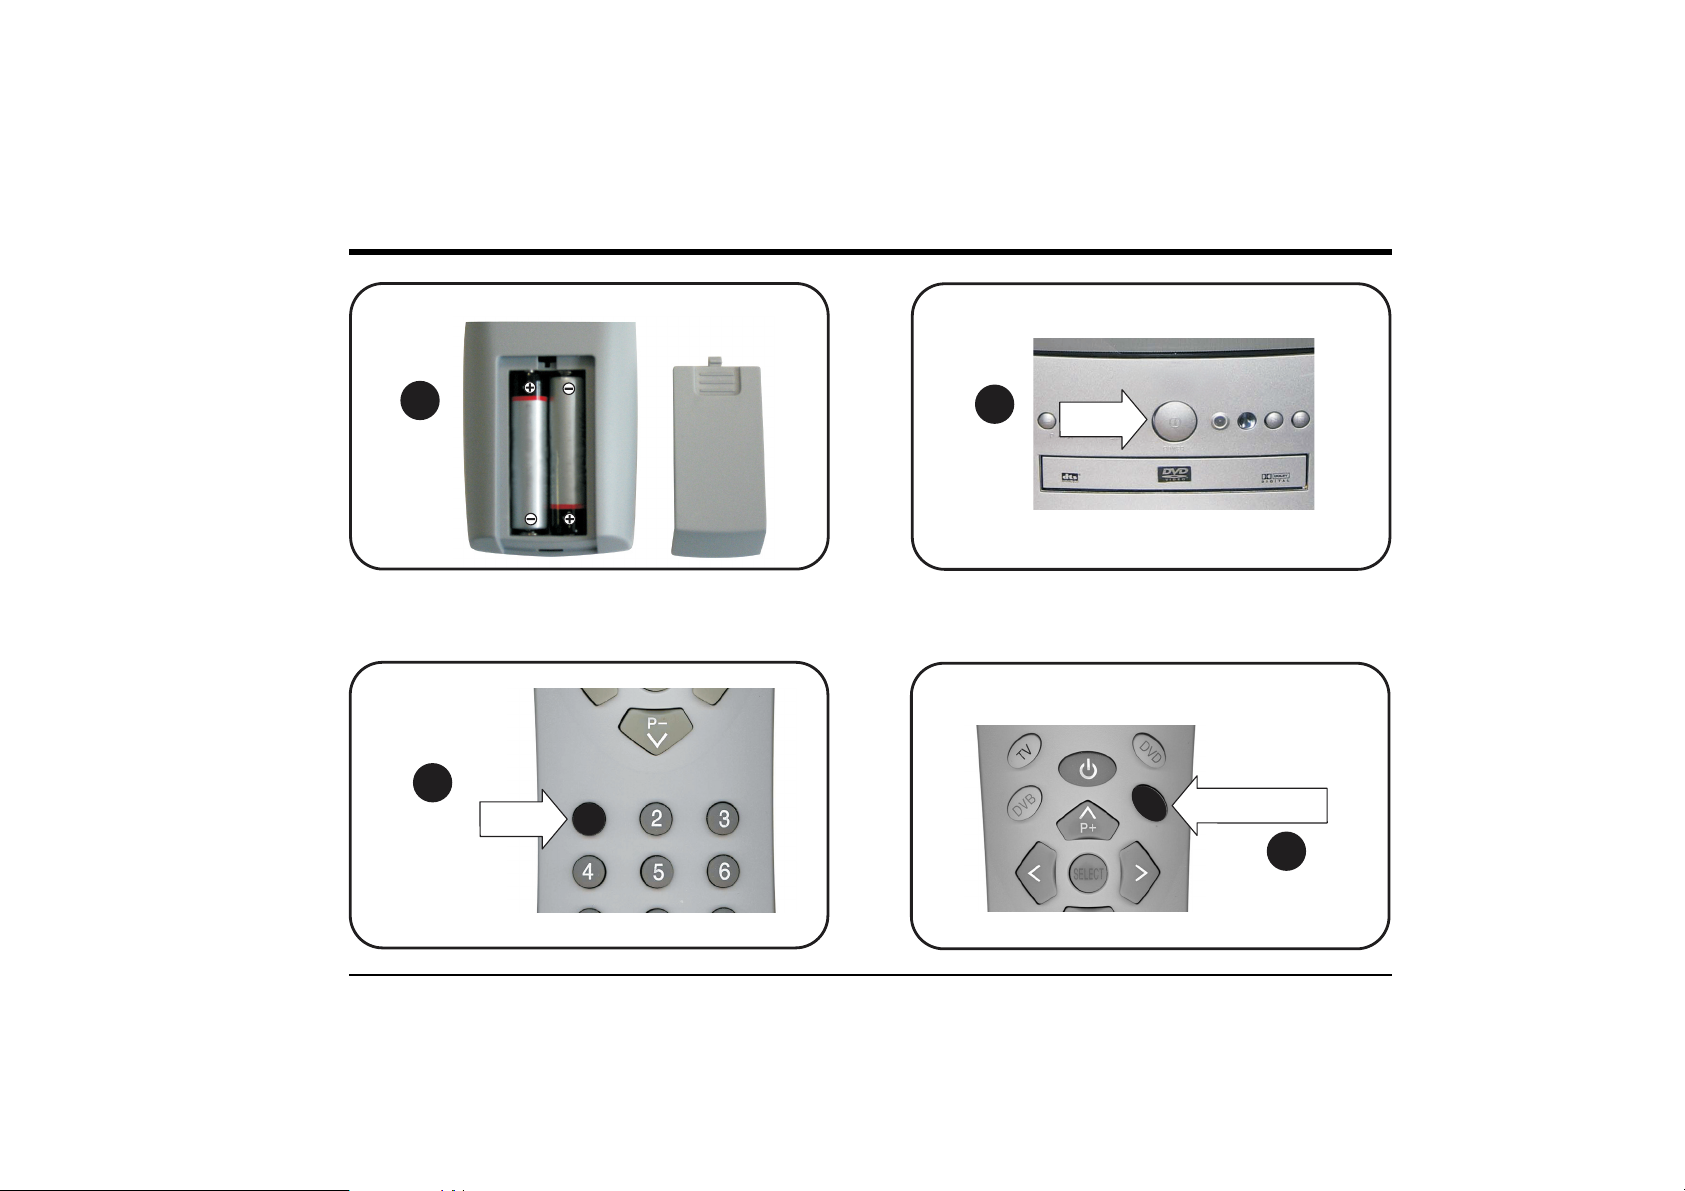
Insert remote control batteries
4
Turn on
6
Press
1
Turn on
5
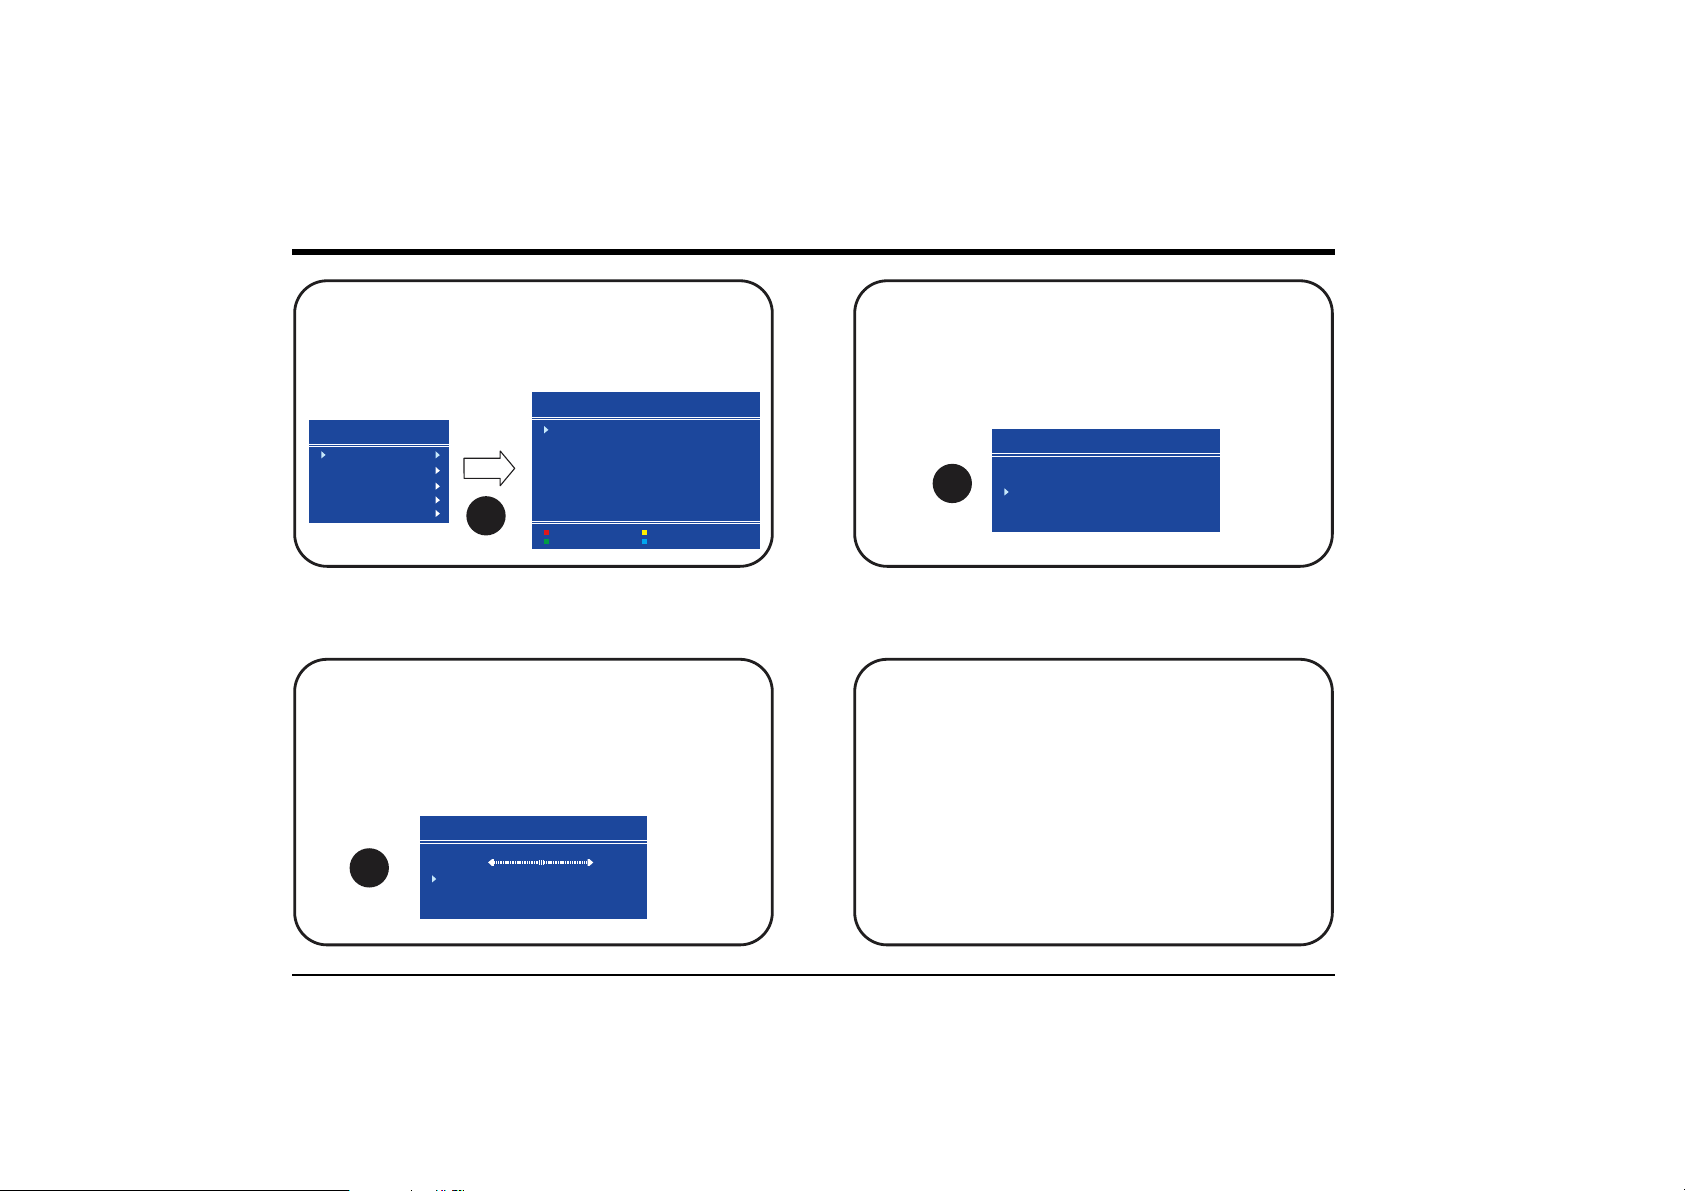
Open TV menu for autostore
Press
MENU
MENU
MENU
Press Menu
7
www.bush-radio.co.uk 9
Page 10
14" DVD/TV Combi with Remote Control
Auto Store
Use the or buttons to select .
Press the button to open the program
menu.
MENU
SOUND
PICTURE
FEATURE
INSTALL.
PROGRAM.
UP DOWN PROGRAM
RIGHT ARROW
PROGRAM.
8
01
02
03
04
05
06
07
08
09
10
NAME
INSERT
BBC1
BBC2
ITV
CH 4
CH 5
ITV
PR11
BBC1
CH 4
PR11
11
12
13
14
15
16
17
18
19
20
------
------
------
------
------
------
------
------
------
------
DELETE
AUTOSTORE
21
------
22
------
23
------
24
------
25
------
26
------
27
------
28
------
29
------
30
------
Auto Store
Use the or arrow buttons to select
Start.
Press the button to begin the
auto store process.
UP DOWN
RIGHT ARROW
10
A. P. S.
A. P.S. IS RUNNING
P 01 VHF1
CANCEL
Auto Store
Press the button to Access the menu.
Use the or arrow buttons to select
your country.
Once the is complete,the
PROGRAM
To rename and edit the saved channels, please refer
to the instructions on page 33. Alternatively press the
MENU
BLUE A.P.S.
LEFT RIGHT
A. P. S.
PLEASE CHECK ANTENNA CABLE
9
AUTO. PROGRAMMING SYSTEM
COUNTRY UK
STANDARD I
START
AUTO STORE PROCESS
menu is displayed.
button twice to begin watching TV.
10 Customer Helpline: 0870 873 0079
Page 11
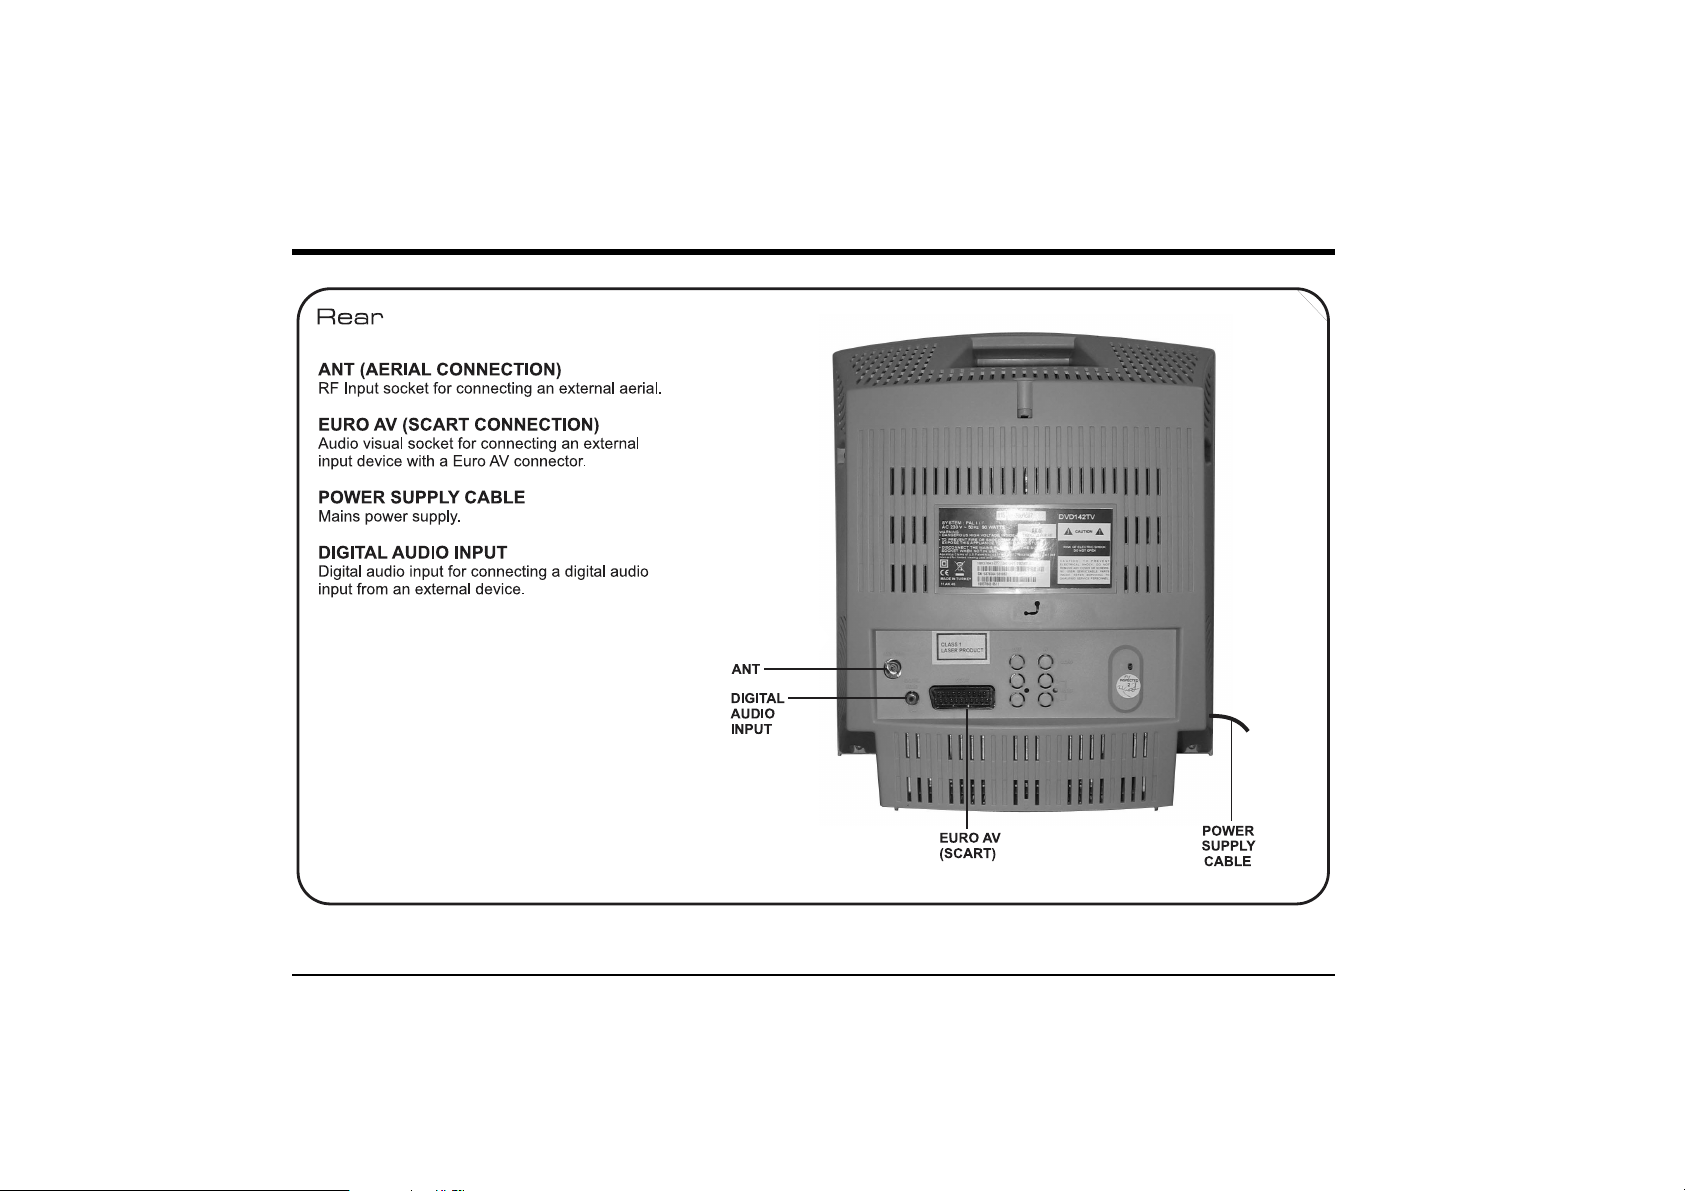
Connecting External Equipment
DVD142TV
You can connect a wide range of audio and video equipment
to your DVD/TV.
NOTE: Refer to the manufacturer’s guide for
further instructions on how to connect the
equipment.
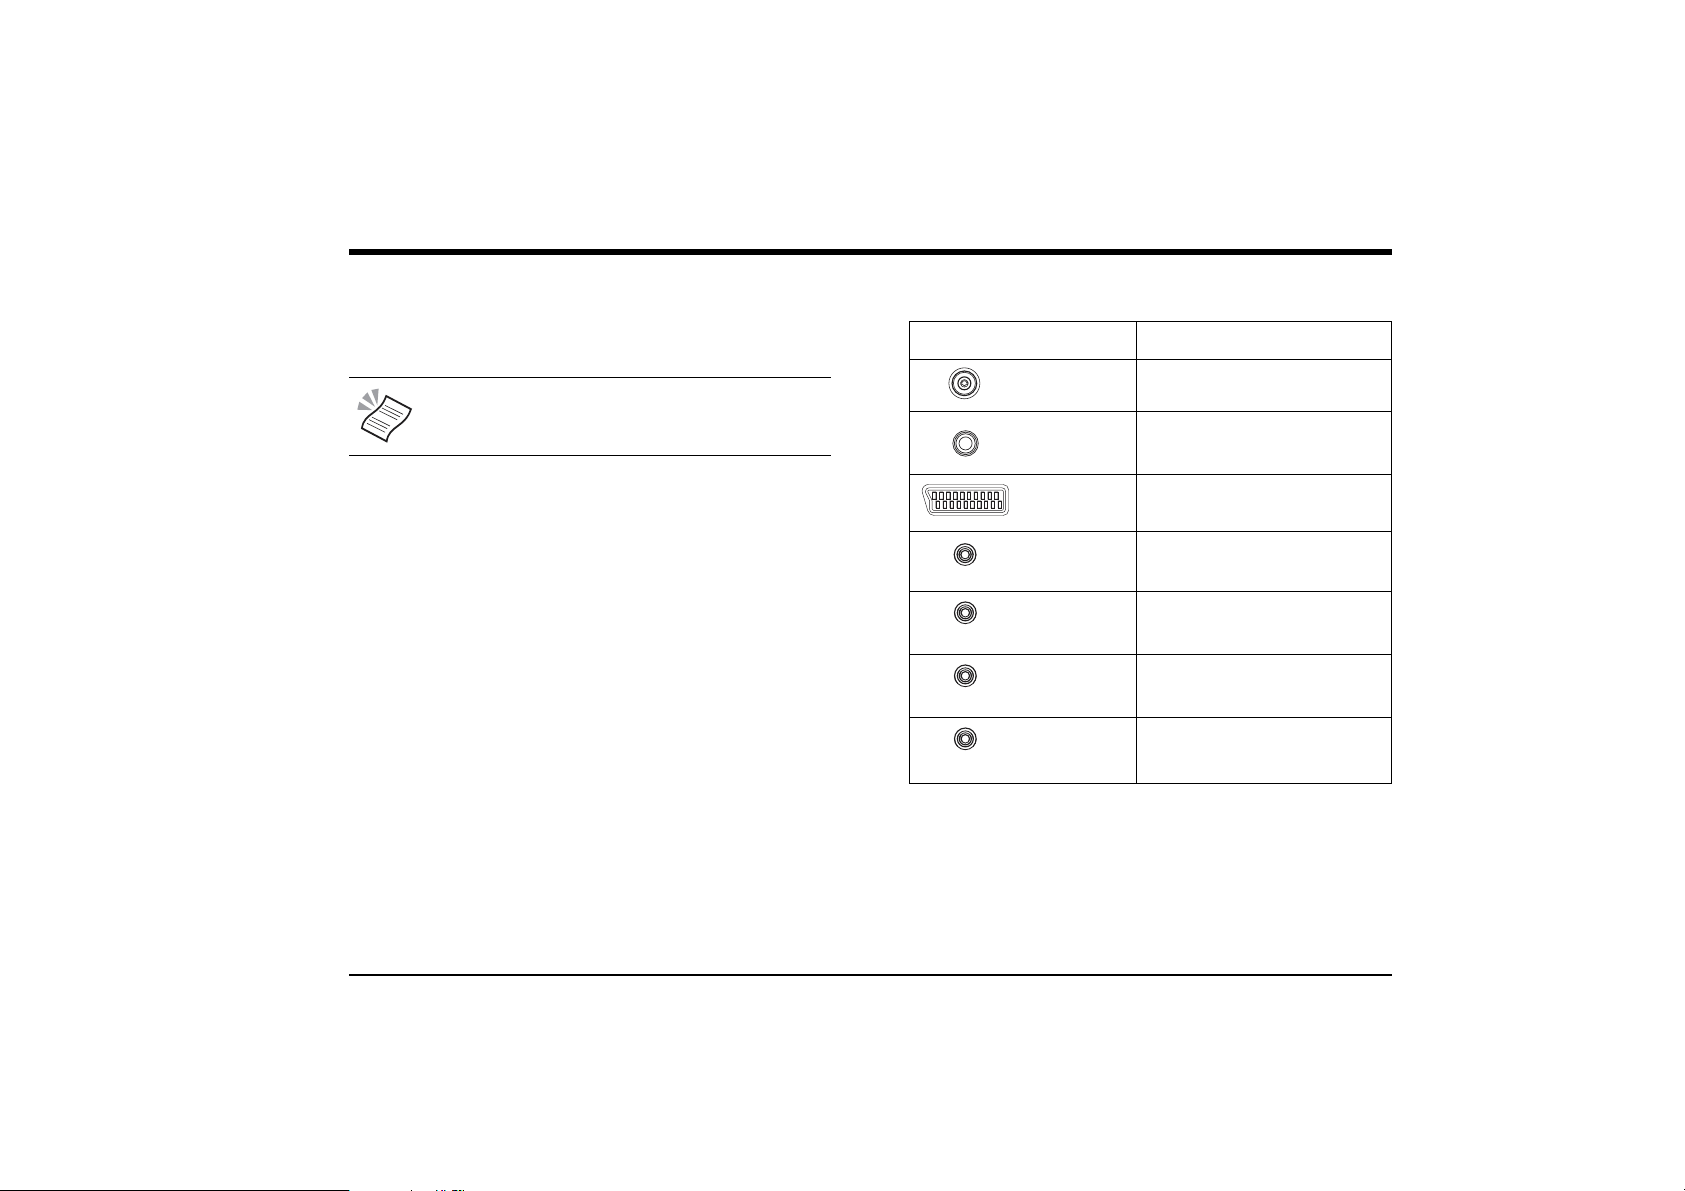
The following table lists a range of the available connectors
on the DVD/TV.
Connector Purpose
ANT Receives TV signals from an
external aerial.
Headphone Transmits audio signals to a
set of personal headphones.
(Yellow)
(White)
(Red)
(Orange)
Euro AV
(SCART)
AV Video Receives video signal only (no
AV Audio
(Right)
AV Audio
(Left)
Digital Audio Receives digital audio signal
Receives a complete AV
(Audio Visual) signal.
audio).
Receives audio signal only (no
video).
Receives audio signal only (no
video).
only (no video).
www.bush-radio.co.uk 11
Page 12
14" DVD/TV Combi with Remote Control
Switching On
The Remote Control
Inserting Remote Control Batteries
1. On the back of the remote control, slide the battery
compartment cover downwards to remove.
2. Insert the two AAA batteries, ensuring that you follow the
polarity diagram inside the battery compartment.
3. Refit the cover.
We recommend the use of
Ever Ready Energizer batteries.
Battery Disposal
Please ensure batteries are disposed of safely. Never
dispose of batteries in the fire or with household waste. Check
with your local authority for disposal regulations.
Mains Power
Plug the mains plug into a mains socket and switch on.
NOTE: When not in use, disconnect the mains
plug from the mains power supply.
1. Press the POWER button on the front of the DVD/TV to
turn the DVD/TV on. The DVD/TV will be in Standby
mode.
2. Press the NUMERIC buttons or the UP and DOWN
buttons on the remote control or the DVD/TV to switch
the DVD/TV on. The picture will appear after a few
seconds.
NOTE: All buttons referred to are on the remote
control unless otherwise stated.
12 Customer Helpline: 0870 873 0079
Page 13
Setting Up the TV
If this is the first time the DVD/TV has been switched on, you should see a snowy screen. No signal will
be received.
To tune the DVD/TV in to receive a signal, follow the Autostore instructions below.
Menu Navigation
The basic controls needed to go through the menu screens are as follows:
1. Press the MENU button to activate the On-screen menus.
2. Press the UP or DOWN ARROW buttons to move up and down when navigating the On-screen
menus.
3. Press the LEFT or RIGHT ARROW buttons to access an On-screen menu or Sub menu.
4. Press the LEFT or RIGHT ARROW buttons to adjust a selected option.
5. Press the MENU button to return to the previous menu screen or to exit the on-screen menus.
DVD142TV
www.bush-radio.co.uk 17
Page 14
14" DVD/TV Combi with Remote Control
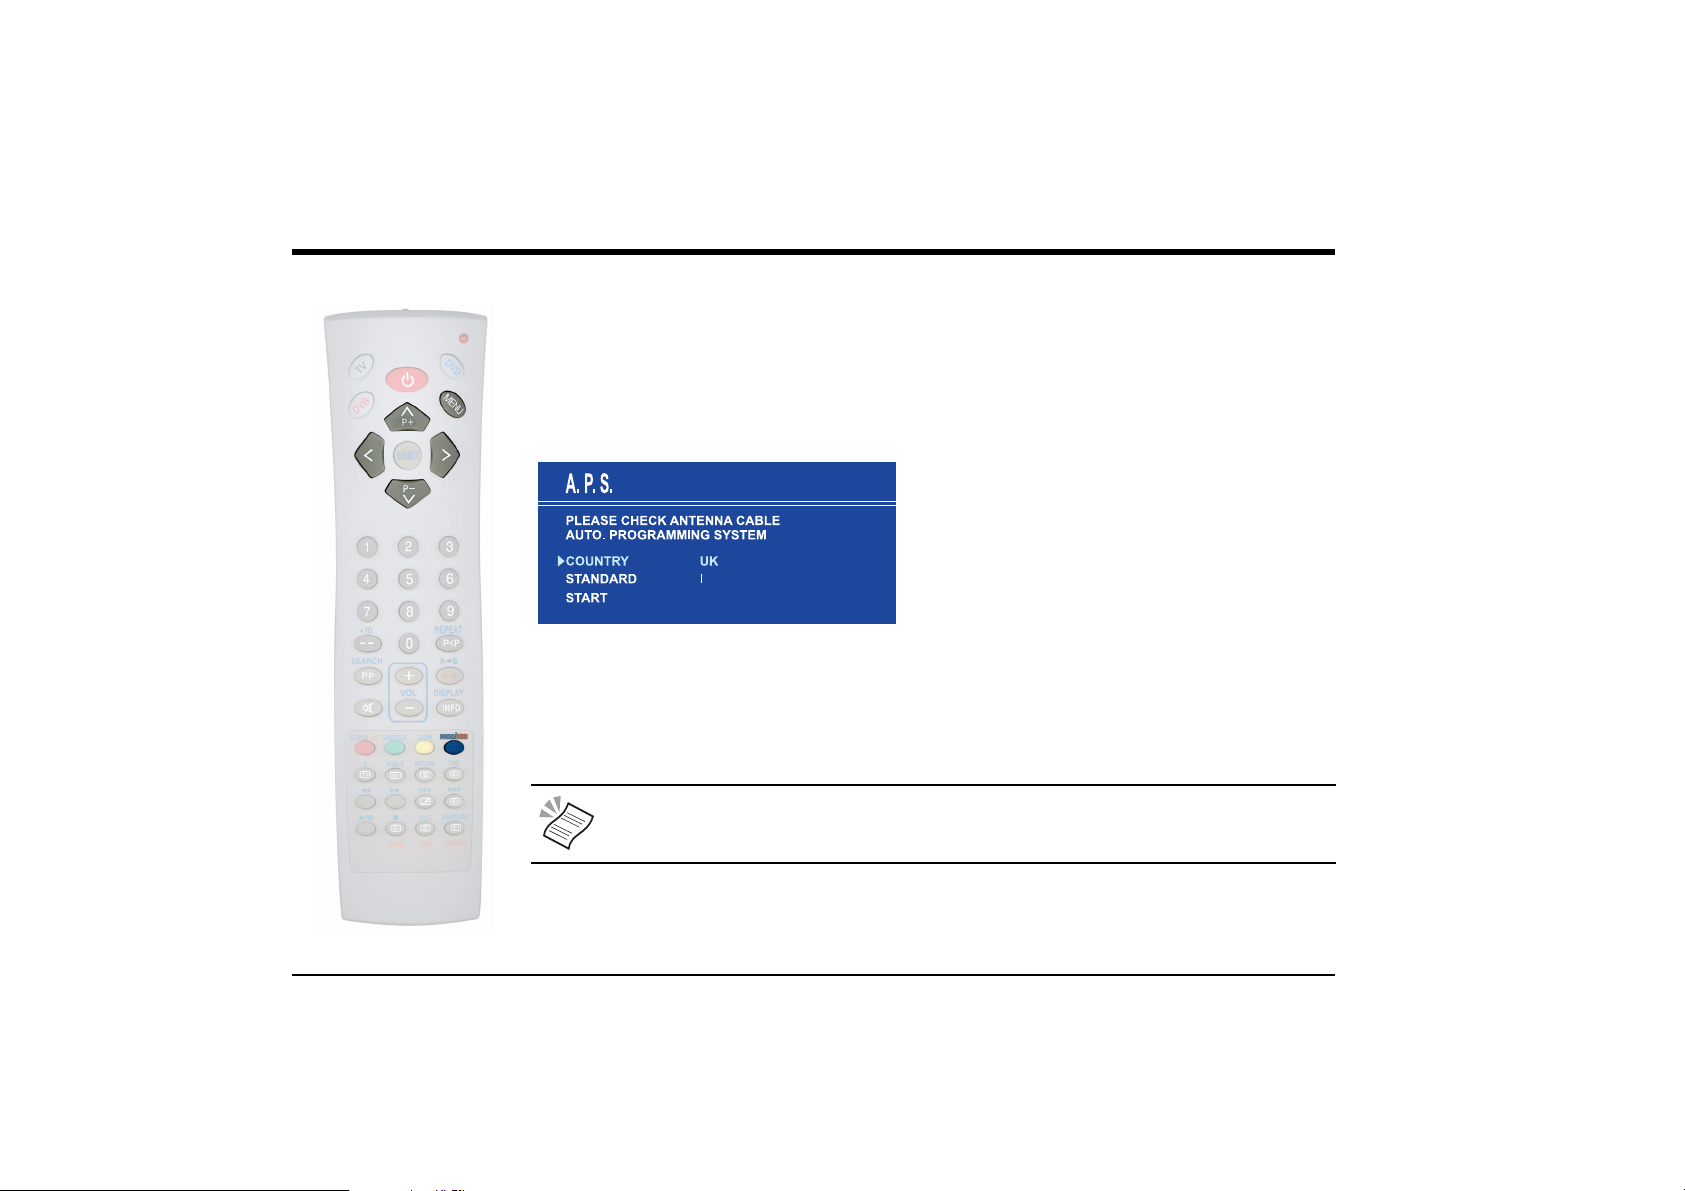
Autostore
1. Press the MENU button to activate the On-screen menus.
2. Press the UP or DOWN ARROW buttons to highlight Program.
3. Press the LEFT or RIGHT ARROW buttons to access the PROGRAM menu.
4. Press the BLUE button to select Autostore. The A.P.S menu will appear as shown below.
5. Use the LEFT or RIGHT ARROW buttons to select your country.
6. Use the UP or DOWN ARROW buttons to highlight Start.
7. Press the LEFT or RIGHT ARROW buttons to begin the Autostore function. This may take several
minutes to complete.
NOTE: To receive a TV signal, you can use an outdoor or indoor aerial. However, if you live
in a poor reception area or use an indoor aerial you may experience loss or corruption of
teletext transmissions.
8. Once the Autostore process is complete, the PROGRAM. menu is displayed. To rename and edit
the saved channels, follow the instructions as described on page 33. Alternatively press the MENU
button twice to begin watching TV.
18 Customer Helpline: 0870 873 0079
Page 15
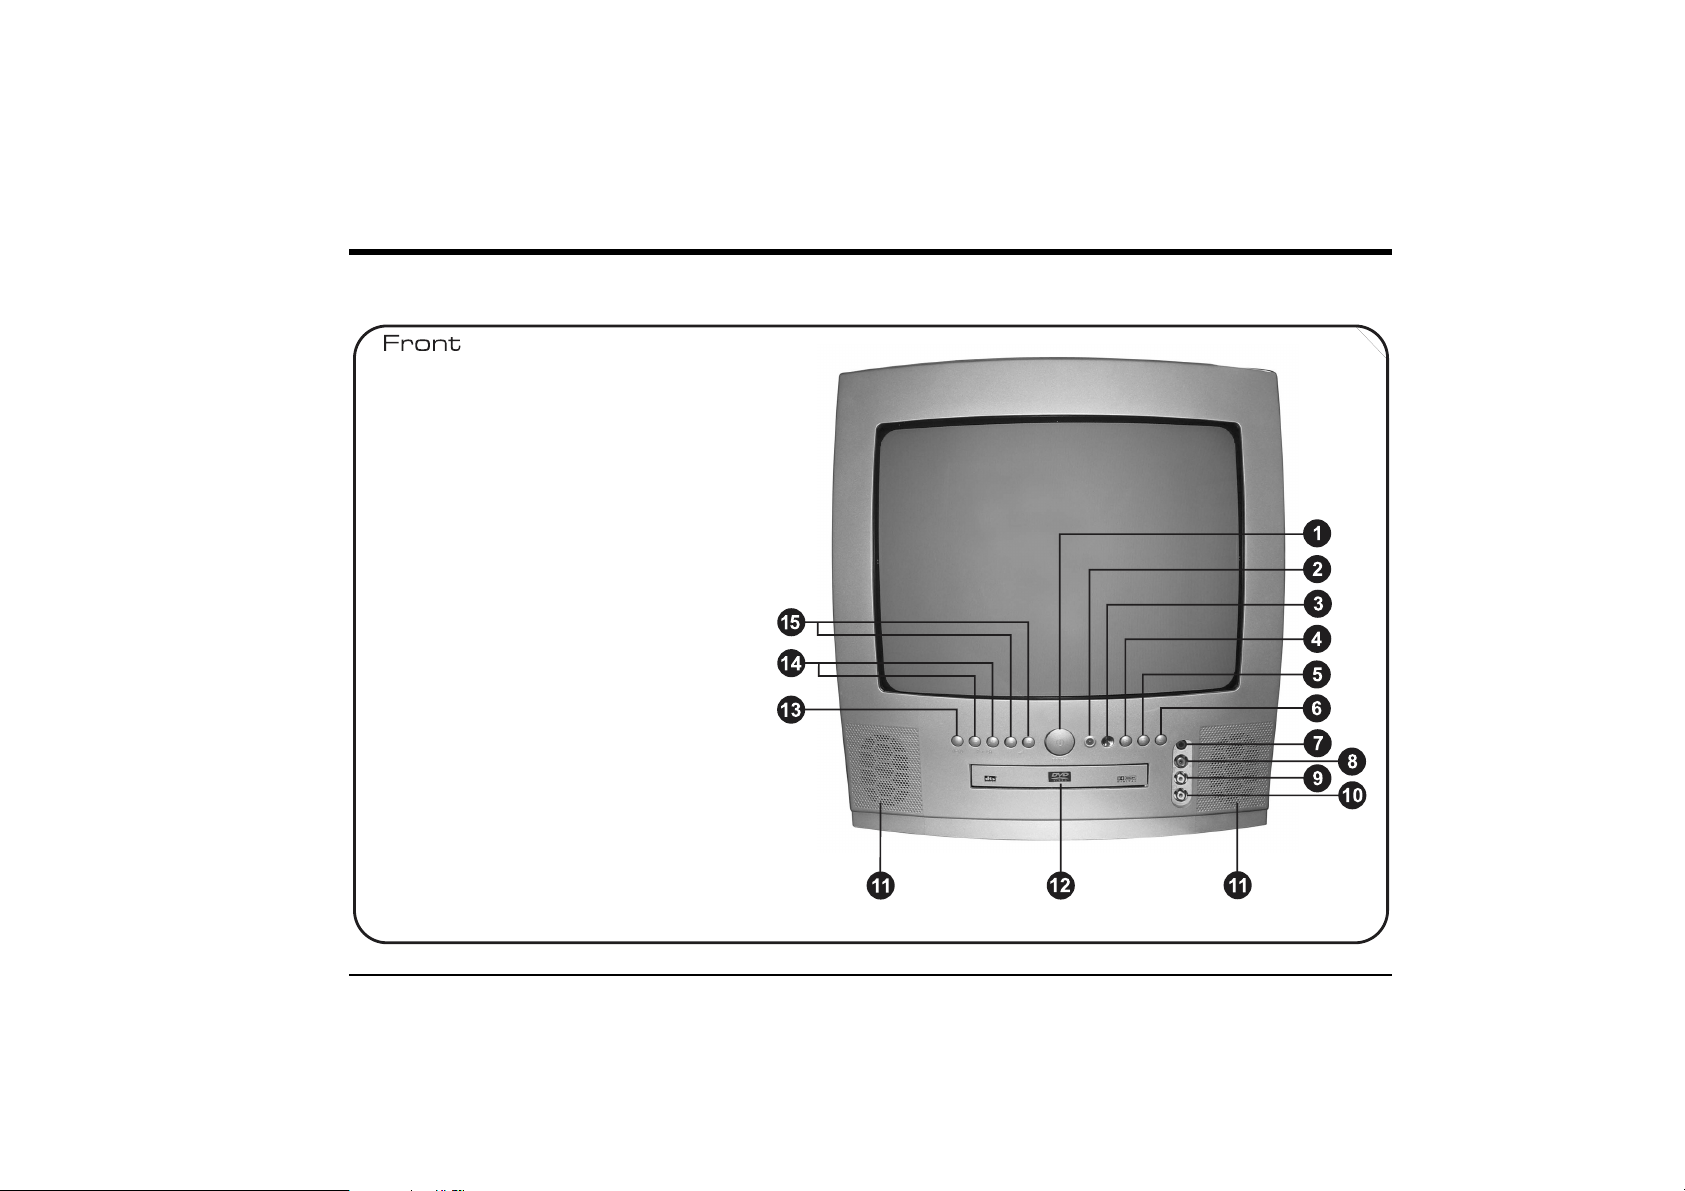
Identification of Controls
1. Power
Switches the DVD/TV on and off.
2. Standby Indicator
3. Remote Control Sensor
4. Play
Play button. Used to start playback of a DVD.
5. Stop
Stop button. Stops playback while playing a DVD.
6. Open/Close
Open and closes the DVD drawer.
7. Headphones
Audio socket for connecting a pair of headphones.
8. AV Audio (Right)
Right audio input socket for connecting an audio
output from an external device.
9. AV Audio (Left)
Left audio input socket for connecting an audio
output from an external device.
10. AV Video
Video input socket for connecting a video output
from an external device.
11. Speakers
12. DVD Drawer
13. Menu
Activates the On-screen menus.
14. P/CH
Channel select buttons. Also used to move up and
down while navigating On-screen menus.
15. Vol Up/Down
Volume adjust buttons. Also used to move up and
down while navigating On-screen menus.
DVD142TV
www.bush-radio.co.uk 13
Page 16
14" DVD/TV Combi with Remote Control
14 Customer Helpline: 0870 873 0079
Page 17
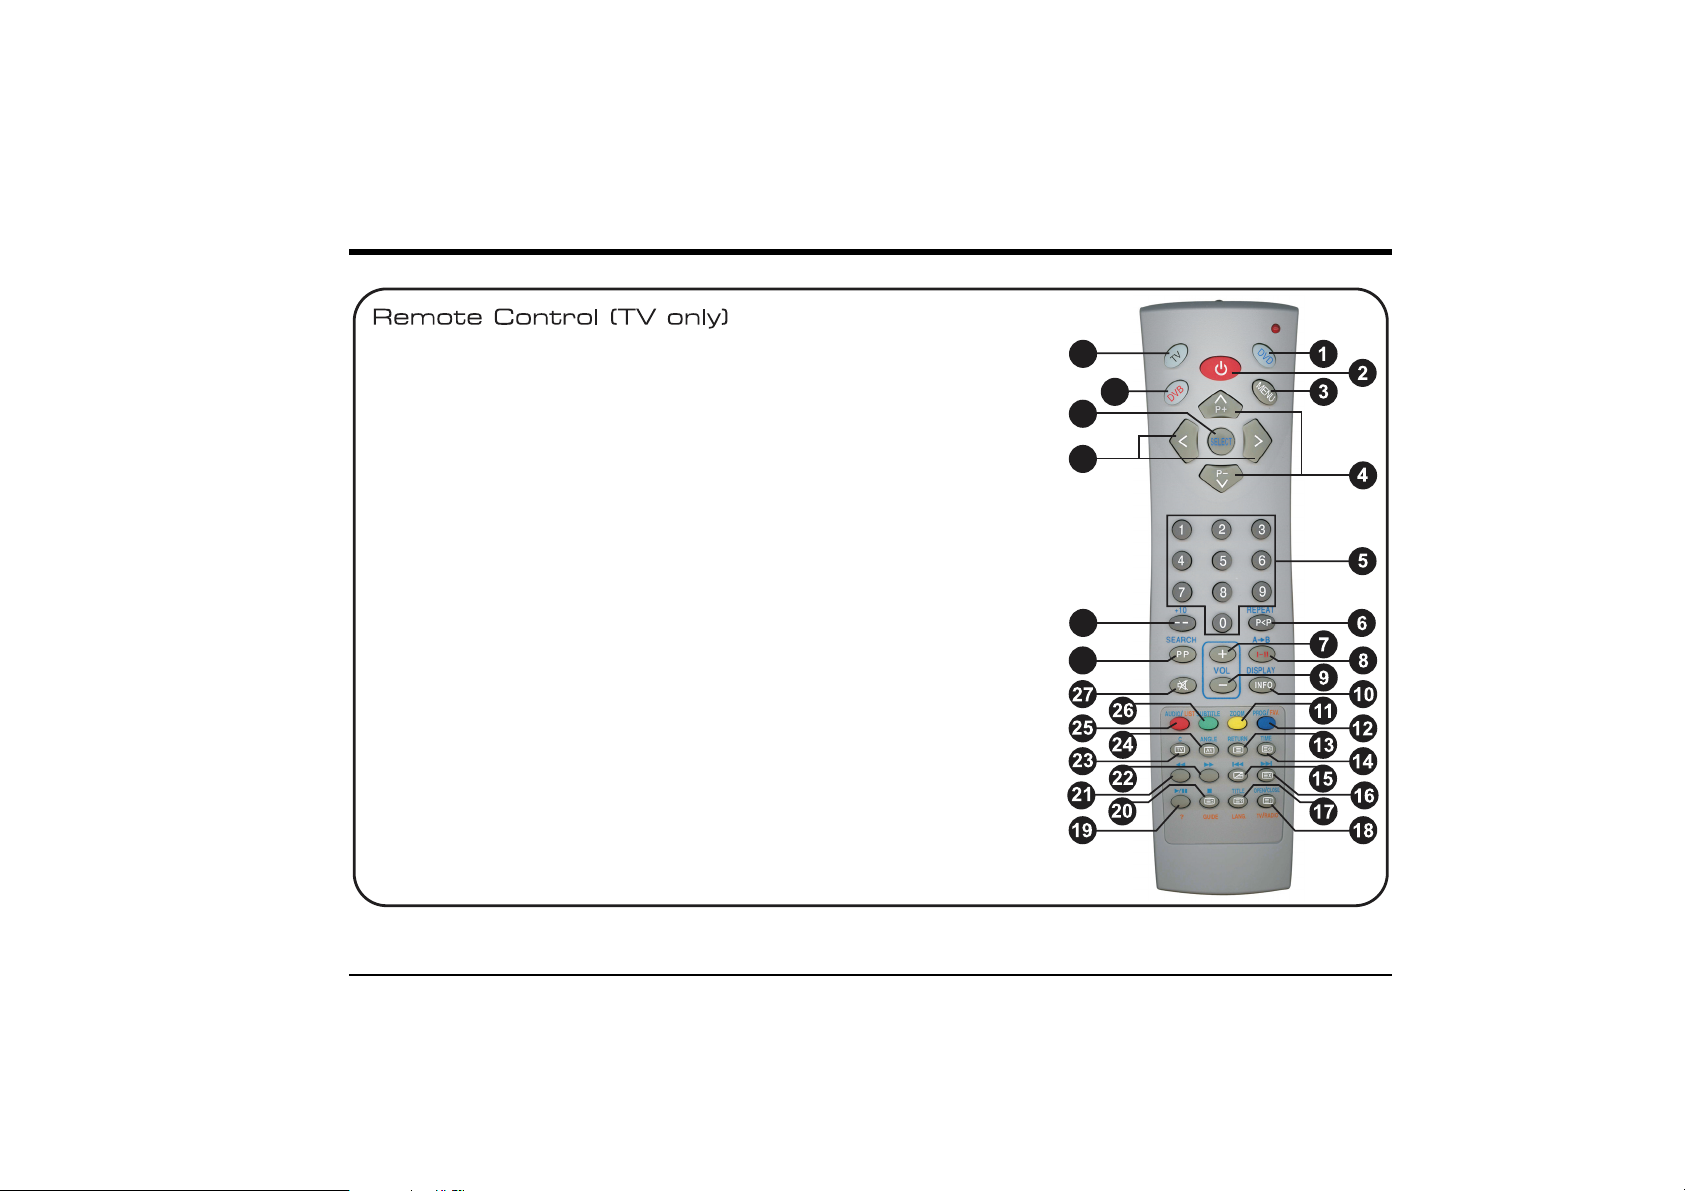
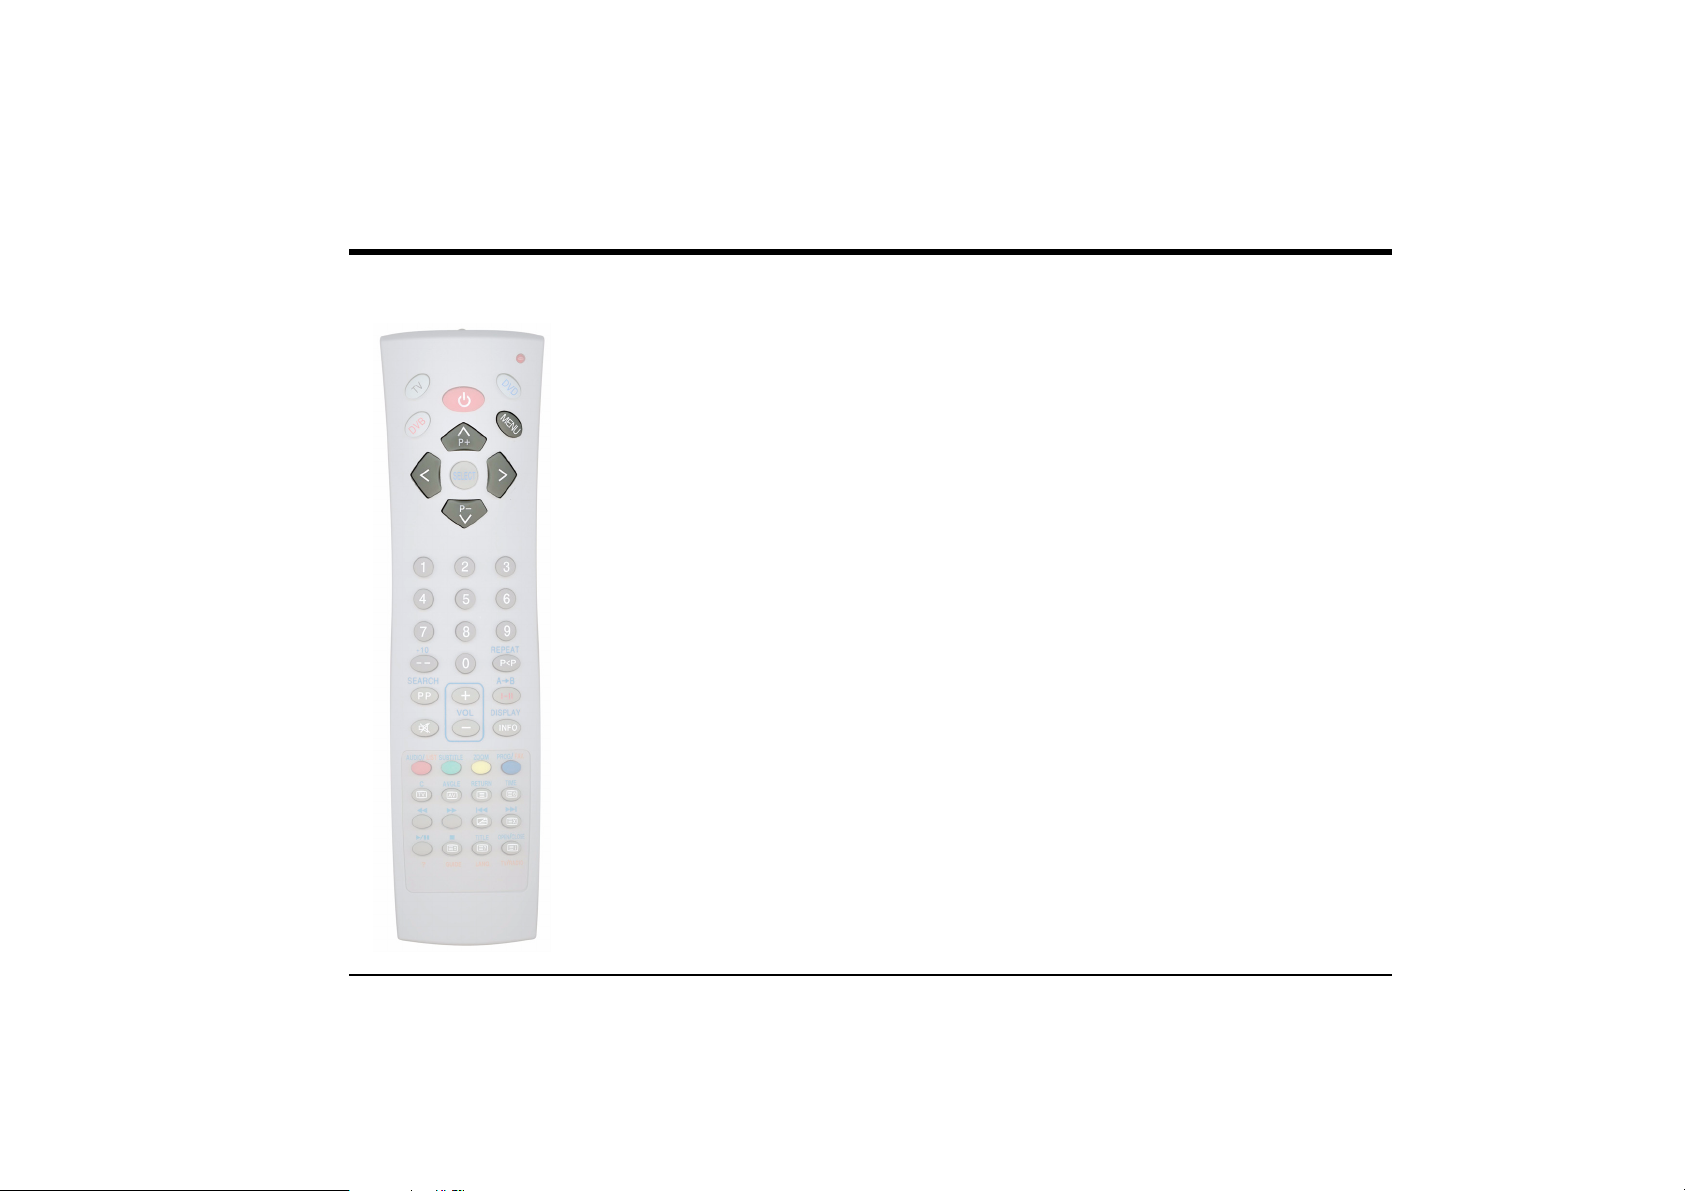
1. DVD
Switches the remote
control to DVD mode.
2. Standby
Switches the DVD/TV into
standby and on again.
3. Menu
Activates on-screen TV
menus.
4. Up/Down Arrow
Buttons
Channel select buttons.
Also used to move up and
down while navigating onscreen menus.
5. Numeric Buttons
6. P<P
Swap between channel
numbers.
7. Vol+
Increases the volume.
8. No Function
9. Vol-
Decreases the volume.
10. Info
Activates the Program
menu.
11. Yellow Button
Activates the Feature
menu. Also used to access
Fast Text options.
12. Blue Button
Activates the Install menu.
Also used to access Fast
Text options.
13. Teletext
Turn teletext on.
14. Sub-Page
Select teletext sub pages.
15. Mix
Mix TV and teletext.
16. Cancel
Interrupt teletext.
17. Reveal
Reveal hidden information.
18. Index
Go to teletext index page.
19. No Function
20. Size
Increase teletext size.
21. No Function
22. No Function
23. TV
Turn teletext off.
24. AV
Scrolls through the
available input sources.
25. Red Button
Activates the Sound menu.
Also used to access Fast
Text options.
26. Green Button
Activates the Picture menu.
Also used to access Fast
Text options.
27. Mute
Turn sound on/off.
28. PP
Returns the picture and
sound to the latest saved
settings.
29. --
Select channel numbers
above 9.
30. Left/Right Arrow
Buttons
Used to move left and right
while navigating on-screen
menus.
31. No Function
32. No Function
33. TV
Switches the remote
control to TV mode.
DVD142TV
33
32
31
30
29
28
www.bush-radio.co.uk 15
Page 18
14" DVD/TV Combi with Remote Control
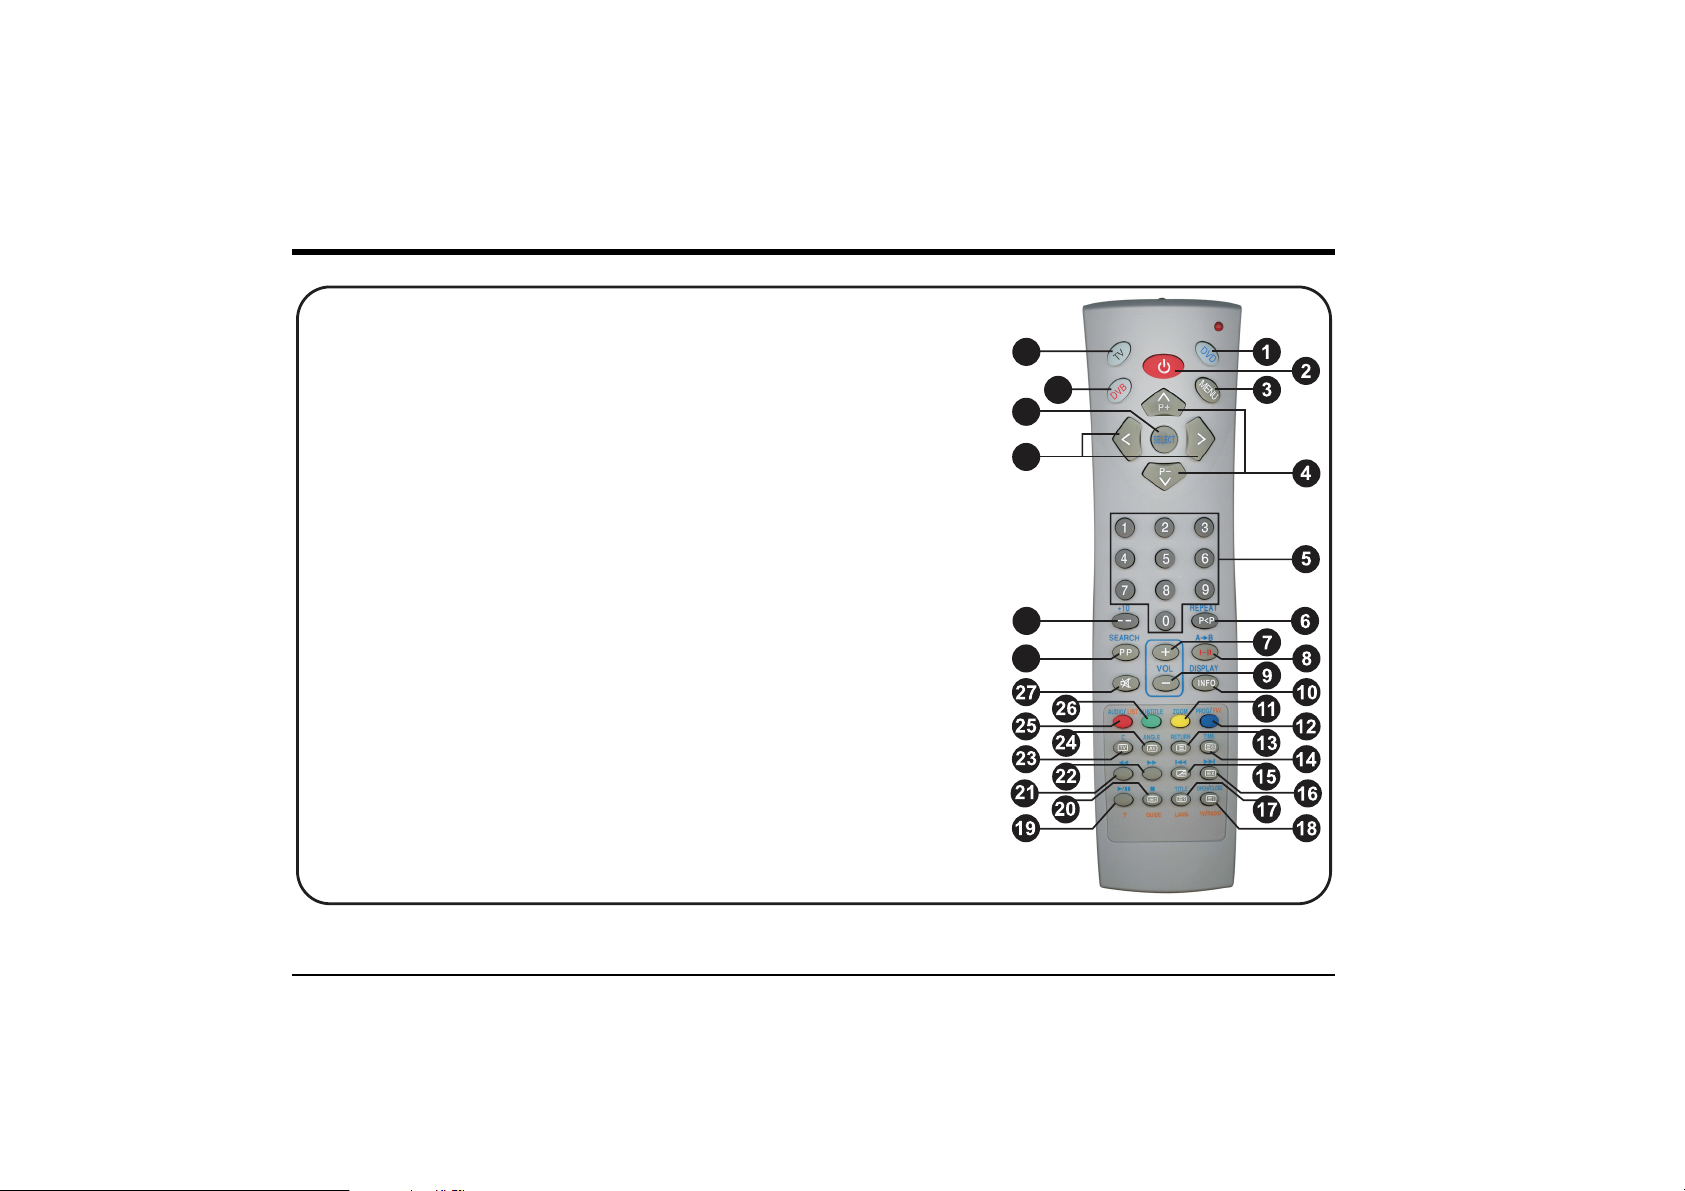
Remote Control (DVD only)
1. DVD
Switches the remote control
to DVD mode.
2. Standby
Switches the DVD/TV into
standby and on again.
3. Menu
Returns to the root menu.
4. Up/Down Arrow
Buttons
Used to move up and down
while navigating the DVD
and on-screen menus.
5. Numeric Buttons
6. Repeat
Scrolls through the available
DVD repeat options.
7. Vol+
Increases the volume.
8. A-B
Used to control the A-B
repeat function.
9. Vol-
Decreases the volume.
10. Display
Access the DVD setup
menus. Also used to display
current information about
the DVD.
11. Zoom
Scrolls through the available
DVD zoom options.
12. No Function
13. No Function
14. Time
Scrolls through the available
DVD time options.
15. Previous
Skip to the previous chapter.
16. Next
Skip to the next chapter.
17. Title
Displays the DVD title
menu.
18. Open/Close
Open and close the DVD
drawer.
19. Play/Pause
Play or pause the DVD.
20. Stop
Stop the DVD.
21. Rev
Fast reverse within a
chapter.
22. Fwd
Fast forward within a
chapter.
23. No Function
24. Angle
Scrolls through the available
DVD angle options.
25. Audio
Scrolls through the available
DVD audio options.
26. Subtitle
Scrolls through the available
DVD subtitle options.
27. Mute
Turn sound on/off.
28. Search
Access the DVD search
options.
29. +10
Used to access chapter
numbers above 10. See
page 19.
30. Left/Right Arrow
Buttons
Used to move left and right
while navigating on-screen
menus.
31. Select
Select an option in the DVD
root and title menus. Also
used to select an option in
the On-screen menus.
32. No Function
33. TV
Switches the remote control
to TV mode.
33
32
31
30
29
28
16 Customer Helpline: 0870 873 0079
Page 19

Using the TV
DVD142TV
TV Controls
Remote Control Mode
The remote control can be used to control either the TV or the DVD.
1. Press the TV button to use the remote control for the TV. Only the TV controls will be available.
2. Press the DVD button to use the remote control for the DVD. Only the DVD controls will be
available.
Programme Selection
You can use the controls on either the TV or remote control to select channels.
1. Press the UP or DOWN ARROW buttons on the remote control or the P/CH buttons on the
DVD/TV.
There are 100 available channels on the TV (0-99), but the two digit channels can only be selected by
using the -- button.
2. Press the -- button to bring up the double digit channel selection mode. The icon will appear in the
top left hand corner of the screen:
3. To select a double digit channel (10-99), press the -- button followed by the two digits. For
example, to select channel 48, press the -- button followed by the 4 button and the 8 button.
Vol u m e
1. Press the VOL +/- buttons on the TV or remote control. A sound level bar will appear on the
screen.
www.bush-radio.co.uk 19
Page 20

14" DVD/TV Combi with Remote Control
Mute
1. Press the MUTE button on the remote control to mute the sound. The mute symbol will appear in
the top centre of the screen.
2. Press the MUTE button again to restore the sound. The mute symbol will disappear.
NOTE: Pressing either of the VOL +/- buttons will also restore the sound.
Previous Programme
1. Press the P<P button to swap between the programme you are watching and the last selected
programme. i.e. If you were watching Programme 1 and change to Programme 3, press the P<P
button to return to Programme 1.
2. Press the P<P button to return to Programme 3.
Input Source Selection
You can select from one of four input sources. These are:
DVD, AV-1 (Euro Scart), F-AV (Front RCA sockets), RGB (Euro Scart).
1. Press the AV button repeatedly to cycle through the available input sources.
NOTE: The RGB input source should be selected if you are experiencing colour problems
with the AV-1 input source.
20 Customer Helpline: 0870 873 0079
Page 21

Using Teletext
DVD142TV
Teletext is an information system that displays text on your TV screen. Using the teletext control
buttons you can view pages of information that are listed in the teletext index.
NOTE: No On-screen display is available in text mode. The contrast, brightness and colour
cannot be changed but the volume control is still available.
NOTE: Make sure the TV channel you are watching transmits teletext.
To E n te r Tex t Mo d e
1. Press the TELETEXT button. The text page will appear, normally the index page.
To Select a Page of Text
1. Find the number of the page in the index and enter using the NUMERIC buttons. The number of
the page will appear in the top left hand corner of the screen.
The page counter will search for your page. When it finds it, the page will be displayed.
TV/TEXT Mix
1. Press the MIX button to view a page of text whilst watching a TV programme. The text will be
superimposed over the TV programme.
To E x it Te xt Mod e
1. Press the TV button. The screen will return to the channel you were watching.
www.bush-radio.co.uk 21
Page 22

14" DVD/TV Combi with Remote Control
Page Stop
If the page of text you have selected contains sub-pages, these sub-pages will automatically be
displayed in order with a delay to allow you to read the page.
1. Press the TELETEXT button to stop the move to the next sub-page. The word ‘Stop’ will appear in
the top left hand corner of the screen.
2. Press the TELETEXT button again to continue moving through the sub-pages.
To Select a Sub-Page
Some text pages contain sub-pages, they are displayed on the right hand side of the screen i.e. 1/7.
To select a sub-page:
1. Press the SUB-PAGE button. The number in the top left hand corner of the screen will be replaced
with ----.
2. Using the NUMERIC buttons, enter the desired sub-page number in the format 0001 for
sub-page 1.
The teletext will search for the sub-page.
To Reveal Information
1. Press the REVEAL button to reveal concealed information (quiz answers etc.).
2. Press the REVEAL button again to conceal the information.
Fast Text
At the bottom of the teletext screen is a row of subject headings in red, green, yellow and blue.
1. Press one of the coloured FAST TEXT buttons on the remote control to access these pages.
2. Press the INDEX button to return to the main page.
22 Customer Helpline: 0870 873 0079
Page 23

DVD142TV
Tex t En l ar gem e nt
1. Press the SIZE button to enlarge the text shown on the teletext screen. Only one half of the page
is shown.
2. Press the SIZE button again to view the second half of the page.
3. Press the SIZE button a third time to return to normal size text page.
Interrupting Teletext
You can interrupt teletext and revert to watching the TV programme.
1. Press the CANCEL button to interrupt teletext and revert to watching the TV programme.
2. Press the CANCEL button again to return to the teletext page you were viewing.
www.bush-radio.co.uk 23
Page 24

14" DVD/TV Combi with Remote Control
On-screen Menus
Sound Menu
The SOUND menu allows you to adjust the sound settings to suit your personal preference. The
available options are:
Volume, AVL.
1. Press the MENU button to activate the On-screen menus.
2. Press the UP or DOWN ARROW buttons to highlight Sound.
3. Press the LEFT or RIGHT ARROW buttons to access the SOUND menu. The SOUND menu will
appear as shown below.
4. Press the UP or DOWN ARROW buttons to select one of the available options, detailed below.
5. Press the LEFT or RIGHT ARROW buttons to adjust the selected option.
6. To save the new settings, press the UP or DOWN ARROW buttons to highlight Store. Press the
RIGHT ARROW button to store the new settings.
24 Customer Helpline: 0870 873 0079
Page 25

DVD142TV
7. Press the MENU button twice to exit the On-screen menus.
NOTE: To access the SOUND menu directly, press the RED button.
Vol u m e
Allows you to increase or decrease the volume.
AVL
The TV has an AVL (Automatic Volume Limiting) function which equalises the volume levels between
different programmes, for example music programmes and commercials. This function can be turned
on or off.
www.bush-radio.co.uk 25
Page 26

14" DVD/TV Combi with Remote Control
Picture Menu
Your DVD/TV has several settings which allow you to control the picture quality. The available options
are:
Brightness, Contrast, Colour, Sharpness, Mode.
1. Press the MENU button to activate the On-screen menus.
2. Press the UP or DOWN ARROW buttons to highlight Picture.
3. Press the LEFT or RIGHT ARROW buttons to access the PICTURE menu. The PICTURE menu
will appear as shown below.
4. Press the UP or DOWN ARROW buttons to select one of the available options, detailed below.
5. Press the LEFT or RIGHT ARROW buttons to adjust the selected option.
6. To save the new settings, press the UP or DOWN ARROW buttons to highlight Store. Press the
RIGHT ARROW button to store the new settings.
26 Customer Helpline: 0870 873 0079
Page 27

DVD142TV
7. Press the MENU button twice to exit the On-screen menus.
NOTE: To access the PICTURE menu directly, press the GREEN button.
• Brightness - Allows you to increase or decrease the brightness of the picture.
• Contrast - Allows you to increase or decrease the contrast of the picture.
• Colour - Allows you to increase or decrease the colour of the picture.
• Sharpness - Allows to increase or decrease the sharpness of the picture.
• Mode - Refer to detailed instructions below.
Mode
The Mode function allows you to adjust the aspect ratio of the screen.
1. Press the RIGHT ARROW button to access the MODE menu.
2. Press the LEFT and RIGHT ARROW buttons to scroll through the available options. The available
options are:
• Auto - Automatically selects the most suitable aspect ratio for the current programme.
• 4:3 - Standard 4:3 aspect ratio.
• 16:9 - Standard Widescreen format.
www.bush-radio.co.uk 27
Page 28

14" DVD/TV Combi with Remote Control
Feature Menu
The FEATURE menu allows you to adjust the general settings of the DVD/TV to suit your personal
preference.
Sleep Timer, Child Lock, Language.
1. Press the MENU button to activate the On-screen menus.
2. Press the UP or DOWN ARROW buttons to highlight Feature.
3. Press the LEFT or RIGHT ARROW buttons to access the FEATURE menu. The FEATURE menu
will appear as shown below.
4. Press the UP or DOWN ARROW buttons to select one of the available options, detailed below.
5. Press the LEFT or RIGHT ARROW buttons to adjust the selected option.
6. To save the new settings, press the UP or DOWN ARROW buttons to highlight Store. Press the
RIGHT ARROW button to store the new settings.
28 Customer Helpline: 0870 873 0079
Page 29

DVD142TV
7. Press the MENU button twice to exit the On-screen menus.
NOTE: To access the FEATURE menu directly, press the YELLOW button.
Sleep Timer
The Sleep Timer function allows you to turn the DVD/TV into Standby mode after a preset mount of
time. The sleep timer can be set in 15 minute increments up to 2 hours.
Child Lock
The Child Lock function prevents operation of the TV side of DVD/TV from the controls on the front
panel. The DVD/TV can only be controlled using the remote control.
NOTE: DVD Controls will still be available.
Language
Allows you to select the On-screen display language.
www.bush-radio.co.uk 29
Page 30

14" DVD/TV Combi with Remote Control
Install Menu
The DVD/TV can be tuned using various methods. The available options are:
Programme, Band, Frequency, Standard, Search, Fine Tuning.
1. Press the MENU button to activate the On-screen menus.
2. Press the UP or DOWN ARROW buttons to highlight Install.
3. Press the LEFT or RIGHT ARROW buttons to access the INSTALL menu. The INSTALL menu
will appear as shown below.
4. Press the UP or DOWN ARROW buttons to select one of the available options, detailed below.
5. Press the LEFT or RIGHT ARROW buttons to adjust the selected option.
6. To save the new settings, press the UP or DOWN ARROW buttons to highlight Store. Press the
RIGHT ARROW button to store the new settings.
7. Press the MENU button twice to exit the On-screen menus.
NOTE: To access the INSTALL menu directly, press the BLUE button.
30 Customer Helpline: 0870 873 0079
Page 31

DVD142TV
Programme
Select a particular channel to apply any changes to.
Band
Select a particular band to search while performing a manual search.
Frequency
Displays the frequency while performing an Manual search.
Standard
Displays the current sound system.
Search
The Search function allows you to perform a manual search for a channel.
1. Press the UP or DOWN ARROW buttons to highlight Programme.
2. Press the LEFT or RIGHT ARROW buttons to select a Programme number to apply the search to.
3. Press the UP or DOWN ARROW buttons to highlight Search.
4. Press the LEFT or RIGHT ARROW buttons to begin the search. Once a programme has been
found the search will stop.
NOTE: Pressing the RIGHT ARROW button will search for higher frequencies and pressing
the LEFT ARROW button will search for lower frequencies.
5. To search for another programme, press the LEFT or RIGHT ARROW buttons.
www.bush-radio.co.uk 31
Page 32

14" DVD/TV Combi with Remote Control
Fine Tuning
The Fine Tuning function allows you to fine tune a programme.
1. Press the UP or DOWN ARROW buttons to highlight Programme.
2. Press the LEFT or RIGHT ARROW buttons to select a Programme number to apply the fine tuning
to.
3. Press the UP and DOWN ARROW buttons to highlight Fine Tuning.
4. Press the LEFT and RIGHT ARROW buttons to fine tune the programme.
NOTE: Pressing the RIGHT ARROW button will search for higher frequencies and pressing
the LEFT ARROW button will search for lower frequencies.
32 Customer Helpline: 0870 873 0079
Page 33

DVD142TV
Program Menu
The PROGRAM menu allows you to name and edit the programmes stored by the DVD/TV. The
available options are:
Name, Insert, Delete, Autostore.
1. Press the MENU button to activate the On-screen menus.
2. Press the UP or DOWN ARROW buttons to highlight Program.
3. Press the LEFT or RIGHT ARROW buttons to access the PROGRAM menu. The PROGRAM
menu will appear as shown below.
4. Press the LEFT, RIGHT, UP and DOWN ARROW buttons to navigate the PROGRAM menu.
5. Press the RED, GREEN, YELLOW or BLUE buttons to select an option.
www.bush-radio.co.uk 33
Page 34

14" DVD/TV Combi with Remote Control
6. Press the MENU button twice to exit the On-screen menus.
NOTE: To access the PROGRAM menu directly, press the INFO button.
Name
The Name function allows you to name or rename a programme using up to 5 characters.
1. Press the LEFT, RIGHT, UP or DOWN ARROW buttons to highlight the programme you wish to
name or rename.
2. Press the RED button to edit the name.
3. Press the LEFT or RIGHT ARROW buttons to select a character.
4. Press the UP or DOWN ARROW buttons to edit the character.
5. Once the name has been edited, press the RED button to store the name or press the BLUE
button to cancel.
Insert
The insert function allows you to move a programme in the list.
1. Press the LEFT, RIGHT, UP or DOWN ARROW buttons to highlight the programme you wish to
move.
2. Press the GREEN button to move the programme.
3. Press the LEFT, RIGHT, UP and DOWN buttons to select the new location for the programme.
4. Press the GREEN button to complete the move or press the BLUE button to cancel.
34 Customer Helpline: 0870 873 0079
Page 35

DVD142TV
Delete
The Delete functions allows you to remove a programme from the list.
1. Press the LEFT, RIGHT, UP or DOWN ARROW buttons to highlight the programme you wish to
delete.
2. Press the YELLOW button to delete the programme.
3. Press the YELLOW button again to confirm the programme delete or press the BLUE button to
cancel.
Autostore
Please refer to the instructions on page 18.
www.bush-radio.co.uk 35
Page 36

14" DVD/TV Combi with Remote Control
Using the DVD
Playing Discs
1. Press the DVD button to switch the DVD/TV from TV mode to DVD mode.
2. Press the OPEN/CLOSE button to open the disc drawer.
3. Insert a disc into the disc drawer inside the guides.
NOTE: Only insert one disc at a time.
4. Press the OPEN/CLOSE button to close the disc drawer. The DVD/TV will begin reading the disc
and playback will begin.
NOTE: The DVD/TV may take some time to read the disc before playback begins.
NOTE: If playback does not automatically begin, press the TV button followed by the AV
button to select the DVD input source.
36 Customer Helpline: 0870 873 0079
Page 37

DVD142TV
If a DVD is Inserted
The film may start automatically or you may be presented with a menu screen, this is dependent on the
way the DVD has been created by the movie company. Some functions such as skip or search may be
disabled during certain sections of the disc (usually the legal notices).
If a CD is Inserted
A menu will appear on screen displaying the files and folders on the disc.
If a JPEG/Picture CD is Inserted
A menu will appear on screen displaying the files and folders on the disc.
Stop
1. Press the STOP button to stop playback. The DVD/TV will enter Pre-Stop mode. The words ‘Press
play to continue’ will appear in the top left of the screen.
2. Press the PLAY/PAUSE button to resume playback. The words ‘Press play to continue’ will
disappear from the screen.
3. Press the STOP button a second time to clear the pre-stop condition. When the PLAY/PAUSE
button is pressed, playback will start from the beginning of the DVD.
Pause
1. Press the PLAY/PAUSE button to pause playback. The DVD/TV will display a freeze frame. The
‘Pause’ symbol will appear in the top right hand corner of the screen.
2. Press the PLAY/PAUSE button to continue playback. The ‘Pause’ symbol will disappear from the
screen.
www.bush-radio.co.uk 37
Page 38

14" DVD/TV Combi with Remote Control
Fast Forward and Reverse
1. Press the FWD or REV buttons during playback to fast forward or reverse.
2. Press the FWD or REV buttons repeatedly to increase the search speed. There are five search
speeds up to 32x, depending on the type of disc inserted.
3. Press the PLAY/PAUSE button to continue normal playback.
Next and Previous
1. Press the NEXT button to skip to the next chapter.
2. Press the PREVIOUS button to skip to the previous chapter.
Repeat
The Repeat function allows you to repeat different sections of a DVD, Audio CD or Kodak Picture CD.
The repeat functions available depend on the type of disc inserted.
Chapter Repeat
1. Press the REPEAT button once to repeat a chapter. The word ‘Chapter’ will appear in the top left
hand corner of the screen.
The current chapter will be repeated when the end of the chapter is reached.
Title Repeat
1. Press the REPEAT button twice to repeat a title. The word ‘Title’ will appear in the top left hand
corner of the screen.
The current title will be repeated when the end of the title is reached.
38 Customer Helpline: 0870 873 0079
Page 39

DVD142TV
All Repeat
1. Press the REPEAT button until the word ‘All’ is displayed in the top left hand corner of the screen.
The disc will be repeated when the end of the disc is reached.
Cancelling Repeat Play
1. To cancel the repeat function, press the REPEAT button repeatedly until the repeat mode
description disappears from the screen.
A-B Repeat
The A-B repeat function allows a selected portion of a title or chapter of any length to be repeated.
1. When the required start point has been reached, press the A-B button. The letter 'A' will be
displayed.
2. When the required stop point has been reached, press the A-B button. The letters 'AB' will be
displayed. The selected portion will be repeatedly played.
3. To cancel the A-B repeat function, press the A-B button a third time.
Zoom
1. Press the ZOOM button repeatedly to cycle through the available zoom factors. The available
zoom factors are X2, X3 and X4.
2. Press the ARROW buttons to move around the screen while in the Zoom mode.
3. To return to the standard zoom factor, press the ZOOM button repeatedly until the zoom mode
description disappears from the screen.
www.bush-radio.co.uk 39
Page 40

14" DVD/TV Combi with Remote Control
Subtitle
1. Press the SUBTITLE button repeatedly to scroll through and select the available subtitle options.
The selected subtitle language will be displayed in the upper left hand corner of the screen.
NOTE: The available subtitle languages will depend on the DVD used, see the DVD cover
for more details on the supported languages.
2. To remove the subtitles, press the SUBTITLE button repeatedly until ‘Subtitle Off’ is displayed in
the upper left hand corner of the screen.
Audio
1. Press the AUDIO button repeatedly to scroll through and select the available audio languages or
commentaries. The selected audio tracks will be displayed in the upper left hand corner of the
screen.
NOTE: The audio function is not supported on all DVDs. See the DVD cover for a list of
audio tracks.
Angle
Some DVDs may be filmed from different angles.
1. Press the ANGLE button repeatedly to scroll through and select the available angles.
NOTE: The angle function may not be supported on all DVDs.
40 Customer Helpline: 0870 873 0079
Page 41

DVD142TV
Search
The Search function allows you to go to a selected point in the DVD by selecting the title, chapter or
time.
Chapter Search
1. Press the SEARCH button once to access the Chapter Search screen.
2. Press the NUMERIC buttons to enter the desired chapter number. The DVD/TV will automatically
begin playing the selected chapter.
Title Search
1. Press the SEARCH button once to access the Title Search screen.
2. Press the LEFT ARROW button to highlight the Title part of the screen.
3. Press the NUMERIC buttons to enter the desired title number. The DVD/TV will automatically
begin playing the selected title.
www.bush-radio.co.uk 41
Page 42

14" DVD/TV Combi with Remote Control
Title Time Search
1. Press the SEARCH button twice to access the Title Time Search screen.
2. Press the NUMERIC buttons to enter the desired time in an hours, minutes and seconds format.
For example, to enter a time of 1 hour, 15 minutes and 20 seconds, press the 1 button followed by
the 1, 5, 2, 0 buttons. The DVD/TV will automatically begin playing at the selected time.
Chapter Time Search
1. Press the SEARCH button three times to access the Chapter Time Search screen.
2. Press the NUMERIC buttons to enter the desired time in hours, minutes and seconds format. For
example, to enter a time of 1 hour, 15 minutes and 20 seconds, press the 1 button followed by the
1, 5, 2, 0 buttons. The DVD/TV will automatically begin playing at the selected time.
42 Customer Helpline: 0870 873 0079
Page 43

DVD142TV
Display
The Display function allows you to display information for the DVD, Audio CD or Kodak Picture CD. The
information displayed will depend on the disc inserted.
1. Press the DISPLAY button. The Information screen will appear displaying information on the title,
chapter, time, audio channel and subtitles.
Time Information
The Time Information function allows you to display only information on the time.
1. Press the TIME button. The Time information screen will appear displaying information on the
time.
2. Press the TIME button repeatedly to cycle through the available Time information options.
www.bush-radio.co.uk 43
Page 44

14" DVD/TV Combi with Remote Control
Title
1. Press the TITLE button at any time while playing a DVD to return to the Title menu.
NOTE: This function may not be supported on all DVD’s.
Menu
1. Press the MENU button at any time while playing a DVD to return to the Root menu.
NOTE: This function may not be supported on all DVD’s.
44 Customer Helpline: 0870 873 0079
Page 45

The DVD On-Screen Menus
The DVD On-screen menus allow you to adjust various settings to suit your personal preference.
NOTE: The DVD On-screen menus are only available when the DVD is in the 'Stop' or 'Prestop' mode.
Video Setup Menu
The VIDEO setup menu allows you to adjust the video settings to suit your personal preference. The
available options are:
Tv Display, Tv Type.
1. Press the DISPLAY button to activate the DVD On-screen menus.
2. Press the LEFT or RIGHT ARROW buttons to display the VIDEO menu.
DVD142TV
3. Press the UP or DOWN ARROW buttons to select one of the available options, detailed below.
4. Press the RIGHT ARROW button or the SELECT button to access a selected option.
www.bush-radio.co.uk 45
Page 46

14" DVD/TV Combi with Remote Control
5. Press the UP or DOWN ARROW button to adjust the selected option.
6. Press the DISPLAY button to exit the DVD On-screen menus.
Tv Display
Allows you to set the desired aspect ratio. The available options are:
• Normal/Ps - Stretches a widescreen format to fill the entire screen (Pan and Scan).
• Normal/Lb - Standard 4:3 format (Letterbox).
• Wide - Standard widescreen format.
Tv Type
The Tv Type function allows you to set the picture format. The available options are:
Pal, Multi and Ntsc.
46 Customer Helpline: 0870 873 0079
Page 47

DVD142TV
Language Setup Menu
The LANGUAGE setup menu allows you to select the language for the On-screen menus and displays.
The available options are:
Osd Lang, Audio, Disc Menu, Subtitle.
1. Press the DISPLAY button to activate the DVD On-screen menus.
2. Press the LEFT or RIGHT ARROW buttons to display the LANGUAGE menu.
3. Press the UP or DOWN ARROW buttons to select one of the available options, detailed below.
4. Press the RIGHT ARROW button or the SELECT button to access a selected option.
5. Press the UP or DOWN ARROW button to adjust the selected option.
6. Press the DISPLAY button to exit the DVD On-screen menus.
• Osd Lang - Allows you to select the DVD/TV On-screen display language.
• Audio - Allows you to select the DVD Audio language.
www.bush-radio.co.uk 47
Page 48

14" DVD/TV Combi with Remote Control
• Disc Menu - Allows you to select the disc menu language.
• Subtitle - Allows you to select the subtitle language.
NOTE: Depending on the DVD, the selected audio and subtitle languages may not be
available. See the DVD cover for a list of audio and subtitle languages.
48 Customer Helpline: 0870 873 0079
Page 49

DVD142TV
Preference Setup Menu
The PREFERENCE setup menu allows you to adjust the general settings for the DVD. The available
options are:
Angle Mark, Standby Time, Default, Downmix, Parental, Password.
1. Press the DISPLAY button to activate the DVD On-screen menus.
2. Press the LEFT or RIGHT ARROW buttons to display the PREFERENCE menu.
3. Press the UP or DOWN ARROW buttons to select one of the available options, detailed below.
4. Press the RIGHT ARROW button or the SELECT button to access a selected option.
5. Press the UP or DOWN ARROW button to adjust the selected option.
6. Press the DISPLAY button to exit the DVD On-screen menus.
www.bush-radio.co.uk 49
Page 50

14" DVD/TV Combi with Remote Control
Angle Mark
The Angle Mark function allows you to turn the Angle Mark on or off. The angle mark indicates when
multiple angles are available during playback.
Standby Time
The Standby Time function allows you to turn the Standby Time on or off. When switched on, a
countdown will appear if no user action is taken after a limited amount of time. When the countdown
reaches zero, the DVD/TV will switch into standby mode. The available countdown times are 5, 15 and
35 minutes.
Default
The Default function allows you to reset the DVD Setup menus to the default factory settings.
1. Press the UP or DOWN ARROW buttons to highlight default.
2. Press the LEFT or RIGHT ARROW button to select Reset.
3. Press the SELECT button. The DVD/TV will be reset.
Downmix
The Downmix function allows you to select the analog audio output type. The available options are:
• Surround - Creates a virtual surround sound.
• Stereo - Creates a stereo sound.
50 Customer Helpline: 0870 873 0079
Page 51

DVD142TV
Parental
Allows you to set the parental control rating level to prevent playback of unsuitable material. The available options are:
1) Kid Saf BBFC Equivalent Uc
2) G BBFC Equivalent U
3) Pg BBFC Equivalent PG
4) Pg 13 BBFC Equivalent 12A
5) Pgr BBFC Equivalent 12
6) R BBFC Equivalent 15
7) Nc-17 BBFC Equivalent 18
8) Adult
NOTE: This function may not be supported on all DVD’s
www.bush-radio.co.uk 51
Page 52

14" DVD/TV Combi with Remote Control
Password
The Password function allows you to set the parental control password.
1. Press the UP or DOWN ARROW buttons to highlight Password.
2. Press the LEFT or RIGHT ARROW button to select Change.
3. Press the SELECT button. The PASSWORD menu will appear:
4. Press the NUMERIC buttons to enter the old or default (0000) password.
5. Press the NUMERIC buttons to enter the new password.
6. Press the NUMERIC buttons to confirm the new password.
7. Press the SELECT button to accept the new password and return to the PREFERENCE menu.
52 Customer Helpline: 0870 873 0079
Page 53

DVD142TV
Troubleshooting
Problem Possible Cause
TV Problems
The TV does not work. Make sure that the power supply is connected and that the mains supply is switched on.
Poor picture. Is the aerial plugged in?
Try changing the direction of the outdoor aerial. High buildings and hills can cause ghost
pictures or double images.
Check the channel is tuned properly.
Try adjusting the picture settings; brightness, colour, sharpness.
Make sure the TV is not located close to electrical appliances that may emit radio
frequency interference.
No TV picture. Is the aerial plugged in properly?
Is the aerial lead damaged?
Are all the plugs in the aerial lead fitted correctly?
Is the TV in the correct input signal mode?
No sound. Is the sound muted? Press the MUTE button.
Is the volume turned down?
No colour. Adjust the colour setting.
Check the programme is broadcast in colour.
Check the channel is tuned properly.
No response from the remote control. Is there an obstruction between the remote control and the sensor on the TV?
Try changing the batteries.
Avoid direct sunlight on the remote control sensor.
Colour stripe (uneven). Turn off the DVD/TV and turn on again after 20 minutes.
www.bush-radio.co.uk 53
Page 54

14" DVD/TV Combi with Remote Control
Problem Possible Cause
DVD Problems
Unless specifically stated, the following applies to DVDs, Audio CDs and Kodak Photo CDs.
DVD Player does not playback. Check there is a DVD inserted, that it is label side up and within
the drawer guides.
Check that the disc is of the correct playable format, e.g. the correct colour system
selected and regional code. Products released in the UK are set to play DVDs of regional
code 2.
A menu is on the TV screen. Press the MENU or DISPLAY buttons to remove the menu.
The disc is dirty. See page 55.
The remote control is too far away from the DVD/TV.
Check if the batteries in the remote control are incorrectly inserted or discharged.
WARNING: IF THIS DOES NOT WORK, CONTACT EITHER YOUR SUPPLIER OR A QUALIFIED TV REPAIR
TECHNICIAN. NEVER ATTEMPT TO REPAIR THE TV YOURSELF.
Product Support: Telephone: 0870 873 0079
Internet: www.bush-radio.co.uk
54 Customer Helpline: 0870 873 0079
Page 55

Care and Maintenance
DVD142TV
Handling Discs
To remove a disc from its storage case, press
down on the centre of the case and lift the disc
out.
Hold the disc by the edges, to avoid touching the
recorded side of the disc.
Cleaning
Cleaning the DVD/TV
Always unplug the DVD/TV from the mains before cleaning.
Clean the screen with a slightly damp, soft cloth.
Do not use abrasive solvents or cleaners as they may
damage the DVD/TV.
Cleaning discs
Fingerprints and dust should be carefully wiped
from the disc's surface with a soft cloth. Audio
discs and DVD discs have no grooves to collect
dust and microscopic debris so gently wiping with a soft cloth
should remove most particles. Wipe in a straight line from the
inside to the outside of the disc. Small dust particles and light
stains should have no effect on reproduction quality.
Never use chemicals such as record sprays, antistatic sprays,
benzene, or thinners to clean the discs. These chemicals can
irreparably damage the disc's surface.
Discs should be returned to their cases after use. This avoids
serious scratches that could cause the laser pickup to skip.
Do not expose discs to direct sunlight, high humidity, or high
temperatures for extended periods. Exposure to high
temperatures can warp the disc.
Do not stick paper or write anything with a ball point pen on
the label side of the disc.
How Do I Dispose of this
Product?
When your DVD/TV has reached the end of its life,
contact your local council regarding available
recycling or disposal options. Do not dispose of
electrical products in the general waste.
Please ensure that used batteries are disposed of safely.
www.bush-radio.co.uk 55
Page 56

14" DVD/TV Combi with Remote Control
Technical Specification
Power Supply
Input AC 220-240V
50/60Hz
Remote Control Batteries 2 x AAA
(supplied)
Number of preset programmes 100
RF Aerial input 75 ohm
(balanced)
Audio output Stereo
56 Customer Helpline: 0870 873 0079
Page 57

Guarantee
This product is guaranteed for 12 months from the date of
original purchase. If any defect arises due to faulty materials
or workmanship, the unit will either be replaced, a refund
given or repaired free of charge (where possible) during this
period by the dealer from whom you purchased the unit.
The guarantee is subject to the following provisions:
• The guarantee is only valid within the boundaries of the
country of purchase.
• The product must be correctly assembled and operated
in accordance with the instructions contained in this
booklet.
• The guarantee does not cover accidental damage,
misuse, or consumable items.
• The guarantee will be rendered invalid if the product is
resold or has been damaged by inexpert repair.
• The manufacturer disclaims any liability for incidental or
consequential damages.
This guarantee is in addition to and does not diminish your
statutory, or legal rights.
DVD142TV
www.bush-radio.co.uk 57
Page 58

Page 59

Page 60

DCS JULY06 DRAFT REV1 DVD142TV
 Loading...