

Page 1
English
Elcometer 355
Coating Thickness Gauge
Standard Model
Operating Instructions
Product Manual
355 Coating Thickness Gauge
For more information: 1300 287 935 / [email protected] / www.burwell.com.au
Copyright 2016 Burwell Technologies
Page 2
English
R
This product meets the Electromagnetic Compatibility Directive. This product is Class B, Group 1
ISM equipment according to CISPR 11 Group 1 ISM product: A product in which there is
intentionally generated and/or used conductively coupled radio-frequency energy which is
necessary for the internal functioning of the equipment itself.
Class B products are suitable for use in domestic establishments and in establishments directly connected
to a low voltage power supply network which supplies buildings used for domestic purposes.
is a registered trademark of Elcometer Limited.
All other trademarks acknowledged.
© Copyright Elcometer Limited. 2009-2011.
All rights reserved. No part of this Document may be reproduced, transmitted, transcribed, stored (in a retrieval
system or otherwise) or translated into any language, in any form or by any means (electronic, mechanical,
magnetic, optical, manual or otherwise) without the prior written permission of Elcometer Limited.
A copy of this Instruction Manual is available for download on our Website via www.elcometer.com.
Doc.No. TMA-0143 Issue 06
Text with Cover No: 4804
355 Coating Thickness Gauge
2 of 48For more information / 1300 287 935
[email protected] / www.burwell.com.au
Page 3

R
1
CONTENTS
Section Page
1 About your gauge . . . . . . . . . . . . . . . . . . . . . . . . . . . . . . . . . . . . . . . . . . . . . . . . . . . . . . . . . . . . . . . . 2
2 Getting started. . . . . . . . . . . . . . . . . . . . . . . . . . . . . . . . . . . . . . . . . . . . . . . . . . . . . . . . . . . . . . . . . . . 5
3 Taking a reading . . . . . . . . . . . . . . . . . . . . . . . . . . . . . . . . . . . . . . . . . . . . . . . . . . . . . . . . . . . . . . . . . 8
4 Calibration - BASE and CAL . . . . . . . . . . . . . . . . . . . . . . . . . . . . . . . . . . . . . . . . . . . . . . . . . . . . . . . 9
5 Batches and memory . . . . . . . . . . . . . . . . . . . . . . . . . . . . . . . . . . . . . . . . . . . . . . . . . . . . . . . . . . . . 10
6 Setup . . . . . . . . . . . . . . . . . . . . . . . . . . . . . . . . . . . . . . . . . . . . . . . . . . . . . . . . . . . . . . . . . . . . . . . . . 12
7 Statistics . . . . . . . . . . . . . . . . . . . . . . . . . . . . . . . . . . . . . . . . . . . . . . . . . . . . . . . . . . . . . . . . . . . . . . 21
8 Transferring readings to a computer . . . . . . . . . . . . . . . . . . . . . . . . . . . . . . . . . . . . . . . . . . . . . . . 22
9 Printing. . . . . . . . . . . . . . . . . . . . . . . . . . . . . . . . . . . . . . . . . . . . . . . . . . . . . . . . . . . . . . . . . . . . . . . . 23
10 Fault Finding / Error Codes . . . . . . . . . . . . . . . . . . . . . . . . . . . . . . . . . . . . . . . . . . . . . . . . . . . . . . . 27
11 Storage. . . . . . . . . . . . . . . . . . . . . . . . . . . . . . . . . . . . . . . . . . . . . . . . . . . . . . . . . . . . . . . . . . . . . . . . 29
12 Maintenance . . . . . . . . . . . . . . . . . . . . . . . . . . . . . . . . . . . . . . . . . . . . . . . . . . . . . . . . . . . . . . . . . . . 29
13 Accessories . . . . . . . . . . . . . . . . . . . . . . . . . . . . . . . . . . . . . . . . . . . . . . . . . . . . . . . . . . . . . . . . . . . . 30
14 Technical Specification . . . . . . . . . . . . . . . . . . . . . . . . . . . . . . . . . . . . . . . . . . . . . . . . . . . . . . . . . . 35
15 Related equipment . . . . . . . . . . . . . . . . . . . . . . . . . . . . . . . . . . . . . . . . . . . . . . . . . . . . . . . . . . . . . . 35
16 Tutorial . . . . . . . . . . . . . . . . . . . . . . . . . . . . . . . . . . . . . . . . . . . . . . . . . . . . . . . . . . . . . . . . . . . . . . . . 36
17 Quick Reference Guide. . . . . . . . . . . . . . . . . . . . . . . . . . . . . . . . . . . . . . . . . . . . . . . . . . . . . . . . . . . 42
355 Coating Thickness Gauge
3 of 48For more information / 1300 287 935
[email protected] / www.burwell.com.au
Page 4

R
2
Thank you for your purchase of this Elcometer 355 Coating Thickness Gauge. Welcome to Elcometer.
Elcometer are world leaders in the design, manufacture and supply of coatings inspection equipment. Our
products cover all aspects of coating inspection, from development through application to post application
inspection.
The Elcometer 355 Coating Thickness Gauge is a world beating product. With the purchase of this gauge
you now have access to the worldwide service and support network of Elcometer. For more information visit
our website at www.elcometer.com
1 ABOUT YOUR GAUGE
The Elcometer 355 Coating Thickness Gauge is a handheld gauge for fast and accurate measurement of
the thickness of coatings.
With a memory of up to 5000 readings in multiple batches and accuracy to ±1%, your gauge is a measuring
system packed with time saving and cost cutting features.
1.1 STANDARDS
The Elcometer 355 can be used in accordance with the following National and International Standards:
FERROUS (F)
ASTM B 499, ASTM D 1186-B, ASTM G 12, BS 3900(C5), BS 5411 (11), DIN 50981, IMO MSC.215 (82),
IMO MSC.244(83), ISO 1461, ISO 2063, ISO 2808-7C, supersedes ISO 2808-6A, BS 3900-C5-6A, BS
5411-11, DIN 50981, ISO 2808-12, ISO 19840, NF T30-124, SSPC-PA2.
355 Coating Thickness Gauge
4 of 48For more information / 1300 287 935
[email protected] / www.burwell.com.au
Page 5

R
3
For the IMO PSPC
a
, the thickness of coatings should be recorded. Your Elcometer 355 can be used for this.
NON-FERROUS (NF)
ASTM D 1400, BS 3900 (C5), BS 5411 (3), BS 5599, DIN 50984, ISO 2360 supersedes BS 5411-3,
ISO 2808-7D supersedes BS 3900-C5-6B, BS 5411-3, DIN 50984, ISO 2808-6B, ISO 2808-12,
ASTM B244 (probes N1, N4).
FERROUS AND NON-FERROUS (FNF)
AS 2331.1.4, AS 3894.3-B, AS/NZS 1580.108.1, ASTM D 7091 supersedes ASTM D 1186, ASTM D 1400,
ASTM E 376, EN 13523-1 supersedes ECCA T1, ISO 2808-12, US NAVY NSI 009-32,
US NAVY PPI 63101-000.
a. International Marine Organisation, Performance Standard for Protective Coatings.
355 Coating Thickness Gauge
5 of 48For more information / 1300 287 935
[email protected] / www.burwell.com.au
Page 6
R
4
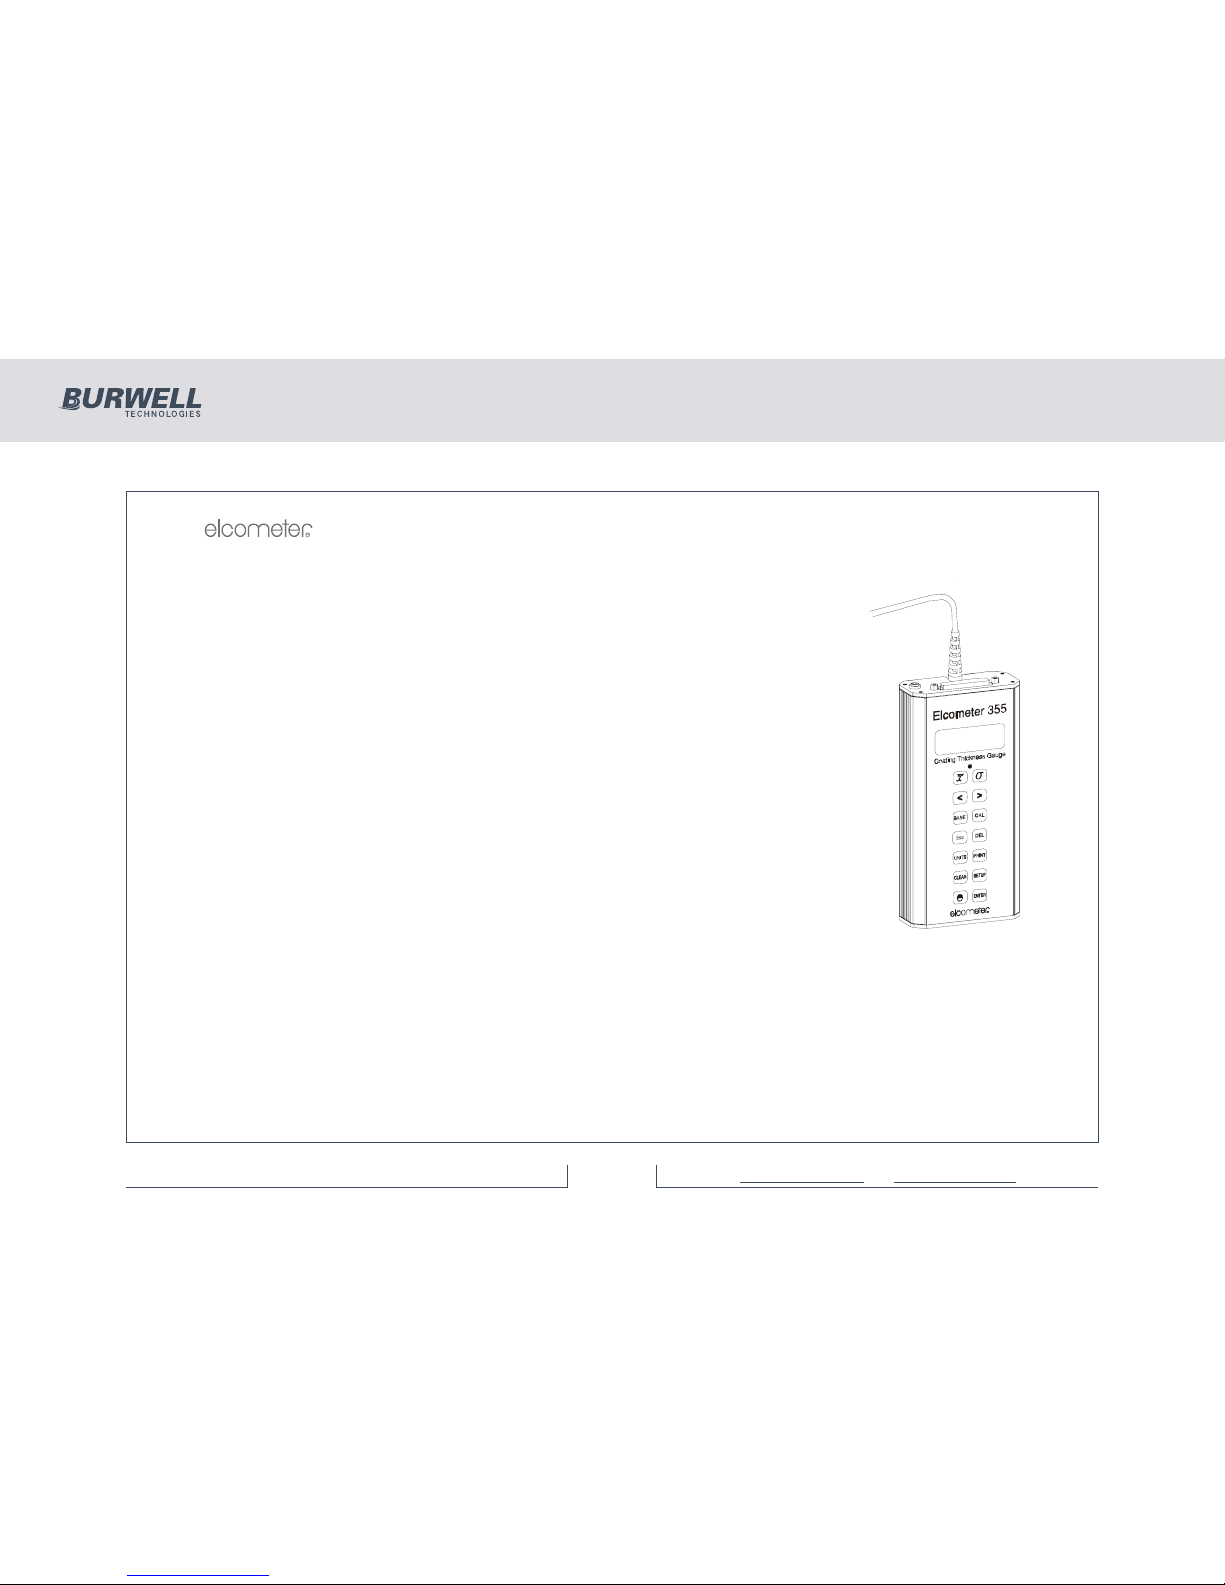
1.2 WHAT THE BOX CONTAINS
• Elcometer 355 Standard Gauge
• Leather carry case
• Precision Hand Grip
• Earpiece
• CD containing data collection software
• PC Cable
• Batteries
• Operating instructions
The gauge is packed in cardboard and foam packaging. Please ensure that this
packaging is disposed of in an environmentally sensitive manner. Consult your Local
Environmental Authority for further guidance.
To maximise the benefits of your new Elcometer 355, please take some time to
read these Operating Instructions.
Do not hesitate to contact Elcometer or your Elcometer supplier if you have any
questions.
355 Coating Thickness Gauge
6 of 48For more information / 1300 287 935
[email protected] / www.burwell.com.au
Page 7
R
5
2 GETTING STARTED
2.1 REMOVING THE CASE
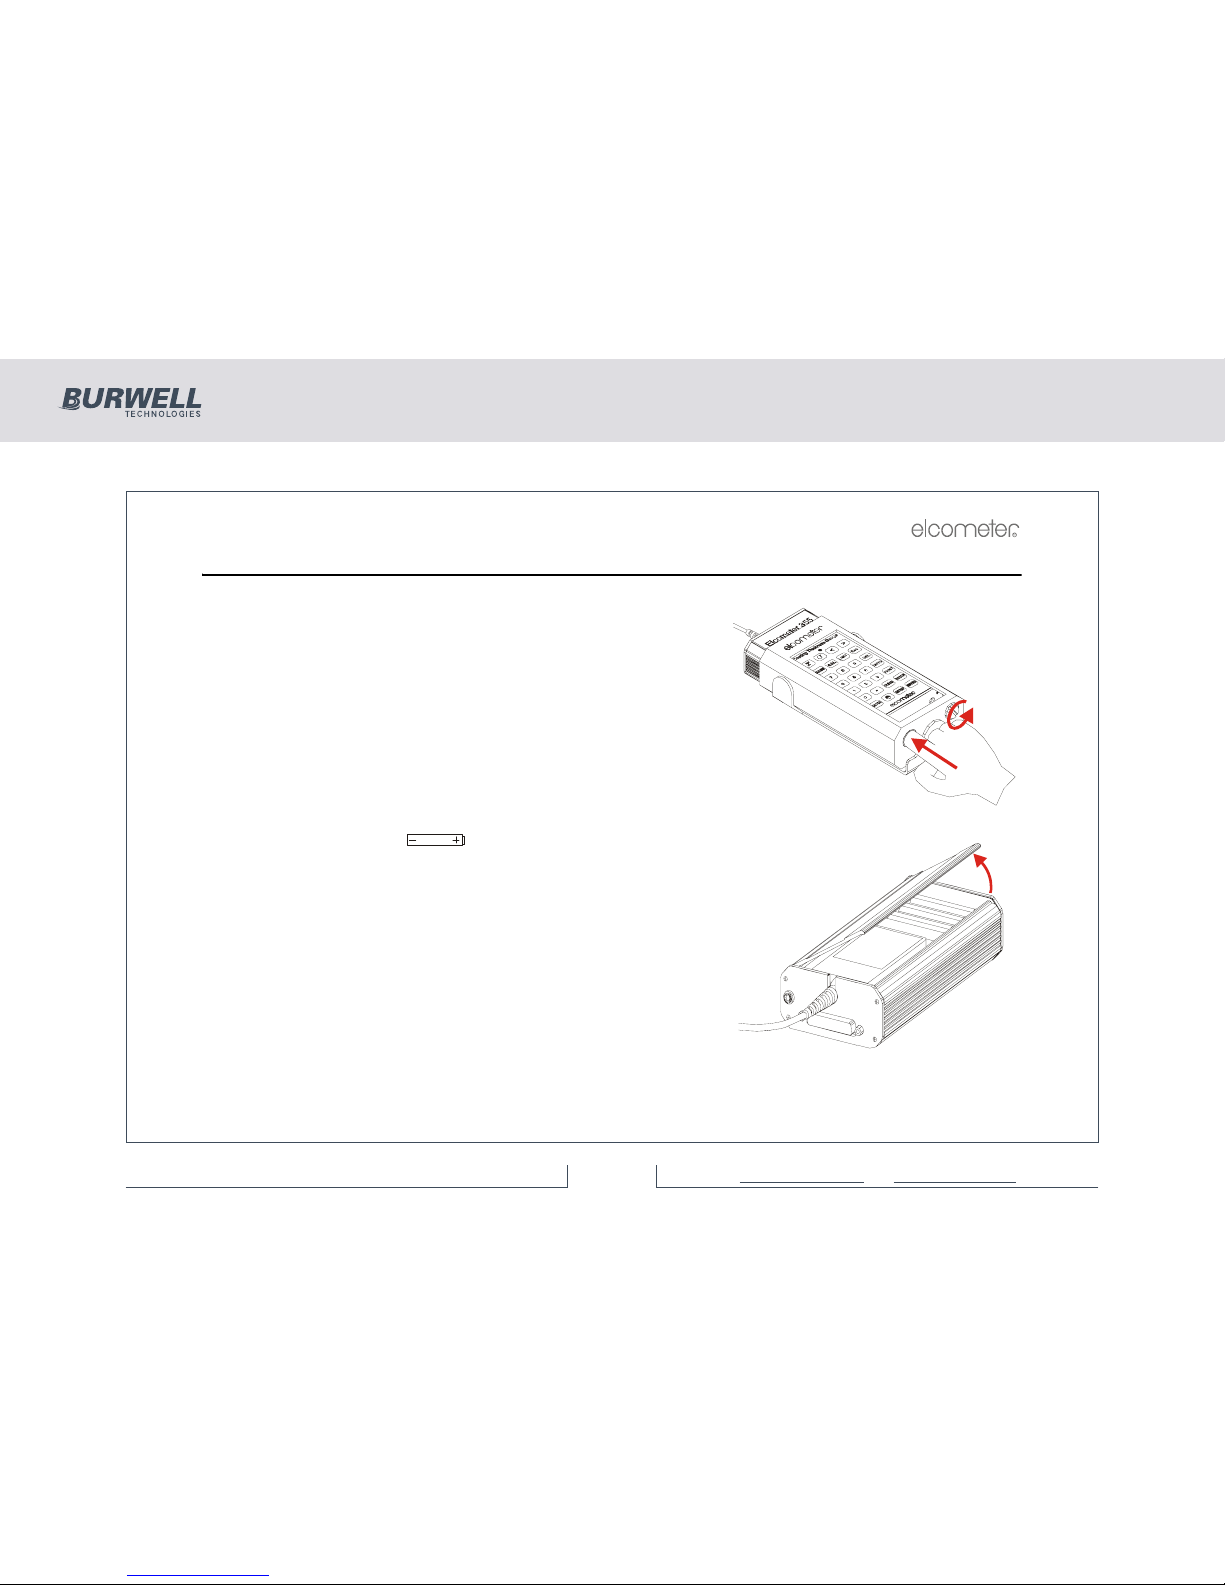
To remove the leather case to gain access to the module and
battery compartments, undo the retaining screw located on the
bottom of the case and remove the gauge by pushing it through
the hole.
2.2 FITTING BATTERIES
Batteries are located under the cover at the rear of the gauge.
Fit three LR6 (AA), alkaline dry batteries, or rechargeable
equivalent; take care to ensure correct battery polarity.
When the battery symbol is shown on the display, the
batteries should be replaced. When the symbol starts flashing,
the batteries will last approximately one more hour.
Note: Remove the batteries from the instrument if it is to remain
unused for a long period of time. This will prevent damage to the
instrument in the event of malfunction of the batteries.
Note: All batteries must be disposed of carefully to avoid
environmental contamination. Please consult your local
Environmental Authority for information on disposal in your
region.
Do not dispose of any batteries in fire.
(Elcometer 355
Top model shown)
355 Coating Thickness Gauge
7 of 48For more information / 1300 287 935
[email protected] / www.burwell.com.au
Page 8
R
6
2.3 CONNECTING A PROBE MODULE
1. Ensure the probe is suitable for the measurements to be made.
2. Switch off the gauge.
3. Open the cover at the back of the gauge.
4. Insert the probe module.
5. Replace the cover.
2.4 SWITCHING THE GAUGE ON AND OFF
• To switch your gauge on, press and hold [ ].
The red LED flashes, the gauge clicks and all segments of the display are illuminated with the
backlight on. The Software Version Number is then displayed.
The instrument will then start up in the mode last used.
Completion of start-up is indicated by one long beep and the red LED flashing.
• To switch your gauge off, press and hold [ENTER] for three seconds.
Your gauge can also be set to switch off automatically - see “Date and time” on page 14.
355 Coating Thickness Gauge
8 of 48For more information / 1300 287 935
[email protected] / www.burwell.com.au
Page 9
R
7
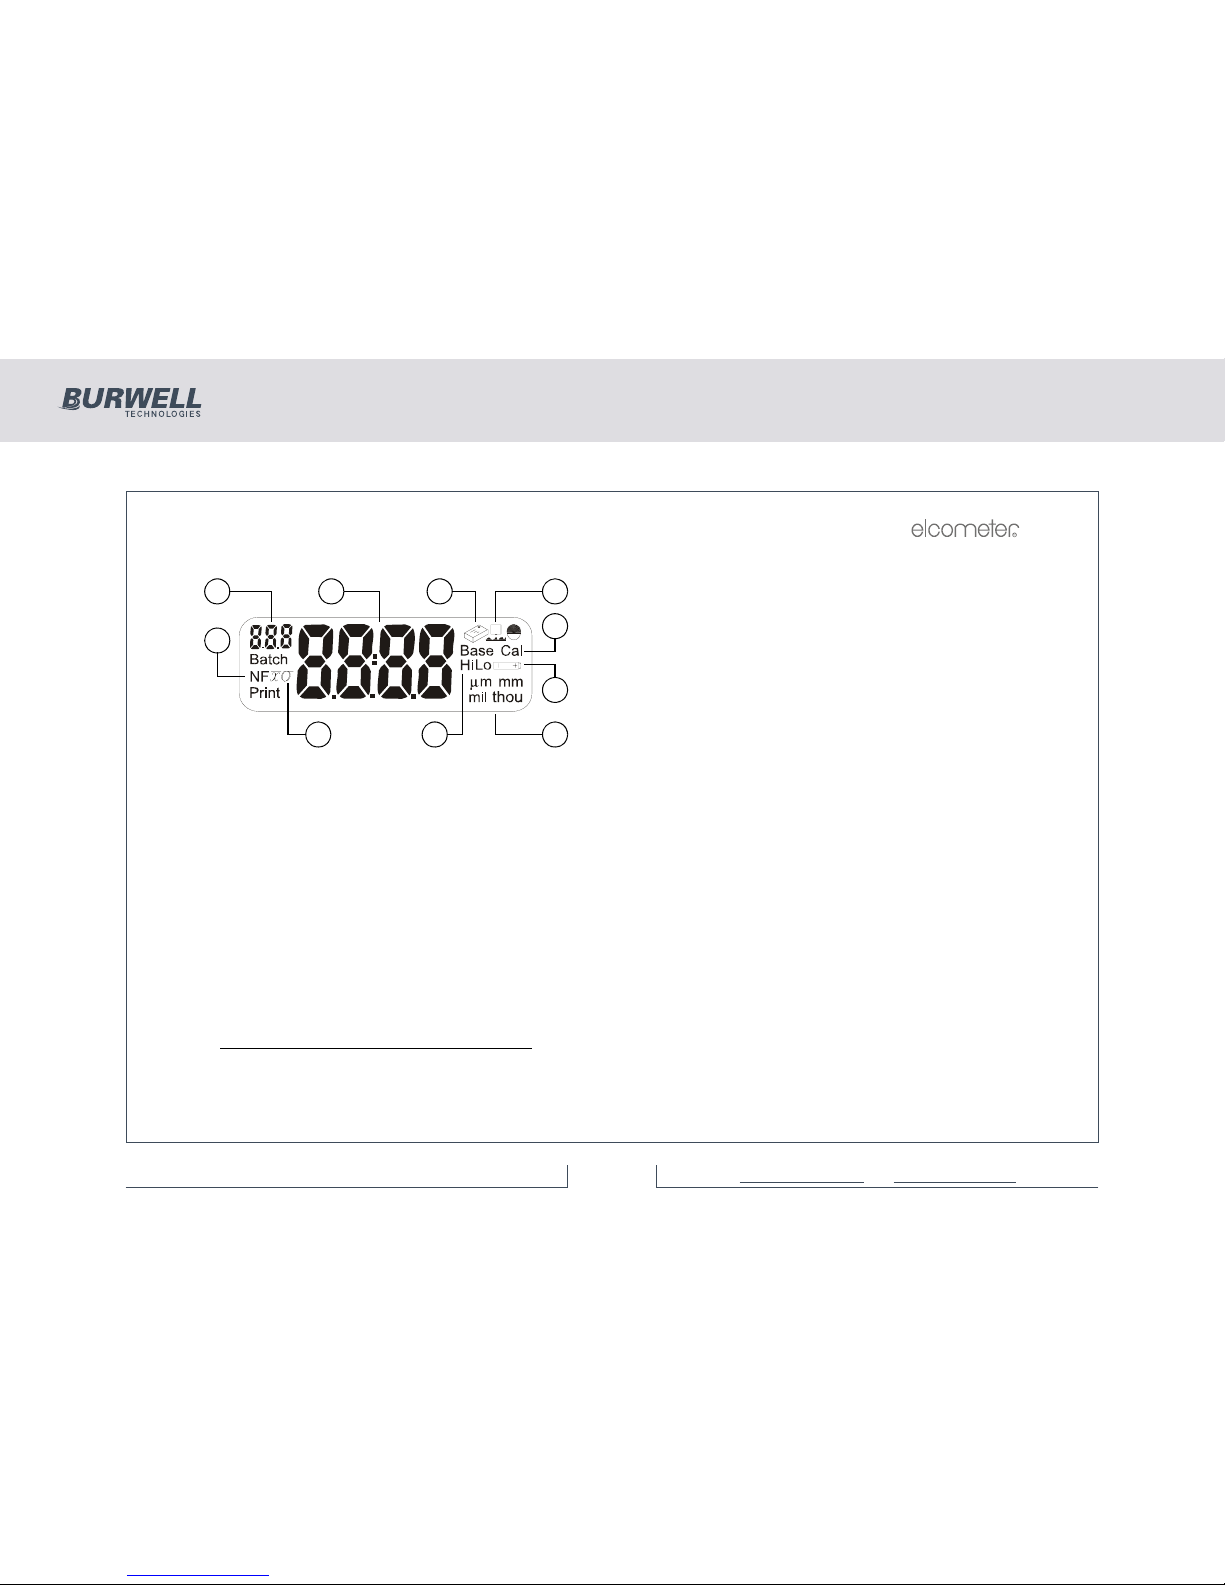
2.5 THE DISPLAY
1. Reading number
2. Reading/menu item/value
3. Service required
4. Rough surface
5. Calibration type
6. Battery condition
7. Units
8. Limits
9. Average/Standard deviation
10. Non-ferrous/Ferrous
2.6 INTERFACE
A data output interface is located on the top of your gauge.
2.7 SELECTING A LANGUAGE
The Elcometer 355 has a number of languages built-in.To select a language, see “Language function” on page 17.
2.8 CHANGING UNITS
Your gauge can display coating thickness in µm
b
(microns), mm, mil and thou.
To change units, press [UNITS].
Note: When units are set to mm, the resolution of the display is such that only 1 µm resolution may be
shown, e.g. 10.8 µm would be displayed as ‘0.011’ mm.
b. µm will not be available as an option on probes which have a range greater than 9999 µm
1 3 4
5
6
789
10
2
355 Coating Thickness Gauge
9 of 48For more information / 1300 287 935
[email protected] / www.burwell.com.au
Page 10
R
8
3 TAKING A READING
Switch on the gauge.
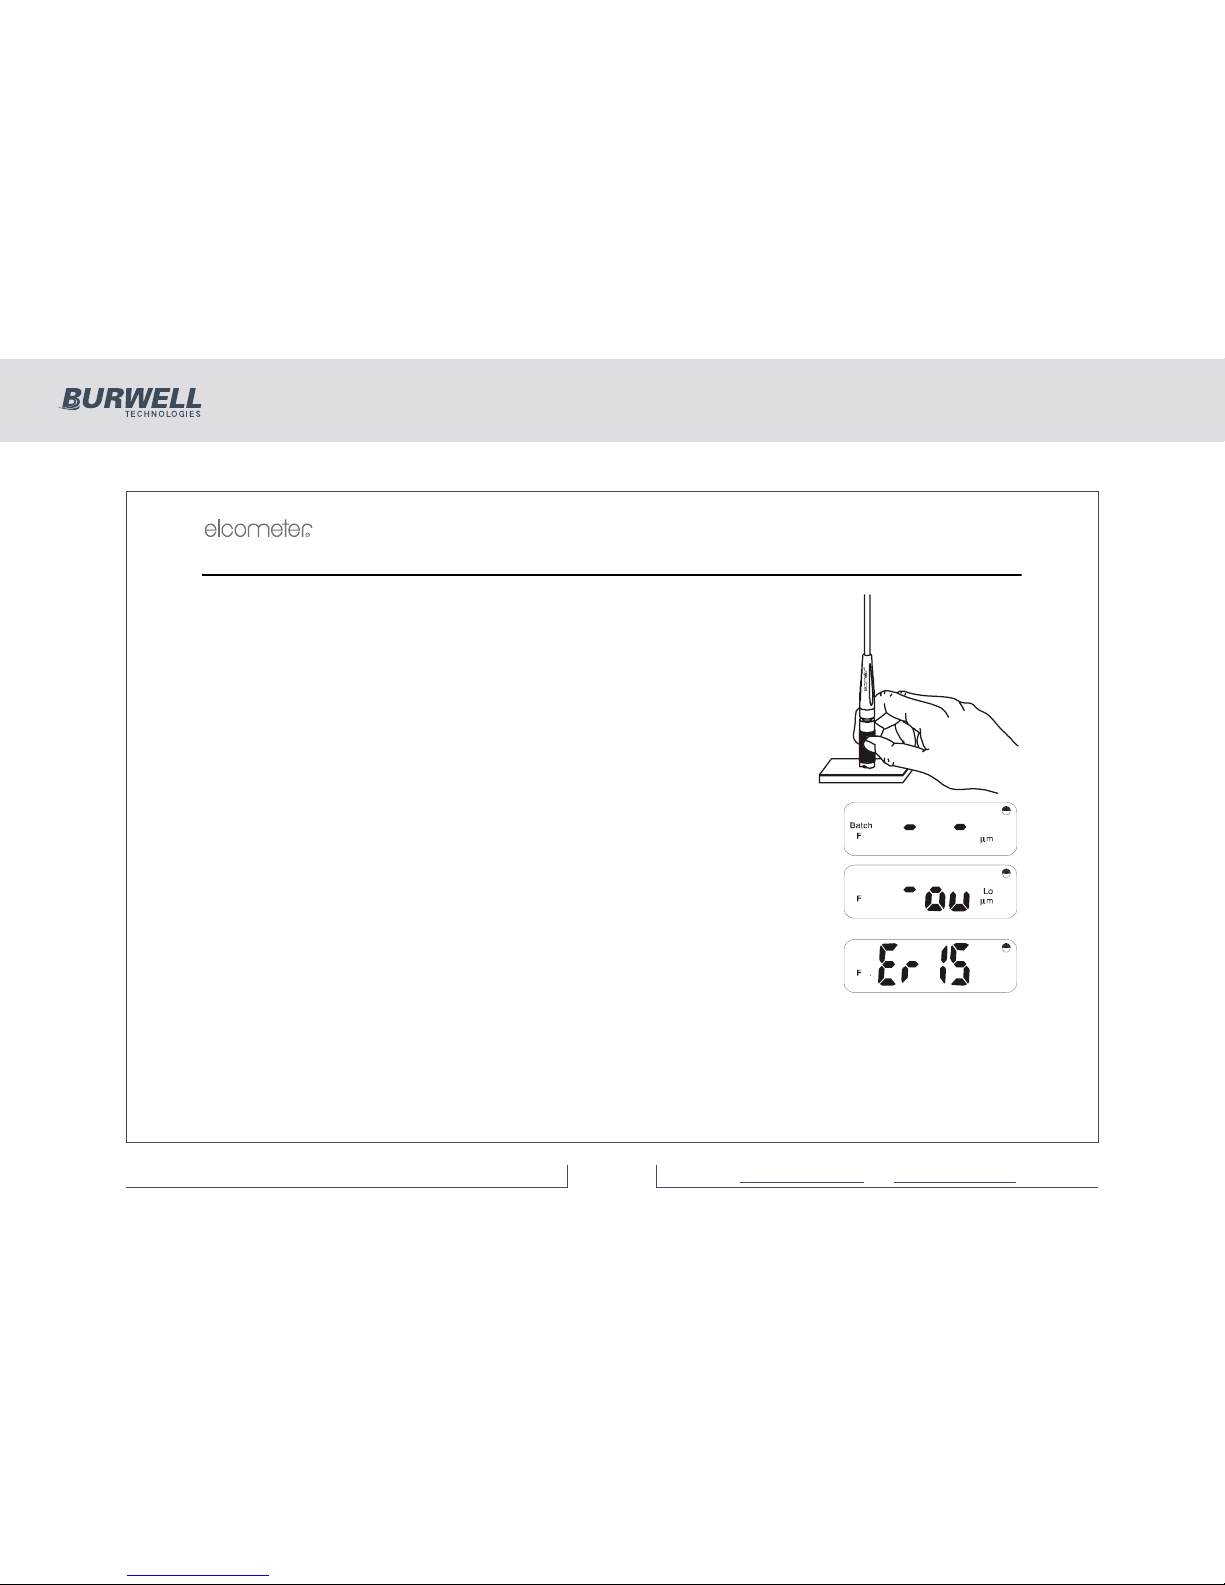
Place the probe on the surface to be measured. The reading may be
inaccurate if the probe is not held as shown.
The green LED will flash and a beep will sound when a valid reading has been
taken.
The coating thickness is shown on the display.
If the reading is just above the range of the module, the display shows:
In certain base conditions a negative over range can occur, indicated by:
In either of these two cases, check and re-calibrate if necessary - see “Calibration
- BASE and CAL” on page 9.
In some conditions, the display may show error codes ‘E14’, ‘E15’, etc. For
details of these error codes, see “Fault Finding / Error Codes” on page 27.
To save readings into memory (batching), refer to the instructions given in
“Batches and memory” on page 10.
R
355 Coating Thickness Gauge
10 of 48For more information / 1300 287 935
[email protected] / www.burwell.com.au
Page 11
R
9
4 CALIBRATION - BASE AND CAL
1. Press [BASE] for low end calibration on a zero plate or low value foil and [CAL] for higher foil.
2. Take a number of readings on the required calibration thickness. (Uncoated material for zero or base,
a thin foil for rough surface or unusual materials and a thick foil for cal).
(A wide range of foils is available - see “Foils” on page 32.)
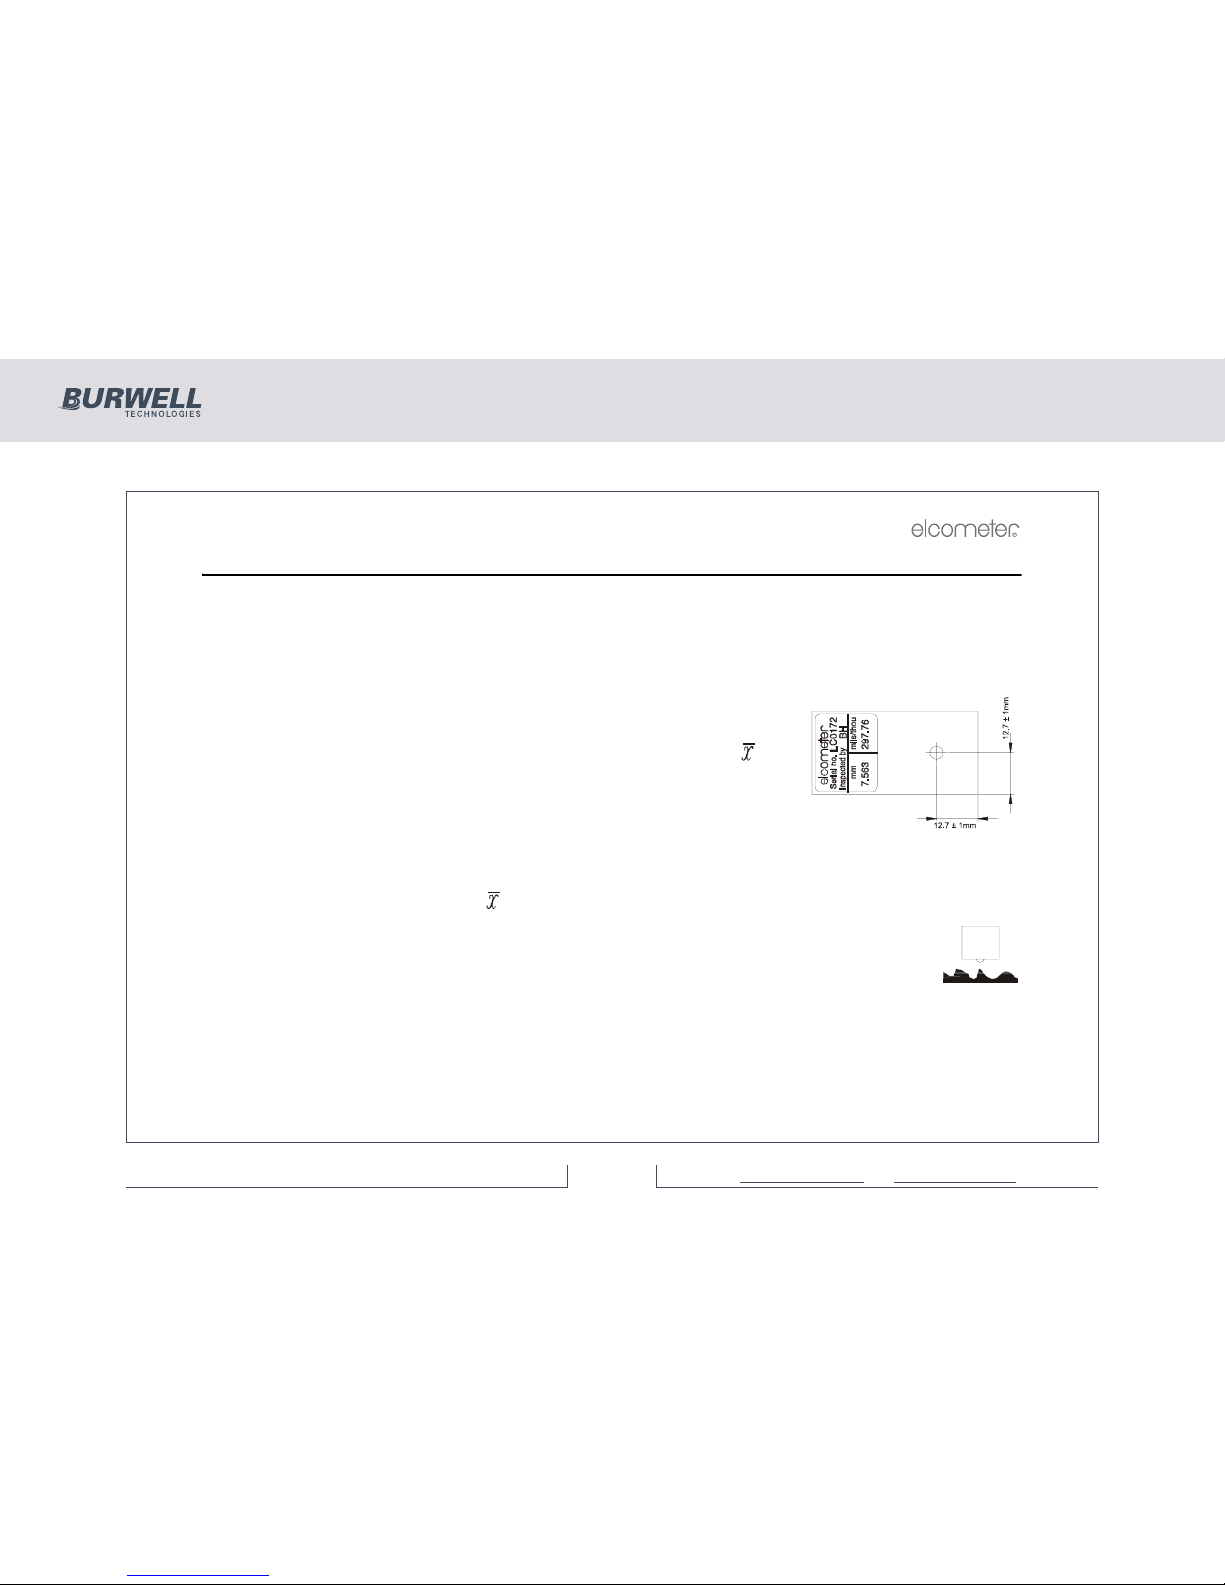
The foil value shown on the label applies to a measurement position
as indicated:
The display will show an average value - indicated by the [ ]
symbol.
3. When the base or cal value shown on the display is stable, then
adjust the display to the required value e.g. ‘0’ or the foil value; use
the [>] (CalUp) or [<] (CalDown) keys to adjust the value and then
press [ENTER].
The ‘base’ or ‘cal’ symbols and [ ] will now be removed from the display.
If a base value greater than zero is entered, the rough surface symbol will be displayed.
This symbol will disappear from the display if the base is reset to zero (0).
Note: If ‘base’ or ‘cal’ are used with regular values, the [BASE] or [CAL] keys may be pressed to recall the
last value entered to the display in order to save re-entering the numeric data. [ENTER] is used to confirm
the display value in memory.
355 Coating Thickness Gauge
11 of 48For more information / 1300 28 7 935
[email protected] / www.burwell.com.au
Page 12
R
10
5 BATCHES AND MEMORY
5.1 SELECTING A BATCH
Batch numbers between 1 and 25 can be selected as follows.
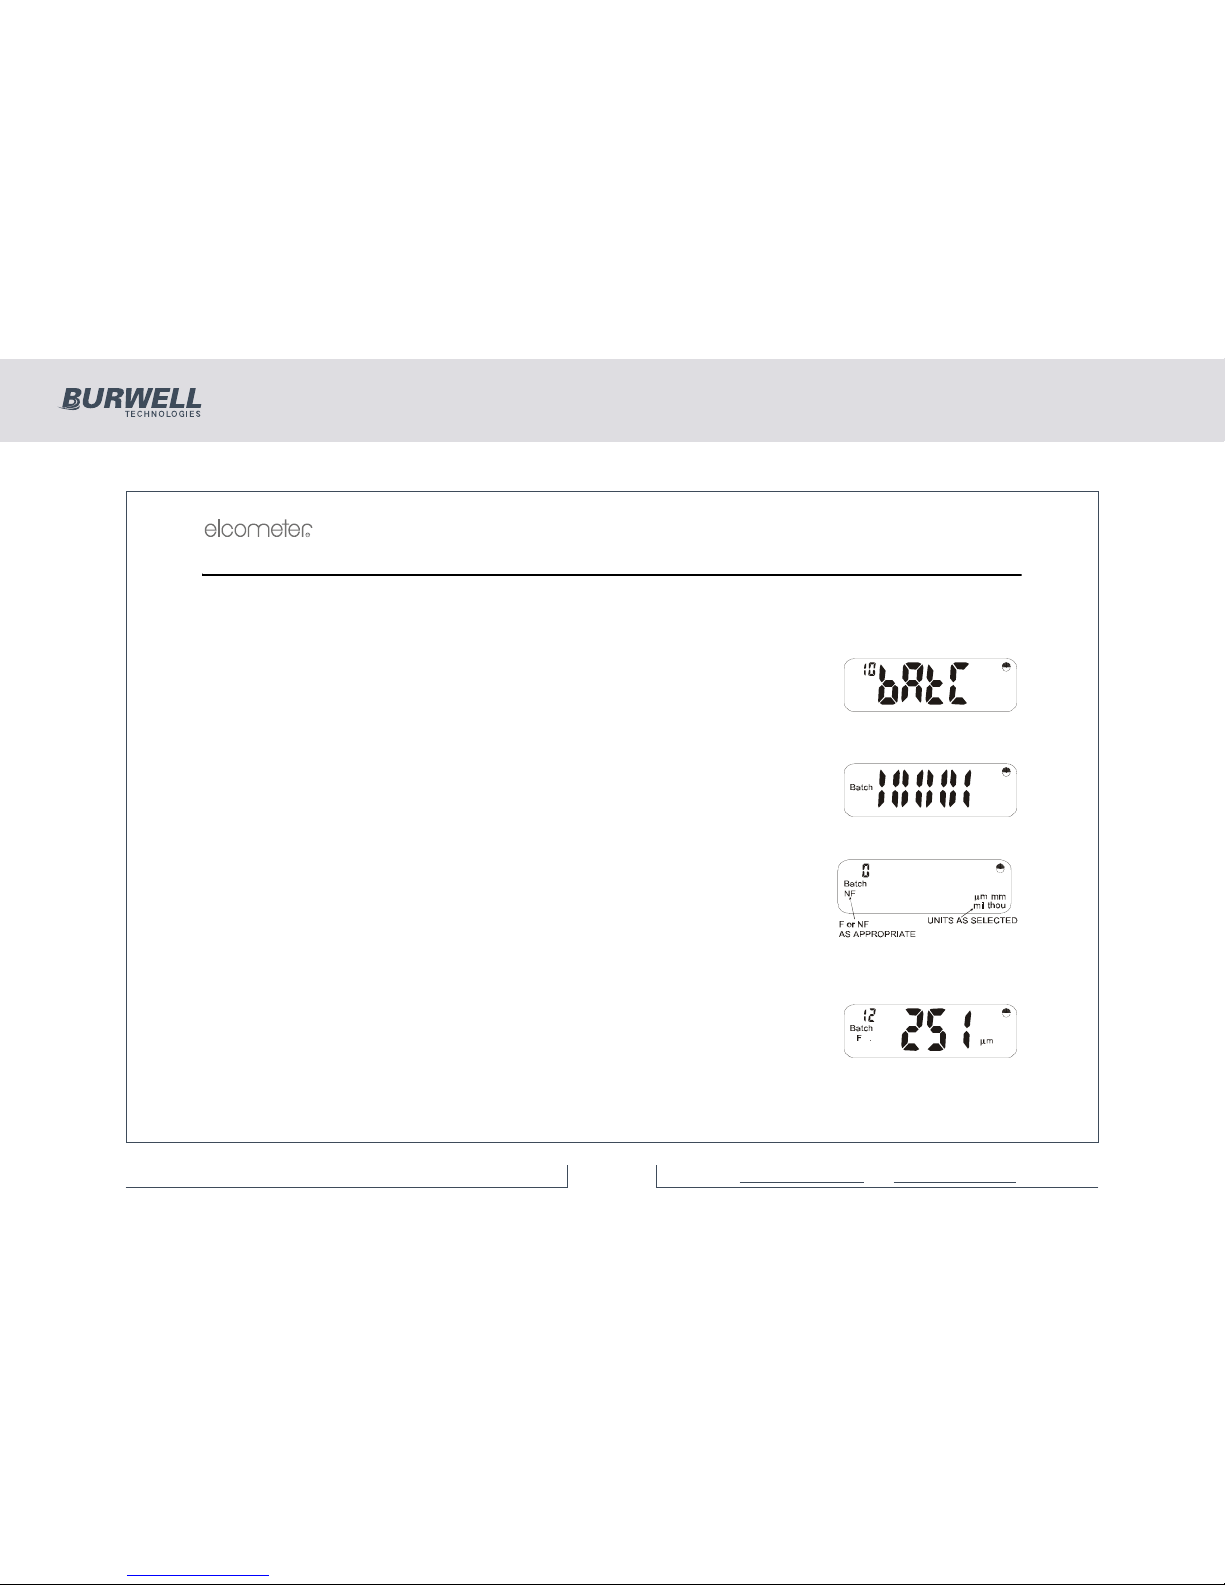
With the instrument switched on, press [SETUP]. The display will show:
If a batch is selected the batch symbol is on.
This signifies the Auto Batch Entry Menu.
Press [ENTER].
An indication of the remaining memory will be displayed:
Bars will be removed from this display as the memory is filled. The upper bars
show approximately 11% increments and the lower bars approximately 1%
increments.
If the batch is new, the display will be blank and ‘0’ will be shown as the reading
no:
Batch numbers from 1 to 25 are preset and can be shown in the display by
pressing [<] or [>] until the batch number required is visible.
When the correct batch number is displayed, press [ENTER] to load this batch in
Auto batch mode.
If data exists in the batch selected, the last reading will be displayed.
355 Coating Thickness Gauge
12 of 48For more information / 1300 287 935
[email protected] / www.burwell.com.au
Page 13
R
11
or, if it is a new batch, then ‘0’ is displayed as a reading number and the reading
display is blank.
If the existing batch has been created with a different module to the one currently
connected, the display shows ‘E14’.
Immediate mode is designated as ‘BATCH 0’. Returning to immediate mode from batch mode clears all
previous immediate mode data and starts at reading ‘0’.
5.2 CLEAR/DELETE BATCH DATA
Data within a batch may be ‘cleared’ leaving the probe type and calibration. Alternatively the batch data and
its associated probe type and calibration may be ‘deleted’.
CLEARING BATCH DATA
Select the batch to be cleared - see “Selecting a batch” on page 10
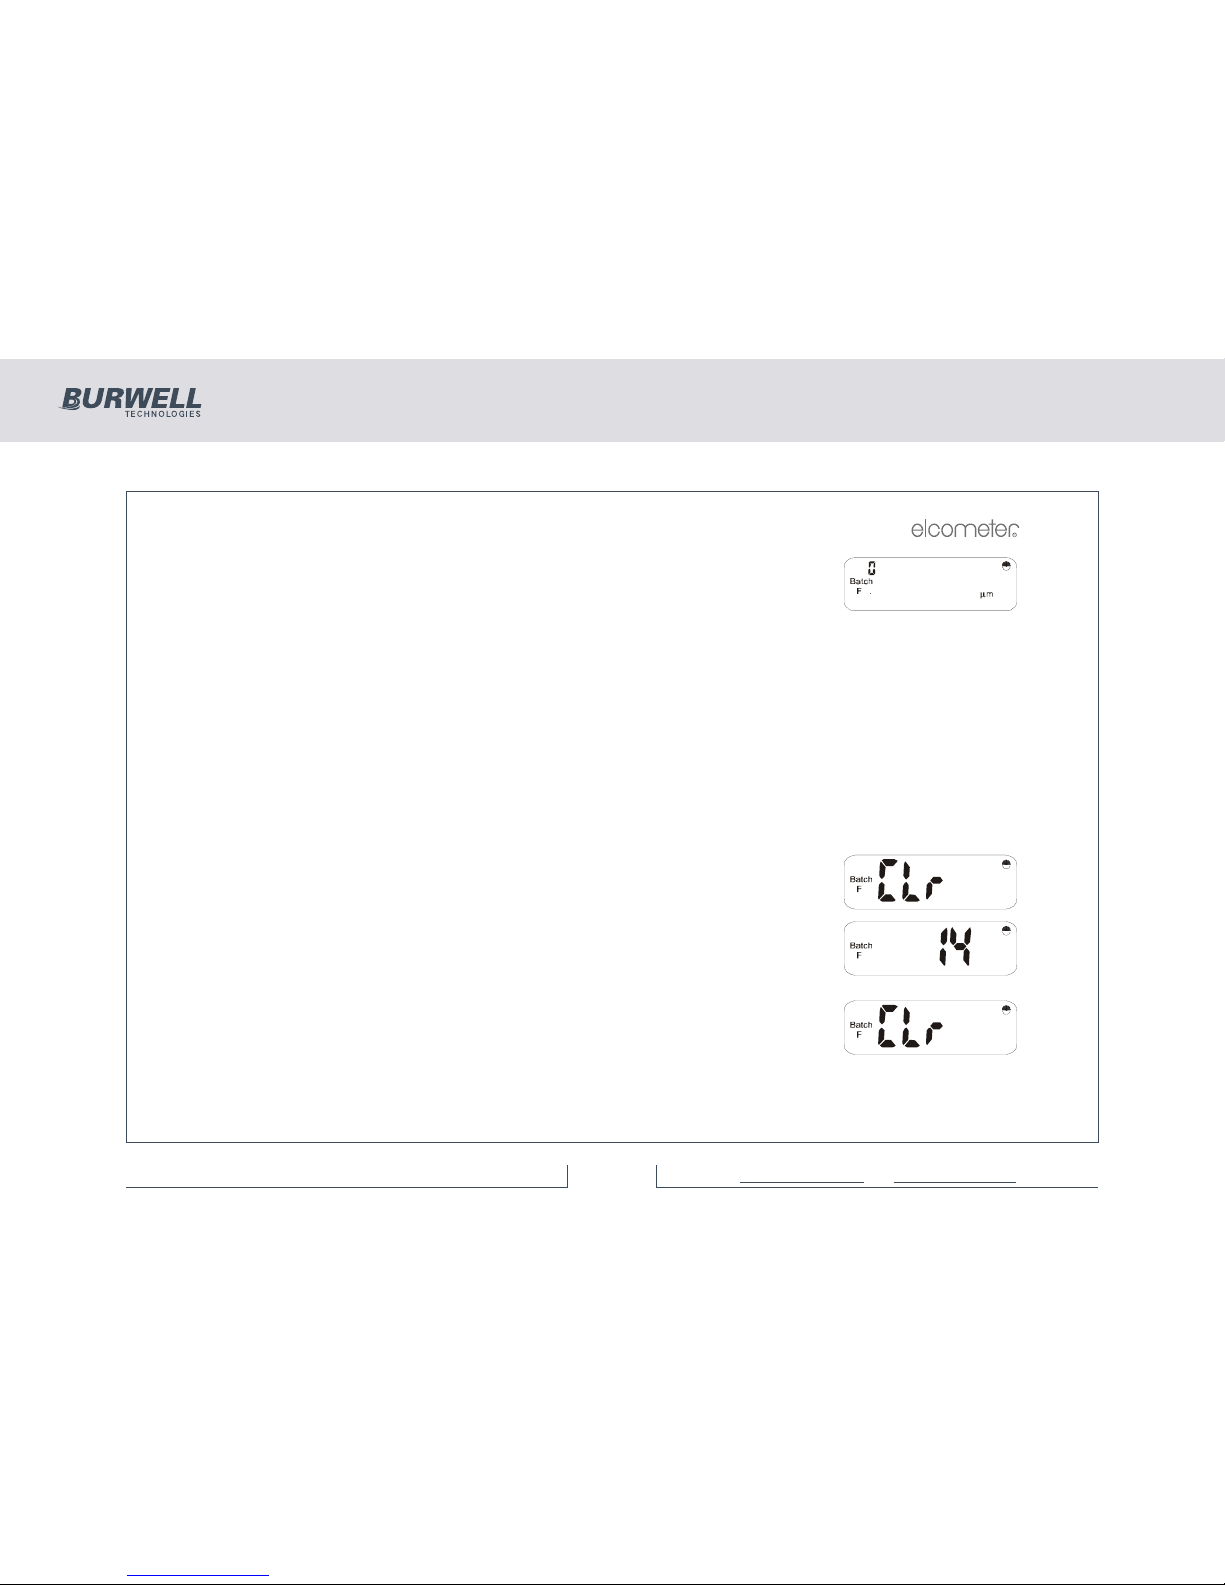
Press [CLEAR] and the display will alternate between ‘Clr’ and ‘batch no’ as
shown (batch number 14 in this example).
Press [ENTER] to clear the selected batch. If ‘Batch 0’ is selected and [CLEAR] is
pressed, then all batches may be cleared and the display will alternate as shown:
355 Coating Thickness Gauge
13 of 48For more information / 1300 287 935
[email protected] / www.burwell.com.au
Page 14
R
12
alternating with
Press [ENTER] to clear all batches, or [Esc] to cancel the operation. Press [Esc]
again to return to immediate mode.
DELETING BATCH DATA
Select the batch to be deleted - see “Selecting a batch” on page 10.
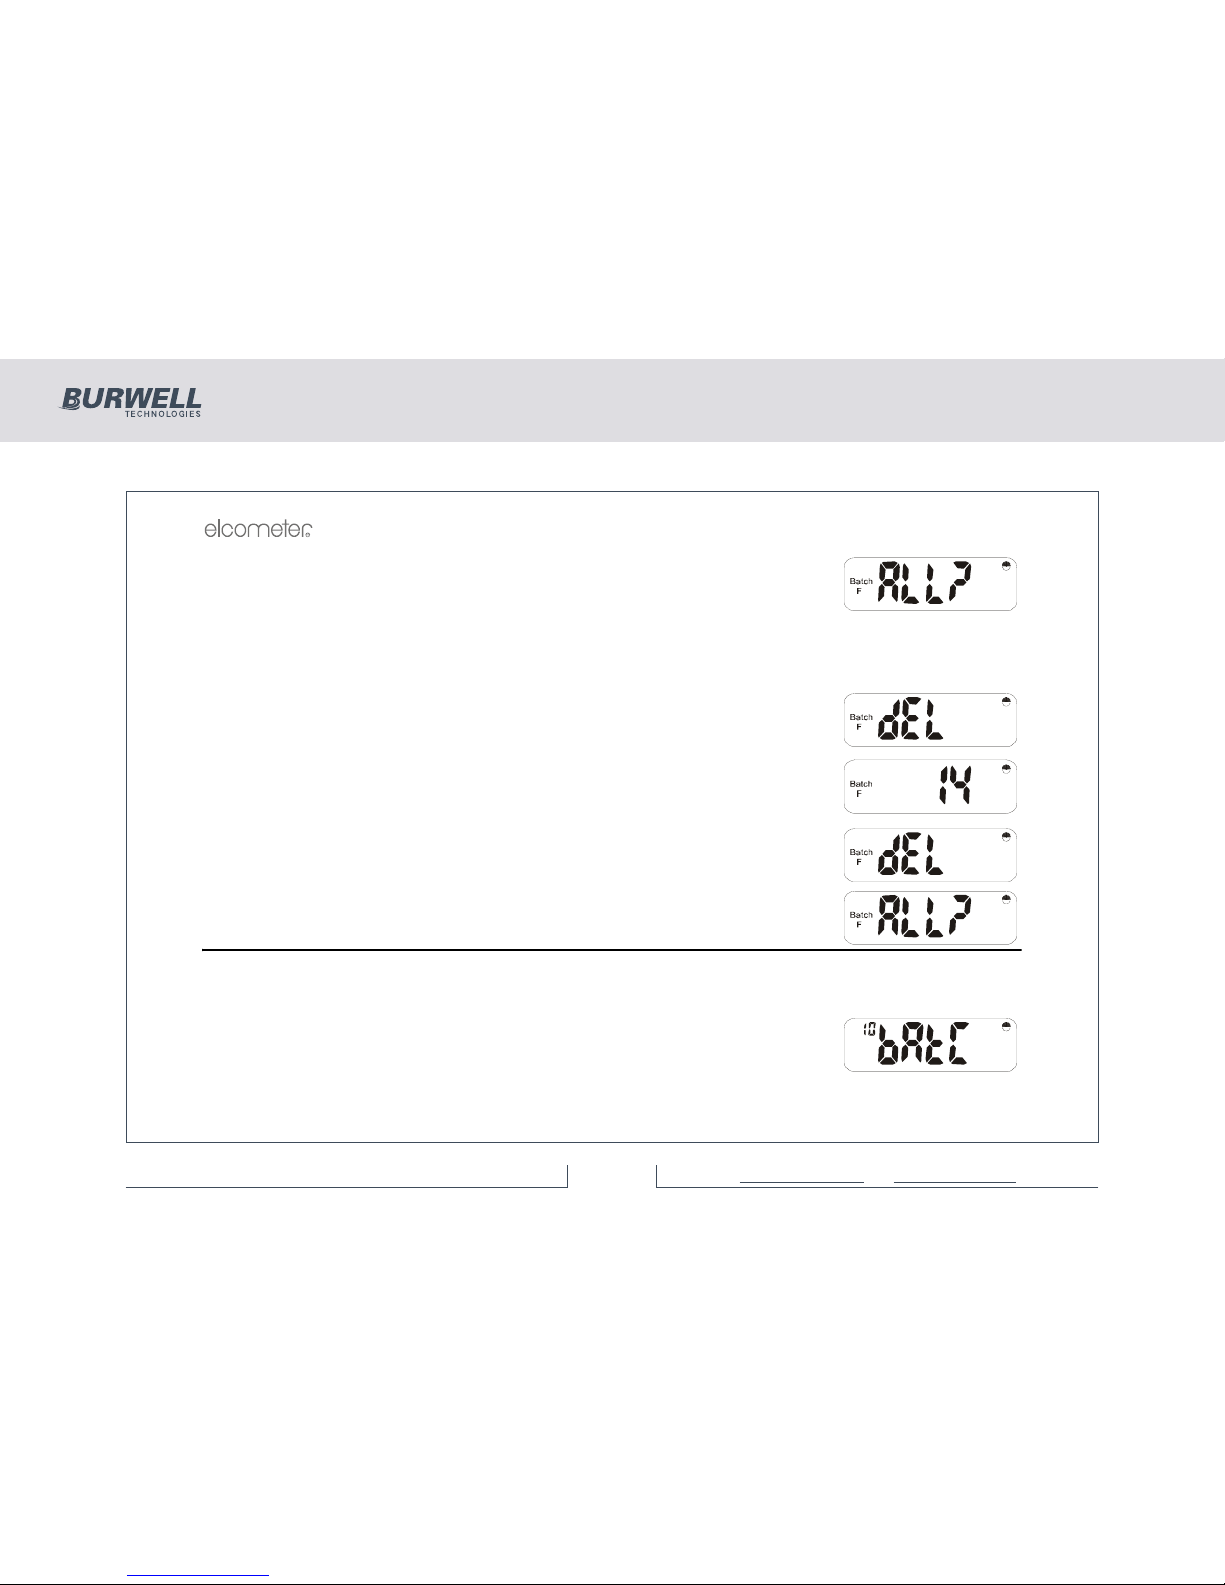
Press [DEL] and the display will alternate between ‘dEL’ and ‘batch no’ as shown
(batch number 14 in this example).
Press [ENTER] to delete the selected batch or [Esc] to cancel the operation.
If ‘Batch 0’ is selected and [DEL] is pressed, then all batches may be deleted and
the display will alternate between ‘dEL’ and ‘ALL?’
Press [ENTER] to delete all batches or [Esc] to stop the operation.
6 SETUP
The setup mode enables the User to adjust a number of different functions to suit the way the instrument is
operated. The setup mode is based around 10 functions, each of which has sub-functions.
After pressing [SETUP], Function No 10 (for auto batching mode) will be
displayed:
355 Coating Thickness Gauge
14 of 48For more information / 1300 287 935
[email protected] / www.burwell.com.au
Page 15
R
13
Other functions may be selected by using [<] or [>] to go through the list. If [<] or [>] are pressed the
individual functions are displayed and [ENTER] must then be pressed to select that function for modification.
The symbol ‘nA’ in the display indicates that the function is not available in the Standard version of software.
Once a function is entered, [<] or [>] are used to either select the alternatives, or modify the value.
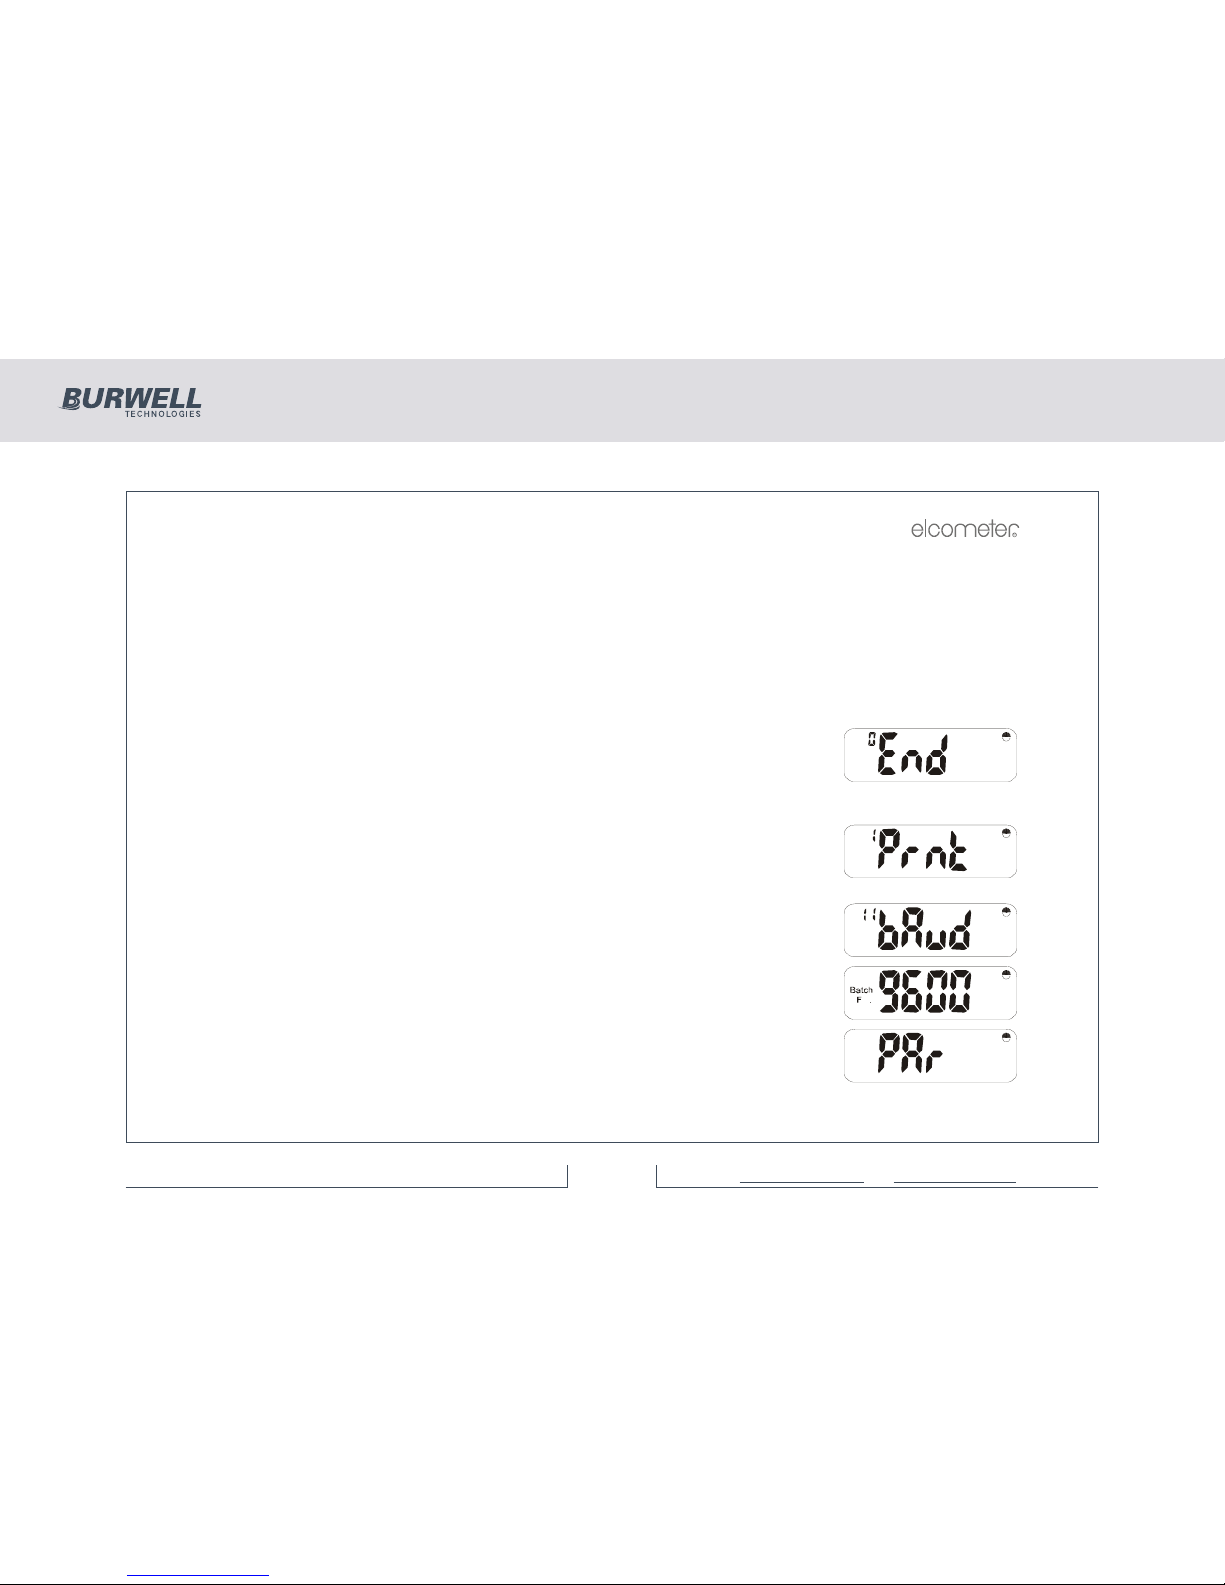
Sub-functions are displayed using a second number in the ‘n’ display. e.g. ‘11’ for baud function within ‘Prnt’.
Select the required value for the function or sub-function by pressing [ENTER]. Exit the function by pressing
[SETUP] the required number of times (or [Esc]) to step back through the Sub Menus.
This display signifies the end of each menu’s options.
The following sections describe each function (in numerical order).
6.1 PRINTER SETUP FUNCTIONS
Having pressed [SETUP] use [<] or [>] to select:
Press [ENTER].
Printer SetUp Sub-Functions
For serial printing, the printer’s baud rate must be selected in the range 30038,400.
Press [ENTER] and use [<] or [>] to select one of the options which are available
e.g.
Press [ENTER] to set this option to required rate and return to the Printer SetUp
Menu, or [Esc] to cancel the operation.
355 Coating Thickness Gauge
15 of 48For more information / 1300 287 935
[email protected] / www.burwell.com.au
Page 16
R
14
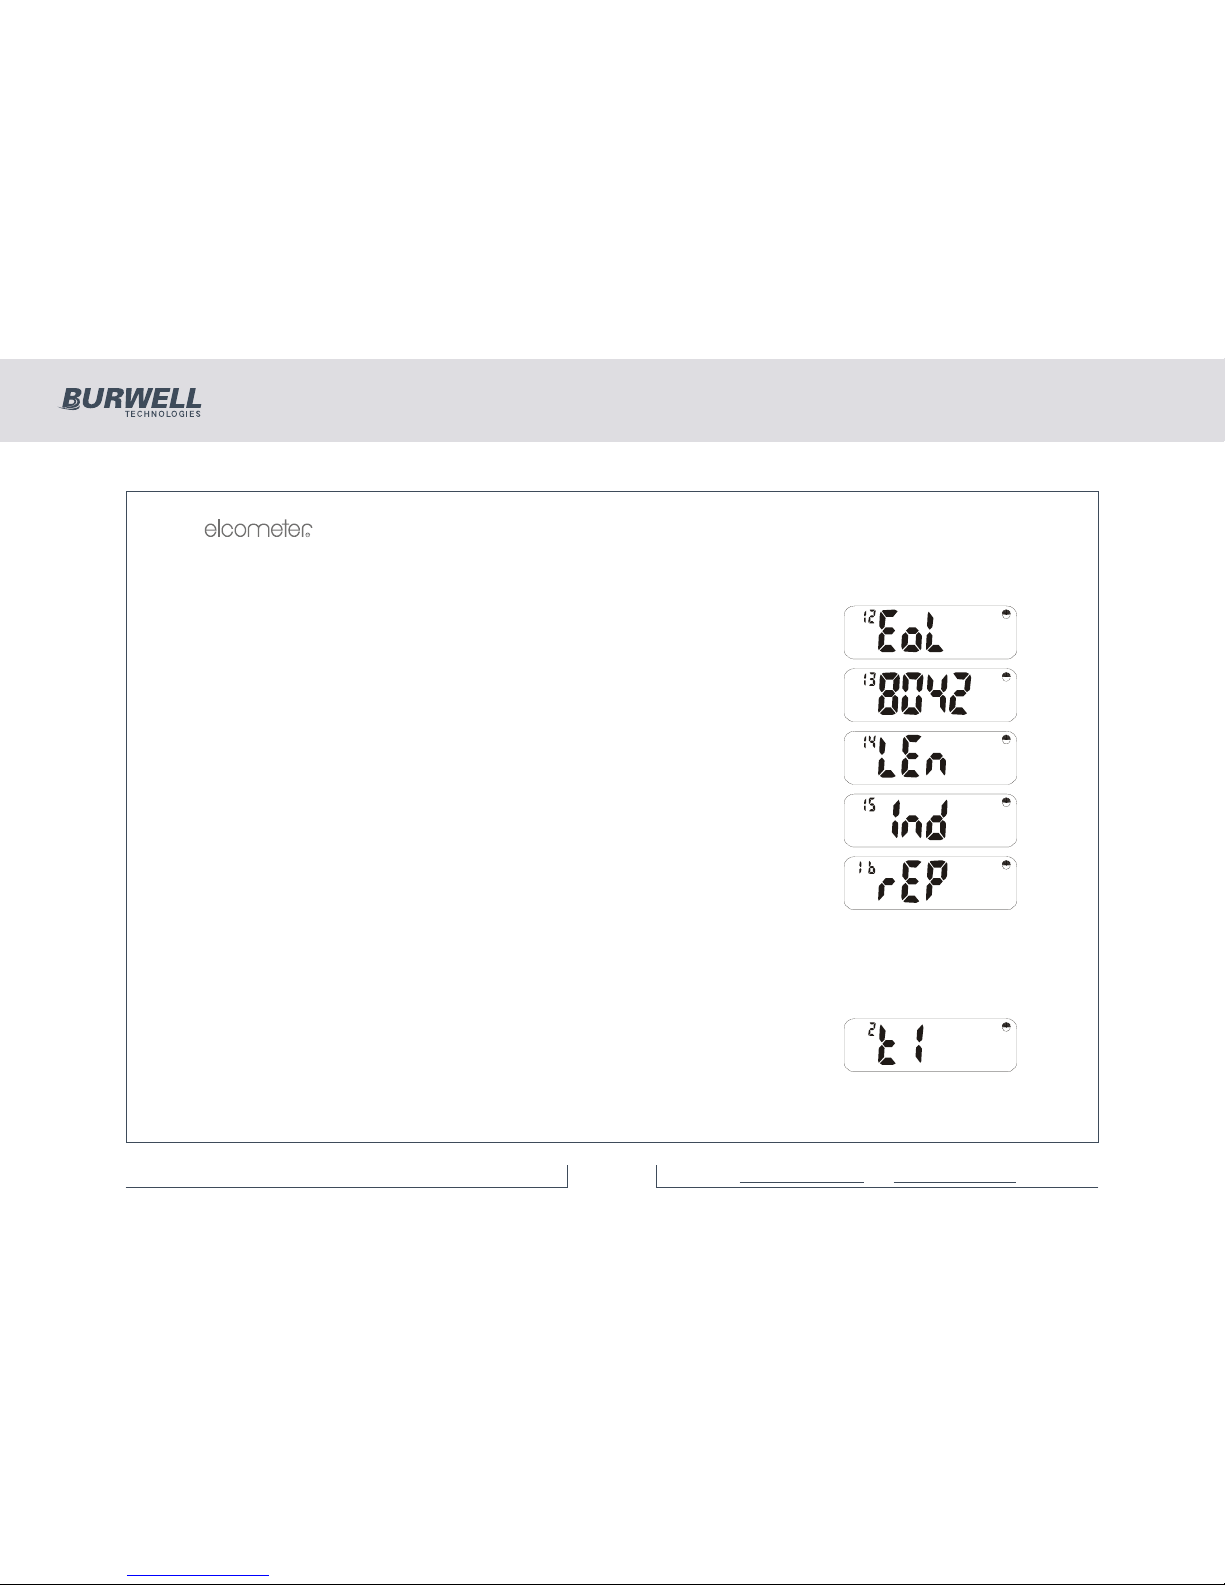
Continue stepping through the Printer SetUp Menu by using [>]. Press [ENTER] at the required option and
use [<] and [>] to select within that option ([Esc] cancels the operation):
End of line character is Cr or CrLF.
Selects 80 or 42 column printing (42 col. for Elcometer Portable Printer).
Page length 0-100 lines (0 for continuous printing).
0-10 spaces of indentation from left (not available with 42 column printer).
Type of report: Full or PArt (no readings).
6.2 DATE AND TIME
When setting the date and time, the display flashes a 2 digit pair for day, month, hours or minutes. These
may be adjusted up or down by using [<] and [>] respectively. The year is a 4 digit number with limits of
1994 and 2093 and is adjusted using the [<] and [>] keys as before.
Having pressed [SETUP], use [<] or [>] to select, followed by [ENTER]:
Date and Time Sub Functions.
355 Coating Thickness Gauge
16 of 48For more information / 1300 287 935
[email protected] / www.burwell.com.au
Page 17
R
15
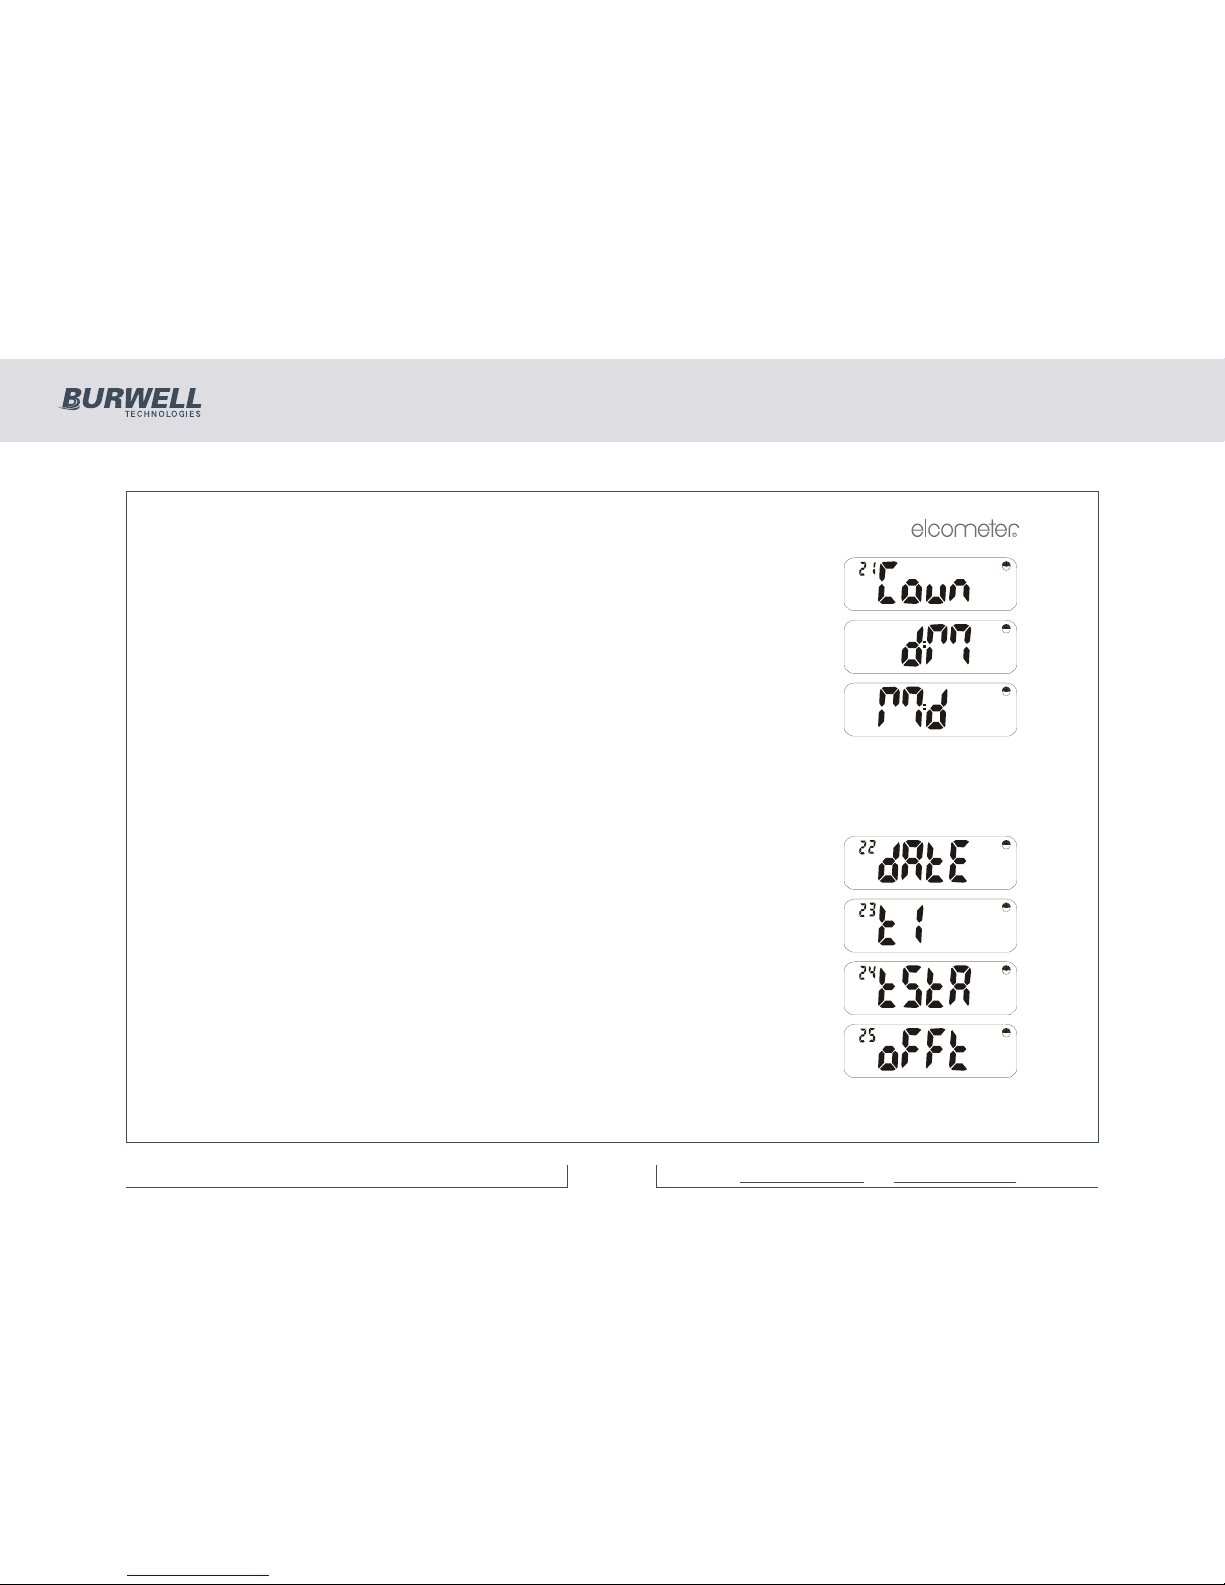
Use [<] or [>] to select any of the following five sub functions:
Date format by Country
There are two date formats available:
or
d:M for Day:Month (UK)
M:d for Month:Day (USA)
Press [ENTER] or [Esc] to return to the ‘Coun’ display.
Continue stepping through the time and date functions by using [>]. Press [ENTER] at the required option
and use [<] and [>] to select within that option ([Esc] cancels the operation):
Set day/month and year).
Set time of day.
Time stamp (not available on Elcometer 355 model Standard).
Switch off timeout period in minutes (1-30) or 0 for none.
355 Coating Thickness Gauge
17 of 48For more information / 1300 287 935
[email protected] / www.burwell.com.au
Page 18
R
16
6.3 BEEPER FUNCTION
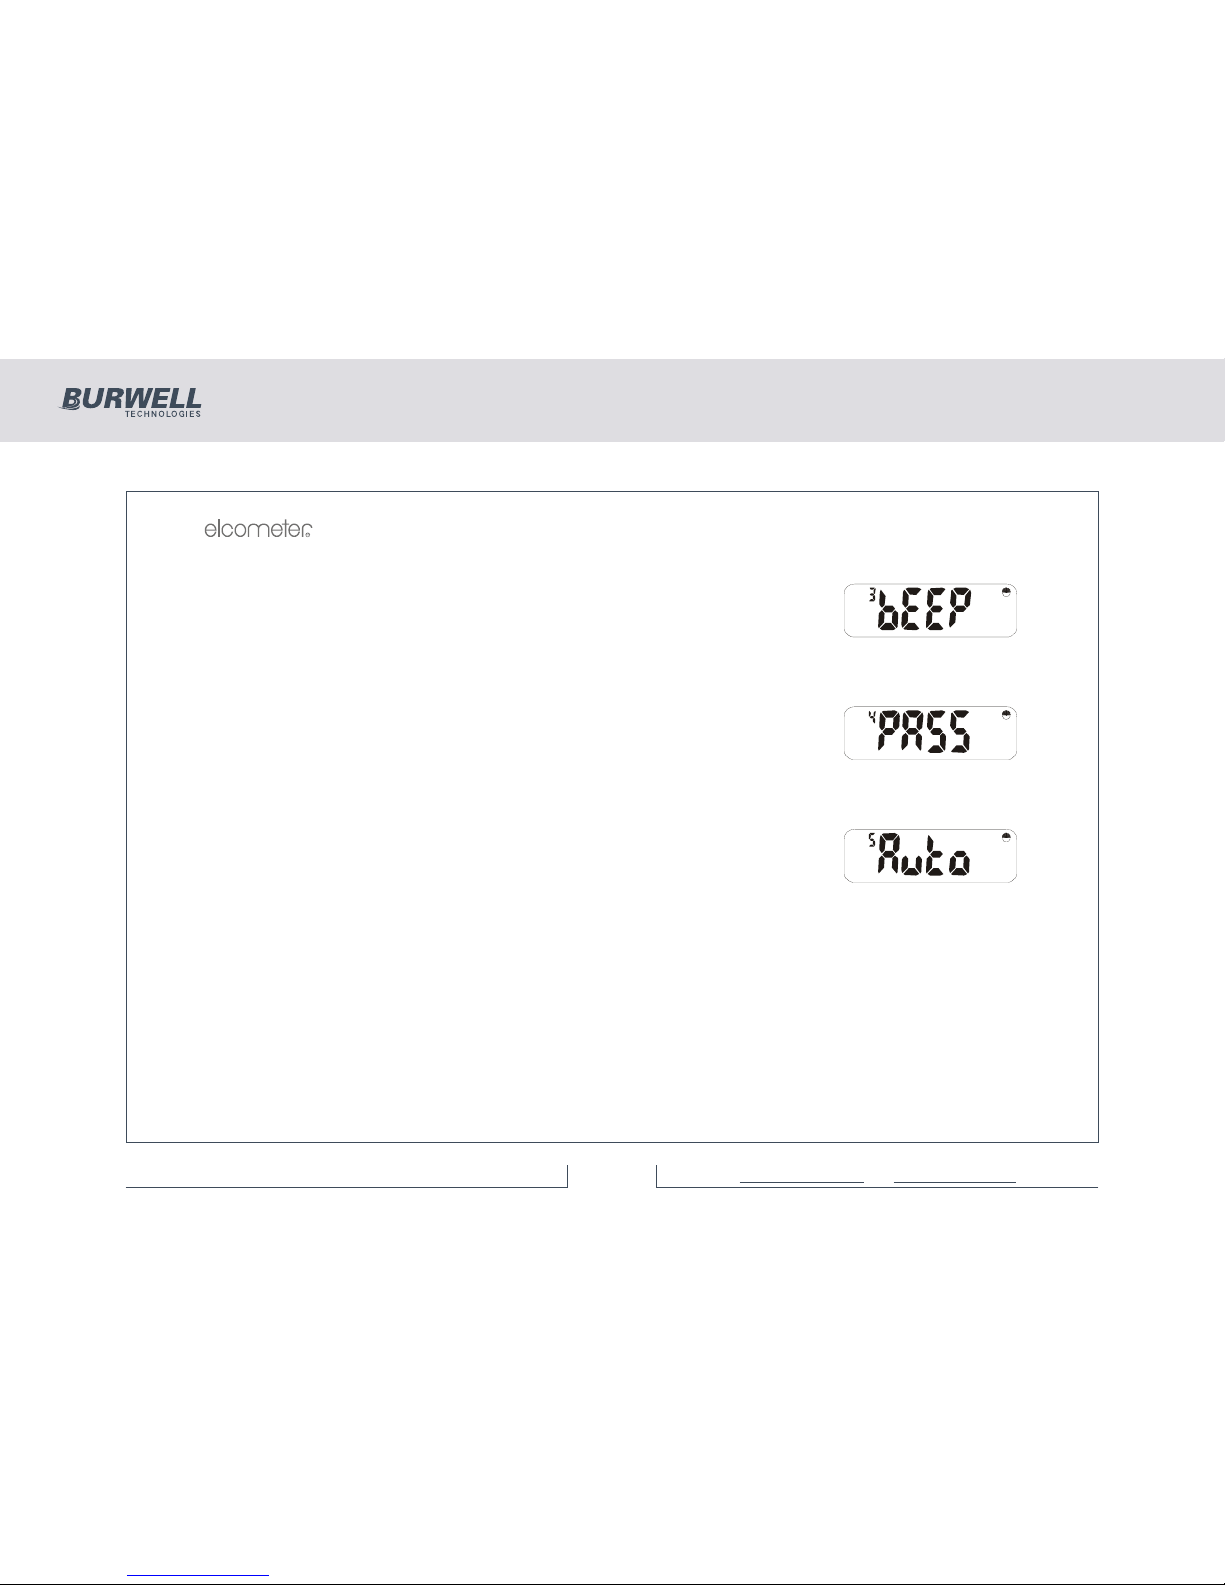
Having pressed [SETUP], use [<] or [>] to select:
Press [ENTER], and set beeper volume level using [<] or [>] (1 - 4 or 0 for none).
Press [ENTER] to return to the ‘bEEP’ display or [Esc] to cancel the operation.
6.4 PASSWORD FUNCTION
Having pressed [SETUP], use [<] or [>] to select:
Password Function
(not available on Elcometer 355 model Standard)
6.5 AUTO MEASUREMENT MODE FUNCTION
Having pressed [SETUP], [<] or [>] selects:
This mode takes readings automatically and displays them digitally in the chosen
units giving a form of analogue display. Press [ENTER] and use [<] and [>] to
toggle between:
no - Normal digital Coating Thickness mode.
YES - Produces readings automatically.
The beeper should be turned off to stop it sounding continuously. Press [ENTER] to set this option or [Esc]
to cancel the operation.
355 Coating Thickness Gauge
18 of 48For more information / 1300 287 935
[email protected] / www.burwell.com.au
Page 19
R
17
6.6 BATTERY FUNCTION
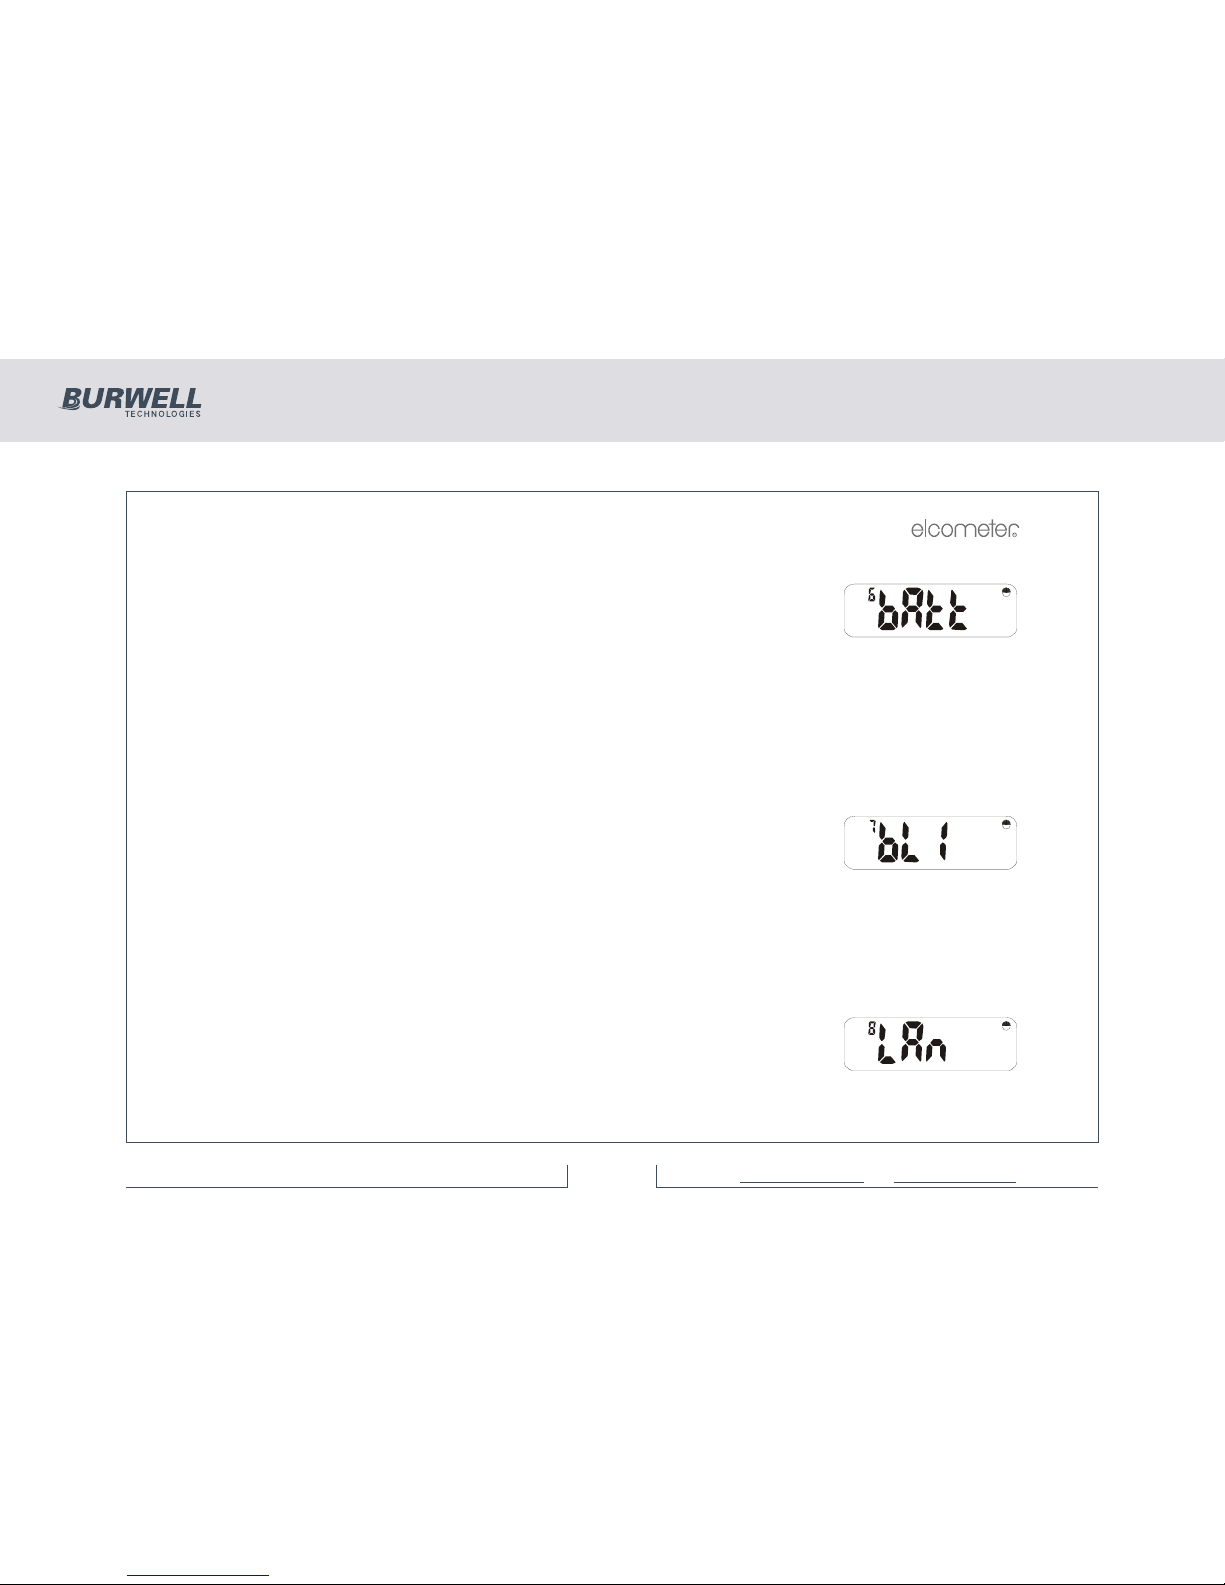
Having pressed [SETUP], use [<] or [>] to select:
Press [ENTER] to show the battery level as a number of units. New alkaline
batteries should display approximately 220 units. New Rechargeable batteries
should display approximately 180 units. All batteries need to be replaced at
readings of approximately 145. Note that Elcometer supplied rechargeable batteries should give a life of
1hr. between a flashing and a constant battery symbol, but alkaline batteries should last for a number of
hours.
Press any operations key to return to the ‘bAtt’ display.
6.7 BACKLIGHT FUNCTION
Having pressed [SETUP], use [<] or [>] to select:
Backlight Enable/Disable.
Press [ENTER] and use [<] and [>] to toggle between:
on - Ensures the backlight is on at all times when required, but timed to maximise battery life.
oFF - The backlight will be off at all times except for power up display test.
Press [ENTER] to set this option or [Esc] to cancel the operation.
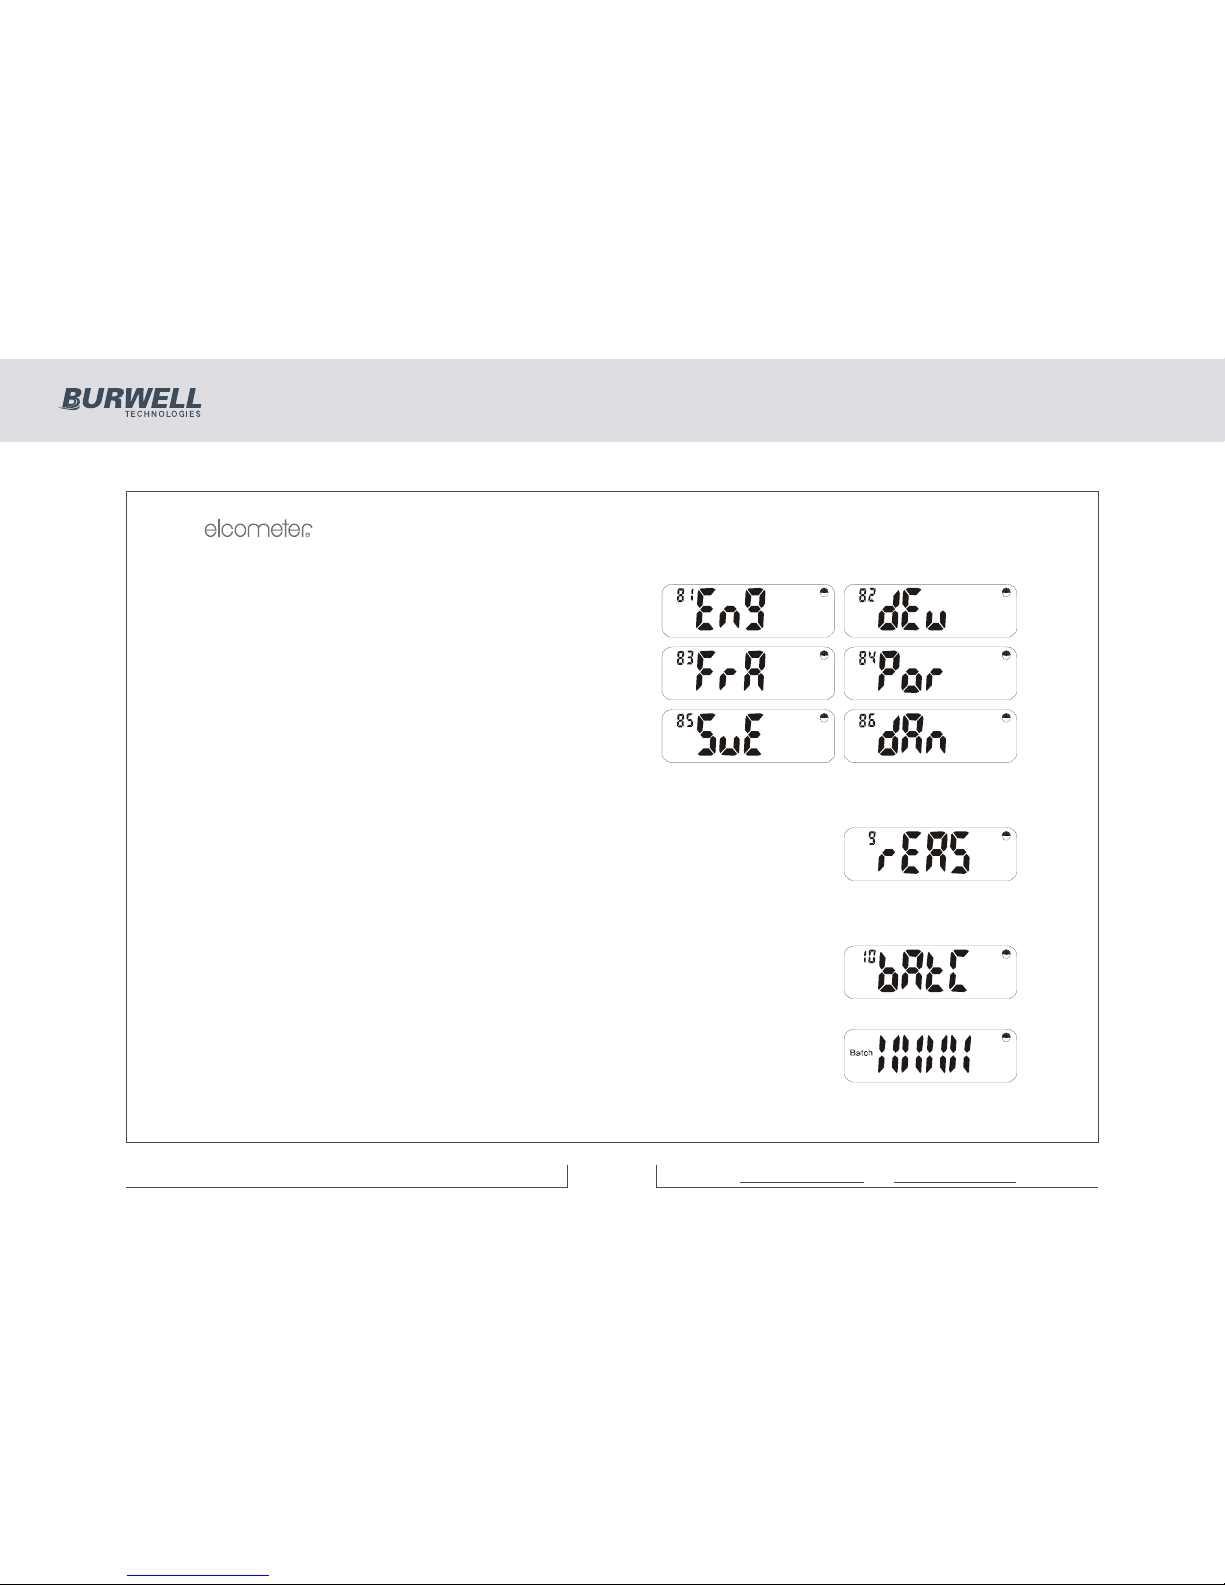
6.8 LANGUAGE FUNCTION
Having pressed [SETUP], use [<] or [>] to select:
Language formats used on printouts.
Press [ENTER] to see which language version is active.
355 Coating Thickness Gauge
19 of 48For more information / 1300 287 935
[email protected] / www.burwell.com.au
Page 20
R
18
The following languages are available:
English German
French Portuguese
Swedish Danish
Press [SETUP], [ENTER] or [Esc] to return to the ‘LAn’
display.
6.9 REASONABLE LIMITS FUNCTION
Not available with standard software.
The ‘nA’ message will be displayed and the Elcometer 355 then exits the SetUp
Menu automatically.
6.10 AUTOBATCH
This signifies the Autobatch entry Menu.
Note: If a batch is selected the batch symbol is on.
Pressing [ENTER] will consecutively display the following information:
This display shows the memory level for approximately 1 second.
355 Coating Thickness Gauge
20 of 4 8For more information / 1300 287 935
[email protected] / www.burwell.com.au
Page 21
R
19
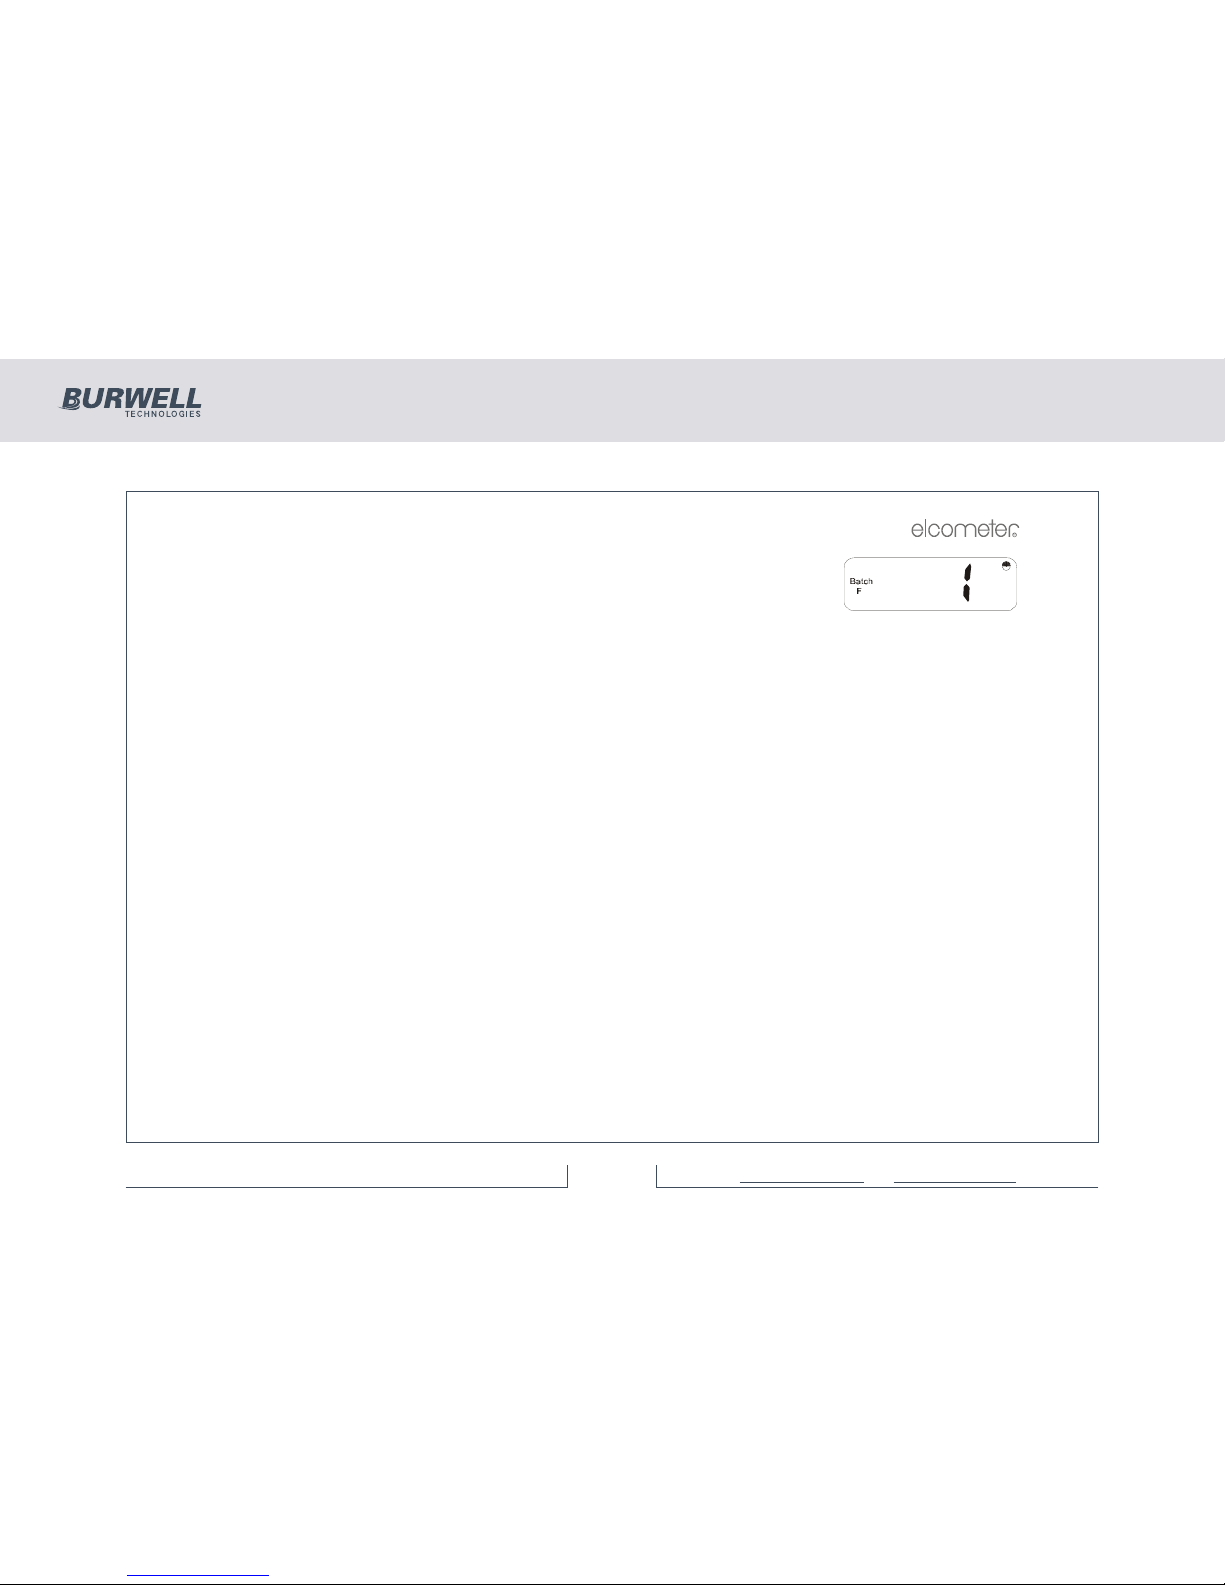
F or NF symbol shows batch with reading for F or NF probe.
The preset batch numbers from 0-25 can be shown in the display by pressing [<]
or [>].
Note: Immediate mode is designated as ‘BATCH 0’. Returning to immediate mode from batch mode clears
all previous immediate mode data and starts at reading ‘0’.
Note: If ‘E14’ is displayed when entering an existing batch, the batch has been set up with a different type
of probe module.
355 Coating Thickness Gauge
21 of 4 8For more information / 1300 28 7 935
[email protected] / www.burwell.com.au
Page 22
R
20
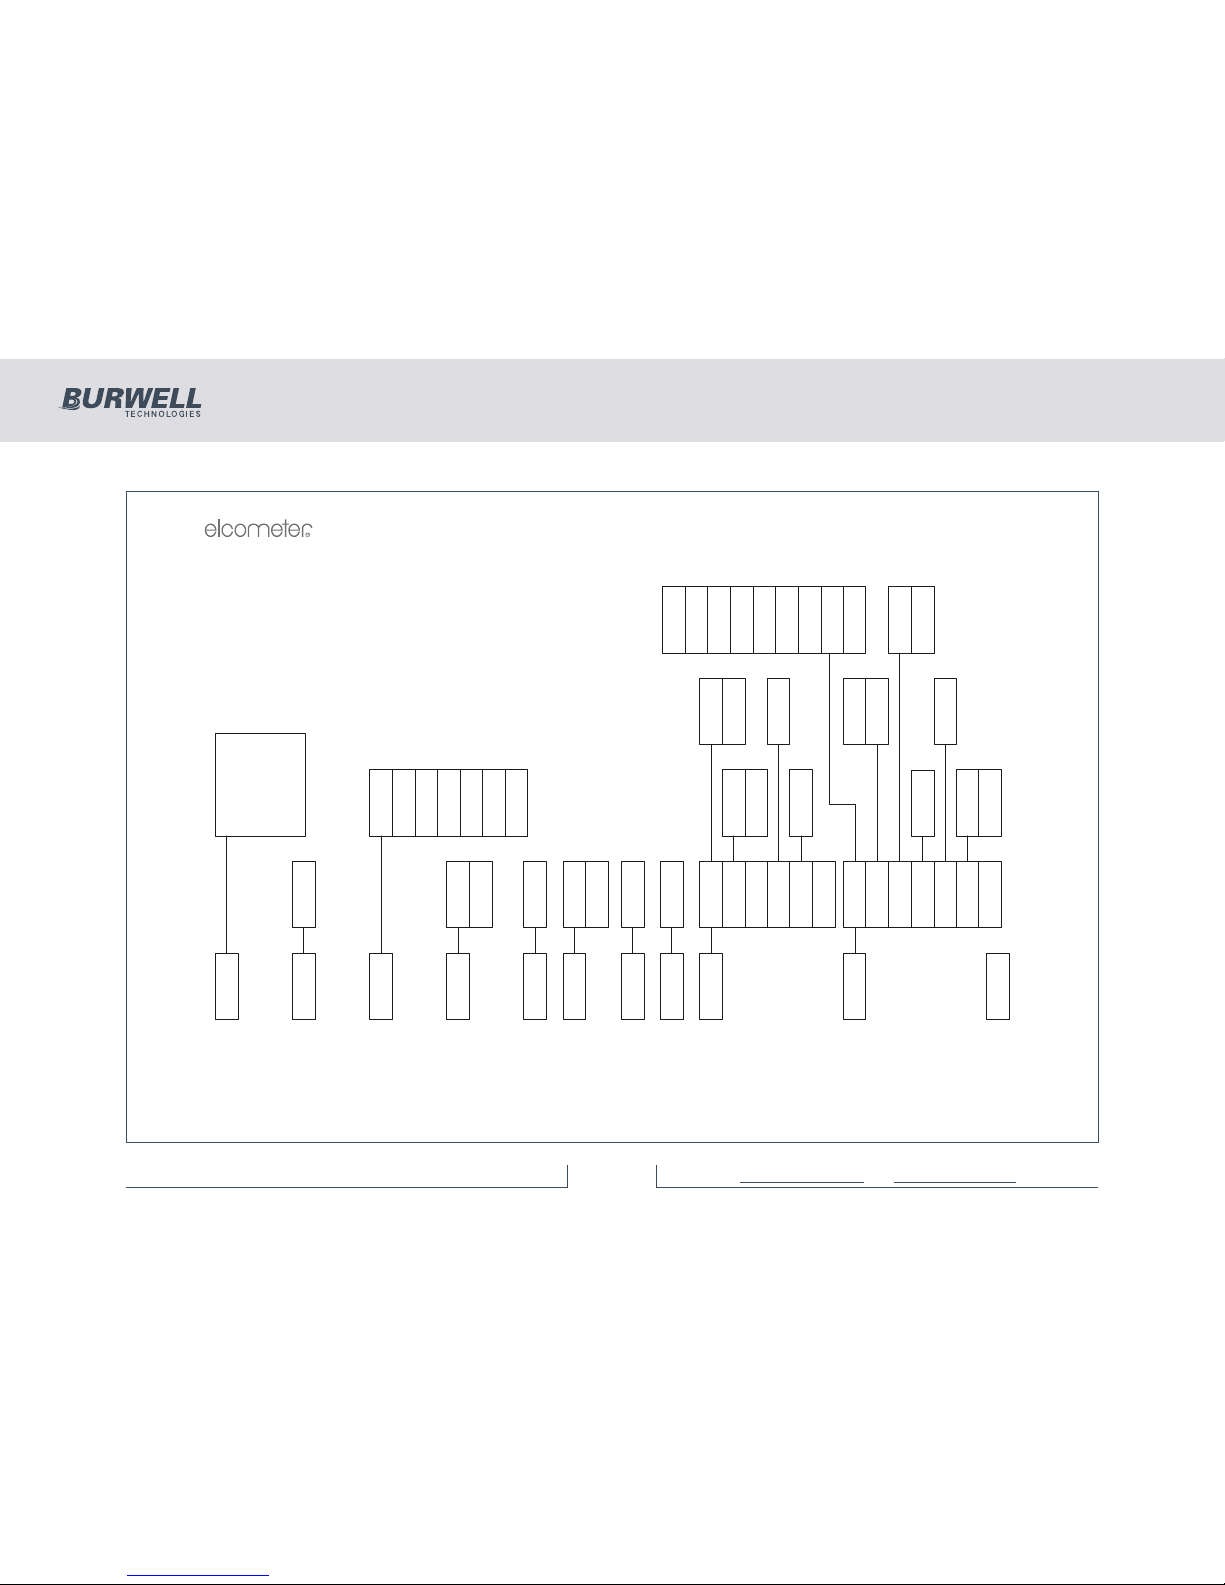
6.11 SETUP CHART
10 bAtC
9 rEA S
8 LAn
7 bLI
6 bAtt
5 Auto
4 PA S S
3 bEEP
2 tl
1 Prnt
0 End
16 rE P
0 End
nA
on
oFF
batt 210
YES
no
nA
1,2,3,4
21 Coun
22 dAte
23 tl
24 tStA
25 offt
0 End
11 bAud
12 Eol
13 8042
14 LEn
15 lnd
d:M
M:d
nA
CrLf
Cr
Ind 0
81 Eng
82 dEu
83 FrA
84 Por
85 Sue
86 dAn
0 End
4.10
1994
off 5
LEn 66
FuLL
PArt
38400
19200
9600
4800
2400
1200
600
300
PAr
80
42
Preset
Batches 1-25
0=Immediate
mode
355 Coating Thickness Gauge
22 of 4 8For more information / 1300 287 935
[email protected] / www.burwell.com.au
Page 23
R
21
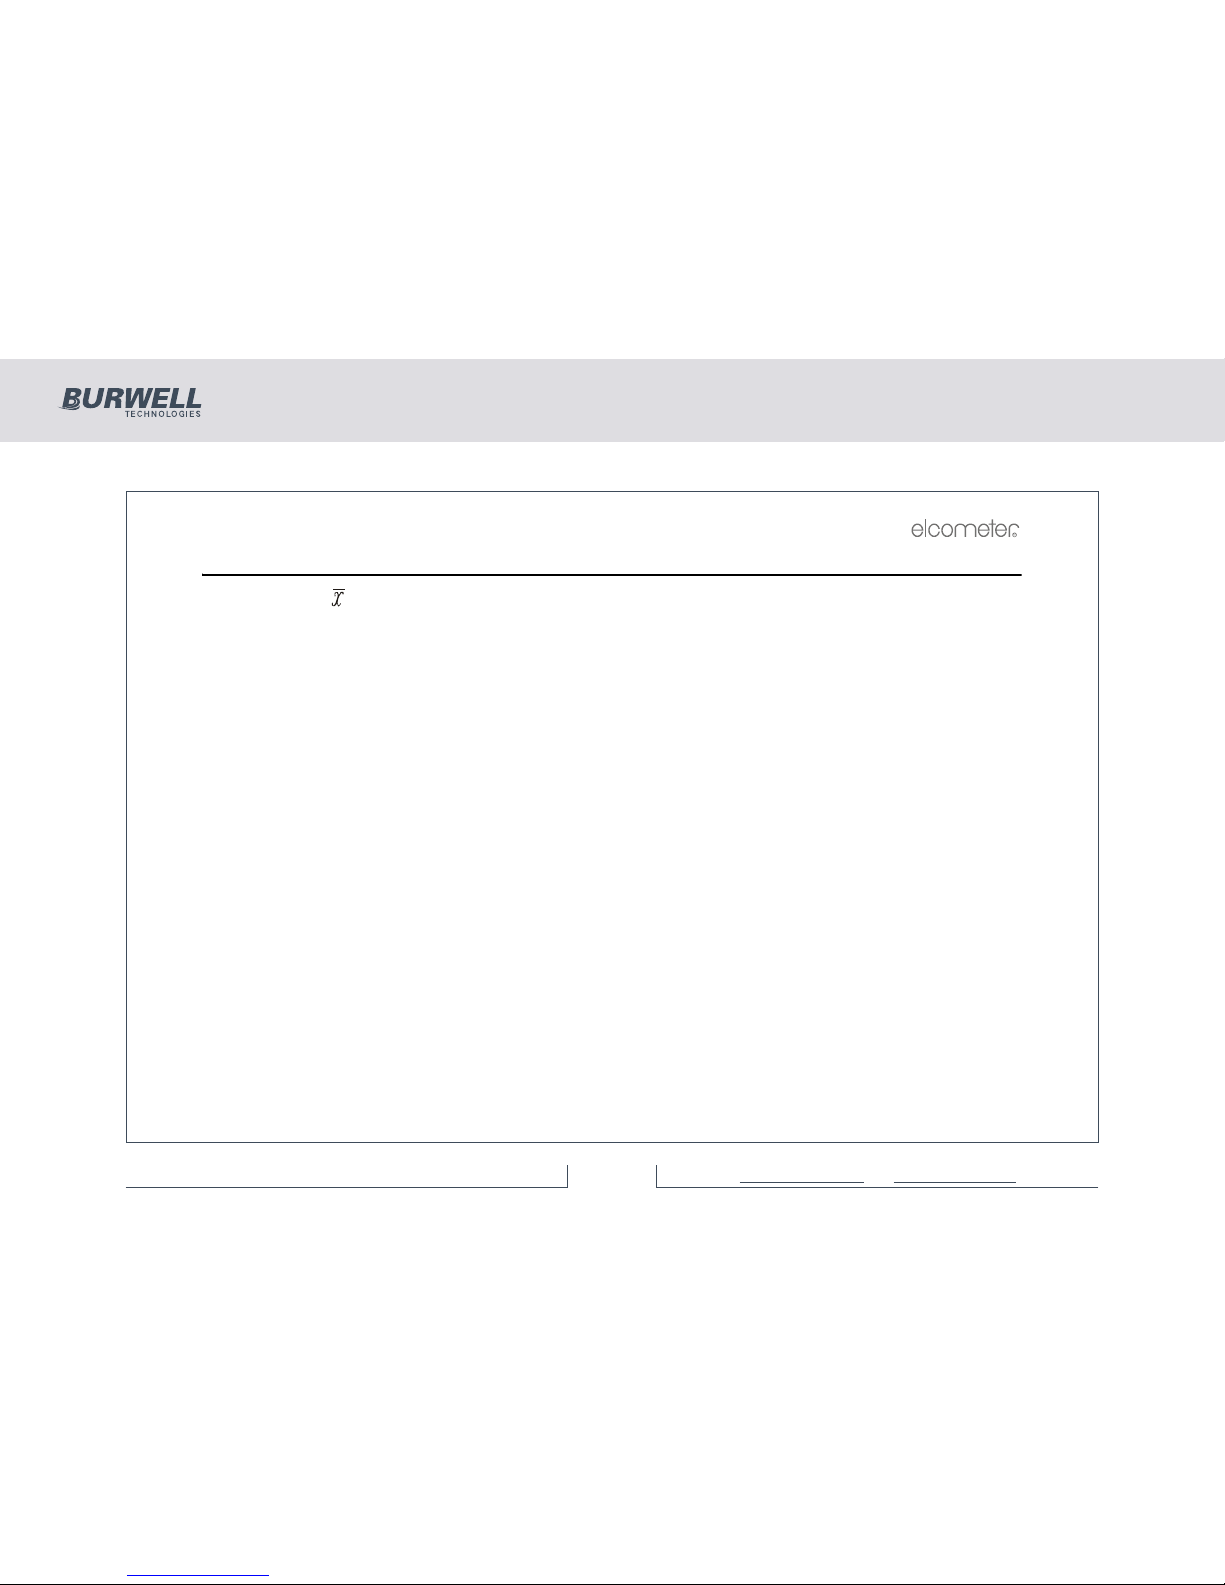
7 STATISTICS
The stats keys [ ], [σ], [<] and [>] will display (for 1 second or for as long as the key is pressed) mean,
standard deviation, lowest and highest readings whether in immediate (Batch 0) or auto batch mode.
355 Coating Thickness Gauge
23 of 4 8For more information / 1300 287 935
[email protected] / www.burwell.com.au
Page 24

R
22
8 TRANSFERRING READINGS TO A COMPUTER
Your gauge comes complete with software which allows data to be transferred to a PC using a cable. The
CD supplied with your gauge includes the following software.
• Elcometer Data Transfer Software (EDTS
+
Excel Link). This software allows the user to transfer
data from the memory of the gauge into Microsoft Excel using the PC connection cable. The data can
then be processed in software such as Word or Excel.
• ElcoMaster Software for Measurement Data. This software allows the user to transfer data from the
memory of the gauge to a PC for archiving, analysis and reporting. Data is transferred using the PC
connection cable. ElcoMaster includes all the charts that you may need together with a report designer
to let you design your reports the way you wish to see these.
• ElcoMaster Data Conversion Software. This software converts existing measurement data to
ElcoMaster format. The following types of measurement data can be converted; Elcometer EDCS Win,
EDCS Plus and EDCS.
All this software can also be downloaded from the Elcometer website www.elcometer.com
8.1 TRANSFERRING USING A PC CABLE
1. Connect your gauge to your PC COM port using the cable supplied. For USB, use the optional
adapter, sales part number T99916716.
2. Switch on your gauge.
3. Start the software and follow the instructions included with the software.
355 Coating Thickness Gauge
24 of 4 8For more information / 1300 287 935
[email protected] / www.burwell.com.au
Page 25
R
23
9 PRINTING
The Elcometer 355 can be used with EPSON compatible serial and parallel printers with the appropriate
interface leads. The setup mode may be used to select either the baud rate for serial printers or the parallel
output printing mode. If the Elcometer portable mini printer is being used, the 42 column mode should be
selected with the 8042 sub-function within the Prnt function of setup - see “Printer setup functions” on
page 13. The Full report can be shortened to PArt, which has statistics and histogram (not Batch 0).
9.1 PRINTER COMMANDS
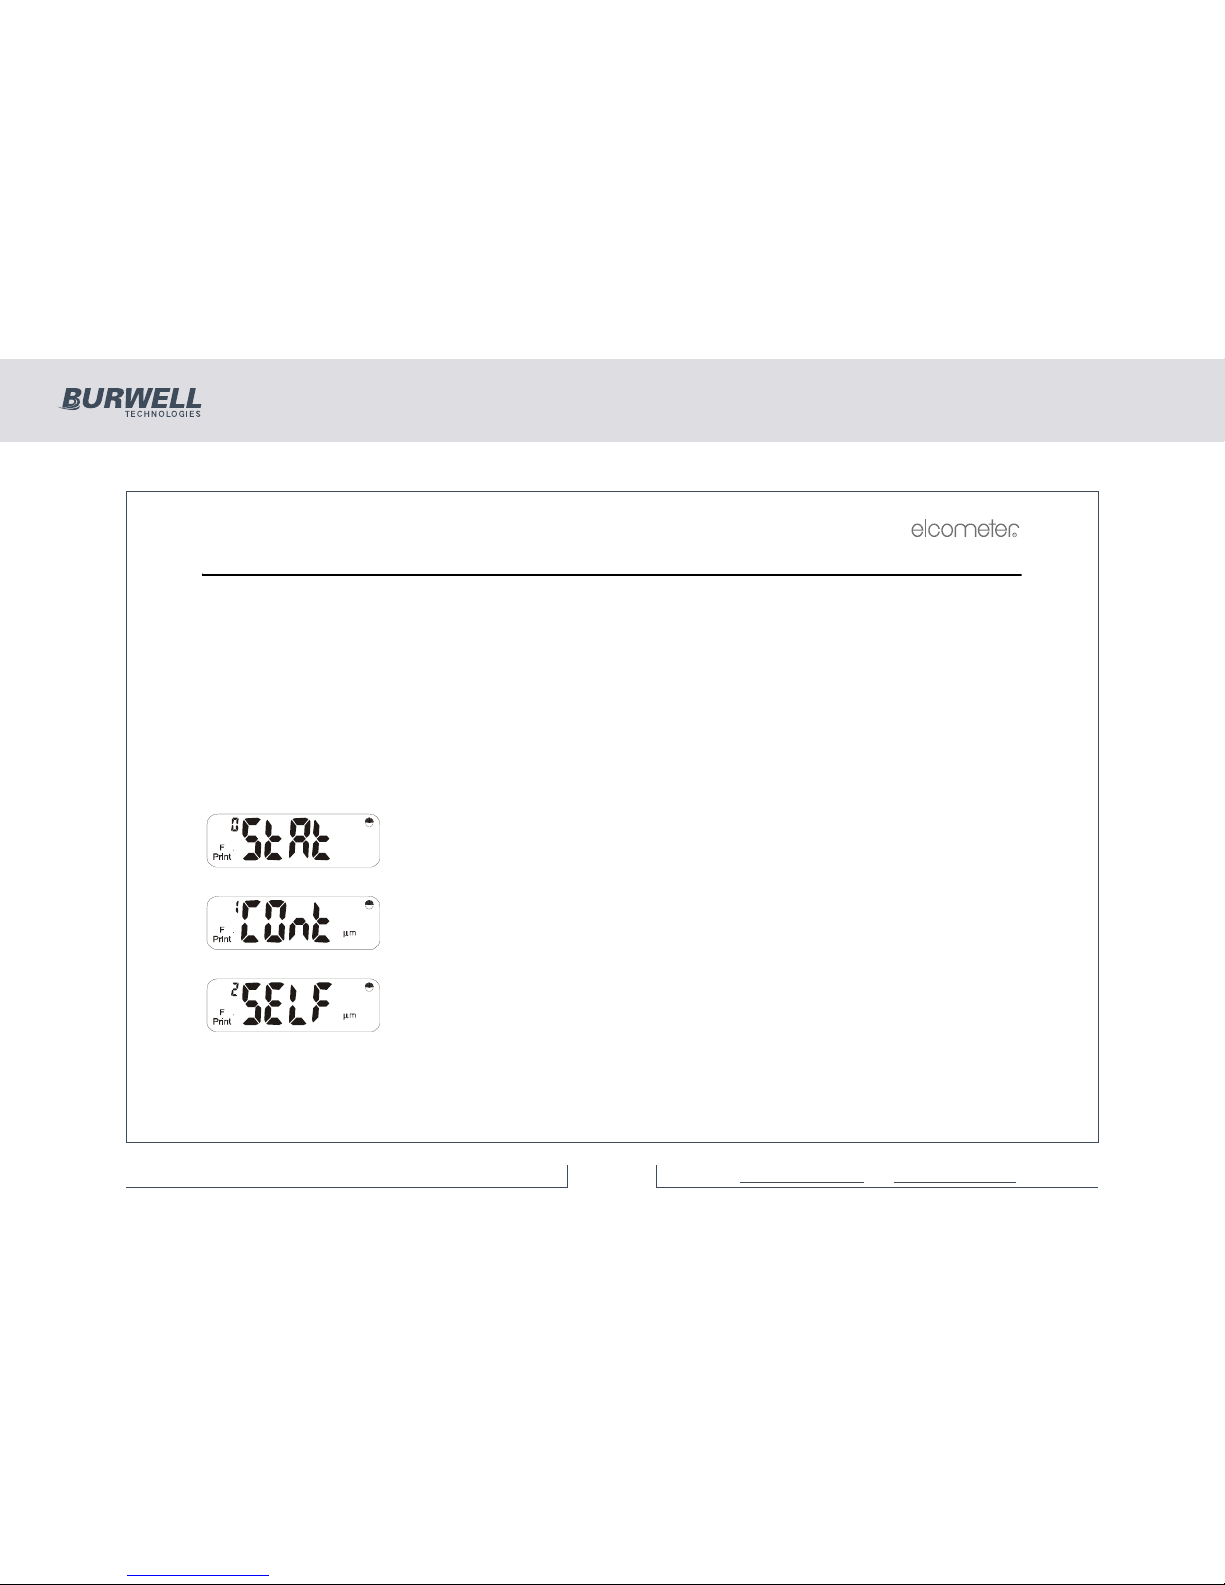
Press [PRINT] to access the printing functions:
Use [<] or [>] to move between Print modes, [ENTER] to set a particular option or [Esc] to exit.
Press [ENTER] to print statistics and histogram for current batch* or immediate
mode data.
Press [ENTER] for continuous printing mode as readings are taken.
Press [ENTER] to print a selected F batch*. Use [<] and [>] to select required F
batch. Press [ENTER] to print.
355 Coating Thickness Gauge
25 of 4 8For more information / 1300 287 935
[email protected] / www.burwell.com.au
Page 26
R
24
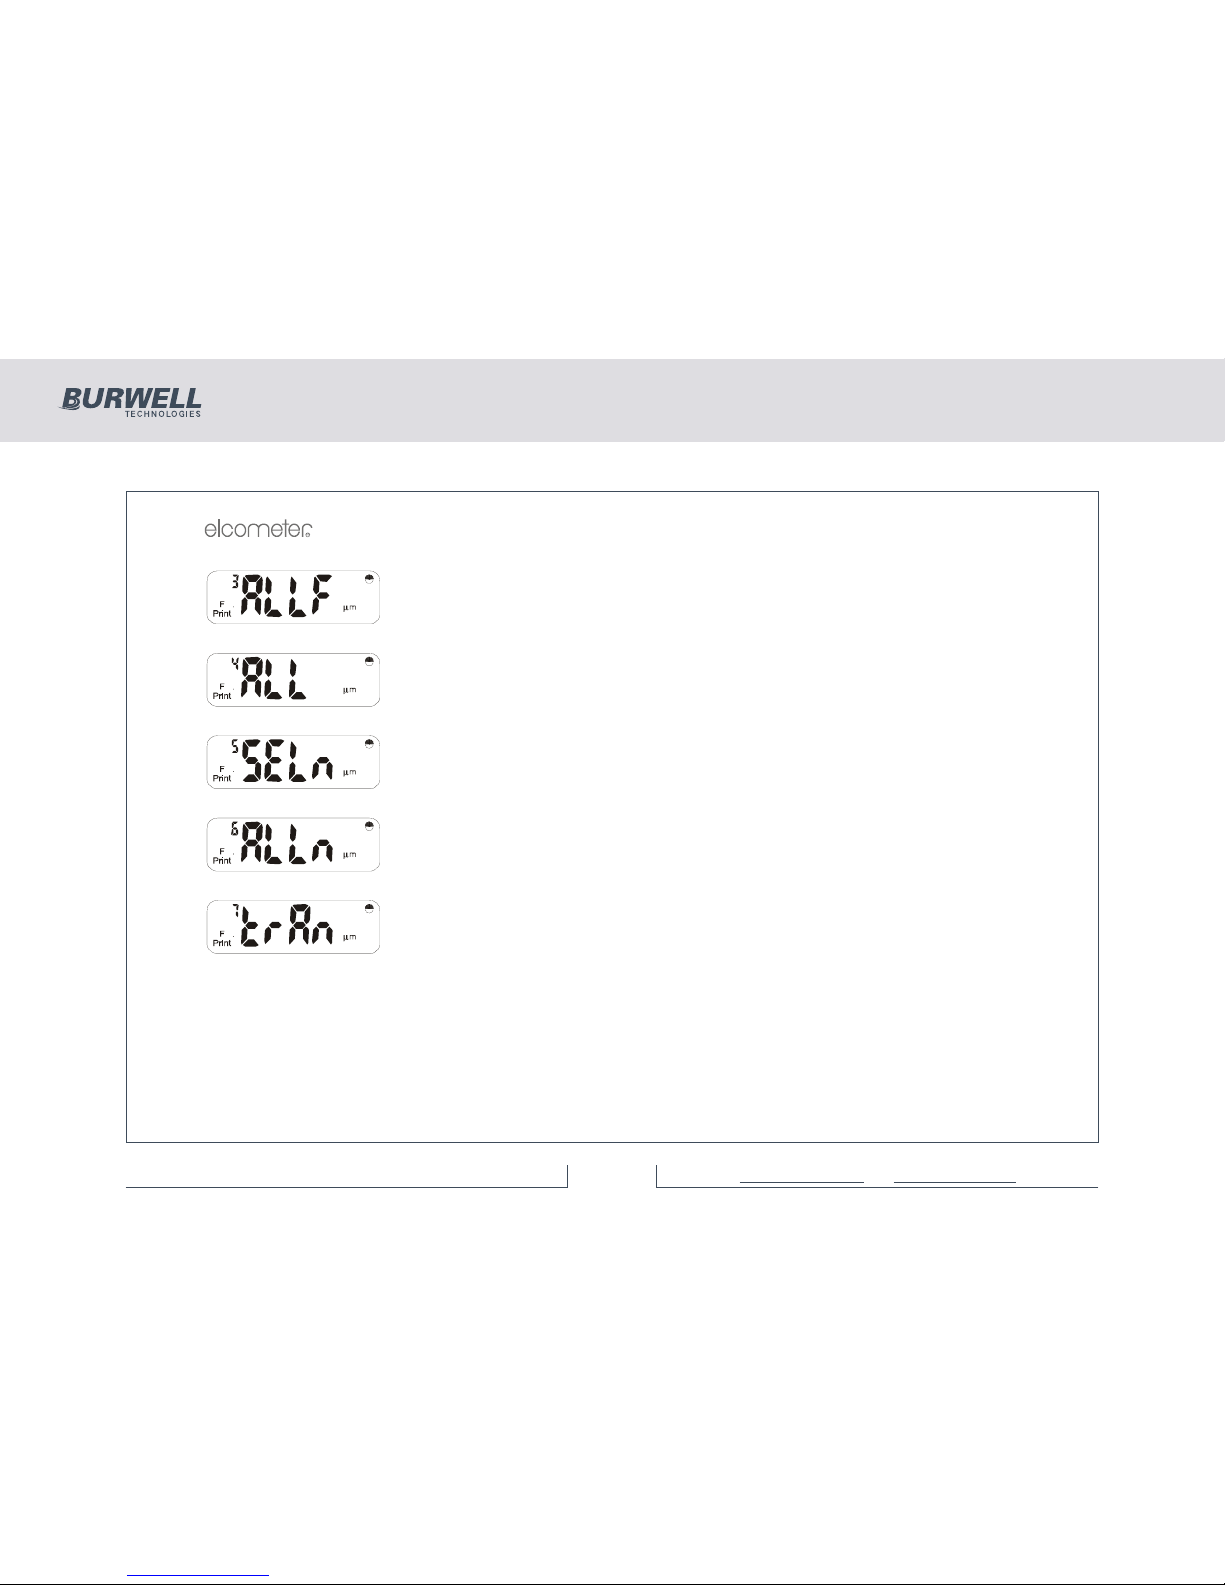
Press [ENTER] to print all F batches* in the order in which they were used.
Press [ENTER] to print all F and then all N batches* used.
Press [ENTER] to print a selected N batch*. Use [<] and [>] to select required F
batch. Press [ENTER] to print.
Press [ENTER] to print all N batches* in the order in which they were used.
Press [ENTER] to select specific transfer mode which may be used to transfer
data to Elcometer’s ElcoMaster™ Software or to other data collectors.
355 Coating Thickness Gauge
26 of 4 8For more information / 1300 287 935
[email protected] / www.burwell.com.au
Page 27
R
25
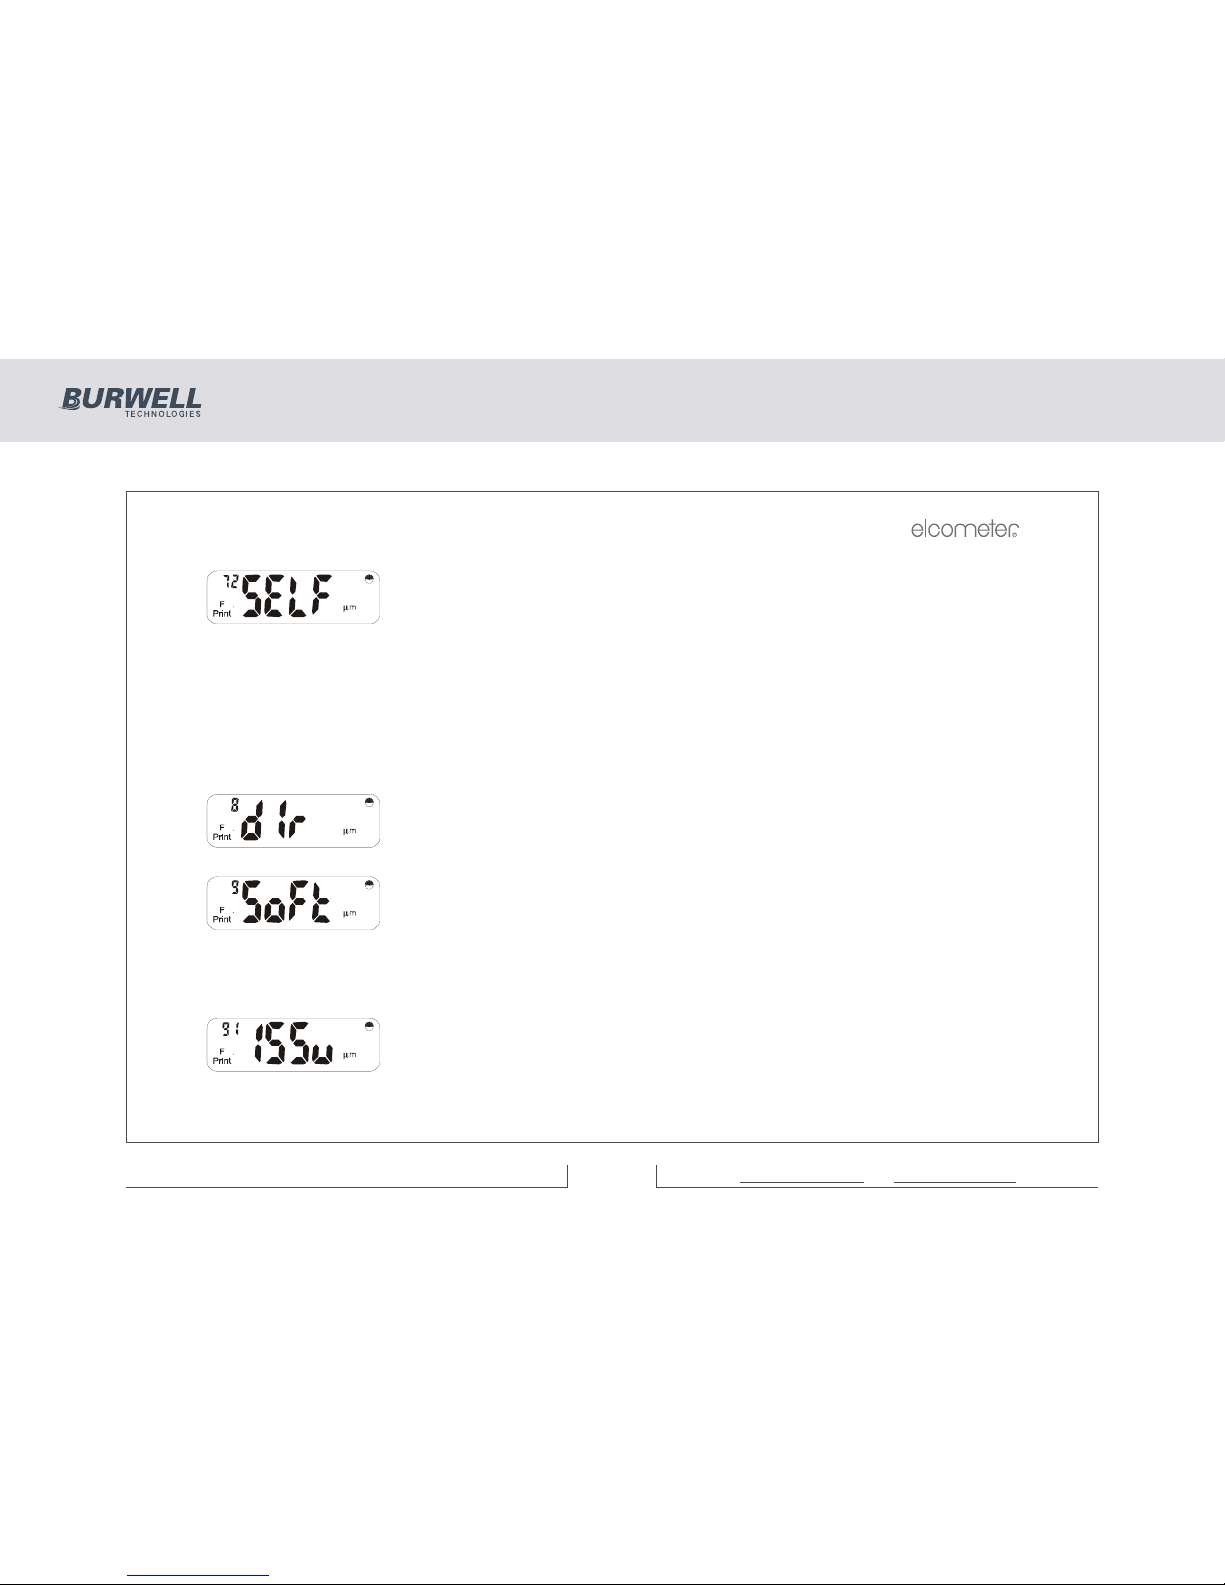
Use [<] and [>] to select the required sub-function of transfer mode.
Sub-functions 72 to 76 (incl.) mimic print functions 2 to 6 shown previously.
Note: Sub-functions 71 (COnt) and 70 (oFF) are not available in the Elcometer
355 standard model. (If the User tries to operate either of these 2 sub-functions,
the ‘nA’ message will be displayed before being returned to the ‘trAn’ display).
Press [SETUP] or [Esc] to return to the ‘trAn’ display.
Continue with [>] to view
Press [ENTER] to print out a ‘directory’ of all batches stored within the
instrument. Data will include probe type, scale and number of readings. Press
[ENTER], [SETUP] or [Esc] to exit this option.
Press [ENTER] to view a number of software related functions.
Use [<] and [>] to select the required sub-function (numbers 91 to 96 incl.) as
follows:
Press [ENTER] to display the software issue and version no. in form V.xx where
x = issue no.
355 Coating Thickness Gauge
27 of 4 8For more information / 1300 287 935
[email protected] / www.burwell.com.au
Page 28
R
26
Note: The batch symbol may be displayed if the instrument is in batch mode when the [PRINT] key is
pressed. Also the units symbol will be dependent upon the units in use. For simplicity, µm are shown in all
of the above displays.
* Detail depends on the setting of Report - whether it is Full or PArt.
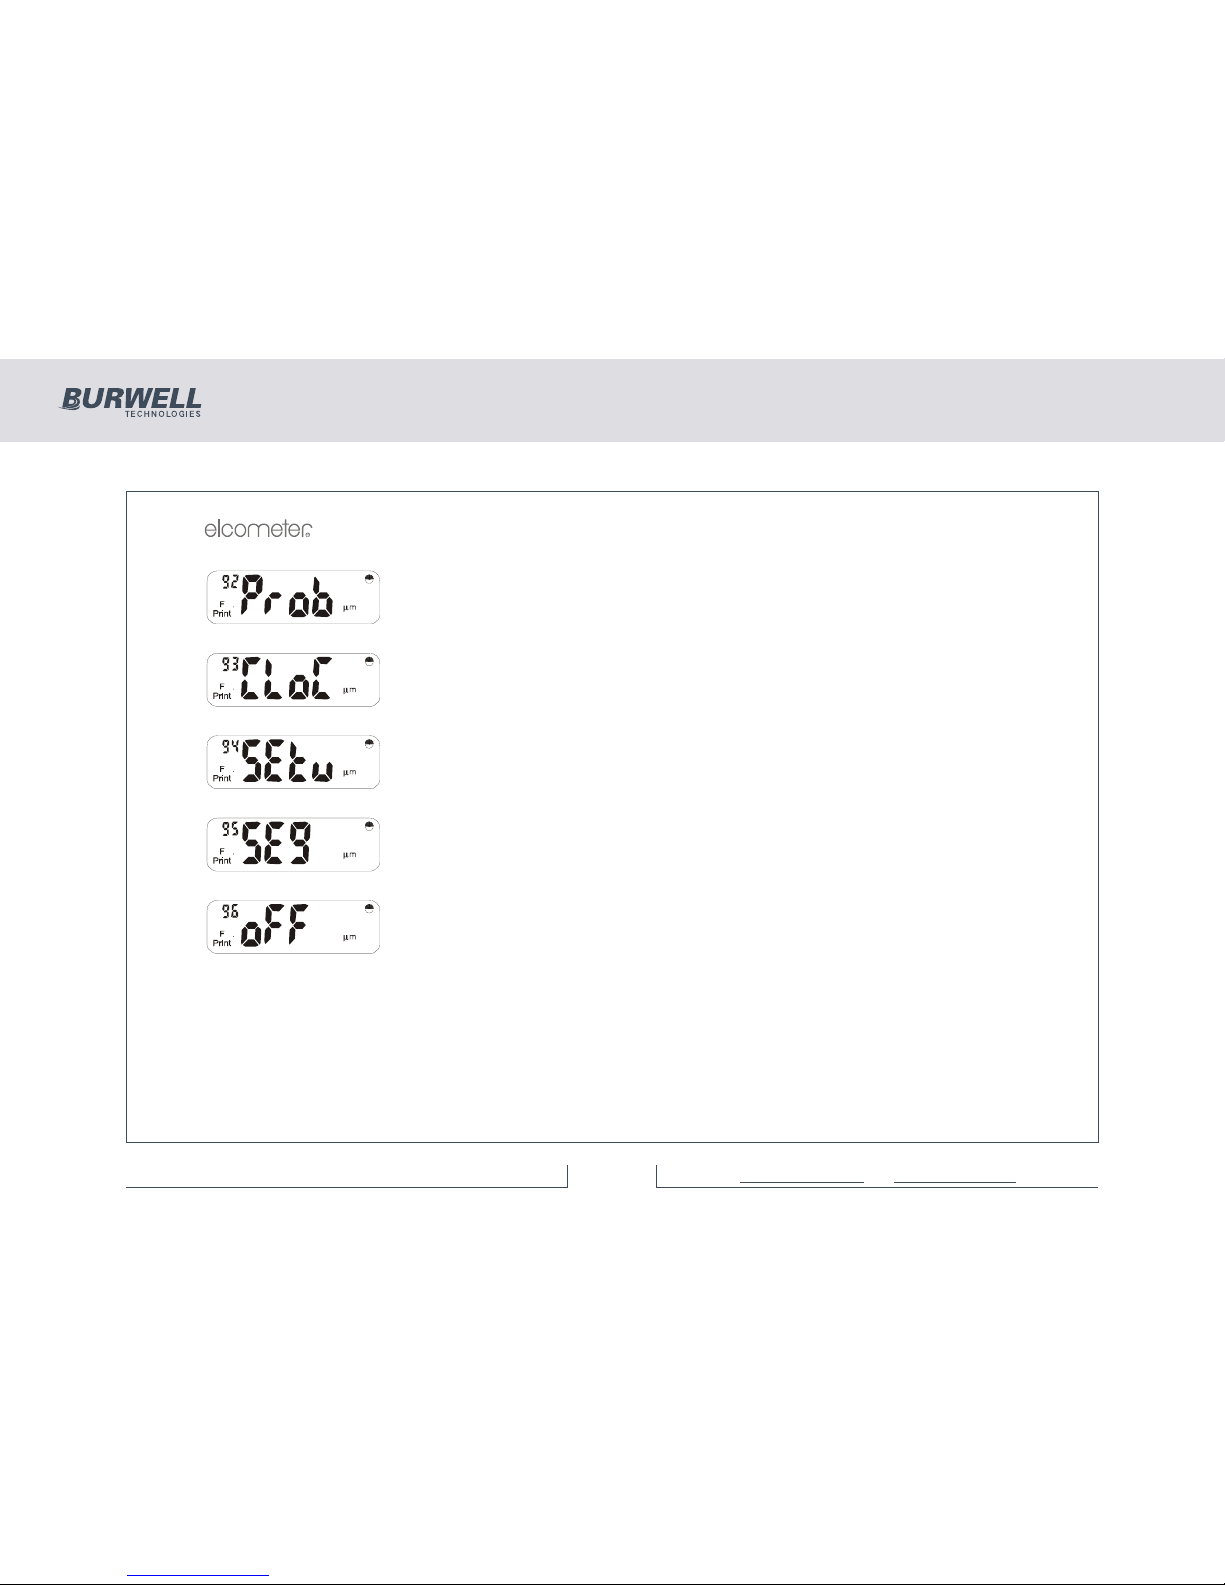
Press [ENTER] to display the probe type and scale number.
Press [ENTER] to display the current time, with the seconds in the small reading
number display. Press any key to exit.
Press [ENTER] to print out the current setup parameters as detailed in ‘Setup ‘.
Press [ENTER] to show all display segments and show the backlight is working.
Press [ENTER], [Esc] or [SETUP] to end.
Press [ENTER] to turn the Elcometer 355 off, or [Esc] or [SETUP] to return to the
‘SoFt’ display.
355 Coating Thickness Gauge
28 of 4 8For more information / 1300 287 935
[email protected] / www.burwell.com.au
Page 29
R
27
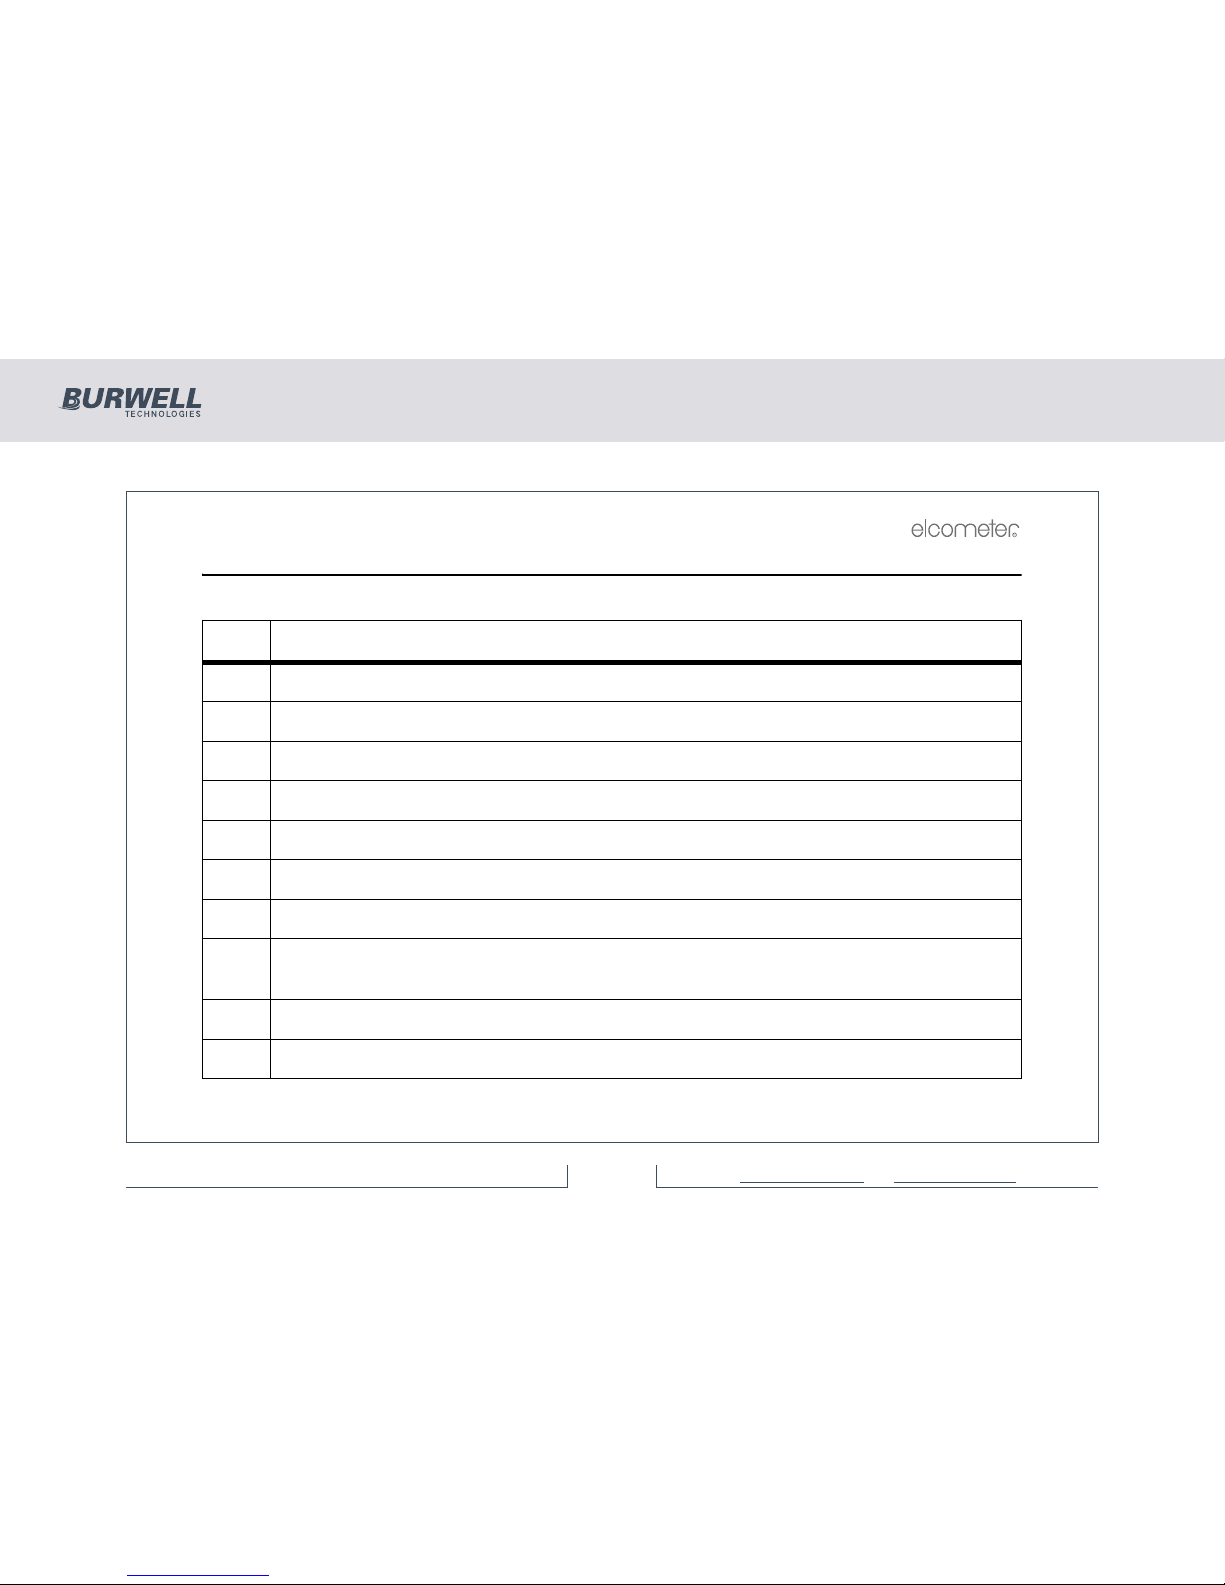
10 FAULT FINDING / ERROR CODES
To cancel any error code press [ENTER] or [Esc]:
Code Explanation
E01 Calibration has been lost.
E02 Cal difference error is too large/small.
E03 A base value with too great a difference to that currently stored.
E04 Cal was attempted with too large a value.
E05 Base was attempted with too large a value.
E06 Number of readings is greater than 999.
E07 Too many readings stored.
E08 The printer is off-line. (There may be a delay of approximately 30 seconds before receiving
this message).
E10 The memory is full.
E11 No readings were taken before trying to enter a base or cal factor.
355 Coating Thickness Gauge
29 of 4 8For more information / 1300 287 935
[email protected] / www.burwell.com.au
Page 30
R
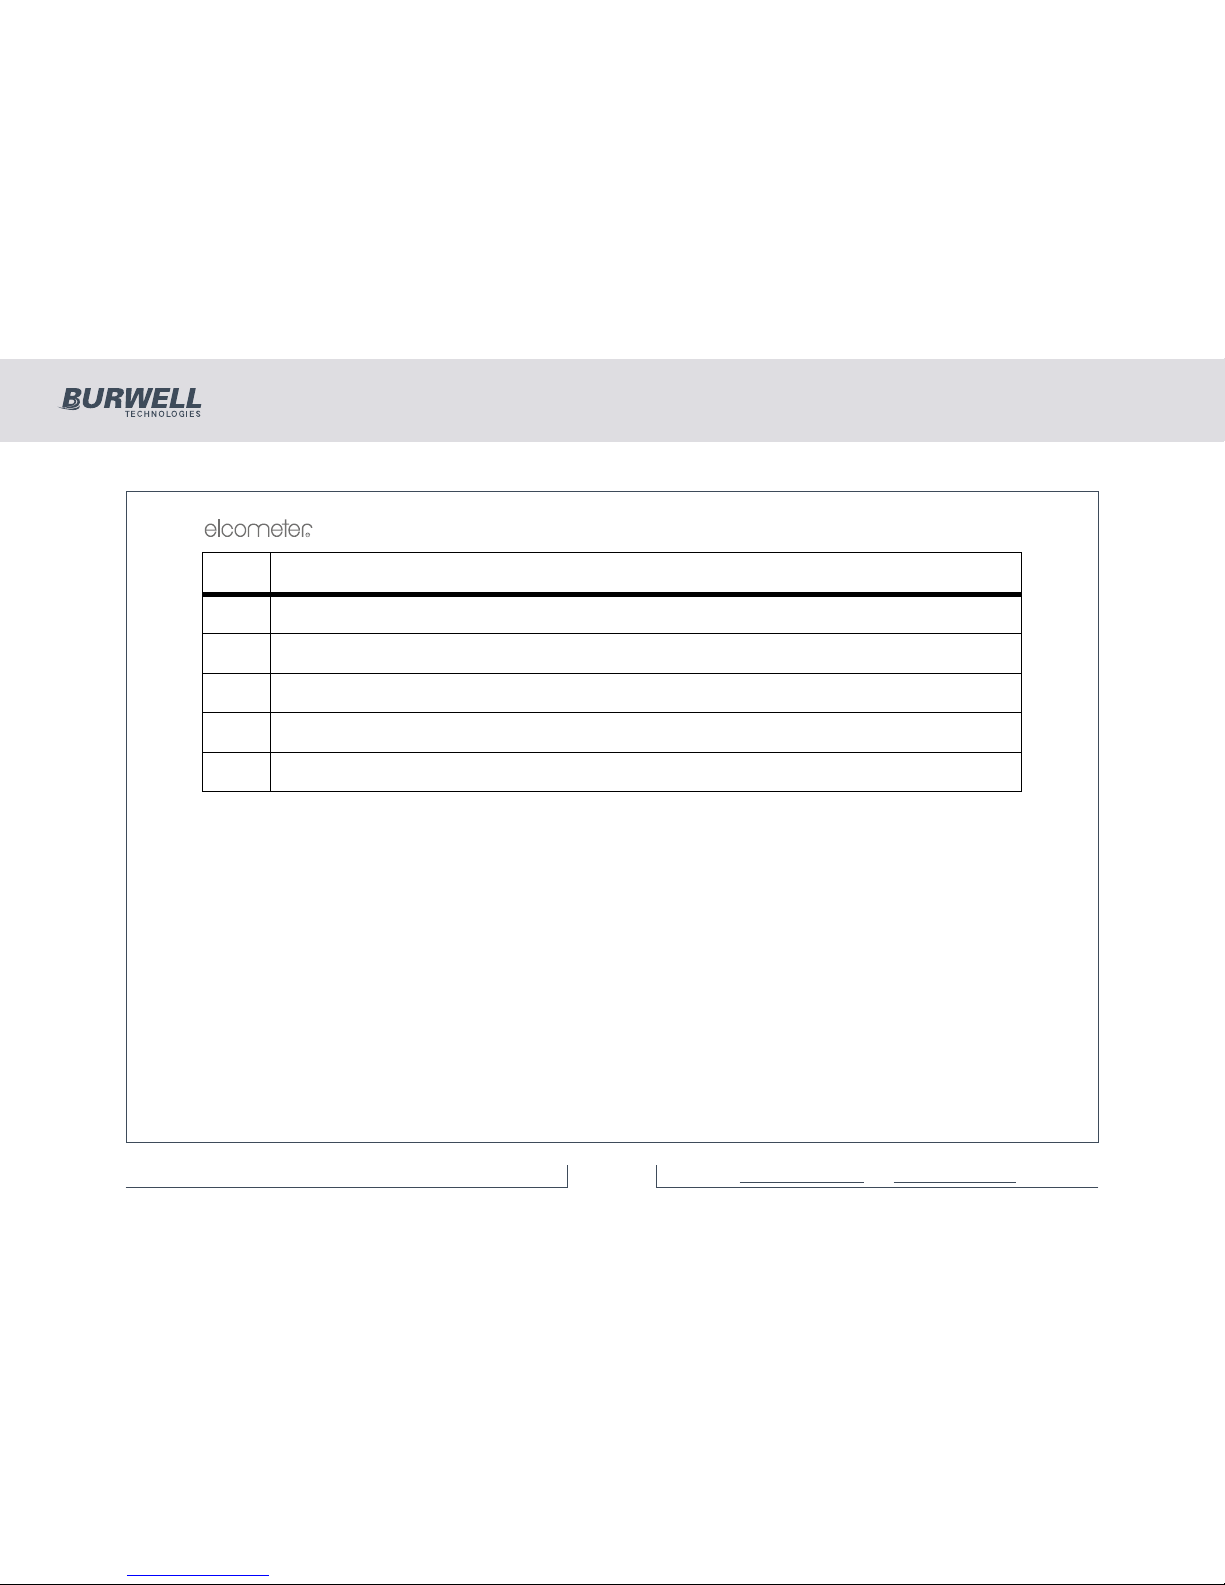
28
E13 Selected batch type not available.
E14 The probe module currently used is different to when this batch was created.
E15 The probe module is not responding or is not plugged in.
E18 Calibration Factor error. Too large a value has been entered for a Cal Factor.
E99 Cannot complete standard deviation calculation
Code Explanation
355 Coating Thickness Gauge
30 of 4 8For more information / 1300 287 935
[email protected] / www.burwell.com.au
Page 31
R
29
11 STORAGE
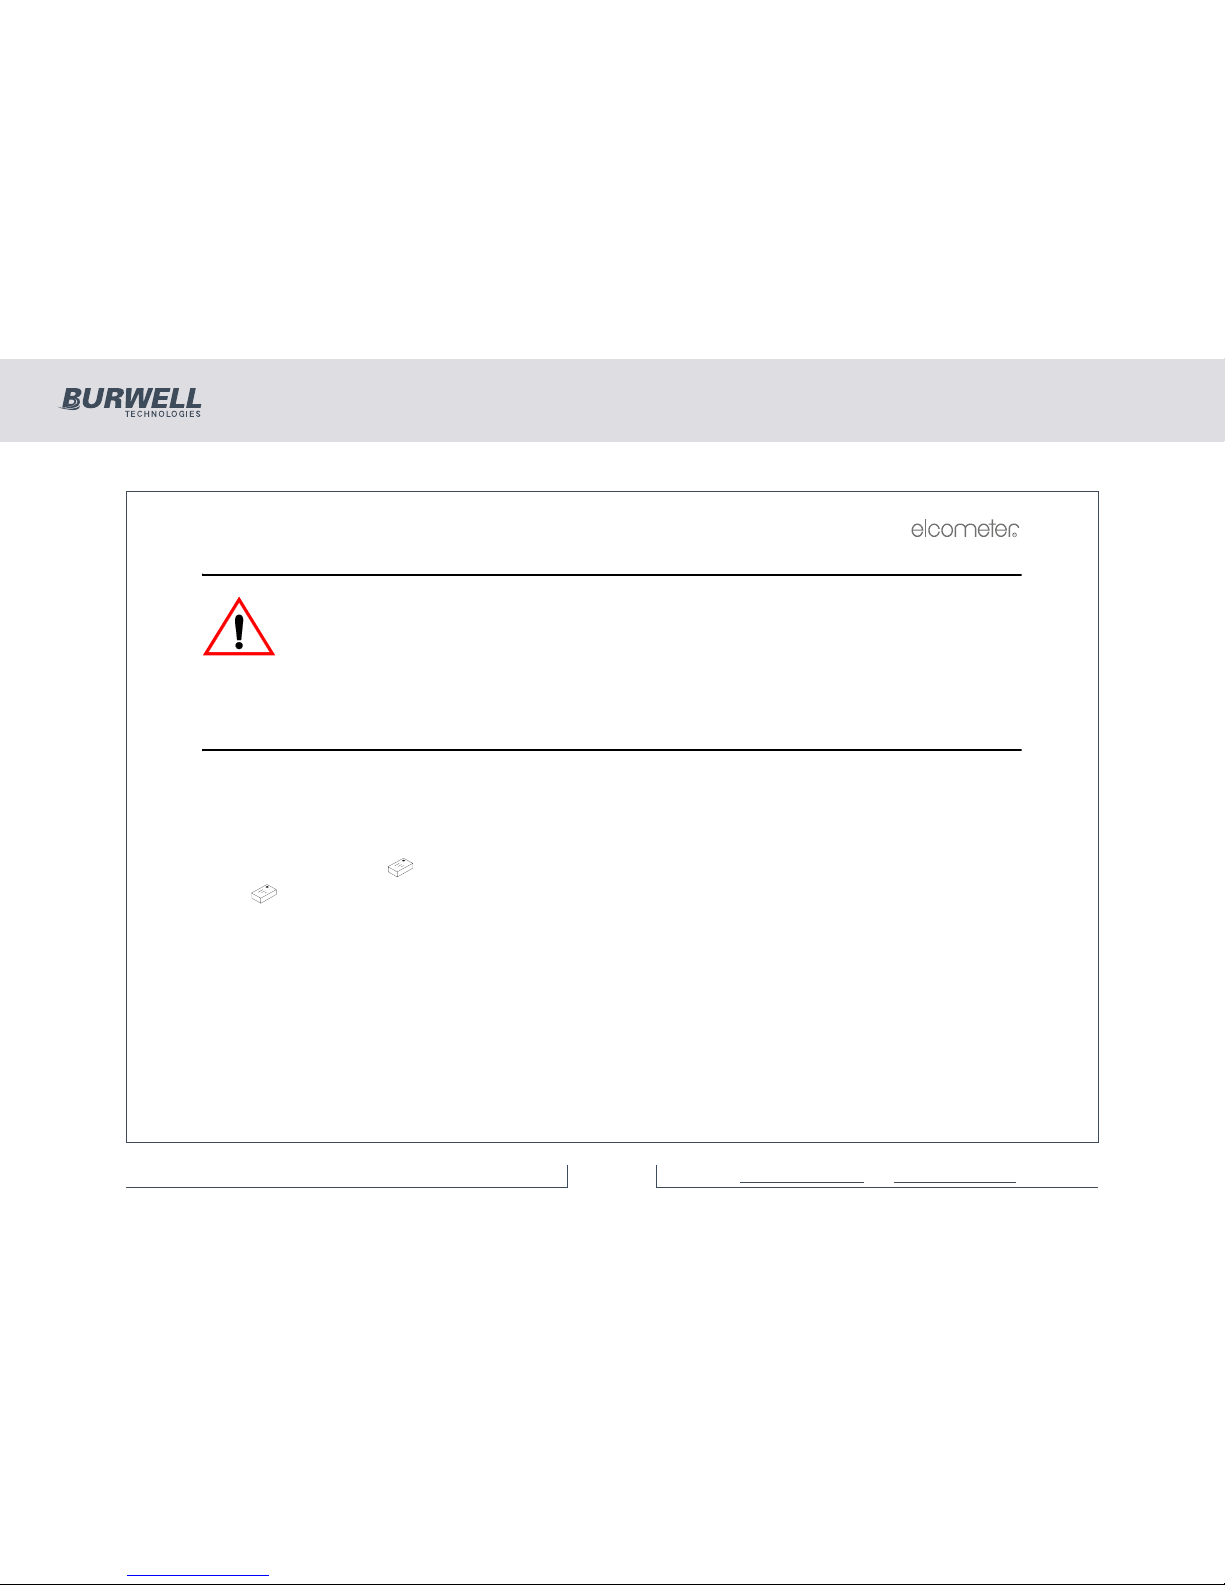
This gauge incorporates a Liquid Crystal Display (LCD). If the display is heated above 50°C
(120°F) it may be damaged. This can happen if the gauge is left in a car parked in strong sunlight.
Always store the gauge in its carrying pouch when it is not being used.
Remove the batteries from the gauge and store them separately if the gauge is to remain unused
for a long period of time. This will prevent damage to the gauge in the event of malfunction of the batteries.
12 MAINTENANCE
You own one of the finest hand-held coating thickness gauges in the world. If looked after, it will last a
lifetime.
If you are not sure if your gauge is performing correctly, please contact Elcometer or your local Elcometer
supplier for advice.
If during calibration the symbol appears, this indicates that servicing is required.
If the symbol is flashing, the instrument can still be used, but it should be returned for service at the
next convenient opportunity.
If the symbol remains solid on the display while the instrument is switched on, then the instrument cannot
be calibrated and should be returned for servicing immediately.
If you return your Elcometer 355 for any reason, please describe why as fully as possible. Make sure that
you include any probe modules that are associated with the condition, as most faults are associated with
the consumable item (the probe) and an alternative module may allow further use of your gauge. Regular
checks of the probe module performance are therefore recommended.
355 Coating Thickness Gauge
31 of 4 8For more information / 1300 287 935
[email protected] / www.burwell.com.au
Page 32

R
30
The gauge does not contain any user-serviceable components. In the unlikely event of a fault, the gauge
should be returned to your local Elcometer supplier or directly to Elcometer. The warranty will be invalidated
if the gauge has been opened.
Contact details can be found:
• on the outside cover of these operating instructions
• at www.elcometer.com
13 ACCESSORIES
A range of optional accessories is available for your Elcometer 355 Coating Thickness Gauge. For more
information, or to place an order, please contact Elcometer or your local Elcometer supplier.
Consult the following sections for details of:
• probe modules
• foils
• precision hand grip
• probe placement jig
• protective covers
• rechargeable batteries
• dry batteries
• headphones/earpiece
355 Coating Thickness Gauge
32 of 4 8For more information / 1300 287 935
[email protected] / www.burwell.com.au
Page 33
R
31
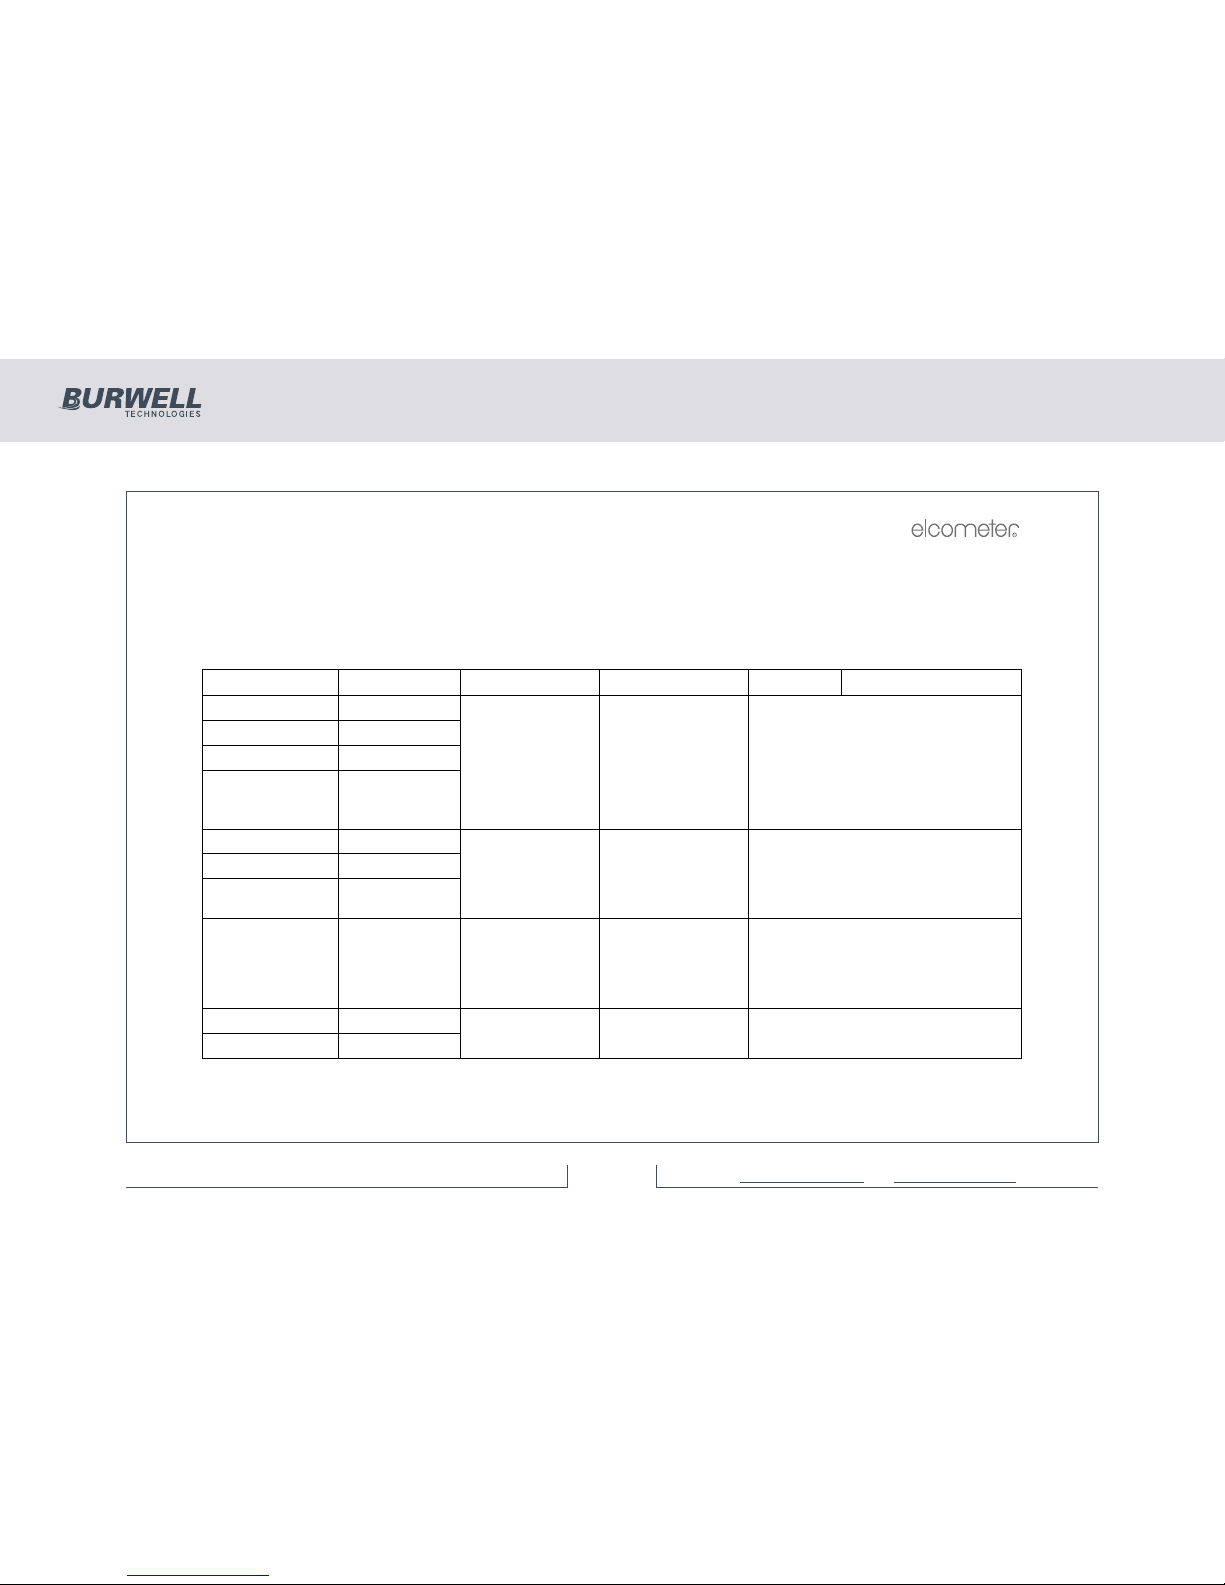
13.1 PROBE MODULES
Elcometer's unique Probe Modules allow versatile application of the Elcometer 355 Coating Thickness
Gauges. Probe Modules can be freely interchanged as required on both ferrous (F) and non-ferrous (NF)
metal substrates. Most Probe Modules are capable of an accuracy of ±1% of the reading on a variety of
coatings and surfaces.
Probe type Part number Range Accuracy Resolution in range
F1 Standard T35511952 0 µm to
1500 µm
0 mils to 60 mils
±1% or ±1 µm
±1% or ±0.04 mil
0.1 µm 0 µm to 200 µm
0.05 µm 200 µm to 500 µm
1.0 µm 500 µm to 1500 µm
0.005 mils 0 mils to 8 mils
0.02 mils 8 mils to 20 mils
0.05 mils 20 mils to 60 mils
F1 Right Angle T35511953
F1 Telescopic T35511959
F1 A
(Automotive)
T35512400
F2 Standard T35511954 0 mm to 5 mm
0 mils to 200
mils
±1% or ±5 µm
±1% or ±0.2 mil
2 µm 0 µm to 0.5 mm
5 µm 0.5 mm to 5 mm
0.1 mils 0 mils to 20 mils
0.2 mils 20 mils to 200 mils
F2 Right Angle T35511955
F2 Telescopic T35511960
F3 Standard T35511956 0 mm to 13 mm
0 mils to 500
mils
±2% or ±30 µm
±1% or ±1 mils
5 µm 0 µm to 1mm
10 µm 1 mm to 13 mm
0.2 mils 0 mils to 40 mils
0.5 mils 40 mils to 500 mils
F4 Standard T35511950 0 µm to 250 µm
0 mils to 10 mils
±1% or ±1 µm
±1% or ±0.04 mil
0.1 µm 0 µm to 250 µm
0.005 mils 0 mils to 10 mils
F4 Right Angle T35511951
355 Coating Thickness Gauge
33 of 4 8For more information / 1300 287 935
[email protected] / www.burwell.com.au
Page 34

R
32
13.2 Foils
Each probe module is supplied with an appropriate set of precision foils measured using a linear
displacement transducer with an accuracy of 1% or 1 µm (whichever is the greater) of the reading.
F5 (Rebar) T35511962 0 µm to 800 µm
0 mils to 32 mils
±1% or ±2 µm
±1% or ±0.08 mil
1 µm 0 µm to 800 µm
0.1 mils 0 mils to 32 mils
F6 Standard T35511964 0 mm to 25 mm
0 mils to 1000
mils
±2% or ±100 µm
±1% or ±4 mils
10 µm 0 mm to 5 mm
50 µm 5 mm to 25 mm
0.5 mils 0 mils to 200 mils
2 mils 200 mils to 1000 mils
N1 Standard T35511982 0 µm to
1500 µm
0 mils to 60 mils
±1% or ±1 µm
±1% or ±0.04 mil
0.1 µm 0 µm to 200 µm
0.05 µm 200 µm to 500 µm
1.0 µm 500 µm to 1500 µm
0.005 mils 0 mils to 8 mils
0.02 mils 8 mils to 20 mils
0.05 mils 20 mils to 60 mils
N1 Right Angle T35511983
N2 Standard T35511984 0 mm to 5 mm
0 mils to 200
mils
±1% or ±15 µm
±1% or ±0.6 mil
2 µm 0 mm to 0.5 mm
5 µm 0.5 mm to 5 mm
0.1 mils 0 mils to 20 mils
0.2 mils 20 mils to 200 mils
N4 (Anodisers) T35511980 0 µm to 250 µm
0 mils to 10 mils
±1% or ±1 µm
±1% or ±0.04 mil
0.1 µm 0 µm to 250 µm
0.005 mils 0 mils to 10 mils
Probe type Part number Range Accuracy Resolution in range
355 Coating Thickness Gauge
34 of 4 8For more information / 1300 287 935
[email protected] / www.burwell.com.au
Page 35
R
33
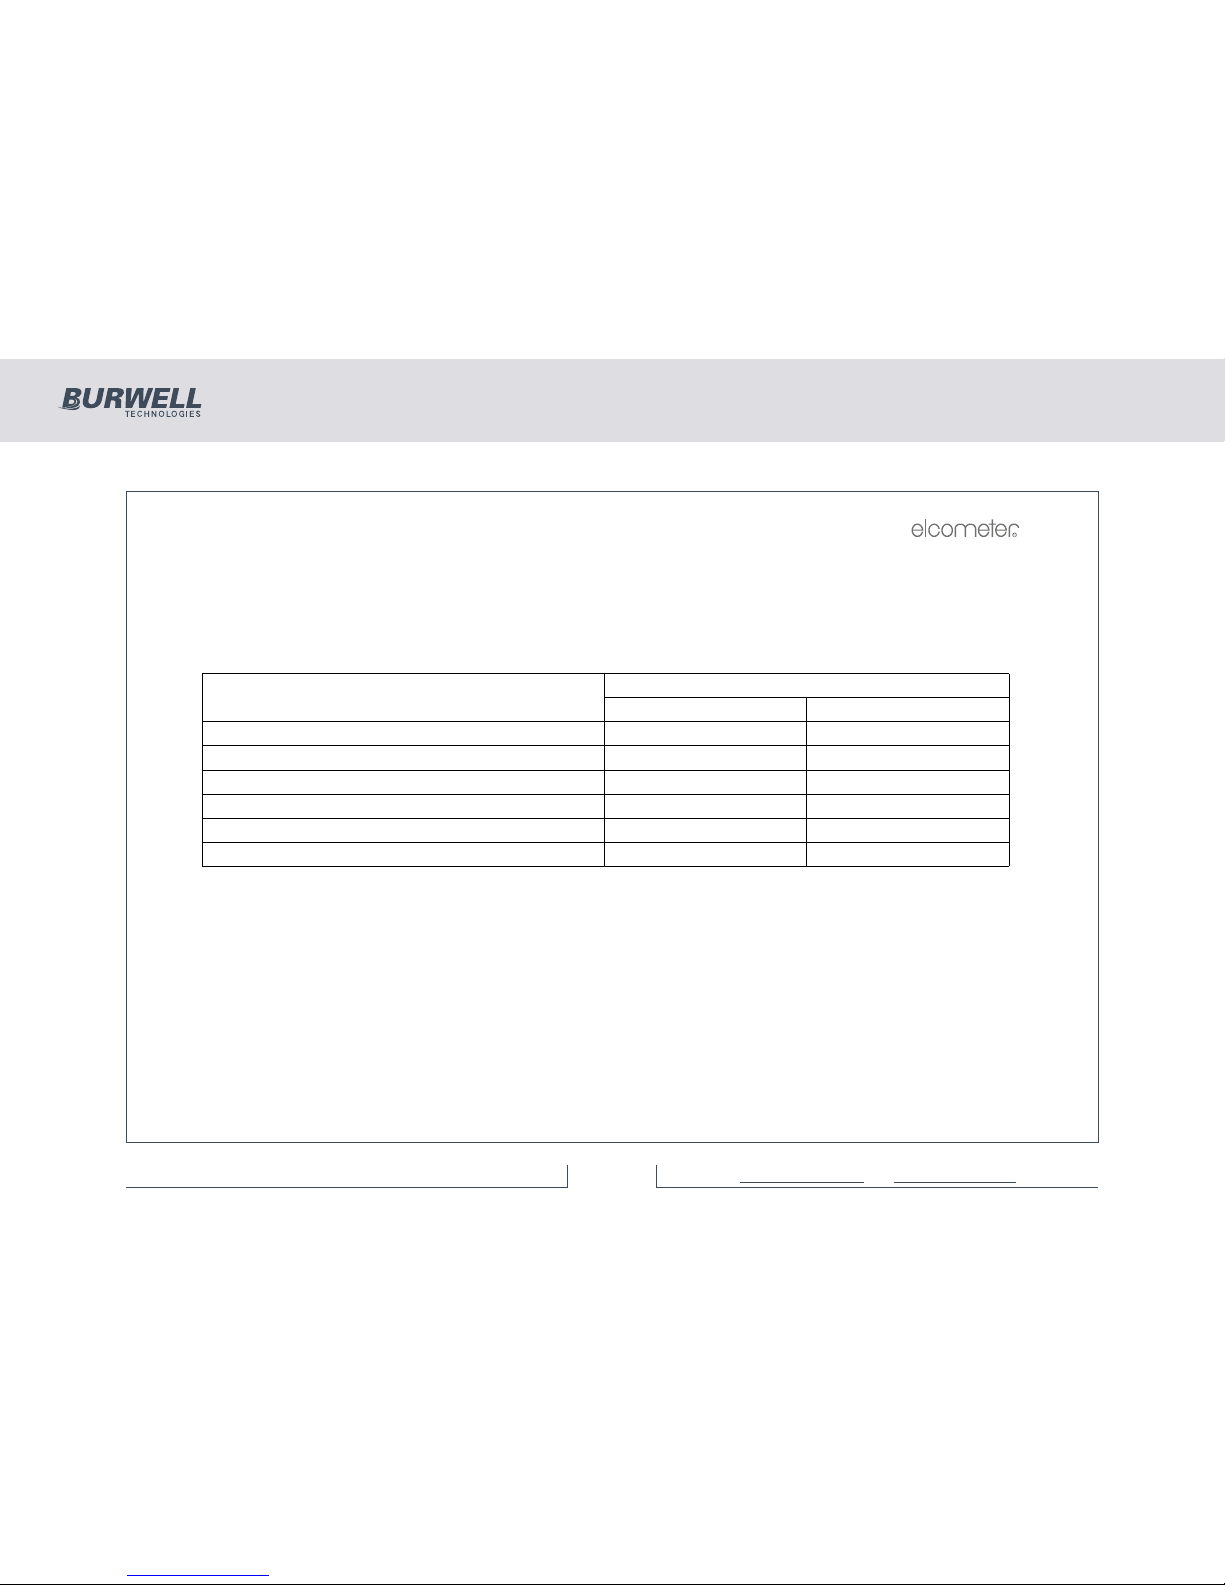
These sets are consumable items and will need replacing on a regular basis depending on their use and
the care taken during use and storage.
If required, these foil sets or individual foils can be supported at the time of purchase by an optional
Calibration Certificate with traceability to National Standards. Foil set sales part numbers are as follows:
Also available on request are Certified Coated Thickness Standards on ferrous or non ferrous metal
substrates, consisting of a zero plate and 4 thickness values to Customer’s requirements and measured to
an accuracy of 1% or 1mm whichever is the greater. These Standards are all supplied with a Calibration
Certificate.
13.3 Precision hand grip
The Elcometer 355 is supplied with a precision hand grip for use with the F1, F2 and N1 standard style
probes. The grip is designed to help control the placement of the probe on surfaces in a repeatable way so
that the optimum accuracy capability can be achieved. The grip controls the cable and positions the tip at
Foil Set
Part Number
Without Certificate With Certificate
Scale 1 : 1500 µm (60 mils) T99022255-1 T99022255-1C
Scale 2 : 5000 µm (200 mils) T99022255-2 T99022255-2C
Scale 3 : 13 mm (500 mils) T99022255-3 T99022255-3C
Scale 4 : 250 µm (10 mils) T99022255-4 T99022255-4C
Scale 5 : 800 µm (32 mils) T99022255-5 T99022255-5C
Scale 6: 25 mm (980 mils) T99022255-6 T99022255-6C
355 Coating Thickness Gauge
35 of 4 8For more information / 1300 287 935
[email protected] / www.burwell.com.au
Page 36

R
34
right angles to the substrate to avoid any errors that are introduced by variations in these parameters. The
probe can be used without the grip where the smaller diameter probe is advantageous, but some effect on
accuracy may result from the probe twisting between measurements or not being truly set at right angles to
the substrate. If a replacement Hand Grip is required, use Sales Part Number T35512026.
13.4 Probe placement jig
A probe stand which can be used to position a range of probes on small components is available. Use Sales
Part Number T95012880.
13.5 Protective covers
The Elcometer 355 is supplied with some clear plastic, disposable sheets which protect the unit from
overspray. Additional covers are available in lots of 10. Use Sales Part Number T35512051.
13.6 Re-chargeable batteries
The Elcometer 355 can be operated using 3 x 1.2 V nickel metal hydride (NiMH) cells which are charged
externally. Suitable chargers are available for all voltage options.
13.7 Dry batteries
The Elcometer 355 can be powered by 3 x 1.5 V (LR6) AA alkaline cells. Zinc carbon batteries will give a
shorter operating life.
13.8 Headphones/earpiece
The Elcometer 355 has a 3.5mm jack socket fitted to the top end plate next to the 25 way D socket. This
may be used with an earpiece with volume control (Part No. T35512220) or with headphones (Part No.
T35512216) so that the beeper signals can be heard in high ambient noise environments.
355 Coating Thickness Gauge
36 of 4 8For more information / 1300 287 935
[email protected] / www.burwell.com.au
Page 37

R
35
14 TECHNICAL SPECIFICATION
For specification details of probe modules please see the separate probe Module Data Sheet.
Instrument Dimensions: 175 mm x 83 mm x 42 mm (6.9" x 3.3" x 1.6")
Weight: 650 g (1.43 lbs) (incl. probe module and batteries)
Operating Temperature: 0°C to 50°C (32°F to 120°F)
Storage Temperature: -10°C to 60°C (14°F to 140°F)
Batteries: 3 x 1.5 V AA cells alkaline or 3 x 1.2 V NiMH re-chargeable cells
Battery Life: Alkaline 40 hours minimum
NiMH 20 hours minimum
15 RELATED EQUIPMENT
Elcometer produces a wide range of coating thickness gauges and associated paint inspection equipment.
Users of the Elcometer 355 may also benefit from the following Elcometer products:
• Elcometer 550 Uncured Powder Thickness Gauges
• Elcometer 157 Coating Thickness Gauge
• Elcometer 211 Coating Thickness Gauge
• Elcometer 101 Coating Thickness Gauge
For further information contact Elcometer, your local Elcometer supplier or visit www.elcometer.com
355 Coating Thickness Gauge
37 of 4 8For more information / 1300 287 935
[email protected] / ww w.burwell.com.au
Page 38
R
36
16 TUTORIAL
This tutorial is intended to demonstrate the features of the Elcometer 355 Standard instrument and is
designed to work with an F1 module fitted to an unused Elcometer 355. If other modules are used, or if
information is stored from previous operations, the response of the instrument to the commands below may
be different. It is also intended to familiarise the User with of the functions of the Elcometer 355, but actual
use of the instrument depends on application and requirements of the process.
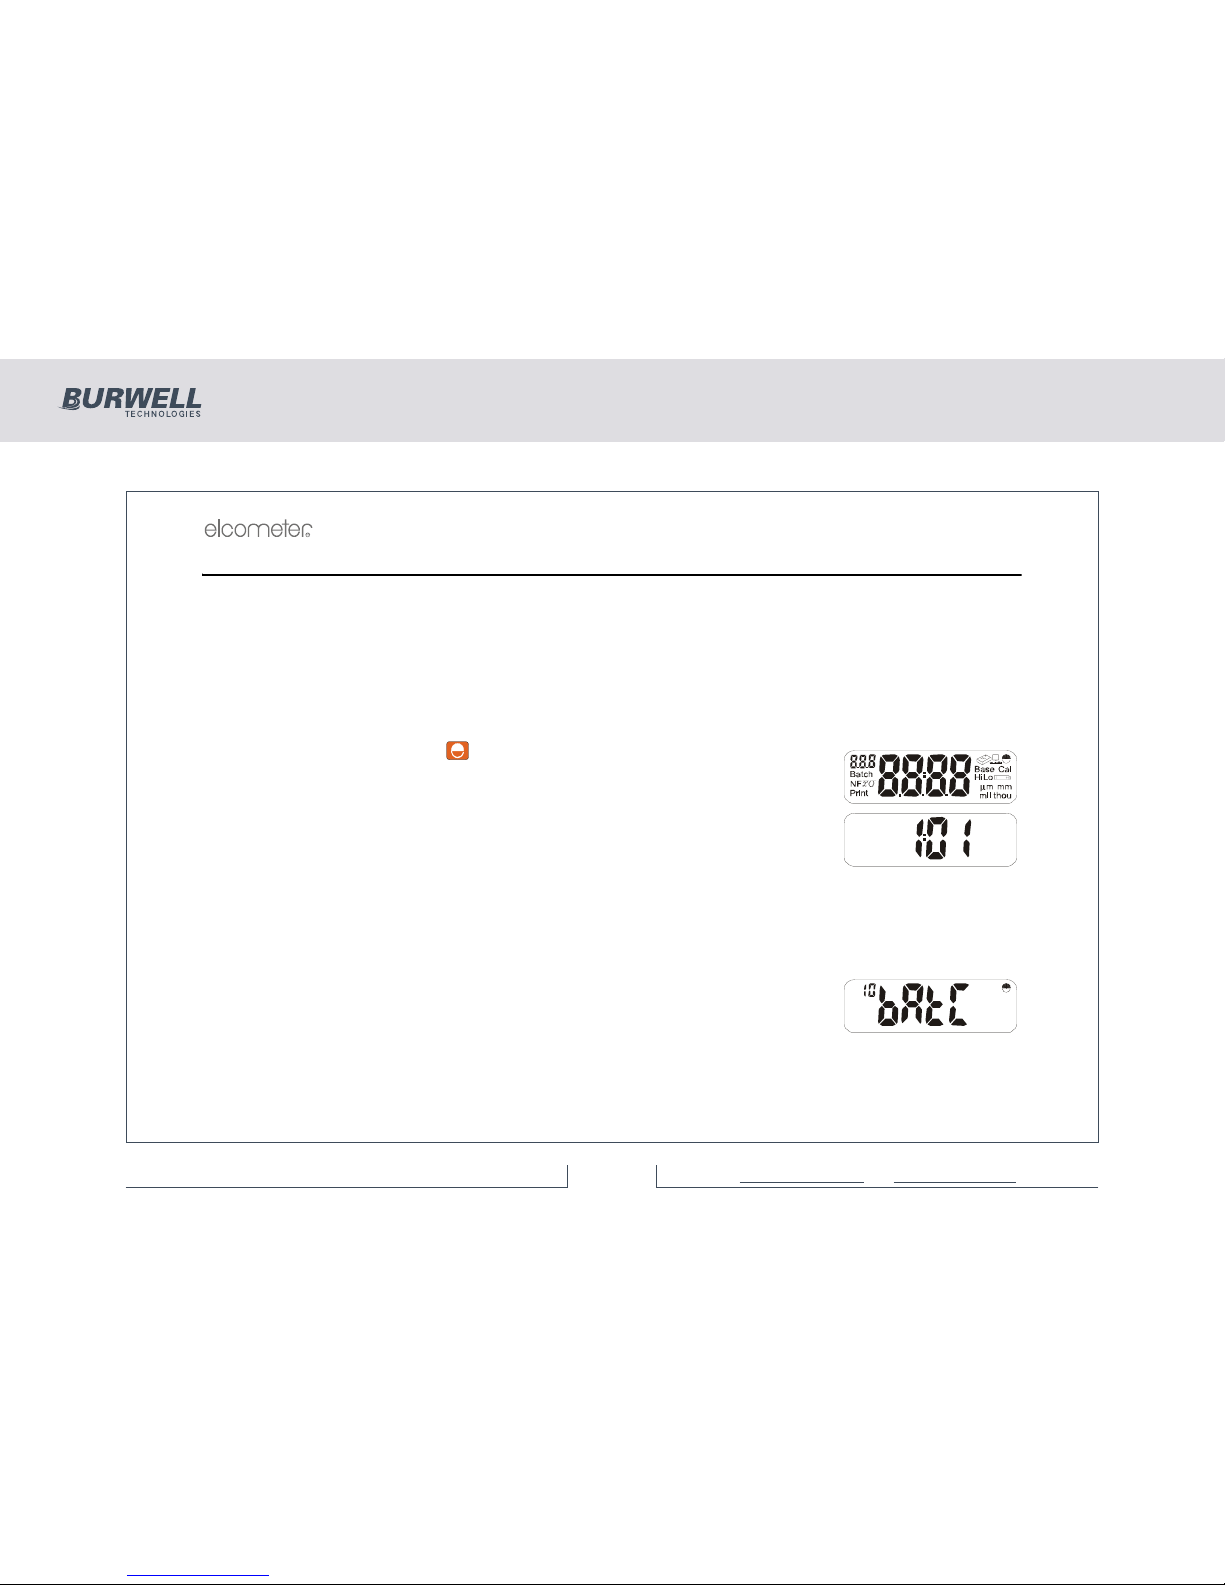
16.1 Switch ON
To switch on press and hold [ ]. Note display of all segments and software
identification.
The instrument ‘wakes up’ in the mode last used. To switch off, press and hold
[ENTER] for approximately 3 seconds).
Note: The instrument will normally switch off automatically after 1 minute if no operation is carried out - see
“Date and time” on page 14 to adjust.
16.2 Select Immediate Mode (Batch 0)
Press [SETUP] and the display shows:
Note: If a batch is selected the batch symbol is on.
355 Coating Thickness Gauge
38 of 4 8For more information / 1300 287 935
[email protected] / ww w.burwell.com.au
Page 39
R
37
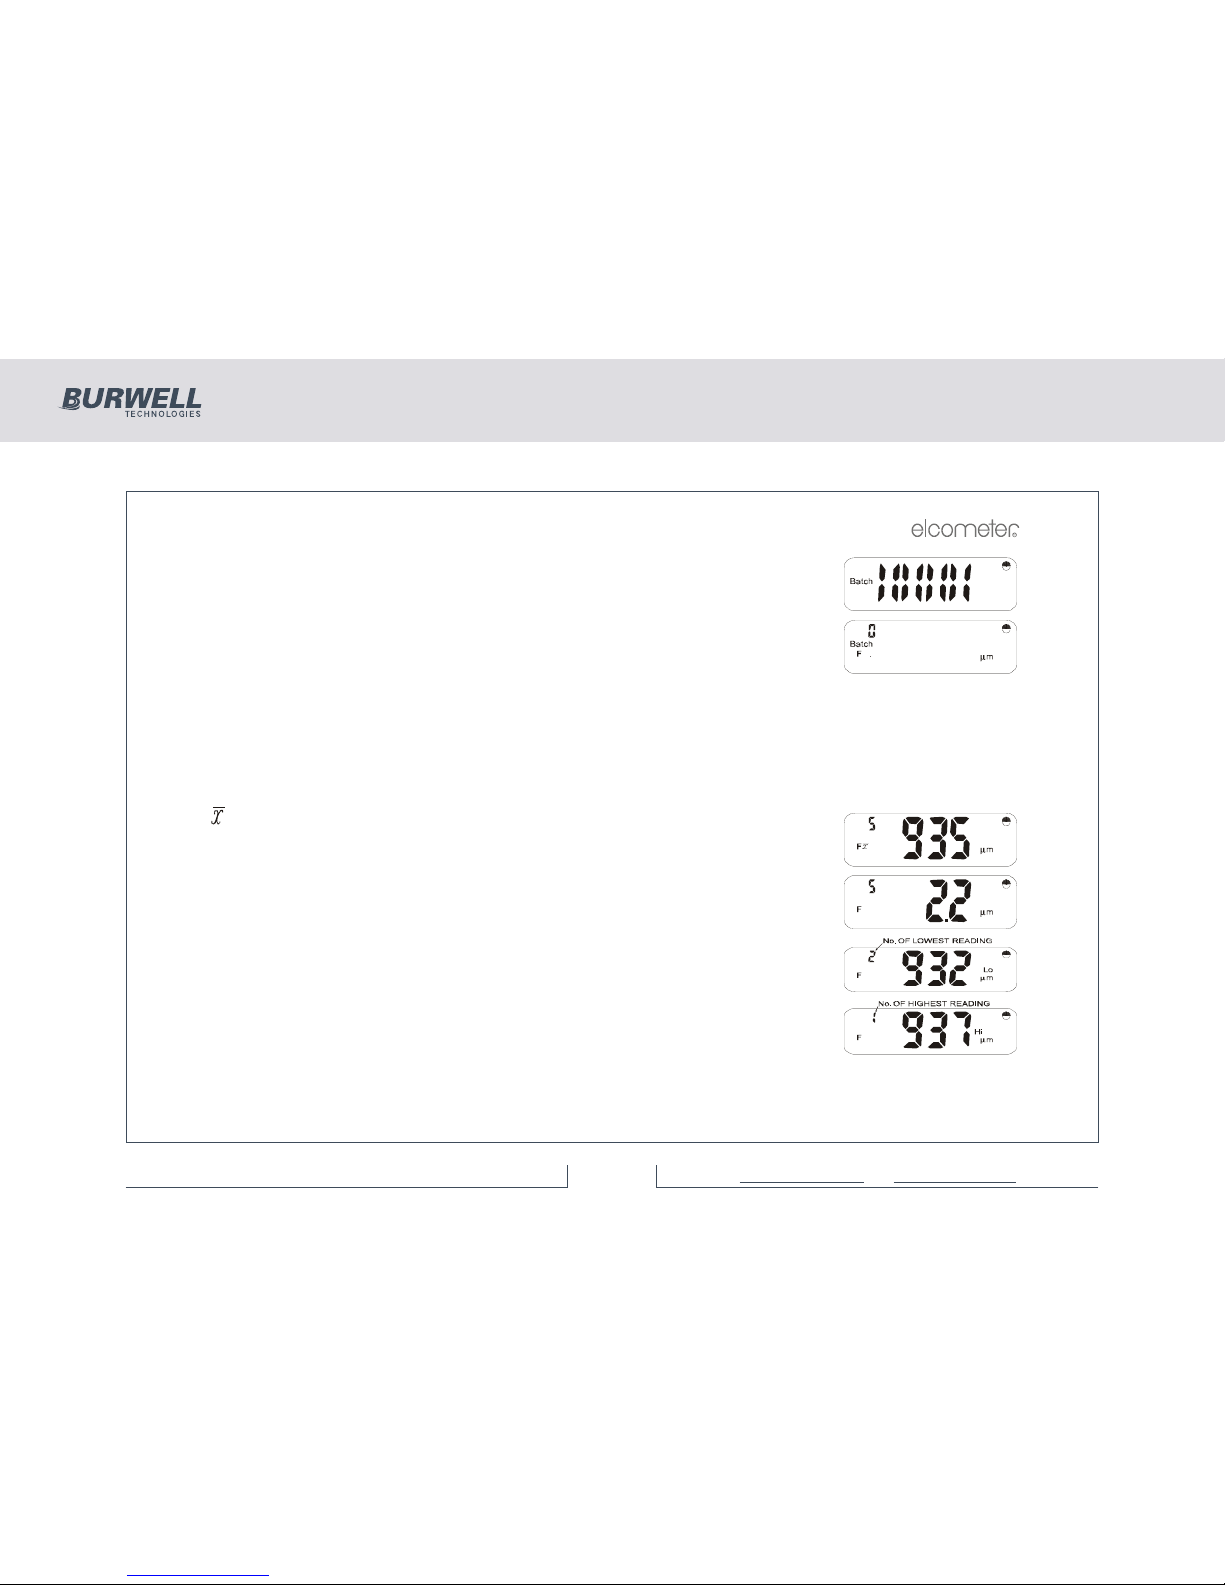
Press [ENTER] and the display will flash:
The batch number is then shown.
Press [ENTER] again and the display will show:
16.3 Display some Statistics
Take a set of up to five readings on a foil on a mild steel surface. (e.g. 935 microns).
The number of readings increments in the top left hand corner as each reading is displayed. The last reading
is held on the display.
Press and hold:
[ ] to read mean
[σ] to read standard deviation
[<] to read lowest reading
[>] to read highest reading
355 Coating Thickness Gauge
39 of 4 8For more information / 1300 287 935
[email protected] / ww w.burwell.com.au
Page 40
R
38
16.4 Operate in different Units
Change units by pressing [UNITS] once for mm, again for mil, again for thou, again for return to µm, Note
the change in value of the reading as the units change.
16.5 Set CALibration and BASE Values
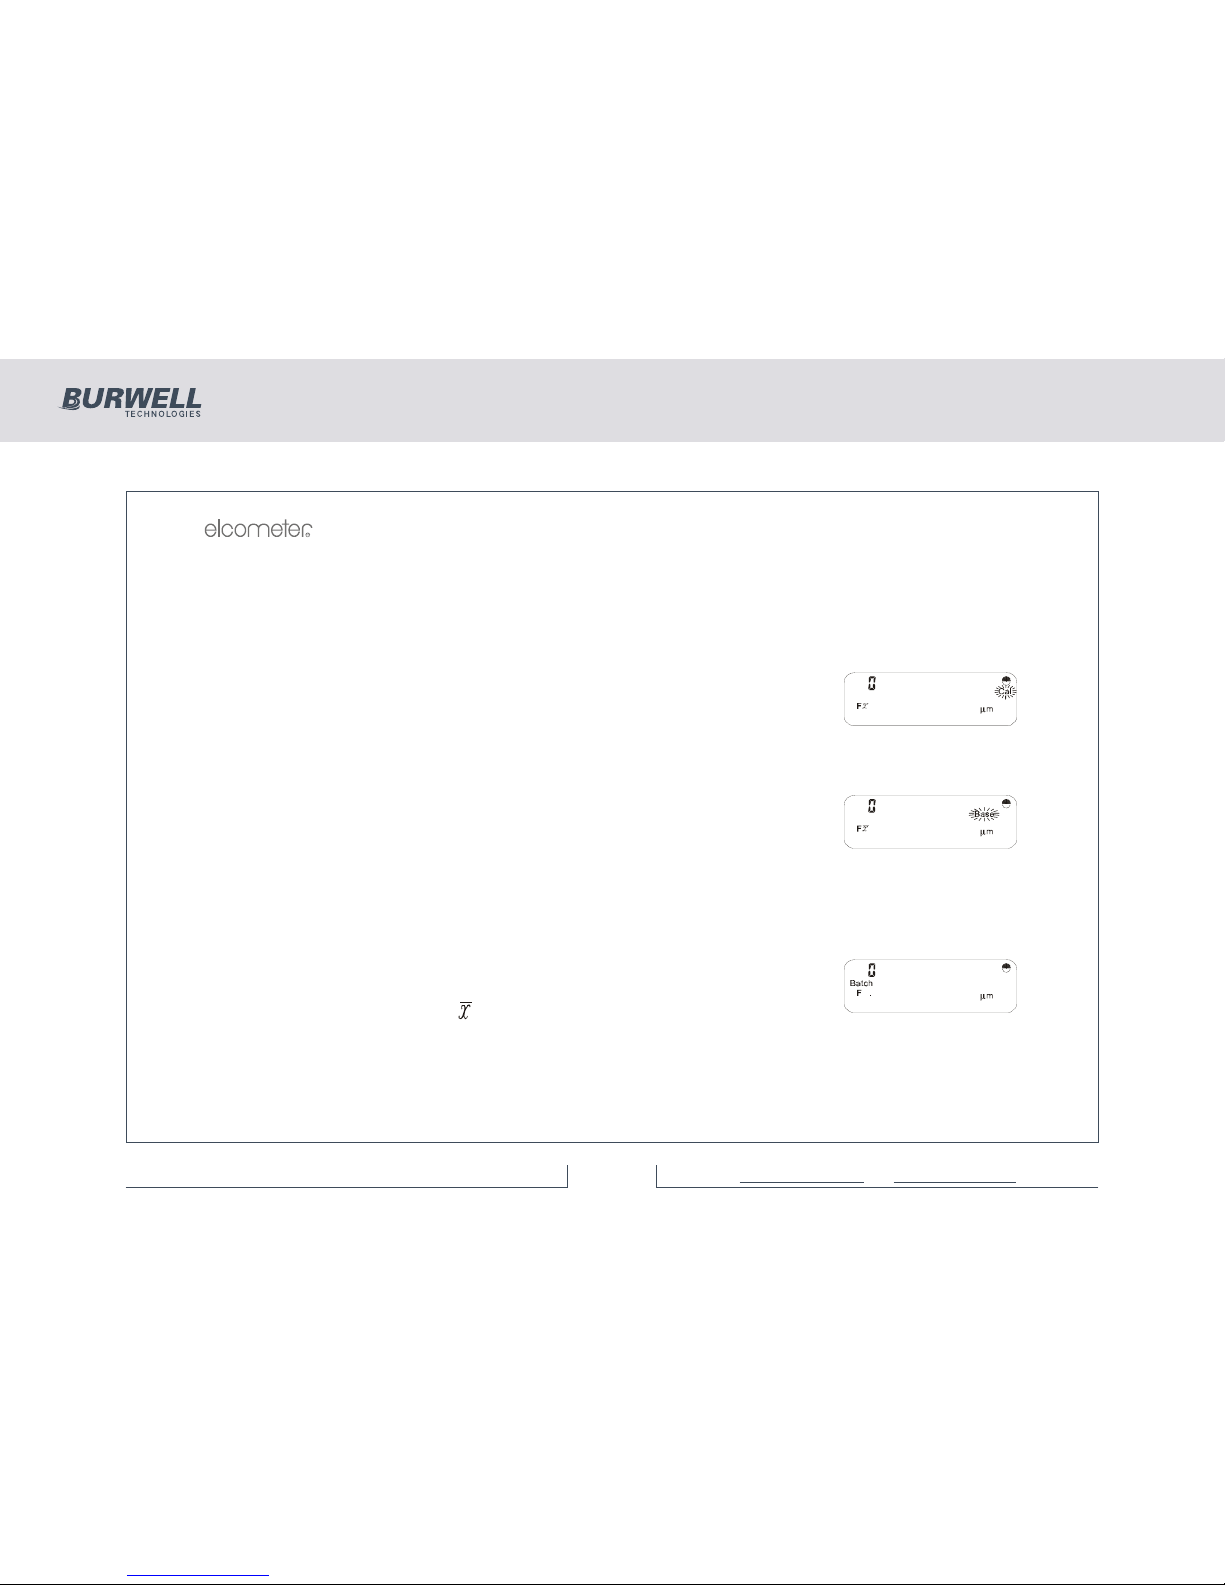
Ensure the display shows ‘µm’. Press [CAL] and the display will show:
Take a set of readings on a known value of foil on a steel substrate. The display
will show the running mean for the set of readings.
Modify the reading to be the actual value of the foil using the [>] or [<] and press
[ENTER]. ‘Cal’ will disappear and the reading display will blank.
Press [BASE] and the display will show:
Take a set of readings on the bare steel substrate.
Enter zero either by accepting ‘0.0’ in the display by pressing [ENTER], or by
modifying the value in the display to read 0.0 by using the [>] or [<] keys and then
pressing [ENTER].
16.6 Send Readings to Memory
Set up Batch 1 by pressing [SETUP] [ENTER], adjusting the display to ‘1’ using
[>]. Then press [ENTER]. The display will show:
Take a set of readings and view , σ, < and> as before.
355 Coating Thickness Gauge
40 of 4 8For more information / 1300 287 935
[email protected] / ww w.burwell.com.au
Page 41
R
39
16.7 Show use of ‘DEL’ and ‘CLEAR’ Controls
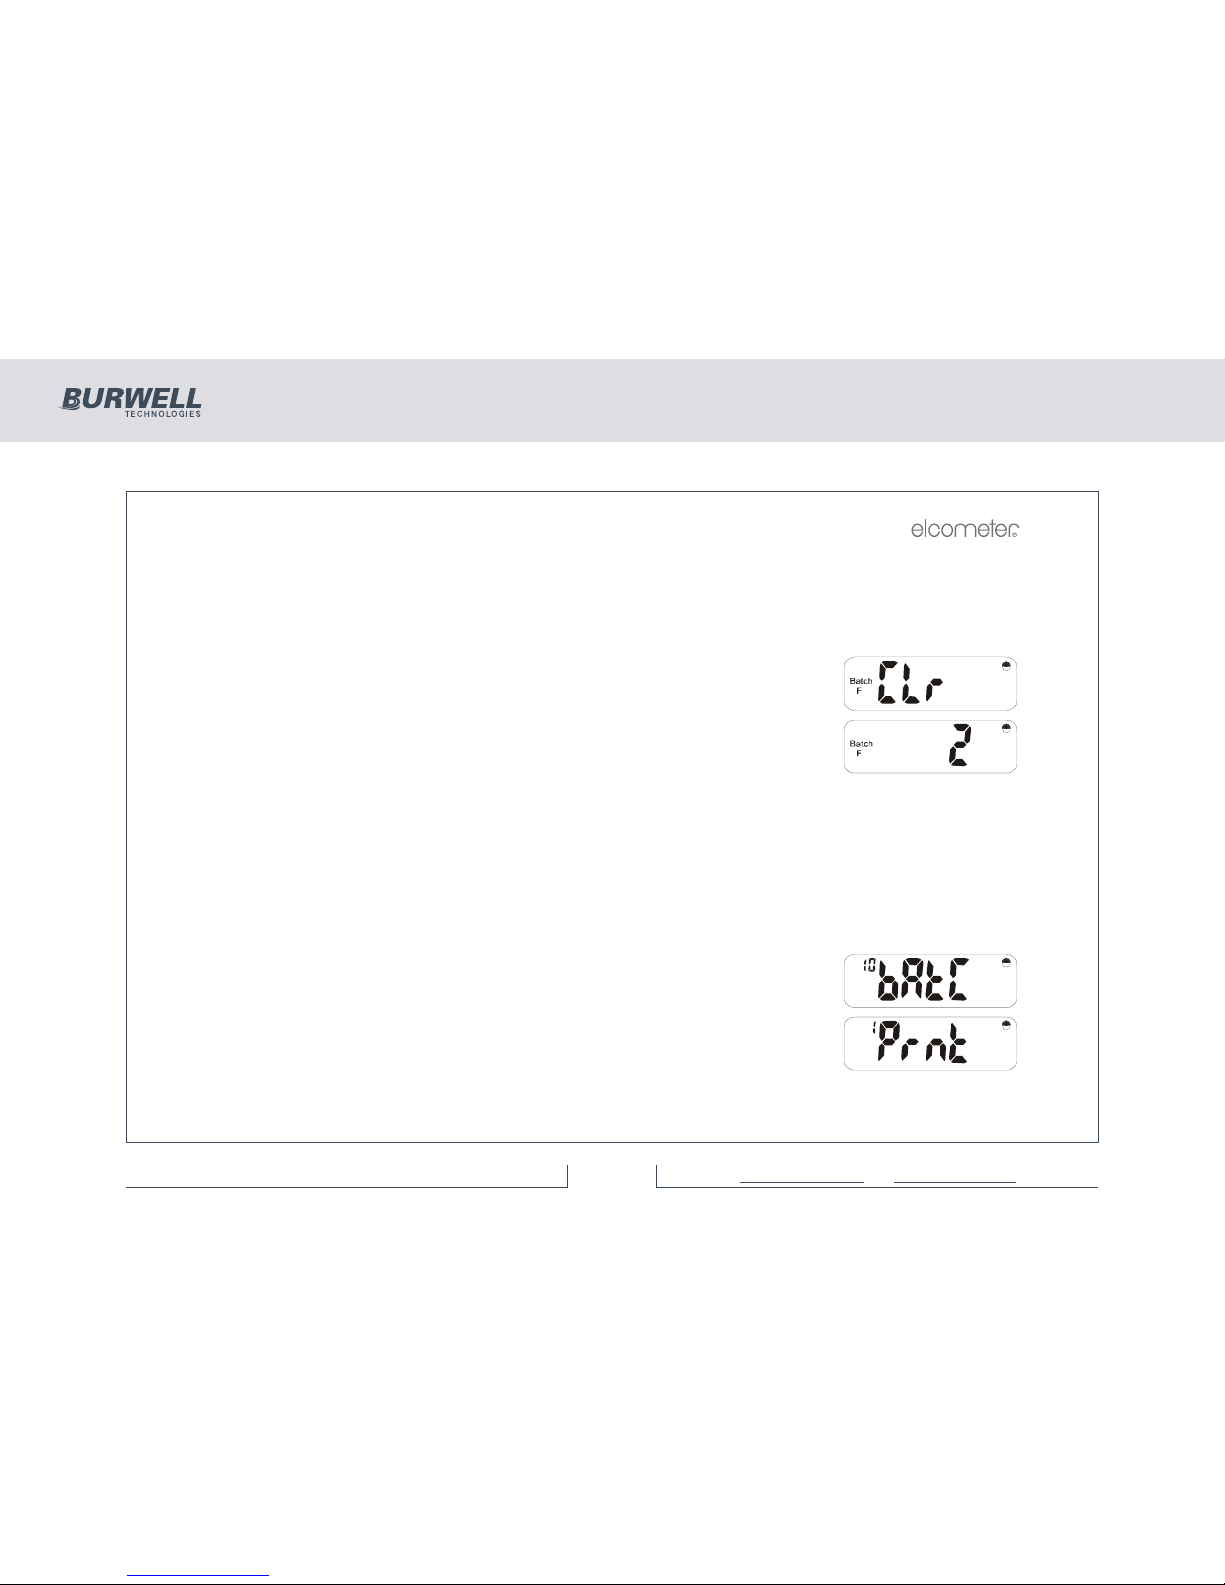
Set up Batch 2 by pressing [SETUP] [ENTER], adjusting the display to read ‘2’ using [>] and pressing
[ENTER]. (The ‘batch’ symbol will always flash until [ENTER] is pressed).
Take a set of readings as before. Now press [DEL] and note that the last reading is deleted.
Press [CLEAR] and the display will flash:
and
Press [ENTER] and Batch 2 readings will be cleared.
16.8 See which Batches are being used
Standard software has Batch numbers 1 to 25 present.
Press [SETUP] and [ENTER]. The current batch number is displayed. Using [>] step through each batch
number. If ‘F’ or ‘N’ flashes, then data is stored in the batch. If neither ‘F’ nor ‘NF’ flashes there is no data
in that batch.
16.9 SETUP FUNCTIONS
Press [SETUP] and the display will show:
Use [>] twice to get to the Printer Setup Menu.
355 Coating Thickness Gauge
41 of 48For more information / 1300 287 935
[email protected] / ww w.burwell.com.au
Page 42
R
40
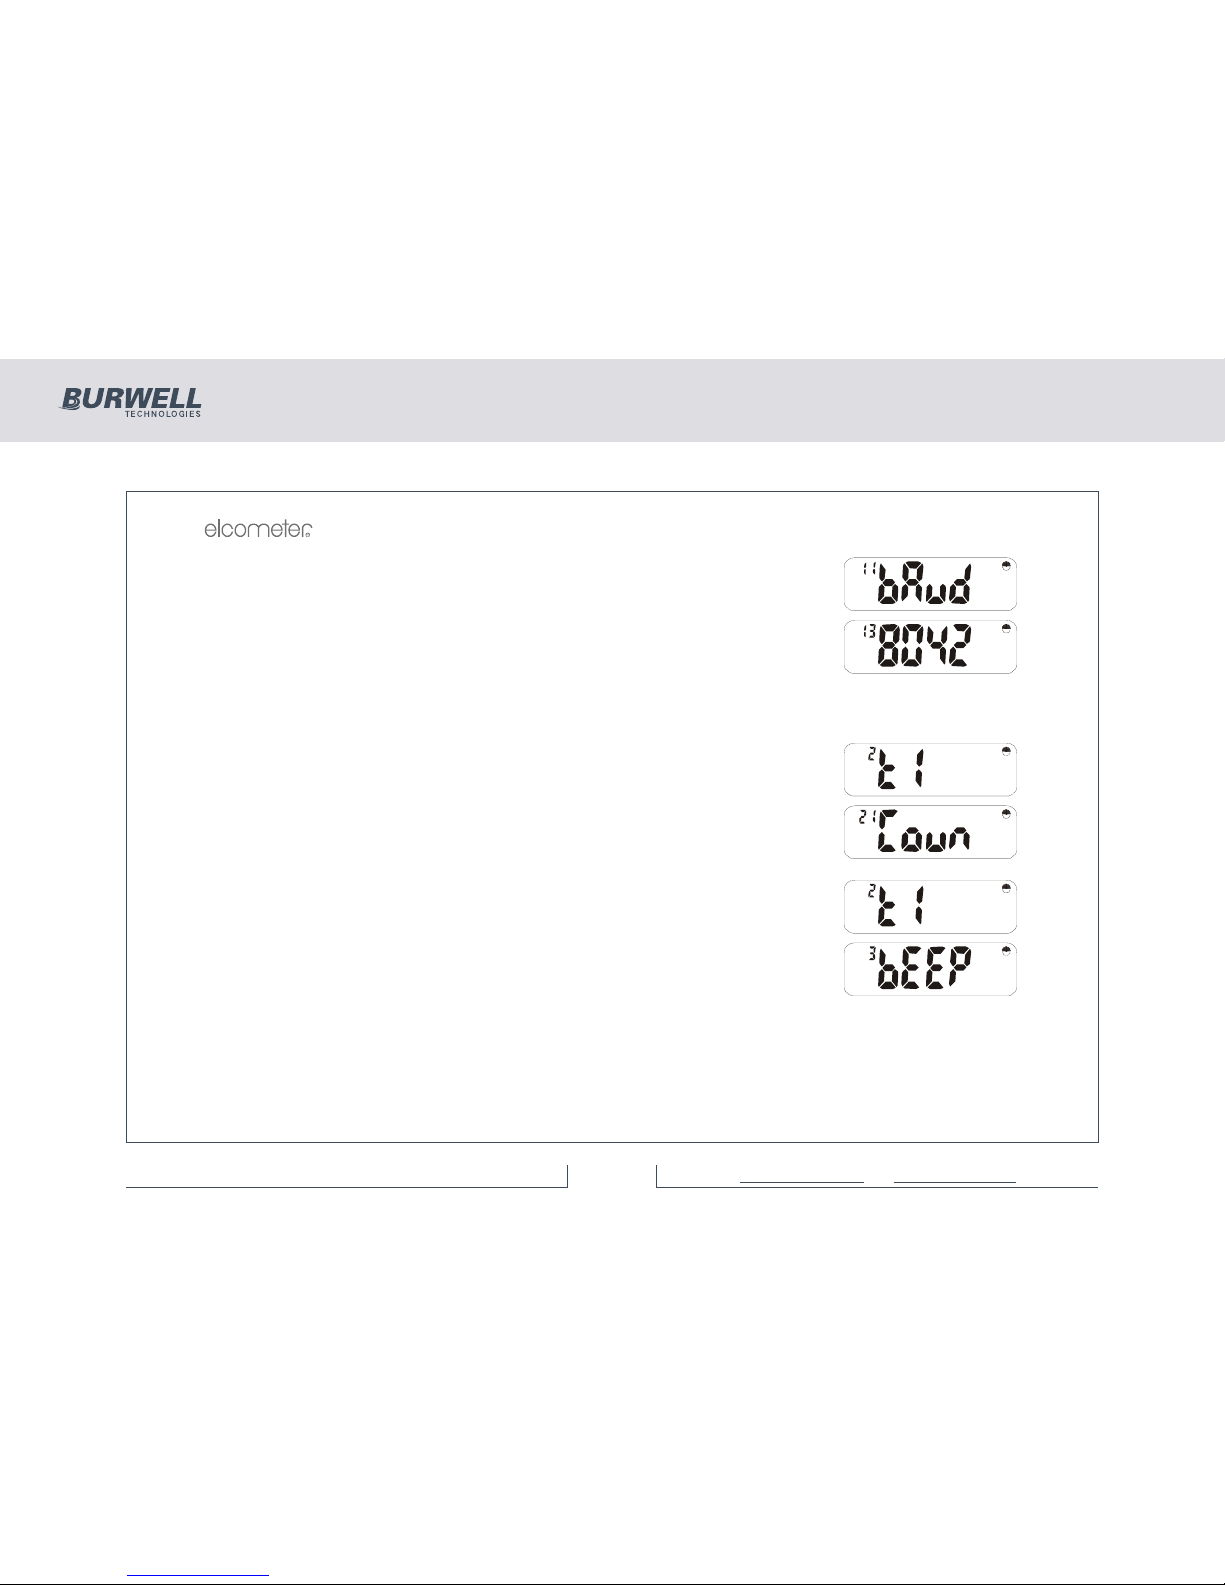
Press [ENTER] to select the printer setup, and the display will show:
Press [>] to step through the baud rate selections to:
This selects 80 column format (A4) or 42 column format (Elcometer Portable
Printer). Press [ENTER]. [<] and [>] will toggle between 80 and 42. Select 42 and
press [ENTER].
Press [SETUP] or [Esc] to return to the ‘Prnt’ display.
Press [>] to select the time and date option:
Press [ENTER].
Use [>] to select ‘dAtE’ and press [ENTER]. The day number will flash. Press
[ENTER] and the month number will flash; [ENTER] again and the year flashes.
Press [ENTER] again to return to the Sub Menu. Press [SETUP] or [Esc] to return
to:
Press [>] to step through the Main Menu to the beeper volume option:
Press [ENTER] to display the current volume, 0-4. (0=Off, 4=Loudest). Press [<]
or [>] to step through these options. Press [ENTER] to select choice and return to
the ‘bEEp’ display (or [Esc] to cancel the operation).
355 Coating Thickness Gauge
42 of 4 8For more information / 1300 287 935
[email protected] / ww w.burwell.com.au
Page 43
R
41
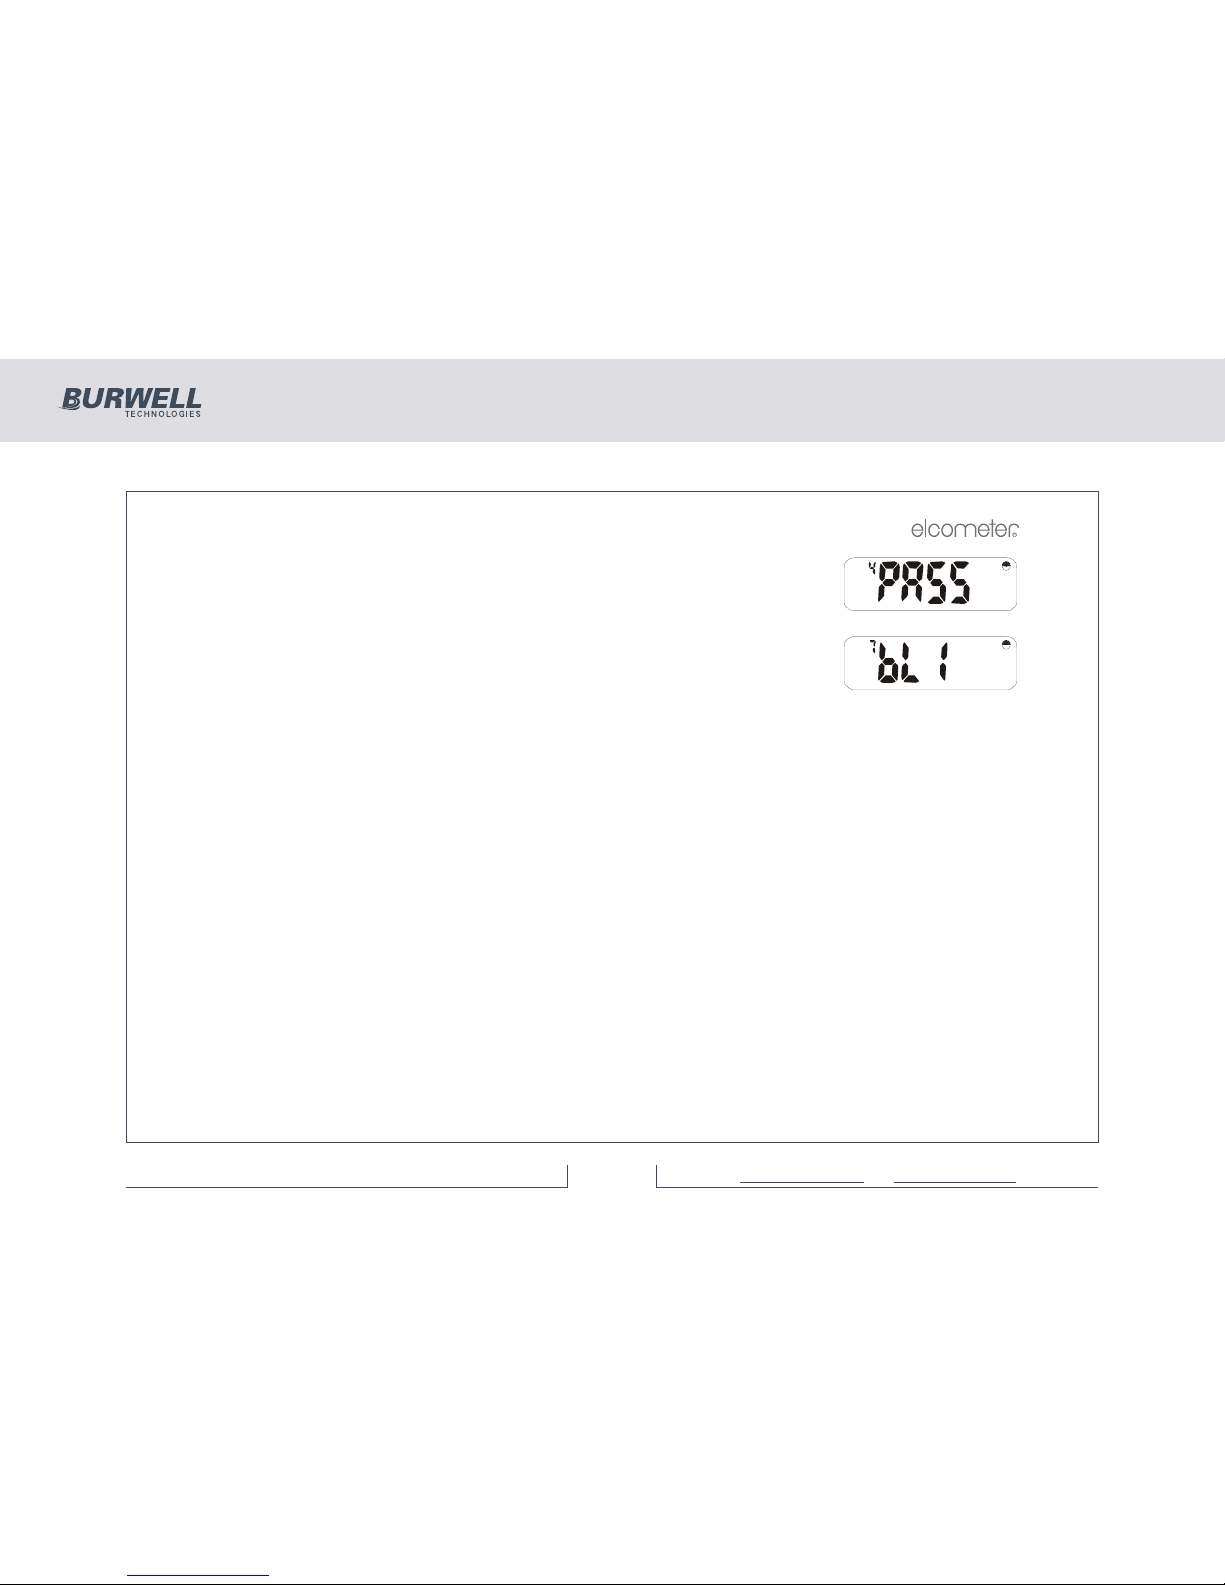
Press [>] to step through to Password Select option:
Note: This function is not available in Standard software. If [ENTER] is pressed at
this stage the instrument will return to the readings mode.
Press [SETUP] and use [>] to step through to backlight option:
Pressing [ENTER] displays current status - ‘oFF’ or ‘on’. [<] or [>] toggles between
these two options. [ENTER] selects the chosen status and returns to the ‘bLi’
display.
355 Coating Thickness Gauge
43 of 4 8For more information / 1300 287 935
[email protected] / ww w.burwell.com.au
Page 44
R
42
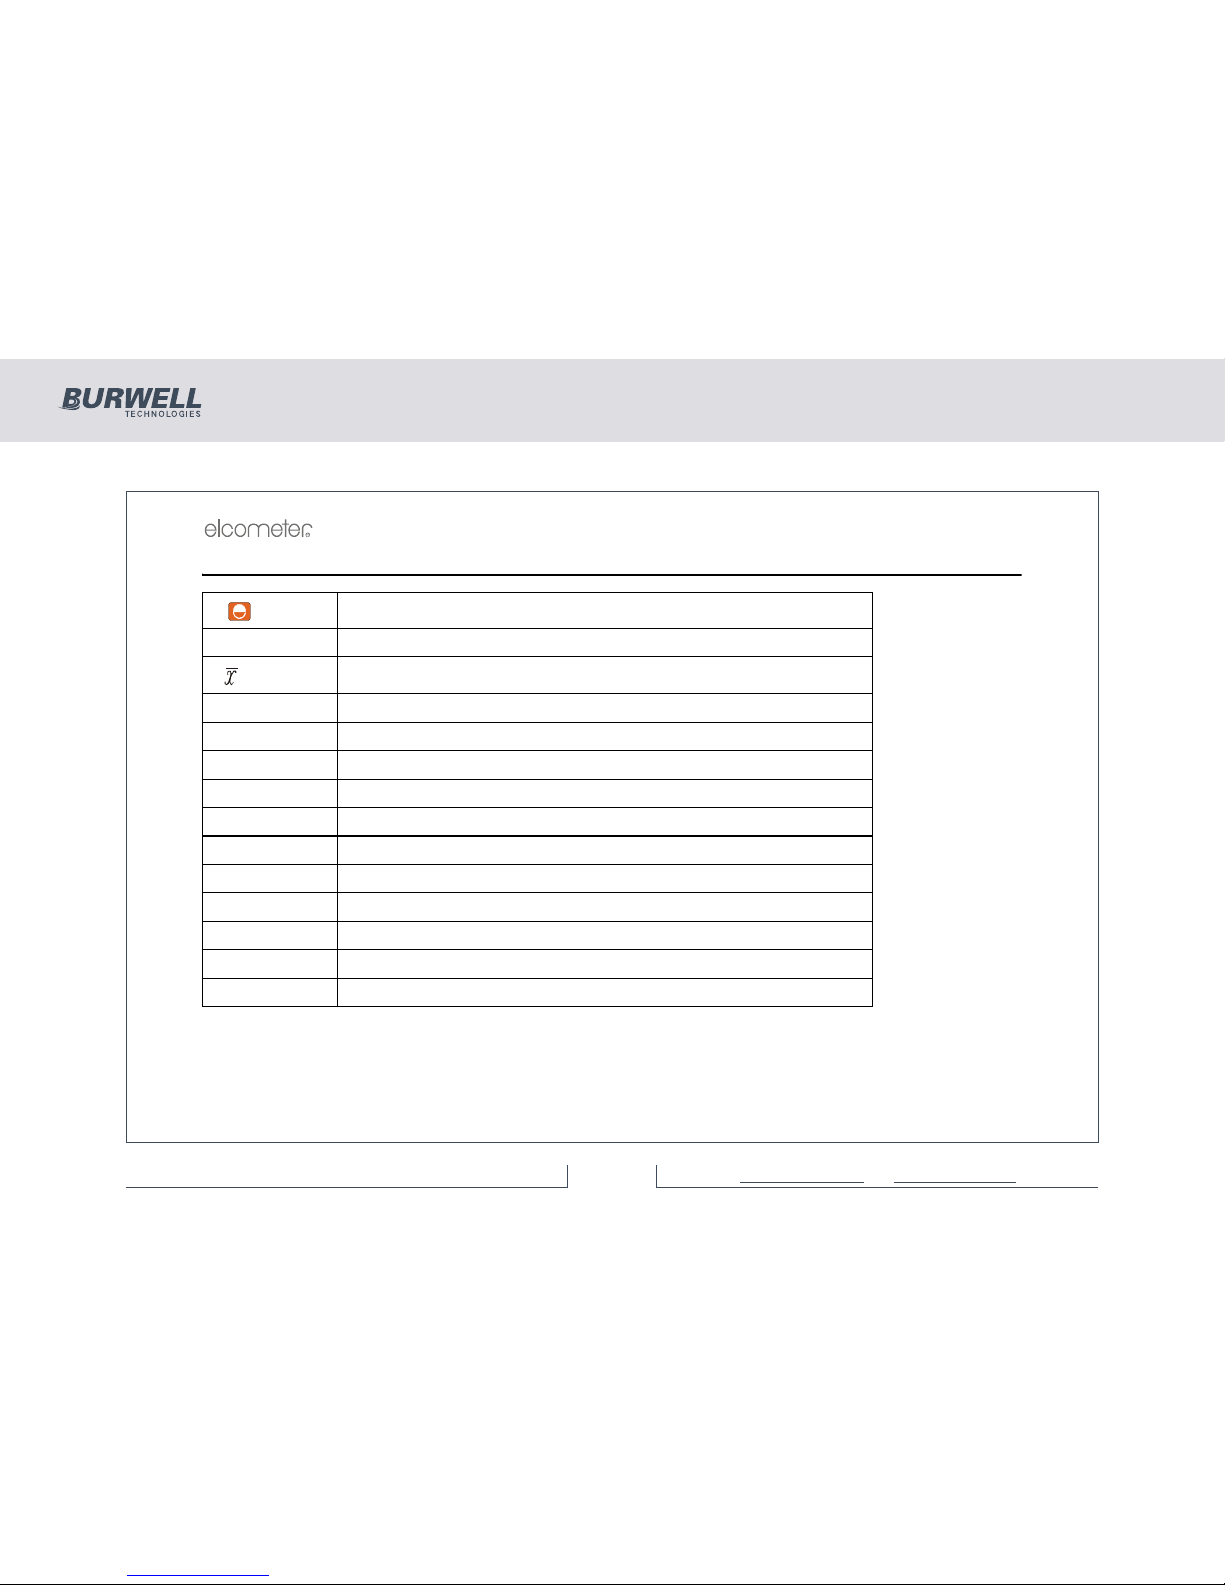
17 QUICK REFERENCE GUIDE
[]
Switch on
[ENTER] Enter data or batch mode / Switch off - hold key down
[]
Display mean
[σ] Display standard deviation
[<] Display lowest reading
[>] Display highest reading
[BASE] Set lowest calibration point
[CAL] Set highest calibration point
[Esc] Escape from function
[DEL] Delete last reading
[UNITS] Select units - µm, mm, mil, thou
[PRINT] Select print modes
[CLEAR] Clears immediate mode and readings and statistics from a batch
[SETUP] Setup User defined values e.g. batch selection
355 Coating Thickness Gauge
44 of 4 8For more information / 1300 287 935
[email protected] / ww w.burwell.com.au
Page 45

R
43
Basic Calibration
In the following section [<] or [>] is used to vary the number entered.
[BASE] Select mode [CAL]
[<], [>] Adjust value [<], [>]
[BASE] Select previous value [CAL]
[ENTER] [ENTER]
Batch Mode
[SETUP] Select mode
[<] or [>] Scroll through batches
[ENTER] Select batch
Batch Clear
[SETUP] [ENTER] [CLEAR] [ENTER] [ENTER]
To clear current batch
[SETUP] [ENTER] ([<] or [>]) [CLEAR] [ENTER] [ENTER]
To clear specified batch
[SETUP] [ENTER] ([<] or [>] to Batch 0) [CLEAR] [ENTER] [ENTER]
To clear all batches
355 Coating Thickness Gauge
45 of 4 8For more information / 1300 287 935
[email protected] / ww w.burwell.com.au
Page 46

R
44
Batch Delete
[SETUP] [ENTER] [DEL] [ENTER] [ENTER]
To delete current batch
[SETUP] [ENTER] ([<] or [>]) [DEL] [ENTER] [ENTER]
To delete specified batch
[SETUP] [ENTER] ([<] or [>] to Batch 0) [DEL] [ENTER] [ENTER]
To delete all batches
SetUp Mode
[SETUP] [<] or [>] then [ENTER]
To select required function
Then use: [<] or [>] [ENTER]
For sub-function
[<] or [>] [ENTER]
To change sub-function
[SETUP] (+ [SETUP] or [Esc] as necessary)
To exit
Printing Mode
[PRINT] [<] [>] [ENTER]
To select print mode
355 Coating Thickness Gauge
46 of 4 8For more information / 1300 287 935
[email protected] / ww w.burwell.com.au
Page 47

R
45
Switch Instrument Off
Hold down [ENTER] for more than 3 seconds
Note: The Elcometer 355 will automatically switch off after 60 seconds (User selectable between 1 and 30
minutes - see “Date and time” on page 14).
355 Coating Thickness Gauge
47 of 4 8For more information / 1300 287 935
[email protected] / ww w.burwell.com.au
Page 48

R
www.elcometer.com
THE NETHERLANDS
Elcometer NL
Newtonlaan 115
3584 BH Utrecht
Tel: +31 (0)30 210.7005
Fax: +31 (0)30 210.6666
email: [email protected]
www.elcometer.com
GERMANY
Elcometer Instruments GmbH
Ulmer Strasse 68
D-73431 Aalen
Tel: +49(0)7361 52806 0
Fax: +49(0)7361 52806 77
e-mail: [email protected]
www.elcometer.de
FRANCE
Elcometer Sarl
97 Route de Chécy
45430 BOU
Tel: +33 (0)2 38 86 33 44
Fax: +33 (0)2 38 91 37 66
e-mail: [email protected]
www.elcometer.fr
ASIA & THE FAR EAST
Elcometer (Asia) Pte Ltd
896 Dunearn Rd
Sime Darby Centre #03-09
Singapore 589472,
Tel: +65 6462 2822
Fax: +65 6462 2860
e-mail: [email protected]
www.elcometer.com
ENGLAND
Elcometer Limited
Edge Lane
Manchester M43 6BU
Tel: +44 (0)161 371 6000
Fax: +44 (0)161 371 6010
e-mail: [email protected]
www.elcometer.com
USA
Elcometer Inc
1893 Rochester Industrial Drive
Rochester Hills Michigan 48309
Tel: +1 248 650 0500
Toll Free: 800 521 0635
Fax: +1 248 650 0501
e-mail: [email protected]
www.elcometer.com
BELGIUM
Elcometer SA
Rue Vallée 13
B-4681 Hermalle /s Argenteau
Tel: +32 (0)4 379 96 10
Fax: +32 (0)4 374 06 03
e-mail: [email protected]
www.elcometer.be
JAPAN
Elcometer KK
7F Toranomon MT40 Bldg. 5-13-1
Toranomon, Minato-ku
Tokyo 105-0001
Tel: +81 (0)3-4530-9714
Fax: +81 (0)3-4530-9713
email: [email protected]
www.elcometer.co.jp
355 Coating Thickness Gauge
48 of 4 8For more information / 1300 287 935
[email protected] / ww w.burwell.com.au
 Loading...