

Page 1
!!
BURSON
Burson Timekeeper Power Amplifier
User Manual
Want free warranty extension? Please read page 7 for details
!
Page 2

!
2!
!
Thank You.
All of us at Burson Audio would like to say thank you, and congratulations for purchasing the Burson
Timekeeper. We sincerely believe that your Burson Timekeeper is an intelligent investment that will
bring you many years of musical enjoyment and satisfaction.
We understand how eager you are to begin listening and we want you to become familiar with the full
capabilities of the Burson Timekeeper. However, before powering on the device, we encourage you to
look through the manual.
Team Burson
Our Philosophy
The less the equipment tampers with the music, the greater the music becomes. This has been the
core design philosophy of Burson Audio since 1996. If the equipment is honest and transparent then
the proper ,tempo, dynamics and tone will materialise as a natural expression of the music and it
becomes unnecessary to flavour the original sound. We work towards this ideal through the research
and development of customised solid state circuitries that is precise to our applications. Only then
will each component involved be pushed to their performance peak. And only then will the end result
be consistent with our idealism.
Our Approach
We know that when countless time is spent on a project that we love, the fruit of our labour will not
only sound beautiful but look beautiful too. Only when we don't dare to touch it anymore will it be
introduced to the world as a Burson creation.
Page 3

!
3!
Unpacking
After carefully unpacking your Burson Timekeeper, inspect for any shipping damage and call your
dealer immediately if any is found. Do not plug your Burson Timekeeper into any outlet if you find
shipping damage. Please save all packing materials so the unit can be easily and safely shipped if the
need arises.
The Accessories
• AC power cord
• Timekeeper Power Amp
• User manual with warranty registration instruction
Choosing a Location for the Timekeeper
The sound quality of all high-performance audio components can be degraded by vibration. Try to
avoid stacking other audio component on top of the Timekeeper and allow minimum of 1cm clearance
around the Timekeeper for heat regulation. For best performance, place the Burson Timekeeper on
a solid surface with minimized vibration.
!
Page 4
!
4!
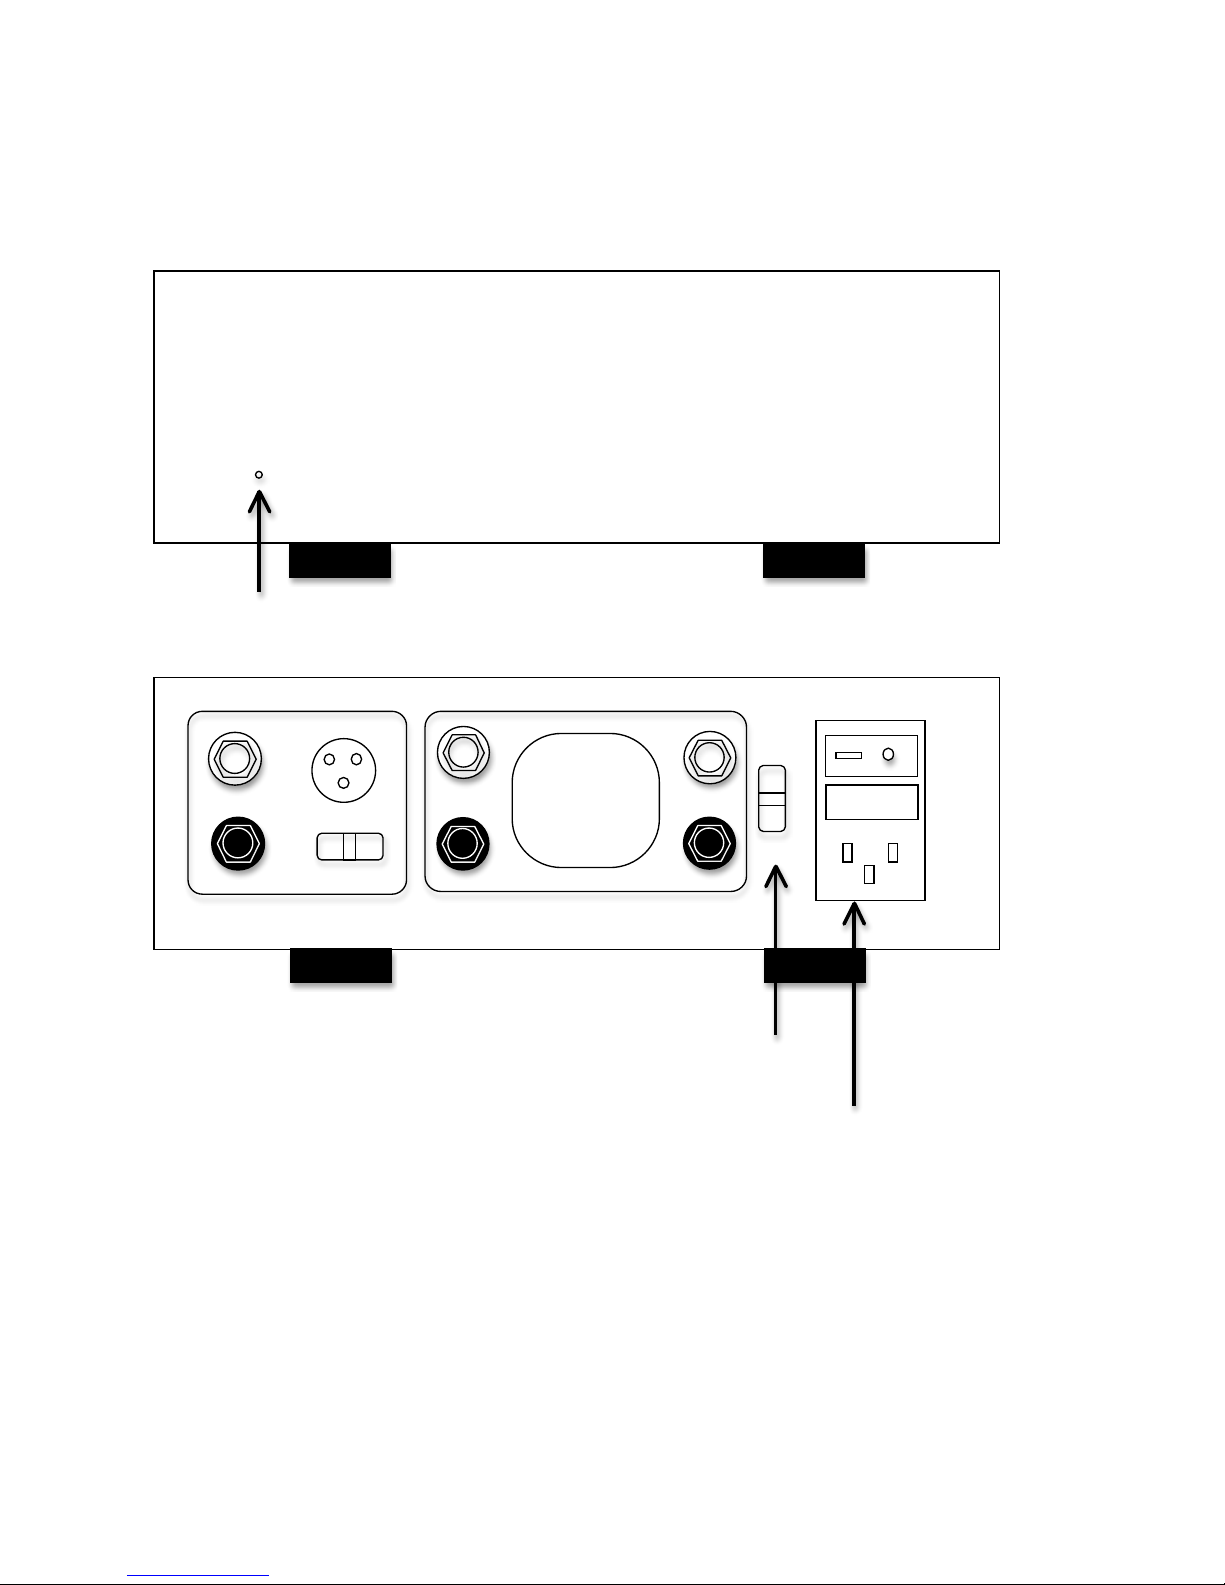
Connections
This section provides instructions to connect the Burson Timekeeper to the rest of your music system.
Avoid static shocks to the inputs or outputs. Before connecting or removing a cable, touch any
grounded surface, such as the chassis of a component that is plugged into an AC socket. Inputs and
outputs can be safely connected to the Burson Timekeeper when its AC power is switched off.
BURSON
Power indicator
115V / 230V Main
voltage switch
Power Switch & Fuse Holder (5A Fast
Blow type)
Page 5
!
5!
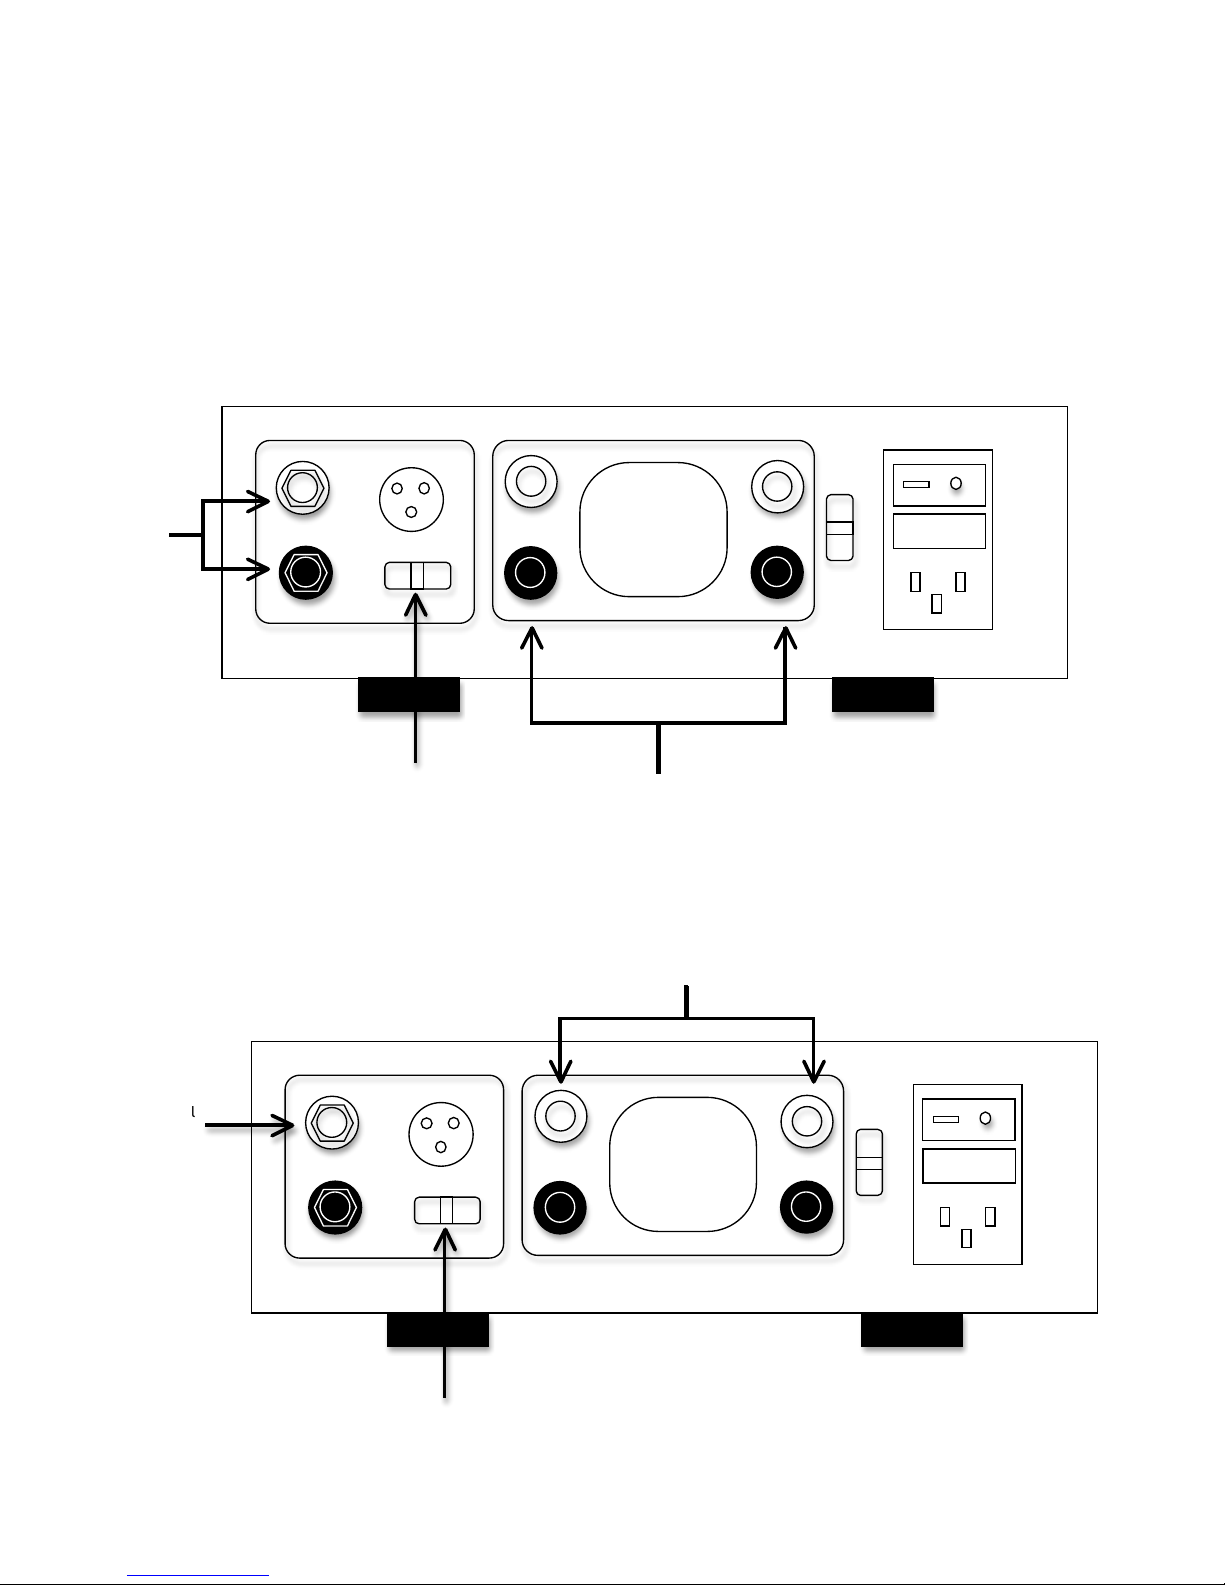
Switching between Stereo Power Amp and Mono block
Please power off the Burson Timekeeper before switching between Stereo Power Amp and Mono block
configuration. Please see to following connection diagram for the correct way to connect the
Timekeeper.
Stereo Mode Connections
RCA Bridge Mode Connections
!
!
Select “Stereo” from
the selection switch
Connect to Left & Right speakers
Connect to speaker according to
“+” & “-“ symbol.
Select “Bridge” from
the selection switch
One channel
RCA Inputs
Stereo RCA
Inputs
Page 6
!
6!
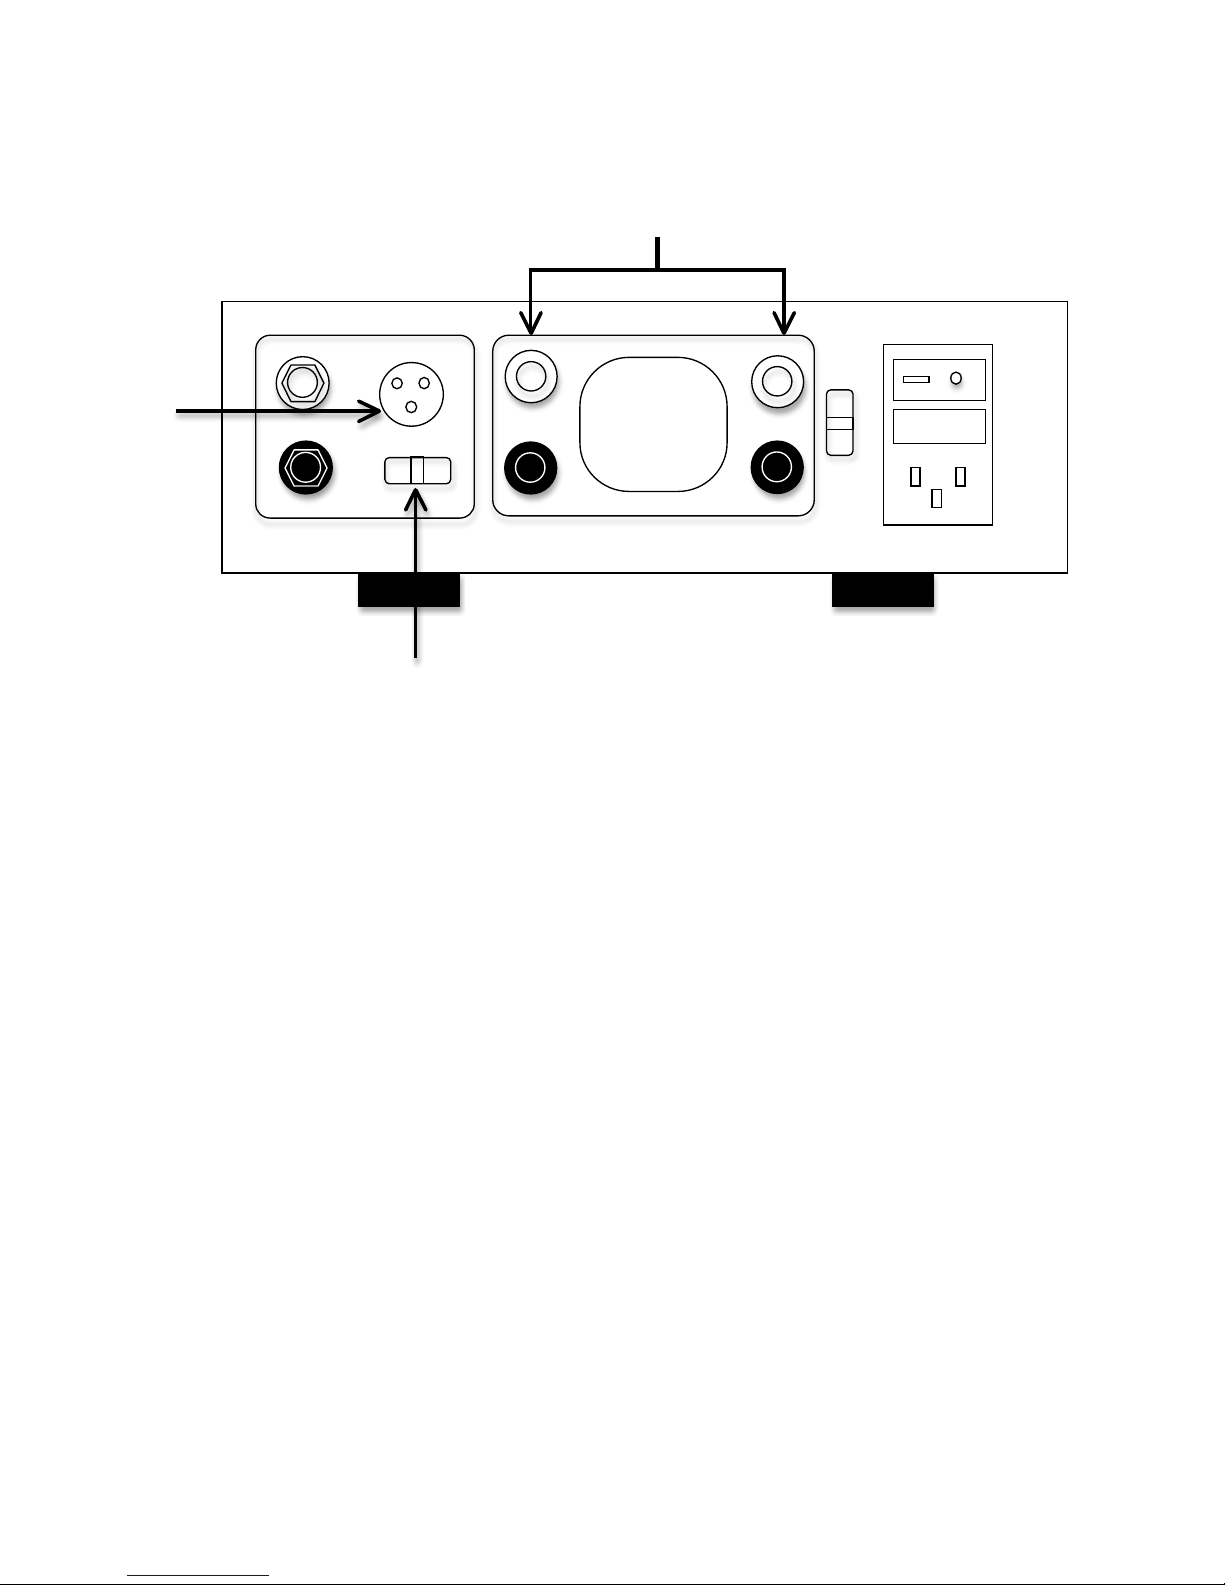
XLR Bridge Mode Connections
Connecting to AC Power
Check to make sure your Burson Timekeeper has been manufactured for operation at your AC line
voltage. Attempting to use your Burson Timekeeper at any voltage other than specified on the rear of
the unit may cause damage that is not covered by Burson’s warranty.
Break-in and warm-up
Careful listeners will notice that the sound of the Burson Timekeeper improves steadily after the unit
is powered-up. A new unit will undergo more dramatic changes when power is applied for the first
time. Depending on the resolution of the system and the attentiveness of the listener, you may find
that the sound continues to improve over the first several weeks of operation. If the power is
disconnected for a period of an hour or more, the unit will undergo similar but less dramatic break-in.
Powering up
Make sure volume control has been turned to minimal when using your Timekeeper for the first time.
Always power up your source machine first and your power amp last. When powering down your
system reverse the steps.
Select “XLR” from
the selection switch
Connect to speaker according to
“+” & “-“ symbol.
One channel
XLR Inputs
Page 7

!
7!
Tips
• Connect your Timekeeper directly to the wall socket with a good quality power cable Instead
of channel thought a power board will yield better result.
• Warm up your Timekeeper for 30 min is recommenced before each listening section.
• It is recommended to apply contact clearing product such as Deoxit ProGold Contact Cleaner
to all input and output connectors every 6 months.
Free Warranty Extension
All Burson Audio products are covered by 12 months of warranty (See conditions below). You can
extend the warranty to 24 months by sending a photo of your audio system with the inclusion of the
Burson product to [email protected] (it would be much appreciated if you can share your
Burson experience with us) with the date of your purchase and the name of authorized dealer.
Warranty Conditions
Burson Audio warrants that this product shall be free from defects in materials and workmanship for:
1 year for all parts of the product. The warranty period begins at the date of sale and is subject to
the following requirements and understandings:
1. This is a non transferable warranty.
2. The product must not have been modified in any manner whatsoever, or the warranty is
immediately voided.
3. The product must not have been stored in a humid, damp environment; nor subjected to
weather, water, or salt spray.
4. During the warranty period Burson will replace a defective Burson product with a similar
available product, at no cost to the owner for labor, materials, and shipping charges from
Burson.
5. Burson shall not, under any circumstances, be liable for any incidental or consequential
damages arising from the loss of property or other damage or losses due to the failure of a
Burson. Burson will not pay for loss of use or inconvenience caused by the failure of a Burson.
Burson will not pay for damage caused to other audio components caused by the failure of
the Burson within the limits allowed by Australian Law.
6. The customer is responsible for the shipping charges for all repairs, warranty or non-
warranty, shipped to Burson. Burson will pay return shipping to the customer or dealer
(within the Australia) for all warranty replacements. Special shipping methods or services
will not be covered by Burson.
7. This product is only warranted in the country of original sale by Burson.
 Loading...