

Page 1
BURNSIDE
T355 fixed cellular terminal
BURNSIDE
www.burnsidetelecom.com
user manual
Page 2

Page 3

1
Contents
2 Introduction
2 Welcome
3 Overview
4 Setting up
4 Remove the cover
4 Install your SIM car
d
5 Connect the batter
y
5 Replace the cove
r
5 Position the terminal
6 Connect the antenn
a, telephone and power adapter
7 Switch o
n
8 Data and fax connection
s
9 Configuring and connecting the terminal for dat
a
14 Everyday use
14 Status indications
15 Making and receiving calls
15 Ring back tes
t
15 Power loss during operatio
n
16 Security: PIN and PUK code
s
16 Call waitin
g
17 In-call diallin
g
17 Conference call
s
18 Configuration codes
19 Basic configuration codes
24 Advanced configuration code
s
24 Call forwardin
g
25 Call barrin
g
26 Call waitin
g
27 Security feature
s
27 Phone number presentatio
n
28 Further information
28 Troubleshooting
28 Important safety informatio
n
30 Index
Page 4

2
Introduction
Welcome
Thank you for choosing the Burnside T355 fixed cellular terminal - this device
allows you to use a standard telephone in locations where landline phone
connections are unavailable, impractical or too expensive. The T355 uses a
quad-band transceiver and supports GPRS (General Packet Radio Service) for
increased data communication rates.
Your Burnside T355 terminal allows any attached telephone to be used in the
same way as a normal telephone.
Supplied items
In addition to this guide, please ensure that you have the following:
• Burnside T355 terminal,
• Compact antenna,
• Mains power adapter,
• Telephone cable adapter (not supplied in all kits),
• USB connections cable (not supplied in all kits).
Additional items that you will require
• A valid SIM card,
• A touch tone telephone (preferably one that includes a caller identification
feature on its display: Calling Line Identification [CLI] or Caller ID). You can
also use a cordless phone base station, but not an ISDN phone, VoIP phone
or non-standard phone designed for use with a PBX.
Page 5
3
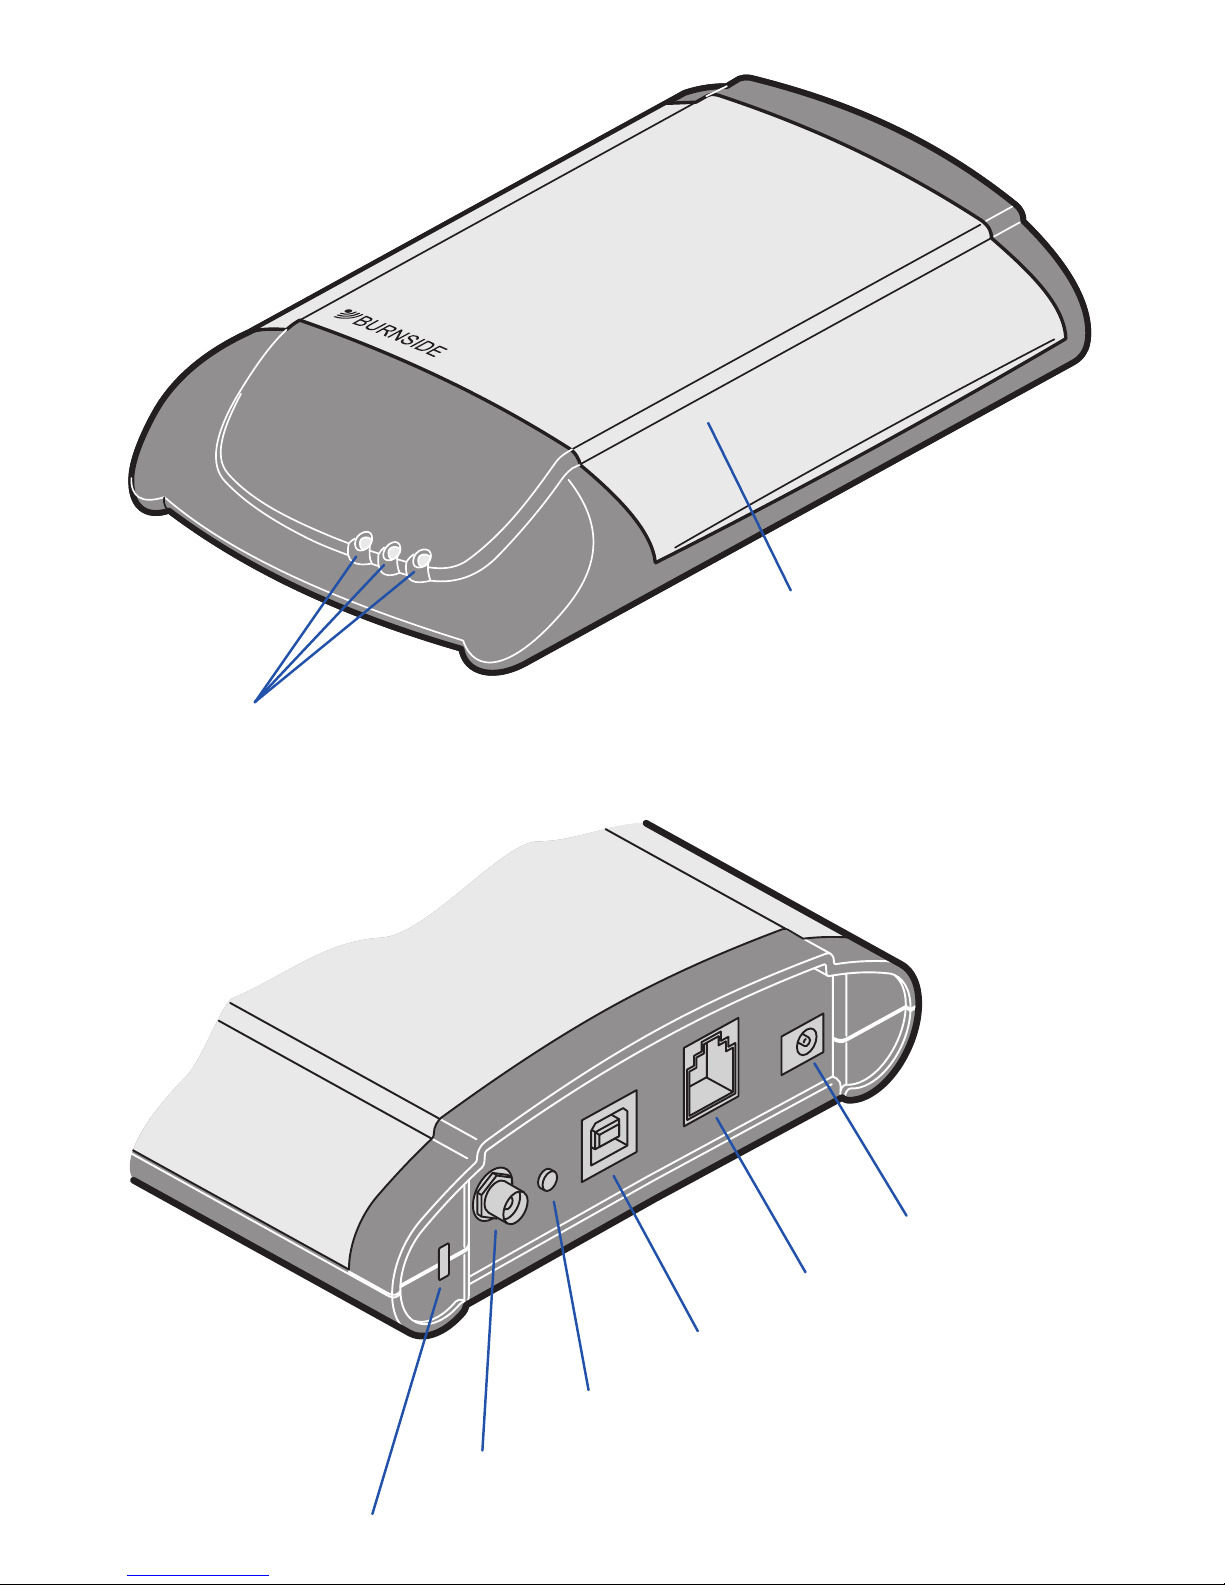
Indicators
Provide status information about power
input and other operational factors
Slot for Kensington™ cable lock
Antenna connector
On/off switch
USB connector
Phone connector
Power connector
Overview
Removable cover gives
access to the SIM card
slot and backup battery
Page 6
4
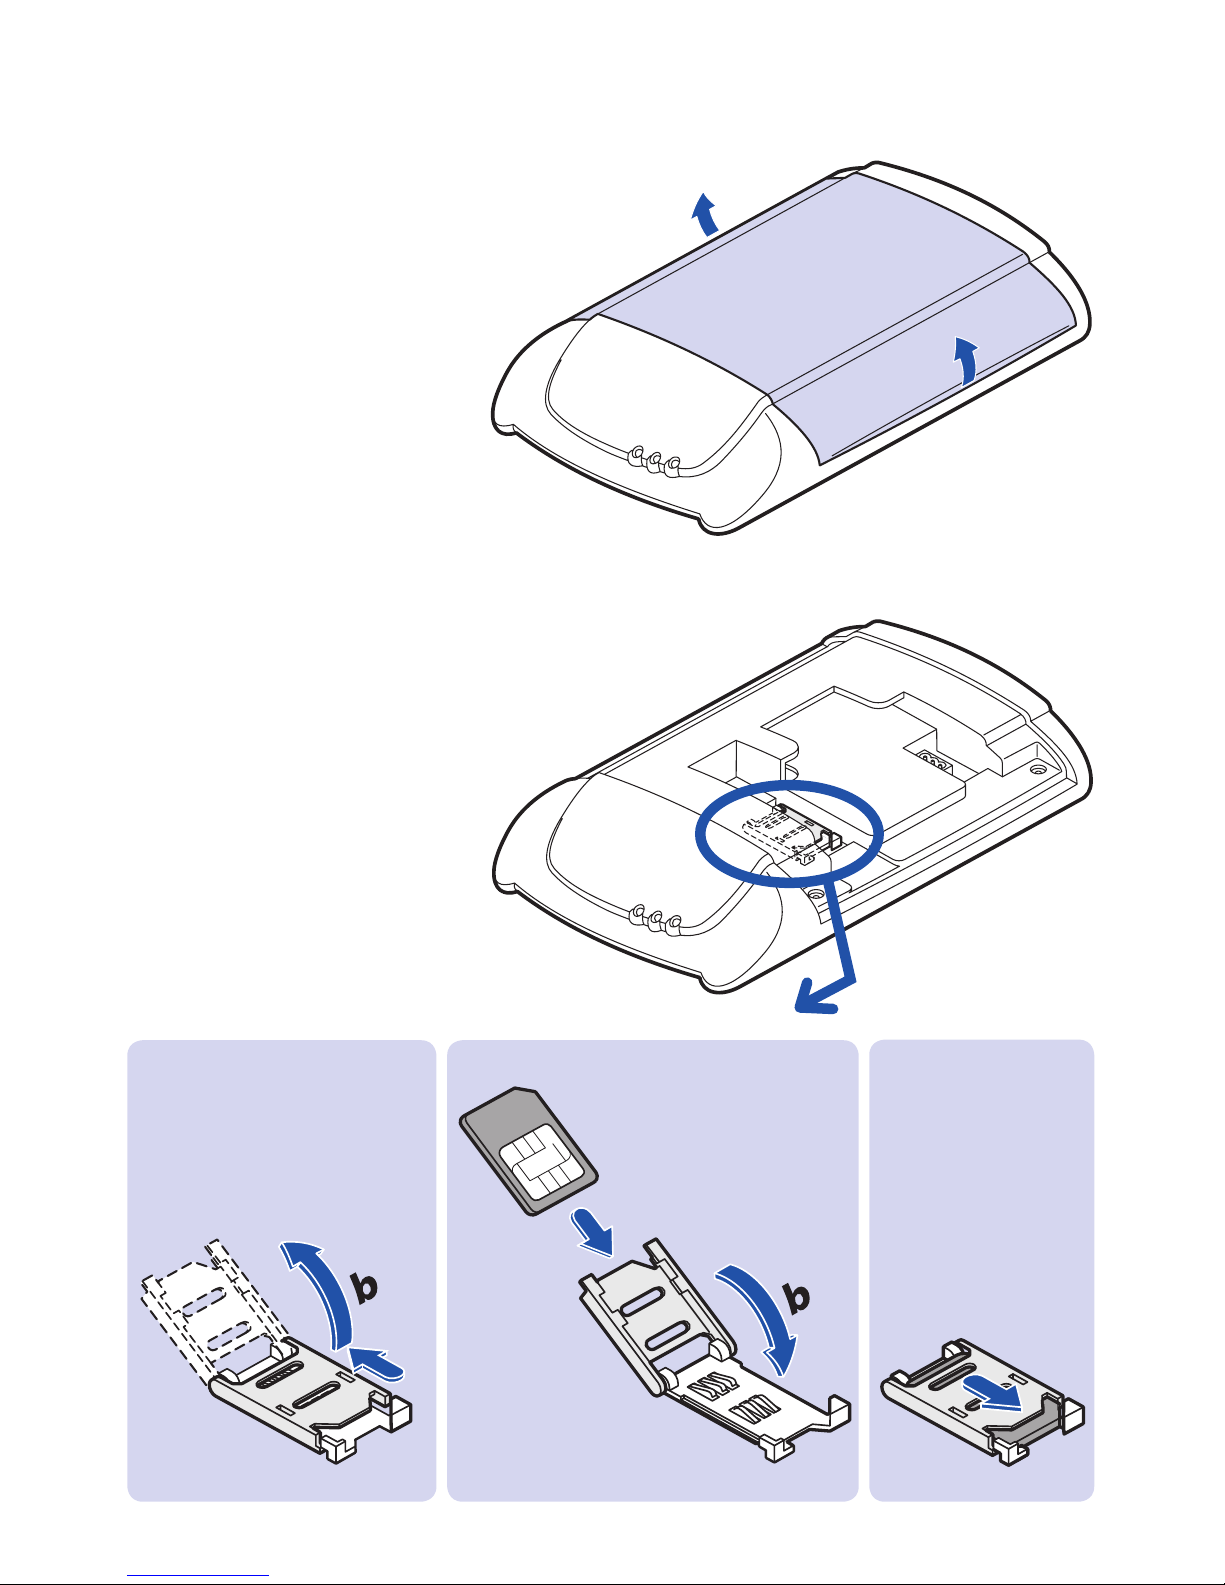
Install your SIM card
Note: Ensure the T355 is switched off before
installing a SIM card (the front panel indicators
should not be illuminated or flashing).
If they are, remove the power
connector and, if necessary,
press and hold the small
red button on the rear panel
until the amber and centre
green indicators illuminate,
and then release the button.
Setting up
Remove the cover
1 Place the terminal on a level
surface.
2 Grip the ridges on either
side of the light-grey top
cover and lift it gently
from the base unit. This
will reveal the SIM card
holder and the battery.
a
a
2
1 (a) Slide back the
hinged lid to unlock it,
then
(b) swing it open.
3 Press down
on the hinged
lid and slide it
forward so that it
locks into place.
(a) Insert the SIM card
into the hinged lid
as shown.
(b) Swing
shut the
hinged lid
ensuring that
the SIM card
remains fully in place.
Page 7
5
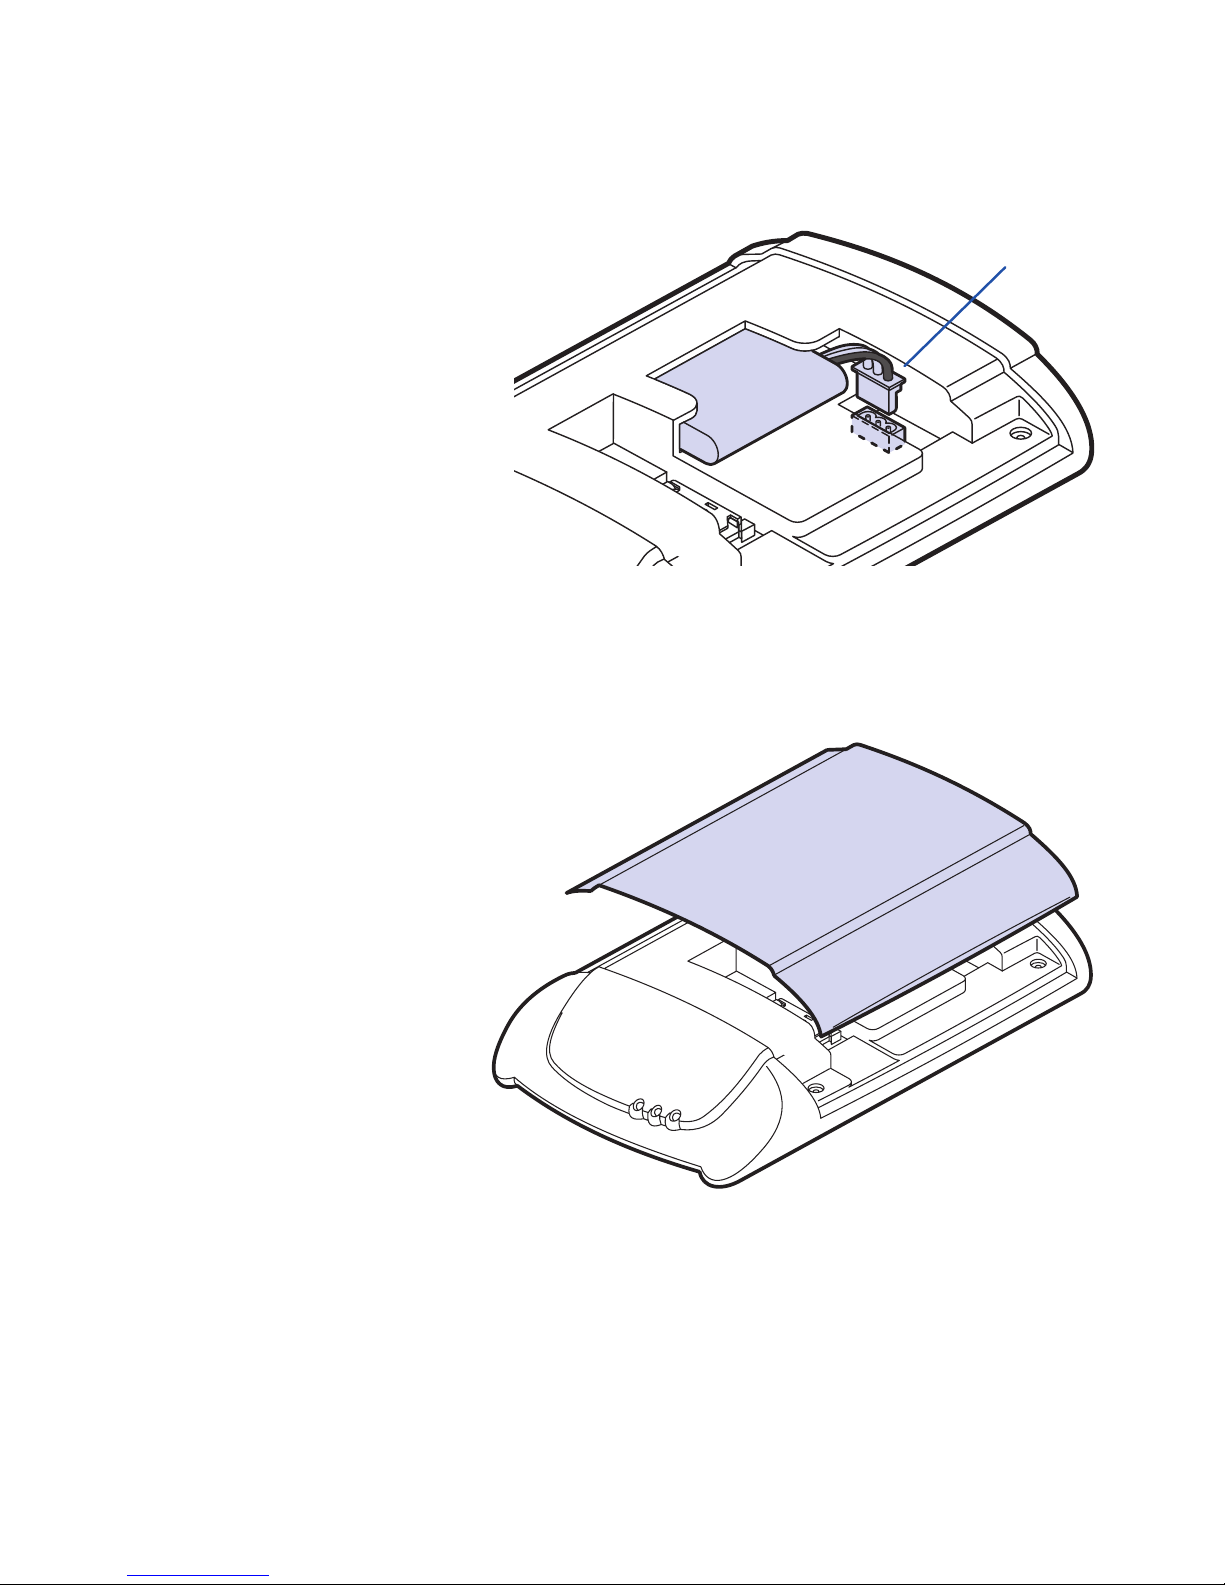
Connect the battery
Your terminal may have been shipped
with its battery disconnected. If so:
1 Locate the battery lead and
plug it gently but firmly into
the adjacent socket (it will
fit one way only, however,
take extra care to fit it cor
rectly with the black wire
closest to the rear corner of
the unit).
Replace the cover
1 Align the cover correctly with the base unit.
2 Press the cover onto the base until it
clicks into place. If the unit is to
be wall mounted, you can
reverse the cover so that
the lettering is the correct
way up.
Black
wire
Position the terminal
Before connecting the external items to your terminal, place the unit in a suitable
location, but keep it at least one metre from your telephone to avoid interference.
See the inside rear page for a wall mounting template.
Low signal strength
If the signal strength is insufficient (indicated by the amber and centre green
indicators both flashing once every two seconds), you may need to adjust the
position of the antenna.
Page 8
6
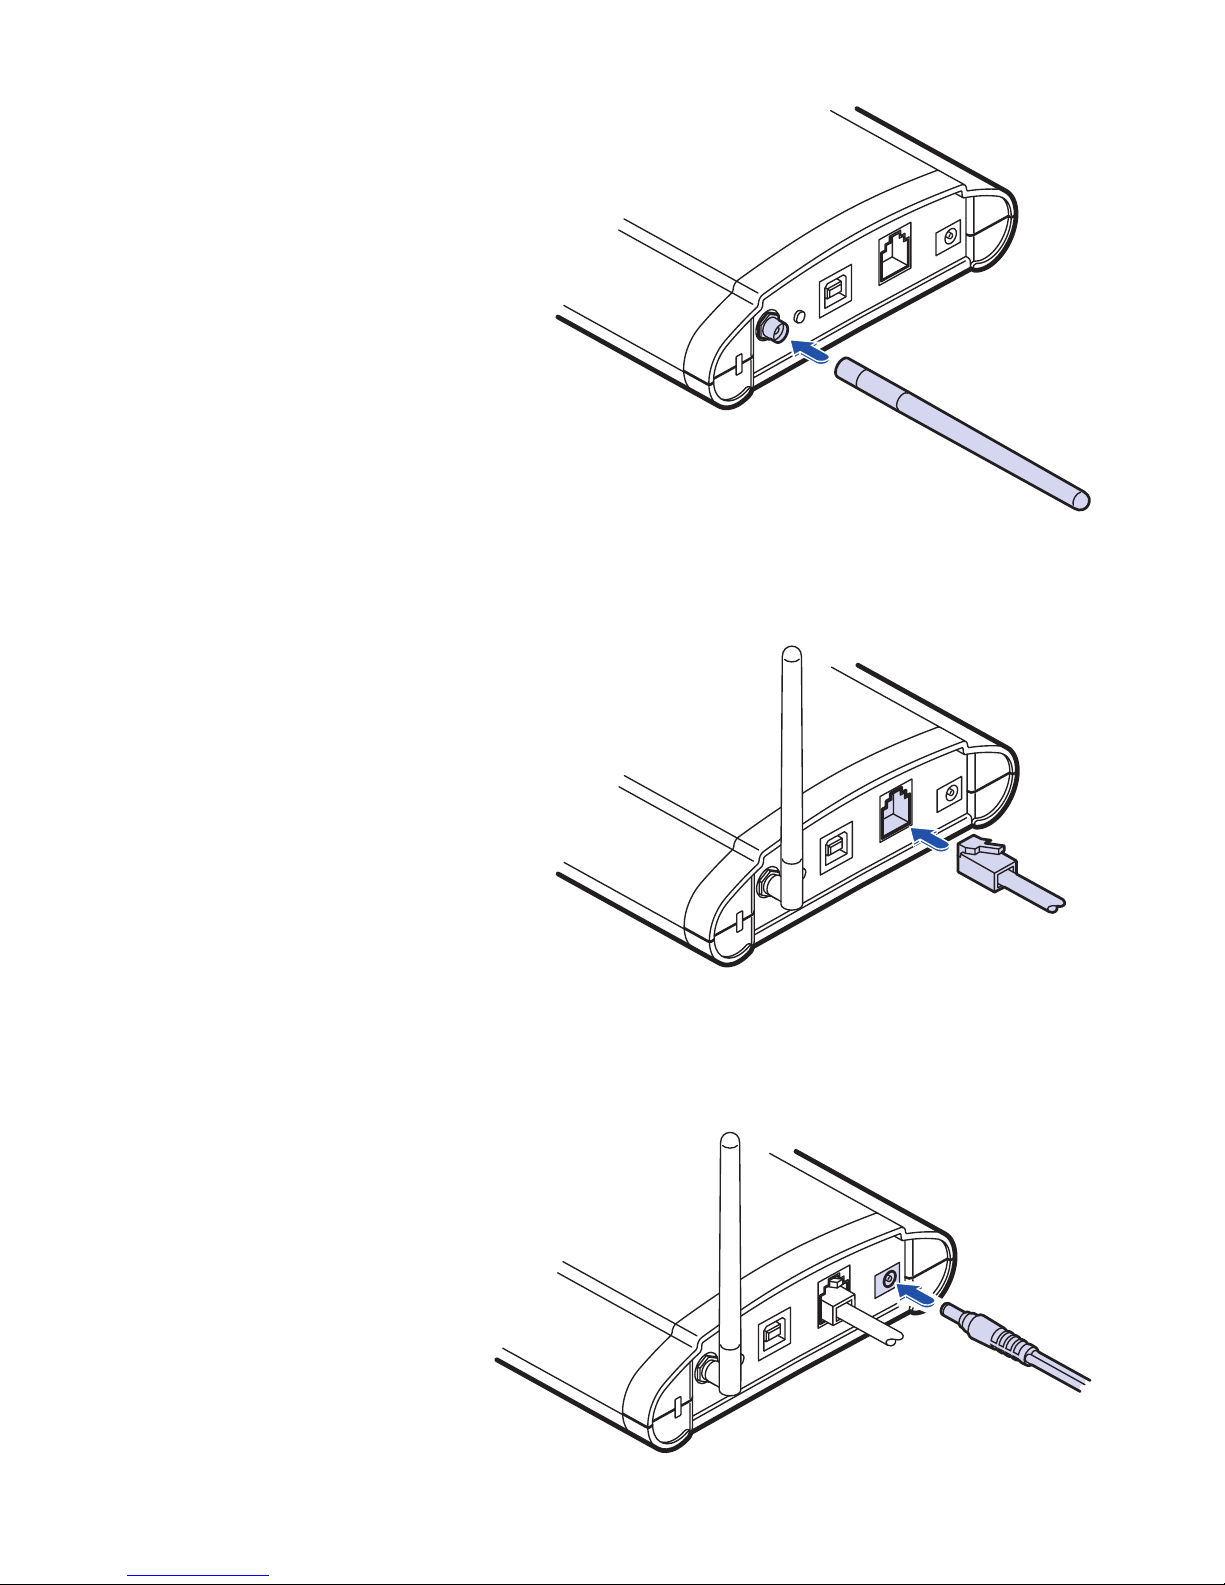
Connect the antenna
1 Align the supplied antenna (or another suitable
GSM antenna) with the circular connector
on the far left of the rear panel.
2 Attach the antenna and twist
the connector collar clockwise
until it is finger-tight - do not
overtighten.
Note: In use, the antenna
should always be vertical. The
supplied antenna has a hinge so
that you can position it correctly. When
the unit is wall mounted the antenna should
point straight down. See the inside rear page for
a wall mounting template.
Connect the power adapter
1 Attach the connector from
the power adapter to the
socket on the far right of
the rear panel.
2 Plug the power adapter
into a nearby mains
outlet.
The right hand green
indicator on the front panel
should illuminate to show
that power is supplied.
Connect a telephone
1 Connect a standard corded
telephone to the socket
on the rear panel. If your
phone has a different
connector than a standard
RJ11 type, use an adaptor
(supplied in some kits).
Page 9
7
Switch on
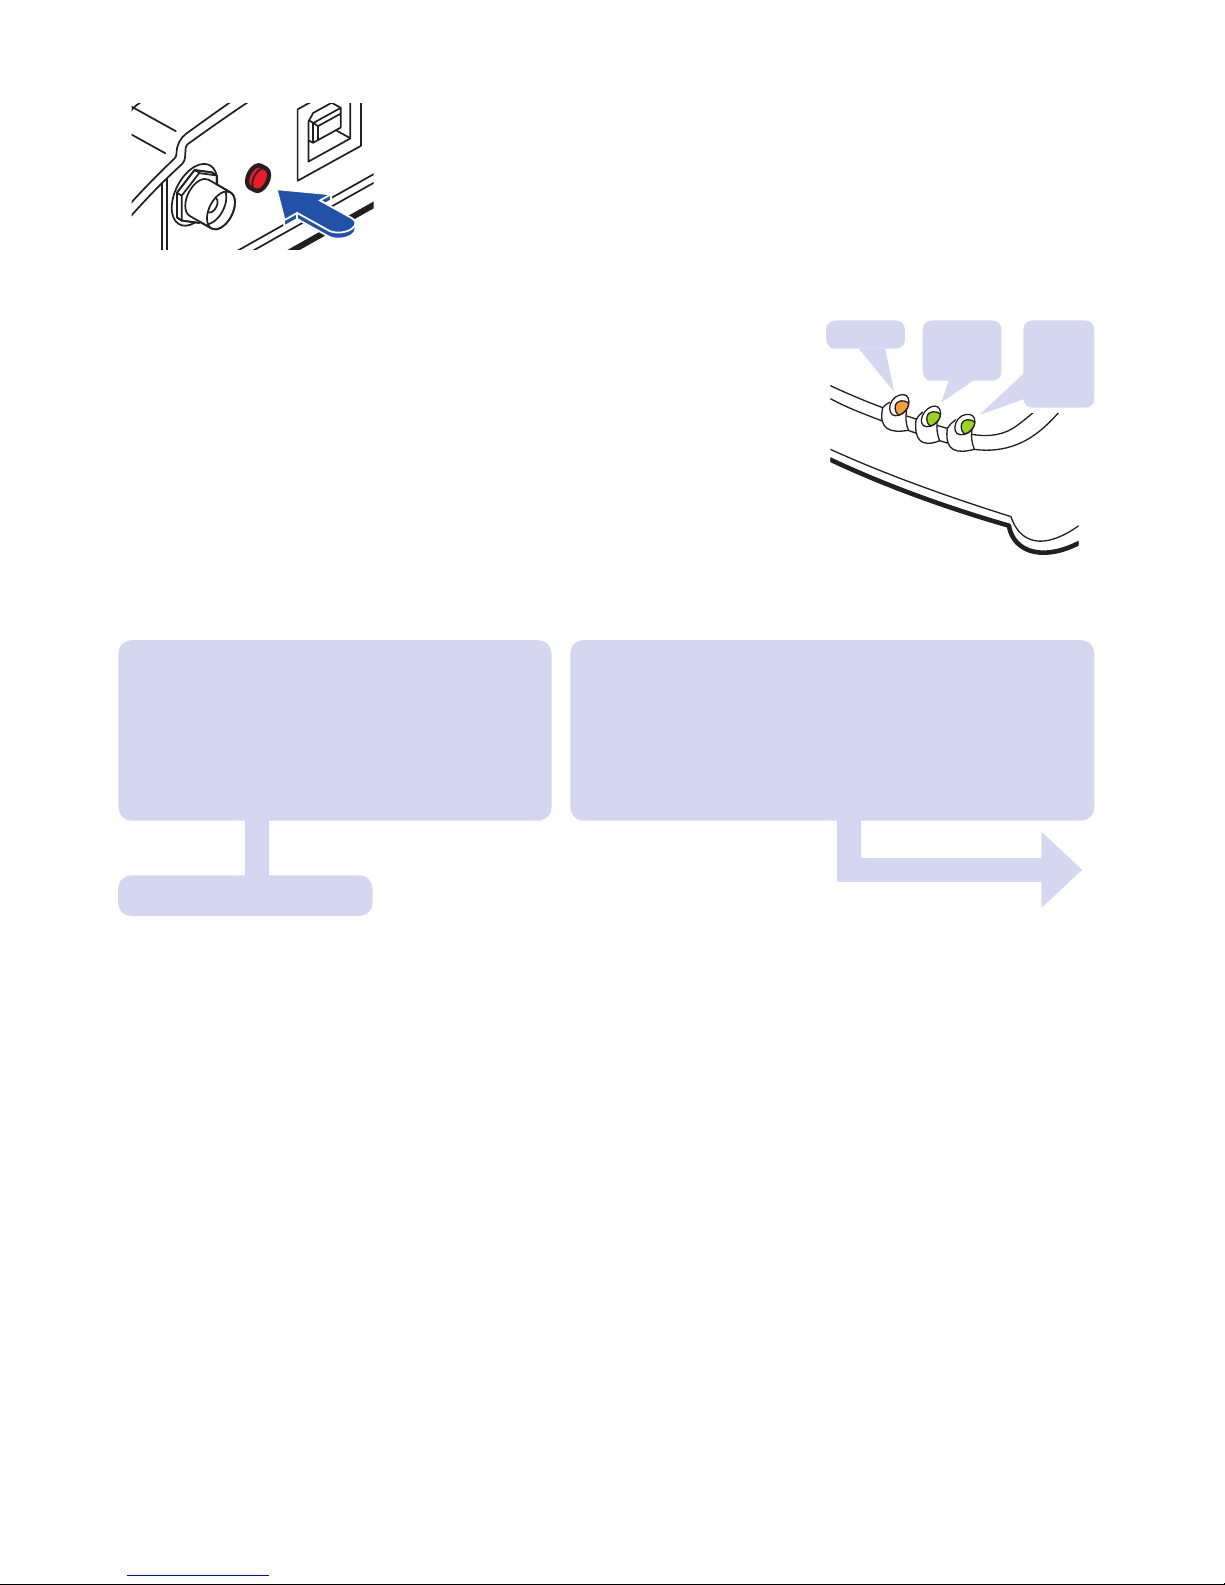
On the terminal rear panel, press and hold the red button
until the front panel amber and centre green indicators illuminate, then release the button.
Note: If the indicators fail
to illuminate when the button is pressed, the battery may
be fully discharged. If so, please allow up to one hour for
the battery to obtain sufficient charge.
Amber
Centre
green
Right
hand
green
Centre green indicator extinguishes
and amber indicator shows a rapid
on/off flash.
This indicates that a PIN code is
required to unlock the SIM card.
Centre green indicator changes to a short
flash every two seconds.
This is the ‘standby’ flash and shows that
the terminal is ready for use. Please see
page 14 for further details
.
Enter a PIN code
1 Lift the handset (you will hear a series of short tones instead of a dial tone).
2 On the telephone keypad, dial the following:
*8*
[PIN code] # where [PIN code] is a 4 to 8-digit code for the SIM card.
• If the code is accepted: You will hear two short beeps, the amber indicator
will extinguish and the centre green indicator will show a short ‘standby’
flash every two seconds. The terminal is now ready for use, please see the
next page for details about making and receiving calls.
• If the code is rejected: You will hear a single low pitched beep. Check that
you have the correct PIN code for the SIM card in use, replace the handset
and then try again.
Note: If you enter an incorrect PIN code three times, the
SIM card will lock and you will need to get a special unblocking (PUK) code
(see page 16 for details).
When the initialisation is complete, the terminal will do one of two
things (depending on whether a PIN code is required):
Switching off
On the terminal rear panel, press and hold the red button until the front panel
amber and centre green indicators illuminate, then release the button. These two
indicators should then switch off and remain off. The right hand green indicator will
remain on until the power input is removed.
The centre green indicator will show a rapid on/off flash
while the terminal initialises itself (approx 15 secs).
Page 10

8
Data and fax connections
The T355 terminal supports both CSD (Circuit Switched Data) communication as
well as GPRS (General Packet Radio Service) for higher data rates:
• Standard CSD data rates are either 9600bps or 14400 bps depending on the
GSM service and allow low speed data communication and digital fax over the
GSM network.
Note: During a voice call, an incoming CSD call or fax will experience the
number as busy. If an attempt is made to make an outgoing CSD or fax call
from the connected computer, the voice call will be disrupted. When an outgoing voice call is attempted, the terminal will report the busy tone.
• GPRS data communication can operate at up to 86 kbps and is suitable for
email and light-duty web surfing. In addition, GPRS can be used as an “uplink”
data connection for a satellite-based broadband service.
Note: GRPS connections can remain active at all times, if required. When data
is flowing, new incoming and outgoing voice calls will be met with a busy tone.
When a voice call is established, an attempt to send/receive data will result in
a failure, for example a “server not found” message. When the voice call has
ended, the data connection may resume without any special intervention.
TAPI compatibility
Some applications, such as contact management or phone diallers, may require
TAPI compatible voice dialling commands.
To initiate TAPI mode, dial *8821#. To revert to the GSM voice dialling command
protocol, dial
*8820#.
Page 11
9
Configuring and connecting the terminal for data
Notes:
It is important to install the Windows driver before connecting the terminal to the
computer.
A USB type B interface is provided for connection to a computer using a standard
USB type A to B cable (supplied in some kits).
These instructions cover installation on Windows XP, however, drivers are also
included for Windows 98SE, Windows Me and Windows 2000.
Stage 1 - Install the drivers
1 Insert the installation CD-ROM (if supplied) or download and save the neces-
sary USB driver file from the Burnside website (http://www.burnsidetelecom.com/site.php/00002.html). For the downloaded fi
le, you will need to
use the utility PKZIP® (www.pkware.com) to decompress and save the files
held within.
2 From the CD-ROM or the downloaded files, locate and run the file:
CP210xVCPInstaller.exe. It may be necessary to temporarily turn off any virus
protection. The driver will install two layers;
a ‘USB layer’ and a ‘COM port
layer’. When prompted, accept the installation.
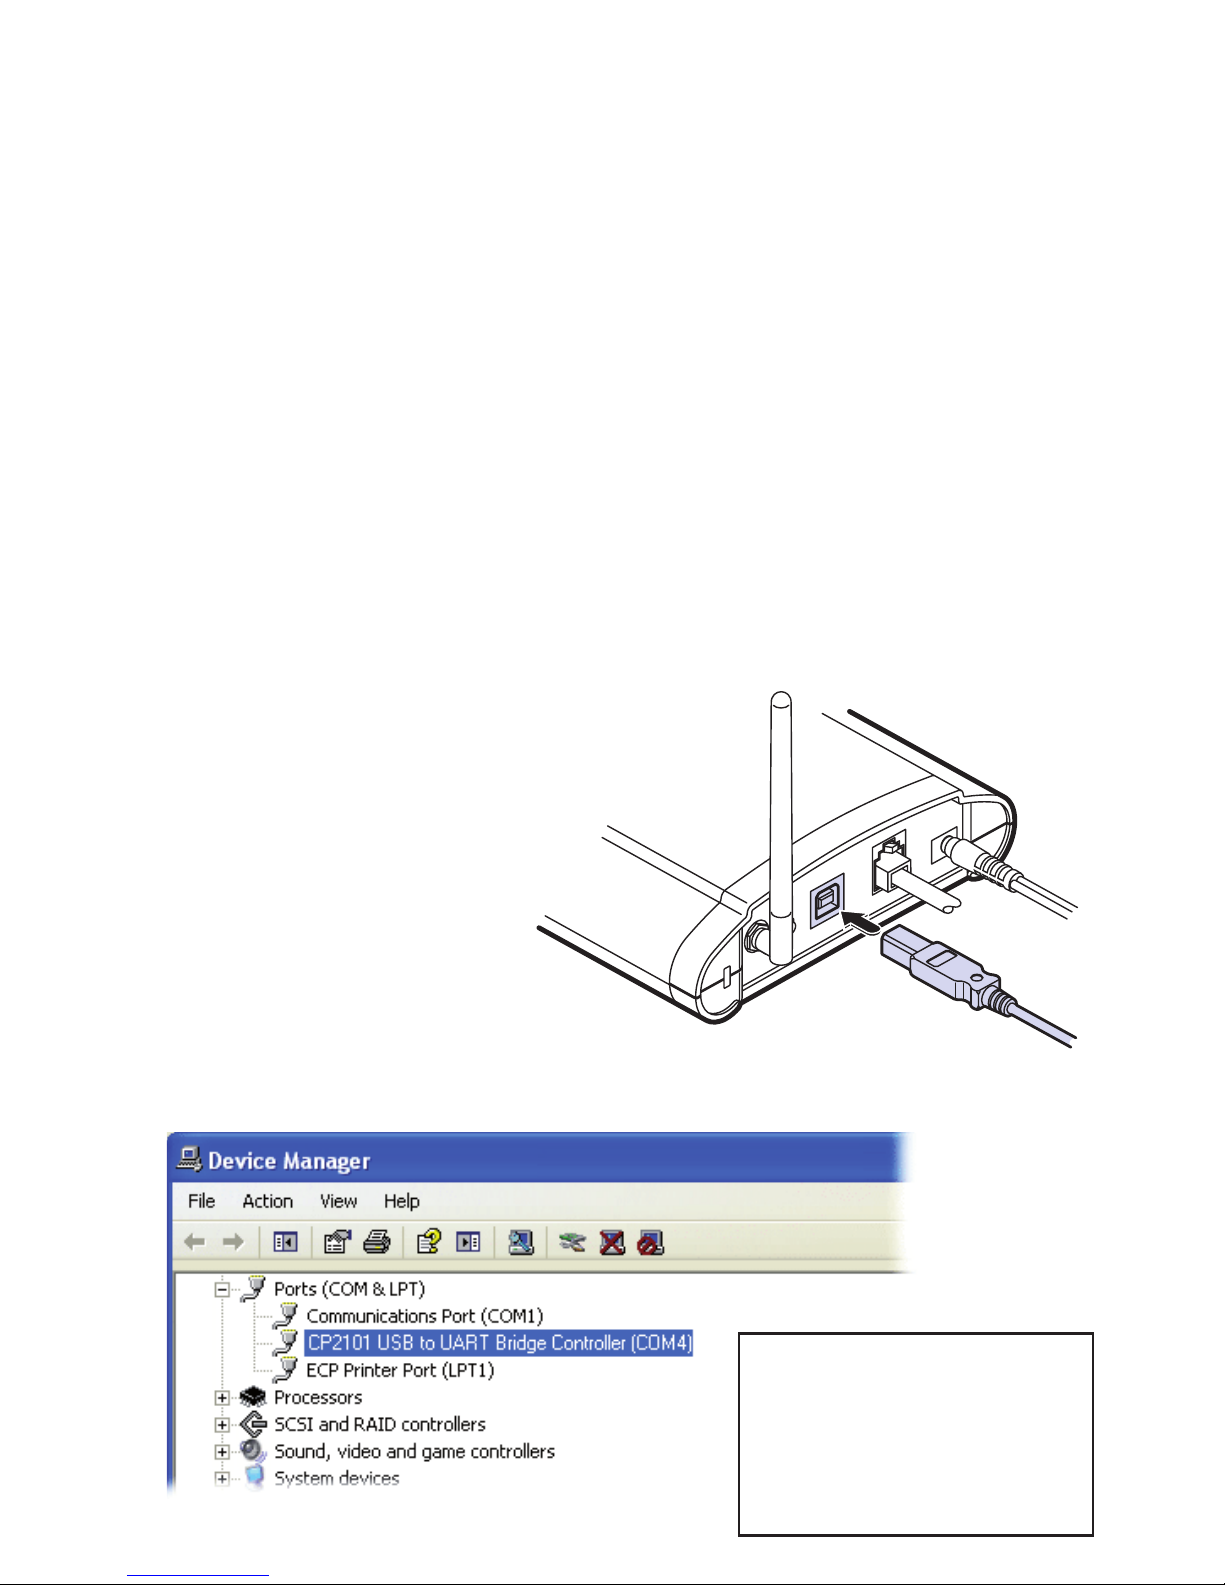
3 Connect one end of a USB type
A to B cable (supplied in some
kits) to the USB socket on the
rear panel of the terminal.
4 Connect the other end of the
cable to a vacant (type A)
USB socket on the computer
system.
5 To establish which COM port has been assigned, this can be viewed from the
control panel/system properties/hardware/device manager as shown below:
Note: To remove the driver,
use the Add/Remove programs function from the
system control panel and
select “CP210xUSB to UART
Bridge Controller”
Page 12

10
Stage 2 - Configure Windows
To use most applications on Windows such as an email client, web browser or
dialler, it is necessary to set up a standard modem.
To set up a connection in Windows XP:
1 In the Control Panel, select ‘Phone & Modem Options’, select the ‘Modems’ tab
and then click the ‘Add...’ button.
2 In the ‘Add Hardware Wizard’ window, select the ‘Don’t detect my modem...’
option and click the ‘Next >’ button.
3 Under “Manufacturer” select ‘Standard Modem Types’, under ‘Models’ select
‘Standard 19200 bps Modem’ and click the ‘Next >’ button. A list of available
ports will be displayed.
4 Select the port that is assigned to the T355 terminal, such as COM4 (see step
5 on the previous page for details about how to find out) and click the ‘Next >’
button.
5 When prompted, click the ‘Finish’ button. Now the modem is installed, select
‘Properties’ and then select the ‘Maximum Port Speed’ to be ‘115200’. This is
the basic configuration for all models.
To connect to the internet using this modem connection, create a new dialup net
working configuration in the normal way, suitable for your ISP and make sure the
“connect using” is set to the “standard 19200 modem”
You are now ready to connect.
Fax
You can use the terminal to send and receive faxes from a PC using fax software.
We recommend the fax capability that is installed as standard in Windows XP
Professional (free option provided with Windows XP Home). You can send a fax
with most SIMs and services including “pay as you go” but before you can receive
a fax, you will need to obtain a dedicated fax number from your service provider
and this is normally only available with a contract SIM.
Page 13
11
GPRS
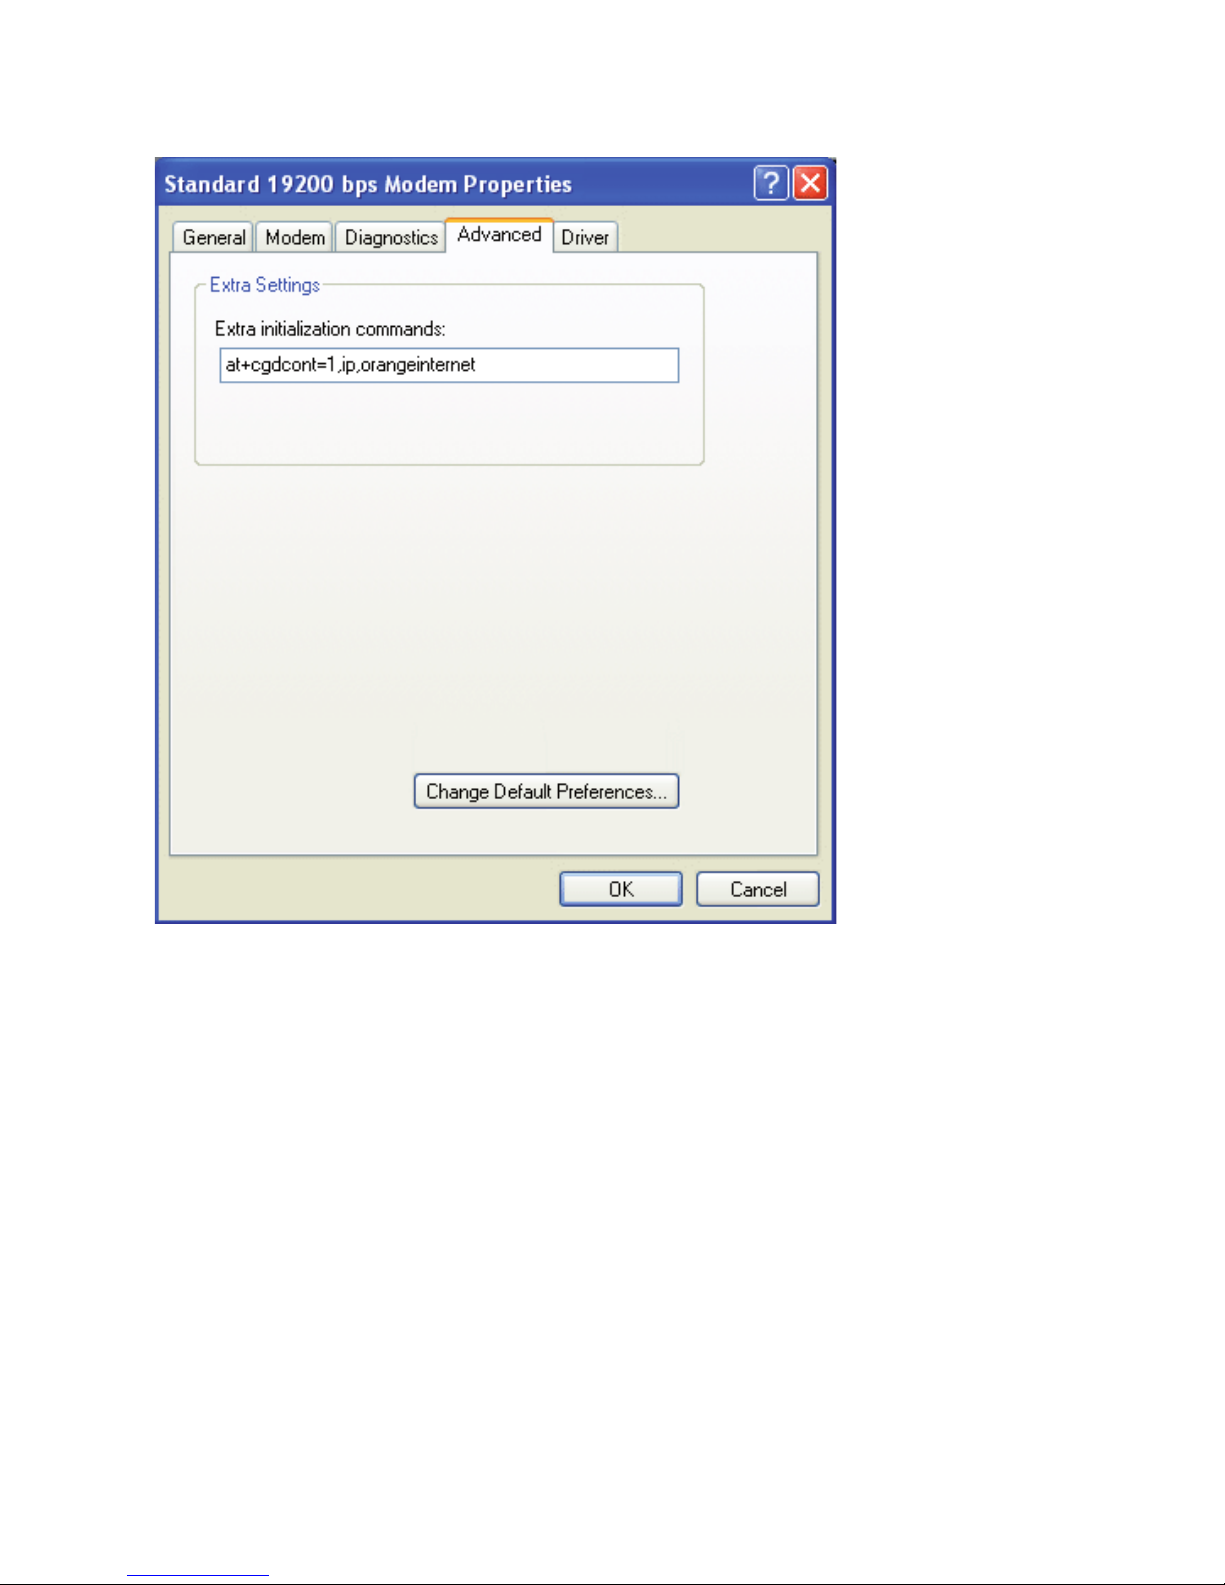
To make a GPRS connection, you must configure the terminal by assigning an
initialisation command in the modem Advanced section of the modem Properties:
The string should be <at+cgdcont=1,ip,orangeinternet> where ‘orangeinternet’ is
the Access Point Name (APN), see below for more examples:
UK GPRS settings
Mobile Operator APN Username Password
Vodafone internet web web
O2 mobile.o2.co.uk mobileweb password
T Mobile general.t-mobile.uk user wap
Orange orangeinternet user pass
Tesco-mobile prepay.tesco-mobile.com tescowap password
BT Mobile btmobile.bt.com user wap
Virgin goto.virginmobile.uk user (leave blank)
Please consult with your service provider if the above settings do not work, they
may have changed.
continued
Page 14
12
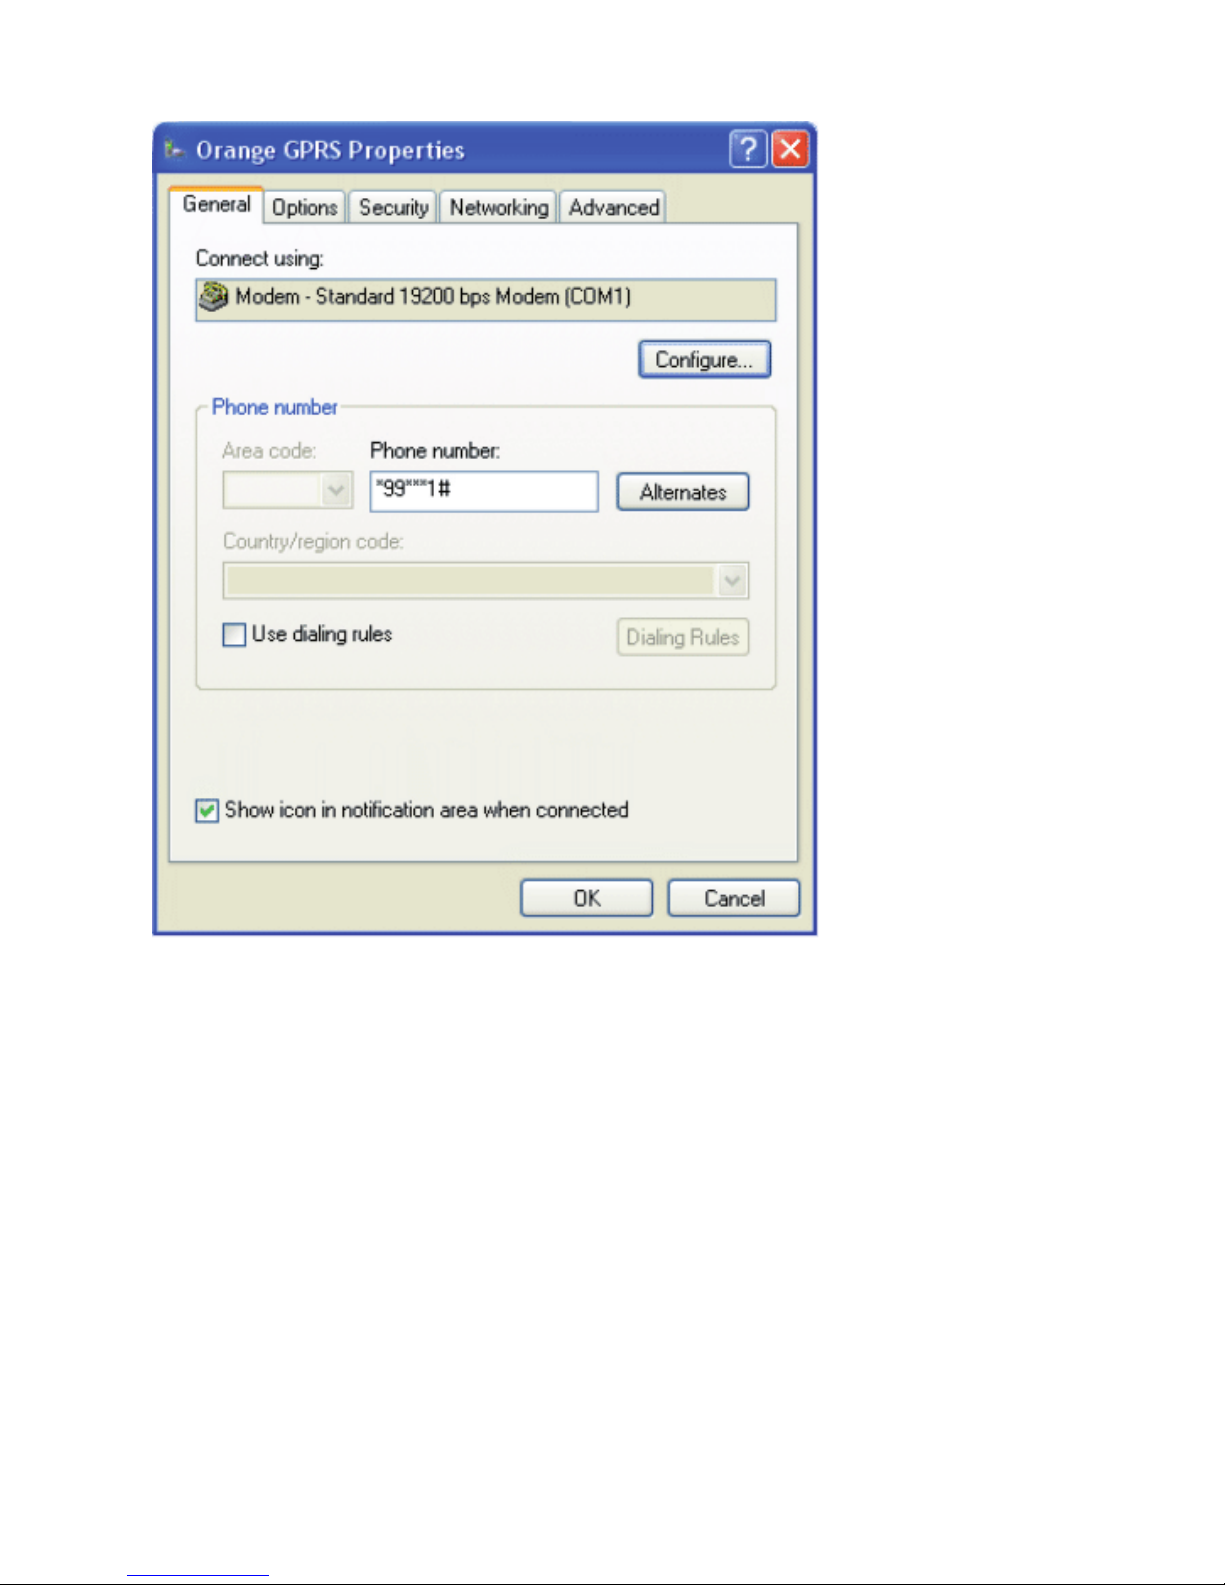
Now assign the phone number for GPRS which is *99***1# (star 99 star star star 1
hash) see below:
Page 15

13
Testing the driver installation
After the device driver has been installed and a COM port assigned, make a test
connection using Hyperterm (accessories/communications). The connection will
be direct to COMx and select 115200 8/N/1.
Enter AT<cr> and you should see the OK response. Enter ATI<cr> and the model
number of the Siemens GSM module will be displayed.
SMS server
The terminal is particularly suitable for SMS server applications that fully utilise
ETSI compliant commands for sending and receiving SMS. This can also co-exist
with voice applications such as LCR on a PBX.
SMS sender
There is a free “SMS Sender” application from Microsoft. This will work with the
terminal. To locate the application, search for “Microsoft SMS Sender”.
Page 16
14
Everyday use
The terminal aims to make the operation of the attached phone very straightforward and as close as possible to using a standard landline phone. There are
numerous operational factors involved in achieving normal operation and the
terminal uses its front panel indicators (and also plays tones through the phone
earpiece) to communicate its current status.
Status indications
Standby
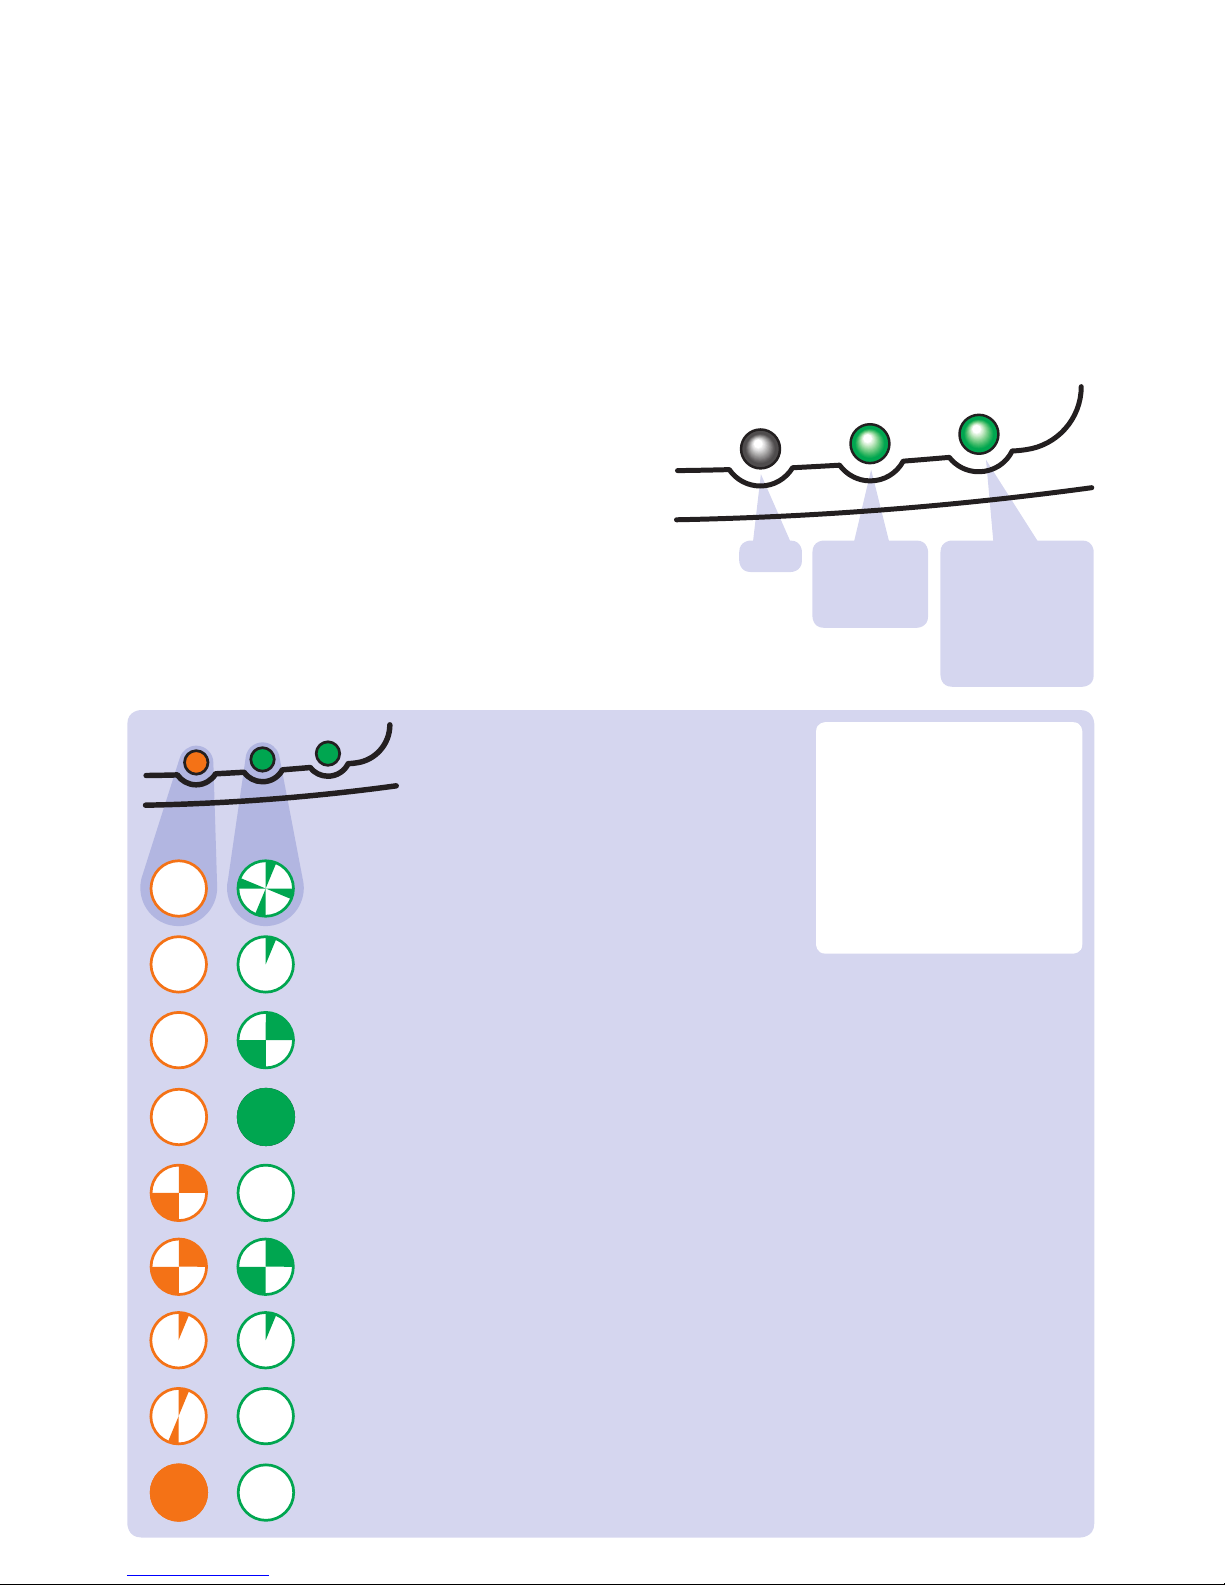
When the terminal is ready to make and receive calls it will show the following (standby)
indications Ü
AMBER
CENTRE
GREEN
RIGHT
HAND
GREEN
Off One flash
every two
seconds
On (if power
is applied)
or
Off (if running
from battery)
AMBER
GREEN
GREEN
Standby - ready for use
SIM card is locked, valid PIN code required (page 16)
Incoming call
SIM card is blocked, PUK code required (page 16)
Initialising/searching
Weak signal
Fault
Call in progress
Battery low, please wait
In these representations,
each complete circle
represents two seconds
and the shaded portions
show the period for
which each indicator
is on within that two
seconds.
Other indications
The amber and centre green indicators
provide status information by flashing on
and off in various ways as shown below.
Page 17

15
Switching on and off
Please see page 7 for details.
Making calls
Use the attached phone almost exactly as you would use a standard landline
phone.
1 Lift the handset and listen for a dial tone.
If you hear a series of short tones, the terminal is either waiting for a PIN code
(see page 7) or no SIM card is installed.
2 Dial the required number and then press the
# key to place the call.
If you do not dial #, the call will be placed automatically, three seconds after
the last button is pressed. You can adjust the delay period (see page 19).
Emergency calls
If the SIM is locked or there is not even a SIM installed, it will still be possible to
make emergency calls provided there is sufficient signal coverage. Simply dial the
112 international emergency number or the country specific emergency number
defined by your SIM (e.g. 999 in the UK).
Receiving calls
When the phone rings, lift the handset and take the call in the normal way.
If the caller’s number is made available by the network, and the attached phone
supports Caller ID, it will be shown on the display of the phone.
Ring back test
The ring back test can confirm the link with the attached phone as well as the
Caller ID feature (if supported) and the current ring style. If possible, you should
also test by making calls to, and receiving calls from another phone.
1 Lift the handset and dial
*
9#
2 Replace the handset. The attached phone should ring (for 30 seconds or until
you lift the handset).
If the attached phone supports Caller ID, the display should show the number
‘01234567890’ and the message ‘Test Call’.
Power loss during operation
If the terminal loses mains power during normal operation, it will revert to using its
internal battery. Once the battery level becomes low, the terminal will automatically
switch off. If power is restored, the terminal will automatically resume operation
without requiring the power button to be pressed. Battery charging is controlled
automatically.
Page 18

16
Security: PIN and PUK codes
If the SIM card is locked, instead of a dial tone you will hear short beeps indicating
that a valid PIN code is required. Enter the PIN code using the sequence:
*8*
[PIN code] #
If you make a mistake before pressing the
# key, hang up and start again.
Take care to correctly enter the PIN code. The SIM PIN mechanism is designed to
provide a high level of protection. Only three consecutive attempts are permitted
for normal PIN code entry, after which an unblocking code (PUK) will be required.
This is protected by several levels of time prevention to avoid repeated guessed
attempts. A total of ten attempts are allowed before the SIM becomes unusable.
See page 21 for further details about entering PUK codes.
Time to wait before next PUK input is allowed:
1st failed attempt No time to wait
2nd failed attempt 4 seconds
3rd failed attempt 3 * 256 seconds
4th failed attempt 4 * 256 seconds
5th failed attempt 5 * 256 seconds
6th failed attempt and so forth 6 * 256 seconds, etc.
The standard PIN code can be between 4 and 8 digits. The PUK is always 8 digits
and can be obtained from your service provider.
Special call features
The terminal supports special network call features that give you greater flexibility.
Special call features require the use of the button on the attached phone which is
commonly labelled RECALL or R.
Call waiting
Providing call waiting is enabled (see the ‘Advanced configuration codes’ section)
and supported by your network, an incoming call whilst the phone is in use will
sound a tone in the handset. You have the following options:
Call waiting options
• To ignore the call, wait until the caller either hangs up or is diverted.
• To reject the waiting call and continue with the active call, press
R0.
• To end the active call and accept the waiting call, press R1
.
• To put the active call on hold and accept the waiting call, press
R2.
• To swap between the held call and the active call, press
R2 again.
Page 19

17
In-call dialling
To make another call while one call is already active.
• Press the R key and dial the number. The active call will be put on hold.
• To swap between the held call and the active call press
R2.
Conference calls
To have a conversation with two or more parties.
• Dial the first person in the normal way.
• Press
R and then dial the next person.
• Press
R3 to create a conference call.
• To add another person, press
R and dial the next number. When the person
answers, press R3 to join them to the conference.
If the call is answered by voice mail or the wrong person, press R1 to reject and
return to the conference.
To end the conference call, hang up the telephone.
• To remove one person from the conference, press R1x (where x is the number
of the person in the order the call was set up).
• To have a private conversation with one member of the conference, press
R2x
(where x is the number of the person in the order the call was set up). The
other parties will be placed on hold. To return to the conference, press R3.
• To transfer the call to the other parties and end your call, press
R4.
Notes:
•
The availability of these facilities are dependant on the SIM card and service
provider.
• If you try to add a party to a conference call and the call is answered by the
voice mail, you should disconnect that party otherwise the conference may be
recorded to voice mail until it becomes full.
• Replacing the handset phone will terminate all calls (held, calling, active or
waiting).
• If there is an incoming call while the phone is in use but no call is active, a ringing tone will be heard through the handset. When the handset is replaced, the
phone will ring and the call may be answered in the normal way.
Page 20

18
Configuration codes
The terminal offers many configuration options which are all selected by using
the attached phone to enter the configuration codes that are detailed within this
section.
Entering configuration codes
1 When not in a call, lift the phone handset.
2 Carefully dial the required code sequence, as listed in this section.
The attached phone will audibly respond to the entered codes in one of two
ways:
• Two short mid tones - the code has been accepted.
• One long low tone - the code has been rejected.
Conventions
In this guide, configuration code items in [square brackets] are mandatory,
whereas items in <chevron brackets> are optional.
Page 21

19
Basic configuration codes
The codes within this sub-section are concerned with the general set up and
behaviour of the terminal and the attached phone.
Basic configuration code format
The basic configuration codes all adhere to the following basic format:
My number sending [80]
This determines whether your telephone number should be declared to the person
being called.
• Use the standard network config for Caller ID (CLI) sending (default)
*
801#
• Always send Caller ID (CLI) information, irrespective of
the standard network configuration.
*
802#
• Always withhold Caller ID (CLI) information, irrespective of
the standard network configuration.
*
803#
Note: You can override the above settings and send/withhold your
number by using the following prefix codes:
*
31#[phone number] to make a call and declare your number, or
#31#[phone number] to make a call and withhold your number.
Dial delay [81]
This determines the delay following the last digit pressed, to placing a call using
the number that has been entered. The standard setting is 3 seconds. The range
is adjustable between 1 and 9 seconds, in one second intervals.
*
81[delay]# where [delay] is a value between 1 and 9.
For example, to set a four second delay, enter:
*
814#
Note: Regardless of the delay setting, a call can be started immediately by
entering # at the end of the number.
[CODE]#
Command
prefix
Command
suffix
Configuration code:
80 My number sending
81 Dial delay
82 Ringing style
83 Volume boost
84 Caller ID type
85 Alternate line service
86 Set clock
88 PBX related settings
888 Factory reset
Page 22

20
Ringing style [82]
This determines which of five ringing styles (cadences) that the attached phone
should use to announce incoming calls. The standard setting is 1, the standard
UK ringing style.
• UK style
*
821#
• German style
*
822#
• French style
*
823#
• Spanish style
*
824#
• US style
*
825#
Note: Use the ring back test (*9#) to hear the chosen ringer style.
Volume boost [83]
This allows you to apply a boost to the earpiece audio level, for use in noisy environments. The standard setting is 0 - no boost.
*
83[boost]# where [boost] is a value between 0 and 3.
Caller ID type [84]
This determines which Caller Line Identity (CLI) or Caller ID type will be used to
communicate to the attached phone. CLI is a convenient and useful feature that allows the phone to display a caller’s telephone number, date, time and name (if there
is a match in the phonebook) before the call is answered.
• No CLI
*
840#
• ETSI V23 (default)
*
841#
• Bellcore (USA)
*
842#
• ETSI DTMF
*
843#
(legacy European system)
Alternate line service [85]
If your SIM card supports two numbers for voice calls, you can select which line to
use for outgoing calls.
• Select line one
*
851#
• Select line two
*
852#
Page 23

21
Set clock [86]
The terminal uses an internal clock to provide revised date and time information
to the attached phone (via the Caller ID function) every time an incoming call is
received.
The date and time information will be maintained providing the battery is connected
and has some power remaining, even if the terminal is switched off. However, if the
battery is disconnected, the date and time will be lost.
*86*
[YYMMDDHHMMSS]#
For example, to set 10:25:30 on 14 February 2007,
enter: *86*070214102530#
Note: You can optionally use the ring back test (*9#) to immediately send the
entered date and time to the phone.
PBX related settings [88]
End of call signalling
This determines the method used to indicate that an incoming call has ended. No
change is usually required, however, this may require alteration if the terminal is
connected to certain PBX equipment.
• Progress tone and K-Break (default)
*
8801#
• Progress tone and line reversal
*
8802#
• Progress tone
*
8803#
Recall/flash-hook control
This controls the recall/flash hook functions and can be altered to avoid inadvertently activating in-call functions when the terminal is connected to a PBX.
• Disable recall/flash hook functions
*
8810#
• Enable recall/flash hook functions (default)
*
8811#
TAPI voice dial compatibility
This feature allow the use of contact management, diallers and other software that
use standard AT commands for dialling calls.
• Disable TAPI voice dial compatibility /
set ETSI GSM mode (default)
*
8820#
• Enable TAPI voice dial compatibility
*
8821#
Line reverse signalling on outgoing call connection
Line reverse signalling may be used by PBX and other equipment to establish if an
outgoing call has been connected. However some equipment may be confused
by this signal, so this option is provided.
• Disable reverse signalling
*
8830#
• Enable reverse signalling (default)
*
8831#
Page 24

22
Automatic switch off when charger plug is disconnected
When the DC plug is removed from the terminal’s power socket, it will log off from
the network (if connected) then switch off. This is the equivalent of pressing the
red push button to turn off the unit.
• Disable Automatic switch off
*
8840#
• Enable Automatic switch off (default)
*
8841#
SMS remote status
It is possible to interrogate the status of the terminal by sending it an SMS (text
message). The status will be returned to the phone that sent the message.
• Disable SMS remote status (default)
*
8850#
• Enable SMS remote status
*
8851#
The default setting is not to accept the remote status as it would conflict with
applications that may want to use the terminal’s SMS capability via the USB, for
example an SMS server application.
When the remote status is enabled, the terminal selects the SIM memory for SMS
and reads and deletes ALL incoming SMS. When it encounters an SMS beginning
with ‘1234st’ it will reply with the status:
1. Signal level.
2. Charger power status.
3. If the charger power had been lost.
4. Battery voltage.
5. Temperature (reset after reading)
6. Number of missed calls.
7. IMEI
8. Firmware revision.
Example SMS sent to the phone that requested the status:
Signal: -89dBm
Charger: on
Bat: 4.191 Volts
Temperature Now: 20
Min: 18
Max: 26
IMEI 353857016948321
Firmware: 2.6
Note in the above example, there had been no missed calls and the power had
not failed at any time before the last status command, reset or turning on.
When the charger power is supplied, the battery level will stabilise between 4.1V
and 4.2V. At other times the voltage may be as low as 3.6V, below this level the
unit will turn itself off.
Page 25

23
Compatibility mode
When compatibility mode is selected, the terminal will start operating as soon as
charge power is applied to the unit and there is sufficient battery power. When
charge power is removed, the unit will disconnect from the network and shut
down. Setting *8841# has no effect in this mode. The centre green LED is permanently lit when the terminal is ready to make or receive calls.
• Disable Compatibility mode (default)
*
8860#
• Enable Compatibility mode
*
8861#
Restore factory settings [888]
Restore the following basic settings to their
default values: 80, 81, 82, 83, 84, 880 and 881.
Other configuration settings remain unaltered.
*
888#
Page 26
24
Advanced configuration codes
The advanced configuration codes may be entered using the telephone handset
and also, when using a USB data connection, by using the dialling sequence
“ATD” followed by the appropriate configuration code. When using the data connection (see page 8), it is additionally possible to interrogate the status of certain
network settings, using the
*
# command prefix.
Call forwarding
Call forwarding is a network service which allows incoming calls to be diverted
to an alternative number (such as a voicemail box) when certain criteria are met.
In concert with your service provider, the terminal allows you to control various
aspects of the call forwarding service. The various forwarding criteria are not mutually exclusive and can be used in combination to divert different types of calls to
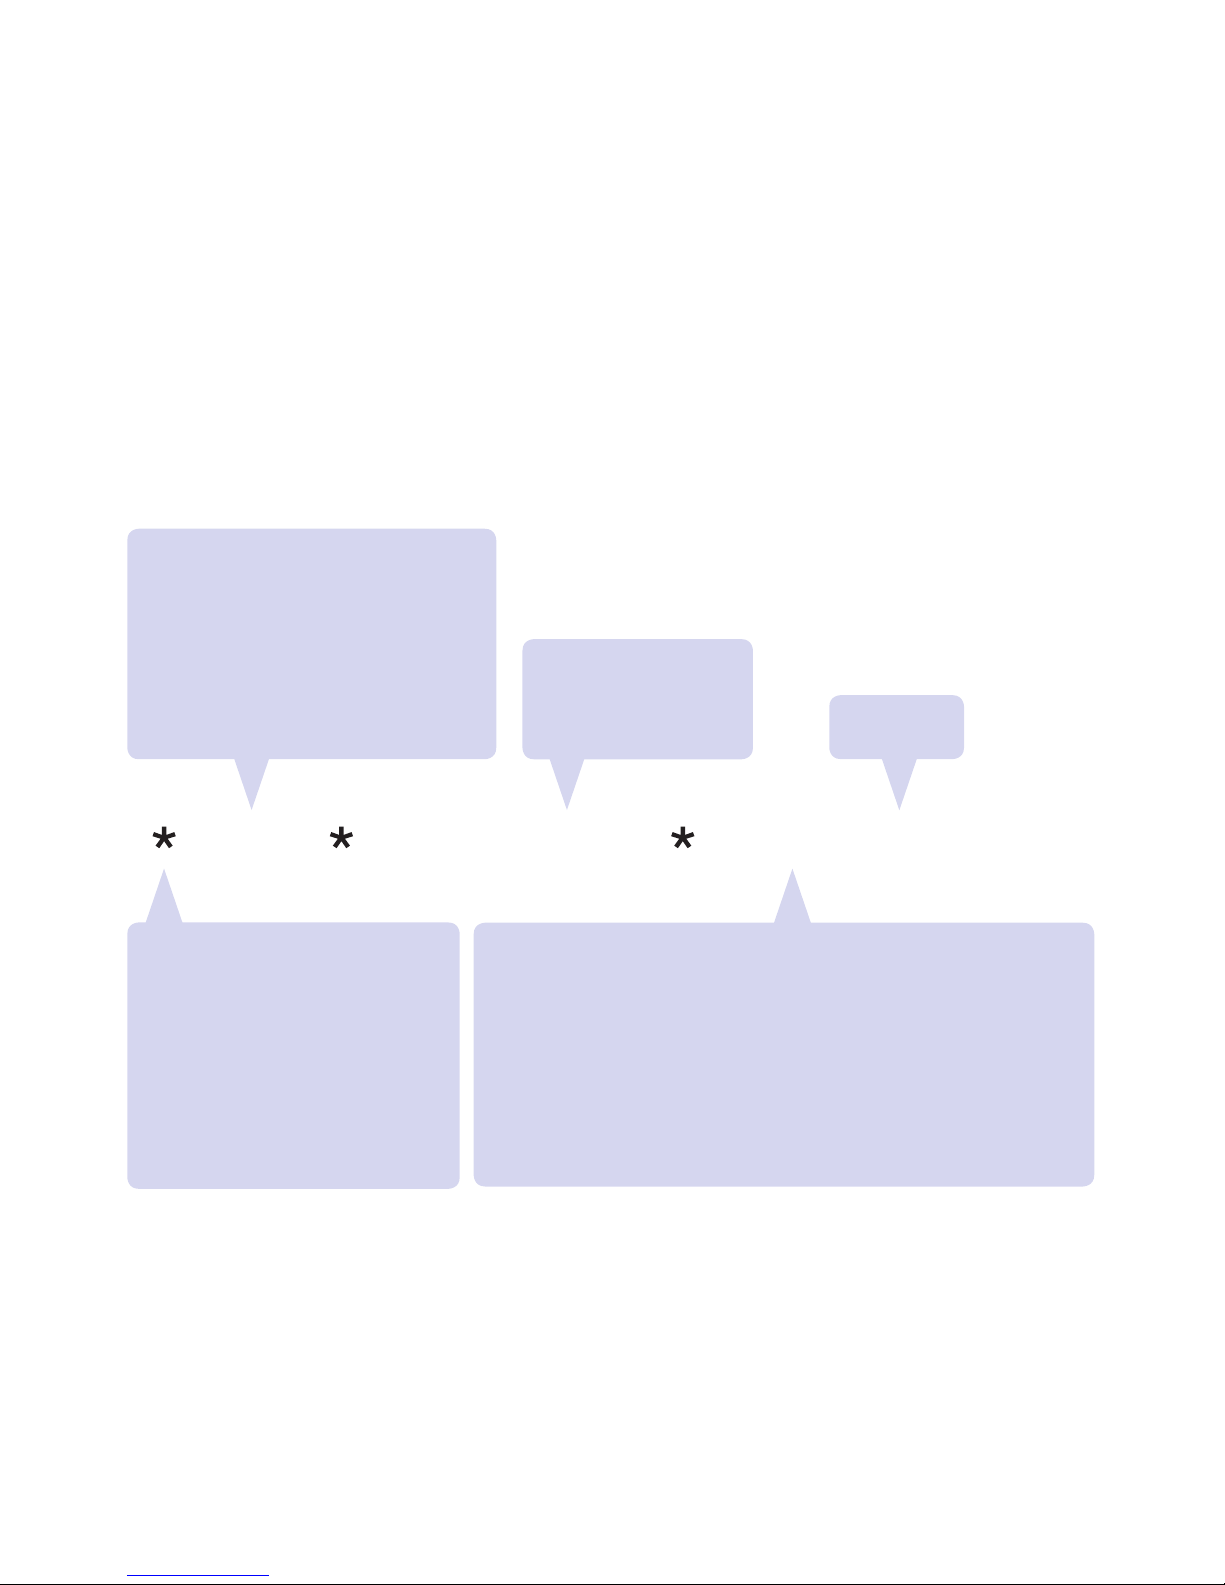
separate numbers. Commands are composed as follows:
The
service type allows you to optionally specify one or more particular types of
incoming call to forward.
Call forwarding examples
• To register a new number and activate call forwarding when busy (to the
phone number 01234 567890): **67*01234567890*#
• To deactivate call forwarding when busy: #67
*
• To reactivate call forwarding when busy to 01234 567890 again: *67
*
[ACTION] <PHONE NUMBER> <SERVICE> #
<SERVICE> types:
Voice only
11
Fax only 13
SMS only
16
SMS+FAX 12
Voice+FAX 19
Voice+SMS+FAX 10
Data circuit async. 25
Command prefixes:
Activate
*
Register and activate
**
Deactivate #
Unregister and deactivate
##
Check status (interrogate)
¹ *#
¹ Interrogation is only possible
via a data connection.
Data circuit sync.
24
PAD 27
Packet 26
Data circuit async+PAD 21
Data circuit sync.+packet
22
Data circuit asyn.+sync.+PAD
20
All services
(omit code)
[ACTION] criteria:
Forward unconditionally 21
Forward when busy
67
Forward when no reply
61
Forward when signal lost 62
Forward all calls
002
Forward all conditional types
004
<PHONE NUMBER>
to which calls that
meet the criteria
should be forwarded
Command
suffix
Page 27

25
Call barring
Call barring is a network service which allows incoming and/or outgoing calls that
meet certain criteria to be barred from being received or made. In concert with
your service provider, the terminal allows you to control various aspects of the call
barring service. The various barring criteria are not mutually exclusive and can be
used in combination to produce a tighter set of barring regulations. Commands
are composed as follows:
The
service type allows you to optionally specify the services to be barred.
Deactivating collective barring settings
For all of the [ACTION] criteria shown above, it is possible to deactivate them individually using the # command type and their respective criteria codes. However, it
is also possible to deactivate the following three barring groups collectively:
• Deactivate all barring
#330*[PASSWORD]*<SERVICE>#
• Deactivate all outgoing barring
#333*[PASSWORD]*<SERVICE>#
• Deactivate all incoming barring #353
*
[PASSWORD]*<SERVICE>#
Call barring examples
• To bar all international voice calls (where the password is 0000):
#331*0000*11#
• To deactivate all call barring (where the password is 1111):
#330*1111#
[ACTION] [PASSWORD] <SERVICE> #
[ACTION] criteria:
Bar all outgoing calls
33
Bar all outgoing international calls 331
Bar all outgoing international calls except to home country
332
Bar all incoming calls 35
Bar all incoming calls outside of home country 351
Note: The PASSWORD is
initially configured by the
network service provider
and is typically 0000
or 1111. This can be
changed - see ‘Security
features’ on page 2
7
<SERVICE> types:
Voice only
11
Fax only 13
SMS only
16
SMS+FAX 12
Voice+FAX 19
Voice+SMS+FAX 10
Data circuit async. 25
Command prefixes:
Activate
*
Deactivate #
Check status (interrogate)
¹ *#
¹ Interrogation is only possible
via a data connection.
Data circuit sync.
24
PAD 27
Packet 26
Data circuit async+PAD 21
Data circuit sync.+packet
22
Data circuit asyn.+sync.+PAD
20
All services
(omit code)
Command
suffix
Page 28
26
Call waiting
Call waiting is a network service that, when enabled, signals an incoming call
when a call is already in progress and additionally allows the first call to be held
while the second is answered. In concert with your service provider, the terminal
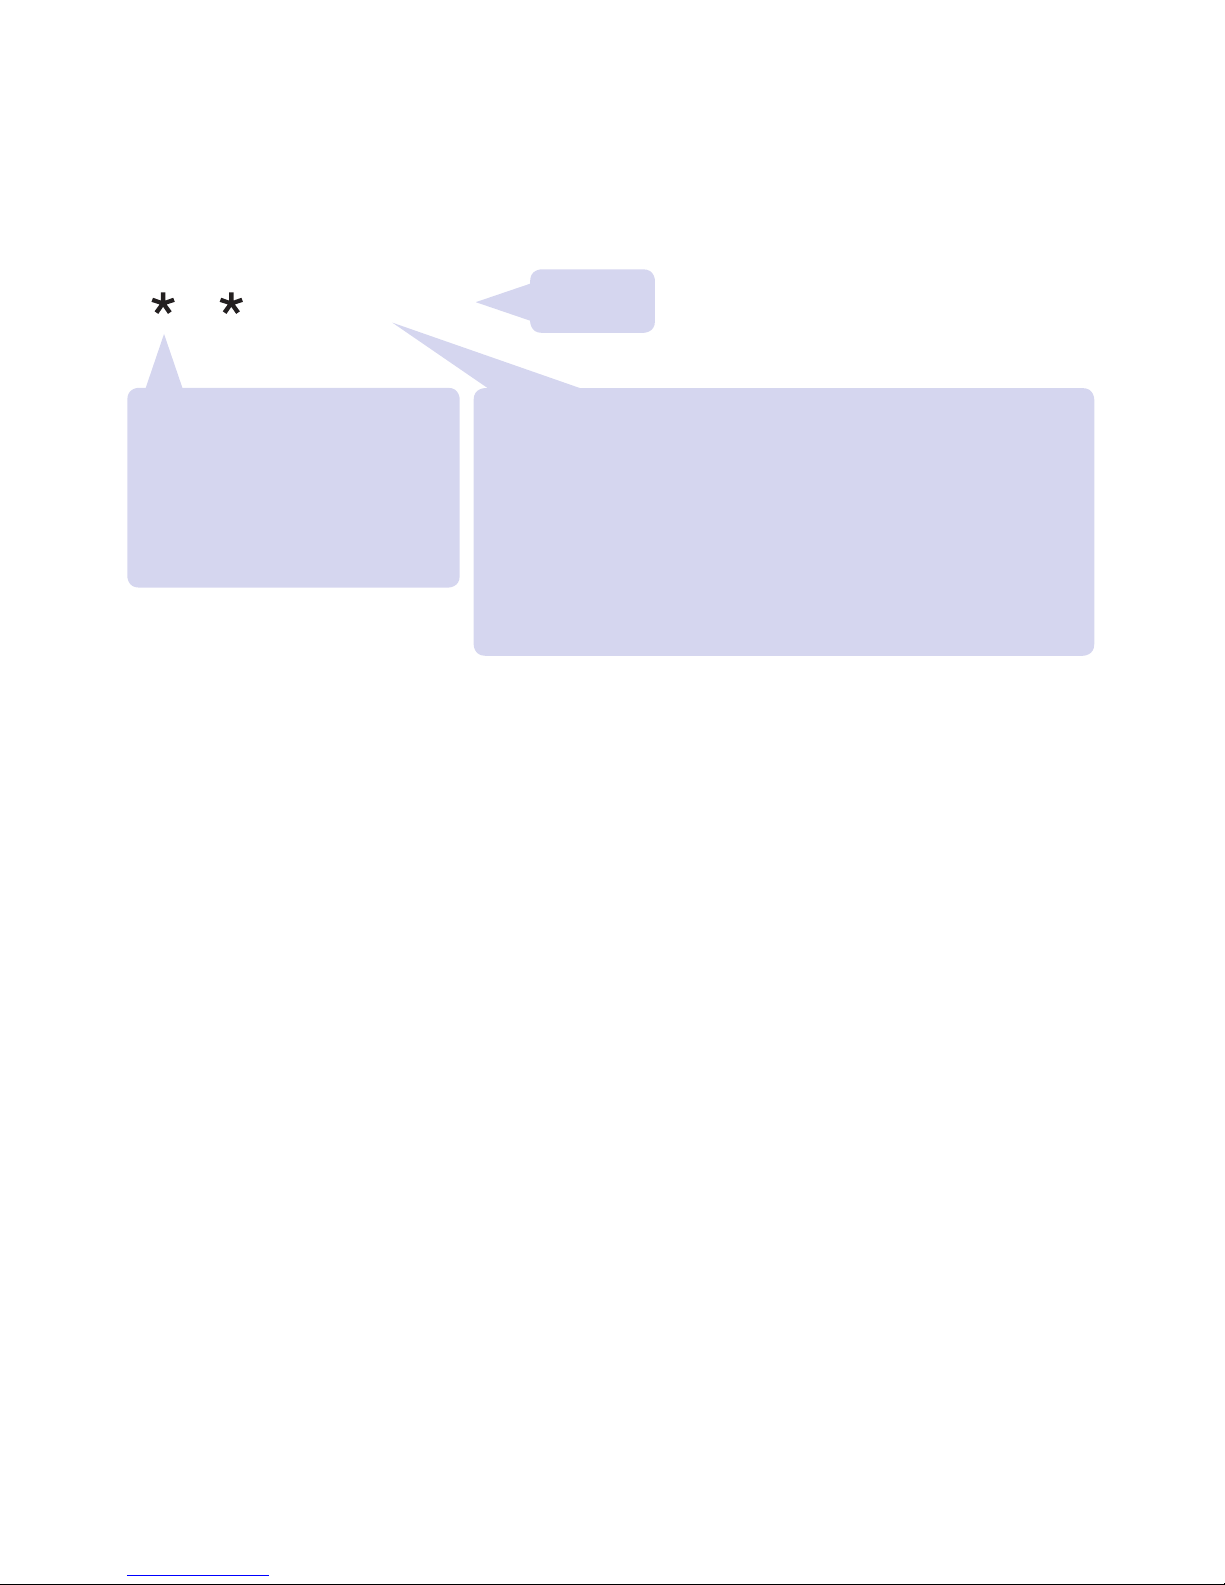
allows you to control various aspects of the call waiting service. Commands are
composed as follows:
The
service type allows you to optionally specify one or more particular types of
incoming call which will be permitted to interrupt an existing call.
Call waiting examples
• To activate call waiting for all types of call: *43#
• To deactivate call waiting for all types of call:
#43#
43 <SERVICE> #
<SERVICE> types:
Voice only
11
Fax only 13
SMS only
16
SMS+FAX 12
Voice+FAX 19
Voice+SMS+FAX 10
Data circuit async. 25
Command prefixes:
Activate
*
Deactivate #
Check status (interrogate)
¹ *#
¹ Interrogation is only possible
via a data connection.
Data circuit sync.
24
PAD 27
Packet 26
Data circuit async+PAD 21
Data circuit sync.+packet
22
Data circuit asyn.+sync.+PAD
20
All services
(omit code)
Command
suffix
Page 29

27
Security features
These commands relate to the security access features of the SIM card and
network services.
• Unlock PIN1
*8*
[PIN1]#
• Disable PIN1 lock
1
*
870*[PIN1]#
• Enable PIN1 lock
*
871*[PIN1]#
• Change PIN1
**
04[old PIN]*[new PIN]*[new PIN]#
• Change PIN2
**
042*[old PIN2]*[new PIN2]*[new PIN2]#
• Unblock PIN1
2
**05*
[PUK]*[new PIN]*[new PIN]#
• Unblock PIN2
2
**
052*[PUK]*[newPIN]*[newPIN]#
• Unlock “PS” lock
3
#0003[MASTER PHONE CODE]#
• Change call barring password
4
*03*330*[old PW]*[new PW]*[new PW]#
Notes:
1
Some SIM cards will not allow you to disable PIN1 protection.
2
The PUK (Personal UnblocKing code) is provided by the service provider.
3
The PS (Phone to SIM) lock is an optional feature which ensures that the T355
terminal may only be used with a single SIM card. The Master Phone Code is
issued by Burnside once the IMEI number (printed on the underside of the
terminal) is declared. Please contact Burnside for more details about this optional
feature.
4
Confirm the old call barring password with your network service provider.
Phone number presentation
These commands relate to the use of the Caller Line Identity (CLI) or Caller ID
feature supported by the terminal.
• Use network CLI configuration (default)
*
801#
• Force sending CLI for all calls
*
802#
• Force withholding CLI for all calls
*
803#
• Make a single call and send CLI
*
31#[phone number]
• Make a single call and suppress CLI #31#[phone number]
The following commands need to be sent via a USB computer link in order to
receive a valid response code.
• Check CLI presentation state
*
#30# response: +CLIP: 0,n
• Check CLI sending state in network
*
#31# response: +CLIR: 0,n
• Check presentation state of call
*
#76# response: +COLP: 0,n
• Check presentation state of call
*
#77# response: +COLR: 0,n
where n is 4 for active and 1 for inactive
Page 30

28
Further information
Troubleshooting
If the amber light is indicating a fault, this may be caused by the following:
• There is no SIM installed.
Remedy: Turn off the unit and install a SIM. Then turn the unit back on.
• There is no battery installed and/or connected.
Remedy: Remove the power, install and connect the battery. Restore power.
• The unit has overheated.
Remedy: Locate the terminal in a cooler location. In particular keep out of
direct sunlight.
• Low signal indication or continuous searching indication (see page 14).
Remedy, either locate the terminal in a more suitable position to achieve a
stronger signal or use an antenna connected via a cable that has gain or is
located in a more suitable location.
Important safety information
Battery
Do not use any other battery other than the one supplied with your terminal.
Power supply
Do not use any other power supply other than the one supplied with your terminal.
Failure to use either the supplied battery or charger can damage the terminal and
will invalidate the warranty.
Operating environment
Make sure that no special regulations are in force that impose restrictions on the
use of mobiles. Restrictions to mobiles would also apply to the terminal.
Electronic devices
Most modern electronic equipment is shielded from radio frequency (RF) signals.
However, certain electronic equipment may not be shielded against the RF signals
from your terminal.
Pacemakers
Pacemaker manufacturers recommend that a minimum separation of 20 cm (6
inches) be maintained between a hand-held wireless phone and a pacemaker.
The same restriction should apply to the antenna of the terminal. If you have any
reason to suspect that interference is taking place, switch off the terminal immediately.
Page 31

29
Hearing aids
Some digital wireless phones may interfere with some hearing aids. In the event of
such interference, you may want to consult your service provider.
Other medical devices
Operation of any radio transmitting equipment, including cellular phones, may
interfere with the functionality of inadequately protected medical devices. Consult
a physician or the manufacturer of the medical device to determine if they are
adequately shielded from external RF energy or if you have any questions.
Switch off your terminal in health care facilities when any regulations posted in
these areas instruct you to do so.
Hospitals or health care facilities may be using equipment that could be sensitive
to external RF energy.
Vehicles
RF signals may affect improperly installed or inadequately shielded electronic systems in motor vehicles (e.g. electronic fuel injection systems, electronic anti-skid
(anti-lock) braking systems, electronic speed control systems, air bag systems).
Check with the manufacturer or its representative regarding your vehicle. You
should also consult the manufacturer of any equipment that has been added to
your vehicle.
Potentially explosive atmospheres
Do not install the terminal or site the antenna in any area with a potentially explosive atmosphere and obey all signs and instructions.
Areas with a potentially explosive atmosphere are often but not always clearly
marked. They include below deck on boats; chemical transfer or storage facilities;
vehicles using liquefied petroleum gas (such as propane or butane); areas where
the air contains chemicals or particles, such as grain, dust or metal powders.
Emergency calls
Important! This terminal, like any wireless phone, operates using radio signals,
wireless and landline networks, as well as user-programmed functions, which cannot guarantee connection in all conditions.
Therefore, you should never rely solely upon any wireless device for essential
communications (e.g. medical emergencies).
Remember, to make or receive any calls, your terminal must be switched on and in
a service area with adequate cellular signal strength. Emergency calls may not be
possible on all wireless phone networks or when certain network services and/or
phone features are in use. Check with local cellular service providers.
Page 32

30
Index
A
Alternate line
service selection 20
Antenna
connection 6
B
Battery
connection 5
C
Call barring
configuration 25
password change
27
Caller ID
configuration 27
control codes
19
type selection 20
Caller Line Identity.
See Caller ID
Call forwarding
configuration 24
Calls
emergency
15
making and receiving
15
Call waiting
configuration 26
in-call options
16
CLI. See Caller ID
Clock
setting 21
Conference calls
in-call options
17
Configuration codes
advanced
24
basic 19
entering 18
Cover
removal 4
D
Dial delay 19
E
Emergency calls 15
F
Factory
reset 23
Fax
connection 8
Flashing codes 14
I
In-call dialling 17
Indicators
status 14
when switching on 7
P
PBX
related settings 21
PIN code 16
configuration 27
entering 7
Positioning 5
Power
switch on/off 7
Power adapter
connection 6
Power loss 15
PUK code 16
R
Reset 23
Ring back test 15
Ringing style 20
S
Safety information 28
Signal strength 5
SIM card
installation 4
Supplied items 2
Switch on/off 7
T
Telephone
connection 6
Testing
ring back 15
Troubleshooting 28
V
Volume boost 20
www.ctxd.com
Documentation by:
Page 33
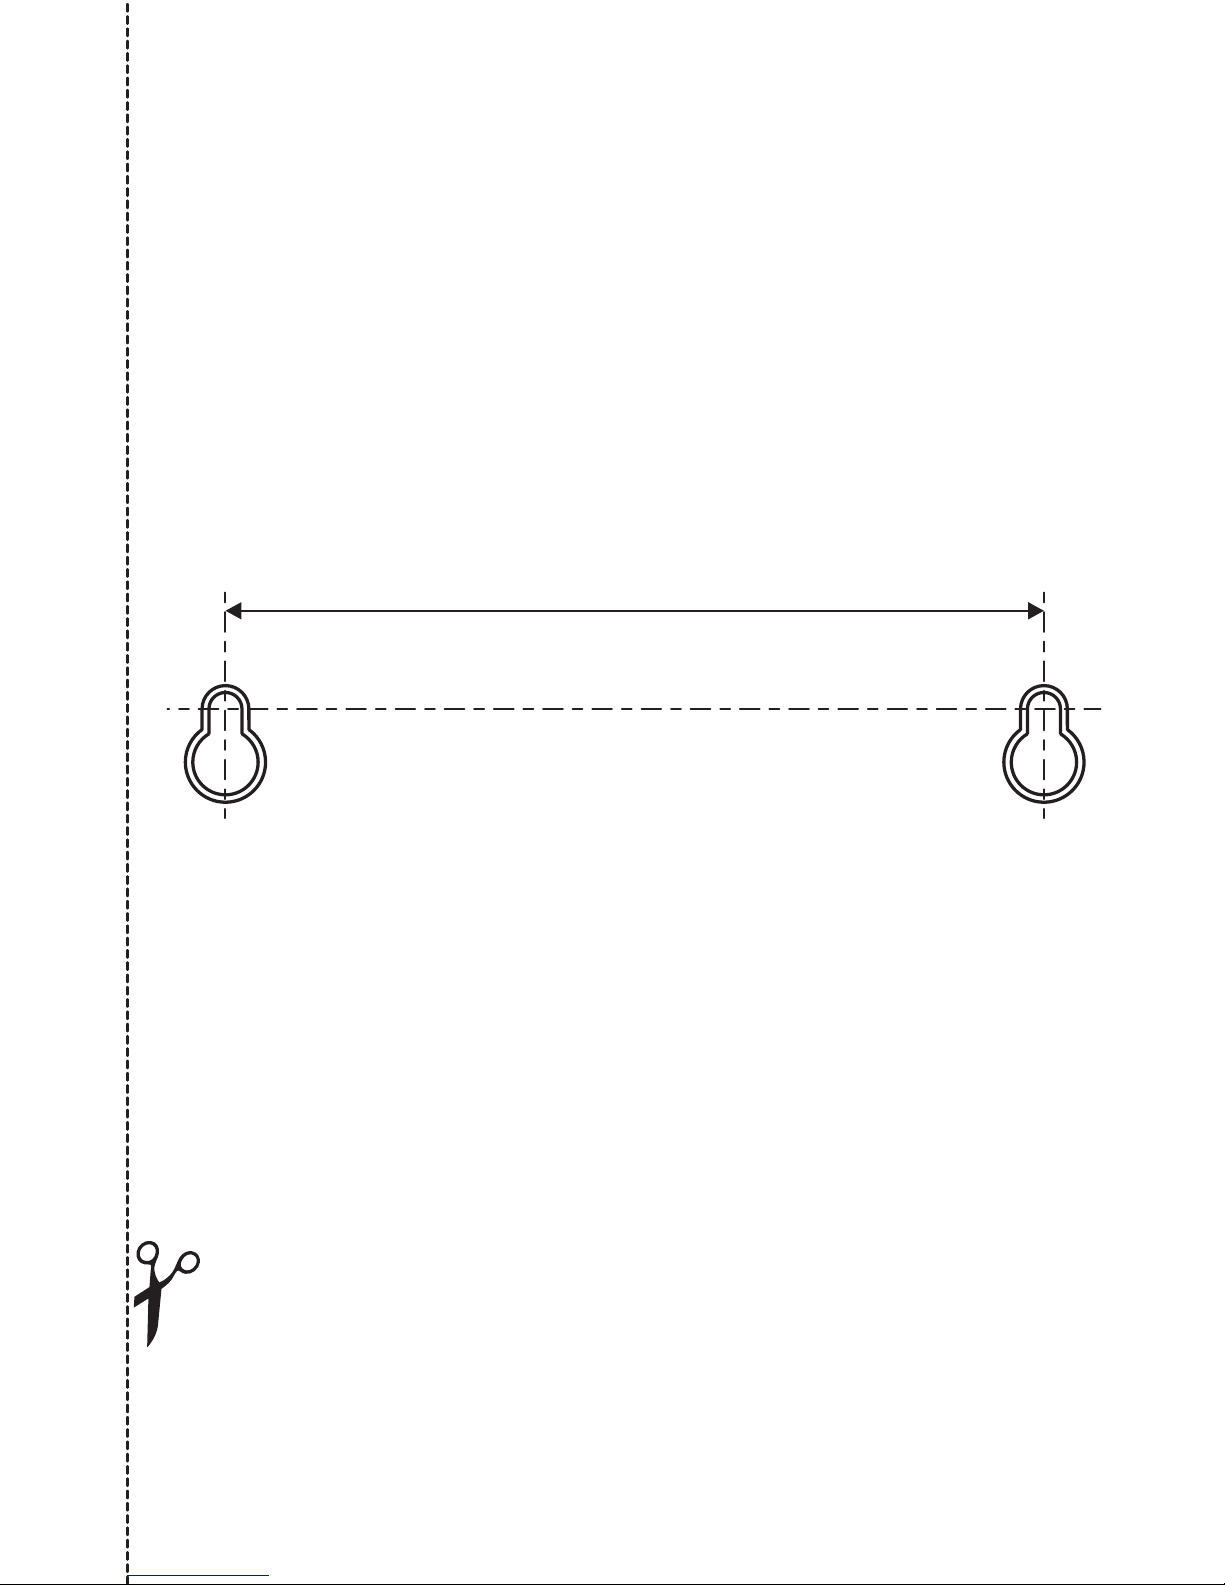
88mm [3 ”]
7
/
16
T355 mounting template
Use this template to position screw holes
when wall mounting the terminal.
You are recommended to use 3mm x 30
pan-head screws.
Page 34

Burnside Technology Limited
Unit 1, Church Close Business Park,
Todber, Sturminster Newton,
Dorset DT10 1JH, United Kingdom
BURNSIDE
www.burnsidetelecom.com
BURNSIDE
Part number MANU-00001-03
 Loading...