

Page 1
D
E
F
7
M4
R
e
d
ia
l
8
9
4
M
3
Mute
5
6
1
2
M2
M1
N
a
m
e
s
Register
SM
S
M
en
u
Select
M
ailb
o
x
Clear
C
al
l
3
0
M5
Handsfree
+
#
W
ireles
s
M
odules
by
Siem
ens
BURNSIDE
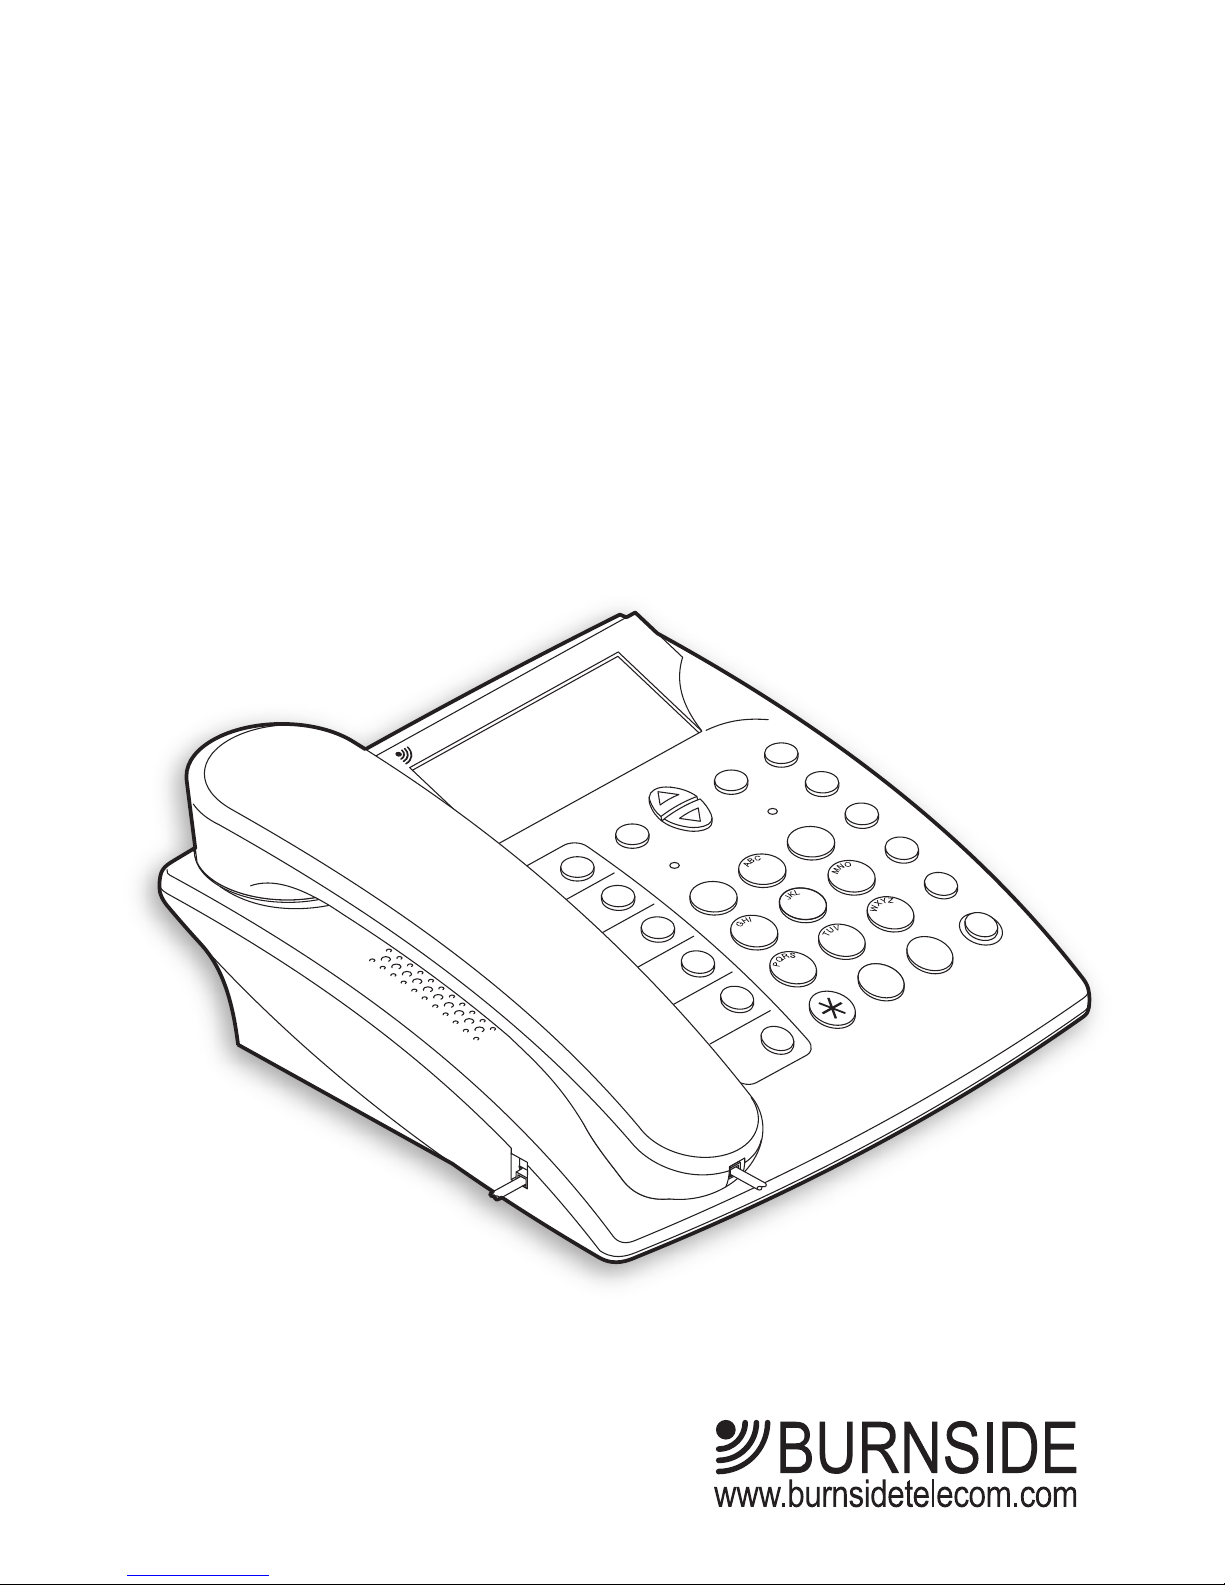
Burnside P350 / P390
desktop mobile phone
user guide
Page 2

Page 3

1
Contents
2 Introduction
2 Welcome
3 Setting up
3 Install your SIM card
4 Attach the handset cabl
e
4 Unlock the transit switc
h
5 Attach the antenn
a
5 Prepare the power adapte
r
5 Attach the power adapte
r
6 Using your phone
6 Switching on
6 Switching of
f
7 The standby scree
n
8 Making and receiving call
s
10 Managing more than one cal
l
12 Menu options
13 Menu options layout
14 Phonebook
19 Speed dial memory button
s
20 Messages
24 Call registe
r
26 Divert
28 Tones
29 Settings
30 General setting
s
31 Call setting
s
32 Security setting
s
32 Date and time setting
s
32 Restore settings
33 Status
34 Options
34 Stub antenna
35 Headset
36 Linking to a compute
r
37 Important safety information
Page 4
2
Introduction
Welcome
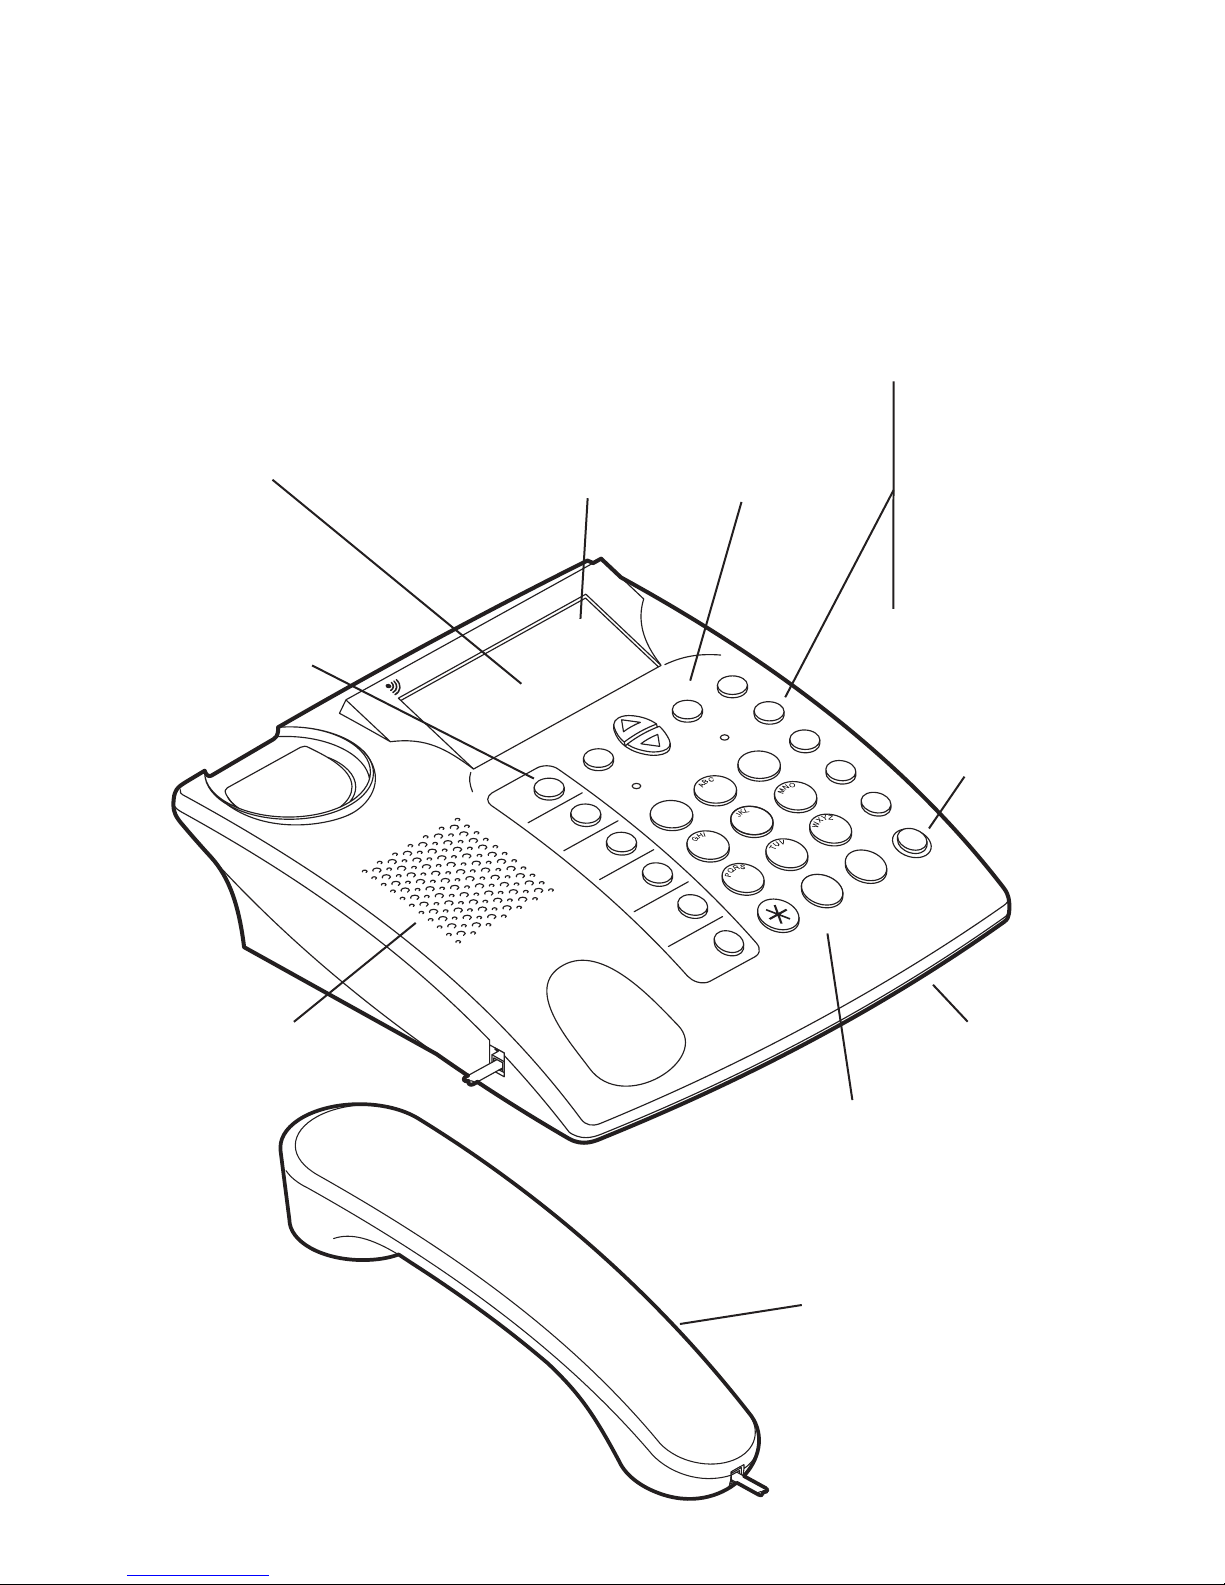
Thank you for choosing the P350 / P390 desktop mobile phone from
Burnside Telecom. Combining the ease of use of a landline phone with the
flexibility of a mobile phone, your phone provides landline simplicity almost
anywhere.
Internal lithium polymer
battery with up to 5
days standby time
Supplied complete with an
autosensing power adapter/
battery charger and a country
specific socket converter
Sturdy handset with
quality microphone
and earpiece
P390 models additionally
support GPRS data
communications.
D
E
F
7
M4
Redial
8
9
4
M3
Mute
5
6
1
2
M
2
M
1
Names
Register
SMS
M
e
n
u
S
e
le
c
t
M
a
ilb
o
x
C
le
a
r
C
a
ll
3
0
M5
Handsfree
+
#
Wireless
Modules
by
S
ie
m
e
n
s
BURNSIDE
Speaker
Backlit
fullsize
display
screen
Large clear alpha
numeric keys for
dialling and writing
text messages
Direct
access to
your
phonebook
and special
contacts
Direct access to:
• Menu
• SMS messaging
• Calls register
• In call muting
• Last number
redial list
Large
menu
control
buttons
Clear
status and
charge
indications
Handsfree
operation
Microphone
A range of
antennae
to suit most
situations
Page 5
3
Setting up
Install your SIM card
Your SIM (Subscriber Identity Module) card is your identity on the mobile
phone network. It can also store your phonebook contact details. Without a
working SIM card, your phone can only make emergency calls (subject to
network availability).
Note: When handling your SIM card, limit your movements to reduce static
electricity and avoid touching the gold contacts.
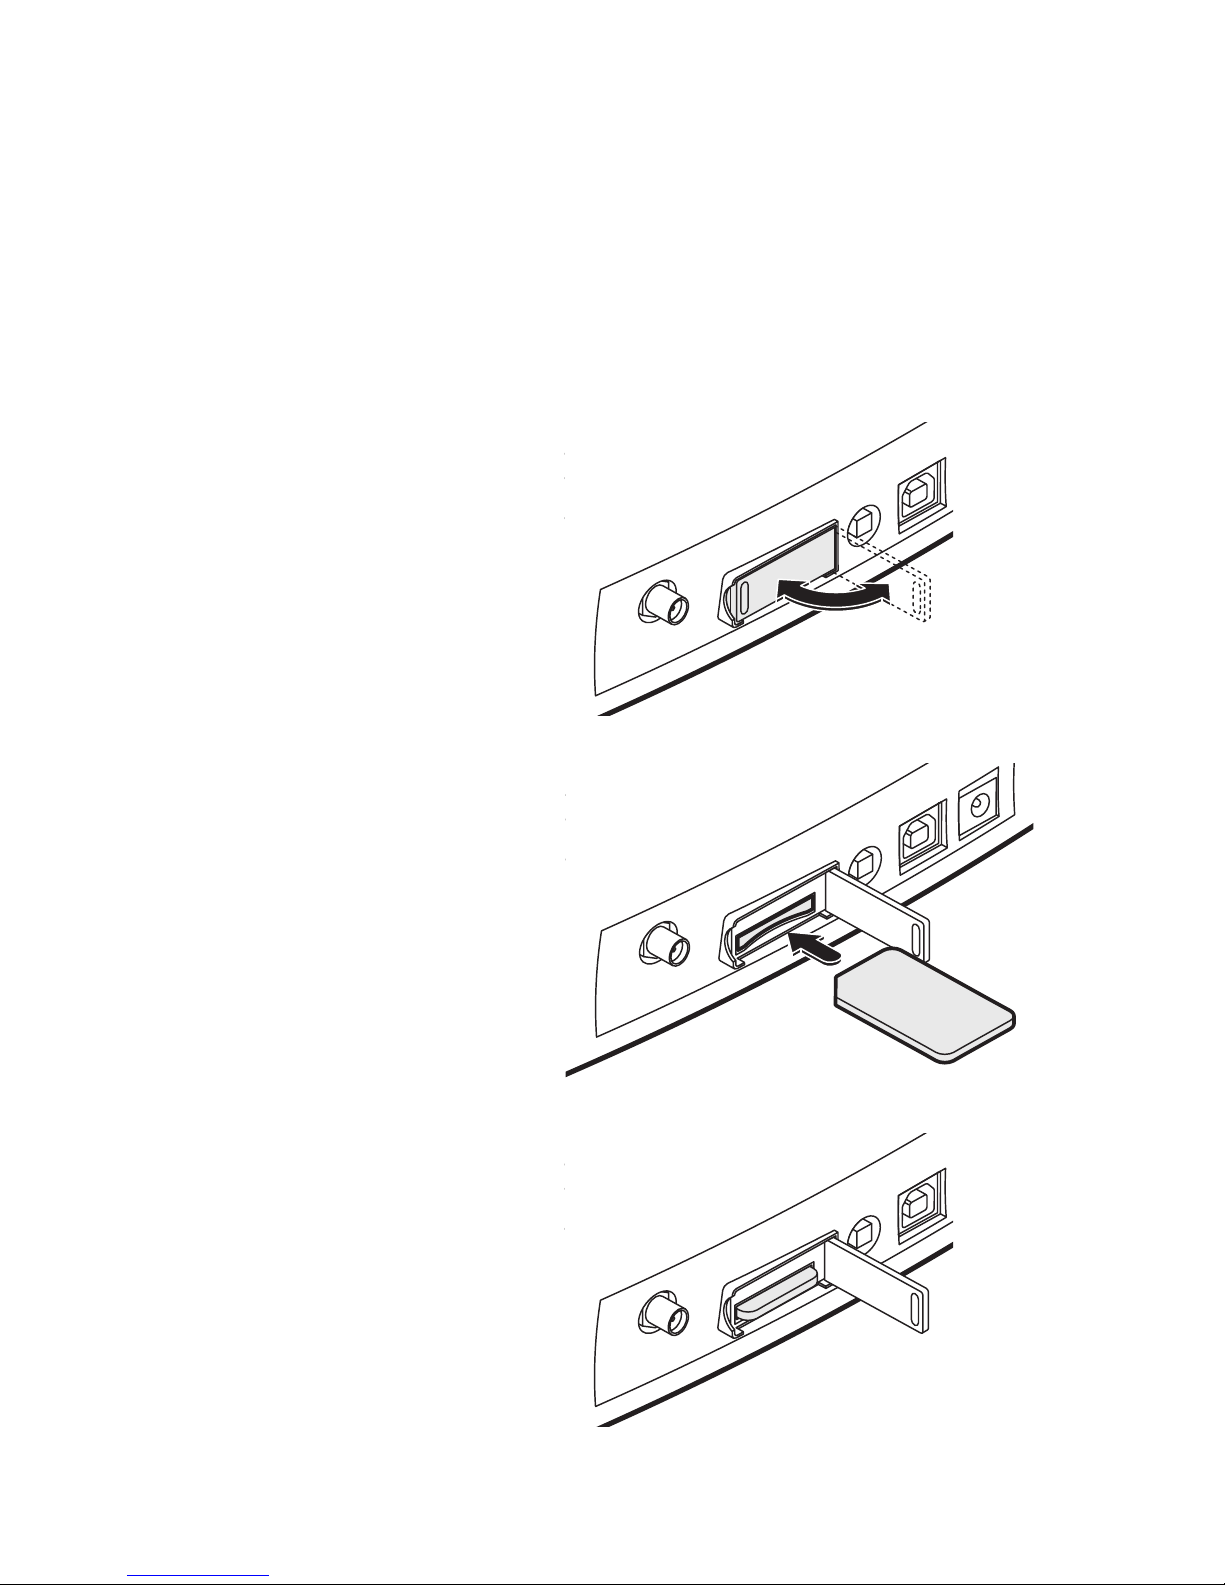
1 Ensure that the phone is switched
off. On the rear panel of the
phone, carefully swing open the
SIM slot door.
2 Orientate your SIM card with
its contacts facing downwards
and the notched corner facing
towards the slot.
3 Push the SIM card into the slot
until it clicks into place. Close the
door.
Note: To remove the SIM card,
press it inwards to release and
partially eject it. Then slide it out
of the slot.
Page 6
4
Unlock the transit switch
When shipped, the phone is locked for transit to prevent it from switching on
accidentally. You need to unlock the phone before it will operate.
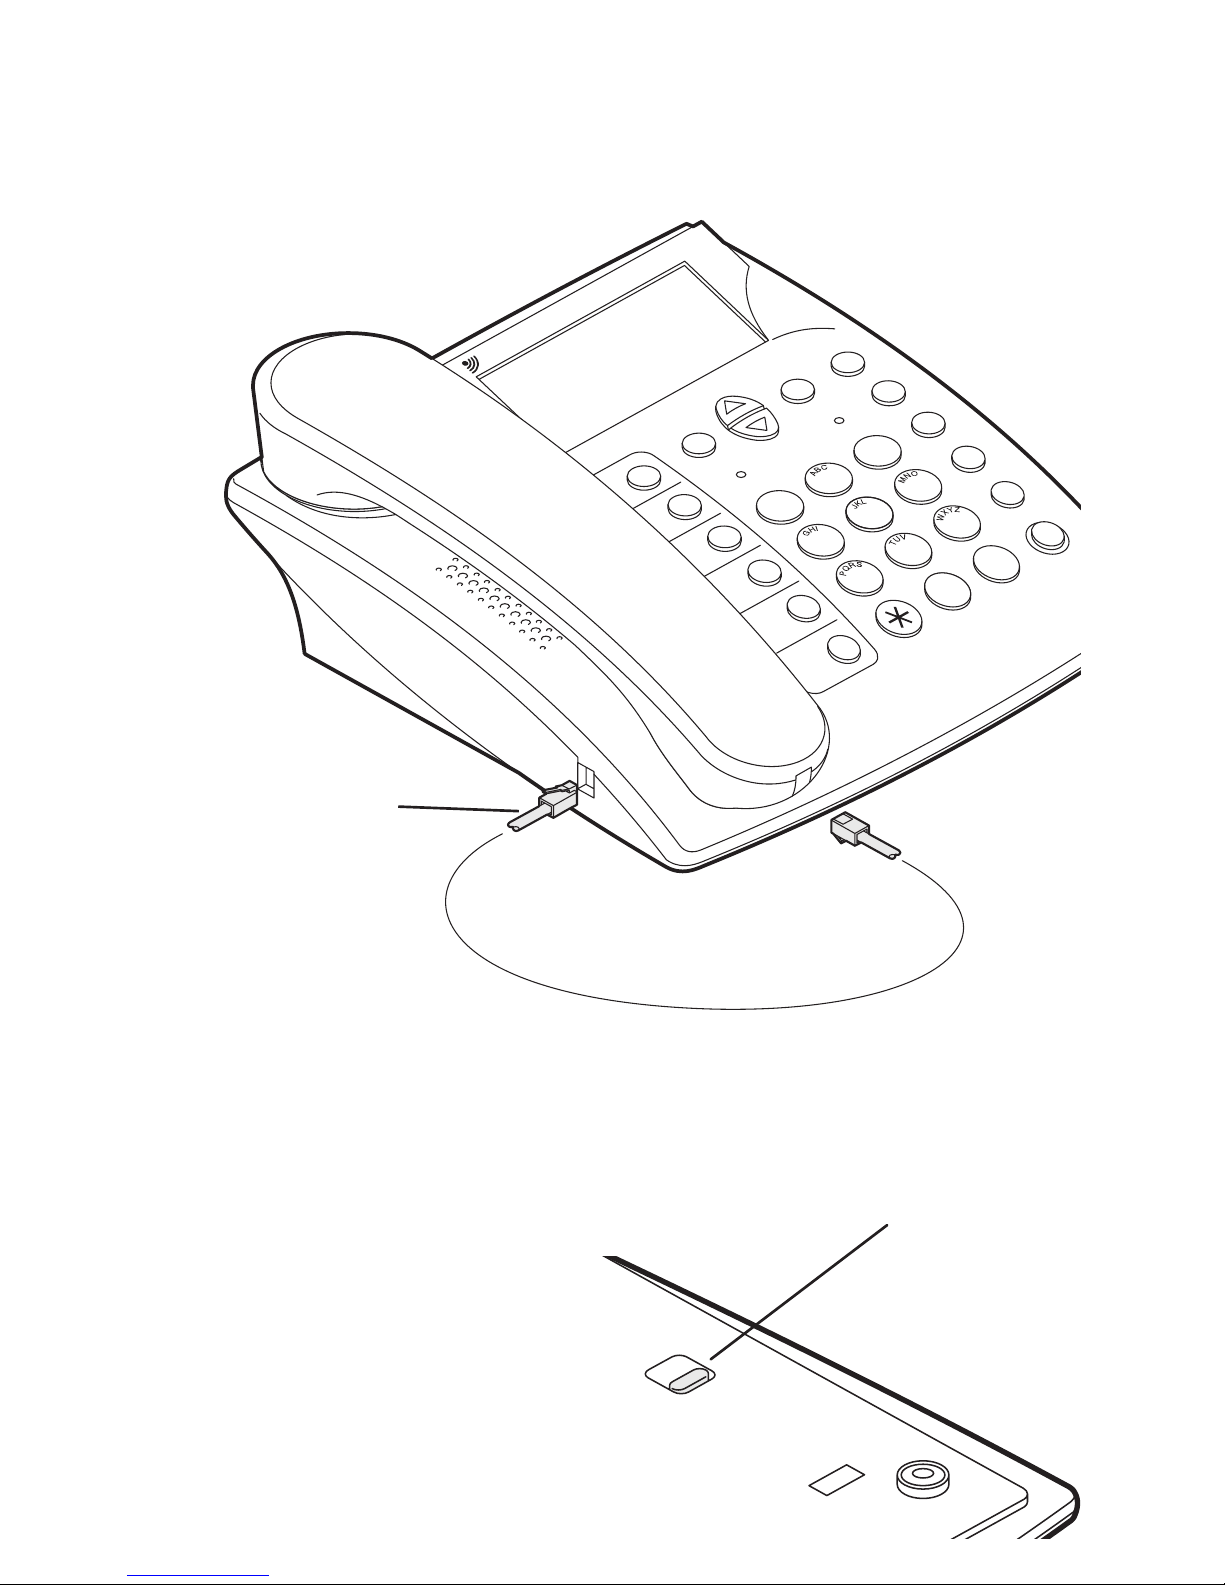
1 On the underside of the
phone, locate the recessed
switch near to where the
handset cable attaches.
2 Slide the switch towards the
rear of the phone unit.
The phone will not switch on
at this stage.
Attach the handset cable
1 Locate the handset and the supplied cable.
2 Connect one end of the cable to the socket at the base of the handset
and the other end to the socket in the left side of the phone body.
D
E
F
7
M4
R
e
d
ia
l
8
9
4
M
3
Mute
5
6
1
2
M2
M1
N
a
m
e
s
Register
SM
S
M
en
u
Select
M
ailb
o
x
Clear
Cal
l
3
0
M5
Handsfree
+
#
W
ireless
M
odules
by
Siem
ens
BURNSIDE
Handset cable
Loc
ked
positio
n
Unloc
ked
positio
n
Transit
switch
Note: An optional headset is available, see the Options section for details.
Page 7
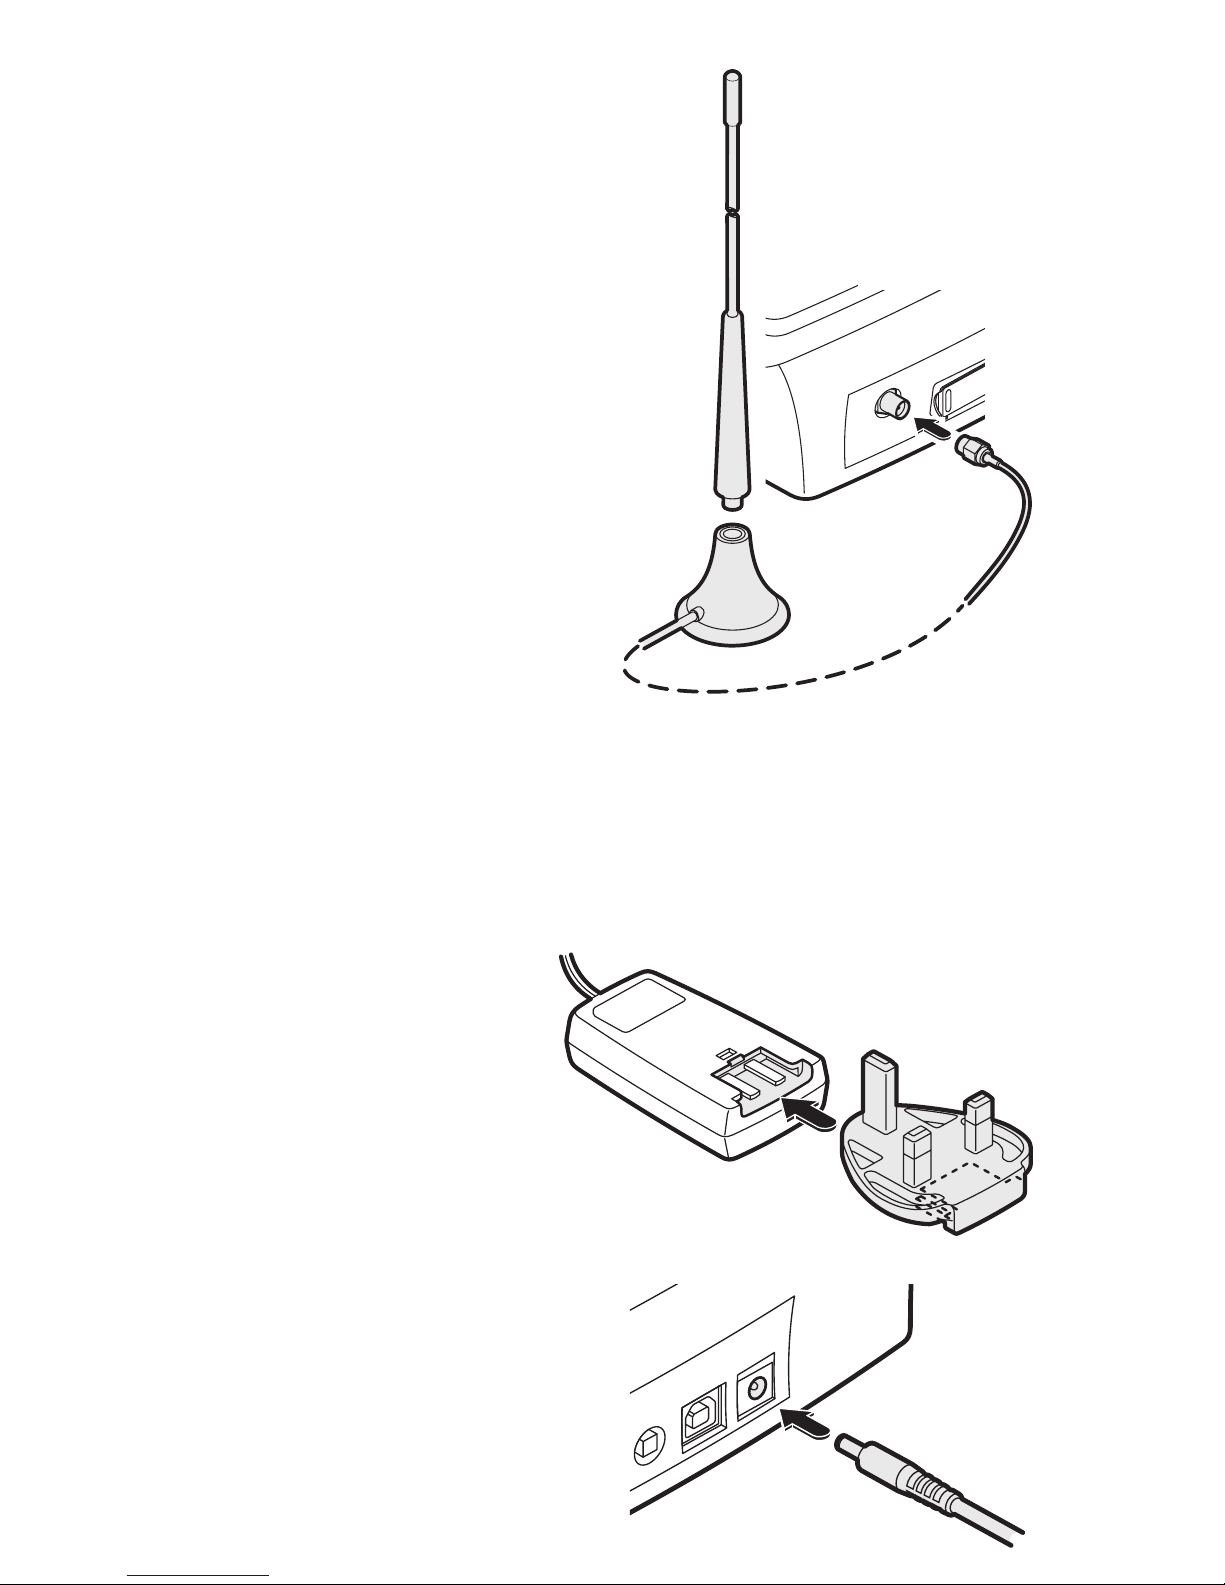
5
Attach the power adapter
1 Attach the connector from the power
adapter to the socket on the far right
of the rear panel.
2 Plug the power adapter main body
into a nearby mains outlet and en
-
sure that the outlet is switched on.
Prepare the power adapter
The supplied power adapter will either be fully specific to your location or
will be an adaptable unit with at least one snap-on plug to suit the mains
power sockets used in your area. If appropriate, you may need to attach the
snap-on plug, if it has not already been fitted.
1 Locate the power adapter main body and the appropriate snap-on plug
(if it has not already been fitted to the main body).
2 Orientate the snap-on plug so
that its underside connection
slots are aligned with the two
metal blades of the adapter
main body, as shown here:
3 Slide the plug into the adapter
main body and press it firmly
into place until you hear a click
(as it snaps into position).
Attach the antenna
The supplied antenna has a magnetic mount
and a two metre cable for remote positioning.
1 Assemble the antenna by screwing the upper
section into the base until it is finger tight.
2 Position the antenna where required, if pos
sible on a secure metal surface (preferably
iron or steel).
Note: Keep the antenna base away from
monitor screens, televisions, diskettes, credit
cards, etc. because the magnetic base can
affect these items.
3 Feed the antenna cable to the rear of the phone,
attach the connector to the antenna socket
and twist the collar until it is finger tight.
Note: Ensure that the antenna cable
does not cause a trip hazard.
Note: You can use
the status screen to
assist with antenna
positioning - see
page 33.
Page 8

6
Using your phone
Switching on
1 Ensure that a valid SIM card is installed and that either:
• The power adapter is attached (as discussed in the previous section),
or
• The internal battery has been charged for at least two hours (or
until the display shows ‘charged’) before it is used without mains
connection.
Whenever power is applied, the internal battery will be charged
automatically.
2 On the rear panel, press and hold the
red button for roughly one second, then
release.
• The screen should illuminate and
display an initial message while the
phone prepares itself for operation.
• If the SIM card is configured to use a
PIN (Personal Identification Number)
code, you will be asked to enter it.
Enter the appropriate four digit code
and press the
Select button.
Note: take care when entering a PIN code as three successive incor-
rect tries will cause the SIM card to be blocked, requiring a special
unblocking code from your service provider.
• If there is no available network service in the vicinity, the display will
show
Searching... If this condition continues, try a different location
for the phone or antenna.
3 The standby screen will be displayed (see opposite).
Switching off
1 Press and hold the red button until the display goes blank.
Notes
During normal use, the phone should only be switched on and off using
the red button. Use the transit switch only after the unit has been turned
off.
If the transit switch is inadvertently moved to the locked position, the
phone will immediately shut off or enter a charging state if the power
adapter is connected.
Red
power
button
Page 9
7
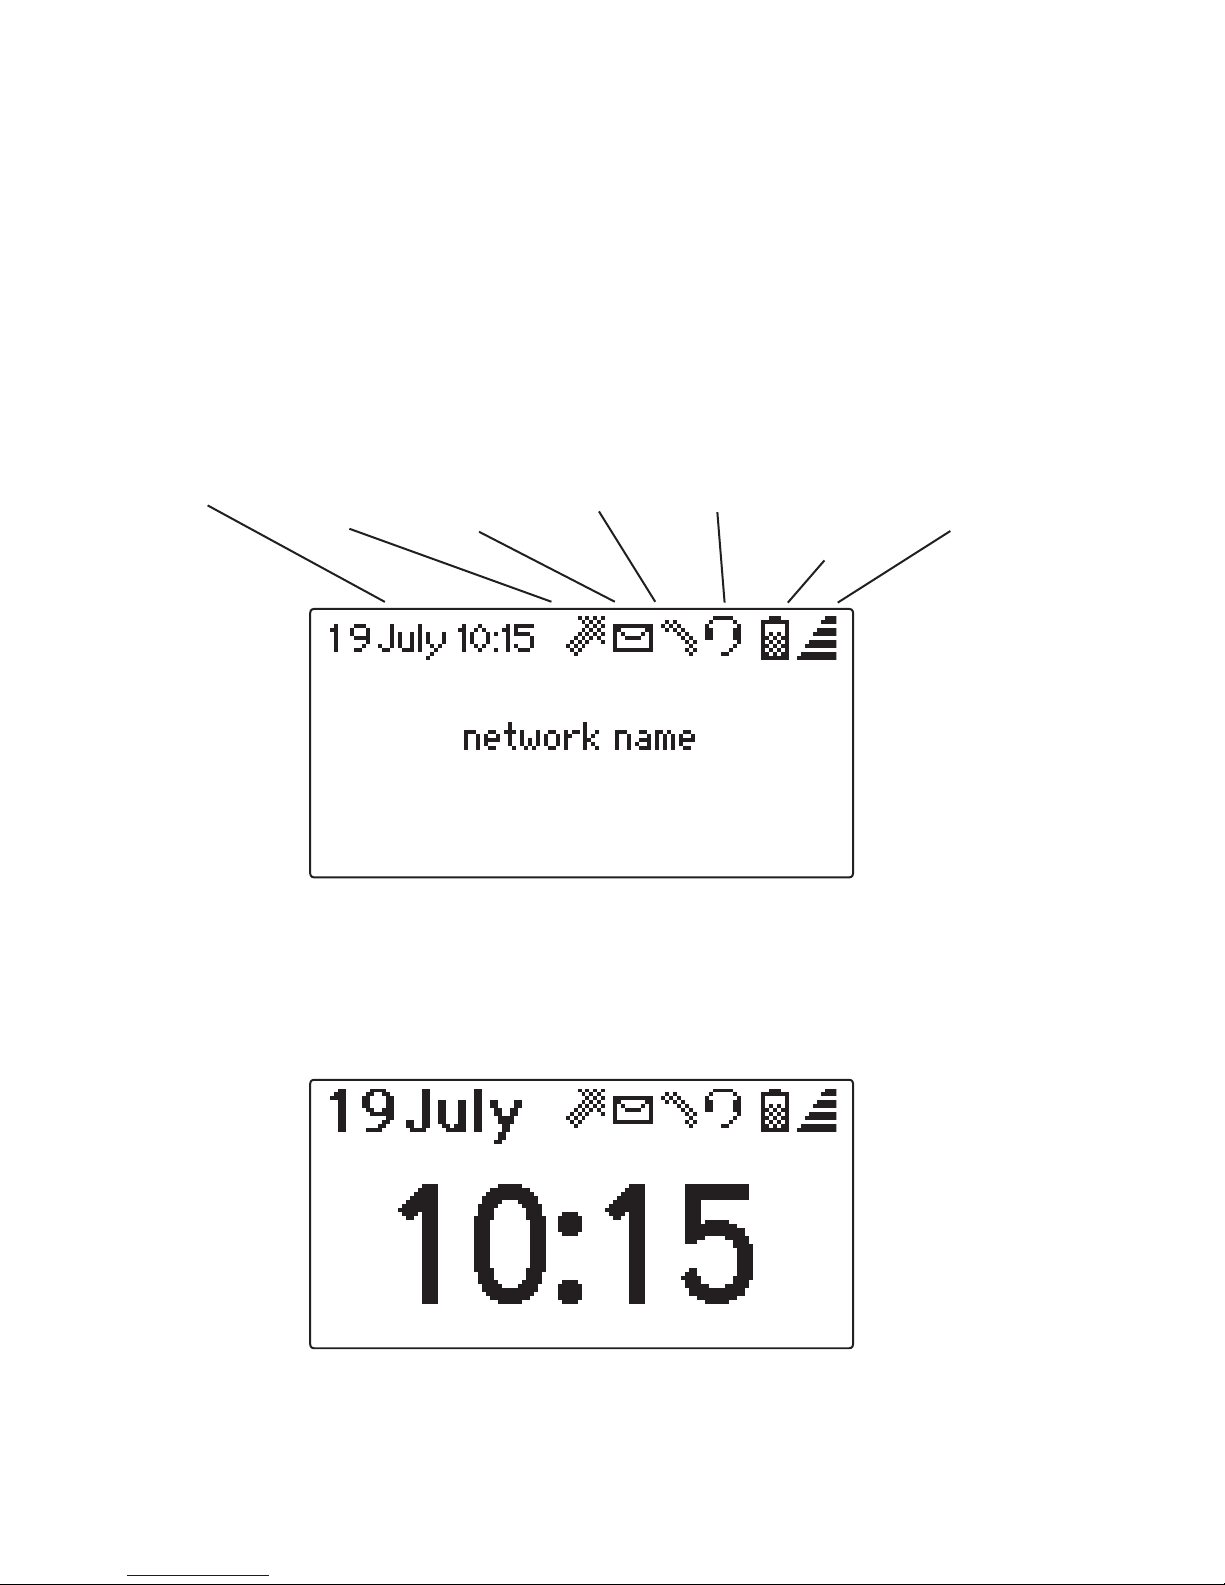
The standby screen
When there is no call in progress and the menu is not being used, the
phone will show the standby screen. The standby screen provides indications of the signal strength, battery charge status as well as the time and
date.
The ordinary standby screen will display the network name in addition to
any relevant status icons.
You also have the option to display a large digit clock rather than the net
-
work name. See the Settings section for details on enabling the ‘big clock’.
Standby screen with big clock option
enabled (see Settings section)
Standby screen showing all status
items and the network name
Date and
time
All calls
fowarded
icon
Message
received
icon
Missed
call icon
Headset
icon
Power/
battery
status
icon
Signal
strength
icon
Note: The big clock will be temporarily removed from display if special information must be shown, such as “SMS inbox full, messages queued” or the
phone is searching for a network connection.
Page 10
8
Making and receiving calls
Although your phone uses mobile communication technology, much effort
has be made to make basic telephone functions work like a high quality
landline phone, but with the added benefit of many mobile phone features.
Important: If the network connection shows Searching... you will not
be able to successfully make or receive calls. There are many factors that
can affect network availability and for this reason, the phone should not be
considered as a fail-safe resource for making emergency calls.
To make a call by dialling
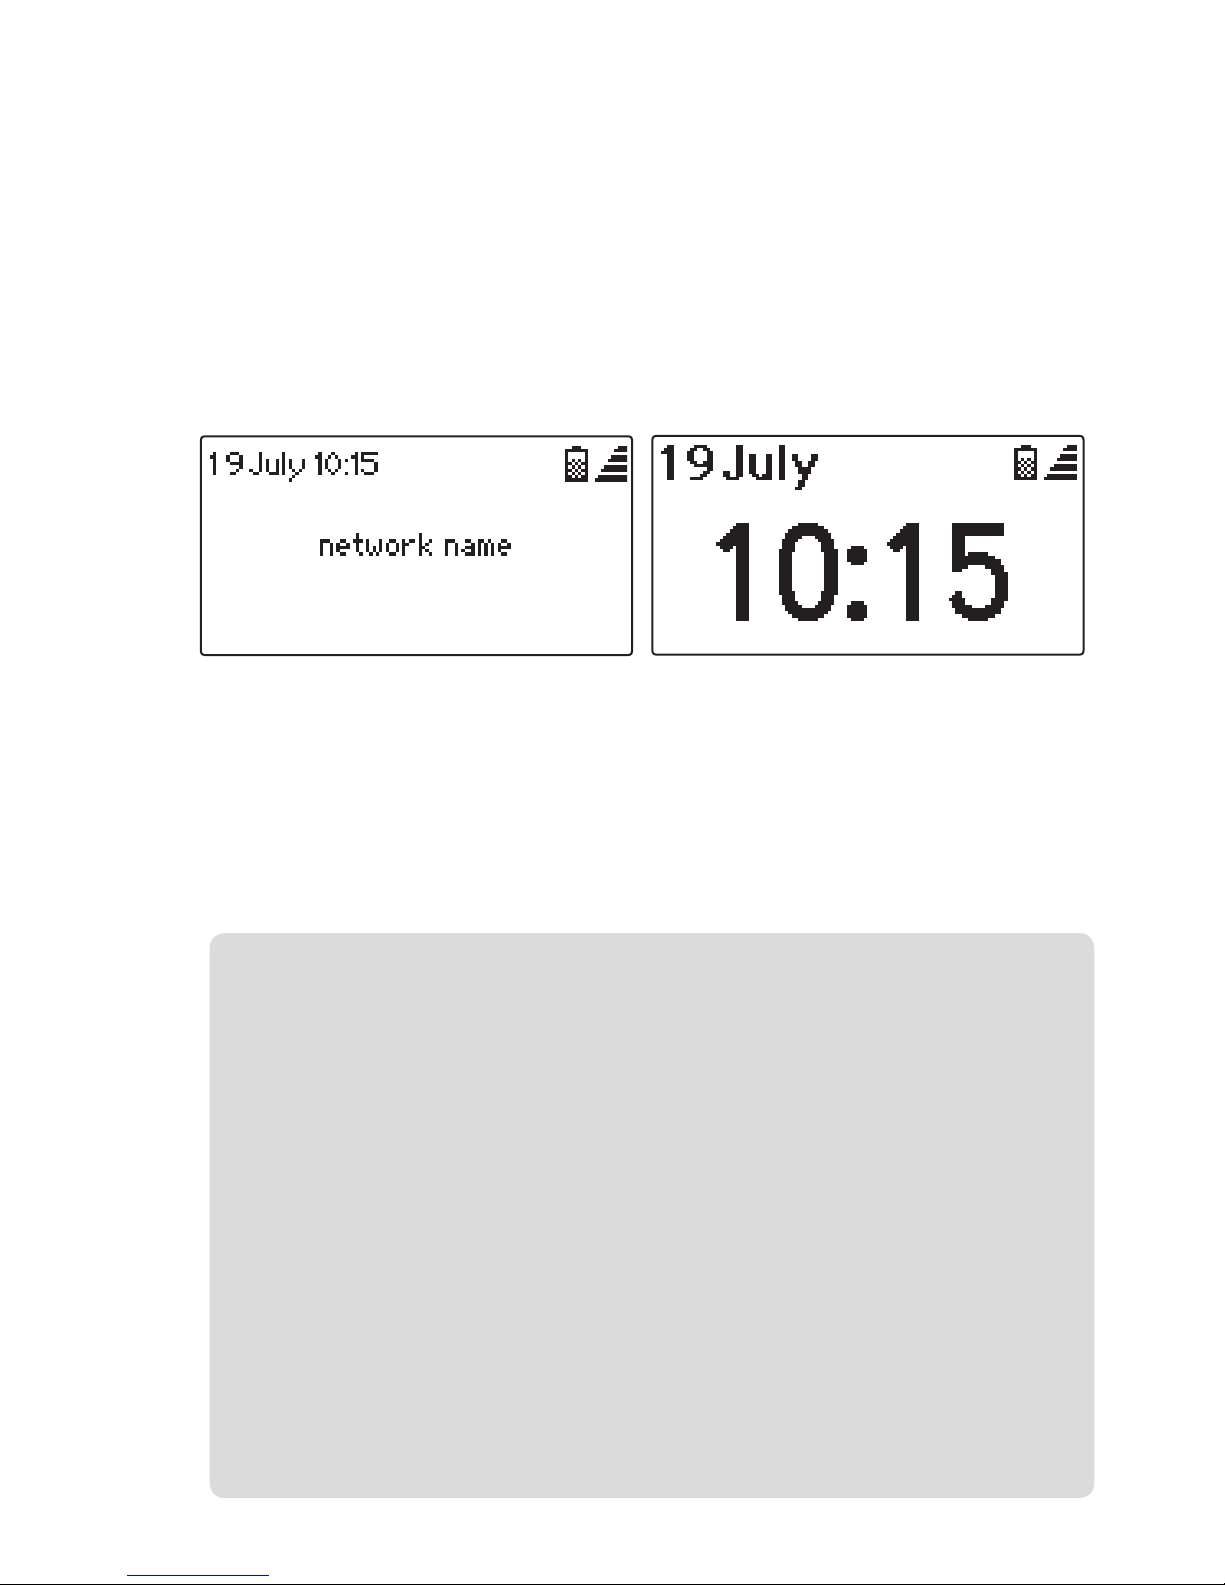
Before making a call, ensure that the standby screen is displayed:
Normal standby screen
showing the network name
Standby screen with the
big clock option enabled
Whether you are using the handset or the handsfree speaker, you can
choose to either:
• Dial first, then pick up the handset (or press the
Handsfree button),
or
• Pick up the handset (or press the
Handsfree button) and then dial.
When dialling:
• Remember that this is a mobile phone, you must enter the full phone
number, including area code, even if the contact is in your area.
• To erase the last entered digit: Press and release the
Clear button.
• To erase all entered digits: Press and hold the
Clear button.
• To enter an international number, press the
*
button twice (a + symbol will be displayed to represent the international dialling code - You
may also be able use your normal international prefix depending on
your SIM and location.). Then enter the country code (two or more
digits) and the remaining number (with the initial zero of the area code
removed).
• If you picked up the handset/pressed the Handsfree button first, the
phone will begin placing the call a short time after the last digit is
pressed. The time delay (4 seconds as standard) between entering the
last digit and placing the call is determined by the
Call delay setting
- see page 30.
You can also use a headset to make and receive calls - see page 35 details.
or
Page 11

9
To redial a previously called number
1 From the standby screen, press the
Redial button to display a list of previ-
ously dialled numbers.
2 Use the
or buttons to highlight the required number (or name) and
then press the Select button.
3 Either pick up the handset or press the
Handsfree button to place the call.
To make a call using your phonebook
1 From the standby screen, press the
Names button adjacent to the lower
left corner of the screen.
2 You can either:
• Press the
Select button to view the first entry within the phonebook.
or
• Press the numeric button that contains the first character of your re
quired contact (press the button repeatedly until the appropriate letter
is shown underlined on the screen). Then, press the Select button to
display the phonebook entries that begin with the chosen character.
3 Use the
or buttons to move up or down the list until the required
entry is highlighted and press the Select button.
4 Either pick up the handset or press the
Handsfree button to place the call.
To make a call using the calls register
1 From the standby screen, press the
Register button.
2 Use the
or buttons to highlight the required option: Missed
calls, Received calls or Dialled numbers.
3 Press the
Select button to display the chosen list.
4 Use the
or buttons to highlight the required number and press the
Select button.
5 Either pick up the handset or press the
Handsfree button to place the call.
To receive an incoming call
When a call is received, your phone will emit the currently selected ringtone.
Note: If the caller’s number has been declared by the network, it will be
shown on the display. If the number is stored within your phonebook, the
corresponding name of the contact will also be shown on the display.
• Either pick up the handset or press the
Handsfree button.
To end a call
• Either replace the handset or (if using the speaker phone), press the
Handsfree button.
continued
Page 12

10
To make a speed dial call
Your phone allows you to assign your five most valued contacts to special
buttons located to the left of the keypad. For details about how to store your
contacts, see page 19.
1 From the standby screen, press the required speed dial memory button.
2 Either pick up the handset or press the
Handsfree button to place the call.
Options during a call
• To adjust earpiece or speaker volume during a call: Use the
and
buttons. Note: Take care not to set the volume too high.
• To mute/un-mute the call: Press the
Mute button.
• To hold the current call: Press the
Menu button and then press the Select
button to choose the highlighted Hold option. To reconnect with the call,
repeat the procedure and choose the Unhold option.
• To hold the current call and begin a new call - please see below.
Managing more than one call
Your phone has the ability to handle more than one call at a time. You may
wish to speak to one person while another is on hold or possibly combine
two or more calls to create a conference.
In each case, the phone will display a summary of the currently active and
held calls.
Note: Support for call waiting and/or multi-party calling is required from your
network service provider for these functions.
To place a call on hold and make a new call
1 During a call, press the
Menu button to display the following:
2 Highlight the New call option and press the Select button.
3 Make the new call by dialling, by using the phonebook, the memory but
-
tons or the calls register, as necessary.
The sections that follow provide details about how you can return to the
held call or optionally join the calls to create a conference.
To end a call and return to another call
• Press the
Menu button, highlight the Remove a call option and press
the Select button. The display will show a list of calls, highlight the call
that you wish to end and press the Select button.
Page 13
11
Further information
• Adding or editing entries in the Phonebook - see page 14
• Sending and receiving SMS text messages - see page 20
• Changing ring tones - see page 28
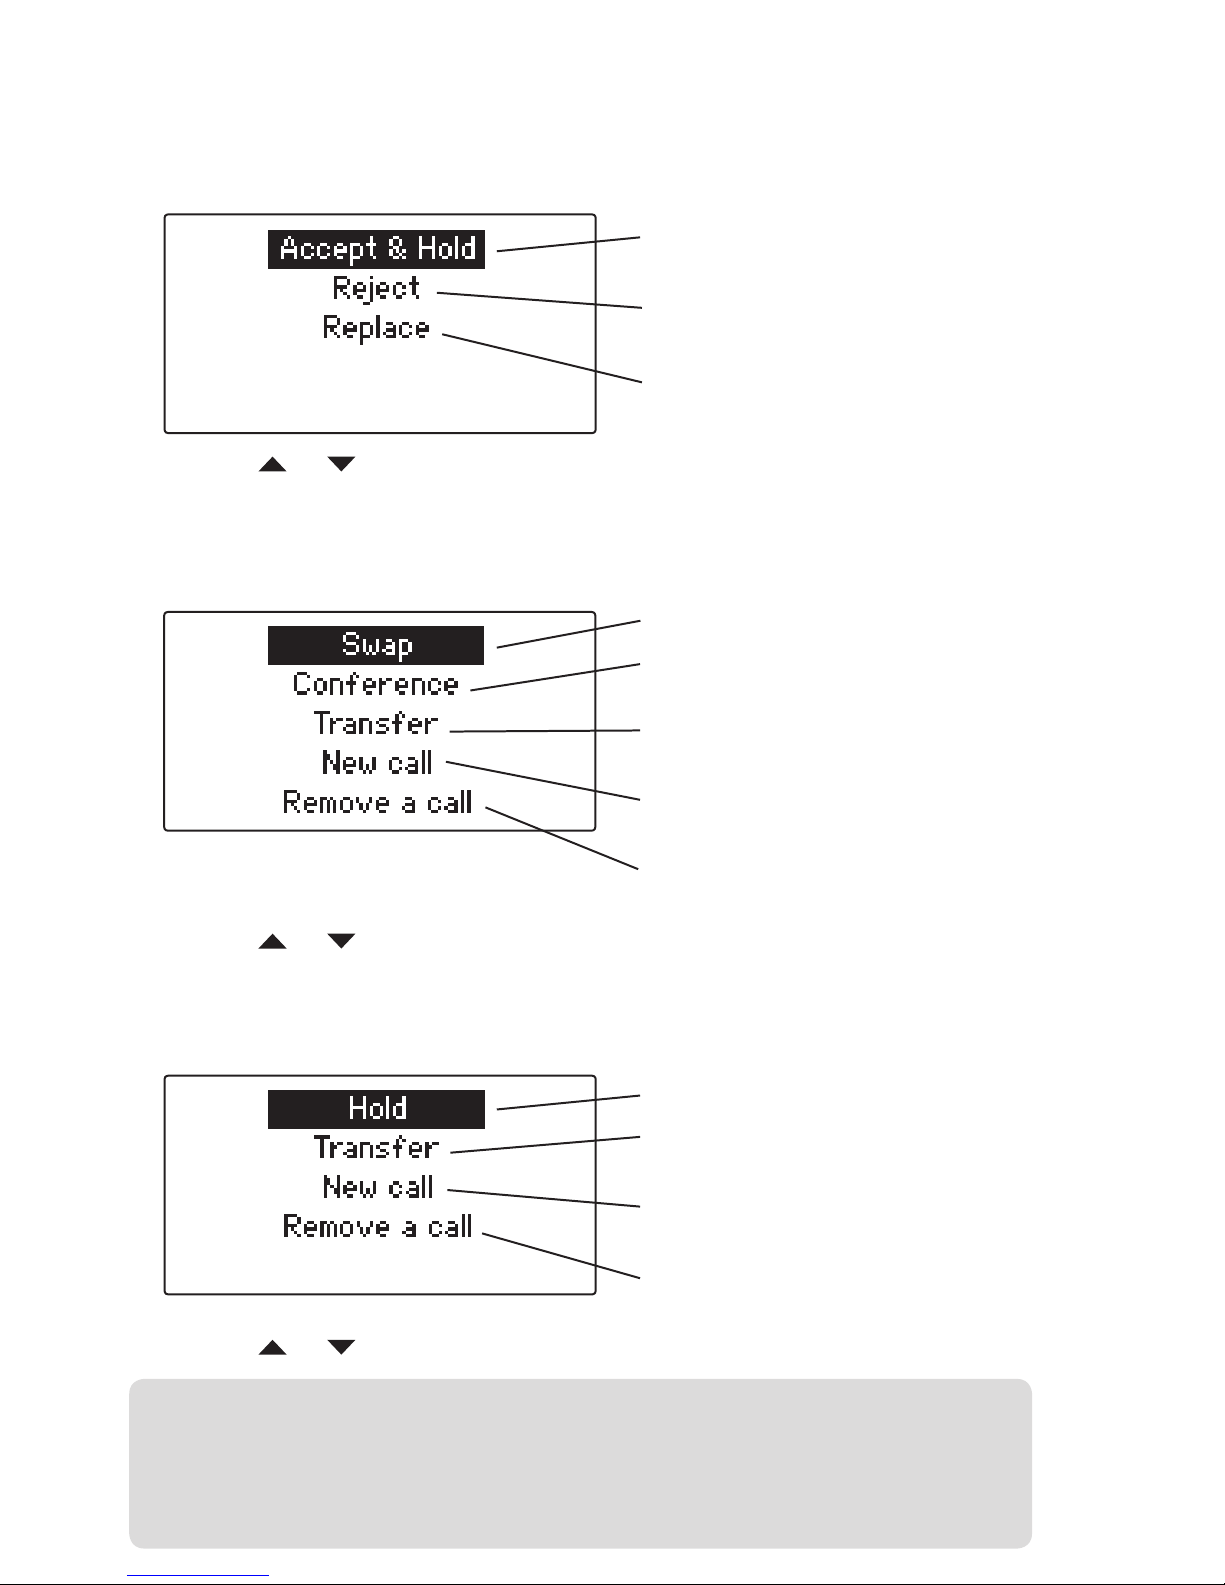
To respond to a new waiting call during an existing call
During a call, if a new call is received, a call waiting tone will be heard and
the display will show the name/number (if known) of the waiting call.
1 Press the
Menu button to display the following:
2 Use the
or buttons to highlight an option and press the Select button.
To change between calls or create/manage a conference
If you have an active call and a held call, your phone provides more options.
1 Press the
Menu button to display the following:
Hold the existing call and connect to
the waiting call
Reject the waiting call and return to
the existing call
End the existing call and replace it
with the waiting call
2 Use the or buttons to highlight an option and press the Select button.
When you have two or more active calls (i.e. a conference), the menu
options change slightly:
1 Press the
Menu button to display the following:
Swap the active and held calls
Makes the held call(s) active and
creates a conference call
Displays a list of existing calls and
allows you to select one to remove
Connects the active and held calls
and disconnects them from the phone
Places the active call(s) on hold and
allows a new call to be made
2 Use the or buttons to highlight an option and press the Select button.
Hold all active calls
Connects the active/held calls and
disconnects them from the phone
Places the active call(s) on hold and
allows a new call to be made
Displays a list of existing calls and
allows you to select one to remove
Page 14
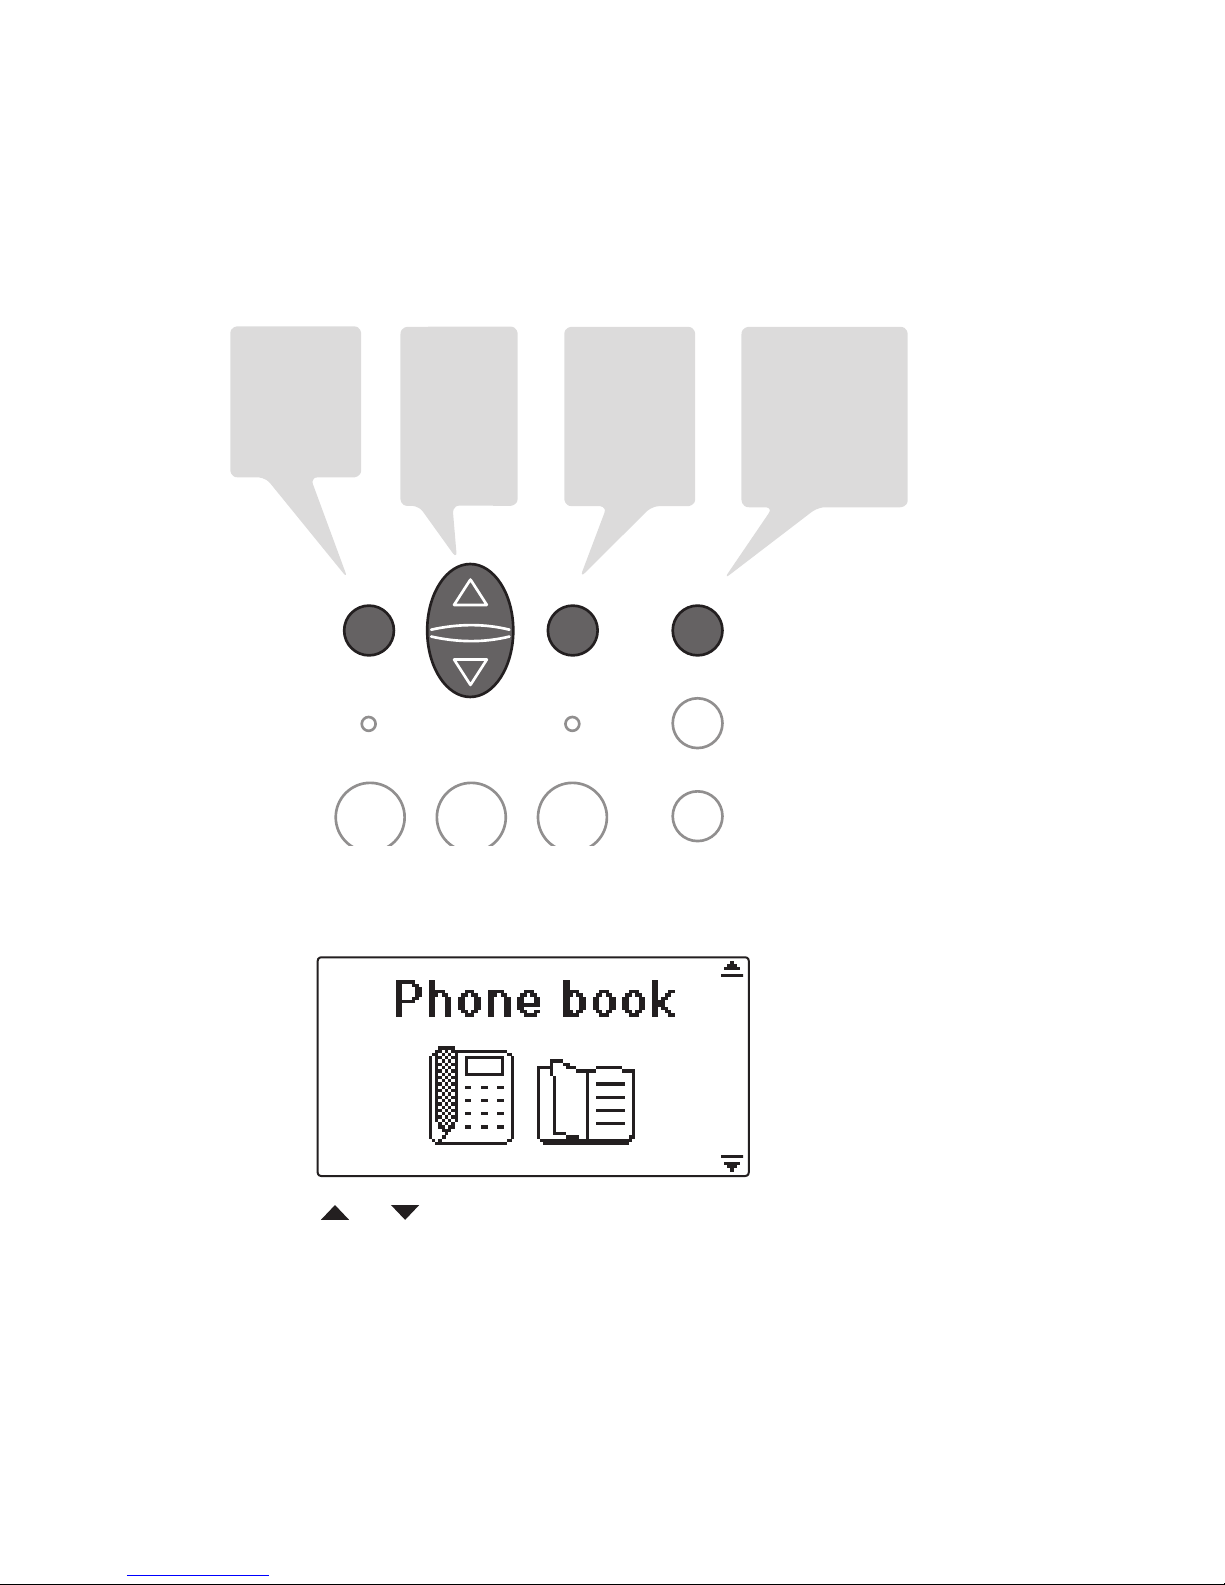
12
Menu options
Your phone includes a menu of options that allow you to access features
such as your phonebook and text messaging as well as the ability to customise phone operation to suit your requirements.
Use the buttons located directly below the display to control the menu:
Menu
Press to enter
(and exit
completely
from) the
menu.
Clear
Call
Select
Mailbox
Menu
SMS
Register
D
E
F
A
B
C
321
Select
Press to
choose the
currently
indicated
menu item.
Up/Down
Press
to move
between
menu
items.
Clear
Press to
exit from
the current
menu item.
To access the menu
1 From standby, press the
Menu button. You will see the first option:
2 Use the
or buttons to move up or down the list of options and then
press the Select button when the required option is highlighted.
Page 15

13
Menu options layout
Phonebook Search page 15
Add name page 16
Status page 17
Memory in use page 17
Utilities page 18
Messages Write message
page 21
Inbox page 22
Sent items page 21
Settings page 23
Call register Missed calls
page 24
Received calls page 24
Dialled numbers page 24
Show durations page 24
Clear page 25
Divert Divert all
page 26
Divert when busy page 26
Divert no answer page 26
Divert when off page 26
Cancel diverts page 27
Tones
page 28
Settings General
page 30
Call page 31
Security page 32
Date & time page 32
Restore page 32
Status
page 33
The pages that follow provide further information about each menu option.
Page 16
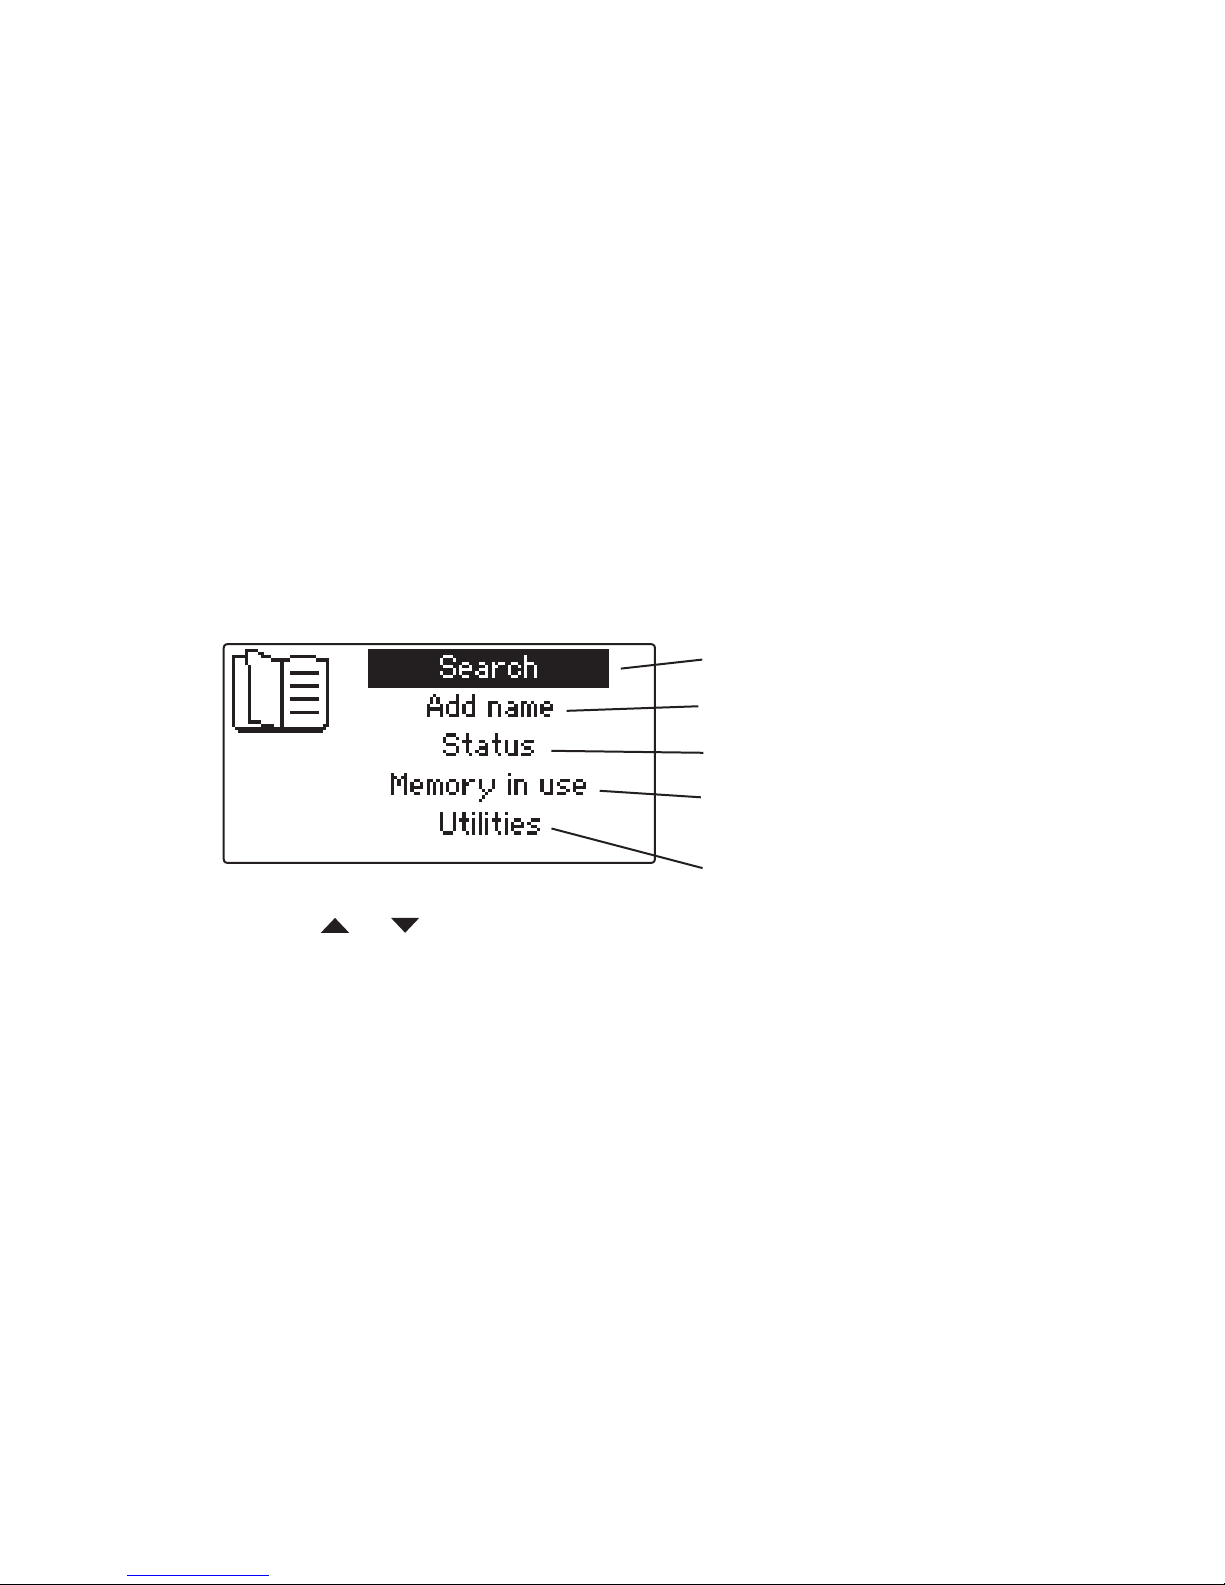
14
Phonebook
The phonebook allows you to store and use many contact numbers and
corresponding names. You can choose to store contacts within the in-built
memory of the phone (up to 250 contacts) or within the memory located on
your SIM card (cards vary in capacity). The advantage of the latter is that
your contacts can easily be moved between different phones. The phonebook allows you to quickly switch between the two storage areas and also
to copy contacts between the two storage areas.
To use your phonebook to make calls
• Please follow the instructions given on page 9 of this guide.
Managing your phonebook
To view phonebook options
1 From standby, press the
Menu button.
2 The Phonebook option is the first one, press the
Select button to choose
it. The display will show the list of phonebook sub-options:
3 Use the
or buttons to move the highlight bar up or down the list
of options and then press the Select button when the required option is
highlighted.
Find an existing entry
Add a new entry
Discover available memory space
Discover/change the memory space
being used for the phonebook
Copy or erase phonebook entries
Page 17
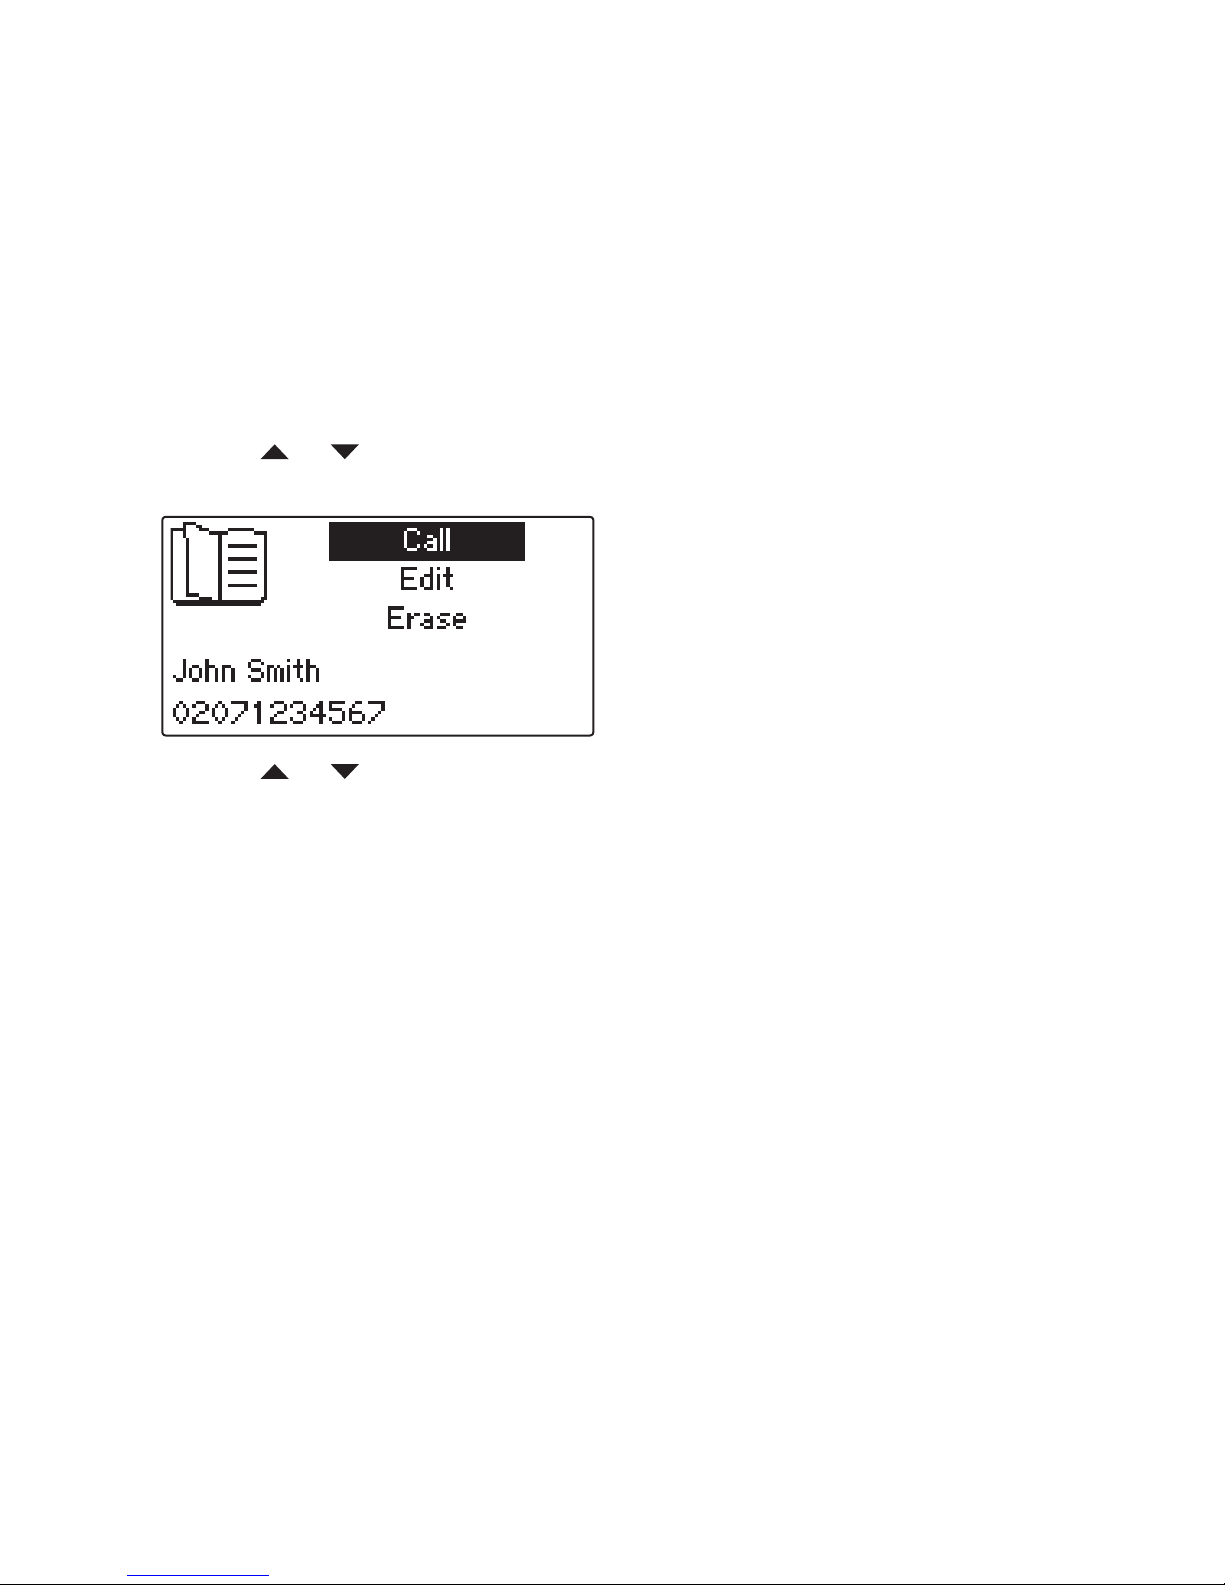
15
To view, edit or erase an entry
1 View the phonebook options: From standby, press the Menu button and
then press the Select button.
2 Ensure that the
Search option is highlighted and press the Select button.
3 Press the numeric button that contains the first character of your required
contact (press the button repeatedly until the appropriate letter is shown
on the screen).
4 Press the
Select button to display the phonebook entries that begin with
the chosen character.
5 Use the
or buttons to highlight the required entry and press the
Select button. A choice of three options will be given for the entry:
6 Use the
or buttons to highlight the required option and press the
Select button.
• If you choose
Call, the phone will dial the chosen entry in handsfree
mode.
• If you choose
Edit, the name of the entry will be displayed such that
you can change it.
Please follow the guidelines given in ‘When entering
or editing contacts’ on the next page.
When the contact name is complete, press the
Select button to save
your changes and to display the corresponding phone number. Edit
the phone number in a similar manner and press the Select button to
save altered entry.
• If you choose
Erase, the screen will ask you to Confirm erase.
Press the Select button to confirm or the Clear button to abort.
Page 18

16
To add a contact
Phonebook entries can either be stored within the in-built phone memory or
within the SIM card memory. It is possible to change between the two areas
and also to copy entries between them. If necessary, check which memory
area is currently in use and how many free locations remain before entering
a new contact entry - please see “To check memory status” opposite.
1 View the phonebook options: From standby, press the Menu button and
then press the Select button.
2 Use the
or buttons to highlight the Add name option and press the
Select button.
3 The display will first prompt you to enter a name for the new contact.
Please follow the guidelines ‘When entering or editing contacts’ shown
below.
4 When the contact name is complete, press the
Select button. The display
will now prompt you to enter a phone number for the new contact.
5 Enter the required phone number for your contact and then press the
Select button. If successful, the display will show: Saved as the new
contact is added to the Phonebook list held within the current memory
storage area.
When entering or editing contacts:
• Use the main numeric keys to enter text. Press a numeric key
repeatedly to produce the appropriate character (characters appear
in the order printed on the key).
• When the required character has been entered, wait for one second
before entering another character that is situated on the same key. A
new character on a different key can be entered immediately.
• To change between upper and lower case characters, press the
#
button.
• Remember that this is a mobile phone, you must enter the full phone
number, including area code, even if the contact is in your area.
• To enter a space, press the
0 button.
• To enter an international number, press the
*
button twice (a + symbol will be displayed to represent the international dialling code - you
do not need to enter the usual two zeroes). Then enter the country
code (two or three digits) and the remaining number (with the initial
zero of the area code removed).
• To erase a character: Press and release the
Clear button.
• To erase all characters: Press and hold the
Clear button.
Page 19
17
To check memory status
1 View the phonebook options: From standby, press the Menu button and
then press the Select button.
2 Use the
or buttons to highlight the Status option and press the
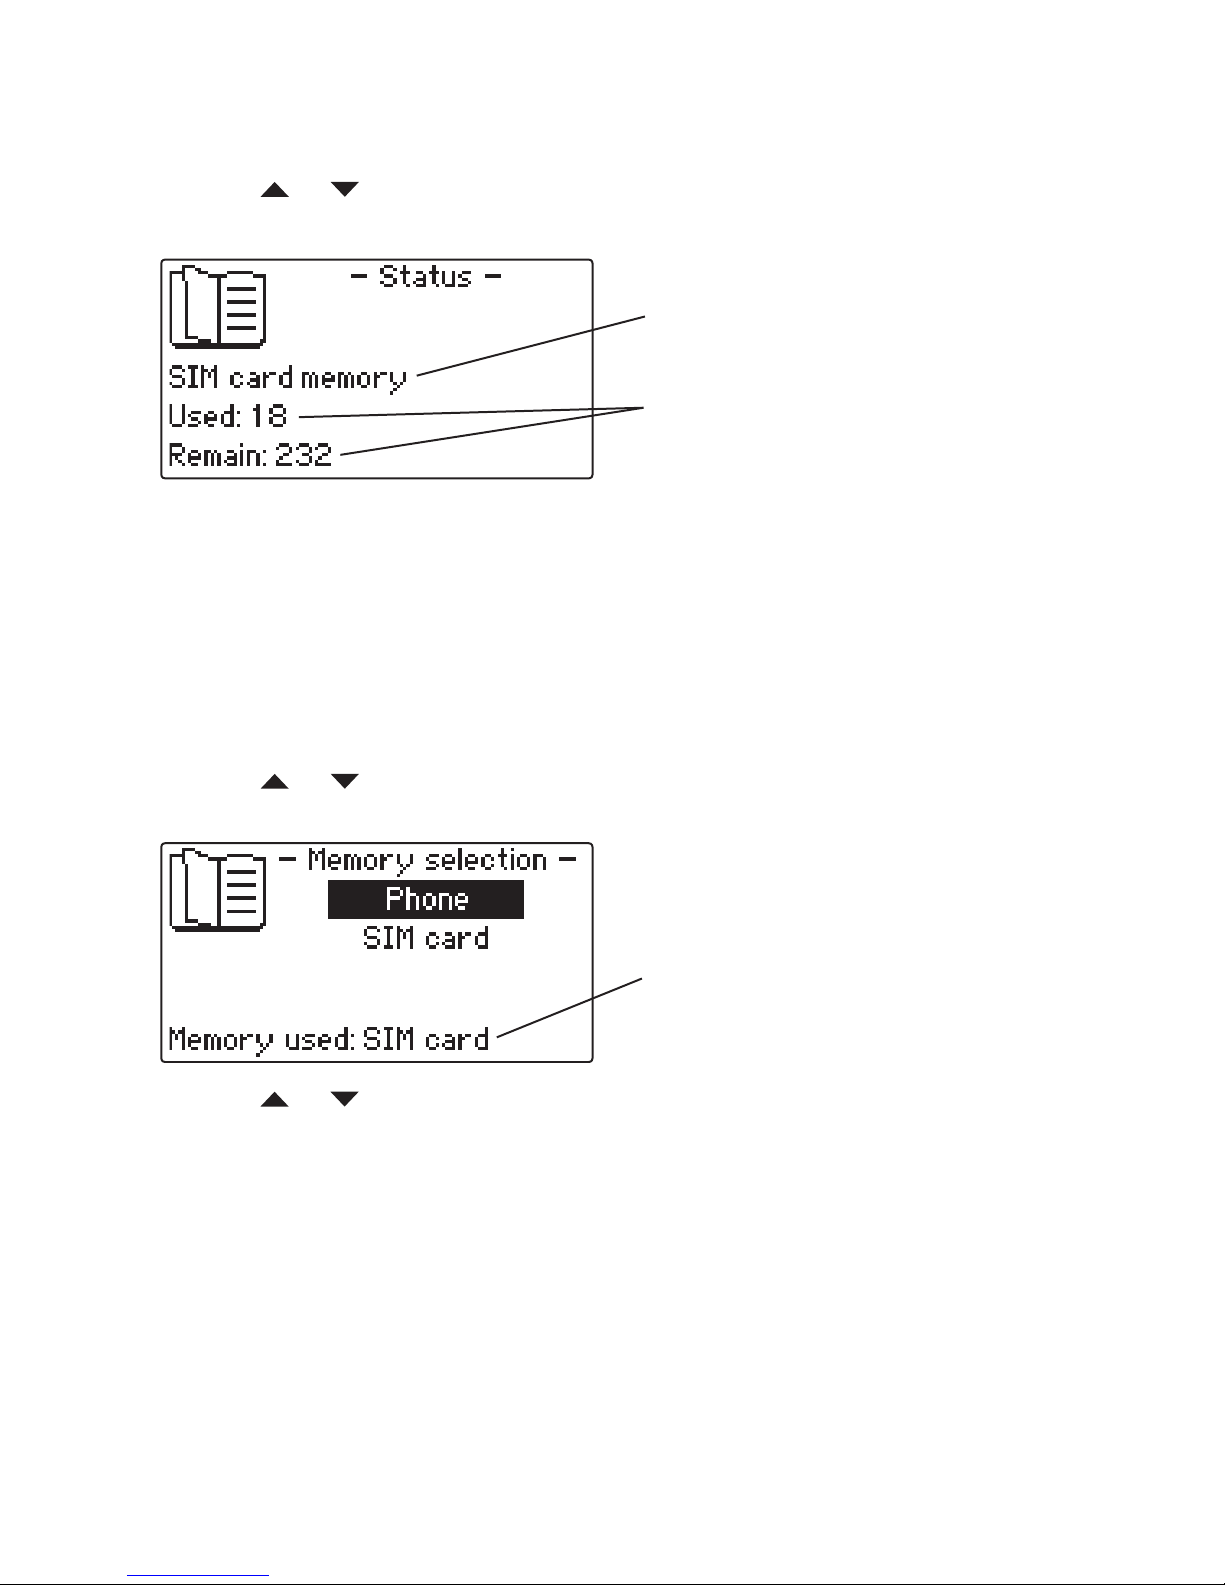
Select button. A display similar to the following will be shown:
3 Press the
Select button to return to the previous menu screen.
To change the phonebook memory space
Phonebook entries can either be stored within the in-built phone memory or
within the SIM card memory. This option allows you to change the currently
active memory area.
1 View the phonebook options: From standby, press the Menu button and
then press the Select button.
2 Use the
or buttons to highlight the Memory in use option and
press the Select button. A display similar to the following will be shown:
Indicates the currently active phonebook memory: Phone or SIM card
The number of contact entry spaces
used and remaining within the currently active memory
3 Use the or buttons to move the highlight to the required phonebook
memory location and press the Select button. The display will confirm
whether the switching operation was successful.
Indicates the currently active phonebook memory: Phone or SIM card
Page 20
18
To copy phonebook memory entries
This option allows you to copy all entries between the phone and SIM card
memory areas or alternatively, to erase all entries within a chosen memory
area.
1 View the phonebook options: From standby, press the Menu button and
then press the Select button.
2 Use the
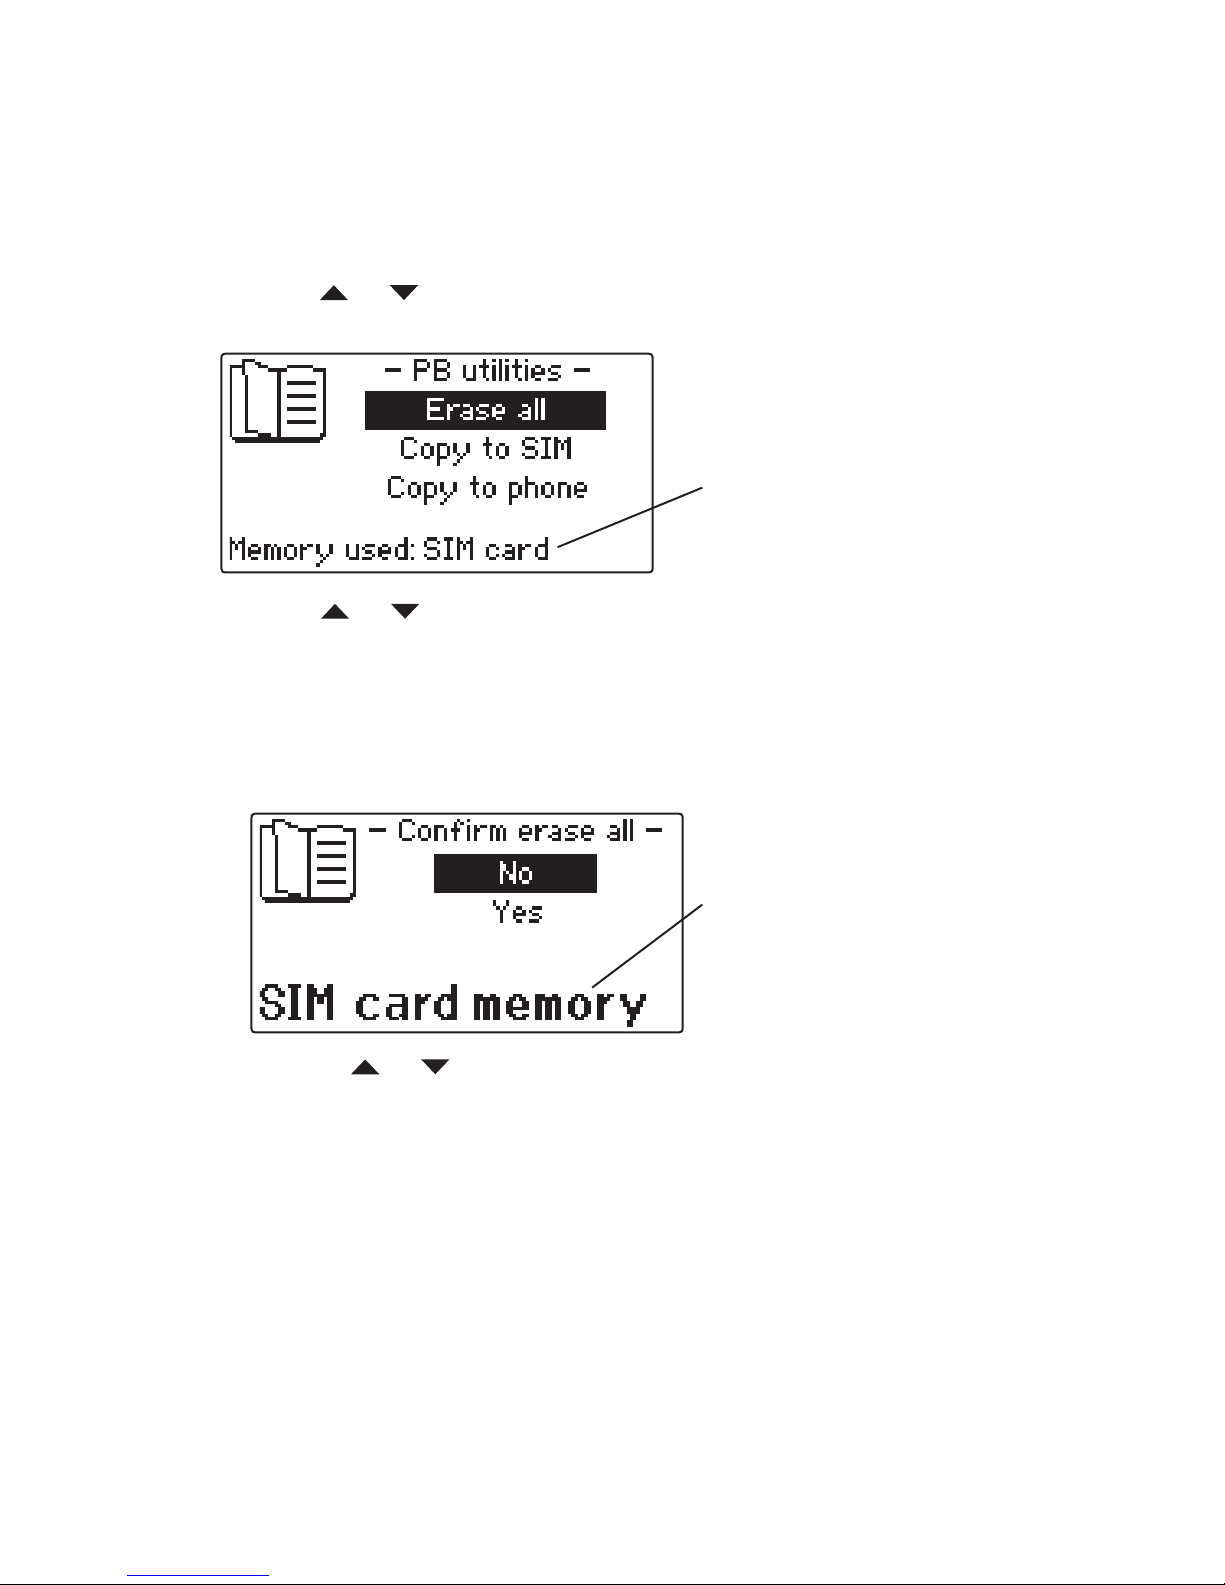
or buttons to highlight the Utilities option and press
the Select button. A display similar to the following will be shown:
3 Use the
or buttons to highlight the required option and press the
Select button.
• Erase all - the display will request confirmation of the erase action
on the memory area listed in the lower section of the screen.
IMPORTANT: Double check that you are erasing phonebook entries
from the correct memory area as the erase action is irreversible.
Indicates the currently active phonebook memory: Phone or SIM card
Use the or buttons to highlight the Yes option and press the
Select button, or No (or press the Clear button) to abort.
• Copy to SIM - copies all phonebook entries held within the phone
memory to the SIM card*.
• Copy to phone - copies all phonebook entries held within the SIM
card to the phone memory*.
* A copied entry with the same name/number as an existing entry in
the destination memory area will occupy a neighbouring location and
will not overwrite the original. The phone will check the destination
memory for sufficient vacant spaces before starting.
Note: Most SIM cards cannot store contact names as long as can be
stored within phone memory. When copying long contact names, any
characters exceeding the SIM card memory limit will be discarded,
leaving the name truncated.
Double check that the appropriate
memory area to be deleted is currently active
Page 21
19
Speed dial memory buttons
The phone features five buttons which allow instant access to
your most regularly used contacts.
To program the speed dial memory buttons
1 From standby, press the button that you wish to program.
The items shown on screen will depend on whether a
number is already associated with that button:
• If the button is vacant, you will see two options:
Phonebook and Create.
Choose
Phonebook to copy an existing contact from
your phonebook, or
Choose
Create to enter first a name and then a number
for the new contact.
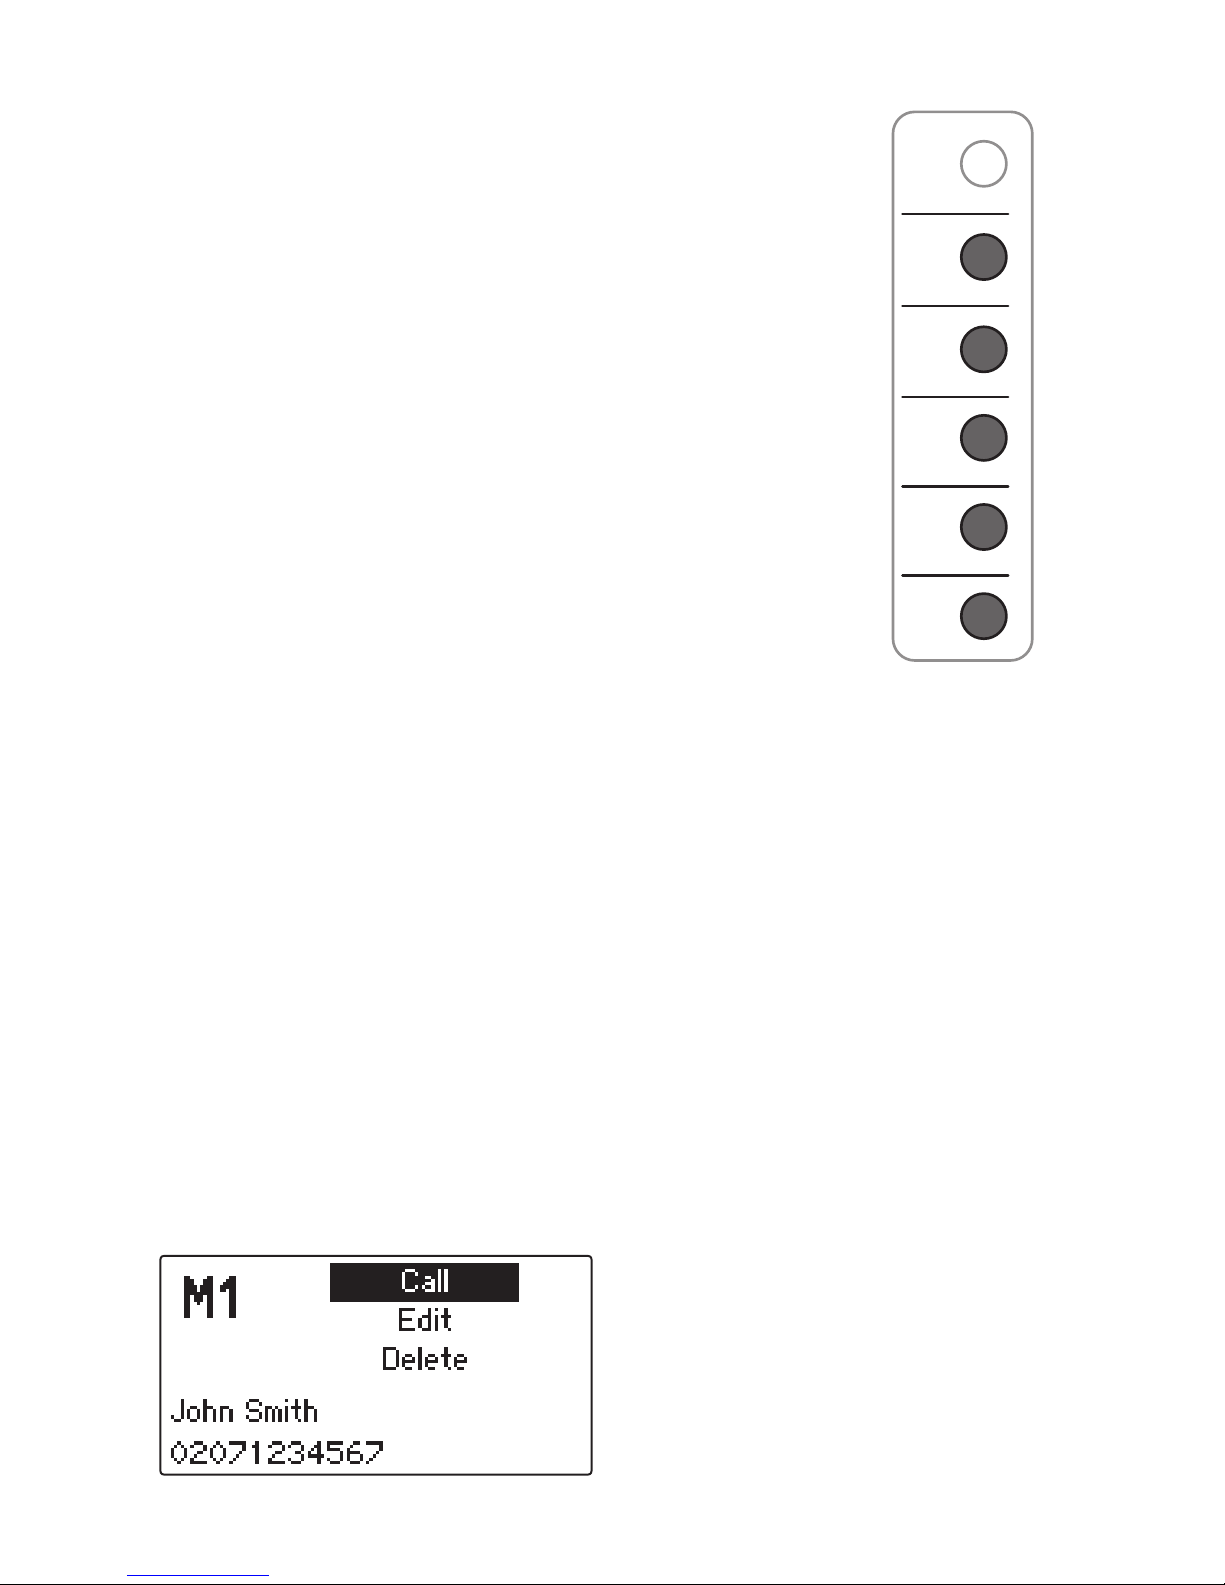
• If the button is occupied, you will see three options:
Call, Edit and Delete.
Choose
Edit to enter first a name and then a number
for the new contact.
2 If desired, carefully remove the transparent plastic surround sheet from
the memory buttons, write the names of your contacts on the paper insert
and then replace the plastic surround sheet.
To delete a speed dial memory
1 From standby, press the button that you wish to delete.
2 Highlight the
Delete option and press the Select button.
3 Press the
Select button once again to confirm.
To make a speed dial call
You can make a speed dial call in several ways:
• Press a memory button and press
Select to open the speaker phone,
• Press a memory button and pick up the handset, or
• Pick up the handset (or press the
Handsfree button) and then press a
memory button.
As the speed dial memory is chosen, you will see a display similar to the
following:
Clear
Names
Call
M1
M2
Select
Mailbox
Menu
SMS
Register
D
E
F
A
B
C
321
M3
M4
M5
Mute
M
N
O
J
K
L
G
H
I
654
Page 22
20
Messages
Your phone allows you to take full advantage of the text messaging services
available through mobile phone technology. You can create and receive text
messages up to a maximum of 160 characters per message.
Note: Text messaging requires network support - ensure that your service
provider contract allows SMS (Short Message Service).
Using messaging
You can use the messaging feature at any time when you are not engaged
within a call. When new messages are received, a ring tone will sound
and the character will be shown on the display. The Mailbox indicator,
located below the Select button, will also flash.
Note: You can change the melody and the volume of the incoming message
ring tone independently of the incoming call ring tone - see page 28.
To view message options
Either:
• Press the
SMS button,
or
• From standby, press the
Menu button, then press the button to display
the
Messages option and press the Select button.
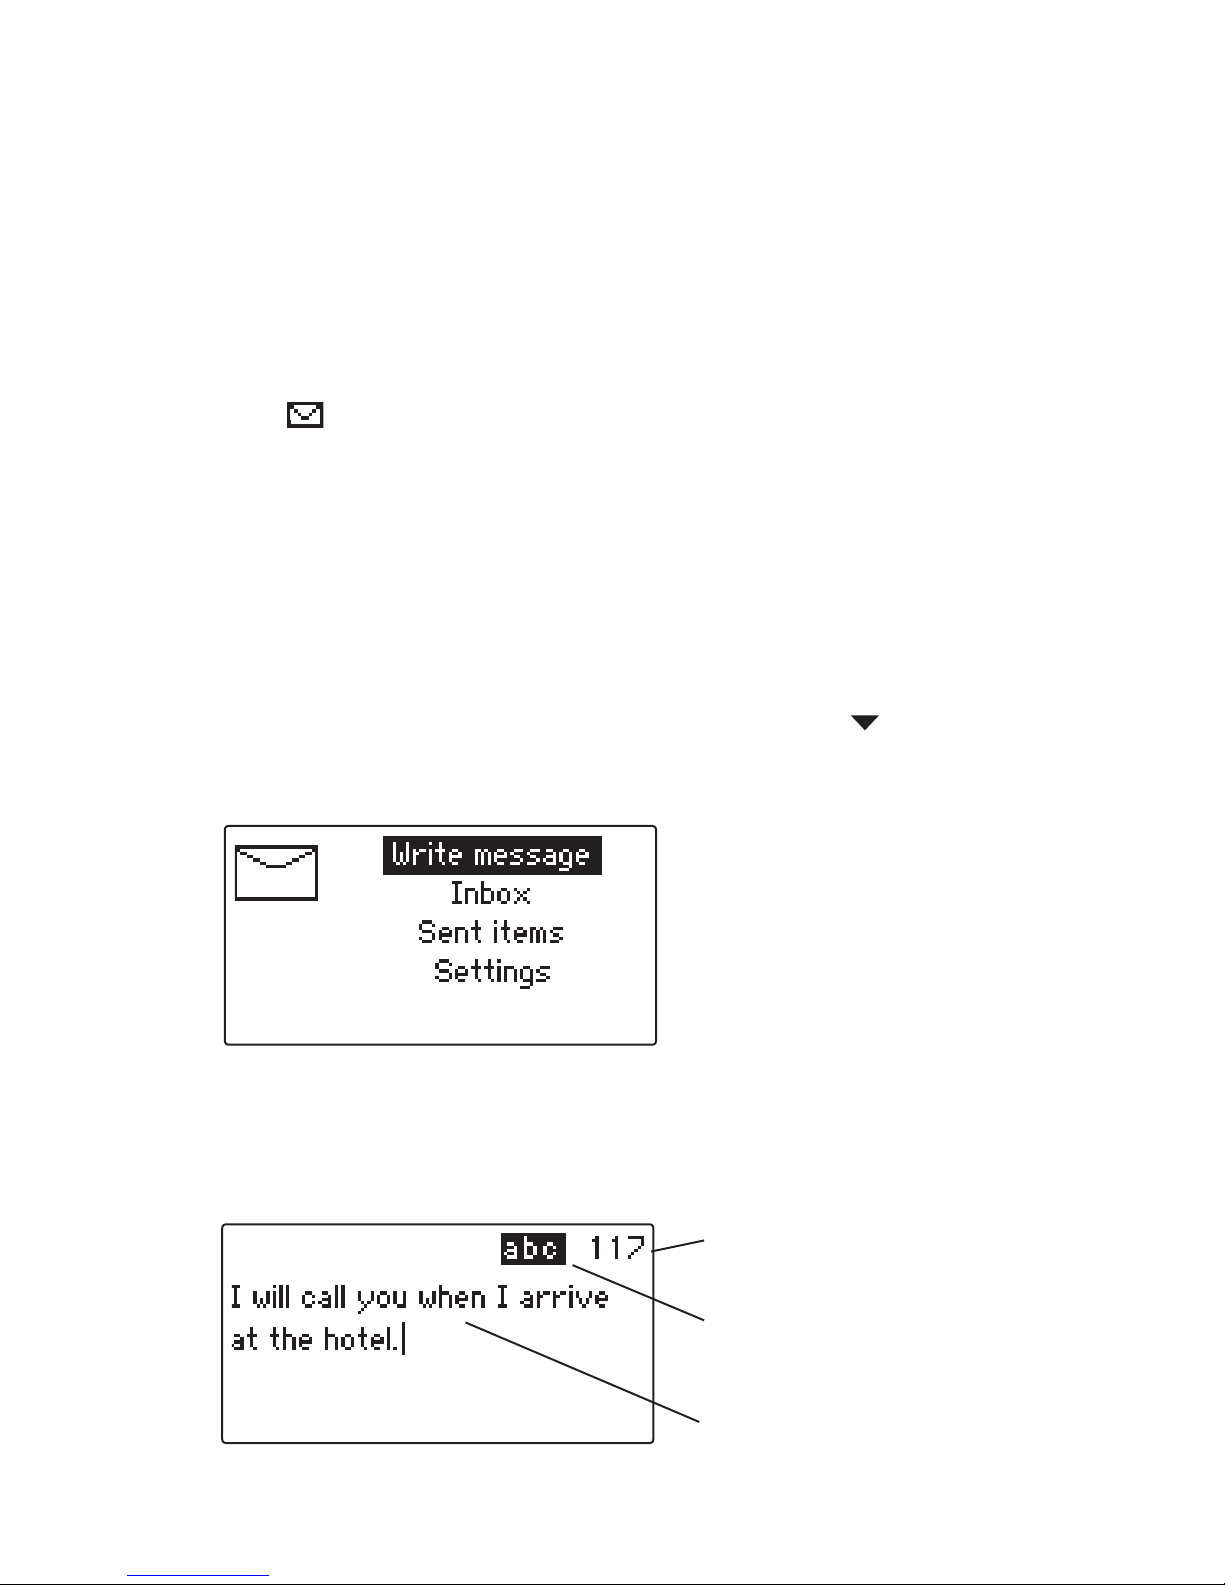
The display will show:
To write and send a new message
1 View the message options: From standby, press the SMS button.
2 Press the
Select button to choose the first option: Write message. The
text editor will be displayed:
Indicates how many more characters may be added to the message
Shows whether upper or lower case
characters are being used - press
the # button to change
Your message text
Page 23
21
3 Use the numeric buttons to enter your message. Please follow the guide-
lines ‘When writing or editing a message’ shown overleaf.
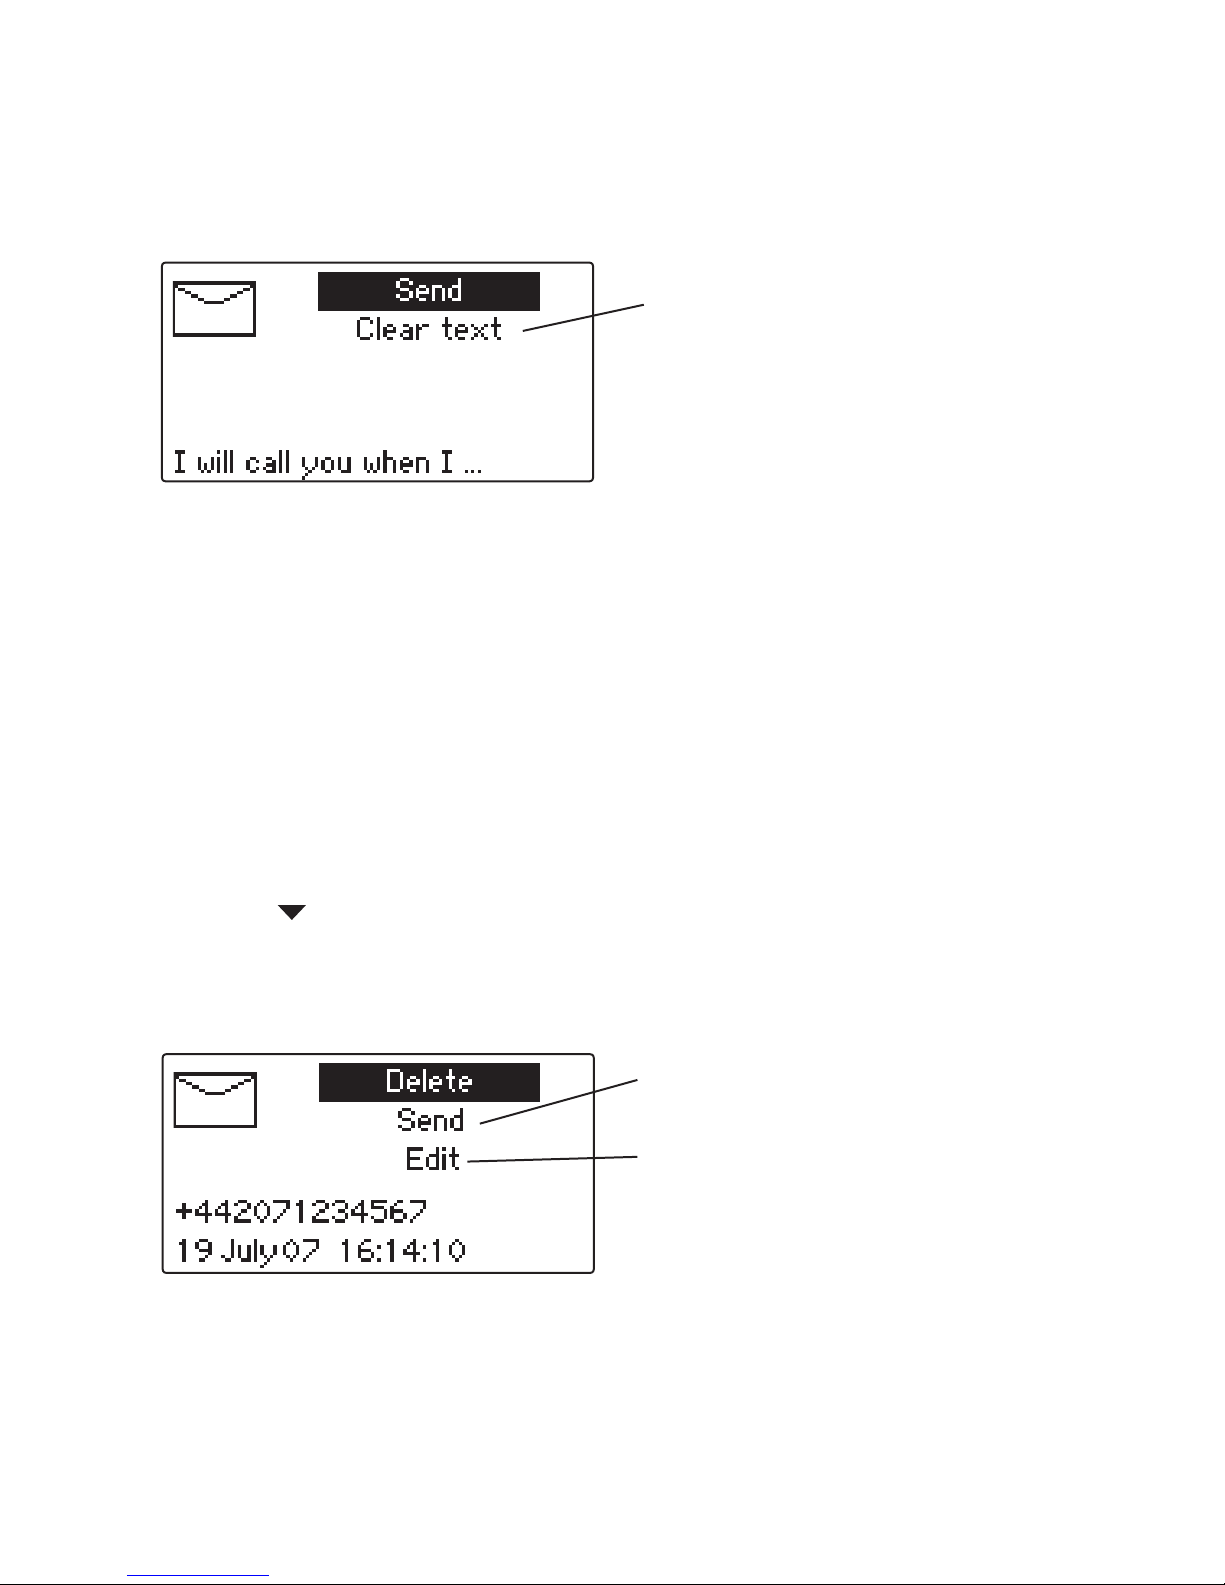
4 When your message is complete, press the
Select button to display the
following message options:
5 To send the message, ensure that the
Send option is highlighted and press
the Select button to display your options for addressing the message:
• Choose the
Phonebook option to select an existing contact and use
the Select button to confirm.
• Choose the
Enter number option to type the phone number of your
intended recipient. Once the number is entered, press the Select button twice to send.
6 The screen will indicate whether the message was successfully sent to
the network.
To delete/edit/re-send previously sent messages
1 View the message options: From standby, press the SMS button.
2 Press the
button to highlight the Sent items option and press the
Select button. A list of your previously sent messages will be displayed.
3 Highlight the required message and press the
Select button to display it.
4 Press the
Select button to view the available options:
Erases the whole message
5 If you have chosen the Send option, you will have two addressing options:
• Choose the
Phonebook option to select an existing contact and use
the Select button to confirm.
• Choose the
Enter number option to type the phone number of your
intended recipient, Then press the Select button twice to send.
6 The screen will indicate whether the message was successfully sent to
the network.
Choose to re-send the message
without editing it
Choose to edit the message before
sending. After you have edited the
message, press the Select button
and choose the Send option.
Page 24

22
To view new or old received messages
1 View the message options: From standby, press the SMS button.
2 Press the
button to highlight the Inbox option and press the Select
button. A list of received messages will be displayed.
• Unread messages are prefixed with
• Previously viewed messages are prefixed with
Note: If the sender is listed within the phonebook, their name will be
shown, otherwise a preview of the message will be displayed.
3 Use the
or buttons to highlight the required message and press the
Select button to view it.
4 Once viewed, either:
• Press the
Clear button to exit from the message, or
• Press the
Select button to view the message options, as described
opposite.
When creating or editing a message:
• Use the main numeric keys to enter text. Press a numeric key
repeatedly to produce the appropriate character (characters appear
in the order printed on the key).
• When the required character has been entered, wait for one second
before entering another character that is situated on the same key. A
new character on a different key can be entered immediately.
• To change between upper and lower case characters, press the
#
button.
• To enter a space, press the
0 button once.
• To begin a new line, press the
0 button twice.
• To erase a character: Press and release the
Clear button.
• To erase the whole message: Press the
Select button, choose the
Clear text option and press the Select button. Choose the Write
text option to re-enter the message editor.
• Press the SMS button to return to the previous options menu.
• Press the Menu button to return to the standby screen.
Page 25
23
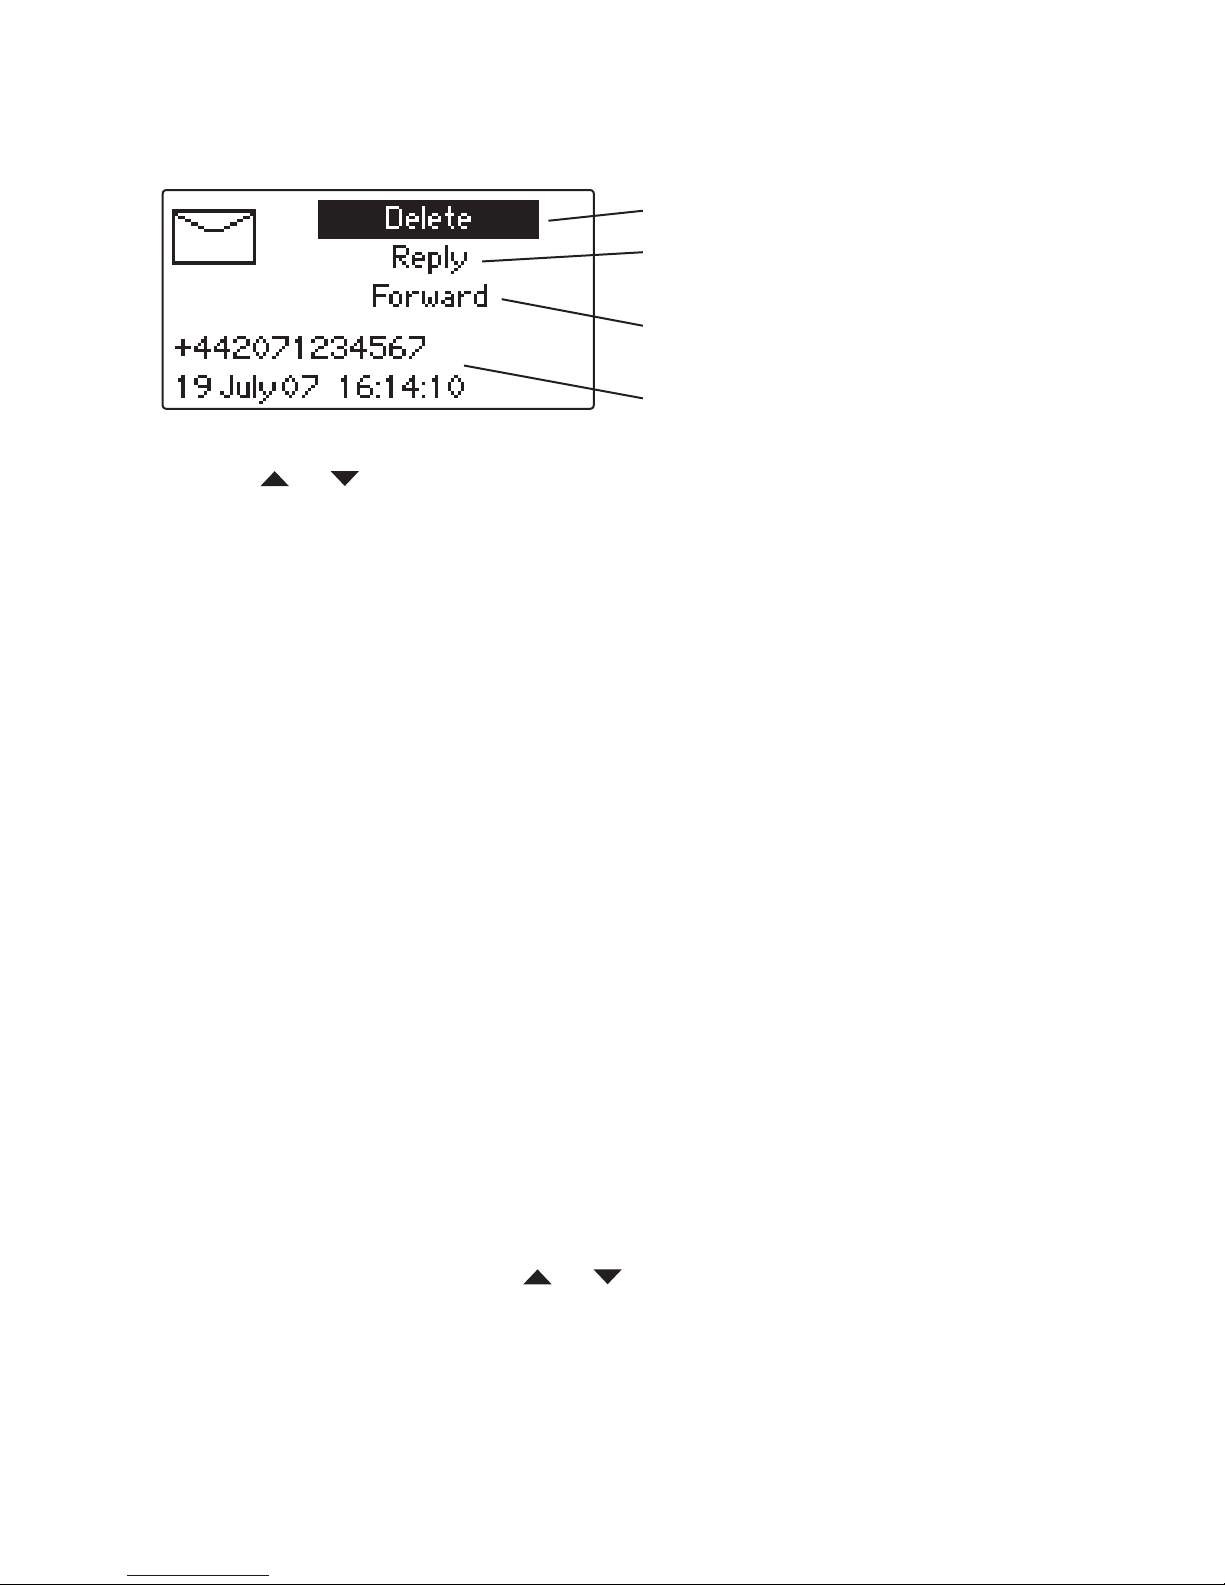
To delete, reply to or forward a message
1 View the received message as described previously.
2 Press the
Select button to view the message options:
3 Use the
or buttons to highlight the required option and press the
Select button.
• Choose the
Delete option to erase the message and use the Select
button to confirm.
• Choose the
Reply option to contact the sender. You will be offered two
options: New text or Edit text. The former option provides a blank
message editing screen, whereas the latter option displays the original
message for you to edit or append. Please follow the guidelines ‘When
writing or editing a message’ shown on the previous page.
When complete, press the
Select button and then press the Select
button again to confirm transmission to the original sender’s phone
number.
• Choose the
Forward option to send the message to another recipient.
You will be offered two options:
Phonebook or Enter number. Use
the former to select an existing contact from your phonebook or the
latter to enter a new phone number.
To view/alter the service centre number
Your phone uses your service provider’s message service centre in order
to retrieve incoming text messages. Usually, the service centre number is
pre-configured on your SIM card and requires no alteration. However, your
phone provides access to the number should it need to be altered.
Note: Do not alter the service centre number unless specifically requested
to do so by your service provider.
1 Press the
SMS button, use the or buttons to highlight the Set-
tings option and press the Select button.
2 Press the
Select button to display the current SMS service centre number.
3 Use the
Clear button to erase digits as required and then enter the new
number.
• To exit without retaining any changes, press the
Menu button.
4 When complete, press the
Select button to save and exit.
Choose to send a reply to the
sender
Choose to send the received
message to another recipient
Choose to erase the message
Phone number/name of sender
and date/time of receipt
Page 26
24
Call register
The call register holds records of all recent incoming and outgoing calls.
Using the list you can quickly place a call to a recent number or add a new
contact to your phonebook. Note: Incoming calls for which the number is
unattainable (e.g. withheld or unavailable numbers, etc.) will not be listed
within the register.
To view the call register
Either:
• Press the
Register button,
or
• From standby, press the
Menu button, then press the button to display
the Call register option and press the Select button.
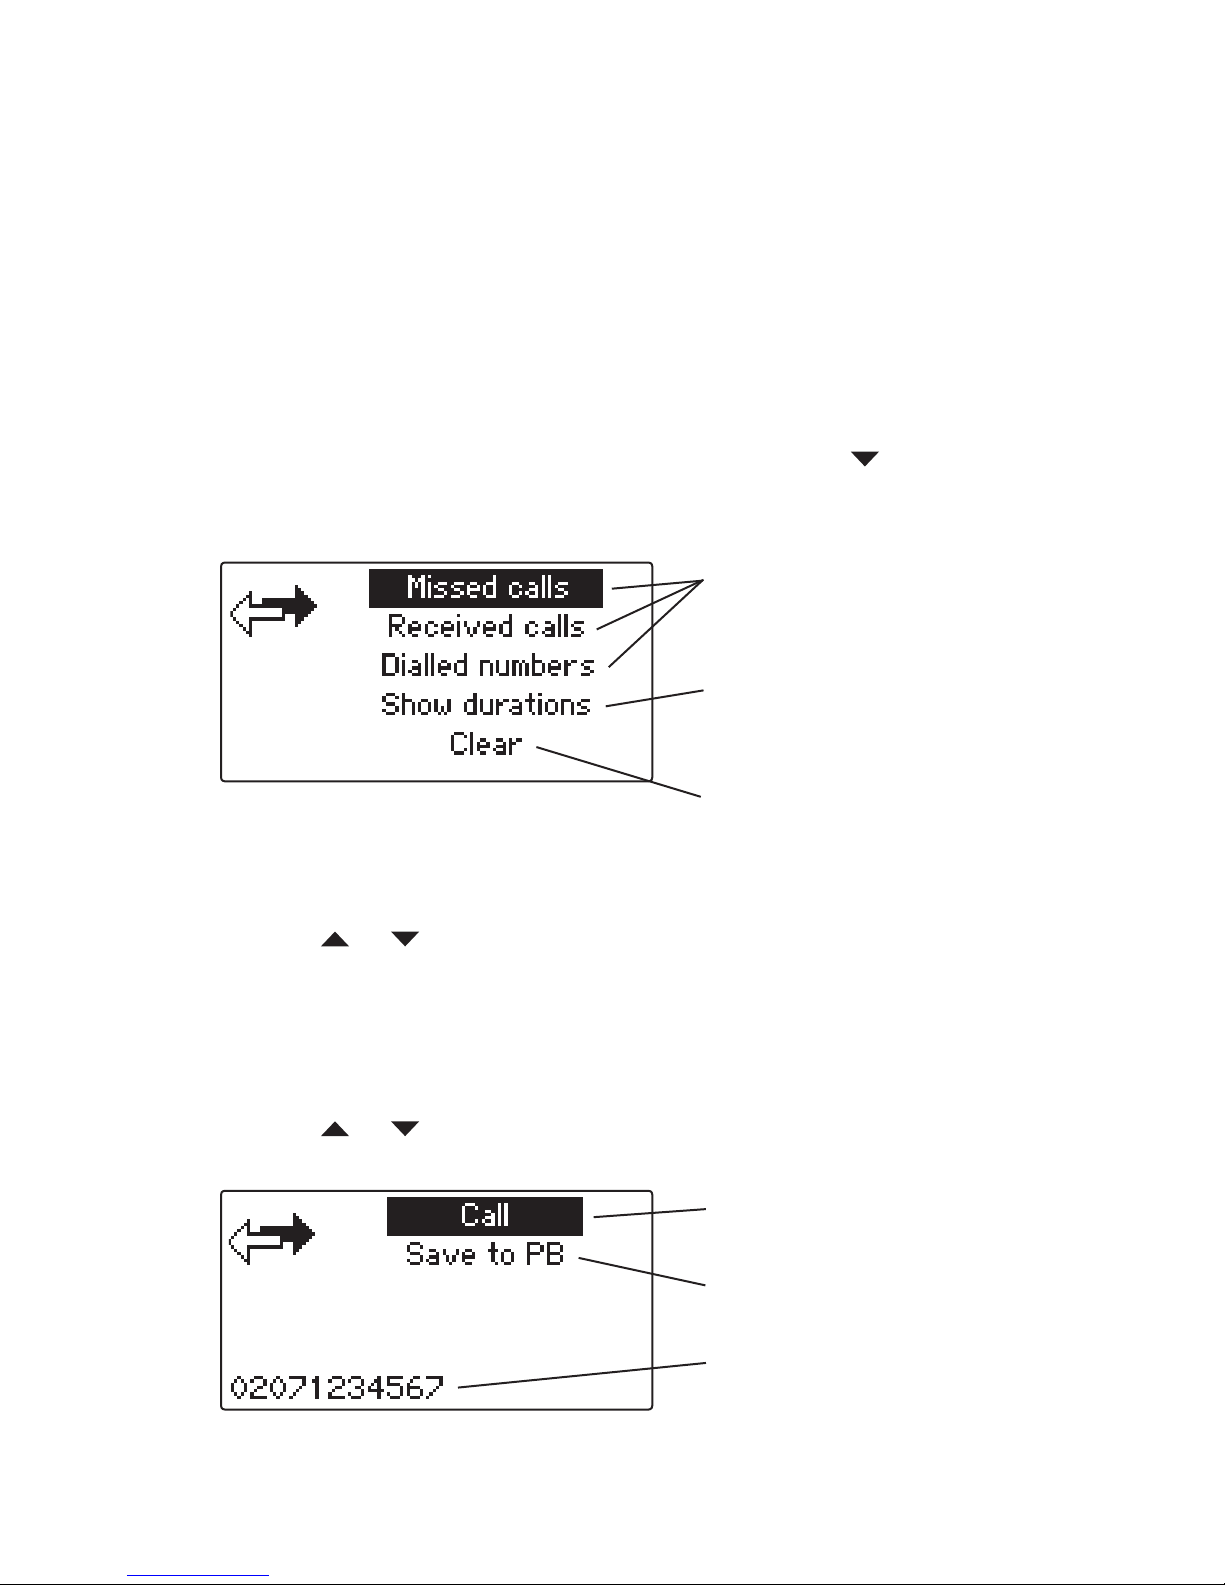
The display will show:
To use a number from the call register (save to phonebook)
1 View the call register sub menu: From standby, press the Register button.
2 Use the
or buttons to highlight the required option and press the
Select button:
• Missed calls - Lists all incoming calls that were not answered.
• Received calls - Lists all incoming calls that were answered.
• Dialled numbers - Lists all outgoing calls that have been made.
3 Use the
or buttons to highlight the required phone number and
press the Select button. The display will show:
Choose to clear any of the call lists
Choose to show the duration of the
last dialled call and the total of all
calls since the last erase action
Choose to view the missed calls,
received calls or dialled numbers
lists
Choose to place a call to the
number
Choose to save the number within
the phonebook
The selected phone number
Page 27
25
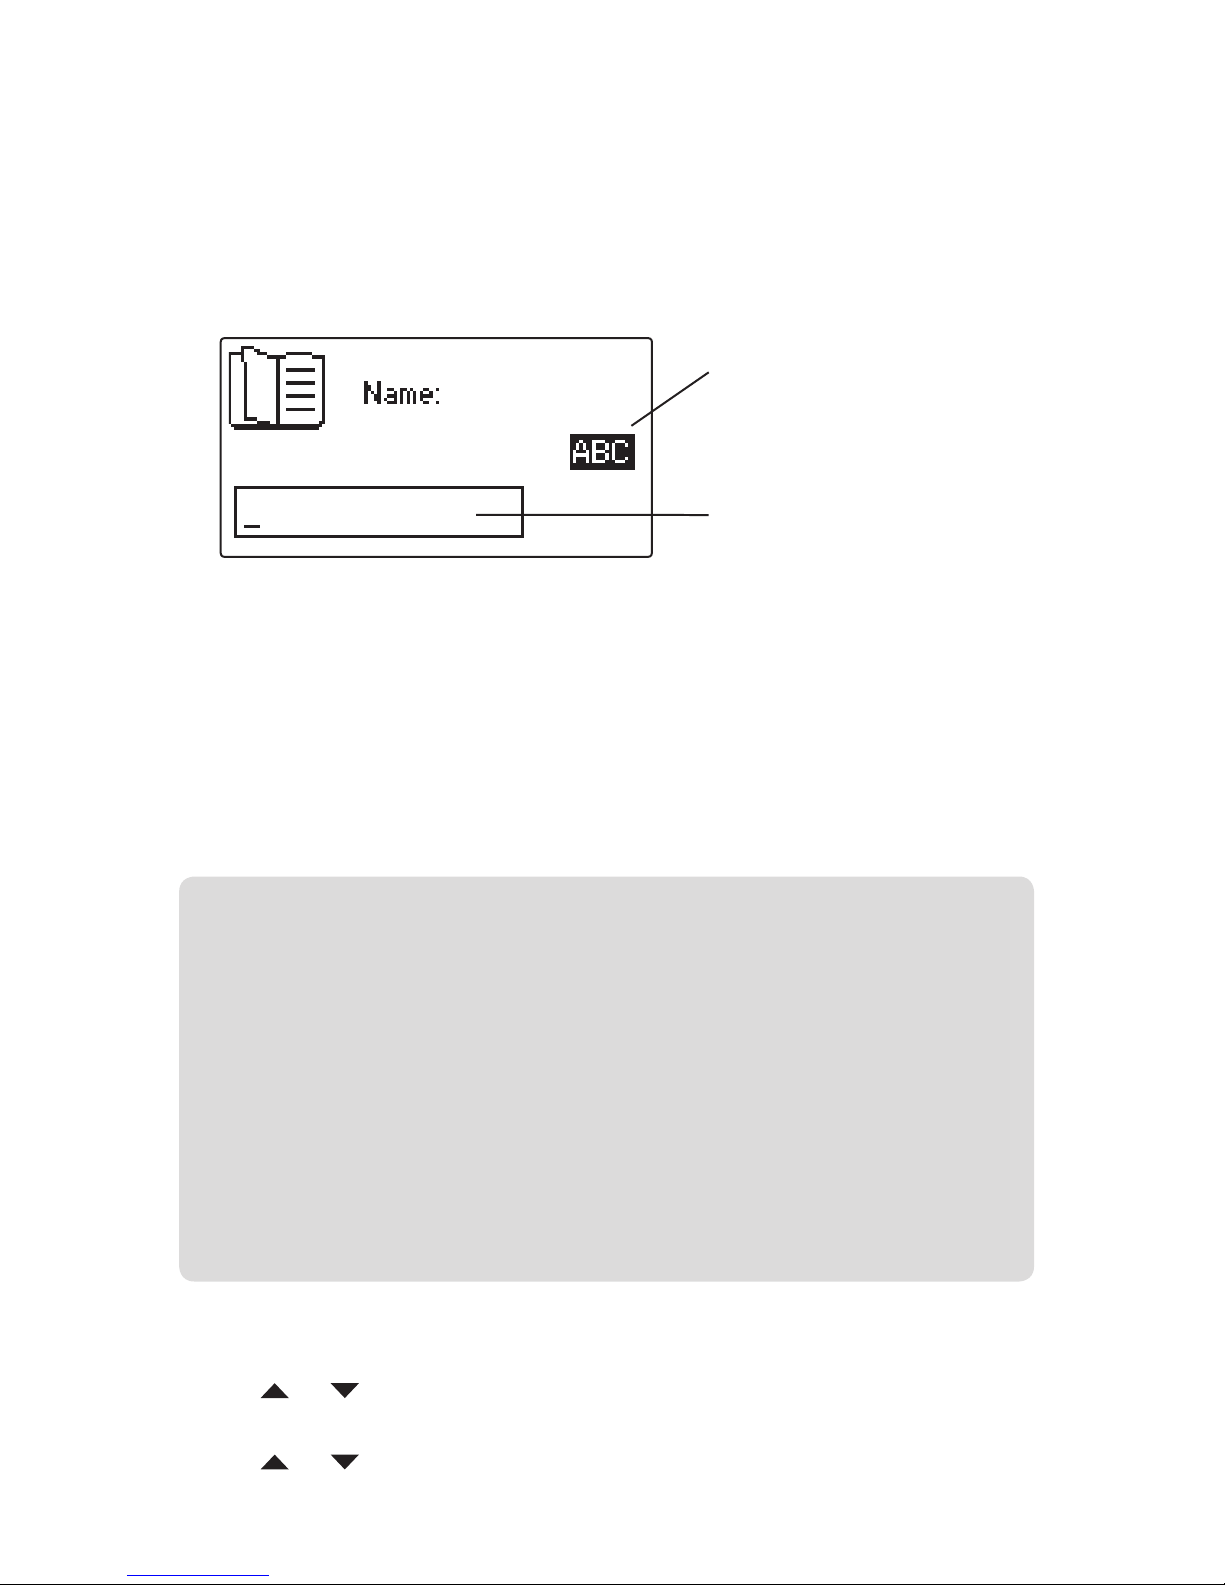
When entering a name:
• Use the main numeric keys to enter text. Press a numeric key re
peatedly to produce the appropriate character (characters appear
in the order printed on the key).
• When the required character has been entered, wait for one second
before entering another character that is situated on the same key.
A new character on a different key can be entered immediately.
• To change between upper and lower case characters, press the
#
button.
• To enter a space, press the
0 button.
• To erase a character: Press and release the
Clear button.
4 You can now, either:
• Choose the
Call option to dial the number immediately, or
• Choose the
Save to PB option to create a new contact within your
phonebook:
a) Highlight the
Save to PB option and press the Select button. The
display will prompt you to enter a name:
b) Use the numeric buttons to enter a name for the contact. Please fol
-
low the guidelines ‘When entering a name’ shown below.
c) Press the Select button to save the name. The display will now
provide the opportunity to edit the phone number that you copied
from the call register. If necessary, use the
Clear button and the
numeric buttons to change the number. Press the Select button to
save the new phonebook entry. Note: The new contact will be saved
to whichever memory is currently being used by the phonebook:
Phone memory or SIM card memory.
Shows whether upper or
lower case characters are
being used - press the #
button to change
Enter the contact name here
To clear the a calls list
1 View the call register sub menu: From standby, press the Register button.
2 Use the
or buttons to highlight the Clear option and press the
Select button.
3 Use the
or buttons to highlight the required list-type and press the
Select button. The screen will ask you to confirm the erase procedure.
4 Press the
Select button to confirm.
Page 28
26
Divert
The divert function allows you to determine the conditions upon which
incoming calls will be diverted to other numbers (either another phone or a
voice mail box) when you are unavailable. You can set the same or different
numbers for each call divert option.
Note: This function is dependent upon support from your service provider.
To set or change divert options
1 From standby, press the
Menu button, then press the button to display
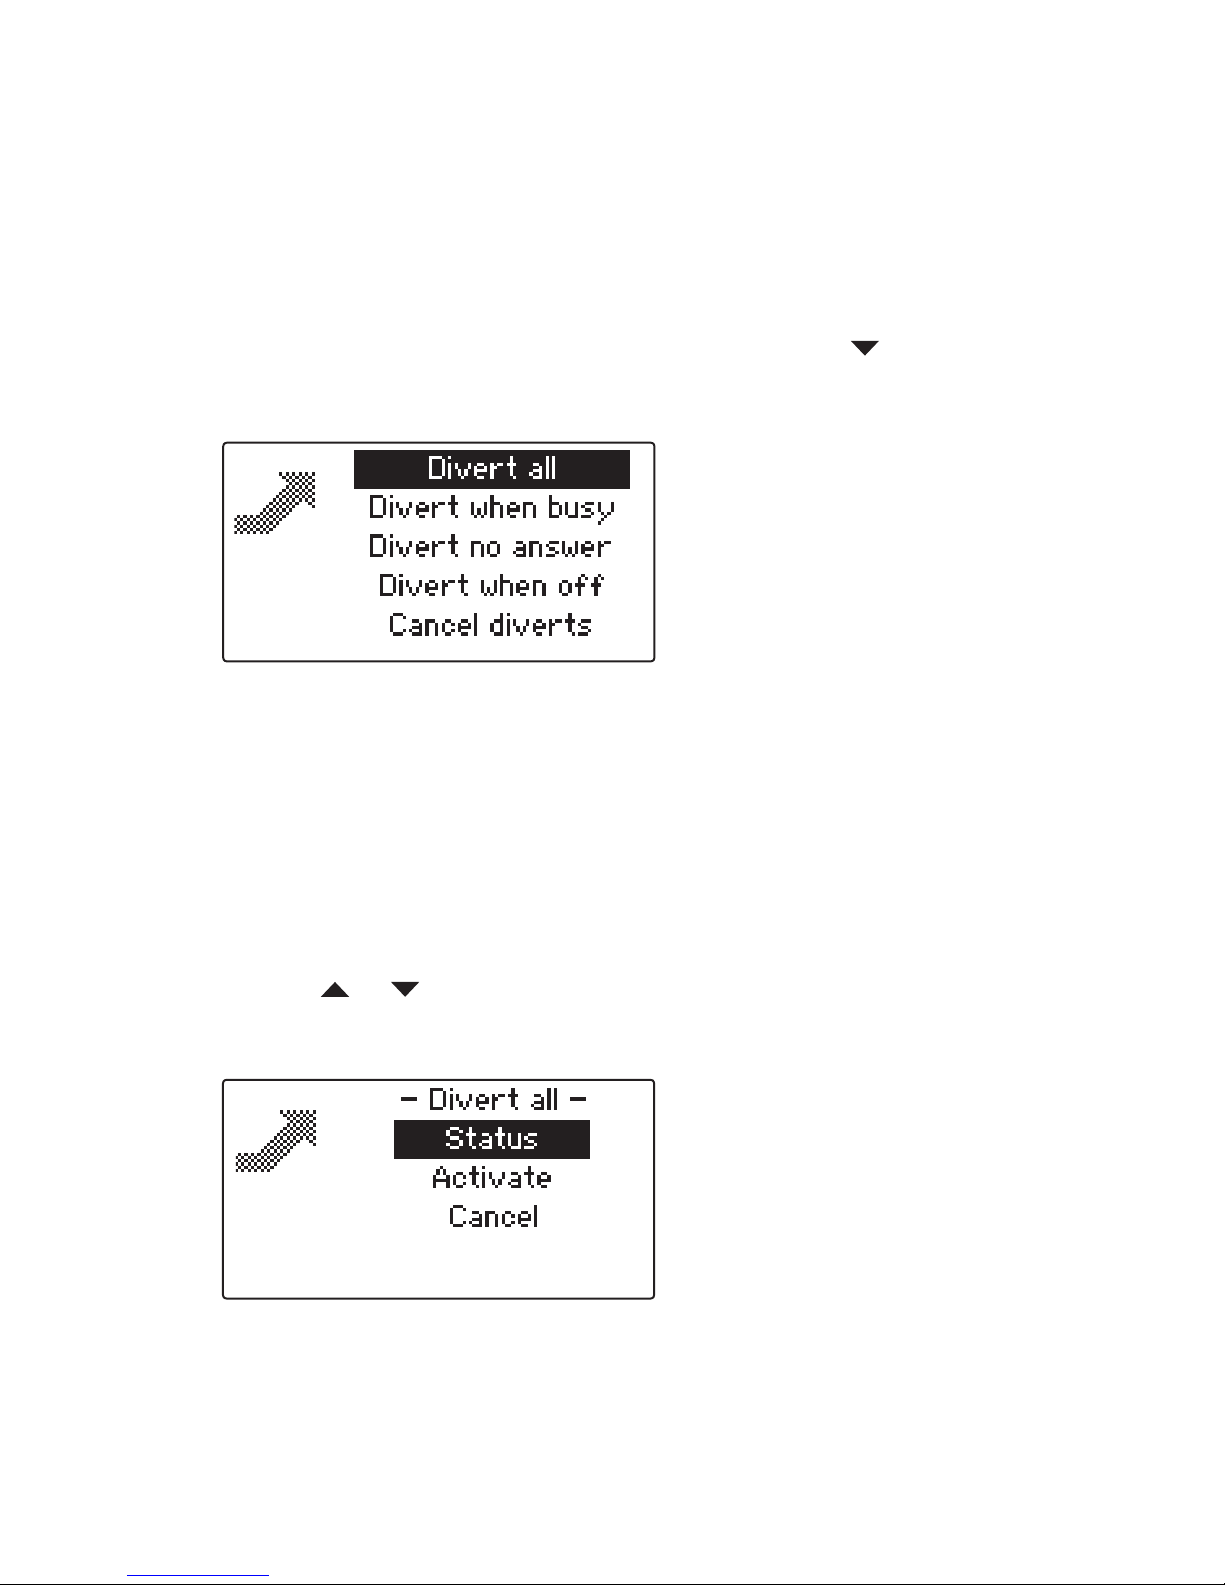
the Divert option and press the Select button. The range of divert
options will be displayed:
• Divert all - Diverts all incoming calls to the specified number.
• Divert when busy - Diverts incoming calls only when your phone is
already engaged in a call.
• Divert no answer - Diverts incoming calls if you do not answer your
phone.
• Divert when off - Diverts incoming calls if your phone is switched
off or cannot be located within the mobile phone network.
• Cancel diverts - Removes all call divert settings.
2 Use the
or buttons to highlight the required option and press the
Select button. For the top four options, the response will be similar. The
display will provide the following options:
• Status - Choose this option to send a query to your service provider
to determine the current divert settings. A response is usually returned
within a few seconds.
• Activate - Choose this option to enable the selected divert scenario.
• Cancel - Choose this option to cancel the selected divert scenario.
Page 29

27
3 When activating a divert: Highlight the Activate option and press the
Select button.
4 You now need to determine where you would like to divert the calls. You
will be presented with two options:
• To voicemail - Choose this option to use your standard voicemail
number.
• To number - Choose this option to divert calls to another phone
number.
5 When diverting to another phone number: Highlight the To number op-
tion and press the Select button. You will be presented with another two
options:
• Phonebook - Choose this option to divert calls to a number held within
your phonebook.
• Enter number - Choose this option to enter a new phone number for
the divert process.
6 Once you have entered or selected your divert number, press the Select
button to register the changes with your service provider. A confirmation
(or error) message will be received within seconds.
To cancel diverts
Divert options can be arranged either individually or collectively to cover
differing instances of your unavailability. Similarly, you can cancel scenarios
individually or collectively to suit your requirements.
1 From standby, press the
Menu button, then press the button to display
the Divert option and press the Select button.
2 You can cancel diverts in two ways:
• Individually - Highlight the divert option that you wish to cancel and
press the Select button. Next, highlight the Cancel option for that
divert and press the Select button. The cancel request will be sent to
your service provider and a response will be received within seconds.
• Collectively - Highlight the Cancel diverts option and press the Se-
lect button. The request to cancel all diverts will be sent to your service
provider and a response will be received within seconds.
Page 30
28
Tones
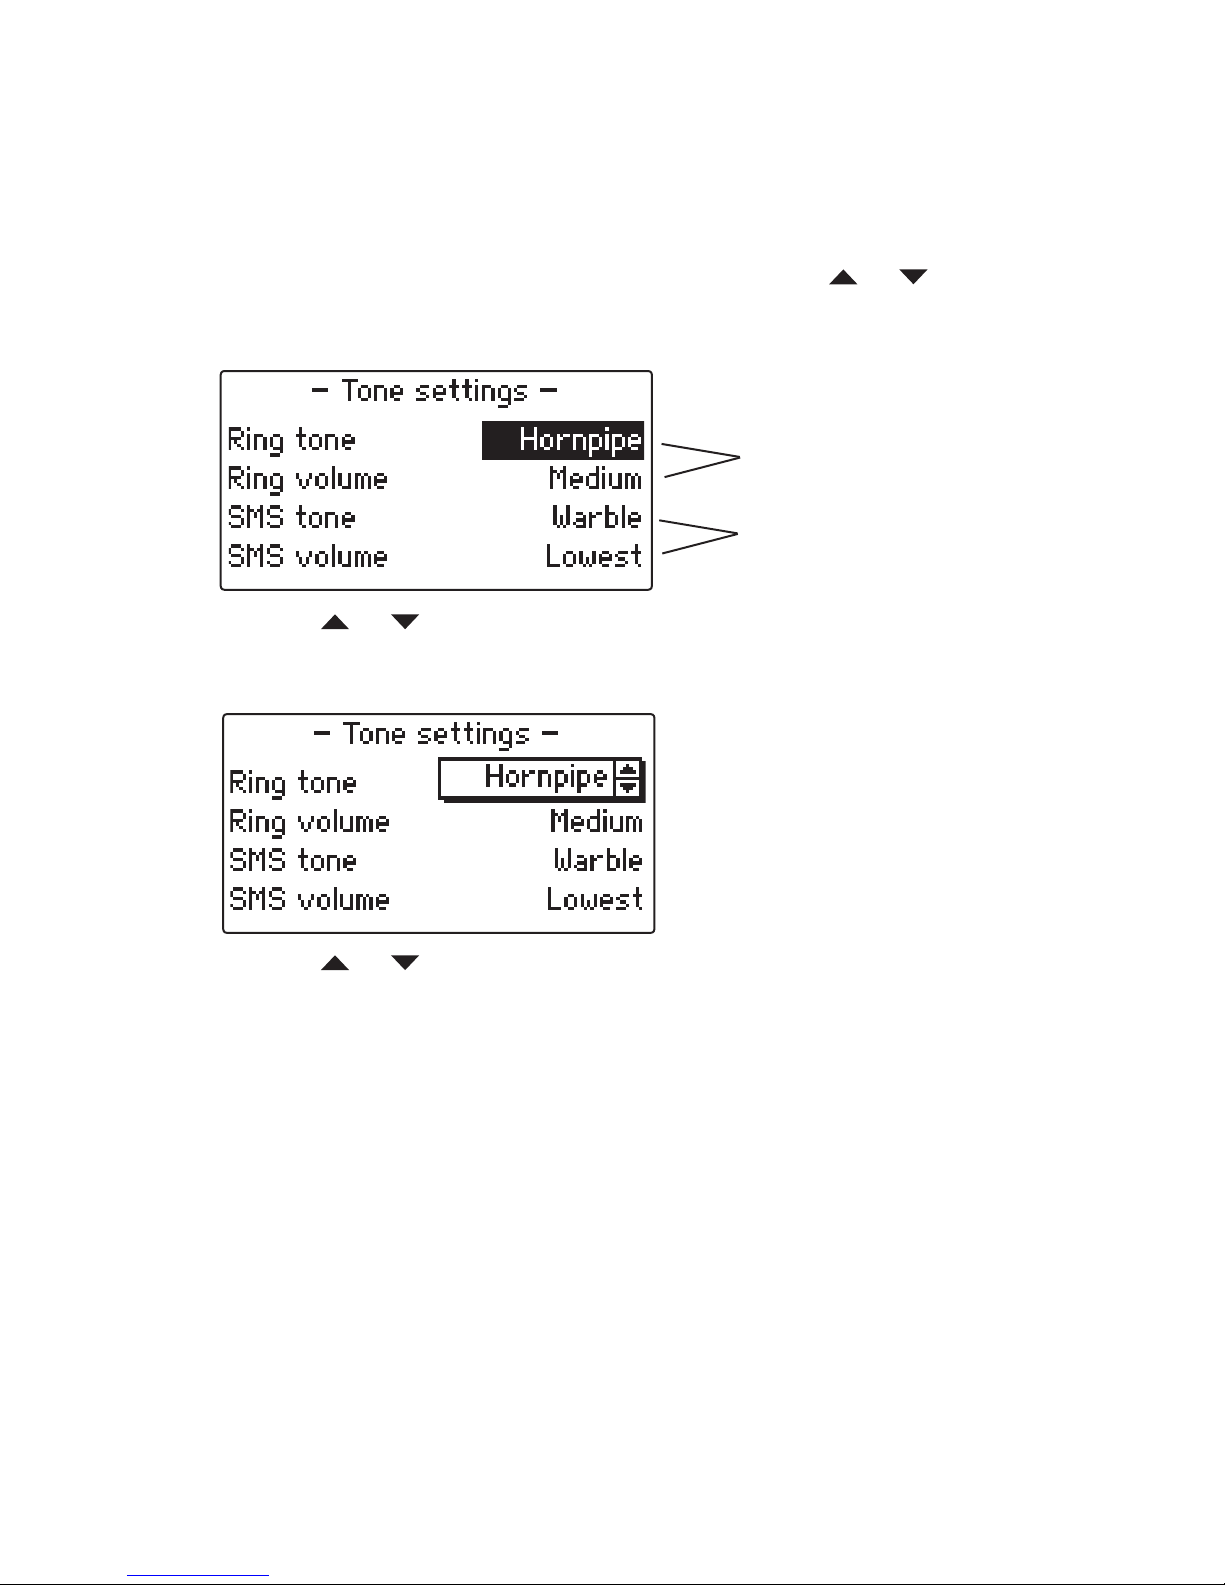
You can set different ring tones for your incoming message and incoming
SMS text messages. Additionally you can set separate volume levels for
both types of tones.
To set tones
1 From standby, press the
Menu button, then use the or buttons to
display the Tones option and press the Select button. The various tone
settings will be displayed:
2 Use the
or buttons to highlight the required setting and then press
the Select button. An option box will open to allow you to change the
chosen setting and a sample of the tone and volume level will be played:
3 Use the
or buttons to scroll through the available items for the
chosen setting. When the setting is correct, press the Select button.
Controls for incoming call tones
Controls for incoming SMS
message tones
Page 31
29
Settings
The phone has numerous settings that allow you to customise its operation
to suit your requirements.
To view and change settings
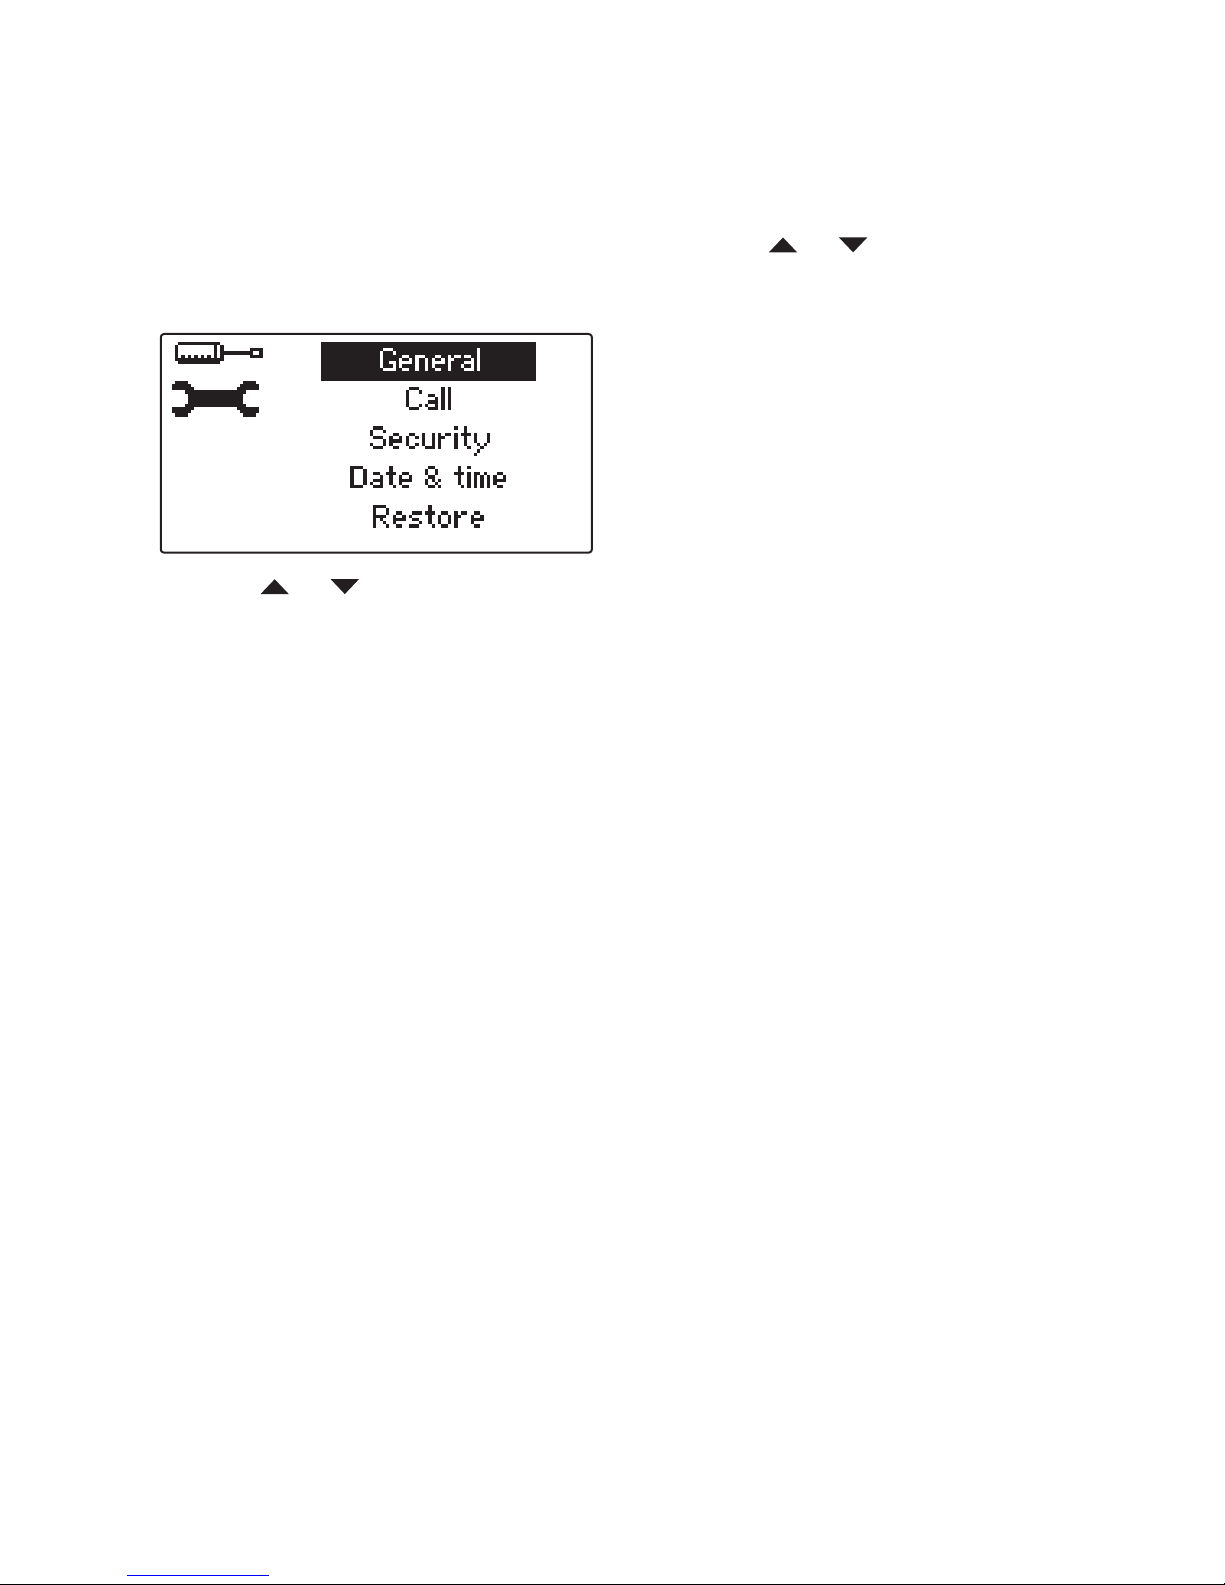
1 From standby, press the
Menu button, then use the or buttons to
display the Settings option and press the Select button. The various
settings are arranged as five main options:
2 Use the
or buttons to highlight the required option and then press
the Select button.
• The various settings are discussed on the next three pages.
Page 32
30
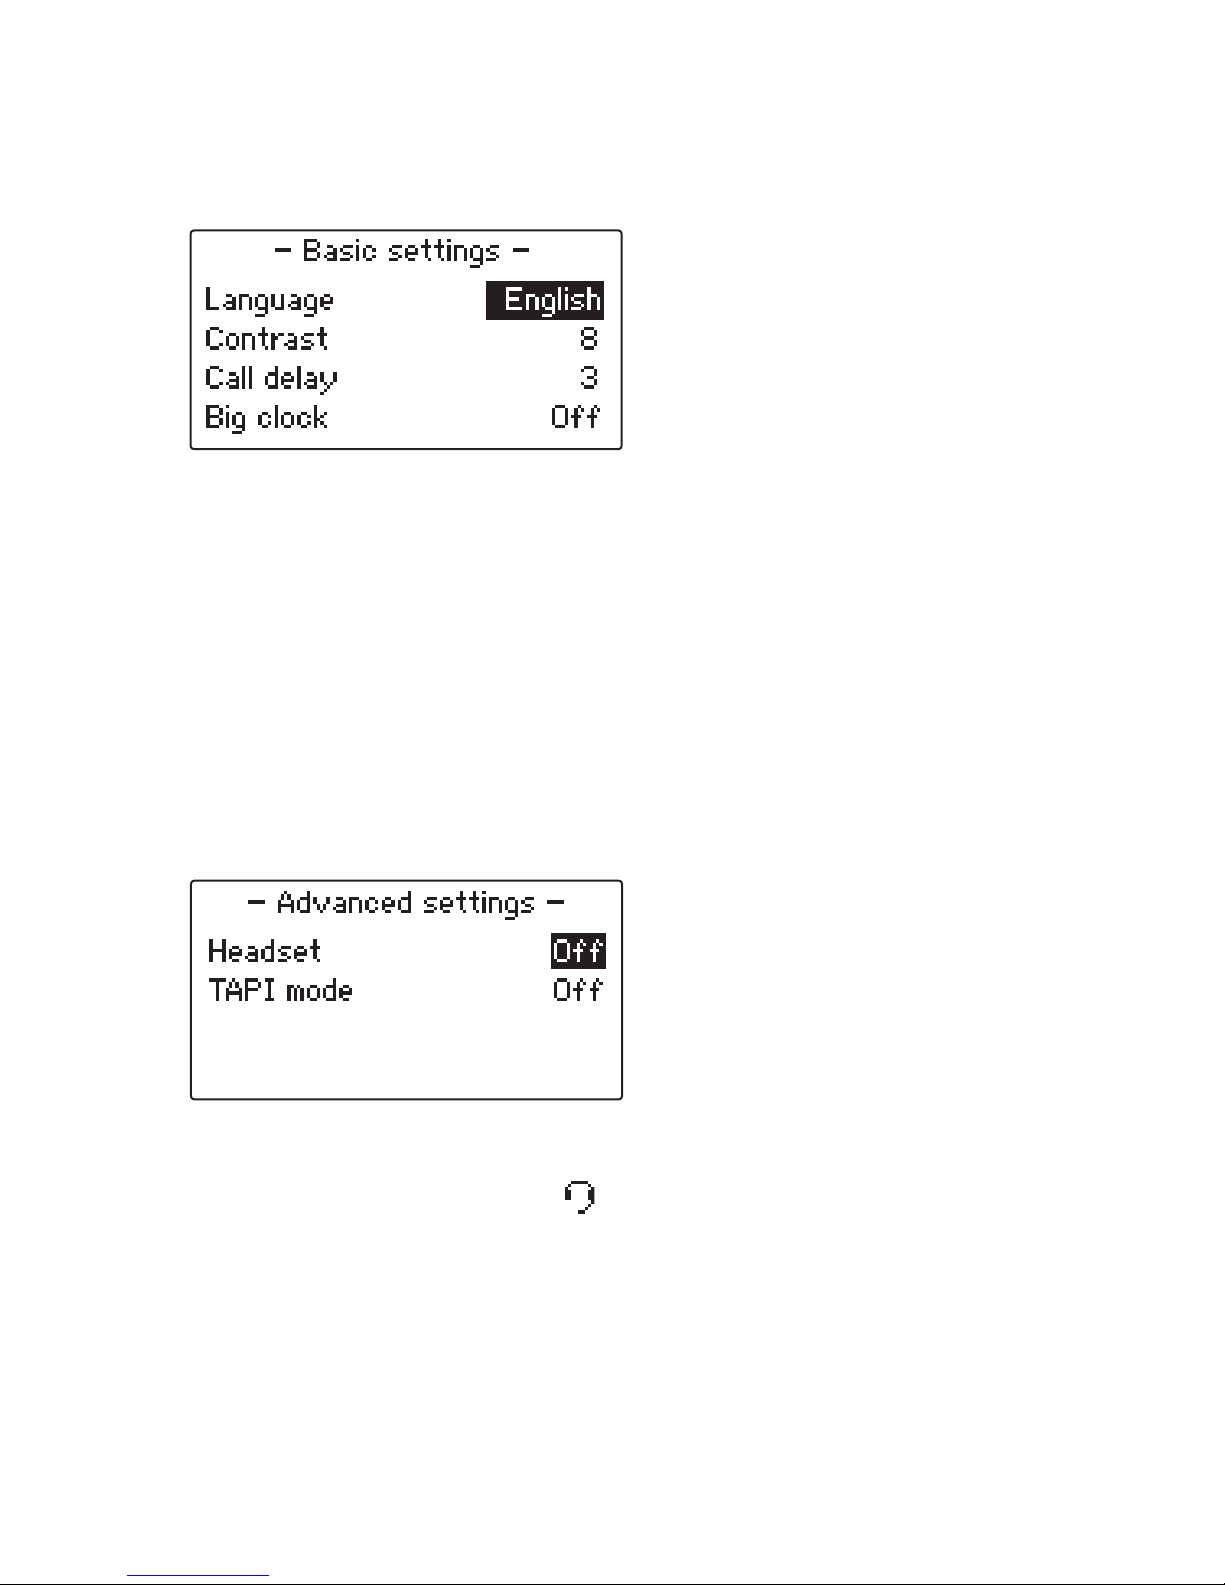
Language: Determines the language used for all phone menus and prompts.
Contrast: Use this option to adjust the contrast between the display charac-
ters and the screen background. Adjustable between 0 and 15, the screen
contrast will immediately respond as you change the value.
Call delay: When you dial phone numbers numbers after lifting the handset (or
pressing the handsfree button) the phone waits for a period of time after the last
entered number before it sends the phone digit to the network. Using this option you can determine the time delay (in seconds) between 1 and 9 seconds.
Big clock: When set to On, this option displays a large digit 24-hour clock
within the standby screen and also increases the size of the date display
characters. The network name is not displayed within the standby screen
when this option is enabled.
General settings
The general settings are arranged within two groups: Basic and Advanced, which are selectable after you choose the General option.
General basic settings
General advanced settings
Headset: Set this option to On when using a headset with the phone in
place of the usual handset (the icon will be displayed in the standby
screen). This will allow you to press and release the Handsfree button to
start and end calls through the headset. This mode also changes the operation of the handset hook switch to allow the handset to be removed while
the headset is used. Thus, the phone will not respond to the hook switch
remaining up, however, you can press and release the hook switch to end a
headset call. See the Headset section on page 35.
TAPI mode: Set this option to On when using the phone in close coopera-
tion with a computer link. This will allow suitable computer applications to
take control of various phone functions using the industry-standard Telepho-
ny Application Programming Interface (TAPI).
Page 33

31
Call settings
Call waiting: This option allows you to Activate or Cancel the call waiting
function provided by your service provider. When enabled, call waiting will
audibly notify you (while you are within a call) that another incoming call has
been received.
Note: This function is dependent upon support from your service provider.
Own number sending: This option allows you to determine how your phone
number is declared to people that you call. You have three options: Yes
(declare the number), No (withhold the number) or Set by network (go along
with your service provider’s standard procedures).
Network selection: This option allows you to influence how the phone
should seek out and use other host networks when your usual network is
not available. As standard, the phone uses the Automatic setting which will
search for and use located networks according to availability and any prearranged roaming agreements between service providers.
The Manual option allows you to scan for all available networks in the vicin
-
ity and choose one from the resulting list.
Voicemail number: This option allows you to enter or edit the phone
number to which calls can be diverted. The appropriate voicemail phone
number is provided by your service provider.
Page 34
32
Security settings
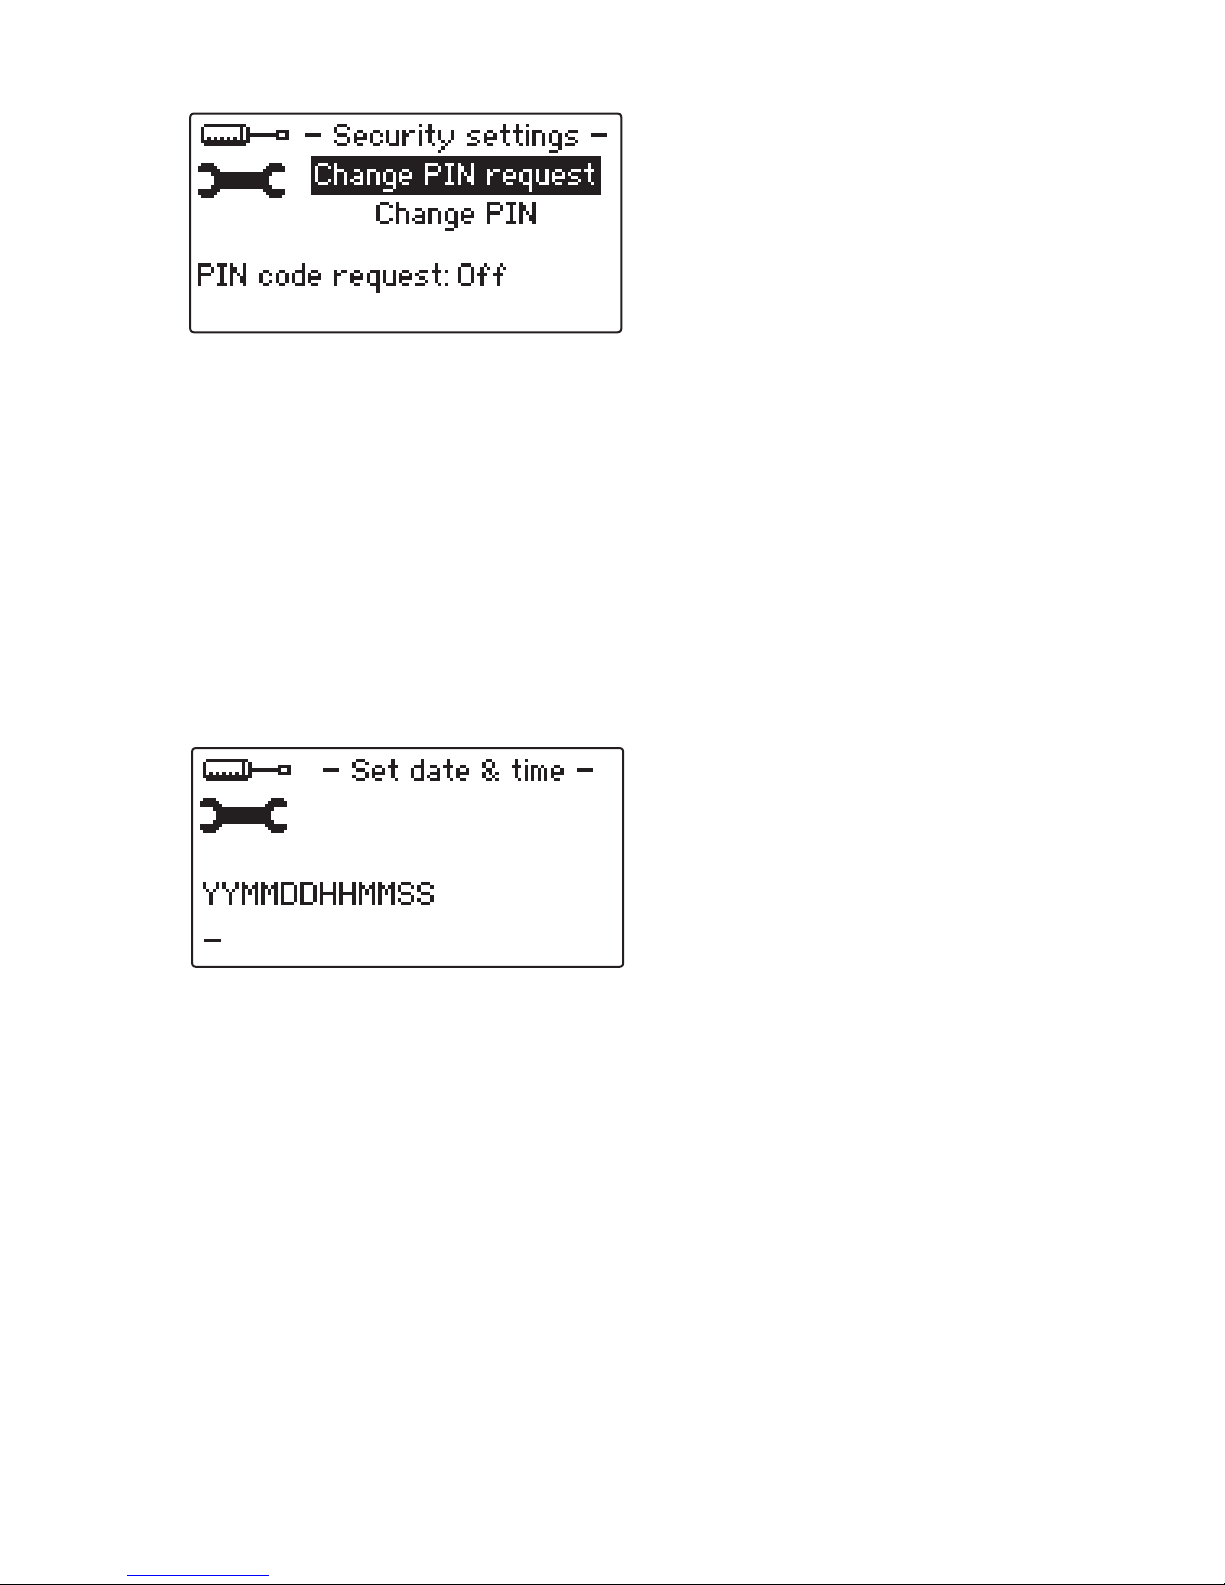
Change PIN request: Use this option to determine whether the SIM card
should request the PIN code whenever the phone is switched on - the
current status of the setting is shown in the lower half of the screen. When
selected, you will be requested to enter the existing PIN code before the
setting can be changed.
Change PIN: This option allows you to change the PIN code that is stored
on the SIM card. When selected, you will be requested to enter the existing
PIN code and then enter the new code twice to confirm. For security purposes the entered digits are not displayed on the screen, however, entered
numbers are represented by asterisks.
Date and time settings
Use this option to set a valid date and time for the internal clock.
You will be prompted to enter both the date and time within a single series
of digits beginning with the year and ending with the seconds -
Note: two
digits per item. The Clear key can be used to delete incorrect digits. Press
the Select key to save when the entry is complete.
Restore settings
Use this option to return the phone settings to their standard settings. Such
a restore operation does not affect the contents of the phonebook, the SMS
message boxes or the call register.
Page 35
33
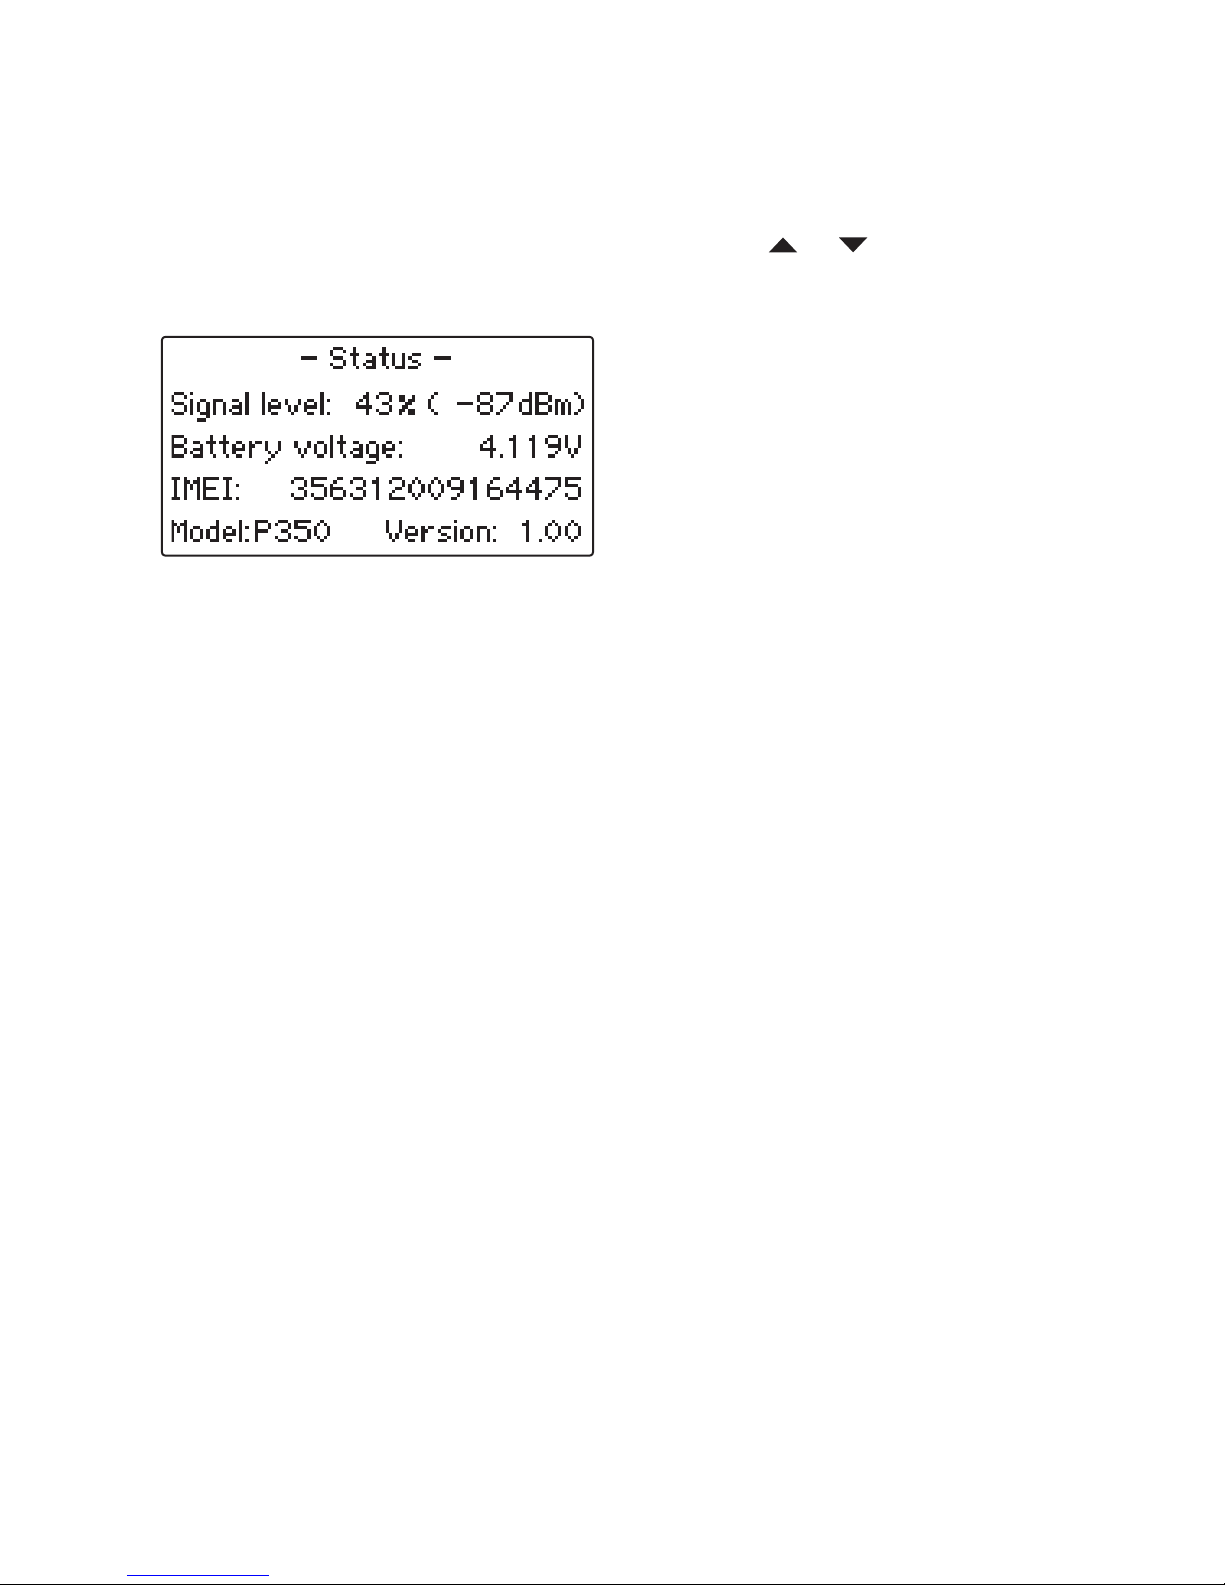
Status
This screen provides additional status information that is normally hidden
from view.
To view the status information
1 From standby, press the
Menu button, then use the or buttons to
display the Status option and press the Select button. The status screen
will be displayed:
Signal level: Shows the current signal strength expressed both logarithmi-
cally in dBm and as a percentage of the dBm level/range.
The signal level reading can be a useful tool when positioning the phone
and antenna for best reception. Display the status screen and move the
phone/antenna until you achieve the highest reading within the available
area.
Battery voltage: Indicates the voltage charge of the battery. The working
range is between 3.6V and 4.2V. At 3.6V, the phone will automatically power
down to protect the battery from complete exhaustion.
IMEI: The International Mobile Equipment Identity is the unique code stored
on your SIM card that differentiates it from every other SIM card, worldwide.
Model: Indicates the model number of the phone (P350 or P390).
Version: Indicates the current version of the internal phone software.
Page 36
34
Options
Stub antenna
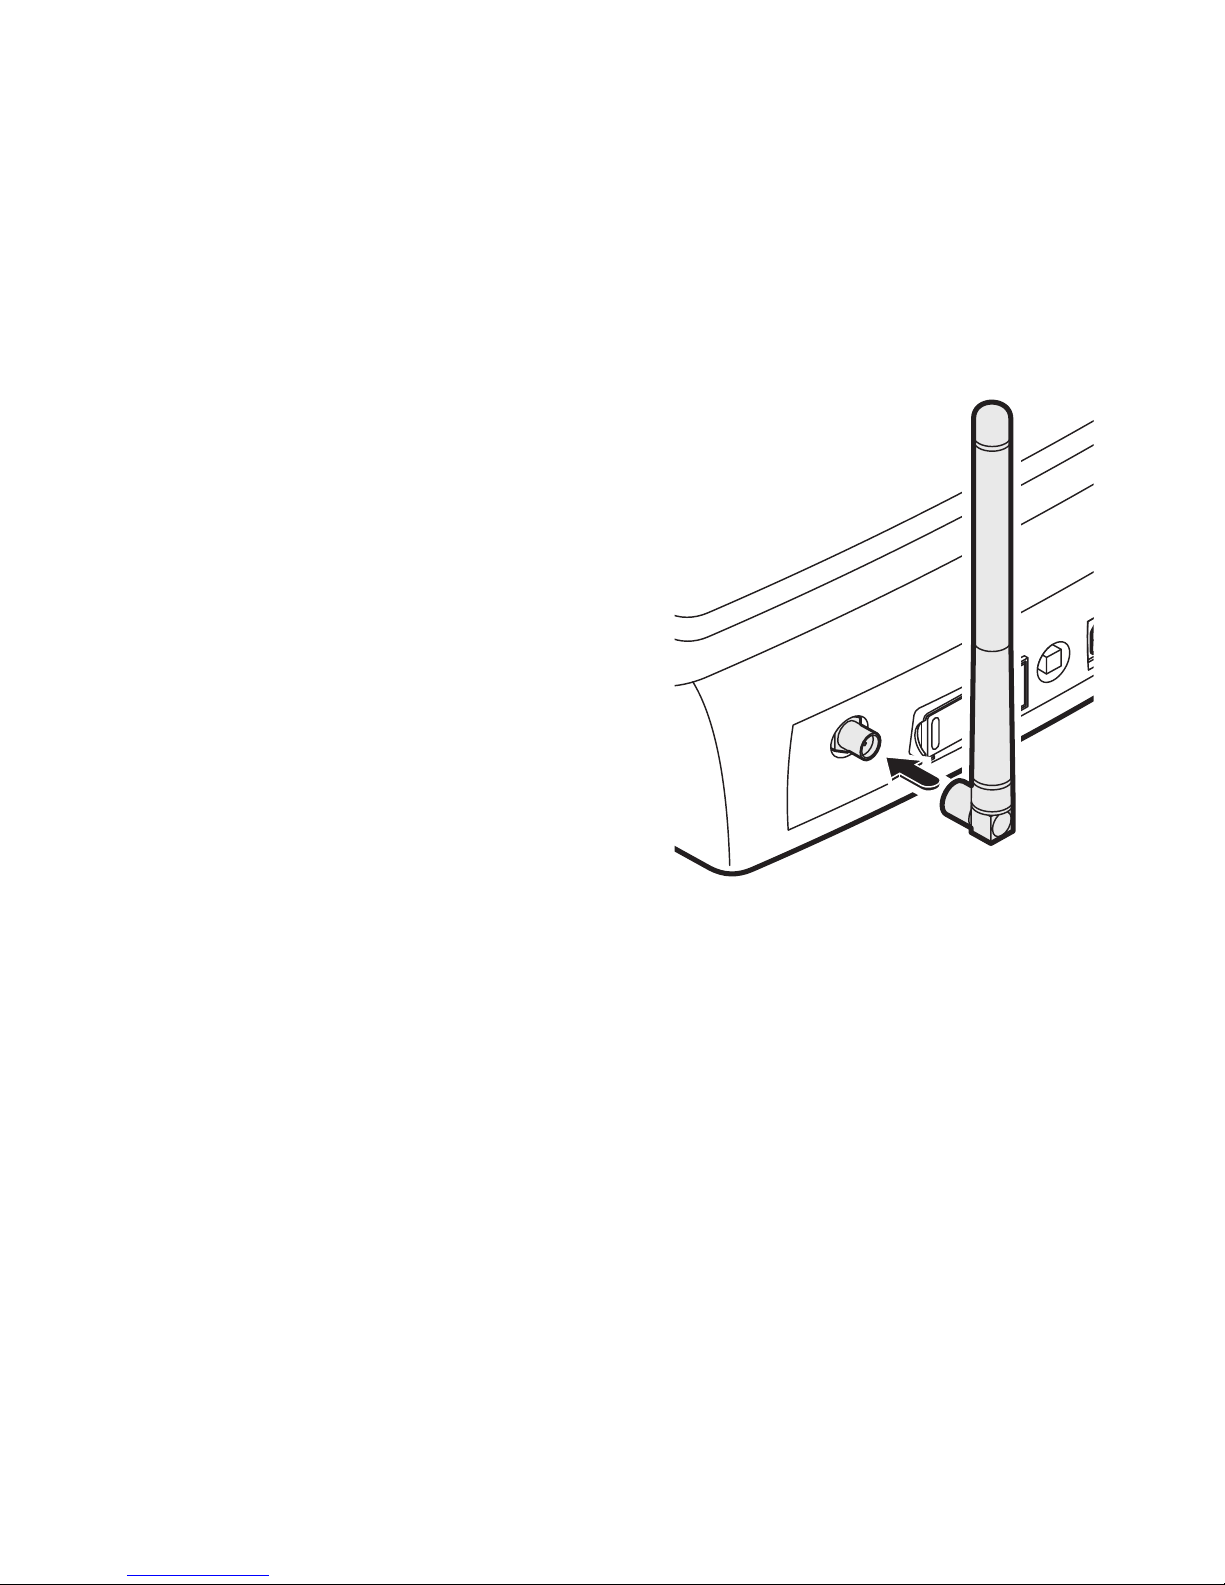
The optional stub antenna can be
mounted directly onto the rear of the
phone for ease of installation.
To use the stub antenna
1 Ensure that the phone is switched
off.
2 Unplug the supplied standard
antenna, if it is installed.
3 Align the stub antenna with the
circular connector on the far left of
the rear panel.
4 Attach the antenna and twist the
connector collar clockwise until it is
finger-tight - do not overtighten.
5 In use, the antenna should always
be vertical. The supplied antenna
has a hinge so that you can posi
-
tion it correctly. .
Note: You can use the signal strength reading within the Status screen to
help determine the optimal phone/antenna position. - see page 33.
Page 37
35
Headset
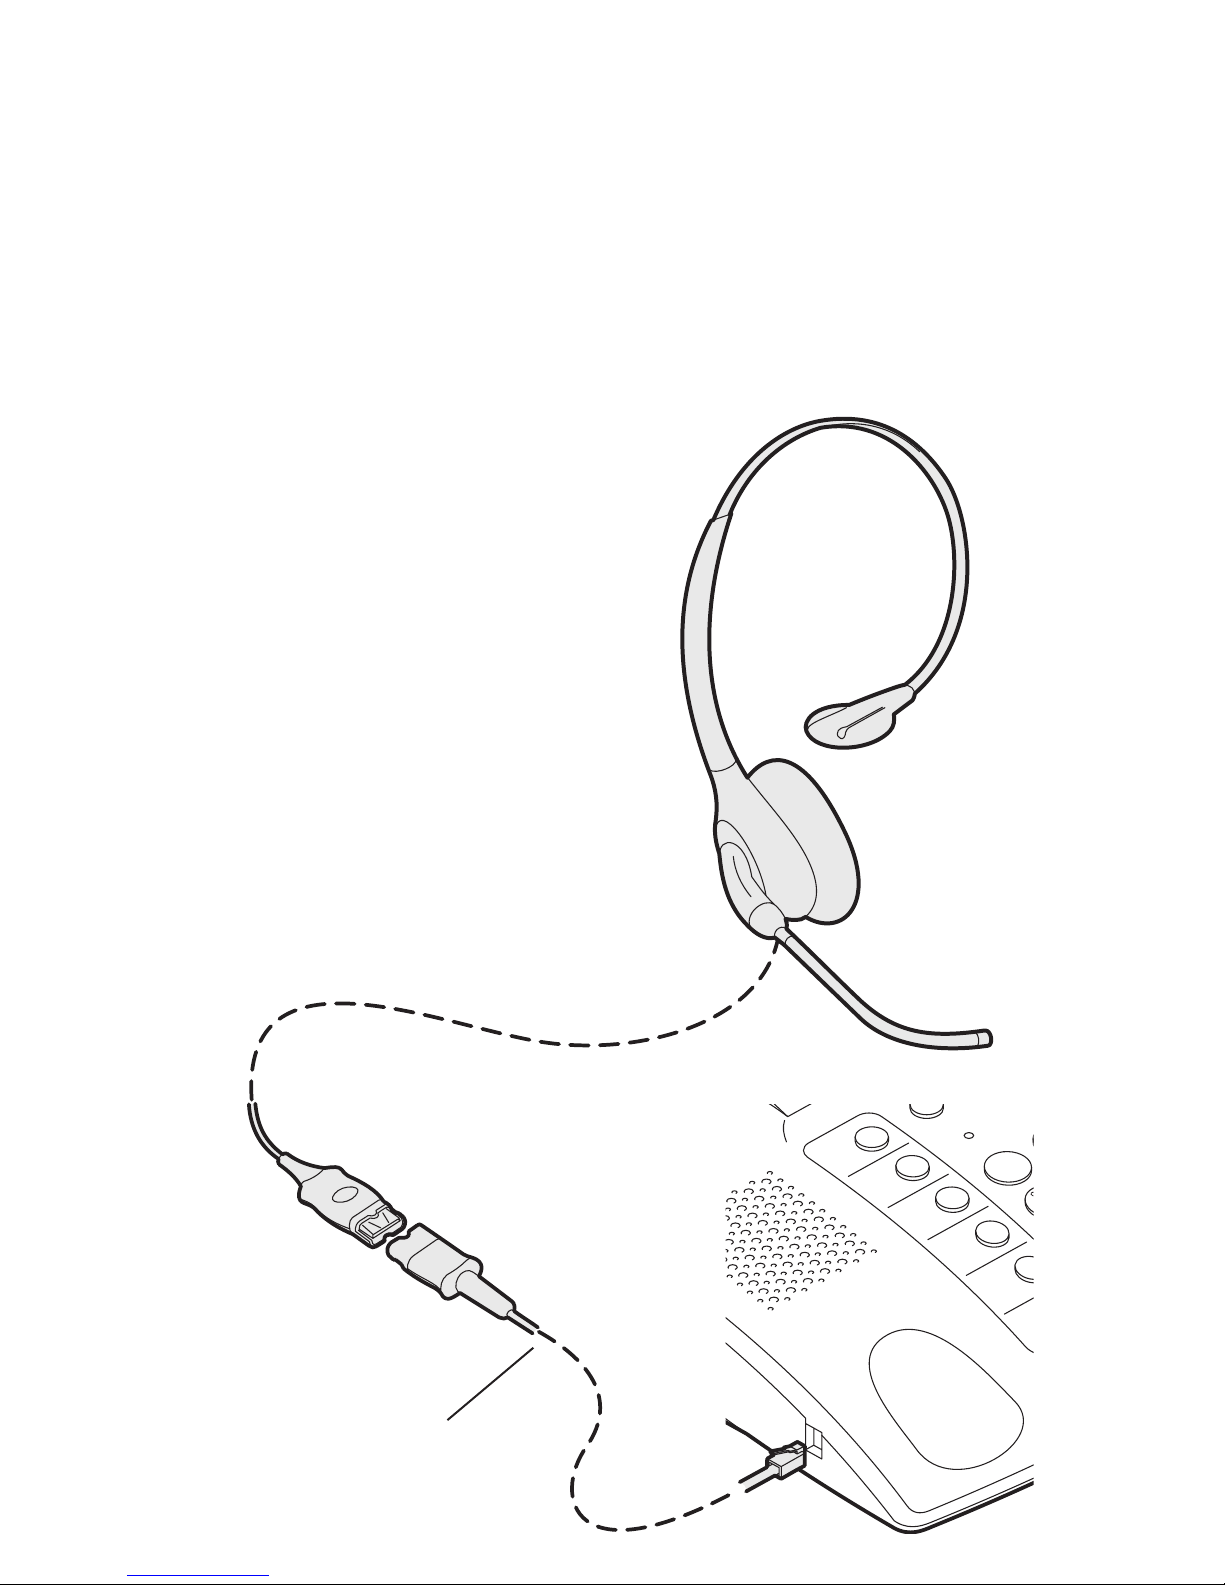
The optional headset is ideal when the phone is being used on a continual
basis. The headset replaces the standard handset and a special menu setting adjusts the behaviour of the phone to allow the Handsfree button as well
as the handset hook switch to be used to control calls via the headset.
M4
M
3
1
M2
M1
N
a
m
e
s
Cal
l
To link the headset
1 Ensure that the phone is switched off.
2 Unplug the normal phone handset, if it
is installed.
3 Link the cable leading from the headset
to the adapter cable.
4 Insert the small connector of the head
set adapter cable to the handset socket
in the left side of the phone body.
5 Switch on the phone and access the
menu:
Settings > General > Advanced
Settings. Enable the Headset option.
See page 30 for further details.
Adapter cable - this must
be compatible with the
‘Panasonic’ pin-out
(Plantronics p/n: U10PS)
Page 38
36
Linking to a computer
The phone is equipped to operate in close cooperation with a computer
system to allow several possibilities:
• Initiate and terminate calls using applications that suppport Microsoft’s
Telephony Application Programming Interface (TAPI) standard,
• Wireless modem, fax, send and receive SMS,
• Updating of the phone’s internal software to the latest version.
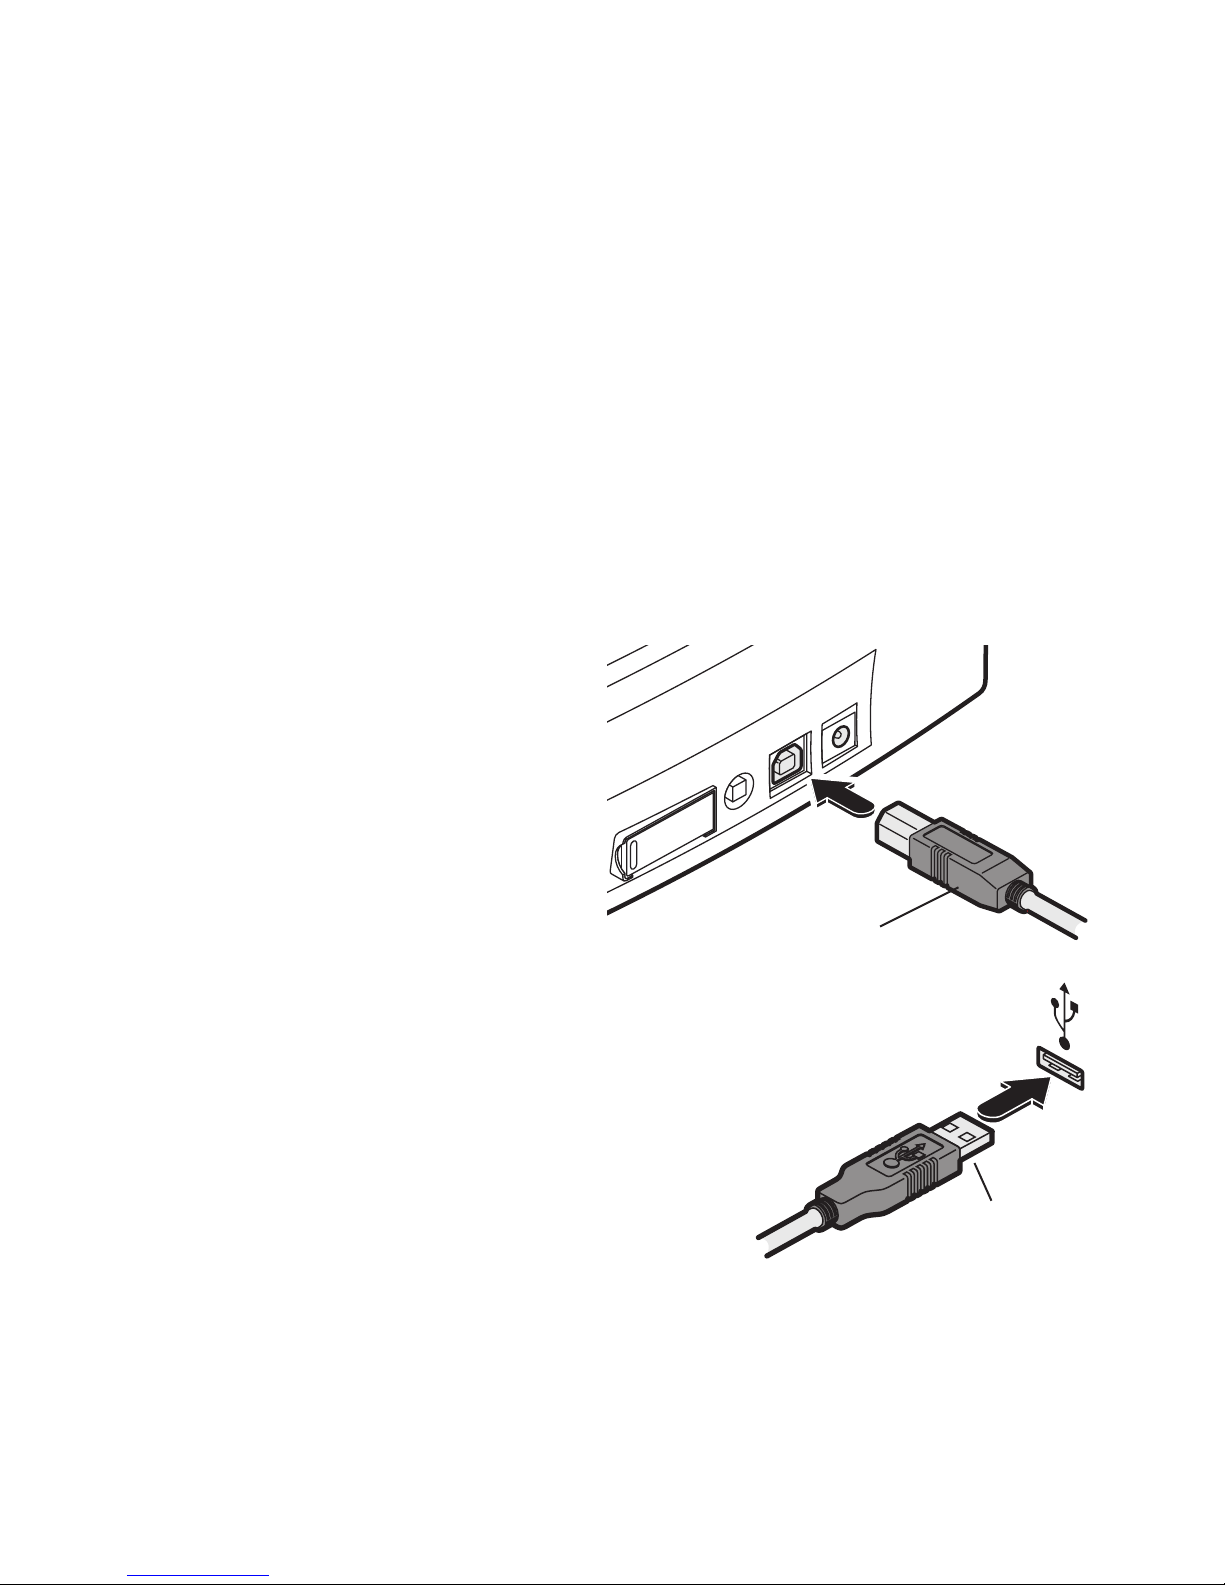
To form the link, you will need a computer equipped with a vacant USB port
and a standard USB cable of appropriate length with a USB type A connec
-
tor at one end and a USB type B connector at the other.
To link the phone to a computer
Note: The phone and the computer can be switched on or off while linking.
1 Before linking the phone and computer, install the USB driver which is
downloadable from
www.burnsidetelecom.com
USB type B
connector
USB type A
connector
4 On the computer, use drivers for a generic 19200 fax/modem.
If you intend to use TAPI enabled applications, ensure that the
TAPI option is enabled within the Settings menu of the phone - see page 30 for
details.
3 At the other end of the USB link cable,
insert the other connector into a vacant USB
socket on the computer.
2 Insert the ‘squarer’ of the
two USB connectors into the
socket on the rear panel of the
phone, between the power in
put socket and the red power
button.
Note: P390 models additionally support GPRS data communications.
Page 39

37
Important safety information
Operating environment
Make sure that no special regulation is
in force that imposes restrictions on the
use of mobile telephones. Restrictions to
mobile telephones would also apply to
this phone.
Electronic devices
Most modern electronic equipment is
shielded from radio frequency (RF) signals. However, certain electronic equipment may not be shielded against the RF
signals from your phone.
Pacemakers
Pacemaker manufacturers recommend
that a minimum separation of 20 cm (6
inches) be maintained between a handheld wireless phone and a pacemaker
The same restriction should apply to the
external antenna of the phone. If you
have any reason to suspect that interfer
ence is taking place, switch off the phone
immediately.
Hearing aids
The phone radio signals may interfere
with some hearing aids. In such event
move the antenna as far away as practi
-
cal or consult your hearing aid supplier.
Other medical devices
Operation of any radio transmitting
equipment, including the phone, may
interfere with the function of inadequately
protected medical devices. Consult a
physician or the manufacturer of the
medical device to determine if they are
adequately shielded from external RF
energy or if you have any questions.
Switch off your phone in health care
facilities when any regulations posted
in these areas instruct you to do so.
Hospitals or health care facilities may be
using equipment that could be sensitive
to external RF energy.
Vehicles
RF signals may affect improperly installed
or inadequately shielded electronic
systems in motor vehicles (e.g. electronic
fuel injection systems, electronic anti-skid
(anti-lock) braking systems, electronic
speed control systems, airbag systems).
Check with the manufacturer or its rep
resentative regarding your vehicle. You
should also consult the manufacturer of
any equipment that has been added to
your vehicle.
Potentially explosive atmospheres
Do not install the phone or site the antenna in any area with a potentially explosive
atmosphere and obey all signs and instructions. Areas with a potentially explosive atmosphere are often but not always
clearly marked. They include chemical
transfer or storage facilities; vehicles
using liquefied petroleum gas (such as
propane or butane): areas where the air
contains chemicals or particles, such as
grain, dust or metal powders.
Emergency calls
Important! The phone, like any wireless
phone, operates using radio signals,
wireless and landline networks, as well
as user-programmed functions, which
cannot guarantee connection in all
conditions. Therefore, you should never
rely solely upon any wireless phone for
essential communications (e.g. medical
emergencies).
Remember, to make or receive any calls
the phone must be switched on and in a
service area with adequate cellular signal
strength. Emergency calls may not be
possible on all wireless phone networks
or when certain network services and/or
phone features are in use. Check with lo
cal cellular service providers. Emergency
calls may be made even when a SIM
card is not installed (subject to network
availability) using the 112 dialling code.
Page 40

Burnside Telecom Ltd
Burnside House
Isington
ALTON
GU34 4PP
United Kingdom
Tel: +44 (0)8700 762766
Fax: +44 (0)1420 520029 extn 4
Email: [email protected]
Web: www.burnsidetelecom.com
Part number 362060 / rev 1.0e (E&OE)
 Loading...