

Page 1
www.burnsidetelecom.com
www.burnsidetelecom.comwww.burnsidetelecom.com
www.burnsidetelecom.com
Burnside P300
No-Button GSM Phone
QuickStart Guide
Burnside Technology Ltd.
Unit 1, Church Close
Business Park,
Todber,
Dorset, DT10 1JH
IMPORTANT!
IMPORTANT!IMPORTANT!
IMPORTANT!
This phone, like any wireless phone,
operates using radio signals and the wireless network,
as well as user-programmed functions, which cannot
guarantee connection in all conditions. Therefore, you
should never rely solely upon any wireless phone for
essential communications (e.g. medical emergencies).
Remember, to make or receive any calls, the phone must
be switched on and in an area with adequate cellular
signal strength.
Emergency calls may not be possible on all wireless
phon
e networks or when certain network services or
phone features are in use. Check with local cellular
service providers. Emergency calls may be made even
when a SIM card is not installed (subject to network
availability) using the 112 dialling code.
Operating environment
Operating environmentOperating environment
Operating environment
Make sure that no special regulation is in force that
imposes restrictions on the use of mobile phones.
Restrictions to mobile phones would also apply to this
telephone. Most modern electronic equipment is
shielded from radio frequency (RF) signals. However,
certain electronic equipment may not be shielded
against the RF signals from your phone.
Pacemakers
PacemakersPacemakers
Pacemakers
Pacemaker manufacturers recommend that a minimum
separation of 20 cm (6 inches) be maintained between a
handheld wireless phone and a pacemaker. The same
restriction should apply to the external antenna of this
phone. If you have any reason to suspect that
interference is taking place, switch off the phone
immediately.
Hearing aids
Hearing aidsHearing aids
Hearing aids
The phone's radio signals may interfere with some
hearing aids. In such cases move the antenna as far
away as practical or consult your hearing aid supplier.
Other medical devices
Other medical devicesOther medical devices
Other medical devices
Operation of any radio transmitting equipment,
including the phone, may interfere with the function of
inadequately protected medical devices. Consult a
physician or the manufacturer of the medical device to
determine if they are adequately shielded from external
RF energy or if you have any concerns. Switch off your
phone in health care facilities when any regulations
posted in these areas instruct you to do so. Hospitals or
health care facilities may be using equipment that could
be sensitive to external RF energy.
Radio transmission equipment
Radio transmission equipmentRadio transmission equipment
Radio transmission equipment
While Burnside products are designed to conform to
international standards regarding the acceptance of
radio frequency interference, certain installation
locations may interfere with their proper operation.
We recommend that Burnside equipment is not installed
in close proximity to any equipment that generates RF
signals (for example, radio transmitters), and is located
as far as possible away from it or in a separate room.
Potentially explosive atmospheres
Potentially explosive atmospheresPotentially explosive atmospheres
Potentially explosive atmospheres
Do not install the phone or site the antenna in any area
with a potentially explosive atmosphere and obey all
signs and instructions. Areas with a potentially explosive
atmosphere are often but not always clearly marked.
They include chemical transfer or storage facilities;
vehicles using liquefied petroleum gas (such as propane
or butane): areas where the air contains chemicals or
particles, such as grain, dust or metal powders.
IMPORTANT SAFETY INFORMATION ABOUT YOUR PHONE
Photographs and drawings used in this guide are for illustration p urposes only, and may differ from details of the actual
product. Burnside has a policy of continual product development, and reserves the right to update and modify product
specifications and features without prior notice. E&OE. Copyright © 2014 Burnside Technology Ltd.
Tel: +44(0)1 258 822 518
E-mail: [email protected]
Page 2

Page 3
INSTALLATION
Thank you for choosing this Burnside P300 No-Button GSM phone. This guide will
help you set up and begin using your phone and its features. Before you use your
new phone, please review the important safety information provided on the back
page of this guide. Then follow the steps below.
QuickStart Guide
QuickStart GuideQuickStart Guide
QuickStart Guide
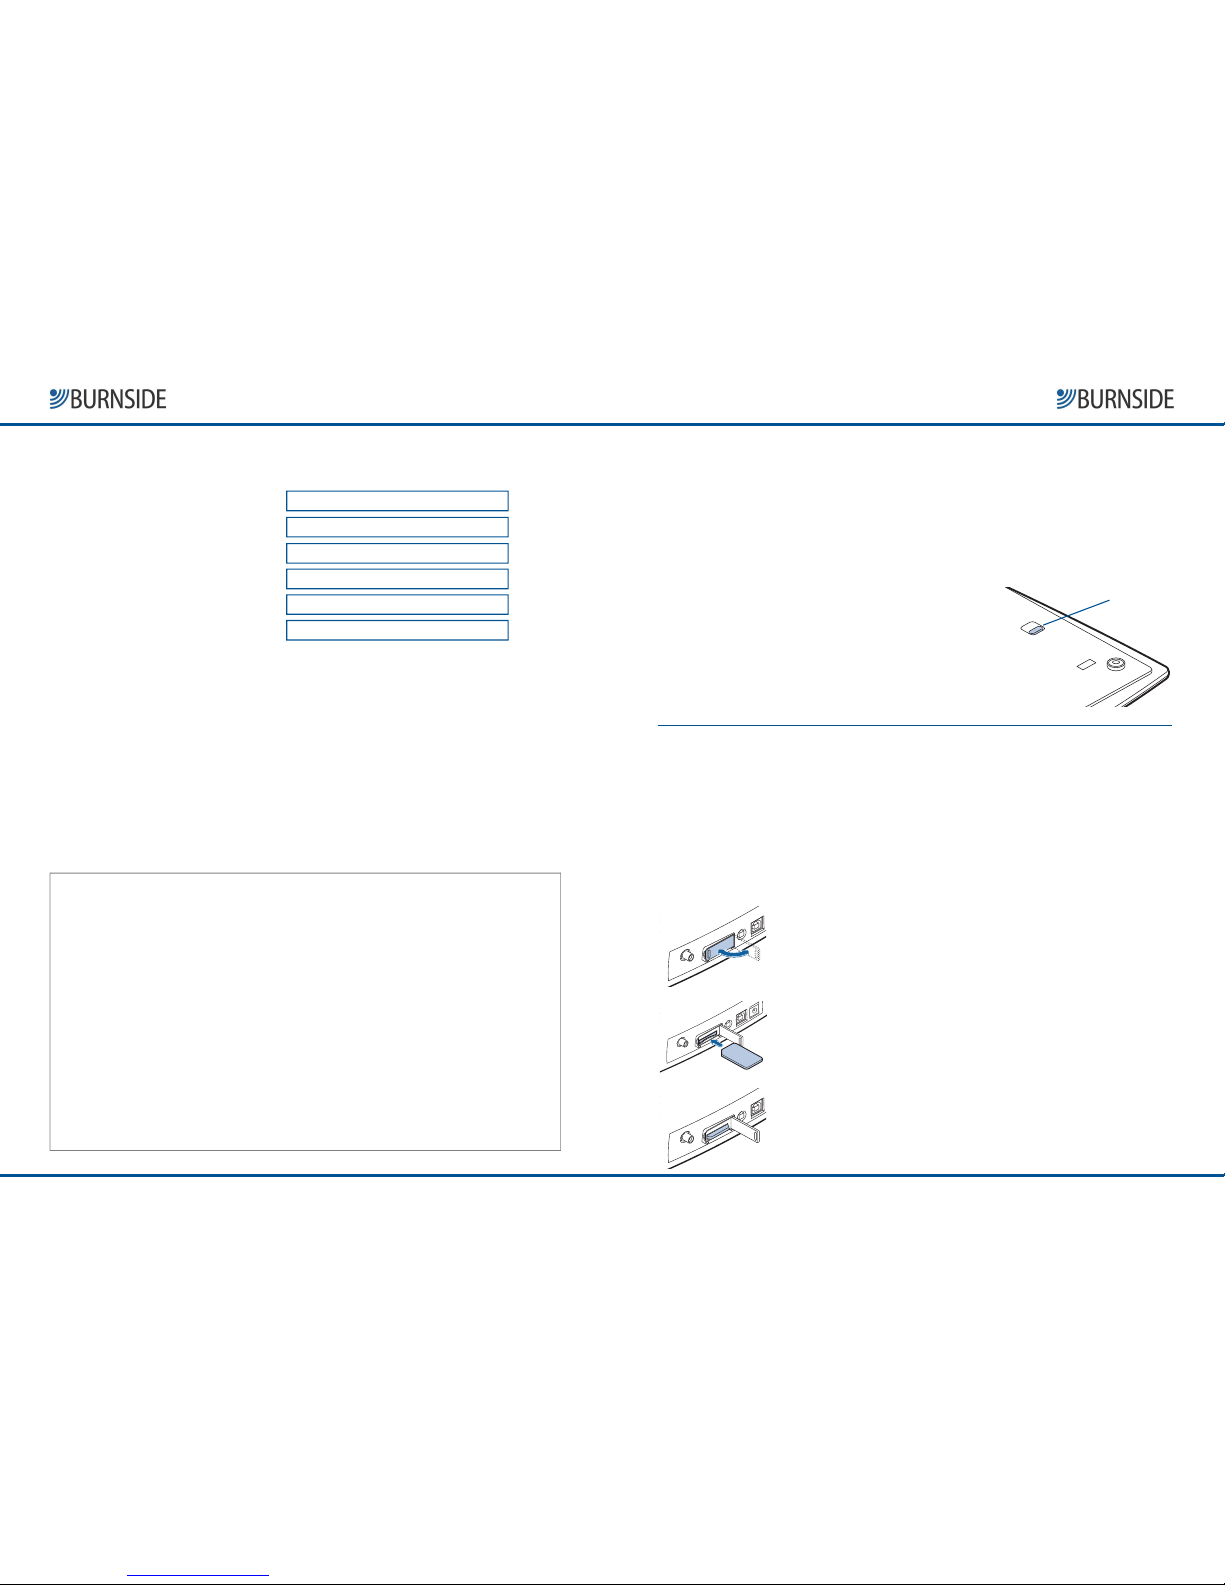
STEP 1 - Unlock the transit switch
When shipped, your phone is locked, to prevent
it from powering on accidentally. You need to
unlock the phone before it will operate. On the
underside of the phone unit, locate the recessed
switch near to where the handset cable attaches.
Slide the switch towards the rear of the phone unit.
(The phone will not switch on at this stage.)
Locked
position
Unlocked
position
Transit switch
STEP 2 - Insert your SIM card
Note: Ensure the phone is switched off when inserting or removing a SIM card.
Your phone requires an active mobile 2G SIM card for normal use. It will not work
with 3G networks. Without a SIM card installed, the phone will only be able to make
emergency calls via the 112 code, if a mobile network signal is available.
Make sure the SIM is not locked. Most typical SIMs are supplied unlocked, but if it is
locked, unlock it using a phone that has a keypad.
On the rear panel of the phone unit, carefully
swing open the SIM slot door.
Position your SIM card with its contacts facing
downwards and the notched corner facing
towards the slot.
Push the SIM card into the slot until it clicks into
place. Close the door.
Note: To remove the SIM card, press it inwards to release and
partially eject it, then carefully pull it out of the slot.
Page 8
Page 8Page 8
Page 8 Page 1
Page 1Page 1
Page 1
USER INFORMATION AND NOTES
IMEI Number
Phone Number
Phone PIN
SIM PUK Number
Customer registration number1
MoniCare® access code2
1
As soon as you have prepared your phone for use, you should register it with
Burnside. Registration ensures that you have access to Burnside's online resources,
including documentation, technical support and news. When you register, you are
given a unique customer registration number, which should be quoted in any
contact with Burnside about your phone.
2
MoniCare® is Burnside's Web-based software that enables you to monitor and
configure your phone from anywhere, using a standard Web browser on a desktop
or laptop computer, or your smartphone. Visit the Burnside Web site at
www.burnsidetelecom.com
www.burnsidetelecom.comwww.burnsidetelecom.com
www.burnsidetelecom.com to learn more and to get in touch with our team.
Page 4
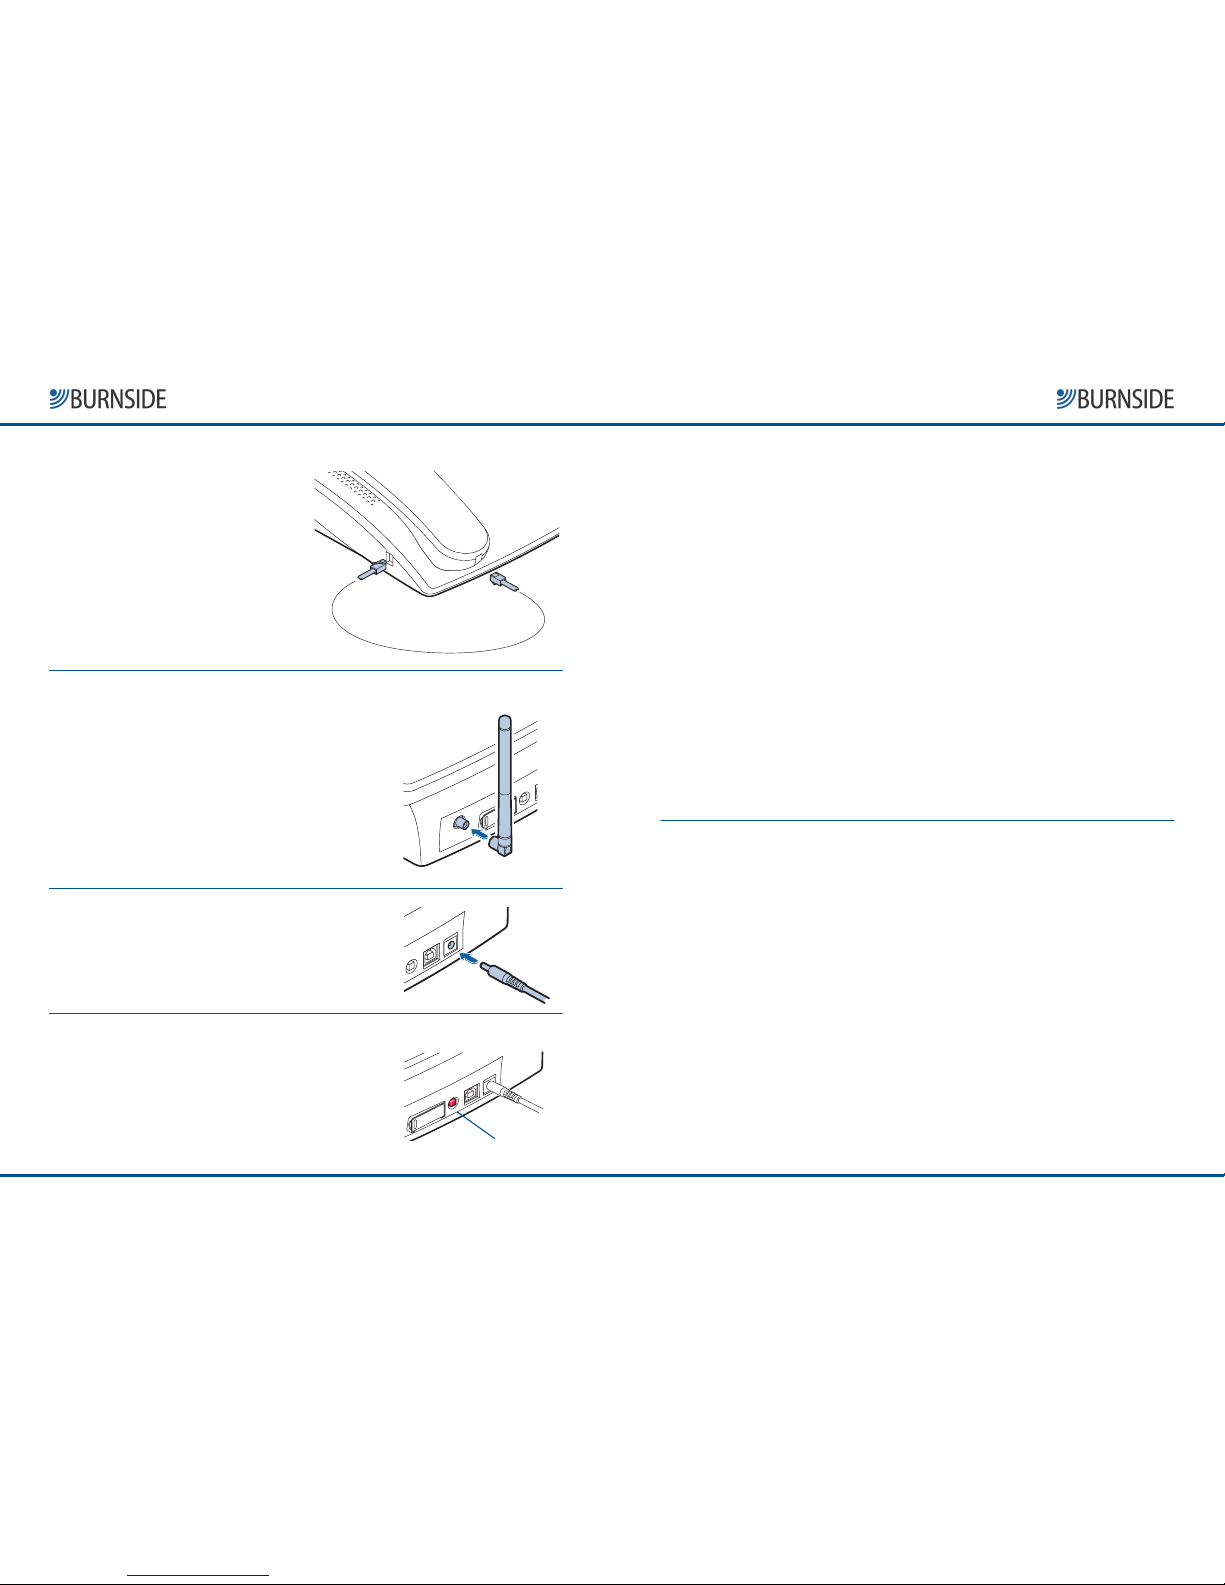
STEP 3 - Connect the handset
Your phone has been supplied with a
handset and connecting cable. These
must be attached to the phone unit
before use.
Connect one end of the cable to the socket
at the base of the handset and the other
end to the socket in the left side of the
phone unit. Each connector will click into
place once inserted correctly.
Burnside P300 No
Burnside P300 NoBurnside P300 No
Burnside P300 No----Button GSM Phone
Button GSM PhoneButton GSM Phone
Button GSM Phone QuickStart Guide
QuickStart GuideQuickStart Guide
QuickStart Guide
Page 2
Page 2Page 2
Page 2 Page 7
Page 7Page 7
Page 7
STEP 4 - Attach the aerial
Align the supplied aerial with the circular
connector on the far left of the rear panel.
Attach the aerial by twisting the connector
collar clockwise until it is finger-tight: do not
overtighten.
In use, the aerial should always be vertical.
The supplied aerial has a hinge so that you
can position it correctly.
STEP 5 - Connect the power adapter
Connect the lead from the supplied power adapter
to the socket on the far right of the rear panel.
Plug the power adapter main body into a nearby
mains outlet.
STEP 6 - Switch on the phone
On the rear panel, press and hold the red button
until the display responds, then release it. To
switch the phone off, press and hold the red
button until the display goes blank. Make sure the
battery is fully charged before using the phone for
any length of time without mains power.
Power switch
7
M4
8
M3
0
M5
+
#
BURNSIDE
●
TROUBLESHOOTING
The phone is not working
The phone is not workingThe phone is not working
The phone is not working
If your phone appears to be not working (the display is blank) or it will not auto-dial
the programmed number on pick-up, follow these steps to check your set-up:
1 Check that the transit switch is unlocked - see page 1, Step 1.
2 If the phone is not connected to a mains power outlet, the internal battery may
be discharged. Use the power adapter to recharge the battery - recharging takes
about two hours to complete.
3 If the phone is connected to a mains power outlet, check that the display is
active. If not, use the red power switch at the rear of the phone to switch it on. If
the display still does not appear, you should contact Burnside (details on the
back page of this guide).
4 If the phone will not auto-dial correctly, check the AUTO configuration - refer to
page 4, Step 1.
5 If calls still cannot be made, check that your SIM card has call credit available.
Calls can't be made reliably
Calls can't be made reliablyCalls can't be made reliably
Calls can't be made reliably
The standby status display shows you the strength of the wireless signal being
received by the phone, and this can be used as a rough indicator - the more bars the
better. However, the phone has a more precise way of helping you find a location
where the best wireless network signal can be received.
From a mobile phone, send the command 1234STAT0 to the phone. After a few
seconds, you will receive a reply message, which contains the phone's status
information. The Signal
SignalSignal
Signal status shows the current signal strength expressed in
logarithmic form (dBm). Lower values are better, and ideally this number should be
between -70dBm and -90dBm. Try moving the phone and aerial position to achieve
the lowest dBm level.
If you continue to have difficulty receiving a reliable wireless signal, you might need
to use an alternative aerial. Visit www.burnsidetelecom.com
www.burnsidetelecom.comwww.burnsidetelecom.com
www.burnsidetelecom.com for details of our range
of specialised aerials to suit more demanding locations.
Page 5
Burnside P300 No
Burnside P300 NoBurnside P300 No
Burnside P300 No----Button GSM Phone
Button GSM PhoneButton GSM Phone
Button GSM Phone QuickStart Guide
QuickStart GuideQuickStart Guide
QuickStart Guide
Page 6
Page 6Page 6
Page 6 Page 3
Page 3Page 3
Page 3
OTHER PHONE COMMANDS
In addition to the commands used to set up the initial configuration, described on
pages 4 and 5, there are two other basic commands that may be useful to you.
Restricting call duration
You can restrict the maximum duration in minutes for each call with the CFG10
command. The number configured must be between 0 and 99, where 0 means
that the call duration is unlimited. The default setting is 4 minutes.
Example: 3210CFG10=8 Sets the maximum call duration to 8 minutes
Retrieving phone status information
The phone's current operating status can be retrieved any time with the STAT0
command. If you send this command from a mobile phone, the P300 will reply with
a text message containing the status information.
Example: 3210STAT0
Reply: STAT0:
State: n (phone state, normally 15)
Signal: -89dBm (signal strength via aerial)
Supply: 6.55V (typically between 6.4V and 6.6V)
Bat: 4.12V (4.2V when fully charged)
Temperature: 20 (temperature in degrees Celsius)
No fault/Fault
Ver: 3.0 (phone firmware version)
IMEI: 357749031743900
If you are not using the REPORT function (page 5, Step 3), and want to see details of
any current faults in the phone, you can use the STAT1 command to retrieve them.
Example: 3210STAT1
Reply: STAT1:
Power break/Power recovered after d:h:m:s
Battery: OK/Low/Fault
Temperature: 20/OK/Fault
Note: If a power break occurs, there is a default delay of 5 minutes before the error appears in the status
or is reported (if REPORT is enabled). This is to prevent errors being generated for brief power outages.
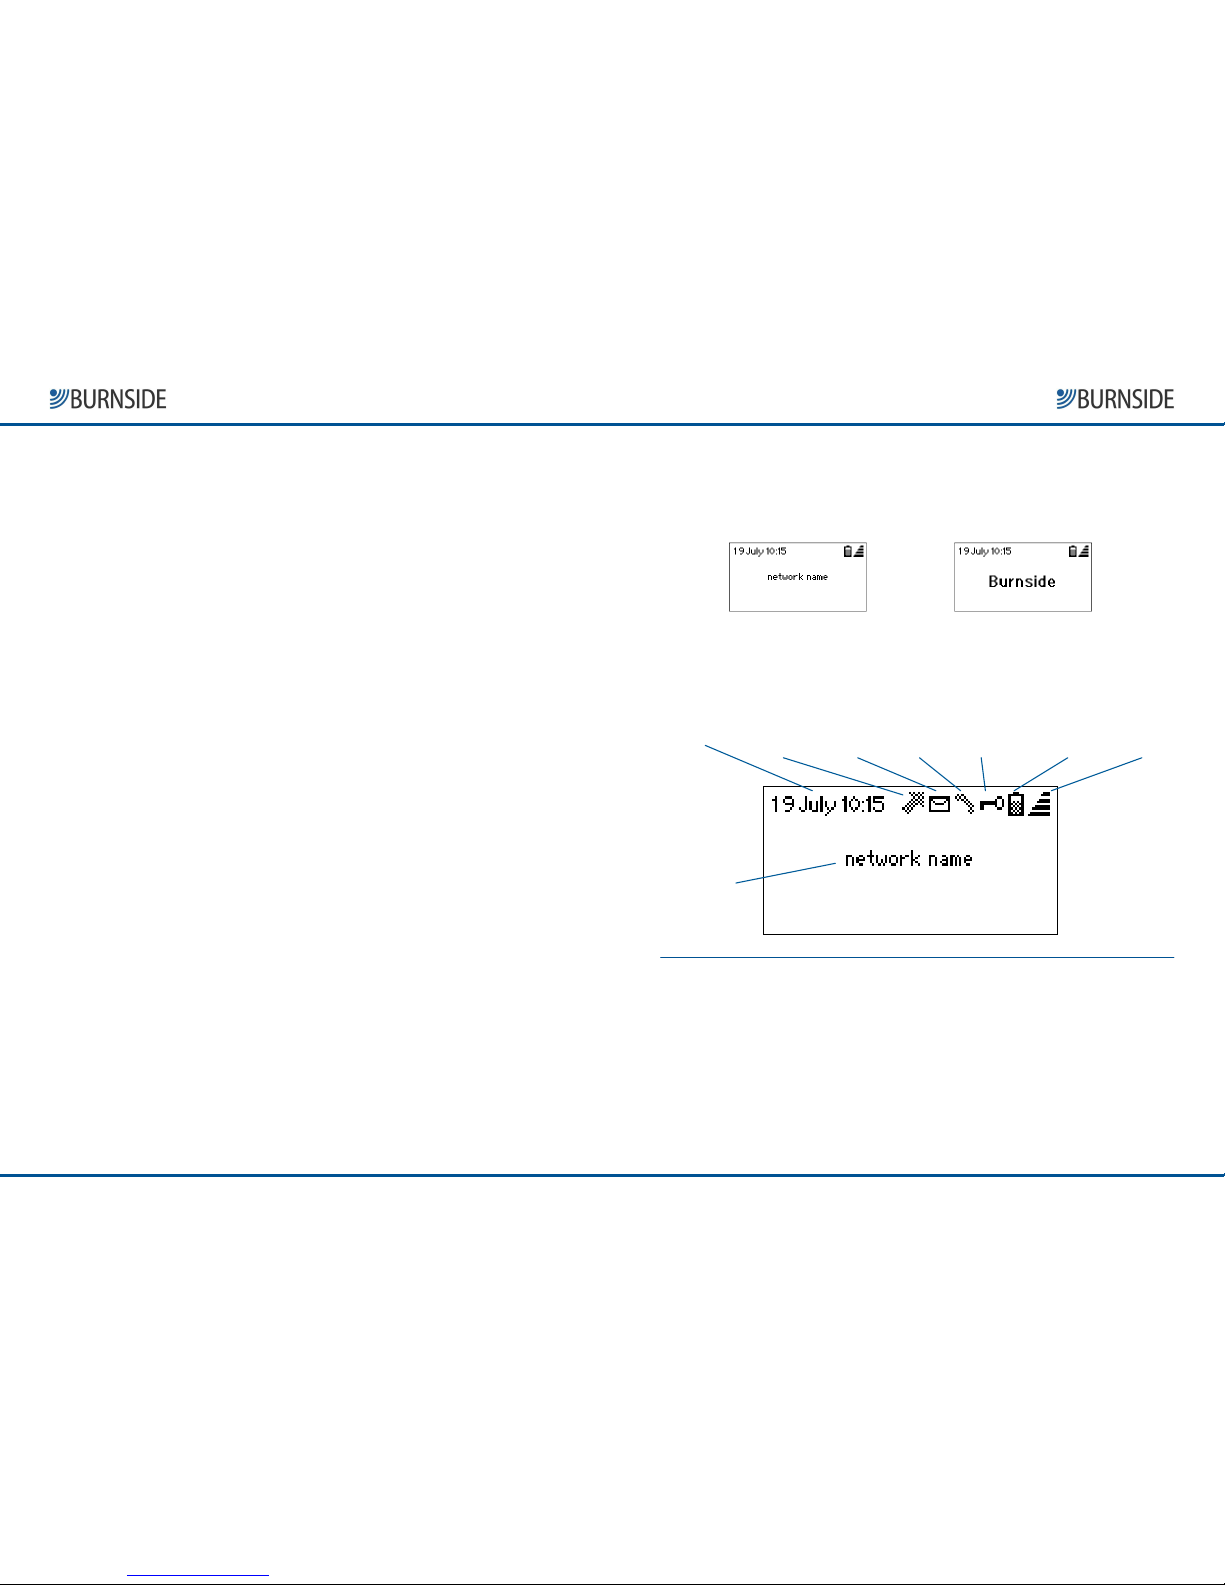
The standby screen
When the phone is switched on and idle, it will display a screen like those shown
below. In addition to the time, date, signal strength and other status icons, you can
choose to make it show the network name or a banner with your own text.
Date and time All calls Message Missed Restricted Power/battery Signal
diverted received call dialling status strength
Screen status indicators
The basic standby screen provides indications of the signal strength, battery charge
status and the time and date. Additional indicators are shown for events such as
missed calls, as well as for certain programmed modes.
Banner display
location
Making and receiving calls
Since the P300 phone has no keys or buttons, the phone can only be used to make
calls to one programmed auto-dial number - see the following pages for details. To
make a call, it is necessary only to pick up the handset, and to end a call, replace it.
The phone can receive calls as normal, and to answer a call, pick up the handset. This
is helpful to an operator whose line may be busy when a call is made, but wants to
call back to the customer.
Page 6
CONFIGURING THE PHONE
The P300 phone has no keypad, and therefore must be configured by using another
mobile phone (or a computer) to send text messages by SMS to it. Each message
contains one or more commands to configure the phone. The syntax for these
messages is quite straightforward, and if the phone receives a command that it
doesn't understand, it replies with an error text message.
SMS commands to the phone must always start with the phone's PIN number
(default 1234). This is followed by a command and the appropriate parameters
for it. Commands are not case-sensitive. Here are a couple of simple examples:
1234AUTO=0123456789
This command sets the phone's auto-dial number.
1234Report=07777123456
This command sets the number to which faults in the operation of the phone will be
reported and enables the reporting function.
Initial configuration
Several commands need to be sent to the phone to customise it for your use. In
addition to setting the auto-dial number, it is recommended that you change the
phone's PIN number from its default, and then lock the SIM card as a security
precaution. Follow these steps to customise your phone (Steps 2 to 5 are optional).
Step 1: Set the auto-dial number
This configures the number that is dialled automatically when the handset is lifted.
The AUTO command also sets the date and time, restricts call duration to 4 minutes
(see page 6), and deletes incoming SMS messages after processing them.
Example: 1234AUTO=0123456789
Step 2: Customise the display
This changes the banner text that is shown in the phone's display panel. The text
must be less than 20 characters in length.
Example: 1234BAN=Local Taxis
Burnside P300 No
Burnside P300 NoBurnside P300 No
Burnside P300 No----Button GSM Phone
Button GSM PhoneButton GSM Phone
Button GSM Phone QuickStart Guide
QuickStart GuideQuickStart Guide
QuickStart Guide
Page 4
Page 4Page 4
Page 4 Page 5
Page 5Page 5
Page 5
Step 3: Turn on error reporting
If the phone suffers a power or battery failure, it can alert you automatically with a
text message, enabling you to take action quickly. This error reporting function can
be enabled and disabled with the commands shown here.
To enable error reporting (or change the number to which messages should be sent),
use the REPORT command as below.
Example: 1234REPORT=07777123456
To disable error reporting, use the same command with no parameters.
Example: 1234REPORT=
Step 4: Change the phone's PIN number
This is a recommended security measure, to protect your phone from unauthorised
use or re-configuration. After changing the phone's PIN number with the PHPIN
command, make a note of it somewhere safe, along with its secondary number (the
'PUK' number that is supplied with the SIM card).
Example: 1234PHPIN=3210
Step 5: Lock the SIM card
Locking your SIM card ensures that if it is lost or stolen, it cannot be used in another
phone without being unlocked. The card cannot be unlocked without the correct
PIN number: this is why we recommend you change the phone's PIN number.
To lock the SIM card, use the LOCK command, together with the SIM's PIN number
that is supplied with the card (often defaults to 0000). Then your phone's PIN and the
SIM's PIN will be the same, making it easier to remember.
Example: 3210LOCK=0000
To unlock the SIM card, usethe UNLOCK command.
Example: 3210UNLOCK
After completing these steps, your phone is ready for use and is protected against
unauthorised use. Other commands are available to configure more advanced
features of the P300 phone, and these are described in the detailed User Guide,
which can be downloaded from the Burnside Web site.
 Loading...