

Page 1
PHASE BREW
8 CUP COFFEE BREWER
™
USE & CARE
MANUAL
HT HG
For use with HT, HG
Page 2
Welcome to Phase Brew!
You’re about to start brewing better coffee in a whole new way! The BUNN Phase Brew
with Heat & Release Technology is different from any coffee maker you’ve used before.
Unlike typical drip machines, BUNN Phase Brew doesn’t ‘drip’ right away. In fact, it doesn’t
drip at all – it flows.
Phase Brew heats all the water to the right brewing temperature, then quickly
releases it through our unique sprayhead for an optimal 4-minute brewing phase and
amazing coffee flavor in just 10 minutes!
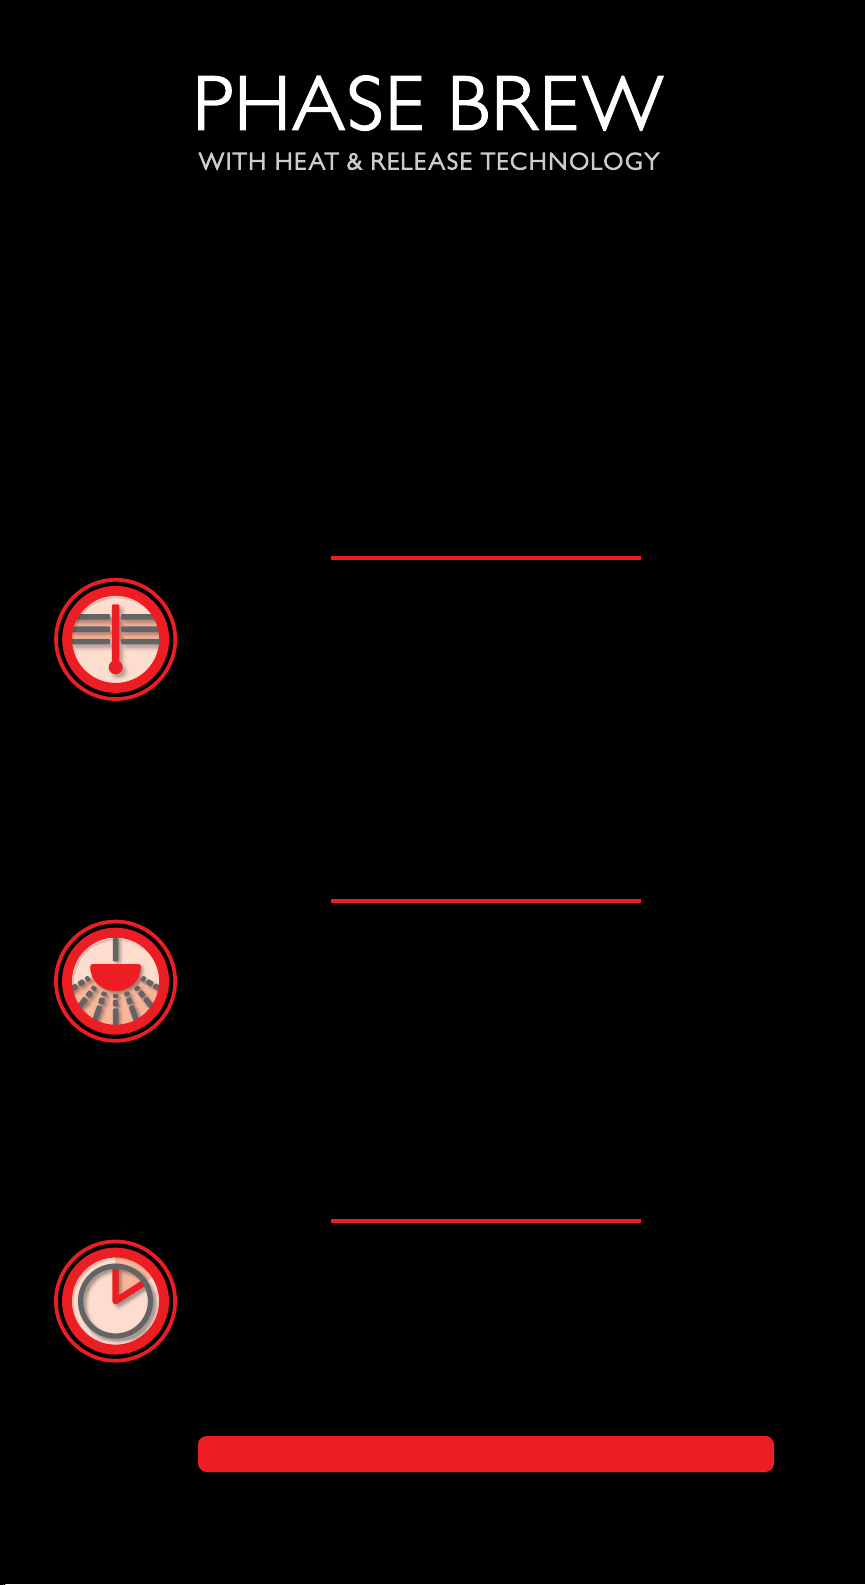
THE BUNN PHASE BREW EXPERIENCE
the 6-minute heating phase
When you fill the brew funnel with coffee grounds, the top tank with
water, and press the On/Off button, coffee won’t flow into the carafe
right away – even though the 6-minute heating phase has begun.
What you’ll hear: After a few minutes, you’ll hear some bubbling
and rumbling sounds, which are perfectly normal. It’s the sound of
our Cyclonic Heating System™ bringing the water to about 200°F –
the right temperature to brew without bitterness.
What you’ll see: As you look at the control panel, you’ll see
“Heating Water” and a moving ‘racetrack’. This tells you you’re in
the heating phase.
*
the release
When all the water reaches the optimal brewing temperature, it’s
released from the top tank to our unique sprayhead – beginning the
optimal 4-minute brewing phase.
What you’ll hear: During the release, you’ll hear a ‘whoosh’ of
water to our unique sprayhead.
What you’ll see: As water is released to the sprayhead, the top
tank empties and the heating element creates steam. Most of the
steam is channeled back into the brew funnel, but some escapes
through the top of the brewer.
the 4-minute brewing phase
Following the 6-minute heating phase and release, the 4-minute
brewing phase begins!
What you’ll see: Rich coffee leaving the brew funnel and flowing
into the carafe.
What you’ll smell: Amazing coffee aroma!
10 MINUTES TO PERFECT COFFEE!
*Length of heating phase is affected by the temperature of water
poured into the brewer and the room’s temperature.
Page 3
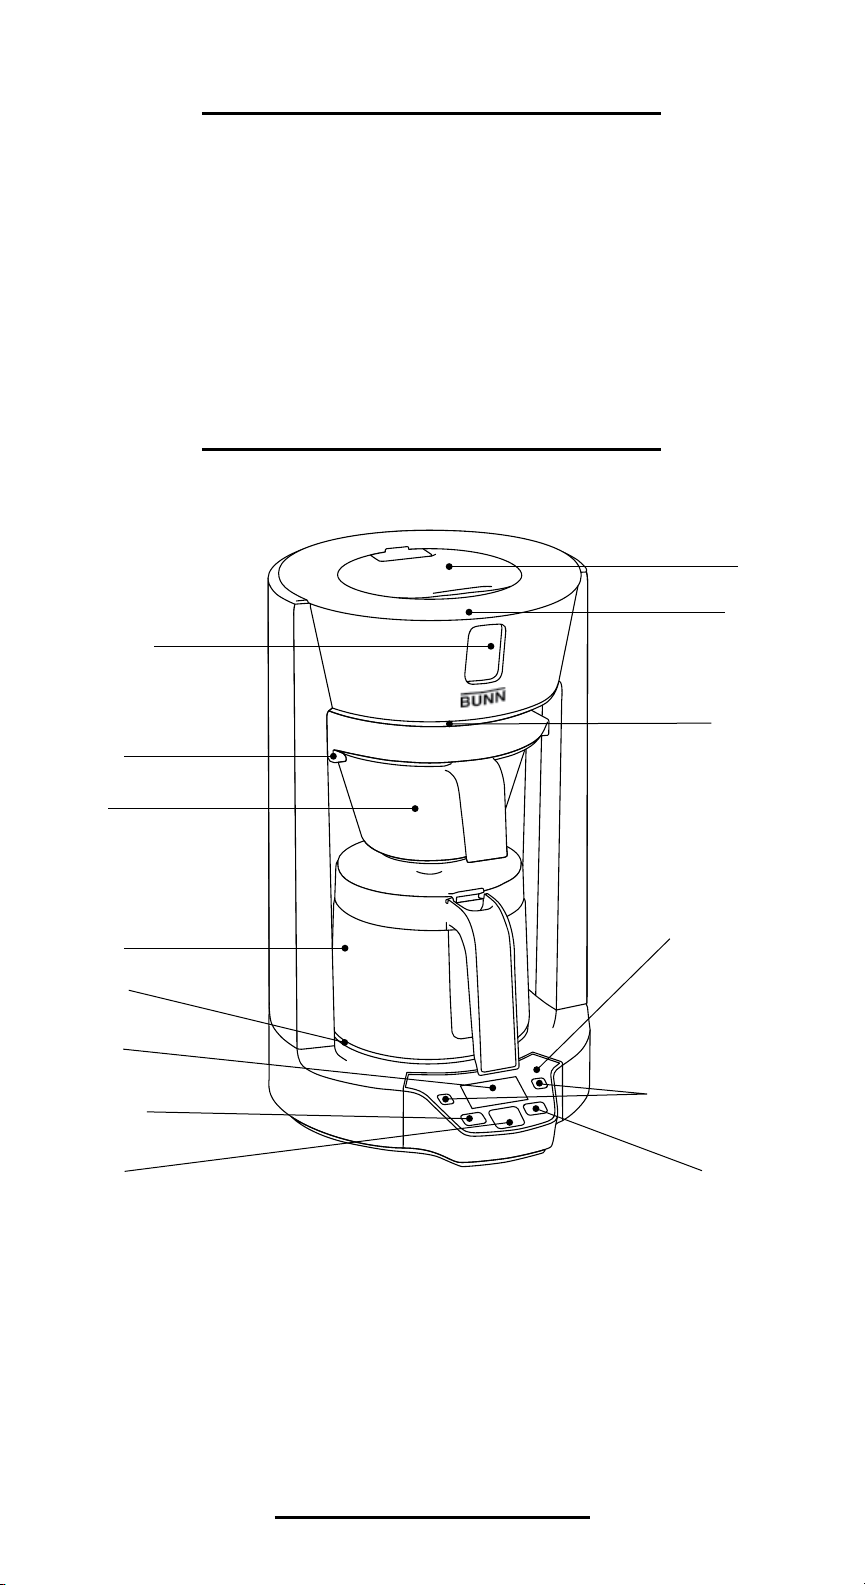
TABLE OF CONTENTS
Get To Know Your Brewer ....................... 1
Important Safeguards ............................... 2
Why BUNN Brews Better ....................... 3
Programming Your Brewer ..................... 3
Brewing Better with Phase Brew ............ 4
GET TO KNOW YOUR BREWER
BUNN PHASE BREW
WATER-FILL
WINDOW
FUNNEL
GUIDES
Brew Better Tips ....................................... 5
Cleaning & Maintenance .......................... 6
Troubleshooting ......................................... 7
Authorized Service .................................... 7
Limited Warranty ...................................... 8
SPIN LID
TOP TANK
SPR AY HEAD
BREW
FUNNEL
CARAFE
WARMER
PL AT E
DI GITA L
DISPLAY
SET CLOCK
BUTTON
ON/OFF
BUTTON
CONTROL PANEL
HOUR AND MINUTE
BUTTONS
AUTO-START
BUTTON
specifications
electrical: UL and C-UL Listed for Household Use Only. This brewer has an attached,
3-prong grounded cord set and requires 2-wire service with ground, rated 120 volts AC,
10.83 amps, single phase, 60 Hz. Total watts 1300.
brew capacity: 4 – 8 cups (5 oz.) per batch (20 – 40 oz.).
high altitude use: Water boils at a lower temperature in high altitude environments
(over 4,000 feet). At high altitudes, use a model with “D” designation as the thermostat has
been preset for these environments.
1
Page 4

IMPORTANT SAFEGUARDS
Follow basic safety precautions when using electrical appliances to reduce the risk of fire,
electric shock, and/or personal injury:
• READ ALL INSTRUCTIONS.
• Do not touch hot surfaces. Use handles.
• Do not place cord, plugs, or brewer in
water or other liquids.
• Do not open lid during heating or
brewing phases.
• Close supervision is necessary when
brewer is used by or around children.
• Let brewer cool before removing or
replacing parts, and before cleaning.
• Do not operate brewer with a damaged
cord or plug or if the brewer malfunctions
or is damaged in any way. Return brewer
to an authorized service center for
examination, adjustment, or repair (see
page 7).
• Using an accessory not evaluated for use
with this brewer may cause injury.
• Do not place brewer on or near a hot gas
or electric burner or in a heated oven.
• Do not use brewer for any purpose other
than its intended use.
• Do not remove brew funnel or carafe
while brewing.
• Do not use carafe on a range top or in
a microwave.
• Do not set a hot carafe on a cold surface.
• Do not use a cracked carafe or a carafe
with a loose or weakened handle.
• Do not pour any liquid into the water tank
other than water or vinegar for cleaning,
as specified in this manual.
• Do not clean carafe with cleansers, steel
wool pads, or other abrasive materials.
• When brewer is not in use, keep lid in the
closed position.
• For indoor household use only.
• Do not let cord hang over edge of table
or counter or touch hot surfaces.
note: The short power-supply cord supplied reduces the risk of becoming entangled in or tripping
over a longer cord. If an extension cord is used, its marked electrical rating must be at least as great
as the electrical rating of the brewer. Make sure the extension cord does not hang over the edge of a
table or counter and that it cannot be pulled on by children or tripped over. The extension cord must
be a 3-wire cord of the 3-prong, 3-socketed, grounding type (including grounding conductor).
save these instructions
Record the Model and Date Code
before using (located on the lower back of
your brewer).
model:
date code:
Questions?
Visit www.bunn.com or call
USA 1-800-352-BUNN (2866)
Canada 1-800-263-2256
Please have your Model and Date Code
ready when calling for service.
WARNING
RISK O F FIRE OR EL ECTRIC AL SHOCK
TO REDUCE RISK OF FIRE OR ELECTRIC SHOCK
DO NOT DISASSEMBLE THE BREWER
NO USER-SERVICEABLE PARTS INSIDE
REPAIR SHOULD BE DONE BY AUTHORIZED
SERVICE PERSONNEL ONLY
This symbol alerts
you to important
operating and
service instructions.
This symbol alerts you to
the risk of fire or electric
shock in the accompanying
message.
2
Page 5

WHY BUNN BREWS BETTER
PHASE BREW VS. TYPICAL DRIP
BUNN Phase Brew is different from any brewer you’ve used before. Unlike ordinary coffee
makers, BUNN Phase Brew doesn’t ‘drip’ right away. In fact, it doesn’t drip at all. That’s
because BUNN Heat & Release Technology heats all the water to the right temperature,
then quickly releases it through our unique sprayhead for an optimal 4-minute brewing
phase and amazing coffee flavor in just 10 minutes!
BUNN PHASE BREW VS. TYPICAL DRIP
PROGRAMMING YOUR BREWER
note: You must set the clock to use the brewer and the optional Auto-Start function. Remember to
reset the clock for time changes and power outages.
set clock
1. Plug 3-prong power cord into standard
electrical outlet.
2. Display will flash until clock is set.
3. Press Clock button.
auto
1. Place BUNN coffee filter and coffee
grounds into the brew funnel and slide into
the funnel guides.
2. Fill brewer with 20 – 40 oz. of water and
place carafe on base of brewer (failure to
follow steps 1 and 2 may result in property
damage).
3. Press Auto-Start button. Hour and Minute
buttons will light up, time will flash on
digital display.
4. Set time using Hour and Minute buttons.
Numbers scroll forward only. Stop at
desired Auto-Star t time. Take care to
select correct AM/PM time.
5. When desired brewing time is on the
digital display, it will be set and Auto-Start
will activate in 10 seconds. Once activated,
-start
4. Set time using Hour and Minute buttons.
Numbers scroll forward only. Take care
to select correct AM/PM time.
5. Press Clock button again to lock in time.
(
optional
Auto-Start button will be illuminated. Do
not press the button again as it will cancel
your selected Auto-Start time.
6. To check your Auto-Start setting at any
time, press the Auto-Start button and the
digital display will flash the programmed
time. The flashing time will remain the set
time unless you change it. After 10 seconds
with no buttons pushed, the Auto-Start
button will illuminate and Auto-Start is set.
7. The Auto-Start function must be
activated each time you want to preschedule a brew. If the Auto-Start button
is not illuminated, the Auto-Start
function is not activated.
8. To cancel a programmed Auto-Start, press
the Auto-Start button twice.
)
3
Page 6

HOT
CAUTION
h
m
auto
start
clock
on/o
HEATING WATER
h
m
auto
start
clock
on/o
HEATING WATER
HOT
CAUTION
HOT
CAUTION
h
m
auto
start
clock
on/o
HEATING WATER
HOT
CAUTION
h
m
auto
start
clock
on/o
HEATING WATER
BREWING BETTER
WITH PHASE BREW
1. Place BUNN coffee filter into the brew funnel.
2. Measure fresh coffee into the filter, shaking gently to level
the grounds.
We recommend 1 – 2 heaping Tbsp. of drip grind per cup.
3. Slide brew funnel into funnel guides.
4. Fill carafe with water – minimum 4 cups (20 oz.),
to maximum 8 cups (40 oz.).
Open spin lid on top of brewer; pour water into top tank.
Close spin lid. Do not open lid during heating or brewing phases.
5. Position carafe on base under brew funnel.
Preheating for models with a thermal carafe is recommended. See
Brew Better Tips on page 5 for details.
6. Press On/Off button to begin 6-minute heating phase.
Brewer is on when the red light under the button is illuminated.
The warmer plate will also be on – and will automatically shut
off after 2 hours.
Digital display will read ‘Heating Water’ and a moving ‘racetrack’
graphic will be displayed.
7. 4-minute brewing phase begins immediately after heating
phase is completed.
At the end of the brewing phase, remove brew funnel and discard
filter and grounds. Do not touch hot grounds.
To turn the warmer off when the brewing phase completes, push
the On/Off button (no red light visible).
4
Page 7

BREW BETTER TIPS
You’ll always brew better with BUNN! These BREW BETTER TIPS will help you
get the most flavor from every cup!
• Use BUNN paper filters – they’re made with a special grade of paper to extract the
purest coffee flavor. And they’re taller, so you won’t end up with overflow and grounds
in your coffee.
• For the best coffee flavor, grind beans just before brewing and be sure to use enough
coffee. For a full pot of coffee (40 oz.), we recommend 1 – 2 heaping Tbsp. of drip grind
per cup, or about 1 – 1.5 inches of coffee in a flat-bottom filter.
number of cups (5 oz.) number of tbsp.
4
6
8
• Dispose of filter and grounds immediately after brewing to prevent drip-through of
bitter flavors trapped in used coffee grounds.
• For best coffee flavor, coffee can be held in a glass carafe for up to 30 minutes or in a
thermal carafe for about 2 hours.
• Preheat thermal carafe for best results. Fill with hot water for about 30 seconds,
and then empty before brewing coffee into carafe. Preheating the thermal carafe
prevents coffee from losing temperature when it enters the carafe.
• For maximum freshness, store coffee in a clean, dry place away from heat, vents, and
extreme cold.
• Fresh, good-tasting water is essential for a perfect cup. If your water contains excessive
sediment, or has an ‘off ’ taste or odor, we recommend using filtered water.
4 – 8
6 – 12
8 – 16
bunn accessories
BUNN offers a complete line of brewer accessories, including paper filters, glass carafes,
thermal carafes, replacement funnels, and more.
Visit www.bunn.com to order parts and accessories or call the BUNN Retail Division at
1-800-352-BUNN (2866).
5
Page 8

CLEANING & MAINTENANCE
basic cleaning
Wash the brew funnel and glass carafe after each use – they’re top rack dishwasher safe.
If using a thermal carafe, hand wash the carafe and lid after each use. Every 2 to 4 weeks
remove the sprayhead and clean. Occasionally wipe the outside of your brewer, including the
area above the funnel, with a mild, non-citrus detergent and a damp cloth. While cleaning
your brewer, check the glass carafe handle and tighten with a standard screwdriver if it’s loose.
deep
cleaning
Deep clean your brewer at least every 3 months or if the digital display flashes between the
time and ‘CLE.’ The frequency of cleaning depends on the mineral content of your water (the
higher the mineral content, the more often you should deep clean).
1. Remove the sprayhead by turning with
your fingertips.
2. Check the sprayhead. If plugged with
mineral deposits or white flakes, use a
toothpick to remove. Clean the sprayhead
with a cloth and mild detergent. Rinse the
sprayhead with water.
3. Slide empty brew funnel into the funnel
guides under the sprayhead.
4. Open the spin lid on top of the brewer
and fill brewer with water to the 6-cup
(30 oz.) mark.
thermal
To disassemble the thermal carafe for cleaning, rotate lid counterclockwise to remove. Use a
mild, non-abrasive detergent to wash the lid thoroughly – paying particular attention to the
passage where the coffee brews through the lid. Do not use a scrub pad or other abrasive
cleaners, as this will scratch the stainless steel carafe.
To remove coffee stains from inside the thermal carafe, place a paper filter into the brew
funnel and pour two teaspoons of powder dishwasher detergent into the paper filter.
Slide brew funnel into funnel guides and open spin lid. Pour one carafe of cold water into
brewer. Position carafe on base plate of brewer and press the On/Off button. When cycle
is complete, remove brew funnel and discard the filter and detergent; rinse brew funnel
thoroughly. Let carafe cool for 10 – 15 minutes. Using a long-handled, soft-bristled brush,
clean the inside of carafe and the outer rim to remove any stains or debris. Occasionally
scrub the carafe pour lip and the area around it, including the lid, with a mild detergent and
warm water. Use a soft cloth and scrub hard. When finished, pour solution into sink and
thoroughly rinse carafe and lid with clean water.
carafe cleaning
5. Add 2 cups (10 oz.) of white vinegar to
brewer, filling it to the 8-cup mark.
6. Close the spin lid.
7. Place empty carafe on the base plate
of brewer.
8. Press the On/Off button to cycle the
vinegar solution through the brewer.
9. Empty carafe at end of cycle.
10. Run 2 – 3 additional cycles with full carafes
of water to flush remaining vinegar
solution from the brewer.
11. Reinstall sprayhead.
6
Page 9

TROUBLESHOOTING
problem suggestions
Brewer does not
turn on
Coffee is not
brewing
Brew time is
longer than usual
Brew funnel
overflows
Warmer plate
stays on after
brewing phase
• Make sure brewer is plugged into a working outlet.
• Press the On/Off button to begin brew (red light will be illuminated).
• Make sure brewer is plugged into a working outlet.
• Make sure brewer is filled with water. A minimum of 4 cups (20 oz.) is
needed to begin brewing.
• Make sure brewer clock is set.
• Press the On/Off button to begin brew (red light will be illuminated).
• Check to see if Auto-Start time was programmed accurately.
• Check sprayhead holes for debris. Clean sprayhead and perform
deep cleaning. See Deep Cleaning instructions (page 6).
• Be sure filter basket is properly inserted.
• Use BUNN paper filters – they are taller to prevent overflow.
• Be sure sprayhead is in place.
• If overflow continues, contact BUNN for a flow restrictor sprayhead.
• Warmer plate automatically shuts off after 2 hours. To shut off
manually, push the On/Off button (red light will turn off).
Programmed
Auto-Start did
not work
Digital display
flashes between
time and ‘CLE’
Rumbling noise
• Make sure AM/PM was accurately selected.
• Reprogram for Daylight Savings Time or a power outage if needed.
• Make sure Auto-Start button is illuminated.
• Perform deep cleaning. See Deep Cleaning instructions (page 6).
• Normal while water is heating.
• Will occur if you pour fresh water into unit immediately after brewing.
• Will occur if you pour fresh water into unit when the warmer is still on
from previous brew.
AUTHORIZED SERVICE
www.bunn.com
-o-matic corporation
bunn
the united states:
in
1400 Stevenson Drive, Springfield, IL 62703
900 E. Townline Rd., Creston, Iowa 50801
1-800-352-BUNN (2866)
in canada:
280 Industrial Parkway S., Aurora, Ontario L4G 3T9
1-800-263-2256
To receive full assistance, have the Model and Date Code ready when calling.
7
Page 10

LIMITED WARRANTY
Bunn-O-Matic warrants the BUNN HT and HG Coffee Brewers (“Brewers”), except
glass carafe, to be free from defects in materials and workmanship existing at the time of
manufacture and appearing within one of the following warranty periods:
Three (3) years from the date of original purchase of a NEW BREWER.
The later of three (3) years from the date of original purchase or one (1) year from the date
REPAIRED OR REPLACEMENT BREWER is received by the customer when returned to
Bunn-O-Matic before the new Brewer warranty has expired.
One (1) year from the date REPAIRED OR REPLACEMENT BREWER is received by the
customer when returned to Bunn-O-Matic after the new Brewer warranty has expired.
One (1) year from the date of purchase of a REMANUFACTURED BREWER.
If such a defect appears during the warranty period, we will (at our sole option) repair
or replace the defective Brewer with no charge for service or parts, provided Brewer is
delivered at the customer’s expense to one of the authorized service centers listed on page
7 of this booklet.
Warranty does not cover claims resulting from misuse, failure to follow instructions on
installation and use, use with water having a high mineral content, neglect, use of
unauthorized attachments, commercial use, use on a current or voltage other than
specified on the Brewer, or unauthorized service during the warranty period on conditions
otherwise covered by warranty.
THIS WARRANTY SHALL BE EXCLUSIVE AND SHALL BE IN LIEU OF ANY OTHER
EXPRESS WARRANTY, WRITTEN OR ORAL, INCLUDING BUT NOT LIMITED TO
ANY EXPRESS WARRANTY OF MERCHANTABILITY OR FITNESS FOR A PARTICULAR
PURPOSE. THE DURATION OF ANY IMPLIED WARRANTIES, INCLUDING BUT NOT
LIMITED TO ANY IMPLIED WARRANTIES OF MERCHANTABILITY OR FITNESS FOR A
PARTICULAR PURPOSE, IS EXPRESSLY LIMITED TO THE PERIOD OF DURATION OF
THIS LIMITED WARRANTY.
Some states do not allow limitations on how long an implied warranty lasts, so the above
limitation may not apply to you.
THE CUSTOMER’S EXCLUSIVE REMEDY FOR BREACH OF THIS WARRANTY OR OF
ANY IMPLIED WARRANTY OR OF ANY OTHER OBLIGATION ARISING BY OPERATION
OF LAW OR OTHERWISE SHALL BE LIMITED AS SPECIFIED HEREIN TO REPAIR OR
REPLACEMENT, AT OUR SOLE OPTION. IN ANY EVENT, RESPONSIBILITY FOR SPECIAL,
INCIDENTAL, AND CONSEQUENTIAL DAMAGES IS EXPRESSLY EXCLUDED.
Some states do not allow the limitation or exclusion of incidental or consequential damages,
so the above limitation or exclusion may not apply to you.
This warranty gives you specific legal rights; you may have other rights, which vary from
state to state.
The BUNN logo is a trademark of Bunn-O-Matic Corporation.
42741.0000B 04/11©2010 BUNN-O-MATIC CORPORATION
www.bunn.com
8
Page 11

CAFETERA
™
POR FASES
CAFETERA DE 8 TAZAS
MANUAL DE USO
Y CUIDADO
HT HG
Para modelos HT y HG
Page 12

CAFETERA POR FASES
con tecnología de calentamiento y liberación
¡Bienvenido a su Cafetera por Fases!
Usted esta a punto de empezar a colar un mejor café de una manera totalmente nueva.
La Tecnología de Calentamiento y Liberación de BUNN es diferente de cualquier otra
cafetera que usted haya utilizado anteriormente. A diferencia de las típicas
cafeteras de goteo, la Cafetera por fases de BUNN, no gotea inmediatamente,
de hecho, no gotea del todo – fluye.
La cafetera por fases calienta el agua a la temperatura correcta para colar, después
rápidamente la libera a través de una cabeza roceadora especial para un colado óptimo
de 4-minutos dando como resultado en sólo 10 minutos, un increíble sabor a café.
LA EXPERIENCIA DE LA CAFETERA
POR FASES DE BUNN
la
fase de calentamiento de 6-minutos
Cuando Usted llene el filtro con café molido, el tanque superior con
agua y presione el botón de ON/OFF, el café no fluirá dentro de la
jarra de manera inmediata – a pesar de que la fase de calentamiento
de 6-minutos ya ha comenzado.
Lo que usted escuchará: Después de unos minutos, usted escuchará
algunos sonidos de hervor y retumbar, los cuales son perfectamente
normales. Es el sonido de nuestro sistema Ciclónico de Calentamiento™
que está calentando el agua a alrededor de 200ºF (93°C) –
temperatura correcta para colar sin amargar.
Lo que usted verá: Cuando Usted vea la Pantalla Digital, verá que
dice “Heating Water” (Agua Calentándose) y una gráfica de agua
corriendo. Esto le indica que usted está en la fase de calentamiento.
la liberación
Cuando el agua alcanza la temperatura óptima para colar será liberada
del tanque y enviada a la cabeza roceadora especial dando inicio a la
fase de 4-minutos de colado óptimo.
Lo que usted escuchará: Durante la liberación, usted escuchará un
ruido donde el agua es enviada para la cabeza roceadora especial.
Lo que usted verá: Conforme el agua se libera a la cabeza roceadora,
el tanque superior se vacía creando vapor. La mayor parte del vapor se
canaliza de vuelta al embudo para colar, y otro poco se escapa a través
de la parte superior de la cafetera.
*
la fase de colado de 4-minutos
¡Después de la fase de calentamiento y liberación de 6-minutos, la fase
de colado de 4-minutos comienza!
Lo que usted verá: Rico café saliendo del embudo de colar y fluyendo
dentro de la jarra.
Lo que usted olerá: ¡Un increíble aroma a café!
¡
SÓLO 10 MINUTOS PARA UN
CAFÉ PERFECTO!
*La duración de la fase de calentamiento se ve afectada por la temperatura del
agua que se vierte dentro de la cafetera al igual que la del ambiente del colado.
Page 13

TABLA DE CONTENIDO
Conozca su cafetera .......................................... 1
Medidas de Seguridad Importantes................2
Porque BUNN Cuela Mejor ............................. 3
Programando su Cafetera ...............................3
Colando Mejor con la Cafetera por Fases ........4
CONOZCA SU CAFETERA
COLADO FASE BUNN
VENTANA DE
NIVEL DE AGUA
GUÍAS DEL
EMBUDO
Consejos para un mejor colado ......................5
Limpieza y Mantenimiento ...............................6
Detección de Fallas ............................................7
Servicio Autorizado ...........................................7
Garantía Limitada ..............................................8
TAPA MOVIB LE
TAN QUE
SUPERIOR
CABEZA
ROCEADORA
EMBUDO
PARA COLAR
JARRA
PLACA
CALEN TADORA
PANTALLA
DI GITA L
BOTÓN PROGR AMADOR
DE RELOJ
BOTÓN DE
ENCENDIDO/APAGADO
BOTONES DE HORA
BOTÓN DE ENCENDIDO
PANEL DE
CONTROL
Y MINUTO
AUTOMÁT ICO
especificaciones
informacion eléctrica: Clasificación UL y C-UL solamente para uso doméstico.
Esta cafetera tiene un cable de conexión a tierra de 3-clavijas y requiere servicio de 2-cables
con tierra clasificados para 120 voltios AC, 10.83 amperes, una fase, 60 Hz. 1300 vatios.
capacidad de colado: 4 – 8 tazas (5 oz.) por jarra (20 oz. – 40 oz.).
uso en lugares de gran altitud: El agua hierve a temperatura más baja en lugares
de gran altitud (sobre 4,000 pies). En sitios de gran altitud, use un modelo con la designación
‘D’ en el cual el termostato ha sido preprogramado para esos ambientes.
1
Page 14

INTRUCCIONES IMPORTANTES DE SEGURIDAD
Siga las medidas básicas de seguridad al utilizar aparatos electrodomésticos para reducir el
riesgo de incendio, choque eléctrico y/o lesiones personales.
• LEA TODAS LAS INSTRUCCIONES.
• No toque las superficies calientes. Utilize
las asas.
• No coloque el cable, enchufes o la cafetera
en agua u otros líquidos.
• No abra la tapa durante el calentamiento
o fases de colado.
• Supervisar de cerca cuando la cafetera
este funcionando y haya niños en el área.
• Deje enfriar la cafetera antes de quitarle
o cambiarle piezas, al igual que antes
de limpiarla.
• No use la cafetera si el cable, el enchufe o
la cafetera no funciona bien o esta dañada
de alguna forma. Devuelva la cafetera a
un centro de servicio
autorizado para que sea examinada,
ajustada o reparada. (Vea la página 7).
• El uso de accesorios no diseñados para
esta cafetera, podría resultar en daños
o lesiones.
• Para uso dentro de la casa solamente.
• No permita que el cable cuelgue sobre el
borde de una mesa o cubier ta prefabricada
o toque superficies calientes.
• No coloque la cafetera en o cerca de
un quemador eléctrico, gas caliente u
horno caliente.
• No use esta cafetera para cualquier otro
propósito distinto a aquél para el cual
fue destinada.
• No retire el embudo o la jarra mientras
esté colando.
• No use la jarra sobre una hornilla o en
un microondas.
• No coloque una jarra caliente sobre una
superficie fría.
• No utilice una jarra quebrada o una jarra
que tenga la manija suelta o débil.
• No vierta en el tanque del agua líquidos
distintos a agua o vinagre para su limpieza,
tal como se especifica en este manual.
• No limpie la jarra con limpiadores, esponjas
de acero u otros materiales abrasivos.
• Cuando la cafetera no este en uso, la tapa
deberá estar en posición cerrada.
nota: El cable eléctrico corto proporcionado reduce el riesgo de enredarse en un cable más largo.
Si se usa un cable de extensión, el régimen nominal del cable deberá de ser como mínimo igual al del
régimen nominal de la cafetera. Asegúrese que el cable de extensión no cuelgue del mostrador o de la
mesa para evitar que los niños lo jalen o se tropiecen. El cable de extensión deberá de ser del tipo con
tres clavijas, enchufe de 3 agujeros, con conexión a tierra de 3 alambres, (Incluyendo conductor a tierra).
conserve este instrucciones
Apunte el Modelo y el Código de Fecha
que encuentran en la parte baja de su
cafetera antes de usarla.
modelo:
codigo de fecha:
¿Preguntas?
Visite www.bunn.com en inglés o llame al
USA 1-800-352-BUNN (2866)
Canadá 1-800-263-2256
Para recibir asistencia integral, por favor
NO CONTIENE PIEZAS QUE EL USUARIO PUEDA REPARAR
ADVERTENCIA
RIES GO DE FUEG O O DESCAR GA ELÉCT RICA
PARA REDUCIR EL RIESGO DE FUEGO
O DESCARGA ELÉCTRICA
NO DESARME LA CAFETERA
LA REPARACIÓN DEBERÁ SER EFECTUADA POR
PERSONAL AUTORIZADO SOLAMENTE
Este símbolo le
advierte de importantes
instrucciones operativas
y de servicio.
Este símbolo le advierte
del riesgo de incendio o
descarga eléctrica en el
mensaje que lo acompaña.
tenga listo su número de Modelo y Código de
Fecha cuando llame para solicitar servicio.
2
Page 15

PORQUE BUNN CUELA MEJOR
COLADO POR FASES BUNN VS. COLADO TÍPICO
La Cafetera por Fases BUNN es diferente de cualquier otra cafetera que haya usado antes.
Diferente de las cafeteras ordinarias. La Cafetera por Fases BUNN no gotea inmediatamente.
En realidad, no gotea en absoluto. ¡Es porque calienta el agua a la temperatura correcta, luego
rápidamente la libera a través de una cabeza roceadora especial para comenzar la fase de
colado óptima de 4-minutos dando como resultado en sólo 10 minutos, un increíble sabor a café!
COLADO POR FASES BUNN VS. COLADO TÍPICO
PROGRAMANDO SU CAFÉ
nota: Usted deberá de programar el reloj para hacer uso de la cafetera y de la función opcional
de automático. Recuerde cambiar la hora del reloj por cambios de hora y apagones.
programe su reloj
1. Enchufe el cable de conexión de 3 clavijas
dentro de un enchufe normal.
2. La pantalla digital brillará hasta que el
reloj se programe.
3. Presione el botón de reloj.
automático
1. Pon un filtro marca BUNN con los granos de
café recién molido en el embudo de la cafetera
y deslicelo hacia las guias para el embudo.
2. Llene la cafetera con 20 – 40 oz. de agua
y coloque la jarra en la base de la cafetera
(el no seguir con los pasos 1 y 2 podrá
resultar en daños a la propiedad).
3. Presione el botón de Automático. Los
botones de Hora y Minuto se prenderán,
la hora brillará en la pantalla digital.
4. Usando los botones de Hora y Minuto
programe la hora. Los números solamente
se mueven para adelante. Pare a la hora
deseada de Automático. Cuide de seleccionar
correctamente si la hora es AM/PM.
5. Cuando la hora deseada de colar aparece
en la pantalla digital, la hora se marcará y
el automático se activará en 10 segundos.
El botón de Automático se iluminará.
4. Use los botones de hora y minutos para
programar la hora. Los números solamente se
mueven para adelante (Cuide de seleccionar
correctamente si la hora es AM/PM).
5. Presione el botón de reloj nuevamente
para asegurar la hora.
(
opcional
No presione el botón de nuevo porque
esto cancelara la hora seleccionada de
Automático.
6. Para checar su programación de
automático a cualquier hora, presione el
botón de Automático y la pantalla digital
exhibirá la hora programada a menos
que la cambie. Después de 10 segundos
sin presionar los botones, el botón de
Automático se iluminará y el Automático
estará programado.
7. La función de Automático deberá
ser programada cada vez que quiera
re-programar un colado. Si el botón de
Automático no esta iluminado, la función
de Automático no está activada.
8. Para cancelar un Automático ya
programado, presione el botón de
Automático dos veces.
)
3
Page 16

HOT
CAUTION
h
m
auto
start
clock
on/o
HEATING WATER
h
m
auto
start
clock
on/o
HEATING WATER
HOT
CAUTION
HOT
CAUTION
h
m
auto
start
clock
on/o
HEATING WATER
HOT
CAUTION
h
m
auto
start
clock
on/o
HEATING WATER
COLANDO MEJOR
CON LA CAFETERA POR FASES
1. Coloque el filtro del café BUNN dentro del embudo
para colar.
2. Mida el café fresco dentro del filtro, agítelo suavemente
para nivelar todas las partículas del café.
Nosotros recomendamos de 1 – 2 Cucharadas colmadas por taza.
3. Deslice el embudo para colar dentro de las guías del filtro.
4. Llene la jarra con agua – mínimo 4 tazas (20 onzas).
Máximo 8 tazas (40 onzas).
Abra la tapa de arriba de la cafetera; vierta el agua dentro
del tanque.
Cierre la tapa del tanque del agua. No abra la tapa durante las
fases del colado.
5. Coloque la jarra debajo del embudo de colar.
Para modelos con jarra térmica se recomienda pre-calentar.
Por detalles vea Consejos Para Mejor Colado página 5.
6. Presione el botón de On/Off para comenzar la fase de
6-minutos de calentamiento.
El colado se está haciendo cuando la luz roja debajo del botón está
iluminando. La placa calentadora también estará prendida – y se
apagará automáticamente después de dos horas.
En la Pantalla Digital se leerá “Heating Water” (Agua Calentándose)
y un gráfico en movimiento se exhibirá.
7. La fase de colado de 4-minutos comienza inmediatamente
después de que la fase de calentamiento está completa.
Al final de la fase del colado, retire el embudo para colar y deseche
el filtro y la borra. No toque el café molido caliente.
Para apagar una placa calentadora, cuando la fase de colado está
completa, presione el botón de On/Off (no hay luz roja visible).
4
Page 17

CONSEJOS PARA UN MEJOR COLADO
¡Usted siempre colará mejor con BUNN! Estos CONSEJOS DE MEJOR COLADO
le ayudarán a obtener el máximo sabor de cada taza.
• ¡Use filtros de papel BUNN! – están hechos de un papel de calidad especial para
proporcionar el mejor sabor del café. Son resistentes y estan hechos de modo que los
lados son más altos para que el café no se derrame ni suelte partículas.
• Para el mejor sabor del café, muela los granos del café fresco inmediatamente antes de
colar. Para una jarra completa (40 onzas), nosotros recomendamos 1 – 2 Cucharadas
colmadas de café molido por taza, o aproximadamente 1 – 1.5 pulgadas de café en un
filtro de fondo plano.
número de tazas (5 onzas) número de cucharadas
4
6
8
• Deseche el filtro y el café molido inmediatamente después de colar para evitar el
goteo de sabores amargos atrapados del café utilizado.
• Para mejor sabor del café, el café puede mantenerse en una jarra de vidrio hasta por
30 minutos o en una jarra térmica por aproximadamente 2 horas.
• Para mejores resultados precaliente la jarra térmica. Llénela con agua caliente como
por 30 segundos y después vacíe el agua antes de colar el café dentro de la jarra.
Precalentando la jarra térmica previene que el café pierda su temperatura cuando
entra en la jarra.
• Para frescura máxima, guarde el café en un sitio limpio y seco alejado de la calefacción
o ventilación o de frío extremo.
• Agua fresca de buen sabor es esencial para una taza perfecta de café. Si su agua
contiene cantidades excesivas de sedimentos, o tiene un sabor y olor desagradable,
nosotros le recomendamos usar un acondicionador de agua.
4 – 8
6 – 12
8 – 16
accesorios de bunn
BUNN ofrece una línea completa de accesorios, incluyendo filtros de papel, jarras, jarras
de vidrio, embudos de remplazo y más.
Visite www.bunn.com para ordenar partes y accesorios o llame a la División de BUNN al
1-800-352-BUNN (2866) ambos servicios en inglés.
5
Page 18

LIMPIEZA Y MANTENIMIENTO
limpieza básica
Lave el embudo de colar y la jarra de vidrio después de cada uso – ambos son aptos para
lavaplatos en la rejilla superior. Si usted está usando una jarra térmica lave a mano la jarra
y la tapa después de cada uso. Cada 2 o 4 semanas quite y limpie la cabeza roceadora.
Ocasionalmente limpie la parte externa de su cafetera, incluyendo el área sobre el embudo
con un jabón suave para lavar platos que no contenga componentes cítricos y con un paño
húmedo. Al limpiar su cafetera, revise si la asa de la jarra de vidrio esta floja, y de ser así
aprietela con un desarmador común.
limpieza
Deberá limpiar su cafetera a fondo por lo menos cada 3 meses o si la pantalla digital brilla
de manera intermitente entre la hora y las letras “CLE.” La frecuencia de lavado dependerá
de los minerales que contenga el agua de su area (entre mayor contenido mineral, más
frecuencia de lavado).
1. Quite la cabeza roceadora volteándola
con la punta de los dedos.
2. Revise si la cabeza roceadora tiene deposi-
tos minerales o costras blancas, de ser así,
use un palillo de dientes para removerlas.
Limpie la cabeza roceadora con un
detergente suave y un paño, enjuaguela
con agua y dejela sin instalar.
3. Deslice el embudo vacío dentro de las
guías de la cabeza.
4. Abra la tapa de arriba de la cafetera y
llene la cafetera con agua hasta la marca
de 6-tazas (30 onzas).
5. Añada 2 tazas de vinagre blanco o hasta
que llegue a la marca de 8 tazas.
limpieza
de la jarra térmica
periódica
6. Cierre la tapa de arriba.
7. Ponga la jarra vacía en la placa base de
la cafetera.
8. Presione el botón de On/Off para que
el ciclo de la solución del vinagre pase a
través de la cafetera.
9. Vacíe la jarra al final del ciclo.
10. Para fluir la solución de vinagre que quedó
en la cafetera, haga 2 – 3 ciclos adicionales
de jarras llenas de agua limpia.
11. Finalmente, instale la cabeza
roceadora nuevamente.
Para desmontar la jarra térmica para su limpieza, gire la tapa en sentido contrario a
las agujas del reloj. Use un detergente suave y no abrasivo para lavar la tapa a fondo
prestando atención especial al pasaje donde el café se cuela a través de la tapa.
No utilice fibra de fregar ni ningún otro dispositivo abrasivo de limpieza, ya que esto
rayará la superficie de acero inoxidable de la jarra.
Para eliminar las manchas de la parte interna de la jarra, coloque un filtro de papel
dentro del embudo de colar y vierta dos cucharadas pequeñas de polvo detergente dentro
del filtro de papel. Deslice el embudo de colar en los rieles del embudo de colar y abra la
tapa de la cafetera. Vierta una jarra de agua fría en la cafetera. Coloque la jarra en la placa
base de la cafetera y presione el botón de On/Off. Cuando termine el ciclo, retire el embudo
de colar y deseche el filtro y detergente; enjuague el embudo de colar cuidadosamente.
Deje reposar la jarra durante 10 – 15 minutos. Utilizando un cepillo de mango largo y cerdas
suaves, limpie la parte interna de la jarra y el aro exterior para eliminar cualquier mancha o
suciedad. Ocasionalmente frote el reborde de la jarra por donde se vierte el café y el área
de alrededor incluyendo la tapa, con un detergente suave y agua tibia. Use un paño suave
y frote vigorosamente. Cuando termine, deseche la solución en el fregadero y enjuague
cuidadosamente la jarra y la tapa con agua limpia.
6
Page 19

DETECCIÓN DE FALLAS
problema sugerencias
La cafetera no
enciende
• Asegúrese que la cafetera esté conectada a un enchufe que trabaje.
• Presione el botón de On/Off para comenzar a colar (la luz roja
estará iluminada).
El café no se
está colando
El tiempo
del colado
se demora
demasiado
El embudo se
desborda
Placa caliente se
queda prendida
después de la
fase del colado
Se programó
colado
automático
y no trabajo
• Asegúrese que la cafetera esté conectada a un enchufe que trabaje.
• Asegúrese que la cafetera tiene suficiente agua. Un mínimo de 4 tazas
(20 onzas) es necesario para comenzar a colar.
• Asegúrese que el reloj está programado.
• Presione el botón de On/Off para comenzar a colar (la luz roja
estará iluminada).
• Revise para ver si se programó el tiempo de Automático correctamente.
• Revise los hoyos de la cabeza roceadora por si tiene suciedad.
Limpie la cabeza roceadora haciendo una limpieza periódica.
Vea instrucciones de Limpieza Periódica (página 6).
• Asegúrese que la canasta del filtro esté correctamente posicionada.
• Use filtros de papel BUNN – son altos para prevenir desbordes.
• Asegúrese que la cabeza roceadora este en su lugar.
• Si el desbordamiento continúa, consiga la cabeza roceadora de BUNN
que restringe el paso del líquido.
• Placa de calentamiento se apaga automáticamente después de dos
horas, para apagarla manualmente, presione el botón de On/Off
(luz roja se apagará).
• Asegúrese que seleccionó correctamente AM/PM.
• Vuelva a programar por Cambio de Hora o por apagones si
es necesario.
• Asegúrese que el botón de automático está iluminado.
Pantalla digital
intermitente
entre la hora
y “CLE”
Sonido alto
que retumba
• Haga limpieza periódica. Vea instrucciones de Limpieza Periódica
(pagina 6).
• Normal mientras el agua se está calentando.
• Podrá ocurrir si usted vierte agua fresca dentro de la unidad
inmediatamente después de colar.
• Podrá ocurrir si usted vierte agua dentro de la unidad cuando la placa
calentadora todavía está encendida del colado anterior.
SERVICIO AUTORIZADO
www.bunn.com
-o-matic corporation
bunn
los estados unidos:
en
1400 Stevenson Drive, Springfield, IL 62703
900 E. Townline Rd., Creston, Iowa 50801
1-800-352-BUNN (2866)
en canada:
280 Industrial Parkway S., Aurora, Ontario L4G 3T9
1-800-263-2256
Para recibir mejor asistencia cuando llame tenga a la mano el Modelo y el Código de Fecha.
7
Page 20

GARANTÍA LIMITADA
Bunn-O-Matic garantiza la BUNN HT y HG Cafeteras (“Cafeteras”) excepto la jarra
de vidrio, que estén libres de defectos en material y mano de obra, al momento de su
fabricación y los que aparezcan dentro de uno de los siguientes periodos de garantía:
Tres (3) años desde la fecha de la compra original de una CAFETERA NUEVA.
La fecha que sea posterior a los tres (3) años de la fecha de compra o un (1) año de la fecha
en que la cafetera fue REPARADA O en que el cliente recibió la cafetera REEMPLAZADA
cuando se la devolvió a Bunn-O-Matic antes de que venza la garantía de la cafetera nueva.
Un (1) año de garantía desde la fecha en que el cliente recibió la cafetera REPARADA O
REMPLAZADA, cuando se haya devuelto a Bunn-O-Matic después que la nueva garantía
de la cafetera haya vencido.
Un (1) año a partir de la fecha de compra de una cafetera REMANUFACTURADA.
Si el defecto aparece durante el periodo de garantía, repararemos o remplazaremos la
cafetera defectuosa (únicamente a discreción nuestra) sin costo alguno por el servicio o las
piezas, con la condición de que el cliente corra con los gastos de envío de la cafetera a uno
de los centros de servicio autorizado que se encuentran enumerados en la página 7 de
este folleto.
Esta garantía no cubre reclamos que sean consecuencia del uso inadecuado del producto,
aquellos debidos a no haber seguido las instrucciones de instalación y cuando se utilice con
agua que tenga un alto contenido de minerales, negligencia, utilización de accesorios no
autorizados, uso comercial, uso con una corriente o voltaje diferente de aquel especificado
en la cafetera o el servicio no autorizado durante el periodo de garantía en condiciones que
de otra forma estarían cubier tas por la garantía.
ESTA GARANTÍA SERÁ EXCLUSIVA Y SUSTITUYE CUALQUIER OTRA GARANTÍA
EXPRESA, ESCRITA U ORAL, INCLUYENDO PERO SIN LIMÍTE A CUALQUIER GARANTÍA
EXPRESA DE IDONEIDAD PARA UN FIN DETERMINADO O ADECUACIÓN PARA UN
PRÓPOSITO PARTICULAR. LA DURACIÓN DE CUALQUIER GARANTÍA IMPLÍCITA
INCLUYENDO, PERO SIN LIMITARSE A CUALQUIER GARANTÍA IMPLÍCITA DE
IDONEIDAD PARA UN FIN DETERMINADO O ADECUACIÓN PARA UN FIN
PARTICULAR ESTÁ EXPRESAMENTE LIMITADA AL PERIODO DE DURACIÓN DE
ESTA GARANTÍA LIMITADA.
Algunos Estados no permiten limitaciones sobre la duración de una garantía implícita, de
modo que la limitación mencionada es posible que no aplique a su caso.
EL RECURSO EXCLUSIVO DEL CLIENTE POR EL INCUMPLIMIENTO DE ESTÁ
GARANTÍA O DE CUALQUIER GARANTÍA IMPLÍCITA O DE CUALQUIER OTRA
OBLIGACIÓN QUE SURJA CONFORME A LA LEY ESTARÁ LIMITADO SEGÚN LO
ESPECIFICADO ANTERIORMENTE PARA REPARAR O REEMPLAZAR, A NUESTRA
ÚNICA DISCRECCIÓN. EN CUALQUIER CASO SE EXCLUYE EXPRESAMENTE LA
RESPONSABILIDAD POR DAÑOS INCIDENTALES O CONSECUENCIALES.
Algunos Estados no permiten la exclusión o limitación de daños accidentales o consecuenciales,
de modo que la limitación o exclusión anteriormente expresada puede que no sea aplicable
en su caso.
Esta garantía le otorga derechos legales específicos, pero también podría tener otros
derechos que varían de Estado a Estado.
The BUNN logo is a trademark of Bunn-O-Matic Corporation.
42741.0000B 04/11©2010 BUNN-O-MATIC CORPORATION
www.bunn.com
8
 Loading...