

Page 1
COFFEE AND TEA BREWER
USE & CARE MANUAL
Page 2

The trifecta
Get ready to experiment and produce Full Cup coffee and tea with a brew
method unlike any other you have tried.
™
trifecta MB
commercial model trifecta used in specialty barista shops and tea rooms
around the world. The essential flavor oils of coffee beans and tea leaves
are precisely extracted in three distinct phases to produce a deep, amplified
beverage described as Full Cup.
With 25 unique brew settings and the choice to prepare 6 to 12 oz. at a time,
you essentially achieve a personalized micro brew in each small batch. Enjoy
this elevated level of control and repeatability without sacrificing speed and
convenience.
from BUNN utilizes the same Air Infusion™ technology as the
®
Experience
Turbulence Cycle
Turbulence, or a mixing of the grounds or leaves, is created when air is infused into
the Brew Chamber. trifecta’s Turbulence Cycle control adjusts the sequence of
mixing and pausing. This is done to extract rich, deep flavors in coffee or tea. You
can choose from five Turbulence Cycles to unlock unique tasting notes specific to
individual coffee and tea origins and produce noticeable changes in your cup.
Infusion Time
The time water is in contact with coffee or tea determines the amount of
material extracted, a major component affecting flavor. trifecta’s Infusion Time
control offers 5 choices ranging from 40 seconds to 3 minutes to account for
different roasts of coffee beans and varying fragility of tea leaves.
Press Out
trifecta’s unique press out further amplifies the result in the cup when air in
the chamber presses the beverage through a fine-gauge metal screen. This
pressurized filtering intensifies the concentrated oils and aromatics not typically
retained in other brew methods.
With trifecta, whether you love to explore or find yourself repeating the same
setting, you will find yourself saying, “I need a Full Cup!”
www.bunnathome.com
Page 3
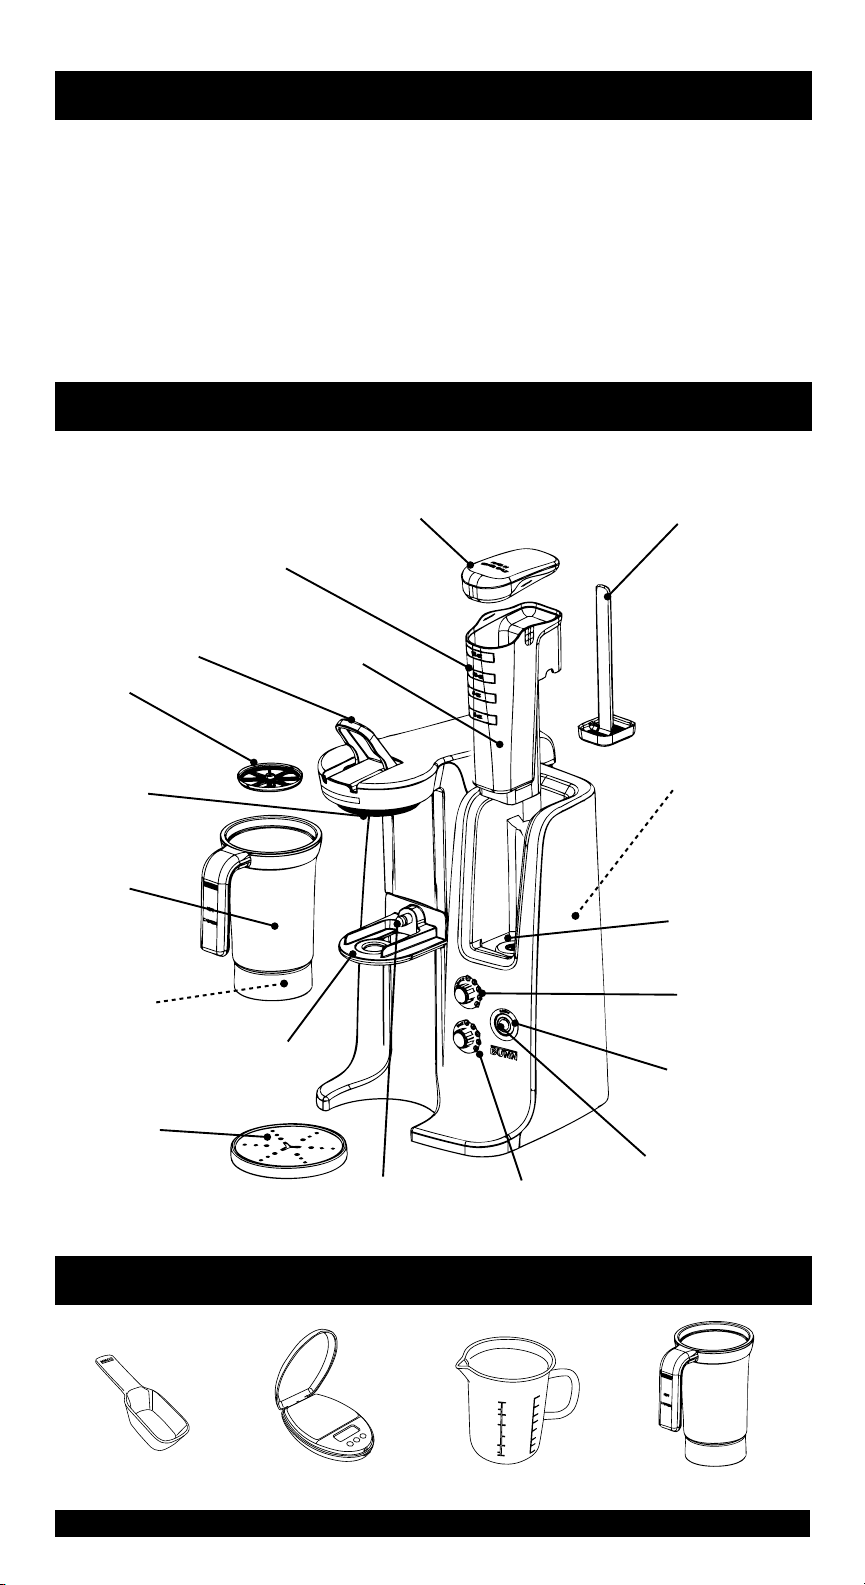
TABLE OF CONTENTS
Get to Know your trifecta ............................... 1
Important Safeguards.........................................2
Setting up trifecta .................................................3
Brewing with trifecta ...........................................4
Use and Care Tips ................................................6
Energy Saving Functions ...................................6
Cleaning & Maintenance ...................................7
GET TO KNOW YOUR BREWER
trifecta MB Coffee and Tea Brewer
REMOVABLE LID
WATER VOLUME
MARKINGS
L AT C H
BREW
SCREEN
WAT E R
RESERVOIR
Storing your Brewer ............................................8
Brew Chamber Check Valve
Maintenance .............................................................9
Indicator Light Reference .............................. 10
Troubleshooting ................................................... 11
Authorized Service .............................................12
Limited Warranty ................................................13
STRAINER
SPRAYHEAD
BREW
CHAMBER
BREW
CHAMBER
CHECK VALVE
DRIP
T R AY
BREW
CHAMBER
PLATFORM
AIR INFUSION
NOZZLE
INFUSION TIME
CONTROL
ACCESSORIES INCLUDED
STAINLESS STEEL
HOT WATER TANK
RESERVOIR
LIGHT
TUR BULENCE
CYCLE CONTROL
BREW
BUTTON LIGHT
BREW
BUTTON
trif e c ta® MB coffee and tea Brewer
BREW PITCHERDIGITAL SCALESCO OP
EXTRA
BREW CHAMBER
1
Page 4
SPEC I FI C ATIONS
Electrical: This brewer has an attached, 3-prong grounded cord set and requires 2-wire
service with ground, rated 120 volts ac, 12 amps, 60 Hz. Components include a 1450-watt tank
heater. Note: Do not operate brewer on the same outlet as other electrical appliances.
Brew Capacity: 6 to 12 oz. batch.
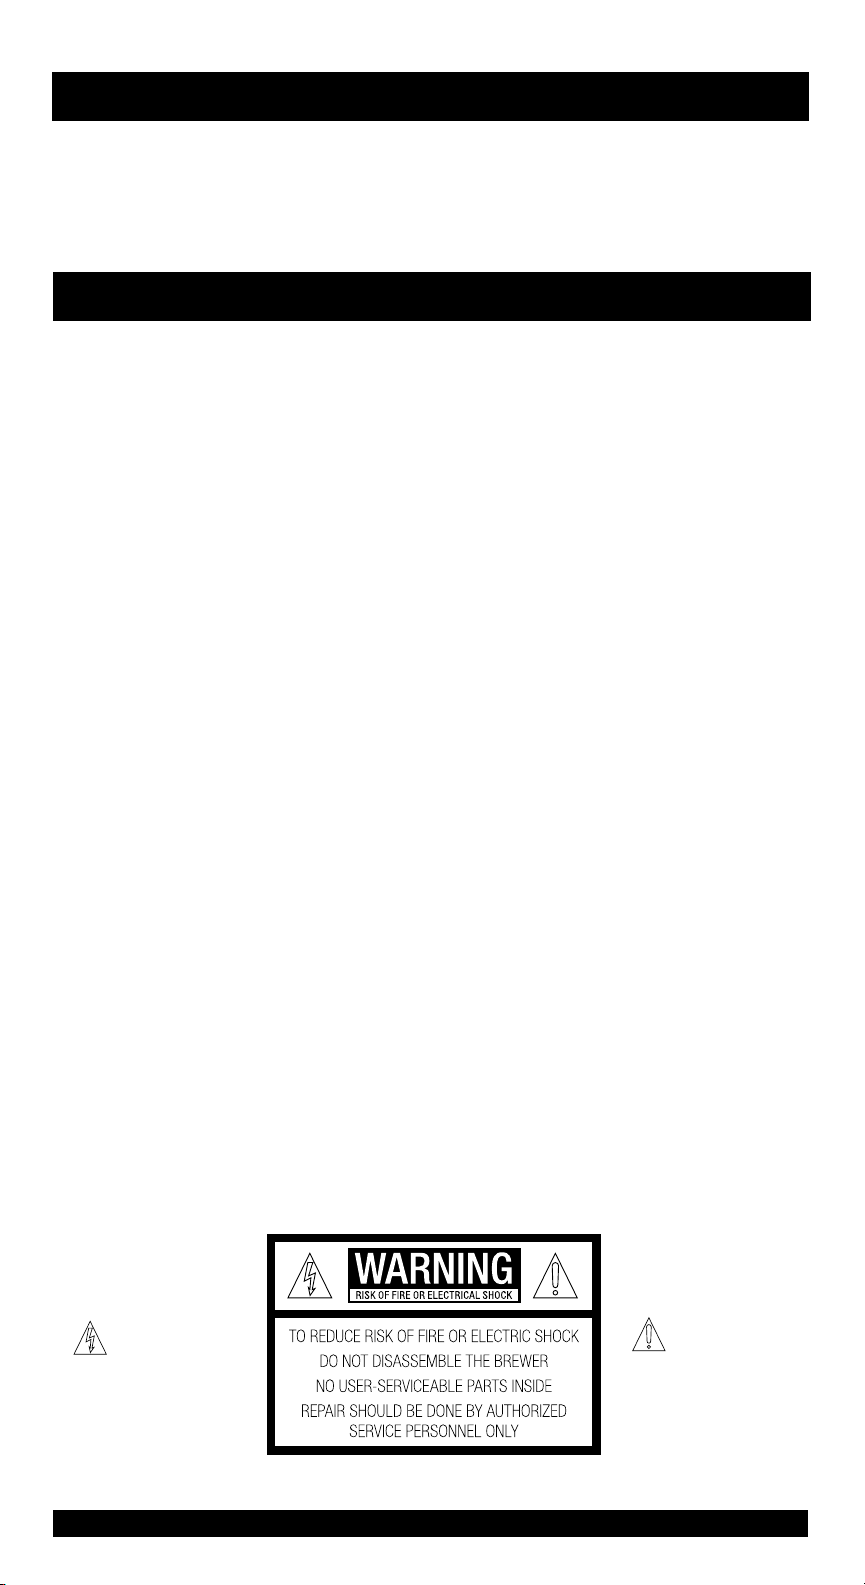
IMPORTANT SAFEGUARDS
IMPORTANT SAFEGUARDS
Follow these basic safety precautions when using electrical appliances to reduce the risk of
fire, electric shock, and/or personal injury:
• Read all instructions.
• Do not touch hot surfaces. Use handles or
knobs.
• To protect against electric shock, do not
place cord, plug, or brewer in water or
liquid.
• Close supervision is necessary when the
brewer is used by or near children.
• Unplug from outlet when not in use for
extended periods of time and before
cleaning. Allow to cool before putting on
or taking off par ts, and before cleaning.
• Do not operate the brewer with a
damaged cord or plug, or after the brewer
malfunctions or has been damaged in any
manner. Return the brewer to an Authorized Service Facility for examination,
adjustment, or repair.
• The use of an accessory not evaluated for
use with this brewer may cause injuries
and is not authorized.
• For indoor use only.
• Do not let the power cord hang over edge
of table or counter, or touch hot surfaces.
• Do not place the brewer on or near a hot
gas or electric burner, or in a heated oven.
• Do not use brewer for other than its
intended use.
• Do not remove Brew Chamber, Brew
Pitcher or cup while brewing.
• Pressing the Brew Button during a brew
will cancel the Brew Cycle. The next Brew
Cycle will dispense the full volume of the
Brew Chamber.
• To avoid container over flow, empty Brew
Pitcher or cup before each Brew Cycle.
• Never place hands directly under the Brew
Chamber. Hot water and steam can be
present.
• Do not place brewer in a sink or near
other water source. Remove Water
Reservoir and fill separately or remove
Water Reser voir Lid and fill in place with a
clean water container.
• When the brewer is idle, the Lid should be
in the closed position.
• Always use a Brew Pitcher or cup that is
larger than the water volume you filled in
the Water Reservoir.
• Keep hands away if container overflows.
Wait until brew finishes, let liquid cool,
then for subsequent brews pour in less
liquid or use a larger cup or Brew Pitcher.
• Never brew without the Brew Chamber
in place.
• Use cold water only.
• Do not pour any liquid into the Water
Reservoir other than water or vinegar for
cleaning, as specif ied in this manual.
• Do not clean Brew Chamber or Water
Reservoir with cleansers, steel wool pads,
or other abrasive materials.
• Never use or store brewer below freezing.
Damage may occur.
• Brewer must be placed on a level surface
for operation. Do not tip machine.
• Brewer must be stored upright.
• After use, brewer must be upright when
moved.
This symbol alerts
you to the risk of fire
or electric shock in the
accompanying message.
2
This symbol alerts
you to important
operating and
service instructions.
SAVE THESE INSTRUCTIONS
trif e c ta® MB coffee and tea Brewer
Page 5
SETTING UP T R IFEC TA
IMP O RTA N T: trifecta has an internal Hot Water Tank that must be filled with water before first use.
Plug the unit into a standard 110V electrical outlet.
1
NOTE: The Brew Button and Reservoir Lights will alternately flash indicating that
the Hot Water Tank needs to be filled.
Insert Brew Chamber by lifting the Latch, press the Brew
2
Chamber into Air Infusion Nozzle at the base of the Brew
Chamber Platform and close the Latch.
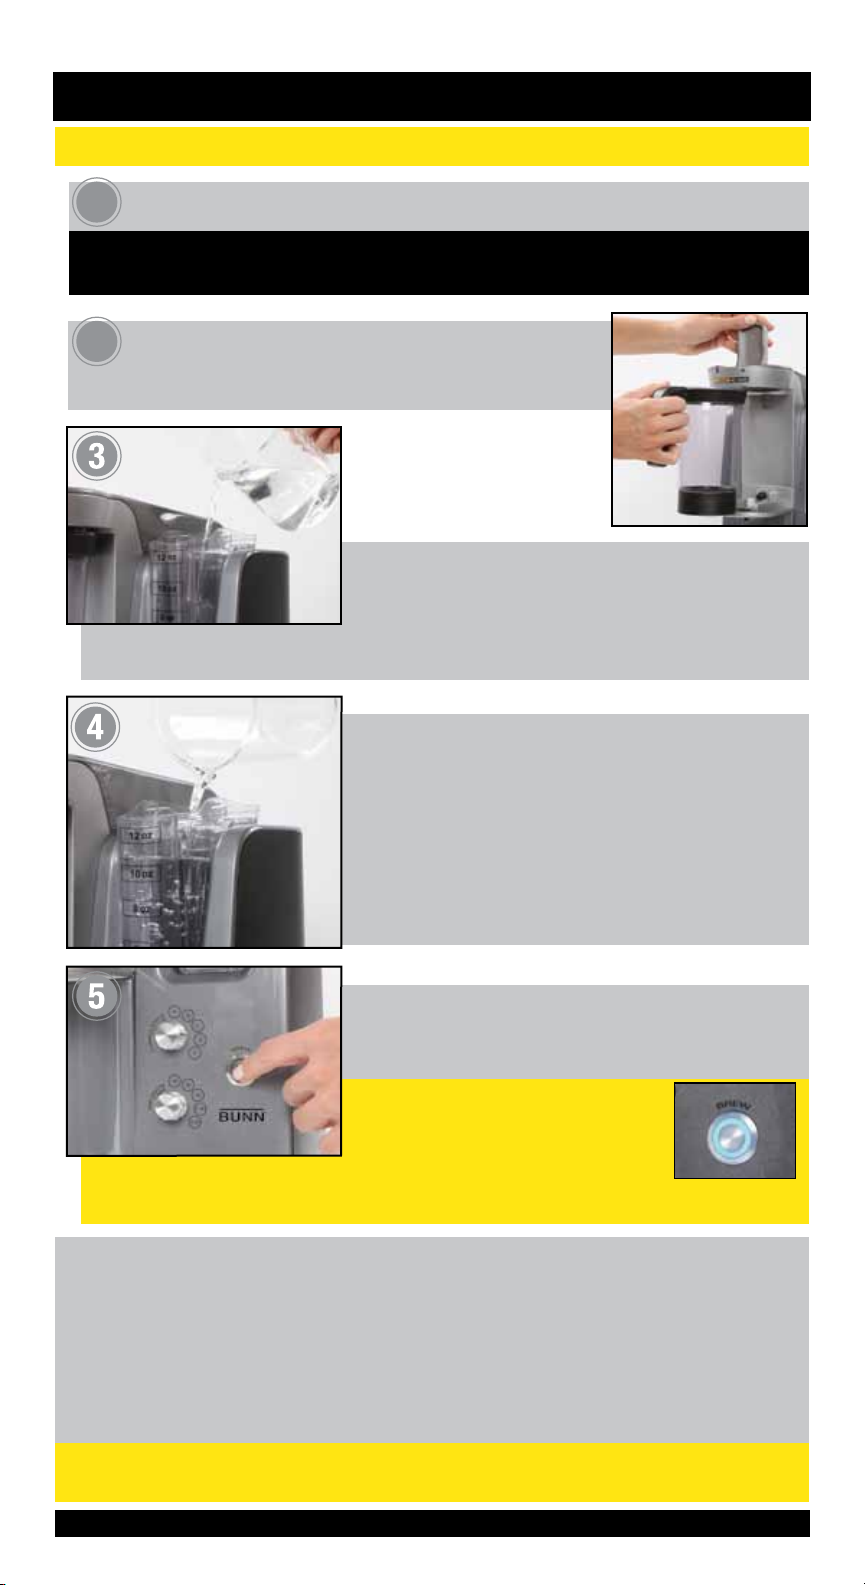
Remove Lid on Water Reservoir and pour in cold water
to the top 12 ounce mark. Wait as the water level drops
and the Water Reservoir empties completely.
Pour in another 12 ounces and wait for the water level to stabilize.
Add water to fill the Water Reservoir to the top 12
ounce mark. Place a cup with 12 ounce capacity
or the Brew Pitcher under the Brew Chamber and
press the Brew Button.
Water will automatically pump from the Water
Reservoir through the internal Hot Water Tank and
into the Brew Chamber. Then the water in the Brew
Chamber will press out into the cup or Brew Pitcher.
Repeat step 3 by emptying the cup or Brew Pitcher
and fill the Water Reservoir again. Press the Brew
Button.
After the water presses out the
second time, you should begin to
hear the sound of the heater bringing
water to the proper temperature. The Brew Button will begin to
flash. When the Brew Button light stays solid blue trifecta MB is ready to use.
HIGH ALTITUDE PROGRAMMING: Water boils at a lower temperature in high
altitude environments (over 4,000 feet). To program trifecta for use at high altitude,
remove the Brew Chamber and press the Brew Button 5 times quickly (within five
seconds). The Brew Button Light will quickly flash 5 times to indicate the brewer is
programmed for high altitude use. To return trifecta to normal operation, remove
the Brew Chamber and press the Brew Button 5 times (in under 5 seconds). The
Brew Button Light will quickly flash 10 times to indicate the brewer is programmed for
regular altitudes.
NOTE: High Altitude Programming can only be done after setup is completed and trifecta
MB is ready to use.
trif e c ta® MB coffee and tea Brewer
3
Page 6

BREWING WITH TRIFECTA
1
2
3
Remove Brew Chamber by lifting the Latch and
pulling on Brew Chamber handle.
Pour ground coffee† or loose tea into the Brew Chamber.
typical coffee ratio = 2 grams coffee / 1 ounce water
typical tea ratio = 2.5 grams / 6 ounces of water
CAUTION: Do not use more than 35 grams of coffee.
Note: See Brewing Guide for additional information.
Replace Brew Chamber and fully close the Latch.
Note: Brew Chamber must be fully engaged with Air
Infusion Nozzle. Confirm by ensuring that the Brew
Chamber base is pushed into the bottom edge of the
Brew Chamber Platform with about 1/8 inch of the
Aluminum Rail showing.
4
Fill Water Reservoir to preferred level from 6 to 12 ounces. Always use clean
water. Remember, the amount you put in is what will press out.
If Water Reservoir is in the machine when you pour in water,
fill it to the Bottom Line of the desired ounce marking.
If Water Reservoir is at a faucet or other water source when you
put in water, fill it to the Top Line of the desired ounce marking.
Note: For very precise measurement, use a calibrated liquid measuring device.
†
Grinders vary, we recommend a drip to coarse grind. If the grind is too f ine, trifecta may not push out all the brewed coffee.
4
trif e c ta® MB coffee and tea Brewer
Page 7

BREWING WITH TRIFECTA
5
6
7
Place a cup or Brew Pitcher centered on the Drip
Tray just below the Brew Chamber. Use a cup large
enough to hold the amount of water you poured in.
Select Turbulence Cycle and Infusion Time by turning
controls to desired position.
Recommended starting point for coffee is C :45.
Recommended starting point for tea is C 3:00. See
Brewing Guide for more details.
Press Brew Button to begin the brewing process.
Water will enter the Brew Chamber and your
selected Turbulence Cycle
will occur followed by a final
press out. Wait for the press
out to finish before removing
cup or Brew Pitcher.
CAUTION: beverage will be hot!
8
NOTE: Do not remove Brew Screen after each use. See page 8 for instructions to
clean the Brew Screen.
To clean Brew Chamber, turn it over, knock to
loosen grounds and dispose of grounds. Rinse the
Brew Chamber with water and wipe clean with
damp cloth or paper towel to remove coffee oils if
necessary.
TIP: Rinsing the Brew Chamber with a water only
Brew Cycle is recommended. Remember the water
that will be dispensed is hot.
trif e c ta® MB coffee and tea Brewer
5
Page 8

USE & CARE TIPS
• Run a water only Brew Cycle on a regular basis to help flush out any residual coffee
or tea particles or oils. This is especially important before or after extended periods of
non-use.
• Distilled, reverse osmosis, and highly purified water are not recommended for brewing
coffee as it lacks the minerals to bring out the natural flavors of coffee. Some common
bottled water may be too purified. If you want to use bottled water, look for words
like “filtered”, “spring water”, “mineral water” or “drinking water”. Avoid using bottled
water with words like “purified”, “distilled” or “mineral free”.
• Do not leave brewed coffee grounds or tea leaves in the Brew Chamber for extended
periods of time (overnight etc.). This makes the Brew Chamber more difficult to clean
and may lead to particles in the Brew Chamber Check Valve.
• BREW CANCEL - A brew can be canceled during the Brew Cycle by pressing the
Brew Button. Although some water may drip out, the pump will immediately stop
forcing water through the Brew Chamber. Always wait for hot liquid to stop dripping
before removing the Brew Chamber.
CAUTION: When a Brew Cycle is canceled, it will stop the Brew Cycle in progress.
Press the Brew Button to press out all contents of the Brew Chamber. Always ensure
there is a cup of adequate capacity or Brew Pitcher to hold the contents of the Brew
Chamber.
• WATER LEVEL MARKINGS - The Water Reservoir has water level markings from 6
to 12 ounces. Minimum brew is 6 ounces and maximum brew is 12 ounces. Remember,
the amount of water you put in the Water Reservoir is the amount that will press out.
If Water Reservoir is in the machine when you pour in water, fill it to the Bottom Line
of the desired ounce marking. If Water Reservoir is at a faucet or other water source
when you put in water, fill it to the Top Line of the desired ounce marking.
ENERGY SAVING FUNCTIONS
• After 6 hours idle, the heater inside the Stainless Steel Hot Water Tank drops to 140°F
to conserve energy. The Brew Button will change from a bright blue to a dim blue
light. To exit energy saver/ sleep mode, press the Brew Button or lift the Latch. The
Brew Button light will flash and the heater will begin heating. It takes about 1 minute to
get back to the optimal brewing temperature of 200°F.
• After 26 hours idle, the heater inside the Stainless Steel Hot Water Tank will turn
off for sleep mode and the Brew Button will glow dimly. To exit energy saver/ sleep
mode, press the Brew Button or lift the Latch. The Brew Button light will flash and the
heater will begin heating. It takes about 2 minutes to get back to the optimal brewing
temperature of 200°F.
USER NOTICES
Carefully read and follow all notices on the equipment and in this manual. They were
written for your protection. All notices on the equipment should be kept in good condition.
Replace any unreadable or damaged labels by visiting our web site at www.bunn.com.
WARNING HOT LIQUIDS
TO AVOID DAMAGE AND INJURY
• DISCARD CHAMBER IF
CRACKED
• CLEAN WITH MILD NONABRASIVE SOAP AND
WATER
# 43022.1000
# 37280.0001
WARNING
• DO NOT OVERLOAD CIRCUIT.
• ALWAYS ELECTRICALLY GROUND THE CHASSIS.
• DO NOT DEFORM PLUG OR CORD.
• FOLLOW NATIONAL AND LOCAL ELECTRICAL CODES.
• KEEP COMBUSTIBLES AWAY.
FAILURE TO COMPLY RISKS EQUIPMENT
DAMAGE, FIRE OR SHOCK HAZARD.
READ THE ENTIRE OPERATING MANUAL
BEFORE USING THIS PRODUCT
# 00986.0002
# 00824.0002
WARNING
Risk of fire or
electrical shock.
Do not open.
No user serviceable
parts inside.
Do not immerse.
Household and
commercial type.
Repair should be done
by authorized Service
Personnel only.
# 37267.0000
AVERTISSEMENT
Risque d'incendie ou
d'électrocution.
Ne pas ouvrir.
Aucune pièce réparable
par l'utilisateur à
l'intérieur.
Ne pas immerger.
Type ménager et
commercial.
Les réparations doivent être
confiées aux personnes
qualifiées.
6
trif e c ta® MB coffee and tea Brewer
Page 9

DA I LY C L E A NI NG
Follow all cleaning by running a Brew Cycle with water only to flush out any residual cleaners
or soap.
BREW CHAMBER
Coffee oils will build up on the inside of the Brew Chamber. We suggest cleaning
your Brew Chamber every day it is used.
IMPORTANT: There is no need to remove your Brew Screen for daily cleaning. Removing
the Brew Screen can allow coffee particles into the Brew Chamber Check Valve and cause it
to clog.
HAND CLEANING
1. Wash with warm, soapy water and a soft cloth, being careful not to press on or
rotate the Brew Screen at the bottom. Be sure to turn the Brew Chamber over
and rinse the bottom of the Brew Chamber.
2. Rinse thoroughly.
3. Allow to air dry.
DISHWASHER CLEANING
1. Rinse the Brew Chamber with warm water.
2. Wipe inside of Brew Chamber walls with soft cloth to remove coffee oils.
3. Place Brew Chamber in dishwasher on the top rack.
PERIODIC CLEANING
WARNING: Never place brewer in sink or dishwasher or submerge in water.
The exterior surfaces of your brewer will need periodic hand cleaning. Unplug
brewer and use a soft damp cloth to wipe down the outside surfaces. Use a soft
cloth and mild detergent to clean the Sprayhead area above the Brew Chamber, the
Brew Chamber Platform just below the Brew Chamber and the Air Infusion Nozzle.
Rinse with a clean damp cloth and allow brewer to fully dry before plugging into the
electrical outlet.
1. Separate the metal grate from the tray and clean both parts with warm soapy
water and soft cloth.
2. Rinse thoroughly with clean water, dry and replace.
1. Separate the metal grate from the tray.
2. Place on the top rack.
3. When clean and dry, re-install metal grate back into the tray.
EXTERIOR SURFACES
DRIP TRAY
HAND CLEANING
DISHWASHER CLEANING
trif e c ta® MB coffee and tea Brewer
7
Page 10

PERIODIC CLEANING
continued
WATER RESERVOIR
IMPORTANT: Do not force the Strainer into position. It will only fit properly into the Water Reservoir
one way. If the Strainer does not drop all the way to the bottom, rotate 180º and try again.
HAND CLEANING
1. Remove Strainer by gently rocking it from side to side while pulling it out of the
Water Reservoir.
2. Wash both parts with warm soapy water and a soft
lint free towel. Be careful not to get debris in the mesh
screen area of the strainer or in the bottom area of the
Water Reservoir.
3. Thoroughly rinse with clean water.
4. Allow to air dry.
5. Replace Strainer by dropping into the Water Reservoir
and gently rocking side to side while pushing down.
DISHWASHER CLEANING
1. Separate the Strainer from the Water Reservoir.
2. Place on the top rack.
3. When clean and dry, re-install Strainer into the Water Reservoir. Confirm that there
is no debris under the Strainer or in the bottom area of the Water Reservoir.
1. Rinse the inside of your Brew Chamber thoroughly to remove any particles.
BREW CHAMBER FILTER SCREEN
2. Using a flat head screw driver, gently rotate the Brew Screen counterclockwise
180 degrees and remove from the Brew Chamber.
Be careful not to damage the metal screen material
when using a tool or cleaning the Brew Screen.
3. Wash with warm soapy water and a soft lint free towel.
4. Gently place the Brew Screen back into position in the
bottom of the Brew Chamber. With a flat head screw driver gently push down
and rotate clockwise until Brew Screen is secure.
Place screw driver tip in
center slot of Brew Screen.
DEEP CLEANING
INTERNAL COMPONENTS
Deep clean your brewer at least every 3 months. Mineral deposits may accumulate
due to impurities in the water used to brew. If deposits are not removed, they
can impair the operation of the brewer and reduce product life. The frequency
of cleaning depends on the mineral content of your water (the higher the mineral
content -- the more often you should deep clean).
1. Remove Water Reservoir Lid and fill Water Reservoir with 12 oz. white vinegar
2. Replace Water Reservoir Lid.
3. Push Brew Button to cycle vinegar through the brewer.
4. Run at least 5 Brew Cycles with water only to flush remaining vinegar from the
internal system.
8
trif e c ta® MB coffee and tea Brewer
Page 11

BREW CHAMBER CHECK VALVE MAINTENANCE
Cleaning the Check Valve is only necessary if slow or incomplete press out occurs or if dripping
occurs before press out.
The Brew Chamber Check Valve may need periodic cleaning because your coffee
or tea is pressed through it after every brew. It can clog causing slow or incomplete
press out, or particles can stick in the valve causing dripping before press out.
STEP 1 - Cleaning Brew Chamber and Run a Brew Cycle with Water Only
Rinse the inside of your Brew Chamber thoroughly to remove any particles. Rinse
the outside of the Brew Chamber, concentrating on the Exit Check Valve area on the
underside of the Brew Chamber. Directing a stream of water into the Check Valve
will help flush particles away. Wipe the walls to remove any coffee oils. Confirm that
the Filter Screen is installed correctly. Run a water only Brew Cycle to flush particles
from the Brew Chamber Check Valve. If still clogged or stuck open, repeat the water
only Brew Cycle 2-3 more times. If symptoms persist go to step 2.
STEP 2 - Remove Brew Screen and Flush the Brew Chamber Check Valve
Using a flat head screw driver rotate the Filter Screen counterclockwise 180 degrees
and remove it from the Brew
Chamber (fig 9-1). Visually inspect
the bottom of the Brew Chamber
and the top of the Check Valve
for particles. Using a straw or
toothpick, depress the center
plunger of the Check Valve and
flush or spray with water (fig 9-2).
When satisfied that the Check
Valve is clean, confirm by filling the
Brew Chamber with clean water and look to see if water drips through the valve. If
no drip, replace the Brew Screen and confirm proper operation by running a water
only brew. If Check Valve still drips after repeated flushes, go to step 3.
STEP 3 - Remove Brew Screen , Remove Brew Chamber Check Valve, and Flush
With Brew Screen removed, turn the Brew Chamber over and place the open end on
a flat surface. Locate the exit opening on the bottom of the Brew Chamber. It has 7
small holes arranged in a circle. Using a toothpick, press
down into the center hole and pop the Check Valve loose
(fig 9-3). It should fall inside the Brew Chamber and onto
the flat surface. Flush or spray the Check Valve with clean
water while depressing the spring loaded center plunger
with a toothpick. When satisfied that it is clean, reinstall
the Check Valve into the Brew Chamber. To reinstall,
drop the Check Valve into the chamber and shake till the
valve is in position above the hole at the bottom of the
Brew Chamber. Confirm that the black o-ring on the
Check Valve is facing upwards as you use finger or like tool to press the valve into the
pocket. Make sure it is pressed in untill flush with the bottom surface. Fill the Brew
Chamber with water to check for drips. If there is no drip re-install the Filter Screen
and confirm proper operation by running a water only Brew Cycle. If Check Valve is
still leaking repeat step 3.
NOTE: Be careful not to damage the Filter Screen when using a tool or cleaning
trif e c ta® MB coffee and tea Brewer
9
Page 12

STORING THE BREWER
Unplug the brewer and wait for it to cool. Brewer must be stored upright and above
32°F/ 0°C to prevent damage to the Stainless Steel Hot Water Tank. If you do not use
trifecta for an extended period of time, we recommend running two or three cycles of
water through the brewer prior to brewing coffee or tea.
IMPORTANT HANDLING INFORMATION
To avoid dropping and damaging the brewer, always grasp the brewer by the sides and
bottom, or top and bottom of the brewer.
INDICATOR LIGHT REFERENCE
trifecta MB is equipped with a system for displaying helpful feedback. The Brew Button
Light in conjunction with the Reservoir Light provides valuable feedback or can help you
troubleshoot.
INDICATOR LIGHTS SUGGESTIONS
Brew Button Light and
Reservoir Light flash (alternate
flashing)
Brew Button slowly flashes
Brew Button is lit (steady glow)
Reservoir Light flashes 4 times
after pushing Brew Button
Reservoir Light flashes rapidly
after pushing Brew Button
Brew Button flashes quickly
• Brewer is in initial setup mode and must be primed
with water. See Set ting Up trifecta on page 3.
• Water in the brewer is not up to proper temperature
yet. Wait for the water to heat – the Brew Button will
illuminate solid blue when ready.
• Water is hot and trifecta is ready to brew.
• The Brew Chamber is missing, Latch is not closed or
Latch has not been opened and closed since last
brew cycle.
• Open Latch, remove Brew Chamber, replace Brew
Chamber, close Latch and press the Brew Button
again.
• Add water. A minimum of 6 ounces of water is
required.
• Brew was interrupted by lifting the Latch or pushing
the Brew Button. The button will continue to flash
until you push the Brew Button again. Push the Brew
Button again and (after a brief pause) the brewer will
push out the contents of the Brew Chamber. Note:
Make sure that a cup is positioned on the Drip Tray under the Brew Chamber prior to pushing Brew Button
.
10
trif e c ta® MB coffee and tea Brewer
Page 13

TROUBLESHOOTING
PROBLEM
Brewer doesn’t turn on
Result in the cup is weak
Not all of the beverage presses
out into the cup
Brew Chamber will not come
out of the brewer or is diff icult
to remove
Brew Latch will not engage or
push down
SUGGESTIONS
• Make sure brewer is plugged into a working outlet.
• Brew Button will be illuminated or flashing if there is
power to the machine.
• Try using less water or more coffee or tea
(at least 2 grams of coffee per oz. of water or 2.5 grams
of tea per 6 oz. of water).
• See Brewing Guide.
• Brew Chamber is not fully installed. Conf irm that
Brew Chamber base is pushed onto Brew Chamber
Platform with about 1/8” of aluminum rail showing.
See page 4
• Lift the Latch all the way up and gently pull out the
Brew Chamber. Clean the Brew Chamber Platform,
Air Infusion Nozzle and Brew Chamber Air Inlet with a
soft cloth and mild detergent.
• Lift Latch and make sure that Brew Chamber is fully
pushed into the Brew Chamber platform.
Brewer continues to heat and
Brew Button light continues to
flash
Brew Button is pressed but brew
does not start
Brew Button is pushed but
Water Reservoir doesn’t empty
or some water remains in the
Water Reservoir
• You may be at a higher altitude. See page 3 to
program your machine for high altitude use.
• Make sure brewer is plugged into a working outlet.
• Make sure setup was completed. See Setting Up
trifecta on page 3.
• Make sure Water Reser voir has at least 6 ounces of
water.
• Ensure Brew Chamber is fully inser ted and Latch is
engaged.
• Remove Strainer from Water Reservoir and inspect for
foreign material or any film. Perform Deep Cleaning if
film is present.
• If Brew Button flashes slowly, brewer is heating water
to proper brew temperature – wait approximately 2
minutes until the Brew Button is steady blue.
• Press Brew Button to begin brew.
• Remove Water Reservoir, put back in machine, and
confirm that Water Reservoir is seated properly.
• Lift up Latch and push back down to reset the machine.
• If problem persists, remove Water Reservoir, separate
Strainer and clean thoroughly. Replace Strainer and
Water Reservoir and run a water only Brew Cycle
to test.
trif e c ta® MB coffee and tea Brewer
11
Page 14

TROUBLESHOOTING
PROBLEM SUGGESTIONS
continued
Liquid drips from the Brew
Chamber during the Brew
Cycle
Some or all of the coffee or tea
does not press out at the end of
the Brew Cycle
Water Reservoir is accidently
filled with coffee
Excessive grounds are in the
beverage
• Coffee grounds or tea particles may be in the Brew
Chamber Check Valve.
• Run a water only Brew Cycle to flush the system.
• If problem persist, see page 9 to clean the Brew
Chamber Check Valve.
• The Check Valve in the Brew Chamber may be stuck
closed. See page 9 to clean the Brew Chamber Check
Valve.
• Seal around the top of the Brew Chamber may be
misaligned or damaged. Re-align the seal if possible. If
seal is damaged, call Customer Service for a replacement.
• Remove Water Reservoir and clean Water Reservoir
and Strainer thoroughly.
• Please remember to put only water in the Water
Reservoir.
• Run a water only Brew Cycle to flush the system.
• Rinse Brew Chamber thoroughly
• Remove Brew Screen on bottom of Brew Chamber.
Rinse area under the Brew Screen and check for
holes or damage to metal screen material. If the
Brew Screen is damaged, call Customer Service for a
replacement.
• Reassemble screen properly (see page 8).
Record these numbers from the back of the brewer, before filling the brewer with water.
model: ________________ serial number: __________________
trifecta MB
Questions?
Visit www.bunn.com or call USA 1-888-436-0296
Please have your Model and Ser ial Number ready when calling for service.
NOTE: Do not disassemble. There are no user serviceable parts inside the brewer.
AUTHORIZED SERVICE
www.bunn.com
bunn-o-matic
the united states:
in
1400 Stevenson Drive, Springfield, IL 62703
900 E. Townline Rd., Creston, Iowa 50801
1-888-436-0296
To receive full assistance, have the Model and Serial Number
(located on the back of your brewer) ready when calling.
®
corporation
12
trif e c ta® MB coffee and tea Brewer
Page 15

LIMITED WARRANTY
Model: trifecta MB
Bunn-O-Matic Corp. (“BUNN” or “we”) warrants to the original user (the “buyer” or “you”) of
this equipment that the equipment is free from defects in material and workmanship existing at
the time of manufacture and appearing within two years from the original date of purchase.
If such a defect appears during the warranty period, you must notify us promptly by either (1)
calling us toll-free at 888-436-0296, (2) contacting us through our website (www.BunnAtHome.
com) or (3) writing us at Bunn-O-Matic Corp., Attn. At Home Warranty Administrator, P.O. Box
3227, Springfield, IL 62708-3227.
If we determine, in our sole discretion, that the unit is not in the warranted condition during the
warranty period, we will (at our exclusive option) either (1) arrange for the unit to be repaired, at
no cost to you for par ts or labor, by BUNN, or (2) replace the unit at no charge to you.
Coverage under this warranty is conditioned on you (1) providing us with prompt notice of any
condition for which you seek warranty coverage, (2) providing us, if we request, with proof of the
price and date of your purchase, and (3) returning the unit, if we request, to BUNN for inspection
or repair
This warranty does not apply to any equipment, component or part that, in BUNN’s judgment,
has been affected by misuse, neglect, alteration, improper installation or operation, improper
maintenance or repair, lack of periodic cleaning and descaling, high volume commercial use, use on
a current or voltage other than specif ied, poor water quality, damage, casualty, or unauthorized
service during the warranty period. In addition, the warranty does not apply to replacement of
user replaceable parts, such as seals and gaskets, due to normal wear and tear.
THIS WARRANTY SHALL BE EXCLUSIVE AND SHALL BE IN LI EU OF ANY OTHER
EXPRESS WARR ANTY, WRITTEN OR ORAL, INCLUDING BUT NOT LIMITED TO
ANY EXPRESS WARR ANTY OF MERCHANTABI LITY OR FITNESS FOR A PARTICULAR
PURPOSE. THE DURATION OF ANY IMPLIED WARR ANTIES, INCLUDING BUT NOT
LIMITED TO ANY IMPLIED WARRANTIES OF MERCHANTABILITY OR FITNESS FOR
A PARTICULAR PU RPOSE, IS EXPRESSLY LIMITED TO THE TWO-YEAR PERIOD OF
DURATION OF THE EXPRESS WARR ANTY SET FORTH ABOVE. No one, including the
employees of BUNN or its agents or dealers, is authorized to modify this express warranty or to
make additional oral or written express warranties on our behalf. Accordingly, you should not
rely on any such statements as creating oral or written express warranties that are binding on us.
Some states do not allow limitations on how long an implied warranty lasts, so the above limitation
may not apply to you.
YOUR EXCLUSIVE REMEDY FOR BREACH OF THIS WARRANT Y OR OF ANY IMPLIED
WARRANTY OR OF ANY OTHER OB LIGATION AR ISING BY OPERATION OF LAW OR
OTHERWISE SHA LL BE LIMITED AS SPEC IFIED HEREIN TO REPAIR, REPLACEMENT OR
REFUND, AT OUR SOLE OPTION. IN ANY EVENT, WE WILL NOT BE RESPONSIBLE
FOR ANY SPECIAL, INCIDENTAL OR CONSEQUENTIA L DAMAGES.
Some states do not allow the exclusion or limitation of incidental or consequential damages, so
the above limitation or exclusion may not apply to you.
This warranty gives you specif ied legal rights, and you may have other rights which vary from
state to state.
The BUNN logo is a trademark of Bunn-O-Matic Corporation.
45267.0000A 12/11©2011 BUNN-O-MATIC CORPORATION
trif e c ta® MB coffee and tea Brewer
www.bunn.com
13
Page 16

45627.0000A 2/12 ©2012 Bunn-O-Matic Corporation
 Loading...