

Page 1
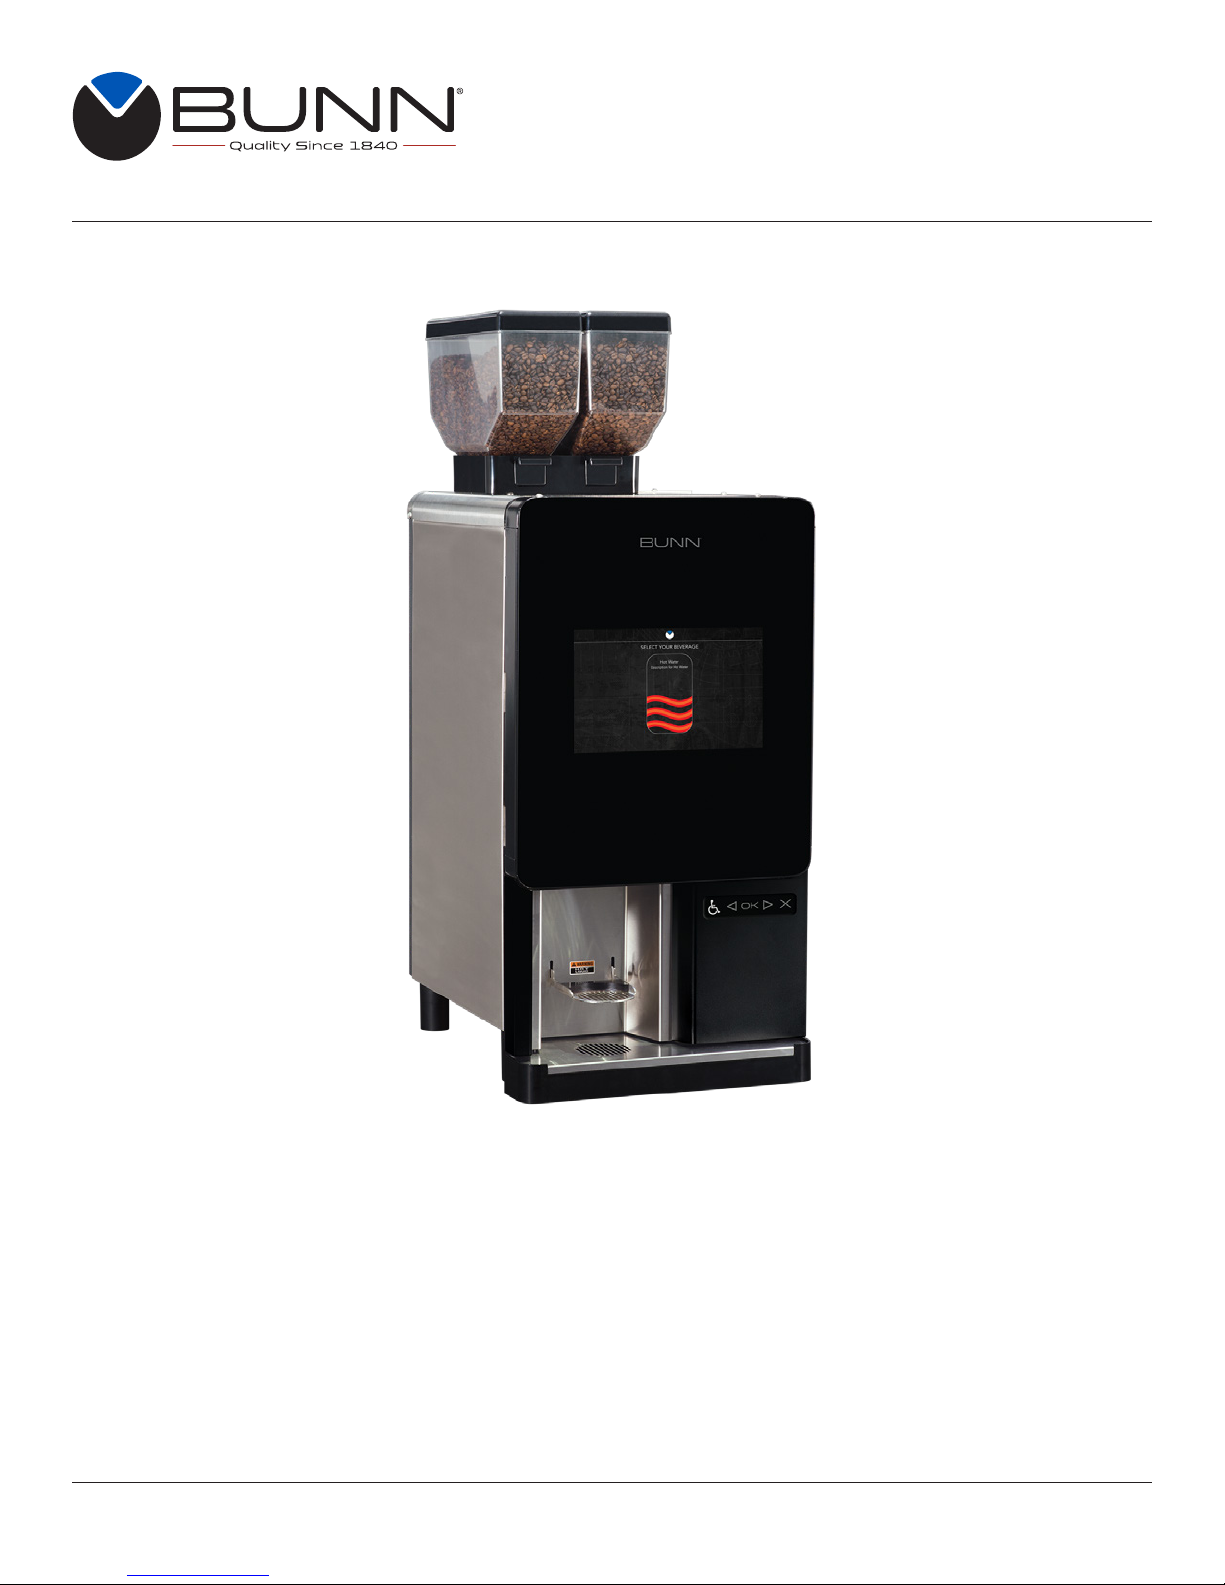
Sure Immersion® 220
Bean-To-Cup, Single Serve, Air Infusion Brewer
PROGRAMMING MANUAL
To ensure you have the latest revision of the Operating Manual, or to view the Illustrated Parts Catalog, Programming Manual, or Service
Manual, please visit the Bunn-O-Matic website, at www.bunn.com. This is the quickest way to obtain the latest catalog and manual updates.
For Technical Service, contact Bunn-O-Matic Corporation at 1-800-286-6070.
Post Office Box 3227, Springfield, Illinois 62708-3227
Phone (217) 529-6601 | Fax (217) 529-6644
54377.0000 D 10/18 © 2016 Bunn-O-Matic Corporation
Bunn-O-Matic Corporation
www.bunn.com
Page 2

BUNN-O-MATIC COMMERCIAL PRODUCT WARRANTY
Bunn-O-Matic Corporation (“BUNN”) warrants the BUNN Sure Immersion system, further described below for a
warranty period of 1 year parts and labor.
These warranty periods run from the date of installation. BUNN warrants that the equipment manufactured by it will
be commercially free of defects in material and workmanship existing at the time of manufacture and appearing within
the applicable warranty period. This warranty does not apply to any equipment, component or part that was not manufactured by BUNN or that, in BUNN’s judgment, has been affected by misuse, neglect, alteration, improper installation
or operation, improper maintenance or repair, damage or casualty. This warranty is conditioned on the Buyer 1) giving
BUNN prompt notice of any claim to be made under this warranty by telephone at (217) 529-6601 or by writing to Post
Office Box 3227, Springfield, Illinois 62708-3227; 2) if requested by BUNN, shipping the defective equipment prepaid to
an authorized BUNN service location; and 3) receiving prior authorization from BUNN that the defective equipment is
under warranty. Additionally the following is excluded from the warranty period.
Warranty Exclusions:
Parts such as, but not limited to, hoppers and lids, drip trays, and plastic parts damaged due to improper
handling or cleaning agents.
Replacement of wear items such as, but not limited to, O-rings, gaskets, tubes, brew box seal, hoses,
and valve seats.
Repairs made necessary due to poor water quality, such as dispense valves, coils, water inlet valves,
scaling in hot water boilers.
Improper voltage, (See equipment operations manual for voltage specifications)
Touch screen due to improper use or damage.
Failure to perform cleaning procedures constitutes improper maintenance.
Failure to have required preventive maintenance performed by a BUNN technician or an authorized
BUNN service agent.
Parts replaced under the terms of this warranty carry the remainder of the machine's parts warranty term,
or 60 days, whichever is greater.
THE FOREGOING WARRANTY IS EXCLUSIVE AND IS IN LIEU OF ANY OTHER WARRANTY, WRITTEN OR ORAL,
EXPRESS OR IMPLIED, INCLUDING, BUT NOT LIMITED TO, ANY IMPLIED WARRANTY OF EITHER MERCHANTABILITY OR FITNESS FOR A PARTICULAR PURPOSE. The agents, dealers or employees of BUNN are not authorized to make modifications to this warranty or to make additional warranties that are binding on BUNN. Accordingly,
statements by such individuals, whether oral or written, do not constitute warranties and should not be relied upon.
If BUNN determines in its sole discretion that the equipment does not conform to the warranty, BUNN, at its exclusive
option while the equipment is under warranty, shall either 1) provide at no charge replacement parts and/or labor (during
the applicable parts and labor warranty periods specified above) to repair the defective components, provided that this
repair is done by a BUNN Authorized Service Representative; or 2) shall replace the equipment or refund the purchase
price for the equipment.
THE BUYER’S REMEDY AGAINST BUNN FOR THE BREACH OF ANY OBLIGATION ARISING OUT OF THE SALE
OF THIS EQUIPMENT, WHETHER DERIVED FROM WARRANTY OR OTHERWISE, SHALL BE LIMITED, AT BUNN’S
SOLE OPTION AS SPECIFIED HEREIN, TO REPAIR, REPLACEMENT OR REFUND.
In no event shall BUNN be liable for any other damage or loss, including, but not limited to, lost profits, lost sales, loss of
use of equipment, claims of Buyer’s customers, cost of capital, cost of down time, cost of substitute equipment, facilities
or services, or any other special, incidental or consequential damages.
2
102318
Page 3

CONTENTS
Warranty ................................................................................................................. 2
Filling Coffee Bean Hoppers ................................................................................ 4
Product and Recipe Setup ................................................................................... 5
Product Setup ................................................................................................... 5
Ginder Calibration ............................................................................................. 7
Recipe Setup ..................................................................................................... 11
Editing Coffee Recipes by Size .................................................................... 13
Enabling Products .............................................................................................. 15
Hopper Setup ..................................................................................................... 16
Machine Settings .................................................................................................. 17
Temperature ...................................................................................................... 17
Bean Hopper ..................................................................................................... 18
Grounds Bin ...................................................................................................... 18
Hot and Ambient Water ..................................................................................... 19
BUNNlink .......................................................................................................... 19
Energy Saver .................................................................................................... 19
Scheduler .......................................................................................................... 20
Vending ............................................................................................................. 20
Service Information ........................................................................................... 20
Factory Reset .................................................................................................... 20
Exporting Files Using USB .................................................................................. 21
Setup of Multiple Machines ............................................................................... 21 - 23
Importing Files Using USB .................................................................................. 24
Copying Settings from Machine to Machine ..................................................... 24 - 25
Adding to Your Brand ......................................................................................... 25 - 28
For additional information, refer to Installation and Operating Guide.
3
102318
Page 4
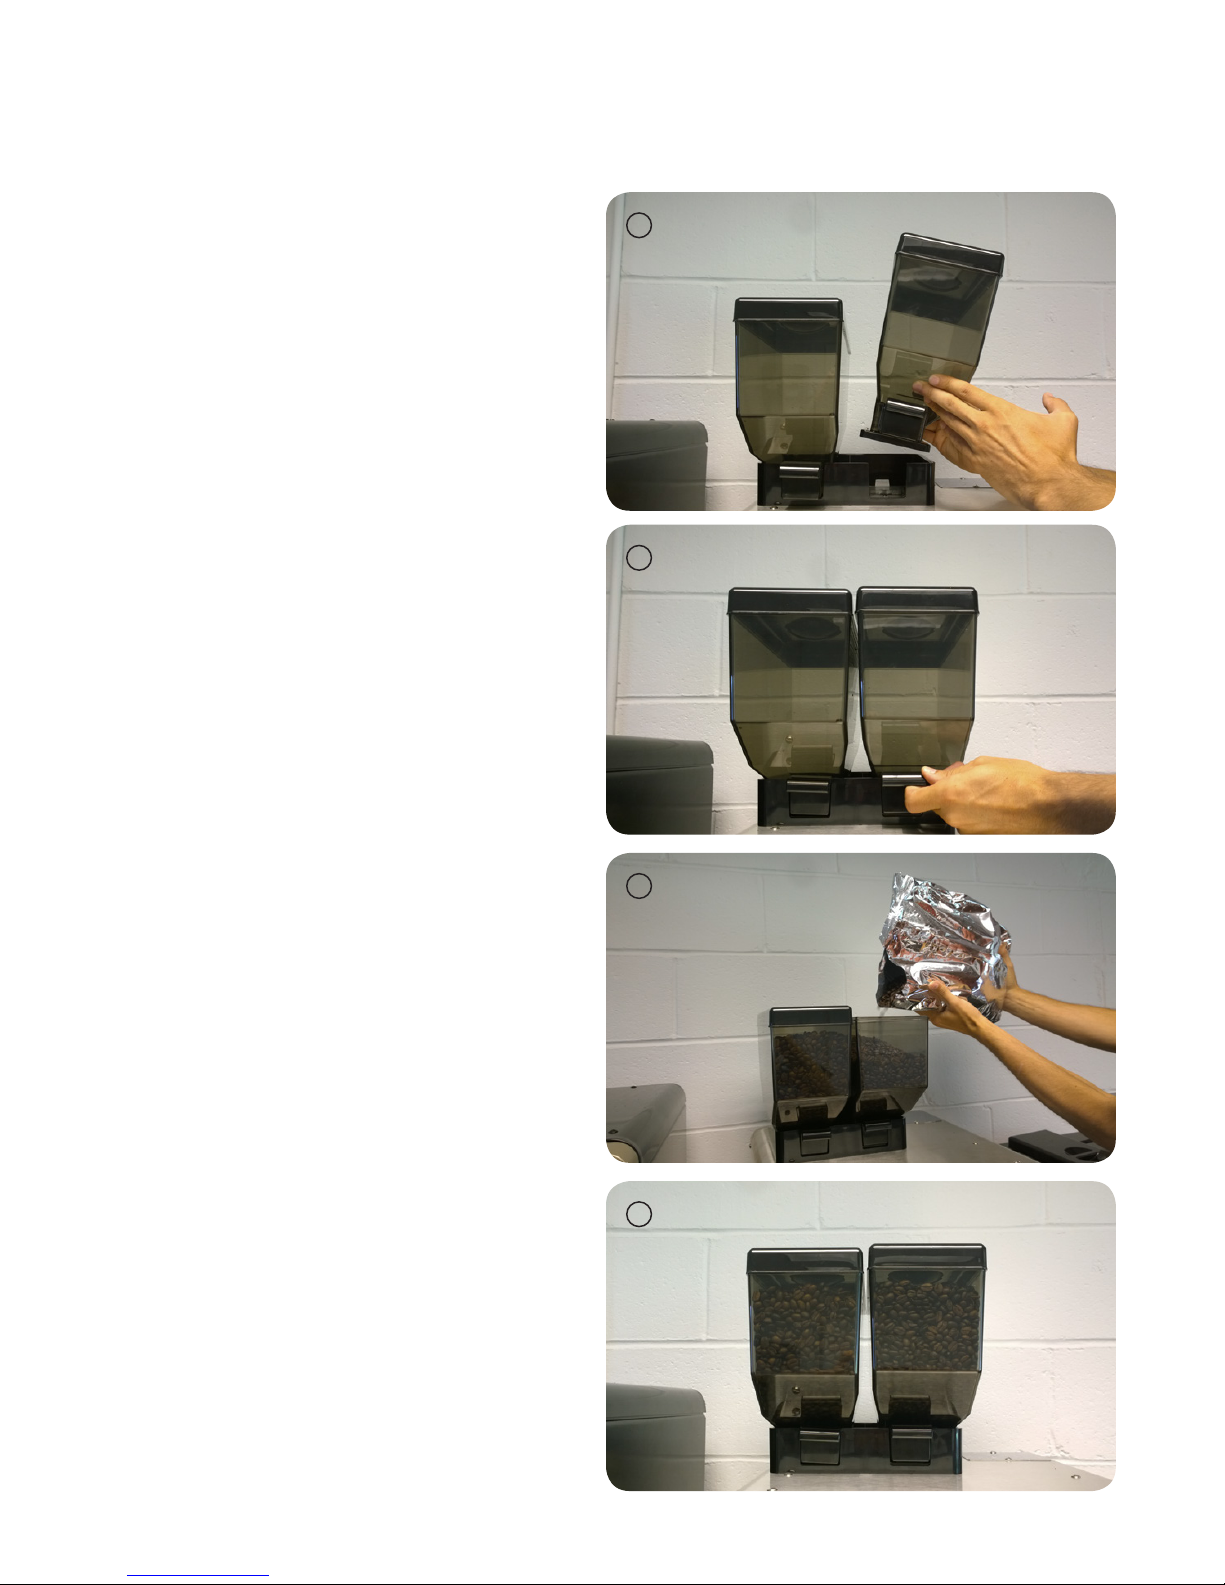
FILLING BEAN HOPPERS
Fill the hoppers with coffee beans.
1. Place an empty hopper in opening on top
of machine.
2. When placed, push gate handle back.
1
2
3. Remove lid and pour whole coffee beans in top
of hopper.
4. Once full, place lid back on top of hopper.
3
4
4
102318
Page 5
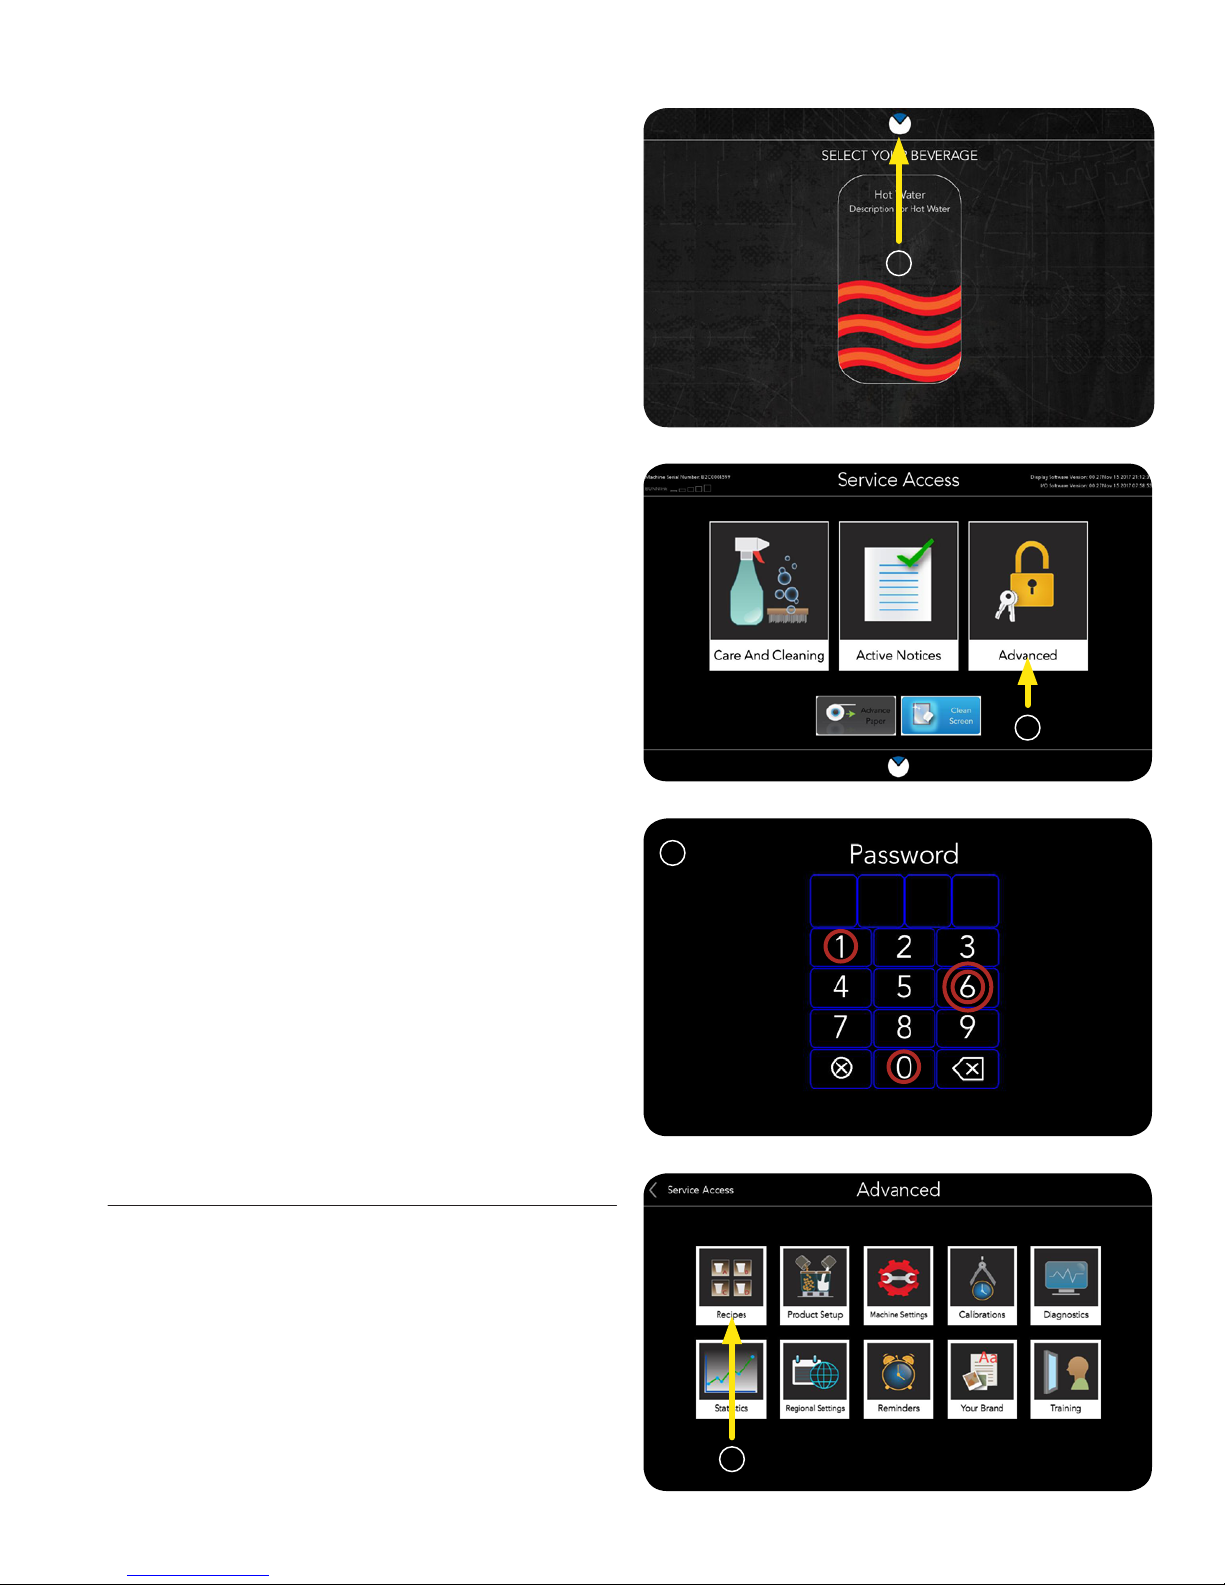
PRODUCT AND RECIPE SETUP
1. Touch and hold the BUNN logo for a few
seconds until SERVICE ACCESS appears
on the display.
2. Select the ADVANCED icon.
1
3. Next, enter the passcode 6601.
Product Setup
First we will setup a coffee Product.
1. Touch the RECIPES icon.
2
3
* * * *
1
102318
5
Page 6
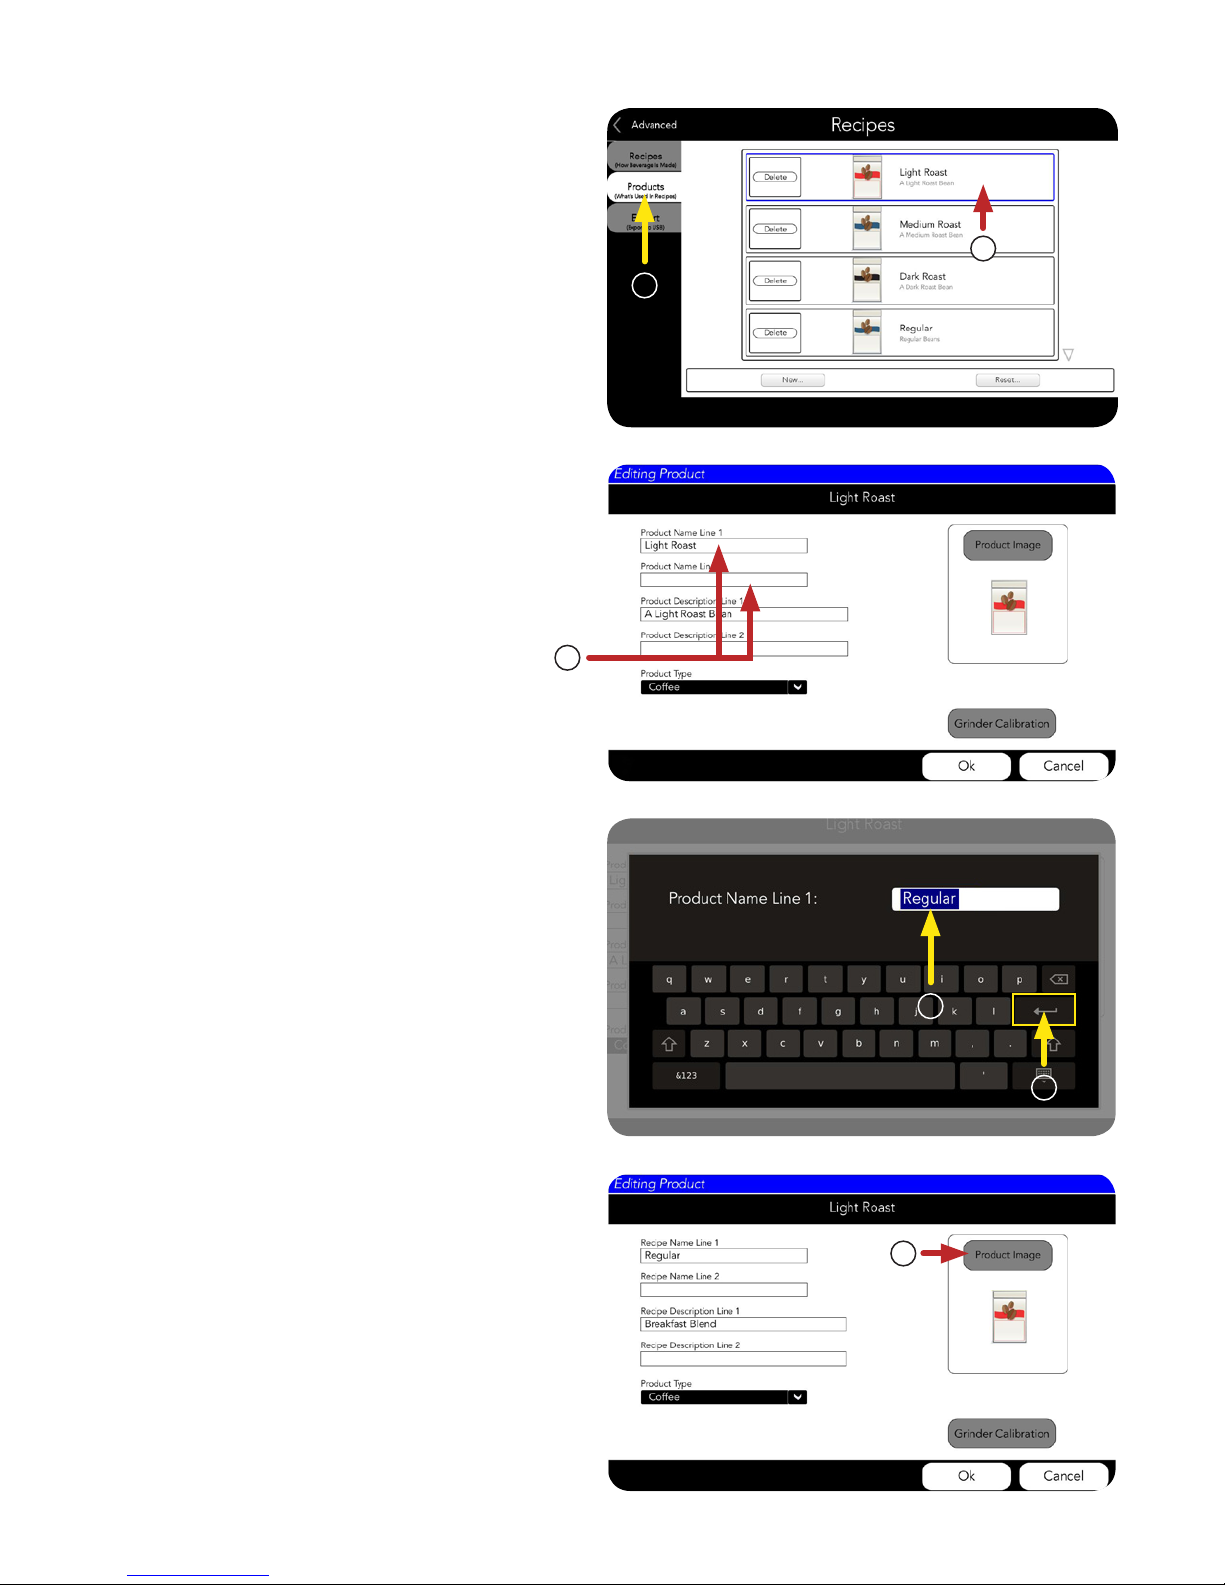
PRODUCT AND RECIPE SETUP (Continued)
2. Next, touch the PRODUCTS tab.
3. Now, choose a product to edit or create.
We will use the “Light Roast” as an example.
4. Next, choose the Product Name Line 1 field.
NOTE: There is a second field if you need more
space to name your product.
3
2
5. Type the name of your coffee, for example
“Regular”
6. Press Return.
NOTE: The Product Name Line 1 and Product
Description Line 1 have been updated for
this example.
4
5
6
7
7. Now, choose a Product Image, or use the
existing badge.
6
102318
Page 7
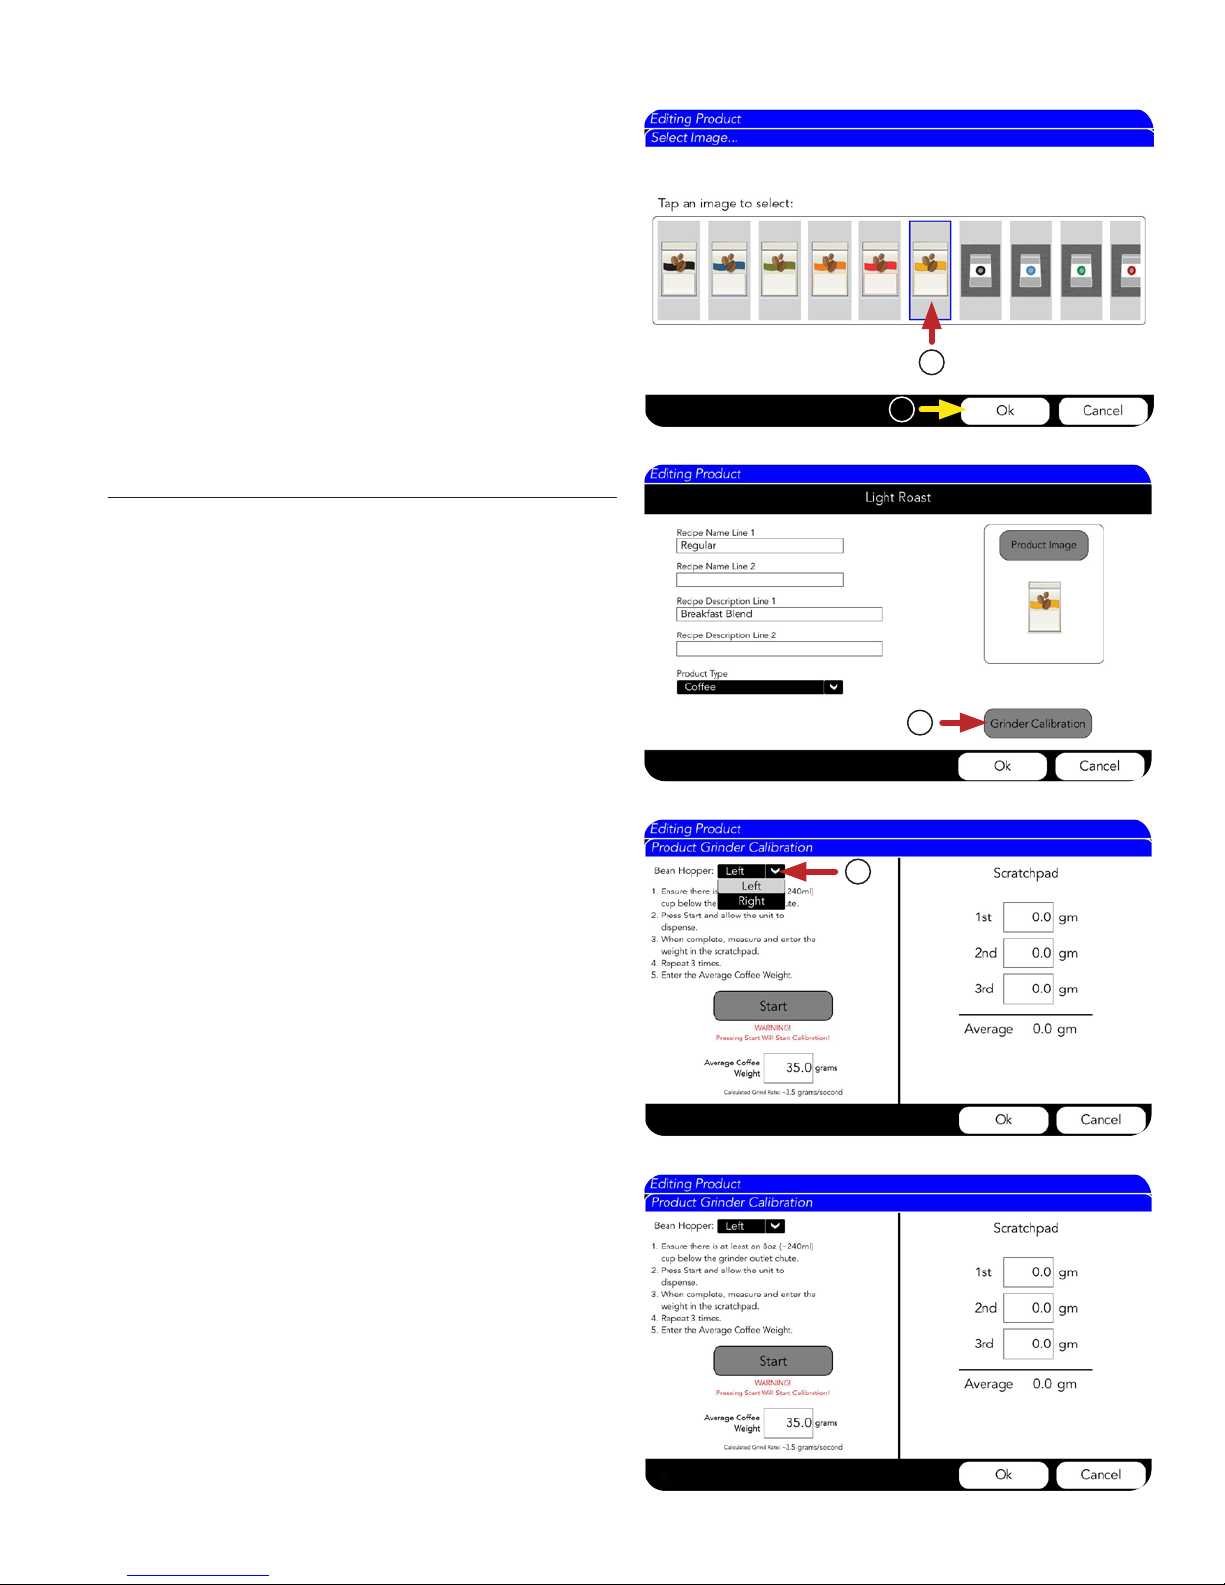
PRODUCT AND RECIPE SETUP (Continued)
8. Next, choose a Product Image.
9. If a new image is chosen, press OK.
Grinder Calibration
1. Select the Grinder Calibration button.
8
9
2. Choose the hopper from the drop down menu.
The default is the left hopper.
NOTE: Choosing the hopper during calibration
is simply telling the machine which grinder to
turn on.
IMPORTANT: The roast calibration stays with
the product. So, if this step is completed and
saved, the recipe “Regular”, for example, will
move to the grinder selected without needing to
recalibrate.
1
2
7
102318
Page 8
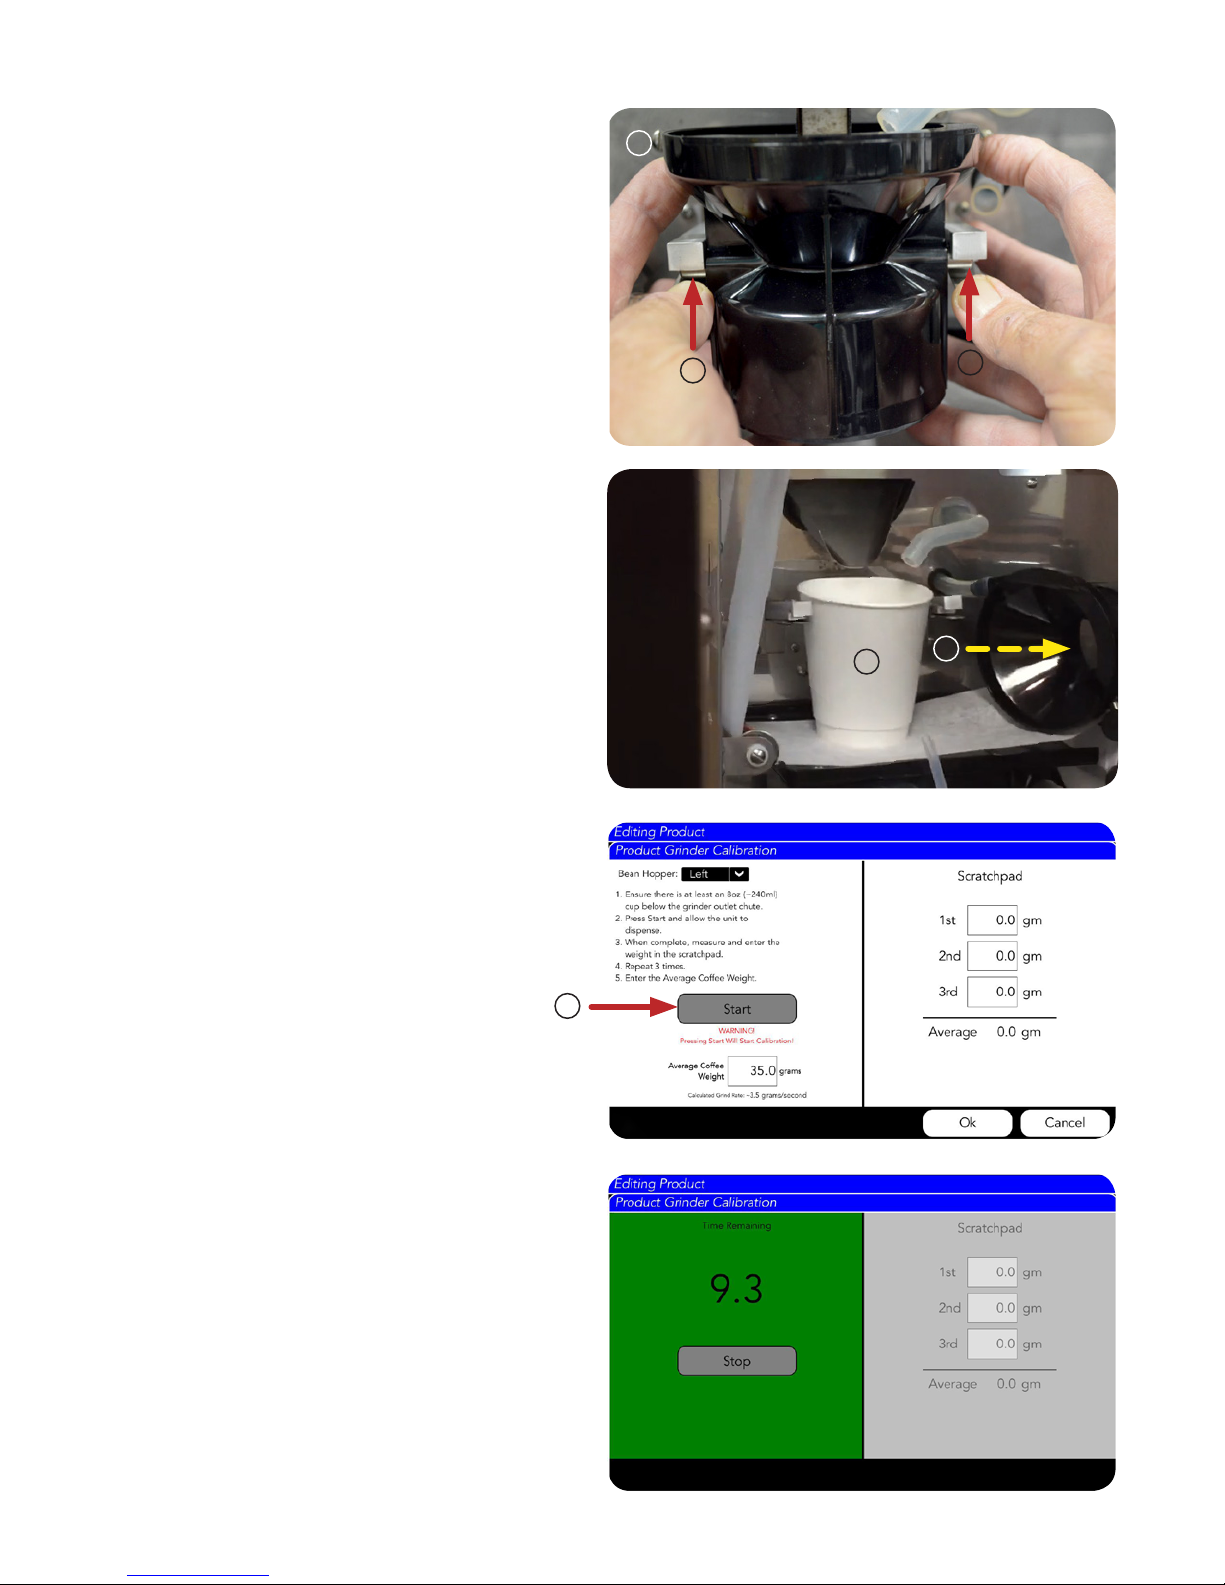
PRODUCT AND RECIPE SETUP
It’s time to Calibrate the grinder.
1. The next step is to open the machine door.
2. Remove funnel.
REMOVING FUNNEL: While pressing down on
both flat springs under the funnel arms, pull the
funnel down and forward to release it from the
funnel arms
3. After opening the machine door, remove the
funnel and place to the side
4. Place an empty cup under the coffee chute
1
2
2
5. Close door and go back to Calibration screen.
6. Next, press the Start button to clear
existing beans. If there are any.
This may take more than one time to
clear completely.
A new screen will appear showing a 10 second
count down timer.
4
6
3
8
102318
Page 9
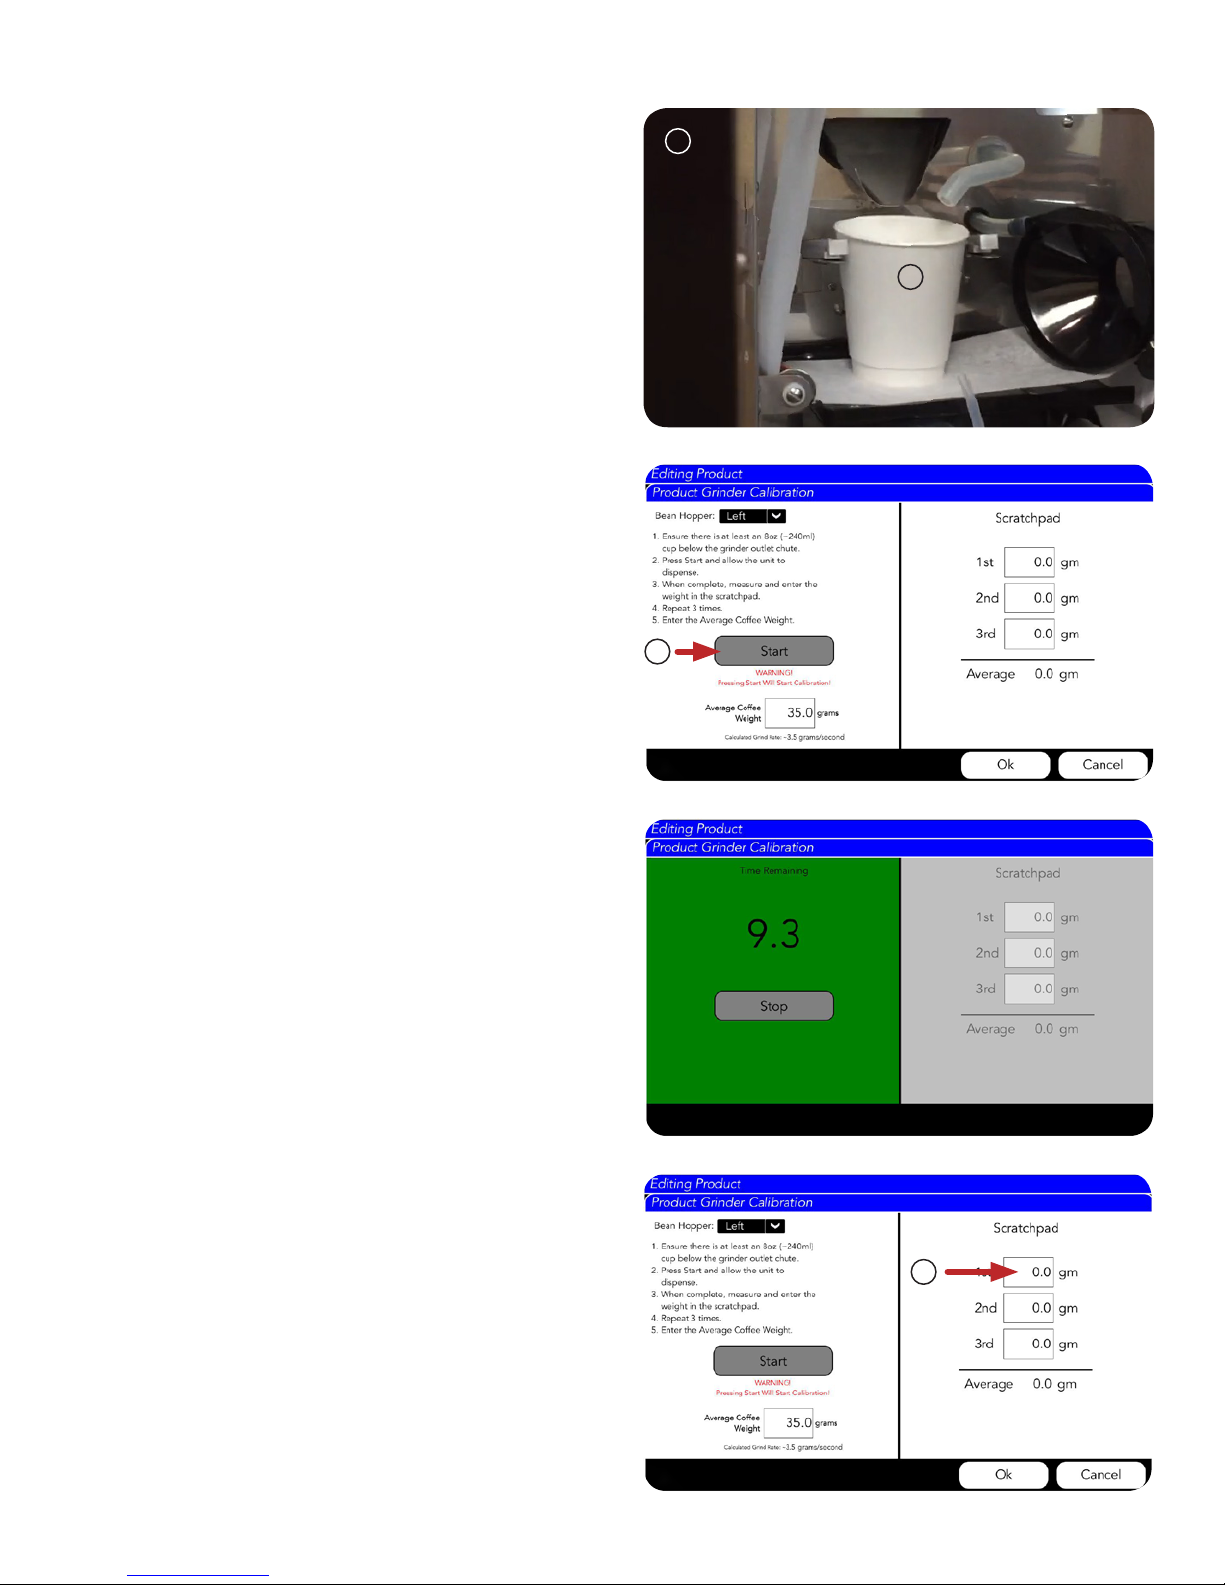
PRODUCT AND RECIPE SETUP (Continued)
7. Open the door, empty the cup, and Tare
(zero) the cup on the scale.
8. Then place the cup under the coffee
chute again.
9. Close the door.
10. Next, press the Start button again. The 10
second count down screen will appear.
The Calibration screen will appear again
when finished.
7
8
11. Next, take the cup out and weigh it.
10
12. Then, press the 1st Field to log the weight of
the coffee in the cup.
12
102318
9
Page 10
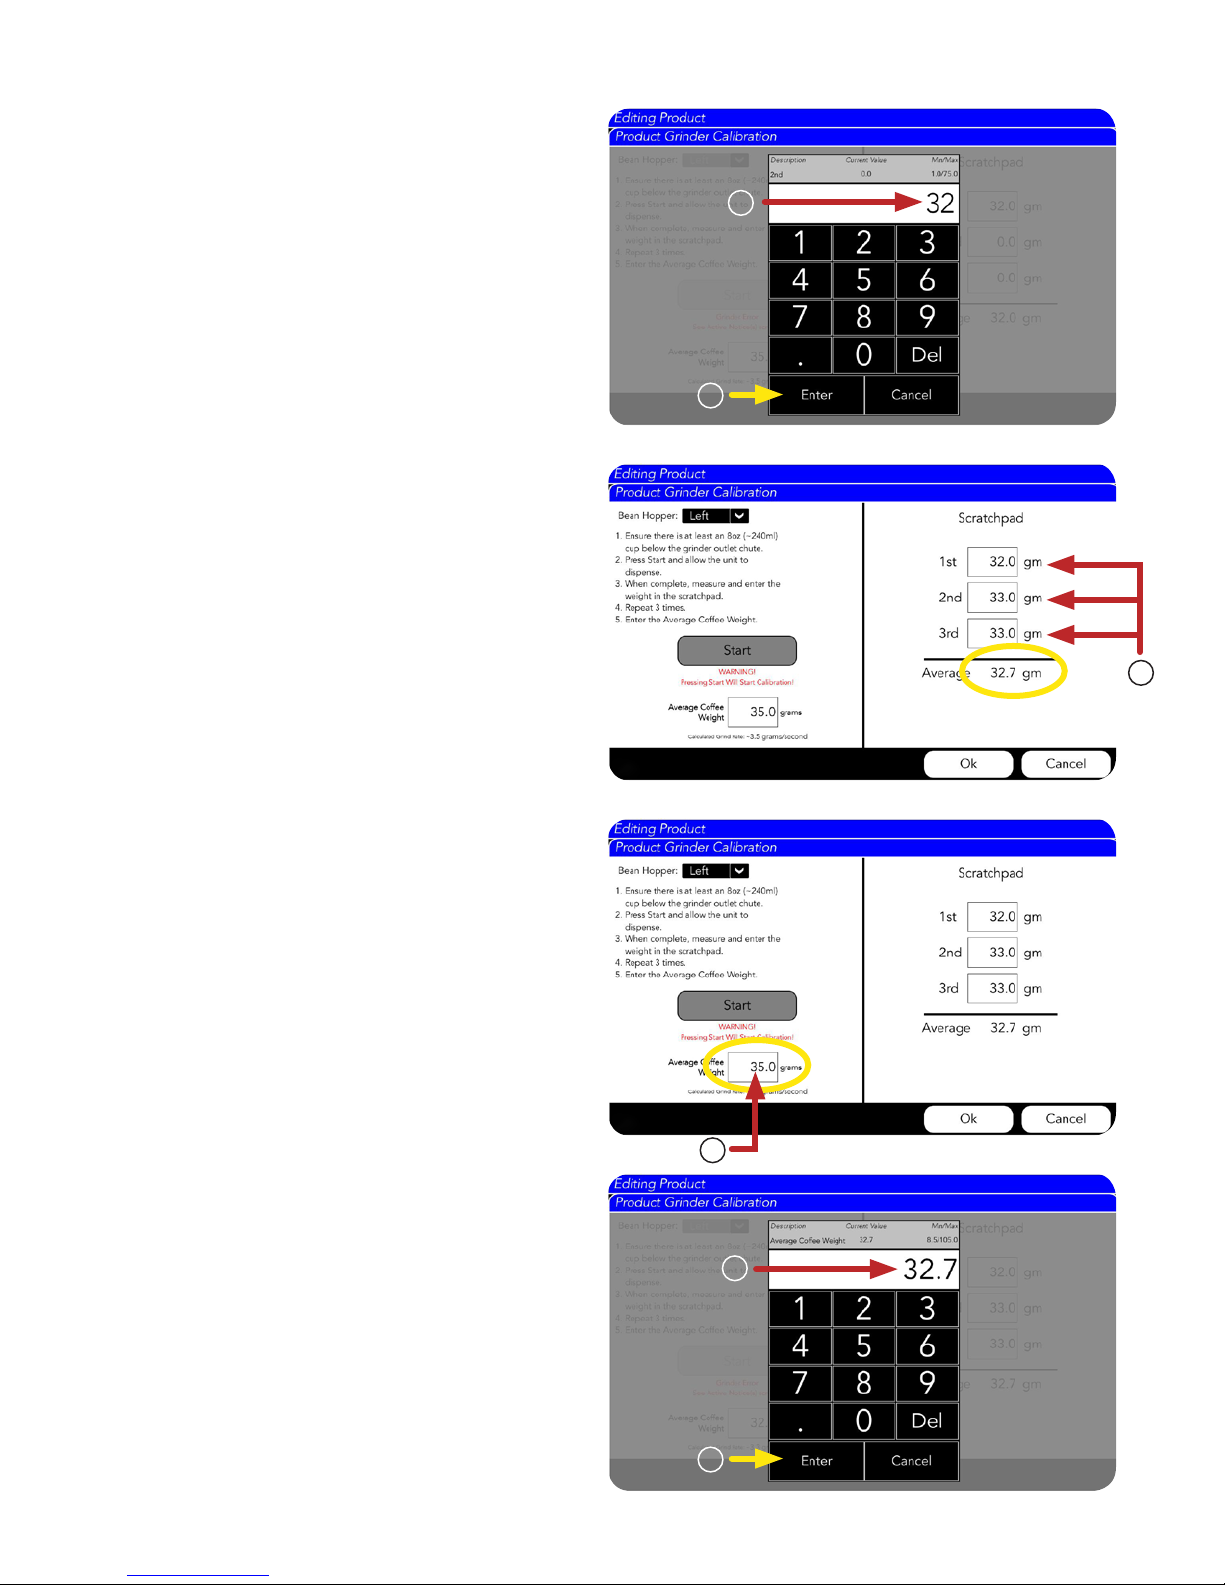
PRODUCT AND RECIPE SETUP (Continued)
After pressing the 1st Field to log the weight of the
coffee in the cup, the input screen will appear for
you to plug in these numbers.
13. Type the weight of the cup
14. Press Enter.
Empty the cup, then repeat steps 7 - 14 two more
times to fill in all 3 weight fields.
1. Next, note the Average Weight of the
three tests.
13
14
For this example it’s 32.7 grams.
2. Now, press on the Average Coffee Weight
field to fill in this amount.
3. The input screen will appear for you to plug in
these numbers.
1
2
4. Press Enter.
3
4
102318
10
Page 11
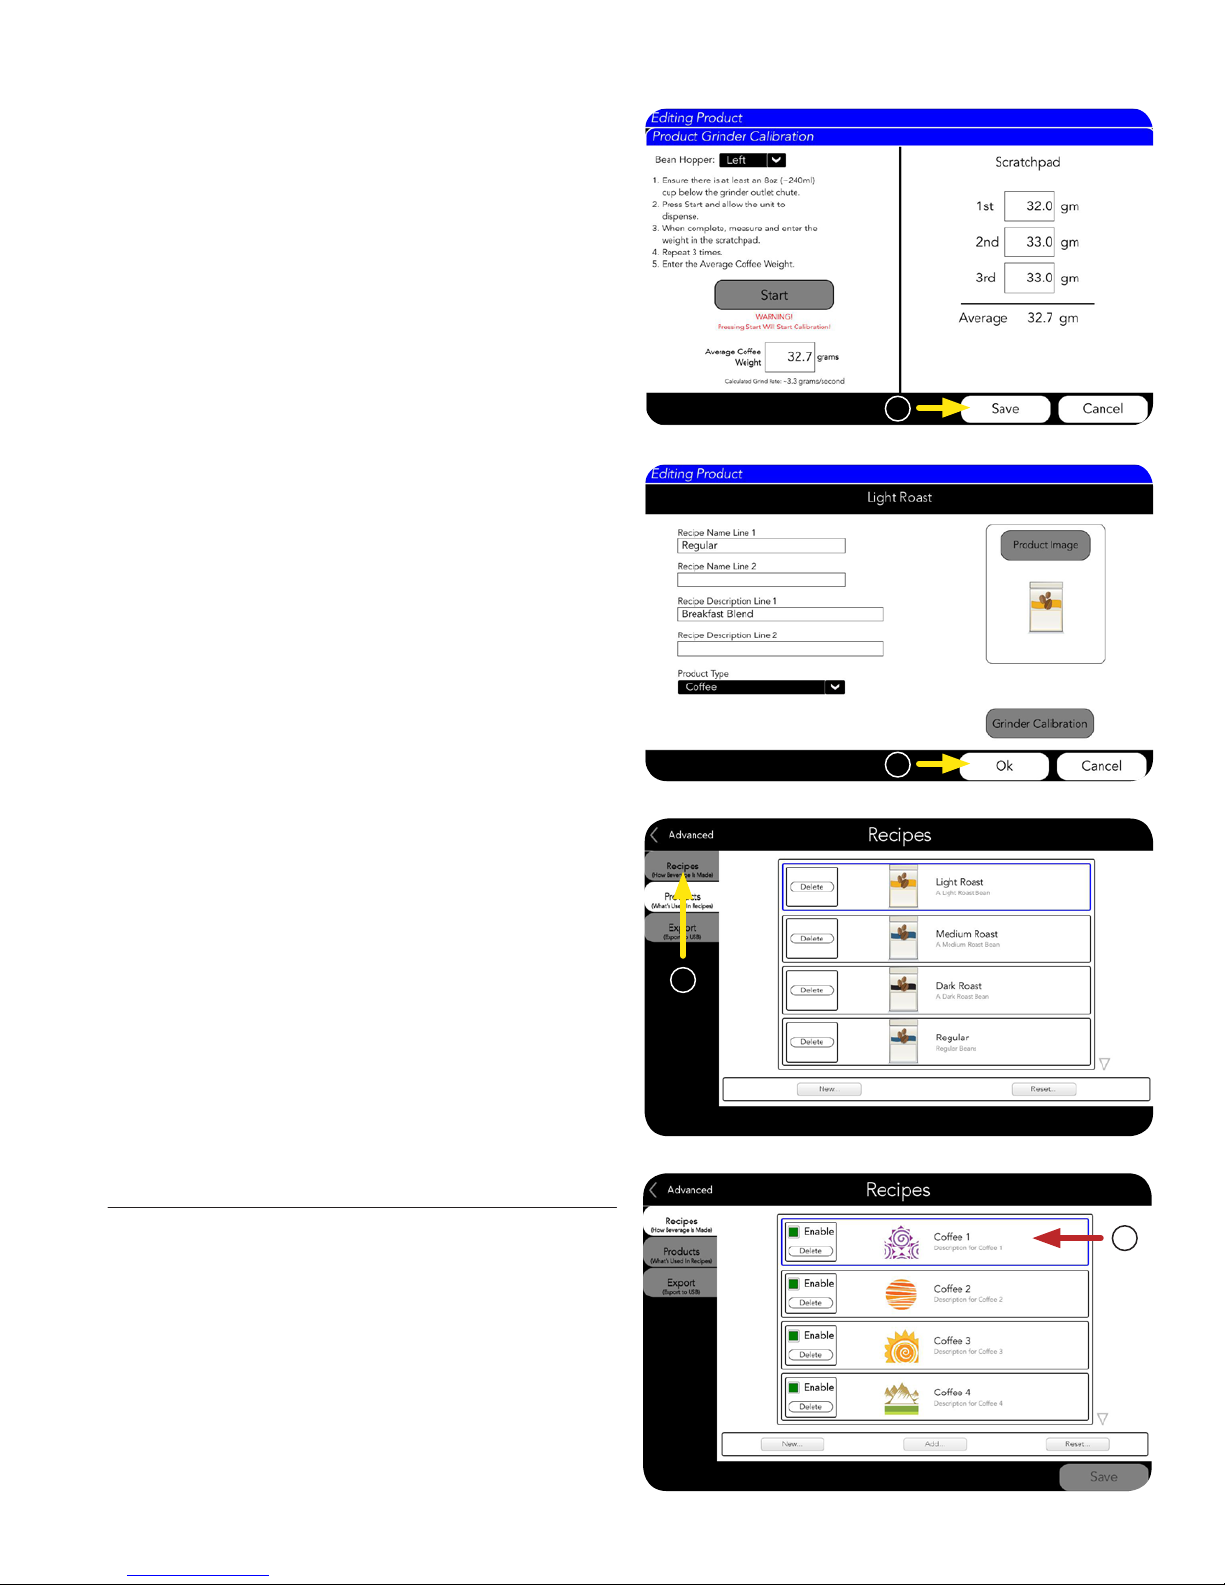
PRODUCT AND RECIPE SETUP (Continued)
5. Press Save to complete Grinder Calibration.
6. Press OK to complete this Product creation.
5
7. You can choose to edit or create new Products,
or move on to creating or editing a coffee
Recipe by pressing the RECIPE tab.
Recipe Setup
Now we will setup a coffee Recipe.
1. For this example, we will select Coffee 1 to edit.
6
7
1
11
102318
Page 12
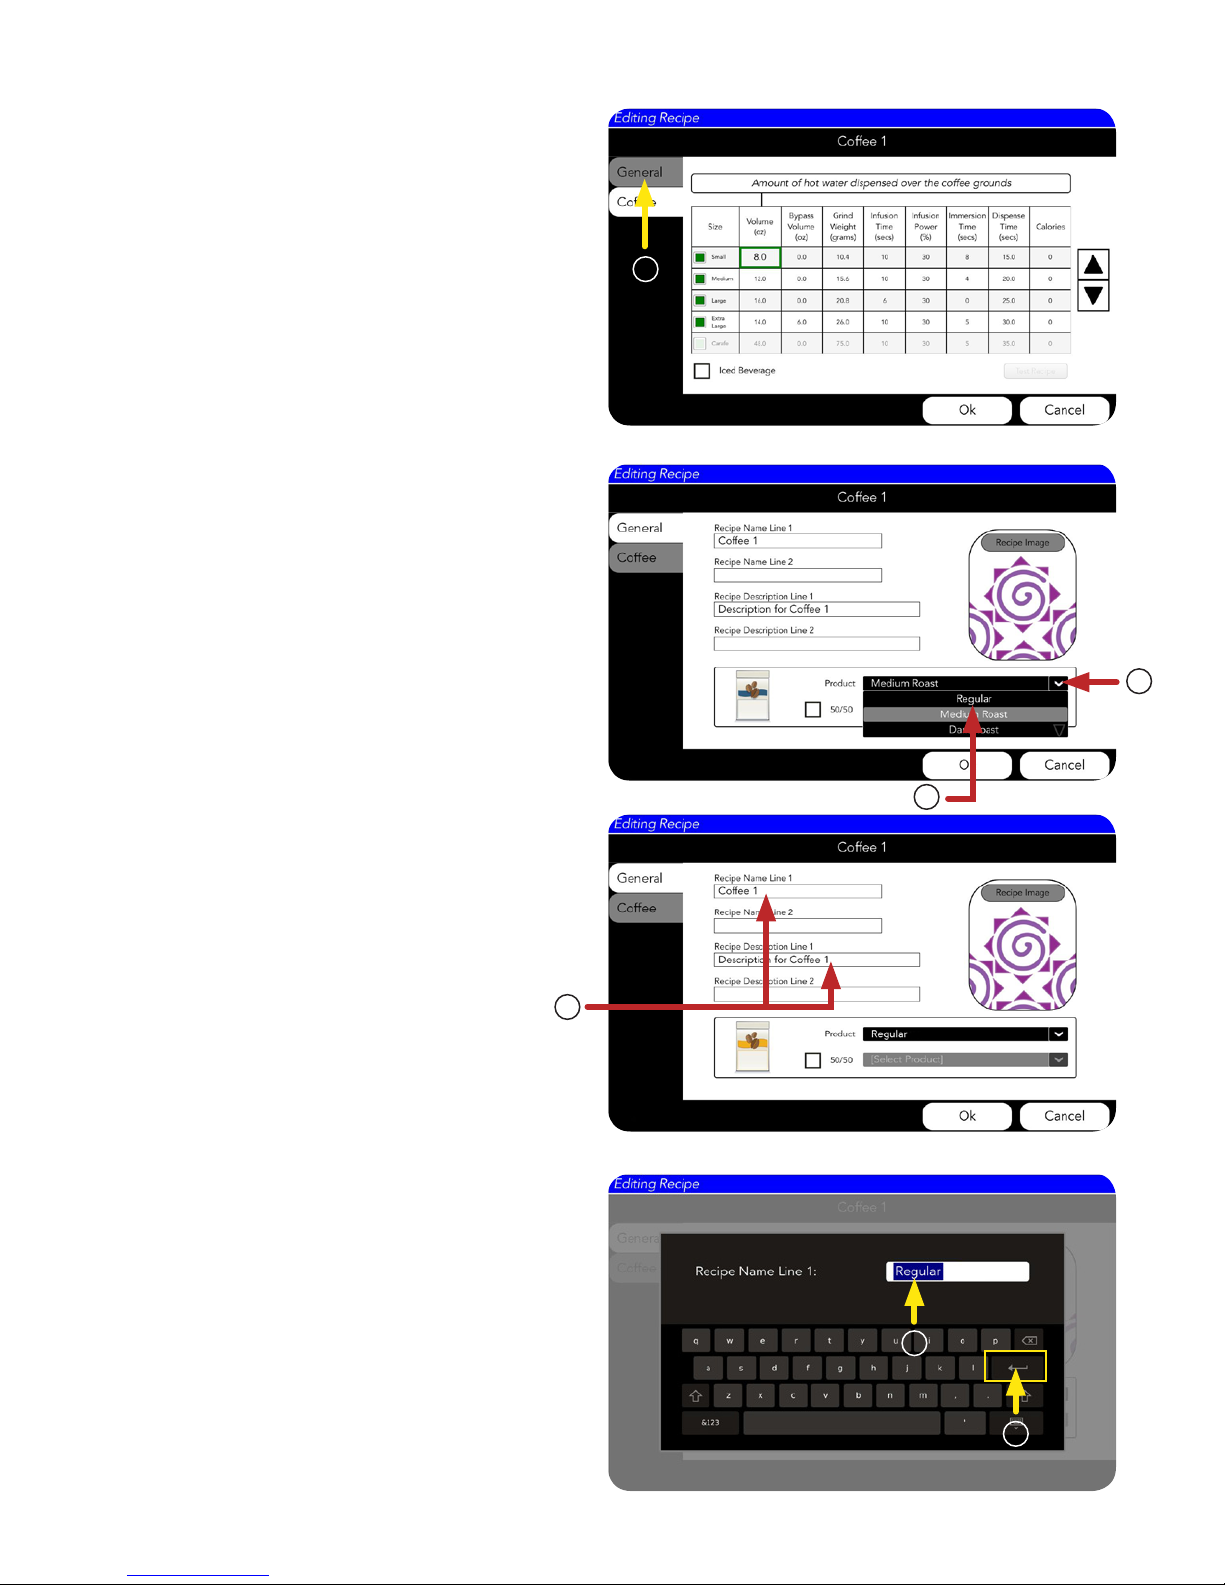
PRODUCT AND RECIPE SETUP (Continued)
2. Now choose the GENERAL tab to edit the
recipe for Coffee 1.
3. Use the drop down menu to select the
preferred coffee
4. We will use the product called “Regular“ for
this example.
2
5. Edit the Recipe Name Line 1 and Recipe
Description Line 1 by pressing on the text field.
There are two extra fields for each if more
space is needed.
By pressing the Recipe Name Line 1 and Recipe
Description Line 1 text fields, an input screen
will appear.
3
4
5
6. Type the description.
7. Press the Return key to complete.
6
7
102318
12
Page 13
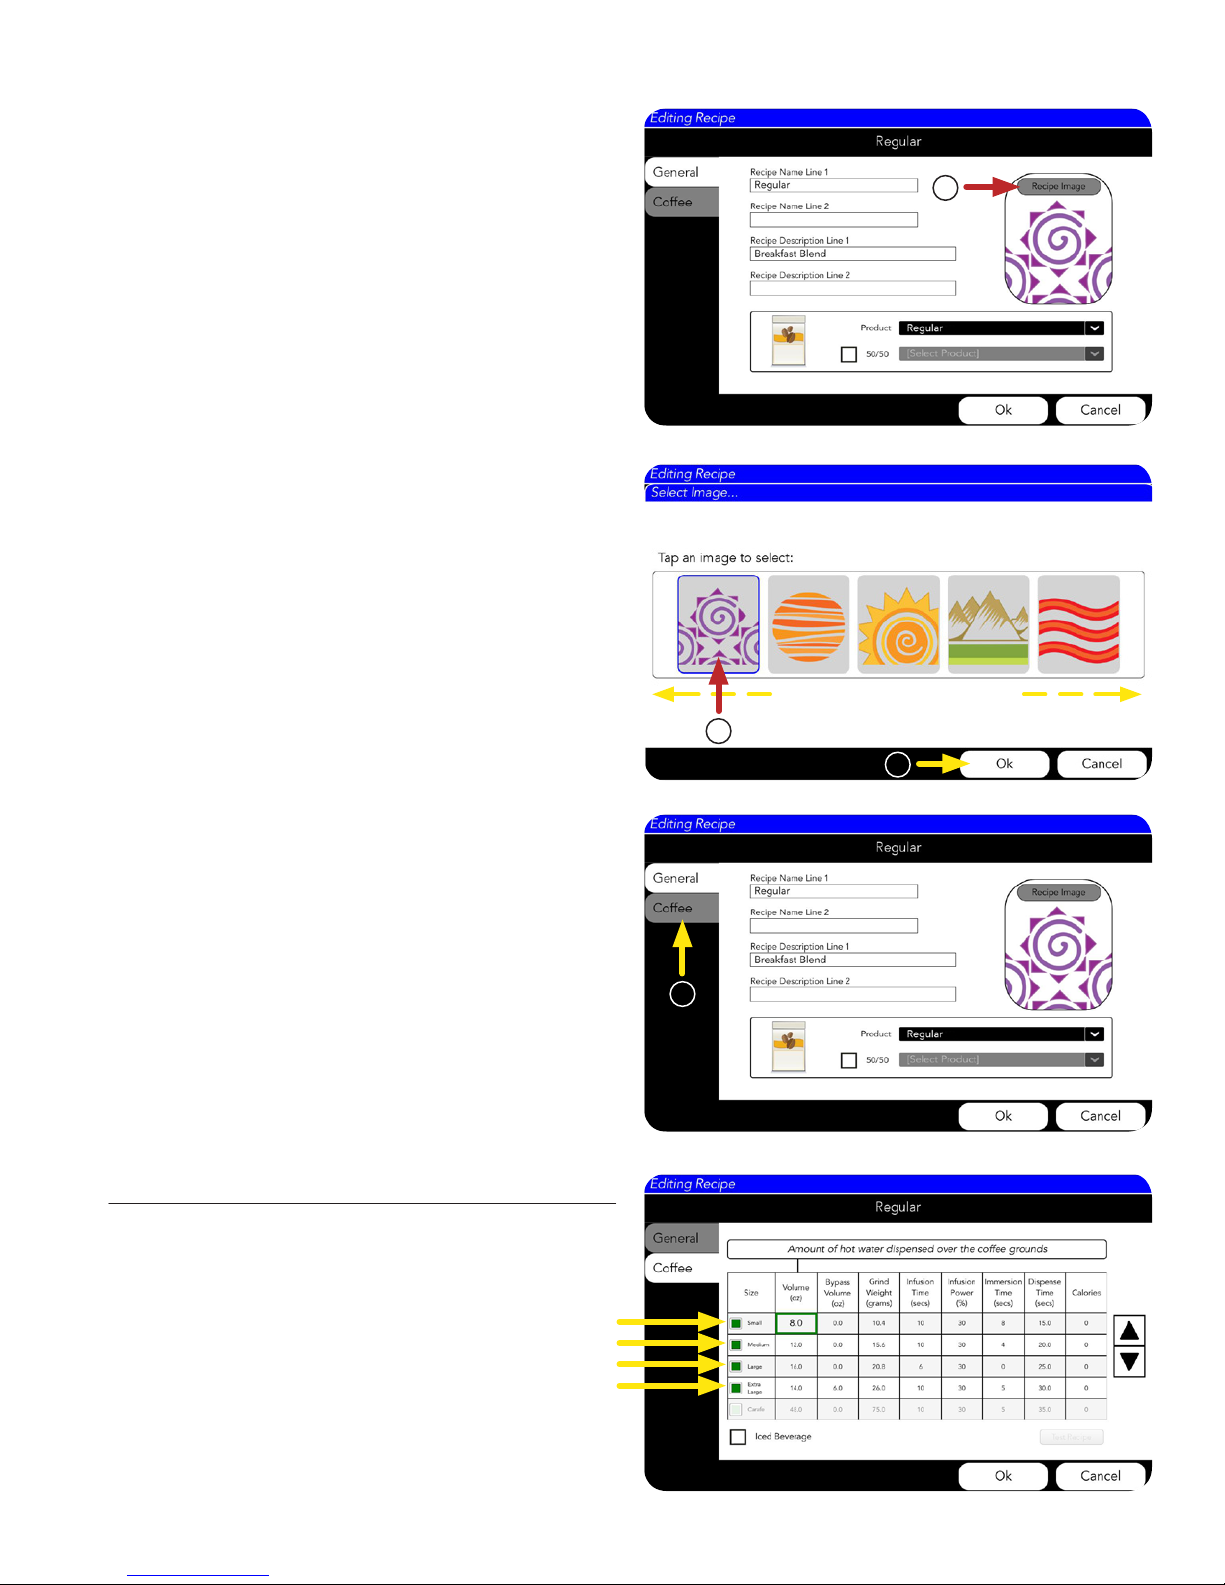
PRODUCT AND RECIPE SETUP (Continued)
8. Next, the Recipe Image can be changed,
if preferred.
9. By swiping side-to-side, you can see the
icon library.
10. Select the image, and press OK.
8
11. Next, press the COFFEE tab.
Editing Coffee Recipes By Size
You can make changes to Recipes for the
sizes enabled.
9
10
11
Example: Each size with a green box
is enabled.
13
102318
Page 14
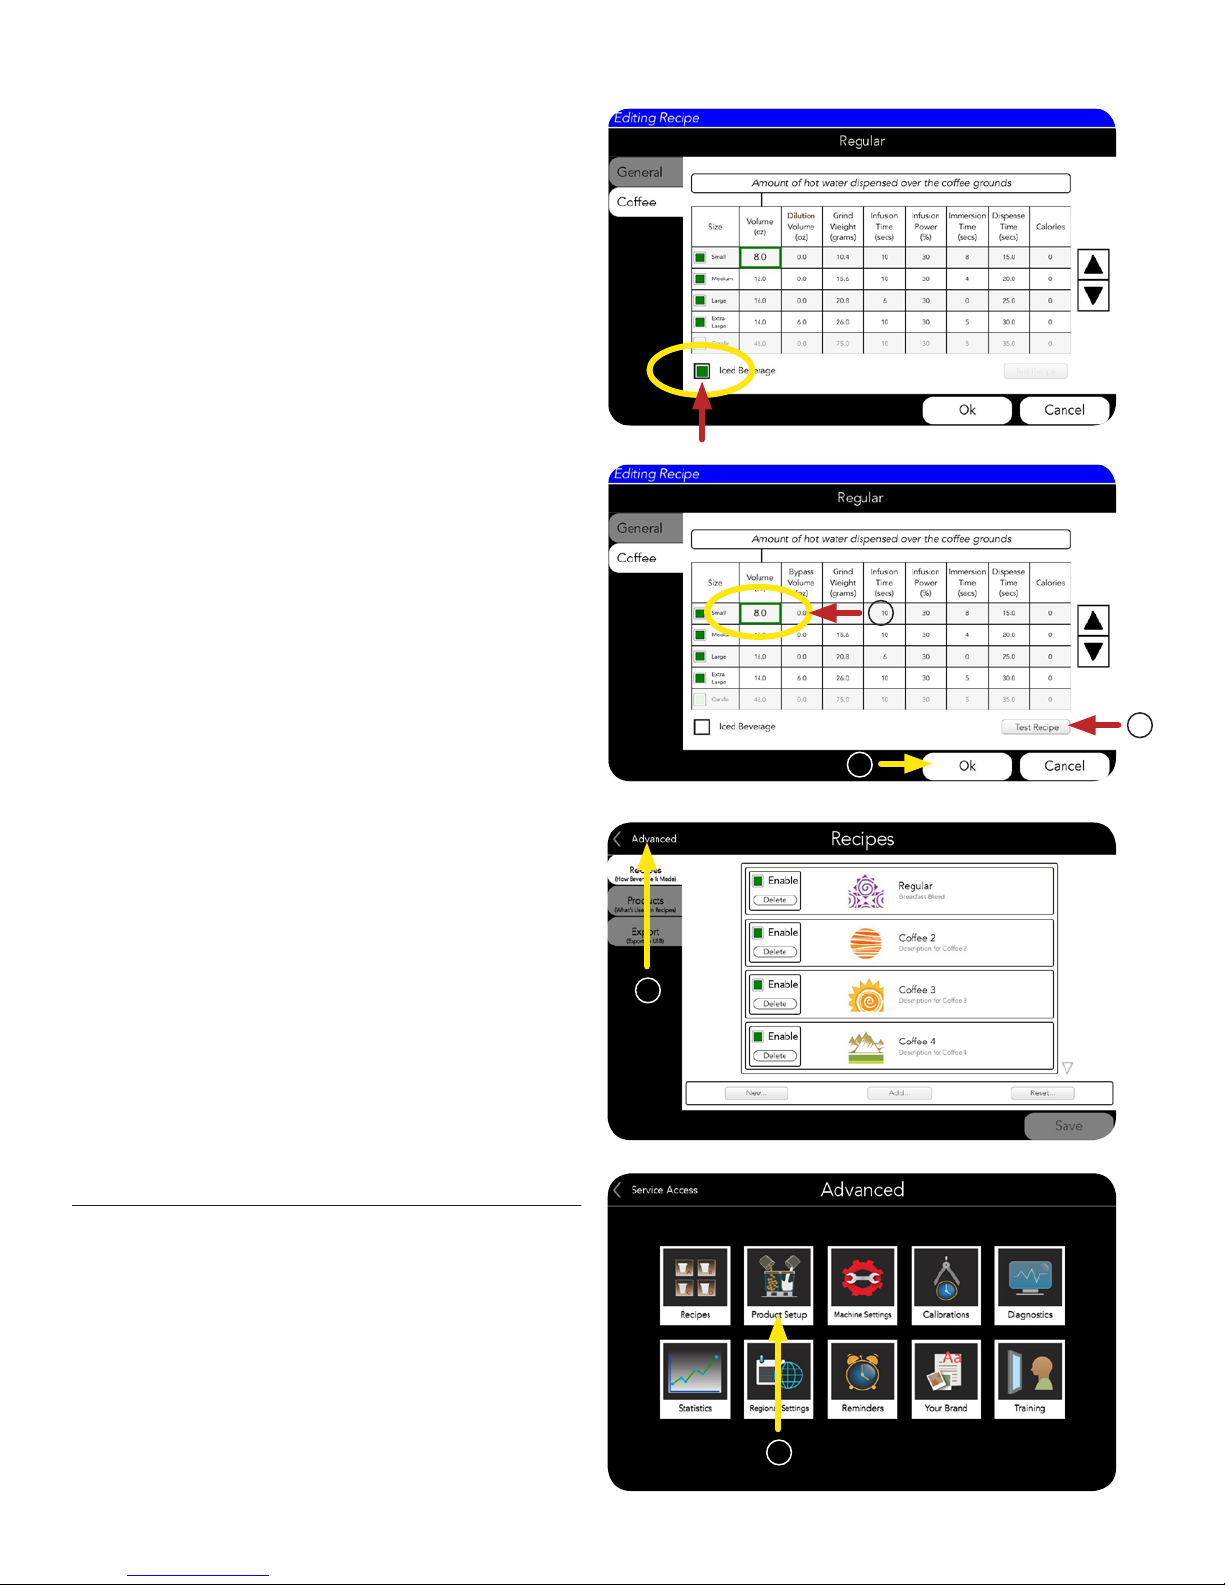
PRODUCT AND RECIPE SETUP (Continued)
To create an Iced Coffee beverage, press the
square labeled Iced Beverage.
This will program the ambient dilution valve in place
of the hot water bypass valve.
Coffee recipes can be edited from this screen by
clicking any of the numbers in the table cells.
1. After edits, the Recipe can be tested by
selecting the Test Re cipe button.
2. This will test the Recipe with the highlighted cell.
For this example the Small will be tested
because the Volume is being revised as shown
by the green border.
3. Press OK if changes are made.
4. When you have all your Products and Recipes
saved, press the ADVANCED link to return to
the ADVANCED menu.
Enabling Products
2
1
3
4
1. Next, select the Product Setup button to enable
and set up the hoppers.
NOTE: The Graphic User Interface will be set
up through the Product Setup button.
1
102318
14
Page 15
PRODUCT AND RECIPE SETUP (Continued)
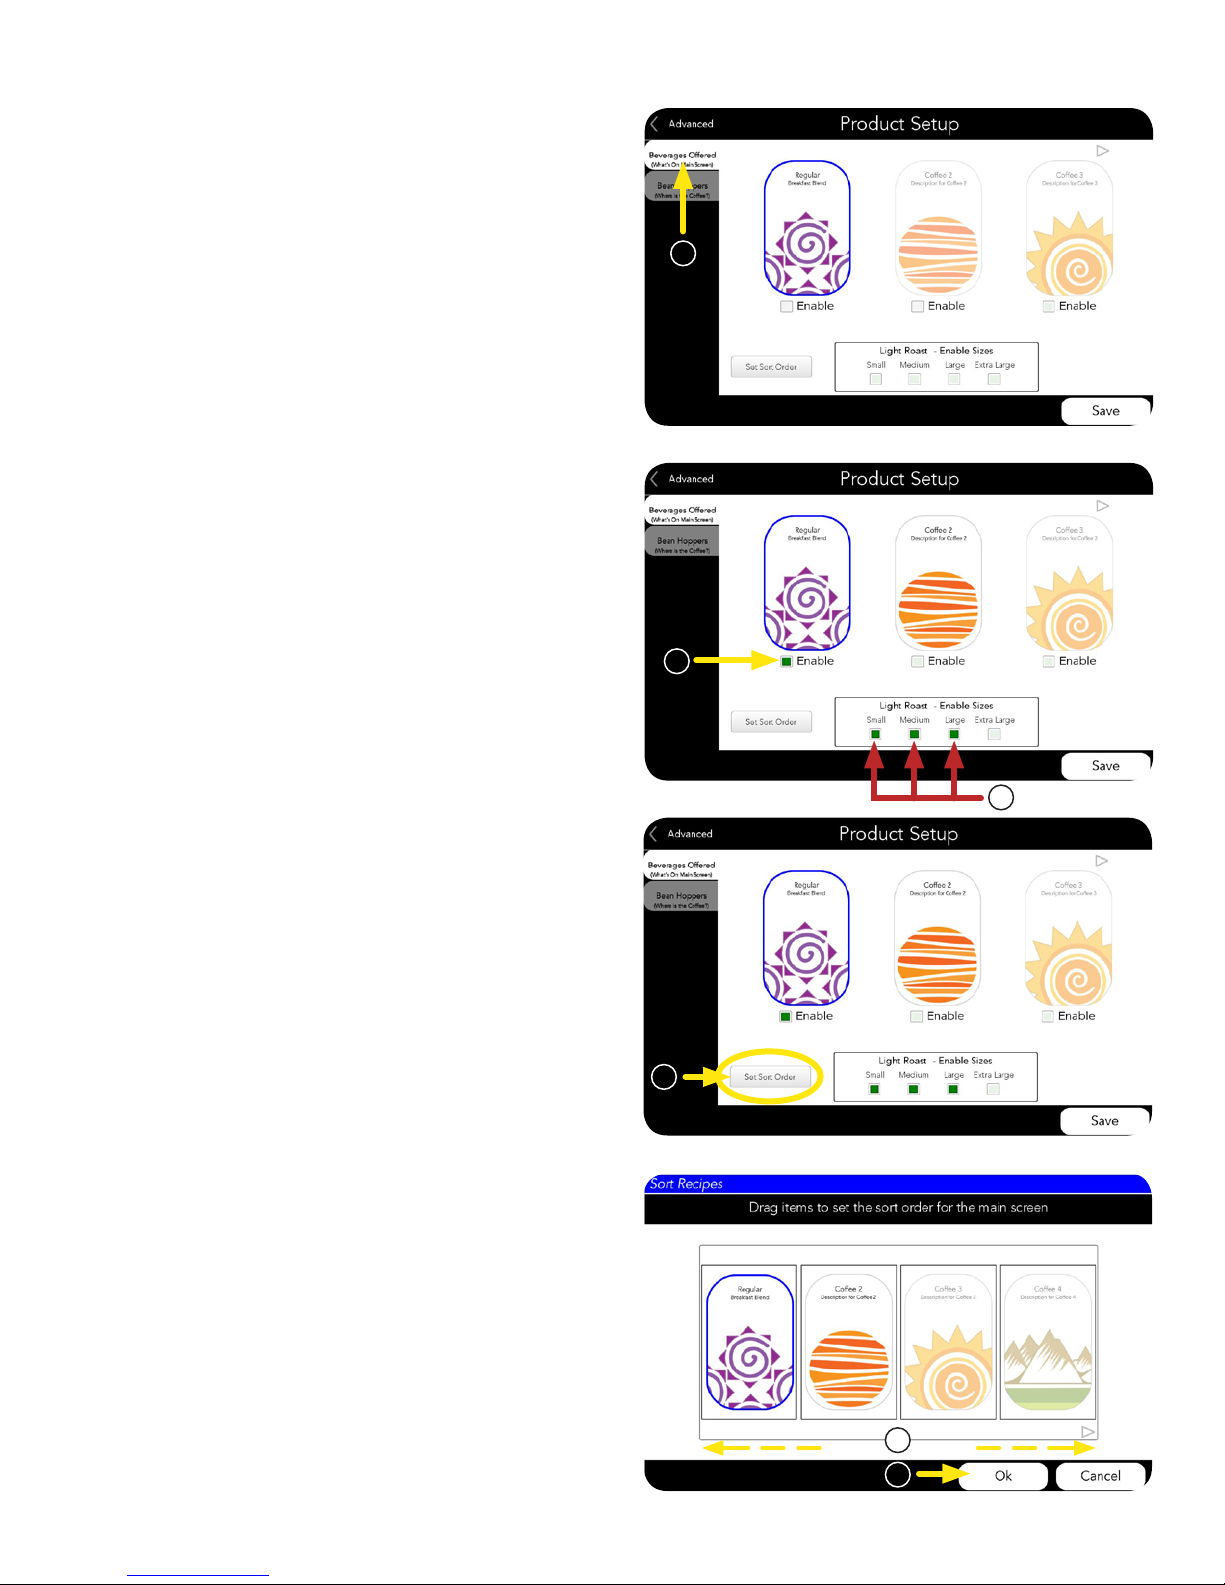
2. Next, select the BEVERAGES OFFERED tab.
3. Choose the Enable boxes for the beverages.
4. Also, choose the size(s) you want available for
each beverage.
2
5. You can organize the way the customer
will view the coffees offered by pressing
the Set Sort Order button.
6. By swiping side-to-side, you can scroll through
the entire icon library. Then, drag the icon
chosen to the preferred position.
3
4
5
This layout will be shown on the
customer screen.
7. Press OK when finished.
6
7
102318
15
Page 16
PRODUCT AND RECIPE SETUP (Continued)
Hopper Setup
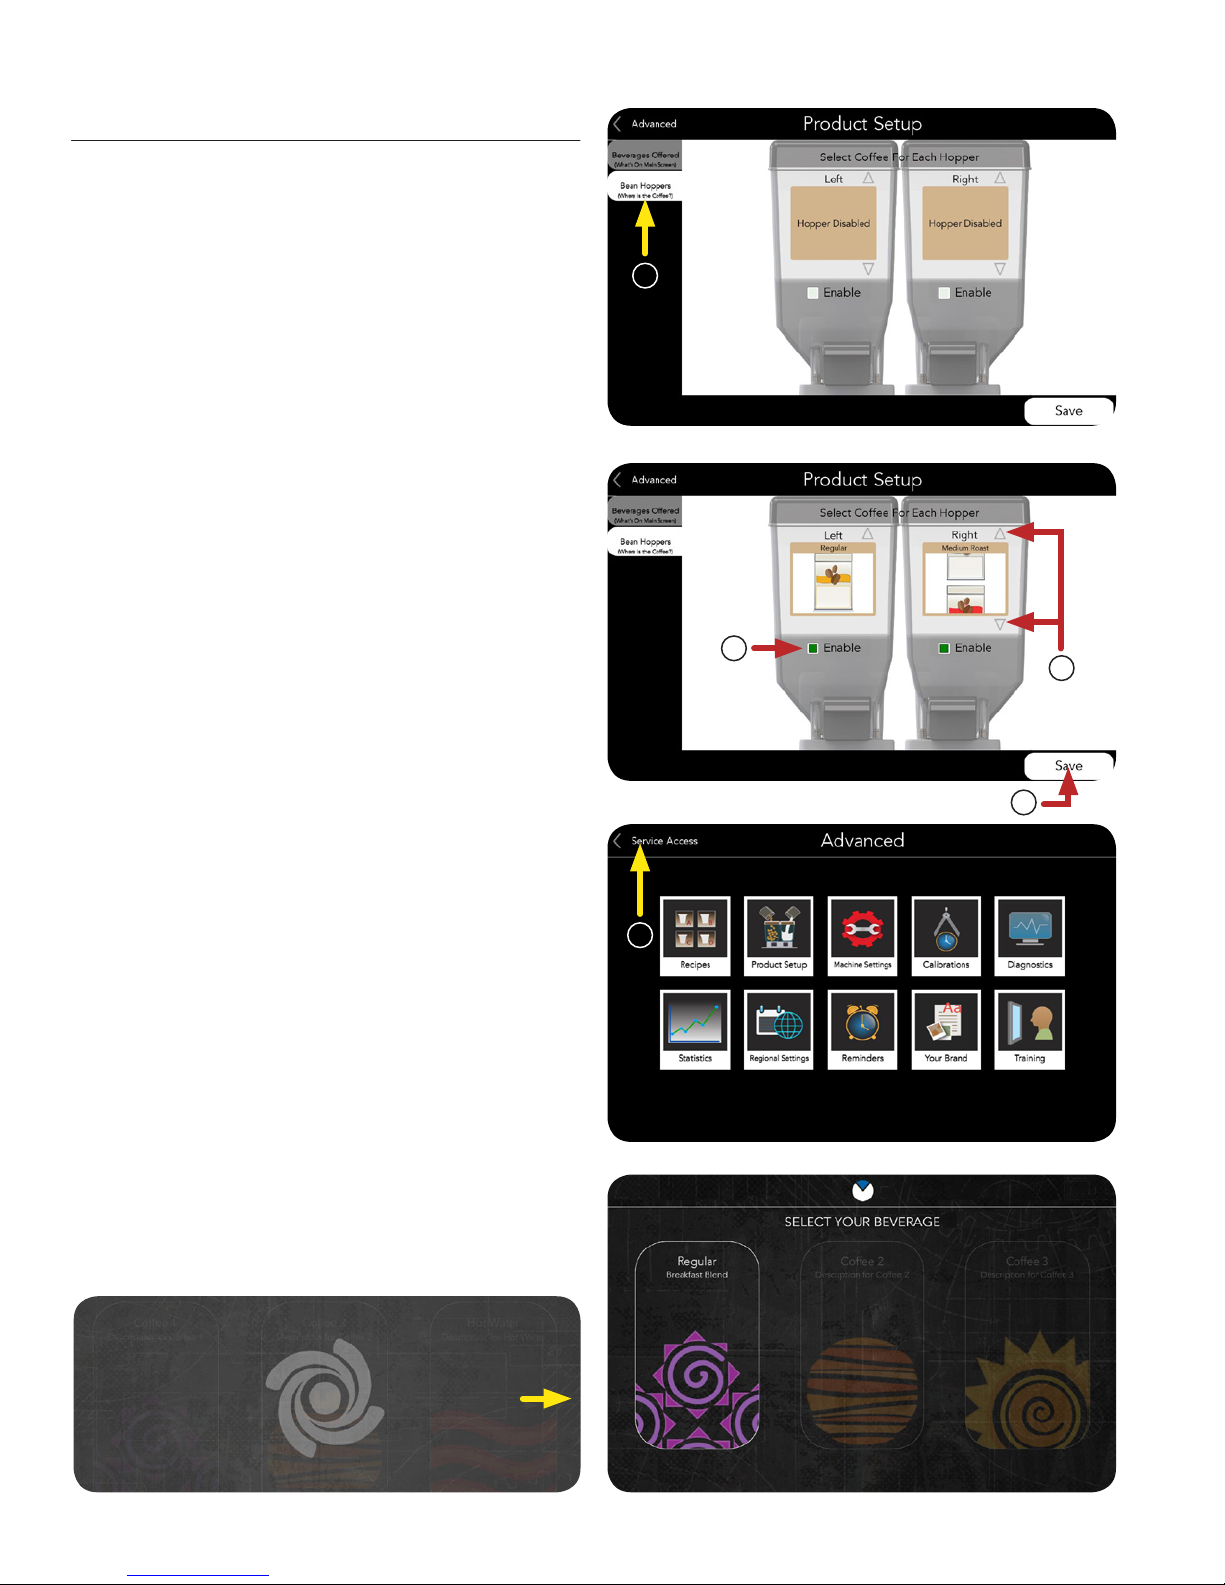
1. Select the BEAN HOPPERS tab to assign
which coffee goes in which hopper.
2. Press the Enable box to select which hopper
to use.
3. After Enabling a hopper, you can use the up
and down arrows to select an icon for the
coffee in that hopper.
4. Press Save when finished.
1
2
3
5. Select SERVICE ACCESS.
After the machine updates, the HOME screen
should appear and the products and variables
you just created should be available.
You are ready to serve.
4
5
Updating...
16
102318
Page 17
MACHINE SETTINGS
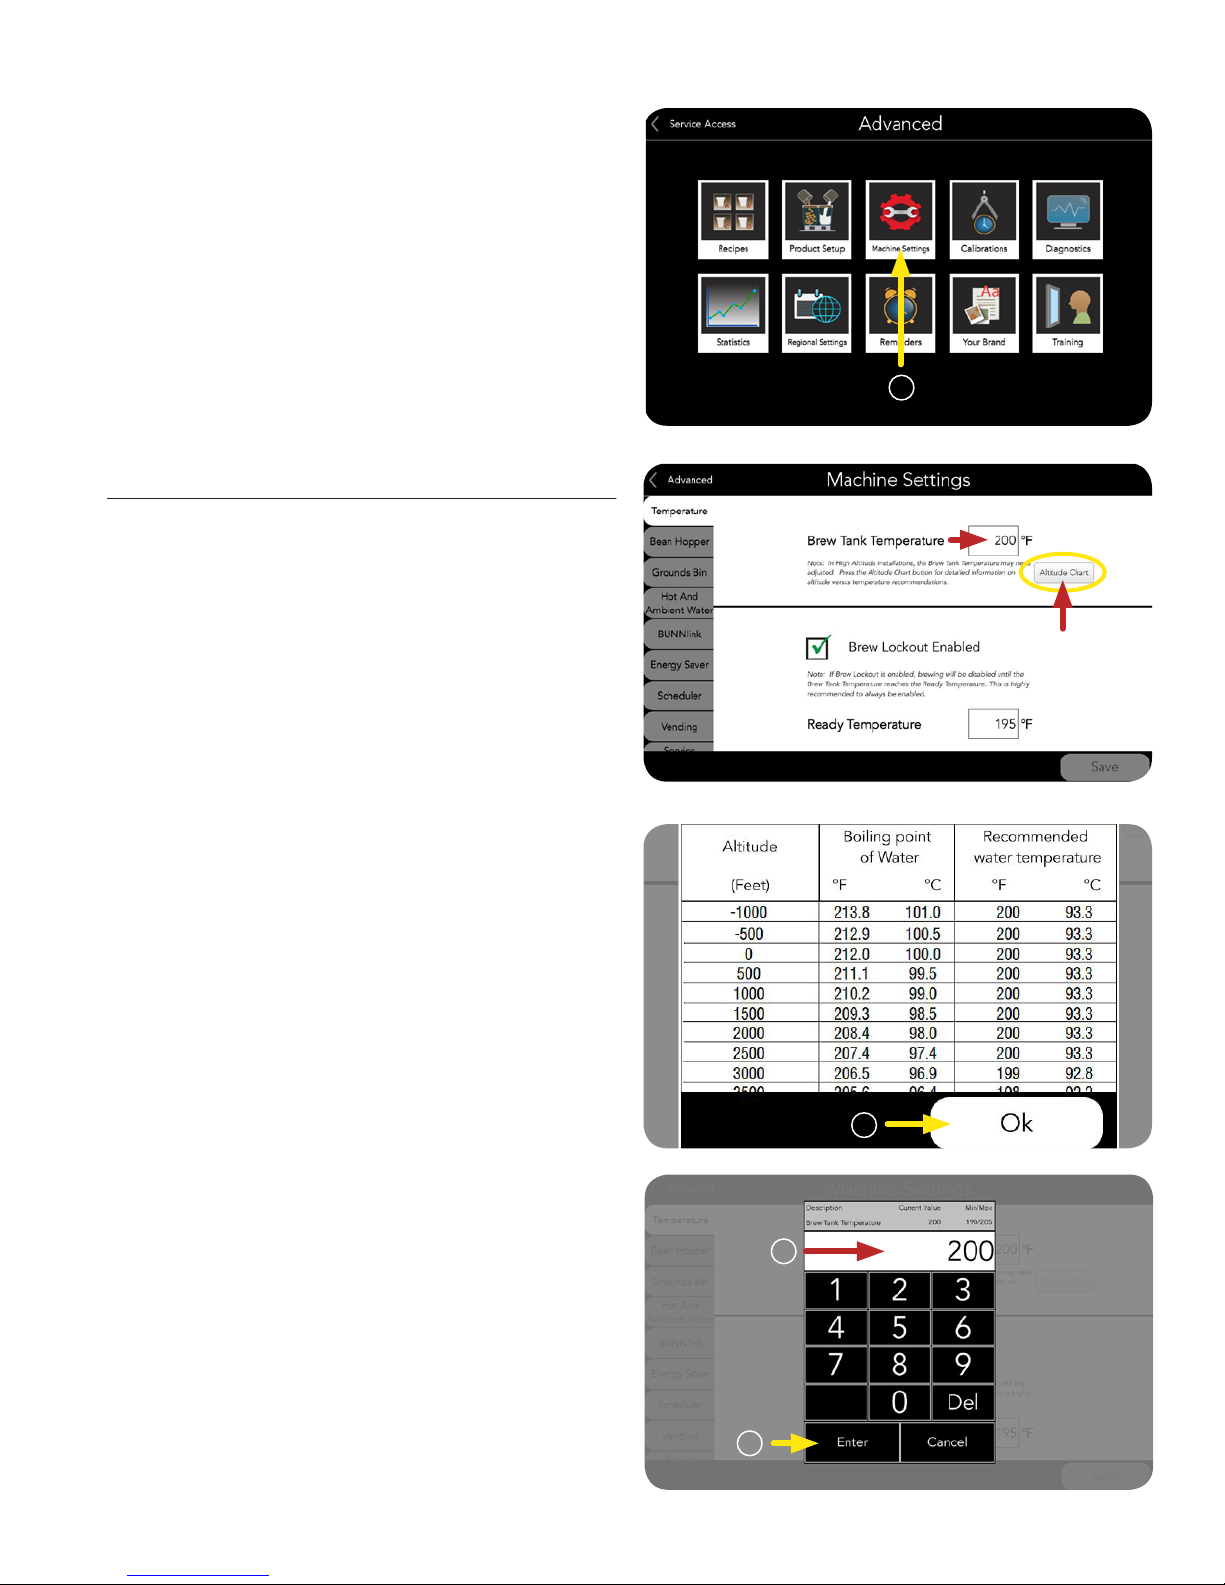
1. Refer to page 5, steps 1 - 3, to access the
ADVANCED menu screen.
Then choose the MACHINE SETTINGS icon.
Temperature
2. The brew tank temperature default is 200°F.
If the temperature needs to be adjusted for high
altitude, press the “Altitude Chart” button.
1
3. On the chart, find your current altitude, then
move to the right to find the suggested tank
temperature setting.
The chart will scroll down for more
altitude settings.
Press OK to return to the temperature screen.
4. Touch the temperature box to enter screen to
alter temperature setting. Enter new temperature
setting.
5. Press Enter to accept.
3
4
5
102318
17
Page 18
MACHINE SETTINGS (Continued)
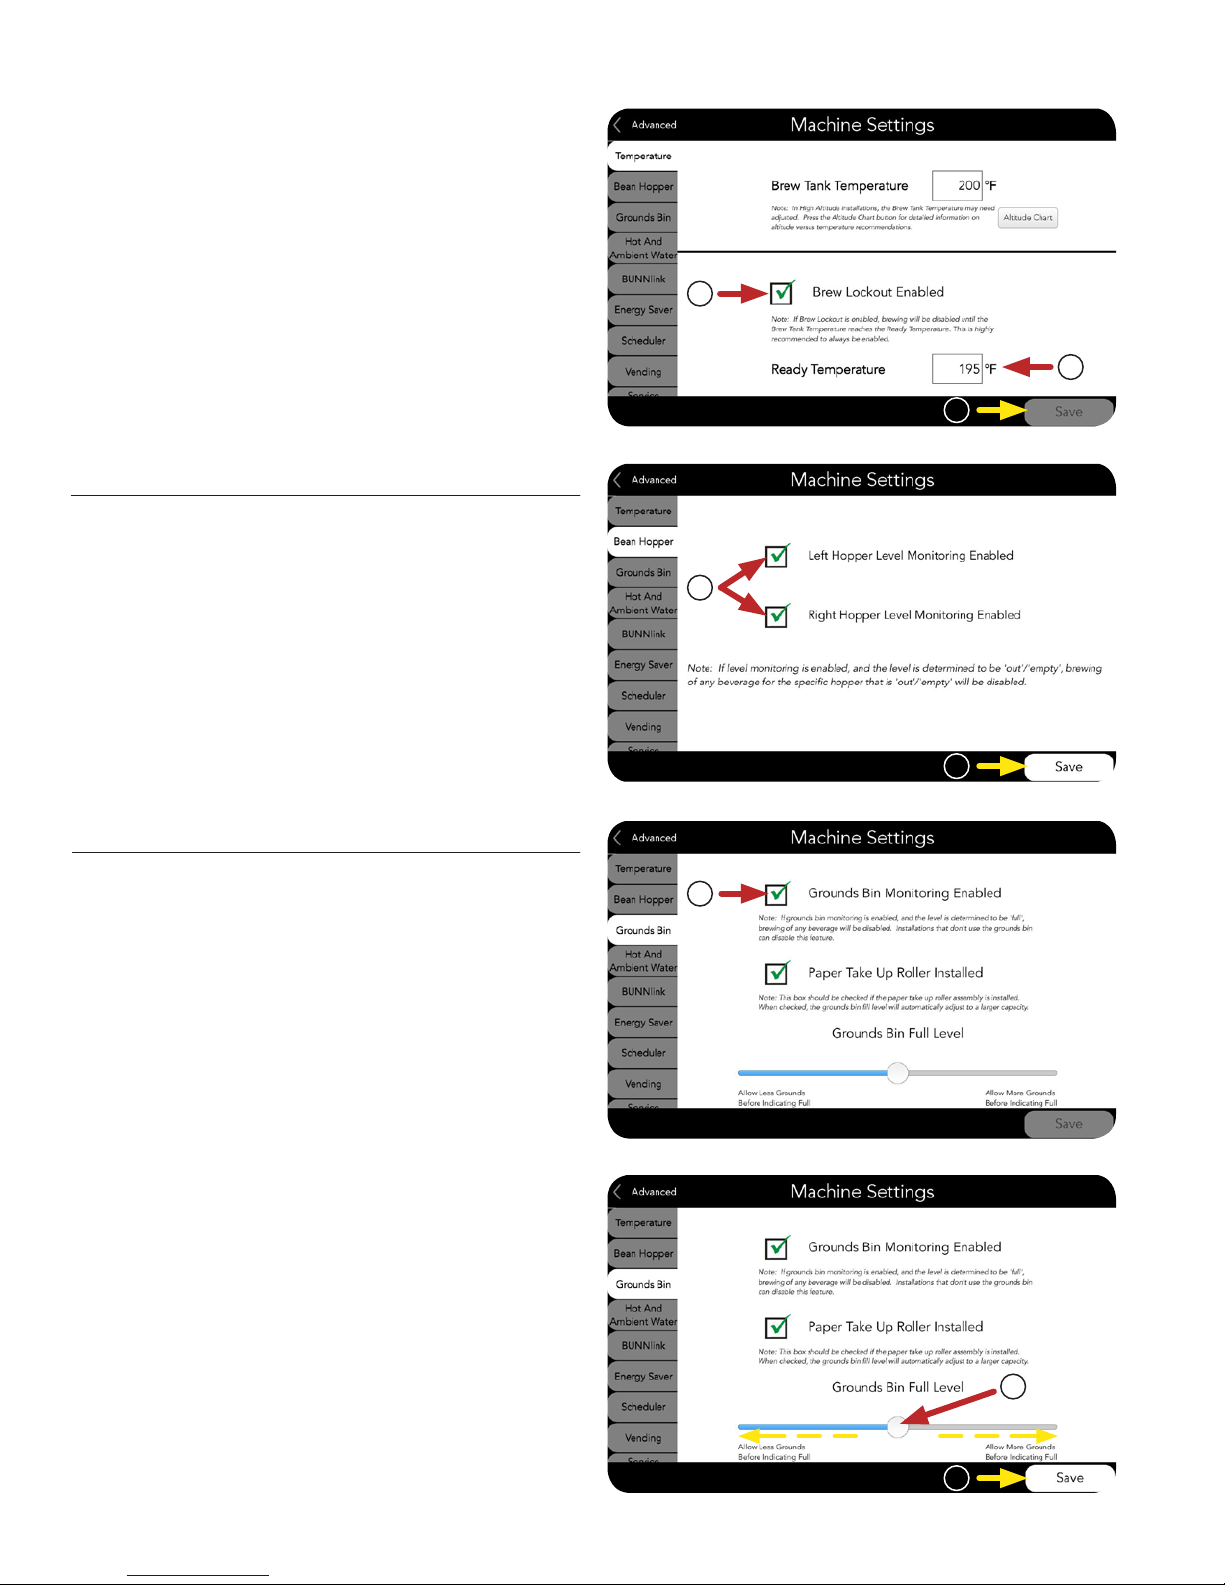
6. If the tank temperature falls below the ready
temperature setting, brewing will be disabled
until the ready temperature is reached.
Press the Ready Temperature box to alter
the ready temperature.
7. Press in the check box to remove the green
check mark, and disable Brew Lockout.
Coffee brewing can be performed regardless
of tank temperature.
8. If any changes are made to the Temperature
screen, press Save to confirm.
Bean Hopper
1. Hoppers have sensors which will indicate when
the hopper is low on beans. To disable bean
hopper level monitoring, press in the check
box for either or both hoppers to remove green
check mark.
7
6
8
1
2. If any changes have been made, press Save
to confirm.
Grounds Bin
The grounds bin and lower panels can be removed
for “through the counter” grounds disposal. In this
mode, the grounds bin detection must be disabled
to allow brewing.
1. Press the check box next to “Grounds Bin
Monitoring Enabled” to remove the green
check mark, and disable grounds bin monitoring.
2. The grounds bin level is monitored by measuring
the grinder on time. When the machine has
determined that enough coffee has been used,
a grounds bin full message will be displayed.
If the grounds bucket is too full, sliding the
button to the left will reduce the amount of
grounds in the bucket before indicating full.
If there is extra room in the bucket at the full
signal, sliding the button to the right will allow
more grounds before indicating full.
2
1
3. If any changes to the screen have been made,
press Save to confirm.
NOTE: “Paper Take Up Roller Installed” should
remain “checked”.
2
3
102318
18
Page 19
MACHINE SETTINGS (Continued)
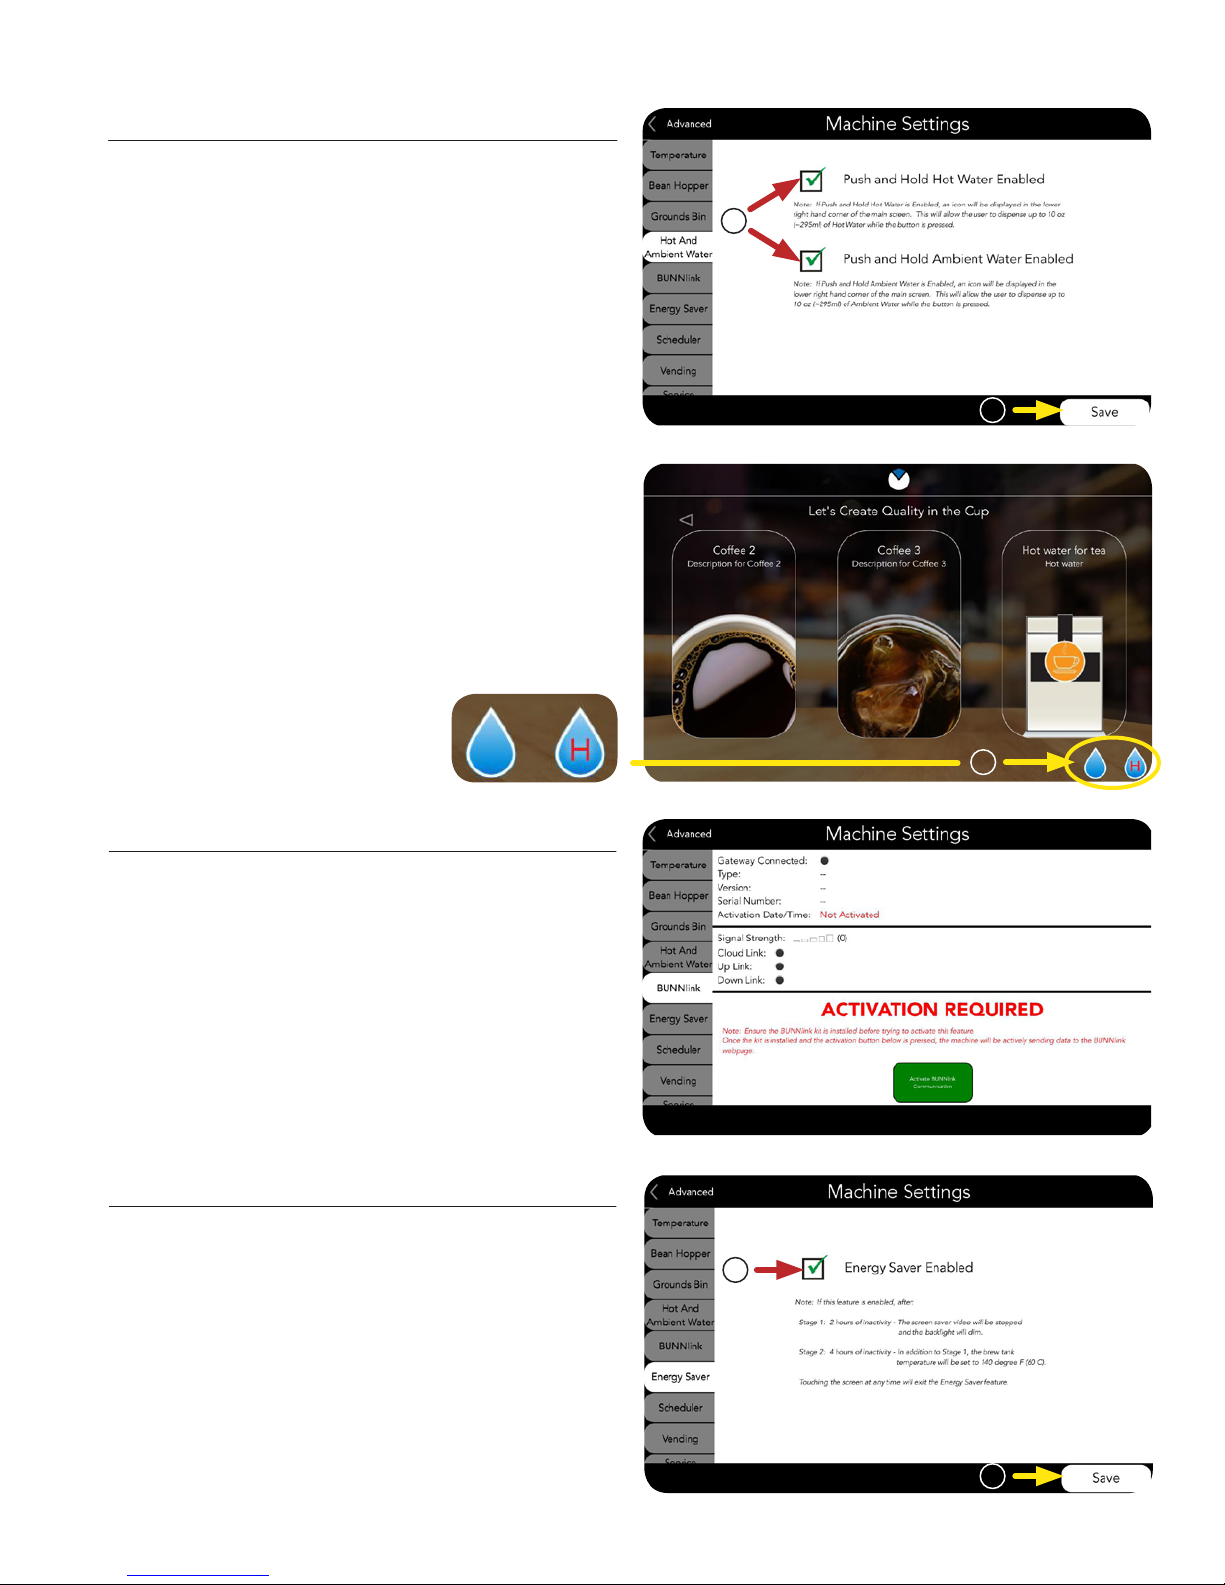
Hot and Ambient Water
1. With the check boxes enabled for Hot and
Ambient Water, icons will be displayed on the
lower right of the main screen for push and
hold dispensing. Either Hot or Ambient Water
dispensing can be disabled by pressing the
check box to remove the green check mark and
disable. This will also remove the corresponding
icon from the main screen.
2. If any changes to the screen have been made,
press Save to confirm.
3. Once enabled, the blue droplet (Ambient) and
(Red H) droplet (Hot) will be displayed on the
main screen.
1
2
BUNNlink
®
If BUNNlink hardware has been installed in the
machine, this screen will indicate that it is active,
and provide other data. There is no editable
information on this screen.
Energy Saver
Touching the check box will add the green arrow
1.
and enable the Energy Saver feature. If the
check box is enabled, the machine will operate
in an energy saver mode. After two hours of
inactivity, the screen saver video will be stopped,
and the backlight will dim. After four hours of
inactivity, the brew tank temperature setting will
drop to 140°F.
3
1
2. Touching the main screen at any time will exit
the Energy Saver feature. If any changes to the
screen have been made, press Save to confirm.
2
102318
19
Page 20
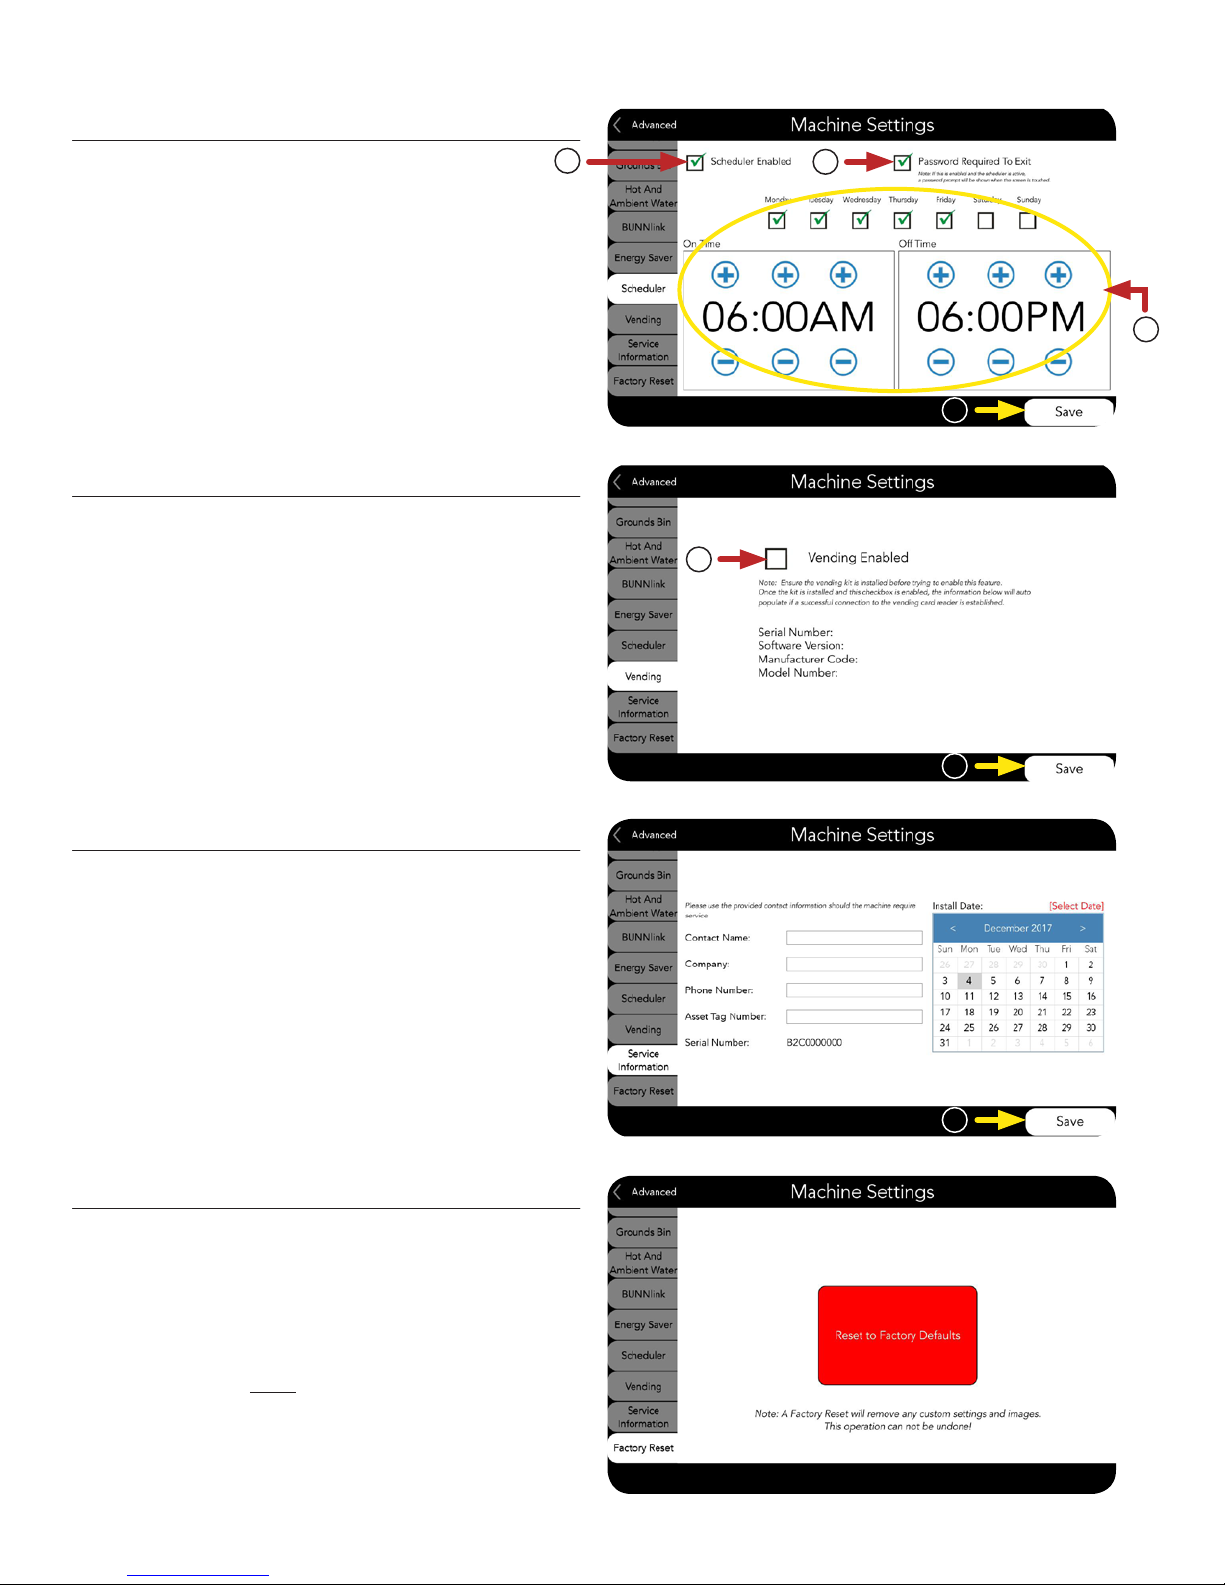
Scheduler
MACHINE SETTINGS (Continued)
1. When Scheduler is enabled, the on/off,
times/days of the week can be set to allow
vending (brewing/dispensing). This can be used
in conjunction with Energy Saver.
2. In this example, the machine is set to allow
vending between 6:00 AM through 6:00 PM
on Monday through Friday.
3. The Password Required To Exit checkbox
means that a password (number) must be
entered to allow vending.
4. Press Save to confirm.
Vending
1. If the cashless vending kit has been installed,
press the box to enable the Vending mode.
If the information shown is populated, Serial
Number:, Software Version:, etc, then a
successful connection to the vending card
reader has been established.
2. If any changes to the screen have been made,
press Save to confirm.
1
1
3
2
4
2
Service Information
1. In the event service may be required,
information for contacting the appropriate
service provider may be entered on this screen
for ready access.
2. If any changes to the screen have been made,
press Save to confirm.
Factory Reset
Pressing the red button will cause stored values to
be restored to the default setting the machine had
when it shipped from the factory.
Caution! This will remove custom setting and
images, and can NOT be undone!
2
20
102318
Page 21
EXPORTING DATA USING USB
Setup of Multiple Machines
Once a machine is setup, you can export all of the
settings and recipes to a USB flashdrive, and then
copy this information to other machines (if they are
to be setup the same way).
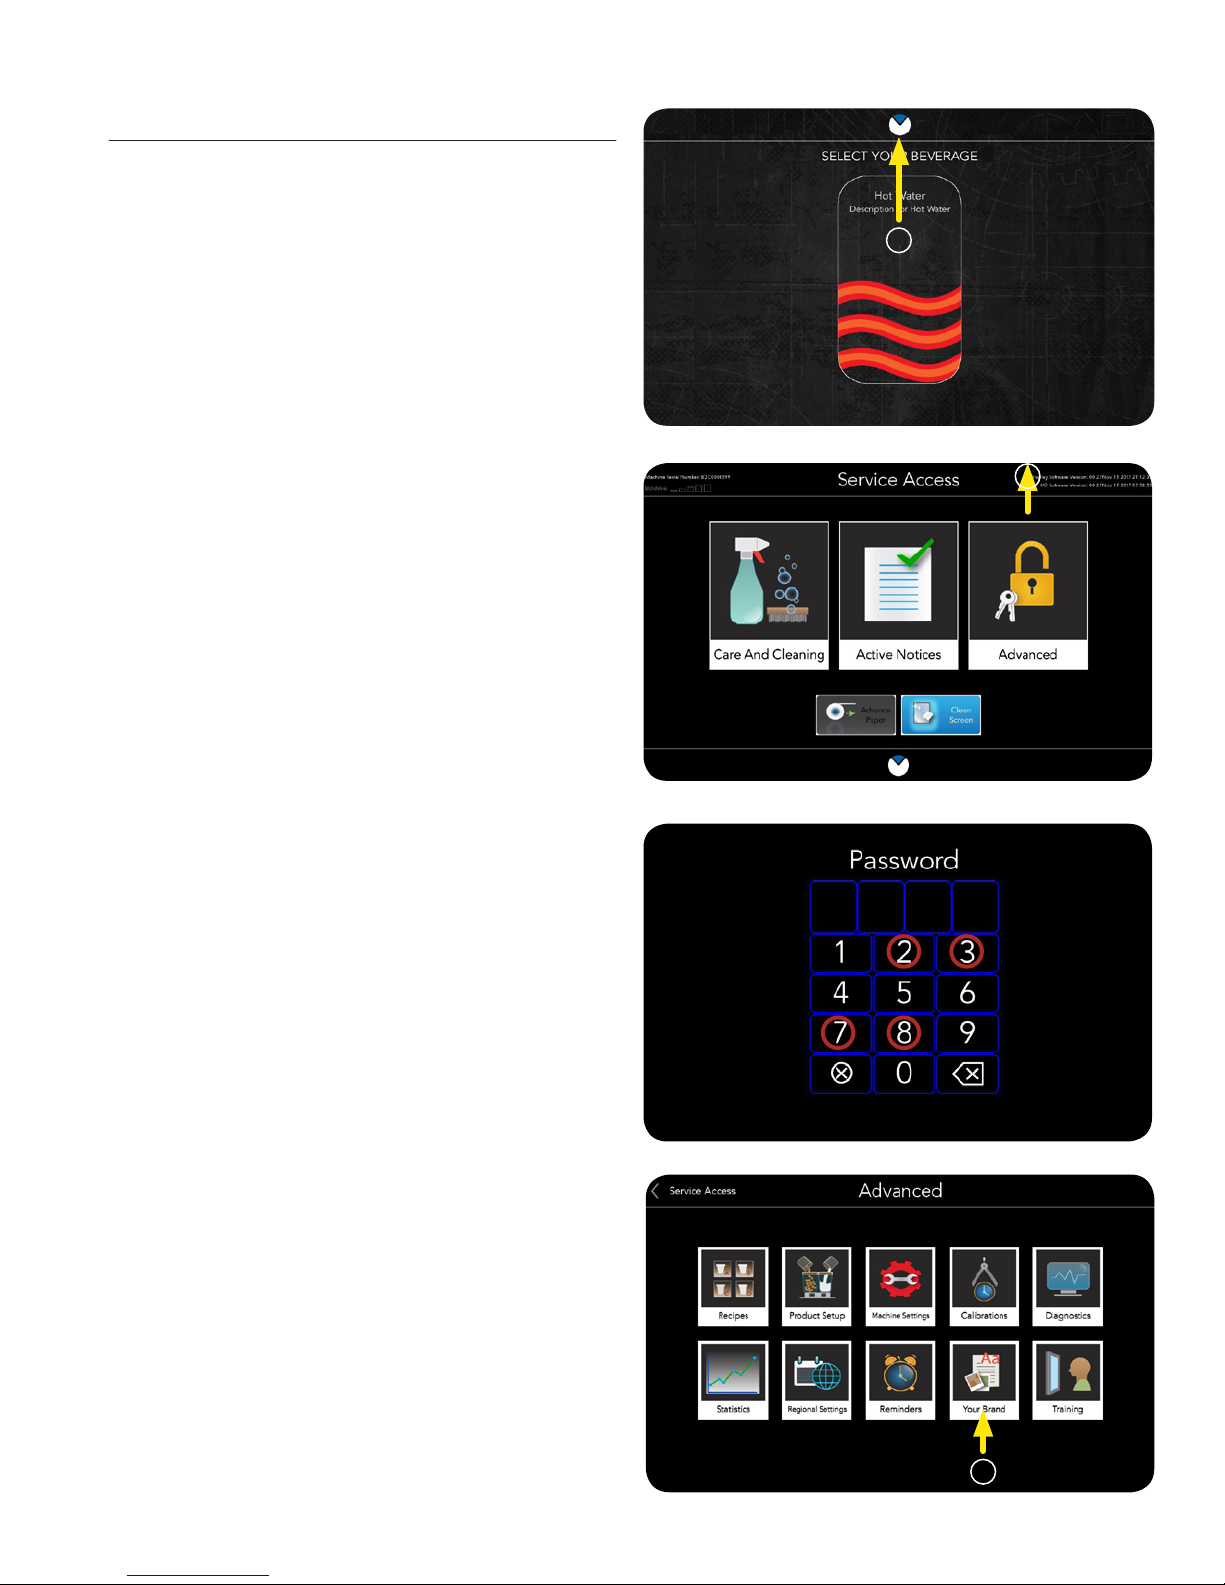
1. Press and hold the BUNN Logo Icon for
three (3) seconds to access the SERVICE
ACCESS screen.
1
2. At the SERVICE ACCESS screen, select the
Advanced button.
3. At the PASSWORD screen, enter 2738.
2
* * * *
4. Next, At the ADVANCED service screen select
the YOUR BRAND icon.
4
102318
21
Page 22
EXPORTING DATA USING USB (Continued)
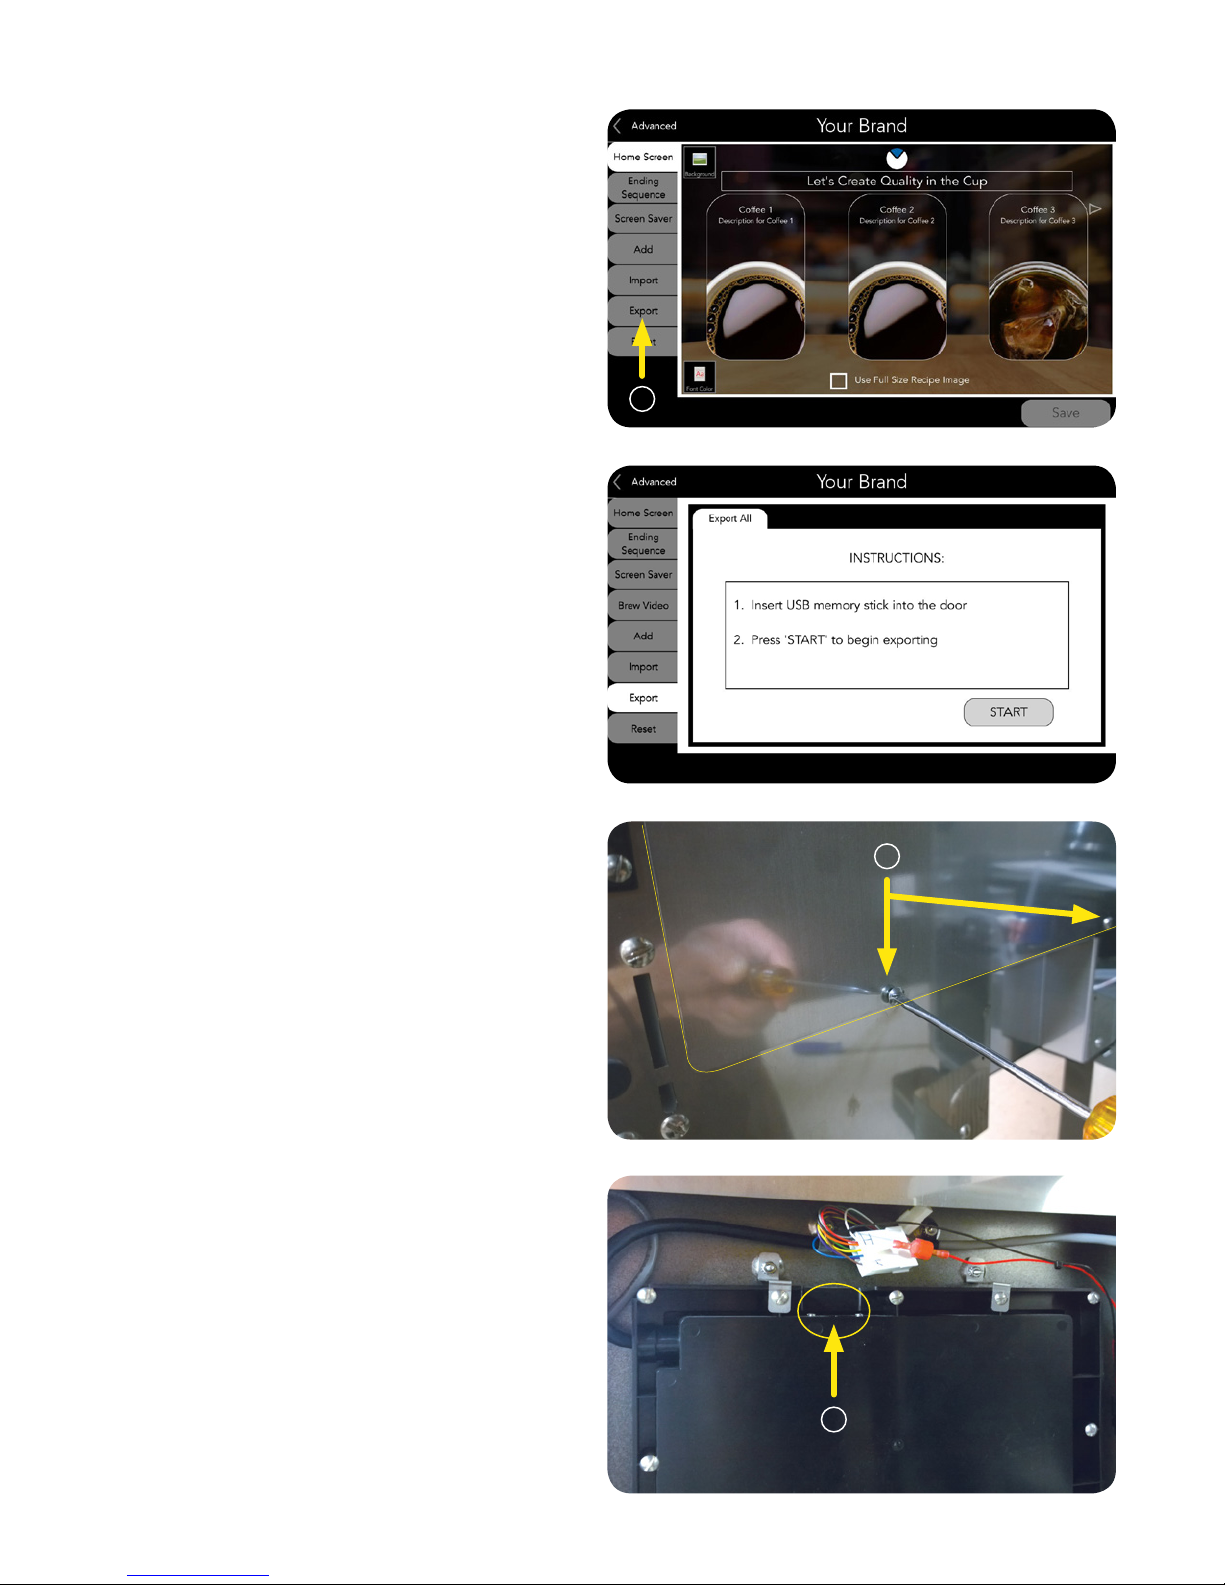
5. At the YOUR BRAND screen select the
EXPORT tab.
6. Next, the user is prompted to insert the
USB stick.
5
7. Remove the two screws from the large
Stainless Steel Cover on the inside of
the door.
8. With the Stainless Steel Cover removed, find
the USB port on top of the display screen.
7
8
102318
22
Page 23
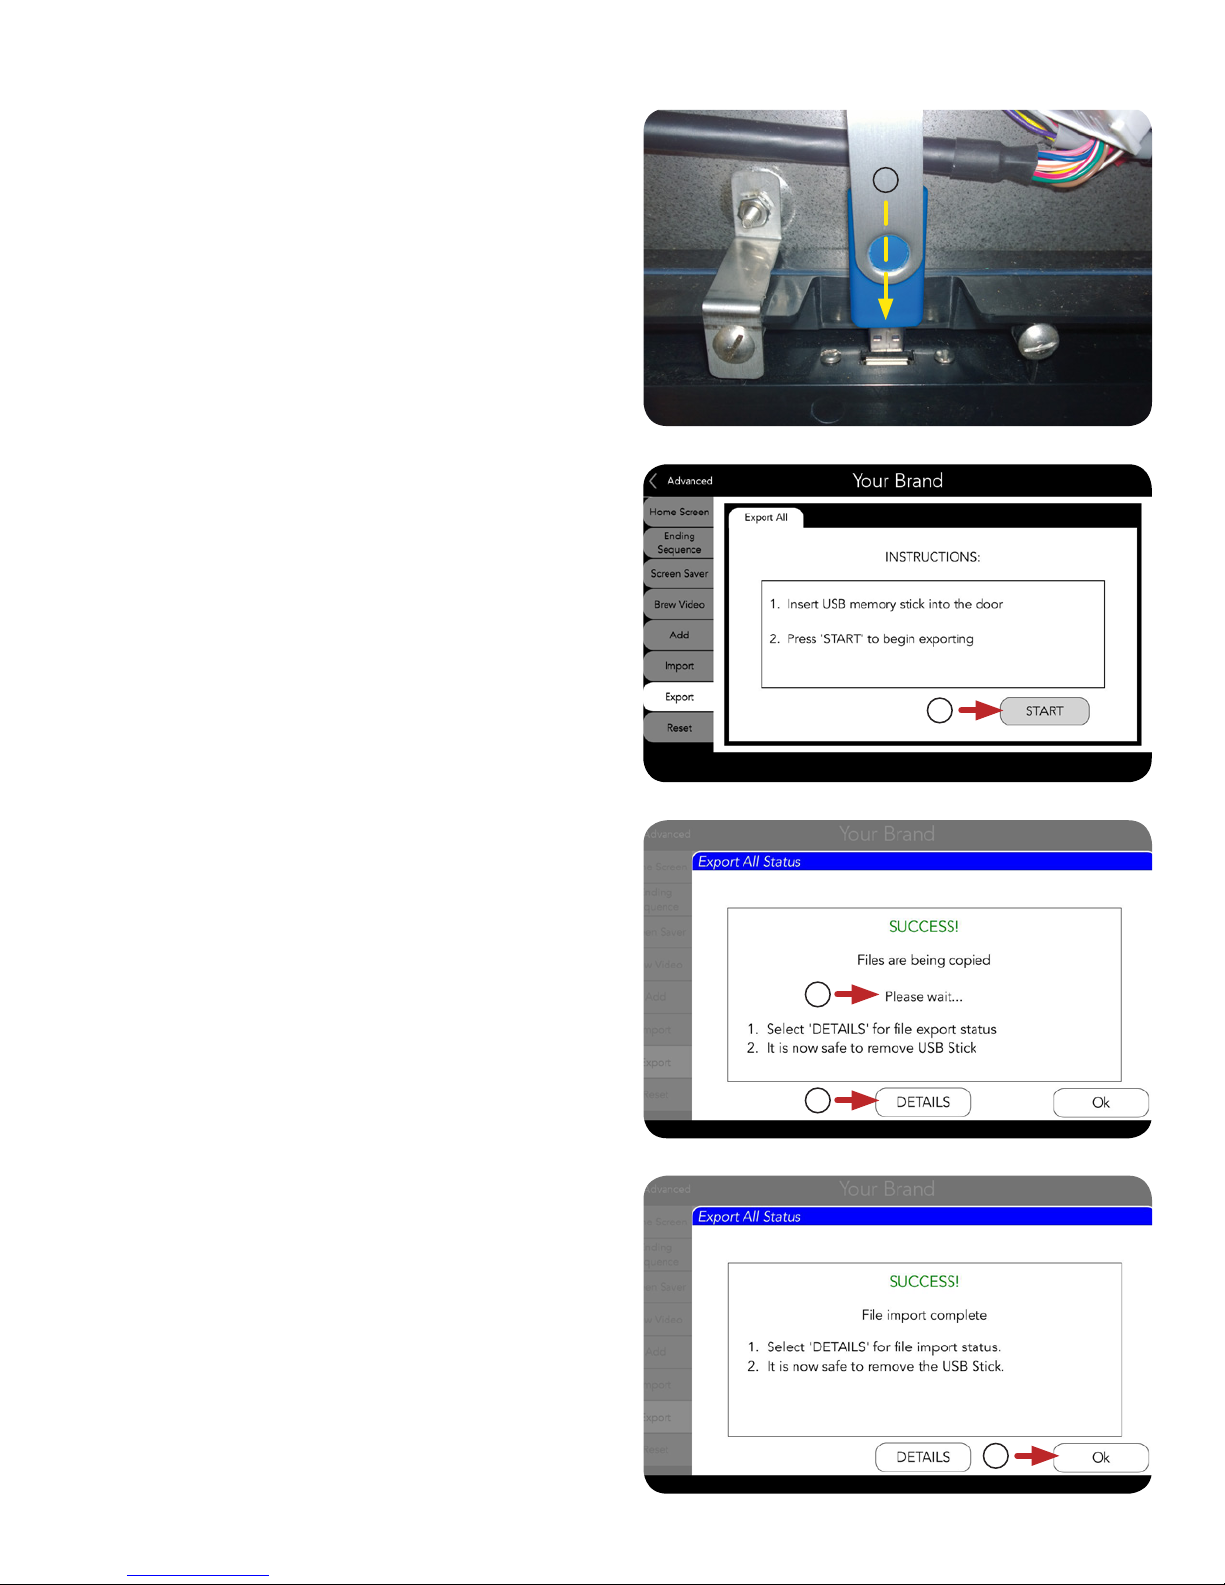
EXPORTING DATA USING USB (Continued)
9. Insert the USB stick into the port.
10. Now that the USB stick is inserted,
press Start.
9
11. A confirmation screen will appear showing the
progress of the export.
12. For more information about the status of the
export, press the Details button.
13. When the export is completed, the OK button
can be selected and the USB stick can be
safely removed.
10
11
12
13
102318
23
Page 24
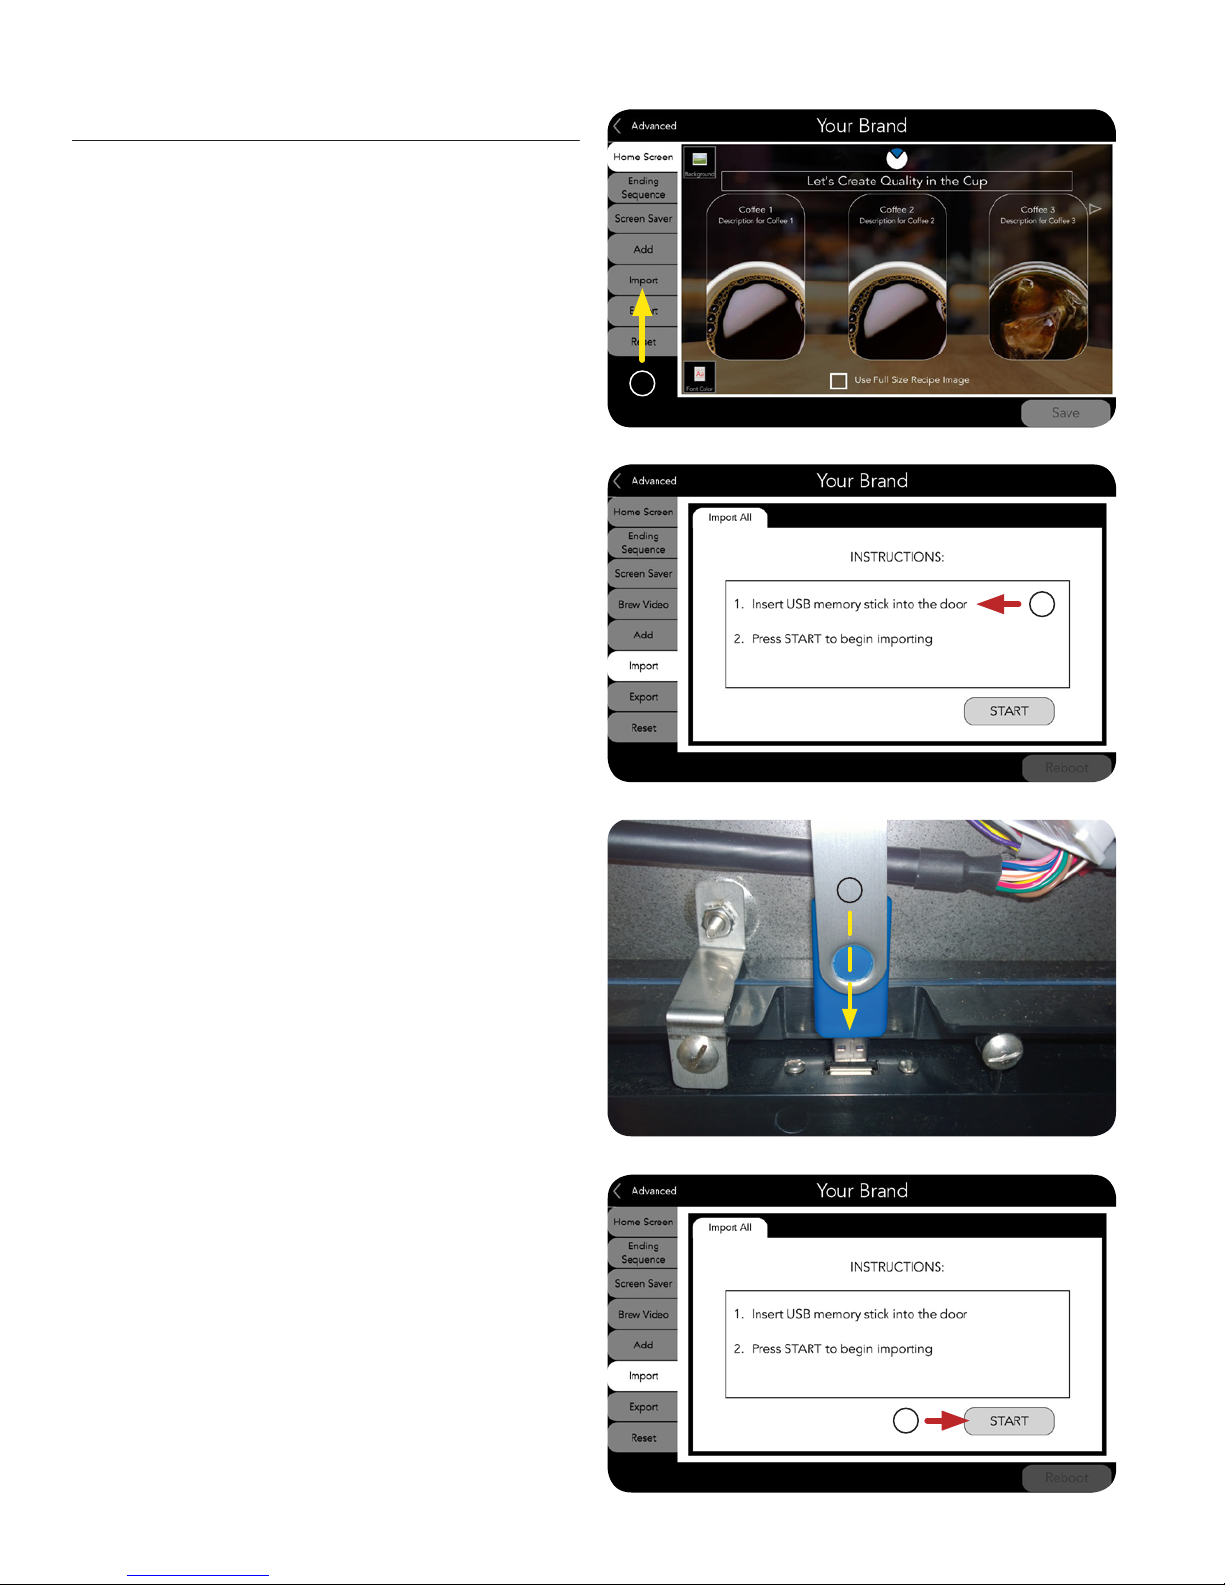
IMPORTING DATA USING USB
Copying Settings from Machine to Machine
1. If you have a USB stick with a copy of all the
settings and recipes from one machine, and
you want to copy this information to another
machine; repeat the process from page 17, in
steps 1 - 4, from the section “Setup of Multiple
Machines”. Then, at the YOUR BRAND screen
on the unit you are moving the settings to, select
the IMPORT tab.
2. The user is prompted to insert the USB stick.
1
2
3. Insert the USB stick.
NOTE: See description of the USB port location
on page 18, steps 7 - 9 in the previous section
called “Exporting Using USB”.
4. Now that the USB stick is inserted,
press Start.
3
4
102318
24
Page 25
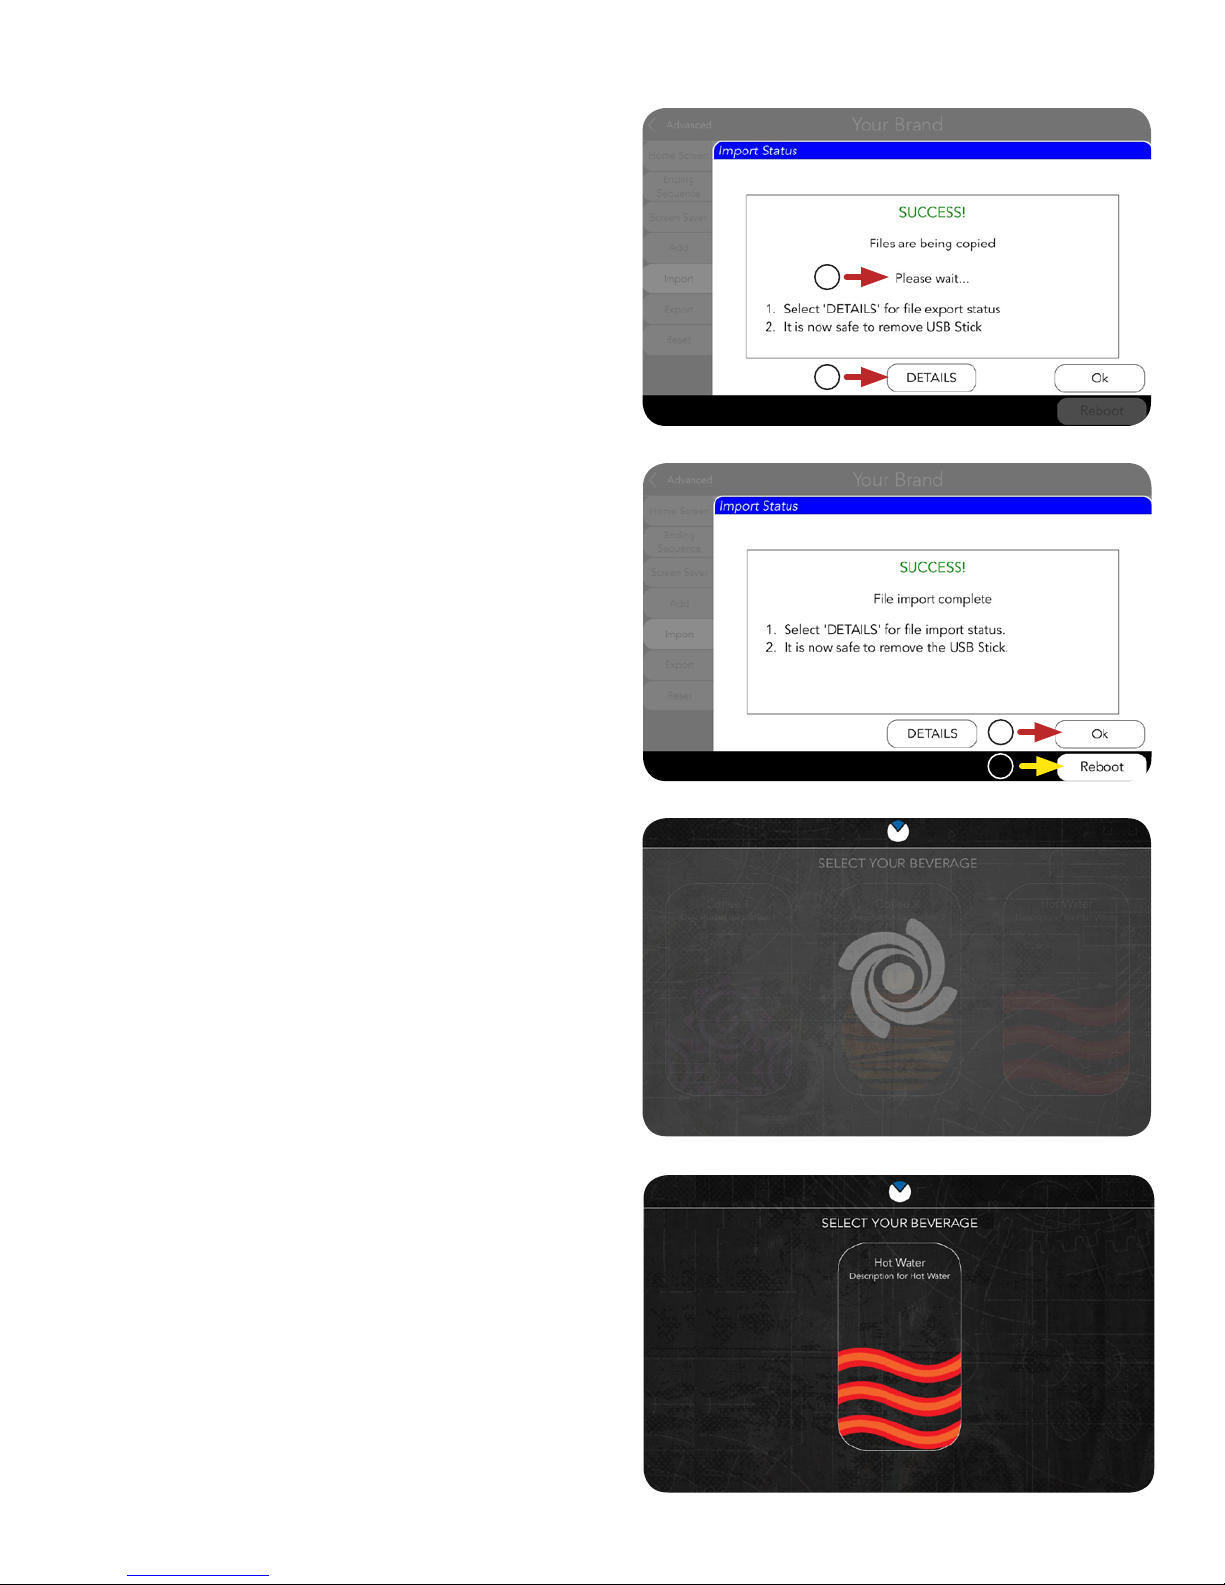
IMPORTING DATA USING USB (Continued)
5. A confirmation screen will appear showing the
progress of the import.
6. For more information about the status of the
import, press the Details button.
7. When the import is completed, the OK button
can be selected and the USB stick can be
safely removed.
8. Next, the Reboot button needs to be selected
to complete the import. This will restart the
machine’s operating system.
5
6
The Update screen will appear.
The Importing Data steps are complete. The
imported settings and recipes should be available
for use.
7
8
Updating...
25
102318
Page 26
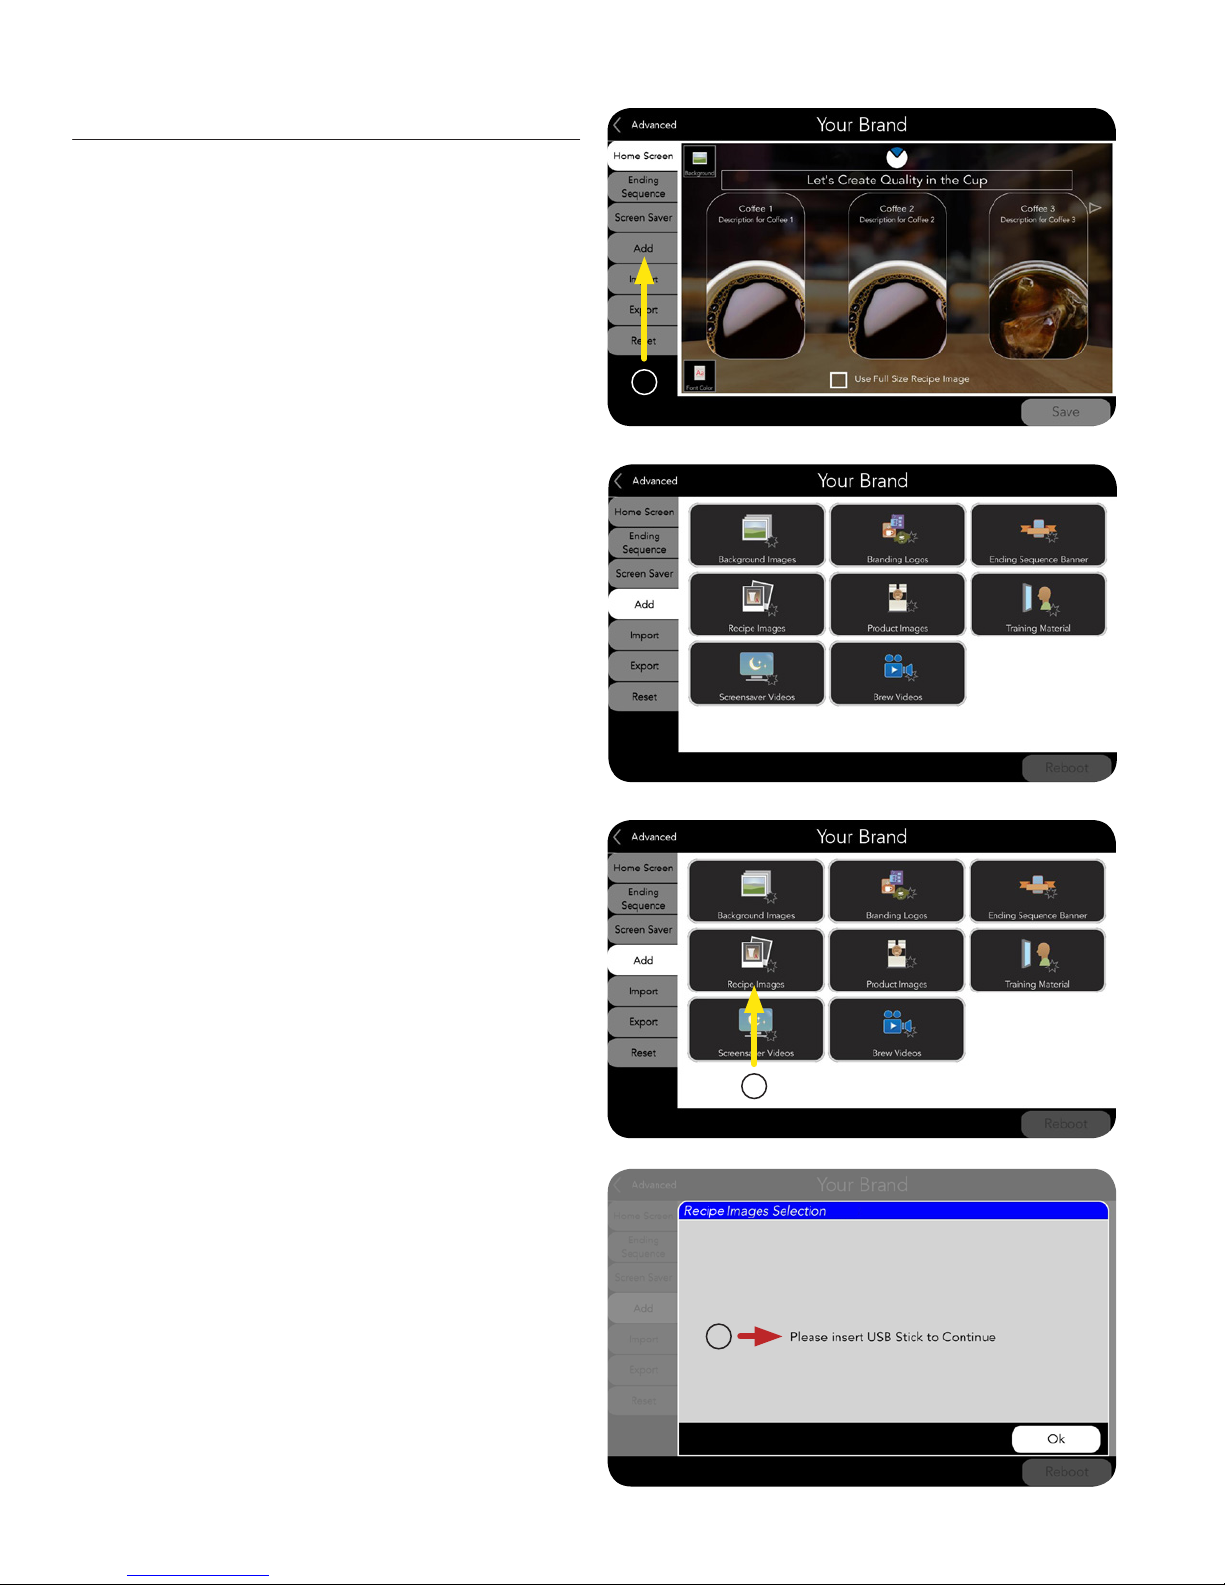
IMPORTING DATA USING USB (Continued)
Adding to Your Brand
1. Refer to page 17. Follow steps 1 - 4 to access
YOUR BRAND menu.
Select the ADD tab.
The YOUR BRAND screen will help you navigate to
the customizable areas of the machine.
Customizable Areas Include:
Background Images
Branding Logos
Ending Sequence Banner
Recipe Images
Product Images
Training Material
Screensaver Videos
Brew Videos
1
2. For this example, we selected the
“Recipe Images” button.
NOTE: The ADD tab should be used by people
approved to make changes to images or
videos that your customers will see.
3. A screen will appear asking to insert the
USB stick.
2
3
26
102318
Page 27
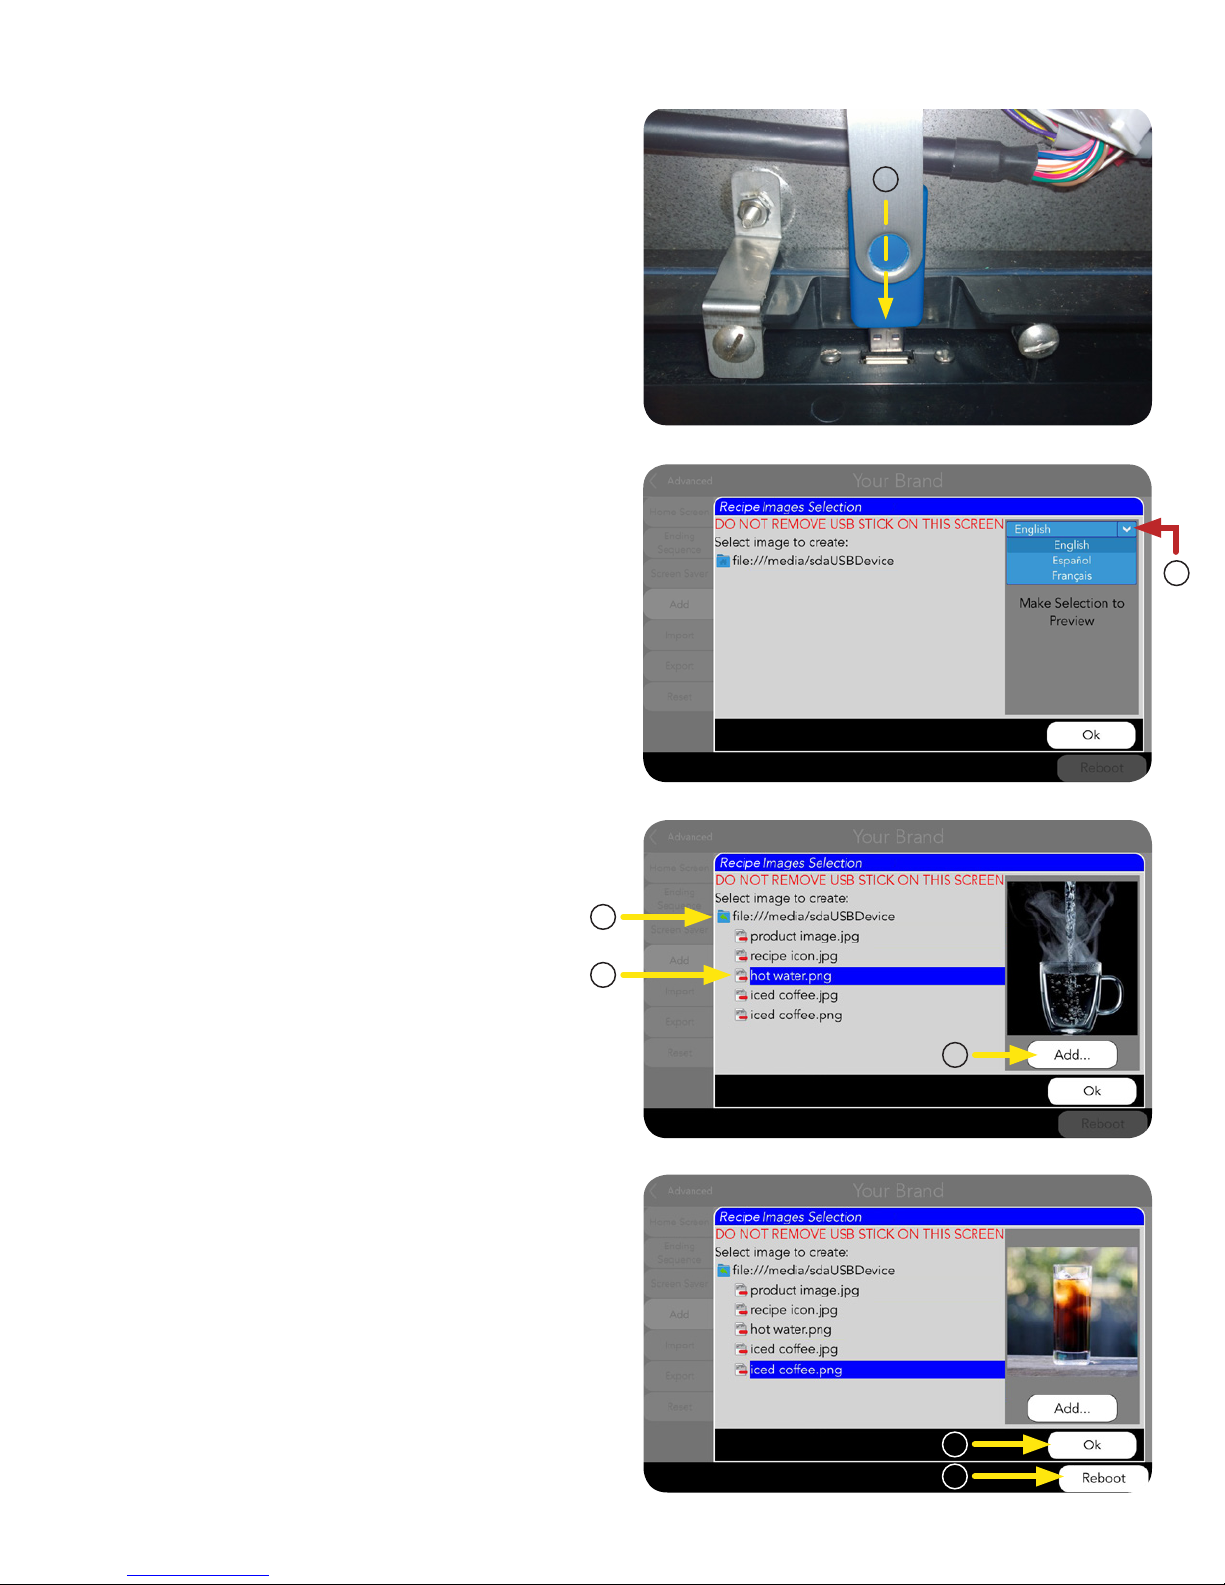
4. Insert the USB stick.
IMPORTING DATA USING USB (Continued)
NOTE: See description of the USB port location
on page 18, steps 7 - 9, in the section called
“Exporting Using USB”.
5. Once the USB is detected, the file
browser screen will appear. (Do not
press OK yet).
Select which language the files should
be imported into (where applicable)
by pressing the arrow on the drop
down menu.
4
5
6. Select the folder location (source).
7. Contents in the folder should appear,
showing either more folders or individual
images. Press the file name of the
chosen image. A preview will appear.
8. If the image is approved, press Add.
9. If needed, repeat steps 7 and 8 to add more
images. When the files are done importing,
press OK.
10. If you are done adding images, the USB stick
can be safely removed, and the Reboot button
should be pressed.
6
7
8
NOTE: The Reboot button will restart the
machine’s operating system.
9
10
102318
27
Page 28
IMPORTING DATA USING USB (Continued)
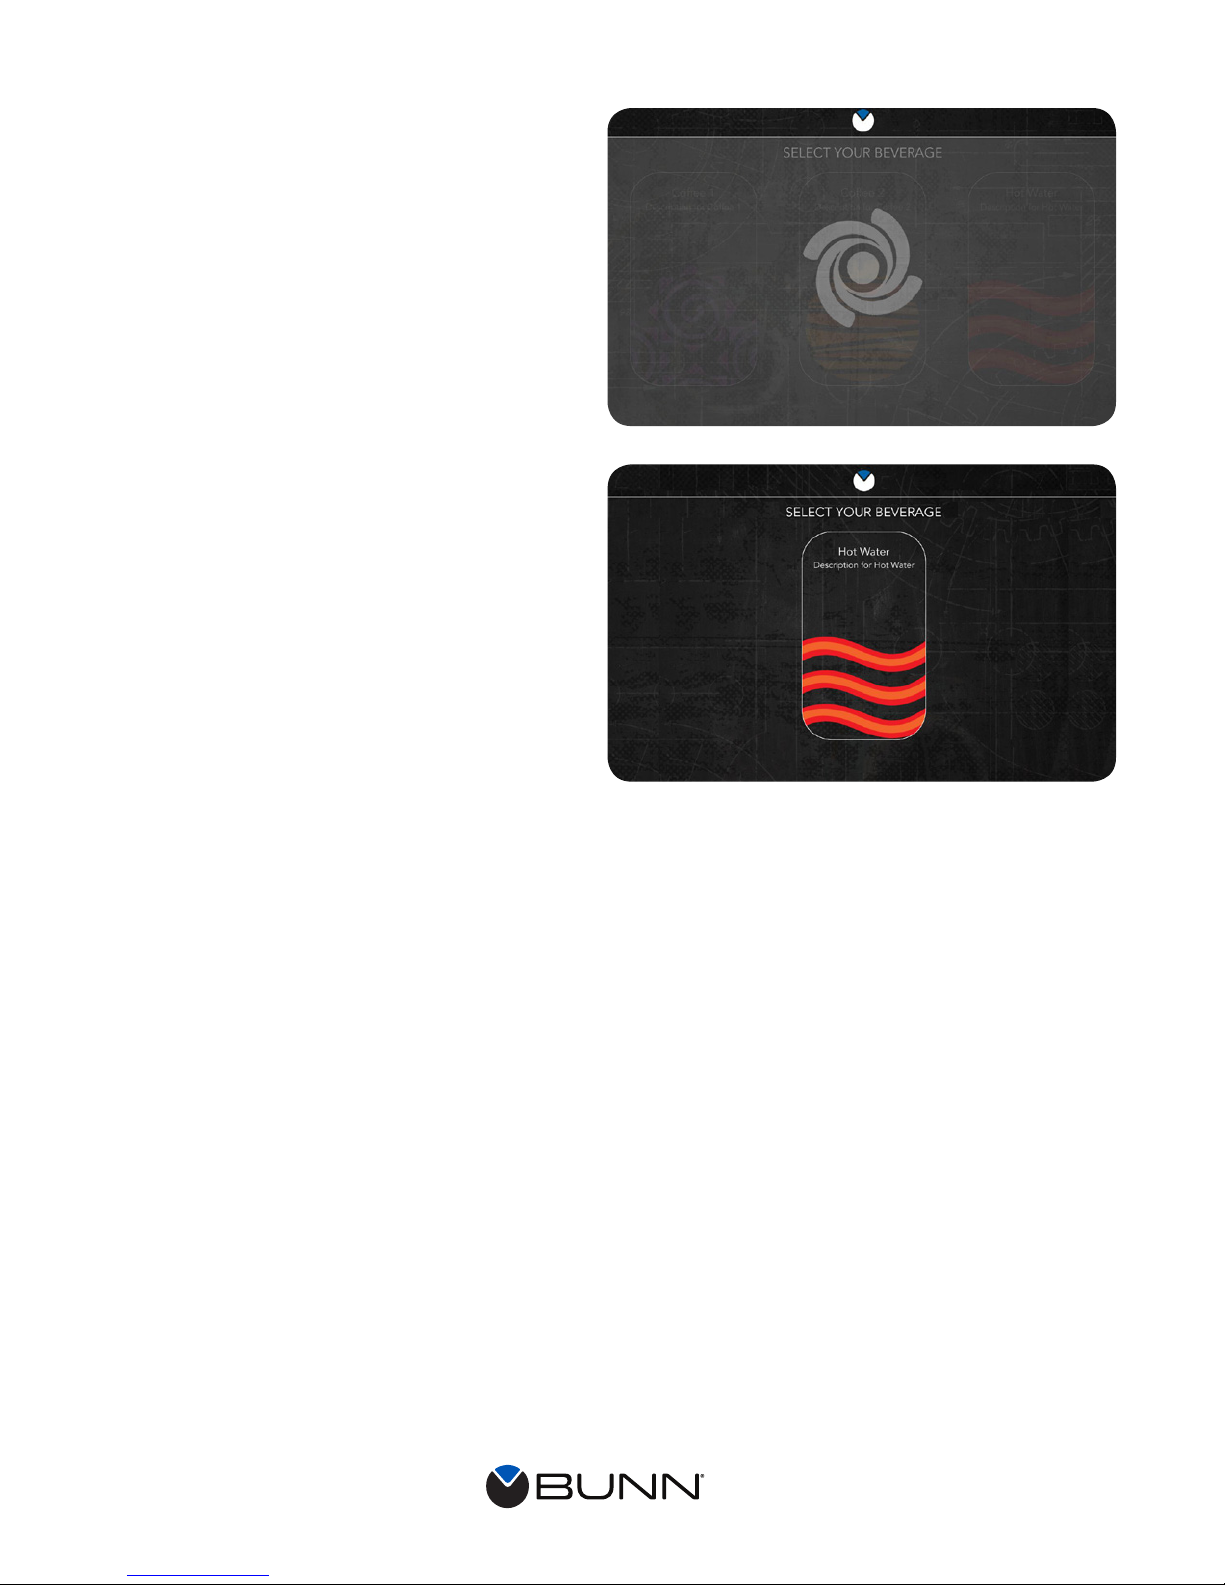
The Update screen will appear.
After the machine updates, the HOME screen
should appear and the products and variables
you just added should be available for you to
customize.
Updating...
102318
 Loading...