

Page 1
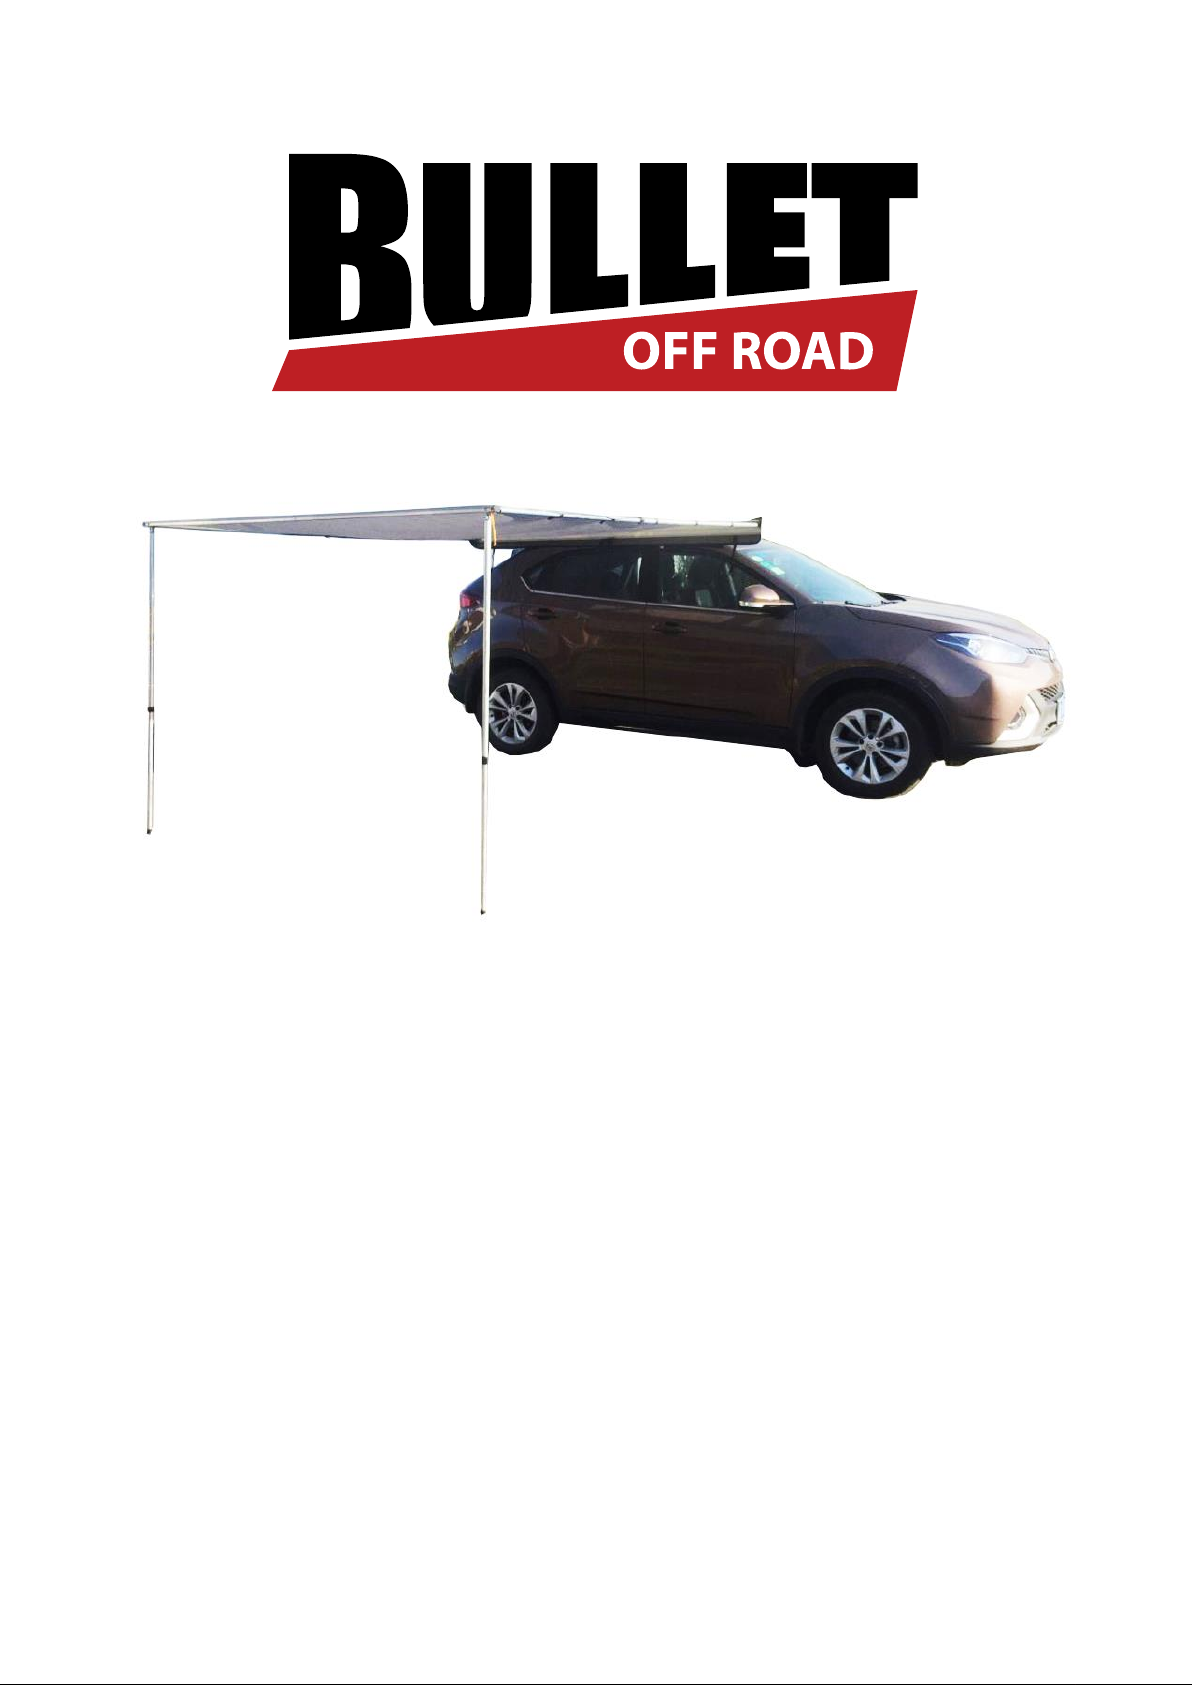
4WD Awning
User Manual
[Revision 1.0 November 2016]
RETAIN THIS MANUAL FOR FUTURE REFERENCE
PLEASE READ THIS MANUAL CAREFULLY BEFORE USE
Page 2
4WD Awning
You WILL be KILLED or
SERIOUSLY INJURED if you do
not follow instructions.
You CAN be KILLED or
SERIOUSLY INJURED if you do
not follow instructions.
You CAN be INJURED if you do
not follow instructions or
equipment damage may occur.
It is important that you read and
understand the instruction manual before
use and keep the manual in a safe place
for future reference. Safety information
presented here is generic in nature – some
advice may not be applicable to every
piece of equipment.
All safety precautions must be observed to
reduce the risk of personal injury when
operating the equipment.
The term “equipment" refers to your
product, be it electrical mains, battery or
petrol engine powered.
IMPORTANT – Handle the equipment
safely and carefully.
BEFORE USE - If you are not familiar with
the safe operation/handling of this
equipment, or are in any way unsure of any
aspect of suitability or correct use it for
your application, you should complete
training conducted by a person or
organization qualified in safe use and
operation of this equipment, including
fuel/electrical handling and safety.
WARNINGS
Read all safety warnings and all
instructions. Failure to follow warnings
and instructions may result in electric
shock, fire and/or serious injury.
Never run a petrol engine in confined
areas.
Do not operate the equipment in
flammable or explosive environments,
such as in the presence of flammable
liquids, gases or dust. Engine and
equipment may create sparks or heat
that may ignite vapors, dust etc
Keep clear of moving parts.
This equipment may be a potential
source of electric shock if misused.
Do not operate the equipment if it is
damaged, malfunctioning or is in an
excessively worn state.
Do not allow others to use the
equipment unless they have read this
manual and are adequately trained.
When using the equipment, basic
safety precautions detailed here must
always be followed to reduce the risk
of fire, electric shock, personal injury
and material damage.
When wiring electrically powered
equipment, follow all electrical and
safety codes.
Ensure all power sources conform to
equipment voltage requirements and
are disconnected before connecting
equipment.
General Work Area Safety
Work areas should be clean and well it.
Do not operate the equipment if
bystanders, animals etc are within
operating range of the equipment or the
general work area.
Personal Safety
Keep packaging away from children - risk
of suffocation! Operators must use the
equipment correctly. When using the
equipment, consider conditions and pay
due care to persons and property.
Prevent unintentional starting of the
equipment - ensure equipment and power
source switches are in the OFF position
before connecting or moving the
equipment. Do not carry equipment with
hands/fingers touching any controls.
Remove any tools or other items that are
not a part of the equipment from it before
starting or switching on.
Stay alert and use common sense when
operating equipment. Do not overreach.
Keep proper footing and balance at all
times. Do not use equipment when tired or
under the influence of drugs, alcohol or
medication. This equipment is not intended
for use by persons with reduced physical,
sensory or mental capabilities.
You must wear appropriate protective
equipment when operating, servicing, or
when in the operating area of the
equipment to help protect from serious
injury, including eye injury, inhalation of
toxic fumes, burns, and hearing loss.
Always wear eye protection. Protective
equipment such as respirators, non-skid
safety shoes, hard hat, hearing protection
etc should be used for appropriate
conditions. Other people nearby should
also wear appropriate personal protective
equipment. Do not wear loose clothing or
jewellery, which can be caught in moving
parts. Keep hair and clothing away from
the equipment.
If devices are provided for the connection
of dust extraction and collection facilities,
ensure these are connected and properly
used. Use of dust collection can reduce
dust-related hazards.
General Equipment Use and Care
Do not force the equipment. Use the
correct equipment for your application. The
correct equipment will perform better and
be safer within its design parameters. Do
not use the equipment if the ON/OFF
switch malfunctions – any equipment that
cannot be controlled with the ON/OFF
switch is dangerous and must be repaired.
Use the equipment and accessories etc. in
accordance with these instructions, taking
into account working conditions and the work
to be performed. Using the equipment for
operations different from those intended
could result in hazardous situations.
Before use, inspect the equipment for
misalignment or binding of moving parts,
loose components, damage or any other
condition that may affect its operation. If
damaged, have the equipment repaired by an
authorized service center or technician before
use.
Always keep the equipment and accessories
(cutting tools, nozzles, bits etc) properly
maintained. Keep the equipment, controls
and handles dry and free from dirt, oil and
grease.
Store the equipment out of reach of children
or untrained persons. To avoid burns or fire
hazards, let the equipment cool completely
before transporting or storing. Never place
the equipment in places where there are
flammable materials, combustible gases or
combustible liquids etc.
The equipment is not weatherproof, and
should not be stored in direct sunlight, at high
ambient temperatures or locations that are
damp or very humid.
Product Use and Care
RECOMMENDATIONS
After installation, drive the vehicle for a
distance, then check that all brackets
and fasteners and the roof racks are
secure. It is advised to regularly check
brackets and fasteners, especially when
travelling over rough terrain.
Use non-stretch fastening ropes or
straps.
Do not use automatic car washes with
the awning installed on the vehicle.
Loads - be aware of the load capacity of
the vehicle roof racks/rails and that the
weight of the awning (approximately
10kg) and its leverage effect is taken
into consideration. Ensure that when
fully loaded, the roof racks/rails are not
operated over 70% of the maximum load
rating, particularly in rough terrain. If in
any doubt, contact a suitably qualified
person for advice.
Safety
Safety messages are designed to alert you to possible dangers or hazards that could cause death, injury or
equipment or property damage if not understood or followed. Safety messages have the following symbols:
2
Page 3

4WD Awning
Table of Contents
Safety ............................................................................................................................................. 2
Parts Identification ........................................................................................................................ 4
Installation ..................................................................................................................................... 5
Opening and Setting-Up the Awning ........................................................................................... 6
Setting-Up the Awning Extension................................................................................................................. 7
Closing and Storing the Awning .................................................................................................. 8
3
Page 4
4WD Awning
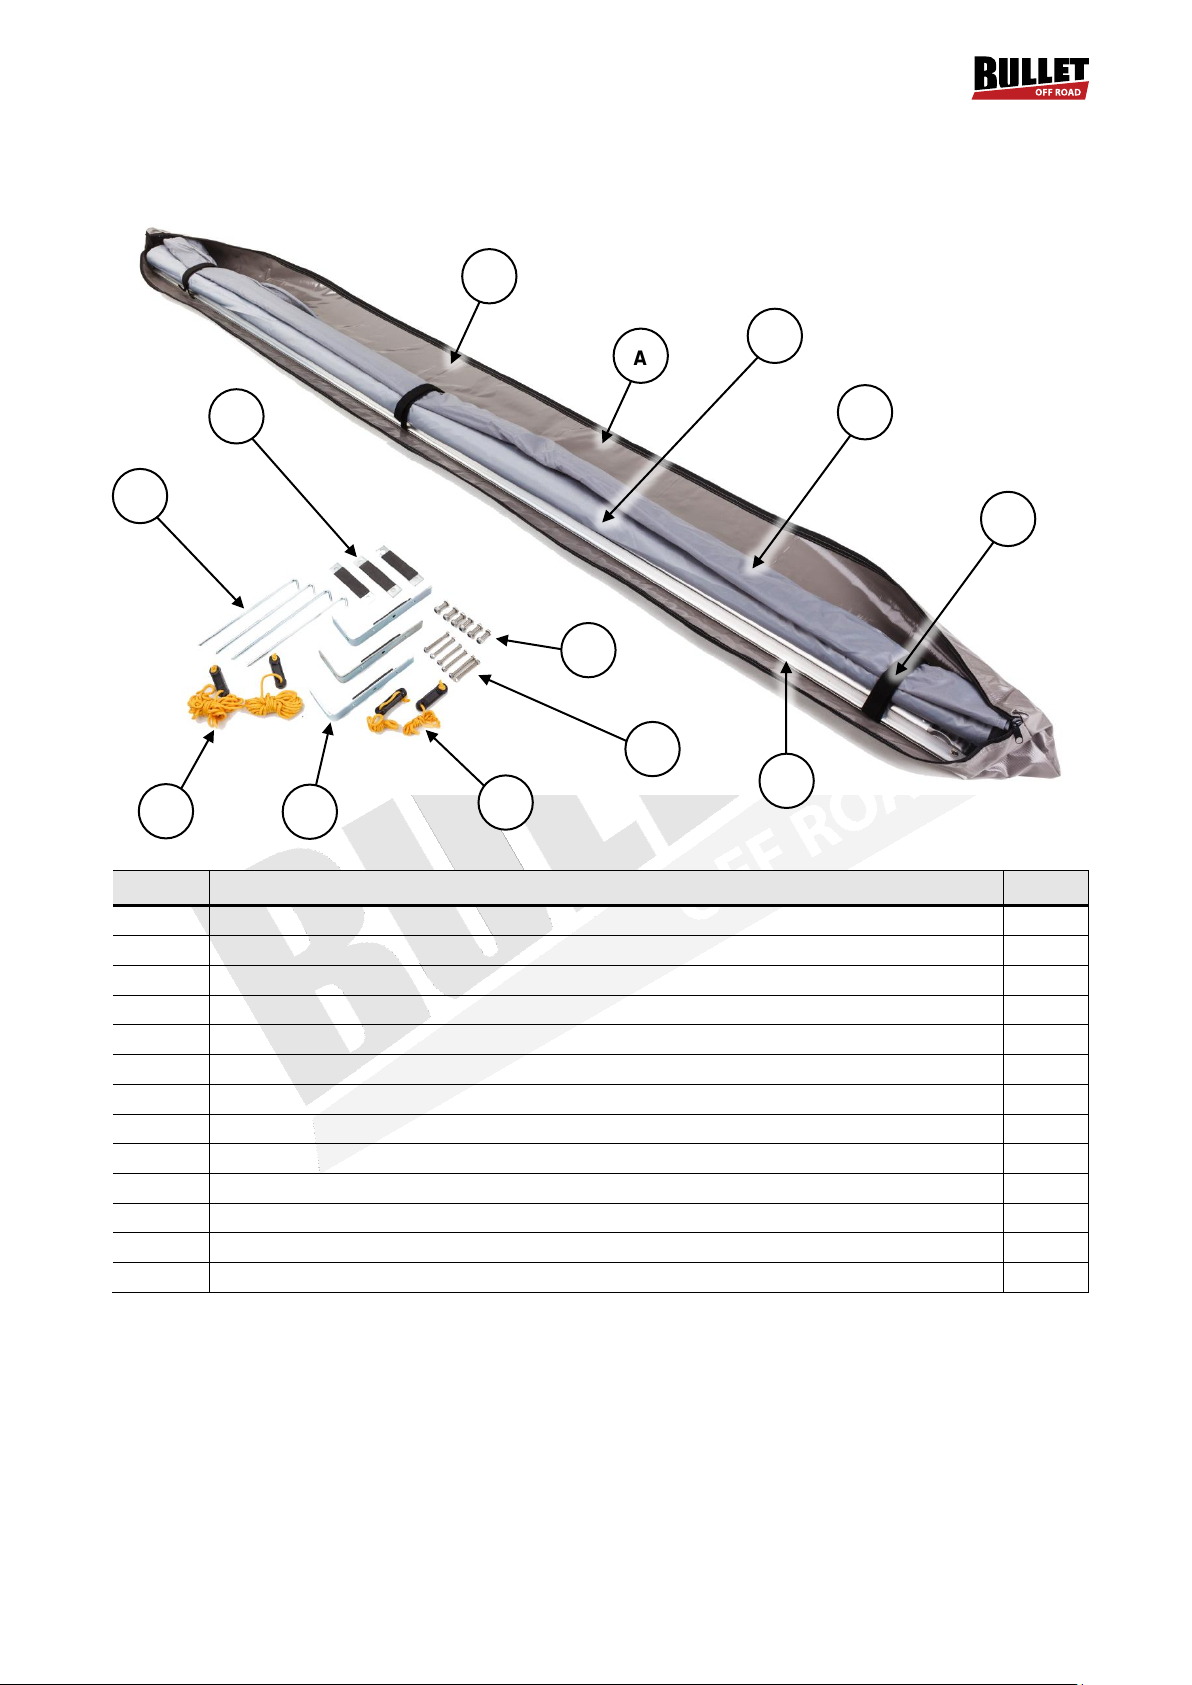
No.
Name
Qty.
1
4WD Awning (includes A, B, C, D and E)
1
2
Mounting Bracket
3
3
Mounting Bracket Clamp
3
4
M8 Bolt / Nut
6
5
M6 Bolt / Nut
6
6
Guy Rope Peg
2 / 4*
7
Guy Rope
2
8
Guy Rope - Short
2*
A
Awning Cover (with zip)
1
B
Awning Canvas and Outer Rail (not shown)
1
C
Awning Rail
1
D
Awning Extension
1*
E
Velcro Straps (not all shown)
-
A B D 5 3
6
7
2
8
4
C
1
E
Parts Identification
* Included with the awning extension.
4
Page 5
4WD Awning
A
B
A D B F E
C
Vehicle
Installation
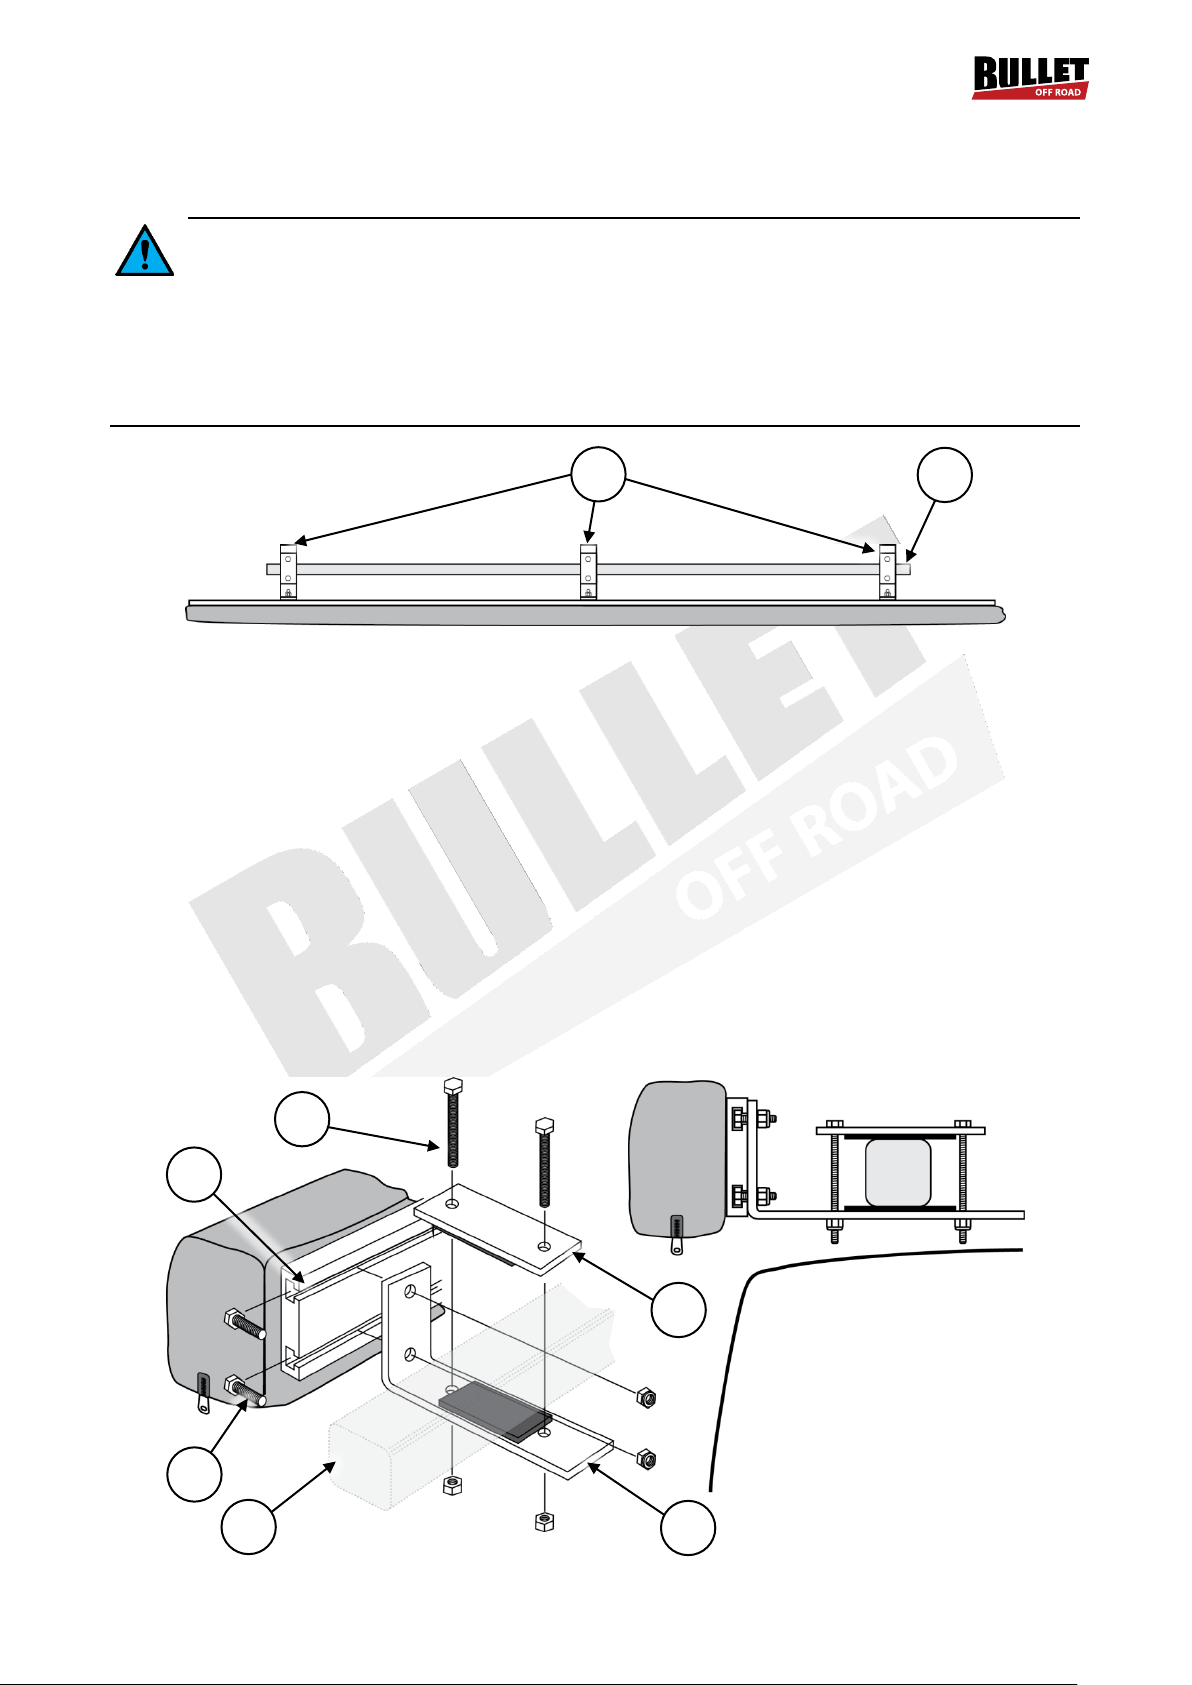
Installation requires 2 or more people []. • The roof rack / rails must be of a suitable type that
runs along the length of the vehicle or provides suitable mounting points. The mountings must be
capable of supporting the weight of the awning. If you have any doubt, consult a suitably qualified person for
advice. • Before installation, check that awning and brackets can be mounted without any interference with
the structure of the vehicle – that is, doors can open and awning parts are not touching the vehicle. • Use all
3 mounting brackets, if possible. • It is recommended to clean the vehicle roof rack rail prior to fitment. •
Appropriate spanners are required for correct installation. Other tools may also be required. • The installation
procedure below is based on mounting the awning to a rail that runs along the length of the vehicle.
1. Using a pencil etc, mark the positions of the mounting brackets (A) on the roof rack rail (B). The middle
bracket should be at the centre of the rail. The outer brackets, if possible, should be close to the ends of
the roof rack rails and as near the roof rack rails mountings as possible.
2. Place a bracket in position, with the "L" shaped part under the rail and the vertical section facing up – the
rubber sections should be against the roof rack rail. It is also possible to have the vertical section facing
down, as long as no part of the awning interferes with the vehicle. Fix the brackets in position using the
clamp (C) and M6 bolts and nuts (D), however, do not fully tighten the fasteners at this stage. If the bolts
are long enough to touch the roof of the vehicle, reverse them so the nut is fitted from the top.
3. Slide 3 M8 bolts (E) into each slot in the awning rail (F) and roughly align them with the brackets.
4. With the awning cover zip facing downward, bring the awning rail up to the brackets and pass the bolts
through the bracket holes and secure with the M8 nuts, however, do not fully tighten the fasteners at this
stage.
5. Double-check that the positions of the brackets and the awning is correct in terms of the vehicle roof and
doors etc, and adjust as required before firmly tightening all fasteners – it is recommended to have the
position of the awning as close to the vehicle as possible. Check that the awning is secure and there is
no movement in the awning brackets.
5
Page 6
4WD Awning
A
C D B
E
G
F
Opening and Setting-Up the Awning
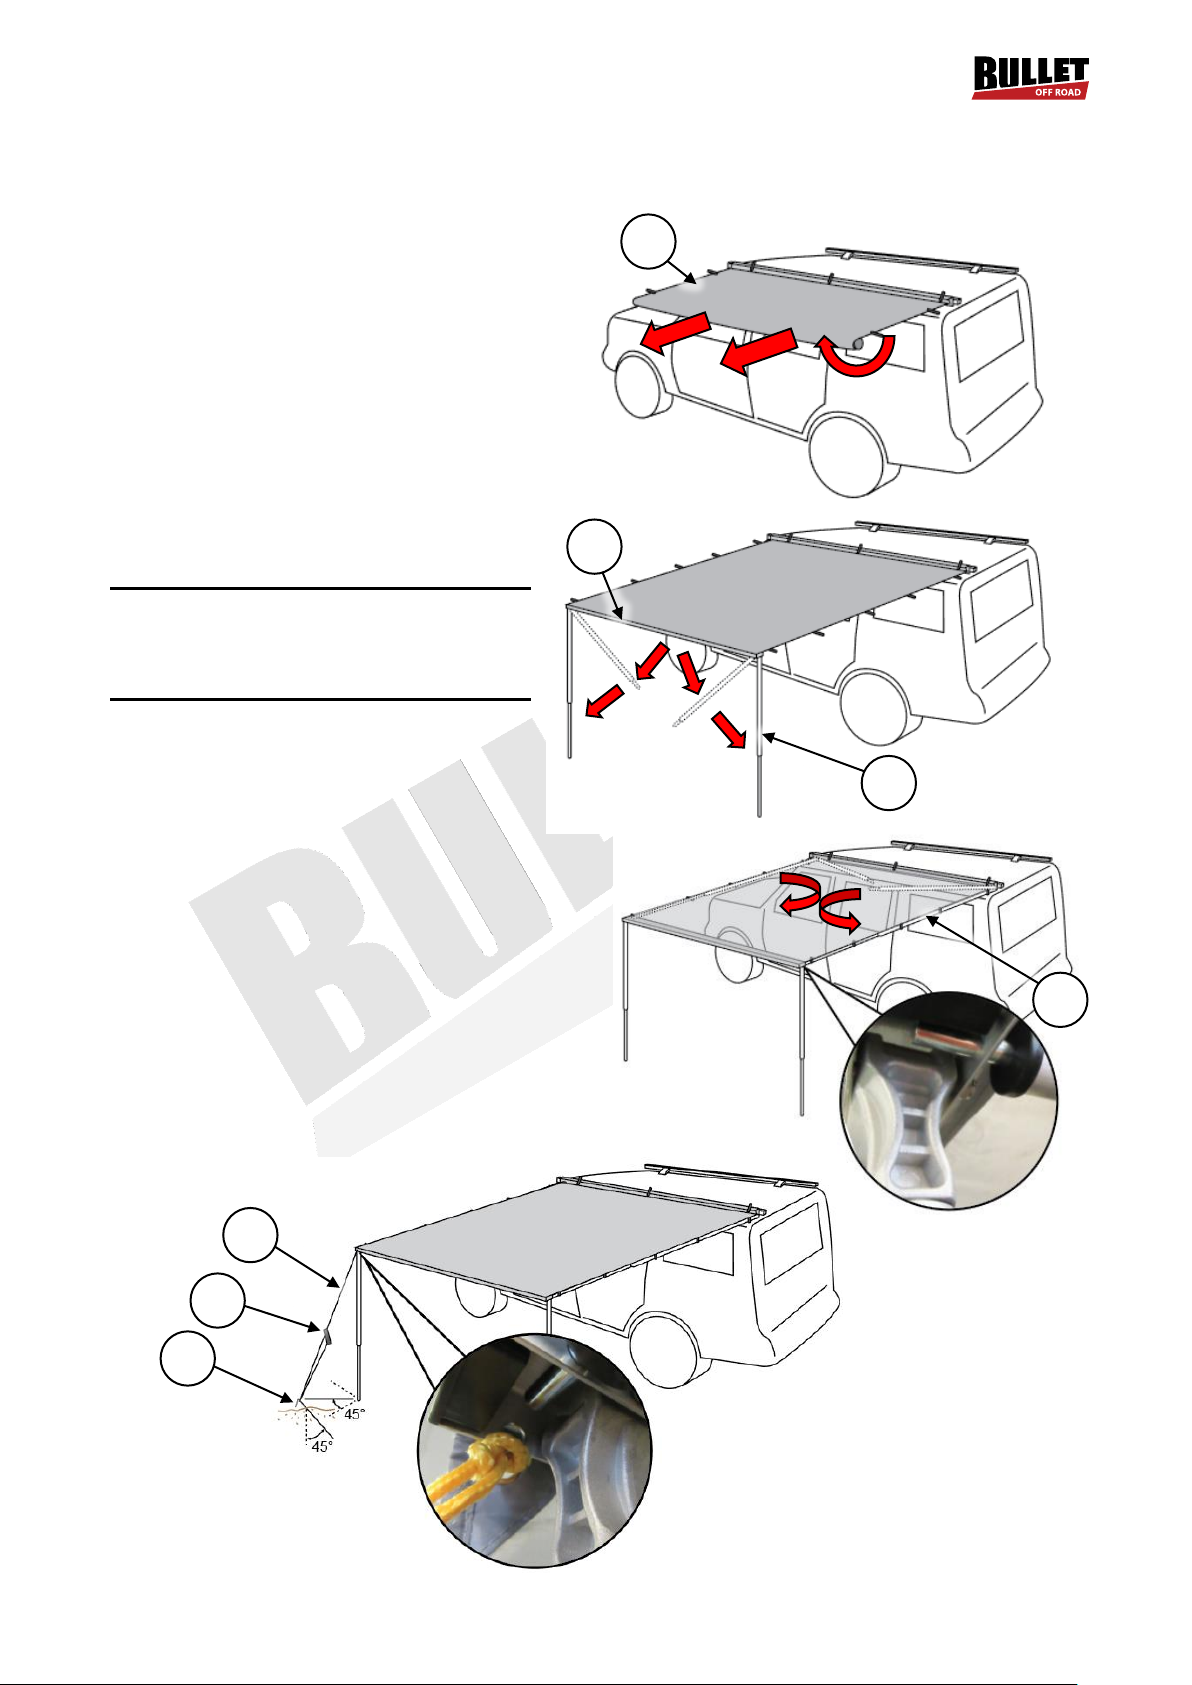
1. Unzip the awning cover and fold it up and out
of the way of the enclosed awning.
2. Undo the Velcro straps and gently roll out the
awning (A). If the awning includes an
extension canvas, remove the extension.
3. When the awning is fully rolled out, swing the
leg (B) on either side down from inside the
outer rail of the awning (C). To extend the leg,
hold the upper tube then rotate the lower tube
left (anti-clockwise) until it is loose, then slide
the lower tube down to the desired position.
To lock the leg, hold the upper tube then
rotate the lower tube right (clockwise) until
it is locked.
Note: It is advisable to have the height of the
awning at the outer edge a little lower than the
height at the vehicle so that in the event of
rain, water runs off the awning.
4. Swing the support arms (D) outward from
the awning rail and extend them fully so
the pin on the end enters the hole in the
outer rail. Adjust the length of the support
arms by rotating the smaller tube to the
right to loosen it, then pull the tube out to
extend it. When in position, lock the support arms
by rotating the smaller tube. The awning should
be fairly taught.
5. Secure the sides of the awning to the support
arms using the Velcro straps.
6. Attach a guy rope (E) to each end of the outer rail
by inserting the free end of the rope through the
hole in the outer rail and tying a suitable knot.
Place a guy rope peg (F) into the ground as
shown, then place the looped end of the guy rope
over the peg hook and slide the tensioner (G) up
the guy rope until taught.
6
Page 7
4WD Awning
A
B
C
D
E
Setting-Up the Awning Extension
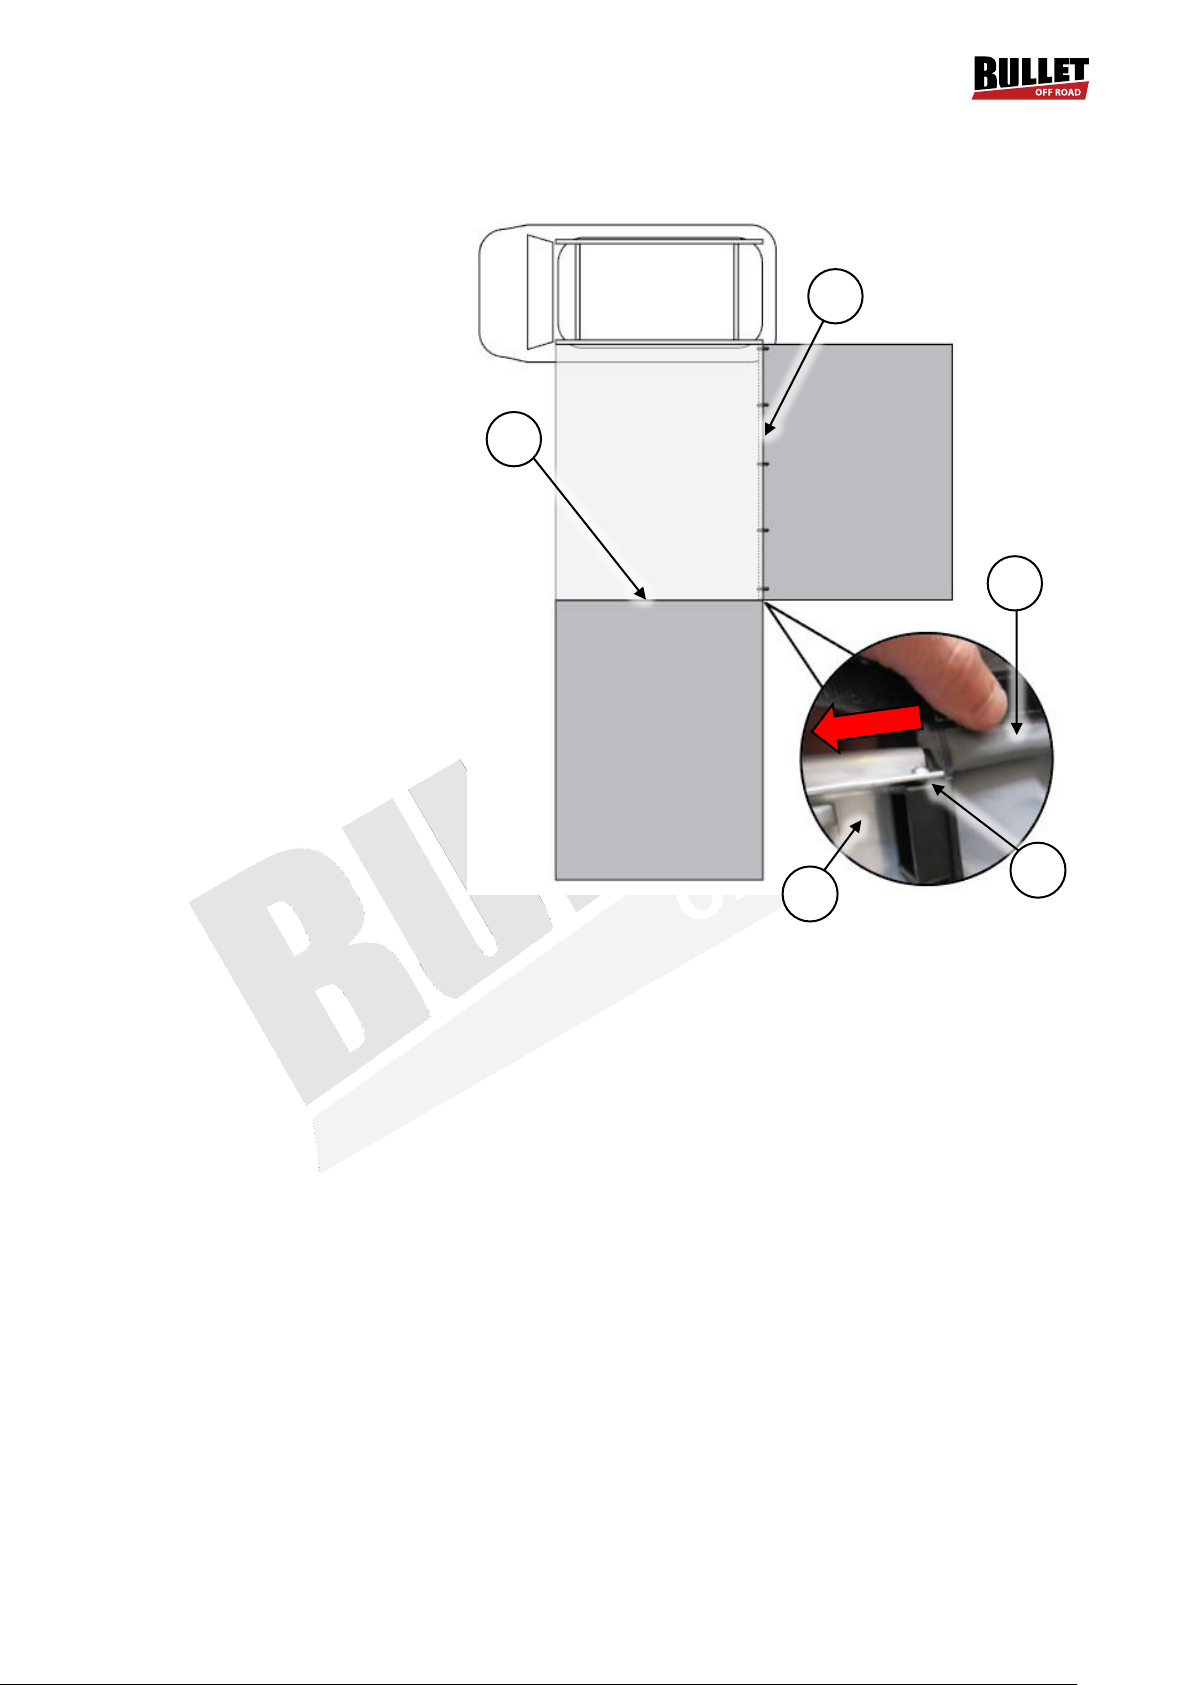
The awning extension can be
attached to the long edge (A) of the
awning to extend the awning width, or
to the outer rail (B) to extend the
awning length.
To attach it to the long edge – roll out
the awning extension and attach the
side with the Velcro straps to the
support arm. To attach it to the outer
rail, slip the end of the extension with
the tube sewn into the edge (C) into
and along the groove (D) in the outer
rail (E). The free end of the extension
can be attached to the ground or
other object using the additional
[short] guy ropes and pegs.
7
Page 8
4WD Awning
D
A
C
B
Closing and Storing the Awning
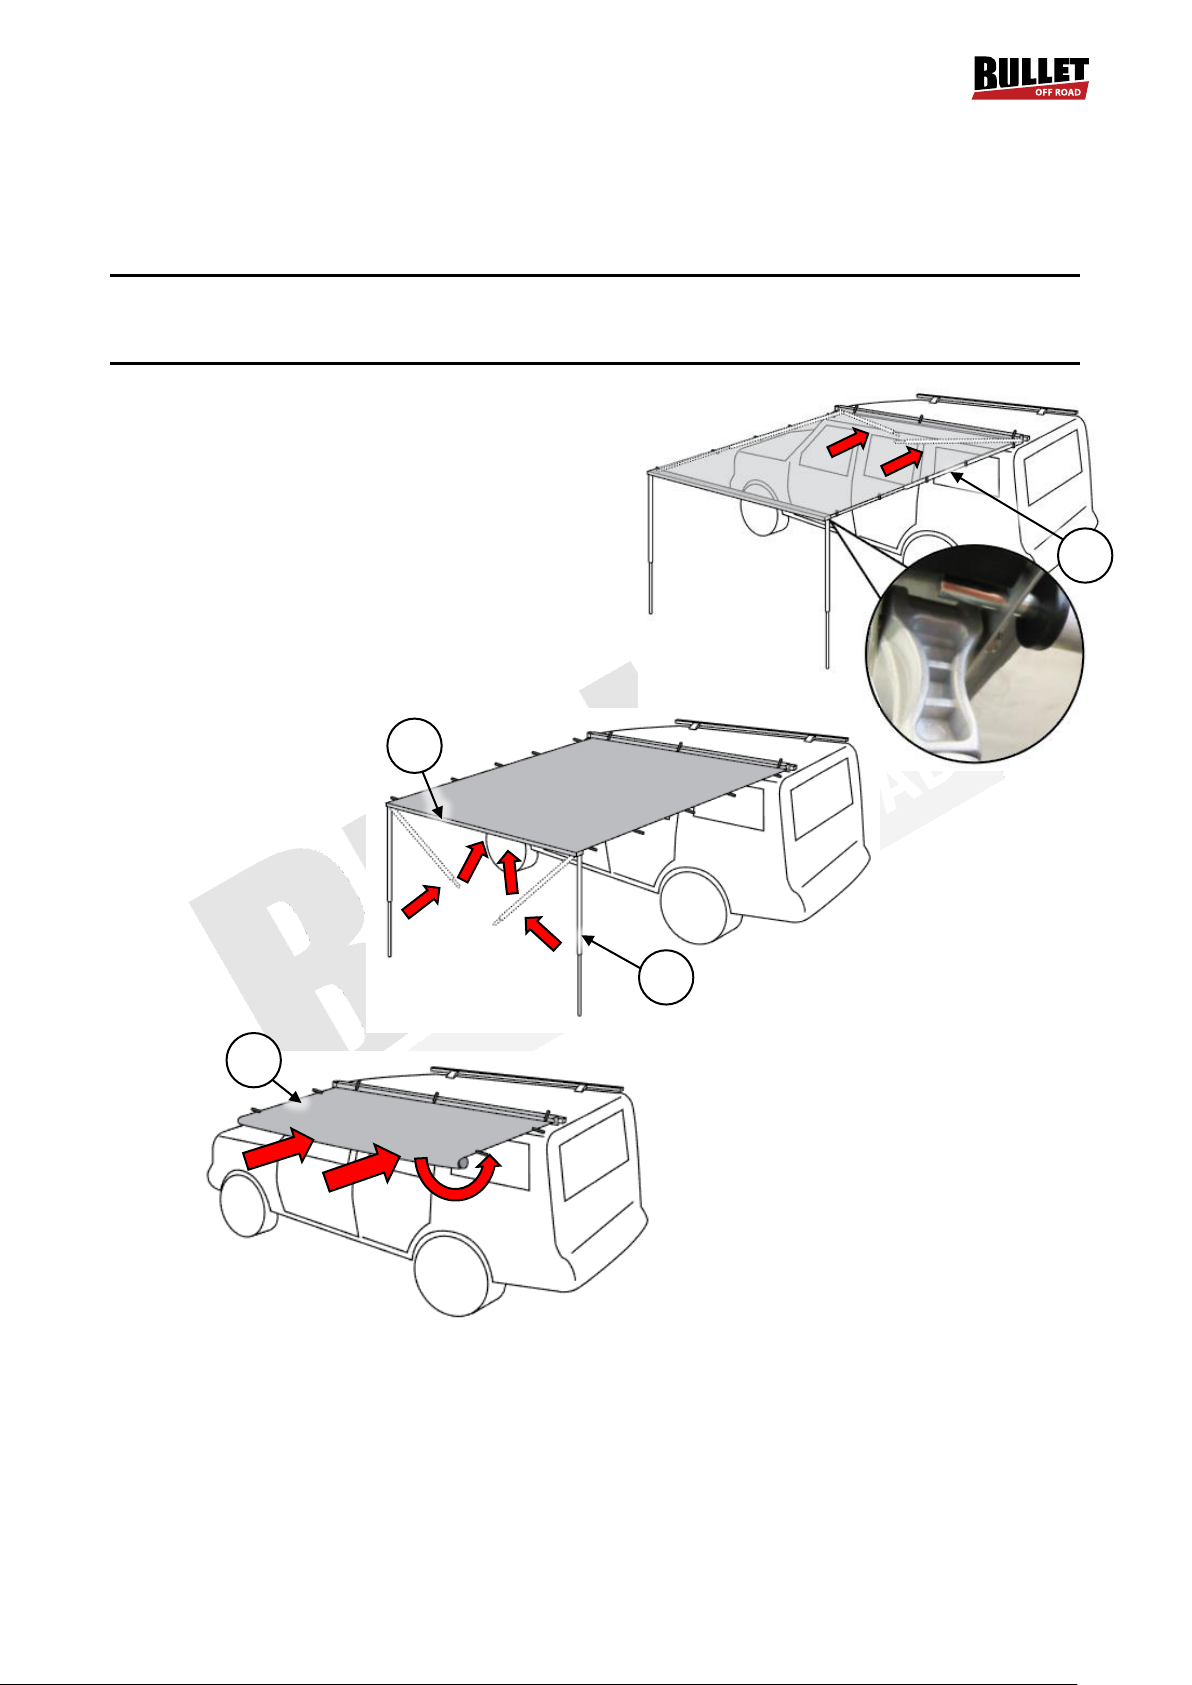
1. Remove the guy ropes and pegs from the awning and extension (if applicable) and store them in the
supplied bag.
Note: If the extension is in use, remove it from the awning – it is either attached to a support arm using
Velcro straps, or must be slid from the groove in the outer rail. Roll up the extension and use the Velcro
straps to keep it from unrolling.
2. Undo the Velcro straps securing the awning to the
support arms (A). Retract the support arms then
swing them back into the awning rail.
3. Hold the end of the awning, then retract the leg (B)
on either side and swing it up and into the outer rail
(C).
4. Proceed to roll the awning (D) up as shown. When
completely folded, use the Velcro straps to secure it
(and the extension, if applicable) to the awning rail.
5. Place the awning cover in position, place the peg
and rope bag inside and fully zip the cover closed.
8
Page 9
4WD Awning
Some experts believe that the incorrect or prolonged use of almost any
product may cause serious injury or death. To help reduce your risk of serious
injury or death, refer to the information below. For more information, see
www.datastreamserver.com/safety
Consult all documentation, packaging and
product labelling before use. Note that
some products feature documentation
available online. It is recommended to print
and retain the documentation.
Before each use, check the product for
loose/broken/damaged/missing parts, wear
or leaks (if applicable). Never use a
product with
loose/broken/damaged/missing parts, wear
or leaks.
Products must be inspected and serviced
(if applicable) by a qualified technician
every 6 months. This is based on average
residential use by persons of average size
and strength, and on a property of average
metropolitan size. Use beyond these
recommendations may require more
frequent inspections/servicing.
Ensure that all users of the product have
completed a suitable industry recognised
training course before being allowed
access to the product.
The product has been supplied by a general merchandise
retailer that may not be familiar with your specific
application or description of application. Be sure to attain
third-party approval from a qualified specialist for your
application before use, regardless of any assurances from
the retailer or its representatives.
This product is not intended for use where fail-safe
operation is required. As with any product (for example,
automobile, computer, toaster), there is the possibility of
technical issues that may require the repair or replacement
of parts, or the product itself. If the possibility of such failure
and the associated time it may take to rectify could in any
way inconvenience the user, business or employee, or
financially affect the user, business or employee, then the
product is not suitable for your requirements. This product is
not intended for use where incorrect operation or a failure of
any kind, including but not limited to, a condition requiring
product return, replacement, parts replacement or service
by a technician may cause financial loss, loss of employee
time or an inconvenience requiring compensation.
If this product has been purchased in error when
considering the information presented here, contact the
retailer directly for details of their returns policy, if required.
9
 Loading...