

Page 1

INSTALLATION GUIDE
•
OWNER’S GUIDE
TALKING ALARM • MODELS 2001 / 2004
CONTENTS
System Features ....................................... 1
Technical Assist ance .................................. 1
Installation Instructions............................ 1-2
Operating Instructions .............................. 2-3
Technical Assistance
All tech personnel are expertly qualified to answer any technical questions.
Technicians are available Monday through Friday from 9:00 a.m. until 8:00 p.m. and Saturday 10:00 a.m. until 4:00 p.m.
Address
288 Canton Avenue • Wintersville, Ohio 43953
Telephone
Phone: 740-264-4710 • 800-878-8007 • Fax: 740-264-7306
Page 2

SYSTEM FEATURES
One Piece Self-Contained Fast and easy to install, usuall y 5 to 10 minutes with no experience.
Only One Wire Fits virtually any vehicle.
Tw o Long Range Four Remotely activates alarm in chirp or voice mode. Slide protection stops
Button Remote Controls accidental alarm activation.
Extra Loud Siren Deters thief from further tampering.
Battery Back-Up (Optional) Alarm will continue to sound even with vehicle battery disconnected.
Current Sensing Alarm will sound with changes in current. EXAMPLE: Dome light or
ignition switch
Electronic Dual Will warn a w a y without going into full alarm.
Stage Shock Sensor
Talking Alarm Demands authority and attention compared to non-talking alarms.
Instant Panic Mode Should you feel threatened you can remotely activate, with a press of the
remote transmitter, a woman’s voice shouting “Please Help Me” , and siren
sounding.
Remote Car Finder Helps you locate your vehicle in crowded parking lots by chirping the siren
8 times.
Automatic Alarm Reset If the alarm is violated, it will stop and rearm itself after 30 seconds.
Scan Deterrent Protects your car from scanning devices sometimes used by thieves to disarm
alarm systems.
Limited Lifetime Warranty Guarantees life-long protection.
TECHNICAL ASSISTANCE
Should you need help. First check our website at www.bulldogsecurity.com/wires.htm or call our toll-free
Tech Support Hotline Monday through Friday 9AM-8PM and Saturday 10AM-4PM EST at 800-8 78-8007 .
Y ou must give the following information:
•Name
•Telephone Number with Area Code (Fax number if applicable)
•Year, Make, and Model of the vehicle
•The model number of the system you are installing
•The type of assistance you are requesting
If you give the above information you will be called back as soon as possible, usually within 10 minutes.
INSTALLATION INSTRUCTIONS
1. Locate a solid, well grounded metal surface under the hood. Any metal fender, firewall, or metal
plate will do. For the loudest sound, the siren should point down. CAUTION: Do not mount close to
exhaust or other high temperature areas. Make sure the alarm as well as the metal it's mounted
to is solid with no moving parts nearby. The siren should not point straight up, as moisture could
collect in the siren horn and damage the system. (See figure #1)
2. Use three self-tapping screws (included) to secure alarm. Screw into a well grounded metal surface.
CAUTION: You must use all 3 screws. (See figure #2)
3. Connect the Red power wire with the supplied alligator clip to any constant +12 volt supply.
(Example: Battery) If installation is correct, alarm will say “Thank You”. (See figure #3)
4. (Optional) For even greater protection, you may now install a 9-volt alkaline battery. This w ould
allow your alarm to operate in the event of a dead or disconnected battery. CAUTION: Optional
battery back-up may be installed onl y after steps 1-3 are completed.
1
Page 3
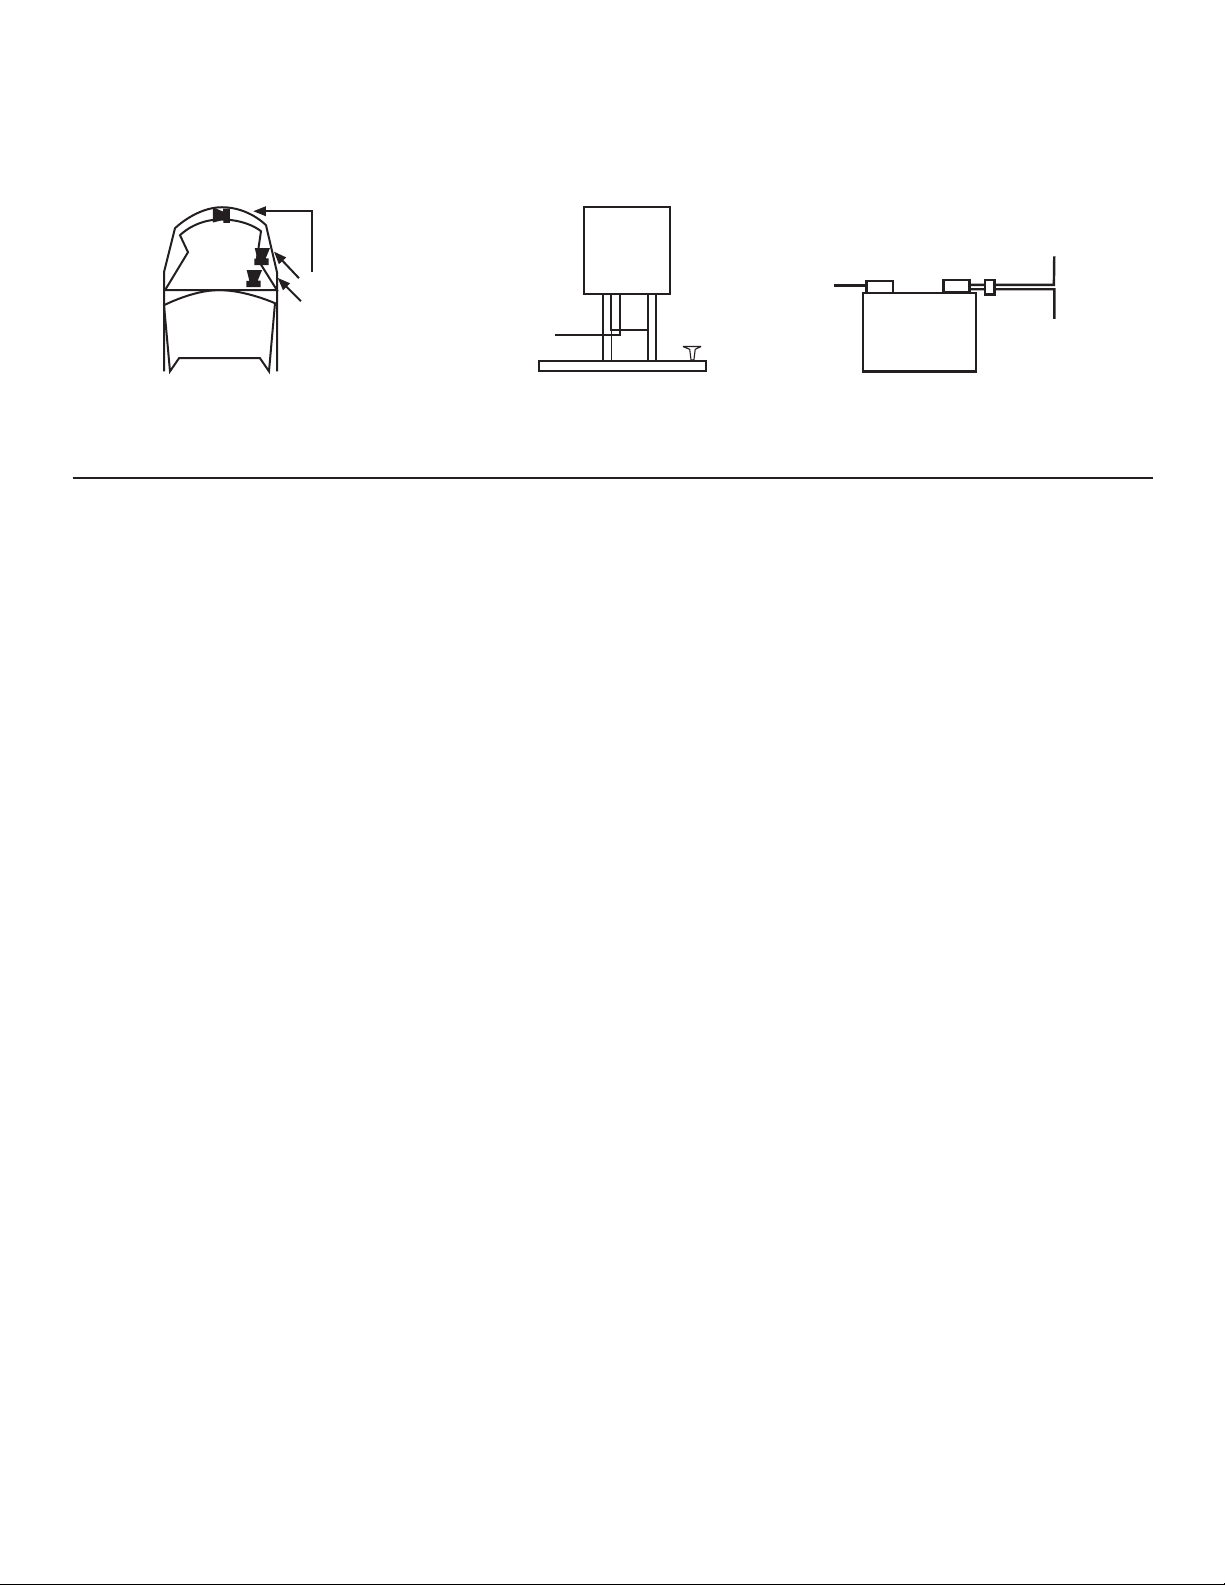
5. For maximum range, keep the Yellow antenna wire straight and as far away from metal as possible.
6. CAUTION: If for any reason you disconnect the power, you must disconnect the 9-volt battery.
When reinstalling, the red wire must be connected before the optional 9-volt battery is installed.
Figure 3Figure 2Figure 1
Alarm
T o Alarm
Red
Possible
Locations
Antenna
Self-tapping
screws
- +
Positive
Cable
OPERATING INSTRUCTIONS
NOTE: Before operating your alarm, slide the protector down
(attached to the back of your remote transmitter) snap off the back and snap to the front.
Arming
Press transmitter button #1 (Arm Talk). The alarm will set and a man's voice will acknowledge by saying
"System Armed”. NOTE: Your alarm will ignore all violations; current and shock, for approximately 45 seconds
after you arm it.
Disarming
Press transmitter button #1 (Arm Talk) again to disarm. Alarm will disarm and a man's voice will acknowledge
by saying "System Disarmed”. NOTE: If the vehicle was tampered with while the alarm was set, the alarm
will have sounded for 30 seconds, shut off and then rearmed itself. When disarmed the alarm will say
"System disarmed, I was tampered with". This is a good time to inspect the vehicle for forced entry marks,
paint dings or scratches, and check to be sure a wheel isn't partially removed, etc. Button #2 (Arm Chirp)
does the same as button #1, except there is no voice. (Example: 1 chirp to arm, 2 chirps to disarm, 3
chirps if impact occurred while the alarm was set, 4 chirps for current sensing)
Adjusting the Shock Sensor
NOTE: The factory setting on the shock sensor should be acceptable for most vehicles. To adjust the shock
sensor, disarm the system, press and hold transmitter button #3 (finder) until the alarm says “Please
Adjust Sensor Now” (approximatel y 5 seconds), immediately release the button. Tap your hood abo ve the
alarm at the sensitivity level you wish. The harder you hit the car the less sensitive the alarm will
be. The alarm will then say “Thank You”. The shock sensor is now set at this sensitivity . Any shock that
is equal to or greater will sound the alarm. Set the sensitivity as often as you wish; however, the
sensitivity level will remain set until the battery is disconnected or you reset it. If you do not tap
the car it will automatically go to maximum sensitivity. This setting is onl y acceptable if the car is
parked inside a garage.
Dual Stage Shock Sensor
A single shock will cause the alarm to respond “You are too close to the vehicle, please move away”.
Continued tampering will cause the alarm to respond “I was tampered with”, and the siren will sound.
Car Finder
While the system is armed, press and release transmitter button #3 (finder). The alarm will chirp 8 times.
This is used to locate your vehicle in a crowded parking lot. (Only when system is armed).
Instant Panic
Press and release transmitter button #4 (panic) to sound the instant panic alarm. A woman’s voice shouts
“Please help me” and alarm sounds for 30 seconds. To stop the alarm before the 30 seconds, press any of
the 4 transmitter buttons. This feature functions at all times; whether the alarm is armed or disarmed,
or the engine is off or running.
2
Page 4

Special Situations
Sometimes when you park your car in heavy rain, near a construction zone, near trucks, etc. you may wish
to lower the sensitivity of your alarm for this arming only. When arming with transmitter button #1,
to lower the sensitivity by 50% press transmitter button #2 within 2 seconds your alarm will say “Thank
you” indicating it accepted your command. To shut the shock sensor off completely , press transmitter
button #2 twice within 2 seconds your alarm will respond by saying “Thank you” twice indicating it received
your command. When arming with transmitter button #2, simply reverse the procedure. The next time the
alarm is set it will go back to the original setting.
Setting the Current Sensor
Disarm the system. Press and hold transmitter button #4 (panic) until the alarm chirps 2 times (Approximately
5 seconds). This indicates that current sensing is now turned off. To turn Current Sensing back on: Disarm
the system. press and hold transmitter button #4 (panic) until the alarm chirps 1 time (Approximately 5
seconds). This indicates that current sensing is now turned on.
NOTE: Factory setting is ON.
Adding a New Transmitter
With the system armed. Press and hold button #1. The system will respond “System Disarmed.” Continue to
hold until the unit responds “Thank You” (approximatel y 10 seconds). A t this time, release button #1 and
press any button on the transmitter you want to add. The alarm will respond “System Disarmed”. Both
transmitters will now operate the system.
3
 Loading...