

Page 1
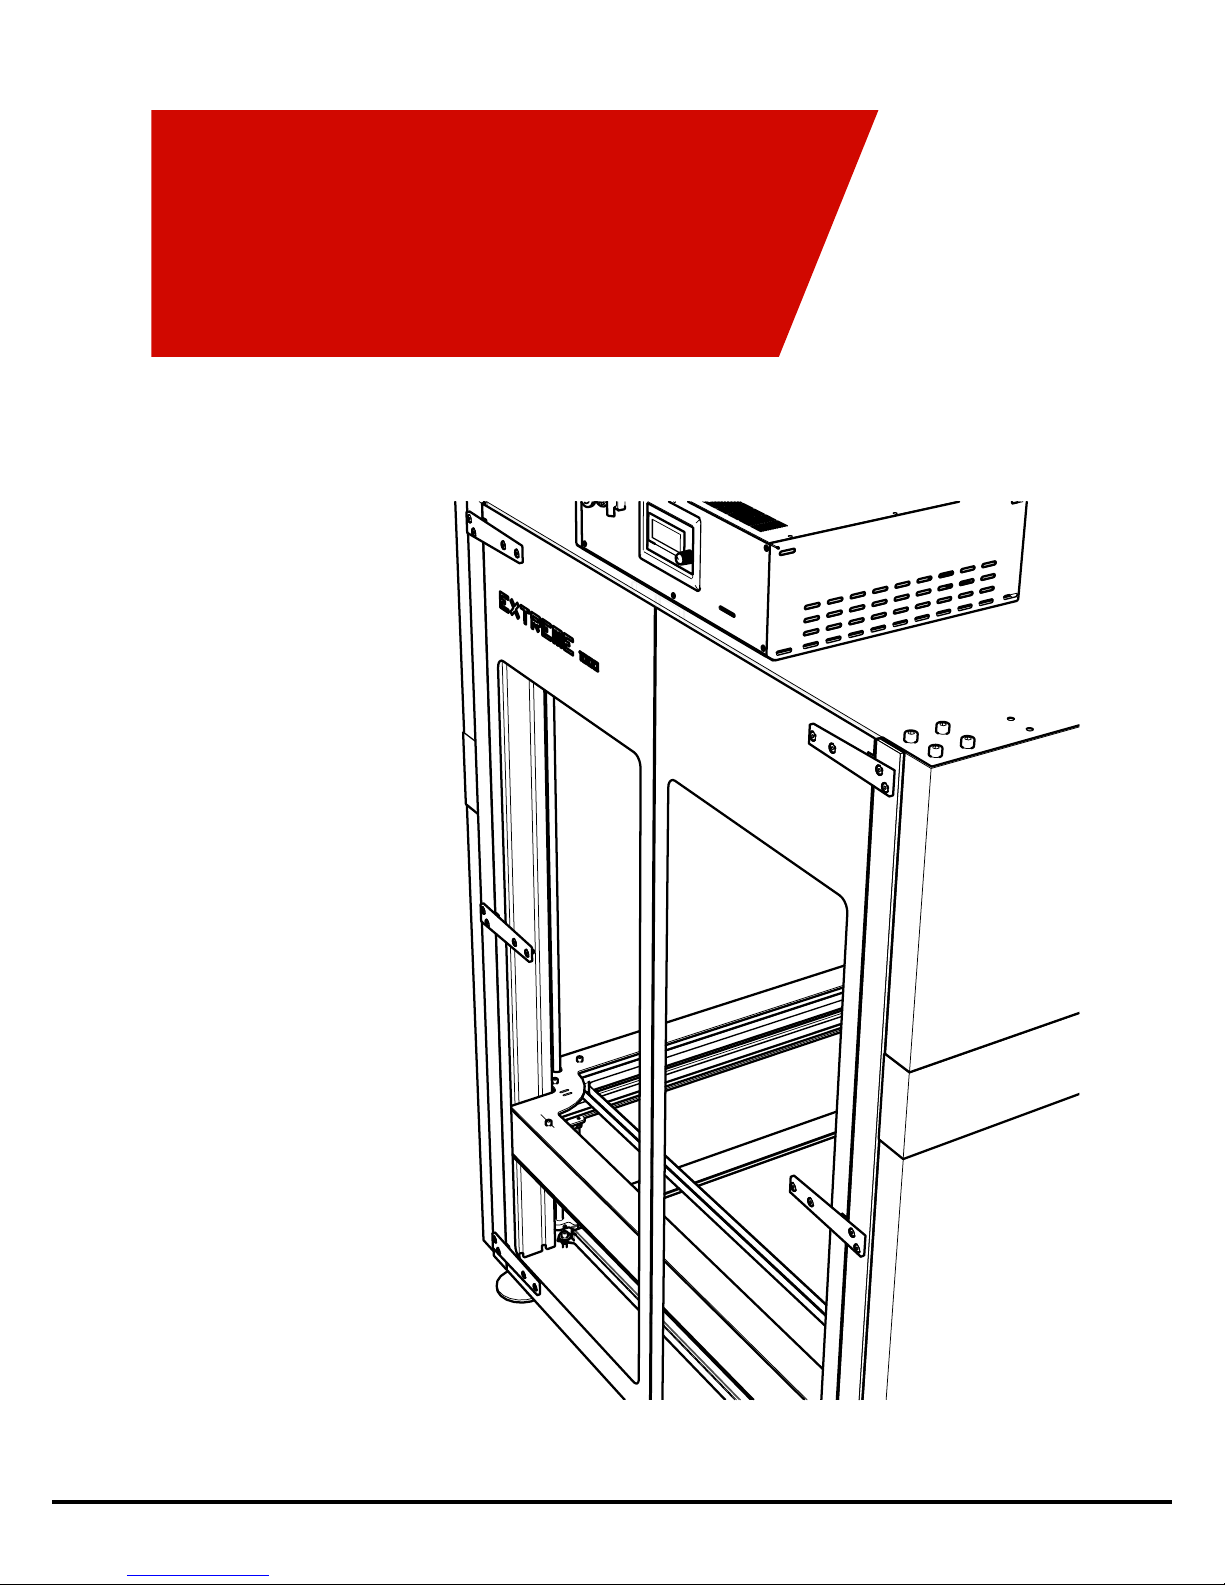
User Manual
Extreme
Page 2

BUILDER V3.5
Page 3

BUILDER V3.5
Introduction
Introduction
This user manual is designed and allow you to easily and securely install and congure our product.
Please read this manual carefully before installation, and use the printer according to these instructions.
Store this manual for later reference.
Warranty
The Builder 3D printers Extruders are warranted only to the original purchaser for a period of three months
from the original purchase date (when the Builder 3D Printers are used with the approved lament delivered
by Builder 3D Printers, normal use and service and without opening the Builder 3D printer) against defective
workmanship and material. The warranty of the extruder system will expire immediately when printing
materials which are not delivered/recommended by Builder 3D Printers. All other parts are warrented for 1
year.
The warranty of the Builder 3D printer will expire when;
• the product is damaged
• neglect
• immersion in water
• abuse
• improper installation
• disassambled
• improper service
If you experience any problems with your Builder 3D printer please visit our YouTube channel which provides
you with service videos that might solve the issue:http://www.youtube.com/user/builder3dprinters. When
sending the Builder 3D printer back to our HQ please contact the helpdesk rst. We need to diagnose the
issues you experience rst before taking any action. Contact helpdesk: [email protected]. If we
are unable to solve the issue by phone or by using one of our YouTube videos we will inform you if the issue
is a “warranty issue”.
Page 4
BUILDER V3.5
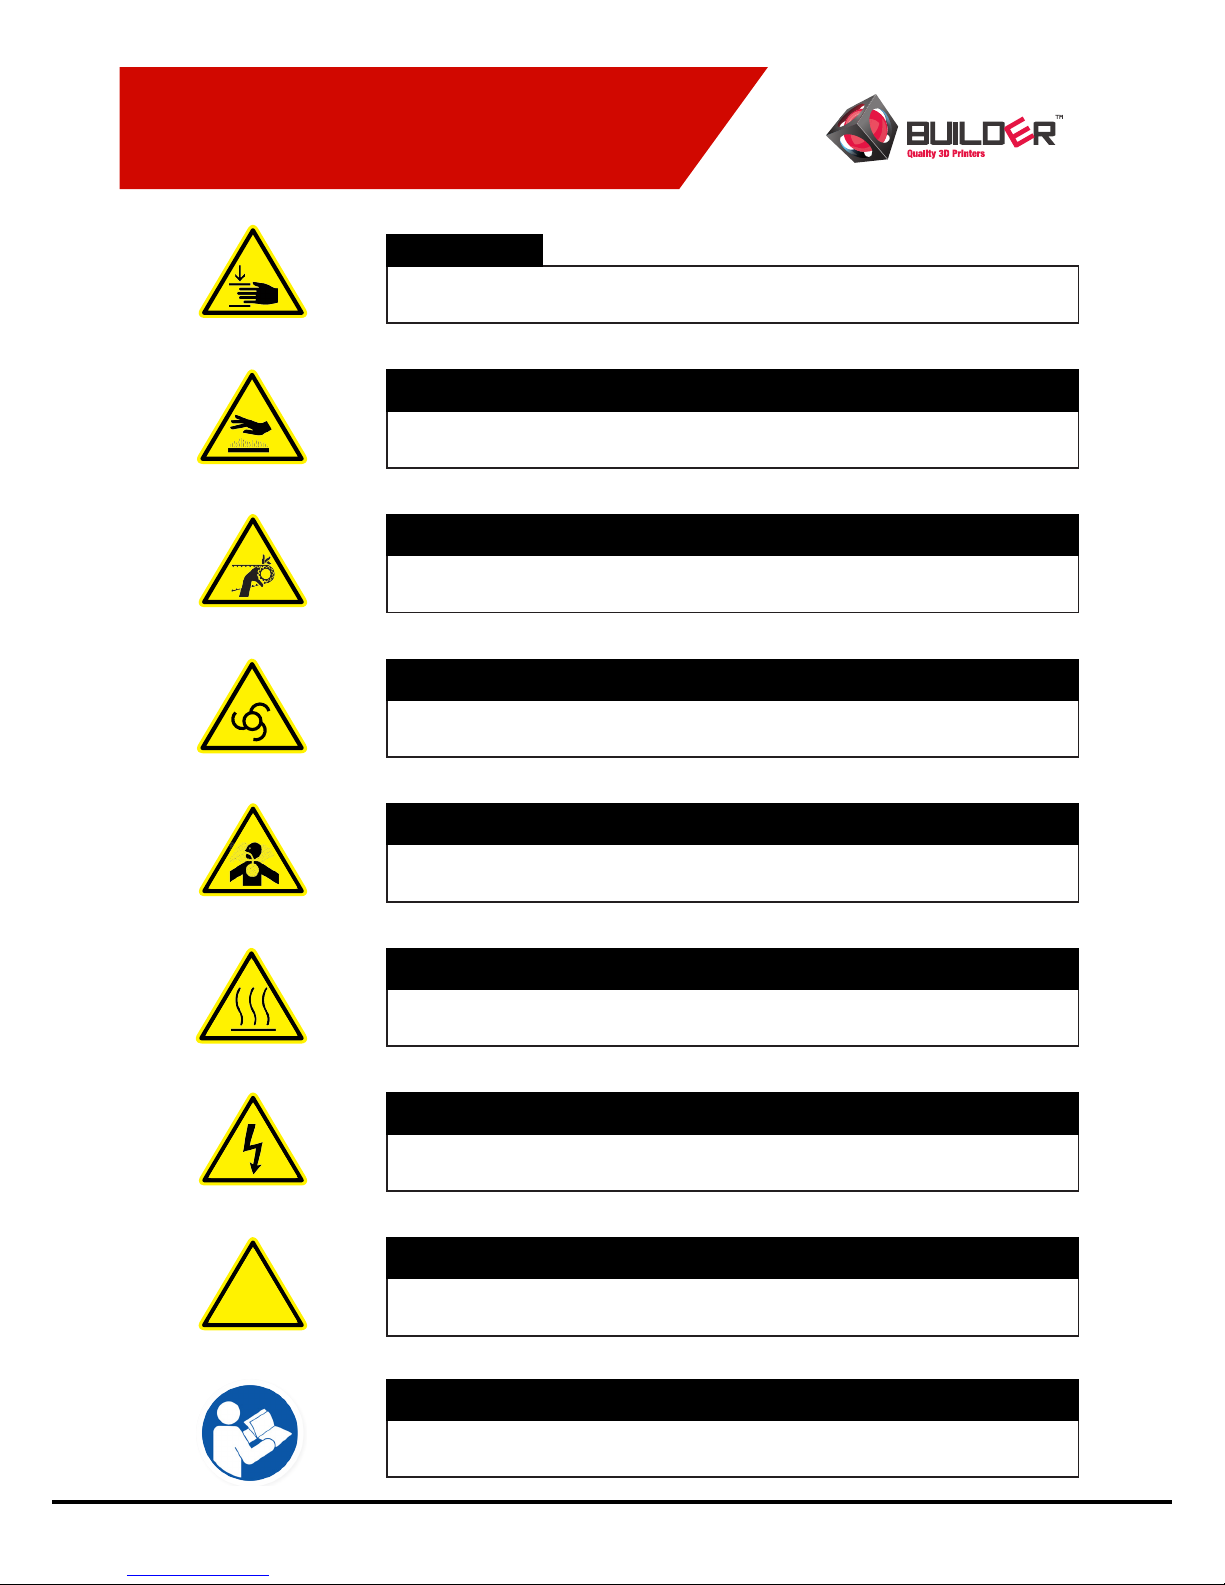
Safety and compliance
Pinch points. Do not reach inside when the machine is in operation.
WARNING
Hot surface. Risk of burns. Always allow the printer to cool down before
touching the buildplate.
WARNING
Moving parts can crush and cut. Do not touch the belt when the machine is
in operation.
WARNING
Machine starts and stops automatically. Do not reach inside the machine
after initiating a program.
WARNING
Breathing fumes may be hazardous to your health. Machine cannot
protect from fumes.
WARNING
Hot surface. Risk of burns. Always allow the printerhead to cool down
before servicing.
WARNING
Hazardous voltage. Risk of electric shock. Always unplug the printer before
doing maintenance.
DANGER
!
Hazardous voltage. Risk of electric shock. Always unplug the printer before
doing maintenance.
DANGER
Hazardous voltage. Risk of electric shock. Always unplug the printer before
doing maintenance.
DANGER
Page 5
BUILDER V3.5
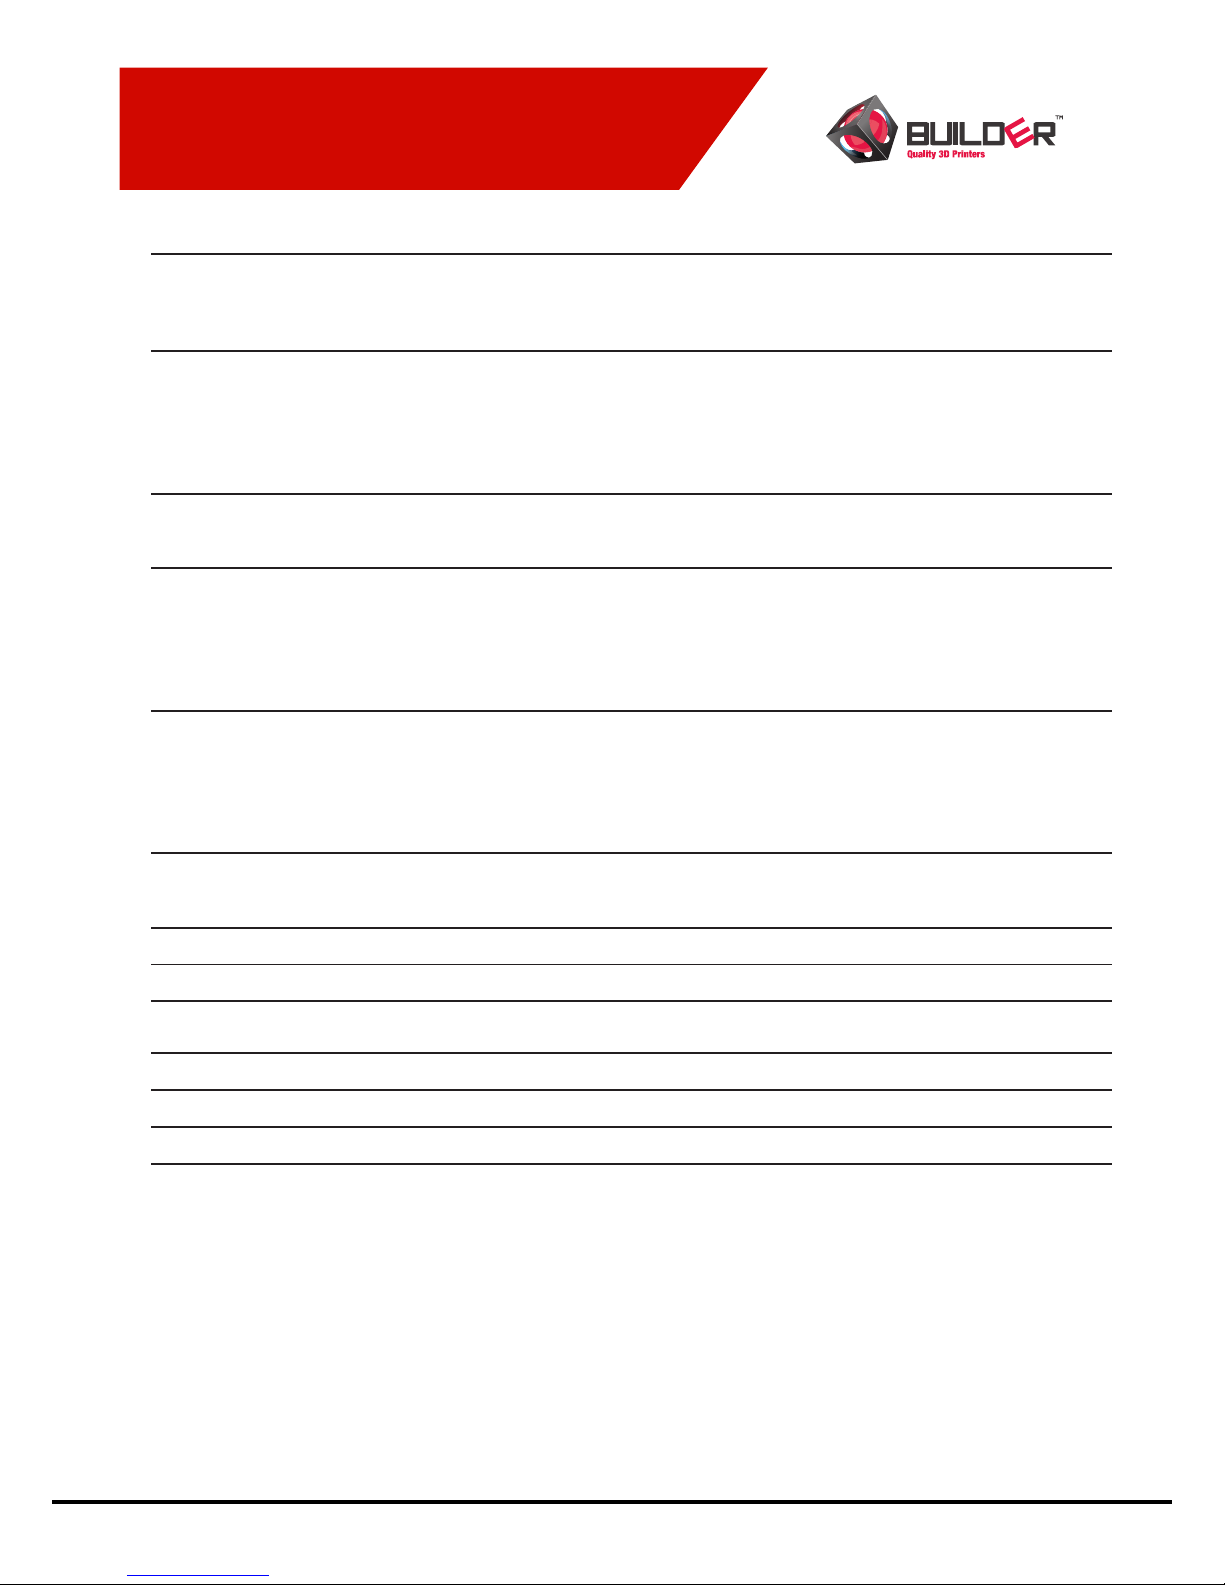
Printing Printer
Print technology: FDM / FFF Dimensions printer
(LxWxH):
Extreme 1000: 1006x1016x
1500
Extreme 2000: 1175x1016x
2300
Build volume (LxWxH): Extreme 1000:
700x700x820 mm
Extreme 1500:
1100x515x820mm
Extreme 2000:
700x700x1820 mm
Weight: Extreme 1000: 220kg
Extreme 1500: 200kg
Extreme 2000: 250kg
Resolution: Low quality : 0.6 mm
Normal quality: 0.4 mm
High quality: 0.2 mm
Frame: Aluminium proles
Print speed: Extreme 1000:
< 80 mm/s
Extreme 1500:
< 80 mm/s
Extreme 2000:
< 80 mm/s
Print platform: Heated glass plate
Travel speed: Extreme 1000:
< 200 mm/s
Extreme 1500:
< 200 mm/s
Extreme 2000:
< 200 mm/s
Certication: CE certied
Position accuracy
stepper:
X: 10 micron
Y: 12,5 micron
Z: 2,5 micron
Nozzle diameter: 0,4 - 0,8 - 1,2 mm Temperature
Filament diameter: 1,75 mm Operating temp printer: 15 - 32° C
Operating temp
nozzle:
180 - 250° C Storage temp printer: 0 - 35° C
Electronics Software
AC input: 100 - 240 V 50/60Hz Software: Simplify3D, Cura
Power consumption: 800 -1800W Operating systems: Windows, MAC
Connections: WiFi, Stand alone from
SD card
Colormix software: Only for Windows
File types: STL / OBJ / AMF / DAE
Overview
Specication printer
Subject can be changed:
Page 6
BUILDER V3.5
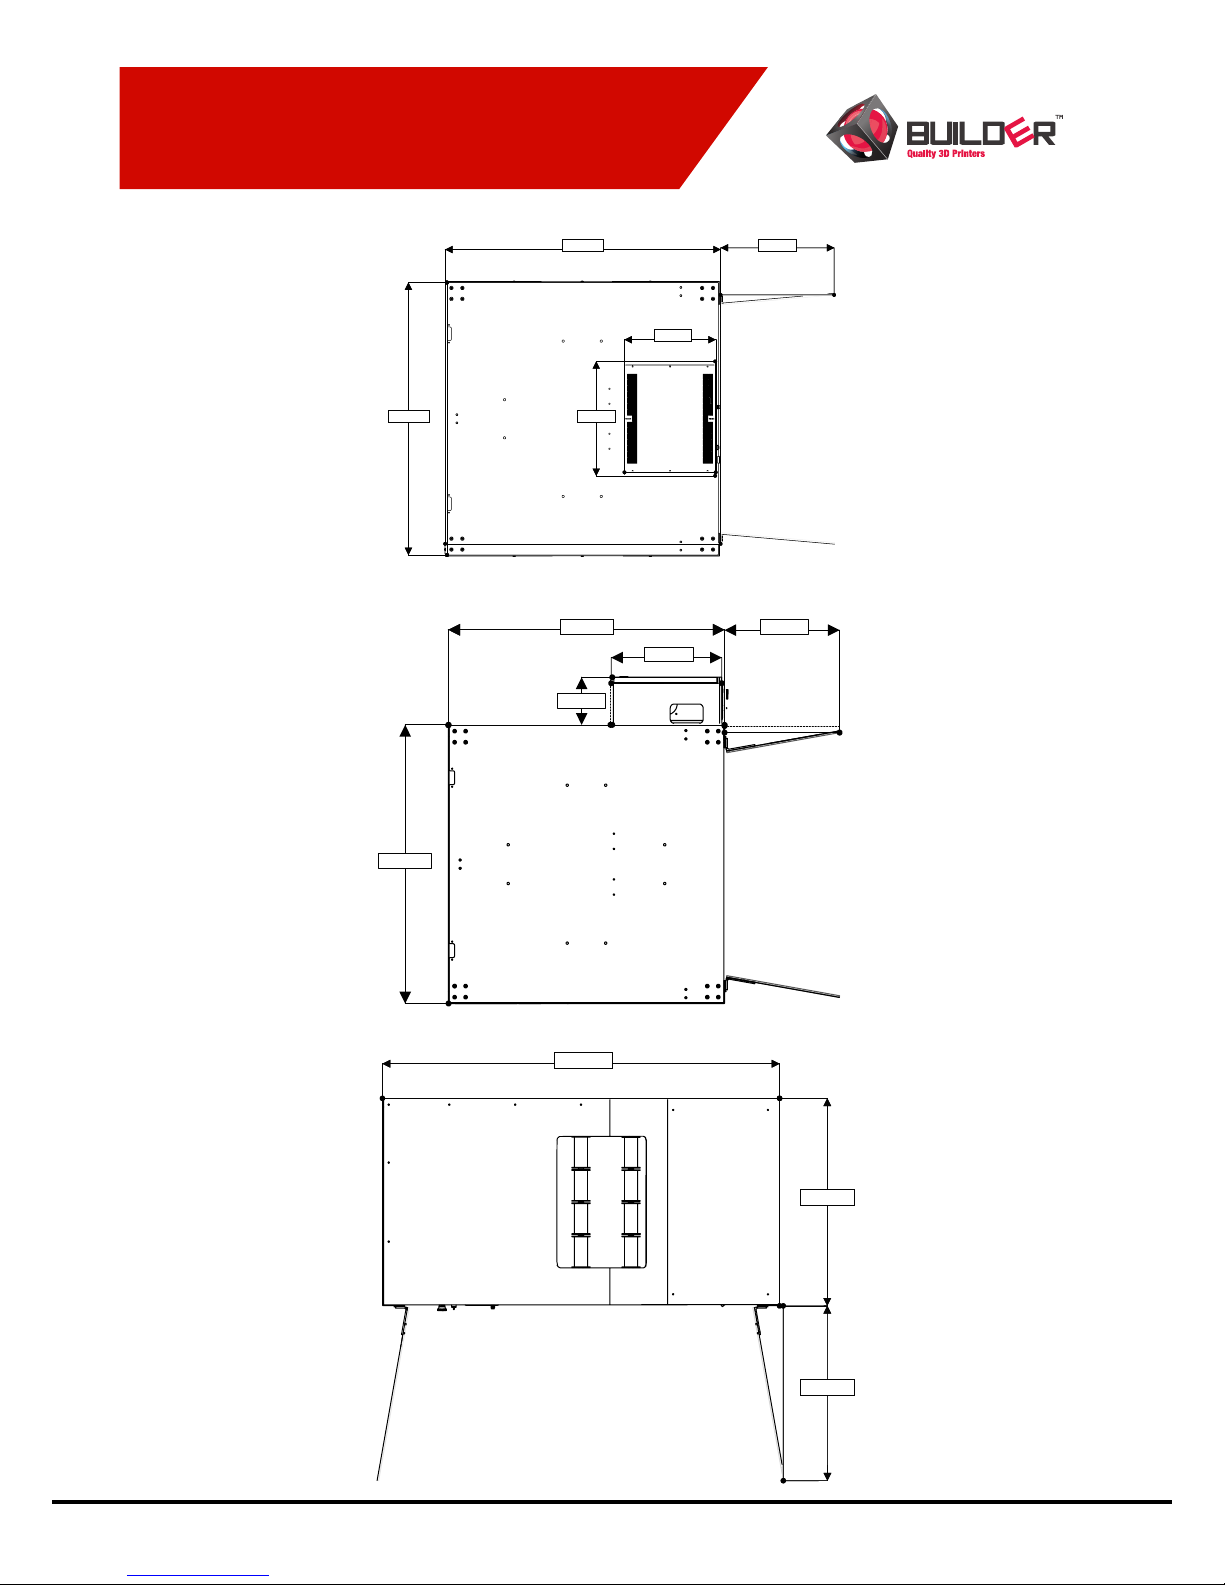
1005,00 mm
1011,00 mm
420,00 mm
420,00 mm
335,00 mm
1005,00 mm
1011,00 mm
420,00 mm
420,00 mm
335,00 mm
1011,00 mm
400,00 mm
170,00 mm
420,00 mm
1005,00 mm
1011,00 mm
663,87 mm
1508,00 mm
788,01 mm
663,87 mm
1508,00 mm
788,01 mm
Overview
Outside dimensions
Extreme 1000
Extreme 2000
Page 7
BUILDER V3.5
64
32
5
1
64
32
5
1
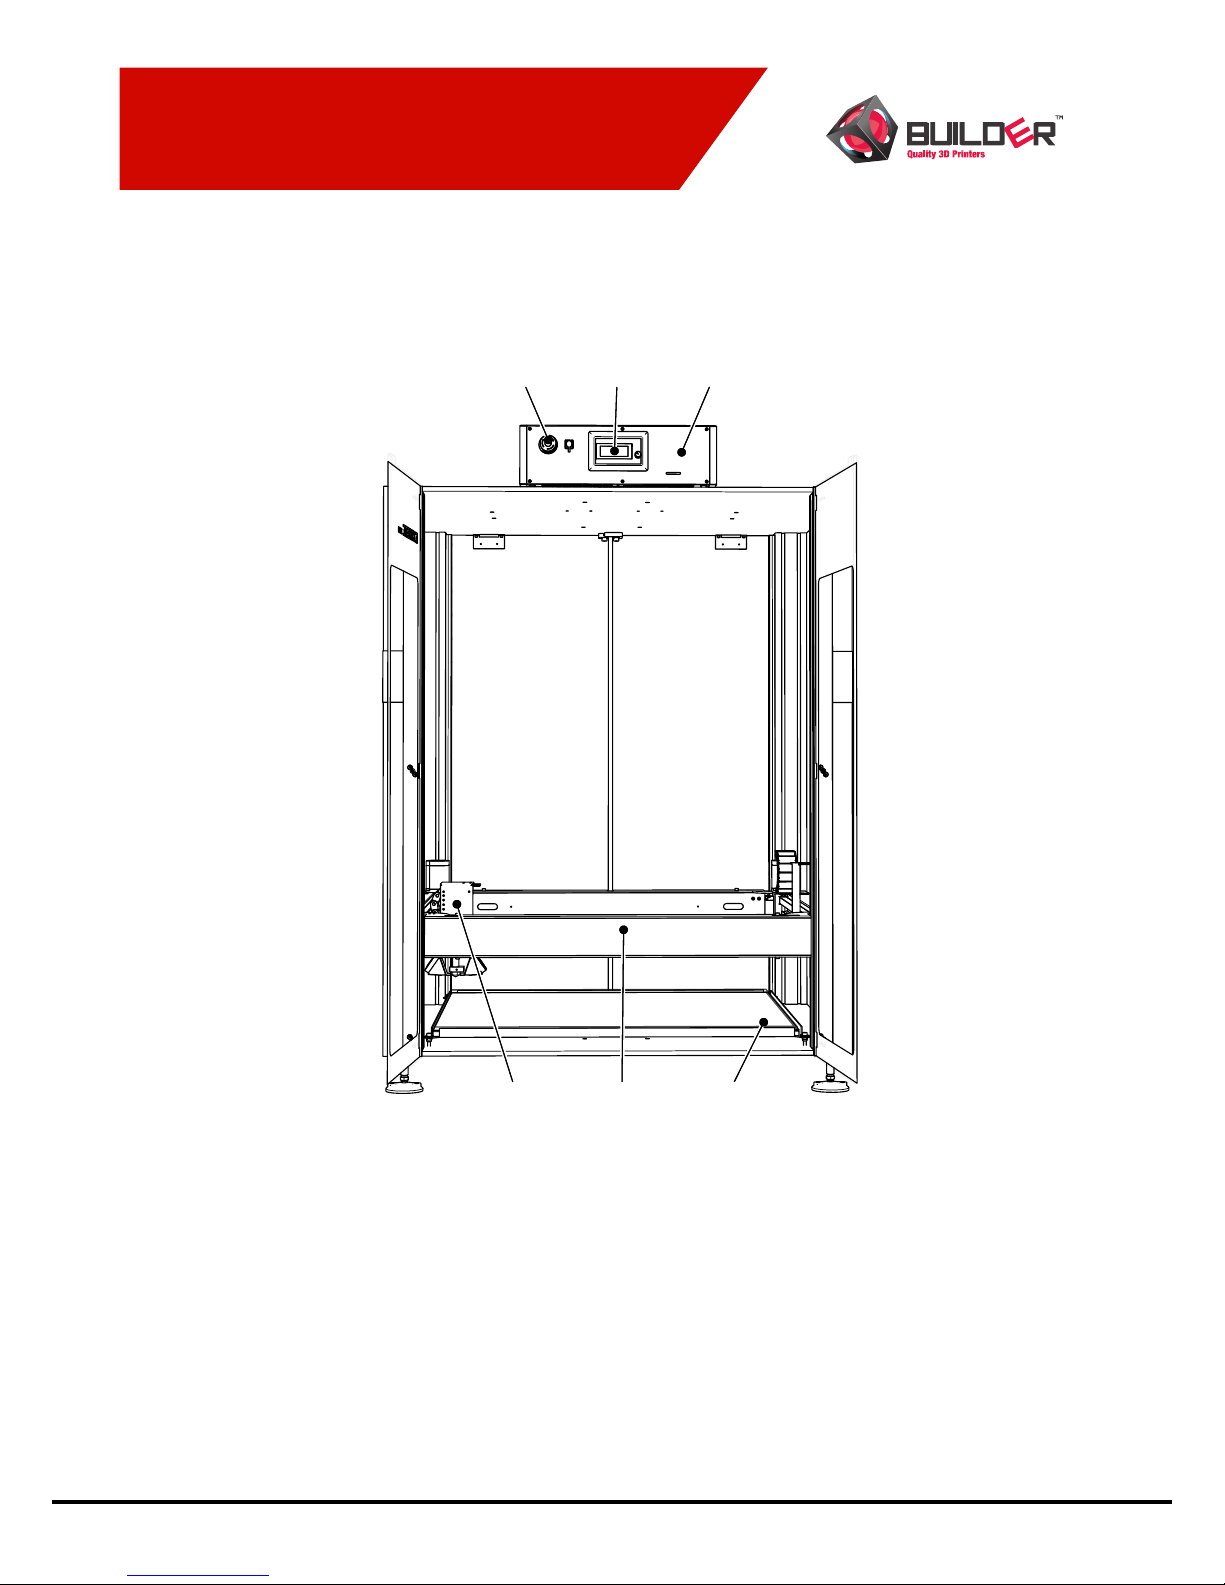
1. Emergency stop
2. LCD display
3. Control Box
4. Printhead
5. Print frame
6. Heated bed
Overview
Extreme 1000
Page 8
BUILDER V3.5
4 6
3
5
2
1
4 6
3
5
2
1
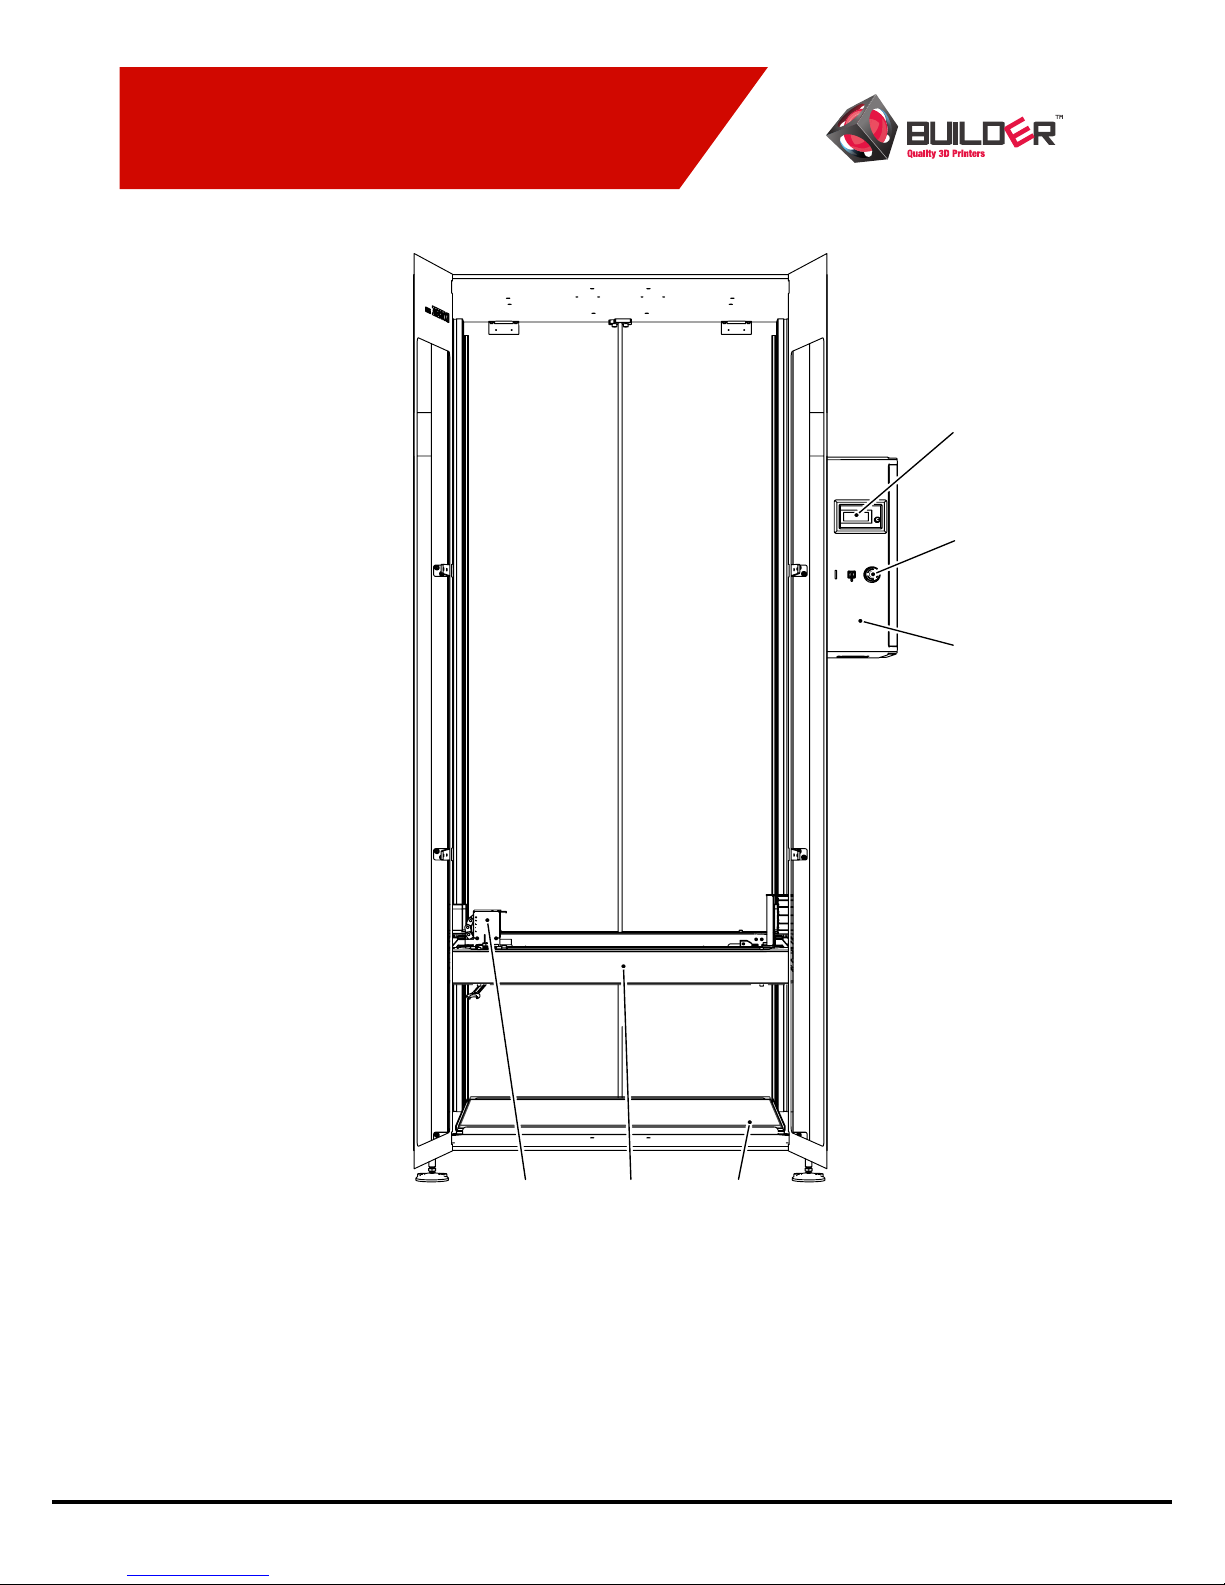
1. Emergency stop
2. LCD display
3. Control Box
4. Printhead
5. Print frame
6. Heated bed
Overview
Extreme 2000
Page 9
BUILDER V3.5
1 2 3
64
5
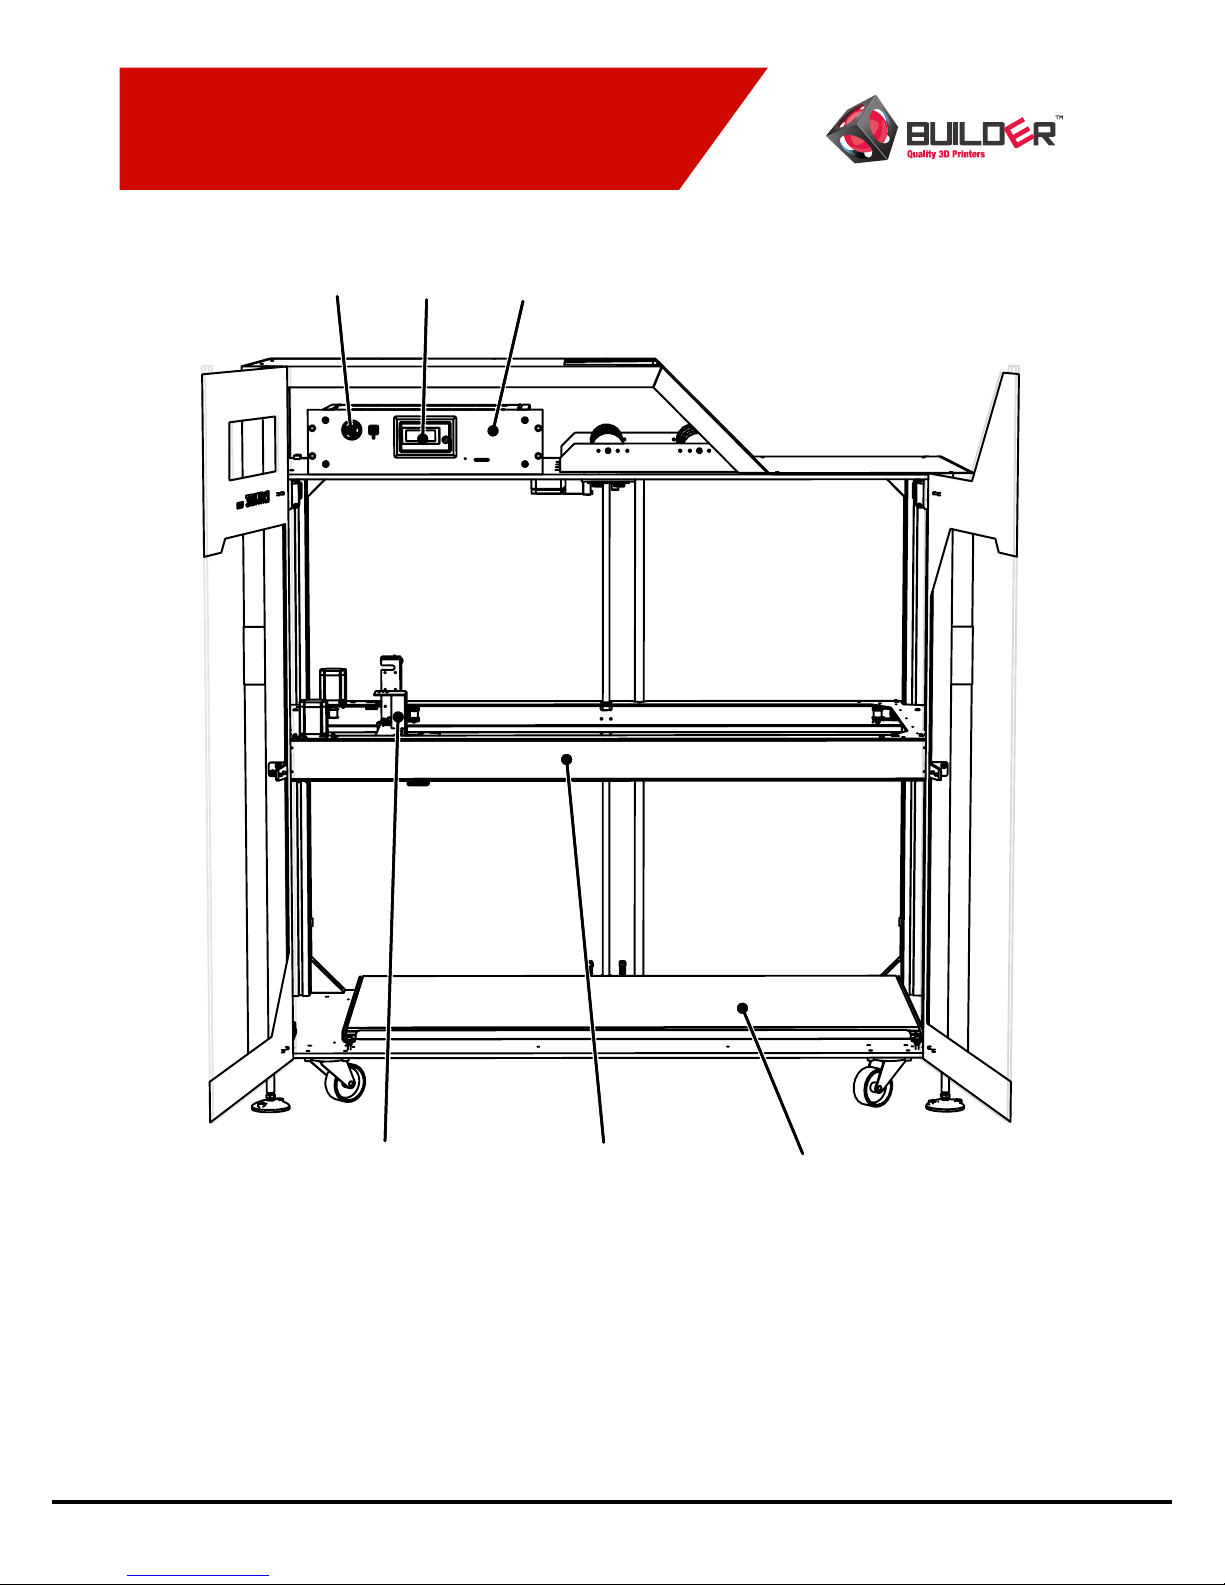
1. Emergency stop
2. LCD display
3. Control Box
4. Printhead
5. Print frame
6. Heated bed
Overview
Extreme 1500
Page 10
BUILDER V3.5
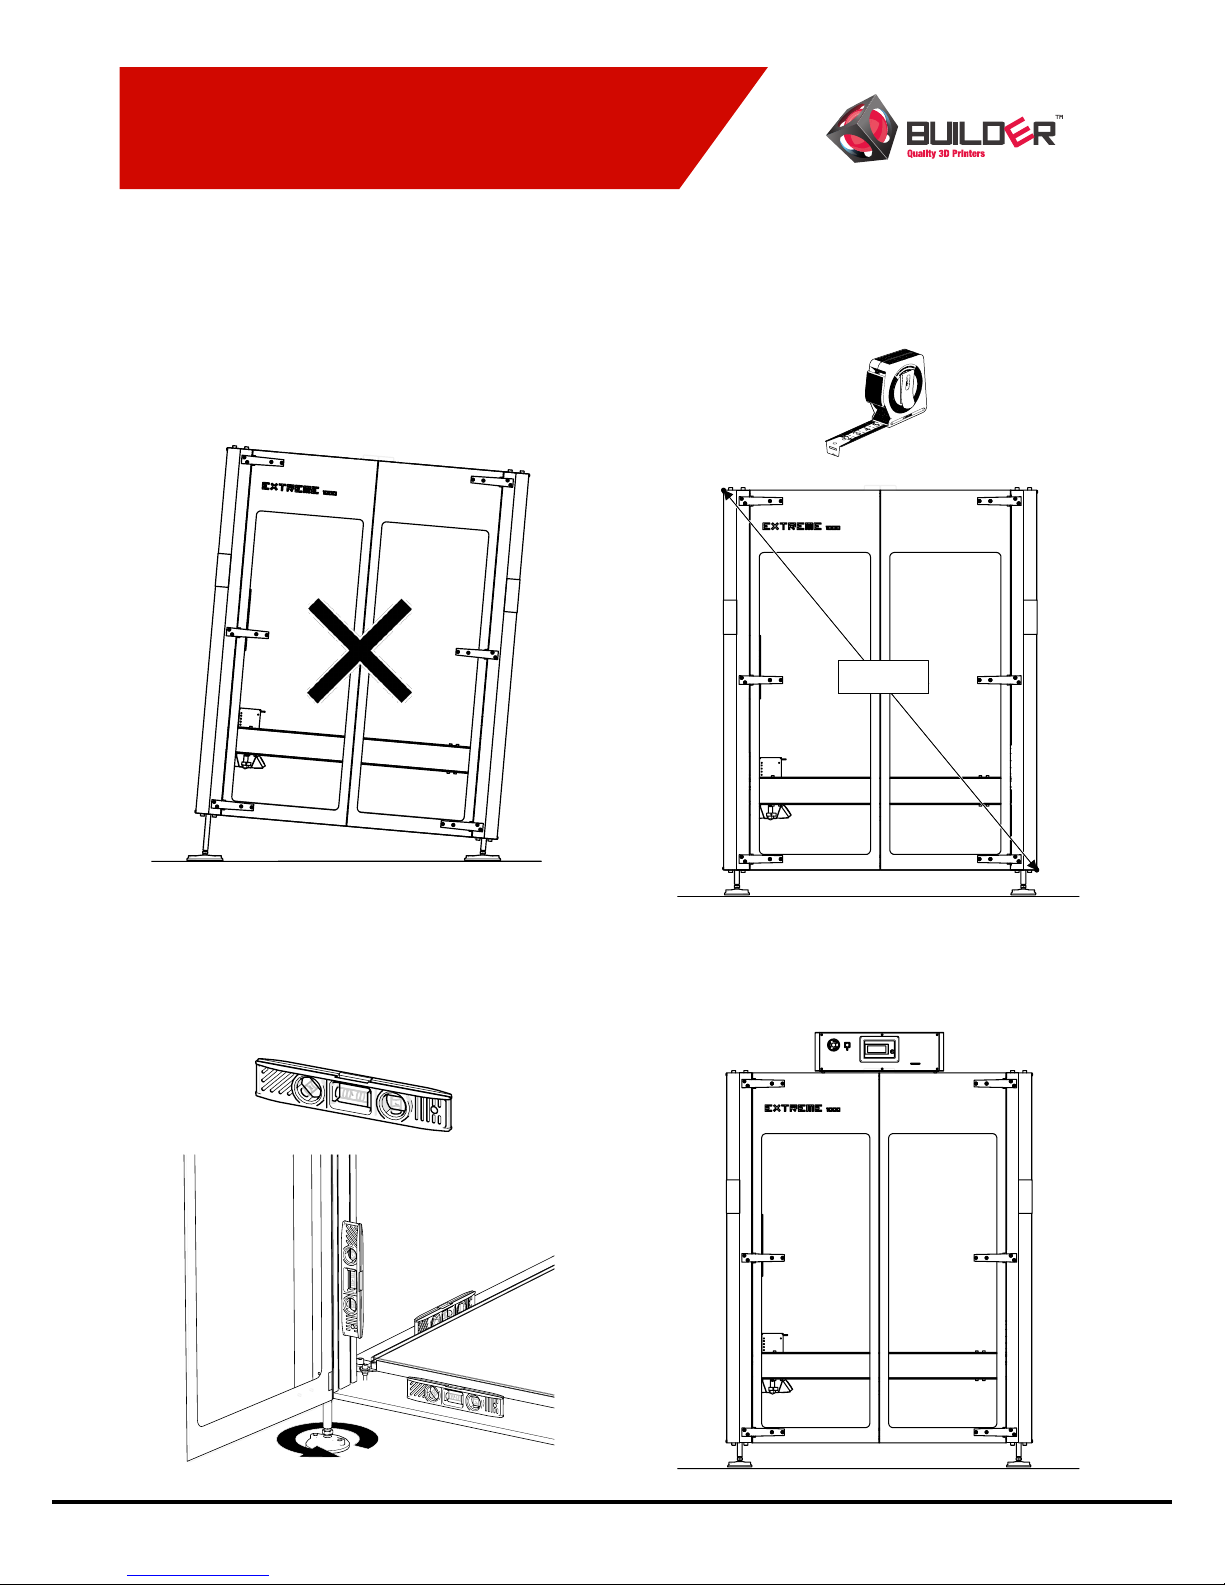
1. Level printer
Place the printer on a concrete oor and check
if the printers is level
2. Spirit level
Level the printer with the included spirit level.
Check all the three axis as shown. Be sure al
the three axis are levelled if not use a wrench
to move up or down the machine feet to get
the machine level
4. Placing control box
When the printer is leveled correctly, place the
controlbox on top of the printer.
Installation
Levelling the printer is important for making
good quality prints.
3. Measure
Measure both diagonals of the printer and
make sure the lenghts are the same. Should
be around 1580 mm. For the Extreme 2000
the length should be around 2437 mm.
1580 mm1580 mm
Installation
Installation printer
Page 11
BUILDER V3.5
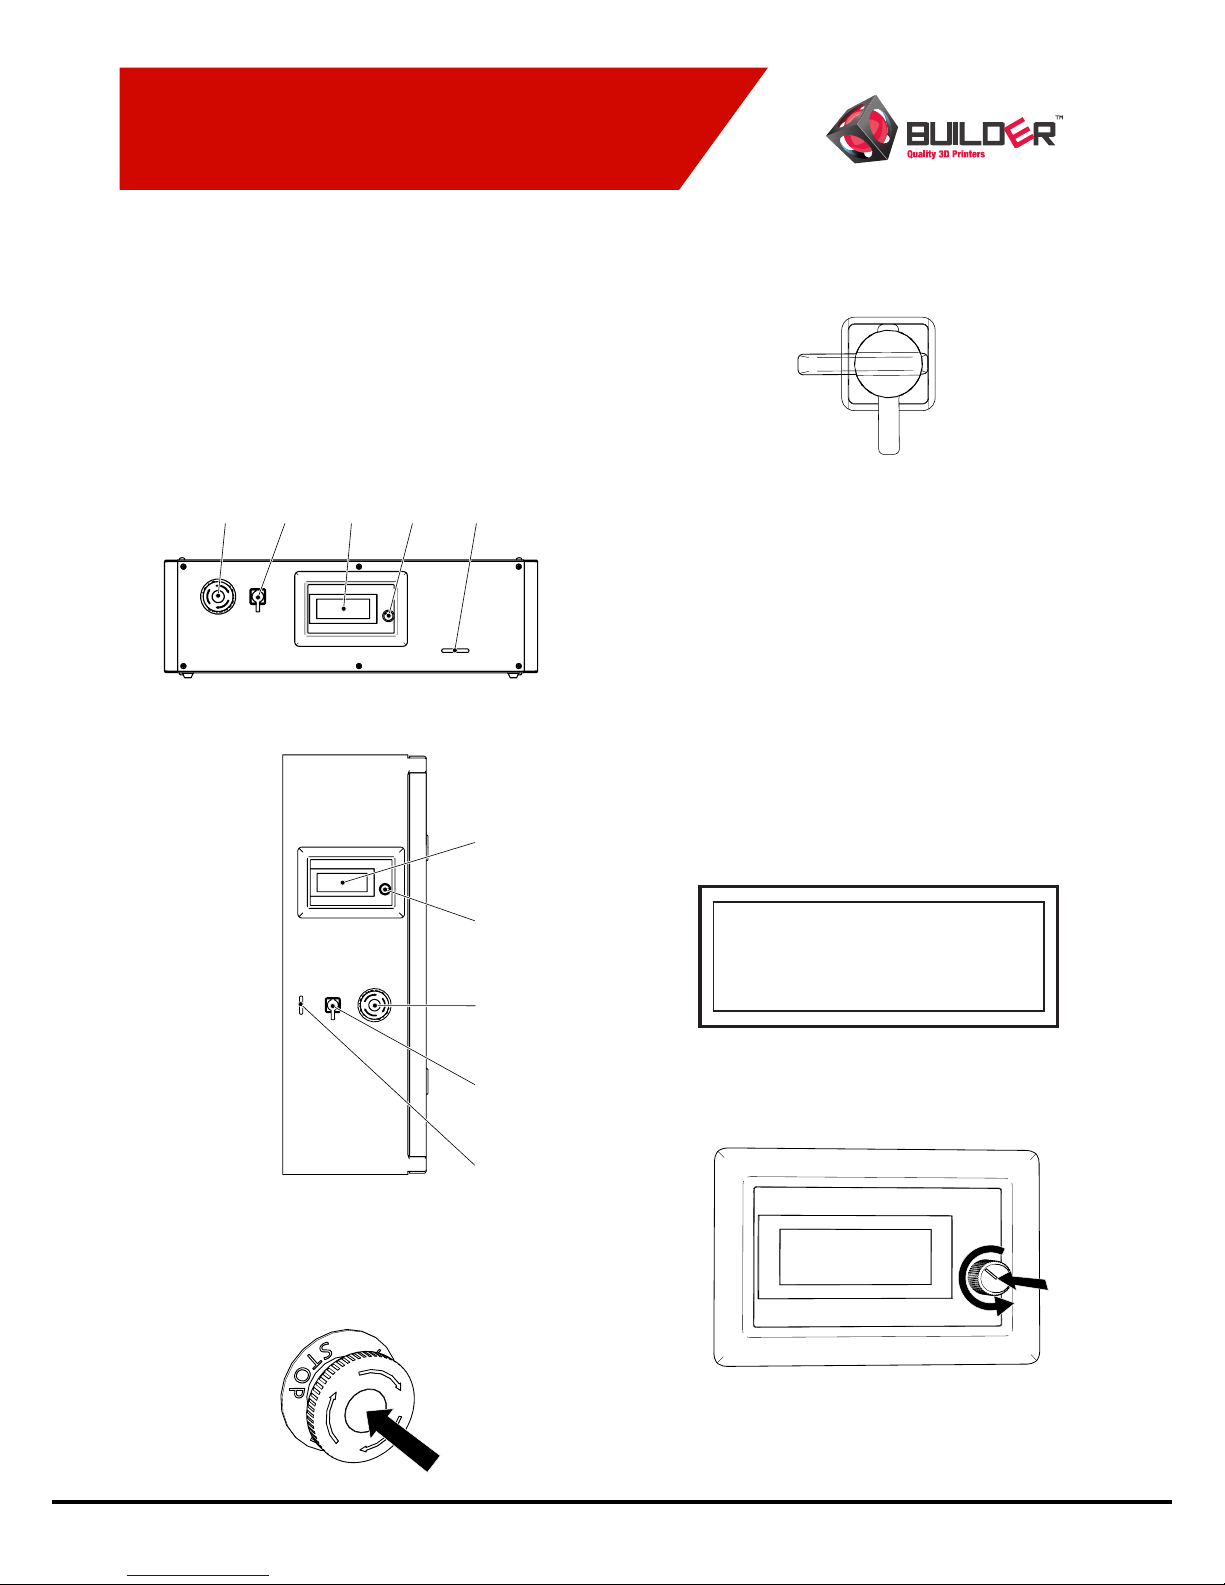
Control Box
Connect all the cables to the controlbox and
switch on the printer with the on / o switch at
the back of the controlbox
53 421 53 421
1. Emergency stop
2. Light switch
3. LCD screen
4. LCD control button
5. SD card slot
Emergency stop
Push the emergency stop in case of an
emergency situation the printer shuts o
the power. Rotate the emergency stop to
deactivate.
Light switch
Rotate the light switch to switch on and o
the LED light during (night) printing.
ON
OFF
LCD control button
Rotate/Push the LCD control button to control
the LCD screen.
LCD Sceen
The display provides information about the
printer and object as shown in the image.
1. Line one tells you the hotend
temperature/ target temperature
and the (L) extruder ratio. When the
extruder ratio is 60 % the left extruder is
feeding 60% and the right extruder 40%
material at the same time.
2. Line two shows you the heated bed
temperature/target temperature and the
Z height of the print head.
3. In line three you can nd the feedrate of
the printing progress, SD card progress
and the printing time.
SD Card slot
Insert the SD Card upside down into the SD
card slot. Push the SD Card to eject. On the SD
card you can nd some printer ready Gcodes.
25/0 L:100:0%
25/0 Z:0000.0
100% SD---% --:-Extreme Builder
1.
2.
3.
Control Box
Layout
5
3
4
2
1
5
3
4
2
1
Extreme 2000 Control Box
Extreme 1000 Control Box
Page 12
BUILDER V3.5
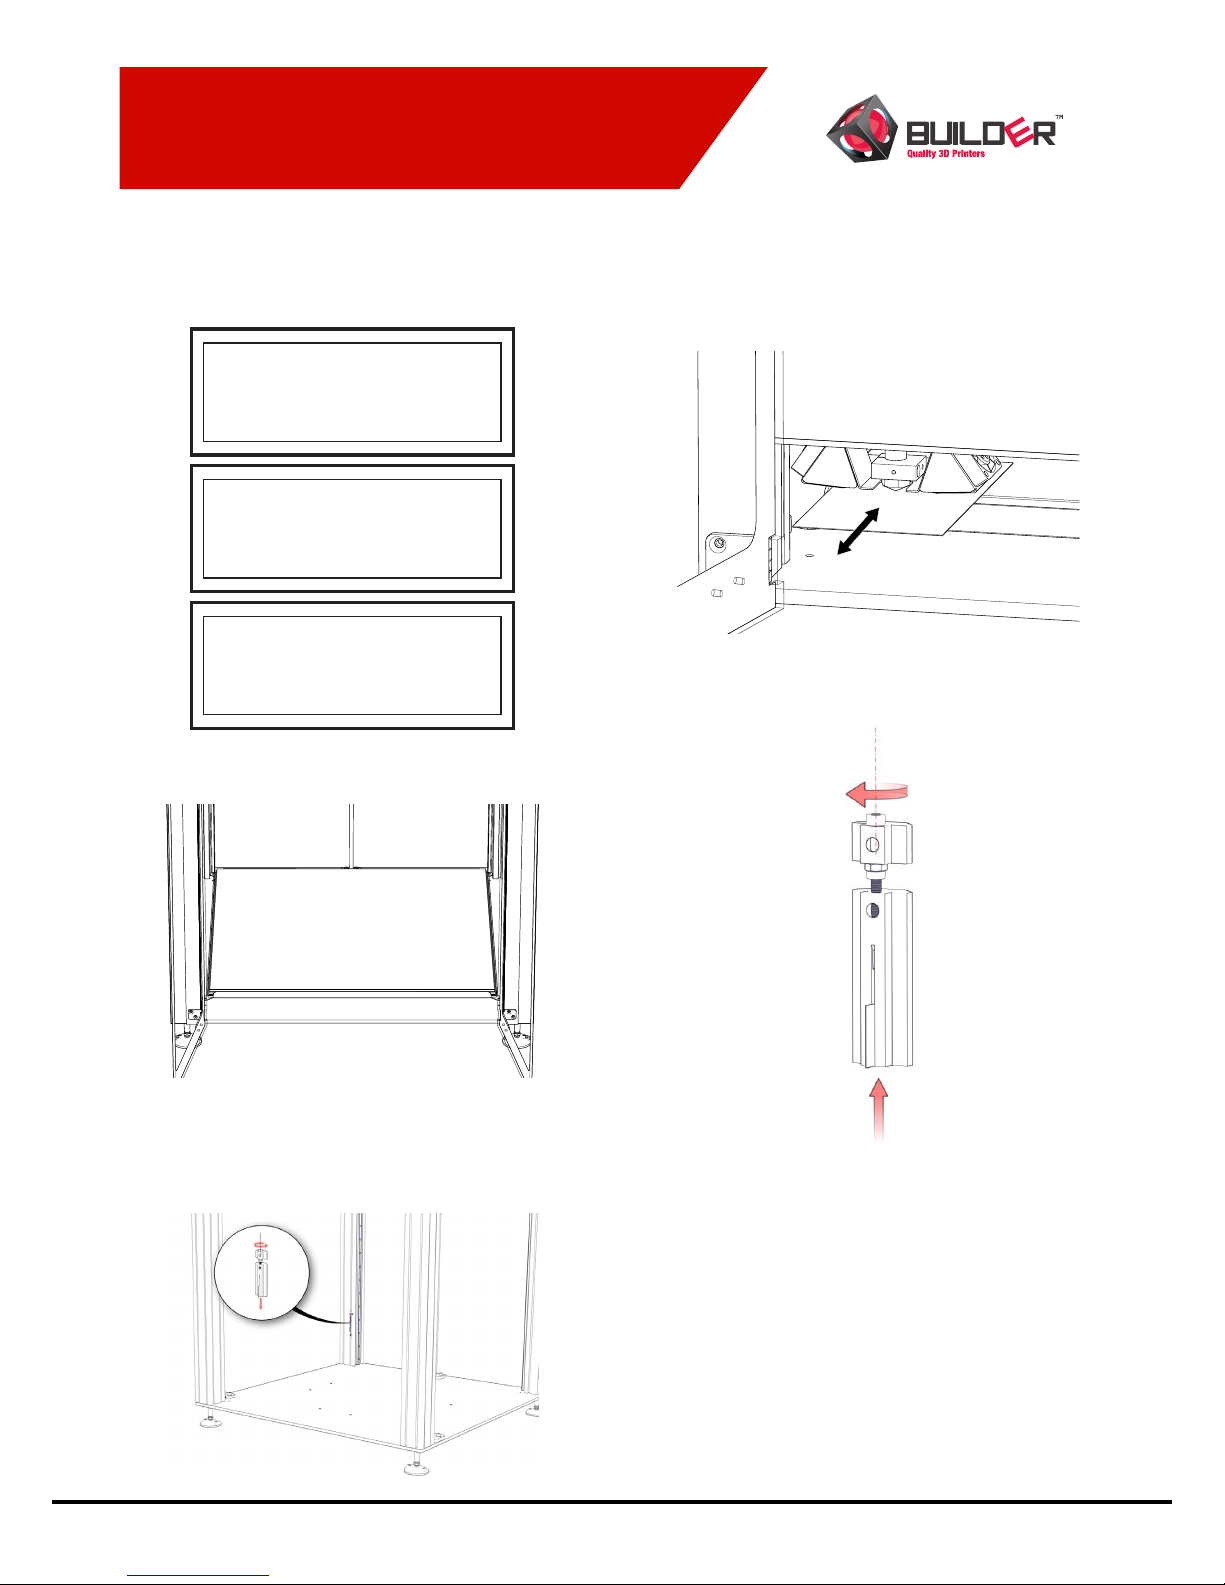
Main
Auto Home
→ Bed leveling
Disable steppers
Bed leveling
Follow the next steps to level the print head.
Use a screwdriver and a piece of paper for
the calibration.
Prepare
To level bed
Adjust offset Z
→ Point 1
The head will now move to point 1 on the bed
surface and start to level the frame
If there is not enough clearance the folded
paper will not t. Then you will have to adjust
the endstops triggers in the left front column
upwards
LCD Screen
Bed leveling
Info Screen
→ Prepare
Control
Settings
When the head and the frame is no longer
move, then you should be able to slide a
folded piece of paper (0.2mm) between the
head and the bed.
If there is more than enough clearance the
folded paper will t very loosely then you will
have to adjust the endstop trigger in the left
front column downwards.
When the folded paper ts some what tightly,
then you can move on to point 2 and 3.
Point 1
Point 1 Point 2
Point 3
Page 13
BUILDER V3.5
Printhead
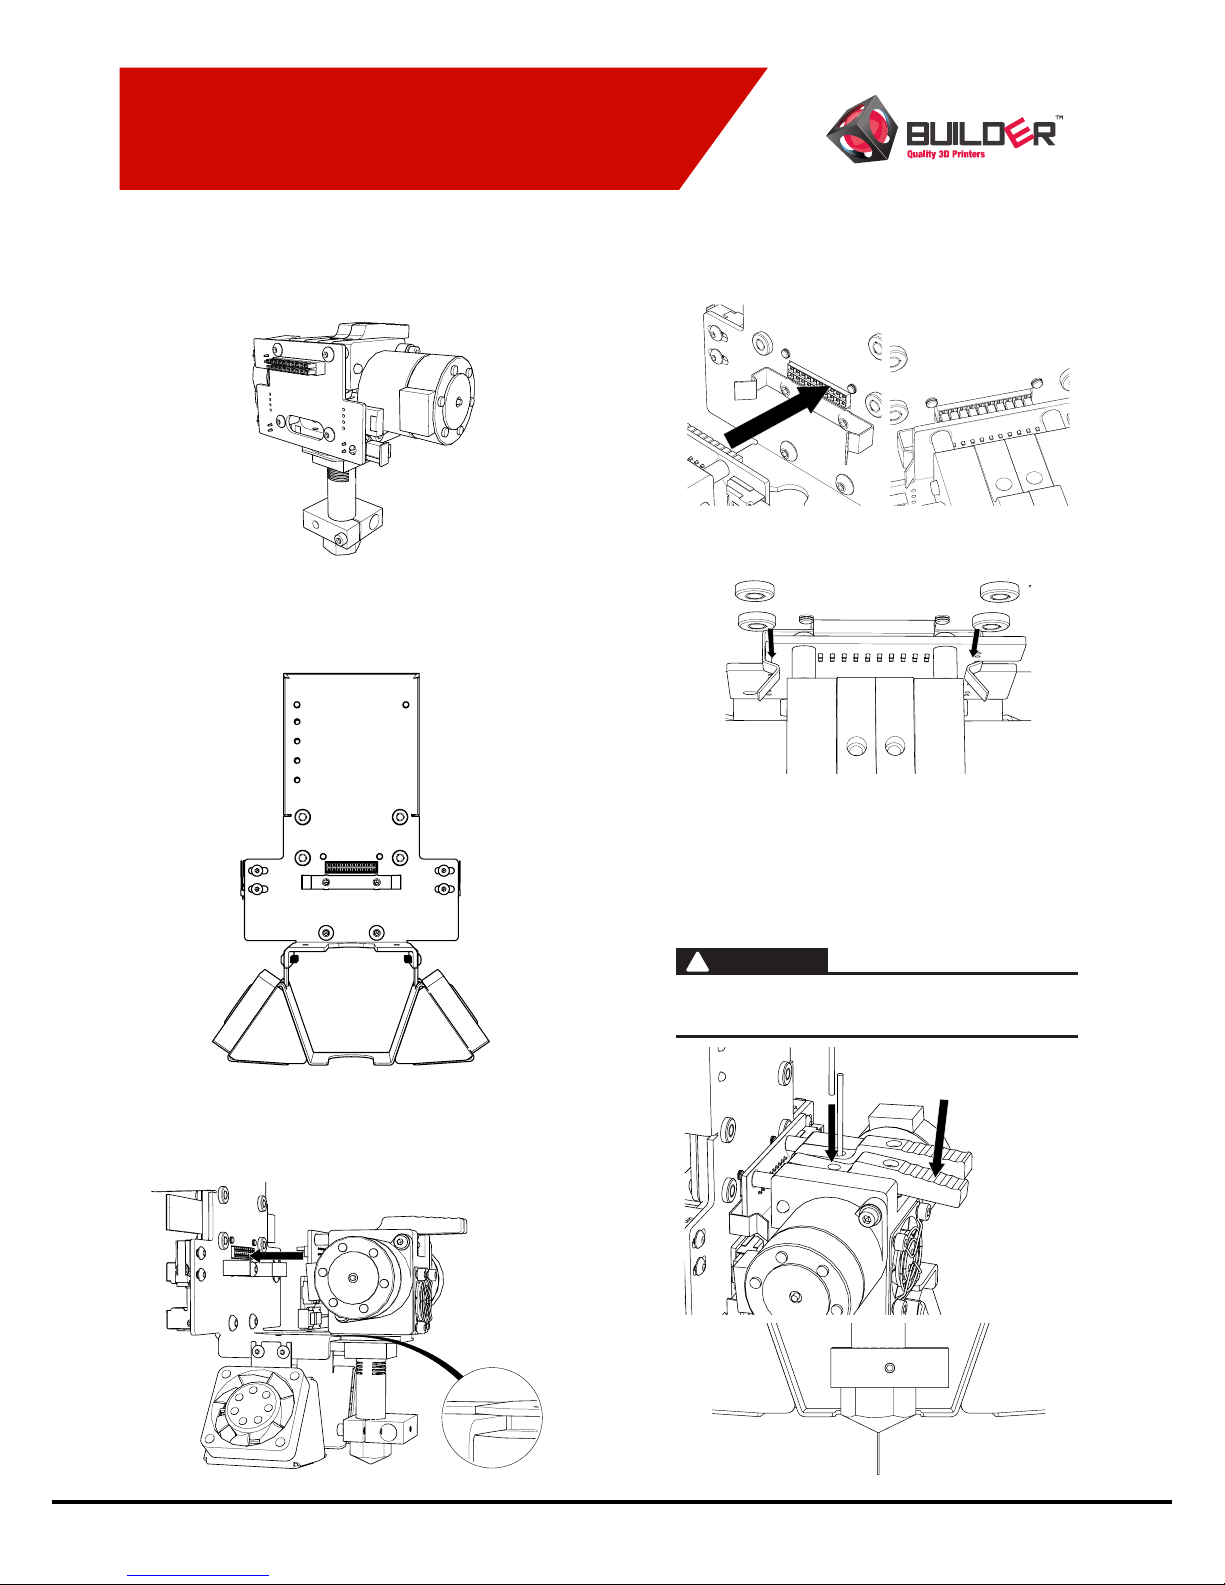
Installing Printhead
Printhead
For easy maintaining it is possible to remove
the printhead from the printhead frame.
Power
Heater
When placing the printhead be sure the
power is switched o. Check power light on
the printhead frame
Placing printhead
Slide the printhead onto the printhead
frame.
Be sure the connectors are alligned in front
of eachother. Push the printhead untill the
connect
Check if the clips are snapped into place
Inserting lament
Push down the button and insert the lament
until you feel some resistance. Now insert
the second lament by doing the same. Keep
pushing the buttons, then push down the
lament until it comes out of the nozzle. Do
this with both laments.
Make sure when priting with the Dual-Feed
both extruder holes are lled with a lament.
WARNING
!
Page 14
BUILDER V3.5
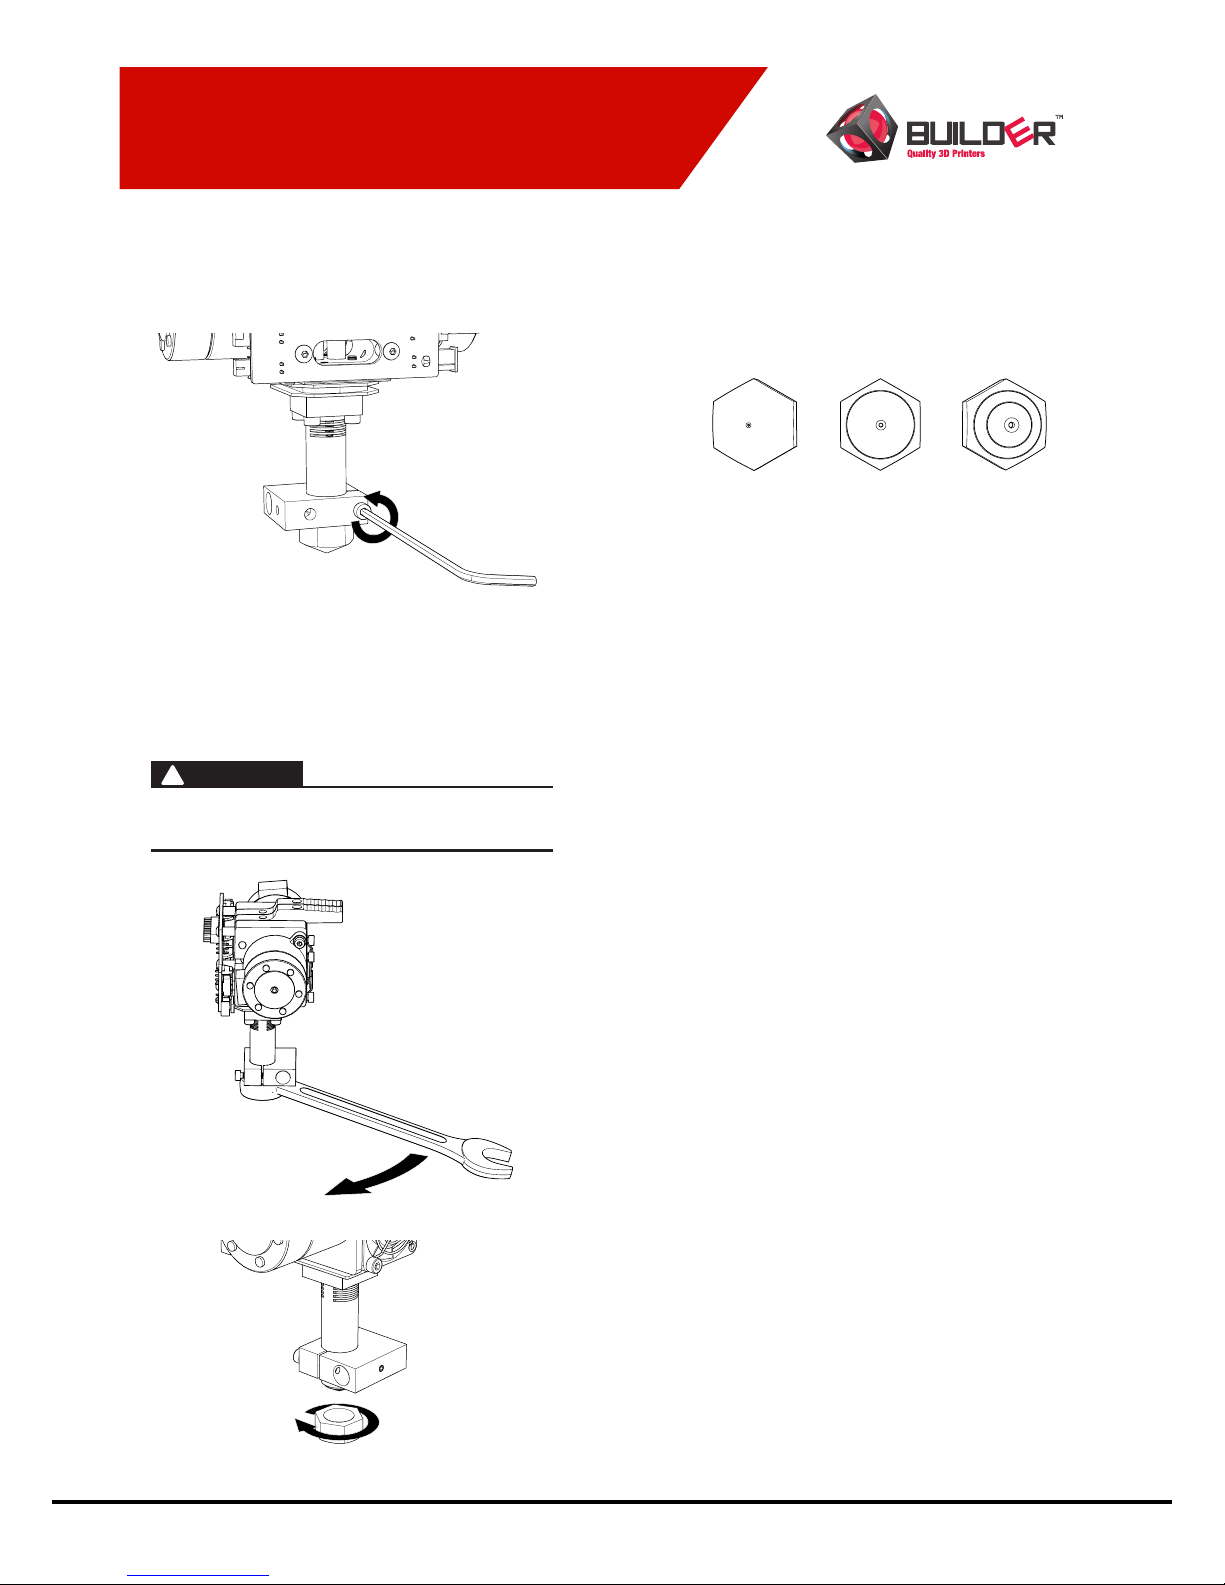
Changing nozzle
Wait untill the printhead is cooled down. Take
the printhead out of the printer and loosen
the heaterblock.
Remove the nozzle using a 17mm wrench
or the included tool. If the nozzle is stuck,
place the extruder in the machine and heat
up the hotend. When it’s reached a temp of
210 degrees Celsius switch o the printer and
take out the extruder to remove the nozzle
The extruder is hot when heating up the
hotend for easy removement.
WARNING
!
When installing the nozzle make sure you
don’t tighten the nozzle too much.
Printhead
Changing nozzle
Nozzle diameters
The nozzles are marked on the top of the
nozzle.
0.4 mm 0.8 mm 1.2 mm
When using nozzles 0.8 and 1.2 mm be aware
the extrusion speed needs to be very high. To
avoid under extrusion tighten the pressure
screws in the levers.
First layer height
The rst layer height depends on the size of
the nozzle. Here are a few examples for the
diferent nozzle sizes:
Nozzle 0.4 mm First layer 0.3 mm
Nozzle 0.8 mm First layer 0.4 mm
Nozzle 1.2 mm First layer 0.6 mm
Page 15
BUILDER V3.5
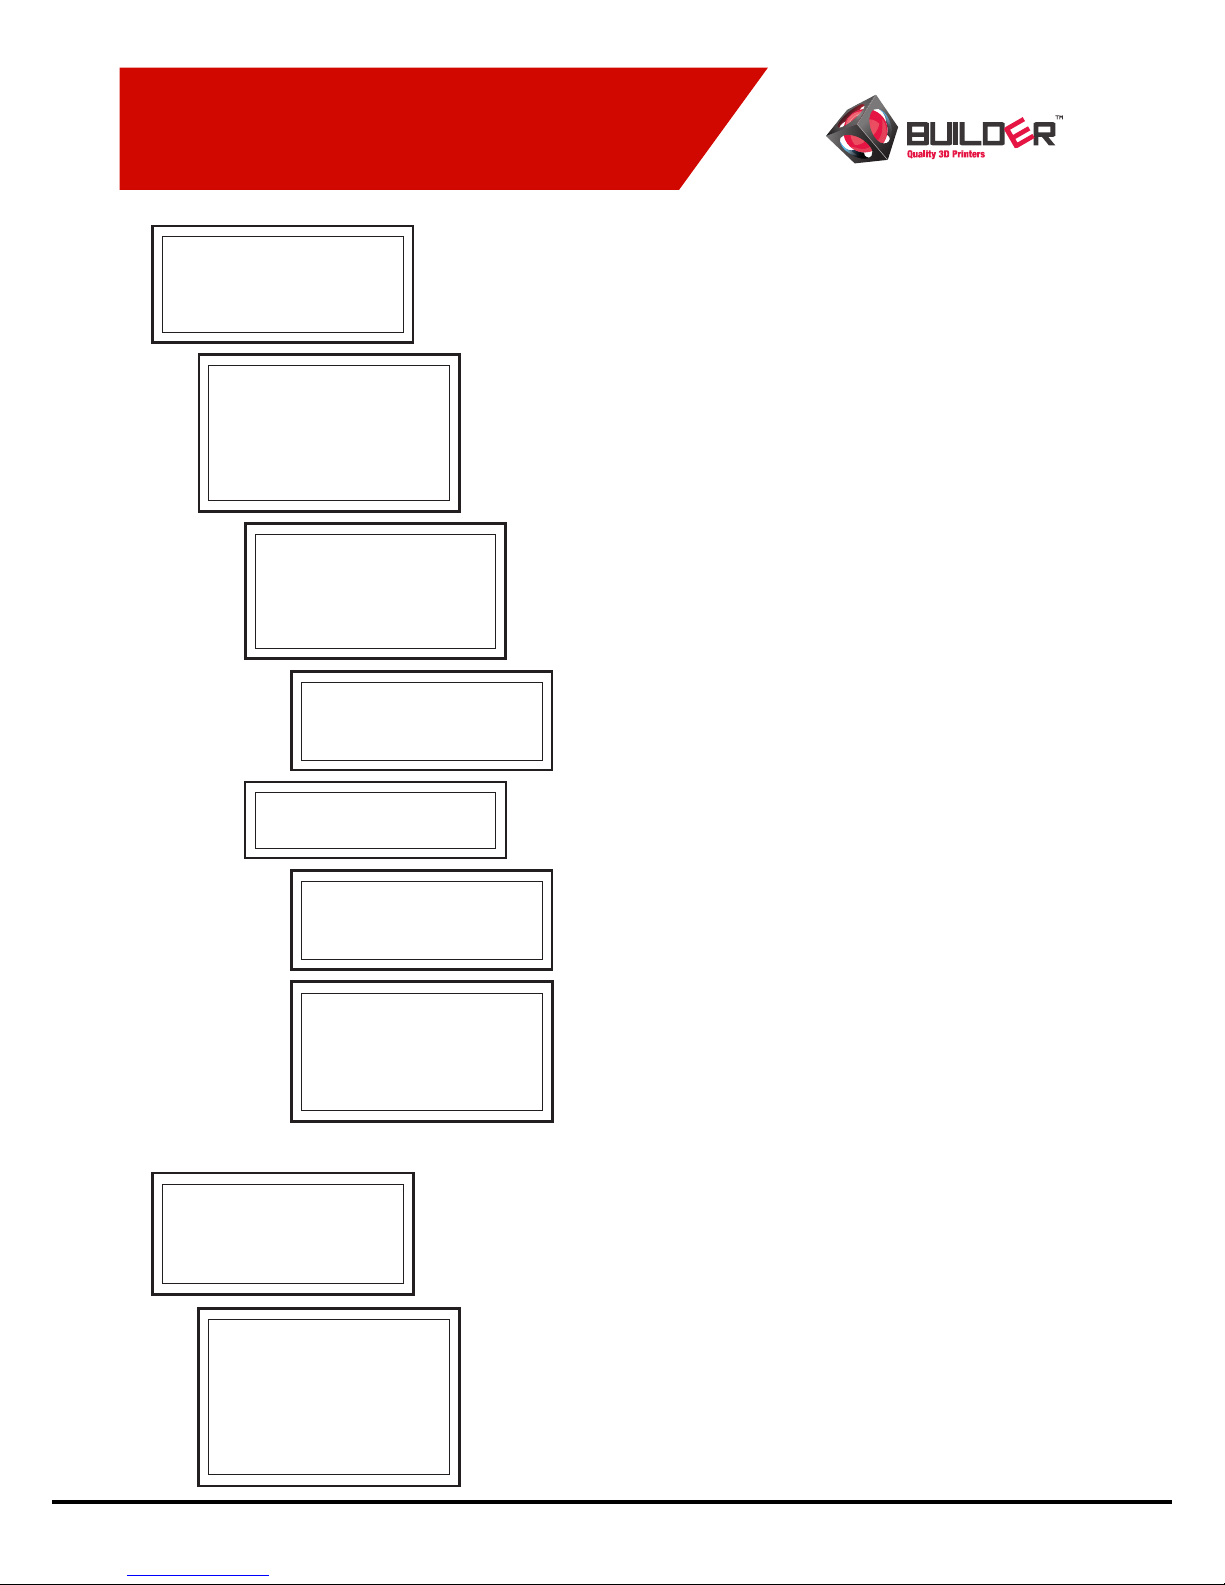
Main
→ Prepare
Control
Print from sd card
Change sd card
Prepare
Auto home
→ Bed leveling
Dissable steppers
Preheat
Cooldown
→ Move axis
Bed leveling
→
To level bed
→
Adjust offset
Point 1
Point 2
Point 3
To level bed
→ Move Z1
→ Move Z2
→ Move Z3
Move axis
→
Move 10mm
→
Move 1 mm
Move 10mm
→ Move X
→ Move Y
→ Move Z
Move 1 mm
→ Move X
→ Move Y
→ Move Z
→ Extr. Left
→ Extr. Right
Main
→ Tune
Control
Print from sd card
Change sd card
Tune
Speed
Nozzles
Bed
Fan speed
Flow
Change filament
Parking
Info screen while printing
Prepare: Menu to prepare printer for printing
Control: Menu to change speed, temp and extruder ratio
Print from SD card: Choose gcode le from SD card
Change SD card: Select when inserting SD card
Auto home: Moves printhead to his home position
Bed Leveling: Menu for level the nozzle relative to bed
Dissable steppers: Shuts o all the stepper motors
Preheat: Preheat bed (60) and nozzle (220)
Cooldown: Shuts o bed and nozzle to cooldown
Move axis: Menu for moving printhead and extruder
To level bed:
Adjust oset: Create an oset between nozzle and bed
Point 1: Move to calibration point 1
Point 2: Move to calibration point 2
Point 3: Move to calibration point 3
Move Z1: Move Z motor 1 up and down
Move Z2: Move Z motor 2 up and down
Move Z3: Move Z motor 3 up and down
Move 10 mm: Move X,Y and Z axis in steps of 10 mm
Move 1 mm: Move X, Y, Z axis and extruders 1mm
Move X: Move the X axis in steps of 10 mm
Move Y: Move the Y axis in steps of 10 mm
Move Z: Move the Z axis in steps of 10 mm
Move X: Move the X axis in steps of 1 mm
Move Y: Move the Y axis in steps of 1 mm
Move Z: Move the Z axis in steps of 1 mm
Extr. Left: Move the left extruder in steps of 1 mm
Extr. Right: Move the right extruder in steps of 1 mm
Speed: Change printspeed
Nozzles: Change the printing temperature
Bed: Change the bed temperature
Fan speed: Change the fan speed
Flow: Change the ow of the material
Change lament: Pauses the print for changing lament
Parking: Pauses the printer and move to his park position
Tune: Menu to tweak the print while printing
Control: Menu to change speed, temp and extruder ratio
Print from SD card: Choose gcode le from SD card
Change SD card: Select when inserting SD card
LCD Screen
Layout
Page 16
BUILDER V3.5
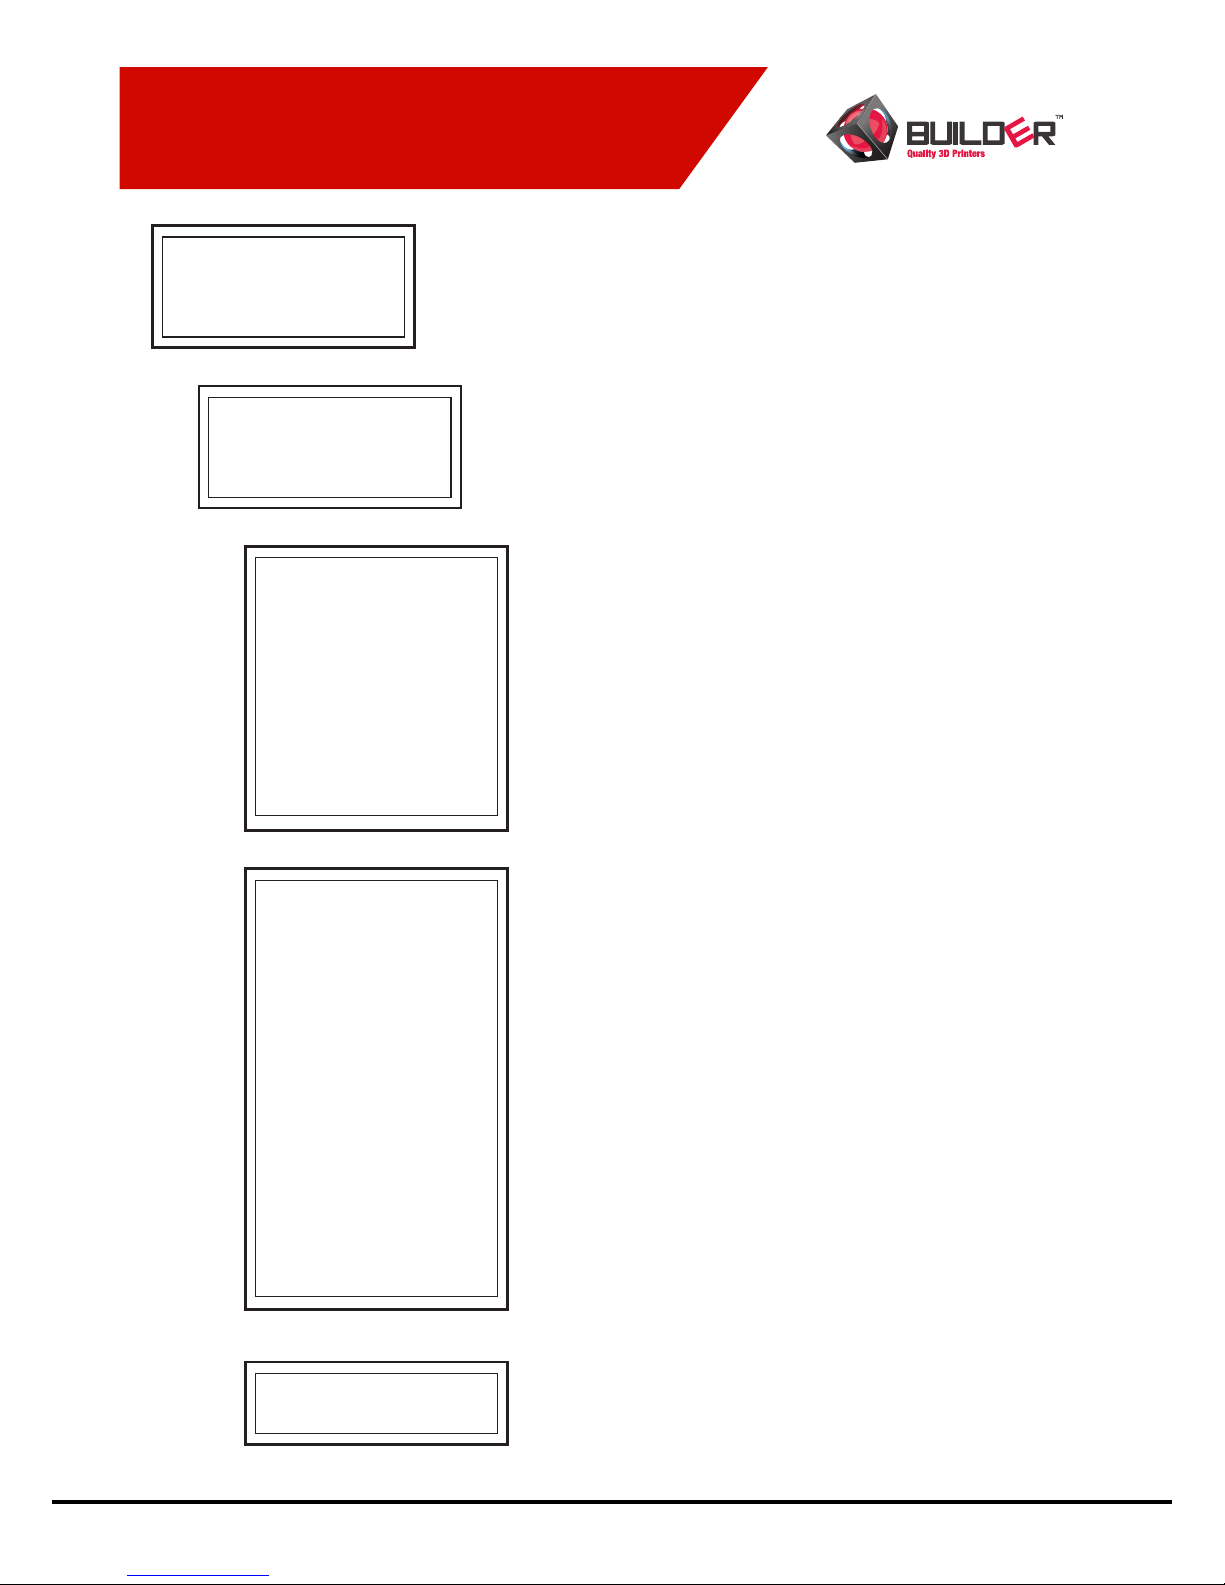
Control
Extruder ratio
→ Temperature
→ Motion
→ Machine info
Main
Prepare
→ Control
Print from sd card
Change sd card
Temperature
Nozzles
Bed
Fan speed
Autotemp
Min
Max
Fact
PID-P
PID-I
PID-D
PID-C
Preheat
Motion
Accel
Vxy-Jerk
Vz-Jerk
Ve-Jerk
Vmax x
Vmax y
Vmax z
Vmax E
Vmin
Vtravmin
Amax X
Amax y
Amax z
Amax e
A-retract
Xsteps/mm
Ysteps/mm
Zsteps/mm
Esteps/mm
Endstopabort
Machine info
Firmware
Factory reset
Prepare: Menu to prepare printer for printing
Control: Menu to change speed, temp and extruder ratio
Print from SD card: Choose gcode le from SD card
Change SD card: Select when inserting SD card
Extruder ratio: Choose percentage of the extruder
Temperature: Menu for changing temperature
Motion: Menu for changing motion related values
Machine info: Menu for factory reset and rmware version
Nozzles: Change nozzle temperature
Bed: Change Bed temperature
Fan speed: Change fan speed
Autotemp: If enabled right temperature will calculated
Min: Minimum temperature if autotemp is enabled
Max: Max temperature if autotemp is enabled
Fact: Factor multiplied by maximum feedrate.
PID-P: Extruder Potential Coecient
PID-I: Extruder Intergral Coecient
PID-D: Extruder Dierential Coecient
PID-C: Heating power = Kc + e_speed, default = 1
Preheat: Menu for changing the preheat values
Accel: Absolute ceiling acceleration for all axis
Vxy-Jerk: Limits the change in acceleration over time for x,y
Vz-Jerk: Limits the change in acceleration over time for z
Ve-Jerk: Limits the change in acceleration over time for e
Vmax X: Maximum X axis velocity
Vmax Y: Maximum Y axis velocity
Vmax Z: Maximum Z axis velocity
Vmax E: Maximum extruder velocity
Vmin: Minimum velocity
Vtravmin: Minimum travel velocity
Amax X: Maximum X acceleration
Amax Y: Maximum Y acceleration
Amax Z: Maximum Z acceleration
Amax e: Maximum extruder acceleration
A-retract: Maximum retract acceleration
Xsteps/mm: Amount of steps for moving 1mm
Ysteps/mm: Amount of steps for moving 1mm
Zsteps/mm: Amount of steps for moving 1mm
Esteps/mm: Amount of steps for moving 1mm
Endstopabort: O, Dont stop if hit endstop while printing
Firmware: Check the rmware version of the printer
Factory reset: settings to original system state
LCD Screen
Layout
Page 17
BUILDER V3.5
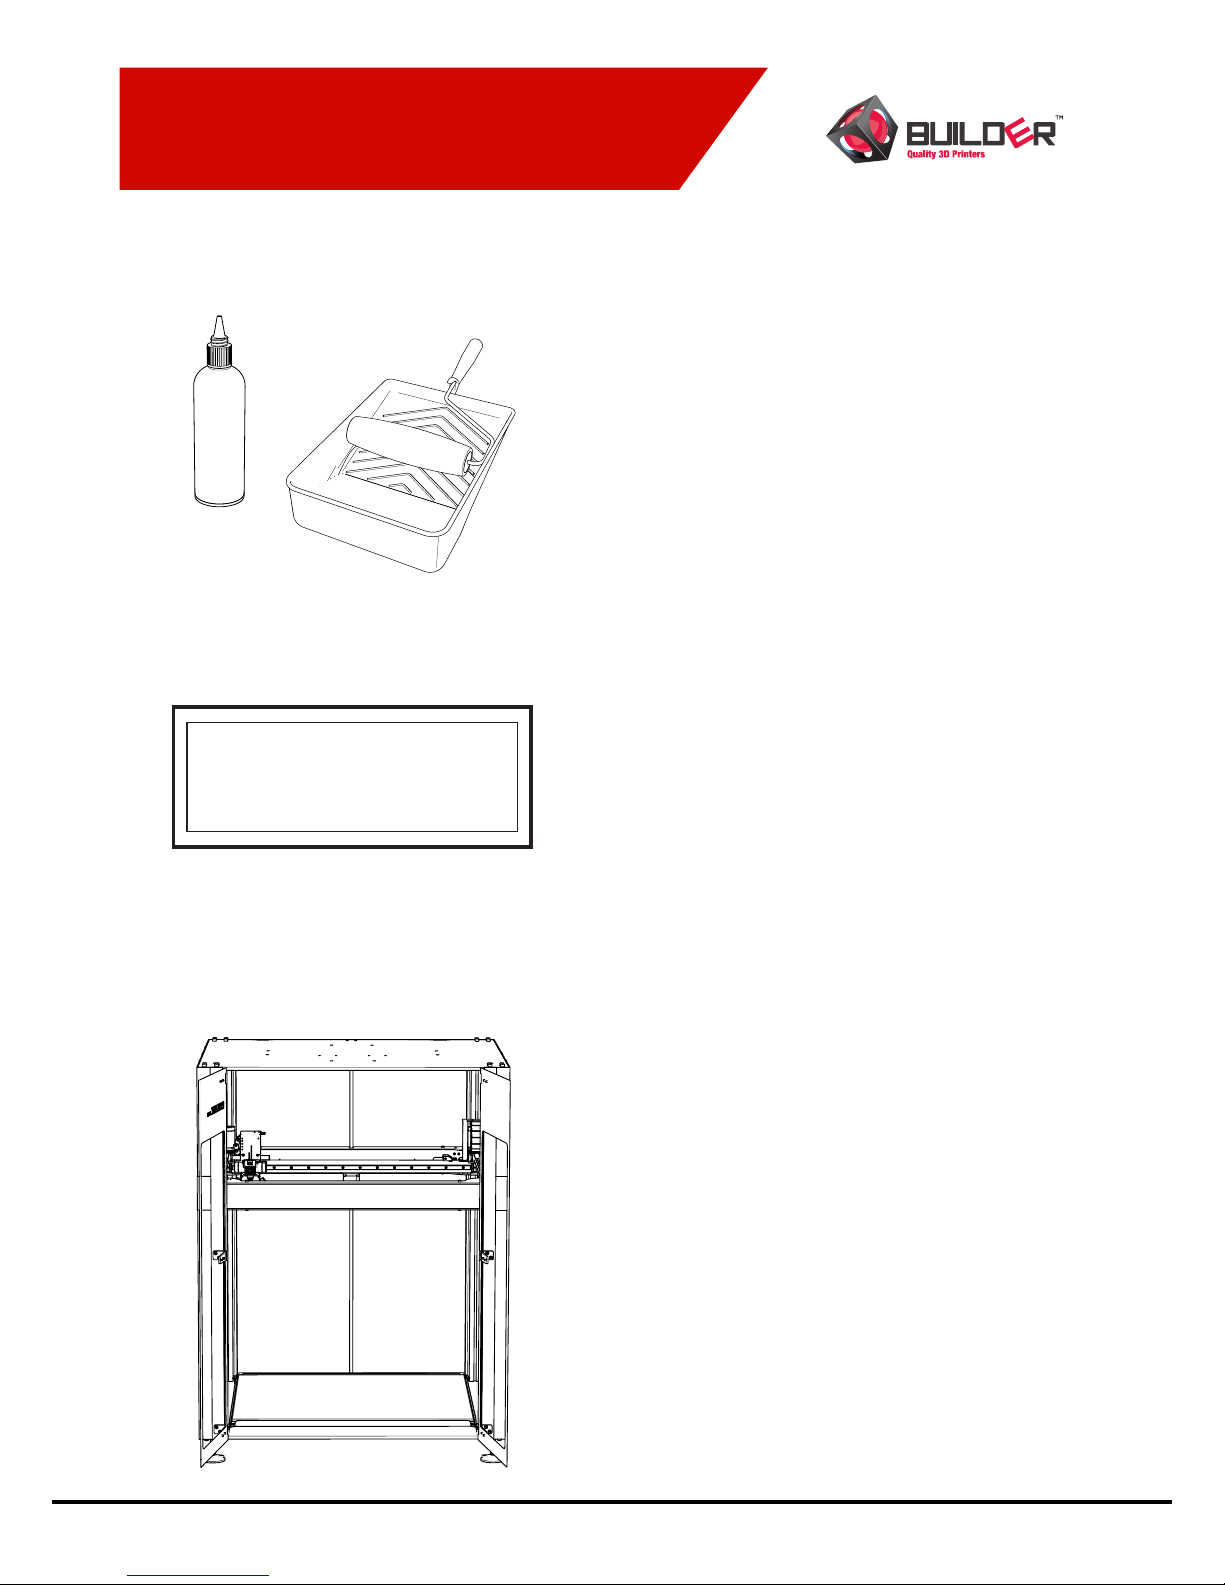
Print platform
Adhesion layer
Auto Home
Bed leveling
Disable steppers
→ Preheat
Add adhesion layer
If the bed has reached his temperature, wait
a few minutes. After a few minutes shut down
the printer and apply the adhesion layer
to the heated bed. Move up the printhead/
frame for easy access.
Preheat
Heat up the machine before applying an
adhesion layer to the bed. Select preheat in
the menu to heat up the printhead and bed.
Adhesion layer
The adhesion layer Builder recommends is
woodglue/water mixed
 Loading...