

Page 1
Congratulations on your purchase of a Buick Rendezvous. Please read this information and your
Owner Manual to ensure an outstanding ownership experience. Note that your vehicle may not
include all the features described in this booklet. Place this booklet in your Owner Manual
portfolio for easy reference.
Instrument Panel . . . . . . . . . . . . . . . . . . . . . . . . .2
Instrument Panel Cluster . . . . . . . . . . . . . . . . . .3
Driver Information Center . . . . . . . . . . . . . . . . . .4
Compass Calibration . . . . . . . . . . . . . . . . . . . . .6
Auto Door Lock/Unlock . . . . . . . . . . . . . . . . . . .6
Daytime Running Lamps (DRL) . . . . . . . . . . . . .6
Headlamp Control . . . . . . . . . . . . . . . . . . . . . . . .7
Automatic Headlamp System . . . . . . . . . . . . . . .7
Fog Lamps . . . . . . . . . . . . . . . . . . . . . . . . . . . . .7
Interior Lamps . . . . . . . . . . . . . . . . . . . . . . . . . . .8
Head-Up Display (HUD) . . . . . . . . . . . . . . . . . . . .8
Manual Dual Climate Control . . . . . . . . . . . . . . .9
Automatic Dual Climate Control . . . . . . . . . . . . .9
Seats . . . . . . . . . . . . . . . . . . . . . . . . . . . . . . . . .10
Outside Rearview Mirrors . . . . . . . . . . . . . . . . .11
Opening the Vehicle Hood . . . . . . . . . . . . . . . .11
Entertainment Systems . . . . . . . . . . . . . . . . . .12
HomeLink®Universal Transmitter . . . . . . . . . .14
Content Theft-Deterrent System . . . . . . . . . . . .15
Ultrasonic Rear Parking Assist (URPA) . . . . . .15
Electronic Liftgate Release . . . . . . . . . . . . . . . .16
Rear Door Security Locks . . . . . . . . . . . . . . . . .16
LATCH System . . . . . . . . . . . . . . . . . . . . . . . . .16
Center Rear Passenger Position
Lap-Shoulder Belt . . . . . . . . . . . . . . . . . . . . . . .17
Automatic Level Control . . . . . . . . . . . . . . . . . .17
All-Wheel Drive (AWD) System . . . . . . . . . . . . .17
Traction Control System (TCS) . . . . . . . . . . . . .17
Fuel Economy . . . . . . . . . . . . . . . . . . . . . . . . . .18
Roadside Assistance Program . . . . . . . . . . . . .20
My GMLink . . . . . . . . . . . . . . . . . . . . . . . . . . . .20
Page 2
2
Getting to Know Your 2004 Rendezvous
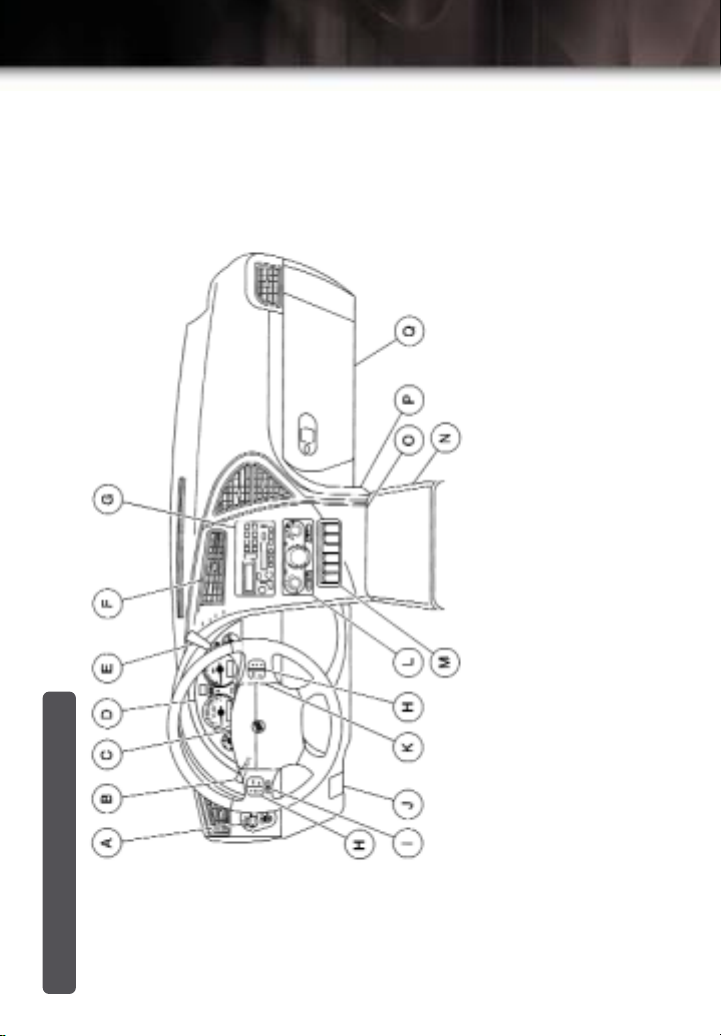
Lighter/Accessory Power Outlet/
Cell Phone Storage/Purse
Storage/Cupholders
N. Front Armrests Storage
O. Ashtray/Cigarette
P. Instrument Panel Fuse Block
Q. Glove Box
Instrument Panel
Driver Information Center (DIC)
Controls
H. Audio Steering Wheel Controls
I. Head-Up Display Switch and
A. Exterior/Interior Lamp Controls
B. Turn Signal/Multifunction Lever
J. Hood Release
K. Ignition Switch
L. Climate Controls
C. Hazard Warning Flasher Switch
D. Instrument Panel Cluster
E. Shift Lever
F. HVAC Vents
G. Audio System
See Section 3 of your Owner Manual.
M. Instrument Panel Switchbank
Page 3

3
C
B
IMPORTANT: The instrument panel
cluster is designed to let you know
of many important aspects of your
vehicle’s operation. It is important to
read your Owner Manual and
become familiar with the information
being relayed to you by the lights,
gauges and indicators, and what
action can be taken to ensure safety
and to prevent damage.
A
Instrument Panel Cluster
See Section 3 of your Owner Manual.
Gauge
Your vehicle’s instrument panel is
equipped with this cluster or one
very similar to it. The instrument
panel cluster includes these key
features:
A. Tachometer
B. Speedometer
C. Fuel Gauge
D. Engine Coolant Temperature
D
Page 4
4
Getting to Know Your 2004 Rendezvous
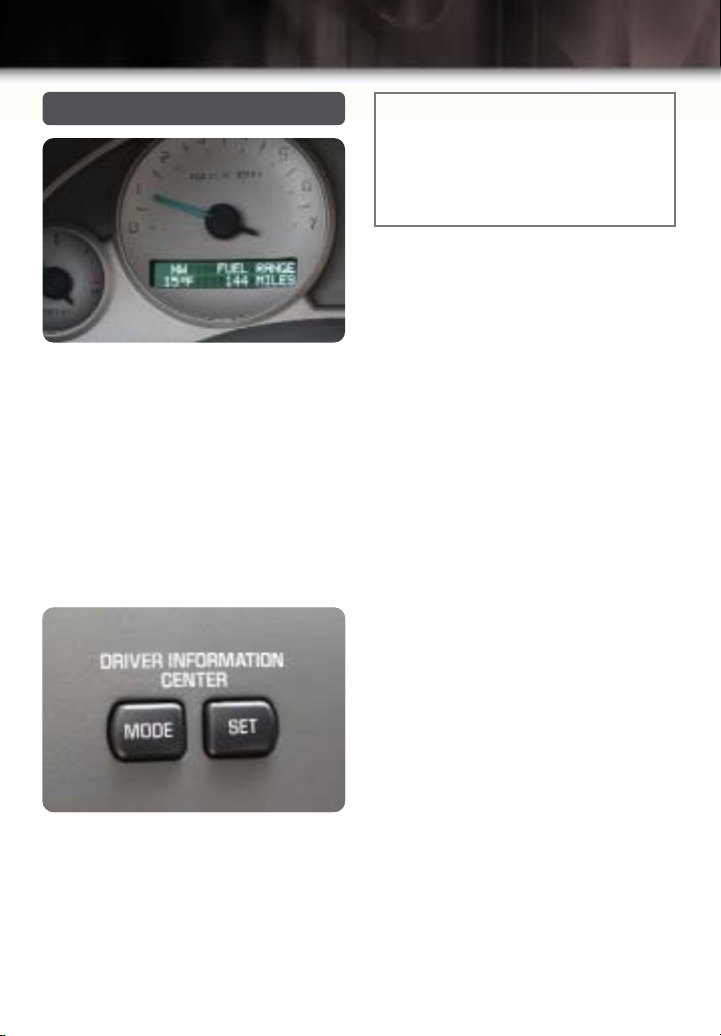
Driver Information Center
If equipped, your vehicle’s Driver
Information Center (DIC) can display a
compass, trip information, fuel economy
information, personalization features and
other messages or warnings. The DIC
display is located on the instrument cluster in the tachometer face, and can be
programmed in English or French. The
DIC controls include MODE and SET
buttons and are located on the instrument panel to the left of the steering
column.
MODE: Press this button to cycle
through the options on the display.
SET: After selecting the mode you wish
to view, use the SET button to toggle
between choices or select the desired
setting.
Note: The DIC will always display the
compass reading and the outside
temperature. If the temperature is below
38˚ F (3˚C), the temperature reading will
toggle between displaying the temperature and the word ICE for two minutes.
Pressing the MODE button repeatedly
will scroll through the following driver
information levels:
•Average fuel economy (AVG ECON)
calculates how many miles per gallon
you are getting based on overall driving conditions
• Instant Economy (INST ECON) calculates miles per gallon being returned
at a particular moment
• Fuel Range (RANGE) estimates the
remaining distance you can drive
without refueling. It is based on
recent fuel economy and remaining
fuel
• FUEL USED displays the amount of
fuel that has been used since it was
last reset
•Average Speed (AVG SPEED) shows
the vehicle’s average speed since
being started. To reset it, press the
MODE button until average speed is
displayed, then press and hold the
SET button until the speed displayed
is replaced by your current speed
• Oil Life Left (OIL LIFE LEFT HOLD
SET TO RESET) displays the percentage of engine oil life remaining
before an oil/oil filter change is needed. Reset this GM Oil Life Indicator
only when the oil is changed. To reset
it, turn the ignition key to ON with the
engine turned off, press the DIC
MODE button until OIL LIFE LEFT
HOLD SET TO RESET is displayed,
Page 5

5
then press and hold the SET button
until three chimes sound and 100% is
displayed
For full engine oil information, see Section 5 of
your Owner Manual.
•Tire Pressure (Tire Inflation Monitor, if
equipped) indicates a large
pressure change in one tire, when the
vehicle is moving. See Section 5 of
the Owner Manual for full details
• Select English or Metric units (USE
SET TO SELECT ENGLISH METRIC)
allows you to select English or metric
units of measure; the SET button toggles between the choices
• OFF turns off the DIC display three
seconds after it is selected. Press
the MODE button to turn the display
back on
The DIC can memorize personalized
settings for up to two drivers. A corresponding Remote Keyless Entry System
transmitter identifies each driver. Using
a key to access the vehicle leaves settings personalized for the last driver in
the vehicle.
Personalizing the DIC
• Enter Programming Mode by turning
the ignition key to ON with the transmission in PARK
• Repeatedly press and release the
MODE button until PERSONALIZATION PRESS SET TO BEGIN is displayed; press the SET button
• On the display, TO SELECT DRIVER
PRESS REMOTE LOCK appears.
Press the LOCK button on your key
fob transmitter. This identifies you
with the key fob signal and the
display now reads, PROGRAM
MODE, indicating that it is ready to
begin programming.
Follow the DIC instructions on the
display to personalize each of the
following:
• Headlamp exit delay
• Interior lighting delay
• Interior lighting on
• Auto door lock/unlock
• Delayed locking
• Remote door unlock
• Lock/unlock feedback
• Seat recall
•Tilt mirror
Exiting Programming Mode
When you have reached the end of
the entire personalization list by
pressing the MODE button, the
PERSONALIZATION SELECTION
DONE message appears on the DIC
display, followed by PRESS SET TO
EXIT MODE TO CONTINUE. To go
back through the list again, press
MODE. If you are satisfied with your
settings, press SET. You can also exit
programming mode by:
• Shifting the vehicle out of PARK (P)
•Turning the ignition key out of the
ON position
• Not programming any commands for
one minute, while in the programming
mode
See Section 3 of your Owner Manual.
Page 6

6
Getting to Know Your 2004 Rendezvous
Compass Calibration
The vehicle’s compass heading is displayed on the DIC display. In some
instances, the compass may not be fully
calibrated from the factory, resulting in
the letter “C” for calibration displayed on
the DIC. Should this condition occur, find
a large area free from metal objects and
drive in a continuous circle three times
to calibrate the compass. The compass
will subsequently calibrate itself.
Also note that there is a difference
between magnetic north and geographic
(“true”) north, which is great enough in
some areas of the country to give a
false reading. In this case, manual calibration is required. See Section 3 of the
Owner Manual to manually calibrate the
compass.
See Section 3 of your Owner Manual.
Auto Door Lock/Unlock
Your vehicle is factory-set to automatically lock all doors when all doors are
closed, the engine is running and the
shift lever is moved out of the PARK (P)
position. All of the doors will also unlock
automatically after the vehicle has been
shifted back into PARK. If your vehicle
is equipped with the DIC, you can use
the DIC MODE and SET buttons to
personalize the automatic lock/unlock to
one of several different settings:
• OFF: When the shift lever is put in
PARK, the doors will not unlock automatically
• DRIVER: When the shift lever is put
in PARK, only the driver’s door will
unlock automatically
• ALL: When the shift lever is put in
PARK, all doors will unlock automatically (original factory setting)
If the DRIVER or ALL setting is selected,
you can also choose additional settings:
• PARK: Automatically unlocks the
selected door(s) when the shift lever
is placed into PARK (original factory
setting)
• KEY OUT: Unlocks the door(s) when
the ignition key is removed
Full DIC programming instructions for
this and all other DIC modes are in
Section 3 of your Owner Manual.
See Section 3 of your Owner Manual.
Daytime Running Lamps (DRL)
The DRL safety feature illuminates the
headlamps at a reduced intensity during
the day to make the front of the vehicle
more visible to others. This feature can
be of particular help in the short periods
just after dawn and shortly before sunset. The DRL illuminates only the headlamps — not the taillamps or side marker lamps.
Note: DRL does not activate if the parking brake is engaged prior to turning the
ignition key on. DRL operation resumes
when the parking brake is released.
See Section 3 of your Owner Manual.
Page 7

7
Headlamp Controls
The exterior lamps knob is located on
the instrument panel, to the left of the
steering wheel. The AUTO position activates the automatic headlamp system
that illuminates all exterior lamps and
the instrument panel/radio lights when
they are needed. The (parking light)
position manually illuminates the taillamps and the instrument panel/radio
lights. The final position manually
activates the headlamps, all exterior
tail/marker lamps and the instrument
panel/radio lights.
See Section 3 of your Owner Manual.
Automatic Headlamp System
If the headlamp rotary knob is in the
AUTO position during daytime driving,
it may temporarily switch the headlamp
and interior light systems, including the
radio display, to the nighttime mode.
This occurs when passing through darker conditions, such as under a bridge or
overpass, or inside a parking garage.
When you start the vehicle at night, the
automatic headlamps will come on
immediately. The light sensor is located
on top of the instrument panel. To
ensure proper system operation, avoid
placing objects or stickers on or near the
sensor.
See Section 3 of your Owner Manual.
Fog Lamps
The Fog Lamps
button is located in
the center of the
exterior lamps
switch that controls
the parking lamps
and headlamps.
To activate the fog
lamps, press the FOG PUSH button.
To turn them off, press the button again
or turn off the ignition. The fog lamps
automatically turn off when you activate
the headlamp high beams, and come
back on when the low beams are turned
back on. (Note: Use of high beams in
fog is not recommended.)
See Section 3 of your Owner Manual.
Page 8

8
Getting to Know Your 2004 Rendezvous
Interior Lamps
The interior lamp control on the instrument panel can be set to:
• OFF, which disables the interior
lamps entirely, whether or not a door
is open
• DOOR, which turns on the interior
lamps when a door is opened
• ON, which turns the interior lamps on
continuously
To adjust instrument panel lamp brightness, press on the center of the interior
lamp control and it will extend. Twist the
knob to achieve the desired illumination
level, and push the control knob to its
stored position.
See Section 3 of your Owner Manual.
Head-Up Display (HUD)
(optional)
The HUD displays important information
on an image that appears to be focused
toward the front of the vehicle.
“Projecting” the information in this way
permits the driver to remain well
informed without taking his or her eyes
off the road.
Information that can be displayed on the
HUD includes:
•Vehicle speed (constant display)
• Current radio station (for three
seconds after status changes)
• CD number and/or track number or
tape (for three seconds after status
changes)
•Turn signal indicators
(when activated)
• High beam indicator (when activated)
• Low fuel warning message
(when activated)
• Check Gauges (when activated)
Turn the HUD
ON/OFF and
adjust brightness:
Turn the HUD OFF
by rotating the
uppermost HUD
control rotary
dimmer knob
counterclockwise
until it clicks off.
Turn the HUD on
by rotating the
same knob
clockwise to the desired level of
brightness.
Adjust the HUD position: With the
driver seat adjusted, press the UP or DN
button on the instrument panel until the
HUD image is in full view (but as low
as possible) straight ahead near the
front bumper. There is no side-to-side
adjustment.
See Section 3 of your Owner Manual.
Page 9

9
Manual Dual Climate Control
(optional)
To cool the vehicle interior more quickly
on very hot days, open the windows just
long enough to let the hot air escape.
For maximum cooling, choose the
coolest temperature setting, activate the
RECIRCULATE and A/C buttons on the
instrument panel and place the A/C
mode knob in the VENT mode.
The driver and front passenger can
adjust the dual zone temperature controls to individual comfort levels.
See Section 3 of your Owner Manual.
Automatic Dual Climate Control
(optional)
Activating the System
To turn the system on, press the driver’s
temperature knob. To turn the system
off, press the passenger temperature
knob.
Automatic Operation: Push the AUTO
button (driver’s temperature knob) and
adjust the temperature knob to the
desired temperature to set automatic air
delivery mode, fan speed, A/C and
recirculation functions.
Manual Operation: Press the MODE
button repeatedly until the desired airflow source is indicated on the display.
Mode selections include:
•Vent
• Bi-Level
• Floor
• Defog/Defrost
Press the upper or lower portion of the
FAN control to raise or lower fan speed
correspondingly.
Press the VENT button to turn the
outside air source on or off. When the
vent is on, the recirculation function
does not work.
Press the RECIRCULATE button to
prevent outside air from entering your
vehicle. This function can keep
unwanted odors out of your vehicle or
can help to speed heating or cooling of
the vehicle.
Adjust the temperature controls
individually to desired driver and
passenger settings.
Press the DEFOG/DEFROST button to
clear the windshield and front side windows of mist, frost and ice. Press the
REAR DEFOG/DEFROST button to
perform the same functions on the rear
glass.
See Section 3 of your Owner Manual.
Page 10

10
Getting to Know Your 2004 Rendezvous
Seats
Memory Seats (Optional): On
equipped vehicles, memory seat controls are located on the driver door
panel. Up to two drivers can program
their preferred seating positions and mirror settings into memory. To store a setting, adjust the seat and mirrors to the
desired positions. Press and hold memory button #1 for more than three seconds. A second driver can store his or
her settings by repeating the process
and pressing memory button #2 for
more than three seconds.
To recall memory positions, the shift
lever must be in PARK (P). To store an
exit position, press memory button #1 or
#2 (whichever driver number is yours),
then adjust the seat to a desired exit
position. Then press the exit button
below the numbered memory buttons for
more than three seconds.
To recall the exit position, the shift lever
must be in the PARK (P) position. Press
the exit button and the seat will move to
the stored exit position.
To link seat and mirror memory settings
to the Remote Keyless Entry System
transmitter through the DIC, enter programming mode (see DIC section of this
guide), press the MODE button until
SEAT RECALL appears and press the
SET button until the arrow points to the
desired ON or OFF position. If the ON
position is selected, press the MODE
button again until RECALL POSITION
appears. Press the SET button until the
arrow is before your choice of the MEMORY or EXIT position. This selects the
automatic seat positioning when the
UNLOCK button on the key fob transmitter is pressed.
See Section 3 of your Owner Manual.
Heated Seats (Optional): The buttons
to control this feature are located on the
instrument panel switchbank. The left
switch is for the driver seat and the right
switch is for the front passenger seat.
Press the top of the switch to turn the
heater on and the bottom of the switch
to turn if off. The switch will turn off
when the ignition is turned to OFF, and if
left in the ON position, will turn on when
the vehicle is restarted.
Note: This heated seat feature does not
shut off automatically once the seat(s)
are warmed. It must be turned off
manually.
Page 11

11
Second-Row Folding Seat: To fold the
seat forward, lift up or push forward on
the recliner lever located on the outboard side of the seat back. When folding the second-row seat forward, ensure
that the center head restraint is placed
in its lowest position to prevent contact
with the front floor console storage area.
Third-Row Stowable Seat (Optional):
To fold the seatback down, pull up on
the latch at the rear of the seat and
push the seatback down until it locks in
place. To raise it, pull up on the same
lever and push up on the seatback to
raise it. This can be done through the
passenger door, and to accomplish this
from the back of the vehicle, a strap is
included to pull up on the seatback.
When the seat is raised, ensure that it is
locked in position. To remove the stowable seat, consult the Owner Manual.
See Section 1 of your Owner Manual.
Outside Rearview Mirrors
Memory Mirrors (Optional):
Personalized mirror positions are programmed into memory at the same time
the memory seats are programmed.
See the Seats section of this guide to
program mirror positions into memory.
Outside Heated (Optional): When you
turn on the rear window defogger, a
defogger also warms the outside mirrors
to clear them of mist, ice and snow.
See Sections 2 and 3 of your Owner Manual.
Opening the Vehicle Hood
To open the hood, pull the hood release
handle located under the driver’s side of
the instrument panel. Under the leading
edge of the hood itself, slide the secondary hood release handle from left to right
and lift the hood. Position the prop rod in
its slot on the underside of the hood as
applicable.
See Section 5 of your Owner Manual.
Page 12

12
Getting to Know Your 2004 Rendezvous
Entertainment Systems
Radio Data System (RDS): Your RDS-
equipped radio has the capability to:
• Seek only radio stations with the program types you prefer (such as Jazz,
Rock, News, etc.)
• Seek stations with traffic
announcements
• Receive announcements concerning
local and national emergencies
• Receive and display messages from
radio stations
RDS features work only on FM stations
that broadcast RDS information and only
when the station is broadcasting the
RDS signal.
Program Type (PTY)
RDS stations may also provide the time
of day, a program type (PTY) for current
programming and the name of the program being broadcast.
Finding a PTY Station
To select and find a desired PTY, perform the following:
1. Press P-TYP.
2. Select a category by turning the
TONE/AUDIO knob.
3. Once the desired category is displayed, press either SEEK arrow to
select the category and take you to
the category’s first station.
4. If an alternate station within that category is preferred and the category is
displayed, press either SEEK arrow
once. If the category is still not displayed, press either SEEK arrow
twice to display the category and go
to another station.
5. If PTY times out and is no longer on
the display, return to Step 1.
See Section 3 of your Owner Manual for
additional RDS and PTY information.
Speed-Compensated Volume (SCV):
Your audio system can compensate
automatically for wind and road noise
that comes with increased vehicle
speed. Press the TUNE/AUDIO button
repeatedly until SPEED VOL appears.
Turn the TUNE/AUDIO button to select
OFF, MIN, MED or MAX. Each higher
setting adds more volume compensation
at increased speeds. Choose OFF to
disable SCV.
Radio with Six-Disc CD (Optional): To
load one CD on vehicles equipped with
the radio/six-disc CD, perform the following steps:
•Turn the ignition on, then press and
release the LOAD side of the LOAD
CD button
•Wait for the green indicator light at
the right side of the slot to turn green
• Insert the disc partway into the slot,
label side up; the player will pull the
disc in
Page 13
13
To load multiple CDs in the Six-Disc CD
Player:
•Turn the ignition on, then press and
hold the LOAD button for two seconds. The unit beeps and the light to
the right of the slot begins to flash
• When the light stops flashing and
turns green, insert a disc partway,
label side up
• The indicator light will begin blinking
and turn green. Load another disc at
this time
• When more than one disc is loaded,
a number for each disc is displayed
•To load more than one but fewer than
six discs, press the LOAD button
again after loading the final CD
• For every CD loaded, a number
appears on the radio display
•To play a specific CD, press the CD
AUX button, then the number of the
CD you want to hear
•Asmall bar appears under the CD
number that is playing, and the track
number appears
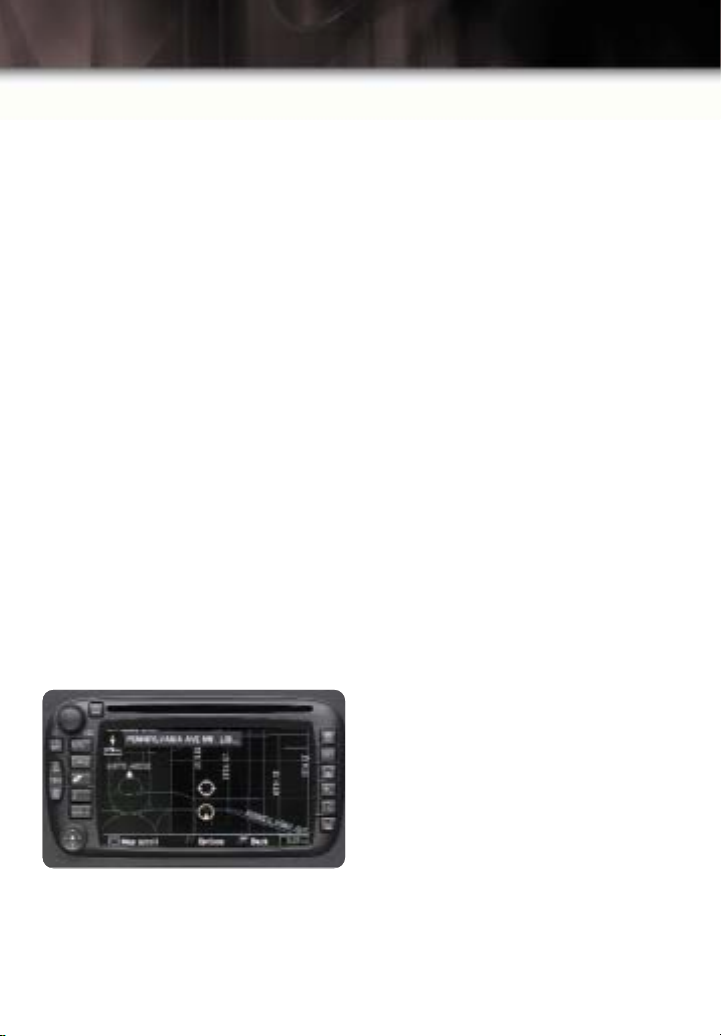
Navigation Radio System (Optional)
Your vehicle’s Navigation Radio System
provides you with detailed maps of all
major highways and roads throughout
the United States. Once you enter a
destination, the system provides turn-byturn instructions for reaching your
destination.
In addition, the system helps you locate
banks, airports, restaurants, post offices,
ATM machines and more.
To operate the Navigation Radio
System:
• Press the VOL button to turn the
Navigation Radio system on and off.
• Insert a map disk into the radio/CD
slot at the top of the faceplate (A
notice may appear, enter the highlighted “NEXT” box by pressing your
control pad).
• Press the DEST key
• Use the control pad to:
– Highlight and enter the “Change”
box on the right (if your geographi-
cal area is not selected)
– Select and enter the “Address” box
– Select and enter your street name.
The system uses a smart speller to
assist you (Note: Use the back
arrow to correct any misspellings)
– Select and enter the correct street
based on the list provided
– Press the “Add” button to calculate
the fastest route
• Press the map button in the upperright corner to enter into the guidance
mode or use the control pad to view
and select alternate routes
Navigation System Operation Tips
• The back arrow always takes you to
the previous screen.
• Pressing any of the hard keys on the
left always brings you back to a top
level menu.
Page 14

14
Getting to Know Your 2004 Rendezvous
• Set routes will remain until the route
is reached or cancelled
• While navigating, you can press the
control pad to bring up a menu that
allows you to cancel the route
• The FASTEST selection will choose
main roads for travel. The SHORTEST selection will route you using
shortcuts
• After selecting the NAV mode, use
the Menu button to set the map
appearance, adjust the voice prompt
volume, and many other features
• The CD button allows you to select
the internal CD player, the external
CD changer (if equipped) or a control
screen for rear seat entertainment (if
equipped) (Note: You cannot play a
CD in the internal CD player and
have route guidance simultaneously)
•You can add several common or
planned destinations as memory
points from the NAV menu. This
allows you to select it as a memory
point from the destination entry
screen
Note: See your 2004 Rendezvous
Navigation System manual for more
information.
Rear Seat Entertainment (Optional):
Available second- and third-seat entertainment includes:
• An audio system
•ADVD player
• Wireless headphones with an
ON/OFF and VOLUME control
• RCA jacks on the overhead console
for the DVD player
• Mini headphone jacks on the back
of the center console for use with
auxiliary devices
•Avideo screen located in the overhead console
Playing DVDs in Temperature
Extremes: The optional DVD player’s
operating temperature range is between
minus-four degrees F (-4˚ F) and 140
degrees F. When temperatures are outside this range, shut off the entertainment system, pull down the video
screen, and heat or cool the vehicle until
the operating range is reached.
See Section 3 of your Owner Manual.
HomeLink®Universal
Transmitter
This programmable transmitter can store
three frequencies for items such as a
garage door opener, entry door lock or
security system. With the ignition OFF,
program the transmitter as follows:
• Press and hold down the two outside
buttons on the unit until the indicator
light flashes, then release the buttons
(about 20 seconds — do not hold for
more than 30 seconds); do not repeat
this step for the second or third
devices that you plan to add to the
HomeLink
®
system
Page 15

15
• Hold the end of your hand-held transmitter up to three inches away from
the surface of the universal transmitter and hold its button and the button
you wish to assign it to on the
HomeLink®system
• Continue holding both buttons (up to
90 seconds may pass as the universal transmitter is being programmed);
the indicator light will begin blinking
slowly, then more quickly.
Programming is complete when the
light on the HomeLink®transmitter
flashes rapidly
• Release both buttons
• Press and release the HomeLink
®
button again. If the indicator light
stays lit constantly, programming is
complete
• Continue programming additional
devices using the transmitters, but do
not press the two outside buttons on
the HomeLink®transmitter again
If the HomeLink
®
indicator light blinks
rapidly for two seconds and remains on
it indicates that your device (usually a
garage door opener) has a “rolling
code.” Continue with the following steps:
• Press the training button (sometimes
marked “LEARN” or “SMART”) on the
garage door opener motor head unit,
making sure that the indicator light
flashes to confirm training mode
• Within 30 seconds, press and hold
the HomeLink®transmitter button programmed in the previous steps
• Press and release this button up to
three times, holding it for two-second
intervals to ensure that the
HomeLink®transmitter has been
trained
See Section 2 of your Owner Manual.
Content Theft-Deterrent System
(optional)
The Content Theft-Deterrent System has
a red indicator lamp atop the center of
the instrument panel that flashes slowly
when the system is armed. After closing
all vehicle doors, the system can be
activated in two ways:
• Press the LOCK button on the
Remote Keyless Entry key fob
• Press the power door LOCK switch
with the door open and the key
removed from the ignition
The alarm is not armed until the indicator light begins blinking (after a delay of
approximately 30 seconds when armed
by the key fob transmitter).
If the alarm is tripped, the horn sounds
and the headlamps and parking lamps
also flash. The alarm sounds whenever
a locked door is opened without the key
or Remote Keyless Entry System transmitter, or someone tries to turn on the
ignition without the correct key.
See Section 2 of your Owner Manual.
Ultrasonic Rear Parking Assist
(URPA)
The URPA feature detects objects up to
five feet (1.5m) behind the vehicle when
the shift lever is in the REVERSE
position and vehicle speed is less than
3 mph (5 km/h). Three color-coded
lights, located in the headliner of the
rear cargo area, provide distance and
system information to the driver. To turn
off the system, press the PARK AID
OFF switch on the instrument panel
switchbank. For full operation details,
consult the Owner Manual.
See Section 3 of your Owner Manual.
Page 16

16
Getting to Know Your 2004 Rendezvous
Electronic Liftgate Release
Your vehicle has a release button on the
inside of the liftgate handle. The Remote
Keyless Entry System transmitter will
also unlock and open the liftgate when
the REAR button on the transmitter is
pressed. To open the liftgate, all doors
must be unlocked and the shift lever
must be in the PARK (P) position.
See Section 2 of your Owner Manual.
Rear Door Security Locks
LATCH System
Your vehicle is equipped with the Lower
Anchorages and Top Tethers for
CHildren (LATCH) system, which
requires a special, compatible Child
Restraint Seat. Lower LATCH anchors
are located in the outboard positions of
the second-row seat. A label (shown) is
applied to the seatback at each anchor
position to help you find the lower
anchors. LATCH-compliant front-facing
seats have two attaching points at the
base as well as a top tether anchor.
When using a LATCH-compliant rearfacing seat, secure it with the LATCH
provisions instead of the vehicle safety
belts.
See Section 1 of your Owner Manual.
To prevent rear seat passengers from
opening the rear doors from the inside,
open a rear door and locate the lock on
the inside of the door. Slide it to the
LOCK position. Repeat the process for
the other rear door. To disable this
feature, reverse the process.
See Section 2 of your Owner Manual.
Page 17

17
Center Rear Passenger Position
Lap-Shoulder Belt
The folding split bench seat’s rear center shoulder belt has a detachable plate
that allows it to be stored in a slot in the
rear upper molding. To use it, attach it to
the belt buckle, completing the threepoint belt routing. The elastic strap on
the driver-side head restraint connects
with a sliding loop on the belt. Hook
the strap to the loop to lower the routing
of the belt as needed for maximum
comfort.
See Section 1 of your Owner Manual.
Automatic Level Control
(optional)
Vehicles equipped with the trailer towing
package and this feature may make an
occasional “whirring” sound under the
rear of the vehicle. Under heavier rear
loads, this noise indicates that the system air compressor is operating to provide a level ride height, this is normal.
See Section 4 of your Owner Manual.
All-Wheel Drive (AWD) System
(optional)
AWD-equipped vehicles automatically
transfer power to the rear wheels when
the front wheels begin to slip. No action
is required by driver and there are no
related lights or buttons to worry about.
There may be a slight noise when the
system engages; this is normal.
See Section 4 of your Owner Manual.
Traction Control System (TCS)
(optional)
Vehicles equipped with TCS limit wheelspin. TCS only operates when it senses
that one or both of the front wheels are
beginning to lose traction. When this
happens, the system operates the front
brakes and reduces engine power to
limit wheelspin. It is normal to hear or
feel the system working. TCS is automatically enabled whenever you start
the vehicle. You can disable it if your
vehicle ever gets stuck in sand, mud or
snow and it is necessary to rock the
vehicle to get it free. To disable TCS,
press the TRAC OFF button located on
the instrument panel switchbank. The
TRAC OFF light then comes on. Enable
the system by pressing the TCS
ON/OFF button again and the TRAC
OFF light will go out.
See Section 4 of your Owner Manual.
Page 18

18
Getting to Know Your 2004 Rendezvous
Fuel Economy
A variety of factors can affect your fuel
economy. They include:
•Vehicle maintenance
• Driving technique
• Proper tire pressure
•Vehicle loads
• Roof (luggage) rack use
•Trailering
• Air temperature/density; headwinds
For best fuel economy:
• Drive with the transaxle selector in
AUTOMATIC OVERDRIVE (D)
• Use only your right foot to activate
the brake pedal
•Avoid “jackrabbit” starts and maintain
a set speed during steady-state
driving
• Maintain proper tire pressure (check
with every fuel-up)
• Keep the vehicle on the recommended maintenance schedule
• Load cargo on the roof rack for long
trips only when necessary
• Understand that trailering reduces
fuel economy
Page 19

Notes
19
Page 20

20
Getting to Know Your 2004 Rendezvous
Roadside Assistance Program
1-800-252-1112
TTY Users: 1-888-889-2438
Buick Motor Division is proud to offer
premium Buick Roadside Assistance to
customers for vehicles covered under
the 3-year/36,000-mile (60,000 km) new
car warranty (whichever occurs first).
As the owner of a 2004 Rendezvous,
you are automatically eligible for Buick
Roadside Assistance. Membership is
free; however, some services may incur
costs.
Buick Roadside Assistance is available
24 hours a day, 7 days a week, 365
days a year; call the number above for
over-the-phone assistance in resolving
minor mechanical problems.
We will provide the following services for
3 years/36,000 miles (60,000 km), at no
expense to you:
• Fuel delivery
• Lock-out service (ID required)
•Tow to nearest dealership for warranty
service
• Flat tire change
• Jump starts
For prompt and efficient assistance when
calling, please provide the following information to the advisor:
• Location of the vehicle
•Telephone number or your location
•Vehicle model, year and color
•Vehicle mileage
•Vehicle Identification Number (VIN)
•Vehicle license plate number
My GMLink
The Buick Owner Center at MyGMLink
is a complimentary service for Buick
Owners, a one-stop resource to
enhance your Buick ownership experience. Exclusive member benefits
include online service reminders, vehicle
maintenance tips, online owner manual,
special privileges and more. Sign up
today at www.mygmlink.com.
Certain restrictions, precautions and safety procedures apply to your vehicle. Please read your Owner
Manual for complete instructions. All information contained herein is based on information available at
the time of printing and is subject to change without notice. Copyright 2003 by GM Corp.
All rights reserved.
04RENDGTK
 Loading...