

Page 1

Black plate (1,1)
MyLink/IntelliLink Features and Functions Guide - 2013 - CRC - 5/4/12
2013 MyLink/IntelliLink Features and Functions Guide M
Infotainment System .. . . . . 3
Introduction . . . . . . . . . . . . . . . . . 3
Infotainment . . . . . . . . . . . . . . . . . . . . 3
Overview . . . . . . . . . . . . . . . . . . . . . . . 3
Using the System . . . . . . . . . . . . . 23
Radio . . . . . . . . . . . . . . . . . . . . . . . 25
AM-FM Radio . . . . . . . . . . . . . . . . . 25
Radio Data System (RDS) . . . . 28
Satellite Radio . . . . . . . . . . . . . . . . 28
Pandora Internet Radio . . . . . . . 30
Stitcher Internet Radio . . . . . . . . 34
Voice Recognition . . . . . . . . 48
Personalization . . . . . . . . . . . 52
Home Page Customization . . . . 52
Bluetooth Phone/
Devices . . . . . . . . . . . . . . . . . . .
Bluetooth . . . . . . . . . . . . . . . . . . . . . 53
Hands-Free Phone . . . . . . . . . . . . 59
Trademarks and License
Agreements . . . . . . . . . . . . . .
Index . . . . . . . . . . . . . . . . . . . . . i-1
Audio Players . . . . . . . . . . . . . 38
CD Player . . . . . . . . . . . . . . . . . . . . . 38
Steering Wheel Controls . . . . . . 40
USB . . . . . . . . . . . . . . . . . . . . . . . . . . 41
Auxiliary Devices . . . . . . . . . . . . . . 46
Bluetooth Audio . . . . . . . . . . . . . . . 47
53
60
Page 2

Black plate (2,1)
MyLink/IntelliLink Features and Functions Guide - 2013 - CRC - 5/4/12
Page 3
Black plate (3,1)
MyLink/IntelliLink Features and Functions Guide - 2013 - CRC - 5/4/12
Infotainment System 3
Introduction
Infotainment
Litho in U.S.A.
Part No. 22948434 A First Printing
The names, logos, emblems,
slogans, vehicle model names, and
vehicle body designs appearing in
this manual including, but not limited
to, GM, the GM logo, BUICK, the
BUICK Emblem, and the names
LaCrosse, Regal, and Verano,
CHEVROLET, the CHEVROLET
Emblem, and the names Equinox,
Malibu, and Volt, GMC, the GMC
Truck Emblem, and the name
TERRAIN are registered trademarks
of General Motors Corporation LLC,
its subsidiaries, affiliates,
or licensors.
The information in this manual
supplements the owner manual.
This manual includes the latest
information available at the time it
was printed. We reserve the right to
make changes in the product after
that time without notice. For
vehicles first sold in Canada,
substitute the name General Motors
of Canada Limited for Buick Motor
Division, Chevrolet Motor Division,
or GMC whenever it appears in this
manual.
Keep this manual with the owner
manual in the vehicle, so it will be
there if it is needed. If the vehicle is
sold, leave this manual in the
vehicle.
Overview
Keeping your eyes on the road and
your mind on the drive is important
for safe driving. The infotainment
system has built-in features
intended to help with this by
disabling some features when
driving. A pop-up displays when a
feature is not available when the
vehicle is in motion.
©
2012 General Motors LLC. All Rights Reserved.
Page 4
Black plate (4,1)
MyLink/IntelliLink Features and Functions Guide - 2013 - CRC - 5/4/12
4 Infotainment System
All functions are available when the
vehicle is parked. Do the following
before driving:
.
Become familiar with the
infotainment system operation,
buttons on the faceplate, and
touch screen buttons.
.
Set up the audio by presetting
favorite stations, setting the
tone, and adjusting the
speakers.
.
Set up phone numbers in
advance so they can be called
easily by pressing a single
button or by using a single voice
command for vehicles equipped
with phone capability.
.
Pair the phone for hands-free
calling and streaming audio
features.
WARNING
{
Taking your eyes off the road too
long or too often while using the
infotainment system could cause
a crash and you or others could
be injured or killed. Focus your
attention on driving and limit
glances at the infotainment
screen. Use voice recognition
whenever possible.
Modifications to any phone/device
may result in the radio not working
properly. Make sure that any device
attached has the latest available
operating system and has not been
modified.
Some software on phones such as
Task Management may affect the
phone functionality of the radio.
Infotainment System Overview
The infotainment system is
controlled by using the buttons,
touch screen, steering wheel
controls, and voice recognition.
See Using the System on page 23.
Page 5
Black plate (5,1)
MyLink/IntelliLink Features and Functions Guide - 2013 - CRC - 5/4/12
Infotainment System 5
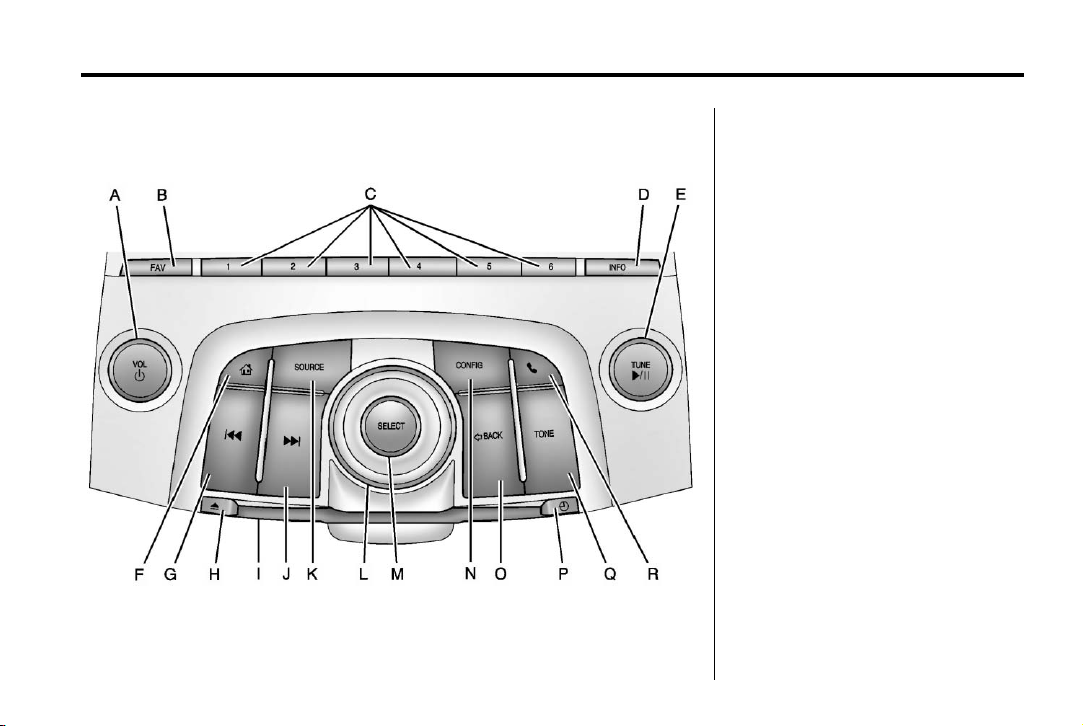
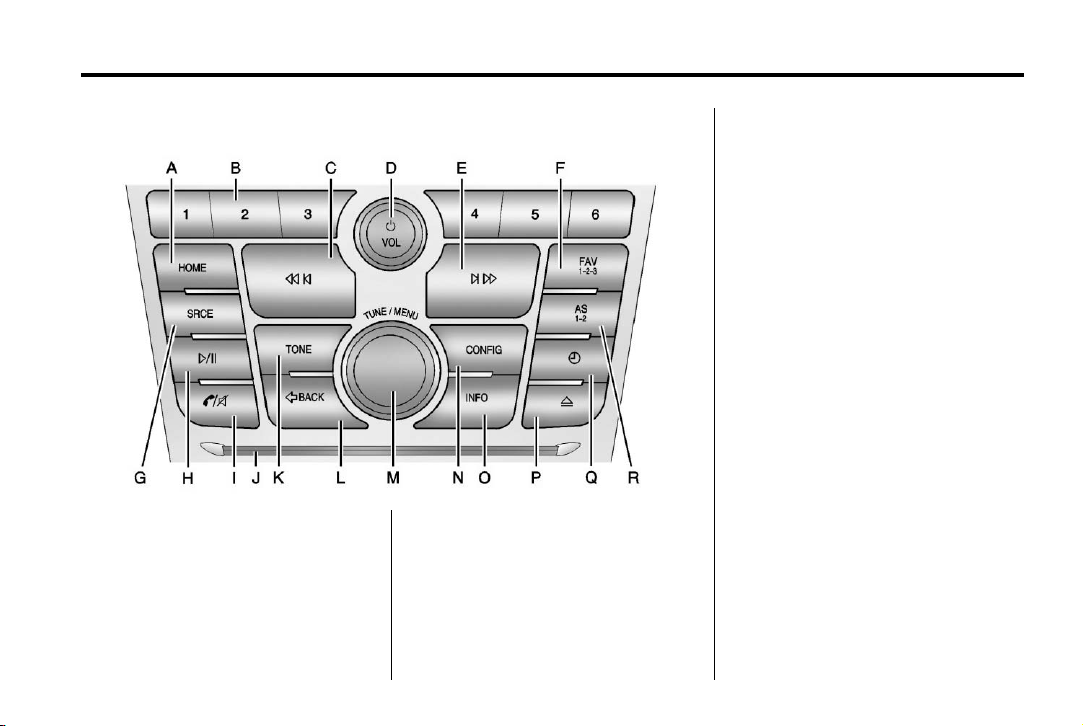
Buick LaCrosse Overview
A. VOL/ O (Volume/Power)
.
Press to turn the system
on and off.
.
Turn to adjust the volume.
B. FAV (Favorites Menu)
.
Press to display or change
the current favorite page
number above the preset
buttons. Keep pressing to
scroll through the favorites
pages. The stored stations
for each list display on the
bottom of the screen. The
number of preset Favorite
Pages can be changed by
pressing the Config button
on the Home Page, then
pressing Radio Settings,
and then pressing Number
of Favorite Pages.
C. Buttons 1−6
.
When using AM, FM,
or XM (if equipped), the
preset buttons can be used
to select stored stations.
Page 6

Black plate (6,1)
MyLink/IntelliLink Features and Functions Guide - 2013 - CRC - 5/4/12
6 Infotainment System
D. INFO (Information)
.
Press to display available
source information.
E. TUNE /
.
k (Tune/Play/Pause)
Turn to manually find a
station.
.
Press to pause or resume
playback. This feature is
unavailable for AM, FM,
and XM (if equipped). See
CD Player on page 38,
Pandora Internet Radio on
page 30, Stitcher Internet
Radio on page 34, USB on
page 41, or Bluetooth
Audio on page 47.
F.
D (Home Page)
.
Press to go to the Home
Page. See “Home Page” in
this section.
g (Previous/Reverse)
G.
.
CD, USB, Bluetooth Audio:
Press to seek to the
beginning of the current or
previous track.
.
CD, USB, Bluetooth Audio:
Press and hold to quickly
reverse through a track.
Release the button to
return to playing speed.
See CD Player on
page 38, USB on page 41,
or Bluetooth Audio on
page 47.
.
AM, FM, XM (if equipped):
Press to seek to the
previous strong station.
H.
X (Eject)
.
Press to eject a disc from
the CD player. See CD
Player on page 38.
I. CD Slot
l (Next/Forward)
J.
.
CD, USB, Bluetooth Audio:
Press to seek the next
track.
.
CD, USB, Bluetooth Audio:
Press and hold to fast
forward through a track.
Release the button to
return to playing speed.
See CD Player on
page 38, USB on page 41,
or Bluetooth Audio on
page 47.
.
AM, FM, XM (if equipped):
Press to seek to the next
strong station.
K. SOURCE
.
Press to change the audio
source to AM, FM, XM (if
equipped), Pandora®,
Stitcher®, CD, USB, AUX,
or Bluetooth® Audio.
L. Multifunction Knob
.
Turn to highlight a feature.
Page 7

Black plate (7,1)
MyLink/IntelliLink Features and Functions Guide - 2013 - CRC - 5/4/12
Infotainment System 7
M. SELECT
.
Press to activate the
highlighted feature.
N. CONFIG (Configuration Menu)
.
Press to adjust features for
Languages, Time and
Date, Radio Settings,
Phone Settings, Display
Settings, and Vehicle
Settings.
O.
/ BACK
.
Press to return to the
previous screen in a menu.
H (Clock Menu)
P.
.
Press to set the time.
Press + or − to increase or
decrease the hours and
minutes displayed on the
clock. See “Clock” in the
owner manual.
Q. TONE
.
Press to access the Tone
Settings menu screen to
adjust Bass, Mid
(Midrange), Treble, EQ,
Fade, and Balance. Tone
settings are specific to
each source. See AM-FM
Radio on page 25.
R.
5 (Phone Menu)
.
Press to enter the phone
main screen. Press and
hold to mute or unmute the
infotainment system. See
Bluetooth on page 53 or
“OnStar” in the owner
manual.
Page 8
Black plate (8,1)
MyLink/IntelliLink Features and Functions Guide - 2013 - CRC - 5/4/12
8 Infotainment System
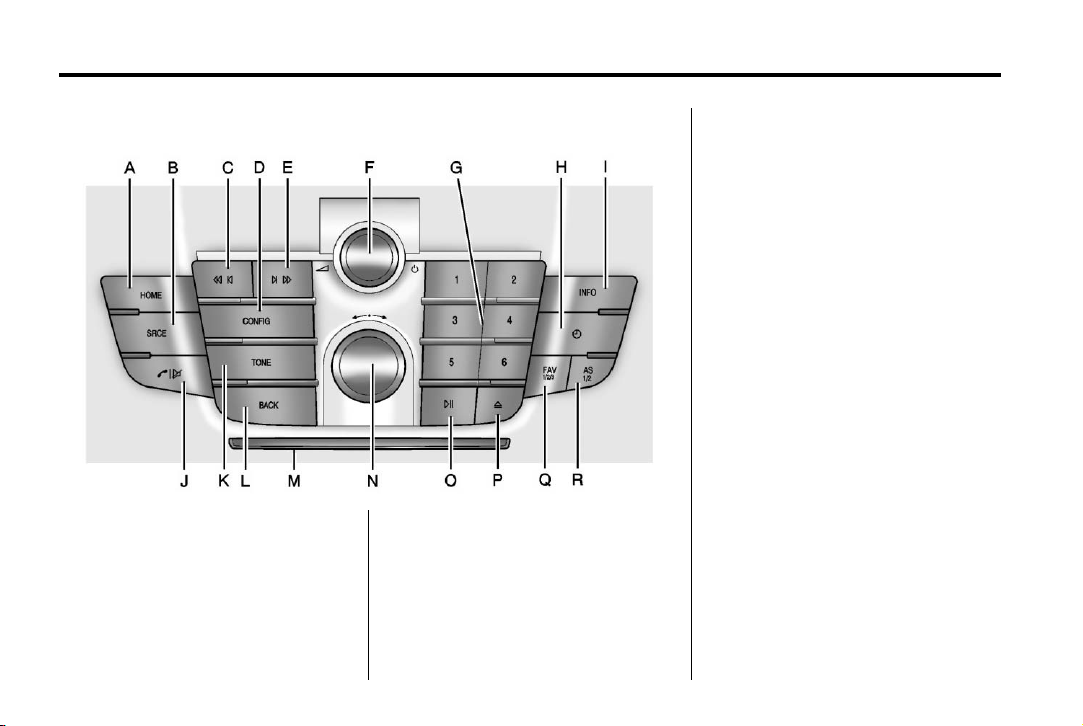
Buick Regal Overview
A. HOME
.
Press to go to the Home
Page. See “Home Page” in
this section.
B. SRCE (Source)
.
Press to change the audio
source to AM, FM, XM (if
equipped), Pandora,
Stitcher, CD, USB, AUX,
or Bluetooth Audio.
C.
s © (Previous/Reverse)
.
CD, USB, Bluetooth Audio:
Press to seek to the
beginning of the current or
previous track.
.
CD, USB, Bluetooth Audio:
Press and hold to quickly
reverse through a track.
Release the button to
return to playing speed.
See CD Player on
page 38, USB on page 41,
or Bluetooth Audio on
page 47.
.
AM, FM, XM (if equipped):
Press to seek to the
previous strong station.
D. CONFIG (Configuration Menu)
.
Press to adjust features for
Languages, Time and
Date, Radio Settings,
Phone Settings, Display
Settings, and Vehicle
Settings.
Page 9

Black plate (9,1)
MyLink/IntelliLink Features and Functions Guide - 2013 - CRC - 5/4/12
Infotainment System 9
E. ¨ \ (Next/Forward)
.
CD, USB, Bluetooth Audio:
Press to seek the next
track.
.
CD, USB, Bluetooth Audio:
Press and hold to fast
forward through a track.
Release the button to
return to playing speed.
See CD Player on
page 38, USB on page 41,
or Bluetooth Audio on
page 47.
.
AM, FM, XM (if equipped):
Press to seek to the
previous strong station.
F.
3 / O (Volume/Power)
.
Press to turn the system
on and off.
.
Turn to adjust the volume.
G. Buttons 1−6
.
When using AM, FM,
or XM (if equipped), the
preset buttons can be used
to select stored stations.
H (Clock Menu)
H.
.
Press to set the time.
Press + or − to increase or
decrease the hours and
minutes displayed on the
clock. See “Clock” in the
owner manual.
I. INFO (Information)
.
Press to display available
source information.
V / $ (Phone/Mute)
J.
.
Press to enter the phone
main screen. See
Bluetooth on page 53 or
“OnStar” in the owner
manual.
.
Press and hold to mute
and unmute the
infotainment system.
K. TONE
.
Press to access the Tone
Settings menu screen to
adjust Bass, Mid
(Midrange), Treble, EQ,
Fade, and Balance. Tone
settings are specific to
each source. See AM-FM
Radio on page 25.
L. BACK
.
Press to return to the
previous screen in a menu.
M. CD Slot
N. Multifunction Knob
.
Press to enter the menu for
the current band or media.
.
Turn to highlight a feature.
.
Press to activate the
highlighted feature.
.
Turn to manually change
the radio station.
Page 10

Black plate (10,1)
MyLink/IntelliLink Features and Functions Guide - 2013 - CRC - 5/4/12
10 Infotainment System
O. w j (Play/Pause)
.
Press to pause or resume
playback. This feature is
unavailable for AM, FM,
and XM (if equipped). See
CD Player on page 38,
Pandora Internet Radio on
page 30, Stitcher Internet
Radio on page 34, USB on
page 41, or Bluetooth
Audio on page 47.
Z (Eject)
P.
.
Press to eject a disc from
the CD player. See CD
Player on page 38.
Q. FAV 1/2/3 (Favorite Pages)
.
Press to display or change
the current favorite page
number above the preset
buttons. Keep pressing to
scroll through the favorites
pages. The stored stations
for each list displays on
the bottom of the screen.
The number of preset
Favorite Pages can be
changed by pressing the
Config button on the Home
Page, then pressing Radio
Settings, and then pressing
Number of Favorite Pages.
R. AS 1/2 (Autostore)
.
See “Autostore” in this
section for more
information.
Page 11
Black plate (11,1)
MyLink/IntelliLink Features and Functions Guide - 2013 - CRC - 5/4/12
Infotainment System 11
Buick Verano Overview
A. HOME (Home Page)
.
Press to go to the Home
Page. See “Home Page” in
this section.
B. Buttons 1−6
.
When using AM, FM,
or XM (if equipped), the
preset buttons can be used
to select stored stations.
C.
s © (Previous/Reverse)
.
CD, USB, Bluetooth Audio:
Press to seek to the
beginning of the current or
previous track.
.
CD, USB, Bluetooth Audio:
Press and hold to quickly
reverse through a track.
Release the button to
return to playing speed.
See CD Player on
page 38, USB on page 41,
or Bluetooth Audio on
page 47.
.
AM, FM, XM (if equipped):
Press to seek to the
previous strong station.
D.
O /VOL (Power/Volume)
.
Press to turn the system
on and off.
.
Turn to adjust the volume.
Page 12

Black plate (12,1)
MyLink/IntelliLink Features and Functions Guide - 2013 - CRC - 5/4/12
12 Infotainment System
E. ¨ \ (Next/Forward)
.
CD, USB, Bluetooth Audio:
Press to seek the next
track.
.
CD, USB, Bluetooth Audio:
Press and hold to fast
forward through a track.
Release the button to
return to playing speed.
See CD Player on
page 38, USB on page 41,
or Bluetooth Audio on
page 47.
.
AM, FM, XM (if equipped):
Press to seek to the
previous strong station.
F. FAV 1-2-3 (Favorite Pages)
.
Press to display or change
the current favorite page
number above the preset
buttons. Keep pressing to
scroll through the favorite
pages. The stored stations
G. SRCE (Source)
H.
Pages can be changed by
pressing the Config button
on the Home Page, then
pressing Radio Settings,
and then pressing Number
of Favorite Pages.
.
Press to change the audio
source to AM, FM, XM (if
equipped), Pandora,
Stitcher, CD, USB, AUX,
or Bluetooth Audio.
p / j (Play/Pause)
.
Press to pause or resume
playback. This feature is
unavailable for AM, FM,
and XM (if equipped). See
CD Player on page 38,
Pandora Internet Radio on
page 30, Stitcher Internet
Radio on page 34, USB on
page 41, or Bluetooth
Audio on page 47.
for each list displays on the
bottom of the screen. The
number of preset Favorite
V / 8 (Phone/Mute)
I.
.
Press to enter the phone
main screen. See
Bluetooth on page 53 or
“OnStar” in the owner
manual.
.
Press and hold to mute the
infotainment system. Press
again to unmute.
J. CD Slot
K. TONE
.
Press to access the Tone
Settings menu screen to
adjust Bass, Mid
(Midrange), Treble, EQ,
Fade, and Balance. Tone
settings are specific to
each source. See AM-FM
Radio on page 25.
Page 13

Black plate (13,1)
MyLink/IntelliLink Features and Functions Guide - 2013 - CRC - 5/4/12
Infotainment System 13
L. / BACK
.
Press to return to the
previous screen in a menu.
M. TUNE/MENU
(Multifunction Knob)
.
Press to enter the menu for
the current band or media.
.
Turn to highlight a feature.
Press to activate the
highlighted feature.
.
Turn to manually change
the radio station.
N. CONFIG (Configuration Menu)
.
Press to adjust features for
Languages, Time and
Date, Radio Settings,
Phone Settings, Display
Settings, and Vehicle
Settings.
O. INFO (Information)
.
Press to display available
source information.
Z (Eject)
P.
.
Press to eject a disc from
the CD player. See CD
Player on page 38.
H (Clock Menu)
Q.
.
Press to set the time.
Press + or − to increase or
decrease the hours and
minutes displayed on the
clock. See “Clock” in the
owner manual.
R. AS 1-2 (Autostore)
.
See “Autostore” in this
section for more
information.
Page 14
Black plate (14,1)
MyLink/IntelliLink Features and Functions Guide - 2013 - CRC - 5/4/12
14 Infotainment System
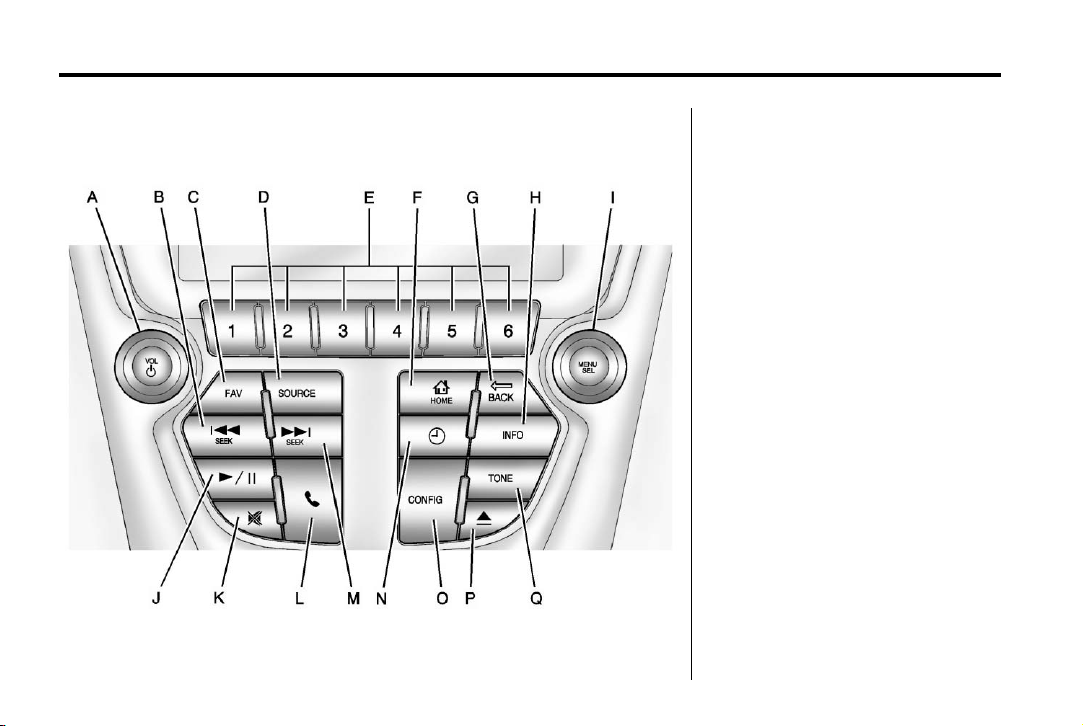
Chevrolet Equinox and GMC Terrain Overview
A. VOL/ O (Volume/Power)
.
Press to turn the system
on and off.
.
Turn to adjust the volume.
g SEEK (Previous/Reverse)
B.
.
CD, USB, Bluetooth Audio:
Press to seek to the
beginning of the current or
previous track.
.
CD, USB, Bluetooth Audio:
Press and hold to quickly
reverse through a track.
Release the button to
return to playing speed.
See CD Player on
page 38, USB on page 41,
or Bluetooth Audio on
page 47.
.
AM, FM, XM (if equipped):
Press to seek to the
previous strong station.
Page 15

Black plate (15,1)
MyLink/IntelliLink Features and Functions Guide - 2013 - CRC - 5/4/12
Infotainment System 15
C. FAV (Favorite Pages)
.
Press to display or change
the current favorite page
number above the preset
buttons. Keep pressing to
scroll through the favorites
pages. The stored stations
for each list displays on the
bottom of the screen. The
number of preset Favorite
Pages can be changed by
pressing the Config button
on the Home Page, then
pressing Radio Settings,
and then pressing Number
of Favorite Pages.
D. SOURCE
.
Press to change the audio
source to AM, FM, XM (if
equipped), Pandora,
Stitcher, CD, USB, AUX,
or Bluetooth Audio.
E. Buttons 1−6
.
When using AM, FM,
or XM (if equipped), the
preset buttons can be used
to select stored stations.
D HOME (Home Page)
F.
.
Press to go to the Home
Page. See “Home Page” in
this section.
G.
E BACK
.
Press to return to the
previous screen in a menu.
H. INFO (Information)
.
Press to display available
source information.
I. MENU/SEL (Menu/Select)
.
Press to enter the menu for
the current band or media.
.
Turn to highlight a feature.
.
Press to activate the
highlighted feature.
.
Turn to manually change
the radio station.
k (Play/Pause)
J.
.
Press to pause or resume
playback. This feature is
unavailable for AM, FM,
and XM (if equipped). See
CD Player on page 38,
Pandora Internet Radio on
page 30, Stitcher Internet
Radio on page 34, USB on
page 41, or Bluetooth
Audio on page 47.
? (Mute)
K.
.
Press to mute the system.
Press again to unmute.
5 (Phone Menu)
L.
.
Press to enter the phone
main screen. See
Bluetooth on page 53 or
“OnStar” in the owner
manual.
l SEEK (Next/Forward)
M.
.
CD, USB, Bluetooth Audio:
Press to seek the next
track.
Page 16

Black plate (16,1)
MyLink/IntelliLink Features and Functions Guide - 2013 - CRC - 5/4/12
16 Infotainment System
.
CD, USB, Bluetooth Audio:
Press and hold to fast
forward through a track.
Release the button to
return to playing speed.
See CD Player on
page 38, USB on page 41,
or Bluetooth Audio on
page 47.
.
AM, FM, XM (if equipped):
Press to seek to the
previous strong station.
N.
H (Clock Menu)
.
Press to set the time.
Press + or − to increase or
decrease the hours and
minutes displayed on the
clock. See “Clock” in the
owner manual.
O. CONFIG (Configuration Menu)
.
Press to adjust features for
Languages, Time and
Date, Radio Settings,
Phone Settings, Display
Settings, and Vehicle
Settings.
P.
X (Eject)
.
Q. TONE
.
Press to eject a disc from
the CD player. See CD
Player on page 38.
Press to access the Tone
Settings menu screen to
adjust Bass, Mid
(Midrange), Treble, EQ,
Fade, and Balance. Tone
settings are specific to
each source. See AM-FM
Radio on page 25.
Page 17
Black plate (17,1)
MyLink/IntelliLink Features and Functions Guide - 2013 - CRC - 5/4/12
Infotainment System 17
Malibu Overview
A. VOL/ O (Volume/Power)
.
Press to turn the system
on and off.
.
Turn to adjust the volume.
B. FAV (Favorite Pages)
.
Press to display the
current page number
above the preset buttons.
The stored stations for
each list display on the
touch-sensitive preset
buttons at the bottom of
the screen. The number of
preset FAV lists can be
changed in the
Configuration Menu.
C.
F (Home Page)
.
Press to go to the Home
Page. See “Home Page” in
this section.
D. SOURCE
.
Press to change the audio
source to AM, FM, XM (if
equipped), Pandora,
Stitcher, CD, USB, AUX,
or Bluetooth Audio.
v / > (Phone/Mute)
E.
.
Press to enter the phone
main screen. See
Bluetooth on page 53 or
“OnStar” in the owner
manual.
F. BACK
/
.
Press to return to the
previous screen in a menu.
Page 18

Black plate (18,1)
MyLink/IntelliLink Features and Functions Guide - 2013 - CRC - 5/4/12
18 Infotainment System
G. TUNE/MENU
.
Turn to highlight a feature.
Press to activate the
highlighted feature.
.
Turn to manually select a
radio station.
H.
Z (Eject)
.
Press to eject a disc from
the CD player. See CD
Player on page 38.
H (Clock)
I.
.
Press to set the time.
Press + or − to increase or
decrease the hours and
minutes displayed on the
clock. See “Clock” in the
owner manual.
J.
p / j (Play/Pause)
.
Press to pause or resume
playback. This feature is
unavailable for AM, FM,
and XM (if equipped). See
CD Player on page 38,
Pandora Internet Radio on
page 30, Stitcher Internet
Radio on page 34, USB on
page 41, or Bluetooth
Audio on page 47.
K. CD Slot
© SEEK ¨
L.
.
CD, USB, Bluetooth Audio:
Press
beginning of the current or
previous track.
© to seek to the
.
CD, USB, Bluetooth Audio:
Press
© and hold to quickly
reverse through a track.
Release the button to
return to playing speed.
See CD Player on
page 38, USB on page 41,
or Bluetooth Audio on
page 47.
.
AM, FM, XM (if equipped):
© to seek to the
Press
previous strong station.
.
CD, USB, Bluetooth Audio:
¨ to seek the next
Press
track.
Page 19

Black plate (19,1)
MyLink/IntelliLink Features and Functions Guide - 2013 - CRC - 5/4/12
.
CD, USB, Bluetooth Audio:
Press
¨ and hold to fast
forward through a track.
Release the button to
return to playing speed.
See CD Player on
page 38, USB on page 41,
or Bluetooth Audio on
page 47.
.
AM, FM, XM (if equipped):
¨ to seek to the
Press
previous strong station.
M. CONFIG (Configuration Menu)
.
Press to adjust features for
Languages, Time and
Date, Radio Settings,
Phone Settings, Display
Settings, and Vehicle
Settings.
N. TONE
.
Press to access the sound
menu screen to adjust
bass, midrange, and treble.
See AM-FM Radio on
page 25.
Infotainment System 19
O. INFO (Information)
.
Press to access the Tone
Settings menu screen to
adjust Bass, Mid
(Midrange), Treble, EQ,
Fade, and Balance. Tone
settings are specific to
each source. See AM-FM
Radio on page 25.
Page 20

Black plate (20,1)
MyLink/IntelliLink Features and Functions Guide - 2013 - CRC - 5/4/12
20 Infotainment System
Chevrolet Volt Overview
A. F (Home Page)
.
Press to go to the Home
Page. See “Home Page” in
this section.
B. SOURCE
.
Press to change the audio
source to AM, FM, XM (if
equipped), Pandora,
Stitcher, CD, USB, AUX,
or Bluetooth Audio.
V (Phone Menu)
C.
.
Press to enter the phone
main screen. See
Bluetooth on page 53 or
“OnStar” in the owner
manual.
.
Press and hold to mute or
unmute the infotainment
system.
D. TUNE/MENU
.
Press to enter the menu for
the current band or media.
.
Turn to highlight a feature.
Page 21

Black plate (21,1)
MyLink/IntelliLink Features and Functions Guide - 2013 - CRC - 5/4/12
.
Press to activate the
highlighted feature.
.
Turn to manually change
the radio station.
E.
} BACK
.
Press to return to the
previous screen in a menu.
F. TONE
.
Press to access the Tone
Settings menu screen to
adjust Bass, Mid
(Midrange), Treble, EQ,
Fade, and Balance. Tone
settings are specific to
each source. See AM-FM
Radio on page 25.
G. CONFIG (Configuration Menu)
.
Press to adjust features for
Languages, Time and
Date, Radio Settings,
Phone Settings, Display
Settings, and Vehicle
Settings.
X (Eject)
H.
.
Press to eject a disc from
the CD player. See CD
Player on page 38.
r SEEK (Previous/Reverse)
I.
.
CD, USB, Bluetooth Audio:
Press to seek to the
beginning of the current or
previous track.
.
CD, USB, Bluetooth Audio:
Press and hold to quickly
reverse through a track.
Release the button to
return to playing speed.
See CD Player on
page 38, USB on page 41,
or Bluetooth Audio on
page 47.
.
AM, FM, XM (if equipped):
Press to seek to the
previous strong station.
Infotainment System 21
J. FAV (Favorites)
.
Press to display the
current favorite page
number above the preset
buttons. Keep pressing to
scroll through the favorites
pages. The stored stations
for each list displays on the
bottom of the screen. The
number of preset Favorite
Pages can be changed by
pressing the Config button
on the Home Page, then
pressing Radio Settings,
and then pressing Number
of Favorite Pages.
K. AS 1-2 (Autostore)
.
See “Autostore” in this
section for more
information.
L. INFO (Information)
.
Press to display available
source information.
Page 22

Black plate (22,1)
MyLink/IntelliLink Features and Functions Guide - 2013 - CRC - 5/4/12
22 Infotainment System
M. VOL/ O (Volume/Power)
.
Press to turn the system
on and off.
.
Turn to adjust the volume.
k (Play/Pause)
N.
.
Press to pause or resume
playback. This feature is
unavailable for AM, FM,
and XM (if equipped). See
CD Player on page 38,
Pandora Internet Radio on
page 30, Stitcher Internet
Radio on page 34, USB on
page 41, or Bluetooth
Audio on page 47.
O. TP (Time Program)
.
Press to set the time.
Press + or − to increase or
decrease the hours and
P.
? (Mute)
.
Q. SEEK
.
.
.
Press to mute the system.
Press again to unmute.
[ (Next/Forward)
CD, USB, Bluetooth Audio:
Press to seek the next
track.
CD, USB, Bluetooth Audio:
Press and hold to fast
forward through a track.
Release the button to
return to playing speed.
See CD Player on
page 38, USB on page 41,
or Bluetooth Audio on
page 47.
AM, FM, XM (if equipped):
Press to seek to the
previous strong station.
minutes displayed on the
clock. See “Clock” in the
owner manual.
Autostore
If equipped, Autostore searches and
stores six FM and six AM stations
with the strongest signal.
To use Autostore:
1. Press SOURCE or SRCE to
select FM or AM.
2. Press the AS 1/2 or AS 1-2
button for two seconds.
3. The radio searches and
automatically stores the six
strongest stations.
Press the AS 1/2 or AS 1-2 button
to alternate between the Autostore
stations and favorites.
Autostore does not delete
previously stored favorite stations.
Autostore does not function with XM
radio stations.
Page 23

Black plate (23,1)
MyLink/IntelliLink Features and Functions Guide - 2013 - CRC - 5/4/12
Infotainment System 23
Using the System
The infotainment system is
controlled by touching the screen;
by using the knobs, and other
buttons.
Voice recognition, through the
steering wheel controls, can be
used to control the infotainment
features.
Press
b / g on the steering wheel
controls to begin voice recognition.
See Voice Recognition on page 48.
Home Page
Touch Screen Buttons
The Home Page allows access to
many of the features.
Back: Press to return to the
previous page.
Home: Press to go back to the
Home Page.
Fav: Press to display a page of
stored (favorite) AM, FM, or XM (if
equipped) stations. Keep pressing
Fav to scroll through the favorite
pages.
More
r : Press to go to the
next page.
Page 1 of the Home Page Menu
can be customized. Up to eight
icons can be selected and sorted for
the first Home Page screen.
To customize the Home Page, press
Menu and use one of the following
options:
Customize: Press to select an
application to add to page 1 of the
Home Page.
Sort: Press to select an icon to
move and swap with another icon.
Restore Home Page Defaults:
Press to restore the default icons on
the home page. Select Yes or
Cancel.
See Home Page Customization on
page 52.
Home Page Features
Touch screen buttons are
highlighted when a feature is
available.
Various functions are disabled when
the vehicle is moving.
Now Playing: Press to display the
active source page. The sources
that may be available are AM, FM,
XM (if equipped), Pandora, Stitcher,
CD, USB, AUX, and Bluetooth
Audio.
See AM-FM Radio on page 25,
Satellite Radio on page 28, CD
Player on page 38, Auxiliary
Devices on page 46, Pandora
Internet Radio on page 30, and
Stitcher Internet Radio on page 34.
Page 24

Black plate (24,1)
MyLink/IntelliLink Features and Functions Guide - 2013 - CRC - 5/4/12
24 Infotainment System
Phone: Press to display the Phone
main page. See Bluetooth on
page 53 and Hands-Free Phone on
page 59.
Config: Press to display the
Configuration Settings main page.
From this display, adjust the
language, time and date, radio,
phone, display, and vehicle settings.
Tone Settings: Press to display
the Tone Settings main page. Adjust
the tone and speakers by pressing
the screen buttons to change the
levels of sound for Bass, Mid
(Midrange), Treble, EQ, Fade, and
Balance. See AM-FM Radio on
page 25.
FM: Press to display the FM main
page and play the current or last
tuned FM station. See AM-FM
Radio on page 25.
AM: Press to display the AM main
page and play the current or last
tuned AM station. See AM-FM
Radio on page 25.
XM: Press (if equipped) to display
the XM main page and play the
current or last tuned XM station.
See Satellite Radio on page 28.
Pandora: Press to display the
Pandora main page and play the
current or last tuned station. See
Pandora Internet Radio on page 30.
Stitcher: Press to display the
Stitcher main page and play the
current or last tuned station. See
Stitcher Internet Radio on page 34.
Bluetooth Audio: Press to display
the Bluetooth Audio main page and
play the current or last song played.
See Bluetooth Audio on page 47.
CD: Press to display the CD main
page and play the current or last CD
track selected. See CD Player on
page 38.
USB Media: Press to display the
USB Media main page and play the
current or last track selected. See
USB on page 41.
AUX: Press to access any
connected auxiliary device. See
Auxiliary Devices on page 46.
Page 25

Black plate (25,1)
MyLink/IntelliLink Features and Functions Guide - 2013 - CRC - 5/4/12
Infotainment System 25
Radio
AM-FM Radio
Playing the Radio
VOL/ O (Volume/Power):
.
Press to turn the radio on or off.
.
Turn to increase or decrease the
volume of the active source.
The steering wheel controls can
also be used to adjust the volume.
See Steering Wheel Controls on
page 40.
Radio Operation
The radio will work when the key is
in ON/RUN or ACC/
ACCESSORY. When the key is
turned from ON/RUN to LOCK/OFF,
the radio will continue to work for
10 minutes or until the driver door is
opened.
The radio can be turned on by
pressing the power button on
the radio and will stay on for
10 minutes. Opening the driver door
will not turn the radio off when
pressing the power button.
Some radios may stay on longer
and reset the time for 10 minutes if
there are any additional presses of
any radio button.
The radio can be turned off at any
time by pressing the power button.
Audio Source
Press SOURCE or SRCE to display
and scroll through the available
sources AM, FM, XM (if equipped),
Pandora, Stitcher, CD, USB, AUX,
and Bluetooth Audio.
Infotainment System Settings
Tone Settings
To access the tone settings, press
TONE or the Tone Settings icon on
the Home Page. Tone settings are
specific to each source.
To adjust the settings:
.
Bass: Press + or − to change
the level.
.
Mid (Midrange): Press + or − to
change the level.
.
Treble: Press + or − to change
the level.
.
EQ: Press or turn the
Multifunction knob or MENU
knob to cycle through the preset
EQ options.
.
Fade: Press the F or R button
for more sound from the front or
rear speakers. The middle
position balances the sound
between the front and rear
speakers.
Page 26

Black plate (26,1)
MyLink/IntelliLink Features and Functions Guide - 2013 - CRC - 5/4/12
26 Infotainment System
.
Balance: Press the L or R button
for more sound from the left or
right speakers. The middle
position balances the sound
between the left and right
speakers.
Finding a Station
Press SOURCE or SRCE to select
AM, FM, XM (if equipped), Pandora,
Stitcher, CD, USB, AUX, and
Bluetooth Audio.
Turn the TUNE, Multifunction, or
MENU knob to find a radio station.
To select a preset station, press
FAV to scroll through the favorite
pages and then press a preset
button on the radio or the screen
button.
Seeking a Station
Press
r SEEK or SEEK [ to
search for a station.
AM
1. Press the AM screen button on
the Home Page or select AM by
pressing SOURCE or SRCE,
or say “Tune AM” or “AM”
through voice recognition.
2. Press the Menu screen button to
display the AM stations or
categories.
3. Press to select an option. To
update the station list, press
Refresh.
FM
1. Press the FM screen button on
the Home Page or select FM by
pressing SOURCE or SRCE,
or say “Tune FM” or “FM”
through voice recognition.
2. Press the Menu screen button to
display the FM stations or
categories.
3. Press to select an option. To
update the station list, press
Refresh.
Page 27

Black plate (27,1)
MyLink/IntelliLink Features and Functions Guide - 2013 - CRC - 5/4/12
Infotainment System 27
SiriusXM (If Equipped)
1. Press the XM screen button on
the Home Page or select XM by
pressing SOURCE or SRCE,
or say “Tune XM” or “XM”
through voice recognition.
2. Press the Menu screen button to
display the XM categories.
3. Press a category and then turn
the Multifunction or MENU knob
to scroll the station list. Press to
select an option.
Storing Radio Station Presets
Up to 36 preset stations can be
stored. AM, FM, and XM (if
equipped) can be mixed.
1. From the AM, FM, or XM main
page, press and hold any 1−6
buttons or one of the preset
screen buttons at the bottom of
the screen. After a few seconds,
a beep is heard and the new
preset information displays on
that screen button.
2. Repeat for each preset.
Mixed-Band Presets
Each favorite page can store
six preset stations. The presets
within a page can be from different
radio bands.
To scroll through the pages, press
FAV or the Fav screen button on the
top bar. The current page number
displays above the preset buttons.
The stored stations for each favorite
page display on the preset buttons.
To change the number of favorite
pages displayed:
1. Press Config on the
Home Page.
2. Press Radio Settings.
3. Press Number of Favorite
Pages.
Recalling a Preset Station
To recall a preset station from a
favorites page, do one the following:
.
Press FAV to display the pop-up.
Select the preset from the
pop-up.
.
Press the Fav screen button at
the top bar to display the preset
pop-up. Press one of the preset
screen buttons to go to the
selected preset station.
.
In the AM, FM, or XM (if
equipped) main page, press one
of the preset screen buttons to
go to the selected preset station.
Page 28

Black plate (28,1)
MyLink/IntelliLink Features and Functions Guide - 2013 - CRC - 5/4/12
28 Infotainment System
Radio Data System (RDS)
RDS features are available for use
only on FM stations that broadcast
RDS information. With RDS, the
radio can:
.
Seek to stations broadcasting
the selected type of
programming.
.
Receive announcements
concerning local and national
emergencies.
.
Display messages from radio
stations.
This system relies on receiving
specific information from these
stations and only works when the
information is available. It is
possible that a radio station could
broadcast incorrect information that
causes the radio features to work
improperly. If this happens, contact
the radio station.
When information is broadcast from
the current FM station, the station
name or call letters display on the
audio screen. RDS can provide a
program type (PTY) for current
programming and the name of the
program being broadcasted.
Satellite Radio
XM™ Satellite Radio Service
Vehicles with a valid XM satellite
radio subscription can receive XM
programming.
XM satellite radio has a wide
variety of programming and
commercial-free music, coast to
coast, and in digital-quality sound.
For more information, see
www.siriusxm.com or call
1-800-929-2100 in the U.S. In
Canada, see www.xmradio.ca or
call 1-877-438-9677.
When XM is active, the station
name, number, category name,
song title, and artist display on the
screen. XM may update the
background picture at any time.
XM Categories
XM stations are organized in
categories.
Page 29

Black plate (29,1)
MyLink/IntelliLink Features and Functions Guide - 2013 - CRC - 5/4/12
Infotainment System 29
Adding or Removing XM
Categories
To customize which XM categories
are used and displayed in the
system:
1. Press CONFIG or the Config
screen button on the
Home Page.
2. Select Radio Settings from the
Settings Menu list.
3. Select XM Categories.
4. Select or deselect any category
to be used in XM mode.
A checkmark will indicate that
the category is selected.
Press “Show All XM Categories” to
restore all XM categories.
XM Channel Art
XM provides updated category
background art and the radio will
automatically update the screen. XM
may send updated category art to
the vehicle. When this happens, the
background art may appear to be
incorrect but the radio will update
once all of the graphics have been
downloaded from XM.
To turn XM channel art on or off:
1. Press CONFIG or the Config
screen button on the
Home Page.
2. Select Radio Settings from the
Settings Menu list.
3. Press XM Channel Art to turn on
or off.
XM Messages
XL (Explicit Language
Channels): These stations, or any
others, can be blocked by request,
by calling 1-800-929-2100 in the
U.S., and 1-877-438-9677 in
Canada.
XM Updating: The encryption code
in the receiver is being updated. No
action is required.
Loading XM: The audio system is
acquiring and processing audio and
text data. No action is needed.
Channel Off Air: This station is not
currently in service.
Channel Unauth: This station is
blocked or cannot be received.
Channel Unavailable: This
previously assigned station is no
longer assigned.
No Artist Info: No artist
information is available at this time
on this station.
Page 30

Black plate (30,1)
MyLink/IntelliLink Features and Functions Guide - 2013 - CRC - 5/4/12
30 Infotainment System
No Title Info: No song title
information is available at this time
on this station.
No CAT Info: No category
information is available at this time
on this station.
No Information: No text or
informational messages are
available at this time on this station.
No XM Signal: The vehicle may be
in a location where the XM signal is
being blocked. When the vehicle is
moved into an open area, the signal
should return.
CAT Not Found: There are no
stations available for the selected
category.
XM Radio ID: If tuned to station 0,
this message alternates with the XM
radio eight-digit radio ID label. This
label is needed to activate the
service.
Unknown: If this message is
received when tuned to station 0,
there could be a receiver fault.
Consult with your dealer.
Check Antenna: If this message
does not clear within a short period
of time, the receiver could have a
fault. Consult with your dealer.
XM Not Available: If this message
does not clear within a short period
of time, the receiver could have a
fault. Consult with your dealer.
Pandora Internet Radio
Pandora® is a free Internet radio
service that streams personalized
radio stations based on artists,
songs, genres, and comedians.
Create stations using the
Pandora website or smartphone
application, then use
, (thumbs down) to personalize
or
stations. To set up an account,
or for more information, go to
www.pandora.com. Pandora may
not be available in Canada or
Mexico.
A phone or tablet with Internet
connection and the Pandora
application installed is required.
- (thumbs up)
Personal cell phone data plans are
used. Make sure the latest version
is installed on the device and the
volume is turned up.
To install Pandora:
.
On an Android™ phone or
Android Tablet, go to the Android
Market, search for Pandora.
Install to the phone, not to the
SD card.
.
On a BlackBerry® phone, go to
the BlackBerry App World™ and
search for Pandora.
.
On an iPhone®, iPad®, or iPod
touch®, go to the iTunes® Store
and search for Pandora.
Launching Pandora
Connect the iPhone, iPad, or iPod
touch to the USB port, or connect
an Android or BlackBerry through
Bluetooth. See Auxiliary Devices on
page 46 or Bluetooth on page 53.
For first time use, set up stations
before connecting to the vehicle.
Page 31

Black plate (31,1)
MyLink/IntelliLink Features and Functions Guide - 2013 - CRC - 5/4/12
Infotainment System 31
The Pandora icon will be available
on the Home Page and the source
pop-up displays if the latest
application is installed on the
device.
Using the iPhone, iPod touch,
or iPad
1. Plug the device into the USB
port. The phone screen must be
unlocked.
2. To launch, do one of the
following:
.
Launch the application on
the device.
.
Press Pandora on the
Home Page.
.
Press b / g and say
“Pandora” or “Tune
Pandora.”
To relaunch Pandora, press
SOURCE or SRCE, or SRC on the
steering wheel controls.
If nothing happens when the
available Pandora screen button is
pressed, download the latest
Pandora application and retry.
Pandora will always be highlighted
on the Home Page when an iPhone,
iPad, or iPod touch is connected
using the USB port. To use, log into
your account.
If the “Please See Device” message
is shown, the login screen may
display on the device.
Using an Android Phone
1. Pair the Android phone using
Bluetooth.
2. Use one of the following to
launch:
.
Launch the application on
the device.
.
Press Pandora on the
Home Page.
.
Press b / g and say
“Pandora” or “Tune
Pandora.”
After Pandora has been launched,
press SOURCE or SRCE, or SRC
on the steering wheel controls to
access Pandora features.
If nothing happens when the
available Pandora screen button is
pressed, download the latest
Pandora application and retry.
If the “Please See Device” message
is shown, the login screen may
display on the device.
Using a BlackBerry Phone
The phone must be unlocked. To
launch Pandora service:
1. Pair the BlackBerry phone using
Bluetooth.
2. Use one of the following to
launch:
.
Launch the application on
the device.
.
Press Pandora on the
Home Page.
Page 32

Black plate (32,1)
MyLink/IntelliLink Features and Functions Guide - 2013 - CRC - 5/4/12
32 Infotainment System
.
Press b / g and say
“Pandora” or “Tune
Pandora.”
After Pandora has been launched,
press SOURCE or SRCE, or SRC
on the steering wheel controls to
access Pandora features.
If nothing happens when the
available Pandora screen button is
pressed, download the latest
Pandora application and retry.
If the “Please See Device” message
is shown, the login screen may
display on the device.
Pandora Menus
Press Menu on the Pandora
main page.
Pandora has a menu system with
the following:
Quickmix: Press to play the
stations in random order.
User-Created Stations: Press to
play a user-created station.
Pandora Features
Pandora has features to rate tracks,
skip tracks, or change stations.
} (Bookmarks): Press while
playing a track to bookmark either
the track or the artist. Bookmarks
are viewable on www.pandora.com.
, (Thumbs Down): When
pressed, Pandora stores the
information, changes to the next
track, and does not play the track on
this station again. This helps
Pandora choose which tracks
should not play on this station. This
feature is only available on
user-created stations.
- (Thumbs Up): When pressed,
Pandora stores this information
and
- is highlighted for the
Page 33

Black plate (33,1)
MyLink/IntelliLink Features and Functions Guide - 2013 - CRC - 5/4/12
Infotainment System 33
remainder of the track. This helps
Pandora choose which tracks
should play on this station.
d (Next Track): When pressed,
Pandora changes to the next track.
k (Play/Pause): Press on the
radio to pause playback. Press
again to resume.
Pandora Skip Limit
Pandora limits the number of skips
allowed on their service. When the
skip limit is reached,
skip the currently playing track,
, feedback will be recorded.
but
Pandora Advertisement
Pandora may display
advertisements. Artist name and
track title will not be displayed and
the skip track button is not
available.
, will not
Switching Between Pandora and
Stitcher
To switch between Pandora and
Stitcher, press the application icon
on the iPhone, iPod touch, or iPad.
This is not required for Android
devices. See Stitcher Internet Radio
on page 34.
Pandora Troubleshooting
Unable to Connect Device to
Vehicle
If the device is unable to connect to
the USB or Bluetooth:
1. Turn the vehicle off.
2. Remove the key from the
ignition.
3. Open and close the driver door,
wait about 30 seconds, and try
to connect the device again.
Unable to Start Pandora
If the device is unable to launch
Pandora:
.
Check that the latest version of
Pandora is installed.
.
Check that there is an active
account logged into Pandora.
.
Have at least one station
created.
.
For Android and BlackBerry
devices, check that the device is
paired with the vehicle, and the
Bluetooth icon on the display is
highlighted.
.
For iPhone, iPod touch, or iPad
devices, check that the USB
cable is connected to the USB
port and the screen is unlocked.
.
Close Pandora on the device
and launch again. Devices that
allow multitasking may require
an extra step to quit the Pandora
application. See the cell phone
manufacturer's user guide.
Page 34

Black plate (34,1)
MyLink/IntelliLink Features and Functions Guide - 2013 - CRC - 5/4/12
34 Infotainment System
Thumbs Up or Thumbs Down
Error
If there is an error trying to rate a
track with the
message “Thumbs Down Error” or
“Thumbs Up Error” will display.
Press OK to retry.
Loss of Audio
Loss of Pandora audio can happen
in different ways:
.
Weak or lost data connection.
.
Device needs to be charged.
.
Application needs to be
relaunched.
.
Connection between phone and
radio lost.
.
If any iPhone, iPod touch,
or iPad is connected to
Bluetooth and the dock
connector, go to the Airplay icon
on the device and select dock
connector or disconnect and
reconnect the dock connector on
the device.
, or - buttons, the
.
The volume is too low. Turn up
the volume on the device.
If the connection is lost between the
application and device, a message
“Please unlock your phone or restart
the phone app and try again” will
display. Press OK to retry.
Common Pandora Messages
Please See Device: When user is
not logged in or when authentication
failed, see the device. Press OK to
continue.
Paused or Audio Paused:
Playback is paused on radio or on
device. Press
k or play on the
device.
No Stations Found: Logged in but
no stations created. Press OK to
continue.
Please Unlock Your Phone or
Restart Phone App and Try
Again: Communication failure
between the radio and the phone
application or device is locked.
See www.pandora.com/help for
more information. If the service will
not work, see your dealer for
assistance.
Stitcher Internet Radio
Stitcher SmartRadio™ is an Internet
radio service that streams news,
sports, and entertainment shows
through the audio system. Create
personalized, on-demand stations or
discover new shows through
Stitcher's preset stations. To set up
an account, download the
application from the Android Market
or iTunes Store, or go to
www.stitcher.com.
A phone or tablet with Internet
connection is required for this
application. Personal cell phone
data plans are used. Make sure the
latest version is installed on the
device and the volume on the
device is turned up.
BlackBerry phones are not
supported for this application.
Page 35

Black plate (35,1)
MyLink/IntelliLink Features and Functions Guide - 2013 - CRC - 5/4/12
Infotainment System 35
To install Stitcher:
.
On an Android phone or Tablet
with Internet connection, go to
the Android Market, search for
Stitcher, and install to the phone,
not to the SD card.
.
On an iPhone, iPad, or iPod
Touch, go to the iTunes store
and search for Stitcher.
Launching Stitcher
Connect the iPhone, iPad, or iPod
Touch to the USB port, or connect
Android through Bluetooth. See
Auxiliary Devices on page 46 or
Bluetooth on page 53. For first time
use, set up the stations before
connecting to the vehicle. The
Stitcher icon will be available on the
Home Page and source pop-up
displays if the latest application is
installed on the device.
Using the iPhone, iPod Touch,
or iPad
1. Plug the device into the USB
port. The phone screen must be
2. Use one of the following to
launch:
.
Press the application on the
device.
.
Press Stitcher on the
Home Page.
.
Press b / g and say
“Stitcher” or “Tune Stitcher.”
3. If Stitcher does not begin
playing, select a category and
then a station.
After Stitcher has been launched,
press SOURCE or SRCE, or SRC
on the steering wheel controls to
access Stitcher features.
If nothing happens when the
available Stitcher screen button is
pressed, download the latest
Stitcher application and retry.
Stitcher will always be highlighted
on the Home Page when an iPhone,
iPad, or iPod Touch is connected
using the USB port. To use, log into
your account.
unlocked.
If the “Please See Device” message
is shown, the login screen may
display on the device.
Using an Android Phone
1. Pair the Android phone using
Bluetooth.
2. Use one of the following to
launch:
.
Press the application on the
device.
.
Press Stitcher on the
Home Page.
.
Press b / g and say
“Stitcher” or “Tune Stitcher.”
3. If Stitcher does not begin
playing, select a category and
then a station.
After Stitcher has been launched,
press SOURCE or SRCE, or SRC
on the steering wheel controls to
access Stitcher features.
Page 36

Black plate (36,1)
MyLink/IntelliLink Features and Functions Guide - 2013 - CRC - 5/4/12
36 Infotainment System
If nothing happens when the
available Stitcher screen button is
pressed, download the latest
Stitcher application and retry.
If the “Please See Device” message
is shown, the login screen may
display on the device.
Stitcher Menus
Press Menu on the Stitcher
main page.
Stitcher has a menu system with the
following:
My Favorites: Displays a list of
favorite stations and shows.
Select and store programs as
favorites on the device and then
access them through My Favorites.
Stitcher Station Categories:
Displays categories by topic.
When a category then sub-category
is selected, the radio will start
playing the first program in that
sub-category.
Turn the Multifunction or MENU
knob to bring up the first 24 stations
of that sub-category.
Current Station Playlist: While
listening to a show, turn the
Multifunction or MENU knob to
display the menu list of shows
available for the current station.
Stitcher Features
Stitcher service has features to rate
or skip shows, or change stations.
q (Favorites): When pressed, the
current show is added to the
favorites station.
, (Thumbs Down): When
pressed, Stitcher changes to the
next show. This helps Stitcher
provide a personalized listening
experience.
- (Thumbs Up): When pressed,
Stitcher stores this information and
- is highlighted for the remainder of
the show. This helps Stitcher
provide a personalized listening
experience.
d (Next Show): When pressed,
Stitcher changes to the next show.
Page 37

Black plate (37,1)
MyLink/IntelliLink Features and Functions Guide - 2013 - CRC - 5/4/12
Infotainment System 37
k (Play/Pause): Press on the
radio to pause playback. Press
again to resume.
Stitcher Advertisement
Stitcher may display
advertisements. Artist name and title
may not be displayed and the skip
track button is not available.
Switching Between Pandora and
Stitcher
To switch between Pandora and
Stitcher, press the application icon
on the iPhone, iPod Touch, or iPad.
This is not required for Android
devices. See Pandora Internet
Radio on page 30.
Stitcher Troubleshooting
Unable to Connect Device to
Vehicle
If the device is unable to connect to
the USB or Bluetooth:
1. Turn the vehicle off.
3. Open and close the driver door,
wait about 30 seconds, and try
to connect the device again.
Unable to Start Stitcher
If the device is unable to launch
Stitcher:
.
Check that the latest version of
Stitcher is installed.
.
Check that there is an active
account logged into Stitcher.
.
Have at least one station
created.
.
For Android devices, check that
the device is paired with the
vehicle, and the Bluetooth icon
on the display is highlighted.
.
For iPhone, iPod Touch, or iPad
devices, check that the USB
cable is connected to the USB
port and the screen is unlocked.
.
Close Stitcher on the device and
launch again. Devices that allow
multitasking may require an
2. Remove the key from the
ignition.
extra step to quit the Stitcher
application. See the cell phone
manufacturer's user guide.
Loss of Audio
Loss of Stitcher audio can happen
due to:
.
Weak or lost data connection.
.
Device needs to be charged.
.
Application needs to be
relaunched.
.
Connection between phone and
radio is lost.
.
If any iPhone, iPod Touch,
or iPad is connected to
Bluetooth and the dock
connector, go to the Airplay icon
on the device and select dock
connector or disconnect and
reconnect the dock connector on
the device.
.
The volume is too low. Turn up
the volume on the device.
Page 38

Black plate (38,1)
MyLink/IntelliLink Features and Functions Guide - 2013 - CRC - 5/4/12
38 Infotainment System
If the connection is lost between the
application and device, a message
“Please unlock your phone or restart
the phone app and try again” will
display. Press OK to retry.
Common Stitcher Messages
Please Try Again Later: A general
error has occurred. A data
connection may be unavailable due
to a weak or lost signal or the
Stitcher service being temporarily
down. Press OK to continue.
Paused or Audio Paused:
Playback is paused on radio or on
device. Press
k or play on the
device.
Please See Device: When user is
not logged in or when authentication
failed, see device. Press OK to
continue. Disconnect the phone
from the radio and follow the
Stitcher account login process on
the phone.
No Stations Found: Logged in but
no stations created. Press OK to
continue.
Please Choose a New Station:
The end of the station has been
reached and there is no more
content to play. Select a new station
through the Stitcher menu.
Please Unlock Your Phone or
Restart Phone App and Try
Again: Communication failure
between the radio and the phone
application or device is locked.
See www.stitcher.com/help for
more information. If the service
will not work, send an e-mail to
feedback@stitcher.com or see your
dealer for assistance.
Audio Players
CD Player
The CD player is capable of playing:
.
Most audio CDs
.
CD-R
.
CD-RW
.
MP3, unprotected WMA, and
AAC formats
When playing any compatible
recordable disc, the sound quality
may be reduced due to the disc, the
method of recording, the quality of
the music recorded, or how the disc
has been handled.
There may be increased skipping,
difficulty reading recorded tracks,
finding tracks, and/or loading and
ejecting. If these problems occur,
check the disc for damage or try a
known good disc.
Page 39

Black plate (39,1)
MyLink/IntelliLink Features and Functions Guide - 2013 - CRC - 5/4/12
Infotainment System 39
To avoid damage to the CD player:
.
Do not use scratched or
damaged discs.
.
Do not apply labels to discs. The
labels could get caught in the
player.
.
Insert only one disc at a time.
.
Keep the loading slot free of
foreign materials, liquids, and
debris.
.
Use a marking pen to label the
top of the disc.
Loading and Ejecting Discs
To load a disc:
1. Turn the vehicle on.
2. Insert a disc into the slot, right
side up. The player pulls it in the
rest of the way. If the disc is
damaged or improperly loaded,
there is an error and the disc
ejects.
The disc automatically plays once
loaded.
X to eject a disc from the
Press
CD player. If the disc is not removed
within a short period of time, it is
automatically pulled back into the
player.
Playing an Audio CD
1. Press the CD screen button on
the Home Page or select CD
from the source pop-up to
display the CD main page.
2. Press the Menu screen button to
display the menu options.
3. Press to select the option.
On the CD main page, the track
number displays and the Song,
Artist, and Album information
displays when available.
Use the following radio controls to
play the disc:
k (Play/Pause): Use to pause or
resume play.
r SEEK (Previous/Reverse):
.
Press to seek to the beginning of
the current or previous track.
If the track has been playing for
less than five seconds, it seeks
to the previous track. If longer
than five seconds, the current
track starts from the beginning.
.
Press and hold to fast reverse
through a track. Release the
button to return to playing
speed. Elapsed time displays.
Page 40

Black plate (40,1)
MyLink/IntelliLink Features and Functions Guide - 2013 - CRC - 5/4/12
40 Infotainment System
SEEK [ (Next/Forward):
.
Press to seek to the next track.
.
Press and hold to fast forward
through a track. Release the
button to return to playing
speed. Elapsed time displays.
Multifunction Knob or MENU or
SELECT: Turn to the right or left to
select the next or previous track.
Press this knob to select from the
list. If a track is selected from the
menu, the system plays the track
and returns to the CD screen.
Error Messages
If Disc Error displays and/or the disc
comes out, it could be because:
.
The disc has an invalid or
unknown format.
.
The disc is very hot. Try the disc
again when the temperature
returns to normal.
.
The road is very rough. Try the
disc again when the road is
smoother.
.
The disc is dirty, scratched, wet,
or upside down.
.
The air is very humid. Try the
disc again later.
.
There was a problem while
burning the disc.
.
The label is caught in the CD
player.
If the CD is not playing correctly, try
a known good CD.
If any error continues, contact your
dealer.
Steering Wheel Controls
Depending on the vehicle options,
some audio functions can be
controlled through the steering
wheel controls.
b / g (Push to Talk): Press to
interact with Bluetooth or voice
recognition. See Bluetooth on
page 53 or Voice Recognition on
page 48.
$ / i (Mute/End Call): Press to
decline an incoming call, or to end a
current call. Press to silence the
vehicle speakers while using the
infotainment system. Press again to
turn the sound on. Press to cancel
voice recognition.
_ SRC ^ (Thumbwheel Control):
Press to select an audio source.
Use the thumbwheel to select the
next or previous favorite radio
station, CD, MP3 track, USB, and
Bluetooth Audio.
_ SRC to skip to the next song
Use
or show using Pandora or Stitcher.
See Pandora Internet Radio on
page 30 and Stitcher Internet Radio
on page 34.
+
x − (Volume): Press + to
increase the volume. Press − to
decrease.
See “Steering Wheel Controls” in
the owner manual.
Page 41

Black plate (41,1)
MyLink/IntelliLink Features and Functions Guide - 2013 - CRC - 5/4/12
Infotainment System 41
USB
Playing from a USB
A USB mass storage or Certified
Windows Vista®/Media Transfer
Protocol (MTP) device can be
connected to the USB port.
The USB port is in the center
console under the armrest.
The USB icon displays when the
USB device is connected.
USB Media Formats
The USB port will support the
following media formats:
.
MP3
.
Unprotected WMA
.
Unprotected AAC
Gracenote®
Gracenote technology embedded
into the radio helps manage and
navigate the USB device music
collection. When a USB device is
connected to the radio, Gracenote
identifies the music collection and
delivers the correct album, artist
name, genres, and cover art on the
screen. If information is missing,
Gracenote will fill it in.
Searching Music Library Using
Voice Recognition
Names: Gracenote improves music
search and navigation by identifying
bands, artists, and albums names
that may be hard to pronounce,
irregular spellings, and nicknames.
For example, Gracenote helps the
system understand artist names like
“INXS” or “Mötley Crüe.” It also
allows the use of names like: “The
Boss,” “G.N.R,” “The Fab Four,” and
thousands of other famous artist
nicknames as voice commands to
access music. See Voice
Recognition on page 48.
Normalization: If equipped,
normalization helps to improve the
voice recognition accuracy for titles
that sound similar. It also helps
group long lists of genres into
10 common genres. For example,
there may be multiple rock genres in
the media library; normalization will
group all those into one Rock
Genre. Normalization default is off.
To turn Normalization on:
1. Press CONFIG or Config on the
Home Page.
2. Press Radio Settings, then press
Gracenote Options.
3. Press Normalization to turn on
or off.
Page 42

Black plate (42,1)
MyLink/IntelliLink Features and Functions Guide - 2013 - CRC - 5/4/12
42 Infotainment System
Cover Art: The Gracenote
embedded database contains cover
art or album art information for the
music on the USB device. If the
music is recognized by Gracenote
and does not have cover art,
Gracenote will use the cover art
found in the embedded database
and display it on the radio. User
predefined cover art will always be
used first. If no cover art is found,
Gracenote cover art will be used.
Gracenote Indexing
While Gracenote is indexing,
infotainment features are available
including selecting music from the
menu. Voice recognition music will
not be available until the radio has
completed indexing the device.
Devices with more music may take
longer to index. The device will
index when plugged into the radio
for the first time. When "New Media
Device Ready" plays, the device is
ready for voice recognition music
searching for changes to the device
and preparing the music list. If
there are no changes, the voice
recognition music search will be
available. The radio will index and
store two devices with up to 10,000
songs on each device.
USB MP3 Player and USB Drives
.
The USB MP3 players and USB
drives connected must comply
with the USB Mass Storage
Class specification (USB MSC).
.
Hard disk drives are not
supported.
.
The radio will not be able to play
back write-protected music.
.
File systems supported: FAT32,
NTFS, Linux, and HFS+
.
The following restrictions apply
for the data stored on a USB
MP3 player or USB device:
‐ Maximum folder structure
depth: 8 levels.
search. On the next connection or
ignition cycle, "Indexing" will show
briefly on the screen. The radio is
‐ Maximum number of MP3/
WMA files that can be
displayed: 10,000.
‐ Playlist entries must be in the
form of relative paths.
‐ The system attribute for
folders/files that contain audio
data must not be set.
To play a USB device, do one of the
following:
.
Connect the USB and it begins
to play.
.
Press the Now Playing screen
button on the Home Page.
.
Press SOURCE or SRCE to
scroll until the USB source
screen is available.
.
Press b / g on the steering
wheel controls to play CD, Artist,
Album, Song Title, or Song
Genre. See Voice Recognition
on page 48.
Page 43

Black plate (43,1)
MyLink/IntelliLink Features and Functions Guide - 2013 - CRC - 5/4/12
Infotainment System 43
The following playlist formats are
supported:
.
M3U (Standard and Extended)
.
iTunes
.
PLS (Standard)
.
WAX
.
ASX
.
RMP
While the USB source is active, use
the following to operate USB
function:
The radio supports plugging a cell
phone in as a USB drive as long as
the cell phone supports USB mass
storage class or has USB disc drive
support enabled.
Multifunction Knob or MENU
Knob: Turn to scroll through the
list. Turn quickly to fast scroll
alphabetically through large lists.
k (Play/Pause): Press to start,
pause, or resume play of the current
media source.
r SEEK (Previous/Reverse):
.
Press to seek to the beginning of
the current or previous track.
If the track has been playing for
less than five seconds, the
previous track plays. If playing
longer than five seconds, the
current track restarts.
.
Press and hold to reverse
quickly through playback.
Release to return to playing
speed. Elapsed time displays.
[ (Next/Forward):
SEEK
.
Press to seek to the next track.
.
Press and hold to advance
quickly through playback.
Release to return to playing
speed. Elapsed time displays.
USB Menu
The following are available through
the USB Menu:
Shuffle: Press to play the tracks
randomly. Press again to stop
shuffle.
Folders: Press to open a folder list
to access the files within the folder
structure.
Playlists:
1. Press to view the playlists on
the USB.
2. Select a playlist to view the list
of all songs in that playlist.
3. Select a song from the list to
begin playback.
Artists:
1. Press to view the list of artists
on the USB.
2. Select an artist name to view a
list of all albums by the artist.
3. To select a song, press All
Songs or press an album and
then select a song from the list.
Albums:
1. Press to view the albums on
the USB.
2. Select the album to view a list of
all songs on the album.
Page 44

Black plate (44,1)
MyLink/IntelliLink Features and Functions Guide - 2013 - CRC - 5/4/12
44 Infotainment System
3. Select a song from the list to
begin playback.
Songs:
1. Press to display a list of all
songs on the USB.
2. Songs are displayed as they are
stored on the disc. To begin
playback, select a song from
the list.
Genres:
1. Press to view the genres on
the USB.
2. Select a genre to view a list of
all songs of that genre.
3. Select a song from the list to
begin playback.
File System and Naming
The songs, artists, albums, and
genres are taken from the file’s
song information and are only
displayed if present. The radio
displays the file name as the track
name if the song information is not
available.
Playing from an iPod®
This feature supports the following
iPod models:
.
iPod Classic (6th generation)
.
iPod Nano (3G, 4G, 5G, and 6G)
.
iPod Touch (1G, 2G, 3G,
and 4G)
.
iPhone (2G, 3G, 3GS, and 4)
.
iPad (1G, 2G)
There may be problems with the
operation and function in the
following situations:
.
When connecting an iPod on
which a more recent version of
the firmware is installed than is
supported by the infotainment
system.
.
When connecting an iPod on
which firmware from other
providers is installed.
To connect an iPod:
1. Connect one end of the standard
iPod USB cable to the iPod's
dock connector.
2. Connect the other end to the
USB port in the center console.
iPod music information displays on
the radio’s display and begins
playing through the vehicle’s audio
system.
The iPod battery recharges
automatically while the vehicle is on.
The iPod shuts off and stops
charging when the vehicle is
shut off.
If the iPod is an unsupported model,
it can still be listened to in the
vehicle by connecting to the
auxiliary input jack using a standard
3.5 mm (1/8 in) stereo cable.
Page 45

Black plate (45,1)
MyLink/IntelliLink Features and Functions Guide - 2013 - CRC - 5/4/12
Infotainment System 45
iPod Menu
Shuffle: Press to play the tracks
randomly. Press again to stop
shuffle.
Use the iPod Menu to select:
Playlists:
1. Press to view the playlists on
the iPod.
2. Select a playlist name to view a
list of all songs in the playlist.
3. Select the song from the list to
begin playback.
Artists:
1. Press to view the artists on
the iPod.
2. Select an artist name to view a
list of all albums with songs by
the artist.
3. Select an album.
4. Select the song from the list to
begin playback.
Albums:
1. Press to view the albums on
the iPod.
2. Select an album name to view a
list of all songs on the album or
select All Songs to view all
songs on the iPod.
3. Select the song from the list to
begin playback.
Genres:
1. Press to view the genres on
the iPod.
2. Select a genre name to view a
list of artists of that genre.
3. Select an artist to view albums
or All Albums to view all albums
of that genre.
4. Select Artist to view albums.
5. Select Album to view songs.
6. Select the song from the list to
begin playback.
Songs:
1. Press to view a list of all songs
on the iPod.
2. Select the song from the list to
begin playback.
Podcasts:
1. Press to view the podcasts on
the iPod.
2. Select a podcast name to begin
playback.
Composers:
1. Press to view the composers on
the iPod.
2. Select the composer to view a
list of songs by that composer.
Page 46

Black plate (46,1)
MyLink/IntelliLink Features and Functions Guide - 2013 - CRC - 5/4/12
46 Infotainment System
3. Select a song from the list to
begin playback.
Audio Books:
1. Press to view the audio books
on the iPod.
2. Select the audio book from the
list to begin playback.
Playing from an iPhone
or iPad®
This feature supports iPhone 3G,
iPhone 3GS, iPhone 4, and iPad.
Follow the same instructions as
stated earlier for using an iPod. To
use voice recognition to play music,
say “Play USB,” “Play Artist,” “Play
Album,” “Play Song,” or “Play
Genre.” See Voice Recognition on
page 48.
iPad and iPhone Troubleshooting
When an iPhone and iPad are
connected through USB and
Bluetooth, the audio may not be
heard when an iPhone or iPad
source on the radio is selected.
If a phone call is received while
listening to an iPad and there is no
audio for the iPad after the call, then
go to the Airplay icon on the device
and select dock connector or
disconnect and reconnect the dock
connector on the device.
Bluetooth Audio and Voice
Recognition
See Bluetooth Audio on page 47
and Voice Recognition on page 48
for information using voice
recognition with Bluetooth audio.
Make sure all devices have the
latest software downloaded.
Auxiliary Devices
This vehicle has an auxiliary input
jack in the center console. Possible
auxiliary audio sources include:
.
Laptop computer
.
MP3 player
.
Tape player
This jack is not an audio output. Do
not plug headphones into the
auxiliary input jack. Set up any
auxiliary device while the vehicle is
in P (Park).
Connect a 3.5 mm (1/8 in) cable
from the auxiliary device to the
auxiliary input jack. When a device
is connected, the system
automatically begins playing audio
from the device over the vehicle
speakers.
If an auxiliary device has already
been connected, but a different
source is currently active, do one of
the following:
.
Press SOURCE or SRCE to
scroll all of the available audio
source screens, until the AUX
source screen is selected.
.
Say “Play Front AUX” using
voice recognition to play the
auxiliary device . See Voice
Recognition on page 48.
Page 47

Black plate (47,1)
MyLink/IntelliLink Features and Functions Guide - 2013 - CRC - 5/4/12
Bluetooth Audio
If equipped, music may be played
from a paired Bluetooth device. See
“Pairing a Phone/Device” under
Bluetooth on page 53.
To play music through Bluetooth
device:
1. Power on the device, pair, and
connect the device.
2. Music can be launched by doing
one of the following:
.
Press the Bluetooth Audio
screen button on the
Home Page.
.
Press SOURCE or SRCE
until Bluetooth Audio is
selected.
.
Press the SRC button on
the steering wheel controls
until Bluetooth Audio is
selected. See Steering
Wheel Controls on page 40.
.
Use voice recognition. See
Voice Recognition on
page 48.
The music can be controlled by
either the infotainment controls or
the controls on the device.
Bluetooth Audio Menu
Press the Menu screen button and
the following may display:
Shuffle: Press the Multifunction
knob or MENU knob to turn shuffle
on or off. Not all devices support the
shuffle feature.
When selecting Bluetooth audio, the
audio player may not be able to
launch. All devices launch and play
back audio differently. Make sure
the correct audio source is playing
on the device for Bluetooth audio
playback on the radio. When the
vehicle is not moving, use the
device to begin playback.
Infotainment System 47
When selecting Bluetooth audio as
a source, the radio may show as
paused on the screen. Press play
on the device or push
playback.
Some phones support sending
Bluetooth music information to
display on the radio. When the radio
receives this information, it will
check to see if any album art is
available and display it.
To play a Bluetooth phone as the
audio source, it must be the active
application on the home screen.
When listening to Bluetooth audio,
the audio that will play through the
radio will be what is active or open
on the phone.
k to begin
Page 48

Black plate (48,1)
MyLink/IntelliLink Features and Functions Guide - 2013 - CRC - 5/4/12
48 Infotainment System
Voice Recognition
Voice recognition allows for
hands-free operation of the
infotainment system features.
Voice recognition can be used when
the radio is on or when Retained
Accessory Power (RAP) is active.
See “Retained Accessory Power
(RAP)” in the owner manual. The
system maintains a minimum
volume level.
Using Voice Recognition
1. Press b / g on the steering
wheel. The audio system mutes.
A voice prompt states, “Please
say a command.” Wait until the
tone is heard before speaking.
If there is no tone, make sure
that the volume is turned up.
While voice recognition is active,
the system displays a
in the top right of the screen.
g symbol
2. Clearly speak one of the
commands listed later in this
section.
Press
b / g twice on the steering
wheel to skip the voice prompt
messages.
Canceling Voice Recognition
1. Press and release $ / i on
the steering wheel control to
cancel a command, if the system
response does not match the
voice command, or say
“Goodbye” or “Cancel.”
2. The system replies, “Goodbye.”
Helpful Hints for Speaking
Commands
.
When multiple commands are
available, choose the command
that works best for you.
.
Words in parentheses are
optional. For example, for
the command “Tune FM
(frequency),” saying “Tune
FM 87.7” or “Tune FM” are both
valid commands.
.
When the command is
recognized, the system will
either perform the function or
ask to confirm the choice.
.
When the system does not
recognize the command, the
system says “pardon.”
.
If experiencing difficulty with the
system recognizing a command,
confirm that the command is
correct. Try saying the command
clearly or wait for a brief moment
after the tone.
.
Background noise such as a
climate control fan positioned on
high, open windows, and very
loud outside noises, even if the
windows are closed, can cause
voice commands to be
misunderstood.
Page 49

Black plate (49,1)
MyLink/IntelliLink Features and Functions Guide - 2013 - CRC - 5/4/12
.
The system is able to recognize
commands in different
languages, such as English,
Canadian French, and Spanish.
The system only recognizes
commands based on the
language selected.
.
To increase or decrease the
voice volume during a voice
recognition session, turn the
volume knob of the radio,
or press the volume steering
wheel control. If the volume is
adjusted during a voice
recognition session, a Volume
bar appears on the screen
showing the voice volume level
as it is being adjusted. This also
changes the volume of the
guidance prompts.
Voice Recognition Help
To enter the help playback session,
clearly speak one of the help
commands.
Help: The system plays back more
specific help commands such as
Radio Settings for the user to
choose from.
Radio: Use this command to learn
about how to select a band (AM,
FM, or XM), and how to change
radio stations by speaking
frequency numbers.
Phone: Use this command to learn
about how to dial, pair a device,
or delete a device.
My Media: Use this command to
learn how to play specific tracks,
artists, albums, devices connected
to the USB port, or to change
sources.
Settings: Use this command to
learn about how to turn Verbose on
or off, or set the language.
Infotainment System 49
Voice Recognition Commands
The following list shows the voice
commands available for the
infotainment system with a brief
description of each. The commands
are listed with the optional words in
parentheses. To use the voice
commands, see the previous
instructions.
Radio Commands
Tune AM, Tune FM, Tune XM,
Tune Pandora, Tune Stitcher:
Instructs the system to go to the
specific band and the last station.
Tune AM (frequency), Tune FM
(frequency), Tune XM (station
number), or Tune XM (station
name): Instructs the system to go
to the specific station.
Thumbs Up: Instructs the system
to give the current song or station a
thumbs up in Pandora or Stitcher.
Page 50

Black plate (50,1)
MyLink/IntelliLink Features and Functions Guide - 2013 - CRC - 5/4/12
50 Infotainment System
Thumbs Down: Instructs the
system to give the current song or
station a thumbs down in Pandora
or Stitcher.
Phone Commands
Dial or Call (phone number or
contact): Instructs the system to
start a phone call. For example, say
“Dial 1 248 123 4567.” To call a
phone book contact, say “Dial” or
“Call,” say the name and location,
and then say “Dial.” For example,
say “Call John at Home” or “Call
John at Work.” If a number is not
recognized, the first number in the
list will be called.
Pair or Connect: Instructs the
system to begin pairing a device.
Digit Dial: Instructs the system to
dial a phone number one digit at a
time. After saying the digits,
say “Dial.”
Redial or Redial Last Number:
Instructs the system to dial the last
phone number called.
Select Device or Change Phone:
Instructs the system to switch to a
different paired device. The device
must be selected from the screen or
using the Multifunction or
MENU knob.
Delete Device: Instructs the
system to delete a paired device.
My Media Commands
CD, AUX, USB, or Bluetooth
Audio: Instructs the system to
change the source.
Play CD: Instructs the system to
play a CD. For example, say
“Play CD.”
Play Artist (artist name): Instructs
the system to play songs by a
specific artist. For example, say
“Play Artist <artist name>.”
Play Album (album title): Instructs
the system to play a specific album.
Play Song (song title): Instructs
the system to play a specific song.
Play Genre (genre name):
Instructs the system to play songs
of a particular genre.
Settings Commands
Verbose (set) on (mode), Verbose
(set) off (mode): Instructs the
system to turn voice prompts on or
off. When off, this feature turns off
voice prompts.
Language (language): Instructs
the system to set the language.
List Devices: Instructs the system
to give a list of devices to use.
Other Commands
Goodbye: Instructs the system to
end a phone call or voice
recognition.
Cancel: Instructs the system to
cancel an action.
Go Back, Back, Previous:
Instructs the system to go back to a
prior menu.
Page 51

Black plate (51,1)
MyLink/IntelliLink Features and Functions Guide - 2013 - CRC - 5/4/12
Infotainment System 51
Main Menu: Instructs the system to
go to the main menu.
Yes, Yep, Yup, Ya, Sure, Right,
Correct, OK, Positive, You Got it,
Probably, You Bet: These can be
used to say “Yes.”
No, Nope, Na, No way, Wrong,
Incorrect, Negative, Not really, No
I said, No I Did Not, No I Do Not:
These can be used to say “No.”
OnStar (If Equipped)
Command
To activate OnStar voice
recognition, press
See “OnStar” in the owner manual.
OnStar: These commands can be
used after the OnStar button is
pressed.
X on the mirror.
Help Commands
.
Help
.
Hands-Free Calling
.
Turn-by-Turn Directions
.
OnStar Info
After each list of help commands,
the following are available:
.
Go Back
.
Repeat
.
Cancel
.
Help
.
Goodbye
Hands-Free Calling
.
Call
.
Store
.
Commands
‐ Call
‐ Store
‐ My Number
‐ Minutes
‐ Store Last Number
‐ Digit Dial
‐ Redial
‐ Dial
‐ Number Recall
‐ Directory
‐ Digit Store
Turn-by-Turn Directions
.
Directory
.
Plan Route
.
Commands
‐ Directory
‐ Store Destination
‐ Plan Route
‐ Delete Destination
Page 52

Black plate (52,1)
MyLink/IntelliLink Features and Functions Guide - 2013 - CRC - 5/4/12
52 Infotainment System
OnStar Info
.
Messages
.
Minutes
.
My Number
.
Commands
‐ Messages
‐ Virtual Advisor
‐ My Number
‐ Minutes
‐ Number Recall
‐ Advisor Playback
.
Virtual Advisor
Virtual Advisor
Choose this option to connect to a
live Advisor.
Personalization
Home Page Customization
The first Home Page can be
customized.
To add screen buttons:
1. Press Menu.
2. Press Customize.
3. Press a screen button to add or
remove from the first Home
Page. A circle with a dot
indicates it will be displayed. The
maximum number of buttons on
Home Page 1 is eight.
4. Press Done.
To move screen buttons:
1. Press Sort.
2. Press to select an icon to move
and swap with another icon on
the first Home Page only.
3. Press Done.
To restore Home Page 1 defaults:
1. Press Menu.
2. Press Restore Home Page
Defaults.
3. Press Yes or Cancel.
Page 53

Black plate (53,1)
MyLink/IntelliLink Features and Functions Guide - 2013 - CRC - 5/4/12
Infotainment System 53
Bluetooth Phone/ Devices
Bluetooth
Overview
For vehicles equipped with
Bluetooth capability, the system can
interact with many cell phones and
devices, allowing:
.
Placing and receiving hands-free
calls.
.
Sharing of the cell phone’s
address book or contact list with
the vehicle. The phone book will
only display when that phone is
connected.
.
Placing outgoing calls by voice
recognition.
The system can be used while in
ON/RUN, ACC/ACCESSORY,
or Retained Accessory Power
(RAP). The range of the Bluetooth
system can be up to 9.1 m (30 ft).
The radio can connect to most
Bluetooth-enabled phones.
Available features and functions
may be dependent on the device.
Bluetooth Controls
Use the buttons located on the
infotainment system and the
steering wheel to operate the
Bluetooth system.
Steering Wheel Controls
b / g (Push to Talk): Press to
answer incoming calls and start
voice recognition.
$ / i (Mute/End Call): Press to
end a call, decline an incoming call,
or cancel voice recognition.
x − (Volume): Press + or − to
+
increase or decrease the volume.
Infotainment System Controls
For information about how to
navigate the menu system using the
infotainment controls, see Overview
on page 3.
V / $ (Phone/Mute): Press to
enter the Phone main menu. Press
and hold to mute or unmute.
Voice Recognition
The voice recognition system uses
commands to control the system
and dial phone numbers.
Things to know when using voice
recognition:
The system may not recognize
voice commands if there is too
much background noise.
A tone sounds to indicate that the
system is ready for a voice
command. Wait for the tone and
then speak.
Speak clearly in a calm and natural
voice.
See Voice Recognition on page 48.
Page 54

Black plate (54,1)
MyLink/IntelliLink Features and Functions Guide - 2013 - CRC - 5/4/12
54 Infotainment System
Audio System
Sound comes through the vehicle's
front audio system speakers and
overrides the audio system. Use the
VOL/
O knob during a call to
change the volume level. The
adjusted volume level remains in
memory for later calls. The system
maintains a minimum volume level.
See Voice Recognition on page 48.
Bluetooth Audio
See Bluetooth Audio on page 47.
Pairing with Infotainment
Controls
A Bluetooth-enabled cell phone
must be paired and then connected
to the vehicle before it can be used.
See your cell phone manufacturer's
user guide for Bluetooth functions
before pairing the cell phone. If a
Bluetooth phone is not connected,
calls will be made using OnStar
Hands-Free Calling, if available.
See “OnStar” in the owner manual.
Pairing Information
.
A Bluetooth-enabled phone and
an audio playback device can be
paired to the system at the
same time.
.
Up to five devices can be paired
to the Bluetooth system.
.
The pairing process is disabled
when the vehicle is moving.
.
Pairing only needs to be
completed once, unless the
pairing information on the cell
phone changes or the cell phone
is deleted from the system.
.
Only one paired cell phone can
be connected to the Bluetooth
system at a time.
.
If multiple paired cell phones are
within range of the system, the
radio will connect to the first
phone in the list or to the phone
that was previously connected.
Pairing a Phone/Device
1. Press the CONFIG button
or
V / $.
2. Select Phone Settings.
3. Select Bluetooth.
4. Select Pair Device (Phone). The
radio displays “Please start
Bluetooth search on your phone.
Confirm or enter number:.” If the
device supports a four-digit
Personal Identification Number
(PIN), it will display. The PIN is
used in Step 6.
5. Start the pairing process on the
cell phone to be paired to the
vehicle. See the cell phone
manufacturer's user guide.
6. Locate and select the device
named after the vehicle make
and model in the list on the cell
phone. Follow the instructions
on the cell phone to enter the
PIN provided in Step 4, or to
confirm the six-digit code
Page 55

Black plate (55,1)
MyLink/IntelliLink Features and Functions Guide - 2013 - CRC - 5/4/12
Infotainment System 55
matches. The system recognizes
the new connected phone after
the pairing process is complete.
7. If the phone prompts to accept
connection or allow phone book
download, select always accept
and allow. The phone book may
not be available if not accepted.
8. Repeat to pair additional
phones.
Listing All Paired and Connected
Phones/Devices
1. Press the CONFIG button.
2. Select Phone Settings.
3. Select Bluetooth.
4. Select Device List.
Deleting a Paired Phone/Device
1. Press the CONFIG button.
2. Select Phone Settings.
3. Select Bluetooth.
4. Select Device List.
5. Select the phone to delete and
follow the screen prompts.
Connecting to a Different Phone
To connect to a different phone, the
new phone must be in the vehicle
and available to be connected to the
Bluetooth system before the
process is started.
1. Press the CONFIG button.
2. Select Phone Settings.
3. Select Bluetooth.
4. Select Device List.
5. Select the new phone to connect
to and follow the screen
prompts.
Pairing with Voice Recognition
A Bluetooth-enabled cell phone
must be paired and then connected
to the vehicle before it can be used.
See the cell phone manufacturer's
user guide for Bluetooth functions
before pairing the cell phone. If a
Bluetooth phone is not connected,
calls will be made using OnStar
Hands-Free Calling, if available.
See “OnStar” in the vehicle owner
manual for more information.
Pairing a Phone
1. Press
2. Say “Pair.” The system responds
3. Start the search for Bluetooth
4. Locate and select the device
b / g. The system
responds “Please Say a
Command,” followed by a tone.
with “Please search for
Bluetooth devices on your
phone, select your vehicle,
confirm and enter the PIN
provided on the screen.”
devices on the phone. Then
select the device and following
the instructions on the phone by
either entering the four-digit PIN
or confirming the six-digit
passcode. The PIN is used in
Step 4.
named after the vehicle make
and model in the list on the cell
phone. Follow the instructions
on the cell phone to enter the
PIN provided in Step 2 or to
confirm the six-digit code
matches. The system responds
“successfully paired.”
Page 56

Black plate (56,1)
MyLink/IntelliLink Features and Functions Guide - 2013 - CRC - 5/4/12
56 Infotainment System
5. Repeat Steps 1−4 to pair
additional phones.
Listing All Paired and Connected
Phones
The system can list all cell phones
paired to it. If a paired cell phone is
also connected to the vehicle, the
system responds with “is connected”
after that phone name.
1. Press
2. Say “Bluetooth.”
3. Say “Device List.”
Deleting a Paired Phone
If the phone name to delete is
unknown, see “Listing All Paired
and Connected Phones.”
1. Press
2. Say “Bluetooth.”
3. Say “Delete Device.”
b / g. The system
responds “Please Say a
Command,” followed by a tone.
b / g. The system
responds “Please Say a
Command,” followed by a tone.
4. The system responds with: “To
delete a device, please touch its
name on the screen.” Select the
device to delete on the display
and it will be removed.
To cancel this command,
press
$ / i on the steering
wheel control or press the BACK
button on the radio faceplate.
Connecting to a Different Phone
or Device
To connect to a different cell phone,
the system looks for the next
available cell phone. Depending on
the cell phone to be connected, this
command may need to be repeated.
1. Press
2. Say “Bluetooth.”
3. Say “Change Phone.”
b / g. The system
responds “Please Say a
Command,” followed by a tone.
.
To select a device, press
the name on the display.
.
If another cell phone is not
found, the original phone
remains connected.
Making a Call Using Phone
Book and Infotainment
Controls
For cell phones that support the
phone book feature, the Bluetooth
system can use the contacts stored
on the cell phone to make calls. See
the cell phone manufacturer‘s user
guide or contact the wireless
provider to find out if this feature is
supported.
When a cell phone supports the
phone book feature, the Phone
Book and Call Lists menus are
automatically available.
The Phone Book menu allows
access to the phone book stored in
the cell phone to make a call.
The Call Lists menu allows access
to the phone numbers from the
Incoming Calls, Outgoing Calls, and
Missed Calls menus on the cell
phone to make a call.
Page 57

Black plate (57,1)
MyLink/IntelliLink Features and Functions Guide - 2013 - CRC - 5/4/12
Infotainment System 57
The radio will display the first 1,000
contacts and the phone numbers for
each contact including Home, Work,
Mobile, and Other.
To make a call using the Phone
Book menu:
1. Press
2. Select Phone Book.
3. Select the letter group of the
4. Select the name.
5. Select the number to call.
To make a call using the Call
Lists menu:
1. Press
2. Select Call Lists.
V / $ once on the radio
or the Phone screen button.
phone book entry to scroll
through the list of names/
numbers.
V / $ once on the radio
or the Phone screen button.
3. Select the Incoming Calls,
Outgoing Calls, or Missed
Calls list.
4. Select the name or number
to call.
Making a Call Using the
Infotainment Controls
To make a call:
1. Press
2. Press Enter Number.
3. Enter the phone number.
4. Select OK to start dialing the
5. Select Call to place the call.
To make a call using voice
recognition, see “Making a Call”
under Hands-Free Phone on
page 59.
V / $ once on the radio
or the Phone screen button.
number.
Accepting or Declining a Call
When an incoming call is received,
the infotainment system mutes and
a ring tone is heard in the vehicle.
Using the Infotainment Controls
Turn the Multifunction or MENU
knob to “Answer” or “Decline” and
press the Multifunction knob or
MENU knob or press Accept or
Decline on the screen.
Using Steering Wheel Controls
Press
b / g to answer or $ / i to
decline the call.
Call Waiting Using the
Infotainment Controls
Call waiting must be supported on
the Bluetooth phone and enabled by
the wireless service carrier to work.
Page 58

Black plate (58,1)
MyLink/IntelliLink Features and Functions Guide - 2013 - CRC - 5/4/12
58 Infotainment System
Switching Between Calls (Call
Waiting Calls Only)
To switch between calls turn and
press the Multifunction knob or
MENU knob and select Switch Call
or select Switch Call on the screen.
Call Waiting Using Steering
Wheel Controls
Call waiting must be supported on
the cell phone and enabled by the
wireless service carrier.
.
Press b / g to answer an
incoming call when another call
is active. The original call is
placed on hold.
.
Press b / g again to return to
the original call.
.
To decline answering the
incoming call, no action is
required or press Decline on the
screen.
.
Press $ / i to disconnect the
current call and switch to the call
on hold.
Conference Calling Using the
Infotainment Controls
Conference calling and three-way
calling must be supported on the
Bluetooth phone and enabled by the
wireless service carrier to work. This
feature is only supported when the
vehicle is not moving.
To start a conference while in a
current call:
1. Turn and press the Multifunction
or MENU knob and select Enter
Number.
2. Enter the phone number and
then select OK.
3. After the call has been placed,
turn or press the Multifunction or
MENU knob and choose Merge
Calls.
4. To add more callers to the
conference call, repeat Steps 1
−4. The number of callers that
can be added is limited by your
wireless service carrier.
Ending a Call
Using the Infotainment Controls
Turn and press the Multifunction
knob or MENU knob and select
Hang Up or press Hang Up on the
screen.
Using Steering Wheel Controls
Press
$ / i.
Muting a Call
During a call, all sounds from inside
the vehicle can be muted so that the
person on the other end of the call
cannot hear them.
Using the Infotainment Controls
Turn and press the Multifunction
knob or MENU knob and select
Mute Call. Press again to
cancel mute.
Page 59

Black plate (59,1)
MyLink/IntelliLink Features and Functions Guide - 2013 - CRC - 5/4/12
Infotainment System 59
Dual Tone Multi-Frequency
(DTMF) Tones
The in-vehicle Bluetooth system can
send numbers during a call. This is
used when calling a menu-driven
phone system.
Using the Infotainment Controls
1. Turn and press the Multifunction
knob or MENU knob and select
Enter Number.
2. Enter the phone number or
select Enter Number on the
screen and select digits and
press OK.
Hands-Free Phone
Using Bluetooth Voice
Recognition
To use voice recognition, press the
b / g button on the steering wheel.
Use the commands below for the
various voice features. For
additional information, say “Help”
while in a voice recognition menu.
Making a Call
Calls can be made using the
following commands.
Dial or Call: These commands can
be used interchangeably to dial a
phone number.
Digit Dial: This command allows a
phone number to be dialed by
entering the digits one at a time.
Re-dial: This command dials the
last number used on the cell phone.
Using the “Dial” or “Call”
Command
To call a number:
1. Press
2. Say “Dial” or “Call.”
3. Say the entire number without
Once connected, the person called
will be heard through the audio
speakers.
b / g. The system
responds “Please Say a
Command,” followed by a tone.
pausing, followed by “Dial.”
To call using a name tag:
1. Press
2. Say “Dial” or “Call” and then say
Once connected, the person called
will be heard through the audio
speakers.
Using the “Digit Dial” Command
This allows a phone number to be
dialed by entering the digits one at
a time.
1. Press
2. Say “Digit Dial.”
3. Say each digit, one at a time, to
b / g. The system
responds “Please Say a
Command,” followed by a tone.
the name tag. For example “Call
John at Work.”
b / g. The system
responds “Please Say a
Command,” followed by a tone.
dial. After each digit is entered,
the system repeats back the
digit it heard followed by a tone.
After the last digit has been
entered, say “Dial.”
Page 60

Black plate (60,1)
MyLink/IntelliLink Features and Functions Guide - 2013 - CRC - 5/4/12
60 Infotainment System
If an unwanted number is repeated
back, say “Clear” to clear the last
number.
Once connected, the person called
will be heard through the audio
speakers.
Using the “Re-dial” Command
1. Press
2. After the tone, say “Re-dial.” The
Once connected, the person called
will be heard through the audio
speakers.
b / g. The system
responds “Please Say a
Command,” followed by a tone.
system dials the last number
called from the connected cell
phone.
Clearing the System
Unless information is deleted out of
the vehicle Bluetooth system, it will
be retained. This includes phone
pairing information. For directions
on how to delete this information,
see “Deleting a Paired Phone/
Device.”
Trademarks and License Agreements
Gracenote
Gracenote®, Gracenote logo and
logotype, and the "Powered by
Gracenote" logo are either a
registered trademark or a trademark
of Gracenote, Inc. in the United
States and/or other countries.
Bluetooth
The Bluetooth® word mark and
logos are owned by the Bluetooth®
SIG, Inc. and any use of such marks
by General Motors is under license.
Other trademarks and trade names
are those of their respective owners.
Pandora
Pandora is a registered trademark
of Pandora Media, Inc., used under
license.
Page 61

Black plate (1,1)
MyLink/IntelliLink Features and Functions Guide - 2013 - CRC - 5/4/12
INDEX i-1
A
Accepting or Declining a Call . . . . 57
Adding or Removing XM
Categories . . . . . . . . . . . . . . . . . . . . . 29
AM-FM Radio . . . . . . . . . . . . . . . . . . . . 25
Audio
Bluetooth . . . . . . . . . . . . . . . . . . . . . . . 47
Audio Players . . . . . . . . . . . . . . . . . . . 38
CD . . . . . . . . . . . . . . . . . . . . . . . . . . . . . 38
Audio System . . . . . . . . . . . . . . . . . . . . 54
Autostore . . . . . . . . . . . . . . . . . . . . . . . . 22
Auxiliary
Devices . . . . . . . . . . . . . . . . . . . . . . . . . 46
B
Bluetooth . . . . . . . . . . . . . . . . . . . . 53, 60
Bluetooth Audio . . . . . . . . . . . . . . . . . 47
Bluetooth Controls . . . . . . . . . . . . . . . 53
Buick LaCrosse Overview . . . . . . . . 5
Buick Regal Overview . . . . . . . . . . . . 8
Buick Verano Overview . . . . . . . . . . 11
Call Waiting Using Steering
Wheel Controls . . . . . . . . . . . . . . . . . 58
Call Waiting Using the
Infotainment Controls . . . . . . . . . . 57
Canceling Voice Recognition . . . . 48
CD Player . . . . . . . . . . . . . . . . . . . . . . . 38
Chevrolet Equinox and GMC
Terrain Overview . . . . . . . . . . . . . . . 14
Chevrolet Volt Overview . . . . . . . . . 20
Clearing the System . . . . . . . . . . . . . 60
Conference Calling Using the
Infotainment Controls . . . . . . . . . . 58
Control
Multifunction . . . . . . . . . . . . . . . . . . . .23
Customization
Home Page . . . . . . . . . . . . . . . . . . . . . 52
Devices
Auxiliary . . . . . . . . . . . . . . . . . . . . . . . .46
USB . . . . . . . . . . . . . . . . . . . . . . . . . . . .41
Dual Tone Multi-Frequency
(DTMF) Tones . . . . . . . . . . . . . . . . . . 59
C
D
E
Ending a Call . . . . . . . . . . . . . . . . . . . . 58
Error Messages . . . . . . . . . . . . . . . . . 40
F
Finding a Station . . . . . . . . . . . . . . . . 26
G
Gracenote . . . . . . . . . . . . . . . . . . . . . . . 60
Gracenote® . . . . . . . . . . . . . . . . . . . . . 41
H
Hands-Free Phone . . . . . . . . . . . . . . 59
Helpful Hints for Speaking
Commands . . . . . . . . . . . . . . . . . . . . . 48
Home Page . . . . . . . . . . . . . . . . . . . . . . 23
Home Page Customization . . . . . . 52
Home Page Features . . . . . . . . . . . . 23
I
Infotainment . . . . . . . . . . . . . . . . . . . . . . 3
Infotainment System Overview . . . 4
Infotainment System Settings . . . . 25
Page 62

Black plate (2,1)
MyLink/IntelliLink Features and Functions Guide - 2013 - CRC - 5/4/12
i-2 INDEX
L
Launching Pandora . . . . . . . . . . . . . . 30
Launching Stitcher . . . . . . . . . . . . . . . 35
Loading and Ejecting Discs . . . . . . 39
M
Making a Call . . . . . . . . . . . . . . . . . . . . 59
Making a Call Using Phone
Book and Infotainment
Controls . . . . . . . . . . . . . . . . . . . . . . . . 56
Making a Call Using the
Infotainment Controls . . . . . . . . . . 57
Malibu Overview . . . . . . . . . . . . . . . . . 17
Mixed-Band Presets . . . . . . . . . . . . . 27
Multifunction Control . . . . . . . . . . . . . 23
Muting a Call . . . . . . . . . . . . . . . . . . . . 58
My Media Commands . . . . . . . . . . . 50
O
OnStar (If Equipped)
Command . . . . . . . . . . . . . . . . . . . . . . 51
Other Commands . . . . . . . . . . . . . . . . 50
Overview . . . . . . . . . . . . . . . . . . . . . . . . 53
Overview, Infotainment System . . . 3
Pairing with Infotainment
Controls . . . . . . . . . . . . . . . . . . . . . . . . 54
Pairing with Voice Recognition . . . 55
Pandora . . . . . . . . . . . . . . . . . . . . . . . . . 60
Pandora Troubleshooting . . . . . . . . 33
Phone
Bluetooth . . . . . . . . . . . . . . . . . . . . . . . 53
Hands-Free . . . . . . . . . . . . . . . . . . . . . 59
Phone Commands . . . . . . . . . . . . . . . 50
Playing an Audio CD . . . . . . . . . . . . 39
Playing from a USB . . . . . . . . . . . . . . 41
Playing from an iPhone
or iPad® . . . . . . . . . . . . . . . . . . . . . . . 46
Playing from an iPod® . . . . . . . . . . . 44
Playing the Radio . . . . . . . . . . . . . . . . 25
Radio Commands . . . . . . . . . . . . . . . 49
Radios
AM-FM Radio . . . . . . . . . . . . . . . . . . . 25
Satellite . . . . . . . . . . . . . . . . . . . . . . . . . 28
P
R
S
Satellite Radio . . . . . . . . . . . . . . . . . . . 28
Settings Commands . . . . . . . . . . . . . 50
Stitcher Troubleshooting . . . . . . . . . 37
Storing Radio Station Presets . . . 27
System
Infotainment . . . . . . . . . . . . . . . . . . . . . 3
U
USB . . . . . . . . . . . . . . . . . . . . . . . . . . . . . 41
USB Media Formats . . . . . . . . . . . . . 41
Using Bluetooth Voice
Recognition . . . . . . . . . . . . . . . . . . . . 59
Using Voice Recognition . . . . . . . . . 48
V
Voice Recognition . . . . . . . . . . . 48, 53
Voice Recognition Commands . . . 49
Voice Recognition Help . . . . . . . . . . 49
X
XM Categories . . . . . . . . . . . . . . . . . . . 28
XM Messages . . . . . . . . . . . . . . . . . . . 29
XM™ Satellite Radio Service . . . . 28
 Loading...