

Page 1

45 Series Rotary Tiller
DESCRIPTION PAGE
Warranty...............................................................................1
Introduction........................................................................2
Safety....................................................................................3
General Safety.....................................................................4
Operating Safety ..................................................................4
Maintenance Safety............................................................5
Transport Safety..................................................................5
Storage Safety.....................................................................5
Safety Signs .........................................................................5
Safety Sign Locations.........................................................6,7
Operation.............................................................................8
Machine Components.........................................................8
Machine Break-in ................................................................9
Pre-operation Checklist......................................................9
Equipment Matching ...........................................................10
Driveline Dimension............................................................10
Attaching/Unhooking...........................................................13
Field Operation....................................................................14
Transporting .........................................................................17
Storage..................................................................................18
Service and Maintenance................................................19
Service..................................................................................19
Fluids and Lubricants..........................................................19
Greasing ...............................................................................19
Servicing Intervals...............................................................20
Maintenance.........................................................................22
A-frame Adjustment ............................................................22
Tine Replacement...............................................................22
Slip Clutch ...........................................................................23
Clutch Maintenance............................................................23
Troubleshooting................................................................24
Assembly.............................................................................25
Bolt Torque.........................................................................26
Parts Lists and Drawings
Tiller Drawings.....................................................................27
Tiller Parts List.....................................................................29
Gearbox Drawing & Parts List...........................................32
PTO Drawing & Parts List..................................................33
Shipping Bundles ................................................................35
TABLE OF CONTENTS
Page 2

45 Series Rotary Tiller
WARRANTY POLICY
Buhler Manufacturing products are warranted for a period of twelve (12) months from
original date of purchase, by original purchaser, to be free from defects in material and
workmanship under correct, normal agricultural use and proper applications.
Buhler Manufacturing’s obligations under this warranty shall be limited to the repair or
exchange, at Buhler Manufacturing’s option, of any Buhler Manufacturing product or
part which proves to be defective as provided. Buhler Manufacturing reserves the right
to either inspect the product at the buyer’s location or have it returned to the factory for
inspection.
The above warranty does not extend to goods damaged or subject to accident, abuse or
misuse after shipment from Buhler Manufacturing’s factory, nor to goods altered or
repaired by anyone other than an authorized Buhler Manufacturing representative.
Buhler Manufacturing makes no Express Warranties other than those, which are
specifically described. Any description of goods, including any references and
specifications in catalogues, circulars and other written material published, is for the
sole purpose of identifying goods and shall conform to such descriptions. Any sample
or model is for illustrative purposes only and does not create an Express Warranty that
the goods conform to sample or model shown.
The purchaser is solely responsible for determining suitability of goods sold. This
warranty is expressly in lieu of all other warranties expressed or implied. Buhler
Manufacturing will in no event be liable for any incidental or consequential damages
whatsoever. Nor for any sum in excess of the price received for the goods for which
liability is claimed.
WARRANTY CLAIMS:
Warranty requests must be prepared on Buhler Manufacturing Warranty Claim Forms
with all requested information properly completed. Warranty Claims must be submitted
within a thirty (30) day period from date of failure repair.
WARRANTY LABOR:
Any labor subject to warranty must be authorized by Buhler Manufacturing. The labor
rate for replacing defective parts, where applicable, will be credited at a rate determined
by the Company, Buhler Manufacturing.
IMPORTANT FACTS:
Buckets and Bucket Tines Carry No Warranty
Bent Spears Carry No Warranty
Snowblower Fan Shafts Carry No Warranty
Mower Blades Carry No Warranty
Portable Auger Parts Have Two (2) Year Warranty
- 1 -
Page 3

45 Series Rotary Tiller
INTRODUCTION
Congratulations on your choice of a Buhler Farm King 45 Series Rotary-Tiller to
complement your landscaping operation. This equipment has been designed and
manufactured to meet the needs of a discerning landscaping industry for the efficient
tilling of soil.
Safe, efficient and trouble free operation of your Tiller requires that you and anyone else
who will be operating or maintaining the machine, read and understand the safety,
operation, maintenance and trouble shooting information contained within the
Operator's Manual.
This manual covers the 60" & 72" Models. Differences are covered and explained
where appropriate. Use the Table of Contents as a guide to locate required information.
Keep this manual handy for frequent reference and to pass on to new operators or
owners. Call your Buhler Farm King Dealer if you need assistance, information or
additional copies of the manual.
OPERATOR ORIE NTATION - The directions left, right, front and rear, as mentioned
throughout this manual, are as seen from the driver's seat and facing in the direction of
travel.
- 2 -
Page 4

45 Series Rotary Tiller
SAFETY
YOU are responsible for the SAFE operation and maintenance of your Buhler Farm
King 45 Series Rotary-Tiller. YOU must ensure that you and anyone else who is going
to operate, maintain or work around the Rotary-Tiller be familiar with the operating and
maintenance procedures and related SAFETY information contained in this manual.
This manual will take you step-by-step through your working day and alert you to all
good safety practices that should be adhered to while operating the Tiller.
Remember, YOU are the key to safety. Good safety practices not only protect you but
also the people around you. Make these practices a working part of your safety
program. Be certain that EVERYONE operating this equipment is familiar with the
recommended operating and maintenance procedures and follows all the safety
precautions. Most accidents ca n be prevented. Do not risk injury or death by ignoring
good safety practices.
* Tiller owners must give operating instructions to operators or employees before
allowing them to operate the Tiller, and at least annually thereafter per OSHA
(Occupational Safety and Health Administration) regulation 1928.57.
* The most important safety device on this equipment is a SAFE operator. It is the
operator's responsibility to read and understand ALL Safety and Operating instructions
in the manual and to follow them. All accidents can be avoided.
* A person who has not read and understood all operating and safety instructions is
not qualified to operate the machine. An untrained operator exposes himself and
bystanders to possible serious injury or death.
* Do not modify the equipment in any way. Unauthorized modification may impair
the function and/or safety and could affect the life of the equipment.
* Think SAFETY! Work SAFELY!
- 3 -
Page 5

45 Series Rotary Tiller
GENERAL SAFETY
1. Have a first-aid kit available for use and know how to use it should the need
arise.
2. Have a fire extinguisher available for use and know how to use it should the need
arise.
3. Wear appropriate protective gear. This list includes but is not limited to:
- a hard hat
- Protective shoes with slip resistant soles
- Protective glasses or goggles
- Heavy gloves
- Wet weather gear
- Hearing protection
- Respirator or filter mask
4. Wear suitable ear protection for prolonged exposure to excessive noise.
OPERATING SAFETY
1. Read and understand the Operator's Manual and all safety signs before
operating, servicing, adjusting, repairing or unplugging.
2. Do not allow riders.
3. Install and secure all guards and shields before starting or operating.
4. Keep hands, feet, hair and clothing away from moving parts.
5. Place all controls in neutral, stop tractor engine, set park brake, remove ignition
key and wait for all moving parts to stop before servicing, adjusting, repairing or
unplugging.
6. Place all tractor and machine controls in n eutral before starting.
7. Never start or operate machine unless sitting on tractor seat.
8. Do not operate machine inside a building unless there is adequate ventilation.
9. Clear the area of bystanders, especially small children, before starting.
10. Stay away from PTO shaft and machine when engaging PTO. Keep others
away.
11. Do not put hands or feet under machine while tractor engine or machine is
running.
12. Always know what you are tilling. Never operate Tiller in an area that has hidden
obstacles. Remove sticks, stones, roots, wire and other objects from working
area before starting.
13. Clean reflectors, SMV and lights before transporting.
14. Use hazard flashers on tractor when transporting.
15. Review safety instructions with all operators annually.
- 4 -
Page 6

45 Series Rotary Tiller
MAINTENANCE SAFETY
1. Follow ALL the operating, maintenance and safety information in the manual.
2. Support the machine with blocks or safety stands when working beneath it.
3. Follow good shop practices
- Keep service area clean and dry.
- Be sure electrical outlets and tools are properly grounded.
- Use adequate light for the job at hand.
4. Use only tools, jacks and hoists of sufficient capacity for the job.
5. Never work on rotor blades or under the machine unless the tractor engine is off
and driveline is disconnected.
6. Make sure all guards are in place and properly secured when maintenance work
is completed.
7. Never wear ill-fitting, baggy or frayed clothing when working around or on any of
the drive system components.
8. Keep hands, feet, hair and clothing away from moving or rotating parts.
9. Clear the area of bystanders, especially small children, when carrying out any
maintenance and repairs or making any adjustments.
TRANSPORT SAFETY
1. Rev iew Transport Safety instructions in tractor manual before moving.
2. Always travel at a safe speed.
3. Always use hazard warning flashers on tractor when transporting unless
prohibited by law.
4. Do not exceed 20 mph (32 kph) during transport.
STORAGE SAFETY
1. Store the unit in an area away from human activity.
2. Do not permit children to play on or around the stored machine.
3. Support frame on stands and blocks to provide a secure base.
SAFETY SIGNS
1. Keep safety signs clean and legible at all times.
2. Replace safety signs that are missing or have become illegible.
3. Replaced parts that displayed a safety sign should also display the current sign.
4. Safety signs are available from your Dealer Parts Department or the factory.
- 5 -
Page 7
45 Series Rotary Tiller
How to Install Safety signs:
* Be sure that the installation area is clean and dry.
* Decide on the exact position before you remove the backing paper.
* Remove the smallest portion of the split backing paper.
* Align the safety sign over the specified area and carefully press the small portion
with the exposed sticky backing in place.
* Slowly peel back the remaining paper and carefully smooth the remaining portion
of the safety sign in place.
* Small air pockets can be pierced with a pin and smoothed out using the piece of
safety sign backing paper.
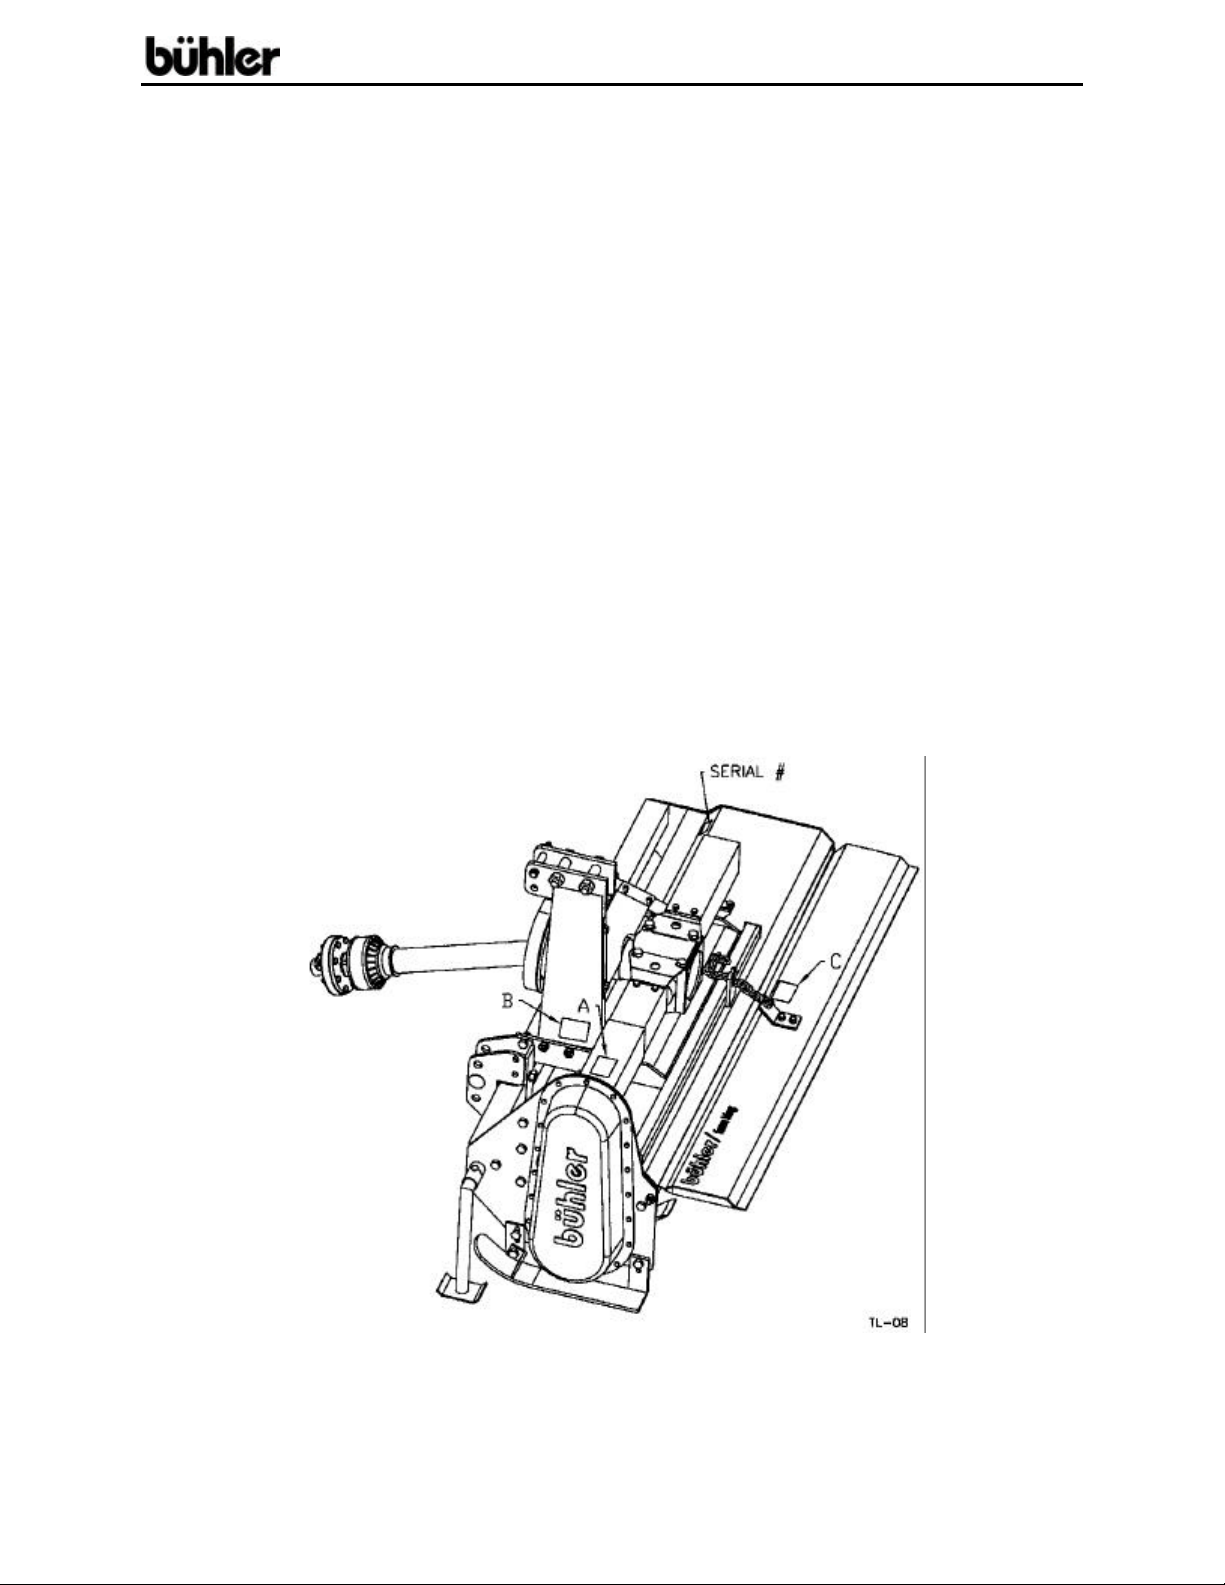
SAFETY SIGN LOCATIONS
The types of safety signs and locations on the equipment are shown in the illustrations
below. Good safety requires that you familiarize yourself with the various Safety Signs,
the type of warning and the area, or particular function related to that area, that requires
your SAFETY AWARENESS.
* Think SAFETY! Work SAFELY!
- 6 -
Page 8

45 Series Rotary Tiller
SAFETY SIGN LOCATIONS – cont’d.
Safety sign “A” Safety sign “B”
Safety sign “C”
REMEMBER - If Safety signs have been damaged, removed, become illegible or parts
replaced without safety signs, new safety signs must be applied. New safety signs are
available from your authorized dealer.
- 7 -
Page 9
45 Series Rotary Tiller
OPERATION
TO THE NEW OPERATOR OR OWNER
The Buhler Farm King 45 Series Rotary Tiller is a machine that combines the primary
and secondary tillage operat ion into one machine. It breaks up the soil and prepares
the seed bed in one pass. Rotational power to the rotor is provided by the tractor PTO.
Be familiar with the machine before starting.
It is the responsibility of the owner or operator to read this manual and to train all
other operators before they start working with the machine. Follow all safety
instructions exactly. Safety is everyone's business. By following recommended
procedures, a safe working environment is provided for the operator, bystanders
and the area around the work site. Untrained operators are not qualified to
operate the machine.
Many features incorporated into this machine are the result of suggestions made by
customers like you. Read this manual carefully to learn how to operate the machine
safely and how to set it to provide maximum field efficiency. By following the operating
instructions in conjunction with a good maintenance program, your Tiller will provide
many years of trouble-free service.
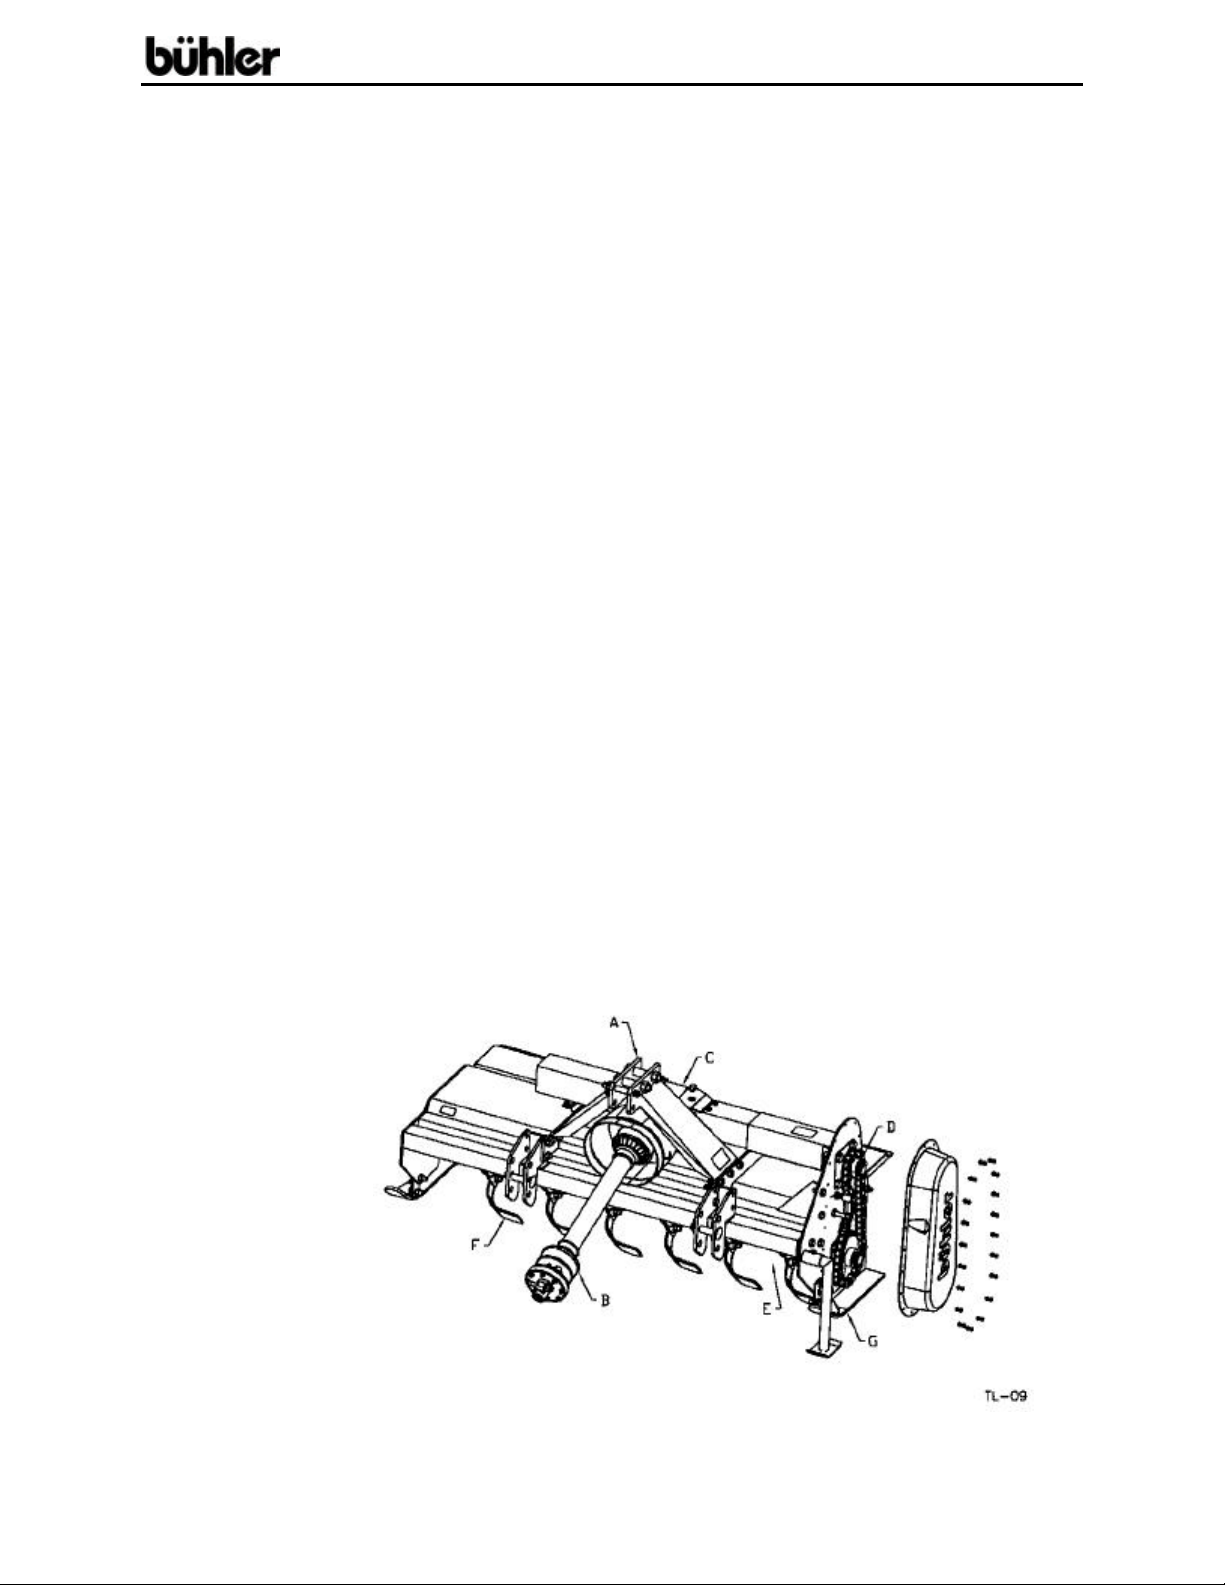
MACHINE COMPONENTS
The Buhler Farm King 45 Series Rotary Tiller consists of a rotating drum that is
equipped with bent blades for breaking up and leveling soil. The blades are turned
through the soil while the machine moves over the working area. A Drag Shield is used
to maintain a level seedbed. Rotational power to the drum is provided by the PTO on
the tractor. The power is transmitted through the gearbox in the center of the machine
to the chain drive down the side. The A-frame can be moved to offset the machine.
A Point A-Frame
B PTO Driveline
C Gear Box
D Chain Drive
E Rotor
F Blades
G Skid Plates
- 8 -
Page 10

45 Series Rotary Tiller
Although there are no operational restrictions on the Tiller when used for the first time, it
is recommended that the following mechanical items be checked:
A. After operating for 1/2 hour or after completing 1/2 acre:
1. Check all nuts, bolts and other fasteners. Tighten to their specified torque
level.
2. Check that the blades are in good condition and bolted securely to the
rotor.
3. Check the oil level in the gear box. Add as required.
4. Check that the PTO driveline shield turns freely.
5. Lubricate all grease points.
B. After operating for 5 hours and 10 hours:
1. Repeat items 1 through 5 of Section A.
2. Then go to the regular service schedule as defined in Section 5.
Efficient and safe operation of the Rotary Tiller requires that each operator reads and
understands the operating procedures and all related safety precautions outlined in this
section. A pre-operation checklist is provided for the operator. It is important for both
personal safety and maintaining the good mechanical condition of the Tiller that this
checklist is followed.
Before operating the machine and each time thereafter, the following areas should be
checked off:
Lubricate the machine per the schedule outlin ed in the Service and Maintenance
Section.
Use only a tractor of adequate power and weight to pull the machine.
Check that the machine is properly attached to the tractor. Be sure retainers are
used on the mounting pins.
Check the oil level in the gearbox. Add as required.
Check that the PTO driveline shield turns freely and that the driveline can
telescope easily. Clean and lubricate if required.
Before using PTO: Slip Clutch PTO’s are shipped with the slip clutch
disengaged. Socket set screws in the clutch assembly must be fully backed out
to engage the clutch.
Check the blades. Be sure they are not damaged or broken and are bolted
securely to the rotor. Repair or replace as required.
Remove any entangled material on rotating parts.
Install and secure all guards, doors and covers before starting.
- 9 -
MACHINE BREAK-IN
PRE-OPERATION CHECKLIST
Page 11
45 Series Rotary Tiller
EQUIPMENT MATCHING
To insure the safe and reliable operation of the Tiller, it is necessary to use a tractor
with the correct specifications. Use the following list as a guide in selecting a tractor to
use on the machine.
1. Horsepower: Use Table 1 as a guide in selecting the tractor horsepower
appropriate for your width of machine. Use only small Agricultural tractors on this
machine.
Table 1 Horsepower vs. Width
Model Width Horsepower
4560 60 inches 45 max.
(1.5m)
4572 72 inches 45 max.
(1.8m)
2. 3 Point Hitch:
The Tiller is equipped with a Category 1, 3 point hitch. Be sure the tractor 3 point
hitch is in the Category 1 configuration. A Category 1 Quick Hitch will fit on the
Tiller.
Install the lift arm blocks or shorten the stop chains to place the arms into the
non-sway configuration. Refer to the tractor manual for details.
3. Load Sensing Hydraulics:
Many newer tractors are equipped with "Load Sensing" hydraulics. It is the
responsibility of the operator to set the tractor hydraulic system to provide "float"
on the 3 point hitch.
The float feature will allow the machine to follow the ground contours during
operation.
4. PTO Shaft:
The tractor must have a 1 3/8" 6 spline 540 RPM PTO shaft to fit the driveline
shaft supplied with the machine. Do not use shaft adapters or operate at any
other speed.
It is not recommended that a tractor with variable speed PTO's be used on the
Tiller. Operating at speeds faster than 540 RPM will overload the drivetrain and
lead to early failures. Attach the safety chains supplied with the PTO shaft,
allowing sufficient slack for the Driveline during turns and operation. Check
booklet attached to the PTO for instructions.
ALERT: Do not exceed the recommended horsepower levels. The use
of horsepower will void the wa rranty.
- 10 -
Page 12

45 Series Rotary Tiller
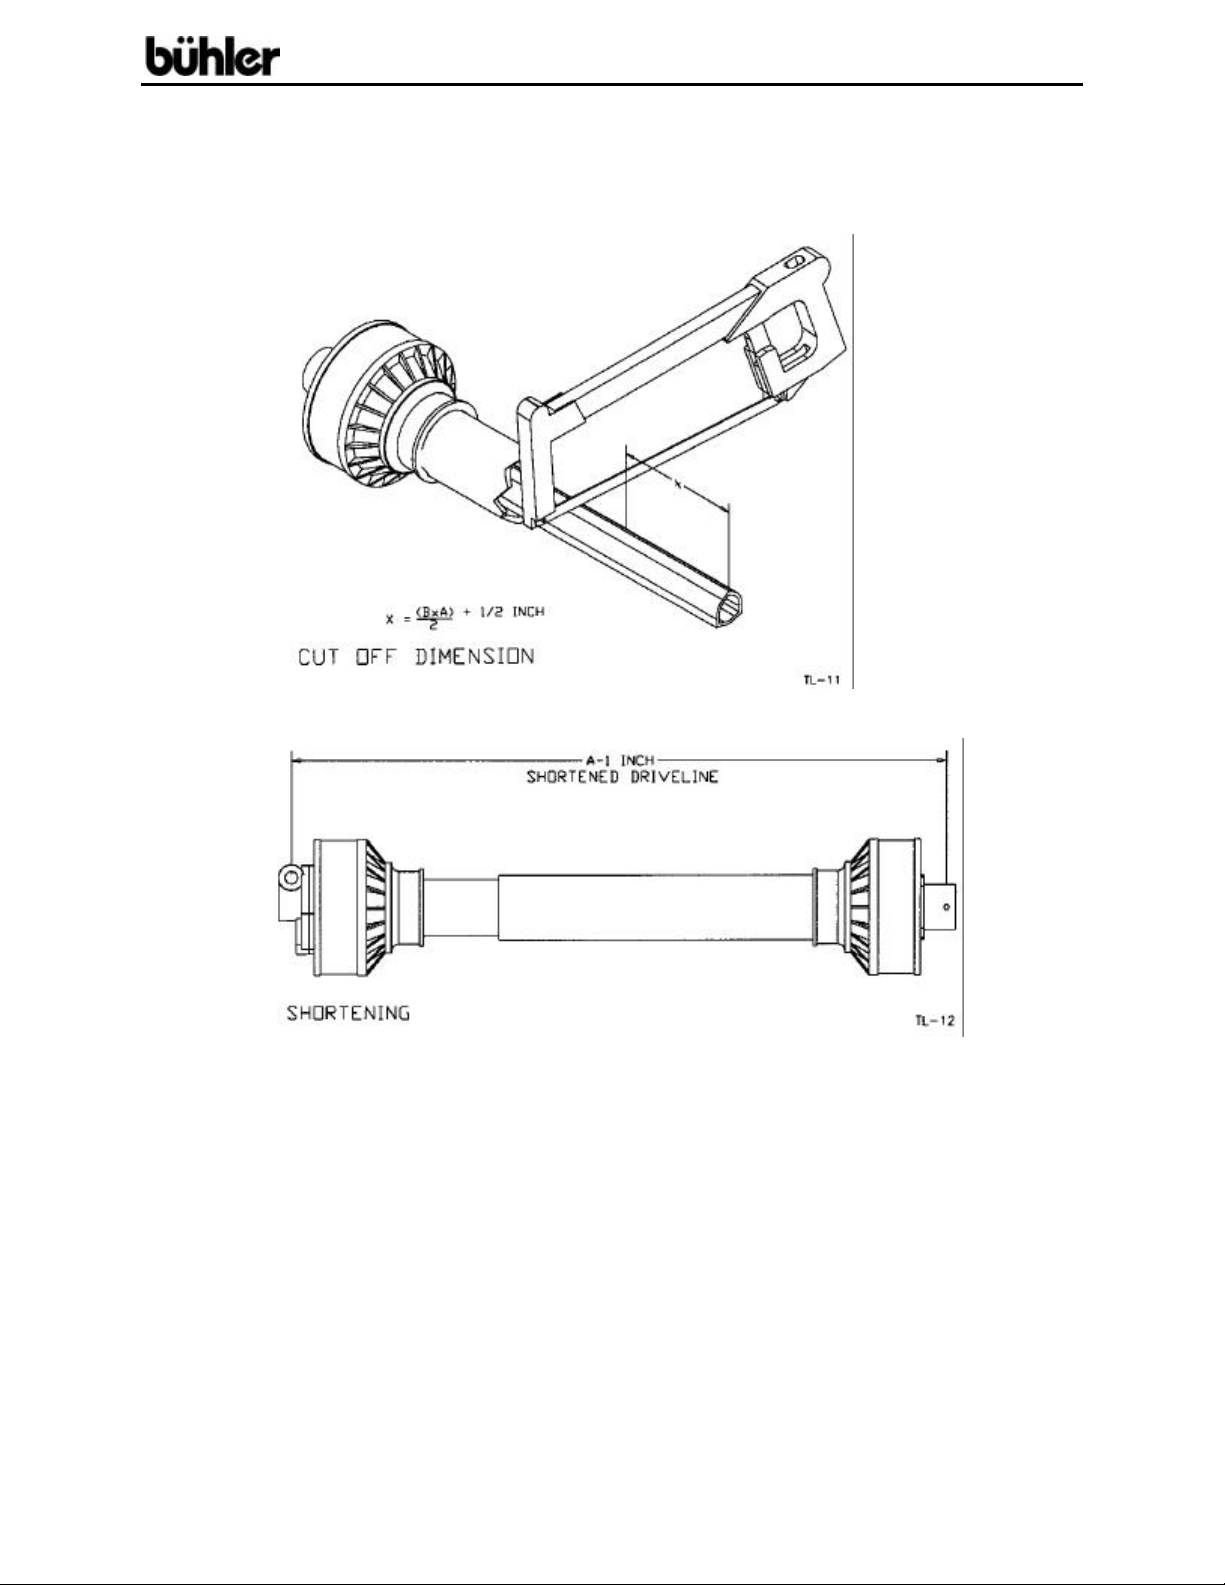
DRIVELINE DIMENSION
A PTO driveline is supplied with the machine. To accommodate the variety of 3 point
hitch geometry available today, the driveline can be too long for some machines and
must be cut. It is very important that the driveline be free to telescope but not bottom
out when going through its working range. If the driveline bottoms out, the bearings on
both the machine and tractor PTO shaft will be overloaded and fail in a short time.
When cutting the driveline, follow this procedure:
1. Clear the area of bystanders, especially small children.
2. Attach the Tiller to the tractor but do not attach the driveline.
3. Raise the machine until the input shaft is level with the tractor PTO shaft.
4. Measure the dimension between the locking groove on the tractor PTO shaft and
the groove on the Tiller input shaft.
5. Measure the same dimensions on the compressed driveline.
6. If the driveline dimension exceeds the machine dimension, the driveline will have
to be cut.
- 11 -
Page 13
45 Series Rotary Tiller
DRIVELINE DIMENSION - CONT'D.
7. Pull the driveline apart and cut 1/2 of the dimension determined in step 5 from
each end. Add another ½ inch (12MM) to each cut off segment.
8. Be sure to use a hacksaw to cut 1/2 from each end of the separated shaft. Cut
both the plastic tube and the metal cores.
9. Use a file to remove the burrs from the edges that were cut.
10. Assemble the two ends of the shaft.
11. Make sure that the shaft can telescope freely. If it does not, separate the two
parts and inspect for burrs or cuttings on the shaft ends. Be sure it telescopes
freely before installing.
12. Make sure the plastic covering shield is free to rotate on the shaft before
installing on the machine.
- 12 -
Page 14

45 Series Rotary Tiller
ATTACHING/UNHOOKING
The Tiller should always be located on a level, dry area that is free of debris and other
foreign objects. When attaching the machine to a tractor, follow this procedure:
1. Clear the area of bystanders, especially small children.
2. Be sure the tractor 3 point hitch is in the Category 1 con figuration and the lift
arms are in the non-sway configuration (See tractor manual).
3. Make sure there is enough room and clearance to safely back up to the Tiller.
4. Attach the PTO driveline to the Tiller if it was removed for storage (See
Assembly).
5. While backing up, align the lift arm balls with the mounting pins on the Tiller.
6. Stop tractor, set park brake, remove ignition key and wait for all moving parts to
stop before dismounting.
7. If your tractor is not equipped with a Quick Hitch:
a. Align the left lower link arm with the mounting pin.
b. Slide the ball over the pin and install the Linch Pin.
c. Use the screw jack on the right lift arm to align the ball with the pin.
d. Slide the ball over the mounting pin and install the Linch Pin.
e. Level the frame using the screw jack.
f. Remove retainer and pin from the mast.
g. Align top link using the turnbuckle.
h. Insert pin and install Linch Pin
i. Level frame using the turnbuckle.
8. Attach the PTO driveline:
a. Check that the driveline telescopes easily and that the shield rotates freely.
b. Attach the driveline to the tractor by retracting the locking pin, slide the
c. Attach the anchor chain on the driveline shield to the frame.
9. Use the 3 point hitch to raise the machine.
10. Remove the blocks from under the Depth Gauge Shoes.
11. Reverse the above procedure when unhooking from the tractor.
ALERT: It may be necessary to add weight to the 3 point hitch to lower
the lift arms.
CAUTION: Be sure that the driveline does not bottom out when going
through its working angles.
yoke over the shaft and push on the yoke until the lock pin clicks into
position. Pull on the yoke to be sure it is locked in position.
- 13 -
Page 15

45 Series Rotary Tiller
FIELD OPERATION
Buhler Farm King 45 Series Rotary Tillers are designed with the inherent flexibility of
operating well in almost any kind of soil and terrain conditions. However, the operator
has the responsibility of being familiar with all operating and safety procedu res and
following them.
Each operator should review this section of the manual at the start of the season and as
often as required to be familiar with the machine. When using, follow this procedure:
1. Review and follow the pre-operation Checklist. R eview Safety Instructions.
2. Attach the tractor to the machine. See Attaching/Unhooking Section.
3. Before going to the field review Transporting Section.
4. Pull into the field and position the machine in a level area.
5. Lower into working position.
6. Set the machine:
a. Level the frame:
Use the screw jack on the right lift arm to level the frame from side-to-side.
b. Depth: Use the Depth Gauge Shoes on each side to set the operating
depth. Position the Depth Gauge Shoes in the top hole for shallow tilling
and in the bottom hole for deep tilling.
ALERT: In soft soil conditions, the skid plates become less effective and
sink into the ground. Use the turnbuckle on the top link to set the frame
angle so the bottom of the Depth Gauge Shoes are level when operating.
c. Offset:
The Category Pin Brackets can be moved 3 to 4 inches along the Deck
Assembly to either side of center if required. Center the machine for
normal operation. Offset if the tire tracks are wider than the machine or
when tilling around trees, bushes or other areas.
d. Drag Shield:
Adjust the chain in the Adjustment Bracket to set the height of the Drag
Shield. Set the Drag Shield to just contact the tilled soil when operating.
- 14 -
Page 16

45 Series Rotary Tiller
FIELD OPERATION - cont'd.
7. Align the unit with the working area.
8. Starting machine:
a. Run the engine at low idle.
b. Slowly engage the PTO control to start the machine.
c. Slowly bring the engine to the rated PTO speed. Never exceed rated
speed.
d. Lower the machine to the ground and proceed down the field.
9. Stopping machine:
a. Slowly decrease engine speed to low idle.
b. Raise machine out of the ground.
c. Disengage PTO clutch slowly.
CAUTION: Place all controls in neutral, lower machine, stop engine, set
park brake remove ignition key and wait for all moving parts to stop before
dismounting.
10. Ground Speed:
Travel speed can vary between 2 and 5 mph (3 and 8 km/h) depending on the
soil and terrain conditions. It is the responsibility of the operator to note the
condition of the job being done and set the speed to obtain a quality tilling job
and maintain control of the machine.
The speed can be increased to optimize tilling.
Decrease speed if you want the soil worked to a finer texture.
11. Operating hints:
a. Determine the moisture content of the soil before starting. Soil that is too
wet will "ball-up" in the rotor blades making tilling impossible. Sandy soils
normally can be worked better than heavy clay or loam soils. It is the
responsibility of the operator to determine the soil type and moisture
content before starting. It may be necessary to wait for the soil to dry out
before starting to work.
b. Set the length of the Top Link to obtain the quality of the job desired
without needlessly using power and fuel in churning the soil. Use the
condition of the seedbed as your guide.
c. When tilling hard or compacted soils, it is recommended that two passes
be used when working. Use the Depth Gauge Shoes on each side of the
frame to adjust the tilling depth of the machine. The second pass should
be made at an angle to the first to give a consistent job and minimize
compaction.
d. Always remove heavy crop cover, all grass and weeds, before starting to
prevent rotor plugging.
- 15 -
Page 17

45 Series Rotary Tiller
FIELD OPERATION - cont'd.
e. The rotation of the Tines propel the machine in the forward direction.
Always use the tractor transmission to control the speed of forward travel.
f. Always disengage the PTO control and raise the machine out of the
ground before depressing the master clutch on the tractor.
g. Use low gear on the tractor to start the job. Increase the speed of forward
travel only as the quality of the job and power available will allow.
h. If the slip clutch slips, reduce the ground speed or raise the machine
slightly out of the ground.
- 16 -
Page 18

45 Series Rotary Tiller
TRANSPORTING
When transporting the machine, review and follow these instructions:
1. Be sure all bystanders are clear of the machine.
2. Be sure that the machine is securely attached to the tractor and all retainer pins
are installed.
3. Clean the SMV emblem, lights and reflectors and be sure they are working.
4. Be sure you are in compliance with all applicable lighting and marking regulations
when transporting. Check with your local authorities.
5. Be sure your machine can clearly be seen by overtaking and oncoming traffic.
6. Keep to the right and yield the right-of-way to allow faster traffic to pass. Drive
on the road shoulder if permitted by law.
7. Do not allow riders.
8. Always use hazard flashers on the tractor when transporting unless prohibited by
law.
9. Use pilot vehicles front and rear when transporting during times of limited
visibility.
10. Never transport the machine faster than 20 mph (32 km/h). The ratio of the
tractor weight to the Tiller weight plays an important role in defining acceptable
travel speed. Table 2 summarizes the recommended travel speed to weight
ratio.
Table 2 Speed vs. weight Ratio
Weight of fully equipped
or loaded implement(s)
relative to weight of
Road Speed towing machine
Up to 32 km/h 1 to 1, or less
(20 mph)
Up to 16 km/h 2 to 1, or less
(10 mph)
Do not tow More than 2 to 1
- 17 -
Page 19

45 Series Rotary Tiller
STORAGE
After the season's use, the machine should be thoroughly inspected and prepared for
storage. Repair or replace any worn or damaged components to prevent any
unnecessary down time at the start of next season. To insure a long, trouble free life,
this procedure should be followed when preparing the unit for storage:
1. Clear the area of bystanders, especially small children.
2. Thoroughly wash the machine using a pressure washer to remove all dir t, mud,
debris and residue.
3. Inspect the blades and rotors for damage or entangled material. Repair or
replace damaged parts. Remove all entangled material.
4. Change the oil in the gear box.
5. Lubricate all grease fittings. Make sure that all grease cavities have been filled
with grease to remove any water residue from the washing.
6. Touch up all paint nicks and scratches to prevent rusting.
7. Move to storage area.
8. Select an area that is dry, level and free of debris.
9. Place blocks under the Depth Gauge Shoes.
10. Unhook from tractor.
11. If the machine cannot be placed inside, cover with a waterproof tarpaulin and tie
securely in place.
12. Store the machine in an area away from human activity.
13. Do not allow children to play on or around the stored machine.
- 18 -
Page 20

45 Series Rotary Tiller
SERVICE AND MAINTENANCE
SERVICE
Follow Maintenance Safety Instructions as outlined.
FLUIDS AND LUBRICANTS
1. Hydraulic Oil:
Use a standard hydraulic oil for all operating conditions.
2. Gear Box Oil:
Use an SAE 85W90 gear oil for all operating conditions.
Gear Box Capacity: 1 U.S. quart (0.85 liter)
3. Chain Case Grease:
Use a multi purpose grease for all operating conditions.
If chain case is removed, refill with 800 grams of grease.
4. Storing Lubricants:
Your machine can operate at top efficiency only if clean lubricants are used. Use
clean containers to handle all lubricants. Store them in an area protected from
dust, moisture and other contaminants.
GREASING
Use a Maintenance Checklist to keep a record of all scheduled maintenance.
1. Use a hand-held grease gun for all greasing.
2. Wipe grease fitting with a clean cloth before greasing, to avoid injecting dirt and
grit.
3. Replace and repair broken fittings immediately.
4. If fittings will not take grease, remove and clean thoroughly. Also clean lubricant
passageway. Replace fitting if necessary.
- 19 -
Page 21

45 Series Rotary Tiller
SERVICING INTERVALS
The periods recommended below are based on normal operating conditions. Severe or
unusual conditions may require more frequent lubrication or oil changes.
8 Hours or Daily; Telescoping Tubes and Quick Disconnect 20 Hours
1. Lubricate PTO driveline (7 locations).
ALERT: When using the safety chains supplied with the PTO shaft, the
shield bearings must be kept lubricated.
80 hours or once a season:
2. Lubricate rotor driven end
bearing (1 location)
3. Lubricate rotor drive end
bearing
(1 location).
4. Lubricate chain drive
bearing
(1 location)
- use 3 squirts only
- push grease in gradually
- 20 -
Page 22

45 Series Rotary Tiller
SERVICING INTERVALS – cont’d.
40 Hours
1. Check gear box oil level.
Add as required
2. Add approximately 10 squirts
of grease in chain case.
Annually
1. Change gear box oil. Refill with SAE 85W90 gear oil.
2. Wash machine.
- 21 -
Page 23

45 Series Rotary Tiller
MAINTENANCE
By following a careful service and maintenance program for your machine, you will
enjoy many years of trouble-free operation.
A-FRAME ADJUSTMENT
When moving the hitch along the front frame to adjust the offset, follow this procedure:
1. Clear the area of bystanders, especially small children.
2. Raise the machine so it is slightly out of the ground.
3. Loosen the u-bolts through the Category Pin brackets.
4. Slide the A-frame along the Deck until the machine is set at the desired
offset.
5. Tighten the clamping bolts to their specified torque.
TINE REPLACEMENT
When the tines are damaged in any way, they will need to be replaced. When
replacing, follow this procedure:
1. Clear the area of bystanders, especially small children.
2. Raise the machine until the tines are slightly above the ground.
3. Stop engine, set park brake, remove ignition key and wait for all moving
parts to stop before dismounting.
4. Place blocks under each Depth Gauge Shoe to support th e machine.
5. Raise the Drag Shield and secure in the up position.
6. Wear leather or heavy canvas gloves when handling Tines.
7. Remove mounting bolts from Tine.
8. Install a new replacement blade and tighten the mounting bolts to their
specified torque.
9. Lower the rear gate.
10. Remove the blocks under the skid plates.
ALERT: An alternate method would be to disconnect the machine
from the tractor and tip it forward on its nose.
-22-
Page 24

45 Series Rotary Tiller
SLIP CLUTCH
During normal operation, the slip clutch can release and slip when encountering an
obstruction or when overloaded. It is designed to slip when the load exceeds 3 times its
nominal rating. When the clutch slips too frequently during normal operating conditions,
it is necessary to replace the clutch linings. NOTE: The PTO shafts are shipped with
the slip clutch disengaged. There are four socket set screws on the inside of the clutch
assembly, which are turned out as far as they go to engage the clutch. Disengage
clutch by turning set screws in fully.
To replace clutch linings, follow this procedure:
1. Disengage the clutch by turning the four set screws all the way in.
2. Remove the outside bolts from the clutch assembly and replace the clutch
linings.
3. When re-tightening the bolts, stop when the clutch spacer starts to touch the
clutch plates. You should be able to just move the spacer by hand when you
have the correct bolt torque.
4. Engage clutch by turning out set screws after assembly is complete.
CLUTCH MAINTENANCE
1. Before first use or after storage of more than one month, the clutch should be
checked.
2. Disengage clutch by turning in the four socket set screws.
3. Run the PTO at low idle to slip the clutch linings. This will help remove the dirt,
corrosion, and surface gloss from the clutch plates and also ensure that the
linings are loose.
4. Engage the clutch by turning out the socket set screws.
5. Normally the clutch will slip at a 20% higher torque after the “run in” than before.
6. Check the temperature of the clutch after running for 20 minutes and every 8
hours after that. If the clutch is hot to the touch or smokes, check that the
outside bolts are correctly tightened as explained in slip clutch section. If clutch
still slips, linings may have to be replaced.
-23-
Page 25

45 Series Rotary Tiller
TROUBLE SHOOTING
The Buhler Farm King 45 Series Rotary Tiller moves curved Tines on a turning rotor
through the ground to break it up and prepare a seed bed. It is a simple and reliable
system that requires minimal maintenance.
In the following section, we have listed many of the problems, causes and solutions to
the problems that you may encounter.
If you encounter a problem that is difficult to sol ve, even after having read through this
trouble shooting section, please call your local Buhler Farm King distributor dealer.
Before you call, please have this Operator's Manual and the serial number from your
Tiller ready.
PROBLEM CAUSE SOLUTION
Rotor won't Slip clutch slipping. Check that clutch is engaged
turn. or replace friction plates. or replace friction plates.
PTO clutch slipping. Set PTO clutch. See
tractor manual.
Broken drive chain. Repair or replace chain.
****
Untilled 3 point hitch not set. Set 3 point hitch in
ground behind float. See tractor
machine. manual.
Traveling too fast. Travel slower.
Ground very hard. Slow down. Make
2 passes.
Machine not leveled. Adjust screw jack
on 3 point arm.
Adjust Depth Gauge
Shoes.
****
Seed bed lumpy. Traveling too fast. Slow down.
Make 2 passes.
****
Uneven seed bed. Machine not level. Level machine.
Drag Shield too high. Adjust Drag Shield.
-24-
Page 26

45 Series Rotary Tiller
ASSEMBLY
The machine is shipped with the PTO shaft not installed.
To install the PTO driveline on the machine, follow this procedure:
1. Clear the area of bystanders, especially small children.
2. Clean the splines on the yoke and the input shaft.
3. Align the splines on the yoke and the shaft.
4. Attach the driveline to the tiller by removing the tapered pin and sliding the
yoke onto the gearbox shaft. Line up the pin with the groove in the
gearbox shaft and fasten with the tapered pin. The plastic gearbox PTO
guard has a removable door on top to access the pin. The A-frame brace
can be removed to improve accessibility. Replace the brace after
tightening the nut on the tapered pin.
5. Be sure the yoke is locked in position. Pull on the yoke to be sure the pin
clicks into position .
6. Be sure that the PTO shaft is the appropriate length for the tractor/Tiller
combination. Refer to Driveline Dimension Section for details.
-25-
Page 27

45 Series Rotary Tiller
BOLT TORQUE
CHECKING BOLT TORQUE
The tables shown below give correct torque values for various bolts and cap screws.
Tighten all bolts to the torques specified in chart unless otherwise noted. Check
tightness of bolts periodically, using bolt torque chart as a guide. Replace hardware
with the same strength bolt.
ENGLISH TORQUE SPECIFICATIONS
Bolt Bolt Torque *
Diameter SAE2 SAE 5 SAE 8
"A" N.m (lb-ft) N.m (lb-ft) N.m (lb-ft)
¼” 8 (6) 12 (9) 17 (12)
5/16" 13 (10) 25 (19) 36 (27)
3/8" 27 (20) 45 (33) 63 (45)
7/16" 41 (30) 72 (53) 100 (75)
½” 61 (45) 110 (80) 155 (115)
9/16" 95 (70) 155 (115) 220 (165)
5/8” 128 (95) 215 (160) 305 (220)
¾” 225 (165) 390 (290) 540 (400)
7/8" 230 (170) 570 (420) 880 (650)
1" 345 (225) 850 (630) 1320 (970)
Torque figures indicated above are valid for non-greased or non-oiled threads and
heads unless otherwise specified. Therefore, do not grease or oil bolts or cap screws
unless otherwise specified in this manual. When using locking elements, increase
torque values by 5%.
* Torque value for bolts and cap screws are identified by their head markings.
-26-
Page 28

45 Series Rotary Tiller
45 SERIES TILLER
-27-
Page 29

45 Series Rotary Tiller
-28-
Page 30

45 Series Rotary Tiller
PARTS LIST
WHEN ORDERING PARTS
Always give your dealer the Model, Color and Serial Number of your machine to assist
him in ordering and obtaining the correct parts. Use the exploded view and tabular
listing of the area of interest to exactly identify the required part.
60'' & 72'' 45 SERIES TILLER
Item # Part # Description
1 906821 Deck Weld't (60'')
906822 Deck Weld't (72'')
2 906903 Side Plate Weld't - L
3 967363 4-Bolt 1 5/8'' Flange Bearing
967364 1 5/8'' Bearing Only
4 982006422 1 5/8'' Oil Seal Plate
5 912300131 2-Bolt 1 1/4'' Flange Bearing
967294 1 1/4'' Bearing Only (greasable)
6 906843 Top Sprocket Spacer 3''OD x 13/16''
7 959223 Bottom Sprocket Spacer 3''OD x 13/16''
8 906845 Sprocket #80 11T 1 5/8'' Bore
9 906844 Sprocket #80 20T 1 5/8'' Bore
10 906846 Roller Chain #80H x 44 Link w/ Conn
11 967377 Chain Tensioner Weld't
12 81620 1/2'' x 1 1/4'' Hex Bolt (pl)
13 906827 Shaft Cover Weld't - R
14 906828 Bearing Cover Weld't - L
15 906912 Shaft Weld't (60'')
906916 Shaft Weld't (72'')
16 959228 Hex Shaft 1 5/8'' x 39'' (60'')
959229 Hex Shaft 1 5/8'' x 44'' (72'')
17 912303601 1 5/8'' Oil Seal
18 982005711 Tension Spring
19 912301557 1 5/8'' Retainer Ring
20 906904 Chain Guard
21 81525 1/4'' x 3/4'' Hex Bolt (pl)
22 84498 1/4'' Lock Nut (pl)
23 81626 1/2'' x 2 3/4'' Hex Bolt (pl)
24 984077 1/2'' Jam Nut (pl)
25 81636 1/2'' Hex Nut (pl)
-29-
Page 31

45 Series Rotary Tiller
26
27 967164 Pound-In Grease Fitting
28 84299 5/8'' x 2'' Hex Bolt (pl)
29 84270 5/8'' x 1 3/4'' Hex Bolt (pl)
30 812482 5/8'' Lock Nut (pl)
31 907349 Safety Cone
32 903171 Spacer 1.05''OD x 2 1/4''
33 906837 A-Frame Bottom Weld't
34 903159 A-Frame Top Weld't - L
35 903160 A-Frame Top Weld't - R
36 906838 A-Frame Brace Plate
37 906213 Drag Shield Weld't (60'')
38 967357 Drag Shield Bracket
39 967362 Drag Shield Hinge Pin
40 903320 Drive Shaft Shield Weld't
41 982605211 Drive Shaft Shield Inner 15''Lg (60'')
42 982605311 Drive Shaft Shield 13''Lg (60'')
43 906835 Drive Shaft Shield Mount Weld't
44 906923 Depth Gauge Shoe Weld't - R
45 906924 Depth Gauge Shoe Weld't - L
46 983000241 Adjustment Mount Bracket
47 907572 Cat. Pin Bracket Weld't
48 907573 1/2'' x 10 1/4'' U-Bolt (pl)
49 84277 1/2'' x 1 1/2'' Hex Bolt (pl)
50 812763 1/2'' x 1 1/2'' Hex Bolt NF Gr8 (pl)
51 9812767 1/2'' Lock Washer Gr8 (pl)
52 812765 1/2'' Hex Nut NF Gr8 (pl)
53 967484 LH Tine
54 967483 RH Tine
55 982000500 Side Stand Weld't
56 912301660 Snapper Clip
57 982000471 1/4'' x 14 Link Chain
58 84000 3/8'' BS Flat Washer (pl)
59 812363 3/8'' Lock Nut Gr8 (pl)
60 84072 3/8'' x 3/4'' Hex Bolt (pl)
61 86170 3/8'' x 1'' Hex Bolt (pl)
62 906913 Gearbox 2050
63 81619 1/2'' x 1'' Hex Bolt (pl)
64 81637 1/2'' Lock Washer (pl)
65 81549 5/16'' x 3/4'' Hex Bolt (pl)
66 81569 5/16'' Lock Washer (pl)
67 965807 Cat. 1 Top Link Pin
812364
906921 Drag Shield Weld't (72'')
982725211 Drive Shaft Shield Inner 18''Lg (72'')
982725311 Drive Shaft Shield Outer 16''Lg (72'')
1/2'' Lock Nut (pl)
-30-
Page 32

45 Series Rotary Tiller
68
69 967361 7/8'' x 4'' Clevis Pin (pl)
70 86171 3/8'' x 1 1/4'' Hex Bolt (pl)
71 811790 3/4'' x 4 1/2'' Hex Bolt (pl)
72 81701 3/4'' Lock Washer (pl)
73 81700 3/4'' Hex Nut (pl)
74 81593 3/8'' Lock Washer (pl)
75 81592 3/8'' Hex Nut (pl)
76 F0409 PTO Shaft
965911
7/16'' Linch Pin
-31-
Page 33

45 Series Rotary Tiller
45 SERIES TILLER GEARBOX - #906913
45 SERIES TILLER GEARBOX PARTS LIST
ITEM PART NO. DESCRIPTION
906913 Gearbox Complete
1 907151 Housing
2 907152 Ball Bearing
3 967303 Snap Ring
4 907153 Oil Seal
5 907154 Ring
6 967305 Snap Ring
7 907155 Roller Bearing
8 907160 Gear Set
9 907161 Hex Shaft
10 907162 Oil Seal
11 967398 Snap Ring
12 967328 Ball Bearing
13 907163 Cover
14 967312 3/8'' Oil Plug
-32-
Page 34

45 Series Rotary Tiller
PTO - F0409
-33-
Page 35

45 Series Rotary Tiller
45 SERIES TILLER PTO PARTS LIST
ITEM PART NO. DESCRIPTION
F0409 Gearbox Complete (104 Series)
907193 Outer Half Shaft - Tracktor
907194 Inner Half Shaft - Implement
1 907186 Yoke - Tracktor End
2 936540 Repair Kit
3 936344 Outer Tube Yoke
4 936351 Flex Pin Outer Yoke
5 907187 Cardan Tube, Outer
6 907188 Cardan Tube, Inner
7 936350 Flex Pin, Inner
8 936345 Inner Tube Yoke
9 907189 Torque Lim Ft32r/4
10 966209 Shield Support, Outer
11 966207 Outer Shld Cone
12 966208 Inner Shld Cone
13 907190 Safety Tube, Outer
14 907191 Safety Tube, Inner
15 966210 Shield Support, Inner
16 936402 Complete Chain
17 907192 Complete Sleeve
18 936519 Bolt & Nut
19 907574 Flange Yoke
20 907575 Antifriction Sleeve
21 907576 Clutch Lining
22 907577 Preassure Plate
23 907578 Flanged Hub 1-3/8"Z6
24 910-075 Taper Pin Kit
25 936512 Set Screw, Special
26 907579 Belleville Spring 3.5mm
27 907580 Belleville Spring 2.5mm
28 907581 Spacer Band FT32
-34-
Page 36

45 Series Rotary Tiller
SHIPPING BUNDLES
QUANTITY BUNDLE
REQUIRED NUMBER DESCRIPTION
C4560 60” Tiller c/w PTO
1 F0414 Deck Assembly
C4572 72” Tiller c/w PTO
1 F0415 Deck Assembly
OPTIONS
F9415 Parking Jack w/Mounting Plate
-35-
 Loading...