

Page 1

INSTRUCTIONS
AND
PARTS MANUAL
UNIVERSAL
BUG-O-MATIC
Please record your equipment identication information below for future reference. This information can be
found on your machine nameplate.
Model Number
Serial Number
Date of Purchase
Whenever you request replacement parts or information on this equipment, always supply the information you
have recorded above.
LIT-BUG-O-MATIC-IPM-0415
Bug-O Systems is guided by honesty, integrity and
ethics in service to our customers and in all we do.
A DIVISION OF WELD TOOLING CORPORATION
280 TECHNOLOGY DRIVE CANONSBURG, PENNSYLVANIA 15317-9564 USA
PHONE: 412-331-1776 http://www.bugo.com FAX: 412-331- 0383
Page 2

SAFETY
PROTECT YOURSELF AND OTHERS FROM SERIOUS INJURY OR DEATH. KEEP
CHILDREN AWAY. BE SURE THAT ALL INSTALLATION, OPERATION, MAINTENANCE
AND REPAIR PROCEDURES ARE PERFORMED ONLY BY QUALIFIED INDIVIDUALS.
MOVING PARTS can
ELECTRIC SHOCK CAN KILL.
cause serious injury.
1) The equipment is not waterproof. Using
the unit in a wet environment may result
in serious injury. Do not touch equipment
when wet or standing in a wet location.
2) The unused connectors have power on
them. Always keep the unused
connectors covered with the supplied
protective panels. Operation of the
machine without the protective panels
may result in injury.
3) Never open the equipment without rst
unplugging the power cord or serious
injury may result.
4) Verify the customer supplied power
connections are made in accordance
with all applicable local and national
electrical safety codes. If none exist, use
International Electric Code (IEC) 950.
5) Never remove or bypass the equipment
power cord ground. Verify the equipment
is grounded in accordance with all
applicable local and national electrical
safety codes. In none exist, use
International Electric Code (IEC) 950.
1) Never try to stop the pinion from
moving except by removing power or
by using the STOP control.
2) Do not remove any protective panels,
covers or guards and operate
equipment.
FALLING EQUIPMENT
can cause serious
personal injury and
equipment damage.
Faulty or careless user installation is
possible. As a result, never stand or
walk underneath equipment.
PLASMA CUTTING can
produce destructive High
Voltage at High Frequency.
1) If using plasma, see that the machine
as well as the plasma power source is
properly grounded.
READ INSTRUCTIONS.
Read the instruction manual before
installing and using the equipment.
2
2) Do not use older model plasma
machines meant for manual operation.
These can leak high frequency at high
voltages, which can cause dangerous
shock, as well as destroy control
circuits.
3) Read the instruction manual page on
plasma cutting carefully, and follow all
precautions.
Page 3

HIGH FREQUENCY WARNINGS
SPECIAL PRECAUTIONS ARE REQUIRED WHEN USING PLASMA,
TIG OR ANY WELDING PROCESS THAT USES HIGH FREQUENCY
TO STRIKE AN ARC.
WARNING: HIGH FREQUENCY CAN EFFECT MACHINE
OPERATION AND THEREFORE, WELD QUALITY.
Read the precautions below before installing and using the equipment.
PRECAUTIONS:
1) Some plasma or welding cables are strong sources of high frequency interference.
NEVER lay a plasma or welding cable across the controls of the machine.
2) Always physically separate the plasma or welding cable leads from the machine
cables. For example, the plasma or welding cable leads should NEVER be bundled
with a pendant cable or the machine power cord. Maximize the separation between
any machine cables and the plasma or welding cables.
3) Strictly follow the grounding procedures specied for the plasma or welding unit.
NOTE: Some plasma and welding units produce exceptionally large amounts of
high frequency noise. They may require a grounding rod be driven into the earth
within six feet (2 meters) of the plasma or welding unit to become compatible with
an automatic cutting or welding process.
4) If the high frequency is produced using a spark gap, adjust the points so the gap is
as small as possible. The larger the gap, the higher the voltage and the higher the
interference.
5) Some plasma or welding units will inject high frequency interference into the AC
power line. Use separate power line branches whenever possible to power the plasma
or welding source and the machine. Do not plug them into the same outlet box.
6) High frequency noise may enter the machine through the plasma or welding supply
remote contactor leads. Some plasma and welding sources can produce noise
spikes of up to several thousand volts. These sources are not compatible with
automated cutting and welding equipment. It is recommended that the remote
contactor leads on these plasma or welding sources not be connected to the machine.
An alternate solution is to purchase a separate remote contactor isolation box.
3
Page 4

UNIVERSAL BUG-O-MATIC
INSTRUCTIONS AND PARTS MANUAL
TABLE OF CONTENTS
PAGE
5 ..........Technical Data
6 ..........Pendant Control Functions
7 ..........Universal BUG-O-Matic BUG-5700 Parts List
8 ..........BUG-5710: Drive Box Assembly
9 ..........BUG-5720: Cover Assembly, 120 Vac
1 0 .........BUG-5715: Base Assembly
11 .........BUG-5725: Cross Drive Assembly
12 .........Drive Unit Wiring Diagram
13 .........Electrical Component Chart Drive Unit
14 .........Wiring Harness BUG-5726 Diagram
1 5 .........PCB-5700: Drive Unit Interconnect PC Board
16 .........PCB-5700: Wiring Diagram
17 .........BUG-5775: Control Pendant / Exploded View
18 .........BUG-5775: Control Pendant / Parts List
1 9 .........Control Pendant, BUG-5775 Wiring Diagram
2 0 .........BUG-5751 Pendant Cable Wiring Diagram
21 .........Rail Options
2 5 .........Carriage Options
28 .........Accessories
2 9 .........Service Procedure / Installing The Cross Rail (WPD-1150)
31 .........Warranty
4
Page 5

UNIVERSAL BUG-O-MATIC
TECHNICAL DATA
Power BUG-5700 120 VAC/50-60/1
Requirements: BUG-5702 240 VAC/50-60/1
BUG-5704 42 VAC/50-60/1
Linear Speed: 3-70 ipm (75-1750 mm/min)
Weave Speed: 4-100 ipm (100-2500 mm/min)
Dwell Time: 0-3 seconds, left and right
Weave Width: 0.1 to 2" (2.5-50 mm)
Steering: 2" (50 mm) left and right of center
4" (100 mm) total
Load Capacity: 30 lbs (14 kg)
Net Weight: 22 lbs (10 kg)
The machine can be mounted on MPD-1065 Releasable Carriage, MPD-1055 18" Carriage, FMD-1100
Carriage for Hi-Flex rail, or on BUG-5910 Tube Carriage. By simply changing the carriage, the machine
will run on any BUG-O rail - Aluminum Rigid, Semi-Flex, Bent Rigid, or Hi-Flex . The chart below shows
which types of rail are compatible with each carriage. See pages 21- 27 for details.
RAILS
CARRIAGES
Aluminum Rigid Rail
Bent Rigid Rail
ARR-1080 & ARR-1085
Hi-Flex Rail
BRR-1180 & BRR-1210
Semi-Flex Rail
FMD-1050
AFR-3000
BUG-5910 Tube Carriage X X X
FMD-1100 Hi-Flex Carriage X
MPD-1055 18" Carriage X
MPD-1065 Releasable Carriage X X
The power Supply transformer is contained inside the unit. Pendant control of all functions is provided, including:
weave speed and amplitude, and centerline steering,
left and right dwell time,
tractor speed and direction,
weld contact on/off.
5
Page 6

PENDANT CONTROL FUNCTIONS
B
A
D
G
C
E
F
H
I
J
BUG-5775 Pendant Control
A. Weave Speed
B. Steering, 2" (50 mm) left or right from center
C. Amplitude, 0-2" (50 mm)
D. Dwell Left, 0-3 sec.
E. Dwell Right, 0-3 sec.
F. Weld Contact Switch
G. Mode Selector Switch
H. Digital Display, Tractor Speed
I. Forward / Off/ Reverse, Tractor Travel
J. Tractor Speed
6
Page 7

UNIVERSAL BUG-O-MATIC BUG-5700 PARTS LIST
8
9
2
6
1
4
ITEM QTY PART NO. DESCRIPTION
1 1 BUG-2975 Cable Mounting Assembly
2 2 BUG-5462 Right Angle Clamp
3 1 BUG-5710 Drive Box 120 V
1 BUG-5712 Drive Box 240 V
1 BUG-5714 Drive Box 42 V
4 1 BUG-5751 Pendant Cable
5 1 BUG-5775 Pendant Control
6 1 BUG-9180-6 Rod, 6" (152 mm)
7 1 BUG-1853 Machined Rack, 7.5"
8 1 BUG-5455 Gun Mounting Group
9 1 BUG-5965 Handle Assembly
3
7
2
5
7
Page 8

BUG-5710: DRIVE BOX ASSEMBLY
6
6
6
7
7
4
7
7
1
7
7
7
7
7
7
2
6
6
6
7
7
5
3
ITEM QTY PART NO. DESCRIPTION
1 1 BUG-5707 Left Side Panel
2 1 BUG-5708 Right Side Panel
3 1 BUG-5715 Base Assembly
4 1 BUG-5720 Cover Assembly 120 V
5 1 BUG-5725 Cross Drive Assembly
6 6 FAS-0114 Pan Hd Scr 6-32" x 3/8"
7 12 FAS-0124 Pan Hd Scr 8-32" x 3/8"
8
Page 9

BUG-5720: COVER ASSEMBLY, 120 VAC*
12
Included
w/item #6
14
17
20
13
8
5
11
9
4
1
15
2
10
13
16
16
15
Included
w/item #6
13
7
19
3
6
18
ITEM QTY PART NO. DESCRIPTION
1 1 ARM-2279 Toggle Switch
2 1 BUG-1393 Volt trap 120 VAC
3 1 BUG-1770-PW Motor control board
4 1 BUG-2923 Circuit Breaker 0.7 amps
5 1 BUG-2924 Reset Button Seal
6 1 BUG-5218 Transformer 117 VAC
7 1 BUG-5721 Cover panel anodized
N/S 1 BUG-5726 Wire harness
8 1 BUG-9445 Power Cord
9 1 BUG-9446 Cord Grip
10 1 BUG-9487 Cable connector 2-T
11 1 BUG-9884 On-Off switch plate
12 1 CAS-1770 Speed Control
13 8 FAS-0114 Pan Hd Scr 6-32 x 3/8"
14 1 FAS-0124 Pan Hd Scr 8-32 x 3/8"
15 8 FAS-0205 Rnd Hd Scr 4-40 x 1/2"
16 8 FAS-1305 Hex nut 4-40
17 1 FAS-1320 Hex nut 8-32
18 1 FAS-1330 Hex nut 10-24
19 1 PCB-5700 Interconnect board
20 1 WAS-0221 #8 INT Star lock washer
* For 240V and 42V machines, refer to Electical Component List on pg 13.
9
Page 10

BUG-5715: BASE ASSEMBLY
ITEM QTY PART NO. DESCRIPTION
1 1 BUG-5709 Base Plate
2 1 BUG-5716 Clutch Assembly
3 2 BUG-5723 Attachment Bar
4 4 FAS-0557 Soc Hd Cap Scr 1/4-20 x 3/4"
5 4 FAS-0825 Flt Hd Slot Scr 8-32 x 1/2"
6 8 FAS-0923 Flt Hd Soc Scr 8-32 x 5/16"
7 1 GOF-3014 Drive Pinion w/ Key & Set Scr
8 1 MPD-1015 Gear Motor (60:1)
9 1 WPD-1013 Rubber Ring Gasket
10 1 WPD-1045 Brake Assembly
10
9
8
2
6
1
7
3
5
6
4
10
Page 11

BUG-5725 CROSS DRIVE ASSEMBLY
1
3
8
6
14
5
10
11
12
13
ITEM QTY PART NO. DESCRIPTION
1 1 BUG-5590 Gear motor
2 1 BUG-5591 Pinion
3 3 BUG-5592 Spacer
4 4 BUG-5594 Slt Pan Hd Scr 3mm x 18mm
5 1 BUG-5595 Pot/ Gear Assembly
6 2 BUG-5670 Adj. Leg & Wheel Assembly
7 2 BUG-5675 Fixed Leg & Wheel Assembly
8 1 BUG-5728-A Cross Drive Support
9 1 WPD-1164 Arm Stop
10 1 FAS-0539 Screw, 10-24 x 1"
11 1 WPD-1150 Cross Arm, 15.50"
12 2 WAS-0230 #10 SAE Flat Washer
13 2 FAS-0537 Screw, 10-24 x 3/4"
14 1 WPD-1177 Post
9
7
4
4
2
5
11
Page 12

BUG-655X DRIVE UNIT / WIRING DIAGRAM
12
Page 13

BUG-655X DRIVE UNIT / ELECTRICAL COMPONENT CHART
ITEM DESCRIPTION
BUG-5990
120 VAC
BUG-5992
240 VAC
BUG-5994
42 VAC
PC Power Cord BUG-9445 GOF-3115 BUG-9442
CB Circuit Breaker BUG-2923 BUG-2952 BUG-2933
TR Transformer BUG-5218 BUG-5231 BUG-5232
SW Toggle Switch ARM-2279
IB Interconnect Board PCB-5700
CN1 Connector, to Pendant BUG-5527
CN2 Connector, to Weld Contact BUG-1034
MT Tractor Motor MPD-1015
BR Brake WPD-1045
MW Weave Motor BUG-5590
MC1 Motor Control, Tractor BUG-1770-UB
MC2 Motor Control, Weave CAS-1770
SVP Servo-Pot BUG-5240
13
Page 14
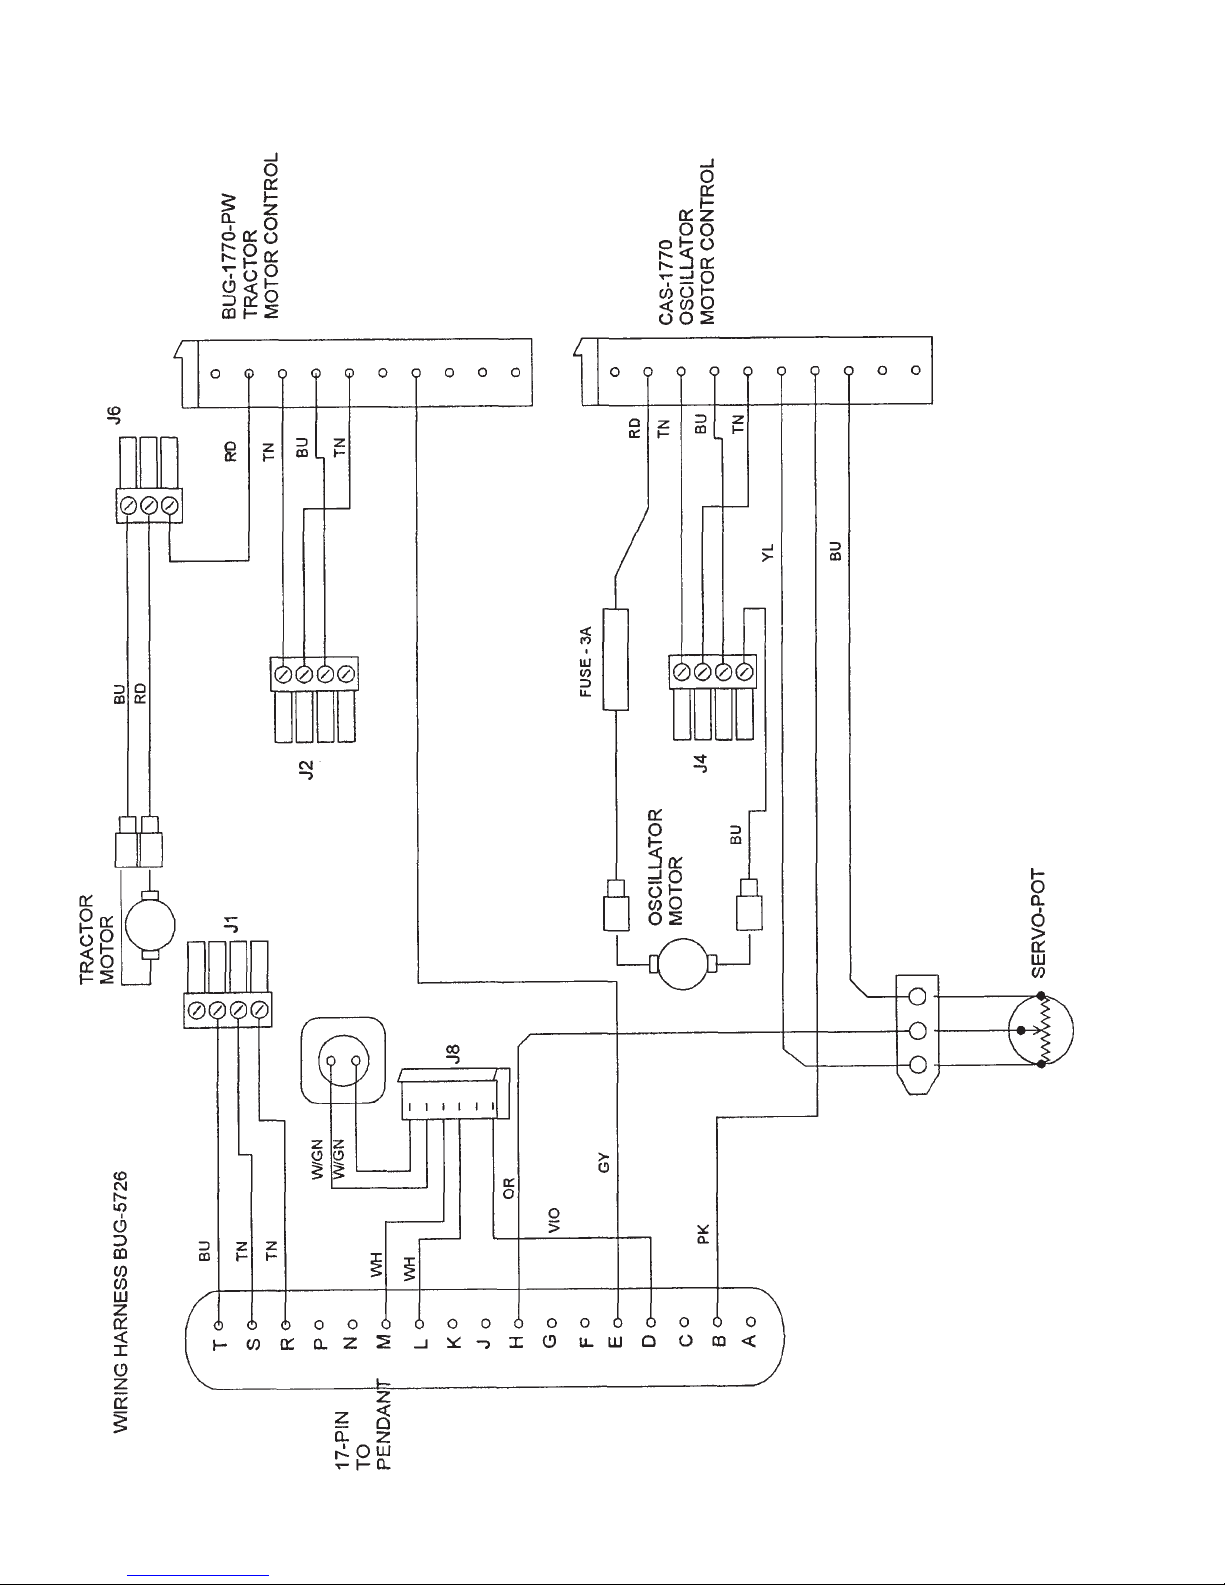
BUG-5726 WIRING HARNESS / WIRING DIAGRAM
14
Page 15

PCB-5700 DRIVE UNIT INTERCONNECT PC BOARD
15
Page 16

PCB-5700 / WIRING DIAGRAM
16
Page 17
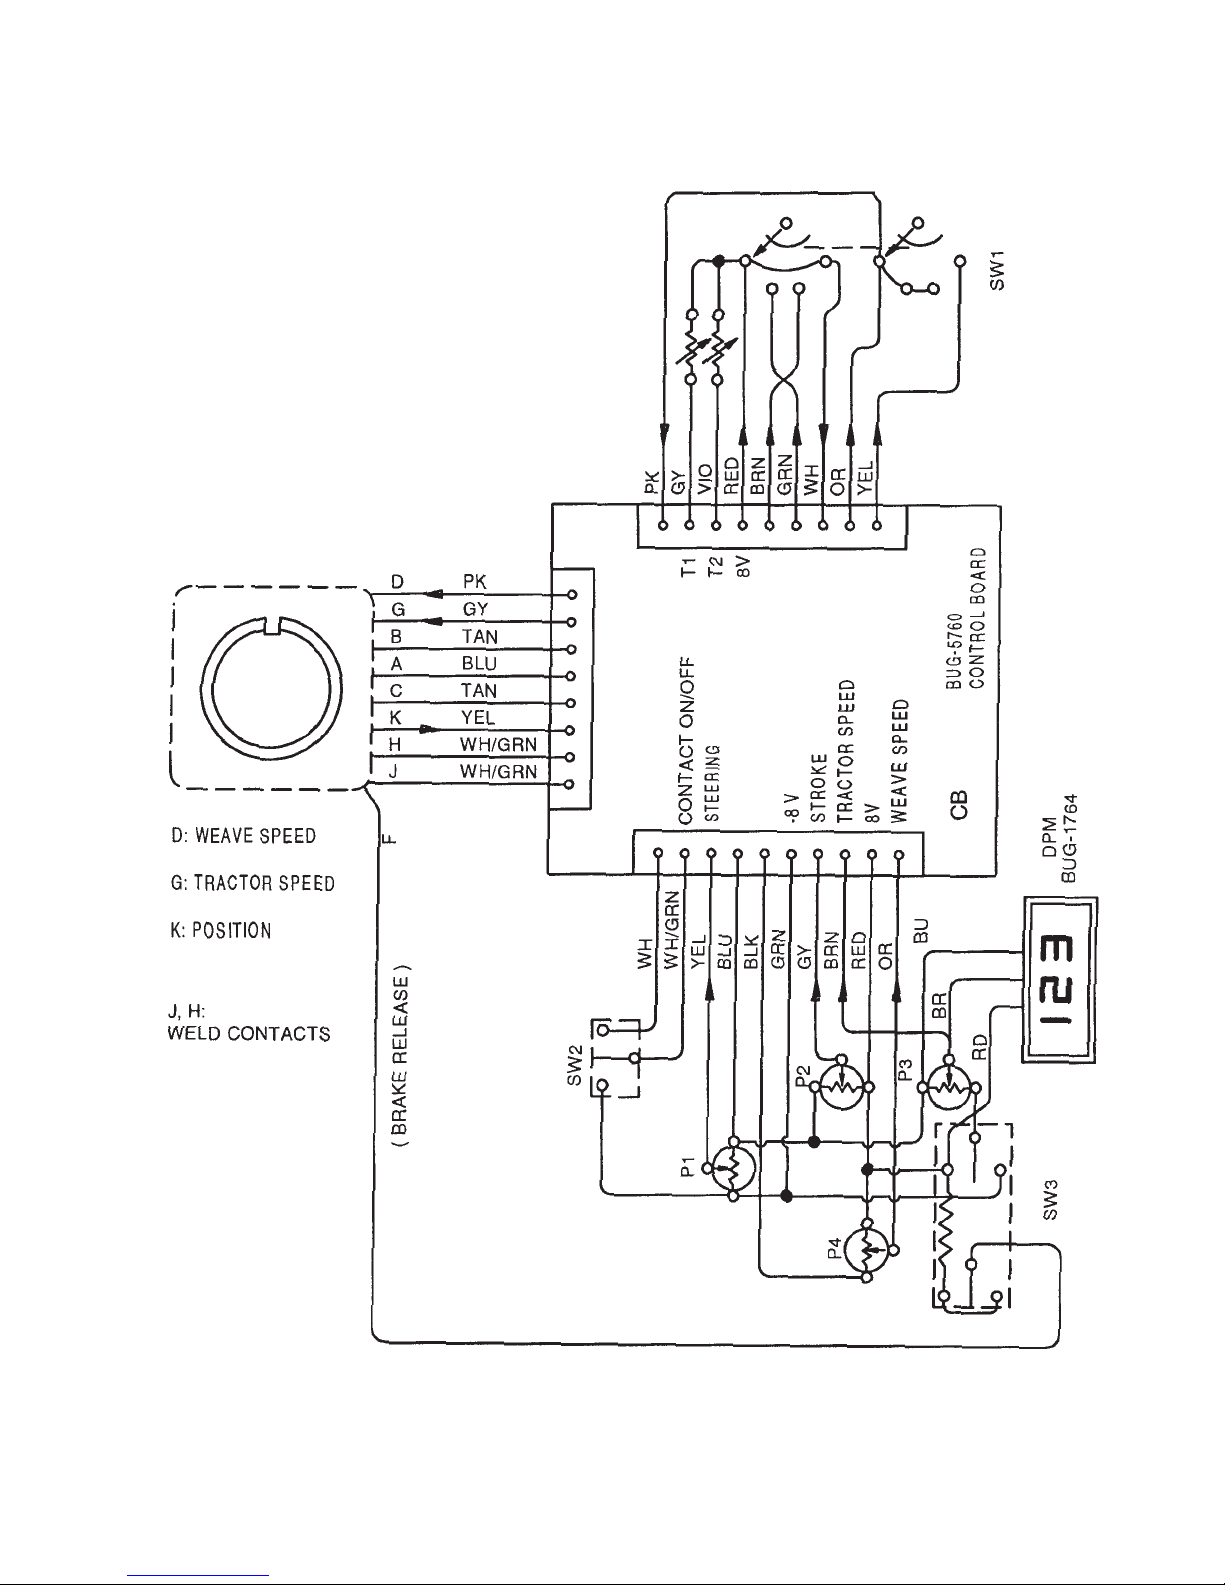
BUG-5775 CONTROL PENDANT / WIRING DIAGRAM
17
Page 18

BUG-5775 CONTROL PENDANT / EXPLODED VIEW
11,16,17
6,11,16
1,9,11
2,19,23
1,11,16
21,22,25
6,11,16
18
20
8
11,16,17
10
11
13
7
4,10
15
12
18
20
14
20
24
3
5
Page 19

BUG-5775 CONTROL PENDANT / PARTS LIST
ITEM QTY PART NO. DESCRIPTION
1 2 BUG-1562 Potentiometer, 10k, 3 turn
2 1 BUG-1764 Digital Meter
3 1 BUG-2034 Teon Washer
4 1 BUG-2255 Toggle Switch, DPDT, On-Off-On
5 1 BUG-2436 Knob Screw
6 2 BUG-5054 Potentiometer, 500 K
7 1 BUG-5363 Rotary Switch, 3-P, 4-position
8 1 BUG-5687 Panel Connector, 10-T, F
9 1 BUG-5757 Knob, Large
10 2 BUG-5758 Toggle Switch Seal
11 7 BUG-5759 Pot Shaft Seal
12 1 BUG-5760 Control Board
13 1 BUG-5761 Toggle Switch, SPDT, On-On
14 1 BUG-5772 Rear Panel
15 1 BUG-5773 Front Panel
16 5 BUG-9621 Knob
17 2 BUG-9677 Potentiometer, 10 K
18 1 BUG-9694 Knob (Pointer)
19 4 FAS-0104 Pan Hd Scr, 4-40 x 3/8 L
20 8 FAS-0114 Pan Hd Scr, 6-32 x 3/8 L
21 4 FAS-0205 Rnd Hd Scr, 4-40 x 1/2 L
22 4 FAS-1305 4-40 Hex Nut
23 1 MDS-1011 Display Bezel
24 1 PAN-1033 Rod Clamp
25 4 WAS-0201 Star Washer #4
19
Page 20

BUG-5751 PENDANT CABLE / WIRING DIAGRAM
A __________________ T Common
B __________________ S
C __________________ R
D __________________ B Osc. Speed
E __________________ P (Osc. Dir)
F __________________ D Brake Release
G __________________ E Tractor Speed
H __________________ L Weld Contact
J ___________________ M Weld Contact
K __________________ H Gear Pot.
20
Page 21

RAIL OPTIONS
With a simple carriage change, the Universal Bug-O-Matic with AHC can be made compatible with
any BUG-O rail. A brief description of each BUG-O rail type is provided below. Contact your BUG-O
representative for more information about these rails and the mounting options available.
ARR-1080 ALUMINUM RIGID RAIL / CROSS SECTION / EXPLODED VIEW /
PARTS LIST
ALUMINUM RIGID RAIL is a rigid channel section made of high quality alloy to machine tool tolerance
as in the section view below. A machined gear rack is mounted on the rail, with which the drive pinion
of the carriage meshes. The wheels of the carriage travel in opposed grooves at either side of the rail,
locking the carriage to the rail.
Heavy duty [H.D] aluminum four-legged rigid rail is supplied in two lengths:
ARR-1080 [93-1/2" (2.37 m)] called 8' (2.37 m) rail
ARR-1085 [46-1/2 (1.18 m)] called 4' (1.18 m) rail.
Extra Heavy Duty aluminum four-legged rigid rail is also
available:
ARR-1250 [93-1/2" (1.18 m)] called 8' (2.37 m) rail
ARR-1200 [46-1/2" (1.18 m)] called 4" (1.18 m) rail.
5
ARR CROSS SECTION VIEW
A
C
D
B
A 2.75" (70 mm)
B 4.0" (102 mm)
C 0.375" (9.5 mm)
D 0.875" (22 mm)
3
4
1
2
6
PARTS LIST
ITEM PART NO. DESCRIPTION
1 ARR-1006 Rack
2 ARR-1027 Splicer Bar
3 ARR-1028 Carriage Bolt
4 ARR-1081 Rail Extrusion
5 FAS-0375 Screw, Hex Hd Cap 5/16-18
6 FAS-1370 Hex Nut 5/16-18
RAIL FOR LONGER SPANS:
When unsupported rail paths longer than nominal 8' (2.37 m) rail are required, multiple sections of standard rail are mounted on plate, I beam, channel or box sections.
21
Page 22

BRR-1180 BENT RIGID RAIL / CROSS SECTION / APPLICATION VIEW /
PARTS LIST
BENT RIGID RAIL (BRR) is a rigid section of high quality alloy bent for circumferential applications. A
machined gear rack is mounted on the rail, with which the pinion of the drive unit meshes, providing
positive drive in all directions. The wheels of the carriage travel in opposed grooves at either side of the
rail, securing the carriage to the rail.
The rail can be ordered as a complete ring (BRR1210-__) or as individual sections (BRR-1180). When
ordering, specify the work diameter (inside or outside),
method of mounting and if a complete ring is required.
On larger diameters, rail can be “leapfrogged” around
the vessel to reduce the quantity needed. Maximum
section length is 80" (2 m).
PARTS LIST
PART NO. QTY DESCRIPTION
ARR-1002 1 Rack
ARR-1027 2 Splicer Bar
ARR-1028 2 Carriage Bolt
ARR-1044-E 1 Rail Extrusion
FAS-0375 2 Screw, Hex Hd Cap 5/16-18
FAS-1370 2 Hex Nut 5/16-18
Note: Adjustable magnet support legs (ARM-2480),
shown above, are sold separately.
BRR CROSS SECTION VIEW
A
C
D
B
A 2.75" (70 mm)
B 4.0" (102 mm)
C 0.375" (9.5 mm)
D 0.875" (22 mm)
22
Page 23

AFR-3000 SEMI-FLEX RAIL / CROSS SECTION / EXPLODED VIEW / PARTS LIST
SEMI-FLEX RAIL (AFR) can be bent inside or outside to a minimum radius of 15' (5 m) without
permanent deformation. A splice plate is mounted at one end of each ex-rail section for connecting
multiple sections of rail. A rack adjusting tool is supplied with every two (2) rails, for moving the rack on
the rail. Available in 8' ( 2.37 m) lengths. Use at least four (4) attachments - vacuum cups or magnets on each section of Semi-Flex Rail.
AFR CROSS SECTION VIEW
A
Minimum Radius
15' (5 m)
8'
(2.37 m)
8'
(2.37 m)
B
A 2.75" (70 mm)
B 4.0" (102 mm)
C 0.33" (8.5 mm)
D 0.500" (12.7 mm)
C
D
2
4
1
5
8
7
6
3
PARTS LIST
ITEM PART NO. DESCRIPTION
1 AFR-1015 Spacer Washer
2 AFR-2001 Rack Adjuster Tool
3 AFR-3002 Splice Plate
4 AFR-3006 Rack
5 AFR-3009 Extrusion, Punched
6 FAS-0955 Screw, Flt Hd Soc 1/4-20
7 FAS-1446-HW S.T. Slt. Hx. 10-32
8 WAS-0230 #10 Washer
23
Page 24

FMD-1050 HI-FLEX RAIL / CROSS SECTION / ASSEMBLED VIEW / PARTS LIST
HI-FLEX RAIL is made from heavy duty, wear resistent stainless steel with steel rack. The rail comes
in 57.7" (1.47 m) lengths and can be held in place with vacuum cups or magnets. This rail can be used
in straight applications or for bends down to 40" (1 m) radius, in or out. Hi-Flex rail can be used on
compound curvatures and can be twisted 10
o
per 24" (600 mm) of length.
Minimum
Radius
40" (1 m)
Minimum
Radius
40" (1 m)
FMD CROSS SECTION VIEW
A
B
C
A 3.995" 102 mm
B 0.080" 2 mm
C 0.250" 6.4 mm
3,5
1
4
6
24
2,7
PARTS LIST
ITEM PART NO. DESCRIPTION
1 FAS-0376 Screw, Hex Hd Cap 5/16-18
2 FAS-1370 Hex Nut 5/16-18
3 FAS-1444 Screw, Phil Pan Hd 10-32
4 FMD-1051 Track
5 FMD-1052 Rack Section, 3 Teeth
6 FMD-1053 Flex-Rail Splice Plate
7 WAS-0250 Washer, SAE 5/16
Page 25

CARRIAGE OPTIONS
The Universal Bug-O-Matic with AHC can be used with many BUG-O carriages, allowing it to be used
on any BUG-O rail. Each carriage is made of high-strength, lightweight aluminum alloy, with wheels
that ride in or along the rail to provide smooth, accurate travel. On each carriage, one set of wheels is
adjustable. All wheels contain permanently lubricated, sealed bearings and their steel components are
plated to resist corrosion.
MDP-1065 RELEASABLE CARRIAGE / EXPLODED VIEW / PART LIST
The MPD-1065 Releasable 12" Carriage has a carrying capacity of 100 lb (45 kg) and can be
placed anywhere on the rail by using the knob located on the side of the carriage, which engages or
disengages the wheels from the rail. Use with BUG-O Aluminum Rigid or Semi-Flex Rails.
6
5
4
ITEM QTY PART NO. DESCRIPTION
1 2 BUG-1984 External Adj. Leg & Wheel Assembly
2 2 FAS-0545 Screw, Soc Hd Cap 10-32 x 1/2
3 2 MPD-1045 Fixed Leg & Wheel Assembly
4 1 MPD-1049 Handle, Black
5 1 MPD-1059 Knob Screw (Included w/carriage)
6 1 MPD-1066 Carriage
2
3
MPD-1055 CARRIAGE 18" / EXPLODED VIEW / PART LIST
The 18" Carriage provides an extended deck for mounting accessories, wire feeder, etc. and has a
carrying capacity of 150 lb. (67.5 kg). Use with BUG-O Aluminum Rigid Rail.
5
1
ITEM QTY PART NO. DESCRIPTION
1 3 BUG-1984 External Adj. Leg & Wheel Assembly
2 3 BUG-2956 Fixed Leg & Wheel Assembly
3 4 FAS-0545 Screw, Soc Hd Cap 10-32 x 1/2
4 2 MPD-1049 Handle, Black
5 1 MPD-1055-PNT Carriage 18"
4
1
3
2
25
Page 26
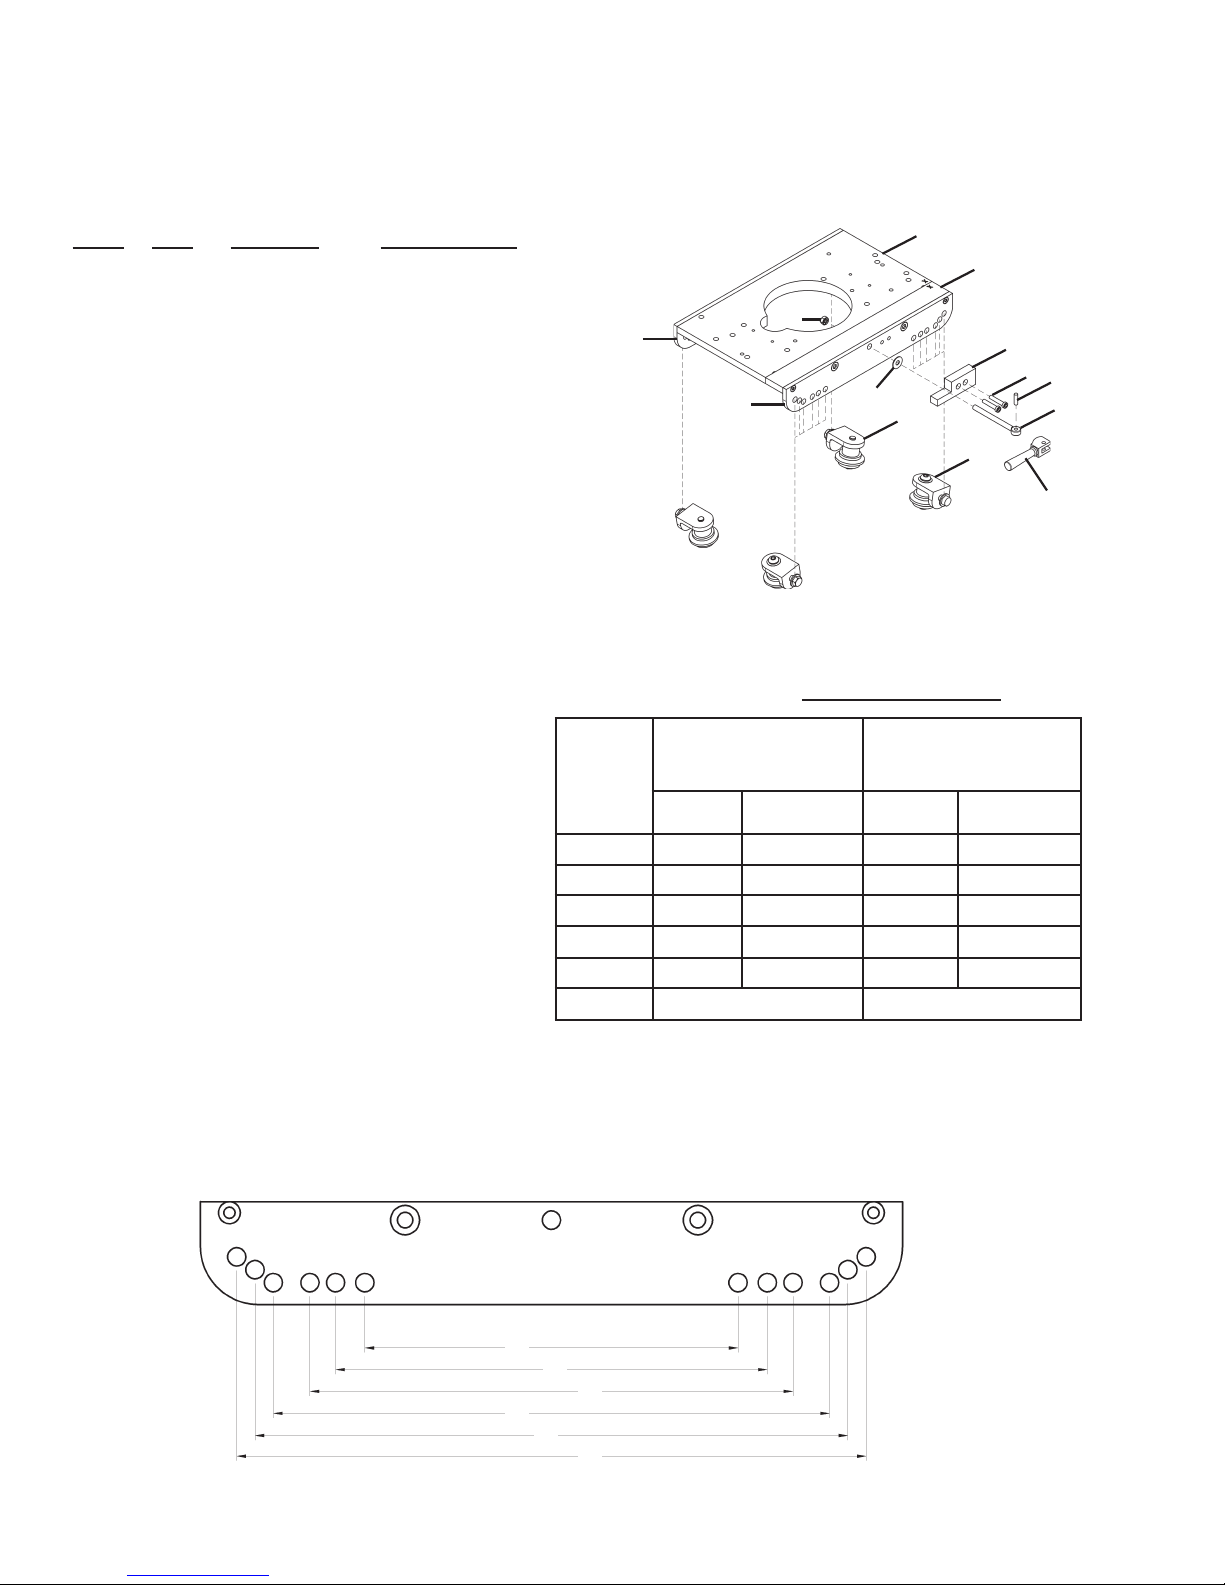
BUG-5960 TUBE CARRIAGE / EXPLODED VIEW / PARTS LIST
The Tube Carriage features a split carriage body for quick and easy placement on the rail. It has a carrying
capacity of 100 lb (45 kg). The carriage also offers six (6) wheel positions for circumferential applications
over a wide range of diameters. Use with BUG-O Aluminum Rigid, Semi-Flex or Bent Rigid Rails.
ITEM QTY PART NO DESCRIPTION
1 1 BUG-5908A Plate Assembly (Incl. Spring x2
& Dowel Pin x2, not shown)
2 1 BUG-5907 Skirt, Right
3 1 BUG-5964 Skirt, Left
4 2 BUG-5918 Fixed Wheel Assembly
5 2 BUG-5920 Adj. Wheel Assembly
6 1 BUG-5961 Modied Cam Handle
7 1 BUG-5962 Cam Stop Block
8 1 BUG-5963 Swing Eye Bolt
9 1 BUG-5916 Dowel Pin
10 1 ARM-2316 Thrust Race
11 1 FAS-1353 Hex Nut, 1/4-20
12 2 FAS-0537 Screw, Soc Hd Cap 10-24 x 3/4
2
11
3
10
1
1
7
12
9
4
5
8
6
INSTALLING THE BUG-5960 DRIVE CARRIAGE
1. Select the correct pair of holes on each side of the carriage for the rail diameter being used (see
chart). If the wheels are not attached to the correct set of holes, remove them and bolt the wheel
brackets in selected holes. Tighten the bolts until the brackets are snug, but still free to rotate.
2. Open the cam handle to separate the
carriage. On the drive unit, loosen and turn
the clutch knob counterclockwise to declutch
the drive pinion.
3. Place the carriage on the rail with the wheels
in the rail grooves. Close the cam handle
and move the carriage back and forth a
few inches. The wheels on their mounting
brackets will align themselves correctly in
the rail grooves.
4. Verify that wheels are properly aligned, then
tighten the wheel mounting bolts
to lock them in position. Rotate the clutch
knob clockwise to engage the drive pinion
with the rack.
5. Verify that pinion is properly engaged in the rack. The correct wheel position will provide a minimum
of 1/8" engagement (approx. 3 mm) between the drive pinion and the gear rack. Note: For some rail
or pipe sizes, the pinion height may need to be adjusted.
Carriage
Wheel
Hole Set
A 20 - 25 500 - 635 9 - 21 230 - 530
B 23 - 35 585 - 890 12 - 31 300 - 790
C 30 - 44 760 - 1120 18 - 40 455 - 1015
D 41 - 60 1040 - 1525 29 - 54 735 - 1375
E 75 - 174 1905 - 4420 64 - 170 1625 - 4320
F at rail at rail
Note: Chart values are for reference only
BRR-1210
Pipe OD
Rail ID
in mm in mm
26
A
B
C
D
E
F
Page 27

FMD-1100 HI-FLEX CARRIAGE / EXPLODED VIEW / PARTS LIST
The Hi-Flex Carriage can be placed anywhere along the track using the quick release knob on the
side of the carriage to engage/disengage the wheels from the track. Use with BUG-O Hi-Flex Rails.
3
4
2
5
1
ITEM QTY PART NO. DESCRIPTION
1 1 BUG-2708 Clamp
2 1 FMD-1060 FMD Clamp Block
3 1 FMD-1062 Carriage (Includes Items 4, 5 & 6)
4 1 FMD-1068 Fixed Wheel Mounting Block
5 1 FMD-1069 Adj. Wheel Mounting Block
6 1 FMD-1072 Knob
6
27
Page 28

ACCESSORIES
BUG-6553 RETROFIT CAS HALL EFFECT FOR BUG-5700 TO BUG-5704
AUTOMATED HEIGHT CONTROL
The BUG-6553 Retrot allows your Universal Bug-O-Matic to have Automated Height Control (AHC)
features. The AHC controls the welding tip to work distance and maintains a constant weld current, or
uniform weld penetration. AHC senses the actual weld current, compares this value to the setpoint, and
raises or lowers the welding gun accordingly. Controls for the AHC are self contained and its drives are
independent from those of the drive unit. AHC features a built-in time delay after the arc is struck, and
automatically shuts off when current drops too low (generally below 60 amp). The operator can temporarily override AHC using the manual jog switch while welding. AHC resumes as soon as the jog switch
is released. To disable the automated height control, move the Auto/Manual switch on the CAS Electronics Box (CAS-1555) to MANUAL.
NOTE: AHC is designed to work with the welding gun above the work piece. Contact Bug-O Systems
for other congurations.
28
Page 29
SERVICE PROCEDURE: INSTALLING THE CROSS ARM (WPD-1150)
OPTION 1 - In the Field
NOTE: Read and understand whole procedure before attempting.
Tools required - ash light or well lighted area, marking pen, tape measure or other measuring device.
1. Place machine on blocks to protect the drive pinion (underneath).
2. Turn machine OFF and disconnect from power supply.
3. Remove the Arm Stop (WPD-1164) and the Height Slide Assembly (CAS-1500).
Encoder
Gear
4. Remove the existing Cross Arm (WPD-1150). Manually
push/pull the Cross Arm from the machine
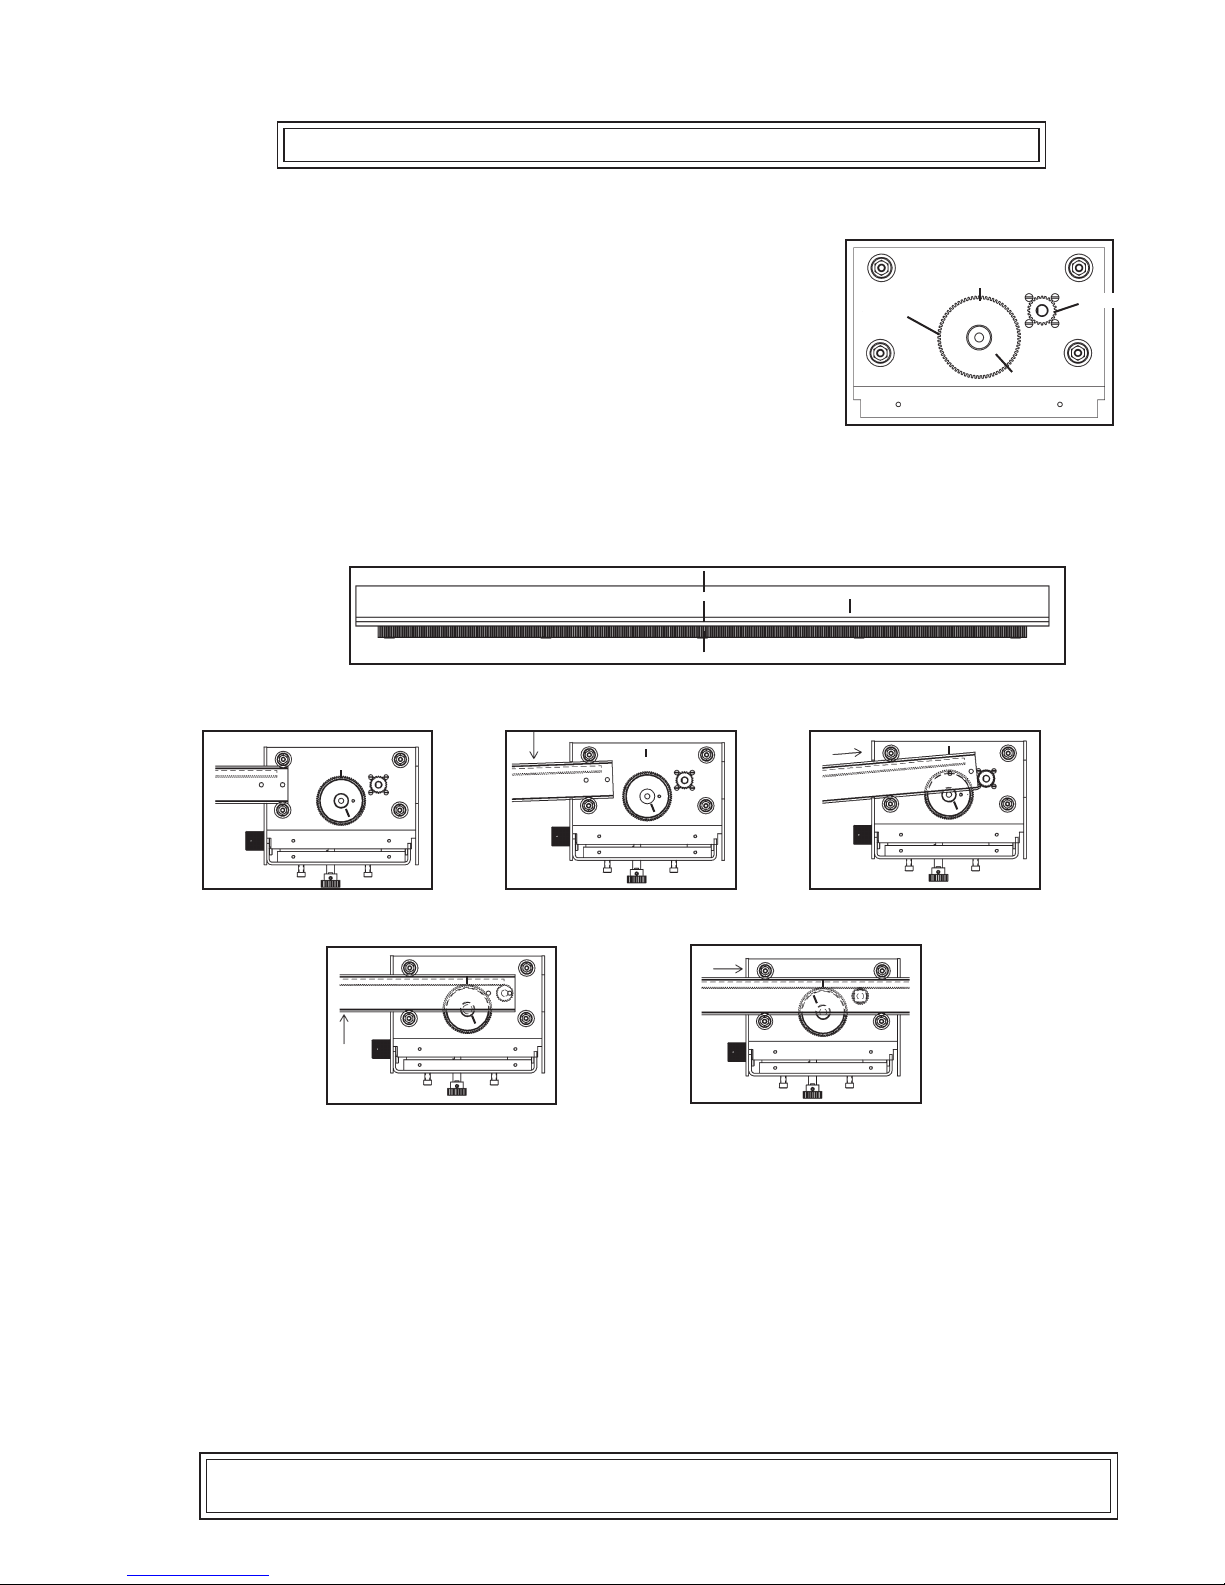
5. Looking from the clutch side of the drive unit, locate the reference mark on the mounting plate (“A” in Figure 1) and the
reference mark on the face of the brass encoder gear (“B” in
Figure 1).
Figure 1: Proper positioning of reference
marks A and B before the V-guide is inserted.
6. As shown in Figure 1, position reference “B” at approximately the 5 o’clock position.
7. Make a mark on the cross arm 3 5/8" right of center (“C” in Figure 2). This will serve as a reference
line for centering the cross arm.
A
Pinion
B
C
L
Figure 2: Placement of reference mark C on the V-guide.
C
8. Inserting from the brass gear side, install the Cross Arm, as shown in gures 3-7.
A
B
Figure 3: Insert Cross
Arm into guide wheels.
Figure 6: When arm is ready to
mesh with pinion, push up on arm.
Figure 4: Push down on
arm to tilt V-guide up.
A
B
A
B
Figure 5: Push cross arm into
machine. Avoid brass gear.
A
B
Figure 7: Push cross arm
in until it is centered.
A
B
Be careful not to bump or mesh brass gear and V-guide rack until V-guide is ready to engage pinion
also. Run the Cross Arm until it is centered (align reference mark “C” with face of side plate). Make
sure the brass gear teeth and the V-guide teeth do not skip.
9. If necessary, connect the Pendant Control (BUG-5755) to the Drive Unit (BUG-5980) using the Pendant Control Cable (BUG-5551-10).
10. On the control pendant, center steering control (1 1/2 turns from either extreme).
11. Connect the machine to a power supply of the proper voltage and turn machine ON to verify that
Cross Arm is centered. The centered V-Guide should stick out of the machine by about 4.25 in (110
mm) on each side.
12. If satised with position of Cross Arm, install Arm Stop and Height Slide Assembly; else repeat steps
4-11.
Note: Reference mark B will no longer apply if the potentiometer was changed in service or
the cross arm was previously centered using the electrical method on page 31.
29
Page 30

SERVICE PROCEDURE: INSTALLING THE CROSS ARM (WPD-1150)
OPTION 2 - The Electrical Way
Tools required: Ohm meter rated to at least 5k Ohm, at screw driver, 3/32" hex key, tape measure or
other measuring device.
1. Place the machine on blocks to protect the pinion (underneath).
2. Remove Right Side Panel (BUG-5708) from the clutch-side of the Drive Box (BUG-5710).
3. If necessary, install the Cross Arm (WPD-1150). Insert from the brass gear side. Make sure the
brass gear teeth and the V-guide teeth do not skip.
4. Center the cross arm. The cross arm will stick out of the machine by 4.25 in (110 mm) on side
when centered.
5. Loosen only the set screw on the gear side of the coupling between the potentiometer and the
brass gear. Refer to gure 8.
6. Unplug wire harness leading from Potentiometer.
7. Using Ohmmeter, measure resistance across Node 1 and Node 3 (refer to gure 9). This should
measure approximately 5000 ohms.
8. Rotate potentiometer until resistance across Node 1 and Node 2 is equal to resistance across
Node 2 and Node 3. This should be approximately 2500 ohms. The potentiometer is now centered.
9. While being careful not to move the potentiometer, secure the coupling to the gear shaft.
10. Plug wire harness from potentiometer into proper terminal on the speed control board (CAS-1770).
11. Connect to power supply of appropriate voltage, turn machine ON and verify that Cross Arm is
centered.
12. Install Right Side Panel.
13. If necessary, install the Arm Stop (WPD-1164) and gun mounting hardware to the ends of the
cross arm.
Brass
(Encoder)
Gear
2
3
1
Potentiometer
Figure 8: Simplied side view of machine with right cover
30
Coupling
(BUG-5708) removed.
Figure 9: Potentiometer
nodes used in Steps 7 & 8.
Page 31

WARRANTY
Model _____________________________
Limited 3-Year Warranty
For a period ending one (1) year from the date of invoice, Manufacturer warrants that any new machine or
part is free from defects in materials and workmanship and Manufacturer agrees to repair or replace at its
option, any defective part or machine. HOWEVER, if the invoiced customer registers the Product Warranty
by returning the Warranty Registration Card supplied with the product within 90 days of the invoice date, or
by registering on-line at www.bugo.com, Manufacturer will extend the warranty period an additional two (2)
years which will provide three (3) total years from the date of original invoice to customer. This warranty does
not apply to machines which, after Manufacture’s inspection are determined by Manufacturer to have been
damaged due to neglect, abuse, overloading, accident or improper usage. All shipping and handling charges
will be paid by the customer.
The foregoing express warranty is exclusive and Manufacturer makes no representation or warranty (either
express or implied) other than as set forth expressly in the preceding sentence. Specifically, Manufacturer
makes no express or implied warranty of merchantability or fitness for any particular purpose with respect to
any goods. Manufacturer shall not be subject to any other obligations or liabilities whatsoever with respect to
machines or parts furnished by Manufacturer.
Manufacturer shall not in any event be liable to Distributor or any customer for any loss of profits, incidental or
consequential damages or special damages of any kind. Distributor’s or customer’s sole and exclusive remedy
against Manufacturer for any breach of warranty, negligence, strict liability or any other claim relating to goods
delivered pursuant hereto shall be for repair or replacement (at Manufacturer’s option) of the machines or parts
affected by such breach.
Serial No. __________________________
Date Purchased: ____________________
Where Purchased:___________________
Distributor’s Warranty:
In no event shall Manufacturer be liable to Distributor or to any customer thereof for any warranties,
representations or promises, express or implied, extended by Distributor without the advance written consent
of Manufacturer, including but not limited to any and all warranties of merchantability or fitness for a particular
purpose and all warranties, representations or promises which exceed or are different from the express limited
warranty set forth above. Distributor agrees to indemnify and hold Manufacturer harmless from any claim
by a customer based upon any express or implied warranty by Distributor which exceeds or differs from
Manufacturer’s express limited warranty set forth above.
HOW TO OBTAIN SERVICE:
If you think this machine is not operating properly, re-read the instruction manual carefully, then call
your Authorized BUG-O dealer/distributor. If they cannot give you the necessary service, write or phone
us to tell us exactly what difculty you have experienced. BE SURE to mention the MODEL and SERIAL
numbers.
31
 Loading...