

Page 1
A50-62113-00005
6262/6262-212/6260/6260-212
User Manual
en
Page 2
en
Important safety instructions
CAUTION: High voltage! Risk of death! High voltages of up to 500 V DC may be present inside the casing for long
periods after being disconnected from the mains. To avoid lethal electric shock, do not open the casing. There are no
user-serviceable components inside. Refer all maintenance to qualified service personnel. Remove the mains cable
when the unit is not in use.
WARNING: To eliminate the risk of fire and electric shock, do not expose this unit to rain or moisture and splashing
or dripping liquid, which might enter the device. Do not place any objects filled with liquid, such as vases, on the unit.
This symbol, wherever it appears, alerts you to the presence of uninsulated dangerous voltage inside
the enclosure—voltage that may be sufficient to constitute a risk of shock.
This symbol, wherever it appears, alerts you to important operating and maintenance instructions in the
accompanying literature. Please read the manual.
1) Read these instructions.
2) Keep these instructions.
3) Heed all warnings.
4) Follow all instructions.
5) Do not use this apparatus near water.
6) Clean only with dry cloth.
7) Do not block any ventilation openings. Install in accordance with the manufacturer’s instructions.
8) Do not install near any heat sources such as radiators, heat registers, stoves, or other apparatus
(including amplifiers) that produce heat.
9) Do not defeat the safety purpose of the polarized or grounding-type plug. A polarized plug has two
blades with one wider than the other. A grounding type plug has two blades and a third grounding prong.
The wide blade or the third prong are provided for your safety. If the provided plug does not fit into your
outlet, consult an electrician for replacement of the obsolete outlet.
10) Protect the power cord from being walked on or pinched particularly at plugs, convenience receptacles,
and the point where they exit from the apparatus.
11) The apparatus shall be connected to a MAINS socket outlet with a protective earthing connection.
12) Where the MAINS plug or an appliance coupler is used as the disconnect device, the disconnect device
shall remain readily operable.
13) Only use attachments/accessories specified by the manufacturer.
14) Use only with the cart, stand, tripod, bracket, or table specified by the manufacturer, or sold with the
apparatus. When a cart is used, use caution when moving the cart/apparatus combination to avoid injury
from tip-over.
15) Unplug this apparatus during lightning storms or when unused for long periods of time.
16) Refer all servicing to qualified service personnel. Servicing is required when the apparatus has been
damaged in any way, such as power supply cord or plug is damaged, liquid has been spilled or objects
have fallen into the apparatus, the apparatus has been exposed to rain or moisture, does not operate
normally, or has been dropped.
17) CAUTION - These service instructions are for use by qualified service personnel only. To reduce the
risk of electric shock do not perform any servicing other than that contained in the operation instructions
unless you are qualified to do so.
18) CAUTION! During use, the valves get very hot and high surface temperatures may be reached at the
rear of this unit. To avoid burning yourself, make all connections while the unit is still cold.
2
Page 3
Table of contents
Introduction ..................................................................................... 4
Before you get started..............................................................................................................4
Online registration............................................................................................................4
Control elements .............................................................................. 5
Front panel.........................................................................................................................5
Rear panel..........................................................................................................................6
Footswitch......................................................................................................................... 6
Inside the BUGERA....................................................................................................... .......7
Wiring the BUGERA .......................................................................... 8
Audio connections ............................................................................ 9
Specifications ................................................................................. 10
Warranty ........................................................................................ 11
en
CAUTION!
³ Please note that high volume levels may cause permanent damage
to your hearing and/or your loudspeakers. Turn all LEVEL controls
to the left before switching on the unit. Be sure to keep the volume
at an appropriate level.
3
Page 4
Introduction
Congratulations! By purchasing the BUGERA, you have
chosen a state-of-the-art valve amplifier.
This 120-Watt full-valve amp offers you 2 full-fledged
channels with 3 tone controls, a separate switchable Effects
Loop plus integrated Reverb, a Crunch function on the
Clean channel and much more. This way you’re in full
control and can get down to the nitty-gritty—your music!
Discover the killer sound of the BUGERA and be inspired
by its versatility. Whatever style you play, this monster
amp gives you the full valve power that you require.
Before you get started
Your product was carefully packed at the factory to ensure
safe transport. Nevertheless, if the box is damaged inspect
the unit immediately for signs of damage.
³ If the unit is damaged please do NOT return it
to us, but notify your dealer and the shipping
company immediately; otherwise, claims for
damage or replacement may not be granted.
³ Always use the original box to prevent damage
during storage or transport.
³ Make sure that children cannot play
unsupervised with the unit or its packaging.
Online registration
Please do remember to register your new BUGERA
equipment right after your purchase by visiting
www.bugera-amps.com and kindly read the terms and
conditions of our warranty carefully.
Should your BUGERA product malfunction, our goal is to
have it repaired as quickly as possible. To arrange for
warranty service, please contact the retailer from whom
the equipment was purchased. Should your BUGERA dealer
not be located in your vicinity, you may directly contact
the BEHRINGER company nearest to you. This contact
information is included in the original equipment packaging
(Global Contact Information/European Contact
Information). Should your country not be listed, please
contact our exclusive distributor BEHRINGER Singapore
(BEHRINGER Holdings (Pte) Ltd., 1 Kim Seng Promenade
#08-08, Great World City West Tower, Singapore 237994,
Tel.: +65 6845 1800, Fax: +65 6214 0275).
Registering your purchase and equipment with us helps
us process your repair claims quicker and more efficiently.
Thank you for your cooperation!
en
³ Please ensure proper disposal of all packing
materials.
Ensure adequate air supply and to avoid overheating do
not place the unit near radiators etc.
³ Please make sure that all devices are properly
grounded. For your own safety, never remove
or disable the ground conductors from the
devices or on the power cords. The unit must
always be connected to the mains outlet with a
protective grounding connection.
³ The tone quality may diminish within the range
of powerful radio broadcasting stations and
high-frequency sources. Increase the distance
between the transmitter and the unit, and use
shielded cables for all connections.
4
Introduction
Page 5
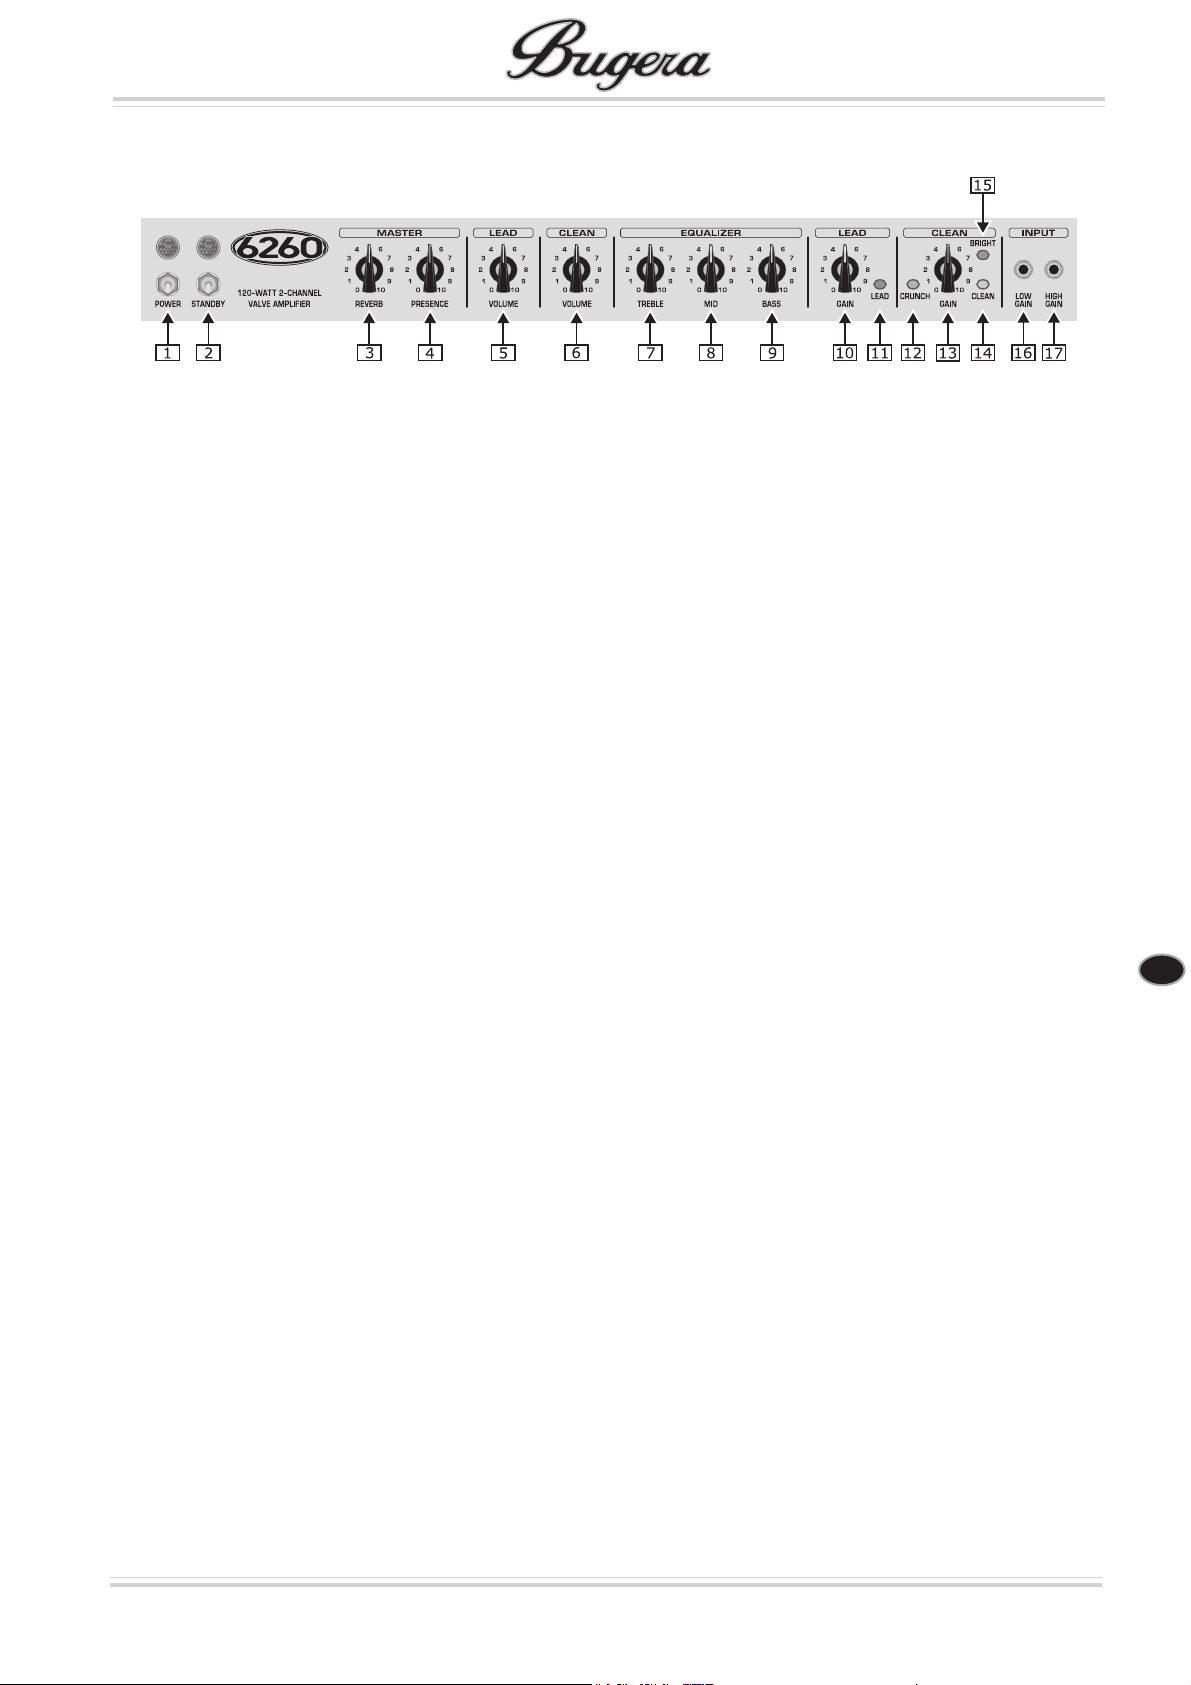
Control elements
Front panel of the BUGERA 6260
Front panel
1 The POWER switch is used to turn the power of the
BUGERA amplifier on and off.
2 The STANDBY switch allows you to place the amp
in STANDBY mode. This way the amp is idle, but the
operational temperature of the valves is maintained
(POWER switch turned on).
3 The REVERB control determines the amount of the
built-in reverb effect. The 6262 (and 6262-212)
features individual REVERB controls for the LEAD and
CLEAN channels. The supplied footswitch lets you
activate the REVERB effect (see Chapter
„Footswitch“).
4 The PRESENCE control modifies the amp’s damping
factor at high frequencies. This is used to fine-tune
the high-frequency range of the speaker cabinet. The
6262 (or 6262-212) features individual PRESENCE
controls for the LEAD and CLEAN channels.
5 This is the VOLUME control that lets you adjust the
volume level of the LEAD channel.
6 This is the VOLUME control that lets you adjust the
volume level of the CLEAN channel.
7 The passive TREBLE control adjusts the upper
frequency range. The 6262 (and 6262-212) features
separate TREBLE controls for the LEAD and CLEAN
channels.
8 The passive MID control adjusts the middle frequency
range. The 6262 (and 6262-212) features separate
MID controls for the LEAD and CLEAN channels.
9 The passive BASS control adjusts the lower frequency
range. The 6262 (and 6262-212) features separate
BASS controls for the LEAD and CLEAN channels.
10 This GAIN control specifies the input level of the
LEAD channel. Turn the control to the right to increase
the preamplifier’s distortion and sustain.
11 The LEAD switch activates the LEAD channel (switch
glows red).
12 The CRUNCH switch activates the gain boost on the
CLEAN channel (switch glows yellow). This way the
CLEAN channel can be used as a second LEAD
channel.
13 This GAIN control specifies the input level of the
CLEAN channel. Turn the control to the right to
increase the preamplifier’s distortion and sustain.
³ Please note that extremely high GAIN settings
in conjunction with extremely high VOLUME
settings can make the combo models vibrate
mechanically. This may occur when played at
extremely high volume levels, which is seldom
done. Should this be the case, adjust the GAIN
and VOLUME settings so that the problem does
not recur.
14 The CLEAN switch activates the CLEAN channel
(switch glows green).
³ You can also activate both channels with the
supplied footswitch. Refer to „Footswitch“ for
details.
15 The BRIGHT switch activates an extra boost in the
high-frequency range (+6 dB at 2 kHz) which only
affects the CLEAN channel.
16 The LOW GAIN input is used for instruments with
an extremely high output level that could distort the
HIGH GAIN input (only 6260 and 6260-212).
17 The HIGH GAIN input (6262 and 6262-212: INPUT)
is 6 dB louder than the LOW GAIN input and is used
for most electric guitars.
³ The HIGH GAIN and LOW GAIN connectors have
identical sensitivity when used at the same time
(both with LOW GAIN sensitivity).
en
Control elements
5
Page 6
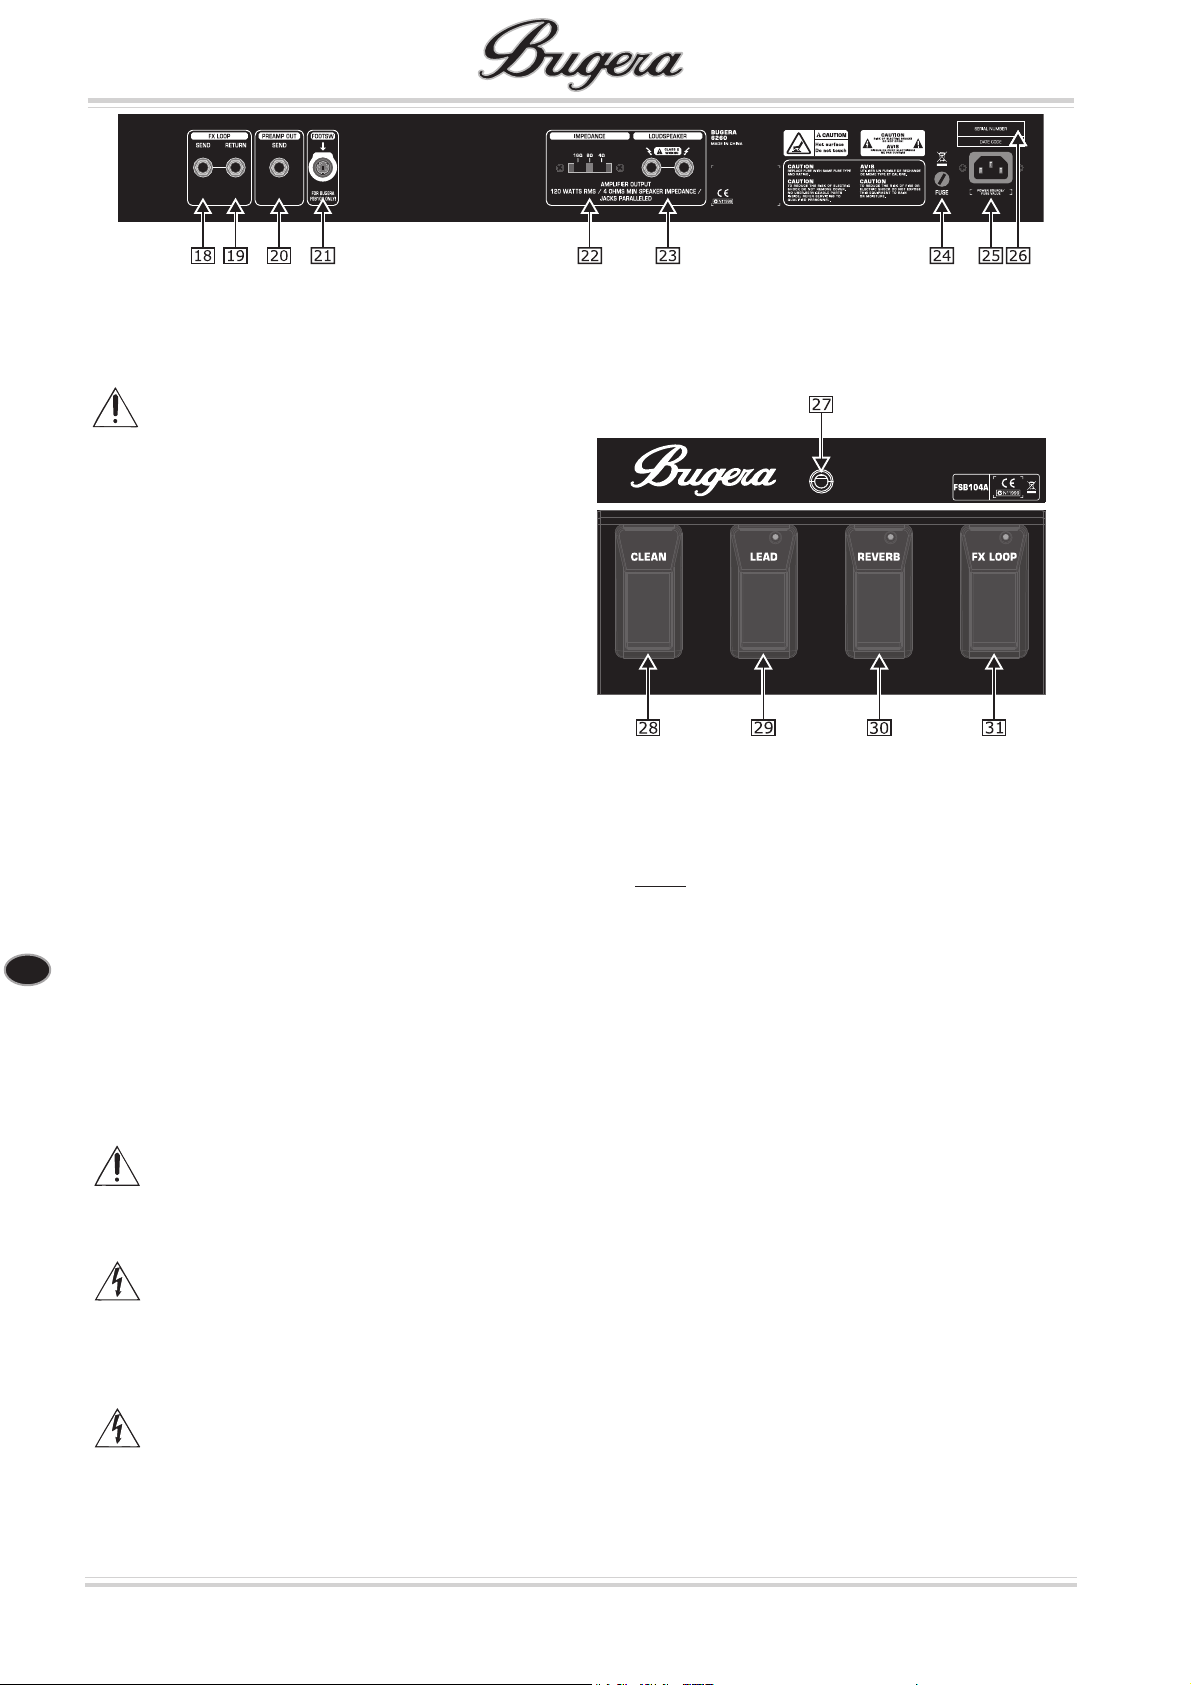
Rear panel of the BUGERA 6260
en
Rear panel
CAUTION!
Hot! Risk of injury! During use, the valves get
very hot and high surface temperatures may
be reached at the rear of this unit. Avoid
touching the controls and connectors on the
rear panel during use. To avoid accidental
contact with hot surfaces, place the rear panel
so that it faces a wall.
18 The SEND output is used to connect a shielded
¼" mono jack cable to the input of an external effects
unit.
19 The RETURN input is used to connect a shielded
¼" mono jack cable to the output of an external
effects unit.
20 The PREAMP OUT SEND output takes the preamp
signal of the amp in order to feed the signal to a
second amplifier and loudspeaker combination, for
example.
21 The 7-pin FOOTSW(itch) connector is provided to
connect to the supplied BUGERA FSB104A footswitch.
Please be sure to connect the cables before switching
on the amplifier. Refer to „Footswitch“ for details.
22 The IMPEDANCE switch lets you specify the
loudspeaker impedance. Always apply the value that
is identical to the impedance of the used speaker
cabinet. When connecting two cabinets with the same
impedance, the switch should be set to half the value
of one of the cabinets. For example, two 16-Ohm
cabinets would require an 8-Ohm setting, while two
8-Ohm cabinets need to be set to the minimum
impedance of 4 Ohms. Please also read „Wiring the
BUGERA“.
23 Both the paralleled LOUDSPEAKER outputs
(¼" mono jacks) are used to connect the speaker
cabinet(s). The minimum impedance is 4 Ohms. The
IMPEDANCE switch should always be set to match
the impedance of the used speaker cabinet.
24 The FUSE is found in the fuse holder. If the fuse is
blown, it needs to be replaced with a fuse of the
same kind by all means. Otherwise, the unit could
seriously be damaged, in which case the warranty is
void. If the fuse is blown repeatedly, you should take
the unit to a qualified service technician. WARNING:
ONLY REPLACE THE FUSE WHEN THE MAINS
CABLE HAS BEEN DISCONNECTED!
25 The IEC MAINS connector is used to connect the
mains cable that has the appropriate voltage ratings
for your country (included). At all times, make the
connections to the amplifier before plugging the cable
into a power outlet.
26 This is the SERIAL NUMBER of the amplifier.
Footswitch
Footswitch BUGERA FSB104A
27 The 7-pin DIN connector is provided to connect the
footswitch cable (included). Then, the cable is
connected to the FOOTSW(itch) connector of the
BUGERA amplifier. Be sure to make a connection
before switching on the amplifier.
28 The CLEAN switch activates the CLEAN/CRUNCH
channel.
29 The LEAD switch activates the LEAD channel. Its LED
illuminates when the channel is active.
30 The REVERB switch activates the REVERB effect. Its
LED illuminates when the effect is active.
31 The FX LOOP switch activates the FX LOOP function.
Its LED illuminates when the FX LOOP is active.
6
Control elements
Page 7
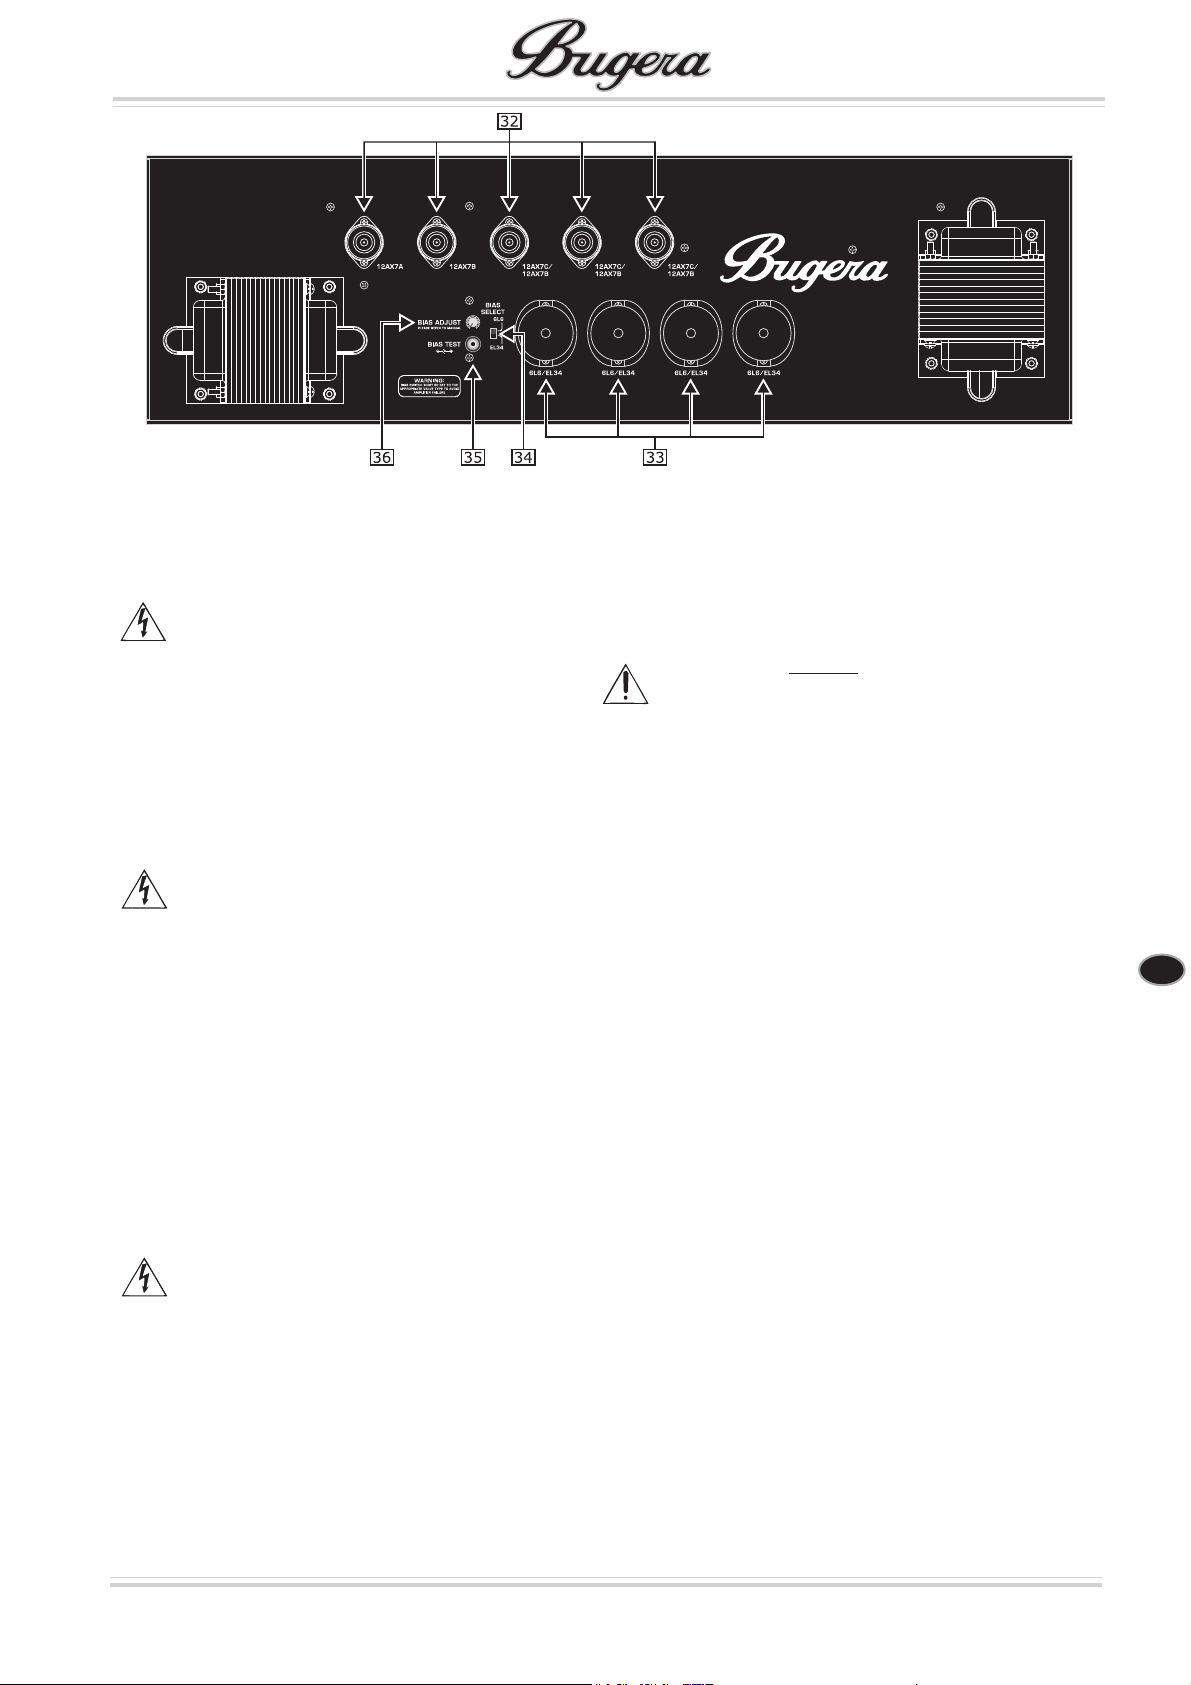
Inside the BUGERA 6260
Inside the BUGERA
DANGER!
High voltage! Risk of death!
High voltages of up to 500 V DC may be present
inside the casing for long periods after being
disconnected from the mains. To avoid lethal
electric shock, do not open the casing. There
are no user-serviceable components inside.
Refer all maintenance to qualified service
personnel. Remove the mains cable when the
unit is not in use.
The parts inside the amplifier operate at high
voltages and high temperatures. To avoid
damage and injury that results from fire or
electric shock, do not drop or spill anything into
the unit’s casing.
Remove the backside of the amplifier’s casing to get to
the valves and the control elements.
32 These are the sockets for the 12AX7A/B/C preamp
valves.
33 These are the sockets for the 6L6 and EL34 power
amp valves. Please take care that the BIAS SELECT
switch (34) is set correctly. The BUGERA amp is
supplied with 6L6GC power amp valves when it leaves
the factory.
34 The BIAS SELECT switch allows the amplifier to
optimally adapt to the used valves (6L6 or EL34).
35 The BIAS TEST connector lets you connect a
voltmeter in order to measure the power amp valves
(bias adjustment). Make sure that the voltmeter is
set to direct current (DC).
36 The BIAS ADJUST control is used to make the bias-
adjustment.
³³
³ Replacing the power amp valves also requires
³³
bias adjustment. You should always use sets
of four matched valves. The valves of the
BUGERA Series are ideal for this purpose.
CAUTION: WE HIGHLY RECOMMEND THAT BIAS
ADJUSTMENTS BE CARRIED OUT BY QUALIFIED
PERSONNEL!
en
Control elements
7
Page 8
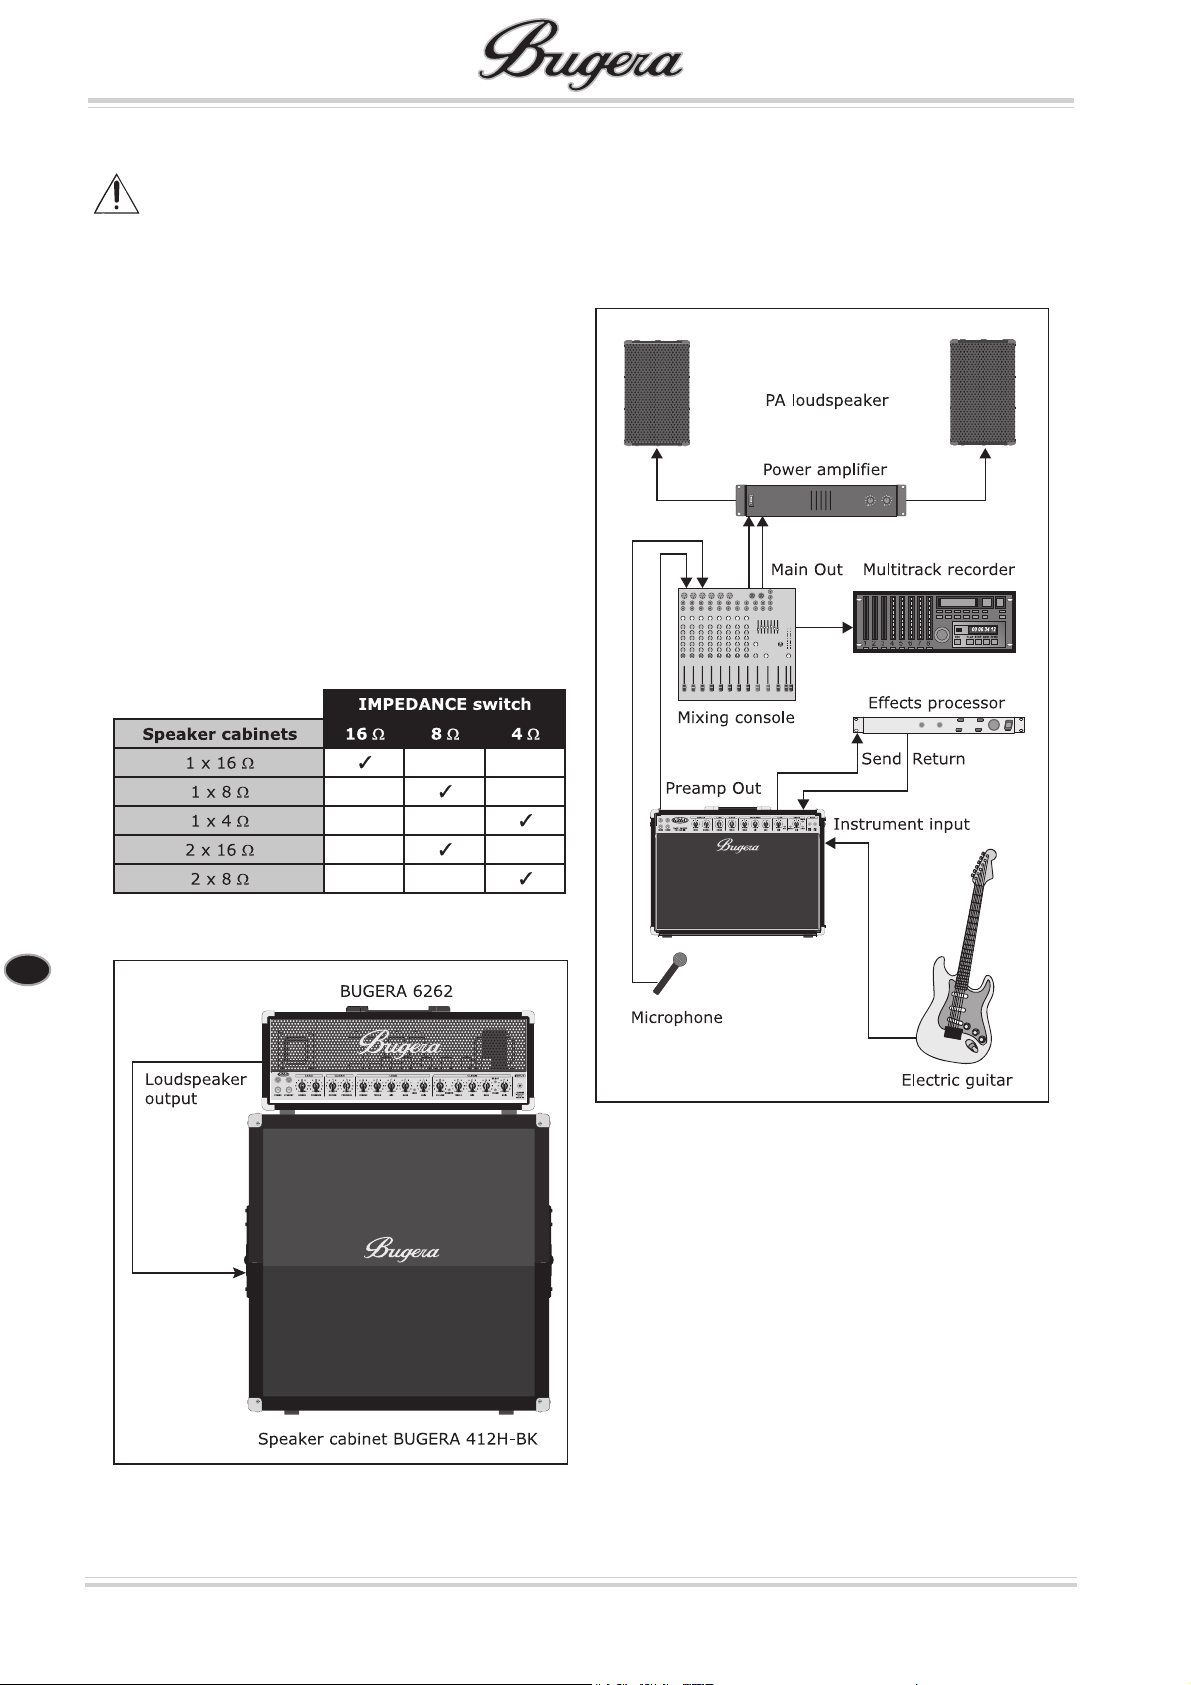
Wiring the BUGERA
CAUTION!
Hot! Risk of injury! During use, the valves will
get very hot and high surface temperatures may
be reached at the rear of this unit. To avoid
burning yourself, make all connections while
the unit is still cold.
The BUGERA amplifier has two paralleled LOUDSPEAKER
outputs which are used to connect one or two speaker
cabinets.
If you only connect one speaker cabinet, be sure that the
IMPEDANCE switch is set to match the impedance of the
connected cabinet.
If you want to connect two speaker cabinets, both cabinets
should have to the same impedance. Be sure to have set
the IMPEDANCE switch correctly. In this case, set it to
half the value of one of the cabinets. When using two
16-Ohm cabinets, the switch therefore needs to be set to
8 Ohms; and with two 8-Ohm cabinets, set it to the
minimum impedance of 4 Ohms.
CAUTION: The loudspeakers in the combos are
connected in series. This results in an impedance of
16 Ohms.
The following figure shows a setup of the 6262-212
together with an external effects unit connected over
the FX LOOP. And the PREAMP OUT is connected to the
line input of a mixer in order to send the signal to a
recording device. In addition, the speaker signal of the
BUGERA is picked up by a microphone and is fed to the
microphone input of the mixer. This way you get a second
guitar signal which then can be amplified by a PA system
and/or can be recorded as well.
en
Impedances
Live setup with a BUGERA combo
BUGERA head with a speaker cabinet
8
Wiring the BUGERA
Page 9
Audio connections
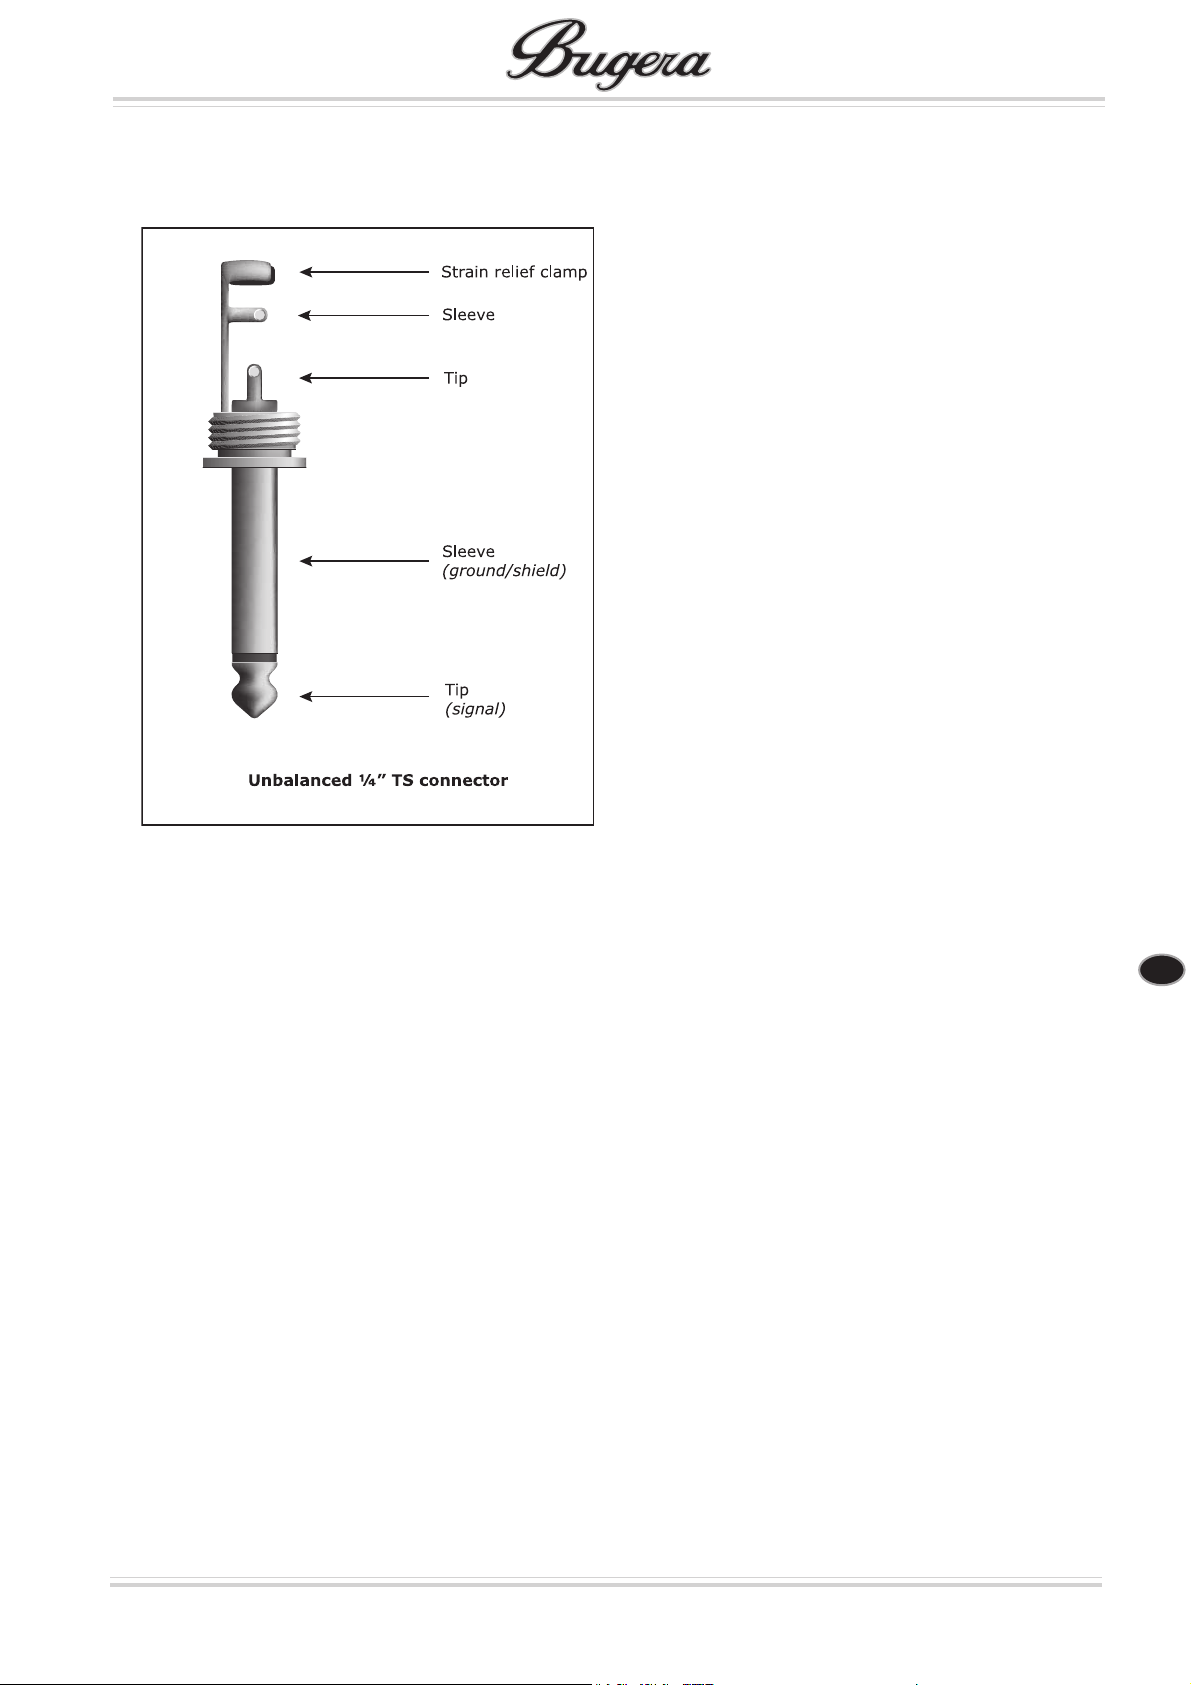
The inputs and outputs of the BUGERA amplifier use mono
jack connectors.
¼" mono jack connector
en
Audio connections
9
Page 10
en
Specifications
PREAMP SECTION
Valves
Type 1 x 12AX7A
1 x 12AX7B
3 x 12AX7C (6260 and 6260-212)
4 x 12AX7C (6262 and 6262-212)
Preamp high-gain input
Impedance 470 kΩ
Clean channel
Nominal input level -34 dBV
Min. input level -50 dBV
Max. input level 0 dBV
Lead channel
Nominal input level -80 dBV
Min. input level -92 dBV
Preamp low-gain input (only 6260 and 6260-212)
Impedance 44 kΩ
All levels attenuated by +6 dB
Effects send
Impedance 47 kΩ or higher
Nominal output level -10 dBV
Effects return
Impedance 470 kΩ
Min. input sensitivity -10 dBV
Preamp output
Impedance 47 kΩ or higher
Nominal output level +10 dBV
POWER AMPLIFIER SECTION
Valves
Type 4 x 6L6GC
Output power
Peak power 120 W / 16, 8, 4 Ω
Loudspeaker connectors
Type ¼" mono jack connectors, unbalanced
Load impedance 4 Ω / 8 Ω / 16 Ω switchable
Internal loudspeakers (only 6262-212 and 6260-212)
Type 2 x 12" BUGERA, 12G70J8
Impedance 8 Ω
Power 70 W (IEC)
Total impedance 16 Ω (series connection)
POWER SUPPLY
Power consumption Max. 350 W
Fuse T 3.15 A H 250 V (100 – 120 V~, 50/60 Hz)
T 1.6 A H 250 V (220 – 240 V~, 50/60 Hz)
Mains connection Standard IEC receptacle
DIMENSIONS/WEIGHT
6260
Dimensions (H x W x D) Approx. 9 25/32" x 27" x 9 11/16"
Weight Approx. 47 lbs (21.5 kg)
6260-212
Dimensions (H x W x D) Approx. 20 13/32" x 27" x 9 3/4"
Weight Approx. 63 lbs (28.5 kg)
6262
Dimensions (H x W x D) Approx. 9 25/32" x 27" x 9 11/16"
Weight Approx. 47 lbs (21.5 kg)
6262-212
Dimensions (H x W x D) Approx. 20 13/32" x 27" x 9 3/4"
Weight Approx. 63 lbs (28.5 kg)
We are constantly striving to maintain the highest professional standards. As a result of these efforts, modifications may be made
from time to time to existing products without prior notice. Specifications and appearance may differ from those listed or illustrated.
10
(249 mm x 687.3 mm x 246 mm)
(518.46 mm x 687.3 mm x 247.65 mm)
(249 mm x 687.3 mm x 246 mm)
(518.46 mm x 687.3 mm x 247.65 mm)
Specifications
Page 11
Warranty
§ 1 Other warranty rights and national law
1. This warranty does not exclude or limit the buyer’s statutory rights provided by national law, in particular, any such rights
against the seller that arise from a legally effective purchase contract.
2. The warranty regulations mentioned herein are applicable unless they constitute an infringement of national warranty law.
§ 2 Online registration
Please do remember to register your new BUGERA equipment right after your purchase by visiting http://www.bugera-amps.com
and kindly read the terms and conditions of our warranty carefully. Registering your purchase and equipment with us helps us
process your repair claims quicker and more efficiently. Thank you for your cooperation!
§ 3 Warranty
1. BEHRINGER warrants the mechanical and electronic components of this product to be free of defects in material and workmanship
for a period of one (1) year* from the original date of purchase, in accordance with the warranty regulations described below.
If the product shows any defects within the specified warranty period that are not excluded from this warranty as described
under § 6, BEHRINGER shall, at its discretion, either replace the product by providing a new or reconditioned product or repair
the product using suitable new or reconditioned parts. In the case that other parts are used which constitute an improvement,
BEHRINGER may, at its discretion, charge the customer for the additional cost of these parts. In case BEHRINGER decides to
replace the product, this warranty shall apply to the replacement product for the remaining initial warranty period, i.e one
year* from the date of purchase of the initial product.
2. If the warranty claim proves to be justified, the product will be returned to the user freight prepaid.
3. Warranty claims other than those indicated above are expressly excluded.
§ 4 Limited warranty valves and meters
Where applicable, BEHRINGER warrants the valves or meters contained in the product to be free from defects in material and
workmanship for a period of ninety (90) days from date of purchase, PROVIDED however, that this limited warranty is extended
only to the original retail purchaser. This limited warranty is also subject to the conditions, exclusions and limitations hereinafter
set forth.
§ 5 Return authorization number
1. To obtain warranty service, the buyer (or his authorized dealer) must call BEHRINGER as exclusive distributor of BUGERA
products (see enclosed list) during normal business hours BEFORE returning the product. All inquiries must be accompanied by
a description of the problem. The buyer or his authorized dealer will receive a return authorization number.
2. Subsequently, the product must be returned in its original shipping carton, together with the return authorization number. The
return shipment address will be indicated by BEHRINGER.
3. Shipments without freight prepaid will not be accepted.
§ 6 Warranty regulations
1. Warranty services will be furnished only if the product is accompanied by a copy of the original retail dealer’s invoice. Any
product deemed eligible for repair or replacement under the terms of this warranty will be repaired or replaced.
2. If the product needs to be modified or adapted in order to comply with applicable technical or safety standards on a national or
local level, in any country which is not the country for which the product was originally developed and manufactured, this
modification/adaptation shall not be considered a defect in materials or workmanship. The warranty does not cover any such
modification/adaptation, irrespective of whether it was carried out properly or not. Under the terms of this warranty, BEHRINGER
shall not be held responsible for any cost resulting from such a modification/adaptation.
3. Free inspections and maintenance/repair work are expressly excluded from this warranty, in particular, if caused by improper
handling of the product by the user. This also applies to defects caused by normal wear and tear, in particular, of faders,
crossfaders, potentiometers, keys/buttons, tubes, guitar strings, illuminants and similar parts.
4. Damage/defects caused by the following conditions are not covered by this warranty:
³³
³ improper handling, neglect or failure to operate the unit in compliance with the instructions given in BEHRINGER user or
³³
service manuals.
³³
³ connection or operation of the unit in any way that does not comply with the technical or safety regulations applicable in
³³
the country where the product is used.
³³
³ damage/defects caused by force majeure or any other condition that is beyond the control of BEHRINGER.
³³
5. Any repair or opening of the unit carried out by unauthorized personnel (user included) will void the warranty.
6. If an inspection of the product by BEHRINGER shows that the defect in question is not covered by the warranty, the inspection
costs are payable by the customer.
7. Products which do not meet the terms of this warranty will be repaired exclusively at the buyer’s expense. BEHRINGER will
inform the buyer of any such circumstance. If the buyer fails to submit a written repair order within 6 weeks after notification,
BEHRINGER will return the unit. Costs for freight and packing will be invoiced separately C.O.D. When the buyer has sent in a
written repair order such costs will also be invoiced separately.
§ 7 Warranty transferability
This warranty is extended exclusively to the original buyer (customer of retail dealer) and is not transferable to anyone who may
subsequently purchase this product.
§ 8 Claim for damages
Failure of BEHRINGER to provide proper warranty service shall not entitle the buyer to claim (consequential) damages. In no event
shall the liability of BEHRINGER exceed the invoiced value of the product.
* Customers in the European Union please contact BEHRINGER Germany Support for further details.
en
Technical specifications and appearance are subject to change without notice. The information contained herein is correct at the time of printing. All
trademarks (except BUGERA, the BUGERA logo, and THE SOUL OF VALVES) mentioned belong to their respective owners, and such use neither constitutes
a claim of the trademarks by RED CHIP COMPANY LTD nor affiliation of the trademark owners with RED CHIP COMPANY LTD. RED CHIP COMPANY LTD
accepts no liability for any loss which may be suffered by any person who relies either wholly or in part upon any description, photograph or statement
contained herein. Colors and specifications may vary slightly from product. Our Products are sold through authorized dealers only. This manual is
copyrighted. No part of this manual may be reproduced or transmitted in any form or by any means, electronic or mechanical, including photocopying and
recording of any kind, for any purpose, without the express written permission of RED CHIP COMPANY LTD. BUGERA-products are distributed exclusively
by the BEHRINGER Group of companies globally, and specifically by BEHRINGER International GmbH in the European Union.
ALL RIGHTS RESERVED.
(c) 2007 RED CHIP COMPANY LTD.
Trident Chambers, Wickhams Cay, P.O. Box 146,
Road Town, Tortola, British Virgin Islands.
Warranty
11
 Loading...