

Page 1
Instukcja obslugi
Upute za uporabu
用户指南
EA
SY
Page 2
Conversion table
3
1
EA
SY
8
9
5a
5
EA
SY
4
7
6
Page 3

Conversion table
°Celsius - °Fahrenheit
°C
45
46
47
48
49
50
51
52
53
54
55
56
57
58
59
60
61
62
63
64
65
66
67
68
69
70
71
72
°F
113,0
114,8
116,6
118,4
120,2
122,0
123,8
125,6
127,4
129,2
131,0
132,8
134,6
136,4
138,2
140,0
141,8
143,6
145,4
147,2
149,0
150,8
152,6
154,4
156,2
158,0
159,8
161,6
°C
73
74
75
76
77
78
79
80
81
82
83
84
85
86
87
88
89
90
91
92
93
94
95
96
97
98
99
100
°F
163,4
165,2
167,0
168,8
170,6
172,4
174,2
176,0
177,8
179,6
181,4
183,2
185,0
186,8
188,6
190,4
192,2
194,0
195,8
197,6
199,4
201,2
203,0
204,8
206,6
208,4
210,2
212,0
Page 4
Pag. 1
polska
english
italiano
italiano
EA
SY
Pag. 11
Pag. 21
Pag. 31
Pag. 41
Pag. 51
Pag. 61
Pag. 71
Pag. 81
Pag. 91
Pag. 101
english
français
deutsch
español
nederlands
polska
hrvatski
中国的
1
Page 5

IMPORTANT NOTICES
Gentile Cliente, grazie per aver scelto Vera, il bollitore di Bugatti. Come tutti gli elettrodomestici, questo
bollitore deve essere usato con prudenza ed attenzione per evitare lesioni alle persone (scottature) o danni
al bollitore stesso.
PRIMA DI ESSERE MESSO IN FUNZIONE,
LEGGERE CON CURA TUTTE LE ISTRUZIONI PER
L’INSTALLAZIONE, L’USO E LA MANUTENZIONE
E LE PRESCRIZIONI DI SICUREZZA.
CHI NON CONOSCE A FONDO LE ISTRUZIONI
D’USO NON DEVE UTILIZZARE IL BOLLITORE.
ATTENZIONE
Non si assumono responsabilità e nessuna lamentela sarà accettata in caso di danni dovuti a :
-impiego errato e non conforme/improprio agli scopi previsti del bollitore.
-uso continuato del bollitore
-riparazioni effettuate da personale non autorizzato
-impiego di pezzi di ricambio e accessori non originali
-utilizzo del Bollitore Vera con prese senza messa a terra.
Per maggiori informazioni, o in caso di problemi che non dovessero trovare sufcienti risposte in questo
manuale, contattare il Servizio Clienti di BUGATTI.
CONSERVARE ACCURATAMENTE QUESTE ISTRUZIONI
Non dimenticate di consegnarle a chi eventualmente utilizzerà il bollitore dopo di voi. Se venissero smarrite
prima di utilizzare la macchina richiedere il libretto istruzioni al Servizio Clienti CASA BUGATTI o spedite
una e-mail a [email protected] o scaricatele dal sito www.casabugatti.it Troverete sulla prima pagina
della copertina le illustrazioni relative al testo. Tenerla aperta durante la lettura delle istruzioni d’uso.
1
Page 6

Indice
Pag. 3 Caratteristiche tecniche
Pag. 3 Descrizione parti del bollitore Vera
Pag. 4 Norme di sicurezza
Pag. 6 Installazione e messa in funzione
Pag. 7 Spegnimento automatico
Pag. 7 Sistema di sicurezza
Pag. 7 Pulizia e manutenzione
Pag. 8 Guasti e rimedi
Pag. 9 Garanzia
Tutti i dettagli del testo sono stati attentamente controllati. L’azienda si riserva il diritto di fornire qualsiasi chiarimento in caso nel testo ci siano errori di stampa o informazioni fuorvianti. Attenzione: L’azienda mantiene aggiornati i dettagli di prodotto presenti nel manuale istruzioni,
incluse le revisioni delle speciche tecniche; si riserva comunque la facoltà di apportare modiche senza preavviso. La prospettiva, la forma e il colore del prodotto si ispirano al prodotto reale standard.
2
Page 7
CARATTERISTICHE TECNICHE
Alimentazione Vedere targhetta dati posta sotto la base
Potenza nominale Vedere targhetta dati posta sotto la base
Dimensioni 220 x 180 x h. 300 mm approssimativamente
Corpo Acciaio inox 18/10
Peso 1,4 kg circa
Lunghezza cavo elettrico 0,75 metri circa
Protezione termica Incorporata
Capacità 1,70 litri
Certicazioni internazionali Vedere targhetta dati posta sotto la base
Garanzia come da certicato allegato
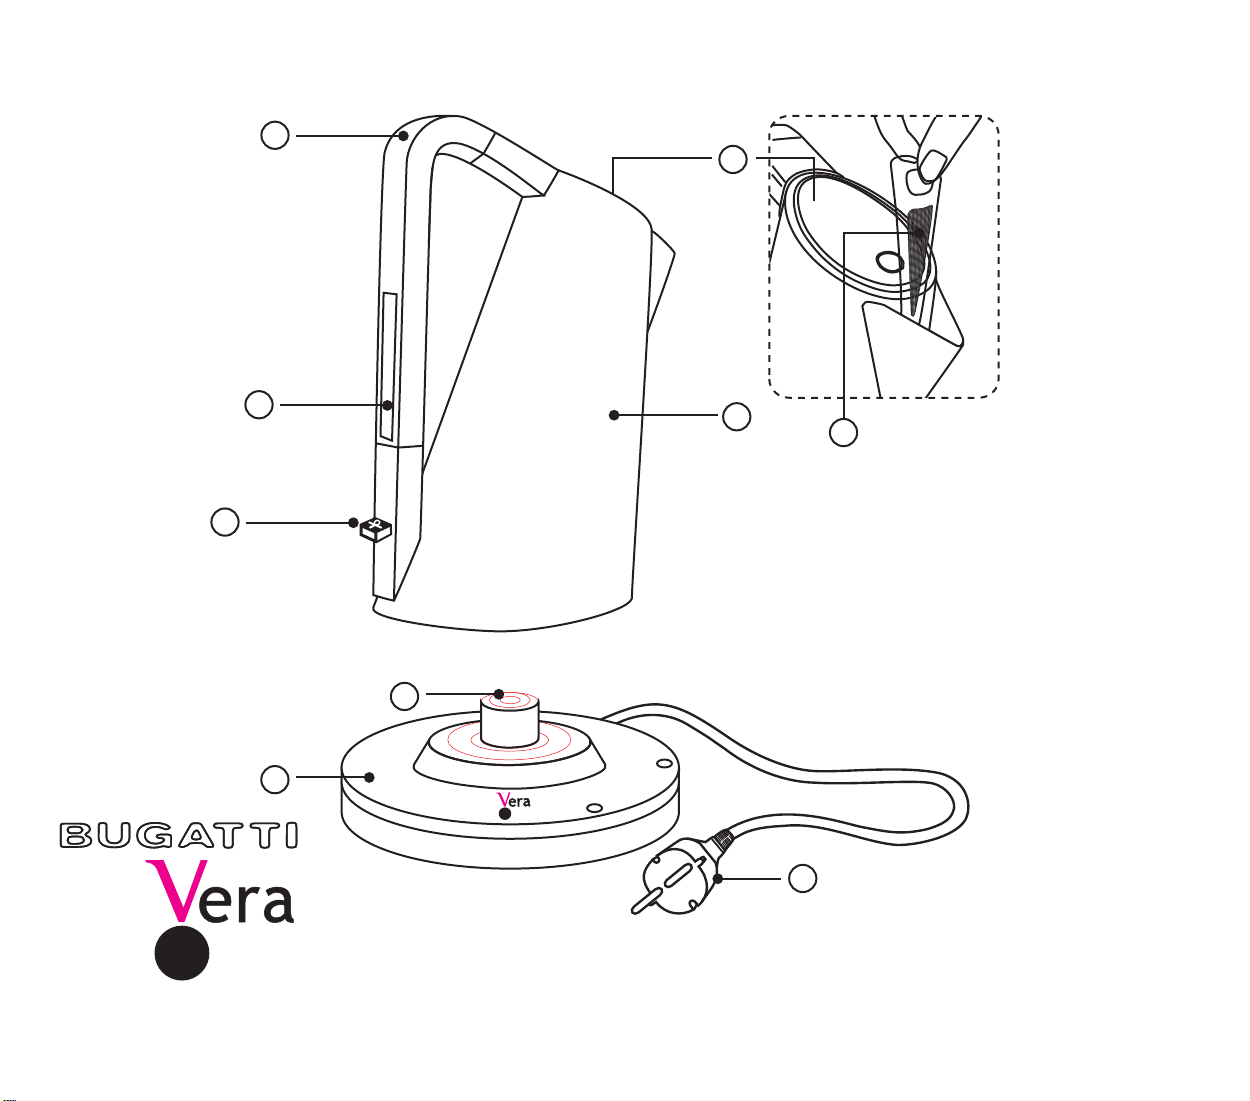
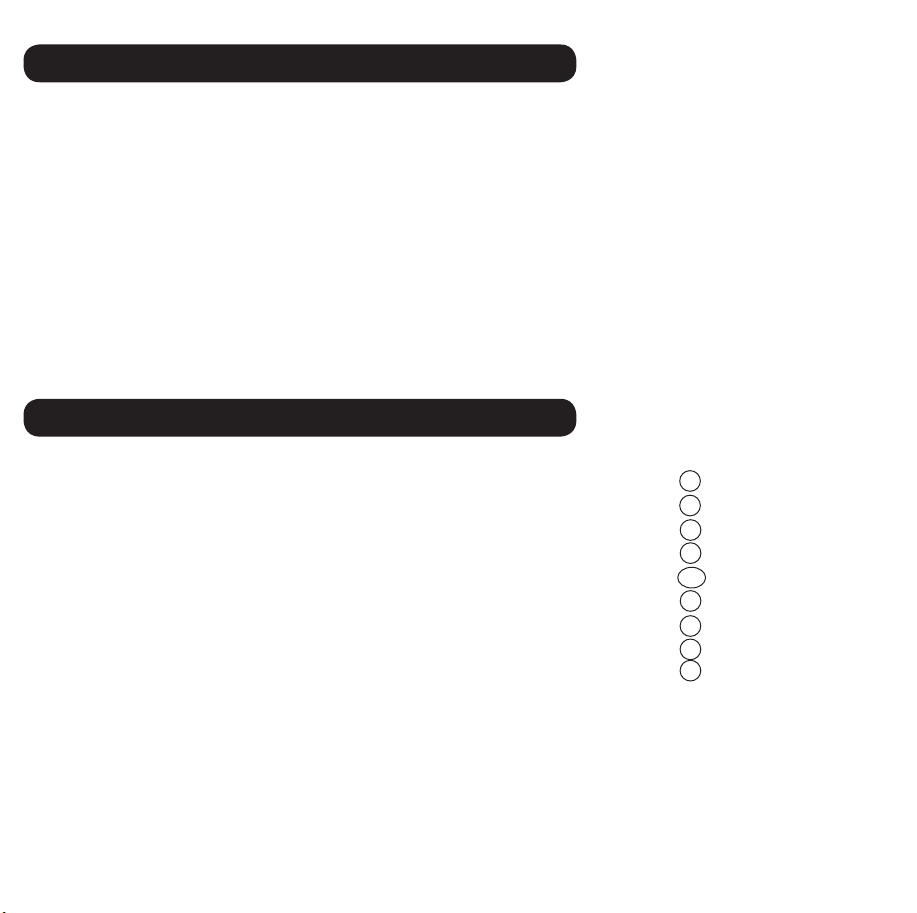
DESCRIZIONE DEI COMPONENTI DEL BOLLITORE
Coperchio
Manico
Corpo Acciaio inox 18/10
Base
Connettore
Spina
Filtro
Indicatore di livello massimo d’acqua
Pulsante On/Off
3
1
3
4
5
5a
6
7
8
9
Page 8

NOTE IMPORTANTI DI SICUREZZA
Quando si utilizzano elettrodomestici, le seguenti precauzioni di sicurezza devono sempre essere seguite:
LEGGERE CON CURA TUTTE LE ISTRUZIONI.
L’APPARECCHIO DEVE ESSERE UTILIZZATO SOLO DA
ADULTI E COMUNQUE DA PERSONE PREVENTIVAMENTE
ISTRUITE AL SUO IMPIEGO. CONSERVARE CON CURA
QUESTE ISTRUZIONI D’USO.
1. PER EVITARE GRAVI LESIONI, SCOSSE ELETTRICHE
ED INCENDI, NON IMMERGERE IL CAVO, LA SPINA,
LA BASE O IL BOLLITORE STESSO IN ACQUA O ALTRI
LIQUIDI,TOTALMENTE O PARZIALMENTE.
ATTENZIONE ALLE SUPERFICI CALDE.
Non toccare le superci calde. Usare solo il manico (3) per prendere il bollitore. Manipolare con maniglie o pomoli o
guanti anticalore tutte le superci calde come il corpo (4) , coperchio (1) e tutte le superci del bollitore:
PERICOLO DI USTIONI !
2. Il bollitore è realizzato SOLO PER L’UTILIZZO DOMESTICO.
e utilizzi simili: aree staff negozi, ufci e altri ambienti lavorativi; in hotel per l’utilizzo dei clienti, motel e altri tipi di
centri residenziali; bed & breakfast.
Non usare l’apparecchio per usi diversi dal suo uso specico. Evitare assolutamente di apportare modiche tecniche che
possono essere causa di rischi.
3. Tenere il bollitore, la base (5) e il cavo fuori dalla portata dei bambini al di sotto degli 8 anni. Occorre una stretta
sorveglianza quando un qualsiasi apparecchio viene utilizzato in presenza di bambini. Staccare dalla presa di corrente
quando l’apparecchio non è in uso e prima della pulizia. Lasciar raffreddare prima di inserire o rimuovere pezzi e prima
di pulire l’apparecchio. Collegare sempre la spina prima all’apparecchio, quindi collegare il cavo alla presa a muro. Per
spegnerlo, portare tutti i pulsanti su “off”, quindi staccare la spina dalla presa di corrente.
4. Viene fornito un cavo elettrico corto, in modo da ridurre i rischi derivanti dal pericolo che si impigli in oggetti, che le
persone vi si possano inciampare a causa di cavi più lunghi. Cavi staccabili elettrici lunghi o prolunghe sono disponibili
e possono essere utilizzati solo se vengono seguiti severi criteri di sicurezza da parte di ELETTRICISTI AUTORIZZATI nel
rispetto delle regolamentazioni riguardanti i cavi elettrici. NON USARE adattatori per le spine elettriche.
Nel caso possa essere utilizzato un cavo più lungo:
a) Le caratteristiche elettriche del cavo staccabile o delle prolunghe devono essere delle stesse caratteristiche indicate
nella targhetta posta sotto la base del bollitore.
4
Page 9

b) L’estensione del cavo deve essere del tipo tre li/poli e deve essere provvisto di messa a terra. In ogni caso un cavo
NOTE IMPORTANTI
Gentile Cliente,
grazie per aver scelto Vera, il bollitore di Bugatti. Come tutti gli elettrodomestici, questo bollitore deve
essere usato con prudenza ed attenzione per evitare lesioni alle persone (scottature) o danni al bollitore
stesso.
PRIMA DI ESSERE MESSO IN FUNZIONE,
LEGGERE CON CURA TUTTE LE ISTRUZIONI PER
L’INSTALLAZIONE, L’USO E LA MANUTENZIONE
E LE PRESCRIZIONI DI SICUREZZA.
CHI NON CONOSCE A FONDO LE ISTRUZIONI
D’USO NON DEVE UTILIZZARE IL BOLLITORE.
ATTENZIONE
Non si assumono responsabilità e nessuna lamentela sarà accettata in caso di danni dovuti a :
-impiego errato e non conforme/improprio agli scopi previsti del bollitore.
-uso continuato del bollitore
-riparazioni effettuate da personale non autorizzato
-impiego di pezzi di ricambio e accessori non originali
-utilizzo del Bollitore Vera con prese senza messa a terra.
Per maggiori informazioni, o in caso di problemi che non dovessero trovare sufcienti risposte in questo
manuale, contattare il Servizio Clienti di BUGATTI.
CONSERVARE ACCURATAMENTE QUESTE ISTRUZIONI
lungo o prolunga non deve sporgere dai mobili o dal tavolo o da mensole onde evitare che possa essere maneggiato/tirato
da bambini.
c)Non porre il bollitore o i cavi su o vicino a fonti di calore, piani cottura a gas o elettrici, dentro o vicino a forni.
d) Non adatto ad uso esterno. Non lasciare che i cavi pendano dagli angoli del tavolo o del bancone, o tocchino
superci calde. Non maneggiare l’apparecchio con cavi o prese danneggiati o dopo che l’apparecchio abbia avuto
malfunzionamenti o sia stato danneggiato in qualsiasi modo. Restituire l’apparecchio al più vicino punto di servizio
autorizzato perché sia esaminato, riparato o aggiustato. L’utilizzo di accessori non raccomandati dal produttore
dell’apparecchio possono provocare incendi, shock elettrici o danni a persone.
e) Se il cavo di alimentazione o prese sono danneggiati, essi devono essere sostituiti dal costruttore o dal suo servizio
assistenza o comunque da una persona qualicata, in modo da prevenire ogni rischio.
5. Non toccare mai le parti sotto tensione elettrica. Possono provocare scosse elettriche e gravi lesioni. Collegare la base
(5), tramite la spina (6) ad una presa di corrente di tensione adeguata. La tensione deve corrispondere a quella indicata
sulla targhetta posta sotto la base del bollitore (4). Assicurarsi che la vostra presa di corrente di tensione sia provvista di
adeguata messa a terra . Non usare il bollitore con piedi nudi o bagnati.
6. Il bollitore va usato solo con la base (5) originale.
7. ATTENZIONE: NON bagnare la base (5) e il connettore (5a) con acqua o altri liquidi.
8. ATTENZIONE: NON riempire mai il bollitore oltre il livello «MAX» (1700 ml) segnato sul display di controllo (8).
9. ATTENZIONE: NON riempire mai il bollitore con acqua quando è posizionato sulla base (5).
10. ATTENZIONE: NON utilizzare latte, caffè o simili. Riempire il bollitore con acqua.
11. ATTENZIONE: NON lasciare il bollitore incustodito durante la sessione di bollitura.
12. ATTENZIONE: NON accendere il bollitore senza acqua. Un uso scorretto in questo senso limita la durata del bollitore.
13. ATTENZIONE: NON tenere premuto il pulsante on/off (9) durante una sessione di bollitura o dopo ogni sessione.
14. ATTENZIONE: NON mettere in funzione il bollitore eccessivamente pieno (livello dell’acqua superiore a 1700 ml) o con
il coperchio aperto. L’acqua bollente può fuoriuscire e danneggiare cose o persone.
15. Assicurarsi sempre di versare l’acqua dal bollitore lentamente e con attenzione.
16. Per evitare scottature evitare di aprire il coperchio (1) mentre l’acqua sta bollendo o subito dopo la ne della sessione
di bollitura. Se si desidera riempire il bollitore con altra acqua, ma il bollitore è ancora caldo, fare attenzione ad aprire il
coperchio (1). PERICOLO DI SCOTTATURE!
17. Dopo ogni sessione di bollitura svuotare completamente il bollitore. Mai lasciare acqua nel bollitore per lunghi periodi
di tempo.
18. Fare attenzione alle superci calde. Toccare con precauzione le parti molto calde. Usate maniglie o presine o tessuti
per forno. ATTENZIONE! PERICOLO DI SCOTTATURE! Fate molta attenzione quando toccate parti molto calde come il
coperchio (1), il corpo (4) e tutte le superci del bollitore.
19. La supercie della base (5) resta calda anche dopo l’utilizzo.
20. Per scollegare il bollitore vericare prima che sia spento e poi staccare la spina dalla presa. Scollegare sempre la spina
(6) dalla presa tirando la spina (6) e non il cavo. Attenzione: Rimuovere sempre la spina (6) dalla presa quando non si
utilizza il bollitore.
21. Porre il bollitore su una supercie piana, facendo attenzione che i piedini aderiscano alla supercie in modo stabile,
così che il bollitore non possa cadere. Non porre il bollitore vicino a fonti di calore o a amma viva.
ATTENZIONE: Mai mettere in funzione il bollitore su un piano inclinato.
22. Per assicurare il corretto funzionamento del bollitore, posizionatelo su una supercie piana in un posto adeguatamente
pulito e luminoso con facile accesso ad un presa elettrica. Tenere il bollitore almeno 10 cm lontano dalle pareti.
23. Non usare il bollitore a contatto o vicino a superci inammabili come tende, tappezzeria, pareti e simili.
24. In caso di difetti, guasti o sospetto difetto dopo una caduta, scollegare la spina immediatamente. Mai collegare un
bollitore difettoso. Le riparazioni devono essere effettuate da un centro assistenza autorizzato BUGATTI. Contattate il
vostro rivenditore o il servizio clienti BUGATTI o spedite una e-mail a [email protected] . In caso di fuoco , utilizzare un
estintore di anidride carbonica (CO2). Non usate acqua o polveri estinguenti.
5
Page 10
Installazione e messa in funzione
L’imballo originale è ideato per la spedizione postale. Conservatelo per rispedire la macchina, in caso di necessità, al
fornitore. Prima di installare il bollitore, attenersi alle norme di sicurezza indicate nelle pagine precedenti. Dopo aver
rimosso il bollitore dall’imballo originale, assicurarsi che sia in perfette condizioni e che nessun componente o elemento,
materiale di imballaggio, cartolina di garanzia, sia accidentalmente caduto dentro il bollitore durante il trasporto o le fasi
di produzione. Il sacchetto di plastica nel quale il bollitore è imballato, deve essere tenuto fuori dalla portata dei bambini
per evitare rischi di soffocamento.
Assicurarsi che il bollitore sia in perfetto stato. Allo scopo di rimuovere sporco che potrebbe essersi accumulato sulle
superci esterne del bollitore, pulire con un panno sofce ed asciutto.
Dopo aver seguito attentamente tutte le precedenti indicazioni , procedete pure con l’installazione del Bollitore
collegando la spina (6) della base (5) alla presa elettrica.
Allacciamento alla rete elettrica: la corrente elettrica può essere mortale. Attenersi scrupolosamente alle norme di
sicurezza. Collegare il cavo elettrico tramite la spina (6) della base (5) del bollitore Vera alla presa elettrica. Il voltaggio
deve corrispondere a quello indicato sulla targhetta posta sotto la base.
Risciacquare accuratamente l’interno e il becco del bollitore, raggiungendo tutte le superci. Riempire il bollitore con
acqua no al livello massimo (1700 ml), far bollire e svuotare con attenzione. Ripetere l’operazione almeno due volte.
Riempire con acqua il bollitore:
a) Rimuovere il bollitore dalla unità di base (5). Reggerlo per il manico (3).
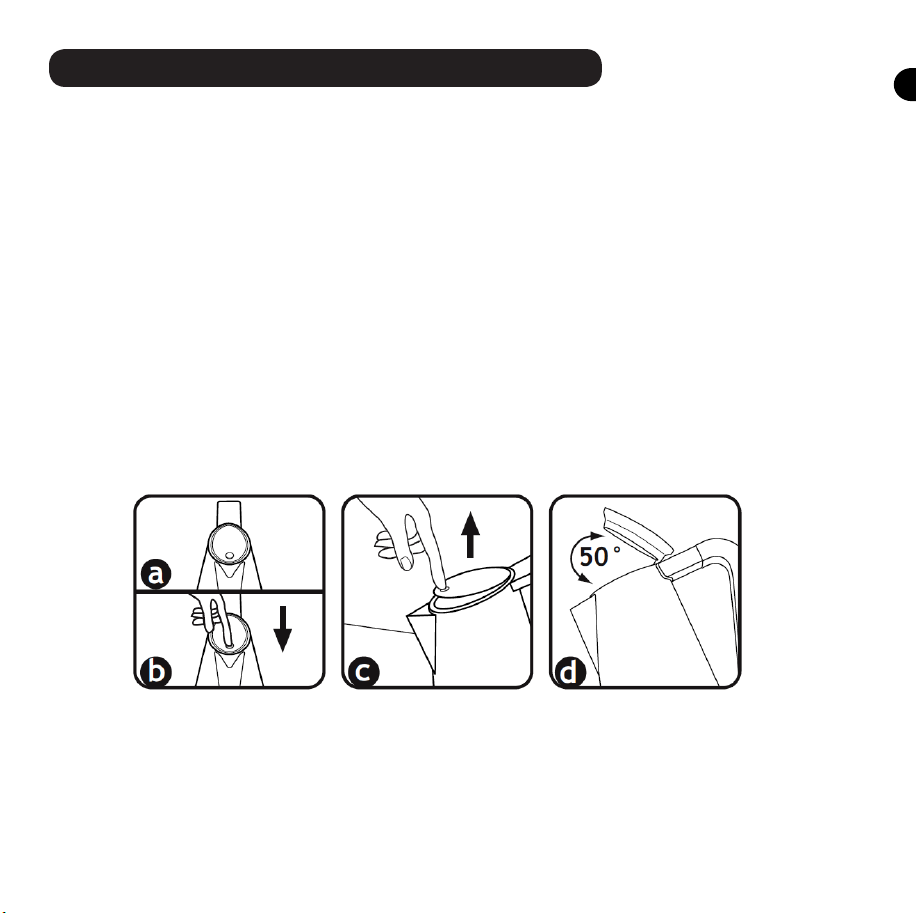
b) aprire il coperchio (1) : premendo sul “punto” di gomma (gura “a”) sul coperchio (1) e premere
in modo deciso (gura “b”). Quindi rilasciare (gura “c”) ed il coperchio (1) si aprirà automaticamente.
Il coperchio (1) non è rimuovibile ed alla massima apertura appare come nella gura “d”.
c) Riempire il bollitore con acqua direttamente dal rubinetto o tramite una caraffa o bottiglia no
al livello necessario. Non superare il livello massimo: 1700 ml.
d) Chiudere il coperchio (1): premendo sul “punto” di gomma (gura “a”) sul coperchio (1).
e) Mettere il bollitore sulla base (5).
f) Per iniziare la sessione di bollitura premere il pulsante on/off (9). La luce posta dietro il pulsante on/off (9)
mostra che il bollitore è funzionante.
Quando la sessione di bollitura termina, l’apparecchio si spegne automaticamente.
Per scollegarlo, assicuratevi che il bollitore non stia lavorando. Non scollegare la spina (6) del bollitore dalla
presa elettrica tirando il cavo. Sempre scollegare la spina (6) dalla presa di corrente tirando solo dalla spina
(6). Per spegnere completamente l’apparecchio, la spina (6) deve essere rimossa dalla presa di corrente.
Assicurarsi che la spina sia provvista di messa a terra (rispettando attentamente le indicazione del punto 5) .
Mai lasciare cavi scoperti che possano venire in contatto con acqua: potrebbero provocare un corto
6
Page 11

circuito !!! (seguire attentamente tutti i punti in merito alle norme di sicurezza).
Attenzione: Mai tenere premuto il pulsante on/off (9) durante una sessione di bollitura o dopo ogni sessione.
Attenzione: Mai azionare il bollitore sprovvisto di acqua.
Spegnimento automatico
Il bollitore è munito di un sistema che spegne automaticamente l’apparecchio appena l’acqua giunge ad
ebollizione.
Se si desidera ottenere acqua calda, il processo di bollitura può essere fermato in qualsiasi momento tramite il pulsante on/off (9) o semplicemente rimuovendo il bollitore dalla base (5).
Per ragioni di funzionamento, della condensa può apparire sul pulsante on/off (9) e sul connettore (5a)
posto nella base (5). Questo accade per ragioni tecniche e non ha ripercussioni sulla sicurezza del prodotto.
Sistema di sicurezza
Un termostato protegge il bollitore da un eventuale surriscaldamento della resistenza: se l’apparecchio
viene acceso accidentalmente mentre è vuoto, questo sistema spegne automaticamente l’apparecchio.
L’apparecchio riprenderà le sue normali funzioni dopo circa 10 minuti.
Se questo termostato non dovesse funzionare a causa di un uso improprio del prodotto, l’apparecchio è
protetto da un altro limitatore di temperatura.
Pulizia e manutenzione
ATTENZIONE: Scollegare sempre il bollitore dalla presa elettrica prima di pulirlo ed assicurarsi che sia freddo. Pulire le superci esterne del bollitore con un panno umido per preservarne la sua lucentezza originale.
Asciugare e lucidare con un panno asciutto e sofce.
Non usare detergenti abrasivi o agenti corrosivi per qualsiasi parte interna od esterna del bollitore.
Non immergere il bollitore o la base nell’acqua o altri liquidi, e assicurarsi che il connettore (5a) nella base
del bollitore e la spina (6) dell’unità di base (5) siano perfettamente asciutti.
a) Filtro (7)
Calcare, o calcio, sono sostanze naturali che si formano nell’acqua, in modo particolare se particolarmente
dura. Il ltro serve per trattenere il calcare nel bollitore evitando che venga bevuto. Il ltro quindi deve
essere pulito regolarmente. Il ltro è inserito nel beccuccio e può essere rimosso estraendolo. Può essere
pulito con una semplice spugna sotto l’acqua corrente.
ATTENZIONE: questa operazione deve essere fatta solo quando il bollitore non sta scaldando l’acqua
e solo quando il corpo risulta freddo. NON RIMUOVERE IL FILTRO QUANDO IL BOLLITORE VERA STA
SCALDANDO O BOLLENDO L’ACQUA E QUANDO LE SUPERFICI SONO CALDE. ACQUA BOLLENTE E VAPORE
POSSONO SCOTTARE!!!
b) Decalcicazione
Per decalcicazione si intende la rimozione del calcare accumulatosi all’interno del bollitore. PER OTTENERE IL MIGLIOR FUNZIONAMENTO DEL BOLLITORE VERA, DECALCIFICATE IL VOSTRO BOLLITORE PERIODICAMENTE. La frequenza della decalcicazione dipende dalla durezza dell’acqua e da quanto spesso usate il
bollitore. Suggeriamo di eseguire l’operazione ogni 100-200 cicli di bollitura, ogni due settimane o comun-
que tutte le volte che il fondo interno al bollitore inizia a mostrare delle macchie biancastre: signica che
sul fondo è presente deposito di calcare. Suggeriamo l’utilizzo di un decalcicante per bollitori in modo da
7
Page 12
sciogliere appieno il calcare. Seguire le istruzioni sulle confezioni dei decalcicanti. In ogni caso, BUGATTI
suggerisce il seguente metodo naturale: riempire il bollitore con 500 ml di aceto bianco di vino e 500 ml di
acqua. Utilizzare una spazzola imbevuta nell’aceto di vino bianco per pulire la barra dei sensori di livello
che si trova all’interno del bollitore in modo da rimuovere il calcare depositato sui sensori stessi. Dopodiché premere il pulsante on/off (14) e fare bollire l’acqua e l’aceto. Potrebbe servire ripetere l’operazione
più volte per rimuovere completamente il calcare. Una volta che la decalcicazione è completata, svuotare
il bollitore e riempirlo di acqua fresca e pulita più volte no a togliere l’odore ed il sapore dell’aceto.
Eventuali altri servizi dovranno essere eseguiti da un tecnico autorizzato.
Guasti e rimedi
In caso di guasti e difetti o se si sospettano inconvenienti al bollitore, staccare immediatamente la spina dalla
presa di corrente. Se non riuscite ad eliminare il guasto attenendovi alle indicazioni riportate nel presente
libretto d’uso potrete contattare il sevizio cortesia BUGATTI. Le riparazioni non effettuate correttamente
comportano gravi rischi per l’utente. Si declina ogni responsabilità relativa a danni causati da riparazioni non
eseguite correttamente: in questi casi, viene inoltre a mancare la copertura della garanzia.
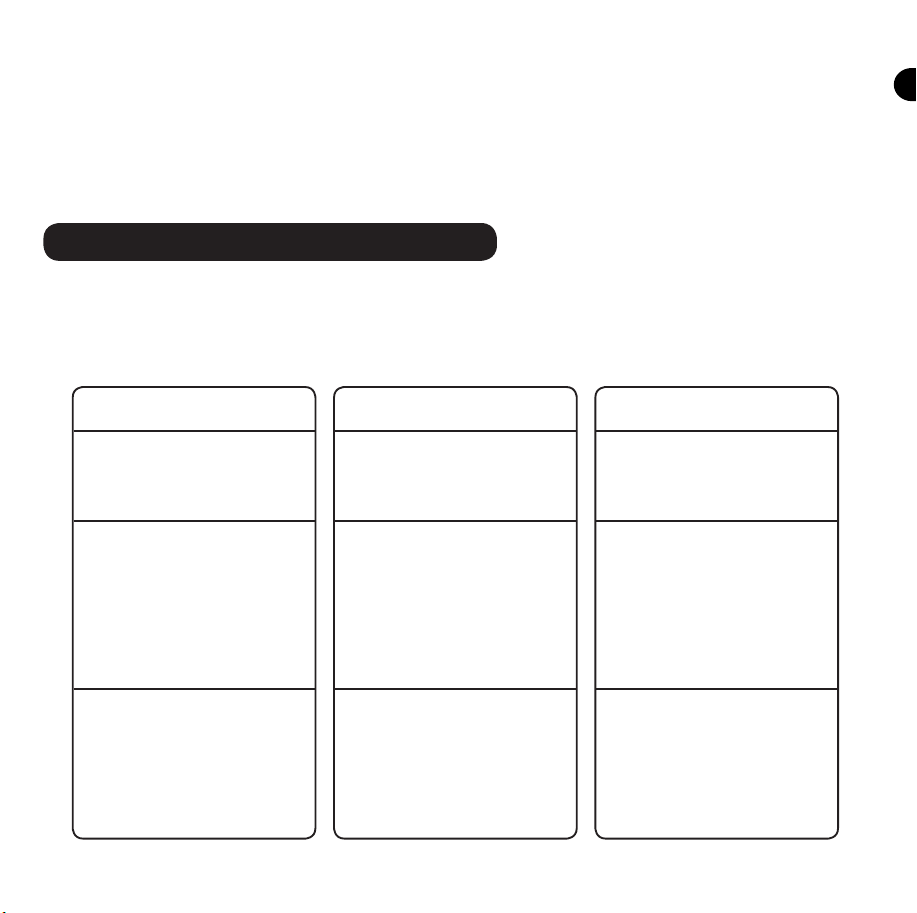
GUASTO
Il bollitore si ferma prima
di aver portato l’acqua alla
temperatura di ebollizione
L’acqua ha un cattivo sapore
Dopo aver acceso il bollitore, si spegne automaticamente dopo pochi secondi
POSSIBILI CAUSE
Calcare presente all’interno
del bollitore
1) L’acqua è presente nel
bollitore da più di 12ore.
2)Il bollitore non è stato
ben lavato dopo il ciclo di
decalcificazione.
Il bollitore è vuoto e interviene il sistema di protezione della resistenza
RIMEDI
Eseguire la decalcificazio-
ne come spiegato al punto
b) del capitolo Pulizia e
manutenzione
1) Si consiglia di cambiare
sempre l’acqua residua
dopo ogni ciclo di bollitura.
2) Eseguire sufficienti lavaggi e cicli di bollitura di
sola acqua dopo la decalcificazione.
Aspettare circa 10 minuti,
riempire il bollitore e far
partire la sessione di bollitura.
8
Page 13

Garanzia
1) Per garanzia si intende la sostituzione o riparazione gratuita delle parti componenti l’apparecchio, che risultano
difettose all’origine per vizi di fabbricazione.
2) in caso di guasto irreparabile o di ripetuto guasto della stessa origine, si provvederà, ad insindacabile giudizio
della casa costruttrice, alla sostituzione del bollitore.
3) La garanzia non copre i Danni causati da:
a) Danni provocati da uso non corretto.
b) difetti causati da cadute o da mancanza di attenzione.
c) errori nella procedura di installazione, non rispetto degli avvertimenti, pulizia e manutenzione.
d) manutenzione e/o modiche apportate da personale non autorizzato.
e) Utilizzo di pezzi di ricambio non originali.
f) trasporto
g) utilizzo del bollitore in modo continuativo senza acqua.
h) ogni altra circostanza che non può essere ascritta ad errori commessi del produttore. Inoltre sono escluse ogni
altra rivendicazione sempre che non sia prevista dalla legge.
4) La garanzia non copre difetti causati da uso improprio in particolar modo a causa di un uso non domestico.
5) La casa produttrice declina ogni responsabilità per eventuali danni che possono, direttamente o
indirettamente, derivare a persone, cose ed animali domestici in conseguenza della mancata osservanza di
tutte le prescrizioni di sicurezza indicate sul libretto istruzioni concernenti specialmente le avvertenze in
tema di installazione, uso e manutenzione della macchina.
6) Riparazioni o sostituzioni non interrompono il periodo di garanzia. Dalla garanzia sono esclusi materiali di
consumo come :Resistenze, guarnizioni, batteria, ltri, etc..
7) Il periodo di Garanzia inizia dalla data riportata sullo scontrino di acquisto o dalla data di ricevimento della
cartolina di garanzia CASA BUGATTI.
9
Page 14
CENTRO ASSISTENZA
Nel caso il bollitore sia difettoso, contattate un rivenditore autorizzato Bugatti, che spedirà il bollitore al produttore
o al centro assistenza più vicino. L’acquirente è responsabile per tutti i costi di trasporto o spedizione per tutte
le riparazioni coperte o non coperte da garanzia. Se possibile, trattenere l’imballo originale del bollitore per le
spedizioni. Importante: se un prodotto non conforme deve essere riparato da altri che non siano rivenditori Autorizzati
BUGATTI, vi preghiamo di ricordare al manutentore di mettersi in contatto con il nostro SERVIZIO ASSISTENZA per
assicurarsi che il problema si correttamente diagnosticato, che venga riparato con i pezzi di ricambio adatti, e che i
prodotto possa rimanere in garanzia.
AVVERTENZE PER IL CORRETTO SMALTIMENTO DEL PRODOTTO AI SENSI DELLA DIRETTIVA EUROPEA 2002/96/EC. Alla ne della sua vita utile il prodotto non deve esser smaltito insieme ai riuti
urbani. Può essere consegnato presso gli appositi centri di raccolta differenziata predisposti dalle
amministrazioni comunali, oppure presso i rivenditori che forniscono questo servizio. Smaltire separatamente un elettrodomestico consente di evitare possibili conseguenze negative per l’ambiente e per la
salute derivanti da un suo smaltimento inadeguato e permette di recuperare i materiali di cui è composto al
ne di ottenere un importante risparmio di energia e di risorse. Per rimarcare l’obbligo di smaltire separatamente gli elettrodomestici, sul prodotto è riportato il marchio del contenitore di spazzatura mobile barrato.
10
Page 15

IMPORTANT NOTICES
Dear Customer, thank you for choosing Vera, the kettle from Bugatti. Like any domestic
appliance, this kettle must be used with care and attention to prevent people getting burnt and the kettle
getting damaged.
BEFORE USING THE KETTLE FOR THE FIRST
TIME, READ ALL THE INSTRUCTIONS ON
INSTALLATION, USE AND MAINTENANCE AND THE
SAFETY INSTRUCTIONS CAREFULLY. DO NOT USE
THE KETTLE UNLESS YOU ARE THOROUGHLY
FAMILIAR WITH THE INSTRUCTIONS.
WARNING
No liability is accepted for damage due to:
- incorrect use or use other than for its intended purpose
- using the kettle continuously
- repairs carried out by unauthorized persons
- use of non-original spare parts or accessories
- plug-in Vera kettle in a non-earthed socket
For further information, or in the event of problems that have not been sufciently addressed
in these instructions, contact Customer Care at BUGATTI .
SAVE THESE INSTRUCTIONS CAREFULLY
pass them on to those who will use the kettle after you. If the instructions are lost before you use the kettle,
request the instruction booklet from Customer Care at BUGATTI or send an e-mail to [email protected] or
download it from www.casabugatti.it. On the rst page of the cover you will nd the illustrations relating to
the text. Keep the rst page open as you read the instructions on use.
11
and remember to
Page 16

Contents
Pag. 13 Technical features
Pag. 13 Description of kettle parts
Pag. 14 Important safeguards
Pag. 16 Installation and starting up
Pag. 17 Automatic shutdown
Pag. 17 Safety system
Pag. 17 Cleaning and maintenance
Pag. 18 Troubleshooting
Pag. 19 Warranty
All the details of the text have been carefully checked. Our company reserves the full right
to explain the elaboration of the text if there is any printing error or misleading information.
Note: please be reminded that our company keeps updated every product detail shown on the instruction
book, including technical specication. We reserve to revise the instruction book without prior
notice. All product’s outlook, shape and color are based on the standard of actual physical products.
12
Page 17
TECHNICAL FEATURES
Power supply See rating plate underneath machine
Power rating See rating plate underneath machine
Dimensions 220 x 180 x h. 300 mm – 8 1/2 ‘’ x 7’’ x 11 3/4 ‘ approximately
Body Pressed Solid 18/10 Stainless Steel
Weight 1,4 kg – 3 Pounds approximately
Length of power supply cord 0,75 meter – 30 inches approximately
Thermal overload protection Built in
Kettle capacity 1,70 litres / 57.48 US .oz / 59.80 UK .oz
Certications See rating plate underneath machine
Warranty As per attached certicate
DESCRIPTION OF KETTLE PARTS
Lid
Stay-cool handle
18/10 stainless steel kettle
Power base unit
Connector
Plug
Filter
Water maximum level mark
On/Off button
13
1
3
4
5
5a
6
7
8
9
Page 18

IMPORTANT SAFEGUARDS
When using electrical appliances, basic safety precautions should always be followed, including the following:
READ ALL INSTRUCTIONS CAREFULLY. THE
KETTLE MUST BE USED ONLY BY ADULTS
WHO HAVE BEEN TRAINED IN ITS USE.
SAVE THESE INSTRUCTIONS CAREFULLY.
1.TO PREVENT SERIOUS INJURIES , ELECTRIC
SHOCKS AND FIRE DO NOT IMMERSE CORDS, PLUGS,
POWER BASE OR THE KETTLE ITSELF IN WATER OR
OTHER LIQUIDS, EITHER PARTIALLY OR TOTALLY.
WARNING: DANGER OF BURNS!
PAY ATTENTION TO HOT SURFACES!
Do not touch hot surfaces. Use only the handle to pick-up the kettle. Use an oven glove when touching hot
parts such as body (4) , lid (1) and all surfaces of the kettle:
DANGER OF BURNS!
2. The kettle has been designed for HOUSEHOLD USE ONLY.
This appliance is intended to be used in household and similar applications such as:
- staff kitchen areas in shops, ofces and other working environments;
- farm houses;
- by clients in hotels, motels and other residential type environments;
- bed and breakfast type environments.
Use kettle only for its intended use. Do not make any technical modications that might cause risks.
3. Keep the kettle, the base (5) and the cable out of reach of children under 8 years old. Close supervision is necessary
when any appliance is used by or near children. Unplug from outlet when not in use and before cleaning. Allow to cool
before putting on or taking off parts, and before cleaning the appliance. Always attach plug to appliance rst, then plug
cord into the wall outlet. To disconnect, turn any control to “off”, then remove plug from wall outlet.
4. A short power cord with plug is supplied to reduce the risk of becoming entangled in objects, to prevent people for
tripping over it and to prevent the cord from wrapping around a longer cord. Long detachable power cords or extension
cords are available but they may be used only if a QUALIFIED ELECTRICIAN can conrm that they comply with wiring
regulations. DO NOT USE plug/socket adapters. If a long detachable power cord or extension cord is used:
a)The electrical rating of the detachable power cord or extension cord should be at least as powerful as the electrical
rating of the kettle indicated underneath the kettle itself.
14
Page 19

b)The extension cord must be of the 3-wire/pole type and must be earthed. A long cord or extension cord must never
protrude from furniture or over counter tops or table tops where it may be pulled on by children or tripped over.
c)Do not place kettle or cords on or near a hot gas ring or electric hotplate, or in or near the oven.
d) Do not use outdoors.
Do not let the cords hang over the edge of the table or counter, or touch hot surfaces.
Do not operate the kettle with a damaged cord or plug or after the appliance develops faults, or has been damaged
in any manner. Return appliance to the nearest authorized service facility for examination or repair. The use of
accessory attachments not recommended by the appliances manufacturer may result in re, electric shock or serious
injuries to persons.
e) If the power cable or plugs are damaged, they must be replaced by the manufacturer or with authorized service
centre or by a qualied person in order to prevent all risks.
5. Never touch live electrical parts. They may cause electric shocks and serious personal injury. Connect the power base
unit (5) to a wall socket having the appropriate voltage. The voltage must correspond to the voltage indicated on the
rating plate underneath the kettle (4). Make sure that the socket that you are using is earthed . Do not use the kettle
with bare or wet feet.
6. The kettle is only to be used with the base (5) provided.
7. WARNING: avoid spillage of water or other liquids on the base (5) and on the connector (5a).
8. WARNING: Never ll the kettle above 1,70 litres (57.48 US .oz / 59.80 UK .oz), the «MAX» mark on the display panel (8).
9. WARNING: Never ll the kettle with water when it is positioned on the power base unit (5).
10. WARNING: Only ll the kettle with clean water. No milk, coffee or others.
11. WARNING: Never operate the kettle unattended.
12. WARNING: Never operate the kettle without water. A mistaken use limits the life of the kettle.
13. WARNING: Never keep pushed the on/off button (9) during a boiling session or after a boiling session.
14. WARNING: Never boil water if the kettle is overlled or with the lid (1) open. Boiling water may splash out and hurt
people.
15. Always ensure that you pour out boiling water slowly and carefully.
16. To prevent burns avoid to open the lid (1) when the water is being boiled or just after the kettle has switched off.
STEAM MAY BURN!
Be careful when opening the lid (1), if the kettle is still hot and you wish to rell it with water. Boiling water can cause
burns.
17. After every boiling session completely empty the kettle. Never leave water in the kettle for a long period of time.
18. Be careful: hot surfaces. Use handles or knobs or wear oven gloves. Be very careful when touching very hot parts such
as lid (1) , body (4) and all surfaces of the kettle. WARNING! DANGER OF BURNS! The kettle body (4) and lid (1) become
very hot during use.
19. The heating element surface is subject to residual heat after use.
20. To disconnect verify that the kettle is switched off and remove the plug (6) from the wall outlet. Always unplug the
appliance by holding the plug not the cord. Note: Remove plug from wall outlet when you are not using the kettle.
21. Place the kettle on a at surface, making sure that the feet adhere rmly to the support surface so that the appliance
cannot be overturned. Do not place the kettle on or near hot surfaces or near naked ames.
CAUTION: Do not operate the kettle on an inclined surface.
22. To be sure that the kettle works correctly, place it on a at surface in an adequately lighted and hygienic environment
with an easily accessible electrical socket. Keep the kettle at least 10 cm (4 inches) away from the walls.
23. Do not use the kettle under or near ammable material such as curtains, wallpaper, walls.
24. In the event of faults, defects or suspected faults after a fall, unplug the kettle immediately. Never start up a
faulty appliance. The repairs must be carried out by the BUGATTI Service Centre. Contact your dealer and/or
contact Customer Care at BUGATTI or send an e-mail to [email protected] . In the event of re, use carbondioxide
(CO2) extinguishers. Do not use water or powder extinguishers.
15
SAVE THESE INSTRUCTIONS CAREFULLY
Page 20
Installation and starting up
The original packaging has been designed for dispatch by post. Keep it in case you need to return the kettle
to the supplier. Before installing the kettle, comply with all the points of the safety instructions on the
previous pages. After removing the kettle from its packaging, make sure that it is in perfect condition and
make sure that no kind of matter, packaging material, warranty sheets or the like have accidentally fallen
inside the kettle during transport or when opening the packaging.
The plastic bag in which the kettle is packaged should be kept out of reach of children as it poses a suffocation hazard. Be sure that the kettle is in perfect conditions. In order to remove dust that may have
accumulated on the exterior surfaces of the kettle, simply dust it off with a dry soft cloth.
After you have carried out the above steps and have strictly followed the safety standards, proceed to
connect to the power supply.
Connecting to power supply: electric current can kill! Follow safety instructions!
Plug the power cord (6) of the Vera kettle into a power socket of the same voltage of the one indicated on
the rating plate underneath the kettle.
Rinse out carefully all the internal surfaces and the spout of the kettle: ll the kettle with water until the
maximum level (1700 ml/ 57.48 US .oz / 59.80 UK .oz), boil it and empty the boiler. Repeat at least two
times.
Fill the kettle:
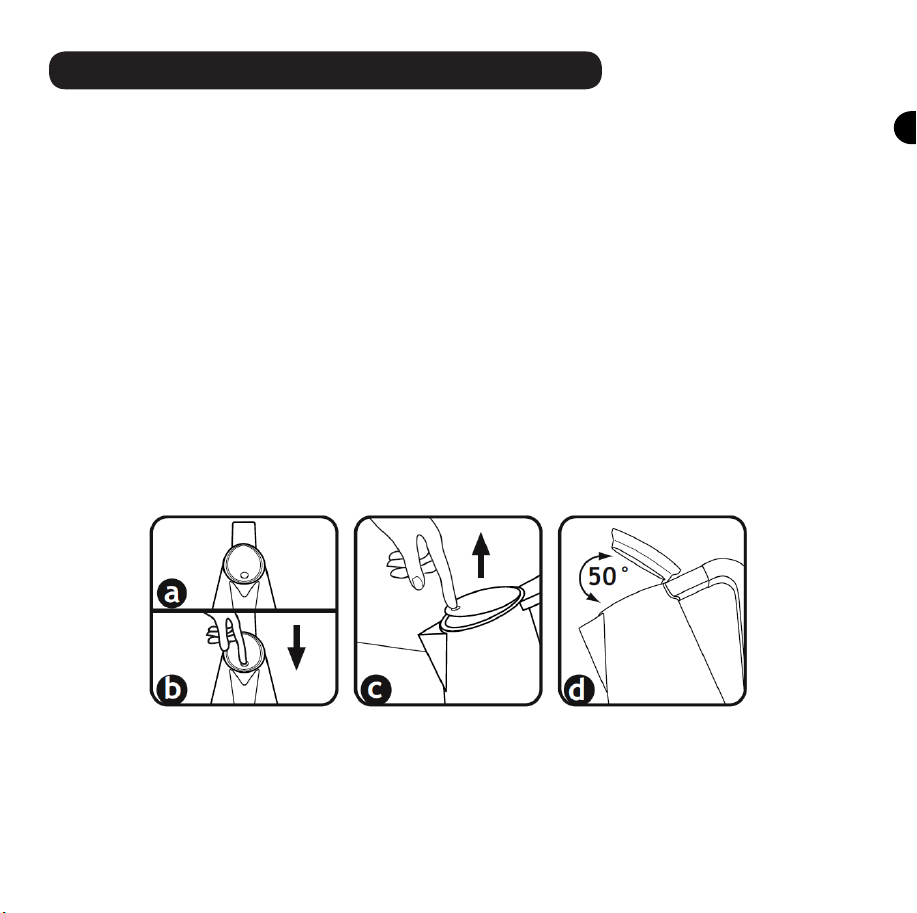
a) remove the kettle body from the power base unit (5). Hold it by the handle (3)
b) open the lid (1) : press on the rubber “point” (picture “a”) on the lid (1) and press down rmly (picture
“b”). Then release (picture “c”) and the lid (1) will open automatically. The lid (1) is not removable and
the max opening is shown in the picture “d”.
c) ll the kettle with water directly under the tap or ll it by pouring water from a bottle, jug or jar to the
needed level. Do not overll the kettle. Be careful not to go over 1700 ml (57.48 US .oz / 59.80 UK .oz).
d) close the lid (1) : press on the rubber “point” (picture “a”) on the lid (1). Never operate the kettle with
the lid (1) open.
e) Put the kettle on the base (5).
f) To boil water just push on the on/off button (9). The light in the on/off button (9) shows that the kettle
is working.
When the boiling session is nished, the kettle automatically switches off.
To disconnect, make sure that the kettle is not running. Do not unplug the kettle from the wall outlet by
pulling on the cord. Always unplug the appliance by holding the plug (6). To switch off completely the device, the plug (6) has to be removed from the socket.
16
Page 21

Make sure that the electric socket that you are using is suitably earthed.
Never allow parts carrying live voltage to come into contact with water: it may cause a short circuit!!!
(follow all the safety instructions specied before).
Be careful: never keep the on/off button (9) pushed during or after every boiling session.
Be careful: never operate the kettle without water.
Automatic shutdown
The kettle is equipped with a system that automatically switches off the device shortly after the water is
boiled.
If warm water is desired, the heating process can be stopped anytime by pulling the on/off button (9). The
shutdown takes place automatically as the kettle is removed from its base (5).
For functional reasons, some condensations may appear at the bottom of the on/off button (9), on the base
(5) and on the connector (5a). This happens for technical reasons and does not bear on the safety of the
device.
Safety system
A thermostat protects the kettle from overheating: if the device is accidentally switched on empty, this
system automatically switches off the device. The device will restart its normal functions in around 10
minutes.
If the rst thermostat protection would not function due to improper use, another temperature limiter
ensures protection.
Cleaning and maintenance
CAUTION: Always disconnect the kettle from the electrical outlet before cleaning.
Before cleaning, be sure the kettle is cold.
Clean the exterior surface of the kettle with a clean, damp cloth to preserve its original highly polished
nish. Dry and polish with a soft cloth.
Do not use abrasive cleansers or scouring agents of any kind on the interior or exterior of the kettle.
Do not immerse the kettle or power base in water or other liquid, and be sure that the electric kettle plug
(6) and connector (5a) of the power base (5) is kept dry.
a) Filter (7)
Scale, or calcium, is a natural substance that forms when hard water is boiled. The lter serves to retain
the calcium in the water kettle. It is important to clean the lter regularly. The lter clips into the spout
and can be removed by pulling it up from the spout. It can be cleaned by gently brushing with a soft brush
under running water.
ATTENTION: This operation can be performed only when the kettle is not working and when the kettle
has cooled down. DO NOT REMOVE THE FILTER WHEN VERA KETTLE IS WORKING AND WHEN THE SUFACE
IS HOT. BOILED WATER AND STEAM CAN BURN!!!
b) Decalcication
Decalcication refers to removing the calcium deposits which may form in the interior metal parts of the
kettle. TO GET THE BEST PERFORMANCE FROM YOUR VERA KETTLE, DECALCIFY YOUR UNIT FROM TIME TO
TIME. Frequency depends on the hardness of your tap water and how often you use the kettle. We suggest
to do it every 100-200 boiling cycles, or every two weeks or every time you see white spots on the internal bottom surface of the kettle: it means that there is limestone sediment. We suggest use of a kettle
descaler in order to dissolve these chalky deposits or lime build up. Follow the instructions on the descaler
17
Page 22
package. By the way BUGATTI suggests the following natural way: if a commercial descaler is not availa-
ble, ll the kettle with 500 ml (16,90 US oz/ 17,59 UK oz) white vinegar and 500 ml (16,90 US oz/ 17,59
UK oz) water. Use a soft brush together with vinegar to clean the plastic water level sensor holder in order
to remove the chalky deposit. Bring the vinegar to a boil. You may need to repeat this several times with
cooled vinegar to remove the calcium build up completely. When the descaling process is complete, empty
the kettle and rinse out several times with clean water.
Any other servicing should be performed by an authorized service representative.
Troubleshooting
If the Vera kettle develops faults or defects or if irregularities are suspected, unplug it immediately. If you
cannot eliminate the fault by following the instructions in this manual, contact Customer Care at BUGATTI.
Repairs carried out incorrectly expose the user to grave danger. No liability is accepted for damage or injury caused by repairs carried out incorrectly and in such cases warranty rights are voided.
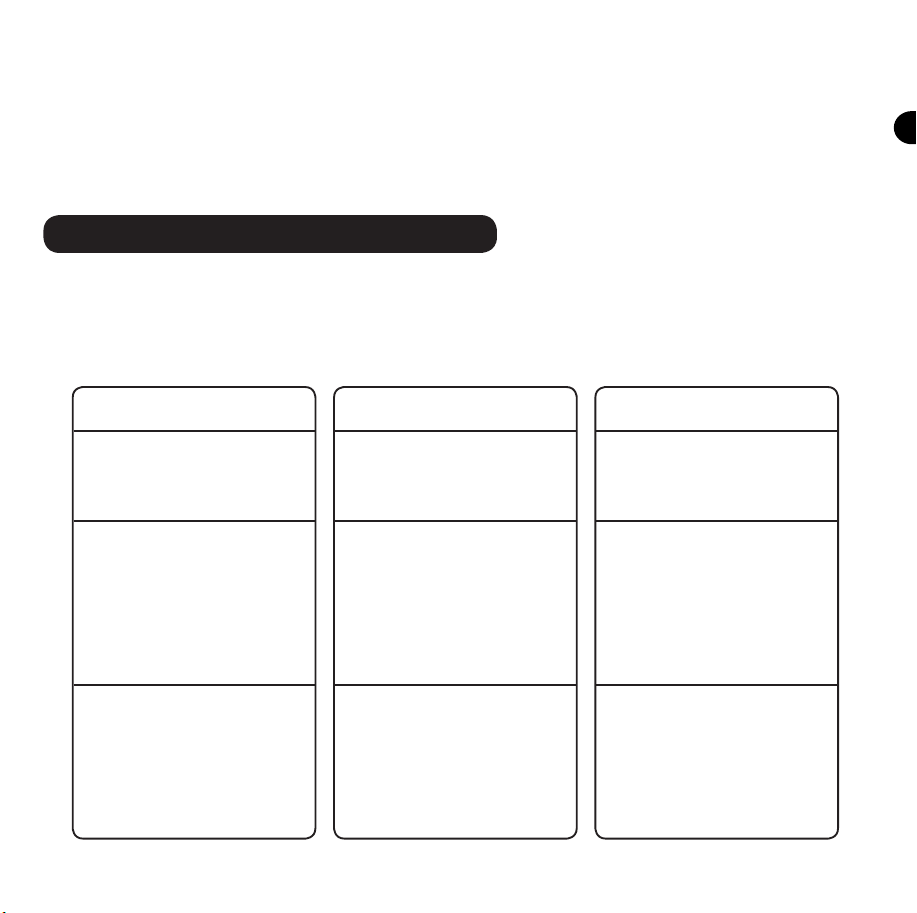
TROUBLE
The kettle does not work propely or stops before boiling.
If the water tastes bad.
The kettle is switched on
and after a few seconds it
automatically switches off.
POSSIBLE CAUSE
There is lime scale into the
kettle.
1) Water is in the kettle
for more then 12 hours.
2)The kettle is not well
washed after the descaling
cycle.
The kettle is empty and the
protection system of the resistance is working.
SOLUTION
Make the descaling as for point
b) of the Cleaning and maintenance chapter.
1) We suggest to change the residual water after each boling cycles.
2)Rinse the kettle sufficient
times in order to remove
completely the descaling
product.
Wait approximately 10 minutes, fill the kettle with
water and switch it on.
18
Page 23

Warranty
1) A warranty is deemed to be the replacement or repair free of charge of the parts making up the kettle that were
faulty at the time of purchase due to manufacturing faults.
2) In the case of irreparable or repeated faults which are due to manufacturing faults as above, at the manufacturer’s
sole discretion, the machine will be replaced.
3) The warranty does not cover damage due to:
a) incorrect or faulty use
b) defects caused by accidental breakages or carelessness
c) failure to follow instructions and warnings, incorrect installation, cleaning and maintenance
d) maintenance and/or modications performed by unauthorized personnel
e) use of non-original spare parts
f) carriage
g) using any kettle function without water continuously
h) any other circumstance that cannot be ascribed to manufacturing faults. Any claims not envisaged by law are
excluded.
4) The warranty does not cover damage due to improper use and in particular due to non-domestic use.
5) The manufacturer accepts no liability for any direct or indirect harm or injury to persons, things and domestic
animals that may arise from failure to abide by all the safety instructions contained in this manual, especially failure
to abide by the instructions on installation, use and maintenance of the kettle.
6) Replacement or repair shall not extend the warranty period. The warranty does not cover the replacement of
consumables, such as the resistances, battery, etc.
7) The warranty runs from the date of receipt of evidence of purchase and of receipt of the warranty card by
BUGATTI.
19
Page 24
SERVICE CENTRE
In the event of a kettle fault, contact an authorized BUGATTI dealer, who will return the kettle to the manufacturer.
The purchaser is responsible for all carriage and/or dispatch costs for all repairs covered or not covered by warranty.
If possible, keep the kettle’s original packing for dispatch.
Important: If the nonconforming product is to be serviced by someone other than contact an authorized BUGATTI
dealer, please remind the service to call our Consumer Service Center to ensure that the problem is properly
diagnosed, the product serviced with the correct parts, and to ensure that the product is still under warranty.
DISPOSAL OF THE PRODUCT IN CONFORMITY TO EUROPEAN DIRECTIVE 2002/96/EC.
At the end of its working life the product must not be disposed of alongside urban waste. It can be delivered
to local-authority separated waste collection centres or to dealers who provide this service. Separated
disposal of a household appliance enables possible negative consequences for the environment and health
arising from improper disposal to be eliminated and enables the materials of which it is made to be recovered in
order to make signicant power and resource savings. The symbol of a moveable waste bin marked with a cross
displayed on the product indicates that as a household appliance it must be disposed of separately.
20
Page 25

REMARQUES IMPORTANTES
Cher Client, merci d'avoir choisi Vera, la bouilloire Bugatti. Comme pour tout appareil
électroménager cette bouilloire doit être utilisée avec précaution et avec attention, an d'éviter de causer
des brûlures à des personnes et pour éviter d'endommager la bouilloire.
AVANT D'UTILISER LA BOUILLOIRE POUR LA
PREMIERE FOIS, LIRE ATTENTIVEMENT TOUTES
LES INSTRUCTIONS POUR L'INSTALLATION,
L'UTILISATION ET LA MAINTENANCE AINSI QUE
LES CONSIGNES DE SECURITE. NE PAS UTILISER
LA BOUILLOIRE SI VOUS NE CONNAISSEZ
PAS OU VOUS NE COMPRENEZ PAS BIEN LES
INSTRUCTIONS.
AVERTISSEMENTS
Aucune responsabilité ne sera acceptée pour des dommages dûs à :
- utilisation incorrecte ou utilisation autre que la destination d'usage prévue
- utilisation constante de la bouilloire
- réparations effectuées par des personnes non autorisées
- utilisation de pièces détachées ou accessoires non originaux
- branchement de la bouilloire Vera dans une prise qui n'est pas une prise qui n'est pas reliée à la terre
Pour plus d'informations, ou en cas de problème qui n'ont pas été sufsamment été abordés
dans ces instructions, contacter le Service Clientèle BUGATTI.
CONSERVEZ CES INSTRUCTIONS AVEC SOIN
de les transmettre aux personnes qui utiliseront la bouilloire après vous. En cas de perte des instructions
avant d'avoir utilisé la bouilloire, demander le guide d'instructions au Service Clientèle BUGATTI ou envoyer
un E-mail à [email protected] ou le télécharger du site www.casabugatti.it. Sur la page de couverture,
vous trouverez les illustrations relatives au texte. Conserver la page de couverture ouverte quand vous lisez
le mode d'emploi.
21
et rappelez-vous de
Page 26

Sommaire
Page 23 Caractéristiques techniques
Page 23 Description des pièces de la bouilloire
Page 24 Précautions importantes
Page 26 Installation et démarrage
Page 27 Arrêt automatique
Page 27 Système de sécurité
Page 27 Nettoyage et entretien
Page 28 Diagnostic de panne
Page 29 Garantie
Toutes les informations contenues dans le texte ont été contrôlées attentivement. Notre société se réserve le
droit d'expliquer l'élaboration du texte en cas d'erreur d'impression ou d'information trompeuse.
Remarque : merci de garder à l'esprit que notre société met à jour toutes les informations sur les produits
indiquées dans ce livret d'instruction, y compris les spécications techniques. Nous nous réservons le droit
de revoir le livret d'instruction dans préavis. L'aspect, la forme et la couleur des produits sont basés sur les
produits physiques réels standards.
22
Page 27
CARACTERISTIQUES TECHNIQUES
Alimentation électrique
Puissance maximum de régime
Dimensions 220 x 180 x h. 300 mm – 8 1/2 ‘’ x 7’’ x 11 3/4 ‘ environ
Corps Acier inoxydable embouti 18/10
Poids 1,4 kg – 3 livres, environ
Longueur du câble électrique 0,75 mètre – 30 pouces, environ
Protection de surcharge thermique Intégrée
Capacité de la bouilloire 1,70 litres / 57.48 US .oz / 59.80 UK .oz
Certications
Garantie Suivant le certicat joint
Voir les valeurs nominales sur la plaque signalétique située sous la machine
Voir les valeurs nominales sur la plaque signalétique située sous la machine
Voir les valeurs nominales sur la plaque signalétique située sous la machine
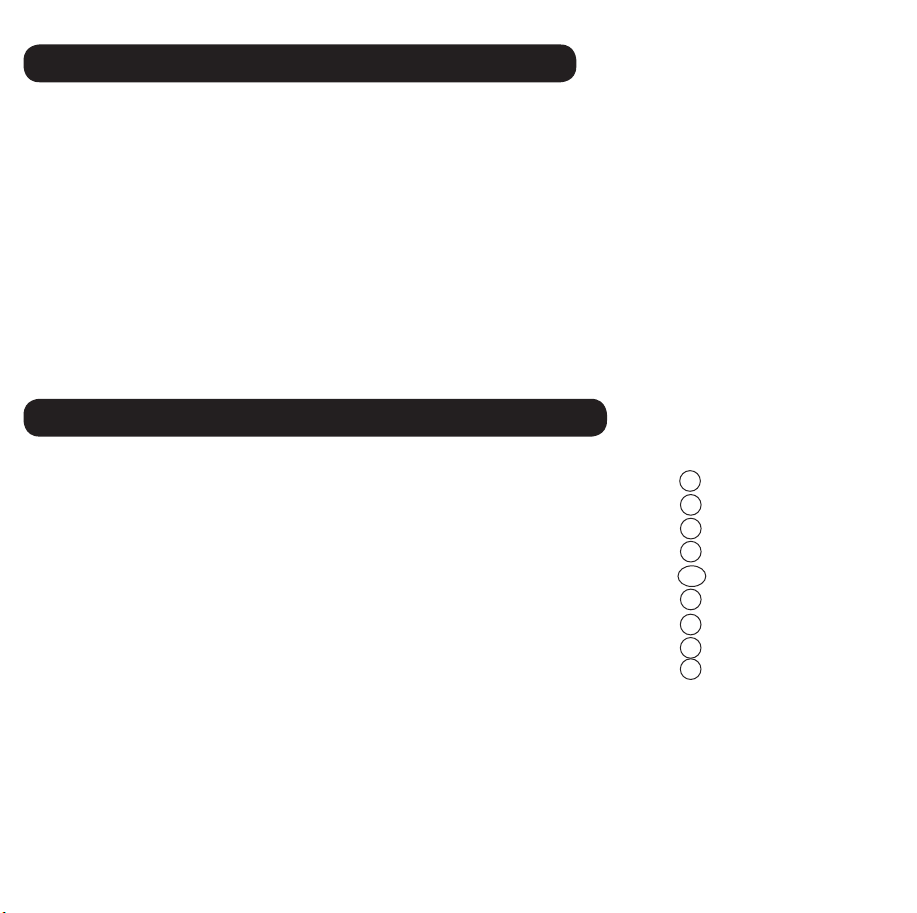
DESCRIPTION DES COMPOSANTS DE LA BOUILLOIRE
Couvercle
Poignée anti-chaleur
Bouilloire en acier inoxydable 18/10
Bloc d'alimentation de base
Connecteur
Prise
Filtre
Marque de niveau d'eau maximum
Bouton On/Off
1
3
4
5
5a
6
7
8
9
23
Page 28

PRECAUTIONS IMPORTANTES
En utilisant des appareils électriques, les précautions de sécurité de base devraient toujours être suivies, y
compris les suivantes:
LIRE ATTENTIVEMENT TOUTES LES INSTRUCTIONS. LA
BOUILLOIRE NE DOIT ETRE UTILISEE QUE PAR DES
ADULTES QUI ONT ETE FORMES A SON USAGE.
CONSERVER SOIGNEUSEMENT CES INSTRUCTIONS.
1.POUR EVITER DES BLESSURES GRAVES, DES
ELECTROCUTIONS ET DES INCENDIES, NE PAS PLONGER
LES CABLES, LES PRISES, LA BASE ELECTRIQUE OU LA
BOUILLOIRE DANS L'EAU OU DANS D'AUTRES LIQUIDES,
PARTIELLEMENT OU ENTIEREMENT.
AVERTISSEMENTS : RISQUE DE BRULURES !
ATTENTION AUX SURFACES CHAUDES !
Ne pas toucher des surfaces chaudes. Utiliser uniquement la poignée pour prendre la bouilloire. Utiliser des maniques quand on
touche des pièces chaudes telles que le corps (4), le couvercle (1) et toutes les surfaces de la bouilloire.
RISQUE DE BRULURES !
2. La bouilloire a été conçue pour USAGE DOMESTIQUE UNIQUEMENT.
Cet appareil est conçu pour un usage domestique uniquement ou applications similaires telles que :
- zone cuisine du personnel dans les magasins, bureaux et autres environnements de travail ;
- fermes ;
- utilisation par les clients dans les hôtels, motels et autres environnements résidentiels de ce type ;
- secteur de type bed and breakfasts.
Utiliser la bouilloire uniquement pour son usage prévu. N'apporter aucune modication technique qui pourrait entrainer des
risques.
3. Mettre la bouilloire, la base (5) et le câble hors de portée des enfants de moins de 8 ans. Une surveillance étroite s’impose
lorsque l’appareil est utilisé auprès des enfants. Débrancher toujours la che de la prise lorsque l’on n’utilise pas l’appareil et
avant de le nettoyer. Débrancher toujours la che même lorsque l’on enlève ou que l’on monte des différents composants, et
avant de le nettoyer. Pour débranche l’appareil, vérier qu’il soit éteint avant d’enlever la prise. Toujours débrancher en tirant
la prise et non le l.
4. Un court câble d'alimentation électrique est fourni pour réduire le risque qu'il ne s'enchevêtre dans des objets, pour éviter
que des personnes ne trébuchent dessus et pour éviter que le câble ne s'enroule autour d'un cordon plus long. Des câbles
d'alimentation longs amovibles ou des rallonges sont disponibles mais ils ne peuvent être utilisés que si un ELECTRICIEN AGREE
peut conrmer qu'ils sont conformes aux réglementations en matière de câblage. NE PAS UTILISER d'adaptateurs (femelle/mâle).
24
Page 29

Si on utilise un câble long amovible ou une rallonge :
a) Les caractéristiques électriques nominales du câble d'alimentation électrique amovible ou de la rallonge doivent être au moins
aussi puissantes que les caractéristiques électriques nominales de la bouilloire, indiquées sous cette dernière.
b) La rallonge doit être de type triphasée, 3 pôles et doit être raccordée à la terre. Un câble long amovible ou une rallonge ne
doit jamais dépasser d'un meuble, au-dessus d'un plan de travail ou d'une table où des enfants pourraient le tirer ou trébucher
dessus.
c) Ne pas placer la bouilloire ni les câbles sur le gaz, sur une plaque chauffante électrique ou dans un four, ni à proximité de ces derniers.
d) Ne pas utiliser en extérieur. Ne pas laisser les câbles pendre de la table ou du plan de travail et ne pas toucher les surfaces
chaudes. Ne pas utiliser la bouilloire si le câble, la prise ou l'appareil présente des défaillances ou s'il a été endommagé
de quelque façon que ce soit. Renvoyer l'appareil au service assistance agréé le plus proche an qu'il soit examiné ou réparé.
L'utilisation de xations ou raccordements auxiliaires non recommandés par le fabricant de l'appareil peut entrainer un incendie,
une électrocution ou de graves lésions corporelles.
e) Si le câble électrique ou les prises sont endommagées, ils doivent être remplacés par le fabricant, par un centre de service
agréé ou par une personne qualiée, an d'éviter tout risque.
5. Ne jamais toucher des parties électriques sous tension. Celles-ci pourraient provoquer des électrocutions et de graves lésions
corporelles. Brancher la base électrique (5) à une prise murale ayant une tension appropriée. La tension doit correspondre à la
tension indiquée sur la plaque signalétique situé sous la bouilloire. S'assurer que la prise utilisée est raccordée à la terre.
Ne pas utiliser la bouilloire pieds nus ou avec les pieds mouillés.
6. La bouilloire doit uniquement être utilisées avec la base (5) fournie.
7. AVERTISSEMENT : éviter de renverser de l'eau ou d'autres liquides sur la base (5) et sur le connecteur (5a).
8. AVERTISSEMENT : Ne jamais remplir la bouilloire avec plus d'1,70 litres (57.48 US .oz / 59.80 UK .oz), la marque «MAX» sur l'écran
d'afchage (8).
9. AVERTISSEMENT : Ne jamais remplir la bouilloire avec de l'eau quand celle-ci se trouve sur la base électrique (5).
10. AVERTISSEMENT : Ne remplir la bouilloire qu'avec de l'eau propre. Pas de lait, ni de café etc.
11. AVERTISSEMENT : Ne pas faire fonctionner la bouilloire sans surveillance.
12. AVERTISSEMENT : Ne jamais faire fonctionner la bouilloire sans eau. Une utilisation incorrecte limite la durée de vie de la
bouilloire.
13. AVERTISSEMENT : Ne jamais garder le bouton on/off (9) enfoncé pendant que la bouilloire bouille ou après qu'elle a bouillie
l'eau.
14. AVERTISSEMENT : Ne jamais faire bouillir l'eau si la bouilloire est trop remplie ou avec le couvercle (1) ouvert. L'eau bouillante
pourrait éclabousser et blesser des personnes.
15. Toujours s'assurer de verser l'eau bouillante lentement et avec précaution.
16. Pour éviter les risques de brûlures LA VAPEUR PEUT BRULER !
Faire attention quand on ouvre le couvercle (1), si la bouilloire est encore chaude et qu'on souhaite la remplir d'eau. L'eau
bouillante peut brûler.
17. Après la période d'ébullition, vider complètement la bouilloire. Ne jamais laisser d'eau dans la bouilloire pendant une longue
période de temps.
18. Attention : surfaces chaudes. Utiliser les poignées, les boutons ou porter des maniques. Etre extrêmement attentif quand
on touche des pièces très chaudes comme le couvercle (1), le corps (4) et toutes les surfaces de la bouilloire. AVERTISSEMENT !
RISQUE DE BRULURES ! Le corps (4) et le couvercle (1) de la bouilloire deviennent extrêmement chauds pendant l'utilisation.
19. La surface de la résistance est soumise à une chaleur résiduelle après l'utilisation.
20. Pour débrancher, vérier que la bouilloire est éteinte et retirer la che (6) de la prise murale. Toujours débrancher l'appareil
en tirant sur la prise et non sur le câble. Remarque : Retirer la che de la prise murale quand on n'utilise pas la bouilloire.
21. Placer la bouilloire sur une surface plane en s'assurant que les pieds adhèrent parfaitement à la surface de support de
manière à ce que l'appareil ne puisse pas se renverser. Ne pas poser la bouilloire sur des surfaces chaudes ou à proximité de
celles-ci, ni à cotés de ammes nues.
MISE EN GARDE : Ne pas utiliser la bouilloire sur une surface inclinée.
22. S'assurer que la bouilloire fonctionne correctement, la placer sur une surface plane dans un lieu disposant d'un éclairage
approprié et d'une hygiène adéquate et qui soit doté d'une prise de courant facilement accessible. Placer la bouilloire à au moins
10 cm (4 pouces) des murs.
23. Ne pas poser la bouilloire sur des surfaces chaudes ou à proximité de celles-ci, ni à côté de ammes nues.
24. En cas de panne, de défauts ou de soupçons d'une panne après une chute, débrancher immédiatement la bouilloire. Ne
jamais démarrer un appareil défectueux. Les réparations doivent être effectuées par le Centre de service BUGATTI. Contacter
le revendeur et/ou le Service Clientèle BUGATTI, ou envoyer un E-mail à [email protected]. En cas d'incendie, utiliser des
extincteurs au dioxyde de carbone (CO2). N'utiliser ni eau ni extincteurs à poudre.
25
CONSERVEZ CES INSTRUCTIONS AVEC SOIN
Page 30
Installation et démarrage
L'emballage original a été prévu pour une livraison par poste. Le conserver au cas où il serait nécessaire de
renvoyer la bouilloire au fournisseur. Avant d'installer la bouilloire, respecter toutes les consignes de sécurité
indiquées dans les pages précédentes. Après avoir retiré la bouilloire de son emballage, s'assurer que celle-ci
est en parfait état et la tenir hors de portée des enfants. S'assurer qu'aucun objet, matériau d'emballage, feuillet de garantie etc. n'est tombé dans la bouilloire pendant le transport ou lors de l'ouverture de l'emballage.
Le sac en plastique dans lequel la bouilloire est emballée devra être tenu hors de portée des enfants dans la
mesure où il représente un risque d'étouffement. S'assurer que la bouilloire est en parfait état. Pour éliminer la
poussière qui peut s'être accumulée sur les surfaces extérieures de la bouilloire, simplement les dépoussiérer à
l'aide d'un chiffon doux et sec.
Après avoir exécuté les étapes susmentionnées et avoir suivi rigoureusement les normes de sécurité, brancher l'appareil à l'alimentation électrique.
Branchement électrique : le courant électrique peut tuer ! Respecter les consignes de sécurité !
Brancher le câble électrique (6) de la bouilloire Vera à une prise de courant ayant la même tension que
celle indiquée sur la plaque signalétique située sous la bouilloire.
Rincer avec soin toutes les surfaces internes et le bec verseur de la bouilloire : remplir la bouilloire avec
de l'eau jusqu'au niveau maximum indiqué (1700 ml/ 57.48 US .oz / 59.80 UK .oz), porter à ébullition et
vider la bouilloire. Répéter au moins deux fois.
Remplir la bouilloire :
a) retirer le corps de la bouilloire du socle de base électrique (5). Le tenir par la poignée (3).
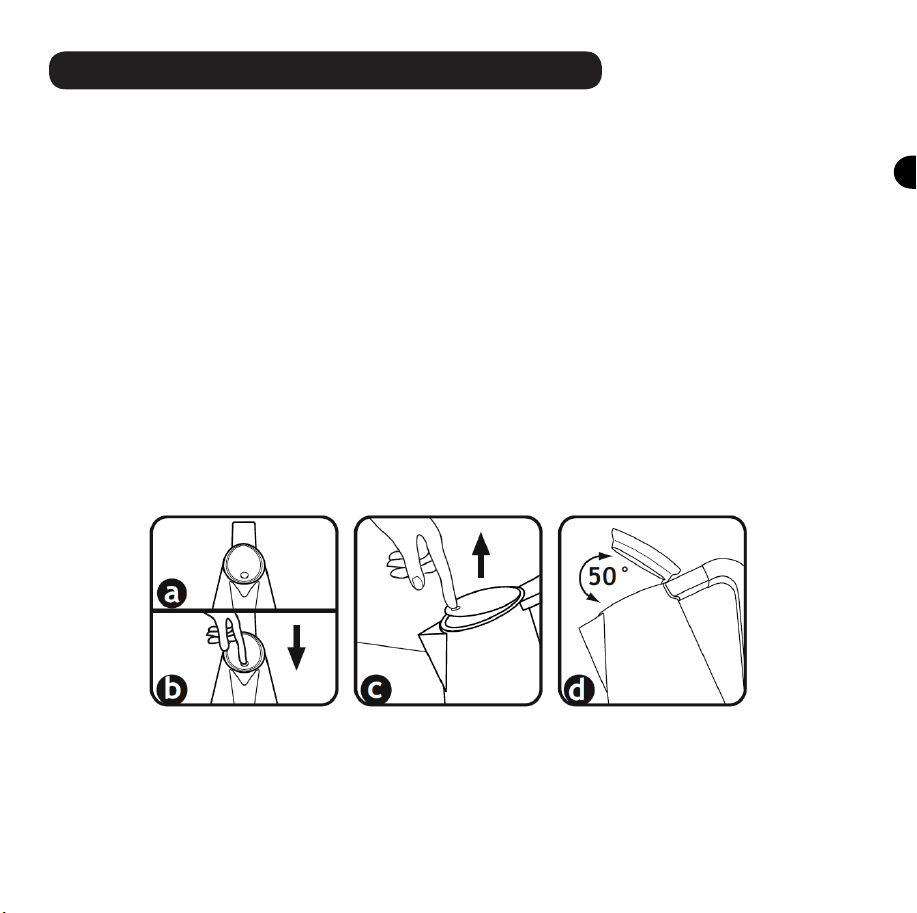
b) ouvrir le couvercle (1) : appuyer sur le "point" en caoutchouc (image "a") situé sur le couvercle (1) et
l'enfoncer fermement (image "b"). Puis relâcher (image "c") et le couvercle (1) s'ouvrira automatiquement.
Le couvercle (1) ne peut pas être retiré et l'ouverture maximum est indiquée dans l'image "d".
c) remplir la bouilloire d'eau, directement sous le robinet ou la remplir en versant de l'eau d'une bouteille,
d'une carafe ou d'un pichet, jusqu'au niveau nécessaire. Ne pas remplir excessivement la bouilloire. Faire
attention à ne pas dépasser 1700 ml ( 57,48 US .oz / 59,80 UK .oz).
d) fermer le couvercle (1) : appuyer sur le "point" en caoutchouc (image "a") situé sur le couvercle (1). Ne
jamais utiliser la bouilloire avec le couvercle (1) ouvert.
e) Ne jamais utiliser la bouilloire avec le couvercle (5) ouvert.
f) Pour porter l'eau à ébullition, appuyer uniquement sur le bouton on/off (9). Le témoin lumineux du
bouton on/off (9) indique que la bouilloire est en marche.
Quand la période d'ébullition est terminée, la bouilloire s'arrête automatiquement.
Ne pas débrancher, s'assurer que la bouilloire n'est pas en fonctionnement. Ne pas débrancher la bouilloire
de la prise murale en tirant sur le câble. Toujours débrancher l'appareil en tenant la prise (6). Pour éteindre complètement l'appareil, la che (6) doit être retirée de la prise de courant.
26
Page 31

S'assurer que la prise de courant utilisée est raccordée à la terre de manière appropriée.
Ne jamais laisser des pièces sous tension entrer en contact avec l'eau : cela pourrait entrainer un court-
circuit !!!
(respecter toutes les consignes de sécurité indiquées précédemment).
Attention : ne jamais garder le bouton on/off (9) enfoncé pendant que la bouilloire bouille ou après qu'elle
a bouillie l'eau.
Attention : ne jamais faire fonctionner la bouilloire sans eau.
Arrêt automatique
La bouilloire est équipée d'un système qui arrête automatiquement l'appareil peut de temps après que l'eau a bouille.
Si on souhaite de l'eau tiède, il est possible d'arrêter la procédure de réchauffement à tout moment en tirant sur le bouton on/off (9). L'arrêt se fait automatiquement quand la bouilloire est retirée de sa base (5).
Pour des raisons fonctionnelles, il est possible de la condensation se forme en bas du bouton on/off (9),
sur la base (5) et sur le connecteur (5a). Ce phénomène se vérie pour des raisons techniques et n'a pas
d'incidence sur la sécurité de l'appareil.
Système de sécurité
Un thermostat protège la bouilloire de la surchauffe : si l'appareil est vide et allumé accidentellement, ce
système éteint celui-ci automatiquement. L'appareil redémarrera avec ses fonctions normales dans un délai
d'environ 10 minutes.
Si la première protection avec le thermostat ne fonctionne pas en raison d'une utilisation incorrecte, un
autre limiteur de température assure une protection.
Nettoyage et entretien
MISE EN GARDE : Toujours débrancher la bouilloire de la prise de courant avant de la nettoyer.
Avant de nettoyer, s'assurer que la bouilloire est froide.
Nettoyer l'extérieur de la bouilloire avec un chiffon propre et humide pour conserver sa nition polie originale. Sécher et polir avec un chiffon doux.
Ne pas utiliser de produits nettoyants abrasifs ou décapants de quelque sorte que ce soit à l'intérieur et
l'extérieur de la bouilloire.
Ne pas plonger la bouilloire ou la base électrique dans l'eau ou dans un autre liquide et s'assurer que la
prise de la bouilloire (6) et le connecteur (5a) de la base électrique (5) sont secs.
a) Filtre (7)
Le tartre ou le calcium est une substance naturelle qui se forme quand on bout de l'eau dure. Le ltre sert
pour retenir le calcium dans l'eau de la bouilloire. Il est important de nettoyer le ltre régulièrement. Le
ltre est installé dans le bec verseur et peut être retiré en le tirant du bec verseur. Il peut être nettoyé en
le nettoyant doucement avec une brosse douce sous l'eau courante.
ATTENTION : Cette opération peut être effectuée uniquement quand la bouilloire ne fonctionne pas et
quand la bouilloire a refroidi. NE PAS RETIRER LE FILTRE QUAND LA BOUILLOIRE VERA EST EN MARCHE
ET QUAND LA SURFACE EST CHAUDE. L'EAU BOUILLANTE ET LA VAPEUR PEUVENT BRULER !!!
b) Décalcication
Par décalcication, il s’agit du nettoyage du calcaire accumulé à l’intérieur de l’appareil. POUR OBTENIR
UN MEILLEUR FONCTIONNEMENT DE LA BOUILLOIRE VERA, VOUS DEVEZ PÉRIODIQUEMENT ENLEVER LE CALCAIRE DE VOTRE APPAREIL. La fréquence du nettoyage dépend de la dureté de votre eau et de l’utilisation
27
Page 32
de la bouilloire. Nous vous suggérons de répéter l’opération tous les 100-200 cycles de la bouilloire, toutes
les deux semaines ou au moins chaque fois que le fond intérieur de la bouilloire commence à montrer des
taches blanchâtres : ça signie que sur le fond on a dépôt de calcaire. Nous vous invitons à utiliser un
décalciant pour bouilloire an de dissoudre complètement le calcaire. Suivre les instructions sur les confections des décalciants. Nous vous conseillons la méthode naturelle suivante : Remplir l’appareil avec 500
ml de vinaigre blanc de vin et 500 ml d’eau. Utiliser une brosse imbue dans le vinaigre de vin blanc pour
nettoyer la barre des capteurs de niveau qui se trouve à l’intérieur de la bouilloire, de façon à enlever le
calcaire déposé sur les capteurs mêmes. Presser le bouton ON-OFF (14) et porter à ébullition. Vous pouvez
répéter l’opération plusieurs fois pour enlever complètement le calcaire. Dès que la décalcication est
nie, vider la bouilloire et le remplir d’eau fraîche plusieurs fois jusqu’à enlever l’odeur de vinaigre.
Tous les autres entretiens devraient être gérés par un centre de service autorisé
Diagnostic de panne
Si la bouilloire Vera présente des pannes ou des défauts ou si on suspecte des anomalies, la débrancher immédiatement. Si vous ne pouvez pas éliminer la panne en suivant les instructions dans ce manuel, contacter le Service Clientèle BUGATTI. Des réparations effectuées incorrectement exposent l'utilisateur à de graves dangers.
Aucune responsabilité n'est acceptée en cas de dommage ou de lésion causé par des réparations effectuées de
manière incorrecte et dans ces cas, les droits à la garantie seront annulés.
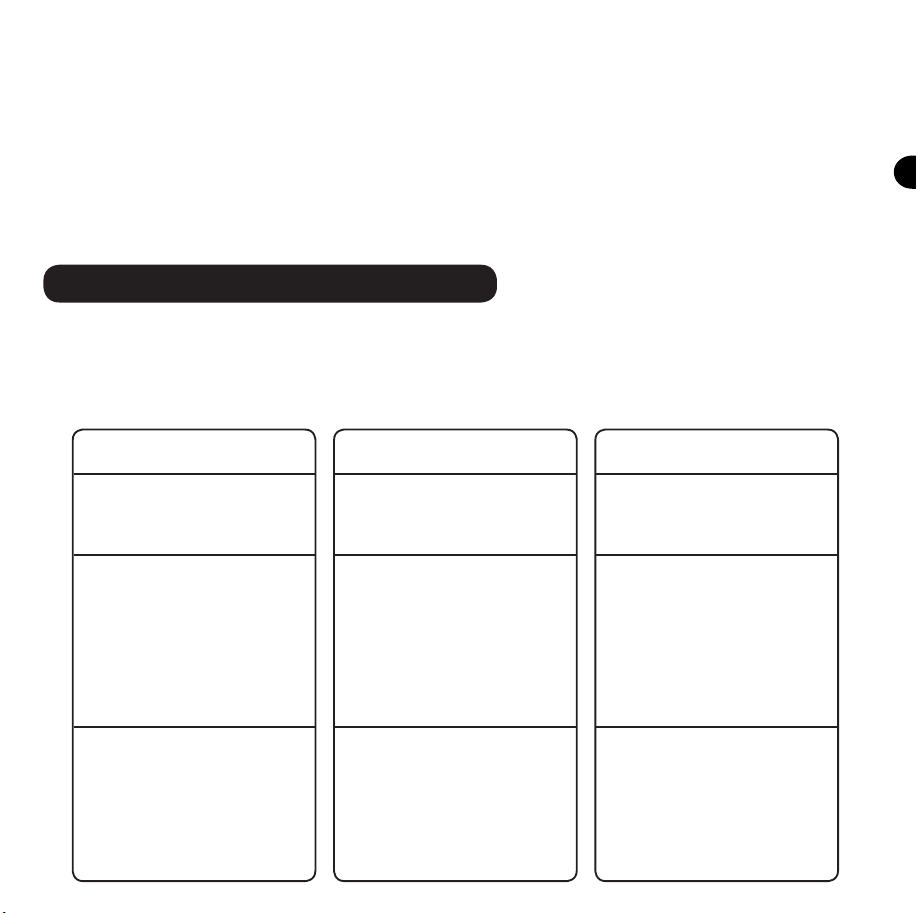
PROBLEME
La bouilloire ne fonctionne pas correctement ou
s'arrête avant de bouillir.
Si l'eau a un mauvais goût.
La bouilloire est allumée
et après quelques secondes
elle s'arrête automatiquement.
CAUSE POSSIBLE
La bouilloire est entartrée.
1) L'eau se trouve
dans la bouilloire depuis plus de 12 heures.
2) La bouilloire n'a pas été
lavée correctement après le
cycle de détartrage
La bouilloire est vide et le
système de protection de la
résistance s'est activé.
SOLUTION
Effectuer le détartrage comme indiqué au point b) du
chapitre"Nettoyage et entretien".
1) Nous recommandons de changer l'eau
résiduelle après chaque cycle d'ébullition.
2) Rincer la bouilloire suffisamment afin d'éliminer
complètement le produit
détartrant.
Attendre environ 10 minutes, remplir la bouilloire
avec de l'eau et l'allumer.
28
Page 33

Garantie
1) Une garantie est jugée être le remplacement ou la réparation gratuite des pièces composant la bouilloire qui sont
défectueuses au moment de l'achat en raison de défauts de fabrication.
2) En cas de pannes irréparables ou répétées qui sont dues à des vices de fabrication susmentionnés, la machine
sera remplacée, à la seule discrétion du fabricant,
3) La garantie ne couvre pas les dommages dûs à :
a) une utilisation incorrecte ou erronée de la machine
b) des défauts causés par des bris accidentels ou des négligences
c) le non respect des instructions et des avertissements, une installation, un nettoyage et un entretien incorrect
d) maintenance et/ou modications effectuées par du personnel non autorisé
e) l'utilisation de pièces détachées non originales
f) transport
g) utilisation de toute fonction de la bouilloire sans eau, constamment
h) toute autre circonstance qui ne peut pas être imputée à un vice de fabrication. Toute réclamation qui n'est pas
envisagée par la loi est exclue
4) La garantie ne couvre pas les dommages dûs à :
5) Le fabricant décline toute responsabilité pour toute lésion ou out préjudice, direct ou indirect, subi par des
personnes, des biens et des animaux domestiques qui peuvent dériver du non respect des consignes de sécurité
contenues dans ce manuel, notamment le non respect des instructions d'installation, d'utilisation et d'entretien de
la bouilloire.
6) Le remplacement ou la réparation ne prolongeront pas la période de garantie. La garantie ne couvre pas le
remplacement des consommables tels que les résistances, la batterie etc.
7) La garantie commence à partir de la date de réception de la preuve d'achat et de réception de la carte de
garantie BUGATTI.
29
Page 34
CENTRE DE SERVICE
En cas de panne de la bouilloire, contacter un revendeur agréé BUGATTI qui enverra la bouilloire au fabricant.
L’acheteur est responsable de tout frais de transport et/ou d’expédition pour toutes les réparations couvertes ou
non couvertes par la garantie. Si possible, laisser la bouilloire dans son emballage original pour l’expédition.
Important : Si le produit non conforme doit être réparé par une personne autre que du personnel de notre centre de
service, contacter un revendeur agréé BUGATTI et rappeler le service assistance d’appeler notre Centre de Service
Clientèle pour s’assurer que le problème a été diagnostiqué correctement, que le produit est réparé avec des pièces
appropriées et an de garantir que le produit est toujours sous garanti.
ELIMINATION DU PRODUIT EN CONFORMITE AVEC LA DIRECTIVE EUROPEENNE 2002/96/CE
A la n de son cycle de durée de vie, le produit ne doit pas être mis au rebut avec les déchets urbains. Il peut
être livré aux centres de collecte et de tri gérés par les collectivités locales ou à des entreprises fournissant
ce service. Une mise au rebut séparée d’un appareil électroménager permet d’éviter des conséquences
négatives pour l’environnement et la santé, dérivant d’une mise au rebut incorrecte et permet de recycler les
matériaux composants l’appareil an d’économiser de l’énergie et des ressources. Le symbole d’une poubelle
marquée d’une croix, apposé sur le produit, indique qu’en tant qu’appareil électroménager, il doit être mis au rebut
séparément.
30
Page 35

WICHTIGE HINWEISE
Sehr geehrte Kunde, danke, dass Sie sich für Vera entschieden haben, den Wasserkocher von Bugatti. Wie jedes
Haushaltsgerät, muss der Wasserkocher vorsichtig und mit Sorgfalt verwendet werden, um Verbrennungen
von Personen und die Beschädigung des Wasserkochers zu vermeiden.
BEVOR SIE DEN WASSERKOCHER ZUM ERSTEN
MAL VERWENDEN DIE GESAMTE ANLEITUNG ZU
INSTALLATION, GEBRAUCH UND WARTUNG UND
DIE SICHERHEITSANWEISUNGEN AUFMERKSAM
LESEN. DEN WASSERKOCHER NICHT VERWENDEN,
WENN SIE NICHT VOLLSTÄNDIG MIT DER
ANLEITUNG VERTRAUT SIND.
ACHTUNG
Es wird keine Haftung für Schäden übernommen, die auf Folgendes zurückzuführen sind:
- falsche oder unzweckmäßige Verwendung
- Dauereinsatz des Wasserkochers
- Reparaturen durch Unbefugte
- Verwendung nicht originaler Ersatz- oder Zubehörteile
- Anschluss des Wasserkochers Vera an eine nicht geerdete Steckdose
Für weitere Informationen oder beim Auftreten von in dieser Anleitung nicht ausreichend
ausgeführten Problemen den Kundendienst von BUGATTI kontaktieren.
DIESE ANLEITUNG SORGFÄLTIG AUFBEWAHREN
denken, sie denjenigen zu übergeben, die den Wasserkocher nach Ihnen verwenden. Wenn die Anleitung
verloren geht, bevor Sie den Wasserkocher verwenden, beim Kundendienst von BUGATTI eine neue Anleitung
anfragen oder eine E-Mail an [email protected] schicken oder die Anleitung auf der Internetseite www.
casabugatti.it herunterladen. Auf der ersten Seite nden Sie die Abbildungen, die sich auf den Text beziehen.
Die erste Seite aufgeschlagen lassen, während Sie die Gebrauchsanleitung lesen.
31
und daran
Page 36

Inhaltsverzeichnis
S. 33 Technische Merkmale
S. 33 Beschreibung der Teile des Wasserkochers
S. 34 Wichtige Sicherheitsmaßnahmen
S. 36 Installation und Inbetriebnahme
S. 37 Automatische Ausschaltung
S. 37 Sicherheitssystem
S. 37 Reinigung und Wartung
S. 38 Fehlersuche
S. 39 Garantie
Alle Details des Textes wurden sorgfältig überprüft. Unser Unternehmen behält sich das Recht vor, die
Bearbeitung des Textes zu erklären, falls ein Druckfehler oder eine irreführende Information vorliegen.
Anmerkungen: Bitte denken Sie daran, dass unser Unternehmen alle Produktdetails inklusive technische
Spezikationen, die in der Anleitung gezeigt werden, aktualisiert. Wir behalten uns vor, die Anleitung ohne
Vorankündigung zu revidieren. Aussehen, Form und Farbe des Produkts basieren auf dem Standard des
tatsächlichen physischen Produkts.
32
Page 37
TECHNISCHE MERKMALE
Stromversorgung Siehe das Typenschild unter dem Gerät
Nennleistung Siehe das Typenschild unter dem Gerät
Abmessungen 220 x 180 x H. 300 mm – ungefähr 8 1/2 ‘’ x 7’’ x 11 3/4 ‘
Gehäuse Gepresster, massiver 18/10-Edelstahl
Gewicht 1,4 kg – ungefähr 3 Pfund
Länge des Stromkabels 0,75 Meter – ungefähr 30 Inch
Überlastschutzeinrichtung Eingebaut
Fassungsvermögen des Wasserkochers 1,70 Liter / 57,48 US .oz / 59,80 UK .oz
Zertizierungen Siehe das Typenschild unter dem Gerät
Garantie Gemäß dem beigelegten Zertikat
BESCHREIBUNG DER TEILE DES WASSERKOCHERS
Deckel
Kaltmetallgriff
Wasserkocher aus 18/10-Edelstahl
Netzteil
Verbinder
Stecker
Filter
Markierung der maximalen Füllmenge
On-/Off-Taste
33
1
3
4
5
5a
6
7
8
9
Page 38

WICHTIGE SICHERHEITSMASSNAHMEN
Beim Gebrauch elektrischer Geräte sollten immer grundlegende Sicherheitsvorkehrungen getroffen werden, unter
anderem Folgende:
DIE GESAMTE ANLEITUNG AUFMERKSAM LESEN. DER
WASSERKOCHER DARF NUR VON ERWACHSENEN VERWENDET
WERDEN, DIE FÜR DESSEN GEBRAUCH INSTRUIERT WURDEN.
DIESE ANLEITUNG SORGFÄLTIG AUFBEWAHREN.
1.UM ERNSTHAFTE VERLETZUNGEN, STROMSCHLÄGE
UND BRÄNDE ZU VERMEIDEN, KABEL, STECKER, NETZTEIL
ODER DEN WASSERKOCHER NICHT IN WASSER ODER
ANDERE FLÜSSIGKEITEN EINTAUCHEN, AUCH NICHT
TEILWEISE. ACHTUNG: VERBRENNUNGSGEFAHR!
ACHTEN SIE AUF DIE HEISSEN OBERFLÄCHEN!
Heiße Oberächen nicht berühren. Nur den Griff verwenden, um den Wasserkocher hoch zu nehmen. Einen Ofenhandschuh
verwenden, wenn Sie heiße Teile, wie das Gehäuse (4), den Deckel (1) und alle Oberächen des Wasserkochers berühren:
VERBRENNUNGSGEFAHR!
2. Der Wasserkocher wurde ausschließlich für den HAUSGEBRAUCH entwickelt.
Die vorgesehene Verwendung ist die im Haushalt und ähnliche Anwendungen, wie zum Beispiel:
- Teeküchen in Geschäften, Büros und anderen Arbeitsbereichen;
- Bauernhöfe;
- von Kunden in Hotels, Motels und anderen Unterkünften;
- Bed and Breakfast.
Den Wasserkocher nur für den vorgesehenen Verwendungszweck benutzen. Keine technischen Änderungen vornehmen,
die zu Gefahren führen könnten.
3. Wasserkocher, Basis (5) und das Kabel außerhalb der Reichweite von Kindern unter 8 Jahren aufbewahren. Eine genaue
Aufsicht ist erforderlich, wenn das Gerät von oder in der Nähe von Kindern verwendet wird. Es ist aus der Steckdose
zu ziehen, wenn es nicht in Gebrauch ist oder gereinigt wird. Vor dem Aufsetzen oder Abbau von Teilen sowie vor der
Reinigung das Gerät abkühlen lassen. Der Stecker ist immer zuerst an das Gerät, danach an die Steckdose anzuschließen.
Zum Ausschalten sind sämtliche Schalter auf „Aus“ zu stellen und anschließend ist der Stecker aus der Steckdose zu
ziehen.
4. Das Stromkabel mit Stecker ist kurz, um ein Verfangen an Gegenständen, ein Stolpern von Personen und das Aufwickeln
um ein längeres Kabel zu vermeiden. Lange Ansteckstromkabel oder Verlängerungskabel sind erhältlich, dürfen aber nur
verwendet werden, wenn ein QUALIFIZIERTER ELEKTRIKER bestätigen kann, dass sie den Anschlussbestimmungen entsprechen.
KEINE Mehrfachsteckeradapter VERWENDEN. Wenn ein langes Ansteckstromkabel oder Verlängerungskabel verwendet wird:
a) Die Nennleistung des Ansteckstromkabels oder Verlängerungskabels sollte mindestens der des Wasserkochers
entsprechen, die unter am Wasserkocher angegeben ist.
34
Page 39

b) Das Verlängerungskabel muss 3-polig sein und eine Erdung haben. Ein Ansteckstromkabel oder Verlängerungskabel darf
niemals über Möbel, Laden- oder Thekentische herausragen, wo er von Kindern heruntergezogen werden kann oder über
ihn gestolpert werden kann.
c) Wasserkocher oder Kabel nicht auf oder in der Nähe eines heißen Gasrings oder einer Elektroherdplatte oder im oder in
der Nähe des Ofens positionieren.
d) Nicht im Freien verwenden.
Das Kabel nicht über die Kante des Tischs oder Ladentischs hängen lassen oder heiße Oberächen berühren lassen.
Wasserkocher nicht mit beschädigtem Kabel oder Stecker verwenden oder nachdem Probleme am Gerät auftreten
oder dies auf irgendeine Weise beschädigt wurde. Gerät zur Überprüfung bzw. Reparatur zum nächstgelegenen
Vertragskundendienst bringen. Die Verwendung von zusätzlichen Teilen, die nicht vom Gerätehersteller empfohlen
werden, kann zu Bränden, Stromschlägen oder schweren Verletzungen von Personen führen.
e) Wenn das Stromkabel oder Stecker beschädigt sind, müssen sie vom Hersteller oder einem Vertragskundendienst
oder Fachpersonal ersetzt werden, um Gefahren zu vermeiden.
5. Niemals unter Strom stehende Teile berühren. Sie können zu Stromschlägen führen und schweren Personenverletzungen. Das
Netzteil (5) an eine Steckdose an der Wand mit geeigneter Spannung anschließen. Die Spannung muss der Spannung entsprechen,
die auf dem Typenschild unten am Wasserkocher (4) angegeben ist. Vergewissern, dass die verwendete Steckdose geerdet ist.
Wasserkocher nicht barfuß oder mit nassen Füßen verwenden.
6. Den Wasserkocher nur mit der mitgelieferten Basis (5) verwenden.
7. ACHTUNG: vermeiden Wasser oder andere Flüssigkeiten auf der Basis (5) und dem Verbinder (5a) zu verschütten.
8. ACHTUNG: Den Wasserkocher niemals mit mehr als 1,70 Liter (57.48 US .oz / 59.80 UK .oz), also über den maximalen
Füllstand «MAX» auf der Anzeige (8) füllen.
9. ACHTUNG: Wasserkocher niemals mit Wasser füllen, wenn er sich auf dem Netzteil (5) bendet.
10. ACHTUNG: Wasserkocher nur mit sauberem Wasser füllen. Nicht für Milch, Kaffee oder andere Flüssigkeiten verwenden.
11. ACHTUNG: Den Wasserkocher nicht unbeaufsichtigt lassen, wenn er in Betrieb ist.
12. ACHTUNG: Den Wasserkocher niemals ohne Wasser verwenden. Eine versehentliche Verwendung verringert die
Lebensdauer des Wasserkochers.
13. ACHTUNG: Die On-/Off-Taste (9) während des Kochens oder nach dem Kochen niemals gedrückt halten.
14. ACHTUNG: Niemals Wasser kochen, wenn der Wasserkocher zu voll oder der Deckel (1) geöffnet ist. Kochendes Wasser
kann herausspritzen und Personen verletzen.
15. Stets sicherstellen, dass das kochende Wasser langsam und vorsichtig ausgegossen wird.
16. Um Verbrennungen vorzubeugen, vermeiden, den Deckel (1) wenn das Wasser gekocht wird oder kurz nach der
Ausschaltung des Wasserkochers zu öffnen. DAMPF KANN ZU VERBRENNUNGEN FÜHREN!
Beim Öffnen des Deckels (1) vorsichtig sein, wenn der Wasserkocher noch heiß ist und aufgefüllt werden soll. Kochendes
Wasser kann zu Verbrennungen führen.
17. Nach jeder Verwendung Wasserkocher vollständig leeren. Niemals für längere Zeit Wasser im Wasserkocher lassen.
18. Vorsicht: heiße Oberächen. Griffe oder Ofenhandschuhe verwenden. Beim Berühren heißer Teile, wie dem Deckel (1),
dem Gehäuse (4) und von allen Oberächen des Wasserkochers vorsichtig sein. ACHTUNG! VERBRENNUNGSGEFAHR! Das
Gehäuse (4) des Wasserkochers wird während der Verwendung heiß.
19. Die Oberäche des Heizelements ist nach der Verwendung noch heiß.
20. Zum Abtrennen überprüfen, ob der Wasserkocher ausgeschaltet ist und den Stecker (6) aus der Steckdose an der Wand
ziehen. Das Gerät stets durch Ziehen am Stecker und nicht am Kabel abtrennen. Anmerkungen: Stecker aus der Steckdose
ziehen, wenn der Wasserkocher nicht verwendet wird.
21. Wasserkocher auf einer ebenen Oberäche platzieren und darauf achten, dass die Füße gut an der Oberäche haften,
sodass das Gerät nicht umgestoßen werden kann. Wasserkocher nicht auf oder in der Nähe von heißen Oberächen oder
offenem Feuer positionieren.
VORSICHT: Wasserkocher nicht auf geneigter Oberäche verwenden.
22. Um sicher zu sein, dass der Wasserkocher korrekt funktioniert, ist er auf einer ebenen Oberäche in einer
beleuchteten und hygienischen Umgebung mit einer leicht zugänglichen Steckdose aufzustellen. Wasserkocher mindestens
10 cm (4 Inch) von den Wänden entfernt positionieren.
23. Wasserkocher nicht unter oder in der Nähe von brennbaren Materialien, wie Vorhängen, Tapeten und Wänden verwenden.
24. Bei Fehlern, Defekten oder vermuteten Fehlern nach einem Herunterfallen den Wasserkocher umgehend abstecken.
35
Page 40
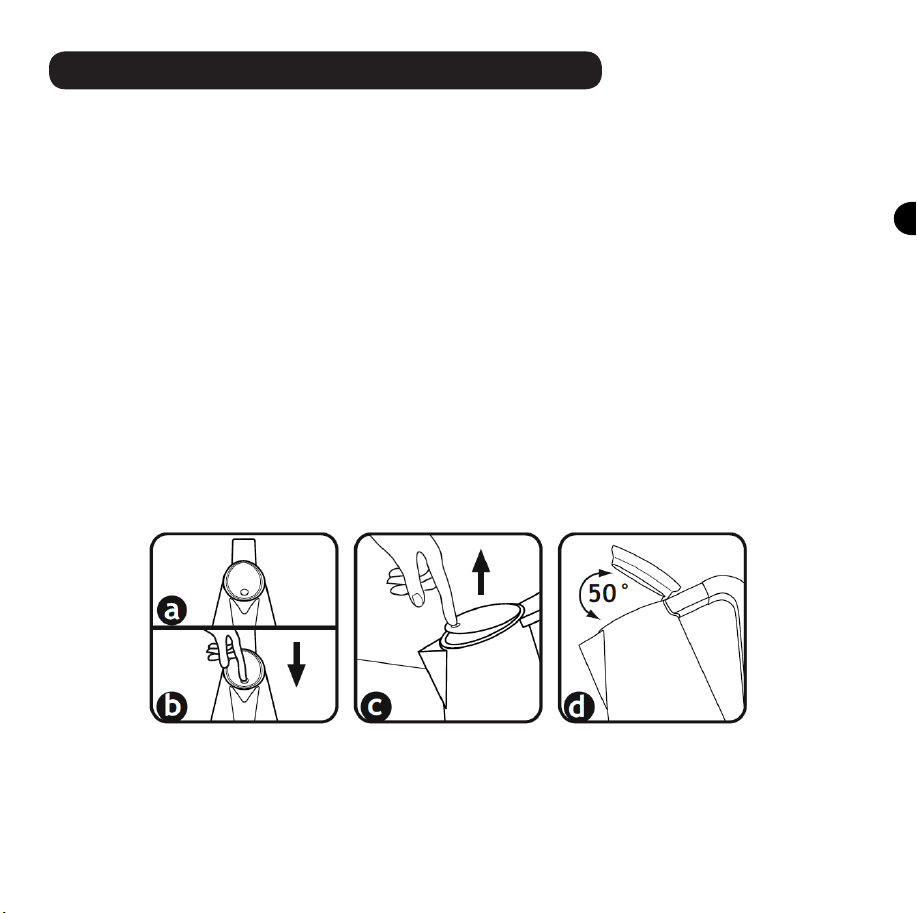
Installation und Inbetriebnahme
Die Originalverpackung wurde für die Versendung per Post entwickelt. Verpackung für den Fall aufbewahren, dass Sie den Wasserkocher zum Hersteller zurückschicken müssen. Vor der Installation des Wasserkochers alle Sicherheitsanweisungen auf der vorherigen Seiten beachten. Nachdem der Wasserkocher aus der
Verpackung genommen wurde vergewissern, dass er sich in einem einwandfreien Zustand bendet und sicherstellen, dass nichts, kein Verpackungsmaterial, Garantiescheine oder Ähnliches unbeabsichtigt während
des Transports oder beim Öffnen der Verpackung in den Wasserkocher gefallen sind.
Der Plastikbeutel, in dem sich der Wasserkocher bendet, sollte außerhalb der Reichweite von Kindern
aufbewahrt werden, weil er zum Ersticken führen kann. Vergewissern, dass sich der Wasserkocher in einem
einwandfreien Zustand bendet. Staub, der sich auf den äußeren Oberächen des Wasserkochers sammeln
kann, mit einem trockenen, weichen Tuch entfernen.
Nachdem die oben beschriebenen Schritte ausgeführt wurden und die Sicherheitsanweisungen genau befolgt wurden mit dem Anschluss an die Stromversorgung fortfahren.
Anschluss an die Stromversorgung: elektrischer Strom kann töten! Sicherheitsanweisungen beachten!
Das Stromkabel (6) des Wasserkochers Vera an eine Steckdose anschließen, deren Spannung der auf dem
Typenschild unten am Wasserkocher angegebenen entspricht.
Alle inneren Oberächen und den Ausguss des Wasserkochers ausspülen: Den Wasserkocher bis zum maximalen Füllstand 1,70 Liter (1700 ml/ 57.48 US .oz / 59.80 UK .oz) füllen, Wasser kochen und Wasserkocher
leeren. Mindestens zweimal wiederholen.
Wasserkocher füllen:
A) Wasserkochergehäuse vom Netzteil (5) lösen. Wasserkocher am Griff (3) halten
b) Deckel (1) öffnen: Auf den „Gummipunkt” (Abbildung „a”) auf dem Deckel (1) drücken und fest runter
drücken (Abbildung „b”). Dann loslassen (Abbildung „c”) und der Deckel (1) wird sich automatisch öffnen.
Der Deckel (1) kann nicht entfernt werden und die maximale Öffnung ist in Abbildung „d” zu sehen.
c) Wasserkocher füllen, indem er direkt unter den Hahn gehalten wird oder mithilfe einer Flasche, einem
Krug oder einem Glas bis zur benötigten Füllhöhe auffüllen. Wasserkocher nicht zu voll machen. Darauf
achten, 1700 ml (57.48 US .oz / 59.80 UK .oz) nicht zu überschreiten.
d) Deckel (1) schließen: Auf den „Gummipunkt” (Abbildung „a”) auf dem Deckel (1) drücken. Den Wasserkocher niemals mit geöffnetem Deckel (1) verwenden.
e) Wasserkocher auf die Basis (5) stellen.
f) Um Wasser zu kochen, einfach die On-/Off-Taste (9) drücken. Das Licht der On-/Off-Taste (9) zeigt an,
dass der Wasserkocher in Betrieb ist.
Wenn das Wasser kocht schaltet sich der Wasserkocher automatisch aus.
Zum Abtrennen vergewissern, dass der Wasserkocher nicht in Betrieb ist. Wasserkocher nicht durch Ziehen
des Kabels aus der Steckdose abtrennen. Das Gerät stets durch Ziehen am Stecker (6) abtrennen. Um das
Gerät vollständig auszuschalten, muss der Stecker (6) aus der Steckdose gezogen werden.
36
Page 41

Vergewissern, dass die verwendete Steckdose angemessen geerdet ist.
Verhindern, dass Strom führende Teile mit Wasser in Berührung kommen: dies kann zu einem Kurzschluss
führen!!!
(Die zuvor ausgeführten Sicherheitsanweisungen beachten.)
Vorsicht: Die On-/Off-Taste (9) während des Kochens oder nach dem Kochen niemals gedrückt halten.
Vorsicht: Den Wasserkocher niemals ohne Wasser verwenden.
Automatische Ausschaltung
Der Wasserkocher ist mit einem System ausgestattet, das das Gerät automatisch kurz nach dem Moment,
wenn das Wasser kocht, ausschaltet.
Wenn warmes Wasser benötigt wird, kann das Kochen jederzeit durch Zeihen an der On-/Off-Taste (9)
unterbrochen werden. Die Ausschaltung ndet automatisch statt, nachdem der Wasserkocher von der Basis
(5) genommen wird.
Aus funktionalen Gründen kann es am Boden der On-/Off-Taste (9), an der Basis (5) und am Verbinder (5a)
zur Kondensatbildung kommen. Dies geschieht aus technischen Gründen und beeinträchtigt die Sicherheit
des Gerätes nicht.
Sicherheitssystem
Ein Thermostat schützt den Wasserkocher vor Überhitzung: wenn das Gerät leer ist und unabsichtlich einge-
schaltet wird, schaltet es dieses System automatisch aus. Das Gerät wird nach circa 10 Minuten wieder voll
funktionsfähig sein.
Sollte der erste Thermostatschutz aufgrund nicht korrekter Verwendung nicht funktionieren, garantiert ein
weiterer Temperaturbegrenzer den Schutz.
Reinigung und Wartung
VORSICHT: Wasserkocher vor der Reinigung stets von der Steckdose trennen.
Vor den Reinigen vergewissern, dass der Wasserkocher kalt ist.
Die Außenoberäche des Wasserkochers it einem sauberen, feuchten Tuch reinigen, um das ursprüngliche
Hochglanznish zu erhalten. Mit einem weichen Tuch trocknen und polieren.
Keine abrasiven Reinigungsmittel oder Scheuermittel jeglicher Art für den inneren oder äußeren Teil des
Wasserkochers verwenden.
Den Wasserkocher oder die Basis nicht in Wasser oder andere Flüssigkeiten eintauchen und vergewissern,
dass der Wasserkocherstecker
(6) und der Verbinder (5a) des Netzteils (5) trocken bleiben.
a) Filter (7)
Die Bildung von Kalk oder Kalzium ist normal, wenn hartes Wasser gekocht wird. Der Filter sorgt dafür, dass
das Kalzium im Wasserkocher bleibt. Es ist wichtig, den Filter regelmäßig zu reinigen. Der Filter ist an den
Ausguss geklemmt und kann durch Ziehen vom Ausguss gelöst werden. Er kann durch sanftes Bürsten mit
einer weichen Bürste unter laufendem Wasser gereinigt werden.
ACHTUNG: Dieser Schritt kann nur ausgeführt werden, wenn der Wasserkocher nicht in Betrieb ist und
abgekühlt ist. FILTER NICHT ENTFERNEN, WENN DER WASSERKOCHER IN BETRIEB IST UND WENN DIE
OBERFLCHE HEISS IST. KOCHENDES WASSER UND DAMPF KÖNNEN ZU VERBRENNUNGEN FÜHREN!!!
b) Entkalkung
Unter Entkalkung versteht man die Entfernung des Kalks, der sich im Inneren des Wasserkochers angesammelt hat. FÜR EINE BESSERE FUNKTIONSWEISE DES WASSERKOCHERS VERA, ENTKALKEN SIE IHN REGELMÄS-
SIG. Die Häugkeit der Entkalkung hängt von der Härte des Wassers und wie oft sie den Wasserkocher
verwenden, ab. Wir empfehlen, den Vorgang alle 100-200 Kochzyklen auszuführen, alle zwei Wochen
37
Page 42
oder jedenfalls immer, wenn der Innenboden des Wasserkochers beginnt, weiße Flecken aufzuzeigen. Wir
empfehlen die Verwendung eines Entkalkers für Wasserkocher, so dass der Kalk vollständig gelöst wird.
Befolgen Sie die Anweisungen auf den Verpackungen der Entkalker. Auf jeden Fall empehlt BUGATTI die
folgende natürliche Methode: Füllen Sie den Wasserkocher
mit 500 ml weißem Weinessig und 500 ml Wasser. Verwenden Sie eine mit weißem Weinessig getränkte
Bürste zur Reinigung der Leiste der Füllstand-Sensoren, die sich im Inneren des Wasserkochers bendet, um
den Kalk, der sich auf den Sensoren abgelagert hat, zu beseitigen. Drücken Sie danach die Taste on/off (14)
und bringen Sie das Wasser und den Essig zum Kochen. Es könnte notwendig sein, den Vorgang mehrmals
zu wiederholen, um den Kalk vollständig zu entfernen. Nach Vollendung der Entkalkung, entleeren Sie
den Wasserkocher und füllen Sie ihn mit frischem und sauberem Wasser mehrmals, bis der Geruch und der
Geschmack des Essigs beseitigt ist.
Jeder weiterer Service sollte von einem autorisierten Kundendienst durchgeführt werden.
Fehlersuche
Bei Fehlern, Defekten oder vermuteten Fehlern am Wasserkocher Vera den Wasserkocher umgehend
abstecken. Wenn der Fehler durch Beachten der Anleitung nicht behoben werden kann, den Kundendienst von BUGATTI kontaktieren. Falsch ausgeführte Reparaturen stellen eine große Gefahr für den
Benutzer dar. Es wird keine Haftung für Schäden oder Verletzungen übernommen, die aufgrund von
falsch ausgeführten Reparaturen verursacht wurden und in diesen Fällen verfällt die Garantie.
PROBLEM
Der Wasserkocher funktioniert nicht korrekt
oder schaltet sich aus,
bevor das Wasser kocht.
Wenn das Wasser schlecht
schmeckt.
Wenn der Wasserkocher
eingeschaltet wird und sich
nach einigen Sekunden automatisch ausschaltet.
MÖGLICHE URSACHEN
Es sind Kalkablagerungen im
Wasserkocher vorhanden.
1) Wasser bleibt länger als 12
Stunden im Wasserkocher.
2) Der Wasserkocher wurde
nach dem Entkalkungszyklus nicht richtig gereinigt.
Der Wasserkocher ist leer
und das Schutzsystem des
Heizwiderstandes funktioniert.
ABHILFE
Entkalkung wie in Punkt b)
des Kapitels zur Reinigung und
Wartung ausführen.
1) Wir empfehlen, das restliche Wasser nach jedem
Kochzyklus zu wechseln.
2) Wasserkocher oft genug
ausspülen, um das Entkalkungsprodukt vollständig zu
entfernen.
Ungefähr 10 Minuten warten, Wasserkocher mit Wasser füllen und einschalten.
38
Page 43

Garantie
1) Eine Garantie ist gleichzusetzen mit dem kostenlosen Ersatz oder Reparatur der Wasserkocherteile, die beim Kauf
aufgrund von Produktionsfehlern fehlerhaft waren.
2) Bei irreparablen oder wiederholt auftretenden Fehlern, die wie oben auf Produktionsfehler zurückzuführen sind,
obliegt die Entscheidung das Gerät zu ersetzen allein dem Hersteller.
3) Die Garantie umfasst keine Schäden, die auf Folgendes zurückzuführen sind:
a) falsche oder fehlerhafte Verwendung
b) Fehler aufgrund von Unfällen oder Sorglosigkeit
c) fehlerhafte Beachtung der Anleitung und Warnhinweise, falsche Installation, Reinigung und Wartung
d) Wartung bzw. Änderungen durch unbefugtes Personal
e) Verwendung nicht originaler Ersatzteile
f) Transport
g) Dauereinsatz einer Wasserkocherfunktion
h) alle weiteren Umstände, die nicht auf Herstellungsfehler zurückgeführt werden können. Alle nicht gesetzlich
vorgesehenen Ansprüche sind ausgeschlossen.
4) Die Garantie umfasst keine Schäden, die auf unzweckmäßige Verwendung zurückzuführen sind, insbesondere bei
Verwendung außerhalb des Hausgebrauchs.
5) Der Herstelle übernimmt keine Haftung für jegliche direkten oder indirekten Verletzungen von Personen, Dingen
und Haustieren, die darauf zurückzuführen sind, dass nicht alle Sicherheitsanweisungen in dieser Anleitung beachtet
wurden, insbesondere der Anweisungen für Installation, Gebrauch und Wartung des Wasserkochers.
6) Ersatz oder Reparatur verlängern die Garantiedauer nicht. Die Garantie deckt den Ersatz von Verschleißmaterialien,
wie von Heizwiderständen, Batterien, etc. nicht.
7) Die Garantiedauer beginnt mit dem Datum des Kaufbelegs und des Erhalts der Garantiekarte von BUGATTI.
39
Page 44
KUNDENDIENST
Bei einem Fehler des Wasserkochers den einen BUGATTI-Vertragshändler kontaktieren, der den Wasserkocher an den
Hersteller zurücksenden wird.
Die Haftung für den Transport und die Transportkosten für alle Reparaturen, ob im Rahmen der Garantie oder nicht,
obliegen dem Käufer. Wenn möglich, die Originalverpackung des Wasserkochers für die Versendung aufbewahren.
Wichtig: Wenn das nicht konforme Produkt von jemand anderem als dem BUGATTI-Vertragshändler entgegen
genommen wird, diese Person bitte daran erinnern, den Kundendienst anzurufen, um sicherzustellen, dass das
Problem richtig diagnostiziert wird, das Gerät die korrekten Teile erhält und die Garantie nicht verfällt.
ENTSORGUNG DES PRODUKTS GEMÄSS DER EUROPÄISCHEN RICHTLINIE 2002/96/EG.
Am Ende seines Lebenszyklus darf das Produkt nicht im Hausmüll entsorgt werden. Es kann bei einer
örtlichen Entsorgungsstelle oder bei Händlern entsorgt werden, die diesen Service anbieten. Eine
getrennte Entsorgung von Haushaltsgeräten verhindert Umweltverschmutzung und Gesundheitsprobleme
durch unsachgemäße Entsorgung und die Materialien können wiederverwertet werden, um Energie und
Ressourcen zu sparen. Das Symbol eines durchgestrichenen mobilen Abfalleimers auf dem Produkt bedeutet, dass es
als Haushaltsgerät getrennt entsorgt werden muss.
40
Page 45

INFORMACIONES IMPORTANTES
Estimado cliente, gracias por haber elegido Veta, el hervidor de Bugatti. Al igual que cualquier aparato doméstico,
este hervidor debe ser utilizado con cuidado y atención para prevenir quemaduras en la gente y daños a la misma.
ANTES DE USAR EL HERVIDOR POR PRIMERA VEZ
LEA ATENTAMENTE TODAS LAS INSTRUCCIONES
SOBRE LA INSTALACIÓN, USO Y MANTENIMIENTO,
ADEMÁS DE LAS INSTRUCCIONES SOBRE
SEGURIDAD. NO USE EL HERVIDOR A A MENOS
QUE CONOZCA EN DETALLE LAS INSTRUCCIONES.
ADVERTENCIA
No se acepta ninguna responsabilidad por los daños debidos a:
- uso incorrecto o uso distinto al previsto
- uso continuo dl hervidor
- reparaciones efectuadas por personas no autorizadas
- uso de partes de recambio o accesorios no originales
- el hervidor Vera se ha enchufado a un enchufe sin toma de tierra
Para mayor información, en en caso de problemas que no hayan sido sucientemente abordados
en estas instrucciones, contacte son el servicio al cliente de BUGATTI.
CONSERVE ESTAS INSTRUCCIONES CUIDADOSAMENTE
y recuerde pasarlas a todos los que usen el hervidor después de usted. Si las instrucciones se pierden antes de
que usted use el hervidor, pida el manual de instrucciones al servicio al cliente de BUGATTI o envíe un e-mail
a [email protected], o descargue de www.casabugatti.it. En la primera página encontrará las ilustraciones
relativas al texto. Mantenga la primera página abierta mientras lee las instrucciones.
41
Page 46

Contenidos
Pág. 43 Características técnicas
Pág. 43 Descripción de las partes del hervidor
Pág. 44 Protecciones importantes
Pág. 46 Instalación y puesta en marcha
Pág. 47 Cierre automático
Pág. 47 Sistema de seguridad
Pág. 47 Limpieza y mantenimiento
Pag. 48 Resolución de problemas
Pag. 49 Garantía
Todos los detalles del texto se han vericado meticulosamente. Nuestra empresa se reserva el derecho a
explicar la elaboración del texto en caso de que exista algún error de impresión o de que la información sea
engañosa.
Nota: recuerde que nuestra empresa mantiene actualizados todos los detalles del producto que aparecen en
el manual de instrucciones, incluidas las especicaciones técnicas. Nos reservamos la posibilidad de revisar
el manual de instrucciones sin previo aviso. La apariencia, forma y color de todos los productos se basa en el
estándar de productos físicos actuales.
42
Page 47
CARACTERÍSTICAS TÉCNICAS
Alimentación eléctrica Consulte la placa de características que hay debajo de la máquina
Índice de potencia Consulte la placa de características que hay debajo de la máquina
Dimensiones 220 x 180 x h. 300 mm – 8 1/2 ‘’ x 7’’ x 11 3/4 ‘ aproximadamente
Cuerpo Sólido comprimido 18/10 Acero inoxidable
Peso 1,4 kg – 3 libras aproximadamente
Longitud del cable de alimentación 0,75 metros - 30 pulgadas aproximadamente
Protección sobrecarga térmica Integrada
Capacidad hervidor 1,70 litros / 57.48 US .oz / 59.80 UK .oz
Certicados Consulte la placa de características que hay debajo de la máquina
Garantía Según certicado adjunto
DESCRIPCIÓN DE LAS PARTES DEL HERVIDOR
Tapadera
Asa siempre fría
18/10 hervidor acero inoxidable
Unidad base alimentación
Conector
Clavija
Filtro
Marca nivel máximo de agua
Botón on/off
43
1
3
4
5
5a
6
7
8
9
Page 48

PROTECCIONES IMPORTANTES
Cuando se utilizan aparatos eléctricos, las precauciones básicas de seguridad deben de ser seguidas, incluyendo lo
siguiente:
LEA CUIDADOSAMENTE TODAS LAS INSTRUCCIONES.
LA EL HERVIDOR SÓLO PUEDE SER UTILIZADO POR
ADULTOS QUE HAYAN SIDO ADIESTRADOS EN SU USO.
CONSERVE CUIDADOSAMENTE ESTS INSTRUCCIONES.
1. PARA PREVENIR HERIDAS GRAVES, DESCARGAS
ELÉCTRICAS Y FUEGO NO SUMERJA LOS CABLES,
CLAVIJAS, BASE POTENCIA O EL HERVIDOR EN AGUA
U OTROS LÍQUIDOS, YA SEA PARCIAL O TOTALMENTE.
ADVERTENCIA: ¡¡Peligro de quemaduras!!
¡TENGA CUIDADO CON LAS SUPERFICIES!
No toque las supercies calientes. Use sólo el asa para coger el hervidor. Use un guante para tocar partes calientes como el cuerpo
(4), la tapa (1) y todas las supercies del hervidor:
¡¡Peligro de quemaduras!!
2. El hervidor ha sido diseñado para un USO EXCLUSIVAMENTE DOMÉSTICO.
Este aparato está diseñado para ser usado en el hogar o en aplicaciones similares como:
- cocinas para el personal en tiendas, ocinas y otros ambientes laborales;
- granjas;
- por los clientes de hoteles, moteles y otros centros residenciales;
- ambientes tipo bed and breakfast.
Use sólo el hervidor para el uso que le corresponde. No haga ninguna modicación técnica que pueda ser arriesgada.
3. Conserve el hervidor, la base (5) y el cable fuera del alcance de niños menores de 8 años. Es necesaria una atenta
supervisión en el caso que el aparato sea utilizado por o cerca de niños. Desconectar siempre el enchufe cuando el
hervidor no està utilizado y antes de limpiarlo. Dejar enfriar el hervidor antes de añadir o quitar componentes y antes
de limpiarlo. Antes, siempre conectar el enchufe al hervidor y despuès conectarlo a la corriente. Para desconectar el
hervidor vericar antes que este apagado y después quitar el enchufe de la toma de corriente.
4. Se suministra un cable de alimentación corto con clavija para reducir el riesgo de que se enganche en objetos, de que
la gente tropiece con él y de que el cable se enrolle en otro más largo. Hay cables de alimentación extraíbles y largos, o
alargadores disponibles, pero estos sólo pueden usarse si un ELECTRICISTA CUALIFICADO conrma que los mismos obeceden a
las normas sobre cableado. NO USE adaptadores clavija/toma. Si se usa un cable de potencia extraíble largo o un cable de
extensión:
a) El índice eléctrico del cable de potencia extraíble o del cable de extensión debe tener, al menos, la misma potencia
44
Page 49

que el índice eléctrico del hervidor que aparece indicado debajo de la misma.
b)El cable de extensión debe ser de 3-cables/tipo polo, y debe estar puesto a tierra. Un cable largo o un cable de
extensión nunca deben sobresalir de los muebles o sobre las supercies o mesas de manera que los niños puedan tirar de
ellos o tropezar.
c) No ponga el hervidor o los cables cerca del anillo de gas caliente o de la placa eléctrica, o cerca del horno.
d) No la use al aire libre. No deje colgar los cables por el borde de la mesa o mostrador, ni que entren en contacto con
supercies calientes. No maneje el hervidor con un cable o clavija dañados o después de que el aparato haya fallado
o haya sido dañado de ninguna forma. Lleve el aparato al servicio autorizado más próximo para que lo examinen o lo
reparen. El uso de enganches de accesorios no recomendados por el fabricante de los aparatos puede ser causa de
incendio, descargas eléctricas o heridas graves a las personas.
e) Si el cable de potencia o las clavijas están dañados deben ser reemplazados por el fabricante , por un servicio de
aistencia autorizado o por una persona cualicada a n de prevenir cualquier tipo de riesgos.
5. No toque nunca partes eléctricas encendidas. Pueden ser causa de descargas eléctricas y de heridas personales graves. Conecte
la unidad base de potencia (5) a la toma de pared del voltaje adecuado. El voltaje debe corresponder al voltaje indicado en la
placa de características que hay debajo del hervidor (4). Asegúrese de que la toma que está usando está puesta en tierra.
No use el hervidor con los pies descalzos o mojados.
6. El hervidor sólo se puede usar con la base (5) suministrada.
7. ADVERTENCIA: evite que el agua u otros líquidos se derramen por la base (5) o el conector (5a).
8. ADVERTENCIA: No llene nunca el hervidor por encima de 1,70 litres (57.48 US .oz / 59.80 UK .oz), la marca de MÁX que
aparece en el display (8).
9. ADVERTENCIA: No llene nunca el hervidor con agua cuando la misma esté colocada en la unidad base de potencia (5).
10. ADVERTENCIA: Llene el hervidor sólo con agua. No la llene con leche, café o similares.
11. ADVERTENCIA: No haga funcionar nunca el hervidor sin vigilancia.
12. ADVERTENCIA: No haga funcionar nunca el hervidor sin agua. El uso erróneo limita la vida del hervidor.
13. ADVERTENCIA: No pulse nunca el botón de encendido/apagado (9) durante o después de la ebullición.
14. ADVERTENCIA: No hierva nunca agua si el hervidor está demasiado lleno o con la tapadera (1) abierta. Al hervir agua
se pueden producir salpicaduras con el consiguiente peligro para las personas.
15. Eche siempre el agua hirviendo lenta y cuidadosamente.
16. Para prevenir quemaduras no abra la tapadera (1) cuando está hirviendo el agua o justo después de haber apagado
el hervidor. ¡EL VAPOR PUEDE QUEMAR! Tenga cuidado al abrir la tapadera (1) si el hervidor aún está caliente y quiere
añadir agua. El agua hirviendo puede causar quemaduras.
17. Vacíe el hervidor después de cada sesión de ebullición. No deje nunca agua en el hervidor durante un largo periodo de
tiempo.
18. Cuidado: supercies calientes. Use manijas o pomos o póngase guantes de horno. Tenga cuidado al tocar partes muy
calientes como la tapadera (1), el cuerpo (4) y todas las supercies del hervidor. ¡CUIDADO! ¡¡Peligro de quemaduras!! El
cuerpo de la cafetera (4) y la tapadera (1) se calientan mucho durante el uso.
19. La supercie del elemento de calentamiento mantiene el calor después del uso.
20. Para desconectarla verique que el hervidor está apagado y quite la clavija (6) de la toma de la pared. Desconecte
siempre el aparato aferrando la clavija, no el cable. Nota: Desenchufe el hervidor cuando no lo esté usando.
21. Ponga el hervidor en una supercie plana, asegurándose de que la base se adhiere rmemente a la supercie de
soporte, de forma que el aparato no se vuelque. No ponga el hervidor sobre o cerca de supercies calientes ni el
proximidad de las llamas.
PRECAUCIÓN: No use el hervidor en una supercie inclinada.
22. Asegúrese de que el hervidor funciona correctamente, póngala en una supercie plana, en un ambiente
adecuadamente iluminado e higiénico con un enchufe eléctrico fácilmente accesible. Ponga el hervidor a al menos 10 cm
(4 pulgadas) de la pared.
23. No use el hervidor debajo o cerca de material inamable como cortinas, papeles pintados, paredes.
24. En caso de avería, defecto o sospecha de avería después de una caída desenchufe de inmediato el hervidor. No
encienda nunca un aparato averiado. Las reparaciones deben ser realizadas por el centro de asistencia técnica de
BUGATTI. Contacte su vendedor y/o el servicio al cliente de BUGATTI o envíe un mail a [email protected] . En caso de
fuego use extintores de dióxido de carbono (CO2). No use agua ni extintores en polvo.
45
CONSERVE ESTAS INSTRUCCIONES CUIDADOSAMENTE
Page 50
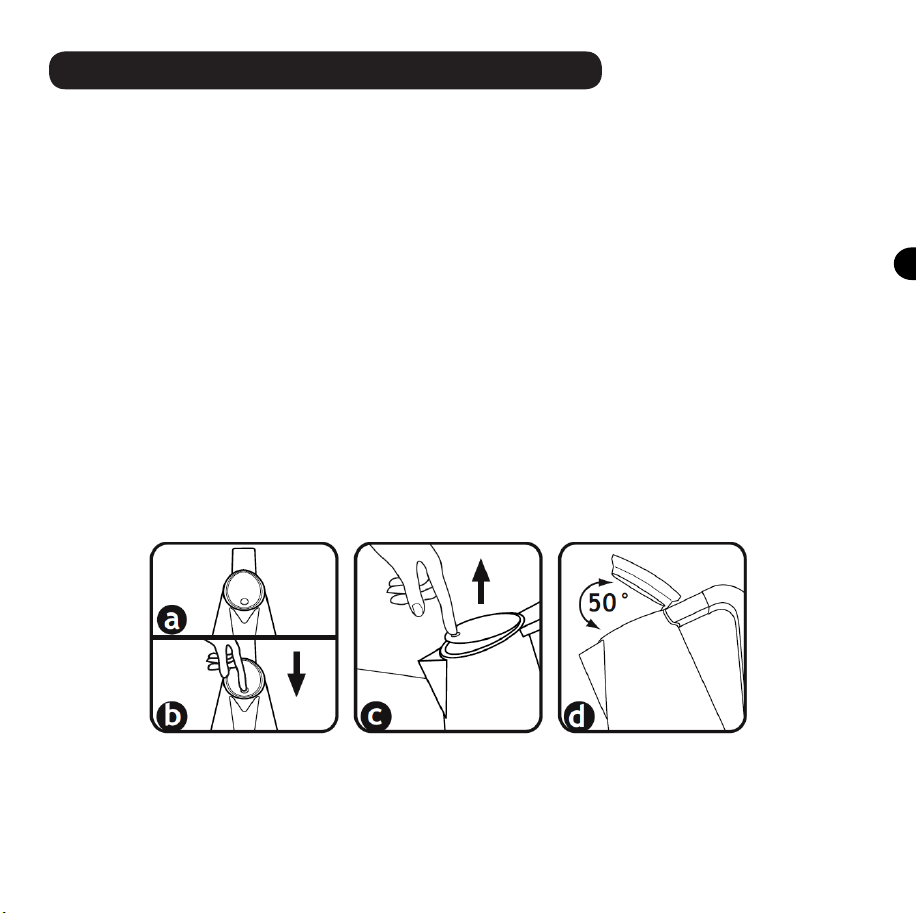
Instalación y puesta en marcha
El embalaje original se ha diseñado para poder ser enviado por correo. Consérvelo por si necesita devolver
el hervidor al proveedor. Antes de instalar el hervidor verique la conformidad con las instrucciones de
seguridad que guran en las páginas anteriores. Antes de sacar el hervidor de su embalaje asegúrese de
que está en perfectas condiciones y de que ninguna sustancia, material de embalaje, hojas de garantía o
similares han caído accidentalmente en el interior del hervidor durante el transporte o al abrir el paquete.
La bolsa de plástico en que está embalada el hervidorra debe conservarse fuera del alcance de los niños, ya
que puede ser causa de ahogo. Asegúrese de que el hervidor está en perfectas condiciones. Use un trapo
suave y seco para quitar el polvo que pueda haberse acumulado en las supercies exteriores de el hervidor.
Conecte el hervidor después de haber seguido estos pasos y de haber obedecido estrictamente a las normas
de seguridad.
Conexión a la alimentación: ¡la corriente eléctrica puede ser causa de muerte! ¡Siga las instrucciones de
seguridad!
Enchufe el cable de alimentación (6) del hervidor Vera en una toma del mismo voltaje que el indicado en
la placa de características que hay debajo del hervidor.
Enjuague cuidadosamente todas las supercies internas y el pitorro del hervidor: llene el hervidor con
agua hasta alcanzar el nivel máximo (1700 ml/ 57.48 US .oz / 59.80 UK .oz), hiérvala y vacíe el hervidor.
Repita al menos dos veces.
Llene el hervidor:
a) saque el cuerpo del hervidor de la unidad base de alimentación (5). Sosténgala por el asa (3)
b) abra la tapadera (1) : pulse el "punto" de goma (imagen "a") de la tapadera (1) y presione rmemente
(imagen "b"). A continuación suelte (imagen "c") y la tapadera (1) se abrirá automáticamente. La tapadera
(1) no se puede quitar y la apertura máxima aparece en la imagen "d".
c) llene de agua el hervidor directamente bajo la tapadera o llénela echando agua de una botella o jarra
hasta el nivel requerido. No llene en exceso el hervidor. Procure no superar 1700 ml (57.48 US .oz /
59.80 UK .oz).
d) cierre la tapadera (1) : pulse el "punto" de goma (imagen "a") de la tapadera (1). No use nunca la tapadera con la tapadera (1) abierta.
e) Ponga el hervidor en la base (5).
f) Para hervir agua pulse el botón encendido/apagado (9). La luz del botón encendido/apagado (9) indica
que el hervidor está hirviendo.
Cuando naliza la ebullición el hervidor se apaga de forma automática.
Asegúrese de que no está funcionando antes de desconectarla. No desconecte el hervidor de la toma de
pared tirando del cable. Desconecte siempre el aparato aferrando la clavija (6). Para apagar por completo
46
Page 51

el dispositivo hay que quitar la clavija (6) de la toma.
Asegúrese de que la toma eléctrica que está usando está adecuadamente puesta en tierra.
No deje que las partes sometidas a voltaje entren en contacto con el agua: ¡¡puede causar un cortocircui-
to!!! (siga todas las instrucciones de seguridad anteriormente especicadas).
Cuidado: no mantenga nunca presionado el botónd e encendido/apagado (9) durante la ebullición.
Cuidado: no haga funcionar nunca el hervidor sin agua.
Cierre automático
El hervidor está equipado con un sistema que la apaga de forma automática inmediatamente después de
que el agua haya hervido.
Si desea tener agua tibia puede detener el proceso de calentamiento en cualquier momento tirando del
botón encendido/apagado (9). El apagado se produce de forma automática cuando se saca el hervidor de
su base (5).
Por motivos funcionales, puede producirse algo de condensación al fondo del botón encendido/apagado (9),
en la base (5) y en el conector (5a). Esto se produce por razones técnicas y no afecta a la seguridad del
dispositivo.
Sistema de seguridad
Un termostato protege el hervidor del sobrecalentamiento: si el aparato se enciende vacío de forma accidental este sistema lo apagará automáticamente. El aparato volverá a funcionar normalmente al cabo de
unos 10 minutos.
Si la primera protección termostato no funciona debido a uso impropio otro limitador de temperatura asegura la protección.
Limpieza y mantenimiento
PRECAUCIÓN: Desconecte siempre el hervidor del enchufe eléctrico antes de limpiarla.
Asegúrese de que el hervidor está fría antes de limpiarla.
Limpie la supercie exterior del hervidor con un trapo mojado y limpio para conservar el pulido del acabado. Seque y abrillante con un trapo suave.
No use limpiadores abrasivos ni estropajos de ningún tipo en el interior o exterior del hervidor.
No sumerja el hervidor o oa base de alimentación en agua o en otro líquido, y asegúrese de que la clavija
eléctrica del hervidor (6)
y el conector (5a) de la base de alimentación (5) se mantienen secos.
a) Filtro (7)
La cal es una sustancia natural que se forma al hervir agua dura. El ltro sirve para retener el agua en el hervidor de agua. Es importante limpiar el ltro con regularidad. Los ganchos del ltro del pitorro se pueden extrair
tirando de ellos hacia arriba. Se puede limpiar con delicadeza con un cepillo suave y bajo un chorro de agua.
ATENCIÓN: Esta operación sólo se puede efectuar cuando el hervidor no está funcionando y cuando se ha
enfriado. NO SAQUE EL FILTRO CUANDO EL HERVIDOR VERA ESTÁ FUNCIONANDO Y CUANDO LA SUPERFICIE DEL MISMO ESTÁ CALIENTE. ¡¡EL AGUA HIRVIENDO Y EL VAPOR PUEDEN SER CAUSA DE QUEMADURAS!!
b) Descalcicación
Por descalcicación se entiende la eliminación de la cal acumulada en el interior del hervidor. PARA
OBTENER UN MEJOR FUNCIONAMIENTO DEL HERVIDOR VERA, DESCALCIFICAR VUESTRO HERVIDOR DE VEZ EN
CUANDO. La frecuencia depende de la dureza del agua y de cuanto use el hervidor. Sugerimos realizar
47
Page 52
esta Operación cada 100-200 ciclos de hervido, cada dos semanas o cada vez se vea que la base interior del
hervidor tiene manchas blancas: signica que en la base hay cal. Sugerimos el uso de un producto descalcicador para hervidores de modo que disuelva completamente la cal. Siga las instrucciones indicadas en el
descalcicador. En cualquier caso les sugerimos el siguiente método natural. En el caso que no sea posible
conseguir un descalcicador, llenar el hervidor con 500 ml de vinagre blanco de vino y 500 ml de agua.
Utilizar un cepillo empapado en vinagre de vino blanco para limpiar la barra de plástico blanco de los sen-
sores de nivel que se encuentra dentro del hervidor al n de eliminar la cal depositada en dichos sensores.
Ponerlo a hervir. Podria servir repetir la operación más veces con vinagre frío para eliminar completamente
la cal. Una vez que la descalcicación esté completada, vaciar el hervidor y llenarlo de agua fresca y limpiarlo hasta eliminar el olor y sabor del vinagre.
Otros servicios van hechos por un técnico autorizado.
Resolución de problemas
Si el hervidor Vera presenta fallos o defectos o si se sospecha alguna irregularidad desenchúfelo de inmediato. Si no puede eliminar el fallo siguiendo las instrucciones dadas en este manual contacte el servicio al
cliente de BUGATTI. Una reparación incorrecta expone al usuario a un peligro grave. No se acepta ninguna
responsabilidad por los daños o heridas causados por las reparaciones incorrectamente realizadas; los derechos de garantía son nulos en estos casos.
PROBLEMA
El hervidor no funciona correctamente o se para antes
de hervir.
Si el agua tiene mal sabor.
El hervidor está enchufado
y se apaga automáticamente al cabo de unos segundos.
CAUSA POSIBLE
Hay una costra de cal en el
hervidor.
1) El agua ha estado en el
hervidor más de 12 horas.
2) El hervidor no se ha lavado bien después del ciclo de
descalcificación.
El hervidor está vacío y el
sistema de protección de la
resistencia está funcionando.
SOLUCIÓN
Efectúe la descalcicación de
acuerdo con el punto b) del
capítulo Limpieza y mantenimiento.
1) Le sugerimos que cambie el agua residual después de cada ebullición.
2) Enjuague el hervidor el
número de veces suficiente
para eliminar por completo
el descalcificador.
Espere unos 10 minutos,
llened e agua el hervidor y
enchúfelo.
48
Page 53

Garantía
1) Por garantía se entiende la sustitución o la reparación gratuita de las partes componentes del hervidor que eran
defectuosas en el momento de la compra debido a fallos de fabricación.
2) En caso de fallos irreparables o repetidos debidos a los fallos de fabricación arriba indicados corresponde al
fabricante decidir la sustitución del aparato.
3) La garantía no cubre los daños debidos a:
a) uso incorrecto o defectuoso
b) defectos causados por rupturas accidentales o descuido
c) incumplimiento de las instrucciones y advertencias, instalación, limpieza y mantenimiento incorrectos
d) mantenimiento y/o modicaciones realizados por personal no autorizado
e) uso de piezas de recambio no originales
f) transporte
g) uso continuo del hervidor sin agua
h) cualquier otra circunstancia que no se pueda atribuir a fallos de fabricación. Se excluye cualquier reclamación
no prevista por la ley.
4) La garantía no cubre el daño debido a uso impropio y, en particular, al uso no doméstico.
5) El fabricante se exime de cualquier responsabilidad por cualquier daño directo o indirecto a las personas, cosas o
animales domésticos derivado de la inobservancia de las instrucciones de este manual, en especial la inobservancia
de las instrucciones sobre la instalación, uso y mantenimiento del hervidor.
6) La sustitución o la reparación no alargarán el periodo de garantía. La garantía no cubre la sustitución de objetos
de consumo como resistencias, batería, etc.
7) La garantía empezará a contar desde la fecha de recepción del recibo de compra y del recibo de garantía de
BUGATTI.
49
Page 54
CENTRO DE ASISTENCIA
En caso de avería del hervidor contacte un vendedor BUGATTI para que lo devuelva al fabricante.
El comprador es responsable de todos los gastos de transporte y/o envíos cubiertos o no por la garantía. A ser posible
conserve el embalaje original del hervidor para el envío.
Importante: Si el producto no conforme debe ser revisado por alguien distinto a un vendedor autorizado BUGATTI,
recuérdele que debe llamar a nuestro centro de asistencia al cliente para asegurarse de que la diagnosis del problema
es correcta, de que el producto se mantienen con las piezas correctas, y de que el producto sigue bajo garantía.
ELIMINACIÓN DEL PRODUCTO DE ACUERDO CON LA DIRECTIVA EUROPEA 2002/96/CE.
El producto no debe eliminarse con los residuos urbanos al nal de su periodo de funcionamiento. Puede
ser eliminado por los centros de recolección separada o por comerciantes que presten este servicio. La
eliminación por separado de los aparatos domésticos evita las posibles consecuencias negativas para el
medio ambiente y la salud derivadas de una eliminación impropia y permite que los materiales que lo componen se
puedan recuperar, lo que supone un notable ahorro de potencia y recursos. El símbolo de un contenedor de basura
desplazable marcado con una cruz que aparece en el producto indica que es un aparato doméstido que se debe
eliminar de forma separada.
50
Page 55

BELANGRIJKE MEDEDELINGEN
Beste klant, dank u voor het kiezen van Vera, de waterkoker van Bugatti. Zoals elke huishoudelijk
apparaat, moet deze waterkoker met zorg en aandacht worden gebruikt om brandwonden en schade aan de
waterkoker te voorkomen.
LEES ALLE INSTRUCTIES BETREFFENDE
INSTALLATIE, GEBRUIK, ONDERHOUD EN DE
VEILIGHEIDSINSTRUCTIES ZORGVULDIG DOOR
VOORDAT U DE WATERKOKER VOOR HET EERST
GAAT GEBRUIKEN. GEBRUIK DE WATERKOKER
NIET TENZIJ U TERDEGE VERTROUWD BENT MET
DE INSTRUCTIES.
WAARSCHUWING
Geen aansprakelijkheid wordt aanvaard voor schade wegens:
- verkeerd gebruik of niet beoogd gebruik
- voortdurend gebruik van de waterkoker
- door onbevoegde personen uitgevoerde reparaties
- gebruik van niet-originele reserveonderdelen of accessoires
- het aansluiten van de Vera waterkoker op een niet-geaard stopcontact
Voor verdere informatie, of in geval van problemen die in deze instructies niet voldoende
besproken worden, neem contact op met de Klantenservice van BUGATTI.
BEWAAR DEZE INSTRUCTIES ZORGVULDIG
ze door te geven aan wie de waterkoker na u zal gebruiken. Indien de instructies verloren zijn geraakt
voordat u de waterkoker gebruikt, vraag een nieuw instructieboekje op bij de Klantenservice BUGATTI of
stuur een email aan [email protected] of ga voor de download naar www.casabugatti.it. Op de eerste
bladzijde van de omslag vindt u de illustraties met betrekking tot de tekst. Houd tijdens het lezen van de
gebruiksaanwijzing de eerste pagina open.
51
en zorg ervoor
Page 56

Inhoud
Pag. 53 Technische eigenschappen
Pag. 53 Beschrijving onderdelen waterkoker
Pag. 54 Belangrijke waarschuwingen
Pag. 56 Installatie en gebruik
Pag. 57 Automatische uitschakeling
Pag. 57 Veiligheidssysteem
Pag. 57 Reiniging en onderhoud
Pag. 58 Problemen oplossen
Pag. 59 Garantie
Alle details van de tekst zijn zorgvuldig gecontroleerd. Onze rma behoudt zich het volste recht voor de
bewerking van de tekst te verklaren in geval van drukfouten of misleidende informatie.
Opmerking: Alle in deze handleiding weergegeven productgegevens worden door onze rma regelmatig
bijgehouden, met inbegrip van technische specicaties. Wij hebben het recht om de handleiding zonder
voorafgaande kennisgeving te herzien. Alle weergaven betreffende aanzien, vorm en kleur van het product
zijn gebaseerd op de standaard van werkelijk fysieke producten.
52
Page 57
TECHNISCHE EIGENSCHAPPEN
Voeding: Zie typeplaatje onder de machine
Nominaal vermogen: Zie typeplaatje onder de machine
Afmetingen circa: 220 x 180 x h. 300 mm - 8 1/2 '' x 7 '' x 11 3/4 '
Behuizing: Solide geperst roestvrij staal 18/10
Gewicht: ongeveer 1,4 kg - 3 lb.
Lengte netsnoer ca.: 0,75 meter - 30 inch
Thermische beveiliging: Ingebouwd
Capaciteit waterkoker: 1,70 liter / 57,48 US .oz / 59.80 UK .oz
Certiceringen: Zie typeplaatje onder de machine
Garantie: Zie bijgevoegd certicaat
BESCHRIJVING ONDERDELEN WATERKOKER
Deksel
Geïsoleerde handgreep
Waterkoker roestvrij staal 18/10
Voet
Connector
Stekker
Filter
Aanduiding maximum waterniveau
Aan/Uit toets
53
1
3
4
5
5a
6
7
8
9
Page 58

BELANGRIJKE WAARSCHUWINGEN
Tijdens het gebruik van elektrische apparatuur moeten de fundamentele veiligheidsvoorschriften altijd in acht genomen
worden, inclusief het volgende:
LEES ALLE INSTRUCTIES AANDACHTIG DOOR. DE
WATERKOKER MAG UITSLUITEND DOOR VOLWASSENEN
GEBRUIKT WORDEN DIE GEÏNSTRUEERD ZIJN IN HET
GEBRUIK ERVAN. BEWAAR DEZE INSTRUCTIES ZORGVULDIG.
1.OM ERNSTIGE VERWONDINGEN, ELEKTROCUTIE EN
BRAND TE VOORKOMEN MOGEN HET SNOER, DE STEKKER,
DE VOET EN DE WATERKOKER ZELF NIET, GEHEEL OF
GEDEELTELIJK, IN WATER OF ANDERE VLOEISTOFFEN
GEDOMPELD WORDEN. WAARSCHUWING: GEVAAR VOOR
BRANDWONDEN! LET OP VOOR HETE OPPERVLAKKEN!
Raak de hete oppervlakken niet aan. Gebruik enkel de handgreep om de waterkoker vast te pakken. Gebruik een ovenwant bij het
aanraken van hete delen zoals wanden van de waterkoker (4), deksel (1) en alle oppervlakken van de waterkoker:
GEVAAR VOOR BRANDWONDEN!
2. De waterkoker is ontworpen UITSLUITEND VOOR HUISHOUDELIJK GEBRUIK.
Dit apparaat is bedoeld voor gebruik in het huishouden en soortgelijke toepassingen zoals:
- personeelskeuken in winkels, kantoren en andere werkomgevingen;
- boerderijen;
- door klanten in hotels, motels en andere soortgelijke accomodaties;
- logies met ontbijt en soortgelijke omgevingen.
Gebruik de waterkoker alleen voor het beoogde gebruik. Geen technische wijzigingen maken die risico's kunnen veroorzaken.
3. Houd de waterkoker, de voet (5) en het netsnoer buiten het bereik van kinderen onder de 8 jaar. Zorg voor een nauwlettend
toezicht indien de apparatuur gebruikt wordt door of in de nabijheid van kinderen. Verwijder de stekker uit het stopcontact
wanneer het apparaat niet gebruikt wordt of wanneer het gereinigd wordt. Alvorens delen van de apparatuur te verwijderen
of deze opnieuw te monteren, zoals ook in geval van reiniging, moet de apparatuur eerst voldoende afkoelen. Altijd de
voedingskabel eerst op het apparaat aansluiten en dan de stekker in het stopcontact steken. Voor het uitschakelen, één
van de schakelaars in de stand “off” plaatsen en dan de stekker uit het stopcontact verwijderen.
4. Het bijgeleverde netsnoer met stekker is bewust kort om het risico van verstrikt raken in objecten te beperken en om te
voorkomen dat mensen over lange snoeren struikelen. Lange afneembare netsnoeren of verlengsnoeren zijn beschikbaar,
maar mogen alleen gebruikt worden indien een GEKWALIFICEERDE ELEKTRICIEN bevestigt dat zij voldoen aan de regels voor
bedrading. GEBRUIK GEEN tussenstekkers. Indien er een lang afneembaar netsnoer of verlengsnoer gebruikt wordt:
a) moet de spanning van het afneembare netsnoer of verlengsnoer minstens zo krachtig als de op de onderkant van de
waterkoker aangegeven spanning.
b) moet het verlengsnoer 3-draads/-polig en geaard zijn. Een lang snoer of verlengsnoer mag nooit over de rand van meubels,
54
Page 59
werkbladen of tafelbladen hangen waar het binnen het bereik is van kinderen en erover gestruikeld kan worden.
c) plaats de waterkoker en het snoer niet in de buurt van gasfornuizen, kookplaten, in of dicht bij ovens.
d) gebruik het apparaat niet buitenshuis. Laat de snoeren niet over de rand van tafels of werkbladen hangen, of in contact komen met
hete oppervlakken. Gebruik de waterkoker niet in geval van beschadigingen aan snoer of stekker, indien het apparaat storingen heeft of op
enige wijze beschadigd is. Breng het apparaat naar het dichtstbijzijnde bevoegde servicecentrum voor onderzoek of reparatie. Het gebruik
van accessoires die niet zijn aanbevolen door de fabrikant van het apparaat kan leiden tot brand, elektrocutie of ernstig persoonlijk letsel.
e) wanneer het netsnoer of de stekker beschadigd zijn, moeten deze worden vervangen door de fabrikant, een erkend servicecentrum of
door een gekwaliceerd persoon, om elk risico te voorkomen.
5. Nooit onder spanning staande elektrische delen aanraken. Dit kan elektrische schokken en ernstig persoonlijk letsel veroorzaken. Verbind de
voet (5) met een stopcontact met de juiste spanning. De spanning moet overeenstemmen met de op het typeplaatje onder de waterkoker (4)
aangegeven spanning. Zorg ervoor dat het stopcontact dat u gebruikt geaard is. Gebruik de waterkoker niet met blote of natte voeten.
6. Gebruik de waterkoker uitsluitend met de bijbehorende voet (5).
7. WAARSCHUWING: mors geen water of andere vloeistoffen op de voet (5) en de connector (5a).
8. WAARSCHUWING: De waterkoker nooit boven 1,70 liter (57.48 VS .oz / 59.80 UK .oz) vullen, de «MAX» aanduiding op het display (8).
9. WAARSCHUWING: De waterkoker nooit met water vullen terwijl deze op de voet (5) staat.
10. WAARSCHUWING: Vul de waterkoker alleen met schoon water. Geen melk, kofe of andere vloeistoffen.
11. WAARSCHUWING: Laat de waterkoker tijdens het gebruik nooit onbeheerd.
12. WAARSCHUWING: Gebruik de waterkoker nooit zonder water. Een verkeerd gebruik beperkt de levensduur van de waterkoker.
13. WAARSCHUWING: Nooit de aan/uit toets (9) tijdens of na het koken ingedrukt houden.
14. WAARSCHUWING: Nooit water koken wanneer de waterkoker overvol is of het deksel (1) open staat. Kokend water kan wegspatten en
verwondingen veroorzaken.
15. Zorg ervoor het kokende water langzaam en voorzichtig te schenken.
16. Om brandwonden te voorkomen moet het deksel (1) tijdens het koken of direct na het uitschakelen nooit geopend worden. OOK DE
STOOM IS HEET! Wees voorzichtig bij het openen van het deksel (1) als de waterkoker nog heet is en u wilt hem opnieuw met water vullen.
Kokend water kan brandwonden veroorzaken.
17. Maak na elke kookcyclus de waterkoker volledig leeg. Nooit voor een lange periode water in de waterkoker laten.
18. Wees voorzichtig: hete oppervlakken. Gebruik de handgrepen of knoppen of draag ovenwanten. Wees zeer voorzichtig bij het aanraken van
zeer hete onderdelen zoals deksel (1), behuizing (4) en alle oppervlakken van de waterkoker. WAARSCHUWING! GEVAAR VOOR BRANDWONDEN! De
behuizing van de waterkoker (4) en het deksel (1) worden tijdens het gebruik zeer heet.
19. Het verwarmingselement blijft na het gebruik nog warm.
20. Let bij het loskoppelen op dat de waterkoker uitgeschakeld is en verwijder de stekker (6) uit het stopcontact. Houd daarbij altijd de stekker vast
en niet het snoer. Let op: Verwijder de stekker uit het stopcontact wanneer u de waterkoker niet gebruikt.
21. Plaats de waterkoker op een vlakke ondergrond en zorg ervoor dat de voetjes stabiel op het oppervlak steunen zodat het apparaat niet
kan kantelen. Plaats de waterkoker niet op of in de buurt van hete oppervlakken of dicht bij open vuur.
LET OP: Gebruik de waterkoker niet op een hellend oppervlak.
22. Om verzekerd te zijn van een correcte werking, plaats de waterkoker op een vlakke ondergrond in een voldoende verlichte en
hygiënische omgeving met een gemakkelijk toegankelijk stopcontact. Plaats de waterkoker tenminste op 10 cm (4 inch) afstand van de
muren.
23. Gebruik de waterkoker niet onder of in de buurt van ontvlambare materialen zoals gordijnen, behang, muren.
24. Ontkoppel de waterkoker onmiddellijk in geval van storingen, defecten of vermoedelijke storingen na een val. Nooit een defect
apparaat inschakelen. De reparaties moeten worden uitgevoerd door de BUGATTI servicecentra. Neem contact op met uw dealer en/
of raadpleeg de Klantenservice van BUGATTI of stuur een e-mail naar [email protected]. Gebruik bij brand koolstofdioxide (CO2)
brandblussers. Geen water of poeder brandblussers gebruiken.
55
Page 60
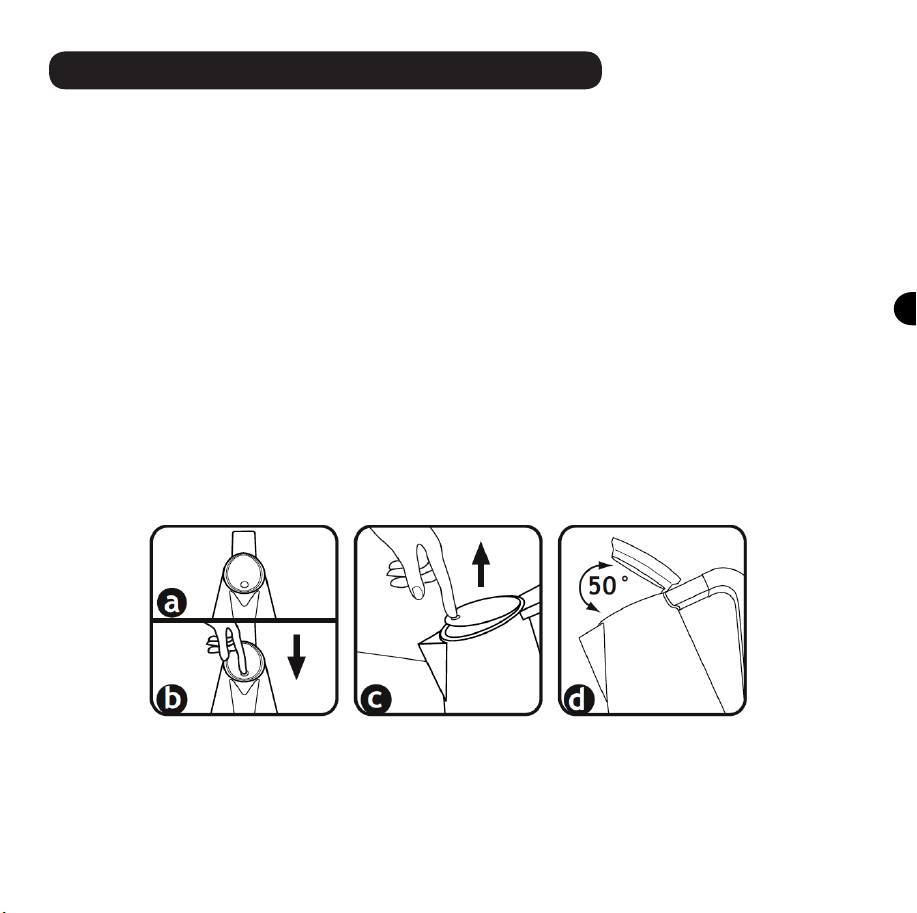
Installatie en gebruik
De originele verpakking is ontworpen voor verzending per post. Bewaar deze voor het geval u de waterkoker moet terugsturen naar de leverancier. Alvorens de waterkoker te installeren moet u voldoen aan alle op de voorafgaande pagina's
weergegeven veiligheidsinstructies. Controleer, na het verwijderen van de verpakking van de waterkoker, dat het apparaat
in perfecte staat verkeert en let op dat er niks, verpakkingsmateriaal, garantiebewijs of iets dergelijks tijdens het transport of bij het openen van de verpakking per ongeluk in de waterkoker terechtgekomen is.
De plastic zak waarin de waterkoker is verpakt moet buiten bereik van kinderen worden gehouden omdat deze een
gevaar voor verstikking vormt. Controleer of de waterkoker in perfecte staat is. Gebruik voor het verwijderen van stof
dat zich op de buitenkant van de waterkoker verzameld kan hebben een droge zachte doek.
Nadat u heeft voldaan aan de bovenstaande stappen en de veiligheidsnormen strikt zijn opgevolgd, kunt u het
apparaat op de voeding aansluiten.
Wees voorzichtig bij het aansluiten op de voeding omdat elektische stroom de dood ten gevolge kan hebben! De
veiligheidsinstructies opvolgen!
Sluit het netsnoer (6) van de Vera waterkoker aan op een stopcontact dat beschikt over de op het typeplaatje
onder het apparaat aangegeven spanning.
Spoel de binnenkant en de tuit van de waterkoker zorgvuldig schoon: vul de waterkoker met water tot aan het
maximum niveau (1700 ml/ 57.48 US .oz / 59.80 UK .oz); breng dit water aan de kook en giet het daarna uit de
waterkoker. Herhaal dit ten minste twee keer.
Vul de waterkoker:
a) verwijder de waterkoker van de voet (5). Houd hem bij de handgreep (3) vast
b) open het deksel (1): druk op de rubberen "punt" (afb. "a") op het deksel (1) en druk stevig omlaag (afb. "b").
Laat dan los (afb. "c") en het deksel (1) gaat automatisch open. Het deksel (1) is niet afneembaar; de maximale
opening wordt getoond in de afbeelding "d".
c) vul de waterkoker tot het gewenste niveau met water direct uit de kraan of gebruik een es of een kan. Doe niet
te veel water in de waterkoker. Let op de 1700 ml (57,48 US .oz / 59.80 UK .oz) niet te overschrijden.
d) sluit het deksel (1): druk op de rubberen "punt" (afb. "a") op het deksel (1). Gebruik de waterkoker nooit met
het geopende deksel (1).
e) Plaats de waterkoker op de voet (5).
f) Druk nu op de aan/uit-toets (9) om het water te koken. Het lampje in de aan/uit-toets (9) geeft aan dat de
waterkoker werkt.
De waterkoker schakelt automatisch uit na het voltooien van de kookcyclus.
Let bij het ontkoppelen op dat de waterkoker niet in werking is. Trek bij het verwijderen van de stekker uit het
stopcontact nooit aan het snoer. Houd bij het verwijderen van de stekker (6) altijd de stekker zelf vast. Om het
apparaat volledig uit te schakelen moet de stekker (6) uit het stopcontact verwijderd worden.
56
Page 61

Zorg ervoor dat het gebruikte stopcontact voldoende geaard is.
Laat nooit spanningsvoerende delen in aanraking komen met water: dit kan een kortsluiting veroorzaken!!!
(alle eerder genoemde veiligheidsinstructies opvolgen).
Opgepast: nooit de aan/uit toets (9) tijdens of na het koken ingedrukt houden.
Opgepast: gebruik de waterkoker nooit zonder water.
Automatische uitschakeling
De waterkoker is uitgerust met een systeem dat het apparaat kort na het koken van het water automatisch
uitschakelt.
Indien u warm water wenst, kan het verhitten van het water op elk gewenst moment onderbroken worden door te
drukken op de aan/uit-toets (9). De waterkoker wordt automatisch uitgeschakeld bij verwijdering vanaf de voet (5).
Wegens functionele redenen, kan er condensatie-vorming plaatsvinden onder de aan/uit-toets (9), op de
voet (5) en op de connector (5a). Dit gebeurt om technische redenen en heeft geen invloed op de veiligheid van het apparaat.
Veiligheidssysteem
Een thermostaat beschermt de waterkoker tegen oververhitting: als het apparaat per ongeluk leeg wordt
ingeschakeld, wordt het door dit systeem automatisch uitgezet. Het apparaat zal haar normale functies na
ongeveer 10 minuten hervatten.
Indien de eerste thermostaat-bescherming als gevolg van een onjuist gebruik niet zou functioneren, zorgt
een andere temperatuur-begrenzer voor bescherming.
Reiniging en onderhoud
LET OP: Neem vóór het reiniging altijd de stekker van de waterkoker uit het stopcontact.
De waterkoker moet vóór het reinigen afgekoeld zijn.
Maak de buitenkant van de waterkoker schoon met een schone vochtige doek om beschadiging van de originele hoog gepolijste afwerking te vermijden. Drogen en opwrijven met een zachte doek.
Gebruik geen schurende reinigingsmiddelen of schuurmiddelen van welke aard dan ook op de binnen- of
buitenkant van de waterkoker.
De waterkoker en zijn voet nooit in water of andere vloeistof dompelen en zorg ervoor dat de stekker van
de waterkoker
(6) en de connector (5a) van de voet (5) droog blijven.
a) Filter (7)
Ketelsteen, of kalkaanslag, is een natuurlijke stof die zich vormt wanneer hard water gekookt wordt. Het
lter heeft de functie de kalkaanslag in de waterkoker tegen te houden. Het is belangrijk het lter regelmatig te reinigen. Het lter klikt vast in de tuit en kan worden verwijderd door het uit de tuit omhoog te
trekken. Maak het lter voorzichtig met een zachte borstel onder stromend water schoon.
LET OP: Deze handeling kan alleen worden uitgevoerd wanneer de waterkoker niet in werking en
afgekoeld is. VERWIJDER HET FILTER NIET WANNEER DE VERA WATERKOKER IN WERKING IS EN HET OP-
PERVLAK HEET IS. KOKEND WATER EN STOOM KUNNEN BRANDWONDEN VEROORZAKEN!!!
b) Ontkalking
De ontkalking betreft de verwijdering van het in de waterkoker aangeslagen kalksteen. VOOR DE BEST
MOGELIJKE WERKING VAN DE WATERKOKER VERA MOET HET APPARAAT REGELMATIG ONTKALKT WORDEN. De
ontkalkingsfrequentie van is afhankelijk van de waterhardheid en de gebruiksfrequentie van de waterkoker. We raden aan deze handeling elke 100-200 kookcycli te verrichten, om de twee weken of in ieder
57
Page 62
geval wanneer er op de bodem van de ketel witte vlekken zichtbaar zijn: deze vlekken zijn afzettingen
van kalksteen. We raden aan een ontkalker voor waterkokers te gebruiken om het kalksteen volledig op
te lossen. Volg de instructies op de verpakking van de ontkalker. BUGATTI suggereert in ieder geval ook de
volgende natuurlijke methode: vul de waterkoker met 500 ml witte wijnazijn en 500 ml water. Gebruik een
met de witte wijnazijn bevochtigde borstel voor het reinigen van de niveausensoren-balk in de ketel om
de daar aanwezige kalkaanslag te verwijderen. Druk vervolgens op de aan/uit-knop (14) en laat het water/
azijnmengsel koken. Mogelijk moet deze handeling meerdere keren herhaalt worden om de kalkaanslag
volledig te verwijderen. Wanneer de ontkalking is voltooid, de waterkoker legen en meerdere keren met
vers en schoon water vullen tot de Tgeur en de smaak van het azijn verwijderd zijn.
Alle andere diensten moeten worden uitgevoerd door een bevoegde onderhoudsvertegenwoordiger.
Problemen oplossen
Indien de Vera waterkoker storingen, defecten of mogelijke onregelmatigheden heeft moet de stekker van
het apparaat onmiddellijk uit het stopcontact verwijderd worden. Wanneer u de storing niet kunt verhelpen door het opvolgen van de instructies in deze handleiding, neem dan contact op met de Klantenservice
BUGATTI. Niet correct uitgevoerde reparaties stellen de gebruiker bloot aan ernstig gevaar. Er wordt geen
aansprakelijkheid aanvaard voor schade of letsel veroorzaakt door onjuist uitgevoerde reparaties; in dit
geval wordt de garantie ongeldig verklaard.
PROBLEEM
De waterkoker werkt
niet goed of stopt voordat het water kookt.
Het water smaakt slecht.
De waterkoker is ingeschakeld maar schakelt na een
paar seconden automatisch
uit.
MOGELIJKE OORZAAK
Er is kalkaanslag in de waterkoker.
1) Het water bevindt
zich sinds meer dan 12
uur in de waterkoker.
2) De waterkoker is na de
ontkalking niet goed gespoeld.
De waterkoker is leeg en de
thermostaat-bescherming
heeft ingegrepen.
OPLOSSING
Ontkalk de waterkoker zoals
beschreven onder punt b) van
hoofdstuk Reiniging en onderhoud.
1) Wij raden aan het resterende water na elke
kookcyclus weg te gooien.
2) Spoel de waterkoker diverse keren om het
ontkalkingsproduct volledig
te verwijderen.
Wacht ongeveer 10 minuten, vul daarna de waterkoker met water en schakel
weer in.
58
Page 63

Garantie
1) Met garantie wordt bedoeld de kosteloze vervanging of reparatie van de onderdelen van de waterkoker die op het
moment van de aankoop als gevolg van fabricagefouten defect zijn.
2) In geval van onherstelbare of herhaalde gebreken die te wijten zijn aan de bovenstaande fabricagefouten wordt
het apparaat, naar goeddunken van de fabrikant, vervangen.
3) De garantie geldt niet voor schade als gevolg van:
a) onjuist of verkeerd gebruik
b) defecten veroorzaakt door incidentele breuk of onvoorzichtigheid
c) het niet opvolgen van de instructies en waarschuwingen, onjuiste installatie, reiniging en onderhoud
d) onderhoud en/of wijzigingen uitgevoerd door onbevoegden
e) het gebruik van niet-originele onderdelen
f) vervoer
g) het continu gebruik van de functies van de waterkoker zonder water
h) elke andere omstandigheid die niet kan worden toegeschreven aan fabricagefouten. Eventuele niet door de wet
voorziene claims zijn uitgesloten.
4) De garantie geldt niet voor schade als gevolg van onjuist gebruik en in het bijzonder als gevolg van niethuishoudelijk gebruik.
5) De fabrikant aanvaardt geen enkele aansprakelijkheid voor directe of indirecte schade of letsel aan personen,
voorwerpen en huisdieren die mogelijk voortvloeien uit het niet naleven van de in deze handleiding beschreven
veiligheidsinstructies, in het bijzonder het niet opvolgen van de instructies voor installatie, gebruik en onderhoud
van de waterkoker.
6) Vervanging of reparatie verlengen de garantieperiode niet. De garantie geldt niet voor het vervangen van
verbruiksmateriaal zoals de weerstanden, batterij, etc.
7) De garantie loopt vanaf de datum van ontvangst van het aankoopbewijs en ontvangst van de garantiekaart door
BUGATTI.
59
Page 64
SERVICE CENTRA
Raadpleeg in geval van een storing van de waterkoker een geautoriseerde BUGATTI dealer, die de waterkoker zal
terugsturen naar de fabrikant.
De koper is verantwoordelijk voor alle vervoers- en/of verzendingskosten voor alle reparaties, wel of niet vallend
onder de garantie. Bewaar indien mogelijk de originele verpakking van de waterkoker voor de verzending.
Belangrijk: Als het niet-conforme product moet worden onderhouden door anderen raadpleeg dan een geautoriseerde
BUGATTI dealer; deze moet vervolgens contact opnemen met onze Klantendienst om er zeker van te zijn dat het
probleem juist geïdenticeerd is, het product onderhouden wordt met de juiste onderdelen en om vast te stellen of
het product nog onder de garantie valt.
VERWERKINGVAN HET PRODUCT IN OVEREENSTEMMING MET DE EUROPESE RICHTLIJN 2002/96/EG.
Aan het einde van zijn levensduur mag het product niet met het normale huisvuil worden weggegooid. Het
kan ingeleverd worden bij een door de overheid aangewezen inzamelpunt of bij dealers die in deze dienst
voorzien. Met de gescheiden verwerking van een huishoudelijk apparaat kunnen mogelijk negatieve gevolgen
voor het milieu en de gezondheid als gevolg van een onjuiste verwerking worden vermeden en kunnen de materialen
waarvan het gemaakt is gerecycled worden hetgeen kan leiden tot aanzienlijke energie- en grondstofbesparingen.
Het symbool van de afvalcontainer met een kruis erdoor, weergegeven op het product, geeft aan dat dit huishoudelijk
apparaat afzonderlijk moet worden verwerkt.
60
Page 65

61
63
66
67
67
67
68
69
61
1162
Page 66

BugattiVera
61
Page 67

off
6264
Page 68
/ x x/ x x
/
63
/
Page 69
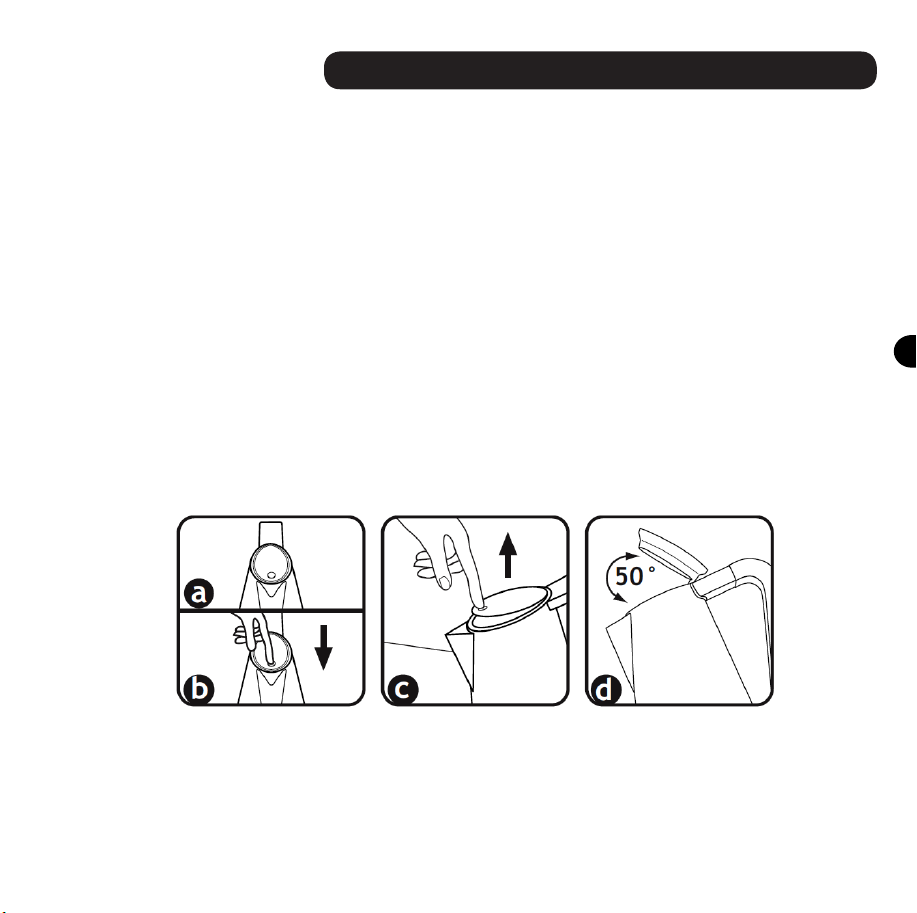
Vera
64
66
Page 70

65
Page 71
66
68
Page 72

VERA
BUGATTI
OFFON
(
)
67
Page 73
2002/96/EC
68
70
Page 74

69
Page 75

WAŻNE UWAGI
Drogi Kliencie, dziękujemy za wybranie Vera - czajnika rmy Bugatti. Jak w przypadku każdego urządzenia
gospodarstwa domowego,
czajnik należy używać zachowując ostrożność i uwagę tak, aby uniknąć poparzenia ludzi i zniszczenia czajnika.
PRZED UŻYCIEM CZAJNIKA PO RAZ PIERWSZY,
NALEŻY PRZECZYTAĆ WSZYSTKIE INSTRUKCJE
NA TEMAT INSTALACJI, ZASTOSOWANIA
I KONSERWACJI, A TAKŻE INSTRUKCJE
BEZPIECZEŃSTWA. NIE UŻYWAJ CZAJNIKA
ZANIM NIE ZAPOZNASZ SIĘ Z INSTRUKCJAMI.
UWAGA
Firma nie ponosi odpowiedzialności za szkody spowodowane:
- niewłaściwym lub innym niż przewidziane użyciem czajnika
- ciągłym użyciem czajnika
- naprawami przeprowadzonymi przez nieautoryzowane osoby
- użyciem nieoryginalnych części zamiennych lub akcesoriów
- podłączeniem czajnika Vera do nieuziemionego gniazdka
W celu uzyskania dalszych informacji lub w przypadku wystąpienia problemów, które nie zostały wystarczająco
opisane
w niniejszej instrukcji, należy skontaktować się z działem obsługi klienta pod adresem BUGATTI.
UWAŻNIE ZACHOWAJ TE INSTRUKCJE
przekazać je osobom, które będą używać czajnik po Tobie. Jeśli instrukcje zostaną utracone przed użyciem
czajnika, należy poprosić o instrukcję obsługi w Centrum Obsługi Klienta w BUGATTI lub wysłać e-mail do
[email protected] lub pobrać ją z www.casabugatti.it. Na pierwszej stronie okładki znajdują się ilustracje
odnoszące się do tekstu. Podczas czytania instrukcji, trzymaj pierwszą stronę otwartą.
71
i pamiętaj, by
Page 76

Zawartość
Strona 73 Dane techniczne
Strona 73 Opis części czajnika
Strona 74 Ważne środki zabezpieczające
Strona 76 Instalacja i uruchomienie po raz pierwszy
Strona 77 Automatyczne wyłączenie
Strona 77 System bezpieczeństwa
Strona 77 Czyszczenie i konserwacja
Strona 78 Rozwiązywanie problemów
Strona 79 GWARANCJA
Wszystkie szczegóły tekstu zostały uważnie sprawdzone. Nasza rma zastrzega sobie prawo do wyjaśnienia
pełnego opracowania tekstu czy jest jakiś błąd drukowania lub wprowadzające w błąd informacje.
Uwaga: należy przypomnieć, że nasza rma ciągle aktualizuje każdy szczegół produktu wskazanego w
niniejszej instrukcji obsługi, w tym specykację techniczną. Zastrzegamy prawo zrewidowania instrukcji
obsługi bez uprzedniego powiadomienia. Wszystkie perspektywy, kształt i kolor produktu są oparte na
standardzie faktycznego wyglądu zycznego.
72
Page 77
Dane techniczne
Moc zasilania Patrz tabliczka znamionowa pod spodem maszyny
Moc znamionowa Patrz tabliczka znamionowa pod spodem maszyny
Rozmiary 220 x 180 x h. 300 mm – 8 1/2 ‘’ x 7’’ x 11 3/4 ‘ w przybliżeniu
Struktura Stała 18/10 ze stali nierdzewnej
Waga 1,4 kg – 3 funty w przybliżeniu
Długość przewodu zasilającego prądu 0,75 m około 30 cali
Termiczne zabezpieczenie przeciążeniowe Wbudowane
Pojemność czajnika 1,70 litrów / 57.48 US .oz / 59.80 UK .oz
Certykaty Patrz tabliczka znamionowa pod spodem maszyny
Gwarancja jak w załączonym certykacie
Opis części czajnika
Pokrywa
Nienagrzewający się uchwyt
18/10 Czajnik ze stali nierdzewnej
Jednostka bazowa zasilania
łącznik
Wtyczka
Filtr
Miarka wskazująca maksymalny poziom wody
Przycisk ON/OFF
73
1
3
4
5
5a
6
7
8
9
Page 78

Ważne środki zabezpieczające
Podczas korzystania z urządzeń elektrycznych należy zawsze przestrzegać podstawowych zasad bezpieczeństwa, w tym
między innymi:
UWAŻNIE PRZECZYTAJ INSTRUKCJE. CZAJNIK
MOŻE BYĆ UŻYWANY TYLKO PRZEZ DOROSŁYCH
KTÓRZY ZAZNAJOMILI SIĘ Z JEGO INSTRUKCJĄ
OBSŁUGI.
UWAŻNIE ZACHOWAJ NINIEJSZE INSTRUKCJE.
1. W CELU ZAPOBIEGANIA POWAŻNYM OBRAŻENIOM,
PORAŻENIOM
ELEKTRYCZNYM I POŻAROM, NIE WOLNO ZANURZAĆ
W WODZIE LUB INNYCH CIECZACH PRZEWODÓW,
WTYCZKI, BAZY ZASILANIA, CZĘŚCIOWO LUB W
CAŁOŚCI. UWAGA: NIEBEZPIECZEŃSTWO POPARZENIA!
UWAŻAJ NA GORĄCE POWIERZCHNIE!
Nie dotykać gorących powierzchni. Podnoś czajnik tylko za rączkę. Użyj rękawicy do piekarnika podczas dotykania
części takich jak korpus (4), pokrywa (1), i wszystkie powierzchnie w czajniku:
NIEBEZPIECZEŃSTWO POPARZENIA!
2. Czajnik jest zaprojektowany TYLKO DO UŻYTKU DOMOWEGO.
Urządzenie przeznaczone jest do stosowania w gospodarstwie domowym i do podobnych zastosowań, takich jak:
- Obszary personelu kuchni w sklepach, biurach i innych środowiskach pracy;
- Domy gospodarskie;
- Przez klientów w hotelach, motelach i innych środowiskach typu mieszkalnych;
- środowiska typu bed and breakfast.
Używaj czajnika tylko zgodnie z jego przeznaczeniem. Nie wolno dokonywać żadnych zmian technicznych, które mogą powodować
zagrożenie.
3. Przechowywać czajnik, podstawę (5) i kabel poza zasięgiem dzieci poniżej 8 lat.
W przypadku gdy jakiekolwiek urządzenie jest wykorzystywane przez dzieci bądź w ich pobliżu, konieczny jest ścisły nadzór.
Odłączyć wtyczkę z gniazdka w przypadku nieużytkowania lub przed przystąpieniem do czyszczenia. Pozostawić do ostygnięcia
przed umieszczaniem bądź usuwaniem części oraz przed przystąpieniem do czyszczenia urządzenia. W pierwszej kolejności zawsze
74
Page 79

wykonać podłączenie do urządzenia, a następnie podłączyć przewód do gniazdka obecnego w ścianie. W celu odłączenia, obrócić
wszelkie elementy sterowania w położenie “off”, a następnie usunąć wtyczkę z gniazdka obecnego w ścianie.
4. Krótki kabel zasilający z wtyczką jest dostarczany w celu zmniejszenia ryzyka zaplątania się w obiektach, aby ludzie nie
potykali się o niego i aby przewód nie owijał się wokół dłuższego kabla. Długie odpinane kable zasilające oraz przedłużacze są
dostępne, ale mogą one być stosowane tylko wtedy, gdy wykwalikowany elektryk może potwierdzić, że są one zgodne z przepisami
instalacyjnymi. NIE UŻYWAĆ adapterów do wtyczek / gniazda. Jeśli stosuje się długi, odłączany przewód zasilania lub przedłużacz:
a) Wartość znamionowa elektrycznego odłączanego kabla zasilania lub przedłużacza powinna być co najmniej tak potężna jak
wartość znamionowa elektrycznego czajnika wskazana pod samym czajnikiem.
b) przedłużacz musi być 3-przewodowy / typ biegunowy i musi być uziemiony. Długi przewód lub przedłużacz nie może nigdy
zwisać z mebli lub blatu stołu, gdzie mógłby być pociągnięty przez dzieci lub ktoś mógłby się o niego potknąć.
c) nie wolno umieszczać czajnika lub przewodów na lub w pobliżu gorącego pierścienia gazowego lub elektrycznej płyty grzejnej,
lub w pobliżu pieca.
d) Nie używać na zewnątrz.
Nie dopuścić, aby przewodu zwisały z krawędzi stołu lub szafki, lub aby dotykały gorących powierzchni.
Nie używaj czajnika z uszkodzonym przewodem lub wtyczką lub gdy urządzenie ma wady, lub zostało uszkodzone w jakikolwiek
sposób. Zawieź urządzenie do najbliższego autoryzowanego serwisu na kontrolę lub do naprawy. Używanie akcesoriów nie
zalecanych przez producenta może wywołać pożar, porażenie elektryczne lub poważne obrażenia dla ludzi.
e) Jeżeli kabel zasilania lub wtyczki są uszkodzone, muszą one zostać zastąpione przez producenta lub autoryzowany serwis albo
przez wykwalikowaną osobę w celu uniknięcia wszelkiego rodzaju ryzyka.
5. Nigdy nie dotykaj odkrytych części elektrycznych. Mogą spowodować porażenie elektryczne lub poważne obrażenia osób.
Podłącz bazę zasilania (5) do gniazda na ścianie mającego odpowiednie napięcie. Napięcie musi odpowiadać napięciu wskazanemu
na tabliczce znamieniowej pod czajnikiem (4). Upewnij się, że gniazdo, które używasz jest uziemione. Nie używaj czajnika
z bosymi lub wilgotnymi stopami.
6. Czajnik można używać tylko z załączoną podstawą (5).
7. UWAGA: uniknąć wycieku wody lub innej cieczy na podstawę (5) i łącznik (5a).
8. UWAGA: Nigdy nie wypełniaj czajnika powyżej 1,70 litrów (57.48 US .oz / 59.80 UK .oz), znaku «MAX» zaznaczonego na panelu
wyświetlacza (8).
9. UWAGA: Nigdy nie napełniaj czajnika wodą gdy jest umieszczony na podstawie (5).
10. UWAGA: Napełniaj czajnik tylko czystą wodą. Nie mlekiem, kawą lun innym.
11. UWAGA: Nie wolno używać czajnika bez nadzoru.
12. UWAGA: Nigdy nie używaj czajnika bez wody. Niewłaściwe zastosowanie ogranicza trwałość czajnika.
13. UWAGA: Nigdy nie przetrzymuj przycisku on / off (9) podczas sesji wrzenia lub po sesji wrzenia.
14. UWAGA: Nigdy nie gotuj wody gdy czajnik jest przepełniony lub gdy pokrywa (1) jest otwarta. Gotowana woda mogłaby
wypłynąć i oparzyć osoby.
15. Upewnij się zawsze, że nalewasz zagotowaną wodę powoli i uważnie.
16. Aby uniknąć oparzenia, nie otwieraj pokrywy (1) podczas wrzenia wody lub zaraz po wyłączeniu czajnika. PARA MOŻE PARZYĆ!
Zachowaj ostrożność przy otwieraniu pokrywy (1), jęśli czajnik jest nadal gorący a chcesz go ponownie napełnić wodą. Gorąca
woda może spowodować poparzenia.
17. Po każdym gotowaniu wody, całkowicie opróżnij czajnik. Nigdy nie zostawiaj wody w czajniku przez długi okres.
18. Zachowaj ostrożność: gorące powierzchnie. Używaj uchwyty lub gałki lub zakładaj rękawice kuchenne. Zachowaj
ostrożność podczas dotykania bardzo gorących części takich jak pokrywa (1), korpus (4) i inne powierzchnie czajnika. UWAGA:
NIEBEZPIECZEŃSTWO POPARZENIA! Korpus (4) i pokrywa (1) stają się bardzo gorące podczas używania.
19. Powierzchnia elementu grzejnego jest przedmiotem ciepła resztkowego po użyciu.
20. Aby odłączyć sprawdź, czy czajnik jest wyłączony i wyjmij wtyczkę (6) z gniazdka sieciowego. Zawsze odłączaj urządzenie
trzymając za wtyczkę, a nie kabel. Nota: Wyciągnij wtyczkę z gniazdka sieciowego, kiedy nie używasz czajnika.
21. Postaw czajnik na płaskiej powierzchni, upewniając się, że stópki przylegają mocno do powierzchni nośnej tak, że urządzenie nie
może zostać przewrócone. Nie stawiaj czajnika na lub w pobliżu gorących powierzchni lub w pobliżu otwartego ognia.
ZAGROŻENIE: Nie używaj czajnika na pochyłej powierzchni.
22. Aby upewnić się, że działa prawidłowo czajnik, umieść go na płaskiej powierzchni w odpowiednio oświetlonym i higienicznym
środowisku z łatwo dostępnym gniazdkiem elektrycznym. Przechowuj czajnik co najmniej 10 cm (4 cale) z dala od ścian.
23. Nie używaj czajnika pod lub w pobliżu materiałów łatwopalnych, takich jak zasłony, tapety, ściany.
24. W przypadku awarii, usterek lub podejrzenia uszkodzeń po upadku, należy natychmiast odłączyć czajnik. Nigdy nie
uruchamiaj wadliwego urządzenia. Naprawy muszą być przeprowadzane przez Centrum Usługowe BUGATTI. Skontaktuj się ze
sprzedawcą i/lub skontaktuj Obsługę Klienta BUGATTI lub wyślij email na [email protected] . W przypadku pożaru używać gaśnic
z dwutlenkiem węgla (CO2). Nie używać gaśnic wodnych lub pyłowych.
75
UWAŻNIE ZACHOWAJ TE INSTRUKCJE
Page 80
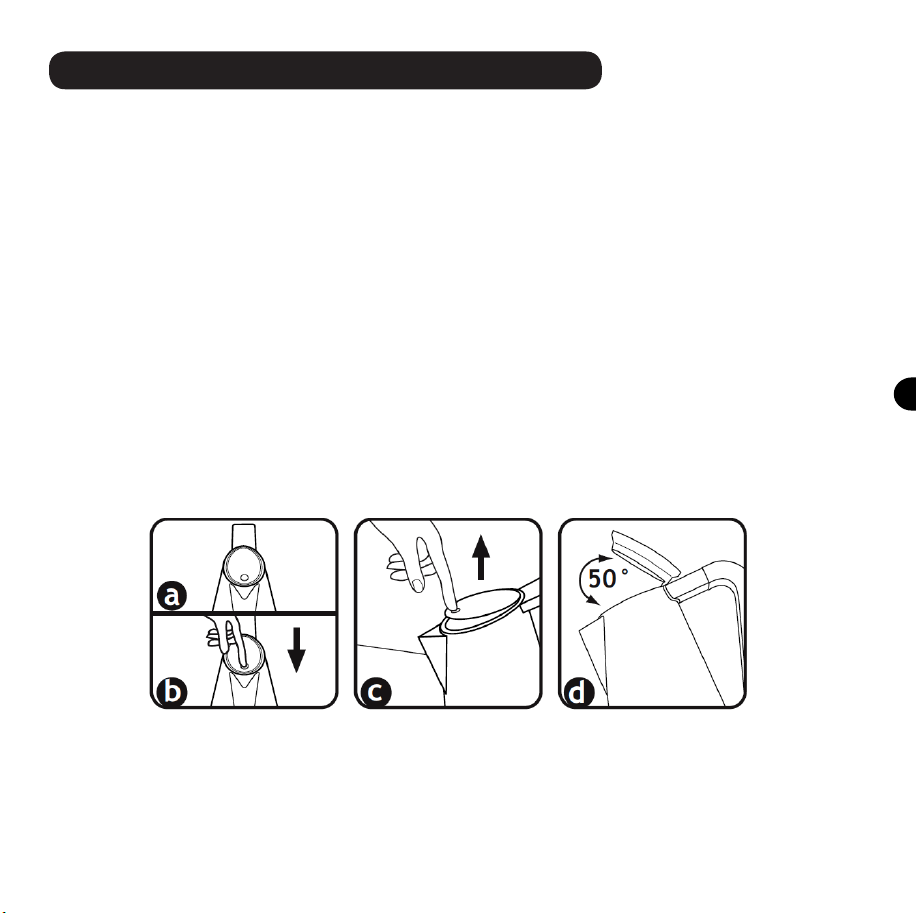
Instalacja i uruchomienie po raz pierwszy
Oryginalne opakowanie zostało zaprojektowane do wysyłki pocztą. Zachowaj je na wypadek konieczności
zwrotu czajnika do dostawcy. Przed zainstalowaniem czajnika, należy spełnić wszystkie punkty instrukcji
bezpieczeństwa na poprzednich stronach. Po wyjęciu czajnika z opakowania, upewnij się, że jest w idealnym stanie i upewnij się, że żaden rodzaj materii, opakowań, arkuszy gwarancji lub podobne nie dostał się
przypadkowo do wnętrza czajnika podczas transportu lub podczas otwierania opakowania.
Plastikowa torebka, w którą czajnik jest zapakowany powinna być przechowywana w miejscu niedostępnym dla dzieci, ponieważ stanowi zagrożenie uduszenia. Upewnij się, że czajnik jest w idealnym stanie. W celu usunięcia kurzu,
który mógł nagromadzić się na powierzchni zewnętrznej czajnika, wystarczy odkurzyć go suchą, miękką szmatką.
Po przeprowadzeniu powyższych kroków i ścisłym przestrzeganiu norm bezpieczeństwa, przejdź do
podłączenia do zasilania.
Podłączenie do źródła zasilania: prąd elektryczny może zabić! Przestrzegaj instrukcji bezpieczeństwa!
Podłącz kabel zasilający (6) czajnika Vera do gniazdka zasilania o takim samym napięciu, które jest wskazane na tabliczce znamionowej pod czajnikiem.
Wypłucz starannie wszystkie wewnętrzne powierzchnie i dziobek czajnika: napełnij czajnik wodą do
maksymalnego poziomu (1700 ml / 57.48 US .oz / 59,80 UK .oz), zagotuj i opróżnij czajnik. Powtórz to
przynajmniej dwa razy.
Napełnij czajnik:
a) wyjmij korpus czajnika z bazy zasilania (5). Trzymaj go za uchwyt (3)
b) otwórz pokrywę (1) : naciśnij gumowy “punkt” (rys. “a”) na pokrywie (1) i mocno go dociśnij (rys. “b”).
Następnie zwolnij (rys. "c") i pokrywa (1) otworzy się automatycznie. Pokrywa (1) nie jest wyjmowana i
otwarcie maksymalne przedstawiono na rysunku "d"
c) napełnij czajnik wodą bezpośrednio z kranu lub wypełnij go przez wlewanie wody z butelki, słoika lub dzbanka do wymaganego poziomu. Nie przepełniaj dzbanka. Nie przekraczaj 1700 ml (57.48 US .oz / 59.80 UK .oz).
d) zamknij pokrywę (1) : naciśnij gumowy “punkt” (rys. “a”) na pokrywie (1). Nigdy nie używaj czajnika gdy
pokrywa (1) jest otwarta.
e) Odstaw czajnik na bazę (5).
f) Aby zagotować wodę poprostu wciśnij przycisk on/off (9). Światło na przycisku on/off (9) wskaże, że
czajnik jest włączony.
Po zagotowaniu wody, czajnik wyłączy się automatycznie.
Aby odłączyć czajnik , upewnij się, że nie pracuje. Nie odłączaj czajnika z gniazda sieciowego ciągnąc za
kabel. Zawsze odłączaj urządzenie trzymając za wtyczkę (6). Aby wyłączyć całkowicie urządzenie, wtyczka
(6) ma być usunięta z gniazda.
76
Page 81

Upewnij się, że gniazdo elektryczne, które używasz jest odpowiednio uziemione.
Nie wolno dopuścić, aby części pod napięciem miały kontakt z wodą: może to spowodować zwarcie!!!
(przestrzegaj wszystkie instrukcje bezpieczeństwa podane wcześniej).
Bądź ostrożny: nigdy nie przytrzymuj przycisku on / off (9) podczas lub po każdej sesji wrzącej.
Zachowaj ostrożność: Nigdy nie używaj czajnika bez wody.
Automatyczne wyłączenie
Czajnik wyposażony jest w system, który automatycznie wyłącza urządzenie, krótko po przegotowaniu
wody.
Jeśli potrzebna jest ciepła woda, proces ogrzewania można zatrzymać w każdej chwili poprzez wciśnięcie
przycisku on / off (9). Wyłączenie odbywa się automatycznie, gdy czajnik jest zdjęty z podstawy (5).
Ze względów funkcjonalnych, kondensacja może pojawić się na dolnej stronie przycisku on / off (9) na
bazie (5) i gniazdku (5a). Dzieje się tak z powodów technicznych, które nie wpływają na bezpieczeństwo
urządzenia.
System bezpieczeństwa
Termostat chroni czajnik przed przegrzaniem: jeśli urządzenie zostanie przypadkowo włączone puste,
system ten automatycznie wyłącza urządzenie. Urządzenie zrestartuje się do swoich normalnych funkcji w
około 10 minut.
Jeśli pierwsza ochrona termostatyczna nie zadziała z powodu niewłaściwego użytkowania, inny ogranicznik
temperatury zapewni ochronę.
Czyszczenie i konserwacja
ZAGROŻENIE: Zawsze odłącz czajnik z gniazdka przed czyszczeniem.
Przed czyszczeniem, upewnij się, że czajnik jest zimny.
Oczyść powierzchnię zewnętrzną czajnika czystą, wilgotną szmatką, aby zachowała swoje oryginalne polerowane wykończenie. Wysusz i wypoleruj miękką szmatką.
Nie używać materiałów ściernych ani środków do szorowania do żadnego rodzaju wnętrza i na zewnątrz
czajnika.
Nie zanurzaj czajnika ani podstawki zasilającej w wodzie lub innej cieczy, i upewnij się, że wtyczka czajnika elektrycznego
(6) i łącznik (5a) bazy zasilania (5) są suche.
a) Filtr (7)
Kamień lub wapń, jest naturalną substancją, która tworzy się, gdy twarda woda jest gotowana. Filtr służy
do zatrzymywania wapnia w czajniku wody. Ważne jest, aby czyścić ltr regularnie. Zaciski ltra są w
dziobku i mogą być usunięte przez pociągnięcie go z dziobka. To może być czyszczone przez delikatne
szczotkowanie miękką szczotką pod bieżącą wodą.
UWAGA: Ta operacja może być wykonywana tylko wtedy, gdy czajnik nie działa i kiedy czajnik ostygnie.
NIE WYJMUJ FILTRA GDY CZAJNIK VERA PRACUJE I GDY POWIERZCHNIA JEST GORĄCA. ZAGOTOWANA
WODA I PARA MOGĄ PARZYĆ!!!
b) usuwanie wapnia
Odkamienianie jest to proces usuwania osadów wapiennych tworzących się wewnątrz czajnika. ABY
ZAPEWNIĆ JAK NAJLEPSZE FUNKCJONOWANIE CZAJNIKA, NALEŻY GO REGULARNIE ODKAMIENIAĆ.
Częstotliwość zależy od twardości stosowanej wody oraz częstotliwości użytkowania czajnika. Zalecamy
przeprowadzanie odkamieniania po około 100-200 cyklach gotowania wody, co dwa tygodnie lub
77
Page 82
zawsze, gdy wewnątrz czajnika zauważy się białe plamy: oznacza to, że na dnie powstał osad wapienny.
Zalecamy użycie specjalnego odkamieniacza do czajników, który w pełni rozpuści osad. Należy się
zastosować do instrukcji wskazanych na opakowaniu odkamieniacza. Firma BUGATTI poleca również
następujący, naturalny sposób odkamieniania: wlać do czajnik 500 ml białego octu winnego i 500 ml
wody. Do czyszczenia paska czujników poziomu, który znajduje się wewnątrz czajnika, użyć szczoteczki
nasączonej octem z białego wina; pozwoli to na usunięcie nagromadzonego osadu z czujników. Następnie
wcisnąć przycisk on/off (14) i zagotować wodę z octem. Może się okazać konieczne kilkakrotne powtórzenie takiej czynności w celu całkowitego usunięcia osadu. Po zakończeniu odkamieniania opróżnić czajnik,
wielokrotnie napełnić go czystą wodą, aby pozbyć się zapachu i smaku octu.
Wszelkie inne czynności serwisowe muszą być wykonywane przez przedstawiciela autoryzowanego serwisu.
Rozwiązywanie problemów
Jeżeli czajnik Vera wykazuje usterki lub wady lub w przypadku podejrzenia nieprawidłowości, należy
odłączyć go od razu. Jeśli nie można usunąć usterki, postępując zgodnie z instrukcjami zawartymi w
podręczniku, należy skontaktować się z obsługą klienta w BUGATTI. Naprawy wykonywane nieprawidłowo
mogą narazić użytkownika na poważne niebezpieczeństwo. Firma nie ponosi odpowiedzialności za szkody
spowodowane przez naprawy wykonane nieprawidłowo, w takich przypadkach prawa gwarancyjne zostaną
odrzucone.
PROBLEM
Czajnik nie działa
prawidłowo i zatrzymuje się
przed zagotowaniem wody.
Jeśli woda źle smakuje.
Jeśli czajnik jest włączony
i po kilku sekundach
wyłącza się automatycznie.
MOŻLIWA PRZYCZYNA
W czajniku zgromadził się
kamień.
1) Woda została pozostawiona w czajniku na
dłużej niż 12 godzin.
2) Czajnik nie został dobrze umyty po cyklu usuwania
kamienia.
Czajnik jest pusty i system
ochrony rezystancji działa.
ROZWIĄZANIE
Dodać odkamieniacz, jak w
punkcie b) rozdziału Czyszczenia i konserwacji.
1) Proponujemy zmienić
resztki wody po każdym
cyklu gotowania.
2) ponownie opłucz czajnik
wystarczającą ilość razy,
aby całkowicie usunąć produkt odkamieniania.
odczekaj około 10 minut,
nalej wody do czjnika i
włącz go.
78
Page 83

GWARANCJA
1) Gwarancja jest uznawana za wymianę lub naprawę bezpłatną części składających się na czajnik, które były
wadliwe w momencie zakupu ze względu na wady produkcyjne.
2) W przypadku nieodwracalnych lub powtarzających się usterek, które z powodu wad produkcyjnych, jak powyżej,
według uznania producenta, urządzenie zostanie zastąpione.
3) Gwarancja nie obejmuje uszkodzeń spowodowanych:
a) nieprawidłowym lub błędnym użyciem
b) uszkodzeniami spowodowanymi przez przypadkowe pęknięcia lub niedbalstwo
c) nieprzestrzeganiem instrukcji i ostrzeżeń, nieprawidłową instalacją, czyszczeniem i konserwacją
d) konserwacją i / lub modykacją wykonywaną przez osoby nieuprawnione
e) użyciem nieoryginalnych części zamiennych
f) przewozem
g) użyciem dowolnej funkcji czajnik bez wody w sposób ciągły
h) wszelkie inne okoliczności, którym nie można przypisać wad fabrycznych. Wszelkie roszczenia nie przewidziane
przez prawo są wyłączone.
4) Gwarancja nie obejmuje uszkodzeń wynikających z niewłaściwego użytkowania, w szczególności ze względu na
niedomowe.
5) Producent nie ponosi odpowiedzialności za jakiekolwiek bezpośrednie lub pośrednie szkody lub obrażenia osób,
rzeczy i zwierząt domowych, które mogą wyniknąć z braku przestrzegania wszystkich wskazówek zawartych w
niniejszej instrukcji, zwłaszcza nieprzestrzegania instrukcji dotyczących instalacji, użytkowania i konserwacji
czajnika.
6) Wymiany lub naprawy nie powodują przedłużenia okresu gwarancji. Gwarancja nie obejmuje wymiany materiałów
eksploatacyjnych, takich jak rezystory, baterii, itp
7) Gwarancja trwa od daty otrzymania dowodu zakupu i otrzymania karty gwarancyjnej przez BUGATTI.
79
Page 84
CENTRUM USŁUG
W przypadku awarii czajnika, skontaktuj się z autoryzowanym dealerem Bugatti, który zwróci czajnik do producenta.
Kupujący jest odpowiedzialny za wszystkie koszty przewozu i / lub wysyłki dla wszystkich napraw objętych lub
nieobjętych gwarancją. Jeśli to możliwe, zachowaj oryginalne opakowanie czajnika do wysyłki.
Ważne: Jeżeli wyrób niezgodny ma być obsługiwany przez kogoś innego niż autoryzowanym dealer Bugatti, proszę
przypomnieć usługę, aby zadzwonić do naszego Centrum Obsługi Konsumenta w celu zapewnienia, że problem jest
prawidłowo zdiagnozowany, produkt naprawiony odpowiednimi częściami, oraz w celu zapewnienia, że orodukt jest
jeszcze na gwarancji.
Usuwanie produktu zgodne z dyrektywą Unii Europejskiej 2002/96 / WE.
Na koniec okresu użytkowania produktu nie należy wyrzucać razem z odpadami komunalnymi. Może być
dostarczony do gminnego wytyczonego centrumzbiórki odpadów lub do dealerów, którzy świadczą tę usługę.
Separowana utylizacja sprzętu gospodarstwa domowego umożliwia ewentualne negatywne skutki dla
środowiska naturalnego i zdrowia wynikające z niewłaściwego unieszkodliwiania i umożliwia eliminowanie
materiałów, z których jest wykonana do odzyskania w celu znaczącej oszczędności energii i zasobów. Symbol
pojemnika na odpady ruchome oznaczony krzyżykiem wyświetlanym na produkcie wskazuje, że jako wyposażenie
gospodarstwa domowego musi być usuwane oddzielnie.
80
Page 85

UPUTSTVA ZA UPORABU
Dragi klijenti, hvala što ste odabrali Veru, kuhalo za vodu Case Bugatti. Poput svakog kućnog aparata
ovaj uređaj se mora koristiti s oprezom kako bi se spriječile ozljede ljudi i oštećenja samog uređaja.
PRIJE PRVE UPOTREBE, PAŽLJIVO PROČITAJTE
SVA UPUTSTVA ZA INSTALACIJU, KORIŠTENJE,
ODRŽAVANJE TE SIGURNOSNE UPUTE. NEMOJTE
KORISTITI KUHALO UKOLIKO NISTE DETALJNO
UPOZNATI SA NAVEDENIM UPUTSTVIMA.
UPOZORENJE
Ne prihvaćamo odgovornost za štetu nastalu zbog:
- neispravne uporabe ili uporabe u svrhu za koju uređaj nije namijenjen
- korištenje kuhala neprestano
- popravaka koje obavljaju neovlaštene osobe
- uporaba neoriginalnih rezervnih dijelova ili pribora
-uključivanje Vera kuhala u utičnicu bez uzemljenja
Za daljnje informacije ili u slučaju problema koji nisu navedeni u ovim uputstvima, obratite se službi za
korisnike CASA BUGATTI.
ČUVAJTE OVE UPUTE
poslije Vas. Ako se upute izgube prije upotrebe kuhala, zatražite nove upute kod službe za korisnike kod CASA
BUGATTI ili pošaljite e-mail na [email protected] ili ga preuzmite sa www.casabugatti.it . Na prvoj stranici
naći ćete ilustracije vezane uz tekst. Držite prvu stranicu otvorenu dok čitate uputstva za uporabu.
i nemojte zaboraviti proslijediti ih onima koji će koristiti kuhalo
Page 86

Sadržaj
Str. 83 Tehničke značajke
Str. 83 Opis dijelova kuhala za vodu
Str. 84 Važne zaštitne mjere
Str. 86 Montaža i puštanje u pogon
Str. 87 Automatsko isključivanje
Str. 87 Sigurnosni sustav
Str. 87 Čišćenje i održavanje
Str.. 88 Rješavanje problema
Str. 89 Jamstvo
Svi detalji teksta su pažljivo provjereni. Naša tvrtka zadržava pravo da objasni razradu teksta ako postoji
tiskarska greška ili pogrešne informacije. Napomena: budite svjesni da naša tvrtka
ažurira sve detalje o proizvodu koji su prikazani na uputama, uključujući i tehničke specikacije.
Zadržavamo pravo na reviziju uputa bez prethodne obavijesti. Izgled, oblik i boja artikla su bazirani na
standardima stvarnog zičkog izgleda artikla.
Page 87
TEHNIČKE ZNAČAJKE
Napajanje Pogledajte pločicu s oznakom ispod uređaja
Ocjena snage Pogledajte pločicu s oznakom ispod uređaja
Dimenzije cca 220 x 180 x h 300 mm
Tijelo 18/10 nehrđajući čelik
Težina cca 1,4kg
Duljina kabela za napajanje cca 0,75m
Termička zaštita od preopterećenja Ugrađena
Kapacitet kuhala 1,70 litara
Certikati Pogledajte tablicu s oznakom ispod stroja
Jamstvo Prema priloženom certikatu
OPIS DIJELOVA KUHALA
Poklopac
Ručka
Kuhalo od nehrđajučeg čelika 18/10
Jedinica za napajanje
Konektor
Utikač
Filter
Oznaka maksimalnog dopuštenog nivoa vode
Prekidač za uključivanje / isključivanje
1
3
4
5
5a
6
7
8
9
Page 88

VAŽNE SIGURNOSNE UPUTE
Prilikom uporabe električnih aparata uvijek treba poštivati osnovne sigurnosne mjere, uključujući sljedeće:
PROČITAJTE PAŽLJIVO SVE UPUTE. UREĐAJ MOŽE
BITI KORIŠTEN SAMO OD STRANE ODRASLIH OSOBA
KOJE SU NAUČENE KAKO GA KORISTITI. SPREMITE
OVA UPUTSTVA.
1.KAKO BI SPRIJEČILI OZBILJNE POVREDE, ELEKTRIČNI
UDAR I POŽAR NEMOJTE URANJATI KABELE, UTIKAČE
ILI SAM BLENDER U VODU ILI DRUGE TEKUČINE BILO
DIJELOM ILI U POTPUNOSTI. UPOZORENJE: OPASNOST
OD OPEKLINA!
OBRATITE POZORNOST NA VRUĆE POVRŠINE!
Nemojte dirati vruće površine. Koristite samo ručku za podizanje kuhala. Koristite rukavicu za pećnicu kada dodirujete vruće
dijelove kao što su tijelo (4), poklopac (1) i sve površine kuhala:
OPASNOST OD OPEKLINA!
2. Kuhalo je dizajnirano SAMO ZA KUĆNU UPOTREBU.
Ovaj uređaj namijenjen je upotrebi u kućanstvu i sličnim okruženjima kao što su:
- kuhinjske prostorije osoblja u trgovinama, uredima i drugim radnim okruženjima;
- seoske kuće;
- klijenti u hotelima, motelima i drugim stambenim tipovima;
- okruženja tipa noćenje i doručak(bed & breakfast).
Koristite kuhalo samo za ono što je namijenjeno. Nemojte raditi nikakvu tehničku modikaciju
3. Držite kuhalo, bazu (5) i kabel izvan dosega djece mlađe od 8 godina.
Bliski nadzor je potreban kada se bilo koji uređaj koristi od strane djece i u blizini djece.
Odspojite iz utičnice kada nije u uporabi i prije čišćenja. Dopustite da se ohladi prije stavljanja ili skidanja dijelova i prije
čišćenja aparata. Uvijek prvo spojite utikač na aparat, a zatim priključite kabel u zidnu utičnicu. Za isključivanje, okrenite
bilo koju kontrolu na “off”, zatim uklonite utikač iz zidne utičnice.
4. Isporučuje se kratki kabel za napajanje s utikačem kako bi se smanjio rizik od upadanja u predmete, kako bi se spriječilo
zapinjanje ljudi o kabel i sprječavanje kabela da se omota oko duljeg kabela. Ne smiju se koristiti dugi kabeli za napajanje ili
produžni kabel osim ako KVALIFICIRANI ELEKTRIČAR može potvrditi da su u skladu s propisima o ožičenju. NEMOJTE KORISTITI
utičnica/utikač adapter. Ako se koristi dugi odvojivi kabel za napajanje ili produžni kabel:
a) Električni rang odvojivog kabela za napajanje ili produžnog kabela bi trebao biti barem jednako velik kao i električni rang
kuhala naveden ispod samog kuhala.
Page 89

B) Produžni kabel mora biti trožilni i mora biti uzemljen.Dugi kabel ili produžni kabel ne smiju nikada izlaziti iz namještaja
ili preko radne površine ili stola gdje ih djeca mogu povući ili onesposobiti.
C) Nemojte stavljati kuhalo ili kabele na ili u blizini toplog plinskog izvora topline ili električne ploče za kuhanje ili u pećnicu
ili blizu pećnice.
D) Nemojte koristiti na otvorenom.Ne dopustite da kabeli vise preko ruba stola ili radne površine ili da dodiruju vruće
površine. Nemojte koristiti kuhalo nakon što je razvio greške ili je na bilo koji način oštećen. Vratite uređaj u najbliži
ovlašteni servis na pregled ili popravak. Korištenje dodatnih dijelova koje proizvođač aparata ne preporučuje može dovesti
do požara, električnog udara ili teških ozljeda osoba.
E) Ako su kabel za napajanje ili utikači oštećeni, moraju biti zamijenjeni od strane proizvođača ili ovlaštenog servisera ili
kvalicirane osobe kako bi se spriječili svi rizici.
5. Nikada ne dirajte električne dijelove. Oni mogu izazvati strujni udar i ozbiljne tjelesne ozljede. Povežite jedinicu
napjanja(5) sa utičnicom odgovarajućeg napona. Voltaža mora odgovarati voltaži navedenoj na pločici ispod uređaja(4).
Provjerite da je utičnica koju koristite uzemljena. Nemojte koristiti kuhalo bosim ili mokrim nogama.
6.Kuhalo se smije koristiti jedino sa bazom(5) koje dolazi u paketu sa kuhalom.
7.UPOZORENJE: izbjegavajte prolijevanje vode ili drugih tekućina po bazi (5) i po priključku (5a).
8. UPOZORENJE: Nikada nemojte puniti kuhalo iznad 1,70 litara, oznaka “MAX” na ploči zaslona (
9. UPOZORENJE: Nikad ne punite kuhalo vodom kad je smješten na bazi (5).
10. UPOZORENJE: Samo punite kuhalo čistom vodom. Ne mlijeko, kavu ili druge tekućine.
11. UPOZORENJE: Ne ostavljajte kuhalo bez nadzora dok je uključeno.
12. UPOZORENJE: Nikada ne uključujte kuhalo bez vode. Pogrešna uporaba ograničava vijek trajanja kuhala.
13. UPOZORENJE: Nikada pritiskati gumb za uključivanje / isključivanje (9) tijekom ciklusa zakuhavanja ili nakon istog.
14. UPOZORENJE: Nikada nemojte kuhati vodu ako je kuhalo prepuno ili ako je poklopac (1) otvoren. Kipuća voda može
prskati i povrijediti ljude.
15. Uvijek pazite da izljevate kipuću vodu polako i pažljivo.
16. Kako biste spriječili opekline, izbjegavajte otvaranje poklopca (1) kada se voda kuha ili nakon što se aparat isključi.
PARA MOŽE OPEĆI!
Budite oprezni pri otvaranju poklopca (1), ako je kuhalo još vruće i želite ga ponovno napuniti vodom. Kipuća voda može
uzrokovati opekline.
17. Nakon svakog kuhanja, potpuno ispraznite kuhalo. Nikada ne ostavljajte vodu u kotlu dugo vremena.
18. Budite oprezni: vruće površine. Koristite ručke ili gumbe ili nosite rukavice za pećnicu. Budite vrlo oprezni prilikom
dodirivanja vrućih dijelova kao što su poklopac (1), tijelo (4) i sve površine kuhala. UPOZORENJE! OPASNOST OD OPEKLINA!
Tijelo kuhala (4) i poklopac (1) postaju vrlo vrući tijekom upotrebe.
19. Površina grijaćeg tijela zadržava vrućinu nakon grijanja.
20. Za odspajanje provjerite je li aparat isključen i uklonite utikač (6) iz zidne utičnice. Uvijek iskopčajte aparat držanjem
za utikača kabela, ne sami kabel. Napomena: Iskopčajte utikač iz zidne utičnice kada ne koristite kuhalo.
21. Postavite kuhalo na ravnu površinu, pazeći da noge čvrsto prianjaju na nosivu površinu kako se uređaj ne bi mogao
prevrnuti. Ne stavljajte kuhalo na ili blizu vruće površine ili blizu otvorenog plamena. OPREZ: Ne koristite kuhalo na kosoj
površini.
22. Kako biste bili sigurni da kuhalo radi ispravno, postavite ga na ravnu površinu u odgovarajuće osvijetljenom i higijenskom
okruženju s lako dostupnom električnom utičnicom. Postavite kuhalo najmanje 10 cm od zidova.
23. Nemojte koristiti kuhalo ispod ili blizu zapaljivog materijala kao što su zavjese, zidne tapete i zidovi.
24. U slučaju grešaka, oštećenja ili sumnji na pogreške nakon pada, odmah isključite kuhalo. Nikada ne pokrećite neispravan
uređaj. Popravke mora obaviti servisni centar BUGATTI. Obratite se svom prodavaču i / ili se obratite službi za korisnike na
BUGATTI-u ili pošaljite e-mail na [email protected] . U slučaju požara, upotrijebite aparate za gašenje požara sa ugljičnim
dioksidom (CO2). Nemojte koristiti vodu ili prah za gašenje požara.
8).
Page 90
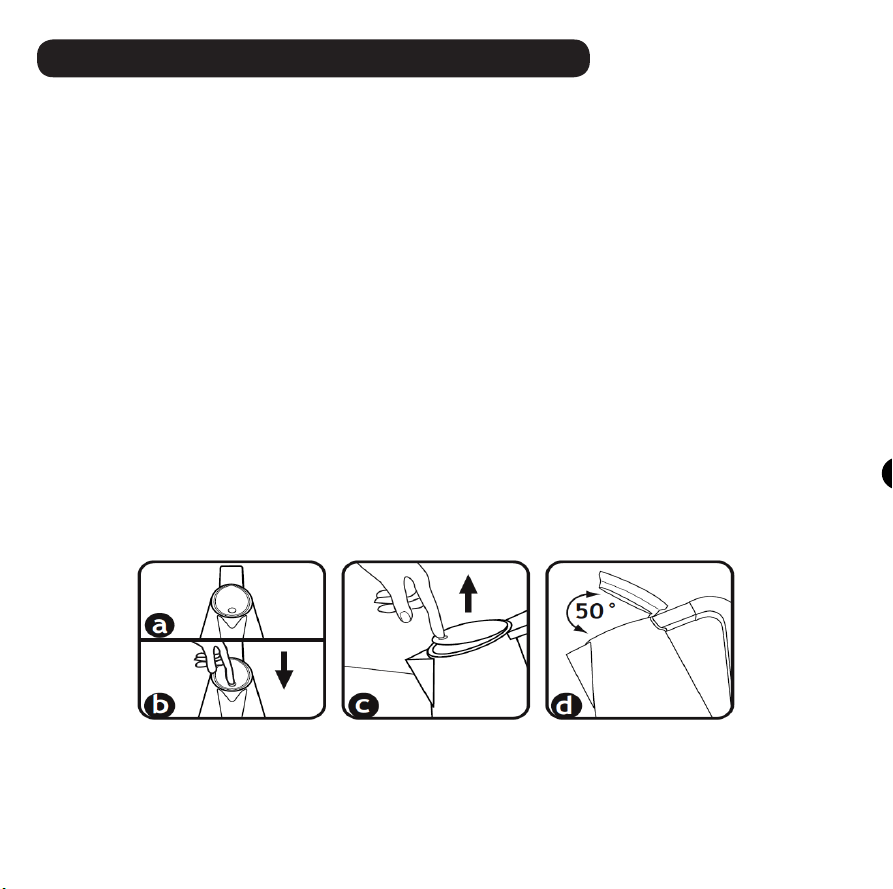
INSTALACIJA I PRVO POKRETANJE
Originalno pakiranje je napravljeno za otpremu poštom. Čuvajte kutiju u slučaju da trebate vratiti kuhalo
dobavljaču. Prije instalacije kuhala strogo se pridržavajte svih točaka prethodno navedenih sigurnosnih
uputa.
Nakon što ste kuhalo izvadili iz pakiranja, provjerite da je u savršenom stanju i provjerite da nikakav materijal, komad ambalaže, jamstvenog lista ili bilo čega nije slučajno ušlo unutar kuhala tijekom prijevoza ili
raspakiravanja.
Držite plastičnu vrećicu u kojoj se kuhalo nalazilo dalje od djece: može uzrokovati gušenje.
Provjerite da je kuhalo u savršenom stanju. Da biste uklonili prašinu koja se mogla nakupiti na vanjskim
površinama kuhala, jednostavno ga obrišite sa suhom mekom krpom.
Nakon što provedete gore navedene korake i strogo se pridržavate sigurnosnih standarda, nastavite s
priključivanjem na napajanje.
Prije prve uporabe, operite posudu za punjenje (1), poklopac (2), posudu (3), brtvu(4) i složenu jednicu
noža(5). Perite neutralnim, neabrazivnim i nekorozivnim deterdžentima, pažljivo isperite i osušite. Kako
bi uklonili prašinu koja se možda nakupila na kućištu motora (6) blendera, jednostavno obrišite sa suhom
mekanom krpom.
Spajanje na napajanje: električna struja može ubiti! U potpunosti se pridržavajte sigurnosnih uputa. Kuhalo
Vera mora biti spojeno preko kabela(6) u utičnicu koja naponski odgovara vrijednosti naznačenoj na pločici
ispod kuhala.
Isperite pažljivo sve unutrašnje površine i izljev kuhala: napunite kuhalo vodom do maksimalne razine (1700
ml), zakuhajte i ispraznite kuhalo. Ponovite najmanje dva puta.
Napunite čajnik:
A) maknite kuhalo sa baze (5). Držite ga za ručku (3)
B) otvorite poklopac (1): pritisnite na gumenu “točku” (slika “a”) na poklopcu (1) i čvrsto pritisnite prema
dolje (slika„b”). Zatim otpustite (slika “c”) i poklopac (1) će se automatski otvoriti. Poklopac (1) se ne
može ukloniti i maksimalna mogućnost otvaranje je prikazana na slici “d”.
C) napunite kotao vodom izravno ispod slavine ili napunite vodom iz boce, vrča ili posude na potrebnu
razinu. Nemojte prepuniti čajnik. Pazite da ne prijeđete 1700 ml.
D) zatvorite poklopac (1): pritisnite na gumenu “točku” (slika “a”) na poklopcu (1). Nikada ne uključujte
kuhalo s otvorenim poklopcem (1).
E) Stavite čajnik na bazu (5).
F) Da biste kuhali vodu samo pritisnite gumb za uključivanje / isključivanje (9). Svjetlo u gumbu za
uključivanje / isključivanje (9) pokazuje da aparat za kuhanje radi.
Kad završi ciklus zakuhavanja čajnik se automatski isključuje.
Da biste ga od spojili, provjerite da kotlić ne radi. Nemojte od spojiti kuhalo iz zidne utičnice povlačenjem
kabela. Uvijek isključite aparat držanjem utikača (6). Da biste potpuno isključili uređaj, utikač (6) treba
ukloniti iz utičnice.
Page 91

Pazite da je električna utičnica koju koristite prikladno uzemljena.
Nikada nemojte dopustiti da dijelovi koji nose živi napon dođu u dodir s vodom: to može uzrokovati
kratki spoj! (Slijedite sve prethodno navedene sigurnosne upute).
Budite pažljivi: nikad ne držite gumb za uključivanje / isključivanje (9) pritisnut tijekom ili nakon svakog ciklusa kuhanja.Budite oprezni: nikada ne uključujte kuhalo bez vode.
Automatsko gašenje
Kuhalo je opremljeno sustavom koji automatski isključuje uređaj ubrzo nakon što se voda zakuha.
Ako želite toplu vodu, postupak zagrijavanja može se zaustaviti bilo kada pritiskom gumba za uključivanje
/ isključivanje (9). Isključivanje se odvija automatski kada se kuhalo ukloni sa baze (5).
Zbog funkcionalnih razloga, na dnu gumba za uključivanje / isključivanje (9), na bazi (5) i na konektoru
(5a) može doći do kondenzacije. To se događa zbog tehničkih razloga i ne utječe na sigurnost uređaja.
Sigurnosni sistem
Termostat štiti kuhalo od pregrijavanja: ako je uređaj slučajno uključen prazan, ovaj sustav automatski
isključuje uređaj. Uređaj će ponovno pokrenuti svoje normalne funkcije za oko 10 minuta.
Ako prva zaštita termostata ne bi funkcionirala zbog nepravilne upotrebe, drugi limitator temperature
osigurava zaštitu.
Čišćenje i održavanje
OPREZ: Prije čišćenja uvijek od spojite kuhalo iz električne utičnice.
Prije čišćenja provjerite je li kuhalo hladno.
Očistite vanjsku površinu aparata čistom, vlažnom krpom kako biste sačuvali njegov izvoran, visoko polirani
premaz. Osušite i polirajte mekom krpom.
Nemojte upotrebljavati abrazivna sredstva za čišćenje ili sredstvo za čišćenje bilo koje vrste na unutarnjoj
ili vanjskoj strani kuhala.
Nemojte uranjati kuhalo ili bazu za napajanje u vodu ili neku drugu tekućinu, i pazite da utikač (6) i
priključak (5a) baze (5) budu suhi.
A) Filtar (7)
Kamenac, ili kalcij, prirodna je tvar koja nastaje kad se kuha tvrda voda. Filtar služi za zadržavanje kalcija
u kuhalu za vodu. Važno je redovito čistiti ltar. Filtar se spaja u izljev i može se ukloniti povlačenjem gore
iz izljeva. Može se očistiti laganim četkanjem mekom četkom pod tekućom vodom.
UPOZORENJE: Ova se radnja može izvesti samo kad kuhalo ne radi i kada se kuhalo ohladi. NEMOJTE
UKLANJATI FILTER KADA VERA KUHALO RADI I KADA JE POVRŠINA VRUĆA. KIPUCA VODA I PARA MOGU
OPEĆI!
B) Dekalcikacija
Dekalciciranje se odnosi na uklanjanje taloga kamenca koji se mogu pojaviti u unutarnjim metalnim
dijelovima kuhala. DA BI VAŠE VERA KUHALO RADILO OPTIMALNO, DEKALCIFICIRAJTE VAŠ UREĐAJ S VREMENA
NA VRIJEME. Frekvencija ovisi o tvrdoći vaše vode iz slavine i koliko često koristite čajnik. Predlažemo da
to učinite svakih 100 do 200 ciklusa zakuhavanja, ili svaka dva tjedna ili svaki put kada vidite bijele mrlje
na unutarnjoj donjoj površini kuhala: to znači da se pojavio vapnenački sediment. Predlažemo uporabu sredstva za uklanjanje kamenca za kuhala kako bi se otopile vapnenačke naslage. Slijedite upute na
sredstvu za uklanjanje kamenca.
Page 92
Usput, BUGATTI sugerira sljedeći prirodni način: ako komercijalno sredstvo za uklanjanje kamenca nije
dostupno, napunite kuhalo s 500 ml bijelog octa i 500 ml vode. Koristite mekanu četku zajedno s ocem kako
biste očistili plastični senzor razine vode i kako biste uklonili talog. Zakuhajte ocat. Možda ćete morati
ponavljati ovo nekoliko puta s ohlađenim octom, kako biste potpuno uklonili kamenac. Kada je postupak
uklanjanja kamenca završen, ispraznite kuhalo i isperite nekoliko puta čistom vodom.
Bilo kakvo drugo servisiranje treba obaviti ovlašteni servisni zastupnik.
Rješavanje problema
Ako kuhalo Vera stekne greške ili nedostatke ili ako se sumnja na nepravilnosti, odmah ga iskopčajte.
Ako ne možete ukloniti kvar slijedeći upute u ovom priručniku, obratite se Bugattijevoj službi za
korisnike. Popravci koji su pogrešno izvedeni, mogu izložiti korisnika ozbiljnoj šteti. Ne prihvaća se nikakva odgovornost za oštećenja ili ozljede uzrokovane neispravnim popravcima i u takvim slučajevima
jamstvena prava ne vrijede.
PROBLEM
Kuhalo ne radi kako treba Ili
se zaustavi prije nego voda
zakuha
Ako voda ima loš okus
Kuhalo je uključeno i nakon
nekoliko trenutaka se
automatski isključi.
M O G U Ć I U Z R O K
U kuhalu ima kamenca
1) Voda je u kuhalu više
od 1 2 s at i
2)Kuhalo nije dobro oprano
nakon procesa uklanjanja
kamenca
Kuhalo je prazno i sustav
zaštite od pregrijavanja se
uključuje
RJEŠENJE
Uklonite kamenac – točka b)
u poglavlju Čišćenje i održ
avanje
1)Savjetujemo Vam da promijenite vodu nakon svakog
zakuhavanja
2)Isperite kuhalo dovoljno
puta kako bi potpuno uklonili sredstvo za uklanjanje
kamenca
Pričekajte otprilike 10 minuta, napunite kuhalo
vodom i uključite ga
Page 93

JAMSTVO
1)Pod jamstvo spada zamjena ili popravak bez naplate, dijelova kuhala koji su bili neispravni u trenutku kupnje
uslijed grešaka u proizvodnji.
2) U slučaju nepopravljivih ili ponovljenih kvarova zbog grešaka u proizvodnji kao što je gore navedeno, proizvođač
će prema vlastitom nahođenju zamijeniti uređaj.
3) Jamstvo ne pokriva oštećenja uzrokovana:
A) nepravilne ili neispravne uporabe
B) kvara uzrokovana slučajnim lomovima ili nepažnjom.
C) nepoštivanje uputa i upozorenja, neispravne instalacije i održavanja
D) održavanje i / ili modikacije koje obavlja neovlašteno osoblje
E) uporaba neoriginalnih rezervnih dijelova
F) prijevoz
G) korištenje bilo koje funkcije kuhala bez vode kontinuirano
H) bilo koje druge okolnosti koje se ne mogu pripisati greškama u proizvodnji. Isključene su sve druge tražbine osim
zakonskih prava.
4) Jamstvo ne pokriva štetu zbog nepravilne upotrebe i naročito zbog uporabe van kućanstva.
5) Proizvođač ne prihvaća nikakvu odgovornost za bilo kakvu izravnu ili neizravnu štetu ili ozljedu osoba, stvari i
domaćih životinja koje mogu proizaći iz nepoštivanja svih sigurnosnih uputa sadržanih u ovom priručniku, osobito
nepoštivanja uputa za instalaciju, uporabu i održavanje kuhala.
6) Zamjena ili popravak neće produljiti jamstveno razdoblje. Jamstvo ne pokriva zamjenu potrošnih materijala kao
što su otpornici, baterije itd.
7) Jamstvo traje od datuma računa i od primitka jamstvene kartice CASA BUGATTI.
Page 94
SERVISNI CENTAR
U slučaju kvara kuhala, obratite se ovlaštenom BUGATTI distributeru, koji će proizvođaču vratiti kuhalo.
Kupac je odgovoran za sve troškove prijevoza i / ili otpreme za sve popravke, bez obzira na to jesu li oni
pokriveni jamstvom.
Ako je moguće, sačuvajte originalno pakiranje kuhala za otpremu.
Važno: Ako će netko drugi, osim kontaktiranog ovlaštenog BUGATTI distributera, servisirati uređaj, molimo Vas da
podsjetite servis da nazove naš centar za korisnike kako bismo osigurali da je problem ispravno dijagnosticiran,
proizvod servisiran s ispravnim dijelovima i da je proizvod još uvijek pod jamstvom.
ODLAGANJE PROIZVODA U SKLADU S EUROPSKIM DIREKTIVIMA 2002/96 / EZ.
Na kraju radnog vijeka proizvod se ne smije odlagati zajedno s komunalnim otpadom. Može se isporučiti lokalnim
odvojenim centrima za skupljanje otpada ili trgovcima koji pružaju tu uslugu. Odvojeno zbrinjavanje kućanskih
aparata omogućuje da se eliminiraju moguće negativne posljedice za okoliš i zdravlje koje proizlaze iz nepravilnog
odlaganja i omogućuju recikliranje materijalima te na taj način ostvaruje značajne uštede energije i resursa. Simbol
pomične kante za otpatke označen križem koji je prikazan na proizvodu označava da se kao kućanski aparat mora
odvojeno zbrinuti.
Page 95

重要注意事项
尊敬的客户,感谢您选择维拉——布加迪电烧水壶。正如任何其他家用
电器,使用该水壶必须格外小心和注意,以防止烫伤以及损坏水壶。
请小心保存这些说明, 并仔细阅读所有说明.
该水壶必须只能由已接受过使用方法培训的成人使用.
为防止重大的受伤、触电和火灾事件,请勿把电源线、
插头、电源座或壶体部分或全部浸到水中或者其他液体中.
警告: 烫伤危险!请注意: 表面很热!
警告: 如果电水壶注水太满, 沸水可能喷出.
警告: 电水壶仅在提供的底座上使用.
对于以下原因造成的损坏,我们不承担责任:
- 不正确的使用或挪作它用
- 连续使用水壶
- 未经授权的人员进行维修
- 使用非原装备件或配件
- 使用未接地的插座连接维拉水壶
欲了解更多信息,或对于该说明书中没有得到充分解决的问题,
请联系我们在布加迪的客服中心。
请妥善保存该说明书
把它交给在您之后使用该水壶的人.如果在您使用水壶前说明书已丢失,请向在布加迪的客服中心索要,或发送
电子邮件到[email protected]或从www.casabugatti.it下载。在封面的第一页,您会发现有关该文本的插
图。在您阅读使用说明书时,请保持第一页在打开状态.
91
并务必要
Page 96

目录
页93 技术特点
水壶部件描述
页93
页94 重要的安全措施
页96 安装和启动
页97 自动断电
页97 安全系统
页97 清洁和维护
页98 故障检修
页99 保修
文本中的所有信息都已经过仔细检查。如有打印错误或误导性信息,本公司对文本的阐述保留所有解释权.
注意:需提醒的是,本公司将不断更新说明书中的每一个产品细节,包括技术规格。我们保留修改说明书而不另行通知
的权利。所有产品的外形、形状和颜色以实际产品为准。
92
Page 97

技术特点
电源 参见设备下方的铭牌
额定功率 参见设备下方的铭牌
尺寸 ‘ 约 220 x 180 x h. 300 mm – 8 1/2 ‘’ x 7’’ x 11 3/4
壶体 加压实心 18/10 不锈钢
重量 约1.4 kg – 3 磅
电源线长度 约 0.75 米 – 30 英寸
热过载保护 内置
水壶容量 1.70 升 / 57.48 美国 fl.oz / 59.80 英国 fl.oz
资质证书 参见设备下方的铭牌
保修 按照附件的证书
水壶部件描述
盖子
防热把手
18/10 不锈钢水壶
电源座
接头
插头
过滤器
最高水位标记
开/关按钮
93
1
3
4
5
5a
6
7
8
9
Page 98

重要注意事项
尊敬的客户,感谢您选择维拉——布加迪电烧水壶。正如任何其他家用
电器,使用该水壶必须格外小心和注意,以防止烫伤以及损坏水壶。
请小心保存这些说明, 并仔细阅读所有说明.
该水壶必须只能由已接受过使用方法培训的成人使用.
为防止重大的受伤、触电和火灾事件,请勿把电源线、
插头、电源座或壶体部分或全部浸到水中或者其他液体中.
警告: 烫伤危险!请注意: 表面很热!
警告: 如果电水壶注水太满, 沸水可能喷出.
警告: 电水壶仅在提供的底座上使用.
请勿接触热的表面。仅使用把手提起水壶。如接触高温部件,
如壶体(4)、盖子(1)和水壶的所有表面,请使用耐高温手套。
烫伤危险!
2.水壶设计为家庭使用。
该电器用于家庭及其类似的用途,如:
-在商店、办公室和其他工作环境的员工厨房区使用;
-在农舍使用;
-客户在旅馆、饭店和其他住宅类型环境中使用;
-在住宿加早餐式的旅馆环境中使用。
水壶不能挪作它用。请勿进行任何可能导致风险的技术改动。
3.把水壶、电源座(5)和电源线放置在8岁以下的儿童接触不到的地方。
当儿童使用或者靠近任何电器设备时,应当密切监督。
不需要使用时,请先拔掉插座再进行清洗。安装、取下、清洗零件前,可以先使其冷却。
需先将插头连接到设备,然后再插到壁式电源插座。要断开电源时,先将所有开关按钮转向“关闭”状态,然后将插头从壁
式电源插座上拔下来。
4.供应带插头的短电源线用于减少缠绕物体的风险,以防止人们被电源线绊倒,并防止该电源线缠绕更长的电源线。同时供
应长的可拆卸的电源线或延长线,但仅在有资质的电工能证实它们符合接线规定的情况下才可使用。请勿使用插头/插座适
配器。如使用长的可拆卸的电源线或延长线:
a)可拆卸电源线或延长线的额定电功率应至少与水壶下方显示的额定电功率一样。
b)延长线必须是3线/极型,且必须接地。长线或延长线决不能
越过家具或台面或桌面,在这些地方可能会被小孩拉扯到或可能会把人绊倒。
c)请勿把水壶或电源线放在或靠近热的煤气灶上或电炉上,或放在或靠近烤箱上。
请勿在室外使用。
请勿让电源线挂在桌子或台面边缘,或接触热的表面。
使用水壶时,请勿用损坏的电源线或插头,或在电器出现故障或
94
Page 99
任何方式的损坏后使用。把电器送到就近的授权维修机构进行检查或维修。家电制造商
不建议使用附件的配件,其使用可能会导致火灾、触电或
严重的人身伤害。
若电源线或插头损坏,必须由制造商或授权服务中心或
有资格的人员更换,以避免所有的风险。
5.切勿触碰带电部件。它们可能会导致触电和严重的人身伤害。把电源座(5)连接到有合适电压的壁式插座。该电压必须与
水壶(4)下方的铭牌上的电压一致。请确保您使用的插座已接地 。请勿使用脚部裸露或潮湿的水壶。
6.该水壶仅使用所提供的电源座(5)。
7.警告:避免水或其它液体溢到电源座(5)和接头上(5a)。
8.警告:水壶装水切勿超过1.7升(57.48 美国 fl.oz / 59.80 英国 fl.oz),在显示面板上有“MAX>”标记(8)。
9.警告:水壶放到电源座(5)上时,切勿给水壶装水。
10.警告:只能给水壶装清水。不能装牛奶、咖啡或其他。
11.警告:在无人看顾的情况下,请勿使用水壶。
12.警告:水壶没有水时切勿操作。错误的使用会缩短水壶的使用寿命。
13.警告:水沸腾过程中或随后切勿一直按开/关按钮(9)。
14.警告:水壶装水过满或盖子(1)打开时切勿烧水。沸腾的水可能会飞溅出来造成人身伤害。
15.您需始终确保缓慢而小心地倒沸腾的水。
16.为防止烫伤,当水正在沸腾或水壶刚刚断电后避免打开盖子(1)。蒸汽可引起烫伤!
如果水壶还是热的,您想重新加水将其装满的话,打开盖子(1)时需小心。开水可引起烫伤。
17.在每次沸腾后,把水壶里的水完全倒空。水壶里的水切勿放很长一段时间。
18.小心:表面很烫。使用提手或把手或戴上耐高温手套。触摸非常热的部位时要非常小心,如盖子(1)、壶体(4)和水壶
的所有表面。警告!烫伤危险!壶体(4)和盖子(1)在使用过程中会变得非常热。
19.加热器件表面在使用后仍有余热。
20.要断开连接,先确认水壶已断开,然后从墙壁插座上拔下插头(6)。始终握住插头而非电源线拔下电器插头。注意:当
你不使用水壶时,应从墙壁插座上拔下插头。
21.将水壶放置在平整的表面上,确保其脚部牢牢附着到支撑表面上,以使电器不会翻倒。请勿将水壶放在或靠近热的表面或
靠近明火。
警告:请勿在斜面上操作水壶。
22.为确保水壶正常工作,将其放置在一个平面上,该平面要有充足的照明和卫生的环境,并且方便连接电源插座。水壶和墙
壁之间的距离应至少保持10厘米(4英寸)。
23.请勿在可燃材料上或靠近可燃材料使用水壶,如窗帘、墙纸、墙壁。
24.在摔落后发生故障、缺陷或疑似故障,应立即拔掉水壶的插头。切勿启动
有故障的电器。必须由布加迪服务中心进行维修。联系您的经销商和/或
联系在布加迪的客服中心或发送电子邮件到 [email protected] 。在发生火灾时,使用二氧化碳
(C02)灭火器。请勿使用水或干粉灭火器。
95
Page 100
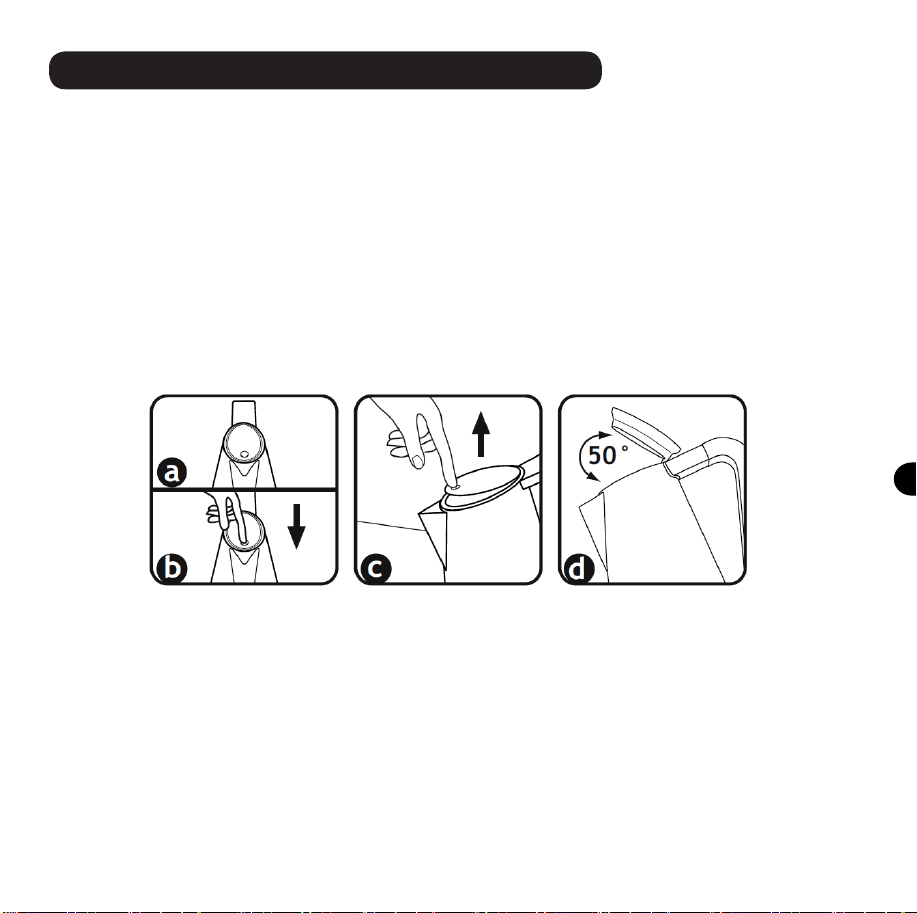
安装和启动
原包装设计可以邮寄发出。保留该包装,以免您需要将水壶退回给供应商。在安装水壶前,遵守前几页安全须
知中的所有要点。去除水壶包装后,确保它状态完好,并确保包装材料、保修单等没有在运输过程中或打开包
装时不小心掉到水壶里。
包装水壶的塑料袋应存放在儿童接触不到的地方,因为它会造成窒息危险。确保水壶状态完好。为去除水壶外
表面上可能集聚的灰尘,只需用柔软的干布擦拭。
当你进行上述步骤、并严格遵守安全标准后,连接到电源。
连接到电源:电流可以致命!遵守安全须知!
请将维拉水壶的电源线(6)插到电源插座上,该电源插座的电压应和水壶下方的铭牌上显示的电压相同。
认真冲洗水壶的所有内表面以及壶嘴,往水壶里装水,直至水面达到最高水位(1700毫升/57.48 美国 fl.oz /
59.80 英国 fl.oz),煮沸后把水倒干。至少重复两次。
水壶装水:
a)把壶体从电源座(5)移开。握住把手(3)。
b)打开盖子(1):按压盖子(1)上的橡胶“点”(图a),并用力向下按(图b)。然后松开(图c),盖子会
自动打开。盖子(1)是不可拆卸的,其最大开口显示在图d。
c)水壶直接在水龙头下接水或用一个瓶子、罐子或广口瓶往水壶里倒水到所需水位。水壶切勿装得过满。请注
意不要高于1700毫升(57.48 美国 fl.oz / 59.80 英国 fl.oz)。
d)打开盖子(1):按压盖子(1)上的橡胶“点”(图a),盖子(1)打开时切勿操作水壶。
e)把水壶放在电源座(5)上。
f)烧水时,仅需按开/关按钮(9)。开/关按钮(9)上的指示灯显示水壶正在工作。
当烧水完成时,水壶会自动断电。
断开前,需确保水壶未在工作。请勿用拔电源线的方式拔掉水壶的壁式插座。始终握住插头(6)拔下电器插
头。要完全断开该设备,需把插头(6)从插座上拔出。
96
 Loading...