

Page 1
Vacuum Pack
Machine
Instruction manual
Vacuümverpakkingsmachine
NL
Handleiding
Machine à emballer sous vide
FR
Mode d'emploi
Vakuumverpackungsmaschine
DE
Bedienungsanleitung
Confezionatrice sottovuoto
IT
Manuale di istruzioni
Envasadora al vacío
ES
Manual de instrucciones
Máquina de embalagem a vácuo
PT
Manual de instruções
Vakuummaskin
S
Bruksanvisning
Vakuumpakkemaskine
DK
Instruktionsvejledning
Vakuum innpakkingsmaskin
N
Brukerhåndbok
Vakuumipakkauskone
FIN
Ohjekirja
Model • Modèle • Modell • Modello • Modelo • Malli:
S097
Page 2

UK
Table of Contents
Safety Tips . . . . . . . . . . . . . . . . . . . . . . . . . . . . . . . . . . . . . . . . . . . . . . . . . . . . . . . . . . . . . . . . . 1
Introduction . . . . . . . . . . . . . . . . . . . . . . . . . . . . . . . . . . . . . . . . . . . . . . . . . . . . . . . . . . . . . . . . 1
Pack Contents . . . . . . . . . . . . . . . . . . . . . . . . . . . . . . . . . . . . . . . . . . . . . . . . . . . . . . . . . . . . . . 1
Location of Controls . . . . . . . . . . . . . . . . . . . . . . . . . . . . . . . . . . . . . . . . . . . . . . . . . . . . . . . . . 2
Operation . . . . . . . . . . . . . . . . . . . . . . . . . . . . . . . . . . . . . . . . . . . . . . . . . . . . . . . . . . . . . . . . . 2
Sealing Food . . . . . . . . . . . . . . . . . . . . . . . . . . . . . . . . . . . . . . . . . . . . . . . . . . . . . . . . . 2
Alter Vacuum Level . . . . . . . . . . . . . . . . . . . . . . . . . . . . . . . . . . . . . . . . . . . . . . . . . . . 3
Overheat Cut-out . . . . . . . . . . . . . . . . . . . . . . . . . . . . . . . . . . . . . . . . . . . . . . . . . . . . . 3
Cleaning, Care & Maintenance . . . . . . . . . . . . . . . . . . . . . . . . . . . . . . . . . . . . . . . . . . . . . . . . . 3
Removing the Vacuum Chamber . . . . . . . . . . . . . . . . . . . . . . . . . . . . . . . . . . . . . . . . . 4
Replacing the Vacuum Chamber . . . . . . . . . . . . . . . . . . . . . . . . . . . . . . . . . . . . . . . . . 4
Troubleshooting . . . . . . . . . . . . . . . . . . . . . . . . . . . . . . . . . . . . . . . . . . . . . . . . . . . . . . . . . . . . 4
Technical Specifications . . . . . . . . . . . . . . . . . . . . . . . . . . . . . . . . . . . . . . . . . . . . . . . . . . . . . . . 5
Electrical Wiring . . . . . . . . . . . . . . . . . . . . . . . . . . . . . . . . . . . . . . . . . . . . . . . . . . . . . . . . . . . . 5
Compliance . . . . . . . . . . . . . . . . . . . . . . . . . . . . . . . . . . . . . . . . . . . . . . . . . . . . . . . . . . . . . . . . 5
NL
Inhoudsopgave
Veiligheidstips . . . . . . . . . . . . . . . . . . . . . . . . . . . . . . . . . . . . . . . . . . . . . . . . . . . . . . . . . . . . . . 6
Inleiding . . . . . . . . . . . . . . . . . . . . . . . . . . . . . . . . . . . . . . . . . . . . . . . . . . . . . . . . . . . . . . . . . . . 6
Verpakkingsinhoud . . . . . . . . . . . . . . . . . . . . . . . . . . . . . . . . . . . . . . . . . . . . . . . . . . . . . . . . . . 6
Locatie van alle onderdelen . . . . . . . . . . . . . . . . . . . . . . . . . . . . . . . . . . . . . . . . . . . . . . . . . . . . 7
Bediening . . . . . . . . . . . . . . . . . . . . . . . . . . . . . . . . . . . . . . . . . . . . . . . . . . . . . . . . . . . . . . . . . . 7
Voedsel sealen . . . . . . . . . . . . . . . . . . . . . . . . . . . . . . . . . . . . . . . . . . . . . . . . . . . . . . . 7
Vacuümniveau wijzigen . . . . . . . . . . . . . . . . . . . . . . . . . . . . . . . . . . . . . . . . . . . . . . . . . 8
Uitschakeling bij oververhitting . . . . . . . . . . . . . . . . . . . . . . . . . . . . . . . . . . . . . . . . . . 8
Reiniging, zorg & onderhoud . . . . . . . . . . . . . . . . . . . . . . . . . . . . . . . . . . . . . . . . . . . . . . . . . . . 8
Verwijderen van de vacuümkamer . . . . . . . . . . . . . . . . . . . . . . . . . . . . . . . . . . . . . . . . 9
Terugplaatsen van de vacuümkamer . . . . . . . . . . . . . . . . . . . . . . . . . . . . . . . . . . . . . . 9
Oplossen van problemen . . . . . . . . . . . . . . . . . . . . . . . . . . . . . . . . . . . . . . . . . . . . . . . . . . . . . 9
Technische specificaties . . . . . . . . . . . . . . . . . . . . . . . . . . . . . . . . . . . . . . . . . . . . . . . . . . . . . . . 10
Elektrische bedrading . . . . . . . . . . . . . . . . . . . . . . . . . . . . . . . . . . . . . . . . . . . . . . . . . . . . . . . . 10
Productconformiteit. . . . . . . . . . . . . . . . . . . . . . . . . . . . . . . . . . . . . . . . . . . . . . . . . . . . . . . . . . 10
FR
Sommaire
Conseils de sécurité . . . . . . . . . . . . . . . . . . . . . . . . . . . . . . . . . . . . . . . . . . . . . . . . . . . . . . . . . 11
Introduction . . . . . . . . . . . . . . . . . . . . . . . . . . . . . . . . . . . . . . . . . . . . . . . . . . . . . . . . . . . . . . . . 11
Contenu de l'emballage . . . . . . . . . . . . . . . . . . . . . . . . . . . . . . . . . . . . . . . . . . . . . . . . . . . . . . . 11
Emplacement des commandes . . . . . . . . . . . . . . . . . . . . . . . . . . . . . . . . . . . . . . . . . . . . . . . . . 12
Operation . . . . . . . . . . . . . . . . . . . . . . . . . . . . . . . . . . . . . . . . . . . . . . . . . . . . . . . . . . . . . . . . . 12
Conditionnement sous vide des aliments . . . . . . . . . . . . . . . . . . . . . . . . . . . . . . . . . . 12
Réglage du niveau de mise sous vide . . . . . . . . . . . . . . . . . . . . . . . . . . . . . . . . . . . . . . 13
Disjoncteur de surchauffe . . . . . . . . . . . . . . . . . . . . . . . . . . . . . . . . . . . . . . . . . . . . . . . 13
Nettoyage, entretien et maintenance . . . . . . . . . . . . . . . . . . . . . . . . . . . . . . . . . . . . . . . . . . . . 13
Retrait de la chambre de mise sous vide . . . . . . . . . . . . . . . . . . . . . . . . . . . . . . . . . . . 14
Pour remonter la chambre de mise sous vide . . . . . . . . . . . . . . . . . . . . . . . . . . . . . . . 14
Dépannage . . . . . . . . . . . . . . . . . . . . . . . . . . . . . . . . . . . . . . . . . . . . . . . . . . . . . . . . . . . . . . . . . 14
Spécifications techniques . . . . . . . . . . . . . . . . . . . . . . . . . . . . . . . . . . . . . . . . . . . . . . . . . . . . . . 15
Raccordement électrique . . . . . . . . . . . . . . . . . . . . . . . . . . . . . . . . . . . . . . . . . . . . . . . . . . . . . 15
Conformité . . . . . . . . . . . . . . . . . . . . . . . . . . . . . . . . . . . . . . . . . . . . . . . . . . . . . . . . . . . . . . . . . 15
Page 3

DE
Inhalt
Sicherheitshinweise . . . . . . . . . . . . . . . . . . . . . . . . . . . . . . . . . . . . . . . . . . . . . . . . . . . . . . . . . . 16
Einführung . . . . . . . . . . . . . . . . . . . . . . . . . . . . . . . . . . . . . . . . . . . . . . . . . . . . . . . . . . . . . . . . . 16
Packungsinhalt . . . . . . . . . . . . . . . . . . . . . . . . . . . . . . . . . . . . . . . . . . . . . . . . . . . . . . . . . . . . . . 16
Teile und Bedienelemente . . . . . . . . . . . . . . . . . . . . . . . . . . . . . . . . . . . . . . . . . . . . . . . . . . . . . 17
Operation . . . . . . . . . . . . . . . . . . . . . . . . . . . . . . . . . . . . . . . . . . . . . . . . . . . . . . . . . . . . . . . . . 17
Nahrungsmittel versiegeln . . . . . . . . . . . . . . . . . . . . . . . . . . . . . . . . . . . . . . . . . . . . . . 17
Vakuumstufe ändern . . . . . . . . . . . . . . . . . . . . . . . . . . . . . . . . . . . . . . . . . . . . . . . . . . . 18
Überhitzungsschutz . . . . . . . . . . . . . . . . . . . . . . . . . . . . . . . . . . . . . . . . . . . . . . . . . . . . 18
Reinigung, Pflege und Wartung . . . . . . . . . . . . . . . . . . . . . . . . . . . . . . . . . . . . . . . . . . . . . . . . . 18
Vakuumkammer entfernen . . . . . . . . . . . . . . . . . . . . . . . . . . . . . . . . . . . . . . . . . . . . . . 19
Vakuumkammer auswechseln . . . . . . . . . . . . . . . . . . . . . . . . . . . . . . . . . . . . . . . . . . . . 19
Störungssuche . . . . . . . . . . . . . . . . . . . . . . . . . . . . . . . . . . . . . . . . . . . . . . . . . . . . . . . . . . . . . . 19
Technische Spezifikationen . . . . . . . . . . . . . . . . . . . . . . . . . . . . . . . . . . . . . . . . . . . . . . . . . . . . 20
Elektroanschlüsse . . . . . . . . . . . . . . . . . . . . . . . . . . . . . . . . . . . . . . . . . . . . . . . . . . . . . . . . . . . 20
Konformität . . . . . . . . . . . . . . . . . . . . . . . . . . . . . . . . . . . . . . . . . . . . . . . . . . . . . . . . . . . . . . . . 20
IT
Indice
Suggerimenti per la sicurezza . . . . . . . . . . . . . . . . . . . . . . . . . . . . . . . . . . . . . . . . . . . . . . . . . . 21
Introduzione . . . . . . . . . . . . . . . . . . . . . . . . . . . . . . . . . . . . . . . . . . . . . . . . . . . . . . . . . . . . . . . 21
Contenuto della confezione . . . . . . . . . . . . . . . . . . . . . . . . . . . . . . . . . . . . . . . . . . . . . . . . . . . 21
Posizione dei comandi . . . . . . . . . . . . . . . . . . . . . . . . . . . . . . . . . . . . . . . . . . . . . . . . . . . . . . . . 22
Funzionamento . . . . . . . . . . . . . . . . . . . . . . . . . . . . . . . . . . . . . . . . . . . . . . . . . . . . . . . . . . . . . 22
Sigillare il cibo . . . . . . . . . . . . . . . . . . . . . . . . . . . . . . . . . . . . . . . . . . . . . . . . . . . . . . . . 22
Modifica del livello di sottovuoto . . . . . . . . . . . . . . . . . . . . . . . . . . . . . . . . . . . . . . . . . 23
Interruttore di surriscaldamento . . . . . . . . . . . . . . . . . . . . . . . . . . . . . . . . . . . . . . . . . 23
Pulizia e manutenzione . . . . . . . . . . . . . . . . . . . . . . . . . . . . . . . . . . . . . . . . . . . . . . . . . . . . . . . 23
Rimozione della camera del vuoto . . . . . . . . . . . . . . . . . . . . . . . . . . . . . . . . . . . . . . . . 24
Montaggio della camera del vuoto . . . . . . . . . . . . . . . . . . . . . . . . . . . . . . . . . . . . . . . . 24
Risoluzione dei problemi . . . . . . . . . . . . . . . . . . . . . . . . . . . . . . . . . . . . . . . . . . . . . . . . . . . . . . 24
Specifiche tecniche . . . . . . . . . . . . . . . . . . . . . . . . . . . . . . . . . . . . . . . . . . . . . . . . . . . . . . . . . . 25
Cablaggi elettrici . . . . . . . . . . . . . . . . . . . . . . . . . . . . . . . . . . . . . . . . . . . . . . . . . . . . . . . . . . . . 25
Conformità . . . . . . . . . . . . . . . . . . . . . . . . . . . . . . . . . . . . . . . . . . . . . . . . . . . . . . . . . . . . . . . . . 25
ES
Índice
Consejos de Seguridad . . . . . . . . . . . . . . . . . . . . . . . . . . . . . . . . . . . . . . . . . . . . . . . . . . . . . . . 26
Introducción . . . . . . . . . . . . . . . . . . . . . . . . . . . . . . . . . . . . . . . . . . . . . . . . . . . . . . . . . . . . . . . 26
Contenido del Conjunto . . . . . . . . . . . . . . . . . . . . . . . . . . . . . . . . . . . . . . . . . . . . . . . . . . . . . . 26
Ubicación de los controles . . . . . . . . . . . . . . . . . . . . . . . . . . . . . . . . . . . . . . . . . . . . . . . . . . . . 27
Funcionamiento . . . . . . . . . . . . . . . . . . . . . . . . . . . . . . . . . . . . . . . . . . . . . . . . . . . . . . . . . . . . . 27
Sellado de alimentos . . . . . . . . . . . . . . . . . . . . . . . . . . . . . . . . . . . . . . . . . . . . . . . . . . . 27
Modificación del nivel de vacío . . . . . . . . . . . . . . . . . . . . . . . . . . . . . . . . . . . . . . . . . . . 28
Interruptor de sobrecalentamiento . . . . . . . . . . . . . . . . . . . . . . . . . . . . . . . . . . . . . . . 28
Limpieza, Cuidado y Mantenimiento . . . . . . . . . . . . . . . . . . . . . . . . . . . . . . . . . . . . . . . . . . . . . 28
Desmontaje de la cámara de vacío . . . . . . . . . . . . . . . . . . . . . . . . . . . . . . . . . . . . . . . . 29
Sustitución de la cámara de vacío . . . . . . . . . . . . . . . . . . . . . . . . . . . . . . . . . . . . . . . . . 29
Resolución de problemas . . . . . . . . . . . . . . . . . . . . . . . . . . . . . . . . . . . . . . . . . . . . . . . . . . . . . 29
Especificaciones Técnicas . . . . . . . . . . . . . . . . . . . . . . . . . . . . . . . . . . . . . . . . . . . . . . . . . . . . . 30
Cableado Eléctrico . . . . . . . . . . . . . . . . . . . . . . . . . . . . . . . . . . . . . . . . . . . . . . . . . . . . . . . . . . 30
Cumplimiento . . . . . . . . . . . . . . . . . . . . . . . . . . . . . . . . . . . . . . . . . . . . . . . . . . . . . . . . . . . . . . 30
Page 4
PT
Índice
Conselhos de segurança . . . . . . . . . . . . . . . . . . . . . . . . . . . . . . . . . . . . . . . . . . . . . . . . . . . . . . 31
Introdução . . . . . . . . . . . . . . . . . . . . . . . . . . . . . . . . . . . . . . . . . . . . . . . . . . . . . . . . . . . . . . . . . 31
Conteúdo da embalagem . . . . . . . . . . . . . . . . . . . . . . . . . . . . . . . . . . . . . . . . . . . . . . . . . . . . . 31
O lugar dos comandos . . . . . . . . . . . . . . . . . . . . . . . . . . . . . . . . . . . . . . . . . . . . . . . . . . . . . . . 32
Funcionamento . . . . . . . . . . . . . . . . . . . . . . . . . . . . . . . . . . . . . . . . . . . . . . . . . . . . . . . . . . . . . 32
Selar alimentos . . . . . . . . . . . . . . . . . . . . . . . . . . . . . . . . . . . . . . . . . . . . . . . . . . . . . . . 32
Alterar o nível do vácuo . . . . . . . . . . . . . . . . . . . . . . . . . . . . . . . . . . . . . . . . . . . . . . . . 33
Interruptor de sobrecarga . . . . . . . . . . . . . . . . . . . . . . . . . . . . . . . . . . . . . . . . . . . . . . 33
Limpeza, cuidados & manutenção . . . . . . . . . . . . . . . . . . . . . . . . . . . . . . . . . . . . . . . . . . . . . . . 33
Retirar a câmara de vácuo . . . . . . . . . . . . . . . . . . . . . . . . . . . . . . . . . . . . . . . . . . . . . . 34
Colocar a câmara de vácuo . . . . . . . . . . . . . . . . . . . . . . . . . . . . . . . . . . . . . . . . . . . . . 34
Resolução de problemas . . . . . . . . . . . . . . . . . . . . . . . . . . . . . . . . . . . . . . . . . . . . . . . . . . . . . . 34
Especificações técnicas . . . . . . . . . . . . . . . . . . . . . . . . . . . . . . . . . . . . . . . . . . . . . . . . . . . . . . . 35
Cablagem eléctrica . . . . . . . . . . . . . . . . . . . . . . . . . . . . . . . . . . . . . . . . . . . . . . . . . . . . . . . . . . 35
Conformidade. . . . . . . . . . . . . . . . . . . . . . . . . . . . . . . . . . . . . . . . . . . . . . . . . . . . . . . . . . . . . . . 35
S
Innehållsförteckning
Säkerhetsråd . . . . . . . . . . . . . . . . . . . . . . . . . . . . . . . . . . . . . . . . . . . . . . . . . . . . . . . . . . . . . . . 36
Inledning . . . . . . . . . . . . . . . . . . . . . . . . . . . . . . . . . . . . . . . . . . . . . . . . . . . . . . . . . . . . . . . . . . . 36
Förpackningsinnehåll . . . . . . . . . . . . . . . . . . . . . . . . . . . . . . . . . . . . . . . . . . . . . . . . . . . . . . . . . 36
Placering av kontrollerna . . . . . . . . . . . . . . . . . . . . . . . . . . . . . . . . . . . . . . . . . . . . . . . . . . . . . . 37
Drift . . . . . . . . . . . . . . . . . . . . . . . . . . . . . . . . . . . . . . . . . . . . . . . . . . . . . . . . . . . . . . . . . . . . . . 37
Försegla livsmedel . . . . . . . . . . . . . . . . . . . . . . . . . . . . . . . . . . . . . . . . . . . . . . . . . . . . . 37
Ändra vakuumnivån . . . . . . . . . . . . . . . . . . . . . . . . . . . . . . . . . . . . . . . . . . . . . . . . . . . 38
Överhettningsbrytare . . . . . . . . . . . . . . . . . . . . . . . . . . . . . . . . . . . . . . . . . . . . . . . . . . 38
Rengöring, omvårdnad och underhåll . . . . . . . . . . . . . . . . . . . . . . . . . . . . . . . . . . . . . . . . . . . . 38
Ta bort vakuumkammaren . . . . . . . . . . . . . . . . . . . . . . . . . . . . . . . . . . . . . . . . . . . . . . 39
Byta vakuumkammaren . . . . . . . . . . . . . . . . . . . . . . . . . . . . . . . . . . . . . . . . . . . . . . . . . 39
Felsökning . . . . . . . . . . . . . . . . . . . . . . . . . . . . . . . . . . . . . . . . . . . . . . . . . . . . . . . . . . . . . . . . . 39
Tekniska specifikationer . . . . . . . . . . . . . . . . . . . . . . . . . . . . . . . . . . . . . . . . . . . . . . . . . . . . . . 40
Elektriska kablar . . . . . . . . . . . . . . . . . . . . . . . . . . . . . . . . . . . . . . . . . . . . . . . . . . . . . . . . . . . . 40
Tillmötesgående . . . . . . . . . . . . . . . . . . . . . . . . . . . . . . . . . . . . . . . . . . . . . . . . . . . . . . . . . . . . . 40
DK
Indholdsfortegnelse
Sikkerhedstips . . . . . . . . . . . . . . . . . . . . . . . . . . . . . . . . . . . . . . . . . . . . . . . . . . . . . . . . . . . . . . 41
Indledning . . . . . . . . . . . . . . . . . . . . . . . . . . . . . . . . . . . . . . . . . . . . . . . . . . . . . . . . . . . . . . . . . . 41
Pakkens indhold . . . . . . . . . . . . . . . . . . . . . . . . . . . . . . . . . . . . . . . . . . . . . . . . . . . . . . . . . . . . . 41
Oversigt over betjeningsanordninger . . . . . . . . . . . . . . . . . . . . . . . . . . . . . . . . . . . . . . . . . . . . 42
Brug . . . . . . . . . . . . . . . . . . . . . . . . . . . . . . . . . . . . . . . . . . . . . . . . . . . . . . . . . . . . . . . . . . . . . . 42
Forsegling af madvarer . . . . . . . . . . . . . . . . . . . . . . . . . . . . . . . . . . . . . . . . . . . . . . . . . 42
Ændring af vakuumniveau . . . . . . . . . . . . . . . . . . . . . . . . . . . . . . . . . . . . . . . . . . . . . . . 43
Udkobling ved overopvarmning . . . . . . . . . . . . . . . . . . . . . . . . . . . . . . . . . . . . . . . . . . 43
Rengøring, pleje og vedligeholdelse . . . . . . . . . . . . . . . . . . . . . . . . . . . . . . . . . . . . . . . . . . . . . 43
Aftagning af vakuumkammeret . . . . . . . . . . . . . . . . . . . . . . . . . . . . . . . . . . . . . . . . . . . 44
Anbringelse af vakuumkammeret . . . . . . . . . . . . . . . . . . . . . . . . . . . . . . . . . . . . . . . . . 44
Fejlfinding . . . . . . . . . . . . . . . . . . . . . . . . . . . . . . . . . . . . . . . . . . . . . . . . . . . . . . . . . . . . . . . . . . 44
Technical Specifications . . . . . . . . . . . . . . . . . . . . . . . . . . . . . . . . . . . . . . . . . . . . . . . . . . . . . . . 45
El-kabler . . . . . . . . . . . . . . . . . . . . . . . . . . . . . . . . . . . . . . . . . . . . . . . . . . . . . . . . . . . . . . . . . . . 45
Overensstemmelseserklæring . . . . . . . . . . . . . . . . . . . . . . . . . . . . . . . . . . . . . . . . . . . . . . . . . . 45
Page 5
N
Innhold
Sikkerhetstips . . . . . . . . . . . . . . . . . . . . . . . . . . . . . . . . . . . . . . . . . . . . . . . . . . . . . . . . . . . . . . . 46
Innledning . . . . . . . . . . . . . . . . . . . . . . . . . . . . . . . . . . . . . . . . . . . . . . . . . . . . . . . . . . . . . . . . . . 46
Pakkeinnhold . . . . . . . . . . . . . . . . . . . . . . . . . . . . . . . . . . . . . . . . . . . . . . . . . . . . . . . . . . . . . . . 46
Plassering av kontroller . . . . . . . . . . . . . . . . . . . . . . . . . . . . . . . . . . . . . . . . . . . . . . . . . . . . . . . 47
Bruk . . . . . . . . . . . . . . . . . . . . . . . . . . . . . . . . . . . . . . . . . . . . . . . . . . . . . . . . . . . . . . . . . . . . . . 47
Tetning av matvarer . . . . . . . . . . . . . . . . . . . . . . . . . . . . . . . . . . . . . . . . . . . . . . . . . . . 47
Endring av vakuumnivå . . . . . . . . . . . . . . . . . . . . . . . . . . . . . . . . . . . . . . . . . . . . . . . . . 48
Utkobling ved overoppheting . . . . . . . . . . . . . . . . . . . . . . . . . . . . . . . . . . . . . . . . . . . . 48
Rengjøring, stell og vedlikehold . . . . . . . . . . . . . . . . . . . . . . . . . . . . . . . . . . . . . . . . . . . . . . . . . 48
Demontering av vakuumkammeret . . . . . . . . . . . . . . . . . . . . . . . . . . . . . . . . . . . . . . . 49
Montering av vakuumkammeret . . . . . . . . . . . . . . . . . . . . . . . . . . . . . . . . . . . . . . . . . . 49
Feilsøking . . . . . . . . . . . . . . . . . . . . . . . . . . . . . . . . . . . . . . . . . . . . . . . . . . . . . . . . . . . . . . . . . . 49
Tekniske spesifikasjoner . . . . . . . . . . . . . . . . . . . . . . . . . . . . . . . . . . . . . . . . . . . . . . . . . . . . . . 50
Elektrisk tilkopling . . . . . . . . . . . . . . . . . . . . . . . . . . . . . . . . . . . . . . . . . . . . . . . . . . . . . . . . . . . 50
Samsvar . . . . . . . . . . . . . . . . . . . . . . . . . . . . . . . . . . . . . . . . . . . . . . . . . . . . . . . . . . . . . . . . . . . 50
FIN
Sisällysluettelo
Turvallisuusvihjeitä . . . . . . . . . . . . . . . . . . . . . . . . . . . . . . . . . . . . . . . . . . . . . . . . . . . . . . . . . . . 51
Johdanto . . . . . . . . . . . . . . . . . . . . . . . . . . . . . . . . . . . . . . . . . . . . . . . . . . . . . . . . . . . . . . . . . . . 51
Pakkauksen sisältö . . . . . . . . . . . . . . . . . . . . . . . . . . . . . . . . . . . . . . . . . . . . . . . . . . . . . . . . . . . 51
Ohjauslaitteiden sijainti . . . . . . . . . . . . . . . . . . . . . . . . . . . . . . . . . . . . . . . . . . . . . . . . . . . . . . . 52
Käyttö . . . . . . . . . . . . . . . . . . . . . . . . . . . . . . . . . . . . . . . . . . . . . . . . . . . . . . . . . . . . . . . . . . . . 52
Elintarvikkeiden pakkaaminen . . . . . . . . . . . . . . . . . . . . . . . . . . . . . . . . . . . . . . . . . . . . 52
Vakuumin tason muuttaminen . . . . . . . . . . . . . . . . . . . . . . . . . . . . . . . . . . . . . . . . . . . 53
Ylikuumenemissuoja . . . . . . . . . . . . . . . . . . . . . . . . . . . . . . . . . . . . . . . . . . . . . . . . . . . 53
Puhdistus, hoito & huolto . . . . . . . . . . . . . . . . . . . . . . . . . . . . . . . . . . . . . . . . . . . . . . . . . . . . . 53
Vakuumikammion poistaminen . . . . . . . . . . . . . . . . . . . . . . . . . . . . . . . . . . . . . . . . . . . 54
Vakuumikammion asettaminen takaisin . . . . . . . . . . . . . . . . . . . . . . . . . . . . . . . . . . . . 54
Vianetsintä . . . . . . . . . . . . . . . . . . . . . . . . . . . . . . . . . . . . . . . . . . . . . . . . . . . . . . . . . . . . . . . . . 54
Tekniset tiedot . . . . . . . . . . . . . . . . . . . . . . . . . . . . . . . . . . . . . . . . . . . . . . . . . . . . . . . . . . . . . 55
Sähköjohdot . . . . . . . . . . . . . . . . . . . . . . . . . . . . . . . . . . . . . . . . . . . . . . . . . . . . . . . . . . . . . . . . 55
Vaatimustenmukaisuus . . . . . . . . . . . . . . . . . . . . . . . . . . . . . . . . . . . . . . . . . . . . . . . . . . . . . . . 55
Page 6

UK
Safety Tips
• Position on a flat, stable surface.
• A service agent/qualified technician should carry out installation and any repairs if required. Do not
remove any components on this product.
• Consult Local and National Standards to comply with the following:
• Health and Safety at Work Legislation
• BS EN Codes of Practice
• Fire Precautions
• IEE Wiring Regulations
• Building Regulations
• DO NOT immerse the appliance in water.
• DO NOT touch the sealing bar during operation.
• Do not turn Off at the plug to halt operation; always use the Stop/Start button or On/Off switch.
• Do not use the appliance for anything other than its intended use.
• Always switch off and disconnect the power supply to the appliance when not in use.
• Not suitable for outdoor use.
• Keep all packaging away from children. Dispose of the packaging in accordance to the regulations of
local authorities.
• If the power cord is damaged, it must be replaced by an BUFFALO agent or a recommended qualified
technician in order to avoid a hazard.
Introduction
Please take a few moments to carefully read through this manual. Correct maintenance and operation of
this machine will provide the best possible performance from your BUFFALO product.
Pack Contents
The following is included:
• BUFFALO Vacuum Pack Machine
• Spare lower sealing gasket
• 20 x sealing food bags (200mm x 300mm)
• Instruction Manual
BUFFALO prides itself on quality and service, ensuring that at the time of packaging the contents are
supplied fully functional and free of damage.
Should you find any damage as a result of transit, please contact your BUFFALO dealer immediately.
1
Page 7
Telephone Helpline: 0845 146 2887 (United Kingdom)
Location of Controls
UK
1. Stop/Start button
2. Vacuum button
3. Vacuum indicator light
4. Power indicator light
5. Sealing indicator light
6. Cover
7. Sealing gasket
8. Upper gasket
9. Hose housing
10. Removable vacuum chamber
11. Sealing bar
12. On/Off switch
13. Chamber release lever
14. Lower sealing gasket
Operation
Note: THIS APPLIANCE IS DESIGNED TO BE USED WITH THE BAGS SUPPLIED. OTHER
BAGS MAY NOT SEAL CORRECTLY.
CONTACT YOUR VACUUM PACK MACHINE SUPPLIER FOR SUITABLE REPLACEMENT
BAGS.
Sealing Food
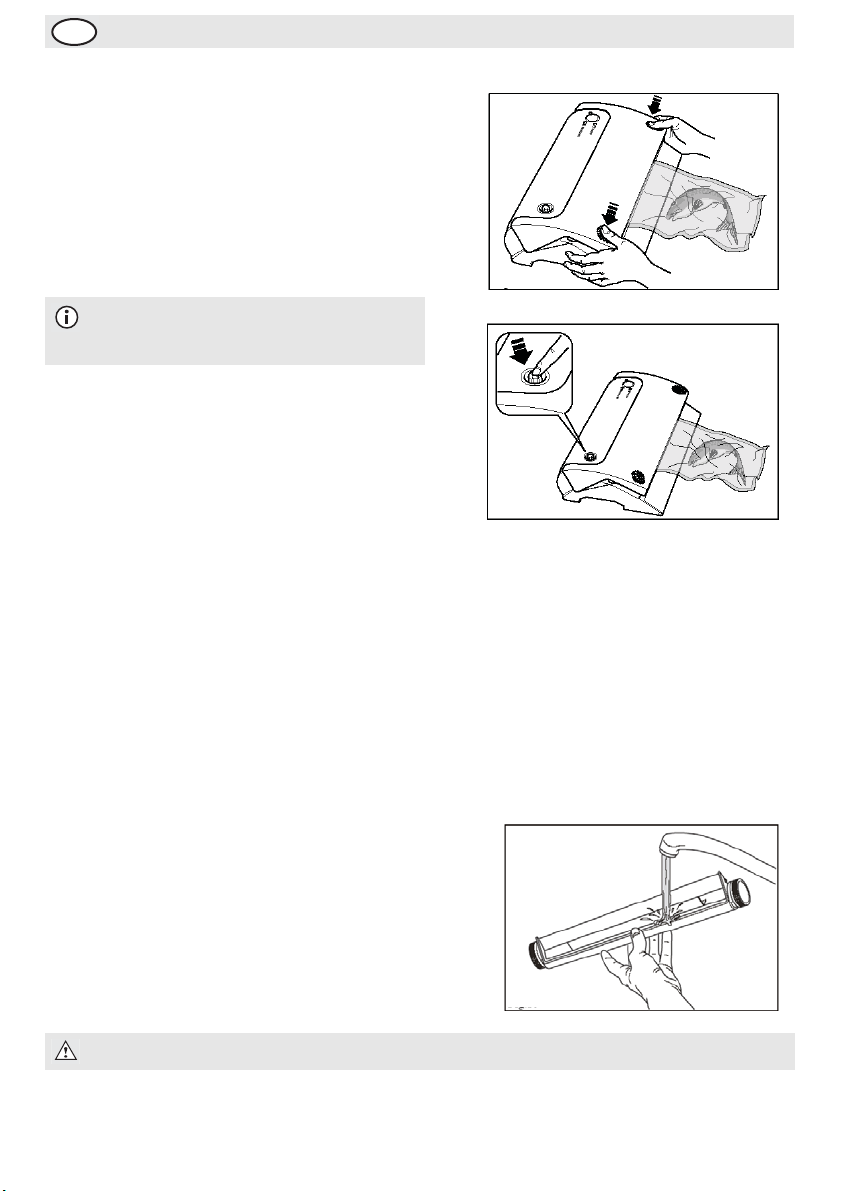
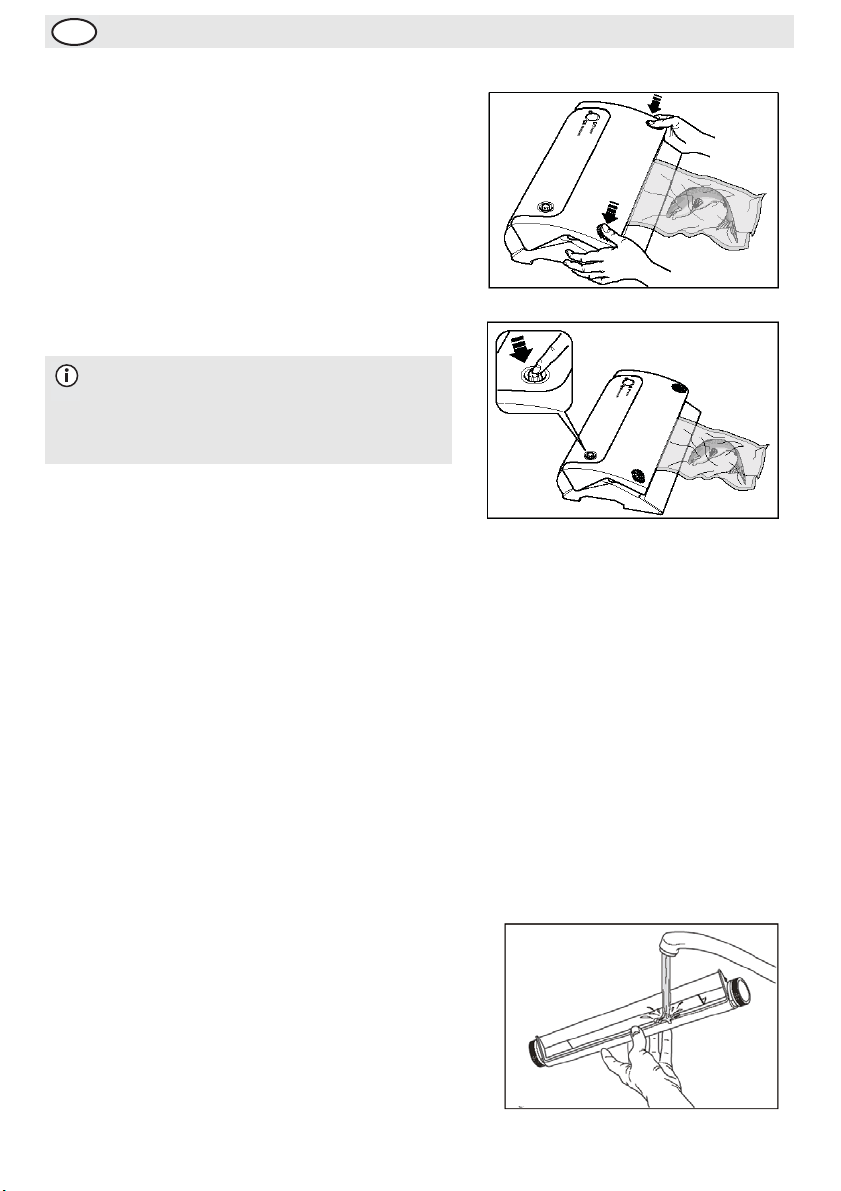
1. Place the food inside in the bag.
Note: Ensure the bag is at least 8cm
longer than the length of the food to be
sealed.
2. Remove any excess liquid or food residue from the
bag.
3. Place the open end of the bag inside the vacuum
chamber.Press the end of the bag against the plate in
the vacuum chamber.
2
Page 8
UK
4. Lower the lid and press down for several seconds; this
begins the vacuum sealing process. The yellow
vacuum indicator light flashes.
5. The sealing indicator light flashes as the appliance
seals the bag.
6. Both lights turn Off when the bag is sealed.
7. With the bag still in place, press the vacuum button to
expel the air removed from the sealed bag.
8. Once complete lift the lid and remove the bag.
Note: If you need to stop the process at
anytime press the STOP button followed
by the Vacuum button.
9. Examine the new seal. If airtight then there should be
a stripe across the seal and be totally flat. A wrinkled
seal could indicate that the seal is not complete.
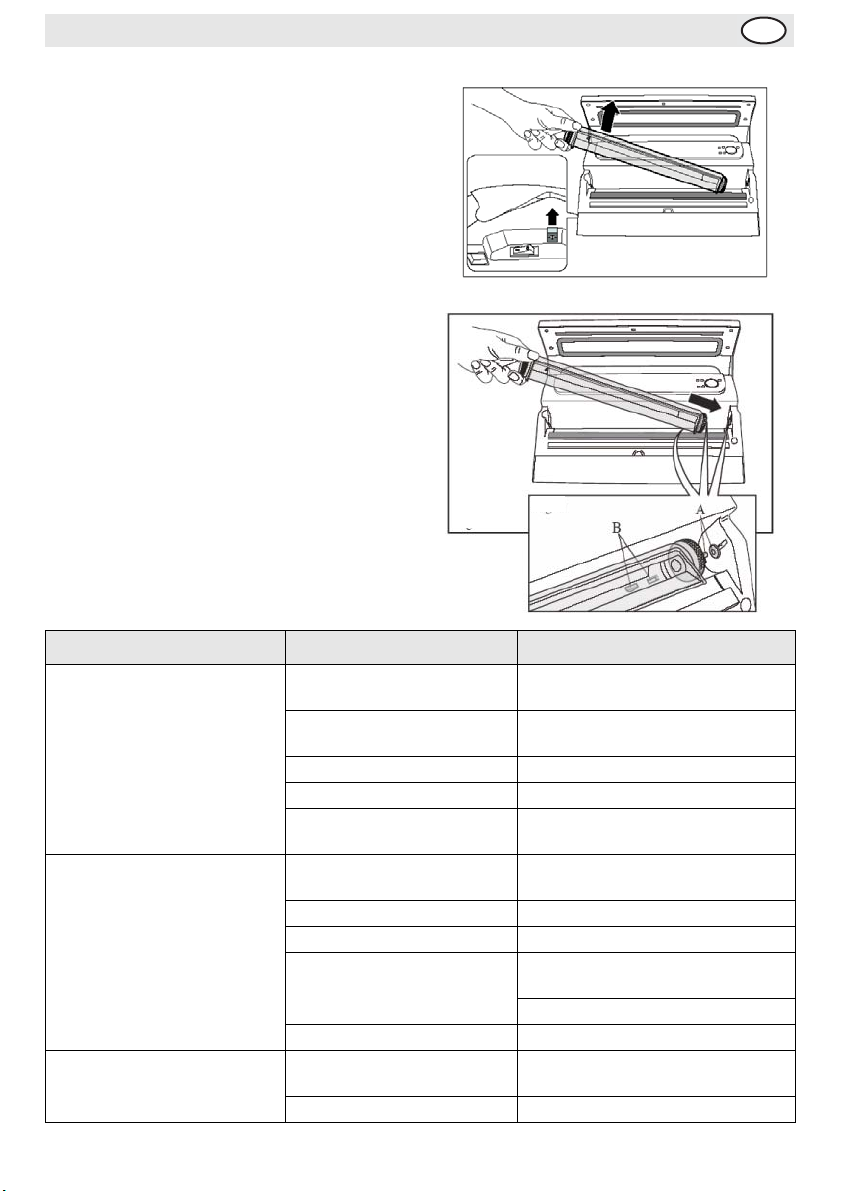
Alter Vacuum Level
The level of vacuum can be changed by stopping the
vacuum process at anytime.
While the air is being drawn out, and the vacuum indicator
is flashing:
1. Press the Stop button at the desired level of vacuum.
2. The sealing indicator turns on and the appliance seals the bag.
3. When both lights go out lift the lid and remove the bag.
Overheat Cut-out
The appliance is fitted with a safety cut-out should the operating temperature exceed safe levels.
If the cut-out is activated then lift the lid and allow anything up to 30 minutes for the appliance to cool
down.
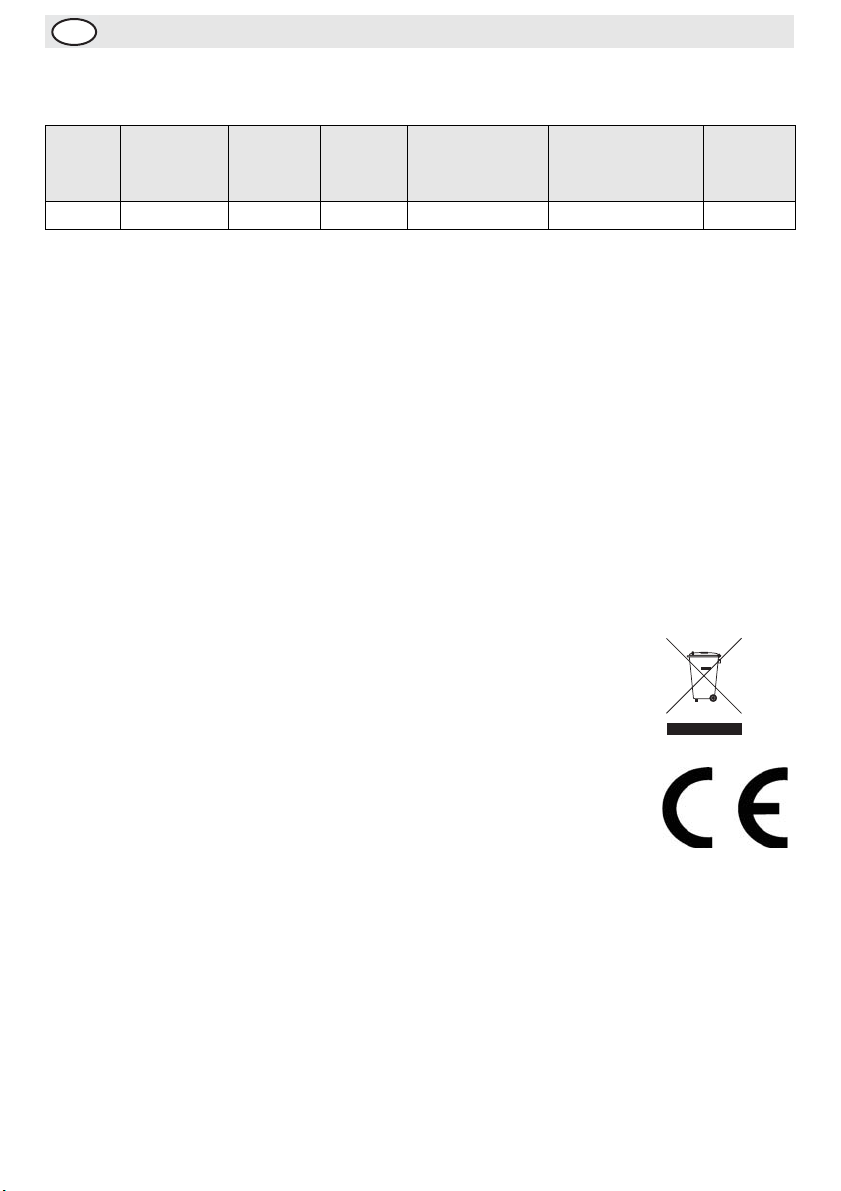
Cleaning, Care & Maintenance
• Use warm, soapy water and a damp cloth for cleaning
parts and the exterior of the appliance.
•Dry thoroughly after cleaning.
• A BUFFALO dealer or qualified technician should carry
out repairs if required.
• Rinse the removable vacuum chamber under running
water.
WARNING: Do not allow any water to spill into the appliance when cleaning.
3
Page 9
Telephone Helpline: 0845 146 2887 (United Kingdom)
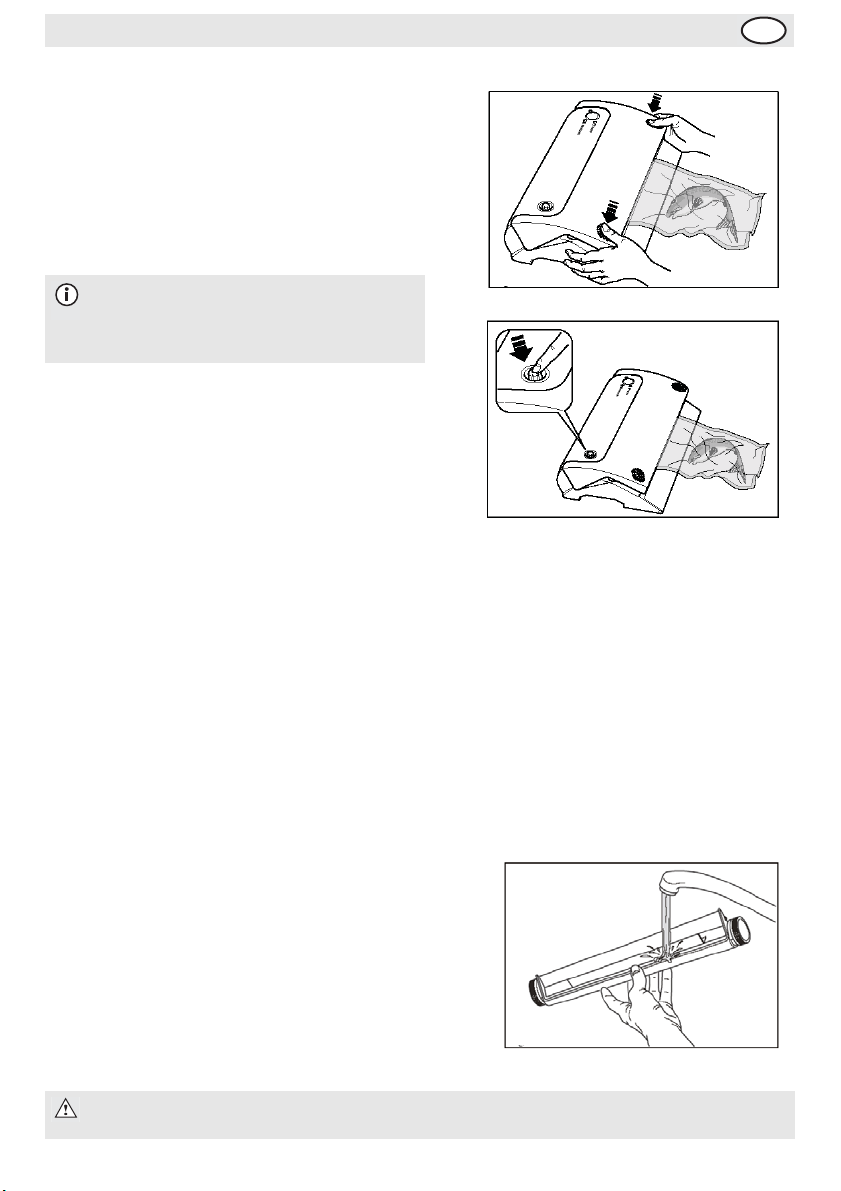
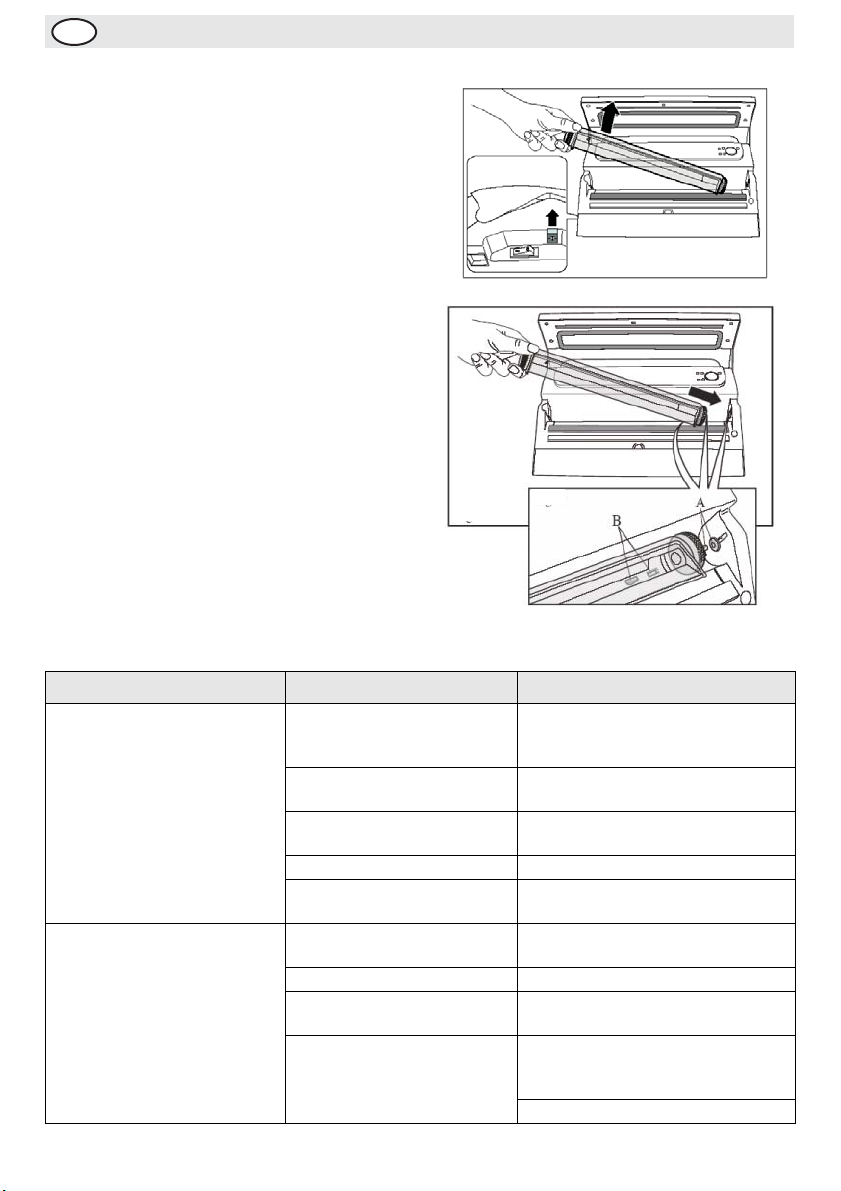
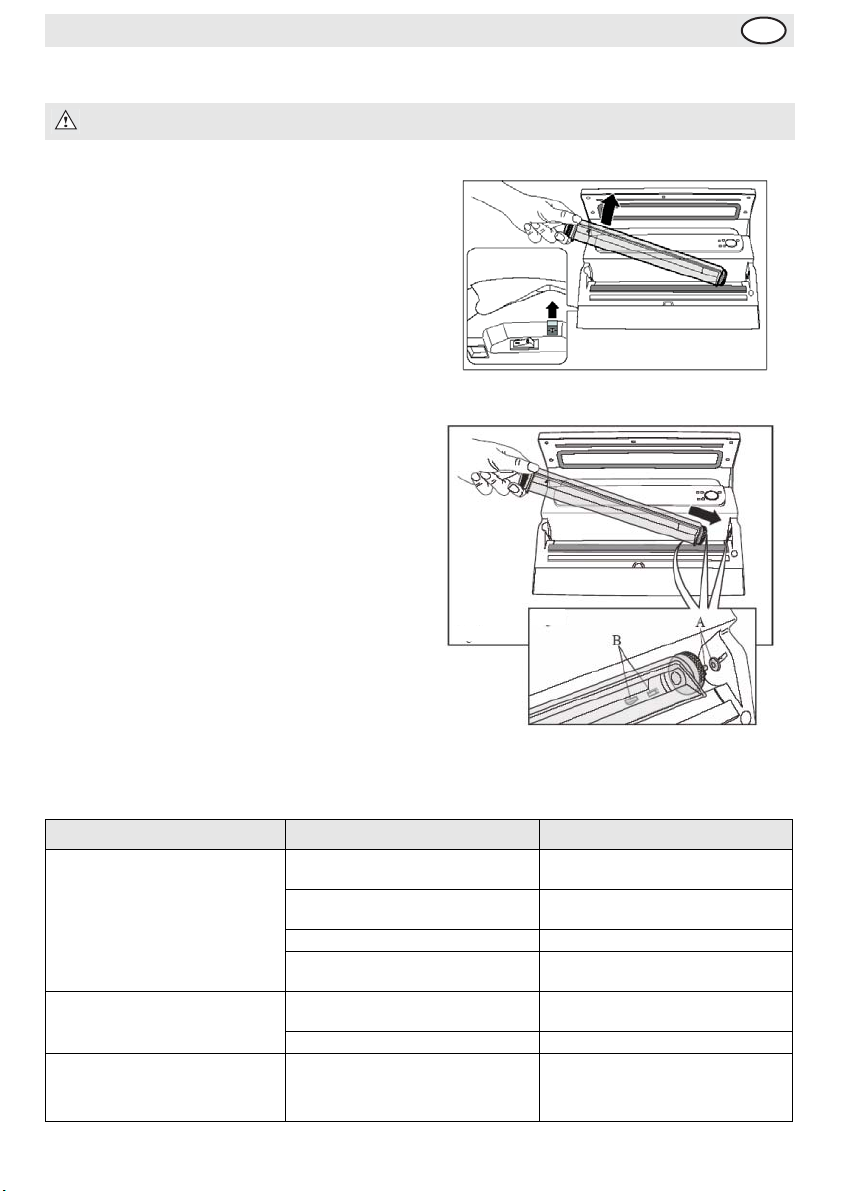
Removing the Vacuum Chamber
1. Pull the chamber release lever.
2. Lift the vacuum chamber and remove it from the
appliance.
Replacing the Vacuum Chamber
1. Slot the right end of the chamber into the
recess.
2. Ensure the suction nozzle (A) connects securely
with the vacuum chamber, and the positioning
knob (B) sits securely in its seat.
3. Press the left side of the chamber down until the
release lever clicks back into place.
Tr ou b le s h oo t in g
UK
Fault Probable Cause Action
The unit is not working The unit is not switched on Check the unit is plugged in correctly
and switched on
Plug and lead are damaged Call BUFFALO agent or qualified
technician
Fuse in the plug has blown Replace the plug fuse
Power supply Check power supply
Internal wiring fault Call BUFFALO agent or qualified
technician
Appliance does not remove all
the air from the bag
Bags are not sealing correctly Sealing bar is overheating Open lid and allow sealing bar to cool
Open end of bag not
completely inserted
Gaskets dirty Clean gaskets
Open end of bag is dirty Clean bag
Bag may be punctured Line bag with paper towels to protect
Incorrect bags used Call Vacuum Pack machine supplier
Incorrect bags used Call Vacuum Pack machine supplier
Open lid and reposition bag
against foodstuffs with sharp edges
Replace bag
down
4
Page 10
UK
Technical Specifications
Vacuum
Model Voltage Power Current
S097 230V 50Hz 300W 1.3A -0.8 bar 90 x 380 x 240 3
pressure
(approx.)
Dimensions
h x w x d mm
Weight
(kg)
Electrical Wiring
This appliance is supplied with a 3 pin, moulded, BS1363 plug and lead, with a 13 amp fuse as standard.
The plug is to be connected to a suitable mains socket.
This appliance is wired as follows:
• Live wire (coloured brown) to terminal marked L
• Neutral wire (coloured blue) to terminal marked N
• Earth wire (coloured green/yellow) to terminal marked E
This appliance must be earthed, using a dedicated earthing circuit.
If in doubt consult a qualified electrician.
Electrical isolation points must be kept clear of any obstructions. In the event of any emergency
disconnection being required they must be readily accessible.
Compliance
The WEEE logo on this product or its documentation indicates that the product must
not be disposed of as household waste. To help prevent possible harm to human
health and/or the environment, the product must be disposed of in an approved and
environmentally safe recycling process. For further information on how to dispose of
this product correctly, contact the product supplier, or the local authority responsible
for waste disposal in your area.
BUFFALO parts have undergone strict product testing in order to comply with
regulatory standards and specifications set by international, independent, and federal
authorities.
BUFFALO products have been approved to carry the following symbol:
All rights reserved. No part of these instructions may be produced or transmitted in any form or by any means,
electronic, mechanical, photocopying, recording or otherwise, without the prior written permission of BUFFALO.
Every effort is made to ensure all details are correct at the time of going to press, however, BUFFALO reserve the
5
right to change specifications without notice.
Page 11

Klantenondersteuning: 040 – 2628080 (Nederland)
NL
Veiligheidstips
• Plaatsen op een vlakke en stabiele ondergrond.
• De installatie en eventuele reparaties zijn door een servicetechnicus/vaktechnicus uit te voeren.
Verwijder geen componenten of servicepanelen van dit product.
• Raadpleeg en volg de plaatselijke en nationale regelgeving op m.b.t. tot het volgende:
• Wetgeving van gezondheid en veiligheid op de werkplaats
• Werkregels
• Brandpreventie
• IEE bekabelingsnormen
• Bouwverordeningen
• Sealbalk tijdens werking NIET aanraken.
• Steker niet gebruiken om de machine uit te schakelen; altijd de Stop/Start- of Aan/Uit-schakelaar
gebruiken.
• Gebruik dit apparaat uitsluitend voor het bestemde gebruik.
• Laat verpakkingsmateriaal niet binnen handbereik van kinderen. Verpakkingsmateriaal in
overeenstemming met de regelgeving van de plaatselijke overheden als afval laten verwerken.
• Indien de stroomkabel beschadigd raakt, dient men deze door een BUFFALO technicus of aanbevolen
vaktechnicus te laten vervangen om gevaarlijke situaties te verhinderen.
Inleiding
Neem de tijd en lees deze handleiding aandachtig door. Een correct gebruik en onderhoud van deze
machine waarborgt de beste prestatie van uw BUFFALO product.
Verpakkingsinhoud
De verpakking bevat het volgende:
• BUFFALO Vacuümverpakkingsmachine
• Reserve onderste sealpakking
• 20 x seal voedselzakken (200 mm x 300 mm)
• Handleiding
BUFFALO is trots op de haar productkwaliteit en dienstverlening en controleer de inhoud van de
verpakkingen, tijdens de verpakkingsfase, op functionaliteit en schade.
Mocht u product door transport zijn beschadigd, neem dan onmiddellijk contact op met uw BUFFALO dealer.
6
Page 12

NL
Locatie van alle onderdelen
Klantenondersteuning: 050 – 609999 (België)
1. Stop/Startknop
2. Vacuümknop
3. Vacuümlampje
4. Stroomlampje
5. Seallampje
6. Deksel
7. Sealpakking
8. Bovenste pakking
9. Kabelbehuizing
10. Verwijderbare vacuümkamer
11. Sealbalk
12. Aan/Uit-schakelaar
13. Kamer ontgrendelingshendel
14. Onderste sealpakking
Bediening
OPMERKING: DIT APPARAAT IS ONTWORPEN VOOR GEBRUIK MET DE BIJGELEVERDE
ZAKKEN. ZAKKEN VAN ANDERE FABRIKANTEN KUNNEN MOGELIJKERWIJZE NIET
CORRECT WORDEN GEDICHT.
VOOR GESCHIKTE SEALZAKKEN NEEMT U CONTACT OP MET UW LEVERANCIER VAN DE
VACUUMVERPAKKINGSMACHINE.
Voedsel sealen
1. Plaats het voedsel in de zak.
Opmerking: de zak dient 8 cm langer te
zijn dan het voedsel dat gesealed moet
worden.
2. Verwijder eventueel vloeistof en voedselresten uit de
zak.
3. Plaats het open uiteinde in de vacuümkamer. Druk het
uiteinde van de zak tegen de plaat in de
vacuümkamer.
7
Page 13
Klantenondersteuning: 040 – 2628080 (Nederland)
4. Sluit het deksel gedurende enkele seconden; hiermee
wordt het sealproces gestart. Het gele vacuümlampje
knippert.
5. Tijdens het sealen van de zak knippert het seallampje.
6. Na het sealen van de zak gaan beide lampjes uit.
7. Met de zak nog steeds op zijn plaats drukt u op de
vacuümknop om de lucht uit de zak te zuigen.
8. Hierna klapt u de deksel open en verwijdert u de zak.
Opmerking: indien u de machine tijdens
deze procedure moet stoppen, druk dan
op de STOP-knop en vervolgens op de
vacuümknop.
9. Controleer de dichting van de zak. Bij een luchtdichte
afsluiting dient men een platte sealstreep over de
volledige lengte van de zakopening te zien. Een
verkreukte sealstreep kan een indicatie zijn van een
slechte dichting.
Vacuümniveau wijzigen
Men kan het vacuümniveau op elk moment gedurende het
vacuümproces wijzigen.
Terwijl de lucht wordt weggezogen, en het vacuümlampje knippert:
1. Druk op het gewenste vacuümniveau op de stopknop.
2. Het seallampje gaat aan en de machine dicht de verpakking.
3. Nadat beide lampjes uit zijn gaan, opent u de deksel en verwijdert de zak.
NL
Uitschakeling bij oververhitting
Het apparaat is voorzien van een veiligheidsuitschakeling die de machine uitschakelt wanneer de veilige
werktemperaturen worden overschreden.
Bij een uitschakeling door oververhitting, open de deksel en laat de machine gedurende circa 30 minuten
afkoelen.
Reiniging, zorg & onderhoud
• Gebruik warm zeepwater en een vochtige doek om de
buitenkant en onderdelen van het apparaat te reinigen.
• Na reiniging goed drogen.
• Eventuele reparaties moeten door een BUFFALO
vertegenwoordiger of een vaktechnicus worden
uitgevoerd.
• De verwijderbare vacuümkamer grondig spoelen onder
stromend water.
WAARSCHUWING: laat tijdens reiniging niet toe dat er water in het apparaat
binnendringt.
8
Page 14
NL
Verwijderen van de vacuümkamer
1. Trek aan de ontgrendelingshendel van de
vacuümkamer.
2. Til de vacuümkamer op en verwijder deze uit het
apparaat.
Terugplaatsen van de vacuümkamer
1. Plaats het rechte uiteinde van de vacuümkamer
in de inkeping.
2. Controleer of de aanzuigkop (A) goed op de
vacuümkamer aansluit en dat de plaatsingsknop
(B) goed op zijn plaats zit.
3. Druk de linkerzijde van de vacuümkamer naar
beneden totdat de ontgrendelingshendel op zijn
plaats klikt.
Klantenondersteuning: 050 – 609999 (België)
Oplossen van problemen
Probleem Mogelijke oorzaak Handeling
Het apparaat werkt niet Het apparaat staat uit Controleer of de stroomkabel van het
Steker en kabel zijn
beschadigd
De zekering in de steker is
gesprongen
Stroomvoorziening Controleer de stroomvoorziening
Storing interne bedrading Laat een BUFFALO technicus of een
De lucht in de zak wordt niet
volledig weggezogen
9
Open uiteinde van de zak niet
volledig in de kamer geplaatst
Pakkingen zijn vuil Pakkingen reinigen
Open uiteinde van de zak is
vuil
Het kan zijn dat de zak een
gaatje heeft
apparaat is aangesloten en of het
apparaat is ingeschakeld
Laat een BUFFALO technicus of een
vaktechnicus komen
Vervang de zekering in de steker
vaktechnicus komen
Open het deksel en plaats de zak op
de juiste wijze
Zak reinigen
Voer de zak met papieren doekjes om
deze tegen de scherpe randen van
voedsel te beschermen
Vervang de zak
Page 15
Klantenondersteuning: 040 – 2628080 (Nederland)
Probleem Mogelijke oorzaak Handeling
De lucht in de zak wordt niet
volledig weggezogen
Zakken worden niet correct
gedicht
Er worden zakken gebruikt die
niet geschikt zijn
De sealbalk is oververhit Open het deksel en laat de sealbalk
Er worden zakken gebruikt die
niet geschikt zijn
Technische specificaties
NL
Neem contact op met uw leverancier
van de vacuümverpakkingsmachine
afkoelen
Neem contact op met uw leverancier
van de vacuümverpakkingsmachine
Model Voltage Vermogen Stroom
S097 230V 50Hz 350W 1,5A -0.8 bar 90 x 380 x 240 3
Vacuümdruk
(ca.)
Afmetingen
h x b x d mm
Gewicht
(kg)
Elektrische bedrading
Men dient de steker op een geschikt stopcontact aan te sluiten.
De bedrading van dit apparaat is als volgt:
• Stroomkabel (bruin) naar de aansluitklem gemarkeerd met L
• Neutraalkabel (blauw) naar de aansluitklem gemarkeerd met N
• Aardekabel (groen/geel) naar de aansluitklem gemarkeerd met E
Dit apparaat moet worden geaard met behulp van een adequaat aardingscircuit.
Bij twijfels raadpleeg een vakkundige elektricien.
De elektrische isolatiepunten mogen niet worden geblokkeerd. In geval van een nooduitschakeling moeten
de isolatiepunten direct toegankelijk zijn.
Productconformiteit
Het WEEE-logo op dit product of bijbehorende documentatie geeft aan dat het product
niet onder huisvuil valt en als zodanig ook niet mag worden verwerkt. Ter preventie
van mogelijke gevaren voor de gezondheid van personen en/of voor het milieu, dient
men dit product in overeenstemming met het voorgeschreven en milieuveilige
recyclingproces als afval te verwerken. Raadpleeg uw productleverancier of uw
plaatselijk afvalverwerkingsbedrijf voor meer informatie over de juiste
afvalverwerking van dit product.
De onderdelen van BUFFALO producten hebben strenge producttesten ondergaan om
te voldoen aan wettelijke regels en specificaties die door internationale,
onafhankelijke en landelijke overheden worden voorgeschreven.
BUFFALO producten zijn goedgekeurd en voorzien van het volgende symbool:
Alle rechten voorbehouden. Het is verboden om deze handleiding, hetzij volledig of gedeeltelijk, elektronisch of
mechanisch te reproduceren, kopiëren, op opslagmedia op te slaan of op enigerlei wijze over te dragen, zonder
Wij hebben er alles aan gedaan om er zeker van te zijn dat op publicatiedatum van de handleiding alle details correct
zijn, desondanks, behoudt BUFFALO het recht voor om specificaties zonder aankondiging te wijzigen.
voorafgaande goedkeuring van BUFFALO.
10
Page 16

FR
Standard d'assistance téléphonique: 050 – 600006 (Belgique)
Conseils de sécurité
• Placez l'appareil sur une surface plane, stable.
• L'installation et les éventuelles réparations doivent être confiées à un dépanneur / technicien qualifié.
Ne retirez aucun composant ou cache de ce produit.
• Consultez les normes locales et nationales pour vous conformer aux :
• lois sur l'hygiène et la sécurité au travail ;
• codes de bonnes pratiques BS EN ;
• précautions contre le risque d'incendie ;
• réglementations sur les branchements électriques IEE ;
• règlements sur la construction.
• NE PAS toucher à la barre de soudure en service.
• N'éteignez jamais la machine à emballer à la prise ; utilisez toujours le bouton Arrêt / Départ ou
l'interrupteur Marche / Arrêt.
• N'utilisez l'appareil que pour l'application pour laquelle il a été conçu.
• Gardez les emballages hors de portée des enfants. Débarrassez-vous des emballages conformément
aux règlements des autorités locales.
• Un cordon d'alimentation endommagé doit être remplacé par un agent BUFFALO ou un technicien
qualifié recommandé, pour éviter tout danger.
Introduction
Nous vous invitons à consacrer quelques instants à la lecture attentive de ce manuel. L'entretien et
l'utilisation appropriés de cet appareil vous permettront de tirer le meilleur de votre produit BUFFALO.
Contenu de l'emballage
Eléments fournis de série :
• Machine à emballer sous vide BUFFALO
• Joint de soudure inférieur de rechange
• 20 x sachets de mise sous vide (200 mm x 300 mm)
• Mode d'emploi
BUFFALO attache une grande importance à la qualité et au service et veille à fournir des produits en parfait
état opérationnel, parfaitement intacts au moment de l'emballage.
Nous vous prions de contacter votre revendeur BUFFALO immédiatement si vous constatez un dommage
quelconque survenu pendant le transport du produit.
11
Page 17

Standard d'assistance téléphonique: 01 64 89 73 61 (Français)
Emplacement des commandes
FR
1. Bouton Arrêt / Départ
2. Bouton de mise sous vide
3. Témoin de mise sous vide
4. Témoin d'alimentation
5. Témoin de soudure
6. Couvercle
7. Joint d'étanchéité
8. Joint supérieur
9. Logement du flexible
10. Chambre de mise sous vide amovible
11. Barre de soudure
12. Interrupteur marche/arrêt
13. Levier de dégagement de la chambre
14. Joint d'étanchéité inférieur
Operation
REMARQUE : CET APPAREIL A ETE CONCU POUR ETRE UTILISE AVEC LES SACHETS
FOURNIS. LES AUTRES SACHETS RISQUENT DE NE PAS SE SOUDER CORRECTEMENT.
CONTACTEZ LE FOURNISSEUR DE VOTRE MACHINE A EMBALLER POUR COMMANDER
LES SACHETS D'EMBALLAGE QUI CONVIENNENT.
Conditionnement sous vide des aliments
1. Placez les aliments dans le sachet.
Remarque : Veillez à ce que le sachet
dépasse d'au moins 8 cm des aliments à
conditionner.
2. Débarrassez le sachet des excédents de liquide ou de
denrées.
3. Placez l'extrémité ouverte du sachet dans la chambre
de mise sous vide. Poussez l'extrémité du sachet
contre la plaque de la chambre de mise sous vide.
12
Page 18
FR
4. Baissez le couvercle et appuyez pendant quelques
secondes, pour amorcer le processus de
conditionnement sous vide. Le témoin jaune de mise
sous vide clignote.
5. Le témoin de soudure clignote pendant le processus
de conditionnement du sachet.
6. Les deux témoins s'éteignent, quand le sachet est
soudé.
7. Avant de retirer le sachet, appuyez sur le bouton de
mise sous vide pour libérer l'air retiré du sachet soudé.
8. À la fin du processus, soulevez le couvercle et retirez
le sachet.
Remarque : Si, pour une raison quelconque,
vous devez interrompre le processus à
n'importe quel moment, appuyez sur le
bouton ARRET puis sur le bouton de mise
sous vide.
9. Examinez le joint. Si le joint est étanche, la bande
transversale devrait couvrir toute la longueur du joint
et être entièrement plate. Des nervures sur le joint
sont sans doute le signe d'un joint inadéquat.
Standard d'assistance téléphonique: 050 – 600006 (Belgique)
Réglage du niveau de mise sous vide
1. Le niveau de mise sous vide peut être modifié en interrompant le processus de mise sous vide à
n'importe quel moment.
2. Pendant l'aspiration de l'air et que le témoin de mise sous vide clignote :
3. Appuyez sur le bouton Arrêt, une fois le niveau d'aspiration atteint.
4. Le témoin de soudure clignote et l'appareil soude le sachet.
5. Quand les deux témoins s'éteignent, soulevez le couvercle et retirez le sachet.
Disjoncteur de surchauffe
L'appareil est muni d'un disjoncteur de sécurité. Ce disjoncteur se déclenche en cas de surchauffe de
l'appareil en service.
Si le disjoncteur se déclenche, soulevez le couvercle et laissez l'appareil refroidir jusqu'à 30 minutes.
Nettoyage, entretien et
maintenance
• Pour le lavage des pièces et de l'extérieur de l'appareil,
utilisez de l'eau tiède savonneuse et un torchon humide.
• Séchez minutieusement l'appareil après l'avoir nettoyé.
• Les réparations, le cas échéant, doivent être confiées à
un agent BUFFALO ou à un technicien qualifié.
13
Page 19
Standard d'assistance téléphonique: 01 64 89 73 61 (Français)
• Rincez la chambre de mise sous vide amovible à l'eau courante.
AVERTISSEMENT : Veillez à ce que l'eau ne s'infiltre pas dans l'appareil au nettoyage.
Retrait de la chambre de mise sous vide
1. Tirez sur le levier de dégagement de la chambre
de mise sous vide.
2. Soulevez la chambre de mise sous vide et
retirez-la de l'appareil.
Pour remonter la chambre de mise sous
vide
1. Insérez le côte droit de la chambre dans
l'encastrement.
2. Veillez à ce que la buse d'aspiration (A) se
raccorde correctement à la chambre de mise
sous vide et à ce que la molette de centrage (B)
se cale au bon endroit.
3. Poussez sur le côté gauche de la chambre,
jusqu'à ce que le levier de dégagement se clipse
au bon endroit.
FR
Dépannage
En cas de panne de votre appareil BUFFALO, vérifiez les données du tableau ci-dessous avant d'appeler
notre standard d'assistance ou votre revendeur BUFFALO.
Dysfonctionnement Cause probable Intervention
L'appareil ne fonctionne pas L'appareil n'est pas allumé Vérifier que l'appareil est bien
La prise et le cordon sont
endommagés
Alimentation Vérifier l'alimentation
Problème de branchement interne Appeler un agent BUFFALO ou un
L’appareil n’aspire pas tout l’air
du sachet
L’appareil n’aspire pas tout l’air
du sachet
Le côté ouvert du sachet n’est que
partiellement inséré
Joints sales Nettoyer les joints
Extrémité ouverte du sachet sale Nettoyer le sachet
branché et allumé
Appeler un agent BUFFALO ou un
technicien qualifié
technicien qualifié
Ouvrir le couvercle et recentrer le
sachet
14
Page 20
FR
Dysfonctionnement Cause probable Intervention
L'appareil ne fonctionne pas
Les sachets se soudent mal Surchauffe de la barre de soudure Ouvrir le couvercle et attendre
Standard d'assistance téléphonique: 050 – 600006 (Belgique)
Le sachet est peut-être troué Doubler le sachet à l’aide de
serviettes en papier, pour le
protéger contre les aliments
présentant des bords tranchants
Remplacer le sachet
Sachets utilisés inadéquats Contacter le fournisseur de la
machine à emballer sous vide
que la barre de soudure
refroidisse
Sachets utilisés inadéquats Contacter le fournisseur de la
machine à emballer sous vide
Spécifications techniques
Modèle Tension Puissance Courant
S097 230V 50Hz 300W 1,3A -0,8 bar 90 x 380 x 240 3
Pression de mise sous
vide (approximative)
Dimensions
h x l x p mm
Poids
(kg)
Raccordement électrique
La prise doit être reliée à la prise secteur qui convient.
Cet appareil est câblé comme suit :
• Fil conducteur (brun) à la borne marquée L
• Fil neutre (bleu) à la borne marquée N
• Fil de terre (vert / jaune) à la borne marquée E
Cet appareil doit être raccordé à la terre, par le biais d'un circuit de mise à la terre dédié.
En cas de doute, consultez un électricien qualifié.
Les points d'isolation électrique doivent être libres de toute obstruction. En cas de débranchement requis
en urgence, ils doivent être facilement accessibles.
Conformité
Le logo WEEE qui figure sur ce produit ou sa documentation indique qu'il ne doit pas
être mis au rebut avec les ordures ménagères. Pour éviter qu'il ne présente un risque
pour la santé humaine et / ou écologique, confiez la mise au rebut de ce produit à un
site de recyclage agréé respectueux de l'environnement. Pour de plus amples détails
sur la mise au rebut appropriée de ce produit, contactez le fournisseur du produit ou
l'autorité responsable de l'enlèvement des ordures dans votre région.
Les pièces BUFFALO ont été soumises à des tests rigoureux pour pouvoir être
déclarées conformes aux normes et spécifications réglementaires définies par les
autorités internationales, indépendantes et fédérales.
Les produits BUFFALO ont été déclarés aptes à porter le symbole suivant :
Tous droits réservés. La production ou transmission, partielles ou intégrales, sous quelque forme que ce soit ou par
n'importe quel moyen, tant électronique que mécanique, sous forme de photocopie, d'enregistrement ou autre de
Nous nous efforçons, par tous les moyens dont nous disposons, de faire en sorte que les détails contenus dans le
présent mode d'emploi soient corrects en date d'impression. Toutefois, BUFFALO se réserve le droit de changer les
15
ce mode d'emploi sont interdites sans l'autorisation préalablement accordée par BUFFALO.
spécifications de ses produits sans préavis.
Page 21

Telefonische Helpline: 0800 – 1860806 (Deutschland)
DE
Sicherheitshinweise
• Auf eine flache, stabile Fläche stellen.
• Alle erforderlichen Montage- und Reparaturarbeiten sollten von Wartungspersonal oder einem
qualifizierten Techniker durchgeführt werden. Keine Bauteile oder Bedienflächen von diesem Produkt
entfernen.
• Für folgende Normen und Vorschriften sind die lokalen und nationalen Normen heranzuziehen:
• Arbeitsschutzvorschriften
• BS EN Verhaltenspraktiken
• Brandschutzvorschriften
• IEE-Anschlussvorschriften
• Bauvorschriften
• Die Versiegelungsleiste während des Betriebs NICHT berühren.
• Nicht den Netzstecker ziehen, um das Gerät auszuschalten; stets die Start-/Stopptaste oder den Ein-/
Ausschalter verwenden.
• Das Gerät nur gemäß Gebrauchsanweisung verwenden.
• Verpackungsmaterial außerhalb der Reichweite von Kindern aufbewahren und gemäß den lokalen
Vorschriften entsorgen.
• Aus Sicherheitsgründen muss ein beschädigtes Stromkabel von einem BUFFALO-Mitarbeiter oder
empfohlenen qualifizierten Elektriker erneuert werden.
Einführung
Bitte nehmen Sie sich einige Minuten Zeit, um diese Anleitung gründlich zu lesen. Durch die korrekte
Wartung und den ordnungsgemäßen Einsatz dieses Geräts erhalten Sie optimale Leistung von Ihrem
BUFFALO-Produkt.
Packungsinhalt
Die Verpackung enthält folgende Teile:
• BUFFALO Vakuumverpackungsmaschine
• Untere Ersatzdichtung
• 20 verschließbare Lebensmitteltüten (200 mm x 300 mm)
• Bedienungsanleitung
BUFFALO ist stolz auf die hochwertige Qualität seiner Produkte und seinen erstklassigen Service. Wir stellen
sicher, dass alle gelieferten Produkte zum Zeitpunkt der Verpackung voll funktionsfähig sind und sich in
einwandfreiem Zustand befinden.
Sollten Sie Transportschäden feststellen, wenden Sie sich bitte unverzüglich an Ihren BUFFALO-Händler.
16
Page 22

DE
Teile und Bedienelemente
1. Start-/Stopptaste
2. Vakuumtaste
3. Vakuumanzeige
4. Stromanzeige
5. Versiegelungsanzeige
6. Abdeckung
7. Dichtung
8. Obere Dichtung
9. Schlauchgehäuse
10. Abnehmbare Vakuumkammer
11. Dichtungsleiste
12. Ein-/Austaste
13. Kammer-Lösehebel
14. Untere Dichtung
Operation
HINWEIS: DIESES GERÄT IST NUR FÜR DIE MITGELIEFERTEN TÜTEN KONZIPIERT. BEI
VERWENDUNG ANDERER TÜTEN ENTSTEHT MÖGLICHERWEISE KEINE KORREKTE
VERSIEGELUNG.
ERKUNDIGEN SIE SICH BEIM LIEFERANTEN IHRER VAKUUMVERPACKUNGSMASCHINE
NACH GEEIGNETEN ERSATZTÜTEN.
Nahrungsmittel versiegeln
1. Die Nahrungsmittel in die Tüte geben.
Hinweis: Darauf achten, dass die Tüte
mindestens 8 cm länger ist als die zu
versiegelnden Nahrungsmittel.
2. Überschüssige Flüssigkeiten oder Nahrungsmittelreste
von der Tüte entfernen.
3. Das offene Ende der Tüte in die Vakuumkammer
legen. Das Tütenende gegen die Platte in der
Vakuumkammer drücken.
17
Page 23

Telefonische Helpline: 0800 – 1860806 (Deutschland)
4. Den Deckel absenken und einige Sekunden lang
herunterdrücken; dadurch wird die Vakuumversiegelung
gestartet. Die gelbe Vakuumanzeige blinkt auf.
5. Die Versiegelungsanzeige blinkt solange, wie das Gerät
die Tüte versiegelt.
6. Sobald die Tüte versiegelt ist, erlöschen beide Anzeigen.
7. Wenn die Tüte noch in Position ist, die Vakuumtaste
drücken, um die aus der Tüte gezogene Luft
auszustoßen.
8. Anschließend den Deckel anheben und die Tüte
entfernen.
Hinweis: Wenn Sie den Prozess zu
irgendeinem Zeitpunkt unterbrechen
müssen, drücken Sie einfach die STOPTaste gefolgt von der Vakuumtaste.
9. Die neue Versiegelung prüfen. Wenn sie luftdicht ist,
müsste ein Streifen durch die Versiegelung laufen und
diese völlig flach sein. Eine faltige Versiegelung könnte
darauf hindeuten, dass die Versiegelung nicht
abgeschlossen ist.
Vakuumstufe ändern
Die Vakuumstufe kann jederzeit durch Unterbrechen des Vakuumprozesses geändert werden.
Während die Luft abgesaugt wird und die Vakuumanzeige blinkt:
1. Die Stopptaste bei der gewünschten Vakuumstufe drücken.
2. Die Versiegelungsanzeige blinkt und das Gerät versiegelt die Tüte.
3. Wenn beide Anzeigen erlöschen, den Deckel anheben und die Tüte entfernen.
DE
Überhitzungsschutz
Wenn die Betriebstemperatur sichere Werte übersteigt, greift der Überhitzungsschutz des Geräts.
Wenn dieser Schutzmechanismus aktiviert wird, den Deckel anheben und bis zu 30 Minuten warten, bis sich
das Gerät abgekühlt hat.
Reinigung, Pflege und Wartung
• Die einzelnen Teile und das Gerät außen mit warmer
Seifenlauge und einem feuchten Tuch reinigen.
• Nach dem Reinigen gründlich abtrocknen.
• Erforderliche Reparaturen sollten von einem BUFFALOMitarbeiter oder einem qualifizierten Techniker
ausgeführt werden.
• Die herausnehmbare Vakuumkammer unter fließendem
Wasser abspülen.
VORSICHT: Beim Reinigen darf kein Wasser in das Gerät eindringen.
18
Page 24

DE
Vakuumkammer entfernen
1. Den Kammer-Lösehebel ziehen.
2. Die Vakuumkammer anheben und vom Gerät
entfernen.
Vakuumkammer auswechseln
1. Das rechte Ende der Kammer in die Lücke
schieben.
2. Darauf achten, dass die Saugdüse (A) sicher in
die Vakuumkammer eingeschoben ist
3. und dass der Positionierungsknopf (B) fest in
Position sitzt.
4. Die linke Seite der Kammer herunterdrücken, bis
der Lösehebel wieder in Position einrastet.
Störungssuche
Bei einem Defekt Ihres BUFFALO-Geräts konsultieren Sie bitte zunächst folgende Tabelle, bevor Sie die
Helpline oder Ihren BUFFALO-Händler anrufen.
Störung Vermutliche Ursache Lösung
Das Gerät funktioniert nicht Das Gerät ist nicht
Gerät saugt nicht die ganze Luft
aus der Tüte
Gerät saugt nicht die ganze
Luft aus der Tüte
19
eingeschaltet
Stecker und Kabel sind
beschädigt
Sicherung im Stecker ist
durchgebrannt
Stromzufuhr Netzstrom prüfen
Interner Vernetzungsfehler BUFFALO-Mitarbeiter oder
Das offene Tütenende ist nicht
vollständig eingeführt
Dichtungen verschmutzt Dichtungen reinigen
Das offene Tütenende ist
verschmutzt
Tüte könnte ein Loch haben Tüte mit Papiertüchern auslegen, um
Prüfen, ob der Netzstecker in die
Steckdose gesteckt wurde und das
Gerät eingeschaltet ist
BUFFALO-Mitarbeiter oder
qualifizierten Techniker kontaktieren
Neue Sicherung in den Stecker
einsetzen
qualifizierten Techniker kontaktieren
Deckel öffnen und Tüte neu
positionieren
Tüte reinigen
sie vor Nahrungsmitteln mit scharfen
Kanten zu schützen
Page 25

Telefonische Helpline: 0800 – 1860806 (Deutschland)
Störung Vermutliche Ursache Lösung
Gerät saugt nicht die ganze Luft
aus der Tüte
Tüten lassen sich nicht korrekt
versiegeln
Tüte könnte ein Loch haben Tüte wieder einlegen
Falsche Tüten verwendet Lieferanten der
Dichtungsleiste überhitzt sich Deckel öffnen und warten, bis sich die
Falsche Tüten verwendet Lieferanten der
Technische Spezifikationen
DE
Vakuumverpackungsmaschine
anrufen
Dichtungsleiste abgekühlt hat
Vakuumverpackungsmaschine
anrufen
Modell Spannung Leistung
S097 230V 50Hz 300W 1,3A -0,8 bar 90 x 380 x 240 3
Strom-
stärke
Vakuumdruck
(annähernd)
Abmessungen
h x b x t mm
Gewicht
(kg)
Elektroanschlüsse
Der Stecker muss in eine geeignete Steckdose gesteckt werden.
Das Gerät ist wie folgt verdrahtet:
• Stromführender Leiter (braun) an Klemme L
• Neutralleiter (blau) an Klemme N
• Erdleiter (grün/gelb) an Klemme E
Das Gerät muss über eine spezielle Erdleitung geerdet werden.
Bei Fragen wenden Sie sich bitte an einen qualifizierten Elektriker.
Elektroisolierpunkte dürfen nicht blockiert werden. Bei einem Notstopp müssen diese Punkte jederzeit sofort
zugänglich sein.
Konformität
Das WEEE-Logo an diesem Produkt oder in der Dokumentation weist darauf hin, dass
das Produkt nicht mit dem normalen Hausmüll entsorgt werden darf. Um potenziellen
Gesundheits- bzw. Umweltschäden vorzubeugen, muss das Produkt durch einen
zugelassenen und umweltverträglichen Recyclingprozess entsorgt werden. Ausführliche Informationen zur korrekten Entsorgung dieses Produkts erhalten Sie von Ihrem
Produktlieferanten oder der für die Müllentsorgung in Ihrer Region zuständige
Behörde.
Alle BUFFALO-Produkte werden strengen Tests unterzogen, um die Einhaltung von
Normen und Spezifikationen internationaler und nationaler Behörden und
unabhängiger Organisationen zu gewährleisten.
BUFFALO-Produkte dürfen durch folgendes Symbol gekennzeichnet werden:
Alle Rechte vorbehalten. Diese Anleitung darf ohne vorherige schriftliche Genehmigung von BUFFALO weder ganz
noch teilweise in irgendeiner Form oder auf irgendeinem Wege - einschließlich elektronischer, mechanischer
Verfahren, durch Fotokopieren, Aufnahme oder andere Verfahren - vervielfältigt oder übertragen werden.
Es werden alle Anstrengungen unternommen um sicherzustellen, dass alle Angaben bei der Drucklegung korrekt
sind. BUFFALO behält sich jedoch das Recht vor, Spezifikationen ohne Vorankündigung zu ändern.
20
Page 26

IT
Suggerimenti per la sicurezza
• Posizionare il fabbricatore di ghiaccio su una superficie in piano e stabile.
• L'installazione e le eventuali riparazioni devono venire eseguite da un agente/tecnico qualificato. Non
rimuovere i componenti o i pannelli di accesso dell'apparecchio.
• Verificare la conformità alle normative locali e nazionali di quanto segue:
• Normativa antinfortunistica sul lavoro
• Linee guida BS EN
• Precauzioni antincendio
• Normativa IEE sui circuiti elettrici
• Norme di installazione
• NON toccare la barra di sigillatura durante il funzionamento.
• Non tirare la spina per arrestare il funzionamento; utilizzare sempre il pulsante Stop/Start o
l'interruttore On/Off.
• Non utilizzare l'apparecchio per scopi diversi da quelli indicati.
• Tenere lontano l'imballaggio dalla portata dei bambini. Smaltire l'imballaggio in conformità alle
normative locali.
• Se danneggiato, il cavo di alimentazione deve venire sostituito da un agente BUFFALO o da un tecnico
qualificato al fine di prevenire eventuali rischi.
Introduzione
Leggere con attenzione il presente manuale. La manutenzione e l'utilizzo corretti di questo apparecchio
consentiranno di ottenere le massime prestazioni da questo prodotto BUFFALO.
Contenuto della confezione
La confezione contiene:
• Confezionatrice sottovuoto BUFFALO
• Guarnizione di tenuta inferiore di ricambio
• 20 x buste per cibo a tenuta (200mm x 300mm)
• Manuale di istruzioni
BUFFALO garantisce una qualità e un servizio impeccabili e assicura che al momento dell'imballaggio tutti i
componenti forniti sono integralmente funzionanti e privi di difetti.
Nel caso siano rilevati danni risultanti dal trasporto del prodotto, rivolgersi immediatamente al rivenditore
BUFFALO locale.
21
Page 27

Posizione dei comandi
IT
1. Pulsante Start/Stop
2. Pulsante sottovuoto
3. Spia di sottovuoto
4. Spia di alimentazione
5. Spia di tenuta
6. Coperchio
7. Guarnizione di tenuta
8. Guarnizione superiore
9. Alloggiamento del flessibile
10. Camera del vuoto rimovibile
11. Barra di sigillatura
12. Interruttore On/Off
13. Leva di rilascio camera
14. Guarnizione di tenuta inferiore
Funzionamento
NOTA: QUESTO APPARECCHIO È PROGETTATO PER ESSERE UTILIZZATO CON LE BUSTE
FORNITE. ALTRE BUSTE POTREBBERO NON SIGILLARSI CORRETTAMENTE.
CONTATTARE IL FORNITORE DELLA CONFEZIONATRICE SOTTOVUOTO PER BUSTE DI
RICAMBIO ADATTE.
Sigillare il cibo
1. Inserire il cibo all'interno della busta.
Nota: assicurarsi che la busta sia di
almeno 8 cm più lunga del cibo da
sigillare.
2. Rimuovere tutto il liquido in eccesso o il cibo residuo
dalla busta.
3. Posizionare il lato aperto della busta all'interno della
camera del vuoto. Premere l'estremità della busta
contro la piastra nella camera del vuoto.
22
Page 28

IT
4. Abbassare il coperchio e premere verso il basso per
alcuni secondi; ha inizio il processo di sigillatura
sottovuoto. La spia gialla del sottovuoto lampeggia
5. La spia di sigillatura lampeggia mentre l'apparecchio
sigilla la busta.
6. Entrambe le spie si spengono quando la busta è
sigillata.
7. Con la busta ancora in posizione, premere il pulsante
sottovuoto per espellere l'aria rimossa dalla busta
sigillata.
8. Una volta completata l'operazione sollevare il coperchio
e rimuovere la busta.
Nota: per interrompere il processo in
qualsiasi momento, premere il pulsante
STOP e quindi il pulsante sottovuoto.
9. Esaminare la nuova sigillatura. Se è ermetica, deve
essere presente una striscia attraverso la sigillatura che
deve risultare completamente piatta. La presenza di
rugosità può indicare che la sigillatura non è completa.
Modifica del livello di sottovuoto
Il livello di sottovuoto può essere modificato interrompendo in qualsiasi momento il processo del sottovuoto.
Quando l'aria viene estratta e la spia del sottovuoto lampeggia:
1. Premere il pulsante Stop al livello desiderato di sottovuoto.
2. La spia di sigillatura si accende mentre l'apparecchio sigilla la busta.
3. Quando entrambe le spie si spengono, sollevare il coperchio e rimuovere la busta.
Interruttore di surriscaldamento
L'apparecchio è dotato di un interruttore di sicurezza che scatta se la temperatura supera il livello di
sicurezza.
Se l'interruttore viene attivato, sollevare il coperchio e attendere fino a 30 minuti per lasciare raffreddare
l'apparecchio
Pulizia e manutenzione
• Utilizzare acqua calda saponata e un panno inumidito
per pulire le parti e la superficie esterna
dell'apparecchio.
• Asciugare completamente dopo la pulizia.
• Le riparazioni devono venire eseguite da un tecnico
qualificato o da un rivenditore BUFFALO.
• Sciacquare la camera del vuoto rimovibile sotto acqua
corrente.
ATTENZIONE: durante la pulizia fare attenzione a non rovesciare acqua all'interno
dell'apparecchio.
23
Page 29

Rimozione della camera del vuoto
1. Tirare la leva di rilascio della camera.
2. Sollevare la camera del vuoto e rimuoverla
dall'apparecchio.
Montaggio della camera del vuoto
1. Inserire l'estremità destra nella rientranza.
2. Assicurarsi che l'ugello di aspirazione (A) sia
saldamente collegato alla camera del vuoto e
che la manopola di posizionamento (B) sia
saldamente insediata.
3. Premere il lato sinistro della camera fino a
quando la leva di rilascio scatta in posizione
IT
Risoluzione dei problemi
Se dovessero verificarsi guasti all'apparecchio BUFFALO, controllare la tabella seguente prima di contattare
la helpline telefonica o il rivenditore BUFFALO.
Guasto Probabile causa Azione
L'apparecchio non funziona L'apparecchio non è acceso Controllare che l'apparecchio sia
La presa e il cavo sono
danneggiati
Il fusibile della presa è guasto Sostituire il fusibile della presa
Alimentazione Controllare l'alimentazione
Guasto dei circuiti interni Rivolgersi a un tecnico qualificato o a
L’apparecchio non rimuovere
tutta l’aria dalla busta
L’apparecchio non rimuovere
tutta l’aria dalla busta
Il lato aperto della busta non è
inserito completamente
Le guarnizioni sono sporche Pulire le guarnizioni
Il lato aperto della busta è
sporco
La busta può essere forata Foderare la busta con tovagliolini di
correttamente collegato e acceso
Rivolgersi a un tecnico qualificato o a
un agente BUFFALO
un agente BUFFALO
Aprire il coperchio e riposizionare la
busta
Pulire la busta
carta per proteggere la busta da cibi
che possono forarla
Sostituire la busta
24
Page 30

IT
Guasto Probabile causa Azione
L’apparecchio non rimuovere
tutta l’aria dalla busta
Le buste non vengono sigillate
correttamente
Specifiche tecniche
Il tipo di busta utilizzato non è
corretto
La barra di sigillatura è
surriscaldata
Il tipo di busta utilizzato non è
corretto
Rivolgersi al fornitore delle
confezionatrice sottovuoto
Aprire il coperchio e lasciare
raffreddare la barra di sigillatura
Rivolgersi al fornitore delle
confezionatrice sottovuoto
Pressione del
Modello Tensione Alimentazio Corrente
S097 230V 50Hz 300W 1,3A -0,8 bar 90 x 380 x 240 3
sottovuoto
(approssimata)
Dimensioni
h x l x p mm
Peso
(kg)
Cablaggi elettrici
La spina deve venire collegata a una presa di rete appropriata.
L'apparecchio ha i seguenti cablaggi:
• Filo sotto tensione (colore marrone) a terminale L
• Filo del neutro (colore blu) a terminale N
• Filo di terra (colore verde/giallo) a terminale E
L'apparecchio deve avere un circuito dedicato di messa a terra.
In caso di dubbi, consultare un elettricista qualificato.
I punti di isolamento elettrico devono essere liberi da ostruzioni. In caso di emergenza, i punti devono
essere facilmente raggiungibili qualora sia necessario scollegarli.
Conformità
Il logo WEEE riportato su questo prodotto o sulla relativa documentazione indica che
il prodotto non può essere smaltito come normale rifiuto domestico. Per evitare
possibili danni alla salute e/o all'ambiente, il prodotto deve venire smaltito utilizzando
una procedura di riciclaggio approvata e sicura per l'ambiente. Per ulteriori
informazioni su come smaltire in maniera corretta questo prodotto, contattare il
fornitore del prodotto o l'ente locale responsabile per lo smaltimento dei rifiuti.
I componenti BUFFALO sono stati sottoposti a un rigoroso collaudo ai fini della
conformità agli standard e alle specifiche normative previste dalle autorità
internazionali, indipendenti e federali.
I prodotti BUFFALO sono autorizzati a esporre il seguente simbolo:
Tutti i diritti riservati. È vietata la riproduzione o la trasmissione in alcuna forma, elettronica, meccanica, mediante
fotocopiatura o altro sistema di riproduzione, di qualsiasi parte delle presenti istruzioni senza la previa
Le informazioni contenute sono corrette e accurate al momento della stampa, tuttavia BUFFALO si riserva il diritto
25
autorizzazione scritta di BUFFALO.
di modificare le specifiche senza preavviso
Page 31

ES
Consejos de Seguridad
• Colóquela sobre una superficie plana, estable.
• Un agente de servicio / técnico cualificado debería llevar a cabo la instalación y cualquier reparación si
se precisa. No retire ningún componente ni panel de servicio de este producto.
• Consulte las Normas Locales y Nacionales correspondientes a lo siguiente:
• Legislación de Seguridad e Higiene en el Trabajo
• Códigos de Práctica BS EN
• Precauciones contra Incendios
• Normativos de Cableado de la IEE
• Normativas de Construcción
• NO toque la barra de sellado con el aparato en funcionamiento.
• No desenchufe el aparato para detener el funcionamiento; utilice siempre el botón Stop/Start o el
interruptor On/Off.
• No utilice el aparato para ningún uso diferente al destinado.
• Mantenga el embalaje fuera del alcance de los niños. Deseche el embalaje de acuerdo con las
normativas de las autoridades locales.
• Si el cable eléctrico resultada dañado, debe ser reemplazado por un técnico cualificado recomendado o
un agente de POLAR para evitar cualquier riesgo.
Introducción
Tómese unos minutos para leer este manual. El correcto mantenimiento y manejo de esta máquina
proporcionará el mejor funcionamiento posible de su producto POLAR.
Contenido del Conjunto
Se incluye lo siguiente:
• Envasadora al vacío BUFFALO
• Junta de sellado inferior de repuesto
• 20 bolsas de alimentos para sellar (200mm x 300mm)
• Manual de instrucciones
BUFFALO se enorgullece de su calidad y servicio y asegura que en el momento del embalaje, el contenido
se suministró con plena funcionalidad y sin ningún defecto.
Si encontrara algún daño resultante del transporte, póngase en contacto inmediatamente con su
distribuidor BUFFALO.
26
Page 32

ES
Ubicación de los controles
1. Botón Start/Stop (puesta en marcha/parada)
2. Botón de vacío
3. Luz indicadora de vacío
4. Luz indicadora de alimentación
5. Luz indicadora de sellado
6. Ta pa
7. Junta de sellado
8. Junta superior
9. Compartimento del cable
10. Cámara de vacío desmontable
11. Barra de sellado
12. Interruptor On/Off
13. Palanca de liberación de la cámara
14. Junta de sellado inferior
Funcionamiento
NOTA: ESTE APARATO SE HA DISEÑADO PARA UTILIZARSE CON LAS BOLSAS
INCLUIDAS. ES POSIBLE QUE LAS BOLSAS DE OTRO TIPO NO SE SELLEN
CORRECTAMENTE.
PÓNGASE EN CONTACTO CON EL PROVEEDOR DE SU MÁQUINA PARA OBTENER BOLSAS
DE REPUESTO ADECUADAS.
Sellado de alimentos
1. Coloque los alimentos dentro de la bolsa.
Nota: asegúrese de que la bolsa sea al
menos 8 cm más larga que el alimento
que vaya a sellar.
2. Elimine cualquier exceso de líquido o resto de comida
de la bolsa.
27
Page 33

ES
3. Coloque el extremo abierto de la bolsa dentro de la cámara de vacío. Presione el extremo de la bolsa
contra la placa de la cámara de vacío.
4. Baje la tapa y presione durante unos segundos; con
esto se iniciará el proceso de sellado al vacío. La luz
indicadora de vacío amarilla empezará a parpadear.
5. La luz indicadora de sellado parpadeará mientras el
aparato sella la bolsa.
6. Las dos luces se apagarán cuando la bolsa esté
sellada.
7. Con la bolsa todavía en su sitio, pulse el botón de
vacío para extraer el aire que se ha sacado de la bolsa
sellada.
8. Una vez que se haya completado el proceso, levante la
tapa y retire la bolsa.
Nota: si tiene que interrumpir el proceso
en cualquier momento, pulse el botón
STOP y luego el botón de vacío.
9. Examine el nuevo sellado. Si es hermético, debería
aparecer una raya continua a lo largo de todo el
sellado y debería quedarse totalmente plano. Si el
sellado está arrugado, esto podría indicar que no se
ha completado.
Modificación del nivel de vacío
El nivel de vacío puede modificarse interrumpiendo el proceso de vacío en cualquier momento.
El indicador de vacío parpadeará mientras se esté extrayendo el aire:
1. Pulse el botón Stop cuando haya llegado al nivel de vacío deseado.
2. La luz indicadora de sellado se encenderá y el aparato sellará la bolsa.
3. Cuando las dos luces se apaguen, levante la tapa y retire la bolsa.
Interruptor de sobrecalentamiento
El aparato cuenta con un interruptor de sobrecalentamiento por si se supera la temperatura operativa por
encima de los niveles de seguridad.
Si se activa este interruptor, suba la tapa y deje que el aparato se enfríe durante hasta 30 minutos.
Limpieza, Cuidado y
Mantenimiento
Utilice agua jabonosa caliente y un paño húmedo para limpiar
las piezas y el exterior del aparato.
Secar bien después de la limpieza.
Un agente de BUFFALO o un técnico cualificado deberían
llevar a cabo las reparaciones en caso de precisarse.
Enjuague la cámara de vacío desmontable debajo del grifo.
ADVERTENCIA: no deje que el agua penetre en el aparato mientras lo limpia.
28
Page 34

ES
Desmontaje de la cámara de vacío
1. Tire de la palanca de liberación de la cámara.
2. Eleve la cámara de vacío y sáquela del aparato.
Sustitución de la cámara de vacío
3. Introduzca el borde derecho de la cámara en el
entrante.
4. Asegúrese de que la boquilla de succión (A) se
acopla bien a la cámara de vacío y de que el
mando de posición (B) se fija bien en su sitio.
5. Presione el lado izquierdo de la cámara hacia
abajo hasta que la palanca de liberación haga un
clic al volverse a encajar en su sitio.
Resolución de problemas
Si su aparato BUFFALO falla, compruebe la tabla siguiente antes de llamar a la línea de asistencia o a su
distribuidor BUFFALO.
Fallo Probable Causa Acción
El aparato no funciona El aparato no está conectado Compruebe que el aparato esté
enchufado correctamente y
conectado
El aparato no extrae todo el aire
de la bolsa
El aparato no extrae todo el aire
de la bolsa
29
El enchufe y el cable están
dañados
El fusible del enchufe se ha
fundido
Suministro eléctrico Compruebe el suministro eléctrico
Fallo del cableado interno Llame a un técnico cualificado o a un
Extremo abierto de la bolsa,
que no se ha introducido del
todo
Las juntas están sucias Limpie las juntas
Extremo abierto de la bolsa,
que está sucio
Puede que la bolsa esté
perforada
Llame a un técnico cualificado o a un
agente de POLAR
Cambie el fusible del enchufe
agente de POLAR
Abra la tapa y vuelva a colocar la
bolsa
Limpie la bolsa
Cubra la bolsa con papel de cocina
como protección frente a los
alimentos con extremos puntiagudos
Page 35

Fallo Probable Causa Acción
El aparato no extrae todo el aire
de la bolsa
Las bolsas no se sellan bien Sobrecalentamiento de la barra
Puede que la bolsa esté
perforada
Se ha utilizado una bolsa
inadecuada
de sellado
Se ha utilizado una bolsa
inadecuada
Especificaciones Técnicas
ES
Cambie la bolsa
Póngase en contacto con el
proveedor del aparato
Abra la tapa y deje enfriar la barra de
sellado
Póngase en contacto con el
proveedor del aparato
Modelo Tensión Potencia Corriente
S097 230V 50Hz 300W 1,3A -0,8 bar 90 x 380 x 240 3
Presión de
vacío (aprox.)
Dimensiones
a x a x p mm
Pesot
(kg)
Cableado Eléctrico
El enchufe tiene que conectarse a una toma eléctrica adecuada.
Este aparato está conectado de la forma siguiente:
• Cable cargado (de color marrón) al terminal marcado como L
• Cable neutro (de color azul) al terminal marcado como N
• Cable de tierra (de color verde / amarillo) al terminal marcado como E
El aparato debe estar conectado a tierra, utilizando un circuito de conexión a tierra especializado.
Si tiene alguna duda, consulte a un electricista cualificado.
Los puntos de aislamiento eléctrico deben mantenerse libres de cualquier obstrucción. En caso de precisarse
una desconexión de emergencia, deben estar disponibles de forma inmediata.
Cumplimiento
El logotipo WEEE en este producto o su documentación indica que no debe eliminarse
como un residuo doméstico. Para ayudar a prevenir posibles daños a la salud humana
y/o el medio ambiente, el producto debe eliminarse en un proceso de reciclaje
aprobado y medioambientalmente seguro. Para obtener más información sobre cómo
eliminar correctamente este producto, póngase en contacto con el proveedor del
mismo o la autoridad local responsable de la eliminación de residuos en su zona.
Las piezas BUFFALO han pasado estrictas pruebas de productos para cumplir las
especificaciones y normas reguladoras establecidas por las autoridades
internacionales, independientes y federales.
Los productos BUFFALO han sido autorizados para llevar el símbolo siguiente:
Reservados todos los derechos. Puede estar prohibida la reproducción o transmisión en cualquier forma o por
cualquier medio electrónico, mecánico, de fotocopiado, registro o de otro tipo, de cualquier parte de estas
Se ha hecho todo lo posible para garantizar que todos los datos son correctos en el momento de su publicación; sin
embargo, BUFFALO se reserva el derecho a modificar las especificaciones sin que medie notificación previa.
instrucciones sin la autorización previa y por escrito de BUFFALO.
30
Page 36

PT
Conselhos de segurança
• Colocar numa superfície plana e estável.
• Um agente de serviço/técnico qualificado deverá efectuar a instalação e quaisquer reparações, caso
necessário. Não retirar qualquer componente ou painéis de serviço deste produto.
• Consultar e cumprir os regulamentos locais e nacionais no que diz respeito à:
• Legislação de saúde e segurança no local de trabalho
• Códigos de trabalho
• Prevenção de incêndios
• Normas para sistemas eléctricos IEE
• Código de construção
• NÃO tocar na barra selante durante o funcionamento.
• Não retirar a ficha da tomada para desligar o aparelho. Deve-se utilizar sempre o botão Stop/Start ou
o botão On/Off.
• Utilize o aparelho exclusivamente para a sua finalidade prevista.
• Ao não utilizar o aparelho, deve sempre desligar o mesmo e retirar a ficha da tomada.Mantenha o
material da embalagem fora do alcance de crianças. O material da embalagem é para ser deitado fora
respeitando as regras das autoridades locais.
• A fim de evitar situações perigosas, a substituição dos cabos de alimentação danificados deve ser feita
por um agente BUFFALO ou um técnico qualificado recomendado.
Introdução
Por favor utilize o tempo necessário para ler atentamente este manual. Uma manutenção e utilização
correcta deste aparelho permitem a melhor capacidade de funcionamento do seu produto BUFFALO.
Conteúdo da embalagem
A embalagem inclui o seguinte:
• Máquina de embalagem a vácuo da BUFFALO
• Elemento selante inferior de reserva
• 20 x sacos selantes (200 mm x 300 mm)
• Manual de instruções
A BUFFALO orgulha-se pelo serviço e a qualidade dos seus produtos e portanto verifica, durante a fase de
embalagem, o estado funcional e o bom estado do conteúdo fornecido.
Quando confrontado com quaisquer danos provocados durante o transporte, contacte imediatamente o seu
fornecedor BUFFALO.
31
Page 37

O lugar dos comandos
PT
1. Botão Stop/Start
2. Botão de vácuo
3. Luz indicadora de vácuo
4. Luz indicadora de alimentação
5. Luz indicadora de selagem
6. Ta mp a
7. Elemento selante
8. Elemento selante superior
9. Compartimento do cabo
10. Câmara de vácuo removível
11. Barra selante
12. Interruptor On/Off (ligar/desligar)
13. Manivela de desbloqueio da câmara
14. Elemento selante inferior
Funcionamento
NOTA: ESTE APARELHO FOI DESENVOLVIDO PARA USAR COM OS SACOS FORNECIDOS.
O USO DE OUTROS SACOS NÃO GARANTE UMA SELAGEM TOTAL.
CONTACTE O SEU FORNECEDOR DA MÁQUINA DE EMBALAGEM A VÁCUO PARA OBTER
OS SACOS APROPRIADOS.
Selar alimentos
1. Coloque os alimentos dentro do saco.
Nota: certifique-se de que o saco tem um
comprimento adicional de 8 cm em relação
aos alimentos que pretende selar.
2. Retire quaisquer líquidos ou resíduos excessivos do
saco.
3. Coloque a abertura do saco dentro da câmara de
vácuo. Carregue o fundo do saco contra a placa na
câmara de vácuo.
32
Page 38

PT
4. Pressione a tampa durante alguns segundos para
baixo, para iniciar o processo de selagem a vácuo. A
luz indicadora de vácuo de cor amarela começa a
piscar.
5. Durante a selagem do saco a luz indicadora de
selagem está a piscar.
6. Assim que o saco estiver selado, ambas as luzes
indicadoras apagam.
7. Com o saco ainda no lugar, carregue no botão de
vácuo para retirar o ar do saco selado.
8. Depois levante a tampa e retire o saco.
Nota: caso necessite de parar o processo,
pode a qualquer momento carregar no
botão STOP e a seguir no botão de Vácuo.
9. Verifique se o saco ficou bem selado. Quando
correctamente selado, a faixa selante é totalmente lisa
ao longo da abertura do saco. Uma faixa selante
amarrotada indica que o saco não está totalmente
isolado.
Alterar o nível do vácuo
Pode alterar o nível do vácuo parando a qualquer momento
o processo de vácuo.
Durante a retirada do ar do saco, a luz indicadora do vácuo está a piscar:
1. Quando atingir o nível de vácuo desejado, carregue no botão Stop.
2. A luz indicadora de selagem acende e a máquina sela o saco.
3. Quando ambas as luzes indicadoras apagarem, abra a tampa e retire o saco.
Interruptor de sobrecarga
Esta máquina dispõe de um interruptor de sobrecarga que desliga a mesma quando os níveis seguros da
temperatura forem excedidos.
Depois do disparo do interruptor de sobrecarga, abra a tampa e aguarde 30 minutos para a máquina
arrefecer.
Limpeza, cuidados &
manutenção
• Utilize água quente com sabão e um pano húmido para
limpar o exterior e as peças da máquina.
• Seque-o cuidadosamente depois da limpeza.
• As reparações necessárias devem ser feitas por um
representante BUFFALO ou técnico qualificado.
• Lave a câmara de vácuo removível com abundância de
água.
AVISO: durante a limpeza deve ter o cuidado para que não entre água na máquina.
33
Page 39

Retirar a câmara de vácuo
1. Puxe a alavanca de desbloqueio da câmara.
2. Levante a câmara de vácuo e retire-a da
máquina.
Colocar a câmara de vácuo
1. Encaixe a extremidade direita da câmara na
abertura.
2. Certifique-se de que a cabeça de sucção (A) está
correctamente encaixada na câmara de vácuo e
que o botão de fixação (B) está correctamente
colocado.
3. Carregue a parte esquerda da câmara para baixo
até a alavanca de desbloqueio clicar no seu
lugar.
PT
Resolução de problemas
Se o seu produto BUFFALO apresentar uma falha, consulte a seguinte tabela antes de telefonar à linha de
apoio ou ao seu agente BUFFALO.
Problema Causa provável A fazer
O aparelho não
funciona
A máquina não tira todo o ar do
saco
O aparelho não
está ligado
A ficha e o cabo estão
danificados
O fusível da ficha
disparou
Fonte de alimentação Verifique a fonte de alimentação
Erro na cablagem interna Chame o agente da BUFFALO ou um
Não introduziu totalmente a
abertura do saco
Os elementos selantes estão
sujos
A abertura do saco está suja Limpe o saco
Verifique a ligação correcta dos cabos
e ligue o aparelho
Chame o agente da BUFFALO ou um
técnico qualificado
Substitua o fusível da ficha
técnico qualificado
Abra a tampa e reposicione o saco
Limpe os elementos selantes
34
Page 40

PT
Problema Causa provável A fazer
A máquina não tira todo o ar do
saco
Os sacos não são correctamente
selados
O saco pode estar furado Forre o saco com papel de cozinha
Não está a utilizar os sacos
adequados
As barras selantes estão
sobreaquecidas
Não está a utilizar os sacos
adequados
Especificações técnicas
para proteger o saco das partes
pontiagudas dos alimentos
Substitua o saco
Contacte o seu fornecedor da
máquina
Abra a tampa e deixe arrefecer a
barra selante
Contacte o seu fornecedor da
máquina
Model Voltagem Alimentação Curronte
S097 230V 50Hz 350W 1,5A -0,8 bar 90 x 380 x 240 3
Pressão de
vácuo (aprox.)
Dimensões
a x l x p mm
Cablagem eléctrica
Deve-se utilizar tomadas adequadas para ligar a ficha do aparelho.
O esquema de electricidade deste aparelho é o seguinte:
• Cabo eléctrico (castanho) para o terminal marcado L
• Cabo neutro (azul) para o terminal marcado N
• Cabo terra (verde/amarelo) para o terminal marcado com E
Este aparelho tem que estar ligado à terra através de um circuito de terra.
Consulte um electricista qualificado em caso de dúvidas.
Os pontos eléctricos isolados devem ficar limpos de qualquer obstrução. Estes pontos têm que ser
imediatamente acessíveis caso seja necessário desligar a electricidade.
Conformidade
O logótipo WEEE neste produto ou a sua documentação indicam que o produto não
deve ser tratado como lixo doméstico. Para ajudar a prevenir possíveis danos para a
saúde humana e/ou ambiente, o produto deve ser eliminado de acordo com um
processo de reciclagem aprovado e seguro para o ambiente. Para mais informação
sobre como eliminar este produto correctamente, contacte o fornecedor do mesmo ou
as autoridades locais responsáveis pela eliminação de desperdícios na sua área.
As componentes BUFFALO foram submetidas a testes rigorosos a fim de cumprirem
as normas e especificações legais determinadas pelas autoridades internacionais,
independentes e nacionais.
Os produtos BUFFALO foram aprovados e trazem o seguinte símbolo:
Peso
(kg)
Todos os direitos reservados. É proibida a reprodução electrónica ou mecânica, ou por qualquer outro meio copiar,
guardar em meios digitais ou transmitir a terceiros estas instruções, seja parcialmente ou na sua totalidade, sem a
Nós nos esforçamos para que no dia de publicação deste manual todos os pormenores sejam correctos, no entanto,
35
a BUFFALO tem o direito de alterar as especificações sem aviso prévio.
autorização prévia de BUFFALO.
Page 41

S
Säkerhetsråd
• Placera på en plan stabil yta.
• Ett serviceombud/kvalificerad tekniker skall utföra installation och reparationer om så krävs. Avlägsna
inte några komponenter eller servicepanler på produkten.
• Konsultera lokala och nationella normer för att efterleva följande:
• Lagstiftning om hälsa och säkerhet i arbetet
• BS EN Tillämpningsregler
• Brandförebyggande åtgärder
• IEE Regler för kabeldragning
• Byggregler
• Ta INTE på förseglingsstången under användning.
• Dra inte ut kontakten när du vill stoppa apparaten, använd alltid Stopp/Start-knappen eller På/Avknappen.
• Använd inte apparaten för andra ändamål än det den är avsedd för.
• Håll allt förpackningsmaterial åtskiljt från barn. Släng förpackningsmaterialet i enlighet med loka
myndigheters regleringar.
• Om elsladden är skadad måste den bytas ut av en BUFFALO-representant eller en rekommenderad
kvalificerad tekniker för att undvika risker.
Inledning
Ta några minuter för att noggrant läsa igenom denna manual. Korrekt underhåll och drift av maskinen
kommer att göra att din BUFFALO-produkt ger bästa möjliga prestanda.
Förpackningsinnehåll
Följande medföljer:
• BUFFALO vakuummaskin
• Undre tätningspackning i reserv
• 20 förseglingsbara matpåsar (200 mm x 300 mm)
• Bruksanvisning
Håll allt förpackningsmaterial åtskiljt från barn. Släng förpackningsmaterialet i enlighet med loka
myndigheters regleringar.
Om elsladden är skadad måste den bytas ut av en BUUFALO-representant eller en rekommenderad
kvalificerad tekniker för att undvika risker.
36
Page 42

S
Placering av kontrollerna
1. Stopp/Start-knapp
2. Vakuumknapp
3. Vakuumindikator
4. Strömindikator
5. Förseglingsindikator
6. Lock
7. Tätningspackning
8. Övre packning
9. Slanghus
10. Löstagbar vakuumkammare
11. Förseglingsstång
12. På/av-strömbrytare
13. Frigöringsspak för kammare
14. Undre tätningspackning
Drift
OBS: APPARATEN ÄR KONSTRUERAD ATT ANVÄNDAS MED DE MEDFÖLJANDE PÅSARNA.
ANDRA PÅSAR KANSKE INTE FÖRSEGLAS SOM DE SKA.
KONTAKTA ÅTERFÖRSÄLJAREN SOM LEVERERADE VAKUUMMASKINEN FÖR LÄMPLIGA
PÅSAR
Försegla livsmedel
1. Placera maten inuti påsen.
Obs: Kontrollera att påsen är minst 8 cm
längre än matbiten som ska förpackas.
2. Avlägsna överflödig vätska och matrester från påsen.
3. Placera påsens öppna ände inuti vakuumkammaren.
Tryck påsens ände mot plattan i vakuumkammaren.
37
Page 43

4. Sänk locket och tryck ned i flera sekunder, det startar
vakuumförseglingen. Den gula vakuumindikatorn
blinkar.
5. Förseglingsindikatorn blinkar när apparaten förseglar
påsen.
6. Båda lamporna slocknar när påsen har förseglats.
7. Låt påsen sitta kvar på plats och tryck på
vakuumknappen för att släppa ut luften som
avlägsnats från den förseglade påsen.
8. Lyft på locket och ta bort påsen när det är klart.
Obs: Tryck på STOPP-knappen och
därefter på vakuumknappen om du
måste avbryta processen.
9. Kontrollera förseglingen. Om den är lufttät ska det
finnas en rand längs förseglingen och den ska vara
platt. En deformerad försegling tyder på att
förseglingen inte är fullständig.
Ändra vakuumnivån
Vakuumnivån kan ändras genom att stoppa
vakuumprocessen.
När luft sugs ut och vakuumindikatorn blinkar:
1. Tryck på Stopp-knappen när önskad vakuumnivå har nåtts.
2. Förseglingsindikatorn tänds och apparaten förseglar påsen.
3. Lyft locket och ta bort påsen när båda lamporna har slocknat.
S
Överhettningsbrytare
Apparaten har en säkerhetsbrytare om driftstemperaturen överstiger den säkra nivån.
Om säkerhetsbrytaren aktiveras ska du lyfta på locket och låta apparaten svalna i upp till 30 minuter.
Rengöring, omvårdnad och
underhåll
• Rengör delarna och apparatens utsida med varmt
tvålvatten och en fuktad trasa.
• Torka apparaten noga efter rengöringen.
• En BUFFALO-återförsäljare eller kvalificerad tekniker bör
utföra reparationer om det behövs.
• Skölj den löstagbara vakuumkammaren under rinnande
vatten.
VARNING: Låt inte vatten tränga in i apparaten när den rengörs.
38
Page 44

S
Ta bort vakuumkammaren
1. Dra i kammarens frigöringsspak.
2. Lyft vakuumkammaren och ta bort den från
apparaten.
Byta vakuumkammaren
1. Skjut in kammarens högra ände i fördjupningen.
2. Kontrollera att sugmunstycket (A) är ordentligt
anslutet till vakuumkammaren och att
positionsratten (B) sitter ordentligt i sätet.
3. Tryck ned kammarens vänstra sida tills
frigöringsspaken snäpps fast på plats.
Felsökning
Om din BUFFALO-apparat påvisar något fel, kontrollera först tabellen innan du ringer till hjälplinjen eller
dinv BUFFALO-återförsäljare.
Fel Möjlig orsak Åtgärd
Apparaten fungerar inte Apparaten är inte påslagen Kontrollera att apparaten är korrekt
Kontakt och ledning är
skadade
Säkring i kontakten har gått Byt ut säkringen
Strömtillförsel Kontrollera strömtillförseln
Internt kabeldragningsfel Ring BUFFALO-representant eller
Apparaten avlägsnar inte all luft
från påsen
39
Påsens öppna ände är inte
ordentligt införd
Packningarna är smutsiga Rengör packningarna
Påsens öppna ände är smutsig Rengör påsen
Det kan vara hål på påsen Lägg papper i påsen för att skydda
Fel påsar används Kontakta återförsäljaren av
ansluten och påslagen
Ring BUFFALO-representant eller
kvalificerad tekniker
kvalificerad tekniker
Öppna locket och positionera om
påsen
den mot matvaror med vassa kanter
Byt påse
vakuummaskinen
Page 45

Fel Möjlig orsak Åtgärd
Påsarna förseglas inte ordentligt Förseglingsstången är
överhettad
Fel påsar används Kontakta återförsäljaren av
Tekniska specifikationer
S
Öppna locket och låt
förseglingsstången svalna
vakuummaskinen
Modell Spänning Kraft Ström
S097 230V 50Hz 300W 1,3A -0,8 bar 90 x 380 x 240 3
Vakuumtryck
(ca.)
Mått
h x b x d mm
Vikt (kg)
Elektriska kablar
Kontakten måste vara ansluten till ett lämpligt eluttag.
Denna apparat har följande kablar:
• Elektrisk kabel (brun) till uttag markerat L
• Neutral kabel (blå) till uttag markerat N
• Jordkabel (grön/gul) till uttag markerat E
Denna apparat måste vara jordad, och bruka en dedikerad jordad krets.
Vid tveksamheter rådfråga en kvalificerad elektriker.
Elektriska isoleringspunkter måste hållas fria från hinder. I händelse av urkoppling vid nödfall krävs, måste
de vara lättåtkomliga.
Du kan också ringa BUFFALO:s hjälplinje för information om nationella företag för avfallshantering i EU.
Tillmötesgående
WEEE-logotypen på den här produkten eller i dokumentationen anger att produkten
inte får kastas med vanliga hushållssopor. För att förhindra hälso- och/eller
miljöskador måste produkten lämnas in på en godkänd insamlingsplats för miljösäker
återvinning. Kontakta leverantören eller de lokala myndigheterna som ansvarar för
sophanteringen om du vill ha mer information om hur produkten ska kastas.
BUFFALO-delarna har genomgått strikt produkttestning för att tillmötesgå reglerande
normer och specifikationer utsatta av internationella, oberoende och statliga
myndigheter.
BUFFALO-produkterna har godkänts för att bära följande symbol:
All rights reserved. No part of these instructions may be produced or transmitted in any form or by any means,
electronic, mechanical, photocopying, recording or otherwise, without the prior written permission of BUFFALO.
Every effort is made to ensure all details are correct at the time of going to press, however, BUFFALO reserve the
right to change specifications without notice.
40
Page 46

DK
Sikkerhedstips
• Anbring apparatet på en jævn, stabil overflade.
• Installation og reparation skal udføres af en serviceagent/kvalificeret tekniker, hvis det bliver
nødvendigt. Fjern ikke komponenter eller servicepaneler på dette produkt.
• Check de lokale og nationale standarder for at imødekomme det følgende:
• Sikkerhed og sundhed på arbejdspladsen
• BS EN Regler for god praksis
• Brandforholdsregler
• IEE Strømkabelregulativer
• Bygningsvedtægter
• De MÅ IKKE røre ved forseglingsbommen under driften.
• De må ikke slukke på stikkontakten for at holde inde med driften - brug altid Stop/Start-knappen eller
On/Off-kontakten.
• De må ikke bruge udstyret til andet end dets tilsigtede formål.
• Opbevar al emballage utilgængeligt for børn. Kasser emballagen i henhold til de lokale love og
bestemmelser.
• Hvis strømkablet er beskadiget, skal det udskiftes af en BUFFALO agent eller en anbefalet kvalificeret
tekniker for at undgå fare.
Indledning
Brug venligst et par øjeblikke på at gennemlæse denne brugsanvisning grundigt. BUFFALO produktet vil
fungere bedst muligt, hvis maskinen vedligeholdes og anvendes korrekt.
Pakkens indhold
Der skal være følgende:
• BUFFALO vakuumpakkemaskine
• Ekstra forseglingspakning (nedre)
• 20 x madposer til forsegling (200mm x 300mm)
•Brugsanvisning
BUFFALO er stolte vores kvalitet og service, der sikrer at det leverede indhold er fuldt funktionelt og fri for
skader ved pakning.
Skulle du alligevel opdage skader, som resultat af transporten, bedes du kontakte din BUFFALO forhandler
med det samme.
41
Page 47

Oversigt over betjeningsanordninger
DK
1. Stop/Start-knap
2. Vakuumknap
3. Vakuumindikatorlampe
4. Strømindikatorlampe
5. Forseglingsindikatorlampe
6. Låg
7. Forseglingspakning
8. Pakning (øvre)
9. Slanghus
10. Aftageligt vakuumkammer
11. Forseglingsbom
12. On/Off-kontakt
13. Udløserhåndtag til kammeret
14. Forseglingspakning (nedre)
Brug
BEMÆRK: DETTE UDSTYR ER DESIGNET TIL AT BRUGES MED DE MEDFØLGENDE POSER.
ANDRE POSER VIL EVT. IKKE FORSEGLES ORDENTLIGT.
KONTAKT DERES LEVERANDØR AF VAKUUMPAKKEMASKINEN FOR AT BESTILLE FLERE
POSER AF DEN RIGTIGE SLAGS.
Forsegling af madvarer
1. Anbring madvarerne inde i posen.
Bemærk: Sørg for, at posen er mindst 8
cm længere end længden på de
madvarer, som skal forsegles.
2. Fjern al overskydende væske eller madrester fra
posen.
3. Anbring den åbne ende af posen inde i
vakuumkammeret. Tryk enden af posen ind mod
pladen i vakuumkammeret.
42
Page 48

DK
4. Sænk låget, og tryk det ned i nogle sekunder - dette
vil starte vakuumforseglingsprocessen. Den gule
vakuumindikatorlampe blinker.
5. Forseglingsindikatorlampen blinker, mens udstyret
forsegler posen.
6. Begge lamper slukkes, når posen er forseglet.
7. Med posen stadig i position skal De trykke på
vakuumknappen for at udstøde den luft, som blev
fjernet fra den forseglede pose.
8. Når posen er færdig, skal De løfte låget og tage posen
ud.
Bemærk: Hvis De på et vilkårligt
tidspunkt er nødt til at stoppe processen,
skal De trykke på STOP-knappen, efter
De har trykket på vakuumknappen.
9. Inspicér den nye forsegling. Hvis den er lufttæt, skal
der være en stribe henover forseglingen, og den skal
også være helt flad. En rynket forsegling kan betyde,
at forseglingen ikke er færdig.
Ændring af vakuumniveau
Vakuumniveauet kan ændres, ved at De på et vilkårligt tidspunkt stopper vakuumprocessen.
Mens luften trækkes ud, og vakuumindikatoren blinker, skal De:
1. Trykke på Stop-knappen ved det ønskede vakuumniveau.
2. Forseglingsindikatoren vil lyse, og udstyret forsegler posen.
3. Når begge lamper slukkes, skal De løfte låget og tage posen ud.
Udkobling ved overopvarmning
Maskinen er udstyret med en sikkerhedsudkobling, hvis driftstemperaturen overskrider de forsvarlige
niveauer.
Hvis udkoblingen aktiveres, skal De løfte låget og give udstyret op til 30 minutter til at køle af.
Rengøring, pleje og
vedligeholdelse
• Brug varmt sæbevand og en fugtig klud til at rengøre
delene og det udvendige af udstyret.
• Tørres grundigt efter rengøringen.
• En BUFFALO forhandler eller en kvalificeret tekniker bør
udføre alle eventuelle reparationer.
• Skyl det aftagelige vakuumkammer under vandhanen.
ADVARSEL: De må ikke spilde vand ind i udstyret, når De gør det rent.
43
Page 49

Aftagning af vakuumkammeret
1. Træk i udløserhåndtaget til kammeret.
2. Løft vakuumkammeret, og tag det af udstyret.
Anbringelse af vakuumkammeret
1. Skub den højre ende af kammeret ind i
fordybningen.
2. Sørg for, at sugemundstykket (A) forbindes
sikkert med vakuumkammeret, og at
positionsknoppen (B) sidder korrekt i lejet.
3. Tryk den venstre side af kammeret nedad, indtil
udløserhåndtaget klikker på plads igen.
Fejlfinding
DK
Hvis der opstår en fejl i BUFFALO apparatet, skal man kontrollere punkterne på følgende skema, før man
ringer til hjælpetelefonlinien eller BUFFALO forhandleren.
Fejl Mulig årsag Løsning
Apparatet virker ikke Apparatet er ikke tændt Kontroller, at apparatet er sat rigtigt i
Stik og ledning er beskadiget Kontakt BUFFALO agenten eller en
En sikring i stikket er sprunget Udskift stiksikringen
Strømforsyning Kontroller strømforsyningen
Intern ledningsfejl Kontakt BUFFALO agenten eller en
Udstyret fjerner ikke al luften fra
posen
Den åbne ende af posen er
ikke helt sat i
Pakninger er snavsede Rengør pakningerne
Posens åbne ende er snavset Rengør posen
Posen er muligvis punkteret Posen fores med papir for at beskytte
stikkontakten og er tændt
kvalificeret tekniker
kvalificeret tekniker
Åbn låget, og anbring posen igen
mod madvarer med skarpe kanter
Udskift posen
44
Page 50

DK
Fejl Mulig årsag Løsning
Udstyret fjerner ikke al luften fra
posen
Poserne er ikke forseglet korrekt Forseglingsbommen er
ringer til hjælpetelefonlinien eller BUFFALO forhandleren.
De forkerte poser bruges Ring til leverandøren af
overopvarmet
De forkerte poser Ring til leverandøren af
Technical Specifications
vakuumpakkemaskinen
Åbn låget, og forseglings-bommen
køle af
vakuumpakkemaskinen
Model Spænding Strøm
S097 230V 50Hz 300W 1,3A -0,8 bar 90 x 380 x 240 3
Strømsty
rke
Vakuumtryk
(ca.)
Mål h x b x d
mm
Vaegt
(kg)
El-kabler
Stikket skal tilsluttes til en passende hovedkontakt.
Apparatet er kabelført som følger:
• Strømførende ledning (brun) til terminal L
• Neutral ledning (blå) til terminal N
• Jordledning (grøn/gul) til terminal E
Dette apparat skal være jordforbundet med et fast fejlstrømsrelæ.
Spørg en autoriseret elektriker i tvivlstilfælde.
Elektriske isolationspunkter skal holdes fri af blokeringer. I nødstilfælde skal de være tilgængelige for
afbrydelse.
Overensstemmelseserklæring
WEEE-logoet på dette produkt eller den tilhørende dokumentation angiver, at
produktet ikke må bortskaffes som almindeligt husholdningsaffald. For at forhindre
mulig fare for personers helbred og/eller miljøet, skal produktet bortskaffes gennem
en godkendt og miljøvenlig genbrugsproces. For yderligere oplysninger om, hvordan
dette produkt bortskaffes korrekt, skal De kontakte leverandøren af produktet eller de
lokale myndigheder, som er ansvarlige for bortkastning af affald i Deres omegn.
BUFFALO dele har gennemgået streng produkttestning for at overholde de normer,
standarder og specifikationer, som er fastsat af internationale, uafhængige og
amerikanske føderale myndigheder.
BUFFALO produkter er godkendt til at bære følgende symbol:
Med forbehold for alle rettigheder. Ingen del af disse anvisninger må produceres eller transmitteres i noget format
eller på nogen måde, hvad enten det drejer sig om elektronisk, mekanisk, fotokopiering, lagring på edb eller andet,
Der er blevet gjort alle bestræbelser på at sikre, at oplysningerne er korrekte på trykningstidspunktet, men
45
før der er blevet forudindhentet skriftlig tilladelse hertil fra BUFFALO.
BUFFALO forbeholder sig ret til at ændre specifikationerne uden varsel.
Page 51

N
Sikkerhetstips
• Plasser på en vannrett og stabil flate.
• Installasjon og all reparasjon skal utføres av en serviceagent eller en kyndig tekniker. Komponenter
eller inspeksjonsdeksler må ikke fjernes på dette produktet.
• Rådfør deg med lokale og nasjonale standarder for å oppfylle følgende:
• HMS-lovgivningen (Helse/Miljø/Sikkerhet)
• Bransjestandard BS EN
• Forholdsregler mot brann
• IEE-forskrifter for tilkopling
• Byggeregler
• Apparatet MÅ IKKE senkes i vann.
• IKKE rør tetningsstangen under drift.
• Ikke slå av ved å dra ut støpselet; bruk alltid start- og stopp-knappen eller bryteren for til- og
frakobling.
• Apparatet må ikke brukes til noen andre formål enn det er beregnet for.
• Ikke egnet for utendørs bruk.
• Slå alltid av og frakople strømtilførselen når enheten ikke er i bruk.Hold all emballasje unna barn.
Emballasjen skal deponeres i henhold til forskrifter bestemt av myndighetene på stedet.
• Hvis strømledningen er skadet skal den skiftes ut av en BUFFALO-agent eller en kyndig tekniker for å
unngå fare.
Innledning
Vennligst ta deg tid til å lese nøye gjennom denne håndboka. Korrekt vedlikehold og bruk av ismaskinen vil
gi best mulig ytelse på ditt BUFFALO-produktet.
Pakkeinnhold
Følgende er inkludert:
• BUFFALO vakuum innpakkingsmaskin
• Reserve nedre tetning
• 20 x tetningsposer for matvarer (200 mm x 300 mm)
• Bruksanvisning
BUFFALO er stolt av sin kvalitet og service, og garanterer at da innholdet ble pakket var det fullstendig
funksjonelt og uten skade.
Skulle du finne noe som helst skade som et resultat av transitt, vennligst ta omgående kontakt med BUFFALO-forhandleren på stedet.
46
Page 52

N
Plassering av kontroller
1. Knapp for stopp / start
2. Vakuumknapp
3. Vakuum signallampe
4. Nettlampe
5. Tetnings signallampe
6. Deksel
7. Tetning
8. Øvre tetning
9. Slangehus
10. Avtakelig vakuumkammer
11. Tetningssta ng
12. Til- og frakoblingsbryter
13. Kammerets utløsningsspak
14. Nedre tetning
Bruk
MERK: DETTE APPARATET ER BEREGNET TIL BRUK MED DE POSENE SOM FØLGER
LEVERANSEN. ANDRE POSER VIL MULIGVIS IKKE TETTE KORREKT.
TA KONTAKT MED LEVERANDØREN AV VAKUUM PAKKEMASKINEN FOR Å FÅ RIKTIGE
ERSTATNINGSPOSER.
Tetning av matvarer
1. Legg matvaren inn i posen
Merk: Sørg for at posen er minst 8 cm
lenger enn lengden av den matvaren som
skal tettes.
2. Fjern eventuell overskytende væske eller matrester fra
posen.
3. Legg posens åpne ende inn i vakuumkammeret. Trykk
posens ende mot vakuumkammerets plate.
47
Page 53

4. Senk lokket og trykk det ned i noen sekunder; dermed
starter prosessen med vakuumtetning. Den gule
vakuumlampen blinker.
5. Tetningslampen blinker mens apparatet tetter posen.
6. Begge lampene slukkes når posen er tettet.
7. Mens posen fortsatt ligger på plass, trykkes på
vakuumknappen for å drive ut den luft som er
fortrengt fra den tettede posen.
8. Etter fullført tetning løftes lokket og posen tas ut.
Merk: Dersom det er nødvendig å stoppe
prosessen på noe tidspunkt, trykkes først
på stoppknappen og deretter på
vakuumknappen.
Undersøk den nye tetningen. Dersom den er lufttett, skal
det være en stripe tvers over tetningen og den skal være
helt flat. En krøllet tetning kan tyde på at tetningen ikke er
fullført.
Endring av vakuumnivå
Nivået av vakuum kan endres ved å stoppe
vakuumprosessen på et hvilket som helst tidspunkt.
Mens luft suges ut og vakuumlampen blinker:
1. Trykk på stoppknappen ved ønsket nivå av vakuum.
2. Tetningslampen slås på og apparatet tetter posen.
3. Når begge lampene blir slått av, løftes lokket og posen tas ut.
N
Utkobling ved overoppheting
Apparatet er utstyrt med vern som kobler ut dersom driftstemperaturen overstiger sikkert område.
Dersom utkoblingen blir aktivert, skal lokket løftes og apparatet må kjøles ned i opp til 30 minutter.
Rengjøring, stell og vedlikehold
• Bruk varmt såpevann og en fuktig klut til rengjøring av
deler og apparatets utvendige områder.
• Tørk grundig etter rengjøring.
• Reparasjoner må overlates til en representant for
BUFFALO eller en kvalifisert tekniker ved behov.
• Skyll det avtakelige vakuumkammeret under rennende
vann.
ADVARSEL: Unngå vannsprut inn i apparatet under rengjøring.
48
Page 54

N
Demontering av vakuumkammeret
1. Dra i kammerets utløsningsspak.
2. Løft vakuumkammeret og ta det ut av apparatet.
Montering av vakuumkammeret
1. Skyv kammerets høyre side inn i sporet.
2. Sørg for at sugedysen (A) er forsvarlig forbundet
med vakuumkammeret og at
posisjoneringsknappen (B) sitter sikkert i sitt
sete.
3. Trykk kammerets venstre side ned inntil
utløserspaken smetter på plass igjen.
Feilsøking
Skulle BUFFALO mikrobølgeovnen utvikle feil, sjekk følgende tabell før du ringer hjelpelinjen eller tar
kontakt med BUFFALO-forhandleren på stedet.
Feil Sannsynlig årsak Aksjon
Ismaskinen fungerer ikke Ismaskinen er ikke slått på Sjekk at støpslet på ismaskinen er plugget inn
Støpsel og ledning er skadet Ring BUFFALO-agenten eller en kyndig tekniker
Sikringen i støpslet har gått Skift ut sikringen i støpselet
Strømtilførsel Sjekk strømtilførselen
Intern koplingsfeil Ring BUFFALO-agenten eller en kyndig tekniker
Apparatet fjerner ikke
all luft fra posen
Posene tetter ikke
korrekt
49
Posens åpne ende er ikke satt
helt inn
Tetninger er tilsmusset Rengjør tetningene
Posens åpne ende er
tilsmusset
Det kan være hull i posen Posen kan fores med papirlommetørklær for å
Feil pose brukt Kontakt leverandøren av vakuum
Tetningsstangen er for varm Åpne lokket og la tetningsstangen kjøles ned
Feil pose brukt Kontakt leverandøren av vakuum
korrekt og at kontakten er slått på
Åpne lokket og sett posen på plass
Rengjør posen
beskytte den mot matvarer med skarpe kanter
Bytt pose
innpakkingsmaskin
innpakkingsmaskin
Page 55

Tekniske spesifikasjoner
N
Modell Spenning Strøm Strømstyrke
S097 230V 50Hz 300W 1,3A -0,8 bar 90 x 380 x 240 3
Vakuum (cirka)
Mål
h x w x d mm
Vekt (kg)
Elektrisk tilkopling
Støpselet skal tilkoples en passende strømkontakt.
Enheten er koplet som følger:
• Strømførende ledning (brun) - koplingspunkt merket L
• Nøytral ledning (blå) - koplingspunkt merket N
• Jordledning (grønn) - koplingspunkt merket E
Denne enheten skal ha jording ved å bruke en dedisert jordingskrets.
Hvis i tvil, rådfør deg med en kyndig elektriker.
Elektriske isolasjonspunkter / skillebrytere skal være uhindret. I et nødstilfelle hvor det er nødvendig med
frakopling, skal de alltid være tilgjengelige.
Samsvar
Logoen WEEE på produktet eller dets dokumentasjon betyr at produktet ikke må
kastes som ordinært husholdningsavfall.
For å hindre skader på mennesker og/eller miljø må produktet kastes eller resirkuleres
gjennom godkjente og trygge prosesser for avfallshåndtering. For ytterligere
informasjon om hvordan produktet kasseres, kontakt den lokale leverandøren eller
miljøstasjon.
Deler brukt av BUFFALO har gjennomgått streng produkttesting for å være i samsvar
med regulative standarder og spesifikasjoner fastlagt av internasjonal, uavhengig og
føderale myndigheter.BUFFALO-produkter har blitt godkjent for å bære følgende
symbol:
Vi tar forbehold om alle rettigheter. Ikke noen del av disse instruksjonene må fremstilles eller oversendes i noen
form eller med noen midler, elektronisk, mekanisk, fotokopiert, nedskrevet eller på noen annen måte, uten at
Det er truffet omfattende tiltak for å sikre at alle detaljer er korrekte på tidspunktet for trykking, men BUFFALO
BUFFALO har gitt skriftlig tillatelse på forhånd.
forbeholder seg retten til å endre spesifikasjoner uten forvarsel.
50
Page 56

FIN
Turvallisuusvihjeitä
• Aseta laite tasaiselle, vakaalle pinnalle.
• Huoltoedustajan/pätevän huoltomiehen tulisi suorittaa asennus ja tarvittaessa kaikki korjaustyöt. Älä
irrota mitään tämän laitteen osia tai huoltopaneelia.
• Katso tietoja paikallisista ja kansallisista standardeista varmistaaksesi, että seuraavia määräyksiä
noudatetaan:
• Työterveys- ja turvallisuuslainsäädäntö
• BS EN-mukaiset ohjeet
• Paloturvallisuusmääräykset
• IEE-johdotusmääräykset
• Rakennusmääräykset
• ÄLÄ upota laitetta veteen.
• ÄLÄ kosketa saumaustankoa käytön aikana .
• Älä kytke laitetta pois päältä irrottamalla pistoke käytön keskeyttämiseksi; Käytä aina käynnistys/
pysäytys-painketta tai on/ei-kytkintä.
• Älä käytä laitetta mihinkään muuhun tarkoitukseen kuin sille aiottuun käyttötarkoitukseen.
• Ei sopi käytettäväksi ulkotiloissa.
• Pidä kaikki pakkausmateriaali poissa lasten ulottuvilta. Hävitä pakkausmateriaali paikallisten
viranomaisten määräysten mukaisesti.
• Jos virtajohto on vaurioitunut, saa sen vaihtaa uuteen ainoastaan BUFFALO-edustaja tai valtuutettu
pätevä huoltomies vaarojen välttämiseksi.
Johdanto
Käytä muutama minuutti tämän ohjekirjan lukemiseen huolellisesti läpi. Kun tätä BUFFALO-tuotetta
huolletaan ja käytetään oikein, saadaan laitteesta paras mahdollinen hyöty.
Pakkauksen sisältö
Pakkaus sisältää seuraavat:
• BUFFALO vakuumipakkauskone
• Varalla oleva alempi saumaustiiviste
• 20 x saumattavia elintarvikepusseja (200mm x 300mm)
•Ohjekirja
BUFFALO on ylpeä laadusta ja palvelusta varmistaen, että laitetta pakattaessa pakkauksen sisältö on täysin
kunnossa ja ilman vikoja.
Mikäli laite on kuljetuksen takia vaurioitunut, ota välittömästi yhteyttä BUFFALO -edustajaan.
51
Page 57

Ohjauslaitteiden sijainti
FIN
1. Pysäytys/käynnistys-painike
2. Vakuumipainike
3. Vakuumin osoitinvalo
4. Virran osoitinvalo
5. Saumauksen osoitinvalo
6. Kansi
7. Saumaustiiviste
8. Ylempi tiiviste
9. Letkun kotelo
10. Irrotettava vakuumikammio
11. Saumaustanko
12. On/ei-kytkin
13. Kammion vapautuspainike
14. Alempi saumaustiiviste
Käyttö
HUOM.: TÄMÄ LAITE ON SUUNNITELTU KÄYTETTÄVÄKSI SEN MUKANA TOIMITETTUJEN
PUSSIEN KANSSA. MUIDEN PUSSIEN SAUMAUS VOI TAPAHTUA VIRHEELLISESTI.
OTA YHTEYTTÄ VAKUUMIPAKKAUSKONEEN TOIMITTAJAAN HANKKIAKSESI SOPIVIA
PAKKAUSPUSSEJA.
Elintarvikkeiden pakkaaminen
1. Aseta ruokatavara pussiin
Huom.: Varmista, että pussi on vähintään
8 cm pitempi kuin vakuumiin pakattava
ruokatavara.
2. Poista kaikki ylimääräinen neste ja ruokatavarasta
irronneet palat pussista.
3. Laita pussin avoin pää vakuumikammion sisään. Paina
pussin pää vakuumikammiossa olevaa levyä vasten.
52
Page 58

FIN
4. Laske kansi alas usean sekunnin ajaksi; jolloin
vakuumisaumausprosessi alkaa. Keltainen vakuumin
osoitinvalo vilkkuu.
5. Saumauksen osoitinvalo vilkkuu samalla, kun laite
saumaa pussin.
6. Molemmat valot sammuvat, kun pussi on saumattu.
7. Kun pussi on vielä paikallaan, paina vakuumipainiketta
saumatusta pussista poistetun ilman saamiseksi ulos.
8. Kun toimenpide on suoritettu, nosta kansi ylös ja ota
pussi laitteesta.
Huom.: Jos prosessi joudutaan jossain
vaiheessa pysäyttämään, paina
pysäytyspainiketta ja sen jälkeen
vakuumipainiketta.
9. Tarkista uusi sauma. Jos sauma on ilmatiivis, menee
sen poikki viiva ja se on täysin lattea. Ryppyinen
sauma voi olla merkki siitä, että sauma ei ole täysin
tiivis.
Vakuumin tason muuttaminen
Vakuumin tasoa voidaan muuttaa pysäyttämällä vakuumiprosessi milloin tahansa.
Kun ilmaa imetään ulos, vakuumin osoitinvalo vilkkuu:
1. Paina pysäytyspainiketta halutulla vakuumin tasolla.
2. Saumauksen osoitin tulee silloin päälle ja laite saumaa pussiin.
3. Kun molemmat valot sammuvat, nosta kansi ja ota pussi laitteesta.
Ylikuumenemissuoja
Laitteeseen on asennettu suojakytkin siltä varalta, että käyttölämpötila ylittää turvalliset lämpötilat.
Jos suoja kytkeytyy päälle, nosta kansi ja anna laitteen jäähtyä korkeintaan 30 minuuttia.
Puhdistus, hoito & huolto
• Käytä lämmintä saippuavettä ja kosteaa liinaa laitteen
osien ja ulkopuolen puhdistamiseen.
• Kuivaa perusteellisesti puhdistuksen jälkeen.
• BUFFALO -edustajan tai pätevän huoltomiehen on
tarvittaessa suoritettava korjaustoimenpiteet.
• Huuhtele irrotettava vakuumikammio juoksevassa
vedessä.
VAROITUS: Älä päästä laitteeseen vettä puhdistuksen aikana.
53
Page 59

Vakuumikammion poistaminen
1. Vedä kammion irrotusvipua.
2. Nosta vakuumikammio ylös ja ota se laitteesta
Vakuumikammion asettaminen takaisin
1. Työnnä kammion oikeanpuoleinen pää
syvennykseen.
2. Varmista, että imusuutin (A) on yhteydessä
varmasti vakuumikammioon ja asetusnappi (B)
on kunnolla paikallaan.
3. Paina kammion vasenta puolta alaspäin kunnes
vapautusvipu napsahtaa takaisin paikalleen.
Vianetsintä
FIN
BUFFALO -laitteeseen tulee vika, tarkista
seuraavassa taulukossa esitetyt seikat ennen kuin otat yhteyttä puhelinpalveluun tai BUFFALO -edustajaan.
Vika Mahdollinen aiheuttaja Toimenpide
Laite ei poista kaikkea
ilmaa pussista
Pussien saumaus ei
tapahdu oikein
Pussin avointa päätä ei ole
asetettu sisään kokonaan
Tiivisteet likaisia Puhdista tiivisteet
Pussin avoin pää on likainen Puhdista pussi
Pussissa saattaa olla reikä Vuoraa pussi paperipyyhkeillä, jotta se
Käytetään vääriä pusseja Ota yhteyttä vakuumipakkauskoneen
Saumaustanko on
ylikuumentunut
Käytetään vääriä pusseja Ota yhteyttä vakuumipakkauskoneen
Avaa kansi ja aseta pussi paikalleen uudestaan
suojattaisiin ruokatavaroiden teräviltä reunoilta
Vaihda pussi uuteen
toimittajaan
Avaa kansi ja anna saumaustangon jäähtyä
toimittajaan
54
Page 60

Tekniset tiedot
FIN
Malli Jännite Teho Virta
S097 230V 50Hz 300W 1,3A -0,8 bar 90 x 380 x 240 3
Vakuumipaine
(likim.)
Mitat
mm
Paino
(kg)
Sähköjohdot
Pistotulppa on liitettävä sopivaan verkkovirtapistokkeeseen.
Laitteen johdot liitetään seuraavasti:
• Jännitteellinen johto (väriltään ruskea) napaan, jossa on merkintä L
• Neutraali johto (väriltään sininen) napaan, jossa on merkintä N
• Maadoitusjohto (väriltään vihreä/keltainen) napaan, jossa on merkintä E
Tämä laite on maadoitettava käyttämällä tarkoitukseen varattua maadoituspiiriä.
Jos et ole varma asiasta, kysy neuvoa pätevältä sähkömieheltä.
Sähkövirran eristyspisteet on pidettävä vapaina kaikista esteistä. Mikäli laite joudutaan hätätapauksessa
kytkemään verkkovirrasta, on niihin päästävä helposti.
Vaatimustenmukaisuus
Tässä tuotteessa tai sen asiakirjoissa oleva WEEE -logo osoittaa, että tuotetta ei saa
hävittää tavallisen talousjätteen mukana. Jotta vältyttäisiin ihmisen terveydelle ja/tai
ympäristölle koituvilta mahdollisilta haitoilta, tuote on hävitettävä hyväksytyllä ja
ympäristön kannalta turvallisella kierrätysprosessilla. Lisätietoja tämän tuotteen
oikeasta hävittämisestä voidaan saada ottamalla yhteyttä tuotteen toimittajaan tai
paikalliseen viranomaiseen, joka on vastuussa jätteiden hävityksestä alueellasi.
BUFFALO-osat ovat käyneet läpi tarkan tuotetestauksen, jotta ne noudattaisivat
kansainvälisten, itsenäisten ja valtiollisten viranomaisten asettamia säädöksiä ja
vaatimuksia.
BUFFALO-tuotteet on hyväksytty merkittäviksi seuraavilla merkinnöillä:
Kaikki oikeudet pidätetään. Mitään näiden ohjeiden osaa ei saa jäljentää tai lähettää missään muodossa tai millään
tavalla, elektronisesti, mekaanisesti, valokopioimalla, nauhoittamalla tai jollain muulla tavalla ilman, että BUFFALO
Kaikki mahdollinen on tehty sen hyväksi, että annetut tiedot olisivat aina painatushetkellä oikeita, mutta BUFFALO
varaa itselleen oikeuden muuttaa tietoja siitä erikseen ilmoittamatta.
on antanut etukäteisen luvan.
55
Page 61

DECLARATION OF CONFORMITY
• Conformiteitsverklaring • Déclaration de conformité • Konformitätserklärung • Dichiarazione di conformità •
• Declaración de conformidad • Declaração de conformidade • Överensstämmelseförsäkran •
• Overensstemmelseserklæring • Konformitetserklæring • Selvitys vaatimustenmukaisuudesta •
Equipment Type • Uitrustingstype • Type d'équipement • Gerätetyp •
Tipo di apparecchiatura • Tipo de equipo • Tipo de equipamento • Vacuum Pack Machine
Enhetstyp • Udstyrstype • Type utstyr • Laitteen tyyppi:
Model • Modèle • Modell • Modello • Modelo: S097
Serial Number • Serienummer • Numéro de série • Seriennummer •
Numero di serie • Número de serie • Número serial • Sarjanumero:
Year of Manufacture • Fabricagejaar • Date de fabrication • Herstellungsjahr •
Anno di produzione • Año de fabricación • Ano de fabricação • Tillverkningsår •
Produktionsår • Produksjonsår • Valmistusvuosi:
Application of Council Directives(s) • Toepassing van Europese Richtlijn(en) • EMC DIRECTIVE 89/336/EEC
Application de la / des directive(s) du Conseil: • Anwendbare EU-Richtlinie(n) • LOW VOLTAGE DIRECTIVE 73/23/EEC
Applicazione delle Direttive: • Aplicación de la(s) directiva(s) del consejo •
Aplicação de directiva(s) do Conselho • Tillämpning av rådets direktiv •
Gennemførelse af Rådets Direktiv(er) af • Applisering av kommuneforskrift(er) •
Neuvoston direktiivi(e)n soveltaminen:
Standards • Standaarden • Normes • Normen • Standard • Estándares •
Normas
• Normer • Standarder • Standardit
:
Producers Name
Nome del produttore • Nombre del fabricante • Nome do fabricante •
Tillverkarens namn • Fabrikantens navn • Produsentens navn • Valmistajan nimi:
Producers Address • Adres fabrikant • Adresse du prodocteur •
Anschrift des Herstellers • Indirizzo del produttore • Dirección del fabricante •
Endereço do fabricante • Tillverkarens adress • Fabrikantens adresse •
Produsentens adresse • Valmistajan osoite:
I, the undersigned, hereby declare that the equipment specified above conforms to the above Directive(s) and Standard(s).
Ik, de ondergetekende, verklaar hierbij dat de hierboven gespecificeerde uitrusting goedgekeurd is volgens de bovenstaande Richtlijn(en) en
Standaard(en).
Je soussigné, confirme la conformité de l'équipement cité dans la présente à la / aux Directive(s) et Norme(s) ci-dessus
Ich, der/die Unterzeichnende, erkläre hiermit, dass das oben angegebene Gerät der/den oben angeführten Richtlinie(n) und Norm(en)
entspricht.
Il sottoscritto dichiara che l'apparecchiatura di sopra specificata è conforme alle Direttive e agli Standard sopra riportati.
El abajo firmante declara por la presente que el equipo arriba especificado está en conformidad con la(s) directiva(s) y estándar(es) arriba
mencionadas.
Eu, o abaixo-assinado, declaro que o equipamento anteriormente especificado está em conformidade com a(s) anterior(es) Directiva(s) e
Norma(s).
Jag, den undertecknande, betygar härmed att ovan specificerade enhet överrensstämmer med ovan direktiv och norm(er).
Jeg, undertegnede, erklærer hermed at udstyret, der er specificeret ovenfor opfylder de ovenstående direktive(r) og standard(er).
Jeg, undertegnede, erklærer herved at utstyret som er spesifisert ovenfor er i overensstemmelse med ovennevnte forskrift(er) og standard(er).
Minä allekirjoittanut vakuutan täten, että yllä mainittu laite noudattaa yllä olevaa(olevia) direktiiviä(direktiivejä) ja standardia(standardeja).
Date • Data • Date • Datum • Data • Fecha • Data • Dato • Päivämäärä: 19/09/2007
Signature • Handtekening • Signature • Unterschrift
Firma • Firma • Assinatura • Underskrift • Allekirjoitus:
Full Name • Volledige naam • Nom et prénom • Vollständiger Name •
Nome completo • Nombre completo • Nome por extenso • Richard Cromwell
Fullständigt namn • Fulde navn • Fullstendig navn • Täydellinen nimi:
• Naam fabrikant • Nom du prodocteur • Name des Herstellers •
•
BUFFALO
Fourth Way
Avonmouth
Bristol
BS11 8TB
United Kingdom
Position • Functie • Fonction • Position • Qualifica • Posición • Função • Marketing Director
Befattning • Stilling • Asema:
Page 62

• Notes • Remarques • Notas • Opmerkingen • Anmerkungen • Notas •
•
Note • Noteringar • Merknader • Bemærkninger • Huomautukset •
Page 63

• Notes • Remarques • Notas • Opmerkingen • Anmerkungen • Notas •
•
Note • Noteringar • Merknader • Bemærkninger • Huomautukset •
Page 64

S097_ML_A5_v1
 Loading...