

Buffalo Technology WYR-G54 User Manual
54 Mbps Wireless Cable/DSL Router
www.buffalotech.com/wireless
User Manual
AirStation G54
WYR-G54
Rev B

Table of Contents
Introduction . . . . . . . . . . . . . . . . . . . . . . . . . . . 05
Installation / Setup . . . . . . . . . . . . . . . . . . . . . . 11
Antenna Installation. . . . . . . . . . . . . . . . . . . . . . 13
Standard Settings . . . . . . . . . . . . . . . . . . . . . . . 14
AOSS Setup . . . . . . . . . . . . . . . . . . . . . . . . . . . 23
Advanced Setup . . . . . . . . . . . . . . . . . . . . . . . . 26
LAN Settings . . . . . . . . . . . . . . . . . . . . . . . . 26
Wireless Settings . . . . . . . . . . . . . . . . . . 26
Wireless LAN Security . . . . . . . . . . . . . . 28
LAN Port . . . . . . . . . . . . . . . . . . . . . . . . 32
DHCP Server . . . . . . . . . . . . . . . . . . . . . 33
Wireless MAC Filtering . . . . . . . . . . . . . 36
Wireless Bridge (WDS) . . . . . . . . . . . . . 38
WAN Settings . . . . . . . . . . . . . . . . . . . . . . . 40
WAN Port . . . . . . . . . . . . . . . . . . . . . . . . 40
WAN Network . . . . . . . . . . . . . . . . . . . . . 43
2

Table of Contents
Network Settings. . . . . . . . . . . . . . . . . . . . . 45
Routing Setup . . . . . . . . . . . . . . . . . . . . 45
Address Translation . . . . . . . . . . . . . . . . 47
Packet Filter . . . . . . . . . . . . . . . . . . . . . . 50
Intrusion Detector . . . . . . . . . . . . . . . . . 55
UPnP . . . . . . . . . . . . . . . . . . . . . . . . . . . 57
Management . . . . . . . . . . . . . . . . . . . . . . . . 58
System Information . . . . . . . . . . . . . . . . 58
Change Password . . . . . . . . . . . . . . . . . 59
Time Setup . . . . . . . . . . . . . . . . . . . . . . 60
Traffic Information . . . . . . . . . . . . . . . . . 61
Client Monitor . . . . . . . . . . . . . . . . . . . . 62
Ping Tool . . . . . . . . . . . . . . . . . . . . . . . . 63
Log Information . . . . . . . . . . . . . . . . . . . 64
Syslog Transfer . . . . . . . . . . . . . . . . . . . 65
Save/Restore Settings . . . . . . . . . . . . . . 66
Reboot/Reload Settings . . . . . . . . . . . . . 67
Firmware Updates . . . . . . . . . . . . . . . . . 68
AOSS . . . . . . . . . . . . . . . . . . . . . . . . . . . 69
3

Table of Contents
Specifications . . . . . . . . . . . . . . . . . . . . . . . . . 71
Troubleshooting . . . . . . . . . . . . . . . . . . . . . . . . 76
Glossary . . . . . . . . . . . . . . . . . . . . . . . . . . . .84
FCC Information . . . . . . . . . . . . . . . . . . . . . . . . 90
Warranty Information. . . . . . . . . . . . . . . . . . . . . 93
Contact Information . . . . . . . . . . . . . . . . . . . . . 94
4

Introduction
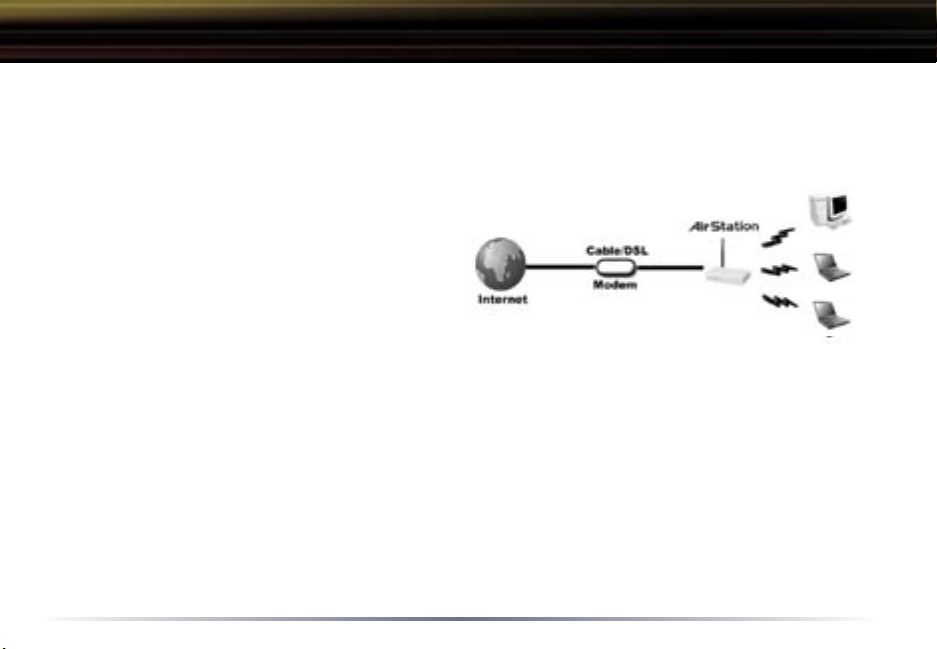
AirStation G54 Wireless Cable/DSL Router (WYR-G54)
This manual introduces you to the AirStation Cable/DSL Router, and will help you connect to your
network quickly.
The WYR-G54 router, is a wireless 4-port router network device that complies with the 2.4GHz
IEEE 802.11g standard specification on wireless LANs. It also supports various advanced router
technologies. The WYR-G54 supports enhanced built-in NAT/SPI firewall functions and is used as
a multi-functional router/link between wired and wireless LAN computers.
Summary of the AirStation WYR-G54 features:
• Support for wireless security encryption using TKIP and WEP.
• DHCP client/server function.
• VPN pass-through, for secure communications using IPSec or PPTP.
• Packet Filtering for eliminating unwanted communication types.
• SOHO/SMB routing and firewall functions provide a safer private networking environment, including support for MS NetMeeting and MSN-Messenger.
• Additional SPI Firewall Functions - DMZ, intrusion detection and notification
• Supports Universal Plug and Play (UPnP).
• Enhanced security features:
- SPI Firewall and DMZ zone functions to prevent unknown intruders.
- Intrusion Detector Firewall (NAT)
5

Introduction
- Dynamic packet filtering.
- Wireless encryption via TKIP and WEP.
- VPN pass-through for IPSec and PPTP connections.
- Packet monitoring and filtering by MAC address, IP address and port.
- PPPoE support
• Buffalo’s easy web interface configuration
• Broadband router static and dynamic routing methods between WAN and LAN based on updated
routing tables. An economical way to bridge multiple networks.
• Web based setup wizards for both Cable and DSL broadband connections.
Home Networking 1
Buffalo AirStation wireless access points enable sharing broadband by simply connecting the
AirStation to a DSL or Cable modem to:
• Share files and printers
• Access and share the Internet
• Share media files
SOHO/SMB Networking
With high-speed DSL or Cable connections readily available, many users can work effectively from
a home office, connected securely to a corporate network. Buffalo’s solutions are ideal for home
6
Introduction
networks that require secure, high-speed access to the corporate LAN. Tools that play an integral
part in Buffalo’s solutions include VPN connectivity for secure access to corporate resources, which
enable the remote employee to handle information from clients or coworkers as if they were in the
office. Connect the Buffalo AirStation Broadband router AP to a Cable or DSL modem in order to:
•Share broadband access
•Share files and printers
•Bridge between multiple networks and multiple
computer platforms
•Provide easy and secure access to home or
company networks from remote locations
System Requirements
• Broadband (High-Speed) Internet connection or existing Local area connection
• Any Wi-Fi (wireless) compatible computer with a Web Browser Internet Explorer or Netscape 4.5
or later. (Safari 1.0 is supported with Macintosh OS X.2)
AirStation WYR-G54 Package Contents
The AirStation WYR-G54 package consists of the following items.
1. WYR-G54 Base Station
2. AC adapter/power cable
3. CAT5 LAN cable
4. Utility CD with Manual
7

Introduction
5. Quick Setup Guide
6. Warranty Statement
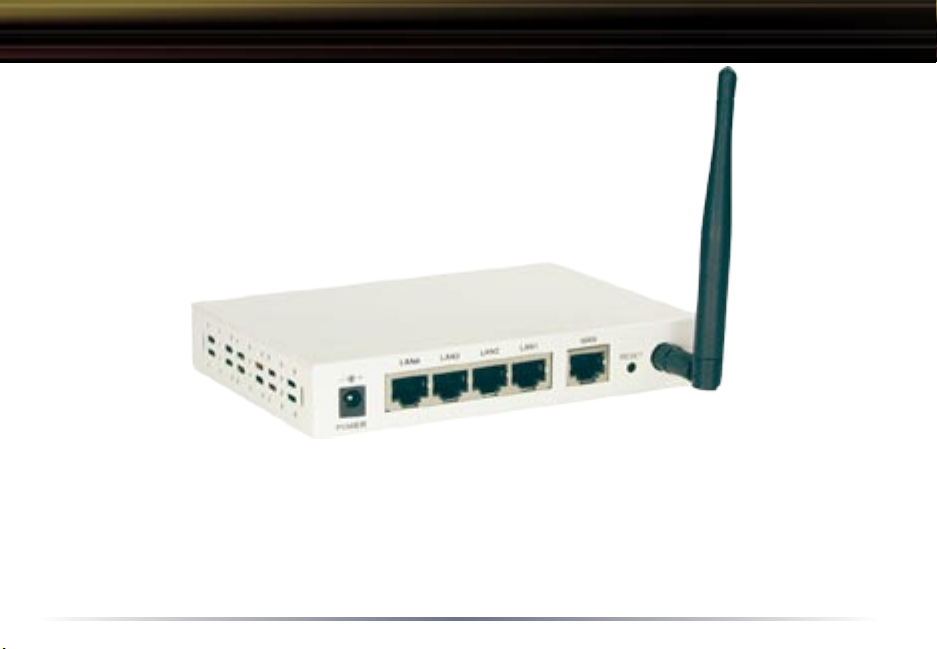
Product Views
Power - Lit when the device is powered on.
Wireless - Lit when the wireless radio is on. Flashes when wireless traffic is present.
WAN - Lit when connection to Cable/DSL modem is present. Flashes when internet traffic is present.
Status - Flashes red when performing diagnostic functions or when an error exists.
Link/Act - Indicates an active link between the corresponding LAN port and another network device.
100 - Lit orange when the corresponding LAN port is communicating at 100 Mbps (otherwise 10 Mbps).
8
Introduction
About the AirStation CD
The AirStation does not require any software to be installed on your computer for configuration.
The AirStation CD contains client drivers for Buffalo Wireless Adapters (i.e. Notebook Adapter and
Desktop PCI Adapter) and the AirStation documentation.
Prior to copying or installing any software, please read the Software License Agreement “license.
9

Introduction
txt”, located in the root folder of the CD. By installing, copying or using the AirStation software, you
are consenting to the terms of this agreement. If you do not agree to all of the terms of the Software
License Agreement, do not download, copy or install the AirStation software.
It is the policy of Buffalo Technology to improve products as new technology, components, software
and firmware become available.
Please consult the AirStation wireless website (http://www.buffalotech.com/wireless) to download
and install the latest firmware for your product.
Follow these simple steps to connect the AirStation to your Broadband Internet connection allowing
you to combine and share wired and wireless computers and printers with the high-speed internet
connection.
1. Power down the Cable or DSL modem and the computer which will be used to configure the
10

Installation / Setup
AirStation router.
2. Plug the Cable or DSL’s LAN Ethernet cable into the AirStation’s WAN port. Initially, you may
need to unplug this cable from your computer, hub or other router.
3. Plug the provided Ethernet cable into a LAN port on the AirStation and plug the other end into
your computer Ethernet adapter’s (NIC) port. If you plan to initially configure the AirStation via a
wireless connection, (not recommended), you may skip this step.
4. Power on your cable or DSL modem, wait one full minute, Power on the AirStation router, wait
another full minute and then power on the computer which will be used to configure the AirStation. If the red DIAG light on the AirStation is lit or flashing after several minutes of being powered on, please consult Buffalo Technical Support.
Introduction
Configuring the AirStation using a standard web browser requires basic wireless configuration
knowledge. Setup includes manual wireless configuration and basic administrative management.
Setup Preparation
Make note of the AirStation’s wired MAC address found on the rear of the AirStation. It is also
recommended you record any other broadband ISP information such as global IP address, subnet
mask address, default gateway address, DNS server address and PPPoE parameters.
Setup Overview
11

Installation / Setup
Buffalo recommends using a wired connection, meaning your computer is physically connected to
the AirStation with a CAT5 straight cable plugged into one of the four LAN ports This type of setup
will eliminate possible setup problems due to any issues with the wireless adapter on the computer
being used to configure the AirStation.
A Web browser version 4.5 or later can be used to configure the AirStation.
Advanced settings for security, filtering and other features will be explained in later sections.
Open the Setup Screen
• Connect the WYR-G54 according to the wiring instructions in Section 2.
• The WYR-G54 has a default LAN IP address of 192.168.11.1 and Subnet Mask of 255.255.255.0.
■ Note: The computer used to configure the AirStation should be set to obtain an IP address
automatically using a DHCP server. The Quick Setup Guide enclosed with the product contains
detailed instructions on how to configure your computer for initial configuration.
On the computer used to configure the AirStation, launch a Web Browser 4.5 or later.
- Enter 192.168.11.1 into the URL field.
- A window will open prompting you to enter a User ID and Password.
12

Antenna
The WYR-G54 has one internal omnidirectional antenna. The
transmission of wireless signals is isotropic, meaning that the
waves are emitted much like the sun distributes light in every
direction. However, connection problems can occasionally
be remedied by simply adjusting the position of the antenna.
External antennas come in all shapes and sizes. Antennas
also come with different connectors. The WHR2-G54 has an
‘MC Connector’ on it. Thus, the antenna must also have an
MC connector.
To install the antenna, slide the antenna connector door on
the back of the WYR-G54 to the right. This will expose the
MC Connector. Attaching the antenna is simple, just insert
the antenna’s MC Connector into the WYR-G54’s MC Connector and firmly push it in until it snaps into place. Once
snapped, the antenna’s connector will swivel with ease. It is
important not to push the antenna connector in at an angle.
To remove the antenna, pull the antenna connector out. It is
important not to pull the antenna connector out at an angle.
13
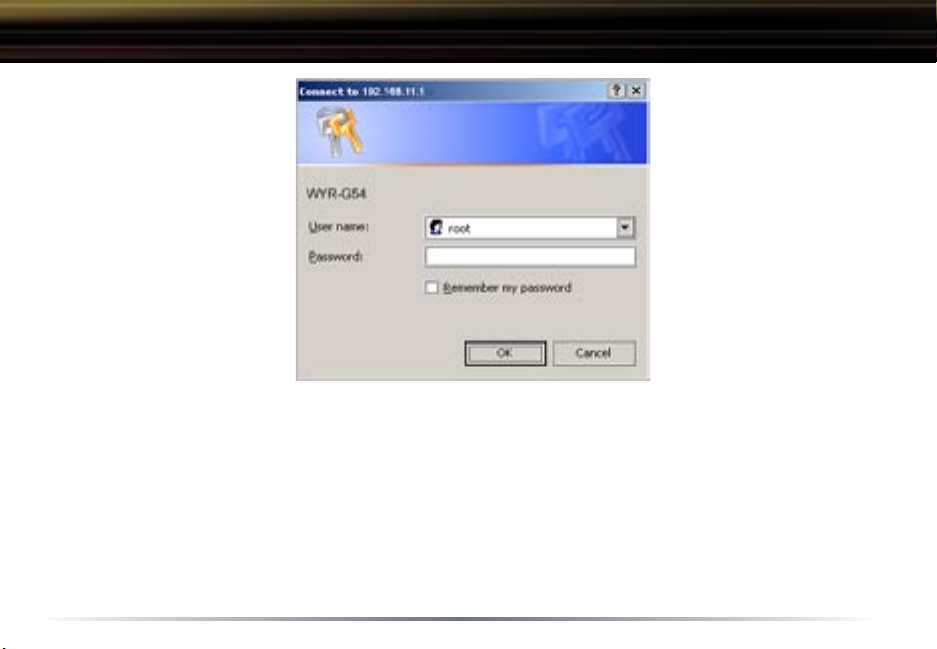
Enter “root” as the User ID and leave the password field blank.
■ Note: These are the factory default settings
Logging In
14
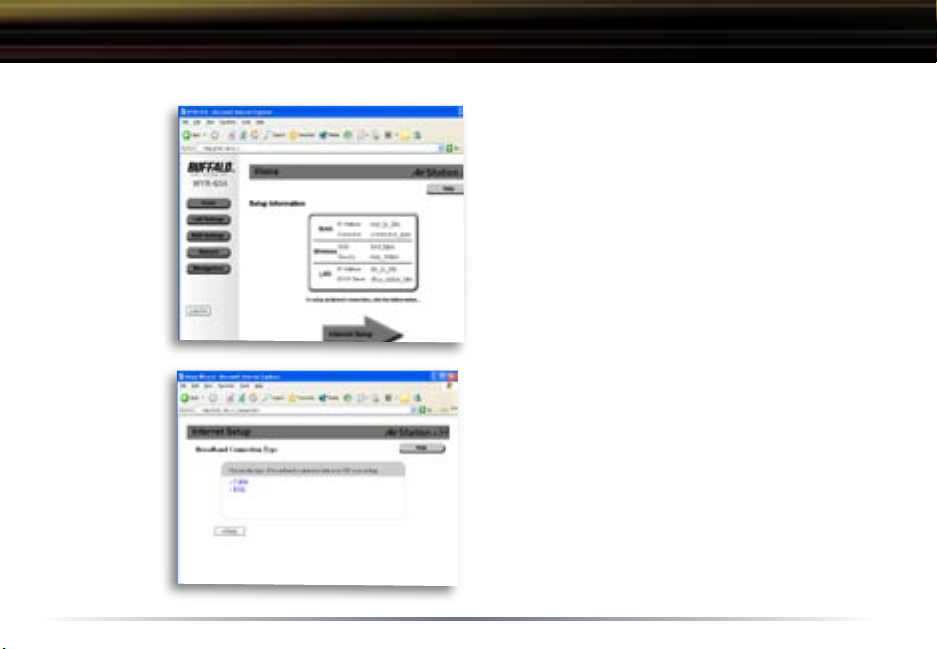
Setup Wizard - Launch
Initial
Settings
Screen
Choosing a
Connection
Type
Internet Setup
• Click the Internet Setup arrow button to begin
the Internet Setup Wizard.
• Advanced users have the option of skipping
this step and begin manually configuring the
access point.
Choosing a Connection Type
Click on the type of broadband connection your
ISP is providing.
Note:
If you are unsure of whether you are using cable
or DSL broadband, please contact your ISP.
DSL users can now skip to Page 18!
15
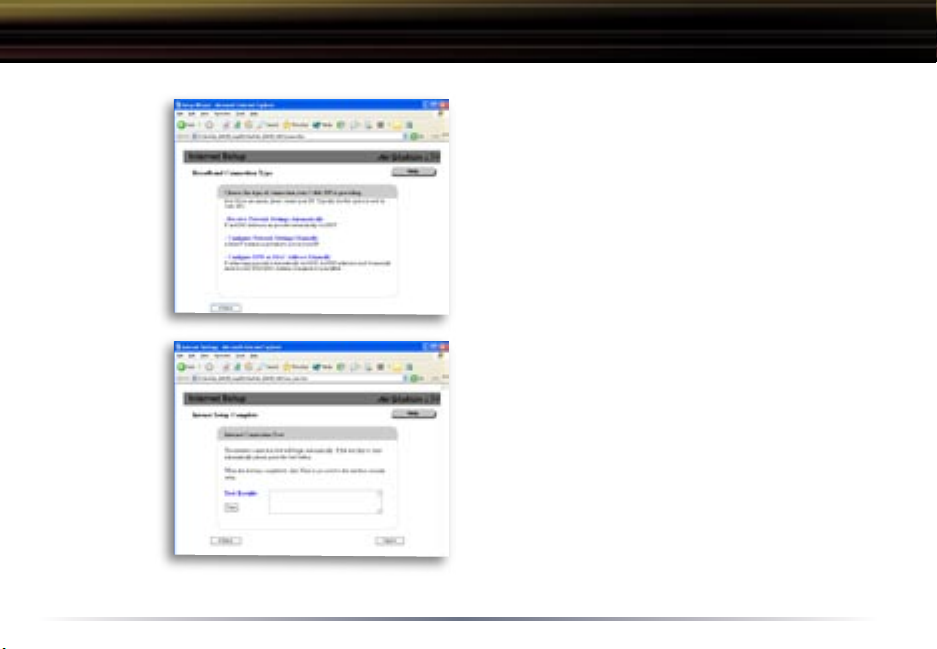
Setup Wizard - Setup
Cable
Connection
Options
DSL PPPoE
Settings
Screen
Cable Connection Options
- Choose the type of connection configuration
as provided by your ISP
- Most Cable operators provide the first type of
configuration - Automatic (DHCP)
Automatic IP Assignment by ISP
- Select ‘Automatic IP Assignment by ISP’ if
your ISP’s DHCP server assigns an IP address
automatically.
16
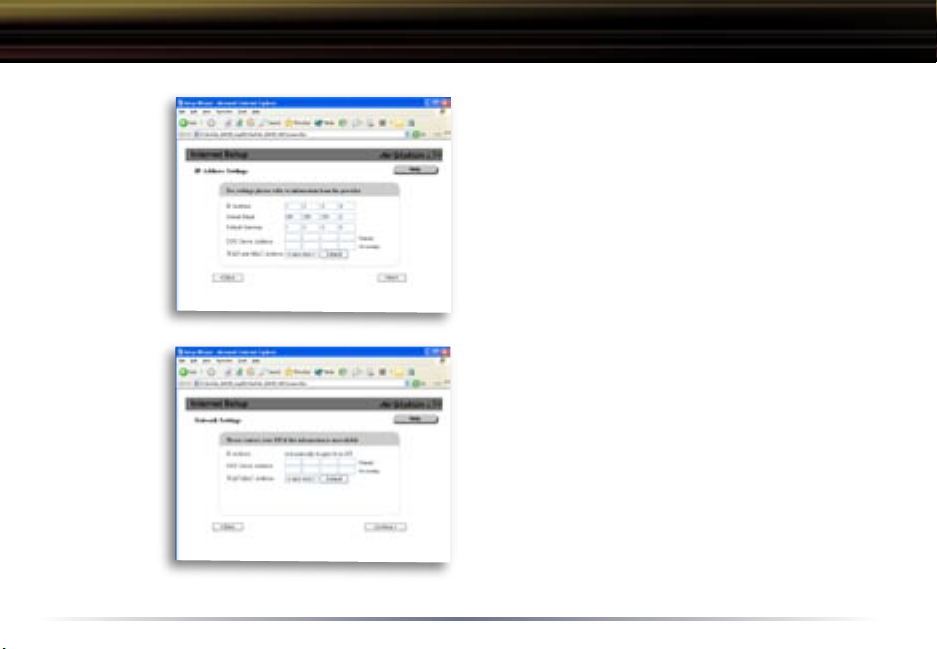
Setup Wizard - Cable
Manual IP
Address
Settings
Automatic IP
Address
Settings with
Manually Entered
DNS Settings
Manual Entry of IP Information
- If your IP Information is provided by your ISP,
fields are provided to fill in the information.
- Some ISPs also require that a certain MAC
Address is used. If this is not specifically required, just use the default MAC Address.
The IP Address is Acquired
Automatically but DNS Server Address
is Entered Manually
-
If the ISP provides your IP configuration automatically, but requires manual entry of DNS
information, fields will be provided for DNS
information after an IP Address is successfully
acquired.
Cable Users can now skip to Page 19!
17

Setup Wizard - DSL
DSL
Connection
Options
DSL PPPoE
Settings
Screen
DSL Connection Options
- Choose the type of connection configuration
as provided by your ISP
- Most DSL operators provide the first type of
configuration - Automatic (DHCP)
- When using a LAN connection type of DSL,
network settings are automatically delivered by
your ISP.
PPPoE Setup
- Enter the requested information into the fields
provided. Note that DNS information is only required to complete setup if specifically required
by the ISP.
18

Setup Wizard - Line Test
Line Test
If the Line Test is successful, the AirStation is now finished with basic setup and client devices
should be able to connect to the Internet through the AirStation. The next step involves setting up
wireless security, which is optional.
Line Test
Once the Setup Wizard is complete a line test
to the Internet will launch to verify successful
entry of settings.
If the connection fails, please verify the accuracy of the entered information with the ISP.
19
 Loading...