

Page 1
Quick Setup Guide
54Mbps Wireless Ethernet Converter-g
WLI-TX1-G54
Use this guide to quickly and easily install
your Wireless Ethernet Converter-g.
For detailed information, refer to the User
Manual on the Utility CD or refer to the
Buffalo Wireless Suppor t Web Pages.
Contents
◗ 54Mbps Wireless Ethernet Converter
◗ CD-ROM
◗ 7ft. Ethernet Cable
◗ AC Adapter
◗ Quick Setup Guide
◗ Warranty Statement
If any items are missing, please contact
the reseller from whom you purchased
this product.
®
System Requirements
◗ Desktop or Notebook Computer
with an available Ethernet (RJ-45)
port
◗ Web browser 5.0 or later
◗ 802.11b or 802.11g access point
(Infrastructure Mode) OR a different
computer with an 802.11b or 802.11g
wireless adapter (Ad-hoc Mode).
www.buffalotech.com/wireless
PY00-29007-DM20 Rev A
1
Page 2
Installation & Configuration
2
Using Web Interface
Windows Setup
Step Installing the Wireless
Ethernet Converter-g
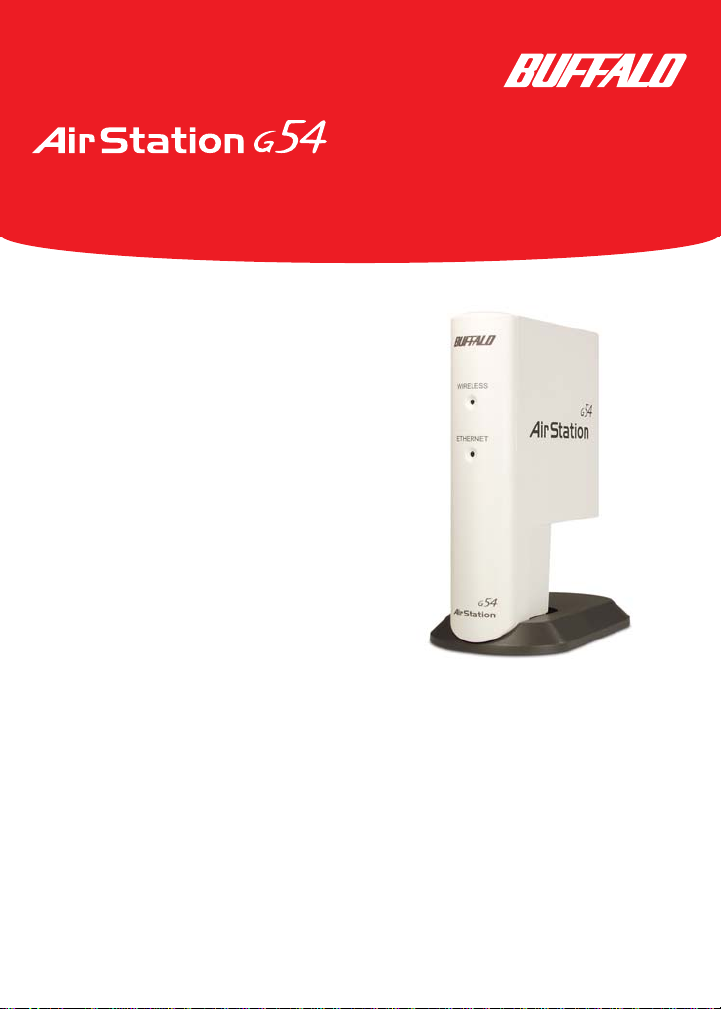
Install the Ethernet Converter to
a computer by connecting one end
of the included Ethernet cable into
an available Ethernet port on your
computer and the other end to the
Ethernet Converter. Ethernet ports
are usually located in the rear of the
computer.
Plug the AC Adapter into a wall
socket or surge protector
(recommended). Connect the AC
Adapter to the Ethernet
Converter.
(Be sure to use the AC Adapter
included with this product or
damage may result.)
Step Configure the TCP/IP
settings of your computer
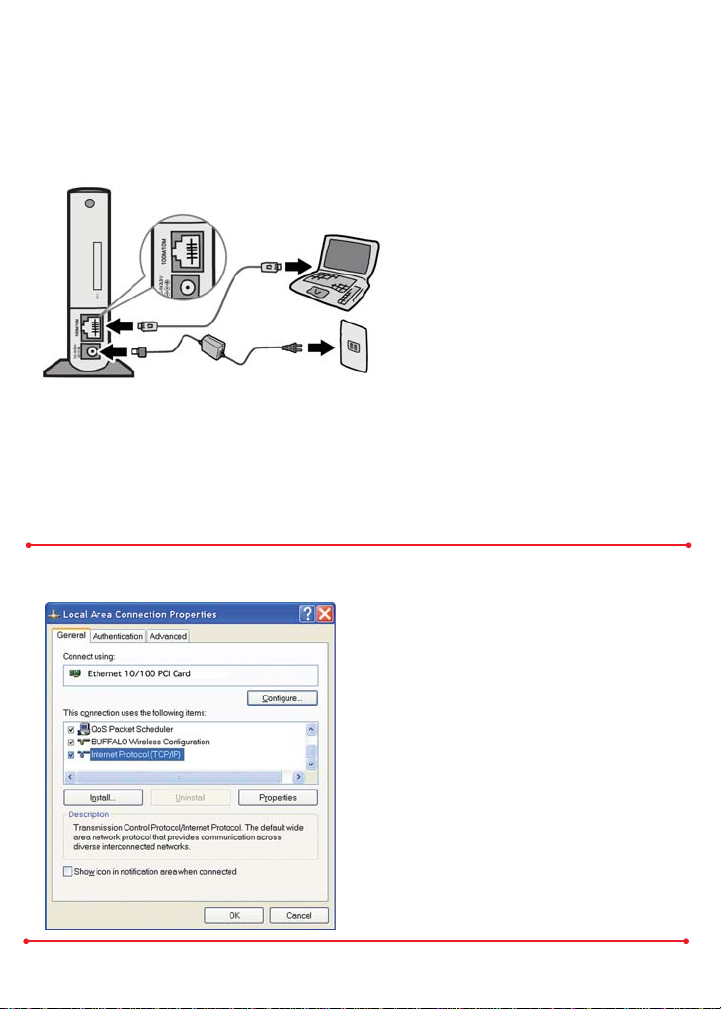
Open your network properties.
Connect Using should be set to use
your active Ethernet NIC Card.
Select Internet Protocol
(TCP/IP).
Click Properties
2
Page 3
Macintosh Setup
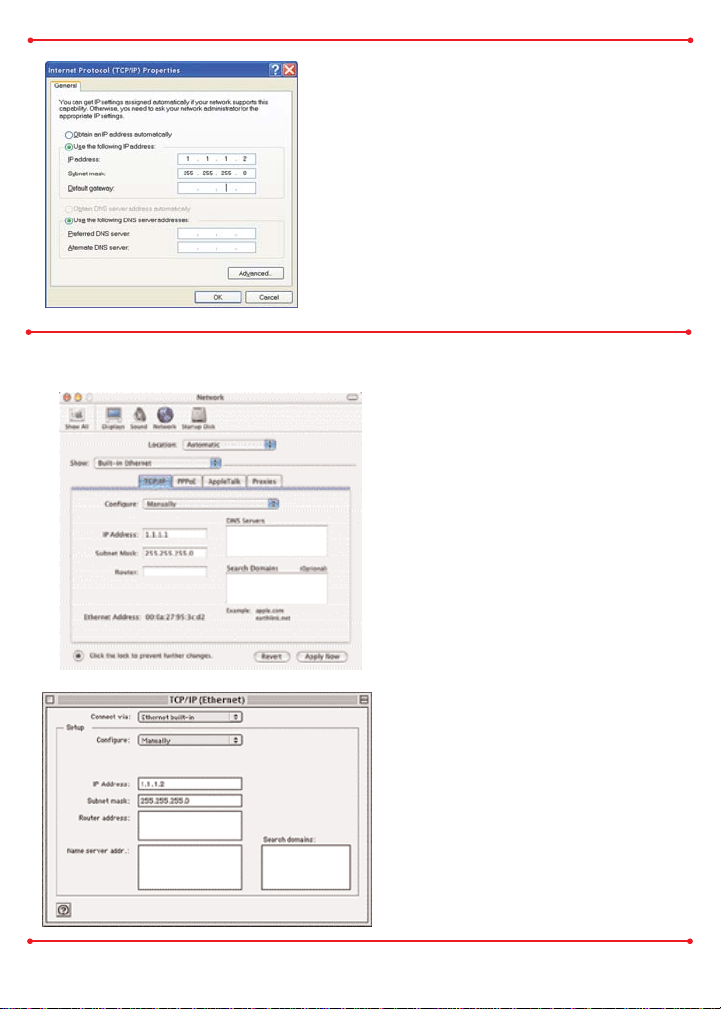
Select Use the following IP
Addres s.
Enter 1.1.1.2 into the IP Address field.
Enter 255.255.255.0 into the Subnet
Mask field.
Click OK.
Click OK again under the Network Properties
window.
OSX - Open your System
Preferences and select Network.
Set Show to Built-in Ethernet
Set Configure to Manually
Enter 1.1.1.2 into the IP Address
field.
Enter 255.255.255.0 into the
Subnet Mask field.
Click Apply Now.
OS9 - Open your Control Panels
and select TCP/IP.
Set Connect via to Built-in
Ethernet
Set Configure to Manually
Enter 1.1.1.2 into the IP Address
field.
Enter 255.255.255.0 into the
Subnet Mask field.
Close and Save.
3
Page 4

Step Connecting the
Wireless Ethernet Converter
to the AirStation.
Open your Web browser 4.5
or later and enter 1.1.1.1 into
the URL field.
The login screen will open.
Enter root as the User ID.
Leave the password field blank.
Click OK
The main configuration
screen of the 54Mbps Ethernet
Converter will open.
Click Search in the ESS-ID
(SSID) field.
4
Page 5

The Ethernet Converter
will scan for available
wireless networks.
Select the SSID (ESS-ID)
of the AirStation or
other Wi-Fi access point
to associate with and
click select.
If encryption is used, select
the Encrypt button and select
ASCII or HEX and enter the
WEP password.
Click Set to Connect.
Some screens may vary from those shown in this guide, depending on the
operating system used. By accepting the default configuration settings, the Ethernet
Converter Manager should discover and configure properly. For more information
about configuring and operating your Wireless Ethernet Converter, refer to the
User Manual on the Utility CD or the Buffalo Support Web Site:
http://www.buffalotech.com/wireless/support.
The Ethernet Converter is now associated with the Local Area Network.
All settings will be retained by the Ethernet Converter when moved between
different computers and peripherals.
5
Page 6

Windows
Step Reset the TCP/IP settings of
your computer
Open your network properties.
Connect Using should be set to use your
active Ethernet NIC Card.
Select Internet Protocol (TCP/IP).
Click Properties
Select Obtain and IP Address
Automatically.
Click OK.
Click OK again under the Network Properties
window.
All settings will be retained by the
Wireless Ethernet Converter when
connected to other devices.
6
Page 7

OSX - Open your System
Preferences and select Network.
Set Show to Built-in Ethernet
Set Configure to Using DHCP
Click Apply Now.
OS9 - Open your Control Panels
and select TCP/IP.
Set Connect via to Built-in
Ethernet
Set Configure to Using DHCP
Server
Close and Save.
Macintosh
Some screens may vary from those shown in this guide, depending on the
operating system used. For more information about configuring and operating
your Wireless Ethernet Converter, refer to the User Manual on the Utility CD or
the Buffalo Support Web Site:
http://www.buffalotech.com/wireless/support.
7
Page 8

Buffalo Technology offers toll-free technical support 24 hours a day, 7 days a week
for this product. Customers in the United States and Canada can obtain technical
support using the following information:
◗ User Manual Available on the AirNavigator CD enclosed with your purchase.
◗ Web www.buffalotech.com/wireless
◗ E-mail help@buffalotech.com
◗ Telephone 866-752-6210 (USA & Canada only)
The constantly evolving state of wireless products and operating systems requires
Buffalo Technology to occasionally release updated software to take advantage of
new technologies and to comply with industry standards. For the most recent
software, firmware, driver, and technical whitepaper releases available, please visit
the Buffalo Technology website.
FCC Compliance Statement - See owners manual for complete statement.
This device complies with Part 15 of the FCC Rules. Operation is subject to the following
two conditions: (1) This device may not cause harmful interference,and (2) this device must
accept any interference received, including interference that may cause undesired operation.
R&TTE Compliance Statement - See owners manual for complete statement
This equipment complies with all the requirements of the DIRECTIVE 1999/5/EC OF THE
EUROPEAN PARLIAMENT AND THE COUNCIL of 9 March 1999 on radio equipment and
telecommunication terminal Equipment and the mutual recognition of their conformity
(R&TTE).
Copyright © 2003 Buffalo Technology, Inc. All Rights Reserved.
Buffalo Technology (USA) Inc., is part of MELCO INC., the global manufacturers of IT peripherals, including memory,
networking, and multimedia products, inside many of the world's computers. All trademarks are property of their
respective owners.
Buffalo Technology
Technical Support
 Loading...