

Page 1
1
Quick Setup Guide
54 Mbps Wireless Desktop PCI Adapter-g
WLI-PCI-G54
Use this guide to quickly and easily install
your 54Mbps Wireless Desktop PCI
Adapter-g. For detailed setup and configuration information, refer to the User
Manual on the Utility CD or the Buffalo
Support Web page.
Contents
◗ AirStation 54Mbps Wireless Desktop PCI
Adapter-g
◗ AirStation 2.4GHz Indoor Omni
Antenna
◗ AirNavigator CD
◗ Quick Setup Guides
◗ Warranty Statement
If any items are missing, please contact
the reseller from whom you purchased
this product.
System Requirements
◗ Desktop PC with an available 32-bit
PCI slot
◗ 10 MB of available disk space
(for Client Manager)
◗ 802.11b or 802.11g access point
(Infrastructure Mode) OR a different
computer with an 802.11b or 802.11g
wireless adapter (Ad-hoc Mode).
◗ Windows XP: Refer to the Windows
XP section of Installing and
Configuring the 54Mbps Desktop
PCI Adapter to install this
product.
◗ Windows 98SE/ME/2000: Refer to
the Windows 98SE/ME/2000 section of Installing and Configuring
the 54Mbps Desktop PCI
Adapter to install your 54Mbps
Desktop PCI Adapter.
Once the 54Mbps Desktop PCI
Adapter has been successfully
installed, continue your setup
by referring to the Installing Client
Manager section of this guide.
www.buffalotech.com/wireless
PY00-11000-DM20 Rev A
®
Page 2
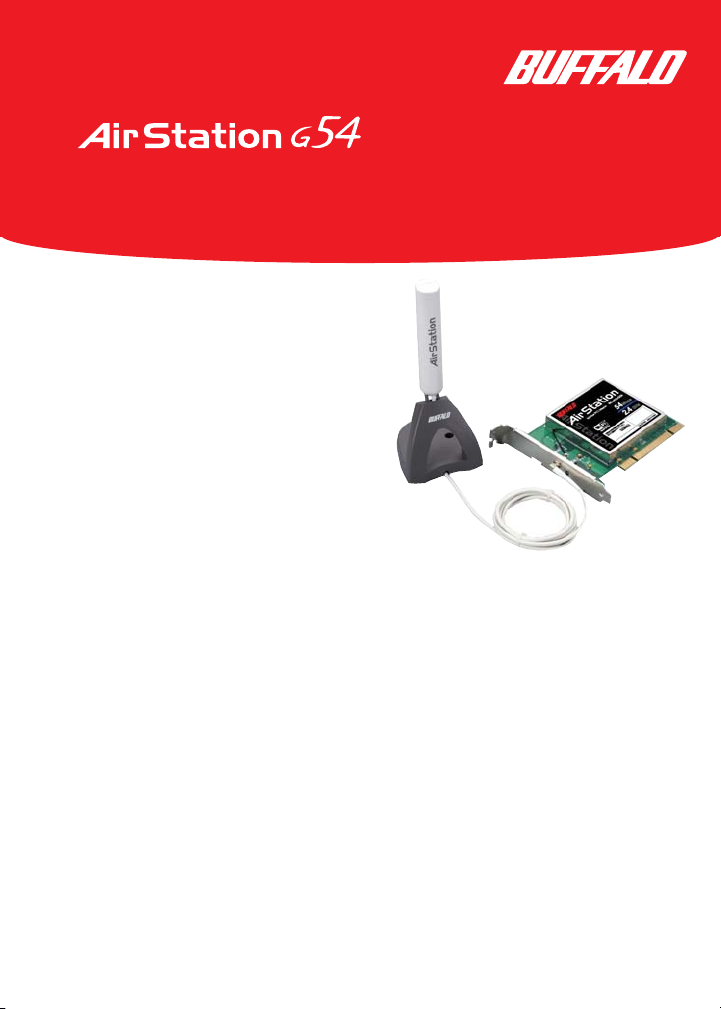
Step Installing the 54Mbps
Wireless Desktop PCI Adapter-g.
With the computer powered
down and the cover removed to
expose the inside of the system,
insert the 54Mbps Desktop PCI
Adapter into an available PCI slot.
The card should fit firmly into the
slot and should be screwed into the
chassis.
Note: Care should be taken not to
unplug any cables or unseat any
other cards installed in the computer during installation of the
Desktop PCI Adapter.
Replace the cover of the computer.
Plug the antenna cable into the
Desktop PCI Adapter. For optimal
performance, locate the antenna
away from the computer to ensure
good signal reception.
Once the cover has been replaced
and the antenna is installed, the
computer can be powered on.
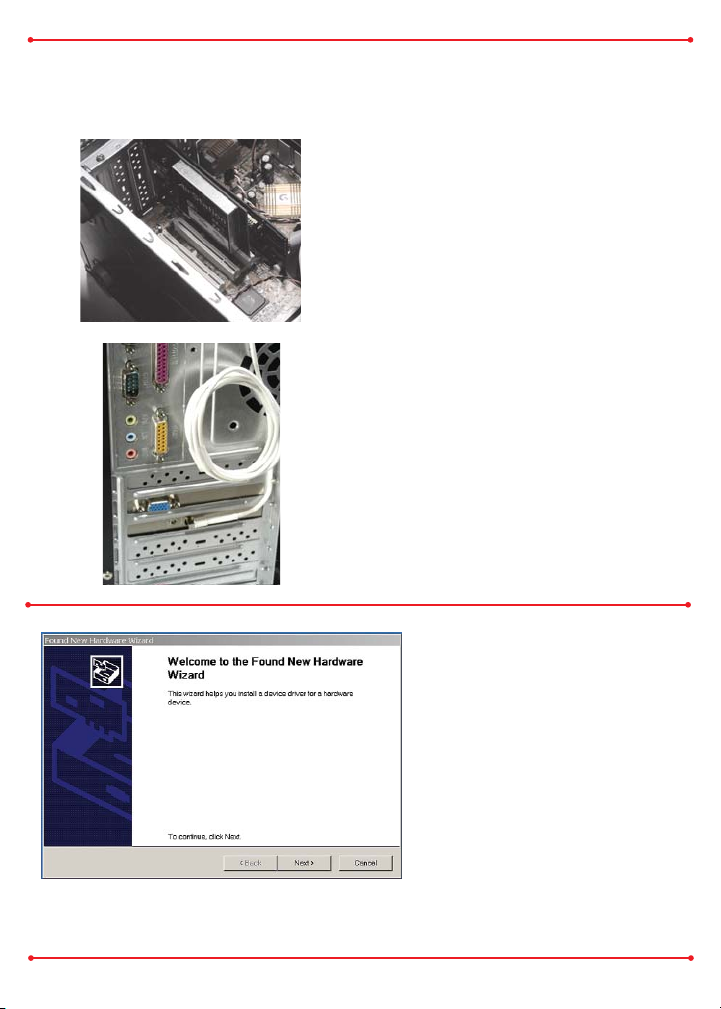
Upon loading Windows and logging
on if necessary, the Found New
Hardware Wizard will launch
automatically.
Insert the AirNavigator CD.
Click the Next button to continue
to the Select Network Adapter
page.
Windows XP
Installation & Configuration
2
NOTE: If AutoRun is enabled, exit out of the automatic Software Installation.
Page 3
Select Install the Software
Automatically. Click the Ne xt button
to continue.
Select the driver you want to install.
If multiple drivers are listed, select the
most recent driver version. Click the
Next button.
NOTE: If prompted to select a search
location, un-select all checkboxes
except for the CD-ROM drive
If a window opens, stating that your
driver does not pass Windows Logo
testing, click the Continue Anyway
button. When the
54Mbps Desktop
PCI Adapter
is successfully installed,
click the Finish button. Restart your
computer if prompted.
3
Page 4
4
Step Configuring Wireless Zero
Configuration Service
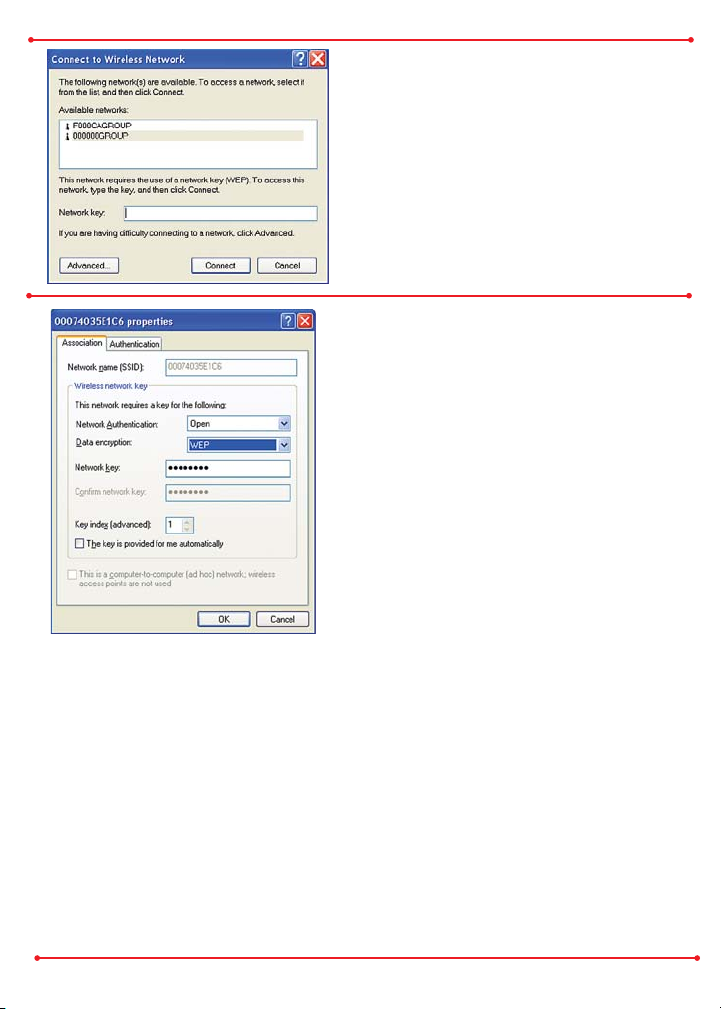
Right click the networking icon in
the taskbar and select View Available
Wireless Networks to display a list
of available wireless networks. Select
an access point network name or SSID
and click the Connect button to
establish a connection.
Select a network name or access
point and click the Advanced button
to enter an SSID and/or
WEP/WPA/WPA-PSK encryption
key into the appropriate field, if
any is necessary and click the
Connect button.
If no Wireless Networks Tab is available,
see step 2C.
NOTE: If configuration is successful,
skip step 2C.
WPA requirements
Windows XP users must use the Wireless Zero Configuration Service with
Service Pack 1 (SP1) and the WPA patch installed. This software can be
downloaded from http://www.microsoft.com.
WIndows 98SE/2000/ME users require a third-party WPA supplicant such as
Odyssey by Funk Software. For more information visit: http://www.funk.com
For more information about the Wireless Zero Configuration Service, refer to the
Microsoft Support Web Site: http://www.microsoft.com
NOTE: Buffalo Technology recommends that users of the Wireless Zero
Configuration Service upgrade to the latest version available free at
www.microsoft.com.
Page 5

5
You have finished installing your 54Mbps Desktop PCI Adapter. See Installing Client
Manager to install Client Manager on your desktop, Client Manager will not
function properly if Wireless Zero Configuration Service is activated. For more
information about configuring and operating your 54Mbps Desktop PCI Adapter
and Client Manager, refer to the Buffalo Support Web Site:
http://www.buffalotech.com/wireless/support
Note: Buffalo Technology recommends that users of the Wireless Zero
Configuration Service upgrade to the latest version freely available at
www.microsoft.com.
If Wireless Zero Configuration
Service is not functioning, select Star t
» Control Panel » Administrative
Tools » Services.
Select Automatic in the Startup
type field to enable Wireless
Zero Configuration Service.
The default value of Wireless
Zero
Configuration
Service is
Automatic.
Page 6

6
Step Installing the 54Mbps
Wireless Desktop PCI Adapter -g
With the computer powered
down and the cover removed to
expose the inside of the system,
care should be taken to not unplug
any cables or unseat any other
cards installed in the computer.
Insert the 54Mbps Wireless
Desktop PCI Adapter into an available PCI slot. The card should fit
firmly into the slot and should be
screwed into the chassis.
Plug the antenna cable into the
Desktop PCI Adapter. Place the
antenna out from under desk to
ensure good signal reception.
Windows 98SE/ME/2000
Installation & Configuration
Page 7

7
Once the chassis has been replaced
and the antenna is installed, the computer can be powered on. Upon
loading Windows and logging on if
necessary, the Found New
Hardware Wizard will launch
automatically.
Click the Next button to continue.
Select Search for a suitable
driver for my device (recommended).
Click the Next button to continue.
Select only the CD-ROM drives
checkbox, and clear any other
checkboxes that are selected.
Insert the AirNavigator CD.
Click the Next button to continue
to the Driver Files Search
Results page.
NOTE: If AutoRun is enabled, exit out of the automatic Software Installation.
Page 8

8
Windows will display a driver
you can use with the 54Mbps
Wireless Desktop PCI Adapter.
Click the Next button to continue.
Windows 2000: If the
Digital Signature Not
Found page opens, informing
you that no digital signature
exists for the driver you are
installing, click the Ye s button
to continue the installation
process. When the 54Mbps
Wireless Desktop PCI Adapter
is successfully installed, click
the Finish button. Restart your
computer if prompted.
You have finished installing your 54Mbps Wireless Desktop PCI Adapter . See
Installing Client Manager to install Client Manager on your computer.
Page 9

9
Installing Client Manager
Insert the AirNavigator CD.
The AirNavigator dialog box will
open automatically. Select Install
Client Manager to launch the
InstallShield Wizard. Click the OK
button.
If the AirNavigator dialog box does
not open automatically, select Start »
Run and enter D:\Setup.exe in the
Open field to open the dialog box man-
ually. D: represents the letter assigned
to the CD-ROM drive. If another letter
is assigned to the CD-ROM drive, your
command should reflect that difference.
Once the Install Shield Wizard
launches, click the Next button to
begin the software installation.
Client Manager is used to associate a Buffalo Wireless Client Card or
Adapter to an access point.
Note: Client Manager does not function properly if the Windows XP
Wireless Zero Configuration Service is enabled.
If you plan to use XP’s Wireless Zero Configuration Ser vice, do not install
Client Manager.
Page 10

10
Confirm that the installation location
for the software is acceptable.To select an
alternate installation location, click the
Browse button and select another location. Click the Next button to continue
to the Select Components page.
Select the components you want to
install and click the Next button to continue to the Start Copying Files page.
Click the Ne xt button to begin copy-
ing the necessary files to install Client
Manager.
Click the Ye s button, when prompted,
to add a shortcut for Client Manager
to your Windows Startup menu. If you
click the Ye s button, Client Manager
will run at startup.
NOTE: Users who frequently change profiles should not add Client Manager
to the Start-up Group.
Page 11

11
Click the Finish button to
complete the installation of
Client Manager. Restart your
computer.
Note: The 54Mbps Desktop
PCI Adapter and Client
Manager will not function prop-
erly until you reboot the system.
Depending on the operating system, some screens may vary. However, by accepting
default installation settings, Client Manager should install properly.
For more information about configuring and operating your 54Mbps Wireless
Desktop PCI Adapter and Client Manager, refer to the Buffalo Support Web Site:
http://www.buffalotech.com/wireless/support.
Open Client Manager and Click the
Survey button.
Click Refresh.
Select the Access Point to connect to.
Add WEP password if applicable.
Click Connect
Client Manager has associated with the access
point
Close Client Manager.
Connecting with Client Manager
Note: Make sure your Access Point is operational prior running Client
Manager.
Page 12

12
Buffalo Technology
Technical Support
Buffalo Technology offers Toll-Free Technical Support 24 hours a day, 7 days a week
for this product. Customers in the United States and Canada can obtain technical
support using the following information:
◗ Online Help Available on the AirNavigator CD enclosed with your purchase.
◗ Web www.buffalotech.com/wireless
◗ E-mail info@buffalotech.com
◗ Telephone 866-752-6210
(USA & Canada only)
The constantly evolving state of wireless products and operating systems requires
Buffalo Technology to occasionally release updated software to take advantage of
new technologies and to comply with industry standards. For the most recent software, firmware, driver, and technical whitepaper releases available, please visit the
Buffalo Technology website.
FCC Compliance Statement - See owners manual for complete statement.
This device complies with Part 15 of the FCC Rules. Operation is subject to the following two
conditions: (1) This device may not cause harmful interference, and (2) this device must accept
any interference received, including interference that may cause undesired operation.
R&TTE Compliance Statement - See owners manual for complete statement
This equipment complies with all the requirements of the DIRECTIVE 1999/5/EC OF THE
EUROPEAN PARLIAMENT AND THE COUNCIL of 9 March 1999 on radio equipment and
telecommunication terminal Equipment and the mutual recognition of their conformity
(R&TTE).
Copyright © 2003 Buffalo Technology, Inc. All Rights Reserved.
Buffalo Technology (USA) Inc., is part of MELCO INC., the global manufacturers of IT peripherals, including memory, networking, and multimedia products, inside many of the world's computers. All trademarks are property of their respective owners.
 Loading...