

Page 1

AirStation WLA-L11G
Setup Guides for Apple Computers
A^^/t Cf/‘yoi/r
Includes:
Setup Guides for 0S9.x and OSX.x
Revision 1.0
January 22, 2002
Buffalo Technology, Inc.
Page 2

A^art Cf/^your
1) WLA-L11G Guide - Overview and illustrations of the network.
0S9.X SETUP
2) Connecting the WLA-L11G to your network and to AC power.
3) Setting up your Mac with OS9.x and AirPort Card to
configure the WLA-L11G.
4) Setting up the WLA-L11G to communicate wirelessly with
another WLA-L11G.
5) Setting up Roaming between two WLA-LUGs.
6) Setting up WEP for the WLA-L11G.
7) Setting up an administrator password.
8) Restricting which MAC addresses may access the WLA-L11G.
OSX.X SETUP
Table of Contents
Page
1
3
3
7
8
9
10
9) Connecting the WLA-L11G to your network and to AC power.
10) Setting up your Mac with OSX.x and AirPort Card to
configure the WLA-L11G.
11) Setting up the WLA-L11G to communicate wirelessly with
another WLA-L11G.
12) Setting up Roaming between two WLA-LIIGs.
13) Setting up WEP for the WLA-L11G.
14) Setting up an administrator password.
15) Restricting which MAC addresses may access the WLA-L11G.
Appendix A - Configuring wireless Macs with OS9.x and AirPort
Card to access a network.
1) Networks with a DHCP server.
2) Networks that require a static IP.
Appendix B - Configuring wireless Macs with OSX.x and AirPort
Card to access a network.
12
12
14
15
16
17
18
A-1
A-3
1) Networks with a DHCP server.
2) Networks that require a static IP.
B-1
B-3
Page 3
A^art A/'yOUr
Page 1
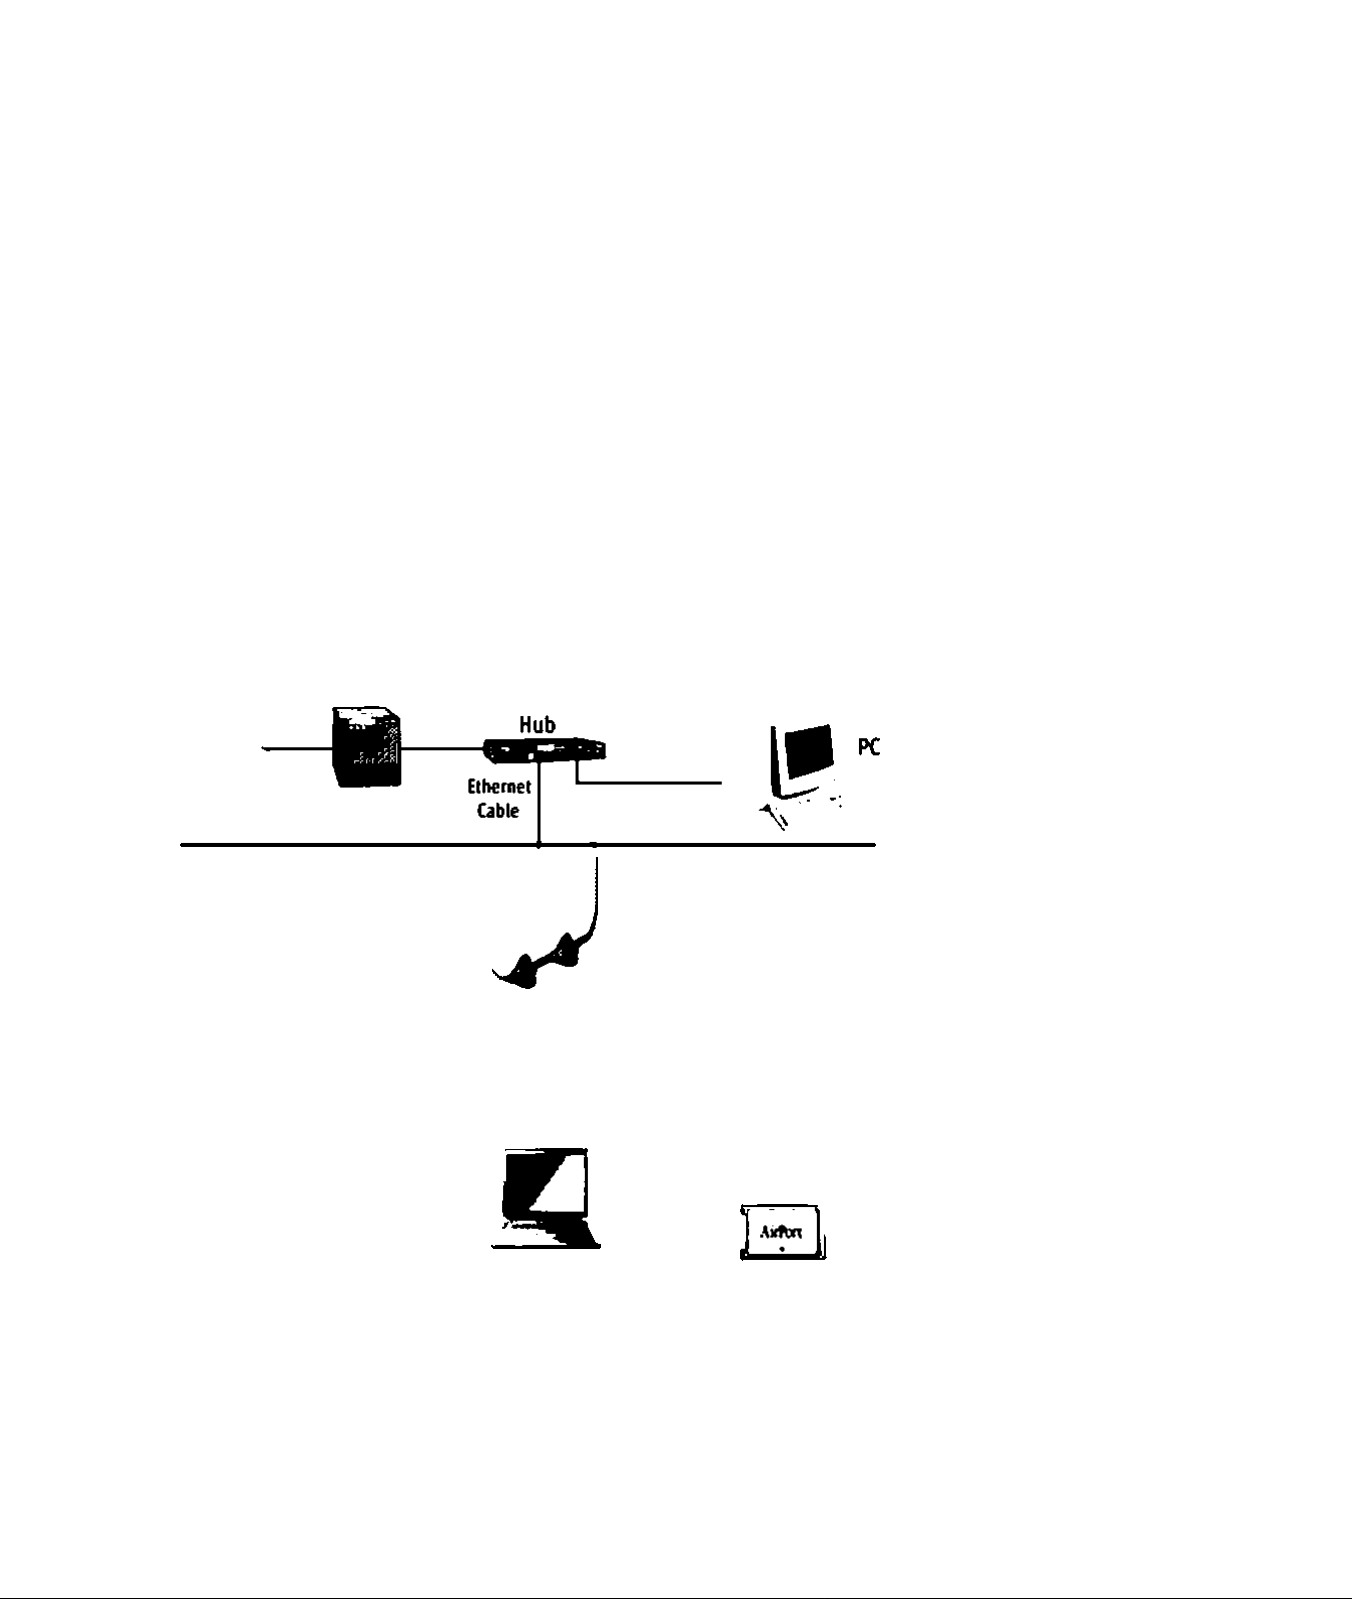
1) WLA-L11G Guide - Overview and illustrations of the network.
The WLA-L11G default mode either allows a DHCP server on a
wired network to assign IP addresses to each wireless computer or
integrates with a wired network that requires an assigned unique IP
address for each computer.
If one of the following pictures [Overview A or Overview B (Page 2)] is
how your finished network will look, proceed to Page 3 (for setup with
OS9.X) or Page 12 (for setup with OSX.x).
Existing Network
Internet
Router
Added Wireless
Network
y^irStation'
Standard Model
‘ 't
Overview A
'4\
B
Desktop PC
Wireless PCI Card
(RM)uire$ PCMCIA Card) Notet»ok PC
Wireless LAN Card
Above: An existing wired network with a WLA-L11G added for wireless
connectivity.
Apple
AirPort Card
Page 4

Mr r^e /fé’rf/T ^/'your
Page 2
\Mmt
“'IS
Oe$Uo^K
W^rdmPOCjrd
<lto9«»%KMCIACor«
Rouler
Com»
^irStation'
SbiM IMMI
e
NMcbOOkK
WrMeulAMOr^
I?
4\
13
Air^lCir^
Overview B
Hub
uü!^ Ir
CM V
' K
^irStation'
SbiMIMH
4^
13
Air^lCore
I
Above: An existing wired LAN with WLA-L11G (left) for wireless connectivity.
On the right, a second WLA-L11G communicates with the WLA-L11G on
the left. The second WLA-L11G connects to an ethernet hub or switch
to provide network connection to the original existing wired LAN.
Page 5
Mr Mé’rfrt
Page 3
0S9.X SETUP
2) Connecting the WLA-L11G to your network and to AC power.
2.1) Connect the WLA-L11G to your existing wired LAN.
Using the supplied ethernet cable, plug one end of the cable into an
open port of one of your existing ethernet hubs or switches. Plug the
other end of the ethernet cable into the port marked "10M/100M"
on the back of the WLA-L11G
(Picture 1).
Picture 1
«•t*.
INIT Button
(Resets the
2.2) Connect the Buffalo AC
adapter to a 120V AC supply
and to the DC-IN of the
WLA-L11G (Picture 1).
10M/100M
DC-IN 6-7V.
AirStation
to Default
settings)
Note:
If you will be configuring more advanced features such as WEP,
or connecting two WLA-LIIGs as a bridge, proceed to Step 3.
Otherwise, refer to Appendix A for setting the wireless Macs with OS9.x
and AirPort Card to use the WLA-L11G.
3) Setting up your Mac with OS9.x and AirPort Card to configure the
WLA-L11G.
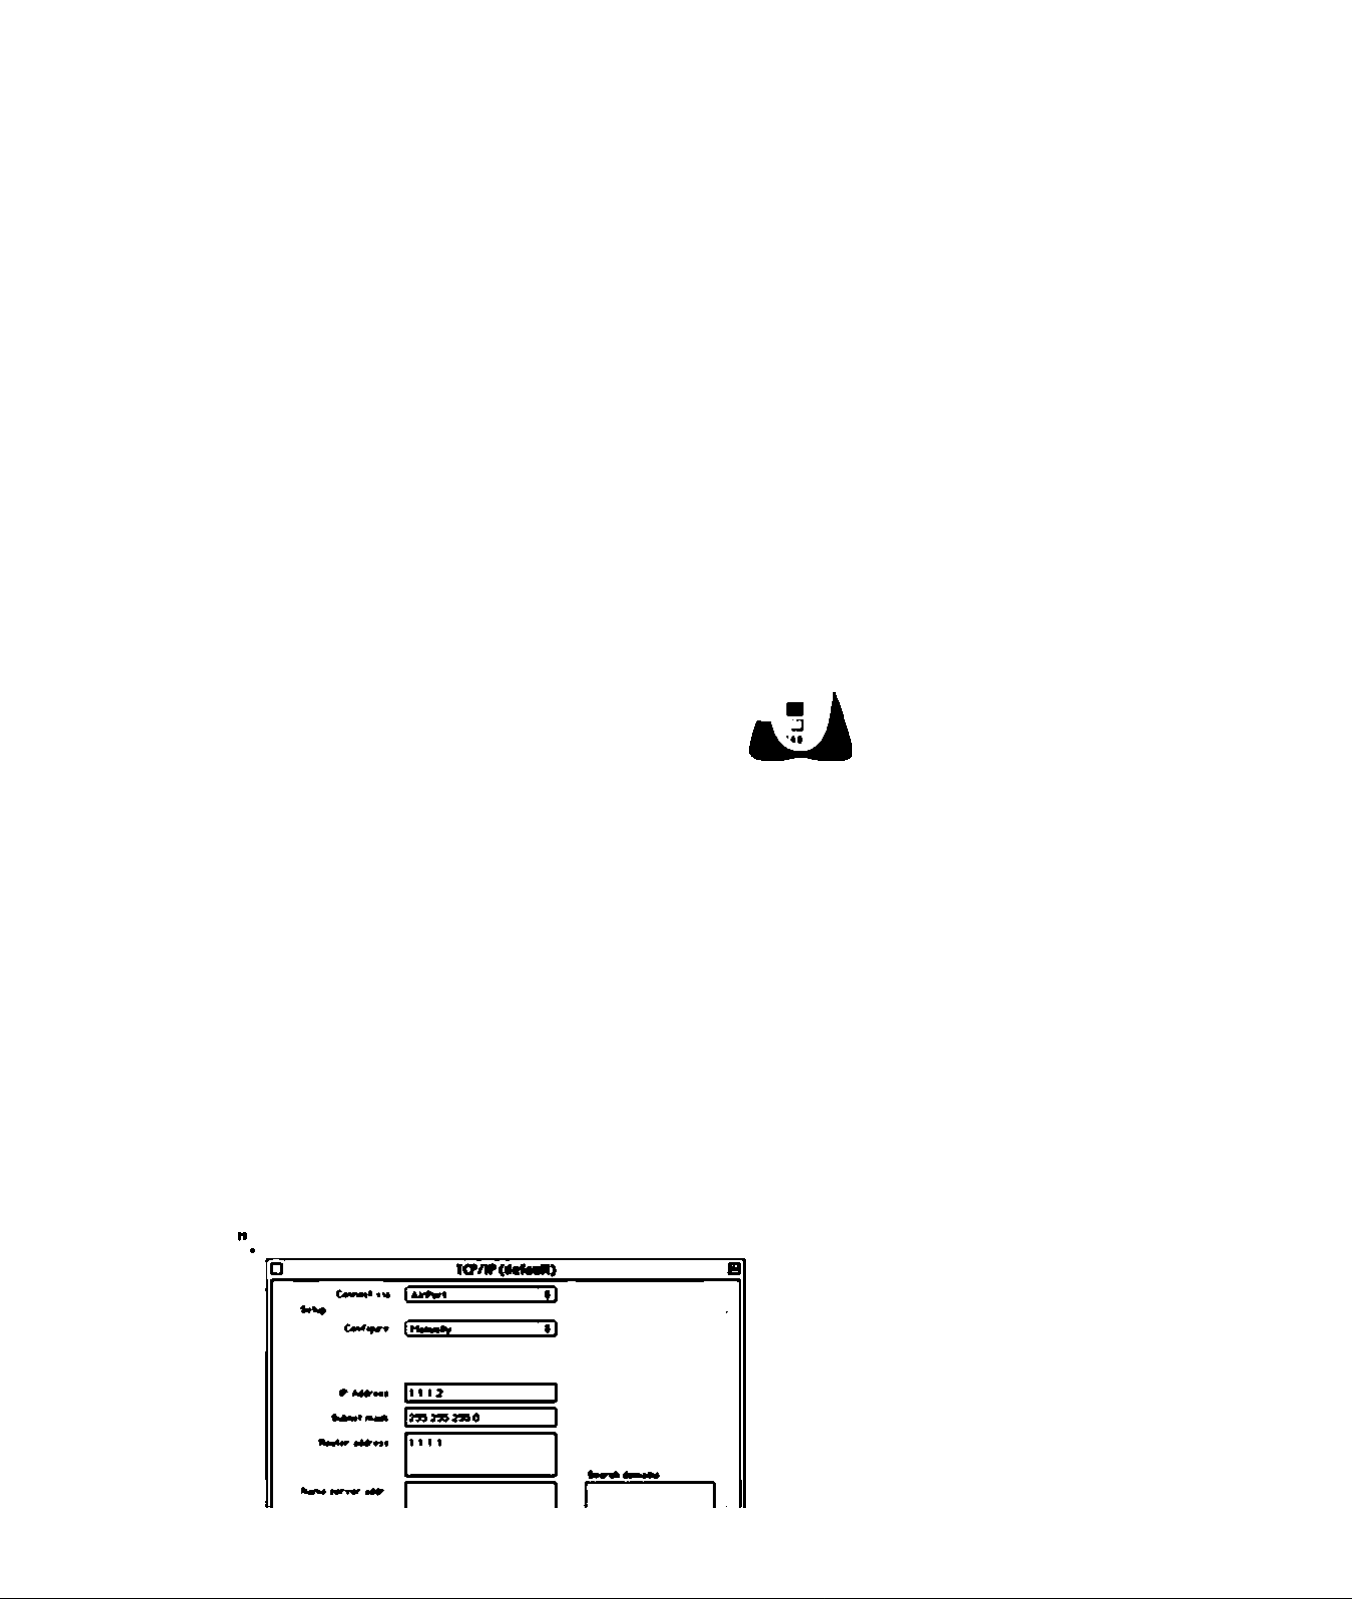
3.1) Go to the Apple icon in the top left corner of your Desktop screen.
Scroll down to "Control Panels", then to "TCP/IP" and select.
Go to "Connect Via" and select "AirPort" (Picture 2).
Beside "Configure", select "Manually". Beside "IP Address", input "1.1.1.2".
Beside "Subnet", input "255.255.255.0". Beside "Router address", input
"1.1.1.1". Leave the remaining fields blank. Close the window and select
Picture 2
TCP/IP
Control Panel
Page 6

A^art Cf/'your
Page 4
3.2) Go to the Apple icon in the top left corner of your Desktop screen.
Scroll down to "Control Panels", then to "AppleTalk” and select.
Go to "Connect via" and select "AirPort" (Picture 3).
Close the window and select "Save".
□
AppleTalk
Picture 3
Connect via: | AirPort
D
3.3) Go to the Apple icon in the top left corner of your Desktop screen.
Scroll down to "AirPort" and select. In the "Settings" section,
verify that "AirPort: On" is displayed. If it is not displayed, select the
"Turn AirPort On" button (Picture 4).
In the "AirPort Network" section, go to "Choose network".
Click on the up/down symbols and select the AirStation's ESS-ID.
This will be a 6-digit alphanumeric followed by the word "GROUP".
Close your AirPort Control Panel window.
[AirPort
_Status
8600BDGR0UP
Getting statue...
Picture 4
^ Settings
_AirPort.
AirPort: On
_ AirPort Network
Choose network: 8600BDGR0UP
Signal level:
Turn AirPort Off I
AirPort ID: 00 30 65 10 3D 2D
Q Allow eelection of closed networks
IJ
Page 7

Page 5
3.4) Open your Internet Browser and input "http://1.1.1.1" as the URL
(Address) (Picture 5) and press the "return" key.
□ © WirelessLAN Series - AirStati
e
B»ck Forward Stop Refresh Home AutoFill Print M^il
Address http://1.1.1.1
ft
1 e
iS
a
Picture 5
The AirStation screen will open in the Browser window (Picture 6).
If only one WLA-L11G is being set up, select the "Advanced Settings" button,
then select "Radio Hardware Settings". Now skip to Step 6, Page 8.
:\VLA-Ivll /WIA-UIG
A» SiaOMi WahmOM
NMif AFPmitf
Tm# miy U
Sy«UiB
AJymtti fw/icunin
rgr;g-a
Picture 6
4) Setting up the WLA-L11G to communicate wireiessly with another
WLA-L11G. (Requires two WLA-LIIGs.)
4.1) Select the "Standard Settings" button (Picture 6).
Note: The WLA-L11G has a feature that allows it to communicate directly to
one other WLA-L11G. It cannot communicate with more than one other
WLA-L11G.
4.2) Type "root", in lower case, into the box beside "User ID".
Select "OK" (Picture 7).
User ID:
Password:
RcAlm:
Q Remember Password | Cancel | || (jK
roo^
Picture 7
Page 8

/it t^e ^/'yout
Page 6
4.3) In the box beside "LAN MAC address”, type in the 12-digit ESS-ID of the
other WLA-L11G that this WLA-L11G will be communicating with. Every two
digits must be separated by a colon (:) (Picture 8). The ESS-ID is found on a
label on the back of the other WLA-L11G, beneath "WIRELESS MAC ADDRESS".
Select "Set".
Picture 8
Basic Settings L
Aii'Station Name L |AP060016
Group Name L [GROUP
AF Coimnmucatioii t
Acceess Point W^ eless LAN MAC addi ess 00:07:40:06:00:17
[set]
This procedure (starting with Step 3.3, Page 4) must be repeated for the second
WLA-L11G with the 12-digit ESS-ID of the first WLA-L11G. When setting
the second WLA-L11G, disconnect the power from the first WLA-L11G
temporarily, as your Internet Browser will try to remain connected to the
first WLA-L11G if it is on.
You will also need to relaunch your Internet Browser to ensure it disconnects
completely from the first WLA-L11G.
4.4) A new screen will appear with the message below (Picture 9). If you
only added the MAC address in Step 8, use your browser return function
twice to return to the WLA-LIIG's start-up screen. If you changed the AirStation
Name or Group Name in the last screen, you will have to relaunch your
browser with "http://1.1.1.1" as the URL to continue.
Complete settings.
After restart Aii Station, you can not coniigure the settings from this screen.
If you want to continue conHguration, please finish browser software then execute it again.
Picture 9
Page 9

Page?
5) Setting up Roaming between two WLA-LIIGs.
Note: The Roaming function allows a wireless computer to search for
the best signal from two WLA-LIIGs.
5.1) On the WLA-L11G start-up screen (Picture 6, Page 5), select the "Advanced
Settings" button. Select "Radio Hardware Settings" from the list
on the left side of the screen (Picture 10).
Expanding
Routing
Picture 10
5.2) The "Radio Hardware Settings" screen
will appear. Beside "Roaming", select
Packet rJter
Wireless LAN Restrictiom
AP Communication
Radio Hardware Settings
"Use" (Picture 11).
^ Generate from Group Name, MAC address and
ESS-m
D$ Channel
Roaming
5.3) Select "Set"
(Picture 12).
5.4) After setting up Roaming in the WLA-L11G, it will be necessary to
reselect the WLA-L11G in your AirPort Control Panel. Refer to Step 3.3,
Roaming settings.
O Generate:
II channel $
©ITseODon’t Use
Set
_______________
Picture 11
Picture 12
Page 4, for reselection. Select ESS-ID "OOOOOOGROUP" for the
new network name.
Close the AirPort Control Panel. Use your browser return function twice
to return to the "Radio Hardware Settings" screen.
Setting up security for the WLA-L11G.
Note: The WLA-L11G comes with several security features: WEP (Wired
Equivalent Privacy), password protection for the administration of the
WLA-L11G, and the ability to restrict the MAC (Machine Address Code)
addresses that are allowed to access the WLA-L11G.
Page 10

/it t^e
Pages
6) Setting up WEP for the WLA-L11G.
6.1) Depending on the type of WEP you want to set up, choose "ASCII" or
"HEX" (Picture 13). The type of WEP is up to the user.
WARNING: If you have a 40-bit AirPort Card you must not input a
128-bit code. Consult your AirPort Card Documentation if you don't know.
40-bit WEP:
ASCII • input a five-digit code. Use any alphanumeric characters
and the underscore (_) sign. ASCII codes are case sensitive.
HEX - input a ten-digit code. Use any combination of numerals and the
letters A through F. HEX codes are not case sensitive.
128-bit WEP:
ASCII - Input a 13-digit code. Use any alphanumeric characters
and the underscore (_) sign. ASCII codes are case sensitive.
HEX - Input a 26-digit code. Use any combination of numerals and the
letters A through F. HEX codes are not case sensitive.
6.2) Input the WEP code you selected into the boxes beside "Encryption
Code" and "Confirm Encryption Code" (Picture 13).
Ena7Pti.nC.de™ i ®А8СДОНЕХ
^ ' I Picture 13
Confinn Enciyptioii Code L I
6.3) Select "Set" (Picture 14).
Note: After setting up WEP in the WLA-L11G, it will be necessary to reselect
the WLA-L11G in your AirPort Control Panel. Refer to Step 3.3, Page 4, for
reselection. Select ESS-ID "OOOOOOGROUP"
for the network name. A screen will appear
requiring a password to join the network.
Input your WEP code, exactly as you did
Set Picture 14
the selected AirPort network requires a
password to join.
Password:
QAdd 10 Keychain
in the WLA-L11G screen, and select "OK"
(Picture 15).
Picture 15
Page 11

Cf/'your
Page 9
7) Setting up an administrator password.
7.1) Relaunch your Internet Browser. Input "httpy/1.1.1.1" as the URL and
press "return" on your keyboard. The WLA-L11G start-up screen will appear.
Select "Advanced Settings". On the left side of the Advanced Settings
Screen, select "Password".
(Picture 16).
Picture 16 Advanced Settings
Return to TOP page
System
7.2) Enter a password of up to eight
alphanumeric characters, and the
Basic
underscore (_) symbol in the "New
Password" and the "Confirm Password"
Password
Time
boxes. The password is case sensitive.
Select "Set" (Picture 17).
Administi ator's User Name L root
New Password L
Picture 17
Confiim Password L
[set]
7.3) Select "Return". You will be prompted for the password. Input the
password into the box beside "Password" and select "OK" (Picture 18).
Connectto "1.1.1.1" as:
User ID:
root
Picture 18
Password:
Realm: SETUP
□ Remember Password Cancel I I OK |
Page 12

Page 10
8) Restricting which MAC addresses may access the WLA-L11G.
8.1) On the left side of the Advanced Settings screen, select "Wireless LAN
Restrictions" (Picture 19).
Expanding
Routing
Packet Filter
Picture 19
Wiieless LAN Restiictions
AP Coinimuucation
Radio Haidwaie Settings
8.2) Place a check in the box beside "permit connection" and select
"Change" to set your wireless computer's MAC address as an authorized
connection (Picture 20). Select "Return".
Note: if there is more than one MAC address showing at this point,
another computer is already connected to the WLA-L11G.
If this is the case, open your AirPort Control Panel to find your MAC address
beside "AirPort ID" (Picture 21). Place a check beside that MAC address
only and select "Change". Select "Return".
Authorized Hireless LAN PCs
IVIAC address Change
Unauthorized weless LAN PCs
Picture 20
MAC address Change
00:30:65:10:3D:2D Opeimit connection
[ Ct>«fne|| Checic all otunamhorized PCs') | look for Wireless IAN Computcr(s)|
AirPort ID: 00 30 65 10 3D 2D Picture 21
The screen will now show your MAC address as authorized (Picture 22).
Autlioiized wii eless LAN PCs L
MAC addiess Change Picture 22
00:30:65:10:3D:2D Dinliibit coimection.
Page 13

Page 11
8.3) Select "Enable", then "Set" (Picture 23). Select "Return".
Wlrelf ss LAN Rf itrictions Sfttingi
Restrict connection from wireless LAN PCs
m*)
® Enable
O Disable
Picture 23
8.4) To allow other wireless computers to access the WLA-L11G, type each
MAC address (with every two Hexadecimal numbers separated by
a colon as shown) into the box beside "MAC address of wireless LAN
PC" and select "Add" (Picture 24). Select "Return".
Each added computer will require the WEP code to access the WLA-L11G.
MAC addresses for AirPort Cards may be found in the Apple AirPort
Control Panel for each computer. MAC addresses of PCs are usually found
on the wireless card itself.
Add wii eless LAN PC to list of autlioiized PCs £
MAC addi'ess of wii'eless LANPC L |00:45:32:0D:76:32| Picture 24
Add
If only one WLA-L11G is being set up, you are finished with setup and
may close the browser.
Note: Setting up the second WLA-L11G.
If a second WLA-L11G is to be set up to communicate with the
first WLA-L11G, repeat steps 3.3-8.4 (OS9) for the second WLA-L11G.
During setup of the second WLA-L11G, the first WLA-L11G should have
the power disconnected. After completing setup of the second unit,
reconnect power to the first unit, and setup is complete.
Note: The ESS-ID (Wireless MAC Address) of the first WLA-L11G will be
used in the "Wireless LAN MAC Address" field for the second WLA-L11G
(Pictures, Page6).
Page 14

/it t^e
Page 12
OSX.X SETUP
9) Connecting the WLA-L11G to your network and to AC power.
9.1) Connect the WLA-L11G to your existing wired LAN.
Using the supplied ethernet cable, plug one end of the cable into an
open port of one of your existing ethernet hubs or switches. Plug the
other end of the ethernet cable into the port marked "10M/100M"
on the back of the WLA-L11G
Picture 25
(Picture 25).
«•t*.
INIT Button
(Resets the
9.2) Connect the Buffalo AC
adapter to a 120V AC supply
and to the DC-IN of the
10M/100M
DC-IN 6-7V.
AirStation
to Default
settings)
WLA-L11G (Picture 25).
Note:
If you will be configuring more advanced features such as WEP,
or connecting two WLA-LIIGs as a bridge, proceed to Step 3.
Otherwise, refer to Appendix B for setting the wireless Macs with OSX.x
and AirPort Card to use the WLA-L11G.
10) Setting up your Mac with OSX.x and AirPort Card to configure the
WLA-L11G.
10.1) Go to the Apple icon in the top left corner of your Desktop screen.
Scroll down to "System Preferences" and select.
Under "Internet & Network", select "Network" (Picture 26).
Internet & Network
Picture 26
i«* © Q tS
Internet Network QuickTime Sharing
10.2) Beside "Show", select "AirPort" (Picture 27).
Select the "AirPort" tab. Beside "Preferred
Network", select the ESS-ID of your WLA-L11G.
This number is found on the back of your
WLA-L11G, under "WIRED MAC ADDRESS".
The last six digits of this number plus the
word "GROUP" will be displayed beside
"Preferred Network".
SA«»
* TCFflP ) AMitTA T fÂSir'
00l04^tl76tS
frHf fti« fwtwt OiOOlACAOur
Picture 27
Page 15

/it t^e
Page 13
10.3) Select the "AppleTalk" tab and place a check in the box beside "Make
AppleTalk Active" (Picture 28).
' TCP/IP Y AppleTalk f Proxies Y AirPoK \
Picture 28
^ Make AppleTalk Active
10.4) Select the "TCP/IP" tab (Picture 29).
Beside "Configure", select "Manually".
In the box beside "IP Address", input "1.1.1.2".
In the box beside "Subnet Mask", input "255.255.255.0".
In the box beside "Router", input "1.1.1.1".
Leave the other fields blank.
f TCP/IP^ AppleTalk ^"proxies | AirPort
Configure: Manually
Domain Name Servers (Optional)
IP Address: 1.1.1.2
Subnet Mask: 255.2SS.25S.O
Router: 1.1.1.1
Search Domains (Optionaii
Picture 29
10.5) Select the "Apply Now" button and (Picture 30) and close the window.
Apply Now ^ Picture 30
10.6) Open your Internet Browser and input "http://1.1.1.1" as the URL
3
(Address) (Picture 31). Press the "return" key.
Address:
O h«p://1.1.1.1/
Picture 31
Page 16

iW/-"
Page 14
The AirStation screen will open in the Browser window (Picture 32).
^JirEjinjCJOrJ iWLA-IJl /\m.a-lik;
AitSuan mÍ9rmtútm
Nm* AfOWOU
Tm 06rU: li
Sri(««K r<*nMl
ltm»4ar<U¿5n SlwrfwJ («^jcivAtaMi
A4vAM«á
ÍO>«i»»uicT|
If only one WLA-L11G is being set up, select the "Advanced Settings" button,
Picture 32
then select "Radio Hardware Settings". Now skip to Step 13, Page 16.
11) Setting up the WLA-L11G to communicate wirelessly with another
WLA-L11G (Requires two WLA-L11GS).
11.1) Select the "Standard Settings" button (Picture 32).
Note: The WLA-L11G has a feature that allows it to communicate directly to
one other WLA-L11G. It cannot communicate with more than one other
WLA-L11G.
11.2) Type "root". In lower case, Into the box beside "User ID".
Select "OK" (Picture 33).
User ID:
P^issword:
RcAlm:
Q Remember Password | Cancel | || CK
roo^
Picture 33
11.3) In the box beside "LAN MAC address", type in the12-digit ESS-ID of the
other WLA-L11G that this WLA-L11G will be communicating with. Every two
digits must be separated by a colon (:) (Picture 34). The ESS-ID is found on
a label on the back of the other WLA-L11G, beneath "WIRELESS MAC
ADDRESS". B.U.S,«»..
Select "Set"
AirSlatien Nai
Na
AP CdBWMC atiM
At<00tt PoiMl LAN MAC »4^9%%
pwooiT
pSoCe
Picture 34
Page 17

Page 15
This procedure, (starting with Step 10, Page 12) must be repeated for the
second WLA-L11G with the 12-digit ESS-ID of the first WLA-L11G. When
setting up the second WLA-L11G, disconnect the power from the first WLA-L11G
temporarily as your Internet Browser will try to remain connected
to the first WLA-L11G if it is on.
You will also need to relaunch your Internet Browser to ensure it disconnects
completely from the first WLA-L11G.
11.4) A new screen will appear with the message below (Picture 35). If you
only added the MAC address in Step 8, Page 14, use your browser return function
twice to return to the WLA-LIIG's start-up screen. If you changed the AirStation
Name or Group Name in the last screen, you will have to relaunch your
browser with "httpy/1.1.1.1" as the URL to continue.
Complete settings.
After restart Aii Station, you can not coniigure the settings from this screen.
Picture 35
If you want to continue conHguration, please finish browser soft>^'are then execute it again.
12) Setting up Roaming between two WLA-LIIGs.
Note: The Roaming function allows a wireless computer to search for
the best signal from two WLA-LIIGs.
12.1)On the WLA-L11G start-up screen (Picture 32, Page 14), select the
"Advanced Settings" button. Select "Radio Hardware Settings" from the list
on the left side of the screen (Picture 36).
Expanding
Routing
Picture 36
12.2) The "Radio Hardware Settings" screen will
appear. Beside "Roaming", select "Use"
(Picture 37).
Packet Filter
Wireless LAN Restriction!
AP Coimnunication
Radio Hardware Settings
^ Generate from Group Name, MAC address and
ESS-ID
Roaming settings.
_______________
O Generate:
DS Channel
II channel $
Picture 37
Roaming
12.3) Select "Set"
(Picture 38).
®lTseODon’t Use
Set
Picture 38
Page 18

Page 16
After setting up Roaming in the WLA-L11G, it will be necessary to
reselect the WLA-L11G in your AirPort Control Panel. Refer to StepIO
Pages 12-13, for reselection. Select ESS-ID "OOOOOOGROUP" for the
new network name. Close the AirPort Control Panel. Use your browser
return function twice to return to the "Radio Hardware Settings" screen.
Setting up security for the WLA-L11G.
Note: The WLA-L11G comes with several security features: WEP (Wired
Equivalent Privacy), password protection for the administration of the
WLA-L11G, and the ability to restrict the MAC (Machine Address Code)
addresses that are allowed to access the WLA-L11G.
13) Setting up WEP for the WLA-L11G.
13.1) Depending on the type of WEP you want to set up, choose "ASCII"
or "HEX" (Picture 39). The type of WEP is up to the user.
WARNING: If you have a 40-bit AirPort Card you must not input a
128-bit code. Consult your AirPort Card Documentation if you don't know.
40-bit WEP:
ASCII • input a five-digit code. Use any alphanumeric characters
and the underscore (_) sign. ASCII codes are case sensitive.
HEX - input a ten-digit code. Use any combination of numerals and the
letters A through F. HEX codes are not case sensitive.
128-bit WEP:
ASCII - Input a 13-digit code. Use any alphanumeric characters
and the underscore (_) sign. ASCII codes are case sensitive.
HEX - Input a 26-digit code. Use any combination of numerals and the
letters A through F. HEX codes are not case sensitive.
Encryption Code (WEP) .
<DASCnOHEX
Picture 39
Confinn Encryption Code
13.2) Input the WEP code you selected into the boxes beside "Encryption Code"
and "Confirm Encryption Code" (Picture 39).
13.3) Select "Set" (Picture 40).
Set Picture 40
Page 19

Page 17
Note: After setting up WEP in the WLA-L11G, it will be necessary to reseiect
the WLA-L11G in your Network Preferences. Refer to StepIO, Pages 12-13,
for reselection. Select ESS-ID "OOOOOOGROUP". Type in the WEP
code beside "Network Password" (Picture 41), exactly as you did in
the WLA-L11G screen, and select "Apply Now".
Preferred Network: OOOOOOGROUP
Picture 41
Network Password:
14) Setting up an administrator password.
14.1) Relaunch your Internet Browser. Input "httpy/1.1.1.1" as the URL and
press "return" on your keyboard. The WLA-L11G start-up screen will appear.
Select "Advanced Settings". On the left side of the Advanced Settings
Screen, select "Password"
(Picture 42).
14.2) Enter a password of up to eight
alphanumeric characters, and the
underscore (_) symbol in the "New
Picture 42 Advanced Settings
Return to TOP page
System
Basic
Password
Time
Password" and the "Confirm Password"
boxes. The password is case sensitive.
Select "Set" (Picture 43).
Administr ator's User Name £ root
New Password £ |
Picture 43
Confiim Password £
I
lift)
Page 20

Page 18
14.3) Select "Return". You will be prompted for the password. Input the
password into the box beside "Password" and select "OK" (Picture 44).
Connectto "1.1.1.1" as:
User ID:
root
Picture 44
Password:
Realm: SETUP
□ Remember Password Cancel I I OK |
15) Restricting which MAC addresses may access the WLA-L11G.
15.1) On the left side of the Advanced Settings screen, select "Wireless LAN
Restrictions" (Picture 45).
Expanding
Routing
Packet Filter
Picture 45
^\^eless LAN Restriction!
AP Conununication
Radio Hardware Settings
15.2) Place a check in the box beside "permit connection" and select
"Change" to set your wireless computer's MAC address as an authorized
connection (Picture 46). Select "Return".
Note: if there is more than one MAC address showing at this point,
another computer is already connected to the WLA-L11G.
If this is the case, open your AirPort Control Panel to find your MAC address
beside "AirPort ID" (Picture 47). Place a check beside that MAC address
(Picture 46) only and select "Change". Select "Return".
wvktt LA?ifCt
MAC
tJCC fCt
MAC Ckmtf
Picture 46
00 W 2DO^#f*<wKW
Oi»»« I *■
AirPort ID: 00 30 65 10 3D 2D
Picture 47
Page 21

Page 19
The screen will now show your MAC address as authorized (Picture 48).
Authorized >^ireless LAN PCs
MAC address Change PiCtUre 48
00:30:65:10:3D:2D O inhibit connection.
15.3) Select "Enable", then "Set" (Picture 49). Select "Return".
LA^ R»«trkCMii
Restrkt fnm «vvWii LAN PCi
• EajU#
O DisaVI#
Picture 49
QH)
15.4) To allow other wireless computers to access the WLA-L11G, type each
MAC addresses (with every two Hexadecimal numbers separated by
a colon as shown) into the box beside "MAC address of wireless LAN
PC" and select "Add" (Picture 50). Select "Return".
Each added computer will require the WEP code to access the WLA-L11G.
MAC addresses for AirPort Cards may be found in the Apple AirPort Control
Panel for each computer. MAC addresses of PCs are usually found on
the wireless card itself.
Add wireless LAN PC to list of authorized PCs
MAC address of wireless LAN PC [0045 320D 3?|
Picture 50
lAddI
If only one WLA-L11G is being set up, you are finished with setup and
may close the browser.
Note: Setting up the second WLA-L11G.
If a second WLA-L11G is to be set up to communicate with the
first WLA-L11G, repeat steps 10.2-15.4 (OSX) for the second WLA-L11G.
During setup of the second WLA-L11G, the first WLA-L11G should have
the power disconnected. After completing setup of the second unit,
reconnect power to the first unit, and setup is complete.
Note: The ESS-ID (Wireless MAC Address) of the first WLA-L11G will be
used in the "Wireless LAN MAC Address" field for the second unit
(Picture 34, Page 14).
Page 22

/it t^e /fé’tftr ^/'yout
Page A-1
APPENDIX A
Configuring wireless Macs with 0S9.x and AirPort Card to access
a network.
Part One: Networks that use a DHCP server to assign IP addresses.
1) Go to the Apple icon in the top left corner of your Desktop screen.
Scroll down to "Control Panels", then to "TCP/IP" and select.
Go to "Connect via" and select "AirPort" (Picture A-1).
Beside "Configure", select "Using DHCP Server".
D
|u»>>tCMCP$»rr>r tl
Picture A-1
tMH 192.1^.0.1
$*«r<A dsm«nif
1921«001
Leave the remaining fields blank.
The IP address and other settings will be suoplied by your network DHCP
server. Close the window and select "Save".
2) Go to the Apple icon in the top left corner of your Desktop screen.
Scroll down to "Control Panels", then to "AppleTalk" and select.
Go to "Connect via" and select "AirPort" (Picture A-2).
Close the window and select "Save".
□
Connect via: | AirPort
AppleTalk
Picture A-2
D
Page 23

/it t^e
Page A-2
3) Go to the Apple icon in the top left corner of your Desktop screen.
Scroll down to "AirPort" and select. In the "Settings" section,
verify that "AirPort: On" is displayed, if it is not displayed, select the
"Turn AirPort On" button (Picture A-3).
In the "AirPort Network" section, go to "Choose network".
Click on the up/down symbols and select the AirStation's ESS-ID.
This will be a 6-digit alphanumeric followed by the word "GROUP".
Note: if Roaming was set up for two WLA-LUGs, select
"OOOOOOGROUP" (Picture A-3).
Close the AirPort Control Panel window.
[AirPort
_Status
8600BDGR0UP
Getting statue...
Signal level: C
^ Settings
_AirPort.
AirPort: On
AirPort ID: 00 30 65 10 3D 2D
0 Allow eelection of closed networks
_ AirPort Network
Choose network: 8600BDGR0UP
4) If WEP was configured during setup
of theWLA-L11G, input the WEP
code in the box beside "Password" and
select "OK" (Picture A-4).
Picture A-3
Turn AirPort Off I
D
the selected AirPort network requires a
password to join.
Password:
QAdd 10 Keychain
I Cancel I I OK
You should now be connected to your network.
Picture A-4
Page 24

Page A-3
Part Two: Networks that require an assigned unique IP address for each
computer (Static IP setup).
1) Go to the Apple icon in the top left corner of your Desktop screen.
Scroll down to "Control Panels", then to "TCP/IP" and select.
Go to "Connect via" and select "AirPort". (Picture A-5)
Beside "Configure”, select "Manually".
The numbers for ”IP Address", "Subnet mask", "Router address",
"Name server addr", and in some cases "Search domains", must
be supplied by your network administrator or your ISP (if your WLA-L11G
is connected to an ISP's modem or router).
Type in your network/iSP numbers, close the window, and select "Save".
CcfwKtvi*. I
3
Picture A-5
Him»
177.10.10
tnC2ii22i
2) Go to the Apple icon in the top left corner of your Desktop screen.
Scroll down to "Control Panels, then to "AppleTalk” and select.
Go to "Connect via" and select "AirPort" (Picture A-6).
Close the window and select "Save".
□
AppleTalk
Connect via: | AirPort
Picture A-6
D
Page 25

/it t^e ^/'yout
Page A-4
3) Go to the Apple icon in the top left corner of your Desktop screen.
Scroll down to "AirPort" and select. In the "Settings" section,
verify that "AirPort: On" is displayed, if it is not displayed, select the
"Turn AirPort On" button (Picture A-7).
In the "AirPort Network" section, go to "Choose network".
Click on the up/down symbols and select the AirStation's ESS-ID.
This will be a 6-digit alphanumeric followed by the word "GROUP".
Note: if Roaming was selected during setup of the WLA-L11G, you will
select "OOOOOOGROUP" beside "Choose network".
Close the AirPort Control Panel window.
[AirPort
_Status
8600BDGR0UP
Getting statue...
Signal level:
^ Settings
_AirPort.
AirPort: On
AirPort ID: 00 30 65 10 3D 2D
Q Allow eelection of closed networks
Turn AirPort Off I
_ AirPort Network
Choose network: 8600BDGR0UP
4) If WEP was configured during setup of
the WLA-L11G, you will be prompted for
a Password (WEP code). Input the WEP
code in the box beside "Password" and
select "OK" (Picture A-8).
You should now be connected to your network.
Picture A-7
IJ
the selected AirPort network requires a
password to join.
Password:
QAdd 10 Keychain
I Cancel I I OK
Picture A-8
Page 26

Page B-1
APPENDIX B
Configuring wireless Macs with OSX.x and AirPort Card to access
a network.
Part One: Networks that use a DHCP server to assign IP addresses.
1) Go to the Apple icon in the top left corner of your Desktop screen.
Scroll down to "System Preferences" and select.
Under "Internet & Network", select "Network" (Picture B-1).
Internet & Network
i«t © Q tSr
Internet Network QuickTime Sharing
Picture B-1
2) Beside "Show", select "AirPort" (Picture B-2).
Select the "AirPort" tab. Beside "Preferred
Network", select the ESS-ID of your WLA-L11G.
This number is found on the back of your
WLA-L11G, under "WIRED MAC ADDRESS".
* TCFnr T AMitTA I 1 atiHn '
00l04^tl26tS
frHf ftt4 fwtwt OMOlACAOur
The last six digits of this number plus the
word "GROUP" will be displayed beside
Picture B-2
"Preferred Network".
If you set up two WLA-LIIGs for Roaming, you will select the network
named "OOOOOOGROUP" as your preferred network.
If you set up WEP in the WLA-L11G, input the WEP code in the box beside
"Network Password" (Picture B-3) and click the "Apply Now" button.
Preferred Network: OOOOOOGROUP
Network Password:
Picture B-3
Page 27

I
Page B-2
3) Select the "AppleTalk" tab and place a check in the box beside "Make
AppleTalk Active" (Picture B-4).
f TCP/IP Y AppleTalk Y Proxies Y AirPoK ^
Picture B-4
^ Make AppleTalk Active
4) Select the "TCP/IP” tab (Picture B-5).
Beside "Configure", seiect "Using DHCP".
Click on the "Apply Now" button.
Picture B-5
Show: Airport
^ TCP/IP J AppleTalk ^^^roxies ^ AirPort ^
Configure: ^ Using DHCP
D
5) Close the window. You should now be connected to your
network.
Page 28

Page B-3
Part Two: Networks that require an assigned unique IP address for
each computer (Static IP setup).
1) Go to the Apple icon in the top left corner of your Desktop screen.
Scroll down to "System Preferences" and select.
Under "Internet & Network", select "Network" (Picture B-6).
Internet & Network
iSH © Q tSr
Internet Network QuickTime Sharing
Picture B-6
2) Beside "Show:", select "AirPort" (Picture B-7). Select the "AirPort" tab.
Beside "Preferred Network", select the ESS-ID
of your WLA-L11G. This number is found on the
* TCPflP ) AMitTA ^ f AiAen '
back of your WLA-L11G, under "WIRED MAC
ADDRESS". The last six digits of this number
OiOOlKAOur
pius the word "GROUP" will be displayed beside
"Preferred Network".
Picture B-7
If Roaming was set up for two WLA-LIIGs, select "OOOOOOGROUP"
(Picture B-8).
If WEP was configured during setup of the WLA-L11G, input the
WEP code in the box beside "Network Password" (Picture B-8) and click
the "Apply Now" button.
Preferred Network: OOOOOOGROUP
Network Password:
Picture B-8
Page 29

Page B-A
3) Select the "AppleTalk" tab and place a check in the box beside "Make
AppleTalk Active" (Picture B-9).
TCPyiP AppleTalk ^ Proxjes ; AirPort
Picture B-9
Make AppleTalk AcTive
4) Select the "TCP/IP" tab (Picture B-10).
Beside "Configure", select "Manually".
The numbers for "IP Address", "Subnet mask", "Router address",
"Name server addr", and in some cases "Search domains", must
be supplied by your network administrator or your ISP (if your WLA-L11G
is connected to an ISP’s modem or router).
Type in your network/ISP numbers, select "Apply" and close the window.
You should now be connected to your network.
' TCP/IP Ì AppleTalk Proxies ] AirPort
Configure; Manoally
Domain Name Servers (Optiojnail
(P Address: &i. 222.84.86
Subnet Mask: 2S5.2S5.2S5.24S
Rooter; 222.84.81
205.177.10.10
159.0.216.222
Search Domains
iOpriOAjI)
Picture B-10
*11 Mbps is the IEEE 802.11g standard theoretical maximum data transfer rate. Actual wireless network throughput is limited by environmental and system factors and will be less.
 Loading...