

Page 1
Communications Between Ethernet LAN
and Wireless LAN
1
What is Next?
Troubleshooting
Self-Diagnostic Function
Setting Screen Tables
Glossary
Product specifications
This manual explains the procedure for communications between Ethernet LAN and wireless
LAN, examples of AirStation settings, and remedies for troubleshooting problems. Refer to this
manual as necessary.
2
3
4
5
6
7
Page 2
Using this Manual
This section explains the symbols used in this manual.
Symbols
Caution
may result in personal injury and/or damage to the equipment.
Note
Reference
Next
Column
• Text in bold indicates the names of menu options, buttons, text boxes, check boxes, software, and dialog
• The WLAR-L11 is referred as AirStation through this manual.
• The personal computer to be used with the wireless LAN card that as manufactured by MELCO INC. is
• The personal computer to be used with the AirStation settings is referred as the Settings Personal Com-
Items to which you must pay attention when handling the product. Failure to follow this mark
Supplementary information that you should know when handling the product.
Refers to the page of related subject.
Advises to which page you should continue next.
Explanatory text with this mark explains convenient facts for you to know.
Glossary and Diacritical Marks Within the Text
boxes, etc., that you can select to perform operations.
called the wireless LAN personal computer.
puter.
Precaution for the Usage
Be sure to read this manual before using the product because this product is refined highly. MELCO INC. is
not responsible for accidents or damages to the personal computer as well as AirStation due to misuse. Misuse of our product will void the guarantee automatically that came with the purchase.
All rights for this manual are owned by MELCO INC. No part of this manual may be transmitted,
reproduced, or revised without permission from MELCO INC.
Product name of other companies used in this manual are trademarks or registered trademarks of
the respective companies. Trademark symbols (
Specifications, design, and other descriptions included in this manual are subject to change
without notice.
This manual is carefully prepared, however, feel free to contact your nearest sales representa-
tive if you have any questions or problems.
In addition, note that MELCO INC. shall not be liable for any expenses incurred due to damage
or loss arising from the use of the WLA-L11, although MELCO INC. has been advised of the
possibility of such damage.
TM
, ®, ©, etc.) are not indicated in this manual.
Page 3

Communication between a wireless LAN and a wired LAN
This chapter describes how to use an AirStation when communicating between a wireless LAN and a wired LAN.
Network Configuration Illustration
Current Network Environment : Wired LAN Network
Desired Network : Network comprising wireless and wired LAN PCs.
.
Setup Flow
The setup flow for communication between wired LAN PCs and wireless LAN PCs is given below..
1
Installing the AirStation P4
2
Setting up the wired LAN PC for the AirStation
3
Setting up the AirStation P16
4
Connecting to the AirStation
5
Connecting to the Network P35
WLA-L11 User’s Manual 1
P6
P22
Page 4

Table of Contents
1 Communications Between Ethernet LAN and
Wireless LAN .................................................... 4
Configuration .............................................................................................. 4
Work Flow Chart ......................................................................................... 5
Installation ................................................................................................... 6
Preparing AirStation Settings
(on the Settings Personal Computer) ......................................................... 7
AirStation Settings (Settings Personal Computer) .................................... 14
Connecting To AirStation .......................................................................... 20
Communications With Other Personal Computers ................................... 25
2 What is Next? ................................................ 26
Displaying AirStation Setting Screen ......................................................... 26
Enabling and Disabling Roaming Function................................................ 27
Limiting Connections from Wireless LAN Personal Computers................. 29
Strengthening Security Using the WEP (Encoding) Function.................... 31
Multiple AirStation Groups......................................................................... 32
Setting Send Mode .................................................................................... 33
Connecting to AirStation Using an AirPort-compatible Personal Computer34
Packet Filter Settings Example.................................................................. 35
IP Address Auto Allocation Functions (DHCP Server) Settings Example.. 36
Checking AirStation’s IP Address .............................................................. 38
Resetting AirStation Settings to the Factory Settings ................................ 38
Checking the Wireless Frequency Status.................................................. 39
3 Troubleshooting ............................................. 41
4 Self-Diagnostic Function................................. 57
5 Setting Screen Tables .................................... 58
Bridge Mode
(Communications Between Ethernet LAN and Wireless LAN) .................. 58
Routing Mode(Connect to Internet Using CATV Network)......................... 62
2 WLAR-L11 Reference Manual
Page 5

6 Glossary.......................................................... 66
7 Product Specifications .................................... 70
Specifications............................................................................................. 70
LAN Port Connector Specifications ........................................................... 71
WLAR-L11 Reference Manual 3
Page 6
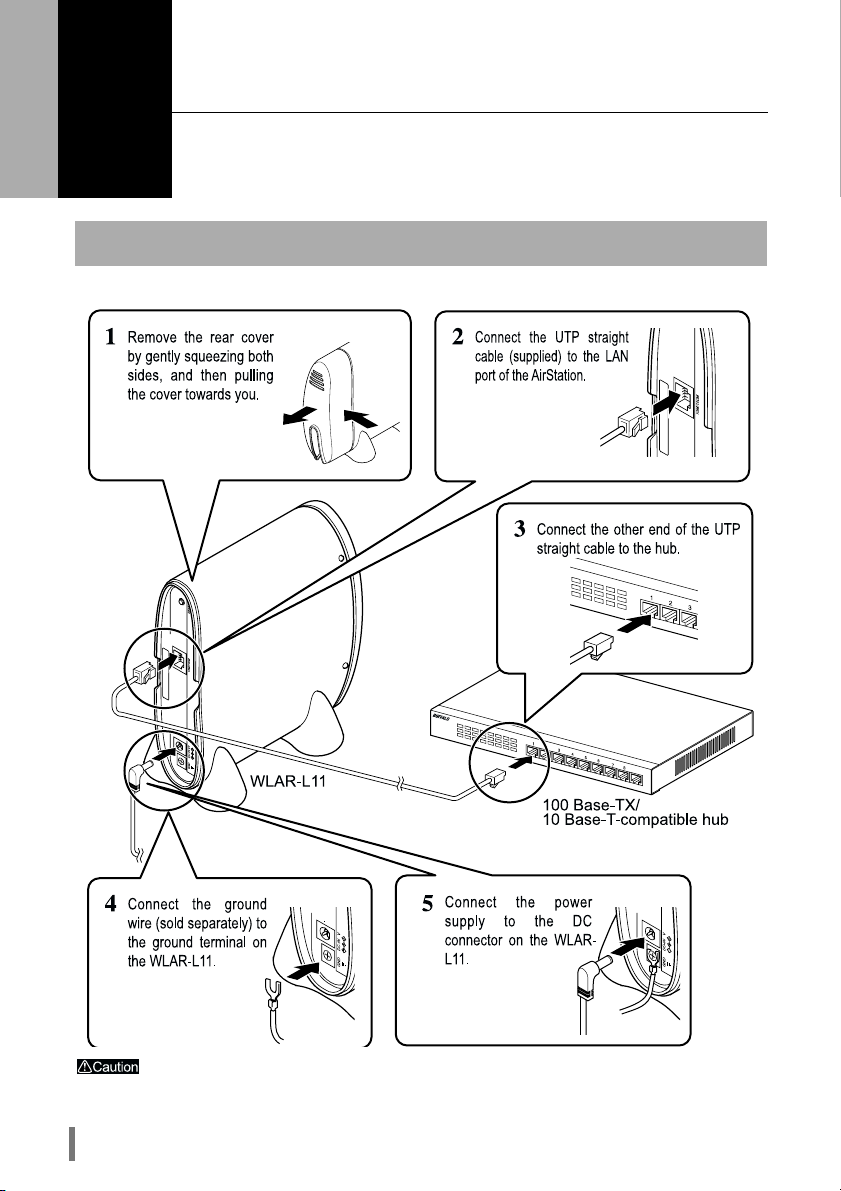
Communications Between Ethernet LAN and Wireless LAN
This section explains the procedure for enabling communication between personal com-
1
Connection to the AirStation, hub, ground wire, and Power supply is shown below.
puters on an Ethernet LAN and personal computers on a wireless LAN using AirStation.
Installation
Be sure to use the supplied AC adapter power supply.
WLA-L11 User’s Manual4
Page 7
Preparing the AirStation Settings
(on the Personal Computer)
The AirStation settings are preformed using a personal computer on the Ethernet LAN. For the proper
AirStation setting, make sure that the following software are installed in the personal computer (hereafter
called the settings personal computer) on the Ethernet LAN.
TCP/IP protocol . . . . . . Refer to the TCP/IP Protocol Setting.
AirStation manager. . . . Refer to Installing the AirStation Manager.
Web browser (Microsoft Internet Explorer version 4.0 or later, or Netscape Navigator 3.0 or later):
Refer to the relevant Web browser manual. Microsoft Internet Explorer is installed
as standard on Windows 98 and Windows 2000.
TCP/IP Protocol Setting
The procedure for setting the proper TCP/IP protocol is depending on the OS used in the PC. Please refer to
the following for the proper settings.
Before the setting, check the LAN port drivers are properly installed in the personal com-
puter and it is connected to the network.
Windows 98/95: Refer to Windows 98/95 below.
Windows 2000: Refer to Windows 2000 below.
Windows NT 4.0: Refer to Windows NT 4.0 below.
Windows 98/95
The TCP/IP protocol is set as follows.
Start your personal computer.
1
Click the Start button, and then select Settings, and then Control Panel.
2
Double-click the Network icon.
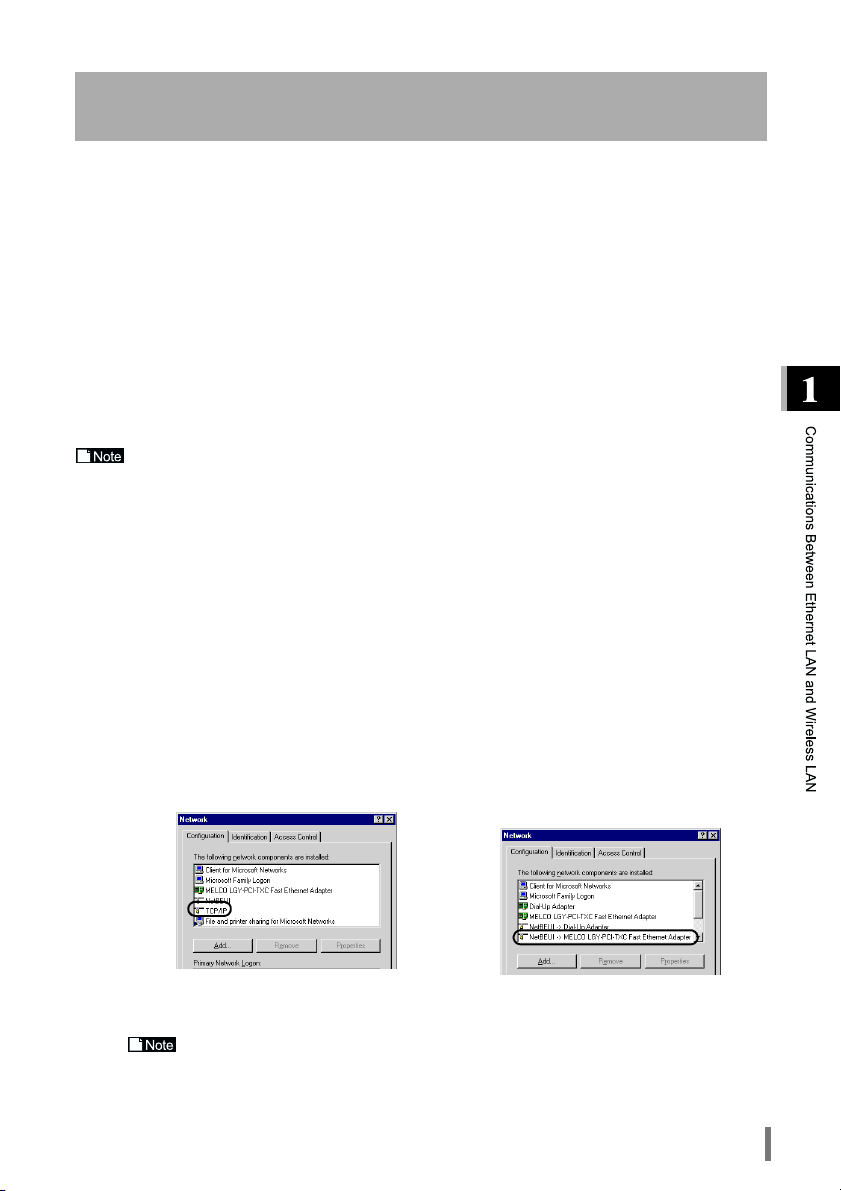
3
In the Network dialog box, check that TCP/IP is displayed in the following net-
4
work components are installed: field.
Only 1 LAN board installed The dial-up adapter and the LAN boards
are installed.
If no TCP/IP is displayed, refer to the Adding TCP/IP Protocols (Windows 98/95)
section (Page 7).
TCP/IP (LAN board driver name) is normally displayed in The following network components are
installed: field.
[TCP/IP-> "LAN board driver name"]
WLA-L11 User’s Manual 5
Page 8
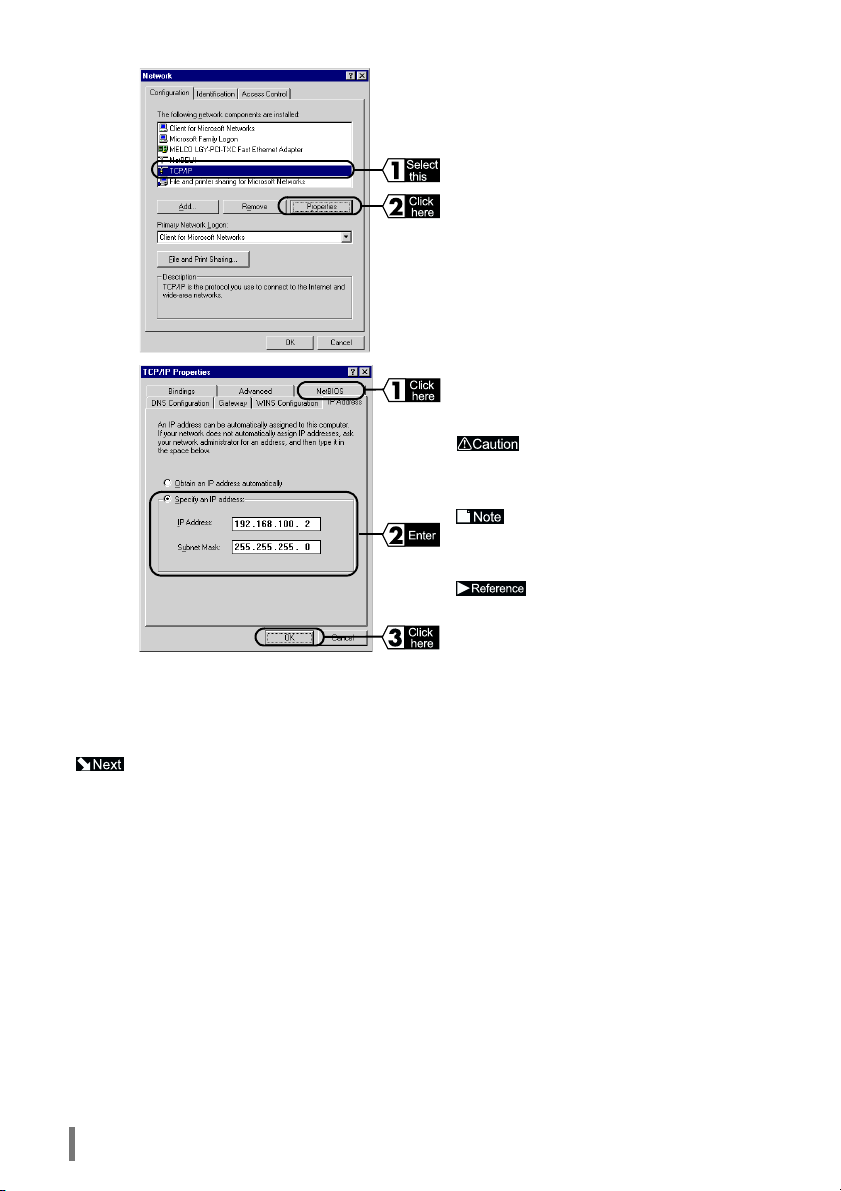
5
Select TCP/IP, and then click the Properties
button.
6
Restart Windows 98/95.
7
The TCP/IP protocol settings for the settings personal computer is completed.
Refer to "Installing AirStation Manager" (page 14).
Click the IP Address tab, and set the IP
address. When you enter the IP address, click
the OK button.
Consult your network manager
for the IP address settings of the personal
computer.
If there is a DHCP server on the
network, select "Obtain an IP address
automatically".
to "Allocating IP Addresses" (page 52) in
Chapter 3 Troubleshooting.
For IP address settings, refer
WLA-L11 User’s Manual6
Page 9
Adding TCP/IP Protocols (Windows 98/95)
If the TCP/IP Protocol is not in added to the settings personal computer, add the protocol using the following
procedure.
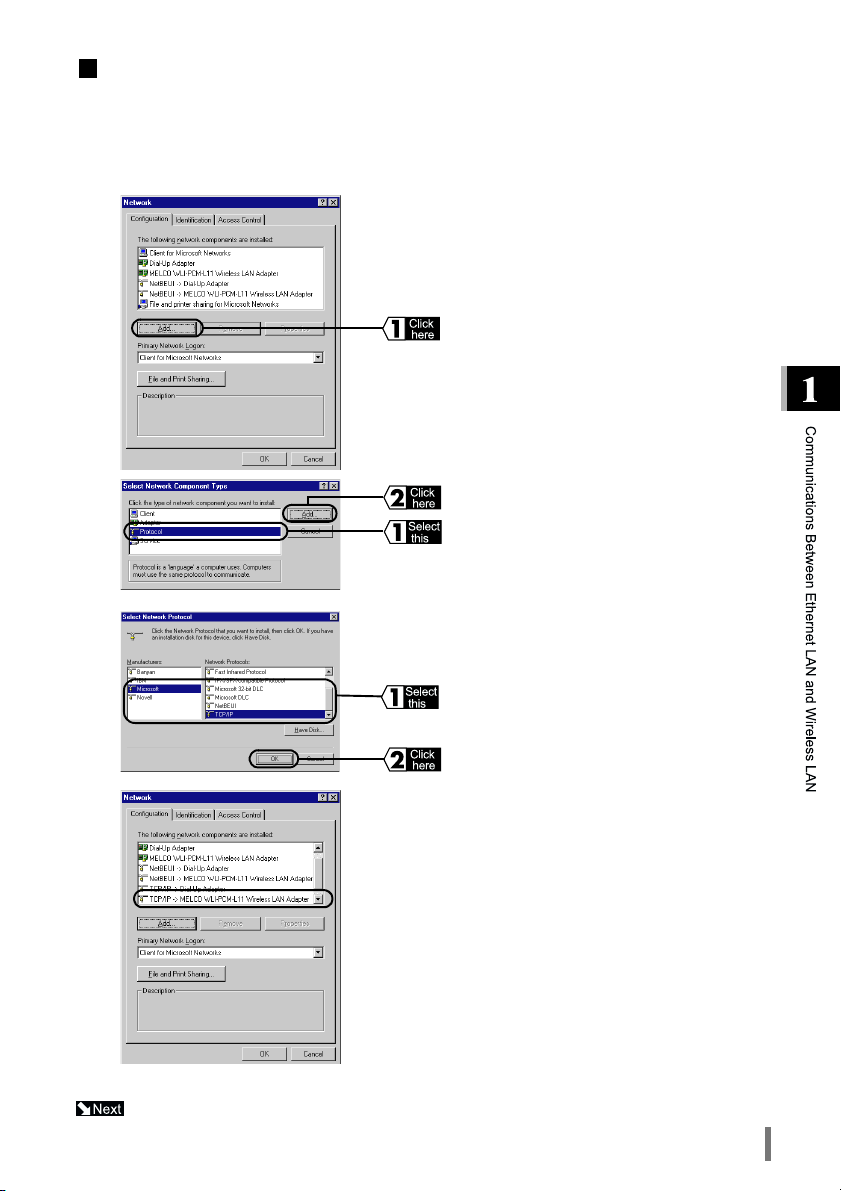
Click the Start button, and select Settings, Control Panel, and then Network.
1
2
Click the Add button.
3
4
5
Select Protocol, and click the Add button.
In the Manufacturers field, select Microsoft,
and in the Network Protocols field, select
TCP/IP and click the OK button.
The TCP/IP protocol is added.
This completes the TCP/IP protocol installation.
Continue to the “TCP/IP Protocol Settings” (Windows 98/95) section procedure Step 5.
WLA-L11 User’s Manual 7
Page 10
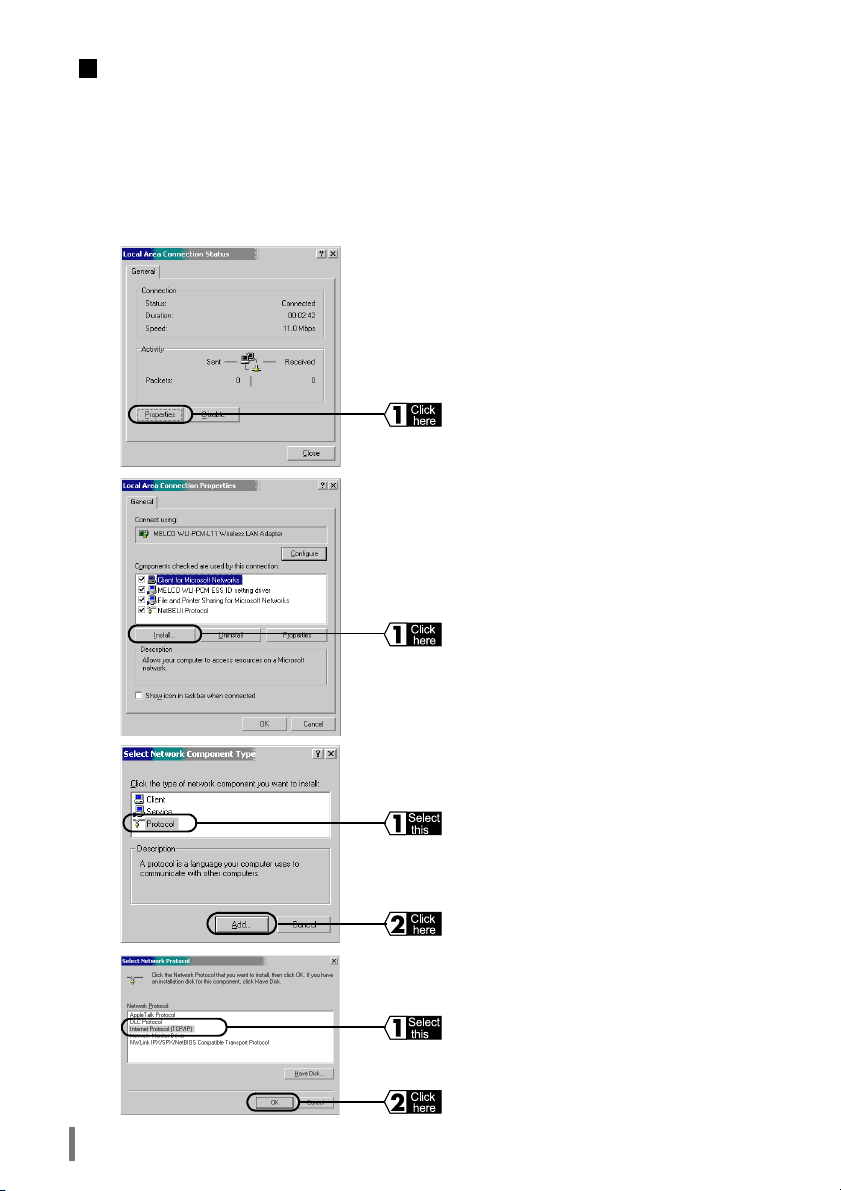
Windows 2000
The TCP/IP protocol is set on the settings personal computer using the following procedure.
Start Windows 2000, and log on using your logon name (e.g., Administrator with
1
administrator access).
Click the Start button. Then select Settings and Network and Dial-up Connec-
2
tions.
Double-click the Local Area Connection icon.
3
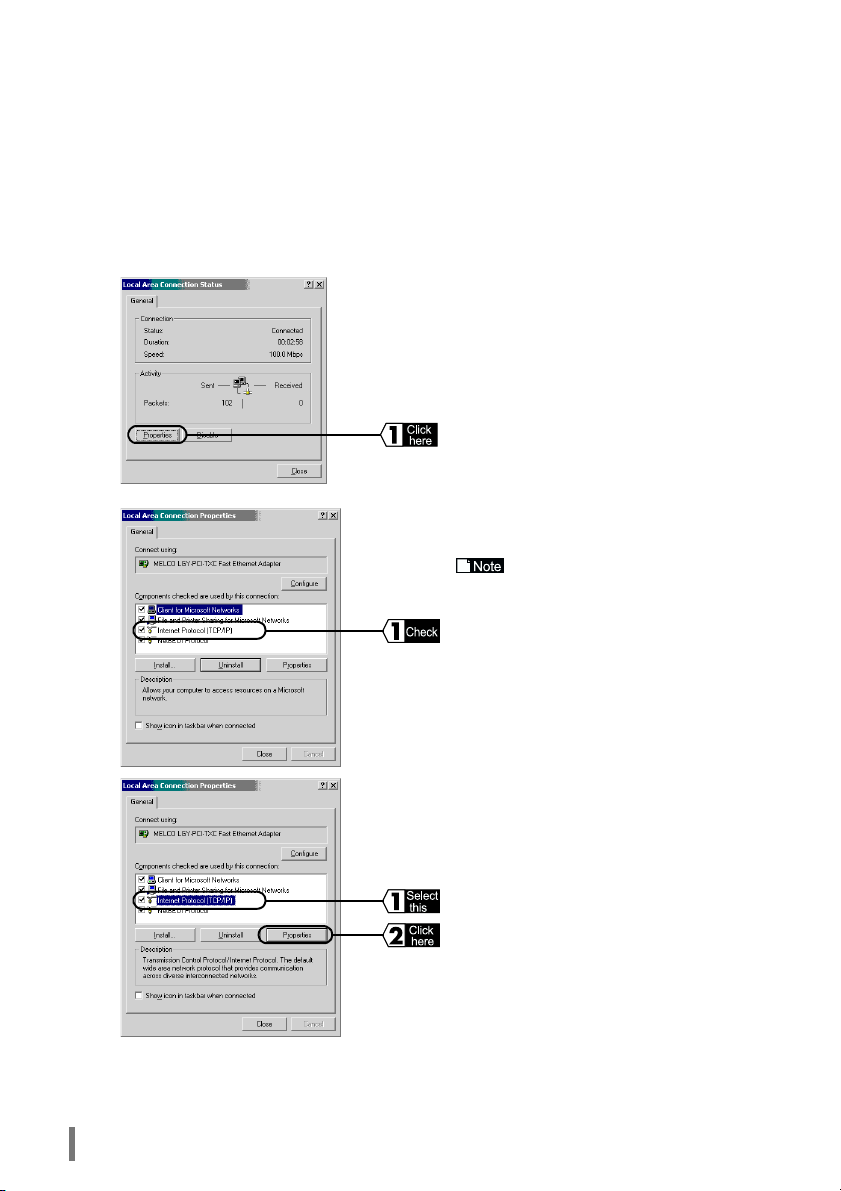
4
Click the Properties button.
5
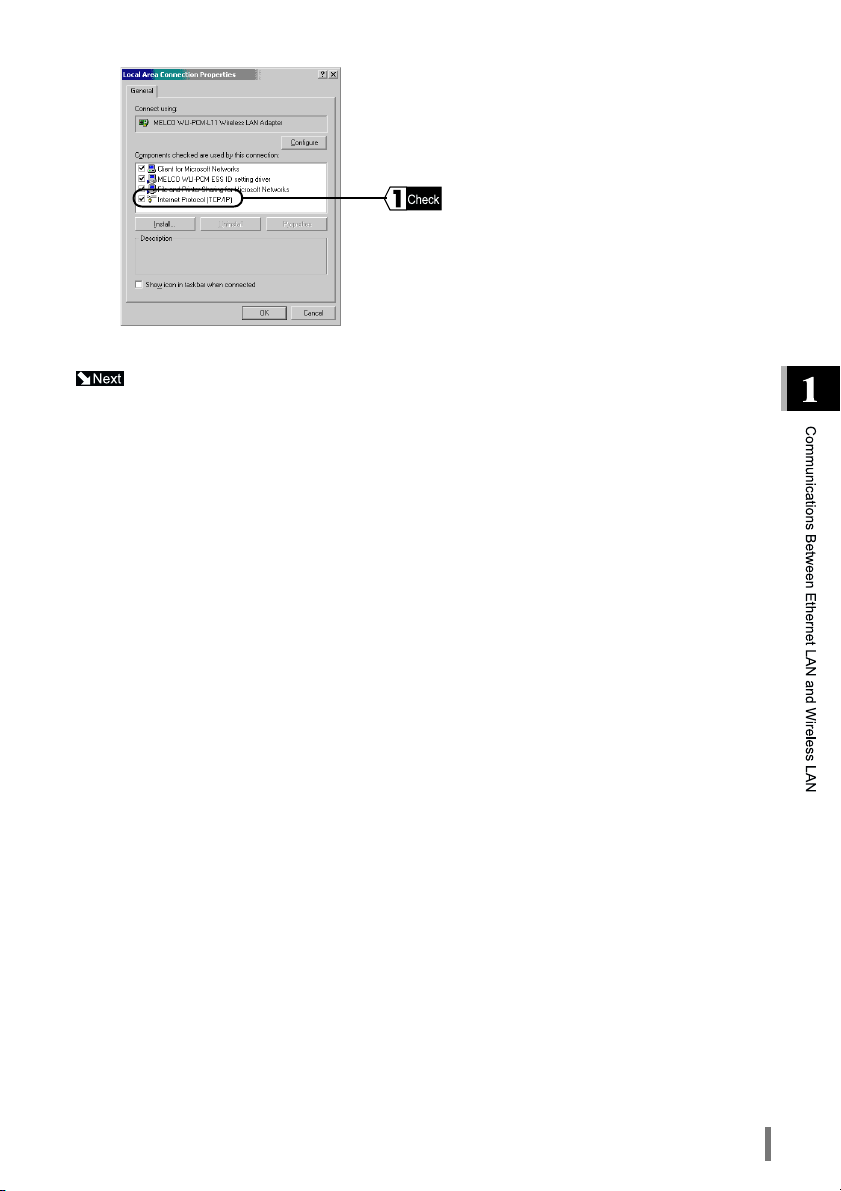
6
Check it Internet Protocol (TCP/IP) is displayed.
If Internet Protocol (TCP/IP) is not
displayed, refer to the Adding TCP/IP Pro-
tocols (Windows 2000) section (page 10).
Select Internet Protocol (TCP/IP), and click
the Properties button.
WLA-L11 User’s Manual8
Page 11
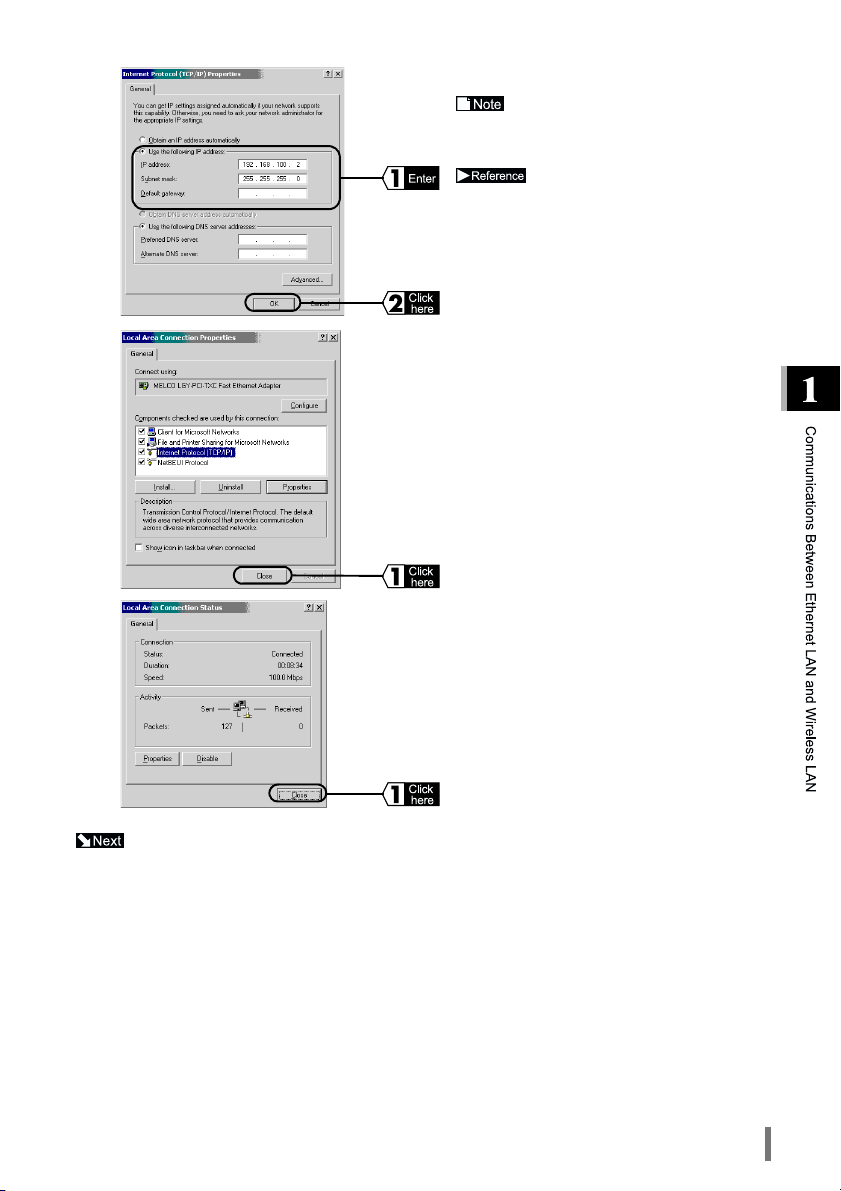
7
Set the IP address, and click the OK button.
If there is a DHCP server on the
network, select "Obtain an IP address
automatically".
For IP address settings, refer
to "Allocating IP Addresses" (page 52) in
Chapter 3 Troubleshooting.
8
9
Refer to "Installing AirStation Manager" (page 14).
Click the OK button.
Click the Close button.
WLA-L11 User’s Manual 9
Page 12
Adding the TCP/IP Protocols (Windows 2000)
If the TCP/IP Protocol is not in added to the settings personal computer, add the protocol using the following
procedure.
Click the Start button, and then select Settings and Network and Dial-up Con-
1
nections.
Double-click the Local Area Connection icon.
2
3
Click the Properties button.
4
5
6
Click the Install button.
Select Protocol, and click the Add button.
Select Internet Protocol (TCP/IP), and click
the OK button.
WLA-L11 User’s Manual10
Page 13
7
This completes the TCP/IP protocol installation.
Continue to the “TCP/IP Protocol Settings” (Windows 2000) section procedure Step 6.
Check if the Internet Protocol (TCP/IP) is
added.
WLA-L11 User’s Manual 11
Page 14
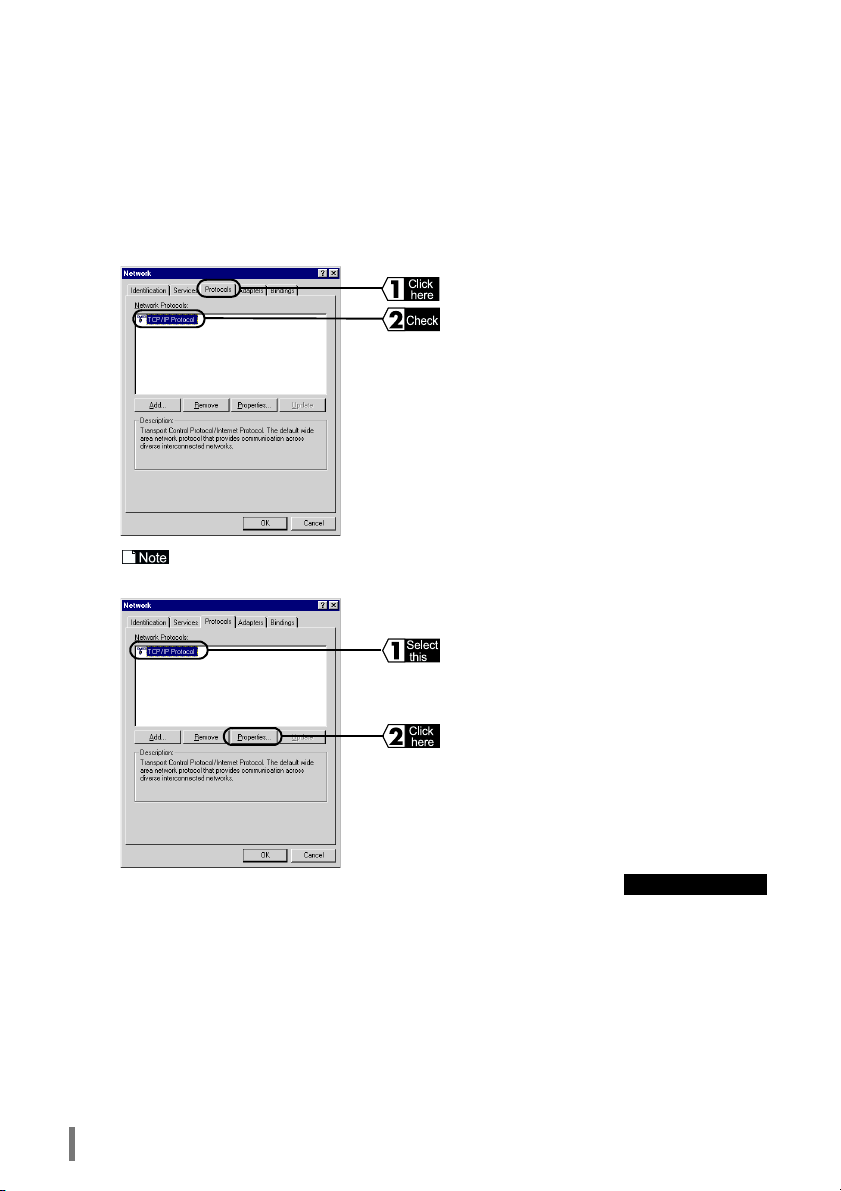
WindowsNT4.0
Make the TCP/IP protocol settings on the settings personal computer using the following procedure.
Start the personal computer.
1
Click the Start button, and then select Settings and Control Panel.
2
Double-click the Network icon.
3
4
If Internet Protocol (TCP/IP) is not displayed, refer to the Adding TCP/IP Proto-
cols (Windows NT 4.0) section (page13).
5
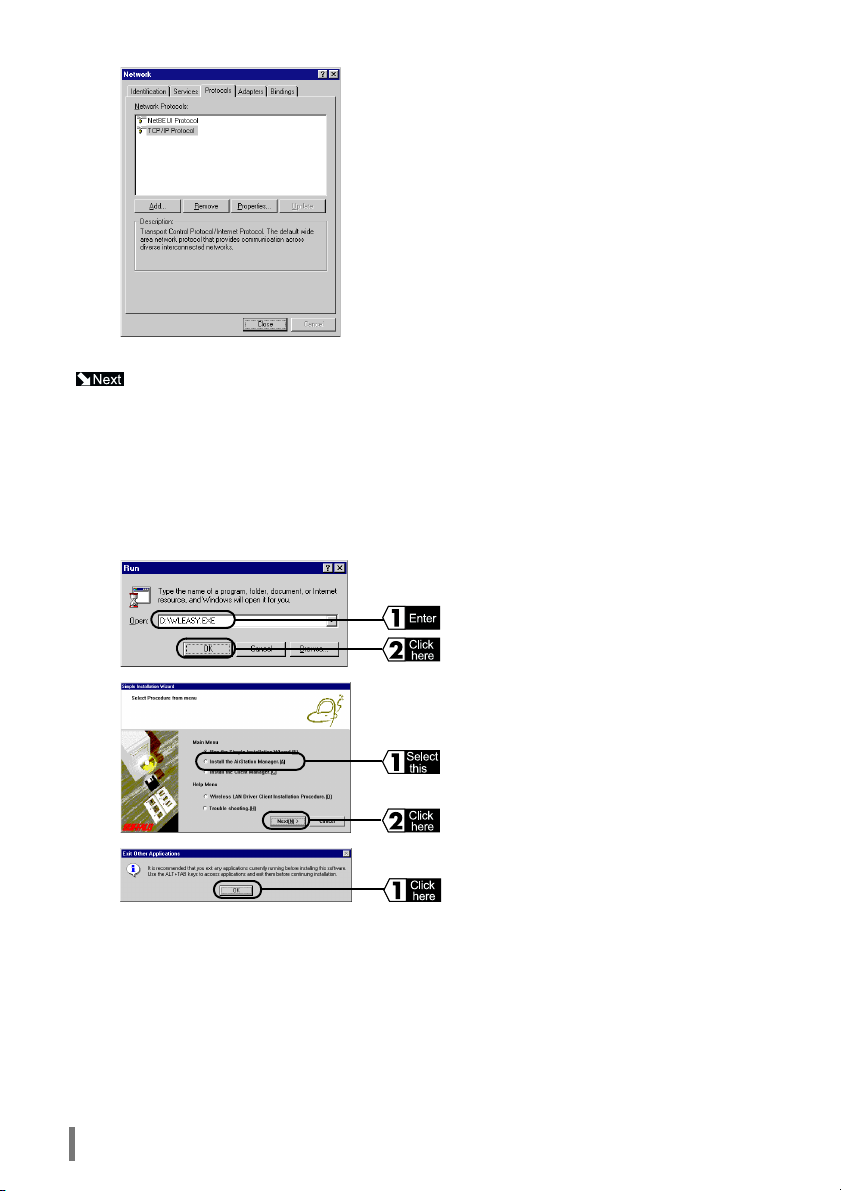
Click the Protocols tab, and make sure that
TCP/IP Protocol is displayed in the Network
Protocols field.
Select TCP/IP Protocol, and click the Proper-
ties button.
Continue to next page
WLA-L11 User’s Manual12
Page 15
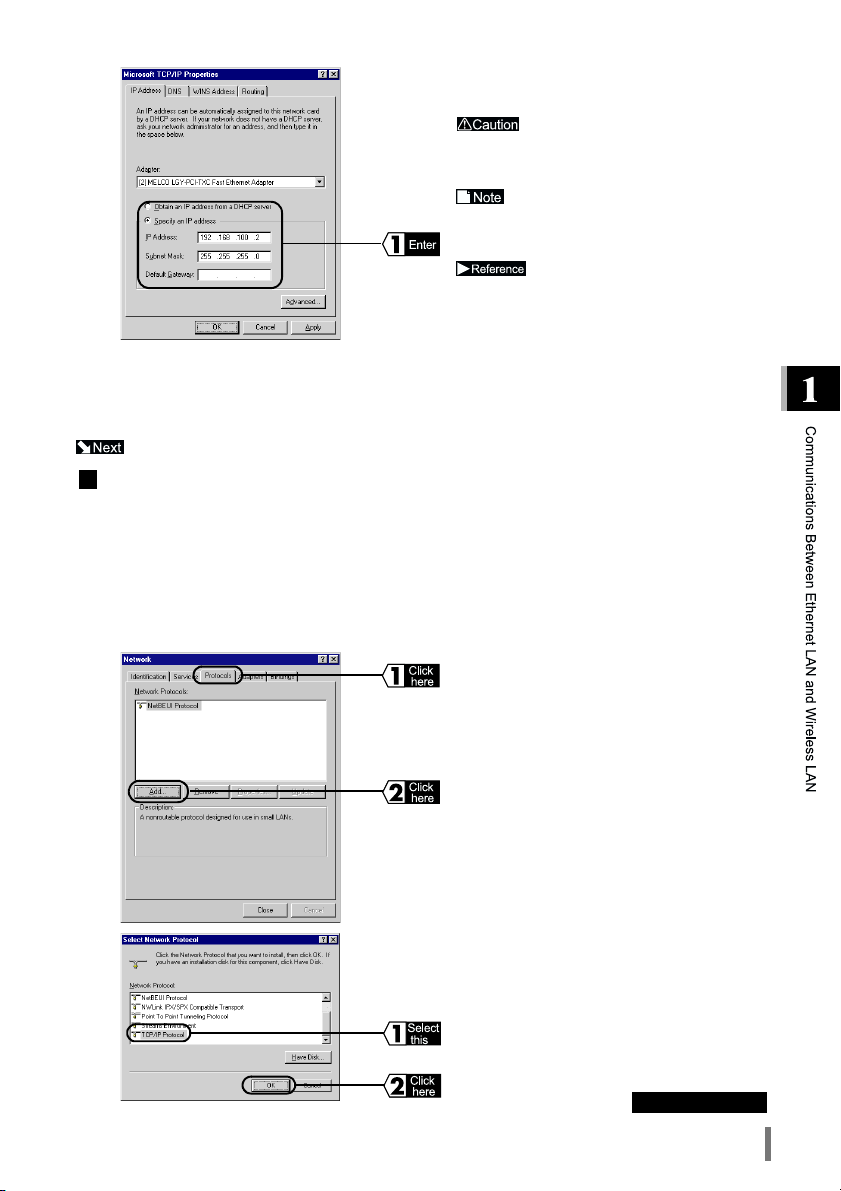
6
Restart Windows NT 4.0.
7
The TCP/IP protocol is set the settings personal computer.
Refer to "Installing AirStation Manager" (page 14).
Set the IP address. When you have entered the
IP address, click the OK button.
Consult your network manager
for the IP address setting of the settings
personal computer.
If there is a DHCP server on the
network, select Obtain an IP address from
a DHCP server.
For IP address settings, refer
to "Allocating IP Addresses" (page 52) in
Chapter 3, Troubleshooting.
Adding the TCP/IP Protocol (Windows NT 4.0)
If the TCP/IP Protocol is not in the settings personal computer, add the protocol using the following procedure.
Click the Start button, and then select Settings, and Control Panel.
1
Double-click the Network icon.
2
3
Click the Protocols tab, and then click the
Add button.
4
Select TCP/IP Protocol, and click the OK button.
Continue to next page
WLA-L11 User’s Manual 13
Page 16
5
This completes the TCP/IP protocol installation.
Continue to the “TCP/IP Protocol Settings” (Windows NT 4.0) section procedure Step 5.
The TCP/IP protocol is added.
Installing AirStation Manager
Install the AirStation Manager in the settings personal computer using the following procedure.
Insert the AirStation Series Driver CD in the CD-ROM drive.
1
Click the Start button, and select Run...
2
3
Enter D:\WLEASY.EXE (where D is the CDROM drive), and click the OK button.
4
5
WLA-L11 User’s Manual14
Select Install the AirStation Manager, and
click the Next button.
Make sure all other applications are closed,
then click the OK button.
Page 17
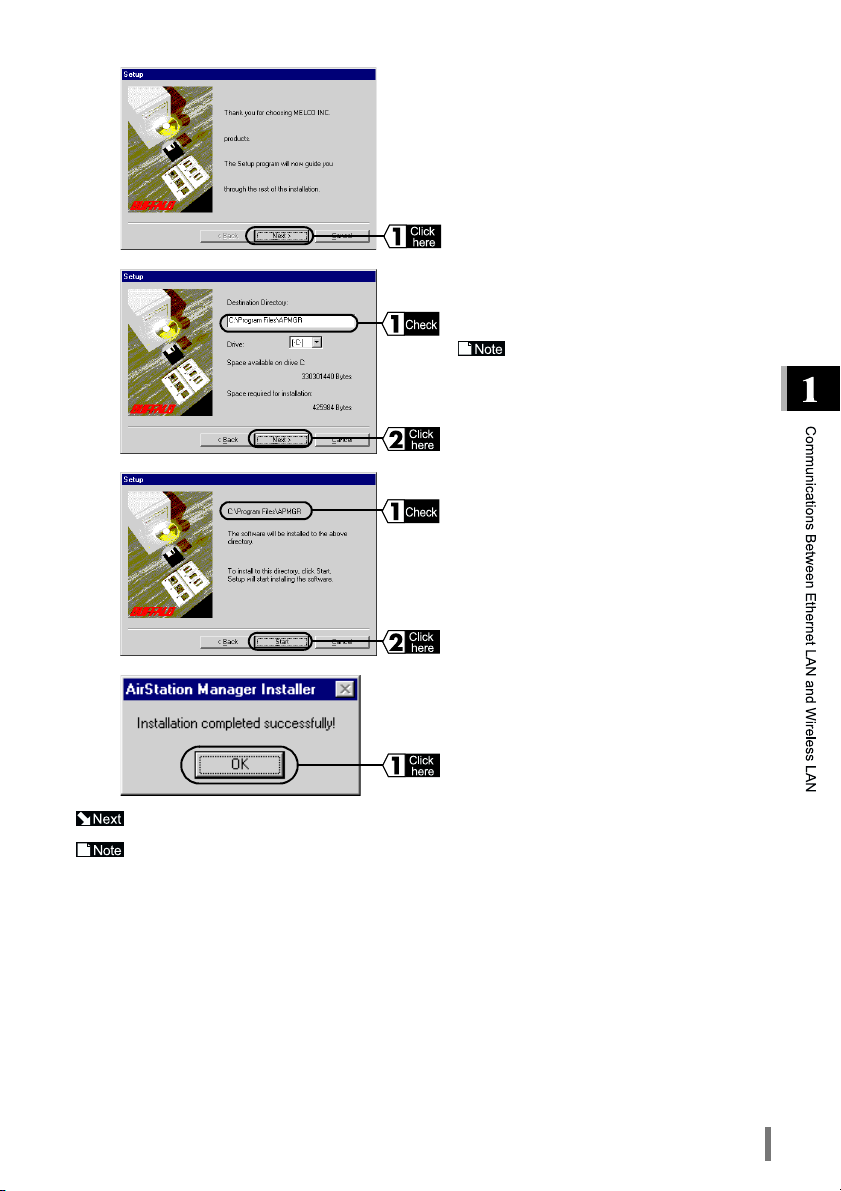
6
Click the Next button.
7
8
9
Refer to "AirStation Settings (Settings Personal Computer)" (page 16).
To remove AirStation Manager, click the Start button, and select Programs, MELCO
AirStation, and Uninstall AirStation Manager, and then follow the instruction on screen.
Select the directory in which you want to
install AirStation Manager, and click the Next
button.
To change the default installation
directory, select a new directory, and then
click the Next button.
Check the installation directory displayed, and
then click the Star t button.
Windows will copy the file to the directory.
Click the OK button.
Installation of the AirStation Manager is completed.
WLA-L11 User’s Manual 15
Page 18
AirStation Settings (Settings Personal Computer)
Make sure a Web browser is installed before making the AirStation settings. For the
installation procedure, refer to the manual supplied with the Web browser. (Microsoft Internet
Explorer is installed as standard on Windows 98 and Windows 2000.)
Setting Procedure.
The AirStation is set in the settings personal computer using the following procedure.
When the AirStation is set for Windows 2000 and Windows NT 4.0 the procedure may be
different. Please refer to "Windows 2000/NT 4.0" (page 19).
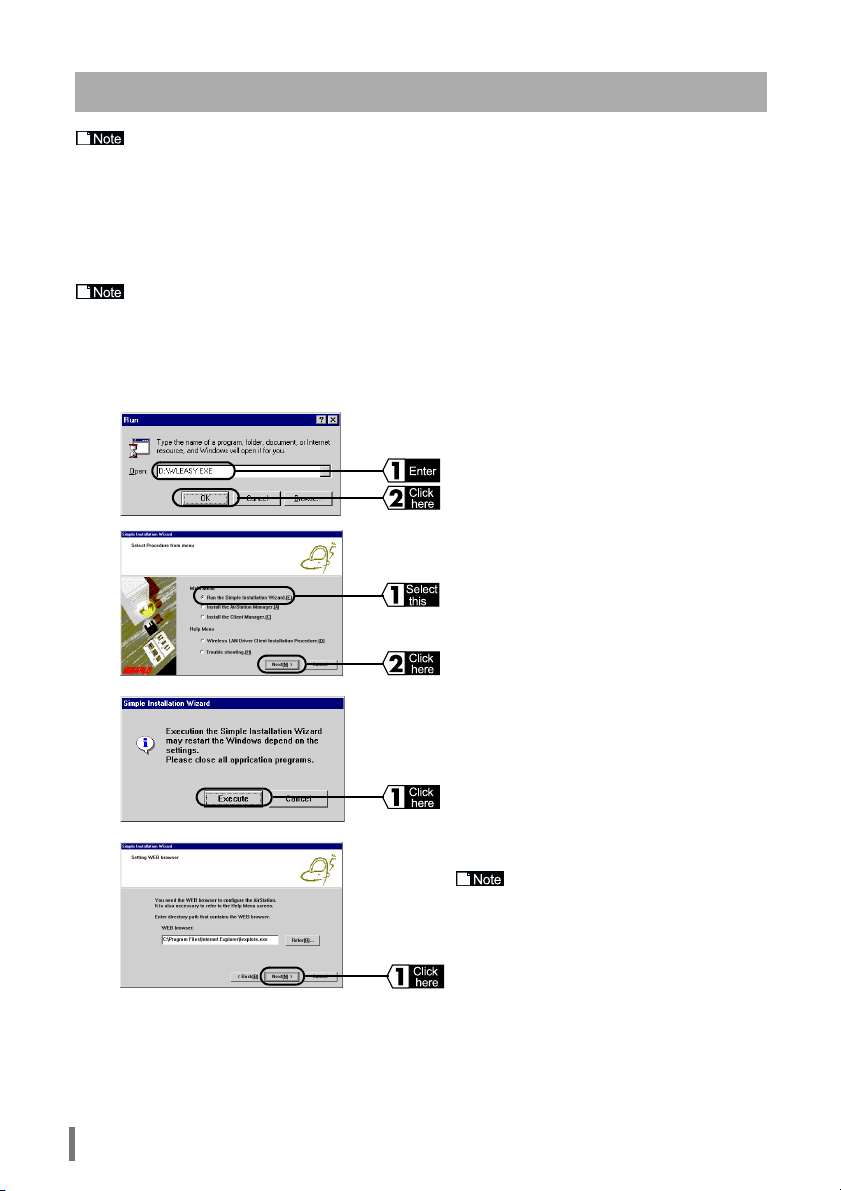
Insert the AirStation Series Driver CD in the CD-ROM drive.
1
Click the Start button, and select Run...
2
3
Enter D:\WLEASY.EXE (where D is the CDROM drive), and click the OK button.
4
5
6
Select Easy Installation Wizard, and click the
Next button.
Make sure all other applications are closed,
then click the Execute button.
Click the Next button.
If the WEB browser field is empty,
the Web browser may not be installed.
Check it the Web browser is correctly
installed. If the Web browser is installed,
enter the path name for the Web browser
from the WEB browser field.
WLA-L11 User’s Manual16
Page 19
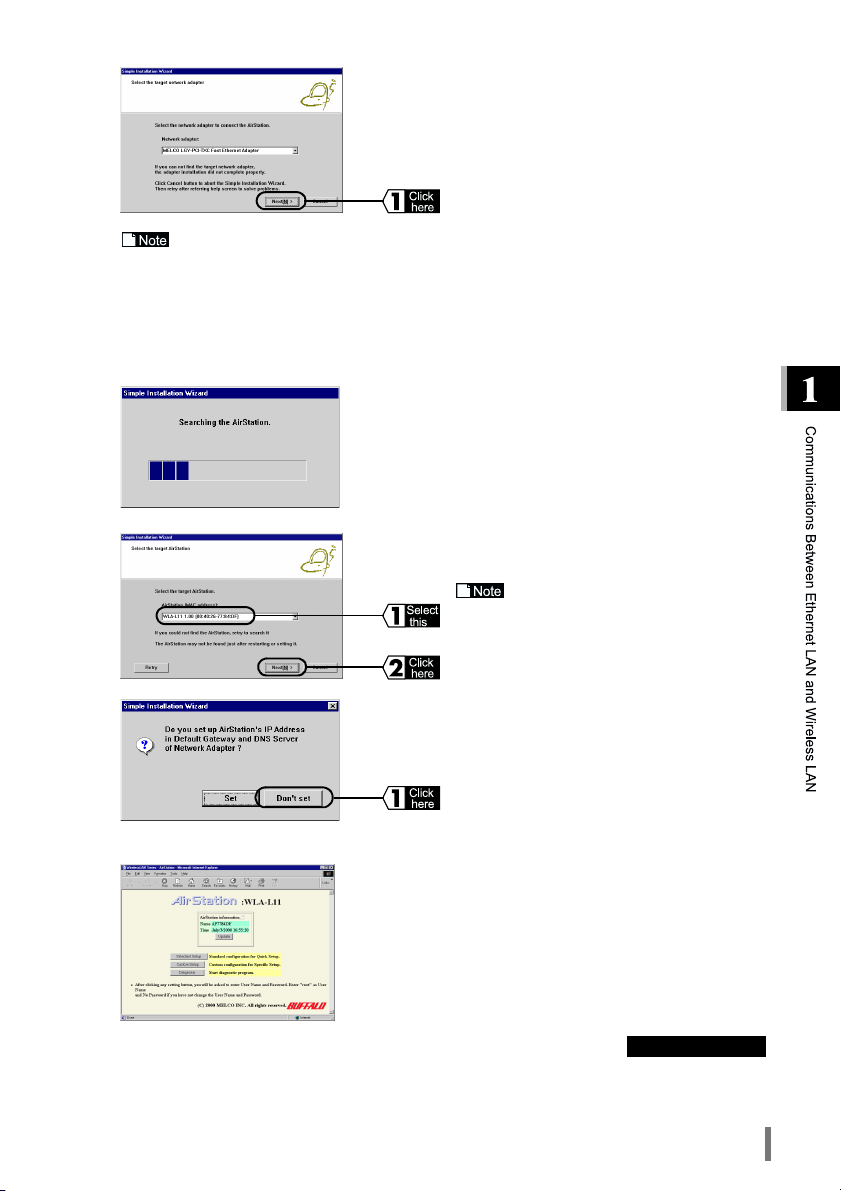
7
• If "Network Adapter Is Not Installed is displayed", the drivers for the wireless LAN card
have not been installed. Refer to the LAN board manual, and install the drivers.
• If "Network Adapter Settings Error is displayed", the TCP/IP settings have not been set
correctly. Refer to the "TCP/IP Protocol Setting" section (page 5) in the Preparing AirStation Settings, and correct the TCP/IP setting.
In the Network adapter field, enter the name of
the LAN card to be used, and then click the
Next button.
8
9
10
11
Windows will search for the AirStation.
Select the AirStation, and click the Next button.
If the AirStation cannot be found,
refer to ""Cannot Find AirStation" Is Dis-
played When Starting the Easy Installation
Wizard" section (page 43) in Chapter 3
Troubleshooting.
Click the Don’t Set button.
Your Web browser will start and the settings
screen will be displayed.
Continue to next page
WLA-L11 User’s Manual 17
Page 20
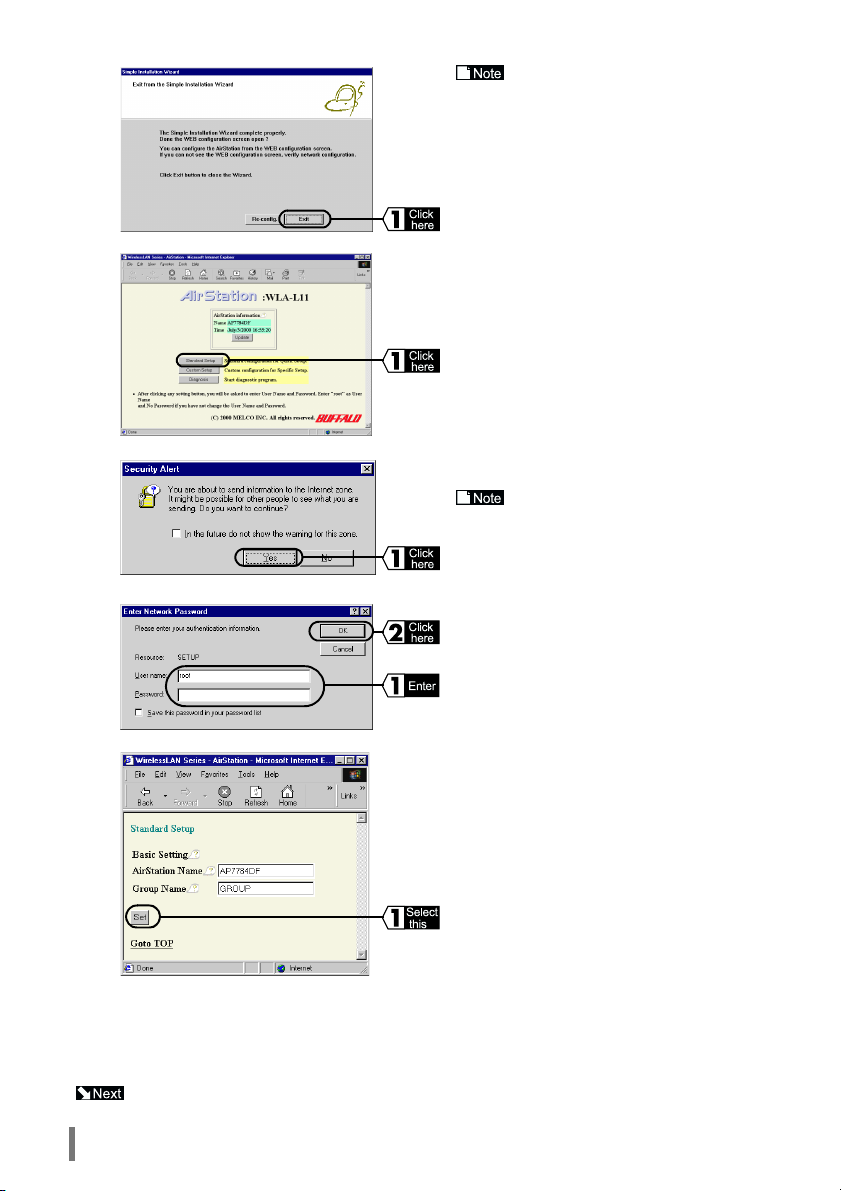
When the settings screen comes
up, click the Exit button in the Easy Installation Wizard Screen to close the Easy
Installation Wizard.
12
13
14
15
Click the Standard Settings button.
Click the Ye s button.
If using Netscape Navigator, the
following message will be displayed: Send
data cannot be protected from here.
The "Enter Network Password screen" will be
displayed. Enter the user name and password
given below, and click the OK button.
User name :"root"
Password :Leave blank
Click the Settings button.
Settings Completed will be displayed. Close the Web browser.
16
This completes the AirStation settings.
Continue to "Connecting To the AirStation" (page 21).
WLA-L11 User’s Manual18
Page 21
Windows 2000/NT 4.0
The AirStation is set in the settings personal computer using the following procedure.
Click the Start button, and select Programs, MELCO AirStation, and then
1
AirStation Manager.
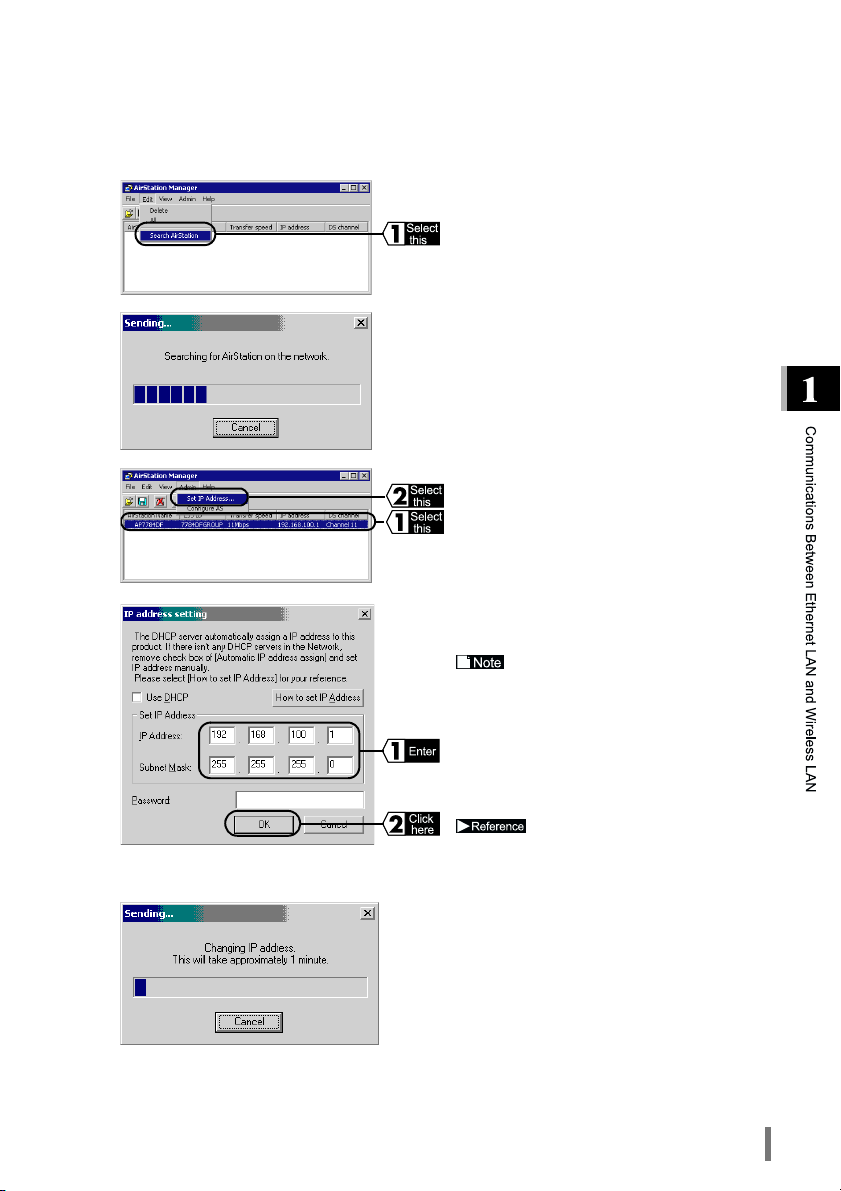
2
Select Edit, and Search AirStation.
3
4
5
Windows will search for the AirStation.
Select the AirStation once it has been found
and then select Admin, and Set IP Address.
The IP address settings is set and click the OK
button.
• Change the IP address and net mask
depending on the environment.
• Consult your network manager for the IP
address settings.
• When making the initial IP address set-
tings, leave the Password field blank.
For IP address settings, refer
to "Allocating IP Addresses" (page 52) in
Chapter 3 Troubleshooting.
6
The AirStation IP address will be changed.
WLA-L11 User’s Manual 19
Page 22

7
Repeat from step 11 onwards in the Settings Procedure(page 16), for comple-
8
tion of the AirStation setting.
Your Web browser will start automatically, and
the settings screen will be displayed.
When the settings screen is not
displayed after the Web browser starts,
refer to the "Setting Screen Is Not Dis-
played" (page 44) section in Chapter 3
Troubleshooting.
WLA-L11 User’s Manual20
Page 23

Connecting To the AirStation
After the AirStation setting is completed the following procedure is need to connect the wireless LAN to the
AirStation.
• Create the AirStation information files.
• Set the wireless LAN personal computer settings.
• Install the Client Manager.
• Set the AirStation connection settings.
• Check the AirStation connections.
Creating the AirStation Information Flies (in the Settings Personal Computer)
Create the AirStation information files from the settings personal computer using the following procedure.
Format a floppy disk or use a ready-formatted disk. Affix a label reading AirSta-
1
tion Information Files to the disk.
Click the Start button, and select MELCO AirStation, and AirStation Manager.
2
3
Select Edit, and Search AirStation.
4
5
6
Insert the AirStation Information Files Disk created in step 1 in the floppy disk
7
drive.
Windows will search for the AirStation.
The AirStation name will be detected, and displayed in black.
If the AirStation cannot be found,
refer to ’"Cannot Find AirStation" Is Displayed When Starting the Easy Installation
Wizard’ section (page 43) in Chapter 3
Troubleshooting.
On the Menu Bar, select File, and then Save
As...
WLA-L11 User’s Manual 21
Page 24

8
Creation of the application information file is completed.
Continue to "Setting the Wireless LAN Personal Computer" (page 22).
In the Save In: field, select 3½" Floppy (A:),
and enter a suitable name such as Airstation.Apd in the File Name: field. Next, click
the Save button.
Setting the Wireless LAN Personal Computer
In order to make the communication between the Ethernet LAN and the wireless LAN possible, you must set
the wireless LAN personal computer settings. The wireless LAN personal computer is set using the following procedure.
Refer to the manual supplied with the wireless LAN card install the drivers and
1
try to set the network settings.
Refer to TCP/IP Protocol Settings in the Preparing AirStation Settings the TCP/
2
IP is set.
The procedure for TCP/IP Protocol Set explains the settings for the Ethernet LAN
on the settings personal computer. The following subjects can be substituted:
LAN board to the wireless LAN card
Settings personal computer to the Wireless LAN personal computer
Continue to "AirStation Connection Settings" (page 25).
Installing Client Manager
It is necessary to install Client Manager to communicate with the AirStation. Follow the steps
below to install Client Manager
Insert the "AirStation Series Drive CD" into the CD-ROM drive.
1
Click the Start button, and select Run.
2
3
WLA-L11 User’s Manual22
.
Enter "D:\WLEASY.EXE (When the CDROM drive is "D") and click OK.
Page 25

4
Select "Client Manager Installation" and
click Next.
5
6
7
8
Quit any other applications that are running
and then click OK.
Click NEXT.
Check that the destination directory for Client
Manager is correct and click NEXT. If you
want to change the directory, enter the path,
select the appropriate drive and click NEXT.
Check that the correct destination directory is
specified and click Start.
Necessary files are copied.
9
Click OK to include the Client Manager icon
in the start-up menu.
If you do not want to include the Client Manager icon in the Start-up menu, click
No.
Continue to next page
WLA-L11 User’s Manual 23
Page 26

10
Go to "AirStation Connection Settings" on page 25.
To uninstall the Client Manager, click Start and select MELCO Wireless LAN and then
Uninstall Client Manager and follow the screen prompts.
Click OK. This completes Client Manager
installation.
WLA-L11 User’s Manual24
Page 27

AirStation Connection Settings
Connect the AirStation using the following procedure.
From the wireless LAN personal computer, click the Start button, and select
1
Programs, MELCO Wireless LAN, and then Client Manager.
2
Insert the AirStation Information Files Disk into the floppy disk drive.
3
4
Select File, and Open.
In the Look In: field, select 3½" Floppy (A:),
the file name (e.g., Airstation.Apd), and then
click the Open button.
5
6
7
8
"The AirStation applications" will be displayed as unavailable.
With the AirStation applications displayed as
unavailable, select the AirStation to which you
want to connect, and then select File, and Con-
nect.
Click the OK button.
If you have set a password using
the WEP key, enter your password in the
Password field.
Windows will search for the AirStation.
WLA-L11 User’s Manual 25
Page 28

9
After connecting to the AirStation, a slow baud rate of 2 Mbps or similar may be displayed.
When communications actually begin, the correct baud rate will be displayed.
Continue to "Checking AirStation Connection" (page 26).
Connection to the AirStation is completed.
When connecting to AirStation is
completed, the application name in the
AirStation display will change from gray to
black, and an antenna mark ( ) will also
be displayed. If the AirStation application
is not displayed in black, refer to "Cannot
Connect to the AirStation Using Client
Manager (Unavailable Even When
Found)" (page 52) in Chapter 3 Trouble-
shooting.
Checking AirStation Connection
Use the client manager to check the connection between the AirStation and the wireless LAN personal computer.
From the wireless LAN personal computer, click the Start button, and select
1
Programs, MELCO Wireless LAN, and then select Client Manager.
2
Select File, Test Connection, and Diagnostic.
Perform the connection test only
for the AirStation applications with the
antenna mark ( ).
3
4
WLA-L11 User’s Manual26
Check the connection status.
The connection test results will be displayed.
Page 29

Connection Test Results
The connection test result display the connection status and the radio status. The following table
shows the test result in detail
Connection status Radio status
Very good Very good
Good Good
Poor Questionable
Very poor Poor
Communications not
possible
The overall diagnosis results are displayed as a combination of connection status and radio status.
Very good: No overall problem
Bad: Indicates an unstable status
If the diagnosis is unstable, perform the following corrective measures.
1. Move the wireless LAN personal computer closer to the AirStation. (Be sure to maintain the distance of
30 cm min.)
2. Change the AirStation position.
3. Improve conditions between the AirStation and the wireless LAN personal computer by rotating units.
4. Check if there is a source of electrical interference such as microwave ovens are near the AirStation or
the wireless LAN personal computer.
Continue to "Communications With Other Personal Computers" (page 28).
WLA-L11 User’s Manual 27
Page 30

Communications With Other Personal Computers
After check the connection to the AirStation use the following procedure to connect personal computers on
the Ethernet LAN using the wireless LAN computers.
Double-click the Network Neighborhood icon on the Desktop.
1
The personal computers connected to the Ethernet LAN and the wireless LAN network will be displayed.
2
Double-click the personal computer
you want to connect to.
If the personal computer you
want to connect to is not displayed, refer
to the "Cannot Connect to PCs on the
Ethernet LAN" section (page 49) in Chapter 3 Troubleshooting.
3
4
Connecting from the wireless LAN personal computer to the Ethernet LAN network is
completed. Use the personal computer in the optimum environment for wireless LAN and Ethernet
LAN.
The drive that has the Shared PC Settings will
be displayed. Double-click the drive to which
you want to connect.
The details on the drive will be displayed, and
access will be enabled.
WLA-L11 User’s Manual28
Page 31

What is Next?
2
This section explains how to change the AirStation settings, and their various uses.
Displaying AirStation Setting Screen
The AirStation setting screen can be displayed using the following procedure.
Refer to the "Installing AirStation Manager" (page 14) section in Chapter 1,
1
Communications Between Ethernet LAN and Wireless LAN, and install the
AirStation Manager.
Click the Start button, and select Programs, MELCO AirStation, and AirSta-
2
tion Manager.
3
4
5
Select Edit, and Search AirStation.
Windows will search for the AirStation.
The AirStation Manager will be displayed.
6
7
Select the AirStation name and select Admin
and Configure AS.
Your Web browser will start and the setting
screen will be displayed.
WLA-L11 User’s Manual 29
Page 32

Enabling and Disabling Roaming Function
While moving from one room to another using one roaming function, you can switch AirStations without
new setting automatically. Set the roaming function can be set using the following procedure.
Be sure to set the roaming function from a personal computer on the Ethernet LAN. If
you set the roaming function from a personal computer on the wireless LAN, you cannot to connect to the AirStation. If it is the case, please refer to Chapter 3 Troubleshooting.
The AirStation Setting
Refer to the "Displaying AirStation Setting Screen" section (page 29) in Chapter
1
2, What is Next?, and display the AirStation setting screen.
2
Click the Custom Setup button.
3
Follow the on-screen instructions to complete the settings.
The followings are set and click the Set button.
Group Name: Enter the same group name for
all the AirStations in the same
roaming network.
Roaming: Use.
WLA-L11 User’s Manual 30
Page 33

Setting the Wireless LAN Personal Computer
From the wireless LAN personal computer, click the Start button, and select
1
Programs, MELCO AIRCONNECT, and then Client Manager.
2
Select File, and Manual....
3
4
5
When you set the roaming function to be
enable, the ESS ID of the AirStation will be
changed to "000000" + group name.
Enter "000000" + group name in the ESS ID
field, and then click the OK button.
Click the OK Button.
If you have set a password using
the WEP key, enter your password in the
Password field.
Windows will search for the AirStation.
6
Check the connection to the AirStation is completed.
The name of the AirStation which
you can connect with the roaming function, will be displayed with an antenna
mark ( ).
WLA-L11 User’s Manual31
Page 34

Limiting Connections from Wireless LAN Per-
sonal Computers
To limit connections to the AirStation from a wireless LAN personal computer, use following procedure.
After setting only wireless LAN personal computers that have been registered can communicate with Ethernet LAN personal computers.
Setting Procedure
Refer to the "Displaying AirStation Setting Screen" section (page 29) in Chapter
1
2, What is Next?, and display the AirStation setting screen.
2
Click the Custom Setup button.
3
4
If the wireless LAN card of your choice on the network is displayed in the Table of
Wireless LAN PCs for which Connection Is Disabled, select the Enable Connection
check box for the relevant MAC address and click the Change button.
Click the Wireless LAN Computer Limitation Setup hyperlink.
Enter the MAC address of wireless LAN personal computers that can connect to the network in the Wireless LAN Computer MAC
Address field. Then click the Add button.
• Refer to the manual enclosed with the
wireless LAN personal computer for the
MAC address.
• When entering the MAC address, separate each two-digit group by entering a
colon (:) between them.
WLA-L11 User’s Manual 32
Page 35

"Add MAC Address" will be displayed. Click the Return button.
5
6
Complete Setting will be displayed. Click the Back button on the Tool Bar.
7
8
In the Connection of Wireless LAN Computer
field, select the Set Limit option and click the
Set button.
If you make the settings using a
wireless LAN personal computer, check
that the wireless LAN personal computer
is registered in Wireless LAN Computers
that can be connected before you click the
Set button. If you made the settings before
registering the wireless LAN personal
computer, refer to the "Reset the AirSta-
tion Setting to the Factory Settings" section (page 38), and reset the settings to
the factory settings.
The added MAC address will be displayed in
the Available Wireless LAN Computer(s)
field.
You can register up to 256 MAC
addresses maximum.
This way, only wireless LAN personal computers that are registered in the Available Wireless LAN Computers field will be able to communicate with personal computers on the Ethernet LAN.
To disable a personal computer with a registered MAC address, clear the Inhibit Con-
nection check box for the relevant MAC address in the Available Wireless LAN Computer(s) field,
and click the Change button.
WLA-L11 User’s Manual33
Page 36

Strengthening Security Using the WEP (Encoding) Function
You can prevent the external decryption of wireless packets by encoding the packets using the WEP function. The AirStation is set using the following procedure.
If the WEP function is already set, communications with Macintosh computers will be dis-
abled as the WEP function is not compatible with the Airport WEP function.
Be sure to set the WEP (encoding) using a personal computer on the Ethernet LAN network. If you set using a personal computer on the wireless LAN, communications with the AirStation may be disabled. If communication with the AirStation is disabled, refer to Chapter 3
Troubleshooting.
Setting Procedure
Refer to the "Displaying AirStation Setting Screen" section (page 29) in Chapter
1
2, What is Next?, and display the AirStation setting screen.
2
Click the Custom Setup button.
3
Settings Completed will be displayed. Close the Web browser.
4
When WEP setting is enabled, you will be prompted to enter your password
whenever you try to connect to the AirStation from the client manager. If no password is
entered, communications with the AirStation will be disabled.
Enter the 5-digit number (password) in the
Encryption Code (WEP) field, and then enter
the same password in the Confirm Encryption
Code field to confirm.
Next, click the Set button.
WLA-L11 User’s Manual 34
Page 37

Multiple AirStation Groups
When multiple AirStations are used to communicate with the wireless LAN personal computers on the same
floor, the baud rate may be reduced. This is because the AirStations are using the same frequency to communicate simultaneously. If this happens, you can enable communications regardless of other LAN networks
by making settings to use different frequencies (wireless channels) in each LAN network (i.e., grouping).
Change the wireless channels and group the networks is done using the following procedure.
Setting Procedure
Refer to the "Displaying the AirStation Setting Screen" section in Chapter 2,
1
What is Next?, and display the AirStation setting screen.
2
Click the Custom Setup button.
3
"Settings Completed" will be displayed. Close the Web browser.
4
Using neighboring channels or other frequencies close to each other may result in
mutual interference. To make sure that there is no interference, set each channel at least
four channels apart. (Changing wireless channels may result in interference with other
wireless equipment.)
"In the Wireless Channel field", select the
wireless channel setting for the AirStation, and
click the Set button.
WLA-L11 User’s Manual35
Page 38

Setting Send Mode
Set the AirStation’s LAN board send mode using the following procedure.
Refer to the "Displaying AirStation Setting Screen" section (page 29) in Chapter
1
2, What is Next?, and display the AirStation setting screen.
2
3
When the AirStation’s send mode is set to full duplex, make sure that the send
mode for the connected hub is also set to full duplex. When the send mode for the connected hub is set to Auto Negotiation and half duplex, and the AirStation’s send mode is
set to full duplex, communications will be disabled.
Follow the screen instructions to complete the settings.
Click the Custom Setup button.
In the "Communication Type" field, select
either full duplex or half duplex, and click the
Set button.
WLA-L11 User’s Manual 36
Page 39

Connecting to the AirStation Using an AirPort-compatible
Personal Computer
Getting Started
The following software is required when the Macintosh AirPort-compatible personal computer is used to
share files with Windows personal computers.
•Software that supports shared files (e.g., DAVE).
Refer to the manual supplied with your software for details of settings to enable file sharing.
Setting Method
To connect to the AirStation using an AirPort-compatible computer, use the following procedure.
Before setting, check if the AirPort software has been installed, or not. (For the procedure
for installing AirPort software, refer to the manual supplied with the AirPort.)
Display the AirStation setting screen using the settings personal computer (Win-
1
dows personal computer).
Refer to the "Displaying AirStation Setting Screen" section (page 29) in Chap-
ter 2, What is Next?
Click the Device Diagnostic button.
2
The AirStation ESS-ID should be displayed in the ESS-ID field.
3
4
Start the AirPort-compatible computer. Select
Apple Menu on the menu Bar, and select AirPort. The AirPort setting tool will start.
5
From the pull-down menu in the Network
Selection field of AirPort Network, select the
AirStation ESS-ID that was identified in step
3.
WLA-L11 User’s Manual37
Page 40

Checking AirStation’s IP Address
You can check AirStation’s IP address validity using the following procedure.
Refer to the "Installing AirStation Manager" section (page 14) in Chapter 1,
1
Communications Between Ethernet LAN and Wireless LAN
Click the Start button, and then select Programs, MELCO AirStation, and
2
AirStation Manager.
3
On the Menu Bar, select Edit. Then select
Search AirStation.
4
5
AirStation’s IP address will be displayed in the IP Address field.
Windows will search for the AirStation.
AirStation’s IP address will be displayed.
Reset the AirStation Setting to the Factory Settings
Turn ON the power supply to the AirStation.
1
Press and hold the factory setting switch on the back of the AirStation for 3 sec-
2
onds minimum. The DIAG lamp on the side (bottom) will flash. When the DIAG
lamp stops flashing, the AirStation is reset to the factory setting.
For the factory setting switch, refer to the "Package Details and Parts Nomencla-
ture and Functions" section in the separate Install manual.
WLA-L11 User’s Manual 38
Page 41

Checking the Wireless Frequency Status
The status of the wireless frequency between the wireless LAN personal computer and the AirStation can be
checked using the following procedure.
Click the Start button, and then select Programs, MELCO Wireless LAN, and
1
Client Manager.
2
On the Menu Bar, select File. Then select Te st
Connection and Diagnostic.
Perform the connection test only
for the AirStations with the antenna
mark( ).
3
4
Check the connection status.
The connection test results will be displayed.
WLA-L11 User’s Manual39
Page 42

Connection Test Result
The connection test results displaies the connection status and the radio status. The following
table shows the test result in detail.
Connection status Radio status
Very good Very good
Good Good
Poor Questionable
Very poor Poor
Communications not
possible
The overall diagnosis results are displayed as a combination of connection status and radio status.
Very good: No overall problem
Bad: Indicates an unstable status
If the diagnosis is unstable, perform the following corrective measures.
1.Move the wireless LAN personal computer closer to the AirStation. (Be sure to maintain the distance of 30
cm min.)
2.Change the AirStation position.
3.Improve conditions between the AirStation and the wireless LAN personal computer by rotating units.
4.Check if there is a source of electrical interference such as microwave ovens are near the AirStation or the
wireless LAN personal computer.
WLA-L11 User’s Manual 40
Page 43

Troubleshooting
3
This section explains the possible causes and remedies of a problem that may occur when
using this product.
Making AirStation Settings
"Network Card Is Not Installed" Is Displayed When Starting
the Easy Installation Wizard
Cause
The network adapter drivers are not installed.
Remedy
Refer to the network adapter manual and install the proper drivers.
For the driver installation procedure, please refer to the manual supplied with the net-
work adapter.
"Network Card Is Configured Incorrect" Is Displayed When
Starting the Easy Installation Wizard
Cause
• Network adapter drivers are not installed correctly.
• A "!" mark or a "X" mark is attached to the network adapter.
Remedy
Refer to the network adapter manual and install the proper drivers.
For the driver installation procedure, please refer to the manual supplied with the net-
work adapter.
WLA-L11 User’s Manual 41
Page 44

"The Network Protocol Setup Is Incorrect" Is Displayed
When Starting the Easy Installation Wizard
Cause
• TCP/IP setting are incorrect.
• Cannot obtain an IP from the DHCP server automatically.
Remedy
Check if TCP/IP is correctly installed and set.
Refer to the "TCP/IP Protocol Setting" section (page 5) in Chapter 1, Communications
Between Ethernet LAN and Wireless LAN
WLA-L11 User’s Manual42
Page 45

.
"Cannot Find AirStation" Is Displayed When Starting the
Easy Installation Wizard
Cause (1)
The entered MAC address is incorrect when the AirStation is set from the wireless LAN personal computer.
Remedy (1)
Check and reenter the AirStation’s MAC address.
For the MAC address, refer to the Parts Nomenclature and Functions section in
Install Manual.
The factory-set group name is "Group". If you are setting for the first time, or have not
changed the group name, check if it is set to "Group" or not.
Cause (2)
The hub and the AirStation are not connected when the AirStation is set from the Ethernet
LAN personal computer.
Remedy (2)
• Check that the hub and the AirStation are firmly connected using a UTP straight cable. (Insert the cable
until you hear a click.)
• Be sure to use a UTP straight cable to connect the AirStation and personal computers to the hub.
Cause (3)
The cable is broken.
Remedy (3)
Reconnect using good UTP straight cable.
Cause (4)
The hub is malfunctioning.
Remedy (4)
• Check if the AirStation and the hub Link lamps are flashing.
• Try connecting the another port on the hub.
Cause (5)
The communication mode for the connected hub and the AirStation is different.
Remedy (5)
Some hubs may not be able to connect correctly to the network using the Auto Negotiation setting. If this occurs, you must set the communications mode manually. Change the setting to
other than Auto Negotiation. If you change the setting and there is still a communications problem, and you can change the hub communications mode, change the hub communications
mode manually to be the same as the AirStation’s mode.
To change the AirStation’s communications mode, refer to the "Setting Method" section (page
37) in Chapter 2, What is Next?
WLA-L11 User’s Manual 43
Page 46

Setting Screen Is Not Displayed
Cause (1)
• When a proxy server is set using the Web browser settings, the setting screen is not displayed.
• Dial up using a modem is set.
Remedy (1)
• When the AirStation is set on a network environment with a proxy server, you must change the Web
browser’s proxy settings.
• Change the setting to disable dial-up from the Web browser settings.
Setting by the following procedure.
Internet Explorer 5 or Later
Start Internet Explorer.
1
On the Menu Bar, select Tools. Then select Internet Options.
2
Click the Connections tab.
3
4
5
Select "Never Dial a Connection", and then
click the
LAN Settings
Click the
the Web browser settings when the Use a
Proxy Server check box is not selected.
Advanced
There should be no problem with
button.
button.
WLA-L11 User’s Manual44
Page 47

6
Enter the AirStation’s IP address in the "Do
Not Use Proxy Server for Addresses Beginning With:" field, and click the
If you do not know the AirStation’s
IP address, search for the AirStation using
the AirStation Manager. For AirStation
Manager details, refer to the "Installing
AirStation Manager" section (page 14) in
Chapter 1, Communications Between
Ethernet LAN and Wireless LAN.
Internet Explorer 4.0
Start Internet Explorer.
1
On the Menu Bar, select View. Then select Internet Options.
2
Click the Connection tab.
3
OK
button.
4
5
Select "Connect to the Internet using a local
area network", and click the
ton in the Proxy server group box.
If the "Access the Internet using a proxy
server" check box is not selected, there
should be no problem for the Web browser
setting.
Enter the AirStation’s IP address in the "Do
not use proxy server for addresses beginning with:" field, and click the
If you do not know the AirStation’s
IP address, search for the AirStation using
the AirStation Manager. For AirStation
Manager details, refer to the "Installing
AirStation Manager" section (page 14) in
Chapter 1, Communications Between
Ethernet LAN and Wireless LAN.
Advanced
OK
button.
but-
WLA-L11 User’s Manual 45
Page 48

Netscape Navigator 4.0 or Later
Start Netscape Navigator.
1
On the Menu Bar, select
2
3
4
5
Edit
, and then select
Preferences
In the Category field, select Proxies.
If Proxies is not displayed, click
the + symbol to the left of the Advanced
option.
If Manual proxy configuration is selected,
View
click the
or "Automatic proxy configuration" is
selected, there should be no problem with
the Web browser settings.
Enter the AirStation’s IP address in the "Do
not use proxy servers for domains beginning
with:" field, and click the
IP address, search for the AirStation using
the AirStation Manager. For the AirStation
Manager details, refer to the "Installing
AirStation Manager" section (page 14) in
Chapter 1, Communications Between
Ethernet LAN and Wireless LAN.
button.
If "Direct connection to the Internet"
OK
button.
If you do not know the AirStation’s
WLA-L11 User’s Manual46
Page 49

After making the setting though the wireless LAN personal
computer, communication with the AirStation is disabled.
Cause (1)
The following AirStation function can be set through the wireless LAN personal computer.
1. Changes to the roaming function setting.
2. Changes to the group name.
3. Changes to the password (WEP) setting.
Remedy (1)
If the communication is disabled because of changes described above, connect to the AirStation using the following procedure.
Make the following settings for all wireless LAN personal computers.
1. Using the wireless LAN personal computer click the Start button. Then select either one of
Programs, MELCO WirelessLAN, and Client Manager.
2. Select File. Then select Connections.
3. In the MAC Address, Group Name, and Destination fields, either as shown below. Then
click the OK button.
In the MAC Address screen field:
• If the roaming function is selected: Enter 00:00:00.
• If the roaming function is not selected: Enter the last six digits of the AirStation’s MAC address.
In the Group Name field:
Enter the name of the group to which the AirStation belongs.
WLA-L11 User’s Manual 47
Page 50

4. Enter the following in the Password field, and click the OK button.
• If you changed the password (WEP):
Enter the password (WEP) set in the AirStation.
• If you did not changed the password:
Click the OK button without entering anything in the Password field.
Check it you can connect to the AirStation and if it does the setting is complete.
WLA-L11 User’s Manual48
Page 51

Wireless LAN PC Communications
If the "Error Message" is Displayed
When you start Client Manager using the wireless LAN personal computer, the error message
wireless LAN card cannot be found, is not displayed.
Cause (1)
The wireless LAN card drivers are not installed correctly.
Remedy (1)
Refer to the wireless LAN card manual, check that the drivers are installed correctly.
Cause (2)
The ESS-ID setting drivers are not installed (Windows 2000 and Windows NT 4.0 only).
Remedy (2)
Install the ESS-ID setting drivers.
For details, refer to the manual supplied with the wireless LAN card.
Cause (3)
You are not trying to log in as a user with Administrator privileges (Windows 2000 and Windows NT 4.0 only).
Remedy (3)
Log in as a user with Administrator privileges.
Cannot Connect to PCs on the Ethernet LAN
Cause (1)
Installation of the Ethernet LAN card (WLI-PCM-L11, etc.) drivers failed.
Remedy (1)
Refer to the wireless LAN card manual, and check that the drivers are installed correctly.
Cause (2)
The Ethernet LAN personal computer network is not set properly (i.e., personal computers on
the same Ethernet LAN are not connected).
Remedy (2)
Refer to the manual supplied with the LAN cards for the Ethernet LAN personal computers,
get the Ethernet LAN personal computers network.
WLA-L11 User’s Manual 49
Page 52

Cause (3)
When you search the network, the connected computers are displayed, but the search process is
slow.
Remedy (3)
Search the computer using the following procedure.
(1) Click the Start button, and then select Find, and Computer...
(2) In the Named: field, enter the name of the computer connected to the network, and click the
Find Now button.
(3) Double-click the icon for the connected computer to connect.
Cause (4)
The TCP/IP Protocol is not installed, or it is not set correctly.
Remedy (4)
Check the wireless LAN personal computer, Ethernet LAN personal computer, and the AirStation IP address setting validity using the following procedure.
Procedure for Checking the wireless LAN personal computer and the Ethernet personal computer IP addresses
Windows 98/95
1.Click the
2.Select the network adapter you are using. Check the value in the IP address field.
If the IP address displayed is incorrect, refer to the TCP/IP Protocol Settings section in Chapter
2, Preparing AirStation Settings of the separate Internet Connection Manual.
WLA-L11 User’s Manual50
Start
button, and then select
Run...
In the Open: field, enter WINIPCFG, and click the OK button.
Page 53

Windows 2000
If the TCP/IP Protocol is installed, you can check the IP address using the following procedure.
1.Click the Start button, and select Programs, Accessories, and Command Prompt.
2.C:\> will be displayed on screen. Enter IPCONFIG/ALL, and press the Enter key.
3.The IP address and sub-network will be will be displayed in the IP Address/Subnet Mask field.
Ethernet adapter Local Area Connection
IP address..................................... :192.168.100.2
Subnet Mask................................. :255.255.255.0
Connection-specific DNS Suffix :
Description................................... :MELCO WLI-PCM-L11 Wireless LAN
Physical Address......................... :00-60-1D-1F-36-23
DHCP Enabled............................ :No
Default Gateway.......................... :
DNS Servers................................ :
If the IP address displayed is incorrect, refer to the TCP/IP Protocol Settings section in Chapter
2, Preparing AirStation Settings in the separate Internet Connection Manual.
Windows NT 4.0
1.Click the Start button, and select Programs, and Command Prompt.
2.Enter IPCONFIG, and press the Enter key. Check the IP address value.
Ethernet adapter wlipcm1
IP address :192.168.100.188
Subnet Mask :255.255.255.0
Default Gateway :192.168.100.1
If the IP address displayed is incorrect, refer to the TCP/IP Protocol Settings section in Chapter
2, Preparing AirStation Settings, of the separate Internet Connection Manual.
Cause (5)
You did not enter your password when starting Windows 98/95. (On the Network Password
screen, you clicked the Cancel button, or pressed the ESC key without entering your password.)
Remedy (5)
When you start Windows 98/95, be sure to enter your password in the Network Password
screen, and click the OK button. If you have forgotten your password, enter another user name.
The user name and password will be registered in the computer.
Cause (6)
The Ethernet LAN personal computer setting and the wireless LAN personal computer setting
are incorrect.
Remedy (6)
Check the IP/TCP protocol validity for the Ethernet LAN personal computer and the wireless
LAN personal computer.
WLA-L11 User’s Manual 51
Page 54

Cause (7)
TCP/IP protocol is installed, but the IP address setting is incorrect.
Remedy (7)
Check if the IP address setting is correct.
Refer to the "Allocating IP Addresses" section (page 52) in Chapter 3, Troubleshooting.
Roaming Function Is Not Operating Correctly
Cause
The AirStation settings are incorrect.
Remedy
• Check that the same AirStation group name has been set for all personal computers performing roaming.
• When setting WEP (encryption), set all AirStation WEP settings to the same.
• After enabling the AirStation’s roaming function, reconnect using the wireless LAN personal computer.
Cannot Connect to the AirStation Using Client Manager
(Unavailable Even When Found)
Cause (1)
Installation of the wireless LAN card drivers is failed.
Remedy (1)
Refer to the wireless LAN card manual and check if the driver is installed correctly. Also check
if the AirStation’s Wireless lamp is lit.
Cause (2)
It is difficult to communicate with the AirStation due to poor radio transmission.
Remedy (2)
Move the wireless LAN personal computer around and making the AirStation closer. Also
check if there are obstacles preventing good communications. Remove the obstacles and connecting again.
Allocating IP Addresses
The following procedure to set the IP address is introduced.
There Is a DHCP Server on the Network (*)
The IP address can be set as follows:
WLA-L11 User’s Manual52
Page 55

Windows 98/95: Read the IP address automatically.
Windows 2000: Read the IP address automatically.
Windows NT 4.0: Read the IP address from the DHCP server.
An IP Address Is Already Allocated to the Personal Computers on
the Network
Check if the IP address is set in the personal computer by the network manager.
An IP Address Is Not Allocated to the Personal Computers on the
Network
Set the IP address on the personal computers as well as the AirStation using the following procedure.
(Setting example)
Personal computer A:192.168.100.2 (255.255.255.0)
Personal computer B:192.168.100.3 (255.255.255.0)
Personal computer C:192.168.100.4 (255.255.255.0)
Personal computer X:192.168.100.254 (255.255.255.0)
*The server automatically allocates IP addresses to the personal computers and the AirStation on the net-
work. If the device with built-in DHCP server function such as the Windows NT server and dial-up
router exists on the network, the DHCP server function may start automatically. Refer to the Windows
NT manual or the dial-up router manual if the DHCP server function is operating, or consult the manufacturer. There is no DHCP server if you are using Windows 98/95 personal computers only on the network.
•
WLA-L11 User’s Manual 53
Page 56

Self-Diagnostic Function
4
If an error occurs, you can identify the error by the DIAG lamp flash number. The DIAG lamp keeps flashing until the power is turned OFF or the AirStation is restarted.
data is being written. Do not turn OFF the power supply to the AirStation while this is happening.
* The data is written when the firmware is replaced.
AirStation will perform self-diagnosis when the power supply is turned ON, or when the
AirStation is restarted.
If the front panel DIAG lamp and the side panel DIAG lamp are flashing alternately, the
Error Details when DIAG Lamp Flashes
No. of
flashes
1 RAM check error Cannot read or write to the internal memory.
2 ROM check error Cannot read or write to the flash ROM
3 Ethernet LAN error The Ethernet LAN controller is broken.
4 Wireless LAN error The Wireless LAN controller is broken.
5 Clock error
9 Error other than the above
Status Explanation
The Clock is not set correctly, or the clock battery may
be depleted.
If one of the above errors is displayed, try removing the AC adapter from the socket to restart.
If the error is still displayed, send the AirStation directly to TECHWORKS INC./Buffallo Technology repair
center. Please call to TECHWORKS INC./Buffalo Technology obtain RMF#.
WLA-L11 User’s Manual54
Page 57

Setting Screen Tables
5
This section explains details of the setting screen tables.
Bridge Mode
(Communications Between the Ethernet LAN and the Wireless LAN)
Setting Screen Configuration
Main menu Standard Setup
Custom Setup Basic Setting(P56)
Password Setup(P56)
Time Setup
Wireless LAN Personal Computer Limit Setting(P56)
Power Management Setup
Diagnosis Information of the Main Unit(P57)
Transfer Packet Condition(P57)
Wireless LAN Computer Information
Ping Test
Set to Default
WLA-L11 User’s Manual55
Page 58

Setting Screens Explanation
• Items marked with an asterisk (*) can be set using the Standard Setup screen.
• For details of the setting items, refer to the on-screen setting Help.
Detailed Settings (Bridge Mode)
Item Explanation Factory setting
Basic Setting
AirStation Name* Set the AirStation name. (See note 1)
Group Name* Set the group name. (See note 2) GROUP
ESS ID Set ESS ID.
Wireless Channel Set the wireless channel (1 to 11). Channel 11
Roaming
Encryption Code
(WEP)
Confirm Encryption
Code
Bit Rate Set the bit rate. Do not fix bit rate.
Communication type
IP Address Set the AirStation IP address. 1.1.1.1
Administrator’s Name
New Password
Confirm Password Reenter the password to confirm. None
Connection to the Wireless LAN Computer
Enable/disable wireless roaming function.
Set the keyword for encryption. (See
note 3)
Reenter the keyword for encryption.
(See note 3)
Set the LAN board communications type
Password Setup
User name to log on to the AirStation’s
setting screens
Set password to log on to the AirStation’s setting screens.
Wireless LAN Personal Computer Limit Setting
Enable the AirStation connection only
from the specified LAN personal computer.
Last six digits of "AP" + MAC
address
Last six digits of MAC address
+ group name
Not used
Not used
-
Half Duplex
root (cannot be changed)
None
No Limit
Note 1: Enter a maximum of 32 alphanumeric characters (case sensitive), and the underbar "_".
Note 2: Enter a maximum of 16 alphanumeric characters (case sensitive), and the underbar "_".
Note 3: Enter a maximum of 5 alphanumeric characters (case sensitive), and the underbar "_".
WLA-L11 User’s Manual 56
Page 59

Machine Diagnostics
Item Explanation
Information of the Main Unit
Model name Display the AirStation product name.
AirStation name Display the AirStation name.
Wireless module firmware
Group name Display the group name.
MAC address of wired
LAN
MAC address of wireless LAN
ESS-ID Display ESS-ID.
Wireless roaming function
Encryption (WEP)
function
DS channel Display the wireless channel.
IP address Setting Display the IP address setting method.
IP address
Net mask
Send number of packets
Send number of error
packets
Receive number of
packets
Receive number of
error packets
Display the wireless firmware name and version.
Display the AirStation’s Ethernet MAC address.
Display the AirStation’s wireless MAC address.
Display whether wireless roaming function is enabled or disabled.
Display whether Encryption (WEP) function is enabled or disabled.
Display the AirStation’s IP address
Transfer Packet Condition
Display the number of packets sent.
Display the number of packets with send errors.
Display the number of packets received.
Display the number of packets with receive errors.
WLA-L11 User’s Manual57
Page 60

Glossary
6
This section explains the glossary of terms used in this manual that are required to
configure the network.
Wireless Channel
If there is more than one Wireless LAN network with different ESS-ID on the same floor, and they are communicating with each other, the baud rate may be slowed, due to the same radio frequency being used. If this
happens, you can still communicate regardless of other LAN networks by using to use different frequencies
(wireless channels).
Note: If they are communications using the wireless LAN, be sure to set all the Units the same wireless
channel.
DHCP Server
When configuring the network TCP/IP, be sure to set the IP address in each personal computer and other
devices. When there is a DHCP server on the network, you can assign IP addresses automatically to the personal computers and the AirStation on the network. If there is Windows 2000, Windows NT, dial-up router,
or other device with built-in DHCP server function on the network, the DCHP server function may start to
operate. For the Windows NT server and dial-up router, or other DCHP server function, refer to the Windows 2000, Windows NT, or dial-up router manual, or consult the manufacturer. There should be no DHCP
server problems for Windows 98/95 personal computers only on the network.
ESS-ID
This ID is used to prevent cross-communication during communication between the AirStation and personal
computers within the wireless LAN. The Wireless LAN personal computers that have the same ESS-ID as
the AirStation can communicate with the AirStation. (ESS-ID is disabled when wireless LAN personal computers are communicating each other.) Set the AirStation ESS-ID as follows: Last six digits of MAC address
+ Group name. The ESS-ID is case sensitive. You can enter a maximum of 32 alphanumeric characters, and
the underbar "_".
LAN (Local Area Network)
Read as one word. A LAN is a network in a comparatively small area, such as campus or within a single
building. The LAN baud rate varies from 10 Mbps to 100 Mbps.
MAC Address (Media Access Control Address)
The MAC address is a physical address specific to each network card. The MAC address is configured from
a total of six bytes as follows: A vendor code comprising the lead three bytes and a 3-byte user code. The
vendor code is managed and assigned by IEEE. The user code is managed using a unique (unduplicated)
number from the network card manufacturer. That is, the MAC address is assigned as a physical address
unique throughout the world. In an Ethernet LAN, the MAC address is used as a base to create a frame for
sending and receiving.
WLA-L11 User’s Manual58
Page 61

TCP/IP(Transmission Control Protocol/Internet Protocol)
TCP/IP is a protocol equivalent to the network and transport levels of the OSI reference model, and it is
defined using RFC. Consequently, different terminals can communicate with each other using TCP/IP.
• Normally, TCP/IP includes the application protocols TELNET and FTP.
• TCP/IP is the standard internet protocol.
WEP (Encryption)
By setting an encryption key in the AirStation, you can prevent wireless packets from being decrypted externally. When connecting to the AirStation with the encryption key you must enter the encryption key from
the client manager.
Windows 98/95 User Name and Password
When you have completed installing the drivers and restarted your computer, the "Enter Network Password"
dialog box will be displayed.
• Enter your user name and password to use the network. You do not need to enter your user name and
password, however, when not using the network.
• Set your user name and password during Windows 98/95 setup. When you log on for the first time, enter
the user name and password you created during the setup.
• Using the network, multiple users can switch between multiple environments. Consequently, you can log
on by entering a new user name and password.
Windows 98/95 Shared Setting Screens
Right-click the icon for the drive you want to share, and select "Sharing" from the menu. The following
screen will be displayed.
The boxes within the screen are as follows:
Not shared : Select to clear shared drives.
Shared As : Select to share drives.
Share Name : You can change the name of the shared drive.
Access Type : You can read and write to the shared drive.
Read Only : You can only read the shared drive.
Full : You can both read and write to the shared drive.
Depends on Password : Use a password to determine access type.
Passwords : You can both read and write depending on the password.
Read-Only Password : Set the password to permit the shared drive to be read only.
Full Access Password : Set the password to permit both reading and writing to the shared drive.
WLA-L11 User’s Manual 59
Page 62

Windows 98/95 Identification Screen
Displayed Screen
Double-click the Network icon and click the "Identification" tab. The following screen will be displayed.
Explanation of Screen Fields
The boxes within the screen are as follows:
Computer name :The name used to identify the computer on the network. Set a unique name for each
personal computer.
Workgroup : The name used to identify the computer workgroup on the network. If there is no
particular need to identify separate workgroups, set the same workgroup name for
all the personal computers on the network.
Computer Description: Use this box to enter additional explanation of the computer name. You can also
leave this box blank.
Firmware
Firmware is the name given to the software (programs) built into hardware such as the router, modem, and
terminal adapter. This software is built into the hardware, so it can be said to be in-between hardware and
software.
Protocol
Protocols are the procedures and regulations for sending and receiving data between the network terminals.
For example, if two computers are communicating, you can send the correct information according to the
regulations by formatting all required information. The protocol such as which terminal sends first, what
type of message, what type of message the receiving terminal should send in reply, the data format, and
responses to communications errors are same of examples.
WLA-L11 User’s Manual60
Page 63

Roaming Function
If using the roaming function and moving from one room to another room, you can switch the AirStation
automatically. With the roaming function, you can easily move from the office to the conference room while
maintaining access to the network.
Ethernet LAN and Wireless LAN
The following terms are used in this manual to clarify the distinction between the wired 10/100 base LAN,
and the wireless LAN.
Ethernet LAN: LAN connected using cables
Wireless LAN: LAN that uses wireless communications
The above terms are used for explanatory in this manual and they are not used generally.
WLA-L11 User’s Manual 61
Page 64

Product Specifications
7
This section explains the AirStation specifications and the LAN port connector specifications.
Specifications
Wireless LAN interface Conforming standards IEEE802.11b (wireless LAN standard protocol)
RCR STD-33, ARIB STD-T66 (low-power data communications system standard)
Communications
method
Data Baud Rate 1, 2, 5.5, 11 Mbps (autosense)
Access method Infrastructure mode
Frequency range (midfrequency)
Communications distance (depending on
ambient conditions)
Antenna Diversity type (built-in)
Ethernet LAN interface Conforming standards IEEE802.3 (10Base-T)
Data baud rate 10 Mbps/100 Mbps (automatic identification only)
Data communications
mode
Power consumption
and current consumption
Weight 510 g
Dimensions 76 x 170 x 205 mm (W x H x D)
6.9 w (max.)/0.1 A (max.)
DS-SS simplex (half duplex) operation
2412 to 2483.5 MHz
25 m indoors, 50 m outdoors at 11 Mbps
35 m indoors, 70 m outdoors at 5.5 Mbps
40 m indoors, 90 m outdoors at 2 Mbps
50 m indoors, 115 m outdoors at 1 Mbps
IEEE802.3u (100Base-TX)
Half duplex/full duplex (set manually)
WLA-L11 User’s Manual62
Page 65

LAN Port Connector Specifications
Use the RJ-45 8-pole connector, specified by ISO/IEC8877:1992.
MDI Signal Assignment
Pin number MDI signal Signal function
1 TD+ Send data (+)
2 TD- Send data (-)
3 RD+ Receive data (+)
4 (Not Use) Not used
5 (Not Use) Not used
6 RD- Receive data (-)
7 (Not Use) Not used
8 (Not Use) Not used
WLA-L11 User’s Manual 63
Page 66

MEMO
WLA-L11 User’s Manual64
Page 67

Notice
The information in this manual is subject to change without notice.
TECHWORKS INC. / Buffalo Technology SHALL NOT BE LIABLE FOR TECHNICAL OR EDITORIAL ERRORS OR OMISSIONS CONTAINED HEREIN OR FOR INCIDENTAL OR CONSEQUENTAL DAMAGES RESULTING FROM THE USE OF THIS MANUAL.
This manual contains information protected by copyright. No part of this manual may be photocopied or reproduced in any form without prior written consent from TECHWORKS INC./Buffalo
Technology.
All rights reserved. Printed in Japan.
Windows and Windows NT are trademarks of Microsoft Corporation.
Federal Communications Commission Notice
This equipment has been tested an found to comply with the limits for a Class B digital device, pursuant to Part 15 of the FCC Rules. These limits are designed to provide reasonable protection
against harmful interference in a residental instration. This equipment generates, uses, and can
radiate radio frequency energy and, if not installed and used in accordance with the instructions,
may cause harmful interference to radio communications. However, there is no guarantee that
interference will not occur in a particular installation. If this equipment does cause harmful interference to radio or television, which can be determined by turning the equipment off and on, the user
is encouraged to try to correct the interference by one or more of the following measures:
• Reorient or relocate the receiving antenna.
• Increase the separation between the equipment and the receiver.
• Connect the equipment into an outlet on a circuit different from that to which the receiver is connected.
• Consult the dealer or an experienced radio/TV technician for help.
Modifications
The FCC requires the user to be notified that any changes or modifications made to this device
that are not expressly approved by MELCO INC. (the manufacturer) may void the user’s authority
to operate the equipment.
*11 Mbps is the IEEE 802.11g standard theoretical maximum data transfer rate. Actual wireless network throughput is limited
by environmental and system factors and will be less.
WLA-L11 User’s Manual
TECHWORKS INC./BUFFALO TECHNOLOGY
24 July, 2000 Second revision
Page 68

PY00-26037-DM10-02
2-01
 Loading...