

Page 1

Stoomoven
Handleiding
Étuve
Mode d'emploi
Dampfgarer
Bedienungsanleitung
Forno a vapore
Manuale di istruzioni
Horno de vapor
Manual de instrucciones
Forno a vapor
Manual de instruções
Ångugn
Bruksanvisning
Dampovn
Instruktionsvejledning
Dampovn
Brukerhåndbok
Höyryuuni
Ohjekirja
NL
FR
DE
IT
ES
PT
S
DK
N
FIN
Steam Oven
Instruction manual
Model • Modèle • Modell • Modello • Modelo • Malli:
Y067
Page 2
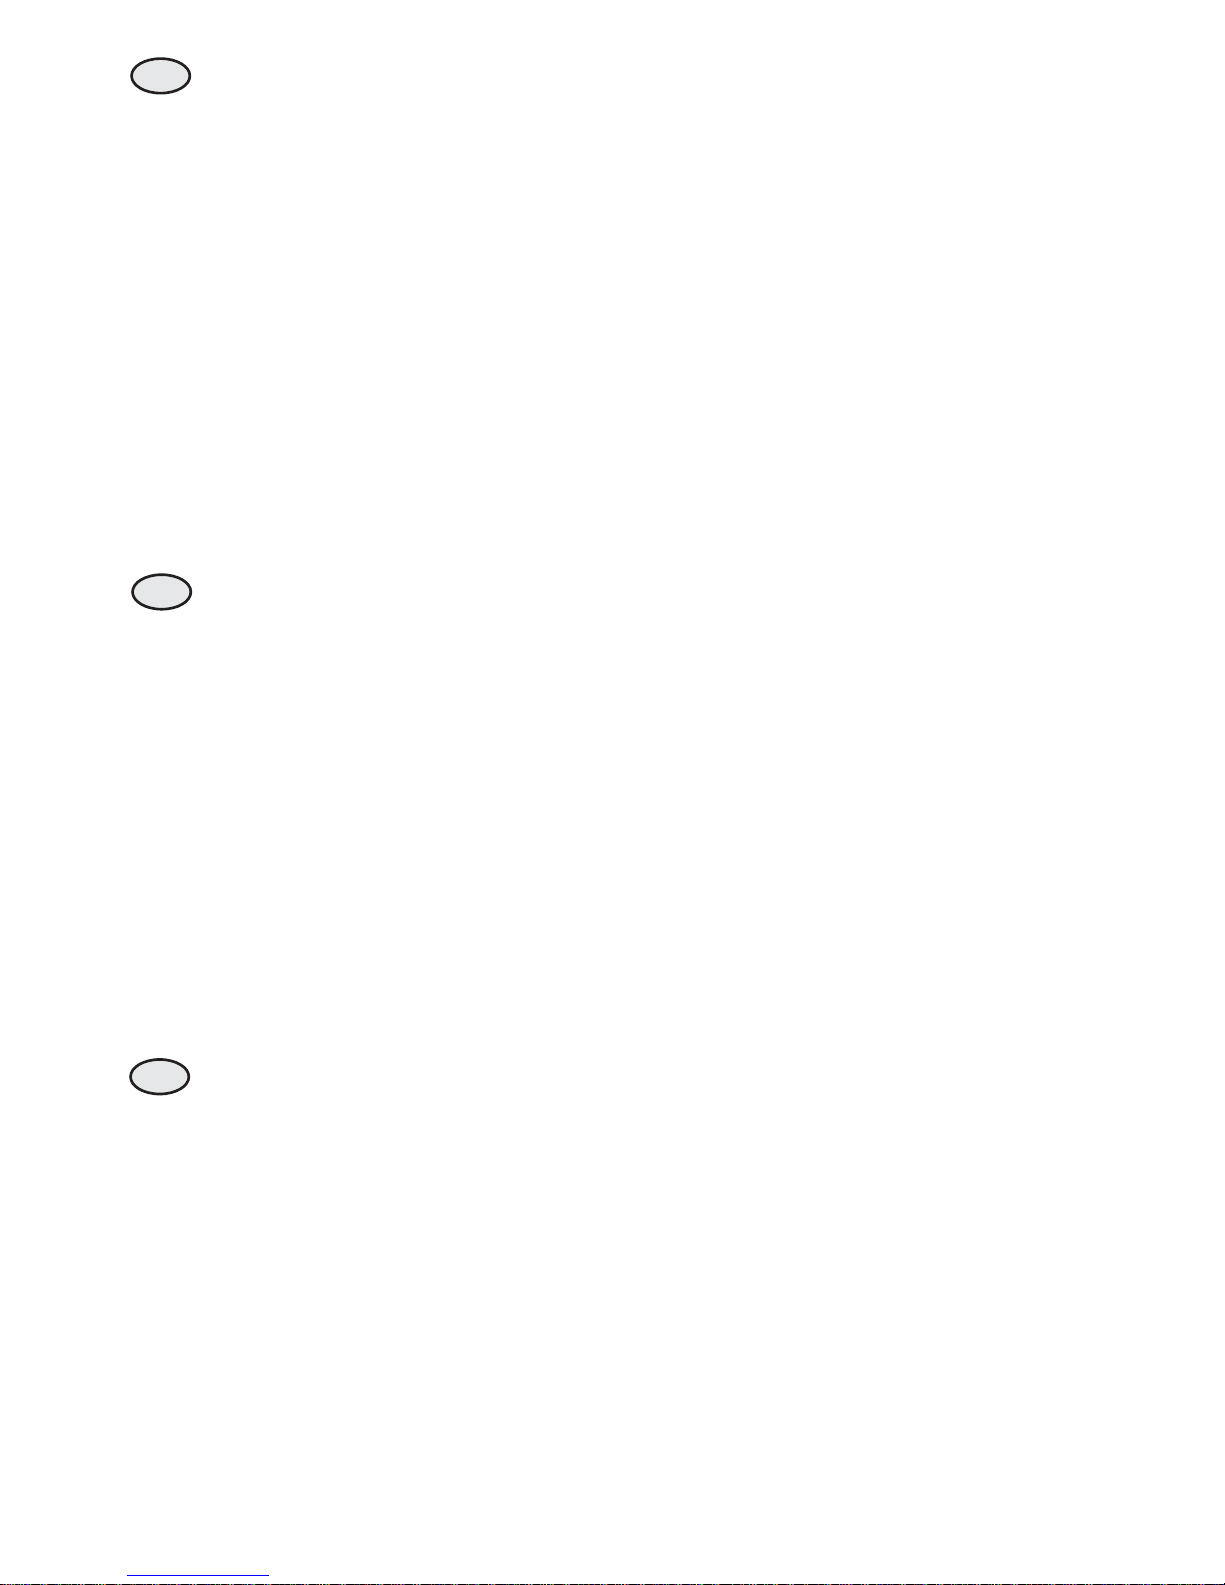
Table of Contents
Safety Tips . . . . . . . . . . . . . . . . . . . . . . . . . . . . . . . . . . . . . . . . . . . . . . . . . . . . . . . . . . 1
Introduction . . . . . . . . . . . . . . . . . . . . . . . . . . . . . . . . . . . . . . . . . . . . . . . . . . . . . . . . 1
Pack Contents . . . . . . . . . . . . . . . . . . . . . . . . . . . . . . . . . . . . . . . . . . . . . . . . . . . . . . 1
Layout of Controls . . . . . . . . . . . . . . . . . . . . . . . . . . . . . . . . . . . . . . . . . . . . . . . . . . . 2
Operation . . . . . . . . . . . . . . . . . . . . . . . . . . . . . . . . . . . . . . . . . . . . . . . . . . . . . . . . . . 2
Using the Oven . . . . . . . . . . . . . . . . . . . . . . . . . . . . . . . . . . . . . . . . . . . . . . . . 2
When Cooking is Finished . . . . . . . . . . . . . . . . . . . . . . . . . . . . . . . . . . . . . . . 2
Cleaning, Care & Maintenance . . . . . . . . . . . . . . . . . . . . . . . . . . . . . . . . . . . . . . . . . . 3
Replacing Water Dispensing Tube . . . . . . . . . . . . . . . . . . . . . . . . . . . . . . . . . 3
Troubleshooting . . . . . . . . . . . . . . . . . . . . . . . . . . . . . . . . . . . . . . . . . . . . . . . . . . . . . 5
Technical Specifications . . . . . . . . . . . . . . . . . . . . . . . . . . . . . . . . . . . . . . . . . . . . . . . 5
Electrical Wiring . . . . . . . . . . . . . . . . . . . . . . . . . . . . . . . . . . . . . . . . . . . . . . . . . . . . . 6
Compliance . . . . . . . . . . . . . . . . . . . . . . . . . . . . . . . . . . . . . . . . . . . . . . . . . . . . . . . . . 6
Inhoudsopgave
Veiligheidstips . . . . . . . . . . . . . . . . . . . . . . . . . . . . . . . . . . . . . . . . . . . . . . . . . . . . . . . 6
Inleiding . . . . . . . . . . . . . . . . . . . . . . . . . . . . . . . . . . . . . . . . . . . . . . . . . . . . . . . . . . . . 6
Verpakkingsinhoud . . . . . . . . . . . . . . . . . . . . . . . . . . . . . . . . . . . . . . . . . . . . . . . . . . . 6
Indeling van de bedieningsknoppen . . . . . . . . . . . . . . . . . . . . . . . . . . . . . . . . . . . . . . 7
Bediening . . . . . . . . . . . . . . . . . . . . . . . . . . . . . . . . . . . . . . . . . . . . . . . . . . . . . . . . . . . 7
Oven gebruiken . . . . . . . . . . . . . . . . . . . . . . . . . . . . . . . . . . . . . . . . . . . . . . . . 7
Reiniging, zorg & onderhoud . . . . . . . . . . . . . . . . . . . . . . . . . . . . . . . . . . . . . . . . . . . 8
Vervanging van de waterdispenserslang . . . . . . . . . . . . . . . . . . . . . . . . . . . . . 9
Oplossen van problemen . . . . . . . . . . . . . . . . . . . . . . . . . . . . . . . . . . . . . . . . . . . . . . 9
Technische specificaties . . . . . . . . . . . . . . . . . . . . . . . . . . . . . . . . . . . . . . . . . . . . . . . 10
Elektrische bedrading . . . . . . . . . . . . . . . . . . . . . . . . . . . . . . . . . . . . . . . . . . . . . . . . . 10
Productconformiteit . . . . . . . . . . . . . . . . . . . . . . . . . . . . . . . . . . . . . . . . . . . . . . . . . . 10
Sommaire
Conseils de sécurité . . . . . . . . . . . . . . . . . . . . . . . . . . . . . . . . . . . . . . . . . . . . . . . . . . 11
Introduction . . . . . . . . . . . . . . . . . . . . . . . . . . . . . . . . . . . . . . . . . . . . . . . . . . . . . . . . 11
Contenu de l'emballage . . . . . . . . . . . . . . . . . . . . . . . . . . . . . . . . . . . . . . . . . . . . . . . 11
Agencement des commandes . . . . . . . . . . . . . . . . . . . . . . . . . . . . . . . . . . . . . . . . . . . 12
Fonctionnement . . . . . . . . . . . . . . . . . . . . . . . . . . . . . . . . . . . . . . . . . . . . . . . . . . . . . 12
Utilisation de l'étuve . . . . . . . . . . . . . . . . . . . . . . . . . . . . . . . . . . . . . . . . . . . . 12
Nettoyage, entretien et maintenance . . . . . . . . . . . . . . . . . . . . . . . . . . . . . . . . . . . . . 13
Remplacement du tube distributeur d’eau . . . . . . . . . . . . . . . . . . . . . . . . . . . 14
Dépannage . . . . . . . . . . . . . . . . . . . . . . . . . . . . . . . . . . . . . . . . . . . . . . . . . . . . . . . . . 14
Spécifications techniques . . . . . . . . . . . . . . . . . . . . . . . . . . . . . . . . . . . . . . . . . . . . . . 15
Raccordement électrique . . . . . . . . . . . . . . . . . . . . . . . . . . . . . . . . . . . . . . . . . . . . . . 15
Conformité . . . . . . . . . . . . . . . . . . . . . . . . . . . . . . . . . . . . . . . . . . . . . . . . . . . . . . . . . 15
UK
NL
FR
Page 3

Inhalt
Sicherheitshinweise . . . . . . . . . . . . . . . . . . . . . . . . . . . . . . . . . . . . . . . . . . . . . . . . . . 16
Einführung . . . . . . . . . . . . . . . . . . . . . . . . . . . . . . . . . . . . . . . . . . . . . . . . . . . . . . . . . . 16
Packungsinhalt . . . . . . . . . . . . . . . . . . . . . . . . . . . . . . . . . . . . . . . . . . . . . . . . . . . . . . . 16
Bedienelemente . . . . . . . . . . . . . . . . . . . . . . . . . . . . . . . . . . . . . . . . . . . . . . . . . . . . . . 17
Betrieb . . . . . . . . . . . . . . . . . . . . . . . . . . . . . . . . . . . . . . . . . . . . . . . . . . . . . . . . . . . . 17
Verwendung des Garers . . . . . . . . . . . . . . . . . . . . . . . . . . . . . . . . . . . . . . . . . 17
Reinigung, Pflege und Wartung . . . . . . . . . . . . . . . . . . . . . . . . . . . . . . . . . . . . . . . . . . 18
Wasserzuleitung auswechseln . . . . . . . . . . . . . . . . . . . . . . . . . . . . . . . . . . . . 19
Fehlersuche . . . . . . . . . . . . . . . . . . . . . . . . . . . . . . . . . . . . . . . . . . . . . . . . . . . . . . . . . 19
Technische Spezifikationen . . . . . . . . . . . . . . . . . . . . . . . . . . . . . . . . . . . . . . . . . . . . . 20
Elektroanschlüsse . . . . . . . . . . . . . . . . . . . . . . . . . . . . . . . . . . . . . . . . . . . . . . . . . . . . 20
Konformität . . . . . . . . . . . . . . . . . . . . . . . . . . . . . . . . . . . . . . . . . . . . . . . . . . . . . . . . 20
Indice
Suggerimenti per la sicurezza . . . . . . . . . . . . . . . . . . . . . . . . . . . . . . . . . . . . . . . . . . . 21
Introduzione . . . . . . . . . . . . . . . . . . . . . . . . . . . . . . . . . . . . . . . . . . . . . . . . . . . . . . . . 21
Contenuto dell'imballaggio . . . . . . . . . . . . . . . . . . . . . . . . . . . . . . . . . . . . . . . . . . . . . 21
Disposizione dei comandi . . . . . . . . . . . . . . . . . . . . . . . . . . . . . . . . . . . . . . . . . . . . . . 22
Funzionamento . . . . . . . . . . . . . . . . . . . . . . . . . . . . . . . . . . . . . . . . . . . . . . . . . . . . . . 22
Utilizzo del forno . . . . . . . . . . . . . . . . . . . . . . . . . . . . . . . . . . . . . . . . . . . . . . 22
Al termine della cottura . . . . . . . . . . . . . . . . . . . . . . . . . . . . . . . . . . . . . . . . . 22
Pulizia e manutenzione . . . . . . . . . . . . . . . . . . . . . . . . . . . . . . . . . . . . . . . . . . . . . . . . 23
Sostituzione del tubo di erogazione acqua . . . . . . . . . . . . . . . . . . . . . . . . . . . 23
Risoluzione dei problemi . . . . . . . . . . . . . . . . . . . . . . . . . . . . . . . . . . . . . . . . . . . . . . 24
Specifiche tecniche . . . . . . . . . . . . . . . . . . . . . . . . . . . . . . . . . . . . . . . . . . . . . . . . . . . 25
Cablaggi elettrici . . . . . . . . . . . . . . . . . . . . . . . . . . . . . . . . . . . . . . . . . . . . . . . . . . . . . 25
Conformità . . . . . . . . . . . . . . . . . . . . . . . . . . . . . . . . . . . . . . . . . . . . . . . . . . . . . . . . . 25
Índice
Consejos de Seguridad . . . . . . . . . . . . . . . . . . . . . . . . . . . . . . . . . . . . . . . . . . . . . . . . 26
Introducción . . . . . . . . . . . . . . . . . . . . . . . . . . . . . . . . . . . . . . . . . . . . . . . . . . . . . . . . 26
Contenido del Conjunto . . . . . . . . . . . . . . . . . . . . . . . . . . . . . . . . . . . . . . . . . . . . . . 26
Disposición de los mandos . . . . . . . . . . . . . . . . . . . . . . . . . . . . . . . . . . . . . . . . . . . . . 27
Funcionamiento . . . . . . . . . . . . . . . . . . . . . . . . . . . . . . . . . . . . . . . . . . . . . . . . . . . . . 27
Utilización del horno . . . . . . . . . . . . . . . . . . . . . . . . . . . . . . . . . . . . . . . . . . . . 27
Limpieza, cuidados y mantenimiento . . . . . . . . . . . . . . . . . . . . . . . . . . . . . . . . . . . . . 28
Cómo cambiar el tubo dispensador de agua . . . . . . . . . . . . . . . . . . . . . . . . . 29
Resolución de problemas . . . . . . . . . . . . . . . . . . . . . . . . . . . . . . . . . . . . . . . . . . . . . . 29
Especificaciones Técnicas . . . . . . . . . . . . . . . . . . . . . . . . . . . . . . . . . . . . . . . . . . . . . . 30
Cableado Eléctrico . . . . . . . . . . . . . . . . . . . . . . . . . . . . . . . . . . . . . . . . . . . . . . . . . . . 30
Cumplimiento . . . . . . . . . . . . . . . . . . . . . . . . . . . . . . . . . . . . . . . . . . . . . . . . . . . . . . . 30
DE
IT
ES
Page 4
Índice
Conselhos de segurança . . . . . . . . . . . . . . . . . . . . . . . . . . . . . . . . . . . . . . . . . . . . . . . 31
Introdução . . . . . . . . . . . . . . . . . . . . . . . . . . . . . . . . . . . . . . . . . . . . . . . . . . . . . . . . . 31
Conteúdo da embalagem . . . . . . . . . . . . . . . . . . . . . . . . . . . . . . . . . . . . . . . . . . . . . . 31
Esquema dos controles . . . . . . . . . . . . . . . . . . . . . . . . . . . . . . . . . . . . . . . . . . . . . . . 32
Funcionamento . . . . . . . . . . . . . . . . . . . . . . . . . . . . . . . . . . . . . . . . . . . . . . . . . . . . . . 32
Usar o forno . . . . . . . . . . . . . . . . . . . . . . . . . . . . . . . . . . . . . . . . . . . . . . . . . . 32
Depois de concluir o processo de cozedura . . . . . . . . . . . . . . . . . . . . . . . . . 32
Limpeza, cuidados & manutenção . . . . . . . . . . . . . . . . . . . . . . . . . . . . . . . . . . . . . . . 33
Substituir o tubo dispensador . . . . . . . . . . . . . . . . . . . . . . . . . . . . . . . . . . . . . 33
Resolução de problemas . . . . . . . . . . . . . . . . . . . . . . . . . . . . . . . . . . . . . . . . . . . . . . 34
Especificações técnicas . . . . . . . . . . . . . . . . . . . . . . . . . . . . . . . . . . . . . . . . . . . . . . . . 35
Cablagem eléctrica . . . . . . . . . . . . . . . . . . . . . . . . . . . . . . . . . . . . . . . . . . . . . . . . . . . 35
Conformidade . . . . . . . . . . . . . . . . . . . . . . . . . . . . . . . . . . . . . . . . . . . . . . . . . . . . . . . 35
Innehållsförteckning
Säkerhetsråd . . . . . . . . . . . . . . . . . . . . . . . . . . . . . . . . . . . . . . . . . . . . . . . . . . . . . . . . 36
Inledning . . . . . . . . . . . . . . . . . . . . . . . . . . . . . . . . . . . . . . . . . . . . . . . . . . . . . . . . . . . 36
Förpackningsinnehåll . . . . . . . . . . . . . . . . . . . . . . . . . . . . . . . . . . . . . . . . . . . . . . . . . . 36
Reglagens placering . . . . . . . . . . . . . . . . . . . . . . . . . . . . . . . . . . . . . . . . . . . . . . . . . . . 37
Användning . . . . . . . . . . . . . . . . . . . . . . . . . . . . . . . . . . . . . . . . . . . . . . . . . . . . . . . . . 37
Använda ugnen . . . . . . . . . . . . . . . . . . . . . . . . . . . . . . . . . . . . . . . . . . . . . . . . 37
Rengöring, omvårdnad och underhåll . . . . . . . . . . . . . . . . . . . . . . . . . . . . . . . . . . . . 38
Byta ut vattendispenserröret . . . . . . . . . . . . . . . . . . . . . . . . . . . . . . . . . . . . . 39
Felsökning . . . . . . . . . . . . . . . . . . . . . . . . . . . . . . . . . . . . . . . . . . . . . . . . . . . . . . . . . . 39
Tekniska specifikationer . . . . . . . . . . . . . . . . . . . . . . . . . . . . . . . . . . . . . . . . . . . . . . . 40
Elektriska kablar . . . . . . . . . . . . . . . . . . . . . . . . . . . . . . . . . . . . . . . . . . . . . . . . . . . . . 40
Tillmötesgående . . . . . . . . . . . . . . . . . . . . . . . . . . . . . . . . . . . . . . . . . . . . . . . . . . . . . 40
Indholdsfortegnelse
Sikkerhedstips . . . . . . . . . . . . . . . . . . . . . . . . . . . . . . . . . . . . . . . . . . . . . . . . . . . . . . . 41
Introduktion . . . . . . . . . . . . . . . . . . . . . . . . . . . . . . . . . . . . . . . . . . . . . . . . . . . . . . . . 41
Emballagens indhold . . . . . . . . . . . . . . . . . . . . . . . . . . . . . . . . . . . . . . . . . . . . . . . . . . 41
Arrangement af betjeningsanordninger . . . . . . . . . . . . . . . . . . . . . . . . . . . . . . . . . . . 42
Brug . . . . . . . . . . . . . . . . . . . . . . . . . . . . . . . . . . . . . . . . . . . . . . . . . . . . . . . . . . . . . . . 42
Sådan anvendes ovnen . . . . . . . . . . . . . . . . . . . . . . . . . . . . . . . . . . . . . . . . . . 42
Når tilberedningen er færdig . . . . . . . . . . . . . . . . . . . . . . . . . . . . . . . . . . . . . 42
Regnøring, pleje og vedligeholdelse . . . . . . . . . . . . . . . . . . . . . . . . . . . . . . . . . . . . . . 43
Udskiftning af vanddispenserslangen . . . . . . . . . . . . . . . . . . . . . . . . . . . . . . . . 43
Fejlfinding . . . . . . . . . . . . . . . . . . . . . . . . . . . . . . . . . . . . . . . . . . . . . . . . . . . . . . . . . . 44
Tekniske specifikationer . . . . . . . . . . . . . . . . . . . . . . . . . . . . . . . . . . . . . . . . . . . . . . . 45
El-kabler . . . . . . . . . . . . . . . . . . . . . . . . . . . . . . . . . . . . . . . . . . . . . . . . . . . . . . . . . . . 45
Overensstemmelse . . . . . . . . . . . . . . . . . . . . . . . . . . . . . . . . . . . . . . . . . . . . . . . . . . . 45
PT
S
DK
Page 5
Innhold
Sikkerhetstips . . . . . . . . . . . . . . . . . . . . . . . . . . . . . . . . . . . . . . . . . . . . . . . . . . . . . . . 46
Innledning . . . . . . . . . . . . . . . . . . . . . . . . . . . . . . . . . . . . . . . . . . . . . . . . . . . . . . . . . . 46
Pakkeinnhold . . . . . . . . . . . . . . . . . . . . . . . . . . . . . . . . . . . . . . . . . . . . . . . . . . . . . . . . 46
Layout av kontroller . . . . . . . . . . . . . . . . . . . . . . . . . . . . . . . . . . . . . . . . . . . . . . . . . . 47
Bruk . . . . . . . . . . . . . . . . . . . . . . . . . . . . . . . . . . . . . . . . . . . . . . . . . . . . . . . . . . . . . . 47
Bruk av ovnen . . . . . . . . . . . . . . . . . . . . . . . . . . . . . . . . . . . . . . . . . . . . . . . . . 47
Når matlagingen er ferdig . . . . . . . . . . . . . . . . . . . . . . . . . . . . . . . . . . . . . . . . 47
Rengjøring, vedlikehold og stell . . . . . . . . . . . . . . . . . . . . . . . . . . . . . . . . . . . . . . . . . 48
Utskifting av vannfordelingsslange . . . . . . . . . . . . . . . . . . . . . . . . . . . . . . . . . 48
Feilsøking . . . . . . . . . . . . . . . . . . . . . . . . . . . . . . . . . . . . . . . . . . . . . . . . . . . . . . . . . . 49
Tekniske spesifikasjoner . . . . . . . . . . . . . . . . . . . . . . . . . . . . . . . . . . . . . . . . . . . . . . . 50
Elektrisk tilkopling . . . . . . . . . . . . . . . . . . . . . . . . . . . . . . . . . . . . . . . . . . . . . . . . . . . 50
Samsvar . . . . . . . . . . . . . . . . . . . . . . . . . . . . . . . . . . . . . . . . . . . . . . . . . . . . . . . . . . . . 50
Sisällysluettelo
Turvallisuusvihjeitä . . . . . . . . . . . . . . . . . . . . . . . . . . . . . . . . . . . . . . . . . . . . . . . . . . . 51
Johdanto . . . . . . . . . . . . . . . . . . . . . . . . . . . . . . . . . . . . . . . . . . . . . . . . . . . . . . . . . . . 51
Pakkauksen sisältö . . . . . . . . . . . . . . . . . . . . . . . . . . . . . . . . . . . . . . . . . . . . . . . . . . . 51
Ohjauslaitteiden sijainti . . . . . . . . . . . . . . . . . . . . . . . . . . . . . . . . . . . . . . . . . . . . . . . . 52
Käyttö . . . . . . . . . . . . . . . . . . . . . . . . . . . . . . . . . . . . . . . . . . . . . . . . . . . . . . . . . . . . . 52
Uunin käyttö . . . . . . . . . . . . . . . . . . . . . . . . . . . . . . . . . . . . . . . . . . . . . . . . . . 52
Kun kypsentäminen on päättynyt . . . . . . . . . . . . . . . . . . . . . . . . . . . . . . . . . . 52
Puhdistus, hoito & huolto . . . . . . . . . . . . . . . . . . . . . . . . . . . . . . . . . . . . . . . . . . . . . . 53
Veden jakeluputken vaihtaminen uuteen . . . . . . . . . . . . . . . . . . . . . . . . . . . . 53
Vianetsintä . . . . . . . . . . . . . . . . . . . . . . . . . . . . . . . . . . . . . . . . . . . . . . . . . . . . . . . . . 54
Tekniset tiedot . . . . . . . . . . . . . . . . . . . . . . . . . . . . . . . . . . . . . . . . . . . . . . . . . . . . . . 55
Sähköjohdot . . . . . . . . . . . . . . . . . . . . . . . . . . . . . . . . . . . . . . . . . . . . . . . . . . . . . . . . 55
Vaatimustenmukaisuus . . . . . . . . . . . . . . . . . . . . . . . . . . . . . . . . . . . . . . . . . . . . . . . . 55
N
FIN
Page 6

1
UK
Safety Tips
• Position on a flat, stable surface.
• A service agent/qualified technician should carry out installation and any repairs if required. Do not
remove any components or service panels on this product.
• Consult Local and National Standards to comply with the following:
• Health and Safety at Work Legislation
• BS EN Codes of Practice
• Fire Precautions
• IEE Wiring Regulations
• Building Regulations
• DO NOT immerse in water or use steam washers to clean the unit.
• DO NOT switch on the appliance when empty of water.
• DO NOT overfill the water container.
• When replacing the water container, make sure the exterior is dry to prevent possible failure of the
appliance.
• Do not allow the water in the container to run out w hile the appliance is in use.
• Stand back when opening the door to avoid the expulsion of steam.
• Ensure any objects used within the oven are sufficiently heat resistant.
• Do not let children near this appliance as some parts become hot during use.
• Keep all packaging away from children. Dispose of the packaging in accordance to the regulations of
local authorities.
• If the power cord is damaged, it must be replaced by an BUFF ALO agent or a recommended qualified
technician in order to avoid a hazard.
Introduction
Please take a few moments to carefully read through this manual. Correct maintenance and operation of
this unit will give the best possible performance from your BUFFALO product.
Pack Contents
The following is included:
• Buffalo Steam Oven
• Water Container
•Water Dispensing Tube x 3
•Wire Rack
•Unperforated Tray
•Perforated Tray
• Instruction Manual
BUFFALO prides itself on quality and service, ensuring that at the time of packaging the contents are
supplied fully functional and free of damage.
Should you find any damage as a result of transit, please contact your BUFFALO dealer immediately.
Page 7

2
UK
Telephone Helpline: 0845 146 2887 (United Kingdom)
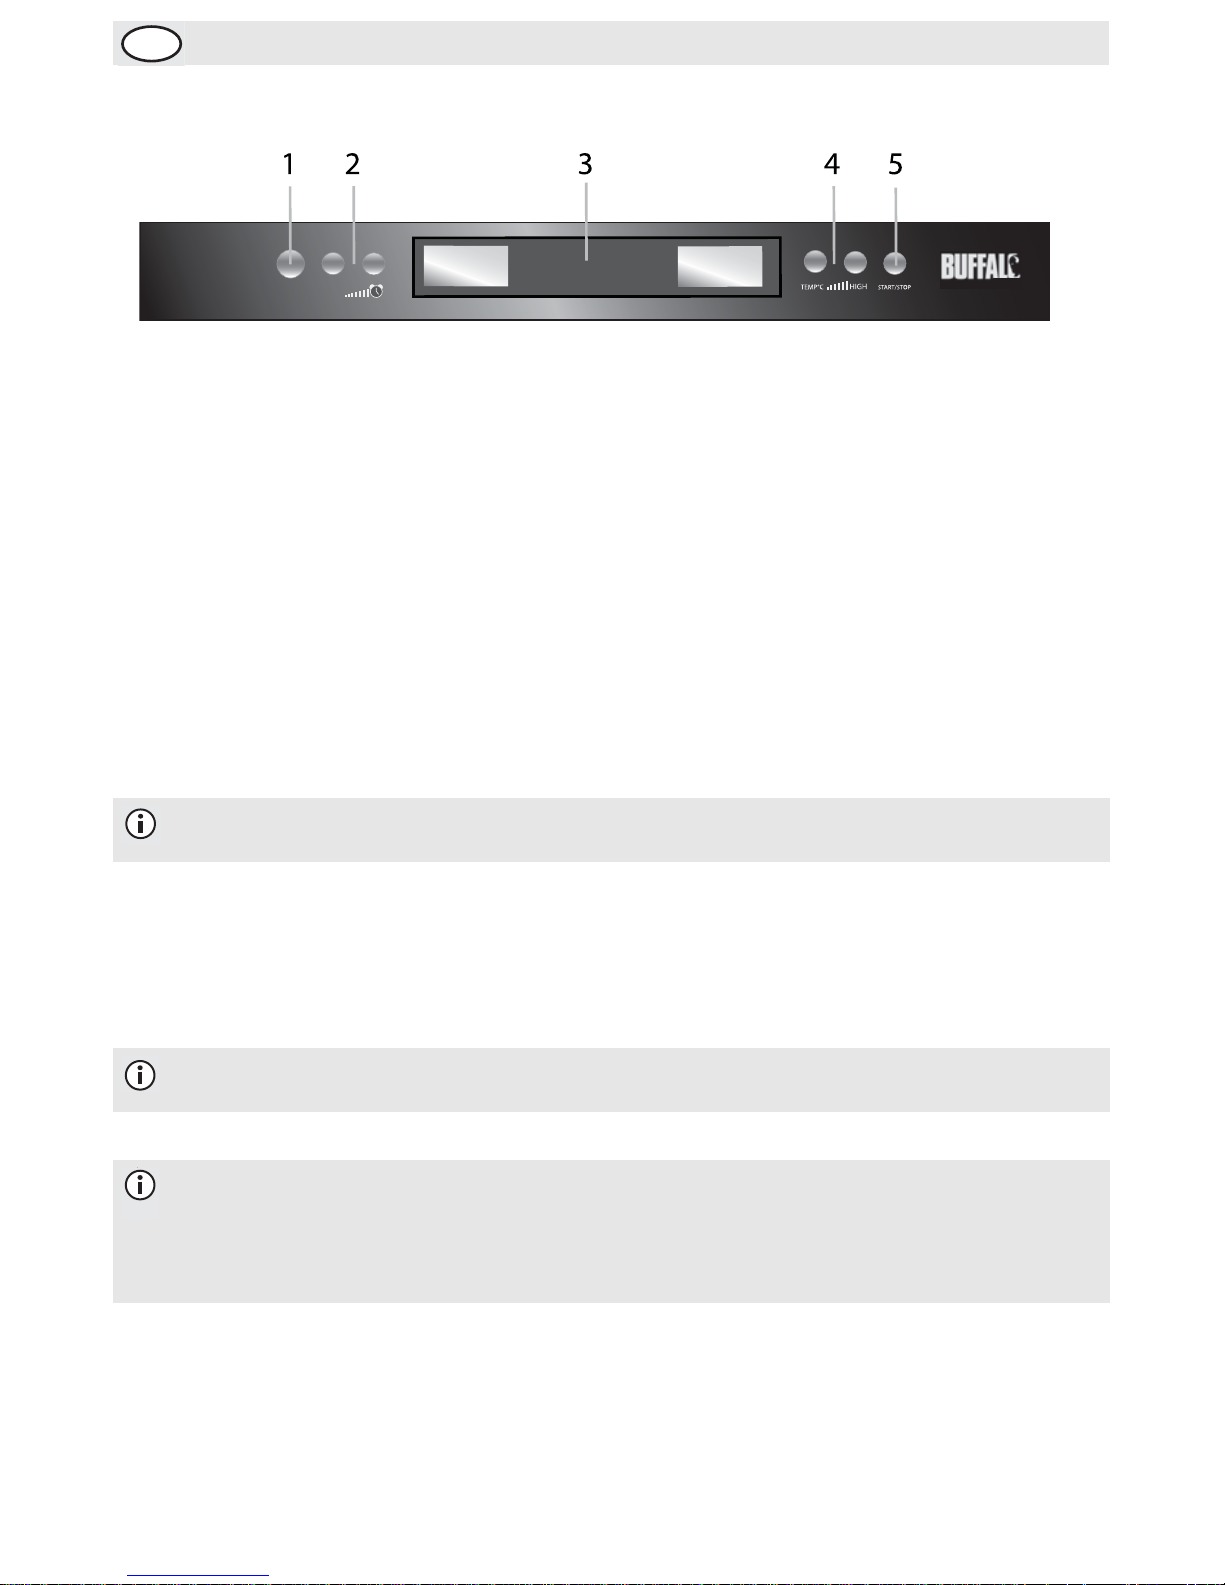
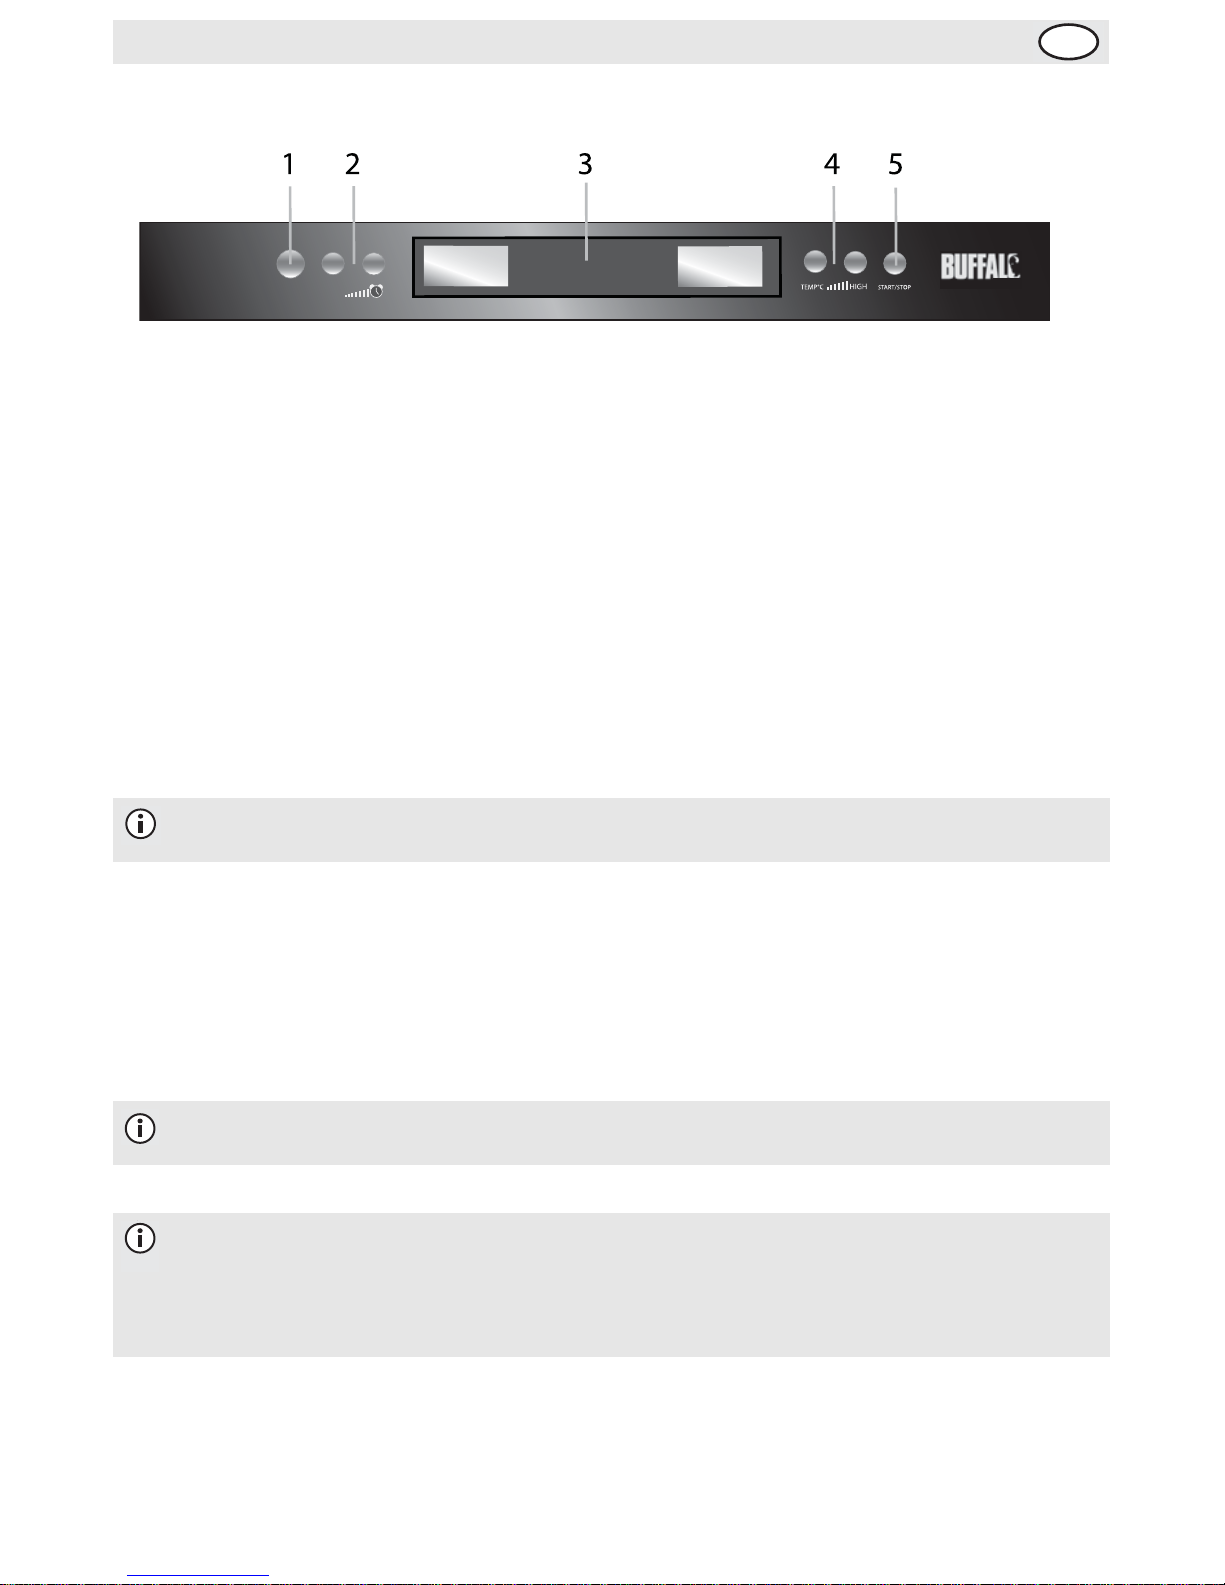
Layout of Controls
Operation
Using the Oven
To use the steam oven, perform the following:
1. Fill the container to the required level. The container displays the water levels by cooking time.
2. Replace the water container. Wipe up any spillages within the appliance and close the door.
3. Press the Power button to turn on the appliance.
4. Press the Time Up and Time Down buttons to set the desired cooking time.
5. Press the Temperature Up and Temperature Down buttons to set the desired temperature.
6. Press the Start button to commence cooking.
When Cooking is Finished
1. Once cooking is complete, the appl iance will sound a short alarm.
2. Remove the food from the oven. Take care to avoid the release of steam.
3. Leave the door of the appliance open to allow the steam to escape completely, and to let the appliance
cool down.
4. When cool, close the door. Press and hold the Power button to turn off the cooker.
Note: Use fresh water each time the appliance is used. Do not overfill.
Note: It is not possible to alter these settings once cooking has commenced. To alter the
settings, the appliance must be restarted.
Note: Opening the door during cooking will pause the cooking process and a Safety Lock
symbol will flash on the temperature display.
The appliance will not operate with the door open. Close the door to resume cooking.
Note: The contents of the oven will be very hot. Remember to wear suitable protective
gloves.
POWER
CLOCK
1. Power button
2. Time Up/Down buttons
3. Display panel
4. Temperature Low/High buttons
5. Start/Stop button
Page 8
3
UK
Cleaning, Care & Maintenance
• Always switch off the appliance and disconnect from the power supply before cleaning.
• Do not use any abrasive cleaning agents on the appliance, use warm soapy water.
• After use, residue may develop within the appliance. Us e 10 parts water to 1 part vi negar to remov e it.
• A BUFFALO agent or qualified technician should carry out repairs if required.
• Take care when cleaning and handling the hot plate within the appliance.
• Periodically, limescale develops on the hot plate. Remove it with a suitable descaling solution.
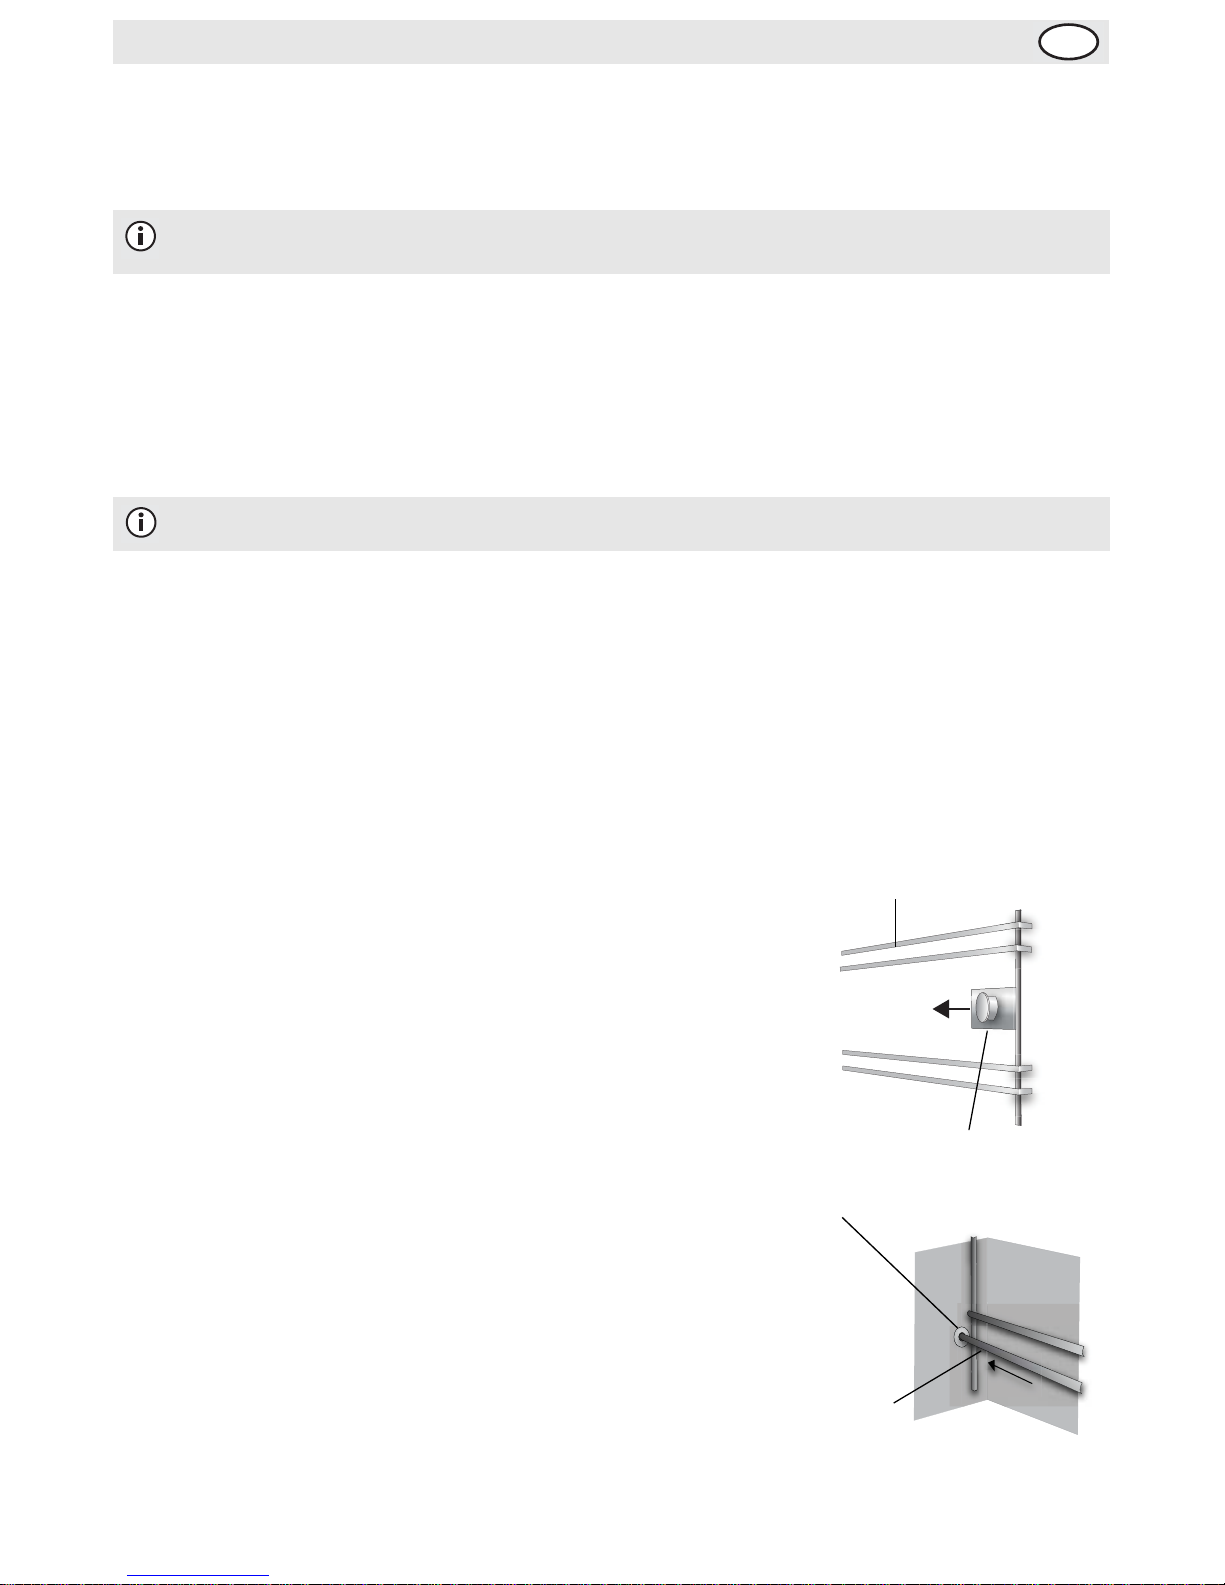
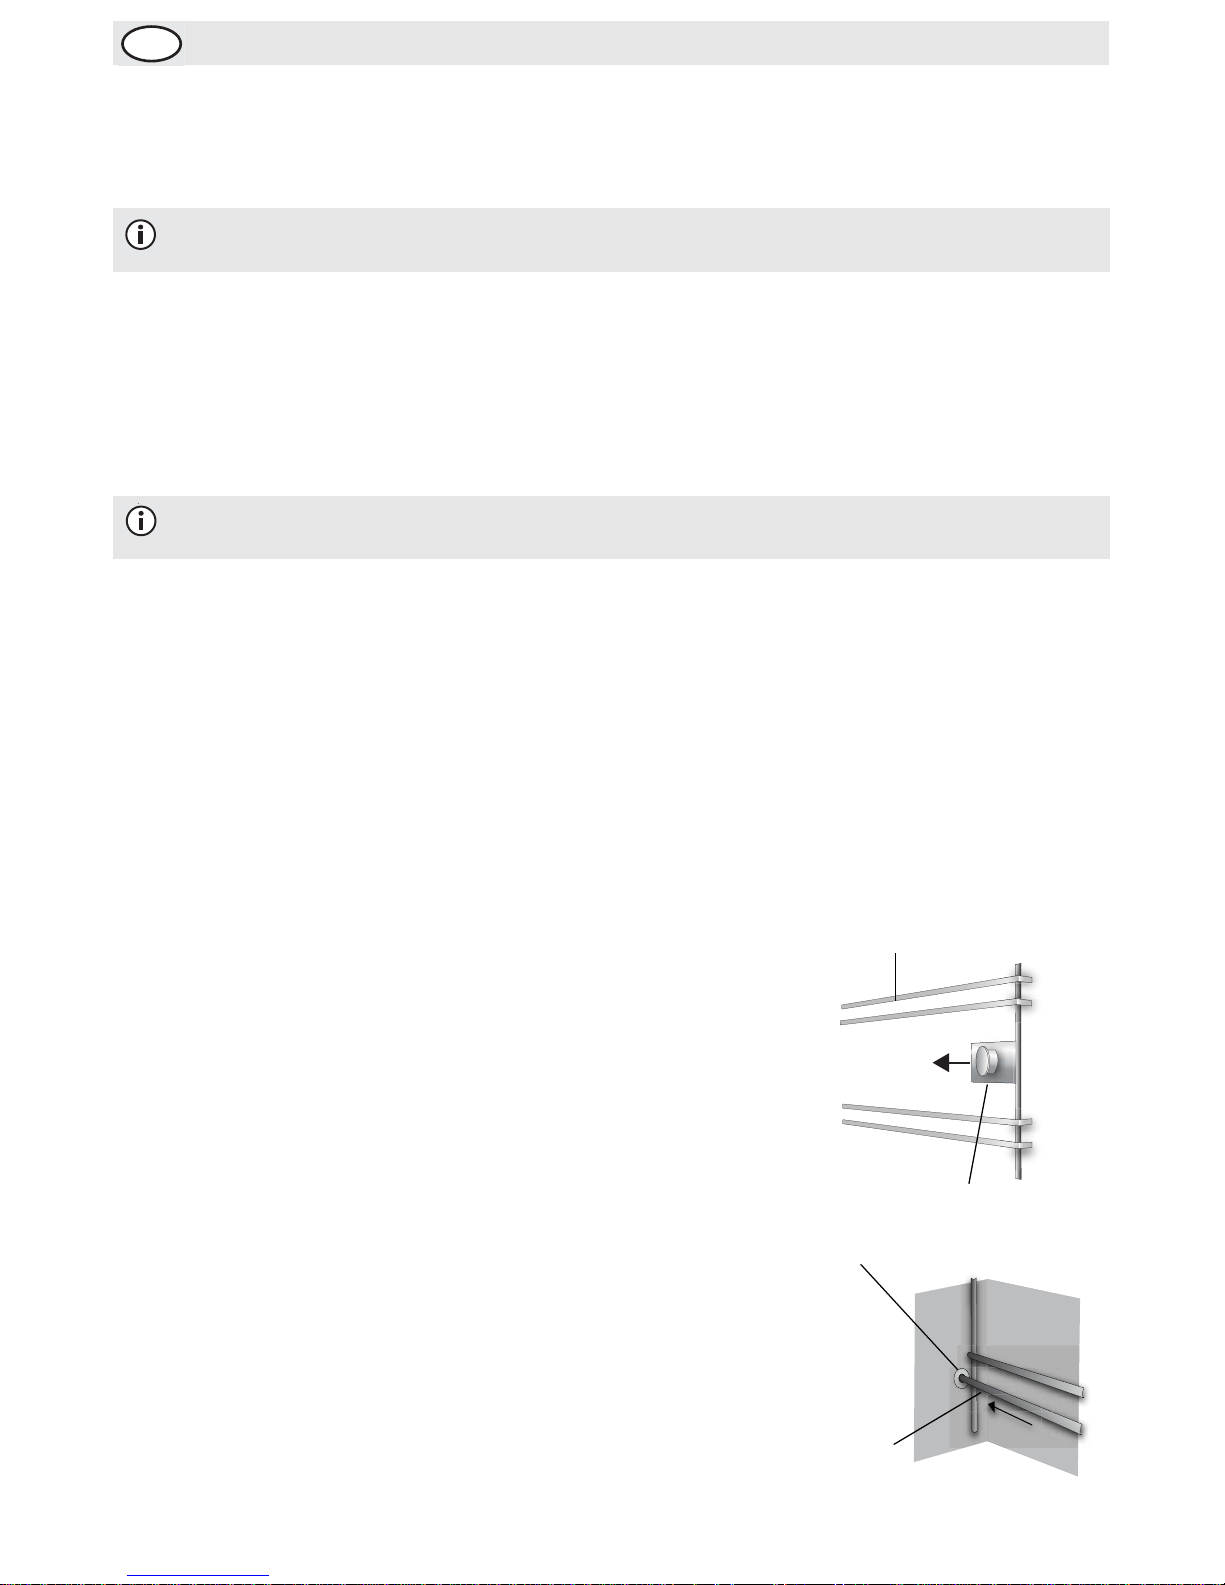
For ease of cleaning, the guide rails can be removed from the appliance:
1. Unscrew the securing nuts from either side of the inside of the
appliance.
2. The guide rails will then drop down and can be removed.
3. The guide rails, liquid pl ate and coo king vess el can all be cleaned in
a dishwasher.
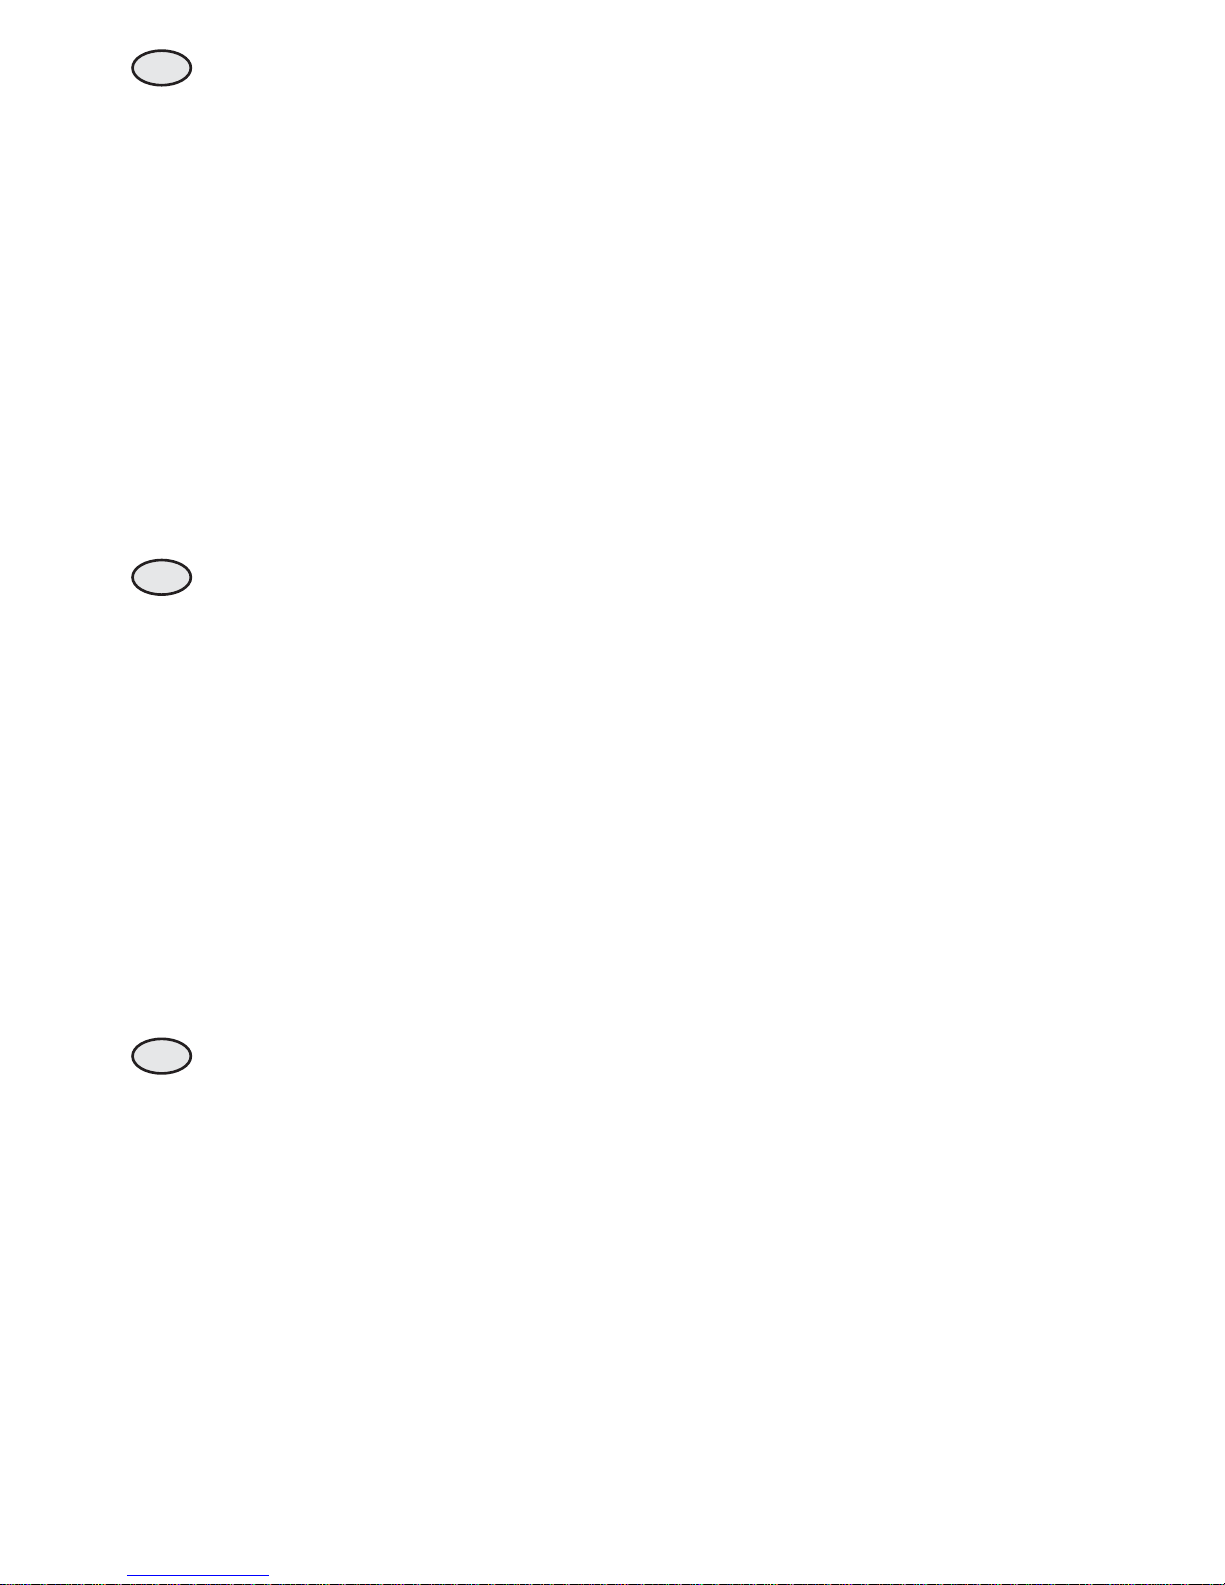
To replace the rails:
1. Slot the extended guide rail in to the hole at the back of the cooking
chamber.
2. Position the hole over the screw thread and screw on the securing
nut.
3. Repeat for the other side.
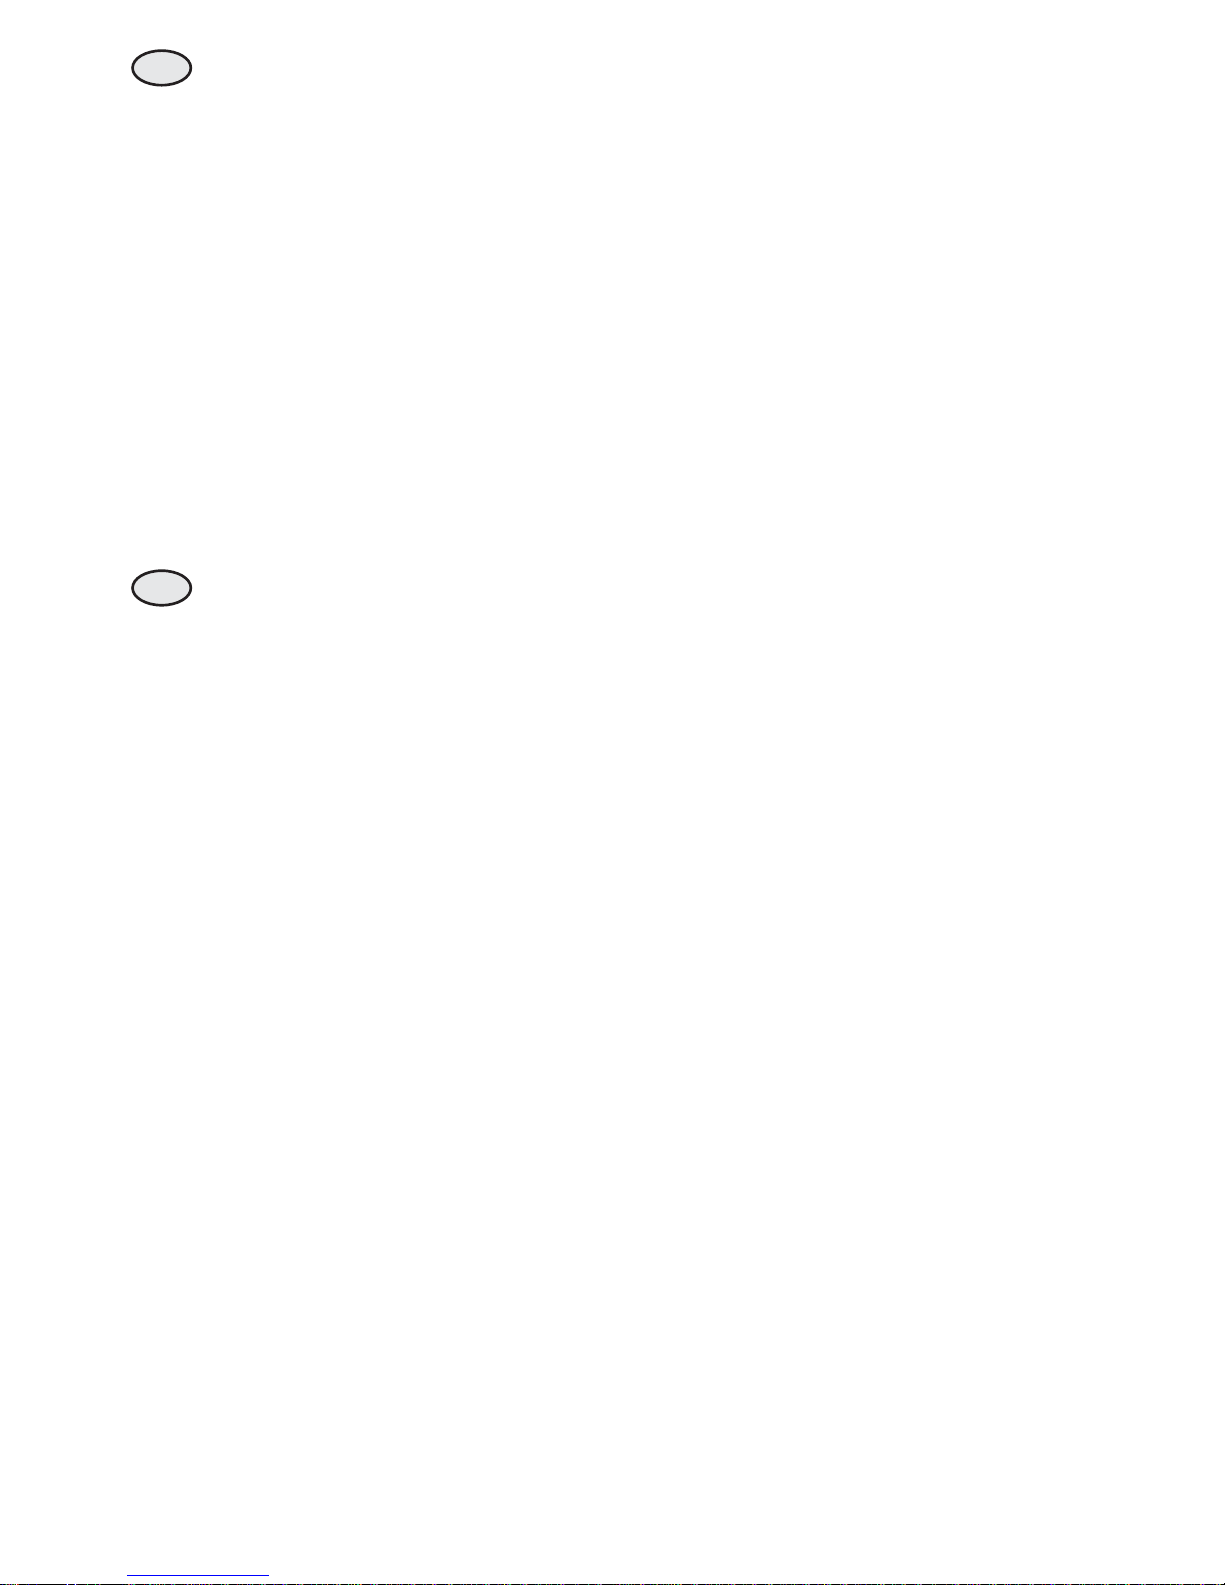
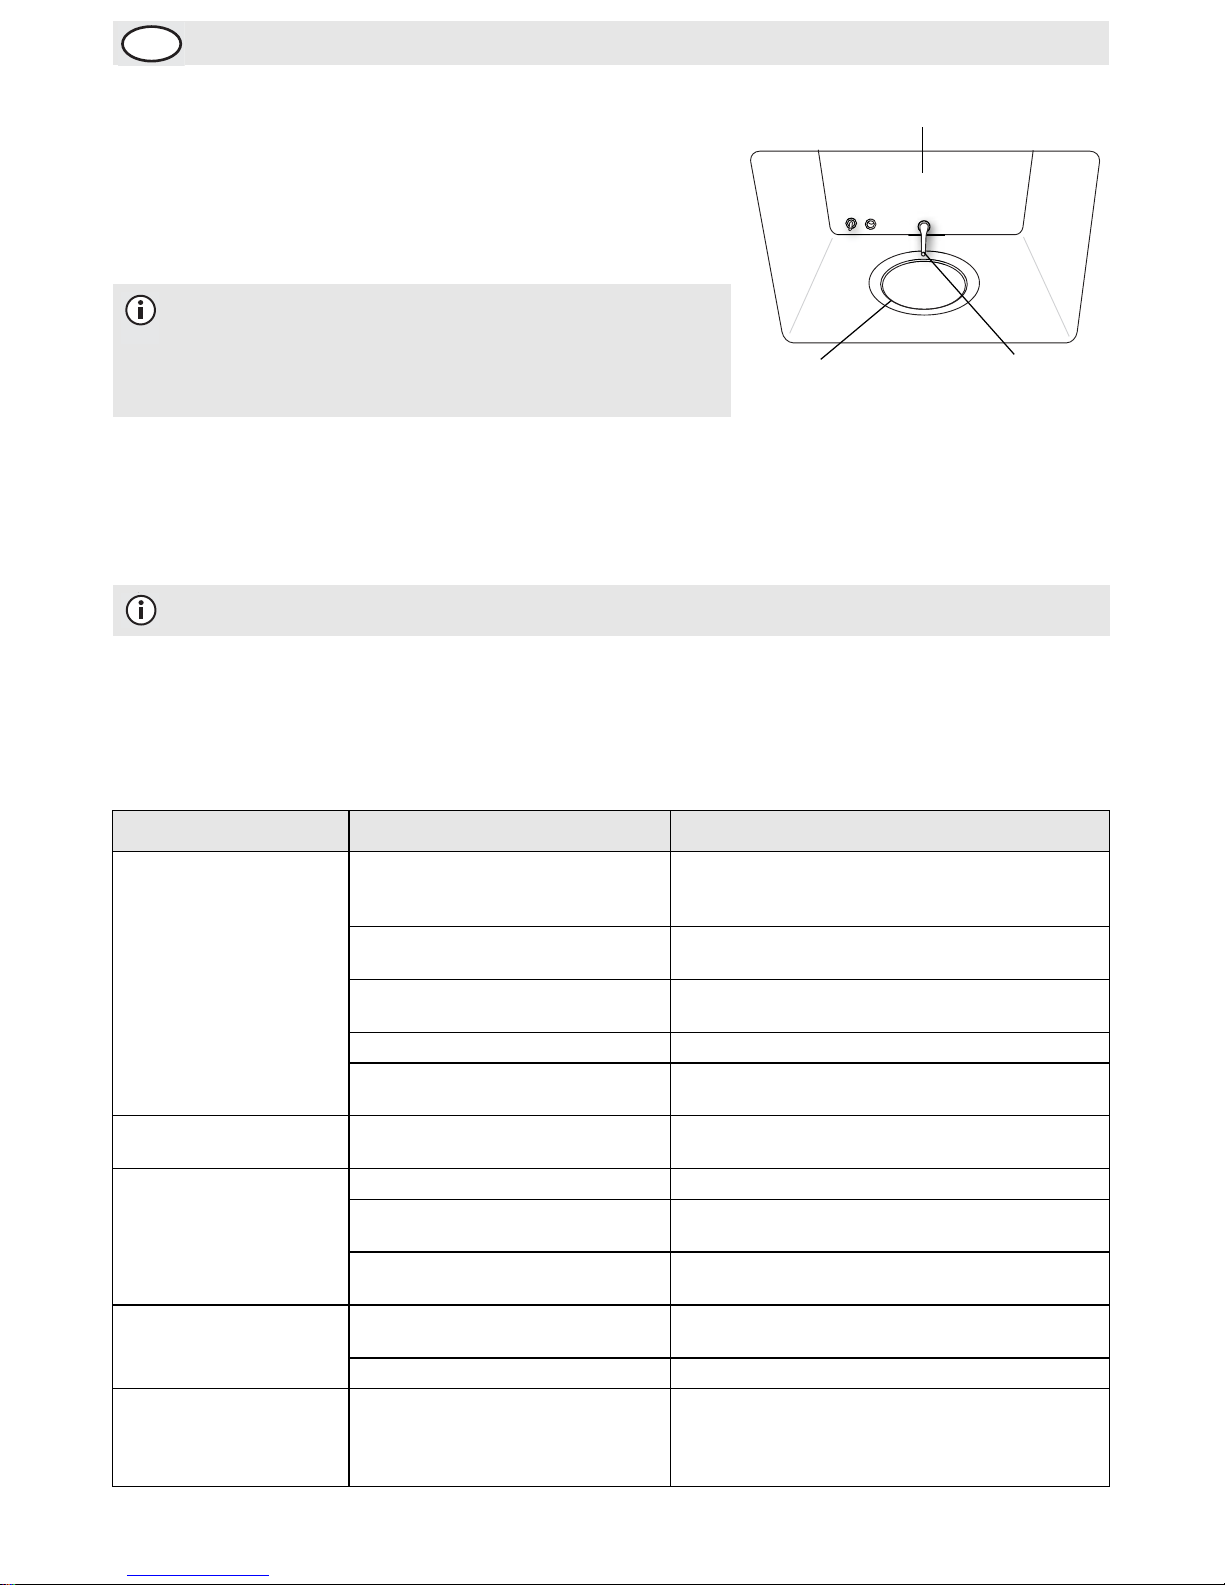
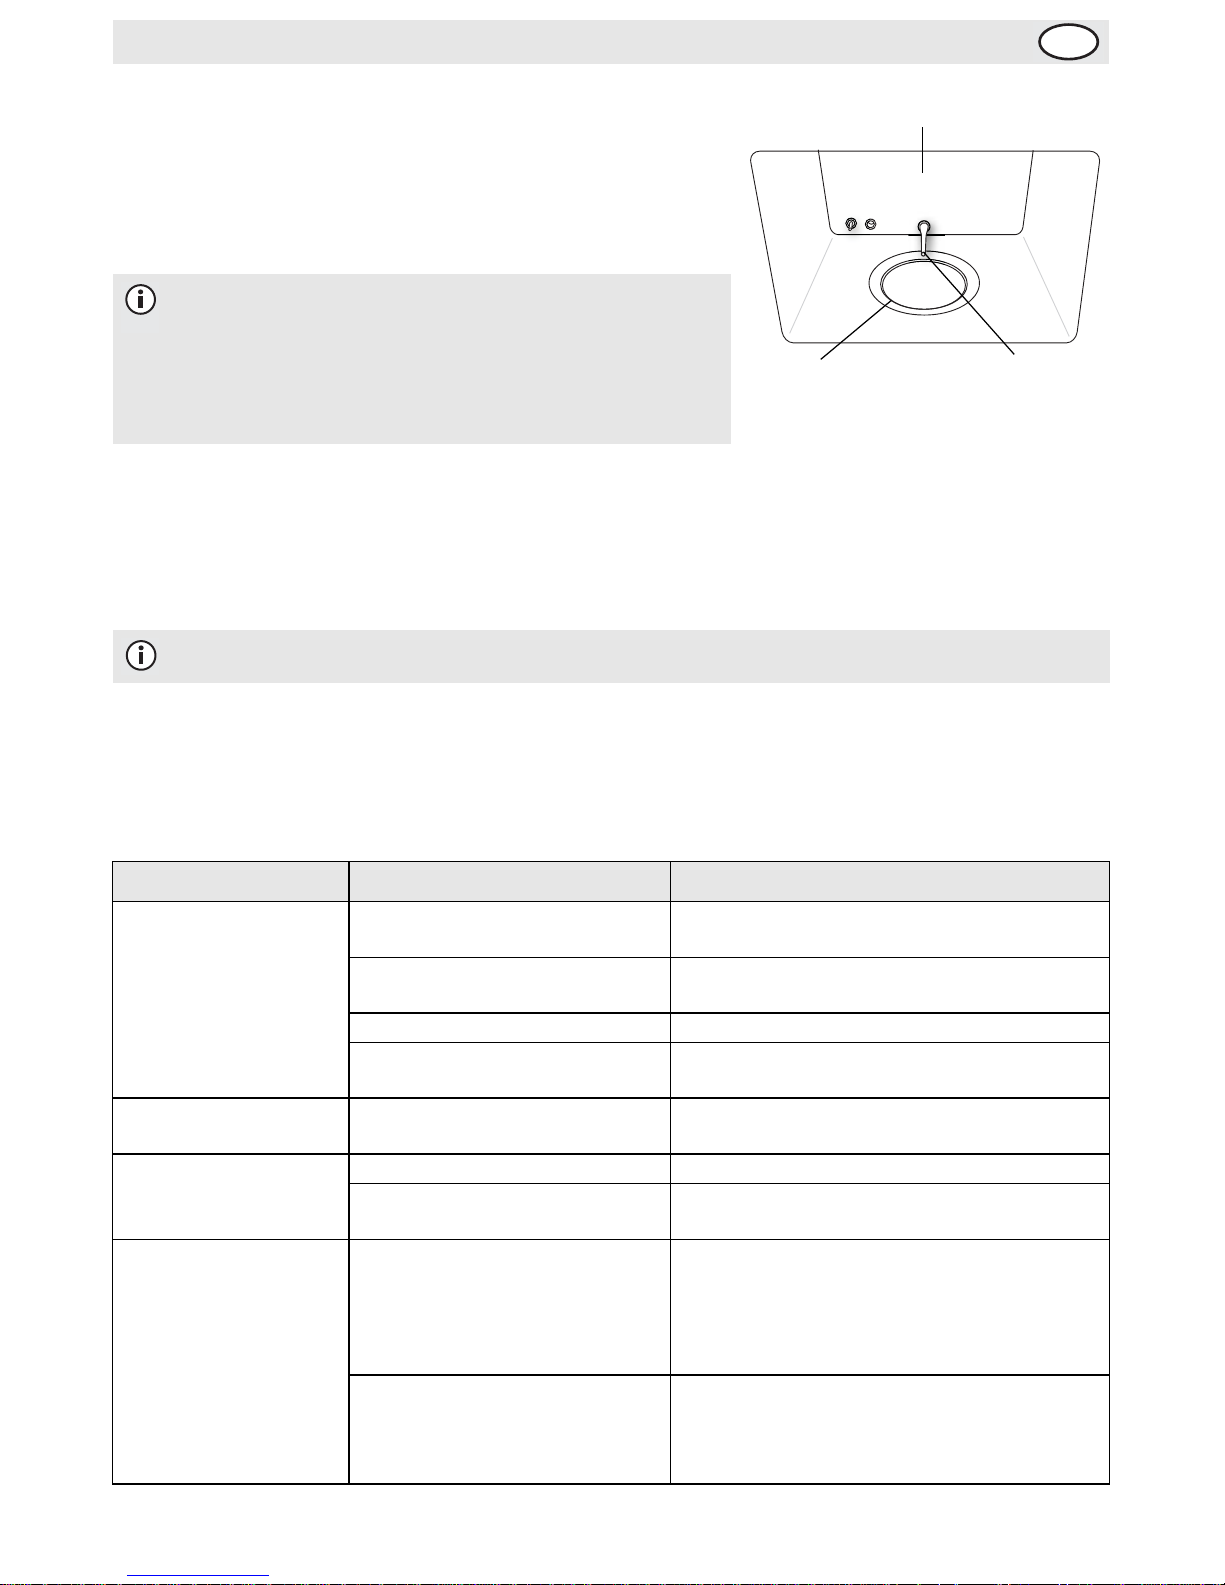
Replacing Water Dispensing Tube
If the water dispensing tube becomes b locked by limescale, it c an
be replaced with a new tube. To replace the tube:
1. Pull out the blocked tube.
2. Slot a replacement tube (supplied) into the hole.
To clean the water container:
1. Remove the container from the appliance and empty any left over water.
2. Remove the lid from the container and clean both parts with warm water.
3. Thoroughly dry the lid an d container.
4. Replace the lid and then insert the container back in to the appliance.
Note: Leave the appliance for at least 8 minutes after cooking before attempting to
clean it.
Note: BUFFALO will not accept any responsibility for
faults caused by the build up of lime scale. In hard
water areas BUFFALO recommends the use of a
water filter to assist in limiting lime scale build up.
Note: Do not fill the container again until it is ready to be used.
Guide rail
Securing nut
Hole
Extended
guide rail
Hot plate
Water dispensing tube
Inner compartment
Page 9
4
UK
Telephone Helpline: 0845 146 2887 (United Kingdom)
Tro u bl e sh o ot i ng
If your BUFFALO appliance develops a fault, please check the following points before calling th e Helpli ne.
Technical Specifications
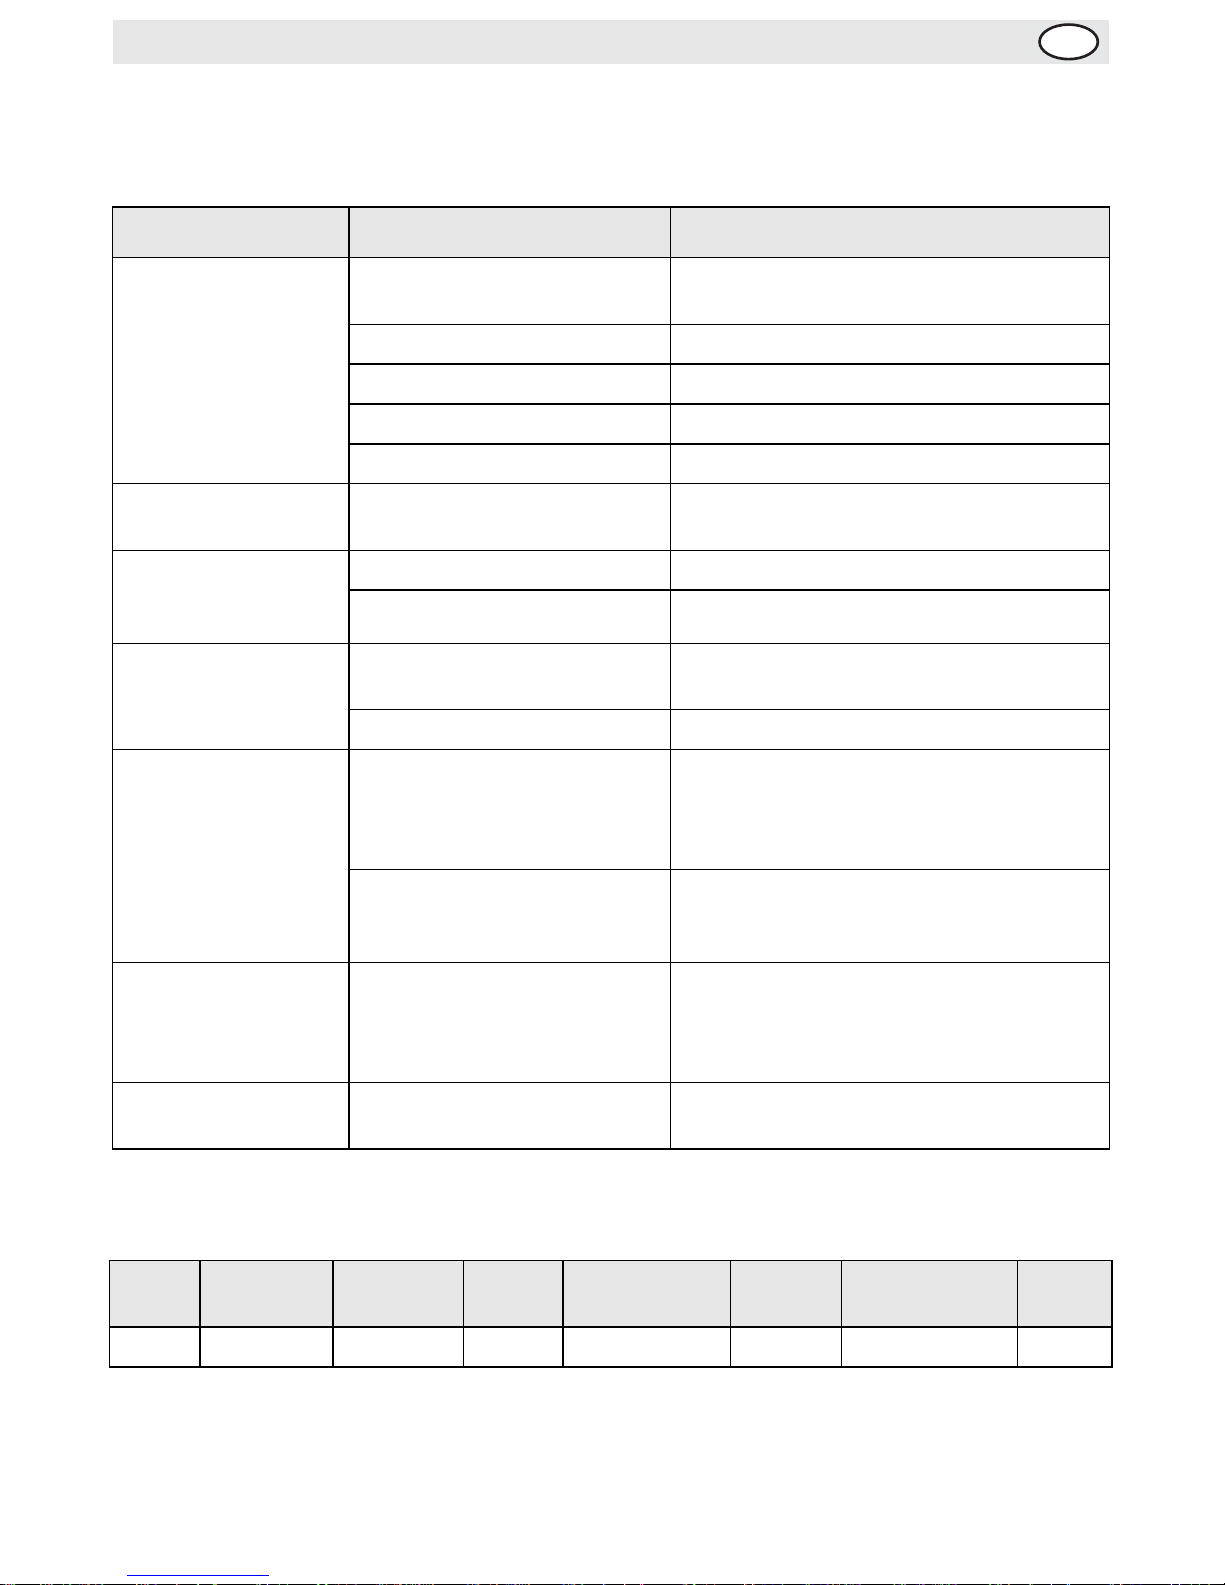
Fault Probable Cause Action
The unit is not working The unit is not switched on Check the unit is plugged in correctly and
switched on
Plug and lead are damaged Call BUFFALO agent or qualified Technician
Fuse in the plug has blown Replace the fuse
Power supply Check power supply
Internal wiring fault Call BUFFALO agent or qualified Technician
The appliance starts
but does not heat up
Water container not properly
inserted
Check container is pushed all the way in to
the appliance
Large amounts of
steam leaks from the
door seals
The door is not properly closed Close the door firmly
The door lock is broken Call BUFFALO agent or qualified Technician
The Display panel is
blank
Cooking information has not
been entered
Enter the cooking time and temperature
Door is not closed properly Open and close the d oor
Water container
symbol is flashing on
the display
No water in the container Remove the container and fill
Reinsert container and wait 2 minutes for the
appliance to reset
The water container symbol will dissapear
Water container is not properly
fixed in the appliance
Reinsert container and wait 2 minutes for the
appliance to reset
The water container symbol will dissapear
Water not reaching hot
plate
Water dispensing tube blocked
by limescale
Clean the tube with a suitable descaling
solution
If this fails to clear the blockage replace with
spare tube (supplied)
Security Lock symbol is
flashing on the display
Door not closed properly Open the door and shut it again
Model Voltage Power Current
Max. Cooking
Temperature
Capacity
Dimensions
W x H x D mm
Weight
Y067 230V 50 Hz 1950W 8.5A 100°C 25 litres 490 x 380 x 324 18kg
Page 10
5
UK
Electrical Wiring
BUFFALO appliances are supplied with a 3 pin, moulded, BS1363 plug and lead, with a 13 amp fuse as
standard.
The plug is to be connected to a suitable mains socket.
BUFFALO appliances are wired as follows:
• Live wire (coloured brown) to terminal marked L
• Neutral wire (coloured blue) to terminal marked N
• Earth wire (coloured green/yellow) to terminal marked E
All BUFFALO appliances must be earthed, using a dedicated earthing circuit.
If in doubt consult a qualified electrician.
Electrical isolation points must be kept clear of any obstructions. In the event of any emergency
disconnection being required they must be readily accessible.
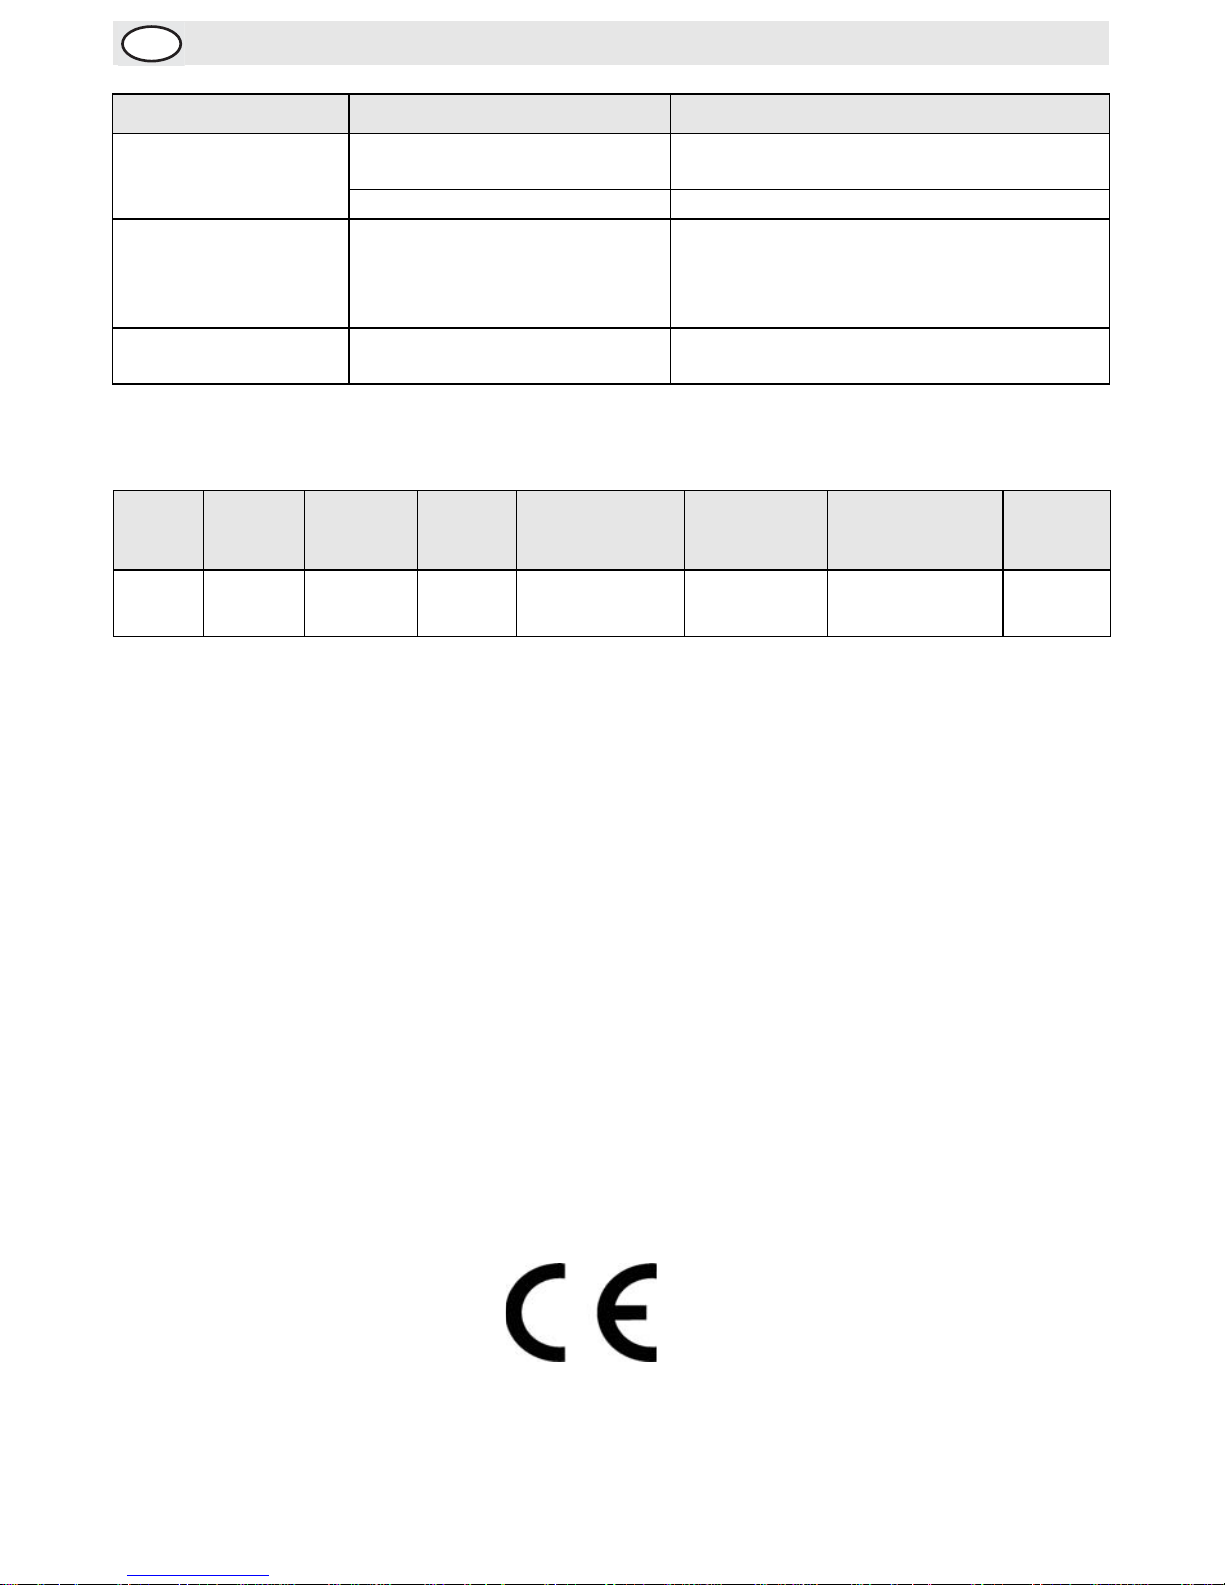
Compliance
BUFFALO parts have undergone stri ct product testing in order to comply w ith regulatory standards and
specifications set by international, independent, and federal authorities.
BUFFALO products have been approved to carry the following symbol:
All rights reserved. No part of these instructions may be produced or transmitted in any form or by any means,
electronic, mechanical, photocopying, recording or otherwise, without the prior written permission of BUFFALO.
Every effort is made to ensure all details are correct at the time of going to press, however, BUFFALO reserve the
right to change specifications without notice.
Page 11

6
NL
Klantenondersteuning: 040 – 2628080 (Nederland)
Veiligheidstips
• Plaatsen op een vlakke en stabiele ondergrond.
• De installatie en eventuele reparaties zijn door een servicetechnicus/vaktechnicus uit te voeren.
Verwijder geen componenten of servicepanelen van dit product.
• Raadpleeg en volg de plaatselijke en nationale regelgeving op m.b.t. tot het volgende:
• Wetgeving van gezondheid en veiligheid op de werkplaats
• Werkregels
• Brandpreventie
• IEE bekabelingsnormen
• Bouwverordeningen
• Het apparaat NIET in water onderdompelen of met stoomreinigers reinigen.
• Het apparaat NIET inschakelen met een leeg waterreservoir.
• Het waterreservoir niet met teveel water vullen.
• Zorg bij de herplaatsing van het waterreservoir dat de buitenkant droog is zodat mogelijke storingen
van dit apparaat worden vermeden.
• Laat tijdens gebruik het water niet uit het waterreservoir lopen.
• Sta niet te dicht bij de oven bij het openen van de ovendeur om aanraking met de uittredende stoom
te voorkomen.
• Controleer alle objecten die u voor de oven gaat gebruiken of ze voldoende hittebestendig zijn.
• Laat kinderen niet in de n a bijheid van dit apparaat komen aangezien bepaalde ovendelen tijdens
gebruik warm worden.
• Laat verpakkingsmateriaal niet binnen handbereik van kinderen. Verpakkingsmateriaal in
overeenstemming met de regelgeving van de plaatselijke overheden als afval laten verwerken.
• Indien de stroomkabel beschadigd raakt, dient men deze door een BUFFALO technicus of aanbevolen
vaktechnicus te laten vervangen om gevaarlijke situaties te verhinderen.
Inleiding
Neem de tijd en lees deze handleiding aandachtig door. Een correct gebruik en onderhoud van deze
machine waarborgt de beste prestatie van uw BUFFALO product.
Verpakkingsinhoud
De verpakking bevat het volgend:
BUFFALO is trots op de haar productkwaliteit en dienstverlening en controleer de inhoud van de
verpakkingen, tijdens de verpakkin gsfase, op functionaliteit en schade.
Mocht u product door transport zijn beschadigd, neem dan onmiddellijk contact op met uw BUFFALO dealer.
• Buffalo Stoom oven
•Waterreservoir
• Waterdispenserslang x 3
•Rooster
• Ongeperforeerde lade
• Geperforeerde lade
• Handleiding
Page 12
7
NL
Klantenondersteuning: 050 – 609999 (België)
Indeling van de bedieningsknoppen
Bediening
Oven gebruiken
Ga als volgt te werk bij het gebruik van de stoomoven :
1. Vul het reservoir tot aan het vereiste niveau. Het reservoir geeft het waterniveau aan de hand van de
kooktijd aan.
2. Het waterreservoir vervangen. Gemorst water in het apparaat verwijderen en ovendeur sluiten.
3. Druk op de Power-knop om het apparaat aan te zetten.
4. Druk op de Time Up- en Time Down-knoppen om de gewenste kooktijd in te stellen.
5. Druk op de Temperature Up- en Temperature Down-knoppen om de gewenste temperatuur in te
stellen.
6. Druk op de START-knop om het kookproces te starten.
Opmerking: altijd vers water voor dit apparaat gebruiken. Het apparaat niet teveel
vullen.
Opmerking: na aanvang van het kookproces is het niet mogelijk om deze instellingen te
veranderen. Om de instellingen te veranderen dient men het apparaat te herstarten.
Opmerking: bij het openen van de deur tijdens gebruik wordt het kookproces
onderbroken en begint het Safety Lock-symbool van het temperatuurdisplay te
knipperen.
Het apparaat werkt niet bij een openstaande ovendeur. Sluit de ovendeur om het
kookproces te hervatten.
POWER
CLOCK
1. Power-knop
2. Time Up/Down-knoppen
3. Displaypaneel
4. Temperatuur laag/hoog-knoppen
5. Start/stop-knop
Page 13
8
NL
Klantenondersteuning: 040 – 2628080 (Nederland)
Na beëindiging van het kookproces
1. Na beëindiging van het kookproces geeft de oven een kort geluidsalarm.
2. Haal het voedsel uit de oven. Vermijd enig contact met de uittredende stroom.
3. Laat de deur van de oven open zodat de stoom volledig kan ontsnappen en laat het apparaat
afkoelen.
4. Sluit de ovendeur wanneer de oven is afgekoeld. Druk en houd de Power-knop ingedrukt om d e oven
uit te schakelen.
Reiniging, zorg & onderhoud
• Alvorens het apparaat te reinigen dient men altijd de stroomvoorziening uit te schakelen.
• Gebruik géén schurende reinigingsmiddelen voor dit apparaat, gebruik warm zeepwater.
• Na gebruik kunnen er resten in het apparaat voorkomen. Gebruik een geschikt reinigingsmiddel om
deze resten te verwijderen.
• Eventuele reparaties moeten door een BUFFALO technicus of een vaktechnicus worden uitgevoerd.
• Wees voorzichtig bij reiniging en handling van de hete plaat in dit apparaat.
• Periodiek kan er zich kalkafzetting op de hete plaat vormen. Gebruik een geschikt ontkalkingsmiddel
om kalkafzetting te verwijderen.
Voor reinigingsgemak zijn de geleidingsrails van het apparaat te
demonteren:
1. schroef beide bevestigingsbouten aan weerszijde van het apparaat
los.
2. De geleidingsrails komen los en zijn dan te verwijderen.
3. De geleidingsrails, de vloeistofplaat en de kookbak kunnen in een
vaatwasmachine wordt schoon gemaakt.
Geleidingsrails plaatsen:
1. plaats de verlengde geleidingsrail in het gat aan de achterzijde van
de kookkamer.
2. Plaats het gat over de schro e f draad en schroef de bevestigingmoer
vast.
3. Herhaal deze handeling aan de andere zijde.
Opmerking: de inhoud van de oven zal zeer heet zijn. Vergeet niet om altijd geschikte
ovenwanten te gebruiken.
Opmerking: Wacht na gebruik minimaal 8 minuten alvorens de oven te reinigen.
Geleidingsrails
Bevestigingsmoer
Gat
Verlengde
geleidings
rail
Page 14
9
NL
Klantenondersteuning: 050 – 609999 (België)
Vervanging van de waterdispenserslang
Wanneer de waterdispenserslang geblokkeerd raakt door
kalkafzetting, kan men deze vervangen door een nieuwe slang.
Om de slang te vervangen:
1. Verwijder de geblok keerde slang.
2. Plaats een (meegeleverde) vervangingsslang in de opening.
Reinigen van het waterreservoir:
1. haal het reservoir uit het apparaat en gooi eventueel achtergebleven water weg.
2. Haal de deksel van het reservoir en reinig beide delen met warm water.
3. Deksel en reservoir grondig drogen.
4. Bevestig de deksel en plaats het reservoir terug in het apparaat.
Oplossen van problemen
Indien er een storing van uw BUFFALO product optreedt, dient u de onderstaande tabel te raadplegen
alvorens contact op te nemen met uw BUFFA LO dealer of de Hulplijn te bellen.
Opmerking: BUFFALO aanvaardt géén enkele
verantwoordelijkheid voor storingen als gevolg van
kalkafzetting. Bij gebruik van hardwater raadt
BUFFALO u aan om een waterfilter te gebruiken om
de kalkafzetting te beperken.
Opmerking: reservoir alleen vullen wanneer klaar voor gebruik.
Probleem Mogelijke oorzaak Handeling
Het apparaat werkt
niet
Het apparaat staat uit Controleer of de stroomkabel van het
apparaat is aangesloten en of het apparaat is
ingeschakeld
Steker en kabel zijn beschadigd Laat een BUFFALO technicus of een
vaktechnicus komen
De zekering in de steker is
gesprongen
Vervang de zekering in de steker
Stroomvoorziening Controleer de stroomvoorziening
Storing interne bedrading Laat een BUFFALO techn ic u s of een
vaktechnicus komen
Het apparaat start
maar warmt niet op.
Waterreservoir niet correct
geplaatst
Controleer of he t reservoir volled ig in het
apparaat zit.
Er komt een grote
hoeveelheid stoom
langs de
deurafdichtingen
De deur is niet goed dicht Sluit de deur
Er komt een grote hoeveelheid
stoom langs de deurafdichtingen
Sluit de deur goed
De deurvergrendeling is defect Laat een BUFFALO technicus of een
vaktechnicus komen
Het displaypaneel geeft
niets aan
Er zijn géén kookinstellingen
ingevoerd
Voer de kooktijd en temperatuur in
De deur is niet goed dicht Open en sluit de deur
Het waterreservoirsymbool op het display
knippert
Er zit géén water in het reservoir Verwijder en vul het reservoir.
Plaats het reservoir opnieuw en wacht 2
minuten totdat het apparaat is gereset.
Het waterreservoir-symbool verdwijnt
Hete plaat
Waterdispenserslang
Binnencompartiment
Page 15
10
NL
Klantenondersteuning: 040 – 2628080 (Nederland)
Technische specificaties
Elektrische bedrading
Men dient de steker op een geschikt stopcontact aan te sluiten.
De bedrading van dit apparaat is als volgt:
• Stroomkabel (bruin) naar de aansluitklem gemarkeerd met L
• Neutraalkabel (blauw) naar de aansluitklem gemarkeerd met N
• Aardekabel (groen/geel) naar de aansluitklem gemarkeerd met E
Dit apparaat moet worden geaard met behulp van een adequaat aardingscircuit.
Bij twijfels raadpleeg een vakkundige elektricien.
De elektrische isolatiepunten mogen niet worden geblokkeerd. In geval van een nooduitschakeling moeten
de isolatiepunten direct toegankelijk zi jn.
Productconformiteit
De onderdelen van BUFFALO producten hebben strenge producttesten ondergaan om te voldoen aan
wettelijke regels en specificaties die door internationale, onafhankelijke en landelijke overheden worden
voorgeschreven.
BUFFALO producten zijn goedgekeurd en voorzien van het volgende symbool:
le rechten voorbehouden. Het is verboden om deze handleiding, hetzij volledig of gedeeltelijk, elektronisch of
mechanisch te reproduceren, kopiëren, op opslagmedia op te slaan of op enigerlei wijze over te dragen, zonder
voorafgaande goedkeuring van BUFFALO.
Wij hebben er alles aan gedaan om er zeker van te zijn dat op publicatiedatum van de handleiding alle details correct
zijn, desondanks, behoudt BUFFALO het recht voor om specificaties zonder aankondiging te wijzigen.
Probleem Mogelijke oorzaak Handeling
Het waterreservoir is niet goed
in het apparaat geplaatst
Plaats het reservoir opnieuw en wacht 2
minuten totdat het apparaat is gereset.
Het waterreservoir-symbool verdwijnt
Water bereikt niet de
hete plaat
De waterdispenserslang is do or
kalkafzetting geblokkeerd
Reinig de slang met een geschikt
ontkalkingsmiddel
Vervang de slang met de (meegeleverde)
reserveslang wanneer de reiniging van de
geblokkeerde slang niet lukt
Het Security Locksymbool op het display
knippert
De deur is niet goed gesloten Open en sluit de deur opnieuw
Model Voltage Vermogen Stroom
Max.
kooktemperatuur
Inhoud
Afmetingen
h x b x d mm
Gewicht
Y067 230V 50 Hz 1950W 8,5A 100°C 25 liters 490 x 380 x 324 18kg
Page 16

11
FR
Standard d'assistance téléphonique: 050 – 600006 (Belgique)
Conseils de sécurité
• Placez l'appareil sur une surface plane, stable.
• L'installation et les éventuelles réparations doivent être confiées à un dépanneur / technicien qualifié.
Ne retirez aucun composant ou cache de ce prod uit.
• Consultez les normes locales et nationales pour vous conformer aux :
• lois sur l'hygiène et la sécurité au travail ;
• codes de bonnes pratiques BS EN ;
• précautions contre le risque d'incendie ;
• réglementations sur les branchements électriques IEE ;
• règlements sur la construction.
• NE PAS immerger l'appareil ou le nett oyer à l'aide d'un nettoyeur à vapeur.
• NE PAS mettre en service une étuve vide.
• NE PAS remplir excessiv e ment le bac d'eau.
• Avant de l'insérer, vérifiez que l'extérieur du bac d'eau est sec pour éviter un éventuel
dysfonctionnement de l'appareil.
• Ne laissez pas l'eau du bac sécher complètement pendant l'utilisation de l'appareil.
• Tenez vous en retrait à l'ouverture de la porte, pour éviter la vapeur évacuée.
• N'utilisez dans l'étuve que des objets suffisamment résistants à la chaleur.
• Ne laissez pas les enfants s'approcher de cet appa reil, dont certaines parties peuvent chauffer en
service.
• Eloignez des enfants les matériaux d'emballage. La mise au rebut des emballages doit s'effectuer
conformément aux règlements stipulés p a r les autorités locales.
• Tout cordon d'alimentation endommagé doit être remplacé par un agent BUFFALO ou par un
technicien qualifié recommandé, pour éviter tout danger.
Introduction
Nous vous invitons à consacrer quelques instants à la lecture attentive de ce manuel. L'entretien et
l'utilisation appropriés de cet appareil vous permettront de tirer le meilleur de votre produit BUFFALO.
Contenu de l'emballage
Eléments fournis de série :
BUFFALO attache une grande importance à la qualité et au service et veille à fournir des produits en parfait
état opérationnel, parfaitement intacts au moment de l'emballage.
Nous vous prions de contacter votre revendeur BUFFALO immédiatement si vous constatez un dommage
quelconque survenu pendant le transport du produit.
• Étuve Buffalo
• Bac à eau
•Clayette
• Tube distributeur d’eau x 3
•Plateau non troué
•Plateau troué
• Mode d'emploi
Page 17
12
FR
Standard d'assistance téléphonique: 01 64 89 73 61 (Français)
Agencement des commandes
Fonctionnement
Utilisation de l'étuve
Procédez comme suit pour utiliser l'étuve :
1. Remplissez le bac jusqu'au niveau requis. Le bac indique les niveaux d'eau correspondant aux temps
de cuisson.
2. Réinsérez le bac à eau. Essuyez les éventuels débordements à l'in téri eur de l'étuve et refermez la
porte.
3. Appuyez sur le bouton de mise sous tension Power.
4. Appuyez sur les boutons Time Up (Plus longtemps) et Time Down (Moins longtemps) pour régler le
temps de cuisson voulu.
5. Appuyez sur les boutons Temperature Up (Plus chaud) et Temperature Down (Moins chaud) pour
régler la température voulue.
6. Appuyez sur le bouton Start (Démarrer) pour faire débuter la cuisson.
Remarque : Utilisez de l'eau fraîche à chaque utilisation de l'appareil. Ne remplissez pas
le bac excessivement.
Remarque : Ces paramètres ne peuvent plus être changés après le démarrage de la
cuisson. Pour les modifier, vous devrez refaire démarrer l'appareil.
Remarque : L'ouverture de la porte pendant la cuisson interrompt le processus de
cuisson ; un symbole Safety Lock (Verrouillage de sécurité) clignote sur l'affichage de
température.
L'appareil ne fonctionne pas porte ouverte. Refermez la porte pour faire redémarrer la
cuisson.
POWER
CLOCK
1. Bouton de mise sous tension
2. Boutons Plus/Moins longtemps
3. Panneau d'af fichage
4. Boutons Moins/Plus chaud
5. Bouton marche/arrêt
Page 18
13
FR
Standard d'assistance téléphonique: 050 – 600006 (Belgique)
À la fin de la cuisson
1. Une fois la cuisson terminée, l'appareil émet un bref signal audible.
2. Retirez les alimen t s de l'étuve. Veillez à ne pas vous laisser surprendre par la vapeur en sortie d'étuve.
3. Laissez ouverte la porte de l'étuve, pour permettre à la vapeur de s'évacuer complètement et donner
le temps à l'appareil de se refroidir.
4. Une fois l'appareil refroidi, refermez la porte. Appuyez sur et maintenez enfoncé le bouton de mise
sous tension Power pour éteindre l'appareil.
Nettoyage, entretien et maintenance
• N'oubliez jamais d'éteindre l'étuve et d'en débrancher le cordon d'alimentation avant de la nettoyer.
• N'utilisez aucun produit de nettoyage abrasif sur l'appareil ; nettoyez-le à l'eau tiède savonneuse.
• Après la cuisson, des résidus peuvent se former à l'intérieur de l'étuve. Retirez-les à l'aide du produit
de nettoyage qui convient.
• Toute réparation éventuellement nécessair e doit être confiée à un agent BUFFALO ou à un technicien
qualifié.
• Prenez les précautions qui s'imposent pour nettoyer et manipuler la plaque chauffante à l'intérieur de
l'étuve.
• Des résidus se forment régulièrement sur la plaque chauffante. Eliminez-les à l’aide de la solution de
détartrage qui convient.
Pour faciliter le nettoyage, les glissiè res peuvent être extraites de l'étuve :
1. Dévissez les écrous de fixation de part et d'autre de l'intérieur de
l'étuve.
2. Les glissières tombent et peuvent être retirées.
3. Les glissières, la plaque collectrice et la cuve de cuisson se lavent
au lave-vaisselle.
Pour remonter les glissières :
1. Faites coulisser la rallonge de glissière dans le trou situé à l'arrière
de la chambre de cuisson.
2. Placez le trou sur le filetage de la vis et vissez l'écrou de fixation.
3. Répétez cette procédure de l'autre côté.
Remarque : Immédiatement après la cuisson, le contenu de l'étuve est très chaud.
N'oubliez pas de porter les gants de protection qui conviennent.
Remarque : Attendez au moins huit minutes après la cuisson avant de procéder au
nettoyage de l'étuve.
Glissières
Ecrou de fixation
Trou
Rallonge
de
glissière
Page 19
14
FR
Standard d'assistance téléphonique: 01 64 89 73 61 (Français)
Remplacement du tube distributeur d’eau
Un tube distributeur d’eau bouché par le calcaire peut être
remplacé par un neuf. Pour remplacer le tube :
1. Sortez le tube bouché.
2. Insérez un tube de rechange (fourni) dans l’orifice.
Nettoyage du bac à eau :
1. Retirez le bac de l'appareil et videz le trop-plein d'eau, le cas échéant.
2. Retirez le couvercle du bac et nettoyez les deux éléments à l'eau tiède.
3. Séchez bien le couvercle et le bac.
4. Remontez le couvercle, puis réintroduisez le bac dans l'étuve.
Dépannage
En cas de dysfonctionnement de votre appareil BUFFALO, vérifiez les données du tableau ci-dessous avant
d'appeler notre standard d'assi stance ou votre revendeur BUFFALO.
Remarque : BUFFALO décline toute responsabilité
en cas de panne causée par l'accumulation de
dépôts calcaires. Dans les régions où l'eau est très
calcaire, BUFFALO préconise l'utilisation d'un filtre
à eau pour ralentir l'accumulation des dépôts
calcaires.
Remarque : Ne remplissez pas le bac avant la prochaine utilisation de l'étuve.
Dysfonctionnement Cause probable Intervention
L'appareil ne
fonctionne pas
L'appareil n'est pas allumé Vérifier que l'appareil est bien branché et
allumé
La prise et le cordon sont
endommagés
Appeler un agent BUFFALO ou un technicien
qualifié
Alimentation Vérifier l'alimentation
Problème de branche m e nt
interne
Appeler un agent BUFFALO ou un technicien
qualifié
L’appareil démarre,
mais ne chauffe pas.
Bac à eau mal inséré Vérifier si le bac a bien été inséré à fond
dans l’étuve
De grosses quantités
de vapeur s’échappent
par les joints de porte
Porte mal fermée Bien fermer la porte
Verrou de porte défectueux Appeler un agent BUFFALO ou un technicien
qualifié
Le panneau d’affichage
reste vierge
Récipient vide Retirer le récipient et le remplir
Réinsérer le récipient et patienter deux
minutes, pendant la réinitialisation de
l'appareil
Le symbole du récipient d'eau s'éteint
Le récipient est mal installé sur
l'appareil
Réinsérer le récipient et patienter deux
minutes, pendant la réinitialisation de
l'appareil
Le symbole du récipient d'eau s'éteint
Plaque
chauffante
Tube distributeur
d’eau
Compartiment interne
Page 20
15
FR
Standard d'assistance téléphonique: 050 – 600006 (Belgique)
Spécifications techniques
Raccordement électrique
La prise doit être reliée à la prise secteur qui convient.
Cet appareil est câblé comme suit :
• Fil conducteur (brun) à la borne marquée L
• Fil neutre (bleu) à la borne marquée N
• Fil de terre (vert / jaune) à la borne marquée E
Cet appareil doit être raccordé à la terre, par le biais d'un circuit de mise à la terre dédié.
En cas de doute, consultez un électr icien qualifié.
Les points d'isolation électrique doivent être libres de toute obstruction. En cas de débranchement requis
en urgence, ils doivent être facilement accessibles.
Conformité
Les pièces BUFFALO ont été soumises à des tests rigoureux pour pouv oir être déclarées conformes aux
normes et spécifications réglementaires définies par les autorités internationales, indépendantes et
fédérales.
Les produits BUFFALO ont été déclarés aptes à porter le symbole suivant :
Tous droits réservés. La production ou transmission, partielles ou intégrales, sous quelque forme que ce soit ou par
n'importe quel moyen, tant électronique que mécanique, sous forme de photocopie, d'enregistrement ou autre de
ce mode d'emploi sont interdites sans l'autorisation préalablement accordée par BUFFALO.
Nous nous efforçons, par tous les moyens dont nous disposons, de faire en sorte que les détails contenus dans le
présent mode d'emploi soient corrects en date d'impression. Toutefois, BUFFALO se réserve le droit de changer les
spécifications de ses produits sans préavis.
Dysfonctionnement Cause probable Intervention
Le symbole du Bac à
eau clignote
Le bac n’est pas suffisamment
rempli
Retirer le bac et le remplir
Bac à eau mal calé dans l’étuve Réinsérer le bac à eau
L’eau n’arrive pas à la
plaque chauffante
Le tube distributeur d’eau est
bouché par le calcaire
Détartrer le tube à l’aide de la solution de
détartrage qui convient
Si le tube reste bouché, remonter un tube de
rechange (fourni)
Le symbole Verrou de
sécurité clignote
Porte mal fermée Ouvrir la porte, puis la refermer
Modèle Tension Puissance Courant
Température
maximale de
cuisson
Contenance
Dimensions
h x l x p mm
Poids
Y067
230V
50 Hz
1950W 8,5A 100°C 25 litres 490 x 380 x 324 18kg
Page 21

16
DE
Telefonische Helpline: 0800 – 1860806
Sicherheitshinweise
• Auf eine flache, stabile Fläche stellen.
• Alle erforderlichen Montage- und Reparaturarbeiten sollten von W artungspersonal oder einem
qualifizierten Techniker durchgeführt werden. Keine Bauteile oder Bedienflächen von diesem Produkt
entfernen.
• Für folgende Normen und Vorschriften sind die lokalen und nationalen Normen heranzuziehen:
• Arbeitsschutzvorschriften
• BS EN Verhaltenspraktiken
• Brandschutzvorschriften
• IEE-Anschlussvorschriften
• Bauvorschriften
• NICHT in Wasser eintauchen oder mit Dampfreinigern reinigen.
• Das Gerät NICHT ohne Wasser einschalten.
• Den Wasserbehälter NICHT überfüllen.
• Beim Auswechseln des Wasserbehälters darauf achten, dass er von außen trocken ist, da durch
Feuchtigkeit das gesamte Gerät beschädigt werden könnte.
• Während des Gebrauchs muss sich stets Wasser im Behälter befinden.
• Beim Öffnen der Tür einen Schritt zurücktreten, da Dampf austreten kann.
• Darauf achten, dass nur hitzebeständige Utensilien in den Garer gegeben werden.
• Gerät außerhalb der Reichweite von Kindern aufstellen, da einige Teile während des Gebrauchs sehr
heiß werden können.
• Verpackungsmaterial außerhalb der Reichweite von Kindern aufbewahren und gemäß den lokalen
Vorschriften entsorgen.
• Aus Sicherheitsgründen muss ein beschädigtes Stromkabel von einem BUFFALO-Mitarbeiter oder
empfohlenen qualifizierten Elektriker erneuert werden.
Einführung
Bitte nehmen Sie sich einige Minuten Zeit, um diese Anlei tung gründlich zu lesen. Durch die korrekte
Wartung und den ordnungsgemäßen Einsatz dieses Geräts erhalten Sie optimale L eistung von Ihrem
BUFFALO-Produkt.
Packungsinhalt
Die Verpackung enthält folgende Teile:
BUFFALO ist stolz auf die hoch wertige Qualität seiner Produkte und seinen erstkl assigen Service. Wir stellen
sicher, dass alle gelieferten Produkte zum Zeitpunkt der Verpackung voll funktionsfähig sind und sich in
einwandfreiem Zustand befinden.
Sollten Sie Transportschäden feststellen, wenden Sie sich bitte unverzüglich an Ihren BUFFALO-Händler.
• Buffalo-Dampfgarer
• Wasserbehälter
• 3 Wasserzuleitungen
• Metallständer
•Feste Schale
•Siebschale
• Bedienungsanleitung
Page 22

17
DE
Bedienelemente
Betrieb
Verwendung des Garers
Einsatz des Garers:
1. Den Behälter bis zur benötigten Höhe füllen. Der Behälter zeigt den Wasserstand je nach Garzeit an
2. Den Wasserbehälter wieder einsetzen. Im Gerät verschüttetes Wasser aufwischen und die Tür
schließen.
3. Das Gerät mit der Ein-/Austaste einschalten.
4. Die gewünschte Garzeit mit den Zeittasten (mehr/weniger) einstellen.
5. Die gewünschte Temperatur mit den Temperaturtasten (höher/niedriger) einstellen.
6. Zum Beginn des Garprozesses die Starttas te dr üc ken.
Hinweis: Bei jedem Einsatz des Geräts frisches Wasser verwenden. Nicht das Gerät über
die Höchstmarke füllen.
Hinweis: Nach Einschalten des Geräts können diese Einstellungen nicht mehr verändert
werden. Um die Einstellungen zu ändern, muss das Gerät neu gestartet werden.
Hinweis: Das Öffnen der Tür während des Garprozesses unterbricht den Garprozess,
und in der Temperaturanzeige blinkt ein Symbol für die Sicherheitssperre.
Das Gerät gart nicht bei geöffneter Tür. Um den Garprozess fortzusetzen, muss die Tür
geschlossen werden.
POWER
CLOCK
1. Ein-/Austaste
2. Zeittasten (mehr/weniger)
3. Anzeigefeld
4. Temperaturtasten (höher/niedriger)
5. Start-/Stopptaste
Page 23

18
DE
Telefonische Helpline: 0800 – 1860806
Nach Ende des Garprozesses
1. Nach dem Garen ertönt ein kurzer Alarm.
2. Die Speisen aus dem Garer nehmen. Dabei ist Vorsicht angebracht, da Dampf entweicht.
3. Die Tür des Geräts geöffnet lassen, damit der Dampf vollständig entweichen kann. Dann das Gerät
abkühlen lassen.
4. Nach dem Abkühlen die Tür schließen. Zum Ausschalte n d e s Ge r ä ts die Ein-/Austaste g e dr ü ck t halten.
Reinigung, Pflege und Wartung
• Vor der Reinigung stets zunächst das Gerät abschalten und den Netzstecker ziehen.
• Zum Reinigen keine Scheuermittel, sondern nur eine warme Seifenlauge verwenden.
• Nach dem Gebrauch können sich Speisereste im Gerät ansammeln.
• Diese mit einem geeigneten Reinigungsmittel entfernen.
• Erforderliche Reparaturen sollten von einem BUFFALO-Mitarbeiter oder einem qualifizierten Techniker
ausgeführt werden.
• Vorsicht beim Reinigen und Berühren der Wärmeplatte im Gerät.
• Im Laufe der Zeit lagert sich Kalk auf der Wärmeplatte ab. Kalk einem geeigneten Entkalkungsmittel
entfernen.
Zur Reinigung können die Führungsschiene n aus dem Garer genommen
werden:
1. Dazu die Sicherungsmuttern auf beiden Seiten im Gerät lösen.
2. So fallen die Führungsschienen hinunter und können entnommen
werden.
3. Die Führungsschienen, der Auffangteller für Flüssigkeiten und der
Garbehälter sind spülmaschinenfest.
Auswechseln der Führungsschienen:
1. Die ausgefahrene Führungsschiene in die Öffnung hinten an der
Garkammer drücken.
2. Die Öffnung über dem Schraubgewinde ausrichten und die
Sicherungsmutter aufschrauben.
3. Auf der anderen Seite ebenso verfahren
Hinweis: Die Speisen und Utensilien im Garer sind sehr heiß. Unbedingt geeignete
Schutzhandschuhe tragen.
Hinweis: Nach dem Garen das Gerät mindestens 8 Minuten abkühlen lassen, bevor Sie
es reinigen.
Führungsschienen
Sicherungsmutter
Öffnung
Ausgefahrene
Führungsschiene
Page 24

19
DE
Wasserzuleitung auswechseln
Wenn die Wasserzuleitung durch Kalk verstopft ist, kann sie wie
folgt durch eine neue Zule itung ausgetauscht werden:
1. Ziehen Sie die verstopfte Zuleitung heraus.
2. Stecken Sie eine Ersatzleitung (im Lieferumfang) in die
Öffnung..
Reinigen des Wasserbehälters:
1. Den Behälter aus dem Gerät nehmen und verbleibendes Wasser ausgießen.
2. Den Deckel abnehmen und Behälter und Deckel mit warmem Wasser reinigen.
3. Deckel und Behälter gründlich trocknen lassen.
4. Den Deckel wieder auflegen und dann den Behälter wieder in den Garer einsetzen.
Fehlersuche
Bei einem Defekt Ihres BUFFALO-Geräts konsultieren Sie bitte zunächst folgende Tabelle, bevor Sie die
Helpline oder Ihren BUFFALO-Händler anrufen.
Hinweis: BUFFALO übernimmt keine Haftung für
Schäden und Defekte, die durch Kalkablagerungen
entstehen. Um Kalkablagerungen zu vermeiden,
empfiehlt BUFFALO in Gebieten mit hoher
Wasserhärte den Einsatz eines Wasserfilters.
Hinweis: Den Wasserbehälter erst beim nächsten Einsatz wieder füllen.
Störung Vermutliche Ursache Lösung
Das Gerät funktioniert
nicht
Das Gerät ist nicht eingeschaltet Prüfen, ob de r Netzstecker in die Steckdose
gesteckt wurde und das Gerät eingeschaltet
ist
Stecker und Kabel sind
beschädigt
BUFFALO-Mitarbeiter oder qualifizierten
Techniker kontaktier en
Sicherung im Stecker ist
durchgebrannt
Neue Sicherung in den Stecker einsetzen
Stromzufuhr Netzstrom prüfen
Das Gerät startet,
erwärmt sich aber nicht
Der Wasserbehälter ist nicht
korrekt eingesetzt
Sicherstellen, dass der Behälter richtig im
Gerät einrastet
Aus den Türdichtung en
tritt viel Dampf aus
Die Tür ist nicht korrekt
geschlossen
Die Tür fest schließen
Der Türriegel ist defekt BUFFALO-Mitarbeiter oder qualifizierten
Techniker anrufen
Keine Anzeige Kein Wasser im Behälter Behälter entnehmen und füllen. Behälter
wieder einsetzen und 2 Minuten warten, bis
die Einstellungen zurückgesetzt si nd
Das Symbol für den Wasserbehälter ist nicht
mehr zu sehen
Wasserbehälter sitzt nicht fest
im Gerät
Behälter wieder einsetzen und 2 Minuten
warten, bis die Einstellungen zurückgesetzt
sind Das Symbol für den Wasserbehälter ist
nicht mehr zu sehen
Wärmeplatte
Wasserzuleitung
Innenbehälter
Page 25

20
DE
Telefonische Helpline: 0800 – 1860806
Technische Spezifikationen
Elektroanschlüsse
Der Stecker muss in eine geeignete Steckdose gesteckt werden.
Das Gerät ist wie folgt verdrahtet:
• Stromführender Leiter (braun) an Klemme L
• Neutralleiter (blau) an Klemme N
• Erdleiter (grün/gelb) an Klemme E
Das Gerät muss über eine spezielle Erdleitung geerdet werden.
Bei Fragen wenden Sie sich bitte an einen qualifizierten Elektriker.
Elektroisolierpunkte dürfen nicht blockiert werden. Bei einem Notstopp müssen diese Punkte jederzeit sofort
zugänglich sein.
Konformität
Alle BUFFALO-Produkte werden strengen Tests unterzogen, um die Einhaltung von Normen und
Spezifikationen internationaler und nationaler Behörden und unabhängiger Organisationen zu
gewährleisten.
BUFFALO-Produkte dürfen durch folgendes Symbol gekennz eic hnet werden:
Alle Rechte vorbehalten. Diese Anleitung darf ohne vorherige schriftliche Genehmigung von BUFFALO weder ganz
noch teilweise in irgendeiner Form oder auf irgendeinem Wege - einschließlich elektronischer, mechanischer
Verfahren, durch Fotokopieren, Aufnahme oder andere Verfahren - vervielfältigt oder übertragen werden.
Es werden alle Anstrengungen unternommen um sicherzustellen, dass alle Angaben bei der Drucklegung korrekt
sind. BUFFALO behält sich jedoch das Recht vor, Spezifikationen ohne Vorankündigung zu ändern.
Störung Vermutliche Ursache Lösung
Symbol für den
Wasserbehälter blinkt
Nicht genügend Wasser im
Behälter
Behälter entnehmen und auffüllen
Wasserbehälter sitzt nicht fest
im Gerät
Den Wasserbehälter erneut einsetzen
Wasser erreicht nicht
die Wärmeplatte
Wasserzuleitung durch Kalk
verstopft
Leitung mit einer geeigneten
Entkalkungslösung reinigen. Sollte dies die
Verstopfung noch nicht beheben, Zuleitung
durch eine Ersatzleitung auswechseln (im
Lieferumfang)
Symbol für den
Sicherheitsriegel blinkt
Tür ist nicht korrekt geschlossen Tür öffnen und wieder schließen
Modell Spannung Leist-ung
Strom-
stärke
Max.
Gartemperatur
Fassungs
vermögen
Abmessungen
h x b x t mm
Gewicht
Y067 230V 50 Hz 1950W 8,5A 100°C 25 liter 490 x 380 x 324 18kg
Page 26

21
IT
Suggerimenti per la sicurezza
• Posizionare il fabbricatore di ghiaccio su una superficie in piano e stabile.
• L'installazione e le eventuali riparazioni devono venire eseguite da un agente/tecnico qualificato. Non
rimuovere i componenti o i pannelli di accesso dell'apparecchio.
• Verificare la conformità alle normative locali e nazionali di quanto segue:
• Normativa antinfortunistica sul lavoro
• Linee guida BS EN
• Precauzioni antincendio
• Normativa IEE sui circuiti elettrici
• Norme di installazione
• NON immergere nell'acqua o utilizzare sistemi di pulizia a vapore per pulire l'unità.
• NON accendere l'apparecchio quando non contiene acqua.
• NON riempire eccessivamente il contenitore dell'acqua.
• Quando si inserisce il contenitore dell'acqua, assicurarsi che la superficie esterna sia asciutta per
prevenire il possibile guast o dell'app arecchio.
• Non consentire che l'acqua nel contenitore evapori completamente quando l'apparecchio è in uso.
• Mantenersi a distanza di sicurezza quando si apre lo sportello per evitare l'espulsione del vapore.
• Assicurarsi che gli oggetti utilizz a ti all'interno del forno siano resistenti al calore.
• Non lasciare avvicinare i bambini all'apparecchio in quanto alcune parti si surriscaldano durante
l'utilizzo.
• Tenere lontano l'imballaggio dalla portata dei bambini. Smaltire l'imballaggio in conformità alle
normative locali.
• Se danneggiato, il cavo di alimentazione deve venire sostituito da un agente BUFFALO o da un tecnico
qualificato al fine di prevenire eventuali rischi.
Introduzione
Leggere con attenzione il presente manuale. La manutenzione e l'utilizzo c orret ti di questo apparecchi o
consentiranno di ottenere le massime prestazioni da questo prodotto BUFFALO.
Contenuto dell'imballaggio
L'imballaggio contiene quanto segue:
BUFFALO garantisce una qualità e un serviz io impeccabil i e assicura che al momento dell'imb allaggio tutt i i
componenti forniti sono integralmente funzionanti e privi di difetti.
Nel caso siano rilevati danni risultanti da l trasporto del prodotto, rivolgersi immediatamente al rivenditore
BUFFALO locale.
• Forno a vapore Buffalo
• Contenitore acqua
• Tubo di erogazione acqua 3x
•Griglia
• Vassoio non perforato
• Vassoio perforato
• Manuale di istruzioni
Page 27

22
IT
Disposizione dei comandi
Funzionamento
Utilizzo del forno
Per utilizzare il forno a vapore, procedere come segue:
1.
Riempire il contenitore fino al livello richiesto. Il contenitore indica i livelli dell'acqua per il tempo di cottura.
2. Posizionare il contenitore dell'acqua. Pulire l'eventuale acqua versata all'interno dell'apparecchio e
chiudere lo sportello.
3. Premere il pulsante di alimentazione per accendere l'apparecchio.
4. Premere i pulsanti tempo su/giù per impostare il tempo di cottura desiderato.
5. Premere i pulsanti temperatura su/giù per impostare la temperatura desiderata.
6. Premere il pulsante Start per iniziare la cottura.
Al termine della cottura
1. Una volta completata la cottura, l'apparecchio emette un breve segnale acustico.
2. Rimuovere il cibo dal forno. Fare attenzione a evitare il rilascio del vapore.
3. Lasciare aperto lo sportello dell'apparecchio per consentire al vapore di venire rilasciato
completamente e all'apparecchio di raffreddarsi.
4. Quando l'apparecchio si è raffreddato, chiudere lo sportello. Premere senza rilasciare il pulsante di
alimentazione per spegnere il forno di cottura.
Nota: riempire con acqua fresca ogni volta che viene utilizzato il forno. Non riempire
eccessivamente.
Nota: non è possibile modificare le impostazioni una volta iniziata la cottura. Per
modificare le impostazioni, è necessario riavviare l'apparecchio.
Nota: l'apertura dello sportello durante la cottura mette in pausa il processo di cottura
e il simbolo del blocco di sicurezza lampeggia sul display della temperatura.
L'apparecchio non funziona quando lo sportello è aperto. Chiudere lo sportello per
riprendere la cottura.
Nota: il contenuto del forno ha una temperatura elevata. Ricordare di indossare guanti
protettivi appropriati.
POWER
CLOCK
1. Pulsante di alimentazione
2. Pulsanti tempo su/giù
3. Display
4. Pulsanti temperatura bassa/alta
5. Pulsante Start/Stop
Page 28

23
IT
Pulizia e manutenzione
• Prima di eseguire la pulizia, spegnere e scollegare l'apparecchio dall'alimentazione.
• Non utilizzare detergenti abrasivi sull'apparecchio, utilizzare acqua saponata.
• Dopo l'utilizzo, possono formarsi residui all'interno dell'apparecchio. Per rimuoverli, utilizzare un
detergente appropriato.
• Le riparazioni devono venire eseguite da un tecnico qualificato o da un agente BUFFALO.
• Fare attenzione quando si pulisce e manipola la piastra riscaldante all'interno dell'apparecchio.
• Il calcare si accumula periodicamente sulla piastra riscaldata. Rimuovere l'accumulo utilizzando una
soluzione anticalcare appropriata.
Per facilitare la pulizia, è possibil e rim uovere i binari di guida
dall'apparecchio:
1. Svitare le viti di fissaggio sui due lat i all'interno dell'apparecchio.
2. I binari di guida si abbassano ed è quindi possibile rimuoverli.
3. I binari di guida, la piastra liquidi e il contenitore di cottura sono
tutti lavabili in lavastoviglie.
Per sostituire i binari:
1. Inserire il binario di guida esteso nel f oro sulla parte posteriore de lla
camera di cottura.
2. Posizionare il foro sopra la filettatura della vite e avvitare il dado di
fissaggio.
3. Ripetere l'operazione per l'altro lato.
Sostituzione del tubo di erogazione acqua
Se il tubo di erogazione acqua viene ostruito dal calcare, è
possibile sostituirlo con un tubo nuovo. Per sostituire il tubo:
1. Estrarre il tubo bloccato .
2. Inserire un tubo di ricambio (incluso) nel foro.
Nota: dopo la cottura, fare trascorrere almeno 8 minuti prima di provare a pulire il forno.
Nota: BUFFALO declina ogni responsabilità in
relazione a guasti causati dalle accumulo di calcare.
In presenza di acqua dura, BUFFALO raccomanda
l'utilizzo un filtro dell'acqua per limitare l'accumulo
di calcare.
Binari di guida
Dado di fissaggio
Foro
Binario di
guida
esteso
Piastra
riscaldata
Tubo di erogazione
acqua
Vano interno
Page 29

24
IT
Per pulire il contenitore dell'acqua:
1. Rimuovere il contenitore dall'apparecchio e svuotare l'eventuale acqua residua.
2. Rimuovere il coperchio dal contenitore e pulire entrambe le parti con acqua calda.
3. Asciugare completamente il coperchio e il contenitore.
4. Posizionare il coperchio e reinserire il contenitore nell'apparecchio.
Risoluzione dei problemi
In caso di guasto dell'erogatore di bevande, controllare quanto segue prima di contattare l'assistenza
telefonica.
Nota: non riempire il contenitore fino a quando non è pronto per l'uso.
Guasto Probabile causa Azione
L'apparecchio non
funziona
L'apparecchio non è acceso Control lare che l'apparecchio sia
correttamente collegato e acceso
La presa e il cavo sono
danneggiati
Rivolgersi a un tecnico qualificato o a un
agente BUFFALO
Il fusibile della presa è guasto Sostituire il fusibile della presa
Alimentazione Cont rol lare l'alimentazione
Guasto dei circuiti interni Rivolgersi a un tecnico qualificato o a un
agente BUFFALO
L'apparecchio si avvia
ma non si riscalda
Il contenitore dell'acqua non è
correttamente inserito
Controllare che il contenitore sia
completamente inserito nell'apparecchio
Una grande quantità di
vapore fuoriesce dalle
guarnizioni dello
sportello
Lo sportello non è chiuso
correttamente
Chiudere saldamente lo sportello
Il blocco dello sportello è rotto Rivolgersi a un tecnico qualificato o a un
agente BUFFALO
Il pannello del display è
vuoto
Non è presente acqua nel
contenitore
Rimuovere e riempire il contenitore
Reinserire il cont enitore e at tender e 2 minuti
per consentire la reimpostazione
dell'apparecchio
Il simbolo del contenitore acqua scompare
dal display
Il contenitore dell'acqua non è
correttamente inserito
nell'apparecchio
Reinserire il cont enitore e at tender e 2 minuti
per consentire la reimpostazione
dell'apparecchio
Il simbolo del contenitore acqua scompare
dal display
Il simbolo del
contenitore dell'acqua
lampeggia nel display
Acqua insufficiente nel
contenitore
Rimuovere il contenitore e riempire
Il contenitore dell'acqua non
correttamente fissato
nell'apparecchio
Reinserire il contenitore dell'acqua
L'acqua non raggiunge
la piastra riscaldata
Il tubo di erogazione acqua è
ostruito dal calcare
Pulire il tubo con una soluzione anticalcare
appropriata
Se l'ostruzione non vie ne r imossa, sostituire
con il tubo di ricambio (incluso)
Page 30

25
IT
Specifiche tecniche
Cablaggi elettrici
La spina deve venire collegata a una presa di rete appropriata.
L'apparecchio ha i seguenti cablaggi:
• Filo sotto tensione (colore marrone) a terminale L
• Filo del neutro (colore blu) a terminale N
• Filo di terra (colore verde/giallo) a terminale E
L'apparecchio deve avere un circuito dedicato di messa a terra.
In caso di dubbi, consultare un elettricista qualificato. I punti di isolamento elettrico devono essere li beri da
ostruzioni.
In caso di emergenza, i punti devono essere facilmente raggiungibili qualora sia necessario scollegarli.
Conformità
I componenti BUFFALO sono stati sottop osti a un rigoroso collaudo ai fini della conformità agli standard e
alle specifiche normative previste dalle autorità internazionali, indipendenti e federali.
I prodotti BUFFALO sono stati auto rizzati a esporre il seguente simbolo:
Tutti i diritti riservati. È vietata la riproduzione o la trasmissione in alcuna forma, elettronica, meccanica, mediante
fotocopiatura o altro sistema di riproduzione, di qualsiasi parte delle presenti istruzioni senza la previa
autorizzazione scritta di BUFFALO.
Le informazioni contenute sono corrette e accurate al momento della stampa, tuttavia BUFFALO si riserva il diritto
di modificare le specifiche senza preavviso
Guasto Probabile causa Azione
Il simbolo del blocco d i
sicurezza lampeggia
nel display
Lo sportello non è chiuso
correttamente
Aprire lo sportello e richiuderlo
Modello Tensione Alimentazio Corrente
Temperatura di
cottura max.
Capacità
Dimensioni
h x l x p mm
Peso
(kg)
Y067 230V 50 Hz 1950W 8,5A 100°C 25 litri 490 x 380 x 324 18kg
Page 31

26
ES
Consejos de Seguridad
• Colóquela sobre una superficie plana, estable.
• Un agente de servicio / técnico cualificado debería llevar a cabo la instalación y cualquier reparación si
se precisa. No retire ningún componente ni panel de servicio de este producto.
• Consulte las Normas Locales y Nacionales correspondientes a lo siguien te:
• Legislación de Seguridad e Higiene en el Trabajo
• Códigos de Práctica BS EN
• Precauciones contra Incendios
• Normativos de Cableado de la IEE
• Normativas de Construcción
• NO la sumerja en agua ni utilice dispositivos de lavado con vapor para limpiar la unidad.
• NO encienda el aparato sin agua.
• NO supere el límite de llenado del cont enedor de agua.
• Al cambiar el contenedor de agua, asegúrese de que el exteri or está seco par a evitar posi bles fallo s del
aparato.
• Procure que no se derrame el agua del contenedor cuando se esté usando el aparato.
• Retírese al abrir la puerta para evitar la expulsión del vapor.
• Asegúrese de que todos los objetos que se empleen dentro del horno son suficientemente resistentes
al calor.
• No deje que los niños se acerquen al aparato ya que algunas piezas se calientan durante su uso.
• Mantenga el embalaje lejos del alcance de los niños. Deseche el embalaj e de acuerdo con las
normativas de las autoridades locales.
• Si el cable eléctrico está dañado, debe ser reemplazado por un agente de BUFFALO o un técnico
cualificado recomendado para evitar cualquier riesgo.
Introducción
Tómese unos minutos para leer este manual. El correcto mantenimiento y manejo de esta máquina
proporcionará el mejor funcionamiento posible de su producto BUFFALO.
Contenido del Conjunto
Se incluye lo siguiente:
BUFFALO se enorgullece de su calidad y servicio y asegura que en el mome nto d el e mba la je, el c o nt eni do
se suministró con plena funcionalidad y sin ningún defecto.
Si encontrara algún daño resultante del transporte, póngase en contacto inmediatamente con su
distribuidor BUFFALO.
• Horno de vapor Buffalo
•Contenedor de agua
• Tubo dispensador de agua x 3
• Bandeja de cable
• Bandeja sin perforar
• Bandeja perforada
•Manual de instrucciones
Page 32

27
ES
Disposición de los mandos
Funcionamiento
Utilización del horno
Para utilizar el horno de vapor, siga estos pasos:
1. Llene el contenedor hasta el nivel indicado. El contenedor indica el nivel de agua según el tiempo de
cocción.
2. Cambie el contenedor de agua. Seque cualquier derrame en el interior del aparato y cierre la puerta.
3. Pulse el botón Power (Encendido) para encender el aparato.
4. Pulse los botones Time Up (Más ti em po) y Time Down (Menos tiempo) para ajustar el tiempo de
cocción deseado.
5. Pulse los botones Temperature Up (Más temperatur a) y Temperature Down (Menos temperatura) para
ajustar la temperatura deseada.
6. Pulse el botón Start (Puesta en marcha) para iniciar la cocción.
Nota: utilice agua limpia cada vez que emplee el aparato. No lo llene en exceso.
Nota: estos ajustes no pueden modificarse una vez que ha comenzado la cocción. Para
modificar los ajustes, es preciso reiniciar el aparato.
Nota: si abre la puerta durante la cocción se detendrá el proceso de cocción y aparecerá
un símbolo de Safety Lock (Bloqueo de seguridad) parpadeante en el indicador de
temperatura.
El aparato no funciona con la puerta abierta. Cierre la puerta para reanudar la cocción.
POWER
CLOCK
1. Botón Power (Encendido)
2. Botones Time Up / Down (más/menos tiempo)
3. Panel de visualización
4. Botones Temperature Low/High (temperatura alta/baja)
5. Botón Start/Stop (puesta en marcha/parada)
Page 33

28
ES
Cuando haya finalizado la cocción
1. Una vez que se haya completado la cocción, el aparato emitirá una breve alarma sonora.
2. Saque los alimentos del horno. Evite el vapor que se libera.
3. Deje la puerta del aparato abierta para que el vapor salga del todo y deje que se enfríe el aparato.
4. Una vez que el aparato esté frío, cierre la puerta. Pulse y mantenga pulsado el botón Power
(Encendido) para apagar el aparato.
Limpieza, cuidados y mantenimiento
• Desconecte el aparato y desenchúfelo del suministro eléctrico siempre antes de llevar a cabo la
limpieza.
• No utilice ningún producto limpiador abrasivo con el aparato, utilice agua caliente con jabón.
• T r as el uso , pueden producirs e residuos dentro del h orno. Util ice un produ cto limpiador adecu ado par a
eliminarlos.
• Un agente de BUFFALO o un técnico cualificado debería llevar a cabo las reparaciones en caso de
precisarse.
• Tenga cuidado al limpiar y manipular la placa de calentamiento en el interior del aparto.
• Periódicamente aparece cal en la placa de calentamiento. Elimínela con una solución de eliminación de
cal adecuada.
Para facilitar la limpieza, los carriles de guía pueden extraerse del aparato:
1. Desenrosque las tuercas de fijación de uno de los lado s del interior
del aparato.
2. Los carriles de guía caerán entonces y podrán extraerse.
3. Los carriles de guía, la placa de líquidos y el recipiente de cocción
pueden limpiarse todos ellos en el lavavajillas.
Para volver a colocar los carriles:
1. Introduzca el carril de guía extendido en el orificio de la parte
posterior de la cámara de cocción.
2. Coloque el orificio sobre la rosca del tornillo y enrosque la tuerca
de fijación.
3. Repita la operación en el otro lado.
Nota: el contenido del horno puede estar muy caliente. Recuerde que debe usar unos
guantes de protección adecuados.
Nota: deje reposar el aparato durante al menos 8 minutos después de cocinar antes de
tratar de limpiarlo.
Carriles de guía
Tuerca de fijación
Orificio
Carril de
guía
extendido
Page 34

29
ES
Cómo cambiar el tubo dispensador de agua
Si el tubo dispensador de agua se obstruye por culpa de la cal,
puede sustituirlo por uno nuevo. Para cambiar el tubo:
1. Retire el tubo obstruido.
2. Introduzca un tubo de sustitución (incluido) en el orificio
Para limpiar el contenedor de agua:
1. Extraiga el contenedor del aparato y vacíe los restos de agua.
2. Retire la tapa del contenedor y limpie ambas piezas con agua caliente.
3. Seque bien la tapa y el contenedor.
4. Vuelva a colocar la tapa e introduzca luego el contenedor de nuevo en el aparato.
Resolución de problemas
Si su dispensador de bebidas sufre un fall o, compruebe estos puntos antes de llamar a la línea de asistencia.
Nota: BUFFALO no aceptará responsabilidad alguna
por los fallos provocados por la acumulación de cal.
En las zonas donde el agua sea dura, BUFFALO
recomienda utilizar un filtro de agua para ayudar a
prevenir la acumulación de cal.
Nota: no vuelva a llenar el contenedor hasta que no esté listo para ser utilizado.
Fallo Probable Causa Acción
El aparato no funciona El aparato no está conectado Compruebe que el aparato esté enchufado
correctamente y conectado
El enchufe y el cable están
dañados
Llame a un técnico cualificado o a un agente
de BUFFALO
El fusible del enchufe se ha
fundido
Cambie el fusible del enchufe
Suministro eléctrico Compruebe el suministro eléctrico
Fallo del cableado interno
Llame a un técnico cualificado o a un agente
de BUFFALO
El aparato se pone en
marcha pero no
calienta
El contenedor de agua no se ha
introducido correctamente
Compruebe si el contenedor ha entrado del
todo en el aparato
Se escapa una gran
cantidad de vapor por
las juntas de la puerta
La puerta no está bien cerrada Cierre bien la puerta
La cerradura de la puerta está
rota
Llame a un agente de BUFFALO o un técnico
cualificado
El panel de
visualización no
muestra nada
No hay agua en el contenedor Extraiga el contenedor y llénelo.
Vuelva a introducir el contenedor y espere 2
minutos para que se reinicie el aparato.
Desaparecerá el símbolo del contenedor de
agua
El contenedor de agua no está
bien colocado en el aparato
Vuelva a introducir el contenedor y espere 2
minutos para que se reinicie el aparato.
Desaparecerá el símbolo del contenedor de
agua
Placa de
calentamiento
Tubo dispensador de
agua
Compartimento interior
Page 35

30
ES
Especificaciones Técnicas
Cableado Eléctrico
El enchufe tiene que conectarse a una toma eléctrica adecuada.
Este aparato está conectado de la forma siguiente:
• Cable cargado (de color marrón) al terminal marcado como L
• Cable neutro (de color azul) al terminal marcado como N
• Cable de tierra (de color verde / amarillo) al terminal marcado como E
El aparato debe estar conectado a tierra, utilizando un circuito de conexión a tierra especializado. Si tiene
alguna duda, consulte a un electricista cualificado.
Los puntos de aislamiento eléctrico deben mantenerse li bres de cualquier obstrucción. En caso de precisarse
una desconexión de emergencia, deben estar disponibles de forma inmediata.
Cumplimiento
Las piezas BUFFALO han pasado estrictas pruebas de productos para cumplir las especificaciones y normas
reguladoras establecidas por las autoridades internacionales, independientes y federales.
Los productos BUFFALO han sido autorizados para llevar el símbolo siguiente:
Reservados todos los derechos. Puede estar prohibida la reproducción o transmisión en cualquier forma o por
cualquier medio electrónico, mecánico, de fotocopiado, registro o de otro tipo, de cualquier parte de estas
instrucciones sin la autorización previa y por escrito de BUFFALO.
Se ha hecho todo lo posible para garantizar que todos los datos son correctos en el momento de su publicación; sin
embargo, BUFFALO se reserva el derecho a modificar las especificaciones sin que medie notificación previa.
Fallo Probable Causa Acción
El símbolo del
contenedor de agua
parpadea en la pantalla
No hay suficiente agua en el
contenedor
Extraiga el contenedor y llénelo
El contenedor de agua no está
bien colocado en el aparato
Vuelva a introducir el contenedor de agua.
El agua no llega a la
placa de calentamiento
El tubo dispensador de agua
está obstruido por la cal
Limpie el tubo con una solución de
eliminación de cal adecuada. Si esto no
resuelve el problema, cambie el tubo
obstruido por uno de repuesto (incluido)
El símbolo del bloqueo
de seguridad parpadea
en la pantalla
La puerta no está bien cerrada Abra la puerta y ciérrela de nuevo
Modelo Tensión Potencia Corriente
Temperatura
máx. de cocción
Capacidad
Dimensiones
a x a x p mm
Peso
Y067 230V 50 Hz 1950W 8,5A 100°C 25 litros 383 x 492 x 365 18kg
Page 36

31
PT
Conselhos de segurança
• Colocar numa superfície plana e estável.
• Um agente de serviço/técnico qualificado deverá efectuar a instalação e quaisquer reparações, caso
necessário. Não retirar qualquer componente ou painéis de serviço deste produto.
• Consultar e cumprir os regulamentos locais e nacionais no que diz respei t o à:
• Legislação de saúde e segurança no local de trabalho
• Códigos de trabalho
• Prevenção de incêndios
• Normas para sistemas eléctricos IEE
• Código de construção
• NÃO submergir em água ou utiliza r m á q u inas de limpeza a vapor para limpar a unidade.
• NÃO ligar o aparelho sem água no reservatório.
• NÃO encher de mais o reservatório de água.
• Ao recolocar o reservatório de água, deve verificar se o exterior está seco a fim de evitar possíveis
avarias do aparelho.
• Durante a utilização do forno não pode retirar a água do aparelho.
• Ao abrir a porta do forno tenha cuidado com o vapor quente que sai do forno.
• Verifique se os r e ci pientes que vai utilizar no forno são resistentes ao calor.
• Não deixar crianças dentro da proximidade do forno já que determinadas partes do forno ficam
quentes.
• Mantenha o material da embalagem fora do alc ance de crianças . O material da embalagem é par a ser
deitado fora respeitando as regras das autoridades locais.
• A fim de evitar situações perigosas, a substituição dos cabos de alim entação danificados dev e ser feita
por um agente BUFFALO ou um técnico qualificado recomendado.
Introdução
Por favor utilize o tempo necessário p a ra ler atentamente este manual. Uma manutenção e utilização
correcta deste aparelho permitem a melhor capacidade de funcionamento do seu produto BUFFALO.
Conteúdo da embalagem
A embalagem inclui o seguinte:
A BUFFALO orgulha-se pelo serviço e a qualidade dos seus produtos e portanto verifica, durante a fas e de
embalagem, o estado funcional e o bom estado do conteúdo fornecido.
Quando confrontado com quaisquer danos provocados durante o transporte, contacte imediatamente o
seu fornecedor BUFFALO.
• Buffalo Forno a vap or
• Reservatório de água
•Grelha
• Tubo dispensador x 3
•Gaveta lisa
• Gaveta perfurada
•Manual de instruções
Page 37

32
PT
Esquema dos controles
Funcionamento
Usar o forno
Siga as seguintes instruções para usar o forno a vapor:
1. Encher o reservatório até ao nível de água desejado. O reservatório indica os níveis de água mediante
o tempo de cozedura.
2. Recolocar o reservatório de água. Limpar a água entornada no interior do aparelho e fechar a porta.
3. Carregar no interruptor principal para ligar o aparelho.
4. Carregar nos botões Time Up e Time Down para escolher o tempo de cozedura desejado.
5. Carregar nos botões Temperature Up e Temperature Down para escolher a temperatura desejada.
6. Carregue no botão START para começar com a cozedura.
Depois de concluir o processo de cozedura
1. Ao concluir o processo de cozedura o aparelho emite um curto alarme sonoro.
2. Retire a comida do forno. Evite qualquer contacto com o v apo r do f o rno .
3. Mantenha a porta do aparelho aberta para deixar o vapor sair e permitir que o aparelho arrefeça.
4. Feche a porta quanto o forno estiver totalmente arrefecido. Para desligar o aparelho carregue e
mantenha o botão principal carregado.
Nota: utilizar sempre água fresca para este aparelho. Não encher excessivamente o
aparelho.
Nota: durante o processo de cozedura não é possível alterar estas definições. Para
alterar as definições é necessário reiniciar o aparelho.
Nota: se abrir a porta durante a cozedura o processo de cozedura será interrompido e o
símbolo do bloqueio de segurança no painel da temperatura começa a piscar.
Não é possível utilizar o aparelho com a porta do forno aberta. Feche a porta do forno
para continuar o processo de cozedura.
Nota: o conteúdo do forno estará muito quente. Não se esqueça de utilizar luvas de
protecção adequadas.
POWER
CLOCK
1. Botão Power
2. Botões Time Up/Down
3. Painel indicador
4. Botões Temperature Low/High
5. Botão Start/Stop
Page 38

33
PT
Limpeza, cuidados & manutenção
• Antes de efectuar qualquer limpeza deve sempre desligar o aparelho e retirar a ficha da tomada.
• Não utilizar produtos de limpeza abrasivos, utilize água quente de sabão.
• Como a utilização do aparelho podem-se acumular resíduos no aparelho. Utilize u produto de limpeza
adequado para limpar os resíduos.
• Um agente da BUFFALO ou técnico qualif icado de verá ef ectuar quaisquer repar ações, cas o necessário .
• Tenha cuidado durante a limpeza e o manuseamento da placa no interior do aparelho.
• Periodicamente se acumula calcário na placa de aquecimento. Utilize um produto descalcificante
adequado para retirar o calcário.
Para facilitar a limpeza é possível remover os suportes deslizantes do
aparelho:
1. desaparafuse os parafusos de ambos os lados do interior do
aparelho.
2. Os suportes deslizantes descem e podem ser retirados.
3. Os suportes deslizantes, placa de líquido e recipiente de coz e dura
podem-se lavados na máquina de lavar loiça.
Recolocar os suportes deslizantes:
1. coloque o suporte deslizante prolongado na abertura na parte
traseira da câmara de cozedura.
2. Coloque o orifício por cima d a rosca e aparafuse a porca de fixação.
3. Faça o mesmo no lado oposto.
Substituir o tubo dispensador
Quando o tubo dispensador é obstruído por calcário, deve
substituir o tubo por um tubo novo. Para substituir o tubo:
1. Retire o tubo obstruído por calcário.
2. Coloque o tubo novo (fornecido) na abertura
Nota: Depois de utilizar o aparelho deve aguardar pelo menos 8 minutos antes de
efectuar qualquer limpeza.
Nota: a BUFFALO não aceita quaisquer
responsabilidades por avarias causadas pela
acumulação de calcário. Em áreas de utilização de
água dura a BUFFALO recomenda a utilização de um
filtro de água para limitar a acumulação de calcário.
Suportes deslizantes
Porca de fixação
Orifício
Suporte
deslizante
prolongad
Placa de
aquecimento
Tubo
dispensador
Compartimento interno
Page 39

34
PT
Limpar o reservatório de água:
1. retire o reservatório do aparelho e esvazie a água do reservatório.
2. Retire a tampa do reservatório e limpe ambas as partes com água quente.
3. Secar bem a tampa e o reservatório.
4. Recolocar a tampa e a seguir colocar o reservatório no aparelho.
Resolução de problemas
Se o seu produto BUFFALO apresentar uma falha, consulte a seguinte tabela antes de telefonar à linha de
apoio ou ao seu agente BUFFALO.
Problema Causa provável A fazer
O aparelho não
funciona
O aparelho não está ligado Verifique a ligação correcta dos cabos e ligue
o aparelho
A ficha e o cabo estão
danificados
Chame o agente da BUFFALO ou um técnico
qualificado
O fusível da ficha disparou Substitua o fusível da ficha
Fonte de alimentação Verifique a fonte de alimentação
Erro na cablagem interna Chame o agente da BUFFALO ou um técnico
qualificado
O aparelho liga mas
não aquece
O reservatório de água não está
bem colocado
Verificar se o reservatório está totalmente
inserido no aparelho
Sai muito vapor at ravés
das guarnições da
porta do forno
A porta não está bem fechada Fechar bem a porta
O bloqueio da porta está
avariado
Chame o agente da BUFFALO ou um técnico
qualificado
O painel não indica
nada
Não há água no reservatório Retire e encha o reservatório
Coloque o reservatório e aguarde dois
minutos até o aparelho fazer o reset
O símbolo do reservatório de água
desaparecerá
O painel não indica
nada
O reservatório de água não está
correctamente colocado no
aparelho
Coloque o reservatório e aguarde dois
minutos até o aparelho fazer o reset
O símbolo do reservatório de água
desaparecerá
O símbolo do
reservatório de água
pisca no painel
indicador
Há pouca água no reservatório Retire e enche o reservatório
O reservatório de água não está
correctamente colocado no
aparelho
Recoloque o reservatório de água
A água não chega à
placa de aquecimento
O tubo dispensador é obstruído
por calcário
Limpe o tubo com um produto
descalcificante adequado
Se não conseguir limpar o tubo entupido,
substitua o tubo entupido pelo tubo novo
(fornecido)
Page 40

35
PT
Especificações técnicas
Cablagem eléctrica
Deve-se utilizar tomadas adequadas para ligar a ficha do aparelho.
O esquema de electricidade deste aparelho é o seguinte:
• Cabo eléctrico (castanho) para o terminal marcado L
• Cabo neutro (azul) para o terminal marcado N
• Cabo terra (verde/amarelo) para o terminal marcado com E
Este aparelho tem que estar ligado à terra através de um circuito de terra.
Consulte um electricista qualificado em caso de dúvidas.
Os pontos eléctricos isolados devem ficar limpos de qualquer obstrução. Estes pontos têm que ser
imediatamente acessíveis caso seja necessário desligar a electricidade.
Conformidade
As componentes BUFFALO foram submetidas a testes rigorosos a fim de cumprirem as normas e
especificações legais determinadas pelas autoridades internacionais, independentes e nacionais.
Os produtos BUFFALO foram aprovados e trazem o seguinte símbolo:
Todos os direitos reservados. É proibida a reprodução electrónica ou mecânica, ou por qualquer outro meio copiar,
guardar em meios digitais ou transmitir a terceiros estas instruções, seja parcialmente ou na sua totalidade, sem a
autorização prévia de BUFFALO.
Nós nos esforçamos para que no dia de publicação deste manual todos os pormenores sejam correctos, no entanto,
a BUFFALO tem o direito de alterar as especificações sem aviso prévio.
Problema Causa provável A fazer
O símbolo do bloqueio
de segurança está a
piscar no painel
indicador
A porta não está bem fechada Abra e feche novamente a porta
Model Voltagem Alimentação Curronte
Temperatura de
cozedura máx.
Capacida
de
Dimensões
a x l x p mm
Pesos
Y067 230V 50 Hz 1950W 8,5A 100°C 25 litros 490 x 380 x 324 18kg
Page 41

36
S
Säkerhetsråd
• Placera på en plan stabil yta.
• Ett serviceombud/kvalificerad tekniker skall utföra installation och reparationer om så krävs. Avlägsna
inte några komponenter eller servicepanler på produkten.
• Konsultera lokala och nationella normer för att efterleva följande:
• Lagstiftning om hälsa och säkerhet i arbetet
• BS EN Tillämpningsregler
• Brandförebyggande åtgärder
• IEE Regler för kabeldragning
• Byggregler
• Sänk INTE ned produkten i vatten eller använd ånga för rengöring av den.
• Slå INTE på apparaten när vattnet är slut.
• Fyll INTE på för mycket i vattenbehållaren.
• Kontrollera att utsidan är torr när vattenbehållaren sätts tillbaka för att förhindra fel.
• Låt inte vattnet i behållaren ta slut när apparaten används.
• Stå åt sidan när luckan öppnas för att undvika ånga som strömmar ut.
• Kontrollera att alla föremål som används i ugnen kan motstå värmen.
• Låt inte barn komma i närheten av produkten eftersom vissa delar blir mycket heta vid användning.
• Håll allt förpackningsmaterial borta från barn. Kasta allt förpackningsmat e rial i en lighet med de lokala
myndigheternas föreskrifter.
• Om nätsladden skadas, måste den bytas av en BUFFALO-representant eller en kvalificerad tekniker för
att undvika faror.
Inledning
Ta några minuter för att noggrant läsa igenom denna manual. Korrekt underhåll och drift av maskinen
kommer att göra att din BUFFALO-produkt ger bästa möjliga prestanda.
Förpackningsinnehåll
Följande medföljer:
Håll allt förpackningsmaterial åtskiljt från barn. Släng förpackningsmaterialet i enlighet med loka
myndigheters regleringar.
Om elsladden är skadad måste den bytas ut av en BUUFALO-representant eller en rekommenderad
kvalificerad tekniker för att undvika risker.
• Buffalo ångugn
• Vattenbehållare
• Vattendispenserrör x 3
• Galler
•Hel plåt
•Perforerad plåt
• Bruksanvisning
Page 42

37
S
Reglagens placering
Användning
Använda ugnen
Gör på följande sätt när du ska använda ugnen:
1. Fyll på behållaren till rätt nivå. Vattennivåerna visas på behållaren efter tillagningstid.
2. Sätt tillbaka vattenbehållaren. Torka bort eventuellt spill inuti apparaten och stäng luckan.
3. Slå på apparaten genom att trycka på strömknappen.
4. Ställ in önskad tillagningstid genom att trycka på knapparna Time Up (Öka tid) och Time Down
(Minska tid).
5. Ställ in önskad temperatur genom att trycka på knapparna Temperature Up (Öka temperatur) och
Temperature Down (Minska temperatur).
6. Starta tillagningen genom att trycka på Startkn appen.
Obs: Använd friskt vatten varje gång produkten används. Fyll inte på för mycket.
Obs: Det går inte att ändra inställningarna när tillagningen har börjat. Om du behöver
ändra inställningarna måste apparaten startas om.
Obs: Om du öppnar luckan under tillagningen kommer tillagningen att sättas på paus
och en säkerhetssymbol blinkar på temperaturskärmen.
Apparaten fungerar inte när luckan är öppen. Stäng luckan när du vill fortsätta
tillagningen.
POWER
CLOCK
1. Strömbrytare
2. Tid upp/ner-knappar
3. Displaypanel
4. Temperatur låg/hög-knappar
5. Start/stopp-knapp
Page 43

38
S
När tillagningen är klar
1. En kort signal hörs när tillagningen är klar.
2. Ta ut maten ur ugnen. Stå åt sidan så att du undviker ångan som strömmar ut.
3. Låt ugnsluckan vara öppen så att ångan kan strömma ut helt och låt sedan ugnen svalna.
4. Stäng luckan när den svalnat. Stäng av apparaten genom att trycka in och hålla strömknappen
intryckt.
Rengöring, omvårdnad och underhåll
• Stäng alltid av och koppla bort apparaten från eluttaget innan apparaten rengörs.
• Använd inte slipande rengöringsmedel. Använd bara varmt tvålvatten.
• Avlagringar kan samlas inuti apparaten efter användning. Avlägsna dem med ett lämpligt
rengöringsmedel.
• En BUFFALO-representant eller kvalificerad tekniker bör utföra reparationer om det behövs.
• Var försiktig när du rengör och hanterar värmeplattan inuti apparaten.
• Kalka periodvis av kalkbildningar på värmeplattan. Ta bort dem med lämplig avkalkningslösning.
Styrskenorna kan tas bort från apparaten för att underlätta rengöringen:
1. Skruv loss fästmuttrarna på båda sidorna inuti apparaten.
2. Styrskenorna lossnar och kan sedan tas bort.
3. Styrskenorna, vätskeplattan och tillagningsbehållaren kan rengöras
i en diskmaskin.
Sätta tillbaka skenorna:
1. För in den förlängda styrskenan i hålet på baksidan av
ugnsutrymmet.
2. Positionera hålet över skruvgängan och skruva fast fästmuttern.
3. Upprepa på den andra sidan.
Obs: Innehållet i ugnen är mycket hett. Kom ihåg att använda något som skyddar
händerna.
Obs: Vänta i minst 8 minuter efter det att apparaten använts innan du rengör den.
Styrskenor
Fästmutter
Hål
Förlängd
styrskena
Page 44

39
S
Byta ut vattendispenserröret
Om vattendispenserröret blockeras av kalkavlagringar, kan det
bytas ut med ett nytt rör. För att byta ut röret:
1. Dra ut det blockerade röre t.
2. Placera ett reservrör (medföljer) i hålet
Rengöra vattenbehållaren:
1. Ta bort behållaren från apparaten och töm ut eventuellt vatten.
2. Ta bort locket från behållaren och rengör delarna i varmt vatten.
3. Torka både locket och behållaren noga.
4. Sätt tillbaka locket och sätt tillbaka behållaren i apparaten.
Felsökning
Om din BUFFALO-apparat påvisar något fel, kontrollera förs t tabellen innan du ringer till hjälplinjen eller din
BUFFALO-återförsäljare.
Obs: BUFFALO ansvarar inte för fel som orsakas av
kalkavlagringar. I områden med hårt vatten
rekommenderar BUFFALO att ett vattenfilter
används för att begränsa kalkavlagringarna.
Obs: Fyll inte på behållaren förrän den ska användas igen.
Fel Möjlig orsak Åtgärd
Apparaten fungerar
inte
Apparaten är inte påslagen Kontrollera att apparaten är k orrekt ansluten
och påslagen
Kontakt och ledning är skadade Ring en BUFFALO-representant eller
kvalificerad tekniker
Säkring i kontakten har gått Byt ut säkringen
Strömtillförsel Kontrollera strömtillförseln
Internt kabeldragningsfel Ring en BUFFALO-representant eller
kvalificerad tekniker
Apparaten startar men
värms inte upp
Vattenbehållaren är inte
placerad på rätt sätt
Kontrollera att vattenbehållaren har skjutits
in helt i apparaten
Stora mängder ånga
tränger ut mellan
tätningarna på luckan
Luckan är inte ordentligt stängd Stäng luckan ordentligt
Luckans lås är trasigt Ring en BUFFALO-representant eller
kvalificerad tekniker
Teckenfönstret är tomt Inget vatten i behållaren Ta bort behållaren och fyll på
Sätt fast behållaren igen och vänta i 2
minuter för att apparaten ska återställas
Symbolen för vattenbehållaren kommer att
försvinna
Värmeplatta
Vattendispenserrör
Inre avdelning
Page 45
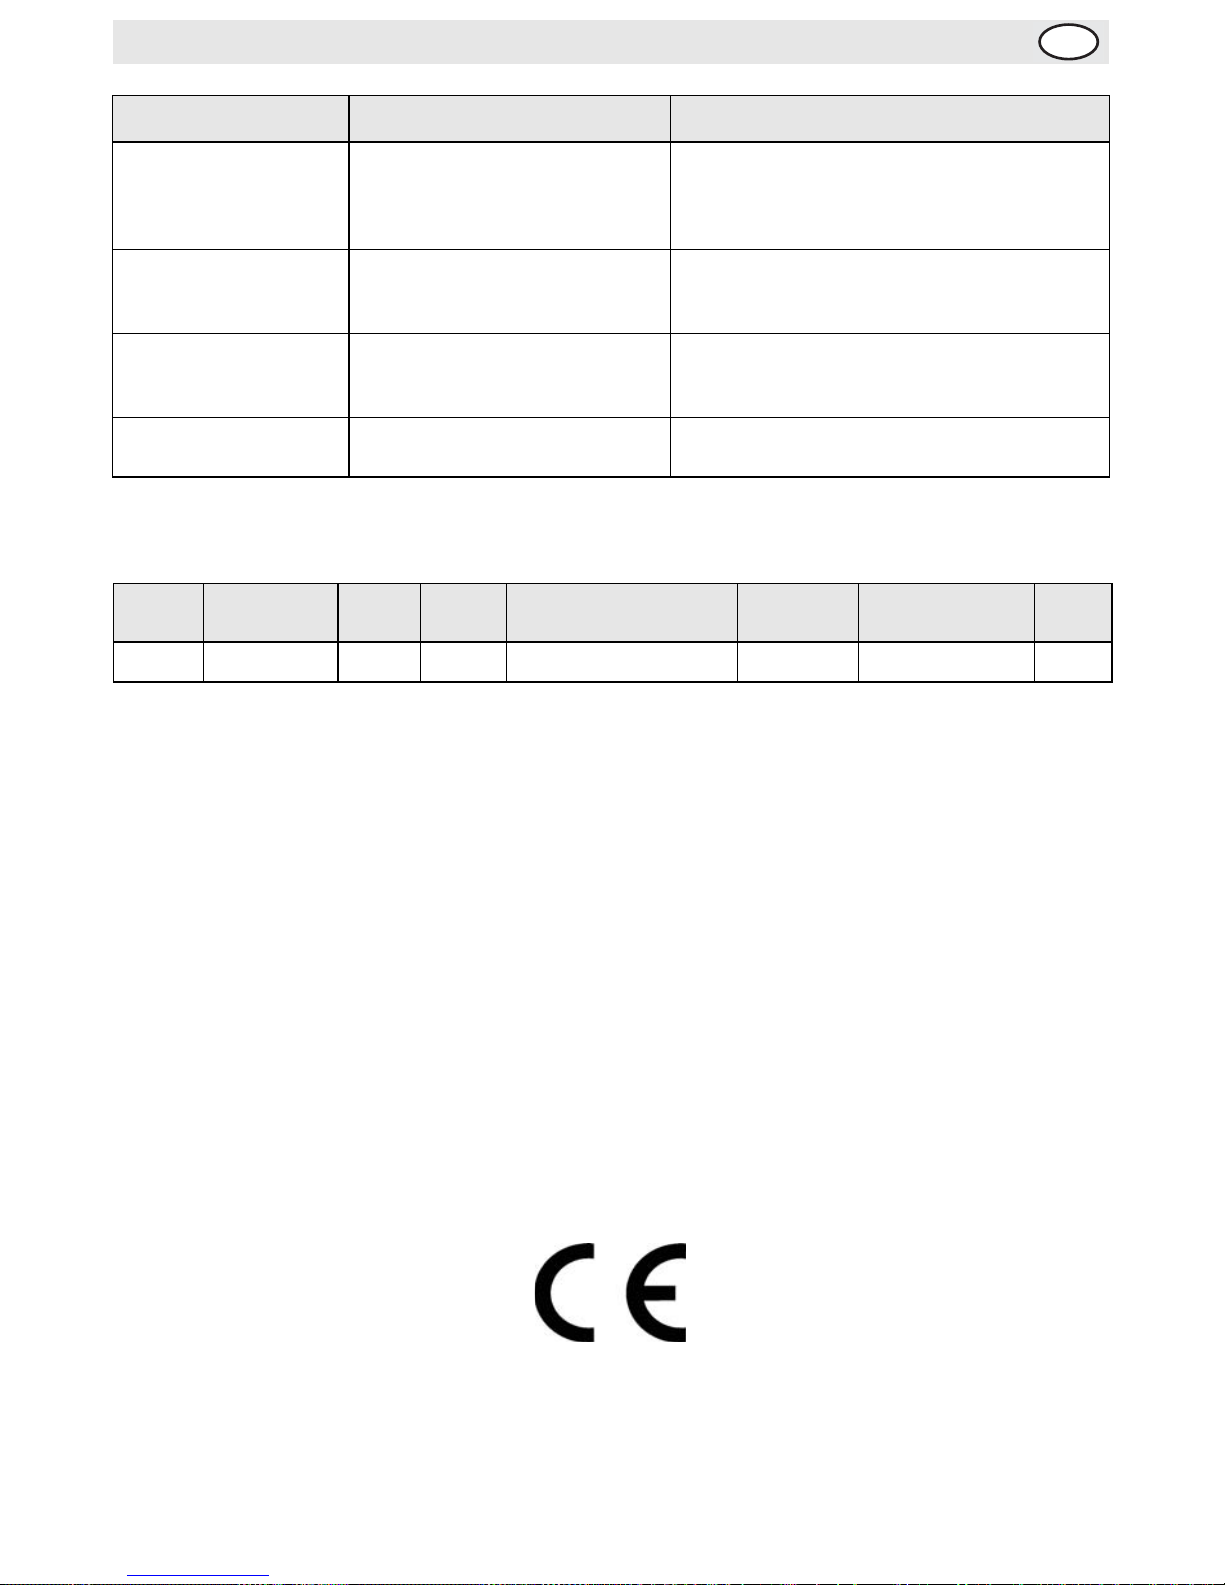
40
S
Tekniska specifikationer
Elektriska kablar
Kontakten måste vara ansluten till ett lämpligt eluttag.
Denna apparat har följande kablar:
• Elektrisk kabel (brun) till uttag markerat L
• Neutral kabel (blå) till uttag markerat N
• Jordkabel (grön/gul) till uttag markerat E
Denna apparat måste vara jordad, och bruka en dedikerad jordad krets.
Vid tveksamheter rådfråga en kvalificerad elektriker.
Elektriska isoleringspunkter måste hållas fria från hinder. I händelse av urkoppling vid nödfall krävs, måste
de vara lättåtkomliga.
Tillmötesgående
BUFFALO-delarna har genomgått strikt produkttestning för att tillmötesgå reglerande normer och
specifikationer utsatta av internationella, oberoende och statliga myndigheter.
BUFFALO-produkterna har godkänts för att bära följande symbol:
Alla rättigheter reserverade. Ingen del av dessa instruktioner får framställas eller överföras i någon form eller på
något sätt, elektroniskt, mekaniskt, fotokopieras, spelas in eller på annat sätt, utan tidigare skriftligt tillstånd från
BUFFALO.
Vi gör allt vi kan för att försäkra att alla detaljer är korrekta då informationen trycks, men, BUFFALO förbehåller
sig rätten att ändra specifikationerna utan tidigare meddelande.
Fel Möjlig orsak Åtgärd
Teckenfönstret är tomt Vattenbehållaren är inte korrekt
fäst på apparaten
Sätt fast behållaren igen och vänta i 2
minuter för att apparaten ska återställas
Symbolen för vattenbehållaren kommer att
försvinna
Vattenbehållarens
symbol blinkar i
teckenfönstret
Det finns inte tillräckligt med
vatten i behållaren
Ta bort behållaren och fyll på den
Vattne t når in te
värmeplattan
Vattendispenserröret är
blockerat av kalkavlagringar
Gör rent röret med lämplig avkalkningslösning.
Byt ut med reservrör (medföljer) om
blockeringen inte kan lösas upp
Säkerhetssymbolen
blinkar i teckenfönstret
Luckan är inte ordentligt stängd Öppna luckan och stäng den igen
Modell Spänning Kraft Ström
Max.
tillagningstemperatur
Kapacitet
Mått
h x b x d mm
Vikt
Y067 230V 50 Hz 1950W 8,5A 100°C 25 liter 490 x 380 x 324 18kg
Page 46

41
DK
Sikkerhedstips
• Anbring apparatet på en jævn, stabil overflade.
• Installation og reparation skal udføres af en serviceagent/kvalificeret tekniker, hvis det bliver
nødvendigt. Fjern ikke komponenter eller servicepaneler på dette produkt.
• Check de lokale og nationale standarder for at imødekomme det følgende:
• Sikkerhed og sundhed på arbejdspladsen
• BS EN Regler for god praksis
• Brandforholdsregler
• IEE Strømkabelregulativer
• Bygningsvedtægter
• Kom IKKE ovnen i vand og rengør den IKKE med dampspuler.
• Tænd IKKE for apparatet, når der ikke er vand i den.
• Fyld IKKE for meget vand i vandbeholderen.
• Når vandbeholderen sættes i igen, skal man sørge for, at ydersiden er tør for at forhindre, at
apparatet evt. svigter.
• Lad ikke vandet i beholderen koge væk, mens apparatet er i brug.
• Stå væk fra døren, når den åbnes for at undgå den udstrømmende damp.
• Sørg for, at de genstande, der anvendes i ovnen, er tilstrækkeligt varmebestandige.
• Lad ikke børn komme i nærheden af dette apparat, da nogle dele bliver meget varme under brug.
• Hold alt indpakningsmateriale væk fra børn. Bortskaf indpakningsmaterialet i overensstemmelse med
de kommunale regler.
• Hvis strømledningen bliver b eskadi get, s kal d en udsk ifte s af en BUFFALO forhandler eller en anbef alet
faguddannet elektriker for at undgå fare.
• Opbevar al emballage utilgængeligt for børn. Kasser emballagen i henhold til de lokale love og
bestemmelser.
• Hvis strømkablet er beskadiget, skal det udskiftes af en BUFFALO agent eller en anbefalet kvalificeret
tekniker for at undgå fare.
Introduktion
Brug et par minutter til at læse denne vejledning omhyggeligt igennem. Korrekt vedligeholdelse og drift af
denne maskine vil give dit BUFFALO produkt den bedst mulige ydelse.
Emballagens indhold
Følgende er inkluderet:
BUFFALO er stolte vores kvalitet og service, der sikrer at det leverede indhold er fuldt funktionelt og fri for
skader ved pakning.
Skulle du alligevel opdage skader, som resultat af transporten, bedes du kontakte din BUFF ALO forhandler
med det samme.
• Buffalo dampovn
•Vandbeholder
• Vanddispenserslange x 3
•Rist
• Fad uden hu ller
•Fad med huller
•Brugsanvisning
Page 47

42
DK
Arrangement af betjeningsanordninger
Brug
Sådan anvendes ovnen
Inden dampovnen tages i brug, skal man gøre følgende:
1. Fyld beholderen med vand til det ønskede niveau. Beholderen viser vandniveauerne i henhold til
tilberedningstid.
2. Sæt vandbeholderen ind i ovnen igen. Tør evt. spild op inde i apparatet og luk døren.
3. Tryk på strømknappen for at tænde for apparatet.
4. Tryk på tid op- og tid ned-knapperne for at indstille den ønskede tilberedningstid.
5. Tryk på temperatur op- og temperatur ned-knapperne for at indstille den ønskede temperatur.
6. Tryk på startknappen for at begynde tilberedningen.
Når tilberedningen er færdig
1. Når tilberedningen er færdig, giver apparatet et kort alarmsignal.
2. Tag maden ud af ovnen. Pas på den udstrømmende damp!
3. Lad ovndøren stå åben, så dampen kan slippe helt ud og apparatet kan køle af.
4. Når apparatet er afkølet, kan døren lukkes. Tryk på strømknappen og hold den nede for at slukke for
ovnen.
Bemærk: Brug frisk vand, hver gang apparatet anvendes. Fyld ikke for meget på.
Bemærk: Det er ikke muligt at ændre disse indstillinger, når tilberedningen først er
begyndt. Hvis indstillingerne skal ændres, skal apparatet startes igen.
Bemærk: Hvis døren åbnes under tilberedningen, standser tilberedningen og et
sikkerhedslåsesymbol blinker på temperaturdisplayet.
Apparatet kan ikke virke, når døren er åben. Luk døren for at fortsætte tilberedningen.
Bemærk: Indholdet i ovnen vil være meget varmt. Husk at bruge grydelapper,
grillhandsker el.lign.
POWER
CLOCK
1. Strømknap
2. Tid op-/ned-knapper
3. Displaypanel
4. Temperatur op -/ned-knapp e r
5. Start/stopknap
Page 48

43
DK
Regnøring, pleje og vedligeholdelse
• Sluk altid for apparatet og tag stikket ud af stikkontakten inden rengøring.
• Anvend ikke skurende rengøringsmidler på apparatet, brug varmt sæbevand.
• Efter brug kan der været opstået kalkaflejringer inde i apparatet. Disse skal fjernes med et egnet
afkalkningsmiddel.
• Eventuelle reparationer skal udføres af en BUFFALO forhandler eller en faguddannet elektriker.
• Der skal udvises forsigtighed, når varmepladen inde i apparatet rengøres og håndteres.
• Kalk vil periodisk blive aflejret på varmepladen. Fjern det med et passende afkalkningsmiddel.
For at gøre det lettere at rengøre apparatet kan styreskinnerne
tages ud.
1. Skru holdemøtrikkerne af i hver side på apparatets inderside.
2. Styreskinnerne vil så falde ned og kan tages ud.
3. Styreskinnerne, væskepladen og fadene kan alle rengøres i
opvaskemaskine.
Sådan monteres skinnerne igen:
1. Sæt den udstrakte styreskinne ind i hullet bagest i ovnrummet.
2. Anbring hullet over skruegevindet og skru så holdemøtrikken på.
3. Gør det samme i den anden side.
Udskiftning af vanddispenserslangen
Hvis vanddispenserslangen bliver tilstoppet af kalk, kan den
udskiftes med en ny slange. For at udskifte slangen skal man:
1. Trække den tilstoppede slange ud.
2. Sætte en udskiftningsslange (medfølger) ind i hullet.
Bemærk: Lad apparatet stå i mindst 8 minutter efter tilberedningen, før der gøres
forsøg på at rengøre det.
Bemærk: BUFFALO påtager sig intet ansvar for fejl,
der skyldes kalkaflejringer. I områder med hårdt
vand anbefaler BUFFALO, at der bruges et vandfilter
for at begrænse dannelsen af kalkaflejringer.
Styreskinner
Holdemøtrik
Hul
Udstrakt
styreskinne
Varmeplade
Vanddispenserslange
Indre sektion
Page 49

44
DK
Sådan rengøres vandbeholderen:
1. Fjern beholderen fra apparatet og tøm den for resterende vand.
2. Tag låget af beholderen og vask begge dele med varmt vand.
3. Tør låget og beholderen grundigt.
4. Sæt låget på igen og sæt derefter beholderen ind i apparatet igen.
Fejlfinding
Hvis der opstår en fejl i dispenseren, skal man kontrollere følgende punkter, før man ringer til
hjælpetelefonen.
Bemærk: Fyld ikke beholderen, før den er klar til at bliv e anvendt igen.
Fejl Mulig årsag Løsning
Apparatet virker ikke Apparatet er ikke tændt Kontroller, at apparatet er sat rigtigt i
stikkontakten og er tændt
Stik og ledning er beskadiget Kontakt BUFFALO agenten eller en
kvalificeret tekniker
En sikring i stikket er sprunget Udskift stiksikringen
Strømforsyning Kontroller strømforsyningen
Intern ledningsfejl Kontakt BUFFALO agenten eller en
kvalificeret tekniker
Apparatet starter, men
varmer ikke op
Vandbeholderen er ikke sat
rigtigt i
Kontrollér, at beholderen er skubbet helt ind
i apparatet
Store mængder damp
strømmer ud ved
dørpakningerne
Døren er ikke lukket rigtigt Luk døren godt til
Dørlåsen er gået i stykker Tilkald en BUFFALO forhandler eller en
faguddannet elektriker
Displaypanelet er
blankt
Der er ikke blevet indtastes
tilberedningsinformationer
Indtast tilberedningstiden og -temperaturen
Døren er ikke lukket rigtigt Åbn døren og luk den igen
Vandbeholdersymbolet
blinker på displayet
Ingen vand i beholderen Tag beholderen af, og fyld den op
Sæt beholderen i igen, og vent i 2 minutter
på , at udstyret nulstilles
Vandbeholdersymbolet vil nu forsvinde
Vandbeholderen sidder ikke
ordentligt fast i udstyret
Sæt beholderen i igen, og vent i 2 minutter
på , at udstyret nulstilles
Vandbeholdersymbolet vil nu forsvinde
Sikkerhedslåsesymbole
t blinker på displayet
Døren er ikke lukket rigtigt Åbn døren og luk den igen
Vandet når ikke hen til
varmepladen
Vanddispenserslangen er
tilstoppet af kalk
Rengør slangen med et pas-sende
kalkfjernermiddel. Hvis dette ikke fjerner
tilstopnin-gen, skal slangen udskiftes med en
ny (medfølger)
Sikkerhedslåsesymbole
t blinker på displayet
Døren er ikke lukket rigtigt Åbn døren og luk den igen
Page 50

45
DK
Tekniske specifikationer
El-kabler
Stikket skal tilsluttes til en passende hovedkontakt.
Apparatet er kabelført som følger:
• Strømførende ledning (brun) til terminal L
• Neutral ledning (blå) til terminal N
• Jordledning (grøn/gul) til terminal E
Dette apparat skal være jordforbundet med et fast fejlstrømsrelæ.
Spørg en autoriseret elektriker i tvivlstilfælde.
Elektriske isolationspunkter s kal holdes fri af blokeringer. I nødstilfælde skal de være tilgængelige for
afbrydelse.
Overensstemmelse
BUFFALO delene har gennemgået strenge produkttests for at opfylde normer, standarder og
specifikationer, der er fastsat af internationale, uafhængige og føderale autoriteter.
BUFFALO produkterne er blevet godkendt til at bære følgende symbol:
Med forbehold for alle rettigheder. Ingen del af disse anvisninger må produceres eller transmitteres i noget format
eller på nogen måde, hvad enten det drejer sig om elektronisk, mekanisk, fotokopiering, lagring på edb eller andet,
før der er blevet forudindhentet skriftlig tilladelse hertil fra BUFFALO.
Der er blevet gjort alle bestræbelser på at sikre, at oplysningerne er korrekte på trykningstidspunktet, men
BUFFALO forbeholder sig ret til at ændre specifikationerne uden varsel.
Model Spænding Strøm Strømstyrke
Maks.
tilberednings-
temperatur
Kapacitet
(liter)
Mål h x b x d
mm
Vægt
Y067 230V 50 Hz 1950W 8,5A 100°C 25 490 x 380 x 324 18kg
Page 51

46
N
Sikkerhetstips
• Plasser på en vannrett og stabil flate.
• Installasjon og all reparasjon skal utføres av en serviceagent eller en kyndig tekniker. Komponenter
eller inspeksjonsdeksler må ikke fjernes på dette produktet.
• Rådfør deg med lokale og nasjonale standarder for å oppfylle følgende:
• HMS-lovgivningen (Helse/Miljø/Sikkerhet)
• Bransjestandard BS EN
• Forholdsregler mot brann
• IEE-forskrifter for tilkopling
• Byggeregler
• Dampovnen MÅ IKKE senkes i vann og det må heller ikke brukes dampvasking til rengjøring.
• Dampovnen MÅ IKKE slås på når den er tom for vann.
• Vannbeholderen MÅ IKKE overfylles med vann.
• Når vannbeholderen settes på plass, sjekk at den er tørr utvendig for å forebygge eventuell svikt på
dampovnen.
• La ikke vannet i beholderen renne ut mens dampovnen er i bruk.
• Gå tilbake når døra åpnes for å unngå eksponering av damp som drives ut.
• Sjekk at alle gjenstander som blir brukt i ovnen har tilstrekk e li g varmebestandighet. La ikke barn
komme i nærheten av dampovne n da noe n av komponentene blir meget varme under bruk.
• Hold all emballasje unna barn. Emballasjen skal deponeres i henhold til offentlige bestemmelser på
stedet.
• Hvis strømledningen er sk adet, skal den skiftes ut av en BUFFALO-agent eller en anbefalt ky n dig
tekniker for å unngå eventuelle farer.
• Hold all emballasje unna barn. Emballasjen skal deponeres i henhold til forskrifter bestemt av
myndighetene på stedet.
• Hvis strømledningen er skadet skal den skiftes ut av en BUFFALO-agent eller en kyndig tekniker for å
unngå fare.
Innledning
Vennligst ta deg tid til å lese nøye gjennom denne håndboka. Korrekt vedlikehold og bruk av ismaskinen vil
gi best mulig ytelse på dit t BUFFALO-produktet.
Pakkeinnhold
Følgende er inkludert:
BUFFALO er stolt av sin kvalitet og service, og garanterer at da innholdet ble pakket var det fullstendig
funksjonelt og uten skade.
Skulle du finne noe som helst skade som et resultat av transitt, vennligst ta omgående ko ntakt med
BUFFALO-forhandleren på stedet.
• Buffalo dampovn
•Vannbeholder
• Vannfordelingsslange x 3
• Stålstativ
• Uperforert brett
• Perforert brett
• Brukerhåndbok
Page 52

47
N
Layout av kontroller
Bruk
Bruk av ovnen
For å bruke dampovnen, foreta følgende:
1. Fyll beholderen opp til nødvendig nivå. Beholderen viser vann-nivåer ved tid for matlaging.
2. Sett vannbeholderen på plass, og tørk opp eventuelt søl i dampovnen og lukk døren.
3. Trykk på strømknappen for å slå på dampovnen.
4. Trykk på "Time Up" (Tid opp) og "Time Down" (Tid ned) knappene for å stille inn ønsket tid for
matlaging.
5. Trykk på "Temperature Up" (Temperatur opp) og "Temperature Down" (Temperatur ned) knappene
for å stille inn ønsket temperatur.
6. Trykk på "Start" knappen for å begynne matlaging.
Når matlagingen er ferdig
1. Når matlagingen er ferdig, høres en kort lydalarm fra dampovnen.
2. Ta maten ut av ovnen. Vær forsiktig og unngå damp som slippes ut.
3. La døren på ovnen være åpen for å få all dampen bort, og for at ovnen skal nedkjøle.
4. Når ovnen er nedkjølt, lukk døren. Trykk og hold på strømknappen for å slå ovnen av.
Merk: Bruk ferskvann hver gang dampovnen skal brukes. Ikke overfyll.
Merk: Det er ikke mulig å endre disse innstillingene når matlaging er satt i gang. For å
endre innstillingene, må dampovnen startes på nytt.
Merk: Hvis døren åpnes und er matlag ing vil mat lagings prosessen p ausere og symbol et
for sikkerhetslåsing (Safety Lock) vil blinke på temperaturdisplayet.
Dampovnen vil ikke fungere når døren er åpen. Lukk døren for å fortsette matlagingen.
Merk: Innholdet i ovnen er meget varmt. Husk å ha på deg egnede vernehansker.
POWER
CLOCK
1. Strømknapp
2. Opp/ned knapp for tidsinnstillin g
3. Displaypanel
4. Knapp for høy/lav temperatur
5. Start-/stoppknapp
Page 53

48
N
Rengjøring, vedlikehold og stell
• Slå alltid dampovnen av og frak o pl e str ømt ilførselen før rengjøring.
• Ikke bruk abrasivt rengjøringsmiddel på dampovnen, men bruk i stedet varmt såpevann.
• Da det kan utvikle seg avleiring i ovnen etter matlaging, skal det brukes egnet rengjøringsmiddel for å
fjerne avleiring.
• Eventuelle reparasjoner skal foretas av en BUFFALO-agent eller en kyndig tekniker.
• Vær forsiktig under rengjøring og når varmeplaten i ovnen håndteres.
• Kalkavleiringer dannes fra tid til annen på varmeplaten. Fjern avleiringen med et egnet
avflakingsmiddel.
For lettvinn rengjøring kan styreskinnene fjernes fra dampovnen som
følger:
1. Skru løs festemutrene på begge sidene innvendig i dampovnen.
2. Styreskinnen vil nå komme løs og kan bli fjernet.
3. Styreskinnene, væskeplaten og beholderen for matlaging kan
vaskes i oppvaskmaskinen.
Sette styreskinnene på plass igjen:
1. Monter den forlengede styreskinnen i hullet bakerst i kammeret for
matlaging.
2. Posisjoner hullet over skruegjengene og skru på festemutteren.
3. Gjenta på den andre siden.
Utskifting av vannfordelingsslange
Vannfordelingsslangen kan skiftes hvis den skulle bli tett av
kalkavleiringer. For å skifte slangen:
1. Trekk ut den tette slangen.
2. Stikk den nye slangen inn i hullet
Merk: La dampovnen være i minst 8 minutter etter matlaging før det settes i gang med
rengjøring.
Merk: BUFFALO aksepterer ikke noe som helst
ansvar for feil som måtte oppstå på grunn av
oppbygging av kjelstein. På steder med hardt vann,
anbefaler BUFFALO å bruke vannfilter for å
begrense oppbygging av kjelstein.
Styreskinner
Festemutter
Hull
Forlenget
styreskinne
Varmeplate
Vannfordelingsslange
Innerseksjon
Page 54

49
N
Gjøre vannbeholderen ren:
1. Fjern beholderen fra dampovnen og tøm ut vann som er til overs.
2. Ta av lokket på beholderen og gjør begge delene rene med varmt vann.
3. Tørk lokket og beholderen grundig.
4. Sett lokket på plass og monter beholderen på plass i dampovnen.
Feilsøking
Hvis kjøledispenseren utvikler feil, sjekk følgende punkter før du ringer hjelpelinjen.
Merk: Fyll ikke beholderen igjen før ovnen skal brukes på nytt.
Fault Probable Cause Action
Ismaskinen fungerer
ikke
Ismaskinen er ikke slått på Sjekk at støpslet på ismaskinen er plugget
inn korrekt og at kontakten er slått på
Støpsel og ledning er skadet Ring BUFFALO-agenten eller en kyndig
tekniker
Sikringen i støpslet har gått Skift ut sikringen i støpselet
Strømtilførsel Sjekk strømti lførselen
Intern koplingsfeil Ring BUFFALO-agenten eller en kyndig
tekniker
Dampovnen starter,
men blir ikke varm
Vannbeholderen er ikke
ordentlig montert
Kontroller at beholderen er skjøvet helt inn i
dampovnen
Det kommer en god del
med damp fra
dørtetningen
Døren er ikke ordentlig lukket Lukk døren godt
Dørlåsen er ødelagt Ta kontakt med BUFFALO-agenten eller en
kyndig tekniker
Displaypanelet er
blankt
Innstillinger for matlaging har
ikke blitt satt inn
Sett inn tid og temperatur for matlaging
Døren er ikke ordentlig lukket Åpne og lukk døren
Symbol for
vannbeholder blinker
på displayet
Beholderen er tom for vann Ta ut beholderen og fyll den
Sett beholderen på plass igjen, og vent i to
minutter til apparatet er tilbakestilt
Vannbeholderens symbol vil forsvinne
Vannbeholderen er ikke
ordentlig på plass i apparatet
Sett beholderen på plass igjen, og vent i to
minutter til apparatet er tilbakestilt
Vannbeholderens symbol vil forsvinne
Symbolet for «Security
Lock» (Sikkerhetslås)
blinker på displayet
Døren er ikke ordentlig lukket Åpne og lukk døren
Vannet når ikke
varmeplaten
Vannfordeligsslangen tett av
kalkavleiringer
Rengjør slangen med et passende
avleiringsmiddel. Hvis slangen fremdeles er
tett, byttes den ut med en ny
Symbolet for "Security
Lock" (Sikkerhetslås)
blinker på displayet
Døren er ikke ordentlig lukket Åpne og lukk døren
Page 55

50
N
Tekniske spesifikasjoner
Elektrisk tilkopling
Støpselet skal tilkoples en passende strømkontakt.
Enheten er koplet som følger:
• Strømførende ledning (brun) - koplingspunkt merket L
• Nøytral ledning (blå) - koplingspu nkt merket N
• Jordledning (grønn) - koplingspunkt merket E
Denne enheten skal ha jording ved å bruke en dedisert jordingskrets.
Hvis i tvil, rådfør deg med en kyndig elektriker.
Elektriske isolasjonspunkter / skillebrytere skal være uhindret. I et nødstilfelle hvor det er nødvendig med
frakopling, skal de alltid være tilgjengelige.
Samsvar
Deler brukt av BUFFALO har gjennomgått streng produkttesting for å være i samsvar med regulative
standarder og spesifikasjoner fastla gt av internasjonal, uavhengig og føderale myndigheter.
BUFFALO-produkter har blitt godkjent for å bær:
Vi tar forbehold om alle rettigheter. Ikke noen del av disse instruksjonene må fremstilles eller oversendes i noen
form eller med noen midler, elektronisk, mekanisk, fotokopiert, nedskrevet eller på noen annen måte, uten at
BUFFALO har gitt skriftlig tillatelse på forhånd.
Det er truffet omfattende tiltak for å sikre at alle detaljer er korrekte på tidspunktet for trykking, men BUFFALO
forbeholder seg retten til å endre spesifikasjoner uten forvarsel.
Modell Spenning Strøm
Strømstyr
ke
Maks.
temperatur for
matlaging
Kapasitet
Mål
h x w x d mm
Vekt
Y067 230V 50 Hz 1950W 8,5A 100°C 25 liter 490 x 380 x 324 18kg
Page 56

51
FIN
Turvallisuusvihjeitä
• Aseta laite tasaiselle, vakaalle pinnalle.
• Huoltoedustajan/pätevän huoltomiehen tulisi suorittaa asen nus ja tarvittaessa kaikki korjaustyöt. Älä
irrota mitään tämän laitteen osia tai huoltopane elia.
• Katso tietoja paikallisista ja kansallisista standardeista varmistaaksesi, että seuraavia määräyksiä
noudatetaan:
•Työterveys- ja turvallisuuslainsäädäntö
•BS EN-mukaiset ohjeet
•Paloturvallisuusmääräykset
•IEE-johdotusmääräykset
•Rakennusmääräykset
• ÄLÄ upota laitetta veteen tai käytä höyrypesureita laitteen puhdistamiseen.
• ÄLÄ kytke laitetta päälle, kun siinä ei ole vettä.
• ÄLÄ täytä vesisäiliötä liian täyteen.
• Asetettaessa vesisäiliötä takai sin paikalleen on v armis tutta v a siitä, ett ä säiliön u lkopu oli on kuiv a, jot ta
estettäisiin laitteen meneminen epäkuntoon.
• Älä anna säiliössä olevan veden loppua laitteen käytön aikana.
• Seiso vähän matkan päässä uunin luukkua avattaessa välttyäksesi ulos tuleval ta höyryltä.
• Varmista, että kaikki uunissa käytettävät astiat kestävät riittävästi lämpöä.
• Älä päästä lapsia uunin läheisyyt een, sillä jotkut osat tulevat kuumiksi käyt ön aikana.
• Pidä kaikki pakkausmateriaali poissa lasten ulottuvilta. Hävitä pakkausmateriaali paikallisten
määräysten mukaisesti.
• Jos virtajohto on vaurioitunut, saa sen vaihtaa uuteen ainoastaan BUFFALO -edustaja tai valtuutettu
pätevä huoltomies vaarojen välttämiseksi.
• Pidä kaikki pakkausmateriaali poissa lasten ulottuvilta. Hävitä pakkausmateriaali paikallisten
viranomaisten määräysten mukaisesti.
• Jos virtajohto on vaurioitunut, saa sen vaihtaa uuteen ainoastaan BUFFALO-edustaja tai valtuutettu
pätevä huoltomies vaarojen välttämiseksi.
Johdanto
Käytä muutama minuutti tämän ohjekirjan lukemiseen huolellisesti läpi. Kun tätä BUFFALO-laitetta
huolletaan ja käytetään oikein, saadaan siitä paras mahdollinen hyöty.
Pakkauksen sisältö
Pakkaus sisältää seuraavat:
BUFFALO on ylpeä laadusta ja palvelusta varmistaen, että laitetta pakattaessa pakkauksen sisältö on täys in
kunnossa ja ilman vikoja.
Mikäli laite on kuljetuksen takia vauri oitunut, ota välittömästi yhteyttä BUFFALO -edustajaan.
• Buffalo höyryuuni
• Vesisäiliö
• Veden jakeluputki x 3
•Ritilä
• Uunipelti ilman reiki ä
• Rei'itetty uunipelti
•Ohjekirja
Page 57

52
FIN
Ohjauslaitteiden sijainti
Käyttö
Uunin käyttö
Toimi seuraavasti uunia käytettäessä:
1. Täytä säiliö tarvittavalle tasolle. Säiliössä on veden pinnan merkinnät kypsennysaikojen mukaan.
2. Aseta vesisäiliö paikalleen. Pyyhi laitteeseen mahdoll is esti vuotanut vesi pois ja sulje uunin luukku.
3. Paina virtapainiketta kääntääksesi laitteen päälle.
4. Paina Time Up (aika ylös) ja Time Down (aika alas) -painikkeita halutun paistoajan asettamiseksi.
5. Paina Temperature Up (lämpötila ylös) ja Temperature Down (lämpötila alas) -painikkeita halutun
paistolämpötilan asettamiseksi.
6. Paina Start -painiketta (käynnistys) kypsentämisen aloittamiseksi.
Kun kypsentäminen on päättynyt
1. Kun kypsentäminen on saatu valmiiksi, laite antaa lyhyen äänimerkin.
2. Ota ruoka ulos uunista. Varo höyryn vapautumista uunista.
3. Jätä laitteen ovi auki, jotta kaikki höyry tulisi ulos uunista ja laite jäähtyisi.
4. Kun laite on jäähtynyt, sulje ovi. Paina virtapainike alas ja pidä sitä alhaalla uunin kytkemiseksi pois
päältä.
Huom.: Käytä puhdasta vettä joka kerta, kun laitetta käytetään. Älä täytä säiliötä liian
täyteen.
Huom.: Näitä asetuksia ei ole mahdollista muuttaa, kun kypsentäminen on alkanut. Jos
asetuksia halutaan muuttaa, on laite käynnistettävä uudestaan.
Huom.: Oven avaaminen kypsentämisen aikana keskeyttää kypsennysprosess in ja
turvalukitusta osoittava merkki vilkkuu lämpötilan näytössä.
Laite ei toimi, kun ovi on auki. Sulje ovi jatkaaksesi kypsentämistä.
Huom.: Uunin sisältö on erittäin kuumaa. Muista käyttää sopivia suojakäsineitä.
POWER
CLOCK
1. Virtapainike
2. Aika ylös/alas-painikkeet
3. Näyttöpaneeli
4. Lämpötila ylös/alas-painikkeet
5. Käynnistys/pysäytys-painike
Page 58

53
FIN
Puhdistus, hoito & huolto
• Kytke laite aina pois päältä ja katkaise virrantulo laitteeseen ennen puhdistamista.
• Älä käytä hankaavia puhdistusaineita laitteen puhdistamiseen, vaan käytä lämmintä saip pu avettä.
• Käytön jälkeen laitteen sisälle voi kertyä jäänteitä. Käytä sopivaa puhdistusainetta niiden
poistamiseen.
• BUFFALO -edustajan tai valtuutetun pätevän huoltomiehen on tarvittaessa suoritettava
korjaustoimenpiteet.
• Ole varovainen, kun puhdistat ja käsittelet laitteessa olevaa lämpölevyä.
• Lämpölevyyn muodostuu aika ajoin kalkkikiveä. Poista se sopivalla kalkinpoistoaineen liuoksella.
Jotta puhdistaminen olisi helpompaa, hyllynkannattimet voidaan poistaa
laitteesta:
1. Ruuvaa kiinnitysmu tterit auki laitteen molemmilta puolilta.
2. Hyllynkannattimet putoavat alas ja ne voidaan poistaa.
3. Hyllynkannattimet, nestelevy ja paistoastiat voidaan kaikki pestä
astianpesukoneessa.
Kannattimet asetetaan takaisin seuraavasti
1. Aseta pidennetty hyllynkannatin uunin sisäosan takaosassa olevaan
reikään.
2. Aseta reikä ruuvin kierteiden kohdalle ja ruuvaa kiinnitysmutteri
paikalleen.
3. Toista toimenpide toisella puolella.
Veden jakeluputken vaihtaminen uuteen
Jos kalkkikivi tukkii veden jakeluputken, voidaan putki vaihtaa
uuteen. Putki vaihdetaan seuraavasti:
1. Vedä tukkeutunut putki ulos laitteesta.
2. Aseta vaihtoputki (toimitettu pakkauksen mukana) reikään.
Huom.: Anna laitteen seistä vähintään 8 minuuttia kypsentämisen jälkeen ennen kuin
yrität puhdistaa sitä.
Huom.: BUFFALO ei kanna mitään vastuuta vioista,
jotka ovat aiheutuneet kalkkikiven
muodostumisesta. BUFFALO suosittelee
vesisuodattimen käyttöä alueilla, joissa on kova
vesi, kalkkikiven syntymisen estämiseksi.
Hyllynkannattimet
Kiinnitysmutteri
Reikä
Pidennetty
hyllynkann
-atin
Lämpölevy
Veden jakeluputki
Sisäosa
Page 59

54
FIN
Vesisäiliö puhdistetaan seuraavas ti:
1. Poista säiliö laitteesta ja tyhjennä siinä mahdollisesti oleva vesi.
2. Poista säiliön kansi ja puhdista molemmat osat puhtaalla vedellä.
3. Kuivaa kansi ja säiliö perusteellisesti.
4. Aseta kansi takaisin paikalleen ja laita sä il iö takaisin laitteeseen.
Vianetsintä
Jos BUFFALO -laitteeseen tulee vika, tarkista seuraavassa taulukossa esitetyt seikat ennen kuin otat
yhteyttä puhelinpalveluun tai BUFFALO -edustajaan.
Huom.: Älä täytä säiliötä ennen kuin se on taas valmiina käyttöön.
Vika Mahdollinen aiheuttaja Toimenpide
Laite ei toimi Laitetta ei ole kytketty päälle Tarkista, että laite on liitetty ve rkkovirtaan
oikein ja kytketty päälle
Pistotulppa ja johto ovat
vioittuneet
Soita BUFFALO -edustajalle tai pätevälle
huoltomiehelle
Pistotulpassa oleva sulake on
palanut
Vaihda sulake uuteen
Virransyöttö Tarkasta virransyöttö
Sisäinen vika johdoissa Soita BUFFALO -edustajalle tai pätevälle
huoltomiehelle
Laite käynnistyy , mutta
ei lämpene
Vesisäiliötä ei ole asetettu
kunnolla paikalleen
Tarkista, että säiliö on ty önnetty kokonaan
laitteeseen
Luukun tiivisteistä
vuotaa runsaasti
höyryä
Luukkua ei ole suljettu kunnolla Sulje luukku hyvin
Luukun tiivisteistä vuotaa
runsaasti höyryä
Sulje luukku hyvin
Luukun lukitus on mennyt rikki Soita BUFFALO -edustajalle tai pätevälle
huoltomiehelle
Näyttöpaneeli on tyhjä Vesisäiliössä ei ole vettä Irrota vesisäiliö ja täytä se
Aseta vesisäiliö takaisin laitteeseen ja odota
2 minuuttia, kun laite nollautuu
Vesisäiliön merkki häviää
Vesisäiliötä ei ole asetettu
laitteeseen kunnolla
Aseta vesisäiliö takaisin laitteeseen ja odota
2 minuuttia, kun laite nollautuu
Vesisäiliön merkki häviää
Vesisäiliön merkki
vilkkuu näytössä
Säiliössä ei ole tarpeeksi vettä Ota säiliö ulos ja täytä se
Vesisäiliötä ei ole asetettu
laitteeseen kunnolla
Työnnä vesisäiliö uudelleen laitteeseen
Vettä e i tule
lämpölevylle
Veden jakeluputki on tukossa
kalkkikiven takia
Puhdista putki sopi valla
kalkinpoistoaineliuoksella
Jos se ei auta tukoksen poistoon, vaihda
putki uuteen (toimitettu pakkau ksen
mukana)
T urv alukituksen merkki
vilkkuu näytössä
Luukkua ei ole suljettu kunnolla Avaa ovi ja sulje se uudelleen
Page 60

55
FIN
Tekniset tiedot
Sähköjohdot
Pistotulppa on liitettävä sopivaan verkkovirtapistokkeeseen.
Laitteen johdot liitetään seuraavasti:
• Jännitteellinen johto (väriltään ruskea) napaan, jossa on merkintä L
• Neutraali johto ( vär iltään sininen) napaan, jossa on merkintä N
• Maadoitusjohto (väriltään vihreä/keltainen) napaan, jossa on merkintä E
Tämä laite on maadoitettava käyttämällä tarkoitukseen varattua maadoituspiiriä.
Jos et ole varma asiasta, kysy neuvoa pätevältä sähkömieheltä.
Sähkövirran eristyspisteet on pidettävä vapaina kaikista esteistä. Mikäli laite joudutaan hätätapauksessa
kytkemään verkkovirrasta, on niihin päästävä help osti.
Vaatimustenmukaisuus
BUFFALO-osat ovat käyneet läpi tark an tuotetestauksen, jotta ne noudattaisivat kansainvälisten, itsenäisten
ja valtiollisten viranomaisten asettamia säädöksiä ja vaatimuksia.
BUFFALO-tuotteet on hyväksytty merkittäviksi seuraavilla merkinnöillä:
Kaikki oikeudet pidätetään. Mitään näiden ohjeiden osaa ei saa jäljentää tai lähettää missään muodossa tai millään
tavalla, elektronisesti, mekaanisesti, valokopioimalla, nauhoittamalla tai jollain muulla tavalla ilman, että BUFFALO
on antanut etukäteisen luvan.
Kaikki mahdollinen on tehty sen hyväksi, että annetut tiedot olisivat aina painatushetkellä oikeita, mutta BUFFALO
varaa itselleen oikeuden muuttaa tietoja siitä erikseen ilmoittamatta.
Malli Jännite Teho Virta
Korkein
kypsennyslämpötila
Tilavuus
(litraa)
Mitat
k x l x s mm
Paino
Y067 230V 50 Hz 1950W 8,5A 100°C 25 490 x 380 x 324 18kg
Page 61

DECLARATION OF CONFORMITY
• Conformiteitsverklaring • Déclaration de conformité • Konformitätserklärung • Dichiarazione di conformità •
• Declaración de conformidad • Declaração de conformidade • Överensstämmelseförsäkran •
• Overensstemmelseserklæring • Konformitetserklæring • Selvitys vaatimustenmukaisuudesta •
Equipment Type • Uitrustingstype • Type d'équipement • Gerätetyp •
Tipo di apparecchiatura • Tipo de equipo • Tipo de equipamento • Steam Oven
Enhetstyp • Udstyrstype • Type utstyr • Laitteen tyyppi:
Model • Modèle • Modell • Modello • Modelo: Y067
Serial Number • Serienummer • Numéro de série • Seriennummer •
Numero di serie • Número de serie • Número serial • Sarjanumero:
Year of Manufacture • Fabricagejaar • Date de fabrication • Herstellungsjahr •
Anno di produzione • Año de fabricación • Ano de fabricação • Tillverkningsår •
Produktionsår • Produksjonsår • Valmistusvuosi:
Application of Council Directives(s) • Toepassing van Europese Richtlijn(en) • EMC Directive 89/336/EEC
Application de la / des directive(s) du Conseil: • Anwendbare EU-Richtlinie(n) • LVD Directive
Applicazione delle Direttive: • Aplicación de la(s) directiva(s) del consejo •
Aplicação de directiva(s) do Conselho • Tillämpning av rådets direktiv •
Gennemførelse af Rådets Direktiv(er) af • Applisering av kommuneforskrift(er) •
Neuvoston direktiivi(e)n soveltaminen:
Standards • Standaarden • Normes • Norm en • Standard • Estándares •
Normas
• Normer • Standarder • Standardit
:
Producers Name
• Naam fabrikant • Nom du prodocteur • Name des Herstellers •
Nome del produttore • Nombre del fabricante • Nome do fabricante •
BUFFALO
Tillverkarens namn • Fabrikantens navn • Produsentens nav n • Valmistajan nimi:
Producers Address • Adres fabrikant • Adresse du prodocteur •
Anschrift des Herstellers • Indirizzo del produttore • Dirección del fabricante •
Endereço do fabricante • Tillverkarens adress • Fabrikantens adresse •
Produsentens adresse • Valmistajan osoite:
I, the undersigned, hereby declare that the equipment specified above conforms to the above Directive(s) and Standard(s).
Ik, de ondergetekende, verklaar hierbij dat de hierboven gespecificeerde uitrusting goedgekeurd is volgens de bovenstaande Richtlijn(en) en
Standaard(en).
Je soussigné, confirme la confor mité de l'équipement cité dans la présente à la / aux Directive(s) et Norme(s) ci-dessus
Ich, der/die Unterzeichnende, erkläre hiermit, dass das oben angegebene Gerät der/den oben angeführten Richtlinie(n) und Norm(en)
entspricht.
Il sottoscritto dichiara che l'apparecchiatura di sopra specificata è conforme alle Direttive e agli Standard sopra riportati.
El abajo firmante declara por la presente que el equipo arriba especificado está en conformidad con la(s) directiva(s) y estándar(es) arriba
mencionadas.
Eu, o abaixo-assinado, declaro que o equipamento anteriormente especificado está em conformidade com a(s) anterior(es) Directiva(s) e
Norma(s).
Jag, den undertecknande, betygar härmed att ovan specificerade enhet överrensstämmer med ovan direktiv och norm(er).
Jeg, undertegnede, erklærer herm ed at udstyret, der er specificeret ovenfor opfylder de ovenstående direktive(r) og standard(er).
Jeg, undertegnede, erklærer herved at utstyret som er spesifisert ovenfor er i overensstemmelse med ovennevnte forskrift(er) og standard(er).
Minä allekirjoittanut vakuutan täten, että yllä mainittu laite noudattaa yllä olevaa(olevia) direktiiviä(direktiivejä) ja standardia(standardeja).
Date • Data • Date • Datum • Data • Fecha • Data • Dato • Päivämäärä: 16/01/2007
Signature • Handtekening • Signature • Unterschrift
•
Firma • Firma • Assinatura • Underskrift • Allekirjoitus:
Full Name • Volledige naam • Nom et prénom • Vollständiger Name •
Nome completo • Nombre completo • Nome por extenso • Richard Cromwell
Fullständigt namn • Fulde navn • Fullstendig navn • Täydellinen nimi:
Position • Functie • Fonction • Position • Qualifica • Posición • Função • Marketing Director
Befattning • Stilling • Asema:
Fourth Way
Avonmouth
Bristol
BS11 8TB
United Kingdom
EN 55014-1:2000+A1:2001+A2:2002,
EN 61000-3-2:200, EN 61000-3-3:1995+A1:2001,
EN 55014-2:1997+A1:2001, EN60335-2-6:2003,
EN 50366:2003
(see also EN 60335-1:02+A11:04)
Page 62

• Notes • Remarques • Notas • Opmerkingen • Anmerkungen • Notas •
•
Note • Noteringar • Merknader • Bemærkninger • Huomautukset •
Page 63

• Notes • Remarques • Notas • Opmerkingen • Anmerkungen • Notas •
•
Note • Noteringar • Merknader • Bemærkninger • Huomautukset •
Page 64

 Loading...