

Page 1
TeraStation WSS 5000
User Manual
Americas: www.buffaloamericas.com
Europe: www.buffalo-technology.com
Asia Pacific: www.buffalo-asia.com
35020065-07
2014.12
Page 2

Contents
Chapter 1 Installation ........................................................5
Diagrams ...............................................................................................5
Installation ............................................................................................8
Turning the TeraStation On and Off..................................................12
Installing Antivirus Software ............................................................12
Chapter 2 Remote Desktop .............................................14
Opening Windows Storage Server ....................................................14
Chapter 3 Windows Update ............................................15
Windows Update ................................................................................15
Chapter 4 Preinstalled Software ....................................16
RAID Builder .......................................................................................16
Buffalo Dashboard .............................................................................16
Email Notification ..............................................................................18
Buffalo Replication ............................................................................19
TeraStation Backup and Replication Folder Settings ......................19
Display Settings .................................................................................20
1
Page 3

Chapter 5 Managing Storage..........................................21
Creating Volumes ...............................................................................21
Volume Types ................................................................................................21
Creating a RAID 5 Volume ............................................................................22
Creating a Mirrored Volume (RAID 1) ..........................................................23
Creating a Striped Volume (RAID 0) ............................................................23
Creating a Spanned Volume .........................................................................24
Creating Simple Volumes (JBOD) .................................................................25
Deleting Volumes ...............................................................................27
Formatting Volumes ..........................................................................28
Hard Drive Replacement Procedure .................................................29
Hard Drive Replacement Examples .............................................................30
Chapter 6 Backup ............................................................38
Back Up in Windows Storage Server .................................................38
Preparing a Backup Destination ..................................................................38
Recovering Backup Data ..............................................................................42
Replication ..........................................................................................45
Buffalo Replication .......................................................................................45
DFS Replication .............................................................................................47
Back Up with NovaBACKUP ...............................................................61
Installation ....................................................................................................61
Chapter 7 Settings ...........................................................63
Date and Time ...............................................................................................63
Server Name, Workgroups, and Domains ...................................................63
2
Page 4

Changing the Password ................................................................................64
Adding a User ................................................................................................65
Adding a Group .............................................................................................66
Creating a Shared Folder ..............................................................................69
Email Notification .........................................................................................73
LCD Display Settings .....................................................................................75
Changing the IP Address ..............................................................................75
Chapter 8 NAS Navigator2 ..............................................77
NAS Navigator2 for Windows ............................................................77
NAS Navigator2 for Mac ....................................................................79
Chapter 9 Appendix ........................................................81
LCD Display .........................................................................................81
Modes ............................................................................................................81
Errors and Status ...........................................................................................81
Default Settings .................................................................................82
Specifications .....................................................................................83
Data Backup .......................................................................................84
Troubleshooting .................................................................................84
Windows Storage Server Recovery Procedure ................................85
Notes ...................................................................................................86
Chapter 10 Regulatory Compliance Information .......... 87
For Customers in the United States .............................................................87
3
Page 5

For Customers in Europe ..............................................................................87
한국 고객 대상 ........................................................................................... 89
4
Page 6
Chapter 1 Installation
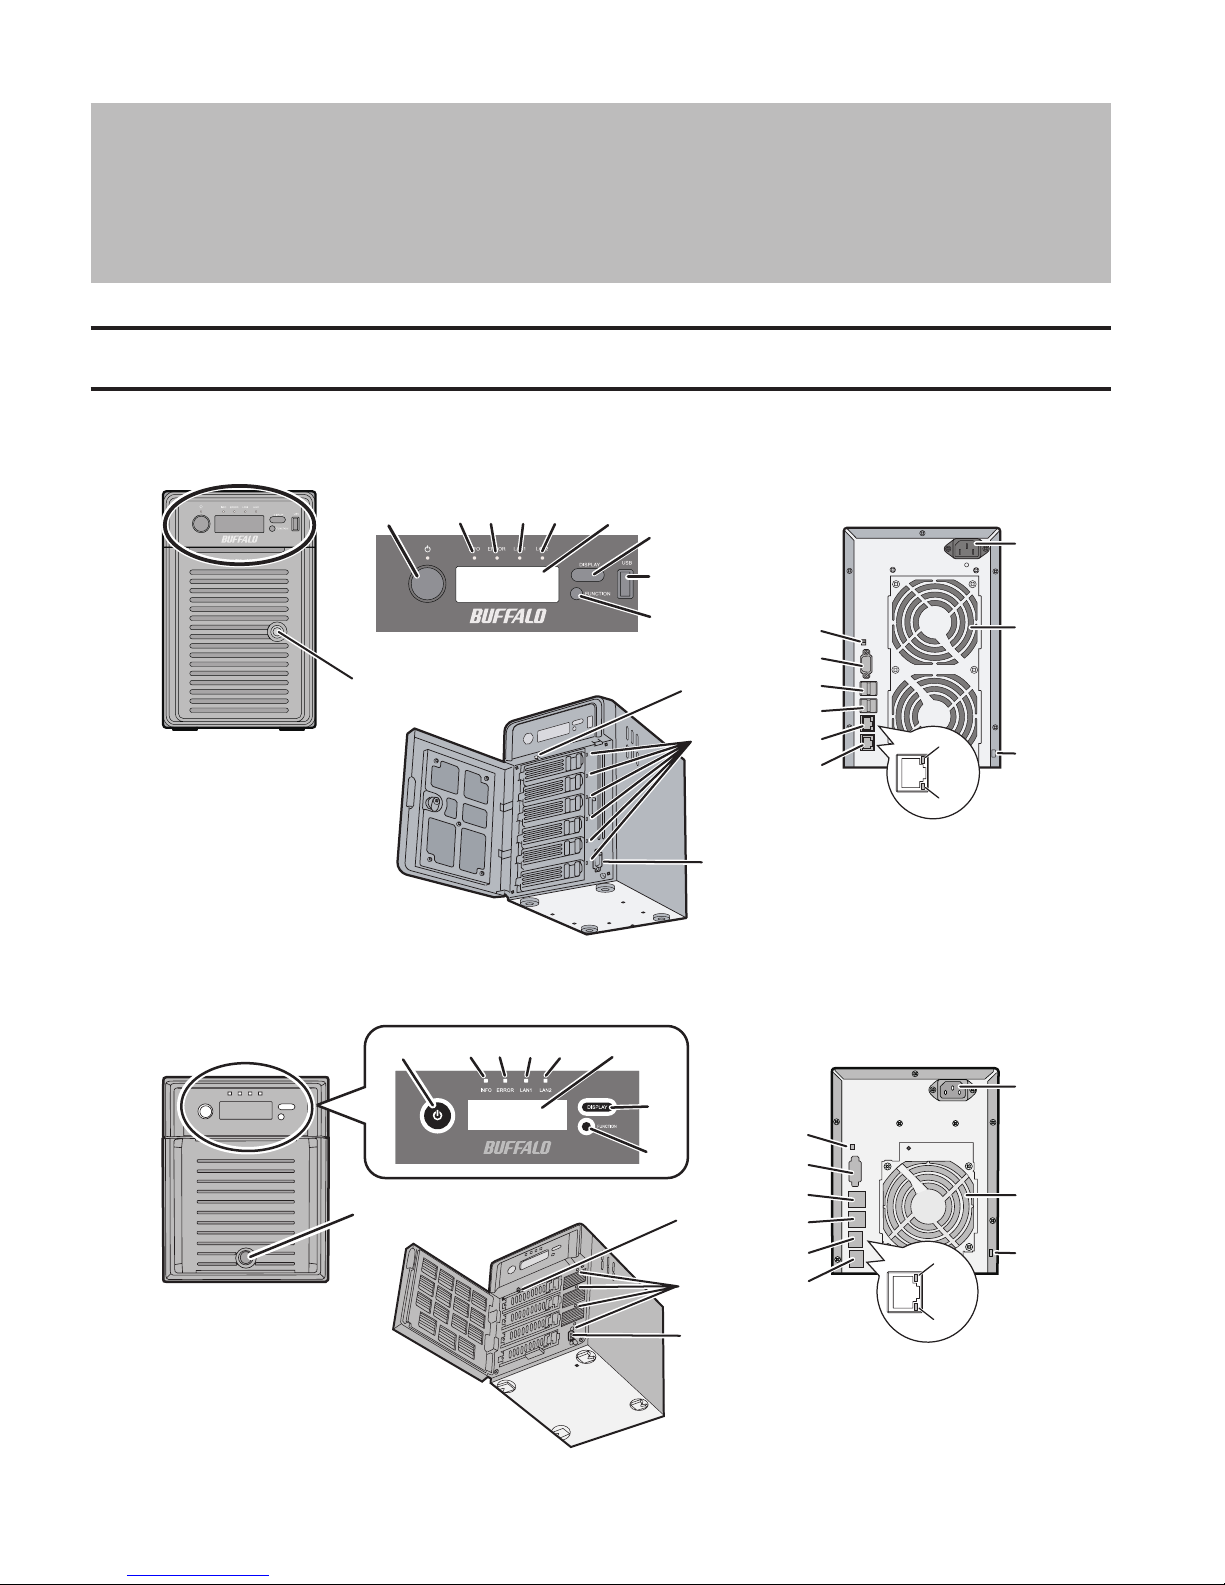
Diagrams
WS5600D
³
±
²
´
µ

·
±µ
±¹
WS5400D
¹
¹
±
²
³
´
µ

·
¸
¸
±°
±±
±°
±±
±²
±²
±³
±´
±µ
±
±·
±¸
±³
±´
±µ
±
±·
±¸
²´
²µ
²´
²µ
²°
²±
±¹
²°
²±
5
Page 7
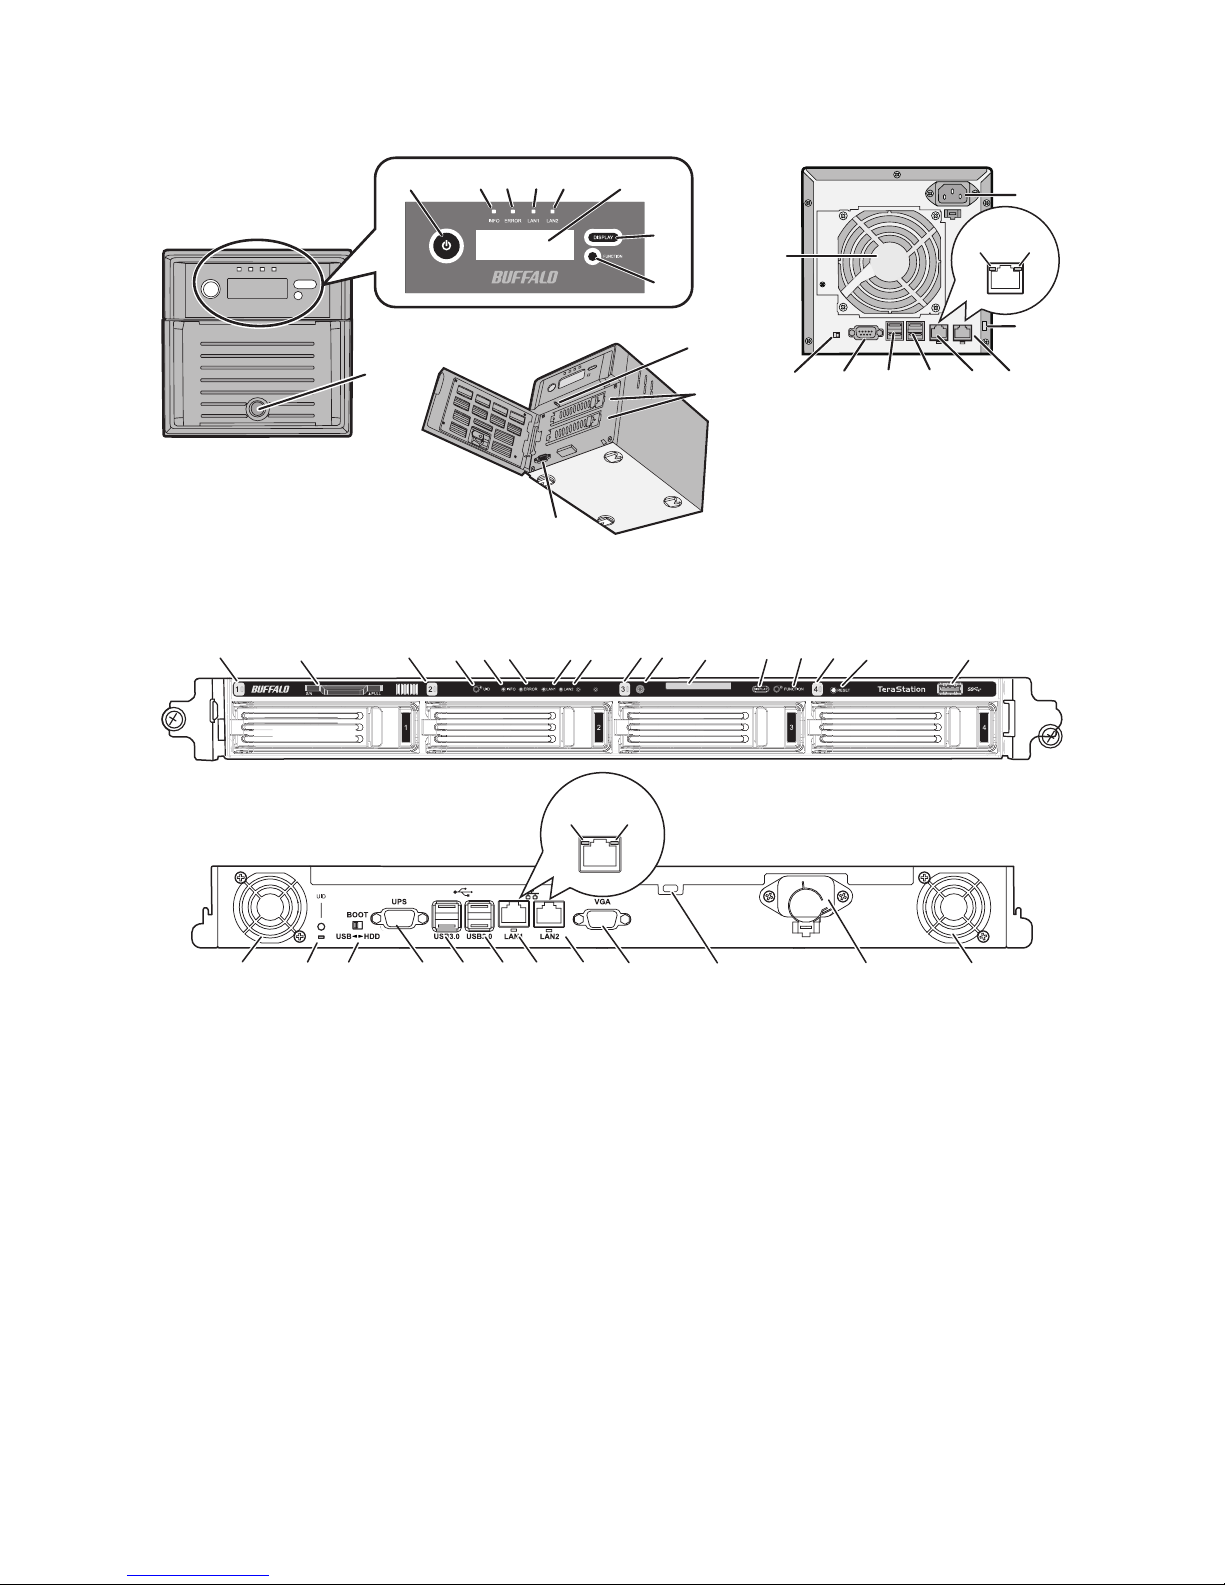
WS5200D
±
²
³
´
µ

±¹
WS5400R
·
²°
¸
±°
¹
±±
±²
±±²³ ²² ±± ±±
±³
±´
±µ
±°±²³ ´ µ¶·¸±±
±
²´
±·
±µ
²µ
²±
±¸
²´ ²µ
²°
²²
±³
±´
±µ
±
±·
±² ±¹
²±±¸
²°
1 Power Button
To power on, connect the power cable and wait for 10 seconds, then press the power button. To power off, press
the power button.
2 Info LED
If there is a status message, the amber info LED will light up. Check the LCD panel to see the status message.
3 Error LED
If there is an error, the red error LED will light up. Check the LCD panel to see the error message.
4 LAN1 LED
When LAN port 1 is connected, this LED glows green. It blinks when the connection is active.
5 LAN2 LED
When LAN port 2 is connected, this LED glows green. It blinks when the connection is active.
6 LCD Panel
6
Page 8

This display shows the status of many TeraStation settings. It also displays errors and messages when available.
7 Display Button
Switches between the different display modes. Also, if the TeraStation is beeping, press this button to stop it.
8 Factory Use Only
9 Drive Lock
Open the front panel with the key to replace hard drives or press the reset button.
10 Reset Button
To shut down and reboot the TeraStation, hold down the reset button.
11 Status LEDs
Normally, these LEDs blink green when hard drives are accessed. If a drive fails, its LED will turn red.
12 VGA Connector
You can connect a VGA monitor to this port. Connecting a monitor directly to the TeraStation is only supported for
monitoring the progress of Windows Update.
13 Boot Mode Switch
Leave the switch in the HDD position during normal operation. To recover settings, insert the recovery USB drive
into a USB 3.0 or 2.0 port, move the boot switch to the USB position, and press the power button.
14 UPS Port
Connect to a UPS.
15 USB 3.0 Port
Compatible Buffalo USB 3.0 hard drives, USB flash drives, digital cameras, and USB UPSs can be connected. USB
hubs are not supported.
16 USB 2.0 Port
Compatible Buffalo USB hard drives, USB flash drives, digital cameras, and USB UPSs can be connected. USB hubs
are not supported.
17 LAN Port 1
Use an Ethernet cable to connect this port to your network.
18 LAN Port 2
This second Ethernet port may be used for network redundancy or backup. You may connect a second TeraStation
directly to this port for backup.
19 Power Connector
Use the included power cable to connect to an UPS, surge protector, or outlet.
20 Fan
Do not block the fan.
21 Anti-Theft Security Slot
Use this slot to secure your TeraStation with a cable lock (not included).
7
Page 9

22 UID Button
Press the UID button on the front or the back of the unit to cycle the blue LED on and off.
23 Serial Number
This sticker shows the TeraStation's serial number.
24 Link LED
Glows orange when the unit is connected to a network.
25 Act LED
This LED shows network activity. It blinks orange when the TeraStation is accessed over the network.
Installation
Note: If using OS X (10.4 or later), download and install "Remote Desktop Connection Client for Mac 2" from http://
www.microsoft.com. For OS X 10.3.9, use version 1.0.3 instead.
1 Connect the TeraStation's Ethernet and power cables and turn it on.
2 Insert the supplied microSD card into your computer. Open the "TeraNavi" folder and double-click TSNavi.exe to
launch TeraNavigator. You can also download the latest version of TeraNavigator from Buffalo's website.
Notes:
• If using Windows 2000 or 2000 Server, make sure that write-protection on the USB device is disabled before
connecting it. To disable write-protection, slide the switch on the USB device toward the USB connector.
• If "Do you want to allow the following program to make changes to this computer ?" is displayed by Windows 8.1,
Windows 8, or Windows 7, click Yes. If "A program needs your permission to continue" is displayed by Windows
Vista, click Continue.
• With Mac OS, double-click the disk image "WS5000-XXX.dmg" (where "XXX" is the software version) from the USB
device and double-click TeraNavigator.
• Disable your antivirus software firewall before continuing. You may not be able to install Buffalo software if
antivirus software or a software firewall are enabled. After you've finished setup, re-enable your firewall or
antivirus software.
8
Page 10
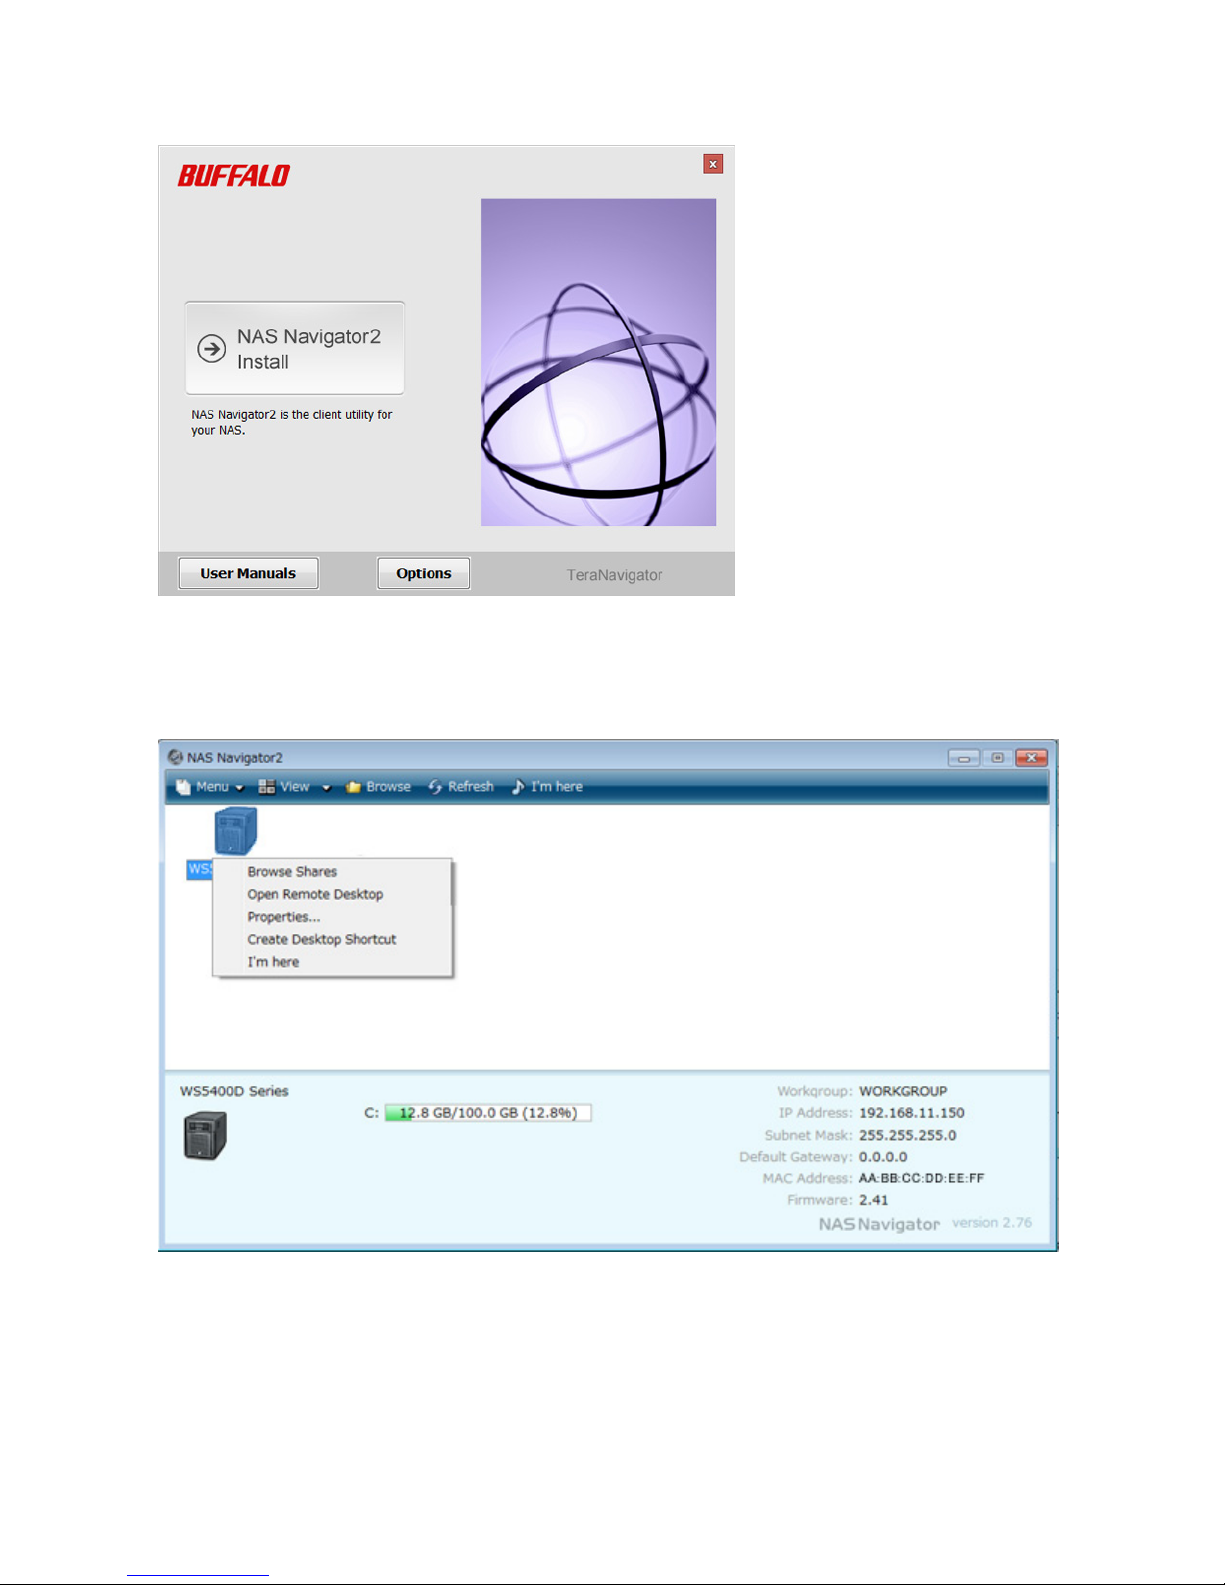
3 Click Begin Installation. The wizard will guide you through installing NAS Navigator2.
4 Click Finish. NAS Navigator2 will open.
5 Right-click on your TeraStation's icon, then select Properties. On a Mac, click the TeraStation's icon while holding
down the control key, then select Configure.
9
Page 11
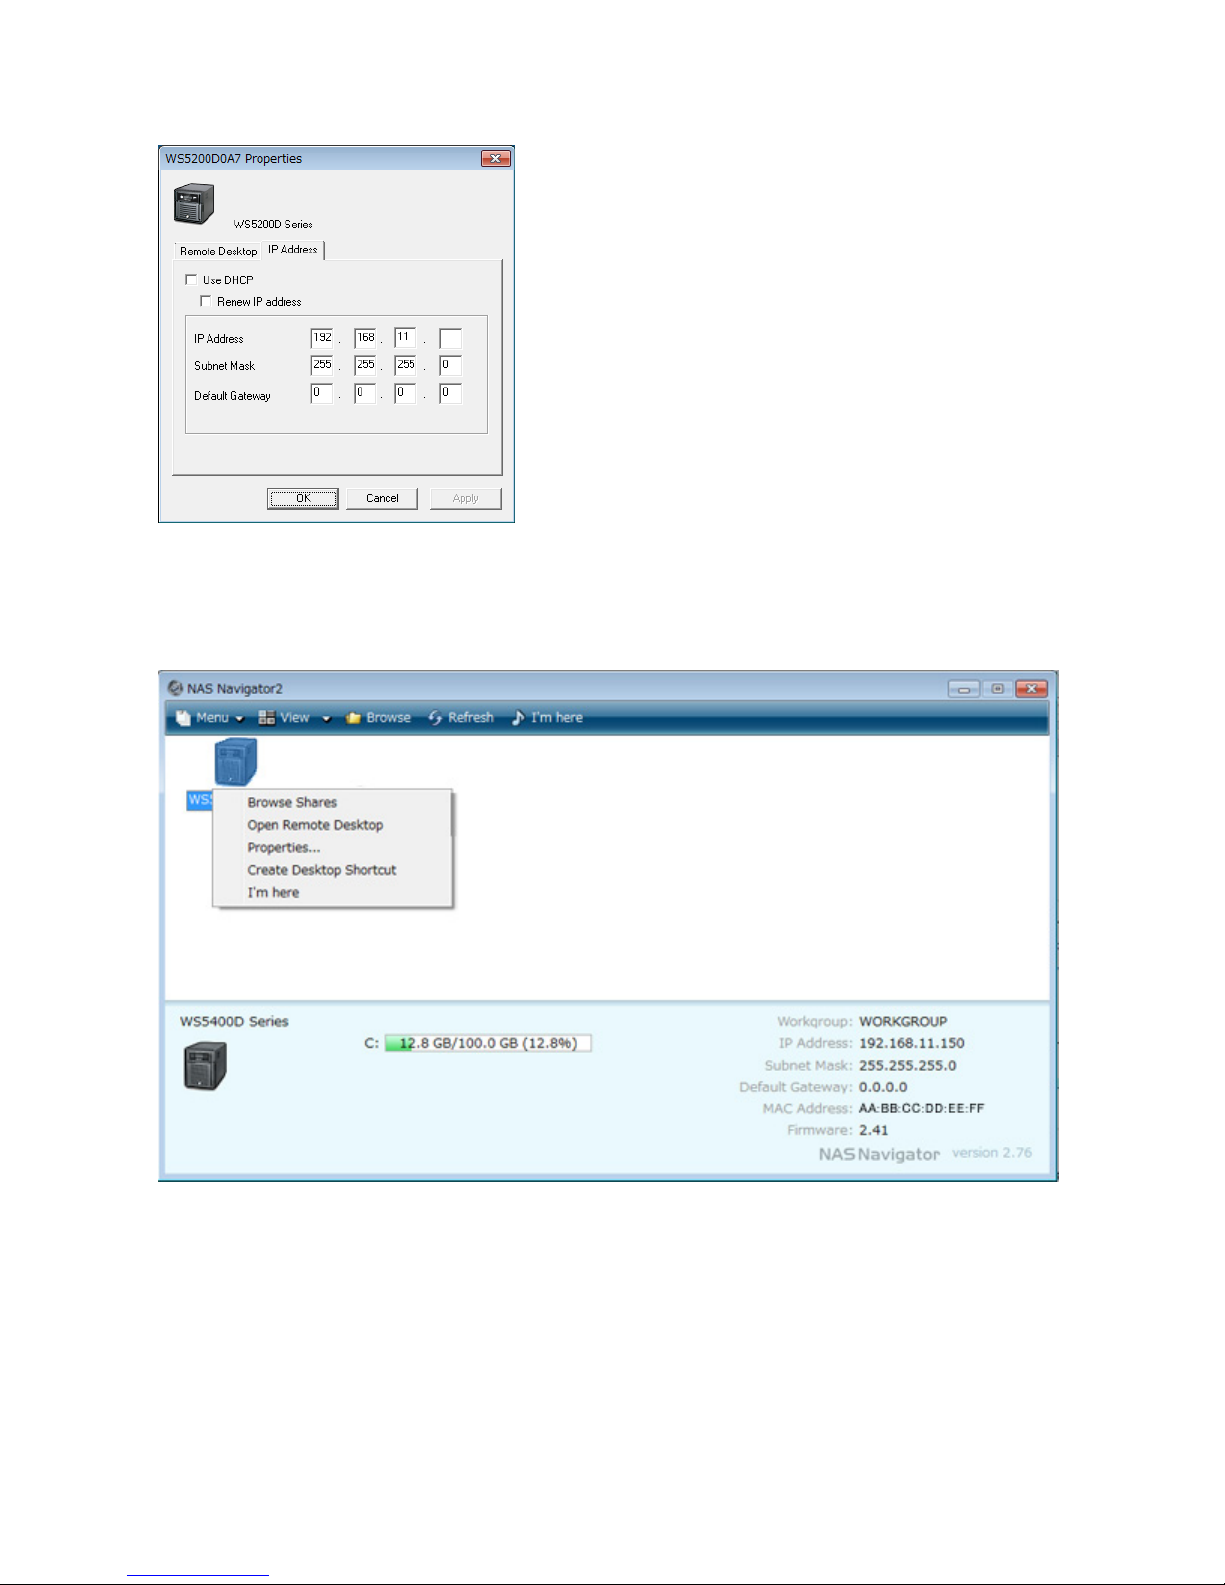
6 Select the IP Address tab and check "Use DHCP" (or enter the IP address settings manually). Click OK.
If you are prompted to enter the administrator password for the TeraStation, it is "password" by default.
Note: If you change the IP address manually, change the DNS settings in Windows Storage Server also.
7 Right-click on your TeraStation's icon and choose Open Remote Desktop. On a Mac, click the TeraStation's icon while
holding down the control key, then select Open Remote Desktop.
Notes:
• If the message "The publisher of this remote connection cannot be identified. Do you want to connect anyway?"
is displayed, click Connect.
• If "The identity of the remote computer cannot be verified. Do you want to connect anyway?" is displayed, click
Yes or Continue.
8 Enter the username and password, then press the Enter key.
10
Page 12
Note: The default username and password are "Administrator" and "password".
9 Go to Server Manager and click Local Server to install the Windows Storage Server update program. Under
"PROPERTIES", click the status shown in "Windows Update". Click Check for updates, then click the available updates.
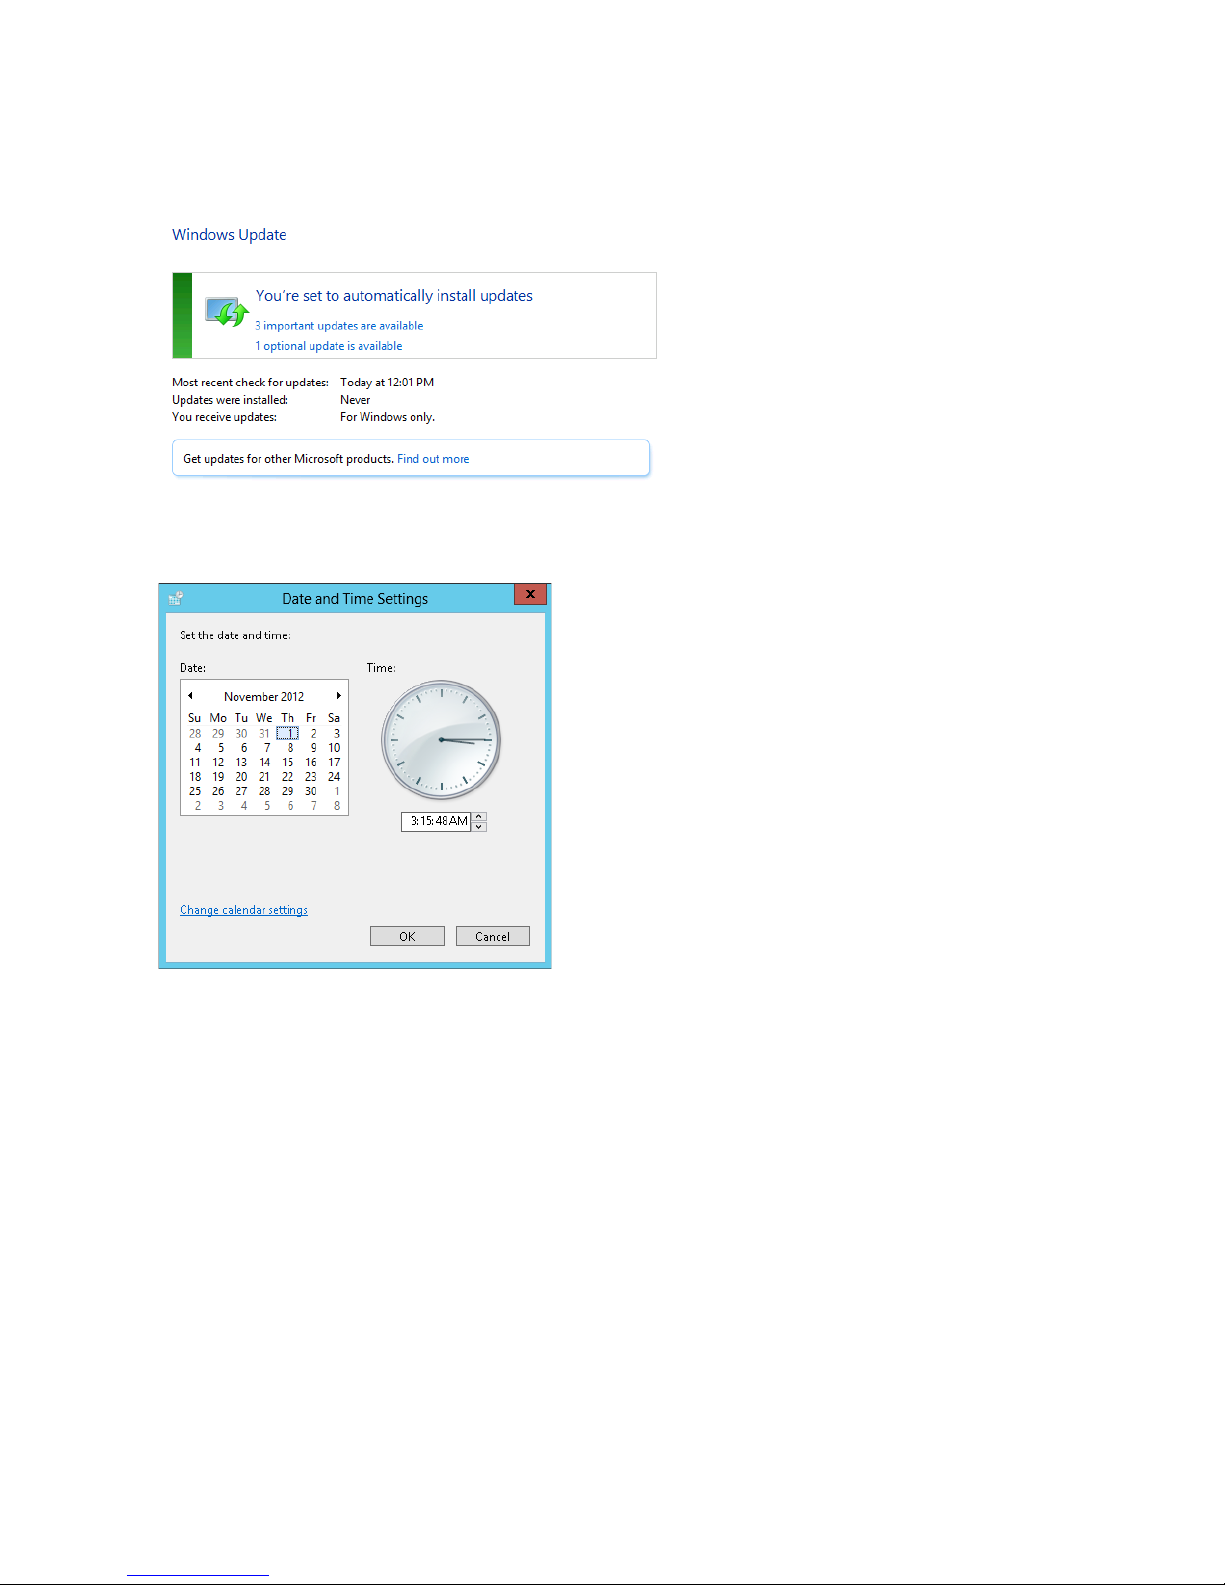
10 Go back to "Local Server" to set the date and time. Under "PROPERTIES", click the item shown next to "Time zone".
In the "Date and Time" tab, click Change date and time. Select the current date and time and click OK.
Note: In the "Internet Time" tab, click Change settings, and check "Synchronize with an Internet time server". The date
and time will be updated automatically.
11 Create a shared folder. See the "Creating a Shared Folder" section in chapter 7 for more details.
12 Change the TeraStation's password. See the "Changing the Password" section in chapter 7 for more details.
11
Page 13
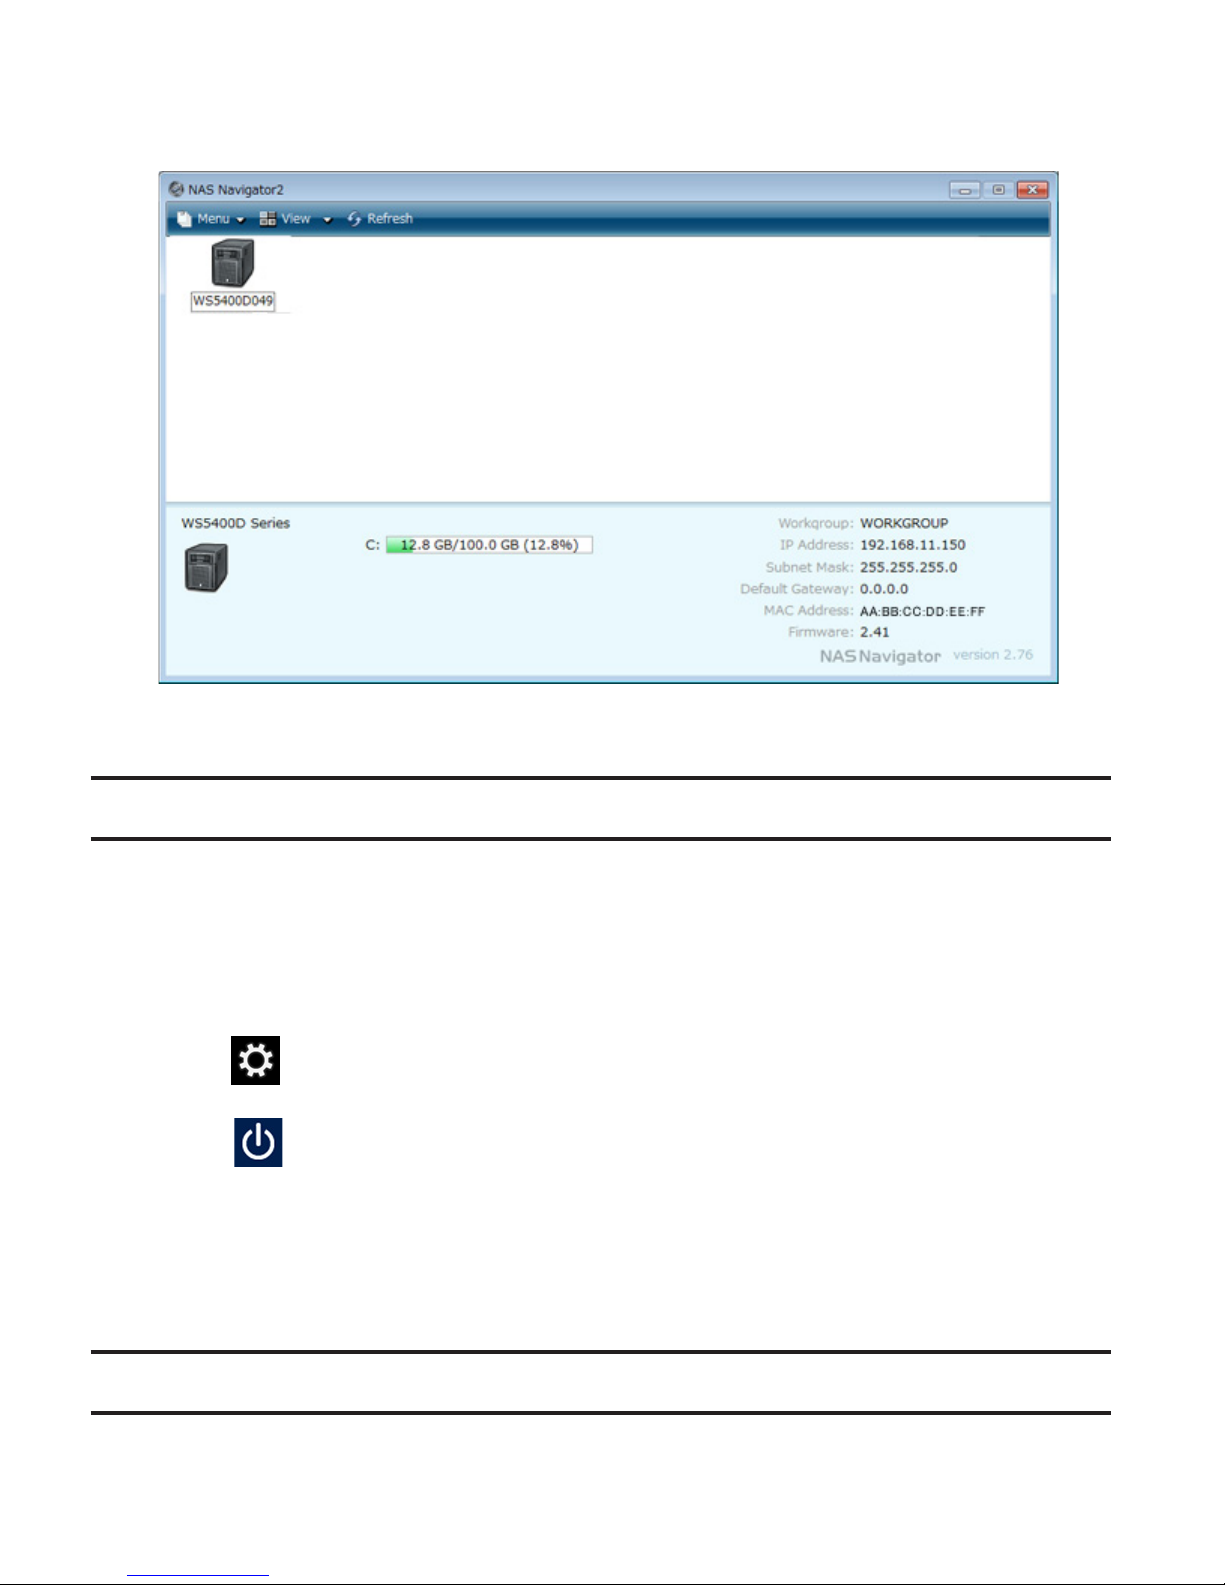
13 In NAS Navigator2, double-click your TeraStation's icon. For Mac OS, the TeraStation is mounted as a drive icon on
the desktop, or it is displayed in the sidebar of the Finder.
Note: Never disable the LAN (network device) settings in Windows Storage Server. Disabling the LAN settings will
also disable access to the TeraStation.
Turning the TeraStation On and Off
Press the power button on the TeraStation to turn it on and off. Or you can turn off your TeraStation by the following
procedure.
Shutting Down Windows Storage Server
1 From the Windows Storage Server Start menu, point the cursor to the upper-right hand corner of the screen, then
click the icon.
2 Click the icon - Shut down.
3 Select the reason why you want to shut down, then click Continue.
When all the LEDs on the front of the TeraStation turn off, the shutdown process is complete.
Note: Always shut down the TeraStation before unplugging it. The TeraStation can be damaged if it is suddenly
unplugged without being powered down first.
Installing Antivirus Software
Installing antivirus software on the TeraStation is strongly recommended.
12
Page 14

Connect a USB CD/DVD drive to the TeraStation's USB port, load the antivirus software CD into the CD/DVD drive, and
install the software.
13
Page 15
Chapter 2 Remote Desktop
Opening Windows Storage Server
Note: If using OS X (10.4 or later), download and install "Remote Desktop Connection Client for Mac 2" from http://
www.microsoft.com. If using OS X 10.3.9, use version 1.0.3 instead.
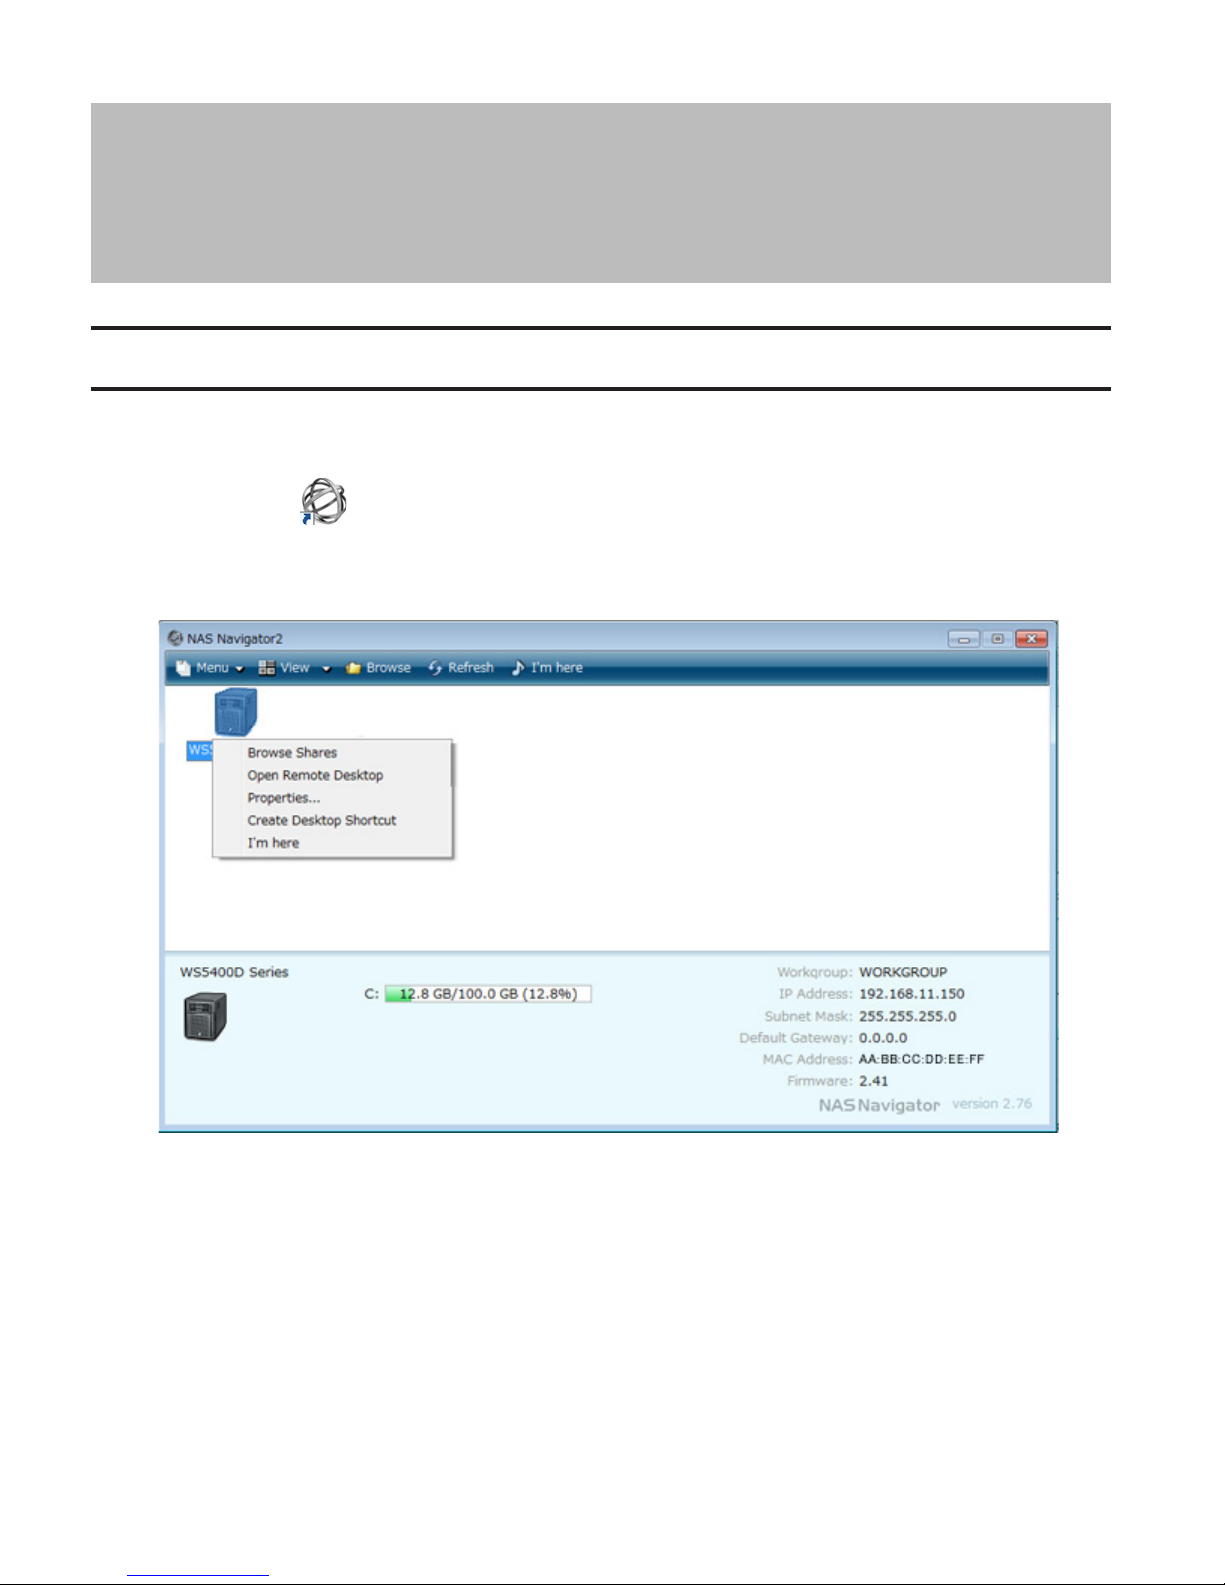
1 Double-click the icon to start NAS Navigator2.
2 Right-click on your TeraStation's icon and choose Open Remote Desktop. For Mac OS, click the TeraStation's icon
while holding down the control key, then click Open Remote Desktop.
Notes:
• If Remote Desktop Connection Software doesn't start on a Mac, exit and re-launch NAS Navigator2. To exit NAS
Navigator2, click the NAS Navigator icon while holding down the control key and click Quit.
• Click the TeraStation icon to view the IP address and other information for the TeraStation.
• If the message "The identity of the remote computer cannot be verified. Do you want to connect anyway?" is
displayed, click Yes or Continue.
3 Enter the admin username and password and press the Enter key. Windows Storage Server will open in the remote
desktop.
Note: The default username and password are "Administrator" and "password".
14
Page 16
Chapter 3 Windows Update
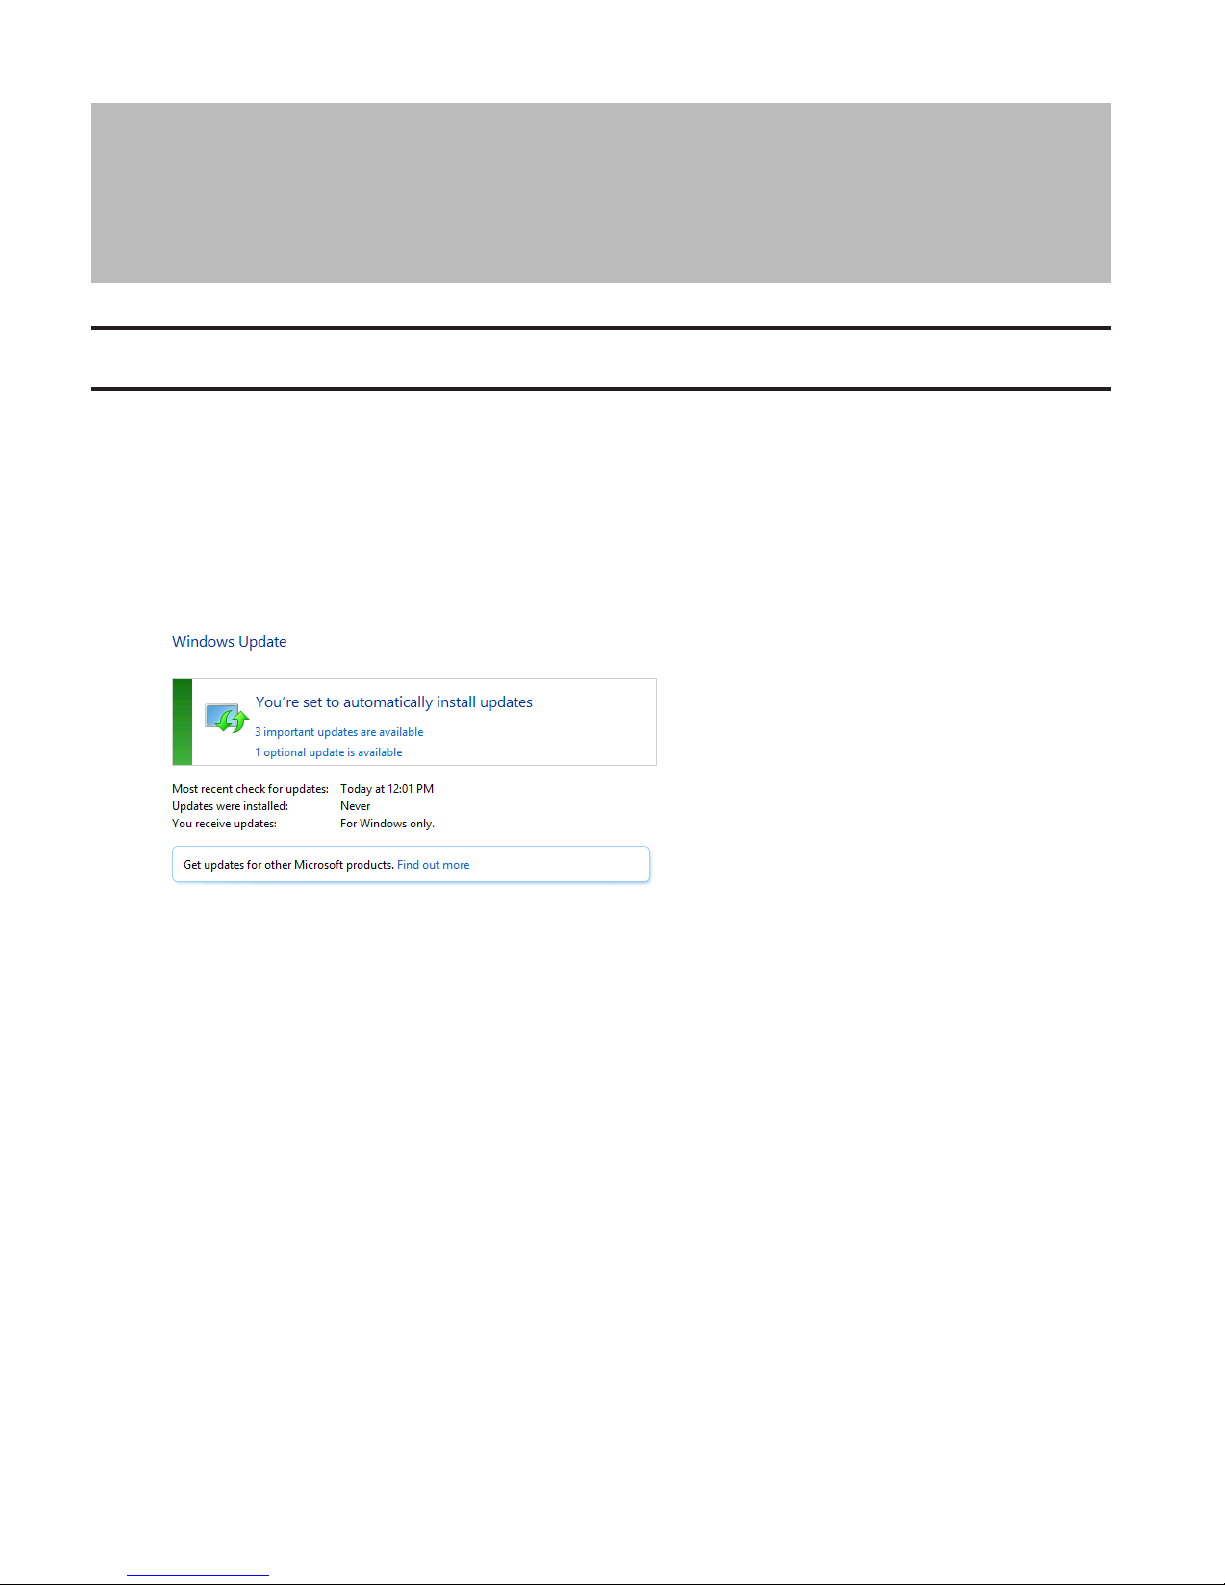
Windows Update
For best results, Windows Storage Server should be updated regularly. Use Windows Update as described below.
Note: The TeraStation must be connected to the Internet to use Windows Update.
1 From the Windows Storage Server Start menu, click Control Panel - System and Security - Windows Update.
2 Click Check for updates.
3 Click available updates.
4 Step through the wizard to install the updates.
15
Page 17
Chapter 4 Preinstalled Software
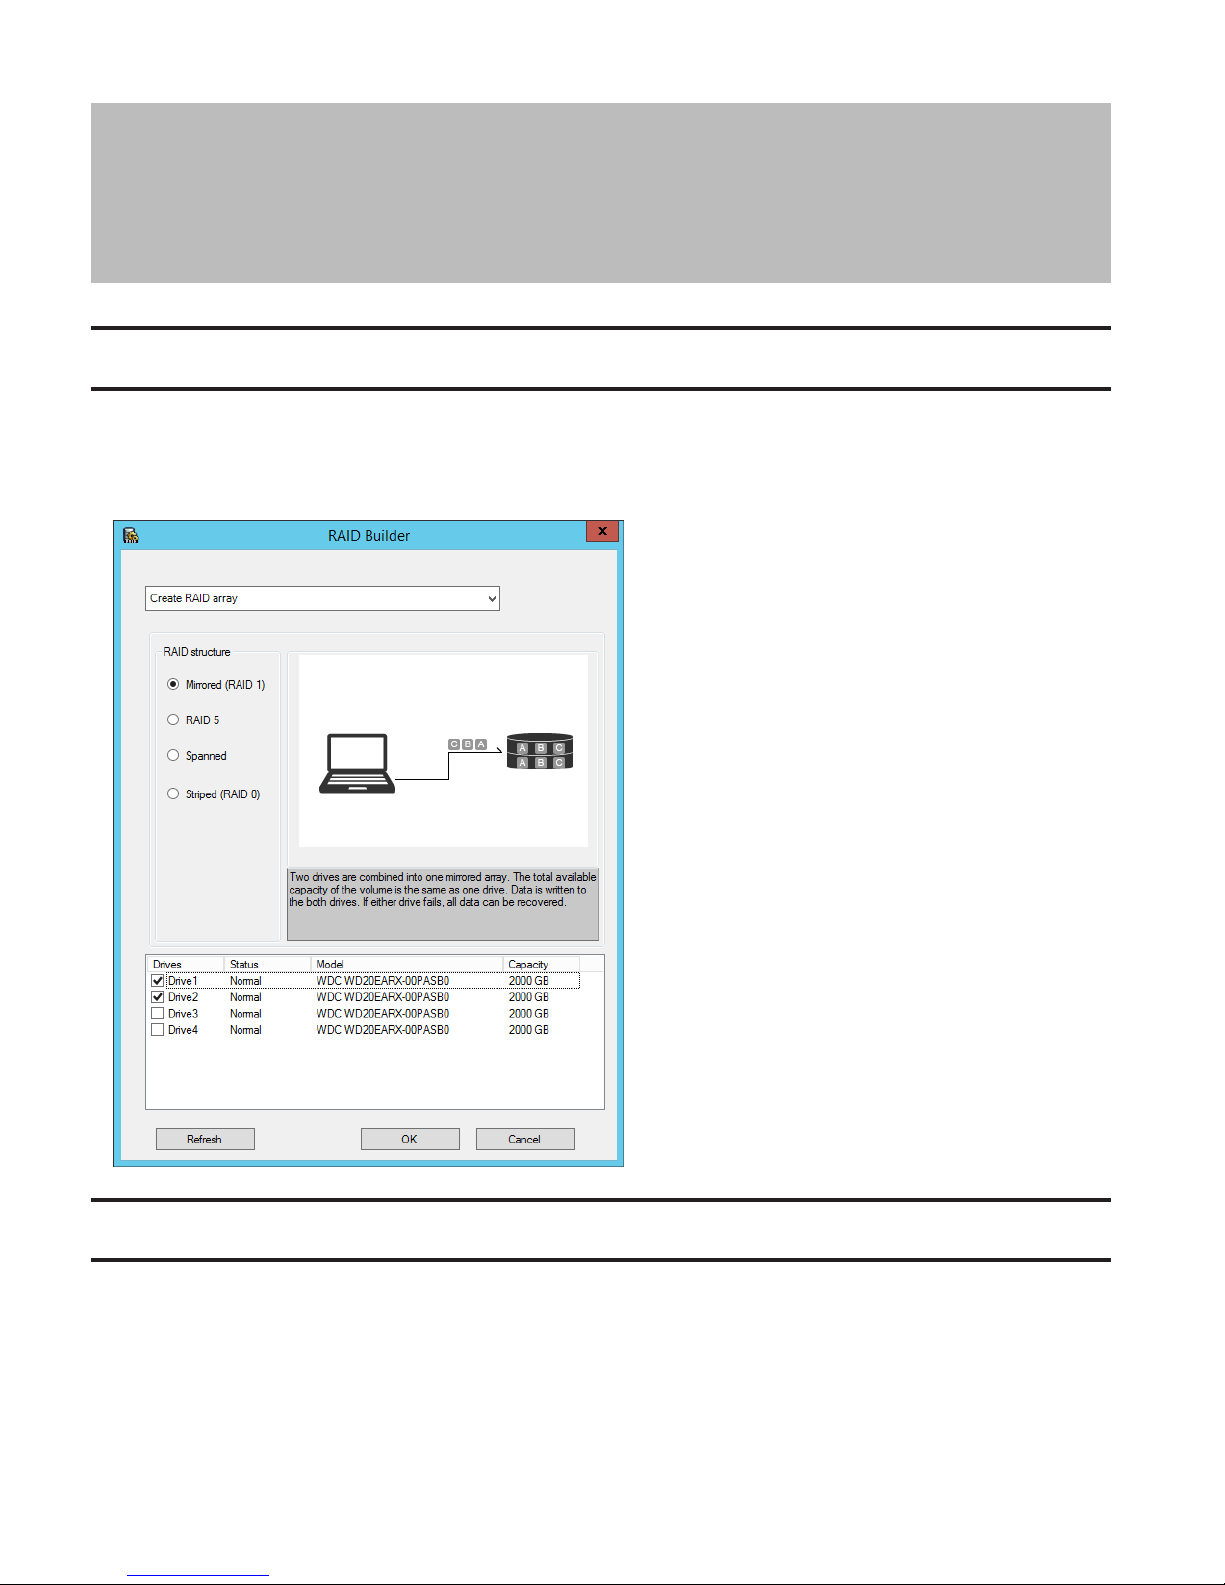
RAID Builder
RAID Builder is used to create RAID arrays. See the "Managing Storage" section in chapter 5 for more details.
To launch RAID Builder, you must be logged in as a member of the Administrators group in Windows Storage Server.
Note: This software cannot be accessed by multiple users at the same time. Before launching it, make sure that it is
not being used by another user.
Buffalo Dashboard
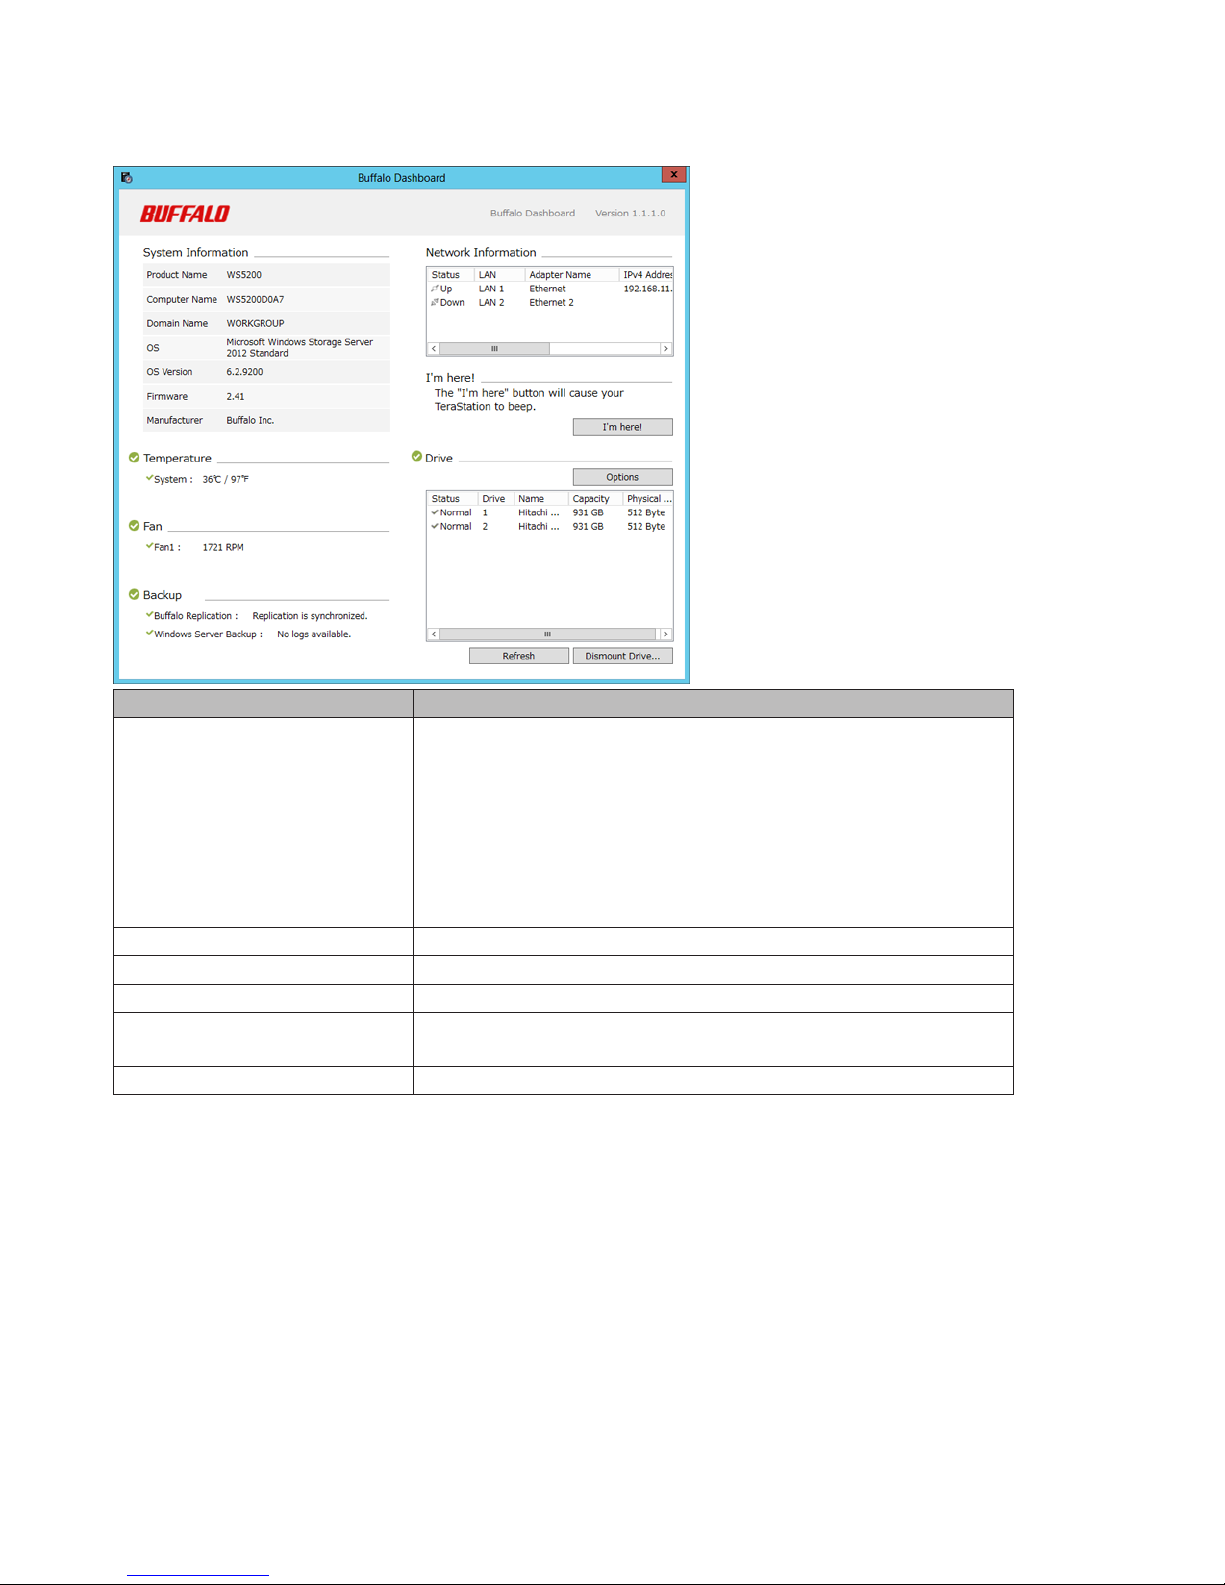
Buffalo Dashboard displays system information and dismounts hard drives. To launch it, double-click the Buffalo
Dashboard icon in the system tray.
16
Page 18
Note: This software cannot be accessed by multiple users at the same time. Before launching it, make sure that it is
not being used by another user.
Items Descriptions
Product Name: Displays the model name of the TeraStation.
Computer Name: Displays the hostname of the TeraStation.
Domain Name: Displays the type of domain that the TeraStation is a
System Information
member of.
OS: Displays the type of Windows installed on the TeraStation.
OS Version: Displays the version of the OS.
Firmware: Displays the firmware version of the TeraStation.
Manufacturer: Displays "Buffalo Inc.".
Temperature Displays the temperature of the system.
Fan Displays the rpm.
Backup Displays the status of backup and replication.
Network Settings
Displays IP addresses, subnet masks, default gateways, LAN port
numbers, and status.
I'm here! Causes your TeraStation to beep.
17
Page 19

Items Descriptions
Displays the status, drive numbers, names, capacity, and physical
sector sizes of each drive.
Refresh: Updates the displayed drive information.
Dismount Drive: Dismounts a drive for safe removal. Select the drive
to dismount and click OK.
Options:
Shut down when the drive's temperature reaches an abnormal value
Drive
Note: The following functions are only available when logged in as administrator:
• Refresh
• Dismount drive
• Options
- The TeraStation will automatically shut down if the drive gets too
hot.
Turn off the drive if an error occurs - The hard drive will automatically
be turned off (dismounted) if a drive error occurs.
How To Dismount Drives:
Click Dismount Drive, check the drive to dismount, then click OK. After
the drive is dismounted, unplug the hard drive from the TeraStation.
Email Notification
Your TeraStation can send you email reports when settings are changed or an error occurs. See the "Email Notification"
section in chapter 7 for more details.
To launch Email Notification, you must be logged in as a member of the Administrators group in Windows Storage
Server.
Note: This software cannot be accessed by multiple users at the same time. Before launching it, make sure that it is
not being used by another user.
18
Page 20
Buffalo Replication
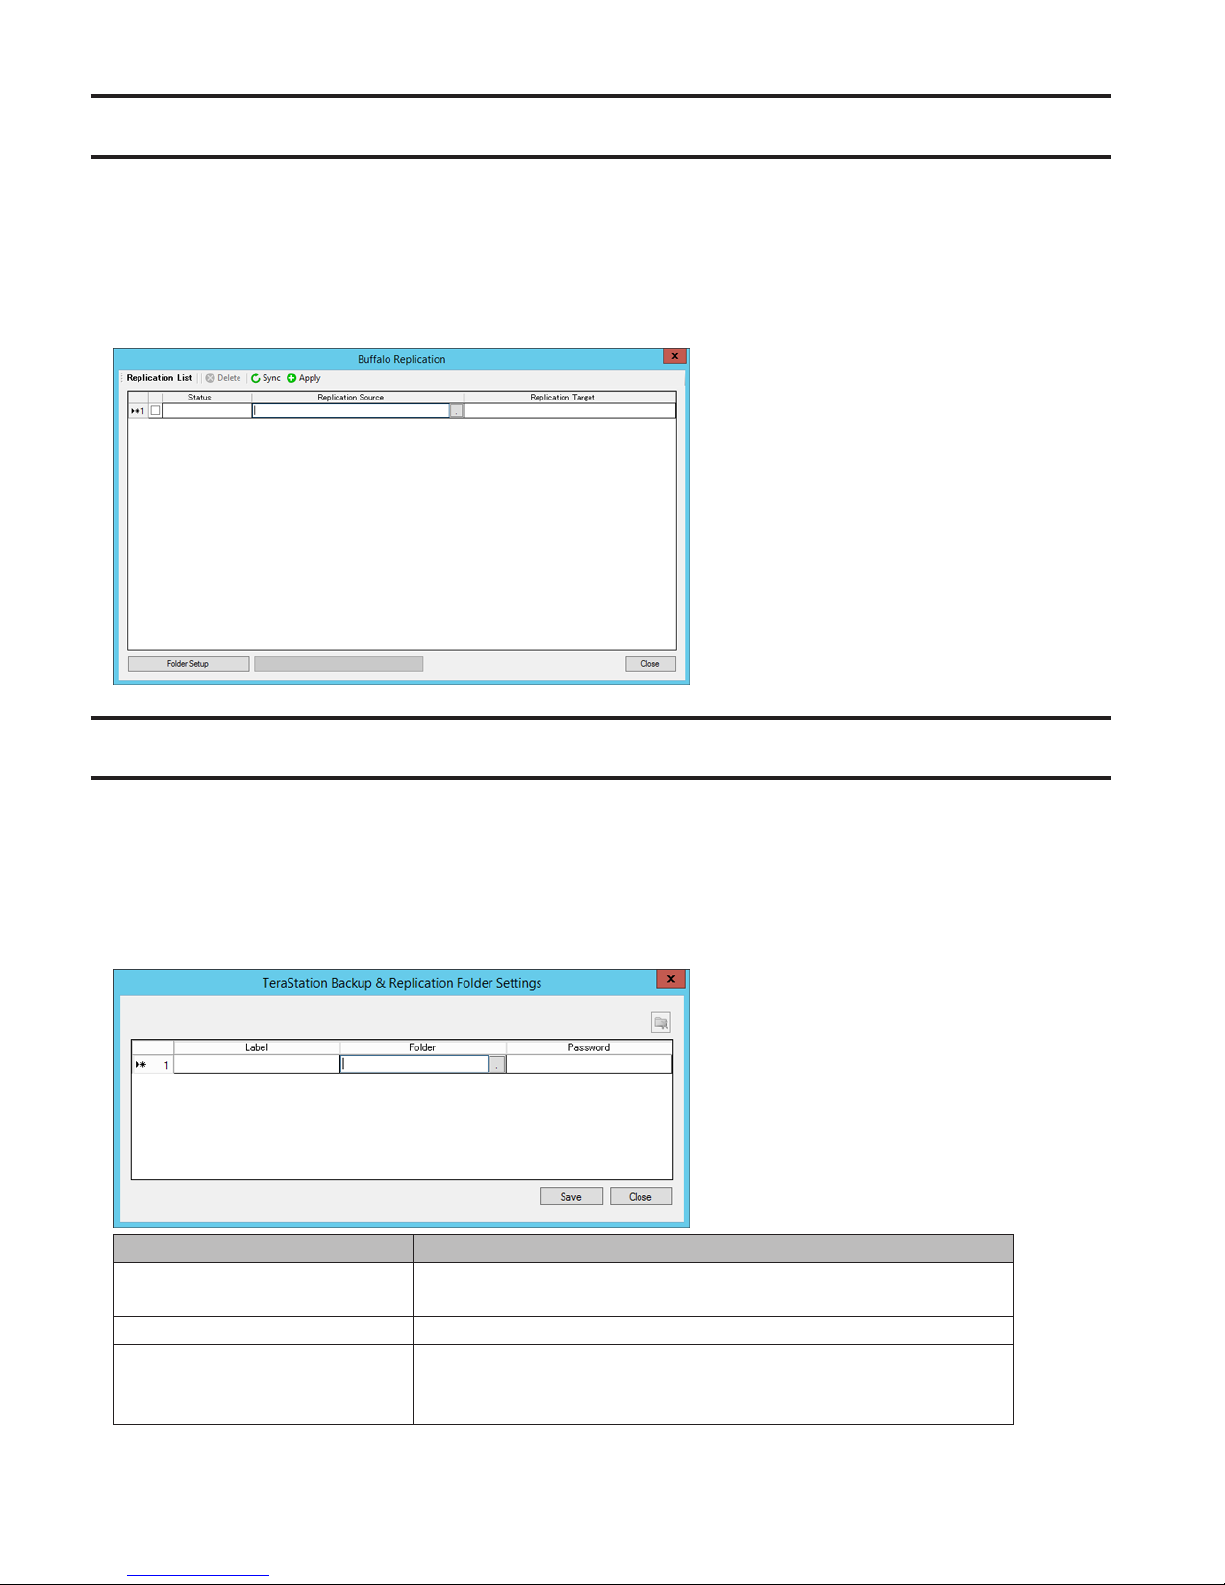
Your TeraStation can be synchronized with another TeraStation, replicating most data. See the "Replication" section in
chapter 6 for more details.
To launch Buffalo Replication, you must be logged in as a member of the Administrators group in Windows Storage
Server.
Note: This software cannot be accessed by multiple users at the same time. Before launching it, make sure that it is
not being used by another user.
TeraStation Backup and Replication Folder Settings
Before using it as a backup device on the network, configure your TeraStation in "TeraStation Backup and Replication
Folder Settings".
To launch TeraStation Backup and Replication Folder Settings, you must be logged in as a member of the Administrators
group in Windows Storage Server.
Note: This software cannot be accessed by multiple users at the same time. Before launching it, make sure that it is
not being used by another user.
Items Descriptions
Label
Folder Specify a shared folder where backup data will be stored.
Password
Enter a name for the backup destination. When you search for backup
devices on the network, this name will appear.
If you enter a backup password (optional), this backup device will
not appear on the list of available devices when people search for it,
unless they search for it by the password.
19
Page 21
Items Descriptions
To remove a folder from the list of available backup targets, select the
folder and click this button.
Display Settings
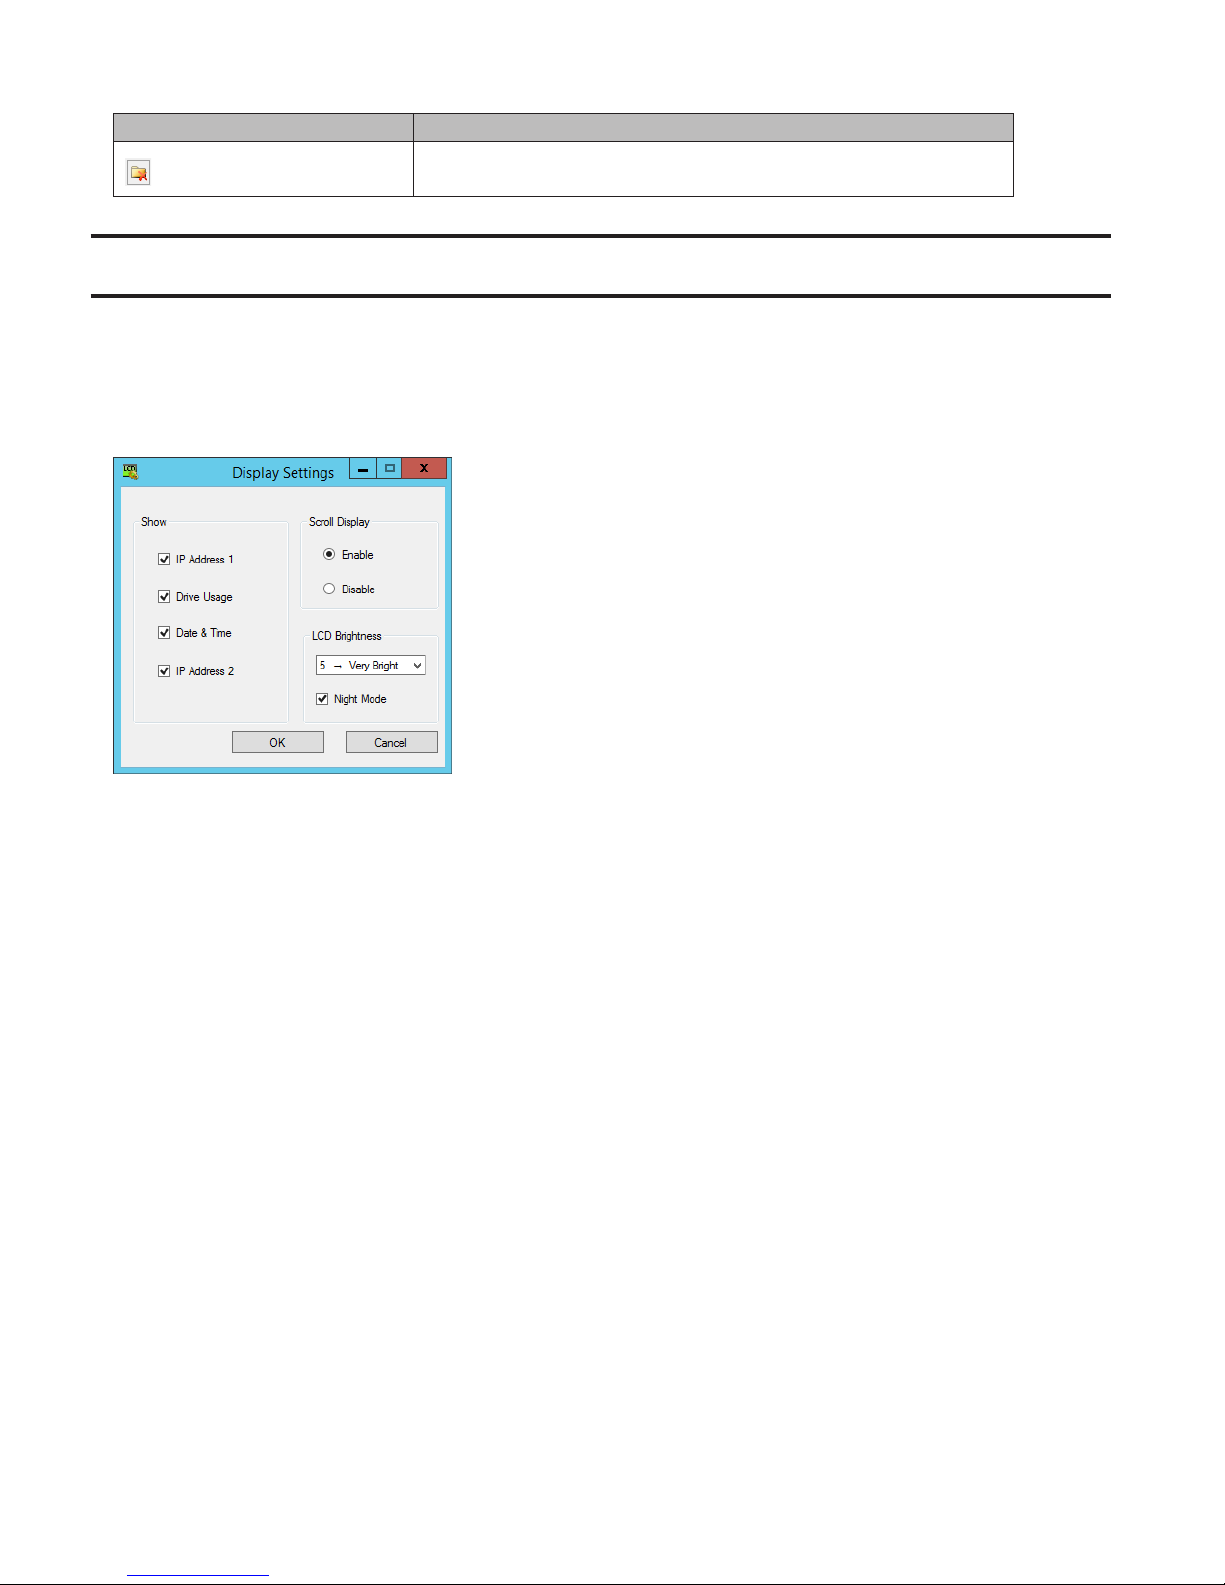
TeraStation's LCD panel settings can be changed using this software. See the "LCD Display Settings" section in chapter 7
for more details.
To launch Display Settings, you must be logged in as a member of the Administrators group in Windows Storage Server.
Note: This software cannot be accessed by multiple users at the same time. Before launching it, make sure that it is
not being used by another user.
20
Page 22

Chapter 5 Managing Storage
Creating Volumes
Volume Types
The features of each volume type are explained below.
Notes:
• Use RAID Builder to create a volume, not the Disk Management options in Windows Storage Server.
• When volumes are deleted or formatted, or the RAID mode is changed, all data stored in that volume is erased.
Before executing these operations, back up any important data.
• In this manual, "recover" means reverting the TeraStation (including the data) to its former state prior to the drive
failure. It doesn't refer to reading data from a failed hard drive.
• RAID synchronization will run automatically after a volume is created. File transfers will be slower while it is
running, which will take about 5 hours per terabyte.
• After a volume is created, unused extra space can't be added to the volume.
• Some space on each drive is not accessible because it is used by the system. The amount used on each drive is
below.
Drive 1: 50 MB
Drive 2: 50 MB
Drive 3 to 6: 100 GB + 150 MB
RAID 5 Volumes
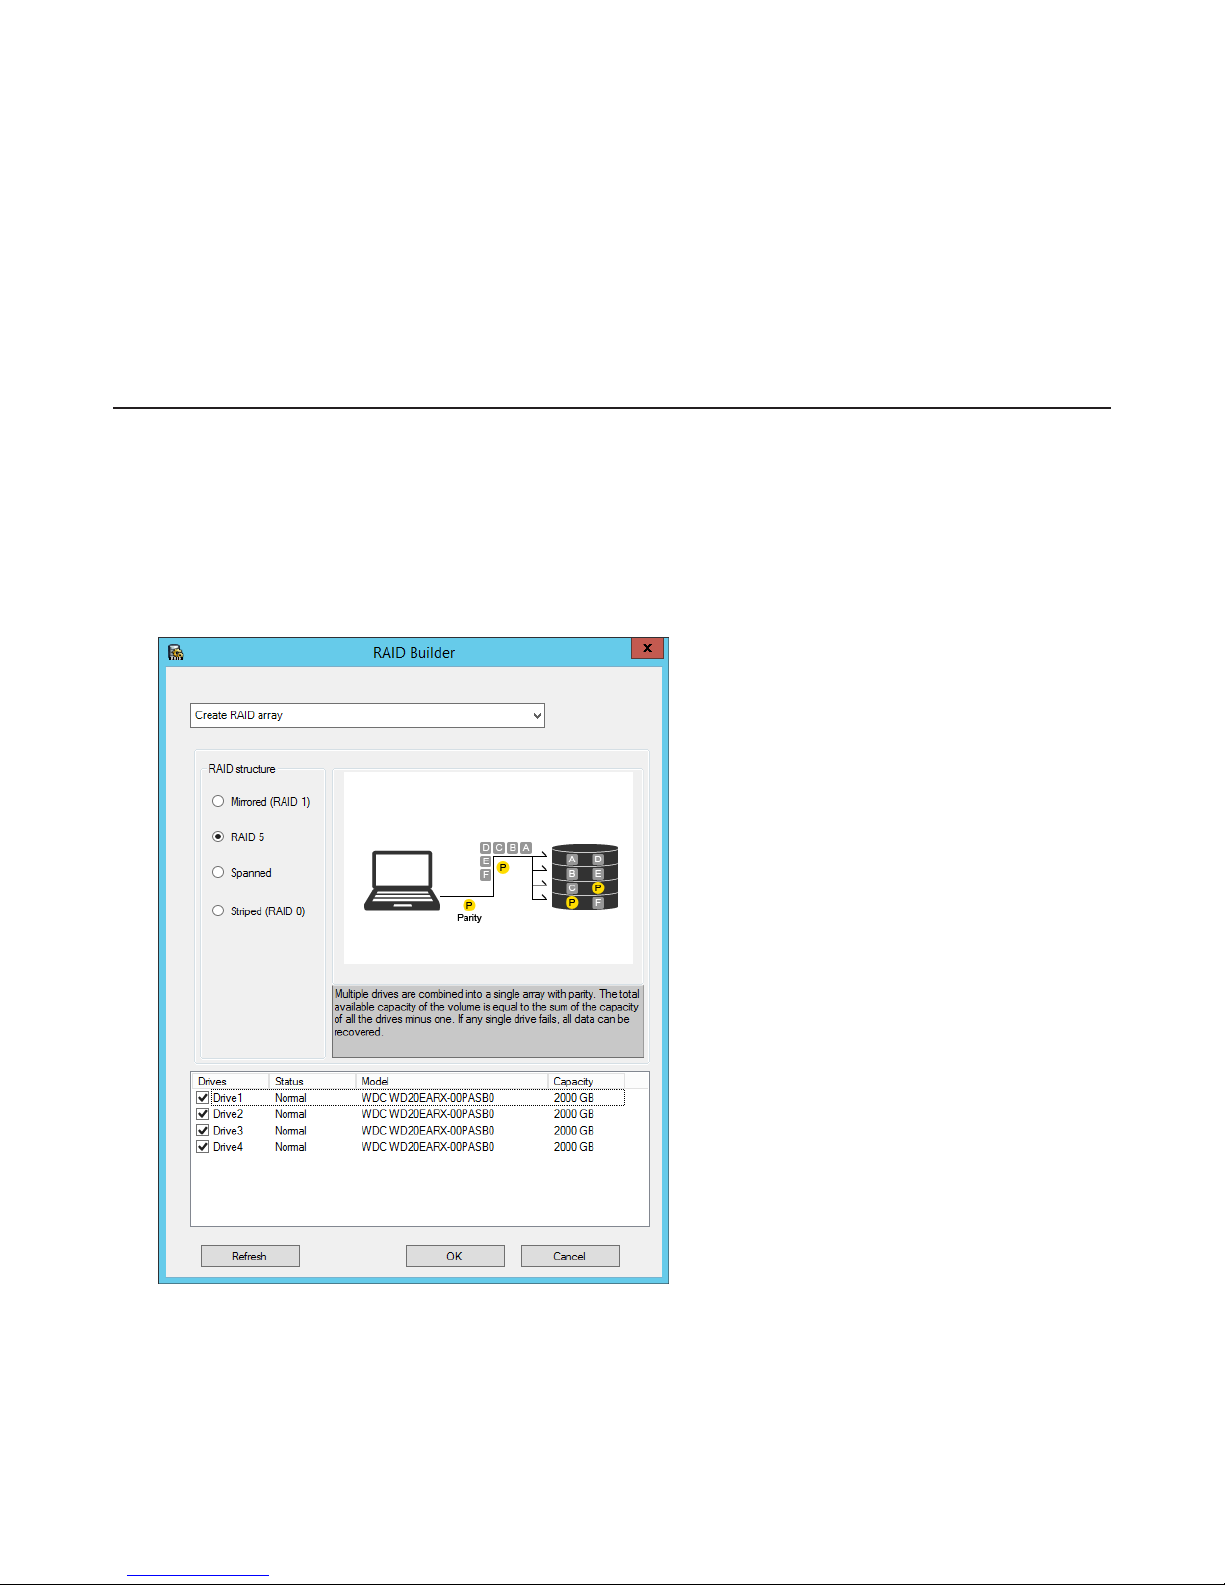
The unallocated areas of three or more hard drives are used as a single array.
If one drive in a RAID 5 array fails, data on the array can be recovered after the failed drive is replaced. However, if two or
more drives fail, all data is lost.
*Available for WS5600D, WS5400D, and WS5400R series TeraStations.
*
Mirrored Volumes (RAID 1)
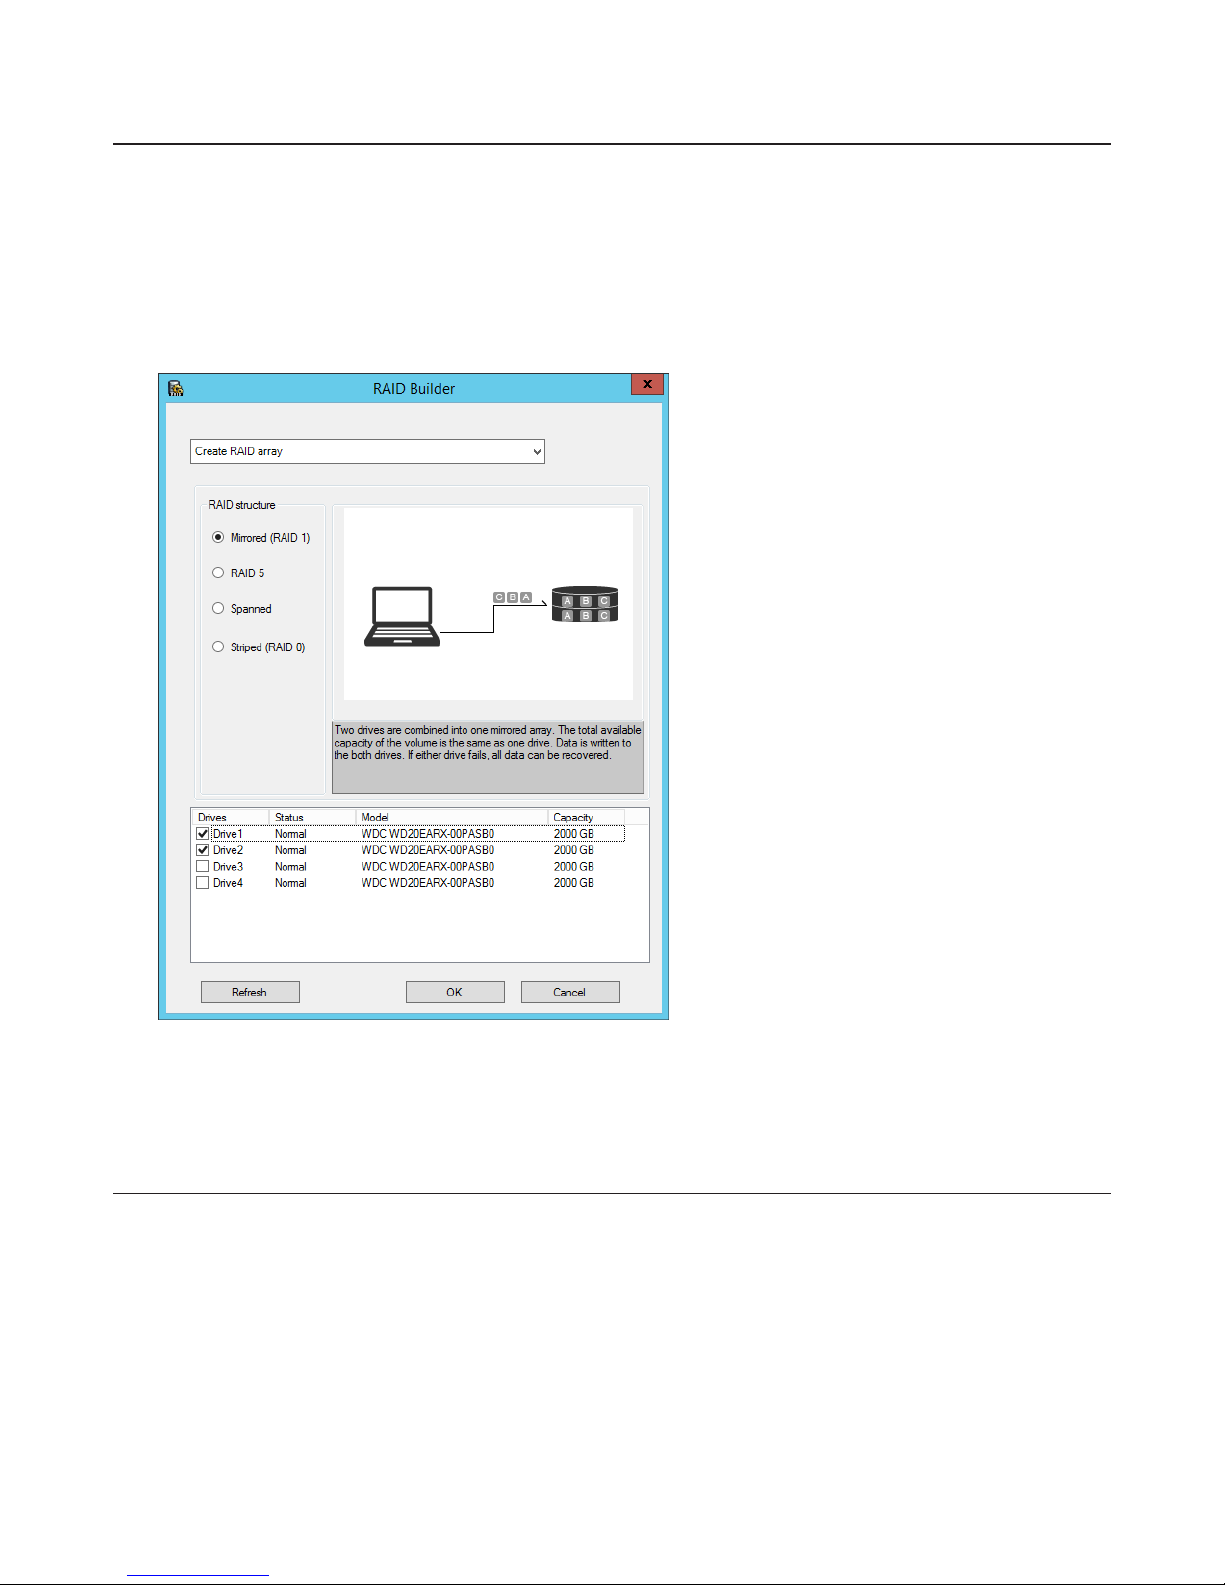
The unallocated areas of two drives are combined into a single RAID 1 array.
Because the same data is written to both drives simultaneously, if one drive fails, data can be recovered from the other
drive. If both drives in the array fail, data cannot be recovered.
Striped Volumes (RAID 0)
The unallocated areas of two or more drives are combined into a single RAID 0 array. However, data cannot be recovered
if even a single drive fails.
21
Page 23
Spanned Volumes
The unallocated areas of multiple hard drives are joined to create a single logical volume. This allows various drive
spaces to be combined efficiently. However, data cannot be recovered if even a single drive fails.
Simple Volumes (JBOD)
The internal hard drives of the TeraStation are each used as individual drives. If a hard drive fails, the data on the failed
hard drive cannot be recovered.
Creating a RAID 5 Volume
1 From the Windows Storage Server Start menu, click RAID Builder.
2 Select "Create RAID array" from the drop-down menu and "RAID 5" under "RAID structure".
3 Select at least three drives to create a RAID 5 array.
4 Click OK.
Examples:
• For a configuration with drive 1 (50 GB), drive 2 (80 GB), drive 3 (58 GB), and drive 4 (100 GB), the usable space on
the RAID volume will be (50 GB x 4 drives) ÷ 3/4 = 150 GB.
• For "n (1 to 4)" identical hard drives in a RAID 5 array, the available space is (n-1)/n times the total drive space.
A RAID 5 volume will be created. Next, create a shared folder on the volume as described in chapter 7.
22
Page 24
Creating a Mirrored Volume (RAID 1)
1 From the Windows Storage Server Start menu, click RAID Builder.
2 Select "Create RAID array" from the drop-down menu and "Mirrored (RAID 1)" under "RAID structure".
3 Select at least two drives to create a RAID 1 array.
4 Click OK.
Example:
For a configuration with drive 3 (58 GB) and drive 4 (100 GB), the usable space on the mirrored volume will be 58 GB.
A mirrored volume will be created. Next, create a shared folder on the volume as described in chapter 7.
Creating a Striped Volume (RAID 0)
1 From the Windows Storage Server Start menu, click RAID Builder.
2 Select "Create RAID array" from the drop-down menu and "Striped (RAID 0)" under "RAID structure".
3 Select at least two drives to create a RAID 0 array.
23
Page 25
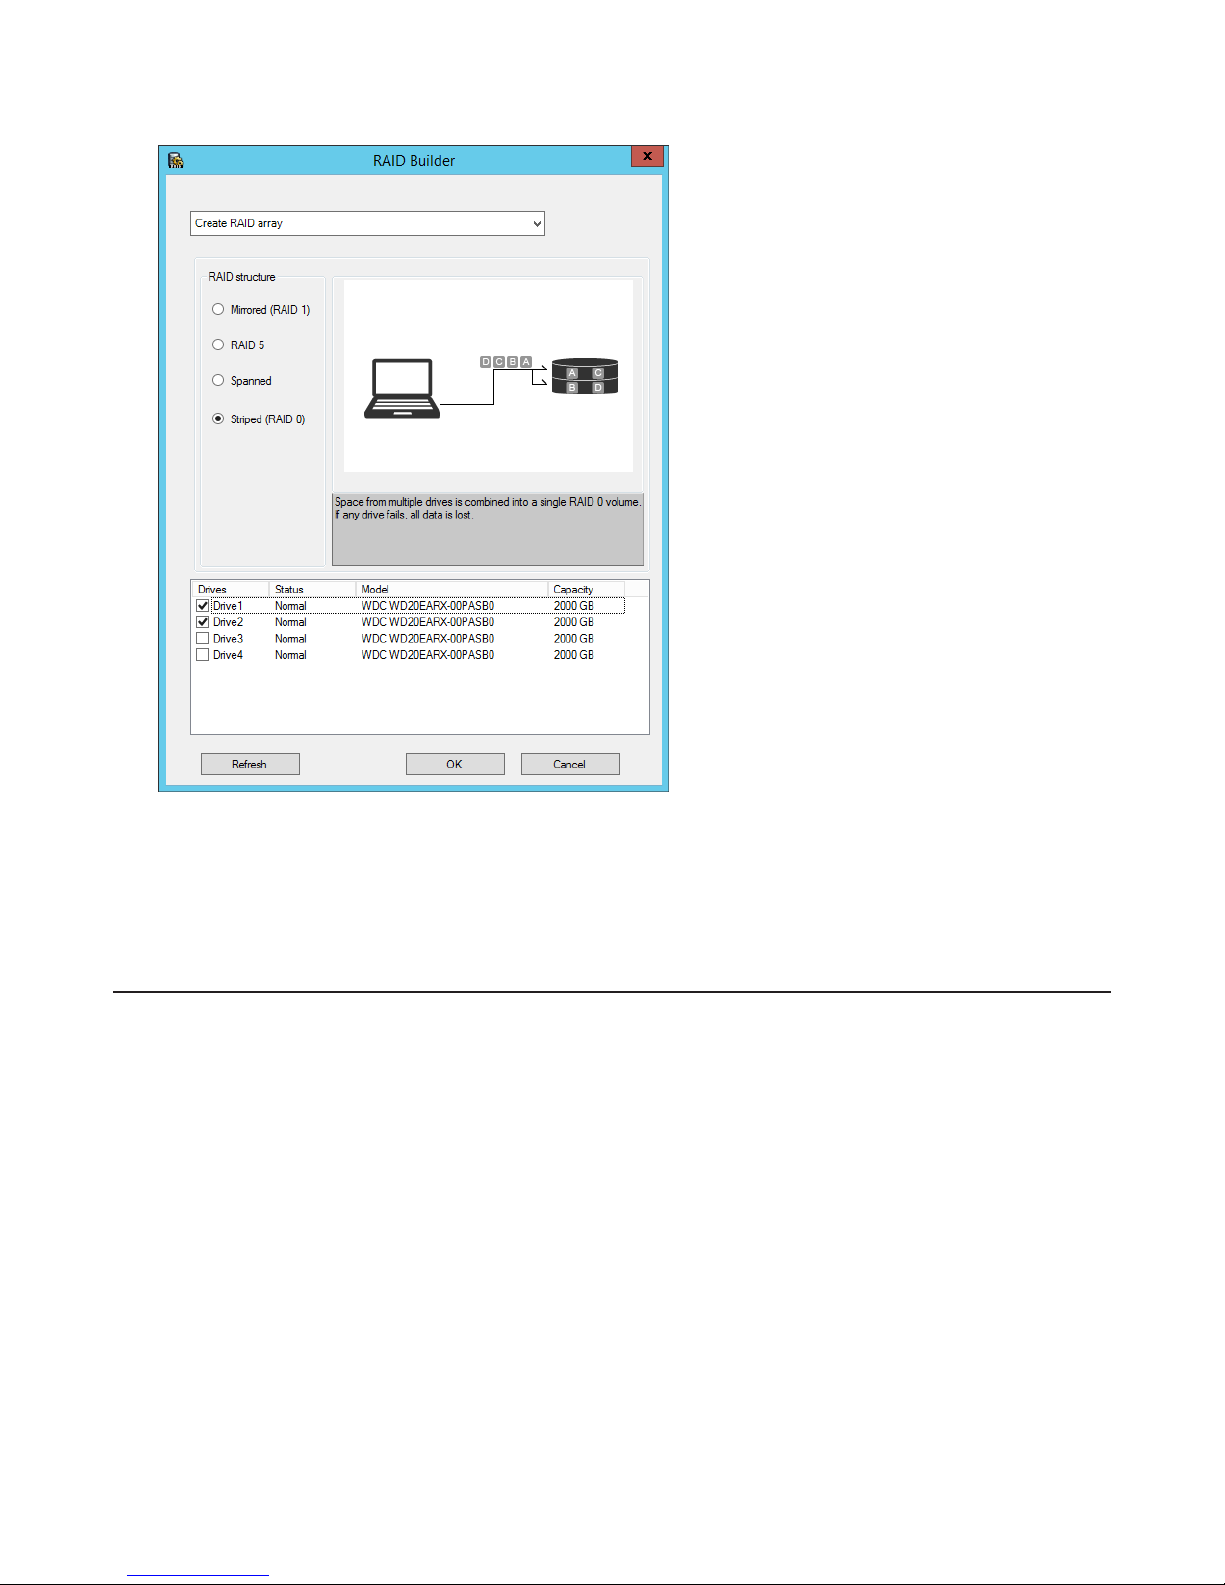
4 Click OK.
Example:
For a configuration with drive 1 (50 GB), drive 2 (80 GB), drive 3 (58 GB), and drive 4 (100 GB), the usable space on the
mirrored volume will be 50 GB x 4 drives = 200 GB.
A striped volume will be created. Next, create a shared folder on the volume as described in chapter 7.
Creating a Spanned Volume
1 From the Windows Storage Server Start menu, click RAID Builder.
2 Select "Create RAID array" from the drop-down menu and "Spanned" under "RAID structure".
3 Select at least two drives to create a spanned array.
24
Page 26
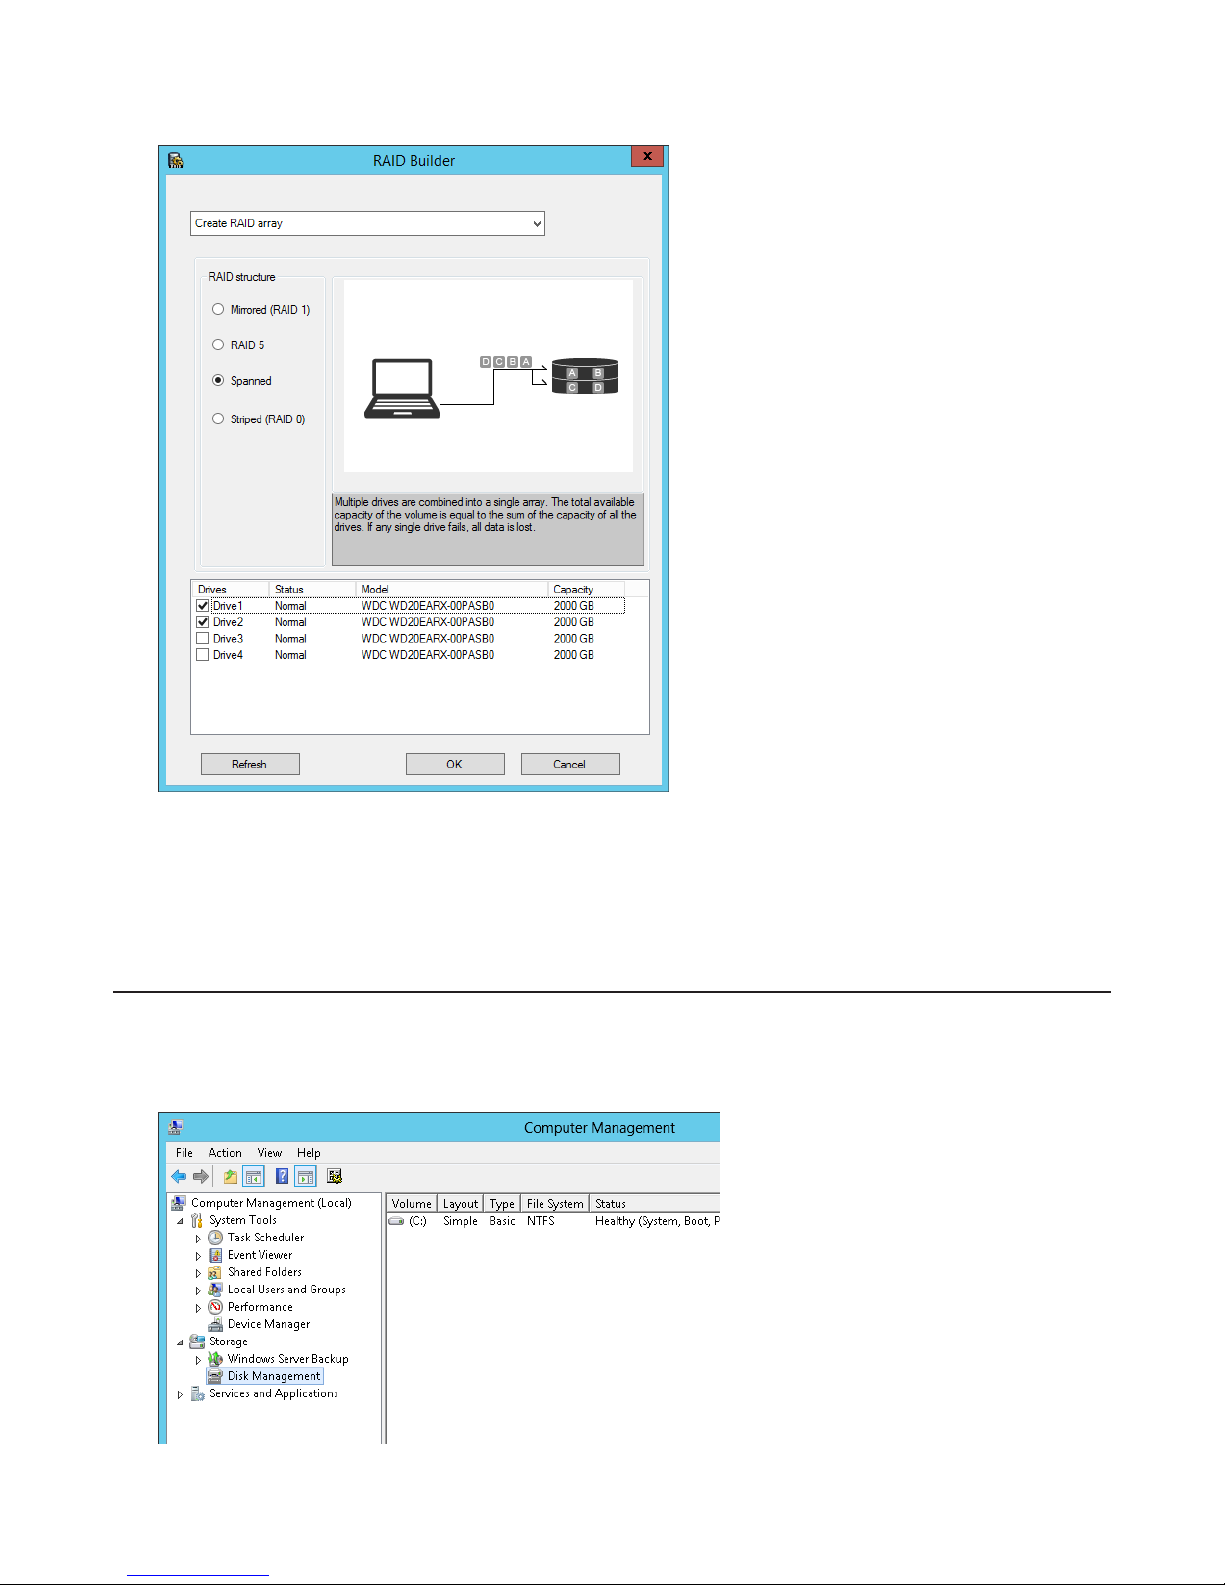
4 Click OK.
Example:
For a configuration with drive 1 (50 GB), drive 2 (80 GB), drive 3 (58 GB), and drive 4 (100 GB), the usable space on the
RAID volume will be 50 GB + 80 GB + 58 GB + 100 GB = 288 GB.
A spanned volume will be created. Next, create a shared folder on the volume as described in chapter 7.
Creating Simple Volumes (JBOD)
1 From the Windows Storage Server Start menu, open Administrative Tools, then double-click Computer Management.
2 Click Disk Management.
25
Page 27

3 Right-click the unallocated area and select New Simple Volume.
4 Click Next.
5 Enter the volume size that you want to create and click Next.
26
Page 28
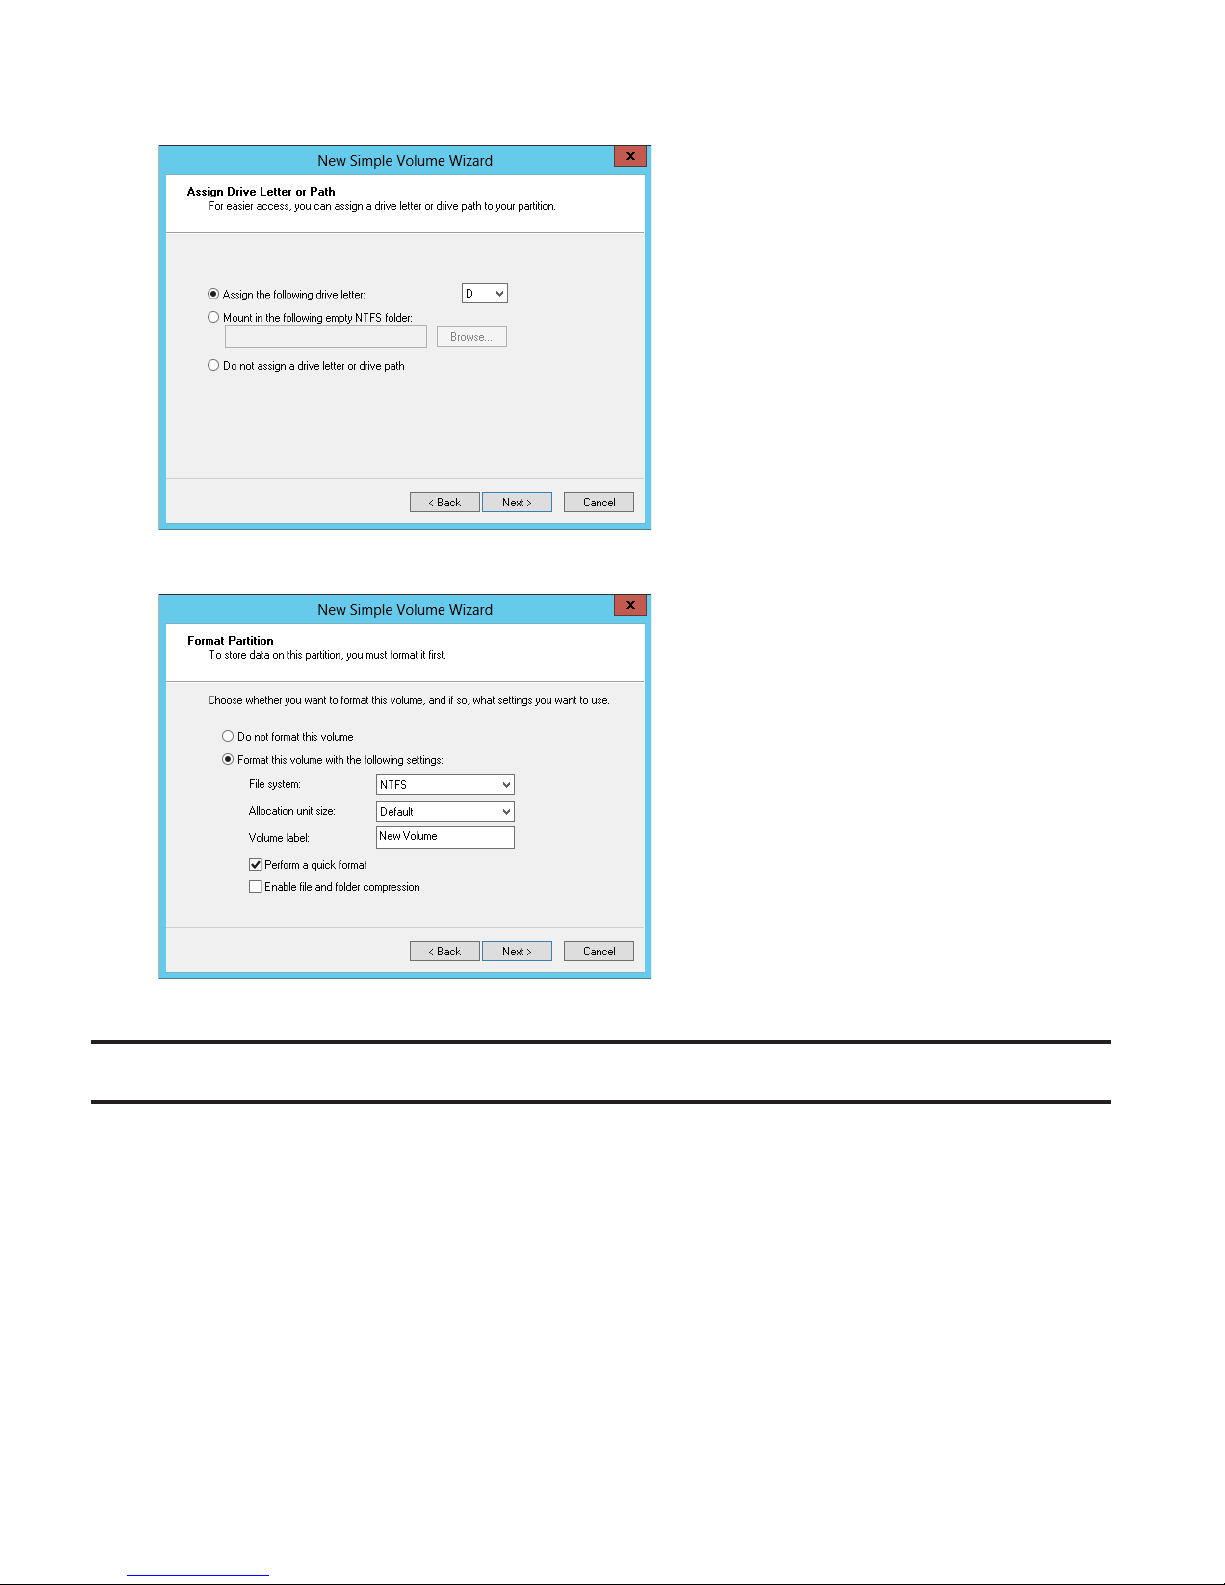
6 Select Assign the following drive letter and click Next.
7 Select Format this volume with the following settings and Perform a quick format and click Next.
A simple volume will be created. Next, create a shared folder on the volume as described in chapter 7.
Deleting Volumes
An unallocated area on a drive is required to create a volume. If there are no unallocated areas, create one by deleting an
existing volume.
1 From the Windows Storage Server Start menu, open Administrative Tools, then double-click Computer Management.
27
Page 29
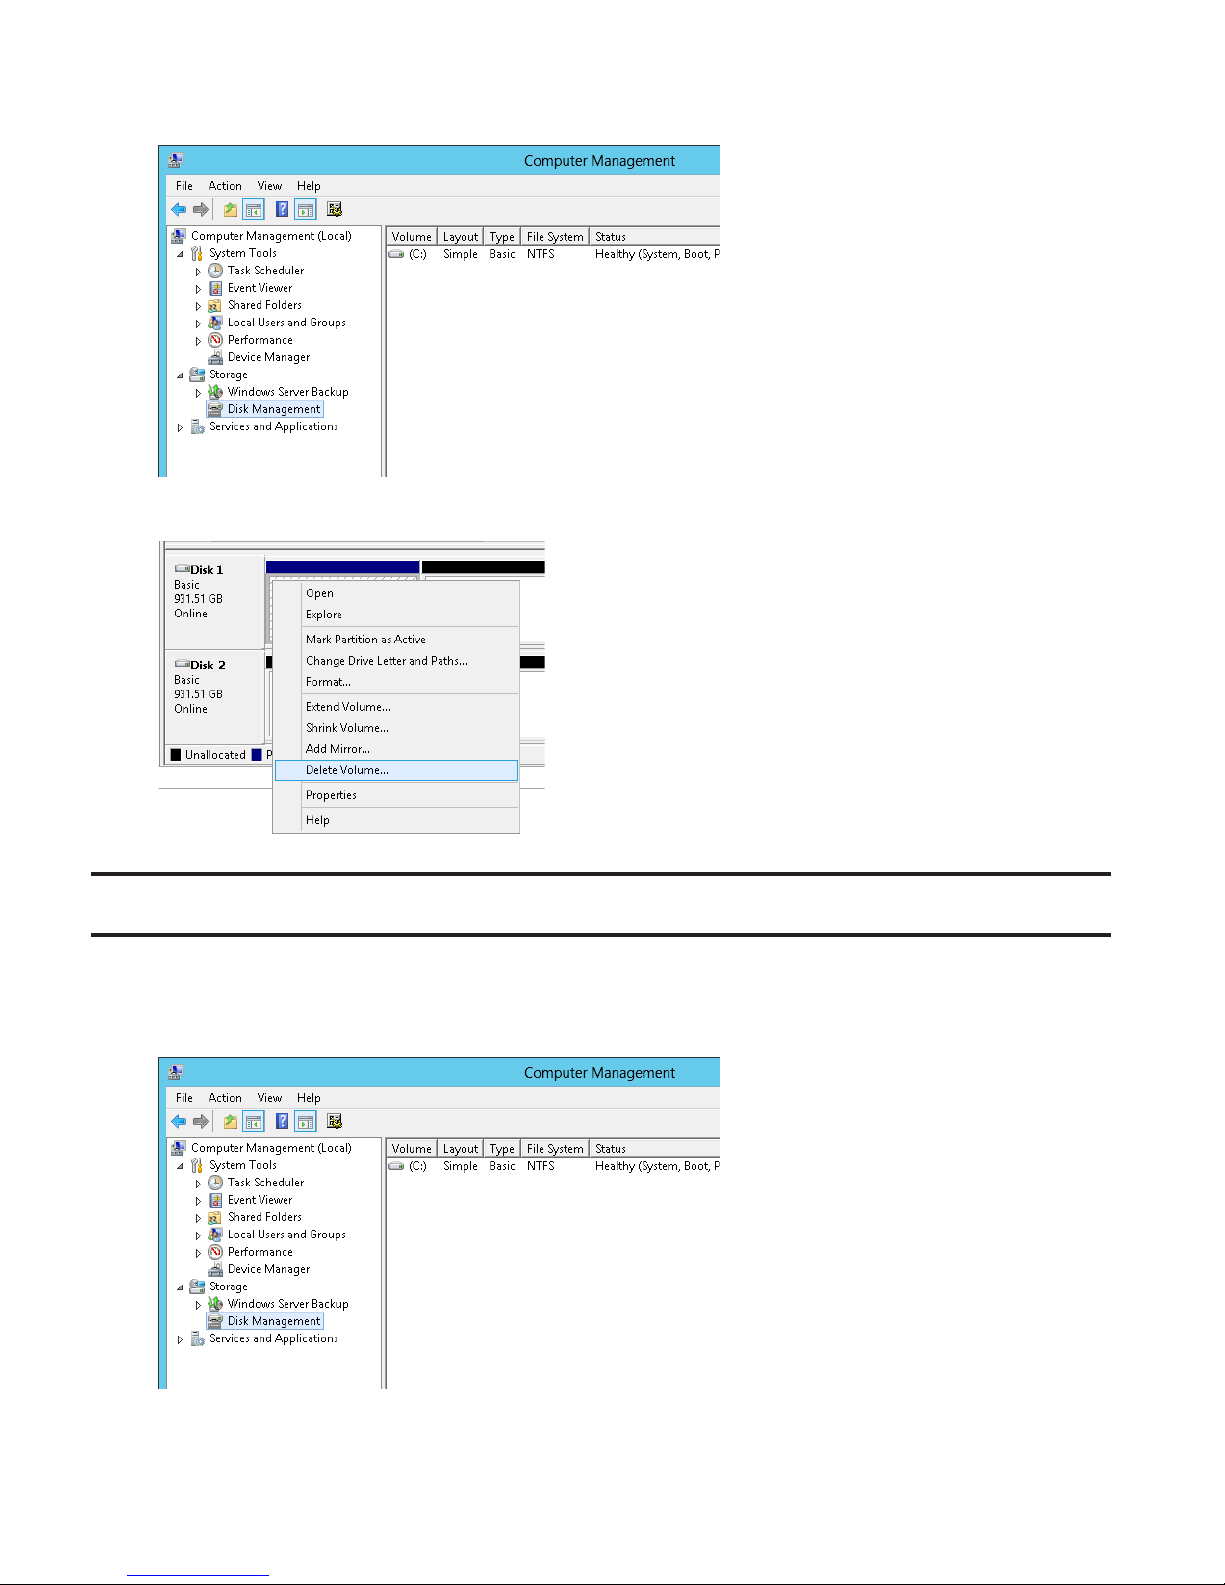
2 Click Disk Management.
3 Right-click the volume that you want to delete and then select Delete Volume.
Formatting Volumes
1 From the Windows Storage Server Start menu, open Administrative Tools, then double-click Computer Management.
2 Click Disk Management.
28
Page 30
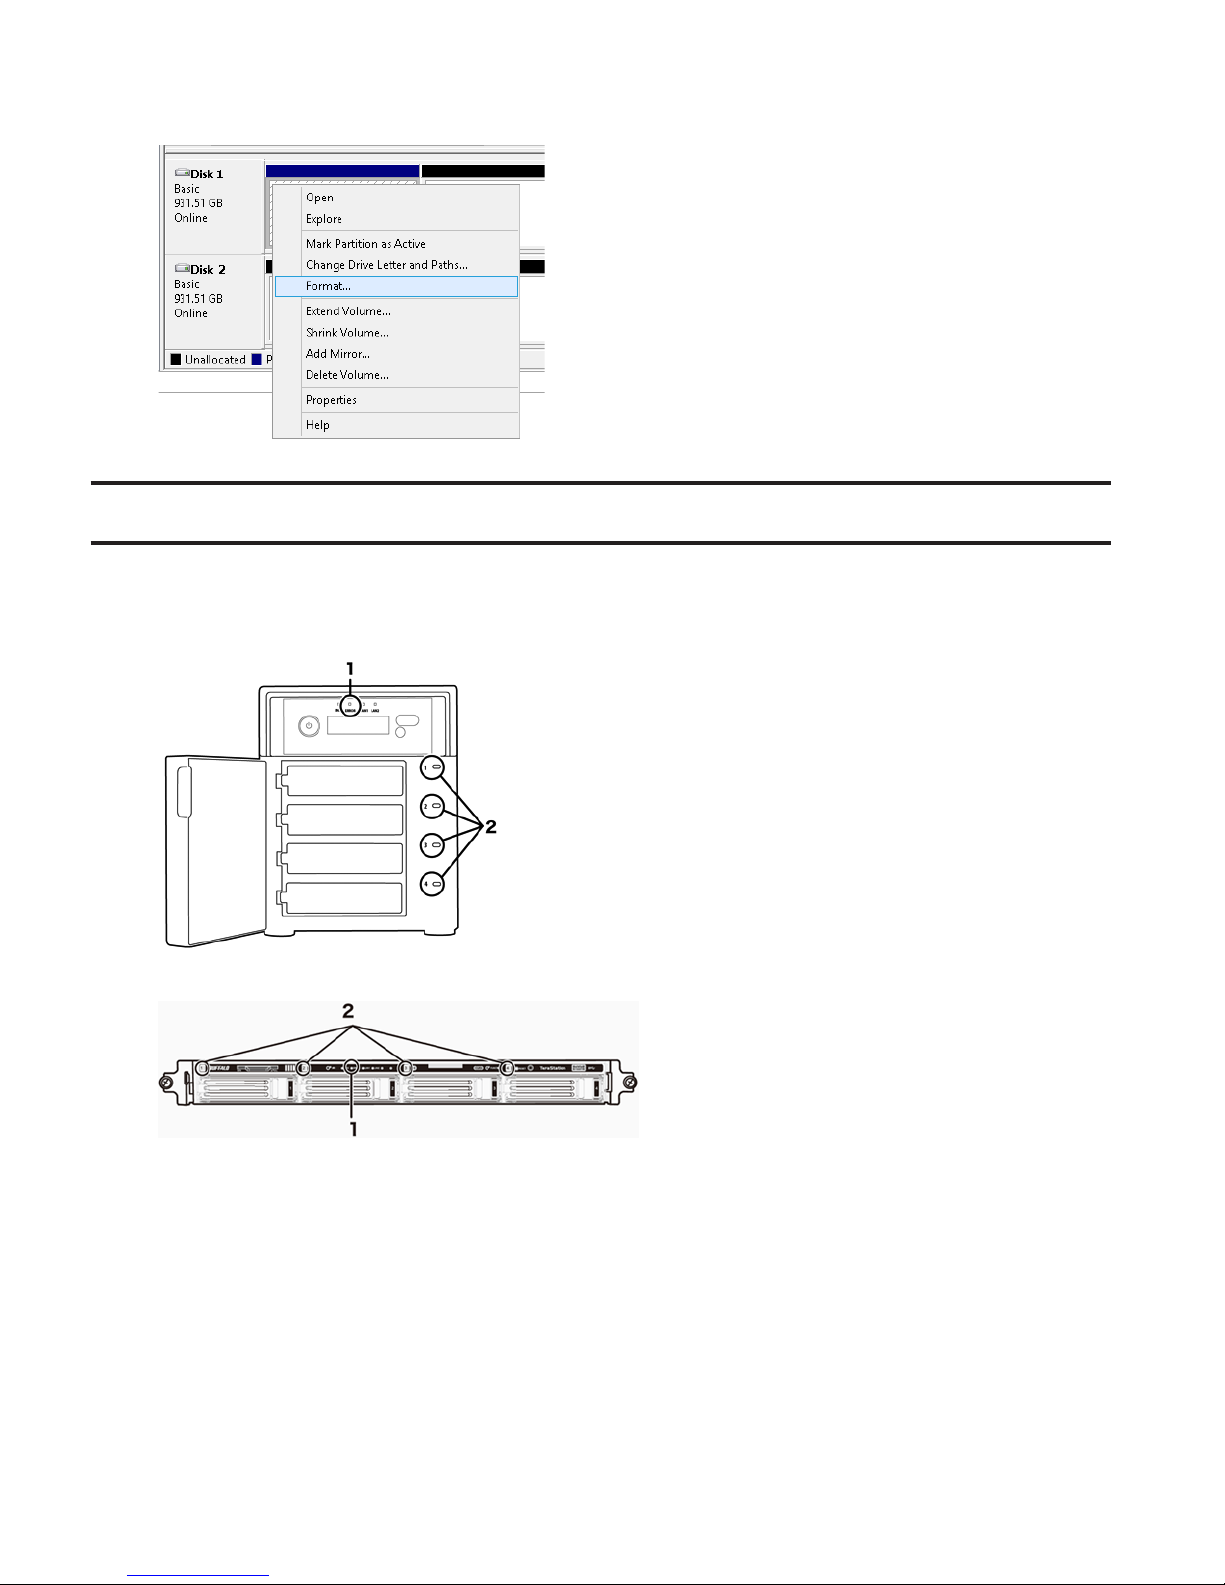
3 Right-click the volume that you want to format and select Format.
Hard Drive Replacement Procedure
Hard drives in the TeraStation show a green status LED during normal operation. If a drive fails, its error LED will glow
red.
1 Error LED
Red if a drive has failed.
2 Status LEDs
Green: Normal operation.
Glowing red: If a drive's status LED is glowing red, the drive has malfunctioned. Dismount the drive in Buffalo Dashboard
before unplugging it from the TeraStation.
Notes:
• Do not unplug a drive whose status LED is not lit red. If you remove the drive without properly dismounting it,
data may be lost or the TeraStation may malfunction.
29
Page 31
• When changing drives, the replacement drive should be a Buffalo OP-HDS series drive of the same size.
• The TeraStation is fragile. Handle it with care. Do not drop or bump the TeraStation.
• Use caution when handling the unit in order to avoid personal injury.
• Never disassemble any parts while you are replacing a hard drive unless instructed to do so in this manual. Any
malfunction or damage caused by disassembling the TeraStation will void your warranty.
• To avoid damaging the TeraStation with static electricity, ground yourself by touching something made of metal
before handling any sensitive electronic parts.
• Do not change the order of the hard drives in the TeraStation. For example, pulling out drive 1 and replacing it
with drive 2 may cause data to be corrupted or lost.
• The boot drive (C:) consists of the mirrored volume and a portion of the two drives from the top. Do not replace
both of these hard drives at the same time.
• If a hard drive is replaced while saving a file, the file can be corrupted. Be sure that the saving operation is
completed before replacing the hard drive.
Hard Drive Replacement Examples
A Drive Failure Occurs in Drive 1 or 2
Notes:
• If one of the drives in the boot drive fails, repair the mirrored volume of the system area first after replacing the
drive. Repairing the volume for the data area first may not always succeed.
• If you used Disk Management to mirror the boot drive, the TeraStation will not boot when the drive fails. Follow
the procedure below.
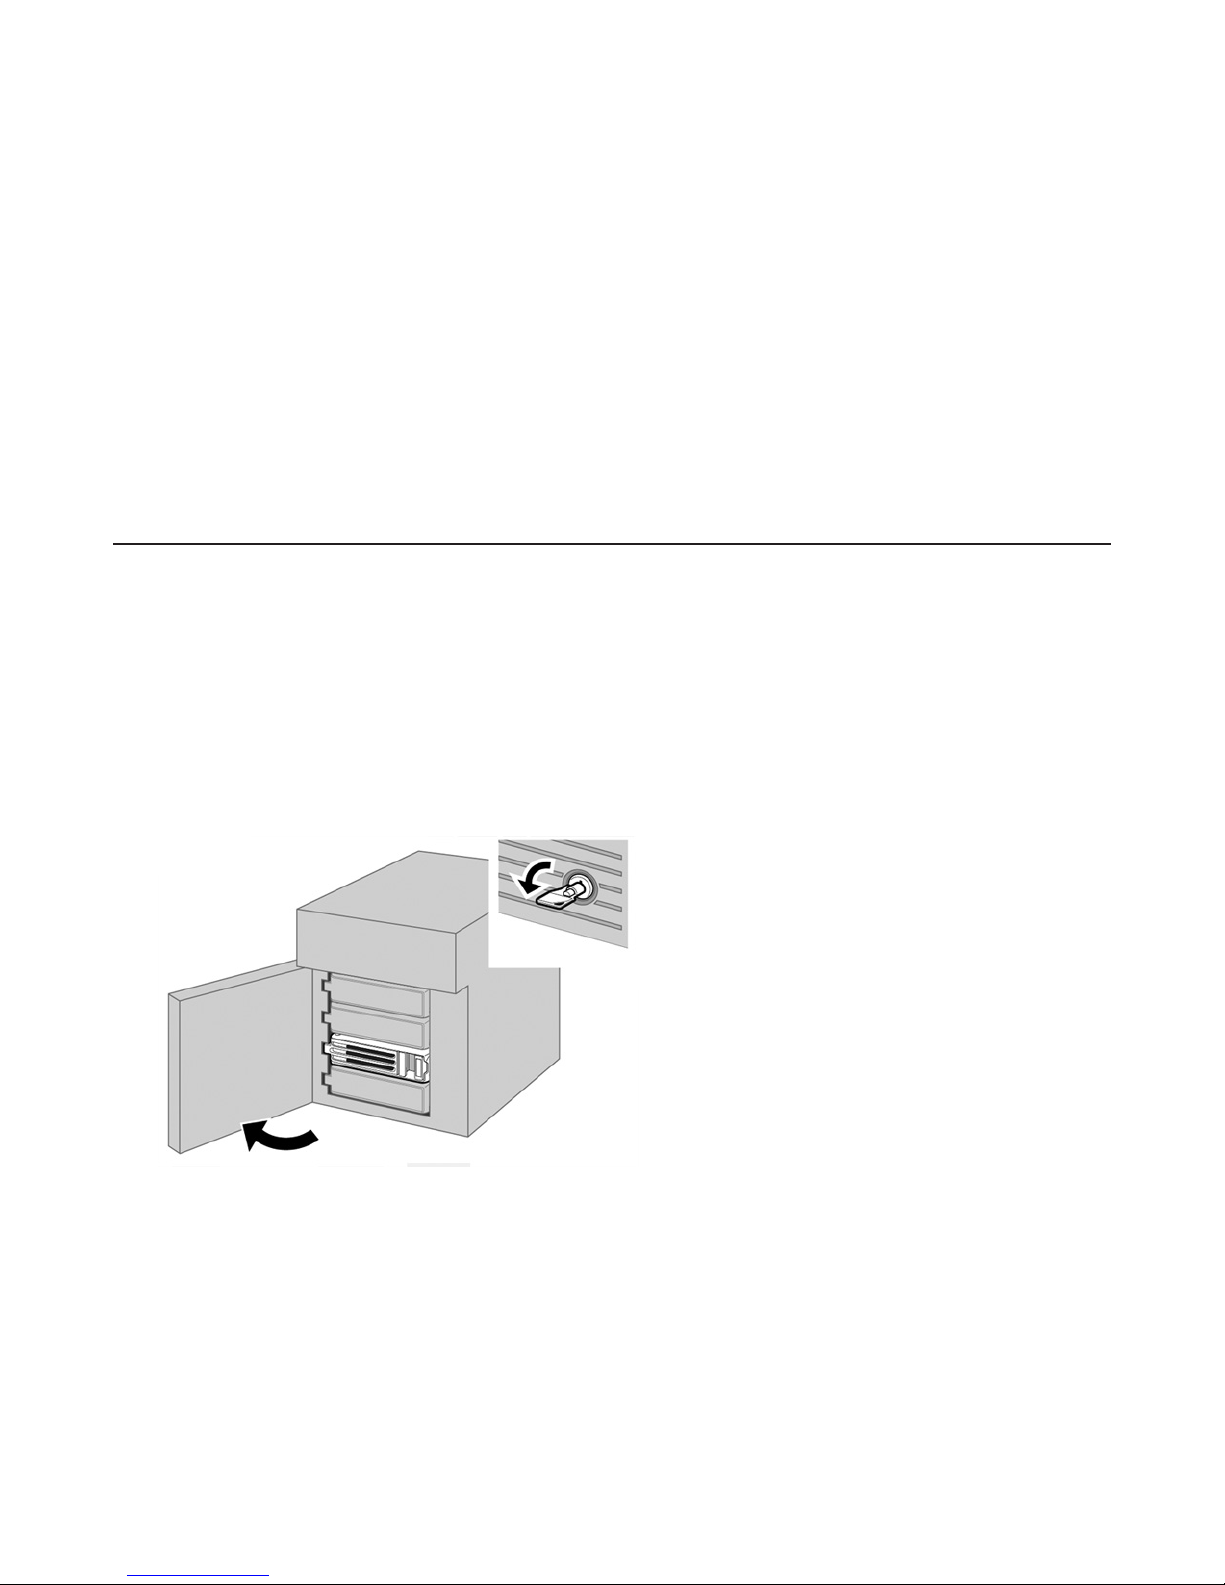
1 If your TeraStation has a front cover, open it with the included key.
2 Make a note of the drive number where the status LED glows red.
3 Shut down the TeraStation.
30
Page 32
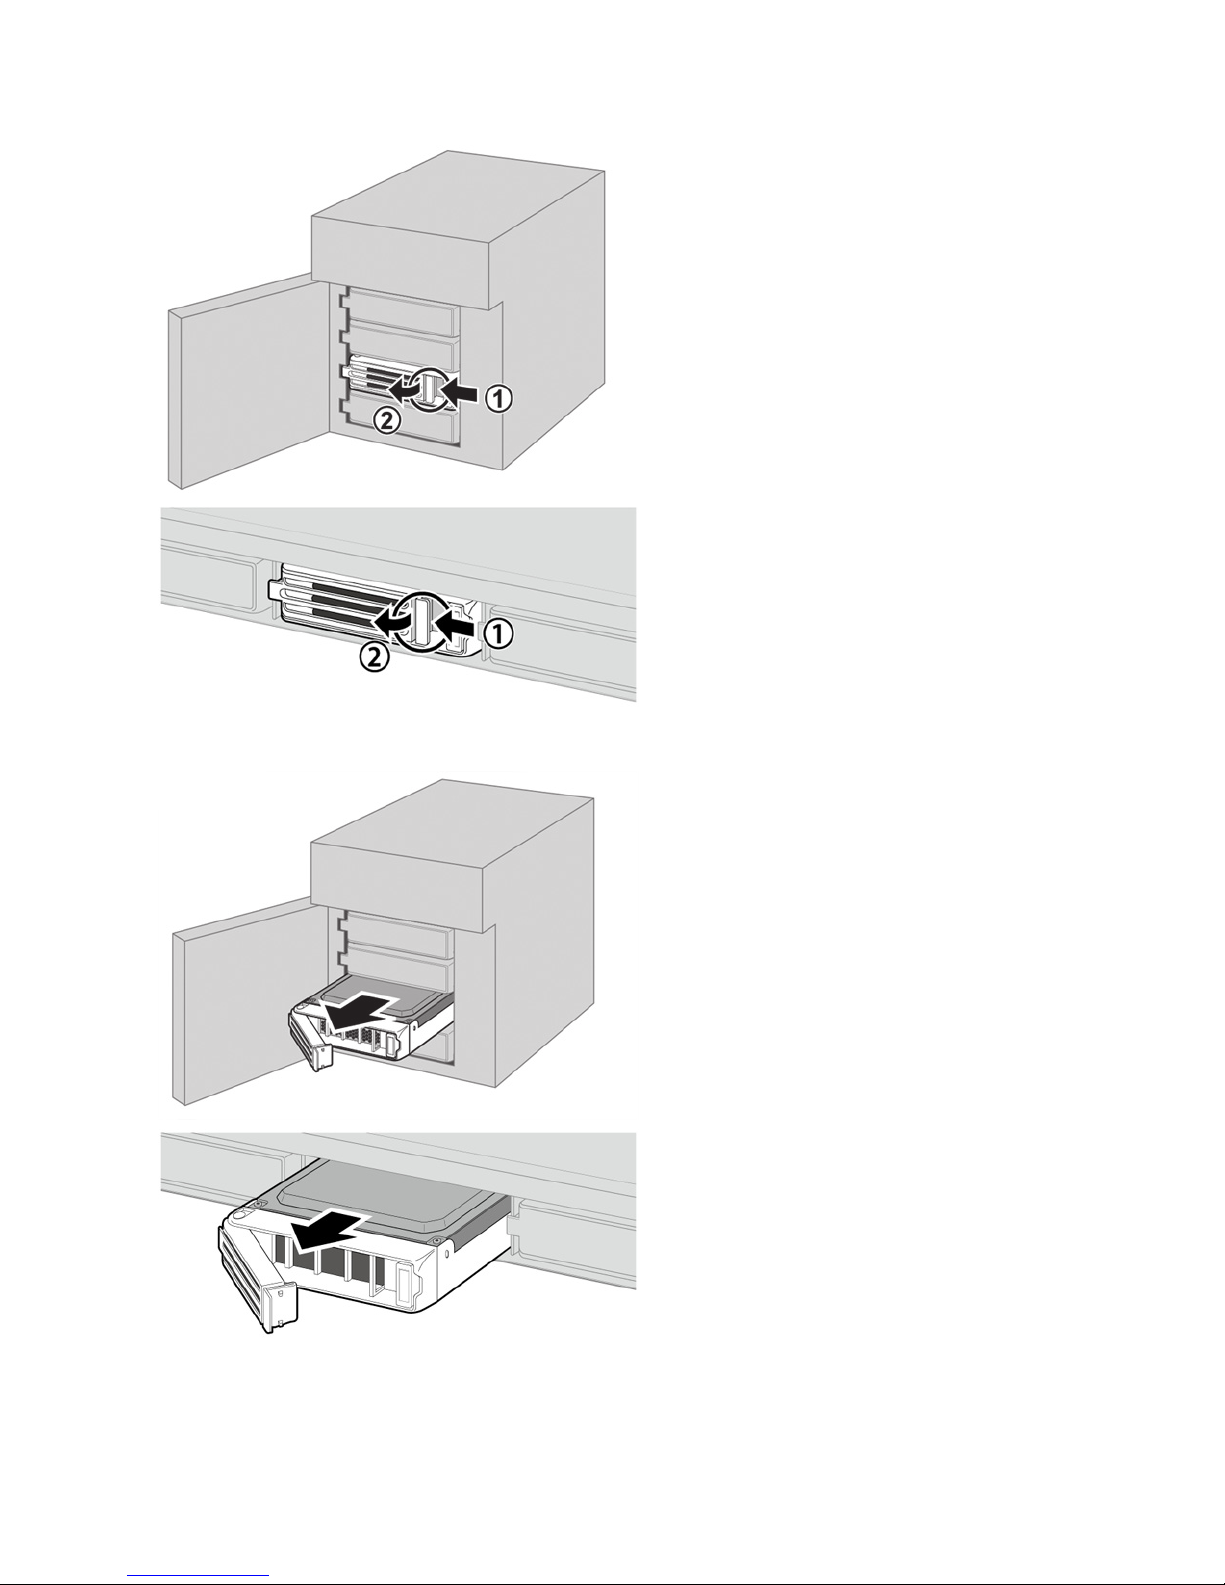
4 Push the unlock button of the failed hard drive and swing the lock mechanism out.
5 Pull out the drive cartridge and remove it from the TeraStation.
31
Page 33
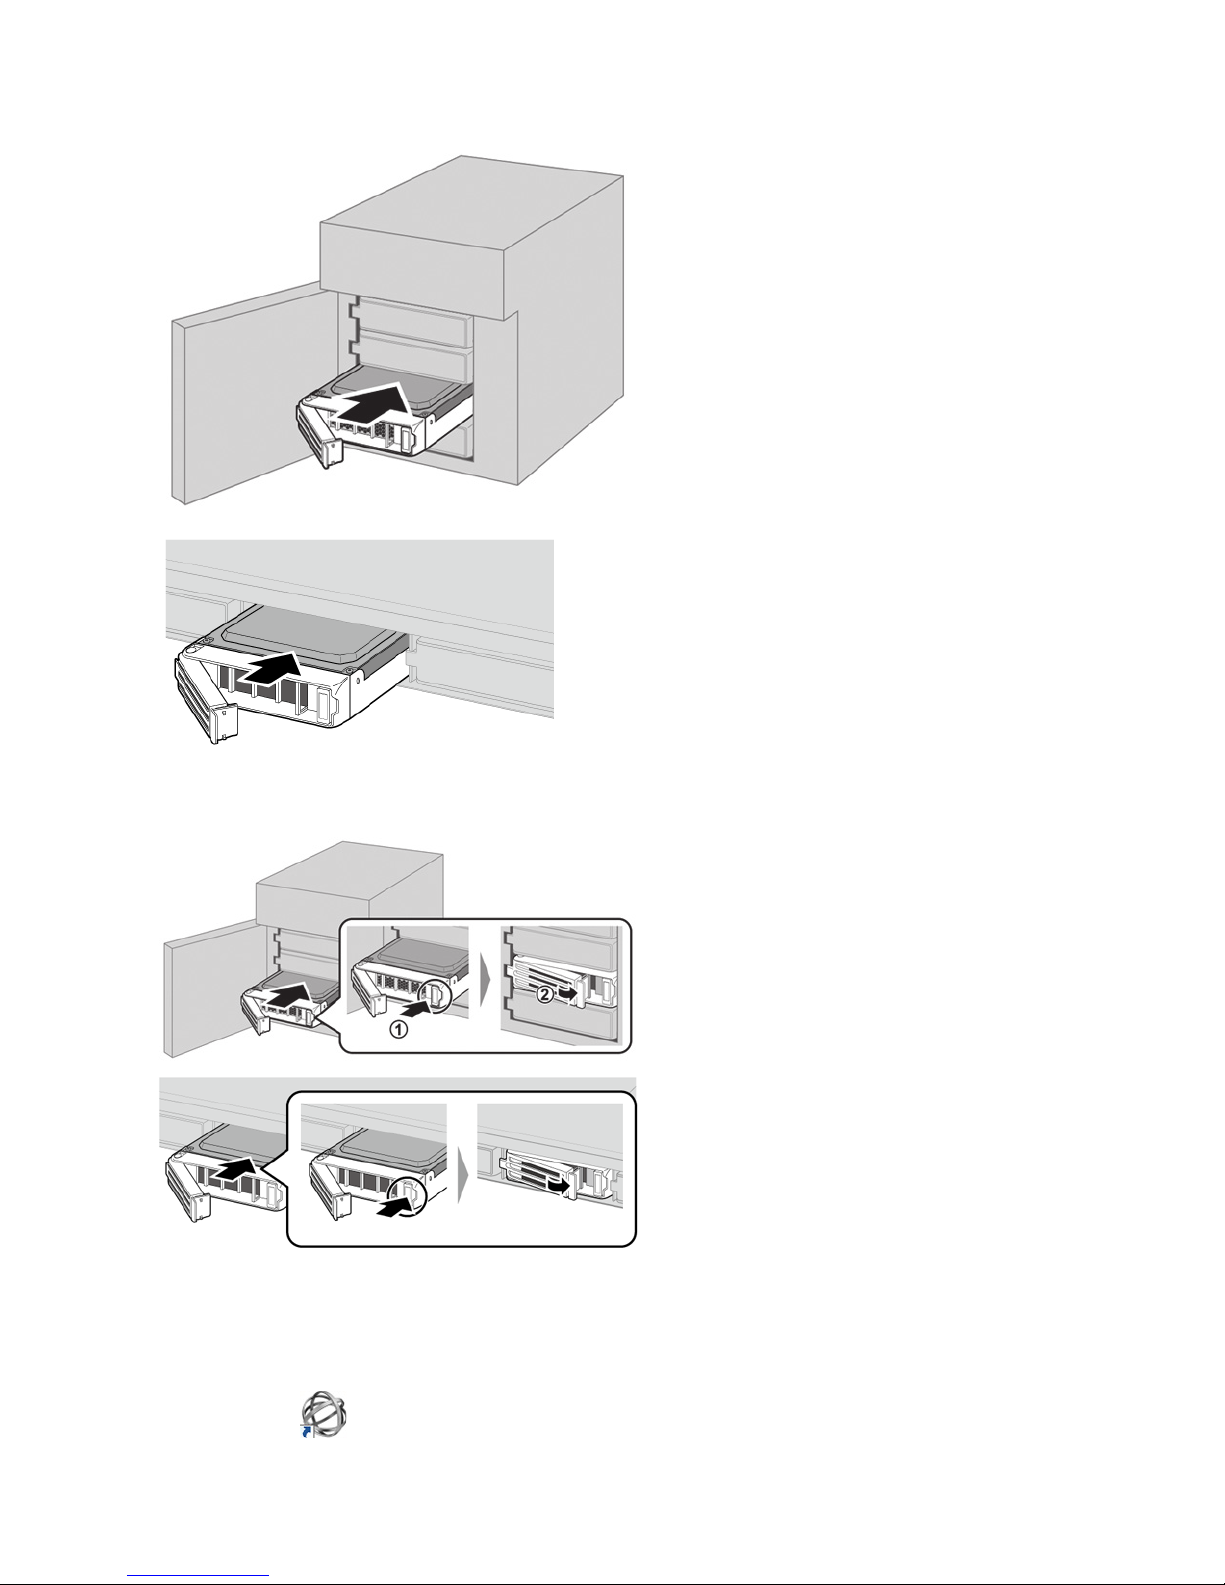
6 Insert the new drive in the empty slot. Slide the drive in with the locking mechanism open.
7 Swing the lock back down until it clicks into place.
8 Close the front cover with the included key. Press the power button on the TeraStation to turn it on.
Note: If drive 1 is being replaced, the red error LED will light up and "POST ERR: 00D9 Boot from HDD x" will be
displayed on the LCD panel. Wait for the unit to reboot. When the reboot is finished, go on to the next step.
9 Double-click the icon to start NAS Navigator2.
32
Page 34
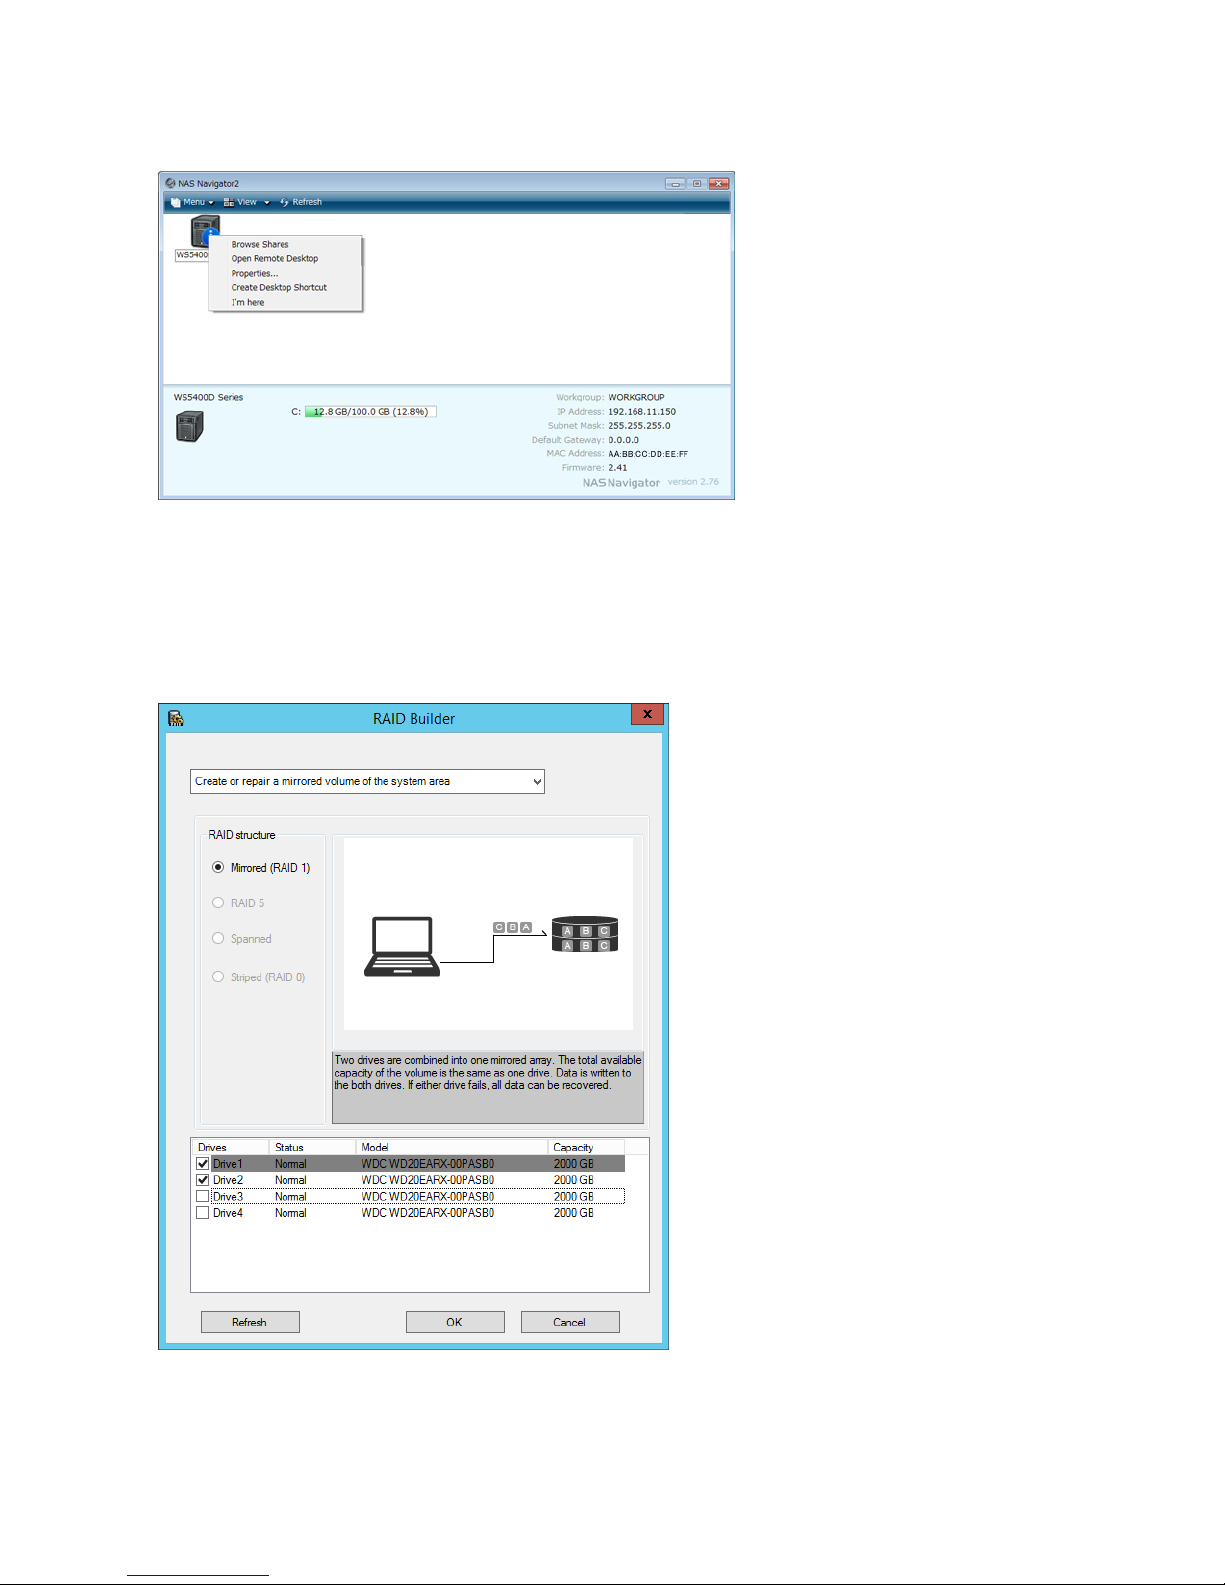
10 Right-click on your TeraStation's icon and click Open Remote Desktop. For Mac, click the TeraStation icon while
holding down the control key and click Open Remote Desktop.
11 Enter the username and password and press the Enter key. Windows Storage Server opens in the remote desktop.
Note: The default username and password are "Administrator" and "password".
12 Click RAID Builder from the Start menu of Windows Storage Server.
13 Select Create or repair a mirrored volume of the system area, check replaced hard drive, and click OK.
14 When "When Drive x will be initialized. Continue?" is displayed, click OK. It will take about an hour for the mirrored
volume to be repaired. You can check the progress of the repair in Disk Management. After creating a mirrored
33
Page 35
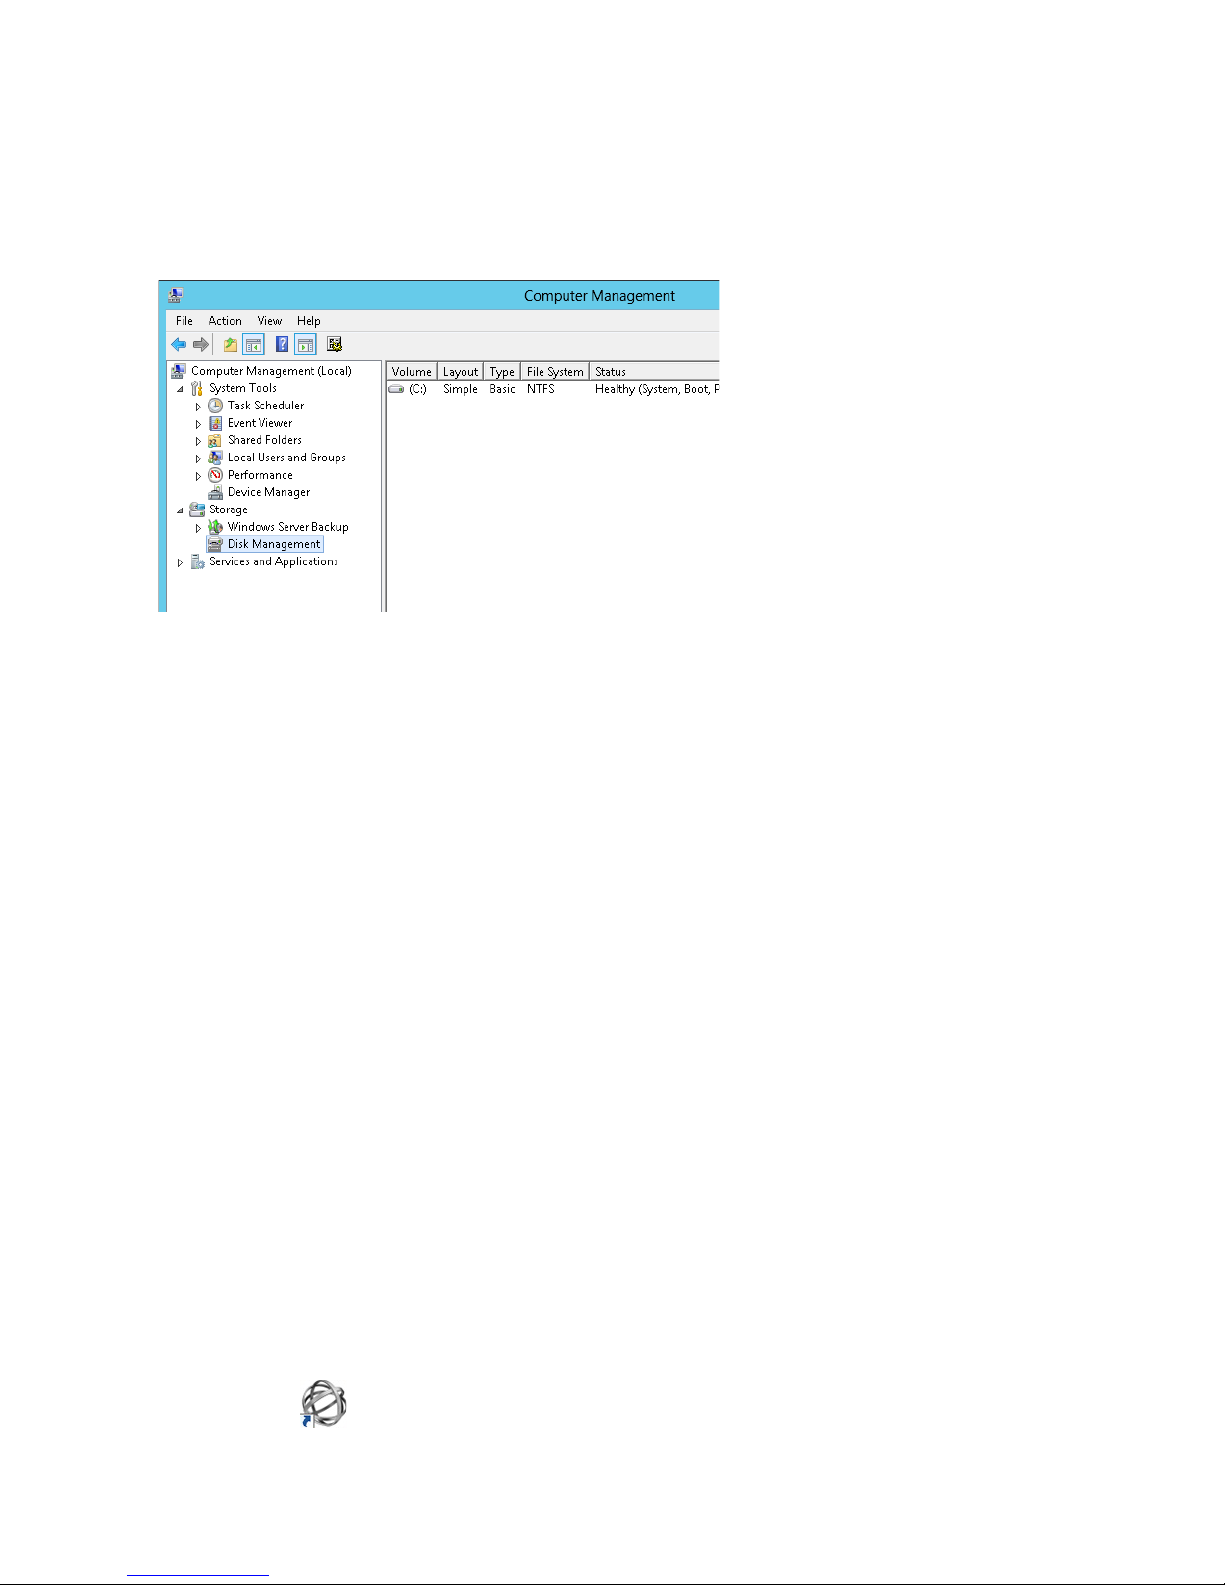
volume, you will see the message dialogue to restart your TeraStation. Follow the instructions displayed. When the
reboot is finished, go to the next step.
15 From the Windows Storage Server Start menu, open Administrative Tools and double-click Computer Management.
16 Click Disk Management.
17 Select the step depending on your purpose for a created volume.
To create a new volume (except for a RAID 5 or mirrored volume):
(1) Right-click the new dynamic disk and select New Volume.
(2) Follow the instructions on the screen to create a new volume.
To restore a RAID 5 volume (RAID resynchronization):
(1) Right-click the volume labeled "Failed Redundancy" and click Restore Volume.
(2) When "Select the disk from the following list" is displayed, select the drive to restore and click OK.
Perform steps (1) and (2) for each volume that requires RAID resynchronization.
(3) Right-click the volume labeled "Missing" and select Delete Disk.
To restore a mirrored volume (RAID resynchronization):
(1) Right-click the volume labeled "Failed Redundancy" and click Remove Mirror.
(2) When "Remove Mirror" is displayed, select the drive with its status missing and click Remove Mirror.
(3) When "Are you sure you want to remove the mirror?" is displayed, click OK.
Perform steps (1) to (3) for each volume that requires RAID resynchronization.
(4) Select the new volume where mirroring will be performed and select Add Mirror.
(5) When "Add Mirror" is displayed, select the drive where mirroring will be performed with the selected volume
and click Add Mirror.
If a Mirrored Volume Failed to Restore
If a mirrored volume doesn't restore the first time, try the steps above a second time. If the mirrored volume still cannot
be restored, contact Buffalo technical support for assistance.
A Drive Failure Occurs among Drives 3–6
1 Double-click the icon to start NAS Navigator2.
34
Page 36
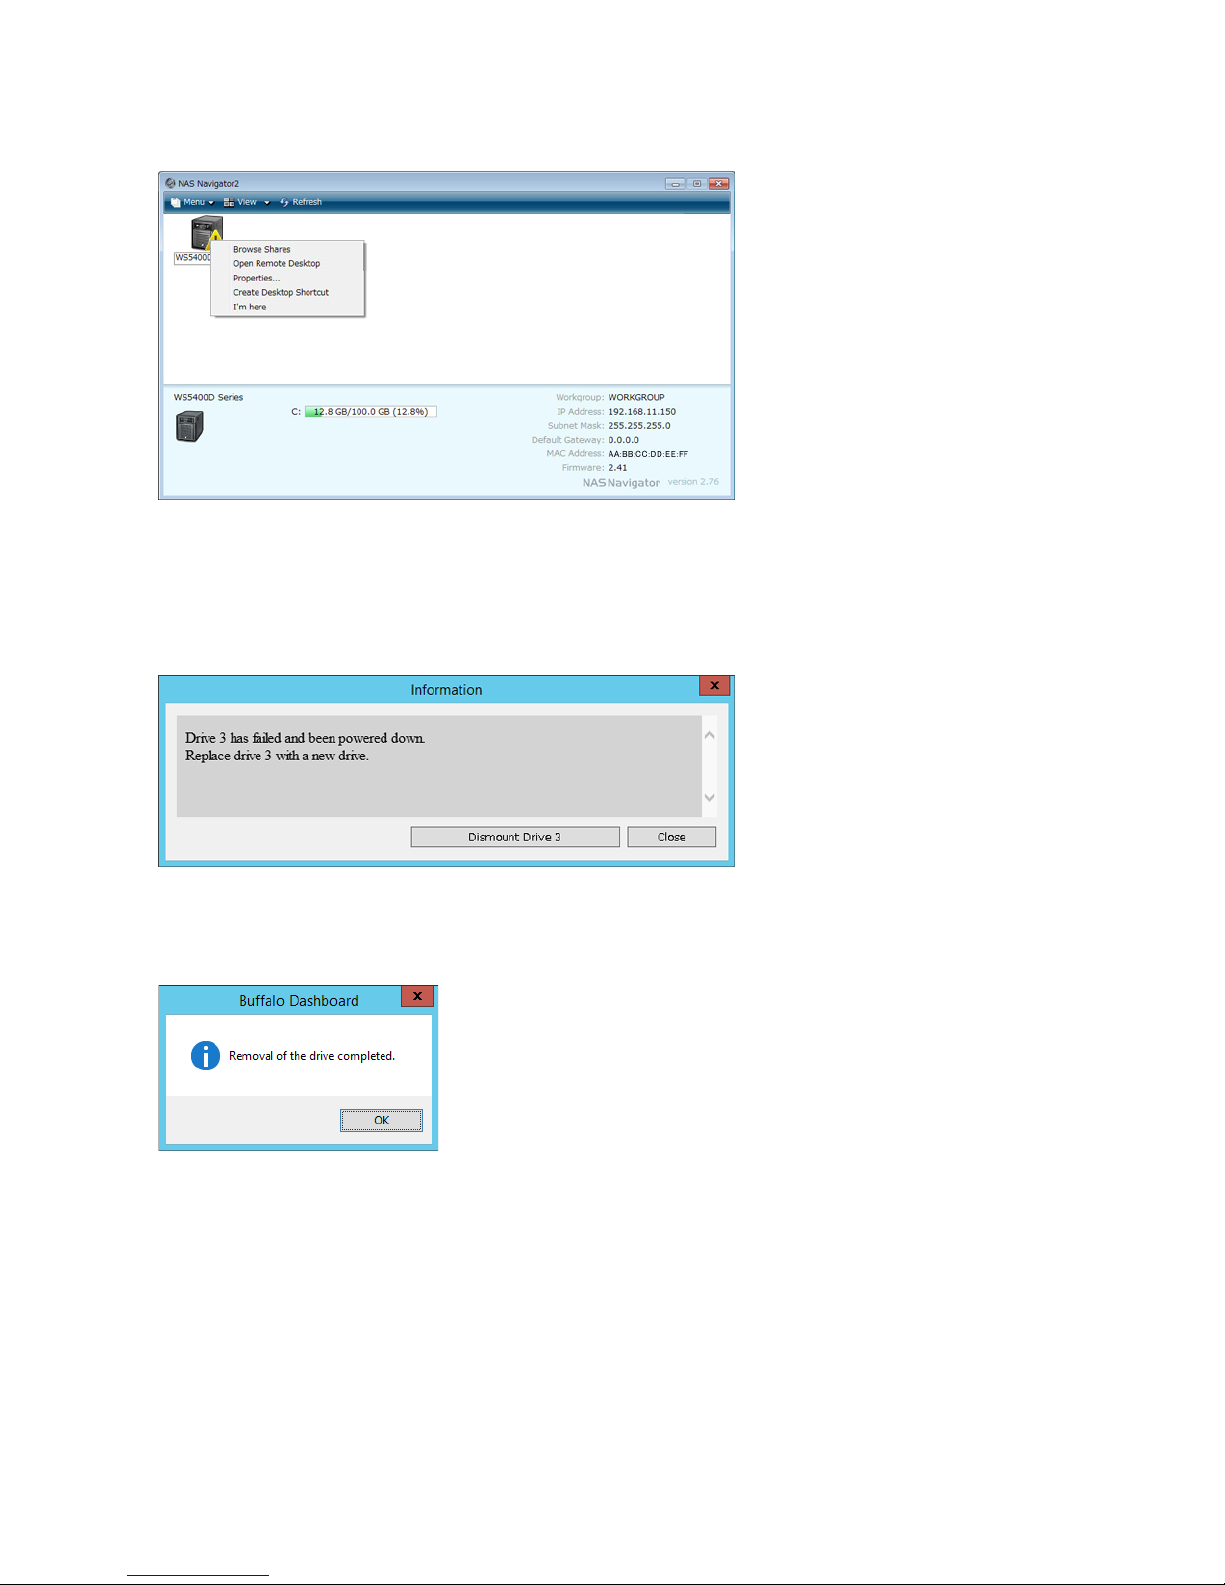
2 Right-click on your TeraStation's icon, then click Open Remote Desktop. For Mac OS, click the TeraStation's icon
while holding down the control key, then click Open Remote Desktop.
3 Enter the username and password, then press the Enter key. Windows Storage Server will open in the remote
desktop.
Note: The default username and password are "Administrator" and "password".
4 The error message (E30) will be displayed in Buffalo Dashboard.
5 Click Dismount Drive X (where "X" is the number of the failed drive).
6 When the message "Removal of the drive completed." is displayed, click OK.
The status LED will stop flashing and glow steadily.
7 If your TeraStation has a front cover, open it with the included key.
8 Push the unlock button of the failed hard drive and swing the lock mechanism out.
9 Pull out the hard drive cartridge and remove it from the TeraStation.
10 Insert the new hard drive (sold separately) into the empty slot. Slide the drive in with the locking mechanism open.
11 Swing the lock back down until it clicks into place.
35
Page 37
12 Close the front cover with the included key. If the hard drive was replaced while the TeraStation was off, power it
on now.
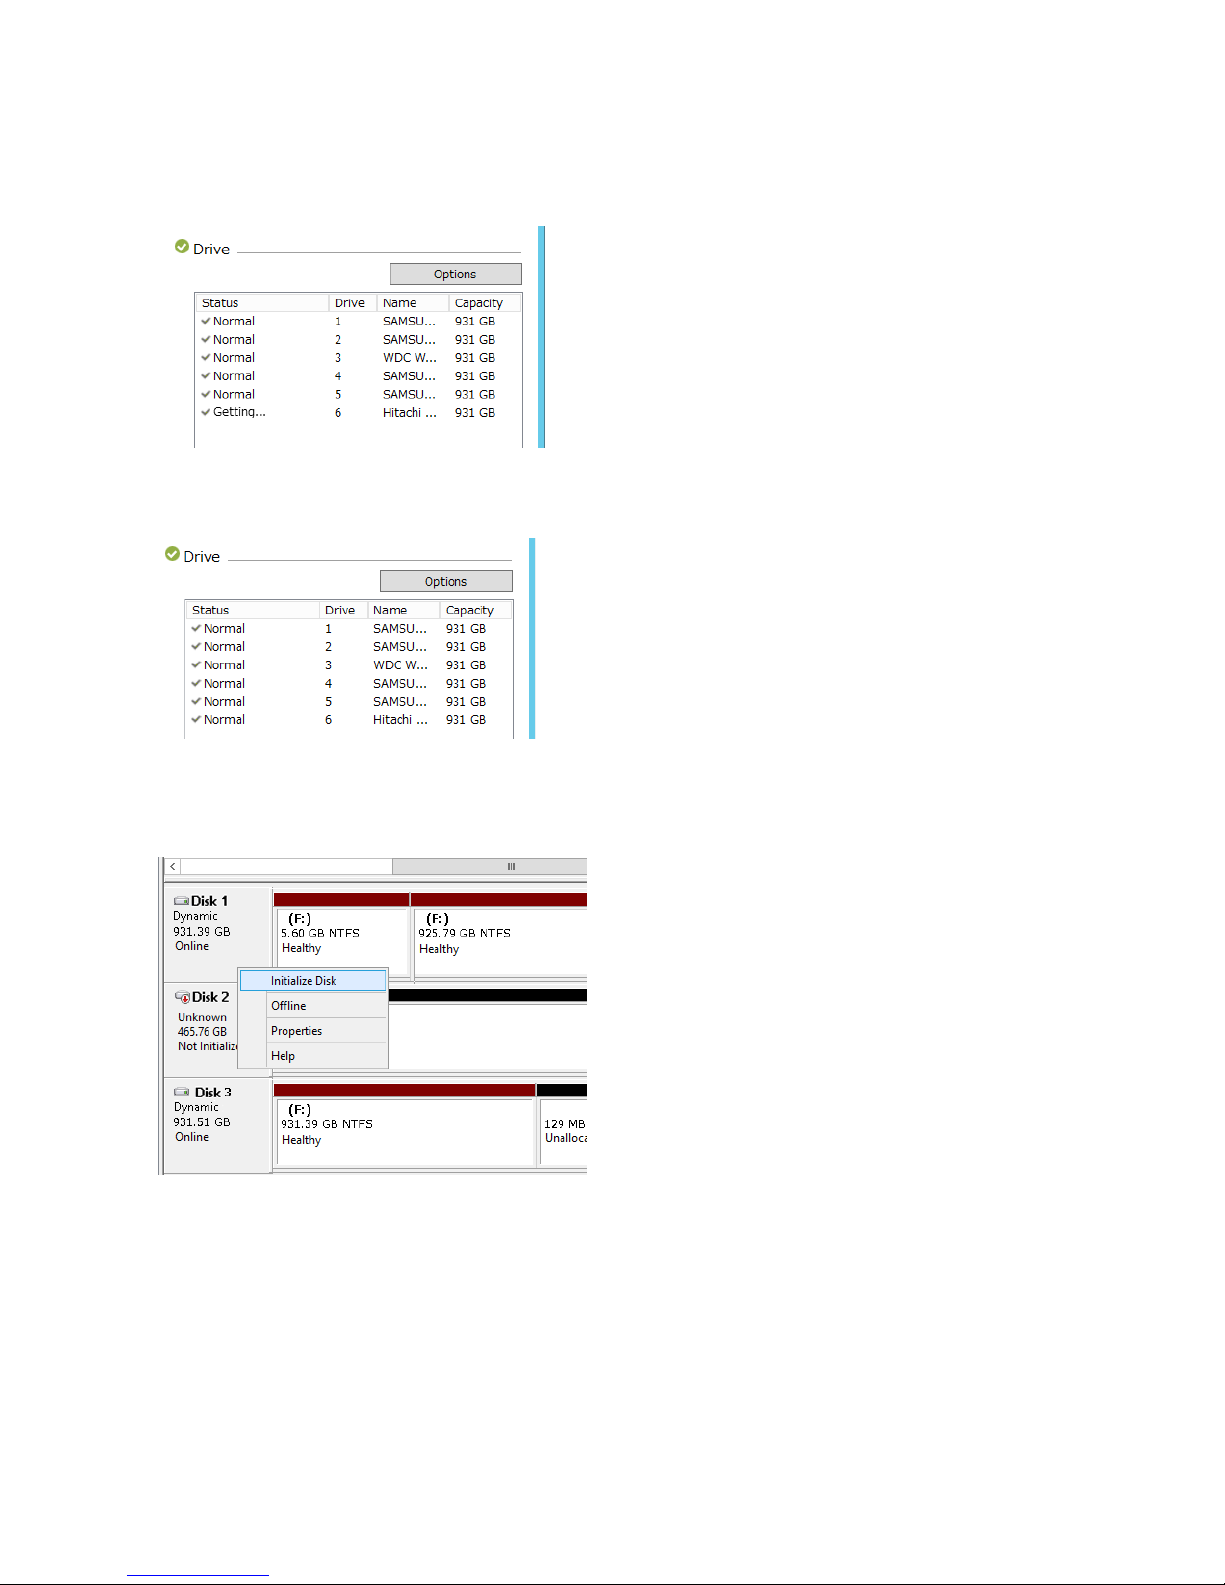
13 Buffalo Dashboard will show the drive status "Getting...".
14 After the drive status changes to "Normal", open Administrative Tools and double-click Computer Management in
Windows Storage Server.
15 Click Disk Management.
16 Right-click the new drive and select Initialize Disk.
36
Page 38
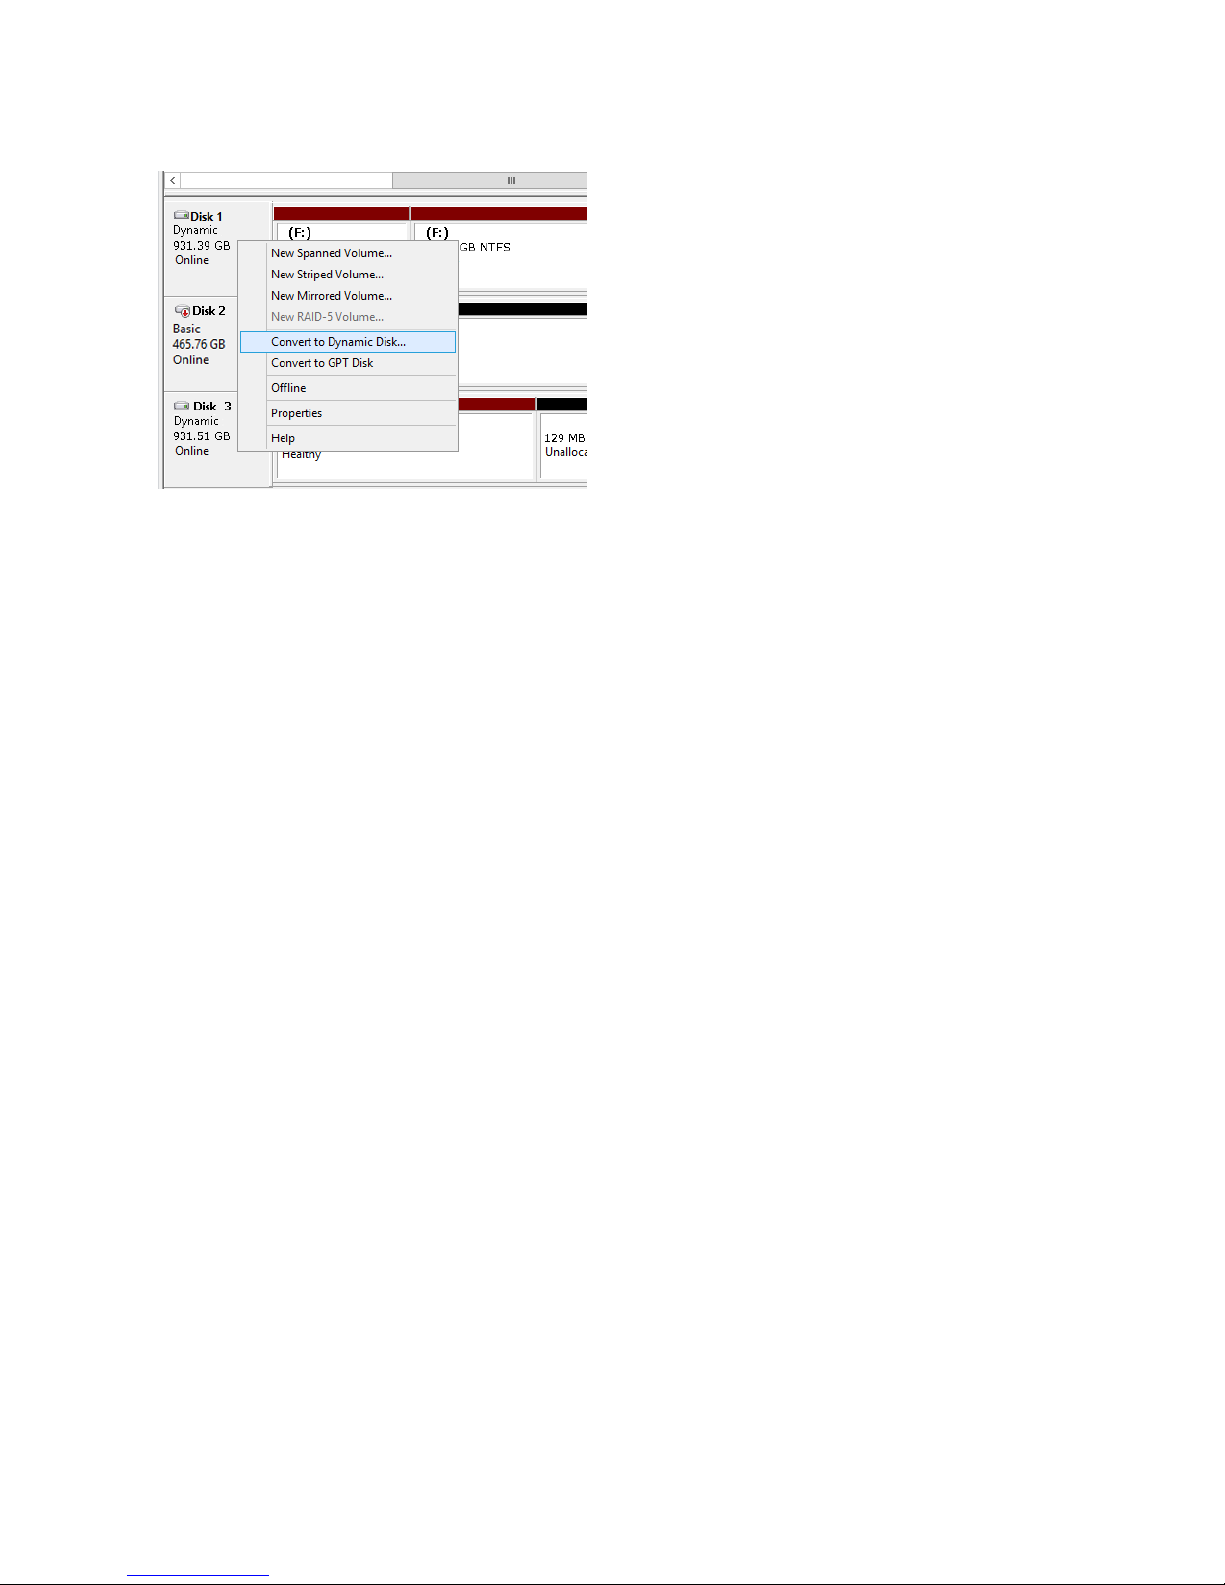
17 Right-click the initialized hard drive and select Convert to Dynamic Disk. A RAID array cannot be built unless the
hard drive is converted to a dynamic disk.
18 Select the step depending on your purpose for a created volume.
To create a new volume (except for a RAID 5 or mirrored volume):
(1) Right-click the new dynamic disk and select New Volume.
(2) Follow the instructions on the screen to create a new volume.
To restore a RAID 5 volume (RAID resynchronization):
(1) Right-click the volume labeled "Failed Redundancy" and click Restore Volume.
(2) When "Select the disk from the following list" is displayed, select the drive to restore and click OK.
Perform steps (1) and (2) for each volume that requires RAID resynchronization.
(3) Right-click the volume labeled "Missing" and select Delete Disk.
To restore a mirrored volume (RAID resynchronization):
(1) Right-click the volume labeled "Failed Redundancy" and click Remove Mirror.
(2) When "Remove Mirror" is displayed, select the drive with its status missing and click Remove Mirror.
(3) When "Are you sure you want to remove the mirror?" is displayed, click OK.
Perform steps (1) to (3) for each volume that requires RAID resynchronization.
(4) Select the new volume where mirroring will be performed and select Add Mirror.
(5) When "Add Mirror" is displayed, select the drive where mirroring will be performed with the selected volume
and click Add Mirror.
37
Page 39
Chapter 6 Backup
To avoid losing data accidentally, back up your data regularly.
Back Up in Windows Storage Server
You can back up TeraStation folders in Windows Storage Server.
Preparing a Backup Destination
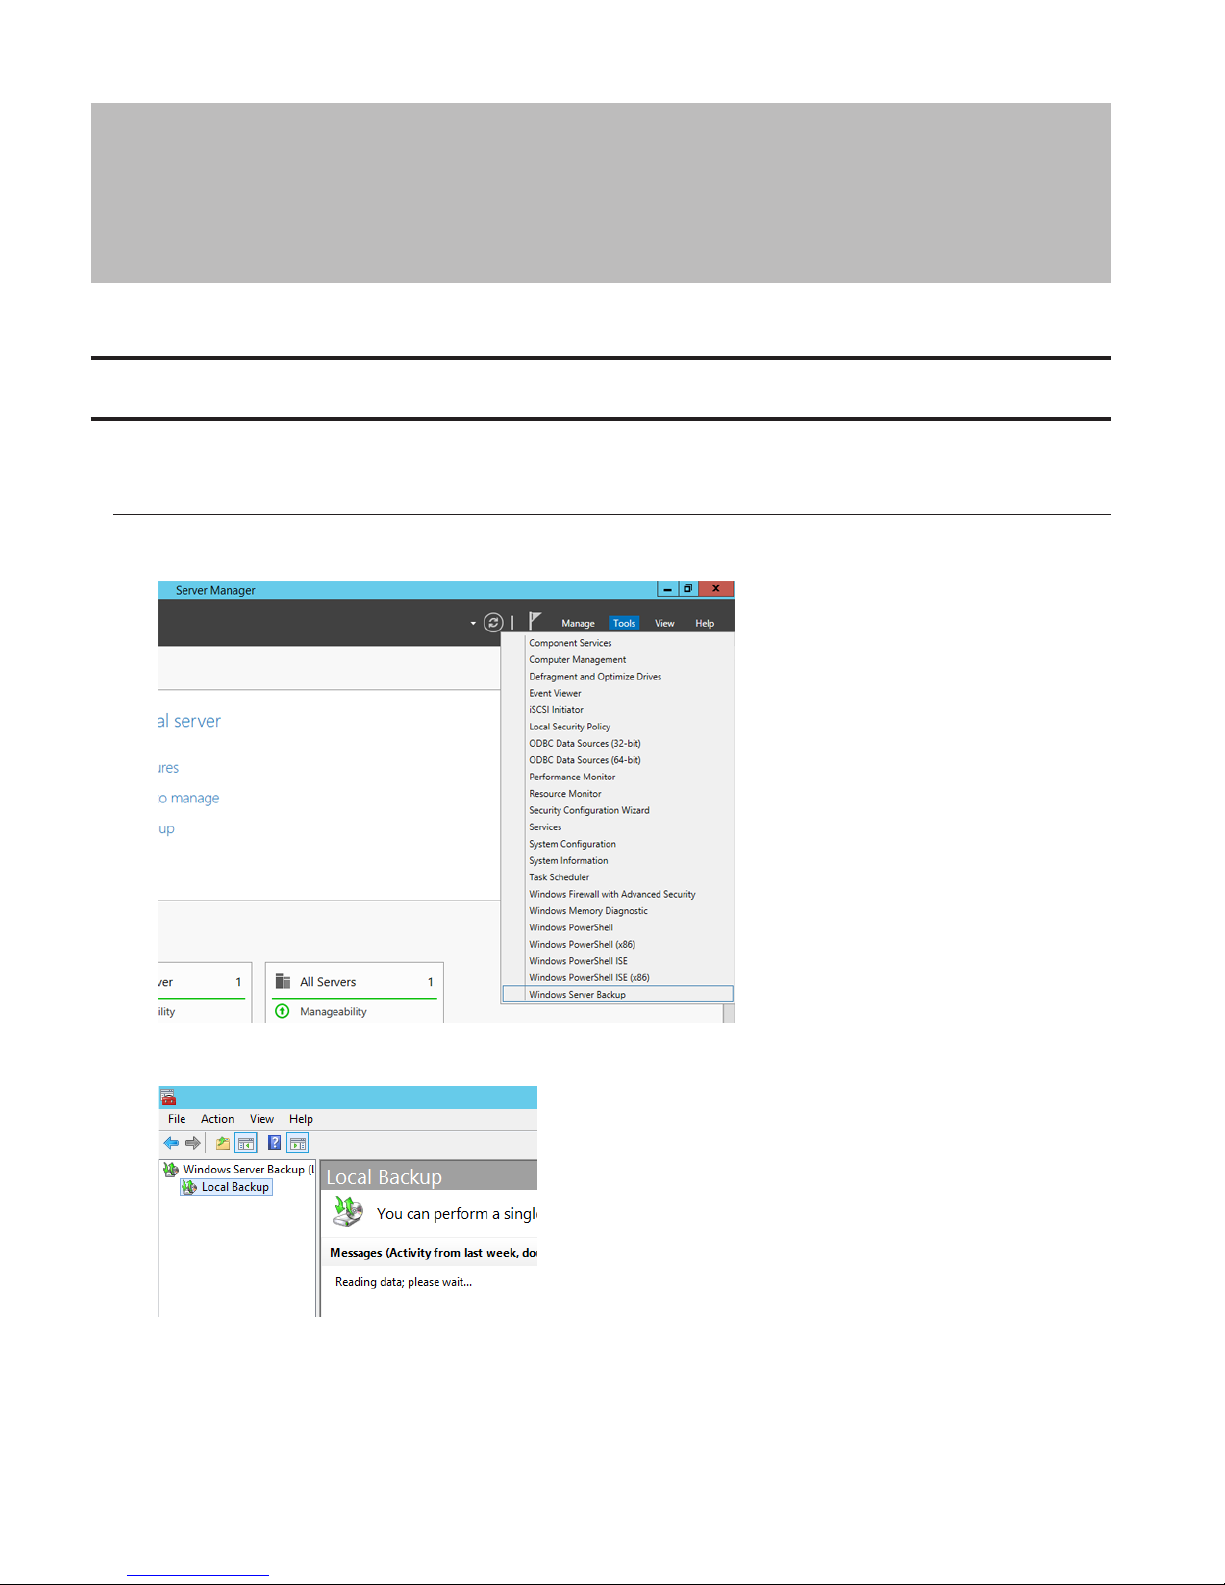
1 In Server Manager, click Tools - Windows Server Backup. Windows Server Backup will start.
2 Click Local Backup. If "Reading data; please wait..." is displayed, please wait until these messages disappear.
38
Page 40
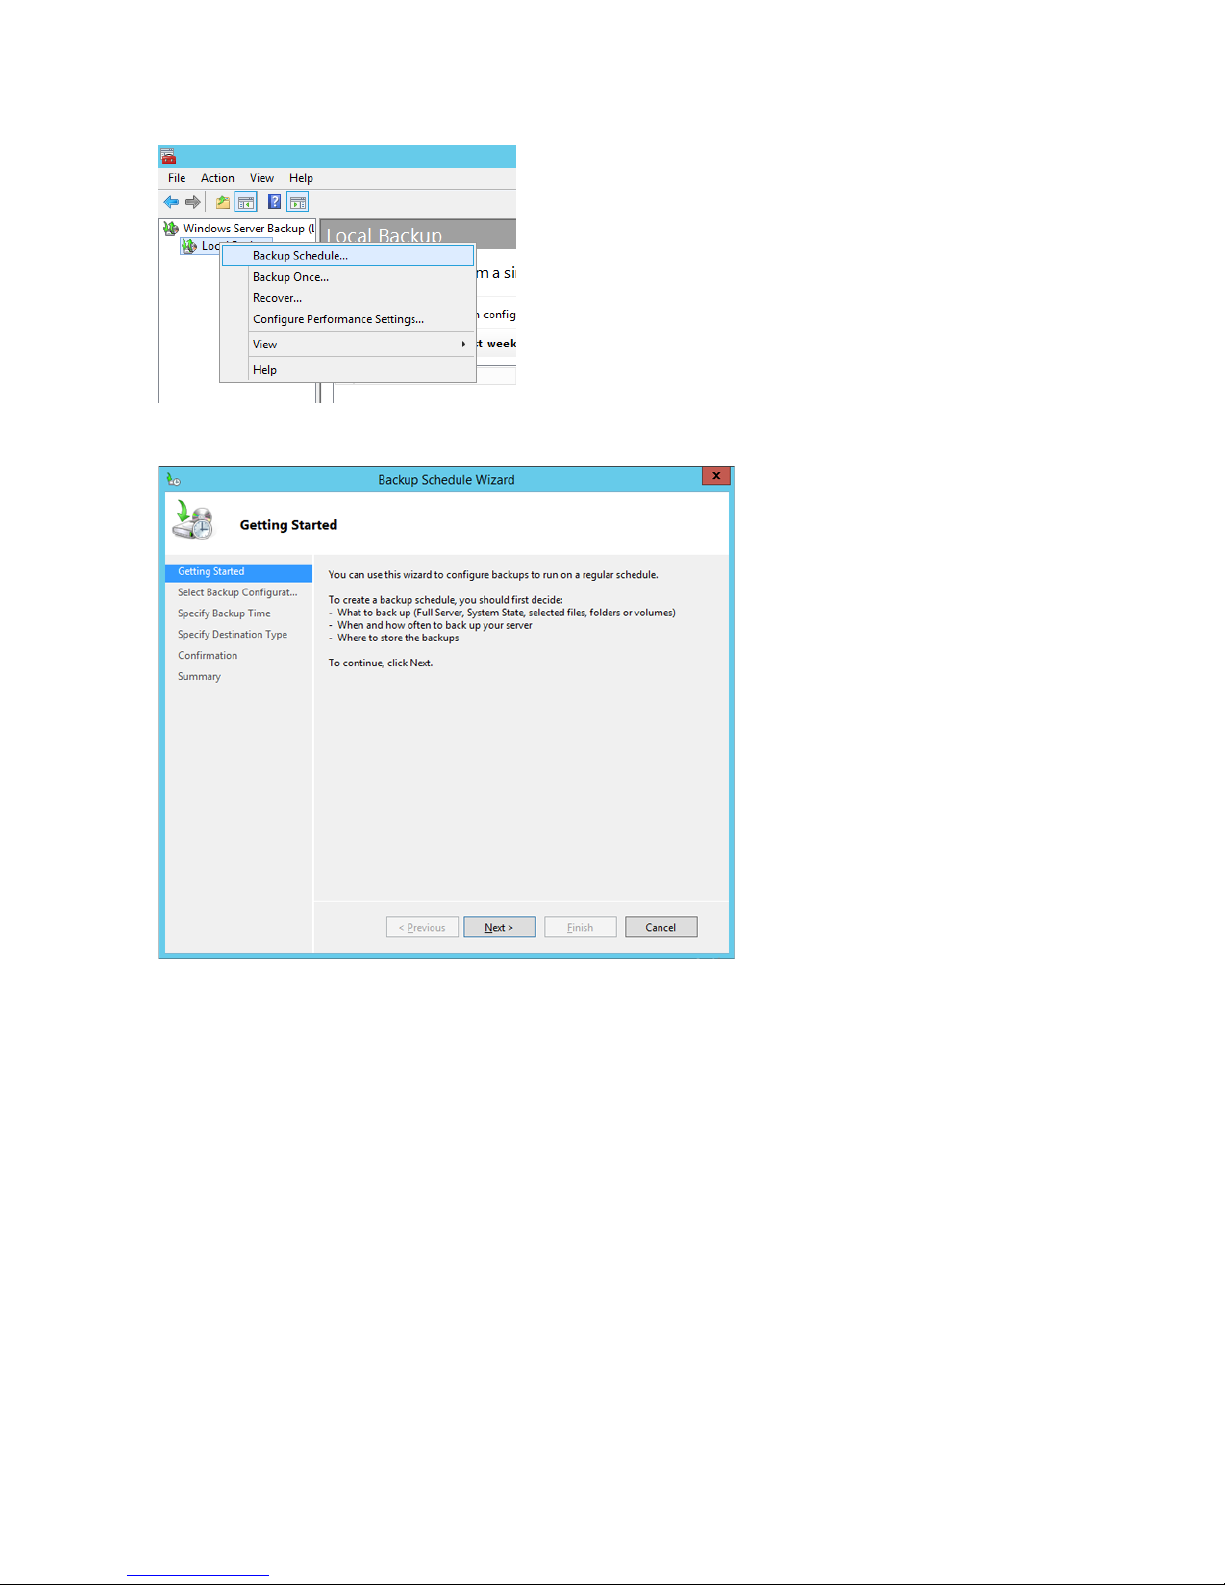
3 Right-click on "Local Backup" and select Backup Schedule.... The backup schedule wizard will start.
4 Click Next.
39
Page 41
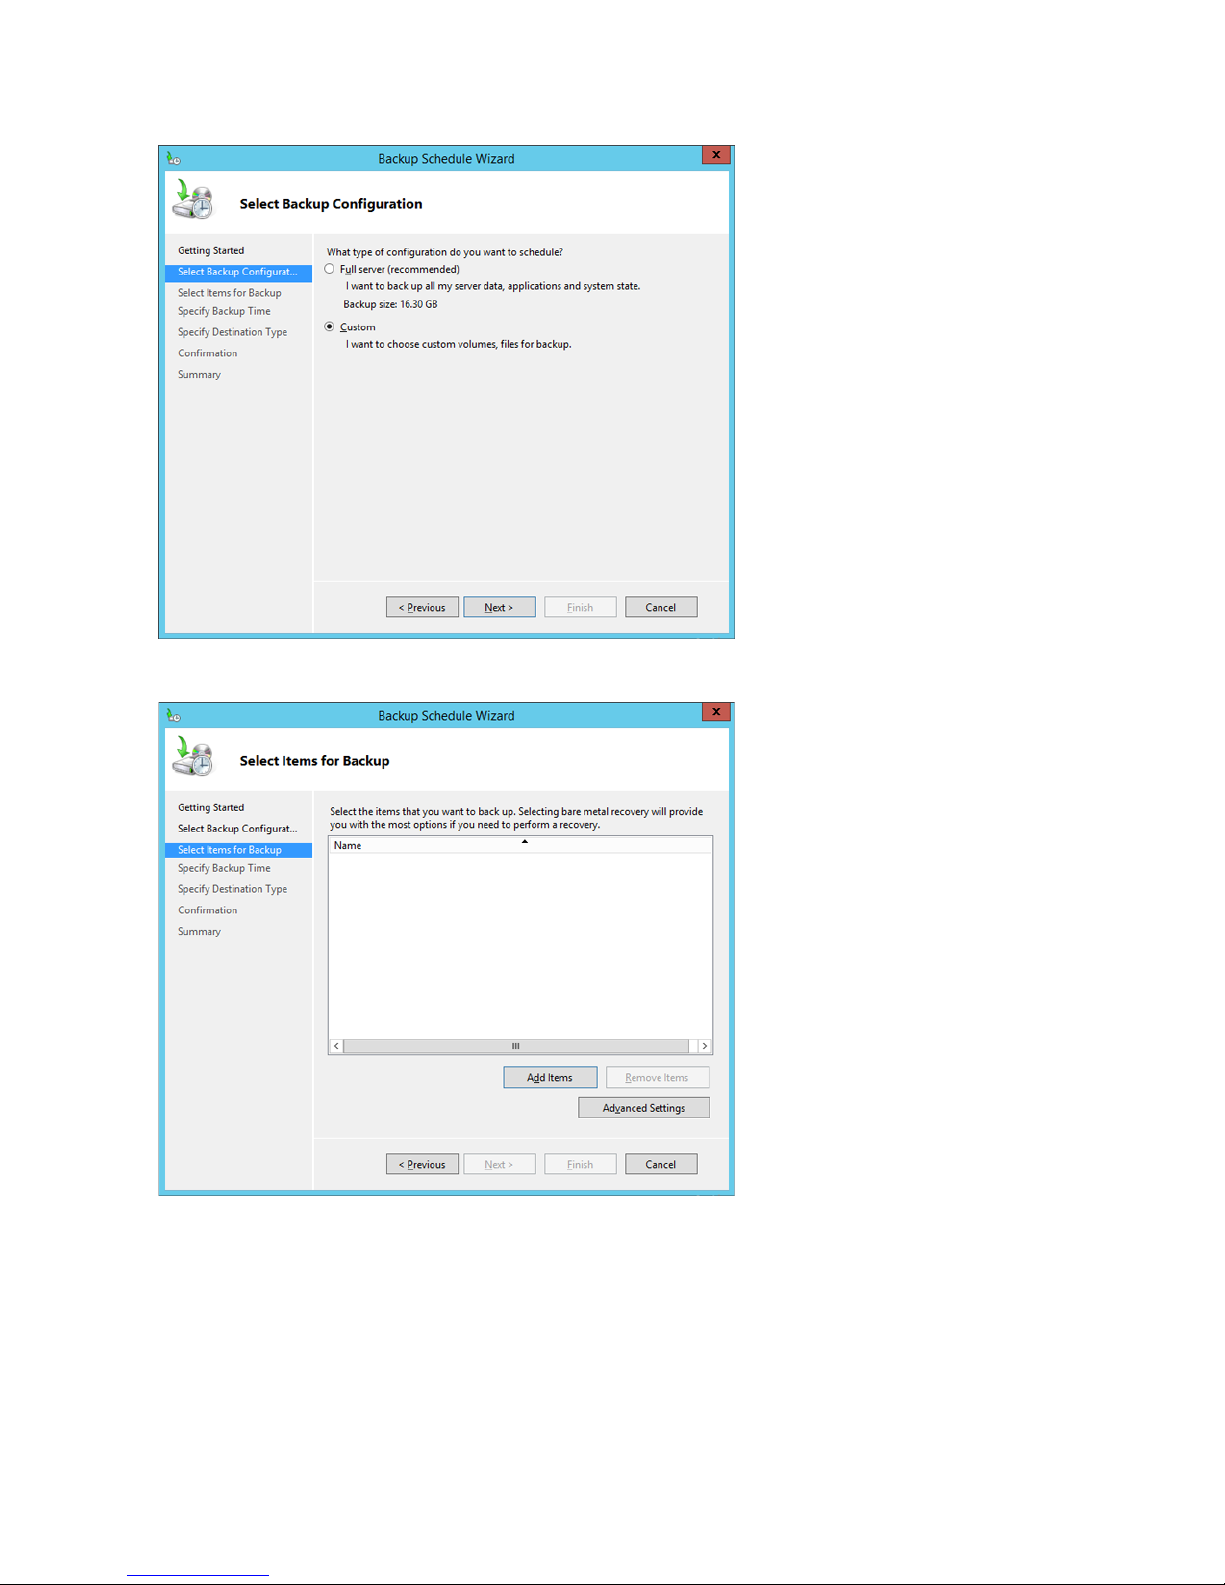
5 Select "Custom" and click Next.
6 Click Add Items.
40
Page 42
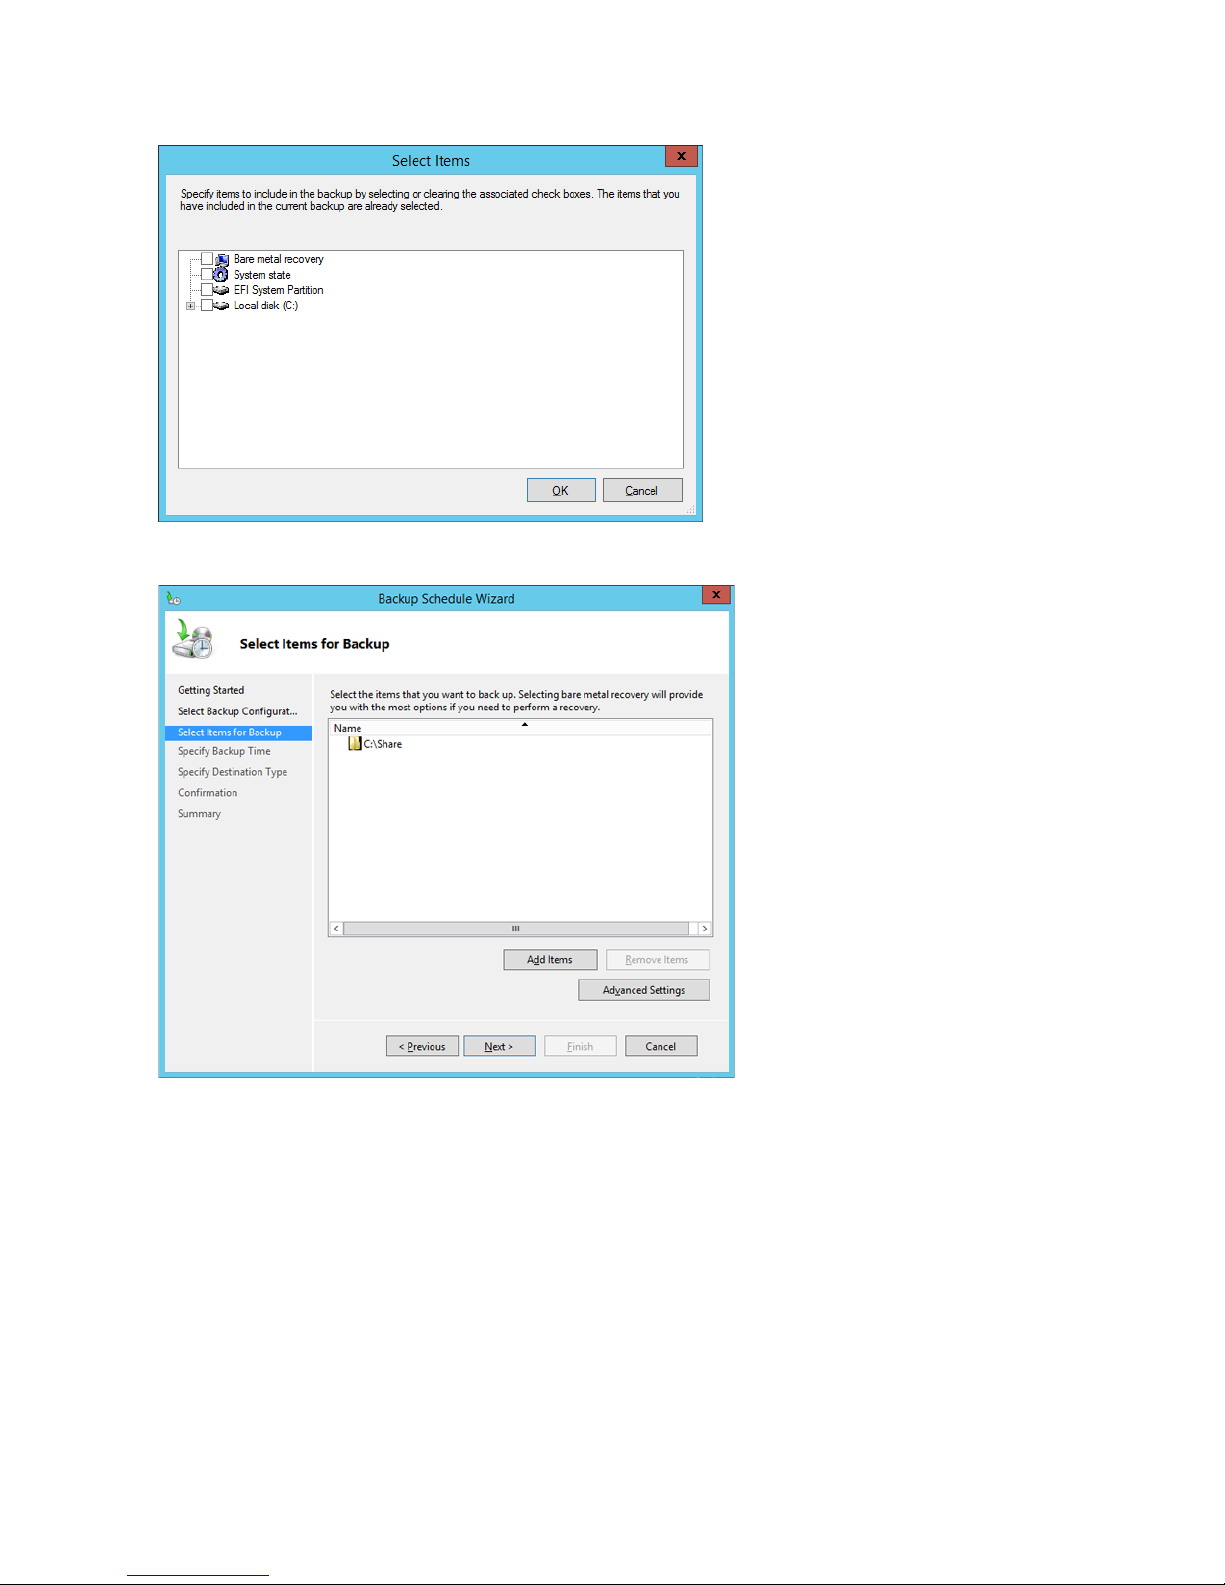
7 Select the backup source folders or drives and click OK.
8 Click Next.
41
Page 43
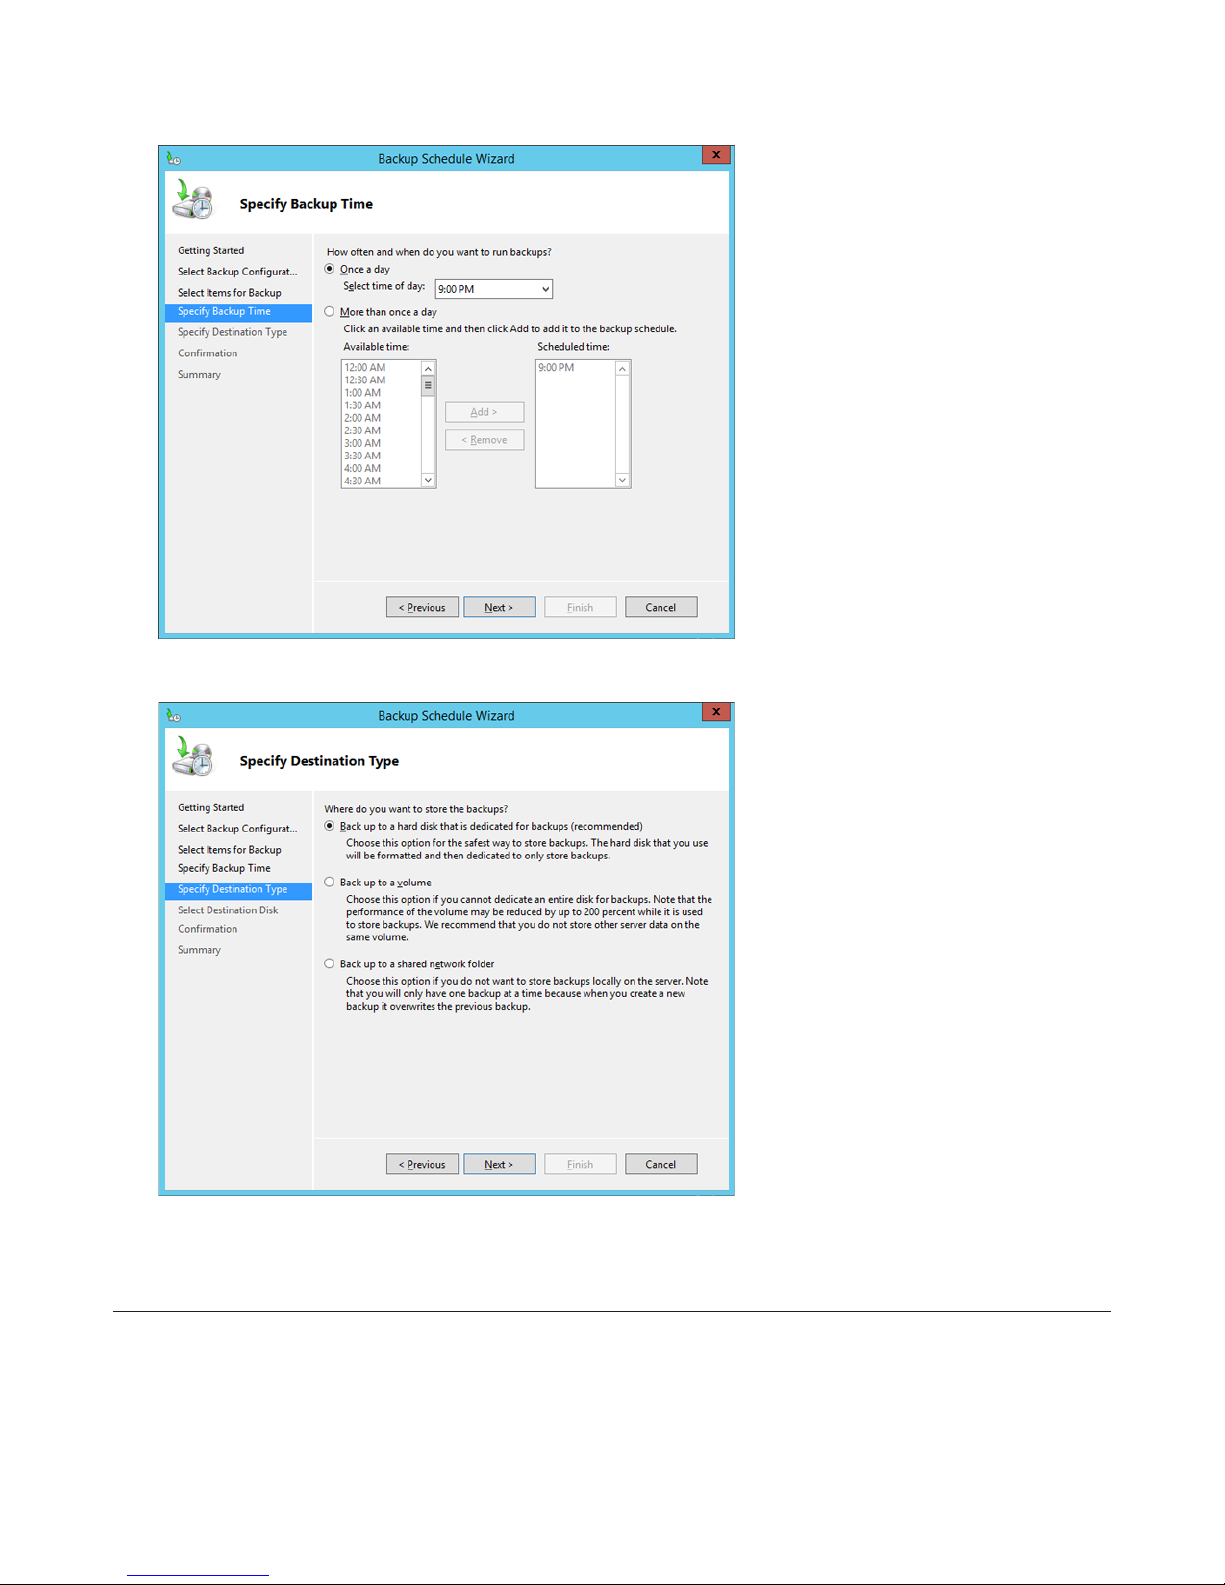
9 Specify the schedule to run the backup and click Next.
10 Select the backup destination and click Next.
11 Step through the wizard to finish.
Recovering Backup Data
Recover the backup data to the TeraStation.
42
Page 44
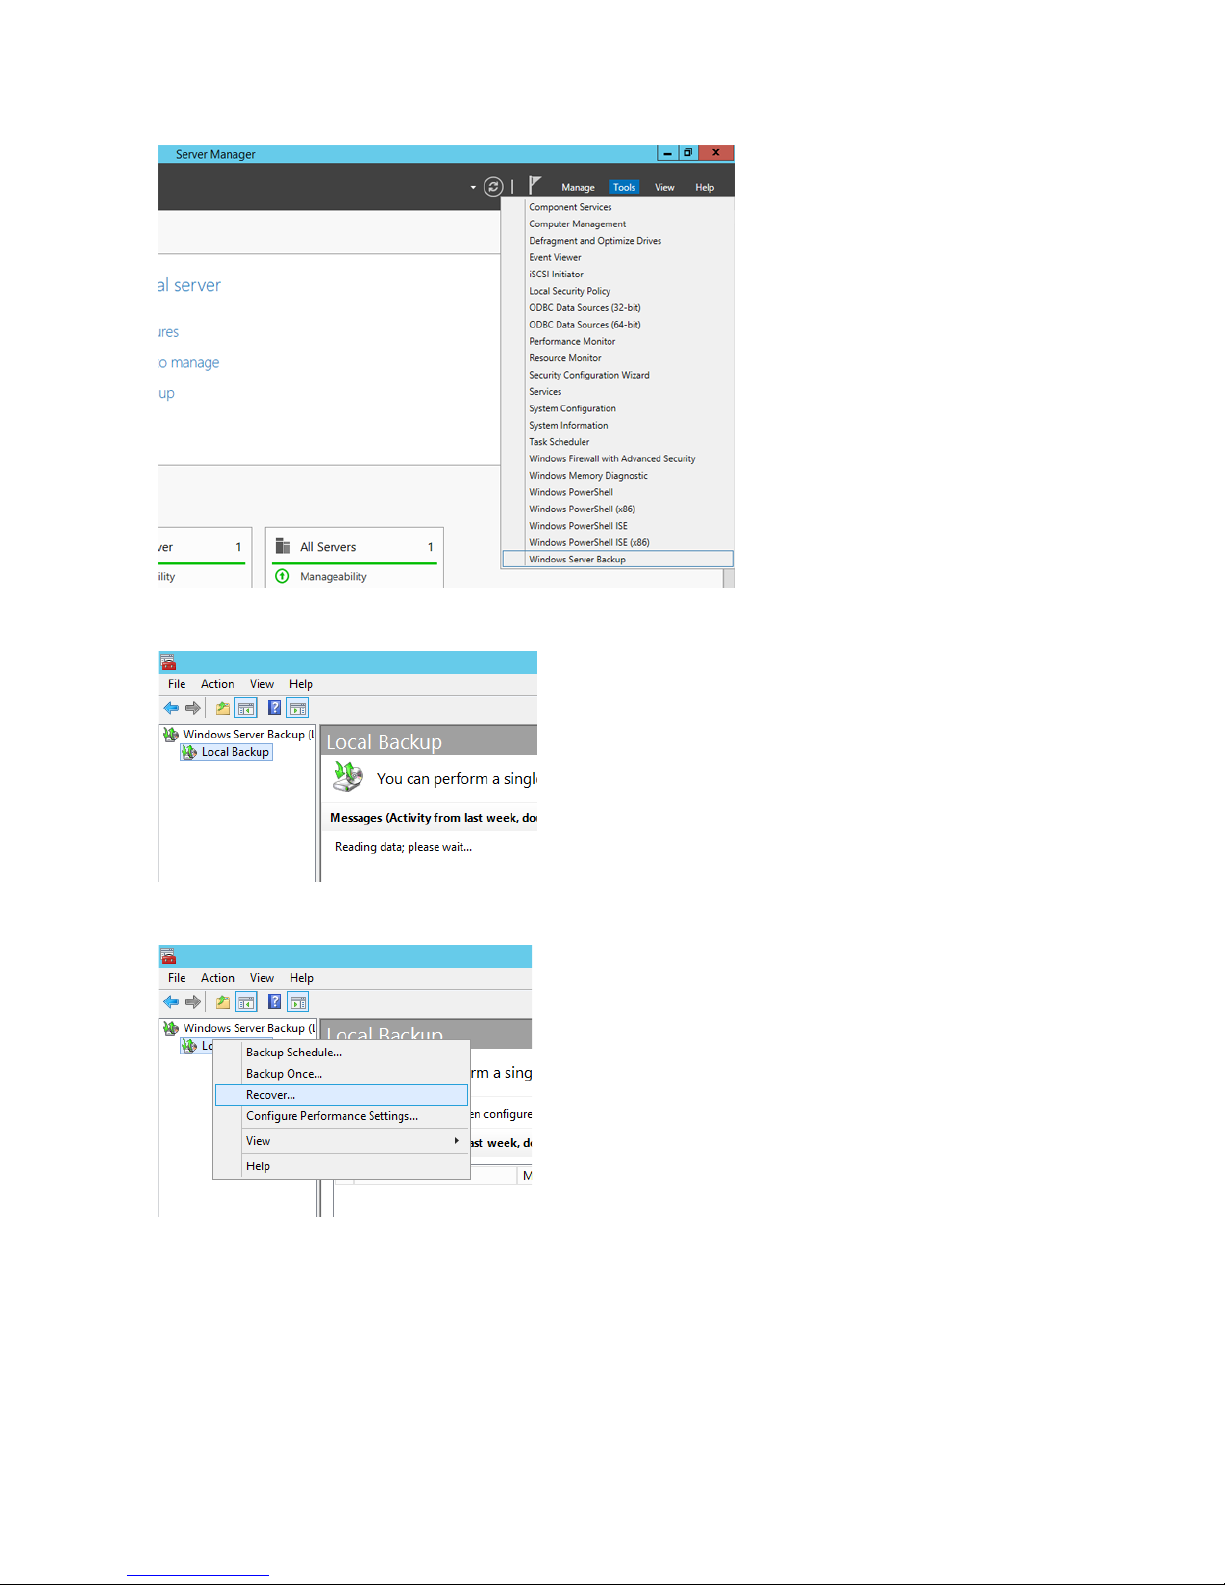
1 In Server Manager, click Tools - Windows Server Backup. Windows Server Backup will start.
2 Click Local Backup. If "Reading data; please wait..." is displayed, please wait until these messages disappear.
3 Right-click on "Local Backup" and click Recover.... The recovery wizard will start.
43
Page 45
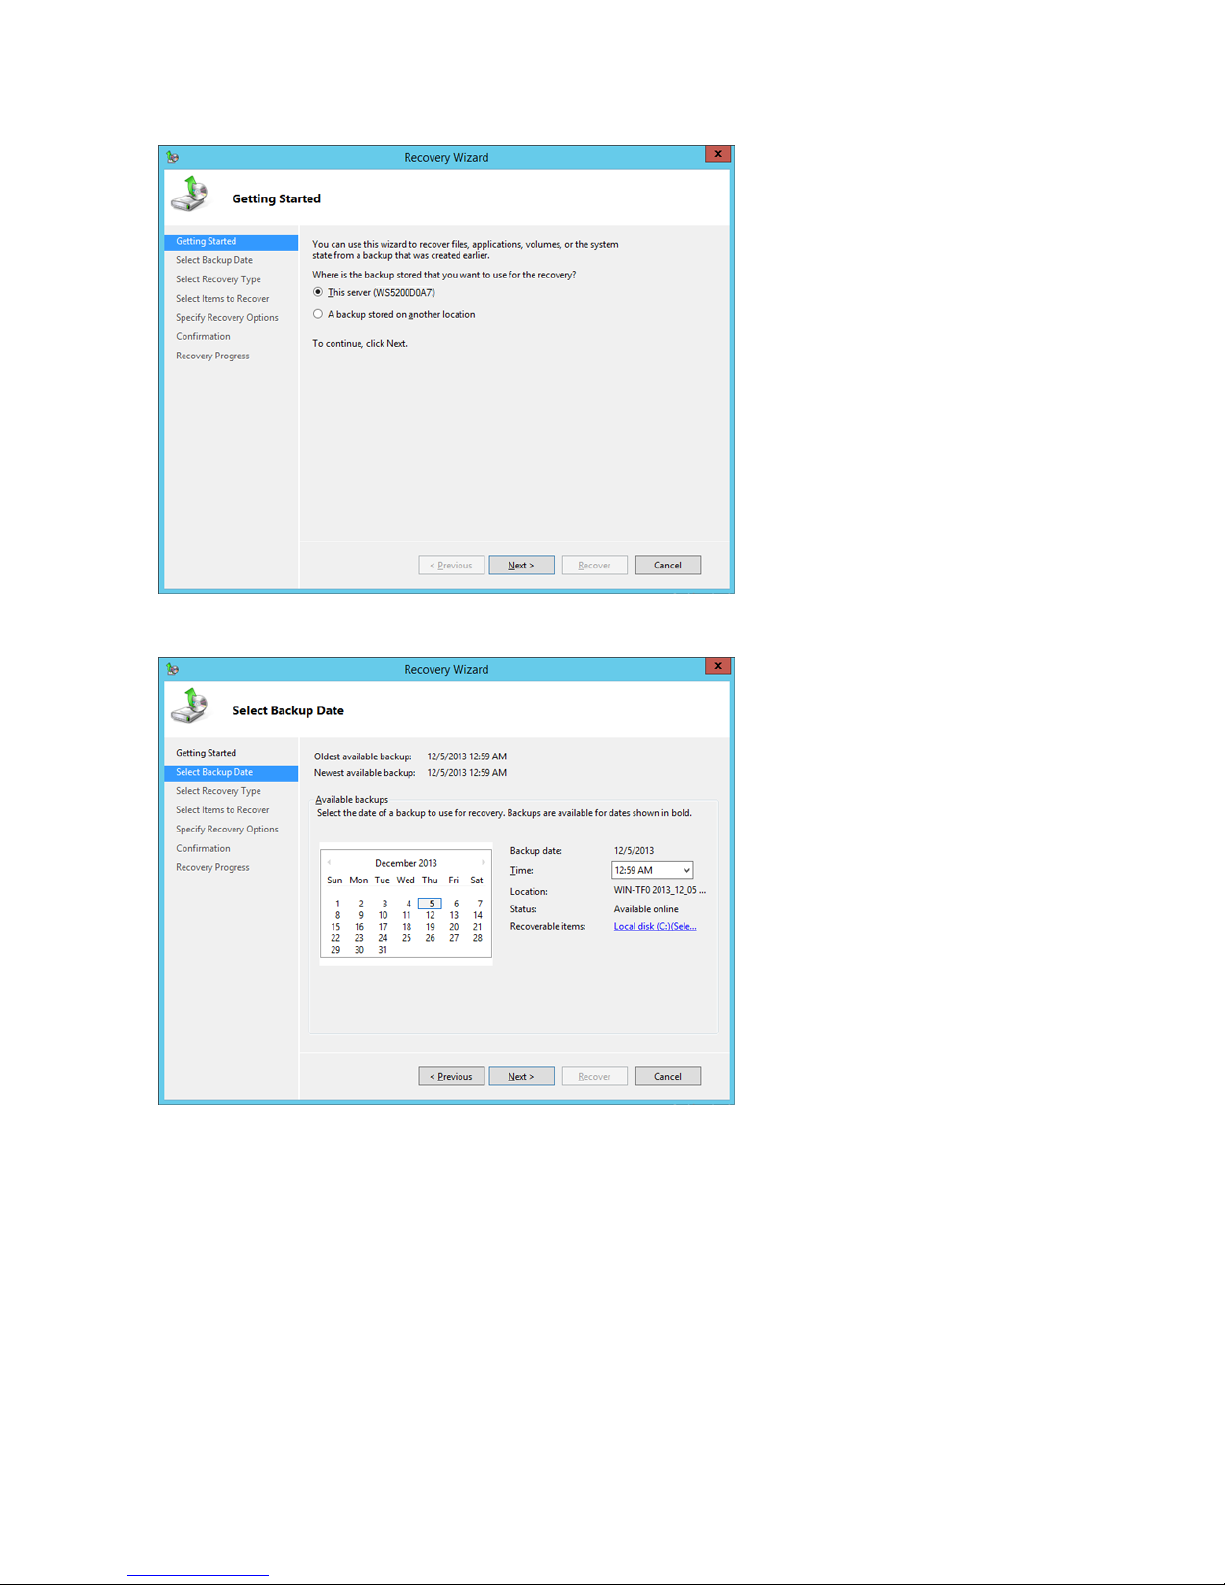
4 Click Next.
5 Select the date when backing up the data and click OK.
44
Page 46
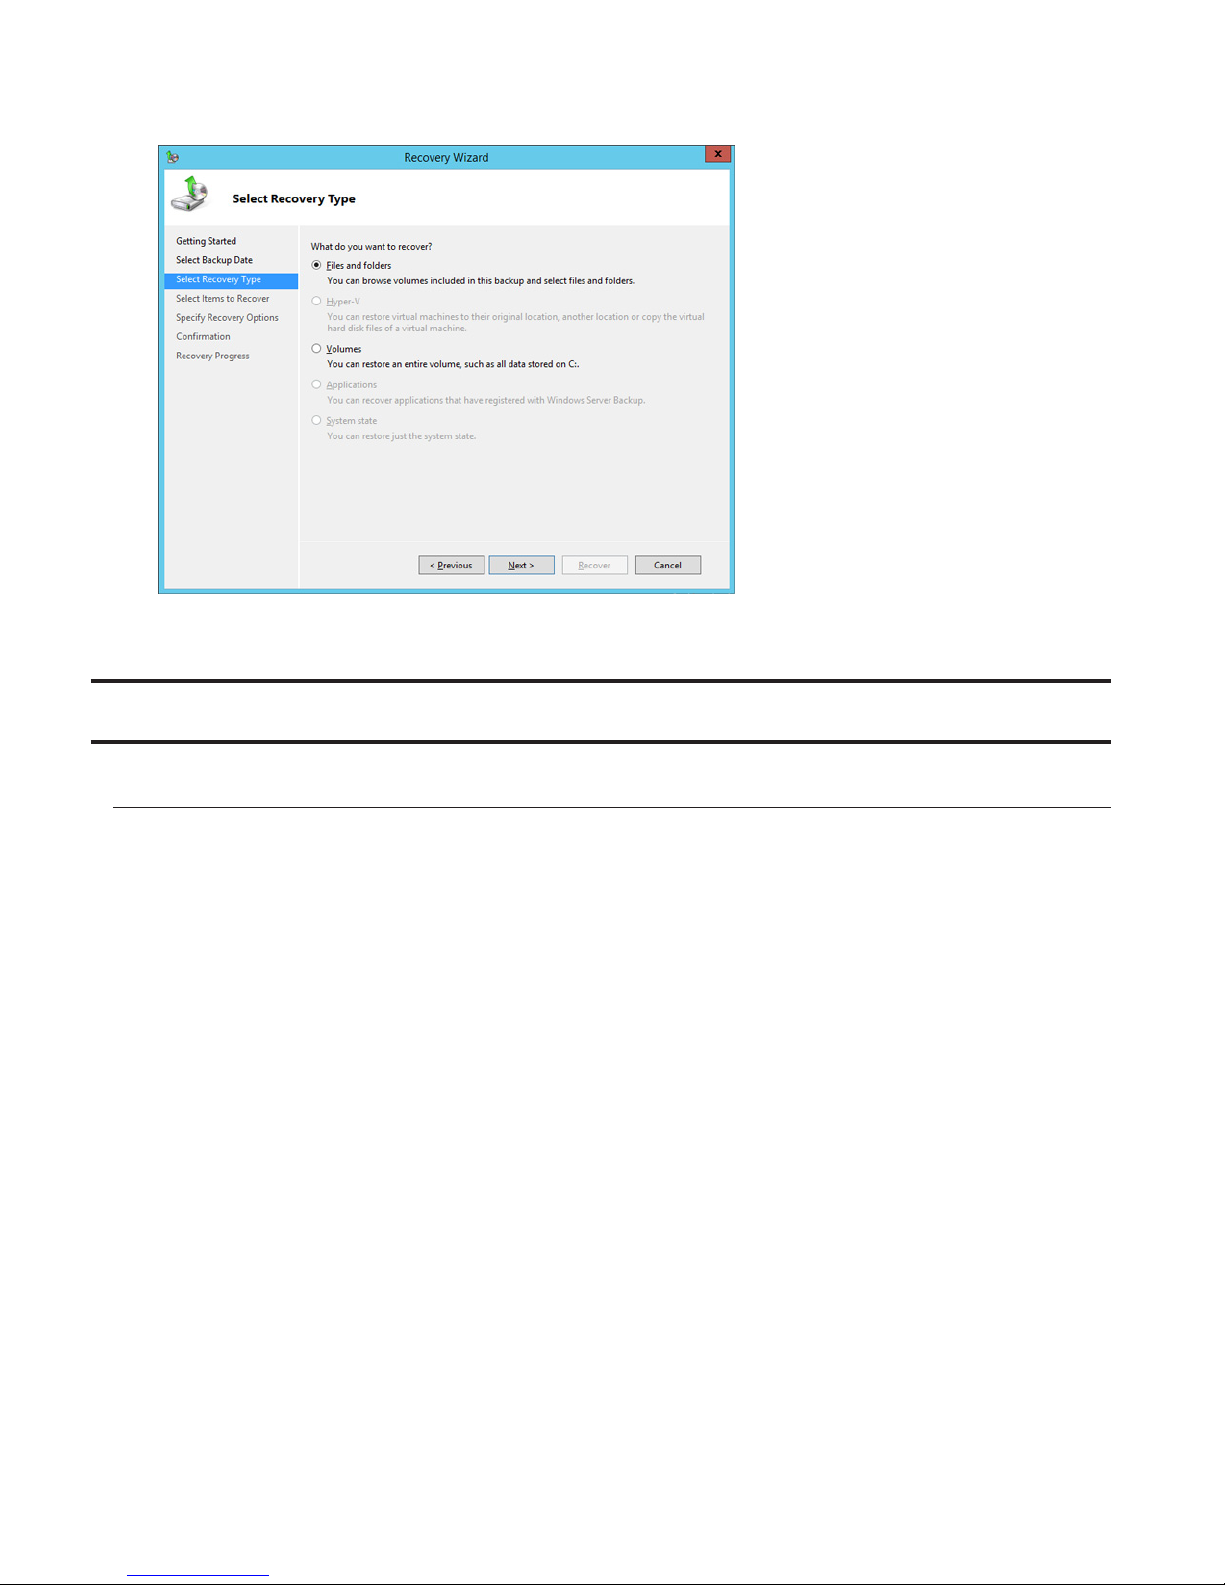
6 Select the recovery targets and click Next.
7 Step through the wizard to finish.
Replication
Buffalo Replication
Replication copies all data from a share to a share on a different TeraStation. This is an easy way to configure a reliable
system to provide data protection in the event your main TeraStation fails. To configure replication, connect an Ethernet
cable to the LAN port of each TeraStation and follow the steps below.
Notes:
• For best results, use static IP addresses for both replication TeraStations (source and target).
• Replication source data is copied to the replication target folder with a differential overwrite. Data that is not in
the replication source will not be overwritten. Access attributes for the folders and files in the replication source
will not be copied to the replication target.
If you use Buffalo WS5000 or WS5000R2 series TeraStations for the replication source and target, start from step 1. If you
use a different TeraStation as the replication target, refer to that TeraStation's user manual to configure as a replication
target. When you finish configuring, go to step 3.
1 Click TeraStation Backup & Replication Folder Settings in the Start menu on Windows Storage Server.
45
Page 47
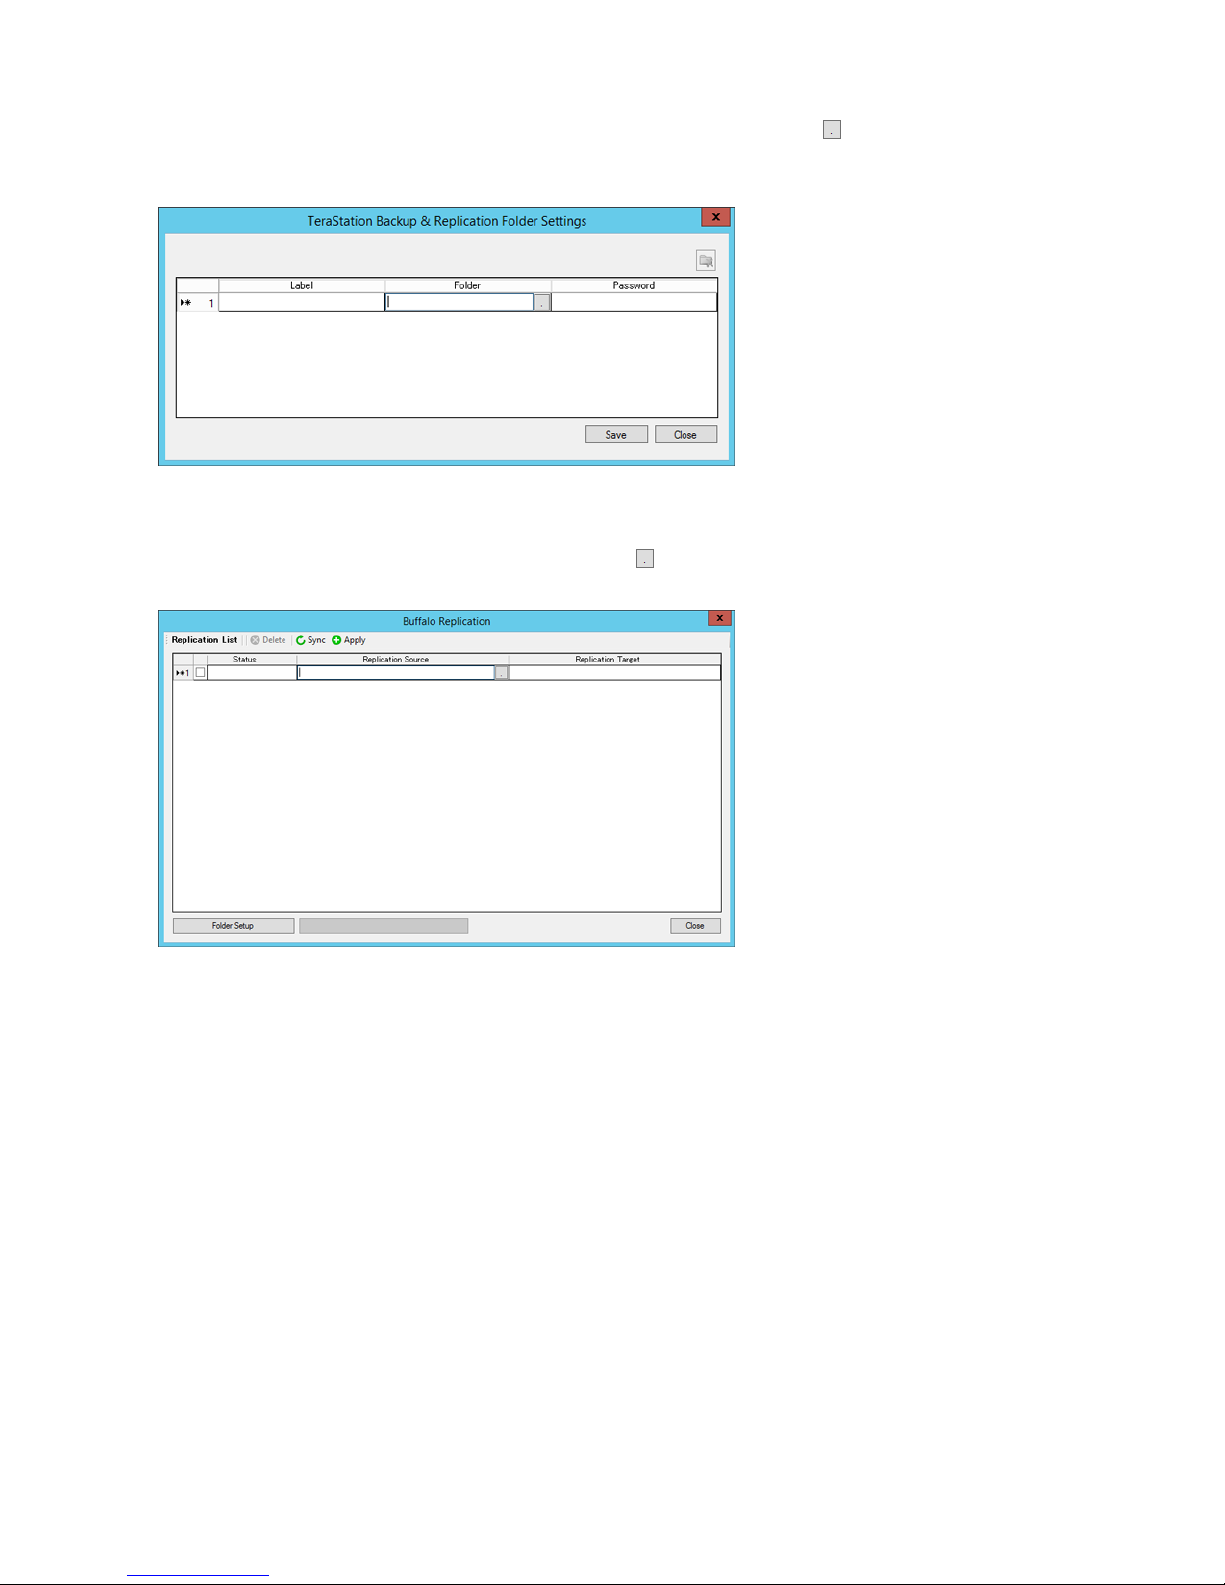
2 Double-click the blank space under "Label" and enter a label for the folder. Click under "Folder" and select the
folder as a replication target. If you enter a backup password, the new folder will not be listed as a target folder for
backup. Click OK when finished.
3 Click Buffalo Replication in the Start menu on Windows Storage Server.
4 Click the blank space under "Replication Target" and click . Select a folder from the list for replication target and
click OK. Click the blank space under "Replication Target" and select the folder from the list. Then click Select.
Note: Folders with backup passwords configured will not be displayed in the list.
5 When the setting is done, click Apply. If you configure the backup password for a folder, entering password dialog
box will be displayed.
To delete the settings from the list, check the task and click Delete. If you click Sync, the task will start differential
overwrite from the replication source data to the replication target.
6 Click Close.
Replication is configured.
Note: The following files and folders will not be replicated:
• Files with periods (.) or underscores (_) as the first character in their name.
• Folders with periods (.) or underscores (_) as the first character in their name.
• .AppleDesktop/
• Network Trash Folder/
• TheVolumeSeHngsFolder/
• .DS_Store/
• .AppleDouble/
46
Page 48
• .AppleDB/
DFS Replication
DFS (Distributed File System) is a set of client and server services that allows Windows users to organize many
distributed SMB file shares into a distributed file system. Follow the steps below to enable DFS on the TeraStation.
Note: To use DFS replication with Windows Storage Server, the TeraStation must join Active Directory domain.
Joining an Active Directory
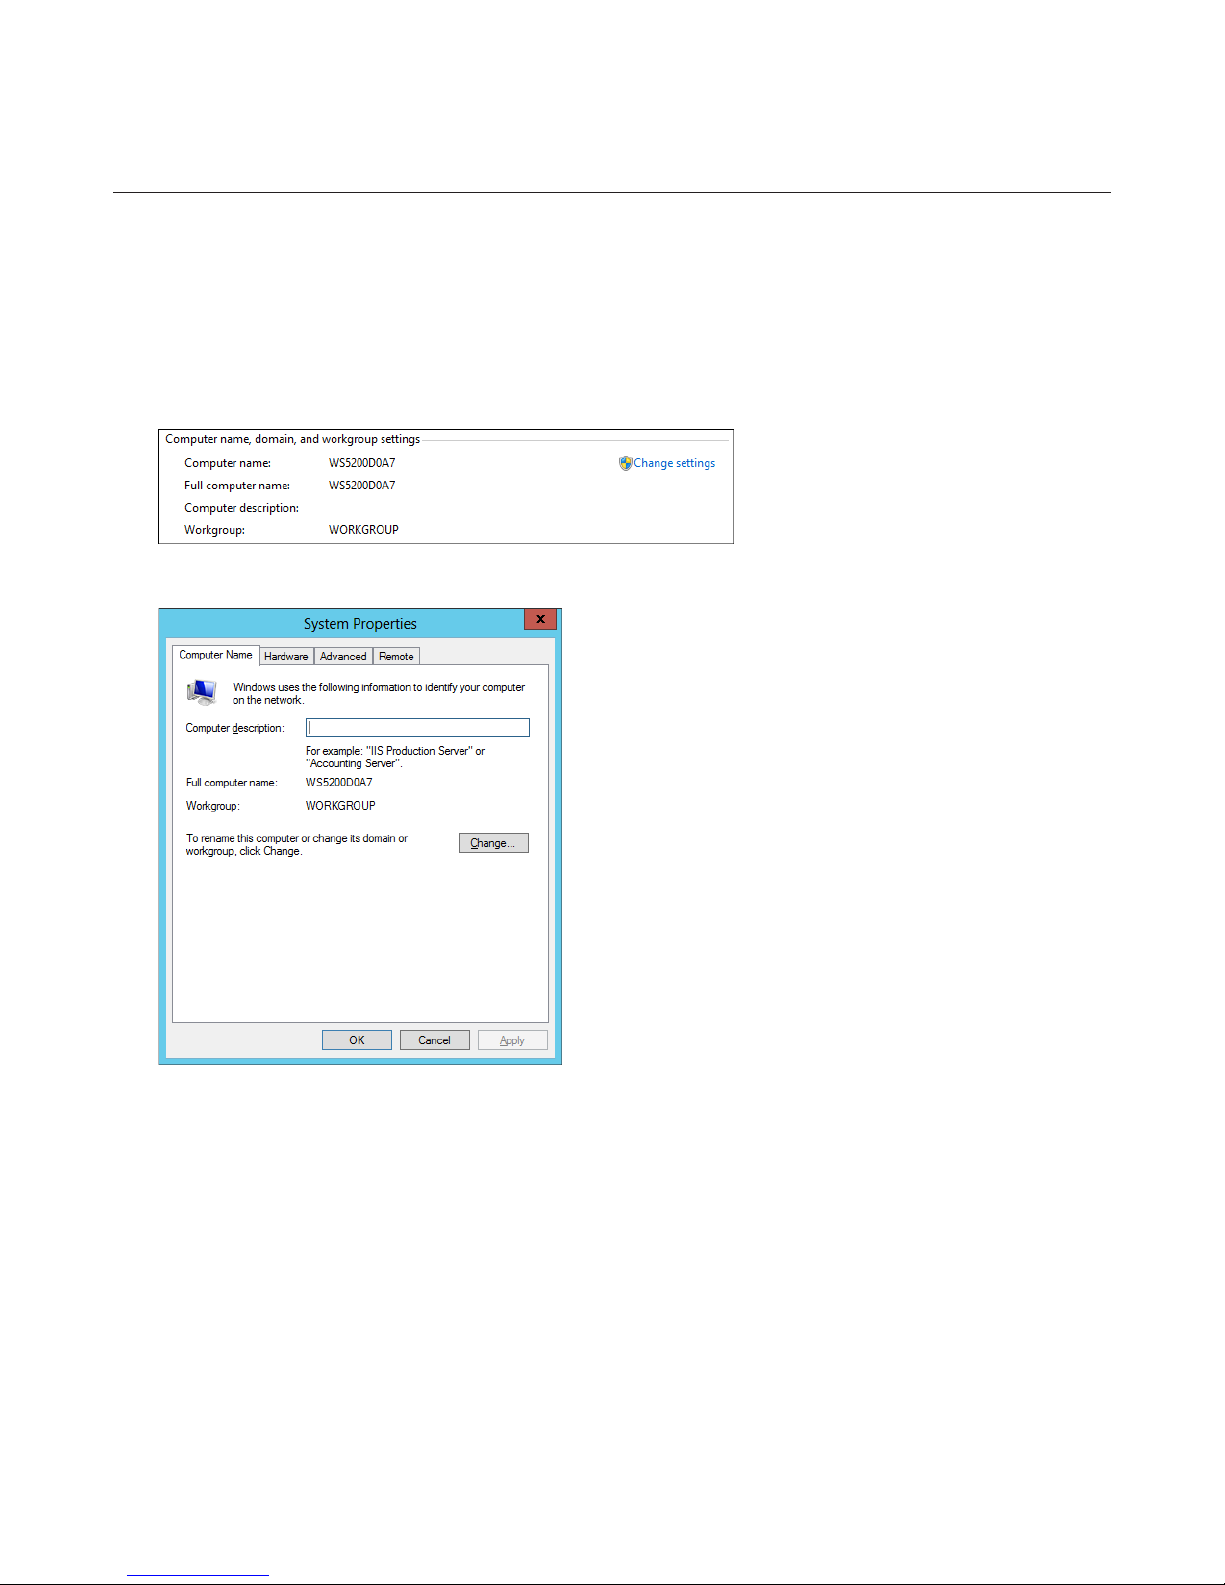
1 In Control Panel, go to System and click Change settings under "Computer name, domain, and workgroup settings".
2 Click Change.
47
Page 49
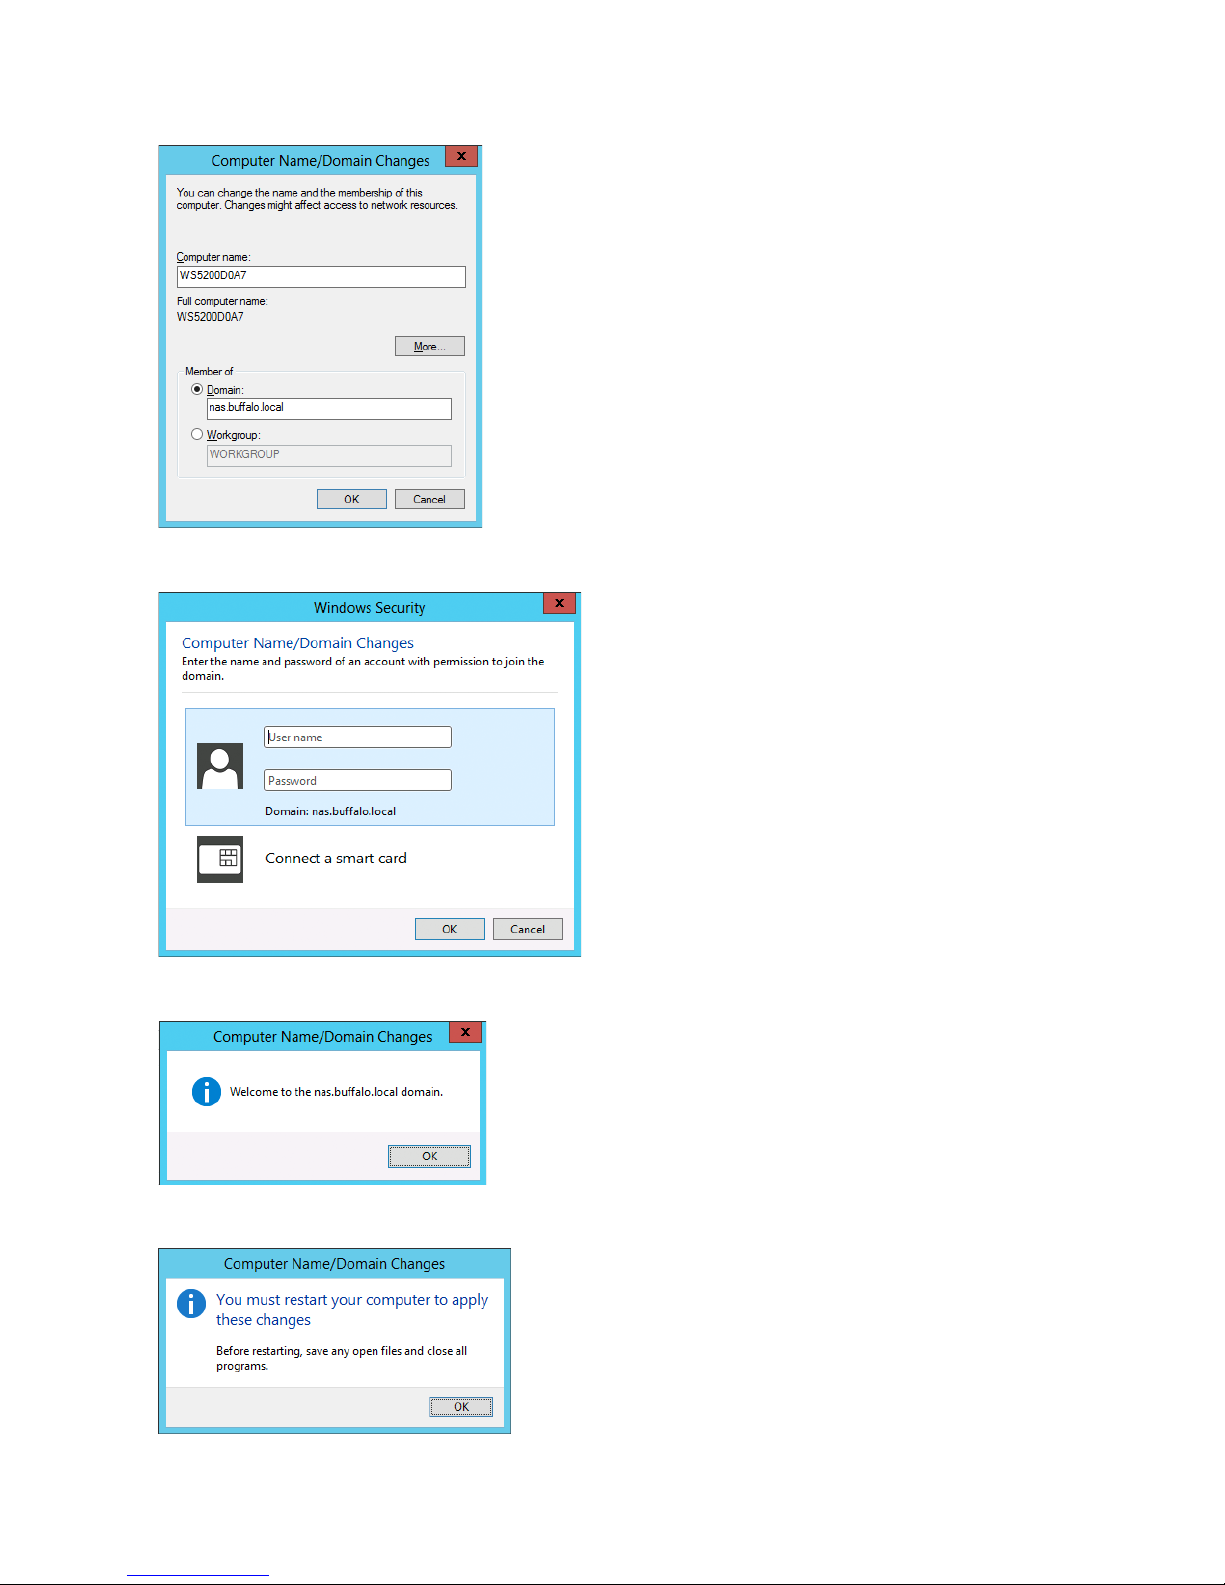
3 Select "Domain", enter a domain name, and click OK.
4 Enter a administrator username and password for the Active Directory domain controller.
5 Click OK when the following message is displayed.
6 Click OK again.
48
Page 50
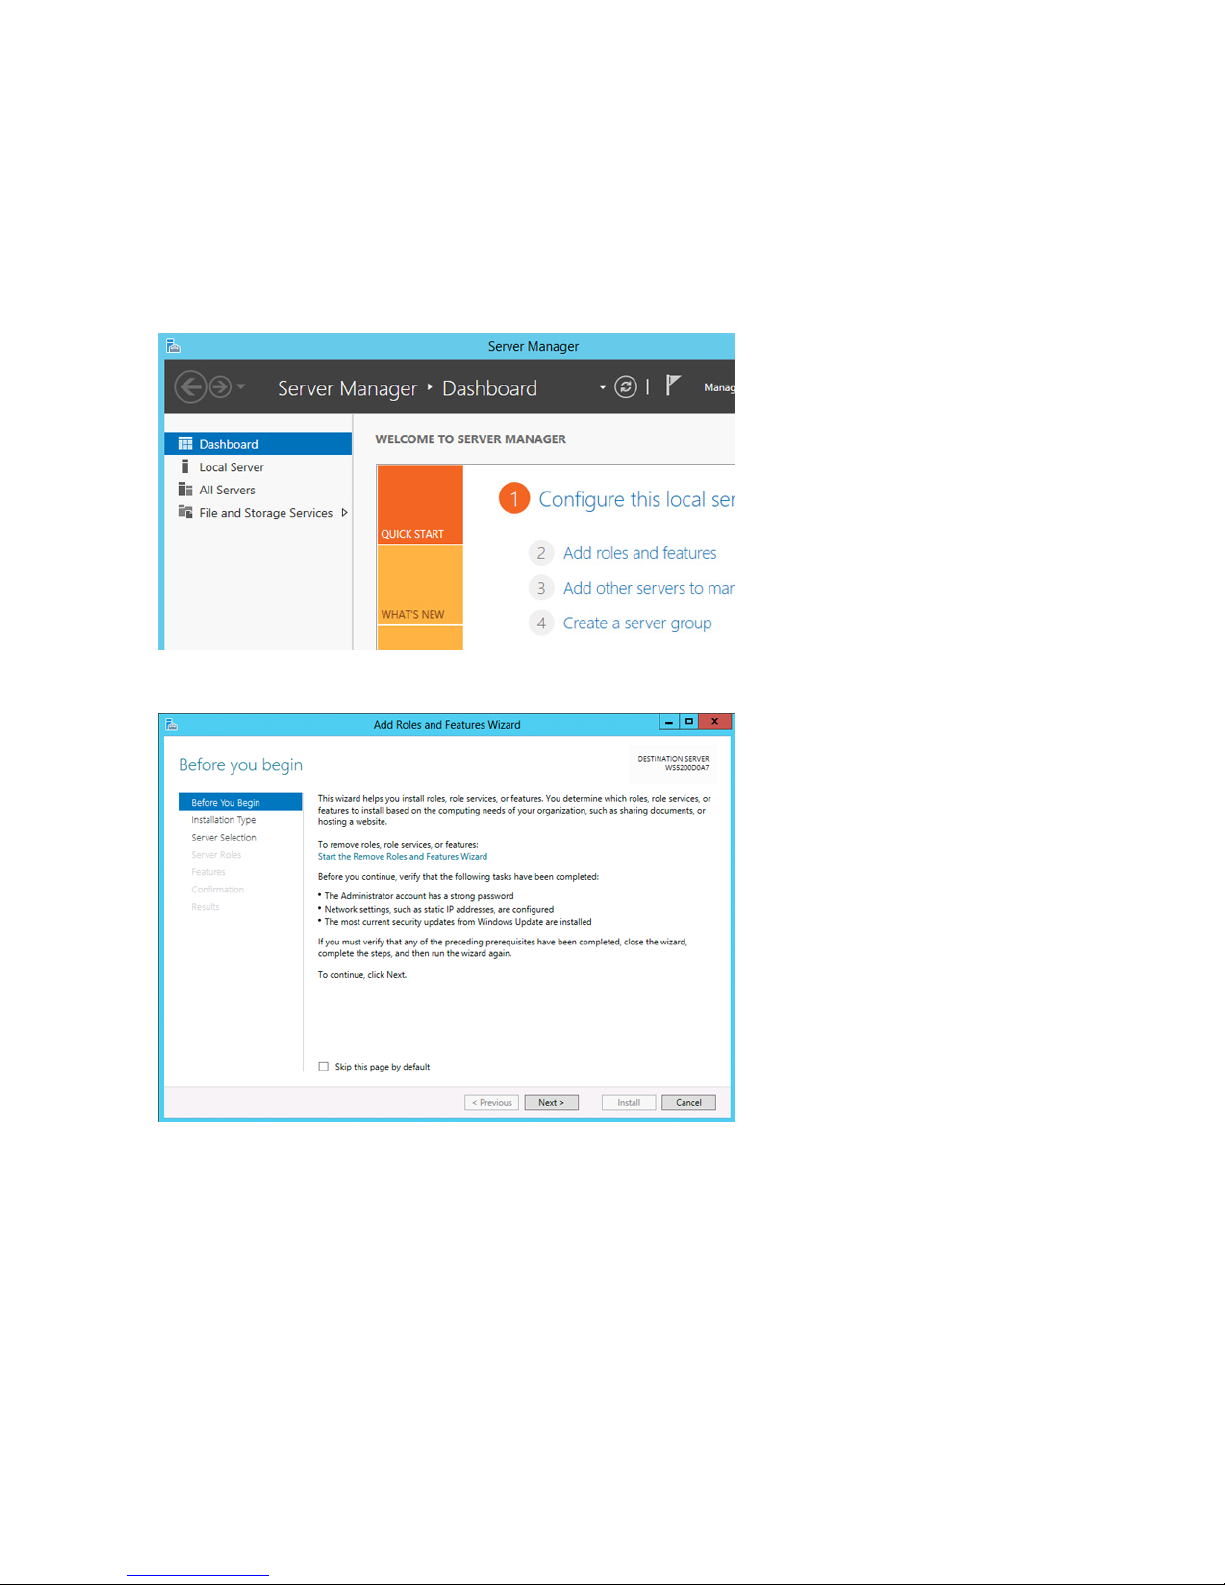
7 Click Close.
8 Click Restart Now and restart your computer to apply settings.
Installing DFS
1 In Server Manager, click Dashboard - Add roles and features.
2 Click Next.
49
Page 51
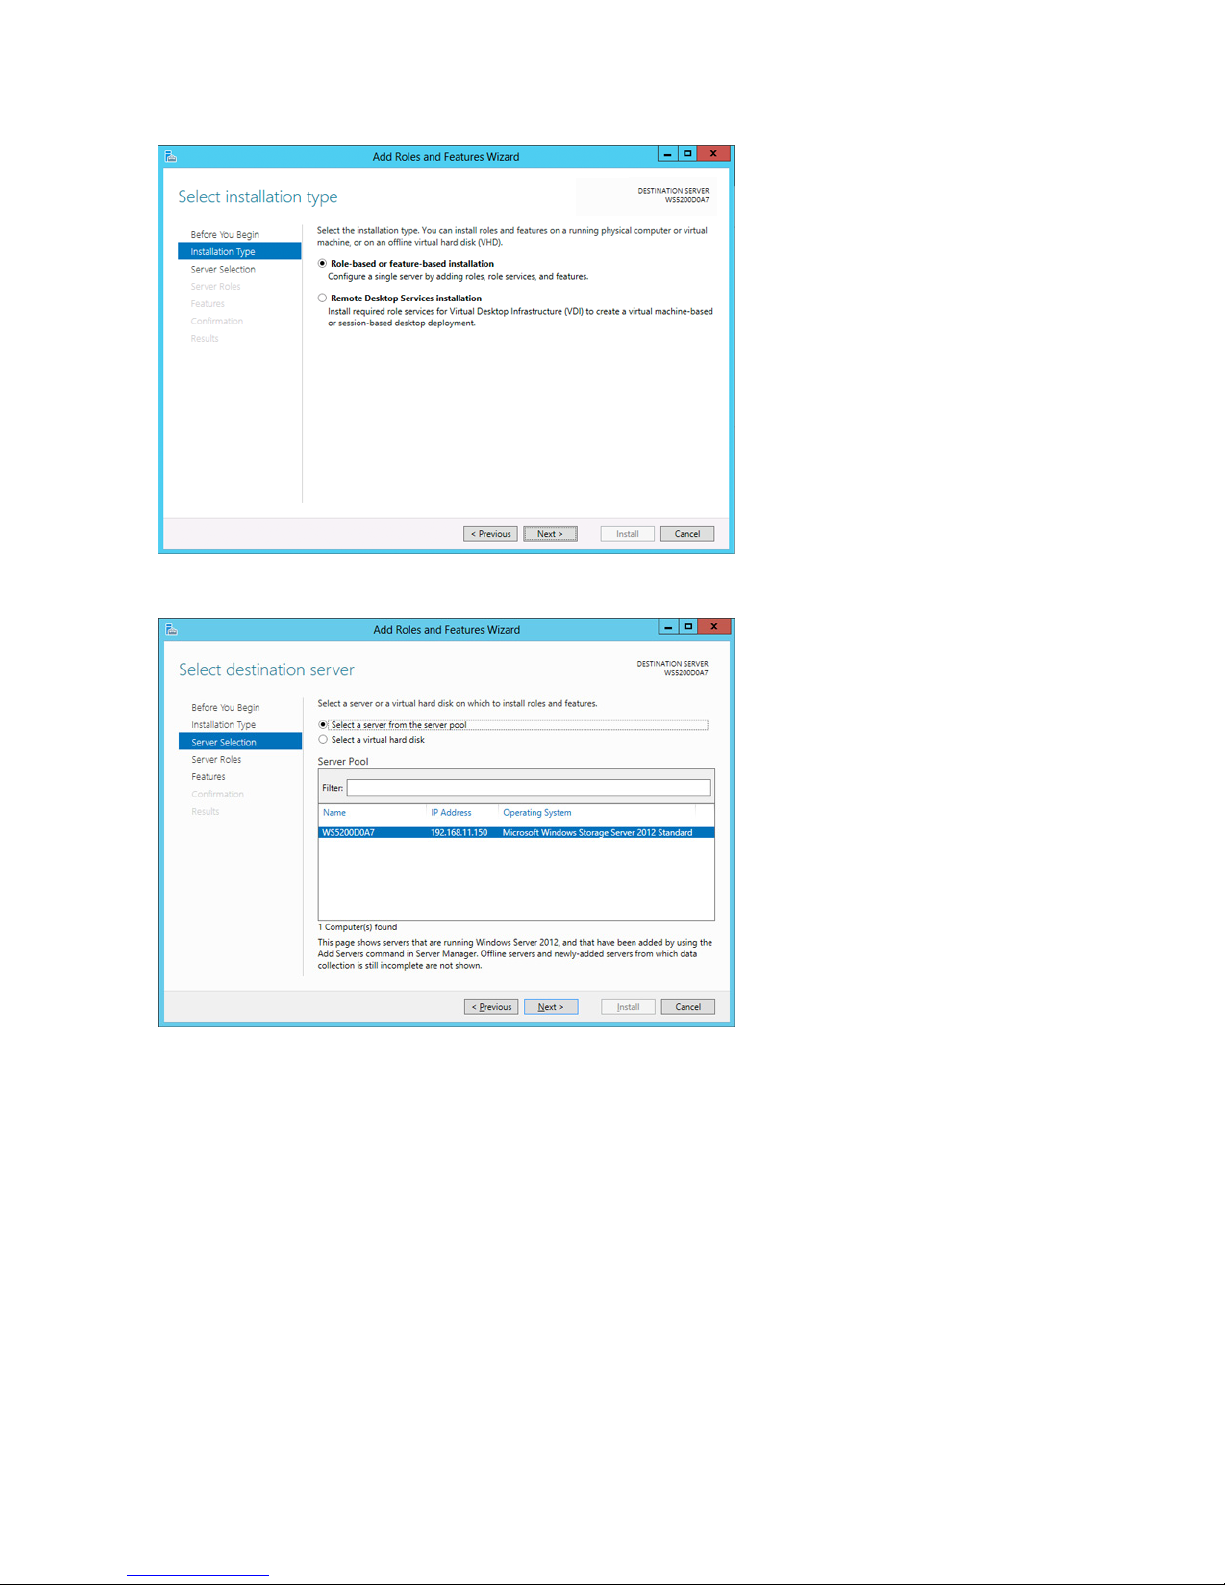
3 Select "Role-based or feature-based installation" and click Next.
4 Click Next.
50
Page 52
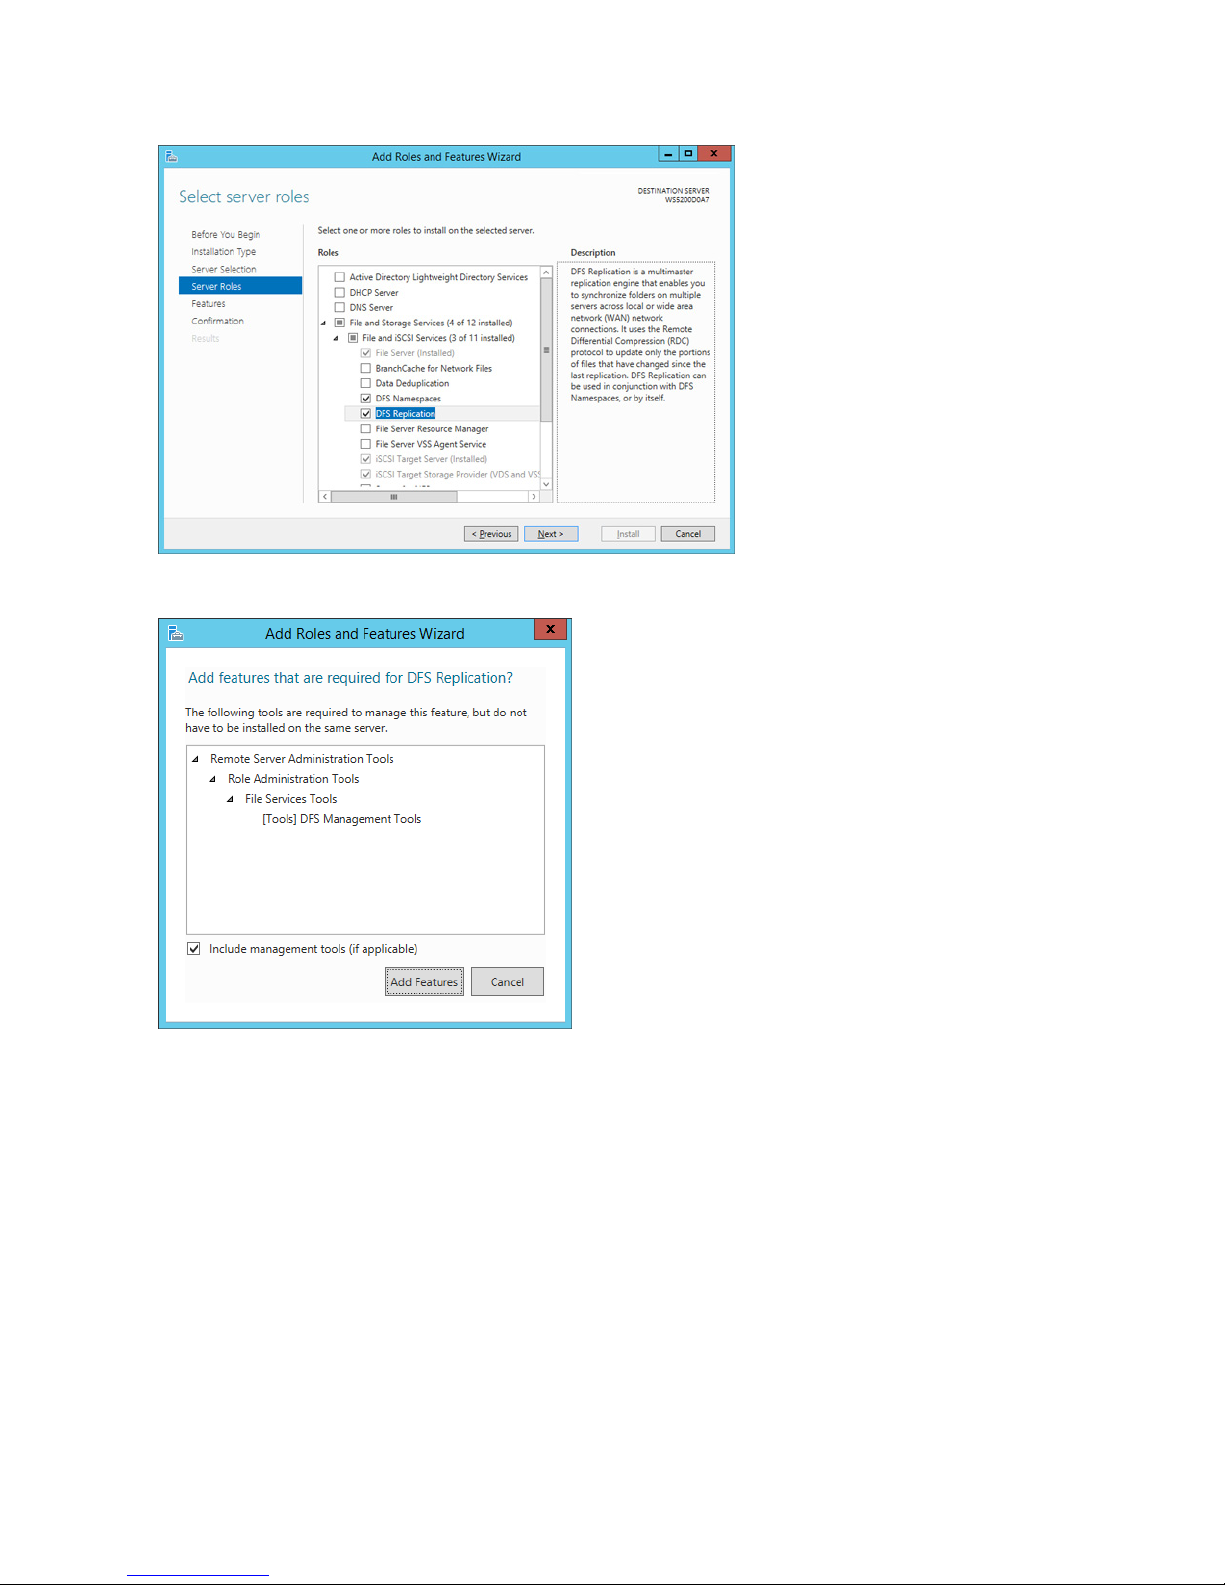
5 Select "DFS Namespaces" and "DFS Replication" in "File and Storage Services" - "File and iSCSI Services".
6 Select "Include management tools (if applicable)" and click Add Features.
51
Page 53
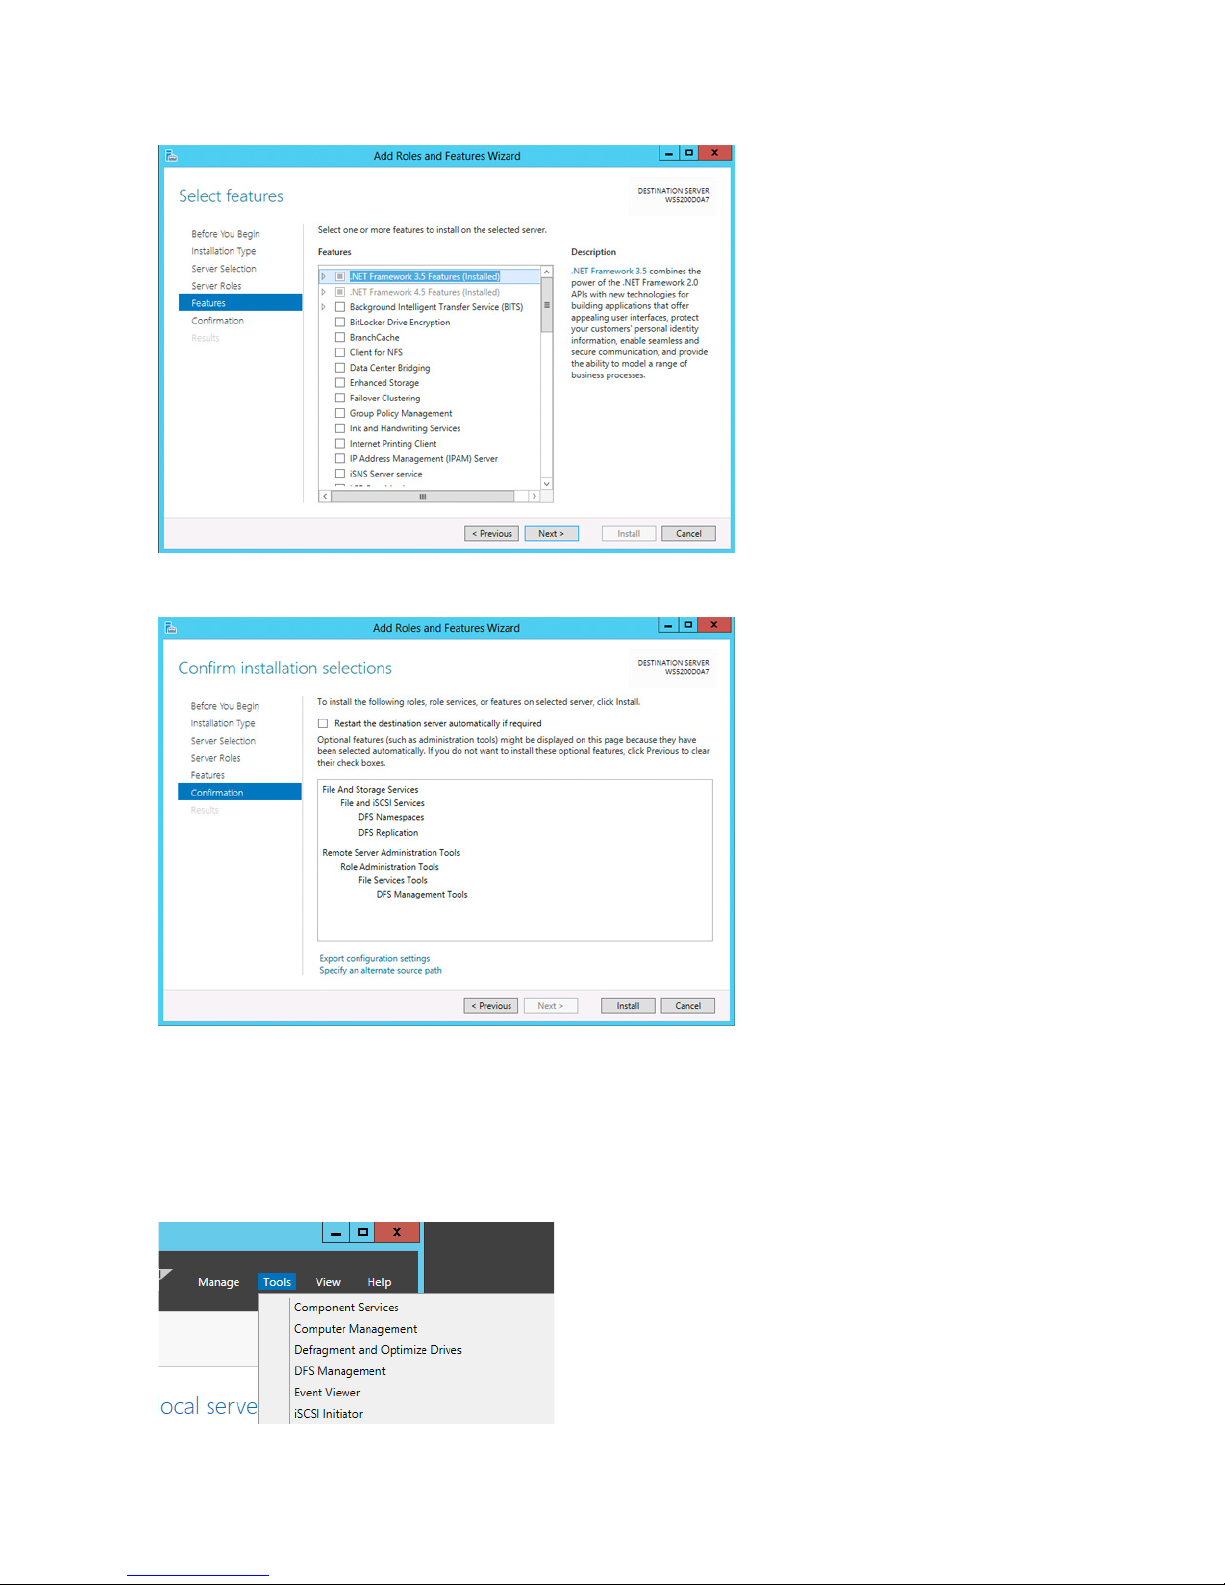
7 Click Next.
8 Click Install.
9 Click Close to finish.
Creating Namespaces
1 In Server Manager, click Tools - DFS Management.
52
Page 54
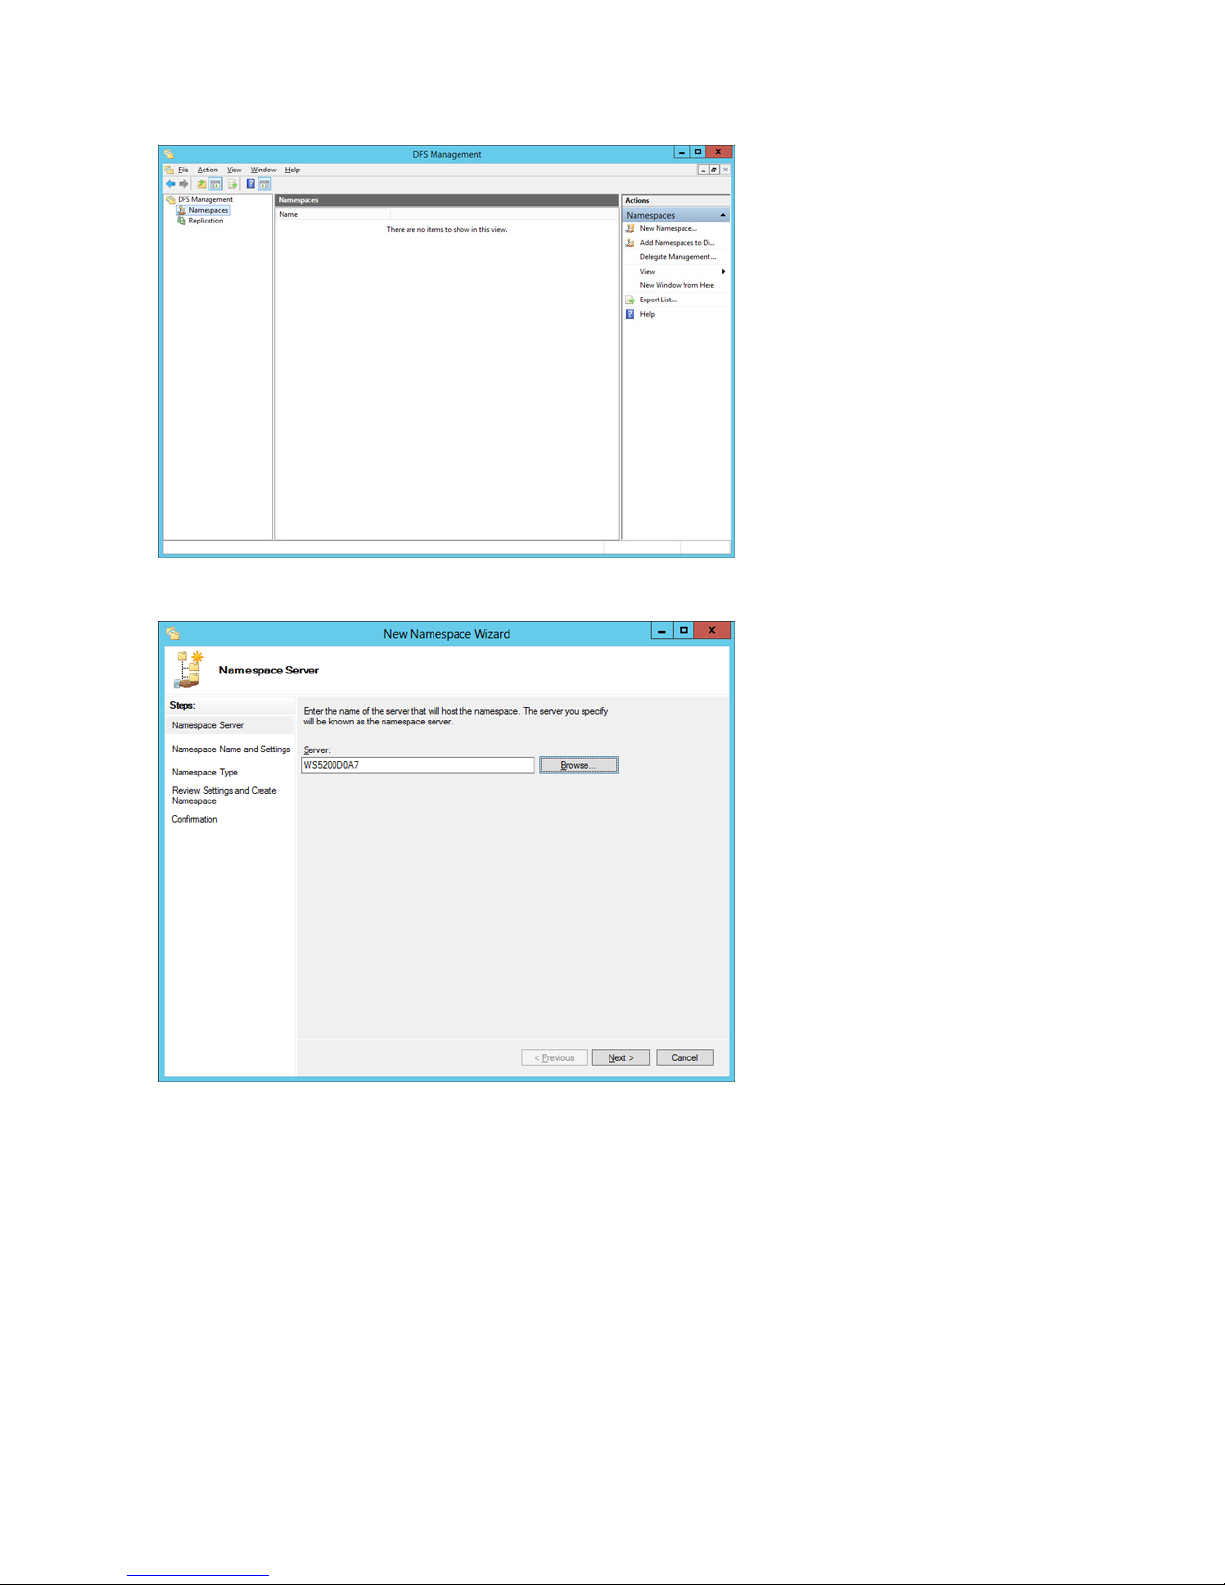
2 Click Namespaces - New Namespace.
3 Enter a hostname for the namespace server and click Next.
53
Page 55
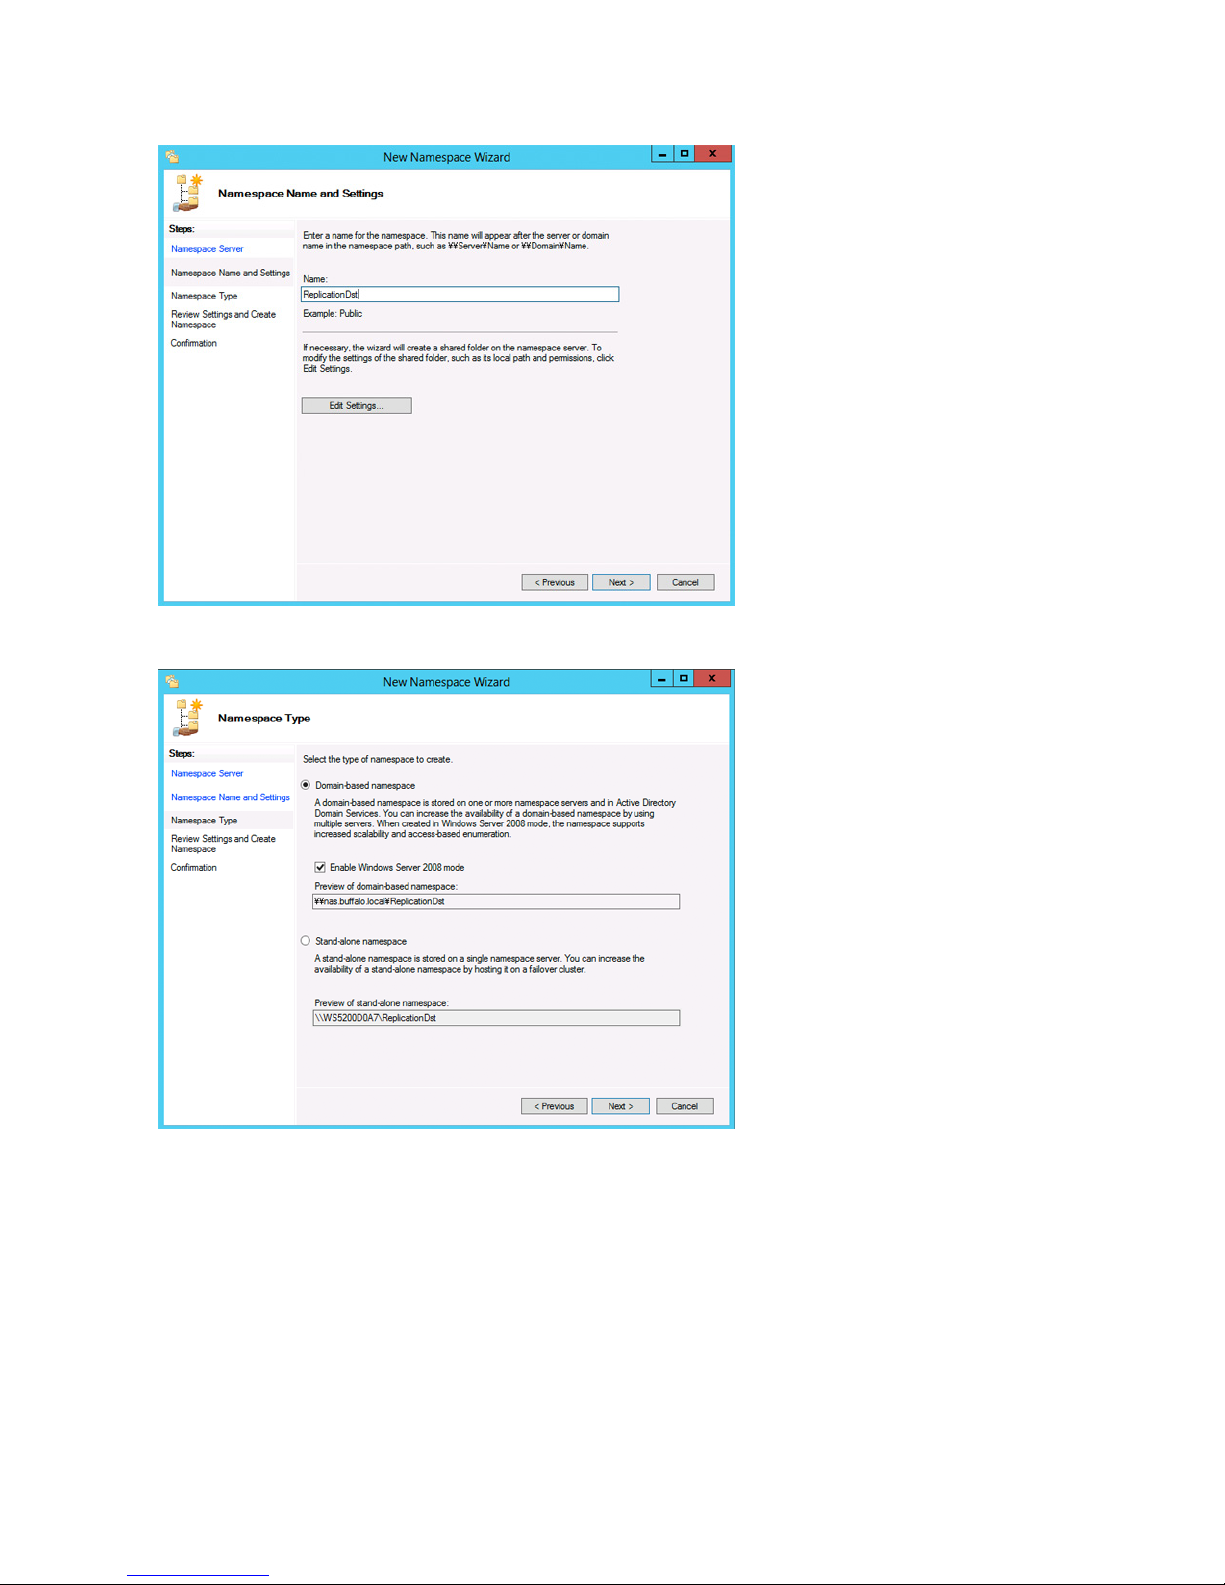
4 Enter a name for the namespace and click Next.
5 Select Domain-based namespace and click Next.
6 Click Create.
7 Click Close when the New Namespace Wizard finishes.
54
Page 56
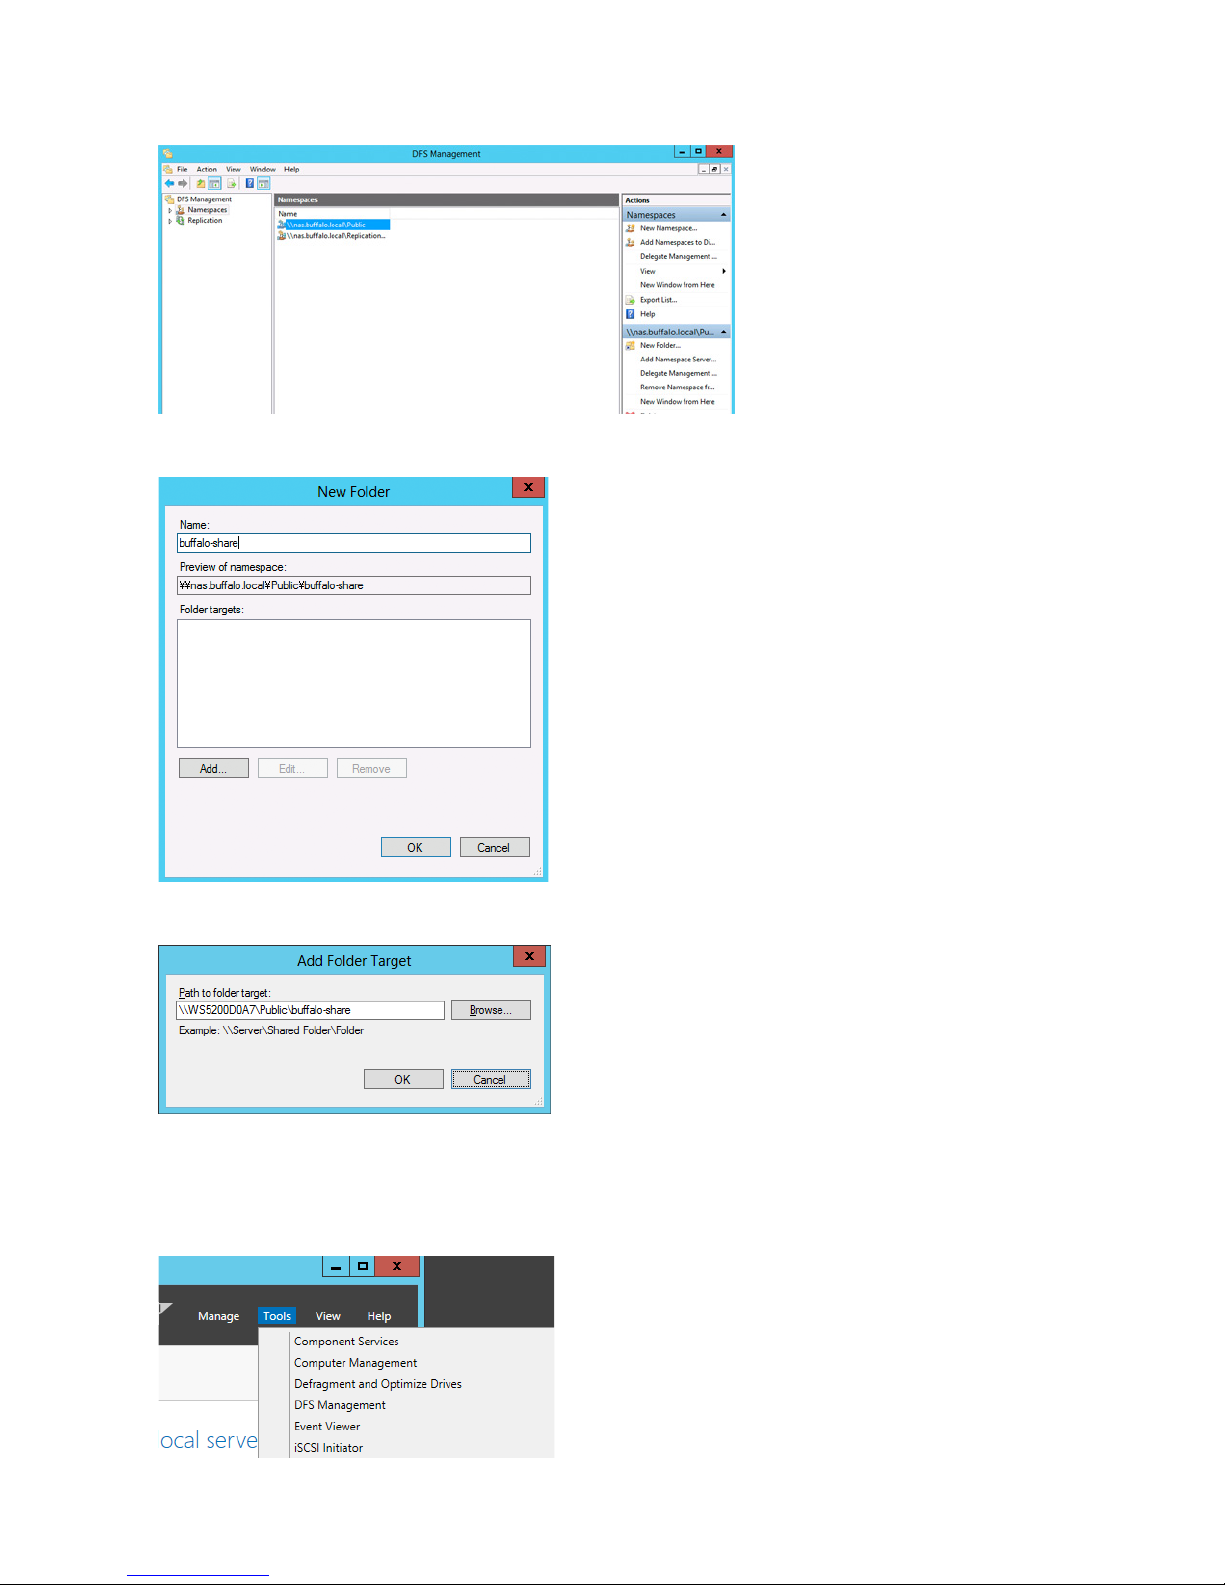
8 In DFS Management, click Namespaces and the name you created through the wizard. Then click New Folder.
9 Enter a folder name and click OK.
10 Enter a path to the folder or select from the list by clicking Browse. Click OK.
Configuring DFS Replication
1 In Server Manager, click Tools - DFS Management.
55
Page 57
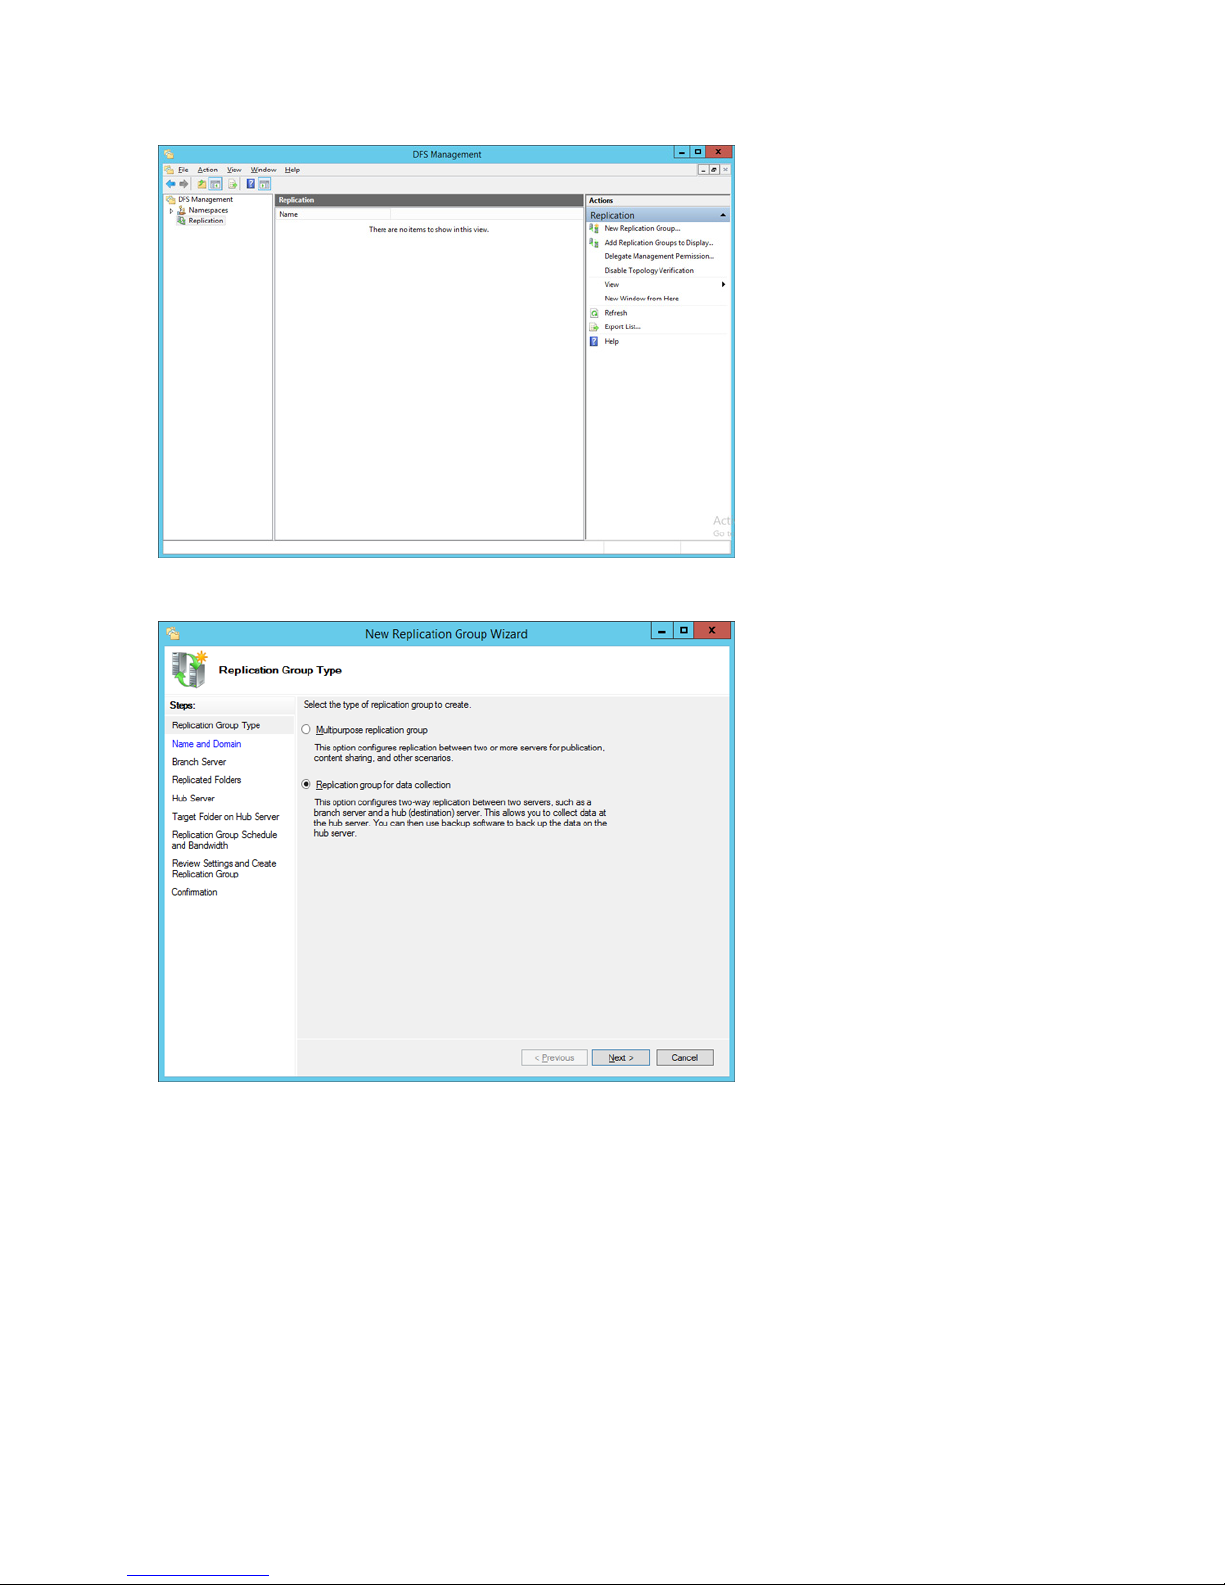
2 Click Replication - New Replication Group.
3 Select the type of replication group and click Next.
56
Page 58
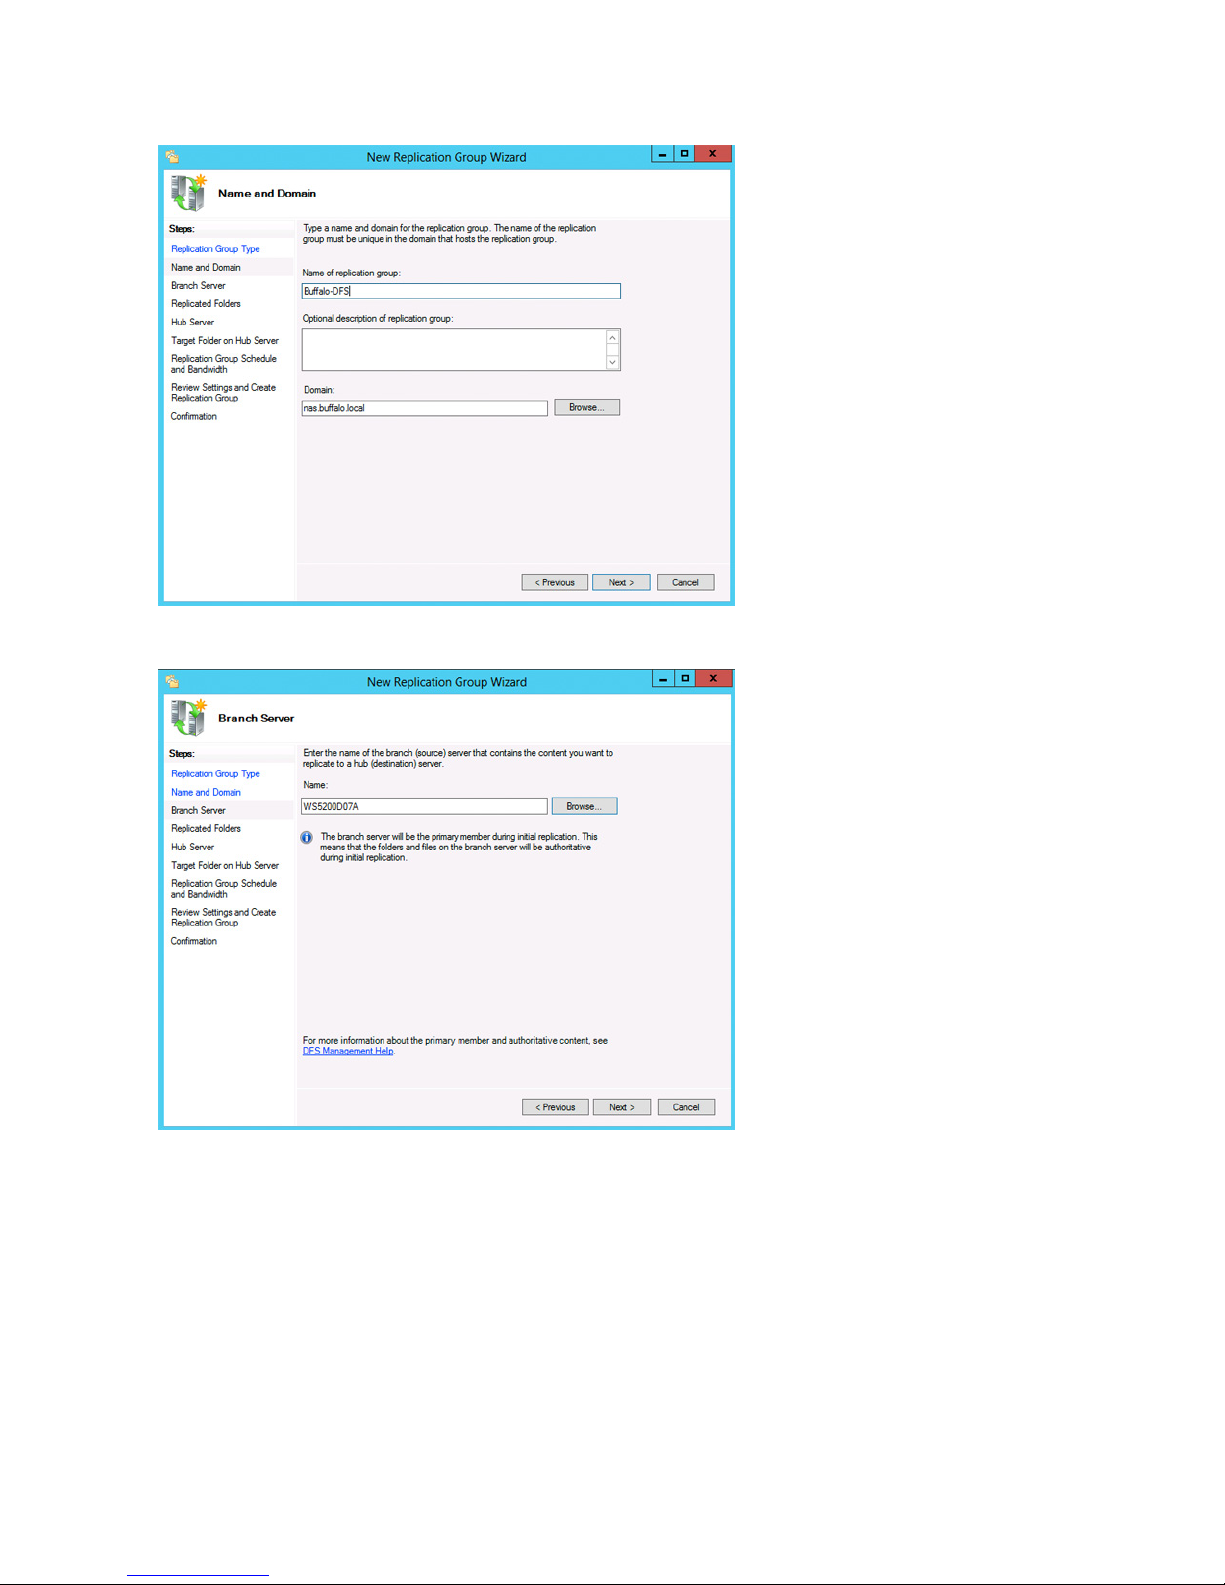
4 Enter a name for the replication group and click Next.
5 Enter the hostname of the file server for the replication source and click Next.
57
Page 59
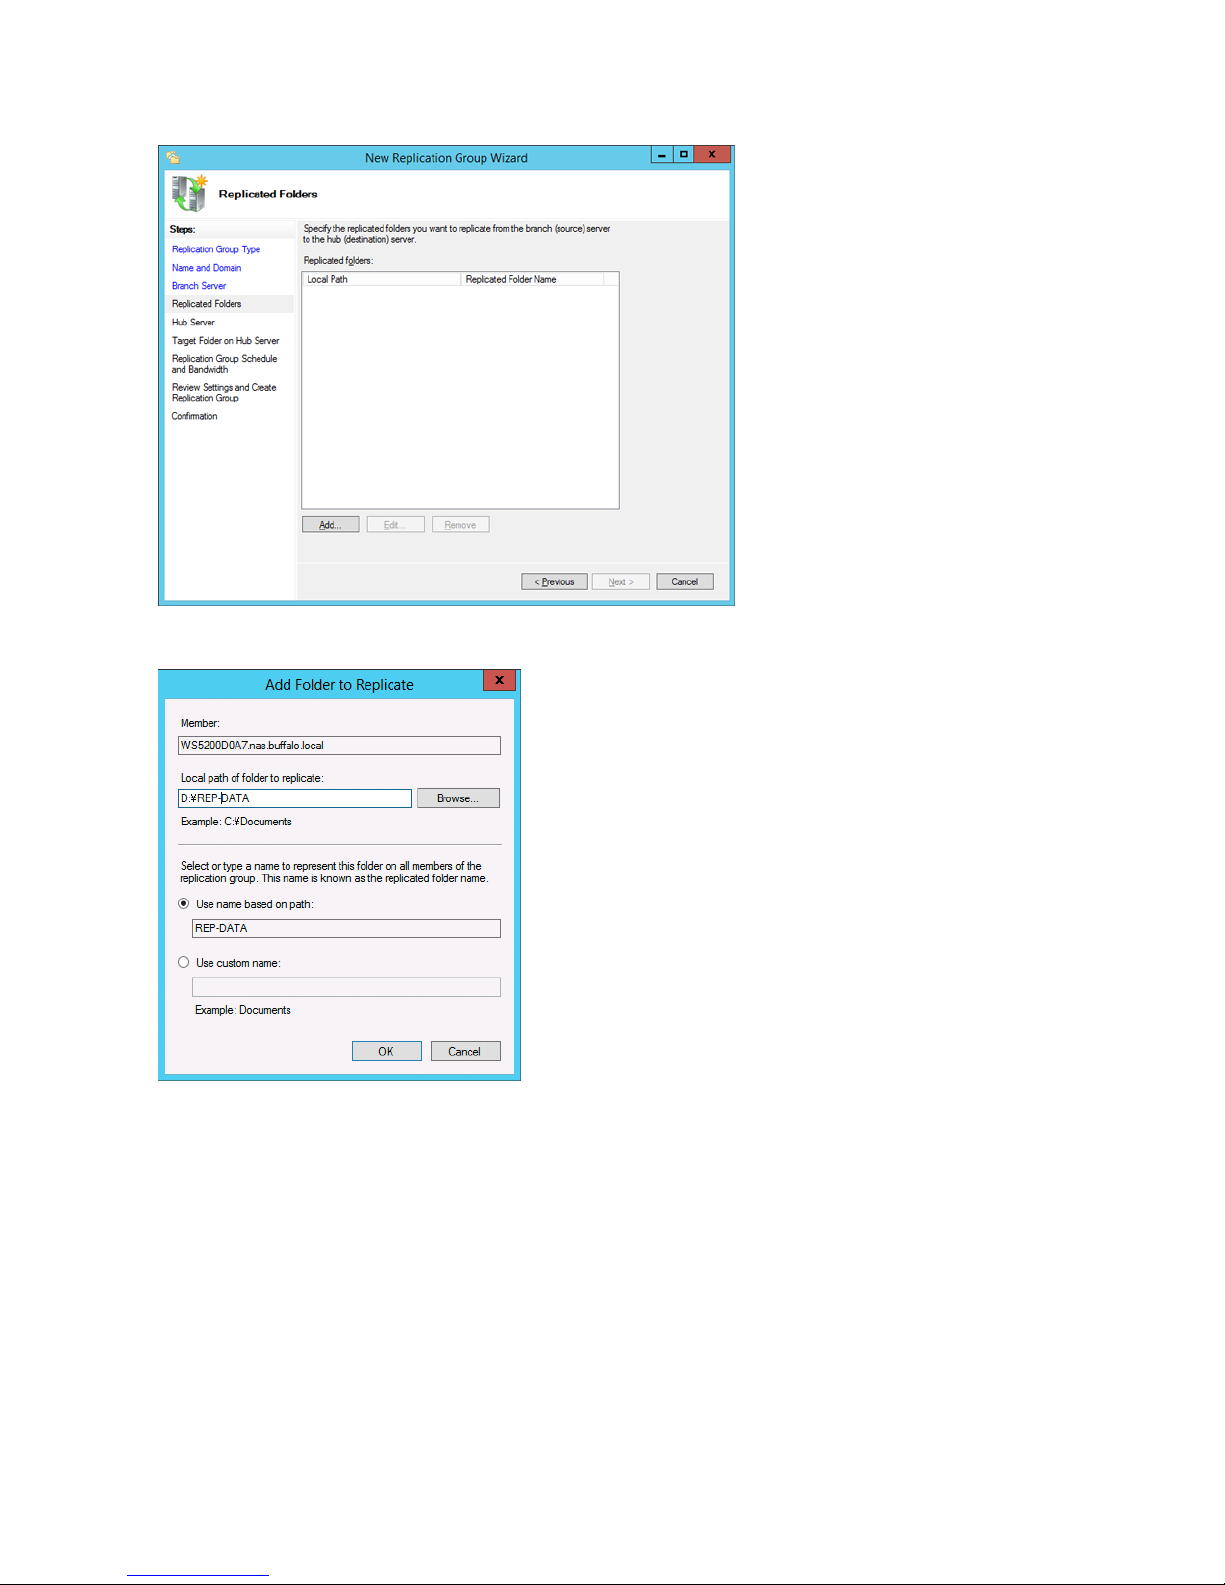
6 Click Add.
7 Enter the path of the replication source and click OK.
58
Page 60
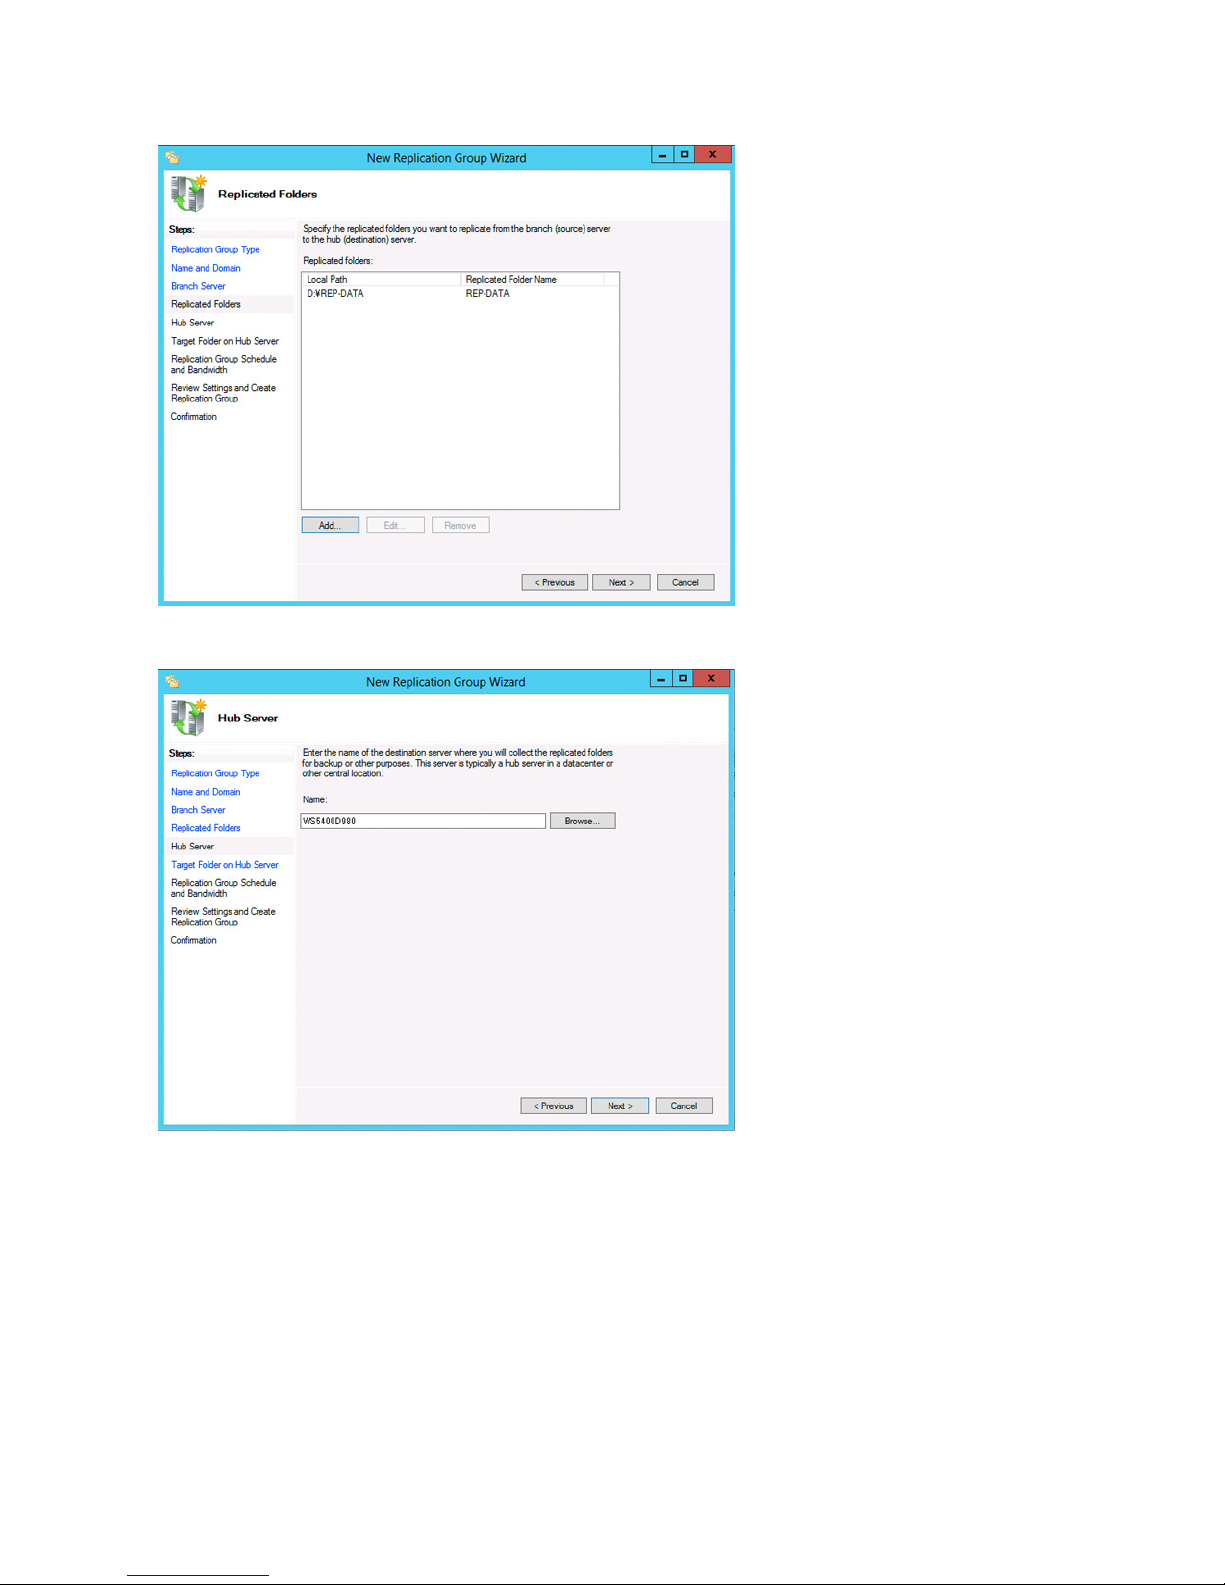
8 Click Next.
9 Enter the hostname of the file server for the replication target and click Next.
59
Page 61
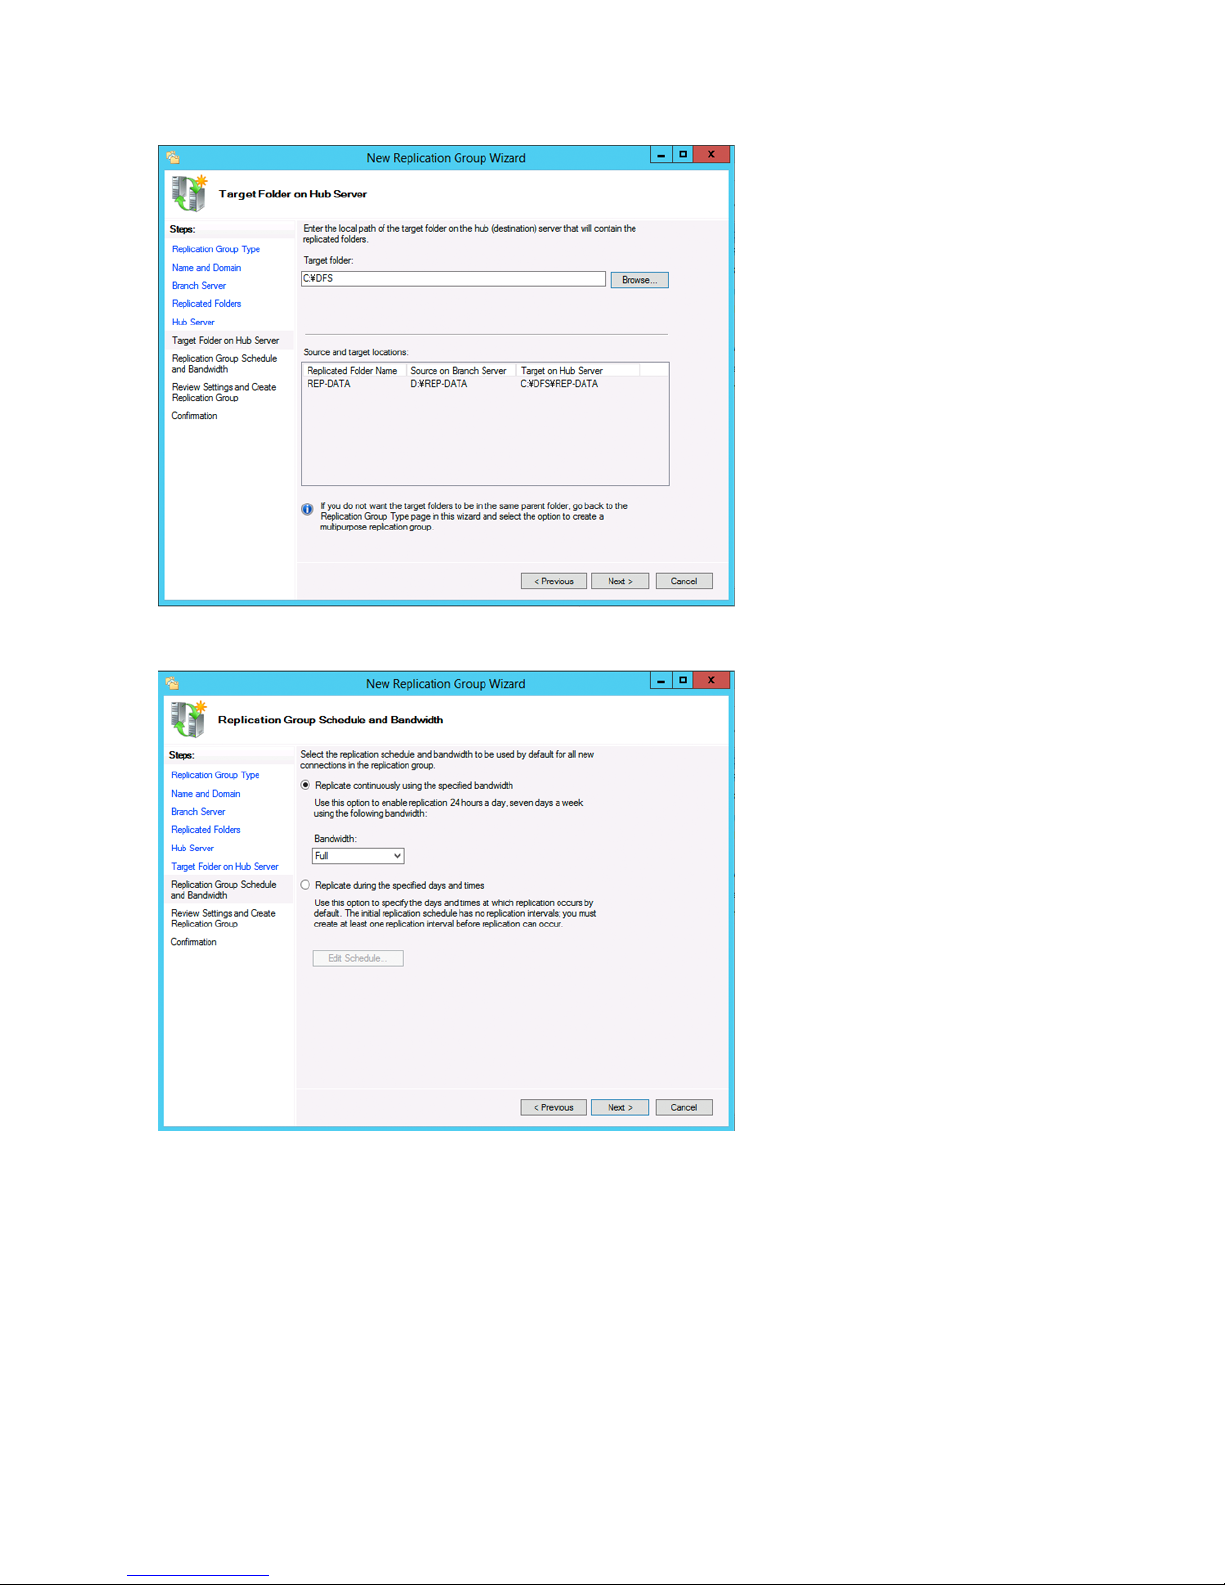
10 Enter the path of the replication target. Alternatively, click Browse and select the folder from the list. Click Next.
11 Click Next again.
Note: You have options to specify the network band and the date and time. To configure bandwidth, select Replicate
continuously using the specified bandwidth and the bit rate from the drop-down list. To configure the schedule time,
60
Page 62
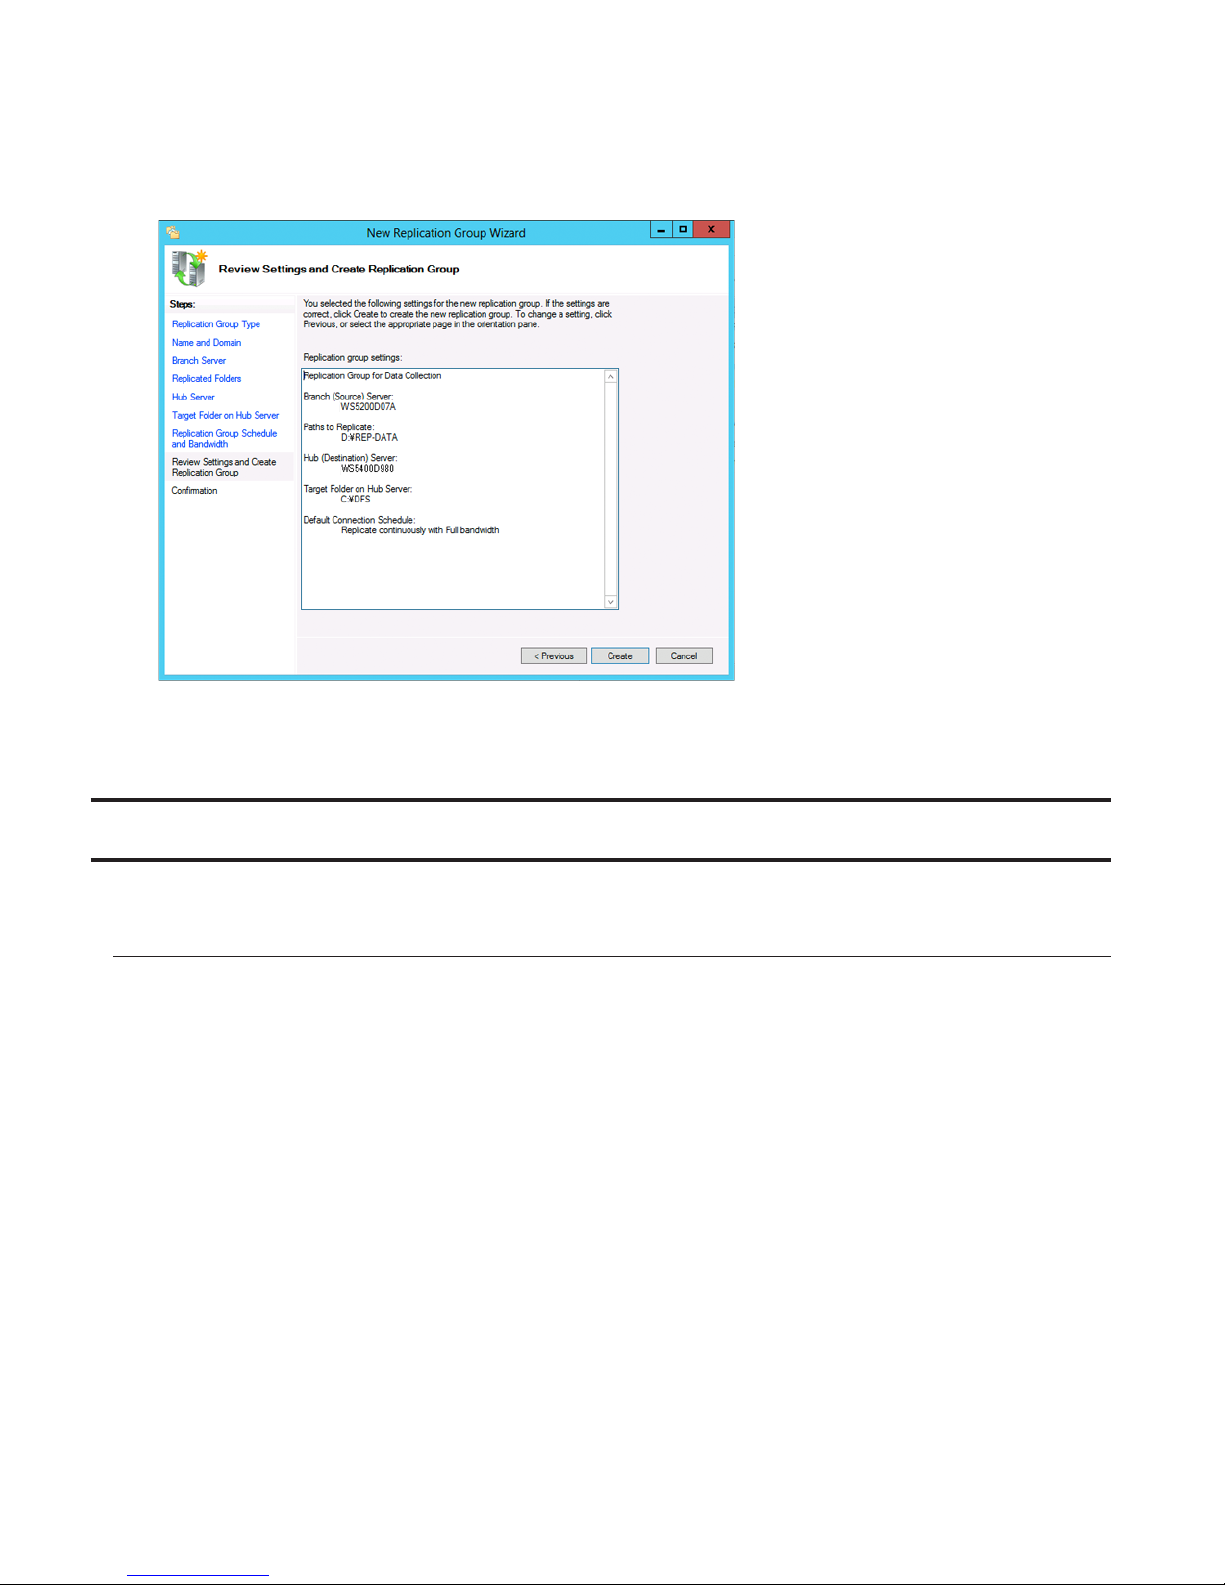
select Replicate during the specified days and times and click Edit Schedule. You can select the date and time in the
displayed window.
12 Click Create.
13 Click Close when finished. DFS replication is now configured.
Note: It may take some time before actual replication is caught up.
Back Up with NovaBACKUP
NovaBACKUP is a Windows utility that lets you back up the data on your computer or TeraStation.
Installation
1 Connect the supplied USB device to your computer. Open the USB device and double-click TSNavi.exe.
TeraNavigator will launch.
2 Click Options - Additional Software Installation.
3 Select "NovaBackup" and click Install.
4 Click Install again.
5 Check "Backup Client" and click Install on the NovaBACKUP installation wizard.
6 Select the installation language and click Next twice.
7 Check on "I accept the terms in the License Agreement", then click Next.
8 Select "Typical" and click Next.
9 Enter your name, company name, and email address. Select "I have a license key" and click Next.
61
Page 63

Notes:
• Name, company name, and email address are required.
• Don't change the license key which is displayed on the screen.
10 Click Finish.
NovaBACKUP is now installed. To launch NovaBACKUP, click the icon on your computer's desktop. For more detail
information, click View Help in the NovaBackup Express Wizard or click Help Topics at the upper right of the NovaBACKUP
home screen.
62
Page 64
Chapter 7 Settings
Date and Time
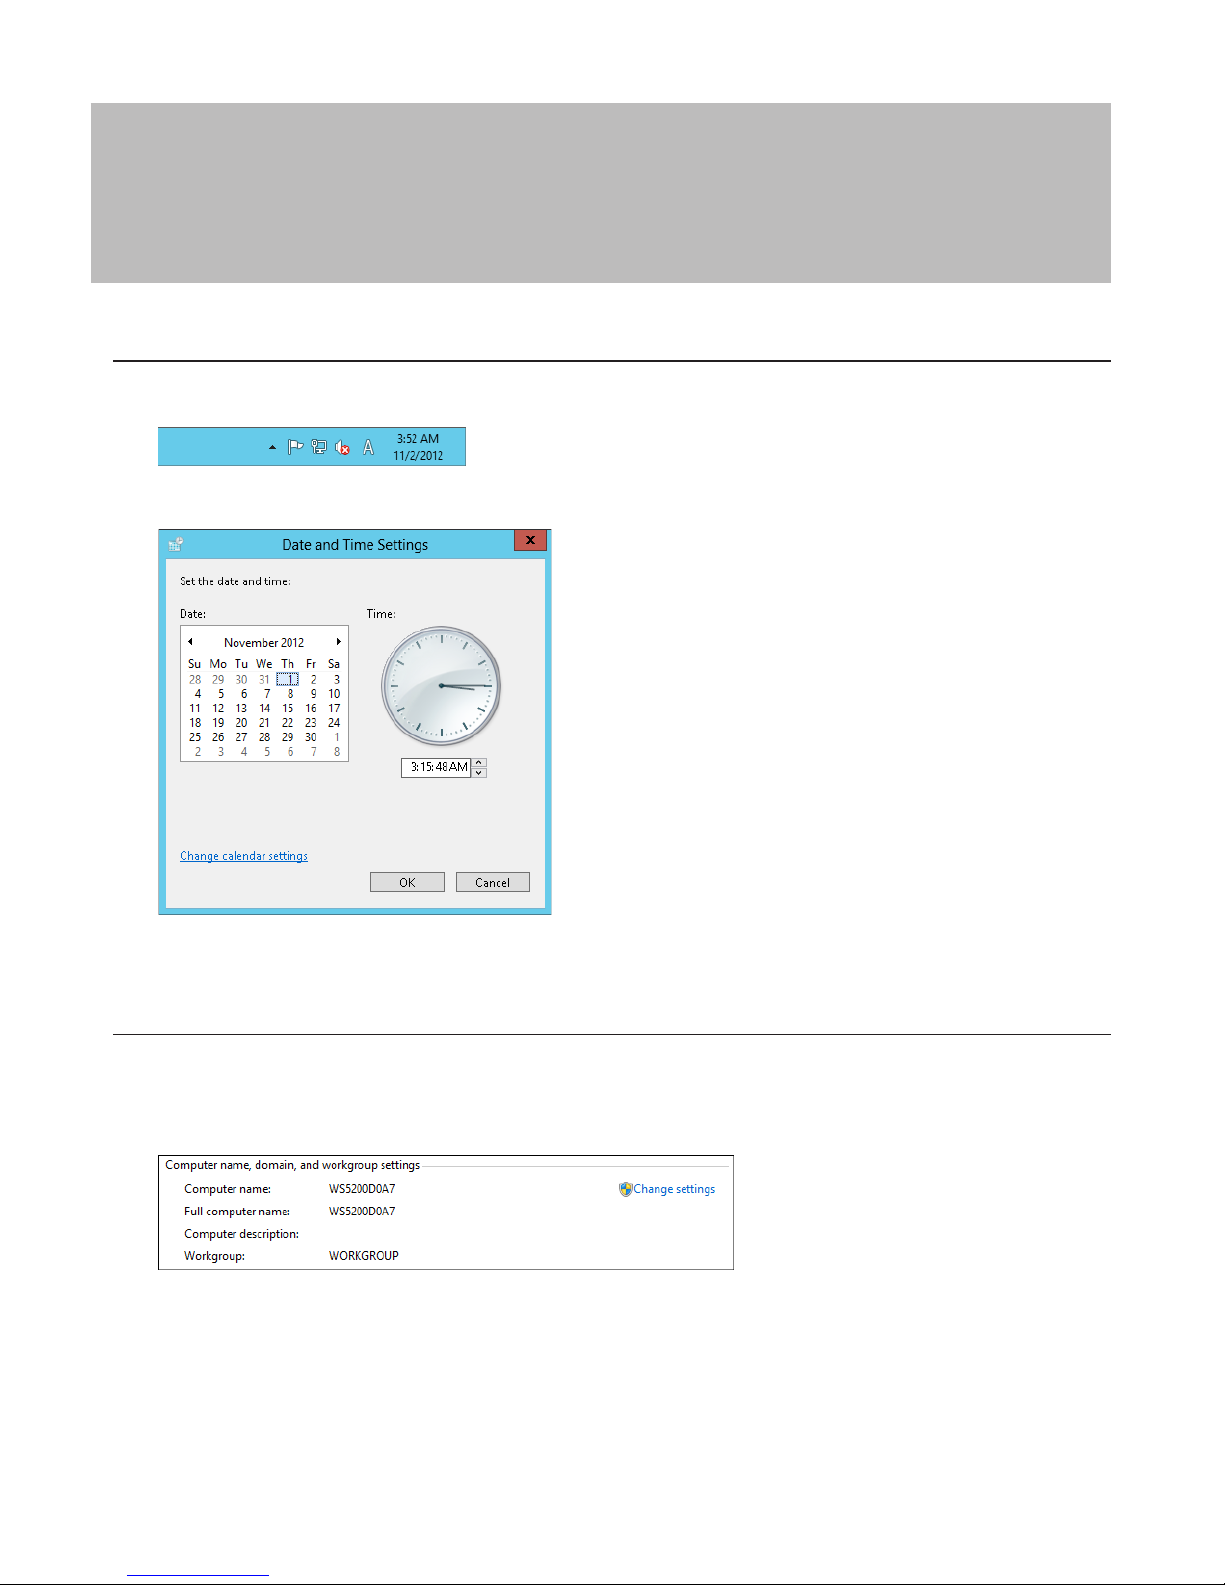
1 Click the time in the system tray of Windows Storage Server.
2 Click Change date and time settings - Change date and time, select the current date and time, and click OK.
Note: In the Internet Time tab, click Change settings, then select Synchronize with an Internet time server. The date and
time can be obtained automatically.
Server Name, Workgroups, and Domains
1 In Control Panel, go to System and click Change settings under "Computer name, domain, and workgroup settings".
2 Click Change settings under Computer name, domain, and workgroup settings.
63
Page 65
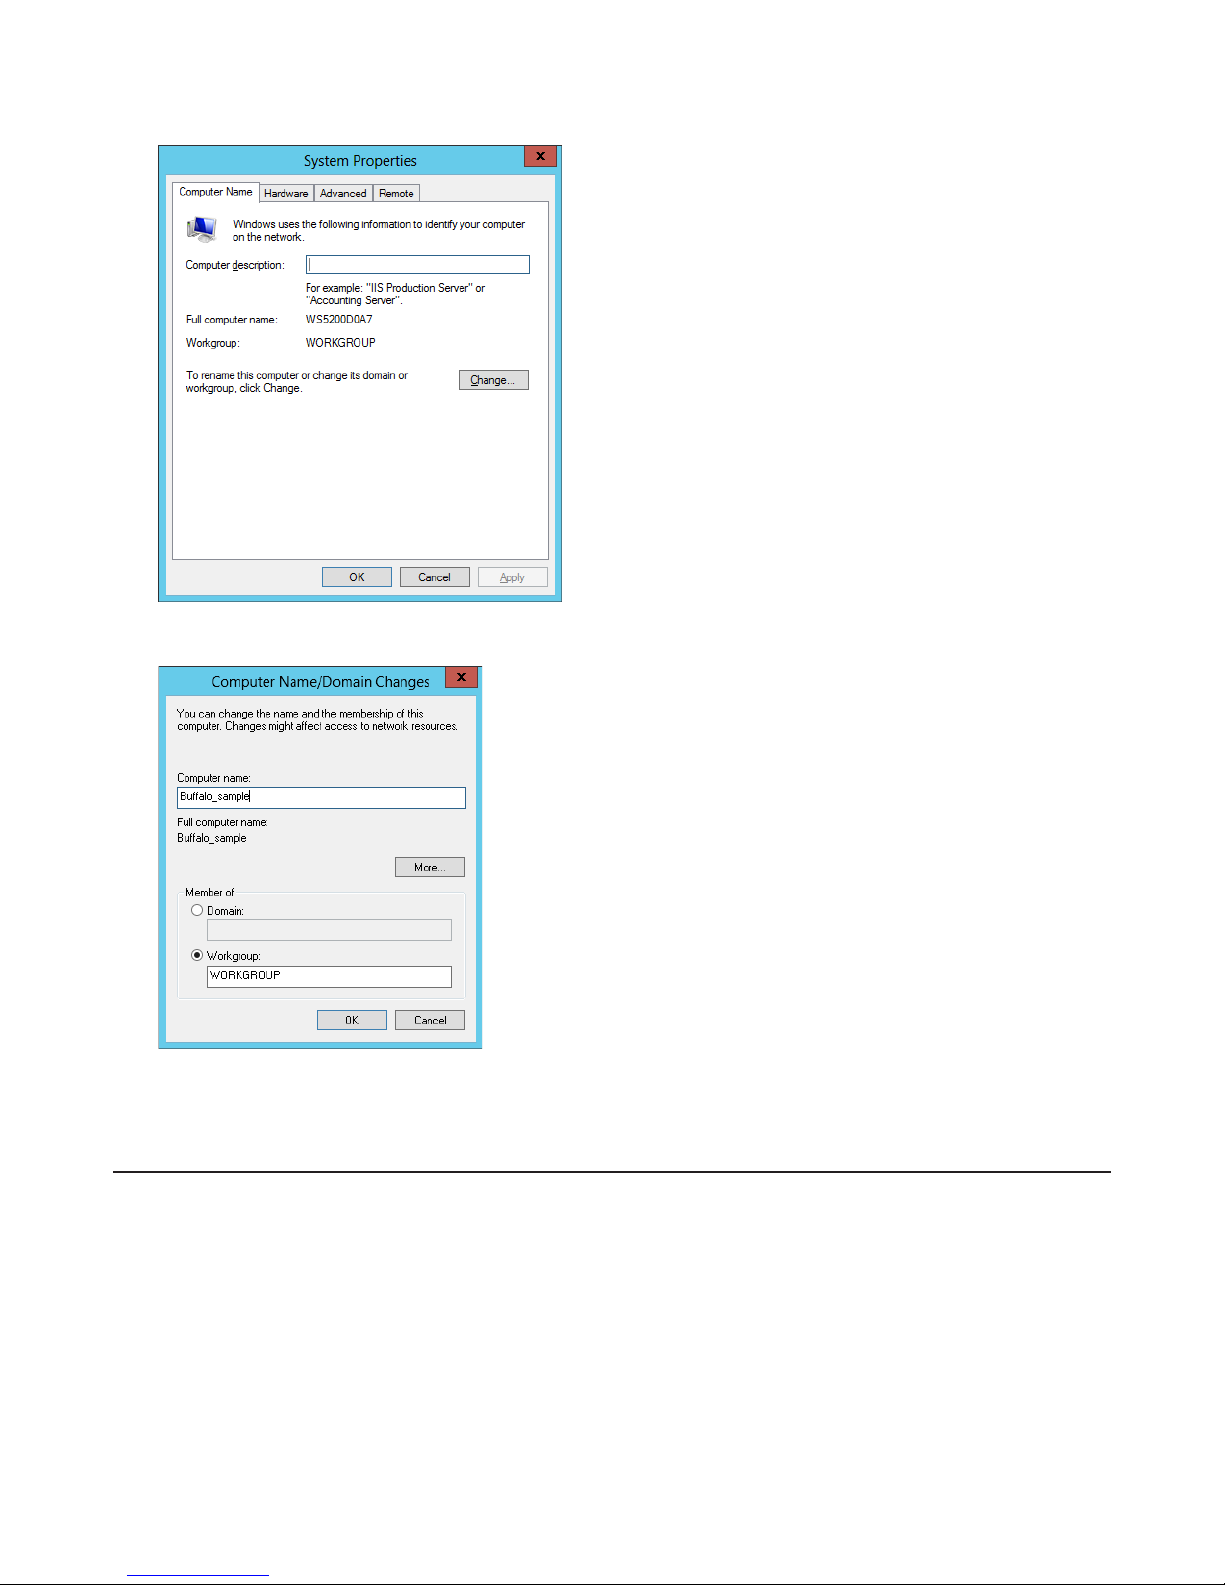
3 In the Computer Name tab, click Change.
4 Enter the computer name, choose domain or workgroup, and click OK.
Note: The computer name should have 16 characters or less. If more than 16 characters are entered, all characters
from the 17th character on are ignored.
Changing the Password
The default password for the TeraStation's administrator account is "password". This is public knowledge, so for security,
you should change it immediately. Follow the procedure below to change the password.
1 From the Windows Storage Server Start menu, open Administrative Tools, then double-click Computer Management.
2 Click Local Users and Groups, then double-click Users.
64
Page 66
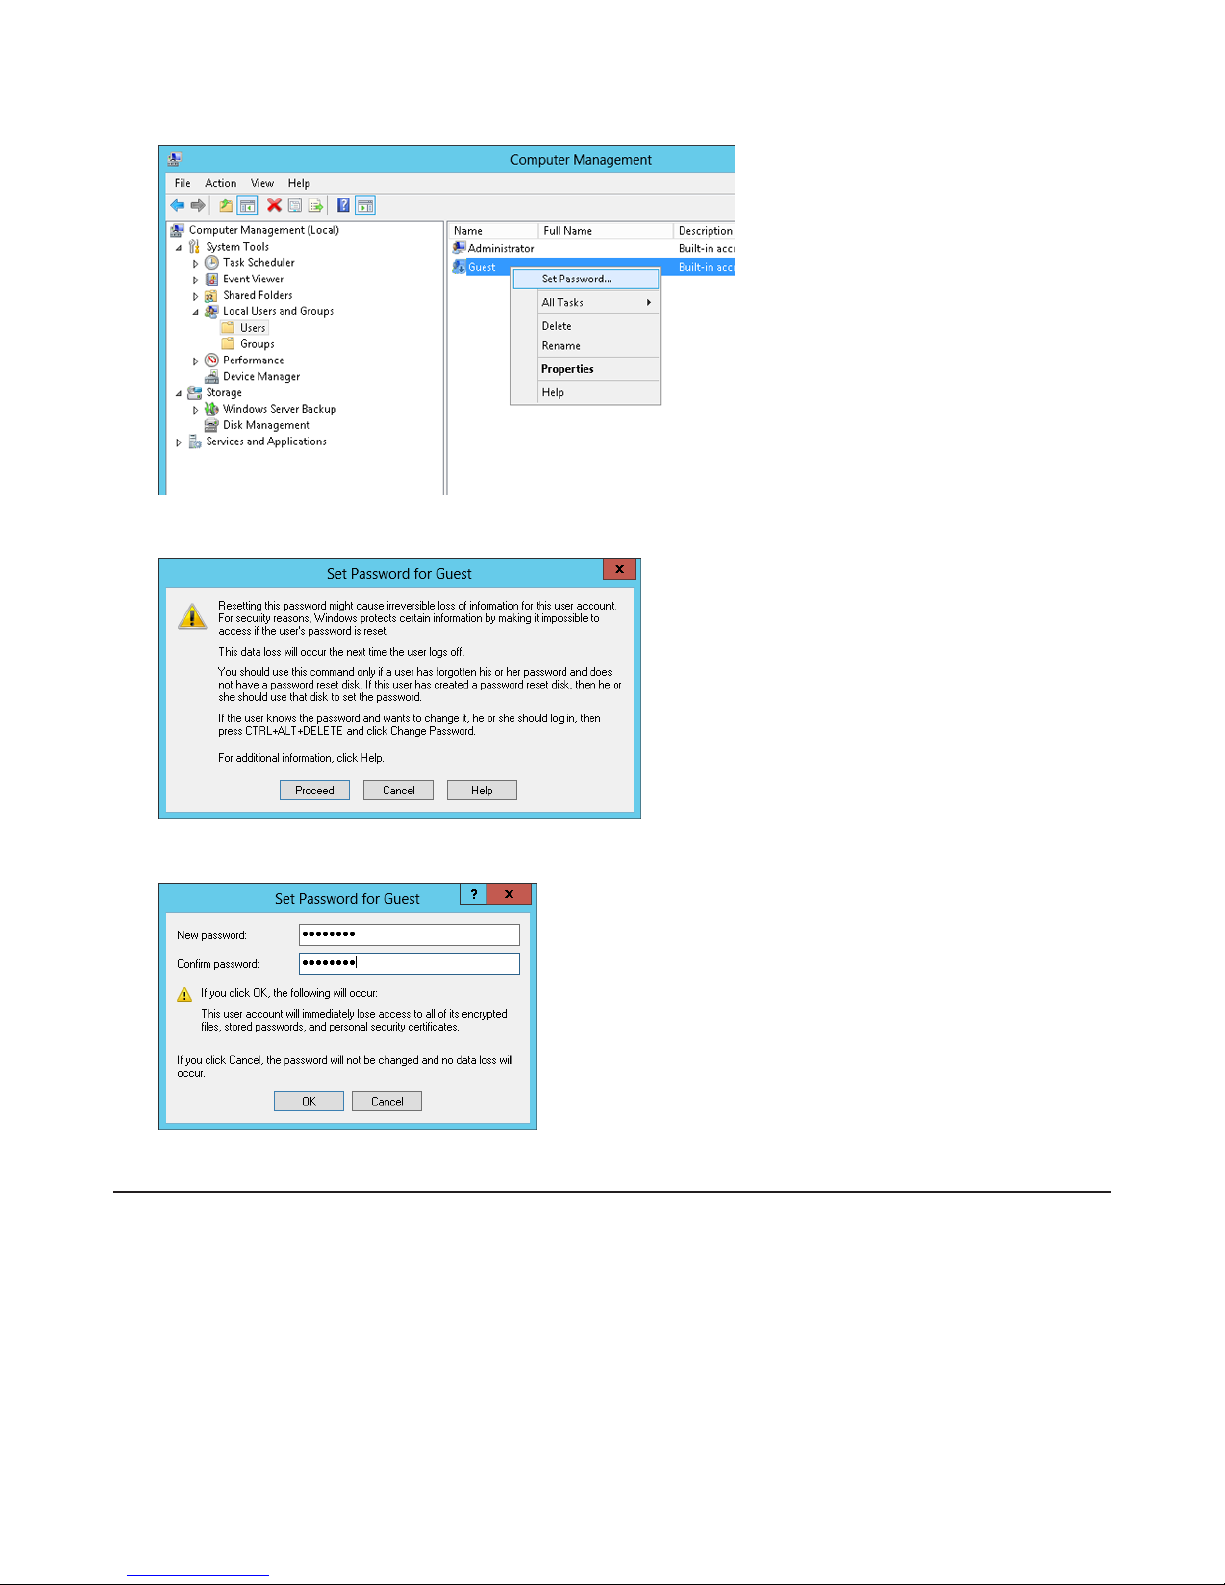
3 Right-click the user whose password will be changed and click Set Password.
4 Click Proceed.
5 Enter a new password (twice).
Adding a User
1 From the Windows Storage Server Start menu, open Administrative Tools, then double-click Computer Management.
2 Click Local Users and Groups.
65
Page 67
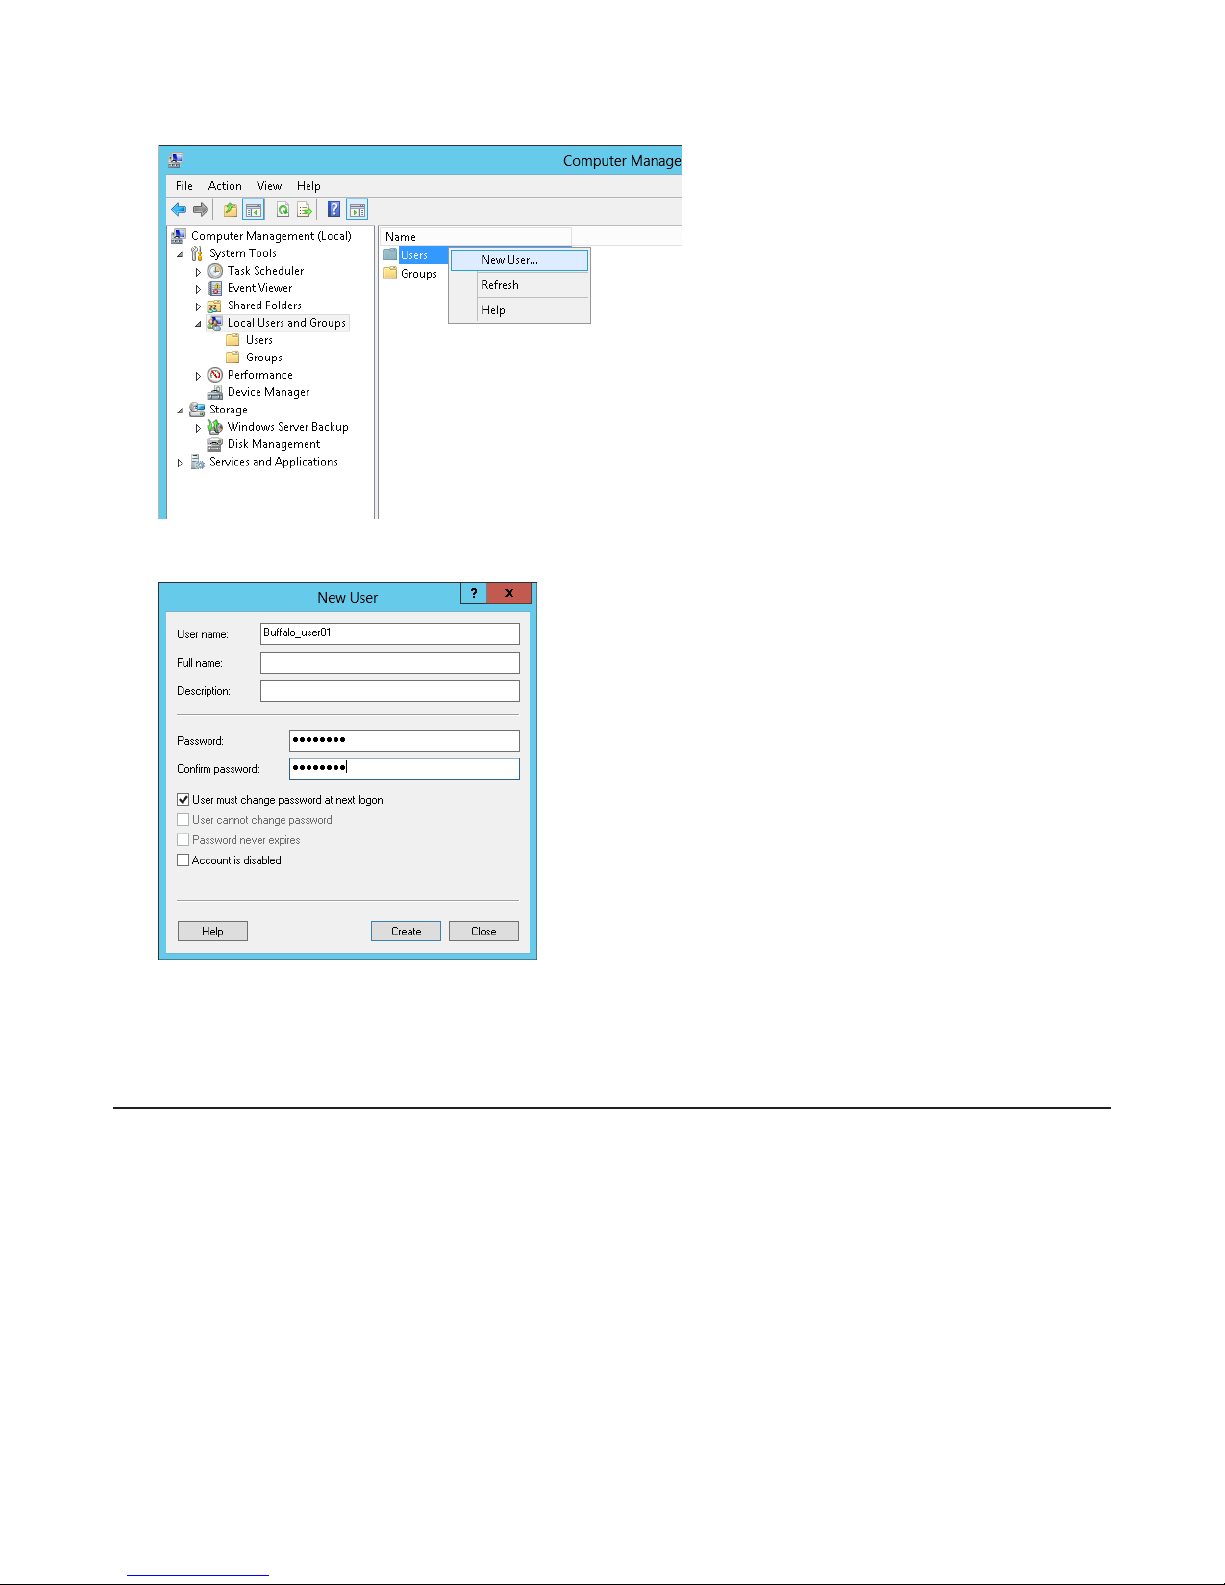
3 Right-click Users and click New User.
4 Enter the desired settings and click Create .
5 Click Close.
Note: Accounts not belonging to the Administrators group cannot be connected by the remote desktop.
Adding a Group
1 From the Windows Storage Server Start menu, open Administrative Tools, then double-click Computer Management.
2 Click Local Users and Groups.
66
Page 68
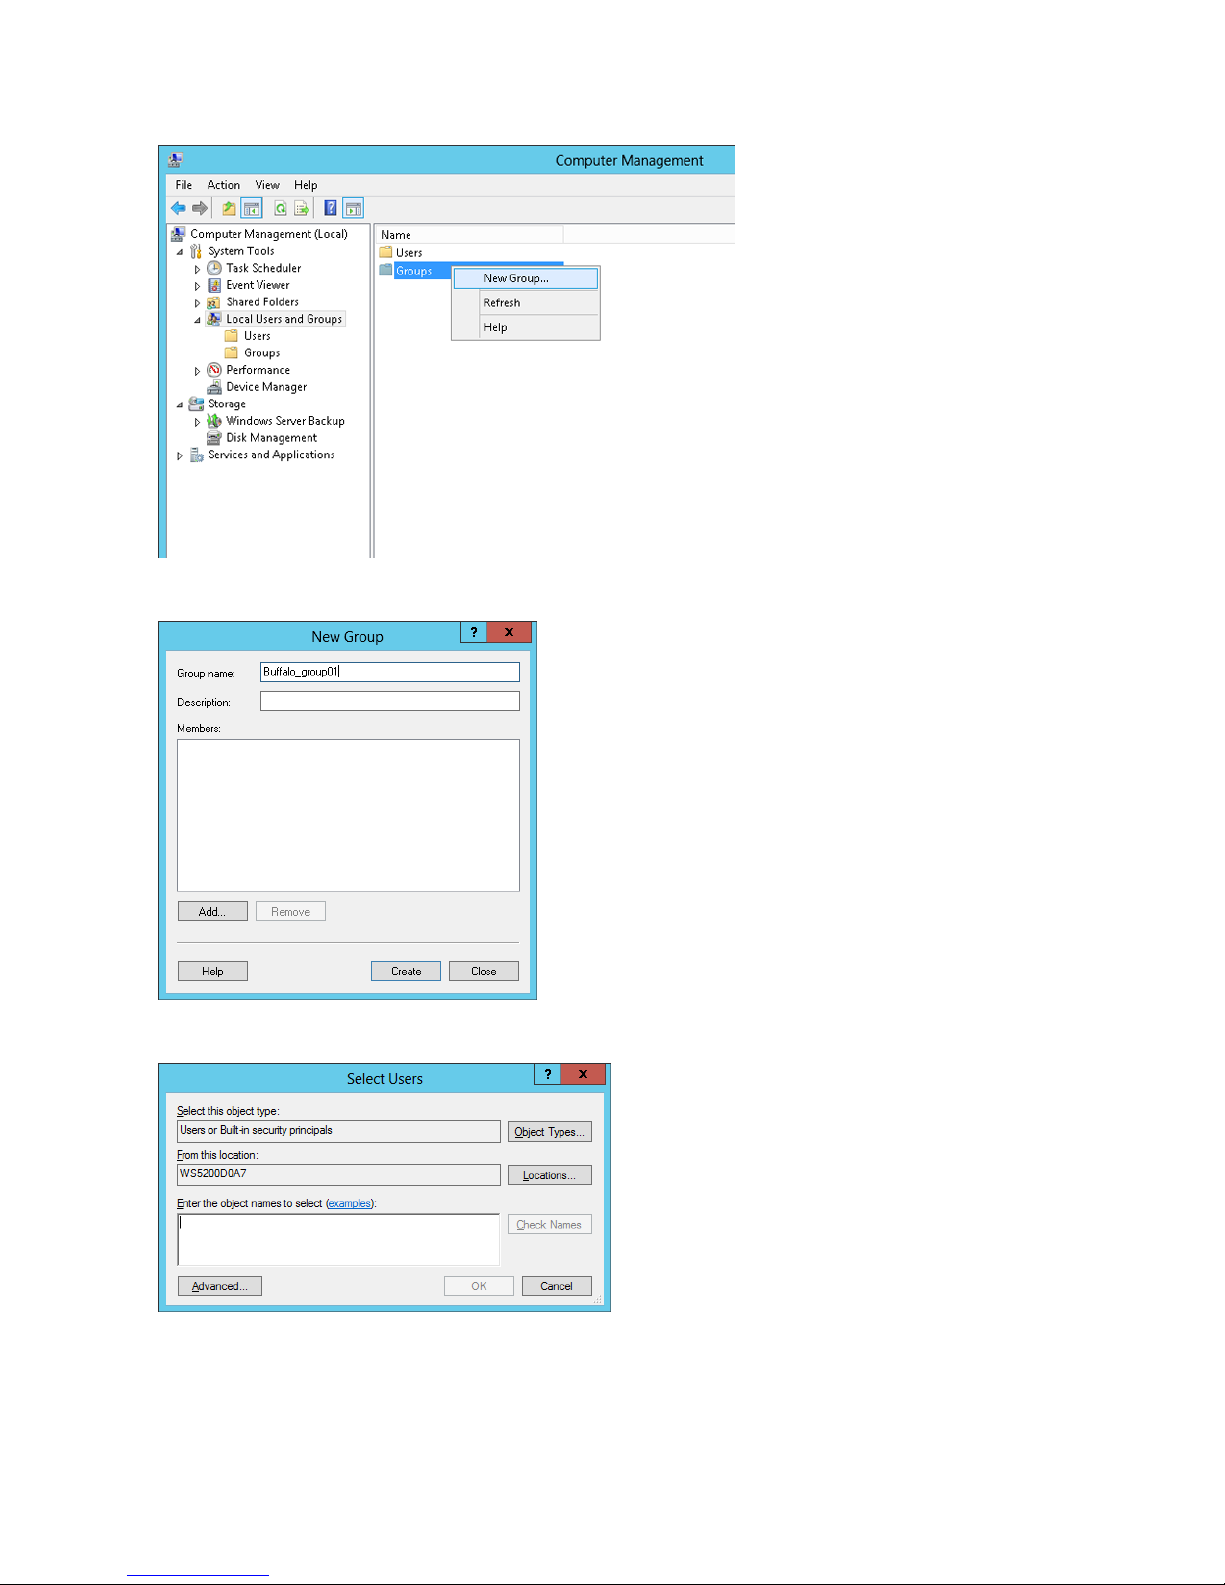
3 Right-click Groups and choose New Group.
4 Enter a group name and click Add.
5 Click Advanced.
67
Page 69
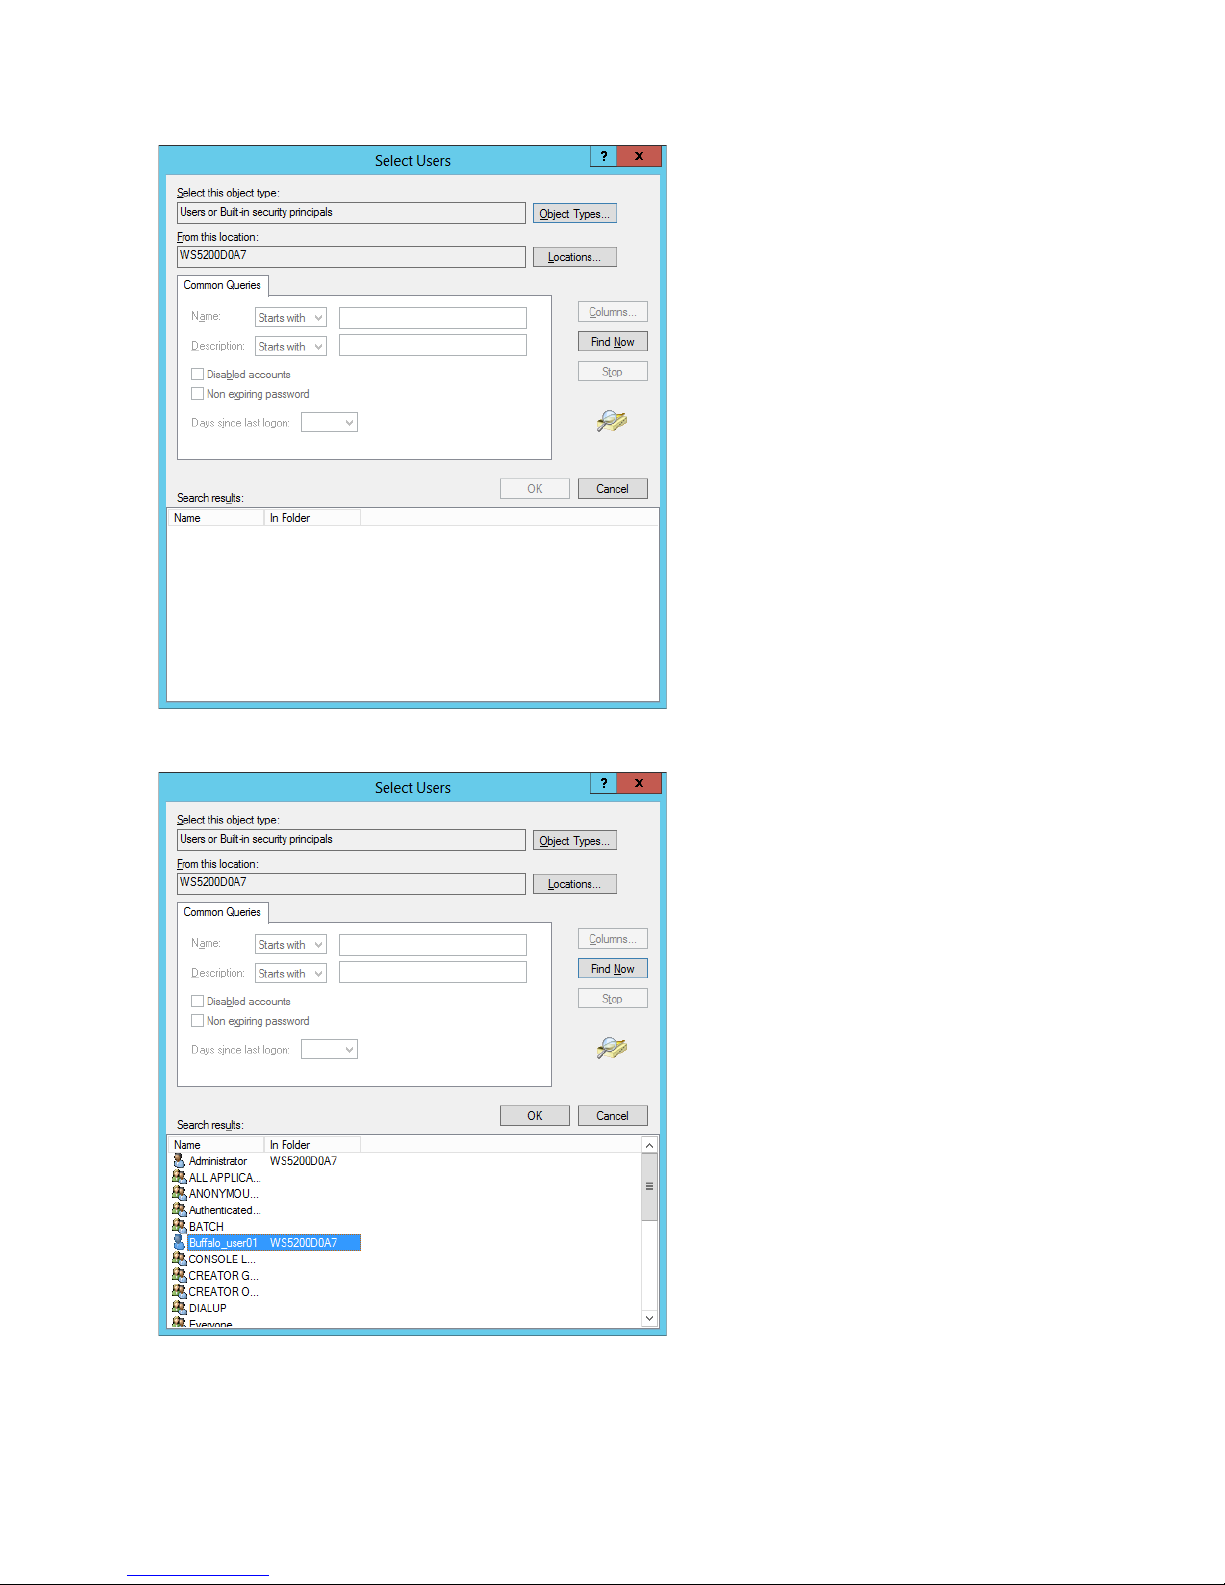
6 Click Find Now.
7 Select the users to be registered to the group, then click OK.
68
Page 70
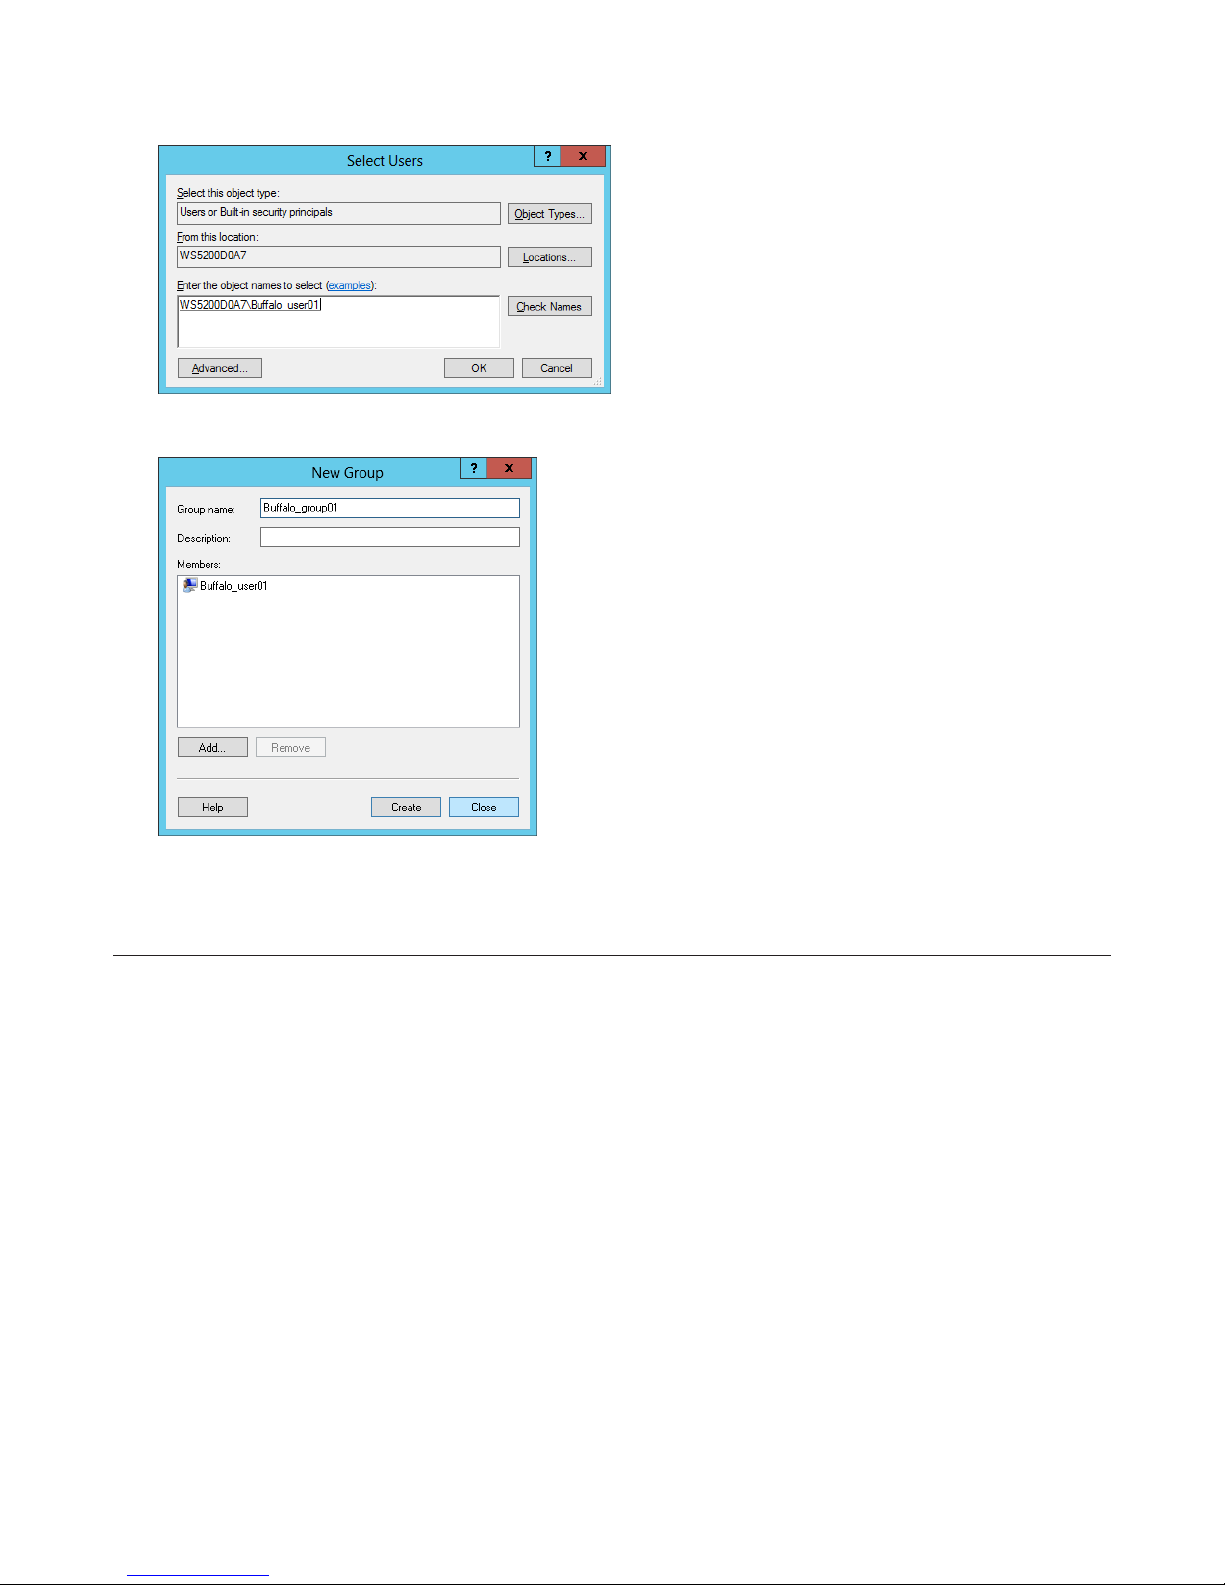
8 Click OK.
9 Click Create.
10 Click Close.
Creating a Shared Folder
No shared folders are configured by default. Before using the TeraStation, follow the procedure below to create one or
more shared folders.
This is an example to create a shared folder, named "Share" in drive D, which anyone can access.
1 From the Windows Storage Server Start menu, open Administrative Tools, then double-click Computer Management.
2 Click Shared Folders.
69
Page 71
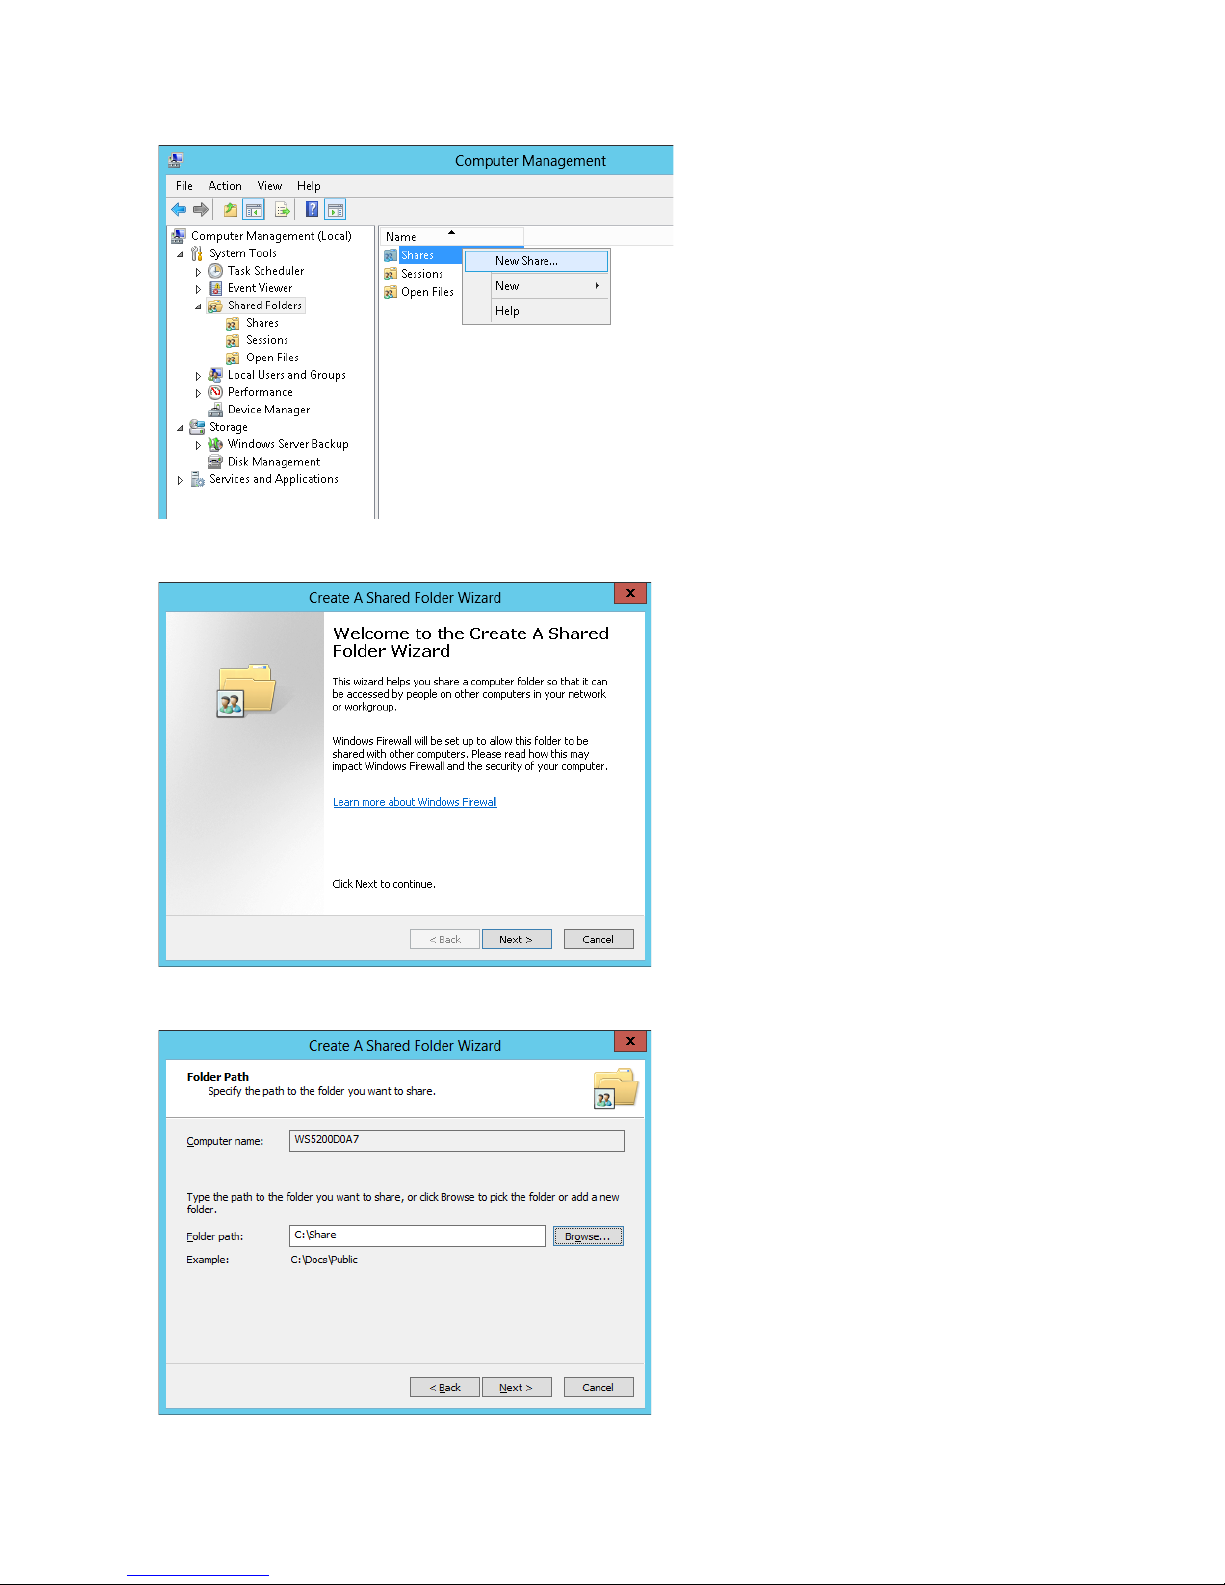
3 Right-click Shares and click New Share.
4 Click Next.
5 Enter the path of an existing folder or a new folder, then click Next.
70
Page 72
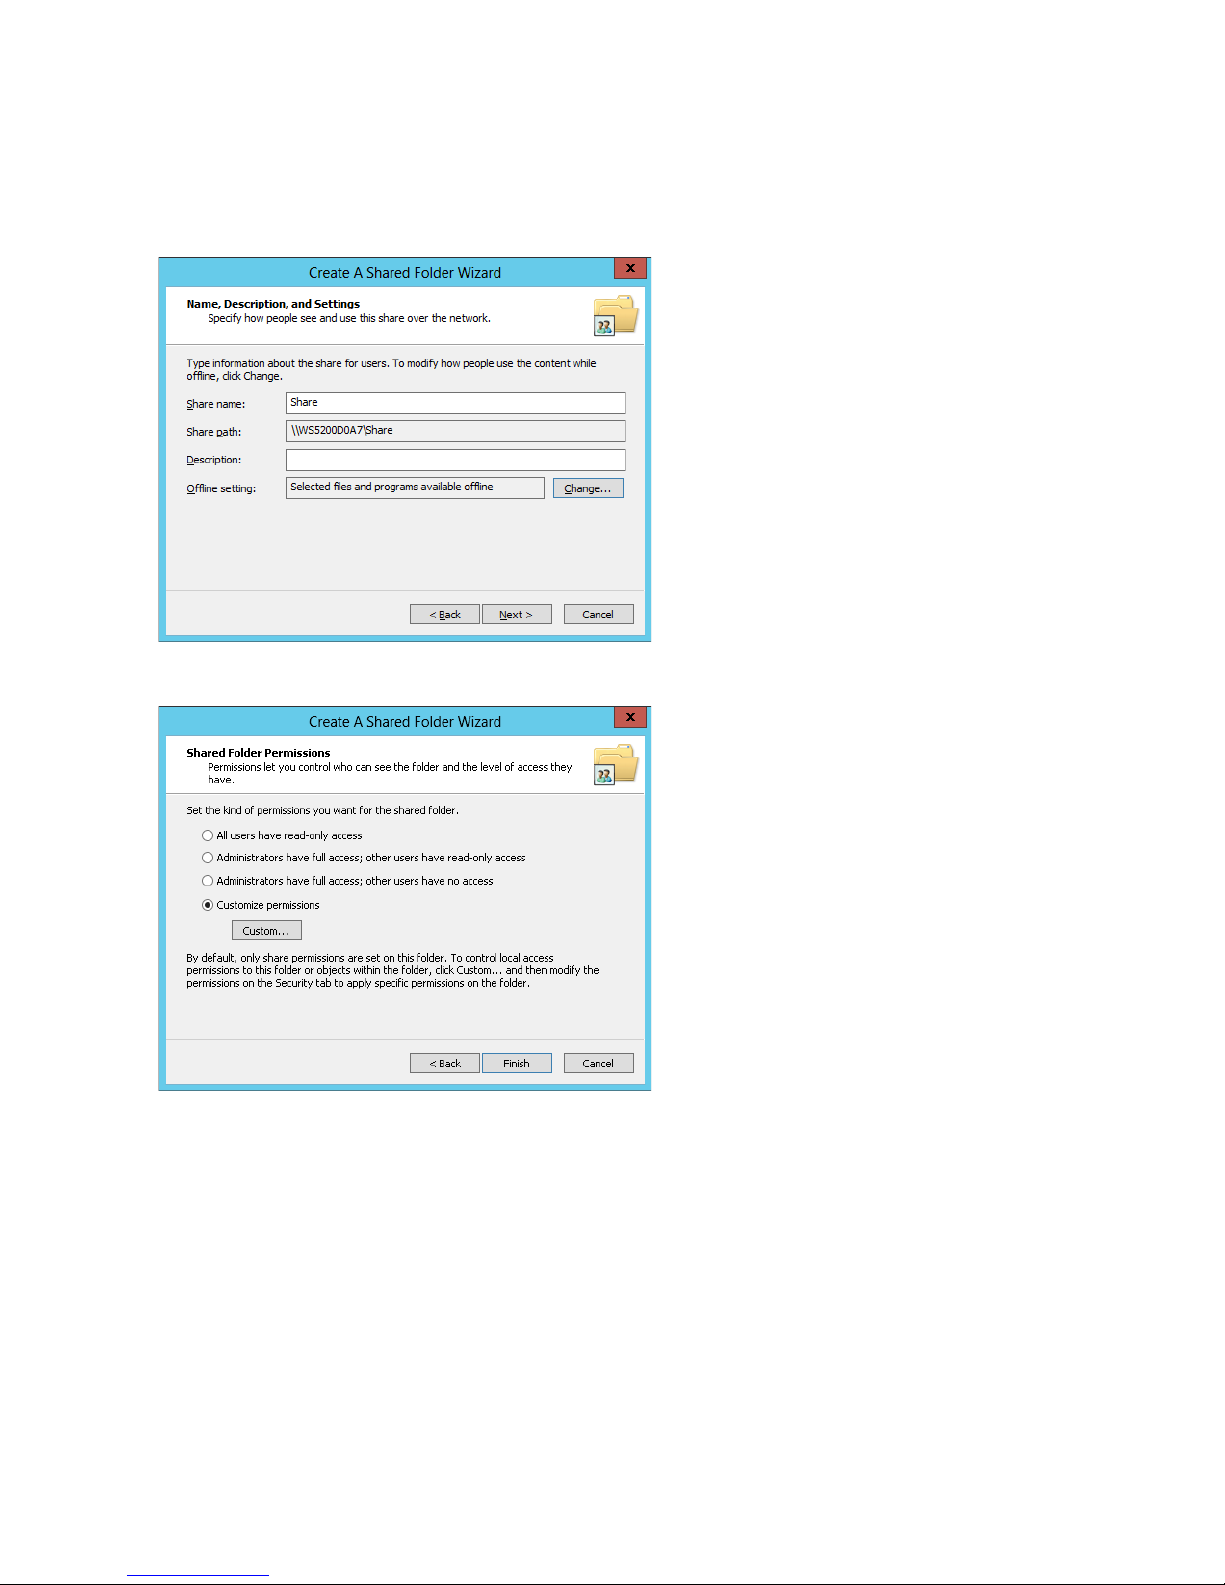
Notes:
• Enter "D:\Share" in folder path to create the shared folder for the first time.
• If the message "The system cannot find the specified path. Do you want to create it?" is displayed, click Ye s.
6 Enter a name for the share and a description (optional), then click Next.
7 Check Customize permissions, then click Custom.
71
Page 73
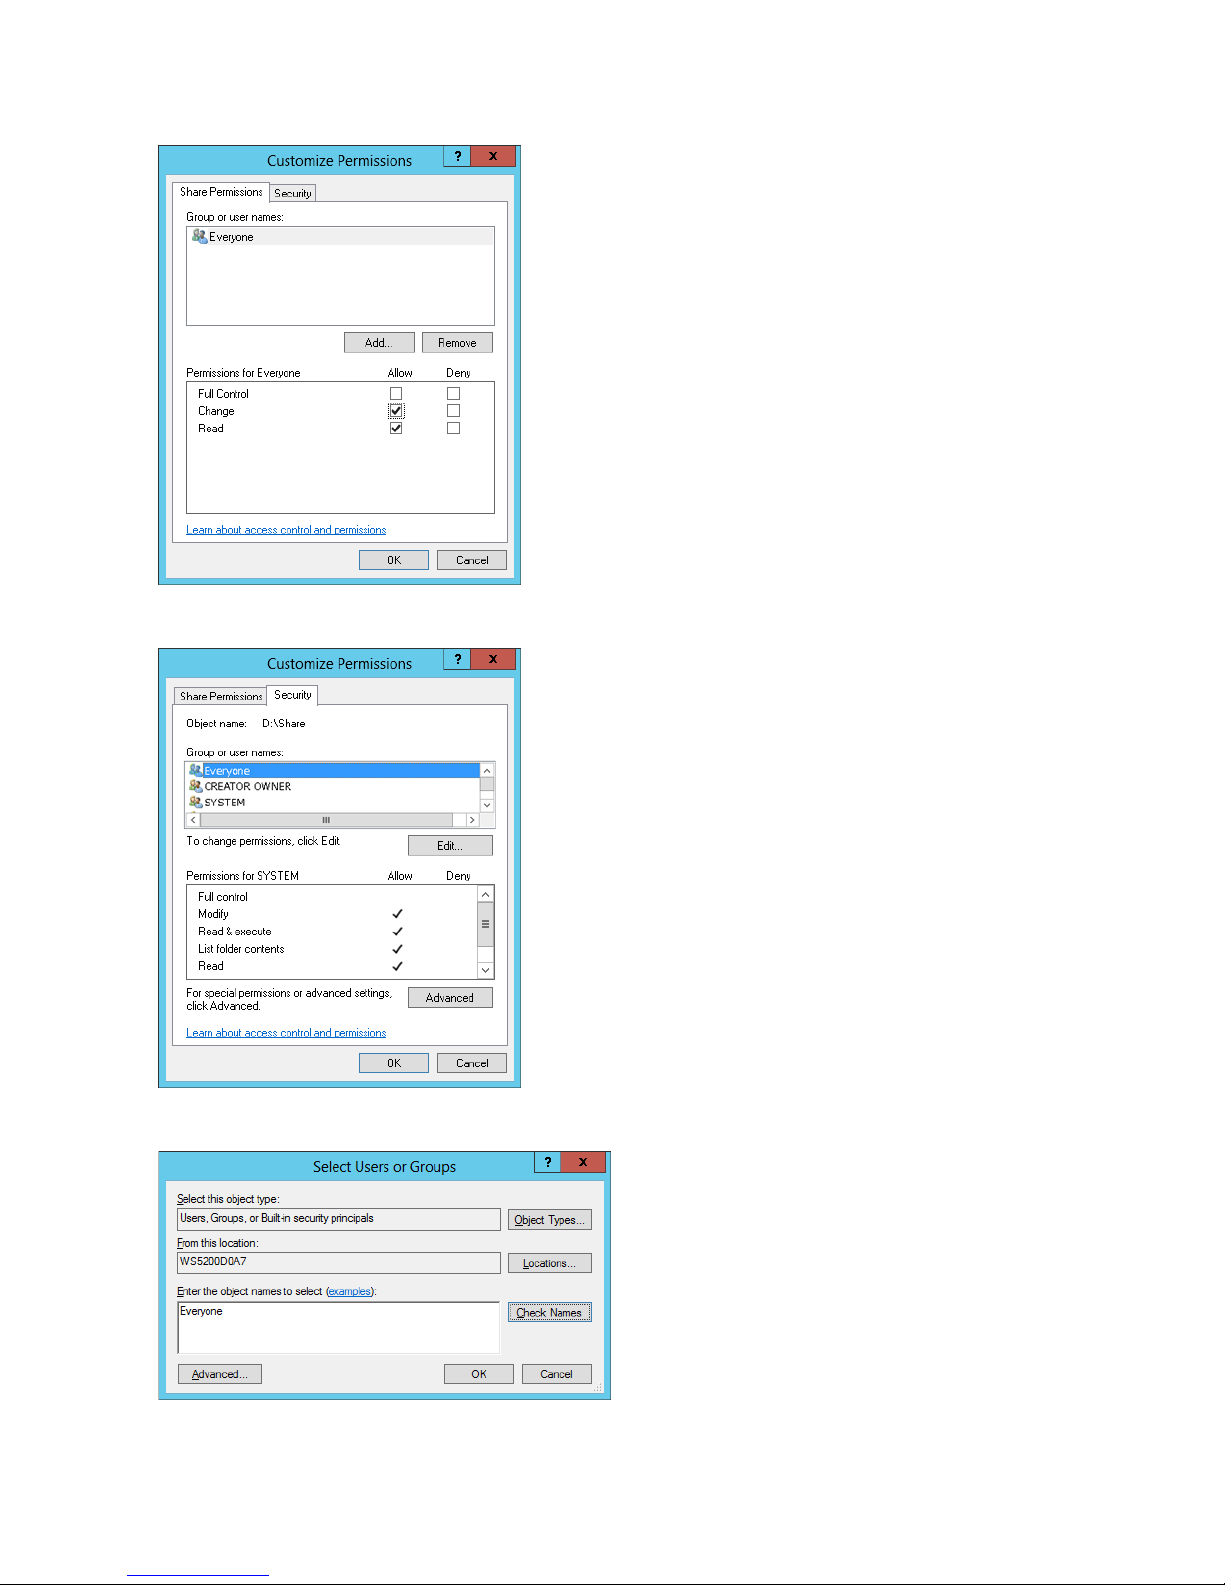
8 Choose Everyone and check Allow for "Change".
9 In the Security tab, click Edit - Add.
10 Enter "Everyone" under "Enter the object names to select", then click OK.
72
Page 74
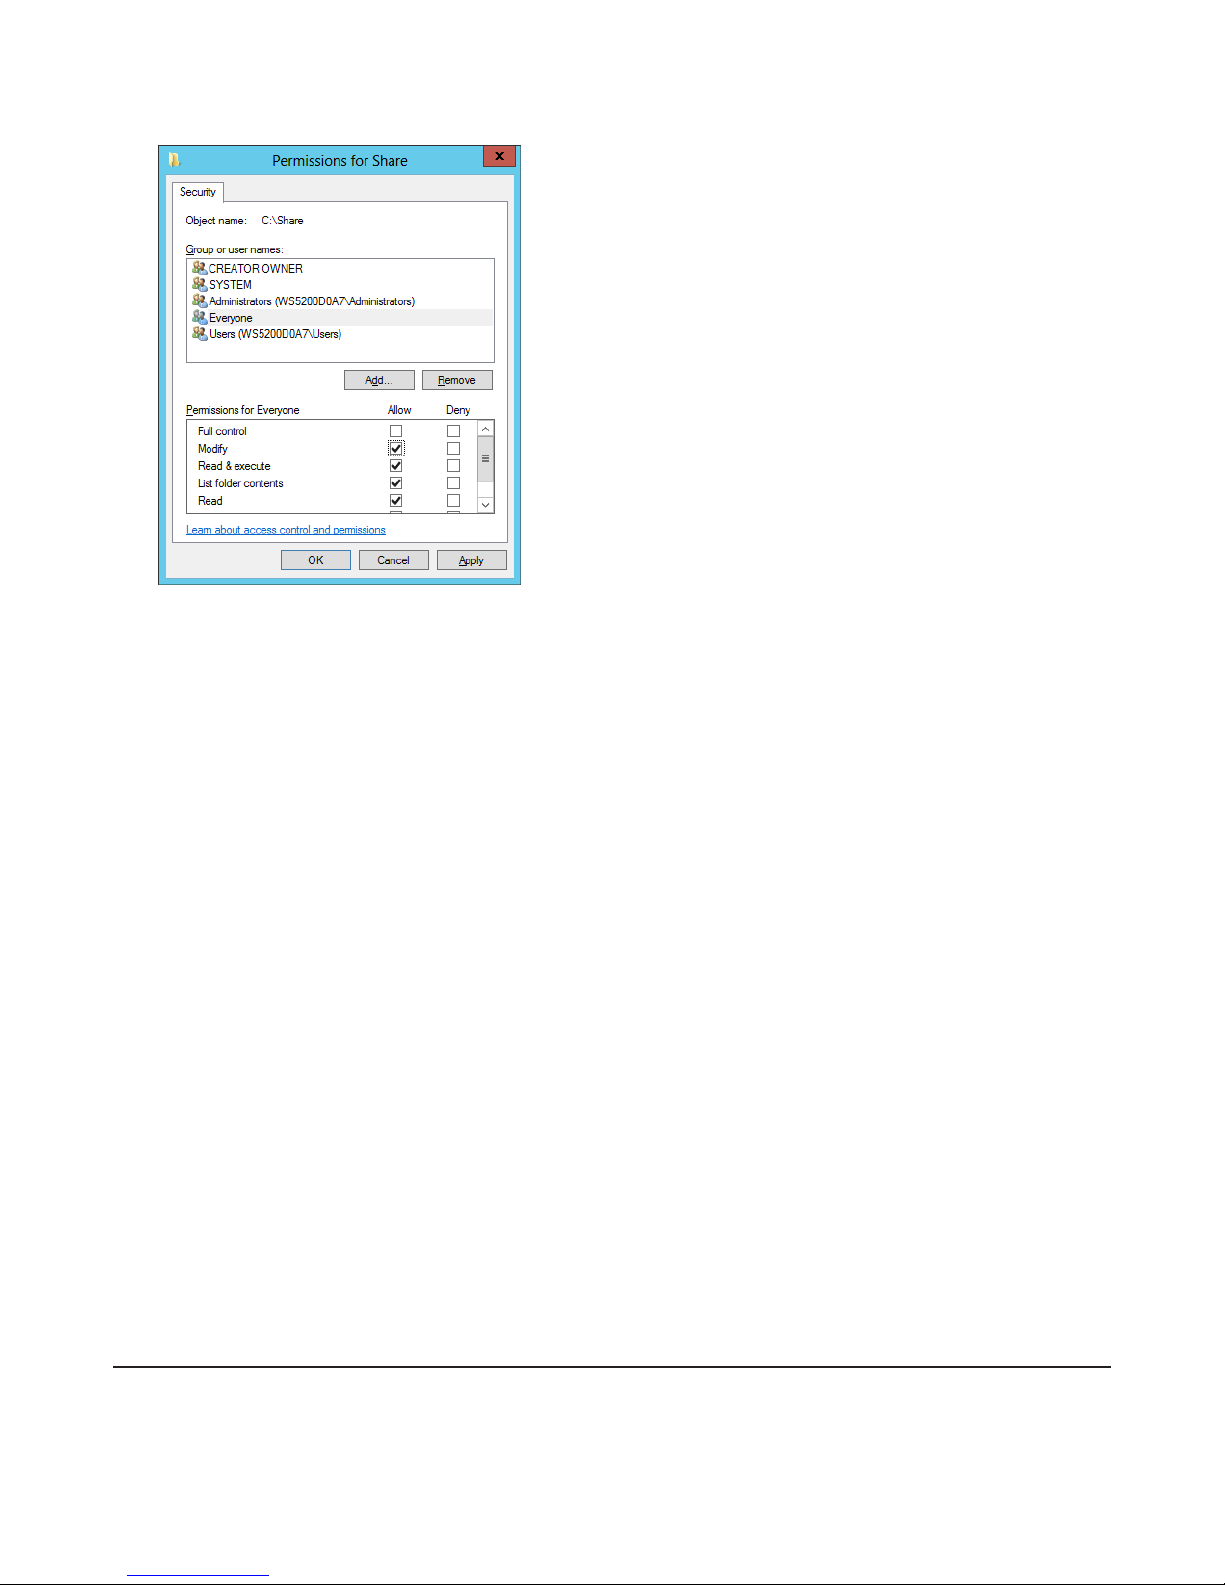
11 Choose "Everyone", then check Allow for Modify.
12 Click OK - OK - Finish - Finish.
13 Click Local Users and Groups in Computer Management.
14 Double-click Users - Guest.
15 In the General tab, uncheck Account is disabled, then click OK.
Notes:
Enable a guest account:
(1) From the Windows Storage Server Start menu, open Administrative Tools, then double-click Computer Manage-
ment.
(2) Click Local Users and Groups.
(3) Double-click Users - Guest.
(4) In the General tab, uncheck Account is disabled, then click OK.
Enable access permissions:
(1) From the Windows Storage Server Start menu, open Administrative Tools, then double-click Computer Manage-
ment.
(2) Click Shared Folders.
(3) Double-click Shared, then the shared folder.
(4) In the Security tab, click Edit.
(5) From the Local Users and Groups list, add the users or groups that will be allowed access (the groups and us-
ers must be created beforehand). To allow access by all users, add a guest and change "Administrators Access
permission" to "Full Control".
Email Notification
Your TeraStation can send you email reports daily, or when settings are changed or an error occurs. Notification emails
may be triggered by any of the following events:
• Hard drive status at scheduled time
73
Page 75
• Hard drive read error
• TeraStation booted
• Fan error
• Temperature exceeded
• Specified event ID logged
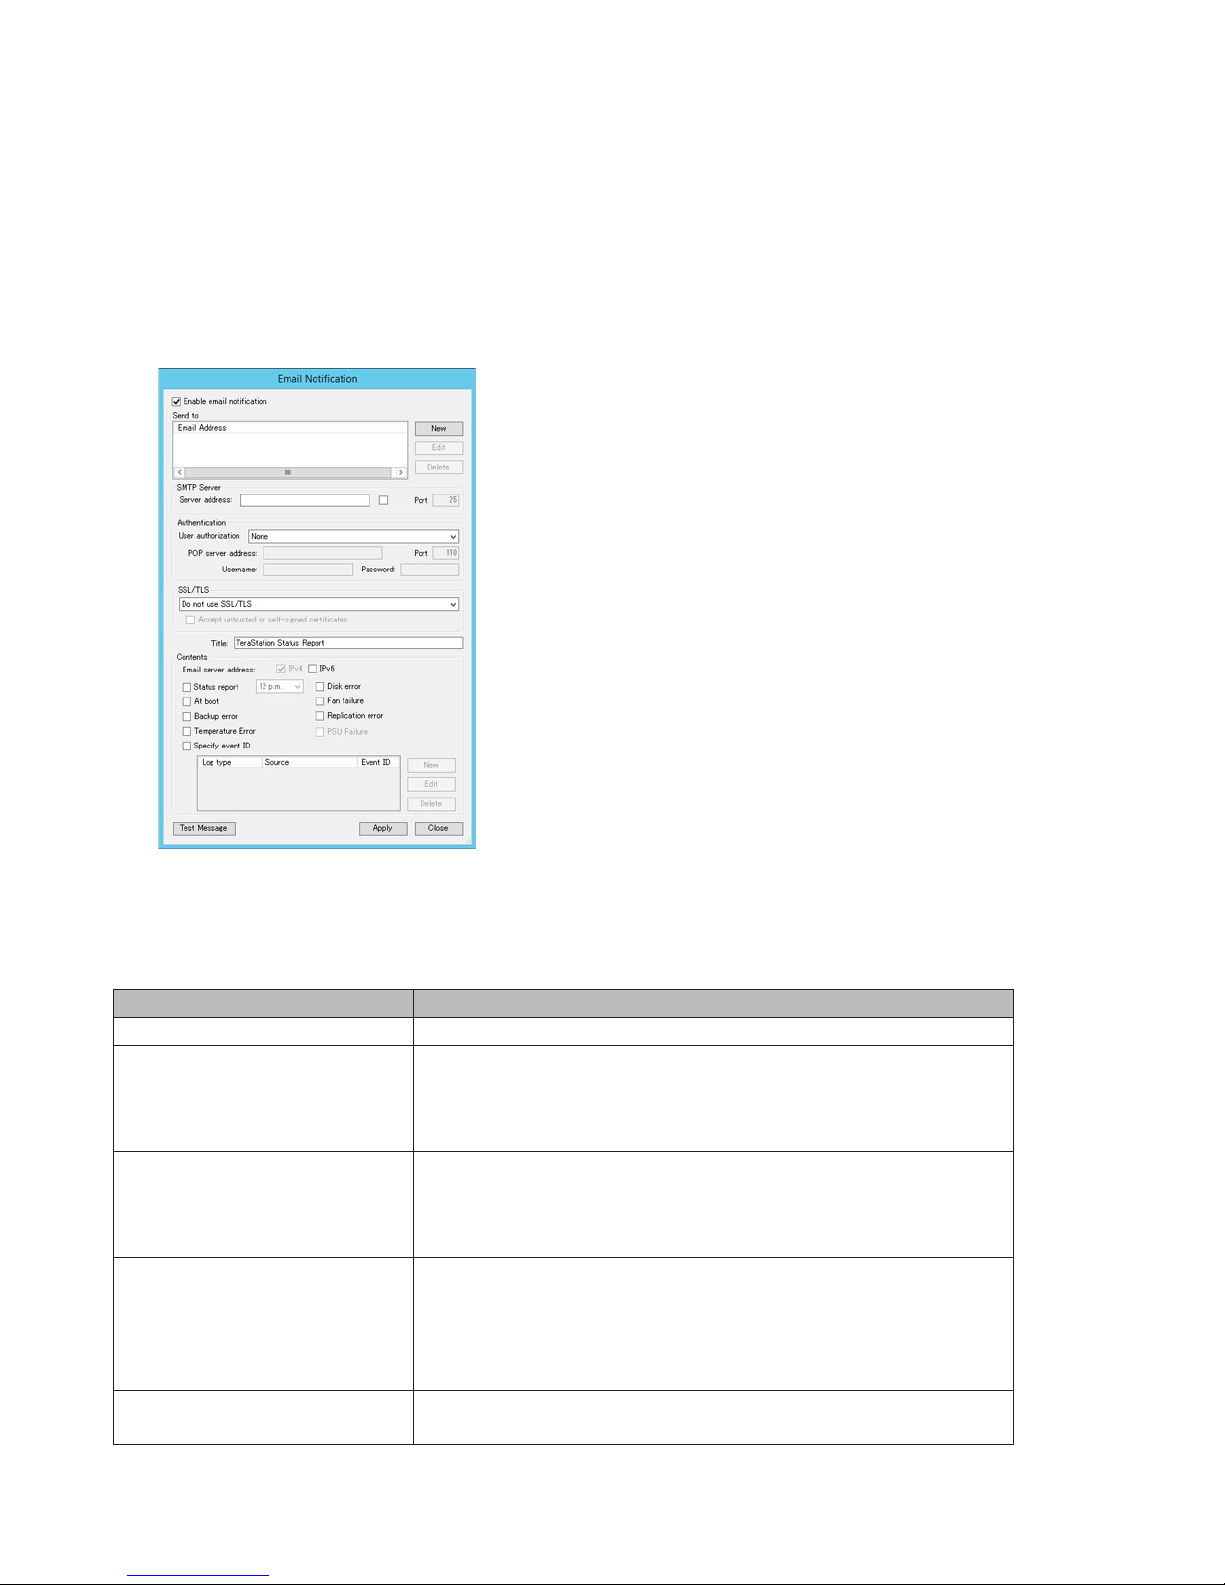
1 From the Windows Storage Server Start menu, click Email Notification.
2 Check "Enable email notification".
3 Click New and enter an email address. You may enter up to five email addresses to receive notifications.
4 Enter your mail server settings and choose what events will trigger notification. Click Apply to finish the email
notification settings. You can send a test email when clicking Test Message.
Items Descriptions
Enable email notification If enabled, email reports will be sent during specific events.
Adds a new receiver for the notification email. Click New to add a new
Send to
SMTP Server
Authentication
SSL/TLS
email address. Click Edit to change the receiver settings or Delete to
remove an address from the list.
Note: Up to 5 email address may be added.
Enter your email SMTP server's address and port number. Port
number 25 is configured by default.
Note: If you choose "None" or "POP before SMTP" for the user
authorization, the port number is locked to "25".
Select the user authorization type from "None", "POP before SMTP",
"LOGIN (SMTP-AUTH/LOGIN)", and "CRAMMD5 (SMTP-AUTH/CRAMMD5)". If "POP before SMTP" is selected, enter the POP server address,
port number, username, and password. Unless specified otherwise,
the standard port number (110) is used.
If "LOGIN (SMTP-AUTH/LOGIN)" or "CRAMMD5 (SMTP-AUTH/CRAMMD5)" is selected, select whether to use SSL or TLS.
74
Page 76
Items Descriptions
Title Enter the subject of the notification email.
Email server address: Check "IPv6" to add IPv6 compatibility to the
email notifications.
Select the event that will trigger the notification emails to be sent.
Status report: Sends regular notification emails at the specified time.
Disk error: Sends an email when a hard drive error occurs.
Contents
Test Message Sends a test email to the email address which is configured.
At boot: Sends an email when the system is booted or restarted.
Fan failure: Sends an email when a fan error occurs.
Temperature error: Sends an email when the TeraStation temperature
exceeds normal levels.
Specify event ID: Sends an email when the specified event IDs are
logged. Enter an event ID to trigger email notifications.
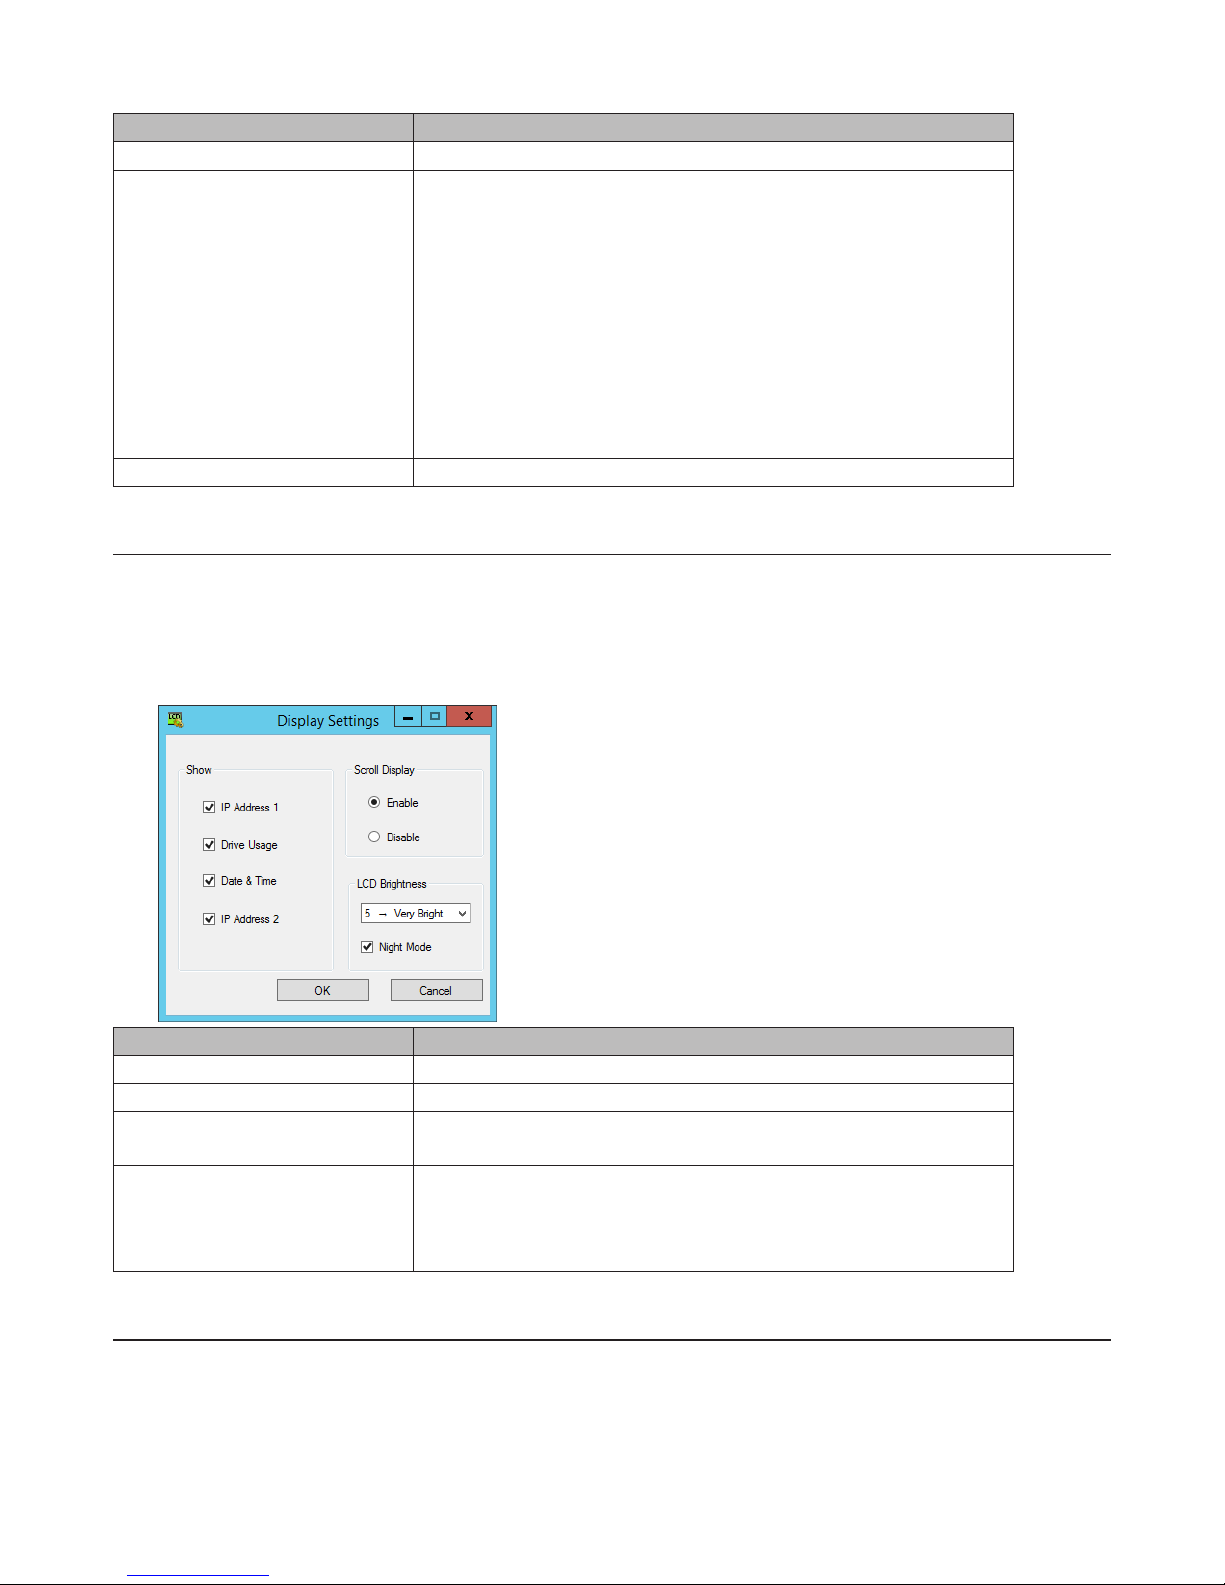
LCD Display Settings
You may configure the LCD on the front of the TeraStation.
1 From the Windows Storage Server Start menu, click Display Settings.
2 Configure the desired settings and click OK.
Items Descriptions
Show Select the item(s) to be displayed on the LCD display.
Scroll Display If enabled, the LCD scrolls through display items at a regular interval.
LCD Brightness
Night Mode
Changing the IP Address
Note: If the TeraStation is being used in a domain environment, the IP address cannot be changed by NAS
Navigator2. To change the IP address, the domain environment administrator must change it at the domain server.
1 Right-click on your TeraStation's icon and click Properties.
Change the brightness of the LCD display from level 1 (darkest) to 5
(brightest).
If checked, the LCD brightness will be set at level 2 (dark) from 6 pm
to 8:59 am the next day.
Note: If the LCD brightness is already set to level 1 (darkest) or level 2
(dark), night mode will be grayed out and cannot be selected.
75
Page 77
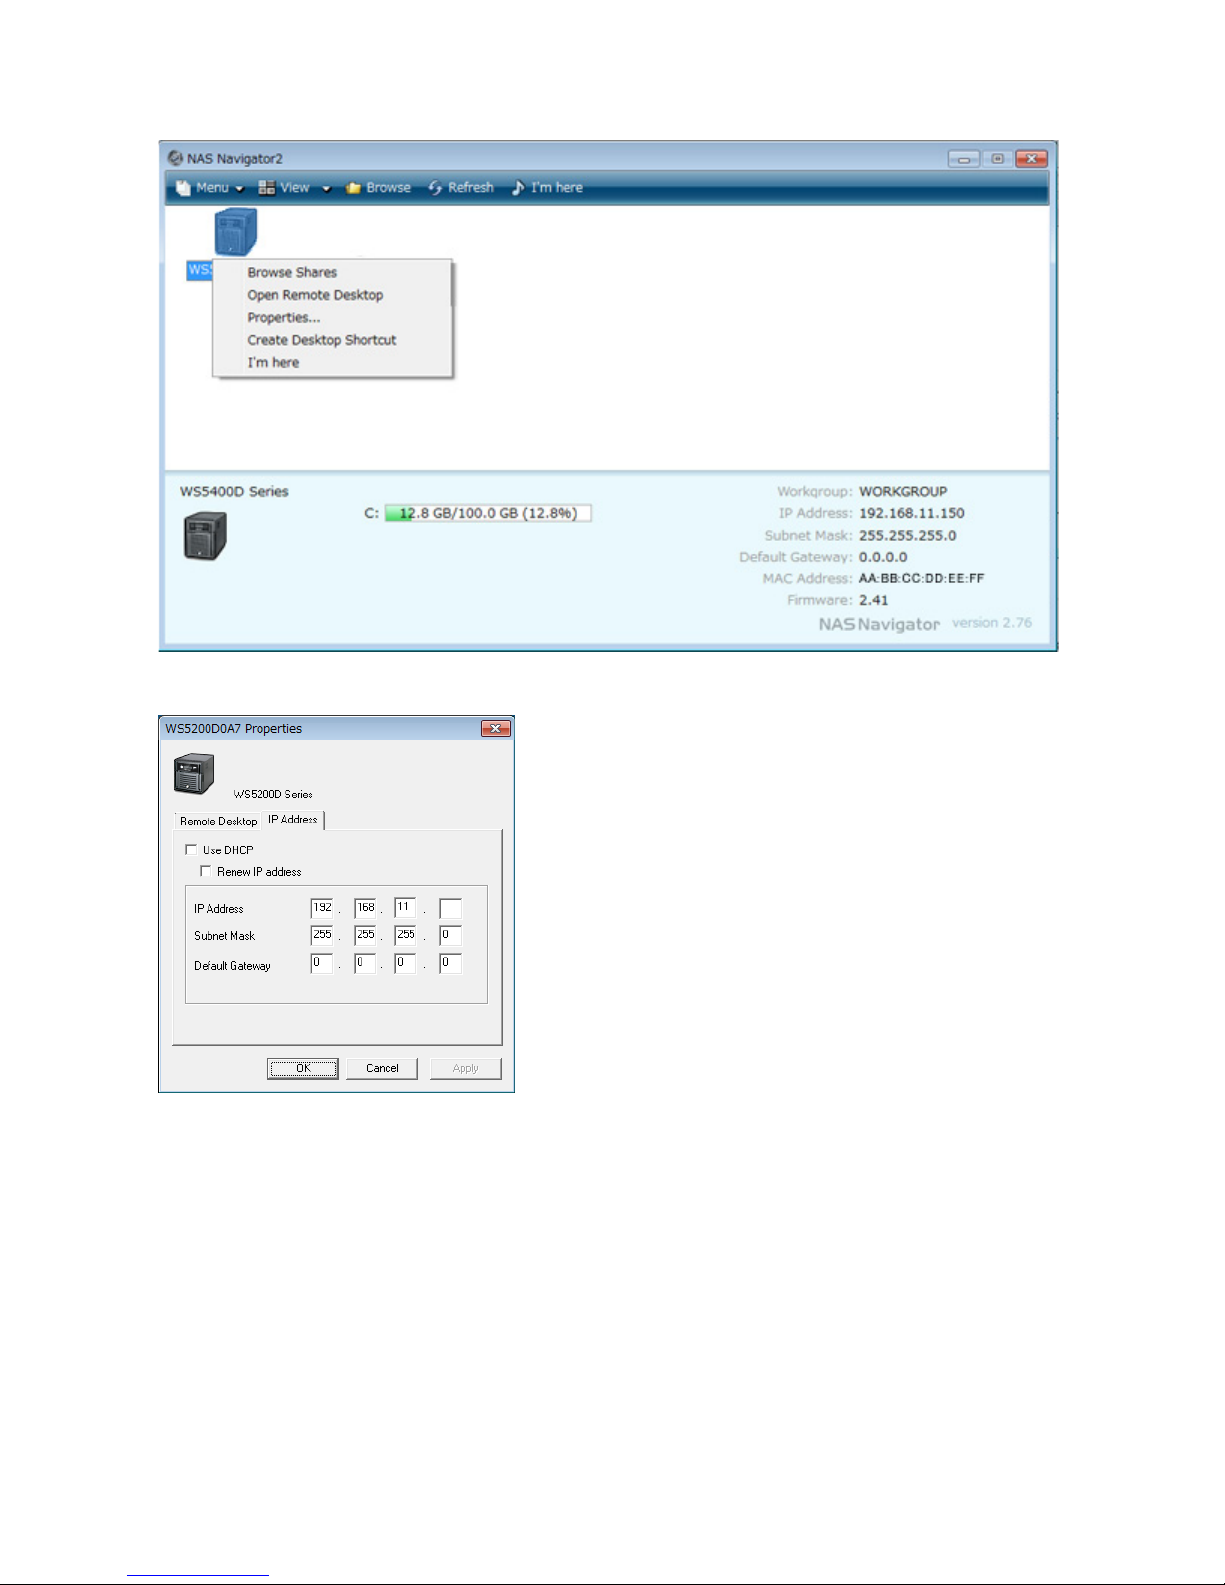
For Mac OS, click the TeraStation icon while holding down the control key, then click Configure.
2 Click the IP Address tab, enter the desired settings, and click OK.
Notes:
• If you don't know how to configure these settings, check "Use DHCP".
• If you are prompted to enter the administrator's password, enter the TeraStation's password (it is set to
"password" by factory default).
76
Page 78
Chapter 8 NAS Navigator2
NAS Navigator2 for Windows
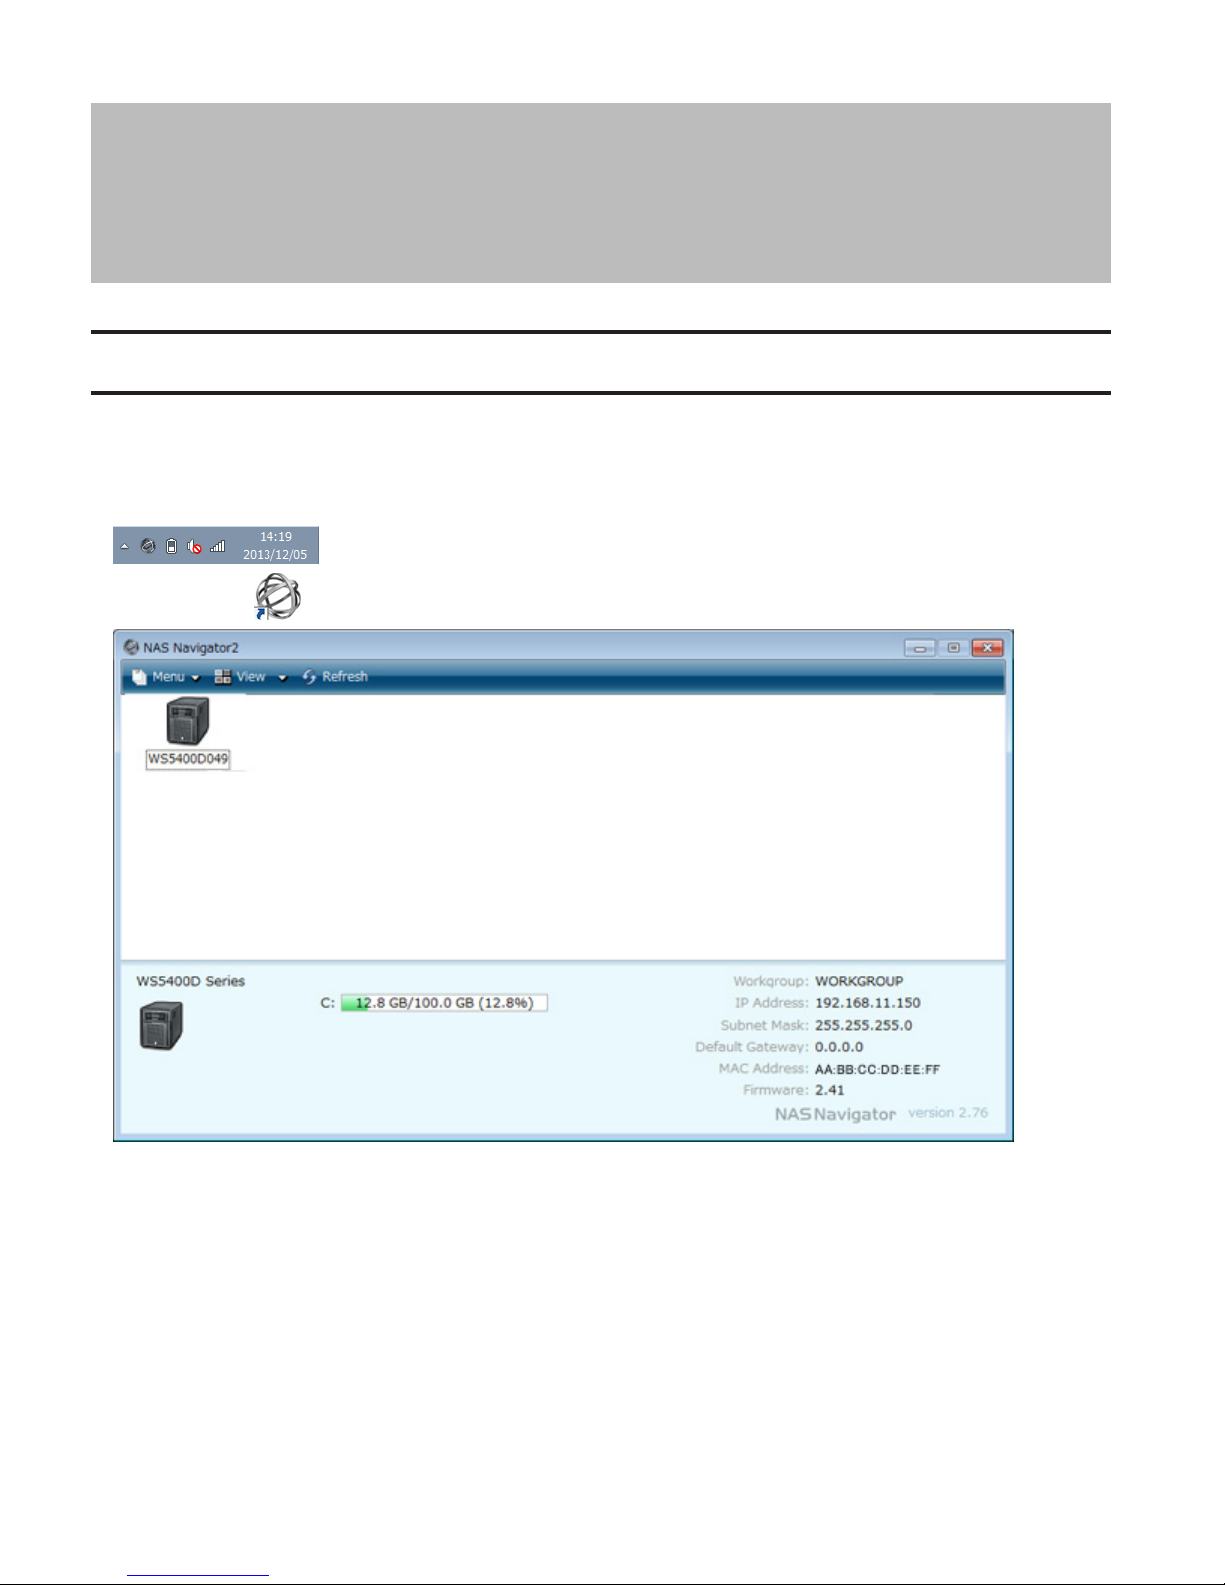
NAS Navigator2 is a utility program that makes it easy to display Windows Storage Server, change the TeraStation's
IP address, or check its hard drive in remote desktop. If you installed the TeraStation with the TeraNavigator, NAS
Navigator2 was installed automatically.
NAS Navigator2 will run in the system tray when the computer is on.
Double-click the icon to start NAS Navigator2.
Click your TeraStation's icon to open a share on the TeraStation and display:
• Total capacity
• Capacity in use
• IP address
• Workgroup
• Subnet mask
• Default gateway
• MAC address
• Firmware version
77
Page 79
Name Description
*
*
Not available for this product (grayed out).
Not available for this product (grayed out).
Assigns all the TeraStation's shared folders as network
drives. This is available only when a shared folder has
been created.
*
Creates a shortcut icon to the TeraStation's shared folder
"share" on the desktop.
Launches NAS Navigator2 in the system tray when
Windows boots.
If an error occurs, an error message will pop up from the
NAS Navigator2 icon in the system tray.
*
Opens the selected TeraStation's properties page.
Menu
Map Share
Disconnect Share
Map All Remote Shares to Drive
Letters
Create Desktop Shortcut
Launch NAS Navigator2 on
Startup
Display Errors
Properties
Close Closes NAS Navigator2.
Icons: Displays icons.
View
Details: Displays hostname, product name, workgroup, IP
address, subnet mask, and default gateway.
View
Sort by
Select the sort order from following to display when
multiple NAS are found:
Hostname, product name, workgroup, IP address, subnet
mask, and default gateway.
Browse
*
Opens the TeraStation's shared folder.
Refresh Searches for NAS devices on the network again.
I'm here
*
Causes your TeraStation to beep.
Browse Shares Opens the TeraStation's shared folder.
Right-click your
device's icon to
show these options.
Open Remote Desktop Opens Windows Storage Server in remote desktop.
Properties Opens the TeraStation's properties page.
Create Desktop Shortcut
Creates a shortcut icon to the TeraStation's shared folder
"share" on the desktop.
I'm here Causes your TeraStation to beep.
*Click on the TeraStation's icon to display these options.
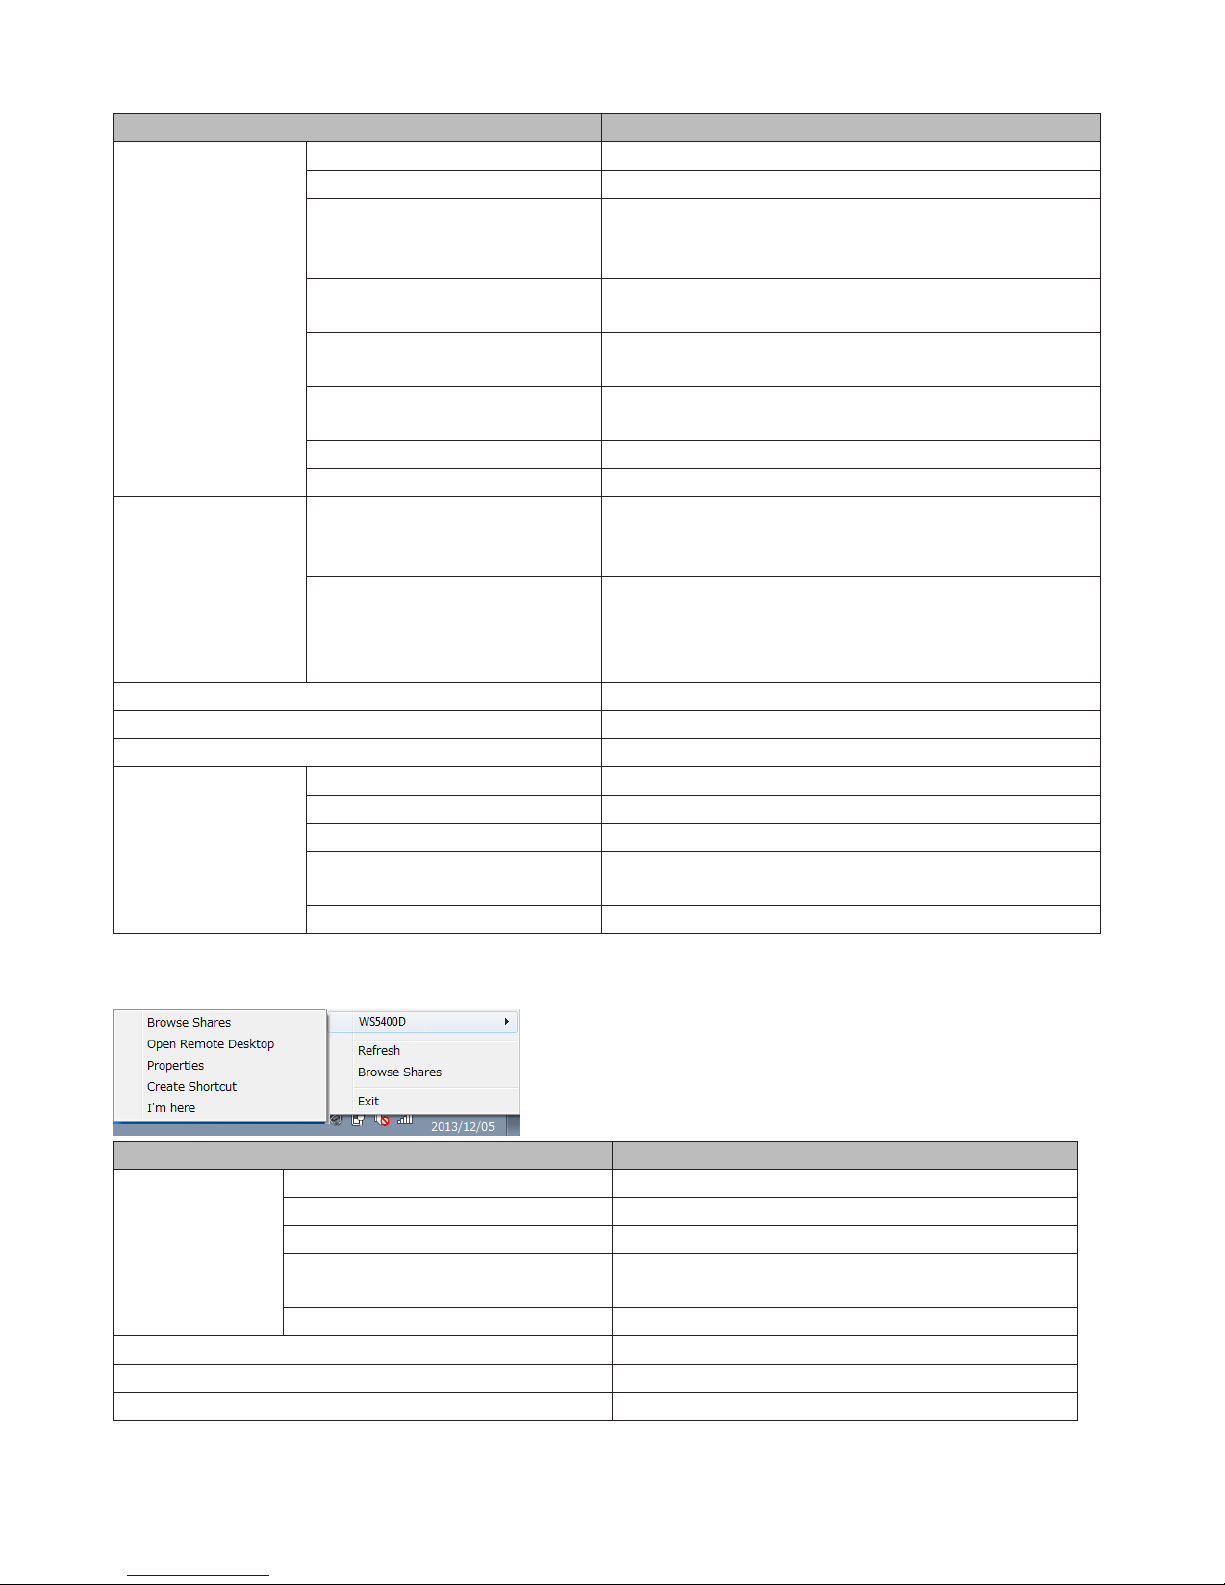
When NAS Navigator2 is minimized, right-click on the NAS Navigator2 icon in the system tray for the following options.
Name Description
Browse Shares Opens the TeraStation's shared folder.
Open Remote Desktop Opens Windows Storage Server in remote desktop.
TeraStation Name
Properties Opens the TeraStation's properties page.
Create Desktop Shortcut
Creates a shortcut icon to the TeraStation's shared
folder "share" on the desktop.
I'm here Causes your TeraStation to beep.
Refresh Refreshes list of NAS devices.
Browse Shares Displays NAS Navigator2 window.
Exit Exits NAS Navigator2.
78
Page 80
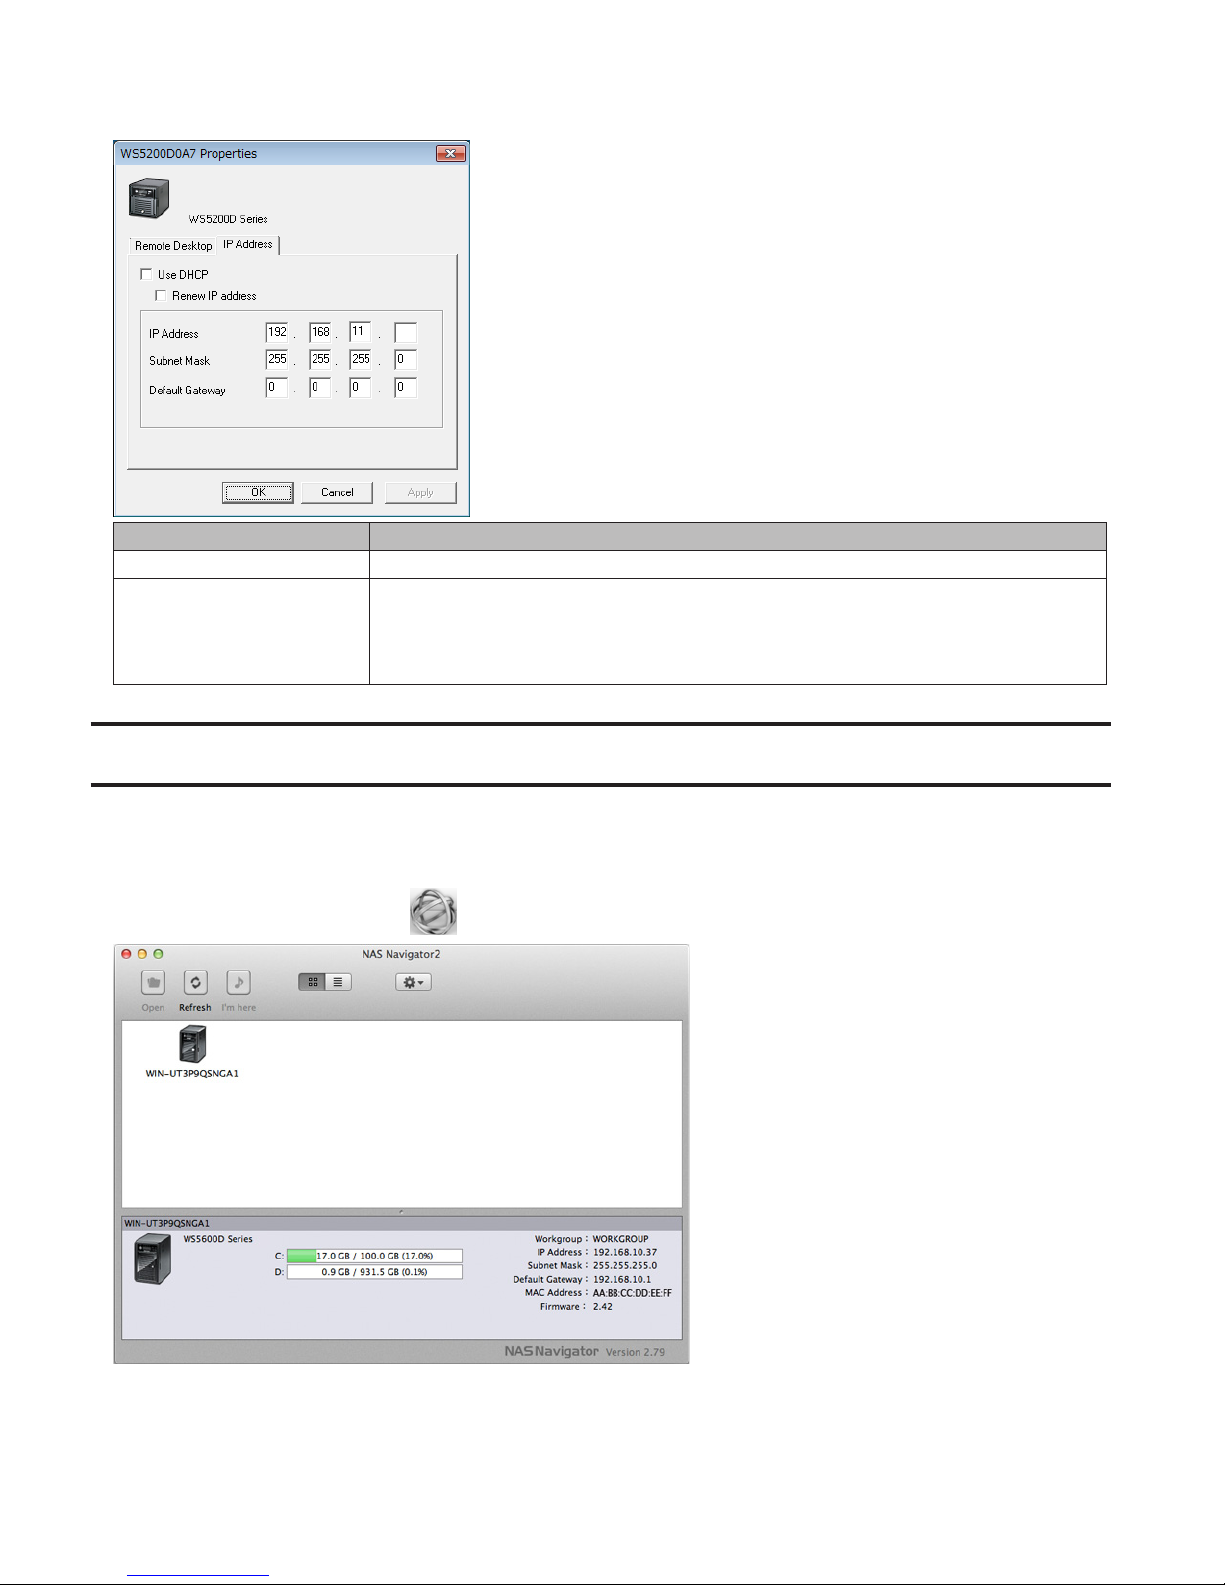
The following tasks may be performed from the TeraStation's properties page.
Name Description
Remote Desktop Click Open Remote Desktop to open Windows Storage Server.
Check Use DHCP to assign an IP address automatically. If there is no DHCP server in the
IP Address
network, you cannot use this function.
Check Renew IP address to obtain an IP address from DHCP server.
You can manually enter an IP address, subnet mask, and default gateway.
NAS Navigator2 for Mac
NAS Navigator2 is a utility program that makes it easy to display Windows Storage Server, change the TeraStation's
IP address, or check its hard drive in remote desktop. If you installed the TeraStation with the TeraNavigator, NAS
Navigator2 was installed automatically.
To launch NAS Navigator2, click the icon in the Dock.
Click on a TeraStation's icon to display:
• Total capacity
• Used capacity
79
Page 81
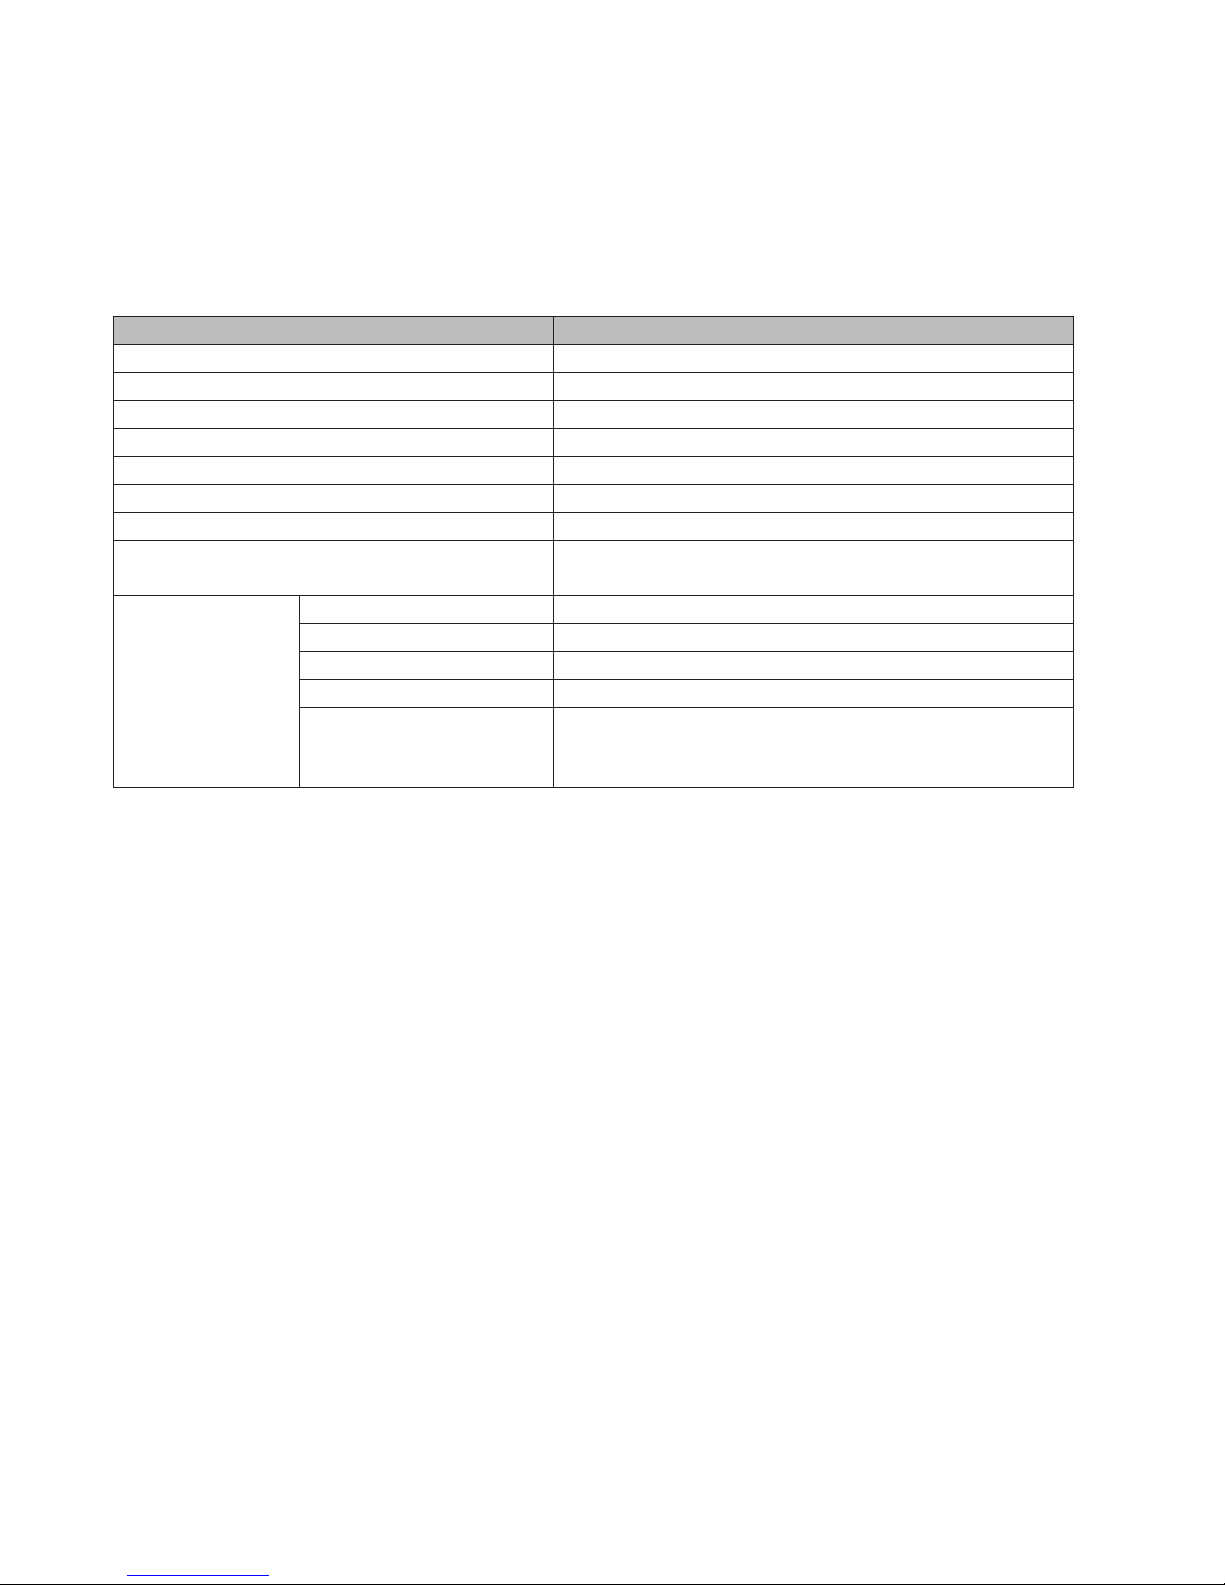
• Workgroup
• IP address
• Subnet mask
• Default gateway
• MAC address
• Firmware version
Double-click it to open a share on the TeraStation.
Name Description
Open Opens the default shared folder for a selected TeraStation.
Refresh Searches for NAS devices on the network again.
I'm here Causes your TeraStation to beep.
Open Remote Desktop Opens Windows Storage Server in remote desktop.
Configure Opens the TeraStation's properties page.
Label Color Selects the color of the name displayed below the icon.
View Options Lets you choose icon size, position, and view mode.
Auto Power Mode
Auto power mode can turn supported TeraStations and
LinkStations on the network on and off automatically.
Open Folder Opens the TeraStation's shared folder.
To display these
options, hold down
the control key
and select your
TeraStation's icon.
Open Remote Desktop Opens Windows Storage Server in remote desktop.
Configure Opens the TeraStation's properties page.
I'm here Causes your TeraStation to beep.
Selects the color of the name displayed below the icon. The
Label Color
menu below is displayed when you click the TeraStation
icon while holding down the control key.
80
Page 82
Chapter 9 Appendix
LCD Display
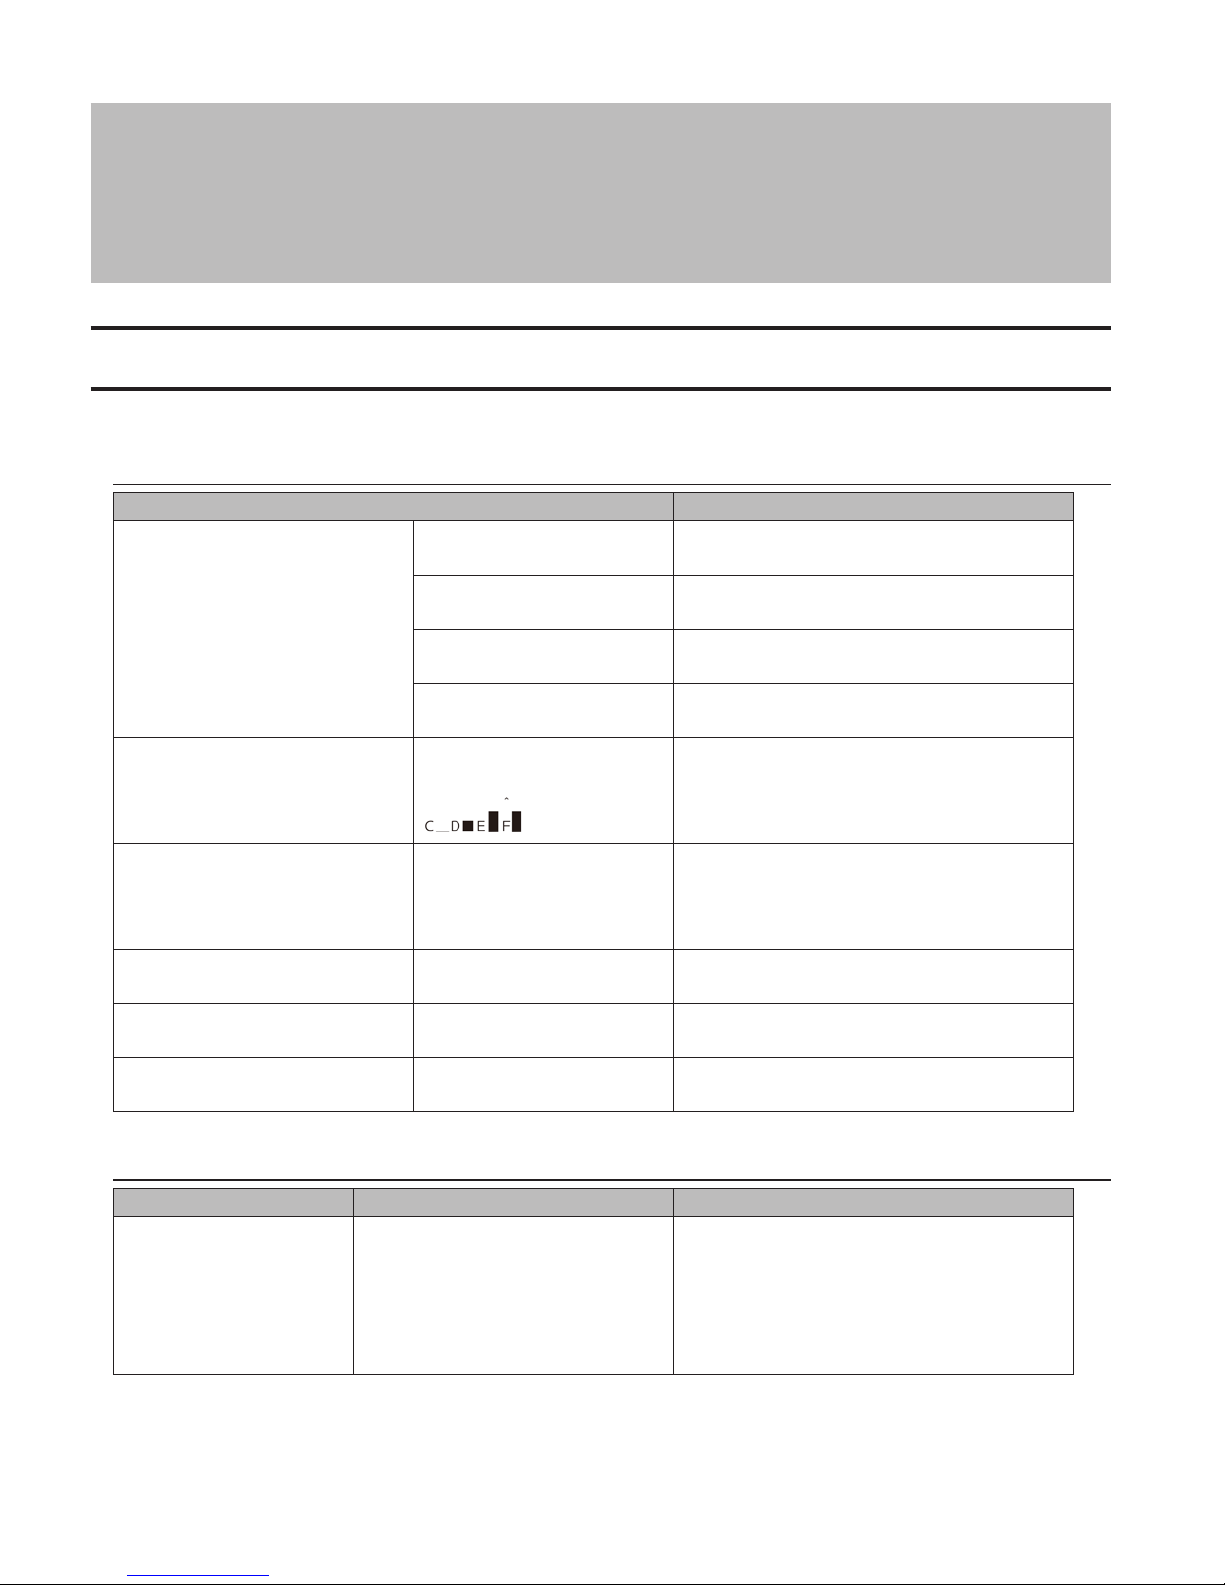
The LCD display can be cycled through different modes by pressing the display button on the front of the TeraStation.
Modes
LCD Message Description
Link Speed
Note: When an Ethernet cable is
connected to LAN Port 2, "LINK
SPEED 2" is displayed.
Disk Space Used
Hostname/IP Address
Calendar/Clock
Installed OS
IP Address 2
LINK SPEED
No LINK
LINK SPEED
10Mbps
LINK SPEED
100Mbps
LINK SPEED
1000Mbps
HDD
USED
WS5000xxx
192.168.11.150
DATE TIME
2012/1/1 11:11
Windows Storage Server
2012
NETWORK2
192.168.11.151
Not connected to network.
Connected at 10 Mbps.
Connected at 100 Mbps.
Connected at 1000 Mbps full duplex.
Bar graphs are shown to indicate the used
space for the C, D, E, and F internal drives of
the TeraStation. When a hard drive is full, it is
indicated by "^".
Displays the hostname and IP address.
Note: If the hostname contains multibyte
characters, they will be replaced with
question marks (?) on the LCD display.
Displays the date and time set in the
TeraStation.
Displays the OS installed on the TeraStation.
Displays the IP address of LAN port 2 when
an Ethernet cable is connected to LAN port 2.
Errors and Status
LCD Message Description Corrective Action
SYSTEM Error E11
Fan Failure
An error occurred in the fan speed.
Check that no foreign objects or dust are
clogging the fan. If any foreign objects or
dust are found, use a pair of tweezers, air
duster, or other tool to remove them. If the
error is displayed again, contact Buffalo
technical support for assistance.
81
Page 83
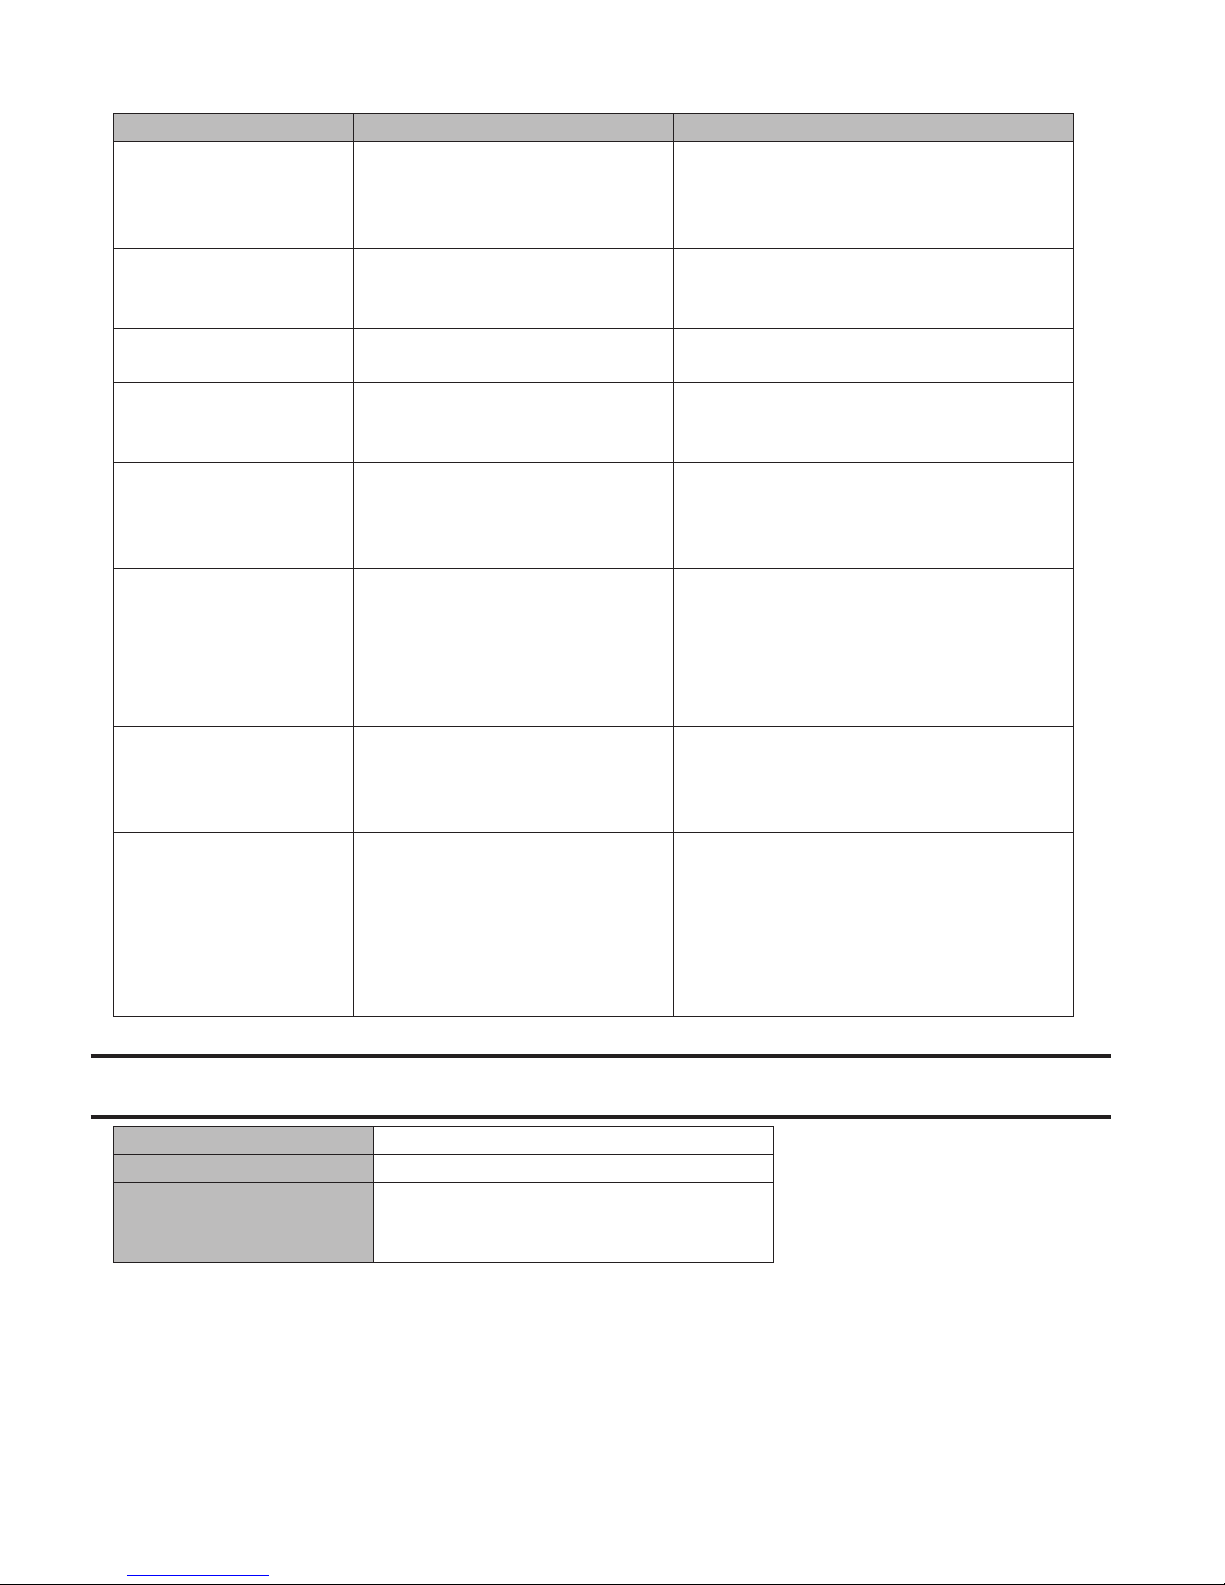
LCD Message Description Corrective Action
Do not place objects in the area around
the TeraStation. Also, move the TeraStation
to a cool location. Make sure that the
TeraStation's fan is working normally.
Hard drive X may be disconnected or may
have failed. After shutting down, reinstall the
hard drive.
Replace hard drive X.
Move the TeraStation to a cool location. Do
not place objects in the area around the
TeraStation.
Check the drive where the error occurred
and replace it with a new hard drive. For
replacing method, refer to the "Hard Drive
Replacement Procedure" section in chapter 5.
Wait until the RAID resynchronization
finishes. It will take about 8–12 hours per
terabyte for a RAID 5 volume and 3–6 hours
per terabyte for a mirrored volume. This
message will disappear when the RAID
resynchronization finishes.
From Buffalo Replication, click Sync to
execute resynchronization. If the error is
displayed again, contact Buffalo technical
support for assistance.
Make sure that the backup job is configured
correctly, and that the NAS is on and not
in standby mode. If the backup job still
fails, check the status of NAS, network, and
backup source and destinations. Also, check
the backup log to see if any errors were
recorded.
SYSTEM Error E12
Cooling Failure
HDx Error E16
HDx Not Found
HDx Broken E30
Replace the DISK
SYSTEM I10
TOO HOT !
Operation I12
DEGRADE MODE
RAID I18
X Drive Rebuilding
Replication I33
Replicate Failure
I54
Backup Failure
A rise in the system temperature
may have exceeded the allowable
safety value.
Unable to find hard drive X.
An error occurred, so hard drive X
was removed from the RAID array.
A rise in the system temperature
may have exceeded the allowable
safety value.
Operating in degraded mode.
Rebuilding drive X in the array.
Note: Transfer speeds are slower
during the rebuilding process.
An error occurred during
replication.
A backup job has failed.
Default Settings
Administrator's Name Administrator
Password password
Drives C and D are configured as
Shared Folders
administrative hidden shares by Windows
Storage Server's default settings.
82
Page 84
DHCP Client
Registered Group
Microsoft Network Group
Setting
RAID Mode
Local Security Policy
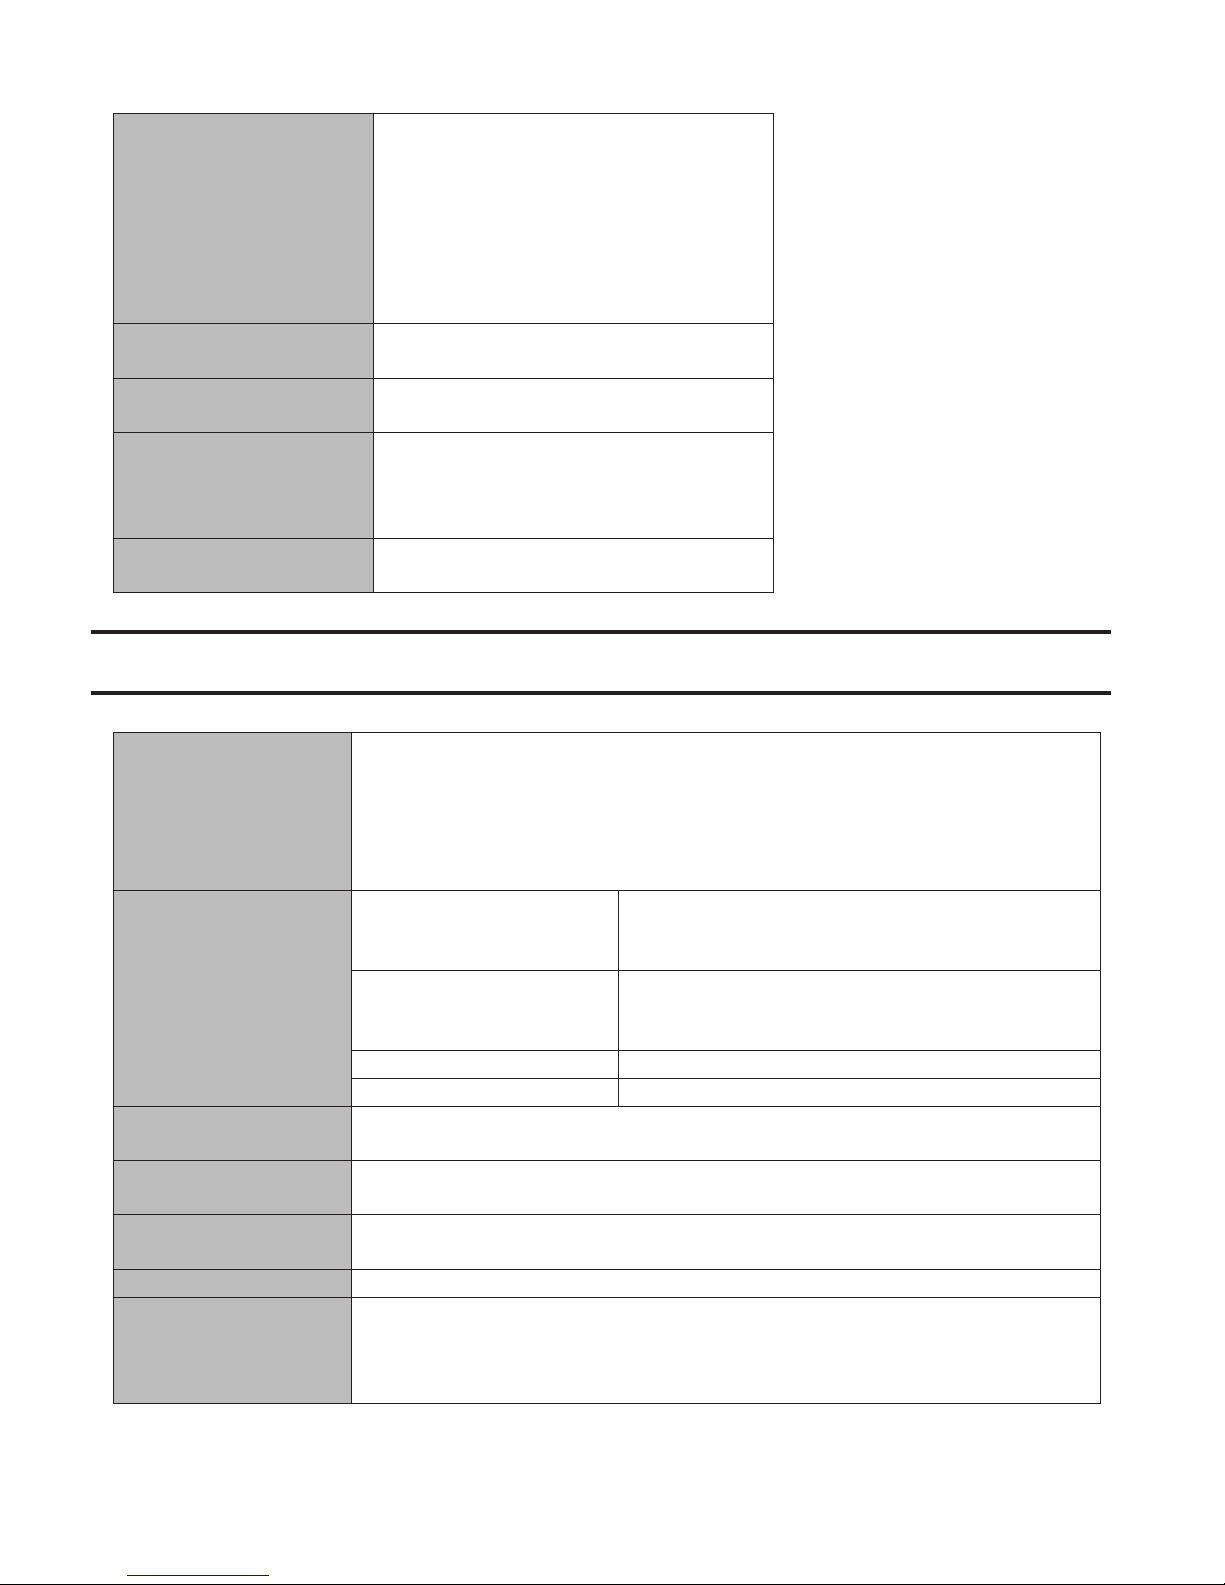
Specifications
Normally, the TeraStation will get its IP
address automatically from a DHCP server on
the network. If no DHCP server is available,
then an IP address will be assigned as
follows:
IP Address: 169.254.xxx.xxx (xxx is assigned
randomly when booting the TeraStation).
Subnet Mask: 255.255.0.0
Windows Storage Server's default groups are
registered.
WORKGROUP
Drive C: A mirrored array using drives 1 and 2
Drive D: A RAID 5 array using all drives
*WS5200D: Drive D is a mirrored array using
drives 1 and 2.
"Password must meet complexity
requirements" is disabled by default.
*
Check the Buffalo website for information about the latest products and specifications.
Workgroup Edition Model:
Microsoft Windows Storage Server 2012 Workgroup Edition
Installed System
LAN Port
USB Port
UPS Port
Internal Hard Drive
Power Supply AC 100–240 V, 50/60 Hz
Dimensions (W x H x D)
Standard Edition Model:
Microsoft Windows Storage Server 2012 Standard Edition
Note: The Microsoft Software License is contained in the ms-license folder in the
supplied USB device. Be sure to read the terms and conditions of this license.
IEEE 802.3ab (1000BASE-T)
Interface
Transfer Speed
Number of Ports 2 ports (supports Auto-MDIX)
Connector Type RJ-45 8-pin
WS5600D, WS5400R: USB 2.0 Port (Series A) x 2, USB 3.0 Port (Series A) x 3
WS5400D, WS5200D: USB 2.0 Port (Series A) x 2, USB 3.0 Port (Series A) x 2
D-sub 9 pin (male) x 1
Compatible UPS are manufactured by Omron or APC.
If a hard drive in the TeraStation malfunctions, replace it with a Buffalo OP-HDS series
drive of the same capacity, available from the Buffalo website.
WS5600D: 170 x 260 x 230 mm; 6.7" x 10.2" x 9.1"
WS5400R: 430 x 44 x 430 mm; 16.9" x 1.7" x 16.9"
WS5400D: 170 x 215 x 230 mm; 6.7" x 8.5" x 9.1"
WS5200D: 170 x 170 x 230 mm; 6.7" x 6.7" x 9.1"
IEEE 802.3u (100BASE-TX)
IEEE 802.3 (10BASE-T)
1000 Mbps full duplex (auto-negotiation)
100 Mbps full duplex/half duplex (auto-negotiation)
10 Mbps full duplex/half duplex (auto-negotiation)
83
Page 85
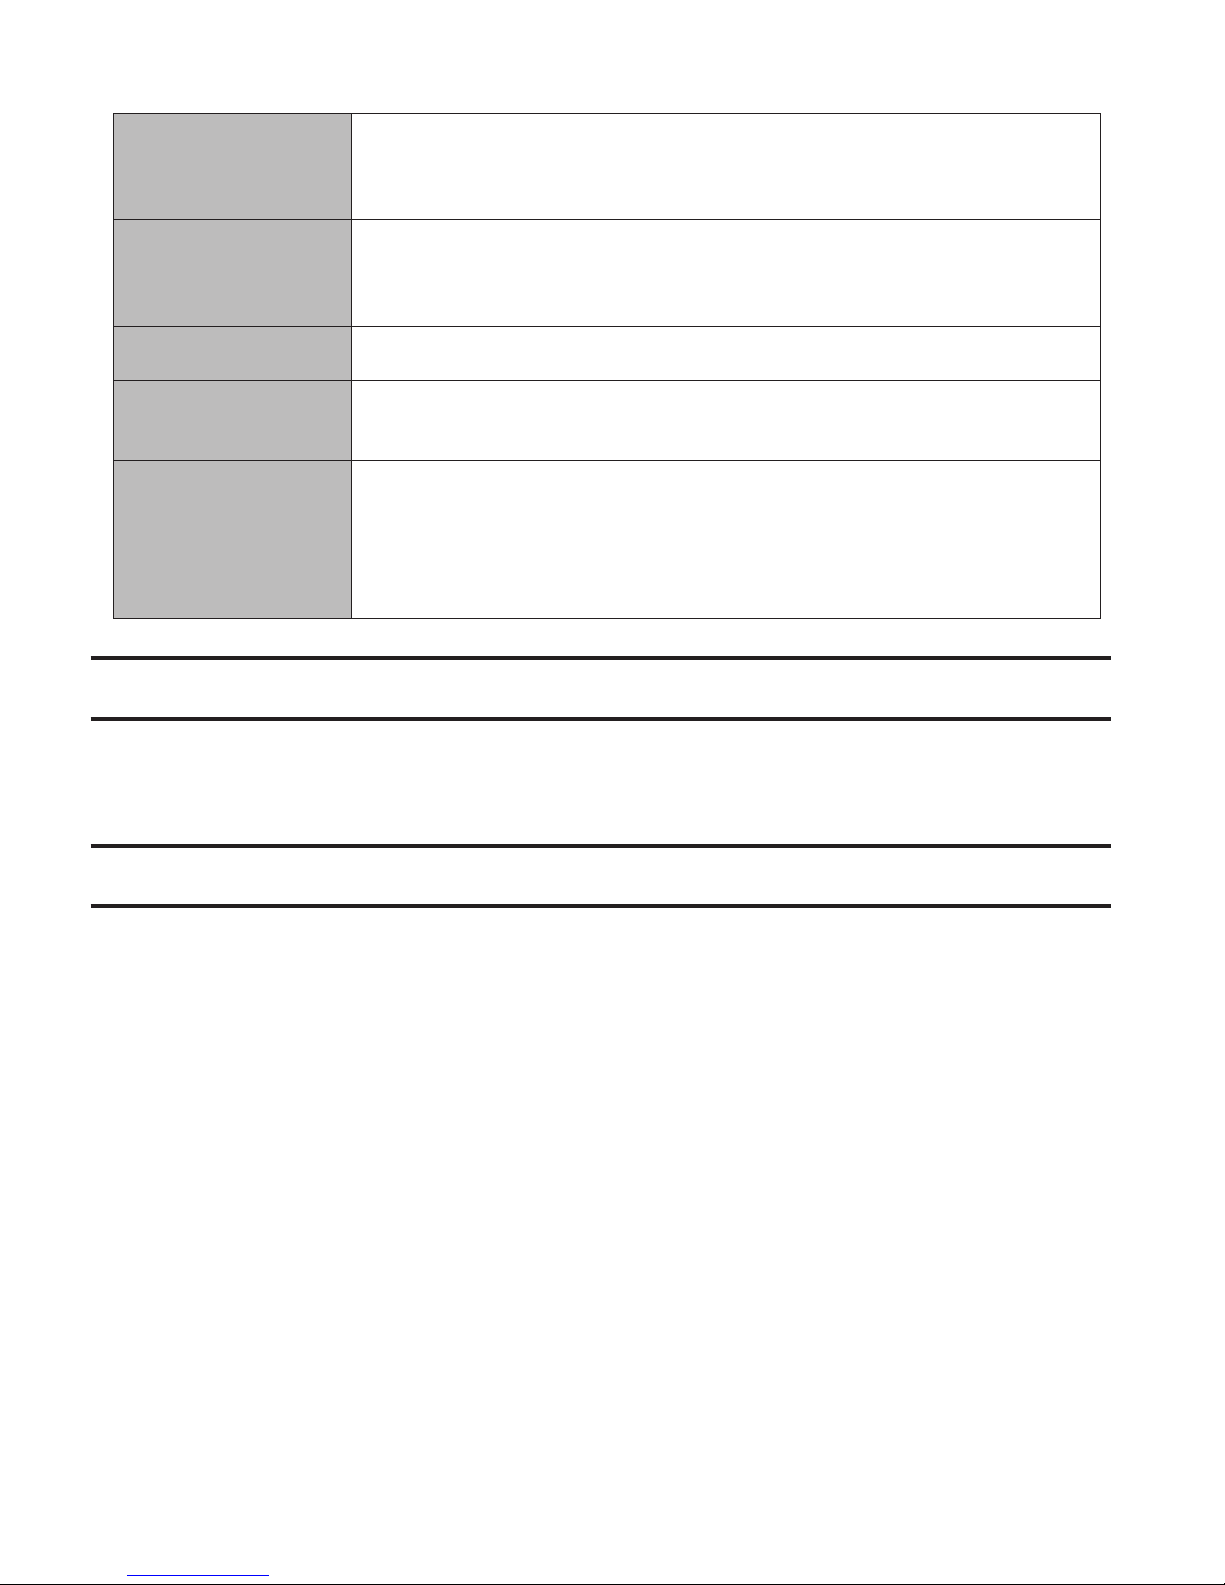
Weight
Power Consumption
(Max.)
Operating Environment
Compatibility
Supported OS
Data Backup
WS5600D: 10.0 kg; 22.1 lb
WS5400R: 9.0 kg; 19.8 lb
WS5400D: 7.5 kg; 16.5 lb
WS5200D: 4.0 kg; 8.8 lb.
WS5600D: 120 W
WS5400R: 100 W
WS5400D: 86 W
WS5200D: 47 W
Temperature: 5–35°C; 41–95°F
Environment Humidity: 20–80% (no condensation)
Windows PCs, Macs, and tablets with wired or wireless Ethernet connection.
Note: The TeraStation requires a network connection with your computer for operation.
The TeraStation cannot connect via USB.
Windows 8.1*, Windows 8*, Windows 7*, Windows Vista*, Windows XP, Windows XP
Media Center Edition (2004 or 2005), Windows 2000, Windows Server 2012, Windows
Server 2008 R2, Windows Server 2008, Windows Server 2003 R2, Windows Server 2003,
Windows 2000 Server, Windows RT 8.1, Windows RT
OS X 10.8, 10.7, 10.6, 10.5, 10.4, 10.3.9
*32-bit and 64-bit
While using the TeraStation, you may lose your important data due to sudden accidents, hard disk failure, or accidental
misoperation. Back up your data regularly! For best results, back up your data to Buffalo drives like the TeraStation,
LinkStation, or DriveStation series.
Troubleshooting
If you can't access your TeraStation:
Typical problems and when you are unable to search using NAS Navigator2 and when the Remote Desktop screen does
not open are described below.
Cause 1. The cables are not connected correctly:
The cables are not physically connected, or there may be a contact defect. Reconnect the AC cable and Ethernet cable
and restart both the computer and TeraStation.
Cause 2. Security software in the background is blocking communication:
Add an exception to your firewall software, or disable the firewall software completely. Turn off any software security
suite that might include a firewall. Try searching again.
Cause 3. Wireless and wired adapters are both enabled:
Disable all adapters except for the LAN adapter connected to the TeraStation.
Cause 4. The LAN cable is defective, or the connection is unstable:
Try changing the hub port or Ethernet cable that you use to connect.
Cause 5. The LAN board, card, or adapter that you are using is defective:
Try changing the LAN board, card, or adapter.
Cause 6. The LAN board or hub transmission mode has not been set:
84
Page 86
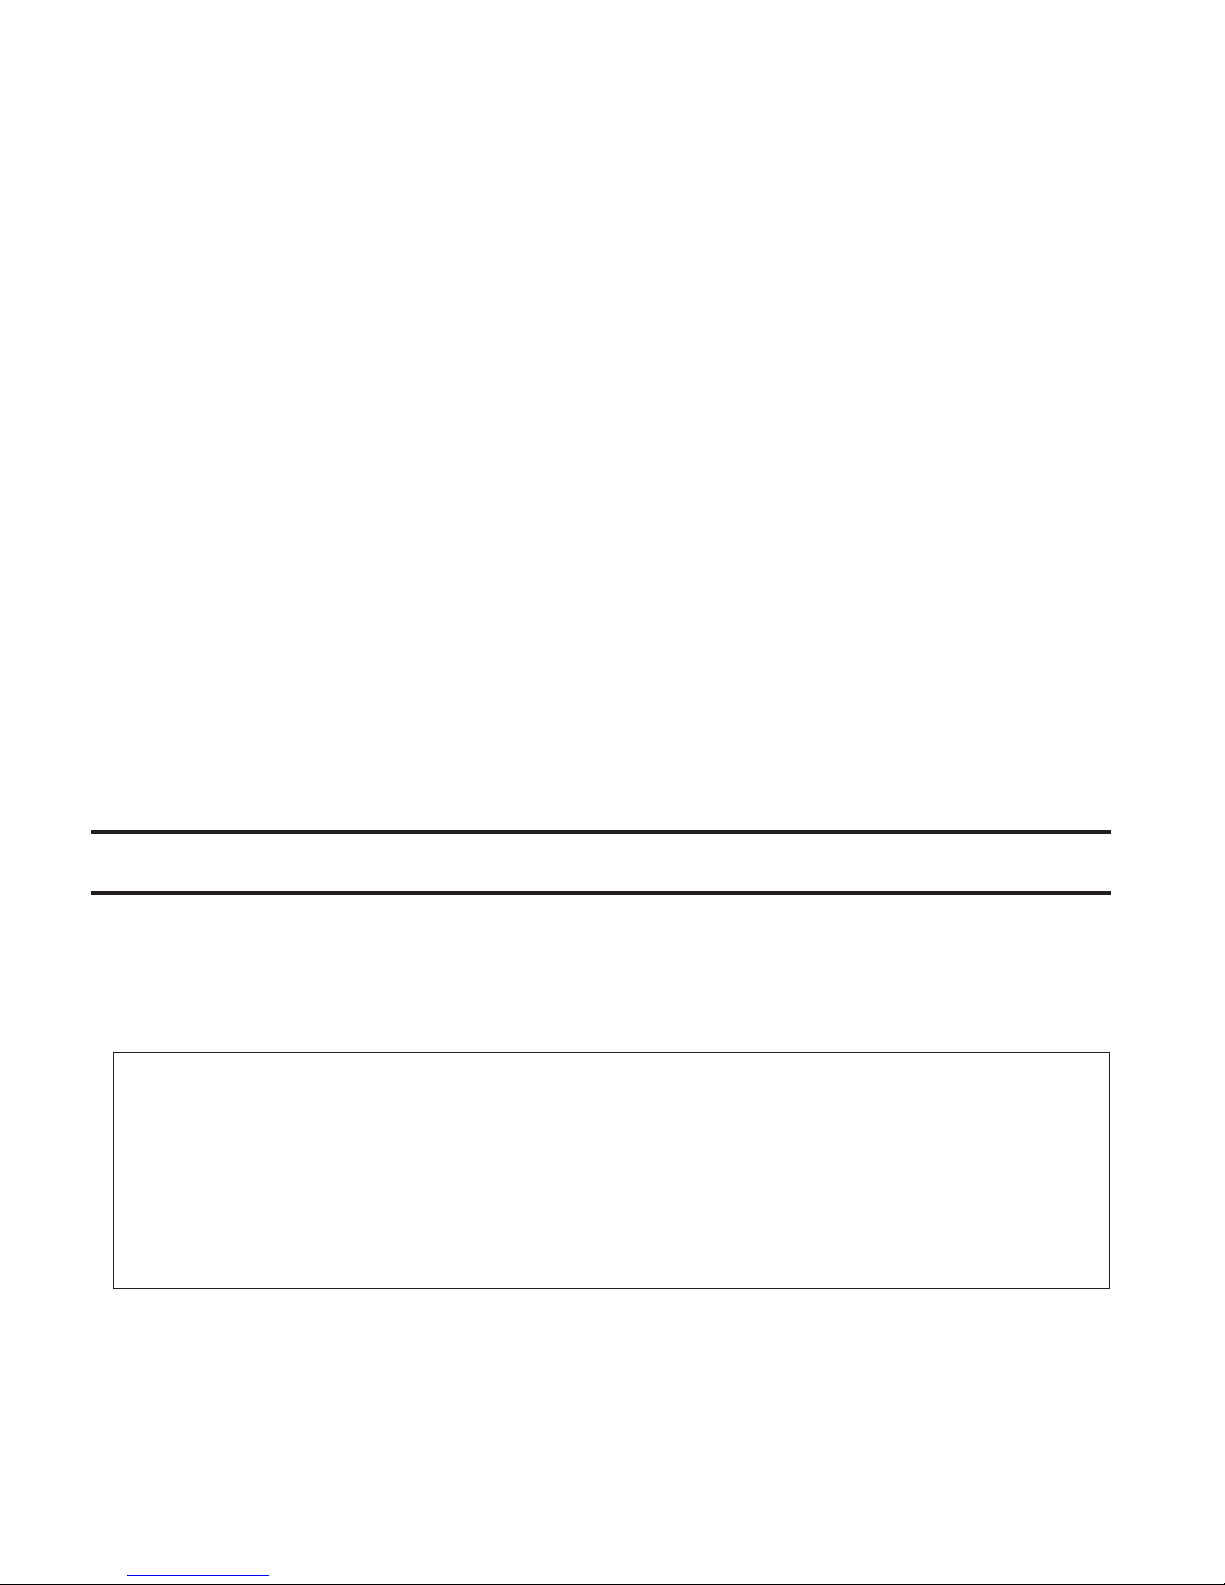
Change the transmission mode in the LAN board or hub to "10M semi-duplex" or "100M semi-duplex". Some LAN boards
or hubs may be unable to connect to the network correctly when the transmission mode is set to "Auto Negotiation".
Cause 7. A network bridge is installed:
If the network has a network bridge that is not being used, remove it.
Cause 8. You are searching from a different network:
You cannot conduct searches beyond your local network subnet. Connect the TeraStation to the same network subnet
as the computer performing the search.
Cause 9. TCP/IP is not operating correctly:
Reinstall the LAN adapter drivers.
Cause 10. "Remote Desktop Connection Client for Mac" is not installed on your Mac:
If using OS X 10.4 or later, download and install "Remote Desktop Connection Client for Mac 2" from http://www.
microsoft.com. If using OS X 10.3.9, use version 1.0.3 instead.
When TeraStation shared folders suddenly do not open
If the TeraStation shared folder is assigned and used as a network drive, access to the TeraStation may suddenly fail if
network settings such as IP addresses or groups are changed. If this happens, follow the procedure in chapter 2 to open
the TeraStation's shared folder with NAS Navigator2.
If you are unable to access the shared folder or the system is unstable
This usually happens because too many software applications are running in Windows Storage Server, causing
a memory shortage. Exit or uninstall some of the software running in Windows Storage Server, then restart the
TeraStation.
Windows Storage Server Recovery Procedure
If Windows Storage Server no longer functions properly, perform recovery using the supplied USB device.
This recovery procedure erases your data. Backing up regularly is highly recommended to avoid missing your important
data.
Do not connect the supplied USB device to another TeraStation. The recovery process performed by the supplied USB
device is intended for this product only.
Recovery is performed by deleting the area for drive 1, setting up a new 100 GB (Basic Disk/Simple) area, and then
copying the Windows Storage Server image to this area.
Note: If there are system areas (or mirrored locations) on hard drives other than drive 1, be sure to delete the system
areas (or disable the mirrored locations) before performing the recovery procedure. If recovery is performed without
deleting these areas, Windows Storage Server may not run after recovery is performed.
If Windows Storage Server fails to run, turn off the TeraStation and perform the recovery procedure again while all
hard drives except for drive 1 (disk 0) are disconnected. After recovery is complete, reconnect the disconnected
drives, which will appear in "Disk Management" as "Foreign". In "Disk Management", right-click Foreign, select Import
Foreign Disks, then right-click this area and click Reactivate Volume to rebuild the RAID array.
1 Turn off the TeraStation, following the procedure in "Turning the TeraStation On and Off" in chapter 1.
2 Connect the supplied USB device to the USB 2.0 port.
If the label on the supplied recovery USB device shows version 2.4 or later, you could use the USB 3.0 port for
recovery.
85
Page 87

3 Set the boot mode switch to "USB", then press the power button.
This executes the recovery process.
4 The TeraStation shuts down automatically when the recovery process is complete.
5 Remove the USB device, set the boot mode switch to "HDD", and press the power button.
When the initial setup is complete, the TeraStation will reboot into Windows Storage Server.
After the recover process is completed, the TeraStation is set to the state below when used at the default
settings.
• Drive 1
100 MB (EFI System partition)
100 GB (Basic Disk/Simple)
The remaining space is an unallocated area.
• Drives 2 to 4
The data on the drives cannot be viewed. They appear as a "Foreign" in "Disk Management".
Note: The data on the drives can be viewed by right-clicking the area displayed as "Foreign" in "Disk Management"
and then selecting Import Foreign Disks.
(1) Mirror the system area by using RAID Builder (drive 1 to drive 2).
(2) Remove the area for RAID 5 in drive 3 and 4.
(3) Create a RAID 5 volume with drives 1–4 using RAID Builder.
Notes
Using an Omron UPS
The TeraStation's LCD panel will not display information correctly when an Omron UPS is first connected. This is because the LCD panel control and the Omron UPS both use COM port 2. To resolve, refer to the Omron's user manual and
change its UPS communication port to a port other than COM 2, then restart the TeraStation.
Ethernet port number is not correct on the Windows Storage Server
Ethernet port numbers on the Windows Storage Server are assigned in the order of recognizing them. They might be
different from printed port numbers.
86
Page 88

Chapter 10 Regulatory Compliance
Information
For Customers in the United States
FCC Statement
This equipment has been tested and found to comply with the limits for a Class A digital device, pursuant to part 15
of the FCC Rules. These limits are designed to provide reasonable protection against harmful interference when the
equipment is operated in a commercial environment. This equipment generates, uses, and can radiate radio frequency
energy and, if not installed and used in accordance with the instruction manual, may cause harmful interference to radio
communications. Operation of this equipment in a residential area is likely to cause harmful interference in which case
the user will be required to correct the interference at his own expense.
This device complies with Part 15 of the FCC Rules. Operation is subject to the following two conditions: (1) this device
may not cause harmful interference, and (2) this device must accept any interference received, including interference
that may cause undesired operation.
Only use the cables and accessories that are included in the package. Don't use other accessories or cables unless
specifically instructed to in the documentation.
For Customers in Europe
EU Declaration of Conformity
Dansk
Dette er et Klasse A-produkt. I et hjemmemiljø kan dette produkt skabe radiointerferens, hvormed det kan være
nødvendigt for brugeren at tage passende forholdsregler.
Der må kun bruges de kabler og det tilbehør der er inkluderet i pakken. Der må ikke bruges andet tilbehør eller kabler,
medmindre det er udtrykkeligt beskrevet i dokumentationen.
Deutsch
Dies ist ein Produkt der Klasse A. In einer häuslichen Umgebung kann dieses Produkt Funkstörungen verursachen. Um
diese zu beheben, müssen ggf. entsprechende Maßnahmen ergriffen werden.
Verwenden Sie ausschließlich die Kabel und Zubehörteile, die im Lieferumfang enthalten sind. Andere Zubehörteile
oder Kabel dürfen nur dann verwendet werden, wenn dies in der Dokumentation ausdrücklich vorgeschrieben ist.
English
This is a Class A product. In a domestic environment, this product may cause radio interference, in which case the user
may be required to take adequate measures.
87
Page 89

This product may cause interference if used in residential areas. Such use must be avoided unless the user takes
special measures to reduce electromagnetic emissions to prevent interference to the reception of radio and television
broadcasts.
Only use the cables and accessories that are included in the package. Don't use other accessories or cables unless
specifically instructed to in the documentation.
Español
Este es un producto de Clase A. En una situación domestica, este producto puede producir interferencias de radio, en
ese caso el usuario deberá tomar las medidas adecuadas.
Utilice únicamente los cables y accesorios incluidos en el paquete. No utilice otros accesorios ni cables a menos que así
se indique en la documentación.
Français
Cet appareil est un produit de Classe A. Dans un environnement domestique, ce produit est susceptible de provoquer
des interférences radio, auquel cas l’utilisateur peut être mis en demeure de prendre des mesures appropriées.
Utilisez uniquement les câbles et accessoires inclus dans ce package. N’utilisez aucun autre accessoire ou câble sauf
instruction spécifique de la documentation.
Italiano
Questo è un prodotto di Classe A. In ambienti domestici il prodotto può causare radiointerferenza, nel qual caso
potrebbe rendersi necessaria l'adozione di opportune misure.
Utilizzare esclusivamente i cavi e gli accessori inclusi nell’imballaggio. Non utilizzare altri accessori o cavi a meno che
non sia specificamente indicato nella documentazione.
Nederlands
Dit is een Klasse A product. Dit product kan in een huishoudelijke omgeving radiostoring veroorzaken in welk geval de
gebruiker adequate maatregelen dient te nemen.
Gebruik alleen de kabels en toebehoren die zich in de verpakking bevinden. Gebruik geen ander toebehoren of kabels
tenzij dit uitdrukkelijk in de handleiding wordt aangegeven.
Norsk
Dette er et produkt i klasse A. I et hjemmemiljø kan dette produktet forårsake radiointerferens, noe som gjør at brukeren
i så fall må foreta passende tiltak.
Bruk kun kabler og tilbehør som er inkludert i pakken. Ikke bruk annet tilbehør eller kabler med mindre spesielt
instruert til å gjøre det i dokumentasjonen.
Português
Este é um produto de Classe A. Num ambiente doméstico, este produto pode provocar interferências de rádio, pelo que
o utilizador poderá ter de tomar medidas adequadas.
Utilizar apenas cabos e acessórios incluídos na embalagem. Não utilizar outros acessórios ou cabos, salvo se
especificamente indicado na documentação.
Suomi
Tämä on luokan A tuote. Tämä tuote voi aiheuttaa radiohäiriöitä kotikäytössä, jolloin käyttäjän on ehkä ryhdyttävä
tarvittaviin toimenpiteisiin.
88
Page 90
Käytä ainoastaan pakkauksen mukana toimitettuja kaapeleita ja varusteita. Älä käytä muita varusteita tai kaapeleita ellei
näin ole erityisesti ohjeistettu asiakirjoissa.
Svensk
Detta är en Klass A-produkt. I en hushållsmiljö kan denna produkt orsaka radiostörningar, och användaren kan i så fall
begäras att vidta lämpliga åtgärder.
Använd bara kablar och tillbehör som ingår i förpackningen. Använd inte andra tillbehör eller kablar om du inte får
uttryckliga instruktioner om det i dokumentationen.
Türk
Bu, A Sınıfı bir üründür. Evde kullanım sırasında bu ürün radyo girisimine yol açabilir ve bu durumda kullanıcının gerekli
önlemleri alması gerekebilir.
Yalnızca pakette bulunan kablo ve aksesuarları kullanın. Belgelerde özellikle belirtilmedikçe başka aksesuar ve kablolar
kullanmayın.
한국 고객 대상
KC
이 기기는 업무용(A급) 전자파적합기기로서 판
매자 또는 사용자는 이 점을 주의하시기 바라
며, 가정외의 지역에서 사용하는 것을 목적으로 합니다.
警告使用者 :
此為甲類資訊技術設備,於居住環境中使用時,可能會造成射頻擾動,在此種情況下,使用者會被要求採取某些
適當的對策。
警 告
此为A级产品,在生活环境中,该产品可能会造成无线电干扰。在这种情况下,可能需要用户对其干扰采取切实可
行的措施。
设备的最高使用室内环境温度: 35° C
仅适用于海拔 2000M 以下地区安全使用。
断开装置为电源软线上的插头。插座应当装在设备的附近,而且应当便于触及到。电池警告语
1.电池不得暴露。
2.使用型号不正确的电池可能导致爆炸。
89
 Loading...