

Page 1
Quick Setup Guide
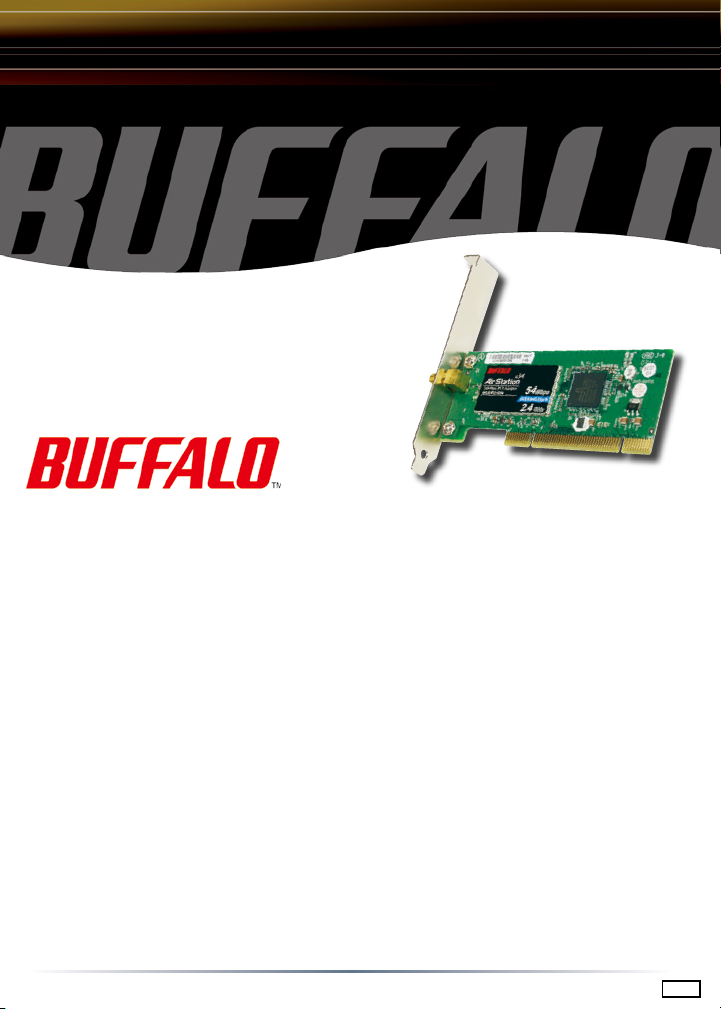
Wireless 54Mbps Desktop
PCI Adapter-g
WLI2-PCI-G54
Use this guide to quickly and easily install your Wireless 54Mbps Desktop PCI
Adapter. For advanced setup and conguration information, refer to the AirStation
Wireless 54Mbps Desktop PCI Adapter Manual, located on the Air Navigator CD.
Contents
◗ Wireless 54Mbps Desktop PCI Adapter (WLI2-PCI-G54)
◗ Brass Buffalo Antenna Adapter
◗ Air Navigator CD
◗ Quick Setup Guides
◗ Warranty Card
If any items are missing, please contact the reseller from whom you purchased this
product.
System Requirements
◗ PC with an available PCI Slot.
◗ Windows 98SE, ME, 2000, XP, 2003
◗ 10 MB of available disk space
◗ 802.11b or 802.11g access point (Infrastructure Mode) OR a different computer
with an 802.11b or 802.11g wireless adapter (Ad-hoc Mode).
PY00-29023-DM20-01
1-01
Page 2
Installing and Conguring the Wireless PCI Adapter:
Windows 98/ME/2000/XP
Step 1 Installing the Wireless PCI Adapter Drivers
Caution: Complete Step 1 before inserting the Wireless 54Mbps Desktop PCI
Adapter.
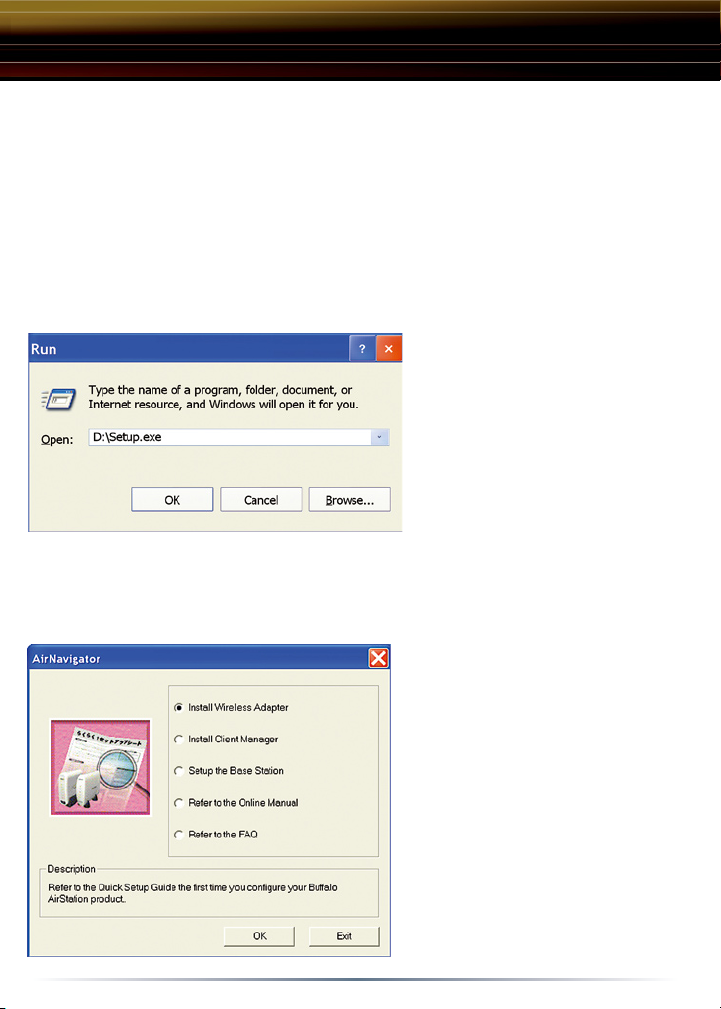
◗ Insert the Air Navigator CD into
the CD-ROM drive of the PC.
The Air Navigator Setup Wizard
launches automatically. If the Air
Navigator Setup Wizard does not
launch automatically, launch the
wizard manually by selecting
Start » Run to open the Run
dialog box. Enter D:\Setup.
exe in the Open eld, where D:
represents the letter assigned to the CD-ROM drive. If another letter is assigned
to the CD-ROM drive, your command should reect that difference. Click the OK
button to launch the wizard.
◗ Select Install Wireless
Adapter. Click the OK button to
begin the installation process.
◗ Review the Software License
Agreement. Click the Yes button
to conrm your agreement with
the terms and continue installing
the Wireless PCI Adapter drivers.
Click the No button to abort the
installation process. Also, close
the onscreen help that appears; it
is not necessary for this setup.
2
Page 3
Windows XP Installation
& Conguration
Step 2 Installing the Wireless 54Mbps Desktop PCI Adapter
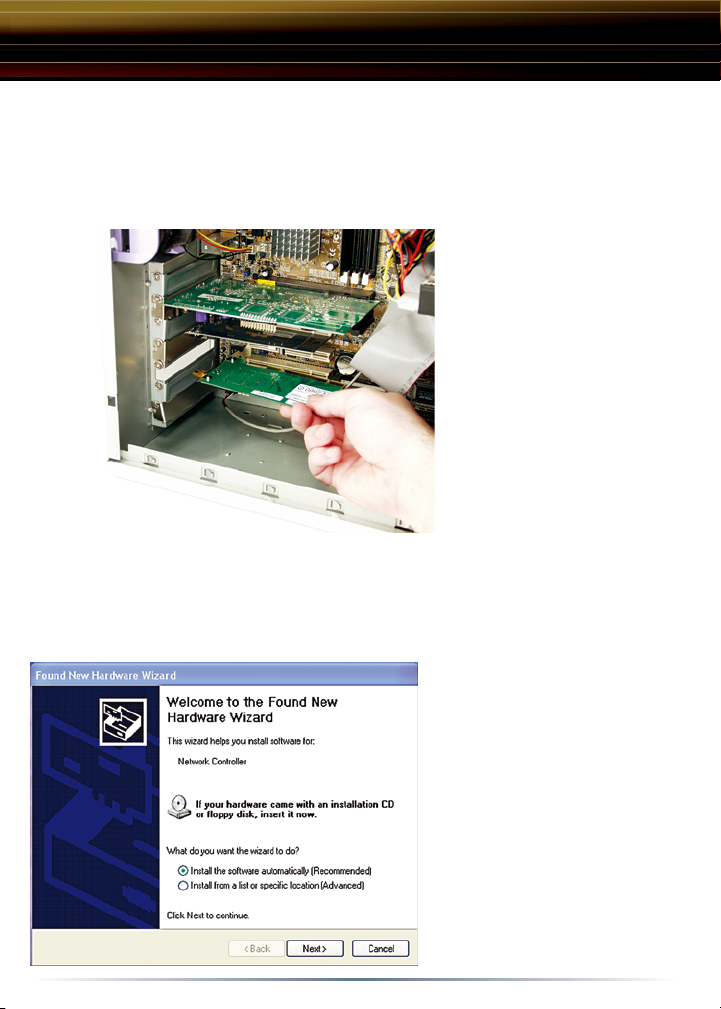
◗ Power off the desktop
PC. Firmly insert the Wireless 54Mbps Desktop PCI
Adapter into an available
PCI slot. PCI slots are
located inside the desktop
computer. Please consult
the PC Manufacturer's documentation for PCI installation instructions. Once the
Wireless 54Mbps Desktop
PCI Adapter is installed
correctly, attach the included
black antenna on the back
of the PCI card, start the
PC and let it boot into Windows. Then, the Found New Hardware Wizard will
launch automatically. If the Found New Hardware Wizard does not launch, turn
off the computer, remove the Wireless 54Mbps Desktop PCI Adapter, reinsert it
into another PCI slot, and restart the computer.
◗ Select Install the software
automatically. Click the Next
button.
3
Page 4
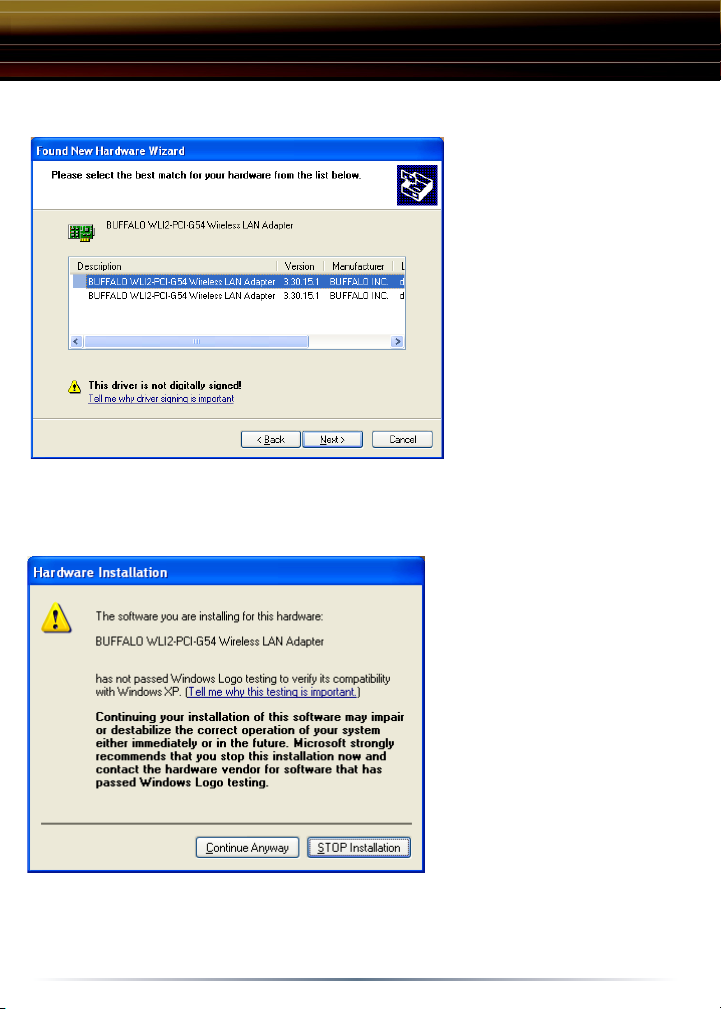
◗ Select the driver you
want to install. If multiple
drivers are listed, select the
most recent driver version.
Click the Next button.
◗ If a window opens,
stating that your driver has
not passed Windows Logo
testing, click the Continue
Anyway button. When
the Wireless PCI Adapter
is successfully installed,
click the Finish button
and restart your PC if
prompted.
4
Page 5
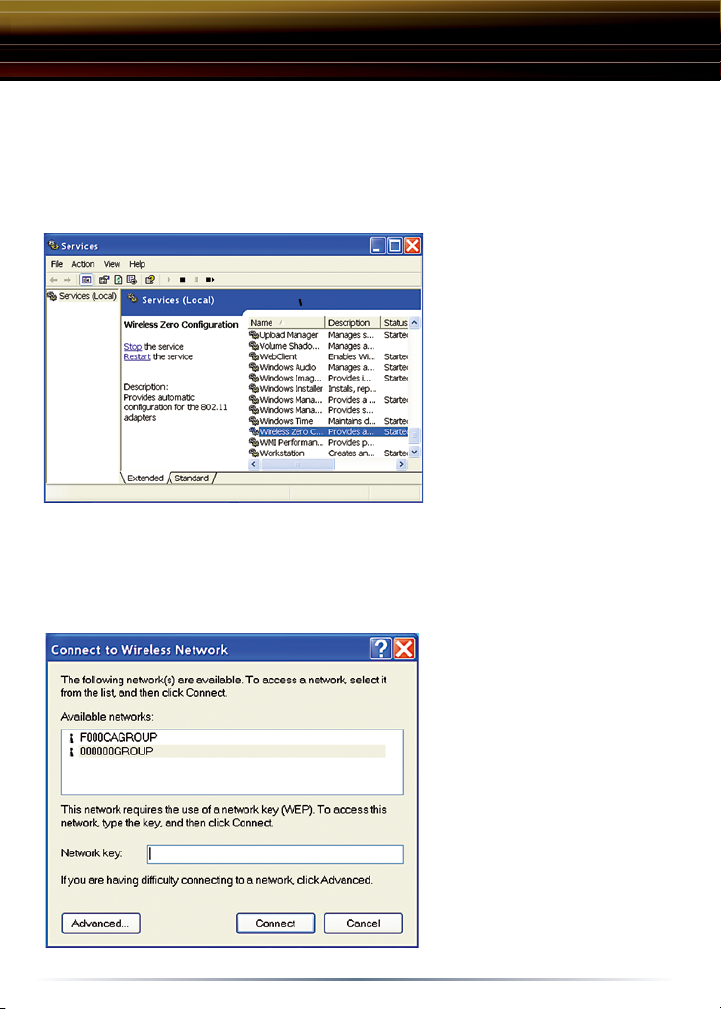
Step 3 Conguring Wireless Zero Conguration Service
n Note: Skip to Page 9 if you are not using Windows XP or prefer not to use
Windows XP's Wireless Zero Conguration Service.
◗ If the Wireless Zero
Conguration Service is
activated, Windows will scan
for available wireless access
points once the Wireless PCI
Adapter is properly installed. If
Windows detects one or more
access points, a networking icon
appears in the taskbar. One
or more wireless networks are
available appears as a caption
accompanying the icon.
n Note: If the Wireless Zero Conguration Service is not functioning, select Start
» Control Panel » Administrative » Tools » Services. Select Automatic in the
Startup type eld to enable the Wireless Zero Conguration Service. The default
value is Automatic.
◗ Right click the networking
icon in the taskbar and select
View Available Wireless
Networks to display a list of
available wireless networks.
See the next step if you
need to enter an SSID
network name or WEP/WPA
encryption key. Select an
access point network
name or SSID and click the
Connect button to establish
a connection.
5
Page 6
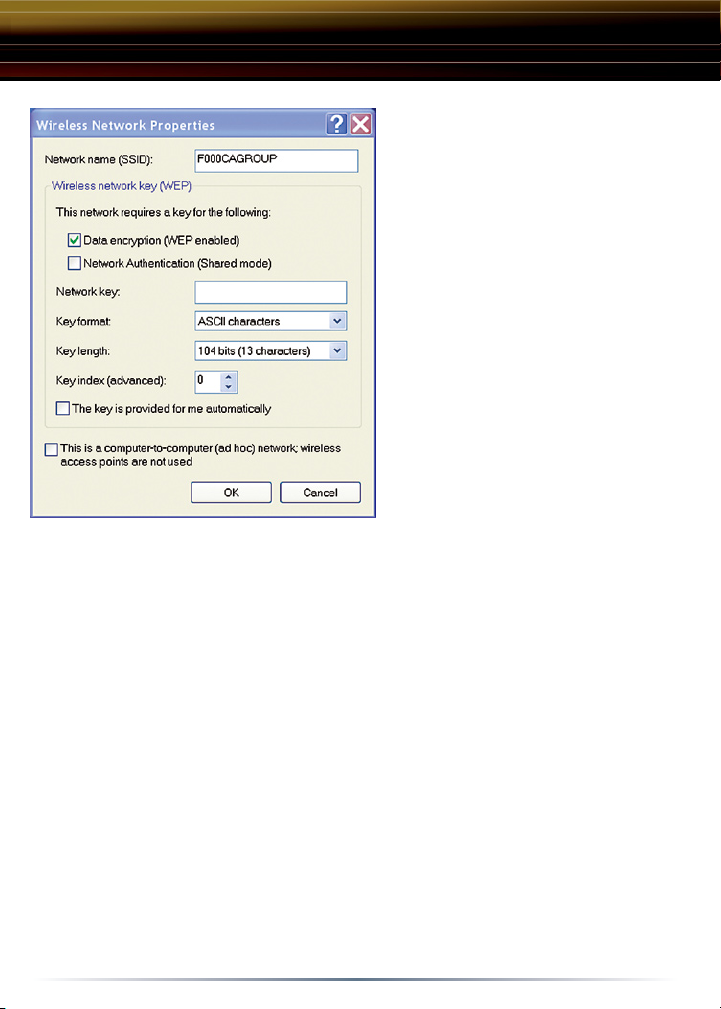
◗ Select a network name or
access point and click the
Advanced button to enter an
SSID network name or WEP
key if necessary.
For more information about the
Wireless Zero Conguration
Service, refer to the AirStation
Wireless 54Mbps Desktop PCI
Adapter's User Manual on the
AirStation CD.
You have nished installing your Wireless 54Mbps Desktop PCI Adapter. If you
prefer using Buffalo's Client Manager over Microsoft's, then see the Installing
Client Manager section to install Buffalo's Client Manager on your PC . For
more information about conguring and operating your Wireless 54Mbps
Desktop PCI Adapter and Buffalo's Client Manager, refer to the AirStation
Wireless 54Mbps Desktop PCI Adapter Help, located on the Air Navigator CD.
n Note: Buffalo Technology recommends that users of the Wireless Zero
Conguration Service upgrade to the latest version freely available at
http://www.microsoft.com
6
Page 7
Windows 98/ME/2000
Installation & Conguration
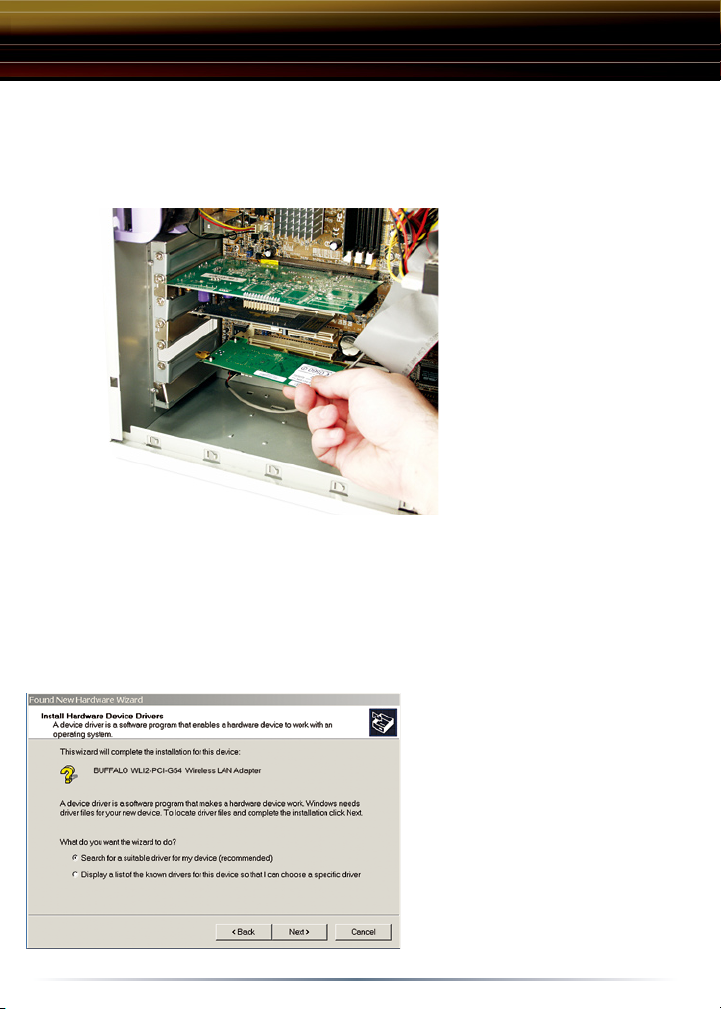
Step 2 Installing the Wireless 54Mbps Desktop PCI Adapter
◗ Power off the desktop
PC. Firmly insert the Wireless 54Mbps Desktop
PCI Adapter into an avail-
able PCI slot. PCI slots are
located inside the desktop
computer. Please consult
the PC Manufacturer's documentation for PCI installation
instructions. Once the Wire-
less 54Mbps Desktop PCI
Adapter is installed correctly,
attach the included black
antenna on the back of the
PCI card, start the PC and
let it boot into Windows. Then, the Found New Hardware Wizard will launch
automatically. If the Found New Hardware Wizard does not launch, turn off the
computer, remove the Wireless 54Mbps Desktop PCI Adapter, reinsert it into
another PCI slot, and restart the computer.
◗ Select Search for a suitable
driver for my device. Click the
Next button to continue to the
Locate Driver Files page.
7
Page 8
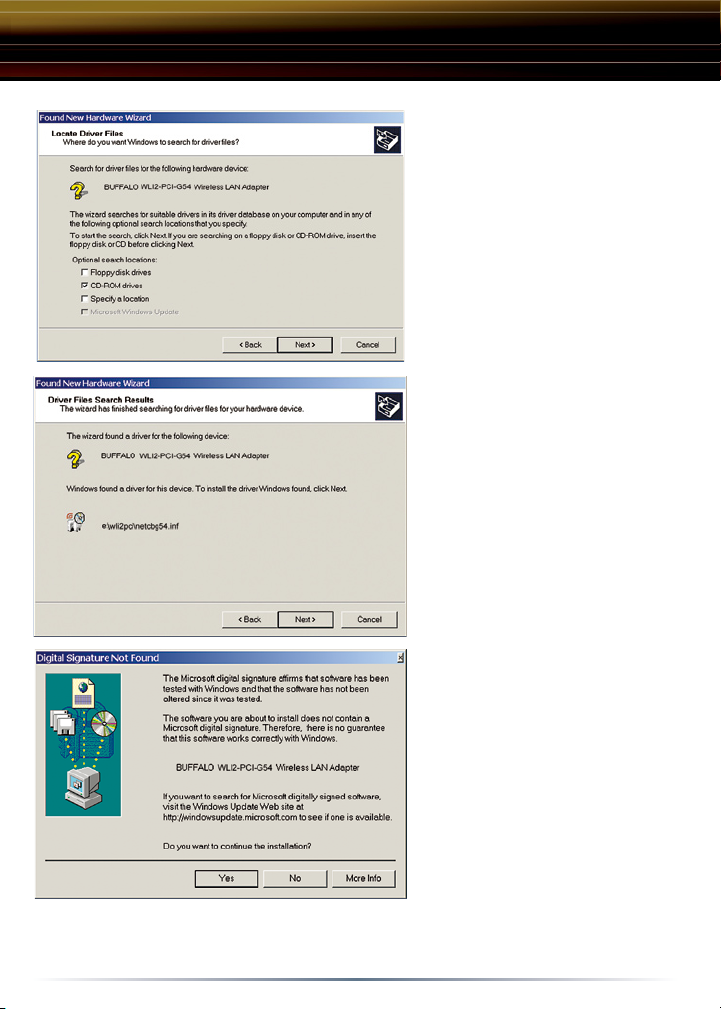
◗ Verify that no Optional search
locations are selected. Clear any
checkboxes that are selected.
Click the Next button to continue
to the Driver Files Search
Results page.
◗ Windows will display a driver
you can use with the Wireless
54Mbps Desktop PCI Adapter.
Click the Next button to continue
the installation process.
◗ Windows 2000: If the Digital
Signature Not Found page
opens, informing you that no
digital signature exists for the
driver you are installing, click
the Yes button to continue the
installation process. When the
Wireless 54Mbps Desktop PCI
Adapter is successfully installed,
click the Finish button and
restart your PC if prompted.
You have nished installing your Wireless 54Mbps Desktop PCI Adapter. See the
Installing Client Manager section to install Client Manager on your PC.
8
Page 9
Installing Client Manager
n Note: Client Manager does not function properly if the Windows XP Wireless
Zero Conguration Service is enabled. Installing Client Manager will automatically
disable this service.
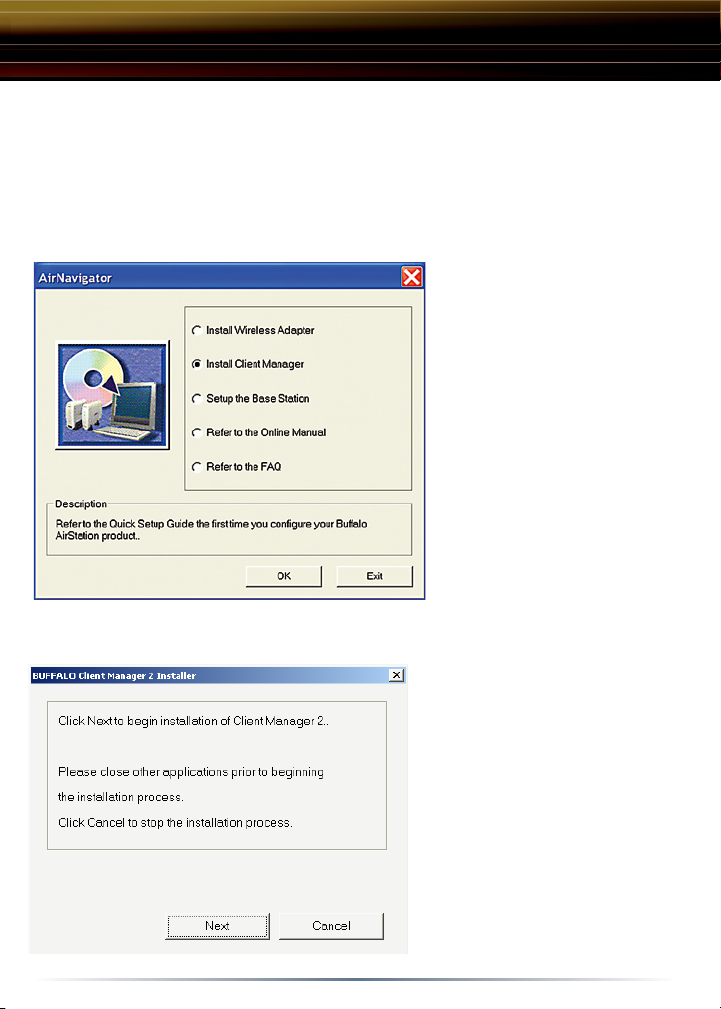
◗ Insert the AirNavigator
CD into the CDROM drive.
The AirNavigator dialog
box will open automatically.
If the AirNavigator dialog box
does not open automatically,
select Start » Run and enter
D:\Setup.exe in the Open
eld to open the dialog box
manually. D: represents the
letter assigned to the CD-
ROM drive. If another letter
is assigned to the CD-ROM
drive, your command should
reect that difference. Click
the OK button. Select Install
Client Manager to launch the
Installer.
◗ Once the Installer Wizard
launches, click the Next
button to begin the software
installation.
9
Page 10
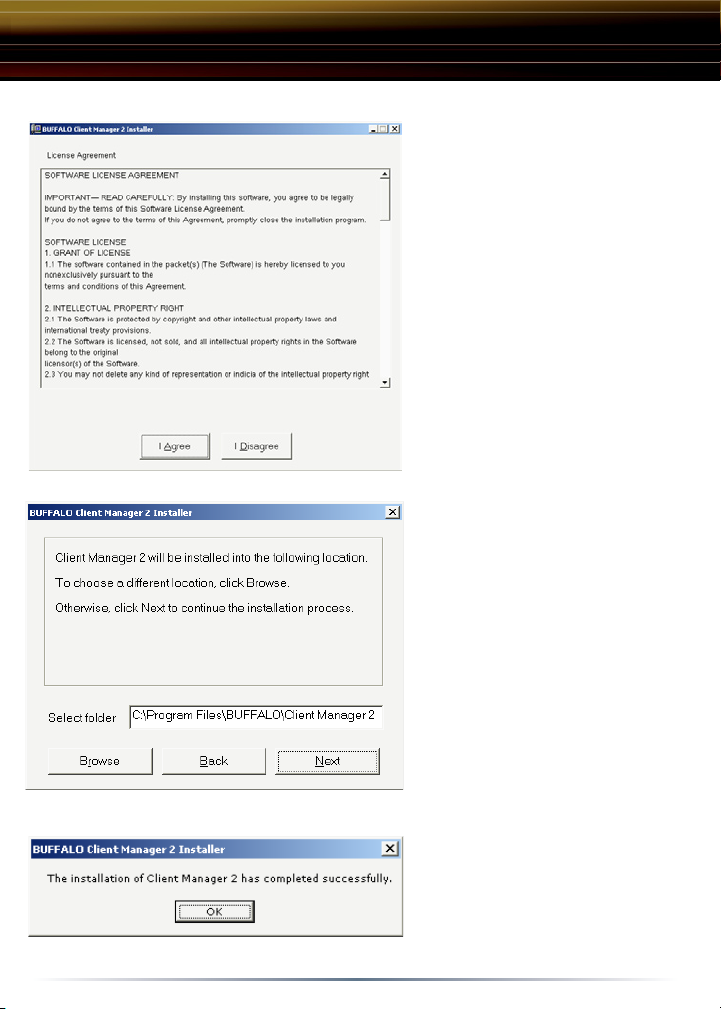
◗ Press Accept to accept the
license agreement and continue
the installation process.
◗ Choose the installation path or
accept the default path and press
the Next button to continue.
Setup will begin copying les at
this point.
10
◗ Press the OK button to
nish and close the installation
program.
Page 11
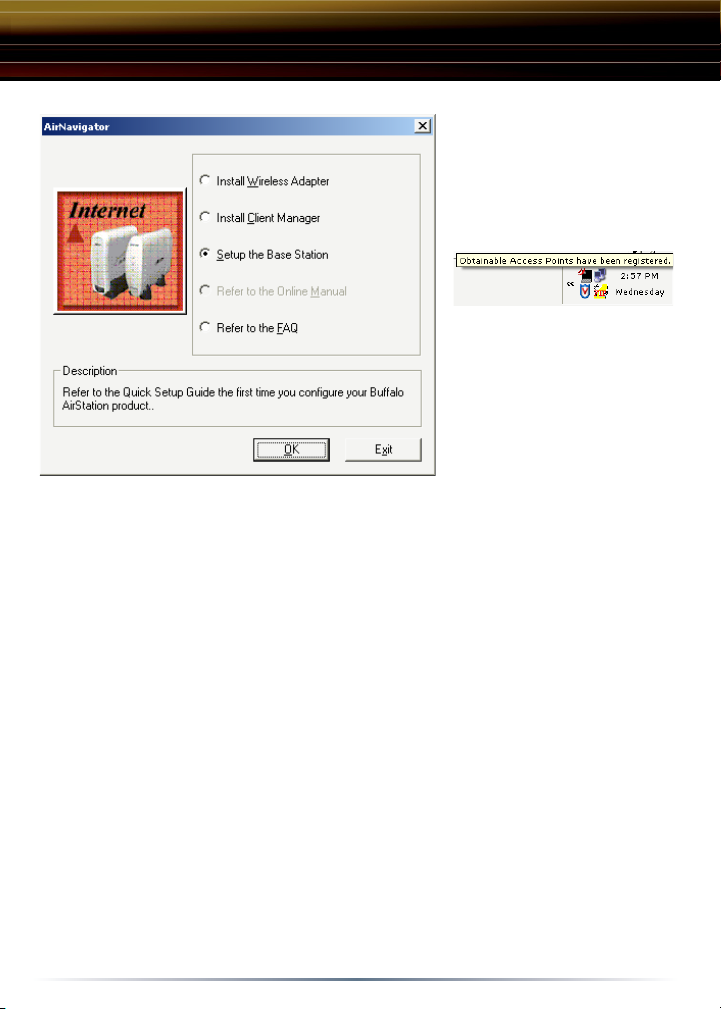
◗ Press the Exit button to
exit the Client Manager
installation utility.
◗ The Buffalo Client
Manager is now installed
and running, right clicking on
its icon (the black notebook
icon) will allow you to begin
using it.
To quickly connect to an available access point double click on its icon, select
the survey screen, select the proper wireless network and press the 'Connect'
button. This will connect you to the Access Point, you may be required to enter
encryption settings to properly connect.
Depending on the operating system, some screens may vary from those shown
in this guide. However, by accepting default installation settings, Client Manager
should properly install.
11
Page 12

Buffalo Technology
Technical Support
◗ Web USA http://www.buffalotech.com/wireless
EUROPE http://www.buffalo-technology.com
CHINA http://www.buffalo-china.com
TAIWAN http://www.buffalo-tech.com.tw
KOREA http://www.buffalotech.co.kr
FCC Compliance Statement - See owners manual for complete statement.
This device complies with Part 15 of the FCC Rules. Operation is subject to the
following two conditions: (1) This device may not cause harmful interference,
and (2) this device must accept any interference received, including interference
that may cause undesired operation.
R&TTE Compliance Statement - See owners manual for complete statement
This equipment complies with all the requirements of the DIRECTIVE 1999/5/
EC OF THE EUROPEAN PARLIAMENT AND THE COUNCIL of 9 March 1999
on radio equipment and telecommunication terminal Equipment and the mutual
recognition of their conformity (R&TTE).
Copyright © 2004 Buffalo Technology, Inc. All Rights Reserved. - Buffalo Technology (USA) Inc., is
part of BUFFALO INC., the global manufacturers of IT peripherals, including memory, networking,
and multimedia products, inside many of the world’s computers. All trademarks are property of their
respective owners.
12
 Loading...