

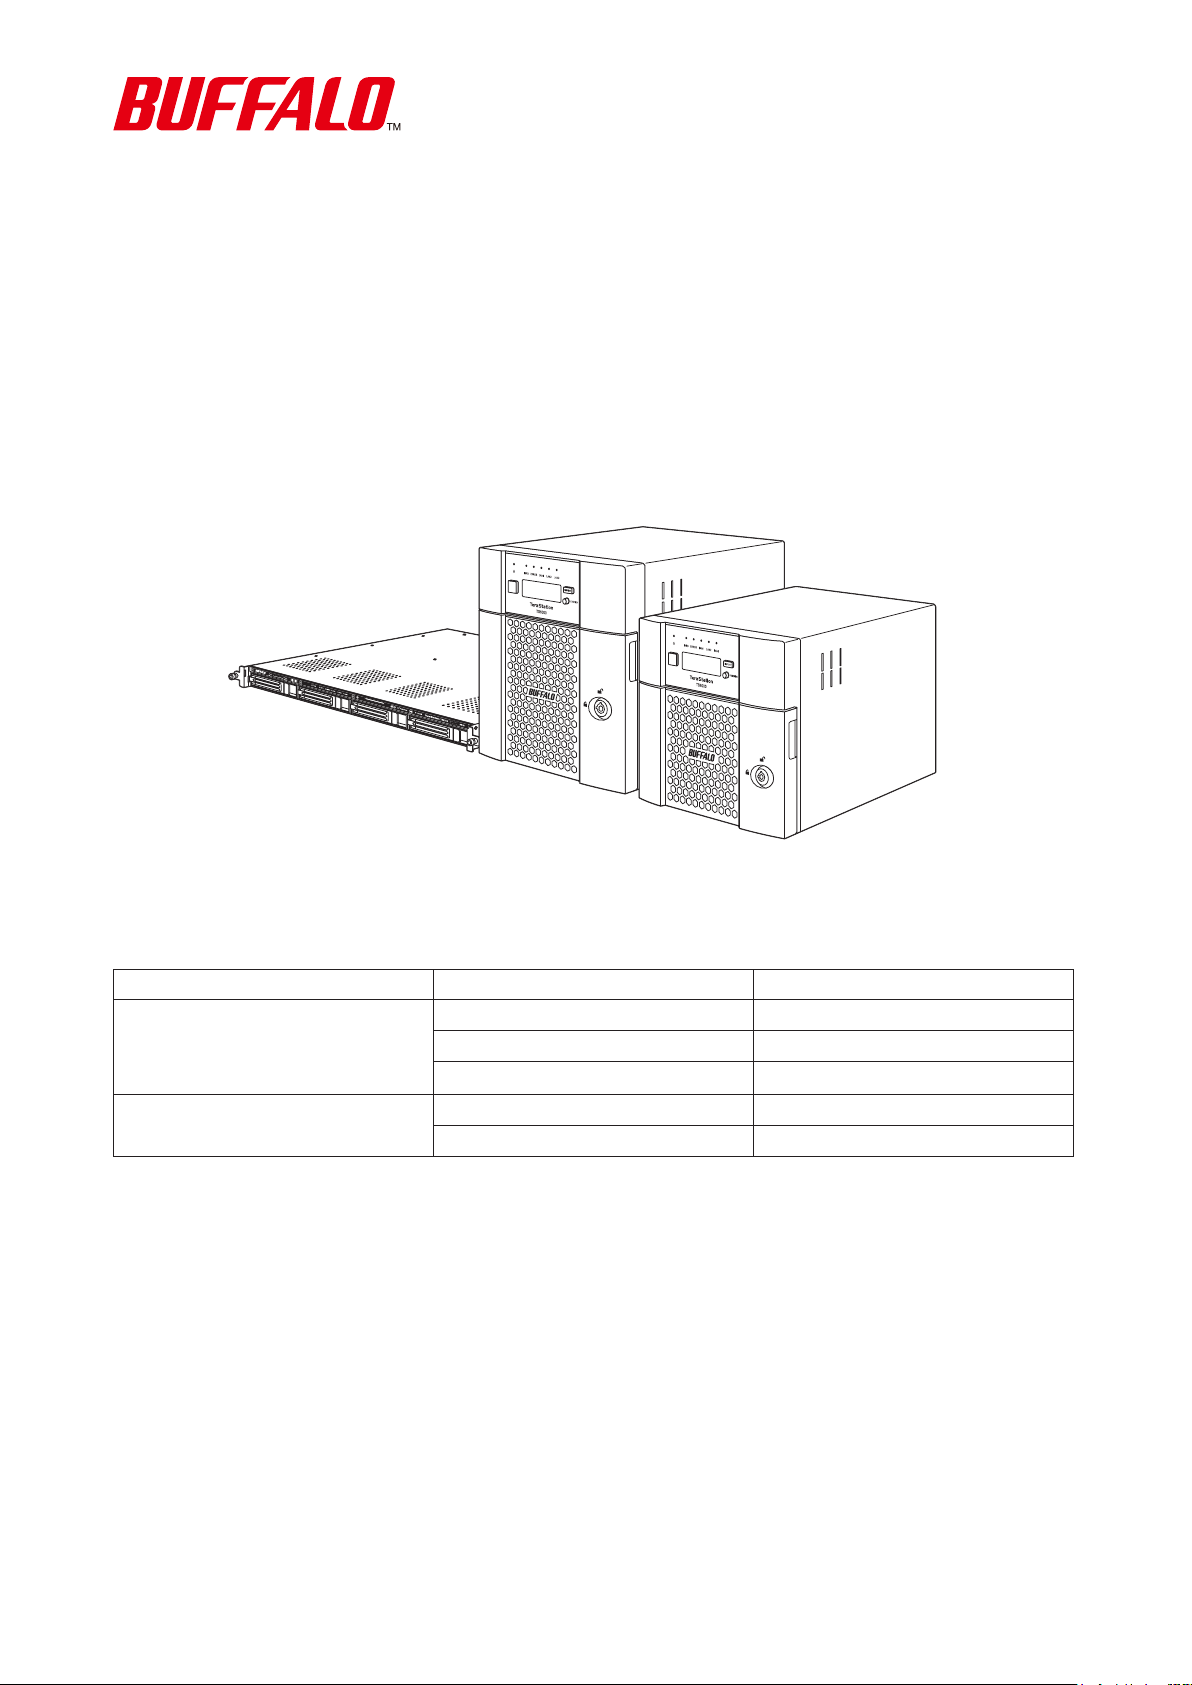
Network Attached Storage
TeraStation 6000
User Manual
TS6200DN Series TS6200DN0402 TS6200DN0802
TS6400DN0804 TS6400DN1604
TS6400DN Series
TS6400RN Series
Please make sure to read this manual before using and follow the procedures. If you have any inquiries about
the product, contact the number on the warranty statement or the packing box. Do not discard the included
documents, the warranty statement, or the packing box.
TS6400DN3204 TS6400DN0802
TS6400DN1602
TS6400RN1604 TS6400RN3204
TS6400RN0802 TS6400RN1602
Americas: www.buffaloamericas.com
Europe: www.buffalo-technology.com
Asia Pacific: www.buffalo-asia.com
35021637-04
March 2020
Notice
Notice
Regulatory Compliance Information
For Customers in the United States
This device complies with Part 15 of the FCC Rules. Operation is subject to the following two conditions: (1) this
device may not cause harmful interference, and (2) this device must accept any interference received, including
interference that may cause undesired operation.
Note: This equipment has been tested and found to comply with the limits for a Class A digital device, pursuant to
Part 15 of the FCC Rules. These limits are designed to provide reasonable protection against harmful interference
when the equipment is operated in a commercial environment. This equipment generates, uses, and can radiate
radio frequency energy and, if not installed and used in accordance with the instruction manual, may cause harmful
interference to radio communications. Operation of this equipment in a residential area is likely to cause harmful
interference in which case the user will be required to correct the interference at his own expense.
For Customers in Europe
Warning: This is a class A product. In a domestic environment this product may be cause radio interference in which
case the user may be required to take adequate measures.
This product may cause interference if used in residential areas. Such use must be avoided unless the user takes
special measures to reduce electromagnetic emissions to prevent interference to the reception of radio and
television broadcasts.
Environmental Information
• The equipment that you have purchased has required the extraction and use of natural resources for its
production.
• The equipment may contain hazardous substances that could impact health and the environment.
• In order to prevent the dissemination of those substances into the environment, and to relieve pressure on
natural resources, we encourage you to seek out an appropriate take-back program. Take-back programs will
reuse or recycle materials of any end-of-life equipment in a responsible way.
• Products with the crossed-out wheeled-bin symbol above should not be recycled. Instead, seek out a take-back
program as mentioned.
• If you need more information on the collection, reuse, and recycling of our end-of-life products, please contact
your local or regional waste administration.
1
Notice
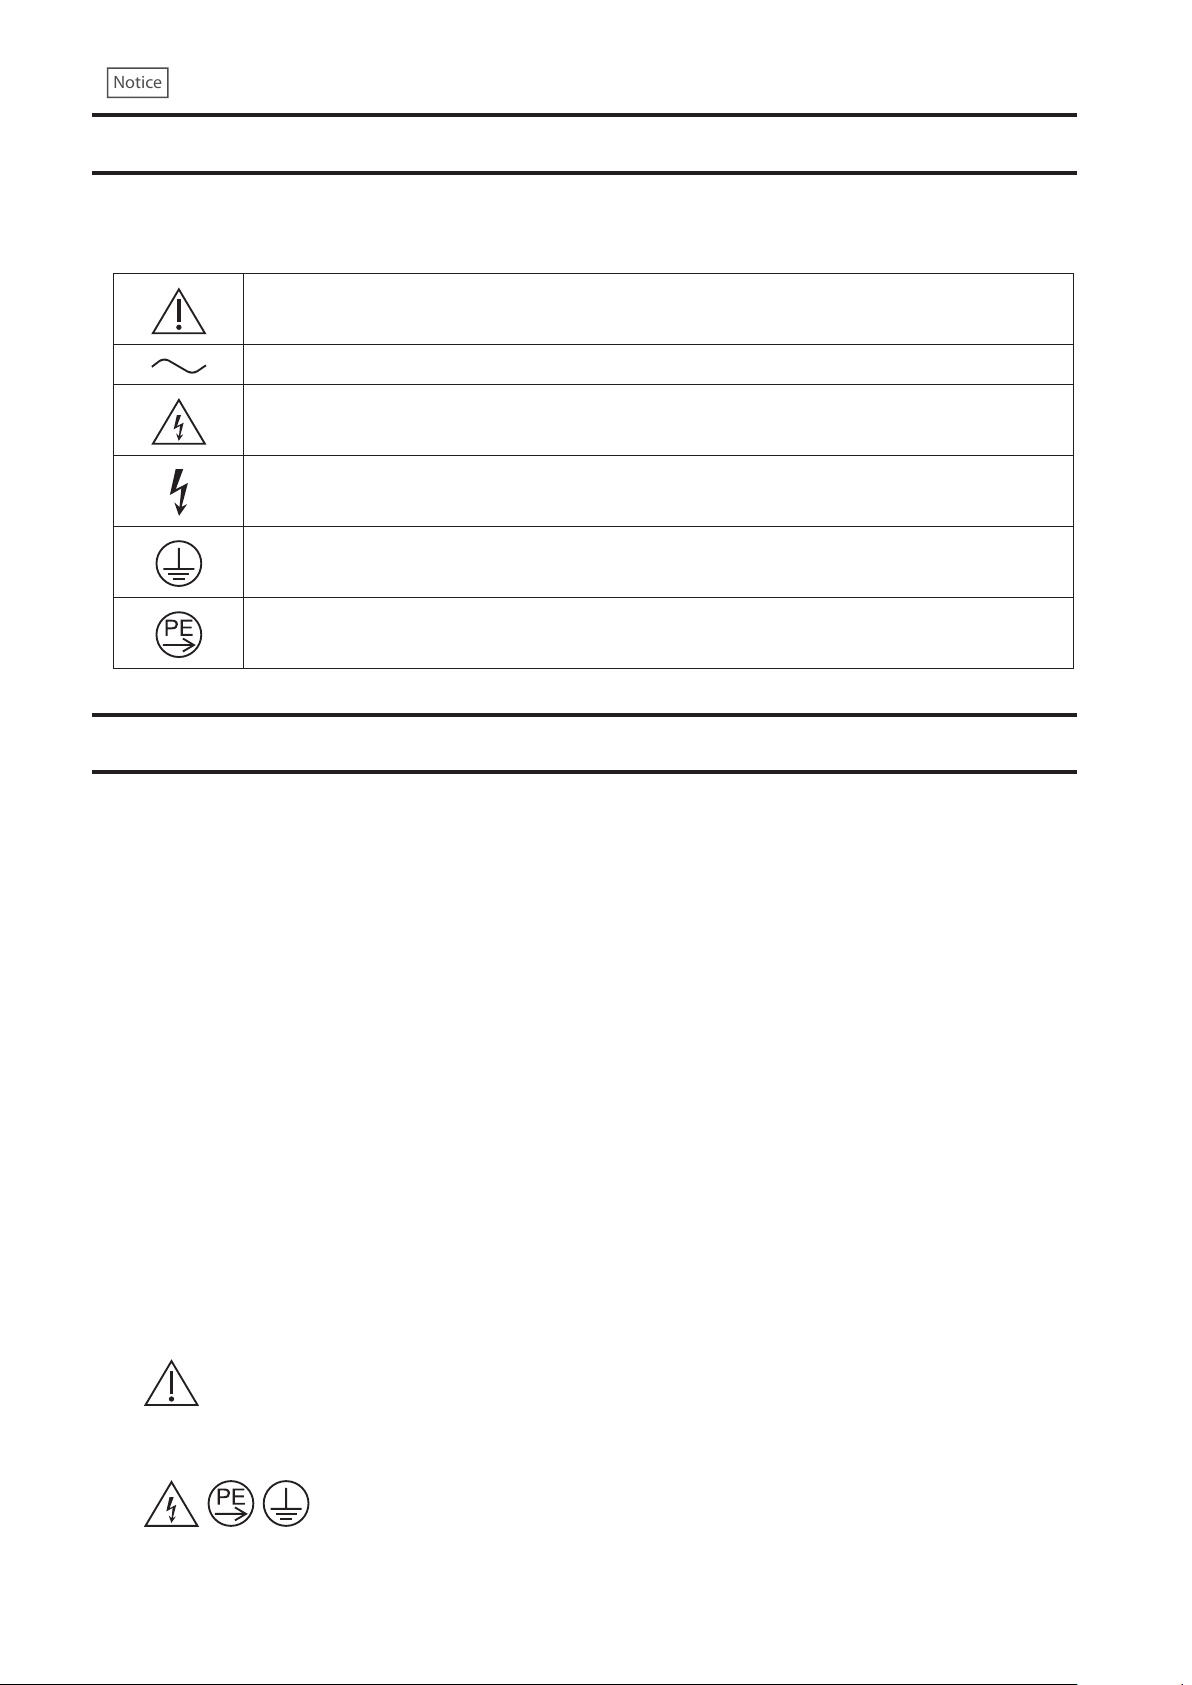
Warning Symbols and Graphical Icons on the Product
Warning symbols are used on the product for safety operation and prevention of injury to you and damage to the
unit. The following explains the meanings of symbols used on the product.
This symbol indicates important warnings or cautions for operation and maintenance. Additional
information will follow this symbol.
This symbol indicates the presence of an alternating current.
This symbol indicates that the equipment may carry risk of electric shock.
This symbol indicates danger of hazardous high voltage.
This symbol indicates a protective earthing terminal.
This symbol indicates that the protective conductor should be connected first to the protective
earthing terminal.
Safety Precautions
Before using your device, basic safety instructions should always be followed.
(1) Read these instructions.
(2) Keep these instructions.
(3) Heed all warnings and follow all instructions.
(4) The socket-outlet shall be installed near the equipment and shall be easily accessible.
(5) Only use the cables and accessories that are included in the package. Don’t use other accessories or cables
unless specifically instructed to in the documentation. Also, do not use USB cables that are 3 meters or longer to
connect USB devices.
(6) The device can only be used in a fixed location, such as a telecommunication center or a dedicated computer
room. When you install the device, ensure that the protective earthing connection of the socket-outlet is verified
by a technician.
Translation to Norwegian:
Utstyr som er koplet til beskyttelsesjord via nettplugg og/eller via annet jordtilkoplet utstyr – og er tilkoplet et
kabel-TV nett, kan forårsake brannfare. For å unngå dette skal det ved tilkopling av utstyret til kabel-TV nettet
installeres en galvanisk isolator mellom utstyret og kabel- TV nettet.
Translation to Swedish:
Utrustning som är kopplad till skyddsjord via jordat vägguttag och/eller via annan utrustning och samtidigt
är kopplad till kabel-TV nät kan i vissa fall medföra risk för brand. För att undvika detta skall vid anslutning av
utrustningen till kabel-TV nät galvanisk isolator finnas mellan utrusningen och kabel-TV nätet.
(7) Do not ingest battery in case of a chemical burn hazard. This product contains a coin/button cell battery.
If the battery is swallowed, it can cause severe internal burns within 2 hours and may lead to death. If you think
batteries might have been swallowed or placed inside any part of the body, seek immediate medical attention.
(8) High touch current. Connect to earth before connecting to supply.
2
Notice
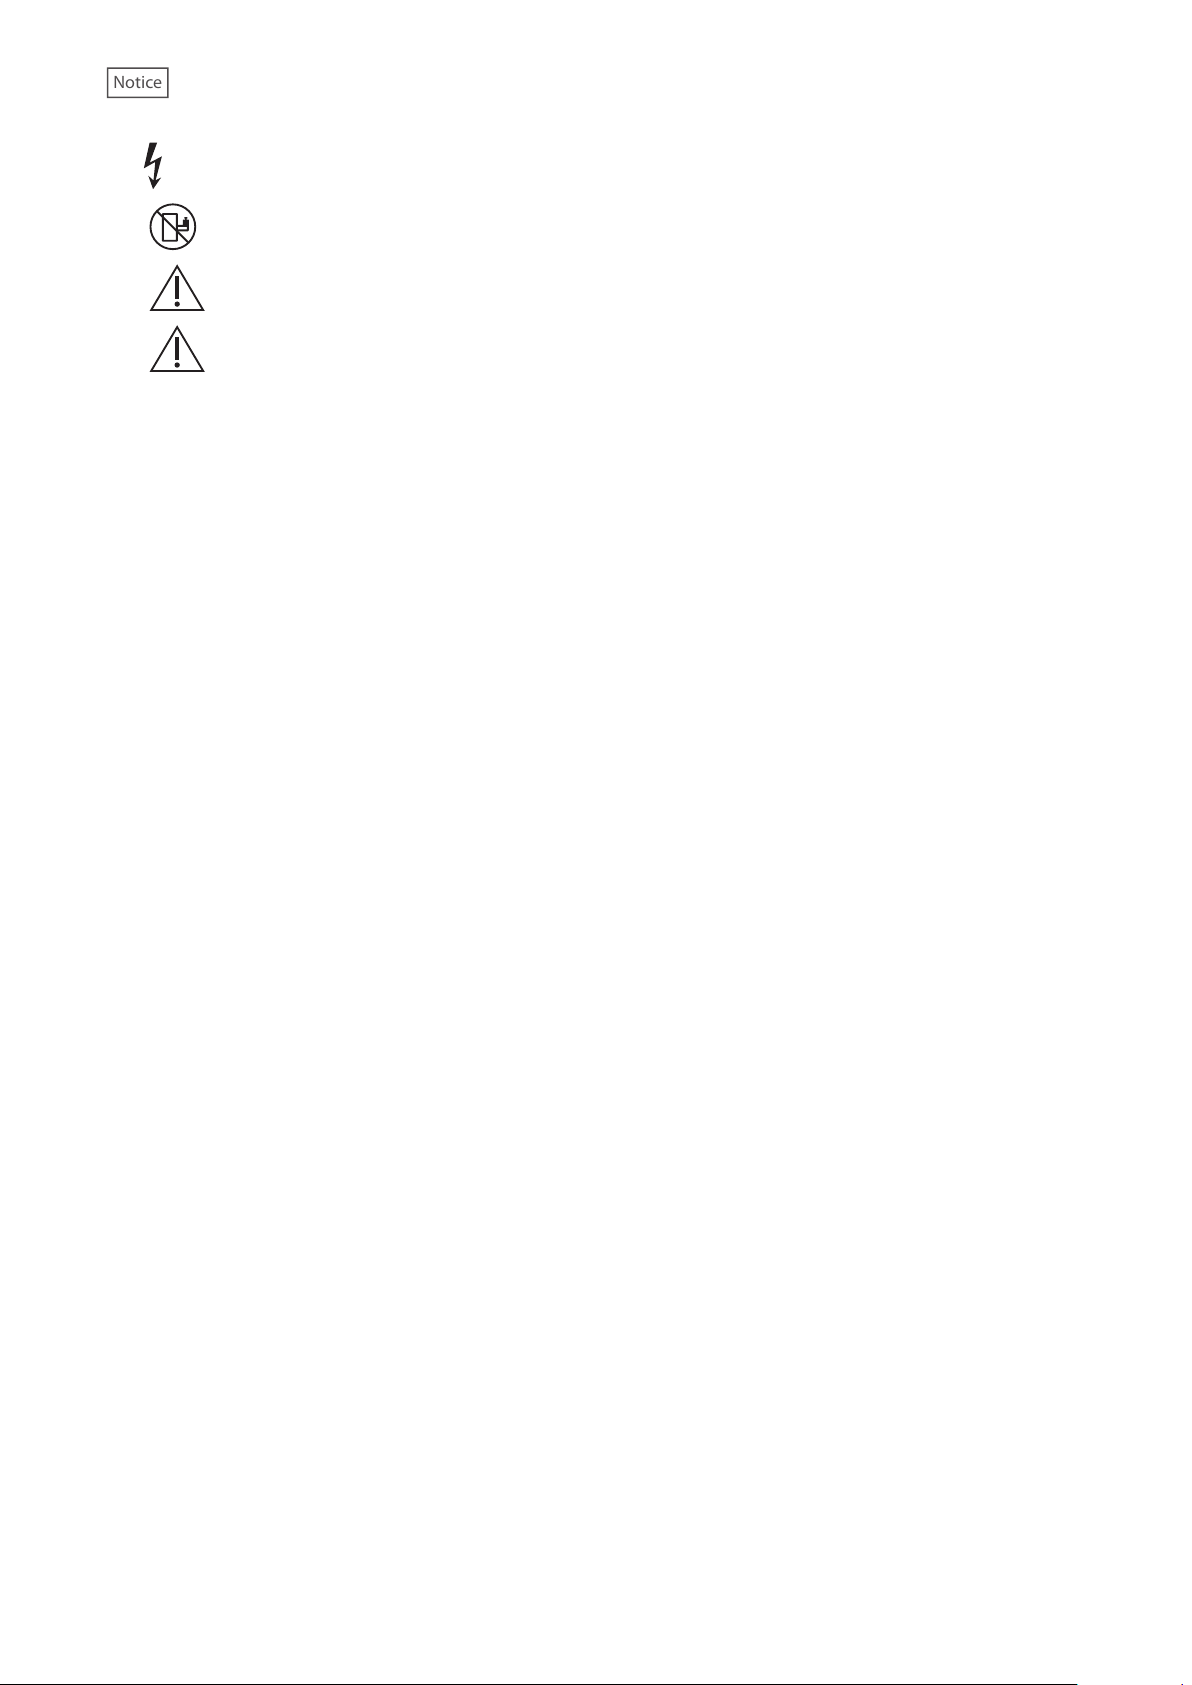
(9) Caution: Do not remove the cover.
(10) Caution: Slide/rail mounted equipment is not to be used as a shelf or a work space.
(11) Caution: Be careful not to injure fingers when handling. Do not remove the cover.
(12) Caution: Do not replace the battery. There is risk of explosion if the battery is replaced with one that is
an incorrect type.
3

Table Of Contents
Notice ..............................................................................1
Regulatory Compliance Information ..............................................1
Warning Symbols and Graphical Icons on the Product .................2
Safety Precautions ...........................................................................2
Chapter 1 Getting Started .......................................... 12
Diagrams ........................................................................................ 12
Turning the TeraStation On and Off............................................. 15
Re-Inserting Drives ....................................................................... 17
Creating an Initialization Drive .................................................... 18
Chapter 2 Configuration ............................................. 19
Configuring Settings via Setup Wizard ....................................... 19
Opening Setup Wizard ............................................................................19
Opening Settings .......................................................................... 20
Checking the Device Information from Dashboard ................... 22
Chapter 3 File Sharing ................................................. 23
Configuring Shared Folders ......................................................... 23
Adding a Shared Folder ........................................................................... 23
Recycle Bin ................................................................................................25
Read-Only Shares .....................................................................................25
Hidden Shares .......................................................................................... 26
Quotas ......................................................................................................26
4

Configuring Users ......................................................................... 27
Adding a User ........................................................................................... 27
Importing User Information ....................................................................29
Adding a Group ............................................................................. 29
Configuring Access Restrictions for Shared Folders .................. 32
Local Users and Groups ...........................................................................32
Active Directory .......................................................................................33
Configuring Access Restrictions for Subfolders ......................... 36
Enabling Subfolders’ Access Restrictions ..............................................36
Restoring Owner and Permission Settings ............................................38
Chapter 4 Storage Management ................................ 41
RAID Modes ................................................................................... 41
Working with RAID Arrays ............................................................ 42
Using JBOD ............................................................................................... 42
Changing RAID Mode ..............................................................................43
Shutting Down the TeraStation Automatically If an Error Occurs ........44
Configuring Actions for If a Drive Used for the RAID Array Has Not Been
Detected ...................................................................................................46
Configuring a Hot Spare .......................................................................... 49
Expanding RAID Capacity Without Deleting Data ................................50
RAID Scanning..........................................................................................54
Adding an External Drive ............................................................. 55
Connecting an External Drive ................................................................. 55
Compatibility ...........................................................................................55
Dismounting Drives ...................................................................... 56
Dismounting Using the Function Button ............................................... 56
Dismounting from Settings ....................................................................56
5

Checking Drives ............................................................................ 57
S.M.A.R.T. ....................................................................................... 58
Displaying S.M.A.R.T. Information .........................................................58
Checking Drive Condition .......................................................................59
Formatting Drives ......................................................................... 60
Encrypting Drives .......................................................................... 61
Erasing Data on the TeraStation Completely .............................. 61
Using the TeraStation as an iSCSI Device .................................... 62
Introduction .............................................................................................62
Creating an iSCSI Volume ........................................................................62
Connecting or Disconnecting Volumes .................................................. 65
Using with Multiple Computers .............................................................. 66
Configuring Access Restrictions .............................................................66
Expanding Volume Sizes .........................................................................69
Deleting Volumes .....................................................................................70
Advanced Settings ................................................................................... 71
Chapter 5 Backup ........................................................ 72
Using Snapshots ............................................................................ 72
Overview ..................................................................................................72
Application for iSCSI Volume Snapshots ...............................................72
Manually Creating a Snapshot ................................................................72
Accessing the Snapshots via SMB ........................................................... 76
Restoring Snapshots ................................................................................78
Configuring Schedule Snapshot ............................................................. 82
Configuring Snapshot Archive Settings .................................................86
Backing Up Data on the TeraStation ............................................ 92
Backup Modes .......................................................................................... 92
6

Preparing a Backup Destination ............................................................. 95
Configuring a Backup Job .......................................................................97
If Backing Up from rsync-Compatible Devices to the TeraStation ..... 101
Restoring Backup Data ..........................................................................101
Backup Logs for If Backup Fails ............................................................105
Replication ................................................................................... 108
Preparing a Replication Destination ....................................................109
Configuring a Replication Job ..............................................................110
Synchronizing Between Source and Destination TeraStations
Periodically .............................................................................................113
Failover ........................................................................................ 114
Before Configuring Failover .................................................................. 114
Usage Restrictions .................................................................................115
Configuring Failover ..............................................................................116
Switching to the Backup TeraStation Manually...................................119
Reconfiguring After Failover Occurs ....................................................119
Synchronizing Between Main and Backup TeraStations Periodically 121
Backing Up Your Mac with Time Machine ................................. 122
Chapter 6 Cloud Services and Remote Access ......... 129
Synchronizing with Dropbox ..................................................... 129
Configuring a New Job ..........................................................................129
Changing Job Settings ..........................................................................132
Creating a Shared Link (Windows Only) ...............................................135
Using Microsoft Azure for Data Preservation ........................... 135
Creating a New Backup Job ...................................................................135
Creating a New Restore Job ..................................................................140
Changing Job Settings ..........................................................................144
Synchronizing with Microsoft OneDrive ................................... 146
7

Configuring a New Job ..........................................................................146
Changing Job Settings ..........................................................................153
Corrective Actions for in Case of Error .................................................156
WebAccess ................................................................................... 157
FTP ................................................................................................ 159
Chapter 7 Advanced Features .................................. 161
Antivirus Software ...................................................................... 161
Activating Virus Scanning .....................................................................161
Configuring Security Settings ..............................................................162
Licenses ..................................................................................................164
Connecting Through a Proxy Server ....................................................165
Updating Antivirus Pattern Files ..........................................................166
Configuring Folders as Virus Scanning Targets ................................... 167
Configuring Virus Scanning ..................................................................168
Checking the Log ...................................................................................169
Opening the Online Help ......................................................................170
Email Notification ....................................................................... 171
Sleep Mode .................................................................................. 173
Wake-on-LAN .............................................................................. 175
UPS (Uninterruptible Power Supply) ......................................... 176
Port Trunking ............................................................................... 177
Offline Files for Windows ............................................................ 179
Accessing from an NFS Client ..................................................... 180
Encrypting Data Transmission ................................................... 184
Encrypting Settings Data ......................................................................184
Encrypting FTP Transfer Data ...............................................................184
8

SSL Keys ..................................................................................................184
SNMP ............................................................................................ 185
Saving and Applying Settings .................................................... 186
Saving Settings ......................................................................................187
Applying Settings ..................................................................................188
Transferring Another TeraStation’s Settings ............................. 189
Creating a Config File (.nas_config) ......................................................189
Transferring Settings .............................................................................190
Restoring Factory Defaults ......................................................... 191
Initializing from Settings ......................................................................191
Initializing with the USB Initialization Drive .......................................191
Resetting the Administrator Password ..................................... 193
Logs .............................................................................................. 193
Displaying TeraStation’s Logs ...............................................................193
Transferring Logs to the Syslog Server ................................................194
Creating a Link to the Logs in the Shared Folder ................................195
Changing Archive Rules for File Access Logs .......................................197
Updating the Firmware ............................................................... 198
Updating Manually ................................................................................198
Updating Automatically ........................................................................199
Configuring Update Notification ............................................... 200
Name, Date, Time, and Language .............................................. 202
Beep Alerts .................................................................................. 204
LCD and LEDs ............................................................................... 205
Proxy Server ................................................................................ 205
Jumbo Frames ............................................................................. 206
Changing the IP Address ............................................................ 208
9

Mapping IP Address and Hostname .......................................... 210
Boot Authentication ................................................................... 211
Notes Before Use ....................................................................................212
Important Notice ...................................................................................212
Setting Up the Authentication Server on a Windows PC ....................212
Configuring Boot Authentication on the TeraStation .........................213
If the TeraStation Cannot Be Accessed .................................................214
Chapter 8 Drive Replacement ................................... 217
Replacing Drives ......................................................................... 217
LEDs ........................................................................................................217
Using a Redundant RAID Mode ............................................................218
Using RAID 0 ........................................................................................... 220
Using JBOD .............................................................................................221
Using a Hot Spare ...................................................................................222
Replacing a Non-Malfunctioning Drive ..................................... 222
Chapter 9 Utilities ...................................................... 224
NAS Navigator2 ........................................................................... 224
Windows .................................................................................................224
macOS .....................................................................................................224
NovaBACKUP ............................................................................... 224
Chapter 10 Appendix ................................................ 225
TeraStation Does Not Work Properly ......................................... 225
Power LED Keeps Blinking ....................................................................225
Booting the TeraStation in Emergency Mode ......................................226
10

Cleaning the Dustproof Filter .................................................... 227
LCD Panel ..................................................................................... 229
Modes .....................................................................................................229
Errors .......................................................................................................230
Status ......................................................................................................231
Default Settings .......................................................................... 233
Specifications .............................................................................. 234
11
Chapter 1 Getting Started
Chapter 1 Getting Started
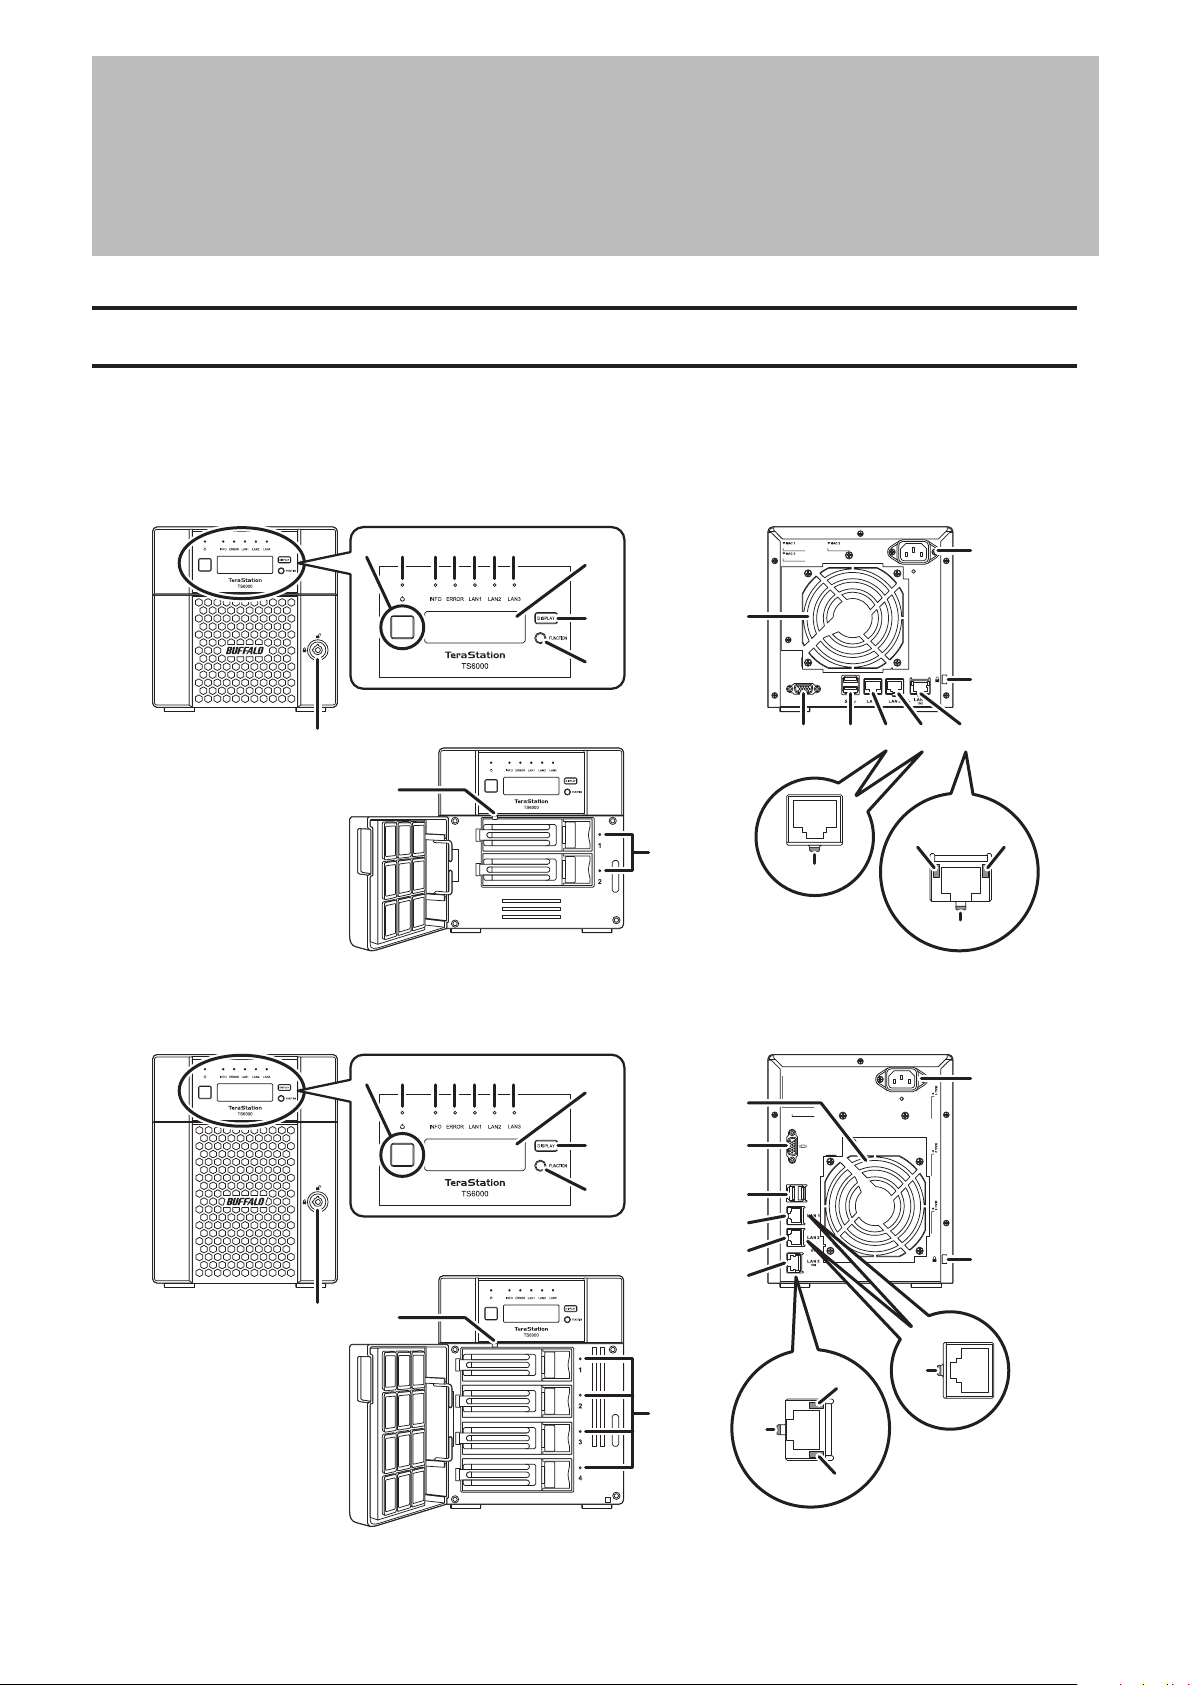
Diagrams
Depending on the number or type of drives in the unit, the model name will be different. Check the sticker on the
packing box for your unit’s model name.
TS6200DN
2
3 4 5 6 71
8
20
TS6400DN
11
12
9
10
13
2
3 4 5 6 71
8
9
10
14
14
15
16
17
18
19
15
24
16 17
21
18 19
25 26
27
20
21
11
12
24
25
13
27
26
12
Chapter 1 Getting Started
TS6400RN
1 122313 22 13 3 4 5 6 7 13 98 1310 16
25
24
26
27
2114 15 23 16 17 18 19 20 14
1 Power Button
To power on, connect the power cable and wait for 10 seconds, then press the power button. To power off,
press and hold down the power button for three seconds.
If the TeraStation beeps, pressing this button for a short period will stop the beeping.
2 Power LED
When the TeraStation is on, the LED glows green.
3 Info LED
If there is a status message, the info LED will light up amber. Check the LCD panel to see the status message.
4 Error LED
If there is an error, the error LED will light up red. Check the LCD panel to see the error message.
5 LAN1 LED
When LAN port 1 is connected, this LED glows green. It blinks when the connection is active.
6 LAN2 LED
When LAN port 2 is connected, this LED glows green. It blinks when the connection is active.
7 LAN3 LED
When LAN port 3 is connected, this LED glows blue. It blinks when the connection is active.
8 LCD Panel
This display shows the status of many TeraStation settings. It also displays errors and messages when available.
9 Display Button
Press to switch between the different display modes. Also, if the TeraStation is beeping, press this button to
stop it.
10 Function Button
Use this button for dismounting USB devices, rebuilding RAID arrays, configuring failover, stopping the
TeraStation’s beeping, and initializing settings using a USB drive.
13

Chapter 1 Getting Started
11 Drive Lock
Open the front panel with the key to replace drives or access the init button.
12 Init Button
Press and hold down this button to initialize the TeraStation’s admin username and password, IP settings, SSL,
and service port restriction settings to their factory default values. The effects of this button can be changed in
Settings.
13 Status LEDs
Normally, these LEDs blink green when drives are accessed. If a drive fails, its LED will turn red.
14 Fan
Spins to prevent overheating inside. Do not block the fan.
15 Not in use.
16 USB Port
Compatible Buffalo USB drives, USB memory devices, and USB UPS connections can be connected. USB hubs
are not compatible.
17 LAN Port 1 (1GbE)
Connect an Ethernet cable to use this port for your network. It is available for communicating at max. 1000
Mbps.
18 LAN Port 2 (1GbE)
Connect an Ethernet cable to use this port for your network. It is available for communicating at max. 1000
Mbps.
19 LAN Port 3 (10GbE)
Connect an Ethernet cable to use this port for your network. It is available for communicating at max. 10 Gbps
if using the included Ethernet or category 6A cable.
Note: To communicate at up to 10 Gbps, all network devices must be compatible with 10GbE.
20 Power Connector
Use the included power cable to connect to a UPS, surge protector, or outlet.
21 Anti-Theft Security Slot
Use this slot to secure your TeraStation with a cable lock (not included).
22 Serial Number
This sticker shows the TeraStation’s serial number.
23 UID Button
Press this button to cycle the blue LED on and off.
24 Link/Act LED
Glows green when the TeraStation is connected to a network. It blinks when the connection is active.
25 Link/Act LED
Glows amber when the TeraStation is connected to a network at 100 Mbps. It blinks when the connection is
active.
14
Chapter 1 Getting Started
26 Link/Act LED
Glows green when the TeraStation is connected to a network at 1000 Mbps, 2.5 Gbps, or 5 Gbps. It blinks when
the connection is active.
27 Link/Act LED
Glows blue when the TeraStation is connected to a network at 10 Gbps. It blinks when the connection is active.
Turning the TeraStation On and Off
Note: Do not disconnect or reconnect the internal drives while turning on or off the TeraStation.
Press the power button on the TeraStation to turn it on.
To turn off the TeraStation, press and hold down the power button for three seconds. Don’t unplug the power cable
without turning the TeraStation off first.
You can also shut down or restart the TeraStation remotely from Settings using the procedure below.
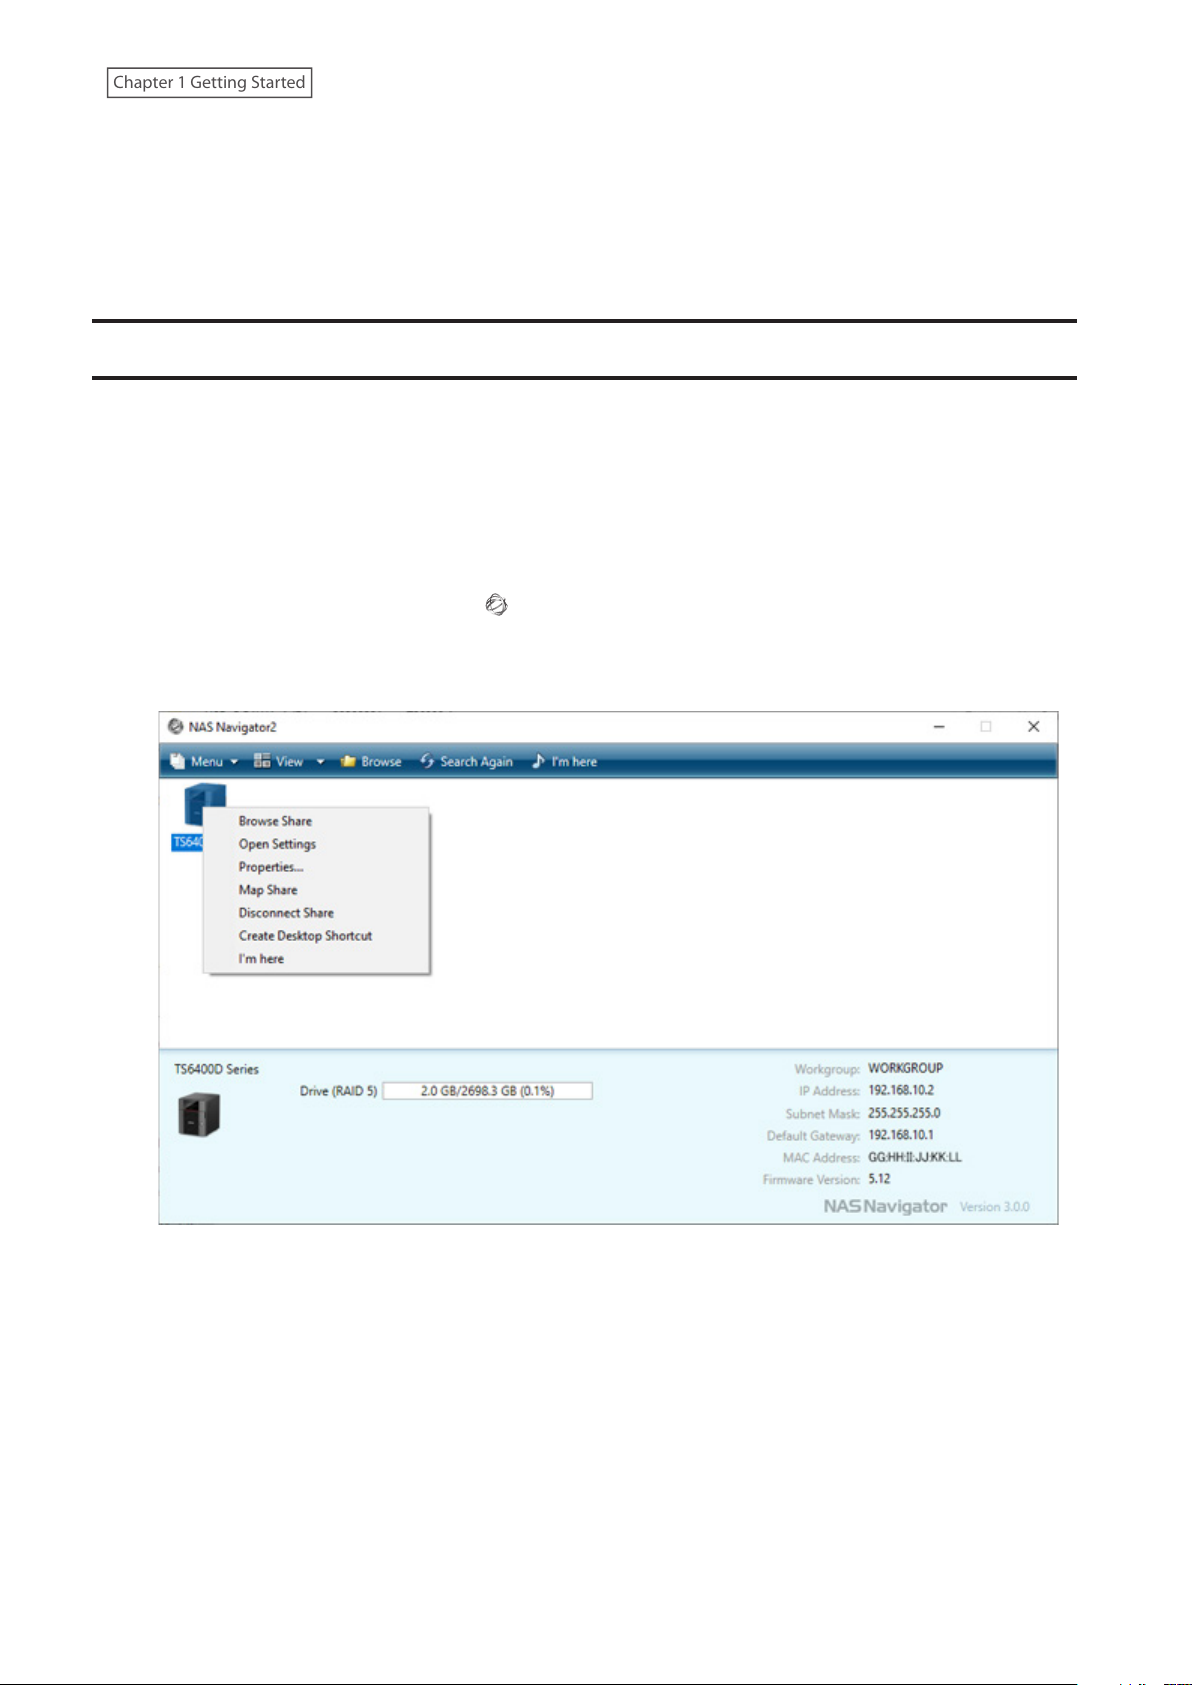
1 Double-click the NAS Navigator2 icon ( ) to start NAS Navigator2.
2 Right-click your TeraStation’s icon and select Open Settings. For macOS, select the TeraStation’s icon while
holding down the control key, then select Open Settings.
15
Chapter 1 Getting Started
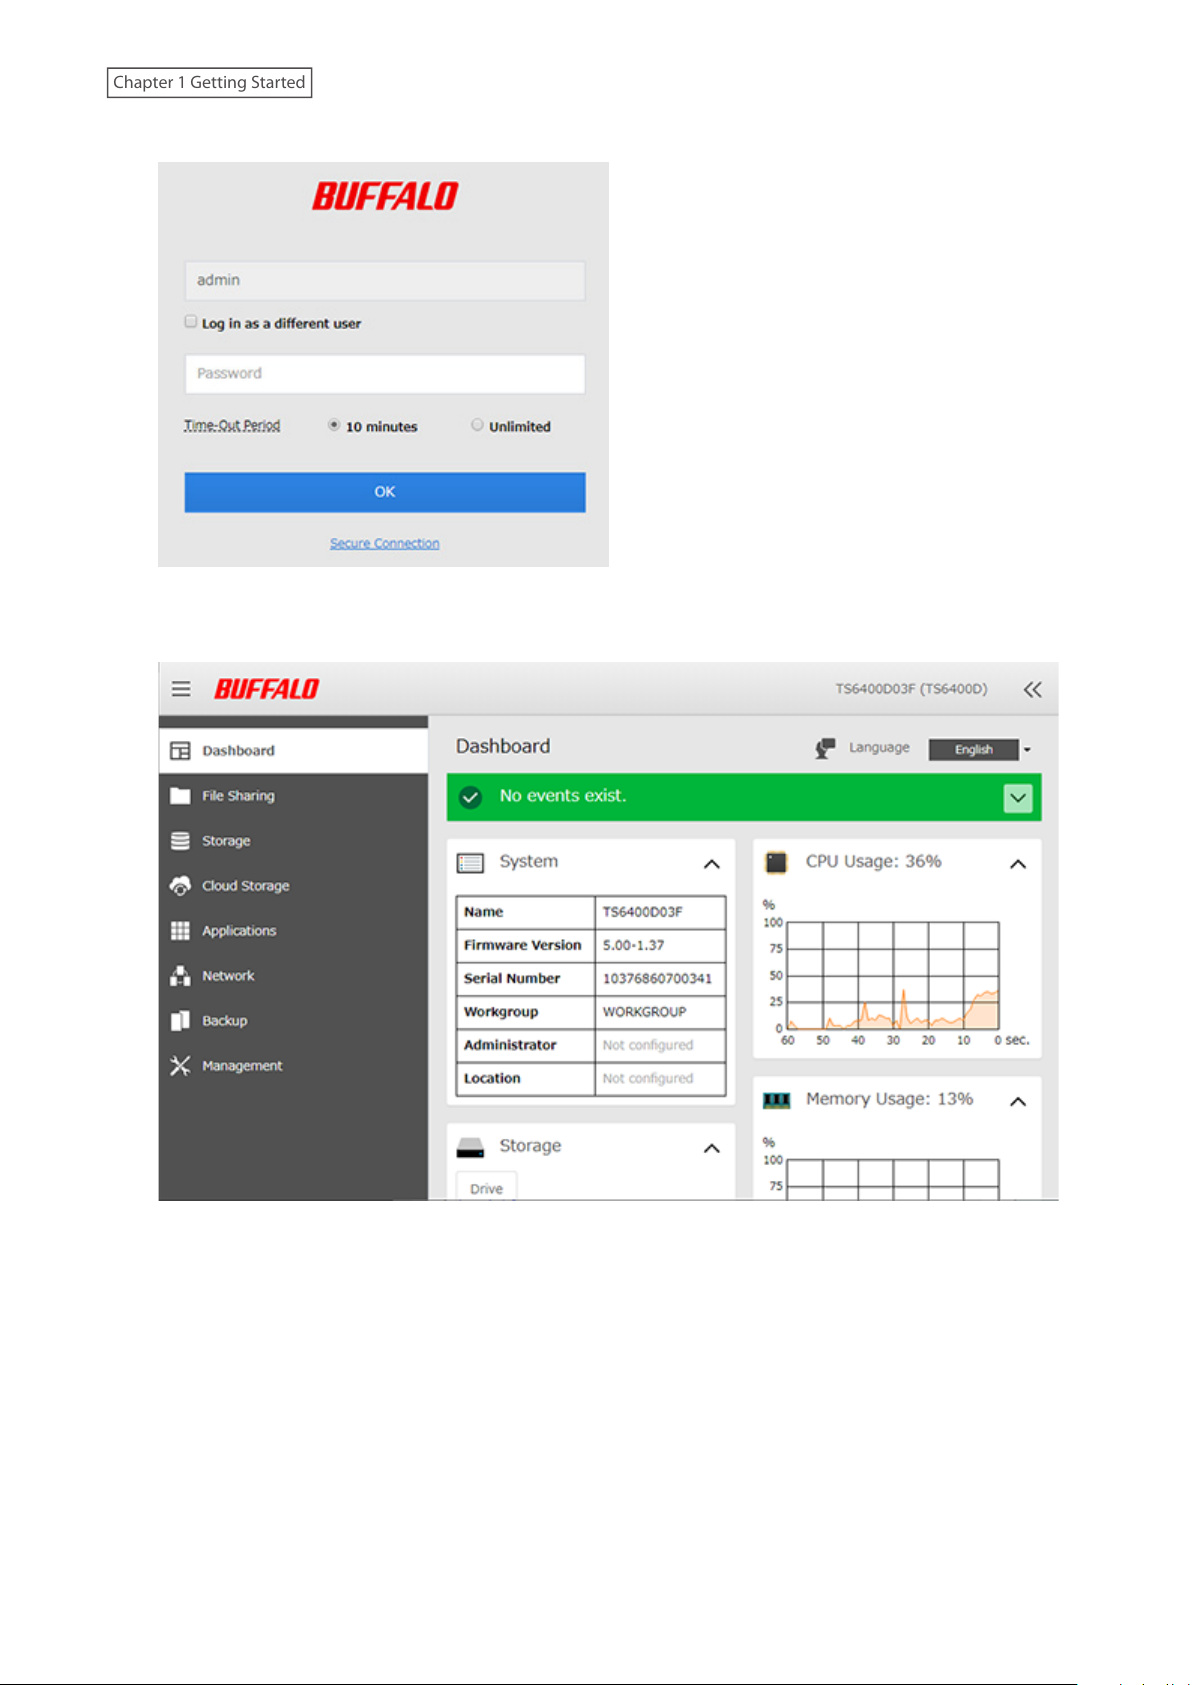
3 Enter the username and password, then click OK.
Note: The default username and password are “admin” and “password”.
4 Settings will open.
16
Chapter 1 Getting Started
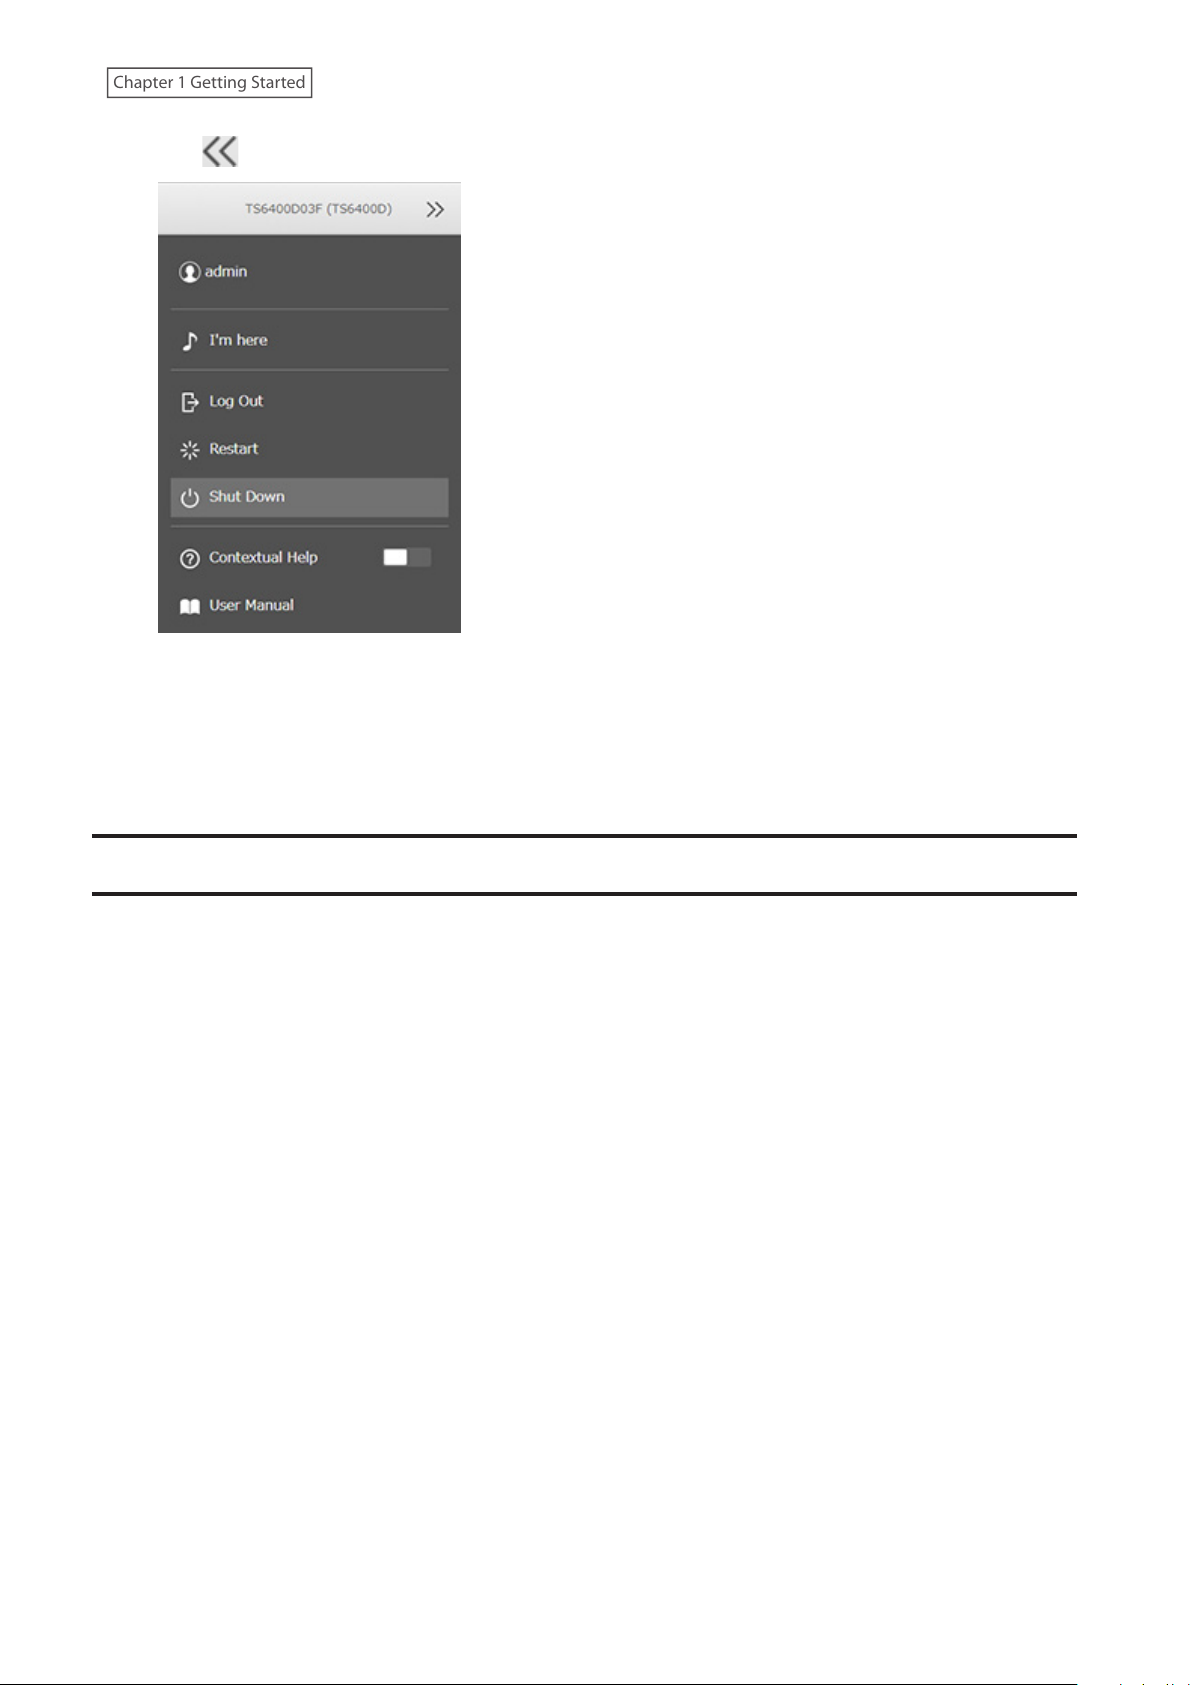
5 Click at the top-right of Settings and choose Shut Down.
6 Click Yes .
7 The “Confirm Operation” screen will open. Enter the confirmation number, then click OK.
When the power LED turns off, the shutdown process is completed.
Re-Inserting Drives
If the E14 or E16 error appears on the LCD panel after initial bootup, follow the procedure below to re-insert the
internal drives.
1 Turn off the TeraStation.
2 Open the front cover with the included key.
3 Push a drive’s unlock button and swing the lock mechanism out.
4 Pull out the drive cartridge and remove it from the TeraStation.
17
Chapter 1 Getting Started
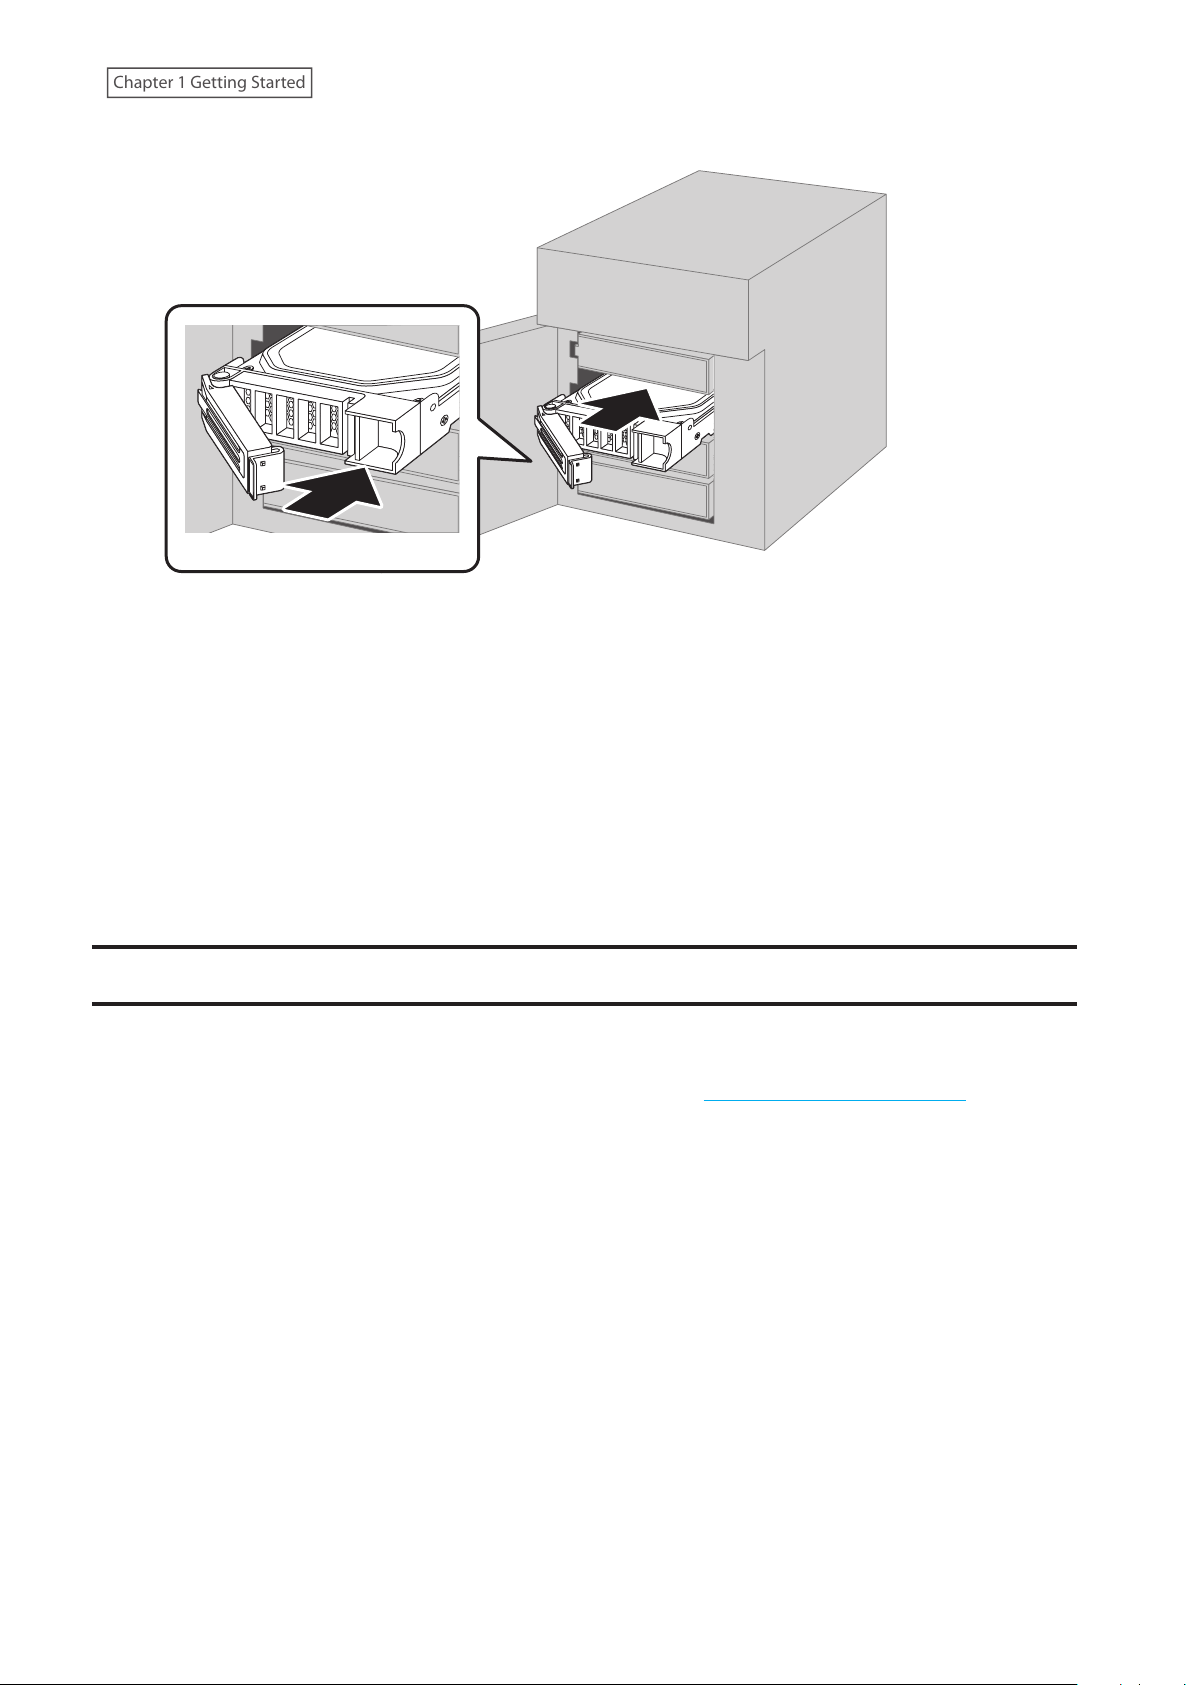
5 Insert the drive back into the same slot with the lock mechanism remaining open.
Push here to insert.
6 Swing the lock back down until it clicks into place.
7 Repeat steps 3–6 for all other installed drives.
8 Once every drive has been re-inserted, close the front cover.
9 Press the power button on the TeraStation.
10 Make sure any error messages have cleared from the LCD panel.
The drives are now inserted properly.
Creating an Initialization Drive
We recommend creating an initialization drive as soon as possible. This USB drive can be used to initialize the
TeraStation’s settings to its factory default values or recover the system if your TeraStation encounters an error that
prevents the unit from booting. For the detailed procedure, refer to the “Creating an Initialization Drive” subsection
in chapter 7.
18
Chapter 2 Configuration
Chapter 2 Configuration
Configure and manage your TeraStation using the Settings interface, accessible from a browser window. Open the
interface using the procedure below or type the TeraStation’s IP address into the URL field of your browser.
Note: Microsoft Edge, Firefox, Google Chrome, Internet Explorer 9 or later, and Safari 9 or later are supported. If you
have difficulty viewing Settings, check the following:
• If there are a large number of registered users, groups, or shared folders, use another browser instead of Internet
Explorer.
• If you have a proxy server enabled in the browser settings, configure the exception settings for Settings or disable
the proxy server.
• With Internet Explorer, set security to Local intranet. On Windows Server operating systems, higher-level security
is configured by default. Set the security to a lower level temporarily.
Configuring Settings via Setup Wizard
When you access Settings for the first time, or after initializing the TeraStation’s settings, the setup wizard will
automatically appear to help you configure several TeraStation settings, such as RAID mode and proxy server
settings.
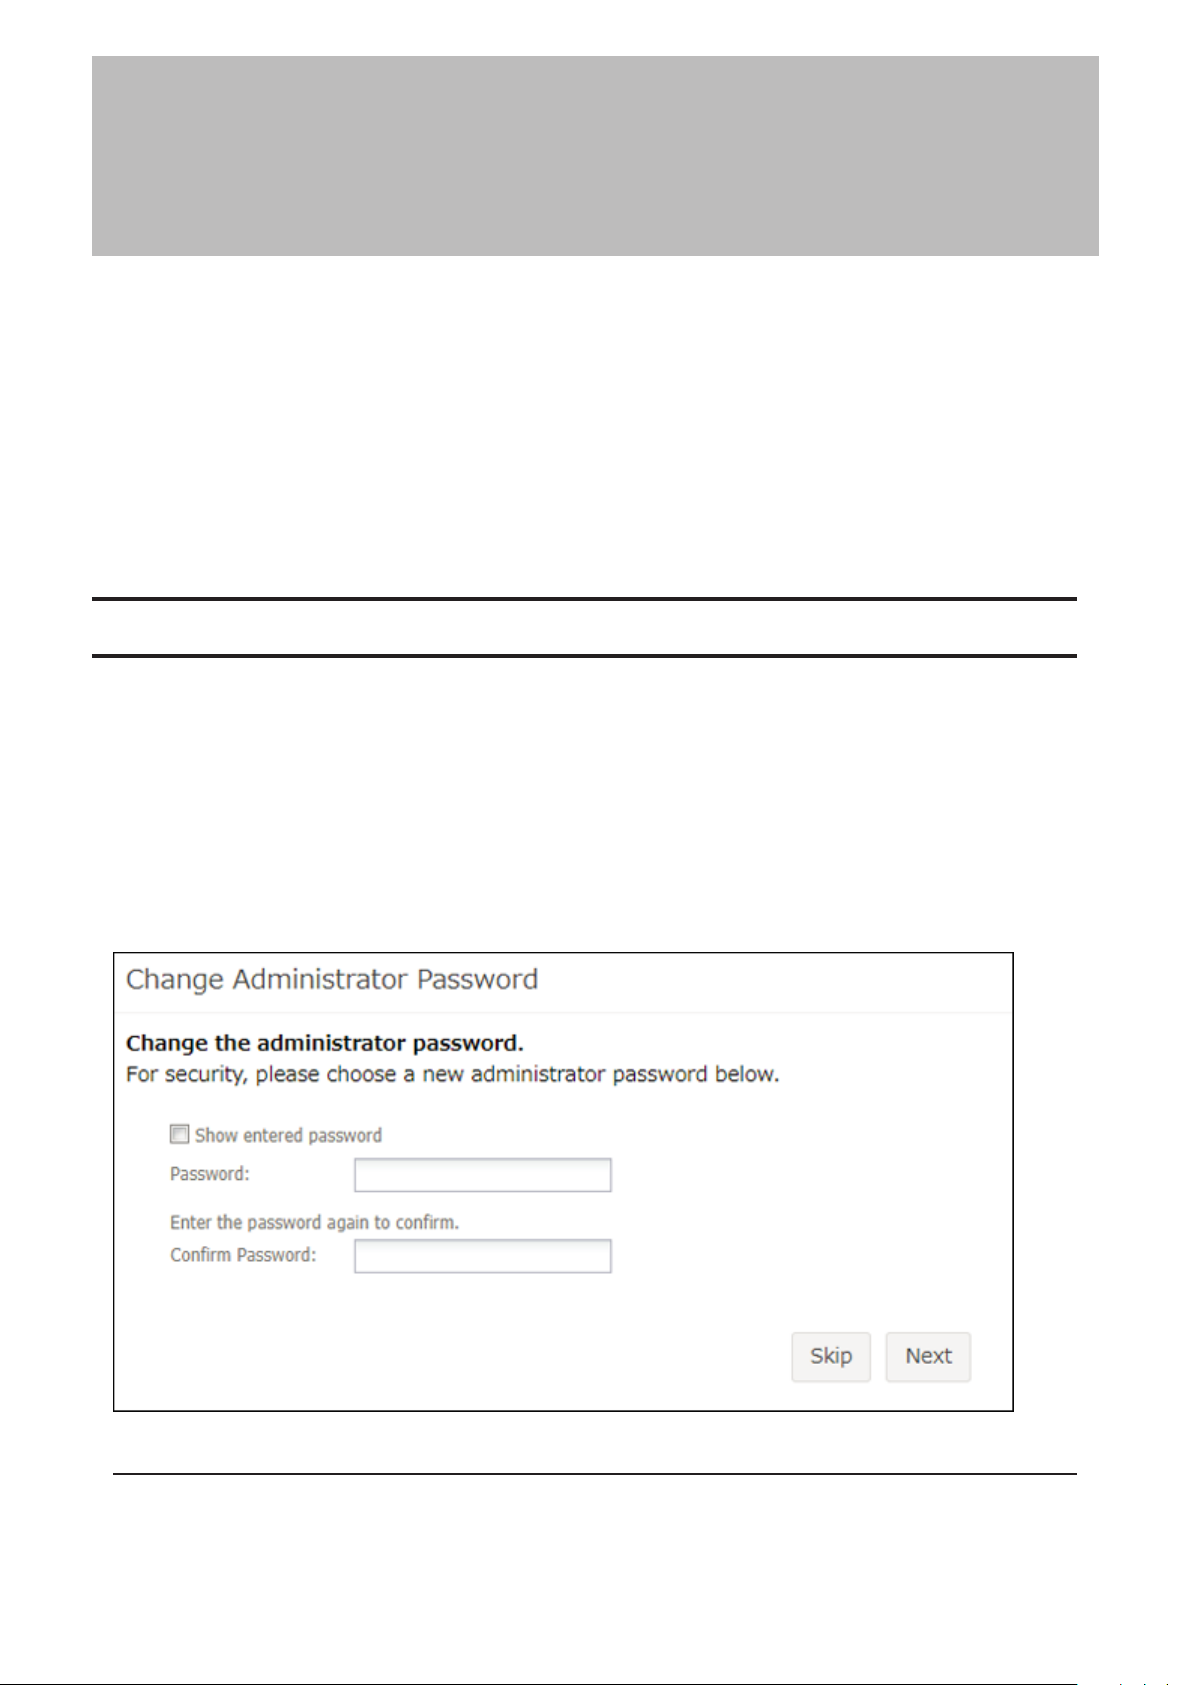
An example screen of the setup wizard is displayed below. Step through the wizard to configure any desired
settings. If there is any setting you would like to configure later, click Skip to move to the next setup wizard screen,
or click Cancel to exit the wizard.
Example of Setup Wizard Screen
Opening Setup Wizard
You may run the setup wizard even after the initial setup or initialization. To launch the setup wizard again, follow
the procedure below.
19
Chapter 2 Configuration
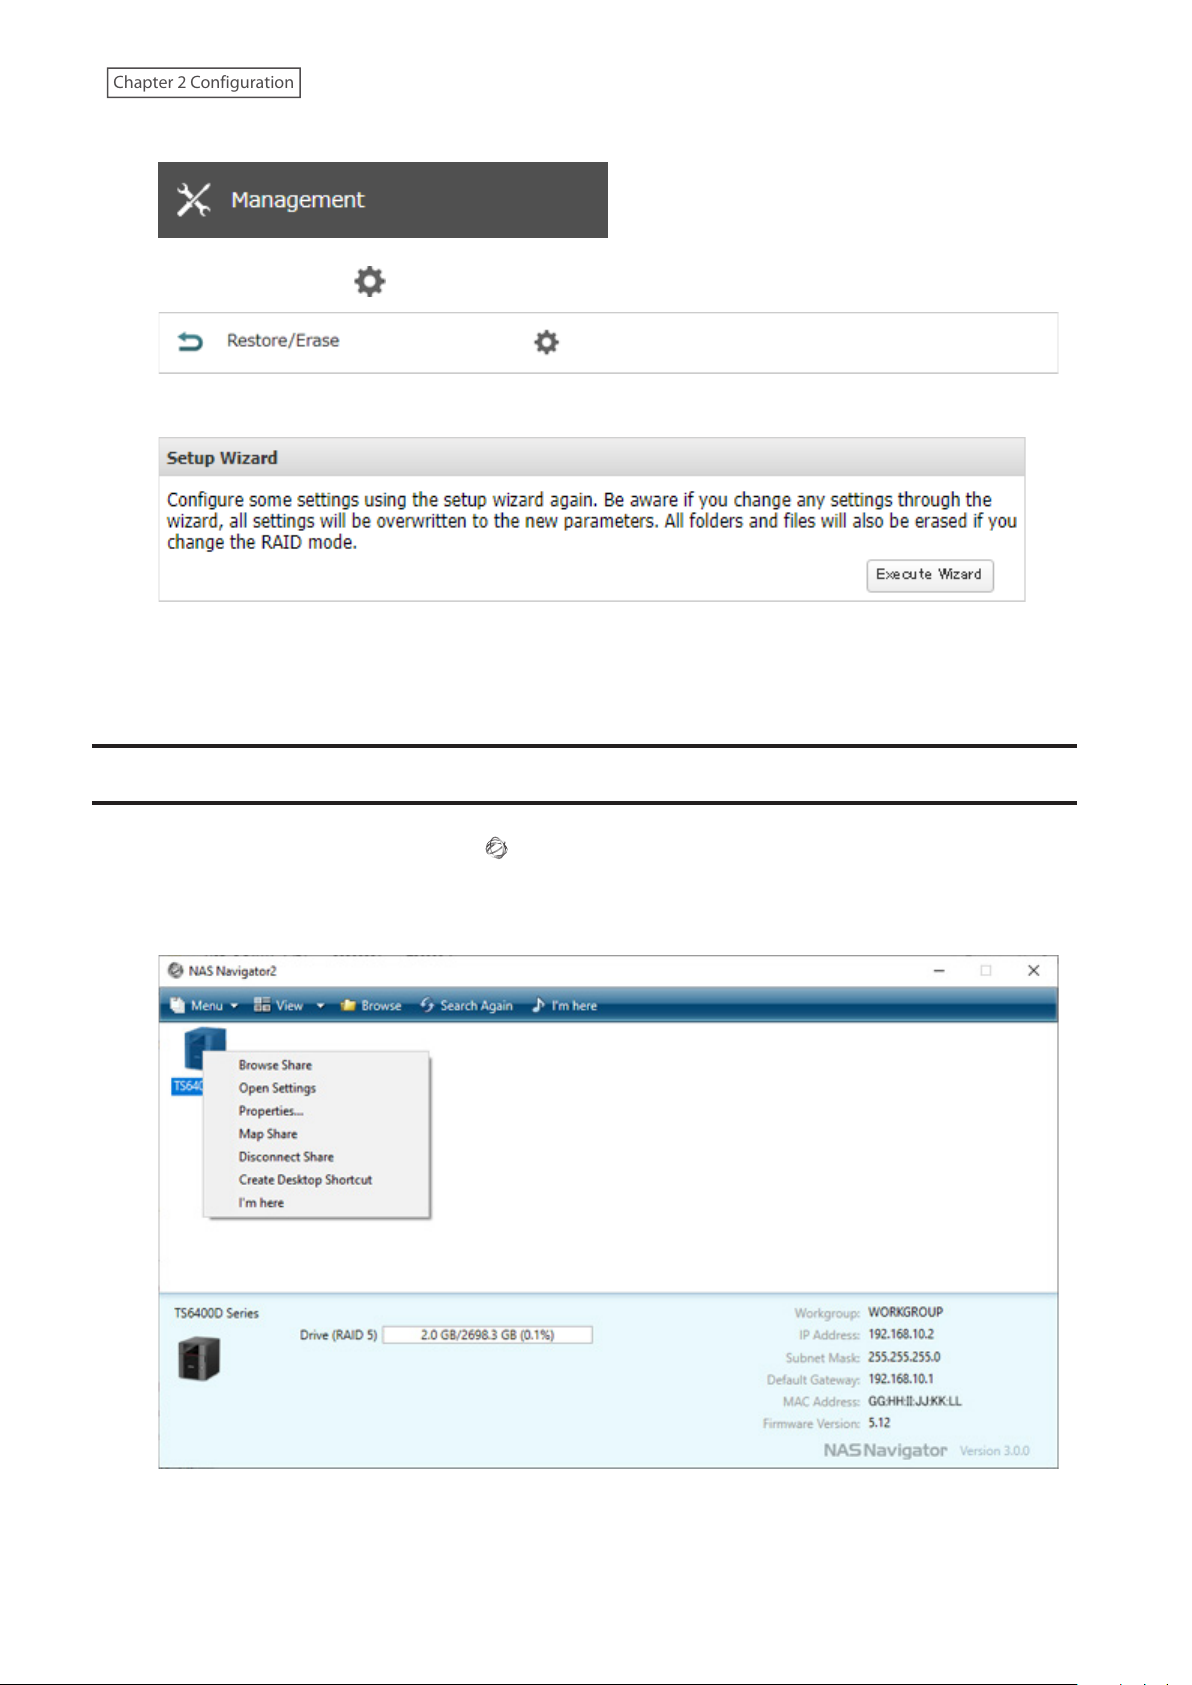
1 From Settings, click Management.
2 Click the settings icon ( ) to the right of “Restore/Erase”.
3 Click Execute Wizard.
4 The “Confirm Operation” screen will open. Enter the confirmation number, then click OK.
5 Follow the procedure on the screen and finish the setup wizard.
Opening Settings
1 Double-click the NAS Navigator2 icon ( ) to start NAS Navigator2.
2 Right-click your TeraStation’s icon and select Open Settings. For macOS, select the TeraStation’s icon while
holding down the control key, then select Open Settings.
20
Chapter 2 Configuration
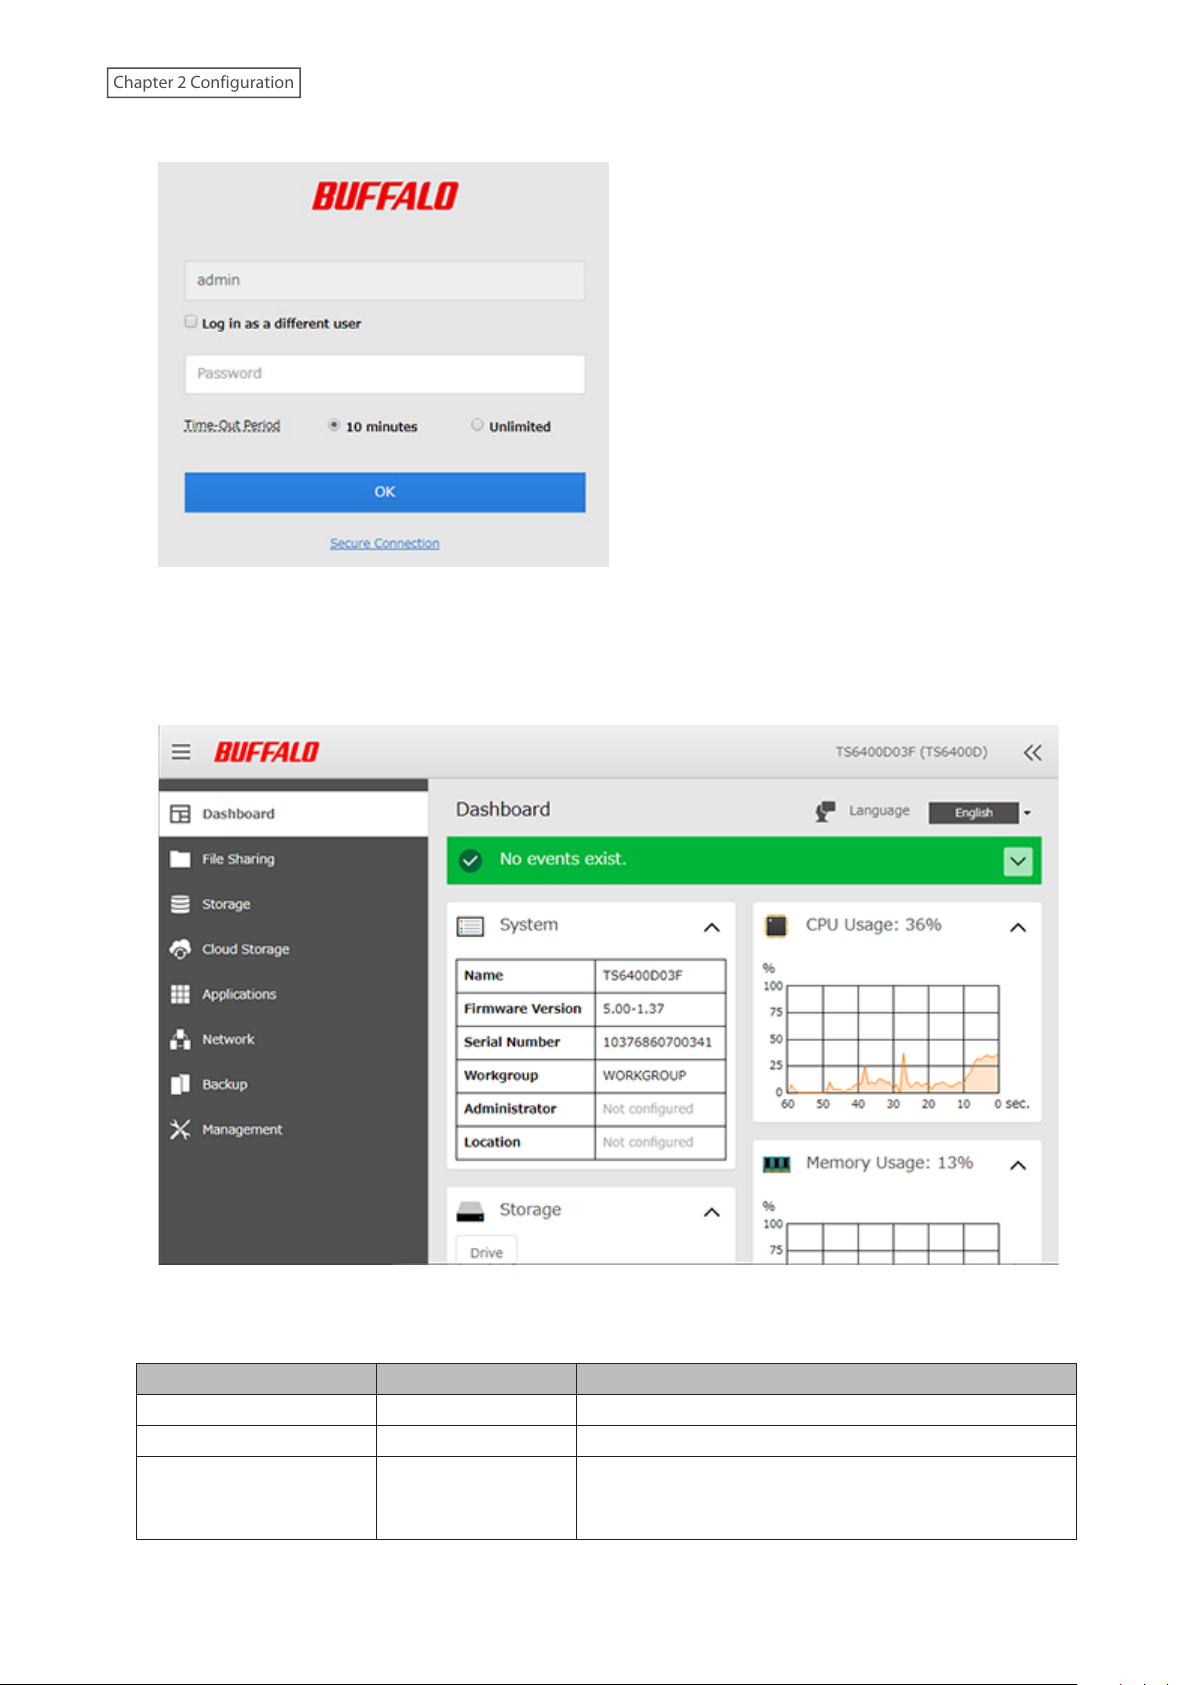
3 Enter the username and password, then click OK.
Notes:
• If the time-out period is set to “10 minutes”, you will be logged out of Settings after 10 minutes of inactivity.
• Click Secure Connection to log in using an encrypted connection.
4 Settings will open.
Notes:
• Username/Password Combinations:
Username Password Settings Available
admin (default) password (default) All
guest blank Guest user information
Your username Your password
If a user is assigned as an administrator, all settings are
available. If assigned to another group, only changing the
password of logged-in users is available.
21
Chapter 2 Configuration
• Click at the top-right of Settings and choose I'm here to have the TeraStation beep so it can be located easily.
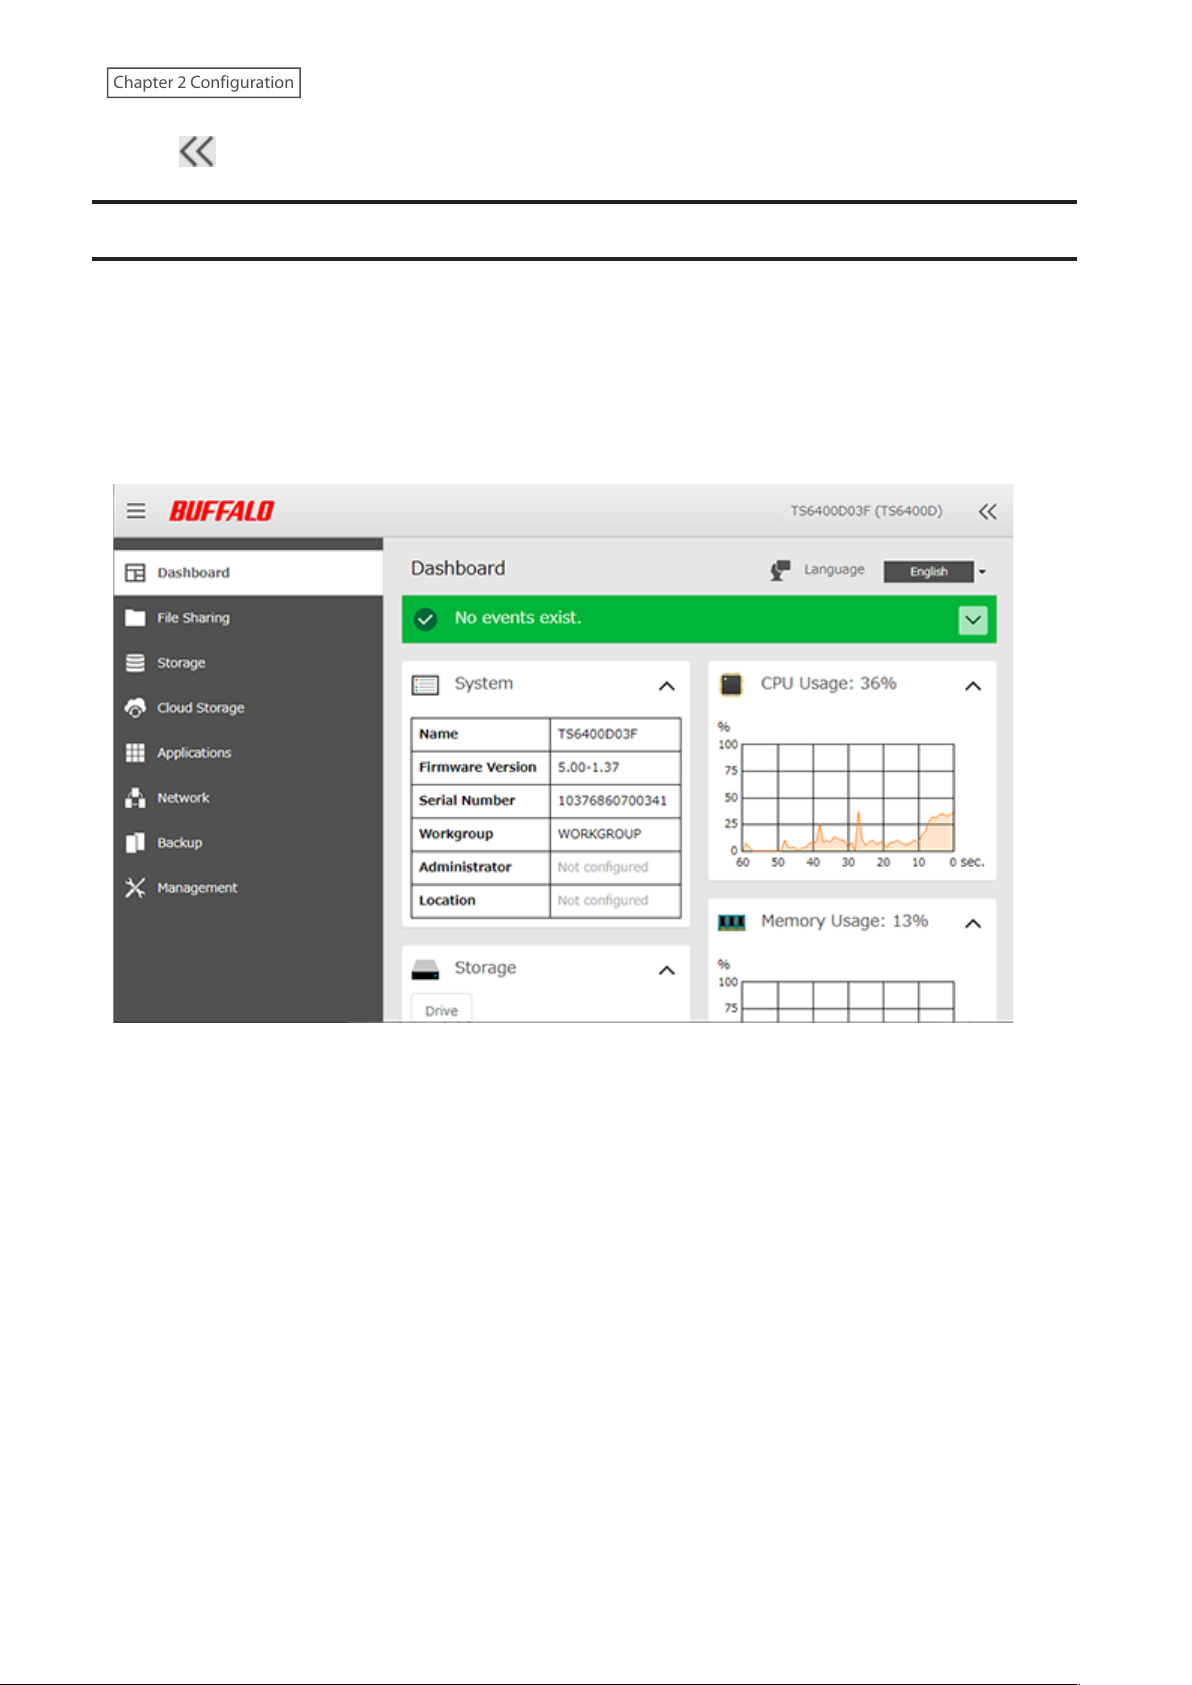
Checking the Device Information from Dashboard
When opening the Settings interface, the Dashboard page will appear first. Dashboard will show the following
device information:
• Notices, such as information events and errors
• System information, such as hostname, firmware version, IP address, etc.
• Drive information, such as used space of internal drives, LVM volumes, iSCSI volumes, etc.
• CPU and system memory usage
• Network information, such as IP address, link speed, sent and received rates, etc.
Notes:
• If the number of files on the TeraStation increases, it will also raise the memory usage of the TeraStation. This
memory usage will decrease after a certain period of time passes. To reduce the memory usage immediately, try
the following operations:
◦ Restarting the TeraStation.
◦ Dismounting the USB drive.
• If there is not enough free space on the TeraStation, it may cause abnormal system behavior. Make sure that there
is always at least 1 GB or larger of free space on the TeraStation.
22

Chapter 3 File Sharing
Chapter 3 File Sharing
You can create users and groups to access the shared folders on the TeraStation and configure access restrictions to
limit access to key data.
Configuring Shared Folders
Adding a Shared Folder
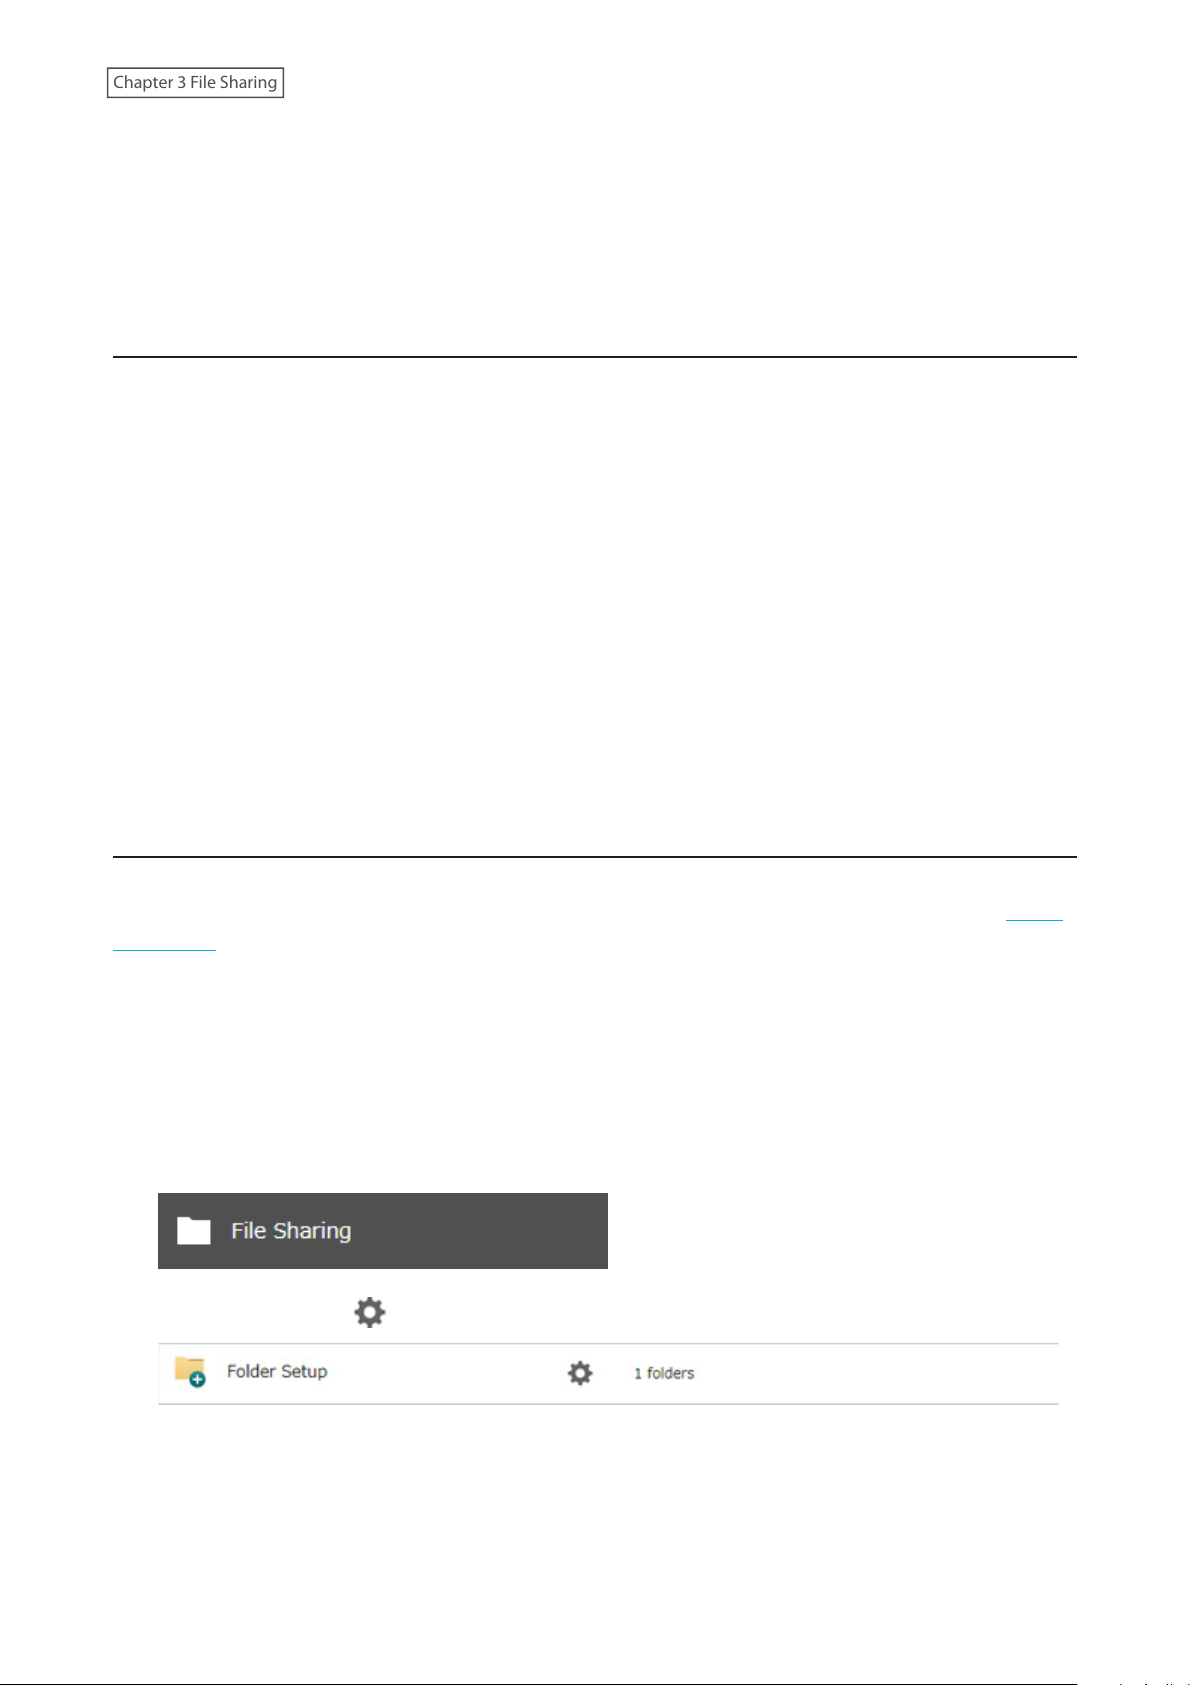
1 From Settings, click File Sharing.
2 Click the settings icon ( ) to the right of “Folder Setup”.
3 Click Create Folder.
23
Chapter 3 File Sharing
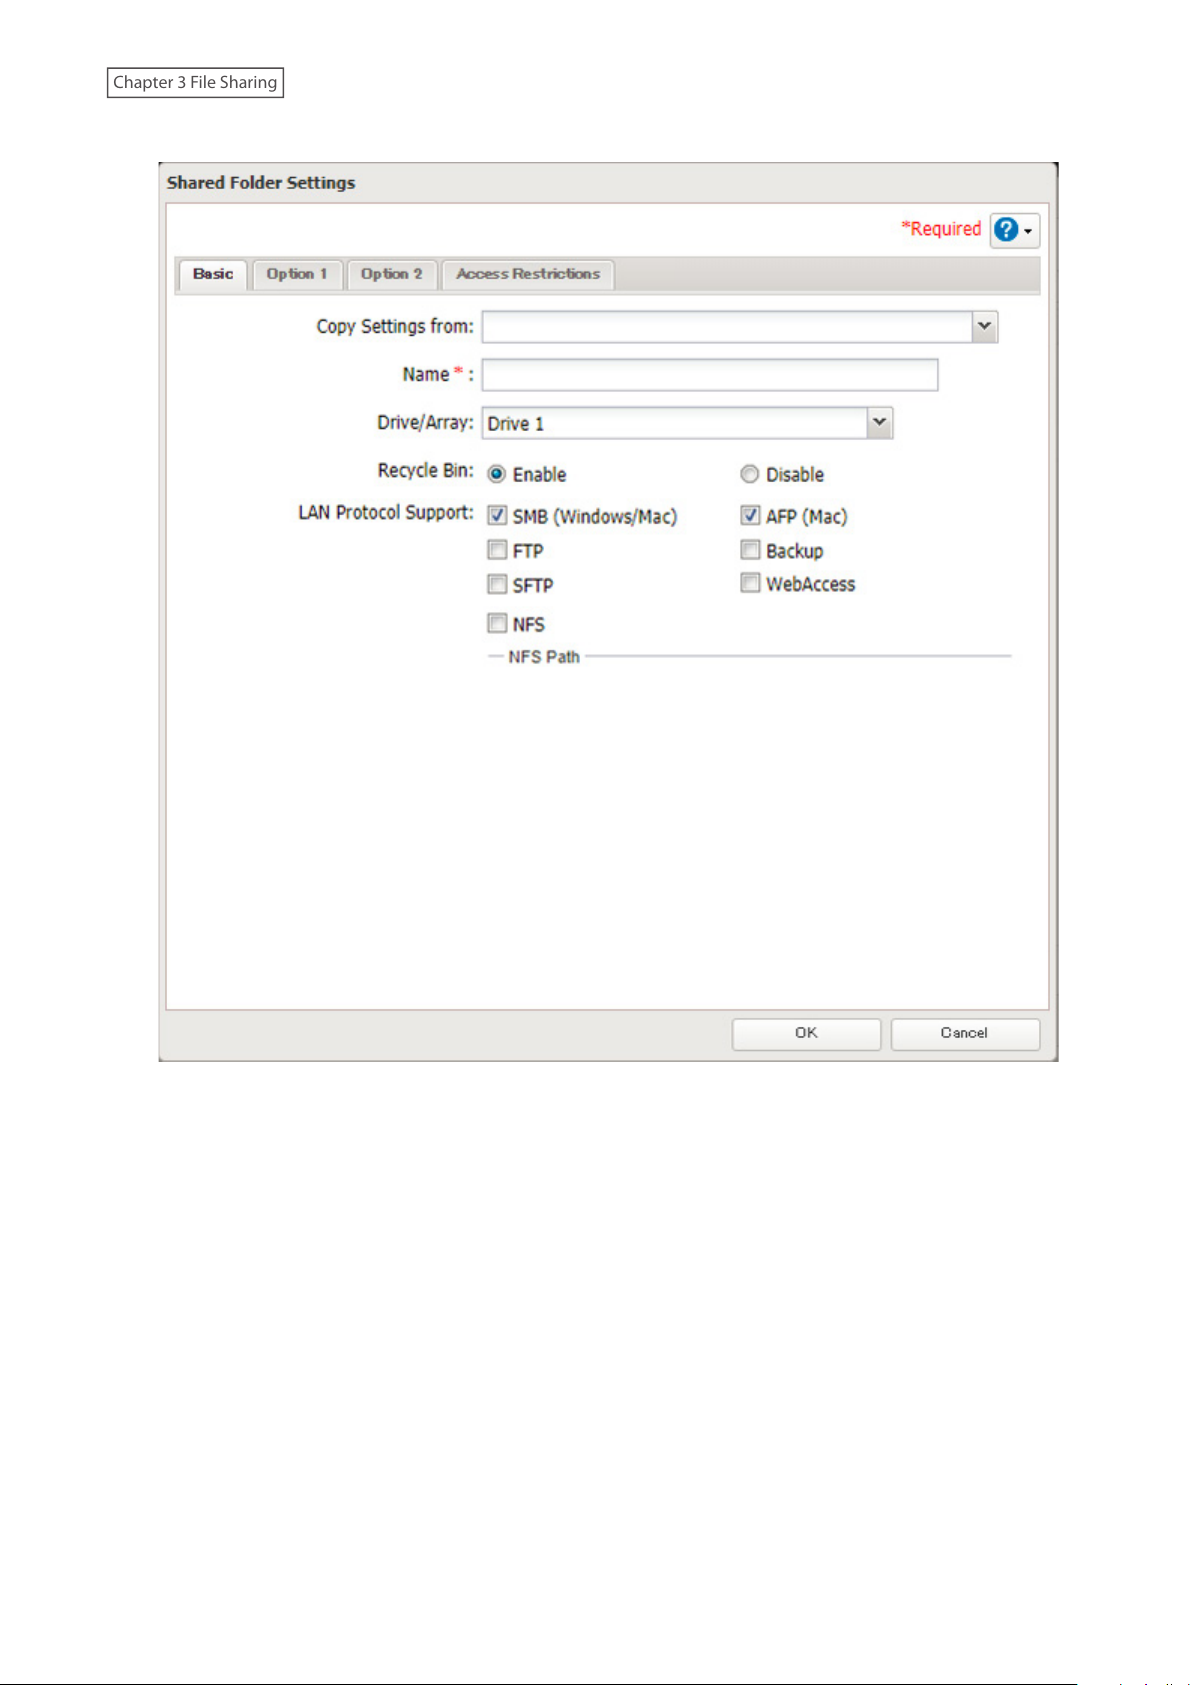
4 Configure the desired settings, then click OK.
Notes:
• Names may contain up to 27 alphanumeric characters, hyphens (-), and underscores (_). Multibyte characters are
supported. The first character should not be a symbol.
• When you click the Option 1 tab, you can enter the folder description. Descriptions may contain up to 75
alphanumeric characters, hyphens (-), underscores (_), and spaces. Multibyte characters are supported. The first
character should not be a space.
• You may create up to 400 shared folders.
• If the names of shared folders accessed via AFP and FTP connections contain multibyte characters, configure the
client language in Management > Name/Time/Language to match the characters. If the setting does not match,
the shared folder name will not be displayed correctly.
• The following characters are handled differently by macOS and Windows devices. Avoid using these characters
when sharing data between macOS and Windows devices:
― ~ ∥ - ¢ £ ¬
• Windows does not support some characters that macOS and the TeraStation allow. If you create a filename on
a Mac using any of the following symbols, it will not display correctly on a Windows computer. You may have to
connect to the TeraStation via AFP in order to display or copy files that contain these symbols in their filenames.
24
Chapter 3 File Sharing
? ] [ / \ = + > < ; : " , | *
• Do not use a name already in use as an iSCSI volume name; do not use any of the following words for the name
of a shared folder as these words are reserved for internal use by the TeraStation: authtest, global, homes,
info, lost+found, lp, msdfs_root, mt-daapd, printers, ram, spool, usbdisk x (where “x” is a number, for example:
usbdisk1)
• Don’t use the following unsupported characters in shared folder names, workgroup names, or filenames:
①②③④⑤⑥⑦⑧⑨⑩⑪⑫⑬⑭⑮⑯⑰⑱⑲⑳ⅠⅡⅢⅣⅤⅥⅦⅧⅨⅩ
ⅰⅱⅲⅳⅴⅵⅶⅷⅸⅹ㎜㎝㎞㎎㎏㏄㎡№㏍℡㊤㊥㊦㊧㊨㈱㈲㈹㍾㍽㍼㍻㍉㌔㌢㍍㌘㌧㌃㌶㍑㍗㌍㌦㌣㌫㍊
㌻¦'"〝〟∮Σ∟⊿
纊褜鍈銈蓜俉炻昱棈鋹曻彅丨仡仼伀伃伹佖侒侊侚侔俍偀倢俿倞偆偰偂傔僴僘兊兤冝冾凬刕劜劦勀勛匀匇匤
卲厓厲叝﨎咜咊咩哿喆坙坥垬埈埇﨏塚增墲夋奓奛奝奣妤妺孖寀甯寘寬尞岦岺峵崧嵓﨑嵂嵭嶸嶹巐弡弴彧德
忞恝悅悊惞惕愠惲愑愷愰憘戓抦揵摠撝擎敎昀昕昻昉昮昞昤晥晗晙晴晳暙暠暲暿曺朎朗杦枻桒柀栁桄棏﨓楨
﨔榘槢樰橫橆橳橾櫢櫤毖氿汜沆汯泚洄涇浯涖涬淏淸淲淼渹湜渧渼溿澈澵濵瀅瀇瀨炅炫焏焄煜煆煇凞燁燾犱
犾猤猪獷玽珉珖珣珒琇珵琦琪琩琮瑢璉璟甁畯皂皜皞皛皦益睆劯砡硎硤硺礰礼神祥禔福禛竑竧靖竫箞精絈絜
綷綠緖繒罇羡羽茁荢荿菇菶葈蒴蕓蕙蕫﨟薰蘒﨡蠇裵訒訷詹誧誾諟諸諶譓譿賰賴贒赶﨣軏﨤逸遧郞都鄕鄧釚
釗釞釭釮釤釥鈆鈐鈊鈺鉀鈼鉎鉙鉑鈹鉧銧鉷鉸鋧鋗鋙鋐﨧鋕鋠鋓錥錡鋻﨨錞鋿錝錂鍰鍗鎤鏆鏞鏸鐱鑅鑈閒隆
﨩隝隯霳霻靃靍靏靑靕顗顥飯飼餧館馞驎髙髜魵魲鮏鮱鮻鰀鵰鵫鶴鸙黑畩秕緇臂蘊訃躱鐓饐鷯
• File and folder names may contain up to 255 single-byte characters.
• Folder and workgroup names whose names contain non-Roman characters may not be displayed correctly.
• If shared folders are accessed from a Mac, information files for the Mac may be generated automatically. Do not
delete these files. If they are deleted from a Windows device, this may prevent further access from a Mac.
• The TeraStation belongs to the default zone in AppleShare; the zone cannot be specified.
• When files are copied to the TeraStation or to a USB drive connected to the TeraStation, file information such as
date created, date modified, and other date information may be updated or changed.
• During a file transfer, if settings are changed, the file transfer operation may be aborted.
• File copying to the TeraStation is protected by a journaling file system. If the Ethernet cable is disconnected or a
power outage occurs while copying data, the following may occur:
◦ Preset data such as the TeraStation name, users, and groups may be erased.
◦ An incomplete file may be copied and the file can no longer be deleted. If this happens, restart the
TeraStation, delete the file, and perform the copy operation again.
• If the Ethernet cable is disconnected from the LAN port during file copying, even if the cable is not in use, the
copy operation will abort. Do not disconnect or reconnect the Ethernet cable to the LAN port during file copying.
Recycle Bin
To protect your data from accidental deletion, you may configure your TeraStation to use a recycle bin instead of
deleting files immediately. The recycle bin will only work with SMB connections. To empty the recycle bin, click File
Sharing > Folder Setup > Empty Recycle Bin in Settings. The recycle bins in all shared folders will be deleted.
Notes:
• You can prevent guests and other users from emptying the trash by navigating to File Sharing > SMB and select
“Administrator only” for the “Recycle Bin Permissions” option.
• If you use macOS, select “Keep when original file is deleted” for the “macOS Temp Files” option by navigating to
File Sharing > SMB. If this setting is changed, files in the recycle bin may be corrupted.
Read-Only Shares
By default, new shares are set with read and write access, but you may change the attribute to read-only. Follow the
procedure below to change the shared folder attribute to read-only.
1 From Settings, navigate to File Sharing > Folder Setup and choose a shared folder.
2 Click the Option 2 tab and change the “Attribute” option to “Read only”, then click OK.
25
Chapter 3 File Sharing
Read-only shares and HFS Plus-formatted USB drives will have “(Read Only)” added to comments in File Explorer.
Notes:
• Configure the share attribute only through Settings. Configuring folder attributes through Windows is not
supported and may cause unexpected behavior.
• To set a read-only share or USB drive to another attribute, follow the procedure above and change the attribute in
step 2 from “Read only” to another attribute.
Hidden Shares
If a shared folder becomes hidden, it will not be displayed under Network, and only certain users will be allowed to
access it. To hide a shared SMB folder, follow the procedure below.
1 From Settings, navigate to File Sharing > Folder Setup and choose a shared folder to make hidden.
2 Click the Option 2 tab and select the “Hidden share (SMB only)” checkbox, then click OK.
Notes:
• If protocols other than “SMB (Windows/Mac)” or “Backup” under “LAN Protocol Support” on the Basic tab are
enabled, the hidden shares option will be grayed out and cannot be selected.
• Configure hidden share attribute in Settings. Configuring them from within Windows is not supported and may
cause unexpected behavior.
To access a hidden folder, open File Explorer in your computer and enter “\\TeraStation name\shared folder name$\”
into the address bar. For example, if the TeraStation name is “TSXXX001” and the shared folder name is “share”, enter
“\\TSXXX001\share$\” to open it.
Quotas
You can set a quota for each shared folder, as well as a threshold alert where you will receive an email notification if
the space used exceeds the configured threshold. To configure email notifications for the quota, refer to the “Email
Notification” section in chapter 7.
Notes:
• When using quotas, disable the recycle bin or empty the trash folder often. The limited space includes the space
used for trash.
• Quotas cannot be set for external drives connected to the TeraStation.
Follow this procedure to limit the shared folder space available for a user.
1 From Settings, click File Sharing.
2 Click the settings icon ( ) to the right of “Folder Setup”.
3 Select the shared folder that will be given a quota.
4 Click the Option 1 tab.
26
Chapter 3 File Sharing
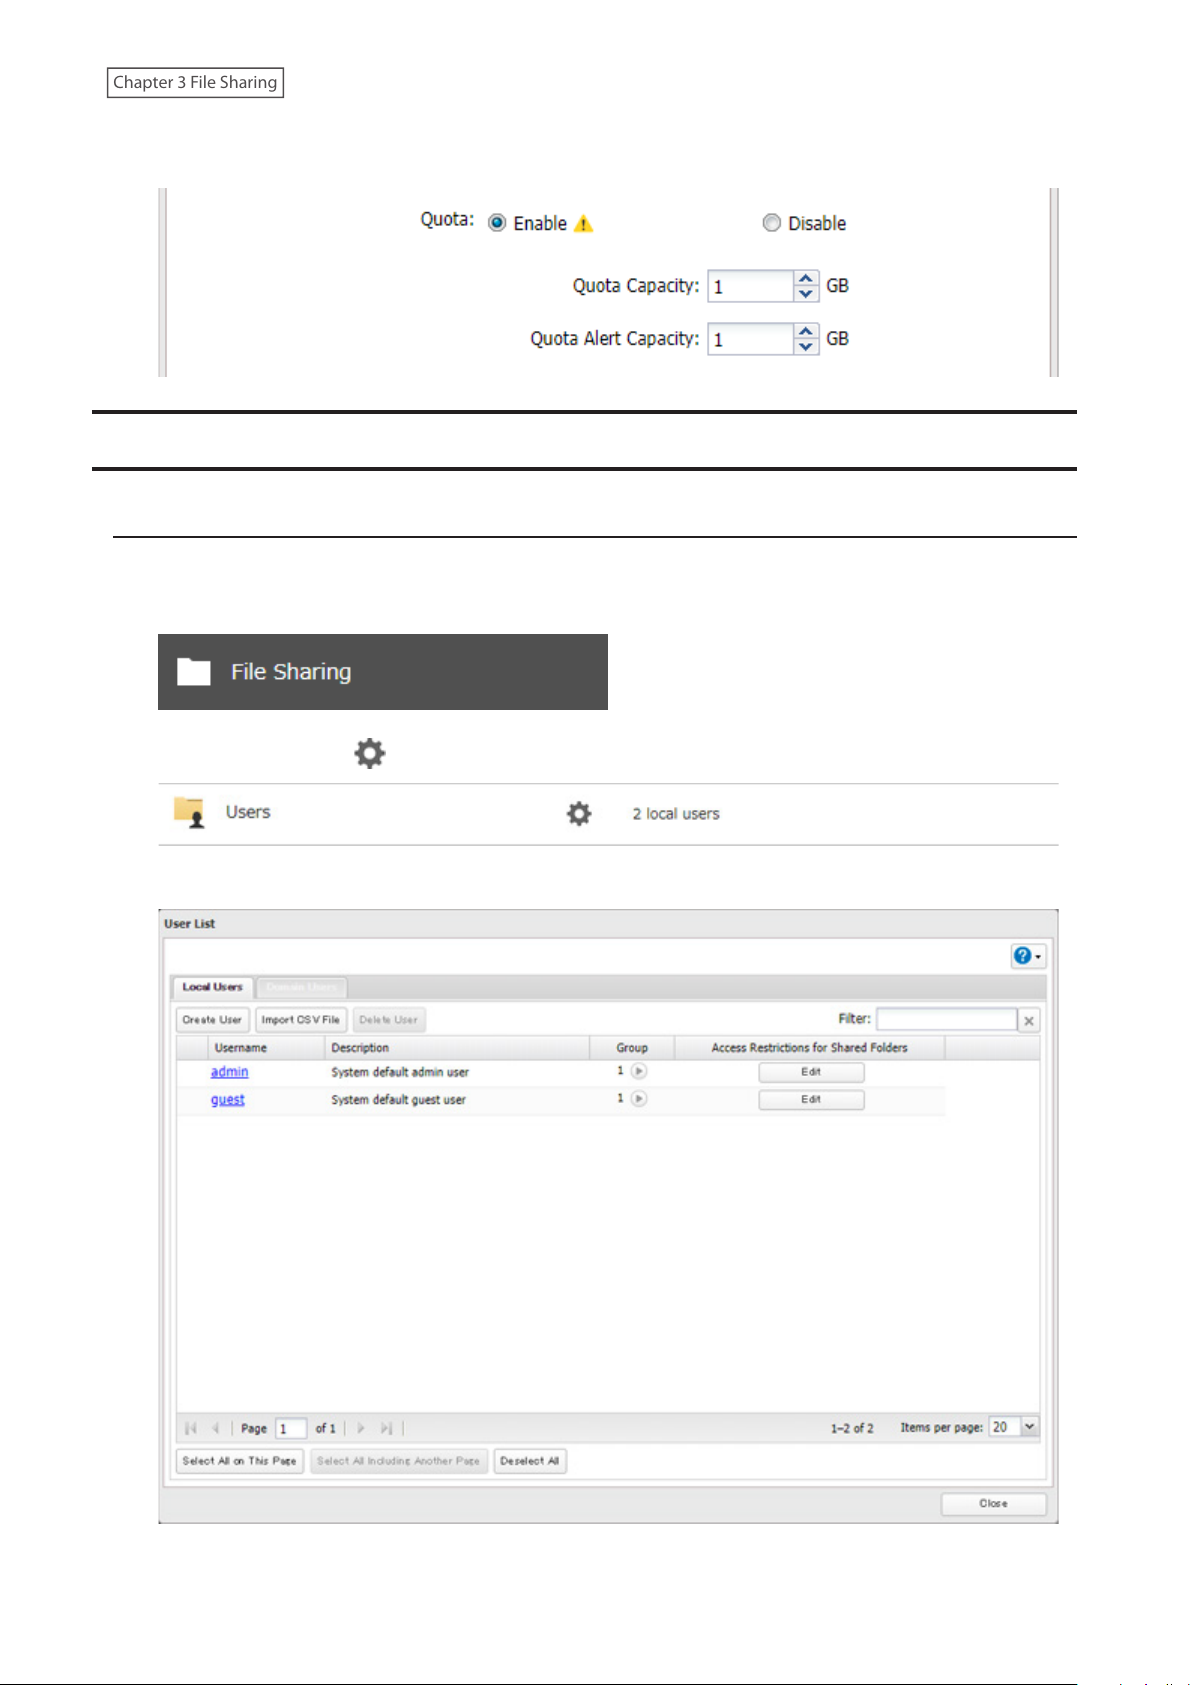
5 Enable quotas, choose the alert and the maximum amount of space the user will be allowed to use, and click
OK.
Configuring Users
Adding a User
Note: The TeraStation can register a maximum 300 of users, which include the default users “admin” and “guest”.
1 From Settings, click File Sharing.
2 Click the settings icon ( ) to the right of “Users”.
3 Click Create User.
27
Chapter 3 File Sharing
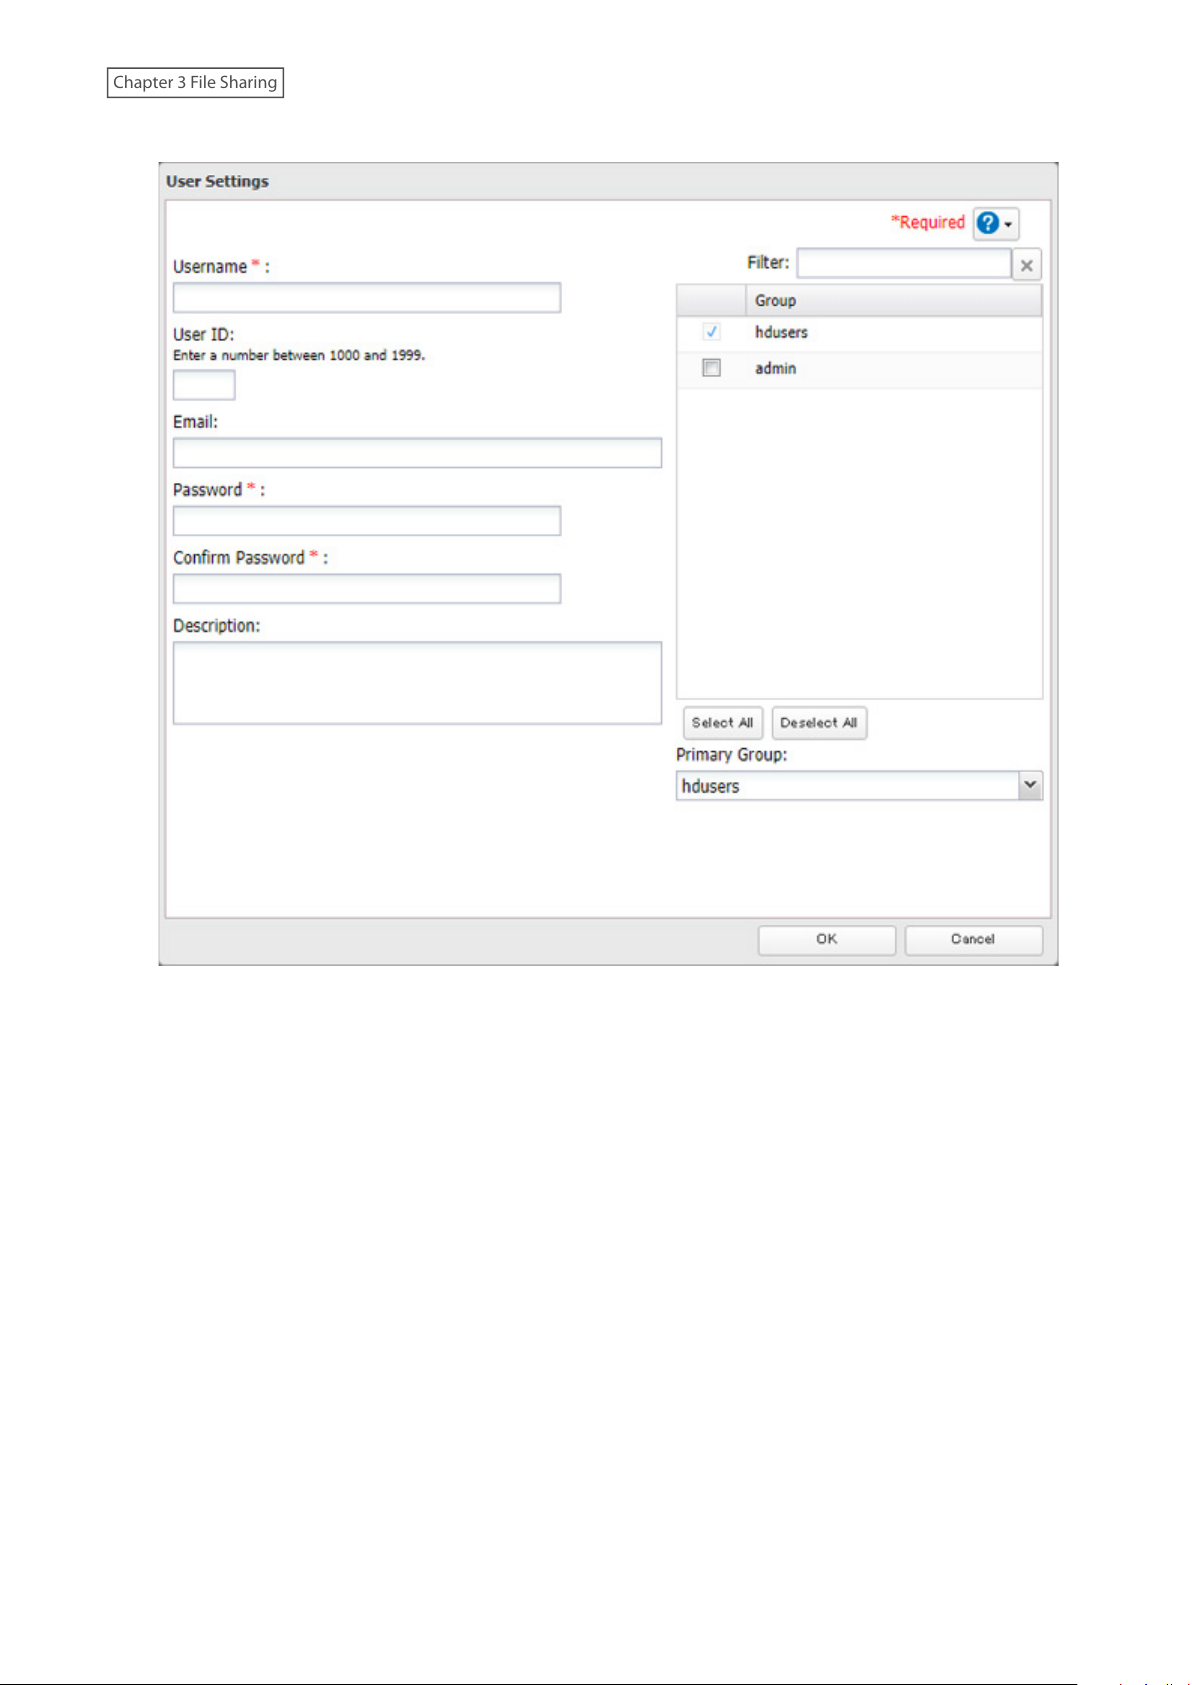
4 Enter the desired settings, then click OK.
Notes:
• Usernames may contain up to 128 alphanumeric characters, hyphens (-), underscores (_), periods (.), and the
symbols ! # & @ $ * ^ %. The first character should not be a symbol.
• The user ID should be a number from 1000 to 1999. Each user ID should be unique. If this field is left blank, a user
ID is assigned automatically.
• Do not duplicate user IDs, group IDs, usernames, or group names. Each should be distinct and unique.
• User descriptions may contain up to 75 alphanumeric characters, hyphens (-), underscores (_), and spaces.
Multibyte characters are supported. The first character should not be a symbol or space.
• Passwords may contain up to 20 alphanumeric characters, hyphens (-), underscores (_), spaces, commas (,),
periods (.), semicolons (;), tildes (~), and the symbols @ ! $ & * + : = ? ] [ ^ } { \. The first character should not be a
symbol unless it is an underscore.
• Use the same username and password for both Windows and the TeraStation or you may be unable to access
shared folders.
• Do not use a name already in use as a group; do not use any of the following words as a username as these
words are reserved for internal use by the TeraStation: _lldpd, adm, admin, administrator, admins, all, apache,
avahi, avahi-autoipd, backup, bin, crontab, daemon, dialout, dip, disk, ftp, ftpuser, fuse, gnats, guest, guests, halt,
hdusers, irc, kmem, libuuid, list, lp, mail, man, messagebus, mysql, netdev, news, nobody, nogroup, none, ntp,
openldap, operator, plugdev, proftpd, proxy, puppet, root, rpc, rpcuser, sambashare, sasl, shadow, shutdown,
snmp, splx, src, ssh, sshd, staff, statd, sudo, sync, syslog, tmhttpd, tty, users, utmp, uucp, winbindd_priv, www,
www-data
28
Chapter 3 File Sharing
Importing User Information
You can import users in File Sharing > Users by clicking Import CSV File.
An example format for user data: Username (required), password (required), and user description (optional).
Example 1: Importing usernames, passwords, and comments
username1,password1,comment1
username2,password2,comment2
username3,password3,comment3
Example 2: Importing usernames and passwords
username1,password1,
username2,password2,
username3,password3,
Guidelines:
• Use commas (,) as separators. Do not put spaces before or after commas. If you don’t want user descriptions, use
a comma after the password at the end.
• If a line is in an incorrect format, the username entered on that line will not be registered.
• If an unavailable name is used by a user or if the username already exists, an error will occur and cancel the
import process. User whose usernames were entered during or after the error occurs will not be imported.
• Do not use commas (,) in the username, password, or user description.
Note: Imported users are added to the “hdusers” group automatically.
Adding a Group
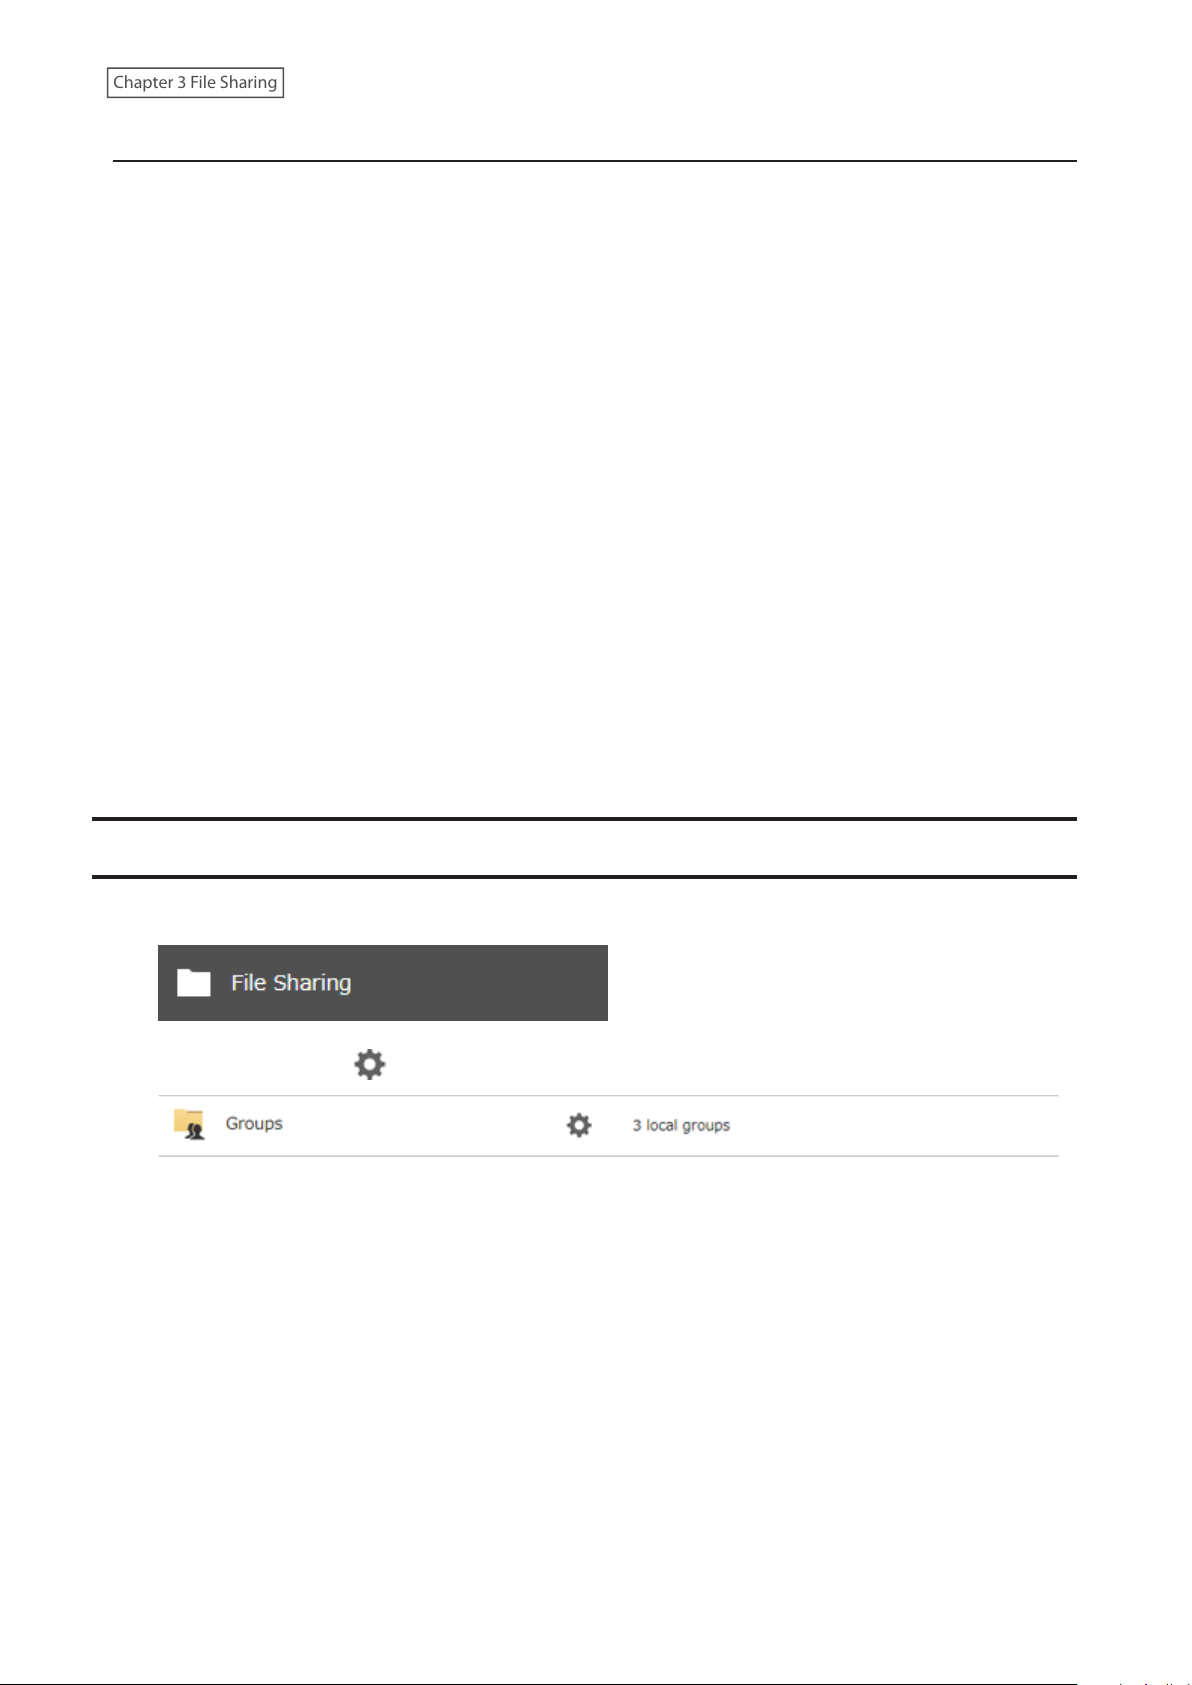
1 From Settings, click File Sharing.
2 Click the settings icon ( ) to the right of “Groups”.
29

Chapter 3 File Sharing
3 Click Add Group.
30

Chapter 3 File Sharing
4 Enter the desired settings, then click OK.
Notes:
• Group names may contain up to 20 alphanumeric characters, hyphens (-), underscores (_), and periods (.). The
first character should not be a symbol.
• Group descriptions may contain up to 75 alphanumeric characters, hyphens (-), underscores (_), and spaces.
Multibyte characters are supported. The first character should not be a symbol or space.
• If the group ID field is left blank, a group ID is automatically assigned. Use numbers between 1000 and 1999 to set
a group ID manually. Don’t use duplicate group IDs.
• You may register up to 300 groups with the TeraStation.
• If you are logged in as a member of the general users group, you can change only your own password. If you’re
logged in as an administrator, you can change any setting, including other users’ passwords. If you are logged in
as a member of the power users group, you can create and edit shared folders, users, and groups.
• Do not use a name in use as a user; do not use any of the following words as a group name as these words are
reserved for internal use by the TeraStation: _lldpd, adm, admin, administrator, admins, all, apache, avahi, avahiautoipd, backup, bin, crontab, daemon, dialout, dip, disk, ftp, ftpuser, fuse, gnats, guest, guests, halt, hdusers,
irc, kmem, libuuid, list, lp, mail, man, messagebus, mysql, netdev, news, nobody, nogroup, none, ntp, openldap,
operator, plugdev, proftpd, proxy, puppet, root, rpc, rpcuser, sambashare, sasl, shadow, shutdown, snmp, splx, src,
ssh, sshd, staff, statd, sudo, sync, syslog, tmhttpd, tty, users, utmp, uucp, winbindd_priv, www, www-data
31

Chapter 3 File Sharing
Configuring Access Restrictions for Shared Folders
You may restrict access to specific shared folders, including external USB drives.
Notes:
• Shared folders with limited access can still be used as backup destinations.
• If you grant both read-only and read and write access to the users or groups, the attributes will become as below:
Group with read and
write access
User with read and write
access
User with read-only access R R R
User with no access R/W R -
R/W: Read and write, R: Read-only, -: No access
R/W R R/W
Group with read-only
access
Group with no access
Local Users and Groups
1 From Settings, click File Sharing.
2 Click the settings icon ( ) to the right of “Folder Setup”.
3 Click the shared folder that you want to set access restrictions for.
32

Chapter 3 File Sharing
4 Click the Access Restrictions tab.
5 Enable “Access Restrictions for Shared Folders”.
6 Select the level of access for the user or group.
: Read and write : Read-only : No access
7 Click OK.
Note: The example above shows access restrictions by users. To restrict access by group, click the Local Groups tab
and select group permissions.
Active Directory
If there is an Active Directory environment, the TeraStation will use account information from the Active Directory
domain controller to set access restrictions for TeraStation’s shared folders. There is no need to perform individual
account management for the TeraStation. If multiple TeraStations are installed on the network, the account
information is centrally managed in Active Directory, greatly reducing the operations required for installation and
management.
Notes:
• If usernames or group names from Active Directory include multibyte characters, you will not be able to
configure access restrictions for them.
• The TeraStation supports a domain environment with a maximum of 10,000 users and groups.
1 From Settings, click Network.
2 Click the settings icon ( ) to the right of “Workgroup/Domain”.
33

Chapter 3 File Sharing
3 Click Edit.
4 Select “Active Directory”, then click Next.
5 Enter the domain controller information and click Search. The domain controller on the same network will
be detected and required settings will be entered into each field automatically. Alternatively, you can also
manually enter the settings.
6 If there is a difference of more than five minutes between the TeraStation’s clock and the domain controller’s
clock, joining the domain or authenticating domain users and groups may fail. For best results, select
“Configure domain controller as an NTP server” if the domain controller can function as the NTP server.
7 Click OK.
8 Click the settings icon ( ) to the right of “Folder Setup”.
34

Chapter 3 File Sharing
9 Click the shared folder that you want to set access restrictions for.
10 Click the Access Restrictions tab.
11 Enable “Access Restrictions for Shared Folders”.
12 Select the level of access for the user or group.
: Read and write : Read-only : No access
13 Click OK.
Notes:
• To have the TeraStation join an Active Directory domain, configure it to use a DNS server that can resolve names
for the Active Directory domain.
• After building an Active Directory domain, the administrator password for joining the domain must be changed
at least once, or joining the Active Directory domain will fail.
• The DNS name and NetBIOS name of Active Directory domains should be identical.
• If the TeraStation is a member server of an Active Directory domain, you cannot connect as a guest user via AFP.
• If your TeraStation is a member server in an Active Directory domain and you change the authentication method
to “Workgroup”, the account on the domain controller will not be deleted automatically.
• If FTP is enabled, local and domain group access restrictions from the AD network do not work. Use user access
restrictions instead.
• If you allow read and write or read-only access for most users, group access restrictions are recommended.
• Depending on the domain controller’s policy settings, the domain controller may force the TeraStation to leave
the Active Directory domain. If this occurs, the TeraStation will lose the domain users and groups so if you have
configured access restrictions using domain accounts, these users will no longer be able to access shared folders.
35

Chapter 3 File Sharing
In such a case, change the policy settings on the domain controller or let the TeraStation join the Active Directory
domain again.
Configuring Access Restrictions for Subfolders
You may restrict access to subfolders in shared folders by configuring access permissions from your computer using
Windows File Explorer.
Notes:
• Depending on the environment, the function may not work properly even if it’s enabled. We recommend
verifying the functionality before using.
• Access permissions configuring from File Explorer is available for up to 18 files and 24 folders. This number of
available access permissions may vary if access permissions are inherited from the parent object.
The number of available access permissions are not many so using group access permissions is recommended
if the permission level is the same to the multiple users; it will save spending the number of available access
permissions.
Enabling Subfolders’ Access Restrictions
1 From Settings, click File Sharing.
2 Click the settings icon ( ) to the right of “Folder Setup”.
36

Chapter 3 File Sharing
3 Click the shared folder that you want to set access restrictions for.
4 Clear all checkboxes for “LAN Protocol Support” other than “SMB (Windows/Mac)”, “Backup”, and “NFS”.
5 Click the Option 2 tab.
6 Enable “Access Restrictions for Subfolders”.
Note: If “Hide Non-Access Permitted Files and Folders” is enabled, non-access permitted sub-files and folders
will not be displayed in shared folders.
7 Click OK.
Enabling subfolders’ access restrictions finished. Next, configure access permissions for each user or group to files
and folders in subfolders from File Explorer.
37

Chapter 3 File Sharing
You may also configure access permissions for domain users and groups. You should have the TeraStation join your
Active Directory domain before configuring access permissions from File Explorer.
Notes:
• If enabling subfolders’ access restrictions for a USB drive, the drive should be formatted using Btrfs, XFS, or ext3.
• To back up files to a backup destination with access permission settings of files and folders in subfolders
unchanged, make sure that the same workgroup name, user IDs, and group IDs are configured between the
backup source and destination.
• If you enable subfolders’ access restrictions and then clear the “Read & execute” checkbox under “Allow” on File
Explorer for users or groups access permissions, these users or groups cannot be allowed to read and execute
even if subfolders’ access restrictions are disabled in Settings. If you deny reading and executing on the same
window, this will remain after disabling subfolders’ access restrictions.
• If the TeraStation’s settings have been initialized but you configure the same UID and GID for new users and
groups, access permissions to files and folders in subfolders may be inherited.
Restoring Owner and Permission Settings
If you changed the owner to an unexpected user or accidentally lost permissions to a specific folder, restore them by
following the procedure below.
1 From Settings, click File Sharing.
38

Chapter 3 File Sharing
2 Click the settings icon ( ) to the right of “Folder Setup”.
3 Click Advanced Settings for Subfolders.
39

Chapter 3 File Sharing
4 Select a folder to restore permissions from the tree.
Note: If you select a root shared folder from the tree, the action will not be run to the recycle bin. To run the
action, select the recycle bin instead.
5 Select the actions and action range to run, then click OK.
6 The “Confirm Operation” screen will open. Enter the confirmation number, then click OK.
40

Chapter 4 Storage Management
Chapter 4 Storage Management
RAID Modes
TeraStations support many types of RAID. The type of RAID arrays available for use depends on how many drives are
installed in your TeraStation.
Notes:
• If you change the RAID mode, all data on the array is deleted. This is true for every procedure in this chapter.
Always back up any important data before performing actions that affect your RAID array.
• Some RAID arrays allow you to change the RAID mode without losing data by adding drives. To change a RAID
mode by adding drives to the existing array, refer to the “Expanding RAID Capacity Without Deleting Data” section
below.
• Drive capacity is displayed in Settings in actual gigabytes. The Properties window in Windows may show GiB
instead, which will be a smaller number.
• If the TeraStation is restarted or shut down while changing the RAID mode, the message that appears on the LCD
panel will change from I46 or I47 to I18.
• RAID 5, 6, or 10 are only available for TeraStations with three or more drives inserted. Please check Settings on
your model before changing the RAID mode.
RAID 6
RAID 6 arrays are available for TeraStations with four or more drives. RAID 6 combines four or more drives into a
single array. The usable space is equal to the sum of the capacity of all drives minus the capacity of two drives. For
example, if four drives are combined into a RAID 6 array, the usable space is the sum of the capacity of two drives. If
two drives in the array become damaged, you can recover data by replacing them. If three or more drives become
damaged, then all data in the array will be lost.
RAID 5
RAID 5 arrays are available for TeraStations with three or more drives. RAID 5 combines three or more drives into a
single array. The usable space is equal to the sum of the capacity of the drives minus the capacity of one drive. For
example, if four drives are combined into a RAID 5 array, the usable space is the sum of three drives. If one drive in
the array becomes damaged, you can recover data by replacing the damaged drive. If two or more drives become
damaged at the same time, then all data in the array will be lost.
RAID 10
RAID 10 arrays are available for TeraStations with four or more drives. In this mode, mirrored pairs of drives in RAID 1
arrays are combined into a RAID 0 array. The usable space is equal to the capacity of the smallest drive multiplied by
the number of drives divided by two.
41

Chapter 4 Storage Management
RAID 1
Combines two or more drives into a mirrored array. The usable space is equal to the capacity of a single drive.
Identical data is written to each drive. If a drive becomes damaged, data can be recovered by replacing the
damaged drive. As long as one drive in the array remains undamaged, all data in the array can be recovered.
RAID 0
Combines two or more drives into a single array. The usable space is equal to the total capacity of all drives in the
array. This simple RAID mode offers faster performance than RAID modes that include parity. If a single drive in the
array becomes damaged, then all data in the array will be lost.
JBOD
This mode uses the drives inside the TeraStation as individual drives. The usable space is equal to the total capacity
of all drives in the TeraStation. If any of the drives become damaged, then all data on that drive will be lost.
Working with RAID Arrays
To change RAID settings, navigate to Storage > RAID in Settings.
Using JBOD
With JBOD, each drive in the TeraStation is addressed separately. To put drives from an array into JBOD, follow the
procedure below.
1 From Settings, click Storage.
2 Click the settings icon ( ) to the right of “RAID”.
42

Chapter 4 Storage Management
3 Click the array to delete.
4 Click Delete RAID Array.
5 The “Confirm Operation” screen will open. Enter the confirmation number, then click OK.
6 Click OK when completed. Next, create a shared folder by referring to the “Adding a Shared Folder” section in
chapter 3.
Changing RAID Mode
To change the RAID mode, first put the drives into JBOD by referring to the “Using JBOD” section above. Then, follow
the procedure below.
1 From Settings, click Storage.
2 Click the settings icon ( ) to the right of “RAID”.
43

Chapter 4 Storage Management
3 Choose a RAID array.
4 Select a RAID mode and the drives to be used, then click Create RAID Array.
5 Click OK.
6 The “Confirm Operation” screen will open. Enter the confirmation number, then click OK.
7 Click OK when completed. Next, create a shared folder by referring to the “Adding a Shared Folder” section in
chapter 3.
Shutting Down the TeraStation Automatically If an Error Occurs
This function will shut down the TeraStation automatically if an error occurs on a drive that is used in a redundant
RAID array. To configure auto shutdown, follow the procedure below.
44

Chapter 4 Storage Management
1 From Settings, click Storage.
2 Click the settings icon ( ) to the right of “RAID”.
3 Click Options.
4 Click Edit.
45

Chapter 4 Storage Management
5 Change the “Error Behavior” option to “Shut down” and click OK.
Configuring Actions for If a Drive Used for the RAID Array Has Not Been Detected
The TeraStation can configure actions for if a drive used for the RAID array cannot be mounted when booting.
Displaying or Hiding the Confirmation Screen
Configure to display or hide the confirmation screen for selecting actions for if a drive used for the RAID array
cannot be mounted when booting. It is configured to display the confirmation screen by default. To hide the screen,
follow the procedure below.
1 From Settings, click Storage.
2 Click the settings icon ( ) to the right of “RAID”.
46

Chapter 4 Storage Management
3 Click Options.
4 Click Edit.
5 Change the “Drive Detection Action Settings” option to “Don't prompt when a drive could not be detected”
and click OK.
47

Chapter 4 Storage Management
When the confirmation screen is hidden, an undetected drive will automatically be dismounted from the TeraStation
and the TeraStation will be in degraded mode if a redundant RAID mode is configured. If RAID 0 is configured, the
RAID array will be corrupted so that data will be lost. It is recommended to proceed without changing settings that
make the confirmation screen appear.
Selecting the Action on the Confirmation Screen
When the confirmation screen is displayed, the following screen will appear after logging in to Settings if the drive
used for the RAID array could not be mounted. Select the action to run when the screen appears.
Conditions and Corrective Actions If Undetected Drives Aren’t Displayed Properly
Even when you configure the NAS to show the confirmation screen if a drive being used for the RAID array cannot
be mounted, undetected drives will not be displayed under the following conditions. If you are using any of the
RAID array configurations below, follow the corrective action.
48

Chapter 4 Storage Management
Conditions Corrective Actions
RAID 10 has been configured. 1 Refer to the “Selecting the Action on the Confirmation Screen”
section above on how to access the confirmation screen.
2 Select “Shut down the TeraStation and reconnect the drives” and
click Execute.
Multiple arrays have been configured.
3 After the TeraStation shuts down, confirm that all drives have
been inserted properly.
4 Press the power button to power on the TeraStation.
5 Log in to Settings and make sure the confirmation screen doesn’t
appear.
Configuring a Hot Spare
If you have a hot spare configured and an array fails, the TeraStation immediately switches over to the hot spare. To
use a hot spare, you need an extra drive that’s not part of any array and a RAID 1 or RAID 5 array.
Notes:
• All data on the hot spare drive is deleted when it is configured as a hot spare and again when it changes from a
spare to a drive in the array.
• A hot spare cannot be configured for TeraStation models with only two drives included.
1 From Settings, click Storage.
2 Click the settings icon ( ) to the right of “RAID”.
3 Choose a RAID array.
49

Chapter 4 Storage Management
4 Click Set as a hot spare.
5 Click Yes .
6 The “Confirm Operation” screen will open. Enter the confirmation number, then click OK.
7 Click OK when completed.
Note: To turn the hot spare back to a normal drive, choose Set as a normal drive.
Expanding RAID Capacity Without Deleting Data
You can create or expand a RAID array without erasing data on the drive by using RMM (RAID Mode Manager).
If using a TeraStation model whose drives are not fully installed into the slots, such as the TS6400DN TeraStation
model with two drives included, follow the procedure to add a new drive first. Otherwise, refer to the procedures in
this section to configure the RAID array. The following examples use the case of the TS6400DN TeraStation model.
Adding a Drive
The procedure for adding a new drive will vary depending on your device.
1 Open the front cover with the included key.
2 Push the drive’s unlock button for the empty slot and swing the lock mechanism out, then pull out the drive
cartridge.
3 Insert the new drive (sold separately) into the empty slot with the lock mechanism remaining open and swing
the lock back down until it clicks into place.
4 Close the front cover.
5 When the drive is recognized, the status LED will flash red and the I32 message will appear on the LCD panel.
50

Chapter 4 Storage Management
6 From Settings, click Storage.
7 Click the settings icon ( ) to the right of “Drives”.
8 Select the inserted new drive and click Format Drive.
9 Select a format type and click Format.
10 The “Confirm Operation” screen will open. Enter the confirmation number, then click OK.
11 Click OK when completed.
Drives Are Currently in JBOD
If the drives are currently in JBOD (not in a RAID array), you may change it to a RAID 1 array. To create the RAID 1
array using RMM, you must have at least two drives available in JBOD.
51

Chapter 4 Storage Management
1 From Settings, click Storage.
2 Click the settings icon ( ) to the right of “RAID”.
3 Choose a RAID array.
4 Set the RAID mode to “RAID 1”.
5 Select the “Add a drive to a RAID array with RMM. Your data will be preserved.” checkbox.
52

Chapter 4 Storage Management
6 Select the drive whose data will be saved from the drop-down list.
7 Select the drive to add to the RAID array.
8 Click Create RAID Array.
9 The “Confirm Operation” screen will open. Enter the confirmation number, then click OK.
10 Click OK when completed.
Drives Are Currently in RAID 1 or RAID 5
If the drives are currently in a RAID 1 or a RAID 5 array, you can use RMM to add drives to the RAID array, then
change the RAID mode.
Note: RMM can be used to expand an array by only one drive per operation. To expand by two or more drives, RMM
must be activated multiple times. For example, if you want to create a RAID 6 array by adding two drives, change the
RAID mode to RAID 5 first using one drive, then change it to RAID 6 using another drive.
1 From Settings, click Storage.
2 Click the settings icon ( ) to the right of “RAID”.
3 Choose a RAID array.
53

Chapter 4 Storage Management
4 Select one drive to add to the RAID array. If changing the RAID mode, choose the desired mode for the array
from the drop-down list. If not, keep the current RAID mode as is.
5 Click Change RAID Array.
6 The “Confirm Operation” screen will open. Enter the confirmation number, then click OK.
7 Click OK when completed.
RAID Scanning
A RAID scan checks your RAID array for bad sectors and if it finds any, it automatically repairs them. Arrays other
than RAID 0 are supported. For best results, run a RAID scan regularly.
1 From Settings, click Storage.
2 Move the RAID scanning switch to the position to enable RAID scanning.
3 Click the settings icon ( ) to the right of “RAID Scanning”.
4 Click Edit.
54

Chapter 4 Storage Management
5 Select when to run the scan and click OK.
Notes:
• Select the “Immediately” checkbox to run a RAID scan immediately.
• To stop a RAID scan, click Cancel RAID Scan.
Adding an External Drive
Connecting an External Drive
Your TeraStation includes USB ports (the number of ports depends on your model), and you can connect external
drives to these ports. Once connected, they appear as shared folders on the TeraStation. Formatted drives are
detected automatically. Unformatted drives should be formatted in Settings.
After a USB drive is recognized, the TeraStation adds “usbdisk x” to the shared folder list, where “x” is the USB port to
which the drive is connected.
Compatibility
Supported file systems for external USB drives are below:
File Systems Recommended Situation
Btrfs Connecting to this TeraStation.
XFS Connecting to another Buffalo NAS device.
*
Ext3
**
NTFS
HFS Plus
exFAT
FAT32 Connecting to both Windows and Mac computers.
**, ***
*
Connecting to another Buffalo NAS device that is a TS-X or older model.
Connecting to Windows computers. The NTFS-formatted drive can use many
more functions of the operating system than an exFAT drive.
Connecting to Mac computers. The HFS Plus-formatted drive can use many more
functions of the operating system than an exFAT drive.
Connecting to both Windows and Mac computers.
*The available USB drive size is up to 16 TB.
**This cannot be formatted from Settings.
***This is read-only from the TeraStation. Files on the USB drive can be copied to the TeraStation.
Connect only one device to each USB port of the TeraStation. Note that only the first partition of a connected USB
drive is mounted. Additional partitions are not recognized.
55

Chapter 4 Storage Management
Notes:
• If your USB 3.0 drive is not reconfigured after rebooting the TeraStation, unplug and reconnect it.
• When copying a file that is over 100 MB to a FAT32-formatted USB drive using File Explorer, an error message may
appear. In such a case, use an FTP or SFTP connection to copy the file.
• When copying files from a shared folder to a FAT32-formatted USB drive, the progress bar may not be displayed
or the file copying may fail. Using a file system other than FAT32 is recommended for the USB drive.
Dismounting Drives
If the TeraStation is powered on, dismount drives (internal and external) before unplugging them. You may
dismount external drives using the function button, or dismount any drive from Settings. If the TeraStation is off,
then all drives are already dismounted and may be unplugged safely.
Note: Do not dismount internal drives while a RAID array is rebuilding or RMM is being configured. If you do, data on
the drives may be lost.
Dismounting Using the Function Button
When you press the function button, the TeraStation will beep once. Press and hold down the button until the
TeraStation beeps again and the button starts blinking blue. When the function button stops blinking and returns to
glowing, the dismount is finished. You may now unplug any USB drives safely.
After 60 seconds, the function button will go out and any drives that have not yet been unplugged will be
remounted.
Dismounting from Settings
1 From Settings, click Storage.
2 Click Drives to dismount an internal drive or USB Drives to dismount an external drive.
56

Chapter 4 Storage Management
3 Select the drive to dismount and click Dismount Drive.
4 The “Confirm Operation” screen will open. Enter the confirmation number, then click OK.
5 When the dismounting process is completed, it is safe to unplug the drive. Disconnect the drive from the
TeraStation.
Note: To remount the drive, unplug it and then plug it back in.
Checking Drives
A drive check tests the data on a drive in the TeraStation or one that is connected via USB for integrity. Errors are
fixed automatically. With large drives, a drive check may run for many hours. Shared folders cannot be accessed
during a drive check. Do not turn off the TeraStation until the drive check is finished. Use the procedure below to run
a drive check.
1 From Settings, click Storage.
2 Click Drives to check an internal drive or USB Drives to check an external drive.
57

Chapter 4 Storage Management
3 Select the drive or array to test, then click Check Drive.
4 Click Check. You have the option of deleting information files from macOS during the check if desired.
S.M.A.R.T.
S.M.A.R.T. (Self-Monitoring, Analysis, and Reporting Technology) monitors internal drives to detect and report
various indicators of reliability, in the hope of anticipating failures. If S.M.A.R.T. informs you of impending drive
failure, you may choose to replace the drive to avoid outages and possible data loss. Follow the procedure below to
check S.M.A.R.T. information for the TeraStation’s internal drives.
Note: S.M.A.R.T. information is only available for internal drives.
Displaying S.M.A.R.T. Information
1 From Settings, click Storage.
2 Click the settings icon ( ) to the right of “Drives”.
58

Chapter 4 Storage Management
3 Select a drive to check and click S.M.A.R.T.
4 The S.M.A.R.T. information for the drive will be displayed. Different information may be displayed depending
on the brand of drives in your TeraStation. Critical attributes are displayed in bold.
Checking Drive Condition
Attributes with the worst value that is equal to or less than the threshold value may be significant. If an attribute
reports a failure, or has had one in the past, it will be displayed in the status column. In such a case, replacing that
drive is recommended.
59

Chapter 4 Storage Management
Formatting Drives
Notes:
• Under some circumstances, data deleted when a drive is formatted can be recovered. To ensure that data is “gone
forever”, a format might not be sufficient. Refer to the “Erasing Data on the TeraStation Completely” section below.
• After a drive is formatted, the “% Used” and “Amount Used” in Settings will not be 0. This is because some drive
space is used for the system area.
1 From Settings, click Storage.
2 Click Drives to format an internal drive or USB Drives to format an external drive.
3 Select the drive or array to format, then click Format Drive.
4 Select a format type, then click Format.
60

Chapter 4 Storage Management
5 The “Confirm Operation” screen will open. Enter the confirmation number, then click OK.
6 Depending on the size and the formatted file system of your drive, the format may take several minutes or
several hours to complete. The I20 message for drives or the I28 message for USB drives will appear on the LCD
panel until the format is completed. Click OK when completed.
Notes:
• Do not turn off or disconnect power to the TeraStation while formatting a drive.
• For drives of 2.2 TB or larger, make sure that the “GPT partition” checkbox is selected.
Encrypting Drives
Internal drives (and arrays) can be encrypted with 256-bit AES during formatting. Encrypted drives and arrays are
then readable only from that specific TeraStation. To decrypt a drive or array, clear the “Encryption” checkbox and
format it again.
Erasing Data on the TeraStation Completely
Under some circumstances, data from formatted drives can be recovered. The drive erasure process in this section
does a much more thorough job of erasing data. This procedure is recommended for removing all data from a drive
in a way that makes it nearly impossible to recover with current tools. The TeraStation will then be in the following
state:
• All drives in JBOD
• An empty shared folder on each drive
• All settings returned to their default values
• All logs deleted
If you remove a drive and then erase all data on the TeraStation, the LCD panel will show the E22 error and the
number of the removed drive. You can still use the TeraStation.
Follow the procedure below to completely and permanently erase all data from your TeraStation.
1 From Settings, click Management.
61

Chapter 4 Storage Management
2 Click the settings icon ( ) to the right of “Restore/Erase”.
3 Click Erase TeraStation.
4 The “Confirm Operation” screen will open. Enter the confirmation number, then click OK.
5 All data on the TeraStation will be permanently erased.
Using the TeraStation as an iSCSI Device
Introduction
iSCSI is a protocol for carrying SCSI commands over IP networks. Unlike traditional SAN protocols such as Fibre
Channel, which requires special-purpose cabling, iSCSI can be run over long distances using existing network
infrastructure. Normal Windows formatting such as NTFS is supported.
Differences Between NAS and iSCSI
With iSCSI, the TeraStation is connected to a single computer, such as a server. Other computers on the network
access files on the TeraStation through the computer it’s connected to. The TeraStation can be used as a local drive
from Windows Server. Features of Windows Server such as Active Directory can be used normally.
As a NAS, the TeraStation is a server, and computers (including other servers) on the network can access shared
folders on it directly. A separate server is not required, and features such as backup are built-in.
Network Configuration
Use gigabit or faster network equipment with iSCSI. For best results, a dedicated network for iSCSI is recommended,
separate from the regular network. By default, the IP address of the TeraStation is automatically assigned from a
DHCP server. However, in this case, if you turn off and restart the TeraStation, the IP address may be changed and
the volumes on the TeraStation may not be accessible. To avoid changing the IP address unexpectedly, using a static
IP address for the TeraStation is recommended.
Connection Tool
The Microsoft iSCSI Software Initiator is already installed on your computer. You don’t need to download and install
it.
Creating an iSCSI Volume
To use the TeraStation as an iSCSI drive, create a volume first. Configure the TeraStation as described below.
62

Chapter 4 Storage Management
Notes:
• If the volume settings are changed, all data on the volume will be erased. Before changing any settings, back up
any important data.
• The TeraStation can have up to 255 volumes, but we recommend creating no more than 32. Exceeding this
volume amount may cause irreparable damage to the unit.
• Do not use a name already in use as a shared folder name; do not use any of the following words for the name of
a volume as these words are reserved for internal use by the TeraStation: array x, authtest, disk x, global, homes,
info, lost+found, lp, mediacartridge x, msdfs_root, mt-daapd, printers, ram, spool, usbdisk x. Any instances of “x”
denote a number (for example: array1 or disk3)
• There are two options for the “Backstore” setting to select the type of iSCSI volume. Refer to the differences below.
◦ File I/O (recommended): This type of volume can specify the volume size and multiple volumes can be
created on one drive or RAID array. This also allows you to expand the volume size after the volume is
created and data has been stored.
Snapshots can be created on the iSCSI volume. The volume can also be set as a backup folder.
◦ Block I/O: This type of volume will create an iSCSI volume for a whole drive or RAID array. However, if you
enable LVM, you can create multiple volumes on the drive or the RAID array or expand the volume size later,
just like a file I/O volume. It is recommended to enable LVM if you want to create multiple volumes on one
drive or RAID array, or expand the volume later.
Block I/O volumes afford higher performance than file I/O volumes because there is less latency when
bypassing the file system layer required for file I/O.
Be aware that block I/O volumes with LVM enabled cannot use snapshots. The volumes also cannot be
used as the backup folders.
1 From Settings, click Storage.
2 Move the iSCSI switch to the position to enable iSCSI.
3 Click the settings icon ( ) to the right of “iSCSI”.
63

Chapter 4 Storage Management
4 Click Create Volume.
5 Enter a volume name, volume description, drive or array where a volume will be created, and volume size. Click
OK when completed.
If you enabled LVM for the target drive or array, or selected “File I/O” for the “Backstore” option, the volume size
that you specify here can be changed later. To change the volume size, refer to the “Expanding Volume Sizes”
section below.
6 Click OK, then click OK again.
64

Chapter 4 Storage Management
Notes:
• If you click Disable Connection for the selected volume in Storage > iSCSI in Settings, the selected iSCSI volume can
no longer be accessed. If you click Enable Connection, the volume will become accessible from the iSCSI initiator
software.
• If you selected “Block I/O” for the “Backstore” option, write cache (WCE) cannot be configured from the “Advanced
Settings” page.
Connecting or Disconnecting Volumes
Note: When changing iSCSI volume settings, the iSCSI service will restart so iSCSI volumes will be unable to connect
temporarily. It is recommended to disconnect the volume before changing the volume settings.
Connecting Volumes
To connect a volume, follow the procedure below.
Note: Do not shut down the TeraStation while connecting to an iSCSI volume. It may cause unexpected data erasure.
Make sure all connections are disconnected before shutdown.
1 From Windows, navigate to Control Panel > System and Security > Administrative Tools > iSCSI Initiator.
2 Enter the IP address of the TeraStation into the “Target” field and click Quick Connect.
3 Confirm if the connection is established and click Done.
Formatting Volumes
If using the connected volume for the first time, the volume should be formatted to be used as a local drive. Follow
the procedure below for formatting.
1 From Windows, navigate to Control Panel > System and Security > Administrative Tools > Computer Management.
2 Click Disk Management.
When the “Initialize Disk” screen appears, click OK without changing any settings.
65

Chapter 4 Storage Management
3 Right-click the drive volume that shows the status “Unallocated” and click New Simple Volume from the
displayed menu. Follow the screen to finish formatting.
When the formatting process is completed, the drive will be visible as an icon in Computer or This PC and can be
used as a normal drive on the computer.
Disconnecting a Volume
1 From Windows, navigate to Control Panel > System and Security > Administrative Tools > iSCSI Initiator.
The status of the connecting volume will be displayed as “Connected” under “Discovered targets”.
2 Select a volume to disconnect and click Disconnect.
3 Click Yes .
4 When the volume status is displayed as “Inactive”, the disconnection was carried out properly.
Using with Multiple Computers
If the TeraStation is divided into multiple volumes (or drives), it can be used with multiple computers. However, it is
not recommended to access a single volume or drive from multiple computers at the same time for security reasons.
When using the TeraStation as an iSCSI device, it should only connect to a single initiator unless the computer
running the initiator also has clustering enabled and configured on its operating system. To avoid using multiple
initiators for access, enable mutual authentication.
Checking Whether iSCSI Volume Is Connected
To check whether an iSCSI volume is connected, navigate to Storage > iSCSI. Current volumes will be listed. If
“Connected” is displayed under “Status”, the volume is currently connected to the client.
Configuring Access Restrictions
A CHAP name and secret can be configured for the entire iSCSI volume or each existing volume. Access restrictions
can be configured so that entering a target CHAP name and secret is required for each connection.
The TeraStation can perform mutual authentication (two-way authentication). Dual passwords ensure that only
authorized client computers can access the volume on the TeraStation.
Follow the procedure below to enable access restrictions.
Configuring Access Restrictions for the Entire TeraStation
1 From Settings, click Storage.
2 Click the settings icon ( ) to the right of “iSCSI”.
66

Chapter 4 Storage Management
3 Click the Security tab.
4 Click Edit under “Access Control (Target Discovery)”.
5 Enable authentication, enter the target CHAP name and secret, and click OK.
Note: To enable mutual authentication in addition to target CHAP name and secret authentication, select the
“Enable mutual authentication” checkbox and enter the initiator CHAP secret.
To search or connect the volume which has mutual authentication enabled from Microsoft iSCSI Initiator,
initiator CHAP secret settings should be configured.
6 Click OK when completed.
Connecting Volumes on the Access-Restricted TeraStation
If access restrictions are configured for the entire iSCSI volume, that volume will not be detected by Microsoft iSCSI
Initiator. To connect that volume, the target CHAP name and secret should be authenticated.
1 Open the Microsoft iSCSI Initiator.
2 Register the initiator CHAP secret to your computer first. If you didn’t enable mutual authentication, skip this
step.
Click CHAP on the Configuration tab. Enter the configured initiator CHAP secret into the “Initiator CHAP secret”
field and click OK.
3 From the Discovery tab, click Discover Portal.
4 Enter the TeraStation’s IP address into the “IP address or DNS name” field and click Advanced.
5 Select the “Enable CHAP log on” checkbox and enter the target CHAP name into the “Name” field and the
target CHAP secret into the “Target secret” field.
67

Chapter 4 Storage Management
If mutual authentication is enabled, select the “Perform mutual authentication” checkbox.
6 Click OK, then click OK again.
7 The iSCSI volumes on the TeraStation will be listed under “Discovered targets” on the Targets tab. Select the
desired volume to connect and click Connect.
8 Click OK.
9 When the status of the selected volume is displayed as “Connected”, the connection is established properly.
Configuring Access Restrictions for Individual Volumes
If access restrictions are configured for a volume, that volume cannot be accessed unless the target CHAP name and
secret are authenticated.
1 From Settings, click Storage.
2 Click the settings icon ( ) to the right of “iSCSI”.
3 Click the volume to enable access restrictions.
4 Enable authentication, enter the target CHAP name and secret, and click OK.
68

Chapter 4 Storage Management
Note: To enable mutual authentication, select the “Enable” checkbox to the right of “Mutual Authentication”
and enter the initiator CHAP secret.
5 Click OK when completed.
Connecting to Individual Volumes that Are Access-Restricted
1 Open the Microsoft iSCSI Initiator.
2 Register the initiator CHAP secret to your computer first. If you didn’t enable mutual authentication, skip this
step.
Click CHAP on the Configuration tab. Enter the configured initiator CHAP secret into the “Initiator CHAP secret”
field and click OK.
3 From the Discovery tab, click Discover Portal.
4 Enter the TeraStation’s IP address into the “IP address or DNS name” field and click OK.
5 The iSCSI volumes on the TeraStation will be listed under “Discovered targets” on the Targets tab. Select the
desired volume to connect and click Connect.
6 Click Advanced.
7 Select the “Enable CHAP log on” checkbox and enter the target CHAP name into the “Name” field and the
target CHAP secret into the “Target secret” field.
If mutual authentication is enabled, select the “Perform mutual authentication” checkbox.
8 Click OK, then click OK again.
9 When the status of the selected volume is displayed as “Connected”, the connection is established properly.
Expanding Volume Sizes
The volume size of the existing volumes can be expanded after they are created.
Notes:
• Expanding the volume size may erase all data on the volume depending on the formatting type. Backing up the
data before expanding the volume size is recommended.
• To expand the volume size, the volume should have “File I/O” selected for the “Backstore” option, or the volume
needs to have been created on a drive or array with LVM enabled.
1 From Settings, click Storage.
2 Click the settings icon ( ) to the right of “iSCSI”.
3 Select the volume to expand.
69

Chapter 4 Storage Management
4 Enter the desired volume size to add and click OK.
5 Click OK.
Deleting Volumes
To delete an existing volume, follow the procedure below.
Note: Deleting a volume will erase all data on the volume. Back up the data before deleting the volume.
1 From Settings, click Storage.
2 Click the settings icon ( ) to the right of “iSCSI”.
70

Chapter 4 Storage Management
3 Select the volume to delete and click Delete Volume.
4 Confirm that the volume is correctly selected on the screen and click OK.
5 The “Confirm Operation” screen will open. Enter the confirmation number, then click OK.
6 Click OK.
Advanced Settings
You can configure the following advanced parameters for each iSCSI volume.
Advanced Parameter Description
HeaderDigest Controls the HeaderDigest usage by the iSCSI target portal group endpoint.
DataDigest Controls the DataDigest usage by the iSCSI target portal group (TPG) endpoint.
Controls the usage of Multiple Connections per Session (MC/S). Initiator and
MaxConnections
InitialR2T
ImmediateData
MaxRecvDataSegmentLength
MaxXmitDataSegmentLength Maximum data segment length in bytes that can be sent.
MaxBurstLength
FirstBurstLength
MaxOutstandingR2T The R2T PDUs that can be in transition before an acknowledge PDU is received.
QueuedCommands Maximum number of commands queued to any session of this target.
File I/O Write Sync
Write Cache (WCE) Increases performance. This cannot be used when block I/O is selected.
LUN Number used to identify a local unit.
target negotiate the maximum number of connections requested and/or
acceptable.
Turns on or off the default use of R2T (Ready to Transfer) for unidirectional and
the output part of bidirectional commands.
Indicates whether the initiator and target have agreed to support immediate
data on this session.
Maximum data segment length in bytes the initiator and target can receive in
an iSCSI Protocol Data Unit (PDU).
Maximum iSCSI data payload in a Data-In or a solicited Data-Out iSCSI
sequence, in bytes.
Maximum amount in bytes of unsolicited data an iSCSI initiator can send to the
target during the execution of a single SCSI command.
Synchronous file I/O provides reliability but slower performance. Asynchronous
writes are faster, but buffered data will be lost if a power outage occurs.
71

Chapter 5 Backup
Chapter 5 Backup
Using Snapshots
Overview
Snapshot is a function that creates a virtual copy of the data currently stored in a shared folder or iSCSI volume on
the TeraStation. Once a snapshot has been created and saved, files and folders that are subsequently modified or
deleted can be restored from the point at which the snapshot was created. The TeraStation allows you to not only
create a snapshot manually, but also schedule automatic snapshots and auto-archive them to save TeraStation
capacity.
The created snapshots will be saved on the TeraStation. As with any file, if a drive malfunctions, all saved snapshots
on that drive will be erased along with the data.
Application for iSCSI Volume Snapshots
To create an iSCSI volume snapshot in the environment where the iSCSI volumes on the TeraStation are connected
using a virtual machine, we recommend using the Buffalo-offered Windows Server application “Snapshot Agent for
TeraStation”, available from the Buffalo website.
The application can create both application-consistent and crash-consistent snapshots. An application-consistent
snapshot contains all current data in memory and all I/O operations. Restoring from an application-consistent
snapshot reverts the volume to the exact same state as when the snapshot was created. A crash-consistent
snapshot, on the other hand, creates a snapshot of all the current files but not ongoing processes. Restoring from a
crash-consistent snapshot only recovers saved data. Refer to the application help for detailed usage procedures.
Manually Creating a Snapshot
For Shared Folders
1 From Settings, click File Sharing.
2 Click the settings icon ( ) to the right of “Folder Setup”.
72

Chapter 5 Backup
3 Click the number under “Snapshot” for the shared folder on the shared folder list.
4 Click Create.
73

Chapter 5 Backup
5 Select or clear the “Lock” checkbox to determine whether the created snapshot will be locked or unlocked and
enter a short description, then click OK. A locked snapshot cannot be deleted due to auto-archiving.
The snapshot will be created in the shared folder.
Notes:
• If an unexpected error occurs while taking a snapshot, you may have run out of available space. If this is the case,
delete or move files to another location and try again.
• Up to 1,024 snapshots can be created for a shared folder. We recommend keeping no more than 65,536
snapshots total on a TeraStation. If you have created more than 65,536 snapshots, it may result in unexpected
system behavior and slowdown.
For iSCSI Volumes
1 From Settings, click Storage.
2 Click the settings icon ( ) to the right of “iSCSI”.
74

Chapter 5 Backup
3 Select the checkbox for the target iSCSI volume and click Show Snapshot List.
4 Click Create.
75

Chapter 5 Backup
5 Select or clear the “Lock” checkbox to determine whether the created snapshot will be locked or unlocked and
enter a short description, then click OK. A locked snapshot cannot be deleted due to auto-archiving.
The snapshot will be created on the iSCSI volume.
Notes:
• If an unexpected error occurs while taking a snapshot, you may have run out of available space. If this is the case,
delete or move files to another location and try again.
• Up to 1,024 snapshots can be created for an iSCSI volume. We recommend keeping no more than 65,536
snapshots total on a TeraStation. If you have created more than 65,536 snapshots, it may result in unexpected
system behavior and slowdown.
Accessing the Snapshots via SMB
From a Windows computer, you can access snapshots using the “Restore previous versions” option.
Note: If the TeraStation joins an Active Directory domain, you cannot access snapshots using the procedure below.
1 From Settings, click File Sharing.
2 Click the settings icon ( ) to the right of “Folder Setup”.
76

Chapter 5 Backup
3 Click the shared folder to access snapshots from the computer.
4 Click the Option 2 tab.
5 Enable shadow copy and click OK.
6 From the computer, access the TeraStation using File Explorer and right-click the shared folder to view
snapshots.
7 Click Restore previous versions.
77

Chapter 5 Backup
8 The entire history of created snapshots will appear. Select the snapshot and the action to be taken for the
snapshot.
Restoring Snapshots
To restore the created snapshots to the shared folder or the iSCSI volume, follow the procedure below.
For Shared Folders
Note: When restoring snapshots, the file sharing service will restart so shared folders will become inaccessible
temporarily.
1 From Settings, click File Sharing.
2 Click the settings icon ( ) to the right of “Folder Setup”.
78

Chapter 5 Backup
3 Click the number under “Snapshot” for the shared folder on the shared folder list.
4 Select the checkbox for the target snapshot and then click Restore.
79

Chapter 5 Backup
5 A new snapshot will be created before restoring the snapshot. Select or clear the “Lock” checkbox to determine
whether the created snapshot will be locked or unlocked and enter a short description, then click OK. A locked
snapshot cannot be deleted due to auto-archiving.
6 Click OK when completed.
For iSCSI Volumes
Note: When restoring snapshots, the iSCSI service will restart so iSCSI volumes will become unable to connect
temporarily. If you have saved the virtual machine to the iSCSI volume, shut down the virtual machine before
restoring.
1 From Settings, click Storage.
2 Click the settings icon ( ) to the right of “iSCSI”.
80

Chapter 5 Backup
3 Select the checkbox for the target iSCSI volume and click Show Snapshot List.
4 Select the checkbox for the target snapshot and then click Restore.
81

Chapter 5 Backup
5 A new snapshot will be created before restoring the snapshot. Select or clear the “Lock” checkbox to determine
whether the created snapshot will be locked or unlocked and enter a short description, then click OK. A locked
snapshot cannot be deleted due to auto-archiving.
6 Click OK when completed.
If you have saved the virtual machine to the iSCSI volume and you are using Snapshot Agent for TeraStation, next
restore the snapshot of the virtual machine using vCenter Server’s management console.
Configuring Schedule Snapshot
If you want to create a snapshot for the purpose of regular backups, follow the procedure below.
For Shared Folders
1 From Settings, click File Sharing.
2 Click the settings icon ( ) to the right of “Folder Setup”.
82

Chapter 5 Backup
3 Click the number under “Snapshot” for the shared folder on the shared folder list.
4 Click Advanced Settings at the lower-left corner of the window.
83

Chapter 5 Backup
5 Click the Schedule tab.
6 Enable schedule snapshot.
7 Select the day of the week and time for when to have a snapshot automatically created.
8 Click OK.
For iSCSI Volumes
1 From Settings, click Storage.
2 Click the settings icon ( ) to the right of “iSCSI”.
84

Chapter 5 Backup
3 Select the checkbox for the target iSCSI volume and click Show Snapshot List.
4 Click Advanced Settings at the lower-left corner of the window.
85

Chapter 5 Backup
5 Click the Schedule tab.
6 Enable schedule snapshot.
7 Select the day of the week and time when to automatically create a snapshot.
8 Click OK.
Configuring Snapshot Archive Settings
If you regularly create snapshots, it will use up capacity on the TeraStation. Snapshot archive settings will allow you
to save capacity on created snapshots by automatically deleting older snapshots. You can set either a version-based
or a timeline-based rule to delete snapshots.
Note: The locked snapshots will be kept even if archive settings are in effect.
For Shared Folders
1 From Settings, click File Sharing.
2 Click the settings icon ( ) to the right of “Folder Setup”.
86

Chapter 5 Backup
3 Click the number under “Snapshot” for the shared folder on the shared folder list.
4 Click Advanced Settings at the lower-left corner of the window.
87

Chapter 5 Backup
5 Click the Auto Archive tab.
6 Select the rule to keep the snapshots. For more detailed information on archiving snapshots, refer to the
“Archive Rule for Snapshots” section below.
7 Click OK.
For iSCSI Volumes
1 From Settings, click Storage.
88

Chapter 5 Backup
2 Click the settings icon ( ) to the right of “iSCSI”.
3 Select the checkbox for the target iSCSI volume and click Show Snapshot List.
4 Click Advanced Settings at the lower-left corner of the window.
89

Chapter 5 Backup
5 Click the Auto Archive tab.
6 Select the rule to keep the snapshots. For more detailed information on archiving snapshots, refer to the
“Archive Rule for Snapshots” section below.
7 Click OK.
Archive Rule for Snapshots
Version-Based
If you enter specific versions, the snapshots created from the latest up to the entered versions will be kept.
Snapshots that don’t match the version will not be removed. There is an option to exclude from the target versions
90

Chapter 5 Backup
until a set number of days has passed. If you set this option and the specified days haven’t passed yet, the snapshots
1234567
will be kept even if they match the target versions to be deleted.
Timeline-Based
This rule uses a timeline of when the snapshot was created to keep snapshots. Using this rule will keep any
snapshots created at closest to 0 minutes on the hour and 12:00 a.m. (midnight) on the day.
The following example illustrates a scenario of when a snapshot is regularly created during 12:00 a.m. to 11:00 p.m.
for every hour everyday and the default archive rule is used, for 24 hours, 7 days, 5 weeks, 6 months, and 0 years.
Current time: 31st, 11:59 p.m.
Mon
1st
12:00 a.m.
Tue Wed Thu Fri Sat Sun
8910 11 12 13 14
2nd
12:00 a.m.
15 16 17 18 19 20 21
3rd
12:00 a.m.
22 23 24 25 26 27 28
4th
Snapshots created every hour between 12:00 a.m. to 11:00 p.m. today are kept by matching the hour-based rule.
One snapshot per day is also kept for the last seven days by matching the day-based rule. One snapshot on every
Monday is also kept for the last five weeks by matching the week-based rule. One snapshot on every first day of the
month is also kept for six months by matching the month-based rule. If you change the year-based rule from the
default settings, one snapshot on January 1st will also be kept for the specified years.
12:00 a.m. 12:00 a.m. 12:00 a.m. 12:00 a.m. 12:00 a.m.
29 30 31
5th
12:00 a.m. 12:00 a.m.12:00 a.m.
91

Chapter 5 Backup
Backing Up Data on the TeraStation
You can back up the TeraStation folders to another shared folder on the same TeraStation, a connected USB drive, or
a shared folder on another Buffalo NAS device, either on the same network or on another network. For best results,
using a 10GbE port to connect a backup device is recommended.
LAN port 3
(Static IP)
LAN port 1
(Static IP)
Backup Source
Network
LAN port 1
(Static IP)
Backup Destination
Backup Modes
LAN port 3
(Static IP)
The following types of backup are available from this TeraStation. To restore data from backup, refer to the
“Restoring Backup Data” section below.
Full Backup
All files in the source will be backed up to the destination. You can specify how many backup versions to keep from
1–400, or select “Unlimited” to keep all backups until the drive is full. If you specify a number of backup versions,
the backup destination folder should be on the same TeraStation or on an external USB drive attached to that
TeraStation.
The backup data will be stored in the folder whose name will be the backup date and time.
• Folders available as backup sources:
◦ Shared folder on the backup source TeraStation
◦ USB drive connected to the backup source TeraStation
◦ Shared folder on another Buffalo NAS device
◦ Shared folder on another rsync-compatible device
• Folders available as backup destinations:
◦ Shared folder on the backup source TeraStation
◦ USB drive connected to the backup source TeraStation
◦ Shared folder on another Buffalo NAS device
◦ Shared folder on another rsync-compatible device
*2
*2, 3, 4
*1
*2
*2, 3
*1 You can select up to the second level of folders. However, if the folder name of a second level folder contains
symbols, that folder may not appear as the target folder.
*2 The folder should have the “Backup” checkbox selected under “LAN Protocol Support” on the shared folder
settings.
*3 If the “Inherit subfolders' access restrictions” option is selected when creating a backup job, use Btrfs, XFS, or ext3
file systems.
92

Chapter 5 Backup
*4 If the “Inherit subfolders' access restrictions” option is selected when creating a backup job, the device should be
a Buffalo NAS device whose subfolders’ access restrictions is available.
Overwrite (Incremental)
The first backup job runs like a full backup. As each subsequent backup job runs, only files that have been changed
since the last full backup will be backed up, but any files deleted from the backup source folder will also remain in
the backup destination folder. The folder structure in the backup destination folder will be the same as the backup
source folder.
• Folders available as backup sources:
◦ Shared folder on the backup source TeraStation
◦ USB drive connected to the backup source TeraStation
◦ Shared folder on another Buffalo NAS device
◦ Shared folder on another rsync-compatible device
• Folders available as backup destinations:
◦ Shared folder on the backup source TeraStation
◦ USB drive connected to the backup source TeraStation
◦ Shared folder on another Buffalo NAS device
◦ Shared folder on another rsync-compatible device
*2
*2, 3, 4
*1
*2
*2, 3
*1 You can select up to the second level of folders. However, if the folder name of a second level folder contains
symbols, that folder may not appear as the target folder.
*2 The folder should have the “Backup” checkbox selected under “LAN Protocol Support” on the shared folder
settings.
*3 If the “Inherit subfolders' access restrictions” option is selected when creating a backup job, use Btrfs, XFS, or ext3
file systems.
*4 If the “Inherit subfolders' access restrictions” option is selected when creating a backup job, the device should be
a Buffalo NAS device whose subfolders’ access restrictions is available.
Overwrite (Differential)
The first backup job runs like a full backup. As each subsequent backup job runs, only files that have been changed
since the last full backup will be backed up, and any files deleted from the backup source folder will also be deleted
from the backup destination folder. The backup destination folder will always remain the same size as the backup
source folder, and the folder structure in the backup destination folder will be the same as the backup source folder.
• Folders available as backup sources:
◦ Shared folder on the backup source TeraStation
◦ USB drive connected to the backup source TeraStation
◦ Shared folder on another Buffalo NAS device
◦ Shared folder on another rsync-compatible device
• Folders available as backup destinations:
◦ Shared folder on the backup source TeraStation
◦ USB drive connected to the backup source TeraStation
◦ Shared folder on another Buffalo NAS device
◦ Shared folder on another rsync-compatible device
*2
*2, 3, 4
*1
*2
*2, 3
*1 You can select up to the second level of folders. However, if the folder name of a second level folder contains
symbols, that folder may not appear as the target folder.
93

Chapter 5 Backup
*2 The folder should have the “Backup” checkbox selected under “LAN Protocol Support” on the shared folder
settings.
*3 If the “Inherit subfolders' access restrictions” option is selected when creating a backup job, use Btrfs, XFS, or ext3
file systems.
*4 If the “Inherit subfolders' access restrictions” option is selected when creating a backup job, the device should be
a Buffalo NAS device whose subfolders’ access restrictions is available.
Management Backup
Each time a backup is executed, management information is stored, and only files that have changed are backed
up. Data is retrieved from the previous backup file for files that were not changed, which can help reduce the space
used for backup and also for referencing status at a particular point in time (for data snapshot applications). You can
specify how many backup versions to keep from 1–400, or select “Unlimited” to keep all backups until the drive is
full. If using an external USB drive as the backup destination, do not use folders from drives formatted with FAT.
The backup data will be stored in the folder whose name will be the backup date and time, and the destination
folder will be set to read-only.
• Folders available as backup sources:
◦ Shared folder on the backup source TeraStation
◦ USB drive connected to the backup source TeraStation
◦ Shared folder on another Buffalo NAS device
◦ Shared folder on another rsync-compatible device
• Folders available as backup destinations:
◦ Shared folder on the backup source TeraStation
◦ USB drive connected to the backup source TeraStation
*2
*1
*2
*2, 3, 4
*1 You can select up to the second level of folders. However, if the folder name of a second level folder contains
symbols, that folder may not appear as the target folder.
*2 The folder should have the “Backup” checkbox selected under “LAN Protocol Support” on the shared folder
settings.
*3 The compatible file systems are ext3, XFS, Btrfs, and NTFS.
*4 If the “Inherit subfolders' access restrictions” option is selected when creating a backup job, use Btrfs, XFS, or ext3
file systems.
Note: For the destination folder, do not use a folder that has already been used as a target folder for another backup
job. If you wish to use a folder that currently contains backup data as the destination folder for another backup job,
format the folder first, or delete all data in the destination folder and change the folder attribute to read and write
before configuring the folder as the destination folder.
Snapshot Backup
Files and snapshots on the backup source will be backed up to the backup destination. Each backup job will create a
snapshot before the job runs.
The first backup job runs like a full backup. As each subsequent backup job runs, only files that have been changed
since the last backup will be backed up, and any files deleted from the backup source folder will also be deleted
from the backup destination folder. The folder structure in the backup destination folder will be the same as the
backup source folder.
• Folders available as backup sources:
◦ Shared folder on the backup source TeraStation
◦ Shared folder on another Buffalo NAS device
• Folders available as backup destinations:
*
94

Chapter 5 Backup
◦ Shared folder on the backup source TeraStation
◦ Shared folder on another Buffalo NAS device
*
*, **, ***
Notes:
• The number of snapshots kept after backing up to the backup destination will vary depending on the autoarchive settings. If the backup snapshot versions are later than the versions on the backup destination, they will
overwrite the earlier snapshot versions.
• If you want to see the history of snapshots on the backup destination folder, use shadow copy or click Restore in
Settings. Refer to the “Using Snapshots” section above.
*The folder should have the “Backup” checkbox selected under “LAN Protocol Support” on the shared folder settings.
**If the “Inherit subfolders' access restrictions” option is selected when creating a backup job, use Btrfs, XFS, or ext3
file systems.
***If the “Inherit subfolders' access restrictions” option is selected when creating a backup job, the device should be
a Buffalo NAS device whose subfolders’ access restrictions is available.
iSCSI Backup
Imaged iSCSI volume data will be backed up. Each backup job will create a snapshot before the job runs. The backup
source and backup destination can be paired and configured together. Backing up an iSCSI volume will create a
“fileio” file in the backup destination shared folder.
The first backup job runs like a full backup. As each subsequent backup job runs, only files that have been changed
since the last full backup will be backed up, and any files deleted from the backup source folder will also be deleted
from the backup destination folder.
• Folders available as backup sources:
◦ Shared folder on the backup source TeraStation
◦ Shared folder on another Buffalo NAS device
◦ The iSCSI file I/O volume on the backup source TeraStation
• Folders available as backup destinations:
◦ Shared folder on the backup source TeraStation
◦ Shared folder on another Buffalo NAS device
◦ The iSCSI file I/O volume on the backup source TeraStation
Notes:
• The number of snapshots kept after backing up to the backup destination will vary depending on the autoarchive settings. If the backup snapshot versions are later than the versions on the backup destination, they will
overwrite the earlier snapshot versions.
• If you select a shared folder as a backup source, only an iSCSI volume can be selected as a backup destination and
vice versa. The same type of folders cannot be used in an iSCSI backup job.
*1, 4
*1
*1, 2, 3, 4
*1 The folder should have the “Backup” checkbox selected under “LAN Protocol Support” on the shared folder
settings.
*2 If the “Inherit subfolders' access restrictions” option is selected when creating a backup job, use Btrfs, XFS, or ext3
file systems.
*3 If the “Inherit subfolders' access restrictions” option is selected when creating a backup job, the device should be
a Buffalo NAS device whose subfolders’ access restrictions is available.
*4 The folders should be created on a Btrfs-formatted area.
Preparing a Backup Destination
Configure a shared folder on a Buffalo NAS device or connected USB drive as a backup destination. The following
procedure explains using another shared folder on a TeraStation as a backup destination. The procedure may vary
95

Chapter 5 Backup
depending on which Buffalo NAS device is selected as a destination. If using a USB drive as a backup destination,
make sure its attribute is set to read and write. To change a read-only USB drive’s attribute to read and write, refer to
the “Read-Only Shares” section in chapter 3.
If you would like to back up data from multiple backup sources, we recommend not using the same backup
destination, as data in the backup destination may be overwritten by subsequent backup jobs. If you must back up
data from multiple backup sources to the same backup destination, using management backup is recommended
for precise version control.
Note: If you want to set this TeraStation as the backup destination for an rsync-compatible device, refer to the “If
Backing Up from rsync-Compatible Devices to the TeraStation” section instead of following the procedure below.
1 From Settings, click File Sharing.
2 Click the settings icon ( ) to the right of “Folder Setup”.
3 Choose the folder to be set as a backup destination.
4 Under “LAN Protocol Support”, select the “Backup” checkbox on the Basic tab.
5 Click OK and proceed to the next step to create a backup device access key.
6 Enter the desired characters into the backup device access key field and click OK.
Note: You may leave this field blank if you do not want a backup device access key, but for security reasons
we highly recommend entering one for the shared folder. If a backup device access key is configured for the
shared folder, that folder will not show up as a target for the backup source or destination when configuring a
backup job on another Buffalo NAS device unless it’s entered. You may create multiple folders using different
96

Chapter 5 Backup
backup device access keys for backup and replication, but only one access key can be used on the TeraStation.
Folders that are configured with a different access key cannot be used.
A backup destination has been created.
Notes:
• If you want to back up to a Buffalo NAS device on another network, follow the procedure below to add the
Buffalo NAS device so it can be used as a backup destination.
(1) Create a new backup job by referring to the “Configuring a Backup Job” section below.
(2) On the screen that allows you to select a shared folder, click List of Servers.
(3) Click Add; select the “Add Buffalo NAS device” option, enter the IP address or hostname of the destination
Buffalo NAS device, then click OK.
(4) Click Close when completed.
(5) Click Refresh and make sure the desired Buffalo NAS device has been added to the list.
• If you want to back up to an rsync-compatible device, follow the procedure below to add the rsync-compatible
device so it can be used as a backup destination.
(1) Create a new backup job by referring to the “Configuring a Backup Job” section below.
(2) On the screen that allows you to select a shared folder, click List of Servers.
(3) Click Add; select the “Add rsync-compatible device” option, enter the IP address or hostname of the
destination device, then click OK. If you want to encrypt the rsync access, enable rsync over SSH and enter
the rsync account settings.
(4) Click Close when completed.
(5) Click Refresh and make sure the desired rsync-compatible device has been added to the list.
• Adding a target TeraStation’s IP address to the “List of Servers” and enabling rsync over SSH is required for
snapshot and iSCSI backups, otherwise the target TeraStation will not appear as a backup destination.
Configuring a Backup Job
You can configure backup jobs by using another shared folder on the Buffalo NAS device or a USB drive connected
to the TeraStation as a destination. You can also back up to a Buffalo NAS device on another network as long as the
two networks are connected by a VPN or the route is configured properly.
1 From Settings, click Backup.
2 Click the settings icon ( ) to the right of “Backup”.
97

Chapter 5 Backup
3 If you had configured a backup device access key for the backup source folder on another Buffalo NAS device
or the backup destination folder, click Set. If you hadn’t, skip to step 5.
4 Enter the backup device access key and click OK.
98

Chapter 5 Backup
5 Click Add.
6 Select backup settings such as date and time to run, then select for the “Operation Mode” drop-down list. Refer
to the differences between the backup modes in the “Backup Modes” section above.
99
 Loading...