

Page 1
Network Attached Storage
LinkStation 500
User Manual
Please make sure to read this manual before using and follow the instructions. If you have any inquiries about
the product, contact the number on the warranty statement or the packing box. Do not discard this manual, the
warranty statement, or the packing box.
Europe: www.buffalo-technology.com
Asia Pacific: www.buffalo-asia.com
35020844-04
2016.03
Page 2

1
Contents
Chapter 1 Getting Started .............................................6
Diagrams ...........................................................................................6
Accessing Shared Folders ................................................................7
Accessing from a Computer ......................................................................7
Accessing from a Mobile Device ............................................................... 8
Turning the LinkStation On and Off ...............................................8
Chapter 2 Configuration ............................................. 12
Opening Settings .......................................................................... 12
Opening from a Computer ......................................................................12
Opening from a Mobile Device ...............................................................13
Resetting Administrator Password .........................................................14
Navigating the Main Menu ........................................................... 15
The Home Screen .....................................................................................15
Launcher ................................................................................................... 16
Customizing the Home Screen ..................................................... 16
Adding New Shortcuts .............................................................................16
Deleting Shortcuts ................................................................................... 16
Restoring Shortcuts ................................................................................. 16
Arranging and Sorting Icons ................................................................... 16
Changing Icons.........................................................................................17
Launcher Options ....................................................................................17
Display Options ........................................................................................17
Wallpaper Options ................................................................................... 18
Changing Display Languages .................................................................19
Page 3

2
Chapter 3 My LinkStation ........................................... 22
Adding Folders .............................................................................. 23
Uploading and Downloading Files .............................................. 25
Uploading from a Computer ...................................................................25
Downloading Files to a Computer .......................................................... 26
Sharing Files and Folders Using Shared Links ............................ 26
Chapter 4 Media Player ............................................... 29
Creating Playlists .......................................................................... 30
Adding Media Files ....................................................................... 31
Playing Files ................................................................................... 32
Chapter 5 Disk Manager ............................................. 34
RAID Arrays .................................................................................... 34
Working with RAID Arrays ............................................................ 34
Using JBOD ............................................................................................... 34
Changing RAID Mode ..............................................................................37
Expanding RAID Array Capacity .............................................................39
Adding an External Hard Drive .................................................... 40
Enabling External Drive Access ..............................................................41
Dismounting an External Drive .................................................... 43
Dismounting Using the Eject Button ......................................................43
Dismounting Using Disk Manager..........................................................44
Formatting Drives ......................................................................... 45
Hard Drive Replacement .............................................................. 47
Step 1 - Replacing a Hard Drive ..............................................................47
Step 2 - Rebuilding the RAID Array .........................................................50
Page 4

3
Chapter 6 System Information ................................... 54
Server Info ..................................................................................... 54
System Log..................................................................................... 55
Chapter 7 Services ....................................................... 57
SHARED .......................................................................................... 57
Adding Shared Folders ............................................................................ 57
Samba ............................................................................................ 60
AFP ................................................................................................. 61
FTP .................................................................................................. 61
DLNA Server .................................................................................. 63
Playing Files on the DLNA Client Device ................................................ 63
iTunes ............................................................................................. 63
Downloader ................................................................................... 65
Enabling Downloader Service ................................................................66
Opening the Download Manager ........................................................... 67
Downloading Files ...................................................................................68
WebAccess ..................................................................................... 69
Configuring WebAccess ...........................................................................70
Accessing Remotely .................................................................................71
Direct Copy .................................................................................... 72
Chapter 8 System ......................................................... 73
Accounts ........................................................................................ 73
Creating Users ..........................................................................................73
Changing Passwords ...............................................................................74
Deleting Users .......................................................................................... 75
Page 5

4
Network ......................................................................................... 76
Changing the Hostname .........................................................................76
Changing the IP Address .........................................................................77
Wake-on-LAN ........................................................................................... 78
System Language .......................................................................... 79
Date & Time .................................................................................... 80
Changing Date and Time ......................................................................... 80
Changing Time Zone ................................................................................ 82
Power Management ...................................................................... 83
Drive Spin Down ......................................................................................83
Sleep Mode ............................................................................................... 85
UPS Sync ...................................................................................................86
Firmware ........................................................................................ 88
Online Update .......................................................................................... 88
Manual Update .........................................................................................88
Backup ........................................................................................... 90
Backing Up from LinkStation .................................................................. 91
Backing Up Your Mac with Time Machine ..............................................97
Reset ............................................................................................. 100
Initializing from Settings ......................................................................101
Initializing with the Function Button ...................................................102
Chapter 9 Configuring from Mobile Devices ........... 103
Settings That Can Be Changed from Your Mobile Device ........ 103
Managing User Accounts ............................................................ 103
Creating Users ........................................................................................103
Changing Passwords .............................................................................105
Deleting Users ........................................................................................106
Page 6

5
Changing the RAID Mode ........................................................... 106
Configuring WebAccess .............................................................. 107
Configuring DLNA Server ........................................................... 113
Managing USB Devices ............................................................... 113
Dismounting USB Drives .......................................................................113
Starting Direct Copy ..............................................................................114
Configuring UPS Sync ............................................................................115
Chapter 10 Utilities .................................................... 116
NAS Navigator2 for Windows ..................................................... 116
Changing the IP Address .......................................................................118
NAS Navigator2 for Mac OS ........................................................ 119
Changing the IP Address .......................................................................121
NovaBACKUP ............................................................................... 121
Chapter 11 Appendix ................................................ 122
When the Power LED Blinks ........................................................ 122
White .......................................................................................................122
Red ..........................................................................................................122
Amber .....................................................................................................123
Default Settings .......................................................................... 123
Specifications .............................................................................. 124
Chapter 12 Regulatory Compliance Information .... 125
For Customers in the United States ........................................... 125
For Customers in Europe ............................................................ 126
Page 7
6
Chapter 1 Getting Started
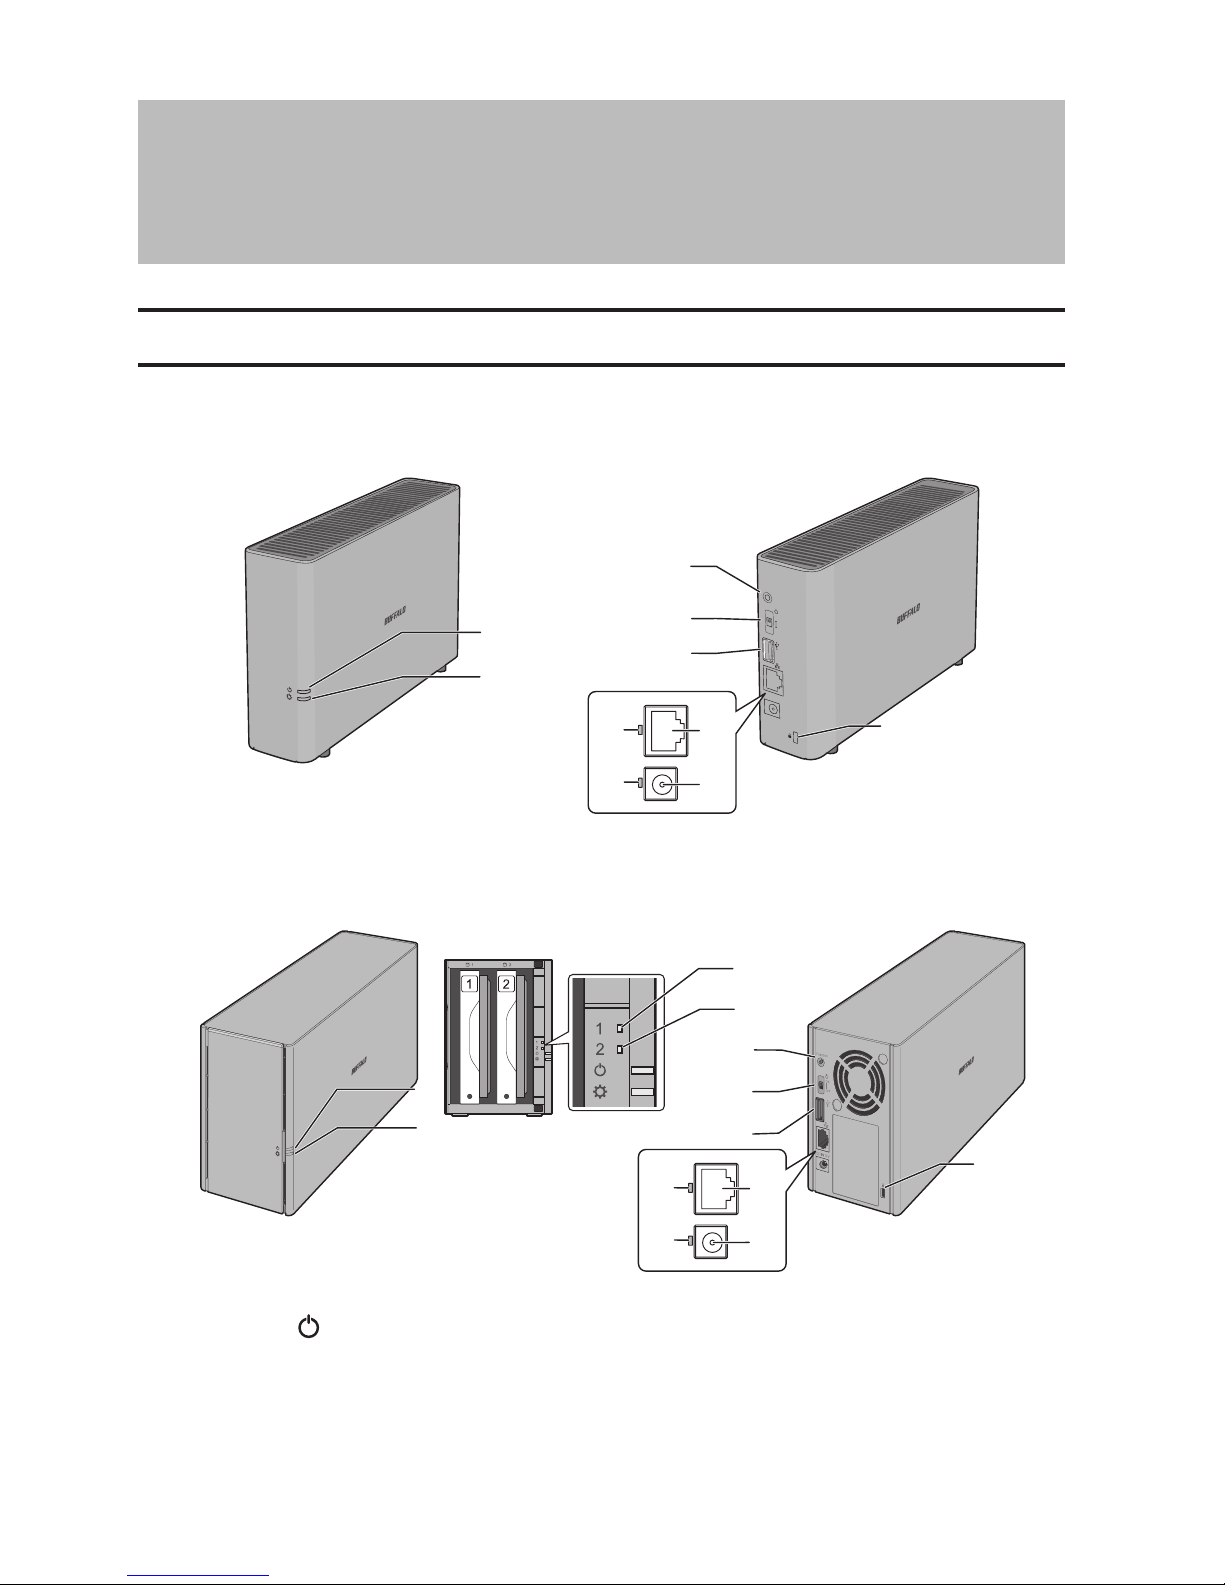
Diagrams
LS510D
Function
ON
OFF
1
2
5
6
7
12
11
8
10
9
LS520D, LS520DE
1
2
5
6
7
12
3
4
11
8
10
9
1 Power LED ( )
The white power LED will light up while the LinkStation is on.
The white power LED blinks while booting or shutting down.
The red power LED blinks when an error occurs.
If there is a status message, the power LED blinks amber.
If there is new firmware available, the power LED glows amber.
Page 8
7
2 Function LED ( )
This LED glows white while the USB device is connected, and blinks white dismounting USB devices and
during Direct Copy.
3 Drive 1 Error LED
If there is an error on drive 1, this LED will light.
4 Drive 2 Error LED
If there is an error on drive 2, this LED will light.
5 Function Button
Use this button for Direct Copy and initializing settings.
6 Power Switch ( )
Move the switch up and down to power on and off.
7 USB 3.0 Port ( )
Compatible Buffalo USB 3.0 hard drives and USB flash drives can be connected. USB hubs are not supported.
8 LAN Port ( )
Connect to a router, hub, or switch on your Ethernet network with the included Ethernet cable.
9 Link and Activity LED
This LED shows network activity. It blinks green when the LinkStation is accessed over the network.
10 Power Connector
Use the included power cable to connect to a surge protector or outlet.
11 Power Status LED
The LED glows green when the power cable is connected.
12 Anti-Theft Security Slot ( )
Use this slot to secure your LinkStation with a cable lock (not included).
Accessing Shared Folders
Accessing from a Computer
1 Double-click the icon to start NAS Navigator2.
2 In NAS Navigator2, double-click your LinkStation's icon.
Page 9
8
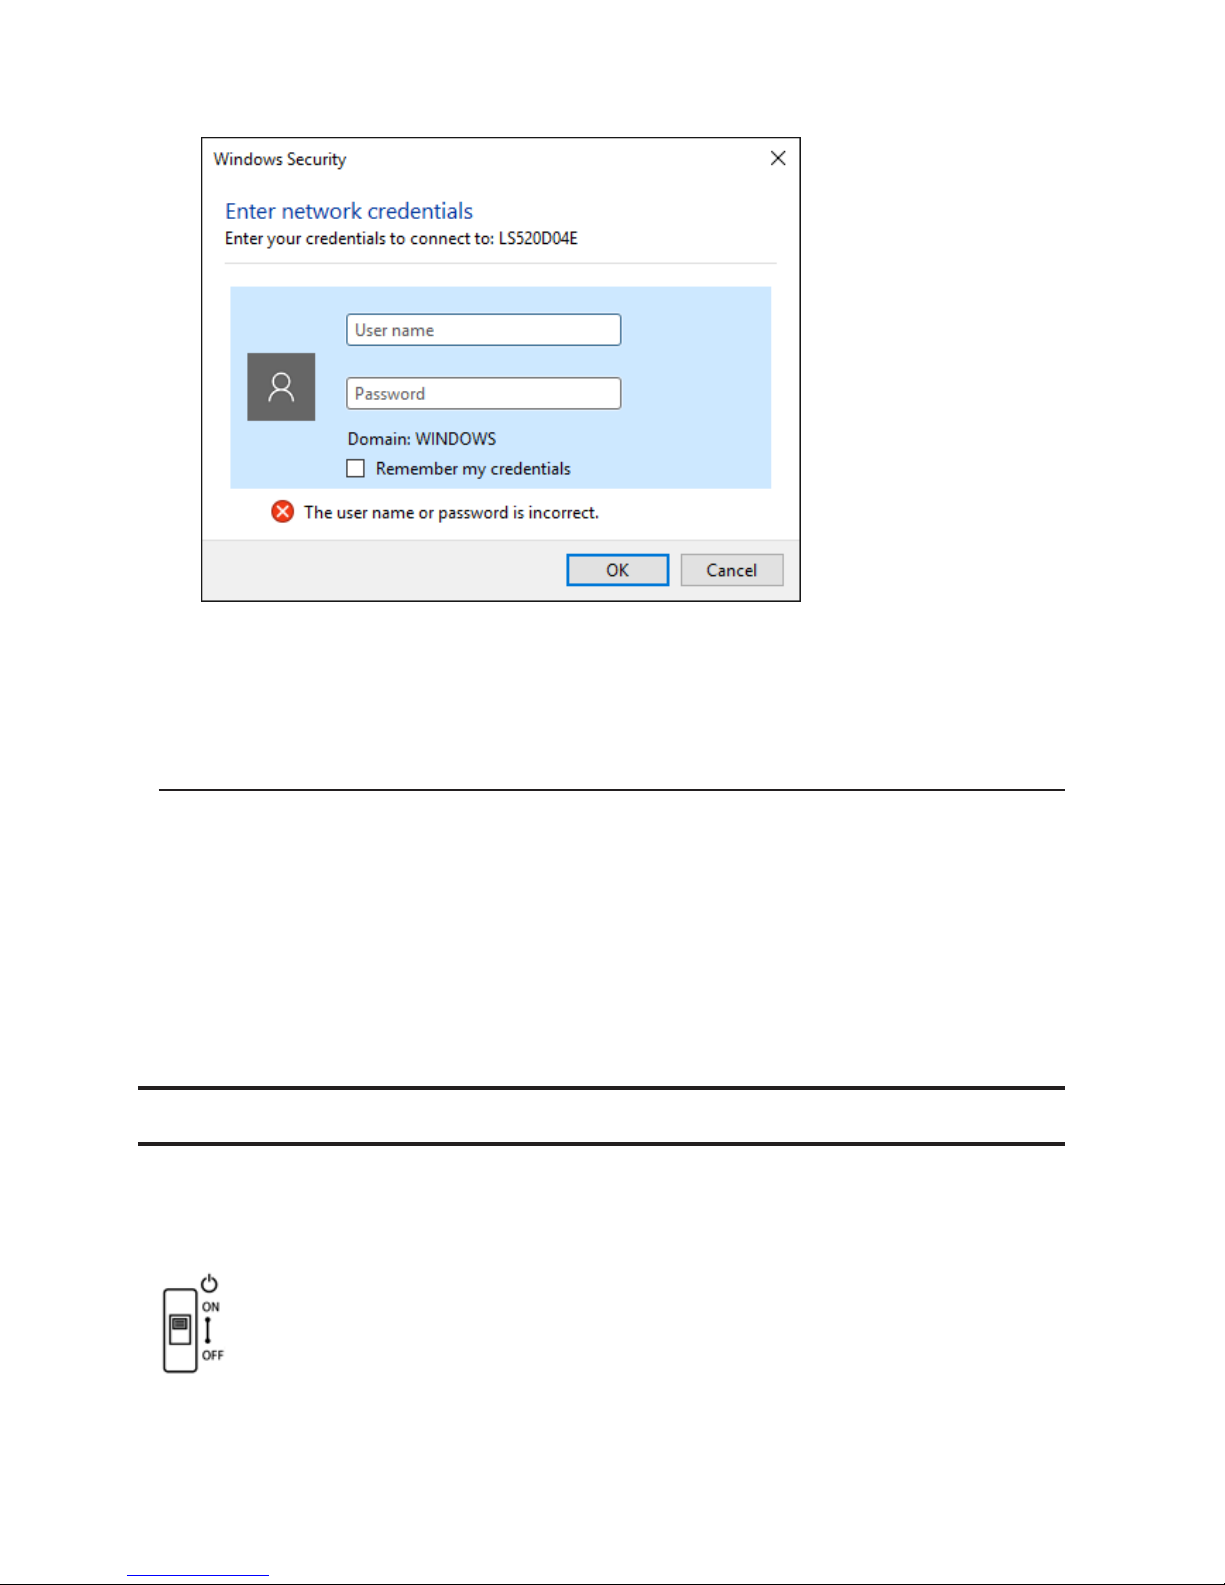
3 When the following screen is displayed, enter the username and password.
4 The Explorer will open with a list of shared folders. For Mac OS, the LinkStation is mounted as a drive icon on
the desktop or it is displayed in the sidebar of the Finder.
Note: 15 GB in each RAID array have been reserved for the system area in the LinkStation, so they cannot be
used when accessing via SMB connection.
Accessing from a Mobile Device
To access shared folders from a mobile device with the following steps, you must configure WebAccess settings first.
To configure WebAccess, see the "WebAccess" section in chapter 6.
1 Open SmartPhone Navigator.
2 Tap your LinkStation from the NAS list.
3 Tap Browse.
Note: Alternatively, you can access shared folders from the WebAccess app. Open the application and tap your
LinkStation in the NAS list.
Turning the LinkStation On and Off
Move the power switch on the back of the LinkStation to the "on" position to turn it on. To turn it off, move the
switch to the "off" position and wait for the unit to fully shut down before unplugging it. Never unplug the AC
adapter without properly shutting down the LinkStation first.
When all the LEDs on the front of the LinkStation turn off, the shutdown process is complete.
Restarting from Settings
You can also restart the LinkStation remotely from Settings. To restarting from Settings, follow the procedure below.
Page 10
9
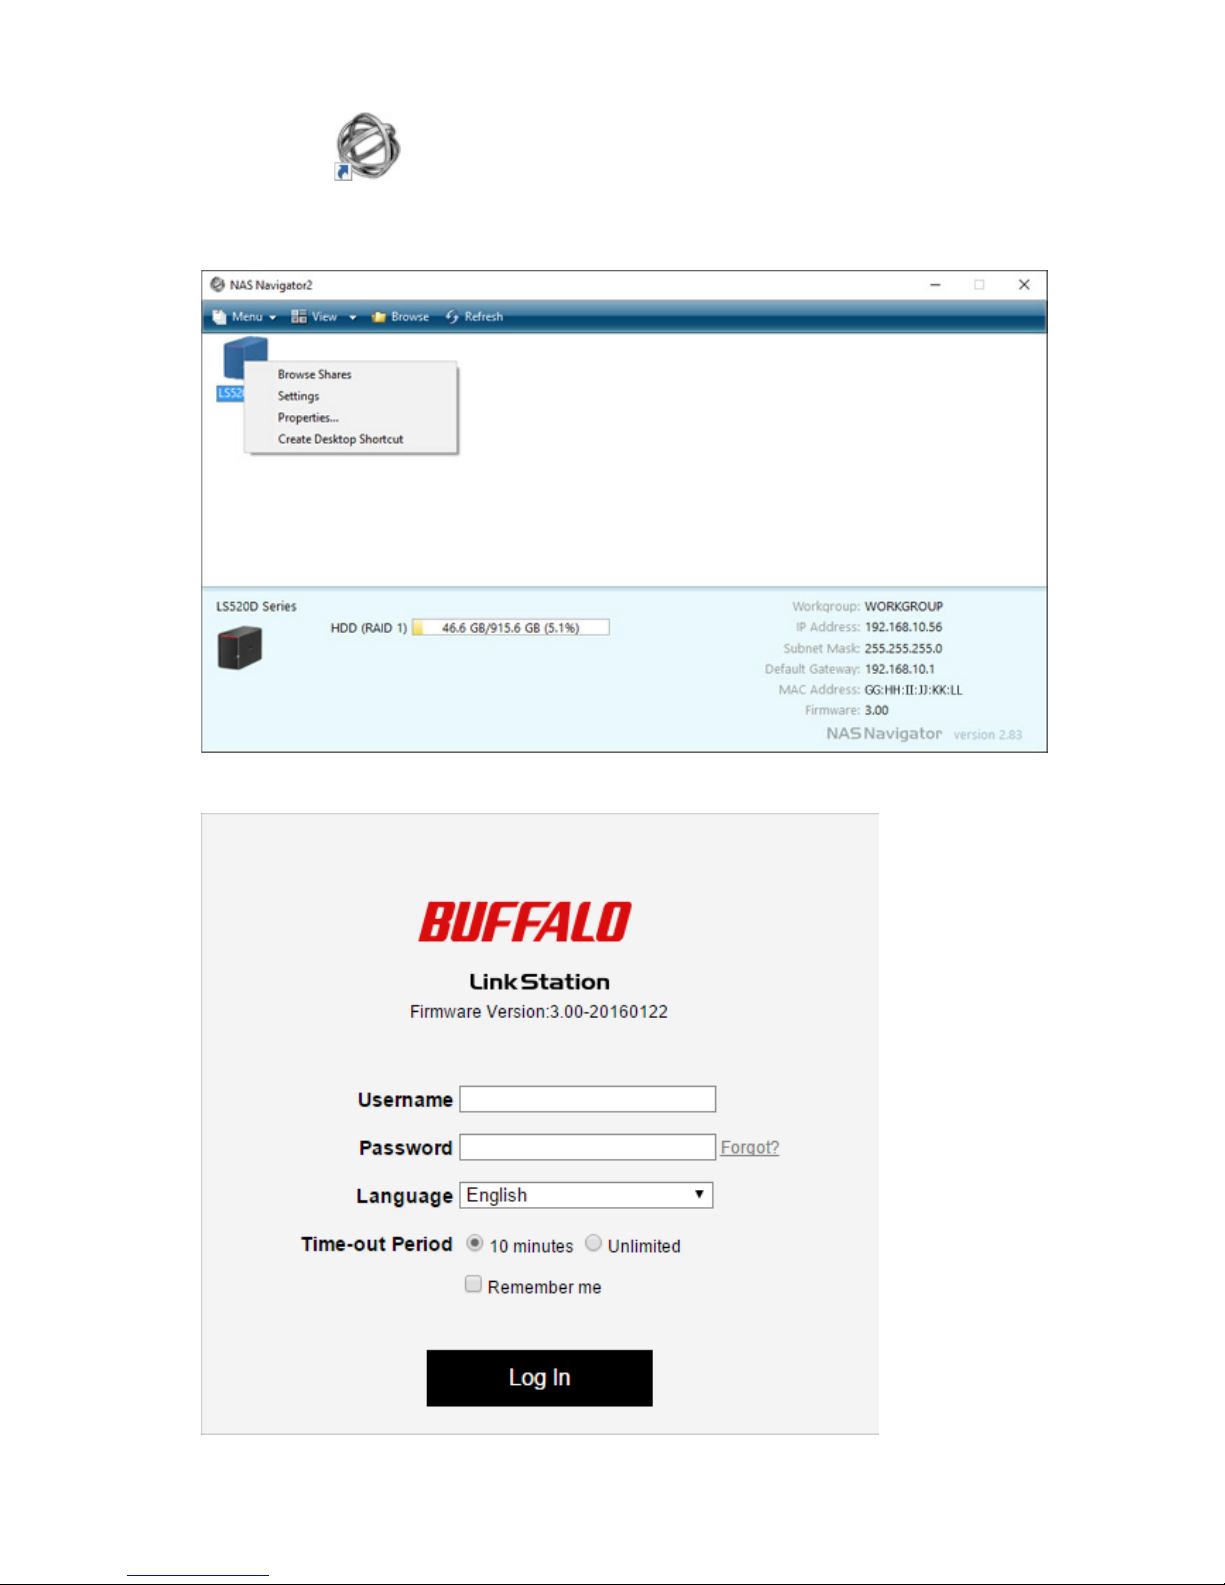
1 Double-click the icon to start NAS Navigator2.
2 Right-click on your LinkStation's icon and choose Settings. For Mac OS, click your LinkStation's icon while
holding down the control key, then select Settings.
3 Enter a username and password, then press the Enter key or click Log In.
Page 11
10
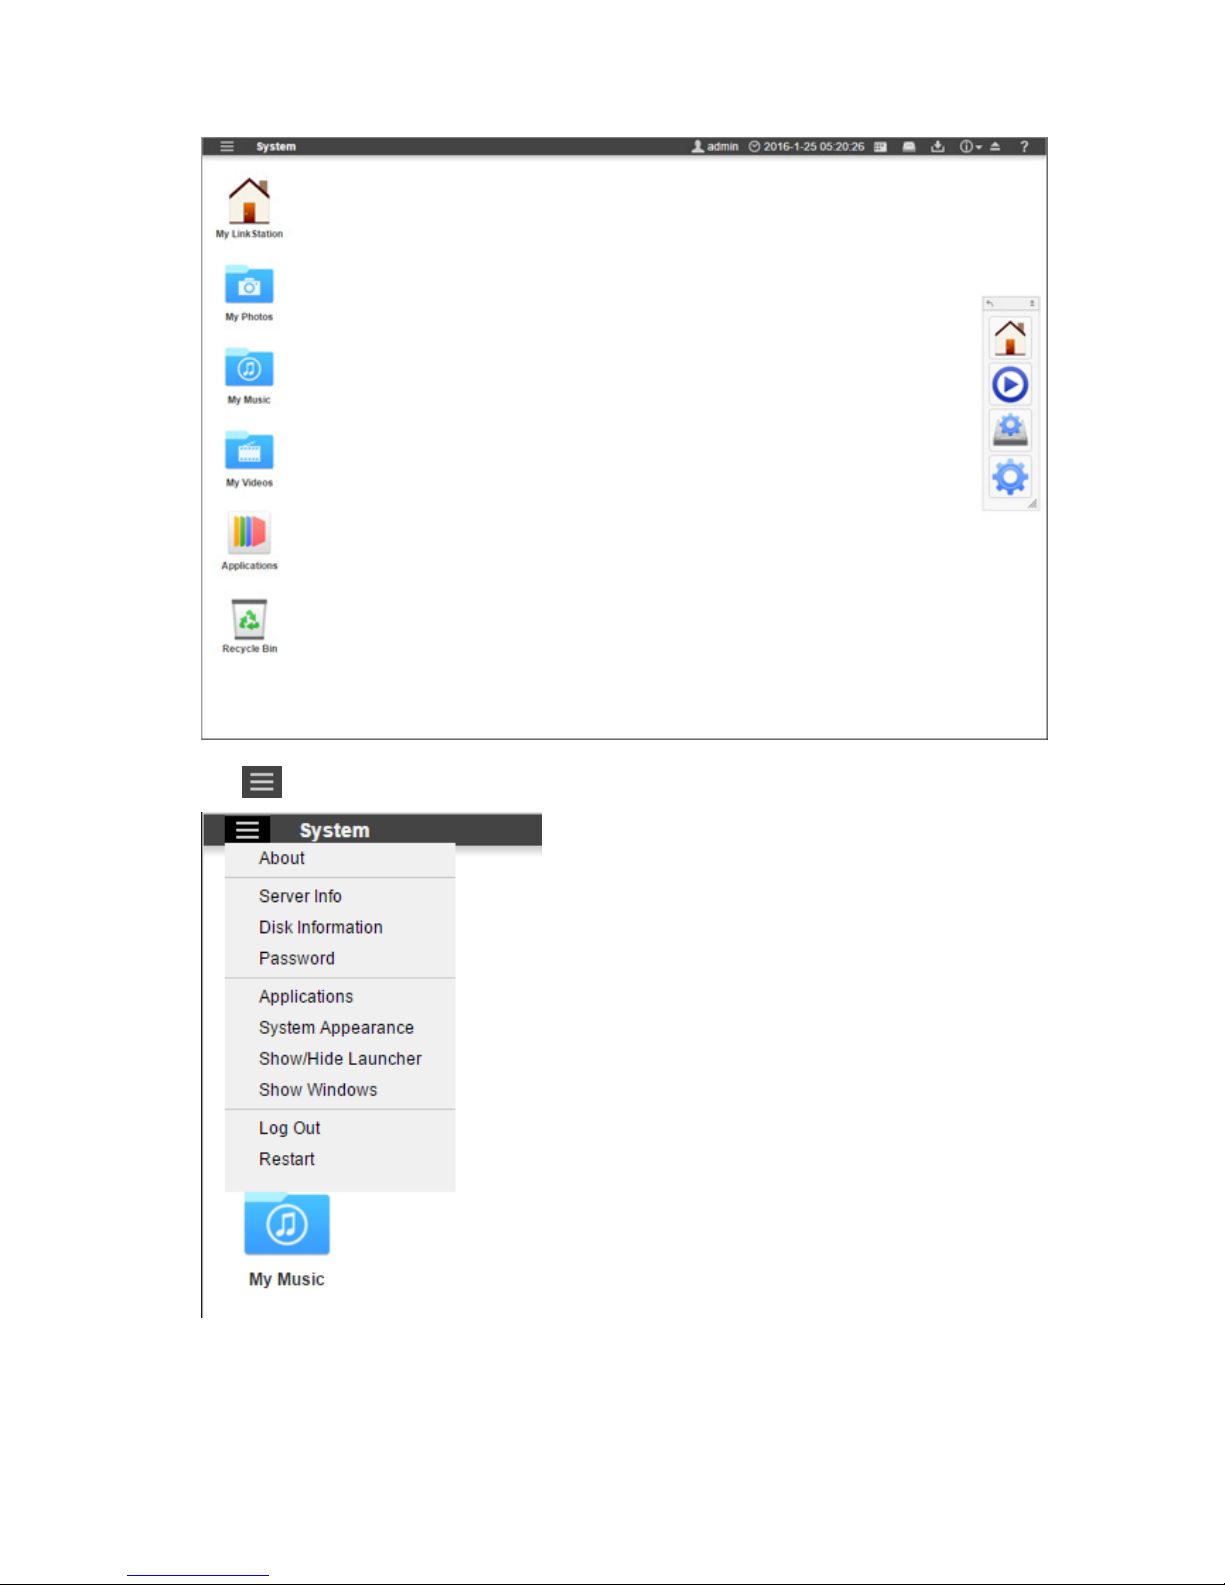
4 Settings will open.
5 Click at the top-left of Settings and choose Restart.
Page 12
11
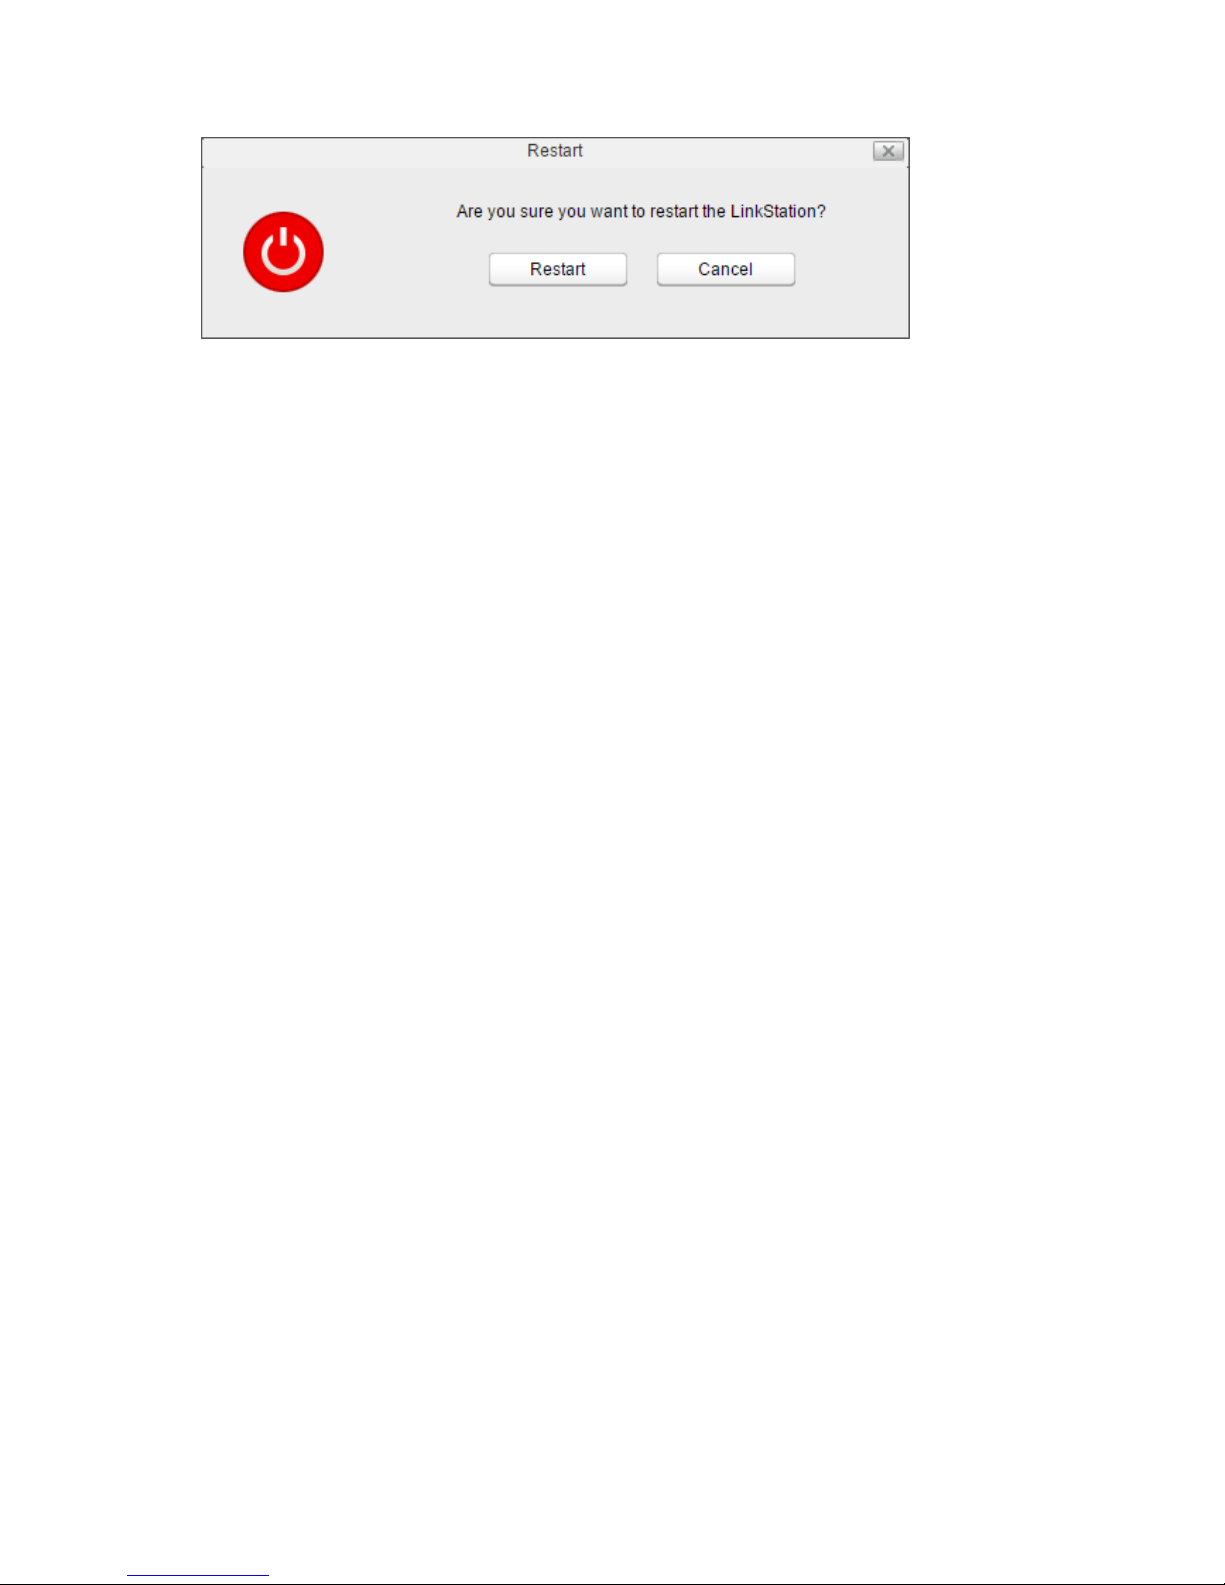
6 Click Restart again.
When the power LED stops flashing and glows white, the restart process is complete.
Page 13
12
Chapter 2 Configuration
Configure and manage your LinkStation using the Settings interface, accessible from a browser window. Open the
interface using the procedure below or type the LinkStation's IP address in the URL field of your browser.
Opening Settings
Opening from a Computer
Note: Internet Explorer 9, Microsoft Edge, Firefox 18, Google Chrome 24, Safari 8, and later are supported. If you
have difficulty viewing Settings, check the following:
• If you have a proxy server enabled in the browser settings, disable the proxy server.
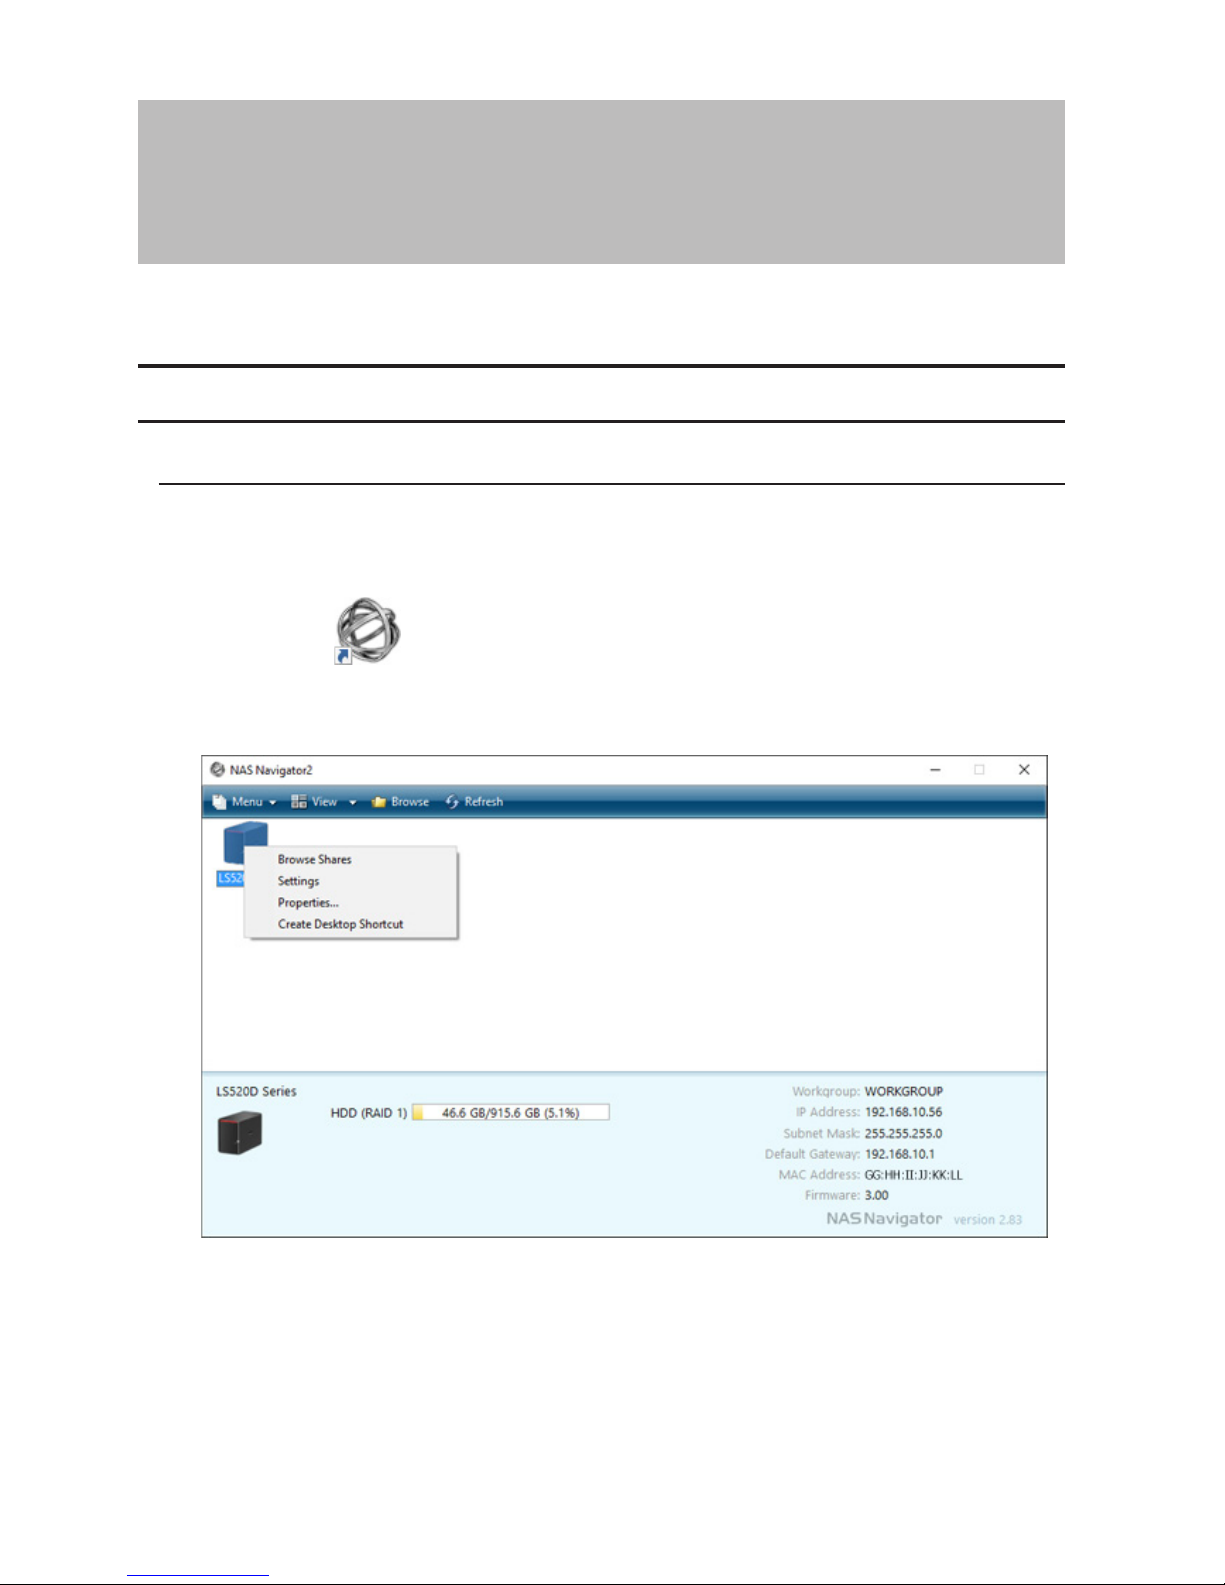
1 Double-click the icon to start NAS Navigator2.
2 Right-click on your LinkStation's icon and choose Settings. For Mac OS, click your LinkStation's icon while
holding down the control key, then select Settings.
Page 14
13
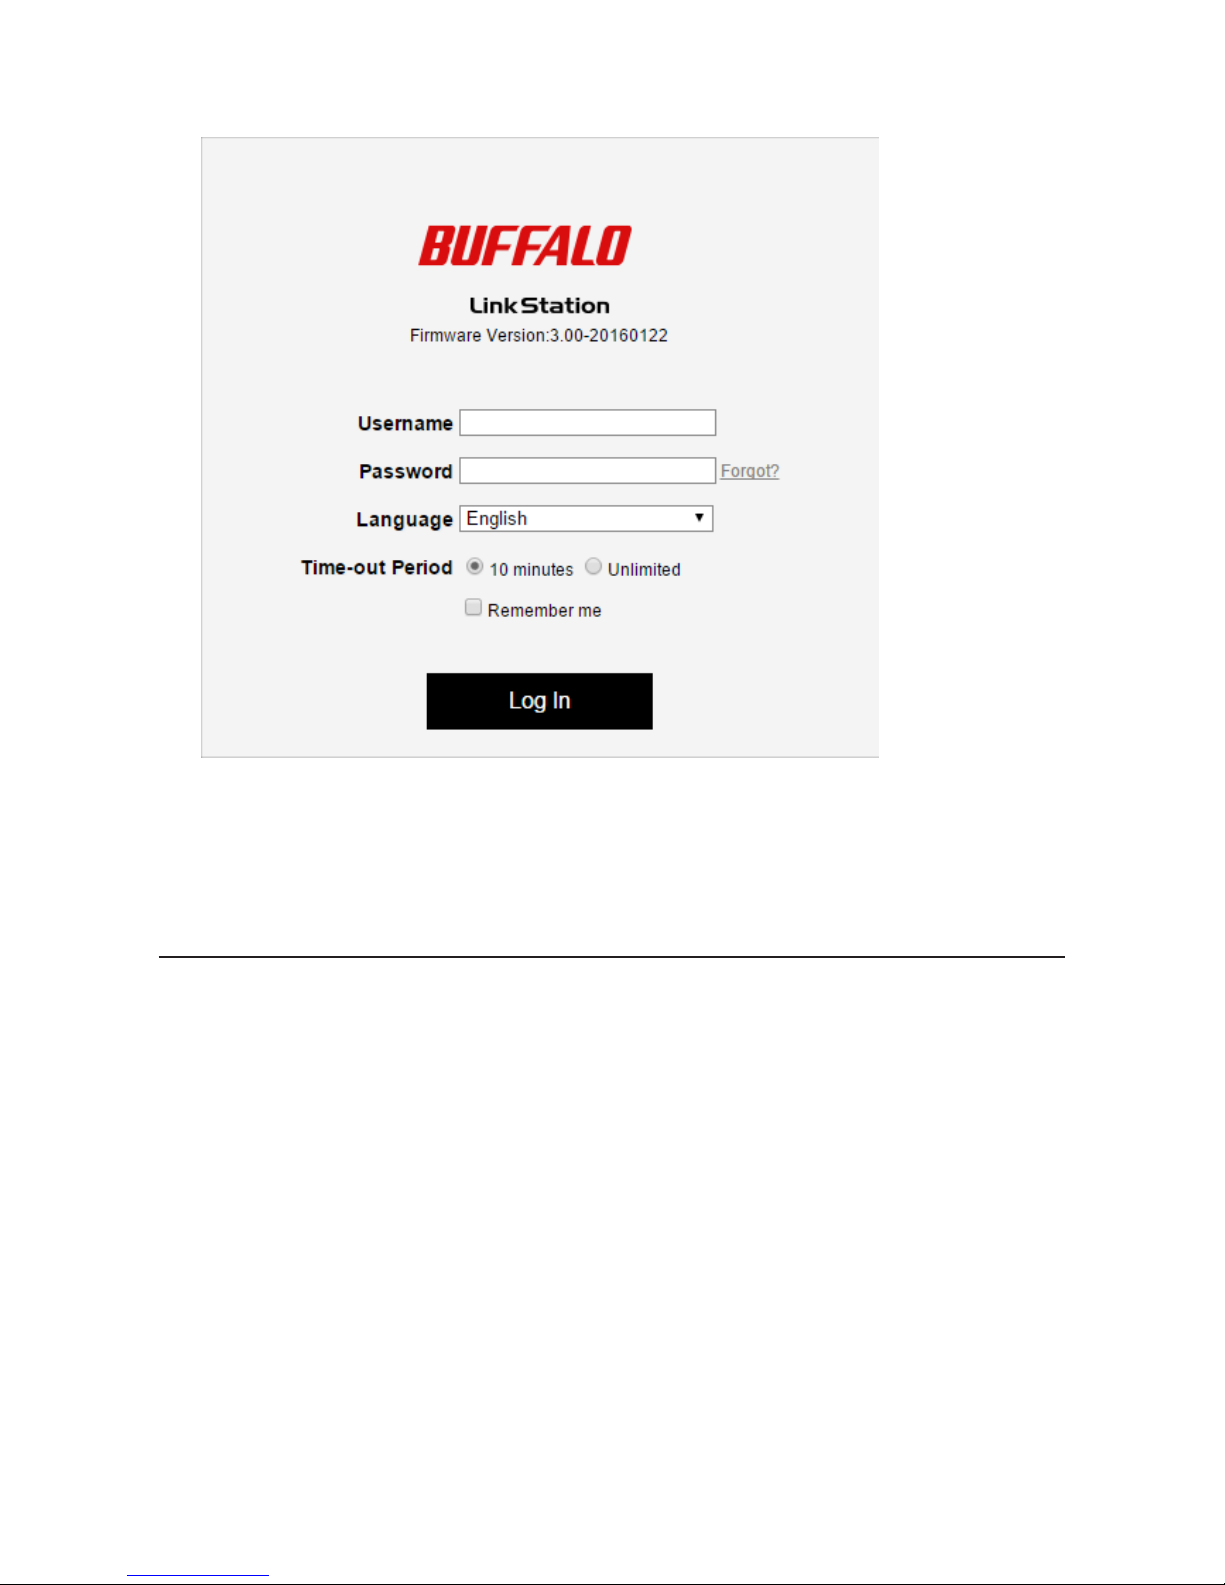
3 The Settings login screen will open.
4 Enter a username and password, then press the Enter key or click Log In.
Notes:
• To log out from Settings, close the browser.
• If the time-out period is set to "10 minutes", you will be logged out of Settings after 10 minutes of inactivity.
Opening from a Mobile Device
You can access your LinkStation's Settings from your iOS or Android device. Download and install "SmartPhone
Navigator" from the App Store or Google Play.
Notes:
• If you have an older version of SmartPhone Navigator installed on your device, update to the latest version.
Your icons and software may be slightly different from the examples in this manual.
• You must be logged in as the "admin" user to change settings.
• Mobile devices that support mobile-optimized Settings display are listed below:
iPhone, iPad, and iPod touch
*
Android smartphones and tablets
**
* iOS 7.0 or later
** Android 4.1 or later
Page 15
14
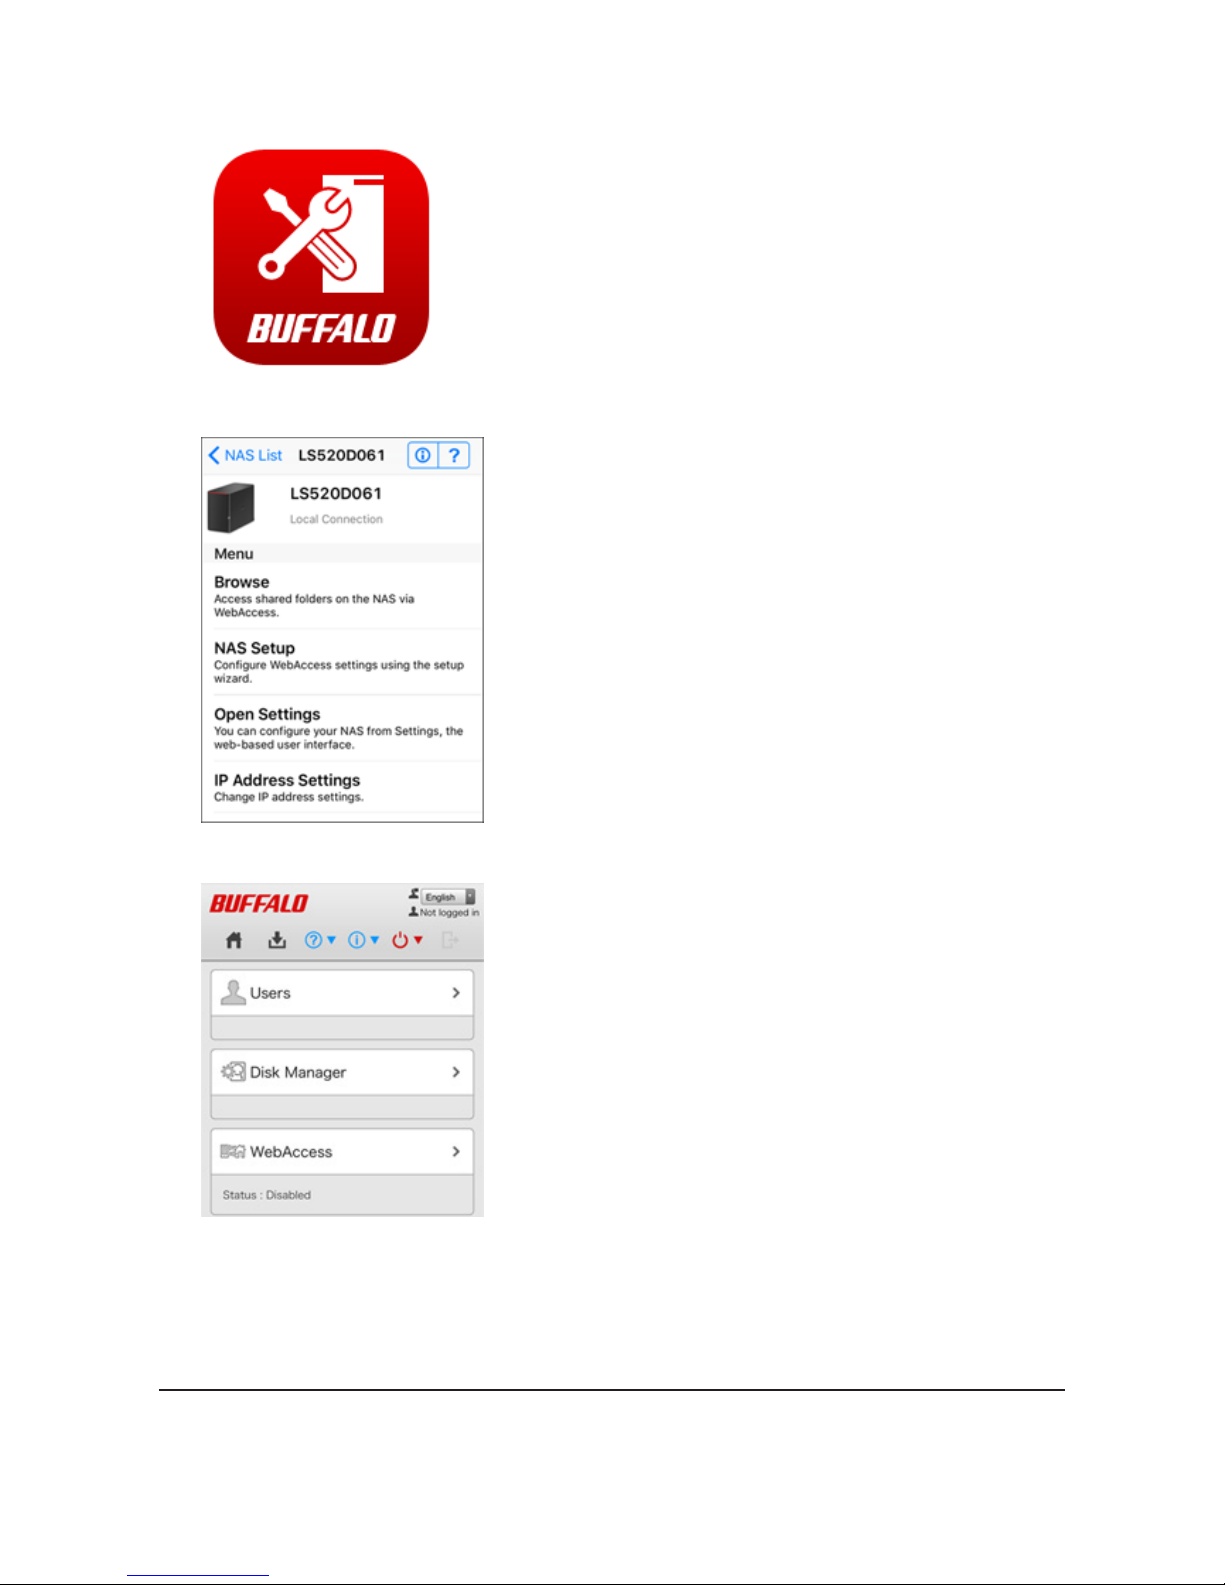
1 Open SmartPhone Navigator on your mobile device.
2 Tap Open Settings.
3 Settings will be displayed.
Notes:
• The first time you go through setup, you'll be given a chance to change the default password, create a user,
select the RAID mode, and correct the time zone settings.
• If you tap any buttons, you will need to enter a username and password.
Resetting Administrator Password
If you forget the admin password and cannot log in to Settings, you can initialize it with the function button. Follow
the procedure below to initialize the password.
Page 16
15
1 Turn off the LinkStation.
2 Turn the LinkStation on while holding down the function button until the power LED flashes amber.
3 Initialization will start. Do not power down the LinkStation while the power LED is blinking.
4 When the power LED glows a steady white, initialization is finished.
Navigating the Main Menu
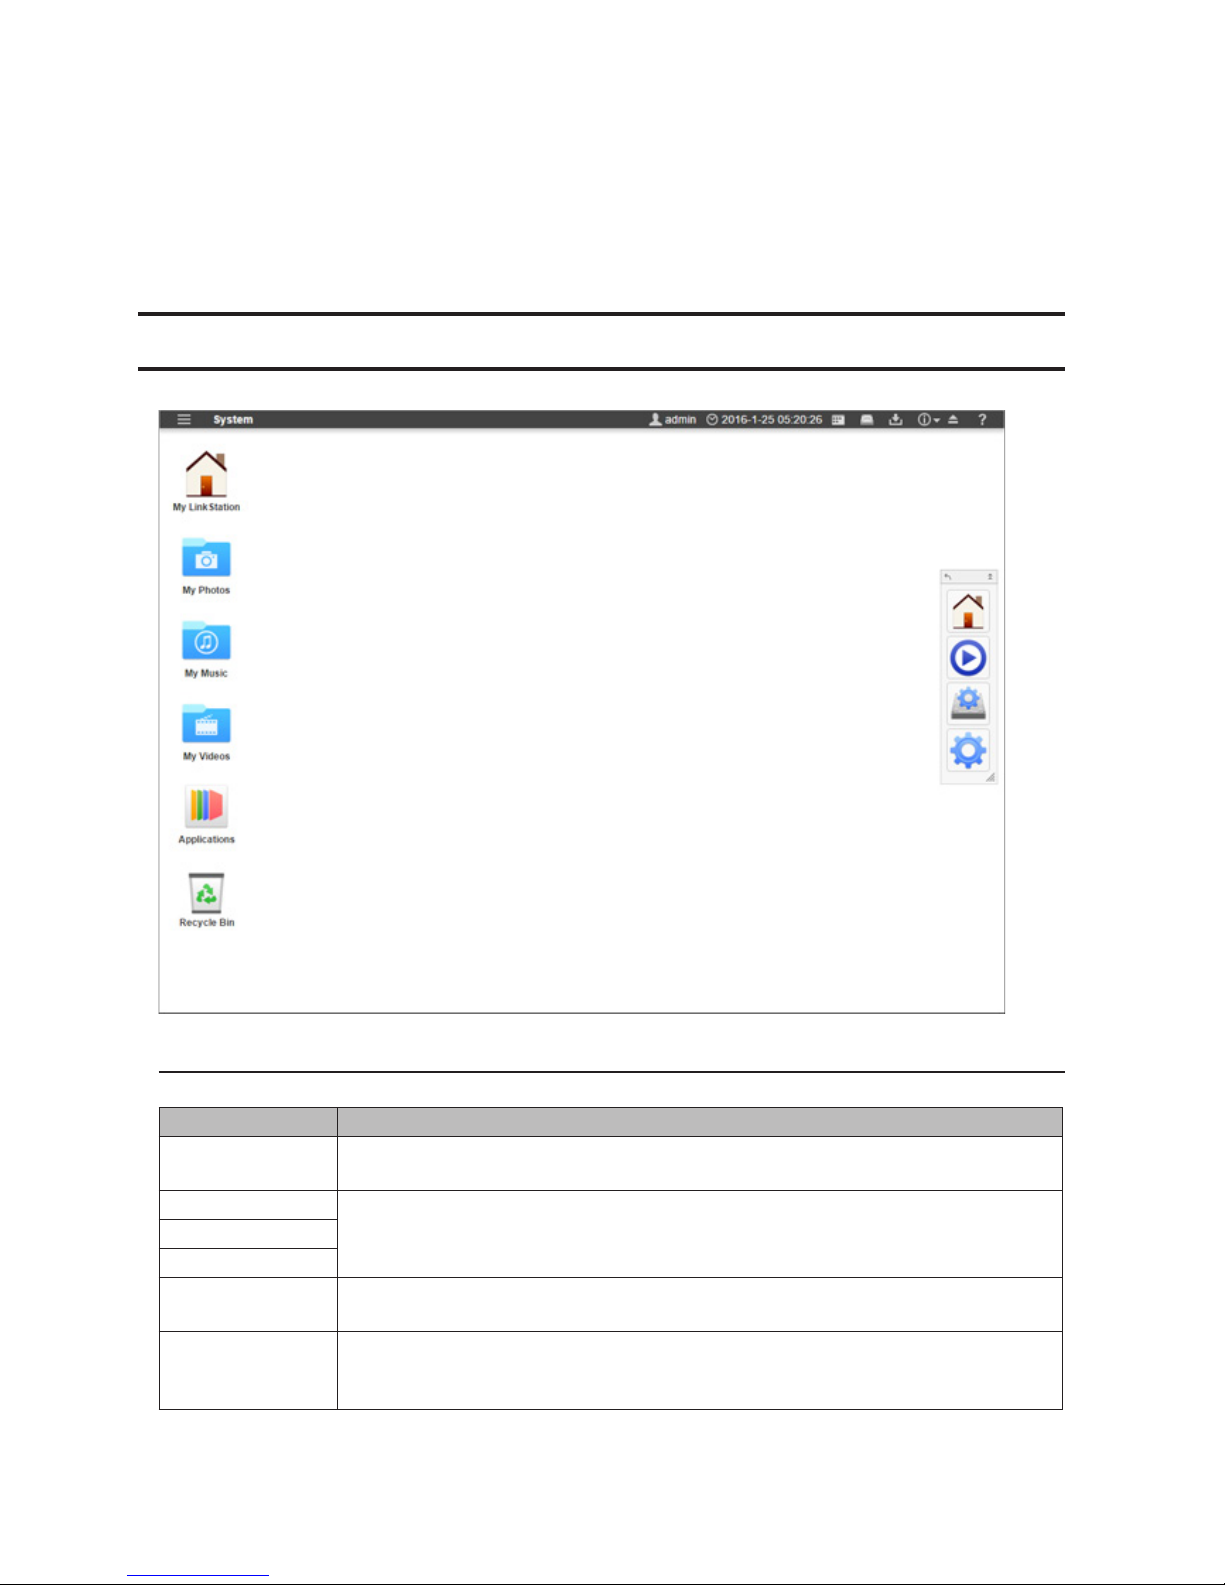
When you log in to Settings, you will see the following screen first.
The Home Screen
The home screen acts like a typical computer desktop. Default shortcuts are listed below:
Item Description
My LinkStation
Accesses all stored files and folders and all LinkStation functions, including creating new
shared folders.
My Photos
Shortcuts of folders that are in My LinkStation.My Music
My Videos
Applications
Contains programs built in to the LinkStation, as well as default shortcuts to system
settings.
Recycle Bin
Stores deleted files. If a file is accidentally deleted, you can restore it from this folder. To
empty the recycle bin, right-click the recycle bin icon, then select Clear.
Note: The recycle bin will only store files deleted from Settings.
Page 17
16
Launcher
The launcher provides instant access to applications and settings of your choice. Even with other windows open
in the LinkStation, the launcher will always stay on top for easy access. You can adjust the launcher size, screen
position, orientation, or even hide it completely, depending on what is convenient for you.
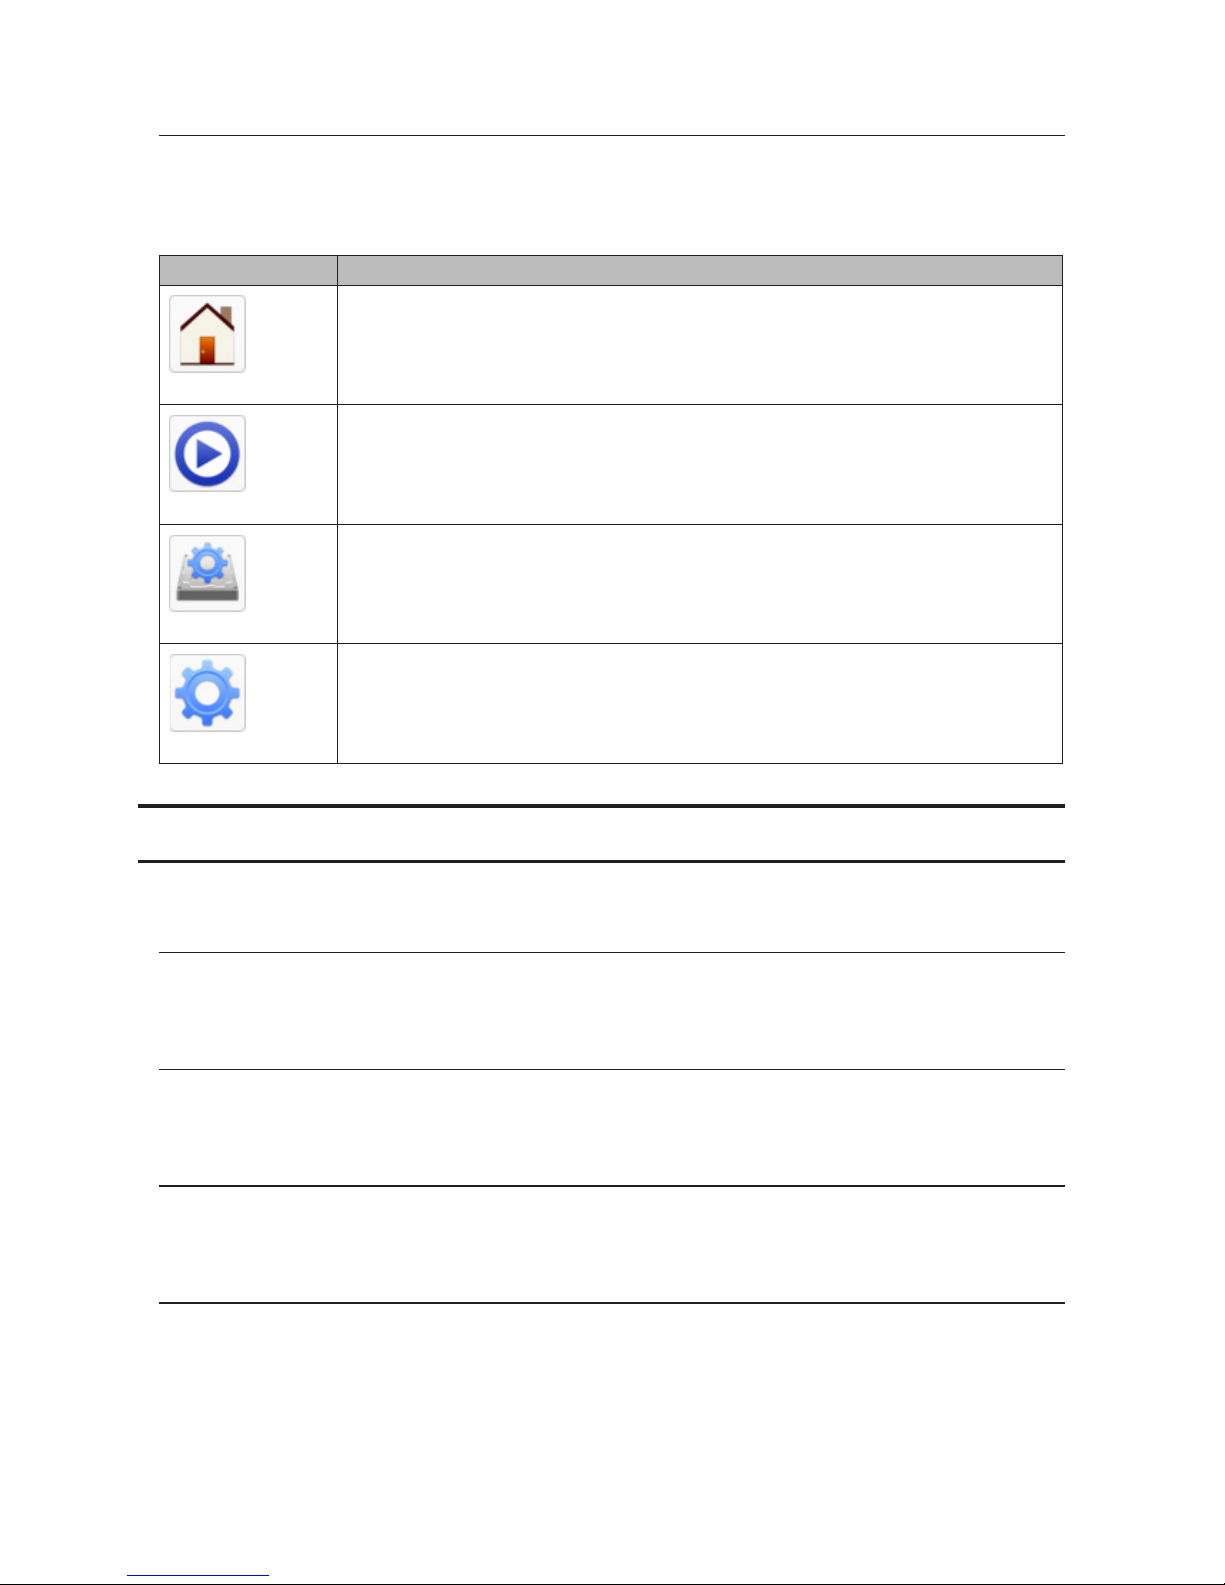
Default launcher shortcuts are listed below:
Item Description
My LinkStation
The same as My LinkStation.
Media Player
Plays audio or video files stored in the LinkStation.
Disk Manager
Manages internal and external drives connected to the LinkStation.
Preferences
Configures optional advanced settings.
Customizing the Home Screen
You can customize the home screen desktop to your specifications.
Adding New Shortcuts
To add a new desktop shortcut for an application, drag the application from the "Applications" folder to the desktop.
To add a desktop shortcut for a file or folder, drag the file or folder from its location to the desktop.
Deleting Shortcuts
To delete a shortcut, you can either right-click on the shortcut and select Delete.
Alternatively, you can drag and drop the shortcut into the recycle bin, then click OK from the dialog window.
Restoring Shortcuts
To restore desktop shortcuts to the default ones, right-click anywhere on the desktop and select Restore Desktop
Icons.
Arranging and Sorting Icons
To re-arrange the icons, simply drag them to your preferred location on the desktop. To sort desktop shortcuts,
right-click anywhere on the desktop and select Sort Desktop Icons. All the shortcuts will be re-arranged starting from
the top-left corner.
Page 18
17
Changing Icons
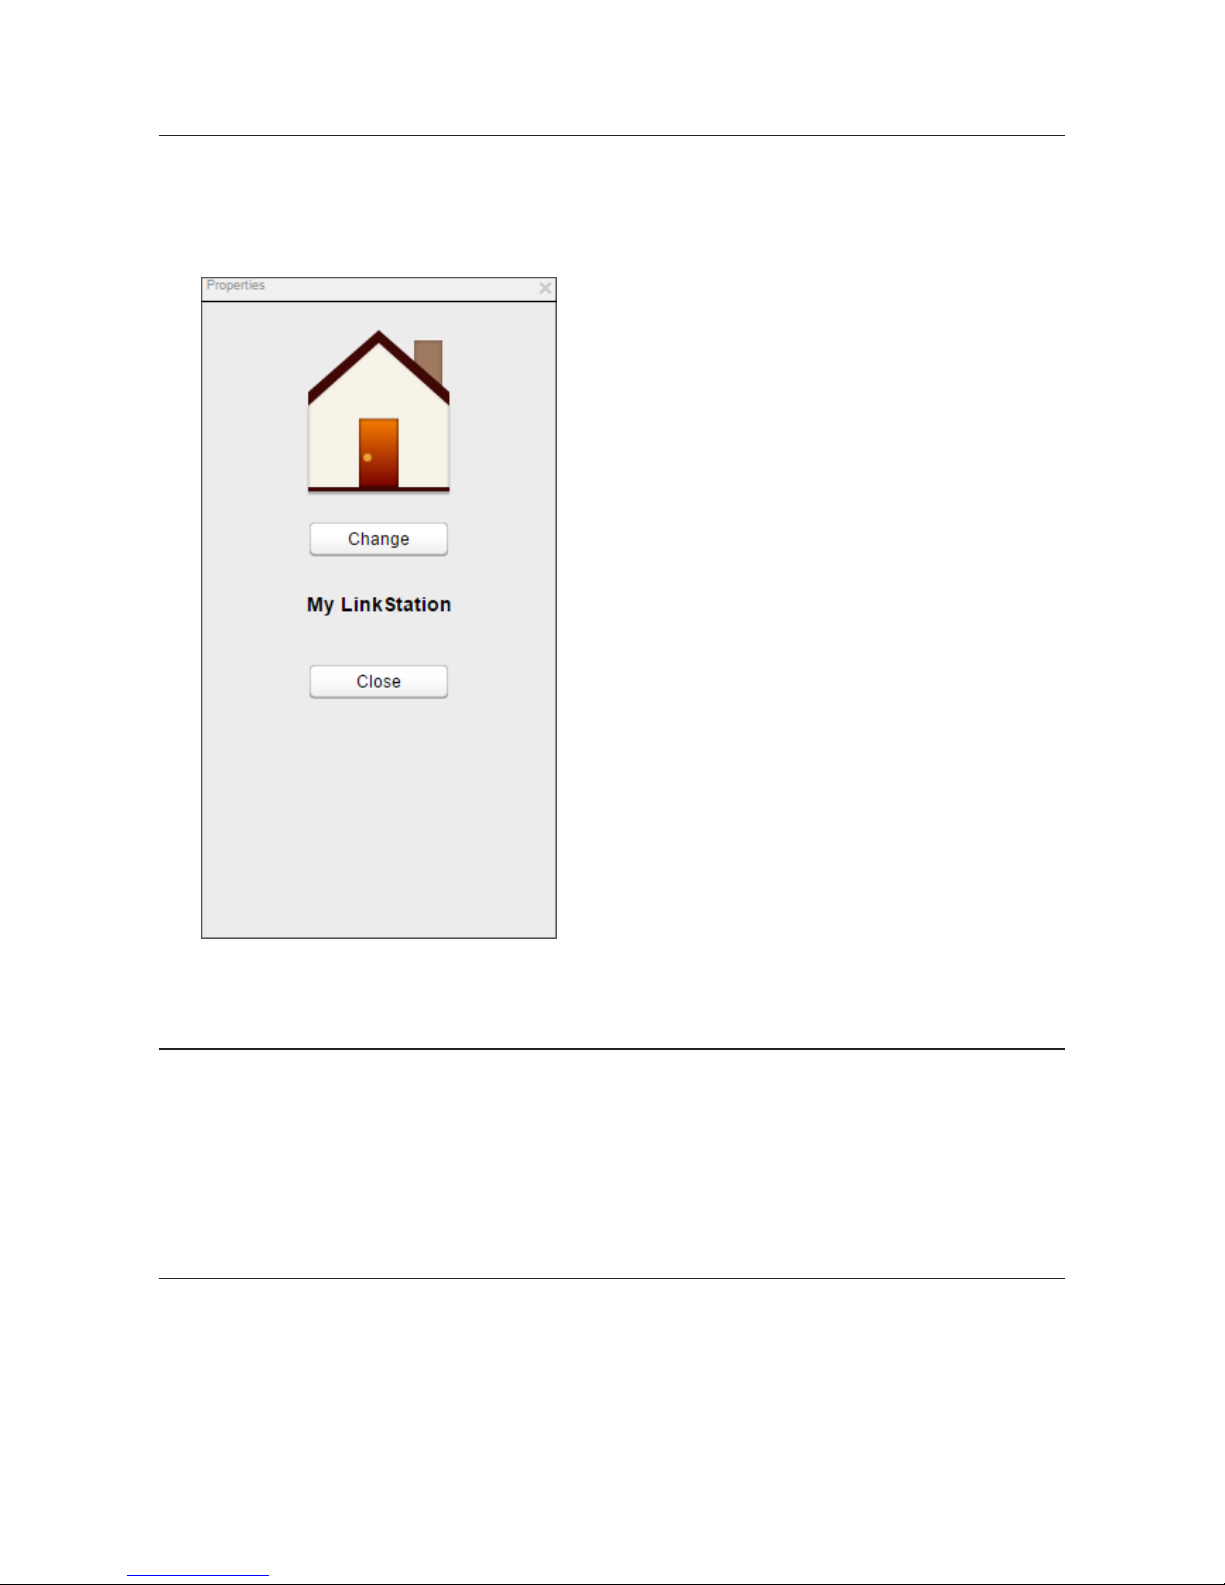
You can change replace an icon image with an image file on your LinkStation.
1 Right-click on a shortcut icon and select Change Icon.
2 Click Change and select the image you want.
3 Click Close.
Launcher Options
You can remove or restore launcher shortcuts just as you would with desktop shortcuts.
In addition to removing applications, you can also change the location and size of the launcher.
• Click and drag on the gray handle to re-position the launcher.
• Click on the double arrows in the gray handle to minimize the launcher.
• Click on the single arrow in the gray handle to flip the orientation from vertical to horizontal or vise versa.
• Click and drag the triangle in the corner of the launcher to resize it.
Display Options
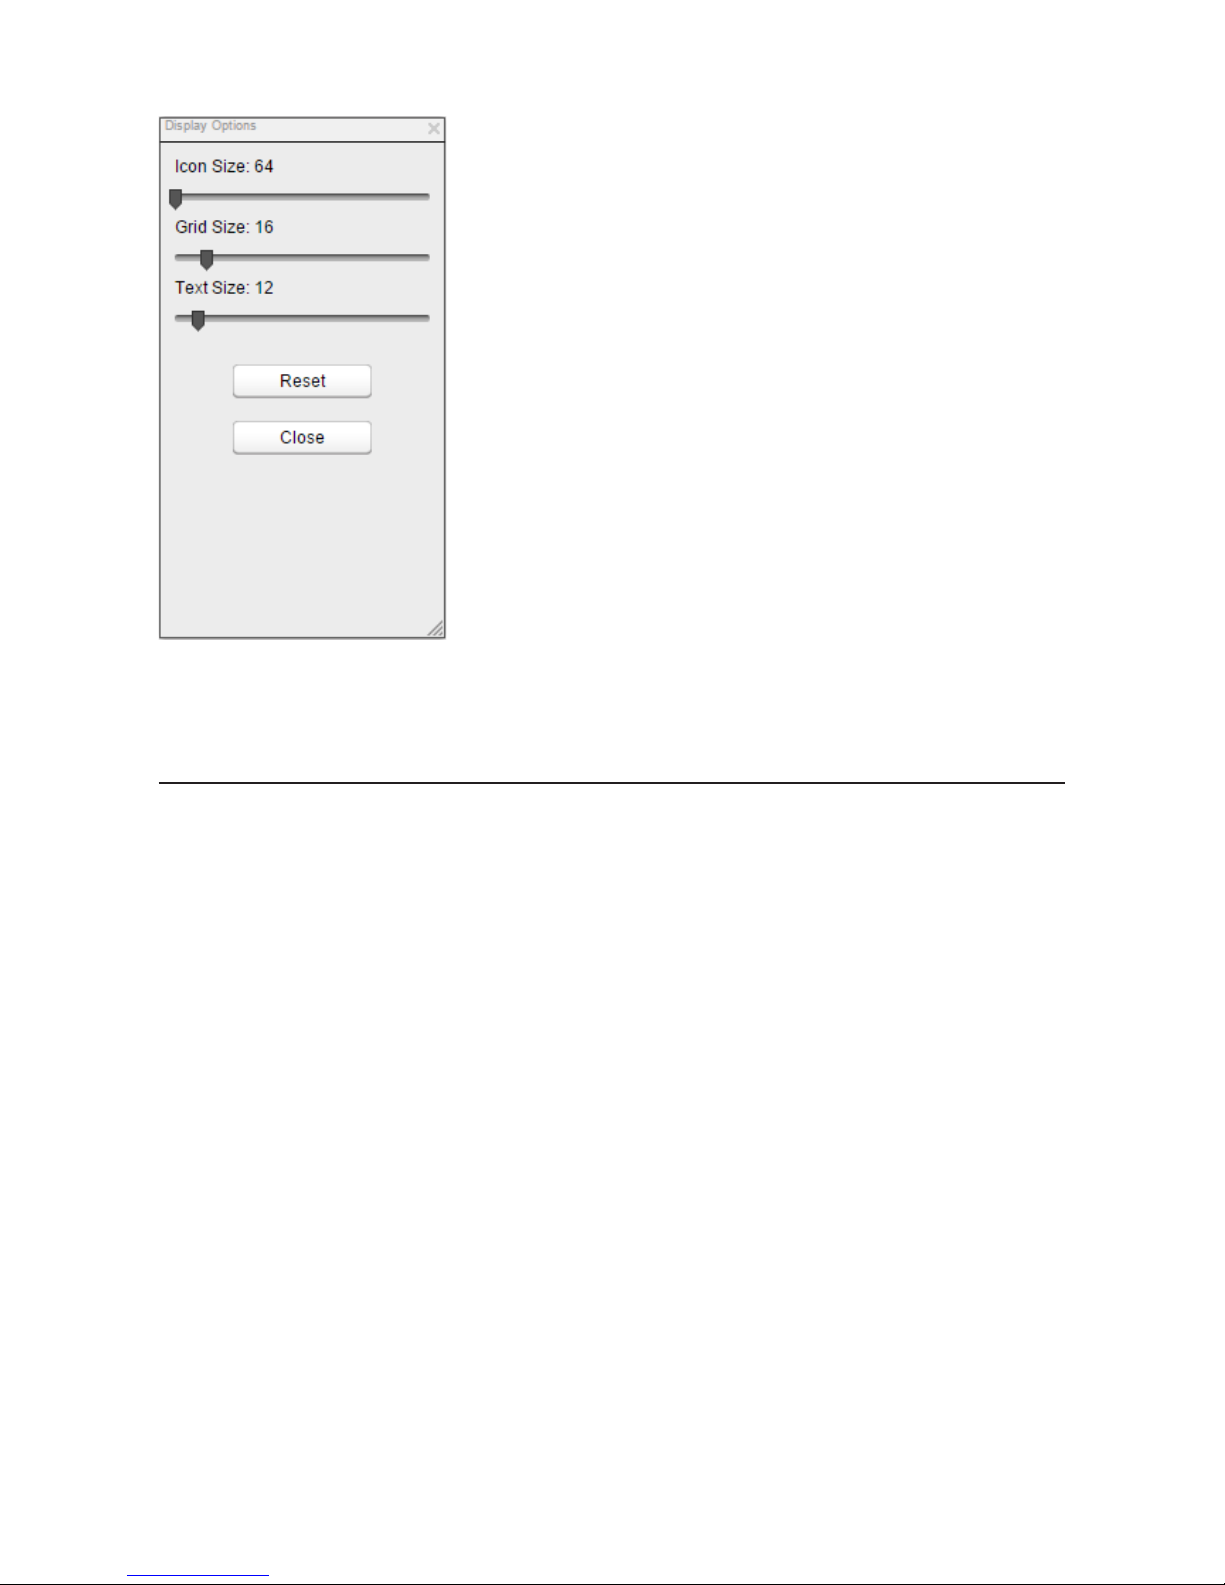
Right-click anywhere on the desktop and select Display Options. You can adjust the sliders to change the item
display sizes. To revert back to the factory default setting, click Reset.
Page 19
18
• Icon Size: Toggle between icon display sizes.
• Grid Size: Toggle between icon grid display sizes.
• Text Size: Toggle between text display sizes.
Wallpaper Options
You can replace the default wallpaper to match your own personal preferences. You can set any image stored on the
LinkStation as the wallpaper. You can also enable the slideshow function to cycle through your images and display a
new image at a preset interval.
1 Right-click on the background and select System Appearance.
Page 20

19
2 Click the Wallpaper tab, then Open. Select the folder where your images are stored, or click View system
wallpapers to view stock images included on your LinkStation. Click on the image you want to set as your
wallpaper.
3 From the "Position" drop-down, select how the image will be displayed.
• Stretch: Stretch the wallpaper to desktop size.
• Center: Places the wallpaper in the center of the desktop.
• Tile: Displays the wallpaper in a tile-like pattern.
• Fill: Make the wallpaper fill the desktop and cut any overflow.
• Fit: Make the wallpaper fit the desktop without overflow.
4 If you enable "Slideshow", you can set an interval in seconds to cycle through images in the selected folder as
the background.
5 If you don't want to use an image as the wallpaper, you can set the background as a solid color and enable the
"No Image" option.
Changing Display Languages
You can change the display language before or after you log in to Settings.
Page 21
20
Changing from Login Page
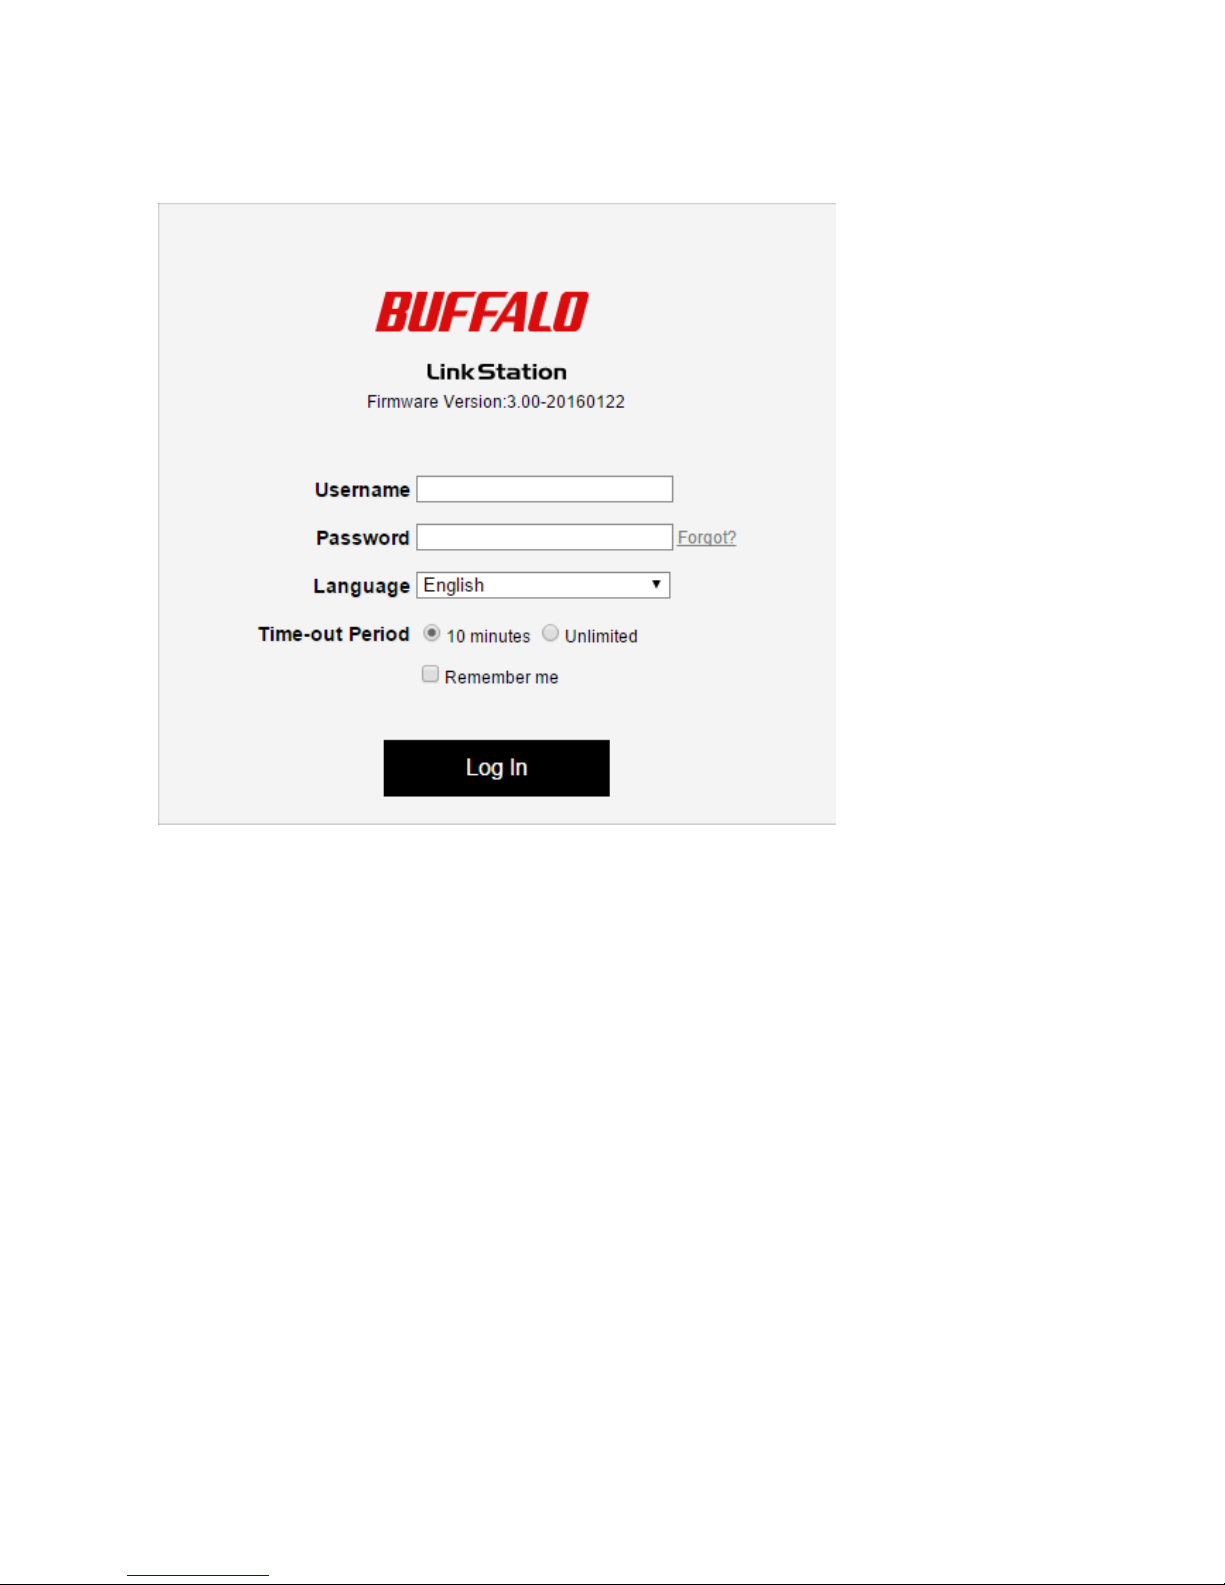
Open Settings and select the language from the drop-down menu. The display language will be changed after you
log in.
Changing from Desktop
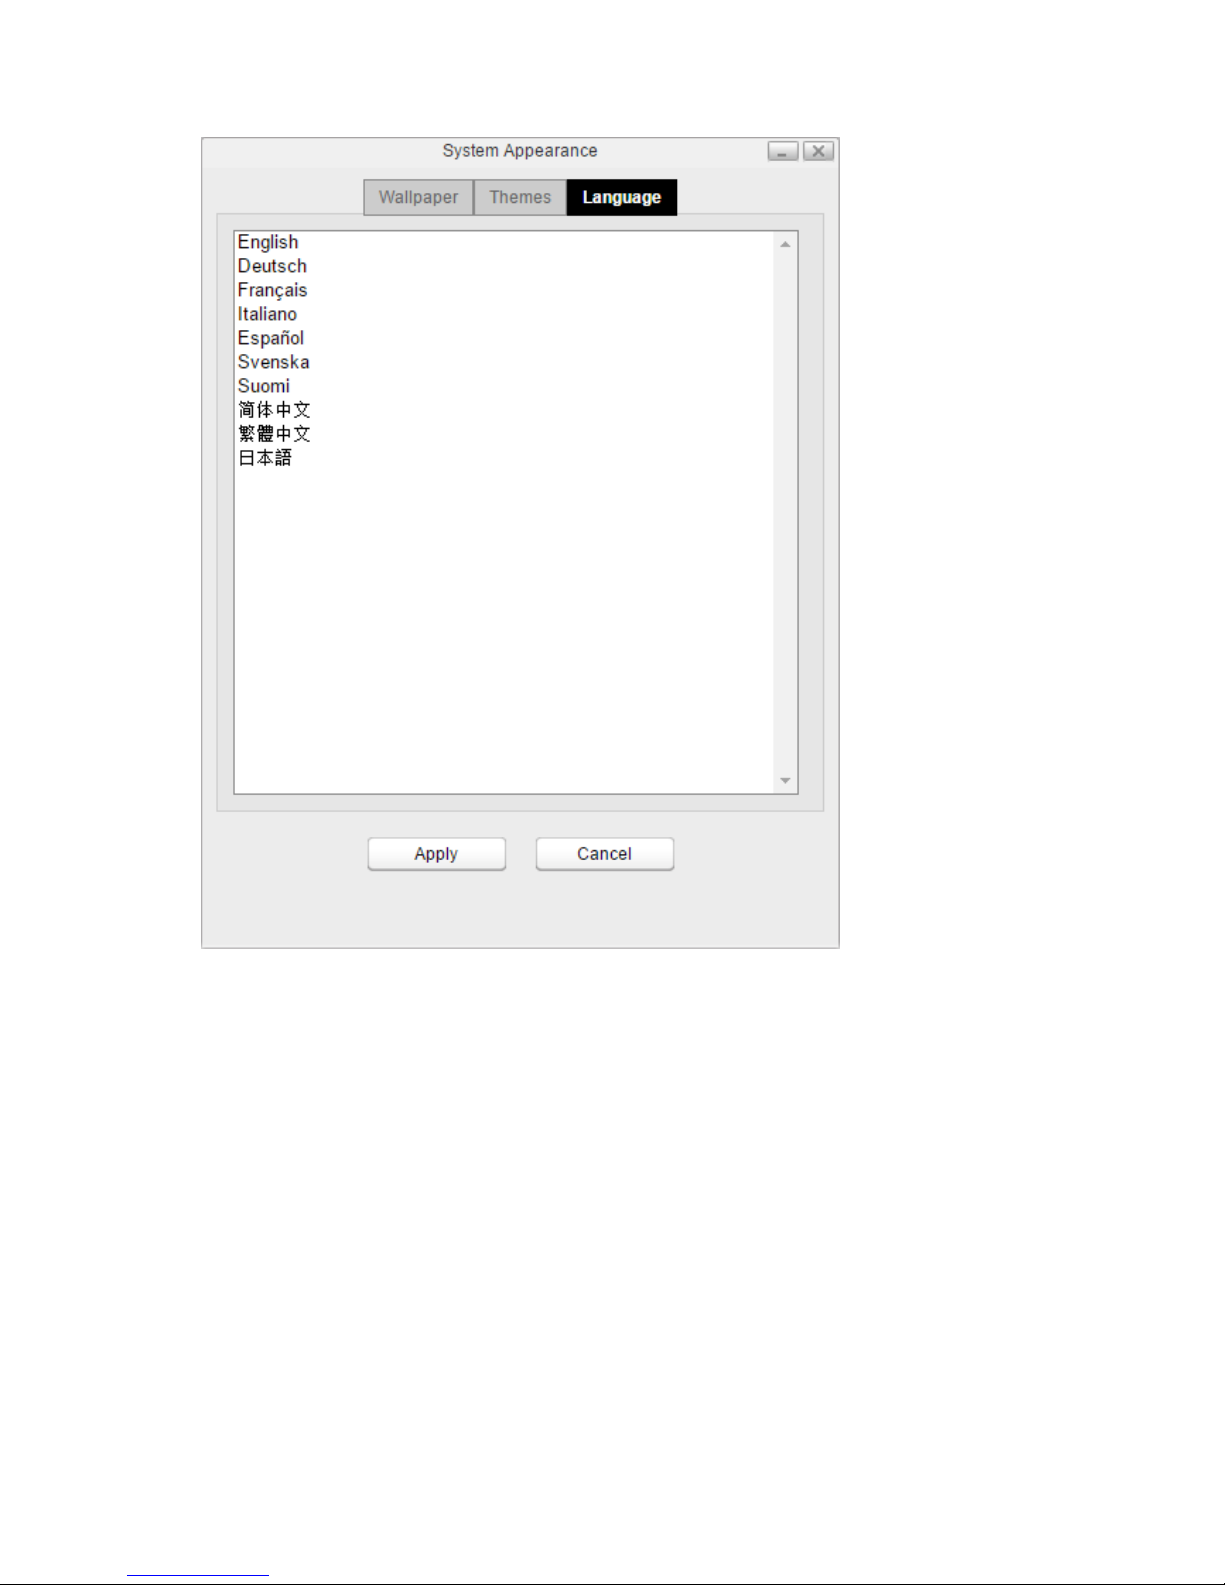
1 Right-click anywhere on the desktop and select System Appearance.
Page 22
21
2 Click the Language tab and select the desired display language from the list.
3 Click Apply.
Page 23
22
Chapter 3 My LinkStation
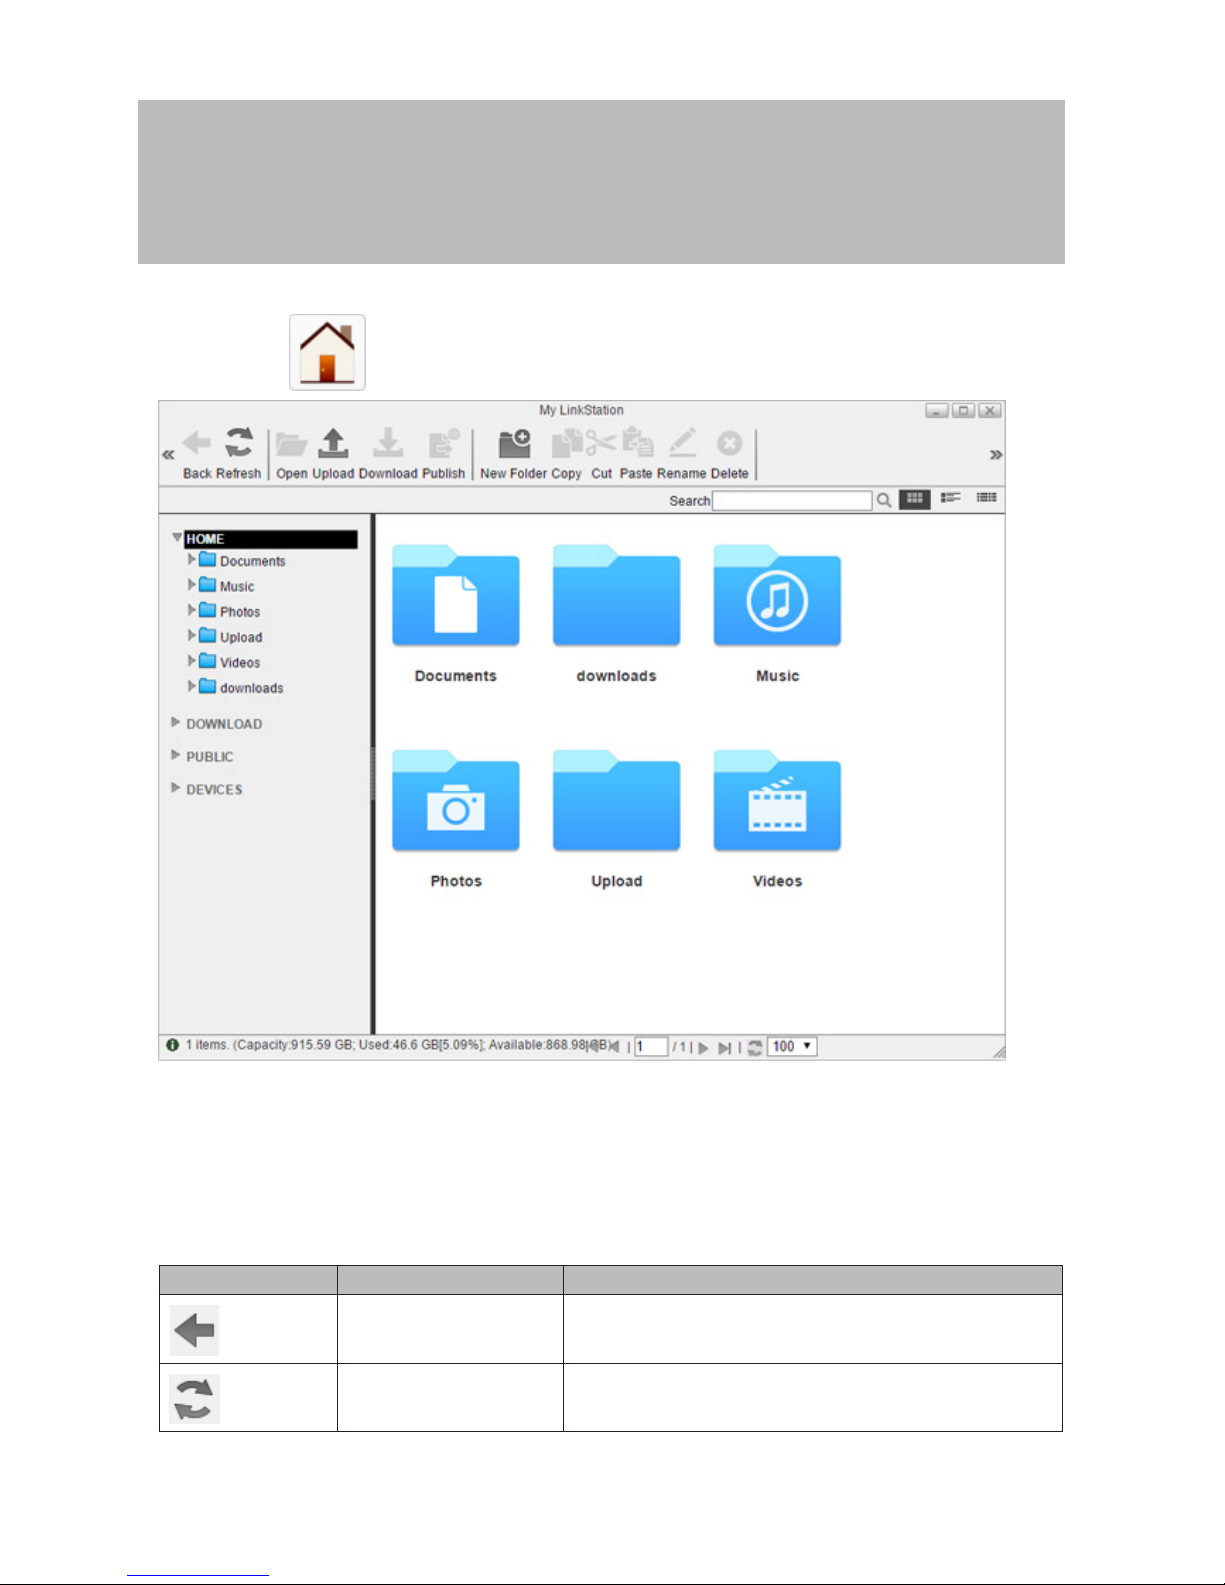
My LinkStation is an application that manages files and folders stored on the LinkStation. To open My LinkStation,
double-click the icon from the home screen.
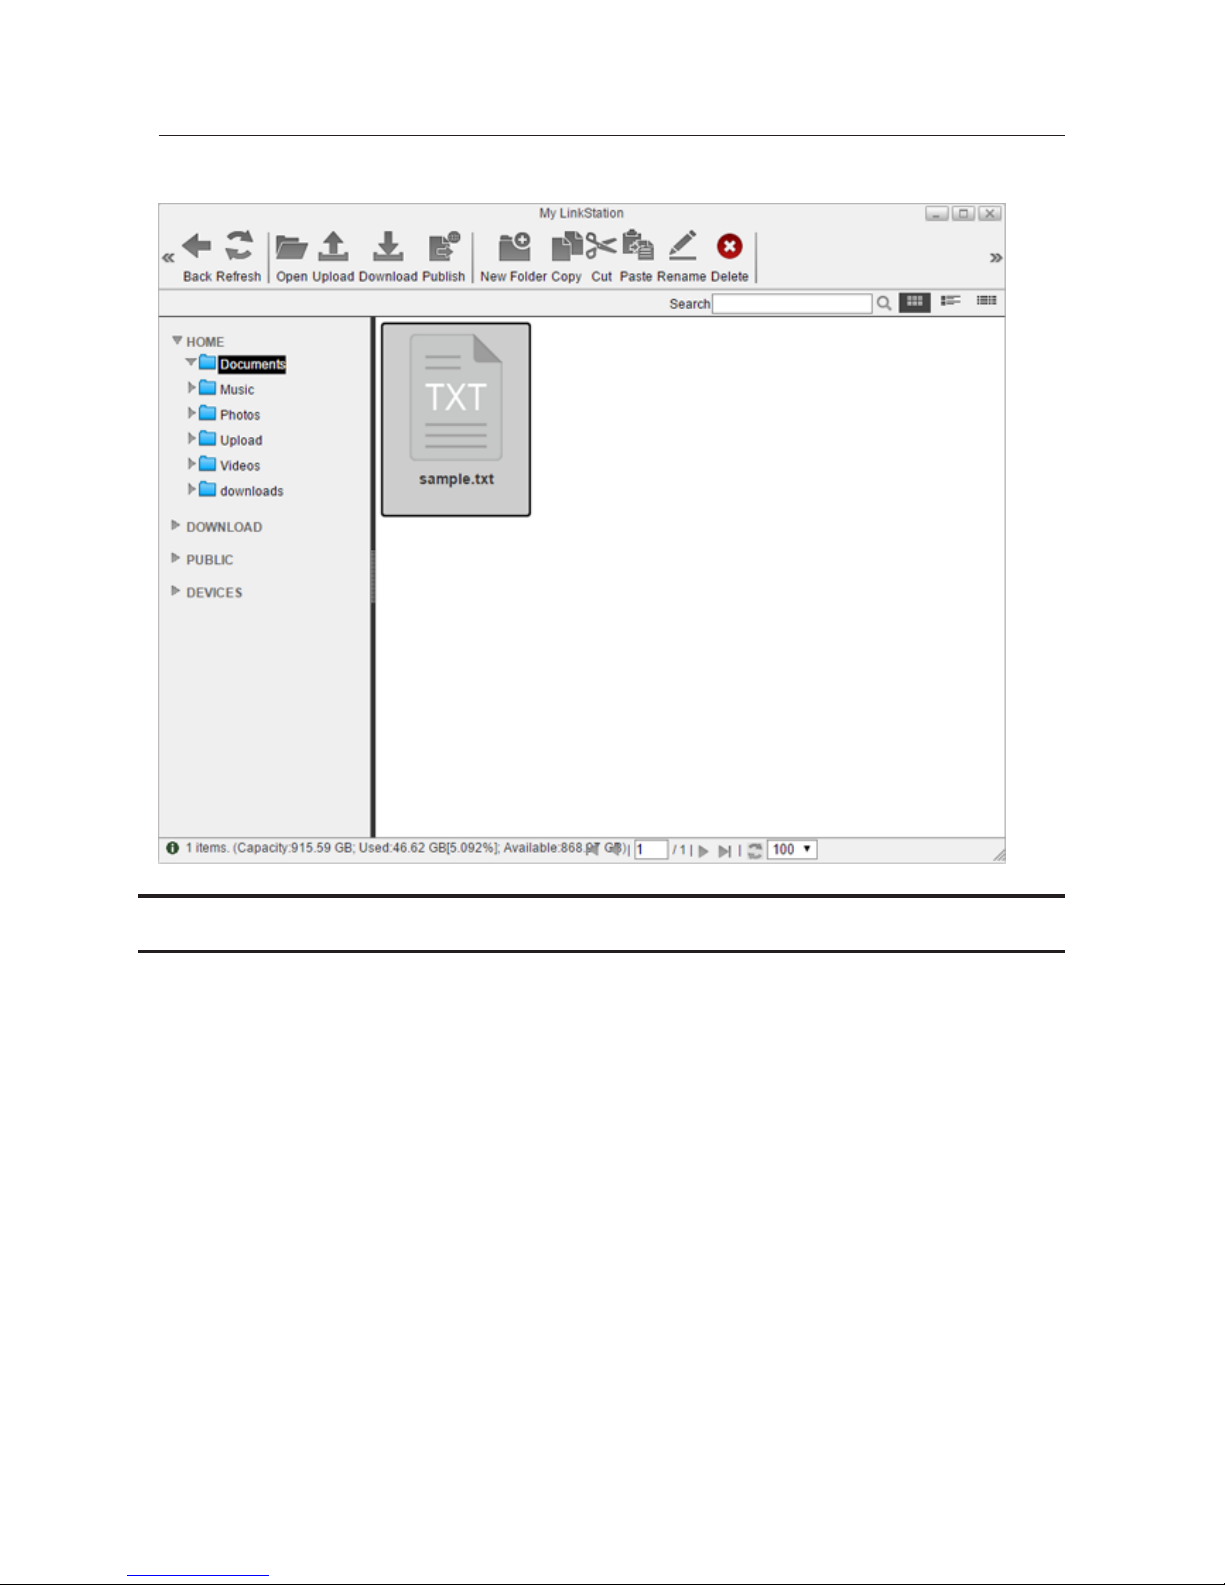
In the My LinkStation window, the following tabs will be displayed on the left as a directory:
• HOME: This shows subfolders in the user area that will be automatically created when creating a user. If you log
in to Settings as the administrator, this will display all folders in the "admin" folder.
• DOWNLOAD: This is a folder that stores downloaded files.
• PUBLIC: This is a folder that any user can access.
• DEVICES: All shared and subfolders that are created in the LinkStation will be displayed.
Note: "Download" and "Devices" folders can only be accessed by the administrator user.
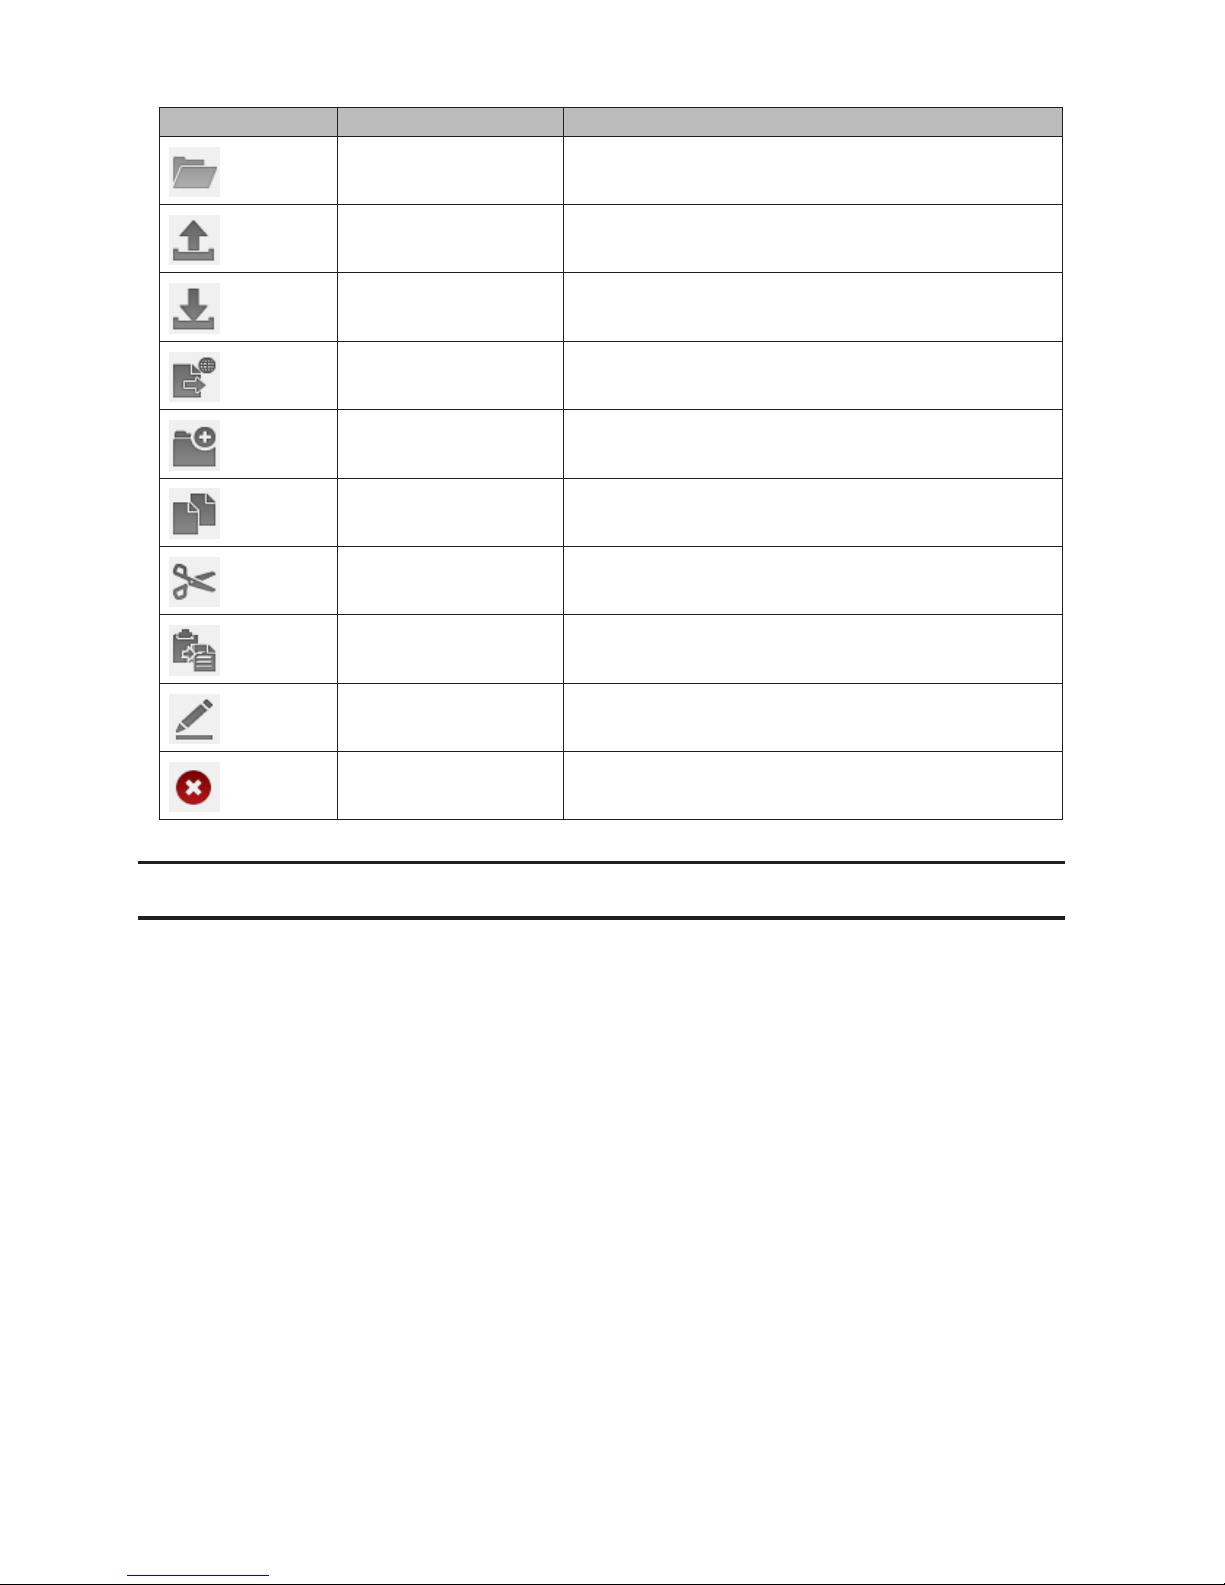
Icons Name Descriptions
Back Return to the previous screen.
Refresh Refresh the screen.
Page 24
23
Icons Name Descriptions
Open Open a file or folder.
Upload Upload a file from your local computer to the LinkStation.
Download Download a selected file to your local computer.
Publish Share the selected folders or files with a link.
New Folder Create a new folder.
Copy
Create a copy of the selected file or folder, either on the
current directory or another that is available to the user.
Cut Cut the selected file or folder.
Paste Paste the selected file or folder to the new location.
Rename Change the name of a file or folder.
Delete Delete the selected file or folder.
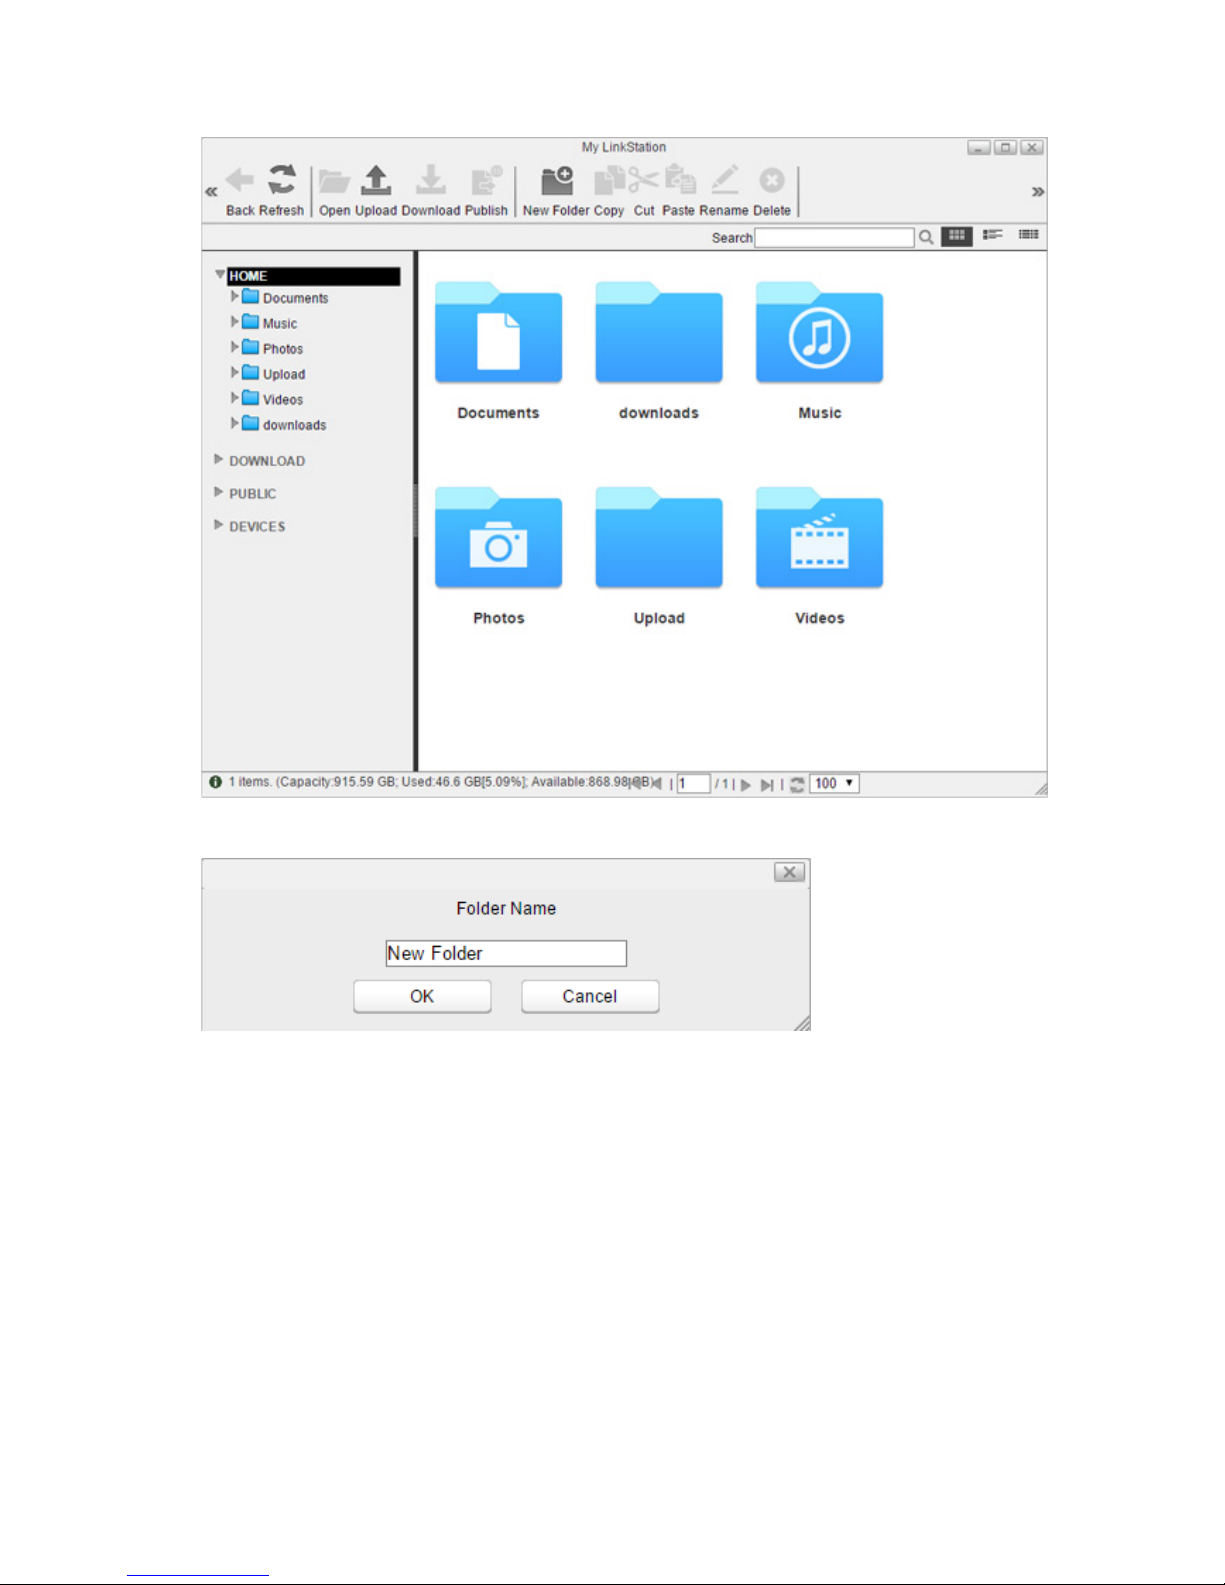
Adding Folders
1 Select a shared folder to add a subfolder from the directory list at the left.
Page 25
24
2 Click New Folder.
3 Enter a desired folder name and click OK.
The folder will be created in the selected shared folder. If you want to share the created folder via the file sharing
protocols in the local network, see the "SHARED" section in chapter 7.
Page 26
25
Uploading and Downloading Files
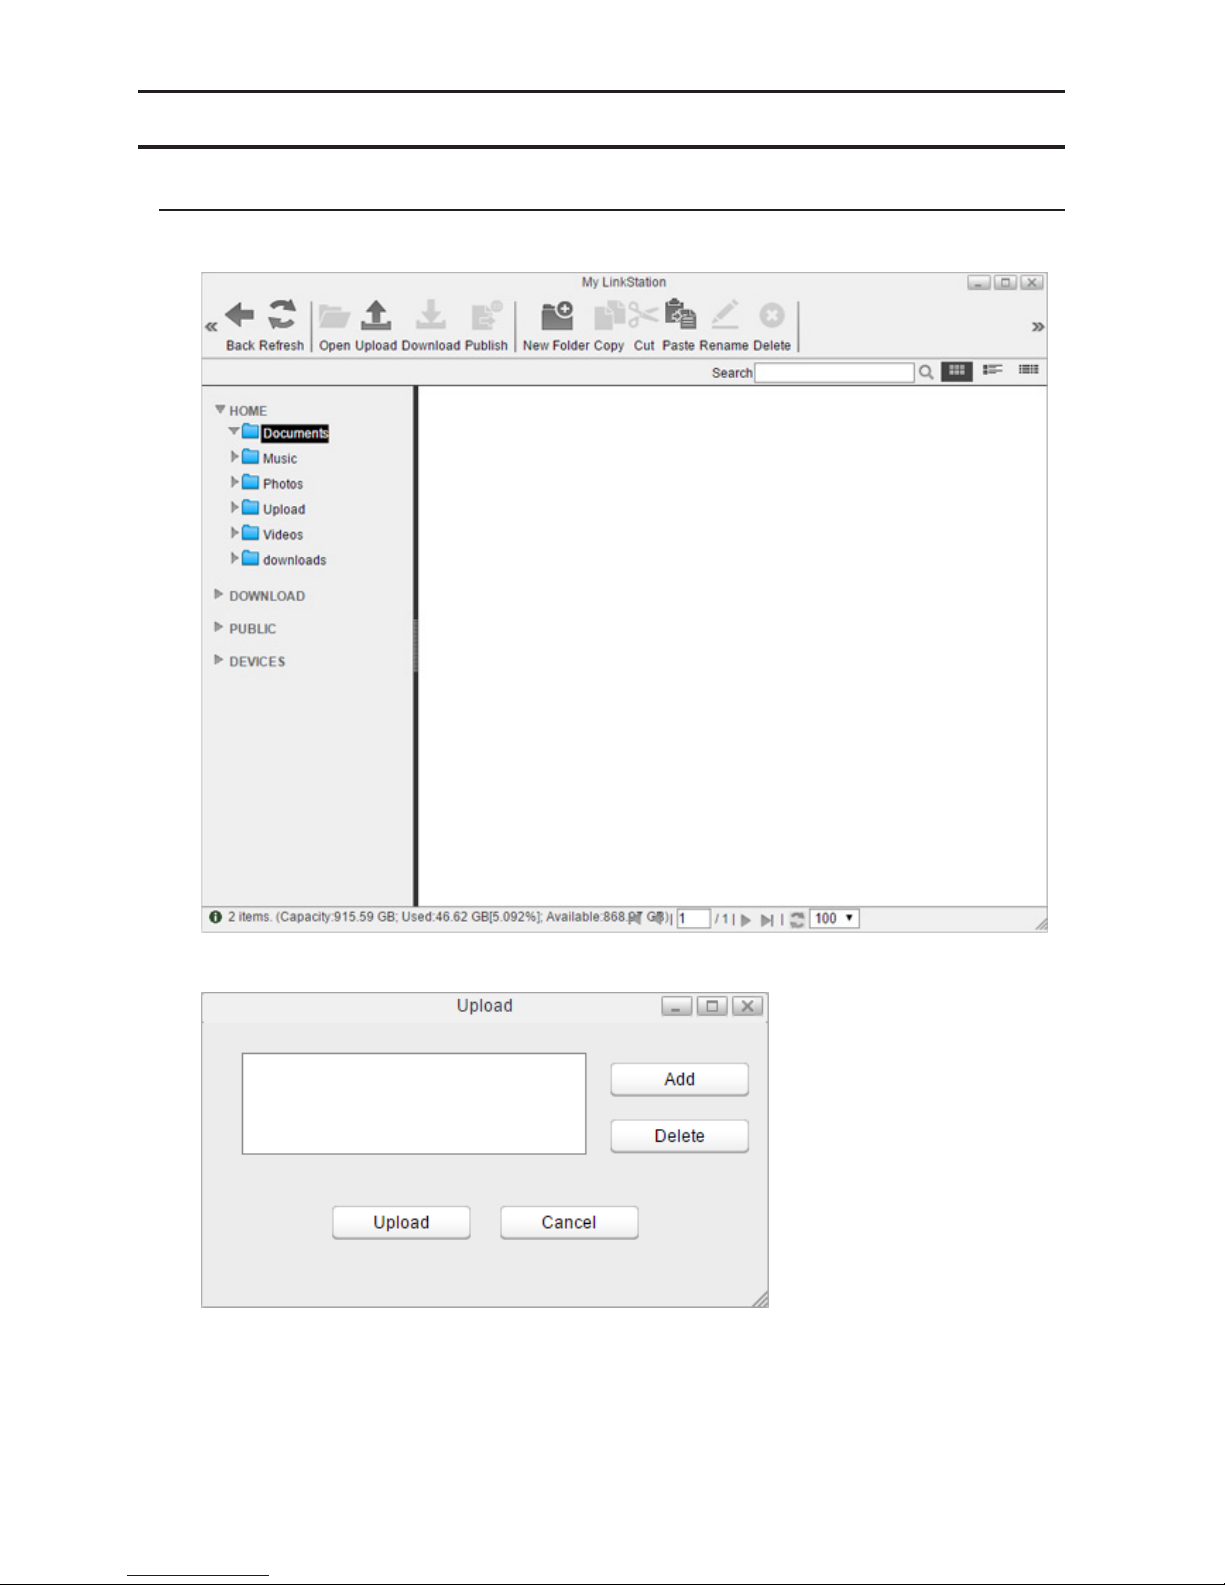
Uploading from a Computer
1 Select a folder to upload a file to and click Upload.
2 Click Add and select a file.
3 The selected file is added to the list. Click Upload.
The file will be uploaded to the LinkStation.
Page 27
26
Downloading Files to a Computer
Select a file to download to your computer and click Download. The selected file will be downloaded to your
computer.
Sharing Files and Folders Using Shared Links
You can create a temporary shared link to share files or folders with other users on the local network or via the
Internet. To enable the access from outside the network, you should configure WebAccess settings before creating
the shared link. For more detailed information about WebAccess, refer to the "WebAccess" section in chapter 7.
Page 28
27
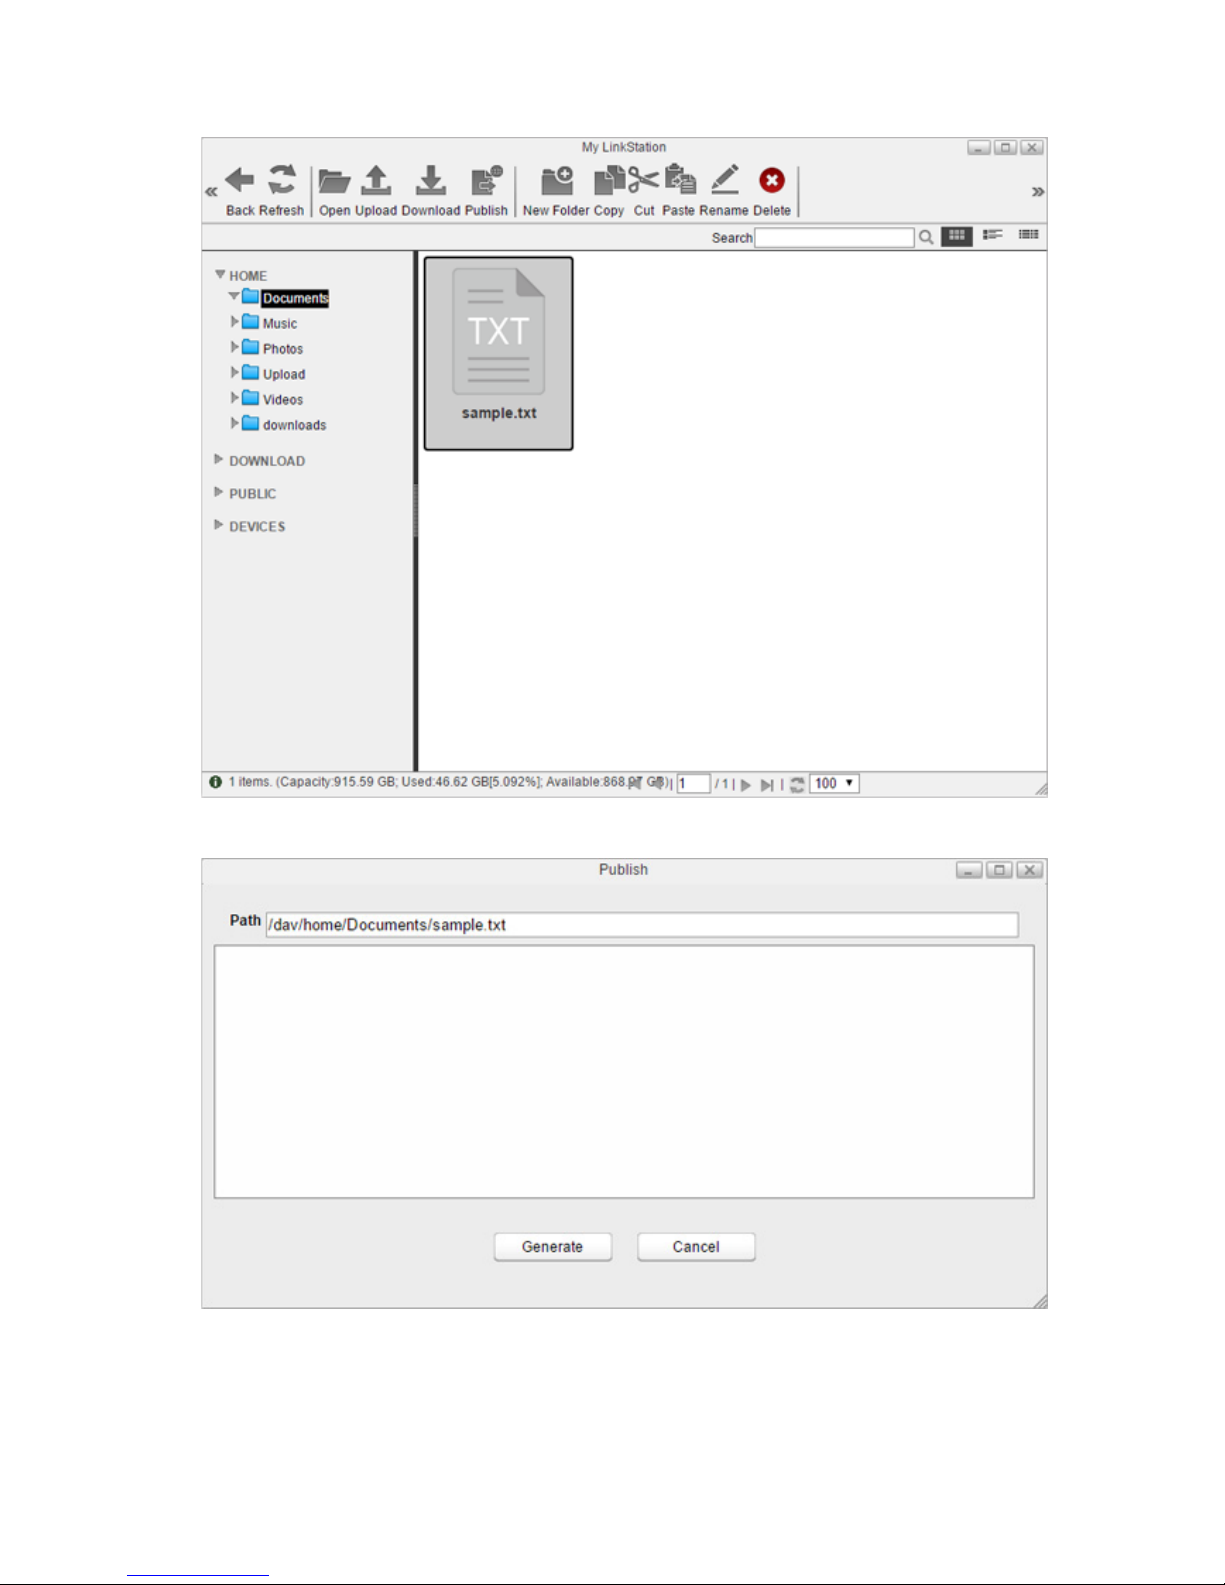
1 Select a folder or file from the main window and click Publish.
2 Click Generate. The temporary shared link will be generated.
3 The shared link will be created. You can send the link by copying and pasting it into an email or messaging
application.
The expiry date is set as to a month from the date when the link is generated. To change the date, click Edit and
specify a date. After you finish editing, click OK to apply changes.
Page 29

28
Notes:
• No other folder or file on the LinkStation can be accessed from the shared link.
• Expired links cannot be accessed.
Page 30
29
Chapter 4 Media Player
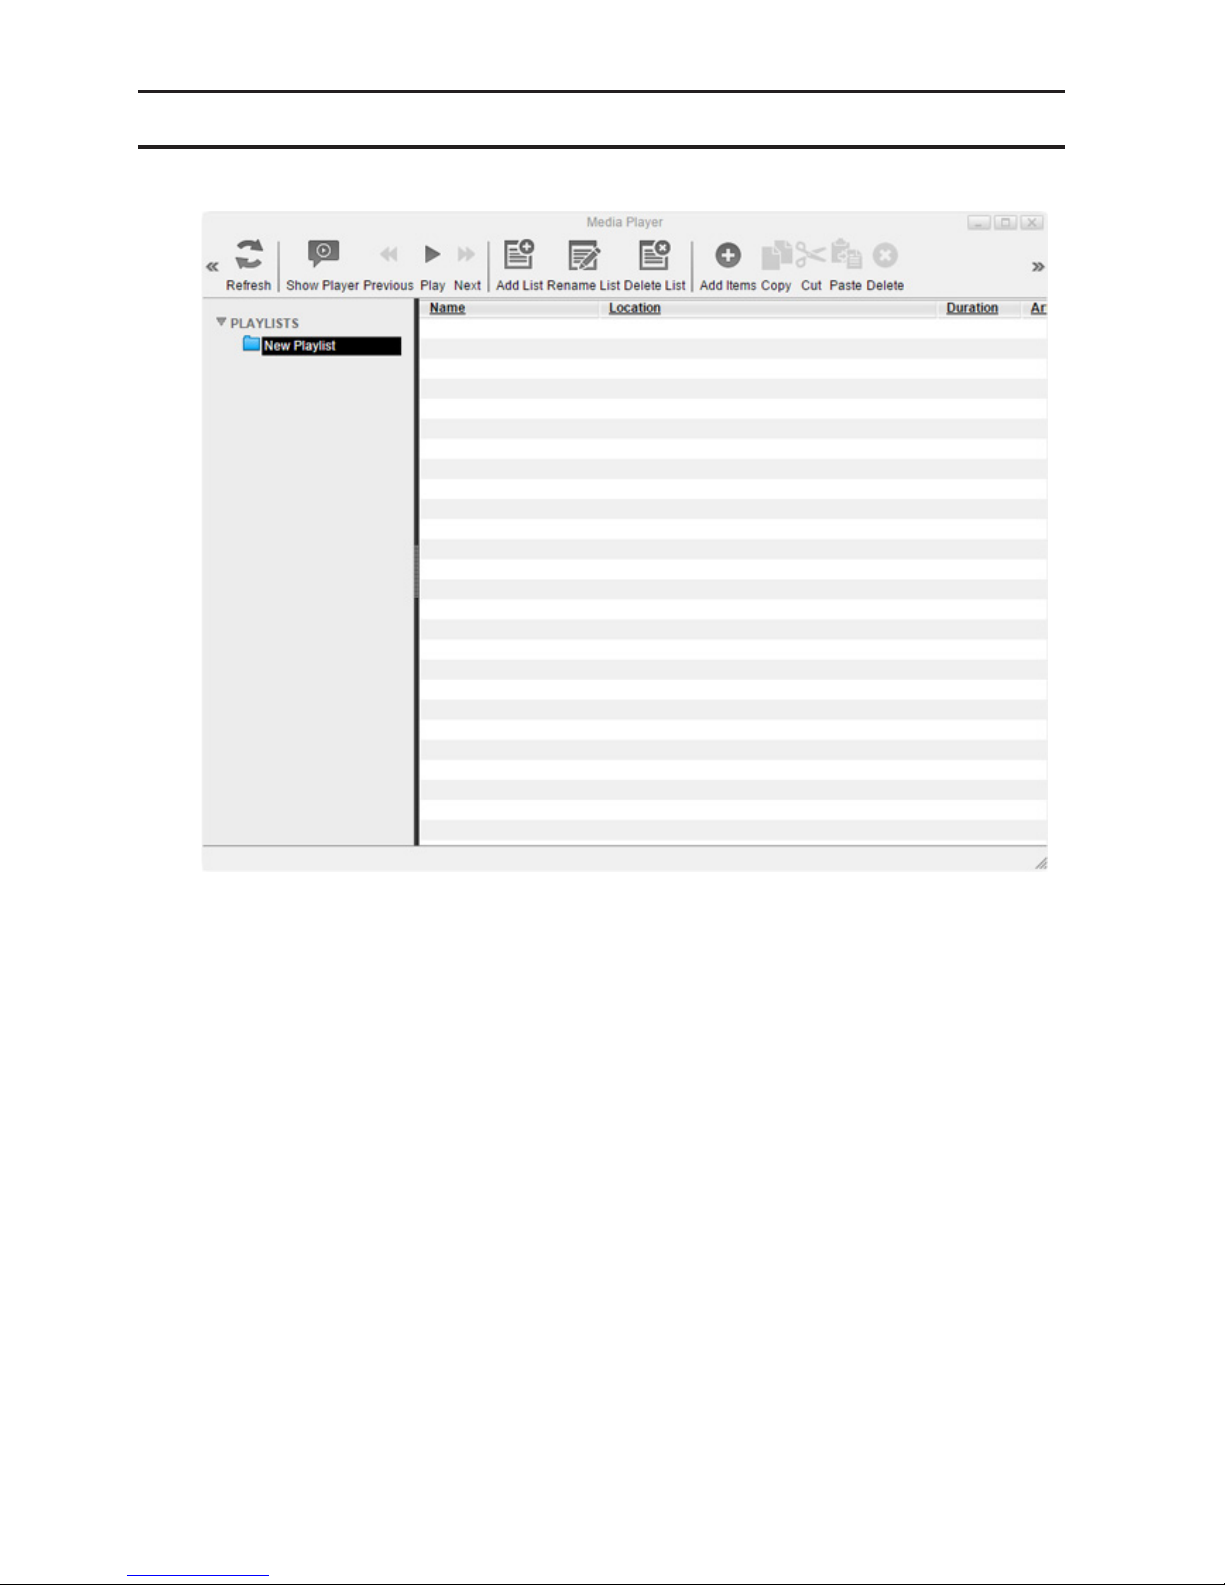
Media Player is an application that can play media files on the LinkStation and create original playlists with the
media files. To open Media Player, click the icon from the home screen.
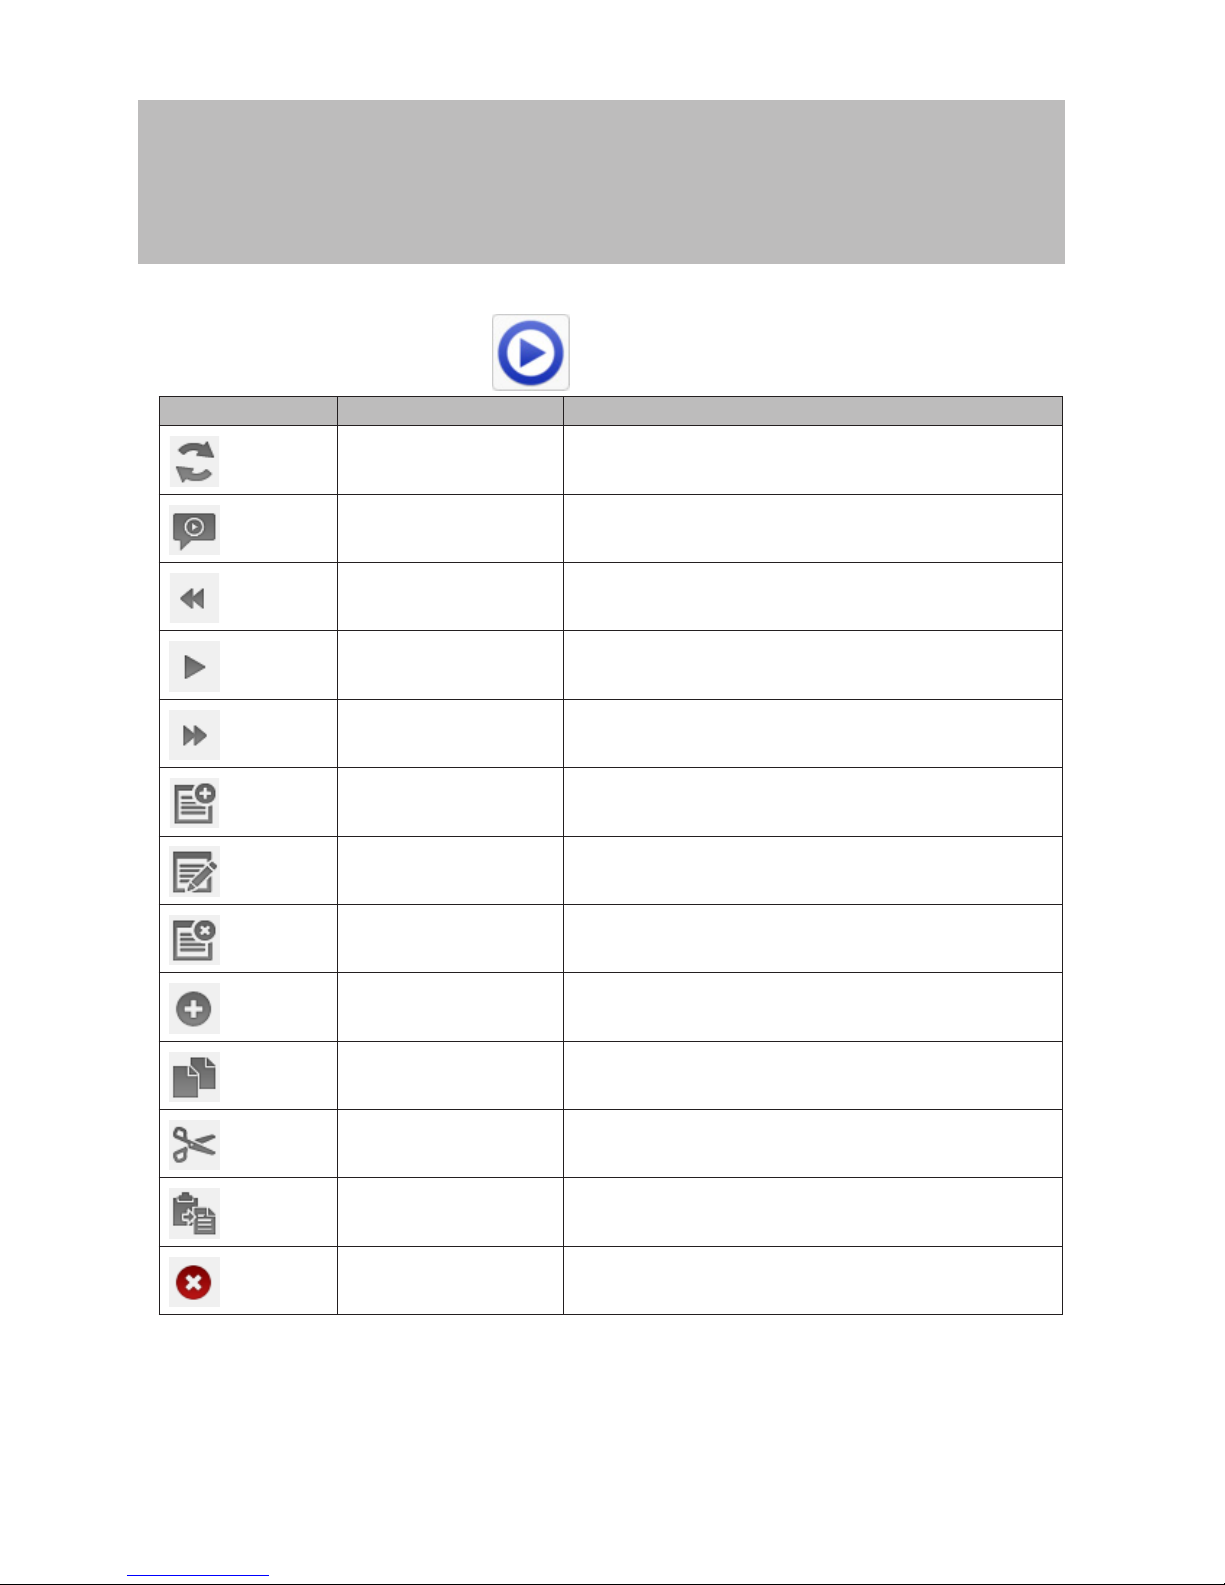
Icons Name Descriptions
Refresh Refresh the screen.
Show Player Displays the media player.
Previous Return to the previous media file.
Play Opens the media player and play media files in the playlist.
Next Skip to the next media file.
Add List Add a new playlist.
Rename List Change the name of a playlist.
Delete List Delete a selected playlist.
Add Items Add a media file to the playlist.
Copy
Create a copy of the selected media file, either on the current
directory or another that is available to the user.
Cut Cut the selected media file.
Paste Paste the selected media file to the new location.
Delete Delete the selected media file.
Page 31
30
Creating Playlists
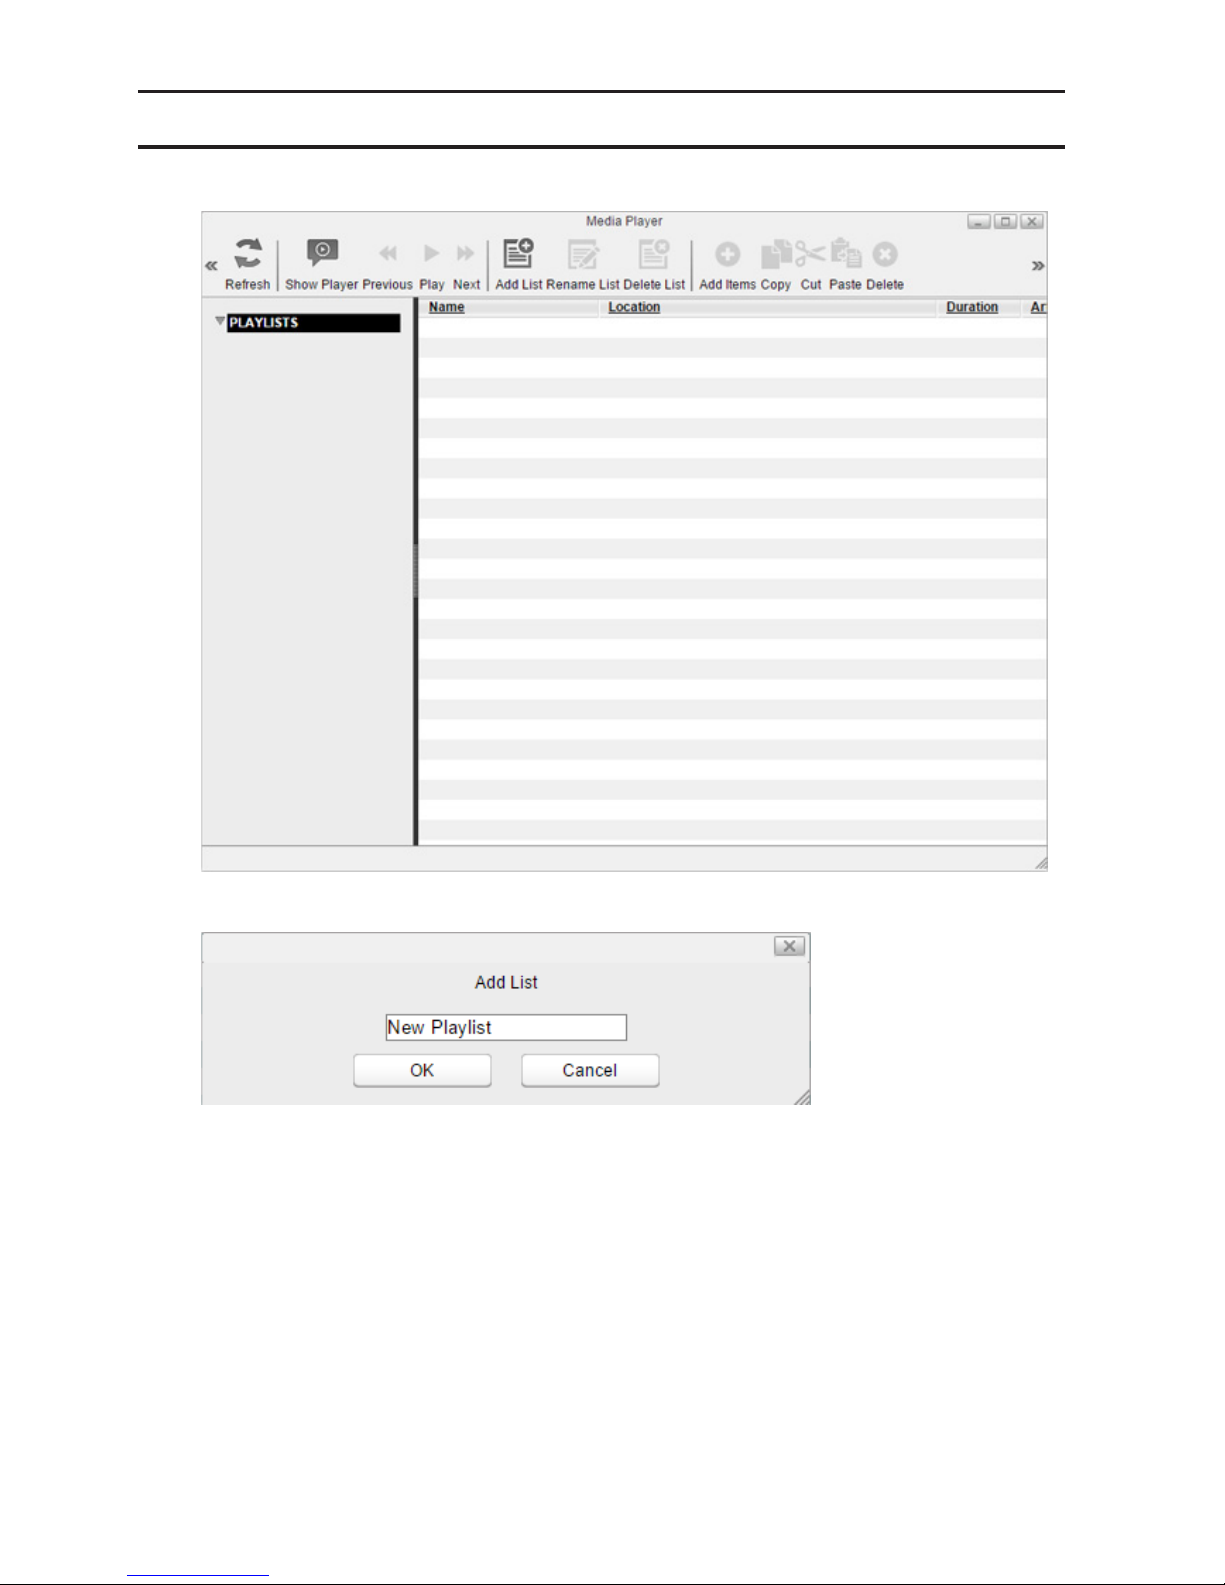
1 Select "PLAYLISTS" at the left of the window and click Add List.
2 Enter a desired playlist name and click OK.
New playlist will be created.
Page 32
31
Adding Media Files
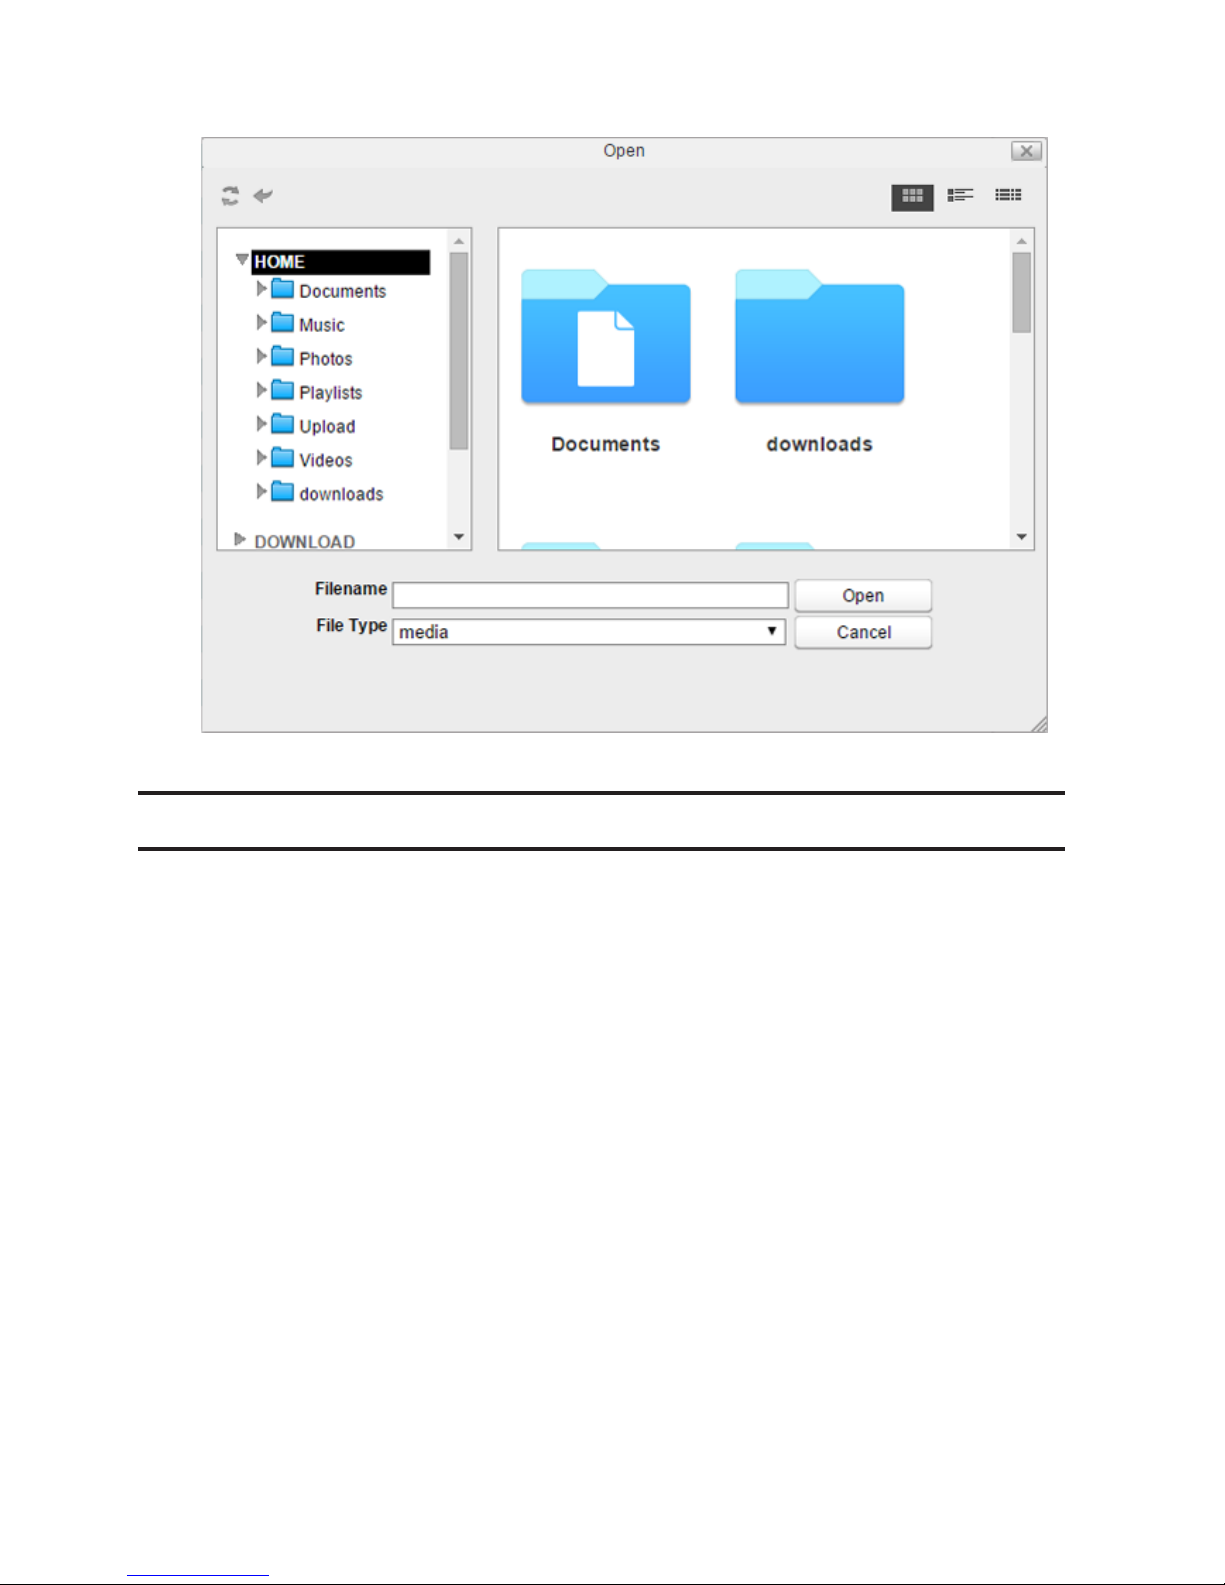
1 Select the playlist at the left of the window and click Add Items.
Page 33
32
2 The dialog box will open. Select a media file to add and click Open.
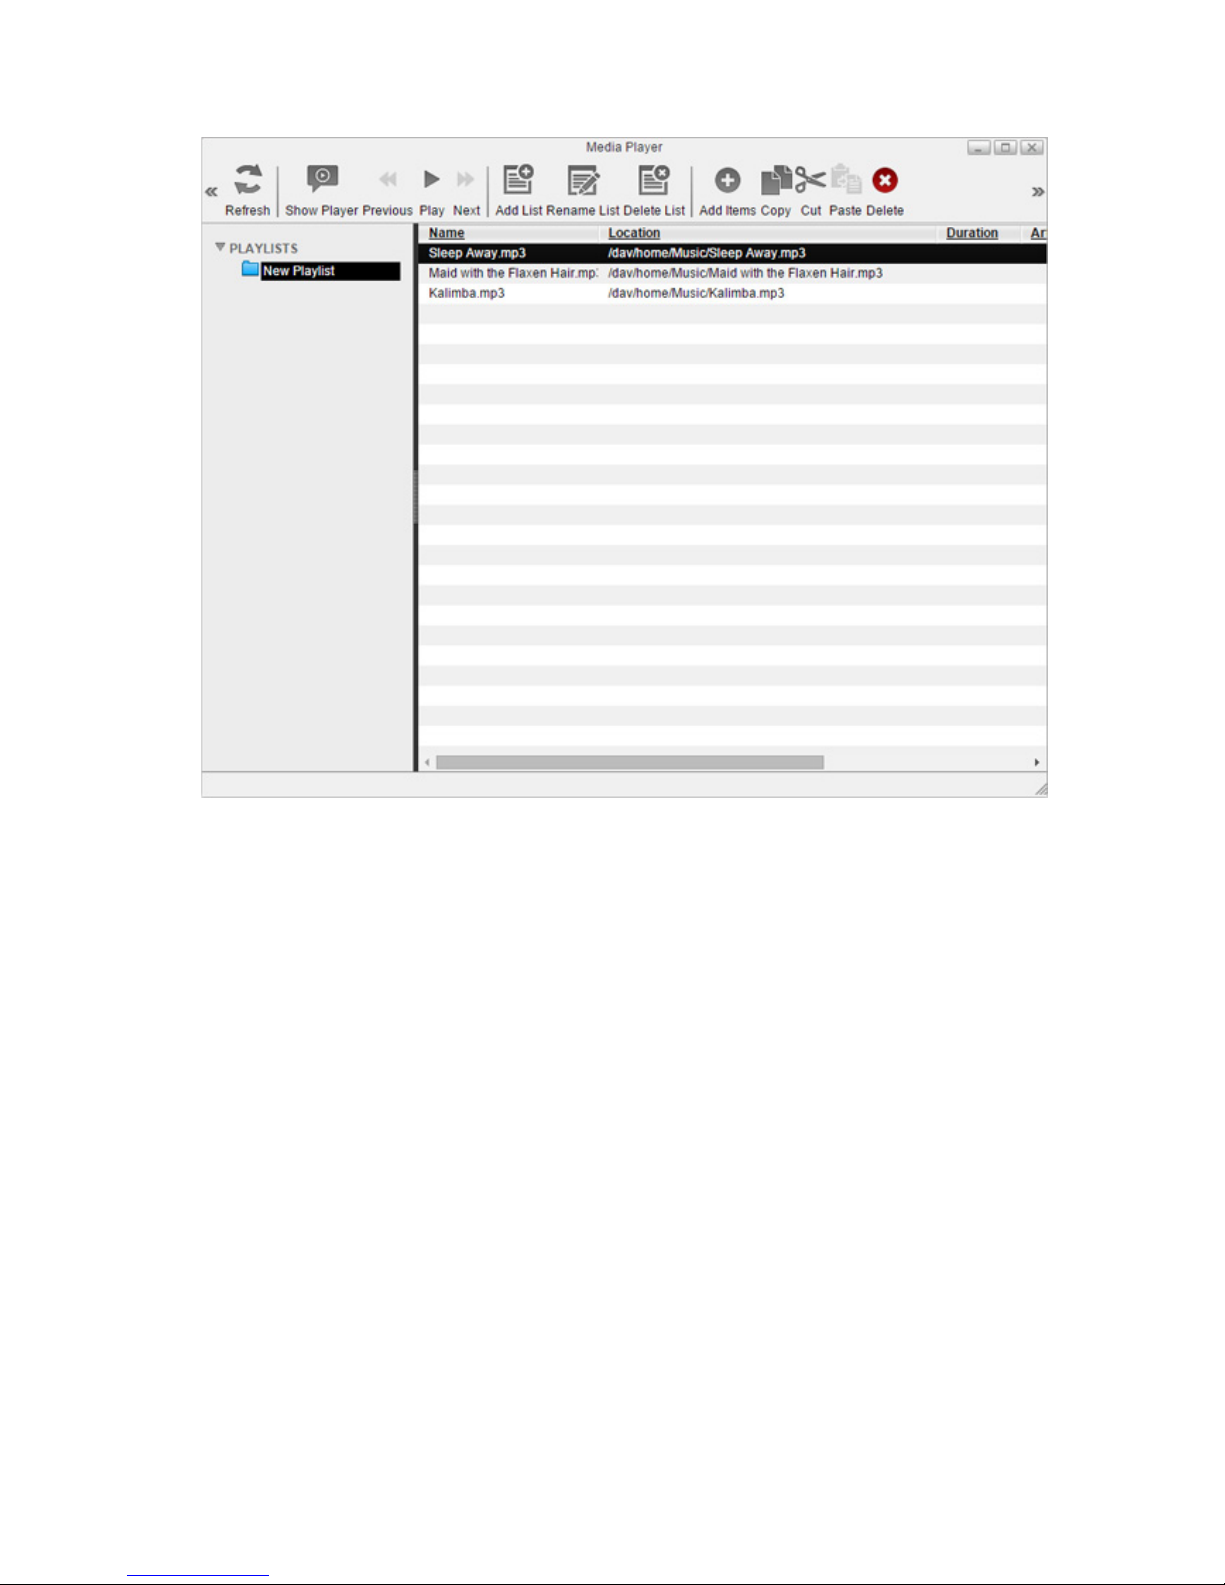
The media file is now added to the playlist.
Playing Files
Media Player supports MP3 or MP4 files (some specific MP4 files may not be compatible) on the browser. Other file
types will be downloaded to the desired location in your computer.
Page 34
33
1 Select the playlist at the left of the window and click Play.
2 Media Player will open and start playing media files. To return to the playlist, click Show Player.
Page 35
34
Chapter 5 Disk Manager
Disk Manager is an application that manages RAID arrays and partitions of internal or external drives. To open Disk
Manager, click the icon from the home screen.
RAID Arrays
The default RAID mode for LS520D is RAID 1.
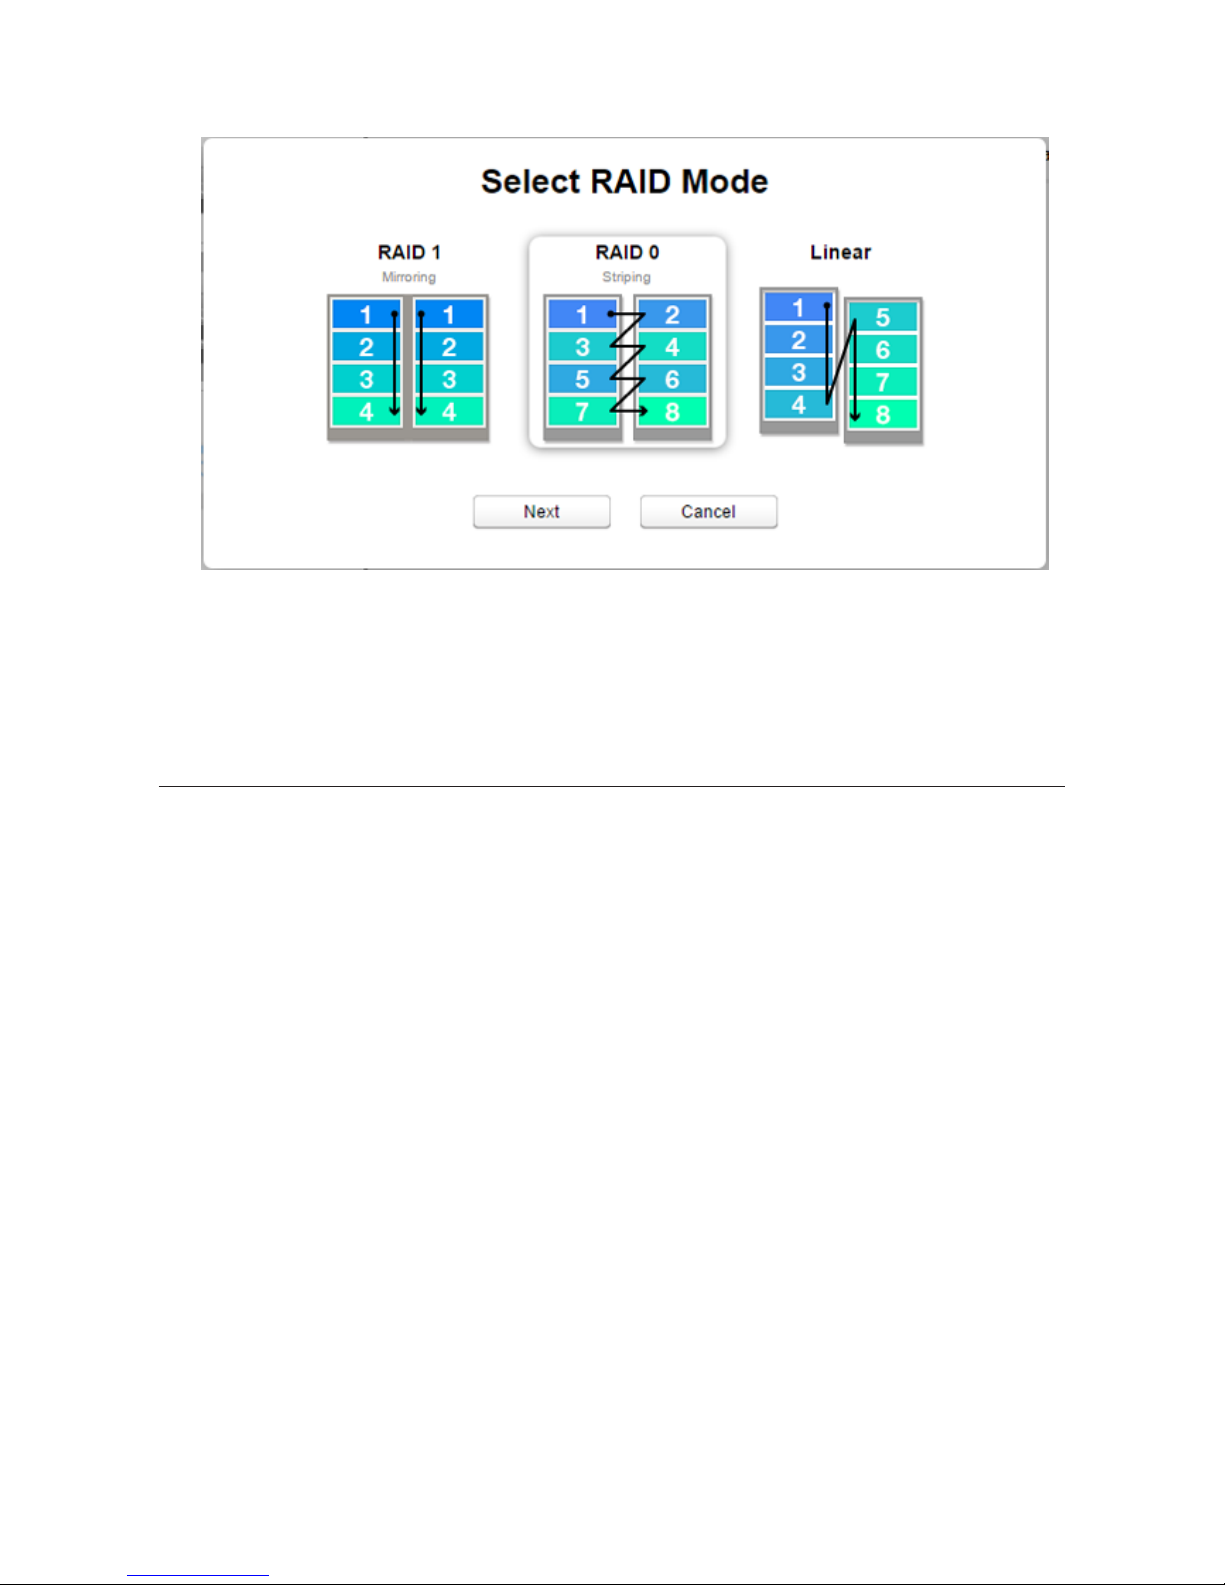
RAID 1
Combines 2 drives from hard drives into a mirrored RAID array. The available space in the array is the capacity of a
single drive. Identical data is written to each drive. If a drive becomes damaged, data can be recovered by replacing
the damaged drive. As long as one drive in the array remains undamaged, all data in the array can be recovered.
RAID 0
Combines 2 drives into a single RAID array. The available space is the total space of all drives used. This simple RAID
mode offers faster performance than RAID modes that include parity. If a single drive in the array fails, then all data
in the array is lost.
Linear
Combines all drives from hard drives into a single virtual drive. For this virtual drive, data will be written onto the first
drive, then to the next drive when the first drive becomes full, and so on. The available space is the total capacity of
all drives. Linear mode offers no redundancy. If any drive becomes damaged, data on the drive will be lost.
JBOD
This mode uses the hard drives inside the LinkStation as individual drives. The available space is the total of all drives
in the LinkStation. If any drive becomes damaged, then the data on that drive is lost.
Working with RAID Arrays
Note: If you change the RAID mode, all data on the array is deleted. This is true for every procedure in this
chapter. Always back up any important data before performing actions that affect your RAID array.
Using JBOD
With JBOD, each hard drive in the LinkStation is addressed separately. To put drives from an array into JBOD mode,
follow the steps below.
Page 36
35
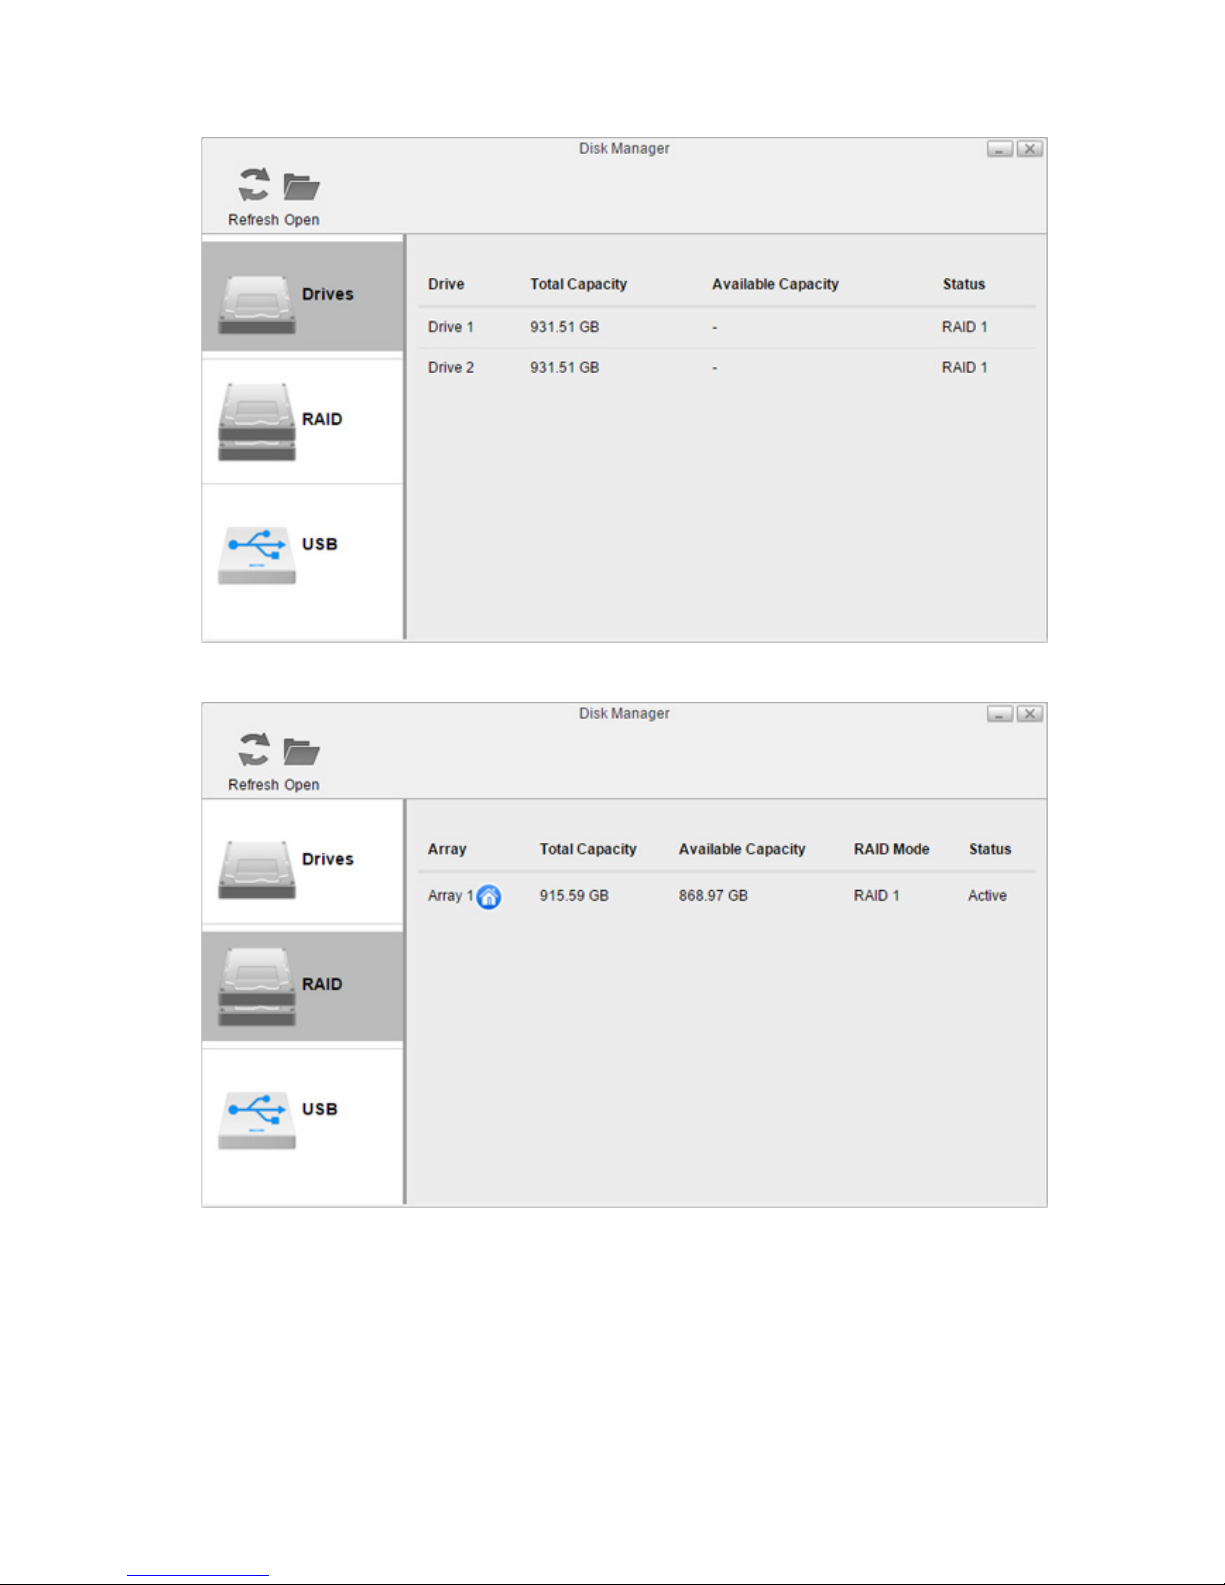
1 In Disk Manager, click the RAID tab.
2 Click the array to delete.
Page 37
36
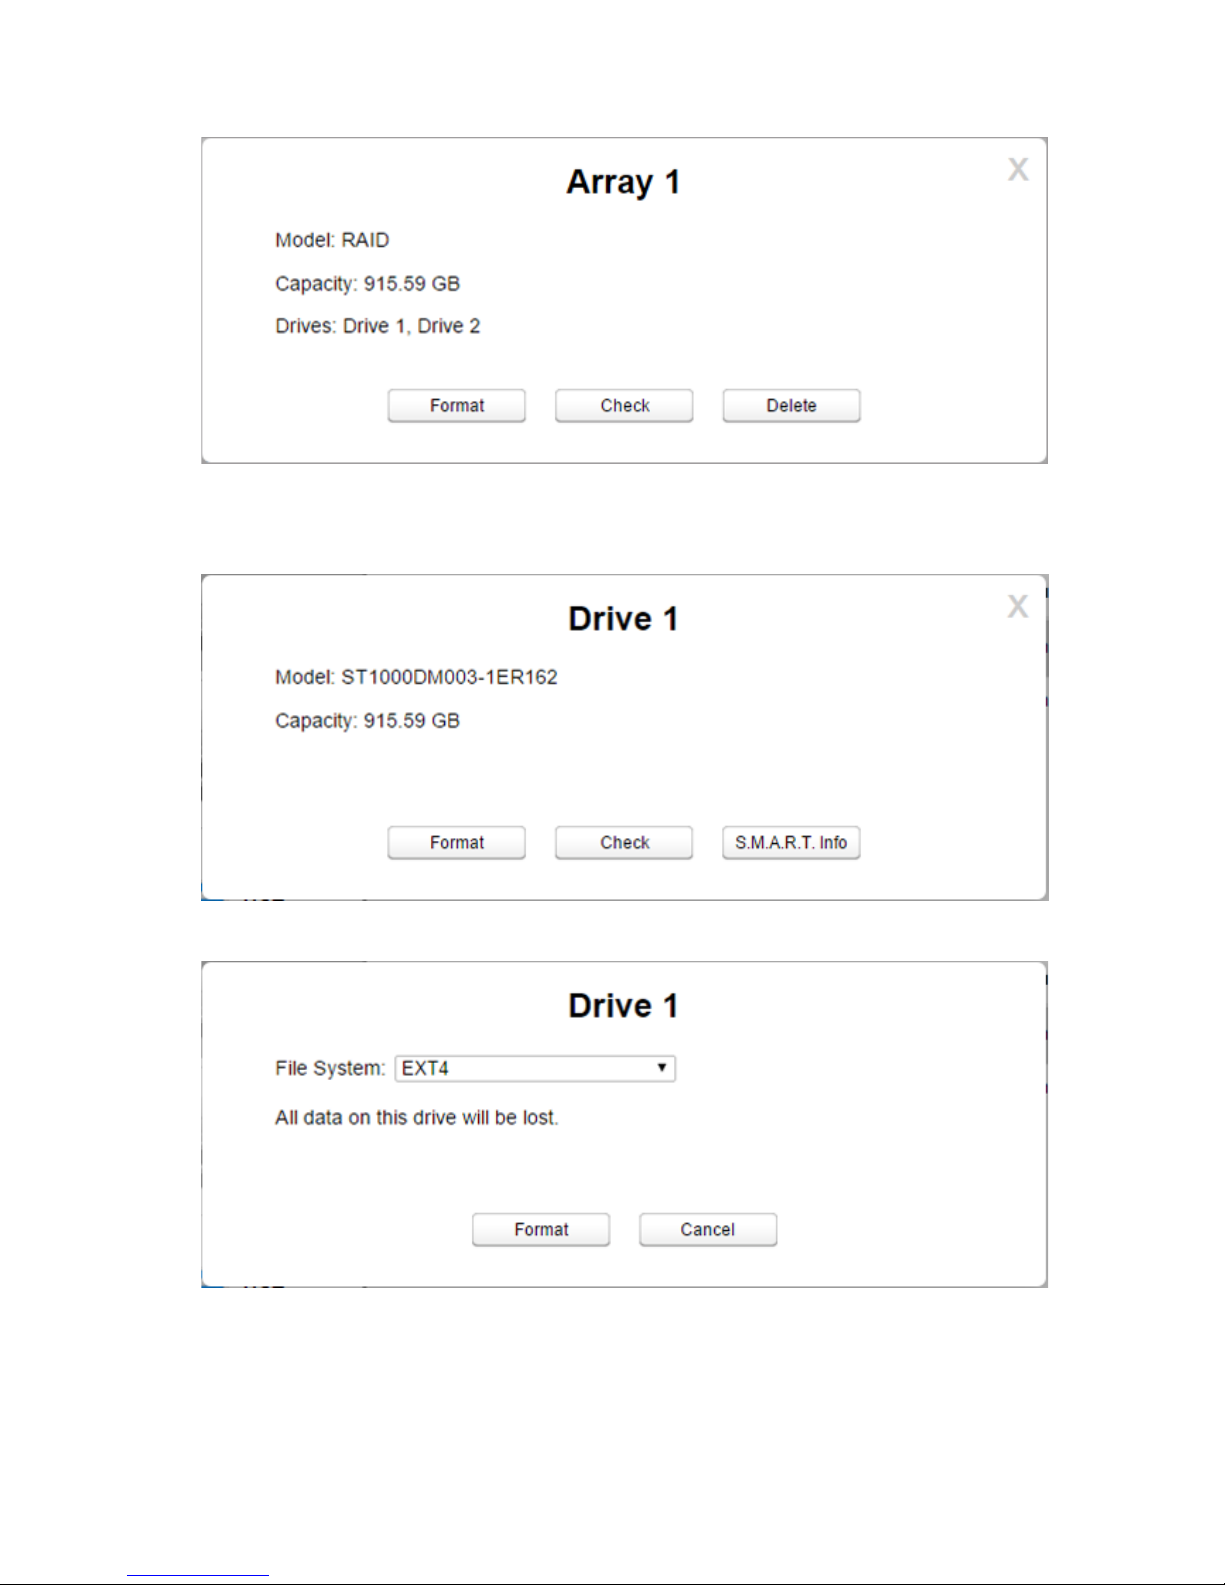
3 Click Delete.
4 Two different warnings will be displayed. Read them carefully and click Yes for both.
5 From the Drives tab, select the drive and click Format.
6 Select the file system from the drop-down menu and click Format.
7 When the format is finished, click OK, then Close.
8 To format another drive, repeat steps 5 to 7.
Once JBOD is configured, the default shared folders will automatically be created only on the drive that is initially
formatted. Create shared folders on the other drives, referring to the "SHARED" section in chapter 7 for the
instructions.
Page 38
37
Changing RAID Mode
To change the RAID mode, first delete the current RAID array. Follow the procedure below.
Note: You can also configure the RAID settings, including changing the RAID mode, using the initial setup
wizard, but you will lose all settings on the LinkStation.
To launch the initial setup wizard, initialize the LinkStation settings from Preferences - Reset, then follow the
instructions on the screen to finish changing the RAID mode.
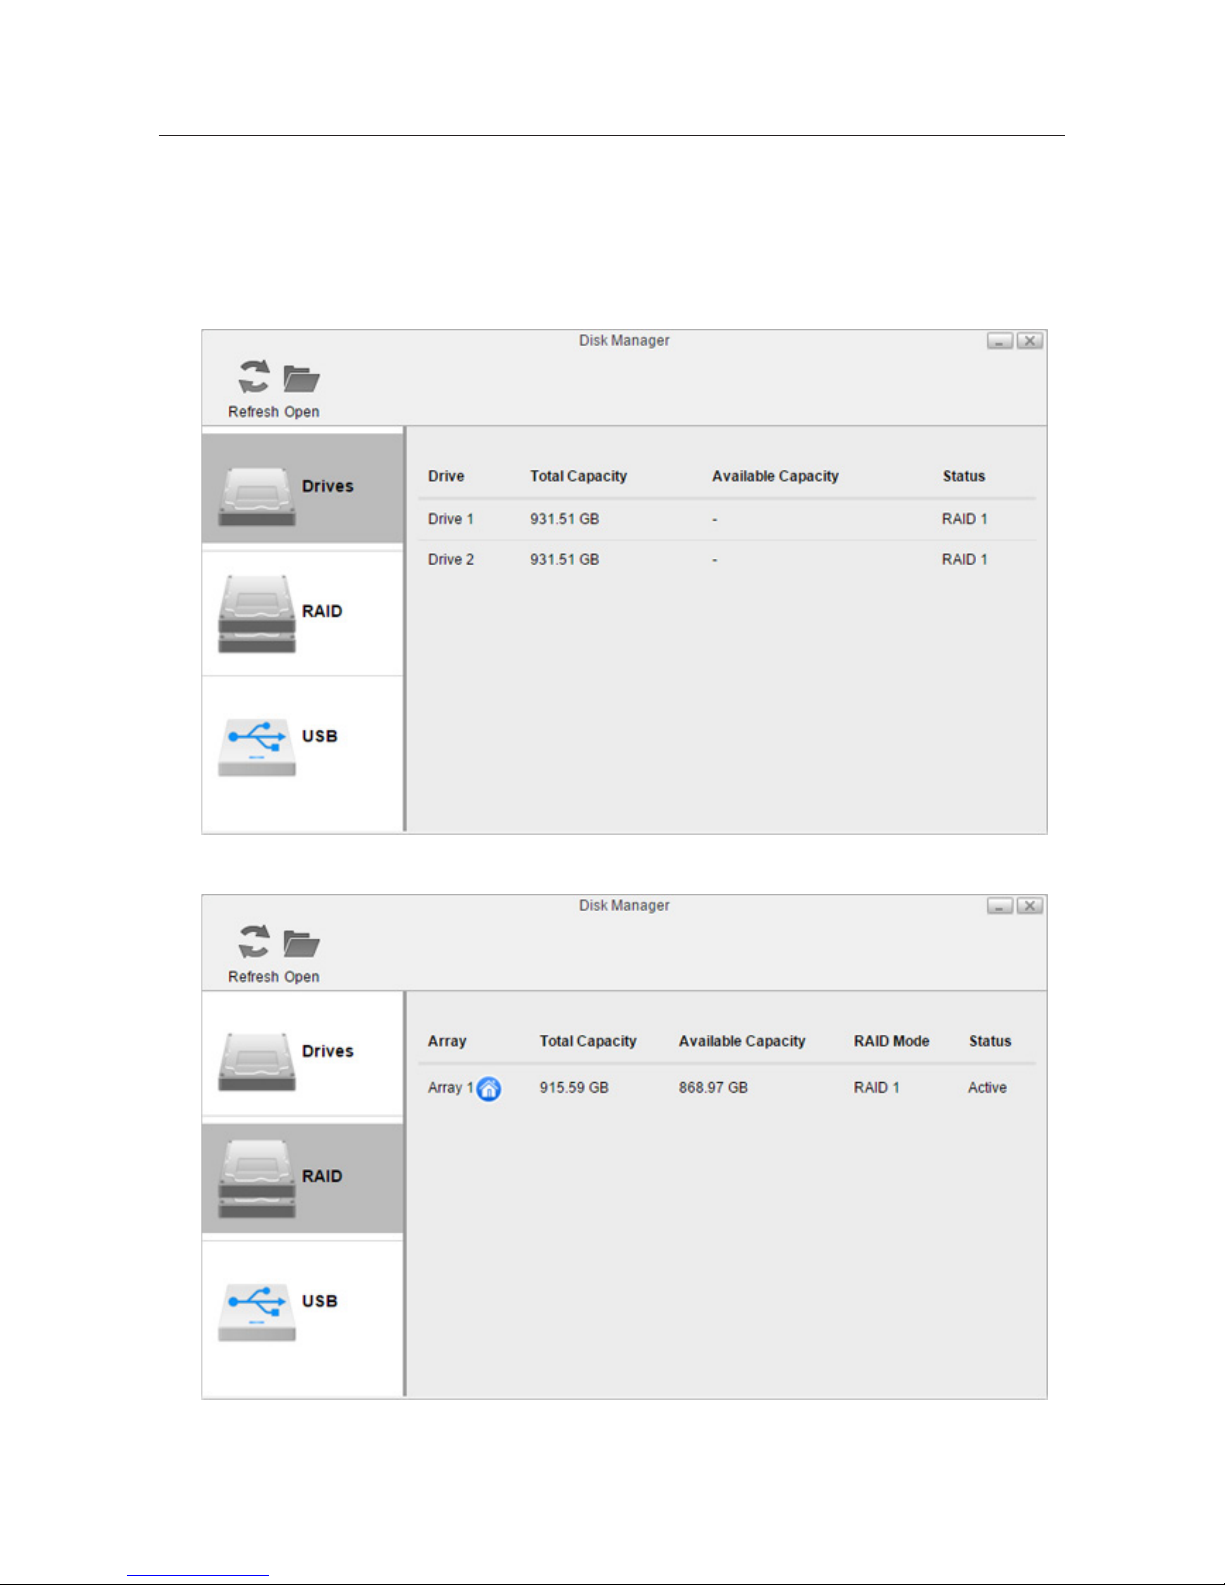
1 In Disk Manager, click the RAID tab.
2 Click the array to delete. If no array is listed, the array has already been deleted. Skip to step 5.
Page 39
38
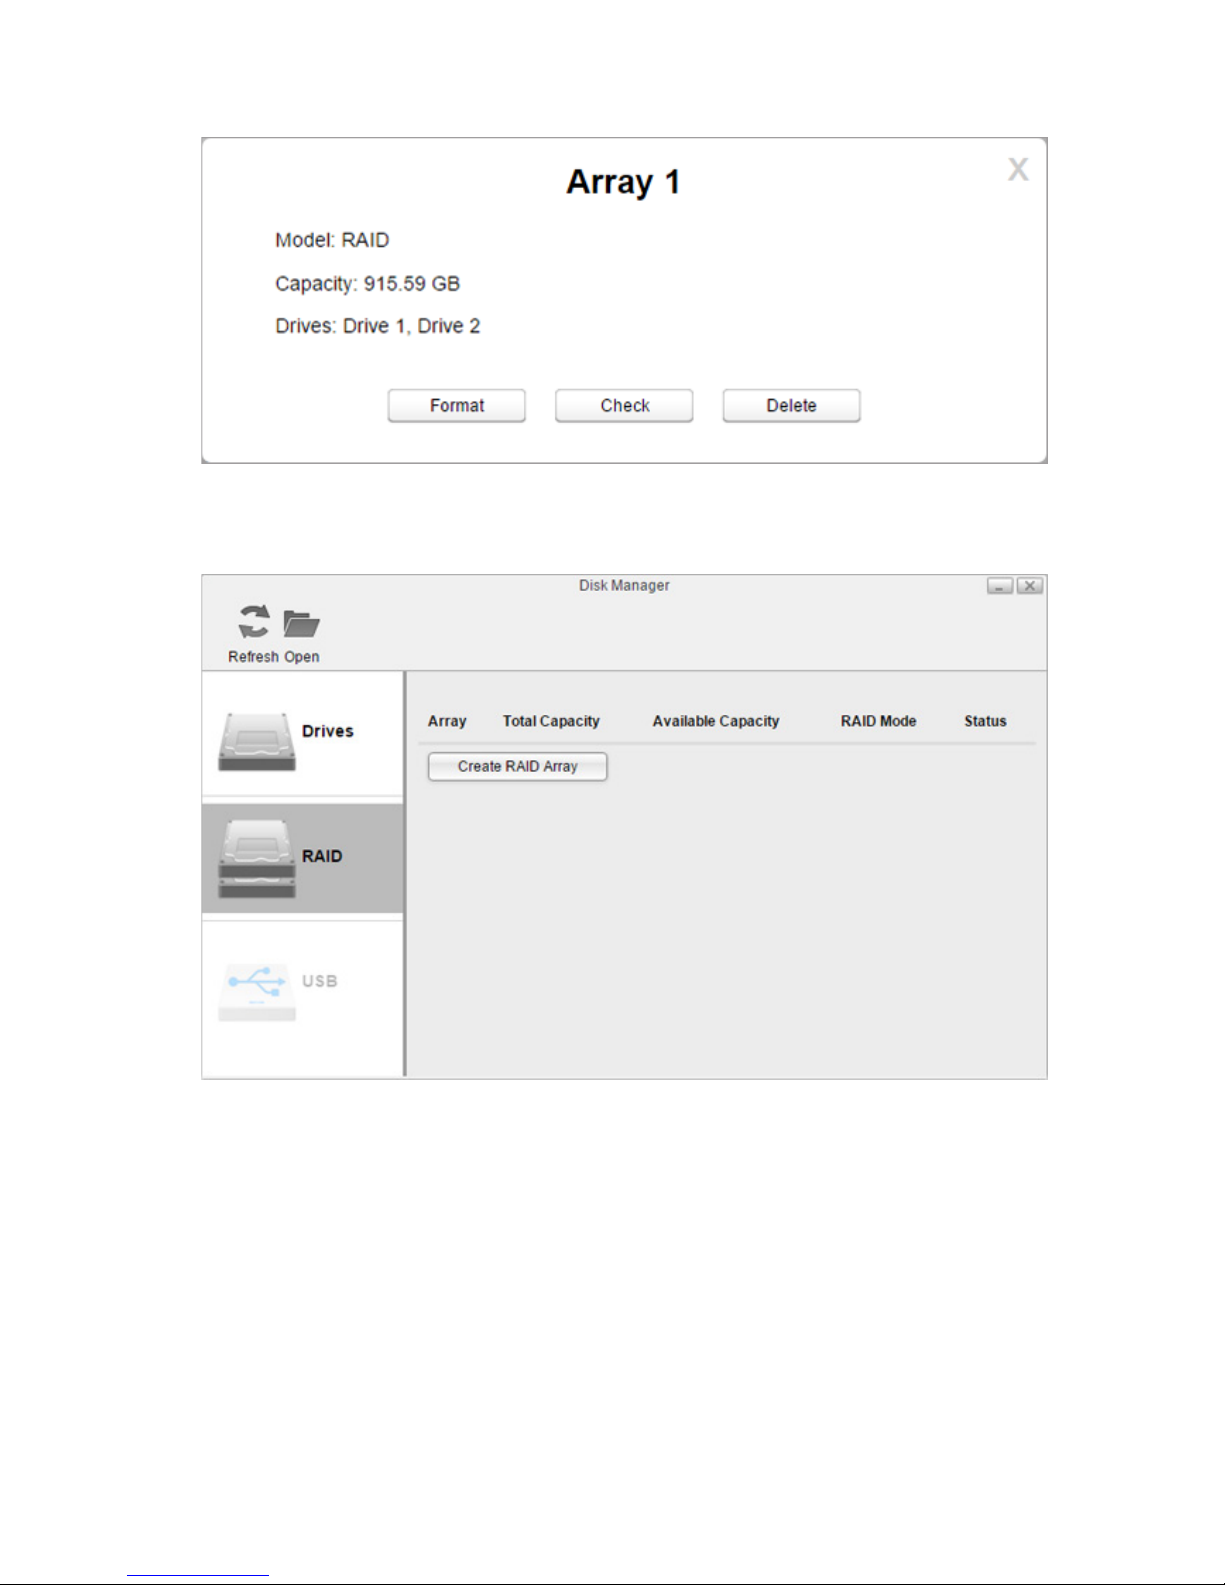
3 Click Delete.
4 Two different warnings will be displayed. Read them carefully and click Yes for both.
5 Click Create RAID Array.
Page 40
39
6 Select a RAID mode and click Next.
7 Click Yes .
8 RAID array creation will start. Wait until it's done. When it's finished, click OK, then Close.
Once the RAID array is configured, create shared folders on the array to use them. Refer to the "SHARED" section in
chapter 7 for the instructions.
Expanding RAID Array Capacity
If the hard drives in your LinkStation are in a RAID 1 array with two drives or they are in degraded mode, you can
expand the RAID array capacity without erasing the data on the drives. To expand the capacity, you should have two
new drives with larger capacity than the remaining drive.
After you expand the RAID array capacity, the file sharing settings on "SHARED" will be restored to the factory
defaults but data will be kept. Please reconfigure the settings to access the shared folders by referring to the
"SHARED" section in chapter 7. This behavior will be corrected in a future firmware update.
1 Shut down the LinkStation and remove one of the drives. Do not remove both drives at the same time.
2 Insert a new drive (larger capacity than remaining drive) and turn on the LinkStation.
3 Power LED will blink amber. Hold down the function button on the back of the LinkStation for 5 seconds.
4 The LinkStation will start rebuilding the RAID array. After a few minutes, the I18 message will be displayed in
NAS Navigator2. Wait until the drive finishes rebuilding; the I18 message will be extinguished.
5 After the RAID array is rebuilt, shut down the LinkStation again and remove another drive.
6 Insert another new drive and turn it on.
7 Power LED will blink amber. Hold down the function button on the back of the LinkStation for 5 seconds.
8 The LinkStation will start rebuilding the RAID array again. Wait until the I18 message will be extinguish as the
same as step 4.
9 After the I18 message disappears, open Settings and click Disk Manager.
Page 41
40
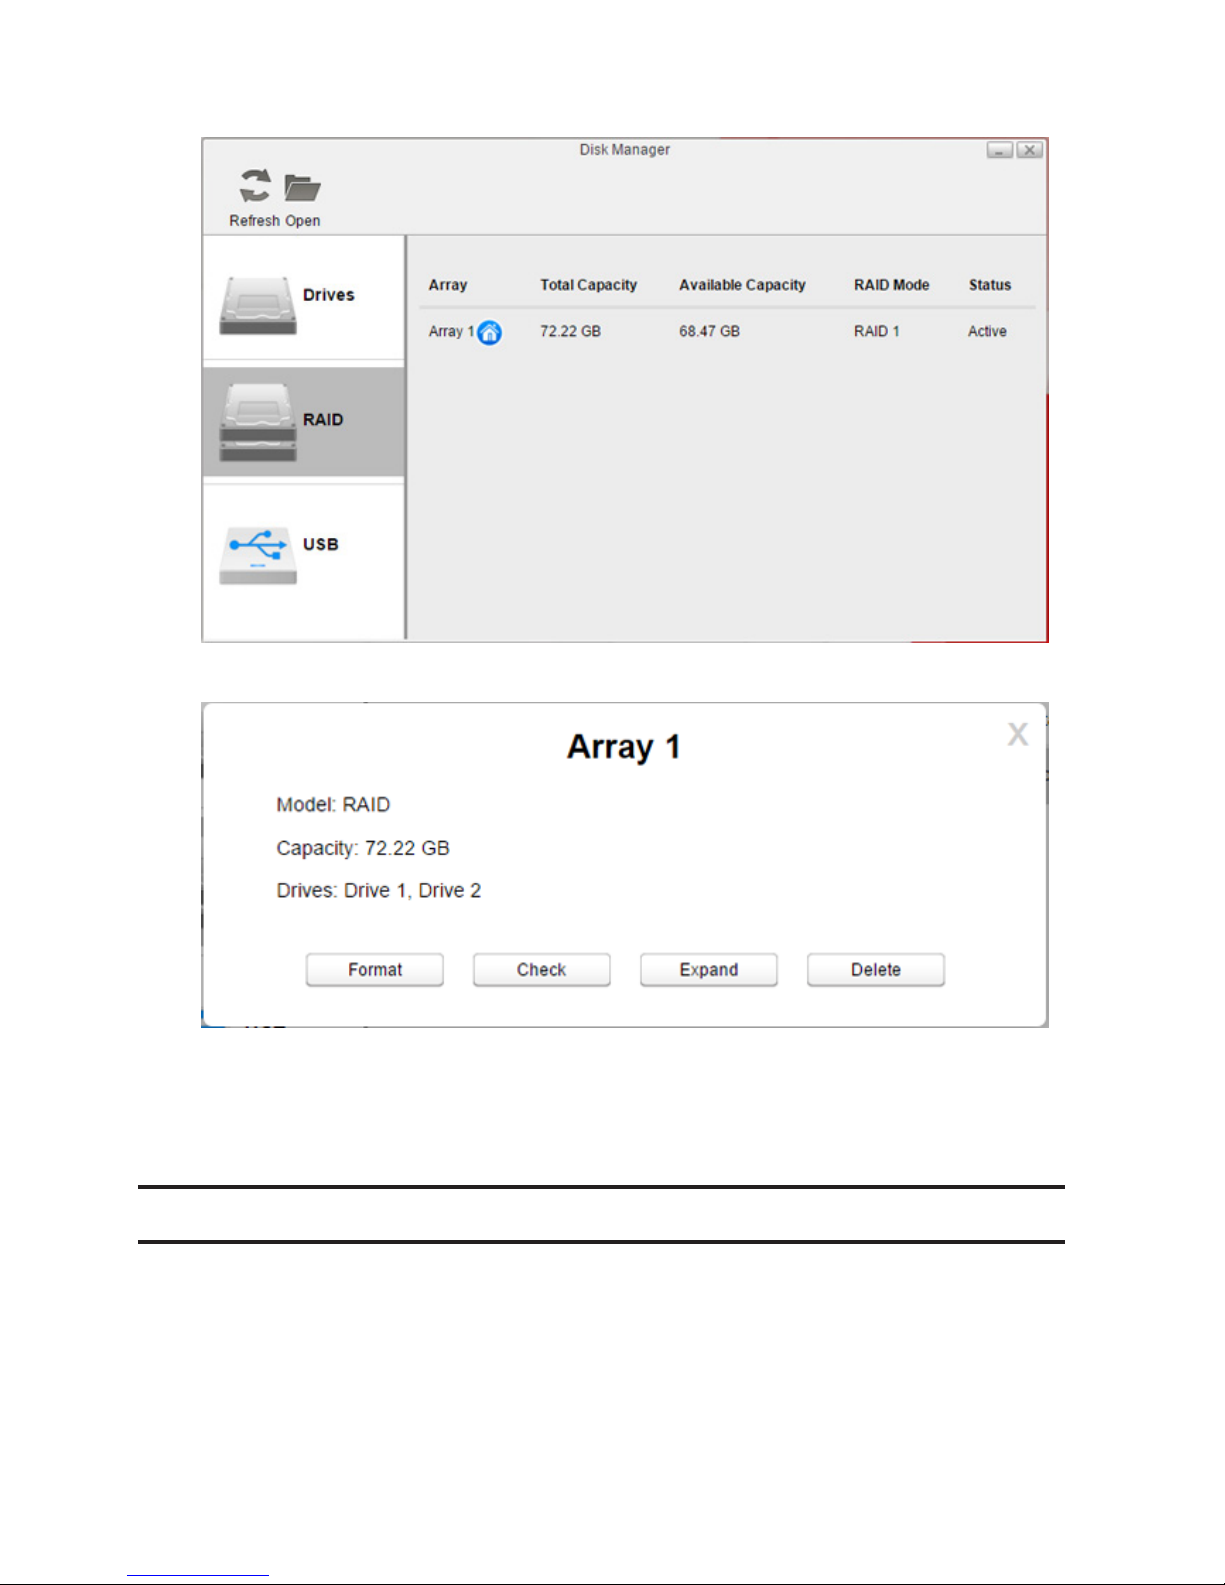
10 Click the RAID tab and the RAID array to make the capacity larger.
11 Click Expand.
12 Read the warning message carefully and click Yes .
13 The RAID array will be rebuilt and its capacity will expand. The power LED will blink amber and I18 and I46
messages will be displayed. Wait until those messages disappear and the power LED returns to a steady white.
Adding an External Hard Drive
The LinkStation includes a USB port and you can connect an external drive or USB storage device to this port. For
external drives, Buffalo USB drives are recommended. The following file systems for external drives are supported:
ext2, ext3, ext4, FAT32, exFAT, NTFS, HFS Plus
Connect only one device to a USB port. Some external drives with automatic power-on doesn't turn on
automatically when connected to the LinkStation. Use their manual switch to turn them on. Be sure to connect only
one bus-powered drive at a time. If there is insufficient bus power for your USB drive, connect its AC adapter.
Page 42
41
Enabling External Drive Access
After connecting the USB drive to the LinkStation, enable access to the drive. Follow the procedure below.
1 Connect the external drive to the USB port on the LinkStation.
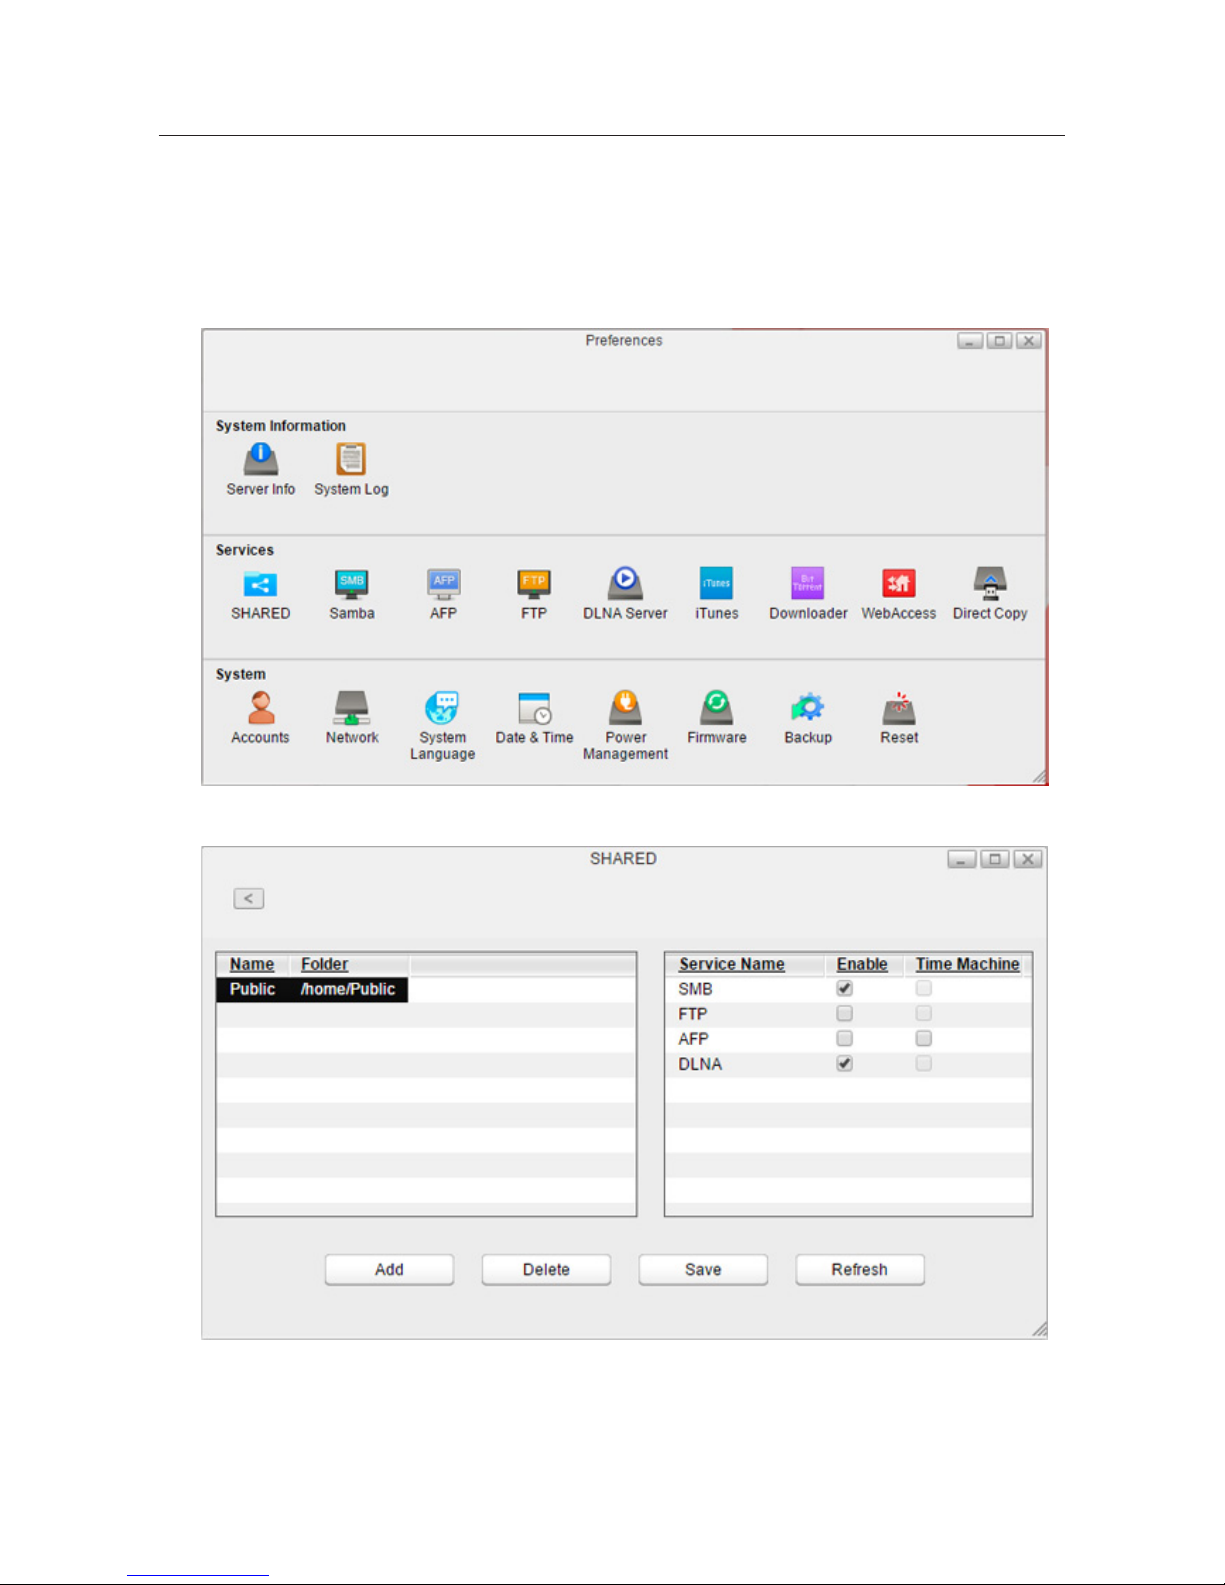
2 In Settings, click Preferences.
3 Click SHARED.
4 Click Add.
Page 43
42
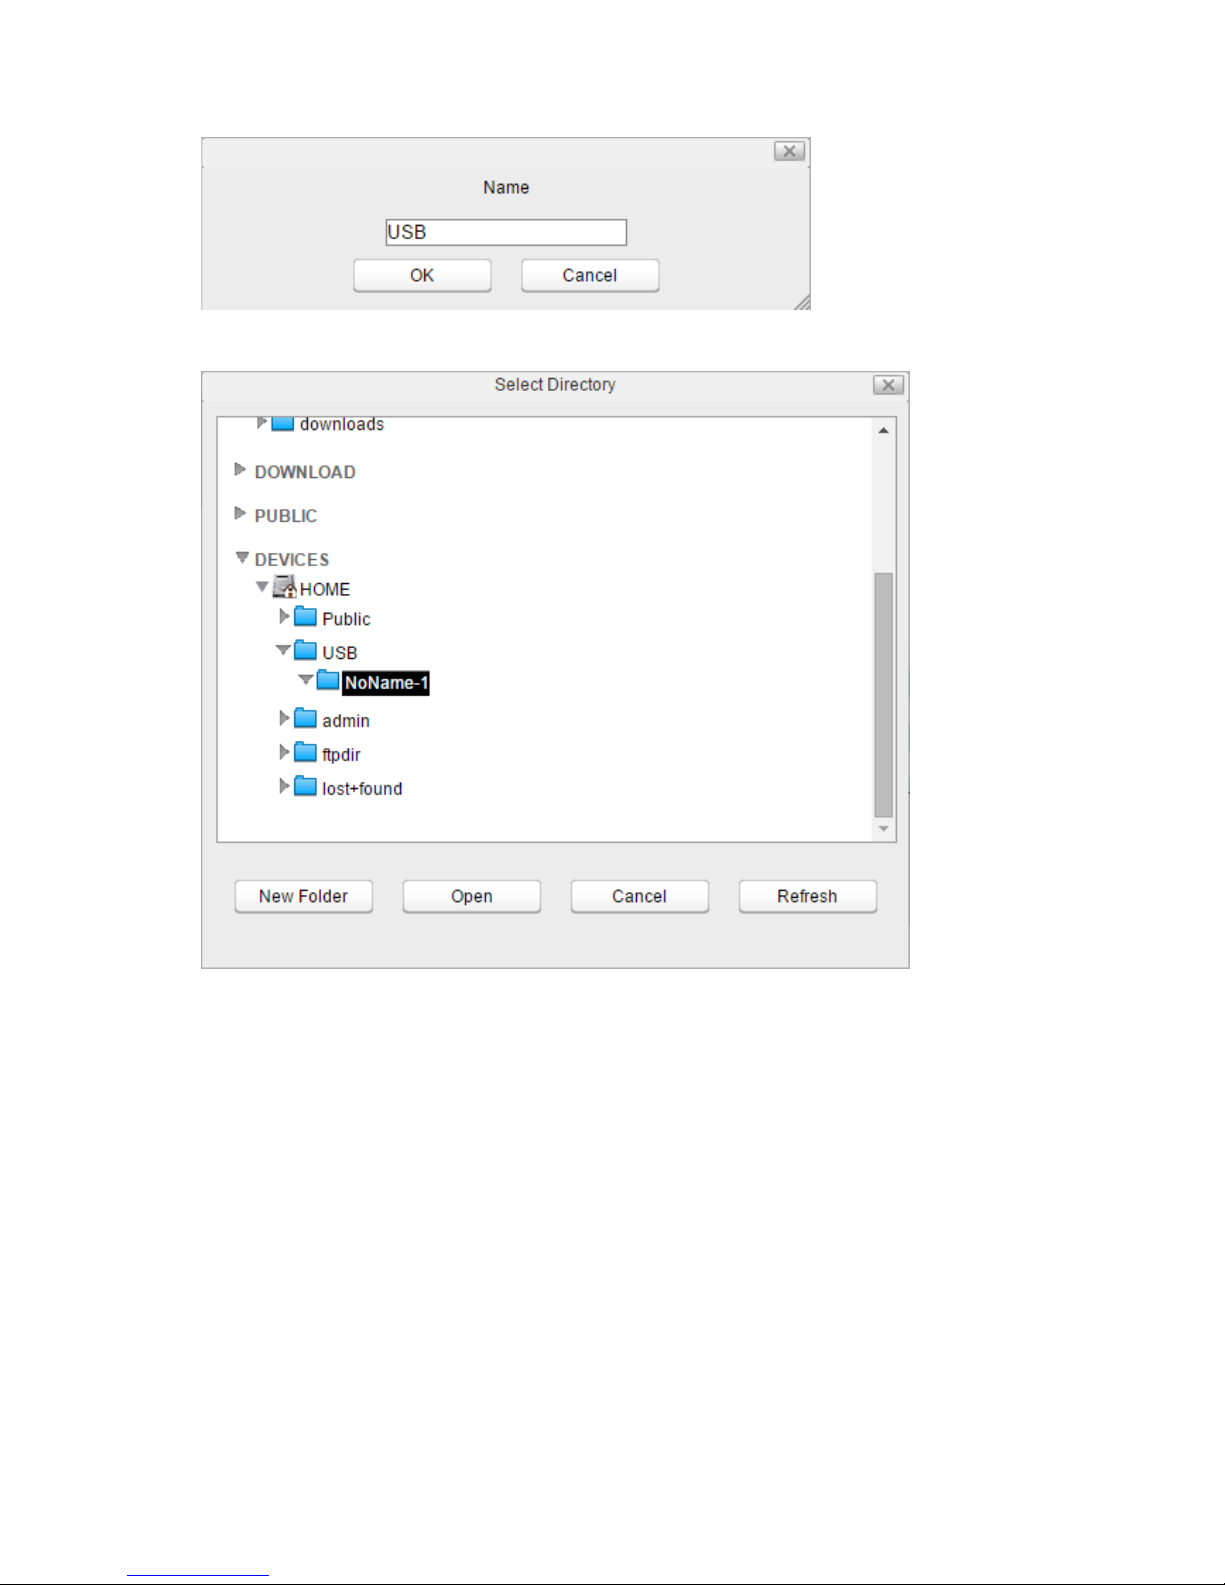
5 Enter a folder name and click OK.
6 Navigate to DEVICES - home - USB and select your external drive.
7 Click Open.
Page 44
43
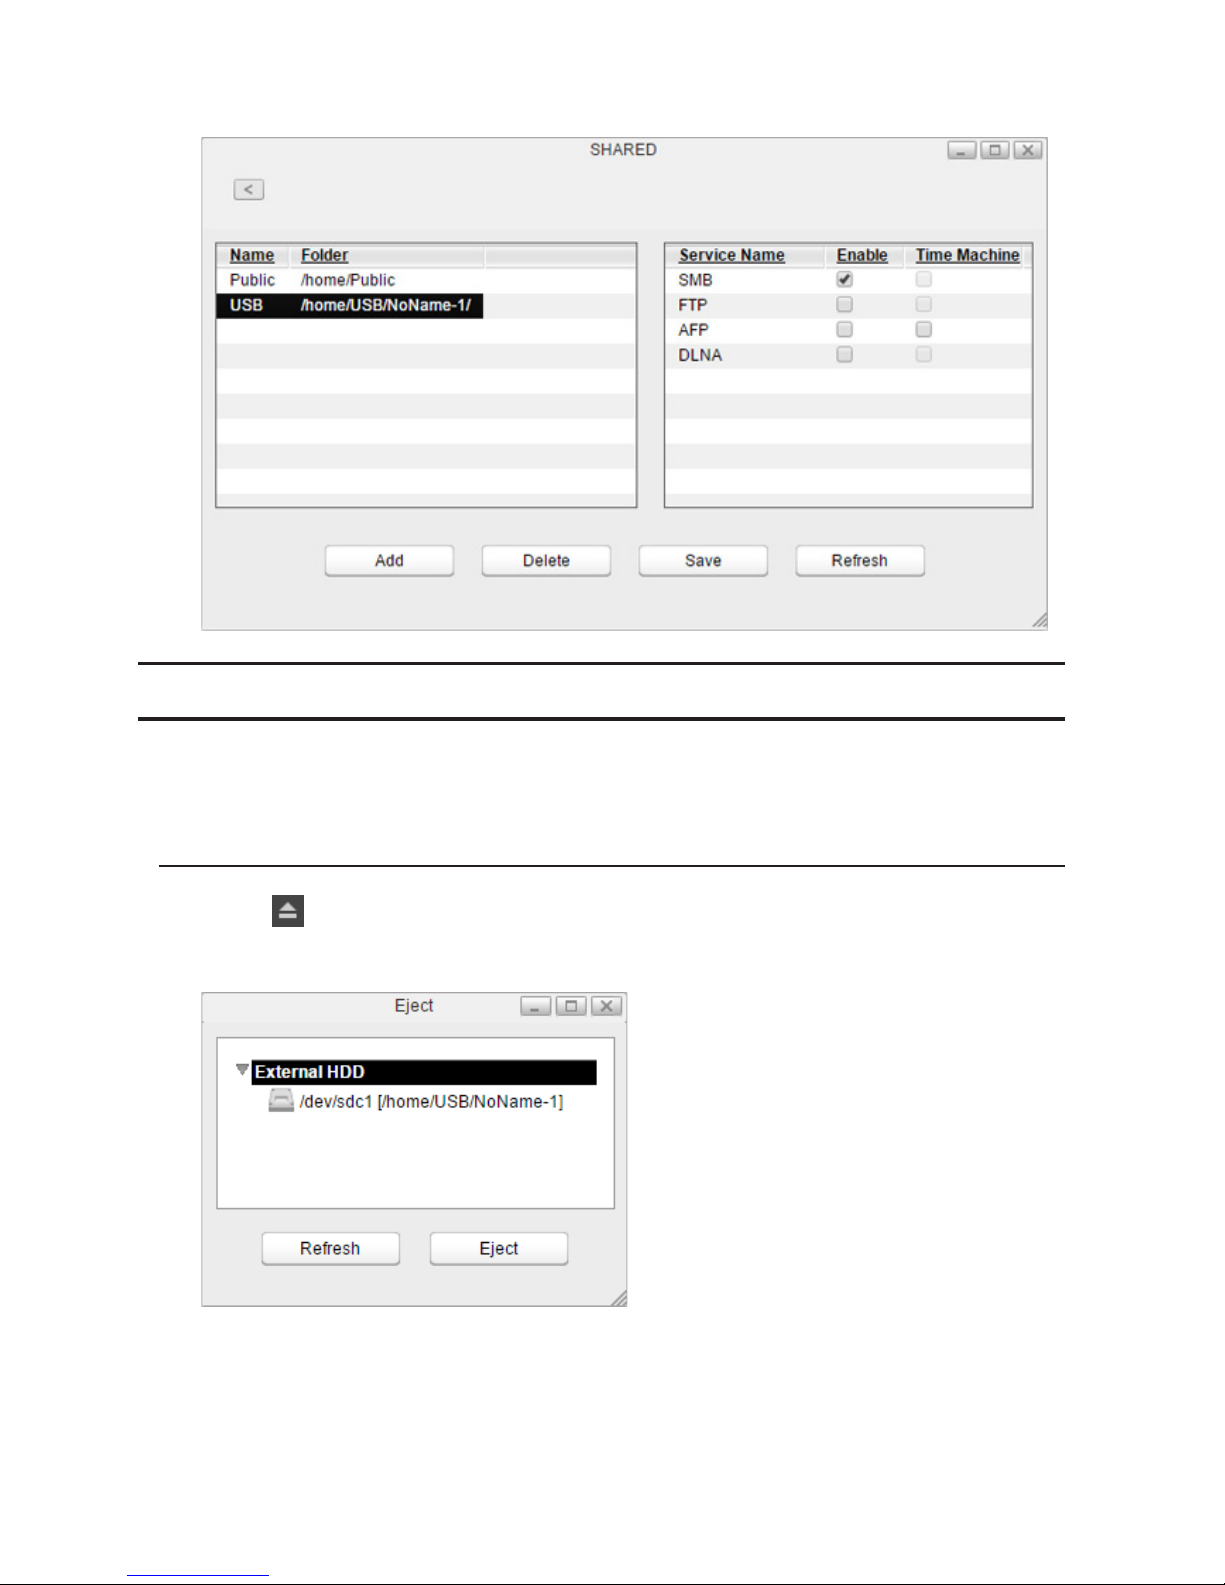
8 The connected USB drive is assigned as a shared folder. Enable "SMB" and other services, then click Save.
Dismounting an External Drive
If the LinkStation is powered on, dismount an external drive before unplugging it. You may dismount the external
drive from Settings. If the LinkStation is off, then the external drive is already dismounted and may be unplugged
safely.
Dismounting Using the Eject Button
1 Click the icon at the upper right corner of the home screen toolbar.
2 Select the device to dismount and click Eject.
3 The external drive will be dismounted.
Once the drive is dismounted, unplug it from the LinkStation.
Page 45
44
Dismounting Using Disk Manager
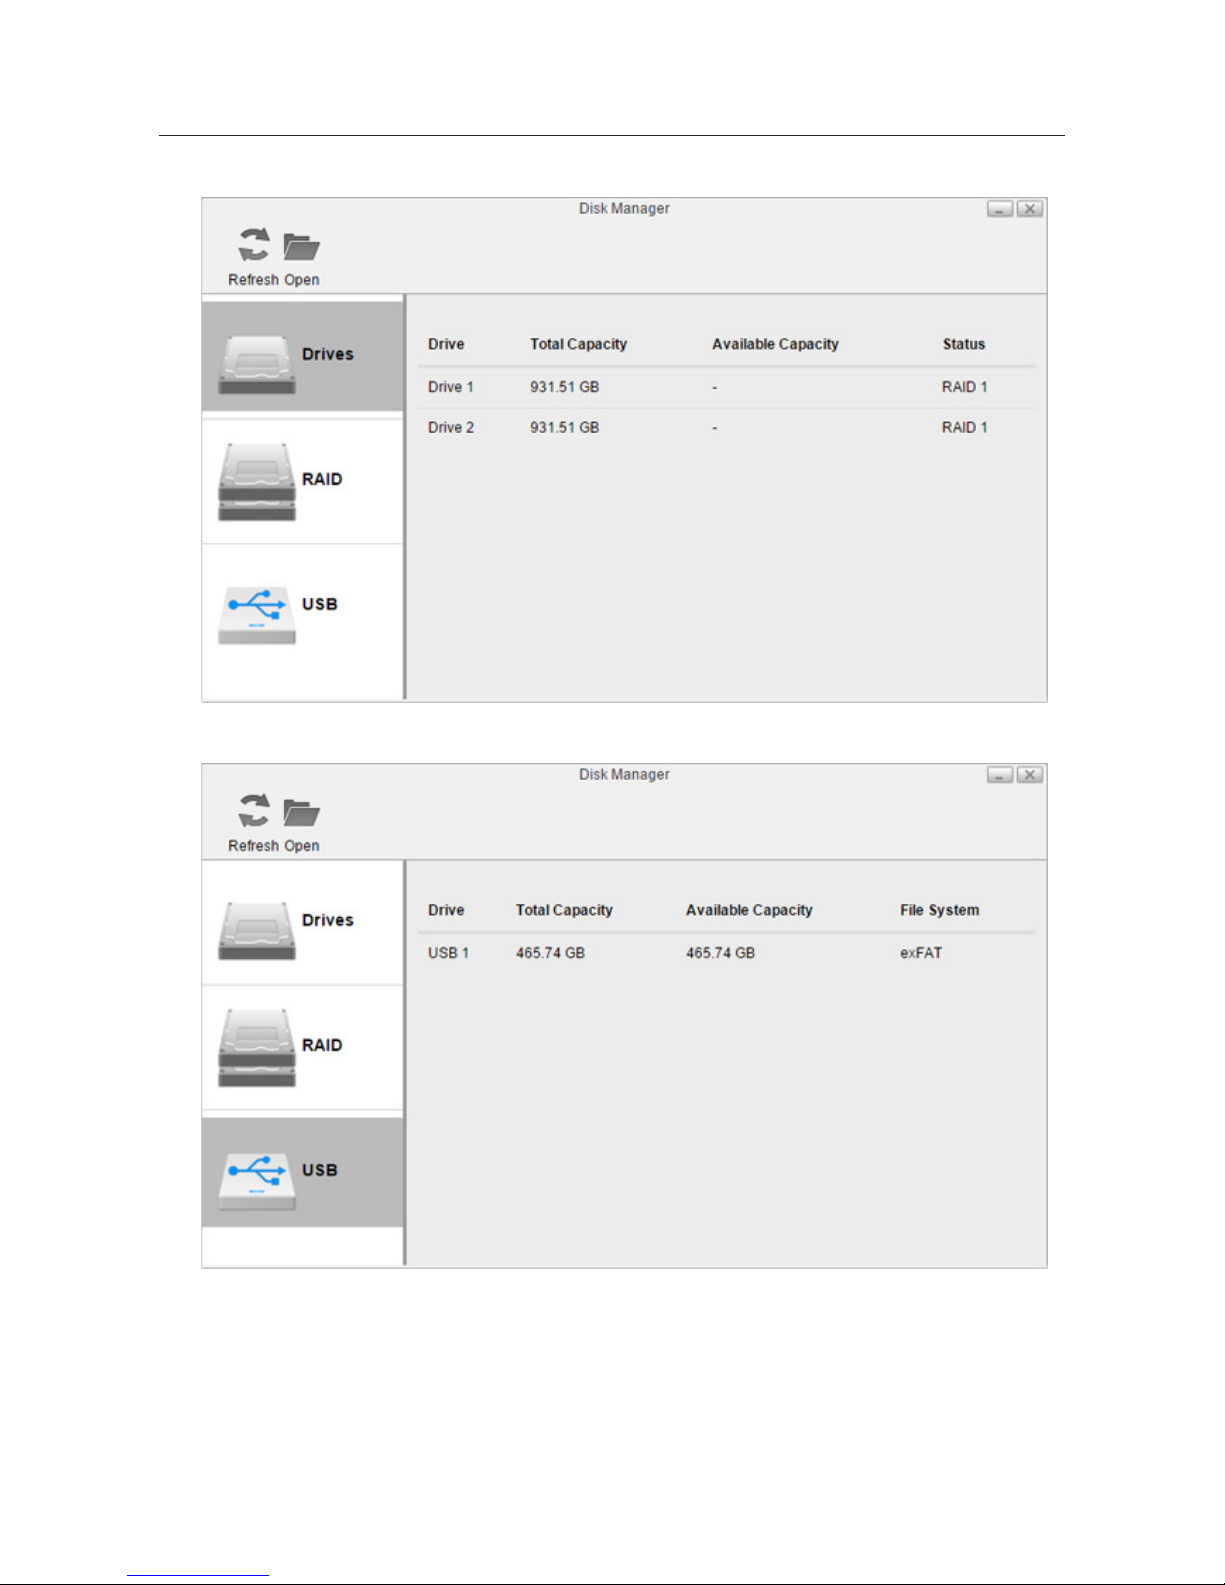
1 In Disk Manager, click the USB tab.
2 The drive information will be displayed. Click the external drive to be dismounted.
Page 46
45
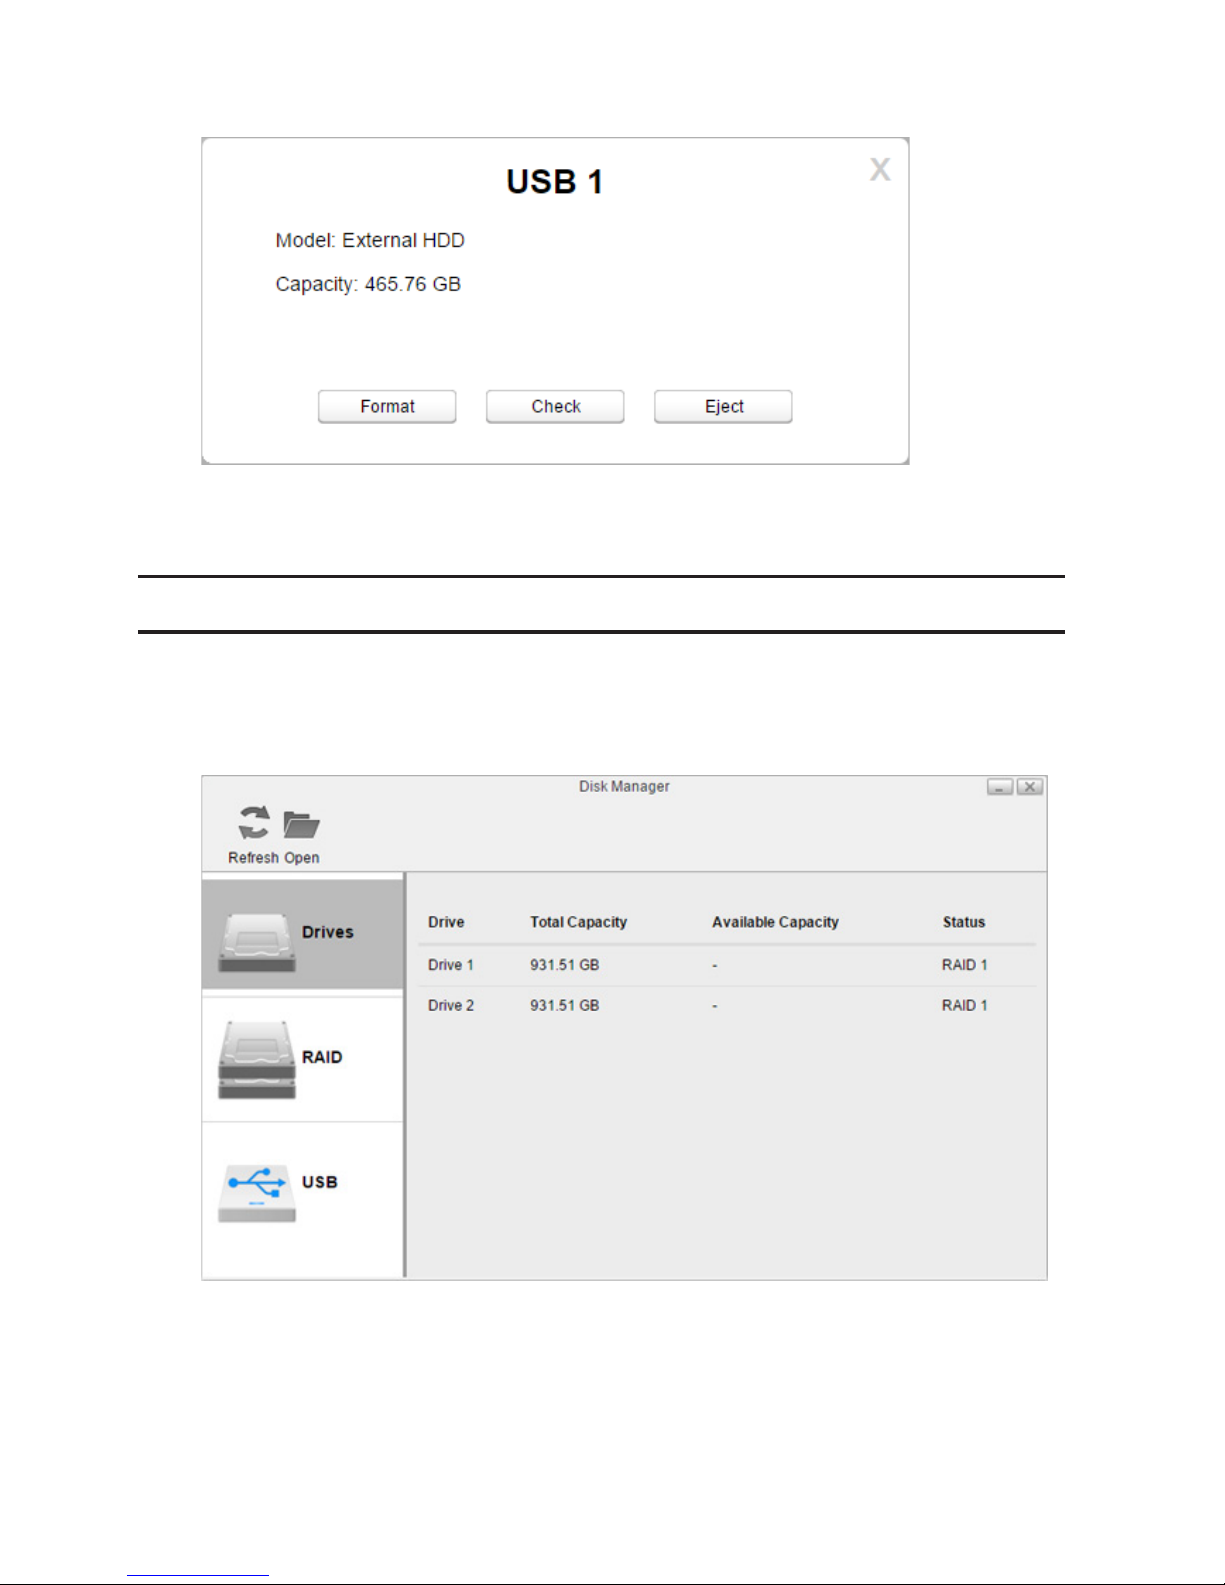
3 Click Eject.
4 The external drive will be dismounted.
Once the drive is dismounted, unplug it from the LinkStation.
Formatting Drives
Note: Since the firmware version 3.00, the hard drive that used to be used on the different LS500 series is
necessary to format when it's inserted.
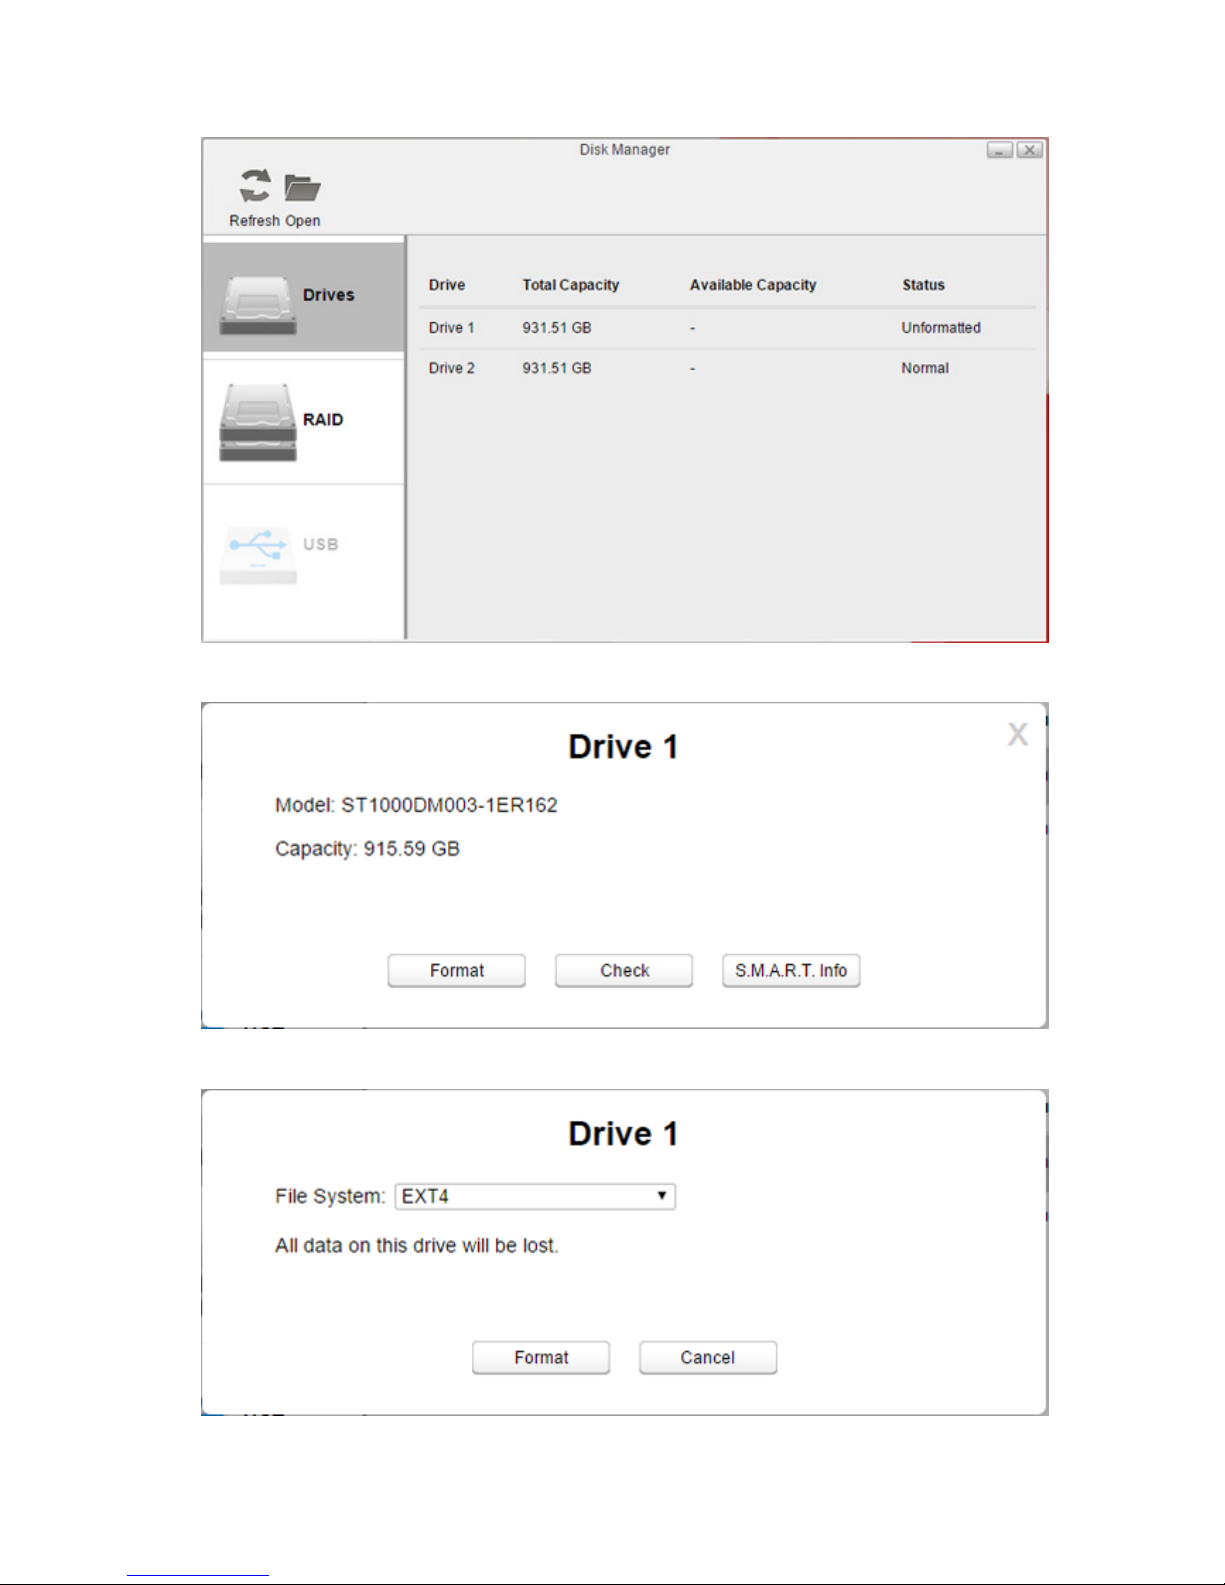
1 In Disk Manager, click the RAID tab (the Drives tab if no RAID array is configured) to format an internal drive or
the USB tab to format an external drive.
Page 47
46
2 Click the array or drive to format.
3 Click Format.
4 Select a file system from the drop-down menu and click Format.
5 When formatting is finished, click OK, then Close.
Page 48

47
Notes:
• Do not turn off the LinkStation or disconnect a hard drive while formatting.
• The following file systems can be formatted from Settings.
Internal Hard Drive ext4
External Hard Drive ext3, ext4, exFAT
Hard Drive Replacement
If a drive fails, NAS Navigator2 and Settings will show an error message. The hard drive will need to be replaced for
the unit to function properly. After the drive is replaced, you will need to rebuild the RAID array.
Notes:
• While the LinkStation is powered on, never unplug or remove drives without dismounting them first, and
never replace a running drive. Power down the LinkStation before changing the drive.
• For the replacement drive, use a Buffalo OP-HDBST series drive. The new drive should be the same size or
larger as the replaced drive. If a larger drive is used, the extra space will not be usable in a RAID 0 array.
However with RAID 1, you can expand current RAID array capacity if you replace a drive with a larger-sized
hard drive. To expand the capacity, refer to the "Expanding the RAID Array Capacity" section above for the
instructions.
• If there is existing data on the replacement drive, back it up as all data on the drive will be lost during the
replacement process.
• If sending a defective drive to Buffalo for replacement, please keep the cartridge as Buffalo will only replace
the hard drive and not the cartridge.
• To avoid damaging the LinkStation with static electricity, ground yourself by touching something made of
metal before handling any sensitive electronic parts.
• Do not change the order of the hard drives in the LinkStation. For example, pulling out drive 1 and replacing
it with drive 2 may cause data to be corrupted or lost.
Step 1 - Replacing a Hard Drive
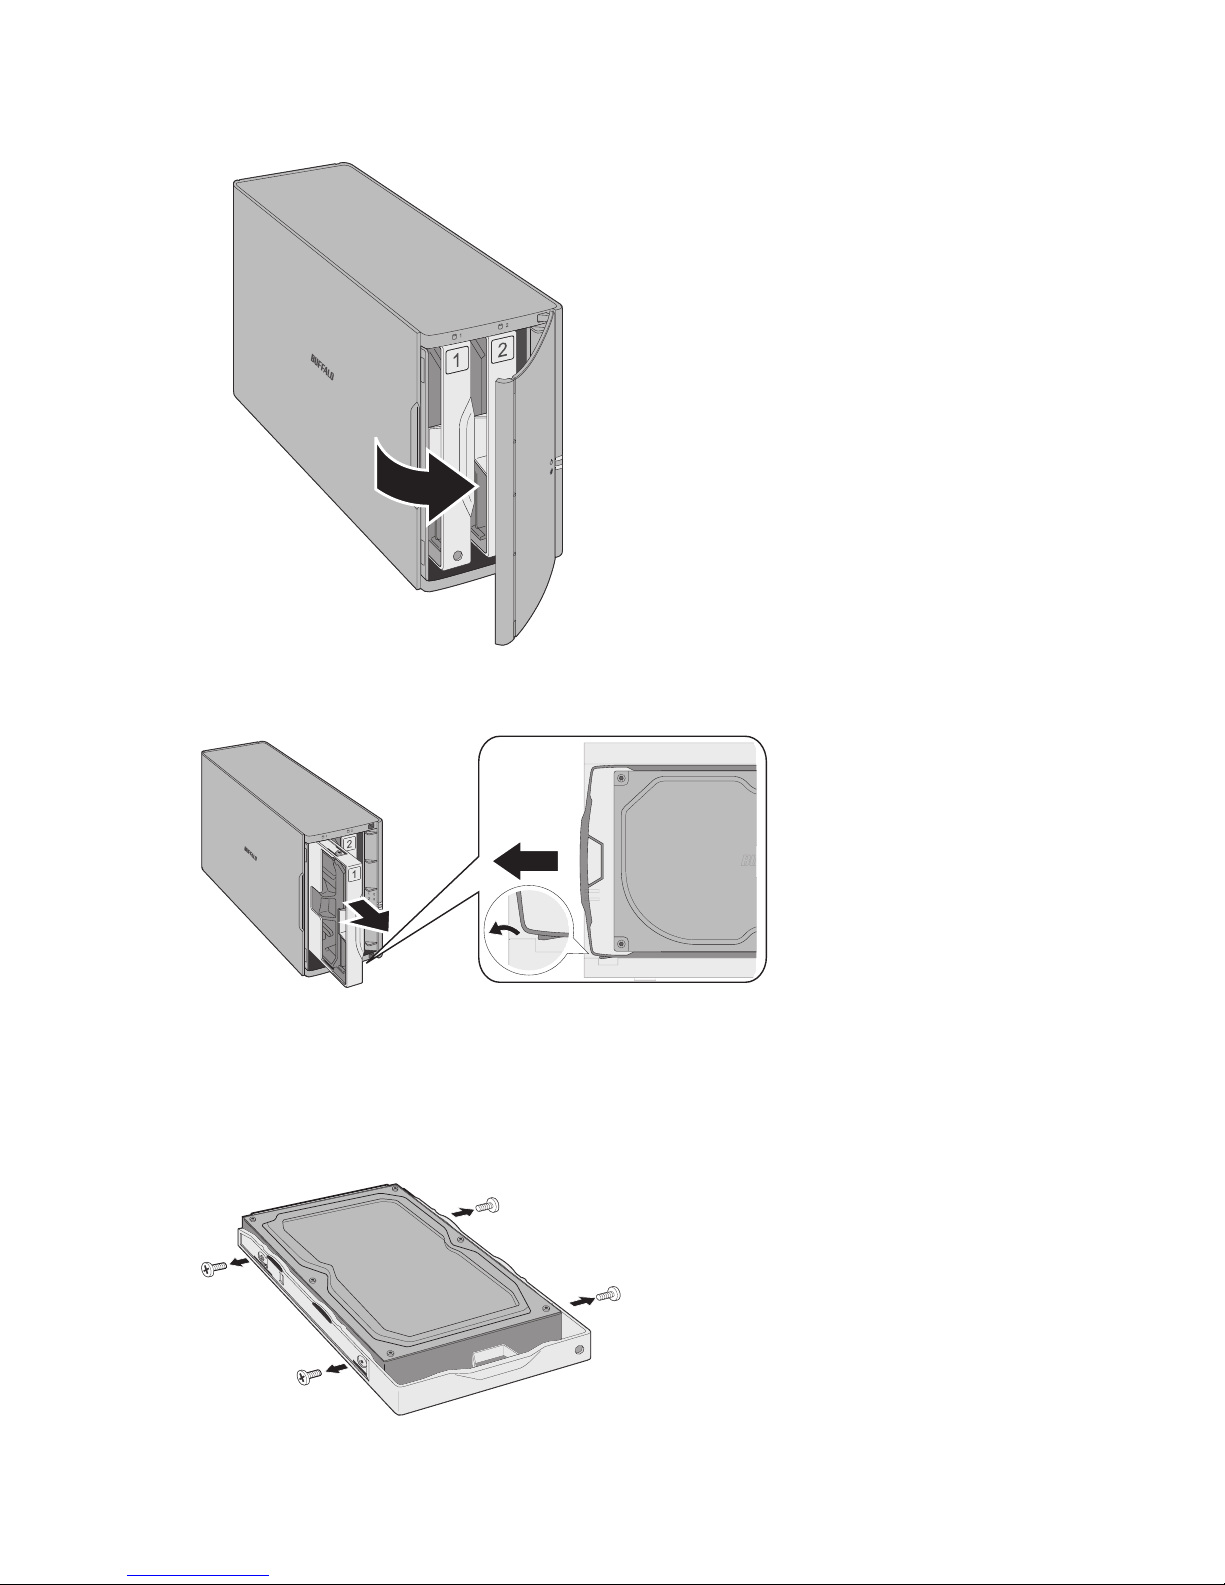
1 Turn the LinkStation off and remove all cables.
Page 49
48
2 Squeeze the left side of the front panel and swing it open.
3 Push the failed drive's cartridge up and remove it from the LinkStation.
Notes:
• Do not press hard on the top of the LinkStation.
• Pull the drive straight out the front of the chassis.
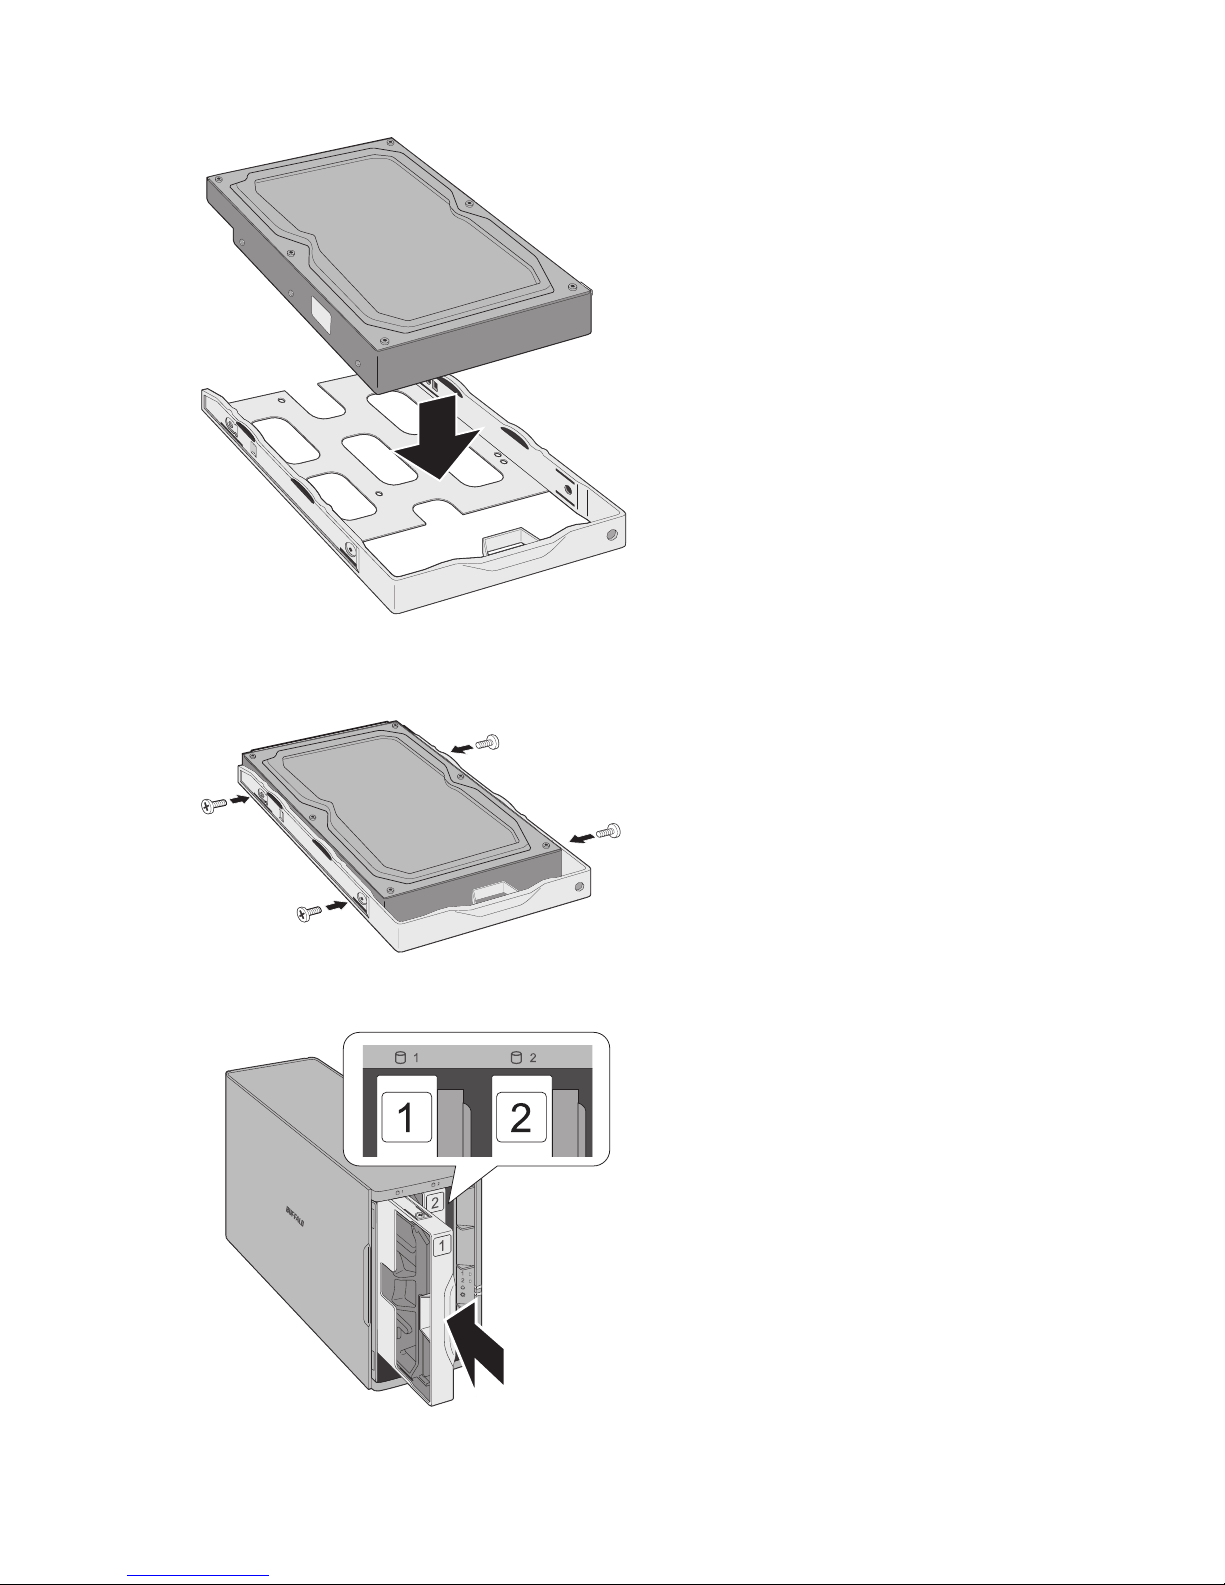
4 Remove the drive from the cartridge.
Page 50
49
5 Install a new Buffalo OP-HDBST series drive in the cartridge.
6 Replace the four screws.
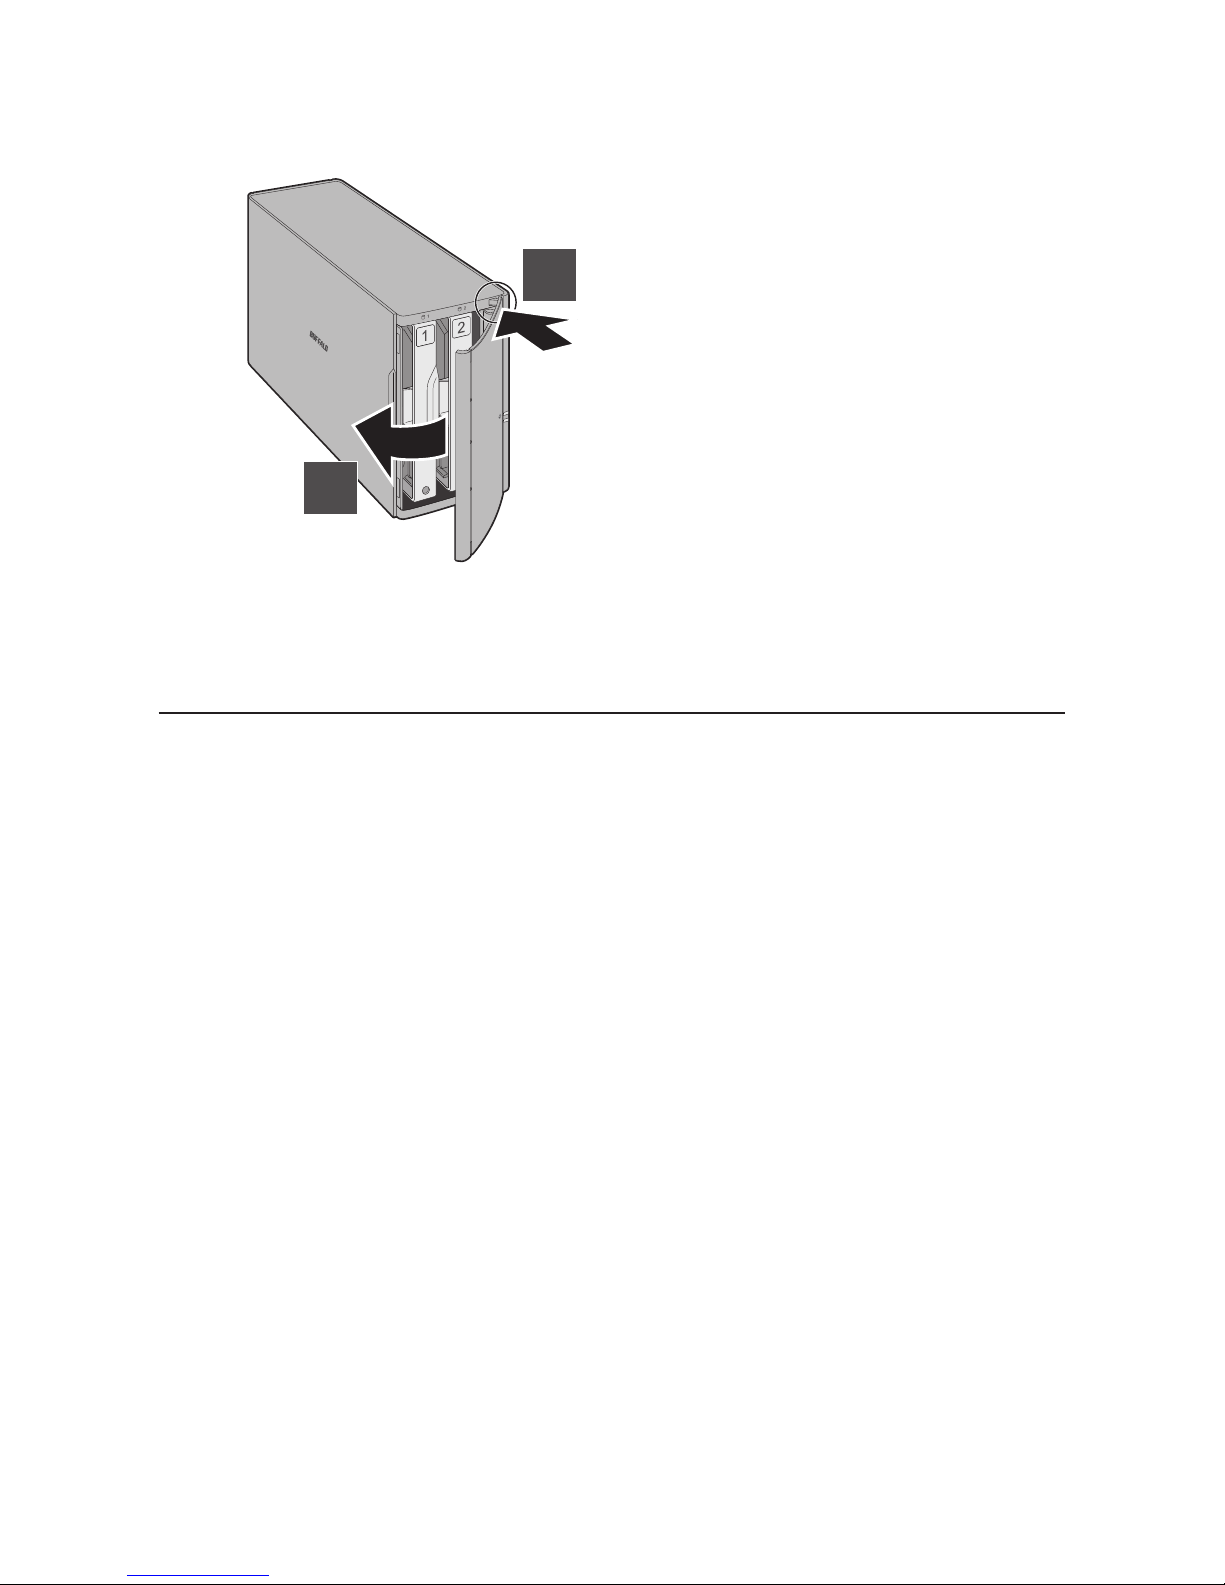
7 Insert the new drive into the empty slot.
Page 51
50
8 Close the front panel.
1
2
9 Connect all cables, then turn on the LinkStation.
Step 2 - Rebuilding the RAID Array
Depending on your RAID mode, the rebuilding procedure will be different. Follow the corresponding procedure
below that matches your RAID mode.
Using RAID 1
1 Follow the drive replacement procedure described above and replace the failed drive with a new drive.
2 Hold down the function button on the back of the LinkStation for 5 seconds.
3 The LinkStation will start rebuilding the RAID array. After a few minutes, the I18 message will be displayed in
NAS Navigator2. Wait until the drive finishes rebuilding; the I18 message will be extinguished.
Using RAID 0 or Linear
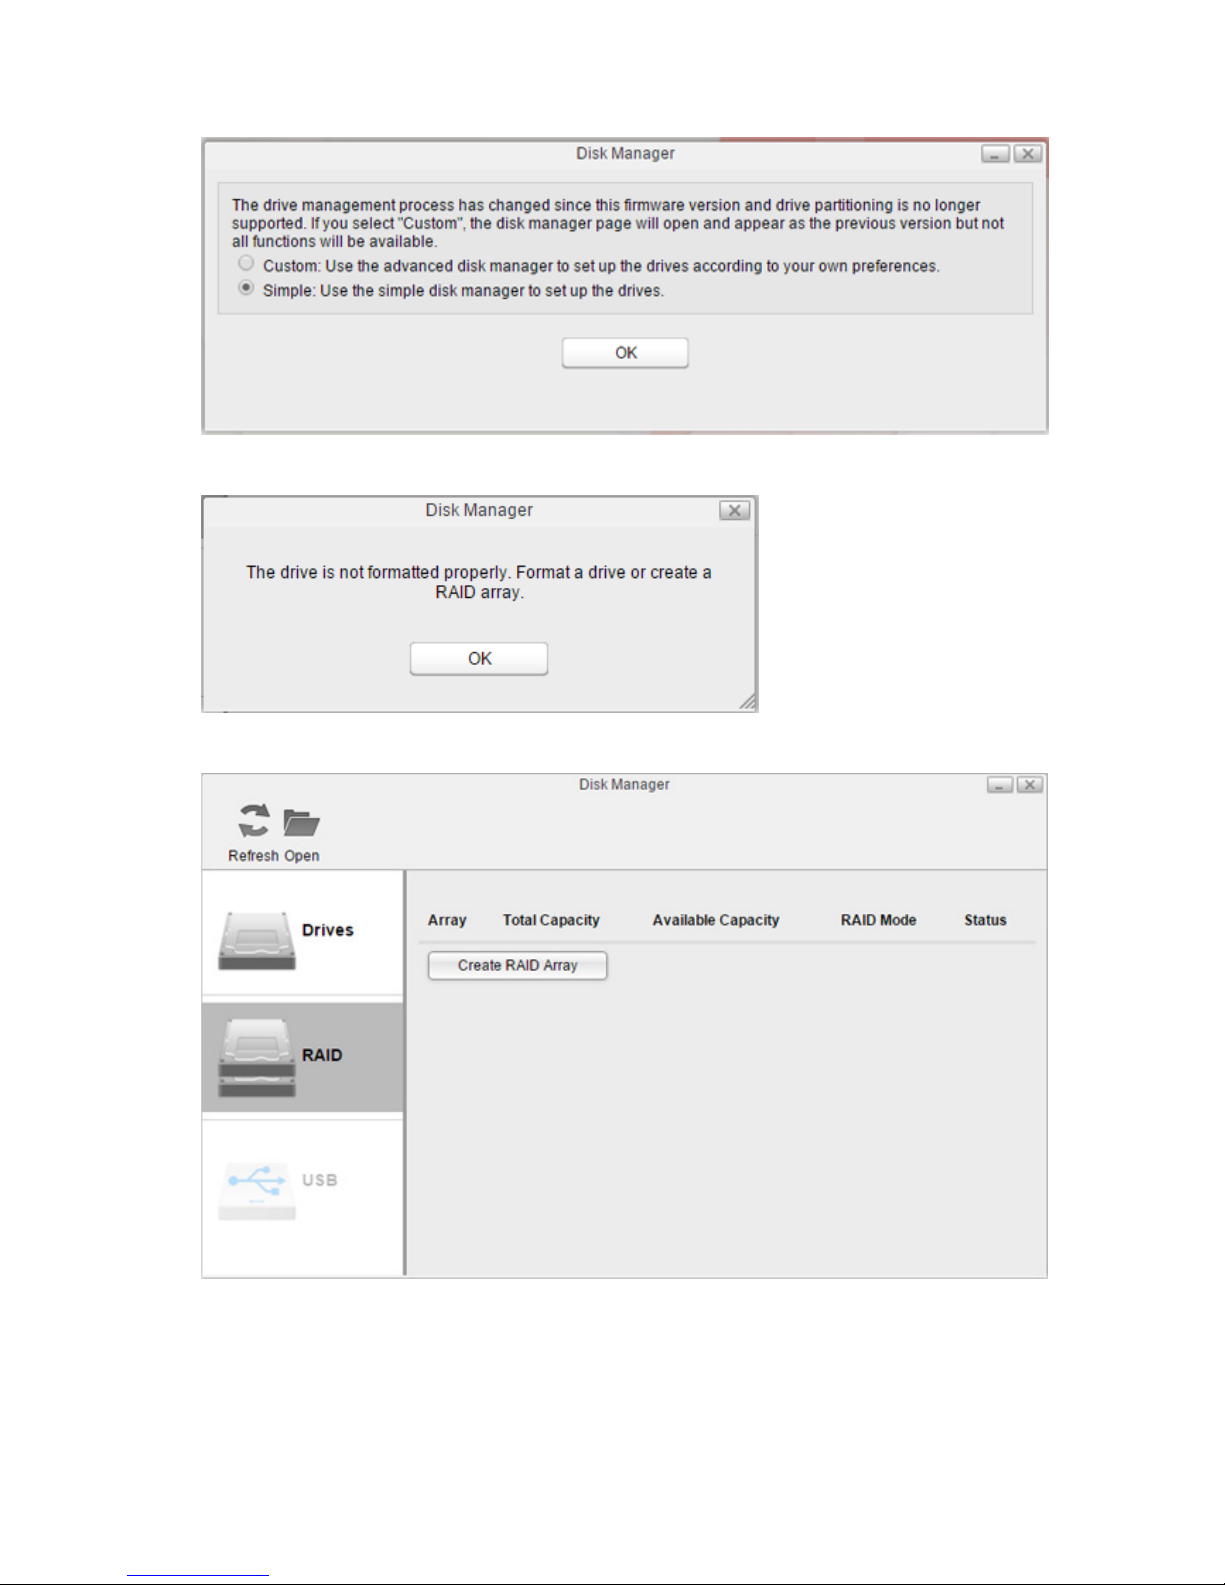
1 Follow the drive replacement procedure described above and replace the failed drive with a new drive.
2 Open Settings and click Disk Manager.
Page 52
51
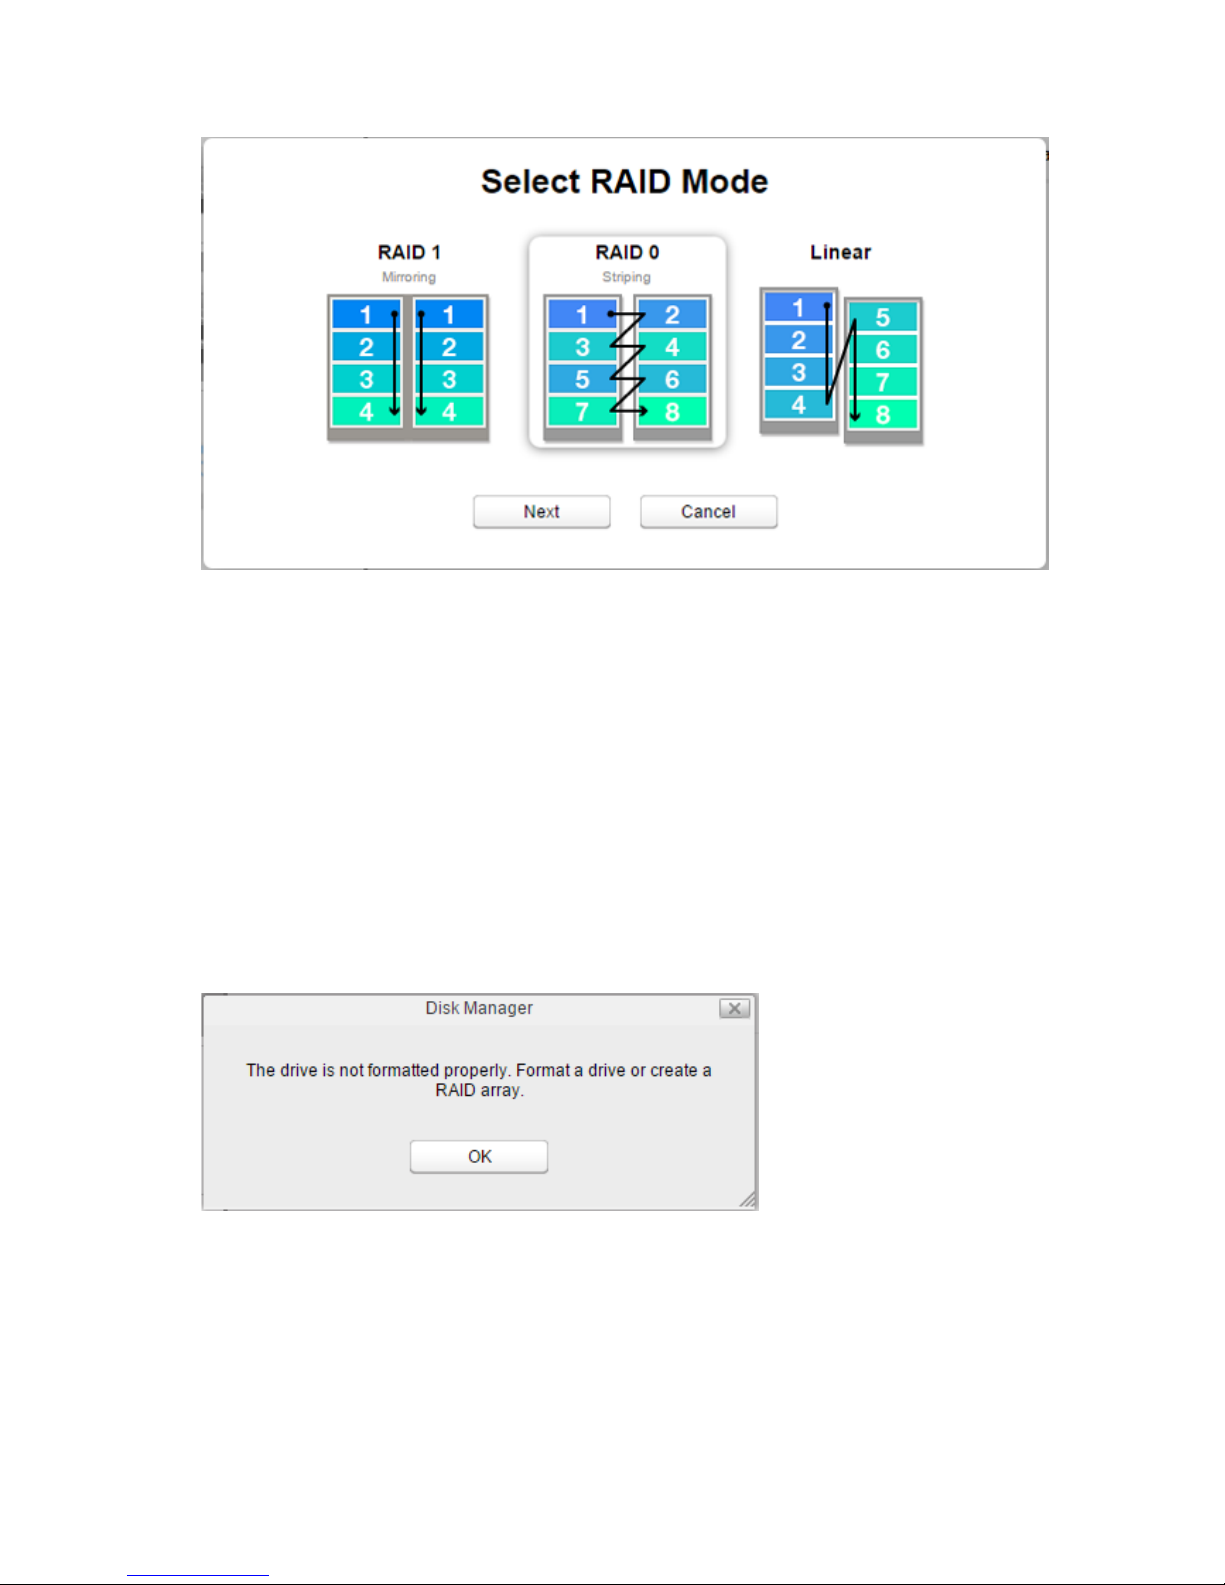
3 When the following window prompts, select "Simple" and click OK.
4 The error message below will be displayed due to a new drive being inserted. Click OK.
5 Click the RAID tab, then Create RAID Array.
Page 53
52
6 Select a RAID mode and click Next.
7 Click Yes .
8 RAID array creation will start. Wait until it's done. When it's finished, click OK, then Close.
Once the RAID array is configured, create shared folders on the array to use them. Refer to the "SHARED" section in
chapter 7 for the instructions.
Using JBOD
If the drive that was initially formatted fails, the LinkStation will not be accessible unless the drive is replaced.
1 Follow the drive replacement procedure described above and replace the failed drive with a new drive.
2 Open Settings and click Disk Manager.
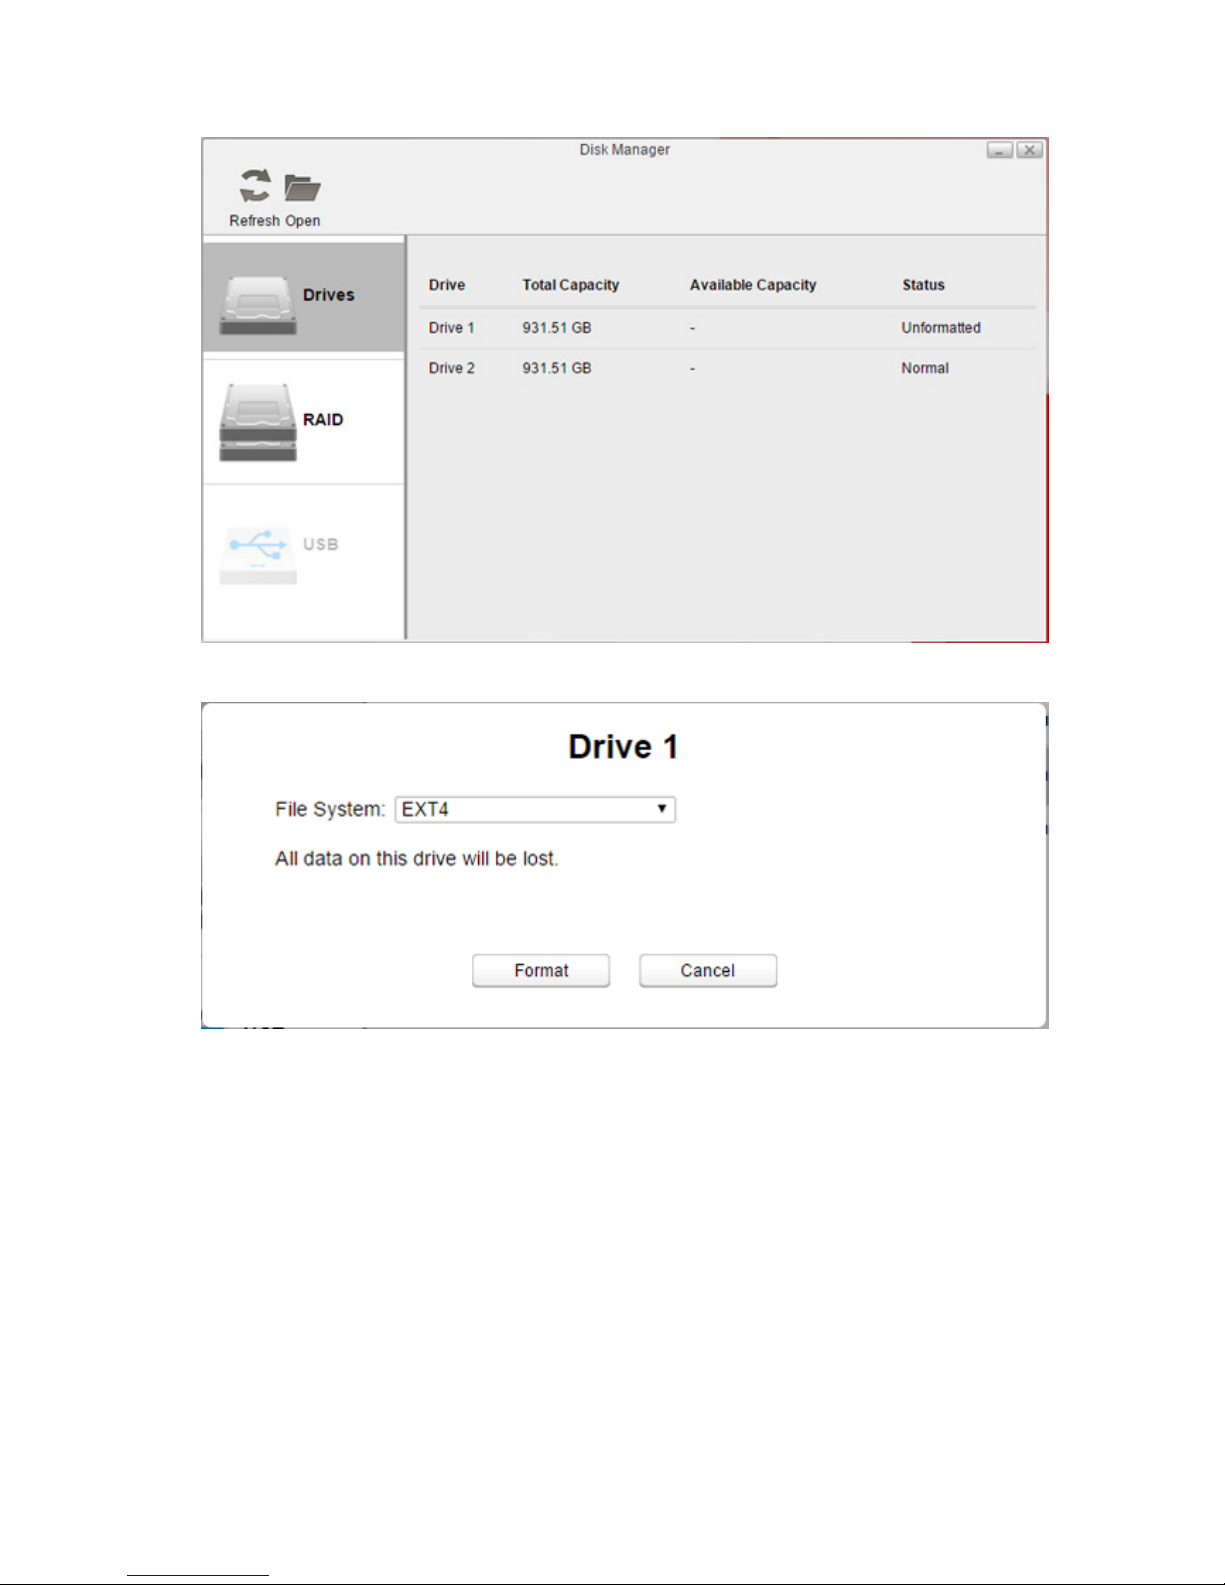
3 The error message below will be displayed due to a new drive being inserted. Click OK.
Page 54
53
4 Select a drive that shows "Unformatted" and click Format.
5 Select a file system from the drop-down menu and click Format.
6 When the format is finished, click OK, then Close.
Once the drive is formatted, create shared folders on the drive to use them. Refer to the "SHARED" section in chapter
7 for the instructions.
Page 55
54
Chapter 6 System Information
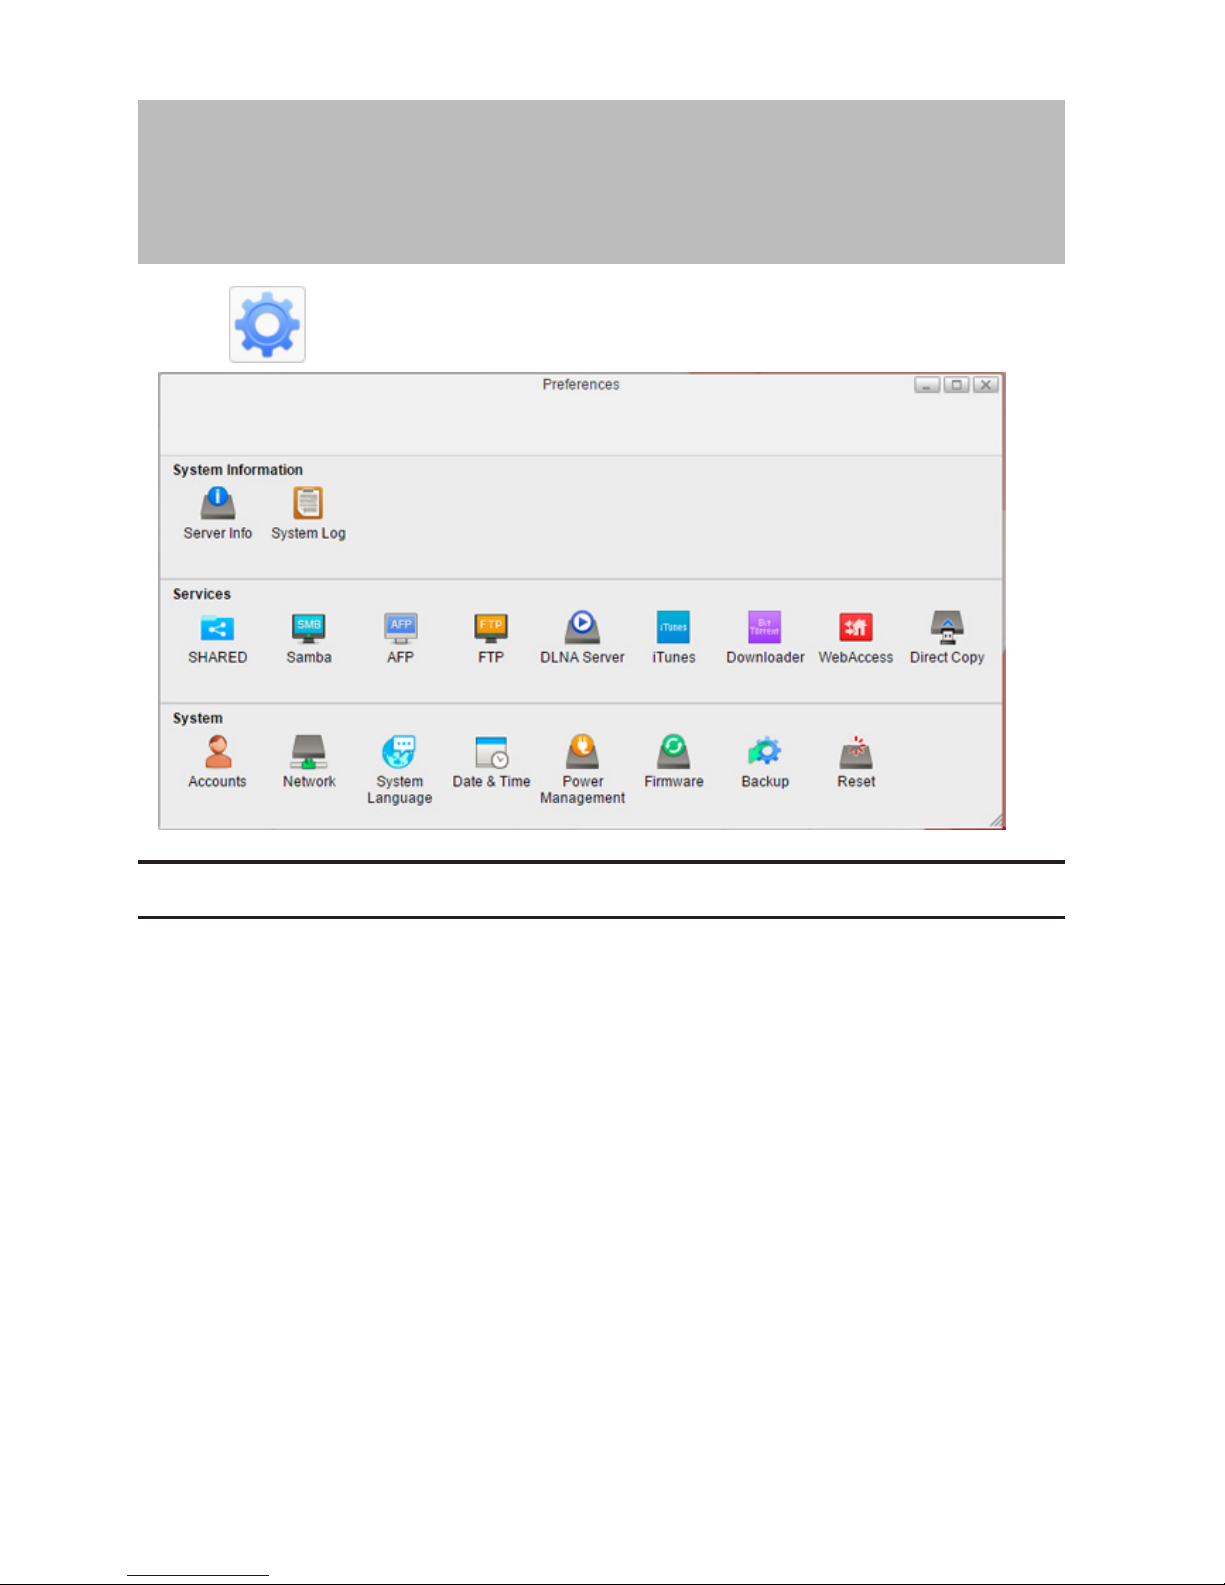
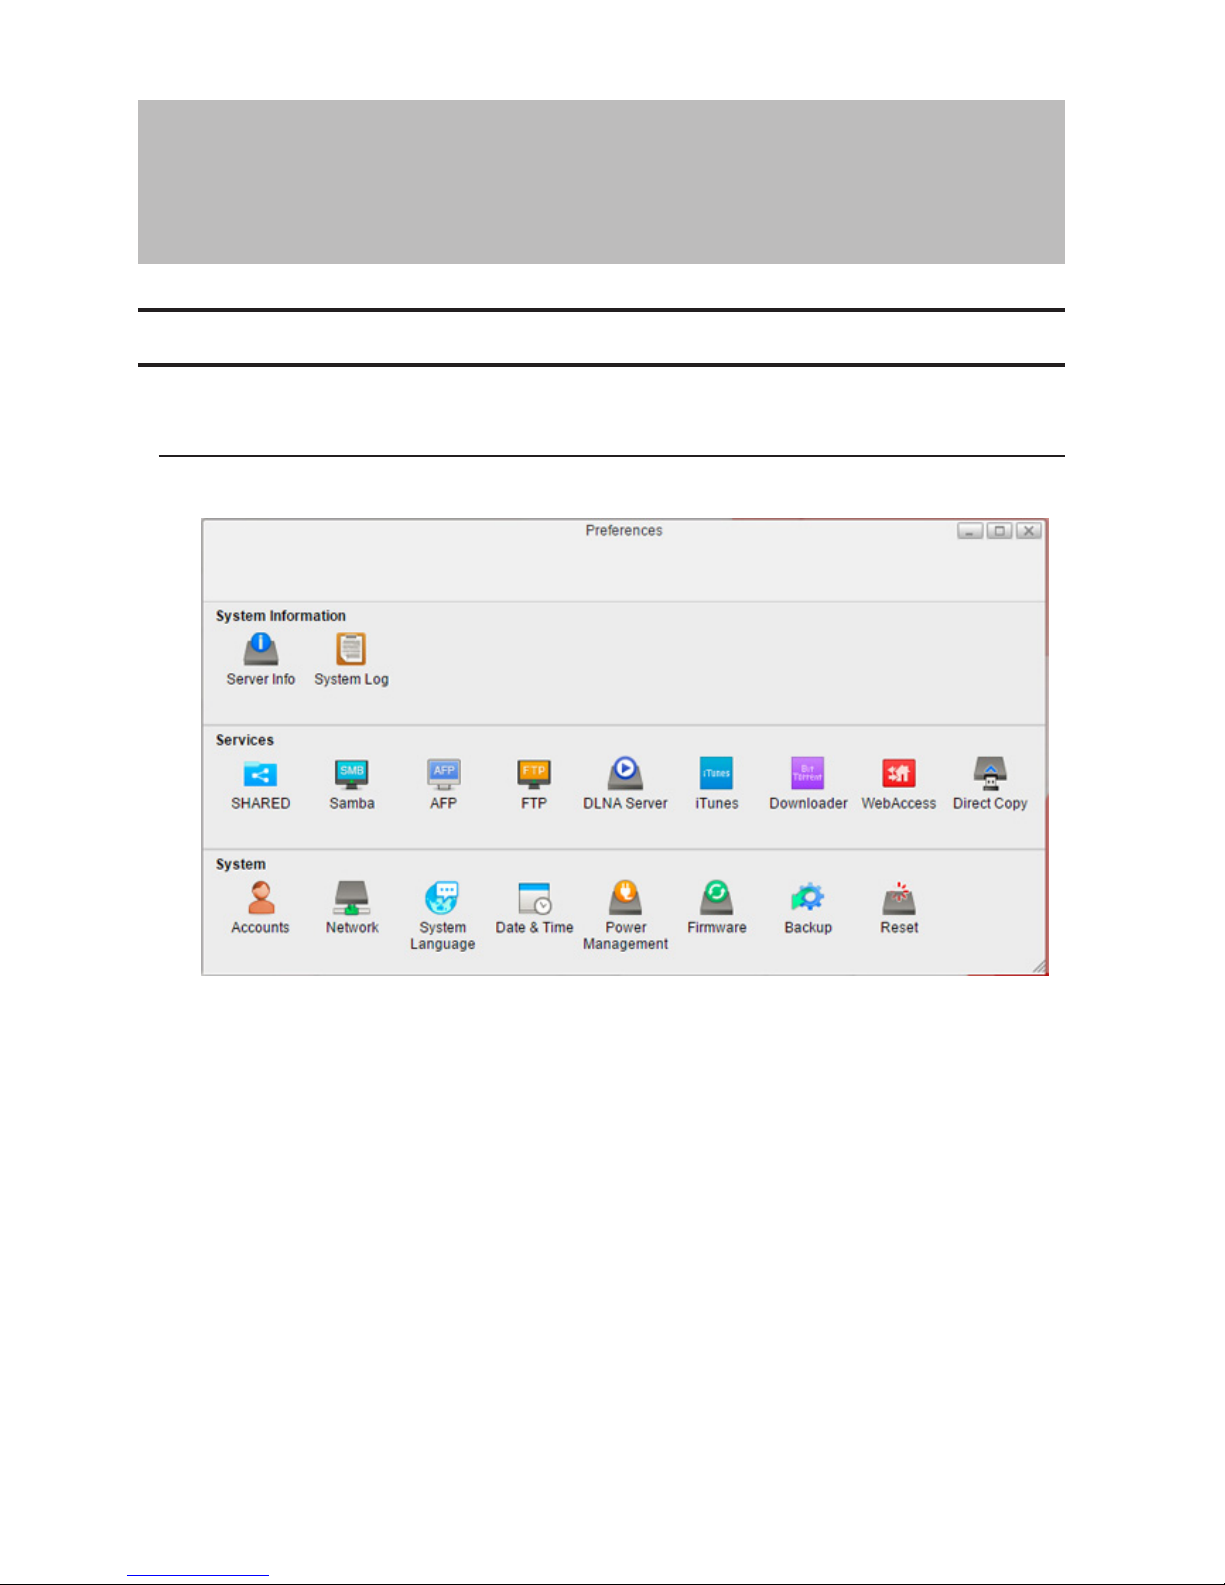
Click the icon in the main menu to open "Preferences".
Server Info
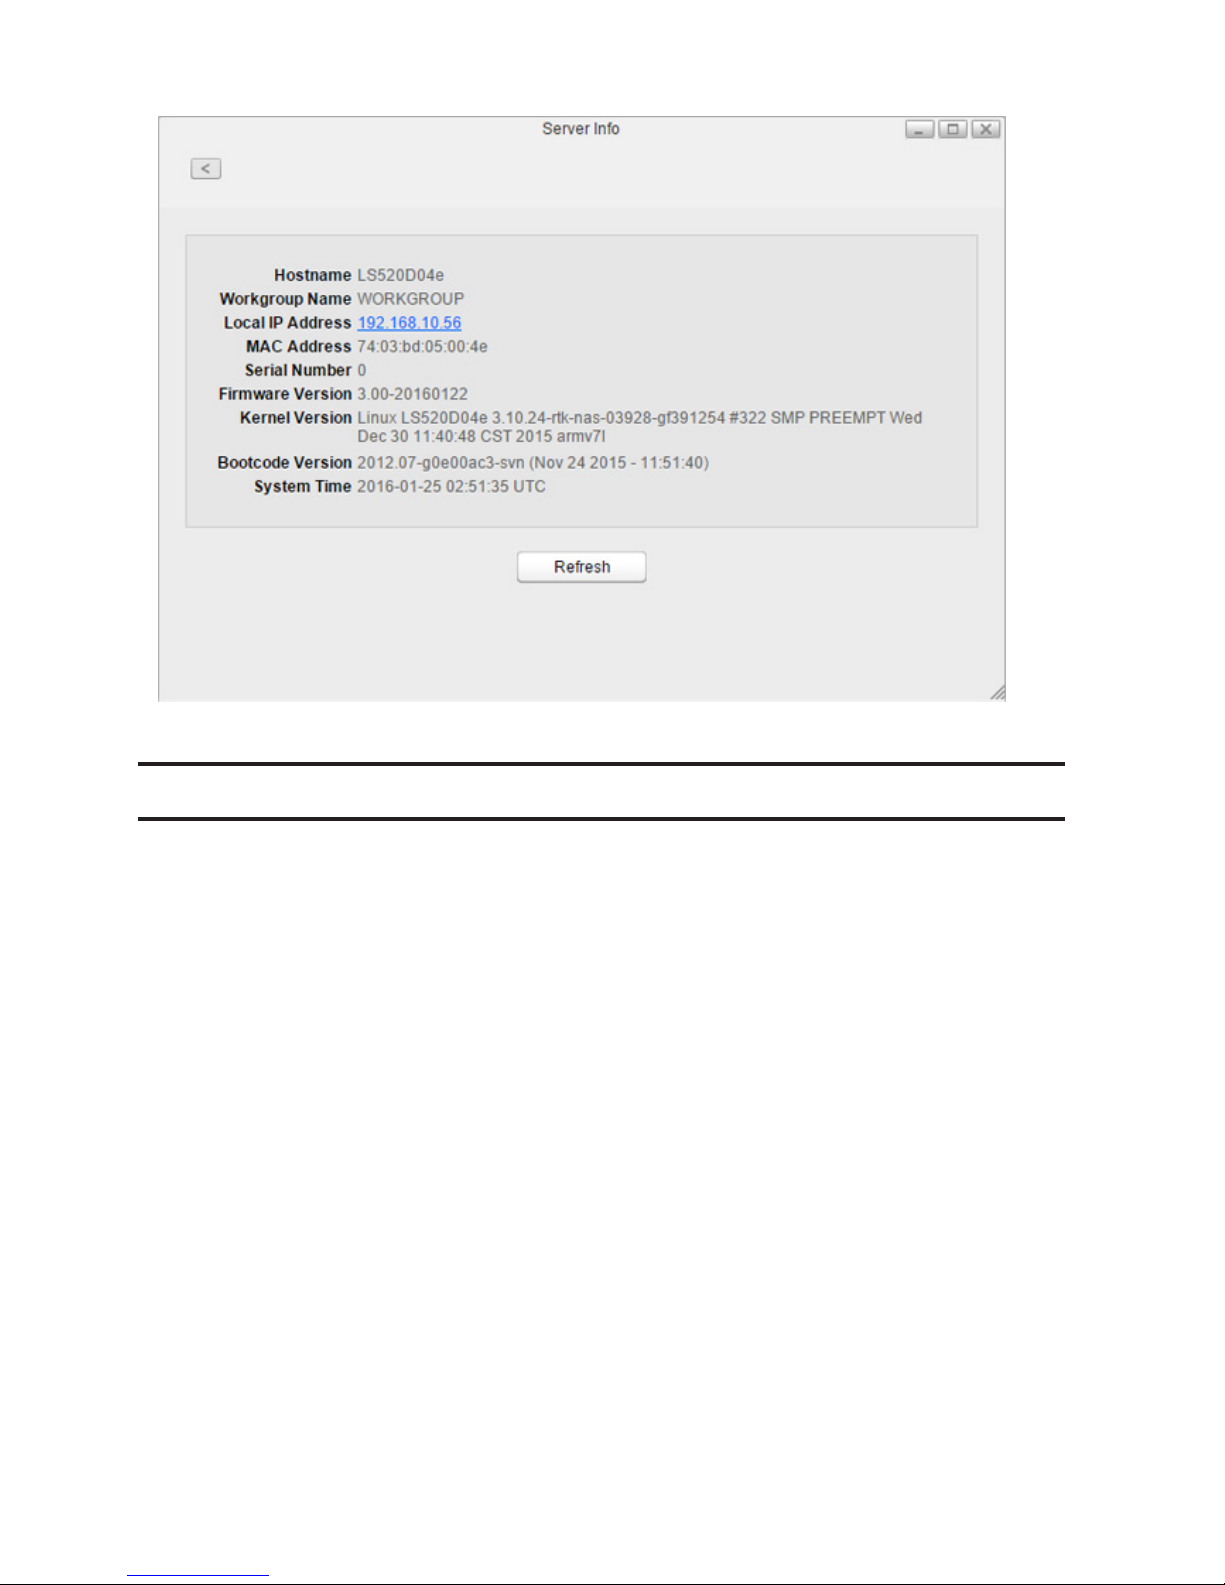
Displays the registered name, hostname, workgroup name, IP address, MAC address, firmware version, time, and
other minor system information.
Page 56
55
To open the Server Info window, click Server Info in Preferences.
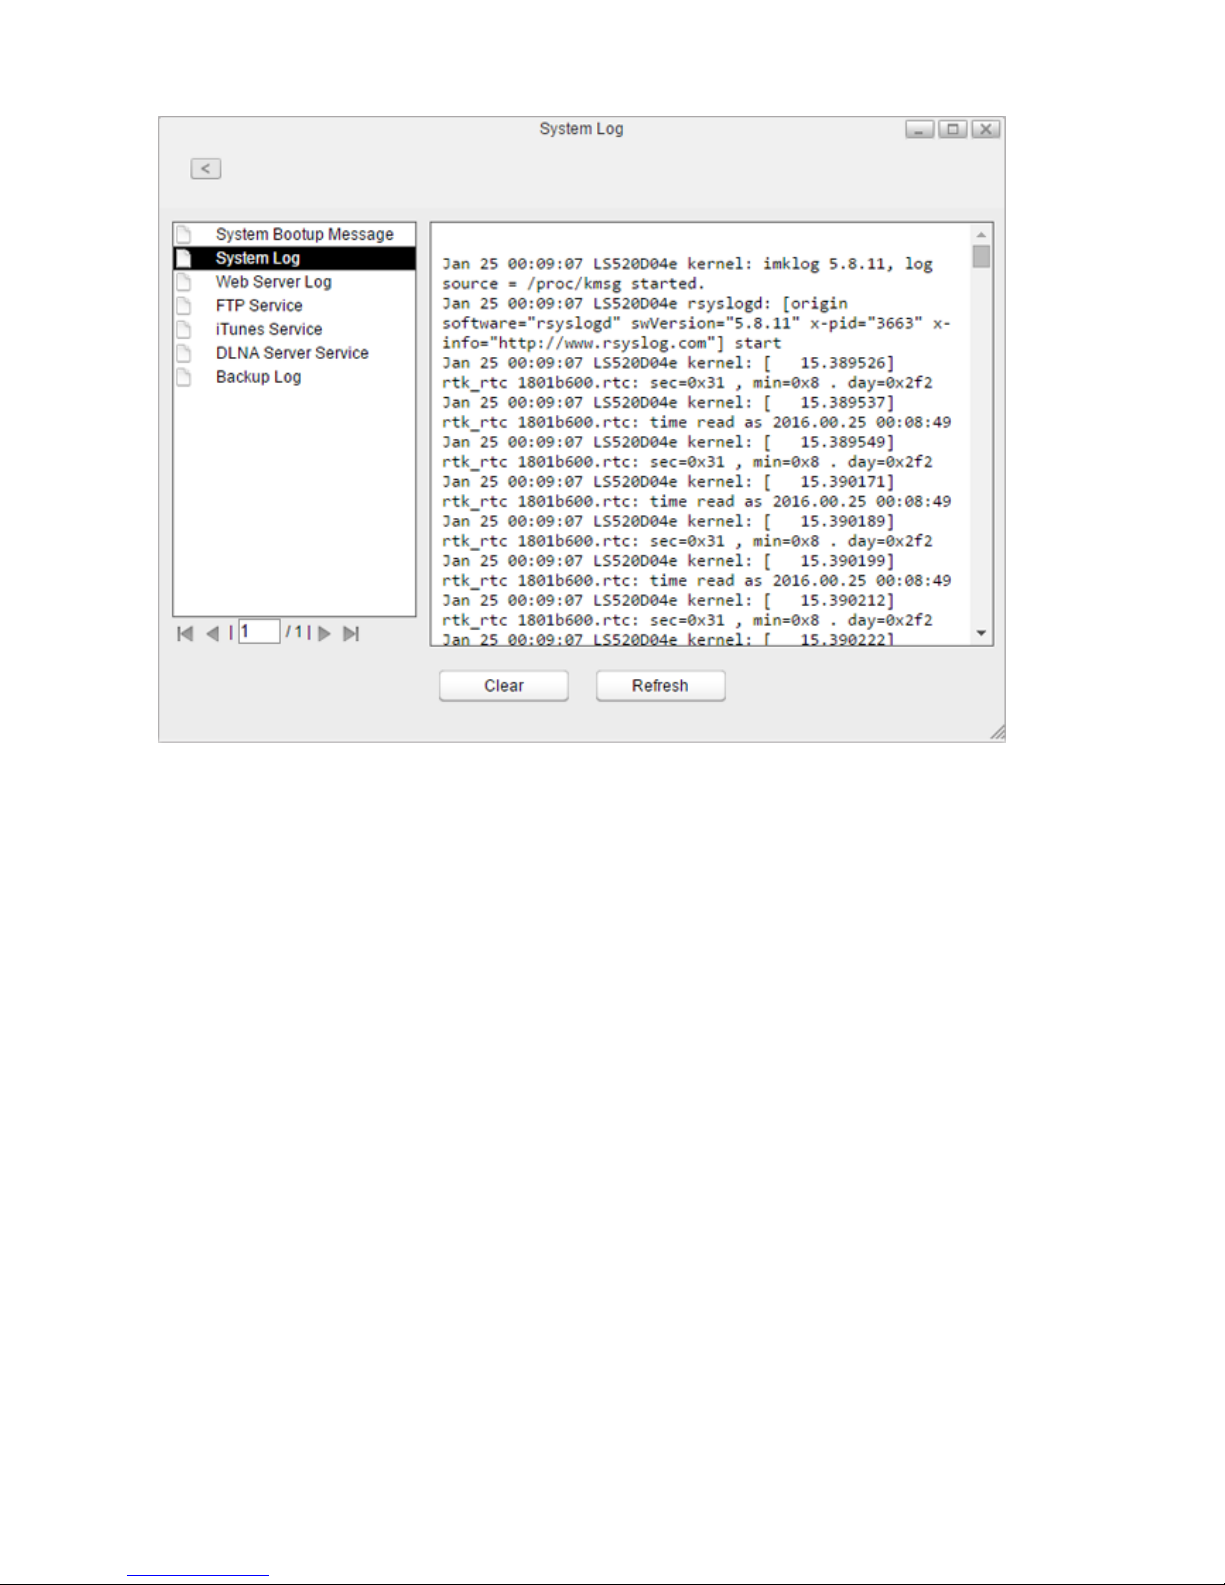
System Log
Displays multiple logs of the LinkStation.
To open the System Log window, click System Log in Preferences.
Page 57
56
Note: Up to 10 latest logs will be kept in the LinkStation.
Page 58
57
Chapter 7 Services
SHARED
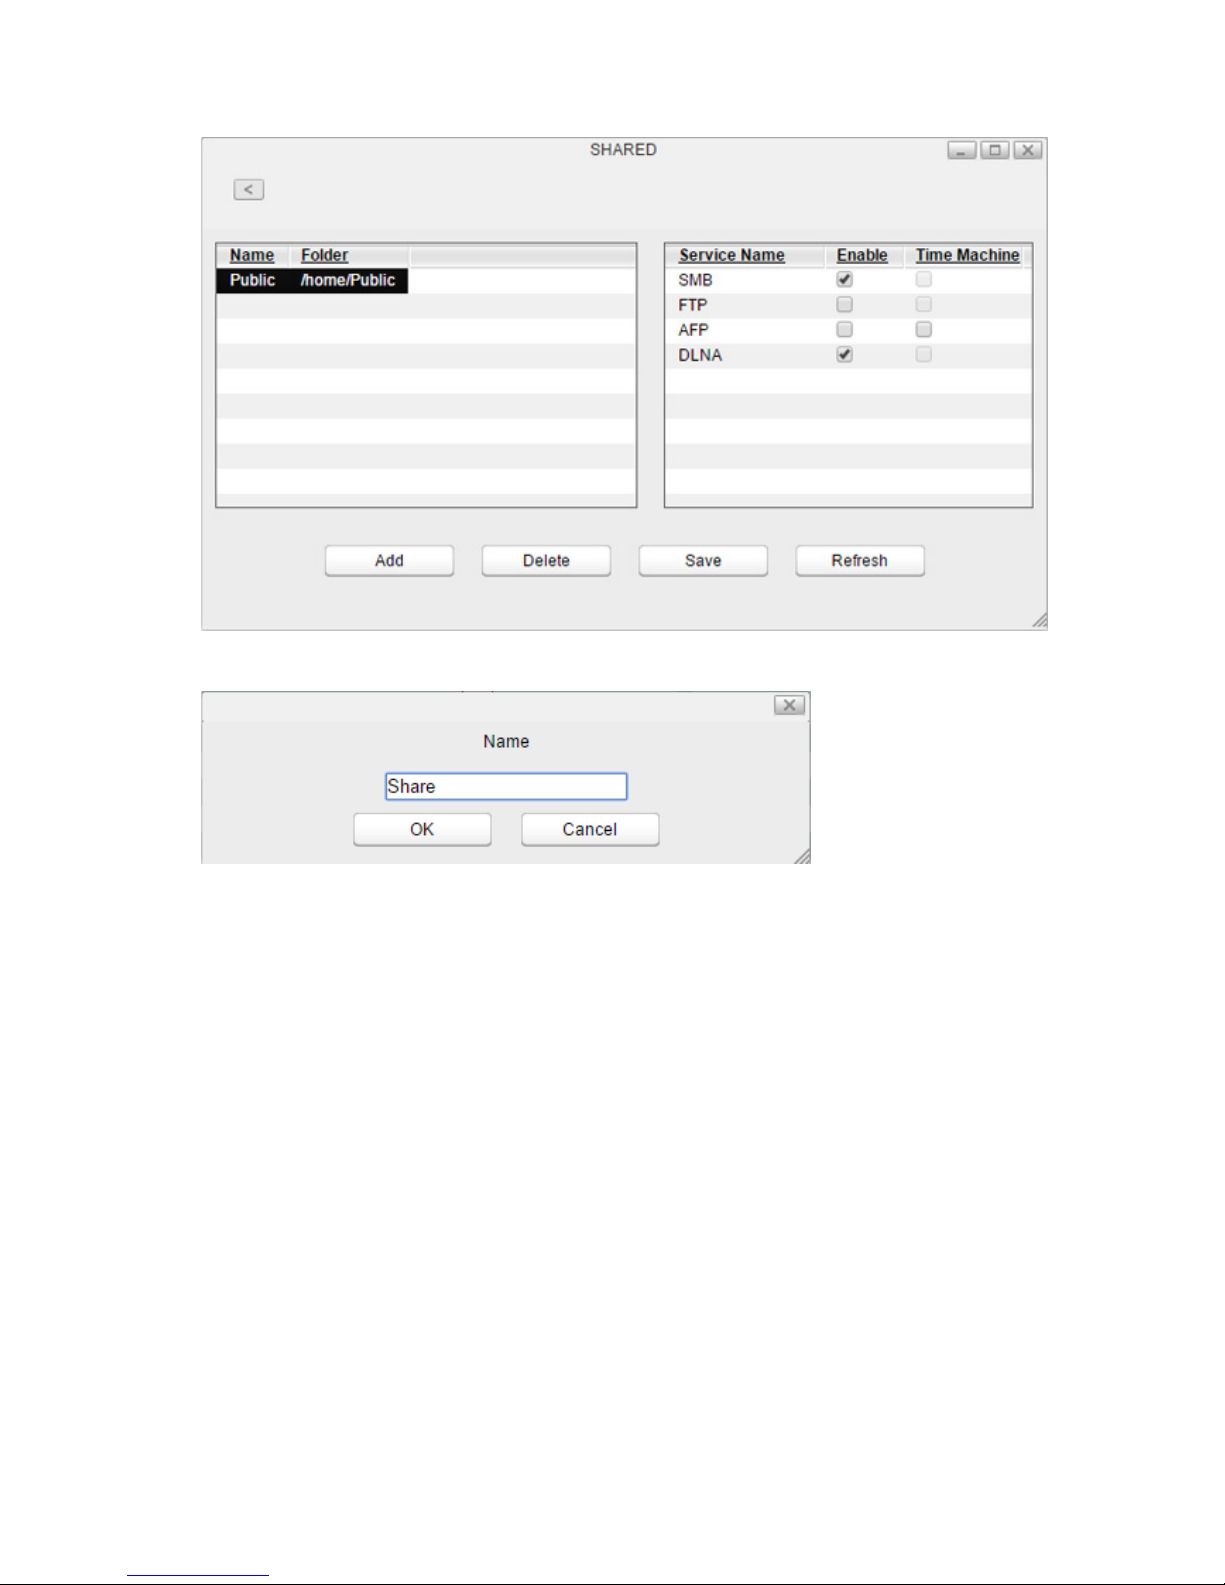
Create or delete shared folders in the LinkStation and enable or disable protocol services.
Adding Shared Folders
1 In Preferences, click SHARED.
Page 59
58
2 Click Add.
3 Enter a folder name and click OK.
Page 60
59
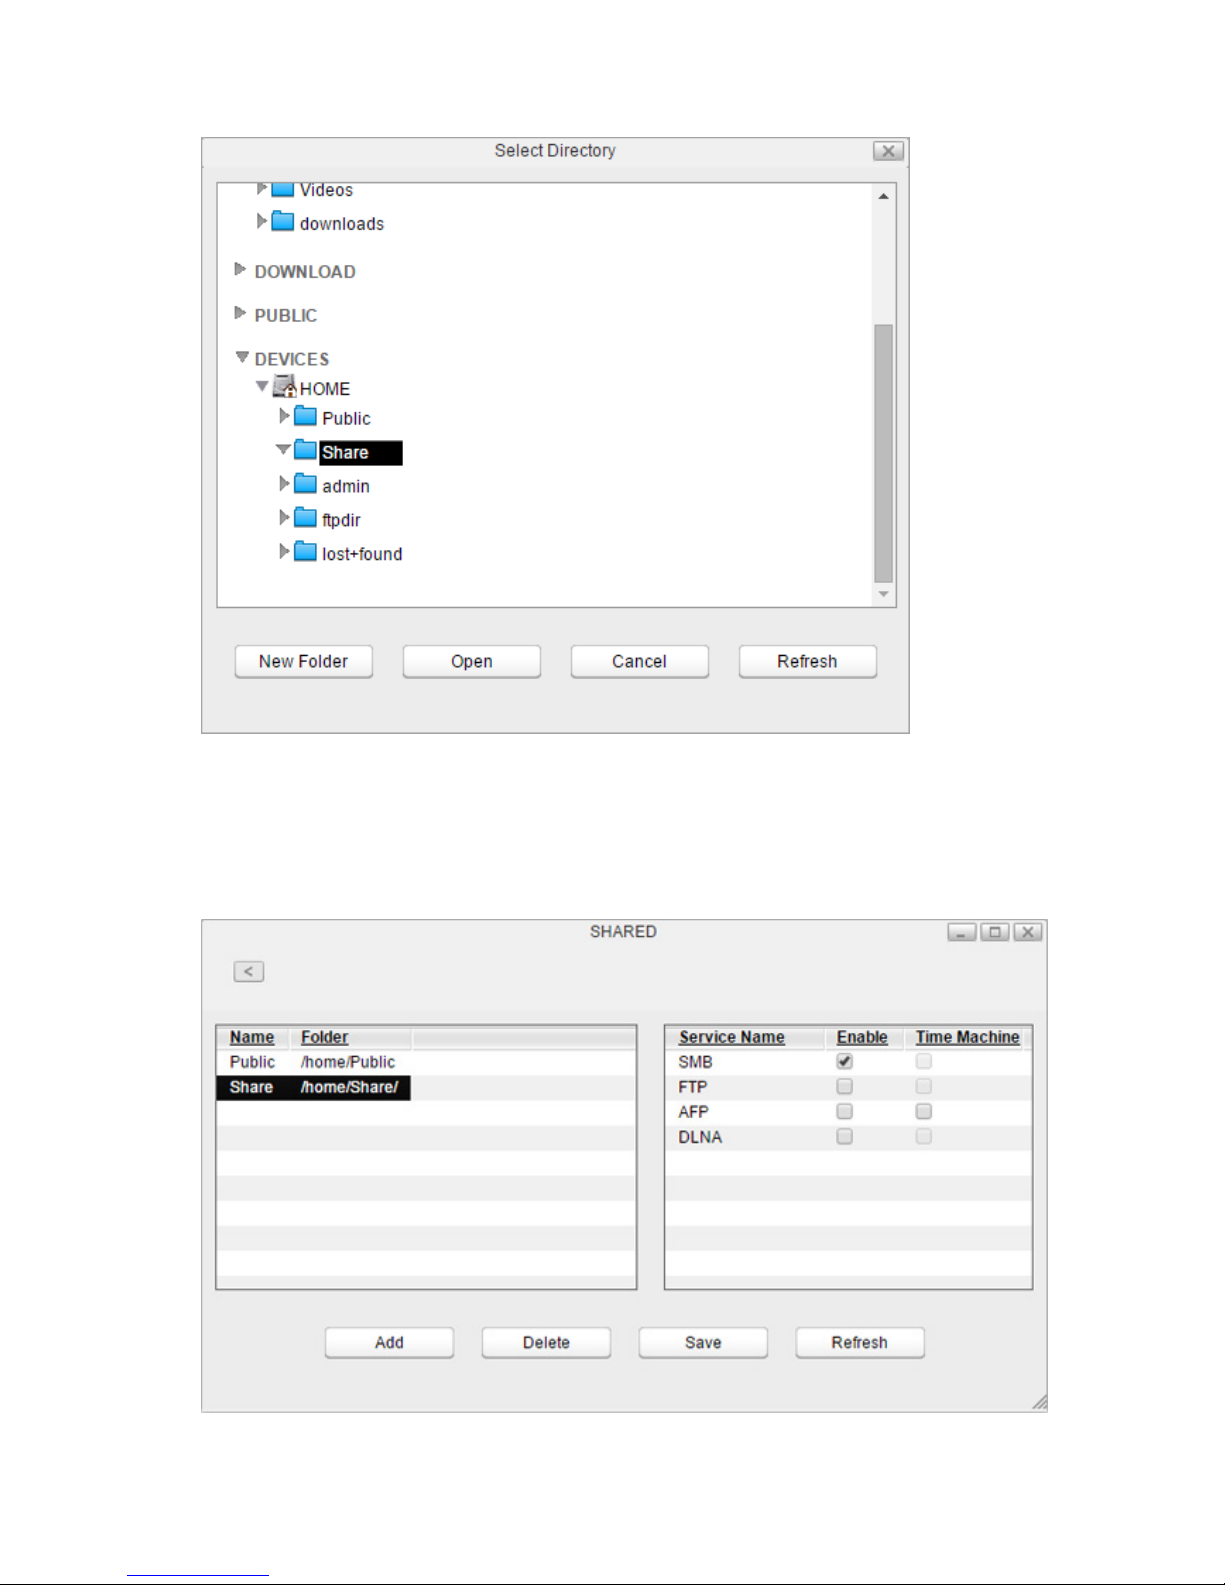
4 Navigate to DEVICES - home and select the shared folder.
If you want to add a new folder to the list, click New Folder, enter a desired folder name, and click OK.
5 Click Open.
6 The shared folder is added to the list. From this screen, you can enable or disable services such as SMB, FTP,
AFP, and DLNA protocols. Check in the checkbox under "Enable". If the file sharing services are not enabled,
they will be enabled automatically.
The folder is now configured as a shared folder.
Page 61
60
Note: Even if you delete the folder name from the list, the folder that exists in the home partition will not be
deleted. Remove it from My LinkStation if the folder is not essential.
Samba
Enable or disable SMB connections for the LinkStation. It is enabled by default.
1 In Preferences, click Samba.
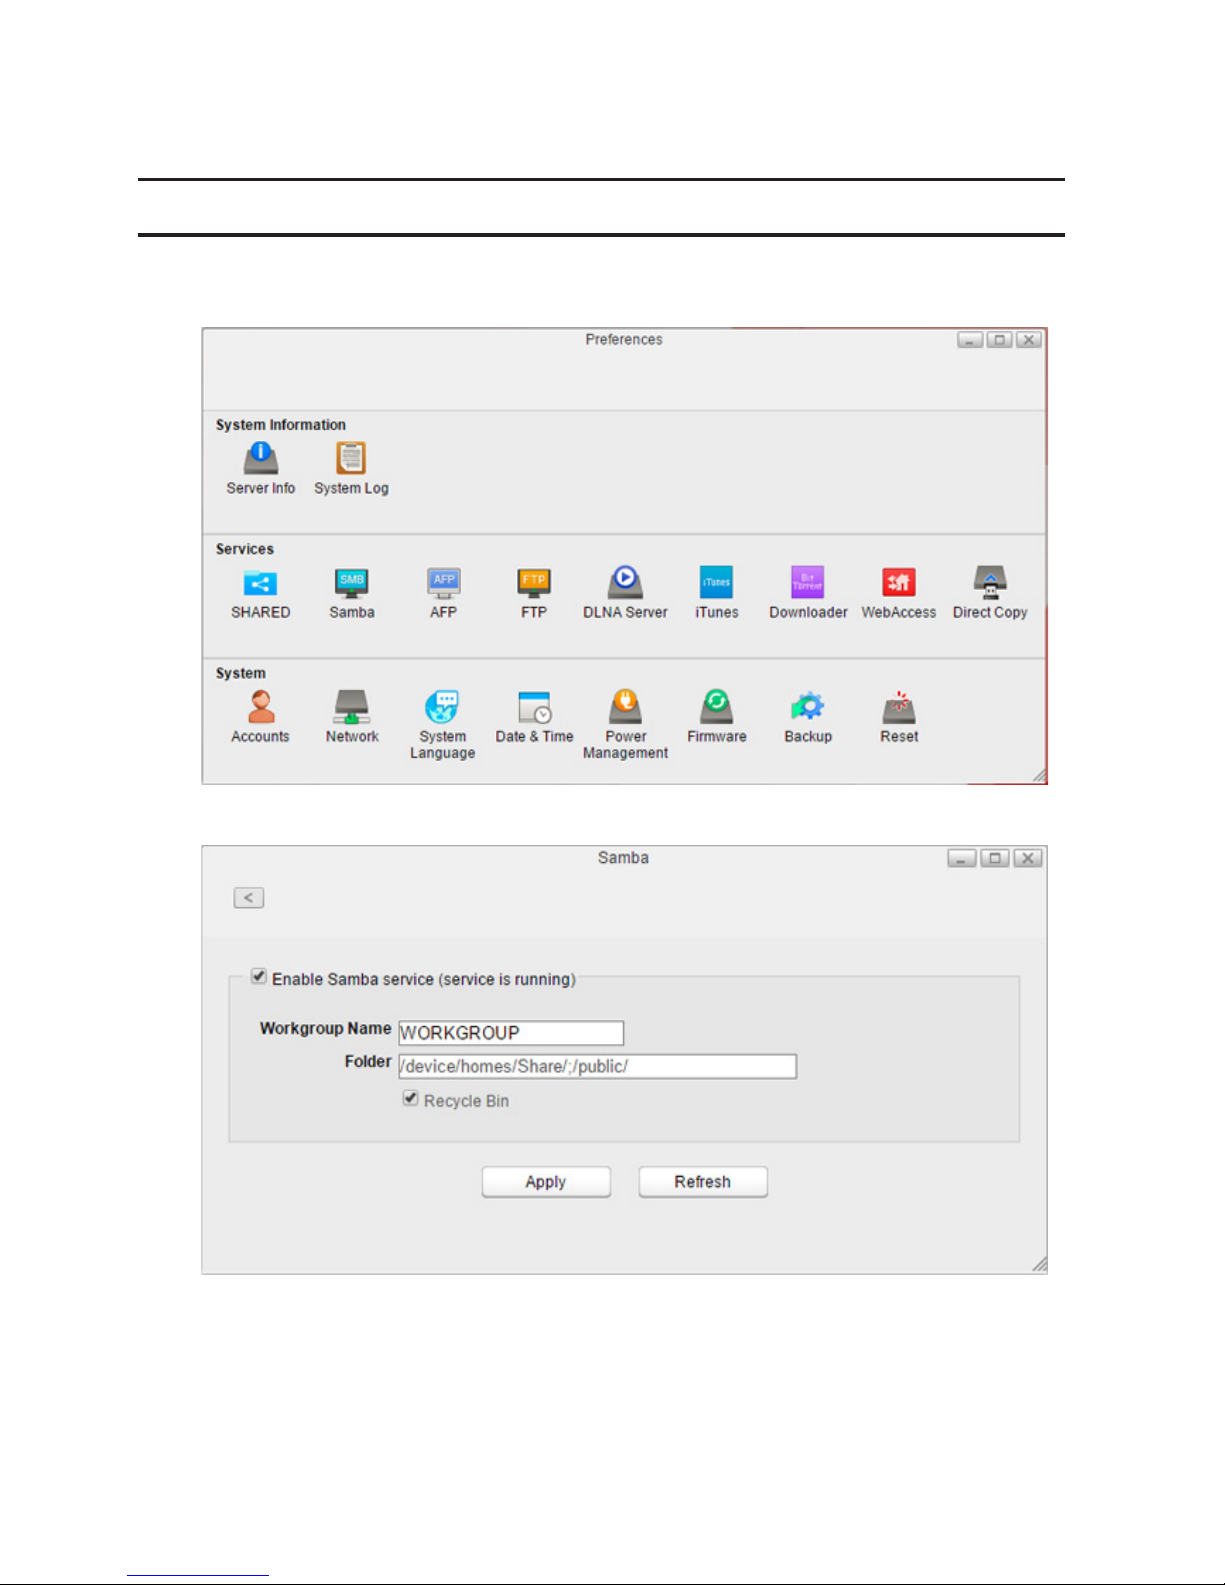
2 Check "Enable Samba service" to enable SMB connections and click Apply.
Even if the file sharing service is enabled, it will not be enabled for the folder automatically. Go to "SHARED" and
enable the service for the folder.
Recycle Bin
To protect your data from accidental deletion, you may configure your LinkStation to use a recycle bin instead of
deleting files immediately. The recycle bin will only work with SMB connections.
Page 62
61
AFP
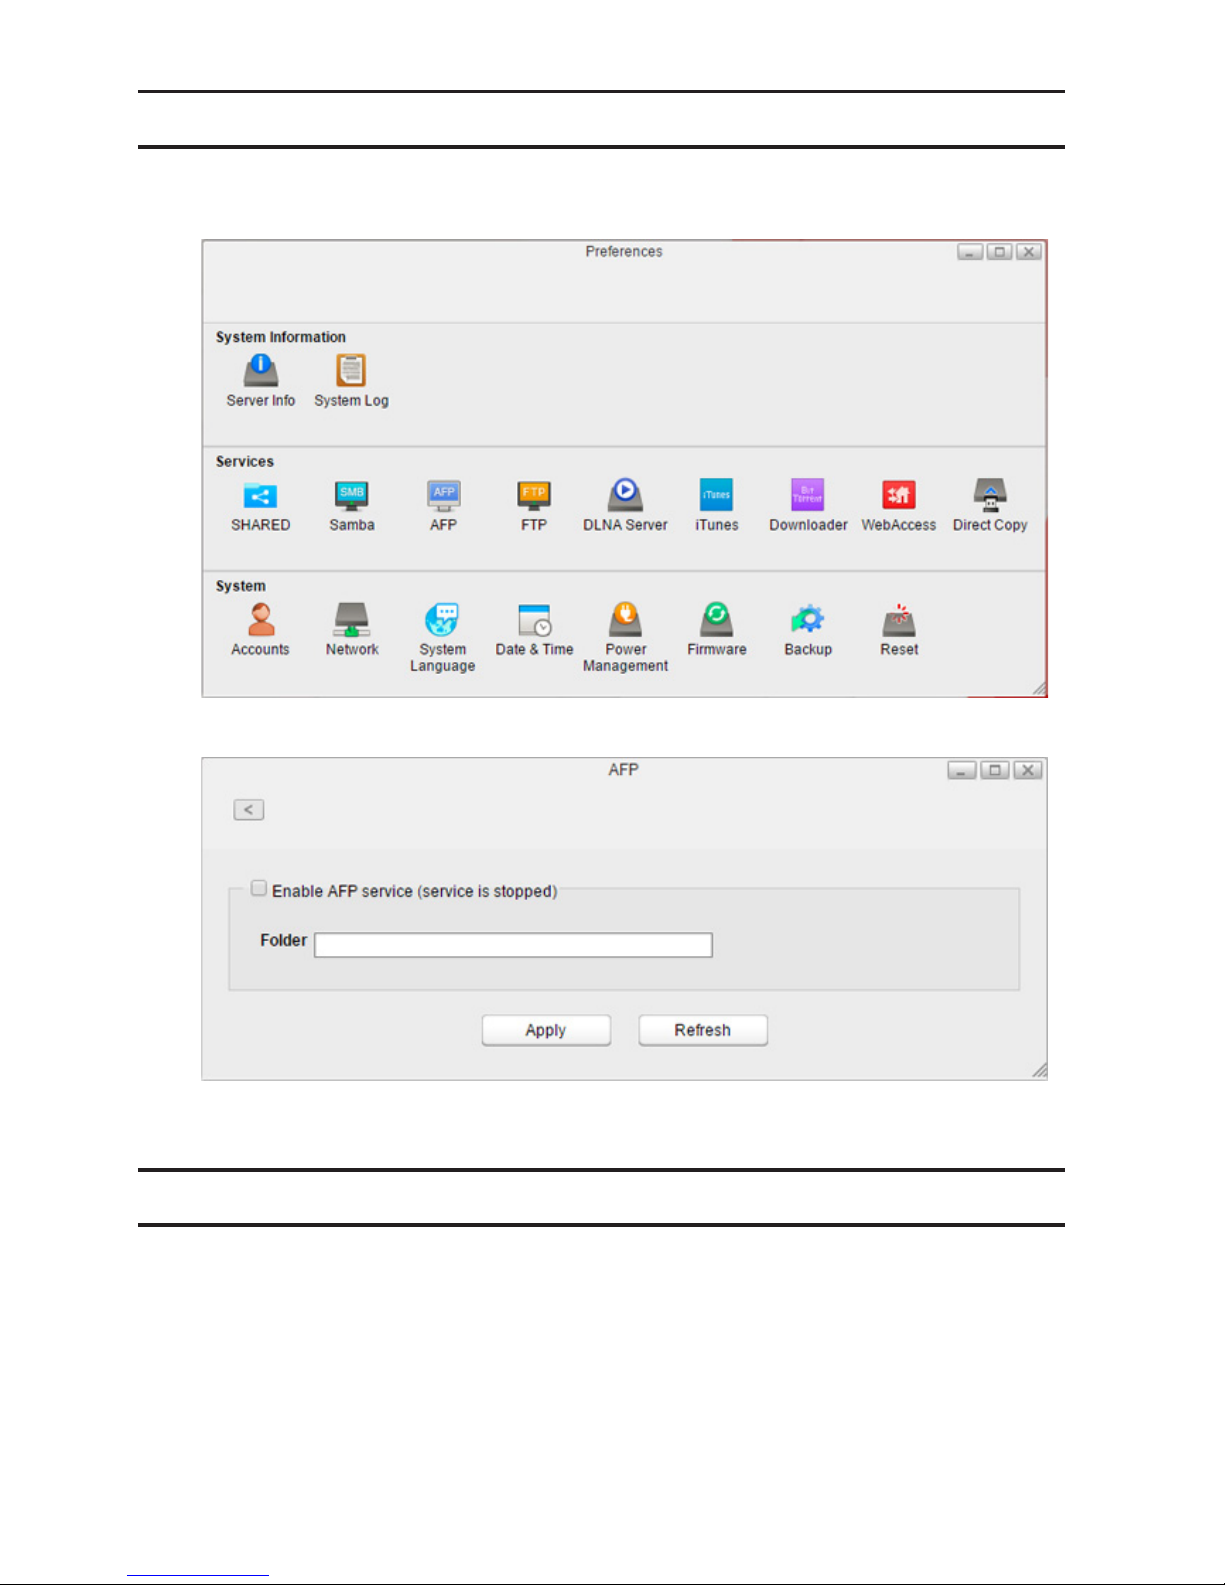
Enable or disable AFP connections for the LinkStation. It is disabled by default.
1 In Preferences, click AFP.
2 Check "Enable AFP service" to enable AFP connections and click Apply.
Even if the file sharing service is enabled, it will not be enabled for the folder automatically. Go to "SHARED" and
enable the service for the folder.
FTP
Enable or disable FTP connection of the LinkStation. It is disabled by default.
Page 63
62
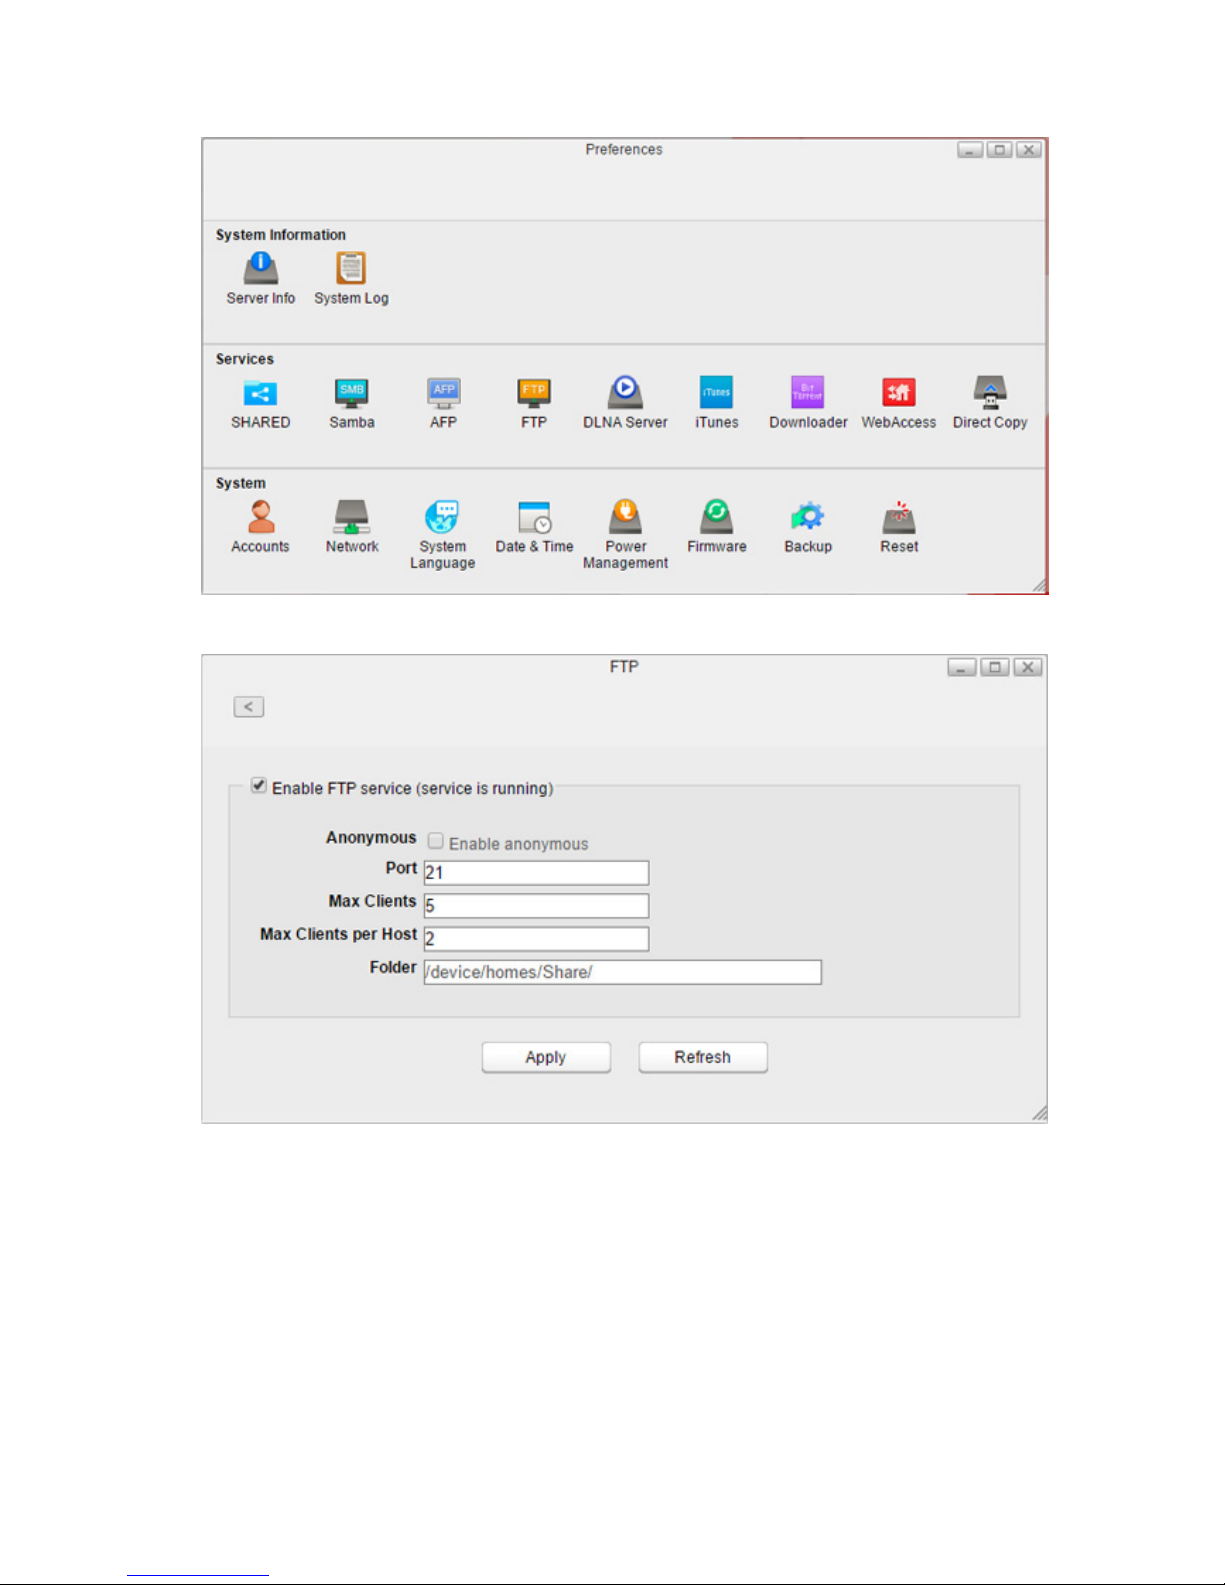
1 In Preferences, click FTP.
2 Check "Enable FTP service" to enable FTP connections.
3 Enter a desired port number and other settings. If you want to allow anonymous access, check "Enable
anonymous".
4 Click Apply.
Even if the file sharing service is enabled, it will not be enabled for the folder automatically. Go to "SHARED" and
enable the service for the folder.
Note: If you access the LinkStation as an anonymous user via FTP, it will be read-only access.
Page 64
63
DLNA Server
Enable or disable DLNA. If enabled, you can view or play files stored in the LinkStation from the DLNA-compatible
devices. It is enabled by default.
DLNA is a set of guidelines for sharing digital media. The LinkStation includes a DLNA server compliant with DLNA
guidelines. Movies, photos, and music saved on the LinkStation can be played on DLNA-compatible TVs, stereo
equipment, game consoles, and other devices on the local network.
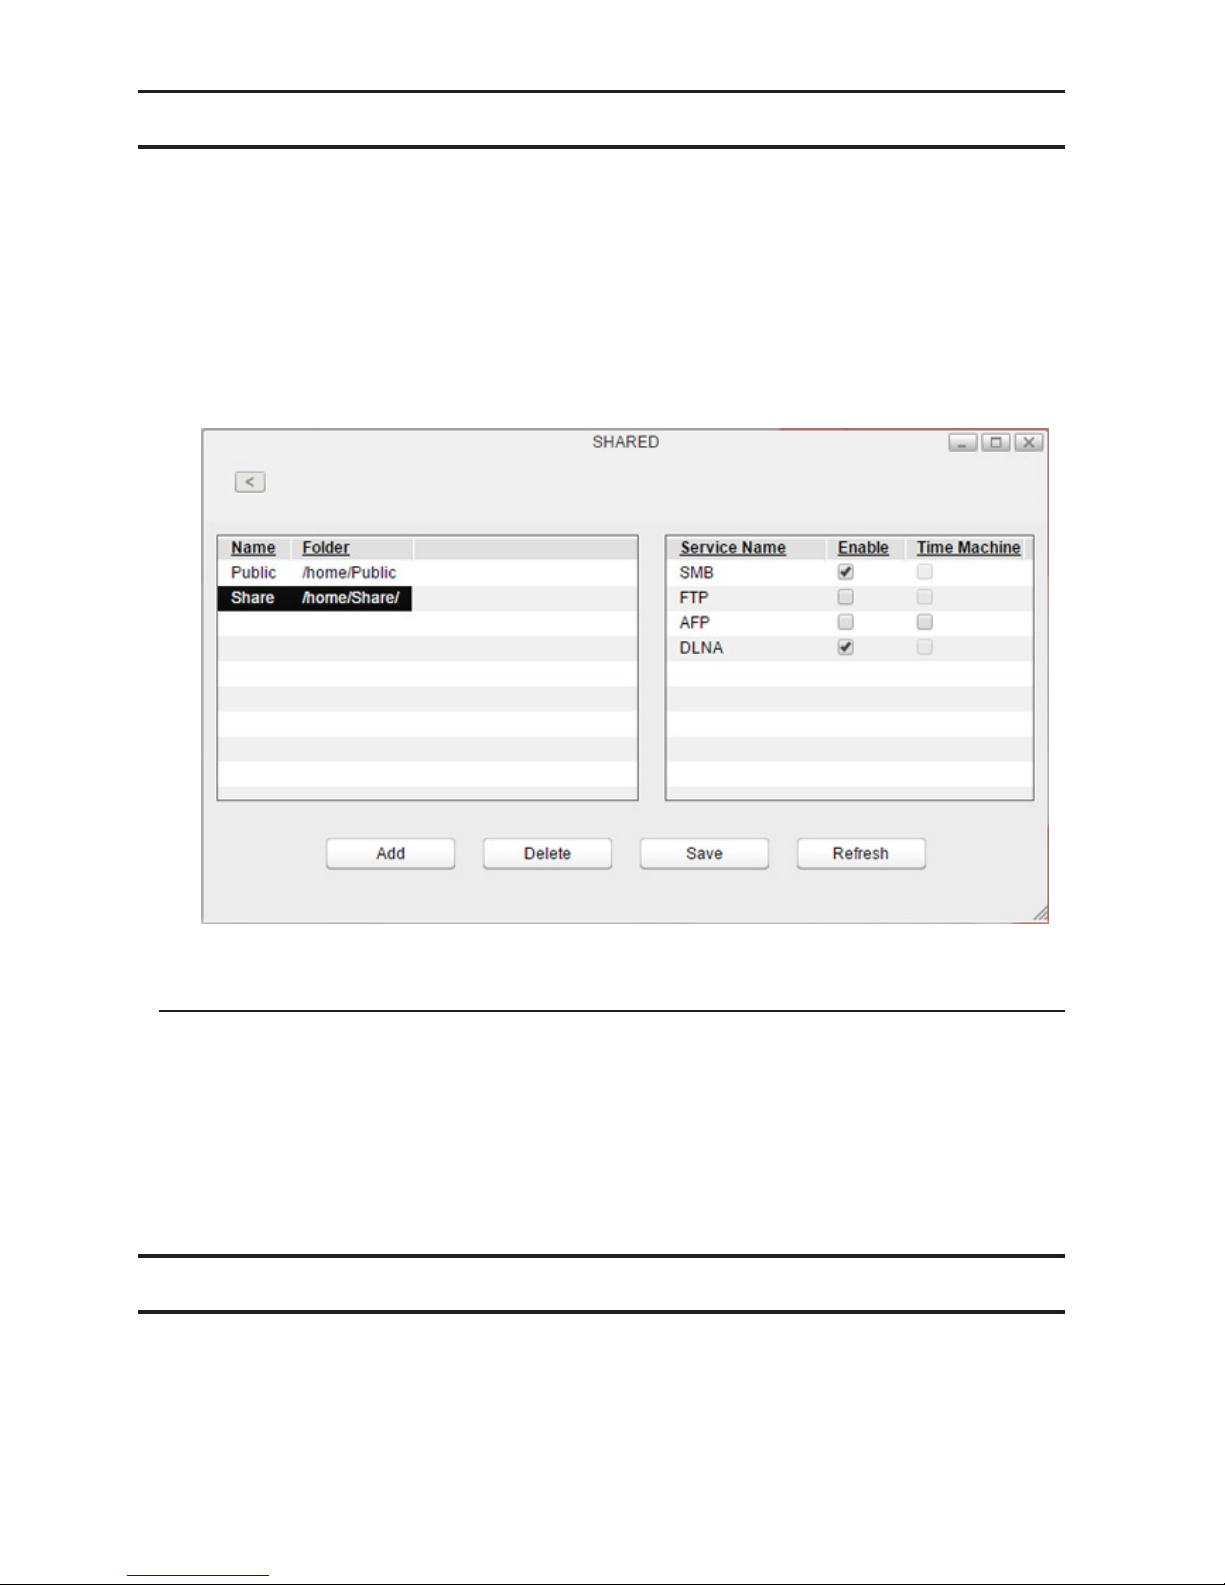
1 In Preferences, click SHARED and select a shared folder for the DLNA server.
2 Make sure that "DLNA" is enabled for the folder. If not, check the checkbox under "Enable" next to "DLNA", then
click Save.
If DLNA service is not enabled, it will be enabled automatically when enabling the service for shared folder.
Playing Files on the DLNA Client Device
To play back content from a DLNA-compatible device:
1 Connect the DLNA-compatible device to the same network as the LinkStation and turn it on.
2 Select the LinkStation in the software of the DLNA-compatible device.
3 Select the content to be played back.
Note: For more information on playing files, see the DLNA-compatible devices' manuals.
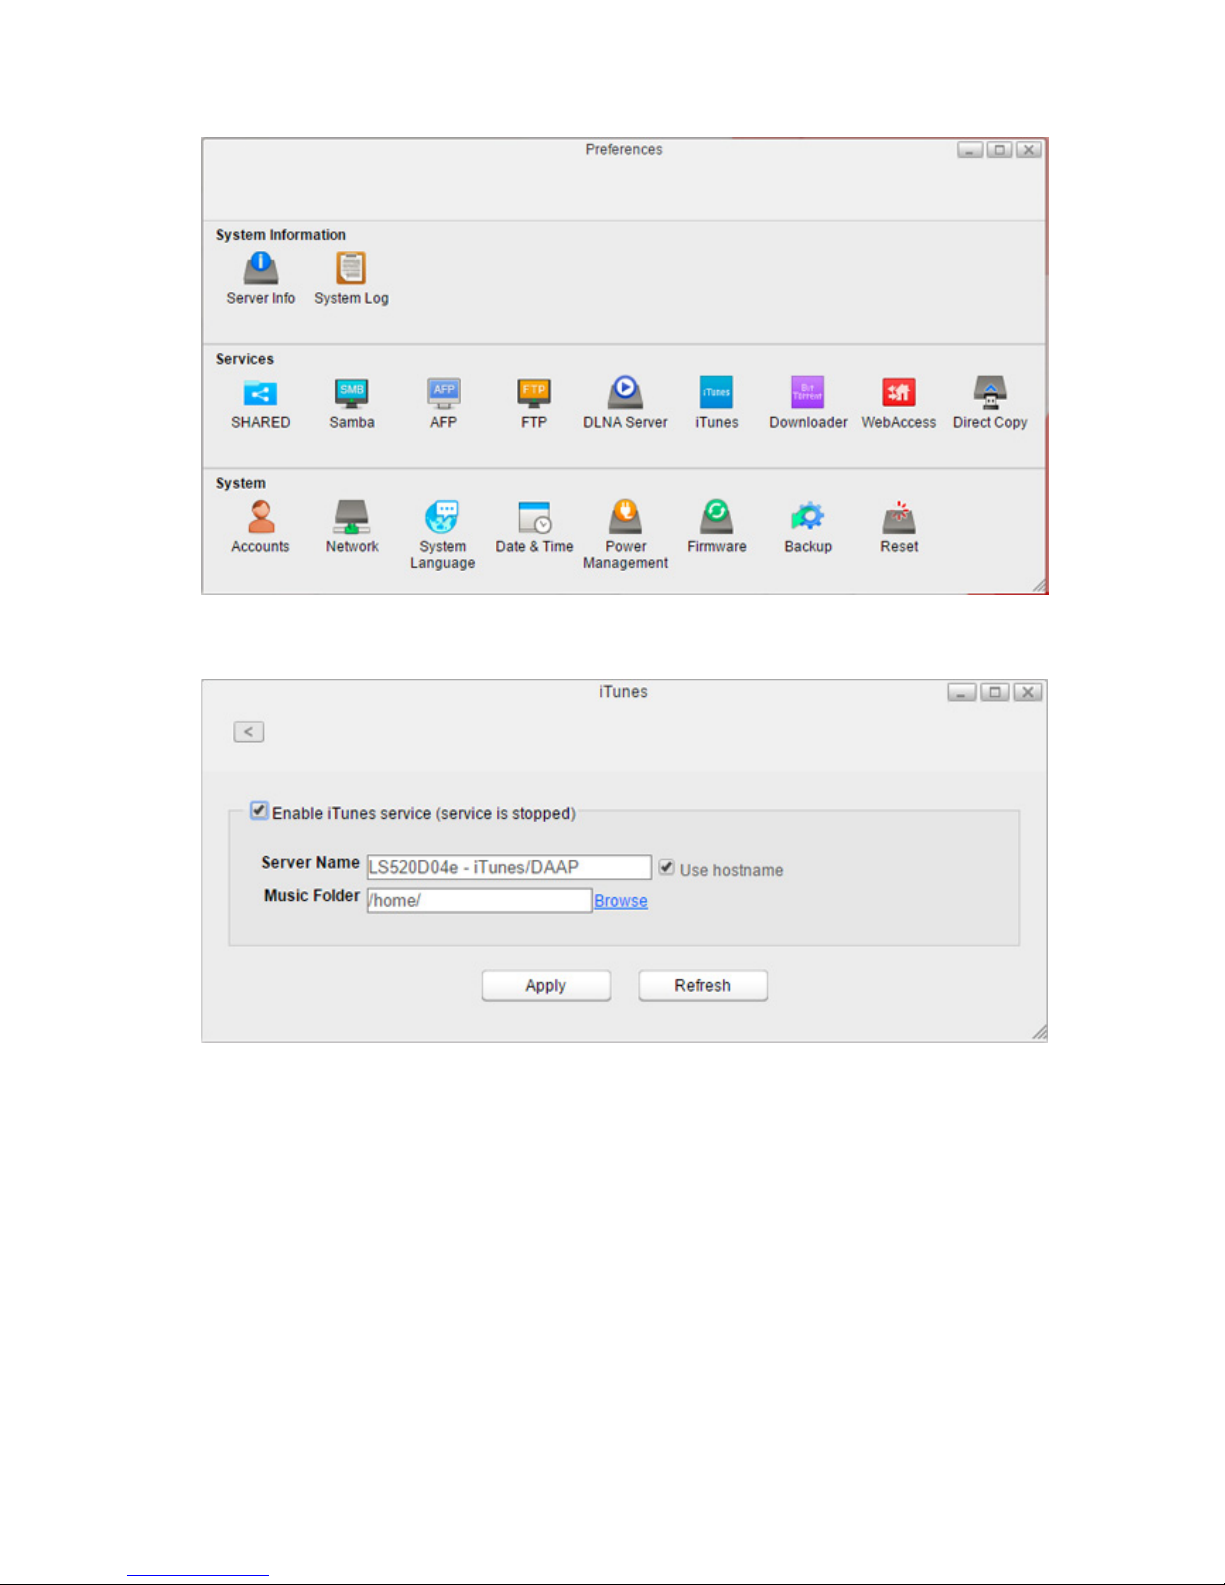
iTunes
Enable or disable the iTunes server, change the server name, and select the folder for sharing. It is disabled by
default. If the iTunes server is enabled, computers on your network with iTunes can play music files stored on the
LinkStation and transfer them to your iOS devices.
Page 65
64
1 In Preferences, click iTunes.
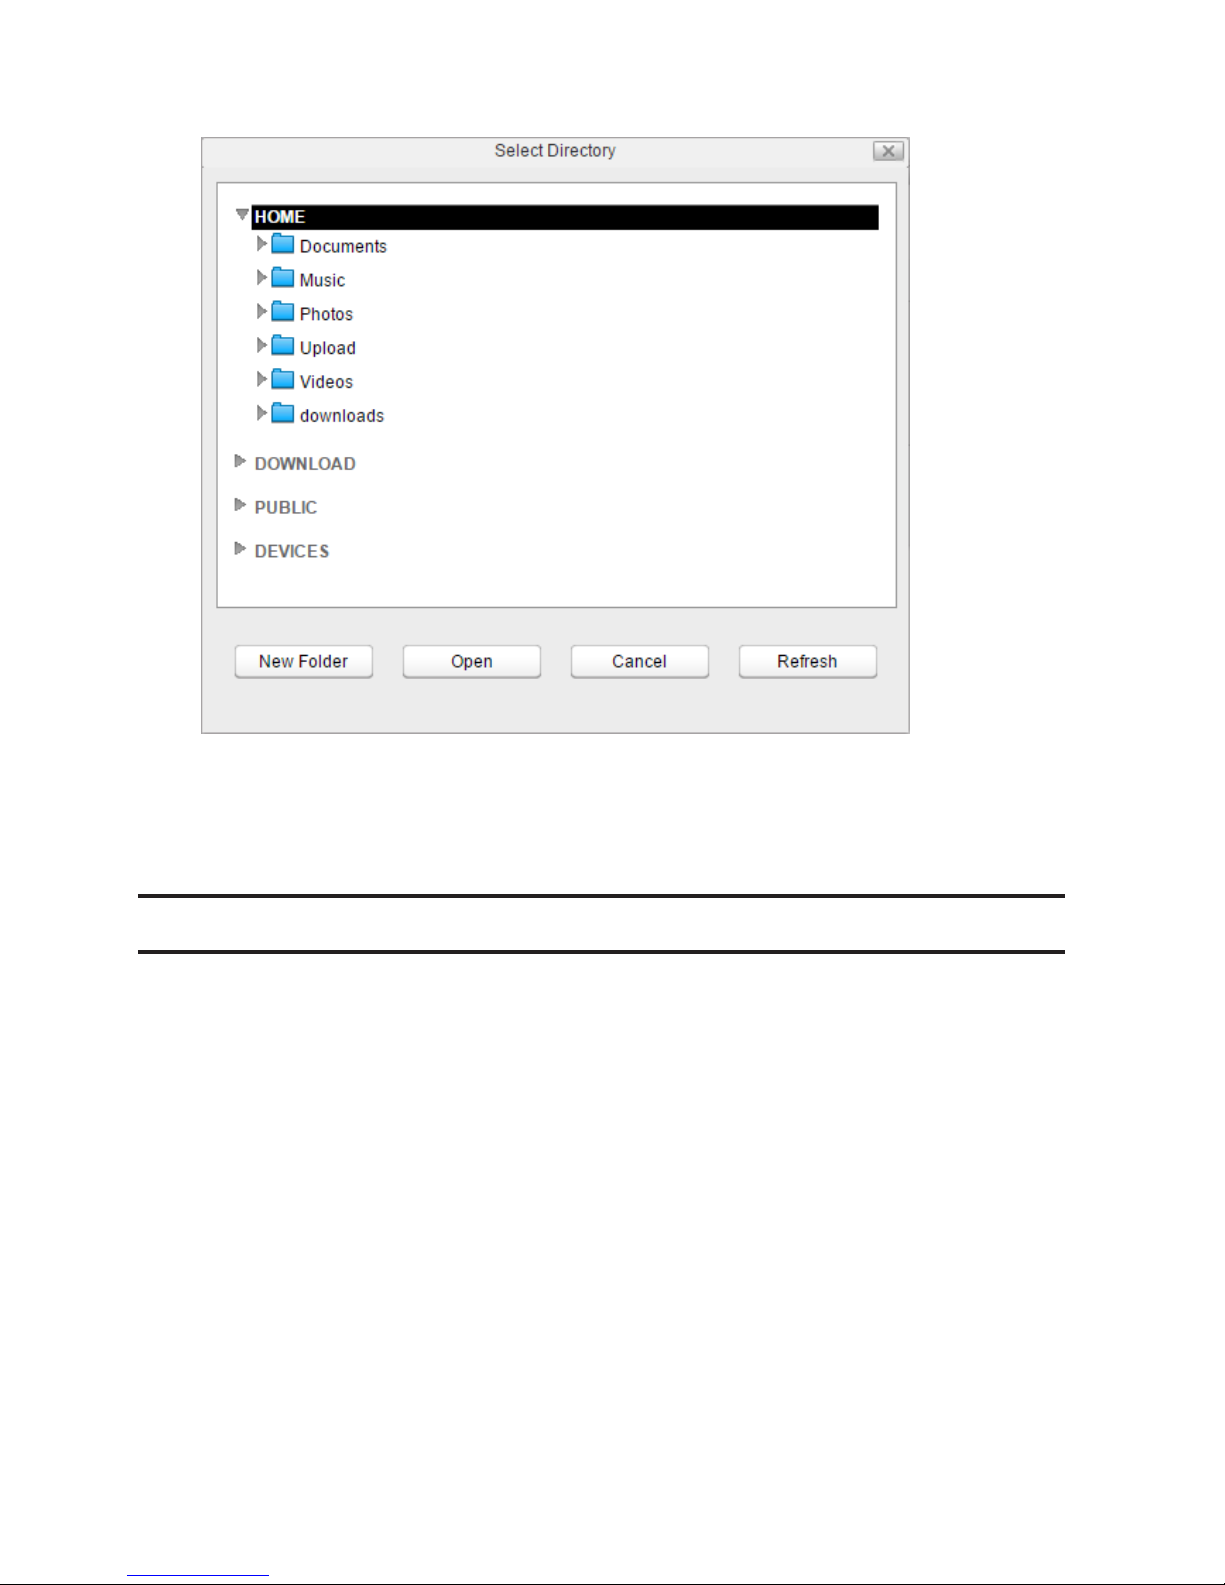
2 Check "Enable iTunes service" to enable the iTunes server and enter a desired server name. If you prefer to use
the LinkStation name as the server name, check "Use hostname".
Page 66
65
3 Click Browse and select the folder to use for iTunes, then click Open.
4 Click Apply.
Note: When you access the iTunes server from a computer or iOS device right after enabling the service on the
LinkStation, the file list may not be displayed properly. In such a case, disconnect and reconnect the LinkStation
to the computer or iOS device. The file list should be updated.
Downloader
Enable or disable BitTorrent. It is disabled by default.
BitTorrent is a protocol for distributing large amounts of data efficiently. The information in this section is for users
who are familiar with BitTorrent.
Page 67
66
Enabling Downloader Service
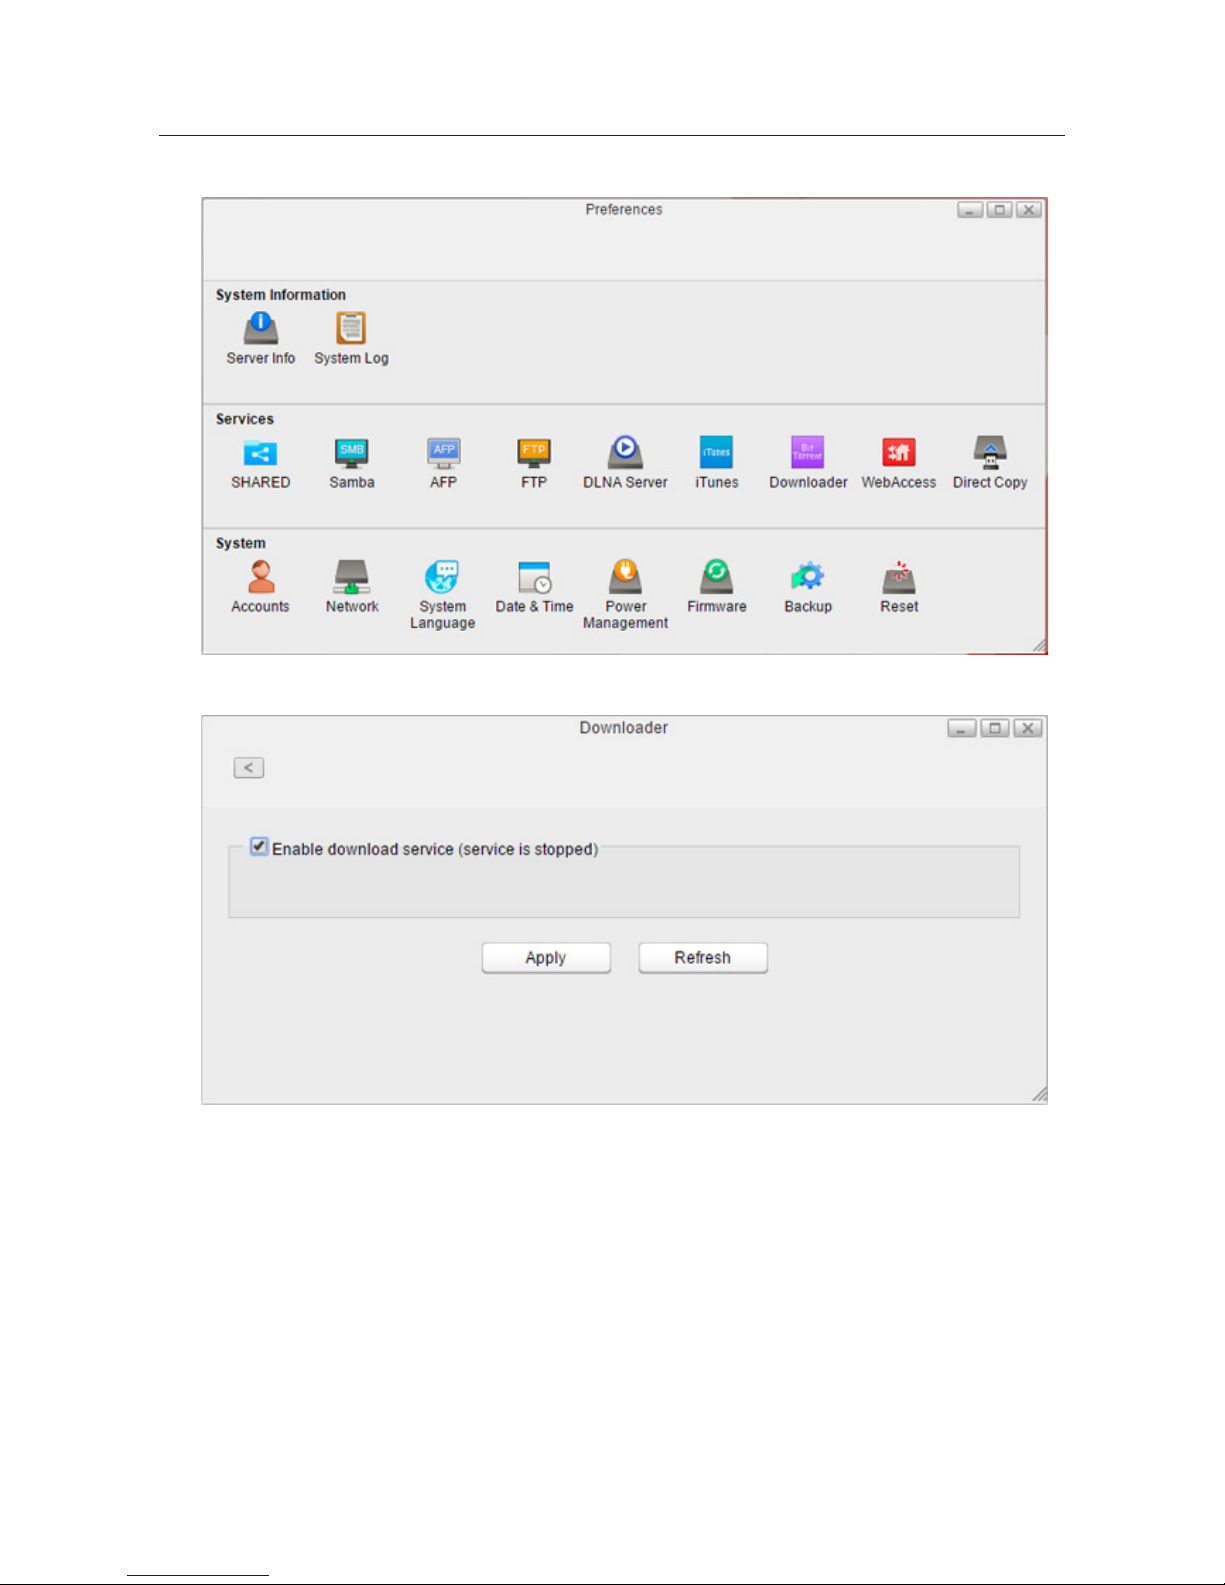
1 In Preferences, click Downloader.
2 Click "Enable download service" to enable BitTorrent and click Apply.
Page 68
67
Opening the Download Manager
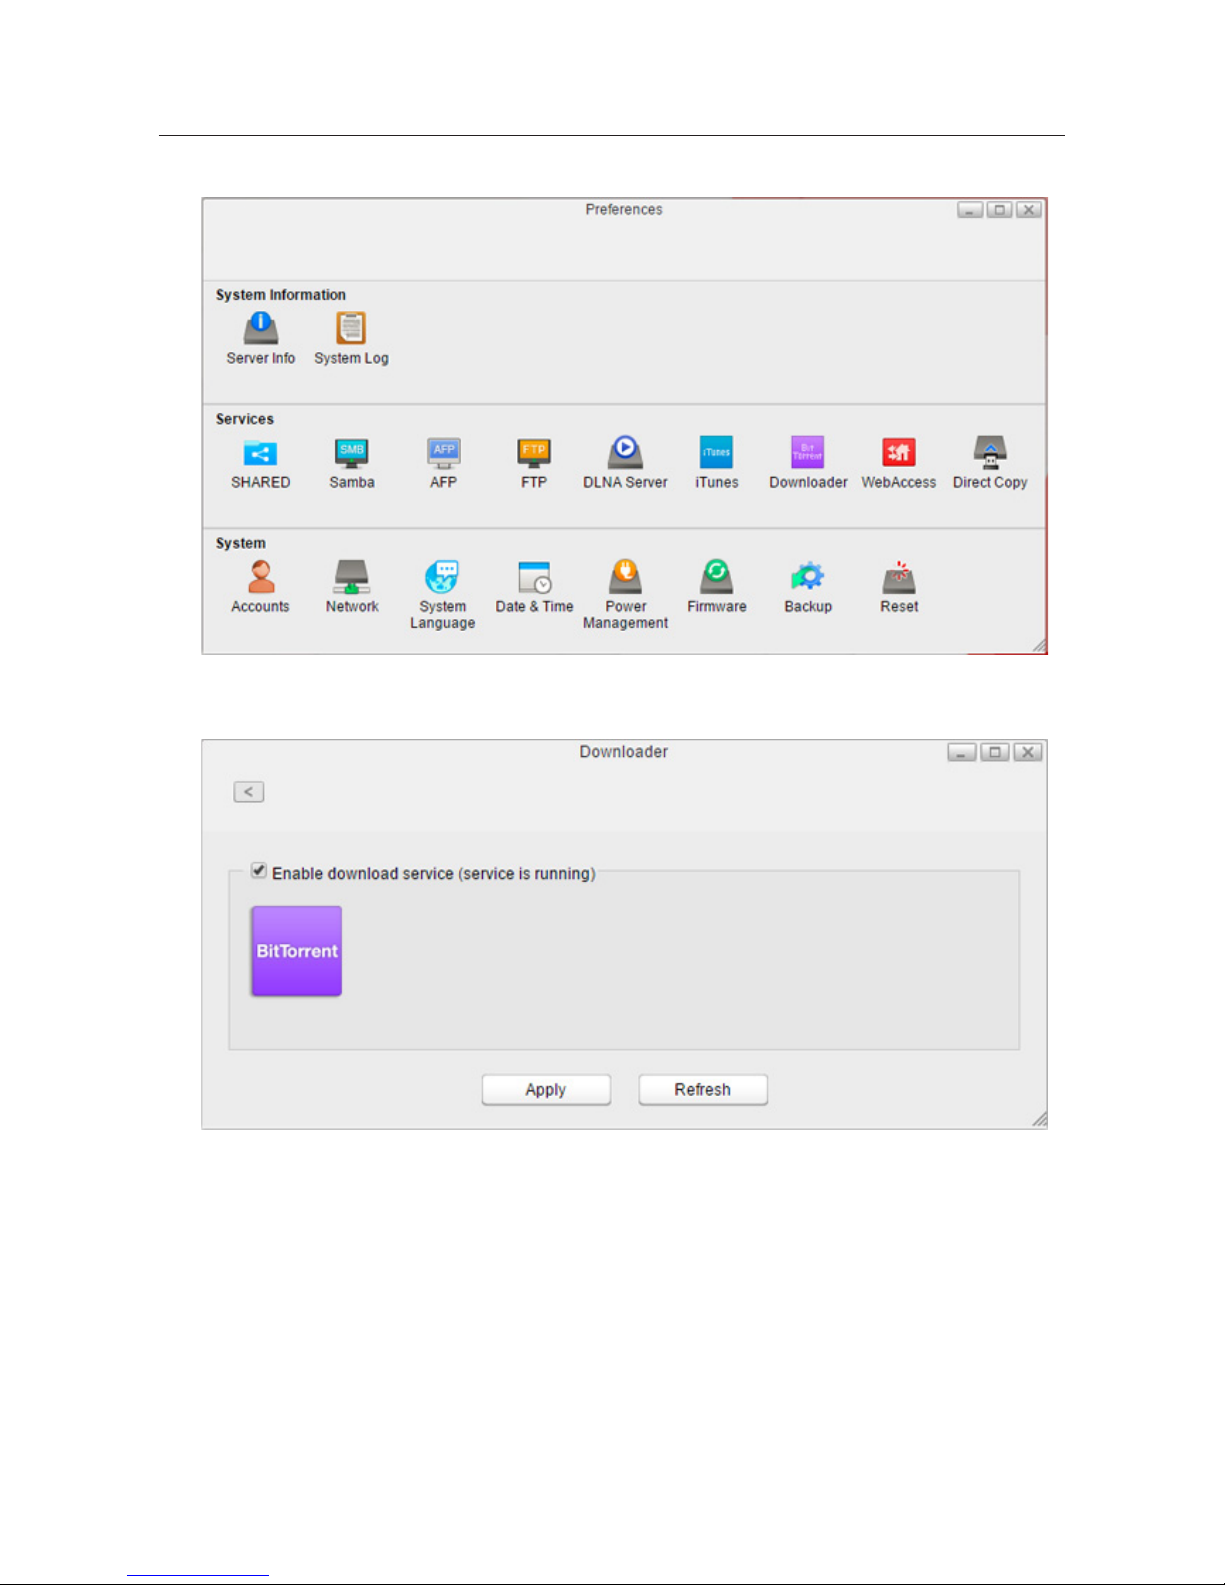
1 In Preferences, click Downloader.
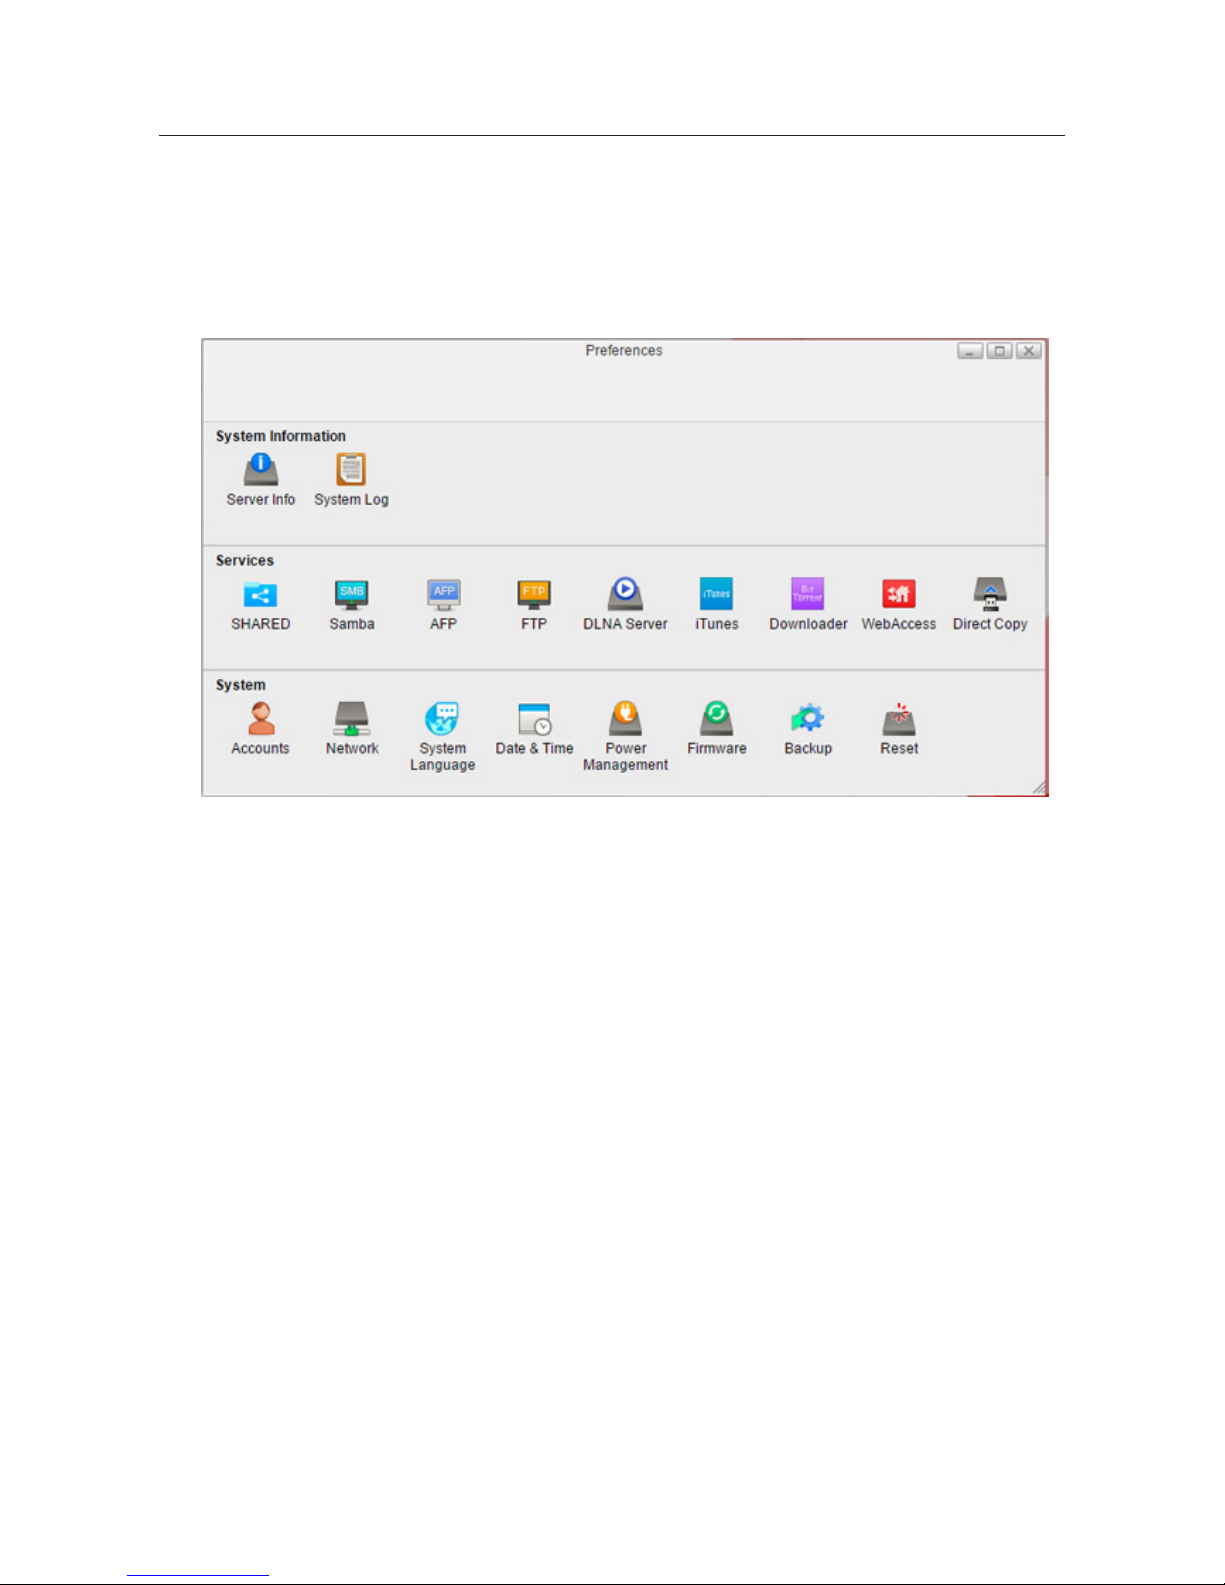
2 Click the icon displayed in the window. If no icon is displayed like the screen below, you should enable it by
following the steps in the "Enabling Downloader Service" section.
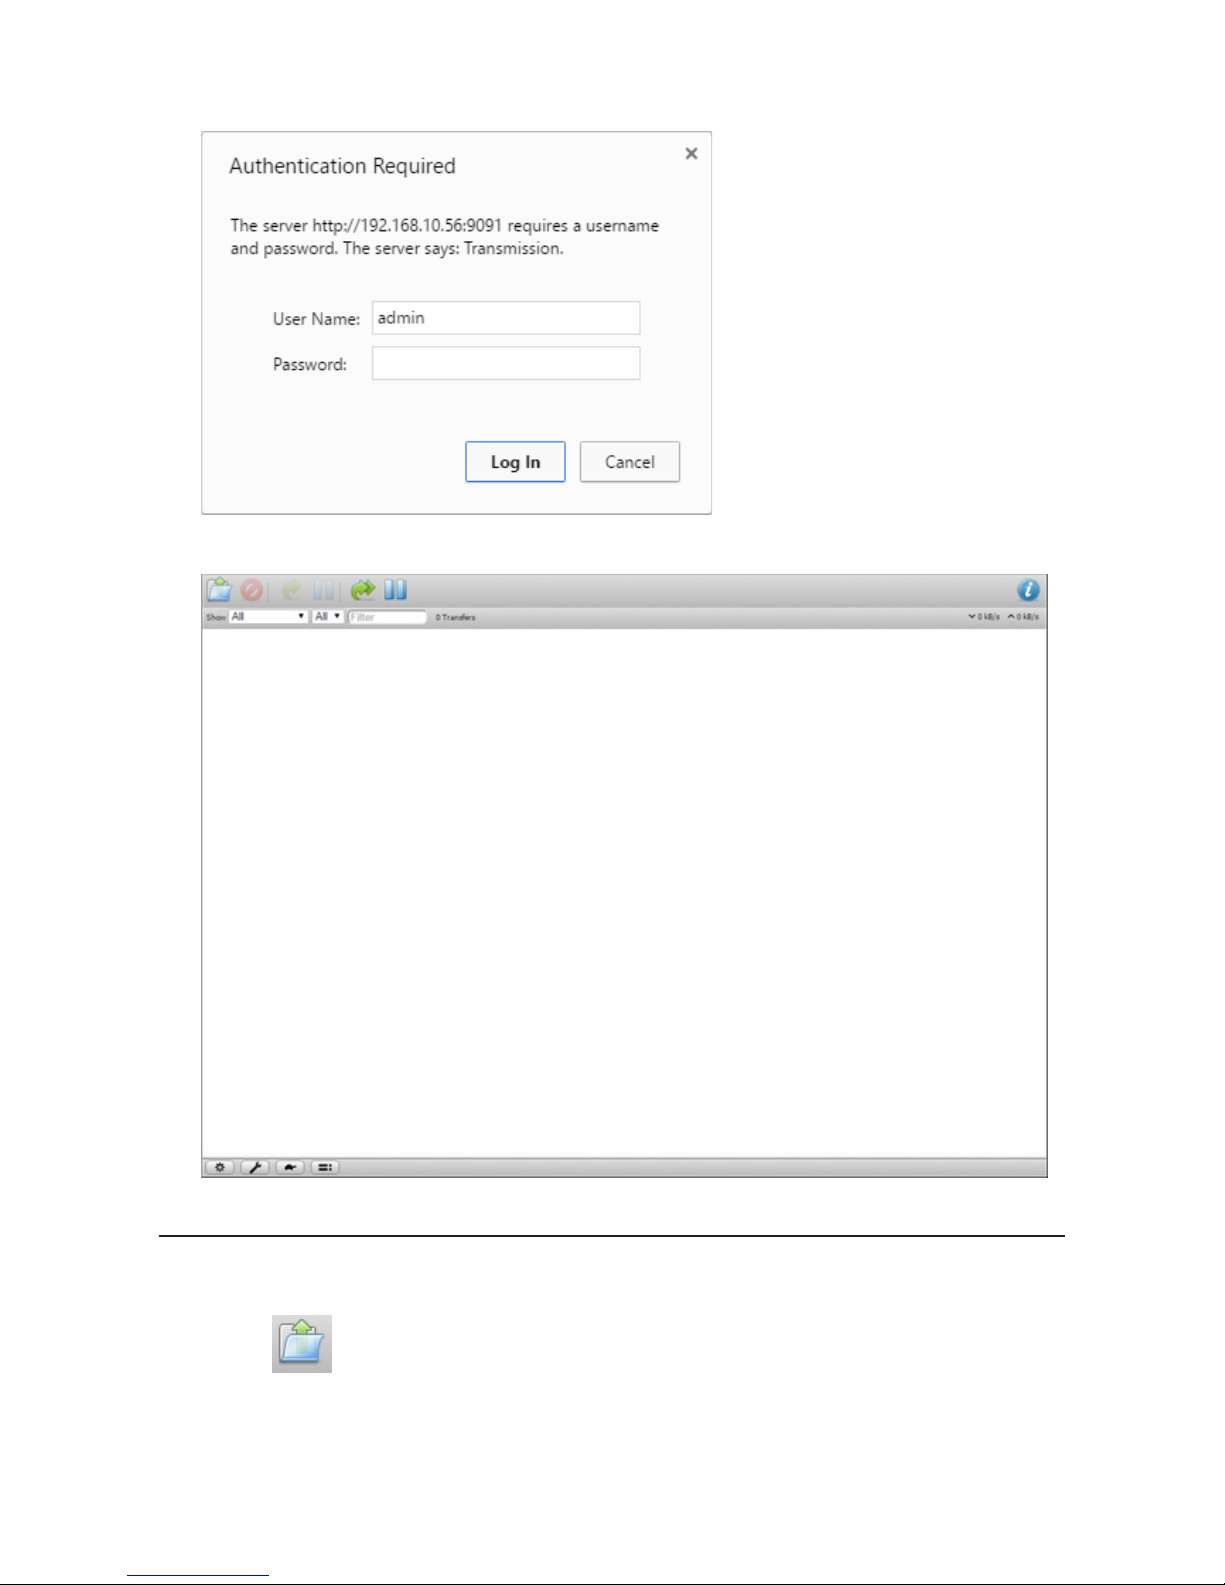
3 Enter a username and password, then click Log In.
Page 69
68
The username is "admin" and the password is blank (no password).
4 The download manager will open.
Downloading Files
1 Open the download manager.
2 Click the icon.
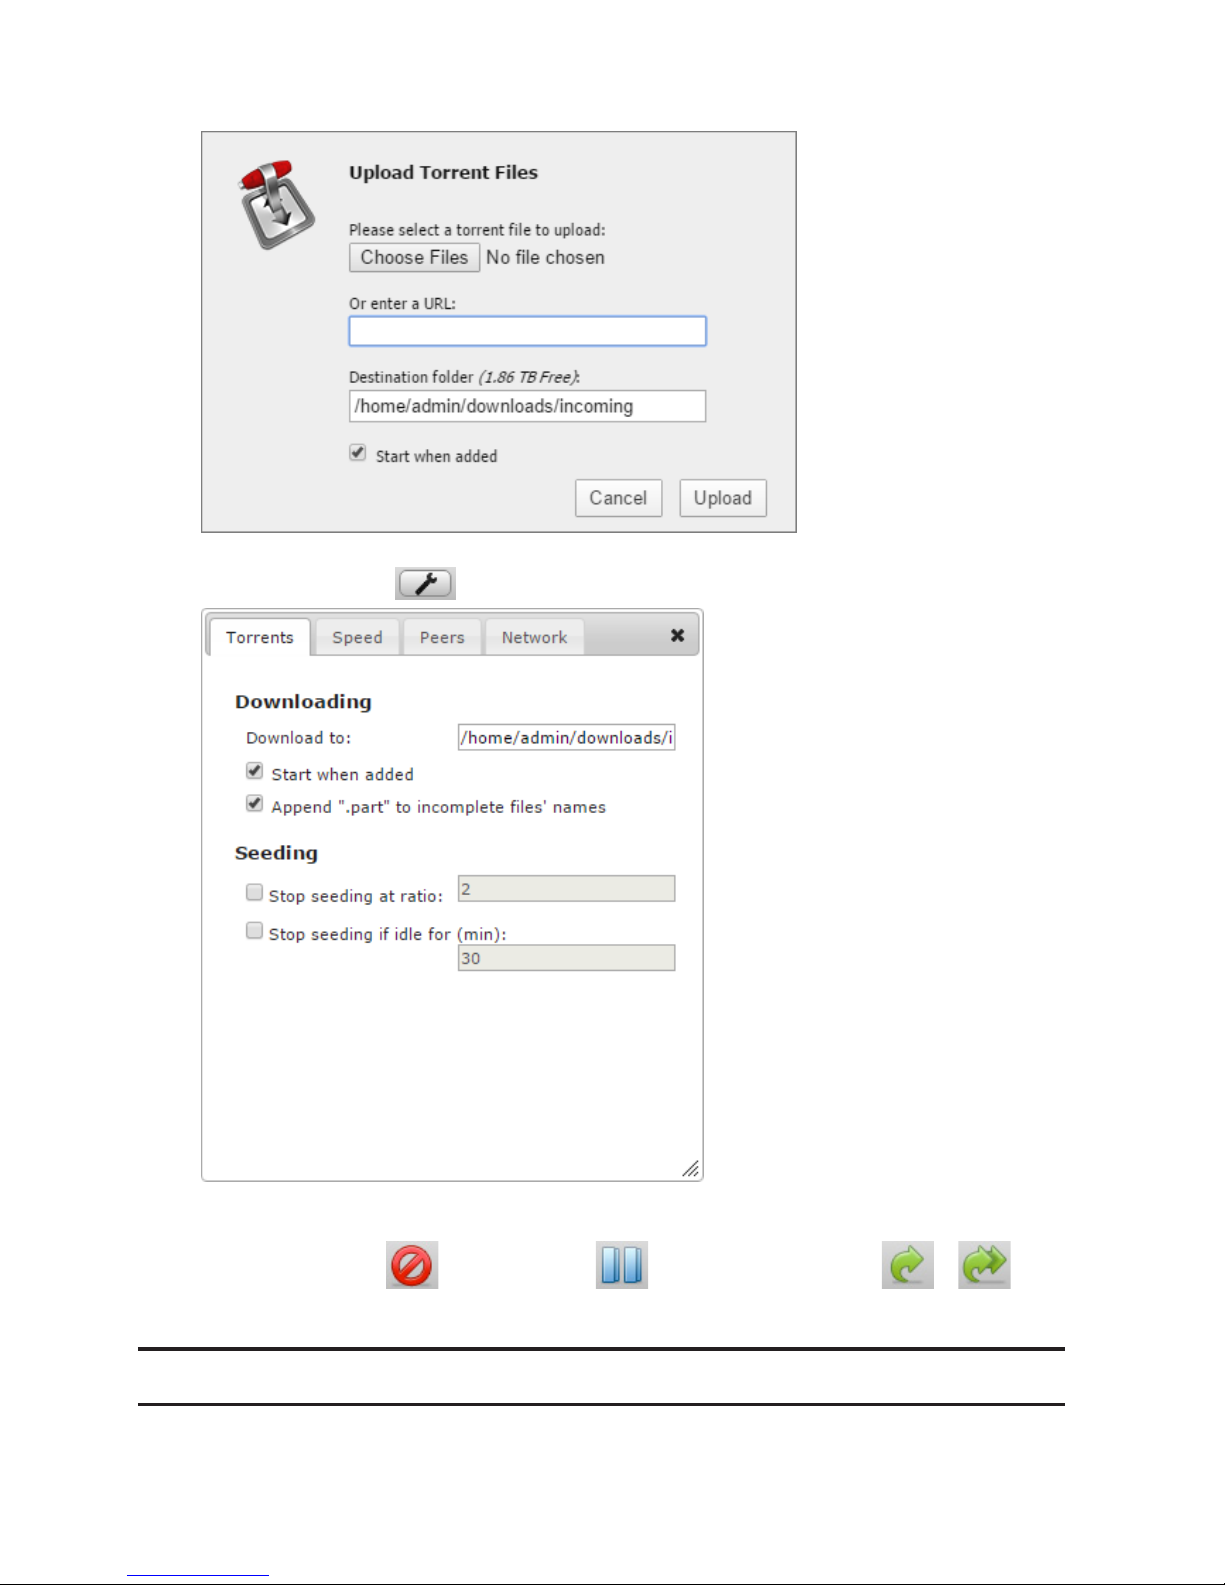
3 Select a file to upload or enter the URL into the "Or enter a URL:" field, specify the location to save the
downloaded file, then click Upload.
Page 70
69
Check "Start when added" to start downloading immediately after clicking Upload.
Note: By default, the downloaded file will be saved in the "incoming" folder in the personal folder. To change the
download folder, click the icon at the left bottom corner and change the directory at "Download to:".
4 The download will start.
To cancel downloading, click , then Remove. Click to pause the download. Click or to
resume.
WebAccess
WebAccess is a program that allows you to remotely access files in your LinkStation's shared folder from your
computer or mobile device through the Internet.
Page 71
70
Configuring WebAccess
By using remote access options that are allowed in the WebAccess screen, you can configure WebAccess settings
using a simpler process.
If you are using LinkStation version 1.10 or earlier, your admin password may not be changed from the
default value. However, WebAccess is always enabled so files on the LinkStation are also published. We highly
recommend changing the password from "password", the default value, to increase security.
1 In Preferences, click WebAccess.
Page 72
71
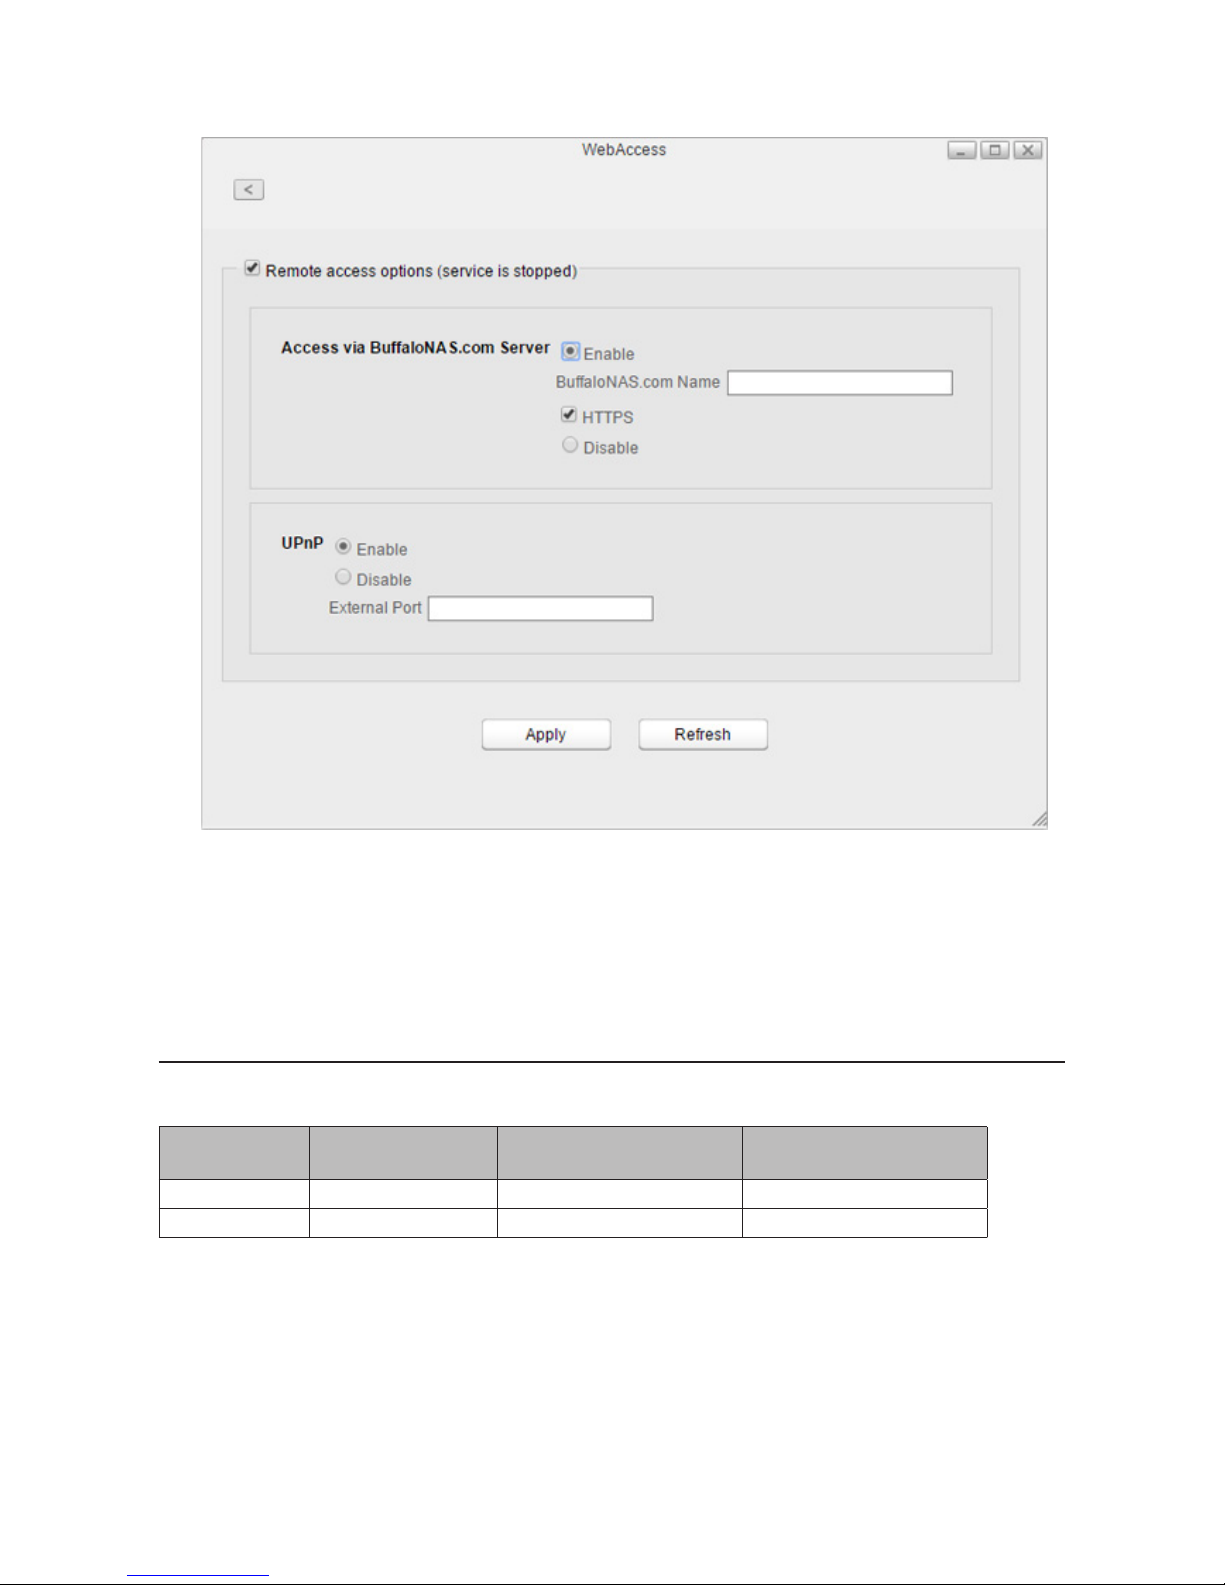
2 Check "Remote access options" to easily configure WebAccess settings.
3 Configure the desired settings, then click Apply.
• You may use the default BuffaloNAS.com registration, or select "Disable" to use a different DNS server.
• Choose a "BuffaloNAS.com Name" for your WebAccess account. Names may contain 3 to 20 alphanumeric
characters, underscores (_), and hyphens (-).
• If your router supports UPnP, enable "UPnP". If UPnP is not supported, disable that setting and enter the
router's external port number into the "External Port" field.
Accessing Remotely
Once settings are configured, you are now ready for remote access from outside the local network. Access attributes
for the shared folders on the LinkStation are as below:
Available User Username Folder
Folder Created in "My
LinkStation"
*
Shared Folder Configured in
"SHARED"
*
admin R/W R/W Registered user R/W
**
- -
R/W: Read and write, -: No access
* For example, if you configure the folder as "share" in SHARED, it will not be accessible via WebAccess, but can be
accessed via the configured file sharing protocols such as SMB, FTP, or AFP.
** Registered users are only able to access folders with their usernames. Other users' folders cannot be accessed.
There are many ways to access WebAccess folders depending on your device.
Page 73
72
• From a computer, go to BuffaloNAS.com site, then log in with your WebAccess account. Or, access Settings
remotely using the URL, http://buffalonas.com/ + your BuffaloNAS.com name. From My LinkStation, you can
access the files on the LinkStation.
• To access from an iOS device, install the "WebAccess i" application from the App Store.
For more instructions: http://buffalonas.com/manual/i/en/
• To access from an Android device, install the "WebAccess A" application from the Google Play.
For more instructions: http://buffalonas.com/manual/a/en/
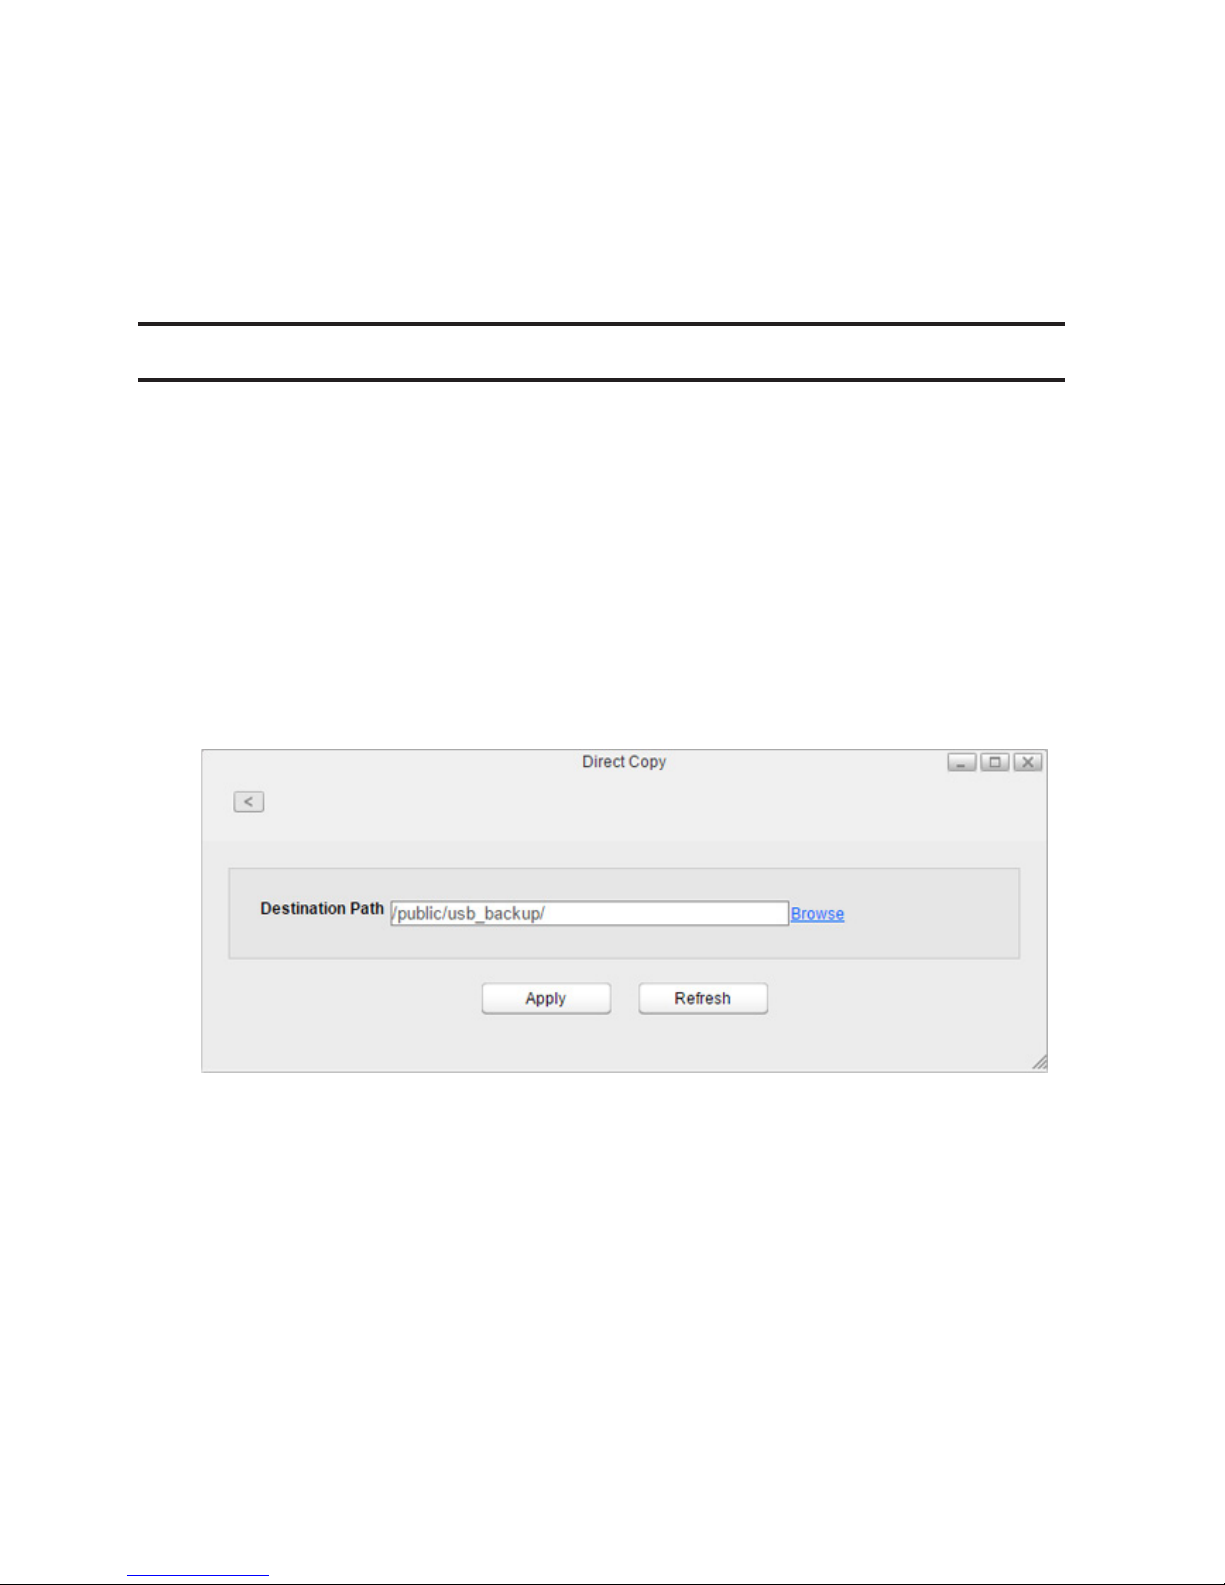
Direct Copy
Use Direct Copy to copy data from a USB mass storage device directly to the LinkStation. To copy using Direct Copy,
follow the procedure below.
Note: Direct Copy will not work while the backup is running. The prior process will work.
1 Connect the USB device. When it mounts, the function LED will light up.
Note: Unsupported devices will not cause the function LED to light.
2 You now have 60 seconds to press the function button once. If you do, the function LED will flash as all the files
on the USB device are copied to the Direct Copy folder ("usb_backup" under "Public" folder) of the LinkStation.
Notes:
• While the function LED is flashing, hold the function button down for 3 seconds to cancel Direct Copy.
• To change the Direct Copy target folder, navigate to Preferences - Direct Copy - Browse, select a new folder, and
click Apply.
3 When the copy operation is finished, the access LED of the USB device will stop flashing and the function
LED on the LinkStation will be extinguished. Dismount the USB device from the LinkStation referring to the
"Dismounting an External Drive" section in chapter 5.
Page 74
73
Chapter 8 System
Accounts
Create or delete users in the LinkStation, or change the administrator password.
Creating Users
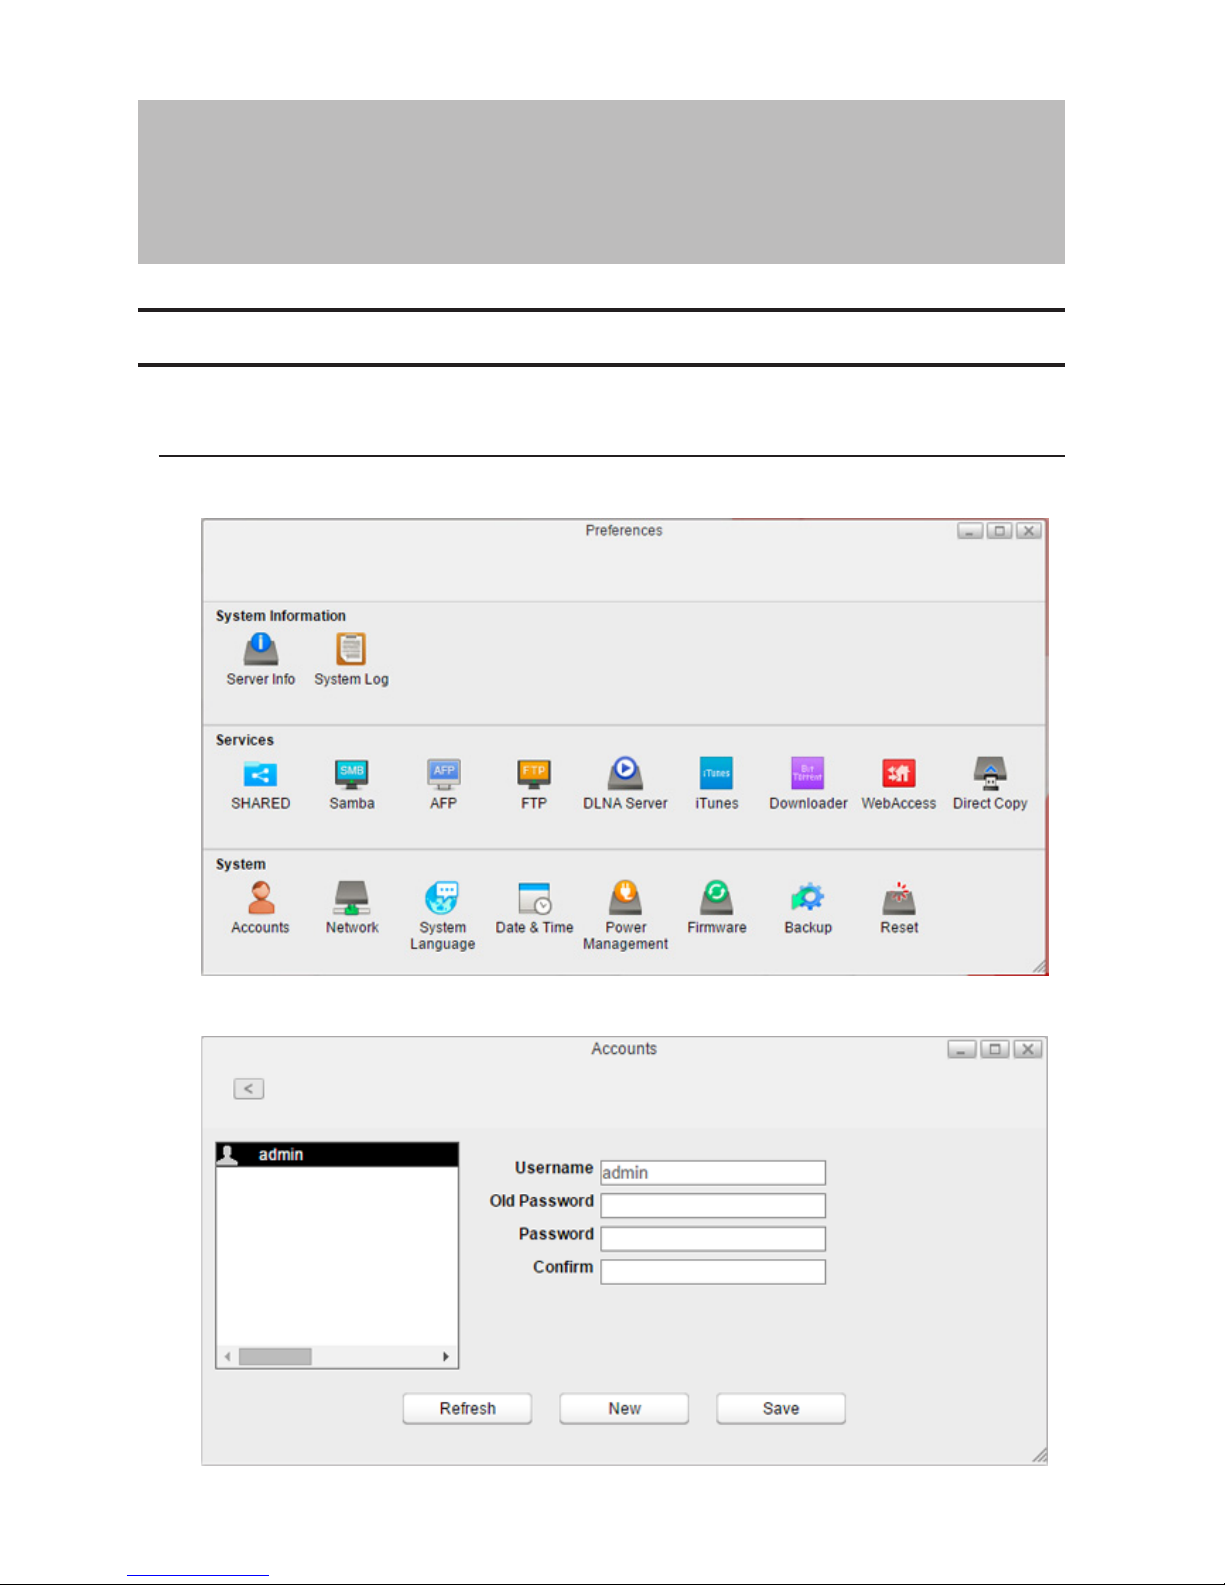
1 In Preferences, click Accounts.
2 Click New.
Page 75
74
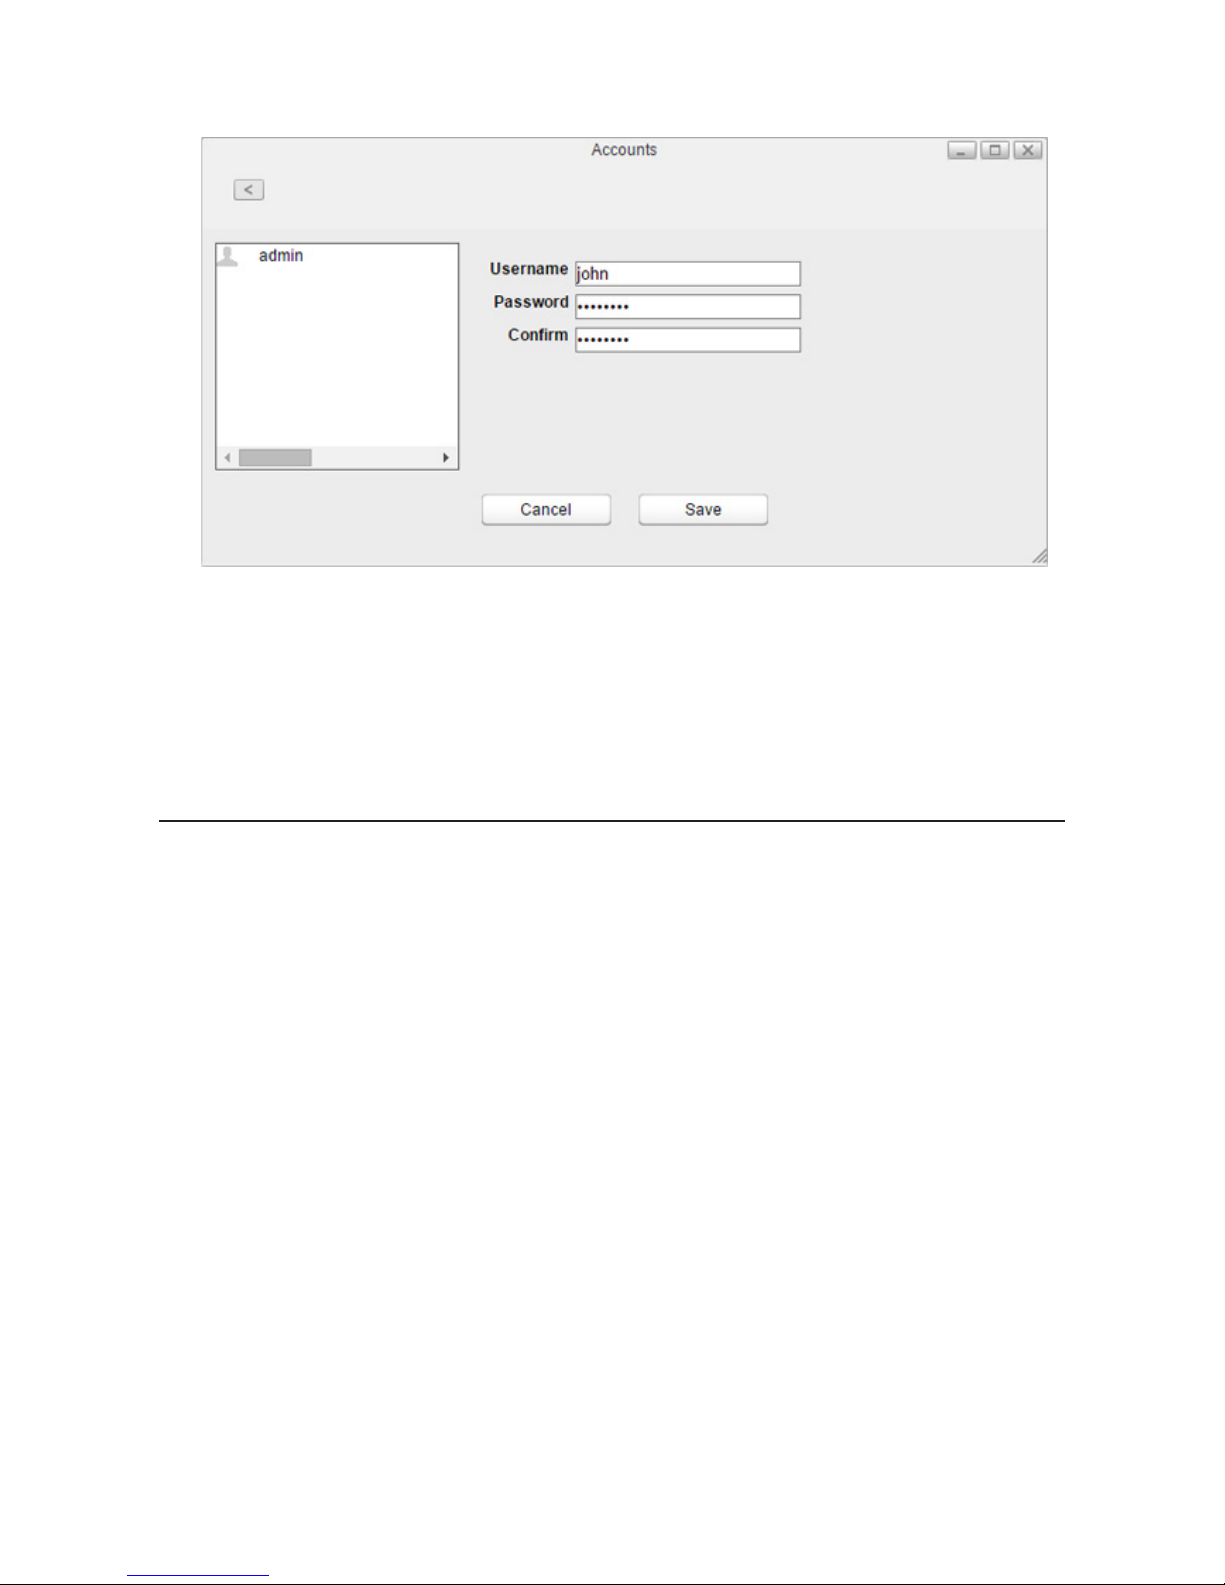
3 Enter a username and password, confirm the new password, then click Save.
A new user will be added to the list.
Notes:
• Usernames may contain up to 32 alphanumeric characters and the following symbols: - _ . ! # + $ ^ %. Do not
use a symbol as the first character.
• Passwords may contain up to 20 alphanumeric characters and the following symbols: - _ @ ! # $ % & ' ( ) * + , . /
; < > = ? " [ ] ^ { } | ~. Do not use a symbol other than an underscore (_) as the first character.
• When a new user is created, a shared folder that uses the username as its folder name is also created.
Changing Passwords
Administrator Password
1 Log in to Settings as the admin user.
2 In Settings, click Preferences.
Page 76
75
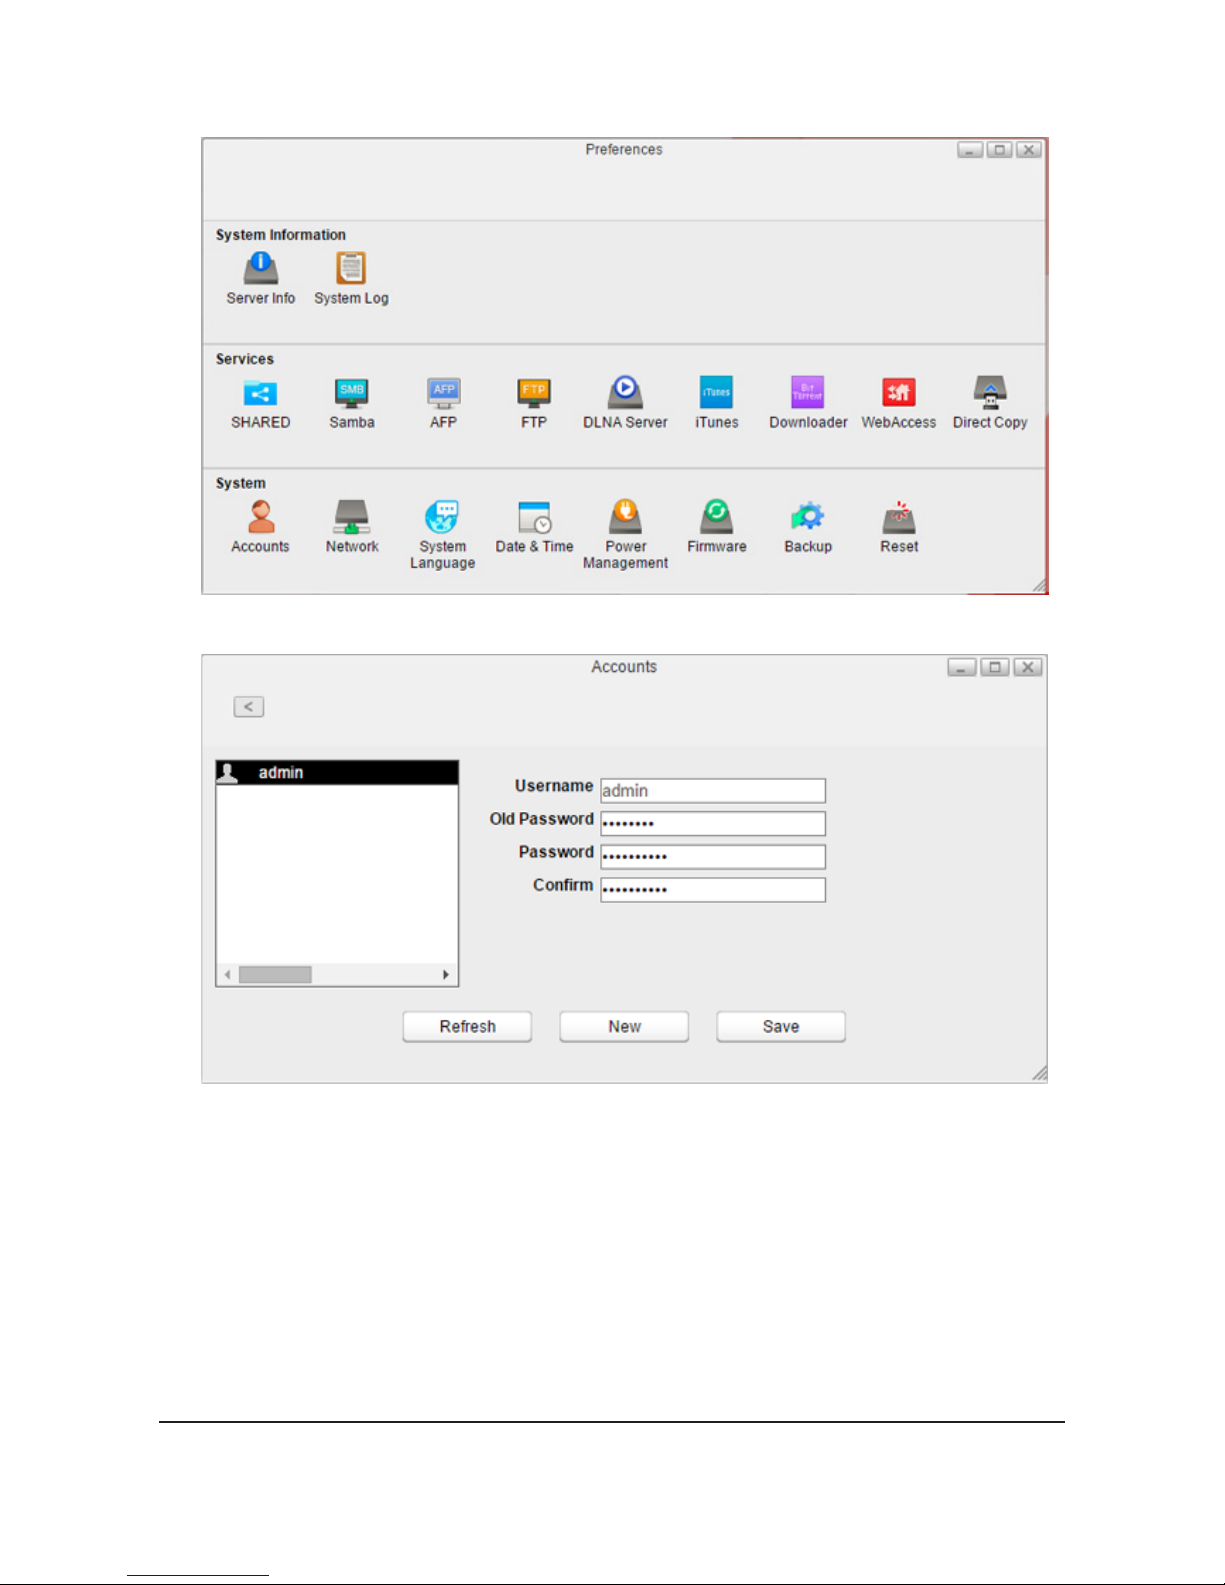
3 Click Accounts.
4 Enter the current password and new password, confirm the new password, then click Save.
Other Users' Passwords
1 Log in to Settings as a user who want to change its password.
2 In Settings, double-click Applications at the desktop.
3 Double-click Password.
4 Enter the current username and new password, confirm the new password, then click Apply.
Deleting Users
1 In Preferences, click Accounts.
Page 77
76
2 Select a user and click Delete.
3 Click OK.
The selected user is deleted.
Note: Even if the user is deleted, that user's shared folder will remain. Delete it manually.
Network
Configure network settings such as a hostname, IP address, or Wake-on-LAN.
Changing the Hostname
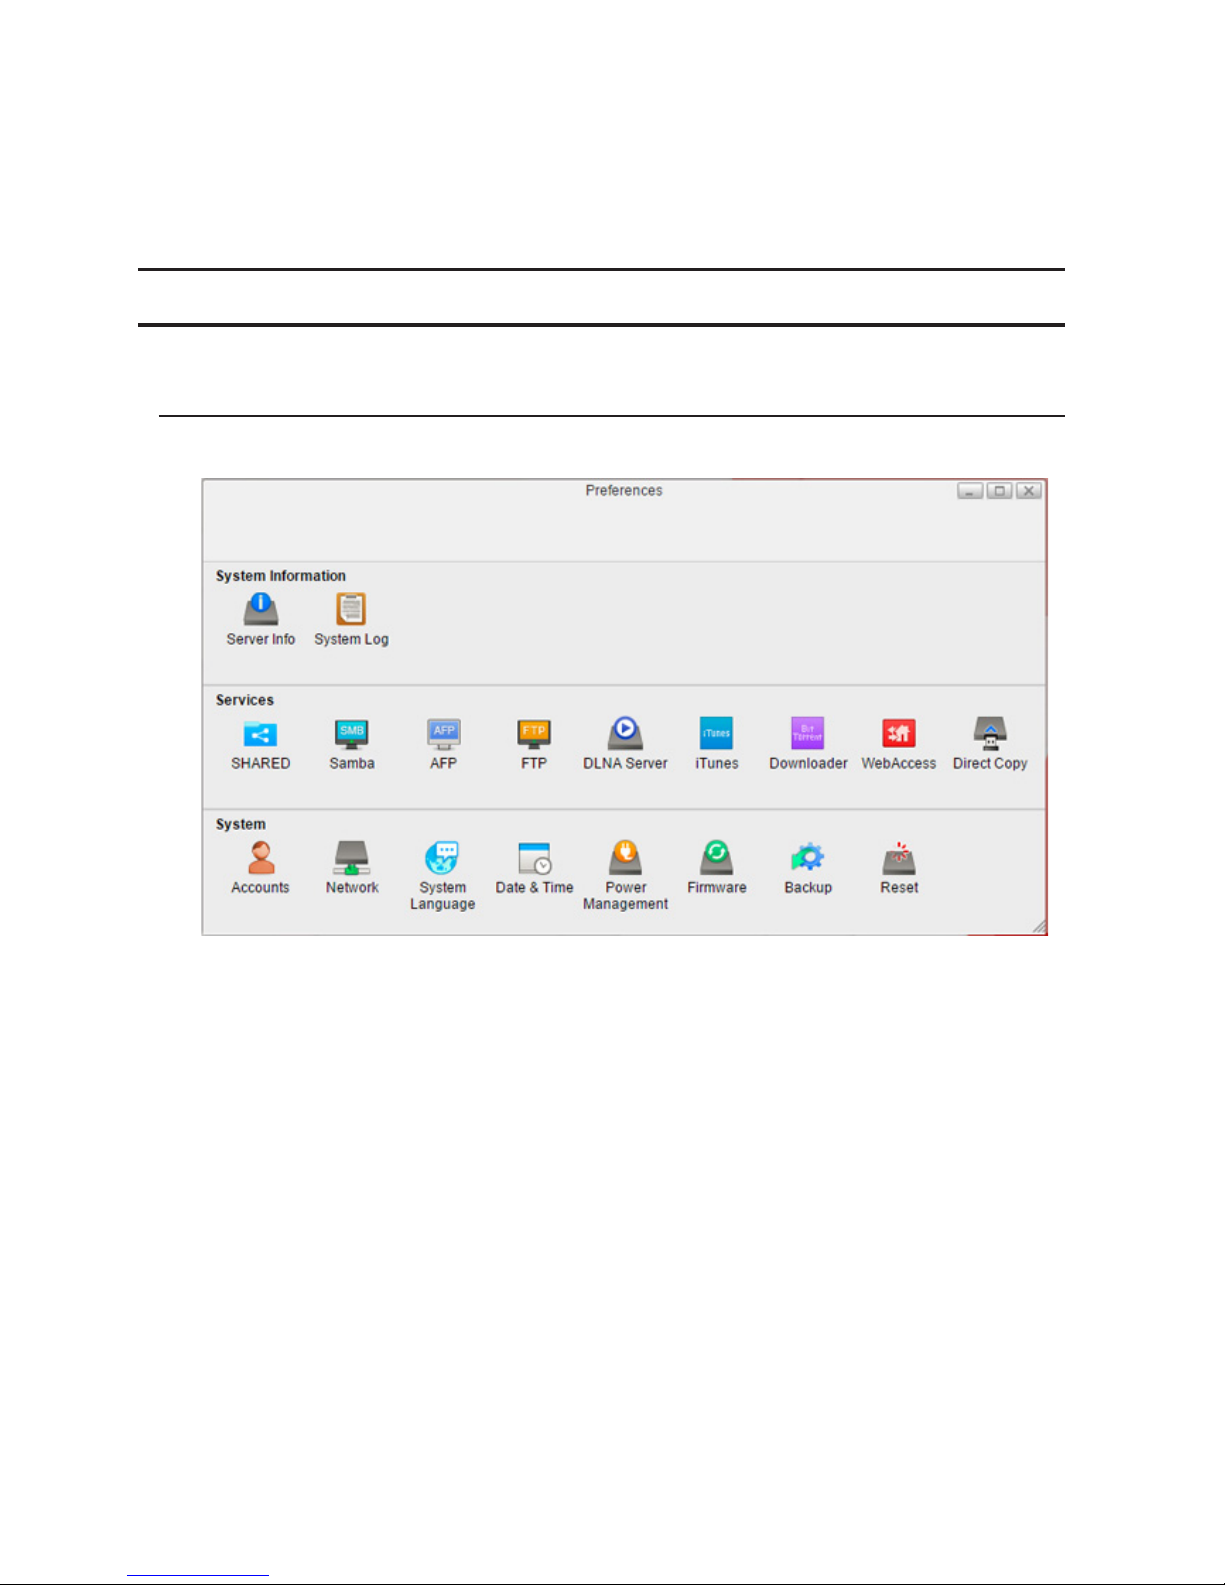
1 In Preferences, click Network.
Page 78
77
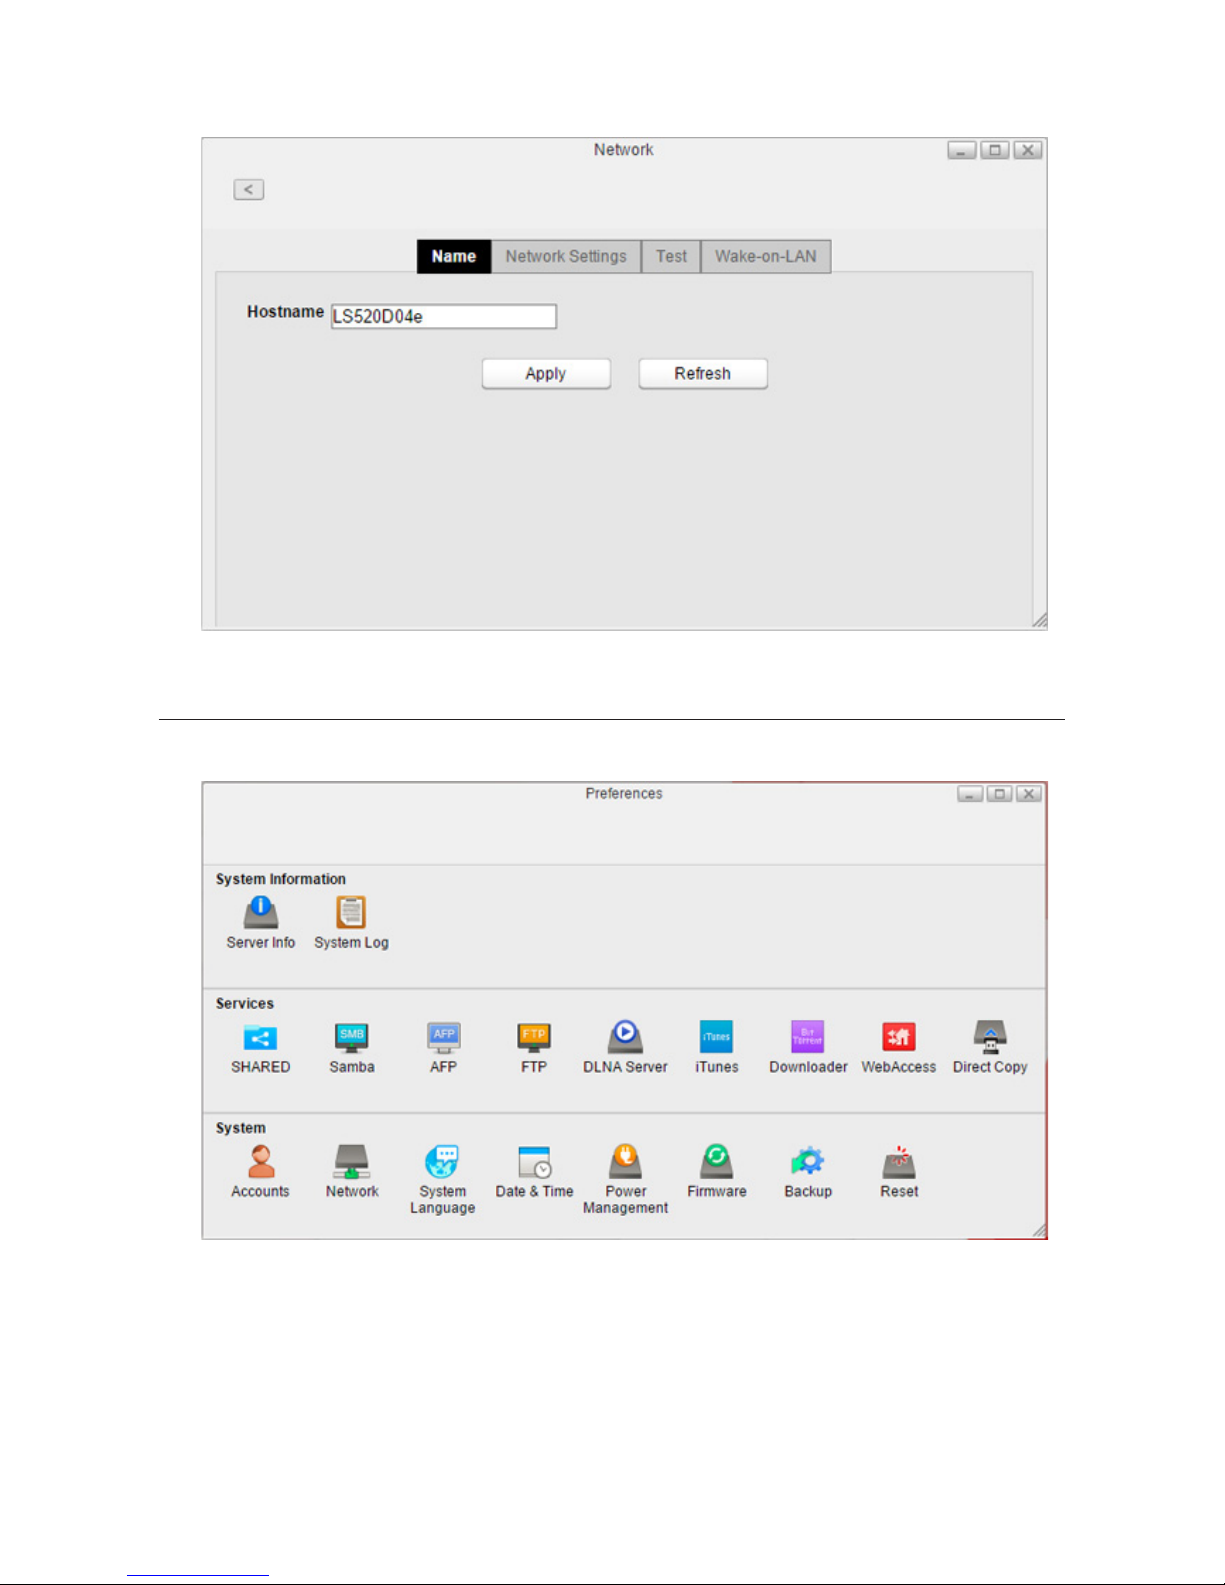
2 Click the Name tab, enter a new LinkStation name, and click Apply.
Note: A hostname may contain up to 15 alphanumeric characters.
Changing the IP Address
1 In Preferences, click Network.
2 Click the Network Settings tab.
Page 79
78
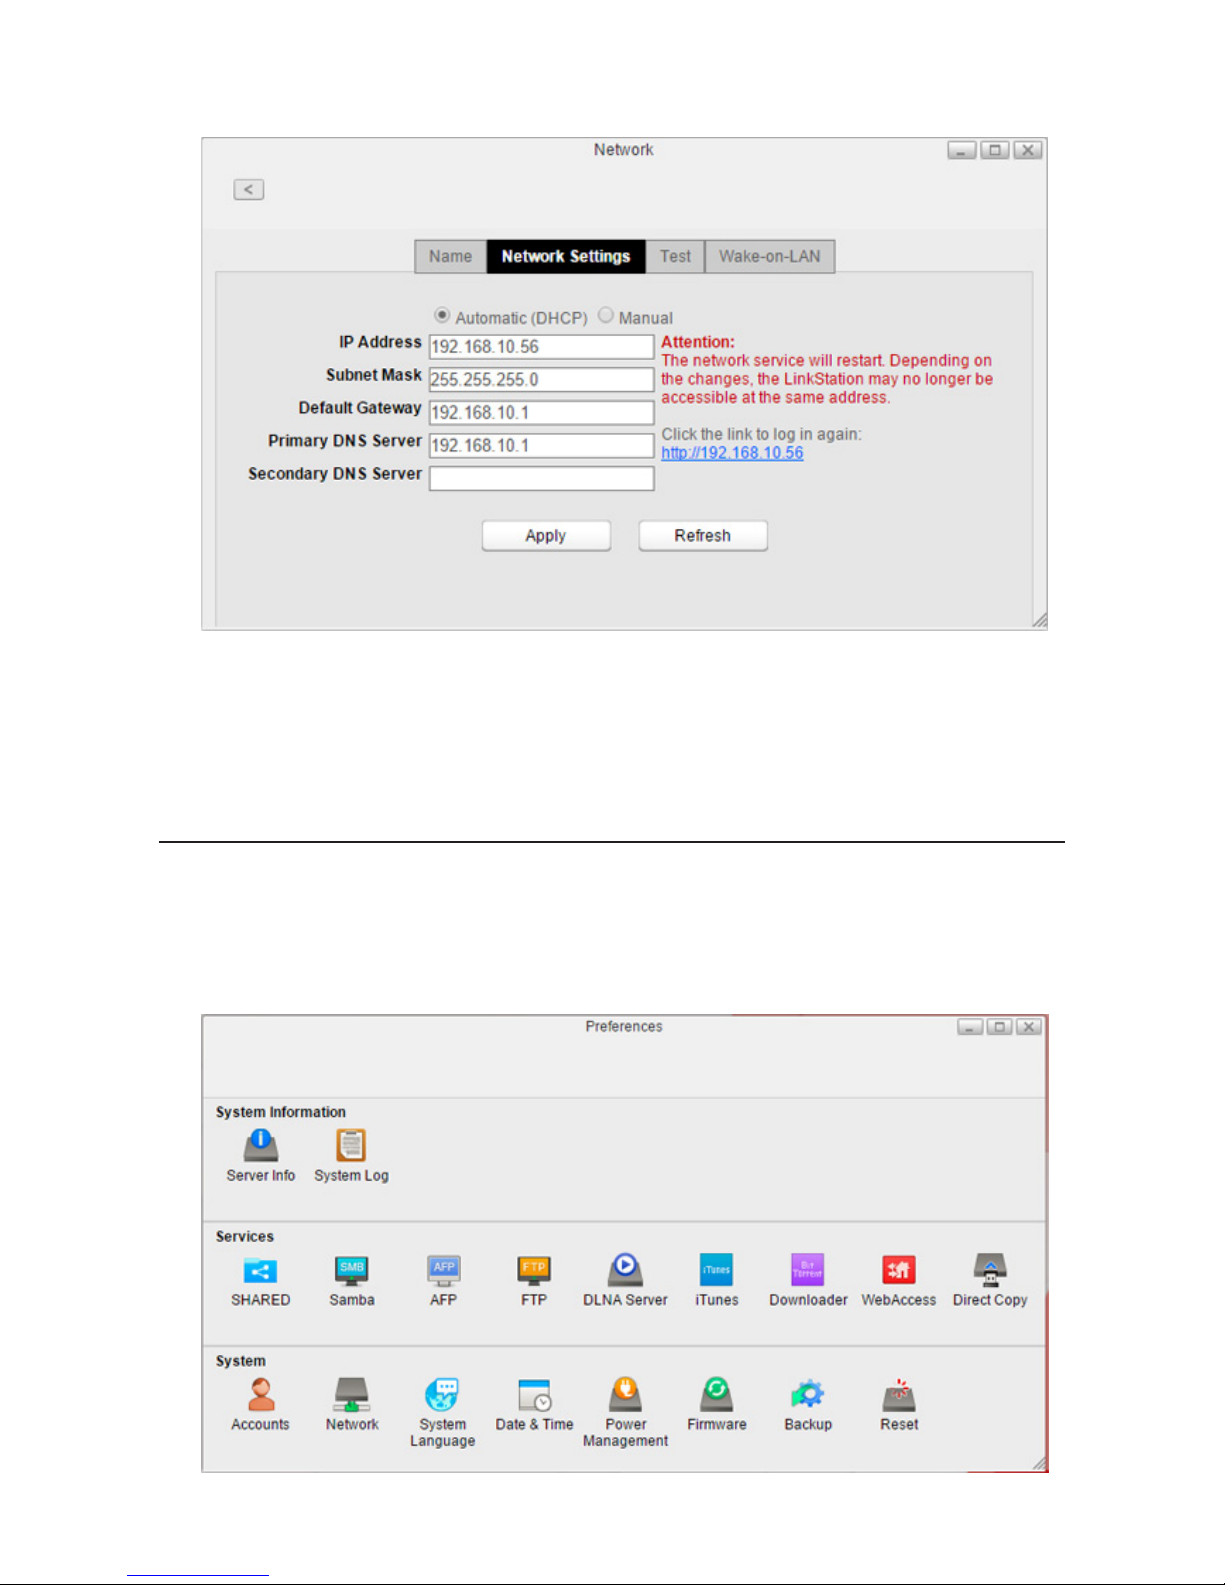
3 Select Manual, enter the desired network address settings, and click Apply.
Note: The following IP addresses are reserved and should not be used. If you configure one of them by accident,
initialize settings with the function button on the LinkStation.
Local loopback address: 127.0.0.1, 255.255.255.0
Network address: 0.0.0.0, 255.255.255.0
Broadcast address: 255.255.255.255, 255.255.255.0
The IP address range from 224.0.0.0 to 255.255.255.0
Wake-on-LAN
The LinkStation supports Wake-on-LAN, which allows it to be turned on remotely. You can only wake the LinkStation
up when the LinkStation is in sleep (standby) mode.
Note: To use Wake-on-LAN, you'll need Wake-on-LAN software that sends magic packets. The LinkStation does
not include Wake-on-LAN software.
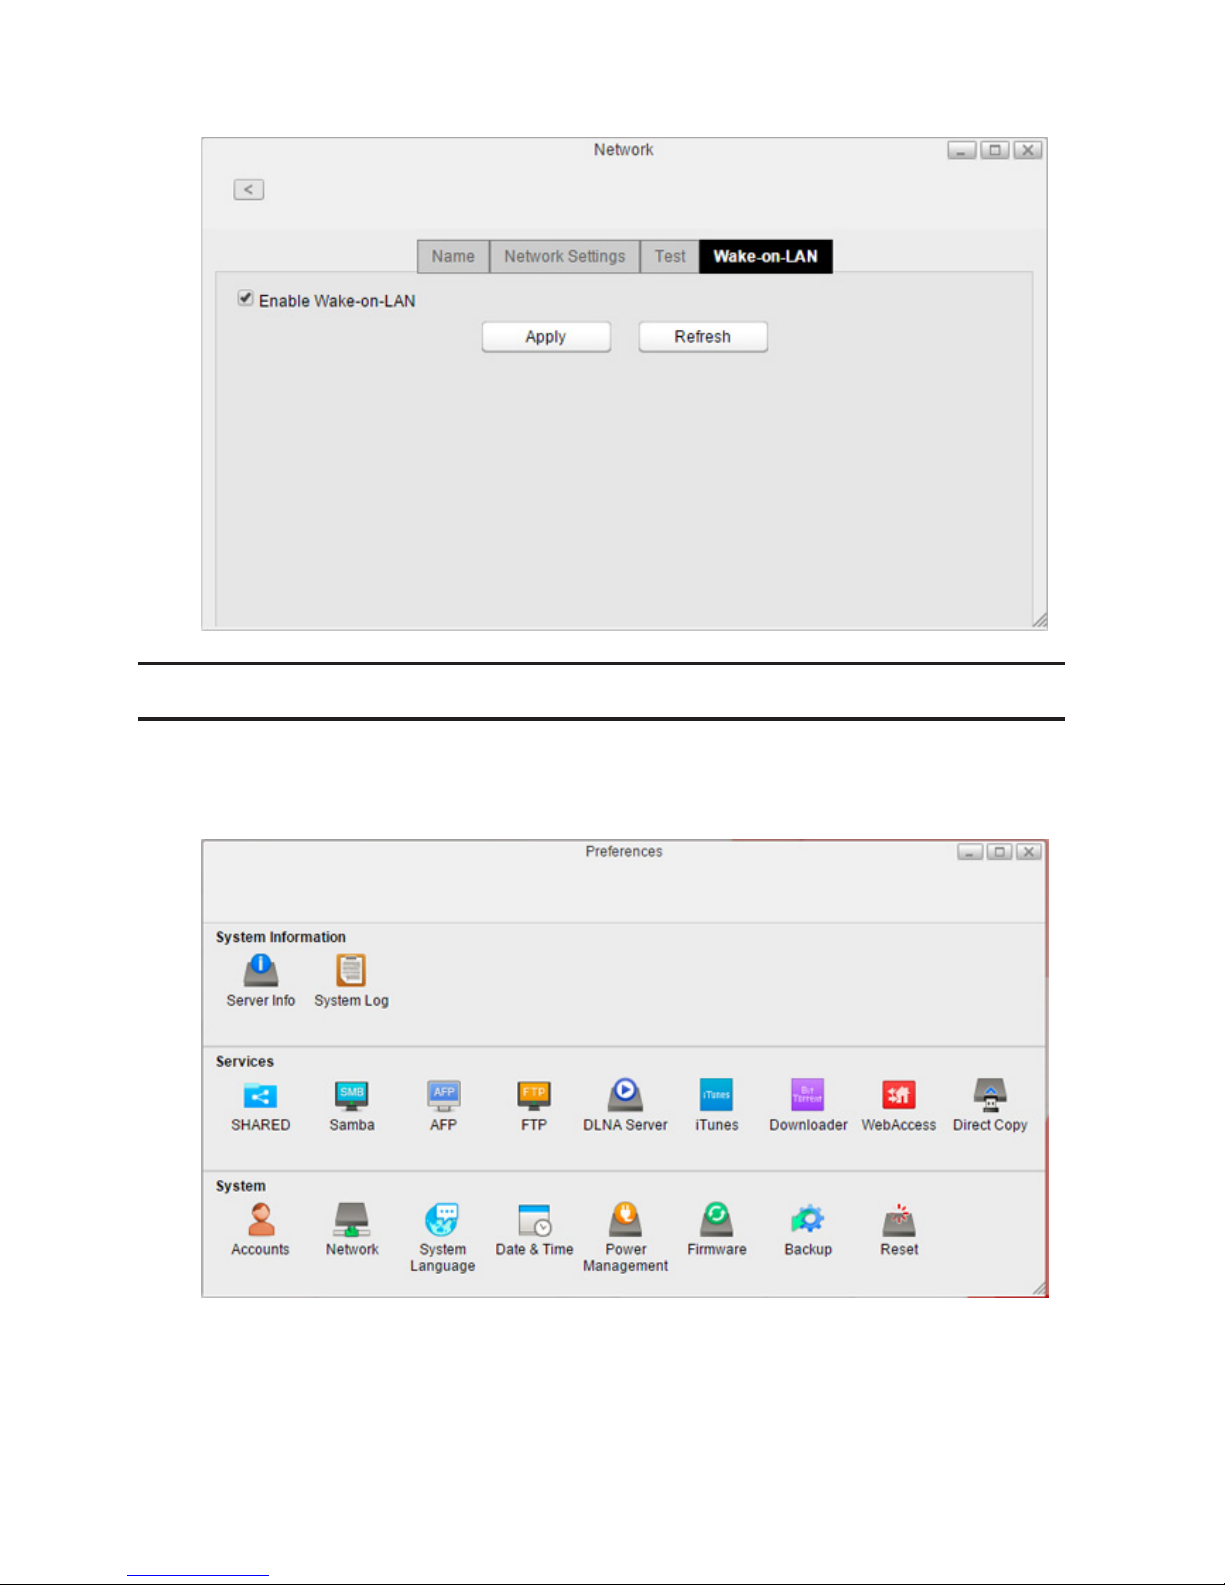
1 In Preferences, click Network.
Page 80
79
2 Click the Wake-on-LAN tab and check "Enable Wake-on-LAN" to enable Wake-on-LAN.
System Language
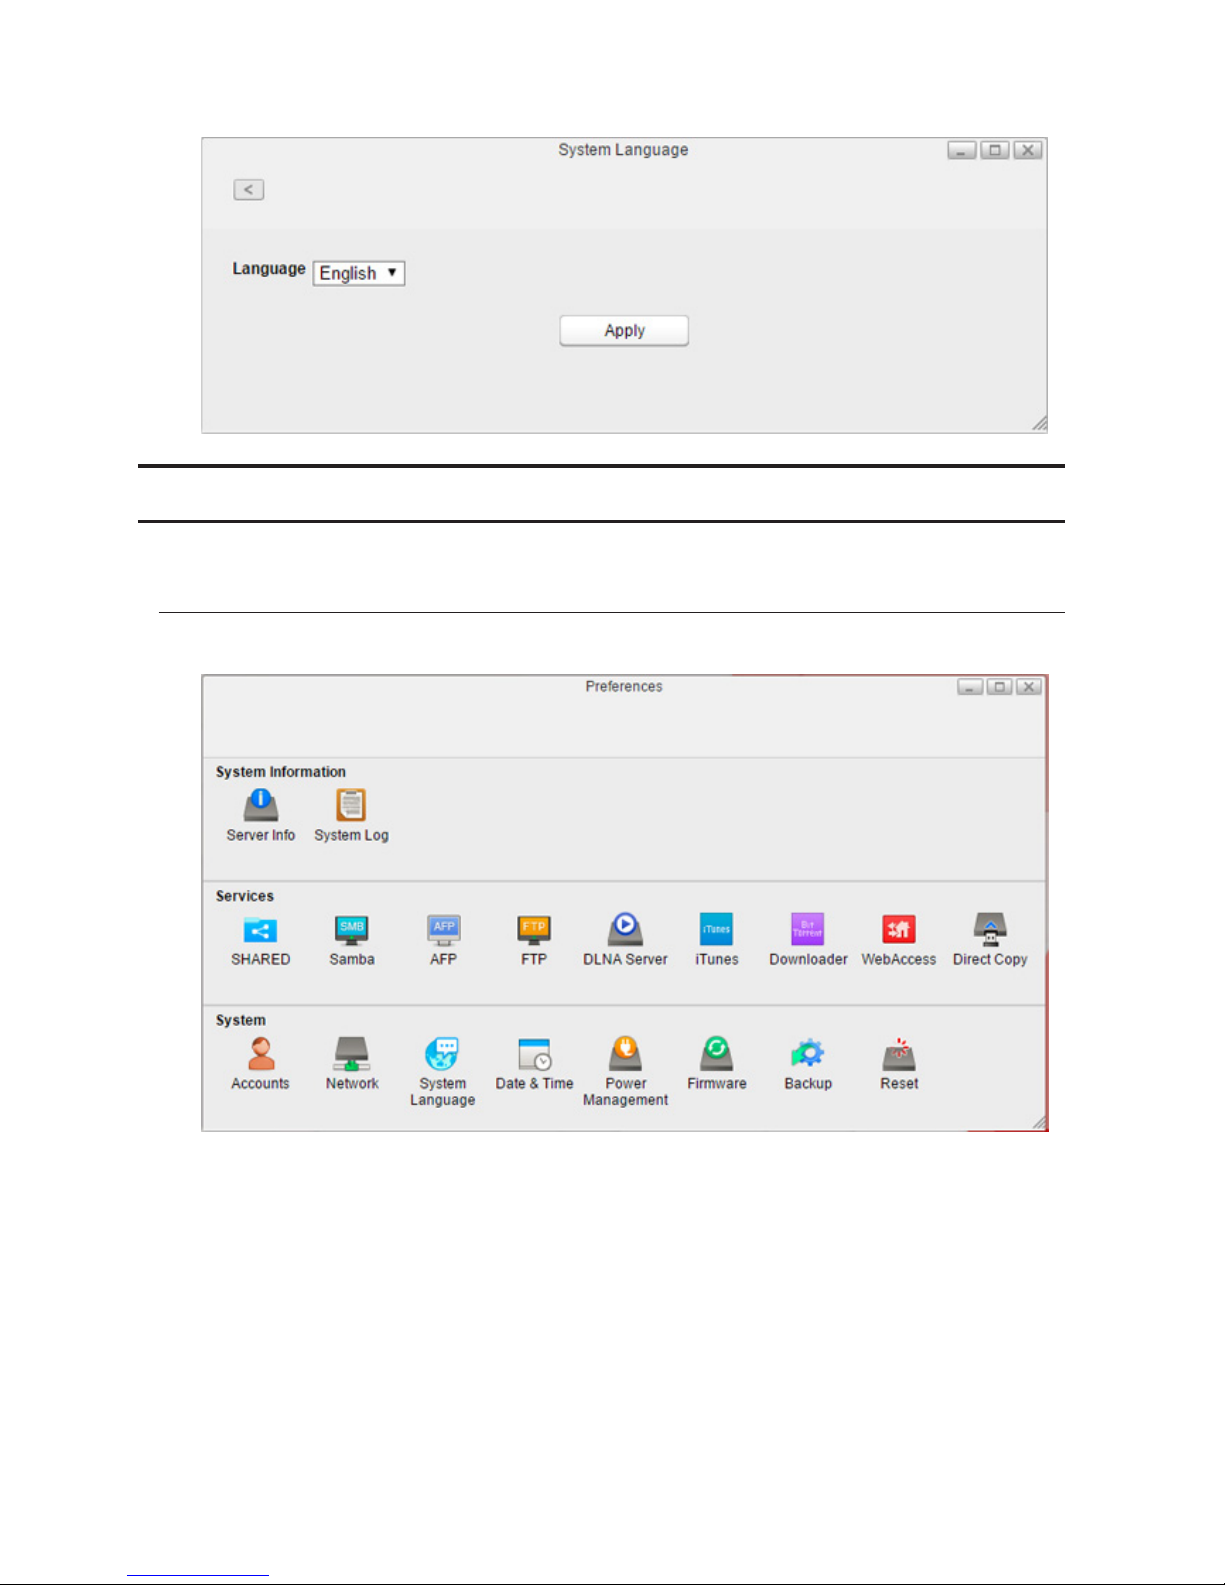
This setting changes the language used by the LinkStation for DLNA. To change the language displayed in Settings,
refer to the "Changing Display Languages" section in chapter 2.
1 In Preferences, click System Language.
Page 81
80
2 Select the language from the drop-down list and click Apply.
Date & Time
Configures time settings such as date and time, time zone, or NTP settings.
Changing Date and Time
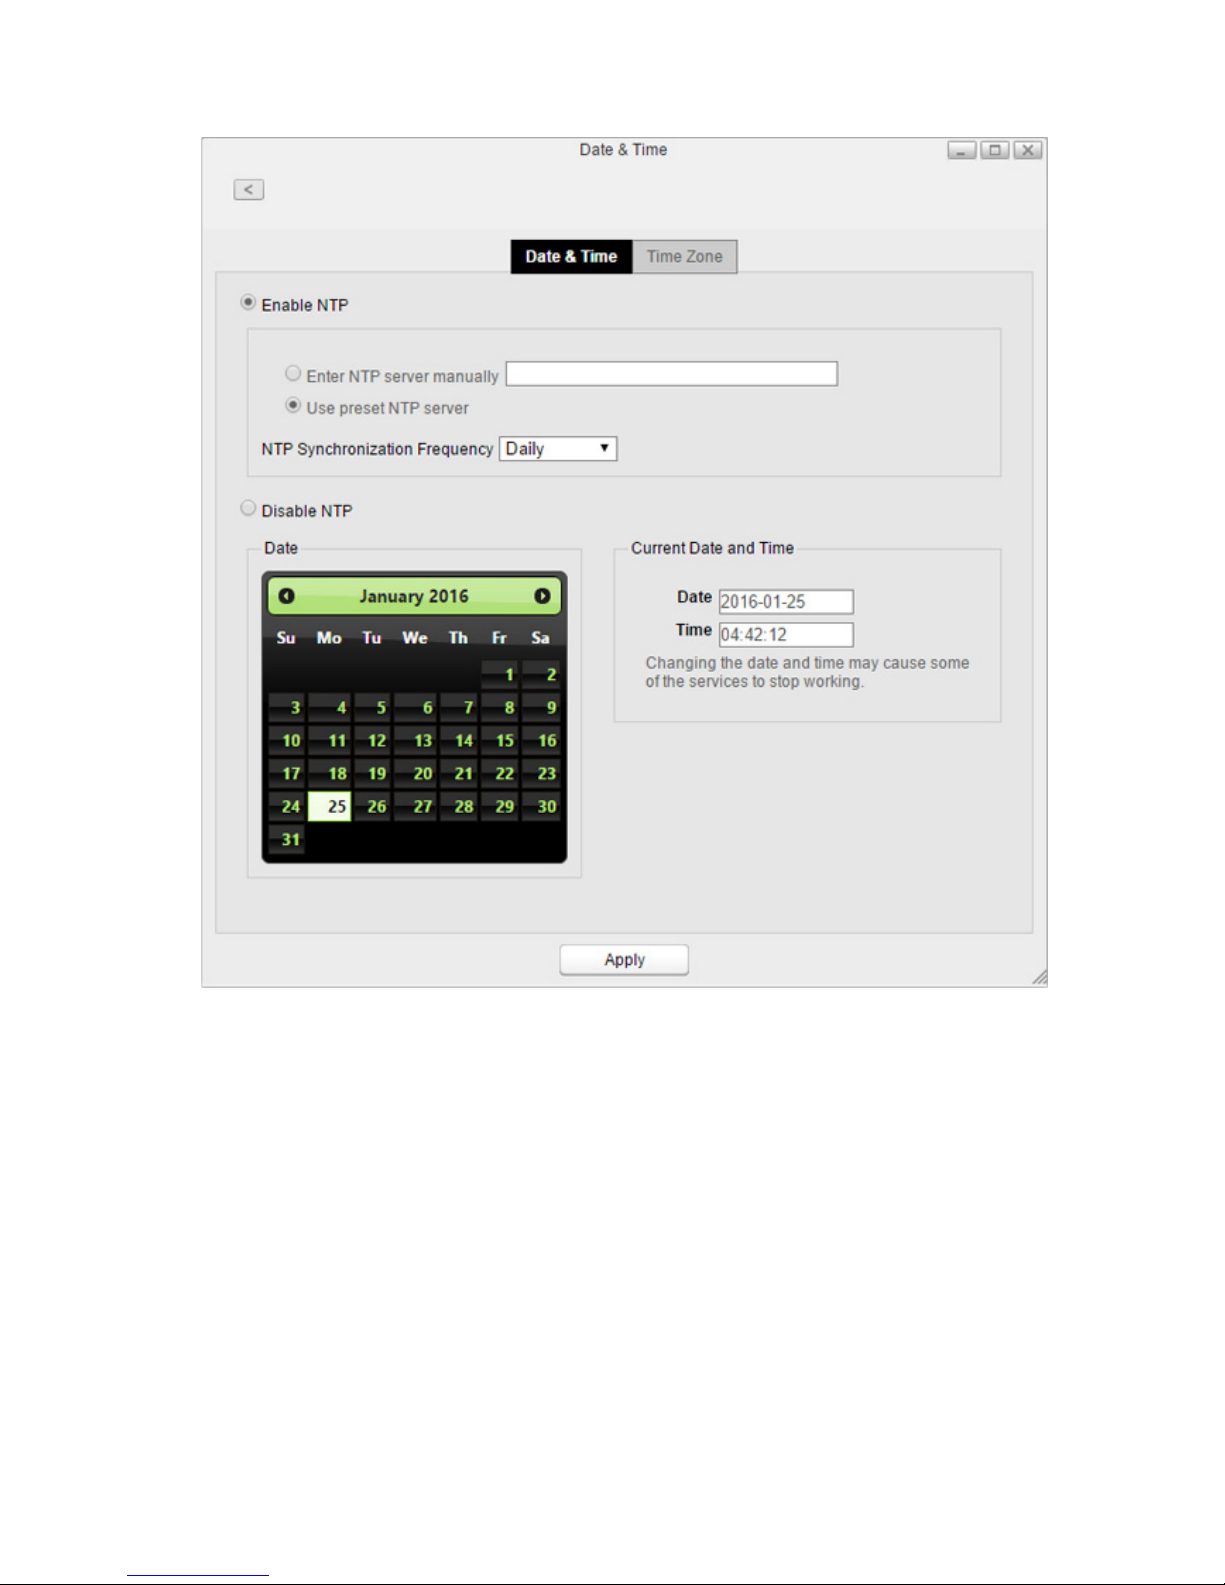
1 In Preferences, click Date & Time.
2 Click the Date & Time tab.
Page 82
81
3 Select whether to enable NTP or manually set the date and time.
If NTP is enabled, the LinkStation adjusts its clock automatically by using the NTP server. You can either
enter the NTP server manually, or use a preset NTP server on the LinkStation and how often to sync with it. If
disabled, select the date from the calendar or enter the date into the "Date" field, and enter the time directly
into the "Time" fields.
4 Click Apply.
Page 83
82
Changing Time Zone
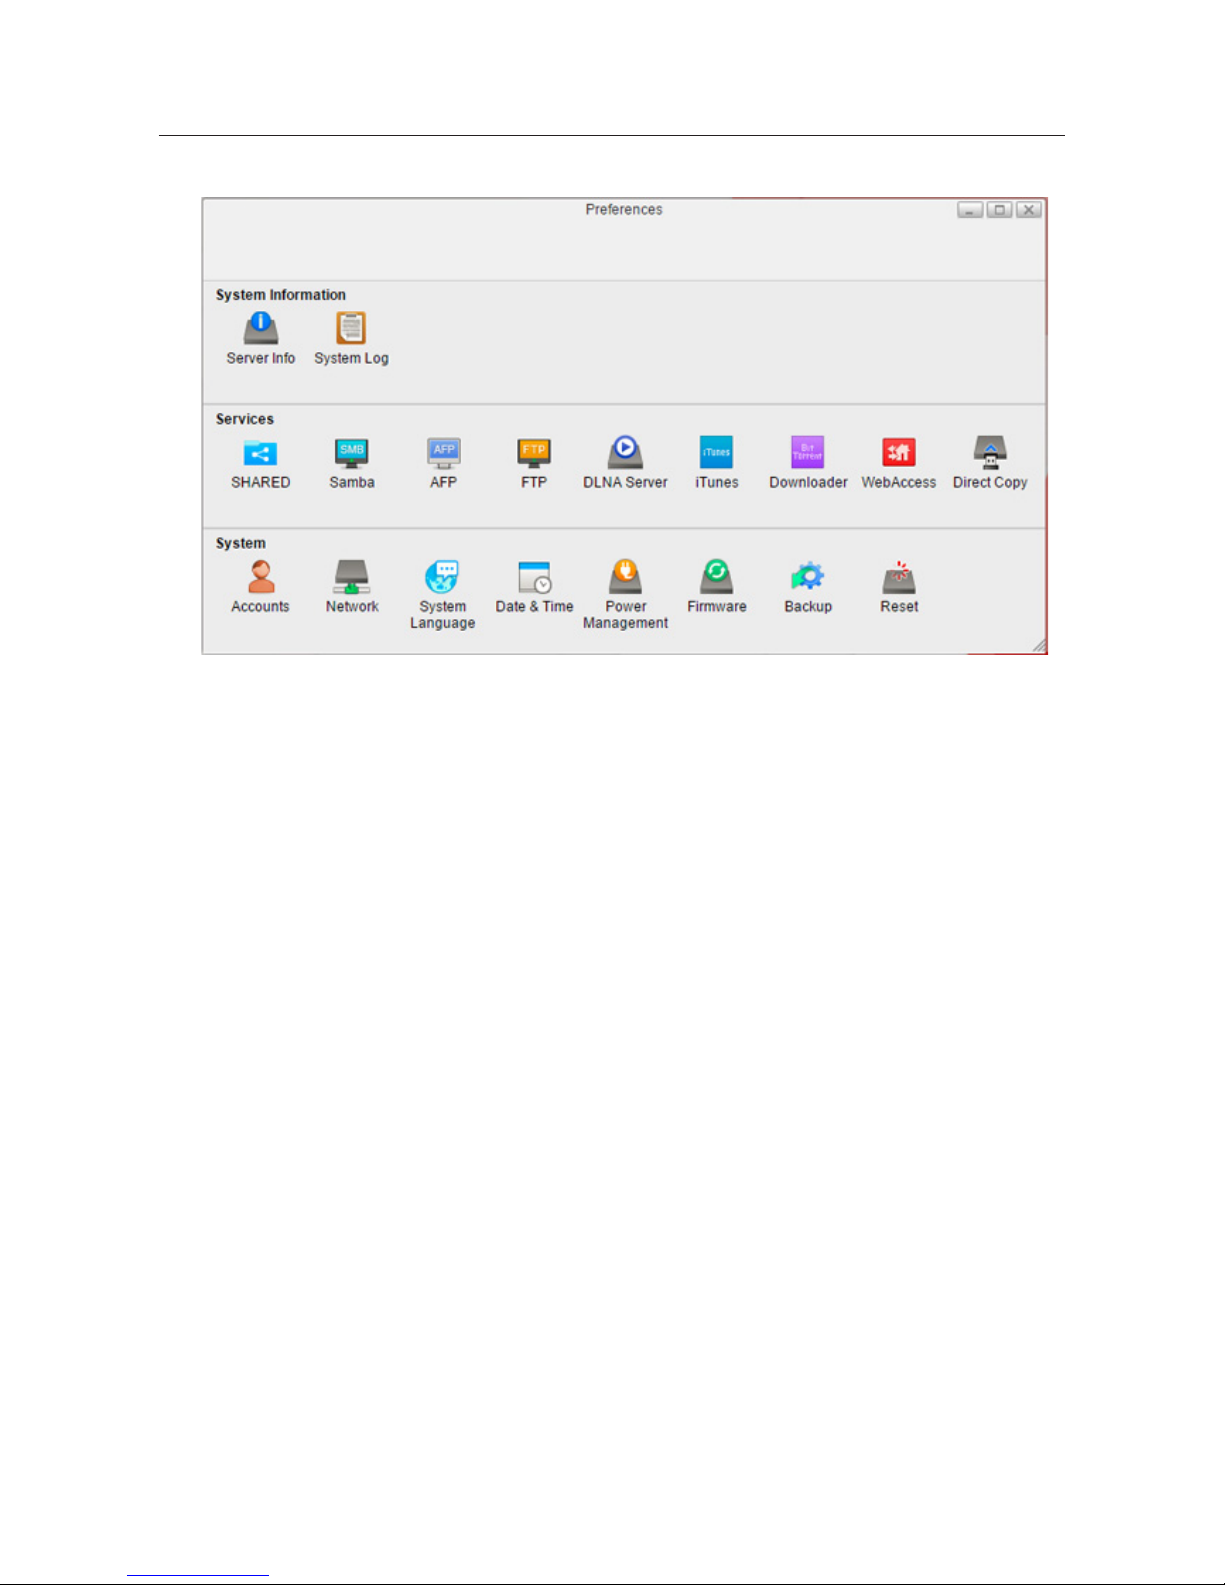
1 In Preferences, click Date & Time.
Page 84
83
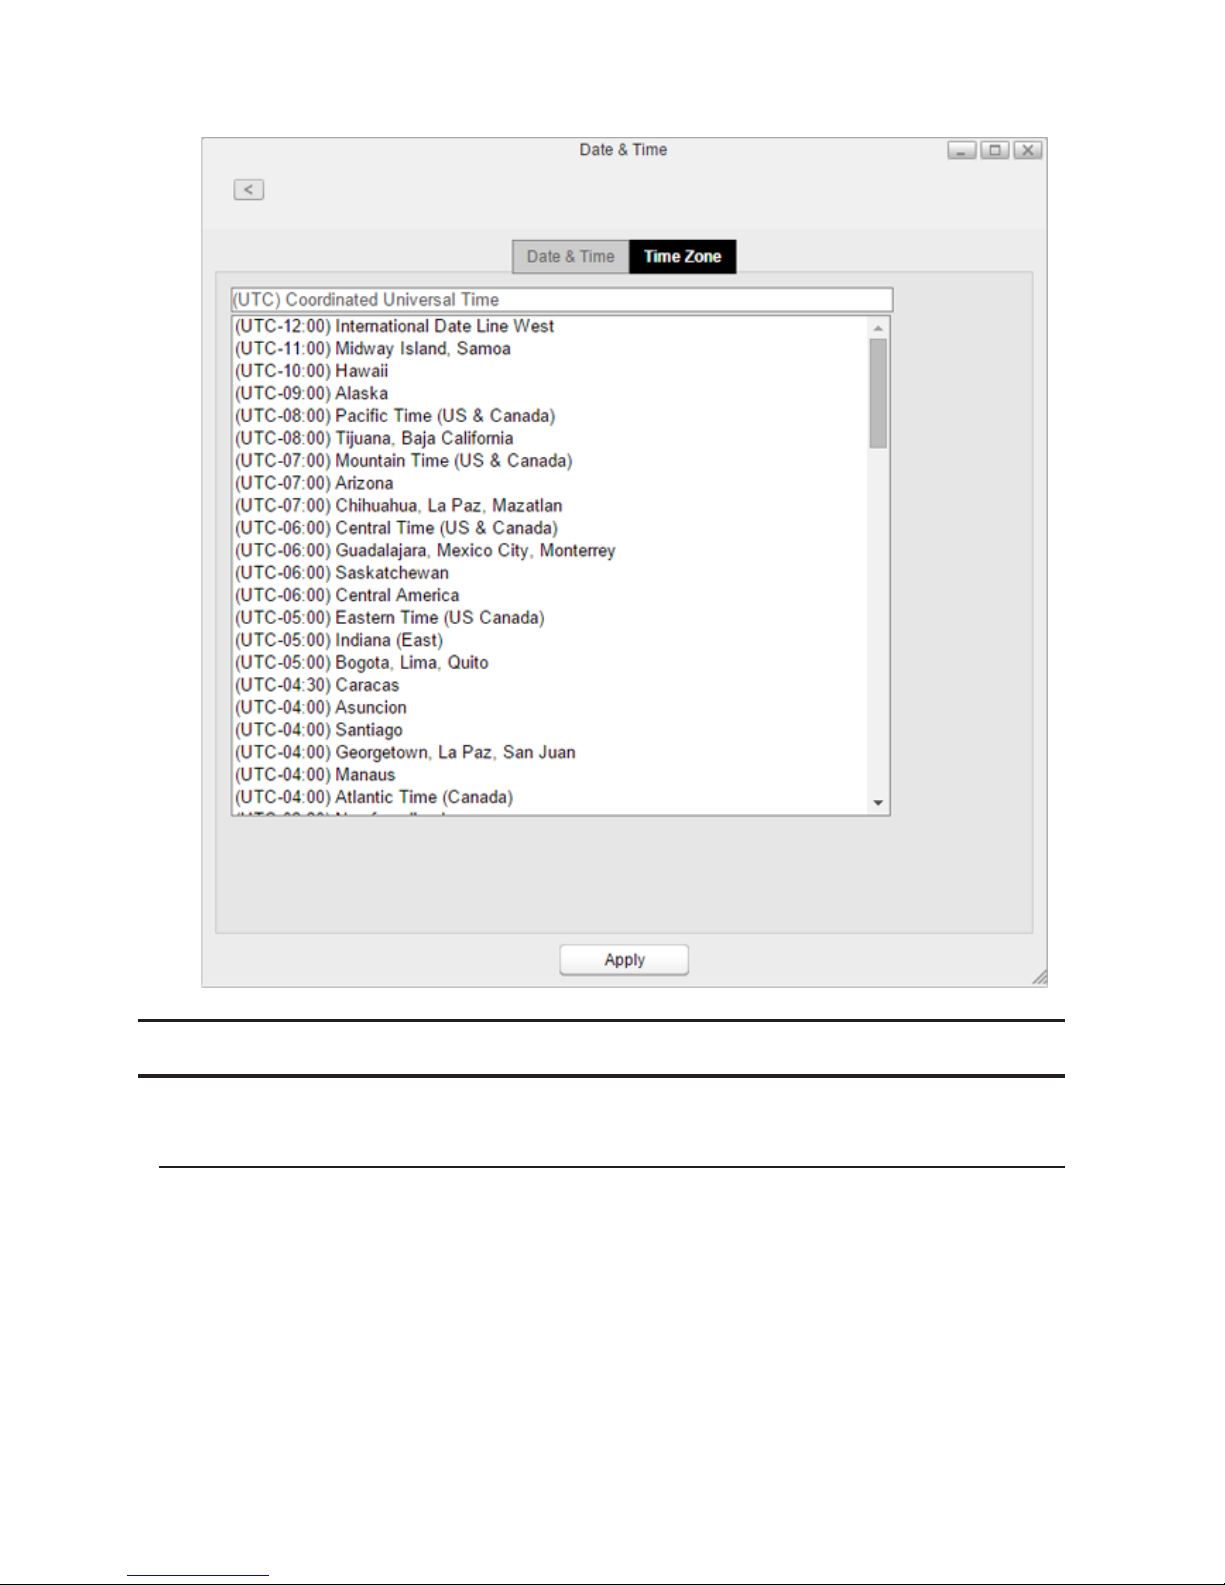
2 Click the Time Zone tab and select the desired time zone from the list, then click Apply.
Power Management
Configures sleep settings for the system or hard drives.
Drive Spin Down
With this function, only hard drives will enter sleep mode. This may help maintain hard drive longevity. While in spin
down, hard drives will start working again once the LinkStation is accessed.
Page 85
84
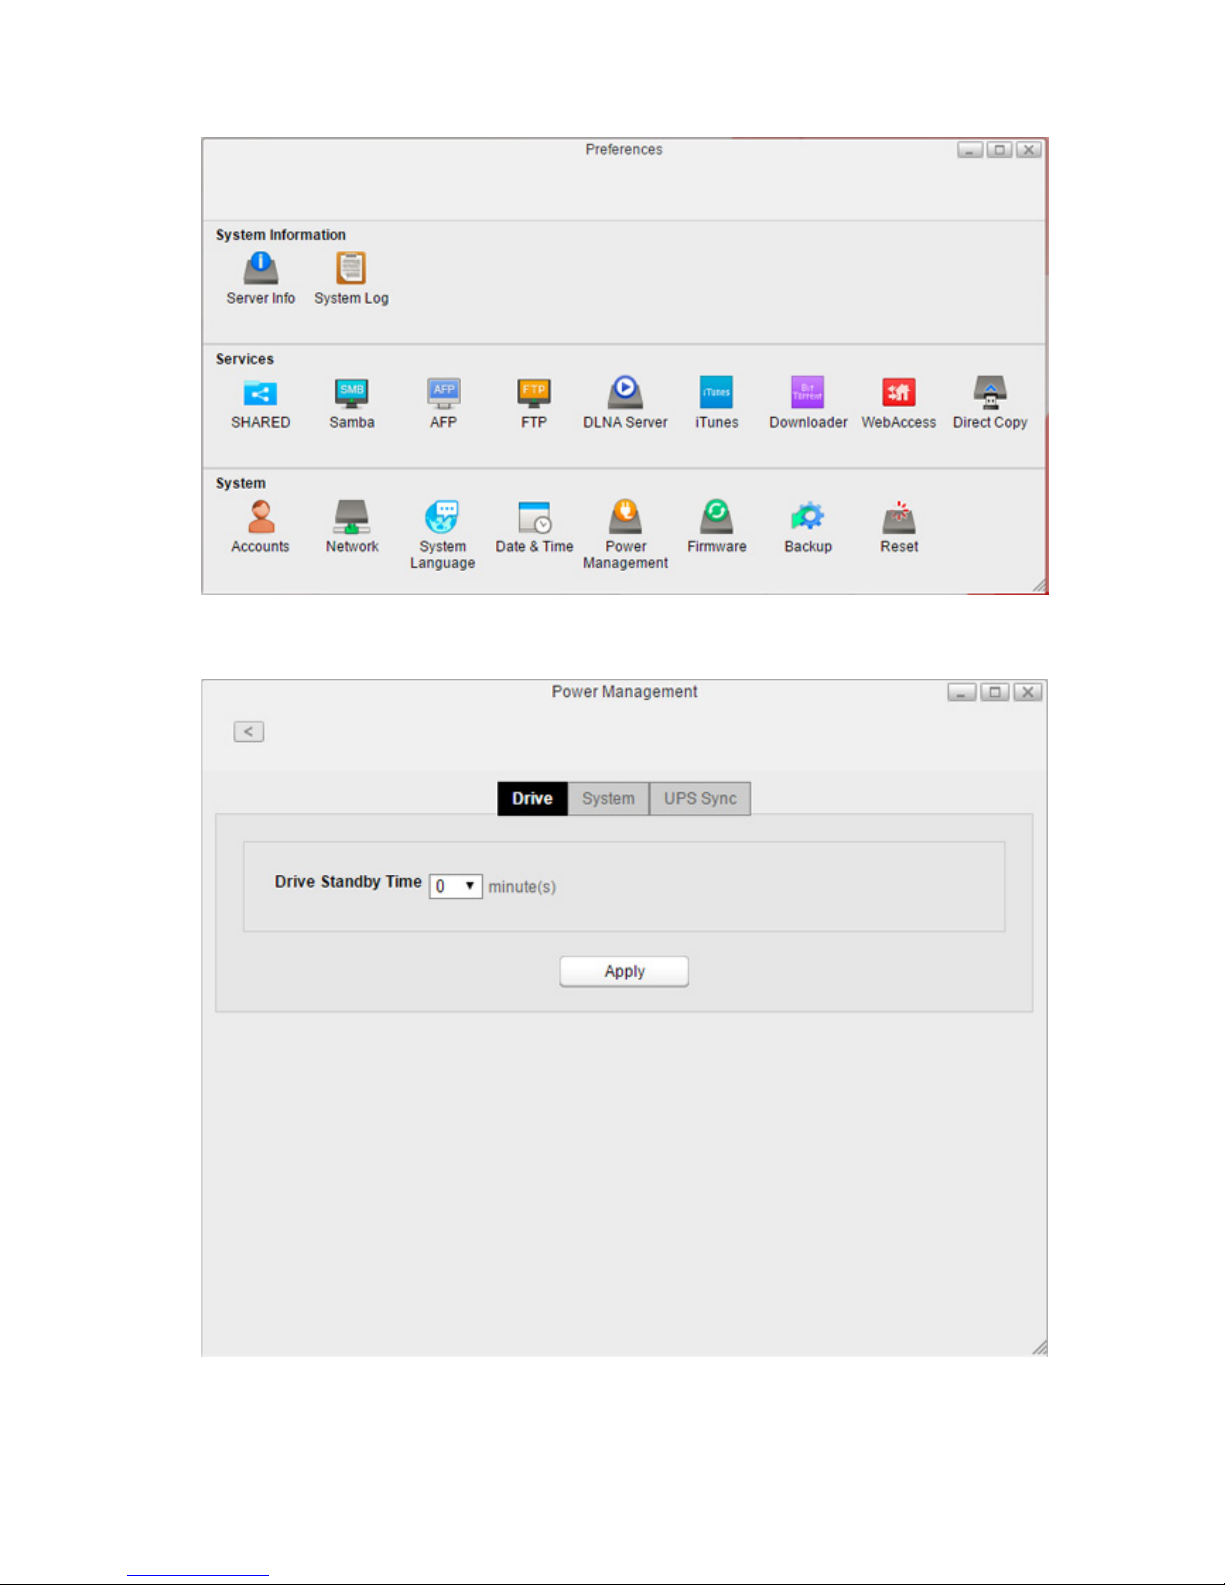
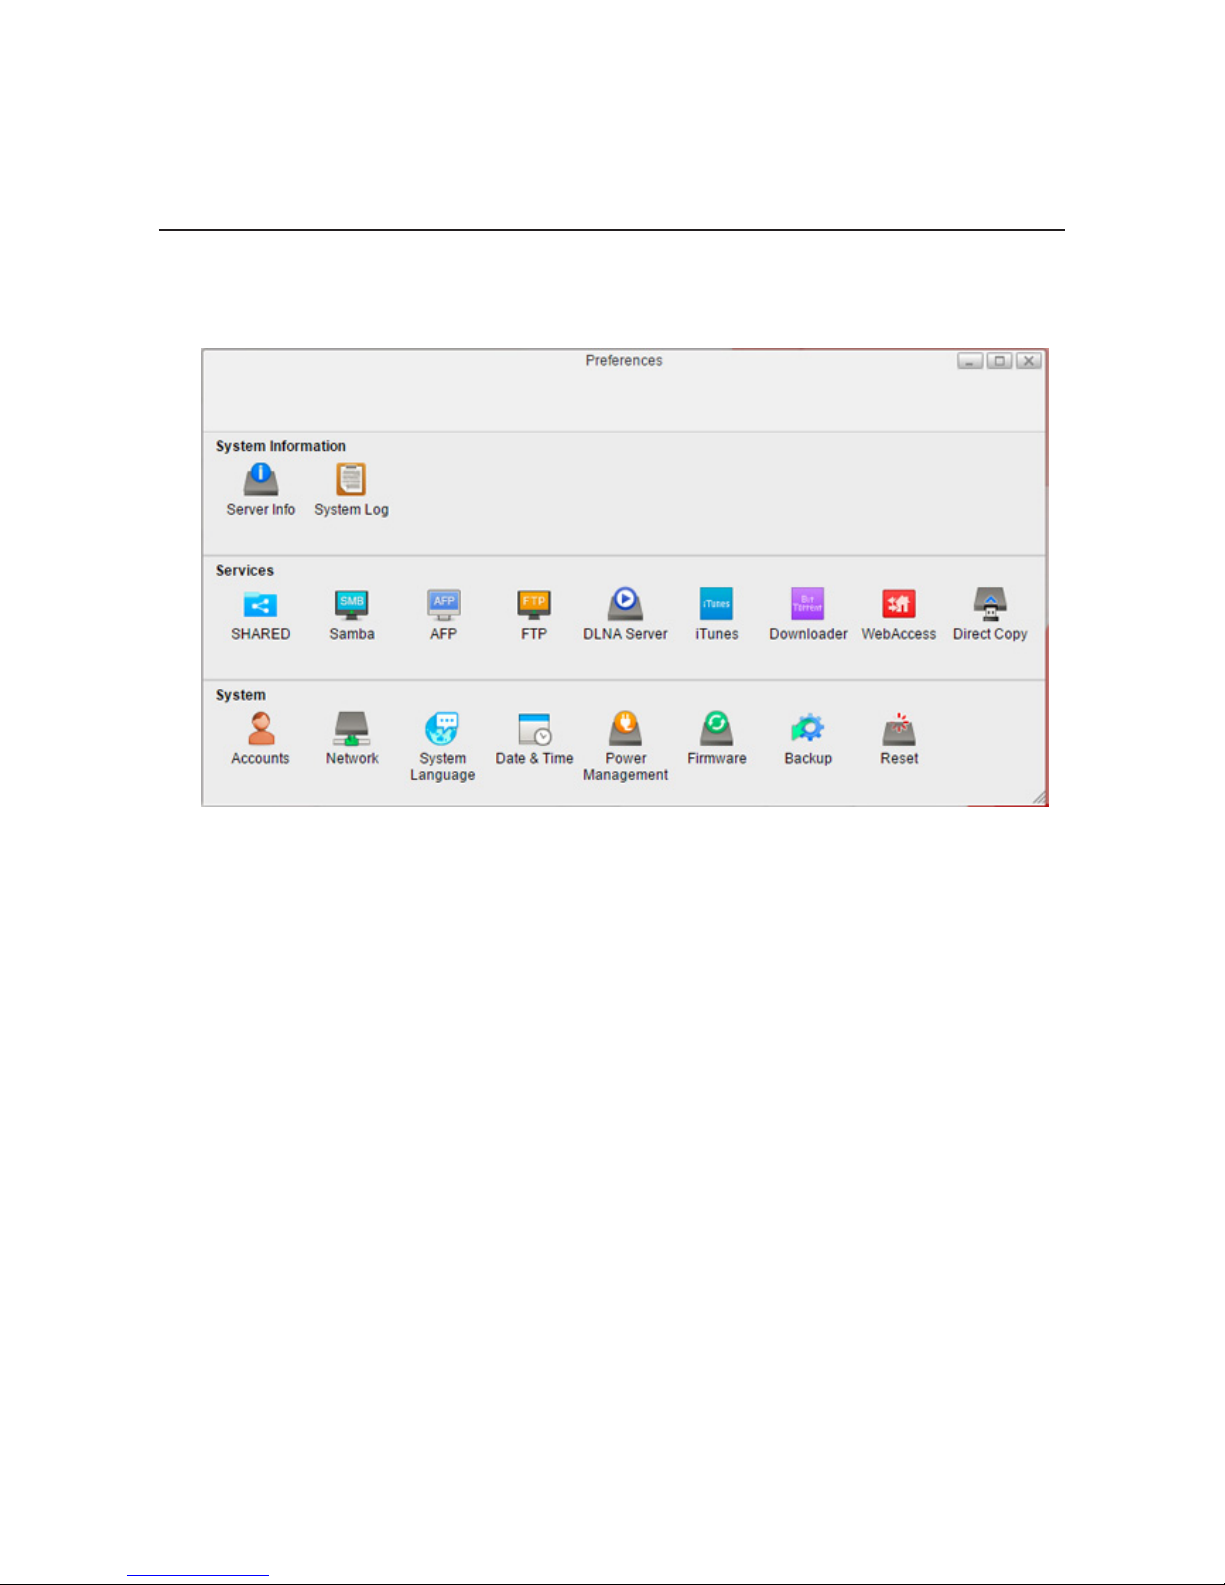
1 In Preferences, click Power Management.
2 Click the Drive tab and configure the time interval when the hard drive will spin down. For example, if you
select 5 minutes as the standby time, the hard drive will spin down 5 minutes after no drive access.
3 Click Apply.
Page 86
85
Note: If you configure spin down settings after formatting internal drives or creating the RAID array with "Auto"
settings from Disk Manager, drive spin down will not occur during specific periods because the formatting
process is still working in the background.
Sleep Mode
To save energy, you can configure a timer to have the LinkStation enter sleep (standby) mode at a designated time,
where all hard drives and LEDs are turned off.
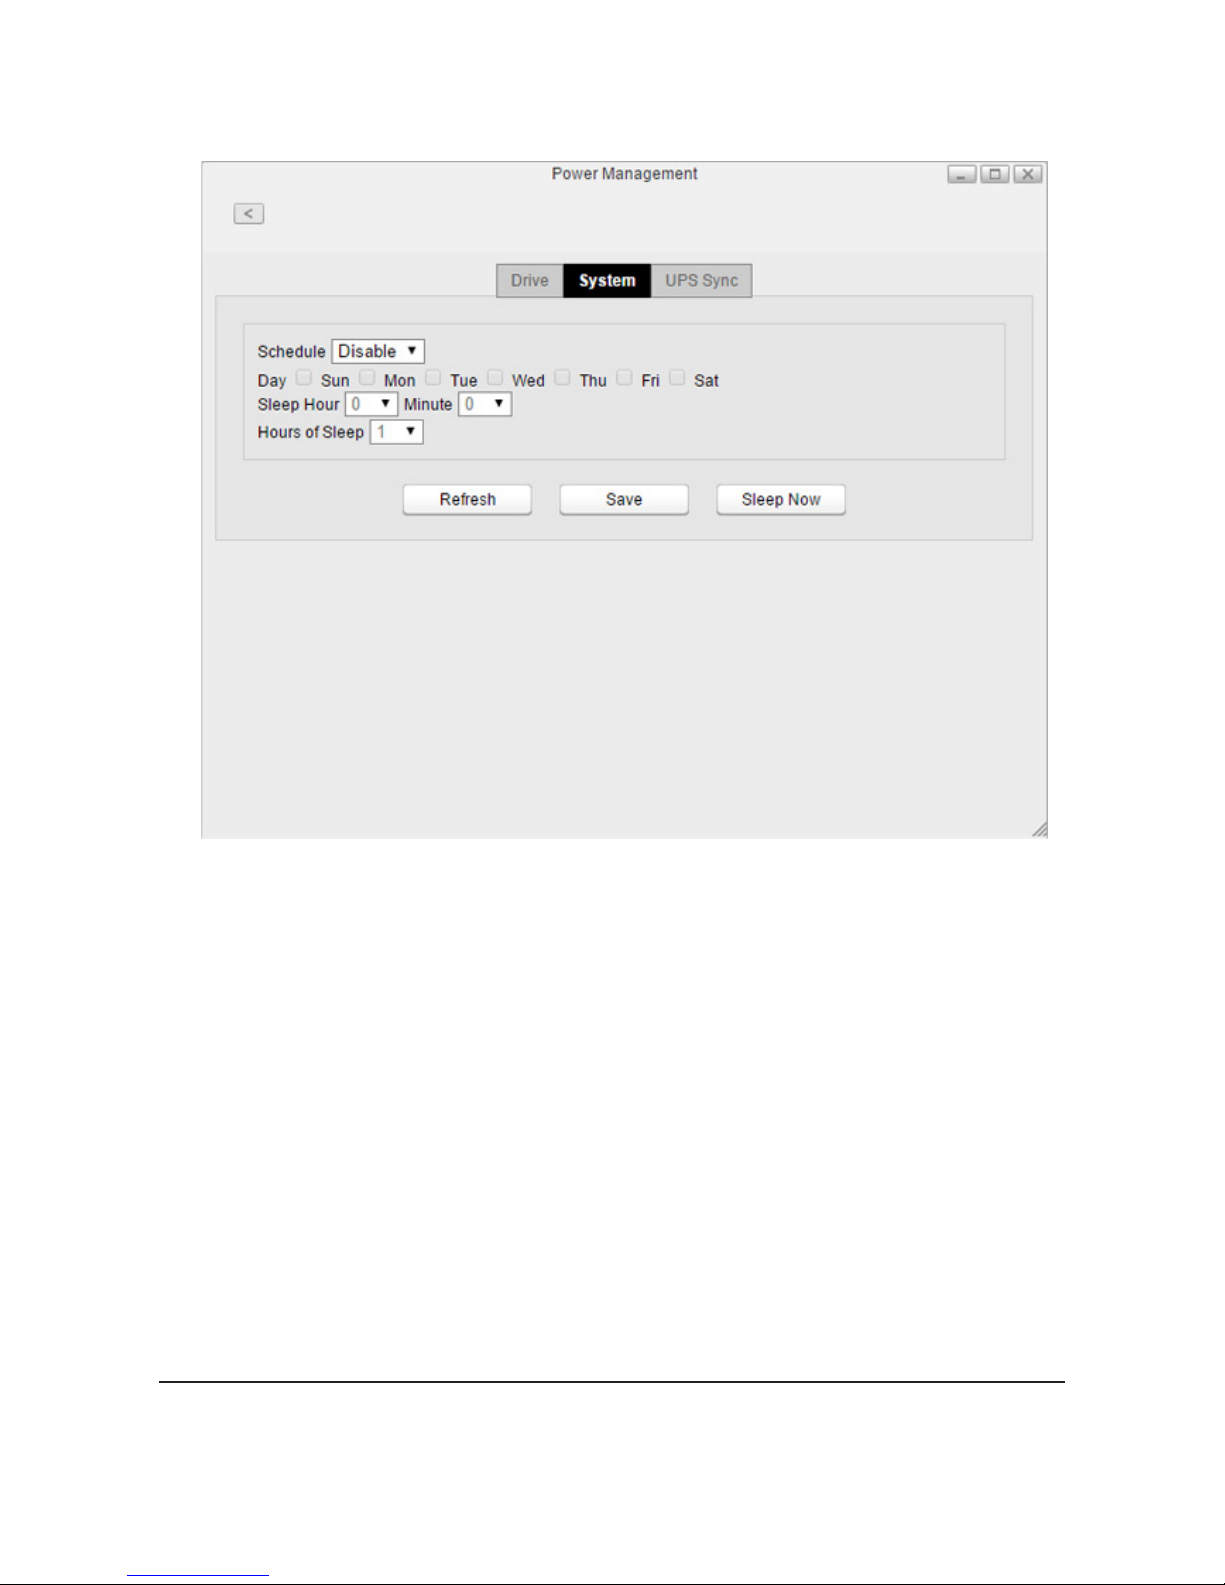
1 In Preferences, click Power Management.
2 Click the System tab.
Page 87
86
3 Select the timer interval from "Daily" or "Weekly", time to go into sleep mode, and how long the LinkStation
will be in sleep mode.
4 Click Save. If you want to make the LinkStation enter sleep mode immediately, click Sleep Now.
Notes:
• Examples of multiple timer settings are shown below.
Example 1:
If running at a current time of 10:00 Wednesday
Schedule: Daily
Sleep Hour: 0:00
Hours of Sleep: 12
The unit goes into sleep mode at 0:00 am and wake up after 12 hours, 0:00 pm on Thursday.
Example 2:
If running at a current time of 10:00 Wednesday
Schedule: Weekly Wednesday
Sleep Hour: 20:00
Hours of Sleep: 12
On every Wednesday, the unit goes into sleep mode at 8:00 pm and wake up after 12 hours, 8:00 am on
Thursday.
• To turn on the LinkStation before the wake-up time when it is in sleep mode, press the function button, use
Wake-on-LAN, or turn off, then on the LinkStation.
UPS Sync
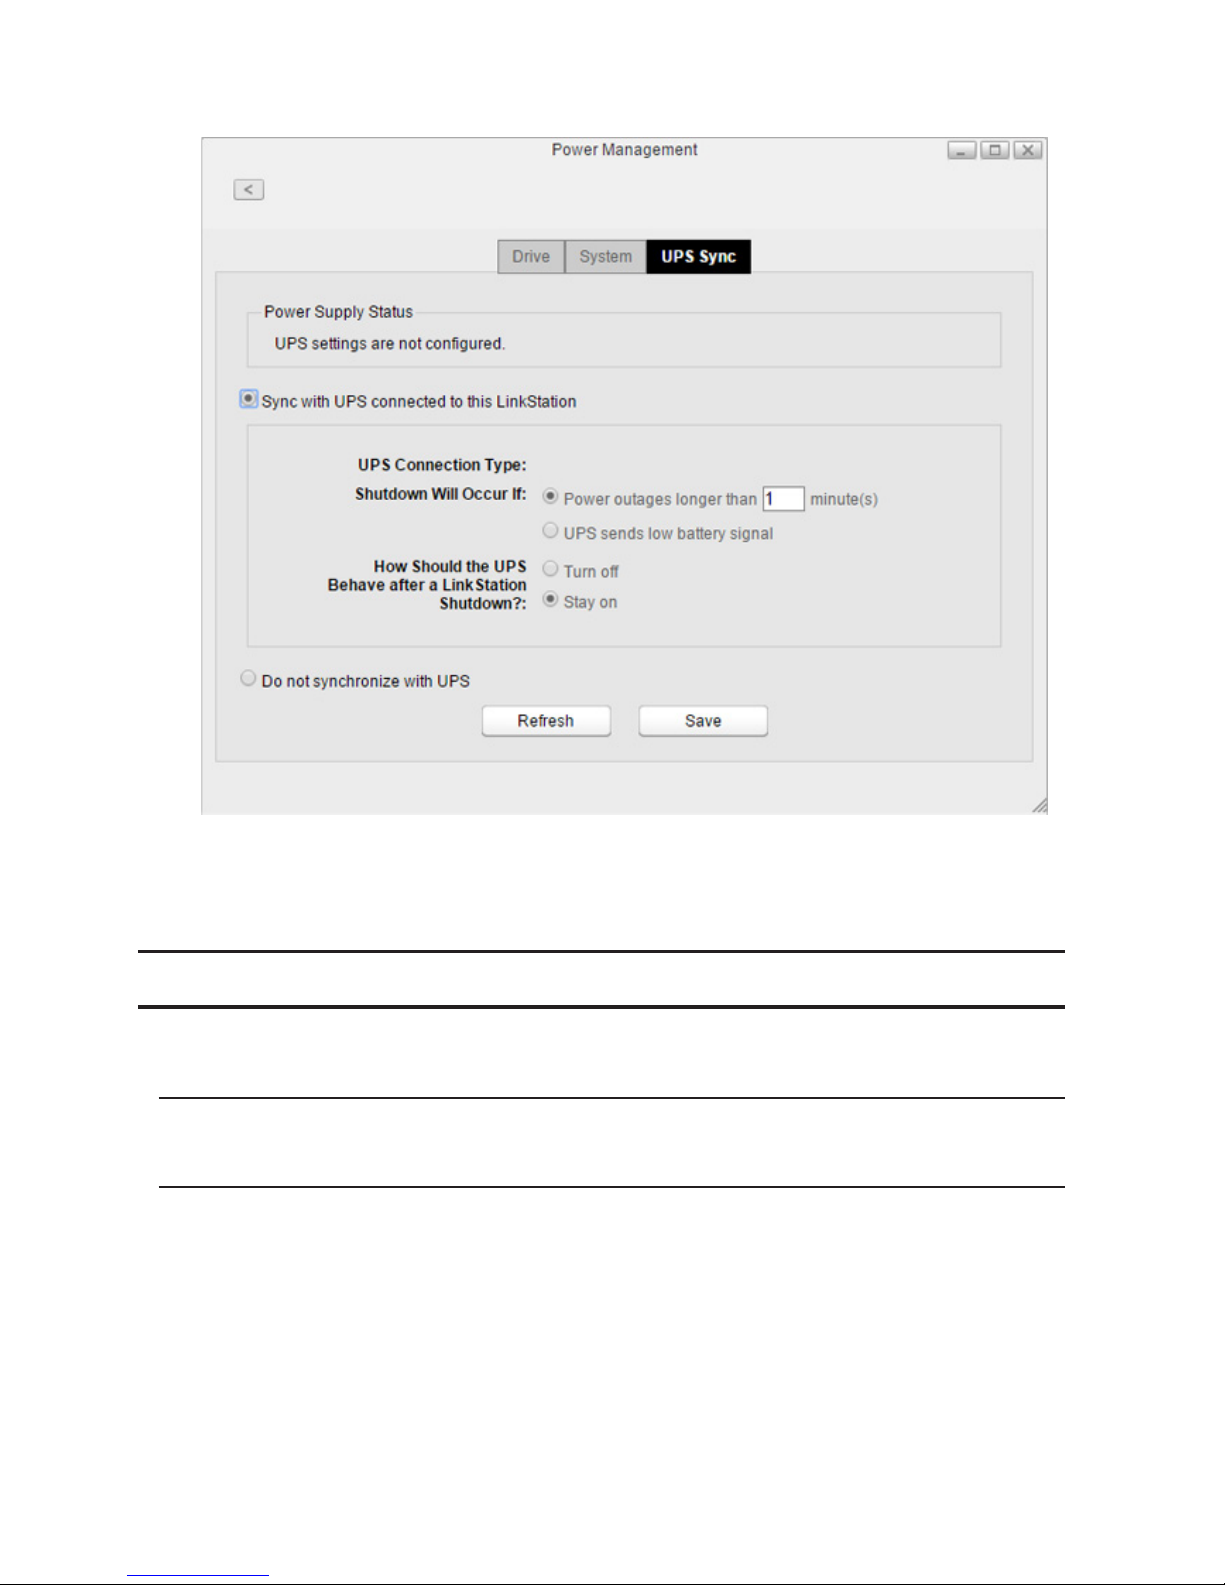
If a UPS (Uninterruptible Power Supply, sold separately) is attached, the LinkStation can be automatically shut down
to protect data in the event of a power outage.
Page 88
87
1 Plug the power cable of the UPS wall socket.
2 Connect the AC cable of the LinkStation to the UPS.
3 Connect the UPS and LinkStation using a USB cable.
4 Turn on the UPS, then the LinkStation.
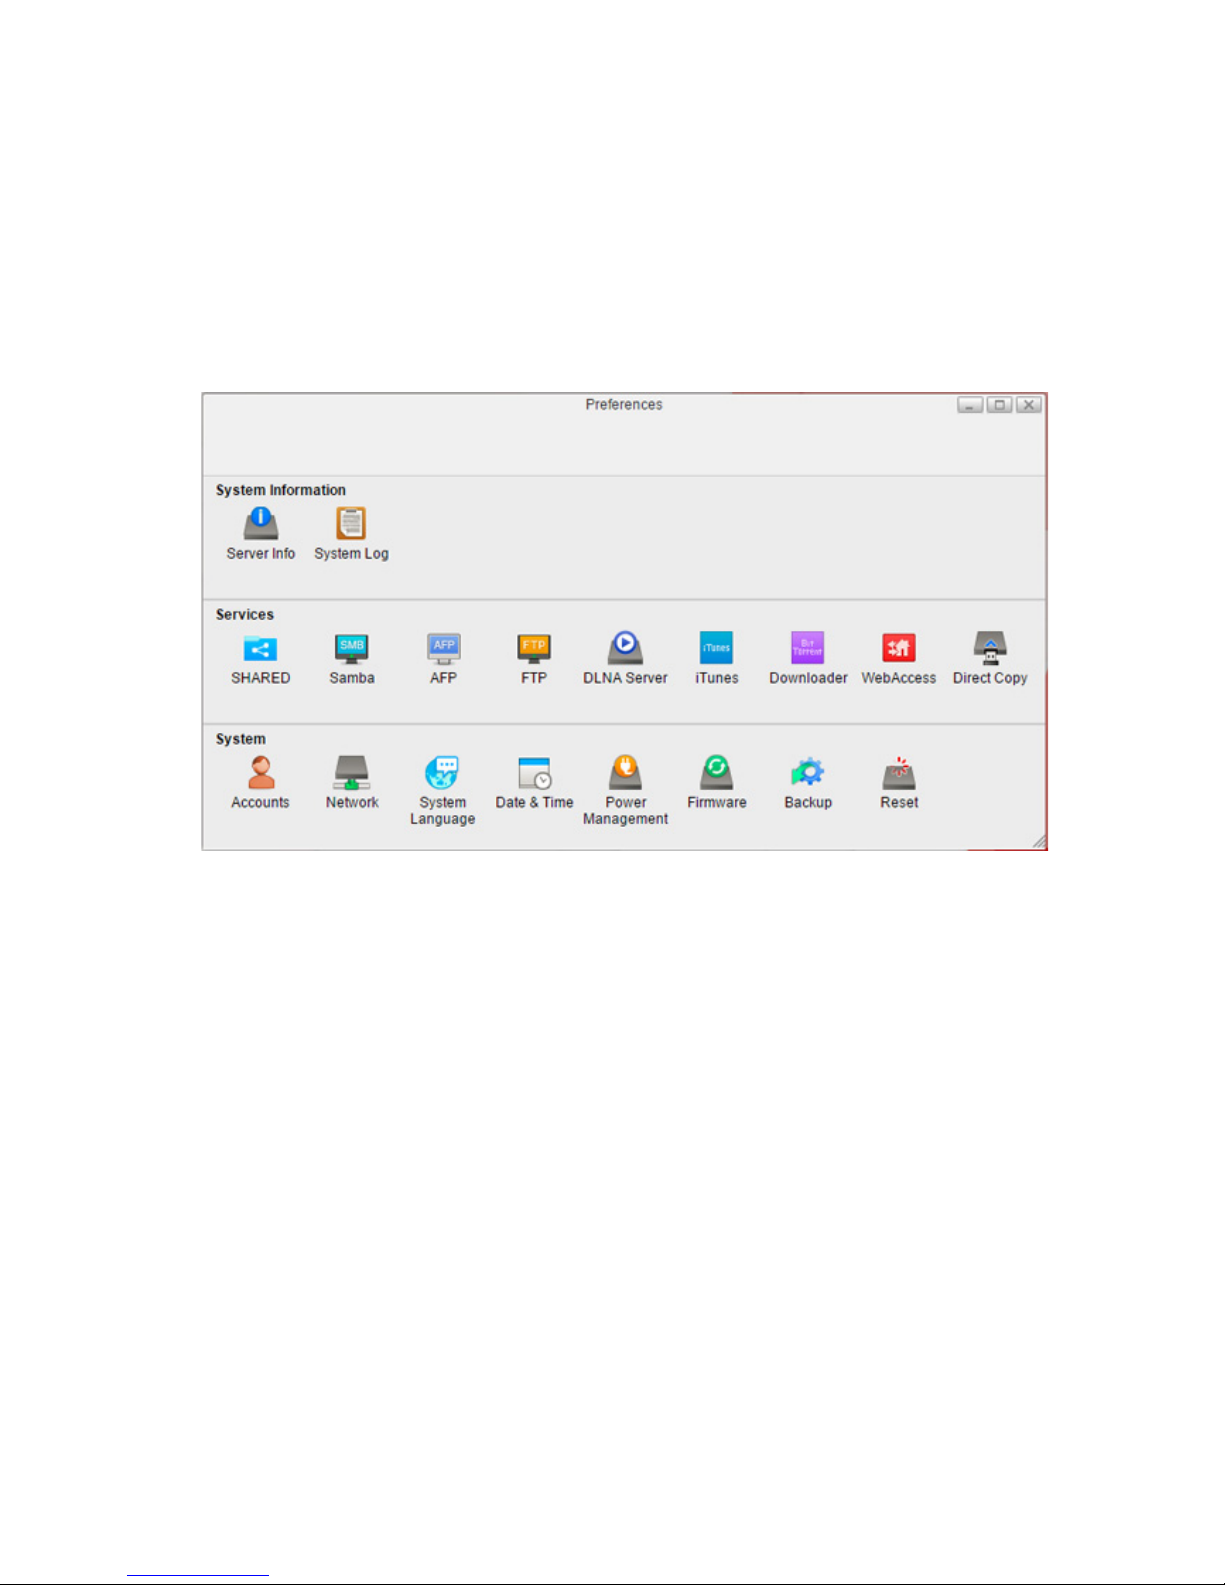
5 In Settings, click Preferences.
6 Click Power Management.
7 Click the UPS Sync tab.
Page 89
88
8 Configure the desired settings, then click Save.
Note: When the LinkStation restarts after an automatic shutdown (such as from a power outage or power
supply problem), verify that the power supply has been restored. If the LinkStation is turned on while it is still
running on the UPS and the power supply has not been restored, automatic shutdown will not occur, even after
the specified time has elapsed.
Firmware
Verify the firmware version or update the LinkStation's firmware. There are two ways to update the firmware.
Online Update
If a new firmware is available, a message and button are displayed in Settings.
Manual Update
You can update the LinkStation's firmware manually.
1 Download the latest firmware image file from the Buffalo website and save the firmware image file to the
LinkStation's shared folder.
Page 90
89
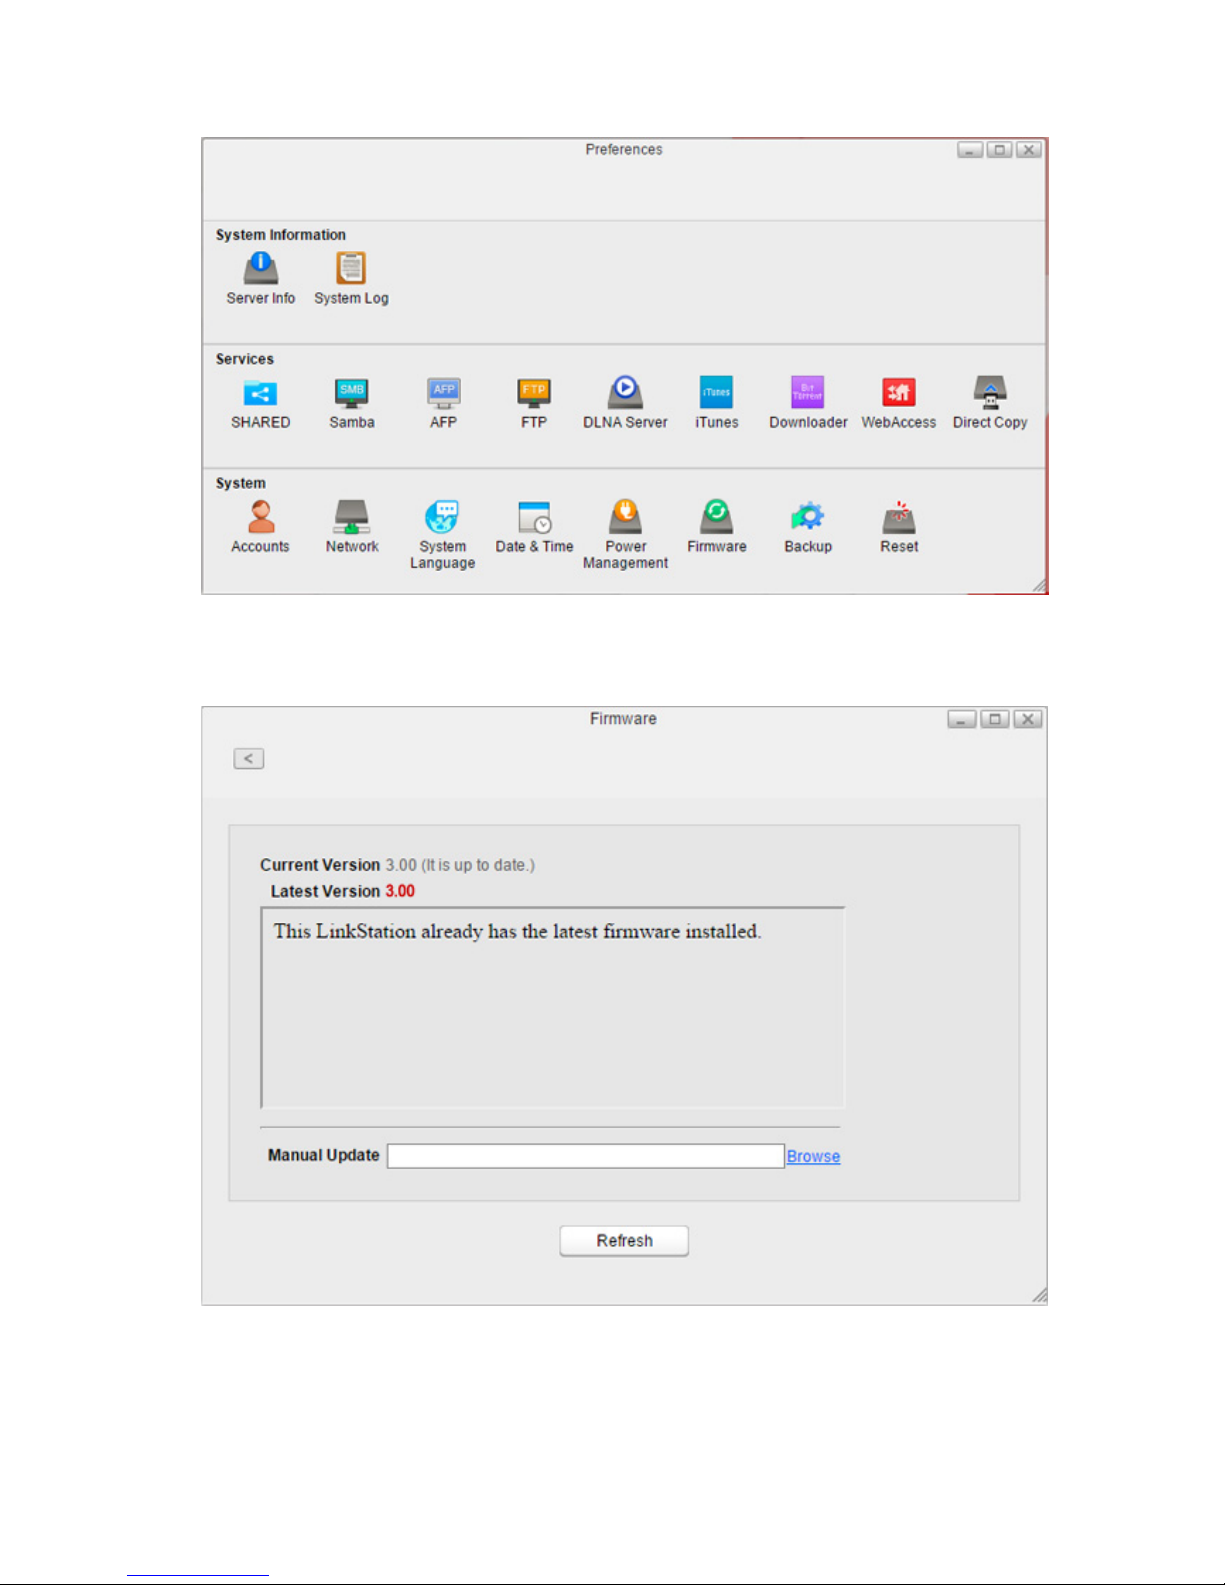
2 In Settings, click Preferences.
3 Click Firmware.
4 Click Browse.
Page 91
90
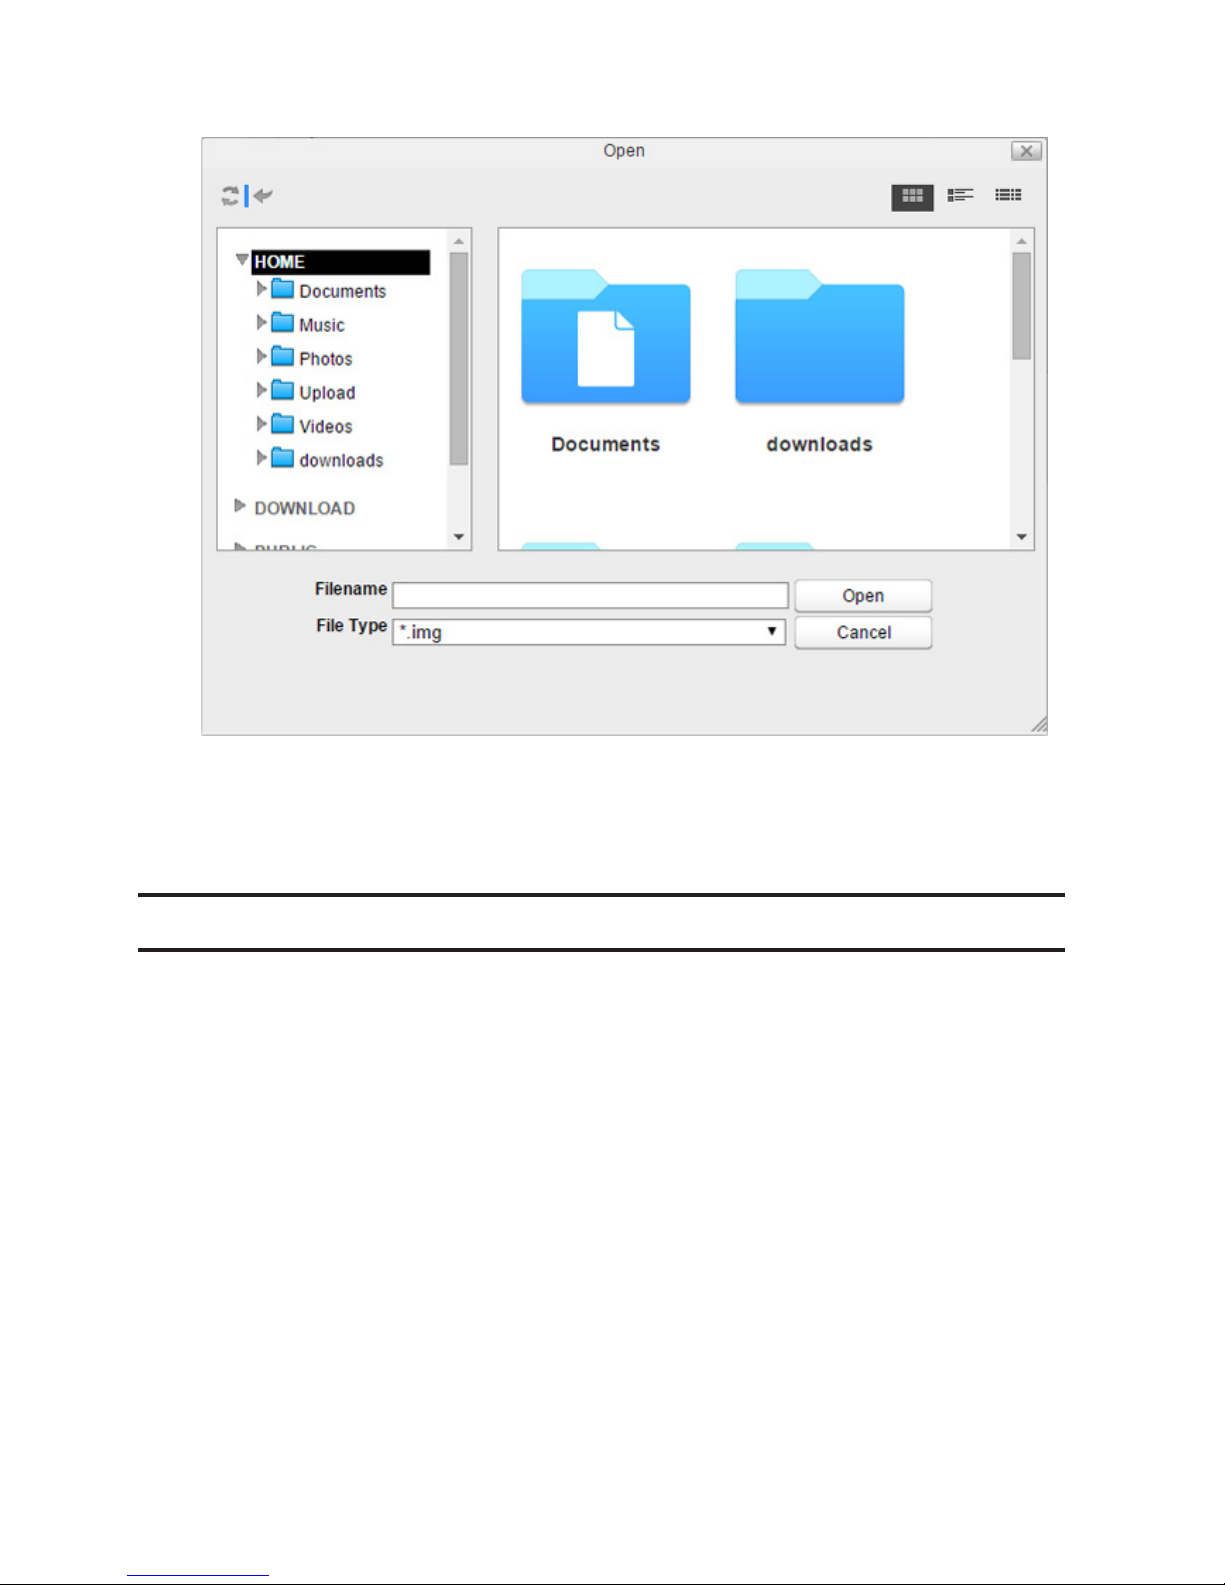
5 Specify the firmware image file that was saved in the LinkStation's shared folder and click Open.
6 Click Apply.
7 While the firmware updates, the power LED blinks amber. Wait until the update is complete and the LED
returns to white.
Backup
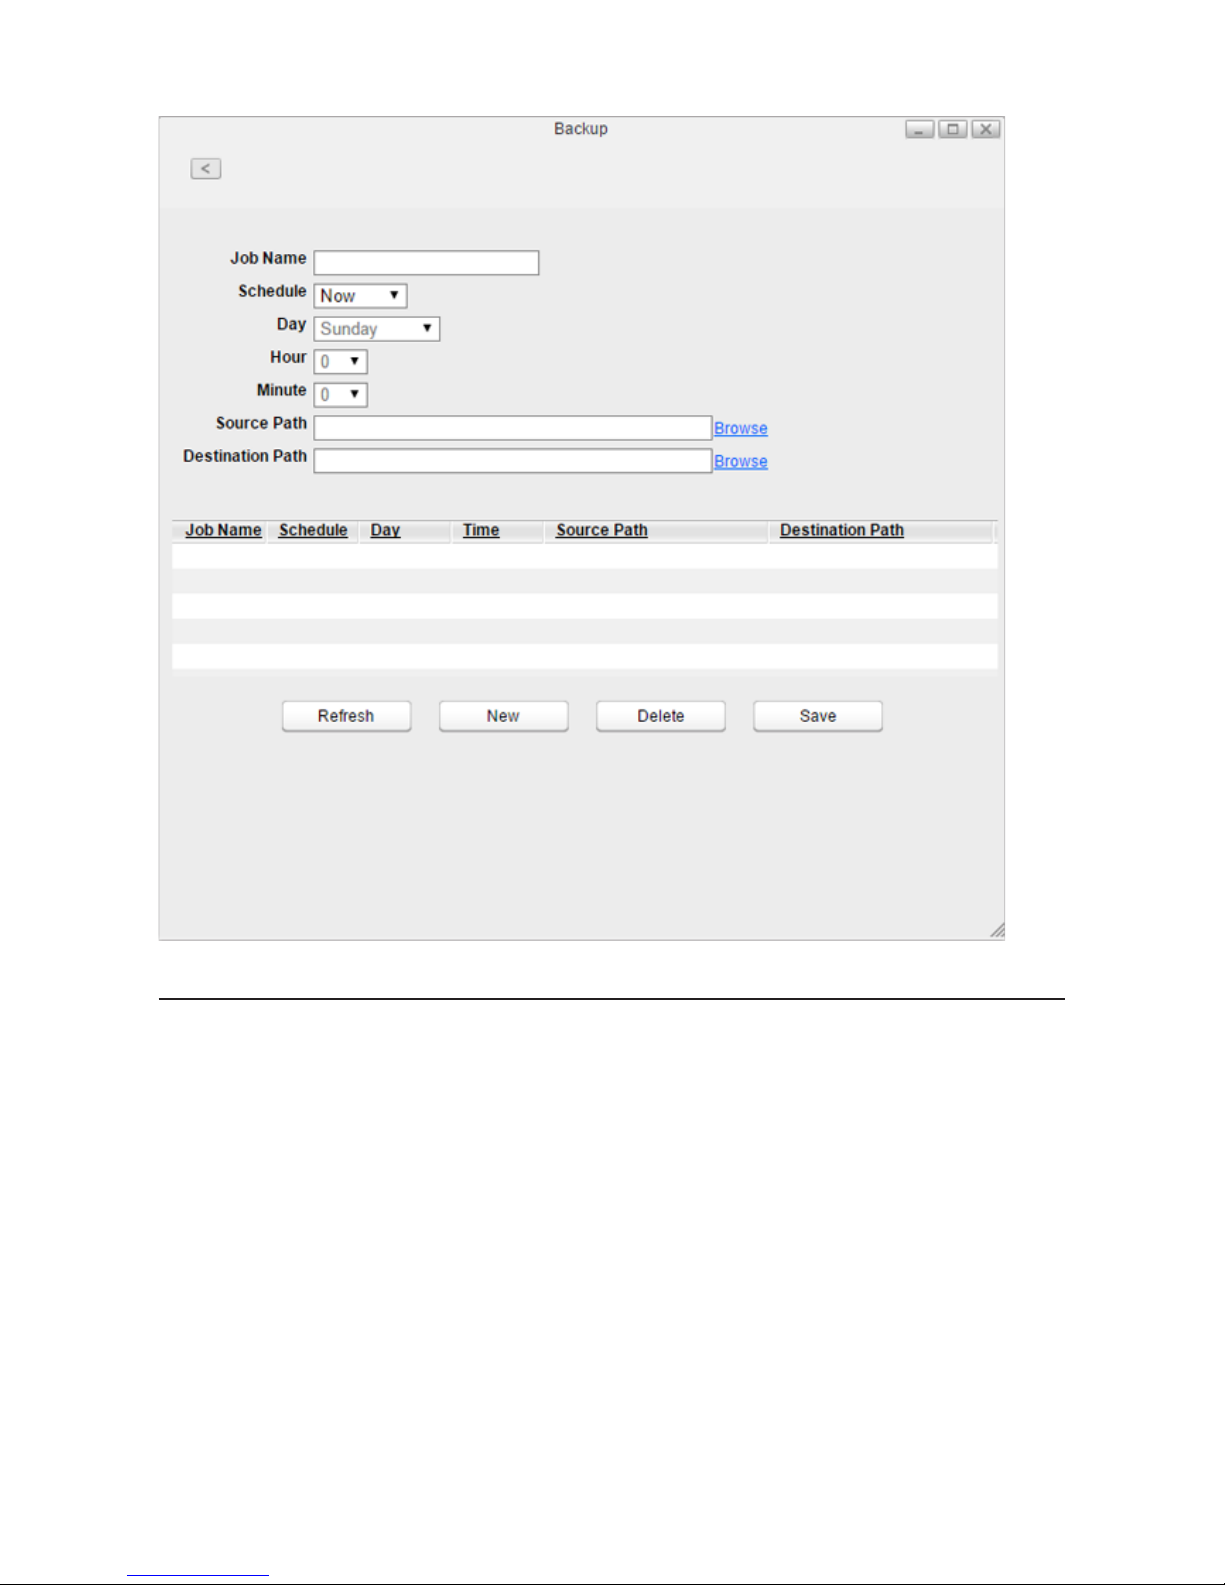
Backs up the data in the LinkStation to another location to avoid unexpected data failure.
Page 92
91
Backing Up from LinkStation
You can back up a LinkStation folder to:
• A different folder on the LinkStation
• A USB device connected to the LinkStation
To create a backup job, follow the procedure below.
Page 93
92
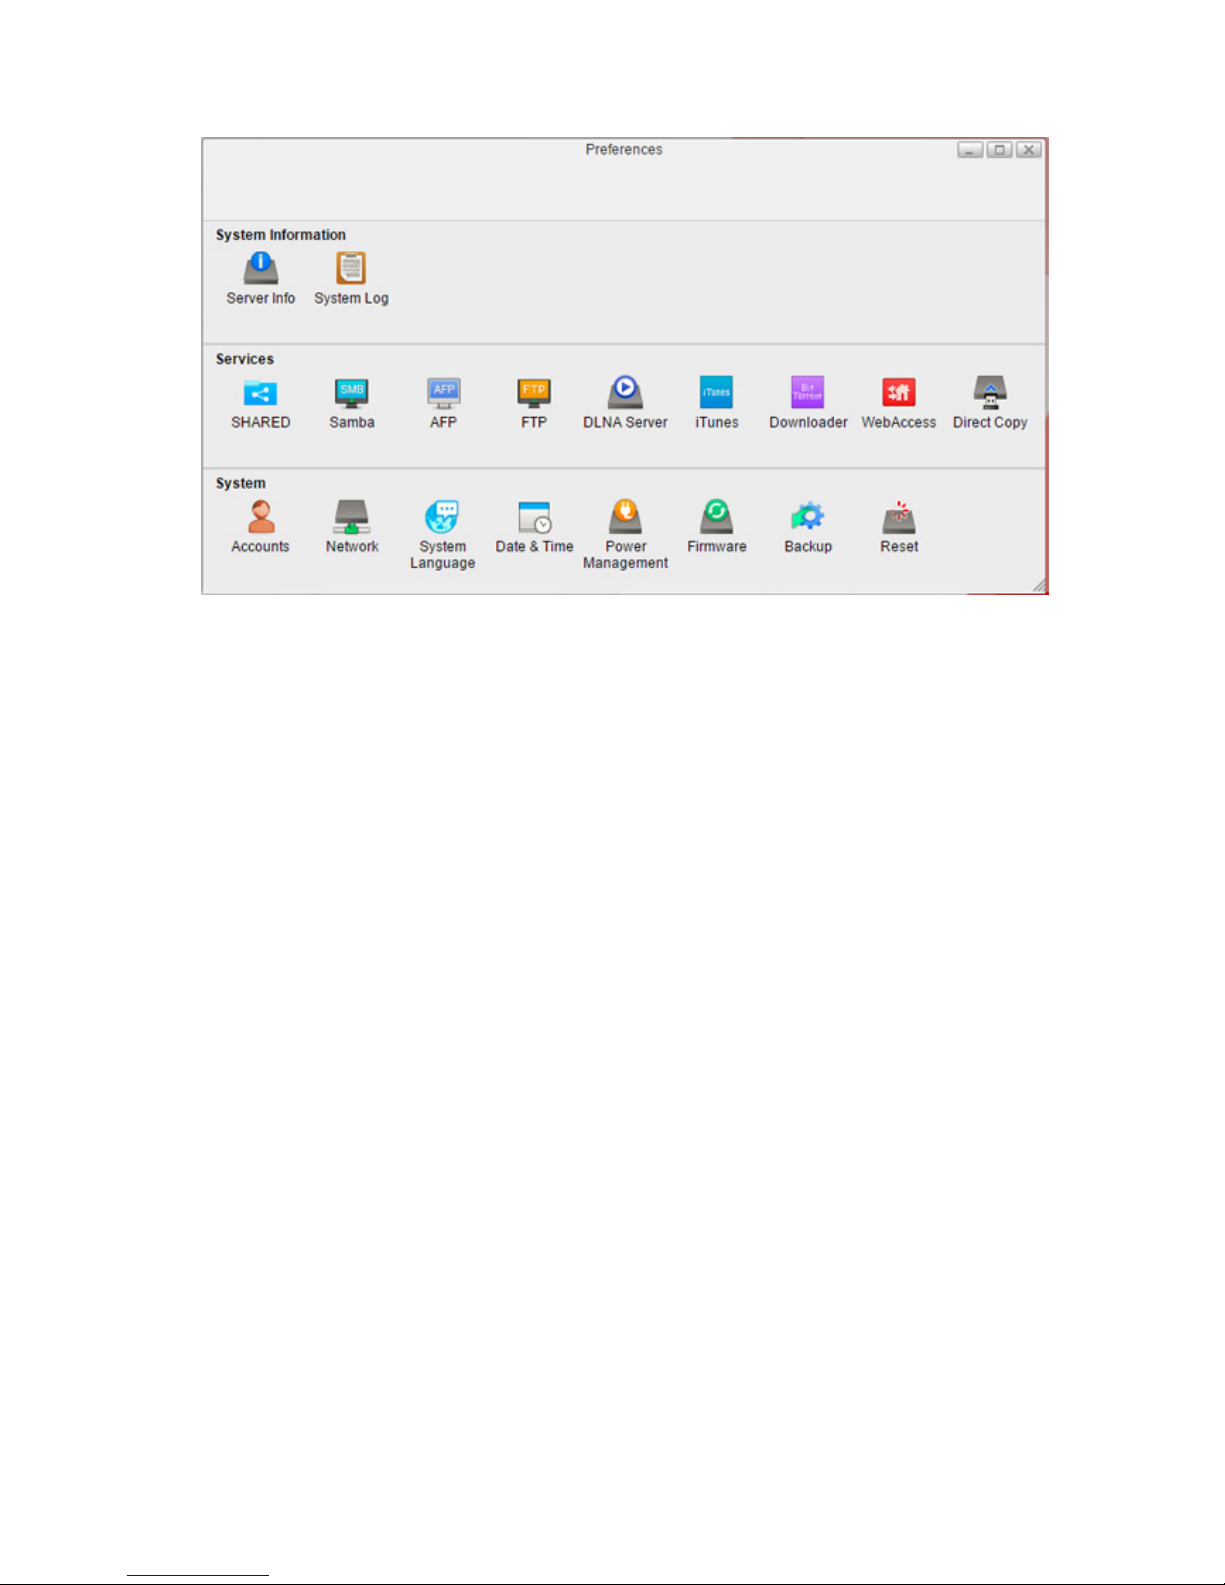
1 In Preferences, click Backup.
Page 94
93
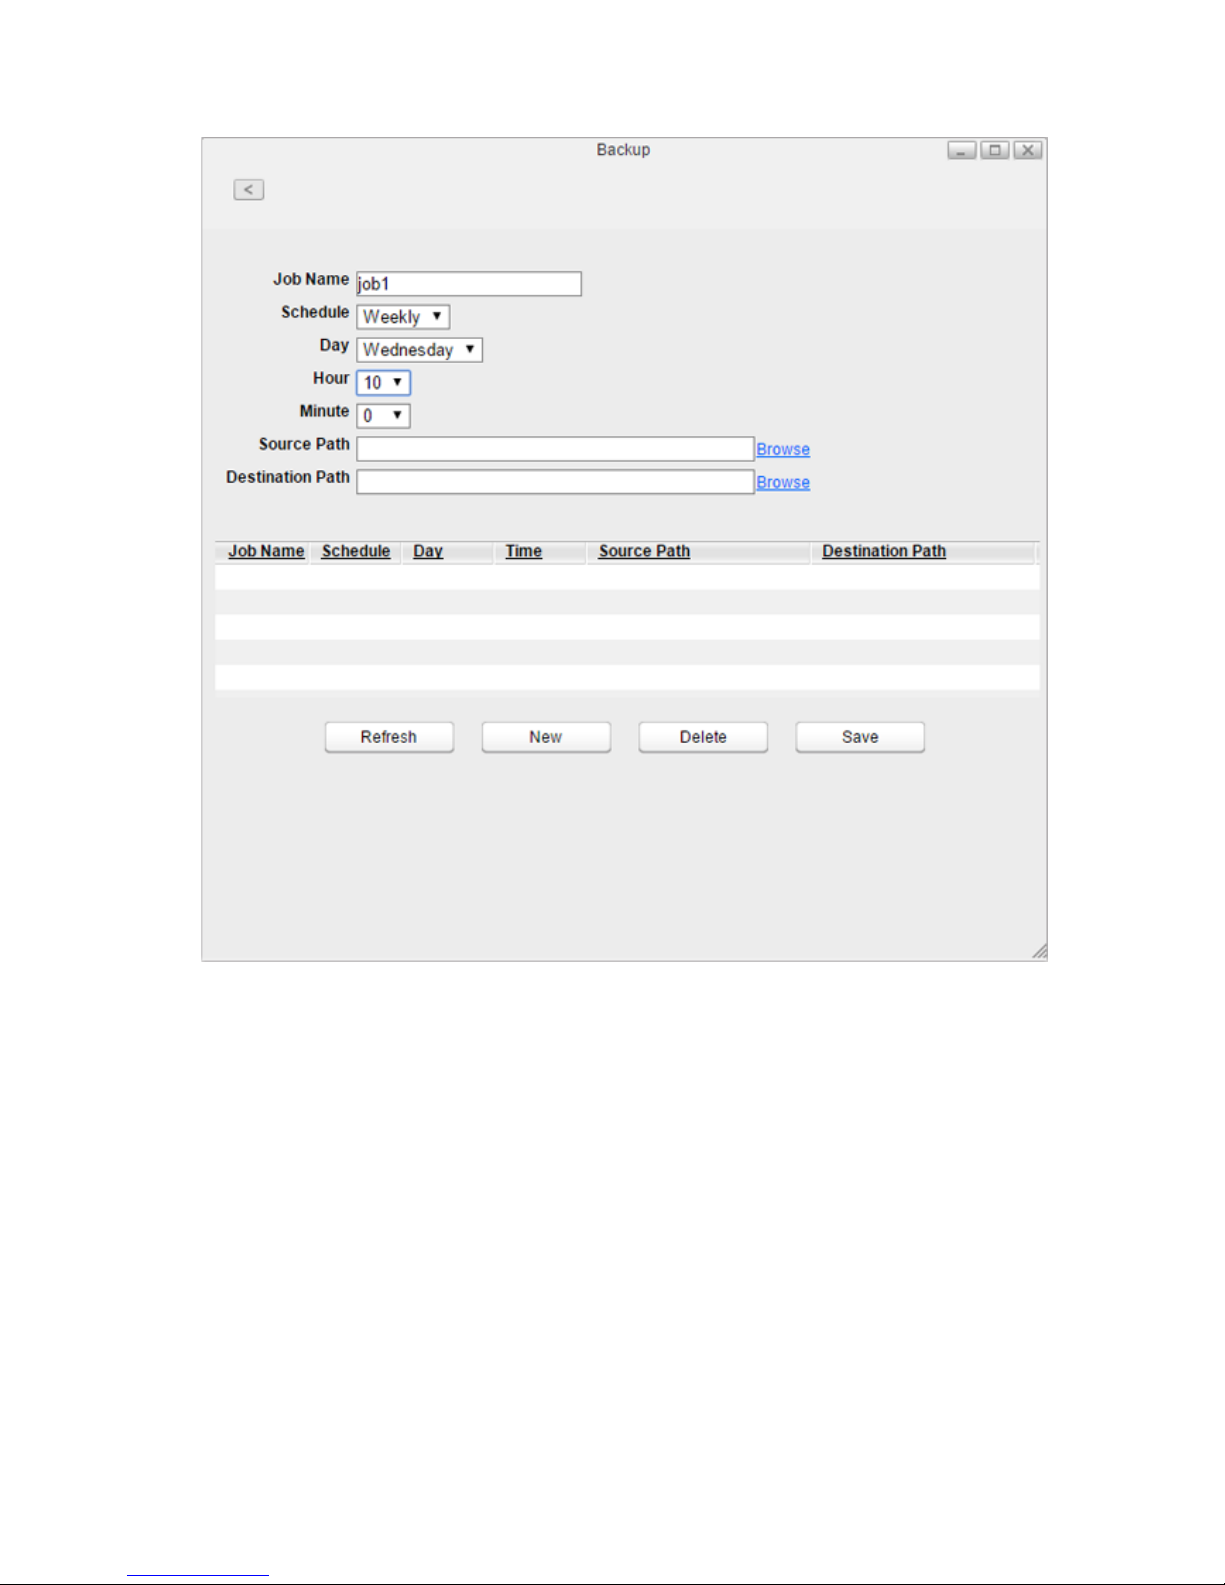
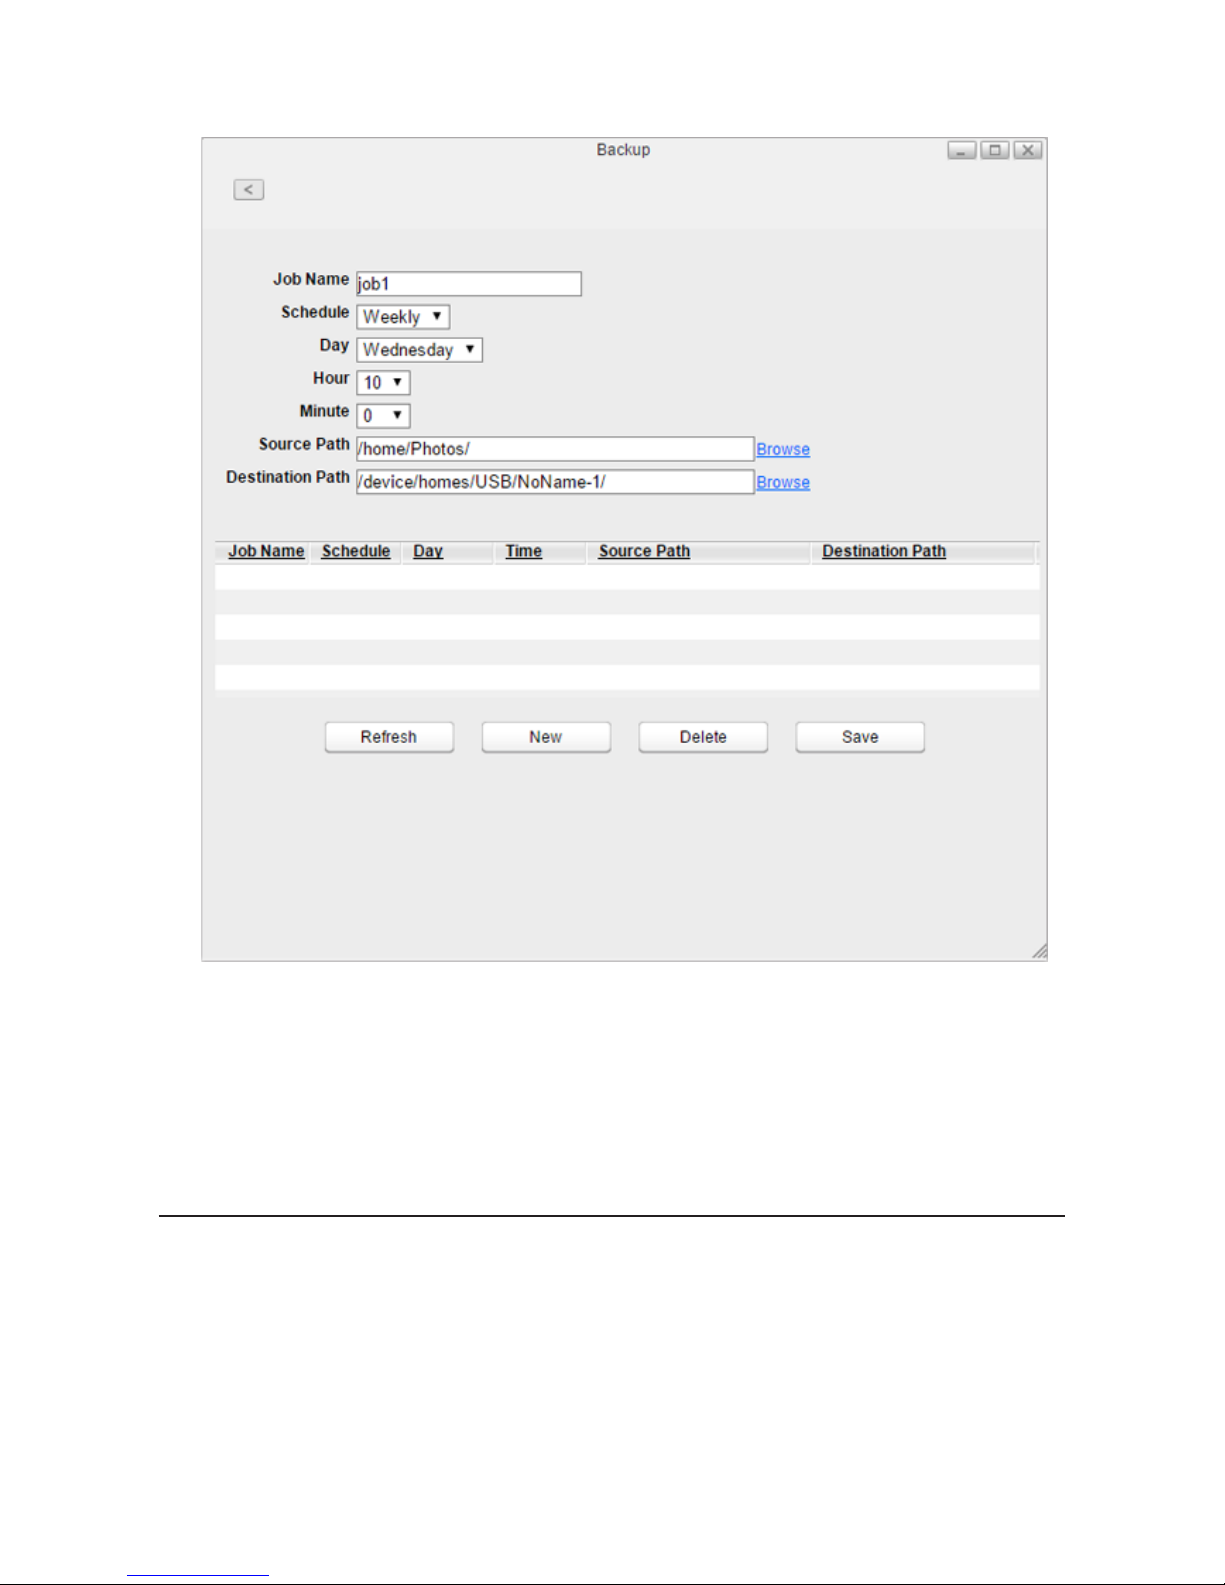
2 Enter a job name and configure backup settings such as date and time to run.
3 Click Browse to the right of "Source Path".
Page 95
94
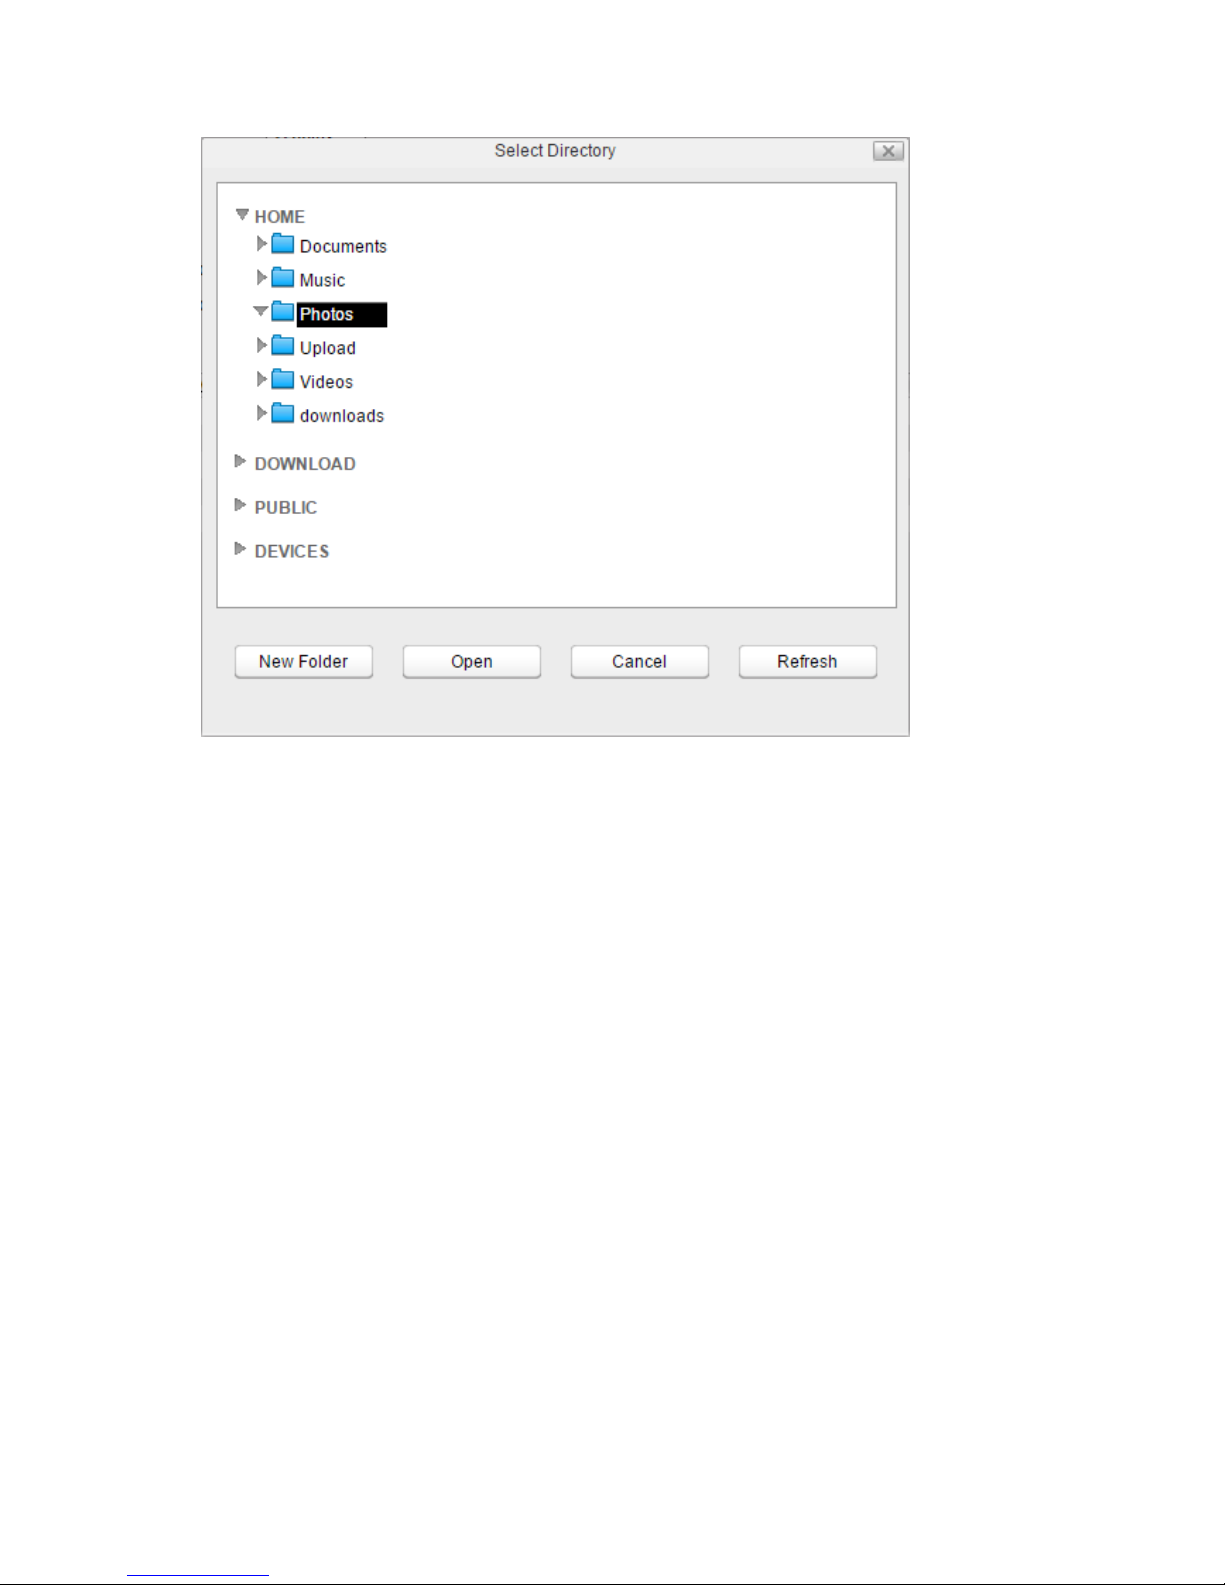
4 Select the folder that will be the backup source, then click Open.
Page 96
95
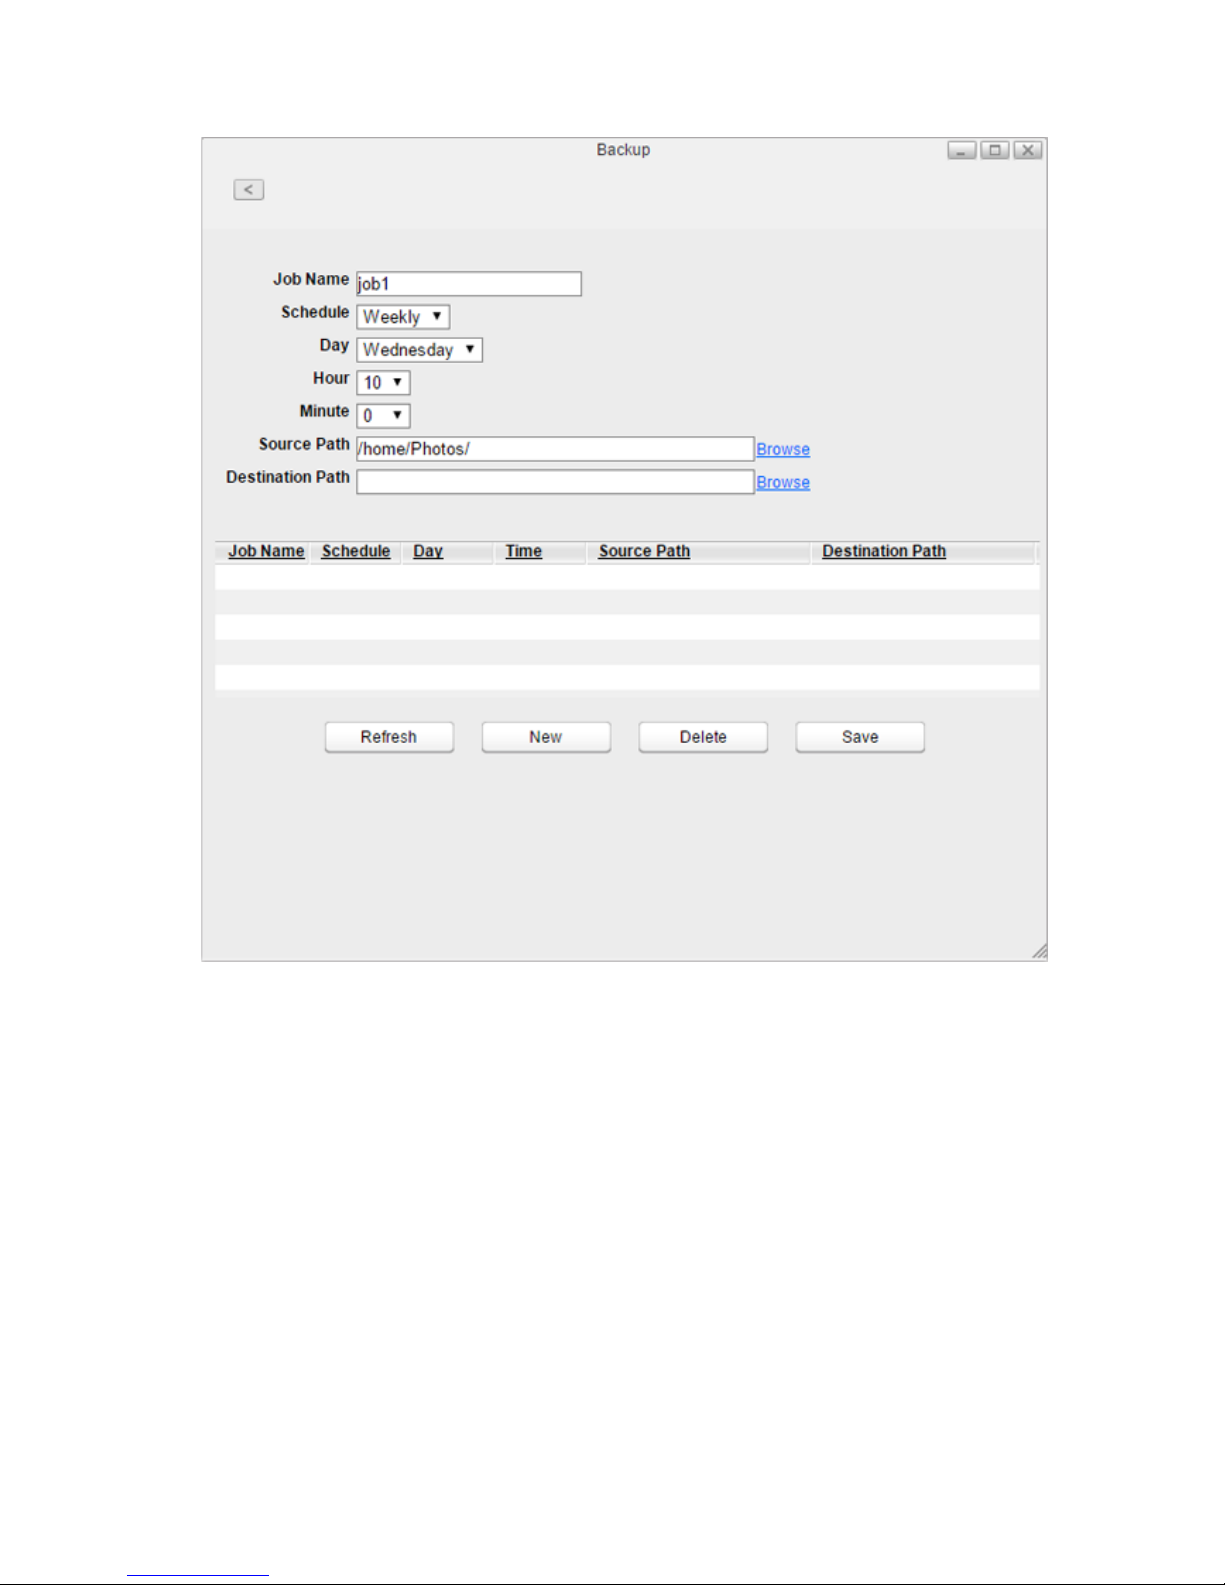
5 Click Browse to the right of "Destination Path".
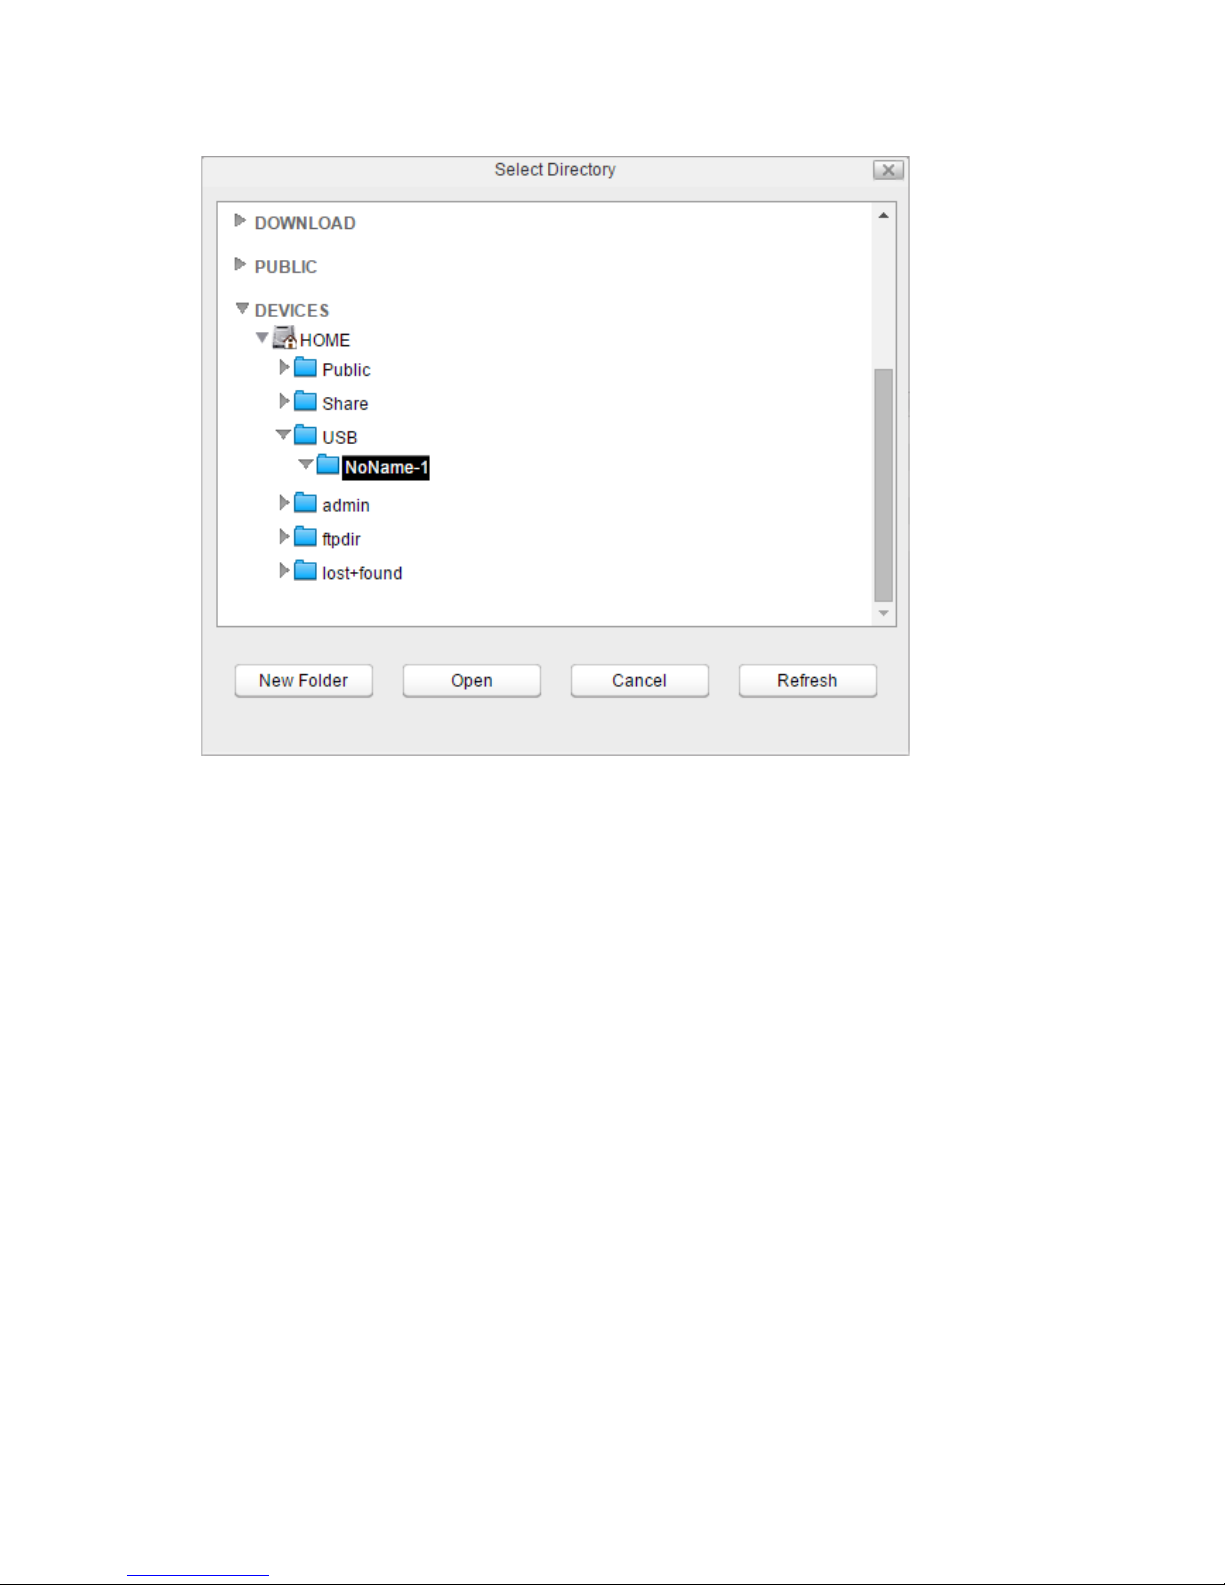
6 Select the backup target and click Open.
Page 97
96
If you want to select the USB device as the backup target, select the USB device hostname under the "USB"
folder. The "USB" folder is not in the USB device.
Page 98
97
7 Click Save.
The backup job is added to the list.
Notes:
• Up to 8 backup jobs can be configured.
• When a backup job starts, a folder that contains the backup date in its folder name will be created in the
backup target automatically and all data will be backed up to that folder.
• If a backup job is scheduled to run while Direct Copy is running, the job will be canceled. The prior process
will work.
Backing Up Your Mac with Time Machine
Time Machine is a backup program included with OS X. To use your LinkStation as a backup destination for Time
Machine, configure it as described below.
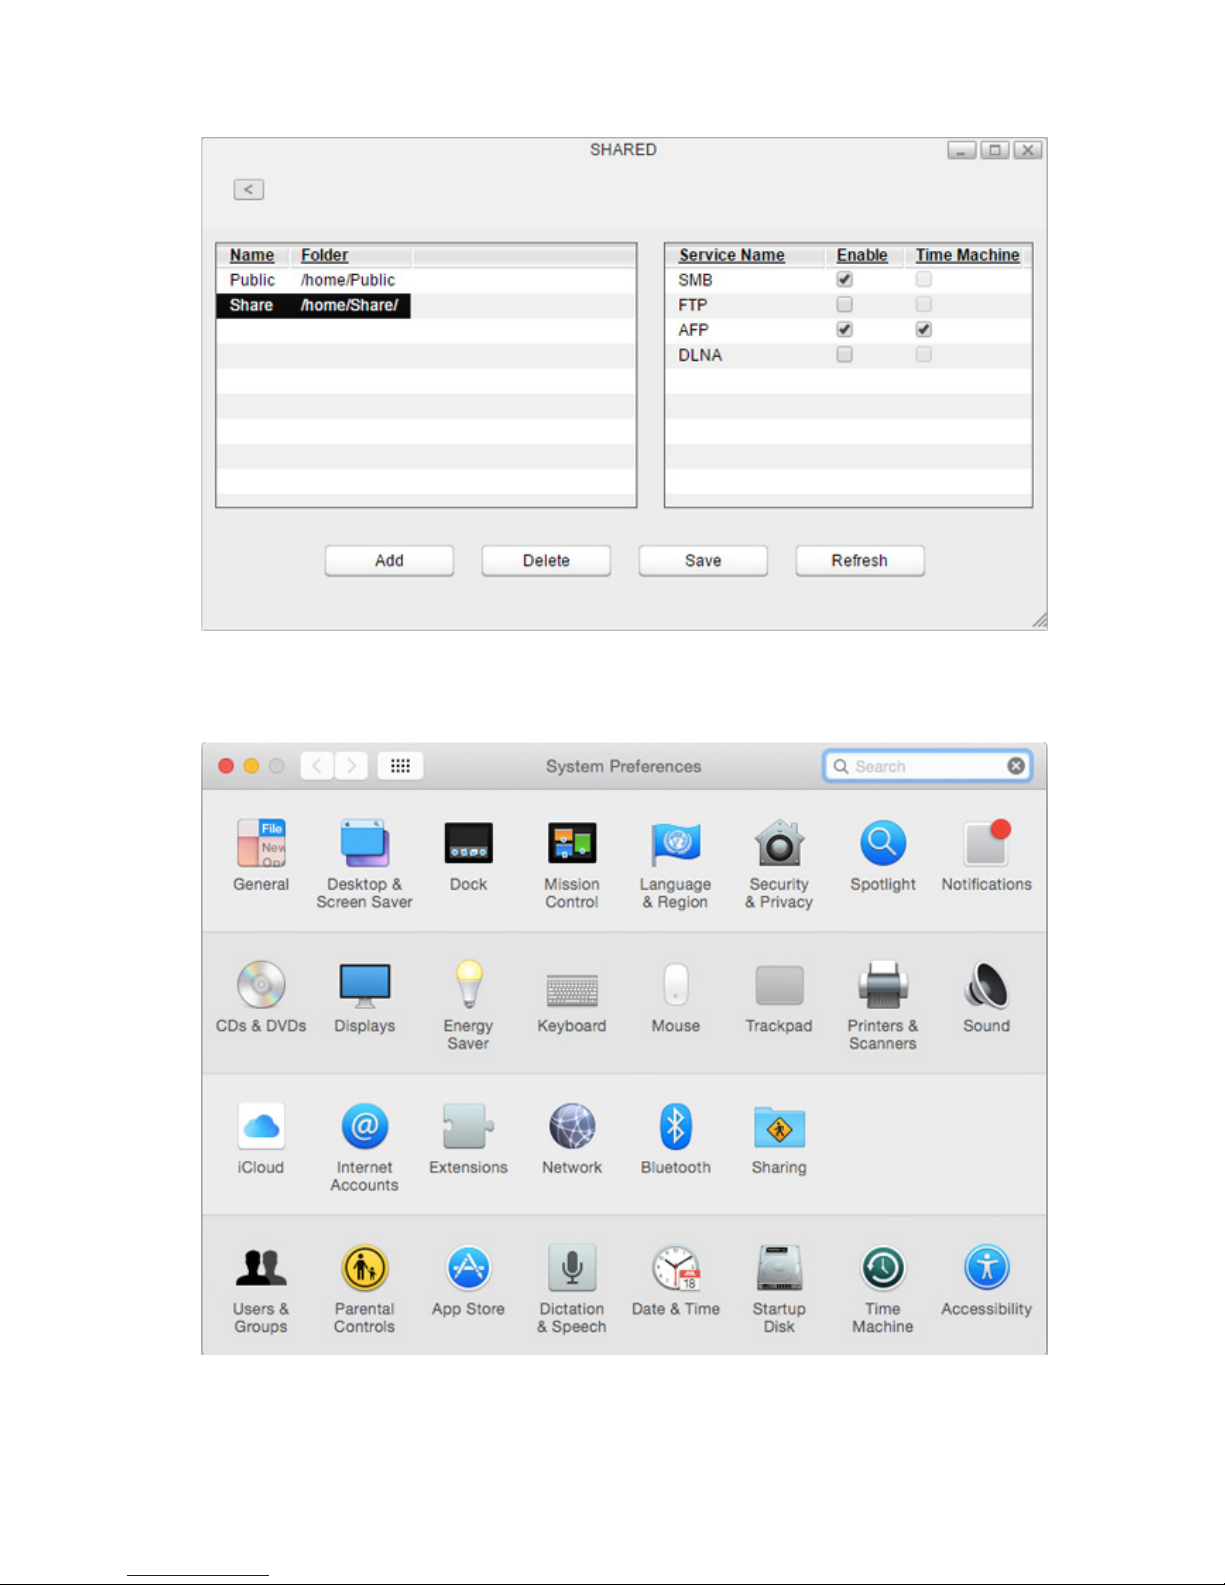
1 In Preferences, click SHARED and select a shared folder as your backup destination for Time Machine.
Page 99
98
2 Check both checkboxes under "Enable" and "Time Machine" next to "AFP", then click Save.
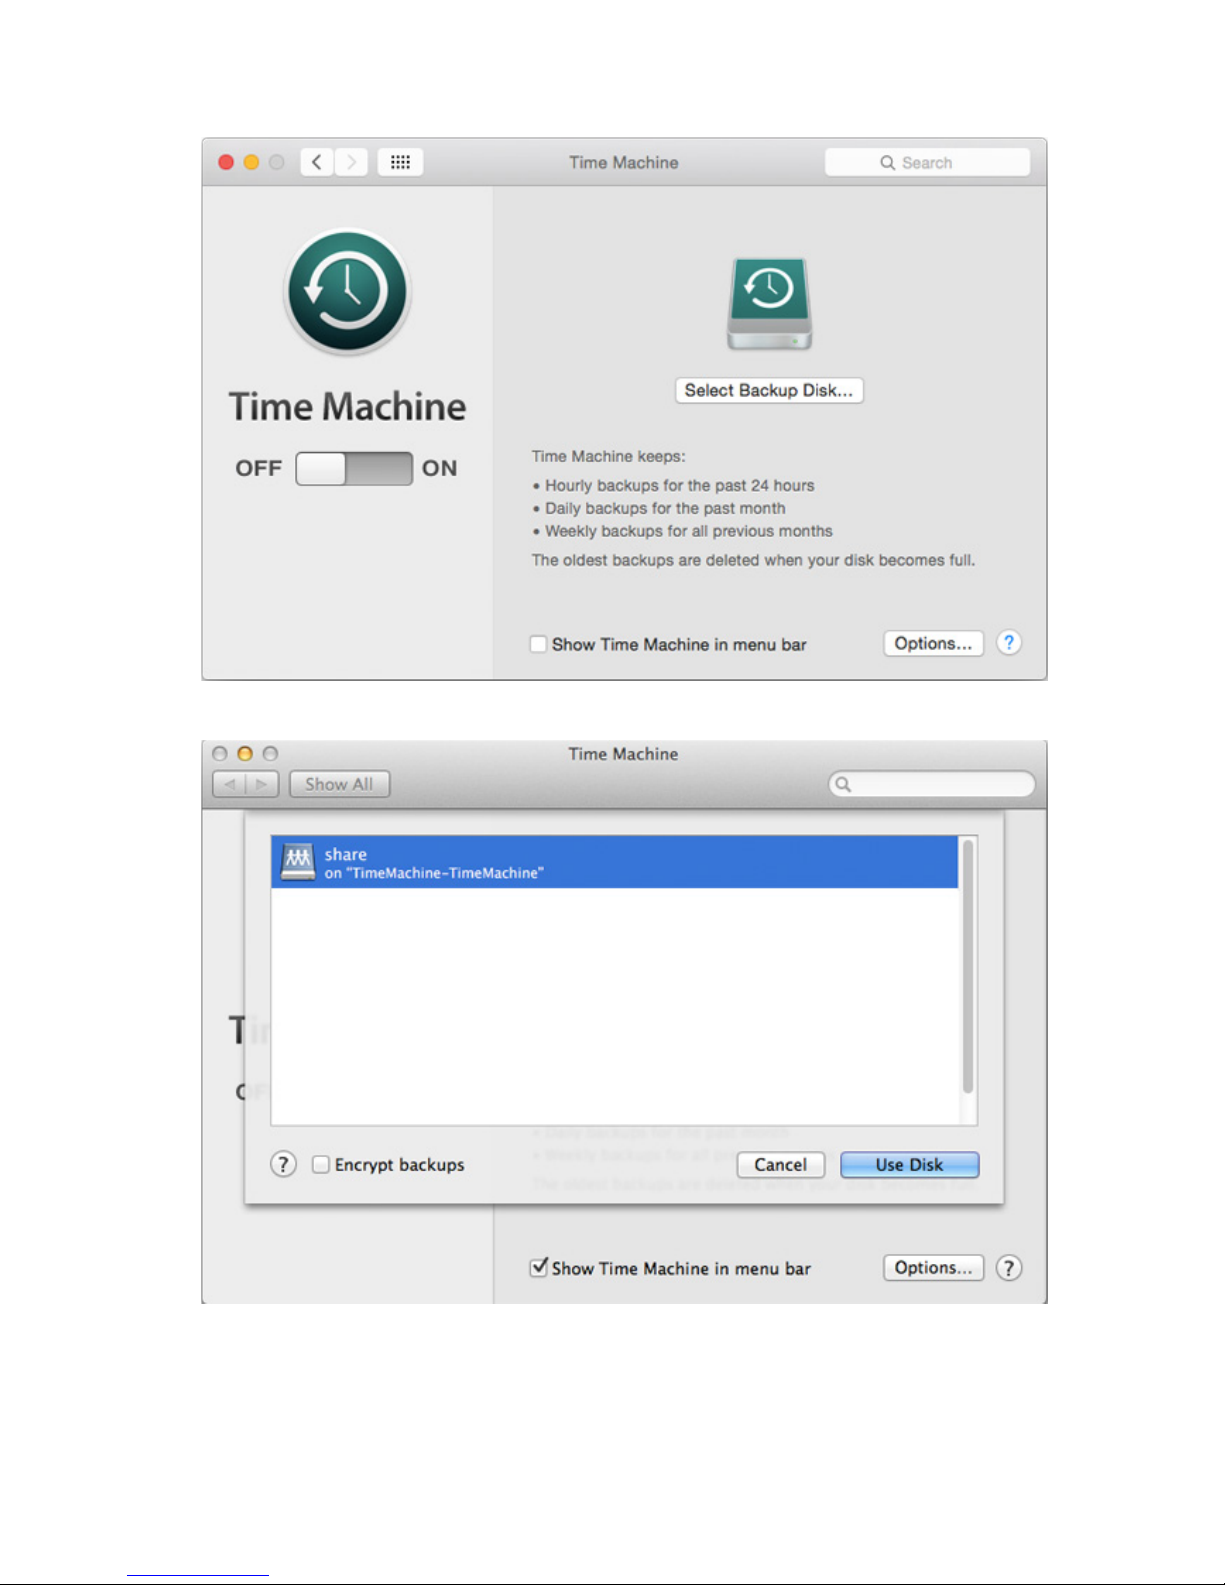
3 On the Mac, open System Preferences.
4 Click Time Machine.
Page 100
99
5 Click Select Backup Disk.
6 Select the LinkStation, then click Use Disk.
 Loading...