

Page 1
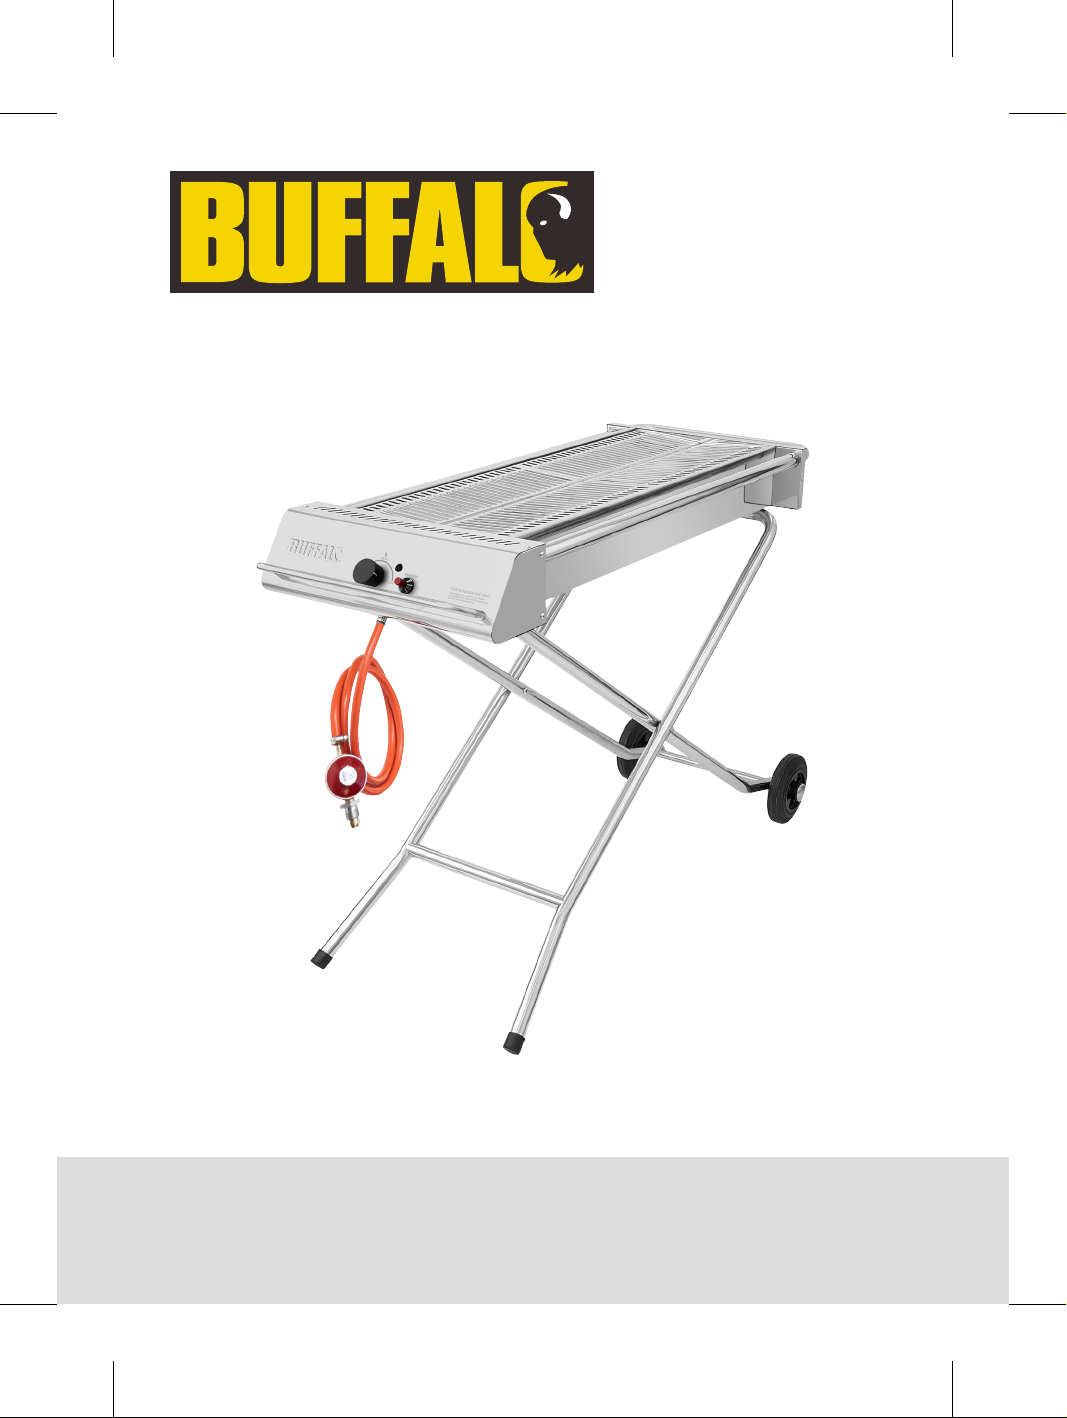
Folding Gas
BBQ
Instruction manual
Model:
JA377
Page 2
EN
Safety Instructions
• Read all instructions before using the appliance and retain for
future reference.
• Follow all warning notices on the appliance.
• Never allow children to operate this appliance.
• Position on a flat, stable surface.
• For outdoor use only.
• Warning: Accessible parts may be very hot.
Keep young children, elderly people, and animals away.
• Always use oven gloves when cooking or carrying out any
adjustments to the barbecue.
• Use purpose designed barbecue tools with long, heat resistant
handles.
• Do not cover the appliance before it completely cools down.
• Do not move the appliance after lit, during use or immediately
after use before it completely cools down.
• Do not leave the appliance unattended during use.
• Turn off the gas supply at the gas cylinder or regulator after
each use, or before carrying out any adjustments.
• Do not modify the appliance in any way.
• Any modification of the appliance, misuse, or failure to follow
the instructions may be dangerous and will invalidate your
warranty.
• Never use accessories which are not recommended by the
manufacturer. Only use original parts and accessories.
• Do not use this appliance in enclosed areas, or near flammable
materials (Petroleum based products, thinners or any other
solid object that carries a flammable warning label).
2
Page 3
EN
• The appliance must not have any overhead obstruction, e.g.
trees, shrubs, lean-to roofs. Ensure a clearance of at least 1m
around the appliance for ample ventilation.
• Do not store or use gasoline or Methylated Fuels or any other
flammable vapours and liquids in the vicinity of this or any
other appliance.
• Never light a gas appliance with gasoline or combustible fluids!
• Do not store any other gas cylinder in the vicinity of this or
any other appliance.
• Keep a fire extinguisher (powder type) handy.
• Keep any electrical cords and fuel supply hose away from the
heat surfaces.
• Do not use to heat any sealed glass/container with food.
Pressure may build up and cause the container to burst,
possibly resulting in personal injury or damage to the
appliance.
• Do not attempt any unauthorized interference of the main
controls on this gas appliance, i.e. gas taps, injectors, valves,
etc.
• During use, do not attempt to disconnect any gas fitting part
on the gas appliance or the gas regulator/cylinder.
• Clean the appliance after use. For cleaning surfaces in contact
with food, please refer to the "Cleaning and Maintenance"
section of this manual.
• Do not obstruct any ventilation openings in the appliance
body.
• Do not enlarge burner ports or orifice/nozzle openings when
cleaning the burner or valves.
• It is recommended this gas appliance be serviced (at least
annually) by a professional. Do not service it yourself.
3
Page 4
EN
Gas, regulator and hose
• If used with LPG bottled gas: A suitable regulator must be
used for butane, propane or mixes.
• LPG gas cylinders should rest on a stable, flat surface.
• Do not place the gas cylinder directly underneath the
barbecue.
• LPG gas cylinders should never be stored or laid on their side,
in the horizontal position. A leak would be very serious and
liquid could enter the gas line with serious result.
• Ensure to use gas hoses with heatproof temperature of higher
than 80°C.
• The hose should hang freely with no bends, twisting, tension,
folds, or kinks that could obstruct free flow of gas. Always
inspect the hose for cuts, cracks, perishing, or excessive wear
before use.
• Apart from the connection point, no part of the hose should
touch any hot barbecue parts. If the hose shows any sign of
damage, replace it immediately with one suitable for use with
LPG gas which meets the national standards for the country of
use.
• Before use, ensure to check for gas leak ( Gas leak testing).
This is the only safe and sure way to detect any gas leaking
from joints and connections of the barbecue after assembly.
• Perform leak test annually, and whenever the gas cylinder is
disconnected or reconnected.
• Do not use an open flame for gas leak test at any time.
• In case of gas leak or gas odour:
- Stop using the appliance and turn off gas supply to it.
- Extinguish any open flame.
- Check for damages, poor connections, etc.
- If odour continues, contact your local dealer.
4
Page 5
EN
Introduction
Please take a few minutes to carefully read through this manual. Correct maintenance and operation of
this appliance will provide the best possible performance from your BUFFALO product.
Pack Contents
The following is included:
• Buffalo folding gas BBQ (with gas hose pre-mounted)
• Gas hose clip (x2, metal)
BUFFALO prides itself on quality and service, ensuring that at the time of unpacking the contents are
supplied fully functional and free of damage.
Should you find any damage as a result of transit, please contact your BUFFALO dealer immediately.
• Pressure regulator
• Instruction Manual
Installation
Caution!
• It is most important that this appliance is installed correctly and that operation is
correct before use. This appliance must be installed in accordance with National and
local codes and regulations covering gas, health and fire safety.
• Installations must be carried out by qualified persons only. Failure to install equipment
to the relevant codes and manufacturer’s specifications shown in this section will void
the warranty.
• Components sealed or having adjustments protected by the manufacturer are only to be
adjusted by an authorized service agent. They are not to be adjusted by the installation
person or users.
• We suggest wearing gloves when carrying out installation and assembling.
• If unsure of any aspect of the installation, instructions or performance of the appliance,
contact your dealer promptly.
Selecting a location
• This appliance is for outdoor use only and should be placed in a well-ventilated area.
• The sides of the barbecue should NEVER be closer than 1 metre from any combustible surface,
including trees and fences and make sure that there are no heat sources nearby (cigarettes, open
flames, spark, etc.). Keep away from any flammable materials!
Assembly
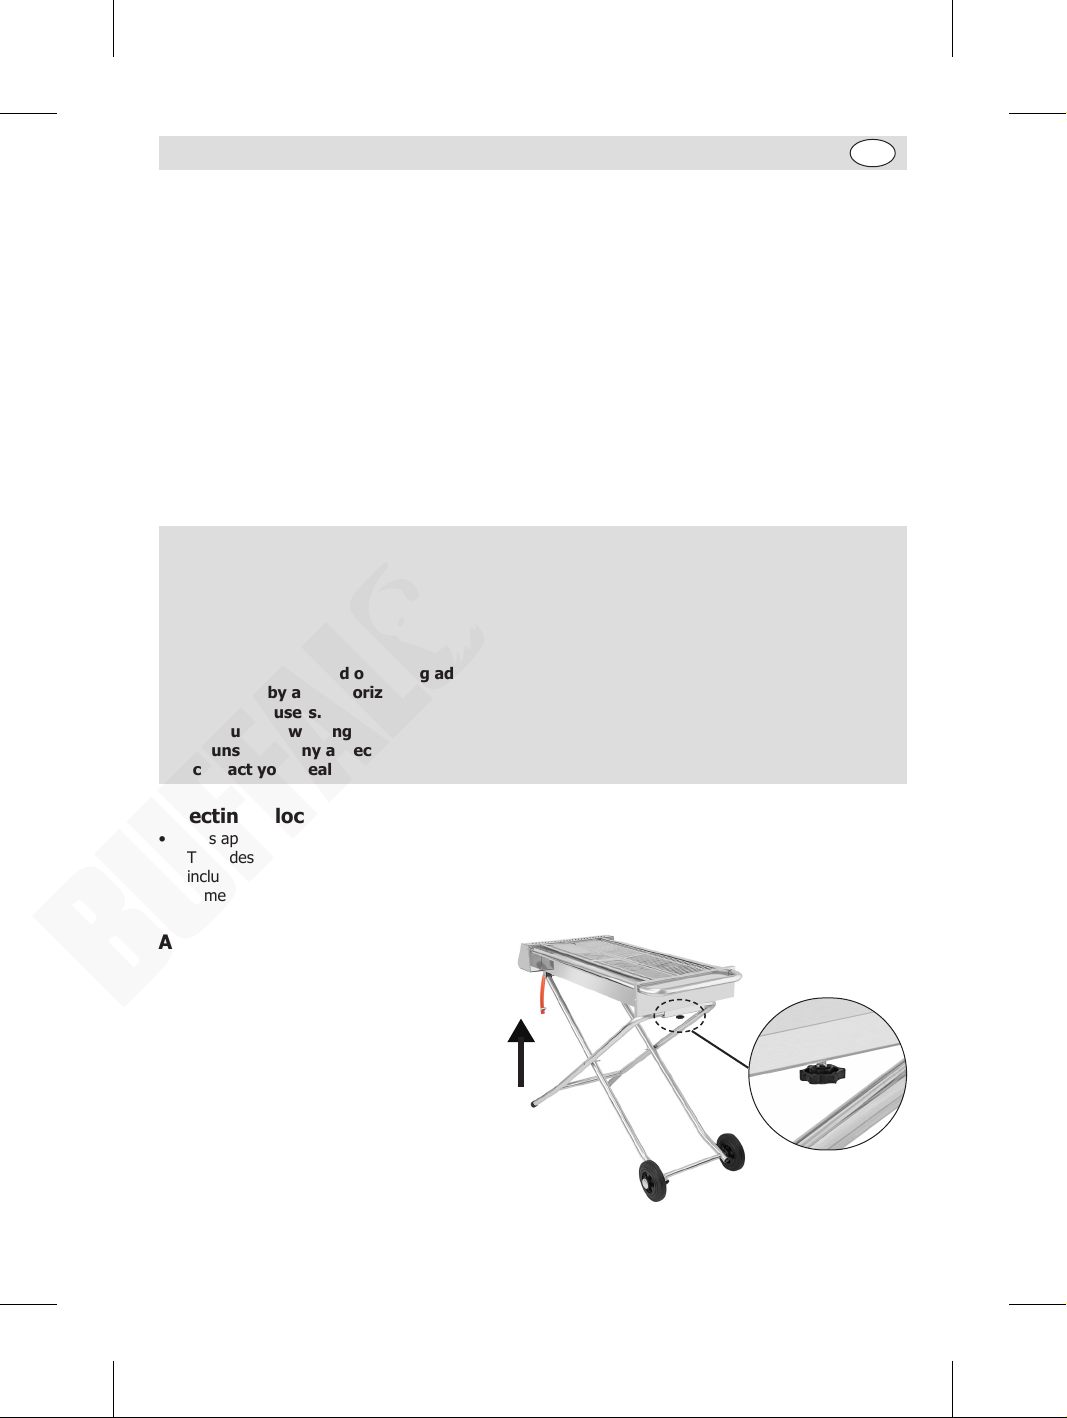
• Remove the appliance from the
packaging. Make sure that all protective
plastic film and coatings are thoroughly
removed from all surfaces.
• Lift the base frame by two adults and
screw the thread to fix.
5
Page 6
EN
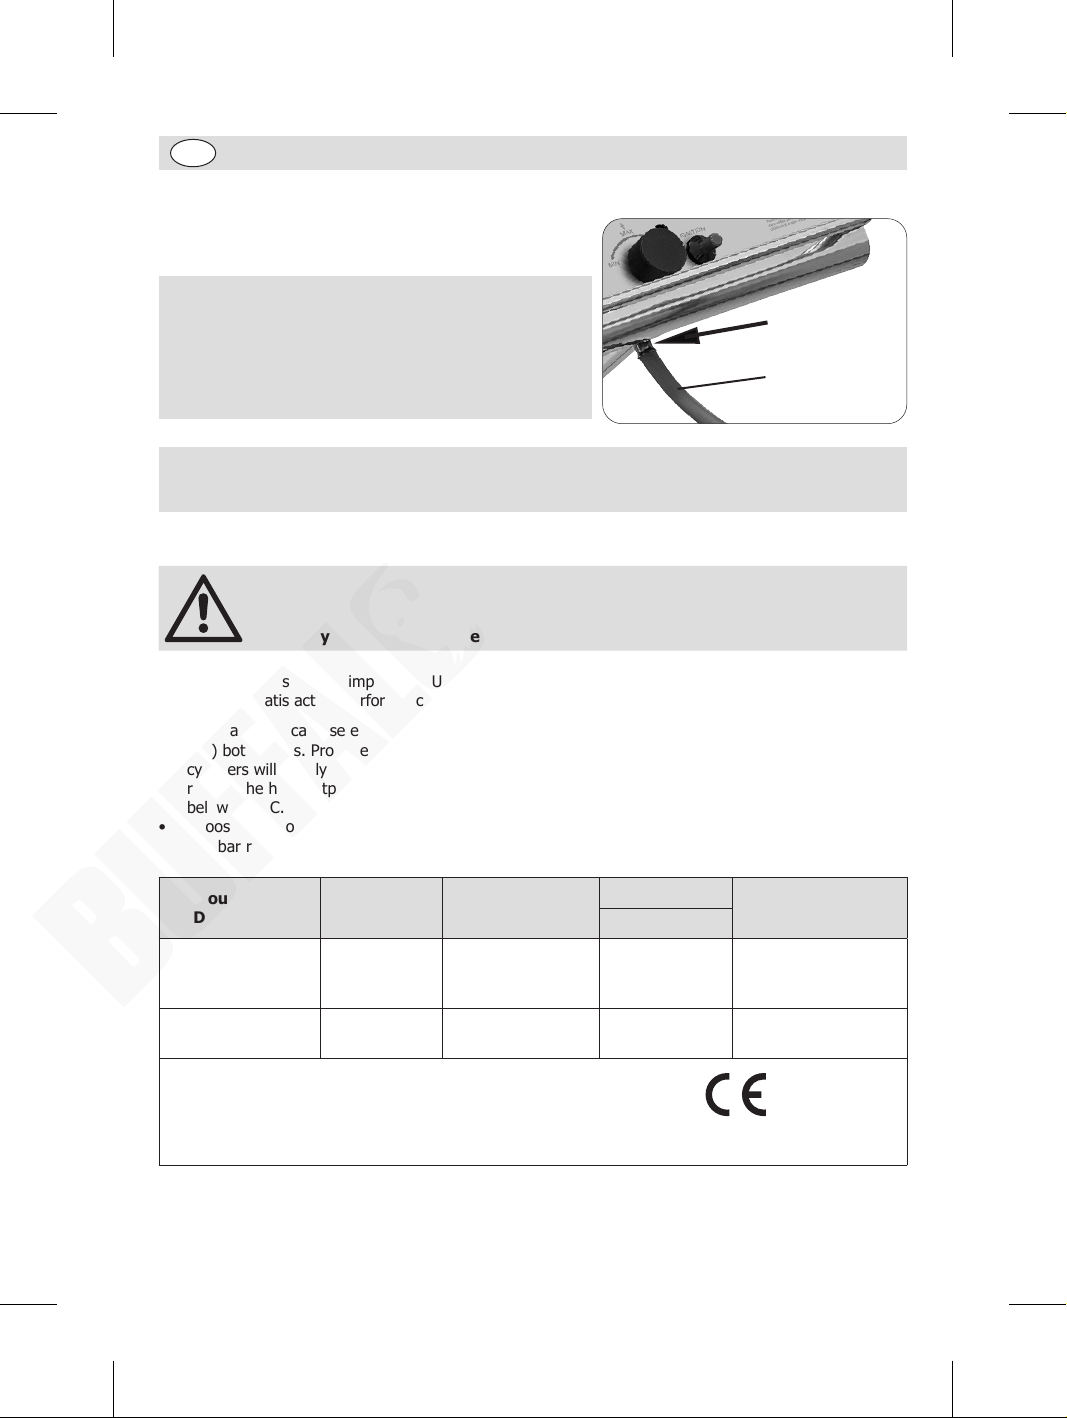
Connecting/changing the gas hose to the appliance
The gas hose with metal connector is pre-mounted to the
appliance.
Caution!
• The gas hose must be changed within the
prescribed intervals or whenever it looks worn/
Metal Connector
damaged. The date on the gas hose is the
manufacturing date, not the expiration date.
• Before replacement, ensure the control knob of
Gas Hose
the appliance is at the OFF position.
Caution!
• The gas hose needs to meet the standard of EN16436-1, and the length is less than 1.5m.
• The hose shall be readily visible across its entire length for inspection after installation.
Choosing the suitable gas cylinder and regulator
Caution! Ensure to have the proper regulator and cylinder in order for the
barbecue to operate safely and efficiently. Use of an incorrect or faulty regulator
is dangerous and will invalidate any warranty.
Consult your local gas dealer for the most suitable gas cylinders and regulators.
An adequate gas supply is imperative. Undersized or low pressure lines will restrict the volume of gas
necessary for satisfactory performance.
• This barbecue can use either propane or butane or propane/butane mixed LPG (liquid petroleum
gas) bottled gas. Propane cylinders, will supply gas all year round, even on cold winter days. Butane
cylinders will supply sufficient gas in summer, but it may affect the performance of the barbecue and
restrict the heat output available from the burner, particularly once the gas temperature starts to fall
below +10°C.
• Choose the proper regulator according to the appliance category and gas pressure, for example, use
37mbar regulator with appliance category I3P for propane gas.
Country of
Destination
Category
Gas and Supply
Pressure
Main Burner
Injector Size Ø
GB, BE, HR, CZ, FR,
GR, IE, IT, LT, NL, PT,
I3P(37) 37mbar 1.24mm 6.5kW
SK, SI, ES, CH, PL
AT, DE, LU, NL, SK,
CH
I3P(50) 50mbar 1.24mm 7.5kW
CAUTION:
USE OUTDOORS ONLY.
This appliance shall be installed in conformity with the current
regulations and used only in a well-ventilated location. Consult the
instruction before installing and using this appliance.
6
Total Nominal Heat
Inputs
ITS-2575-GAR-2442962
Fourth Way, Avonmouth, Bristol, BS11 8TB, UK
Unit 9003, Blarney Business Park, Blarney, Co. Cork, Ireland
15 Badgally Road, Campbelltown, NSW 2560, Australia
Pin 2575DP42962
Page 7
EN
Caution!
• When replacing with a new hose,
turn off the gas cylinder first. Then
disconnect the hose from the gas
cylinder and gas hose inlet on the
appliance.
• A gas cylinder with maximum
diameter 370mm and height 450mm is
recommended for use.
• The regulator needs to meet the
standard of EN16129 with current
version and national regulation.
• Consult your local gas dealer for
the most suitable gas cylinders and
regulators.
Connection to the pressure
regulator and gas cylinder
Caution!
Before connection, ensure
the available gas supply
corresponds to the one shown
on the rating plate located on
the appliance.
Before connection, ensure there is no debris
caught in the head of the gas cylinder, head
of the regulator valve, or in the head of the
burner and burner ports.
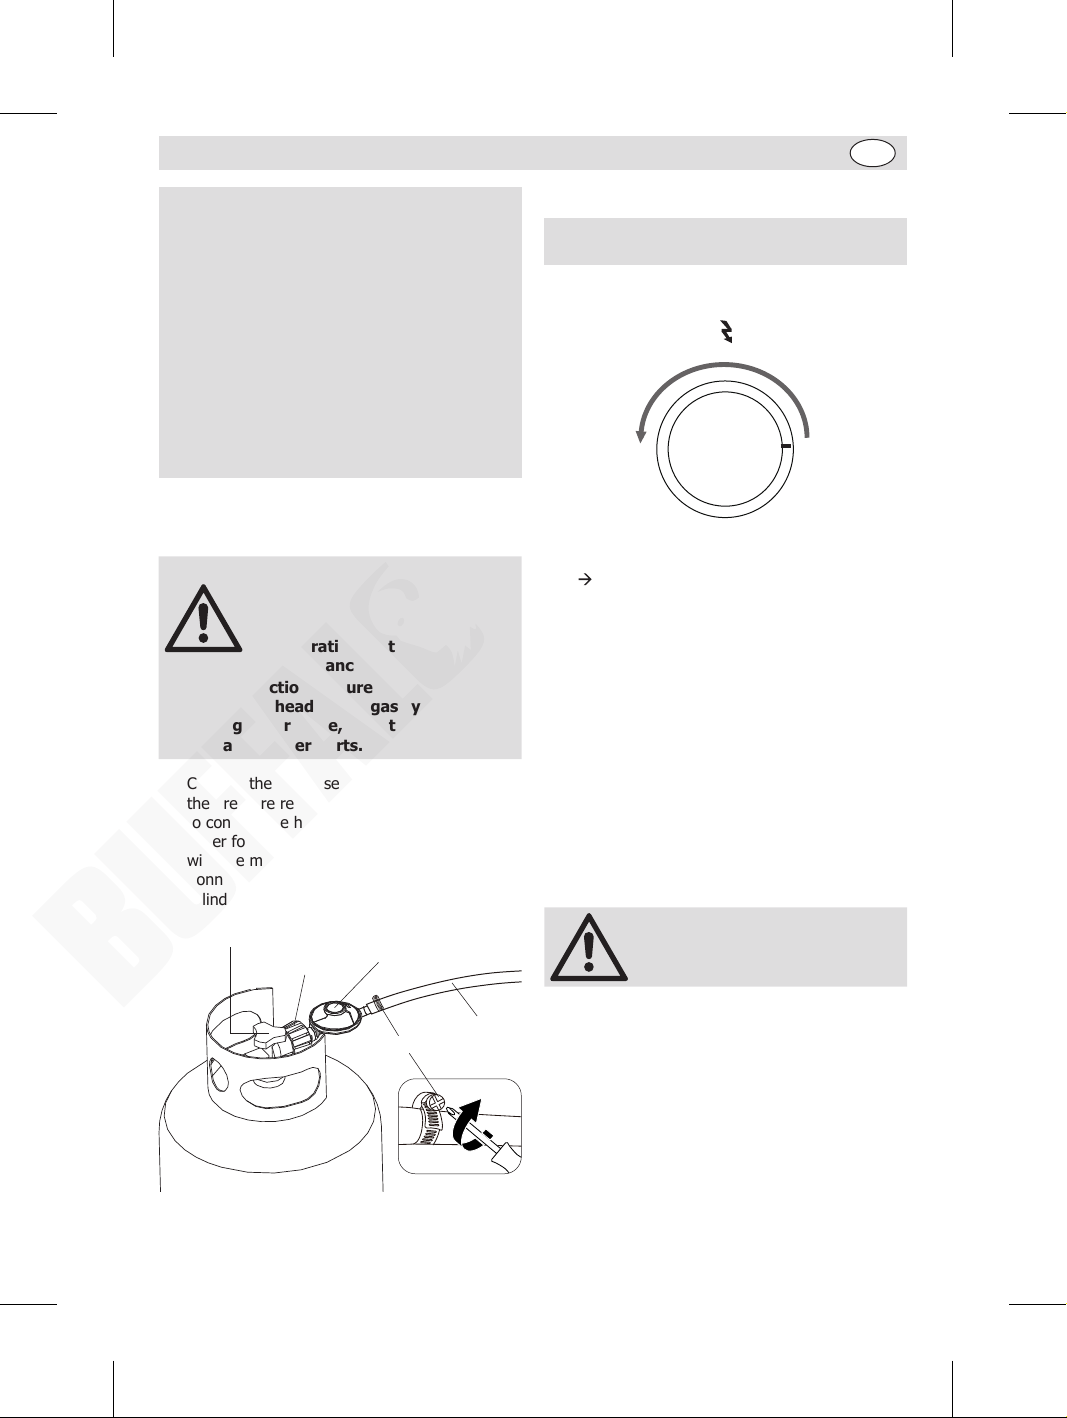
• Connect the gas hose from the appliance to
the pressure regulator (if you have trouble
to connect the hose, soak the hose head into
water for 5 minutes). Secure the connection
with the metal clip on the hose.
• Connect the pressure regulator to the gas
cylinder.
Gas cylinder valve
Knob
Pressure regulator
Gas leak test
Caution! Always perform a leak test in a
well-ventilated area.
1. Confirm the control knob is at the OFF
position.
MAX
MIN
2. Turn on the gas supply at the gas cylinder or
regulator. Turn on the appliance as instructed
(
Operation).
3. Check for leaks by brushing a solution of ½
water and ½ soap over all the gas system
joints, including all valve connections, hose
connections, and regulator connections.
4. If bubbles form over any of the joints, there is
a leak.
- Turn off the gas supply at the gas cylinder
- Re-tighten all joints
- Repeat test
- If bubbles form again, stop using the
appliance and contact your local distributor for
assistance.
5. Wipe the mixed solution from all joints and
connections after leak test.
OFF
Disconnecting a gas cylinder
Caution! While changing the gas
cylinder, keep it away from any
source of ignition.
Gas cylinder
Metal clip
Gas hose
• Caution! Before disconnection ensure to turn
off the gas tap if fitted to the appliance.
• Caution! Before disconnection ensure the gas
cylinder valve is in “CLOSED” position.
• Wait until the burner and pilot light have gone
out.
• Disconnect the pressure regulator from the gas
cylinder by turning the knob counter-clockwise
until loose.
• After connected to a new gas cylinder, a leak
test is necessary to re-do.
7
Page 8
EN
Operation
MIN
OFF
MAX
Clean and inspect the hose
before each use of the
appliance. If there is any
evidence of abrasion, wear,
cuts or leaks, the hose must be
replaced immediately.
Preparation before cooking
• Wipe clean the cooking grids. Let dry
thoroughly.
• To prevent foods from sticking to the cooking
surface, apply a light coat of cooking/vegetable
oil before each barbecuing session.
• Do not face directly over the appliance when
lighting.
Note: When cooking for the first
time, cooking surfaces colour
may change slightly. This is
normal and does no indicate any
defect.
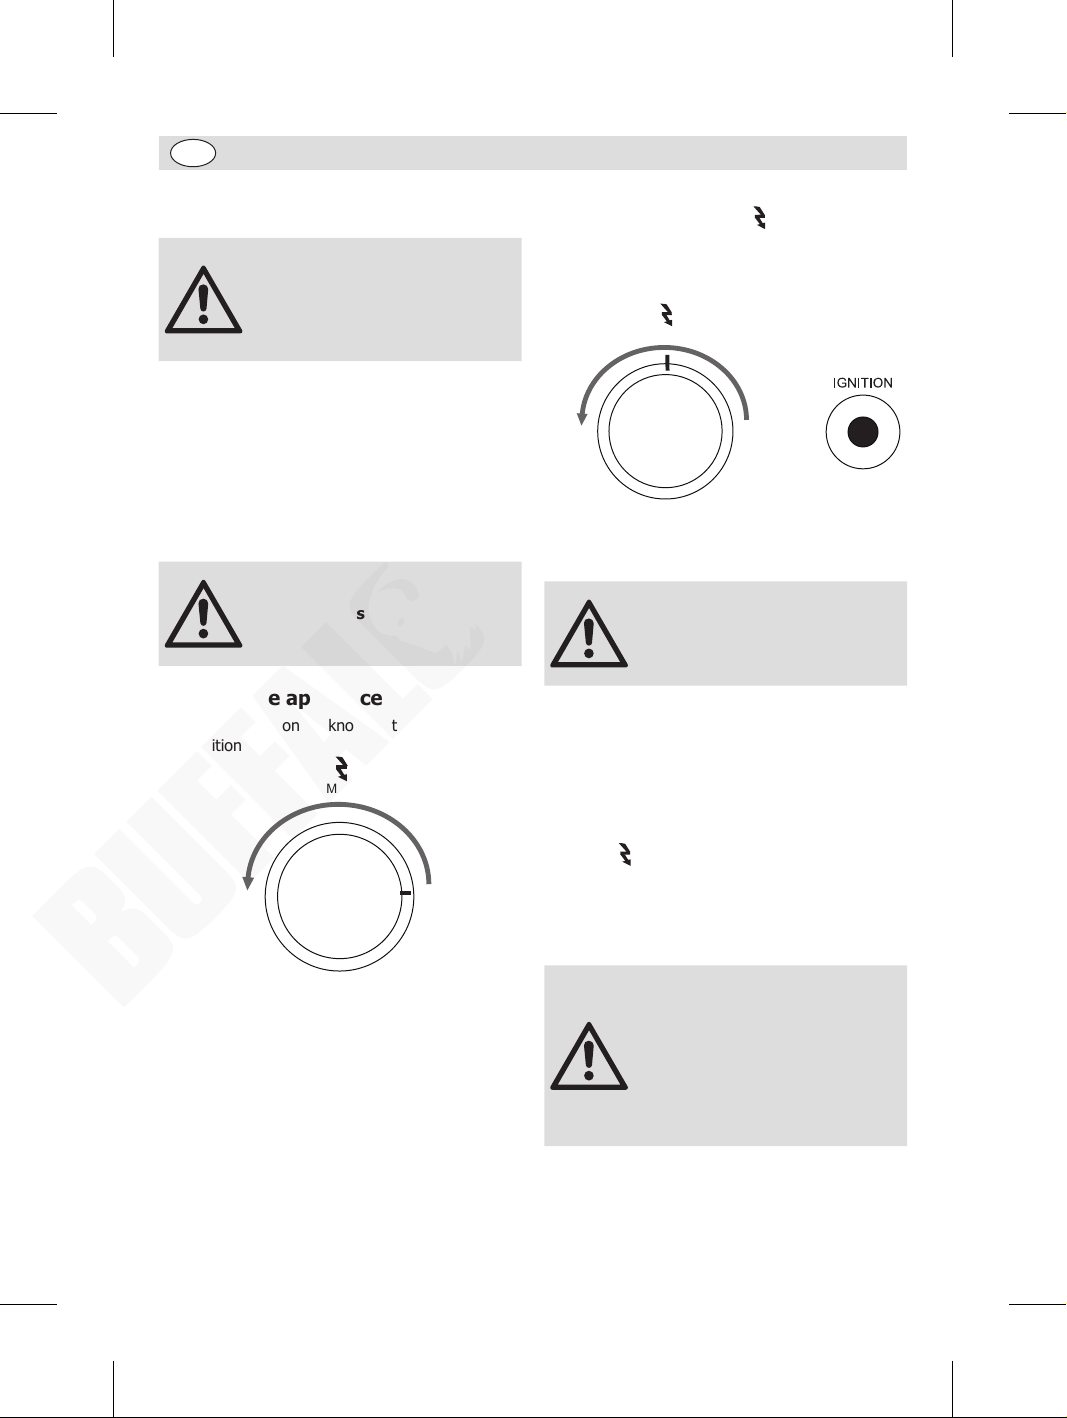
Lighting the appliance
1. Confirm the control knob is at the OFF
position.
MAX
MIN
OFF
3. To ignite the burner, push down and turn
the control knob to MAX
position) while pressing the IGNITION
button. A click sound will be heard and ignition
will take place.
4. After ignition, push down the control knob for
15 seconds to allow the thermocouple to heat.
Warning: If ignition does not
occur in 5 seconds, turn the
control knob off and wait
5 minutes. Then repeat the
lighting procedures.
position (Ignition
Manual ignition
Should automatic ignition fails,
1. Confirm the control knob is at the OFF position.
2. Remove the cooking grids and flame tamers.
3. Push down and turn the control knob to
MAX
position (Ignition position).
4. Light with BBQ lighter at the distance of 5mm
to the burner fire hole.
5. Replace the cooking grids and flame tamers,
ensuring to wear heat-resistant gloves.
2. Turn on gas supply at the regulator or at the
gas cylinder valve.
8
• If the lighting does not
occur in 5 seconds, turn the
control knob to OFF. Wait 5
minutes for the unburnt gas
to evaporate. Afterwards,
re-light.
• For any difficulty with
lighting, please consult your
dealer.
Page 9
EN
Start cooking
1. After ignition, pre-heat the appliance for 10-15 minutes with the MAX setting. This should be done
before each cooking session.
2. After pre-heating, turn the control knob to suit requirements.
3. Place your food on the cooking grids. (The burner heats up the flame tamers underneath the grids,
which in turn pass heat to the food. The natural food juices produced during cooking fall onto the
hot flame tamer and vaporize. The subsequent rising smoke bastes the food, as it travels upwards,
imparting that unique barbecued flavour.)
4. End of cooking session: Turn the control knob to MAX position and burn for 5 minutes. This
procedure will burn off cooking residue, thus making cleaning easier.
5. Turning off the gas appliance: After use, turn the control knob to OFF position. Then switch off
the gas supply at the gas cylinder or regulator.
Energy saving tips:
• Turn the appliance off as soon as cooking is completed.
• Do not preheat longer than recommended.
• Do not use a higher setting than required.
Warning!
Danger of scalding! Always protect your hands when handling parts or food near
the cooking surface.
Flare-up control
• Flare-ups occur when meat is barbecued, and its fat and juices fall upon the hot flame tamer. Smoke
of course helps give food its barbecued flavour, but it is best to avoid excessive flare-up to prevent
food from being burned.
• To control flare-ups, it is ESSENTIAL to trim away excess fat from meat and poultry before grilling.
Use cooking sauces and marinades sparingly and try to avoid very cheap cuts of meat or meat
products as these tend to have a high fat and water content. The burner should always be set to low
settings during cooking.
• When flare-ups do occur, they can usually be extinguished by applying baking soda or salt directly
onto the flame tamer. Always protect your hands when handling parts near the cooking surfaces.
Danger of scalding!
Fat fires
• After each cooking session, clear away the food debris. If the barbecue is to be used for large
gatherings, it will be necessary to turn off and cool the barbecue every 2 hours to remove food debris
and clean it out.
• Cleaning frequency may need to be increased if very fatty foods or cheap meat products are being
cooked. Failure to do this may result in a fat fire, and thus cause injury and seriously damage the
barbecue.
• In the event of a fat fire:
- Turn control knob to OFF position.
- Turn off the gas supply at the gas cylinder or regulator.
- Keep at a safe distance from the barbecue and wait until the fire has burnt out.
- Never douse a barbecue with water. If an extinguisher is used, it should be a powder type.
- If the fire does not abate or even seems to worsen, contact your local Fire Brigade for assistance.
9
Page 10
EN
Cleaning, care & maintenance
Warning!
• Regularly clean your barbecue between uses, especially after extended
periods of storage.
• Ensure the barbecue and its components are sufficiently cool before cleaning
and storage. Never douse the barbecue surfaces with water while still hot.
• To extend the life and maintain the condition of your barbecue, we strongly recommend that the unit
be covered when left outside for any length of time, especially during the winter months. Heavy-duty
barbecue covers and other accessories are available from your local stockist.
• Inspect the barbecue on a regular basis as damp or condensation can form which may result in
damage to the appliance. It may be necessary to dry the barbecue internally. It is possible for mould
to grow on any fat-gathering parts. This should be cleaned off with hot soapy water.
• Any rust that does not come into contact with the food should be treated with a rust inhibitor and
painted with barbecue paint or a heat resistant paint. Any rust on cooking surface should burn off or
be rubbed off.
Body
• Regularly remove excess grease or fat using a cloth dampened with hot soapy water. Dry thoroughly.
• Excess fat and food debris can be removed from inside the body using a soft plastic or wooden scraper.
• Do not immerse the body or hose in water.
Burner
• Burning off any residue after cooking will keep the burner clean.
• Periodically check the burner to ensure it is free from insects and spiders which may clog the gas
system, deflecting gas flow.
• Ensure to clean pipe on burner very carefully and make sure that there are no obstructions. We
recommend the use of a pipe cleaner to clean the pipe area.
Cooking surfaces
• After cooling down, remove any fat or food particles with a plastic or wooden scraper. Do not use a
steel scraper or wire brush.
• Clean with hot soapy water. Rinse well and dry thoroughly.
• Do not use scouring pads or powders as they can permanently damage the finish. Due to the weight
of the parts, we do not recommend cleaning in a dishwasher.
• Failure to keep clean, and excessive buildup can result in a fat fire. This can be hazardous and
severely damage the barbecue. This is not a fault in the barbecue and is therefore not covered by the
warranty.
Storage
• Store in a cool dry place with the lid closed in position. If storing the gas appliance outdoors, ensure
to check that all areas under the front panel are free from any obstructions (insects, for example).
This area must be kept free as this may affect the flow of combustion or ventilation air.
• If storing the gas appliance indoors, the gas cylinder must be disconnected and left outside. The gas
cylinder should always be stored outside, in a dry, well-ventilated area, away from any sources of
heat or ignition. Do not let children tamper with the cylinder.
• When using the barbecue after extended periods of storage, ensure to check for gas leaks and any
obstructions in the burner. Also follow the cleaning procedures to ensure the gas appliance is safe.
Fixings
• It is recommended to check and tighten the metal fixings annually.
10
Page 11
EN
Troubleshooting
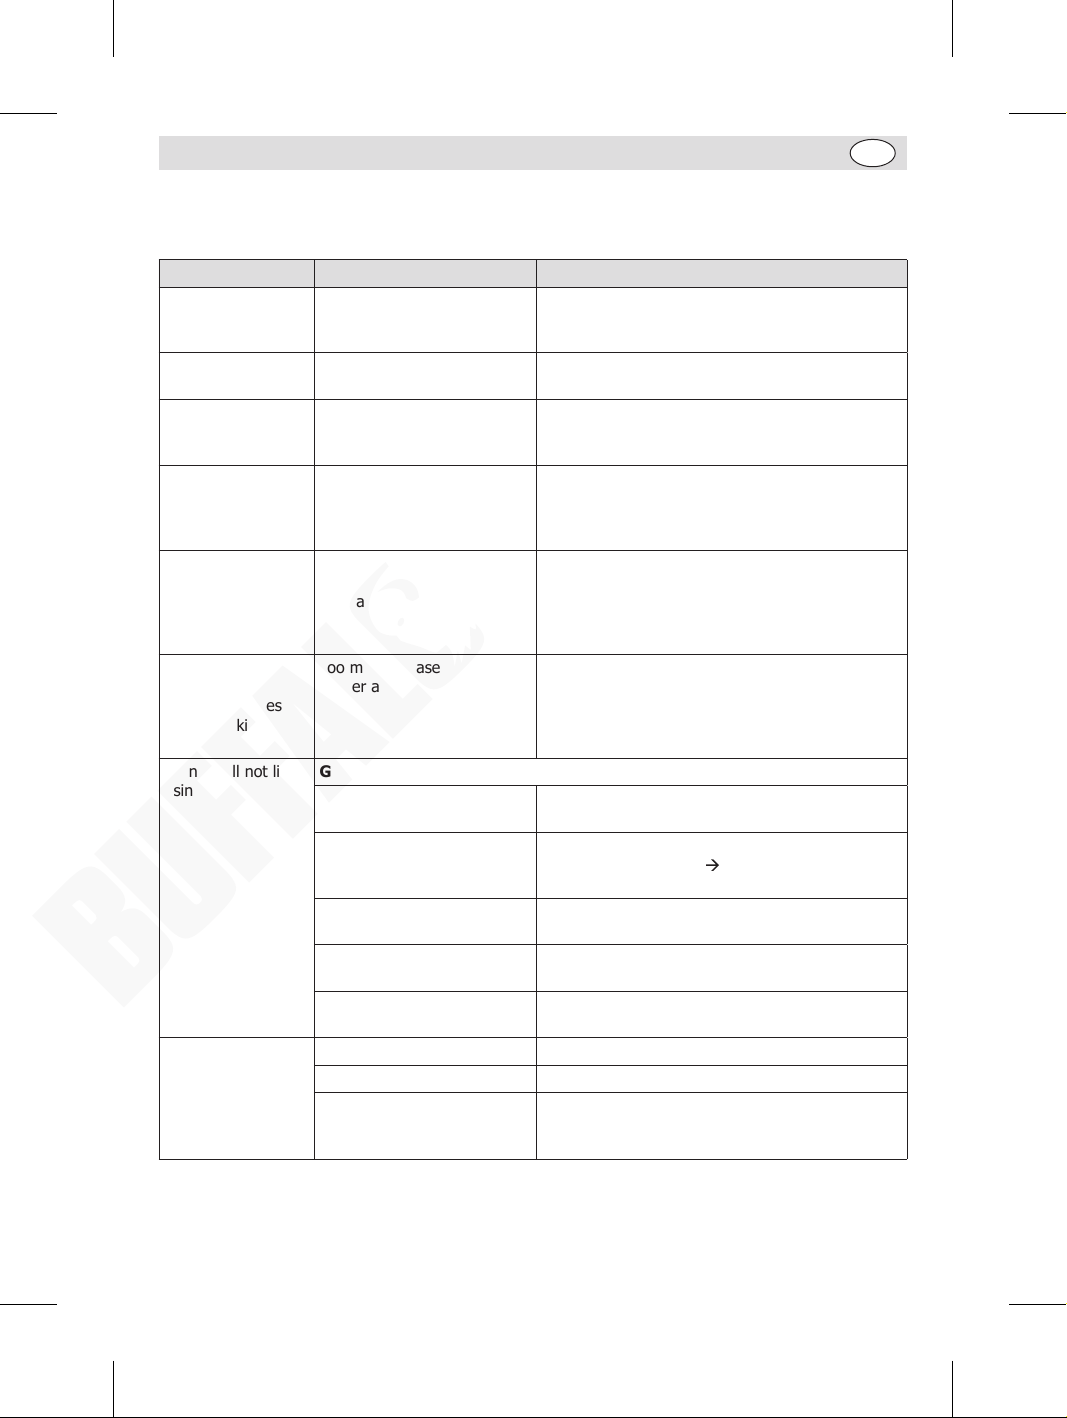
A qualified technician must carry out repairs if required.
Fault Probable Cause Solution
Gas leaking from
cracked/cut/burned
hose
Gas leaking from
LPG cylinder
Gas leaking from
LPG cylinder valve
Gas leaking between
LPG cylinder
and regulator
connection
Fire coming through
control panel
Grease fire
or continuous
excessive flames
above cooking
surface
Burner will not light
using igniter
Sudden
drop in gas
flow or low
flame
Damaged hose Turn off gas at LPG cylinder. If hose is cut or
Mechanical failure due to
resting or mishandling
Failure of cylinder valve from
mishandling or mechanical
failure
Improper installation,
connection not tight, failure
of rubber seal
Fire in burner tube section
of burner due to partial
blockage
Too much grease buildup in
burner area
Gas issues
Burner not engaged with
control valve
Obstruction in burner Ensure burner tube is not obstructed with spider
No gas flow Make sure LPG cylinder is not empty. If not empty,
Vapour lock at coupling nut
to LPG cylinder
Coupling nut and LPG cylinder
valve not fully connected.
Grease buildup Clean burner and inside of appliance / firebox
Excessive fat in meat Trim fat from meat before grilling
Excessive cooking
temperature
cracked, replace hose. See LPG cylinder leak test
and connection regulator to the LPG cylinder
Turn off LPG cylinder valve
Turn off LPG cylinder valve. Return LPG cylinder to
gas supplier
Turn off LPG cylinder valve, remove regulator
from cylinder and visually inspect rubber seal for
damage. See LPG cylinder test and connection
regulator to the LPG cylinder
Turn off the control knob and LPG cylinder valve.
After fire is out and appliance is cold, remove
burner and inspect for spider nests or rust. See
natural hazard and cleaning the burner assembly
pages
Turn off LPG Cylinder. Allow flames to die down.
After cooling, clean food particles and excess
grease from inside firebox area, grease cup/pan/
tray, and other surfaces
Make sure valve positioned inside of burner tube
webs or other objects (
maintenance)
see Section “Sudden drop in gas flow” below
Turn off control knob and disconnect coupling nut
from LPG cylinder. Reconnect and retry
Turn the coupling nut approximately one-half to
three-quarters
Set the control knob to a lower setting
Cleaning, care &
11
Page 12
EN
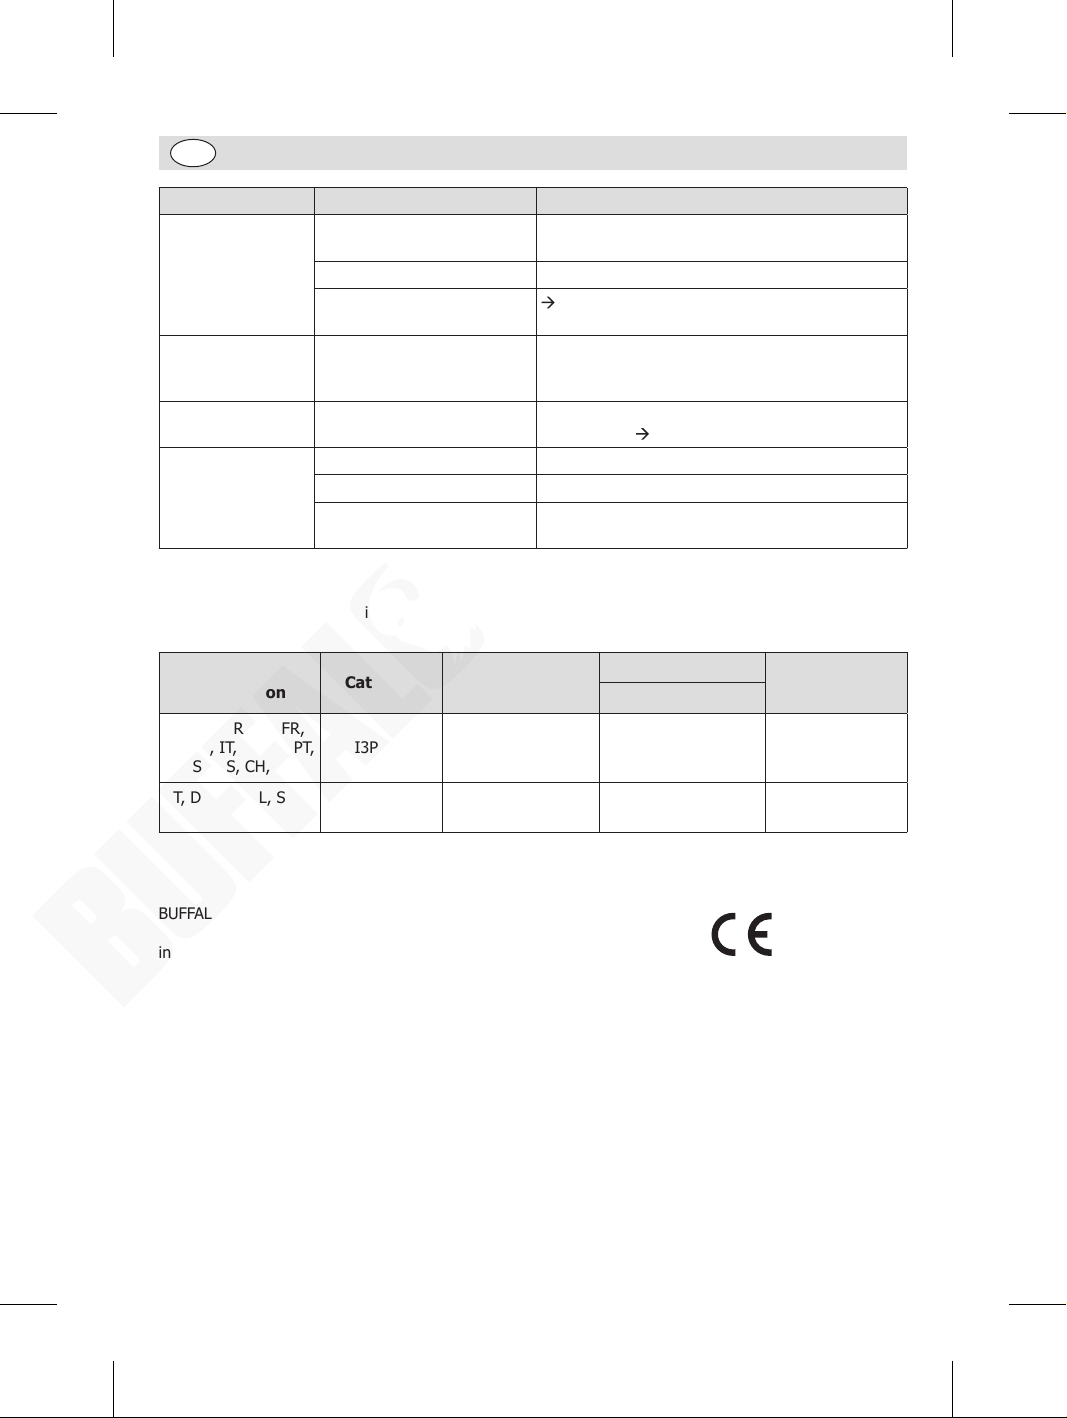
Fault Probable Cause Solution
Flames blow out High or gusting winds Move the appliance to prevent it from facing wind
directly or increase flame height
Low on LPG gas Refill LPG cylinder
Excess flow valve tripped
See section “Sudden drop in gas flow”
above
Persistent grease
fire
Grease trapped by food
buildup around burner system
Turn control knob to OFF. Turn gas off at LPG
cylinder. Let fire burn out. After appliance cools,
remove and clean all parts
Flashback… (fire in
burner tube(s)
Burner and burner tube
blocked
Turn control knob to OFF. Clean burner and/or
burner tube (
Cleaning, care & maintenance)
Flare-up Grease buildup Clean burner and inside of appliance/ firebox
Excessive fat in meat Trim fat from meat before grilling
Excessive cooking
Set the control knob to a lower setting
temperature
Technical specifications
Note: Due to our continuous improvement process, the product specifications are subject to change
without notice.
Country of
Destination
Category
Gas and Supply
Pressure
Main Burner
Injector Size Ø
Total Nominal
Heat Inputs
GB, BE, HR, CZ, FR,
GR, IE, IT, LT, NL, PT,
I3P(37) 37mbar 1.24mm 6.5kW
SK, SI, ES, CH, PL
AT, DE, LU, NL, SK,
CH
I3P(50) 50mbar 1.24mm 7.5kW
Compliance
BUFFALO parts have undergone strict product testing in order to comply
with regulatory standards and specifications set by international,
independent, and federal authorities.
BUFFALO products have been approved to carry the following symbol:
All rights reserved. No part of these instructions may be produced or transmitted in any form or by any means, electronic,
Every effort is made to ensure all details are correct at the time of going to press, however, BUFFALO reserve the right to
mechanical, photocopying, recording or otherwise, without the prior written permission of BUFFALO.
change specifications without notice.
Fourth Way, Avonmouth, Bristol, BS11 8TB, UK
Unit 9003, Blarney Business Park, Blarney, Co. Cork, Ireland
15 Badgally Road, Campbelltown, NSW 2560, Australia
ITS-2575-GAR-2442962
Pin 2575DP42962
12
Page 13
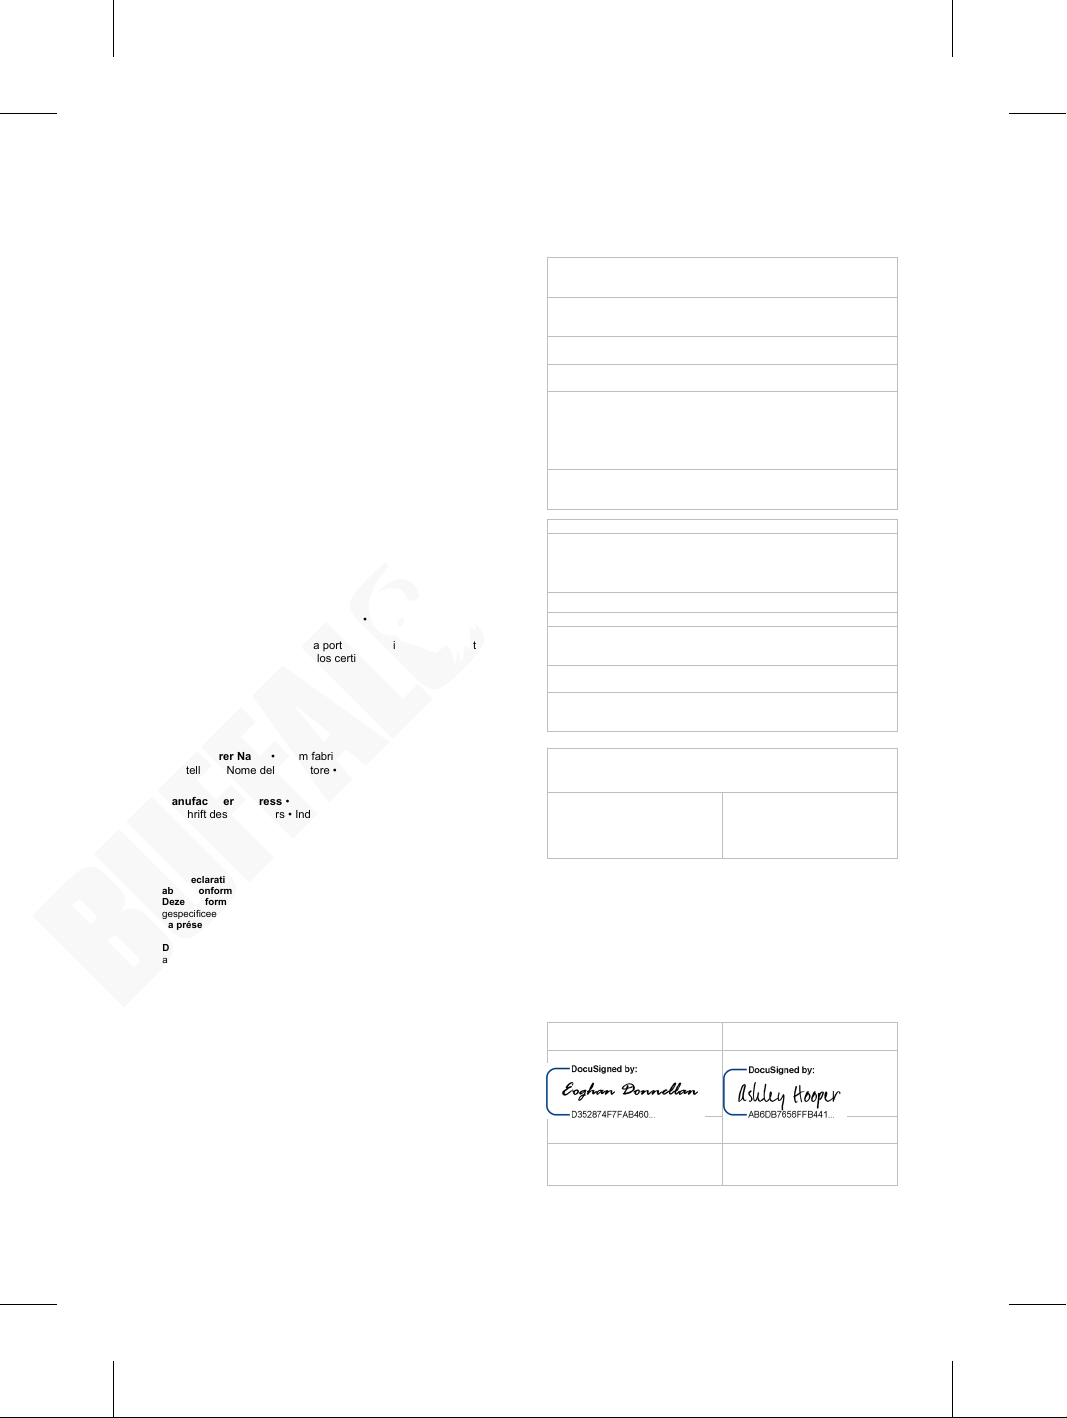
DECLARATION OF CONFORMITY
{SKU description}
{description of the appliance or fitting}
{product code(s)}
JA377
{relevant l egislation and harmonized standards}
Gas Appliance Regulation ( EU) 2016/426
EN 498:20 12
{Name; add ress}
Intertek Italia S.p.A Via Miglioli, 2/A - 20063
{NB No.} 2575
{description of intervention }
Type Exa mination to the
{details of certificate including
Date; Period of validity; Conditions of validity}
Certificate # ITS-257 5-GAR-2442962 rev.0 dated 30thDec 2024
{name of manufacture r} Buffalo
{address of manufactur er}
Co. Cork , Ireland
Fourth Way ,
United Kingdom
Eoghan Donnellan
Ashley Hooper
Commercial
Group Head of
Compliance
07-01-2025 | 08:03:50 GMT
• Conformiteitsverklaring • Déclaration de conformité • Konformitätserklärung • Dichiarazione di conformità •
Equipment Type • Uitrustingstype • Type d'équipement • Gerätetyp • Tipo
di appare cchiatura • Tipo de equipo
Object of the declaration • Voorwerp van de ve rklaring • Objet de l a
déclaration • Gegensta nd das deklariert werden soll • Oggetto della
dichiarazione • Objeto de la declaración • Objeto da declar
Model • Modèle • Modell • Modello • Modelo
Application of Counc il Directives(s)
Toepassing van Europese Richtlijn(e n) • Application de la/des dire ctive(s)
du Conse il • Anwendbare EU-Richtlinie(n) • Applicazione delle Di rettive •
Aplicación de la(s) directiva(s) del consejo
The Notified Body • De Erkende Instantie • Partie notifiée • Der notifizierte
Körper • L’ente notificato • El Cuerpo Notificado
• Declaración de conformidad
Gas Grills for Outdoor Use
ação
Folding Gas BBQ
Cernusco sul Navig lio, Milano - Italy
Performed & issued the certificate(s) • voerde en vaardigde he
certifica(a)t(en) uit • Exécute et délivre les certificats • hat dieses Zertifikat
angefertigt und ausge stellt • Ha portato a termine E ha rilasciato il/i
certificato/i • realiz
Manufacturer Name • Naam fabrikant • Nom du producteur • Name des
Herstellers • Nome del produttore • Nombre del fabricante
Manufacturer Address • Adres fabrikant • Adresse du producteur •
Anschrift des Herstellers • Indirizzo del produttore • Dirección de
This declaration of conformity is issued under the full responsibility of the manufacturer. I, the undersigned, hereby declare that the equipment specified
above conforms to the above Directive(s) and Standard(s).
Deze conformiteitsverklaring w erd uitgevaardigd onder volledige verantwoorlijkheid van de fabricant. Ik, de ondergetekende, verklaar hierbij dat de hierboven
gespecificeerde uitrusting goedgekeurd is vol gens de bovenstaande Richtlijn(en) en Standaard(en).
La présente déclaration de conformité est délivrée sous l’entière responsabilit
présente à la / aux Directive(s) et Norme(s) ci-dessus
Diese Konformitätserklärung w ird unter der vollen Verantwortung des Herstellers ausgestellt. Ich, der/die Unterzeichnende, erkläre hiermit, dass das oben
angegebene Gerät der/den oben angef ührten Richtlinie(n) und Norm(en) entspricht.
La dichiarazione di conformità viene rilasciata dietro completa assunzione di responsabilit
l'apparecchiatura di sopra specificata è conforme alle Direttive e agli Standard sopra riportati.
La declaración de conformidad se emite bajo la total responsabilidad del fabricante. El abajo firmante declara por la presente que el equipo arriba especificado
está en conformi dad con la(s) directiva
Date • Data • Date • Datu m • Data • Fecha
Signature • Handtekening • Signature • Unterschrift • Firma • Firma
Full Name • Volledige naam • Nom et prénom • Vollständiger Name •
Nome comp leto • Nombre completo
Position • Functie • Fonction • Position • Qualifica • Posición
ó y emitió el/los certificado(s)
(s) y estándar(es) arriba menci onadas.
t (de)
Gas Applian ce Regulation (EU) 2016/426
and valid to 29thApril 20 34
l fabricante
Unit 9003
Blarney B usiness Park
Blarney
é du fabricant. Je soussigné, confirme la conformité de l'équipement cité dans la
à da parte del produttore. Il sottoscri tto dichiara che
Avonmouth,
Bristol,
BS11 8TB
07-01-2025 | 08:30:02 GMT
Manager/ Importer
Product Quality &
Page 14
UK
+44 (0)845 146 2887
Eire
NL 040 – 2628080
FR 01 60 34 28 80
BE-NL 0800-29129
BE-FR 0800-29229
DE 0800 – 1860806
IT N/A
ES 901-100 133
Page 15

Page 16

http://www.buffalo-appliances.com/
JA377_EN_A5_v1_2025/01/09
 Loading...