

Page 1
NL
Planetaire Mixer
Handleiding
18
IT
Impastatrice planetaria
Manuale di istruzioni
45
FR
Batteur mélangeur
Mode d'emploi
27
ES
Mezcladora planetaria
Manual de instrucciones
54
DE
Planetenrührmaschine
Bedienungsanleitung
36
PT
Misturadora
Manual de instruções
63
Model • Modèle • Modell • Modello • Modelo • Malli:
GL190 / GL191 / GJ461
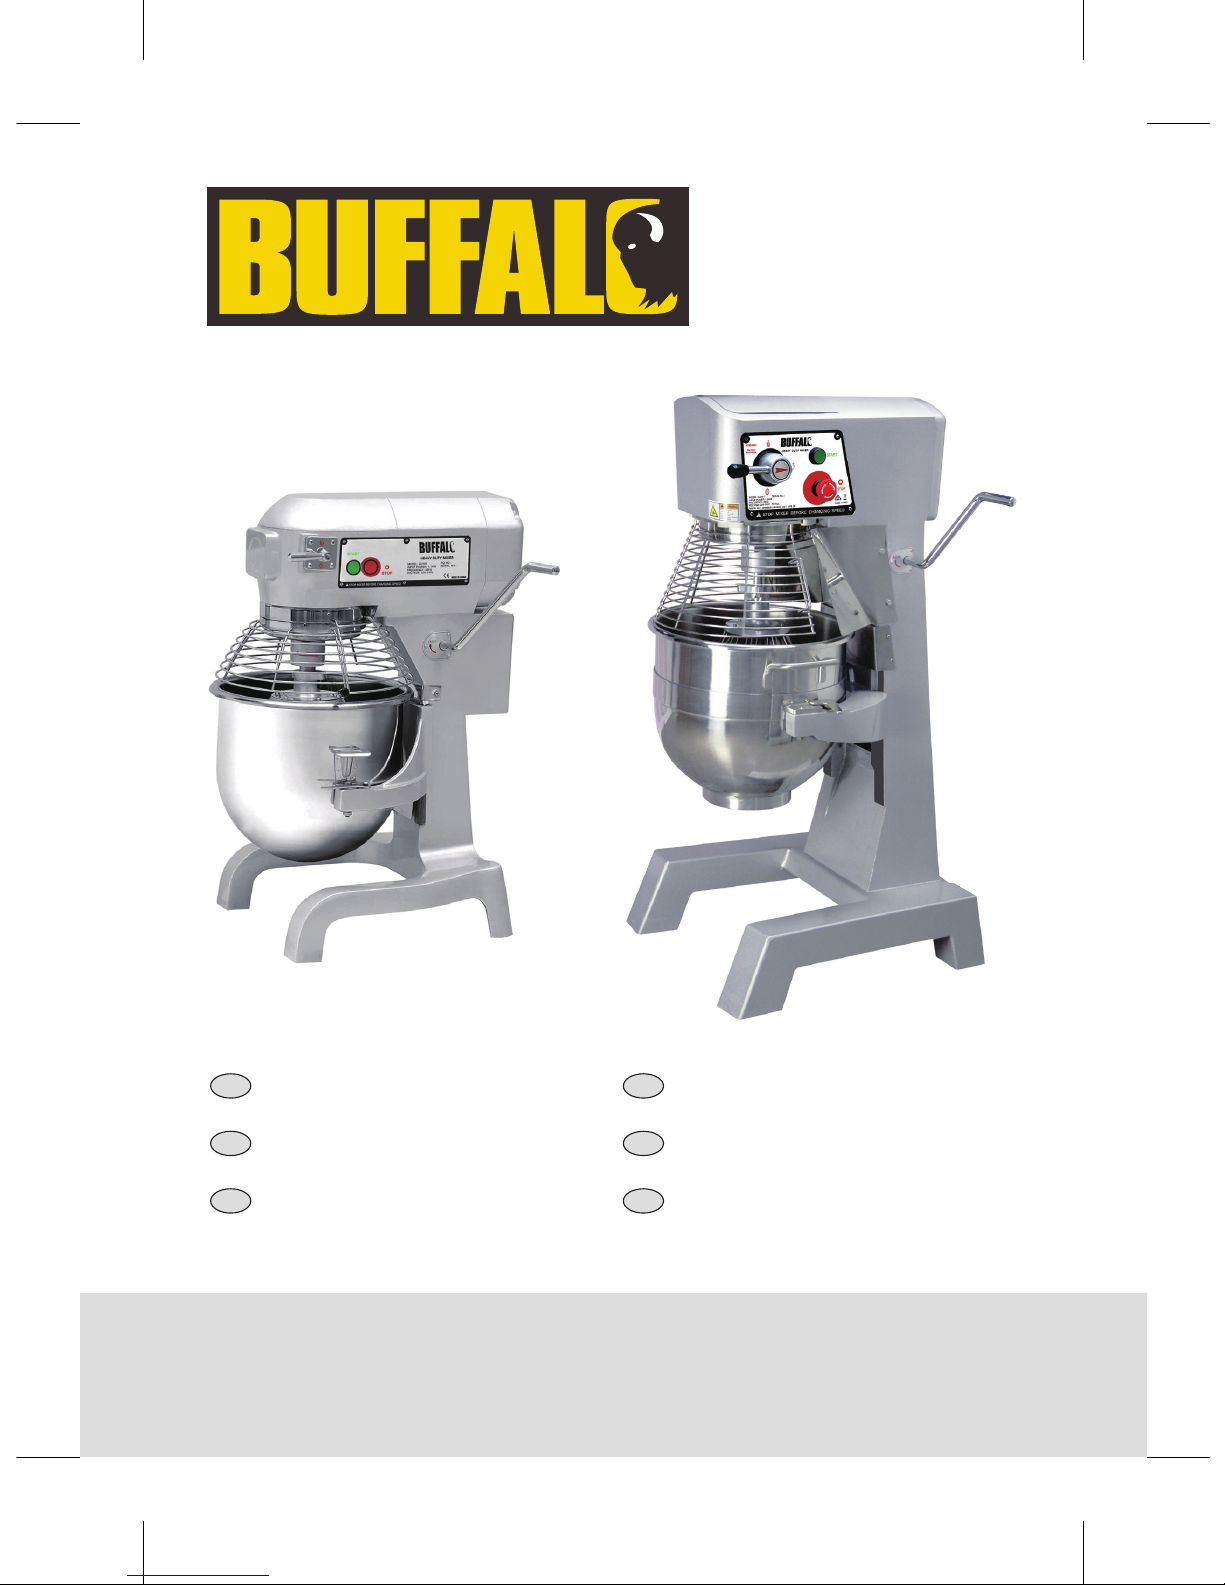
Planetary Mixer
Instruction manual
GL190-GL191_GJ461_ML_A5_v7_20180928.indb 1 2018/9/28 16:02
Page 2
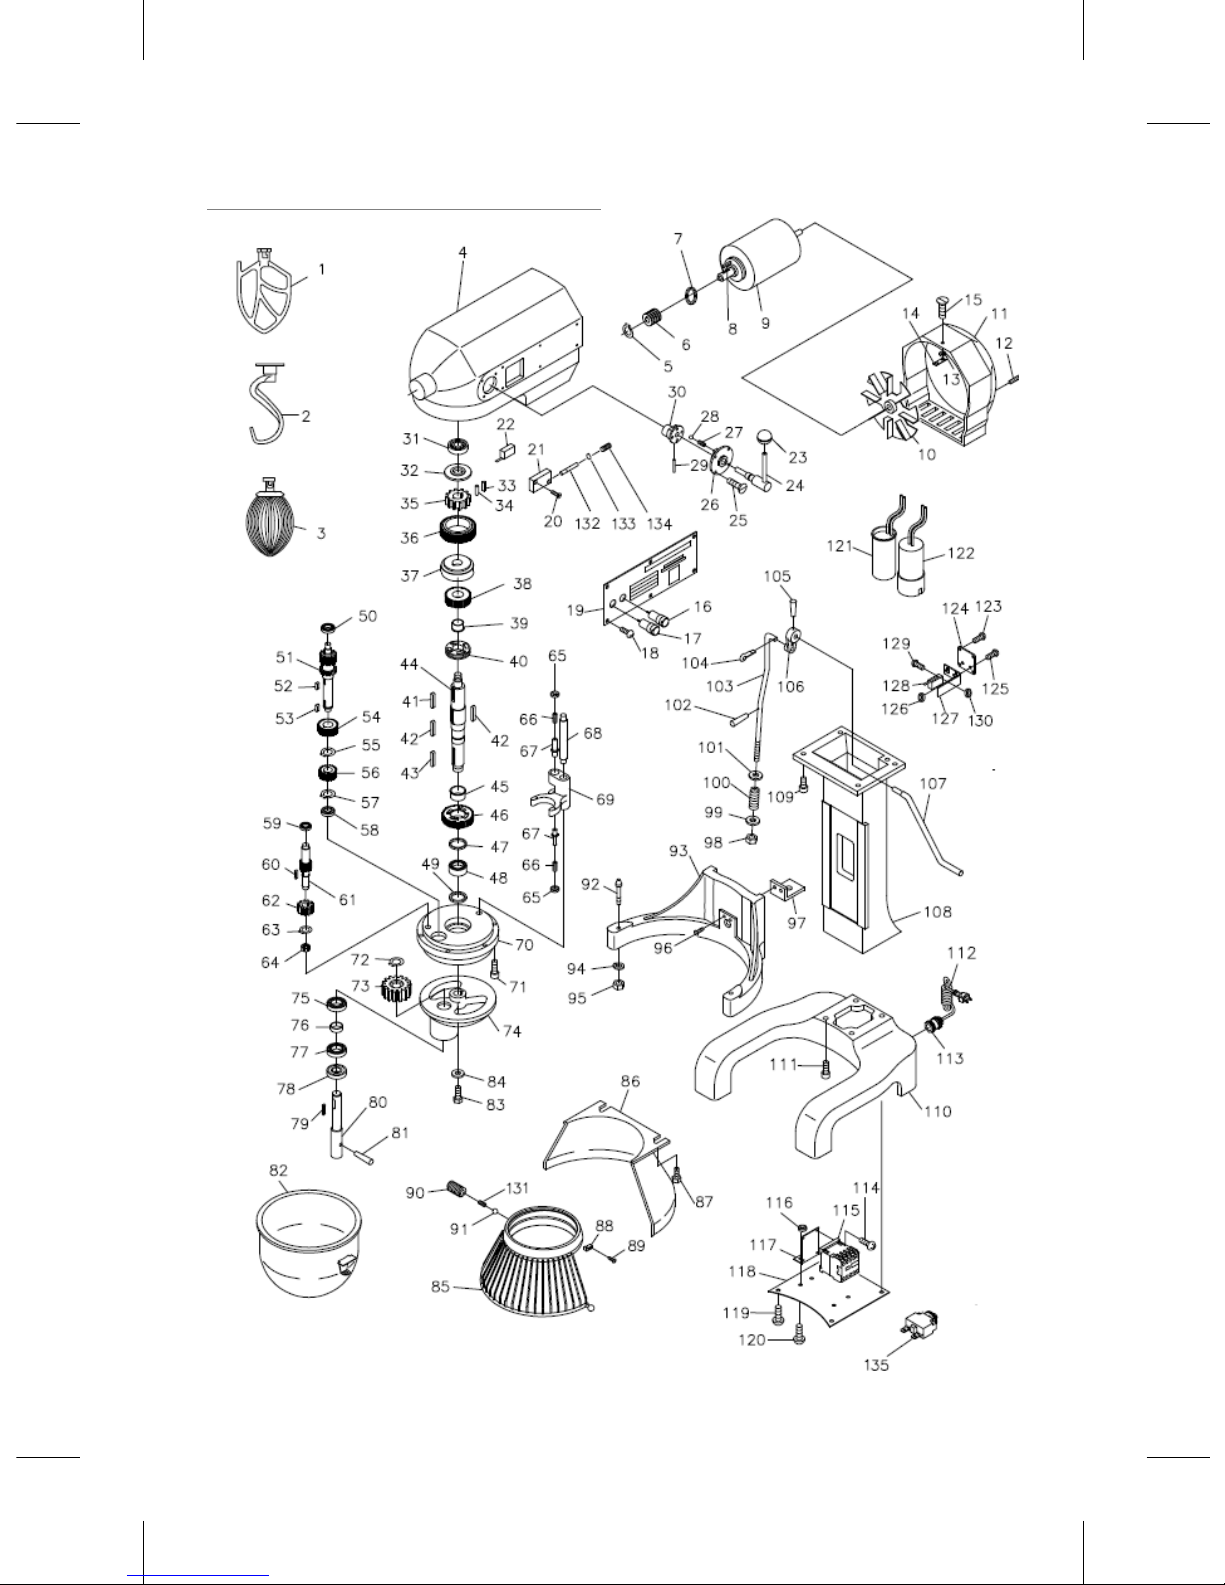
Exploded diagram and spare parts list GL190
GL190-GL191_GJ461_ML_A5_v7_20180928.indb 2 2018/9/28 16:02
Page 3
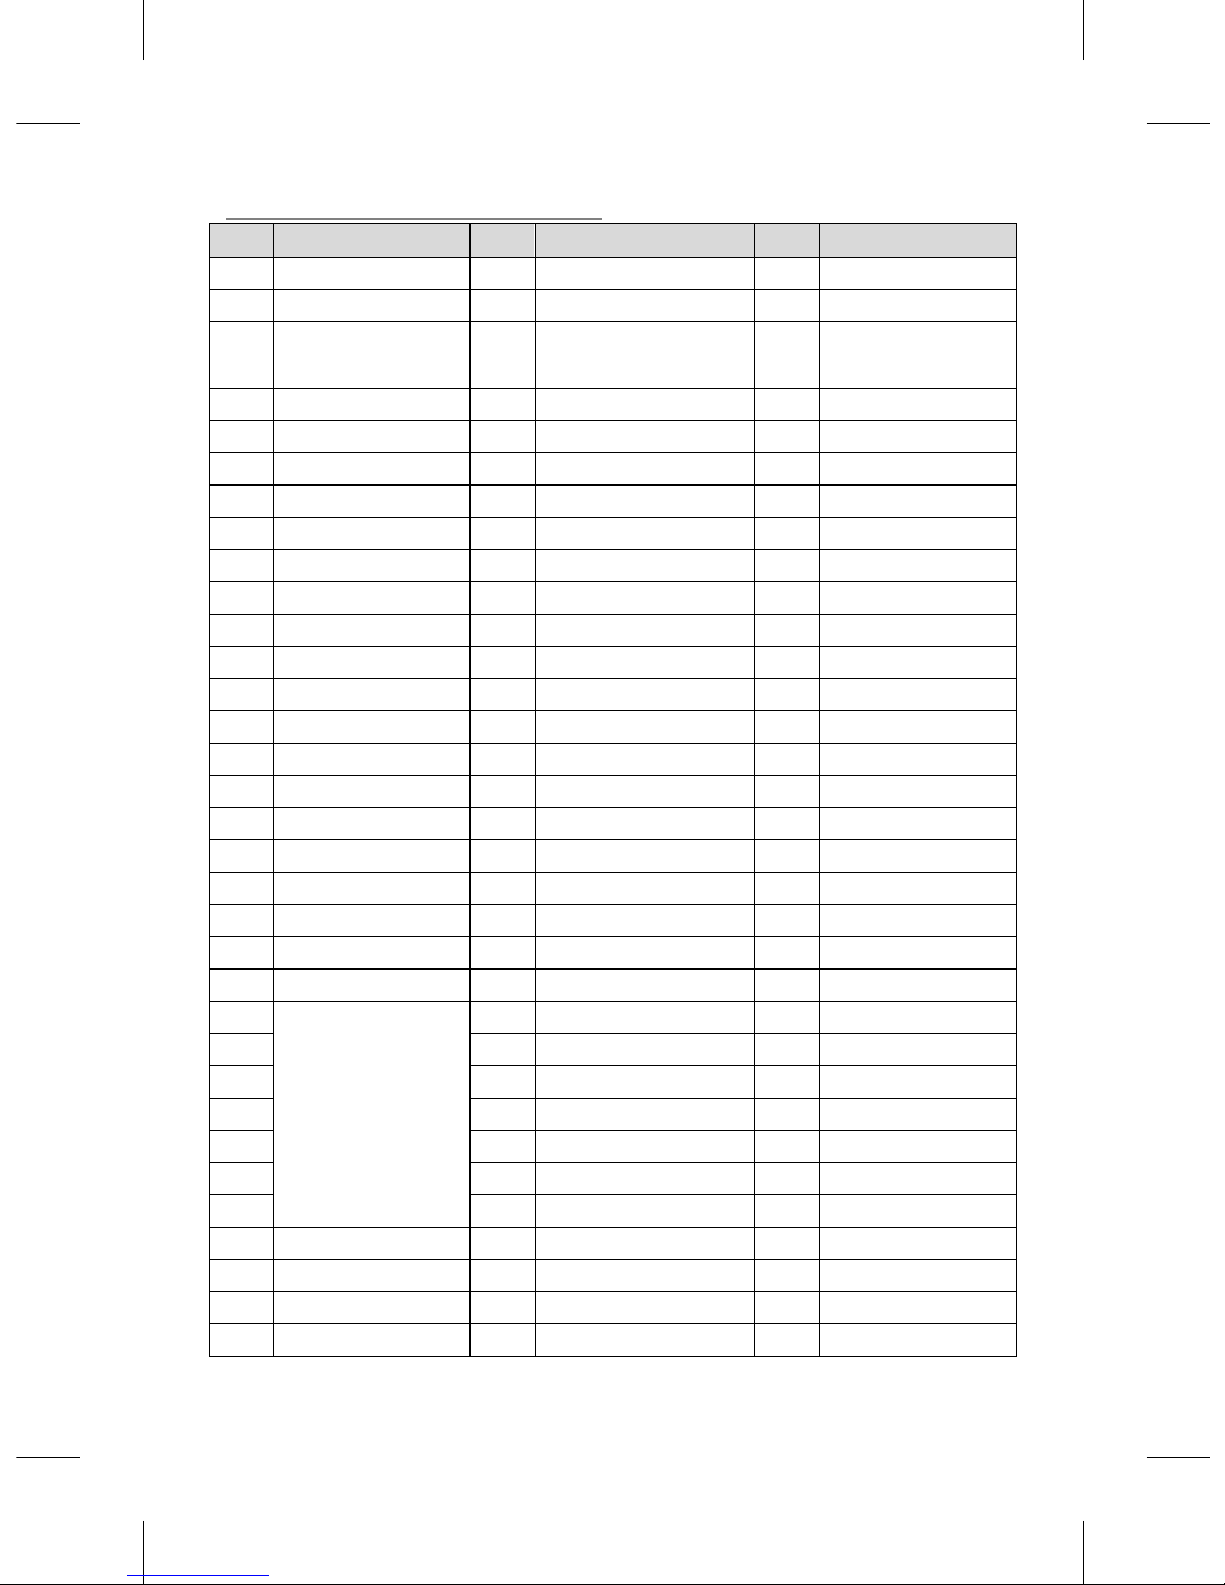
Exploded diagram and spare parts list GL190
No.
Description
No.
Description
No.
Description
1
Flat Beater
48
Bearings
93
Support
2
Dough Hook
49
Seal
94
Washer
3
Wire Whip
50
Bearings
95
Type 1
Hexagon Nut
4
Gear Box
51
Gear Shaft
96
Screw
5
Circlip
52
Key: 5x10
97
Lifting Support
6
Worm Gear
53
Key: 5x10
98
Hexagon
7
Seal
54
Gear
99
Flat Washer
8
Key
55
Circlips
100
Spring
9
Motor
56
Gear
101
Flat Washer
10
Fan
57
Circlips
102
Pin
11
Rear Outer
58
Bearings
103
Connecting Rod
12
Nut M5 x 60
59
Bearings
104
Cotter Pin
13
Washer
60
Key: 5x14
105
Retainer Pin
14
Connector
61
Shaft
106
Crank Lever
15
Nut M4 x 8
62
Worm Gear
107
Handle
16
Red Button
63
Circlips
108
Rear Pillar
17
Green Button
64
Bearings
109
Hexagonal Bolt
18
Nut M4 x 8
65
Control Nut
110
Base
19
Panel
66
Spring
111
Hexagonal Bolt
20
Nut M4x 20
67
Fork Pin
112
Power Cord
21
Micro Switch
68
Shaft
113
Gland
22
Distance
69
Shifting Yoke
114
Screw
23
Handle
Assembly
70
Inner Gear
115
Contact Switch
25
71
Hexagon Socket
116
Type 1
26
72
Circlips
117
AC connector
27
73
Planet Gear
118
Fixing Plate
28
74
Operating Shelf
119
Screw
29
75
Bearing
120
Screw
30
76
Shaft Support
121
Capacitor
31
Bearings
77
Bearing
122
Capacitor
32
Washer
78
Seal
123
Screw
33
Spring
79
Key: 5x20
124
Fixing Plate
34
Roller 6 x 10
80
Spindle
125
Screw
GL190-GL191_GJ461_ML_A5_v7_20180928.indb 3 2018/9/28 16:02
Page 4
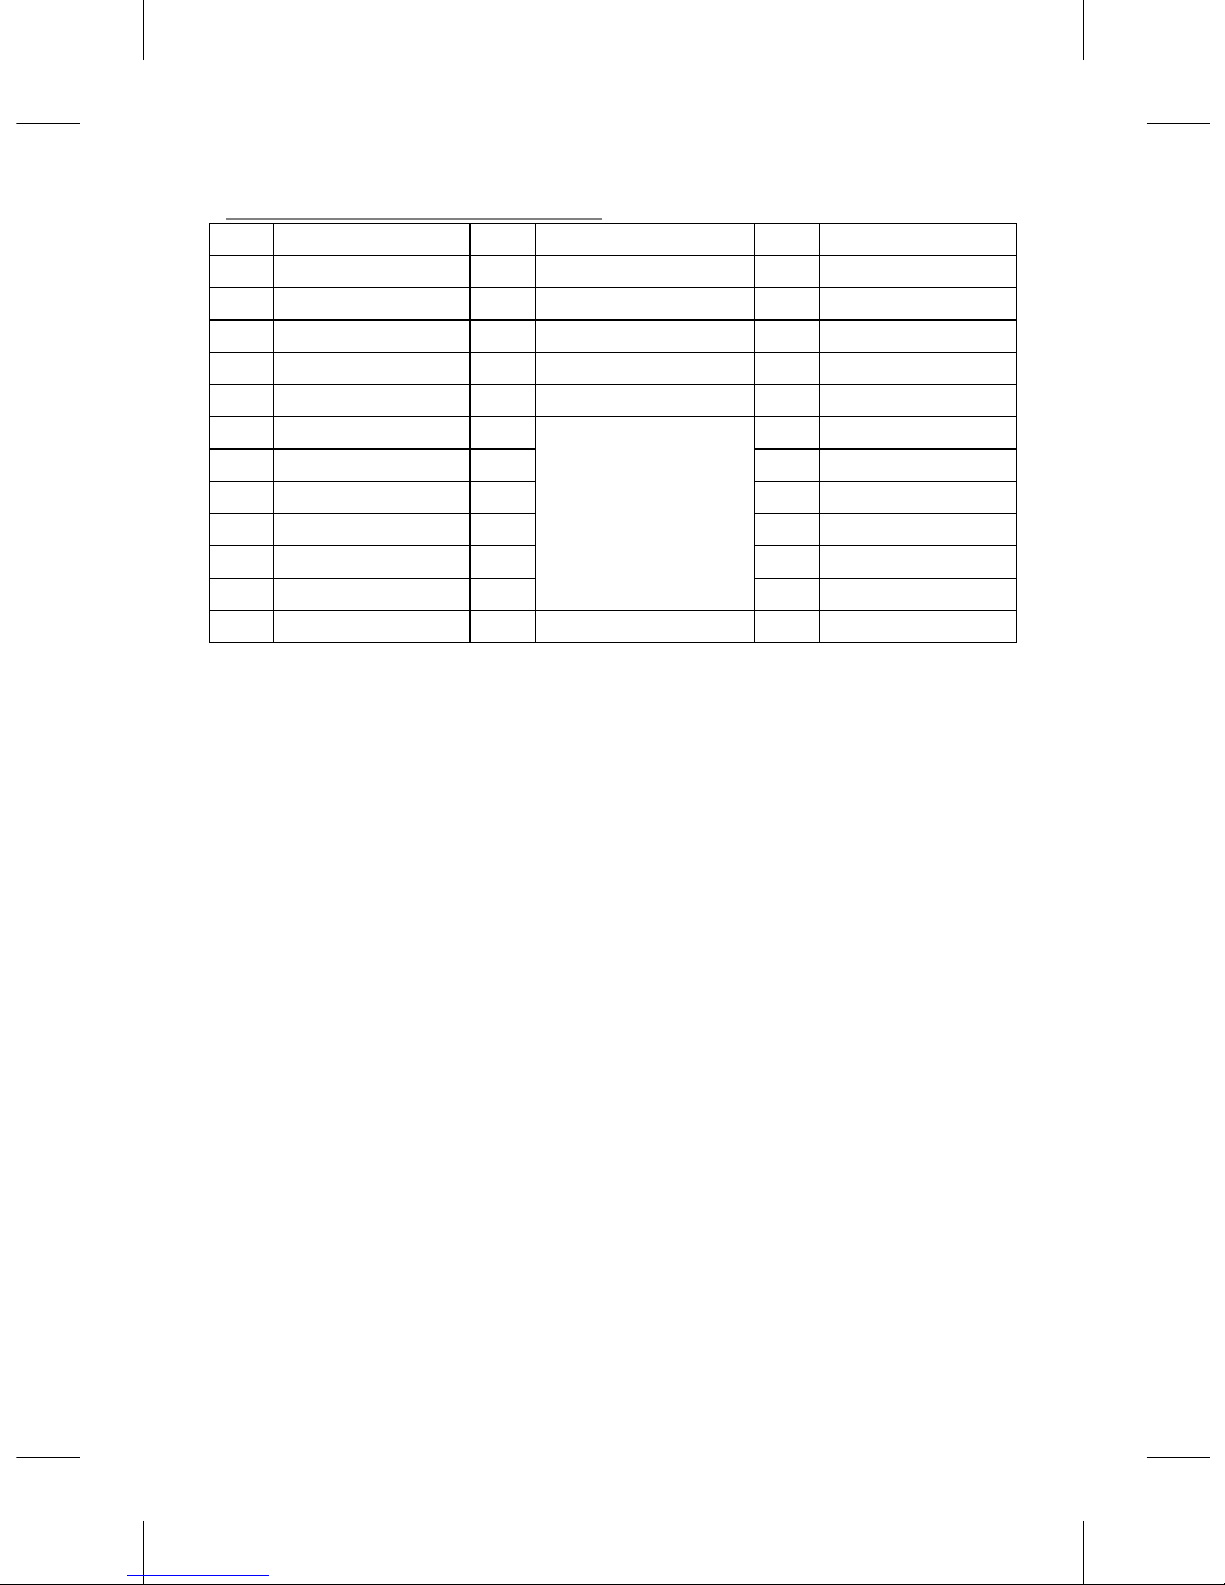
Exploded diagram and spare parts list GL190
35
Gear
81
Retainer Pin
126
Type 1
36
Cog
82
Bowl
127
Bracket
37
Ring Gasket
83
Screw
128
Distance Switch
38
Gear
84
Washer
129
Screw
39
Shaft sleeve
86
Rear Guard
130
Type 1
40
Claw Clutch
87
Bolt
132
Shaft Pin
41
Key: 5x25
85
Front Guard
Assembly
133
Split Washer
42
Key: 5x30
88
134
Spring
43
Key: 5x30
89
135
Overload
44
Main Shaft
90
45
Shaft Sleeve
91
46
Gear
131
47
Washer
92
Taper Pin
GL190-GL191_GJ461_ML_A5_v7_20180928.indb 4 2018/9/28 16:02
Page 5
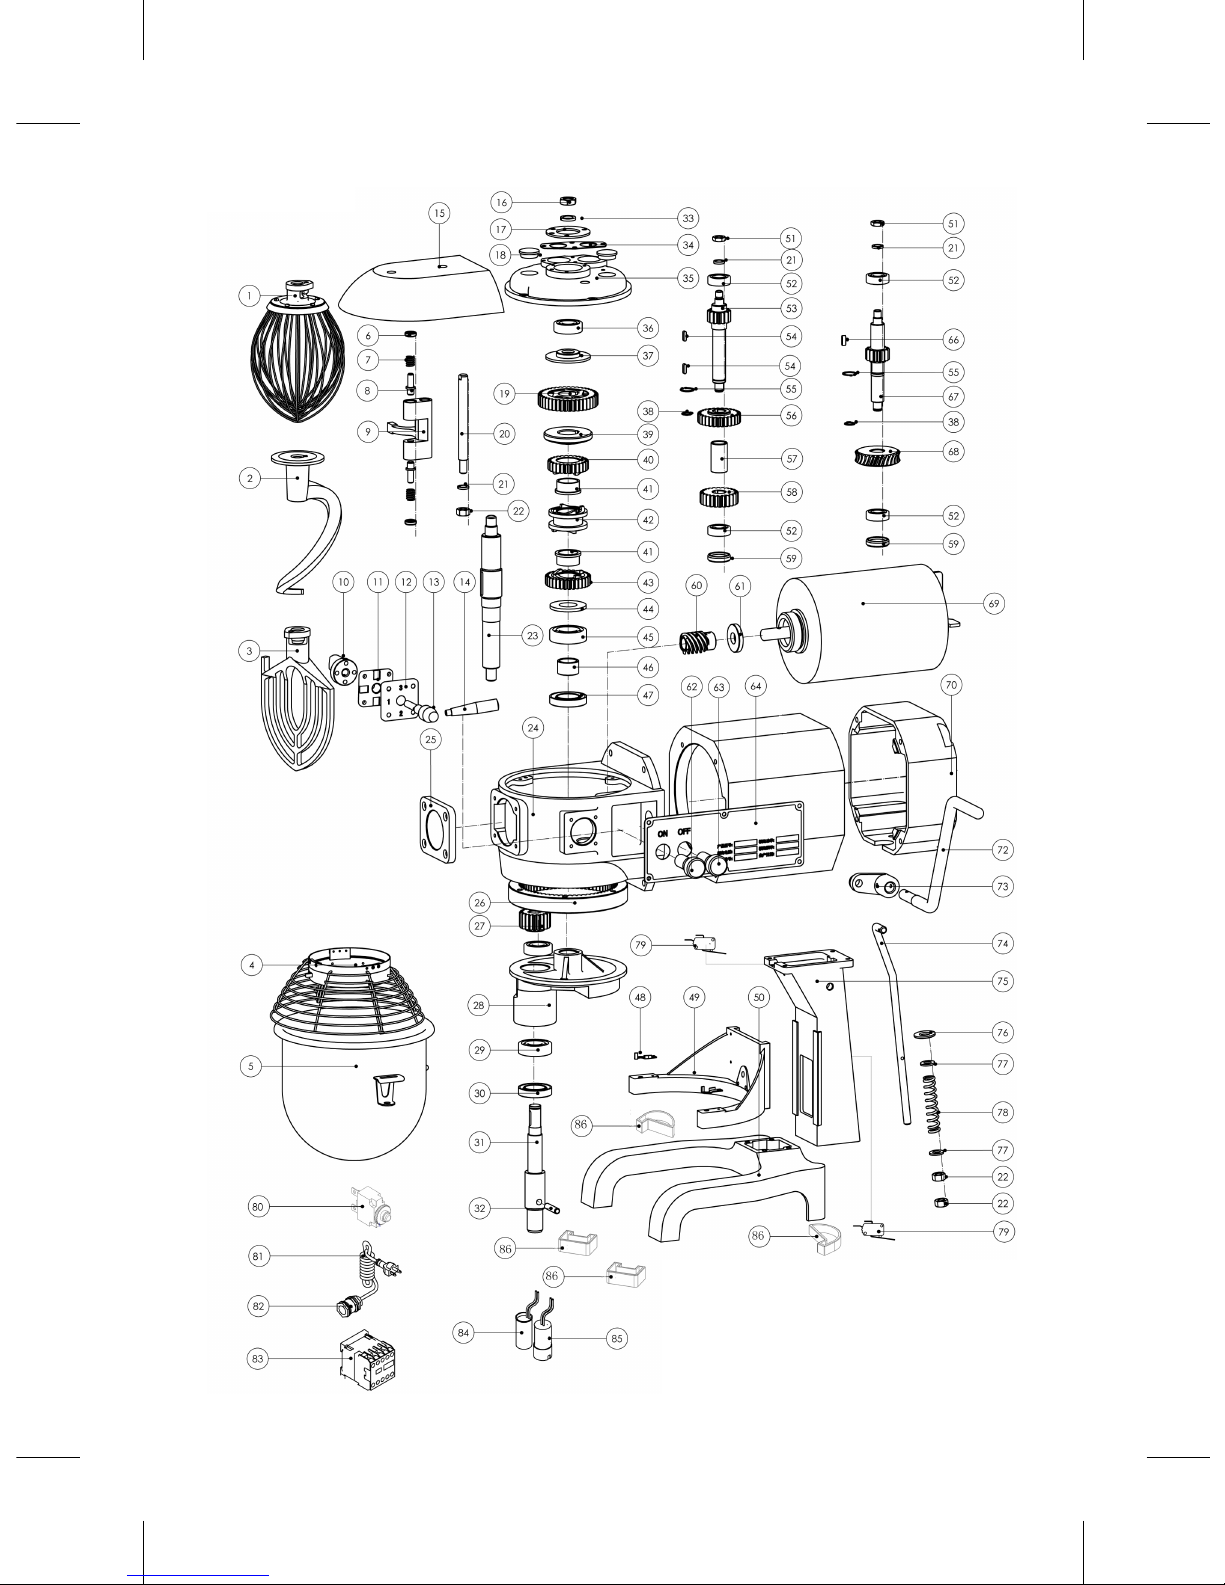
GL191
GL190-GL191_GJ461_ML_A5_v7_20180928.indb 5 2018/9/28 16:02
Page 6

NO. DESCRIPTION NO. DESCRIPTION NO. DESCRIPTION
1 WireWhip 22 Nut 60 Wormwheel
2 SpiralDoughHook 24 GearBox 69
Motor(WithTool)
3 FlatBeater 24 GearBox 61 Oilseal
4 SafetyGuard 25 EndCap 62
GreenButton
5 BowlAssembly 26 InternalGear 63
RedButton
6 Cap 27 Gear 64 Panel
7 Spring 28 OperatingShaft 65 MotorHousing
8 PinShaft 29 Bearing 66 Key
9 ShiftingYoke 30 OilSeal 67 ShaftWormGear
10 CamGear 31 WorkingShaft 68 WormWheel/Gear
11 TransmissionPlate 32 RetainerPin 70 RearCasing
12 TransmissionPlate 33 Spring 70 RearCasing
13 DriveShaft 34 PressingPlate 71 RearPanel
14 GearMech 35 TransmissionSupport 72 Handle-shifter
15 Hood 36 Bearing 73 CrankLever
16 Nut 38 CirclipsforShaft 74 ConnectingRod
17 PressingPlate 46 Bushing 75 Pillar
18 PlugCover 47 OilSeal 76 ClampPlate
19 Cog 48 LockingClamp 77 ClampPlate
23 MainShaft 49 BowlSupport 78 Spring
37 Spacer-Lower 50 Case 79 MicroSwitch/DistanceSwitch
39 RingGasket 51 Nut 80 OverloadSwitch
40 Gear 52 Bearing 81 PowerCord
41 Bushing 53 Gear 82 Gland
42 Sleeve 54 Key 83 ContactSwitch
43 ClawGear 55 CirclipsforShaft 84 Capacitor
44 Washer 56 Gear 85 StartCapacitor
45 Bearing 57 Bushing 86 RubberPadandScrew
20 DeclutchShiftShaft 58 Gear
21 Washer 59 Washer
GL191
GL190-GL191_GJ461_ML_A5_v7_20180928.indb 6 2018/9/28 16:02
Page 7
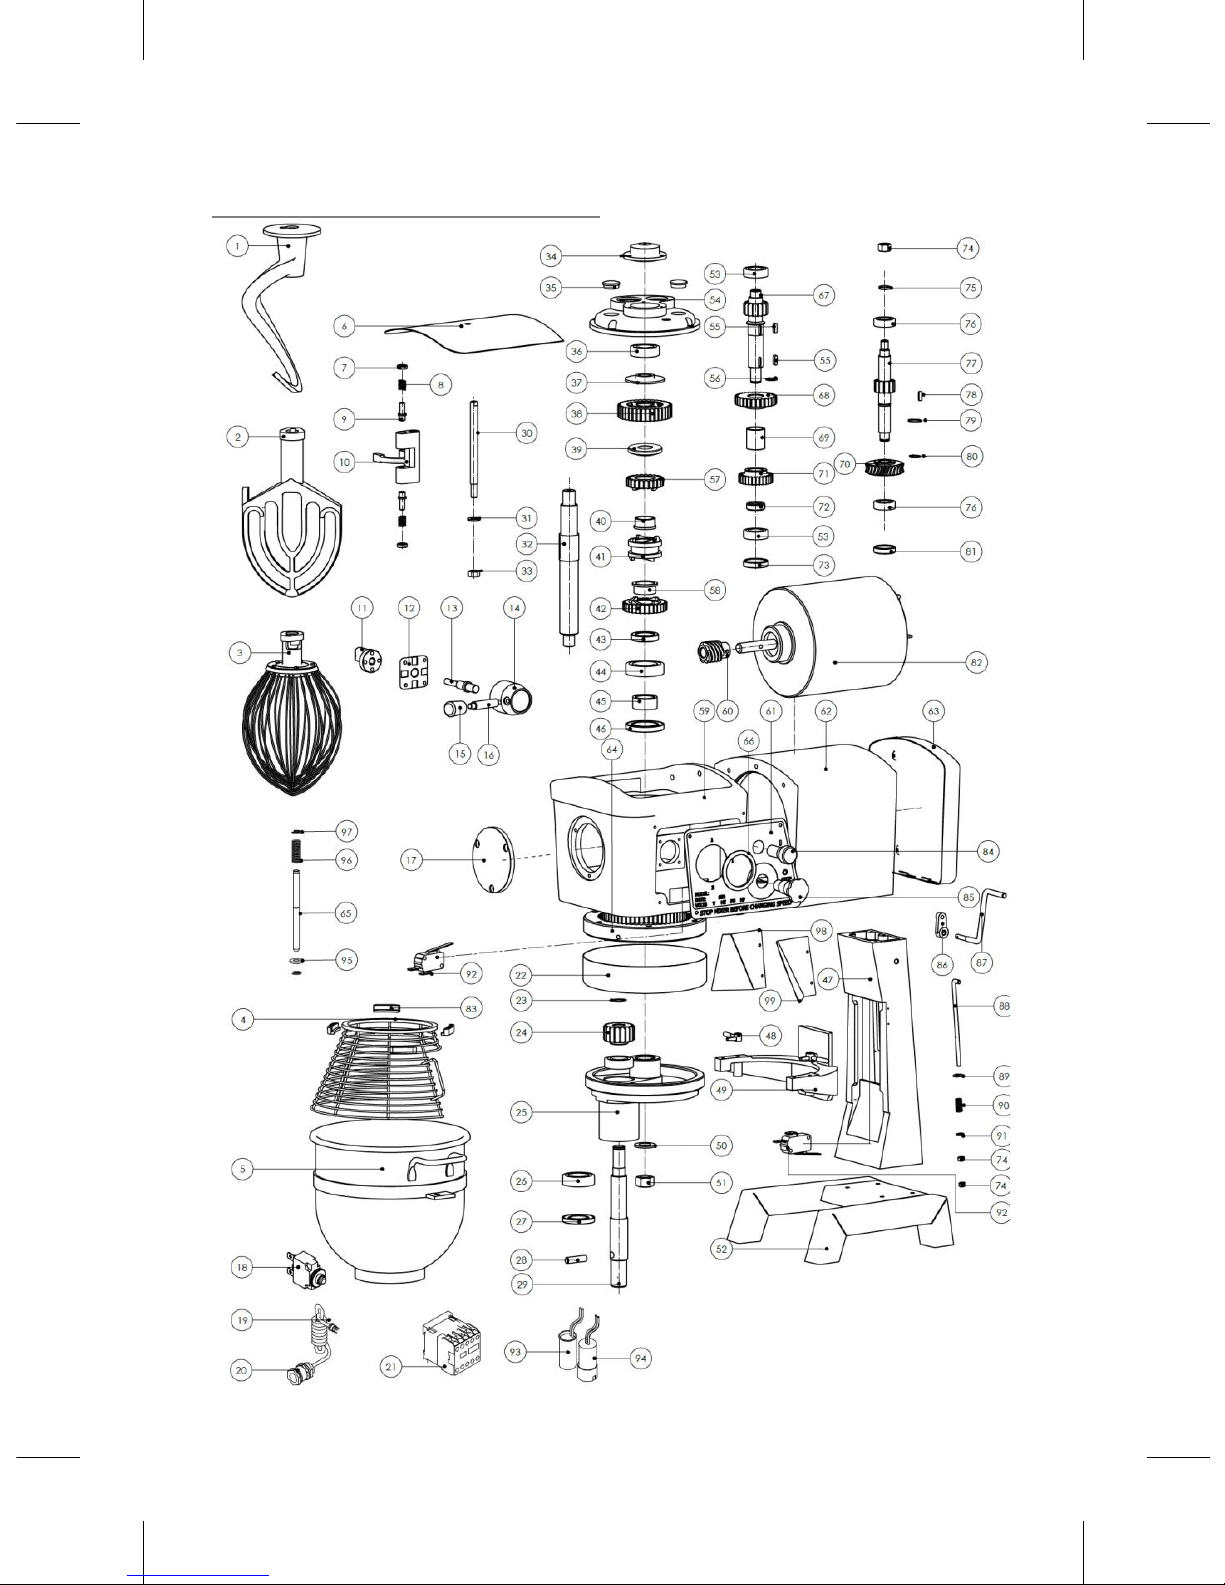
Exploded diagram and spare parts list GJ461
GL190-GL191_GJ461_ML_A5_v7_20180928.indb 7 2018/9/28 16:02
Page 8

Exploded diagram and spare parts list GJ461
No.
Description
No.
Description
No.
Description
1
Dough Hook
33
Top Hat Valve
67
Gear Shaft
2
Flat Beater
34
Flat Valve Cap
68
Gear
3
Wire Whip
35
Bearing
69
Bushing
4
Safety Guard
36
Spacer
70
Gear
5
Bowl
37
Gear
71
Gear
6
Upper Panel
39
Gear
72
Pressing Plate
7
Screw
40
Bushing
73
Spacer
8
Spring
41
Shaft Sleeve
74
Nut
9
Pin Shaft
42
Gear
75
Pressing Plate
10
Shifting Yoke
43
Clamping Plate
76
Bearing
11
Cam Gear
44
Bearing
77
Worm Gear
12
Transmission
45
Bushing
78
Key
13
Drive Shaft
46
Seal
79
Circlips
14
Gear Mech
47
Pillar
80
Circlips
15
Knob
48
Locking Clamp
81
Spacer
16
Extension Bar
49
Support
82
Motor
17
Attachment
50
Clamping Plate
83
Rubber
18
Overload
51
Nut
84
Green Button
19
Power Cable
52
Base
85
Red Button
20
Gland
53
Bearing
86
Crank
21
Contact
54
Transmission
87
Crank lever
22
Hood Ring
55
Key
88
Connecting
23
Circlips
56
Circlips
89
Spring
24
Planet Gear
57
Gear
90
Plate
25
Operating
58
Bushing
91
Clamping Plate
26
Bearing
59
Gear Box
92
Distance
27
Seal
60
Worm Wheel
93
Capacitor 1
28
Pin
61
Panel
94
Capacitor 2
29
Working Shaft
62
Casing
95
Switch
30
Shaft
63
Rear Panel
96
Spring
31
Pressing Plate
64
Internal Gear
97
Washer
32
Main Shaft
65
Switch Axle
98
Fin (left-hand
33
Nut
66
Seal
99
Fin (right-hand
GL190-GL191_GJ461_ML_A5_v7_20180928.indb 8 2018/9/28 16:02
Page 9
9
UK
Safety Tips
THE PLANETARY MIXER IS A DANGEROUS
APPLIANCE AND MUST ONLY BE USED BY
TRAINED PERSONNEL IN ACCORDANCE WITH
THESE INSTRUCTIONS
.
• Position on a flat, stable surface.
• A service agent/qualified technician should carry out
installation and any repairs if required. Do not remove any
components on this product.
• Consult Local and National Standards to comply with the
following:
- Health and Safety at Work Legislation
- BS EN Codes of Practice
- Fire Precautions
- IEE Wiring Regulations
- Building Regulations
• Always stand BEHIND the safety guard when operating the
appliance.
• DO NOT place hands near the rotating attachments when in
use. This can result in severe injury.
• DO NOT remove food from the appliance until the mixing
attachments have come to a complete stop.
• DO NOT immerse the appliance in water.
• DO NOT attempt to mix items that this machine is not
designed for. This can damage the mixing attachments.
• DO NOT use with a damaged mixing attachment.
• DO NOT bypass the safety interlocks.
• Always switch off and disconnect the power supply to the
appliance when not in use.
GL190-GL191_GJ461_ML_A5_v7_20180928.indb 9 2018/9/28 16:02
Page 10

10
UK
• NEVER leave the appliance unattended when in use.
• The appliance is heavy. Take care when moving.
• This appliance must only be used in accordance with these
instructions and by persons competent to do so.
• This appliance is not intended for use by persons (including
children) with reduced physical, sensory or mental capabilities,
or lack of experience and knowledge, unless they have
been given supervision or instruction concerning use of the
appliance by a person responsible for their safety.
• Keep all packaging away from children. Dispose of the
packaging in accordance to the regulations of local authorities.
• If the power cord is damaged, it must be replaced by an
BUFFALO agent or a recommended qualified technician in
order to avoid a hazard.
• Never use accessories which are not recommended by the
manufacturer. They could pose a safety risk to the user and
might damage the appliance. Only use original parts and
accessories.
• Buffalo recommend that this appliance is PAT tested on an
annual basis to ensure the product remains safe.
Product Description
GL190 - 10 litre planetary mixer
GL191 - 20 litre planetary mixer
GJ461 - 30 litre planetary mixer
The BUFFALO Planetary Mixer is a free standing machine that consists of a large bowl mounted below a
motor and gearbox arrangement to which a mixing tool can be attached.
Introduction
The BUFFALO Planetary Mixer has been designed to mix a range of foodstuffs, varying from cream to
dough.
Please take a few moments to carefully read through this manual. Correct maintenance and operation of
this machine will provide the best possible performance from your BUFFALO product.
GL190-GL191_GJ461_ML_A5_v7_20180928.indb 10 2018/9/28 16:02
Page 11
11
UK
Pack Contents
The following is included:
• BUFFALO Planetary Mixer
• Mixing Bowl
• Spiral Dough Hook
• Beater
• Whisk
• Instruction Manual
BUFFALO prides itself on quality and service, ensuring that at the time of packaging the contents are
supplied fully functional and free of damage. Should you find any damage as a result of transit, please
contact your BUFFALO dealer immediately.
Installation
• Ensure the location of the Planetary Mixer is capable of supporting its weight.
WARNING: The Planetary Mixer is
very heavy, care must be taken when
moving it.
• If the appliance is intended to be positioned on a
worktop, please ensure it is secured in position (for
GL190, GL191).
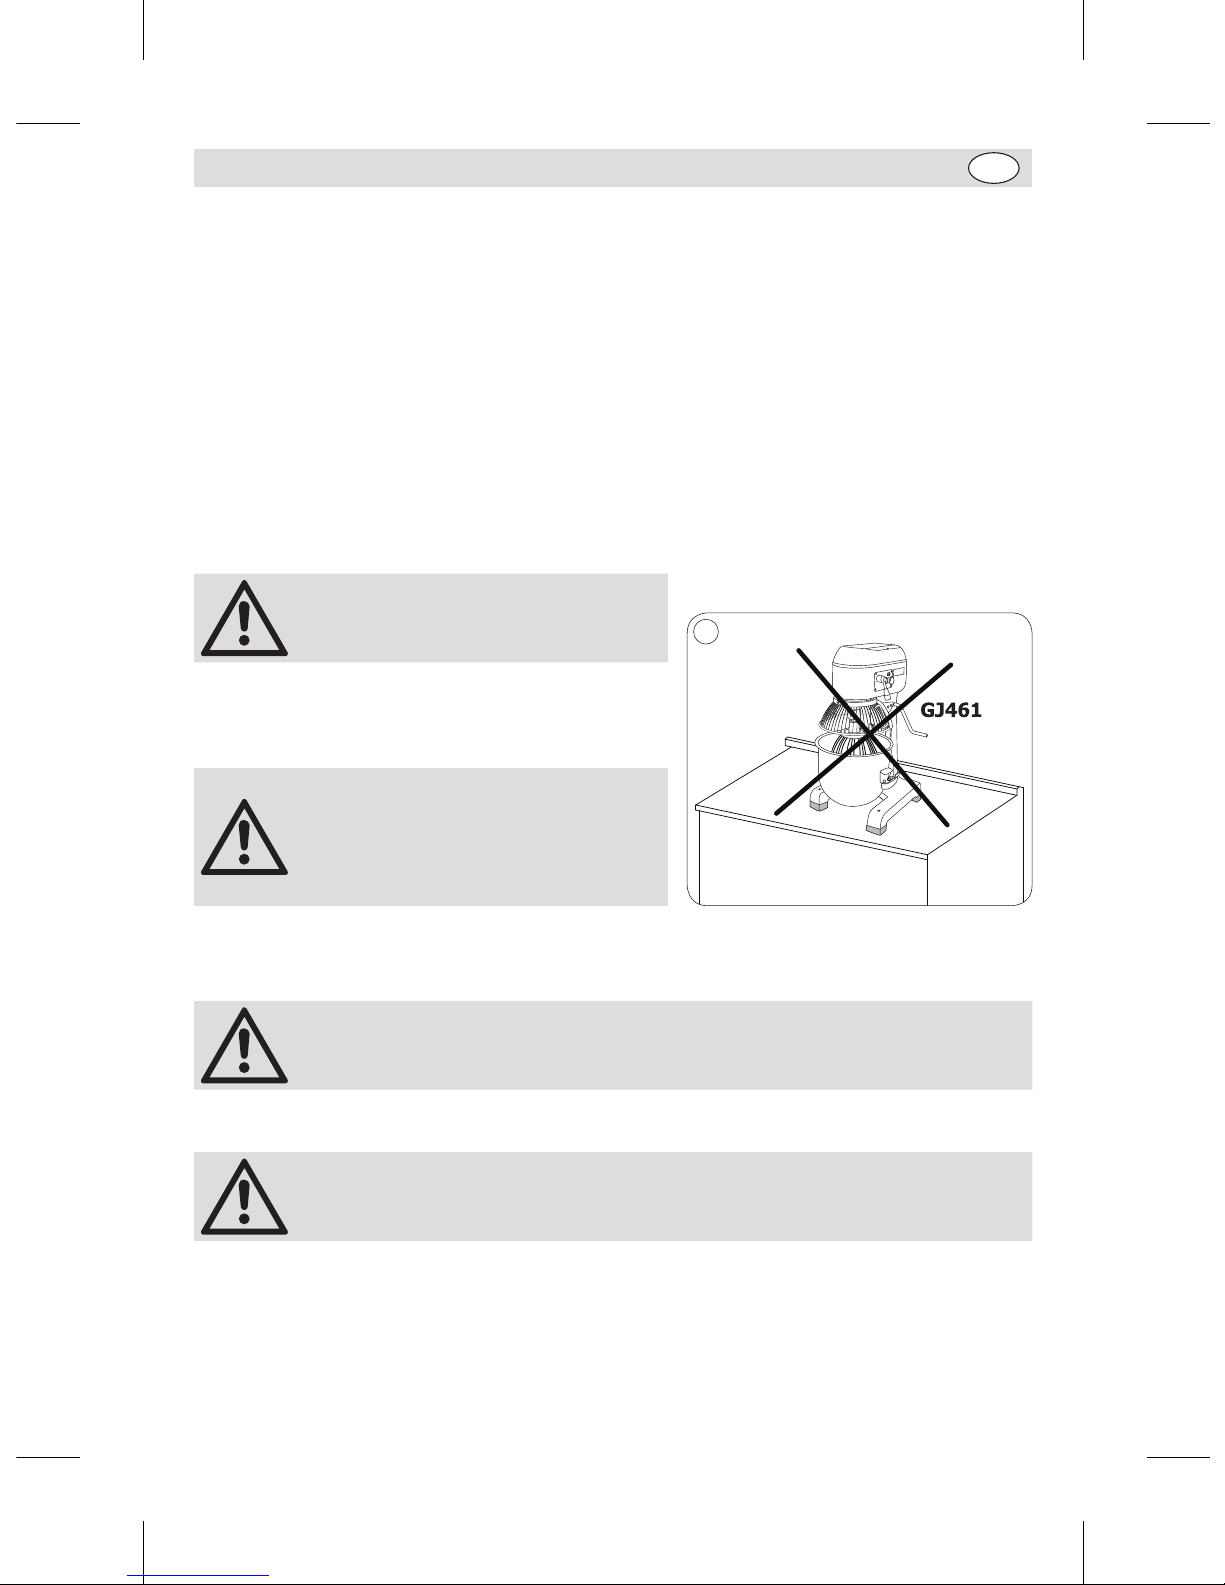
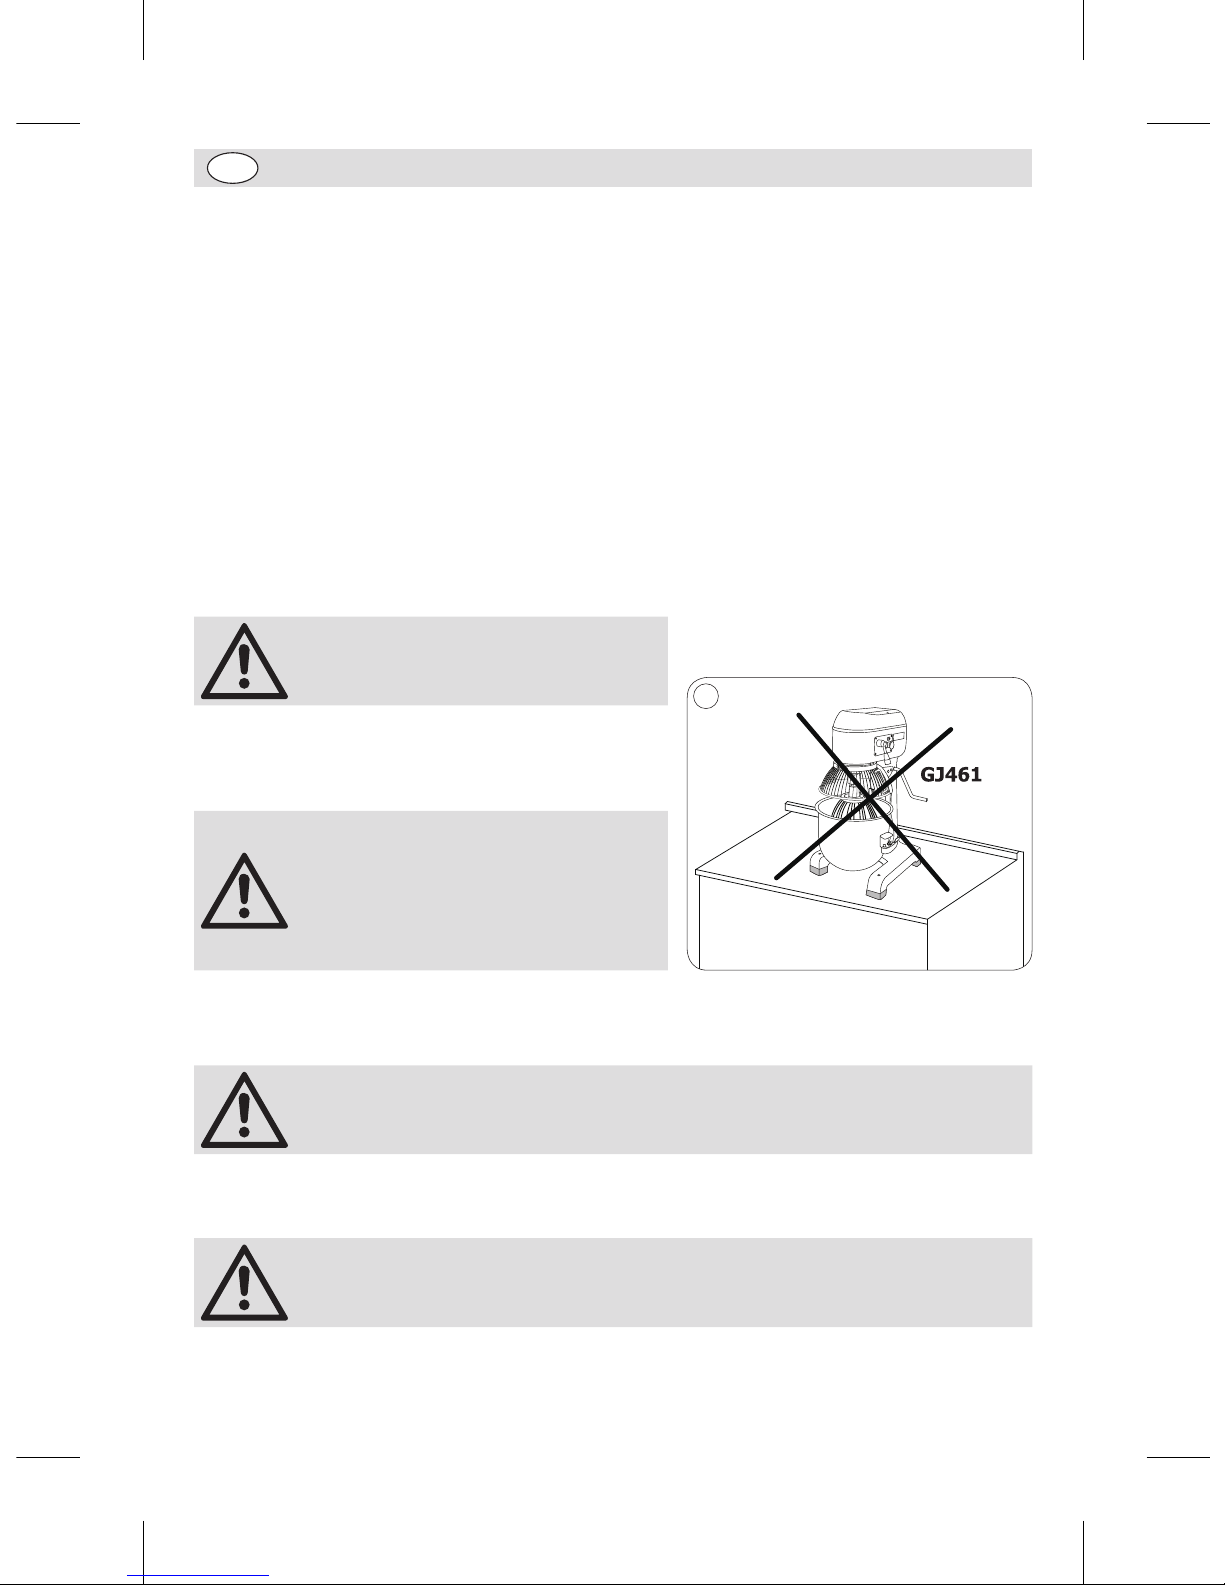
Floor Standing only with mixer GJ461!
Do not place it on any worktop due to
its heavy weight. In addition, it may
vibrate intensely on the worktop during
use, fall from it and result in personal/
property damage.
1
Assembly
WARNING: The bowl must be attached and raised into position prior to starting
the Planetary Mixer.
• BUFFALO accept no responsibility for any injury caused by incorrect assembly of this appliance.
Note: Ensure the feet are level to reduce vibration during operation.
• Remove the appliance from all packaging.
GL190-GL191_GJ461_ML_A5_v7_20180928.indb 11 2018/9/28 16:02
Page 12
12
UK
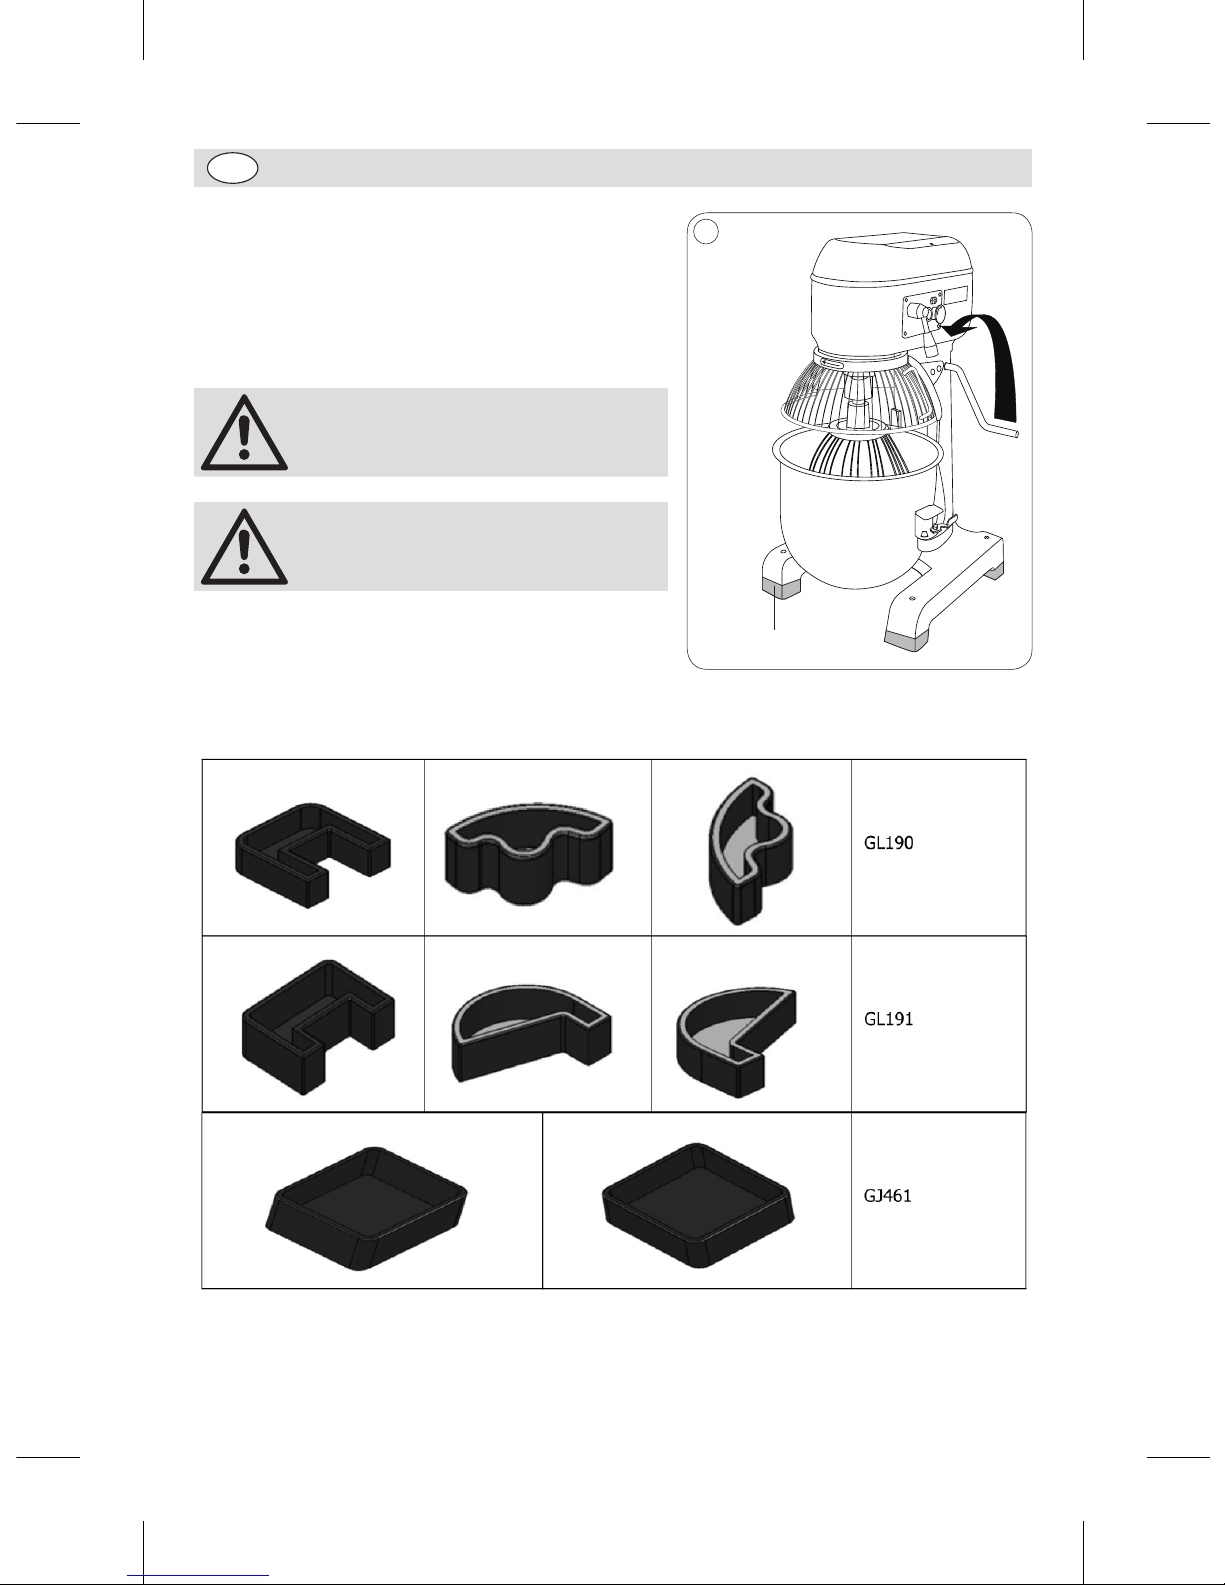
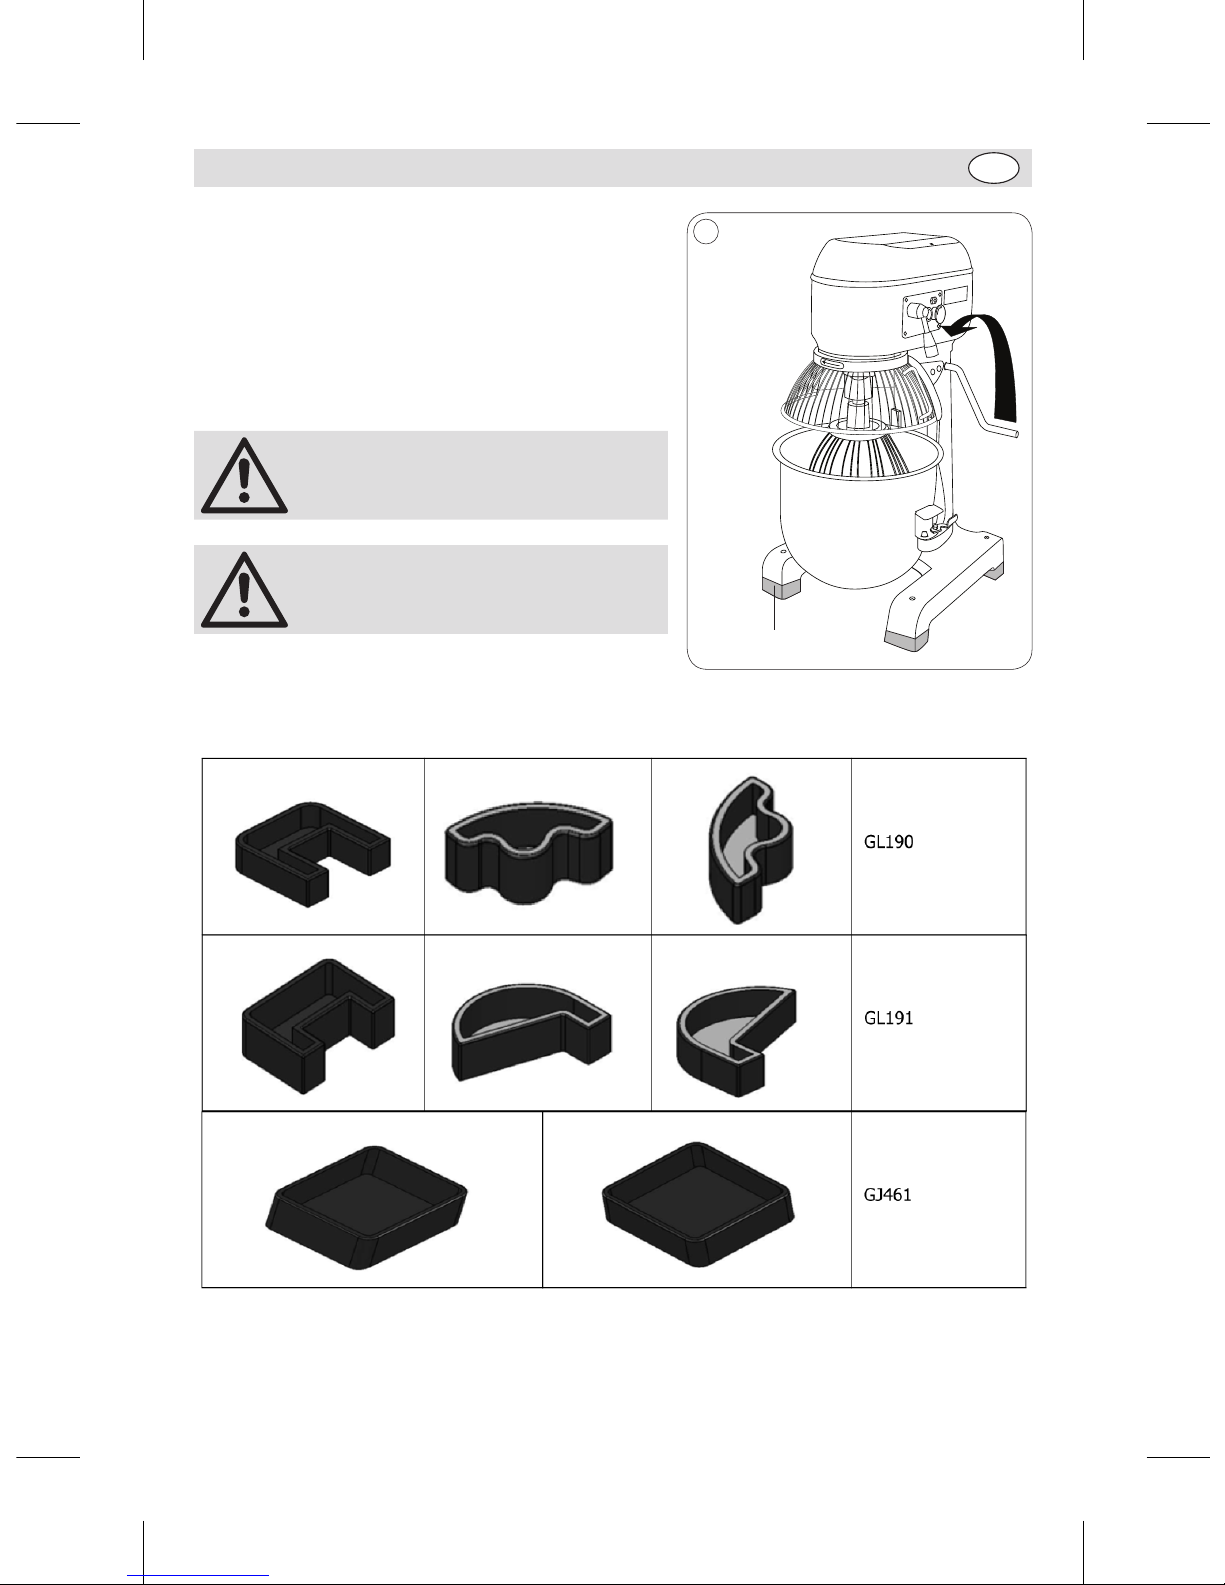
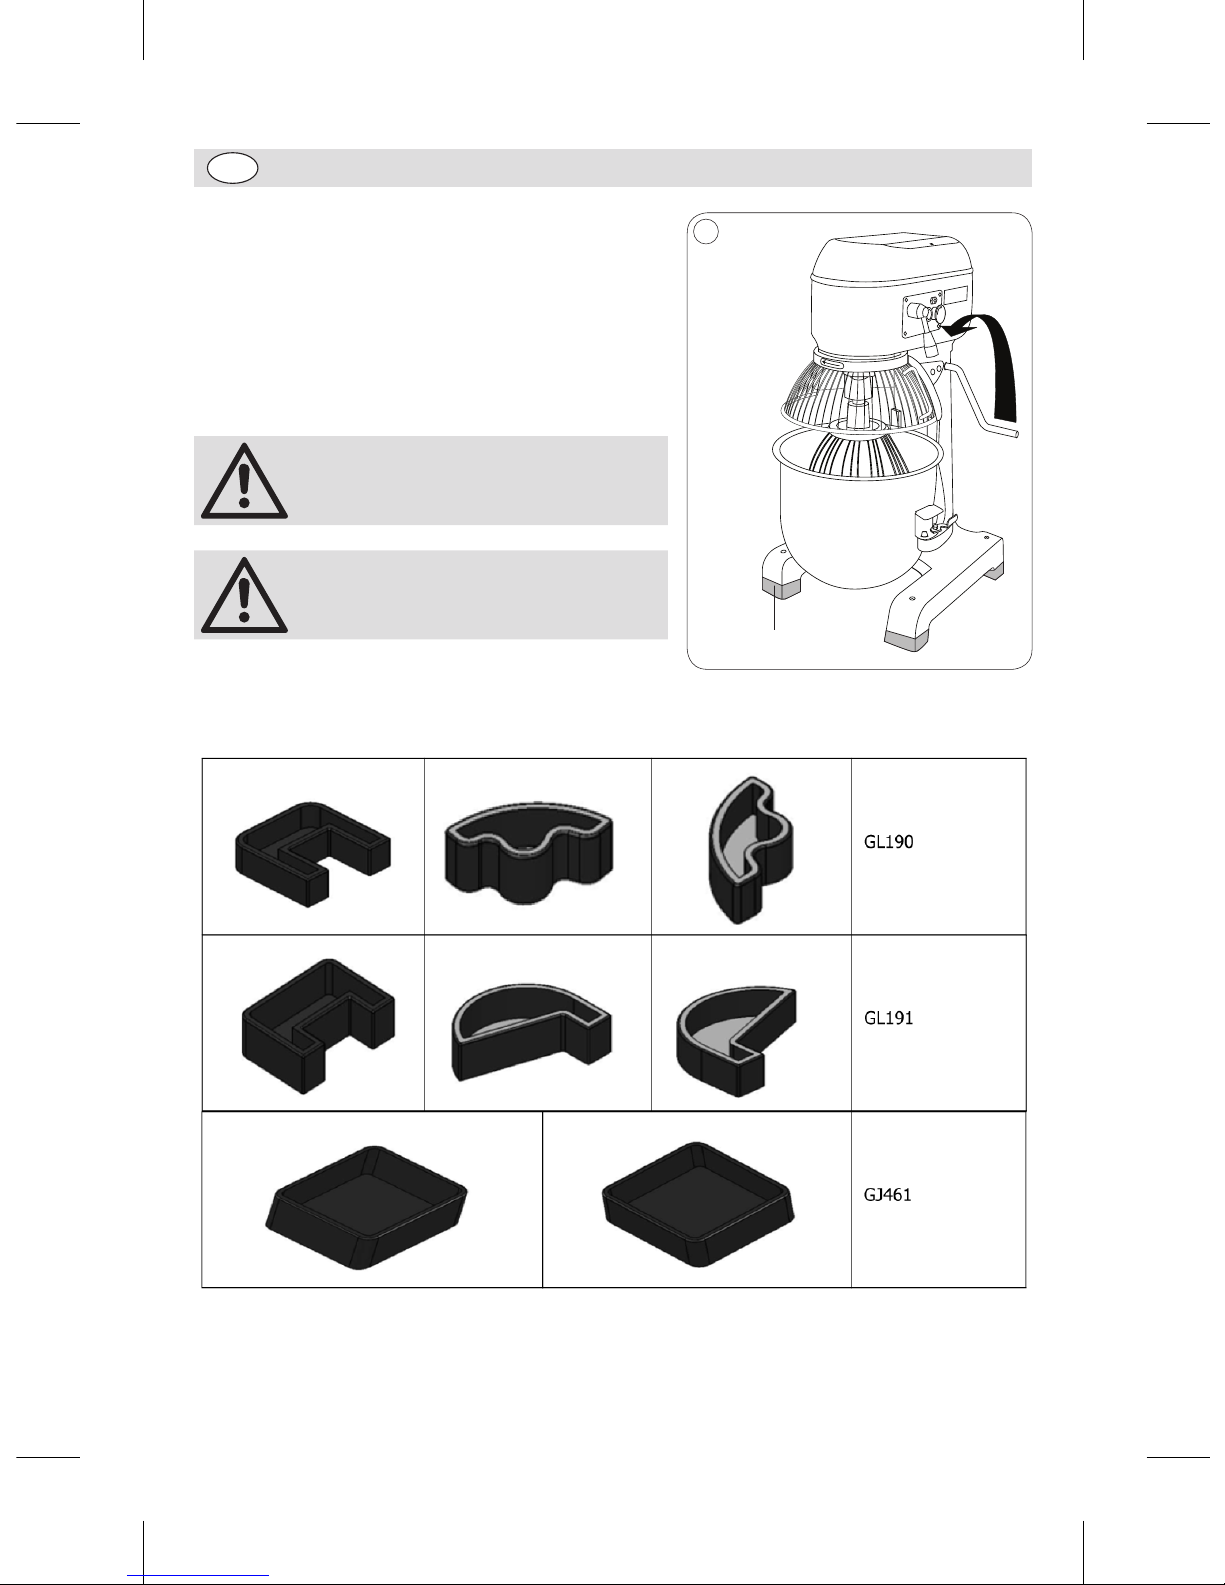
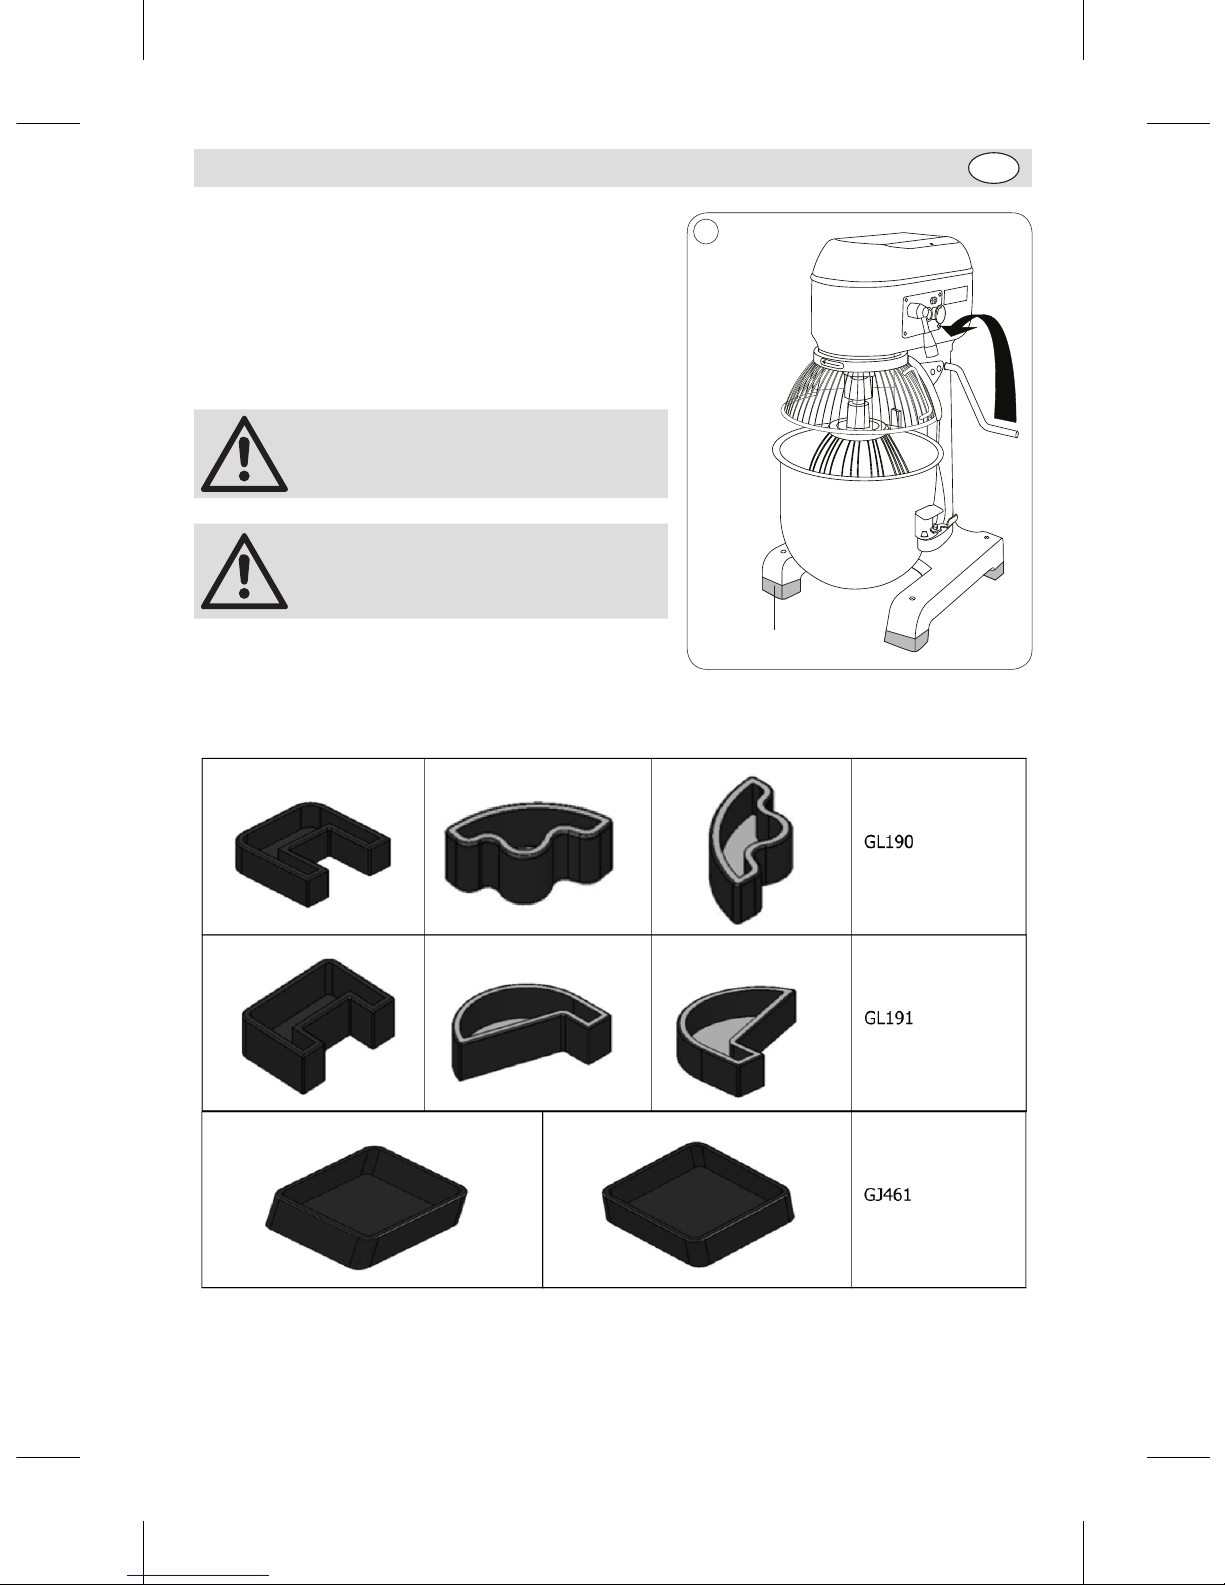
How to install the rubber feet
1. Remove all packaging from the appliance.
2. Remove the wooden pallet from the machine (Loosen
the four bolts at the bottom of the wooden pallet).
3. Take out the rubber feet from the bowl
4. Add the rubber feet to the feet of the machine.
Note: A minimum of two people should
be used to install the rubber feet.
Note: Once the rubber feet have been
installed, ensure the machine is stable.
2
Rubber feet
The type of rubber feet
Rubber feet
Remove all packaging from the appliance.
Remove the wooden pallet from the machine
(Loosen the four bolts at the bottom of the
wooden pallet).
Take out the rubber feet from the bowl
Add the rubber feet to the feet of the machine.
Note: A minimum of two people should
Note: Once the rubber feet have been installed, ensure the machine is stable.
be used to install the rubber feet.
GL190-GL191_GJ461_ML_A5_v7_20180928.indb 12 2018/9/28 16:02
Page 13
13
UK
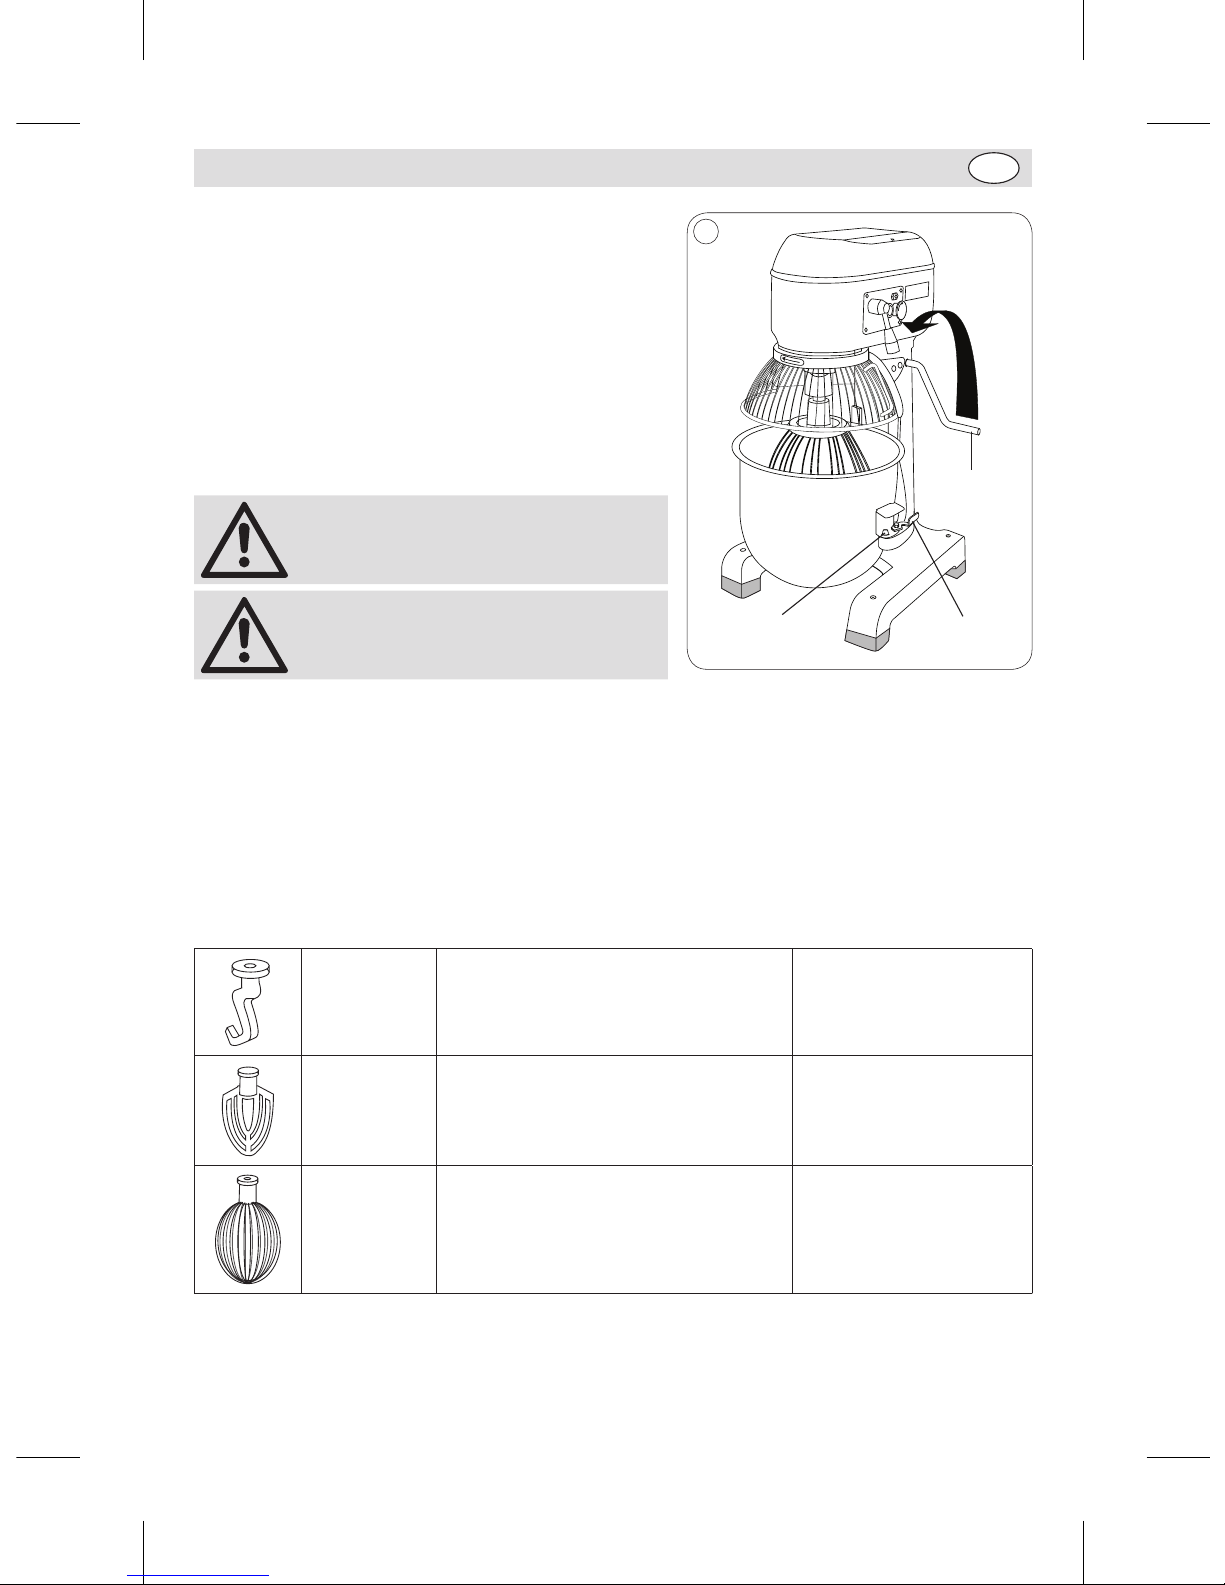
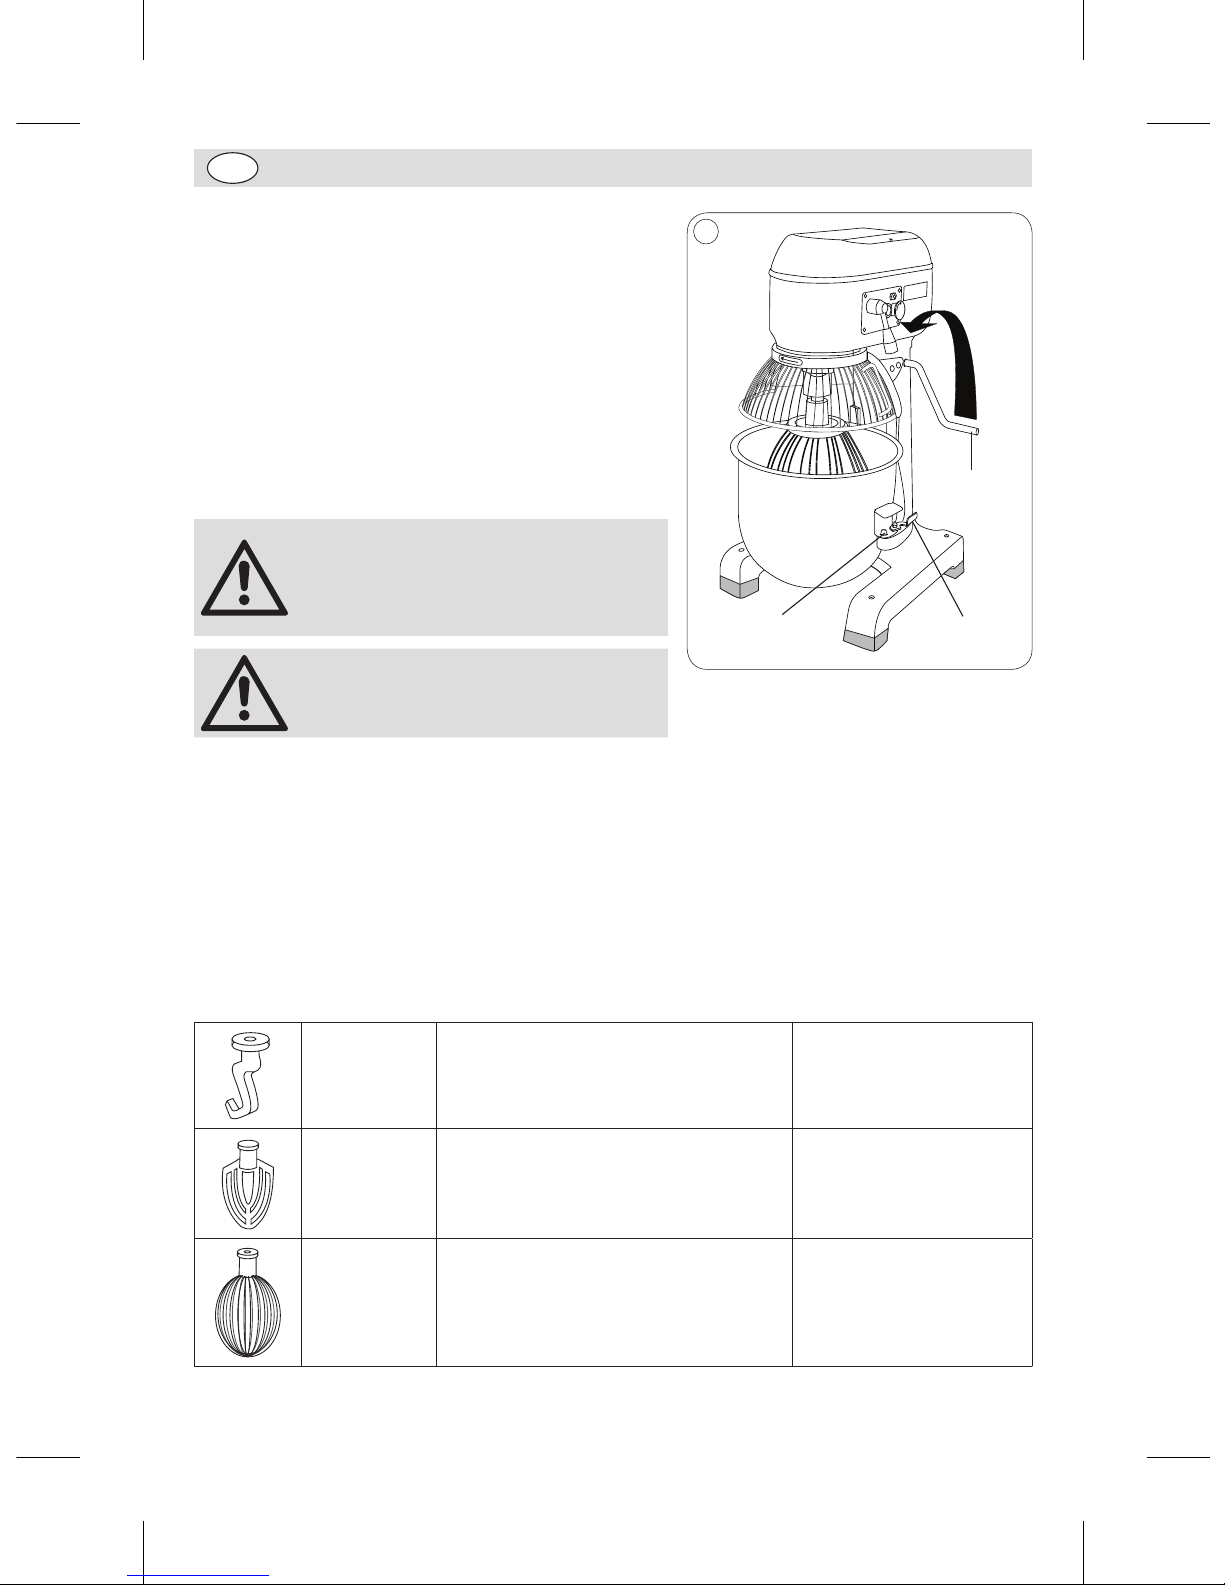
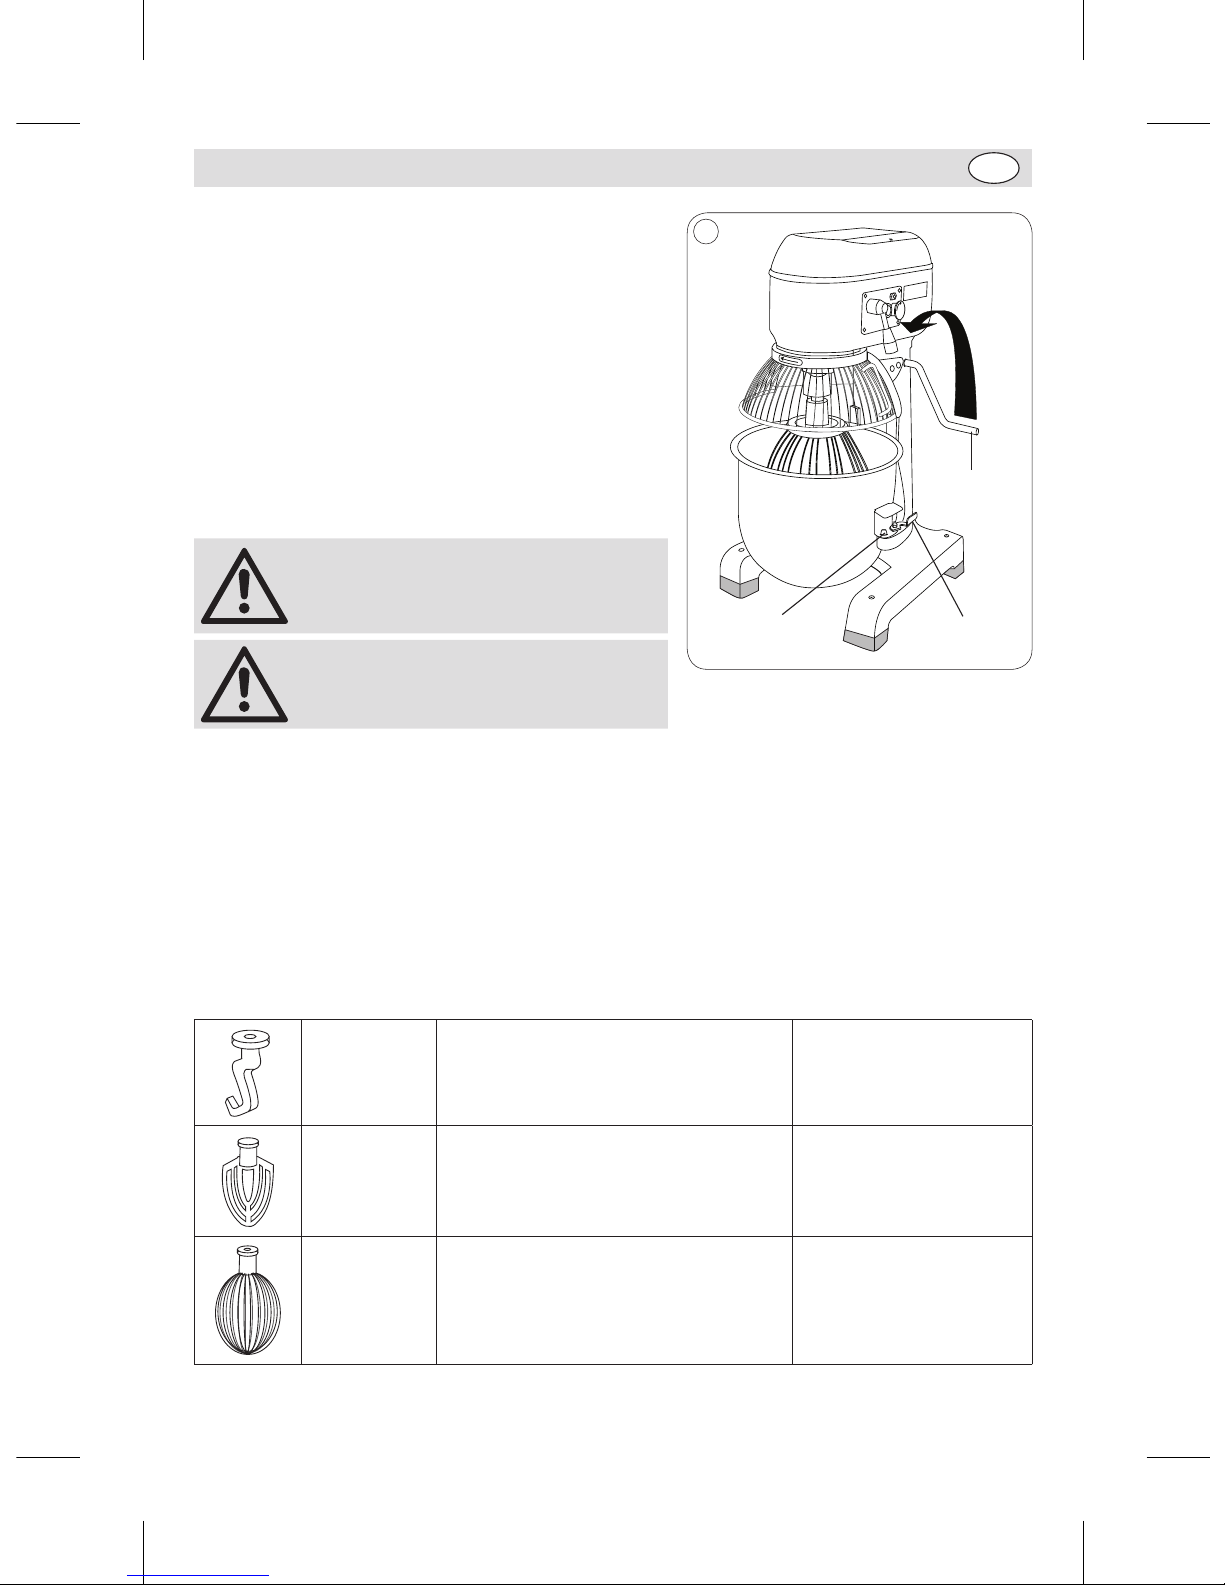
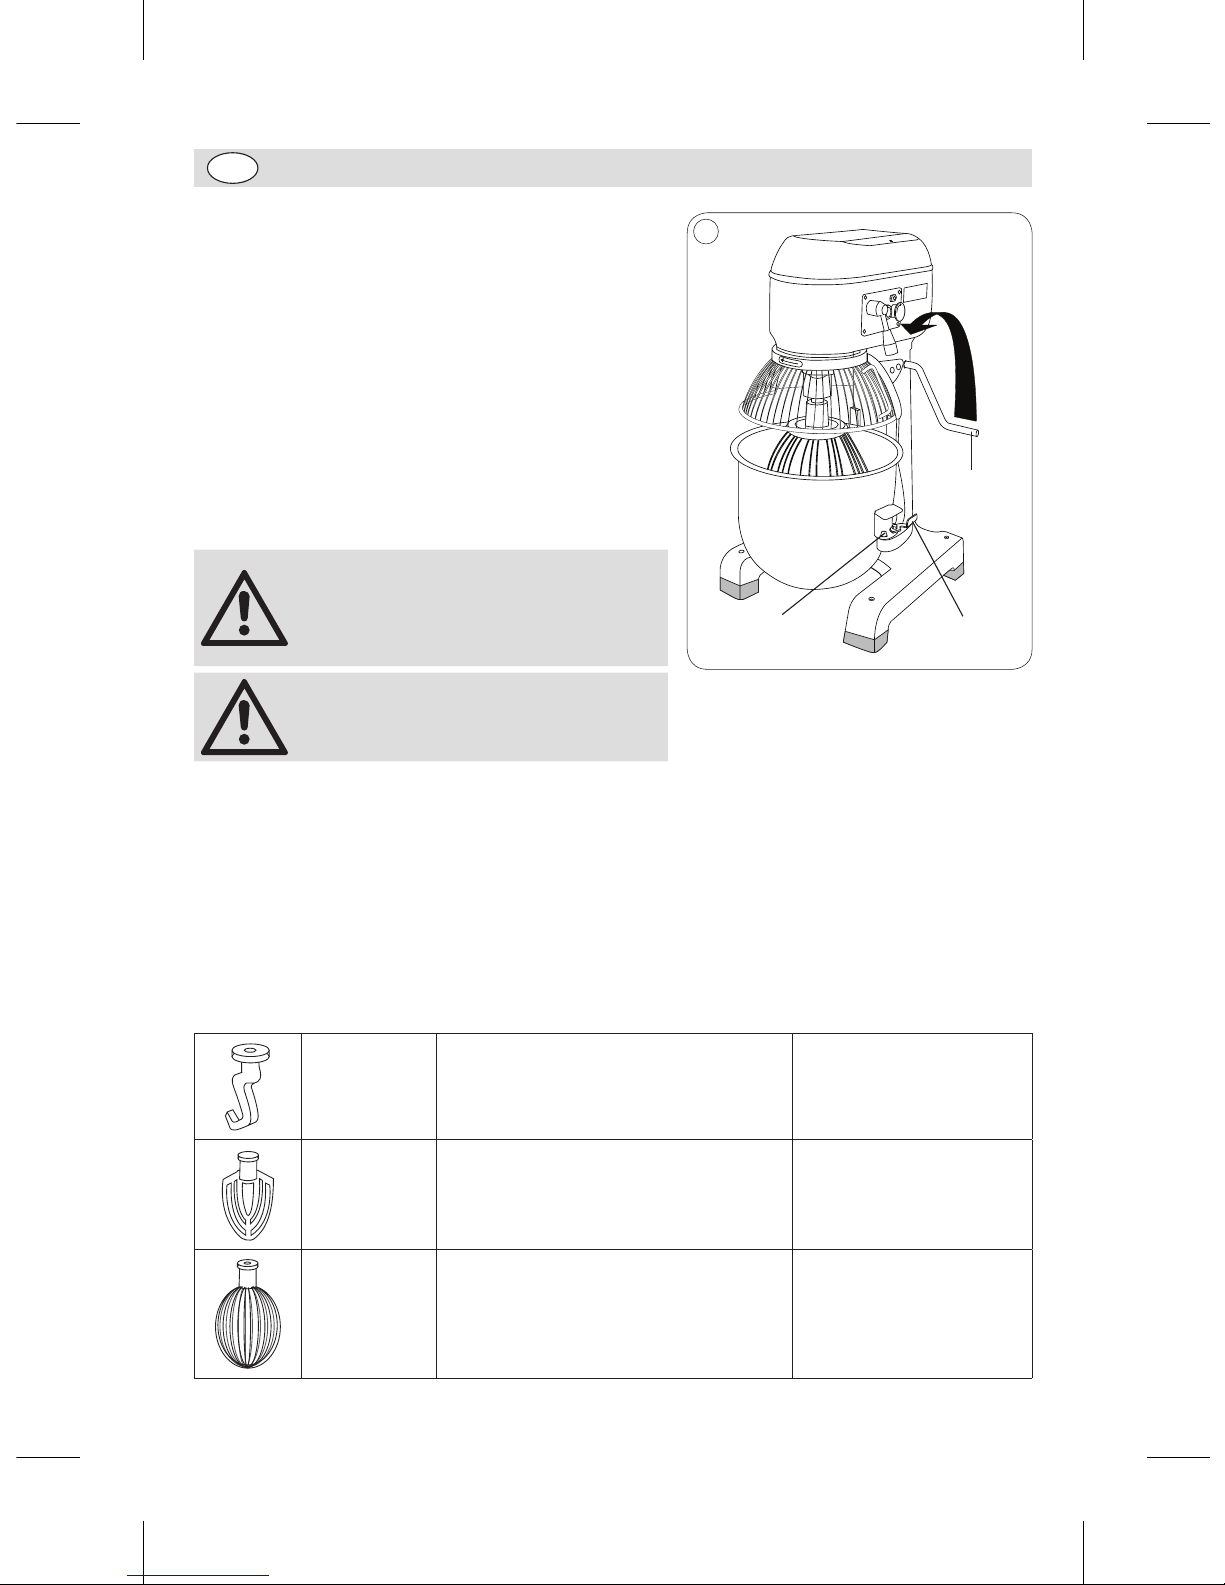
Fitting/Removing the Bowl
1. Turn Off the appliance.
2. Open the safety guard by turning it to the left
(GL190 & GL191) or lifting it above the mixer (GJ461).
3. Lower the bowl with the bowl handle.
4. Release the locking catches either side of the bowl.
5. Lift the bowl. The bowl is held in place by two pins
securing the handles to the cradle and a hole at the
back of the appliance which houses the lug on the
bowl lip.
6. Reverse the procedure to fit the bowl.
Note: Ensure the handle is fully pushed
back and the bowl is completely raised
or the mixer will not work.
Note: Regularly grease the bowl lift
mechanism to ensure smooth operation.
3
Bowl handle
Locking catchSecuring pins
Changing the Mixer Attachment
1. Turn Off the appliance.
2. Open the safety guard by turning it to the left (GL190 & GL191) or lifting it above the mixer (GJ461).
3. Lower the bowl with the bowl handle.
4. Push the mixer attachment up and to the left to release it.
5. Insert the desired attachment. Push up and to the right to lock it into place.
6. Raise the bowl.
BUFFALO recommend the following uses for each attachment:
Spiral Dough
hook
Heavy mixes dough, pie pastry etc. Suitable Gears: 1 Slow
Beater
Firm mixes light pastry, cake/biscuit mix,
icings, fillings and mashed vegetables
Suitable Gears: 1, 2 Medium
Whisk
Light mixes whipped cream, mayonnaise,
egg whites, pancakes and soufflés
Suitable Gears: 1, 2, 3 Fast
GL190-GL191_GJ461_ML_A5_v7_20180928.indb 13 2018/9/28 16:02
Page 14
14
UK
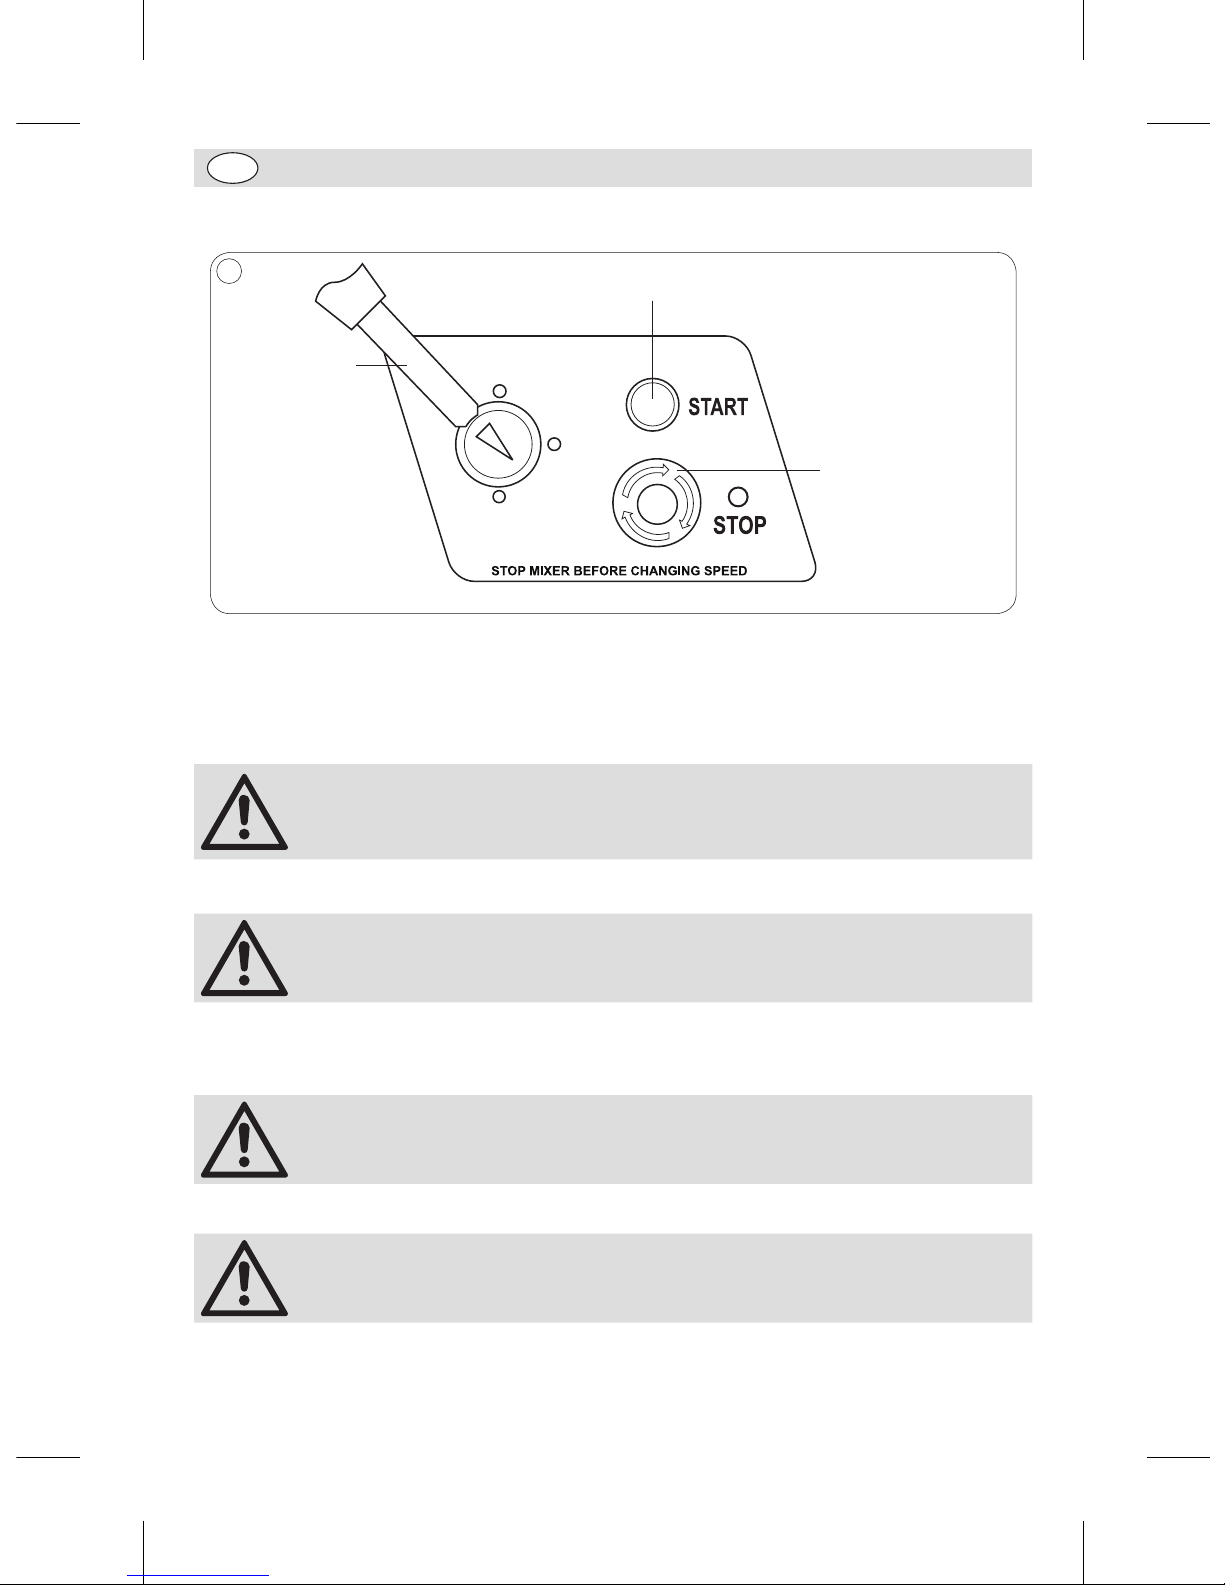
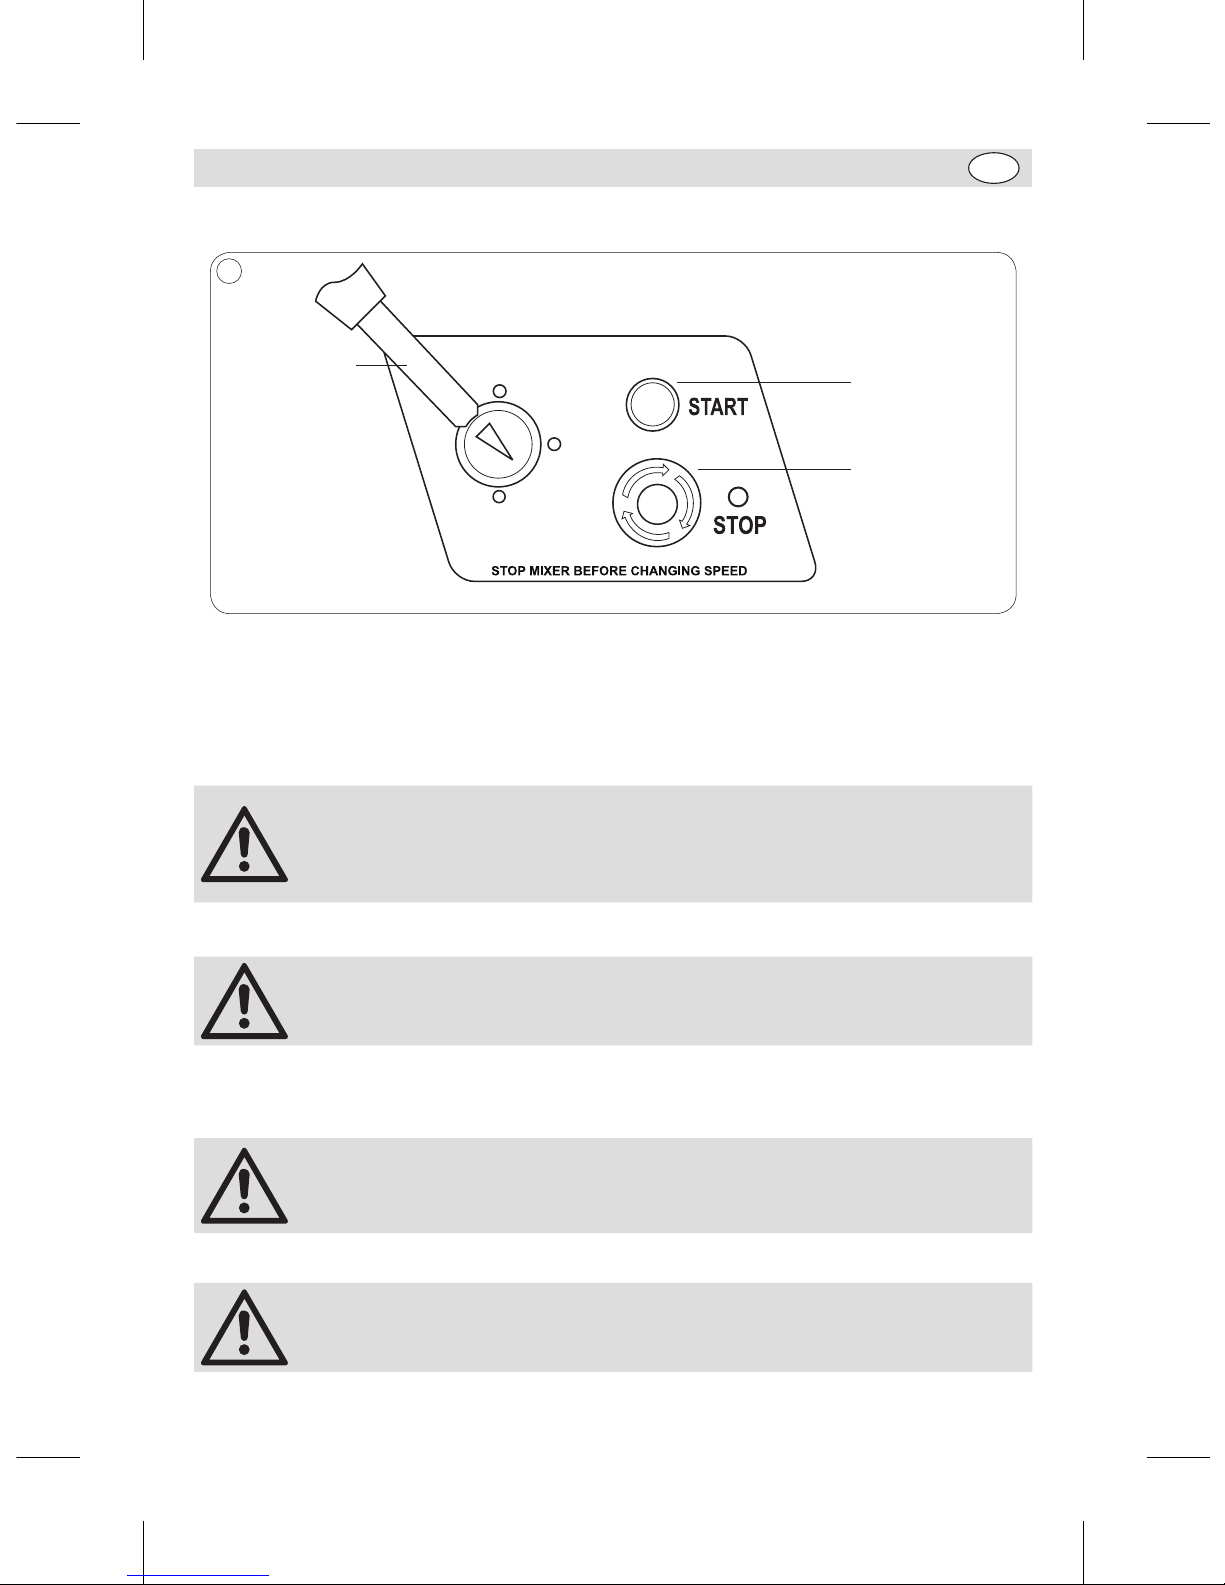
Layout of Controls
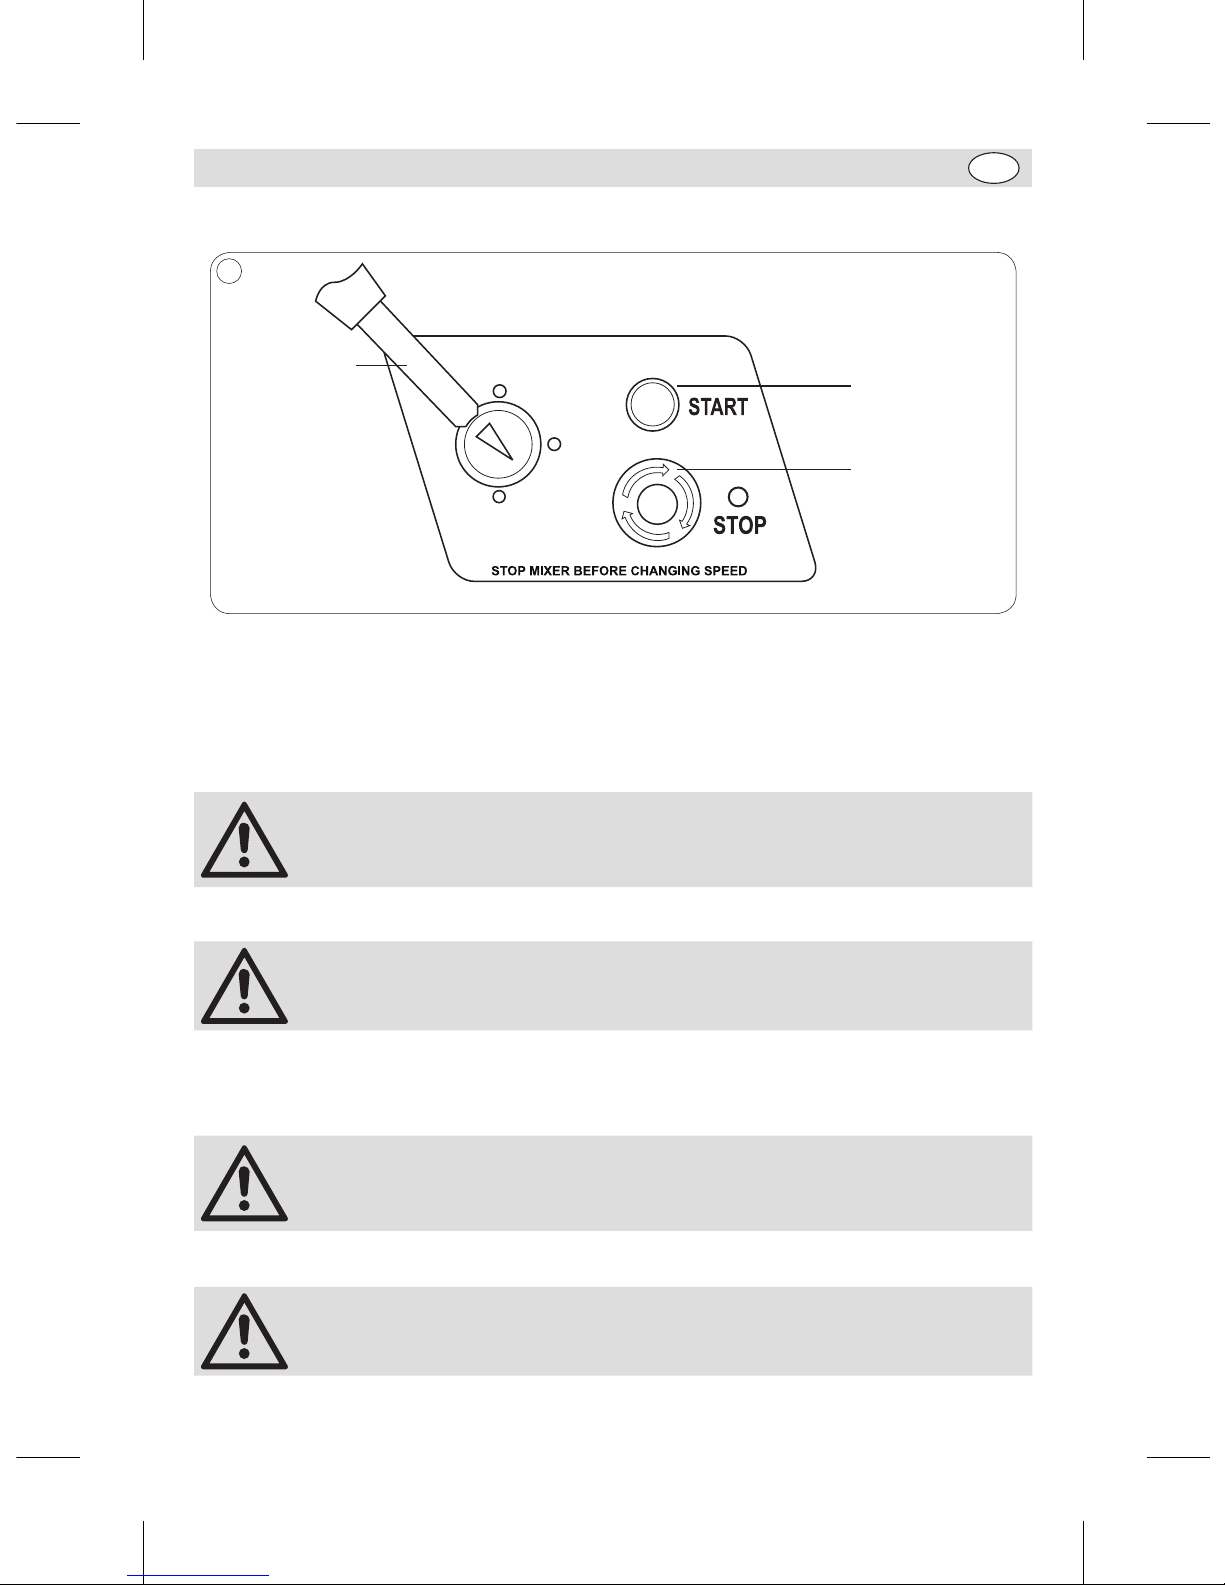
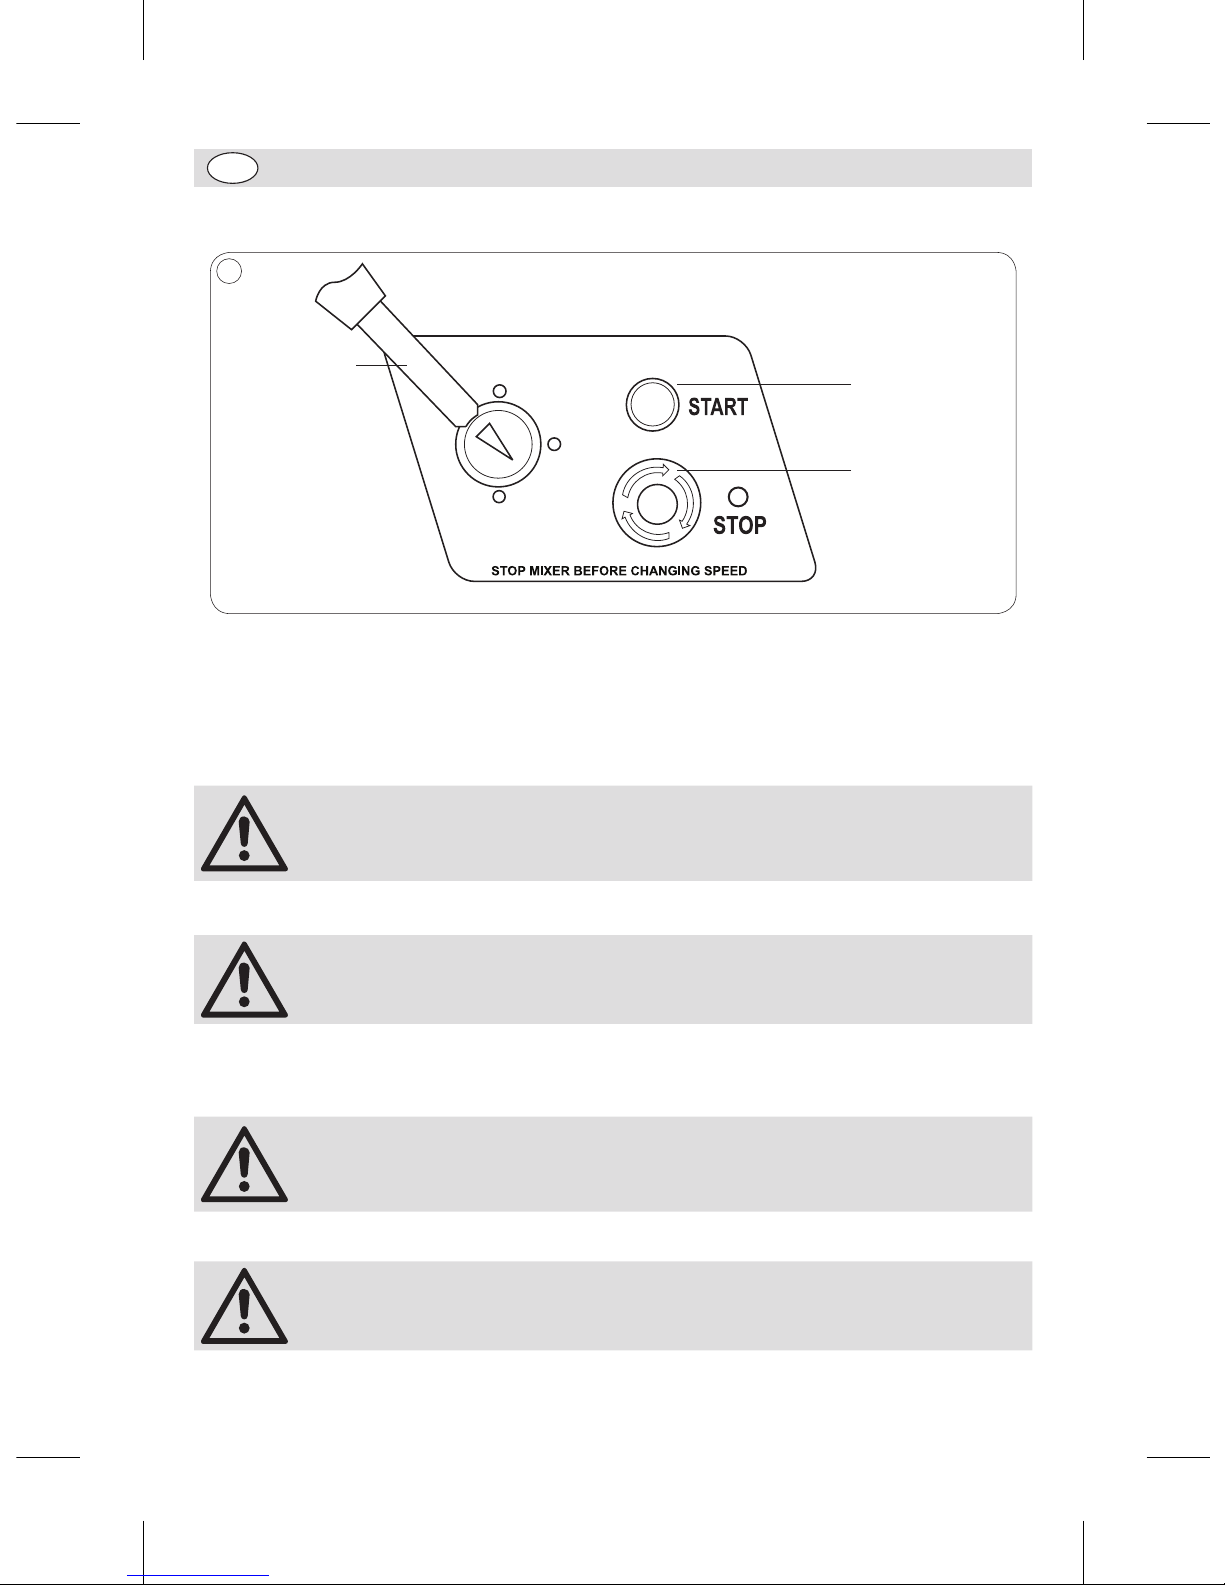
Gear lever
START button
STOP button
4
START button - Press to start the mixer.
STOP button - Press to stop the mixer. Twist clockwise to release and reset (GJ461 only).
GEAR LEVER - Use to adjust the speed of the mixer.
Operation
• Note: Ensure that these instructions have been read thoroughly and the
operation of the appliance is fully understood before use.
• All personnel must be fully trained on the operation and safety precautions
of the Planetary Mixer.
Mixing
WARNING: Always ensure the appliance is turned off before placing hands in
the mixing bowl.
1. Open the safety guard.
2. Fill the bowl.
3. Select the desired speed and close the guard.
• Note: BUFFALO recommend that you start with the slowest speed and
increase the speed gradually as necessary.
• Ensure the safety guard is fully closed or the mixer will not work.
4. Press the START button to begin mixing.
Note: If the appliance is straining to mix then turn the appliance Off and remove
some of the contents of the bowl before restarting.
GL190-GL191_GJ461_ML_A5_v7_20180928.indb 14 2018/9/28 16:02
Page 15
15
UK
Mixing Capacity
Model Bowl Volume Max Flour Max Dough
GL190 10L 2kg 3.2kg
GL191 20L 5kg 8kg
GJ461 30L 7.5kg 11.3kg
Changing Mixing Speed
Note: ALWAYS stop the mixer before attempting to change the mixing speed.
With the appliance turned Off:
1. Select the required gear using the gear change lever.
2. Restart the appliance.
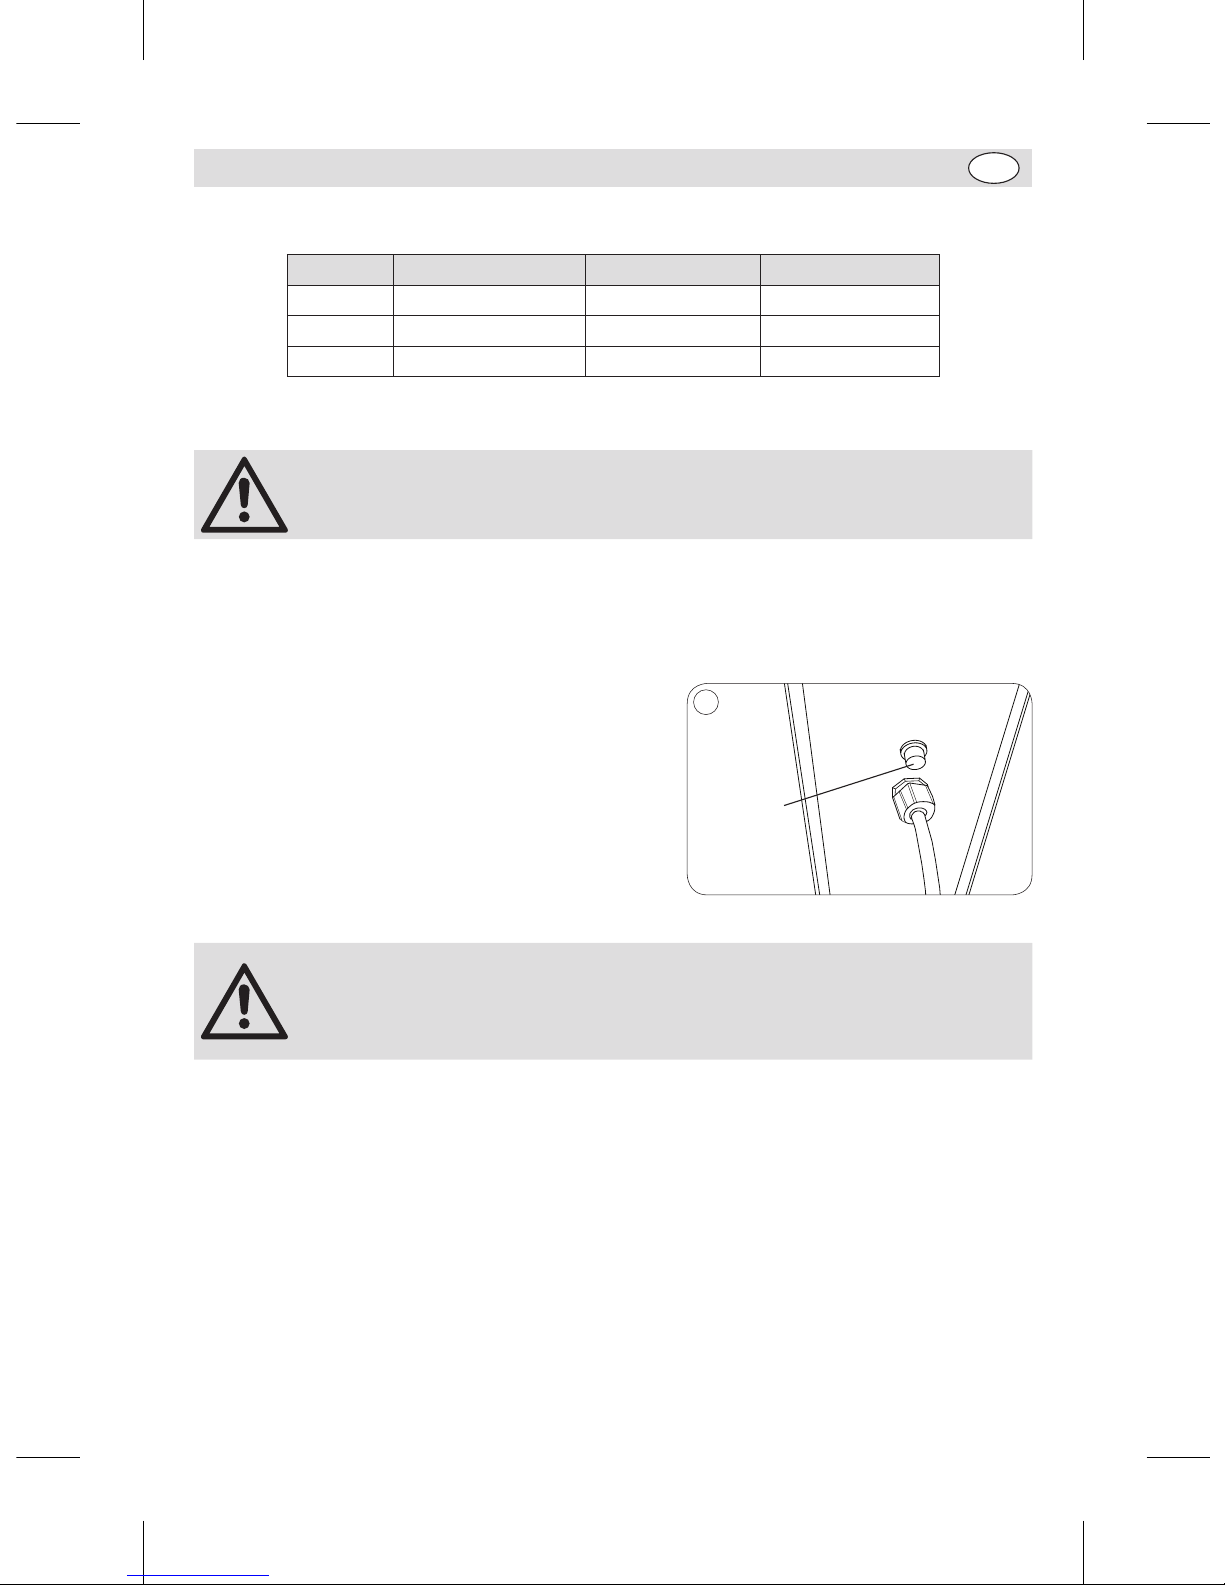
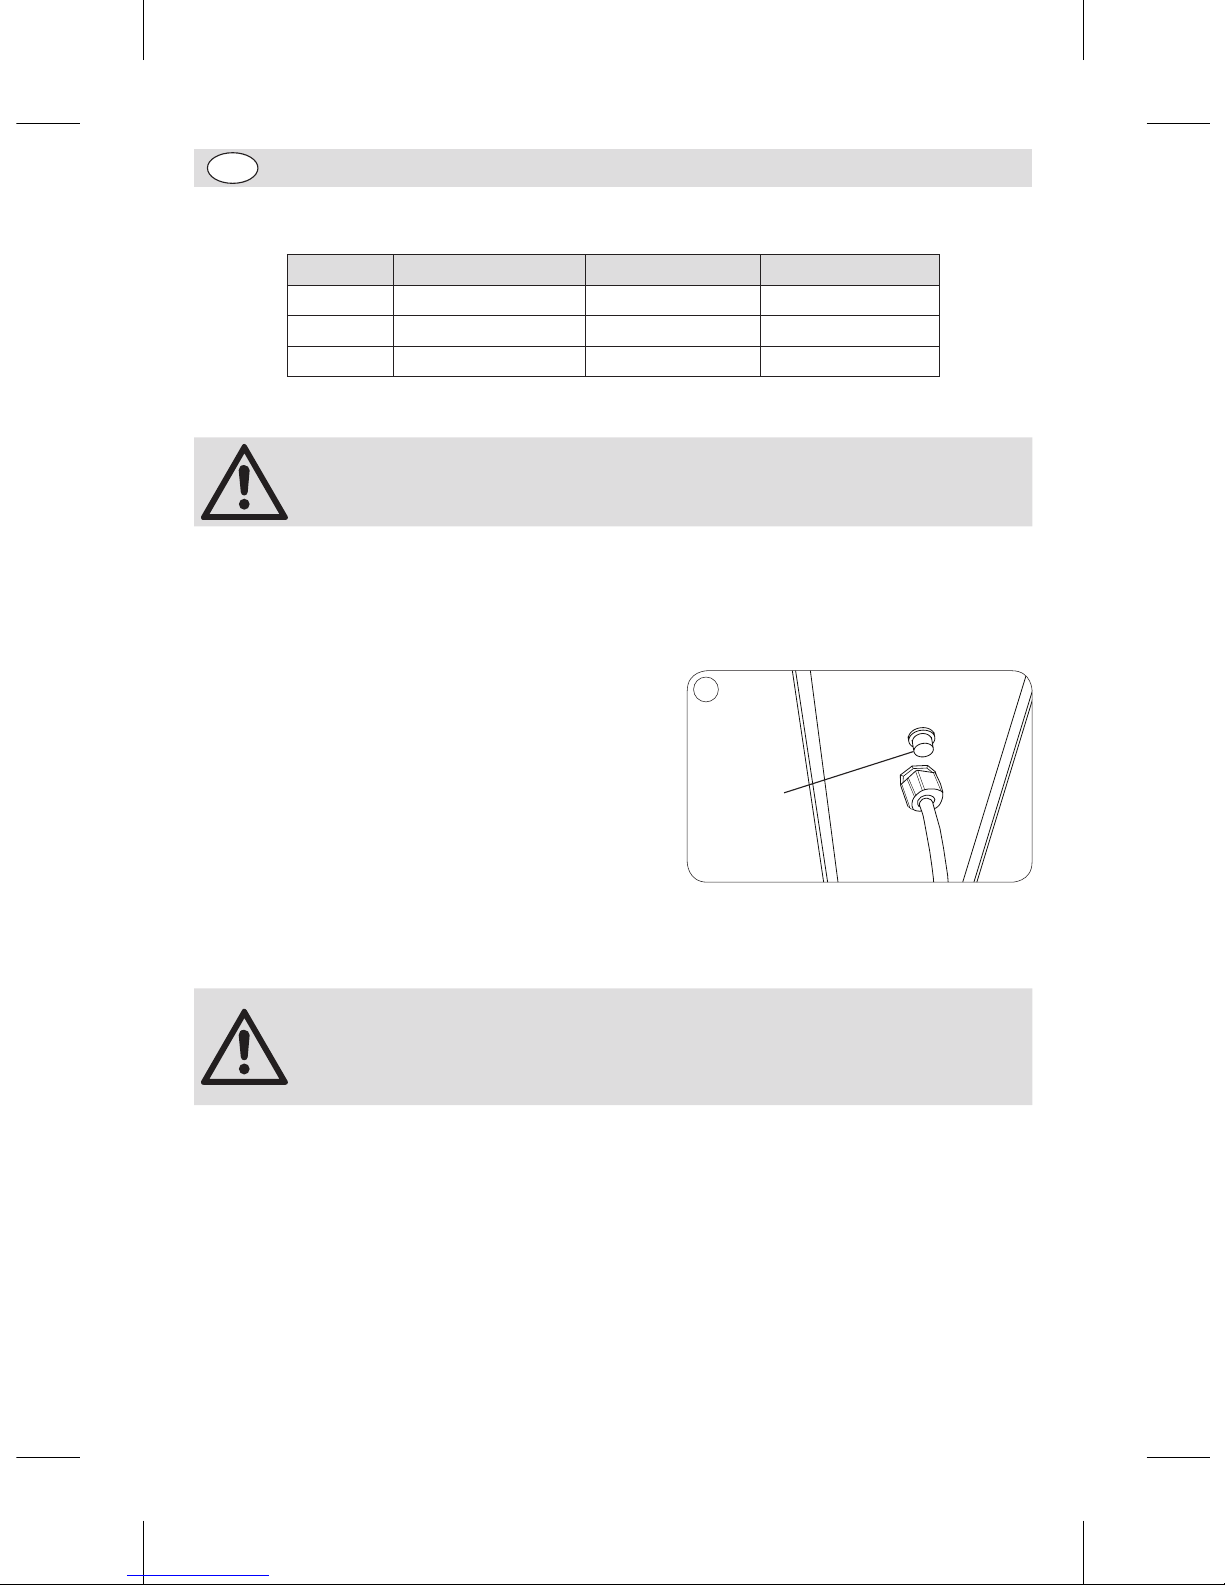
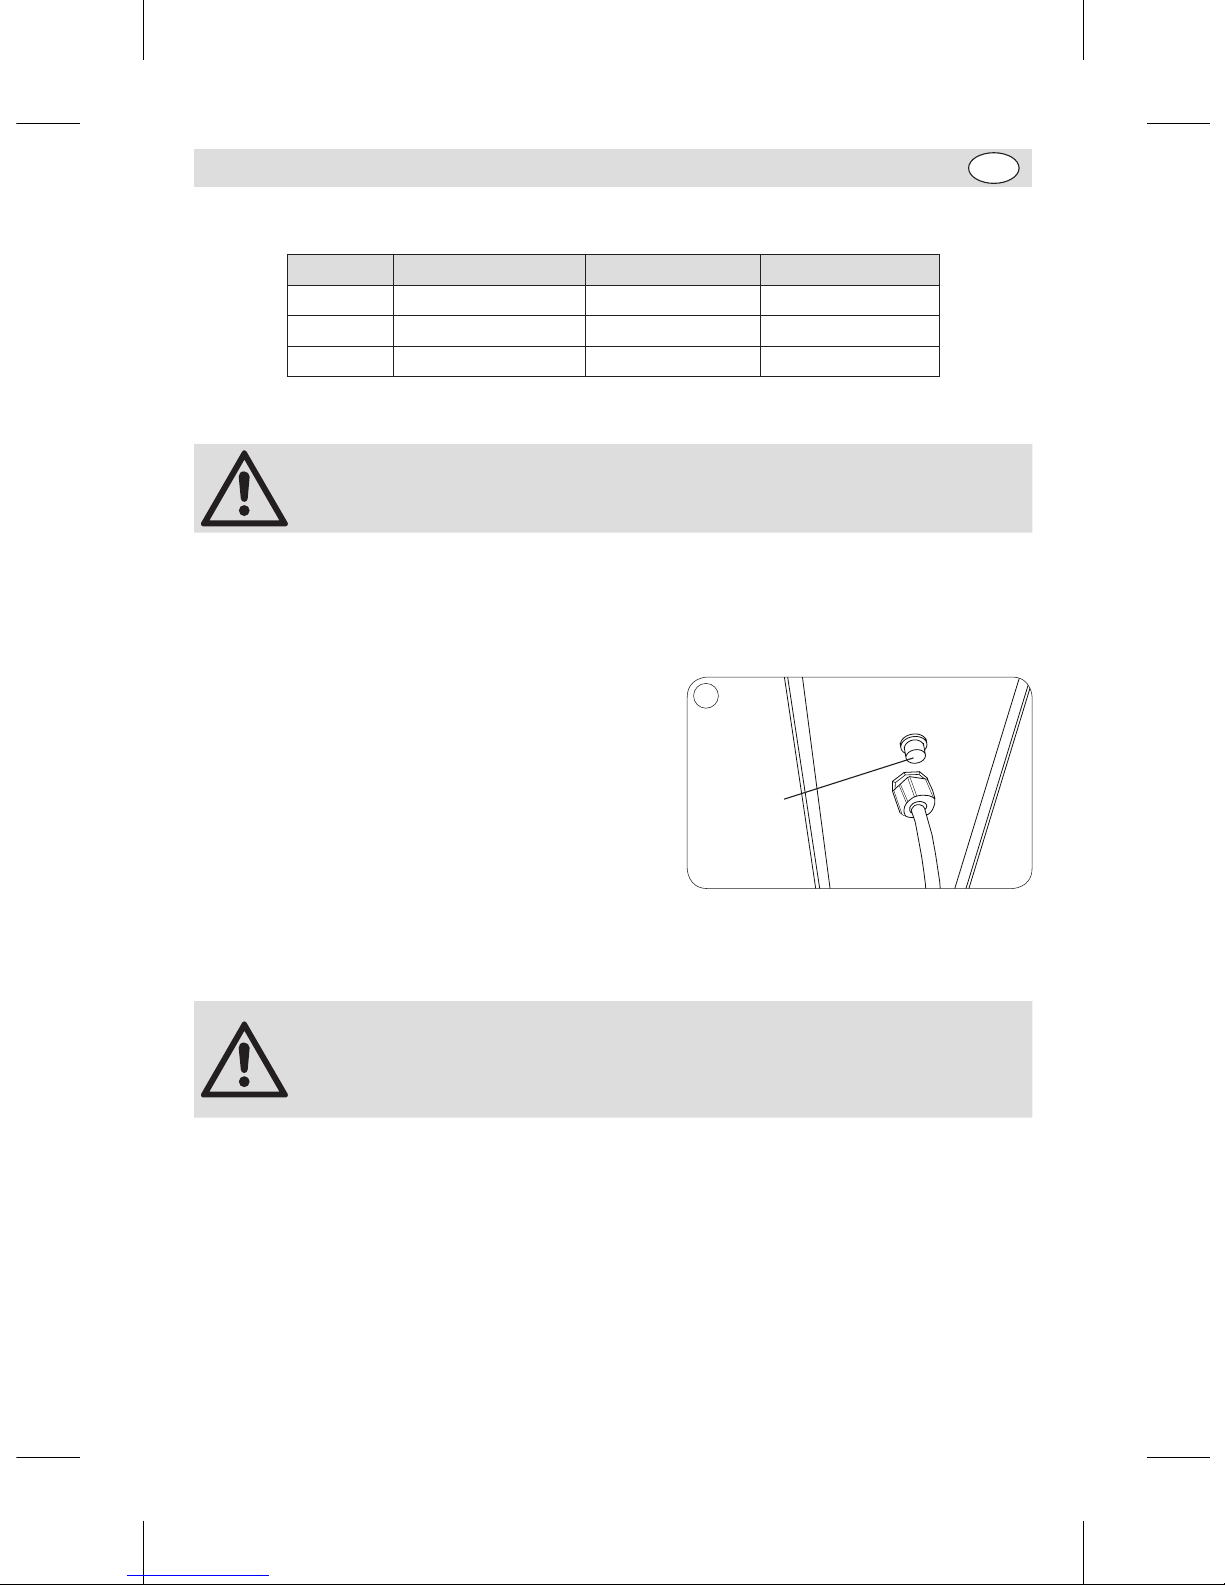
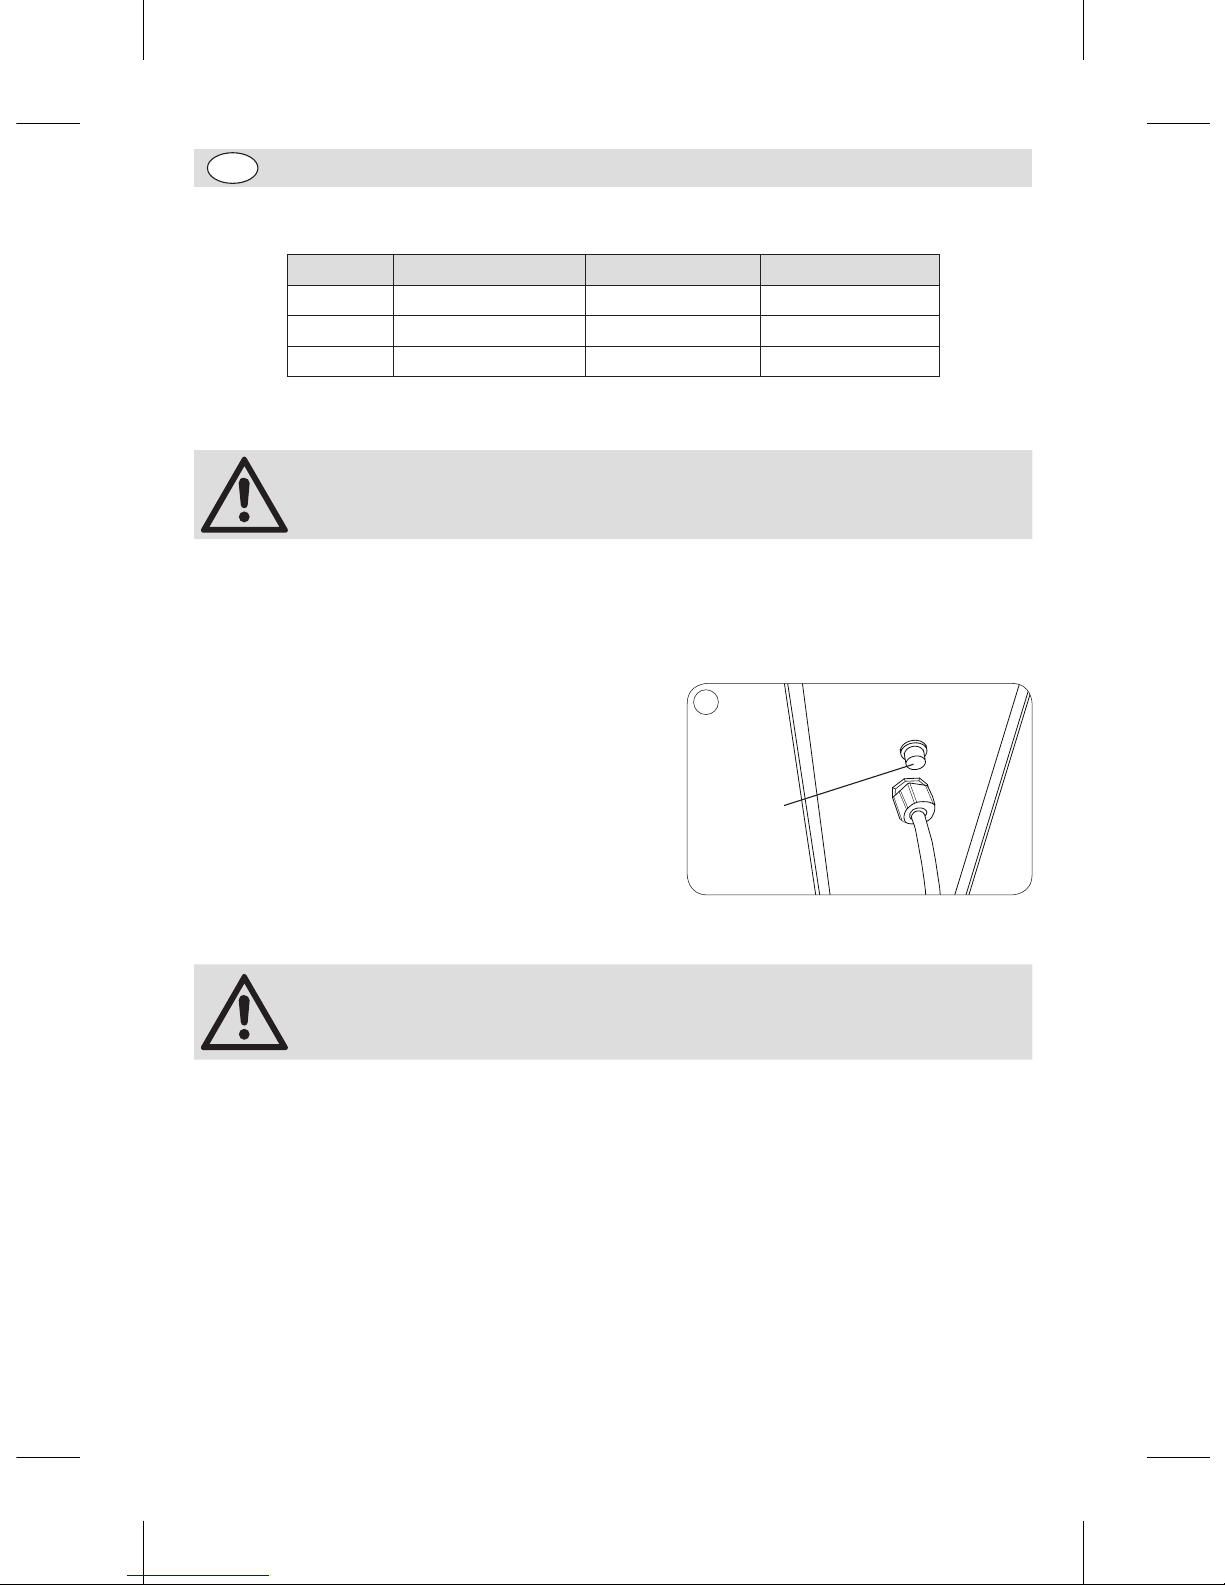
Overload Switch
The Overload switch is situated at the back of the machine
beside the cable entry (Note for GL190: The Overload
switch is on the base).
If the appliance becomes too hot the Overload switch will
stop the machine automatically. If this happens:
1. Turn Off the mixer.
2. Reduce the load in the mixing bowl.
3. Push the Overload switch back in to reset it.
4. Allow the appliance to cool for 20 minutes.
Overload
switch
5
Note:
• In the event of a power cut the Overload switch will cut in to prevent the
appliance from restarting automatically when power is restored.
• Always disconnect the Planetary Mixer from the mains powers supply when
not in use.
Cleaning, Care & Maintenance
• Always turn off the mixer and disconnect from the power supply before cleaning.
• Use warm soapy water to clean the bowl and mixing attachments. Do not use abrasive cleaning
chemicals as these can leave harmful residues.
• Clean the exterior of the appliance with a damp cloth.
• Dry all parts thoroughly after cleaning.
• Do not use jet/pressure washers to clean the appliance.
• Clean the appliance regularly.
GL190-GL191_GJ461_ML_A5_v7_20180928.indb 15 2018/9/28 16:02
Page 16
16
UK
Troubleshooting
If your BUFFALO appliance develops a fault, please check the following table before making a call to the
Helpline or your BUFFALO dealer.
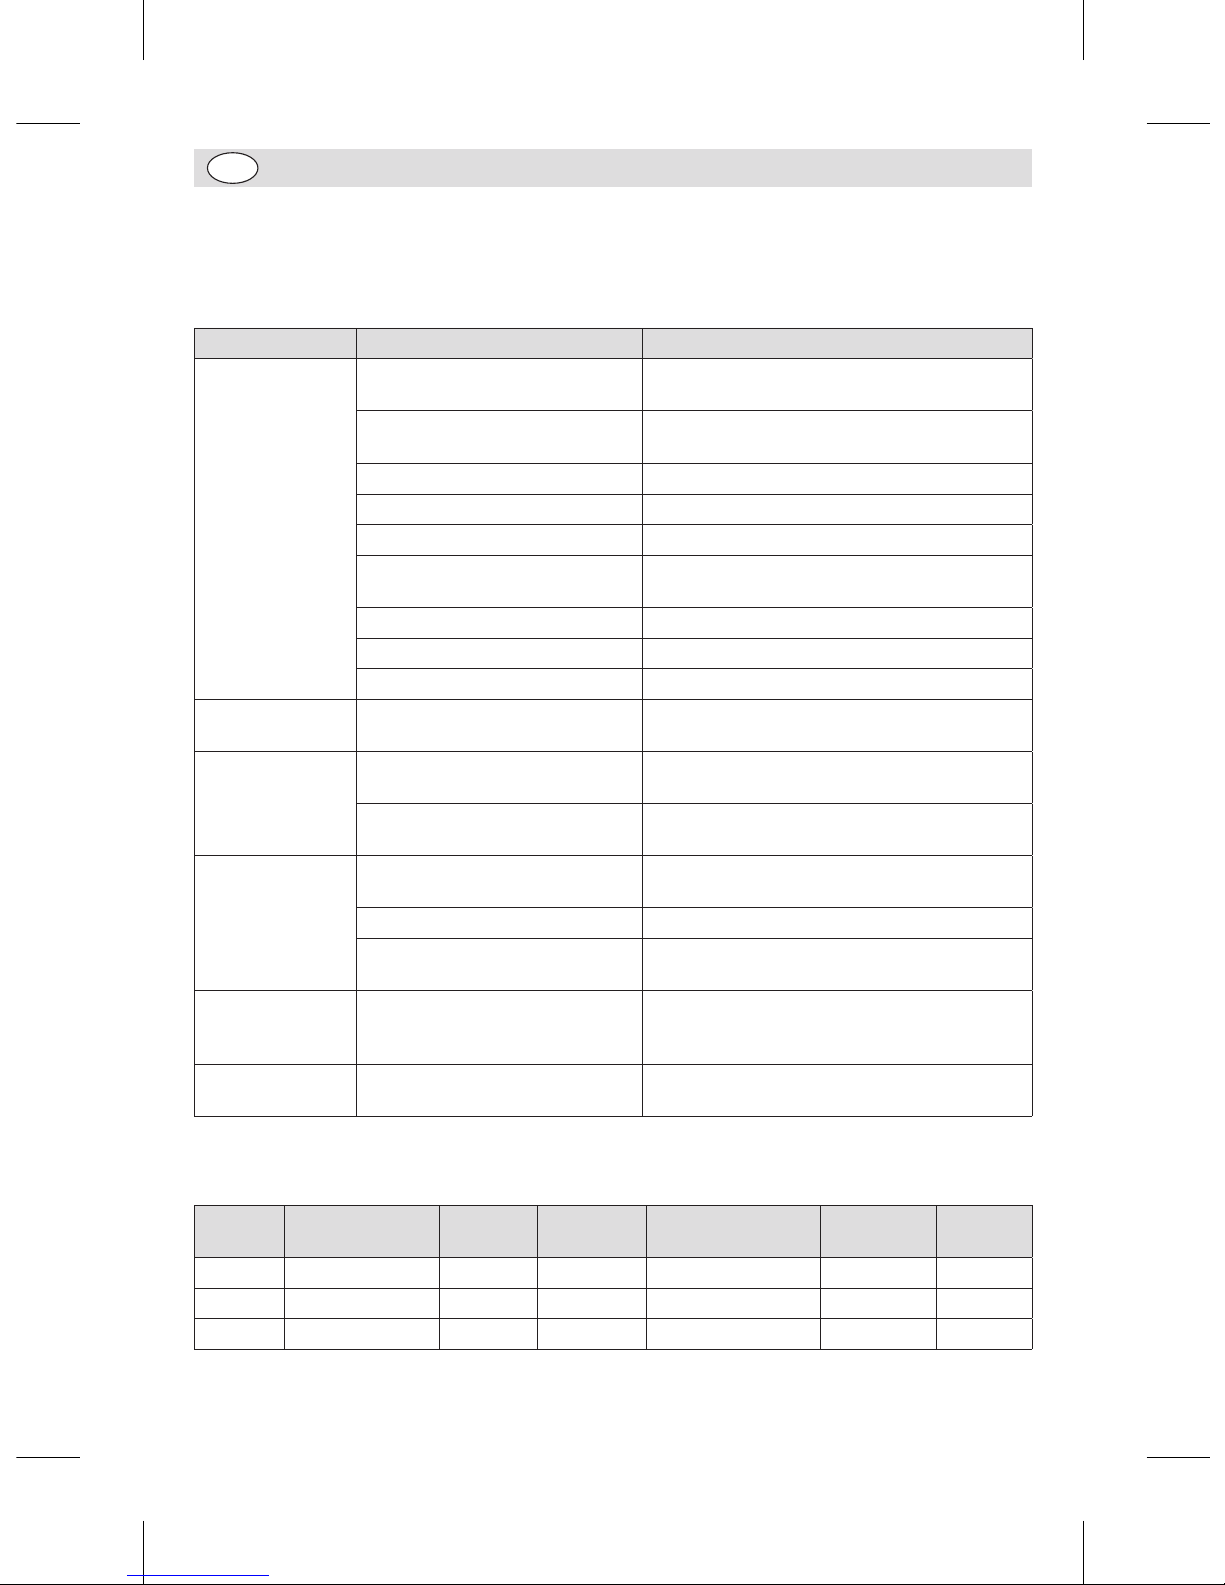
Fault Probable Cause Solution
The appliance is
not working
The unit is not switched on Check the unit is plugged in correctly and
switched on
The Stop button not released
(GJ461)
Turn button clockwise to release
Plug and lead are damaged Call BUFFALO agent or qualified Technician
Fuse in the plug has blown Replace the fuse
Power supply Check power supply
The overload switch has activated See overload switch information in the
Operation section of this manual
Safety Guard not closed Close Safety Guard fully
Appliance not in gear Put in gear
Bowl not fully raised Ensure the Bowl lever is pushed back fully
Bowl will not fit
back in to place
Bowl pins or surrounding area
clogged with mix
Clean the appliance
The appliance is
overheating
The mixing bowl is overloaded Turn off the appliance and empty some of the
contents
The appliance has been operating
for too long
Turn off the appliance and allow to cool down
for 30 minutes
The appliance is
noisy
Bowl or mixing attachment not
correctly fitted
Remove and refit bowl/mixing attachment
Worn bearings/damaged gears Call BUFFALO agent or qualified Technician
Grease has dried up in the
gearbox
Call BUFFALO agent or qualified Technician
The mixing
attachment fails to
rotate properly
The belt has become loose Call BUFFALO agent or qualified Technician
Cannot select gear Gearing cogs misaligned Turn Off appliance and manually turn the whisk
attachment slightly. Select the gear again.
Technical Specifications
Model Voltage Power Current
Dimensions
H x W x D mm
Weight
(kg)
Bowl
Volume
GL190 220-240V 50Hz 550W 1.8A 610 x 395 x 395 36kg 10L
GL191 220-240V 50Hz 1100W 4.7A 794 x 555 x 558 64kg 20L
GJ461 220-240V 50Hz 1500W 6.5A 1142 x 579 × 611 160kg 30L
GL190-GL191_GJ461_ML_A5_v7_20180928.indb 16 2018/9/28 16:02
Page 17
17
UK
Electrical Wiring GL190, GL191
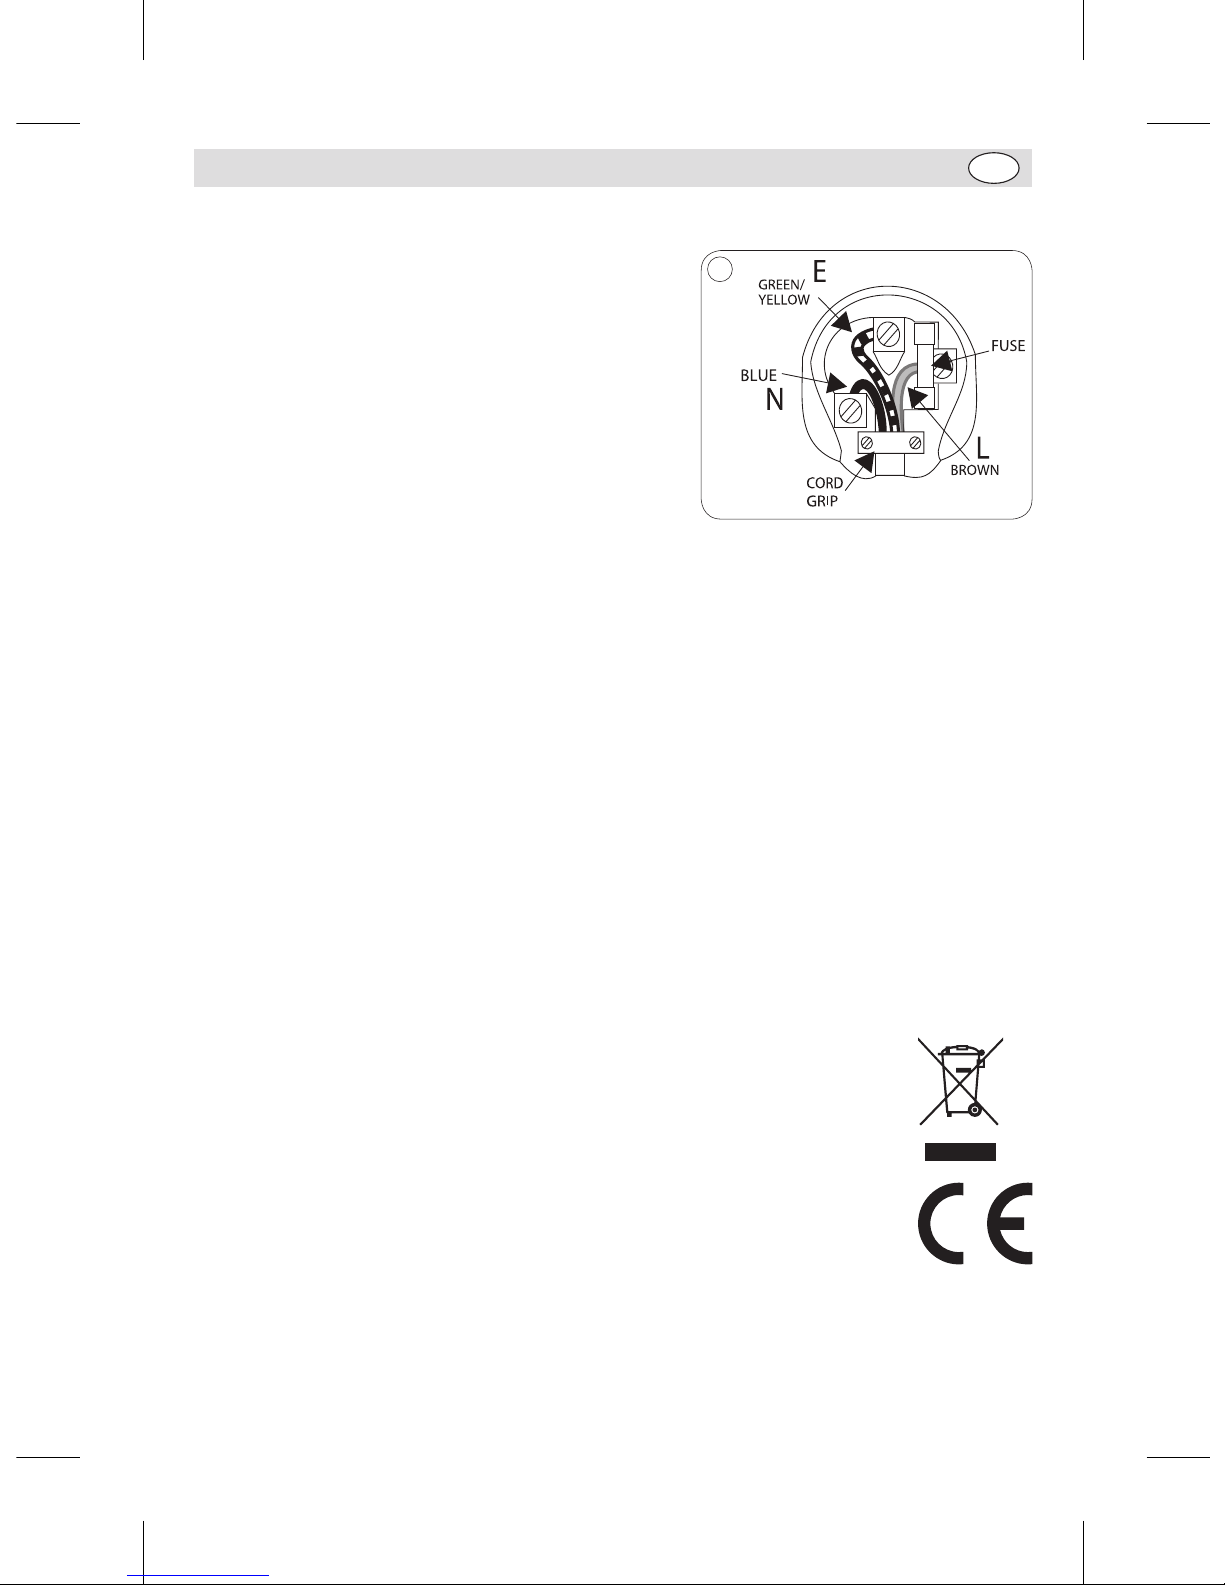
This appliance is supplied with a 3 pin, moulded, BS1363 plug
and lead, with a 13 amp fuse as standard.
The plug is to be connected to a suitable mains socket.
This appliance is wired as follows:
• Live wire (coloured brown) to terminal marked L
• Neutral wire (coloured blue) to terminal marked N
• Earth wire (coloured green/yellow) to terminal marked E
This appliance must be earthed.
If in doubt consult a qualified electrician.
6
Electrical isolation points must be kept clear of any obstructions. In the event of any emergency
disconnection being required they must be readily accessible.
Electrical Wiring GJ461
GJ461 is supplied unplugged and requires hardwiring to a suitable electrical power supply with a 16 amp
rated fuse.
This appliance is wired as follows:
• Live wire (coloured brown) to terminal marked L
• Neutral wire (coloured blue) to terminal marked N
• Earth wire (coloured green/yellow) to terminal marked E
This appliance must be earthed.
Electrical isolation points must be kept clear of any obstructions. In the event of any emergency
disconnection being required they must be readily accessible.
Connection to a suitable power supply should only be carried out by a qualified and
competent electrical engineer.
Compliance
The WEEE logo on this product or its documentation indicates that the product must
not be disposed of as household waste. To help prevent possible harm to human
health and/or the environment, the product must be disposed of in an approved and
environmentally safe recycling process. For further information on how to dispose of
this product correctly, contact the product supplier, or the local authority responsible for
waste disposal in your area.
BUFFALO parts have undergone strict product testing in order to comply with regulatory
standards and specifications set by international, independent, and federal authorities.
BUFFALO products have been approved to carry the following symbol:
All rights reserved. No part of these instructions may be produced or transmitted in any form or by any means, electronic,
mechanical, photocopying, recording or otherwise, without the prior written permission of BUFFALO.
Every effort is made to ensure all details are correct at the time of going to press, however, BUFFALO reserve the right to
change specifications without notice.
GL190-GL191_GJ461_ML_A5_v7_20180928.indb 17 2018/9/28 16:02
Page 18
18
NL
Veiligheidstips
DIT APPARAAT MAG UITSLUITEND IN
OVEREENSTEMMING MET DEZE INSTRUCTIES
EN DOOR COMPETENTE PERSONEN WORDEN
GEBRUIKT.
• Plaatsen op een vlakke en stabiele ondergrond.
• De installatie en eventuele reparaties dienen door een
gekwalificeerde onderhoudsmonteur/vakman uitgevoerd te worden.
Verwijder geen componenten of servicepanelen van dit product.
• Raadpleeg en volg de plaatselijke en nationale regelgeving op
m.b.t. tot het volgende:
- Wetgeving van gezondheid en veiligheid op de werkplaats
- Werkregels
- Brandpreventie
- IEE-bedradingsvoorschriften
- Bouwvoorschriften
• Ga altijd ACHTER de veiligheidsscherm staan wanneer u het
apparaat gebruikt.
• Bij gebruik, plaats uw handen NIET in de buurt van draaiende
componenten. Dit kan ernstig letsel veroorzaken.
• Verwijder GEEN voedsel uit het apparaat voordat alle
mengcomponenten volledig tot stilstand zijn gekomen.
• Dit apparaat NIET in water dompelen.
• Probeer NIET items te mengen waarvoor dit apparaat niet
ontworpen is. Dit kan de mengcomponenten beschadigen.
• Gebruik het apparaat NIET met een beschadigd
mengcomponent.
• Veiligheidsvergrendelingen NIET overbruggen.
• Laat het apparaat NOOIT zonder toezicht achter wanneer het
in gebruik is.
• Het apparaat is zwaar. Wees zeer voorzichtig bij het
verplaatsen van het apparaat.
GL190-GL191_GJ461_ML_A5_v7_20180928.indb 18 2018/9/28 16:02
Page 19

19
NL
• Dit apparaat is niet bedoeld voor gebruik door personen met
lichamelijke, zintuiglijke of mentale beperkingen (inclusief
kinderen) of met gebrek aan ervaring of kennis, tenzij zij
hierin worden begeleid of zijn opgeleid in het gebruik van het
apparaat door een persoon, die verantwoordelijk is voor hun
veiligheid.
• Laat verpakkingsmateriaal niet binnen handbereik van
kinderen. Verpakkingsmateriaal in overeenstemming met
de regelgeving van de plaatselijke overheden als afval laten
verwerken.
• Indien de stroomkabel beschadigd raakt, dient men deze
door een BUFFALO-monteur of aanbevolen vakman te laten
vervangen om gevaarlijke situaties te voorkomen.
• Gebruik nooit accessoires die niet door de fabrikant worden
aangeraden. Zij zouden een veiligheidsrisico kunnen vormen
en het apparaat kunnen beschadigen. Gebruik alleen originele
onderdelen en accessoires.
• Buffalo beveelt aan dat dit apparaat jaarlijks PAT getest wordt
om ervoor te zorgen het product veilig blijft.
Productbeschrijving
GL190 - Planetaire Mixer 10 liter
GL191 - Planetaire Mixer 20 liter
GJ461 - Planetaire Mixer 30 liter
De BUFFALO planetaire mixer is een vrijstaande machine en bestaat uit een grote kom gemonteerd onder
een motor en een versnellingsinrichting waaraan een mixing-tool kan worden bevestigd.
Inleiding
De BUFFALO planetaire mixer is ontworpen voor het mixen van een grote verscheidenheid aan
voedingsmiddelen, variërend van slagroom tot deeg.
Neem de tijd om deze handleiding aandachtig door te lezen. Correct gebruik en onderhoud van deze
machine waarborgt de beste prestatie van uw Buffalo product.
GL190-GL191_GJ461_ML_A5_v7_20180928.indb 19 2018/9/28 16:02
Page 20
20
NL
Verpakkingsinhoud
De verpakking bevat het volgend:
• Buffalo Planetaire Mixer
• Mixkom
• Spiraalvormige deeghaak
• Klopper
• Garde
• Handleiding
BUFFALO is trots op de haar productkwaliteit en dienstverlening en controleer de inhoud van de
verpakkingen, tijdens de verpakkingsfase, op functionaliteit en schade.
Mocht u product door transport zijn beschadigd, neem dan onmiddellijk contact op met uw BUFFALO
dealer.
Installatie
• Zorg dat de plaats waar de planetaire mixer staat het gewicht van de mixer kan dragen.
WAARSCHUWING: De planetaire mixer
is zeer zwaar, dus wees voorzichtig bij
het verplaatsen van het apparaat.
• Als het apparaat op een werkblad wordt geplaatst,
zorg dat het in de stand is vastgezet (voor GL190,
GL191).
Plaats de mixer GJ461 alleen op de
vloer! Plaats het niet op een werkblad
omwille van zijn zwaar gewicht.
Bovendien kan het intens trillen op het
werkblad tijdens gebruik leiden tot het
vallen van het apparaat en persoonlijke
/ materiële schade.
1
Montage
WAARSCHUWING: voordat u de planetaire mixer start, moet de kom bevestigd
zijn en in de verhoogde positie worden geplaatst.
• BUFFALO aanvaardt géén enkele verantwoordelijkheid voor enige vorm van letsel als gevolg van een
onjuiste montage van het apparaat.
Opmerking: zorg dat de steunpoten genivelleerd staan om trillingen tijdens het
gebruik te beperken.
• Haal het apparaat volledig uit de verpakking.
GL190-GL191_GJ461_ML_A5_v7_20180928.indb 20 2018/9/28 16:02
Page 21
21
NL
Hoe de rubberen voeten installeren
1. Verwijder alle verpakking van het toestel.
2. Verwijder de houten pallet van de machine (draai de
vier bouten aan de onderkant van de houten pallet
los).
3. Neem de rubberen voeten uit de kom
4. Bevestig de rubberen voeten aan de voeten van de
machine.
Opmerking: Er zijn minstens twee
personen nodig om de rubberen voeten
te installeren.
Opmerking: Na het installeren van
de rubberen voeten, controleer of de
machine stabiel staat.
2
Rubberen voeten
Het type van rubberen voeten
Rubber feet
Remove all packaging from the appliance.
Remove the wooden pallet from the machine
(Loosen the four bolts at the bottom of the
wooden pallet).
Take out the rubber feet from the bowl
Add the rubber feet to the feet of the machine.
Note: A minimum of two people should
Note: Once the rubber feet have been installed, ensure the machine is stable.
be used to install the rubber feet.
GL190-GL191_GJ461_ML_A5_v7_20180928.indb 21 2018/9/28 16:02
Page 22
22
NL
Plaatsen/verwijderen van de mengkom
1. Zet het apparaat uit.
2. Open de veiligheidskap door deze naar links te draaien.
3. Laat de mengkom met de komhendel zakken.
4. Maak de sluitmechanismen aan beide zijden van de
mengkom los.
5. Til de kom op. De mengkom wordt op zijn plaats
gehouden met behulp van twee pinnen die de hendels
aan de steun bevestigen en met een opening aan de
achterzijde van het apparaat die het uitsteeksel aan de
komrand behuisd.
6. Voer de procedure in omgekeerde volgorde uit om de
mengkom te plaatsen.
Opmerking: controleer of de hendel
volledig naar achteren staat en de
mengkom volledig in de bovenste
positie staat, anders zal de mixer niet
werken.
Opmerking: Regelmatig vet het
mechanisme van de komlift om vlotte
verrichting te verzekeren.
3
Komhendel
Sluitmechanisme
Bevestigingspinnen
Hulpstuk van de mixer verwisselen
1. Zet het apparaat uit.
2. Open de veiligheidskap door deze naar links te draaien (GL190 & GL191) of door deze van de mixer
te tillen (GJ461).
3. Laat de mengkom met de komhendel zakken.
4. Om het hulpstuk van de mixer te halen duwt u deze omhoog en naar links.
5. Plaats het gewenste hulpstuk. Om het hulpstuk te bevestigen duwt uw deze omhoog en naar rechts.
6. Breng de kom omhoog.
BUFFALO raadt het volgende gebruik voor de desbetreffende hulpstukken aan:
Spiraalvormige
deeghaak
Zware mengsels deeg, gebak, etc. Geschikte snelheden: 1
Klopper
Stevige mengsels licht gebak, cake/
koekjes, glazuur, vulling en pureren van
groentes
Geschikte snelheden: 1, 2
Garde
Lichte mengsels kloppen van room,
mayonaise, eiwitten, pannenkoeken en
soufflés
Geschikte snelheden: 1, 2, 3
GL190-GL191_GJ461_ML_A5_v7_20180928.indb 22 2018/9/28 16:02
Page 23
23
NL
Indeling van de bedieningsknoppen
Snelheidshendel
START (AAN)
knop
STOP (UIT)
knop
4
START (AAN) knop - Indrukken om de mixer te starten.
STOP (UIT) knop - Indrukken om de mixer te stoppen. Met de klok mee draaien om de knop te
ontgrendelen en te resetten (alleen GJ461).
SNELHEIDSHENDEL - Om de snelheid van de mixer te regelen.
Bediening
• Opmerking: zorg vóór gebruik dat deze aanwijzingen aandachtig zijn
doorgelezen en dat men de werking van het apparaat volledig begrijpt.
• Al het personeel moet volledig zijn opgeleid in de werking en de
veiligheidsmaatregelen van de planetaire mixer
Mixen
WAARSCHUWING: controleer altijd of het apparaat uitstaat alvorens uw handen
in de mengkom te plaatsen.
1. Open de veiligheidskap.
2. Vul de mengkom.
3. Kies de gewenste snelheid en sluit de veiligheidskap.
• Opmerking: BUFFALO raadt aan om met de langzaamste snelheid te starten
en geleidelijk de snelheid, naar wens, op te voeren.
• Controleer of de veiligheidskap goed gesloten is, anders zal de mixer niet
werken.
4. Druk op de START-knop om met het mixen te starten.
Opmerking: wanneer het apparaat moeizaam werkt, zet het apparaat dan uit en
verwijder een deel van de inhoud alvorens het apparaat opnieuw te starten.
GL190-GL191_GJ461_ML_A5_v7_20180928.indb 23 2018/9/28 16:02
Page 24
24
NL
Het mengen van capaciteit
Model Komgrootte Maximum Bloem Maximun Deeg
GL190 10L 2kg 3.2kg
GL191 20L 5kg 8kg
GJ461 30L 7.5kg 11.3kg
Mixsnelheid veranderen
Opmerking: ALTIJD eerst de mixer stopzetten alvorens de mixsnelheid te
veranderen.
Met de mixer uit:
1. Selecteer de gewenste snelheid met behulp van de snelheidshendel.
2. Herstart het apparaat.
Overbelastingschakelaar
De overbelastingschakelaar (‘Overload’) bevindt zich
aan de achterzijde van de machine naast de kabelinvoer
(Opmerking voor GL190: de overbelastingschakelaar
bevindt zich op de basis).
Wanneer het apparaat te warm wordt, schakelt de
overbelastingschakelaar het apparaat automatisch uit.
Wanneer dit gebeurt:
1. Zet de mixer uit.
2. Haal een deel van de inhoud uit de mengkom.
3. Duw de overbelastingschakelaar in om het apparaat te
resetten.
4. Laat het apparaat gedurende 20 minuten afkoelen.
Overbelastingschakelaar
5
Opmerking: Bij een stroomuitval zal de overbelastingschakelaar het apparaat
uitschakelen zodat bij herstel van de stroomvoorziening het apparaat niet
automatisch wordt ingeschakeld.
Wanneer u de planetaire mixer niet gebruikt, ontkoppel het dan altijd van de
stroomvoorziening.
Reiniging, zorg & onderhoud
• Alvorens de mixer te reinigen dient men de steker uit het stopcontact te halen.
• Gebruik altijd warm zeepwater voor de reiniging van de kom en mengschroef. Gebruik géén bijtende
chemische reinigingsmiddelen aangezien deze schadelijke resten achterlaten.
• Dit product niet met spuit-/drukreinigers reinigen.
• Reinig de buitenkant van het apparaat met een vochtige doek.
• BUFFALO raadt aan om de ketting en de spanningsriem om de twaalf maanden door een BUFFALO
technicus of vaktechnicus te laten smeren respectievelijk te controleren.
• Reinig het apparaat regelmatig.
GL190-GL191_GJ461_ML_A5_v7_20180928.indb 24 2018/9/28 16:02
Page 25
25
NL
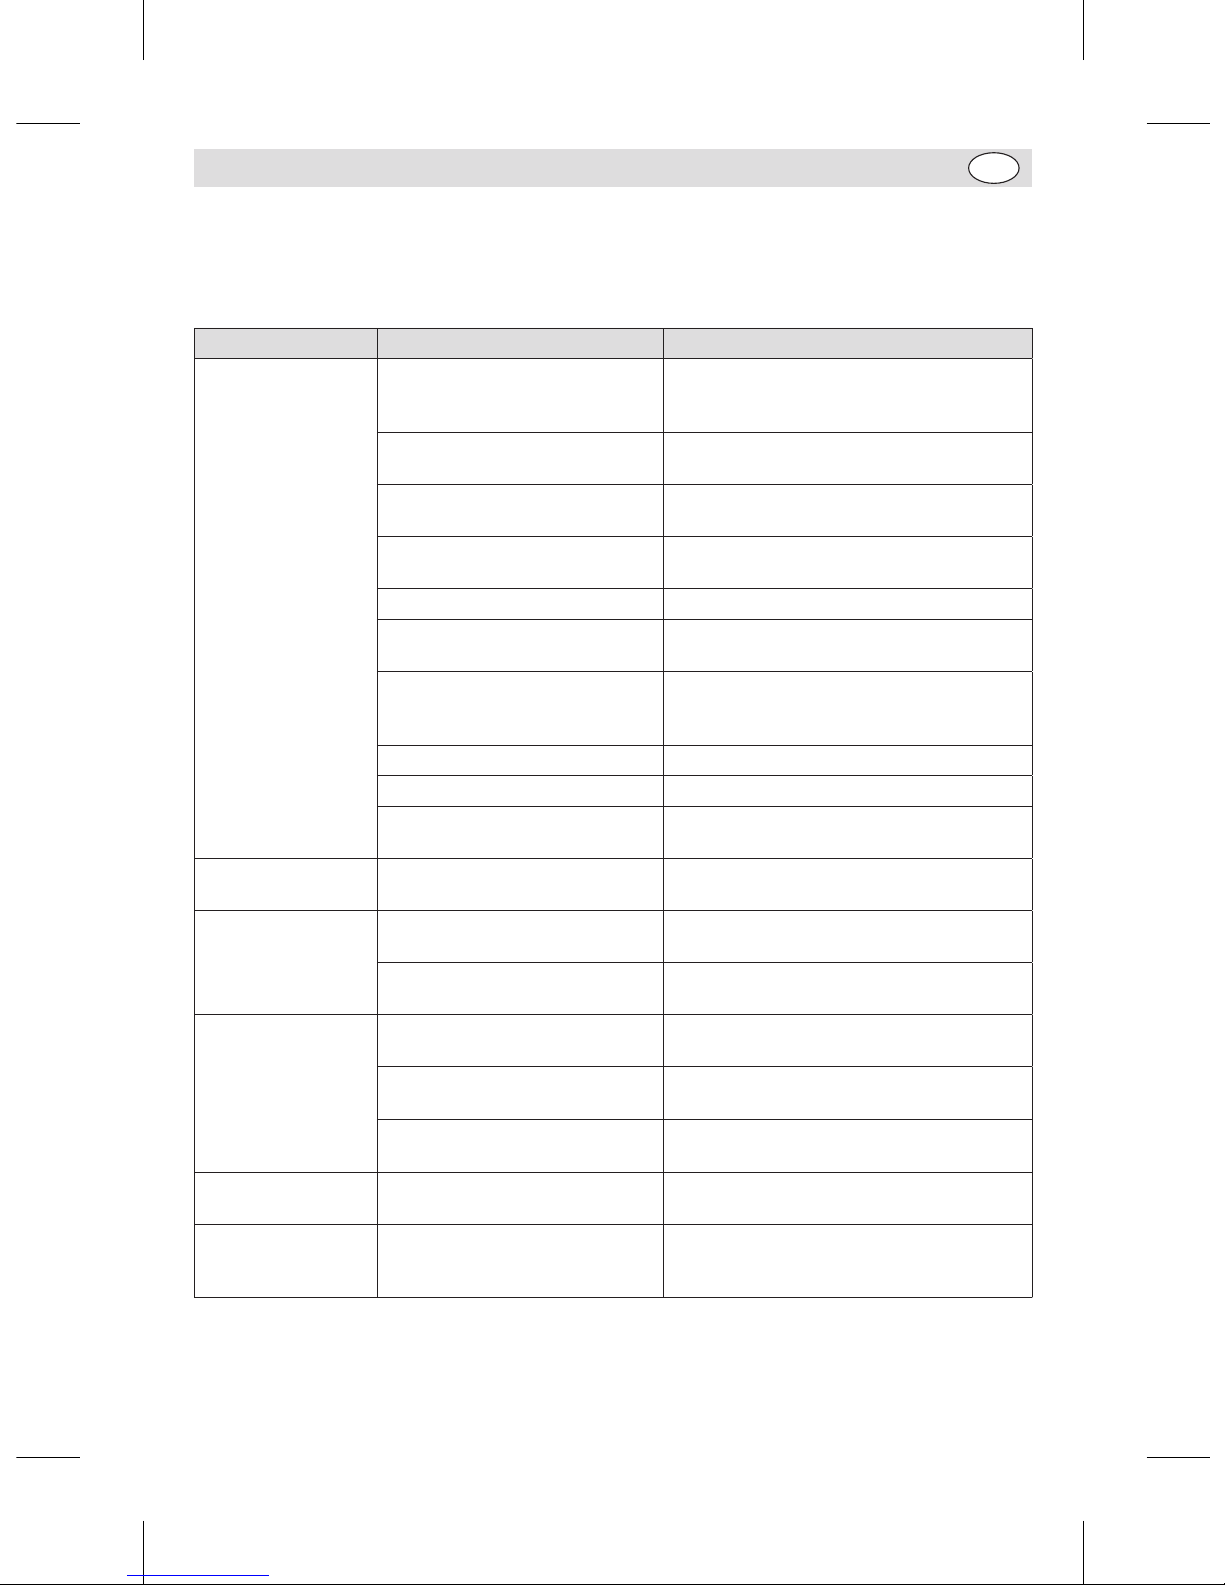
Oplossen van problemen
Indien er een storing van uw BUFFALO product optreedt, dient u de onderstaande tabel te raadplegen
alvorens contact op te nemen met uw BUFFALO dealer of de Hulplijn te bellen.
Probleem Mogelijke oorzaak Handeling
Het apparaat werkt
niet
Het apparaat staat uit Controleer of de stroomkabel van het
apparaat is aangesloten en of het apparaat
is ingeschakeld
De stopknop niet ontgrendeld
(GJ461)
Draai de knop naar rechts om deze te
ontgrendelen
Steker en kabel zijn beschadigd Laat een Buffalo-monteur of een vakman
komen
De zekering in de steker is
gesprongen
Vervang de zekering in de steker
Stroomvoorziening Controleer de stroomvoorziening
Storing interne bedrading Laat een Buffalo-monteur of een vakman
komen
De overbelastingschakelaar is
geactiveerd
Raadpleeg de informatie over de
overbelastingschakelaar in het hoofdstuk
Werking in deze handleiding.
Veiligheidskap is niet gesloten Sluit de veiligheidskap volledig
Geen snelheid geselecteerd Selecteer een mixsnelheid
Mengkom niet in de hoogste stand Controleer of de mengkomhendel volledig
naar achteren staat
De mengkom kan
niet worden geplaatst
De mengkompinnen of
bevestigingsdelen zijn vuil
Reinig het apparaat
Het apparaat raakt
oververhit
De mengkom is te vol Zet het apparaat uit en verwijder een deel
van de inhoud
Het apparaat is te lang achter
elkaar gebruikt
Zet het apparaat uit en laat deze gedurende
30 minuten afkoelen
Het apparaat maakt
veel lawaai
Kom of mengopzetstuk niet
correct gemonteerd
Verwijder en plaats de mengkom/het
mengopzetstuk opnieuw
Versleten lagers / beschadigde
tandwielen
Laat een Buffalo-monteur of een vakman
komen
Smeermiddel is opgedroogd in de
versnellingsbak
Laat een Buffalo-monteur of een vakman
komen
De klopper draait niet
op de juiste wijze
De ketting zit los Laat een Buffalo-monteur of een vakman
komen
Kan geen snelheid
selecteren
Wieltanden niet uitgelijnd Zet het apparaat uit en draai voorzichtig
de garde met de hand. Kies opnieuw een
mixsnelheid
GL190-GL191_GJ461_ML_A5_v7_20180928.indb 25 2018/9/28 16:02
Page 26
26
NL
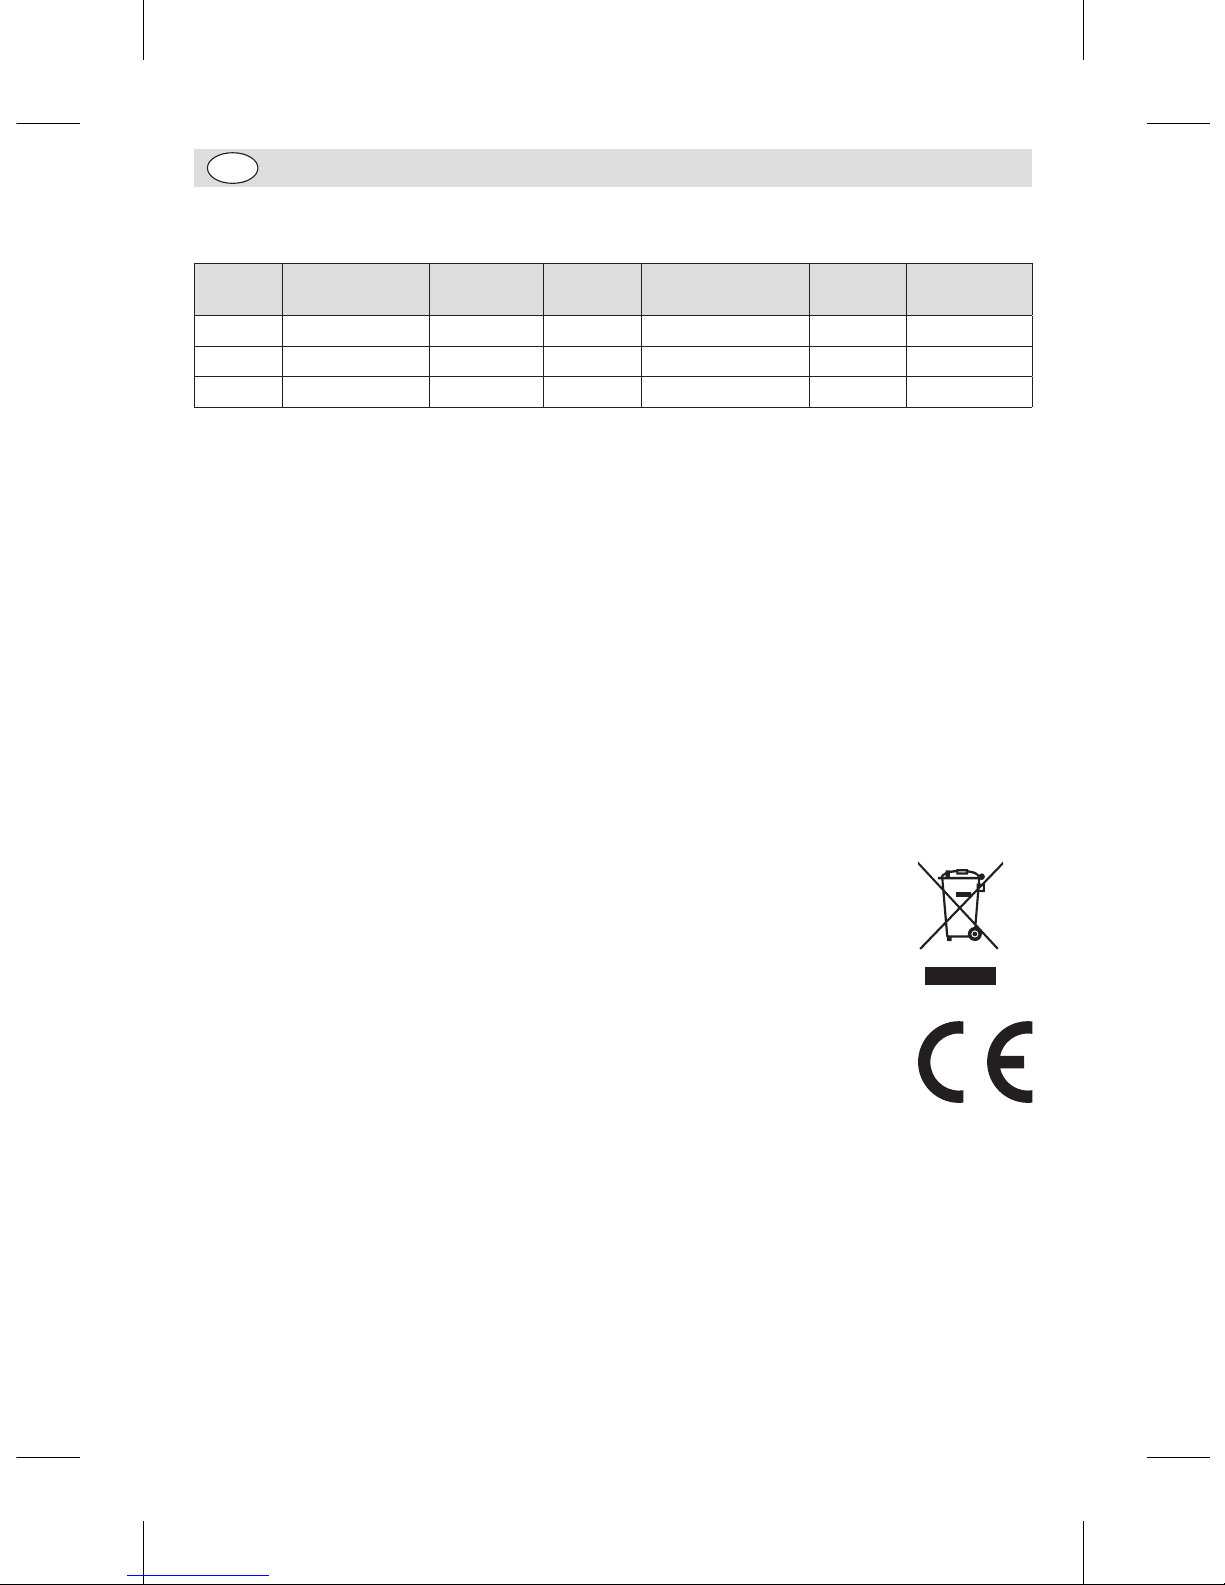
Technische specificaties
Model Voltage Vermogen Stroom
Afmetingen
h x b x d mm
Gewicht Komgrootte
GL190 220-240V 50Hz 550W 1,8A 610 x 395 x 395 36kg 10L
GL191 220-240V 50Hz 1100W 4,7A 794 x 555 x 558 64kg 20L
GJ461 220-240V 50Hz 1500W 6,5A 1142 x 579 × 611 160kg 30L
Elektrische bedrading
Men dient de steker op een geschikt stopcontact aan te sluiten.
De bedrading van dit apparaat is als volgt:
• Stroomkabel (bruin) naar de aansluitklem gemarkeerd met L
• Neutraalkabel (blauw) naar de aansluitklem gemarkeerd met N
• Aardekabel (groen/geel) naar de aansluitklem gemarkeerd met E
Dit apparaat moet worden geaard.
Raadpleeg bij twijfel een vakkundige elektricien.
De elektrische isolatiepunten mogen niet worden geblokkeerd. In geval van een nooduitschakeling
moeten de isolatiepunten direct toegankelijk zijn.
Productconformiteit
Het WEEE-logo op dit product of bijbehorende documentatie geeft aan dat het product
niet onder huisvuil valt en ook niet als zodanig mag worden verwerkt. Ter preventie van
mogelijke gevaren voor de gezondheid van personen en/of voor het milieu, dient men
dit product in overeenstemming met het voorgeschreven en milieuveilige recyclingproces
als afval te verwerken. Neem contact op met uw productleverancier of uw plaatselijke
afvalverwerkingsbedrijf voor meer informatie over de juiste verwerking van dit product.
De onderdelen van BUFFALO-producten hebben strenge producttesten ondergaan om te
voldoen aan wettelijke regels en specificaties die door internationale, onafhankelijke en
landelijke overheden worden voorgeschreven.
BUFFALO-producten zijn goedgekeurd en voorzien van het volgende symbool:
Alle rechten voorbehouden. Het is verboden om deze handleiding, hetzij volledig of gedeeltelijk, elektronisch of mechanisch
te reproduceren, kopiëren, op opslagmedia op te slaan of op enigerlei wijze over te dragen, zonder voorafgaande
goedkeuring van BUFFALO.
Wij hebben er alles aan gedaan om er zeker van te zijn dat op publicatiedatum van de handleiding alle details correct zijn.
BUFFALO behoudt zich echter het recht om specificaties zonder aankondiging te wijzigen.
GL190-GL191_GJ461_ML_A5_v7_20180928.indb 26 2018/9/28 16:02
Page 27
27
FR
Conseils de sécurité
L’utilisation de cet appareil est exclusivement
réservée aux personnes formées en la matière et
doit se conformer à ces instructions.
• Placez l’appareil sur une surface plane, stable.
• L’installation et les éventuelles réparations doivent être
confiées à un dépanneur / technicien qualifié.
• Ne retirez aucun composant ou cache de ce produit.
• Consultez les normes locales et nationales pour vous
conformer aux :
- lois sur l’hygiène et la sécurité au travail ;
- codes de bonnes pratiques BS EN ;
- précautions contre le risque d’incendie ;
- réglementations sur les branchements électriques IEE ;
- règlements sur la construction.
• Cet appareil n’a pas été conçu pour être utilisé par des
personnes (enfants inclus) à capacités physiques, sensorielles
ou mentales réduites ou ne disposant pas d’une expérience ou
de connaissances suffisantes, à moins que lesdites personnes
n’aient été formées ou instruites quant à son utilisation, par
une personne responsable de leur sécurité
• Gardez les emballages hors de portée des enfants.
Débarrassez-vous des emballages conformément aux
règlements des autorités locales.
• Un cordon d’alimentation endommagé doit être remplacé par
un agent BUFFALO ou un technicien qualifié recommandé,
pour éviter tout danger.
• Utilisez toujours l’appareil en vous tenant DERRIÉRE son
dispositif de sécurité.
GL190-GL191_GJ461_ML_A5_v7_20180928.indb 27 2018/9/28 16:02
Page 28

28
FR
• NE PAS placer les mains près des accessories rotatifs de
l’appareil en service. Risque de blessures graves.
• NE PAS retirer des aliments de l’appareil tant que les
accessoires mélanguers ne sont pas parfaitment immobiles.
• NE PAS immerger l’appareil.
• NE PAS essayer de mélanger des ingrédients pour lesquels cet
appareil n’a pas été conçu.Vous risqueriez d’endommager les
accessoires mélanguers.
• NE PAS utiliser un accessoire mélanguer endommagé.
• NE PAS tenter de contourner les mécanismes de verrouillage
de sécurité.
• NE JAMAIS laisser l’appareil tourner sans surveillance.
• L’appareil est lourd. Déplacez-le prudemment.
• N’utilisez jamais d’accessoires non recommandés par le
fabricant. Ces accessoires pourraient exposer l’utilisateur à des
risques, voire endommager l’appareil. Utilisez uniquement des
pièces et accessoires d’origine.
• Buffalo recommande que cet appareil soit testé chaque année
pour s’assurer que le produit demeure sécuritaire.
Description du Produit
GL190 - Batteur mélangeur 10 litres
GL191 - Batteur mélangeur 20 litres
GJ461 - Batteur mélangeur 30 litres
Le Mélangeur à mouvement planétaire BUFFALO est une machine sur pied composée d’un grand bol
monté sous un ensemble moteur / boîte à engrenages, auquel un outil mélangeur peut être relié.
Introduction
Le Mélangeur à mouvement planétaire BUFFALO a été conçu pour mélanger des denrées alimentaires
diverses, de la crème aux pâtes.
Nous vous invitons à consacrer quelques instants à la lecture attentive de ce manuel. L’entretien et
l’utilisation appropriés de cet appareil vous permettront de tirer le meilleur de votre produit BUFFALO.
GL190-GL191_GJ461_ML_A5_v7_20180928.indb 28 2018/9/28 16:02
Page 29
29
FR
Contenu de l’emballage
Eléments fournis de série :
• Batteur mélangeur Buffalo
• Bol de mélange
• Crochet à pâte
• Palette
• Fouet
• Mode d’emploi
BUFFALO attache une grande importance à la qualité et au service et veille à fournir des produits en
parfait état opérationnel, parfaitement intacts au moment de l’emballage.
Nous vous prions de contacter votre revendeur BUFFALO immédiatement si vous constatez un dommage
quelconque survenu pendant le transport du produit.
Installation
• Veillez à poser le Mixeur à mouvement planétaire sur une surface assez solide pour en supporter le
poids.
ATTENTION : Le Mixeur à mouvement
planétaire est très lourd. Il convient
de faire très attention lorsque vous le
déplacez.
• Si vous comptez placer l’appareil sur un plan de travail,
veuillez-vous assurer qu’il est solidement en place (pour
les modèles GL190, GL191).
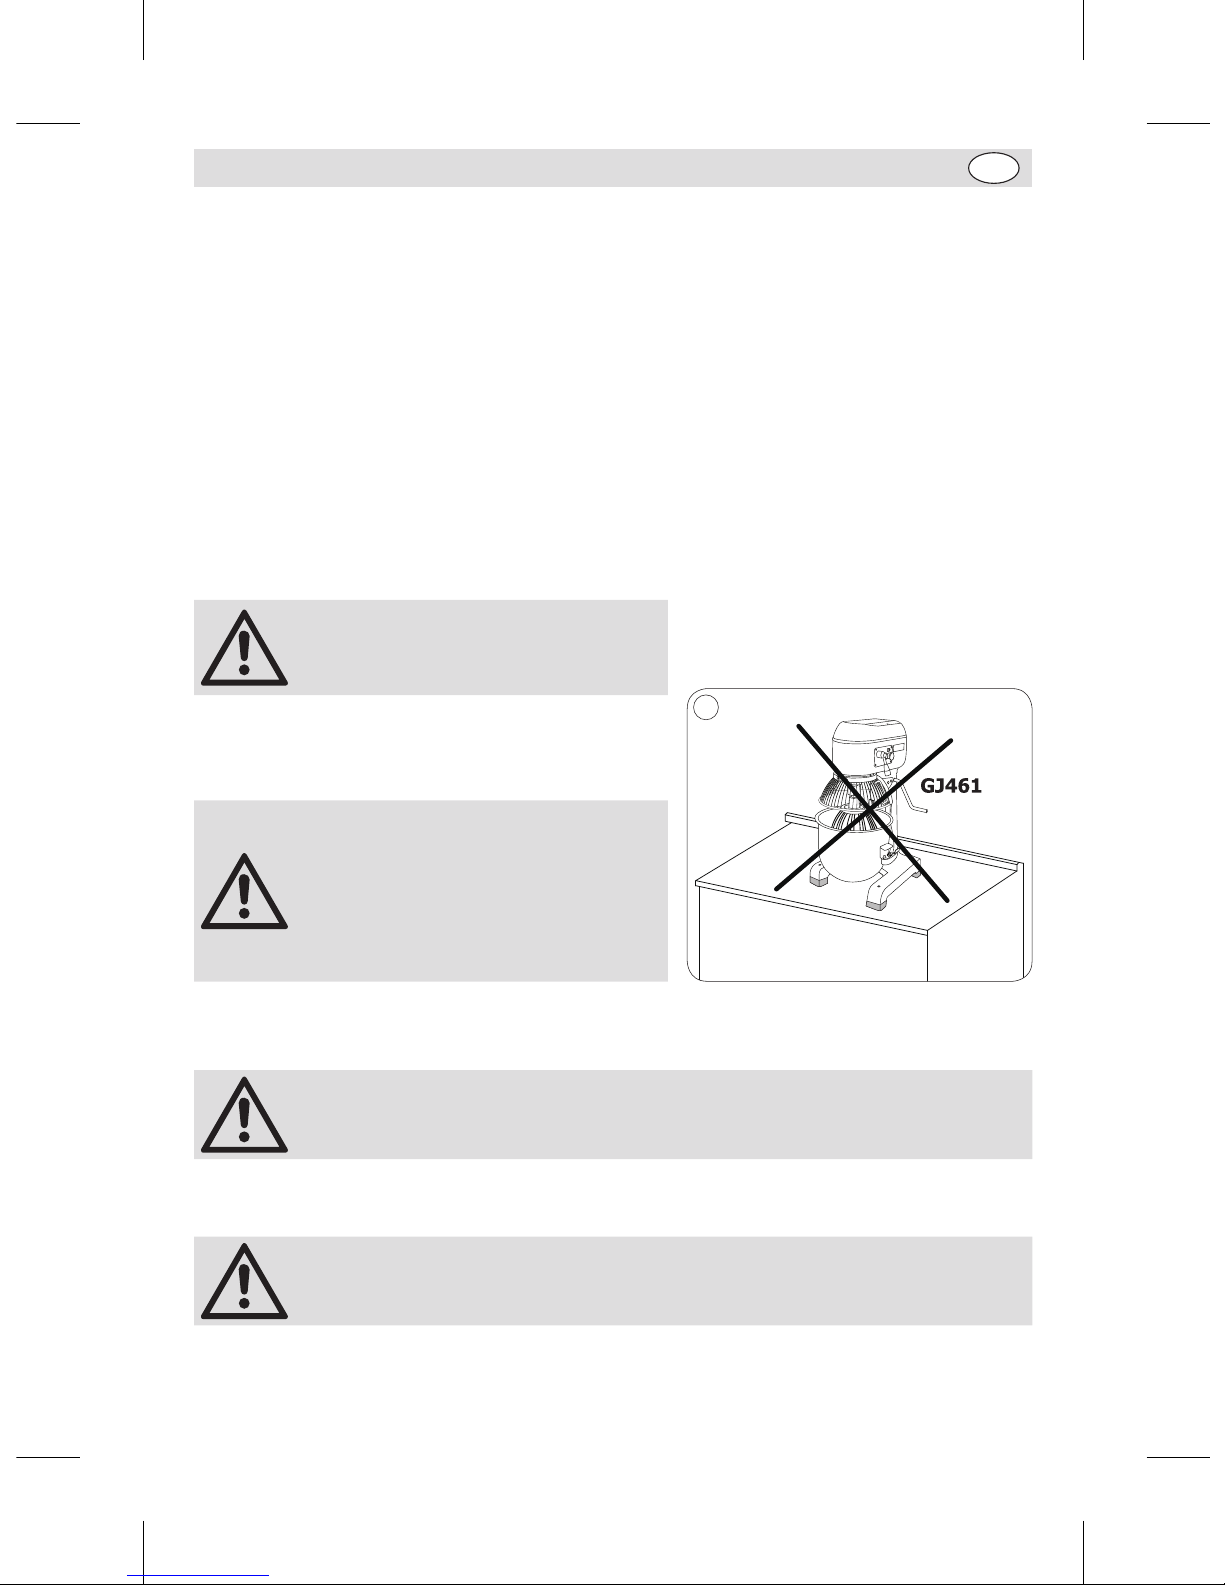
Pose sur le sol possible uniquement
avec le mixeur GJ461 ! Ne pas le placer
sur un plan de travail en raison de son
poids lourd. En outre, il peut vibrer
intensément sur le plan de travail en
cours d’utilisation, tomber de celui-ci
et entraîner des blessures corporelles/
dommages matériels.
1
Montage
ATTENTION : Veillez à installer le bol et à le remonter avant de démarrer le
Mélangeur à mouvement planétaire.
• BUFFALO décline toute responsabilité en cas de blessure consécutive à l’assemblage incorrect de cet
appareil.
Remarque : Veillez à bien monter les pieds de niveau, pour réduire les vibrations
pendant le fonctionnement de l’appareil.
• Sortez l’appareil de l’emballage.
GL190-GL191_GJ461_ML_A5_v7_20180928.indb 29 2018/9/28 16:02
Page 30
30
FR
Comment installer les pieds en
caoutchouc
1. Retirez tout l’emballage de l’appareil.
2. Retirez la palette en bois de la machine (Desserrer les
quatre boulons du fond de la palette en bois).
3. Sortez les pieds en caoutchouc du bol.
4. Ajoutez les pieds en caoutchouc aux pieds de la
machine.
Remarque: L’installation des pieds
en caoutchouc doit être effectuée au
moins par deux personnes.
Remarque: Une fois les pieds en
caoutchouc installés, assurez-vous que
la machine est stable.
2
Pieds en caoutchouc
Type de pieds en caoutchouc
Rubber feet
Remove all packaging from the appliance.
Remove the wooden pallet from the machine
(Loosen the four bolts at the bottom of the
wooden pallet).
Take out the rubber feet from the bowl
Add the rubber feet to the feet of the machine.
Note: A minimum of two people should
Note: Once the rubber feet have been installed, ensure the machine is stable.
be used to install the rubber feet.
GL190-GL191_GJ461_ML_A5_v7_20180928.indb 30 2018/9/28 16:02
Page 31
31
FR
Montage / retrait de la cuve
1. Éteignez l’appareil.
2. Ouvrez le capot de protection en le faisant pivoter vers
la gauche (GL190 & GL191) ou en le levant au-dessus
du mélangeur (GJ461).
3. Baissez la cuve par la poignée.
4. Libérez les verrous de part et d’autre de la cuve.
5. Remontez la cuve. Le calage de la cuve est assuré par
deux axes qui bloquent les poignées contre le berceau
et un trou situé à l’arrière de l’appareil, dans lequel
s’insère la protubérance de la lèvre de la cuve.
6. Pour le remontage de la cuve, inversez la procédure de
retrait.
Remarque : Veillez à bien pousser la
poignée à fond et à ce que la cuve soit
complètement remontée ou le batteur
mélangeur ne fonctionnera pas.
Remarque : Graissez régulièrement le
mécanisme d’ascenseur de cuvette pour
assurer le bon fonctionnement
3
Poignée de
la cuve
VerrouAxes de calage
Pour changer d’accessoire
1. Éteignez l’appareil.
2. Ouvrez le capot de protection en le faisant pivoter vers la gauche (GL190 & GL191) ou en le levant
audessus du mélangeur (GJ461).
3. Baissez la cuve par la poignée.
4. Poussez l’accessoire du batteur vers le haut puis vers la gauche pour le désengager.
5. Insérez l’accessoire qui convient. Poussez le vers le haut et vers la droite pour le caler.
6. Remontez la cuve.
BUFFALO préconise l’utilisation des accessoires suivants pour les applications correspondantes :
Crochet à pâte
à spirale
Mélanges épais pains, pâtes à tourtes, etc. Vitesse(s) préconisée(s) : 1
Palette
Mélanges fermes : pâtes légères, appareil
à gâteaux / biscuits, glaçages, garnitures
et purées de légumes
Vitesse(s) préconisée(s) :
1, 2
Fouet
Mélanges légers : crème fouettée,
mayonnaise, blancs d’oeuf, crêpes et
soufflés
Vitesse(s) préconisée(s) :
1, 2, 3
GL190-GL191_GJ461_ML_A5_v7_20180928.indb 31 2018/9/28 16:02
Page 32
32
FR
Agencement des commandes
Levier de
vitesses
Touche START
(Marche)
Touche STOP
(Arrêt)
4
Touche START (Marche) : Appuyez dessus pour démarrer le mixeur.
Touche STOP (Arrêt) : Appuyez dessus pour arrêter le mixeur. Faites-la tourner dans le sens des
aiguilles d’une montre pour relâcher et réinitialiser (modèle GJ461 exclusivement).
LEVIER DE VITESSES : Sert à régler la vitesse du mixeur.
Utilisation
• Remarque : Veillez à bien lire ces consignes et à ce que le fonctionnement de
cet appareil soit bien compris avant de l’utiliser.
• Le personnel doit être entièrement formé à l’utilisation et aux consignes de
sécurité du Mélangeur à mouvement planétaire.
Malaxage
AVERTISSEMENT : Veillez à bien éteindre la machine avant de mettre les mains
dans la cuve de malaxage.
1. Ouvrez l’écran de sécurité.
2. Remplissez la cuve.
3. Sélectionnez la vitesse qui convient et refermez l’écran de sécurité.
• Remarque : BUFFALO vous recommande de commencer à la première vitesse
et d’augmenter la vitesse progressivement si nécessaire.
• Veillez à ce que l’écran de sécurité soit entièrement fermé ou le batteur
mélangeur ne fonctionnera pas.
4. Appuyez sur le bouton START (Démarrer) pour amorcer le mélange.
Remarque : Si l’appareil a du mal à mélanger les ingrédients, éteignez-le et
délester-le d’une partie du contenu de la cuve avant de le remettre en service.
GL190-GL191_GJ461_ML_A5_v7_20180928.indb 32 2018/9/28 16:02
Page 33
33
FR
Capacite de melange
Modèle Capacité de la cuve Farine Maximum Pate Maximun
GL190 10L 2kg 3,2kg
GL191 20L 5kg 8kg
GJ461 30L 7,5kg 11,3kg
Pour changer la vitesse de malaxage
Remarque : Veillez à TOUJOURS arrêter le batteur avant de changer la vitesse
de malaxage.
Une fois l’appareil éteint :
1. Sélectionnez la vitesse qui convient, à l’aide du levier de changement de vitesses.
2. Faites redémarrer l’appareil.
Disjoncteur de protection contre les surcharges
Le disjoncteur de protection contre les surcharges est situé
au dos de la machine, près de l’entrée de câble (Remarque
concernant le modèle GL190 : le disjoncteur de
protection contre les surcharges se situe sur le socle).
En cas de surchauffe de l’appareil, le disjoncteur de
protection contre les surcharges met hors tension
automatiquement la machine. Dans un tel cas de figure :
1. Mettez hors tension le mixeur.
2. Videz une partie du contenu de la carafe de mixage.
3. Appuyez à nouveau sur le disjoncteur de protection
contre les surcharges pour le réinitialiser.
4. Laissez refroidir l’appareil pendant 20 minutes.
Disjoncteur
de
protection
contre les
surcharges
5
Remarque : En cas de coupure de courant, le disjoncteur de protection contre les
surcharges intervient pour empêcher l’appareil de redémarrer automatiquement
lorsque le courant est rétabli.
Débranchez toujours le Mixeur à mouvement planétaire de la source
d’alimentation lorsque vous ne l’utilisez pas.
Nettoyage, entretien et maintenance
• Éteignez le batteur et débranchez l’appareil de la prise secteur avant de le nettoyer.
• La cuve et la vis de pétrissage se nettoient à l’eau tiède savonneuse. N’utilisez pas de produits
chimiques abrasifs, qui risquent de laisser des résidus.
• Ne nettoyez pas l’appareil à l’aide d’un nettoyeur à jet / haute pression.
• Nettoyez l’extérieur de l’appareil à l’aide d’un torchon humide.
• BUFFALO préconise le graissage de la chaîne et la vérification de la tension de la courroie tous les
douze mois, opérations qu’elle vous conseille de confier à un agent BUFFALO où à un technicien
qualifié.
• Nettoyez régulièrement l’appareil.
GL190-GL191_GJ461_ML_A5_v7_20180928.indb 33 2018/9/28 16:02
Page 34
34
FR
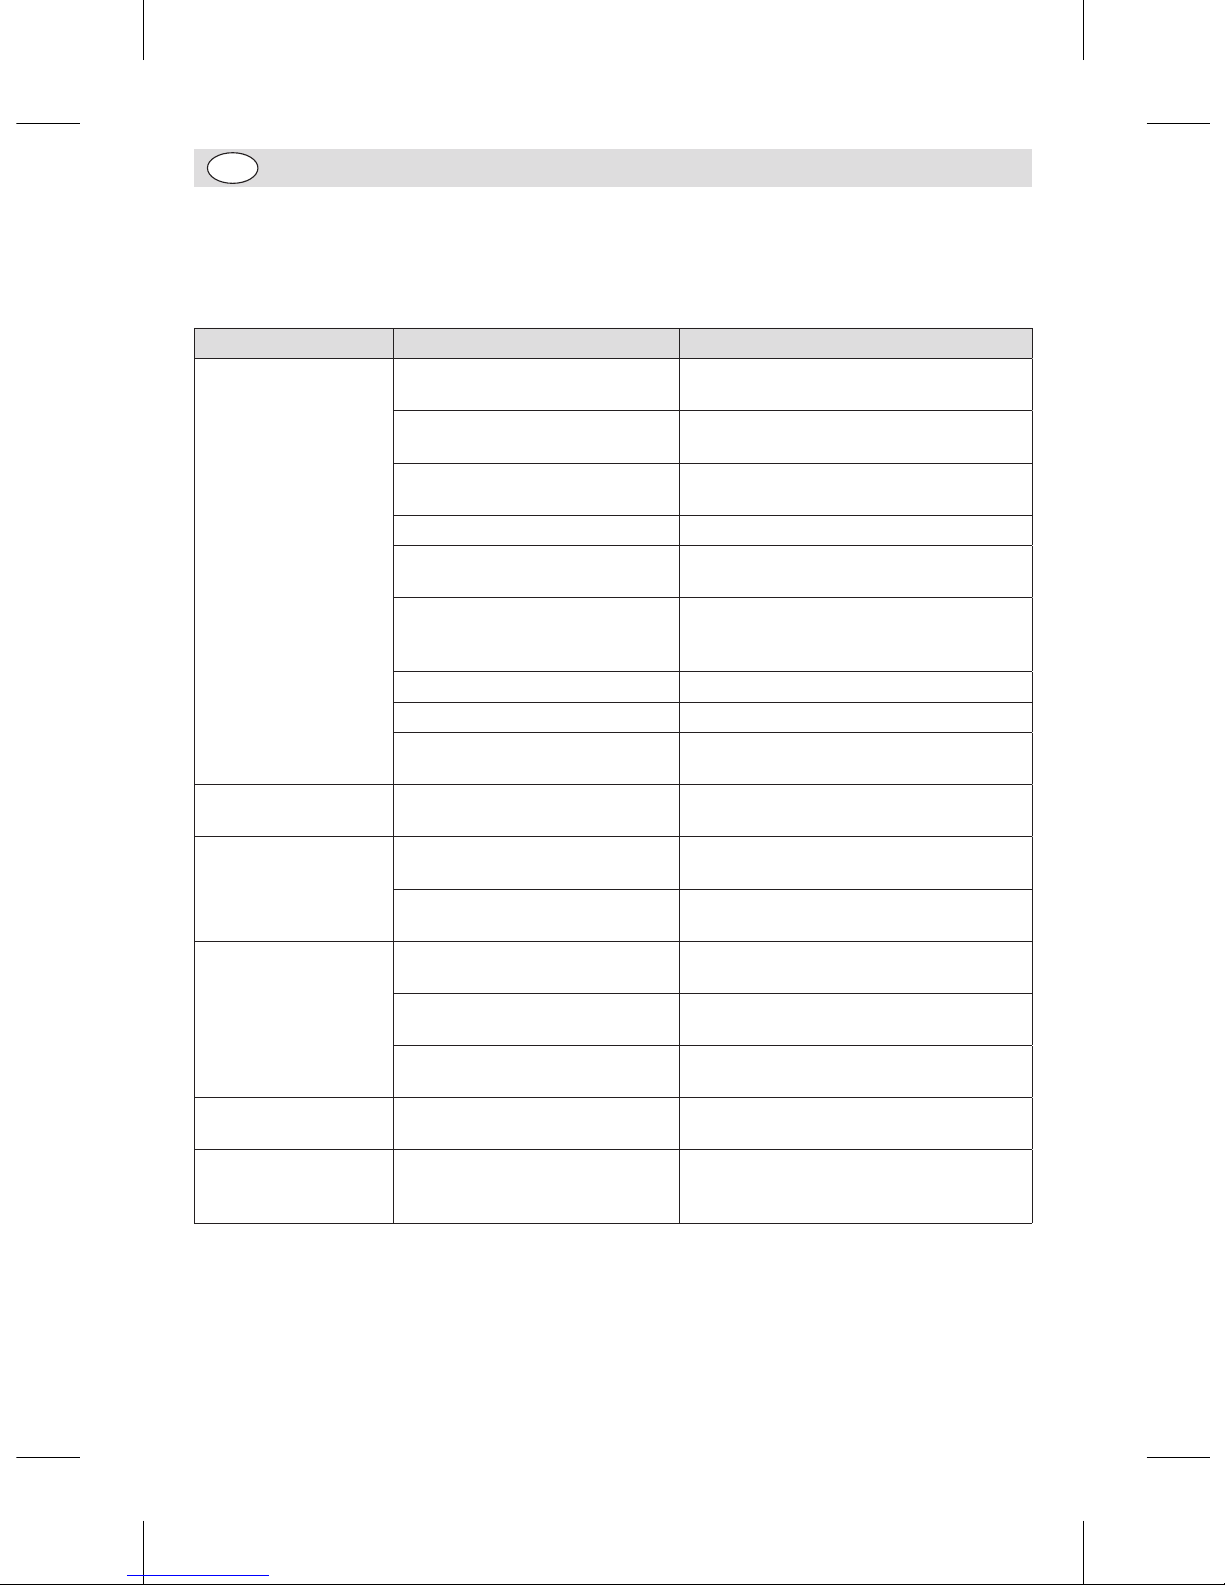
Dépannage
En cas de panne de votre appareil BUFFALO, vérifiez les données du tableau ci-dessous avant d’appeler
notre standard d’assistance ou votre revendeur BUFFALO.
Dysfonctionnement Cause probable Intervention
L’appareil ne fonctionne
pas
L’appareil n’est pas allumé Vérifier que l’appareil est bien branché et
allumé
Bouton d’arrêt coincé (GJ461) Faites pivoter le bouton dans le sens
horaire pour le décoincer
La prise et le cordon sont
endommagés
Appeler un agent BUFFALO ou un
technicien qualifié
Alimentation Vérifier l’alimentation
Problème de branchement interne Appeler un agent BUFFALO ou un
technicien qualifié
Déclenchement de l’interrupteur
de surcharge
voir l’information relative à l’interrupteur
de surcharge à la rubrique Fonctionnement
de ce mode d’emploi.
Écran de sécurité ouvert Fermer à fond l’écran de sécurité
Vitesse mal engagée Engrener une vitesse
La cuve n’est pas remontée à fond Vérifier que le levier de la cuve est
complètement repoussé
Réinsertion de la cuve
impossible
Les axes ou le tour des axes sont
couverts de mélange
Nettoyer l’appareil
Surchauffe de l’appareil Surcharge de la cuve de
pétrissage
Éteindre l’appareil et en retirer une partie
du contenu
L’appareil tourne depuis trop
longtemps
Éteindre l’appareil et le laisser refroidir
pendant 30 minutes
L’appareil est bruyant Bol ou accessoire de mixage mal
monté
Retirez et remontez le bol / accessoire de
mixage
Roulements usés / engrenages
endommagés
Appeler un agent BUFFALO ou un
technicien qualifié
La graisse a séché dans la boîte
de vitesses
Appeler un agent BUFFALO ou un
technicien qualifié
Le fouet tourne mal Courroie desserrée Appeler un agent BUFFALO ou un
technicien qualifié
Sélection d’une vitesse
impossible
Déboîtement des engrenages Éteindre l’appareil et, à la main, faire
légèrement pivoter le fouet. Sélectionner
de nouveau la vitesse
GL190-GL191_GJ461_ML_A5_v7_20180928.indb 34 2018/9/28 16:02
Page 35
35
FR
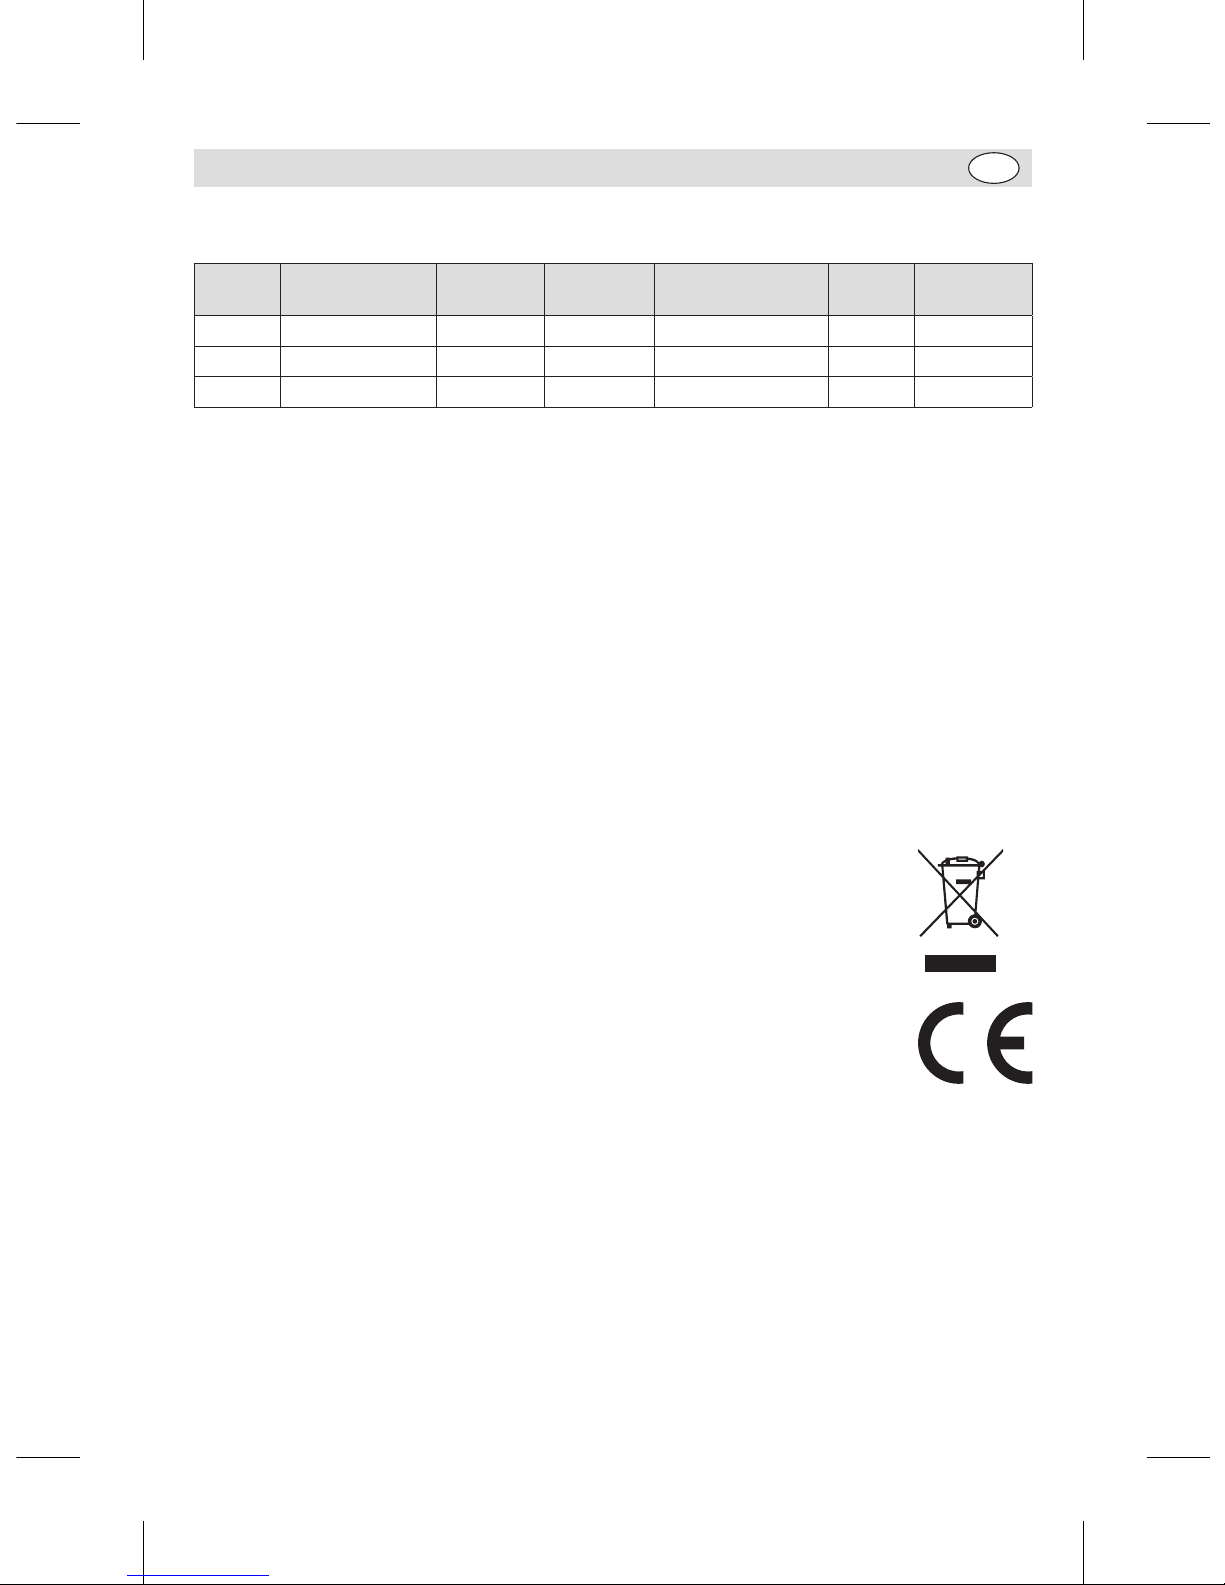
Spécifications techniques
Modèle Tension Puissance Courant
Dimensions
h x l x l mm
Poids
Capacité de
la cuve
GL190 220-240V 50Hz 550W 1,8A 610 x 395 x 395 36kg 10L
GL191 220-240V 50Hz 1100W 4,7A 794 x 555 x 558 64kg 20L
GJ461 220-240V 50Hz 1500W 6,5A 1142 x 579 × 611 160kg 30L
Raccordement électrique
La prise doit être reliée à la prise secteur qui convient.
Cet appareil est câblé comme suit :
• Fil conducteur (brun) à la borne marquée L
• Fil neutre (bleu) à la borne marquée N
• Fil de terre (vert / jaune) à la borne marquée E
Cet appareil doit être mis à la terre.
En cas de doute, consultez un électricien qualifié.
Les points d’isolation électrique doivent être libres de toute obstruction. En cas de débranchement requis
en urgence, ils doivent être facilement accessibles.
Conformité
Le logo WEEE qui figure sur ce produit ou sa documentation indique qu’il ne doit pas
être mis au rebut avec les ordures ménagères. Pour éviter qu’il ne présente un risque
pour la santé humaine et / ou écologique, confiez la mise au rebut de ce produit à un
site de recyclage agréé respectueux de l’environnement. Pour de plus amples détails sur
la mise au rebut appropriée de ce produit, contactez le fournisseur du produit ou l’autorité
responsable de l’enlèvement des ordures dans votre région.
Les pièces BUFFALO ont été soumises à des tests rigoureux pour pouvoir être déclarées
conformes aux normes et spécifications réglementaires définies par les autorités
internationales, indépendantes et fédérales.
Les produits BUFFALO ont été déclarés aptes à porter le symbole suivant :
Tous droits réservés. La production ou transmission, partielles ou intégrales, sous quelque forme que ce soit ou par n’importe
quel moyen, tant électronique que mécanique, sous forme de photocopie, d’enregistrement ou autre de ce mode d’emploi
sont interdites sans l’autorisation préalablement accordée par BUFFALO.
Nous nous efforçons, par tous les moyens dont nous disposons, de faire en sorte que les détails contenus dans le présent
mode d’emploi soient corrects en date d’impression. Toutefois, BUFFALO se réserve le droit de changer les spécifications de
ses produits sans préavis.
GL190-GL191_GJ461_ML_A5_v7_20180928.indb 35 2018/9/28 16:02
Page 36
36
DE
Sicherheitshinweise
Das Personal muss ausführlich im Betrieb und
sicheren Gebrauch der Rührmaschine geschult
werden.
• Auf eine flache, stabile Oberfläche stellen.
• Alle erforderlichen Montage- und Reparaturarbeiten sollten
von Wartungspersonal oder einem qualifizierten Techniker
durchgeführt werden. Keine Bauteile oder Bedienflächen von
diesem Produkt entfernen.
• Für folgende Normen und Vorschriften sind die lokalen und
nationalen Normen heranzuziehen:
- Arbeitsschutzvorschriften
- BS EN Verhaltenspraktiken
- Brandschutzvorschriften
- IEE-Anschlussvorschriften
- Bauvorschriften
• Verpackungsmaterial außerhalb der Reichweite von Kindern
aufbewahren und gemäß den lokalen Vorschriften entsorgen.
• Aus Sicherheitsgründen muss ein beschädigtes Stromkabel von
einem BUFFALO-Mitarbeiter oder empfohlenen qualifizierten
Elektriker erneuert werden.
• Dieses Gerät darf nur gemäß dieser Anleitung und von
kompetenten Personen genutzt oder bedient werden
• Dieses Gerät sollte nur dann von Personen (einschließlich
Kindern) mit reduzierten körperlichen, sensorischen oder
geistigen Fähigkeiten, mangelnder Erfahrung oder Kenntnissen
verwendet werden, wenn sie von einer für ihre Sicherheit
verantwortlichen Person im Gebrauch des Geräts geschult
wurden bzw. ständig beaufsichtigt werden.
• Während des Betriebs stets HINTER der Sicherheitsvorrichtung
stehen.
GL190-GL191_GJ461_ML_A5_v7_20180928.indb 36 2018/9/28 16:02
Page 37

37
DE
• Hände während des Betriebs NICHT in die Nähe der
Drehaufsätze halten. Dies könnte zu schweren Verletzungen
führen.
• KEINE Lebensmittel aus dem Gerät nehman, bis die
Mixvorrichtung zu einem vollständigen Stillstand gekommen
ist.
• Das Gerät NICHT in Wasser eintuachen.
• NICHT versuchen, Produkte zu mischen, für die dieses Gerät
nicht ausgelegt ist. Dies könnte die Mixaufsätze beschädigen.
• KEINEN beschädigten Mixaufsatz verwenden.
• Die Sicherheitsvorrichtungen NICHT umgehen.
• Das Gerät während des Gebrauchs NIEMALS unbeaufsichtigt
lassen.
• Das Gerät ist schwer. Vorsicht beim Transport.
• Die Benutzung von Zubehörteilen, die vom Hersteller nicht
ausdrücklich empfohlen werden, kann Verletzungen und
Beschädigungen verursachen. Verwenden Sie deshalb nur
Originalzubehör.
• Buffalo empfiehlt, dieses Gerät jährlich einem PAT-Test zu
unterziehen, um die Sicherheit des Produktes sicher zu stellen.
Produktbeschreibung
GL190 - Planetenrührmaschine, 10 Liter
GL191 - Planetenrührmaschine, 20 Liter
GJ461 - Planetenrührmaschine, 30 Liter
Die BUFFALO Rührmaschine ist ein unabhängiges Küchengerät. Die Rührschüssel befindet sich unter einer
großen Motor-/Getriebeanlage, an der ein Mix-/Rührutensil angebracht ist.
Einführung
Die BUFFALO Rührmaschine kann die unterschiedlichsten Lebensmittel - von Sahne bis Teig - verrühren.
Bitte nehmen Sie sich einige Minuten Zeit und lesen Sie dieses Handbuch sorgfältig durch. Nur bei
korrekter Wartung und vorschriftsgemäßem Betrieb kann Ihr BUFFALO-Produkt optimale Leistung
erzielen.
GL190-GL191_GJ461_ML_A5_v7_20180928.indb 37 2018/9/28 16:02
Page 38
38
DE
Lieferumfang
Folgende Teile befinden sich in der Verpackung:
• Buffalo Planetenrührmaschine
• Rührschüssel
• Spiral-Knethaken
• Quirl
• Rührbesen
• Bedienungsanleitung
BUFFALO ist stolz auf die hochwertige Qualität seiner Produkte und seinen erstklassigen Service. Wir
stellen sicher, dass alle gelieferten Produkte zum Zeitpunkt der Verpackung voll funktionsfähig sind und
sich in einwandfreiem Zustand befinden.
Sollten Sie Transportschäden feststellen, wenden Sie sich bitte unverzüglich an Ihren BUFFALO-Händler.
Montage
• Achten Sie darauf, dass die Planetenrührmaschine an einem Ort aufgestellt wird, der das Gewicht der
Maschine tragen kann.
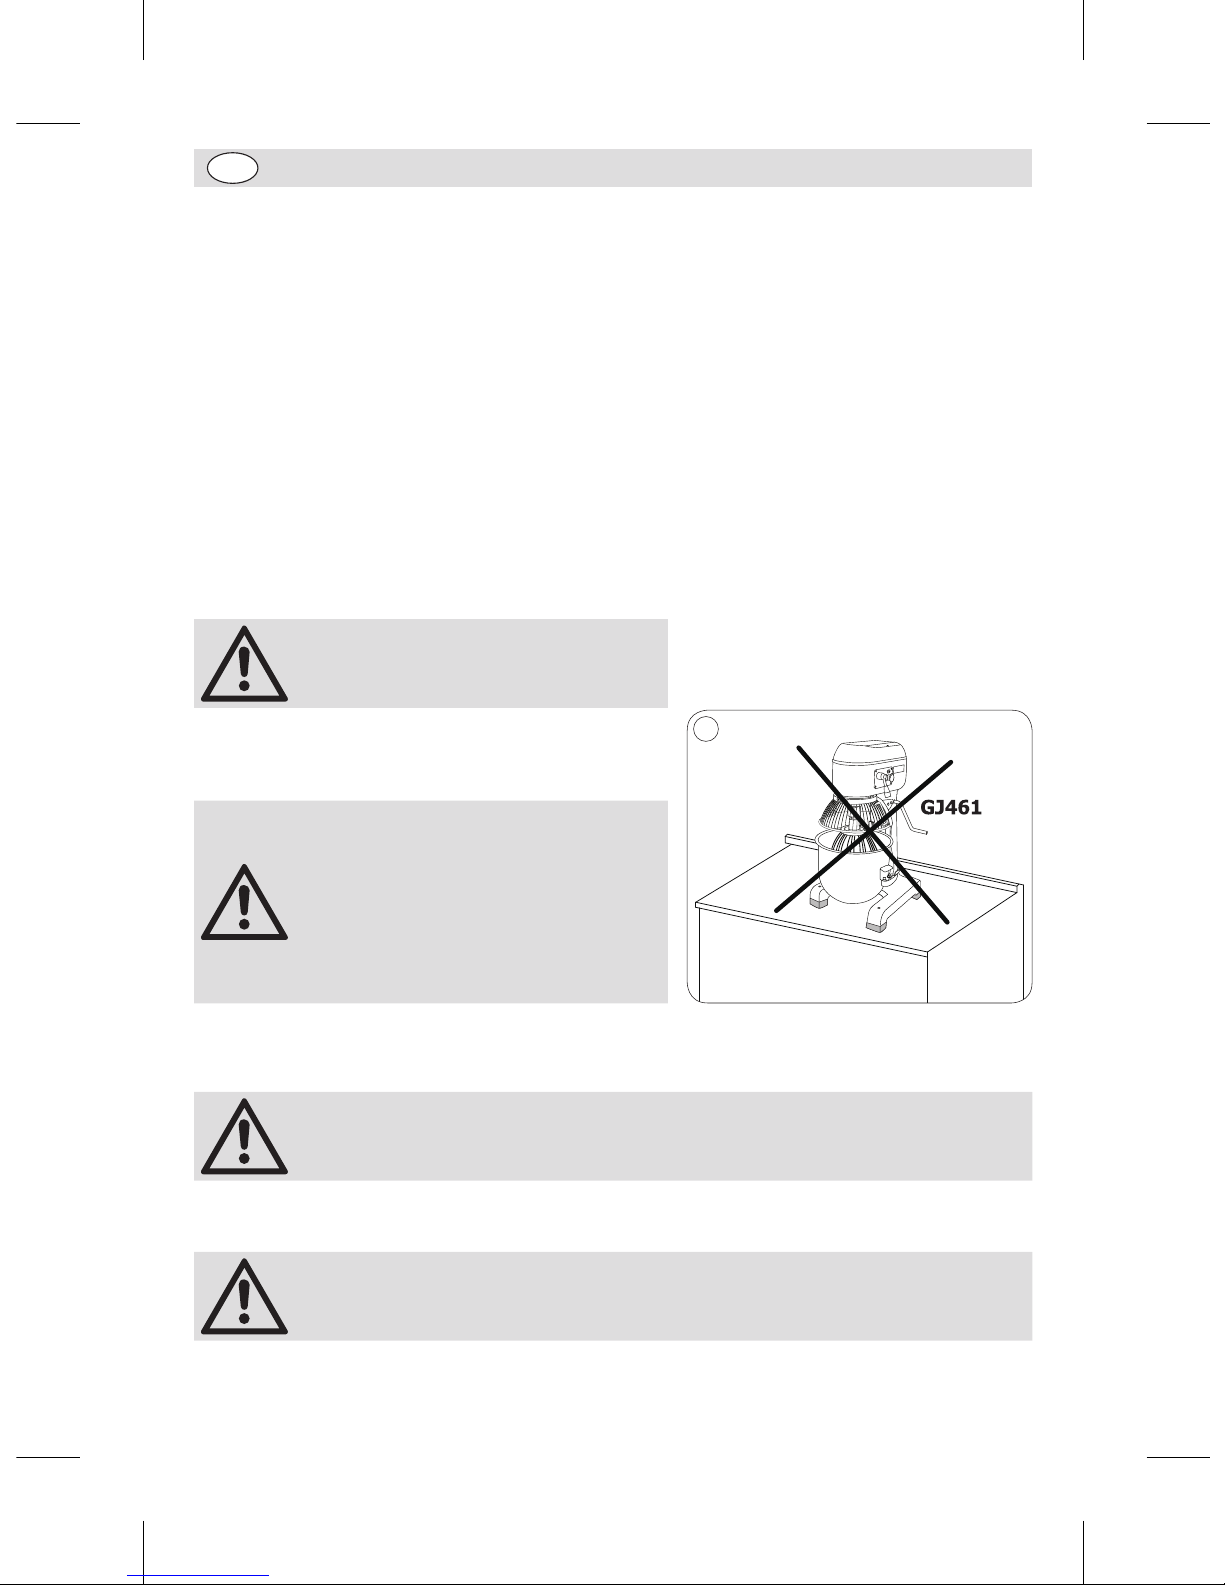
VORSICHT: Die Rührmaschine ist sehr
schwer. Beim Bewegen ist Vorsicht
angebracht.
• Wenn das Gerät auf einer Arbeitsoberfläche platziert
werden soll, stellen Sie sicher, dass es dort gesichert
ist (für GL190, GL191).
Die Rührmaschine GJ461 eignet
sich nur zum Aufstellen auf dem
Boden! Platzieren Sie sie aufgrund
ihres schweren Gewichts nicht auf
einer Arbeitsoberfläche. Außerdem
könnte sie auf der Arbeitsoberfläche
während der Nutzung stark vibrieren,
herunterfallen und Körperverletzungen
oder Sachbeschädigungen verursachen.
1
Zusammenbau
VORSICHT: Vor Einschalten des Geräts muss die Rührschüssel in Position
gebracht und angehoben werden.
• BUFFALO übernimmt keine Verantwortung für Verletzungen, die durch die unkorrekte Montage des
Geräts entstehen.
Hinweis: Darauf achten, dass die Füße gerade und auf einer Höhe sind, um eine
Vibration während des Betriebs zu vermeiden.
• Sämtliche Verpackung entfernen.
GL190-GL191_GJ461_ML_A5_v7_20180928.indb 38 2018/9/28 16:02
Page 39
39
DE
Die Gummifüße befestigen
1. Packen Sie das Gerät aus.
2. Nehmen Sie die Maschine von der Holzpalette
(lösen Sie dazu die vier Bolzen an der Unterseite der
Holzpalette).
3. Nehmen Sie die Gummifüße aus der Schüssel.
4. Befestigen Sie die Gummifüße an den Maschinenfüßen.
Hinweis: Für die Montage der
Gummifüße sind mindestens zwei
Personen erforderlich.
Hinweis: Sobald Sie die Gummifüße
befestigt haben, müssen Sie
sicherstellen, dass die Maschine stabil
steht.
2
Gummifüße
Die Art der Gummifüße
Rubber feet
Remove all packaging from the appliance.
Remove the wooden pallet from the machine
(Loosen the four bolts at the bottom of the
wooden pallet).
Take out the rubber feet from the bowl
Add the rubber feet to the feet of the machine.
Note: A minimum of two people should
Note: Once the rubber feet have been installed, ensure the machine is stable.
be used to install the rubber feet.
GL190-GL191_GJ461_ML_A5_v7_20180928.indb 39 2018/9/28 16:02
Page 40
40
DE
Schüssel einsetzen/entfernen
1. Das Gerät ausschalten.
2. Zum Öffnen der Schutzvorrichtung diese nach
links drehen (GL190 & GL191) oder sie über das
Rührelement (GJ461) anheben.
3. Die Schüssel mithilfe des Griffs absenken.
4. Die Schnappmechanismen auf beiden Seiten der
Schüssel lösen.
5. Die Schüssel anheben. Die Schüssel wird durch
zwei Stifte in Position gehalten, die die Griffe an
der Basis sichern, sowie durch eine Öffnung auf der
Geräterückseite, in die der Ansatz an der Schüssellippe
eingeführt wird.
6. Zum Einsetzen der Schüssel in umgekehrter
Reihenfolge verfahren.
Hinweis: Darauf achten, dass der Griff
vollständig nach hinten gedrückt ist
und die Schüssel ganz angehoben ist,
da die Rührmaschine ansonsten nicht
funktioniert.
Hinweis: Fetten Sie regelmäßig den
Schüsselaufzugmechanismus ein, um
glatten Betrieb sicherzustellen
3
Schüsselgriff
Schnapp-
mechanismus
Haltestifte
Auswechseln des Rührzubehörs
1. Das Gerät ausschalten.
2. Zum Öffnen der Schutzvorrichtung diese nach links drehen (GL190 & GL191) oder sie über das
Rührelement (GJ461) anheben.
3. Die Schüssel mithilfe des Griffs absenken.
4. Den Knethaken, Quirl oder Rührbesen nach oben und links drücken, um ihn zu lösen.
5. Das gewünschte Zubehörteil einsetzen. Nach oben und rechts drücken, um es in Position zu verriegeln.
6. Die Schüssel anheben.
BUFFALO empfiehlt, die einzelnen Zubehörteile wie folgt einzusetzen:
SpiralKnethaken
Schwere Konsistenz Teig, Pastetenteig usw. Geeignete Stufen: 1
Quirl
Feste Konsistenz leichtes Gebäck, Kuchen-/
Keksteig, Glasuren, Füllungen und
zerstampftes Gemüse
Geeignete Stufen: 1, 2
Rührbesen
Leichte Konsistenz
Schlagsahne, Mayonnaise, Eiweiß,
Pfannkuchen und Soufflés
Geeignete Stufen: 1, 2, 3
GL190-GL191_GJ461_ML_A5_v7_20180928.indb 40 2018/9/28 16:02
Page 41
41
DE
Bedienelemente
Stufenschalter
EIN-Taste
AUS-Taste
4
EIN-Taste - zum Einschalten der Rührmaschine drücken.
AUS-Taste - zum Ausschalten der Rührmaschine drücken. Im Uhrzeigersinn drehen, um die Taste zu
lösen und die Einstellung zurückzusetzen (GJ461).
STUFENSCHALTER - reguliert die Geschwindigkeit des Rührwerks.
Betrieb
• Hinweis: Diese Anweisungen unbedingt sorgfältig lesen. Der Betrieb des
Geräts muss vollständig verstanden werden, bevor das Gerät in Betrieb
genommen wird.
• Das Personal muss ausführlich im Betrieb und sicheren Gebrauch der
Rührmaschine geschult werden.
Rühren
VORSICHT: Stets darauf achten, dass das Gerät ausgeschaltet ist, bevor Sie die
Hände in die Schüssel halten.
1. Schutzvorrichtung öffnen.
2. Die Schüssel füllen.
3. Die gewünschte Rührstufe wählen und die Schutzvorrichtung schließen.
• Hinweis: BUFFALO empfiehlt, mit der niedrigsten Stufe zu beginnen und die
Rührgeschwindigkeit nach Bedarf allmählich zu erhöhen.
• Darauf achten, dass die Schutzvorrichtung ganz geschlossen ist, da die
Rührmaschine ansonsten nicht funktioniert.
4. Die START-Taste drücken, um den Rührvorgang zu starten.
Hinweis: Wenn das Gerät Probleme mit dem Rühren hat, das Gerät ausschalten
und etwas Inhalt aus der Schüssel entfernen. Dann das Gerät erneut
einschalten.
GL190-GL191_GJ461_ML_A5_v7_20180928.indb 41 2018/9/28 16:02
Page 42
42
DE
Mischende Kapazitat
Modell Schüsselgröße Maximales Mehl Maximaler Teig
GL190 10L 2kg 3,2kg
GL191 20L 5kg 8kg
GJ461 30L 7,5kg 11,3kg
Mixgeschwindigkeit ändern
Hinweis: Die Rührmaschine IMMER stoppen, bevor Sie versuchen, die
Mixgeschwindigkeit zu ändern.
Wenn das Gerät ausgeschaltet ist:
1. Die gewünschte Rührstufe mit dem Stufenschalter einstellen.
2. Das Gerät erneut starten.
Überlastschalter
Der Überlastschalter befindet sich auf der Geräterückseite
neben dem Kabeleingang (Hinweis für GL190: Der
Überlastschalter befindet sich an der Trägerplatte).
Wenn sich das Gerät überhitzt, stoppt der Überlastschalter
das Gerät automatisch. In diesem Fall:
1. Schalten Sie das Gerät aus.
2. Nehmen Sie etwas Inhalt aus der Rührschüssel.
3. Drücken Sie den Überlastschalter erneut, um ihn
zurückzusetzen.
4. Lassen Sie das Gerät 20 Minuten abkühlen.
5
Überlastschalter
Hinweis: Bei einem Stromausfall wird der Überlastschalter aktiviert um zu
verhindern, dass das Gerät bei Wiederherstellung der Stromzufuhr wieder
automatisch startet.
Ziehen Sie stets den Netzstecker ab, wenn die Rührmaschine nicht benutzt wird.
Reinigung, Pflege und Wartung
• Vor Reinigungsarbeiten stets zunächst das Gerät abschalten und den Netzstecker ziehen.
• Schüssel und Knethaken mit einer warmen Seifenlauge reinigen. Keine Scheuermittel benutzen, da
diese schädliche Ablagerungen hinterlassen können.
• Das Gerät NICHT mit einem Strahl-/Hochdruckreiniger reinigen.
• Das Gerät außen mit einem feuchten Tuch reinigen.
• BUFFALO empfiehlt, die Kette zu schmieren und die Riemenspannung alle zwölf Monate von einem
BUFFALO-Mitarbeiter oder einem qualifizierten Techniker überprüfen zu lassen.
• Das Gerät regelmäßig reinigen.
GL190-GL191_GJ461_ML_A5_v7_20180928.indb 42 2018/9/28 16:02
Page 43
43
DE
Störungssuche
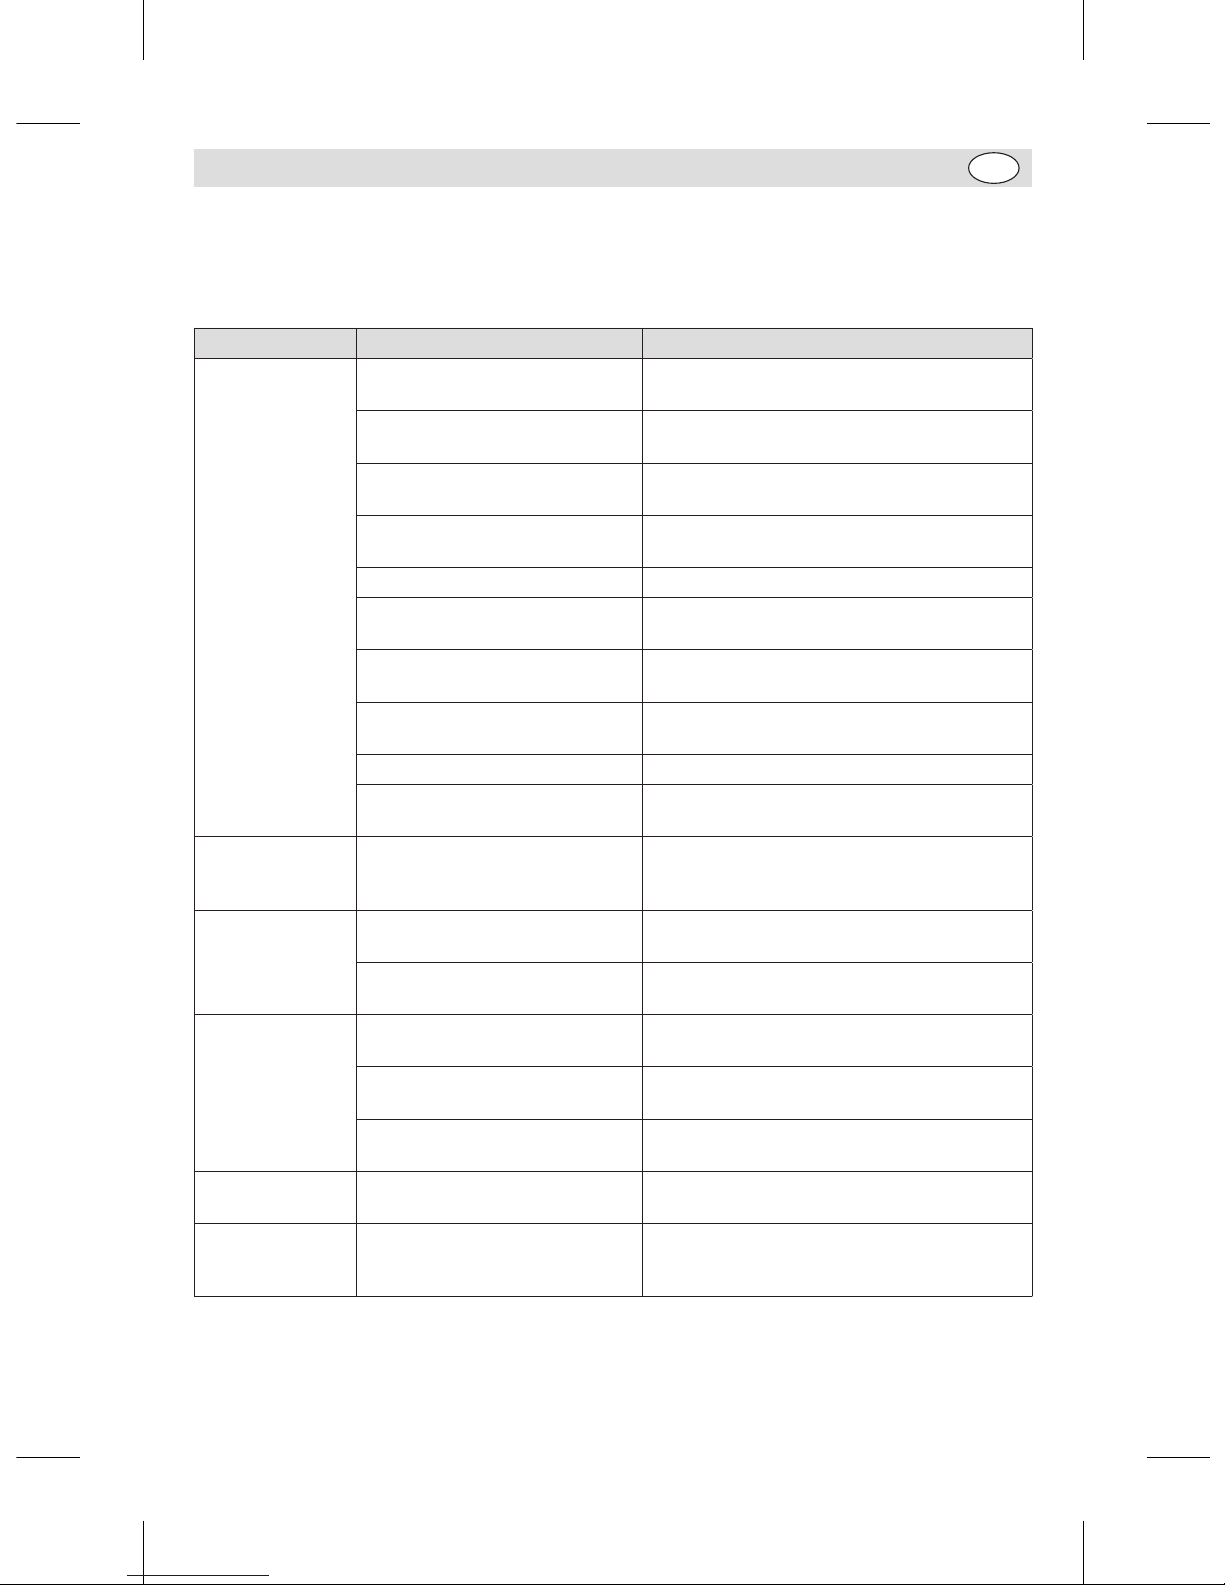
Bei einem Defekt Ihres BUFFALO-Geräts konsultieren Sie bitte zunächst folgende Tabelle, bevor Sie die
Helpline oder Ihren BUFFALO-Händler anrufen.
Störung Vermutliche Ursache Lösung
Das Gerät
funktioniert nicht
Das Gerät ist nicht eingeschaltet Prüfen, ob der Netzstecker in die Steckdose
gesteckt wurde und das Gerät eingeschaltet ist
Stopp-Taste nicht gelöst (GJ461) Zum Lösen die Taste im Uhrzeigersinn drehen
Stecker und Kabel sind beschädigt BUFFALO-Mitarbeiter oder qualifizierten
Techniker anrufen
Sicherung im Stecker ist
durchgebrannt
Neue Sicherung in den Stecker einsetzen
Stromzufuhr Netzstrom prüfen
Interner Vernetzungsfehler BUFFALO-Mitarbeiter oder qualifizierten
Techniker anrufen
Der Überlastschalter wurde
aktiviert
Siehe Informationen zum Überlastschalter im
Bedienungsteil dieses Handbuchs.
Schutzvorrichtung ist nicht
geschlossen
Schutzvorrichtung vollständig schließen
Keine Rührstufe eingestellt Rührstufe einstellen
Schüssel nicht vollständig
angehoben
Darauf achten, dass der Hebel an der Schüssel
ganz zurückgedrückt ist
Schüssel lässt
sich nicht wieder
einsetzen
Schüsselstifte oder umgebender
Bereich sind mit Rührgut verstopft
Das Gerät reinigen
Das Gerät
überhitzt sich
Die Knetschüssel ist zu voll Gerät ausschalten und einen Teil des Inhalts
entleeren
Das Gerät läuft zu lange Das Gerät ausschalten und 30 Minuten lang
abkühlen lassen
Das Gerät ist laut Die Schüssel oder der Mischaufsatz
ist nicht richtig eingesetzt
Schüssel/Mischaufsatz entfernen und wieder
anbringen
Abgenutzte Lager / beschädigte
Zahnräder
BUFFALO-Mitarbeiter oder qualifizierten
Techniker anrufen
Das Fett im Getriebe ist
ausgetrocknet
BUFFALO-Mitarbeiter oder qualifizierten
Techniker anrufen
Die Quirle drehen
sich nicht richtig
Der Riemen hat sich gelöst BUFFALO-Mitarbeiter oder qualifizierten
Techniker anrufen
Keine
Stufeneinstellung
möglich
Zapfen greifen nicht ineinander Das Gerät ausschalten und das Rührzubehör
von Hand leicht drehen.
Erneut die Rührstufe einstellen.
GL190-GL191_GJ461_ML_A5_v7_20180928.indb 43 2018/9/28 16:02
Page 44
44
DE
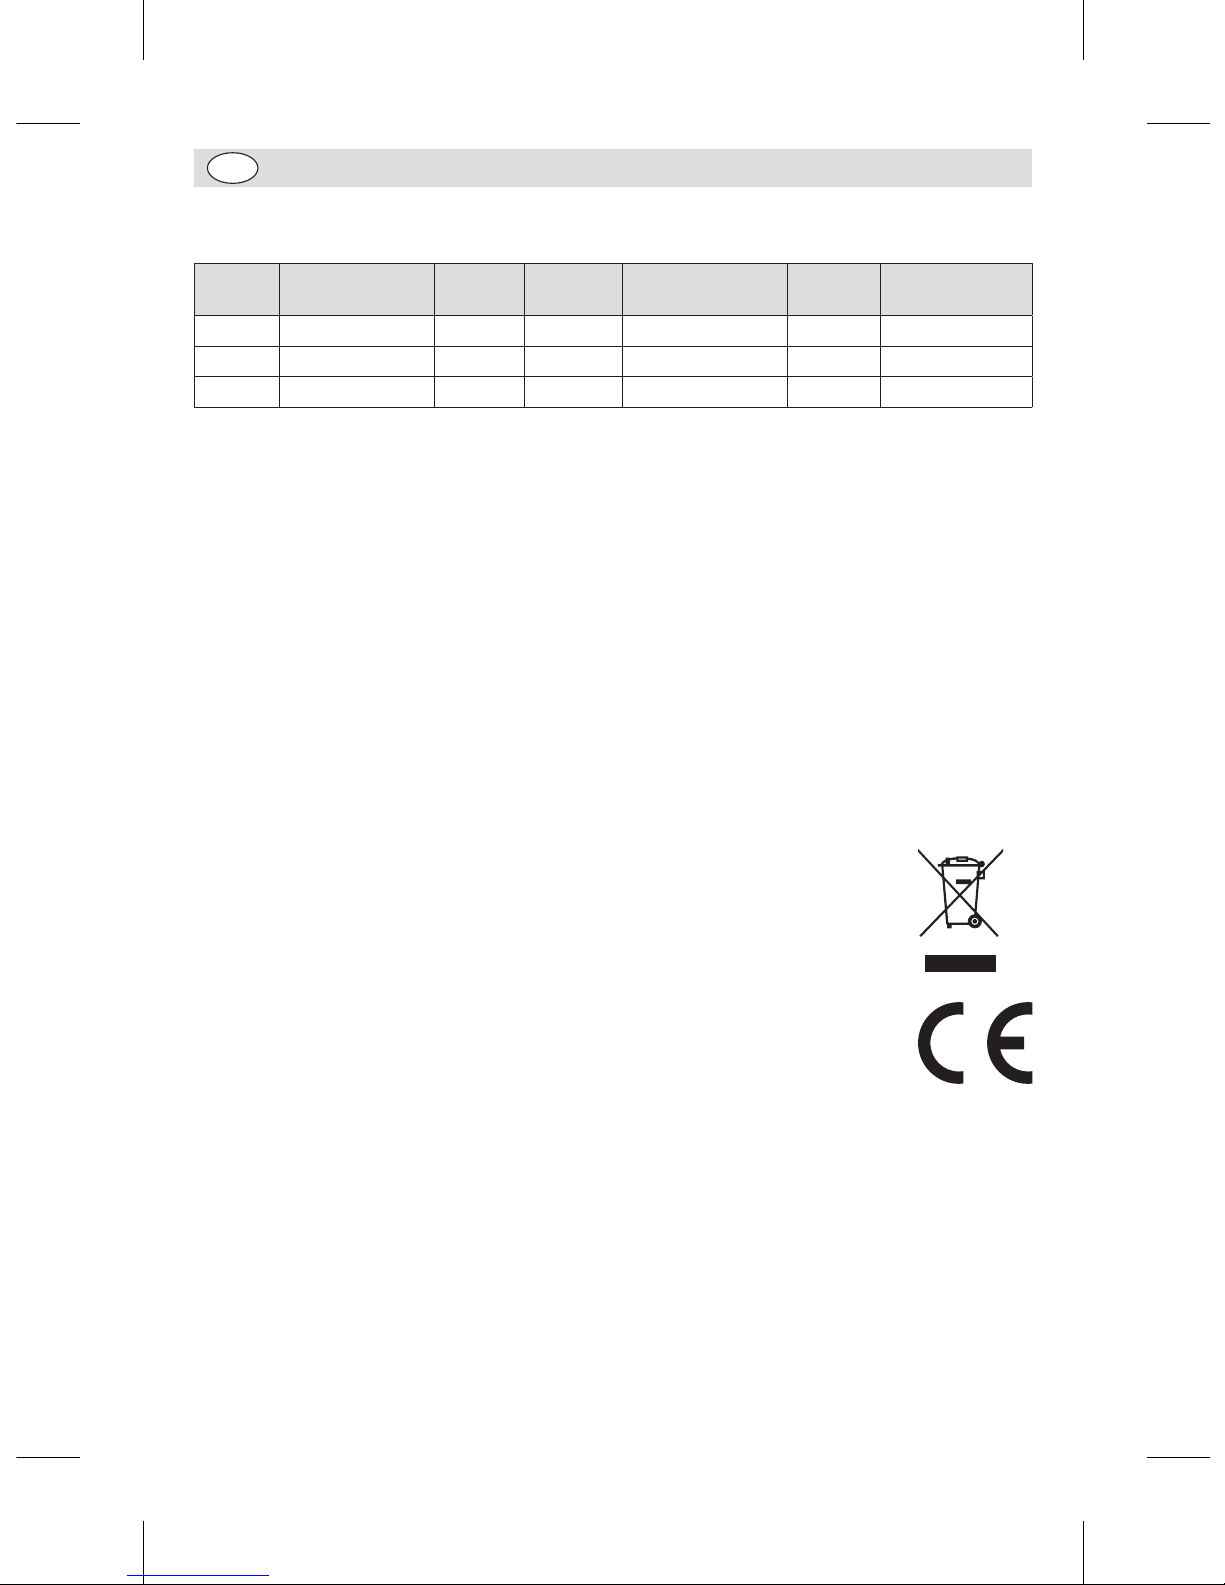
Technische Spezifikationen
Modell Spannung Leistung
Strom-
stärke
Abmessungen
h x b x t mm
Gewicht Schüsselgröße
GL190 220-240V 50Hz 550W 1,8A 610 x 395 x 395 36kg 10L
GL191 220-240V 50Hz 1100W 4,7A 794 x 555 x 558 64kg 20L
GJ461 220-240V 50Hz 1500W 6,5A 1142 x 579 × 611 160kg 30L
Elektroanschlüsse
Der Stecker muss in eine geeignete Steckdose gesteckt werden.
Das Gerät ist wie folgt verdrahtet:
• Stromführender Leiter (braun) an Klemme L
• Neutralleiter (blau) an Klemme N
• Erdleiter (grün/gelb) an Klemme E
Dieses Gerät muss geerdet werden.
Bei Fragen wenden Sie sich bitte an einen qualifizierten Elektriker.
Elektroisolierpunkte dürfen nicht blockiert werden. Bei einem Notstopp müssen diese Punkte jederzeit
sofort zugänglich sein.
Konformität
Das WEEE-Logo an diesem Produkt oder in der Dokumentation weist darauf hin, dass
das Produkt nicht mit dem normalen Hausmüll entsorgt werden darf. Um potenziellen
Gesundheits- bzw. Umweltschäden vorzubeugen, muss das Produkt durch einen
zugelassenen und umweltverträglichen Recyclingprozess entsorgt werden. Ausführliche
Informationen zur korrekten Entsorgung dieses Produkts erhalten Sie von Ihrem
Produktlieferanten oder der für die Müllentsorgung in Ihrer Region zuständige Behörde.
Alle BUFFALO-Produkte werden strengen Tests unterzogen, um die Einhaltung von
Normen und Spezifikationen internationaler und nationaler Behörden und unabhängiger
Organisationen zu gewährleisten.
BUFFALO-Produkte dürfen durch folgendes Symbol gekennzeichnet werden:
Alle Rechte vorbehalten. Diese Anleitung darf ohne vorherige schriftliche Genehmigung von BUFFALO weder ganz noch
teilweise in irgendeiner Form oder auf irgendeinem Wege - einschließlich elektronischer, mechanischer Verfahren, durch
Fotokopieren, Aufnahme oder andere Verfahren - vervielfältigt oder übertragen werden.
Es werden alle Anstrengungen unternommen um sicherzustellen, dass alle Angaben bei der Drucklegung korrekt sind.
BUFFALO behält sich jedoch das Recht vor, Spezifikationen ohne Vorankündigung zu ändern.
GL190-GL191_GJ461_ML_A5_v7_20180928.indb 44 2018/9/28 16:02
Page 45
45
IT
Suggerimenti per la sicurezza
L'apparecchio deve essere utilizzato
esclusivamente da persone esperte e in
conformità con le presenti istruzioni.
• Posizionare su una superficie piana e stabile.
• L’installazione e le eventuali riparazioni devono venire eseguite
da un agente/tecnico qualificato. Non rimuovere i componenti
o i pannelli di accesso dell’apparecchio.
• Verificare la conformità alle normative locali e nazionali di
quanto segue:
- Normativa antinfortunistica sul lavoro
- Linee guida BS EN
- Precauzioni antincendio
- Normativa IEE sui circuiti elettrici
- Norme di installazione
• L’apparecchio non è destinato a essere utilizzato da persone
(inclusi i bambini) con ridotte capacità fisiche, sensoriali o
mentali, o prive della necessaria esperienza e conoscenza
dell’apparecchio, che non abbiano ricevuto supervisione o
istruzioni relative all’utilizzo dell’apparecchio dalle persone
responsabili dello loro sicurezza
• Tenere lontano l’imballaggio dalla portata dei bambini. Smaltire
l’imballaggio in conformità alle normative locali.
• Se danneggiato, il cavo di alimentazione deve venire sostituito
da un agente BUFFALO o da un tecnico qualificato al fine di
prevenire eventuali rischi.
• L’apparecchio deve essere utilizzato esclusivamente da persone
esperte e in conformità con le presenti istruzioni
• Rimanere sempre DIETRO la protezione di sicurezza quandro
l’apparecchio è in funzione.
GL190-GL191_GJ461_ML_A5_v7_20180928.indb 45 2018/9/28 16:02
Page 46

46
IT
• NON avvicinare le mani ai componenti rotanti quando
l’apparecchio è in funzione. Pericolo di gravi lesioni personali
• NON rimuovere il cibo dall’apparecchio fino a quando i
componenti di impasto non si sono completamente arrestati.
• NON immergere l’apparecchio in acqua.
• NON tentare di impastare oggetti o cibi per i quali l’apparecchio
non è progettato, in quanto si possono danneggiare i
componenti di impasto.
• NON utilizzare con componenti di impasto danneggiati.
• NON disattivare i blocchi di sicurezza.
• Sorvegliare SEMPRE l’apparecchio quando è in funzione.
• L’apparecchio è pesante. Fare attenzione durante gli
spostamenti.
• Non usare mai accessori non raccomandati dal fabbricante.
Potrebbero rappresentare un rischio per la sicurezza dell’utente
e danneggiare lo strumento. Usare solo parti e accessori
originali.
• BUFFALO consiglia che il presente strumento faccia il PAT test
ogni anno per garantire la sicurezza del prodotto.
Descrizione dei prodotti
GL190 - Impastatrice planetaria 10 litri
GL191 - Impastatrice planetaria 20 litri
GJ461 - Impastatrice planetaria 30 litri
L’impastatrice planetaria BUFFALO è un apparecchio indipendente che consiste in una grossa vasca di
impasto montata sotto un complessivo motore e ingranaggi al quale può essere fissato uno strumento per
impastare.
Introduzione
L’impastatrice planetaria BUFFALO è stata progettata per impastare una varietà di alimenti, dalle creme
all’impasto per il pane. Leggere con attenzione il presente manuale. La manutenzione e l’utilizzo corretti
di questo apparecchio consentiranno di ottenere le massime prestazioni da questo prodotto BUFFALO.
GL190-GL191_GJ461_ML_A5_v7_20180928.indb 46 2018/9/28 16:02
Page 47
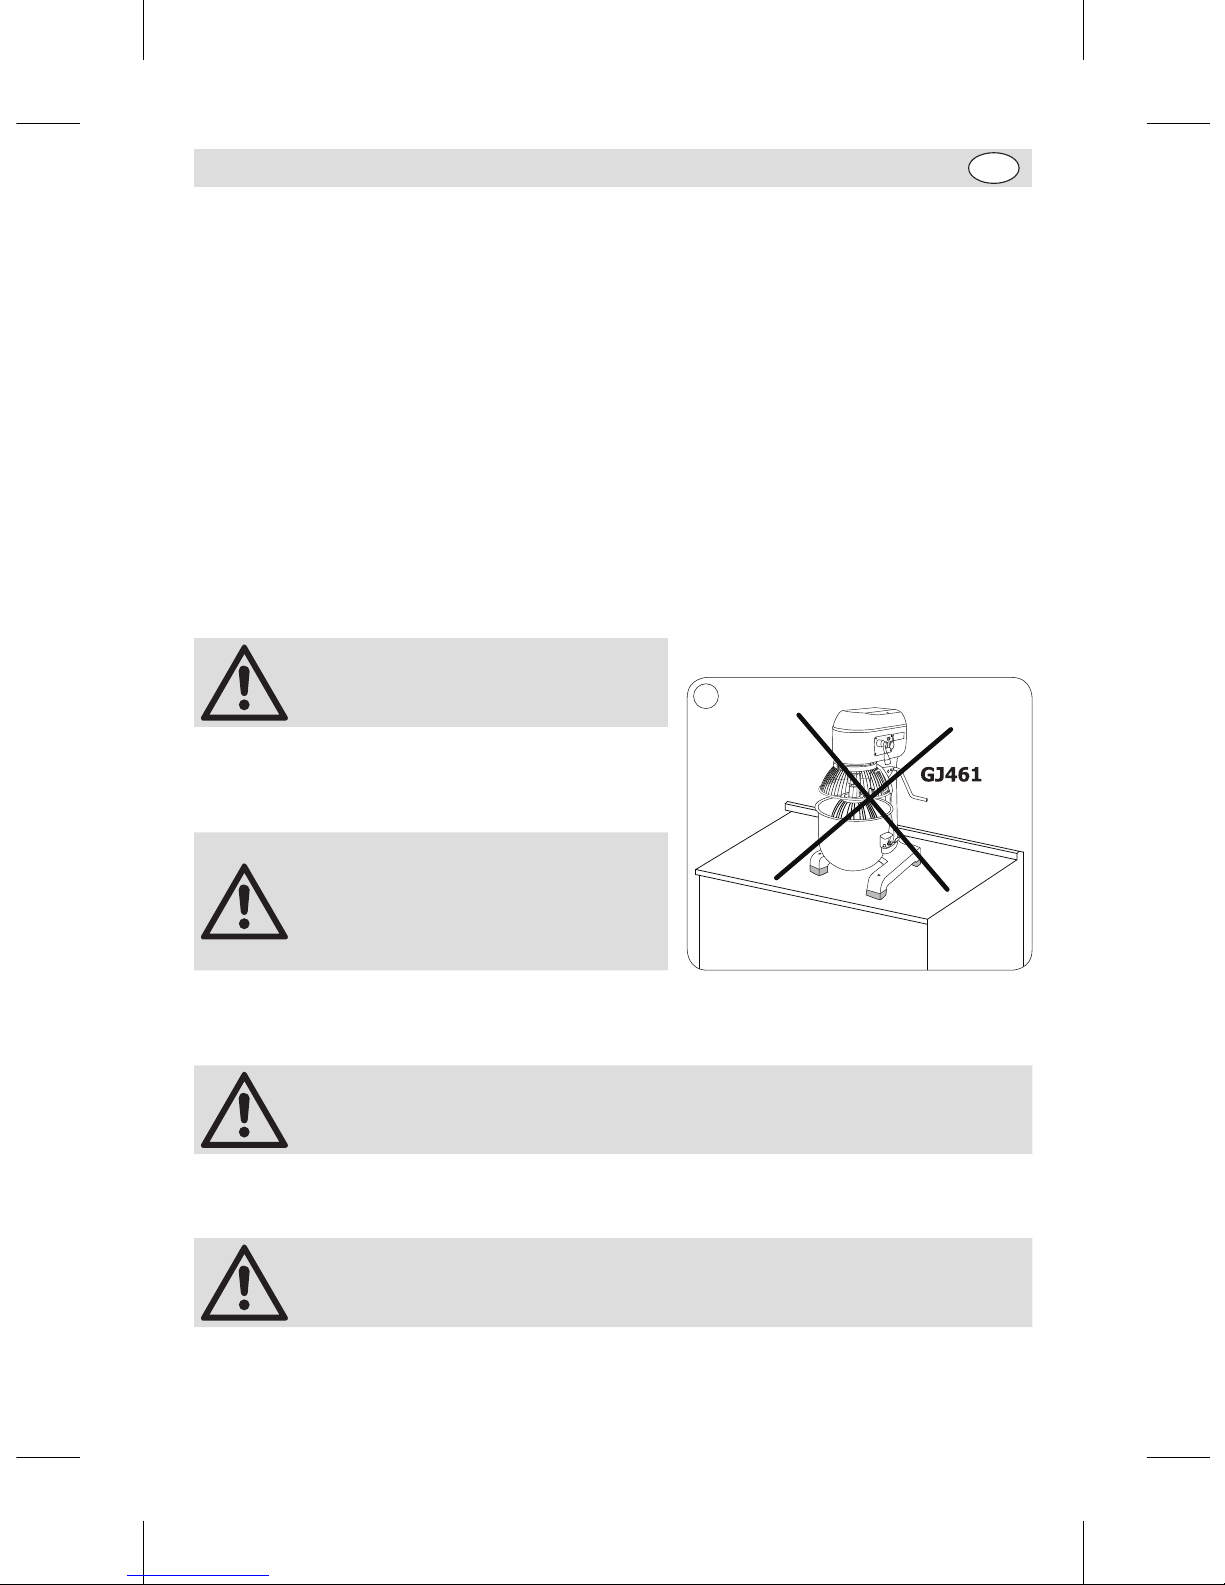
47
IT
Contenuto della confezione
La confezione contiene:
• Impastatrice planetaria Buffalo
• Vasca di impasto
• Uncino per impasto
• Battitore
• Frusta
• Manuale di istruzioni
BUFFALO garantisce una qualità e un servizio impeccabili e assicura che al momento dell’imballaggio tutti
componenti forniti sono integralmente funzionanti e privi di difetti.
Nel caso siano rilevati danni risultanti dal trasporto del prodotto, rivolgersi immediatamente al rivenditore
BUFFALO locale.
Installazione
• Assicurarsi che il piano d’appoggio su cui viene posizionata l’impastatrice planetaria sia in grado di
supportarne il peso.
ATTENZIONE: l’impastatrice planetaria
è molto pesante; prendere le necessarie
precauzioni se è necessario spostarla.
• Se lo strumento è fatto per essere posto su un piano di
lavoro, si prega di assicurarsi che sia ben posizionato
(per GL190, GL191).
A pavimento solamente con
l’impastatrice GJ461! Non porla su
alcun piano di lavoro per il gran peso.
Inoltre, può vibrare intensamente sul
piano di lavoro durante l’uso, cadere e
provocare danni a cose o persone.
1
Montaggio
ATTENZIONE: La vasca d’impasto deve essere fissata e sollevata in posizione
prima di avviare l’impastatrice planetaria.
• BUFFALO declina ogni responsabilità in relazione a lesioni derivanti da un montaggio non corretto di
questo apparecchio.
Nota: Assicurarsi che i piedi siano in piano per ridurre le vibrazioni durante il
funzionamento dell’apparecchio.
• Rimuovere l’apparecchio dall’imballaggio.
GL190-GL191_GJ461_ML_A5_v7_20180928.indb 47 2018/9/28 16:02
Page 48
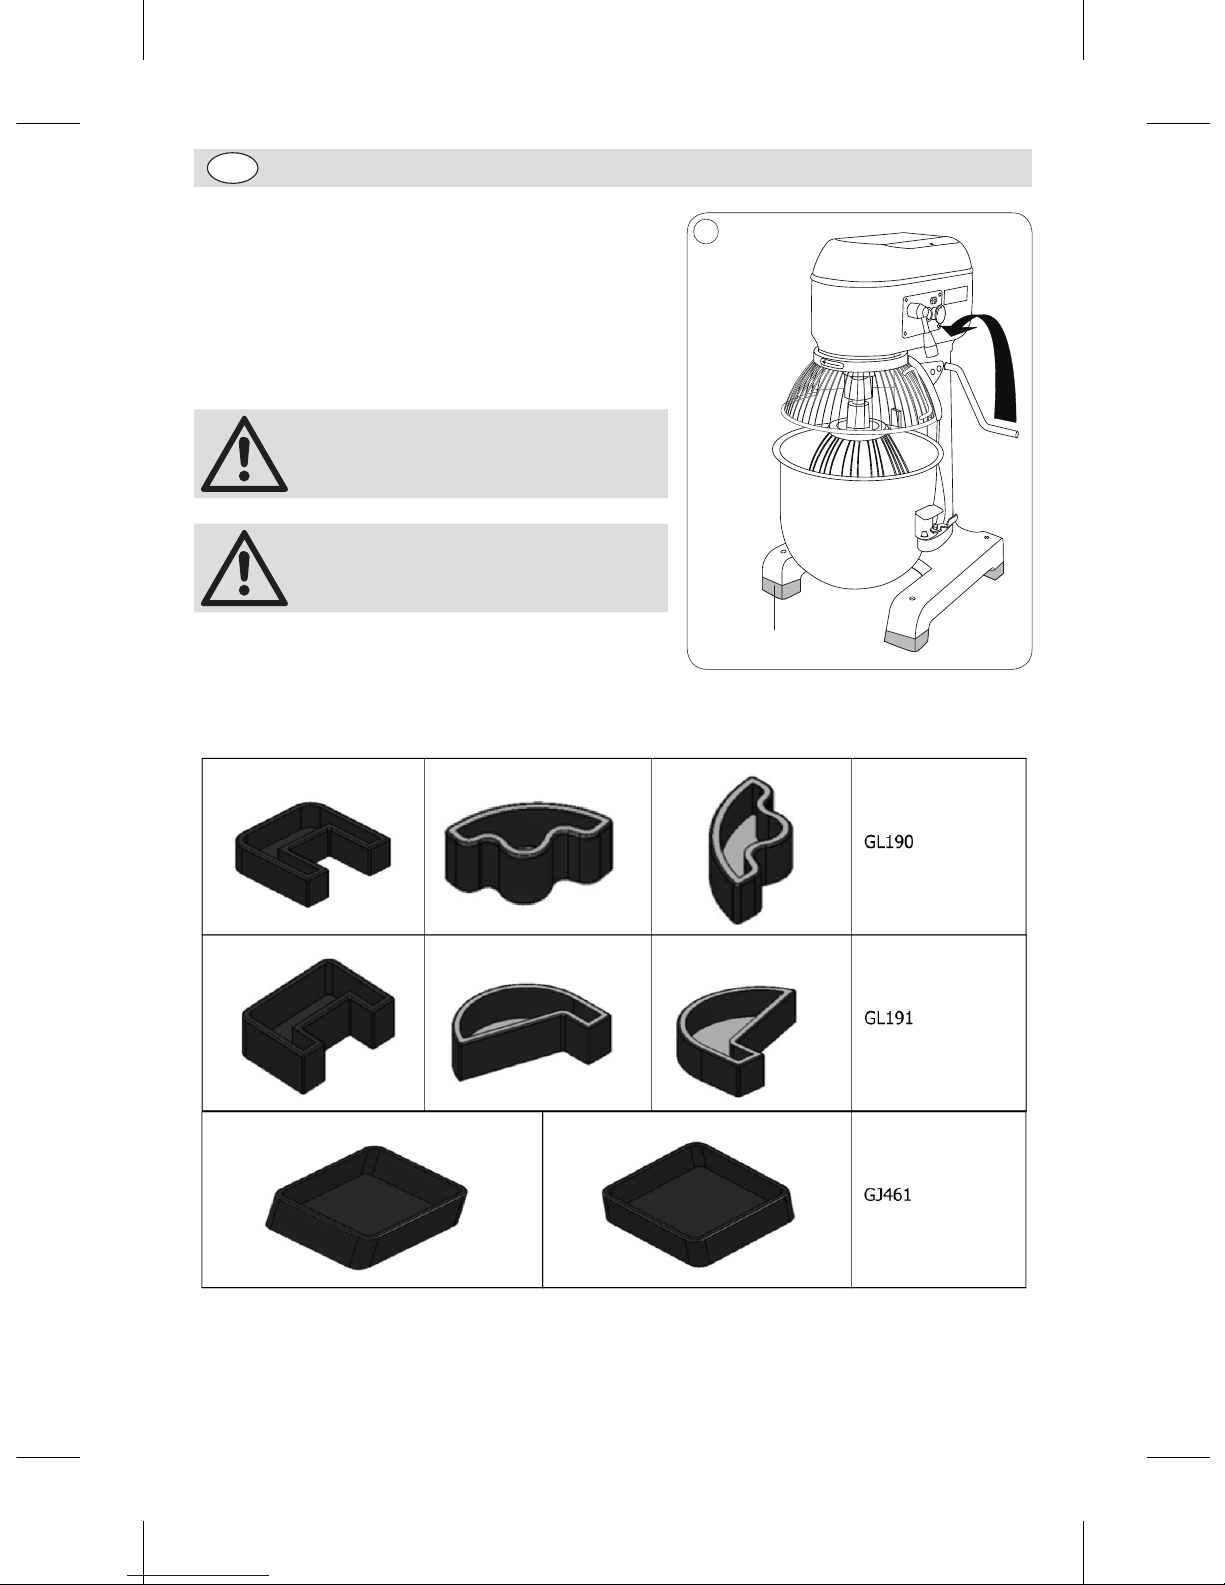
48
IT
Come installare i piedini in gomma
1. Rimuovere tutto l’imballaggio dall’apparecchio.
2. Rimuovere il pallet di legno dall’apparecchio (allentare i
quattro bulloni nella parte inferiore del pallet di legno).
3. Estrarre i piedini in gomma dalla ciotola.
4. Installare i piedini in gomma sui punti di appoggio
dell’apparecchio.
Nota: l’installazione dei piedini in
gomma deve essere effettuata da
minimo due persone.
Nota: una volta che i piedini in gomma
sono stati installati, assicurarsi che
l’apparecchio sia stabile.
2
Piedino in gomma
Tipologie di piedini in gomma
Rubber feet
Remove all packaging from the appliance.
Remove the wooden pallet from the machine
(Loosen the four bolts at the bottom of the
wooden pallet).
Take out the rubber feet from the bowl
Add the rubber feet to the feet of the machine.
Note: A minimum of two people should
Note: Once the rubber feet have been installed, ensure the machine is stable.
be used to install the rubber feet.
GL190-GL191_GJ461_ML_A5_v7_20180928.indb 48 2018/9/28 16:02
Page 49
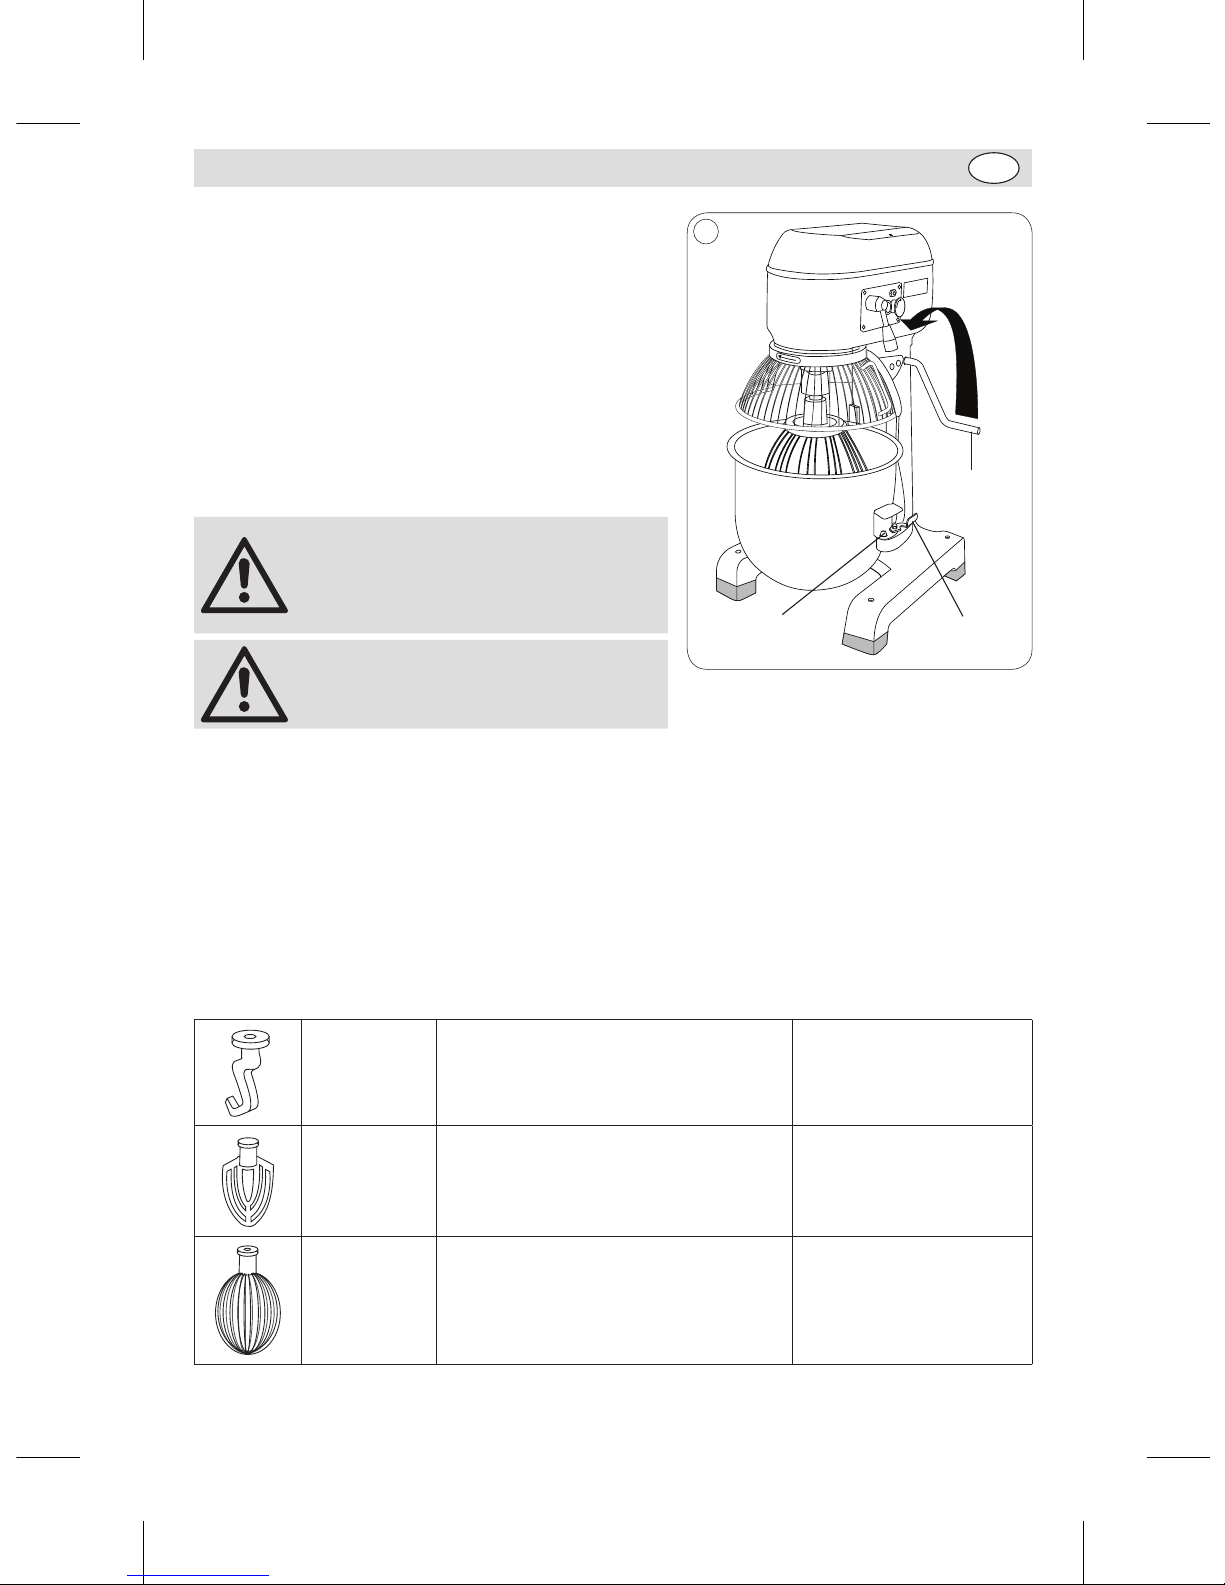
49
IT
Montaggio/Rimozione della vasca
1. Spegnere l’apparecchio.
2. Aprire la protezione di sicurezza ruotandola verso
sinistra (modelli GL190 & GL191) o sollevandola sopra
l’impastatrice (modello GJ461).
3. Abbassare la vasca utilizzando la maniglia della vasca.
4. Rilasciare i blocchi su entrambi i lati della vasca.
5. Sollevare la vasca. La vasca è fissata in posizione
tramite due perni che fissano le maniglie al supporto e
da un foro nella parte posteriore dell’apparecchio in cui
è alloggiata il labbro della vasca.
6. Invertire la procedura per inserire la vasca.
Nota: assicurarsi che la maniglia sia
completamente posizionata all’indietro
e che la vasca sia completamente
sollevata o che l’impastatrice non sia in
funzione.
Nota: Unga regolarmente il meccanismo
dell’elevatore della ciotola per
accertarsi del funzionamento regolare
3
Maniglia
della vasca
Fermo di
bloccaggio
Perni di
fissaggio
Cambio di accessori dell’impastatrice
1. Spegnere l’apparecchio.
2. Aprire la protezione di sicurezza ruotandola verso sinistra (modelli GL190 & GL191) o sollevandola
sopra l’impastatrice (modello GJ461).
3. Abbassare la vasca utilizzando la maniglia della vasca.
4. Spingere l’accessorio dell’impastatrice verso l’alto e a sinistra per rilasciarlo.
5. Inserire l’accessorio desiderato. Spingere verso l’alto e a destra per bloccarlo in posizione.
6. Sollevare la vasca.
BUFFALO consiglia i seguenti utilizzi per ciascun accessorio:
Uncino per
impasto
Impasti più pesanti pasta, impasto per
torte ecc.
Velocità appropriate: 1
Battitore
Impasti compatti pasta sfoglia leggera,
impasto dolci/biscotti, glasse, ripieni e
purea di verdure
Velocità appropriate: 1, 2
Frusta
Impasti leggeri panna montata, maionese,
chiare d’uovo, pancake e soufflé
Velocità appropriate: 1, 2, 3
GL190-GL191_GJ461_ML_A5_v7_20180928.indb 49 2018/9/28 16:02
Page 50
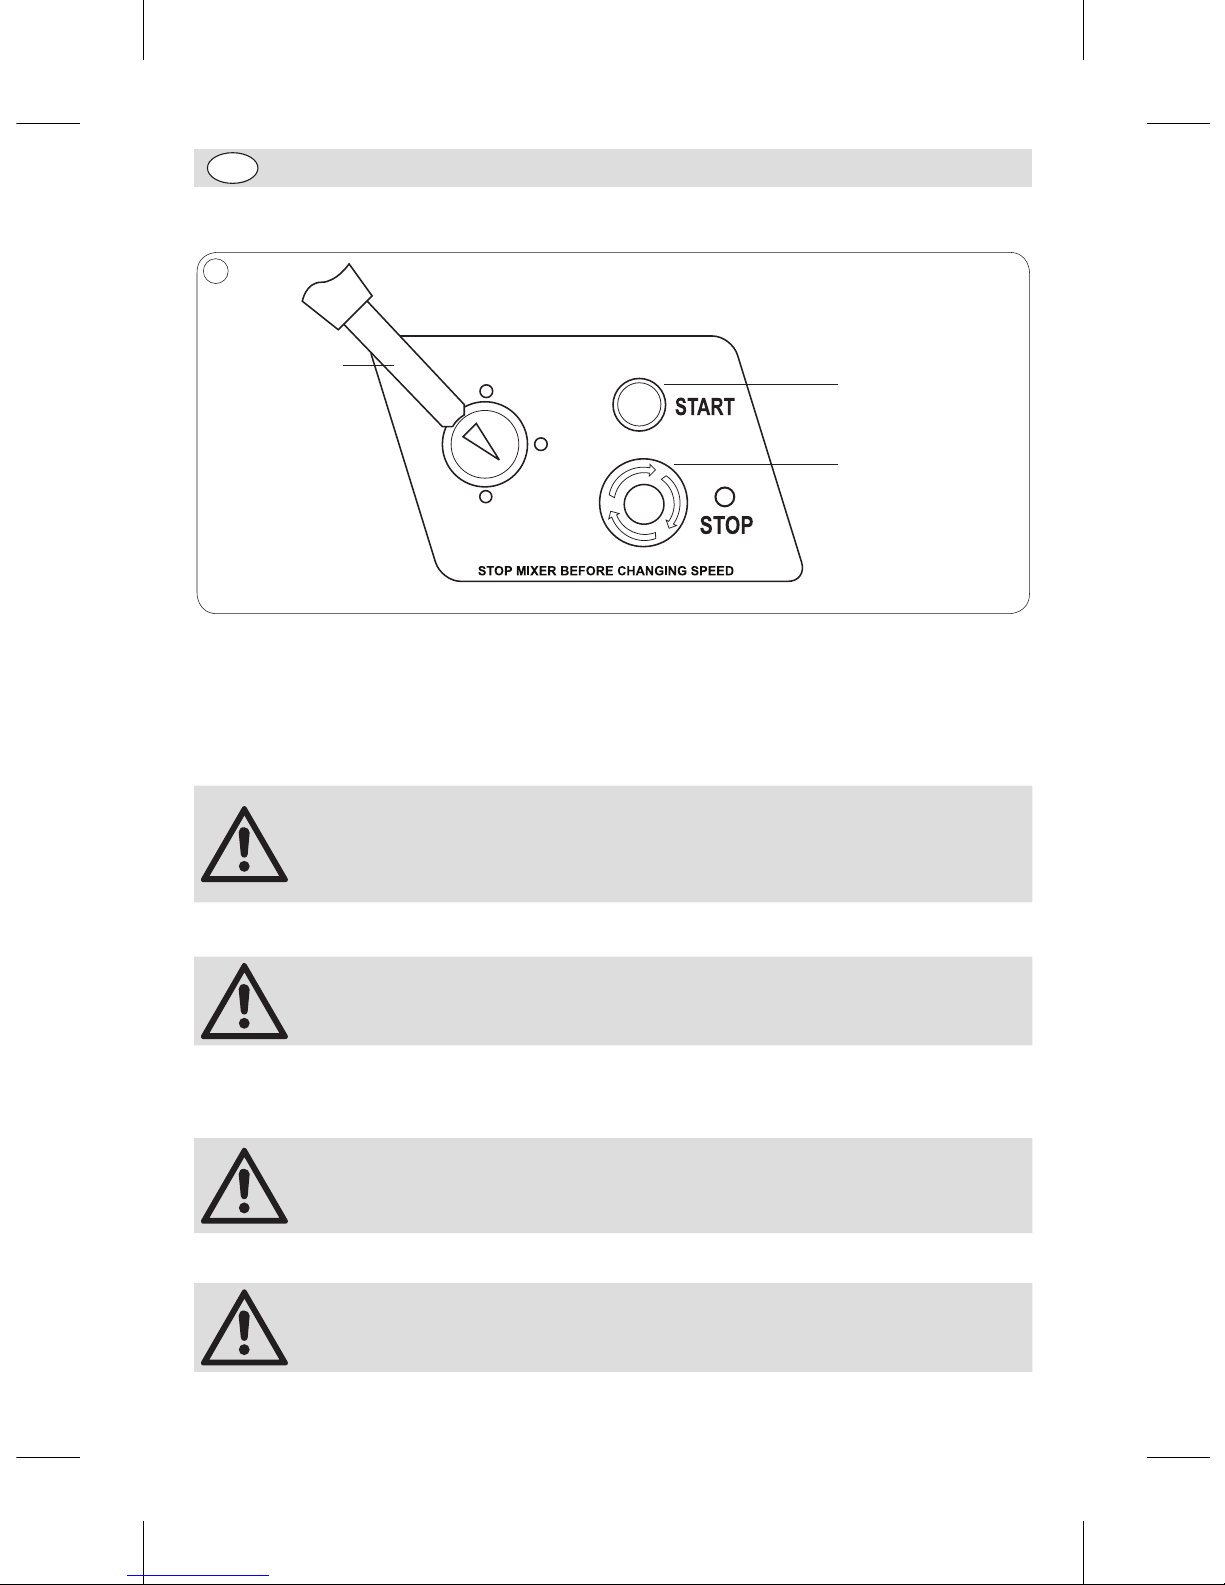
50
IT
Posizione dei comandi
Leva delle
velocità
Pulsante START
Pulsante STOP
4
Pulsante START - Premere per avviare l’impastatrice.
Pulsante STOP - Premere per arrestare l’impastatrice. Ruotare in senso orario per rilasciare e resettare
(solo per GJ461).
LEVA DELLE VELOCITÀ - Utilizzare per regolare la velocità dell’impastatrice.
Funzionamento
• Nota: Prima dell’utilizzo, assicurarsi di leggere e comprendere integralmente
le istruzioni dell’apparecchio.
• Tutti gli addetti devono avere ricevuto un completo addestramento
all’utilizzo dell’impastatrice planetaria e devono rispettarne tutte le
precauzioni di sicurezza.
Operazioni di impasto
ATTENZIONE: assicurarsi sempre che l’apparecchio sia spento prima di infilare
le mani nella vasca di impasto.
1. Aprire la protezione di sicurezza.
2. Riempire la vasca.
3. Selezionare la velocità desiderata e chiudere la protezione.
• Nota: BUFFALO consiglia di iniziare con la velocità più bassa e di aumentarla
gradualmente se necessario.
• Assicurarsi che la protezione di sicurezza sia ben chiusa, in caso contrario
l’impastatrice non funziona.
4. Premere il pulsante START per avviare l’operazione di impasto.
Nota: se l’apparecchio impasta con difficoltà, spegnere l’apparecchio e
rimuovere una parte del contenuto della vasca prima di ricominciare.
GL190-GL191_GJ461_ML_A5_v7_20180928.indb 50 2018/9/28 16:02
Page 51
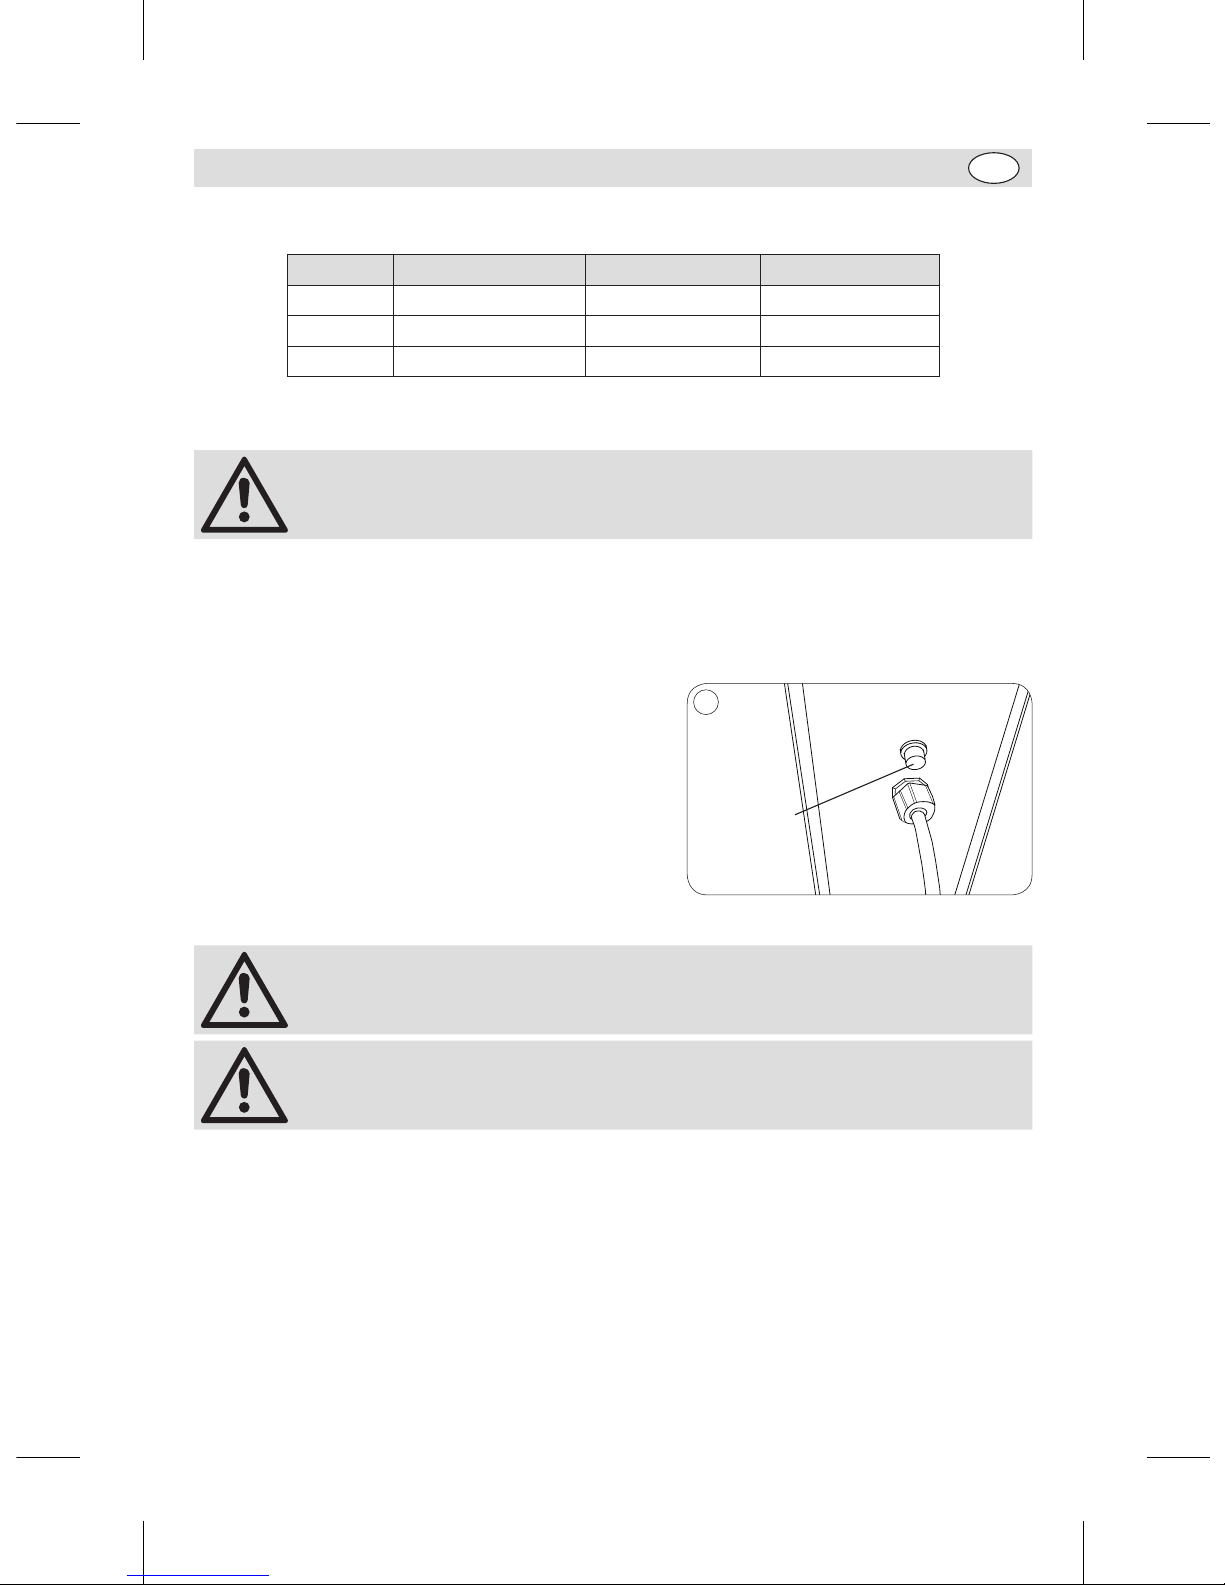
51
IT
Capienza Mescolantesi
Modello Dimensioni vasca Farina Massima Pasta Massima
GL190 10L 2kg 3,2kg
GL191 20L 5kg 8kg
GJ461 30L 7.5kg 11,3kg
Cambio della velocità di impasto
Nota: arrestare SEMPRE l’impastatrice prima di cambiare la velocità d’impasto.
Con l’apparecchio spento:
1. Selezionare la velocità richiesta utilizzando la leva di cambio velocità.
2. Riavviare l’apparecchio.
Interruttore di sovraccarico
L’interruttore di sovraccarico si trova nella parte posteriore
della macchina, accanto all’ingresso del cavo (Nota per
GL190: l’interruttore di sovraccarico si trova sulla base).
Se l’apparecchio si surriscalda l’interruttore di sovraccarico
si arresta automaticamente la macchina. In questo caso:
1. Spegnere l’impastatrice.
2. Ridurre il carico all’interno della ciotola di miscelazione.
3. Premere nuovamente l’interruttore di sovraccarico per
resettarlo.
4. Lasciare raffreddare l’apparecchio per 20 minuti.
5
Interruttore
di
sovraccarico
Nota: In caso di interruzione dell’alimentazione, l’interruttore di sovraccarico
impedisce il riavvio automatico dell’apparecchio al ripristino dell’alimentazione.
Nota: Scollegare sempre l’impastatrice planetaria dalla rete elettrica quando
non è in uso.
Pulizia e manutenzione
• Prima di eseguire la pulizia, spegnere l’impastatrice e scollegare l’alimentazione.
• Utilizzare acqua calda saponata per pulire la vasca e la vite di impasto. Non utilizzare detergenti
chimici abrasivi in quanto possono lasciare residui nocivi.
• Non utilizzare sistemi di lavaggio a getto o a pressione per pulire l’apparecchio.
• Pulire la superficie esterna dell’apparecchio utilizzando un panno inumidito.
• BUFFALO raccomanda che la lubrificazione della catena e il controllo della tensione della cinghia siano
eseguiti ogni 12 mesi da un tecnico qualificato o da un agente BUFFALO.
• Pulire regolarmente l’apparecchio.
GL190-GL191_GJ461_ML_A5_v7_20180928.indb 51 2018/9/28 16:02
Page 52
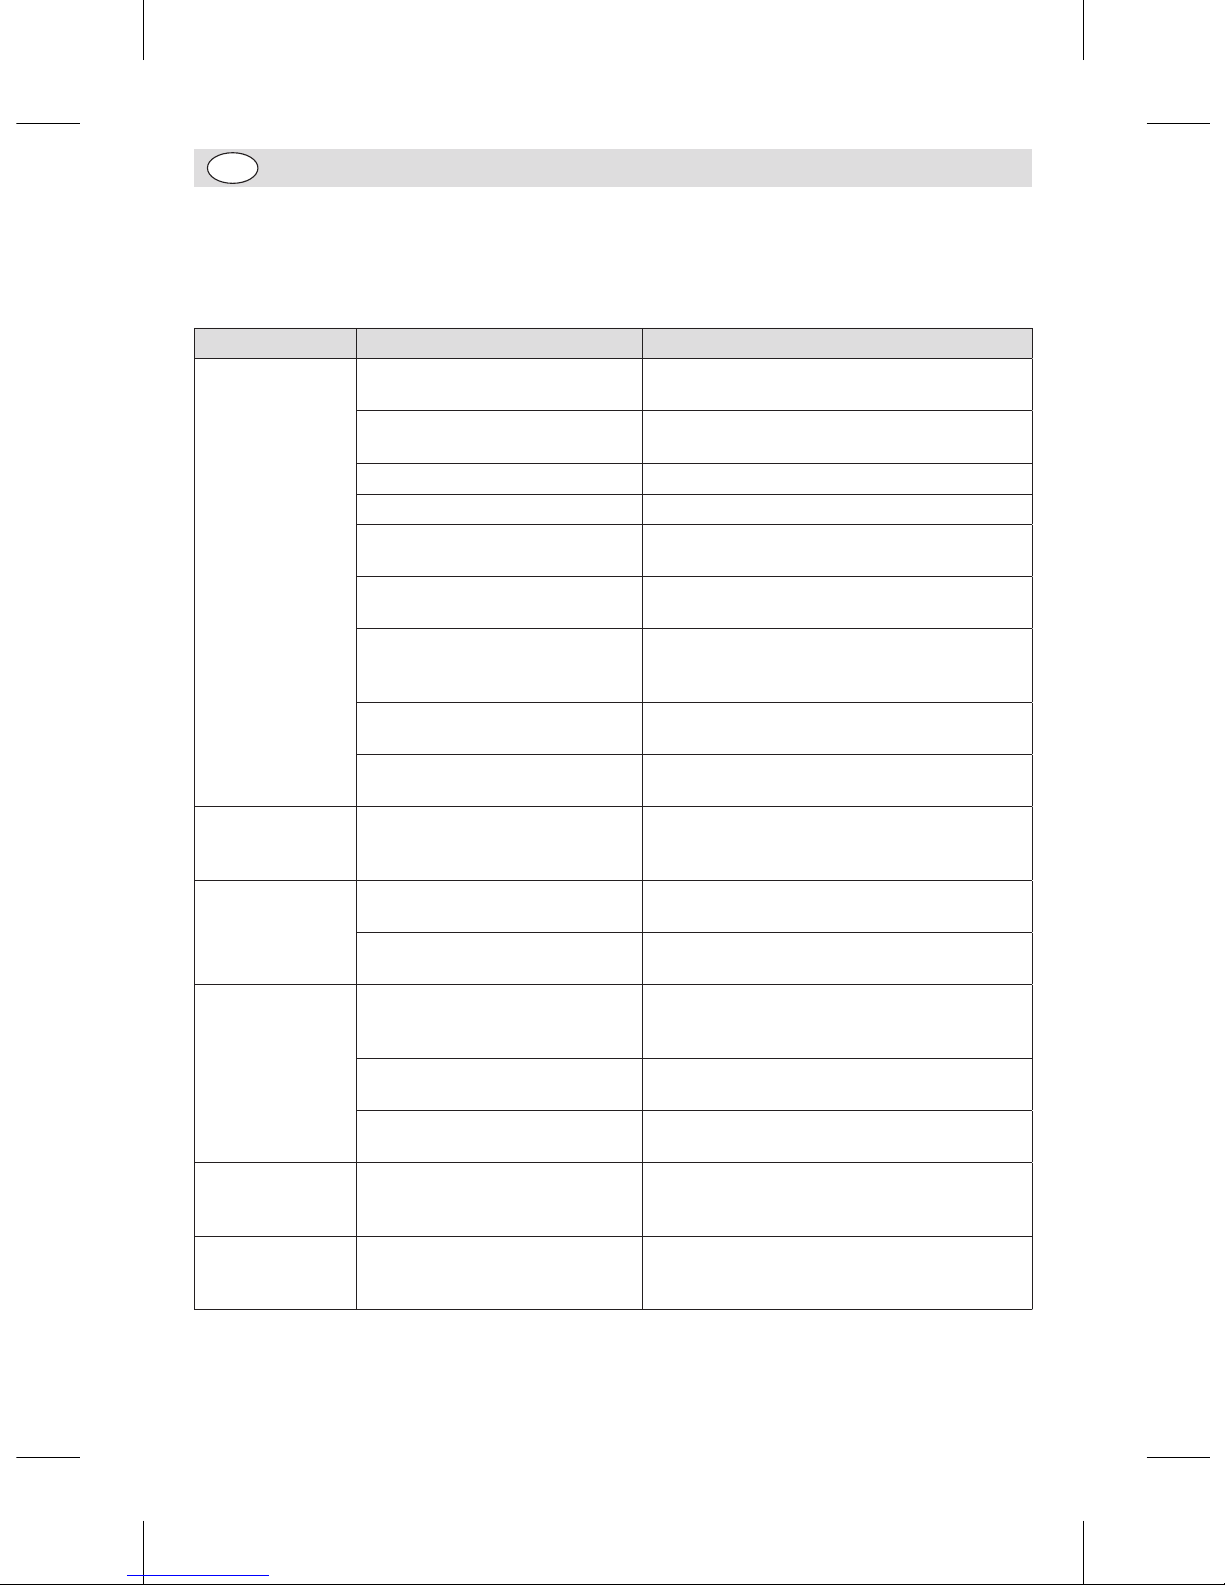
52
IT
Risoluzione dei problemi
Se dovessero verificarsi guasti all’apparecchio BUFFALO, controllare la tabella seguente prima di
contattare la helpline telefonica o il rivenditore BUFFALO.
Guasto Probabile causa Azione
L’apparecchio non
funziona
L’apparecchio non è acceso Controllare che l’apparecchio sia correttamente
collegato e acceso
La presa e il cavo sono
danneggiati
Rivolgersi a un tecnico qualificato o a un
agente BUFFALO
Il fusibile della presa è guasto Sostituire il fusibile della presa
Alimentazione Controllare l’alimentazione
L’apparecchio non è acceso Controllare che l’apparecchio sia correttamente
collegato e acceso
Il pulsante di arresto non è
rilasciato (GJ461)
Ruotare in senso orario il pulsante per rilasciare
L’interruttore di sovraccarico è
stato attivato
Per informazioni sull’interruttore di sovraccarico,
vedere la sezione Funzionamento di questo
manuale
Protezione di sicurezza non chiusa Chiudere completamente la protezione di
sicurezza
Vasca non completamente
sollevata
Assicurare che la leva della vasca sia
completamente posizionata all’indietro
La vasca non
viene inserita in
posizione
I perni della vasca o l’area
circostante sono ostruiti
dall‘impasto
Pulire l’apparecchio
L’apparecchio si
surriscalda
La vasca di impasto è sovraccarica Spegnere l’apparecchio e rimuovere una parte
del contenuto
L’apparecchio è stato in funzione
per un periodo eccessivo di tempo
Spegnere l’apparecchio e lasciare raffreddare
per 30 minuti
L’apparecchio è
rumoroso
Ciotola o accessorio di
miscelazione non montato
correttamente
Rimuovere e rimontare la ciotola / l’accessorio
di miscelazione
Cuscinetti usurati / ingranaggi
danneggiati
Rivolgersi a un tecnico qualificato o a un
agente BUFFALO
l grasso nella scatola degli
ingranaggi si è seccato
Rivolgersi a un tecnico qualificato o a un
agente BUFFALO
La frusta non
ruota in maniera
corretta
La cinghia è allentata Rivolgersi a un tecnico qualificato o a un
agente BUFFALO
Impossibile
selezionare la
velocità
Gli ingranaggi della velocità non
sono allineati
Spegnere l’apparecchio e ruotare leggermente
la frusta manualmente.
Selezionare nuovamente la velocità
GL190-GL191_GJ461_ML_A5_v7_20180928.indb 52 2018/9/28 16:02
Page 53
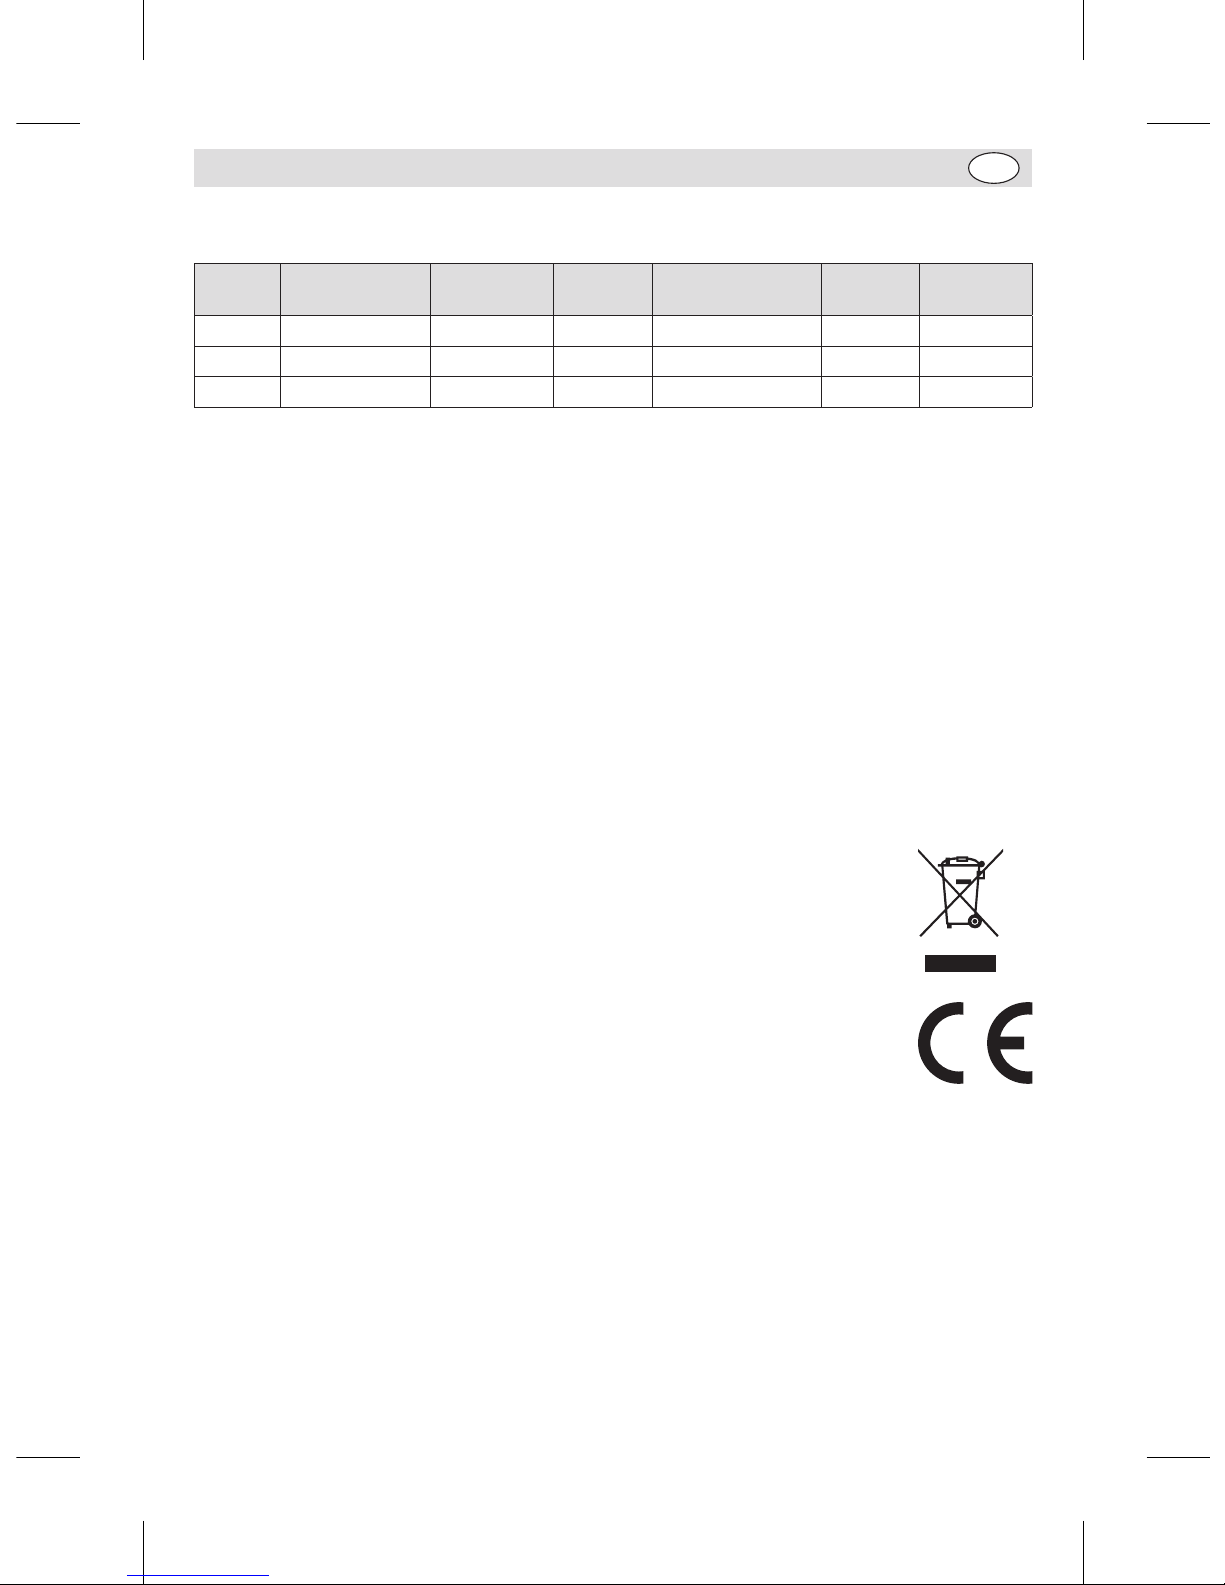
53
IT
Specifiche tecniche
Modello Tensione Alimentazio Corrente
Dimensioni
h x l x p mm
Peso
Dimensioni
vasca
GL190 220-240V 50Hz 550W 1,8A 610 x 395 x 395 36kg 10L
GL191 220-240V 50Hz 1100W 4,7A 794 x 555 x 558 64kg 20L
GJ461 220-240V 50Hz 1500W 6,5A 1142 x 579 × 611 160kg 30L
Cablaggi elettrici
La spina deve venire collegata a una presa di rete appropriata.
L’apparecchio ha i seguenti cablaggi:
• Filo sotto tensione (colore marrone) a terminale L
• Filo del neutro (colore blu) a terminale N
• Filo di terra (colore verde/giallo) a terminale E
Questa apparecchiatura deve essere collegata a terra.
In caso di dubbi, consultare un elettricista qualificato.
I punti di isolamento elettrico devono essere liberi da ostruzioni. In caso di emergenza, i punti devono
essere facilmente raggiungibili qualora sia necessario scollegarli.
Conformità
Il logo WEEE riportato su questo prodotto o sulla relativa documentazione indica che il
prodotto non può essere smaltito come normale rifiuto domestico. Per evitare possibili
danni alla salute e/o all’ambiente, il prodotto deve venire smaltito utilizzando una
procedura di riciclaggio approvata e sicura per l’ambiente. Per ulteriori informazioni su
come smaltire in maniera corretta questo prodotto, contattare il fornitore del prodotto o
l’ente locale responsabile per lo smaltimento dei rifiuti.
I componenti BUFFALO sono stati sottoposti a un rigoroso collaudo ai fini della
conformità agli standard e alle specifiche normative previste dalle autorità internazionali,
indipendenti e federali.
I prodotti BUFFALO sono autorizzati a esporre il seguente simbolo:
Tutti i diritti riservati. È vietata la riproduzione o la trasmissione in alcuna forma, elettronica, meccanica, mediante
fotocopiatura o altro sistema di riproduzione, di qualsiasi parte delle presenti istruzioni senza la previa autorizzazione
scritta di BUFFALO.
Le informazioni contenute sono corrette e accurate al momento della stampa, tuttavia BUFFALO si riserva il diritto di
modificare le specifiche senza preavviso
GL190-GL191_GJ461_ML_A5_v7_20180928.indb 53 2018/9/28 16:02
Page 54
54
ES
Consejos de Seguridad
Todo el personal debe estar plenamente formado
en el funcionamiento y las precauciones de
seguridad de la batidora planetaria.
• Colóquelo sobre una superficie plana y estable.
• Un agente de servicio técnico cualificado debería llevar a cabo
la instalación y cualquier reparación si se precisa. No retire
ningún componente ni panel de servicio de este producto.
• Consulte las Normas Locales y Nacionales correspondientes a
lo siguiente:
- Legislación de Seguridad e Higiene en el Trabajo
- Códigos de Práctica BS EN
- Precauciones contra Incendios
- Normativos de Cableado de la IEE
- Normativas de Construcción
• Este aparato sólo debe utilizarse de acuerdo con estas
instrucciones y por personas competentes.
• Este aparato no debe ser utilizado por personas (niños
incluidos) que tengan limitadas sus capacidades fisicas,
sensoriales o mentales, o que no tengan experiencia y
conocimientos, a menos que estén bajo la supervision o hayan
recibido instrucciones relativas al uso del aparato a cargo de
una persona responsable de su seguridad.
• Mantenga el embalaje fuera del alcance de los niños. Deseche
el embalaje de acuerdo con las normativas de las autoridades
locales.
• Si el cable eléctrico resultada dañado, debe ser reemplazado
por un técnico cualificado recomendado o un agente de
BUFFALO para evitar cualquier riesgo.
• Siempre desconecte el aparato, desconecte el suministro
eléctrico y deje que se enfríe antes de limpiar o cambiar /
sacar piezas.
GL190-GL191_GJ461_ML_A5_v7_20180928.indb 54 2018/9/28 16:02
Page 55

55
ES
• Permanezca siempre DETRÁS del dispositivo de seguridad al
poner el aparato en funcionamiento.
• NO ponga las manos cerca de los accesorios giratorios cuando
se esté utilizando. Esto puede provocar graves daños.
• NO retire comida del aparato hasta que los accesorios
giratorios se hayan parado completamente.
• NO sumerja el aparato en agua.
• NO utilice esta máquina para mezclar productos para los
cuales no está diseñada. Esto puede dañar los accesorios
mezcladores.
• No utilizar la máquina con los accesorios mezcladores
dañados.
• NO se salte los dispositivos de seguridad.
• No deje NUNCA el aparato desatendido cuando no se esté
utilizando.
• El aparato es pesado. Tenga cuidado al moverlo.
• Nunca utilice accesorios que no hayan sido recomendados
por el fabricante. Podrían entrañar riesgos para la seguridad
del usuario y provocar daños en el aparato. Utilice solo
componentes y accesorios originales.
• Buffalo recomienda que las conexiones eléctricas de este
aparato se comprueben anualmente para verificar la seguridad
del producto.
Descripción del Producto
GL190 - Mezcladora planetaria de 10 litros
GL191 - Mezcladora planetaria de 20 litros
GJ461 - Mezcladora planetaria de 30 litros
La batidora planetaria BUFFALO es una máquina autoestable que consta de un gran bol montado debajo
de un motor y un dispositivo de caja de engranajes a la que puede unirse una herramienta mezcladora.
Introducción
La batidora planetaria BUFFALO se ha diseñado para mezclar distintos alimentos, desde cremas hasta
masas.
Tómese unos minutos para leer este manual. El correcto mantenimiento y manejo de esta máquina
proporcionará el mejor funcionamiento posible de su producto BUFFALO.
GL190-GL191_GJ461_ML_A5_v7_20180928.indb 55 2018/9/28 16:02
Page 56
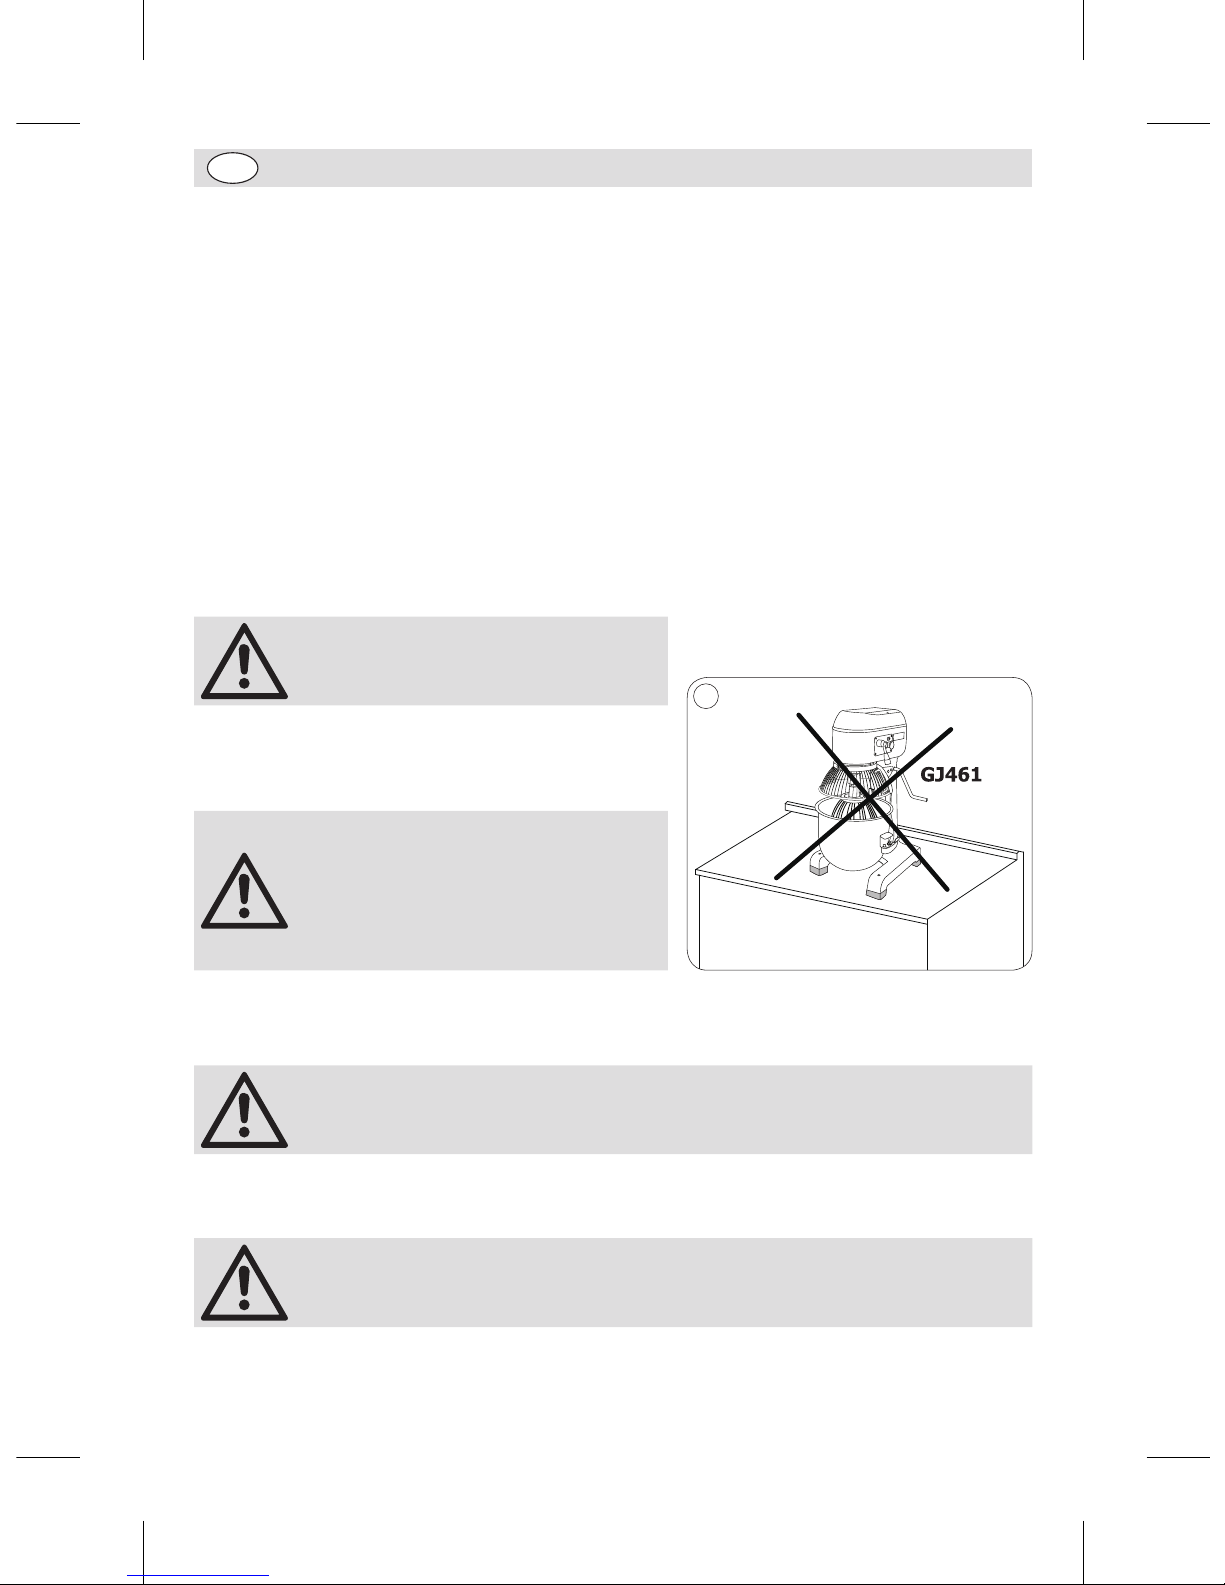
56
ES
Contenido del Conjunto
Se incluye lo siguiente:
• Mezcladora planetaria Buffalo
• Bol de mezclado
• Gancho mezclador de masa espiral
• Batidora
• Varillas
• Manual de instrucciones
BUFFALO se enorgullece de su calidad y servicio y asegura que en el momento del embalaje, el contenido
se suministró con plena funcionalidad y sin ningún defecto.
Si encontrara algún daño resultante del transporte, póngase en contacto inmediatamente con su
distribuidor BUFFALO.
Instalación
• Asegúrese de que el lugar en el que coloque la mezcladora planetaria pueda soportar su peso.
ADVERTENCIA: la mezcladora
planetaria es muy pesada, por lo que
debe tener cuidado al moverla.
• Si el aparato está destinado a ser colocado en una
encimera, asegúrese de que esté asegurado en su
posición (para GL190, GL191).
¡Coloque la mezcladora GJ461 solo
en el piso! No la coloque en ninguna
encimera debido a su gran peso.
Además, puede vibrar intensamente
en la encimera durante su uso, caerse
de ella y originar daños personales /
materiales.
1
Montaje
ADVERTENCIA: El bol debe colocarse y subirse a su posición antes de poner en
marcha la batidora planetaria.
• BUFFALO no acepta ninguna responsabilidad por ningún daño provocado por un montaje incorrecto
de este aparato.
Nota: asegúrese de que las patas están niveladas para reducir las vibraciones
durante el funcionamiento de la máquina.
• Retire completamente el embalaje del aparato.
GL190-GL191_GJ461_ML_A5_v7_20180928.indb 56 2018/9/28 16:02
Page 57
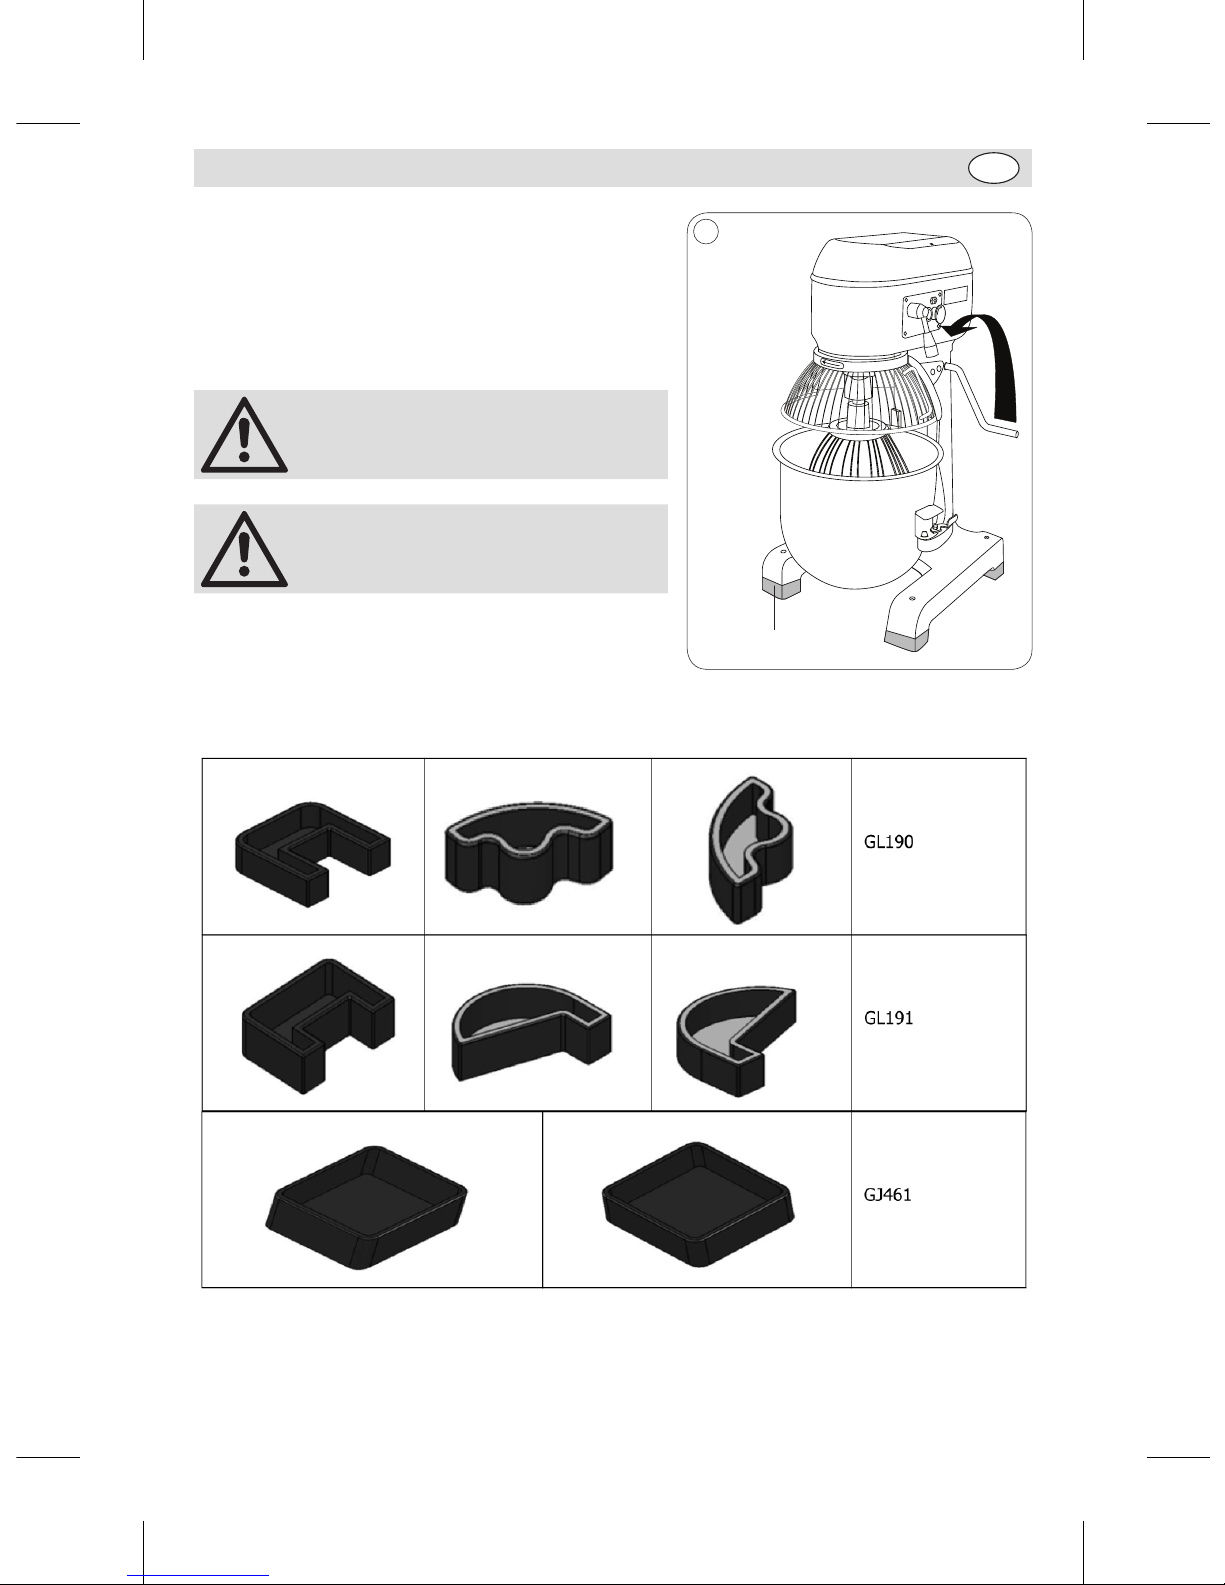
57
ES
Cómo instalar las patas de goma
1. Retire todo el embalaje del aparato.
2. Retire la plataforma de madera del aparato (afloje
los cuatro tornillos situados en la parte inferior de la
plataforma de madera).
3. Saque las patas de goma del recipiente.
4. Coloque las patas de goma en la base del aparato.
Nota: la instalación de las patas de
goma debe realizarse entre al menos
dos personas.
Nota: una vez instaladas las patas de
goma, asegúrese de que el aparato
quede estable.
2
Patas de goma
Tipos de pies de goma
Rubber feet
Remove all packaging from the appliance.
Remove the wooden pallet from the machine
(Loosen the four bolts at the bottom of the
wooden pallet).
Take out the rubber feet from the bowl
Add the rubber feet to the feet of the machine.
Note: A minimum of two people should
Note: Once the rubber feet have been installed, ensure the machine is stable.
be used to install the rubber feet.
GL190-GL191_GJ461_ML_A5_v7_20180928.indb 57 2018/9/28 16:02
Page 58
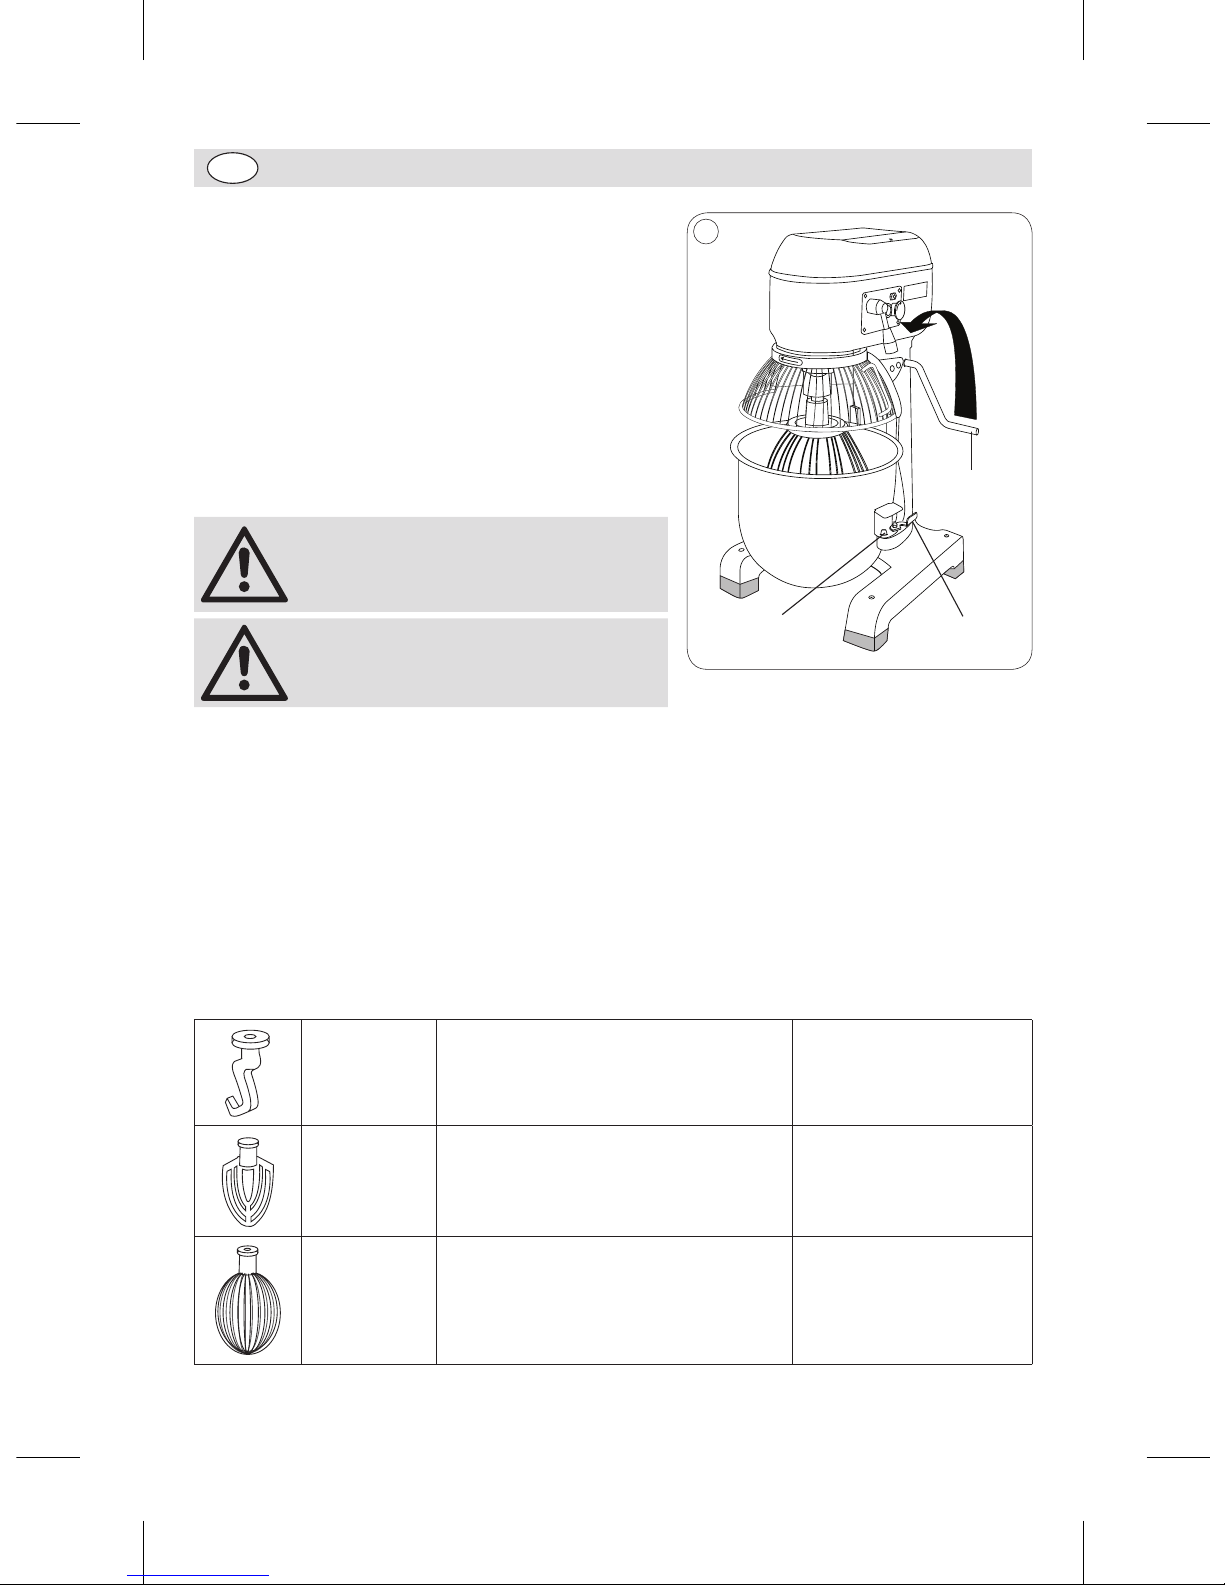
58
ES
Montaje/desmontaje del bol
1. Apague el aparato.
2. Abra el protector de seguridad girándolo hacia la
izquierda (GL190 y GL191) o subiéndolo por encima de
la batidora (GJ461).
3. Baje el bol con el tirador.
4. Suelte los pestillos de fijación de ambos lados del bol.
5. Eleve el bol. El bol se mantiene en su sitio gracias a
dos pasadores que fijan los tiradores a la plataforma y
un orificio en la parte posterior del aparato que alberga
el saliente del bol.
6. Para montar el bol, siga el procedimiento inverso.
Nota: asegúrese de que el tirador está
totalmente retraído y de que el bol se
ha subido del todo, de lo contrario la
mezcladora no funcionará.
Nota: Engrase regularmente el
mecanismo de la elevación del tazón de
fuente para asegurar la operación lisa.
3
Tirador del
bol
Pestillos de
fijación
Pasadores de
fijación
Cambio de los accesorios de la mezcladora
1. Apague el aparato.
2. Abra el protector de seguridad girándolo hacia la izquierda (GL190 y GL191) o subiéndolo por encima
de la batidora (GJ461).
3. Baje el bol con el tirador.
4. Empuje el accesorio de la mezcladora hacia arriba y hacia la izquierda para soltarlo.
5. Introduzca el accesorio que desee. Empuje hacia arriba y hacia la derecha el accesorio para fijarlo en
su sitio.
6. Eleve el bol.
BUFFALO recomienda emplear los accesorios para los siguientes usos:
Gancho
mezclador de
masa espiral
Mezclas pesadas, masa, tartas, etc. Velocidades adecuadas: 1
Batidora
Mezclas firmes como pasteles ligeros,
tartas/galletas, helados, rellenos y puré de
verduras
Velocidades adecuadas: 1, 2
Varillas
Mezclas ligeras como nata, mayonesa,
claras de huevo, creps y souflés
Velocidades adecuadas:
1, 2, 3
GL190-GL191_GJ461_ML_A5_v7_20180928.indb 58 2018/9/28 16:02
Page 59
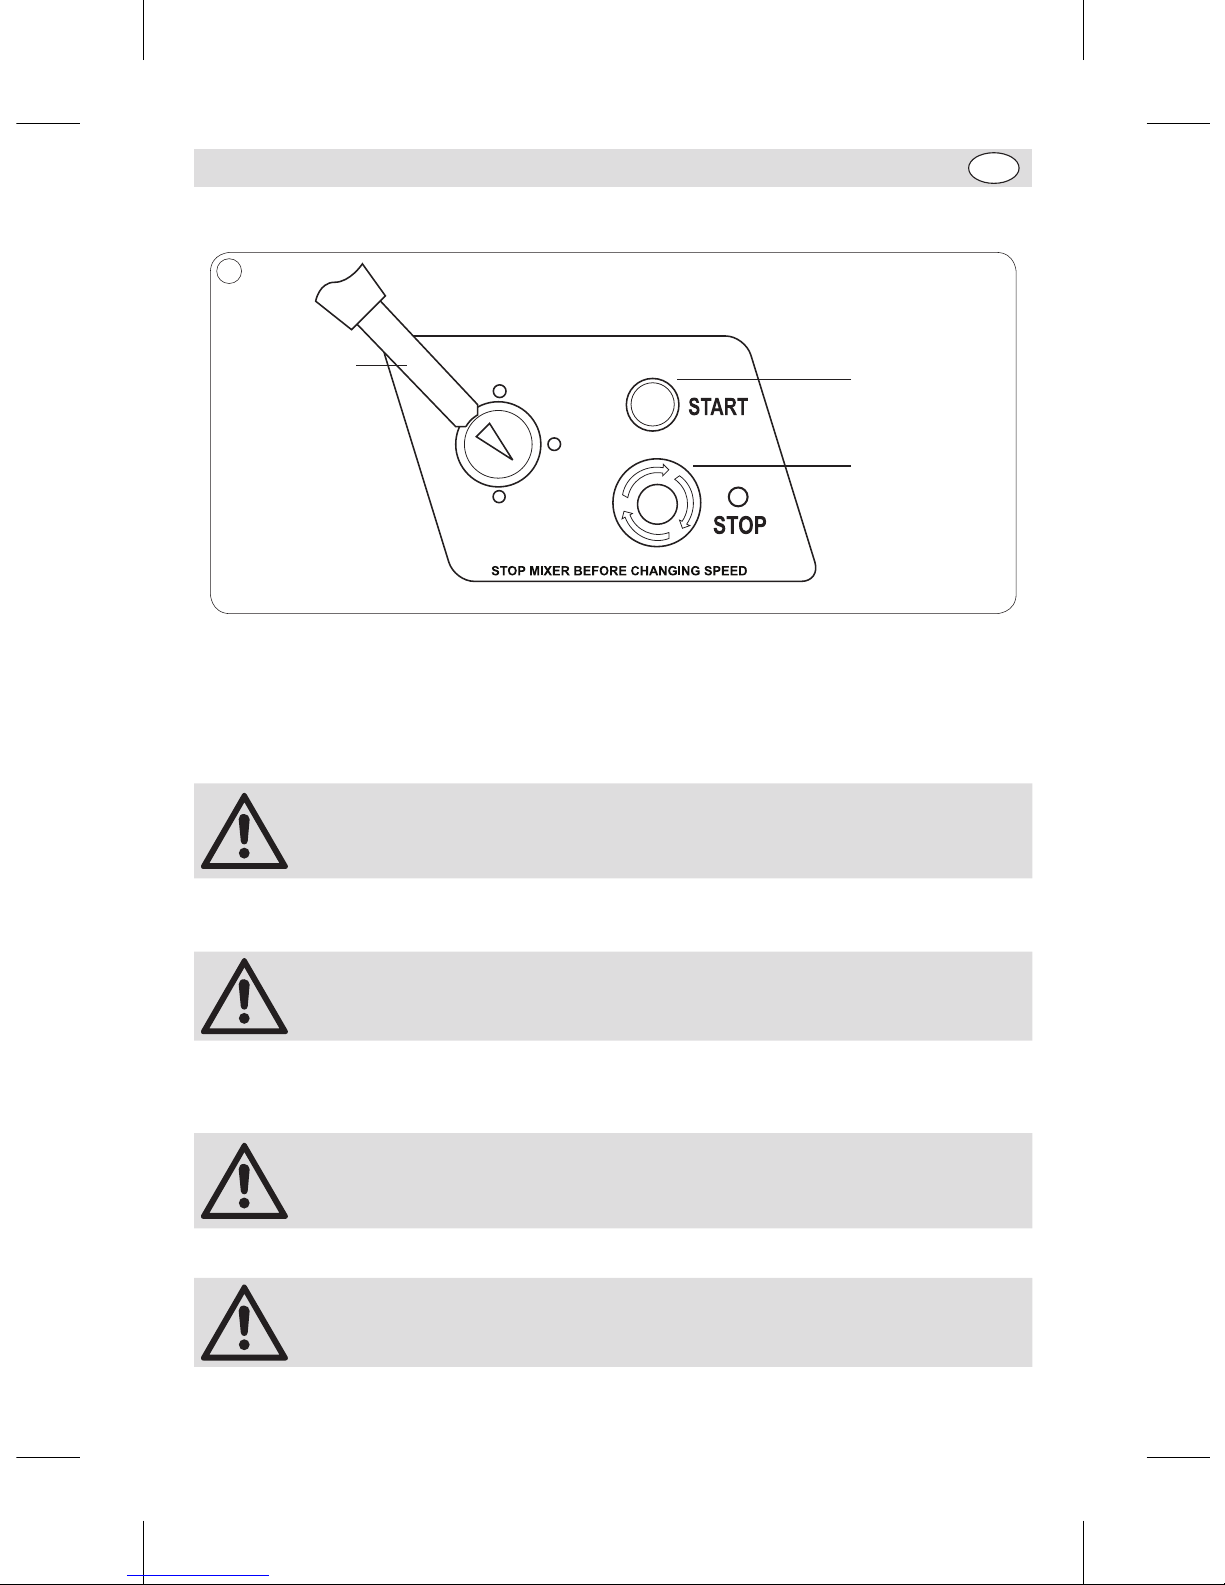
59
ES
Disposición de los controles
Palanca de
velocidades
Botón de
encendido
(START)
Botón de apagado
(STOP)
4
Botón START - púlselo para poner en marcha la mezcladora.
Botón STOP - púlselo para parar la mezcladora. Gírelo hacia la derecha para soltarlo y reiniciar (GJ461).
PALANCA DE VELOCIDADES - úsela para ajustar la velocidad de la mezcladora.
Funcionamiento
• Nota: Asegúrese de haber leído bien estas instrucciones y de que comprende
totalmente el funcionamiento de este aparato antes de usarlo.
• Todo el personal debe estar plenamente formado en el funcionamiento y las
precauciones de seguridad de la batidora planetaria.
Mezclado
ADVERTENCIA: asegúrese siempre de que el aparato esté apagado antes de
meter las manos en el bol de mezcla.
1. Abra el dispositivo de seguridad.
2. Llene el bol.
3. Seleccione la velocidad que desee y cierre el dispositivo de protección.
• Nota: BUFFALO recomienda empezar con la velocidad más baja e ir subiendo
gradualmente en función de sus necesidades.
• Asegúrese de que el dispositivo de protección de seguridad está totalmente
cerrado, de lo contrario la mezcladora no funcionará.
4. Pulse el botón START para iniciar el proceso de mezcla.
Nota: si el aparato no funciona con suavidad, apáguelo y retire parte del
contenido del bol antes de volver a intentarlo.
GL190-GL191_GJ461_ML_A5_v7_20180928.indb 59 2018/9/28 16:02
Page 60
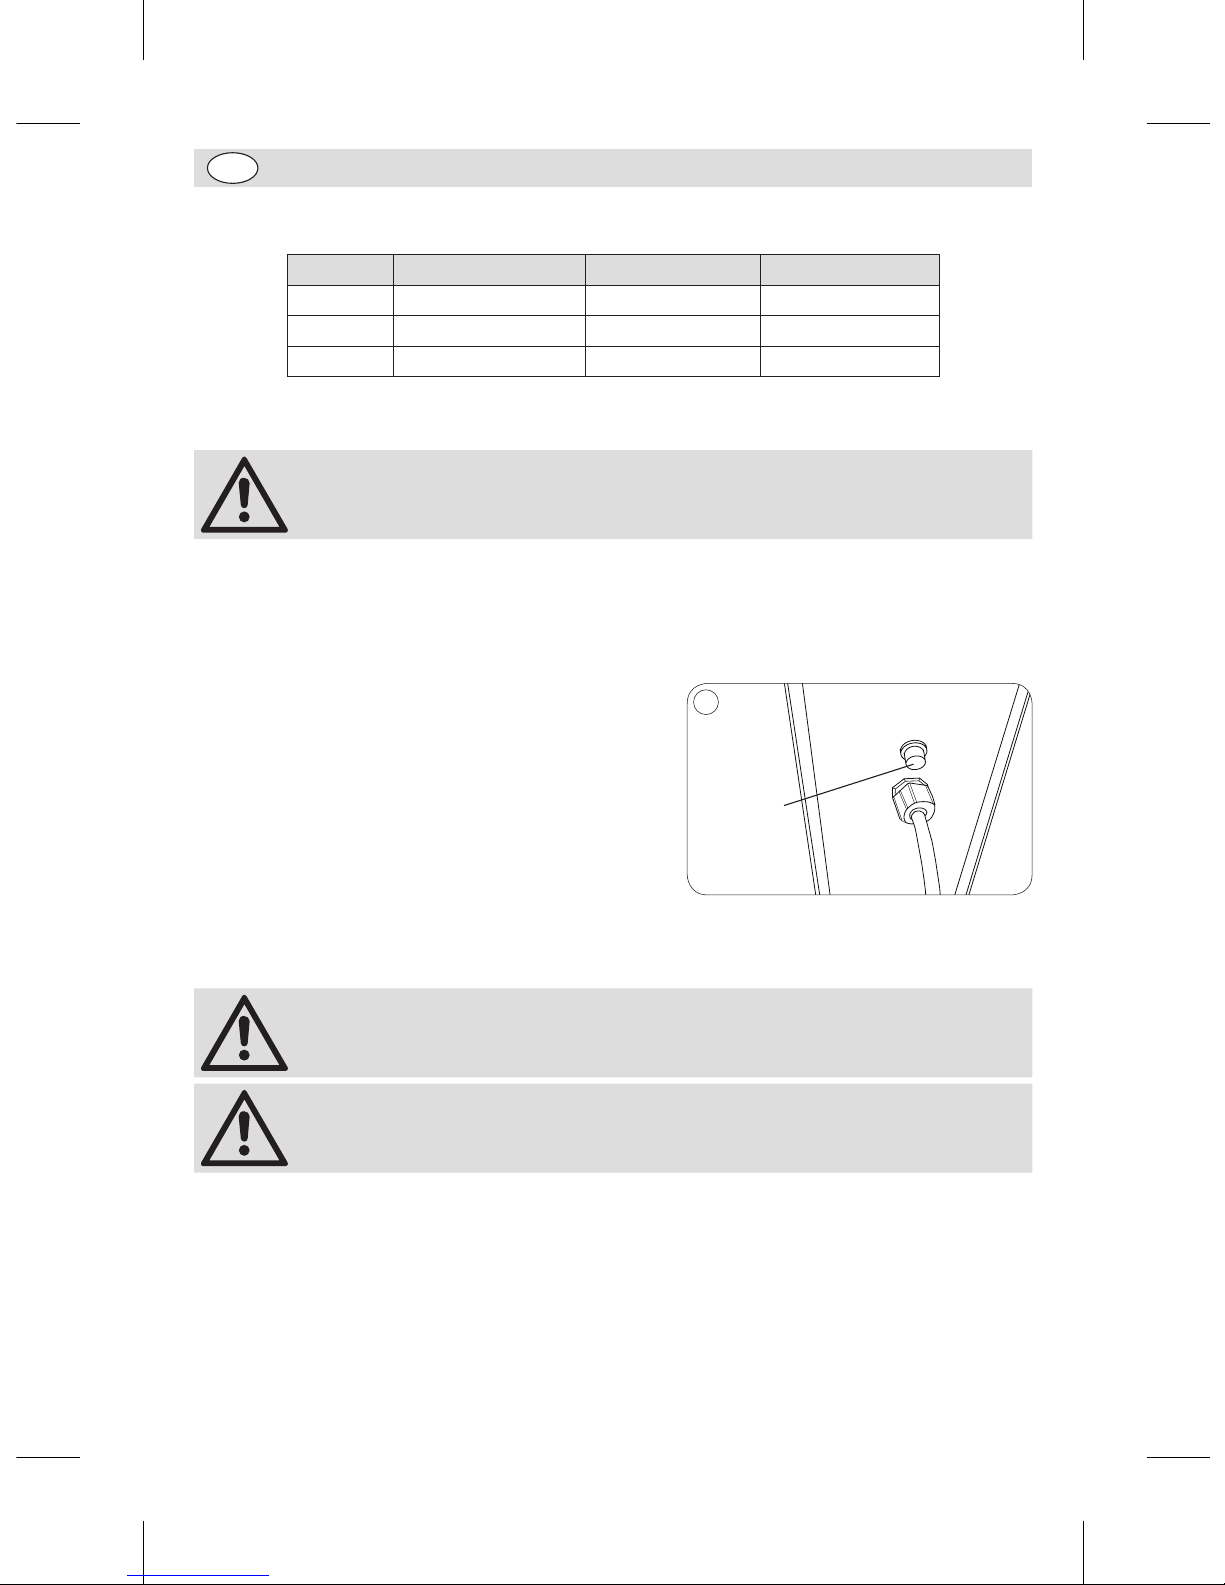
60
ES
Capacidad de mezcla
Modelo Tamaño del bol Harina Maxima Pasta Maxima
GL190 10L 2kg 3,2kg
GL191 20L 5kg 8kg
GJ461 30L 7.5kg 11,3kg
Cambio de la velocidad de mezcla
Nota: pare SIEMPRE la mezcladora antes de cambiar de velocidad.
Con el aparato apagado:
1. Seleccione la velocidad deseada con la palanca correspondiente.
2. Ponga de nuevo en marcha el aparato.
Interruptor de sobrecarga
El interruptor de sobrecarga se encuentra en la parte
trasera de la máquina, debajo de la entrada del cable
(Nota para GL190: el interruptor de sobrecarga está en
la base).
Si el aparato se calienta demasiado, el interruptor de
sobrecarga detendrá la máquina automáticamente. Si
ocurriera esto:
1. Apague la mezcladora.
2. Reduzca la carga del bol de mezclado.
3. Pulse el interruptor de sobrecarga de nuevo para
reiniciar la máquina.
4. Deje que el aparato se enfríe durante 20 minutos.
5
Interruptor
de sobrecarga
Nota: si se produce un corte de energía, el interruptor de sobrecarga actuará e
impedirá que el aparato se vuelva a poner en marcha automáticamente cuando
se recupere la fuente de alimentación.
Nota: desconecte siempre la mezcladora planetaria de la red eléctrica cuando no
la esté usando.
Limpieza, Cuidado y Mantenimiento
• Desconecte la mezcladora y desenchúfela de la toma eléctrica antes de llevar a cabo la limpieza.
• Utilice agua caliente con jabón para limpiar el bol y la espiral mezcladora. No utilice productos de
limpieza abrasivos, ya que pueden dejar residuos nocivos.
• No utilice dispositivos de lavado de chorro / presión para limpiar el aparato.
• Limpie el exterior del aparato con un paño húmedo.
• Limpie el aparato con regularidad.
GL190-GL191_GJ461_ML_A5_v7_20180928.indb 60 2018/9/28 16:02
Page 61
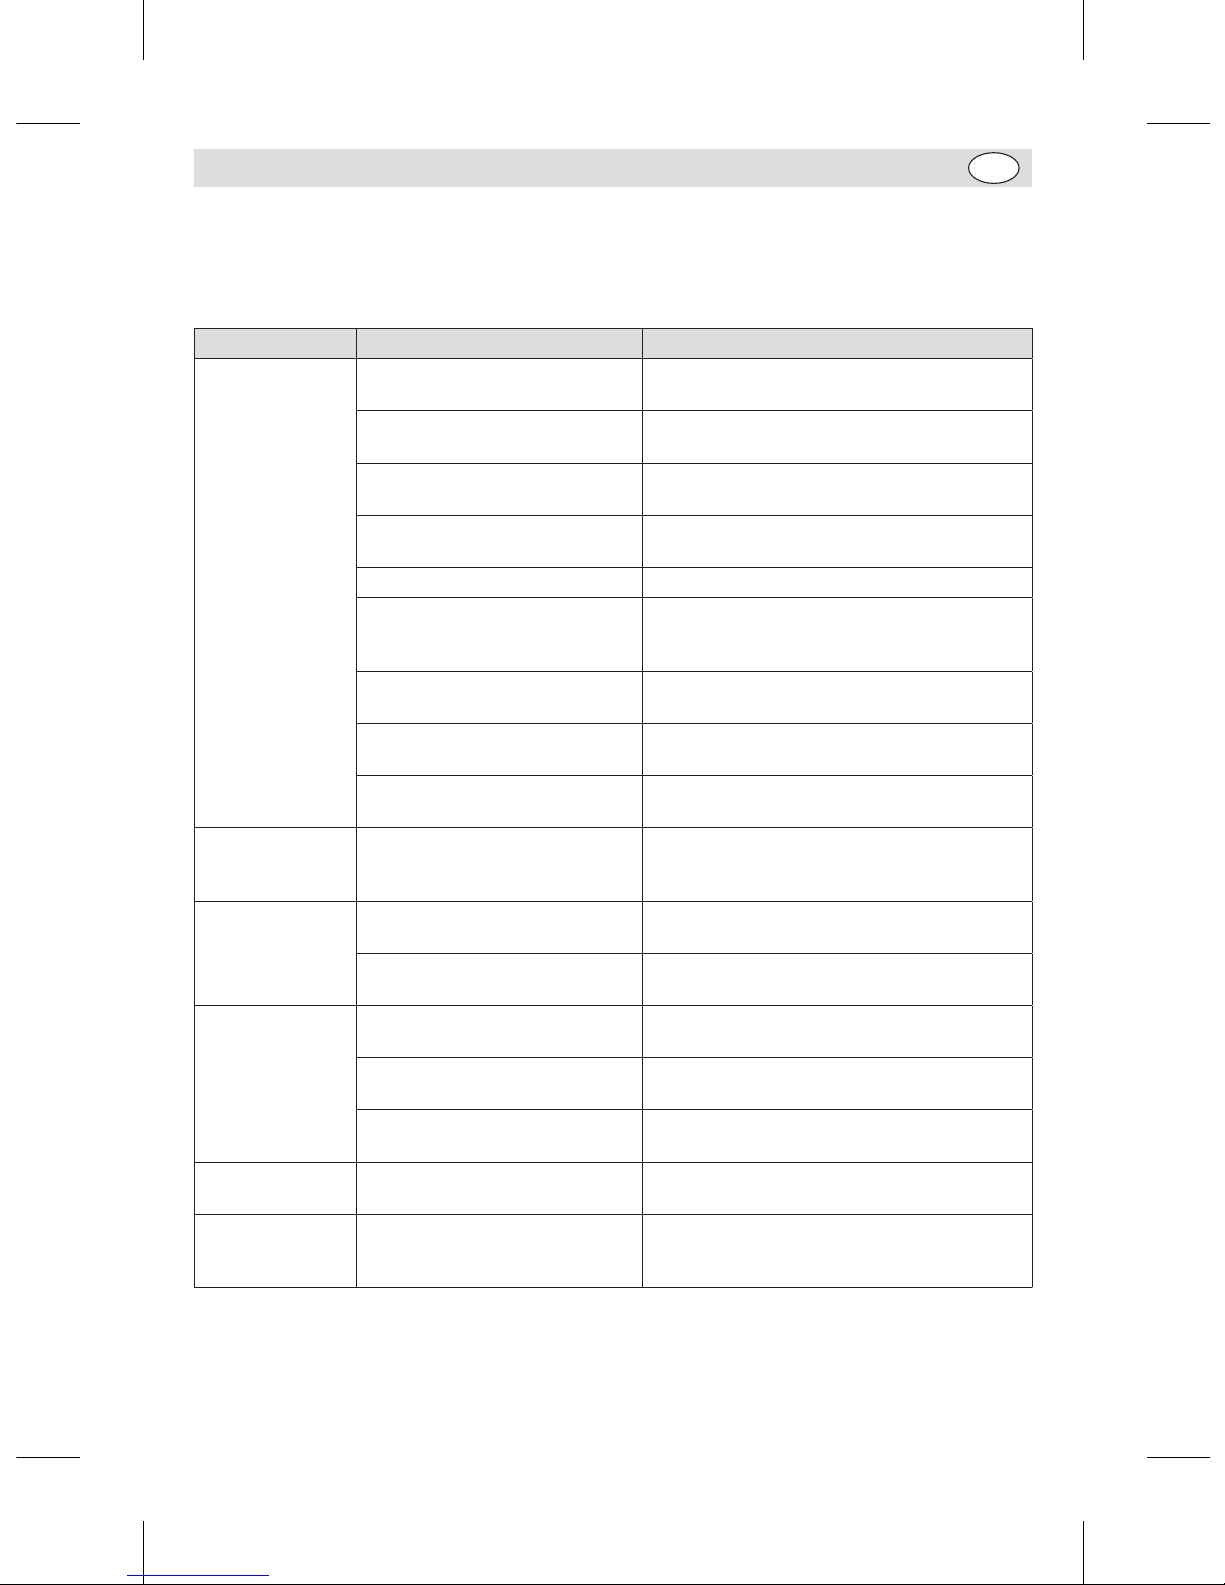
61
ES
Resolución de problemas
Si su aparato BUFFALO falla, compruebe la tabla siguiente antes de llamar a la línea de asistencia o a su
distribuidor BUFFALO.
Fallo Probable Causa Acción
El aparato no está conectado Compruebe que el aparato esté enchufado
correctamente y conectado
El botón STOP (PARADA) Gírelo en el sentido de las agujas de reloj para
soltarlo
El enchufe y el cable están
dañados
Llame a un agente de BUFFALO o un técnico
cualificado
El fusible del enchufe se ha
fundido
Cambie el fusible del enchufe
Suministro eléctrico Compruebe el suministro eléctrico
El interruptor de sobrecarga se ha
activado
Ver la información sobre el interruptor de
sobrecarga en la sección Funcionamiento de
este manual
El dispositivo de protección no
está cerrado
Cierre bien el dispositivo de protección
No se ha introducido ninguna
velocidad en el aparato
Ponga una velocidad
El bol no está arriba del todo Asegúrese de que la palanca del bol está
totalmente retraída
El bol no se fija en
su sitio
Los pasadores del bol o la zona de
alrededor están atascados por la
masa
Limpie el aparato
El aparato se
sobrecalienta
El bol de mezcla está
sobrecargado
Apague el aparato y retire parte del contenido
El aparato ha estado funcionando
durante demasiado tiempo
Apague el aparato y deje que se enfríe durante
30 minutos
El aparato hace
ruido
El accesorio para el bol o mezcla
no está correctamente colocado
Retire y vuelva a colocar el accesorio del bol /
mezcla
Cojinetes desgastados /
engranajes dañados
Llame a un agente de BUFFALO o un técnico
cualificado
La grasa se secó en la caja de
cambios
Llame a un agente de BUFFALO o un técnico
cualificado
El batidor no gira
bien
La correa se ha aflojado Llame a un agente de BUFFALO o un técnico
cualificado
No se puede
seleccionar una
velocidad
Los dientes del engranaje están
mal alineados
Apague el aparato y gire manualmente el
accesorio de las varillas ligeramente.
Seleccione de nuevo la velocidad
GL190-GL191_GJ461_ML_A5_v7_20180928.indb 61 2018/9/28 16:02
Page 62
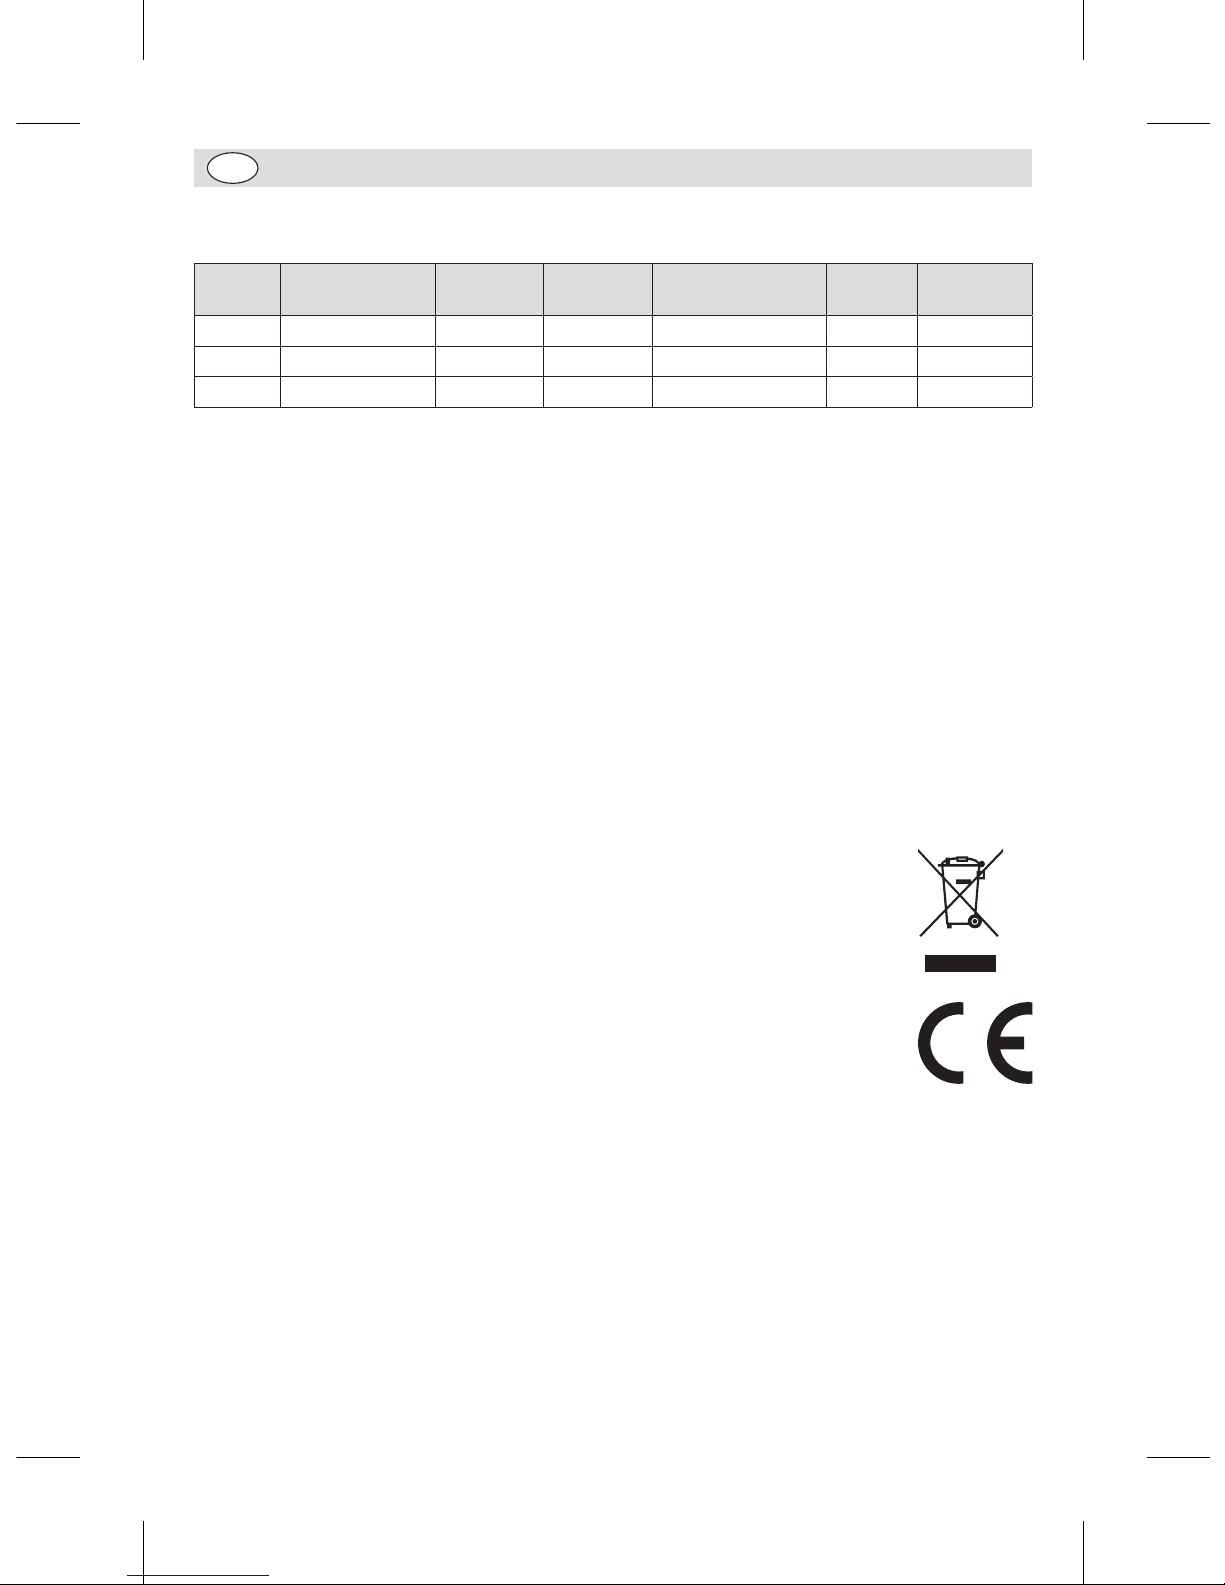
62
ES
Especificaciones Técnicas
Modelo Tensión Potencia Corriente
Dimensiones
a x a x p mm
Peso
Tamaño
del bol
GL190 220-240V 50Hz 550W 1,8A 610 x 395 x 395 36kg 10L
GL191 220-240V 50Hz 1100W 4,7A 794 x 555 x 558 64kg 20L
GJ461 220-240V 50Hz 1500W 6,5A 1142 x 579 × 611 160kg 30L
Cableado Eléctrico
El enchufe tiene que conectarse a una toma eléctrica adecuada.
Este aparato está conectado de la forma siguiente:
• Cable cargado (de color marrón) al terminal marcado como L
• Cable neutro (de color azul) al terminal marcado como N
• Cable de tierra (de color verde / amarillo) al terminal marcado como E
Este aparato debe conectarse a una toma de tierra.
Si tiene alguna duda, consulte a un electricista cualificado.
Los puntos de aislamiento eléctrico deben mantenerse libres de cualquier obstrucción. En caso de
precisarse una desconexión de emergencia, deben estar disponibles de forma inmediata.
Cumplimiento
El logotipo WEEE en este producto o su documentación indica que no debe eliminarse
como un residuo doméstico. Para ayudar a prevenir posibles daños a la salud humana y/
o el medio ambiente, el producto debe eliminarse en un proceso de reciclaje aprobado
y medioambientalmente seguro. Para obtener más información sobre cómo eliminar
correctamente este producto, póngase en contacto con el proveedor del mismo o la
autoridad local responsable de la eliminación de residuos en su zona.
Las piezas BUFFALO han pasado estrictas pruebas de productos para cumplir las
especificaciones y normas reguladoras establecidas por las autoridades internacionales,
independientes y federales.
Los productos BUFFALO han sido autorizados para llevar el símbolo siguiente:
Reservados todos los derechos. Puede estar prohibida la reproducción o transmisión en cualquier forma o por cualquier
medio electrónico, mecánico, de fotocopiado, registro o de otro tipo, de cualquier parte de estas instrucciones sin la
autorización previa y por escrito de BUFFALO.
Se ha hecho todo lo posible para garantizar que todos los datos son correctos en el momento de su publicación; sin
embargo, BUFFALO se reserva el derecho a modificar las especificaciones sin que medie notificación previa.
GL190-GL191_GJ461_ML_A5_v7_20180928.indb 62 2018/9/28 16:02
Page 63
63
PT
Conselhos de segurança
Todo o pessoal deve estar devidamente instruído
sobre o funcionamento e as precauções de
segurança da Misturadora.
• Colocar numa superfície plana e estável.
• Um agente de serviço/técnico qualificado deverá efectuar a
instalação e quaisquer reparações, caso necessário. Não retirar
qualquer componente ou painéis de serviço deste produto.
• Consultar e cumprir os regulamentos locais e nacionais no que
diz respeito à:
- Legislação de saúde e segurança no local de trabalho
- Códigos de trabalho
- Prevenção de incêndios
- Normas para sistemas eléctricos IEE
- Código de construção
• Este aparelho não está indicado para ser utilizado por
pessoas (incluindo crianças) com capacidades físicas,
sensoriais ou mentais limitadas, ou com falta de experiência
e conhecimento, excepto se tiverem sido supervisionadas ou
tiverem recebido instruções acerca da utilização do aparelho
por uma pessoa responsável pela sua segurança
• Este aparelho deve ser utilizado apenas de acordo com estas
instruções e por pessoas competentes.
• Mantenha o material da embalagem fora do alcance de
crianças. O material da embalagem é para ser deitado fora
respeitando as regras das autoridades locais.
• A fim de evitar situações perigosas, a substituição dos cabos
de alimentação danificados deve ser feita por um agente
BUFFALO ou um técnico qualificado recomendado.
• Durante a utilização do aparelho, permaneça sempre ATRÁS
da capa de protecção.
GL190-GL191_GJ461_ML_A5_v7_20180928.indb 63 2018/9/28 16:02
Page 64

64
PT
• Durante o uso, NÃO colocar as mãos perto dos utensilios
rotativos. Isto pode provocar ferimentos graves.
• NÃO remova alimentos do aparelho até que os utensilios de
mistura tenham parado totalmente.
• NÃO mergulhe o aparelho em água.
• NÃO tente misturar alimentos que não sejam indicados para
esta máquina. Isso pode danificar os utensílios de mistura.
• NÃO utilize a máquina com um utensílio de mistura danificado.
• NÃO aplique bypass nos interruptores de segurança.
• NUNCA deixe o aparelho sem vigilància durante a utilização.
• O aparelho é pesado. Tenha cuidado. Tenha cuidado ao
deslocá-lo.
• Nunca use acessórios que não sejam recomendados pelo
fabricante. Podem pôr em risco a segurança do utilizador e
podem danificar o aparelho. Use apenas peças e acessórios
originais.
• A Buffalo recomenda que este aparelho seja testado por PAT
anualmente para assegurar que o produto continua seguro.
Descrição do produto
Misturadora GL190 - 10 litros
Misturadora GL191 - 20 litros
Misturadora GJ461 - 30 litros
A Misturadora BUFFALO é uma máquina autónoma que consiste numa taça larga montada por baixo do
motor e um dispositivo de velocidades ao qual a ferramenta de mistura pode ser ligada..
Introdução
A Misturadora BUFFALO foi concebida para misturar uma variedade de alimentos, desde natas a massa.
Por favor utilize o tempo necessário para ler atentamente este manual. Uma manutenção e utilização
correcta deste aparelho permitem a melhor capacidade de funcionamento do seu produto BUFFALO.
GL190-GL191_GJ461_ML_A5_v7_20180928.indb 64 2018/9/28 16:02
Page 65
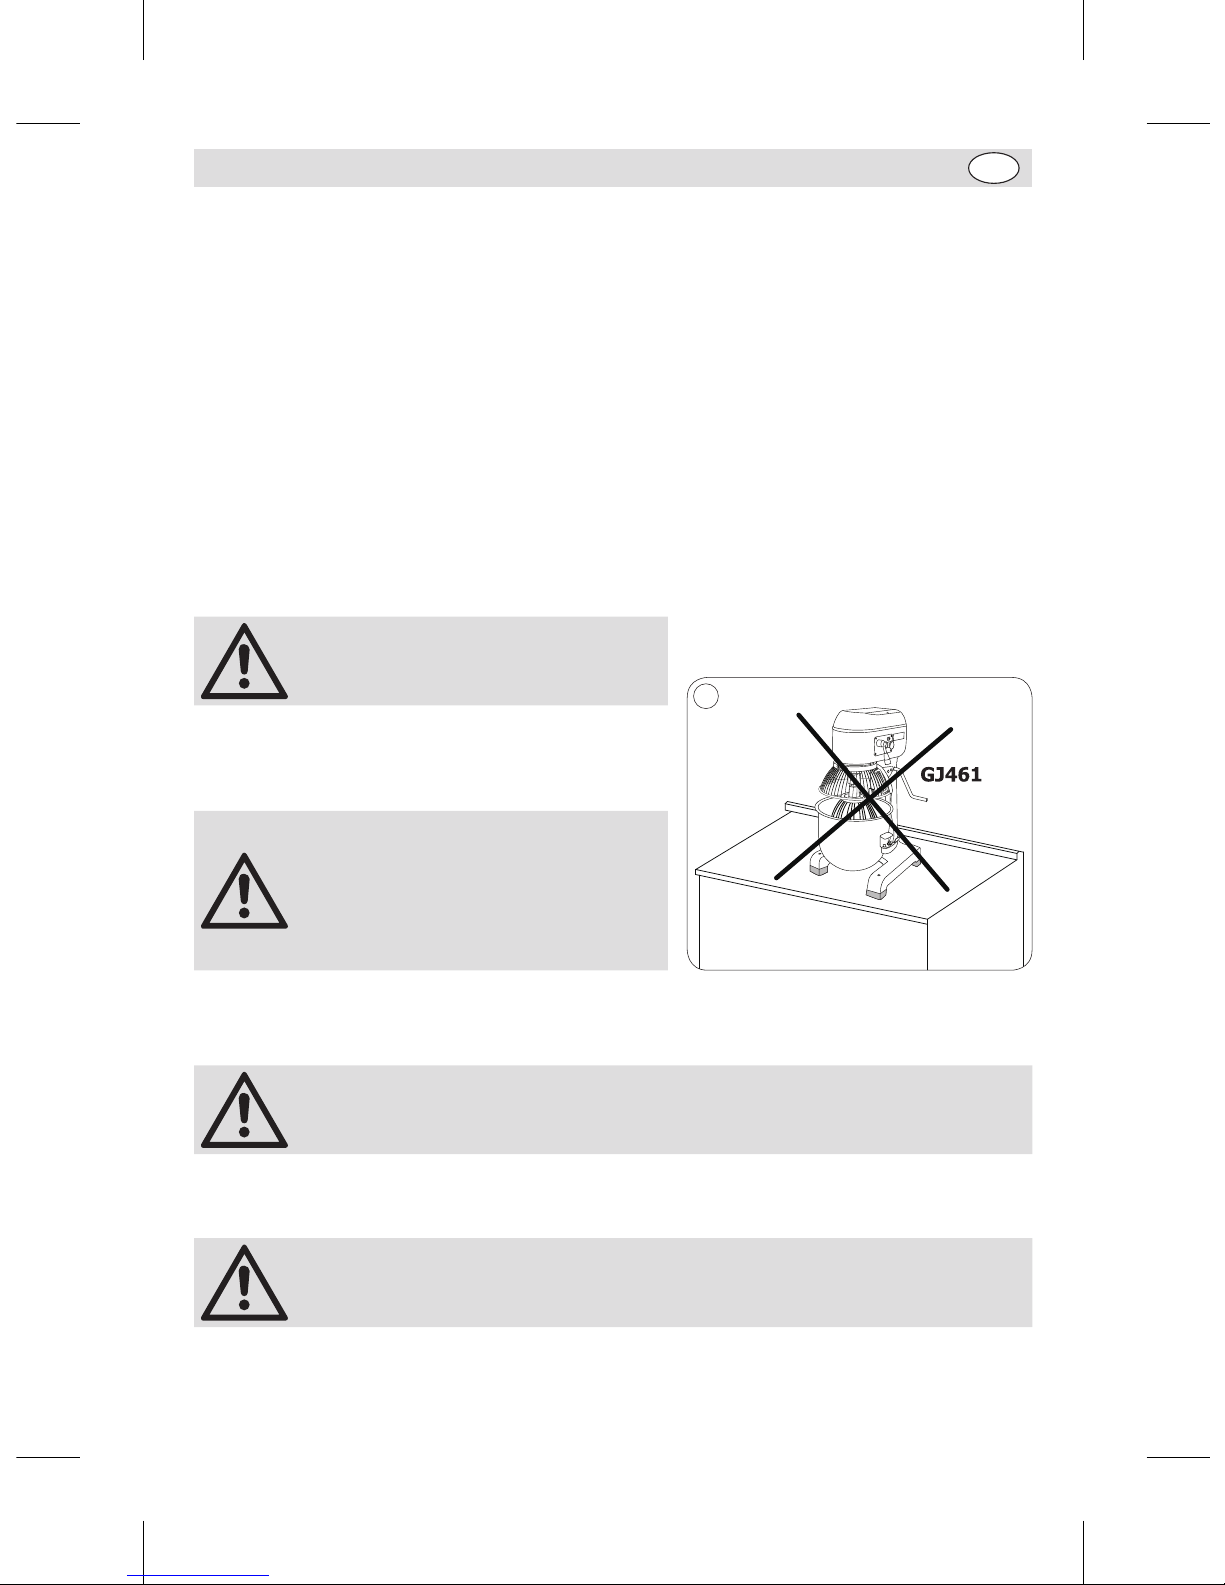
65
PT
Conteúdo da embalagem
A embalagem inclui o seguinte:
• Misturadora da Buffalo
• Taça de Mistura
• Gancho espiral para massas
• Batedor
• Pinha
• Manual de instruções
A BUFFALO orgulha-se pelo serviço e a qualidade dos seus produtos e portanto verifica, durante a fase de
embalagem, o estado funcional e o bom estado do conteúdo fornecido.
Quando confrontado com quaisquer danos provocados durante o transporte, contacte imediatamente o
seu fornecedor BUFFALO.
Instalação
• Certifique-se de que o lugar de apoio da misturadora consegue suportar o peso da mesma.
AVISO: A misturadora é muito pesada,
por isso, deve-se ter cuidado ao
deslocá-la.
• Se o aparelho se destinar a ser posicionado sobre uma
bancada, assegure-se de que esta está bem segura
(para GL190, GL191).
Unidade de chão apenas com a
batedeira GJ461! Não a coloque sobre
qualquer bancada devido ao seu peso.
Além disso, pode vibrar intensamente
durante a utilização em cima da
bancada, cair e causar danos pessoais/
de propriedade.
1
Montagem
AVISO: A taça tem de ser fixada e devidamente posicionada, antes de ligar a
Misturadora.
• A BUFFALO não assume qualquer responsabilidade por lesões provocadas pela montagem incorrecta
deste aparelho.
Nota: Certifique-se de que os pés estão nivelados para reduzir a vibração
durante o funcionamento.
• Retire o aparelho da embalagem.
GL190-GL191_GJ461_ML_A5_v7_20180928.indb 65 2018/9/28 16:02
Page 66
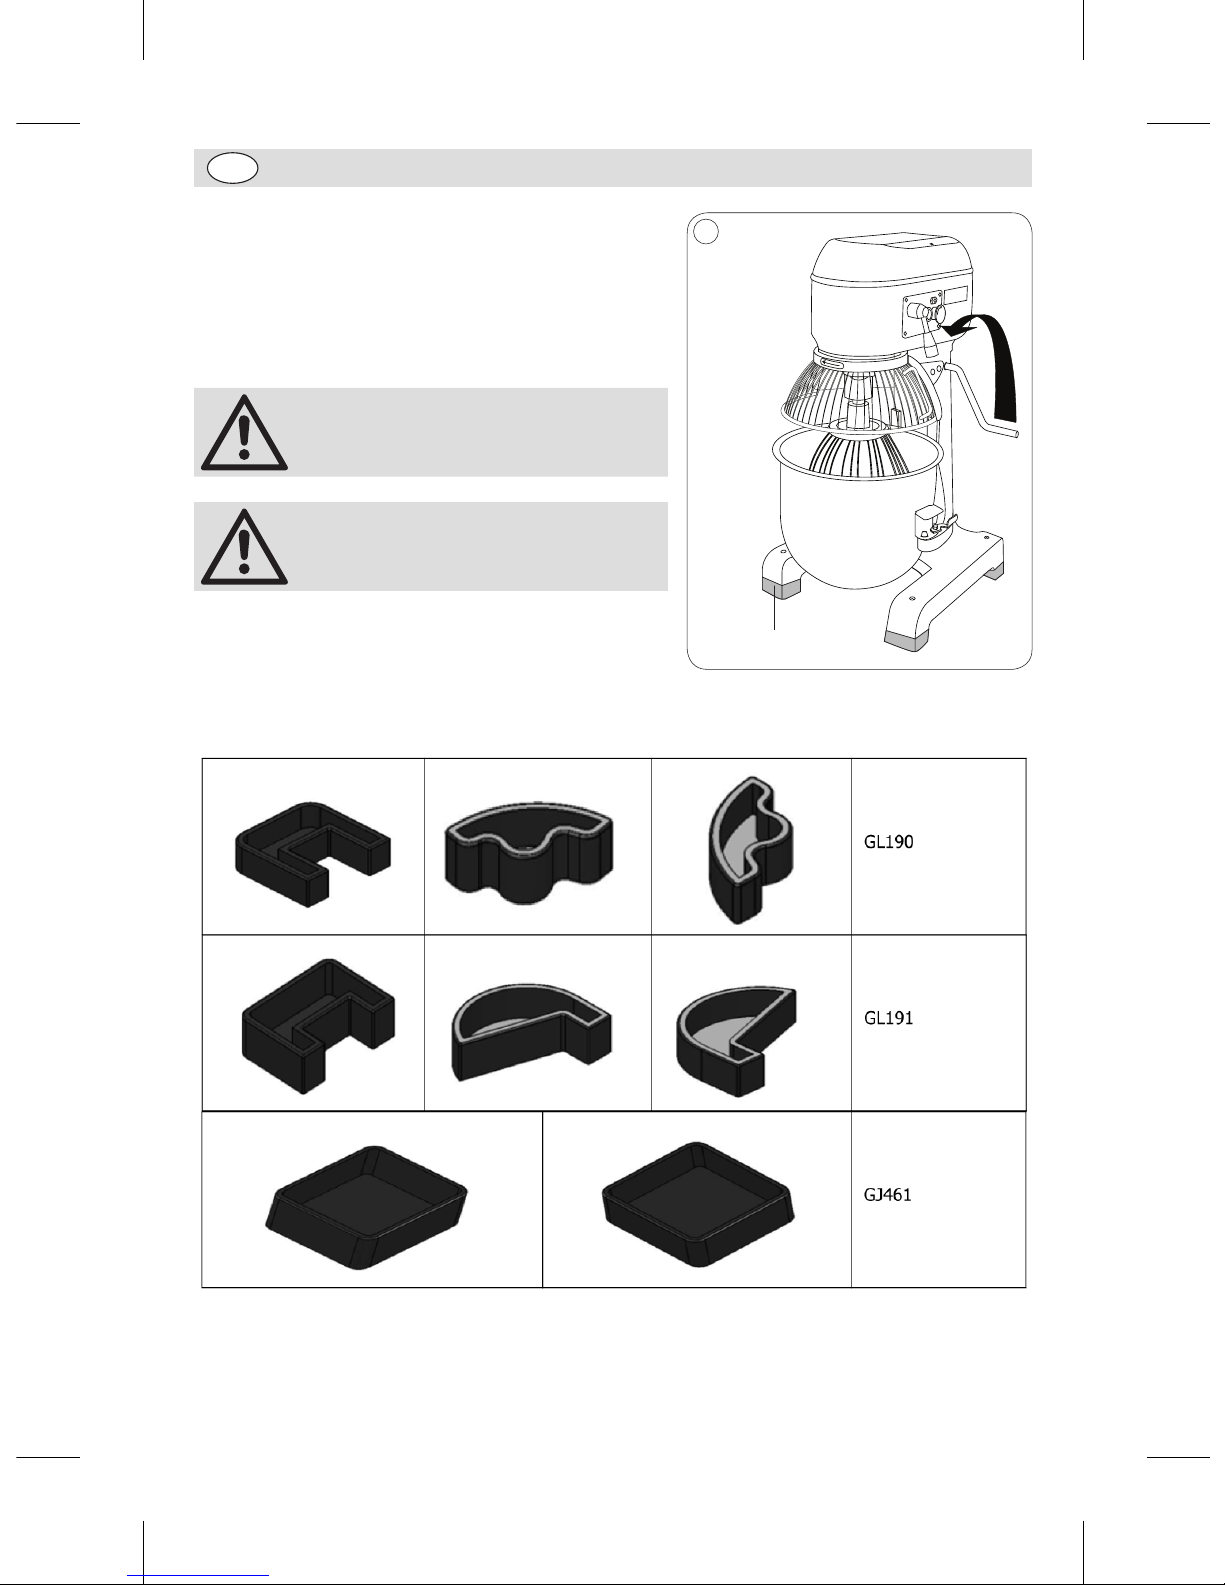
66
PT
Como instalar os pés de borracha
1. Retire todos os materiais de embalagem do aparelho.
2. Retire a palete de madeira da máquina (Solte os quatro
parafusos na parte inferior da palete de madeira).
3. Retire os pés de borracha da tigela.
4. Fixe os pés de borracha nos pés da máquina.
Nota: São necessárias pelo menos duas
pessoas para a instalação dos pés de
borracha.
Nota: Após a instalação dos pés
de borracha certifique-se de que a
máquina está estável.
2
Pés de borracha
O tipo dos pés de borracha
Rubber feet
Remove all packaging from the appliance.
Remove the wooden pallet from the machine
(Loosen the four bolts at the bottom of the
wooden pallet).
Take out the rubber feet from the bowl
Add the rubber feet to the feet of the machine.
Note: A minimum of two people should
Note: Once the rubber feet have been installed, ensure the machine is stable.
be used to install the rubber feet.
GL190-GL191_GJ461_ML_A5_v7_20180928.indb 66 2018/9/28 16:02
Page 67
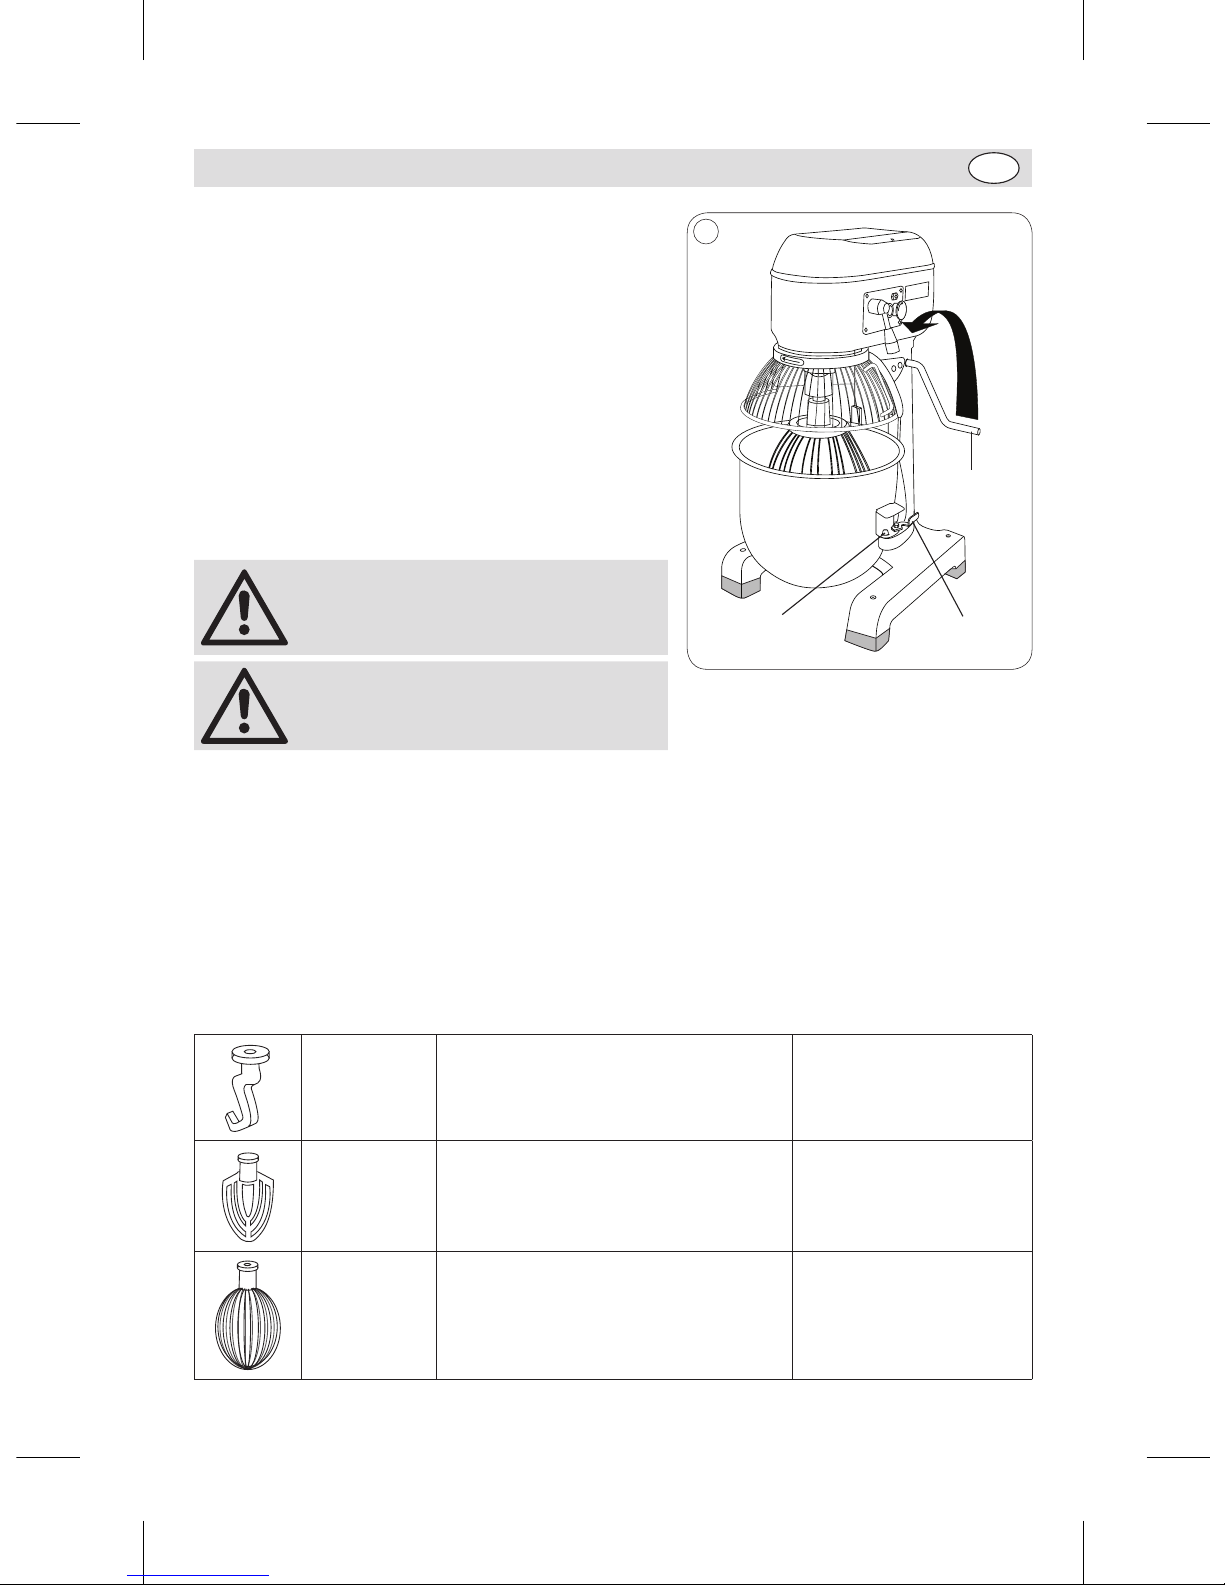
67
PT
Colocar/retirar a taça
1. Desligue o aparelho.
2. 2. Abra a capa de protecção, rodando-a para a
esquerda (GL190 & GL191) ou elevando-a acima da
misturadora (GJ461).
3. Baixe a taça com a manivela da taça.
4. Solte os mecanismos de bloqueio em ambos os lados
da taça.
5. Levante a taça. A taça é presa no lugar com duas
cavilhas que prendem as pegas à estrutura e com o
orifício na parte detrás do aparelho onde se encaixa a
saliência da taça.
6. Execute estas instruções na ordem inversa para
colocar a taça.
Nota: Certifique se a manivela está
totalmente para trás e que a taça
está na posição superior, senão a
misturadora não funciona.
Nota: Lubrifique regularmente o
mecanismo do elevador da bacia para
assegurar a operação lisa.
3
Manivela da
taça
Mecanismo de
bloqueio
Cavilhas
Trocar o utensílio da misturadora
1. Desligue o aparelho.
2. Abra a capa de protecção, rodando-a para a esquerda (GL190 & GL191) ou elevando-a acima da
misturadora (GJ461).
3. Baixe a taça com a manivela da taça.
4. Para desencaixar o utensílio da misturadora empurre o mesmo para cima e para a esquerda.
5. Insira o utensílio pretendido. Para colocar o utensílio empurre-o para cima e para a direita.
6. Levante a taça.
A BUFFALO recomenda os seguintes usos para os respectivos utensílios:
Gancho espiral
para massas
Misturas pesadas para massas, bolos de
pastelaria, etc.
Velocidades adequadas: 1
Batedor
Misturas firmes bolos leves, bolos/biscoitos,
coberturas, enchidos e legumes
Velocidades adequadas: 1, 2
Pinha
Misturas leves natas, maionese, claras,
panquecas e soufflés
Velocidades adequadas: 1,
2, 3
GL190-GL191_GJ461_ML_A5_v7_20180928.indb 67 2018/9/28 16:02
Page 68
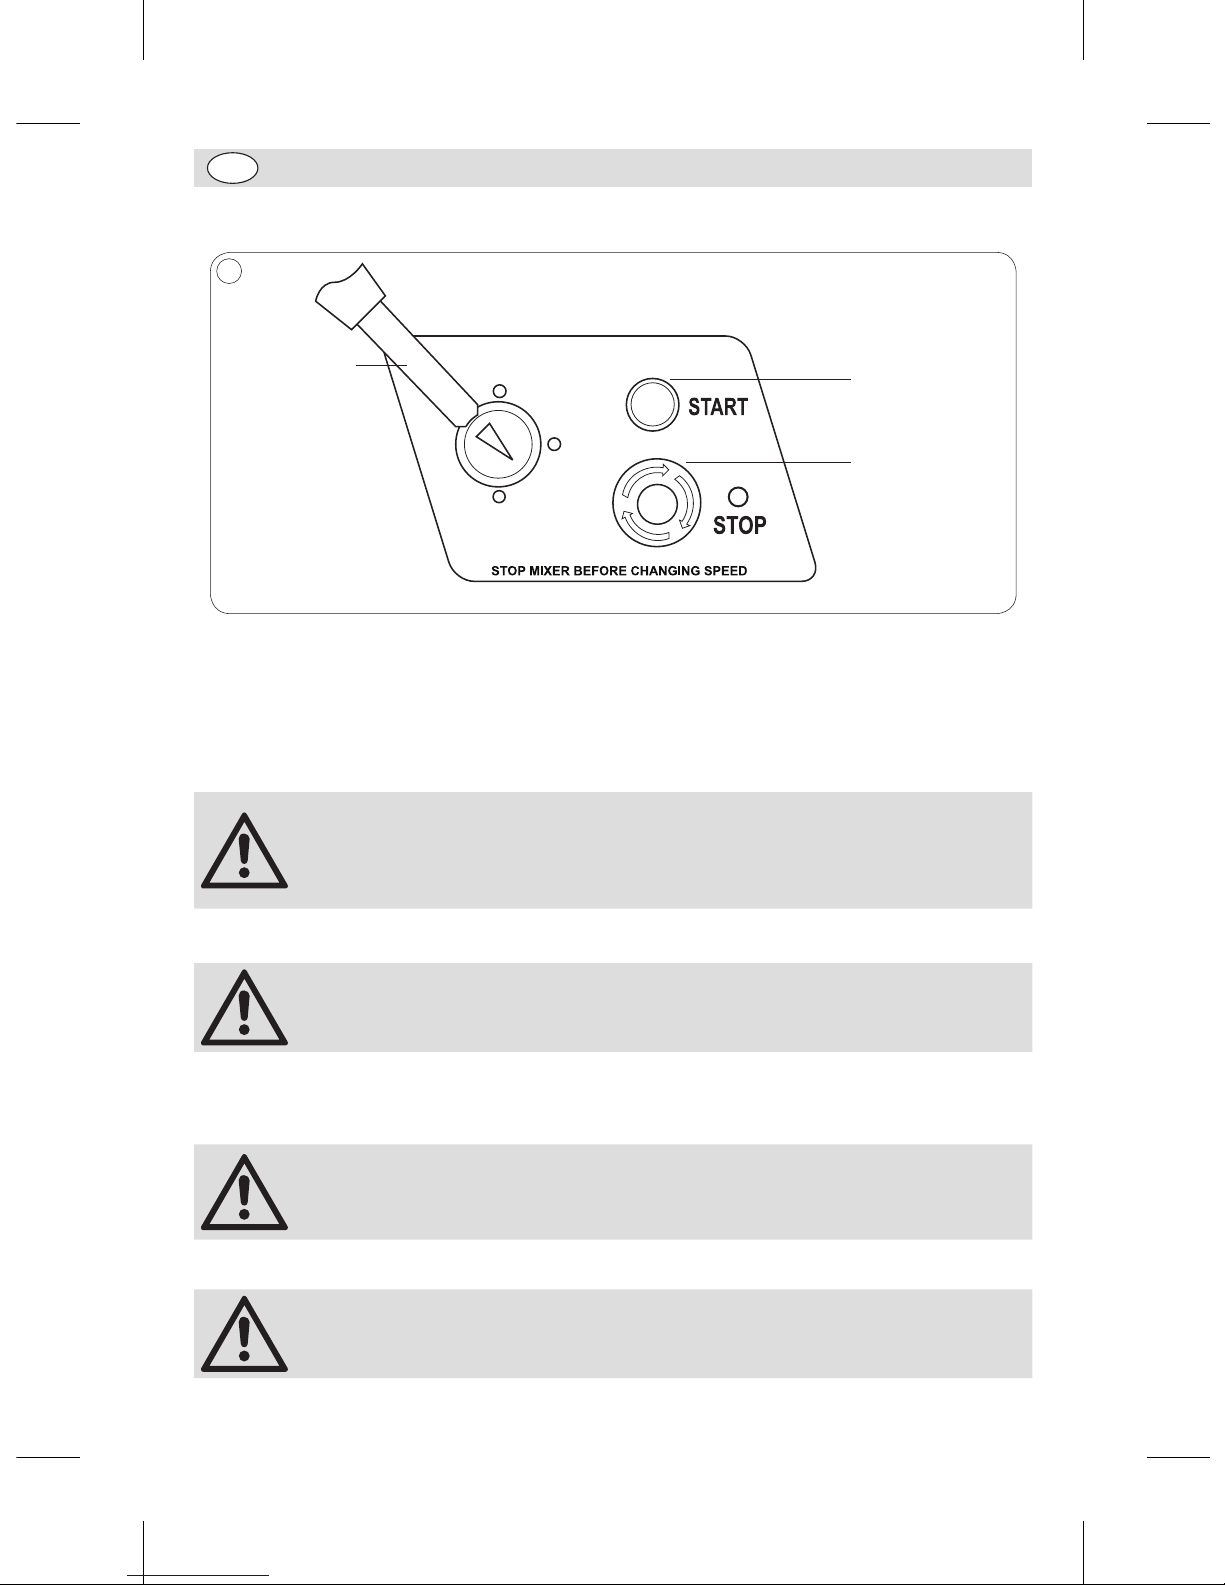
68
PT
Disposição dos controlos
Botão de
velocidade
Botão START
(ligar)
Botão STOP
(desligar)
4
Botão START - carregar para iniciar a misturadora.
Botão STOP - carregar para parar a misturadora. Rodar para a direita para soltar e fazer o reset (apenas
GJ461).
MANÍPULO DE VELOCIDADE - Usar para ajustar a velocidade da misturadora.
Funcionamento
• Nota: Certifique-se de que estas instruções foram lidas atentamente e
que o funcionamento do aparelho é compreendido na totalidade, antes da
respectiva utilização.
• Todo o pessoal deve estar devidamente instruído sobre o funcionamento e
as precauções de segurança da Misturadora.
Misturar
AVISO: Antes de pôr as mãos na taça de mistura deve certificar-se de que o
aparelho está desligado.
1. Abrir a capa de protecção.
2. Enche a taça.
3. Seleccione a velocidade desejada e feche a capa de protecção.
• Nota: a BUFFALO recomenda a utilização da velocidade mais lenta no início e
progressivamente, conforme necessário, ir aumentando a velocidade.
• Certifique que a capa de protecção está totalmente fechada, senão a
misturadora não funciona.
4. Carregue no botão START para começar a misturar o conteúdo.
Nota: Se o aparelho está a forçar a mistura, desligue-o e retire parte do
conteúdo da taça, antes de reiniciar a misturadora.
GL190-GL191_GJ461_ML_A5_v7_20180928.indb 68 2018/9/28 16:02
Page 69
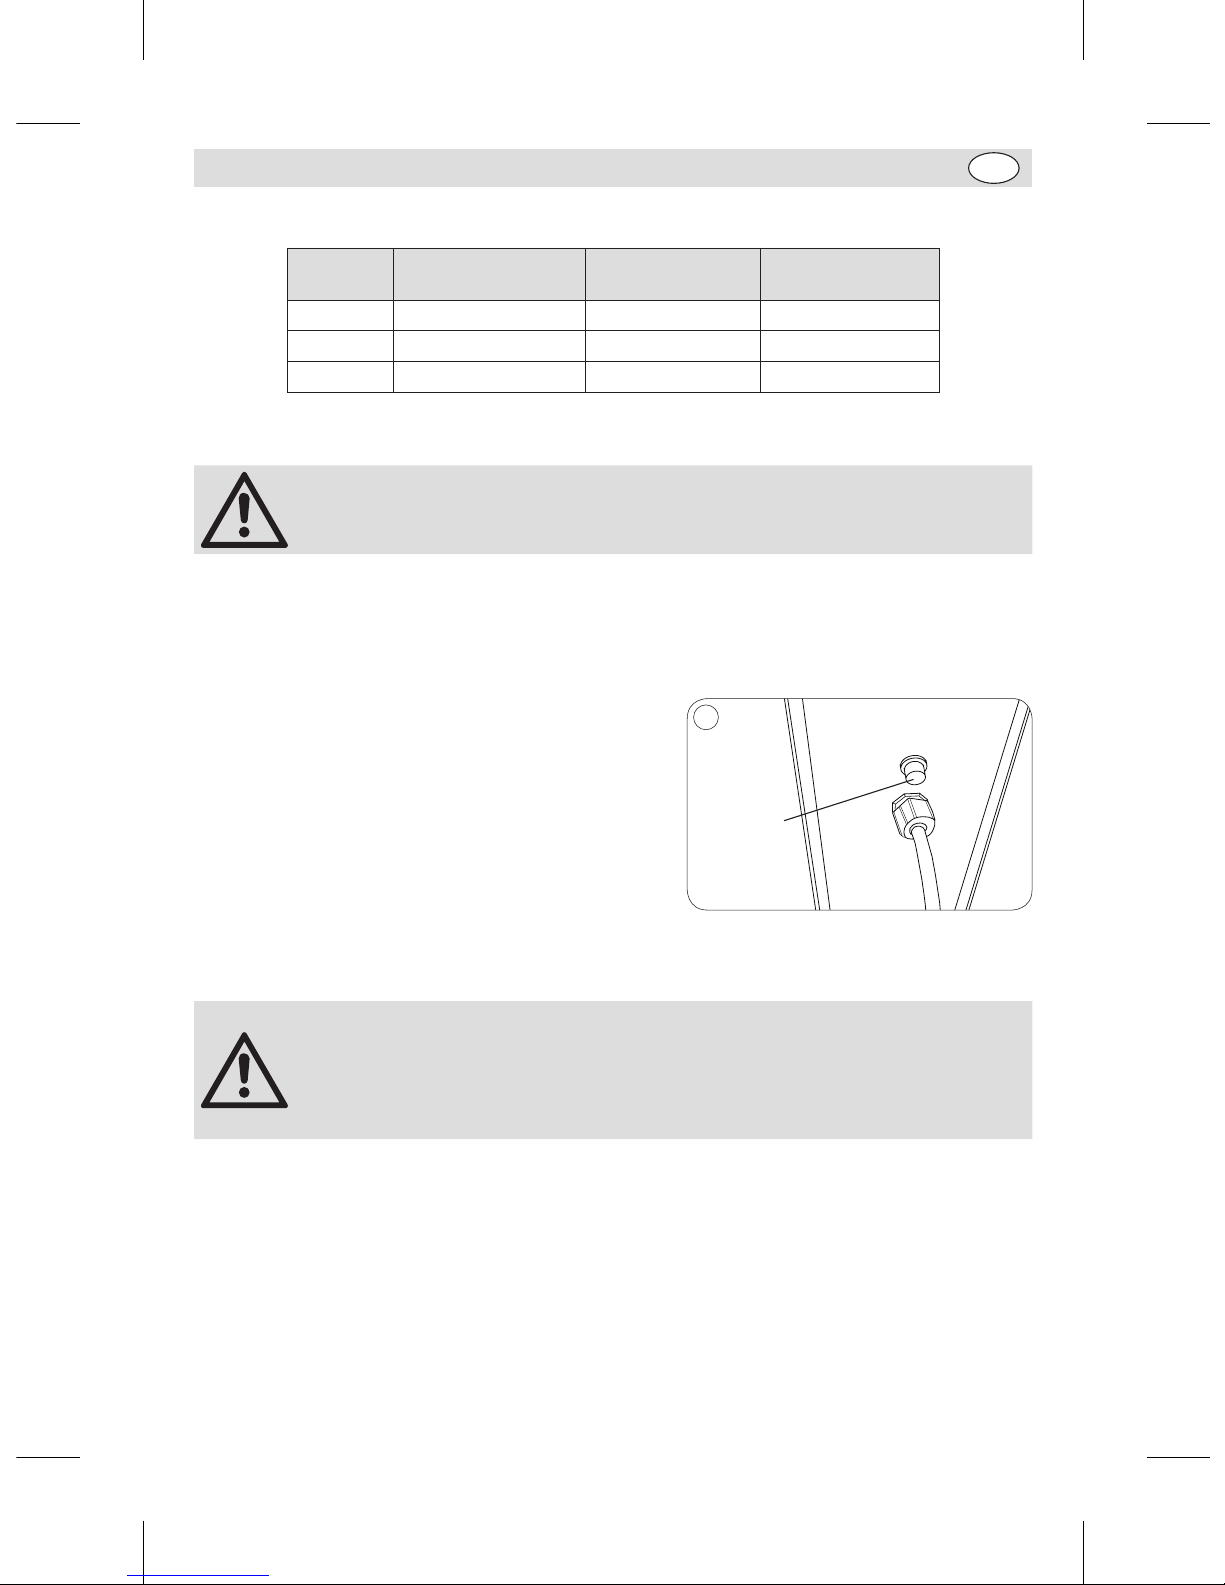
69
PT
Capacidade de mistura
Modelo Tamanho da taça Farinha Maxima
Massa de Pao
Maxima
GL190 10L 2kg 3,2kg
GL191 20L 5kg 8kg
GJ461 30L 7.5kg 11,3kg
Mudar a velocidade de mistura
Nota: Parar SEMPRE a misturadora antes de alterar a velocidade de mistura.
Com o aparelho desligado:
1. Seleccione a velocidade pretendida com o botão de velocidade.
2. Reiniciar o aparelho.
Interruptor de sobrecarga
O interruptor de Sobrecarga está localizado na parte
traseira da máquina, ao lado da entrada do cabo (Nota
para GL190: O interruptor de sobrecarga está na base).
Se o aparelho aquecer demasiado, o interruptor de
sobrecarga desliga automaticamente a máquina. Se isso
acontecer:
1. Desligue a misturadora.
2. Reduza a quantidade na tigela de mistura.
3. Volte a empurrar o botão de sobrecarga para dentro
para fazer o reset.
4. Deixe arrefecer o aparelho durante 20 minutos.
5
Interruptor
de
sobrecarga
Nota:
• Em caso de corte de energia elétrica, o interruptor de sobrecarga é ativado
para evitar que o aparelho se ligue automaticamente quando a energia
elétrica for reposta.
• Desligue sempre a Misturadora da rede elétrica quando não estiver a ser
utilizada.
Limpeza, cuidados & manutenção
• Deve-se desligar a batedeira e retirar a ficha da tomada antes de fazer limpezas.
• Utilize sempre água com sabão para limpar a taça e o parafuso de mistura. Não utilize químicos de
limpeza abrasivos, pois podem deixar restos nocivos.
• Não utilizar máquinas de limpeza a pressão/jacto para limpar o produto.
• Limpe o exterior do aparelho com um pano húmido.
• A BUFFALO recomende que a lubrificação da corrente e o controle da tensão do cinto seja efectuado
anualmente por um agente BUFFALO ou técnico qualificado.
• Limpe o aparelho regularmente.
GL190-GL191_GJ461_ML_A5_v7_20180928.indb 69 2018/9/28 16:02
Page 70
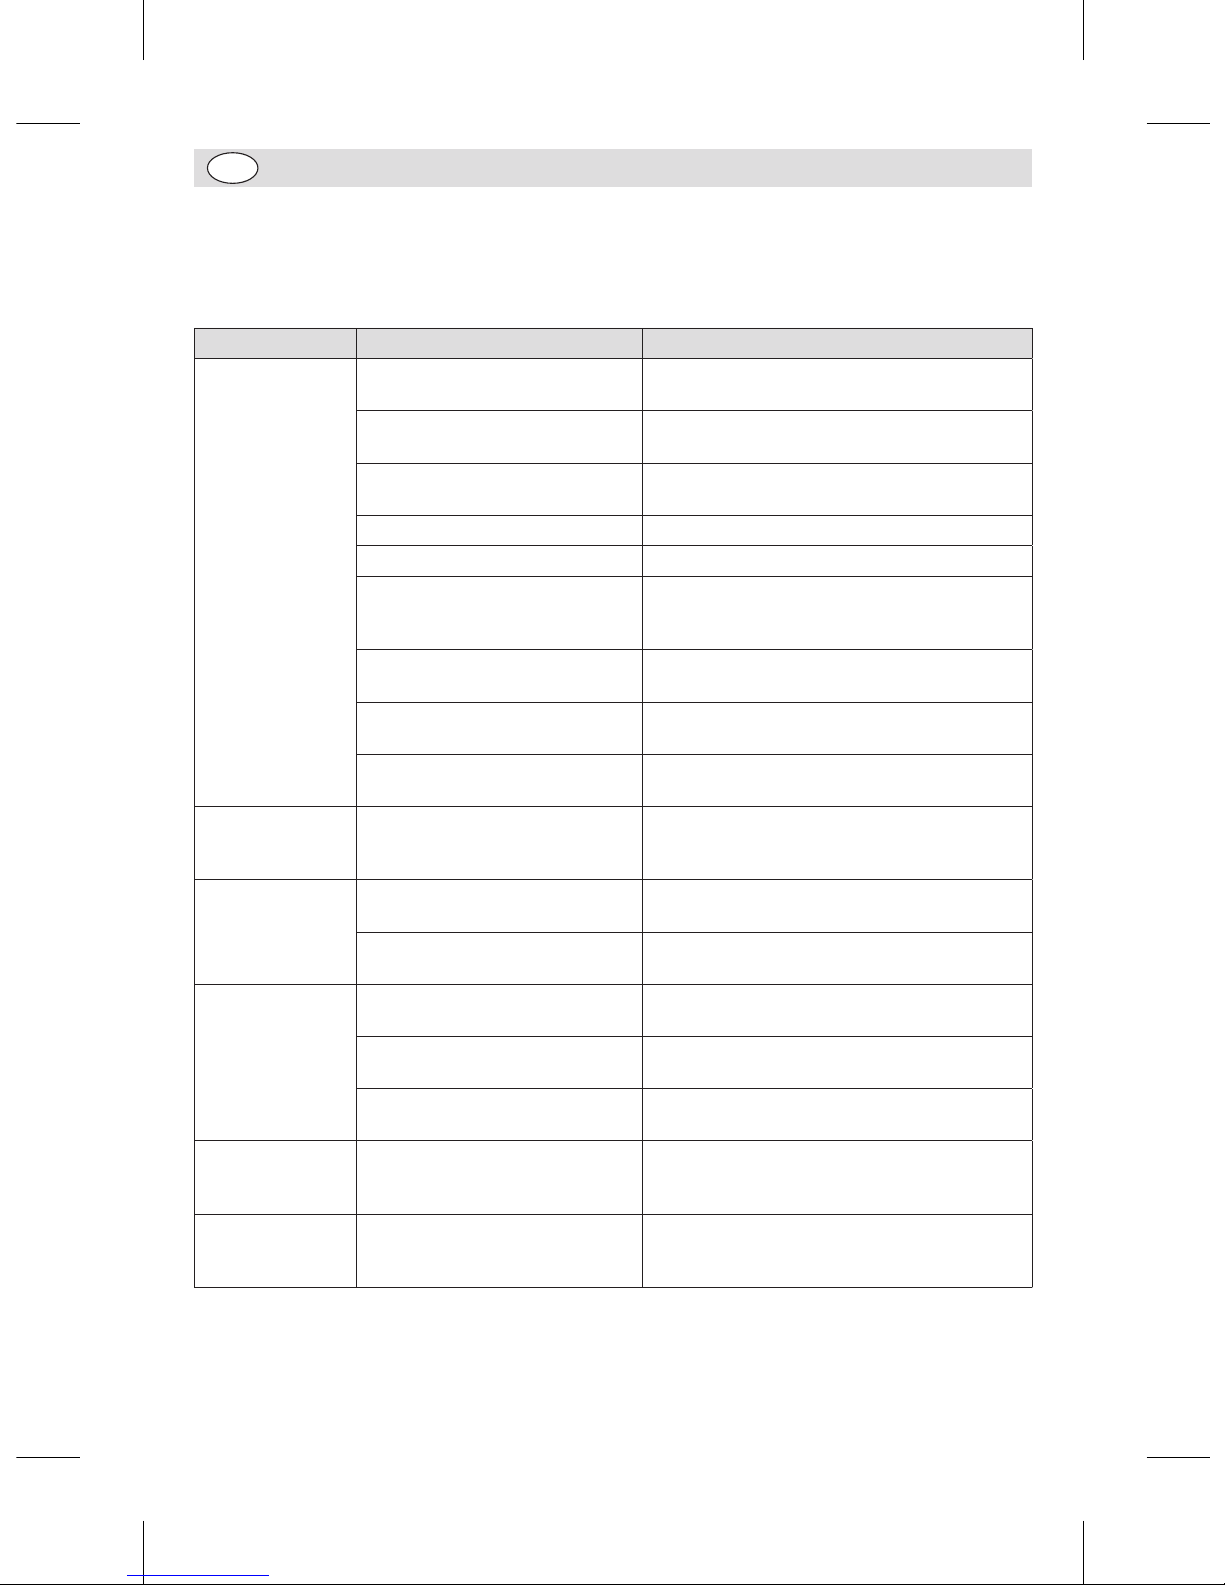
70
PT
Resolução de problemas
Se o seu produto BUFFALO apresentar uma falha, consulte a seguinte tabela antes de telefonar à linha de
apoio ou ao seu agente BUFFALO.
Problema Causa provável A fazer
O aparelho não
funciona
O aparelho não está ligado Verifique a ligação correcta dos cabos e ligue o
aparelho
O botão Stop não se soltou
(GJ461)
Para soltar, rode o botão para a direita
A ficha e o cabo estão danificados Chame o agente da BUFFALO ou um técnico
qualificado
O fusível da ficha disparou Substitua o fusível da ficha
Fonte de alimentação Verifique a fonte de alimentação
O interruptor de sobrecarga foi
activado
Consulte as informações sobre o interruptor de
sobrecarga na secção “Funcionamento” deste
manual
Capa de protecção não está
fechada
Fechar totalmente a capa de protecção
Aparelho não está a funcionar na
velocidade adequada
Escolher a velocidade
Taça não está totalmente em cima Certifique que a manivela da taça está
totalmente para trás
Não é possível
colocar a taça no
lugar
As cavilhas ou a área da taça
estão obstruídas por restos
Limpe o aparelho
O aparelho
sobreaquece
A taça de mistura está demasiado
cheio
Desligue o aparelho e retire parte do conteúdo
O aparelho esteve muito tempo
ligado
Desligue o aparelho e aguarde 30 minutos para
o aparelho arrefecer
O aparelho faz
ruído
Tigela ou acessório de mistura
não montado corretamente
Retire e volte a colocar a tigela / acessório de
mistura
Rolamentos gastos / engrenagens
danificadas
Chame o agente da BUFFALO ou um técnico
qualificado
O lubrificante secou na caixa de
engrenagens
Chame o agente da BUFFALO ou um técnico
qualificado
A peça de rotação
não funciona
correctamente
A correia está solta Chame o agente da BUFFALO ou um técnico
qualificado
Não é possível
escolher uma
velocidade
Os dentes de transmissão não
estão alinhados
Desligue o aparelho e com a mão rode
ligeiramente a pinha Escolha novamente a
velocidade pretendida
GL190-GL191_GJ461_ML_A5_v7_20180928.indb 70 2018/9/28 16:02
Page 71
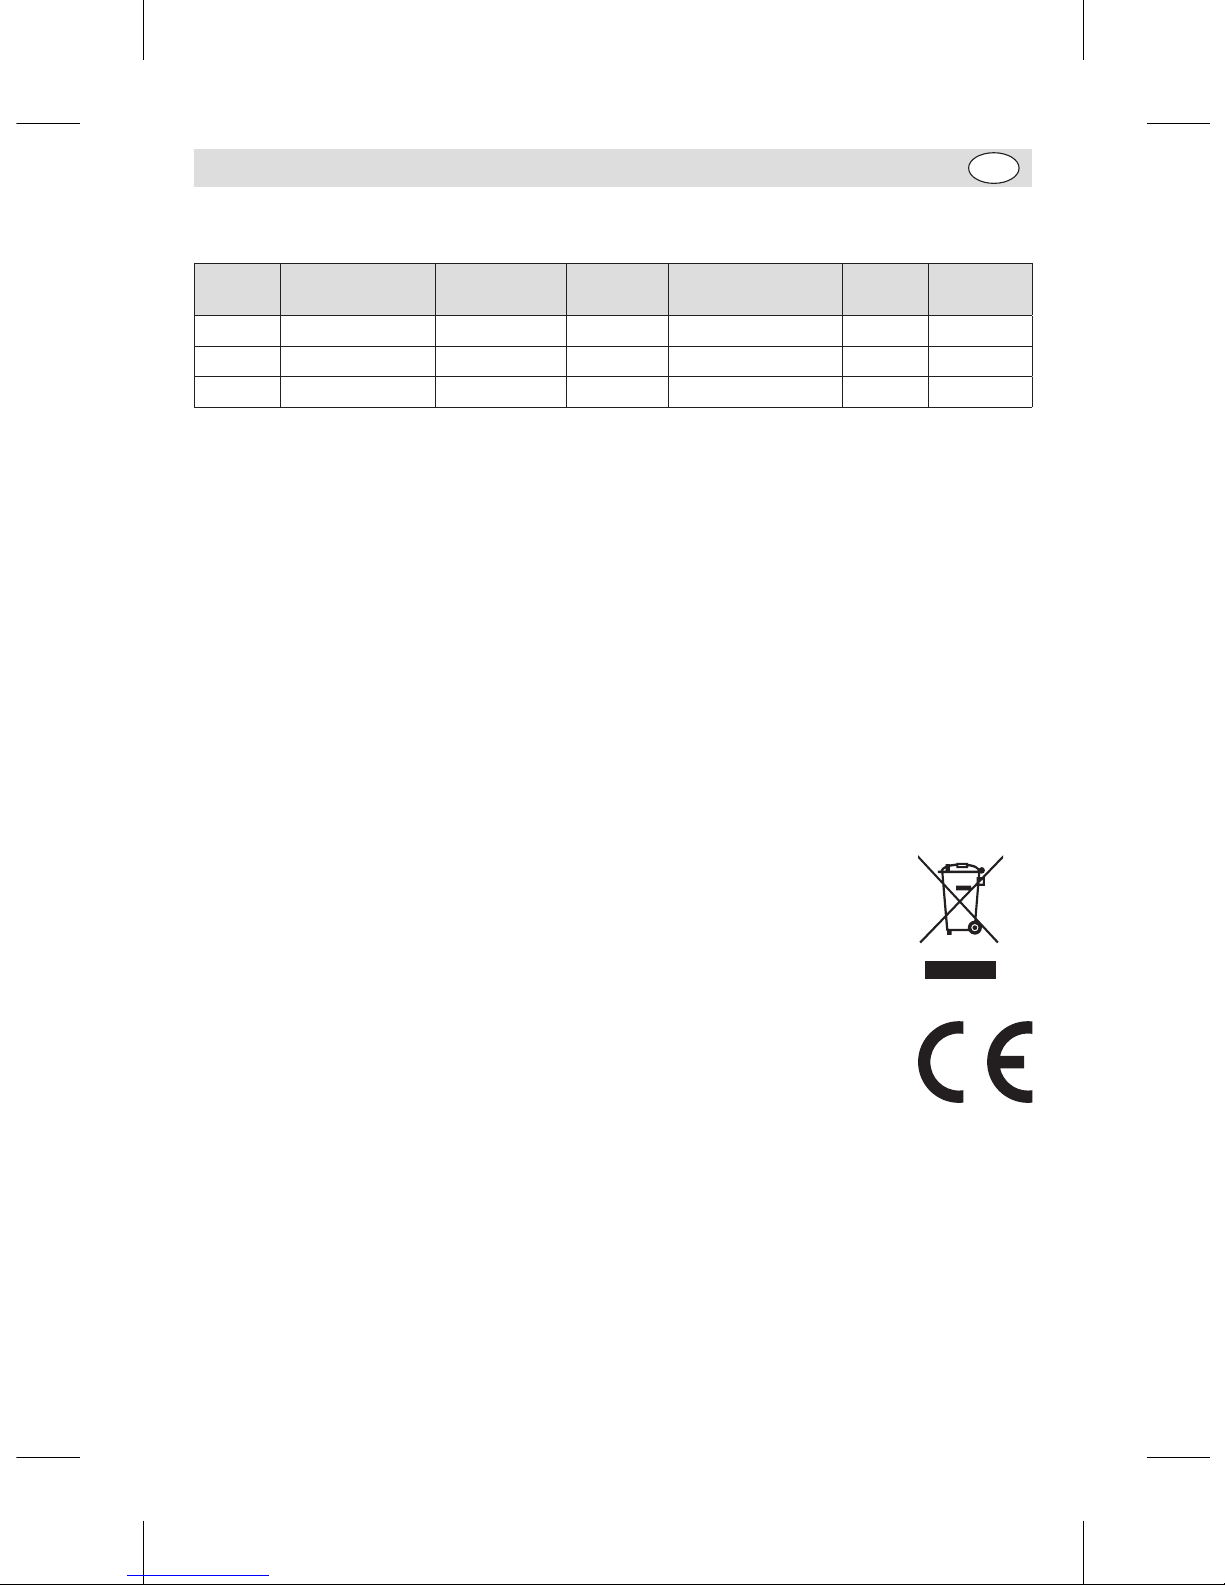
71
PT
Especificações técnicas
Modelo Voltagem Alimentação Corrente
Dimensões
a x l x p mm
Pesos
Tamanho
da taça
GL190 220-240V 50Hz 550W 1,8A 610 x 395 x 395 36kg 10L
GL191 220-240V 50Hz 1100W 4,7A 794 x 555 x 558 64kg 20L
GJ461 220-240V 50Hz 1500W 6,5A 1142 x 579 × 611 160kg 30L
Cablagem eléctrica
Deve-se utilizar tomadas adequadas para ligar a ficha do aparelho.
O esquema de electricidade deste aparelho é o seguinte:
• Cabo eléctrico (castanho) para o terminal marcado L
• Cabo neutro (azul) para o terminal marcado N
• Cabo terra (verde/amarelo) para o terminal marcado com E
Este aparelho tem de estar ligado à terra.
Consulte um electricista qualificado em caso de dúvidas.
Os pontos eléctricos isolados devem ficar limpos de qualquer obstrução. Estes pontos têm que ser
imediatamente acessíveis caso seja necessário desligar a electricidade.
Conformidade
O logótipo WEEE neste produto ou a sua documentação indicam que o produto não deve
ser tratado como lixo doméstico. Para ajudar a prevenir possíveis danos para a saúde
humana e/ou ambiente, o produto deve ser eliminado de acordo com um processo
de reciclagem aprovado e seguro para o ambiente. Para mais informação sobre como
eliminar este produto correctamente, contacte o fornecedor do mesmo ou as autoridades
locais responsáveis pela eliminação de desperdícios na sua área.
As componentes BUFFALO foram submetidas a testes rigorosos a fim de cumprirem
as normas e especificações legais determinadas pelas autoridades internacionais,
independentes e nacionais.
Os produtos BUFFALO foram aprovados e trazem o seguinte símbolo:
Todos os direitos reservados. É proibida a reprodução electrónica ou mecânica, ou por qualquer outro meio copiar, guardar
em meios digitais ou transmitir a terceiros estas instruções, seja parcialmente ou na sua totalidade, sem a autorização
prévia de BUFFALO.
Nós nos esforçamos para que no dia de publicação deste manual todos os pormenores sejam correctos, no entanto, a
BUFFALO tem o direito de alterar as especificações sem aviso prévio.
GL190-GL191_GJ461_ML_A5_v7_20180928.indb 71 2018/9/28 16:02
Page 72
UK 0845 146 2887
NL 0800 – 29 1 29
040 – 2628080
FR 0800 - 29 2 29
01 60 34 28 80
DE 0800 – 1860806
IT N/A
ES 901-100 133
GL190-GL191_GJ461_ML_A5_v7_20180928.indb 72 2018/9/28 16:02
Page 73
DECLARATION OF CONFORMITY
• Conformiteitsverklaring • Déclaration de conformité • Konformitätserklärung • Dichiarazione di conformità •
• Declaración de conformidad • Declaração de conformidade
Equipment Type • Uitrustingstype • Type d'équipement •
Gerätetyp •
Tipo di apparecchiatura • Tipo de equipo • Tipo de equipamento
10, 20 & 30 Litre Planetary Mixers
Model • Modèle • Modell • Modello • Modelo • Malli
GL190, Gl191, GJ461
Application of Council Directives(s)
Toepassing van Europese Richtlijn(en) • Application de la/des
directive(s) du Conseil • Anwendbare EU-Richtlinie(n) •
Applicazione delle Direttive • Aplicación de la(s) directiva(s) del
consejo • Aplicação de directiva(s) do Conselho
Machinery Directive (MD) 2006/42/EC
EN ISO 12100:2010
EN 60204-1:2006 +A1:2009
EN 454:2014
Electro-Magnetic Compatibility (EMC) Directive
2014/30/EU
EN 55014-1:2006 +A1:2009 +A2:2011
EN 55014-2:2015
EN 61000-3-2:2014
EN 61000-3-3:2013
Restriction of Hazardous Substances Directive
(RoHS) 2011/65/EU
Producer Name • Naam fabrikant • Nom du producteur • Name
des Herstellers • Nome del produttore • Nombre del fabricante •
Nome do fabricante
Buffalo
Producer Address • Adres fabrikant • Adresse du producteur •
Anschrift des Herstellers • Indirizzo del produttore • Dirección
del fabricante • Endereço do fabricante
Fourth Way,
Avonmouth,
Bristol,
BS11 8TB
United Kingdom
I, the undersigned, hereby declare that the equipment specified above conforms to the above Directive(s) and Standard(s).
Ik, de ondergetekende, verklaar hierbij dat de hierboven gespecificeerde uitrusting goedgekeurd is volgens de bovenstaande
Richtlijn(en) en Standaard(en).
Je soussigné, confirme la conformité de l'équipement cité dans la présente à la / aux Directive(s) et Norme(s) ci-dessus
Ich, der/die Unterzeichnende, erkläre hiermit, dass das oben angegebene Gerät der/den oben angeführten Richtlinie(n) und Norm(en)
entspricht.
Il sottoscritto dichiara che l'apparecchiatura di sopra specificata è conforme alle Direttive e agli Standard sopra riportati.
El abajo firmante declara por la presente que el equipo arriba especificado está en conformidad con la(s) directiva(s) y estándar(es)
arriba mencionadas.
Eu, o abaixo-assinado, declaro que o equipamento anteriormente especificado está em conformidade com a(s) anterior(es) Directiva(s)
e Norma(s)
Date • Data • Date • Datum • Data • Fecha • Data
18th September 2018
Signature • Handtekening • Signature • Unterschrift
Firma • Firma • Assinatura
Full Name • Volledige naam • Nom et prénom • Vollständiger Name •
Nome completo • Nombre completo • Nome por extenso
Ashley Hooper
Position • Functie • Fonction • Position • Qualifica • Posición • Função
Technical & Quality Manager
GL190-GL191_GJ461_ML_A5_v7_20180928.indb 73 2018/9/28 16:02
Page 74

GL190-GL191_GJ461_ML_A5_v7_20180928.indb 74 2018/9/28 16:02
Page 75

GL190-GL191_GJ461_ML_A5_v7_20180928.indb 75 2018/9/28 16:02
Page 76

GL190-GL191_GJ461_ML_A5_v7_20180928
http://www.buffalo-appliances.com/
GL190-GL191_GJ461_ML_A5_v7_20180928.indb 76 2018/9/28 16:02
 Loading...